Loading ...
Loading ...
Loading ...

5
Leveling the Kegerator
It is important for the kegerator to be leveled in order to work
properly. It can be raised or lowered by rotating the plastic sheaths
around each of the feet on the bottom of the unit. If you find that the
surface is not level, rotate the feet until the kegerator becomes
level. You may need to make several adjustments to level it. We
recommend using a carpenter’s level to check the machine.
1. Place a carpenter’s level on top of the product to see if the
kegerator is level from front to back and side to side.
2. Adjust the height of the feet as follows:
Turn the leveling feet clockwise to lower that side of the refrigerator.
Turn the leveling feet to the counterclockwise to raise that side of
the refrigerator.
IMPORTANT: Once you are ready to install it in a cabinet or directly
on the floor, you must adjust the feet to level the kegerator.
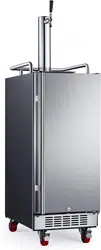
Installing the Stainless Steel Door Handle
BR1500SS, BR1500SSOD models only
To install the door handle:
1. Remove the four screws from the side of the door. This should
be the side opposite of the door hinge.
2. Place and align the openings of the handle hinges over the
screw holes in the side of the door.
3. Insert and tighten the screws to hold the handle in place.
CAUTION: Do not over-tighten the screws as this may cause
damage to the handle or to the stainless steel door
Installing the Casters
This unit comes with four casters. These are an optional accessary
to assemble if you would like to make the unit more mobile. To
install the casters:
1. Remove the four leveling legs from the bottom of the unit.
2. Separate the front casters and back casters. The front casters
have a lever for a brake lock.
3. Place the top plate of the caster over the area of the removed
leveling leg and align the opening to the screw hole openings.
4. Insert the screws to attach the caster to the cabinet.
5. Make sure the screws are tight so the caster is installed firmly.
Loading ...
Loading ...
Loading ...