Loading ...
Loading ...
Loading ...
English
11
nOTE: The battery pack is not fully charged out of the
carton. Follow instructions outlined (see Charging
a Battery).
1. Read the Safety Instruction section of thismanual.
2. Wear eye and earprotection.
3. Ensure magazine is empty of allfasteners.
4. Check for smooth and proper operation of contact
trip and pusher assemblies. Do not use tool if either
assembly is not functioning properly. nEVER use
a tool that has the contact trip restrained in the
actuatedposition.
5. Keep tool pointed away from yourself andothers.
6. Insert fully charged batterypack.
Using the Trigger Lock-off (Fig. F)
WARNING: To reduce the risk of serious personal
injury, do not keep trigger depressed when tool is not
in use. Keep the trigger lock-off switch LOCKED (Fig.F)
when the tool is not inuse.
WARNING: To reduce the risk of serious personal
injury, lock off trigger, disconnect battery pack
from tool and remove nails from magazine before
makingadjustments.
Each
DeWALT
nailer is equipped with a trigger lock-off
2
which when pushed to the right as shown in FigureF,
prevents the tool from firing a nail by locking the trigger and
bypassing power to themotor.
Fig. F
2
When the trigger lock-off is pressed to the left, the tool will
be fully operational. The trigger lock-off should always be
locked off whenever any adjustments are made or when
tool is not in immediateuse.
NOTICE: Do not store tool with battery pack installed. To
prevent damage to the pack and to ensure best battery
life, store battery packs out of the tool or charger in a cool,
drylocation.
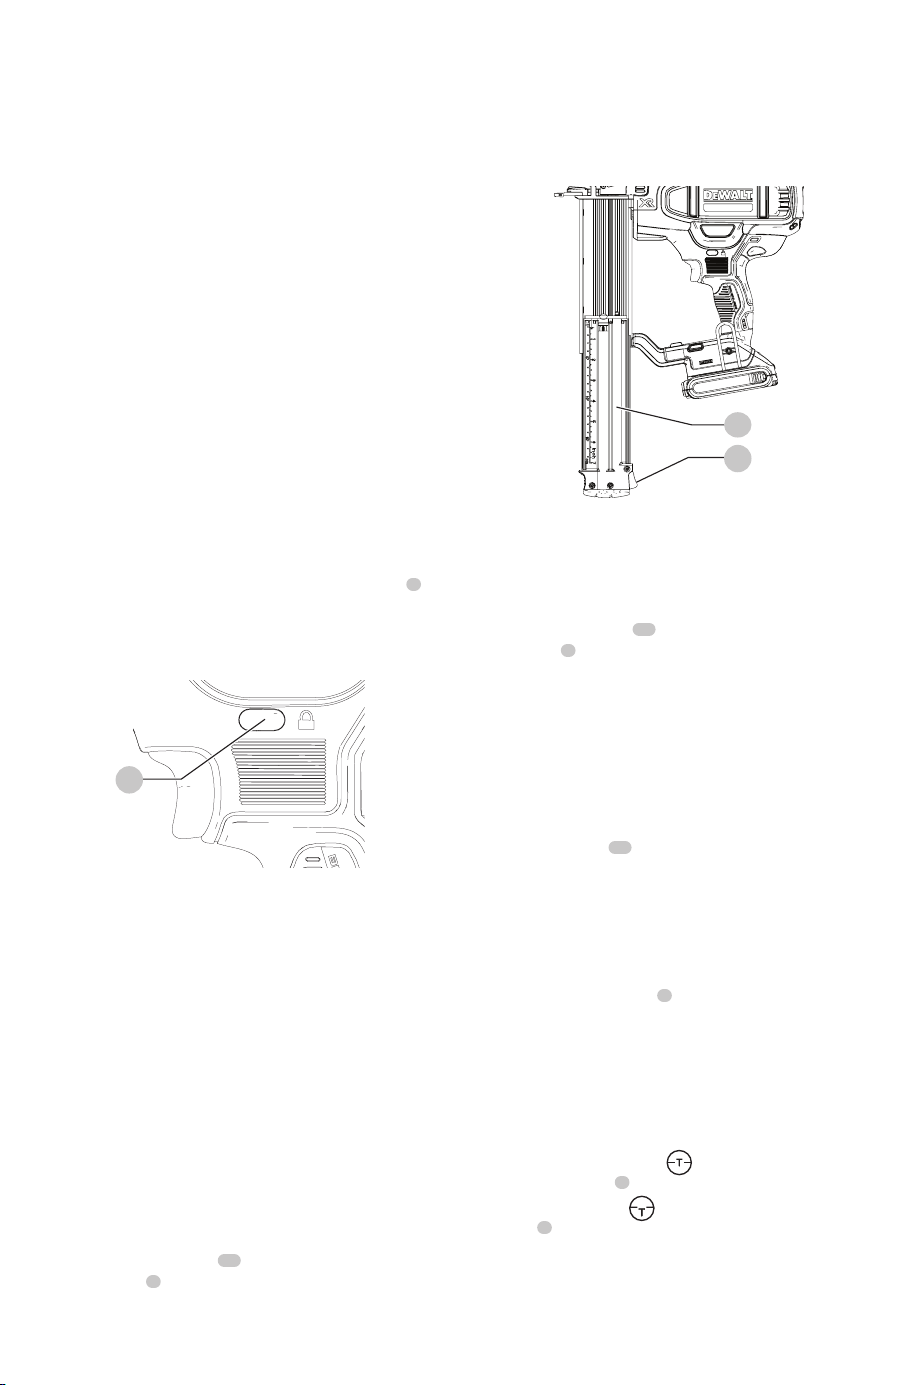
Loading the Tool (Fig. G)
WARNING: Keep the tool pointed away from yourself
and others. Serious personal injury mayresult.
WARNING: Never load nails with the contact trip or
trigger activated. Personal injury mayresult.
WARNING: Always remove battery pack before
loading or unloading nails. Serious personal injury
mayresult.
1. Press magazine latch
16
and open sliding
magazine
7
fully.
2. Insert fasteners into the side of magazine; fasteners
should be loaded with chisel tip against front
of magazine.
3. Close sliding magazine until the magazine latch
clips snuggly.
Fig. G
7
16
Unloading The Tool
WARNING: The trigger lock-off should always be
locked off whenever any adjustments are made or
when tool is not inuse.
1. Press magazine latch
16
and open sliding
magazine
7
fully.
2. Tip the tool up until the nails slide freely out of the side
of the magazine. Close sliding magazinefully.
3. Open the jam clear door on the nosepiece to verify
there are no nailsremaining.
Dryfire Lock Out feature
Tool is equipped with a dryfire lock out feature to prevent
tool from cycling when there are no fasteners loaded. When
the low nail indicator
17
is visible, the tool is running low
on fasteners. If this happens, the tool will be locked out
and will not actuate until more nails are loaded. (Refer to
Loading the Tool)
Adjusting Depth (Fig. H)
The depth that the fastener is driven can be adjusted using
the depth adjustment wheel
3
on the side of thetool.
WARNING: To reduce risk of serious injury from
accidental actuation when attempting to adjust
depth, ALWAYS:
• Remove batterypack.
• Engage trigger lock-off.
• Avoid contact with trigger duringadjustments.
1. To drive the nail shallower , rotate the depth
adjustment wheel
3
away from the nose of thenailer.
2. To sink a nail deeper , rotate the depth adjustment
wheel
3
toward the nose of thenailer.
Loading ...
Loading ...
Loading ...