VA24E Series
LCD Monitor
User Guide

ii
Copyright © 2019 ASUSTeK COMPUTER INC. All Rights Reserved.
No part of this manual, including the products and software described in it, may be reproduced,
transmitted, transcribed, stored in a retrieval system, or translated into any language in any form or by any
means, except documentation kept by the purchaser for backup purposes, without the express written
permission of ASUSTeK COMPUTER INC. (“ASUS”).
Product warranty or service will not be extended if: (1) the product is repaired, modied or altered, unless
such repair, modication of alteration is authorized in writing by ASUS; or (2) the serial number of the
product is defaced or missing.
ASUS PROVIDES THIS MANUAL “AS IS” WITHOUT WARRANTY OF ANY KIND, EITHER EXPRESS
OR IMPLIED, INCLUDING BUT NOT LIMITED TO THE IMPLIED WARRANTIES OR CONDITIONS OF
MERCHANTABILITY OR FITNESS FOR A PARTICULAR PURPOSE. IN NO EVENT SHALL ASUS, ITS
DIRECTORS, OFFICERS, EMPLOYEES OR AGENTS BE LIABLE FOR ANY INDIRECT, SPECIAL,
INCIDENTAL, OR CONSEQUENTIAL DAMAGES (INCLUDING DAMAGES FOR LOSS OF PROFITS,
LOSS OF BUSINESS, LOSS OF USE OR DATA, INTERRUPTION OF BUSINESS AND THE LIKE),
EVEN IF ASUS HAS BEEN ADVISED OF THE POSSIBILITY OF SUCH DAMAGES ARISING FROM ANY
DEFECT OR ERROR IN THIS MANUAL OR PRODUCT.
SPECIFICATIONS AND INFORMATION CONTAINED IN THIS MANUAL ARE FURNISHED FOR
INFORMATIONAL USE ONLY, AND ARE SUBJECT TO CHANGE AT ANY TIME WITHOUT NOTICE,
AND SHOULD NOT BE CONSTRUED AS A COMMITMENT BY ASUS. ASUS ASSUMES NO
RESPONSIBILITY OR LIABILITY FOR ANY ERRORS OR INACCURACIES THAT MAY APPEAR IN THIS
MANUAL, INCLUDING THE PRODUCTS AND SOFTWARE DESCRIBED IN IT.
Products and corporate names appearing in this manual may or may not be registered trademarks or
copyrights of their respective companies, and are used only for identication or explanation and to the
owners’ benet, without intent to infringe.
Table of contents
Notices ......................................................................................................... iv
Care & Cleaning ......................................................................................... vii
1.1 Welcome! ...................................................................................... 1-1
1.2 Package contents ......................................................................... 1-1
1.3 Assembling the monitor .............................................................. 1-2
1.4 Connect cables ............................................................................. 1-3
1.4.1 Rear of the LCD monitor ................................................. 1-3
Installaion ....................................................................................... 1-5
1.4.2 Sixsidesgure ................................................................ 1-7
1.5 Monitor introduction .................................................................... 1-8
1.5.1 UsingtheControlsbutton .............................................. 1-8
2.1 Detachingthearm/stand(forVESAwallmount) ............ 2-1
2.2 Adjusting the monitor .................................................................. 2-2
3.1 OSD (On-Screen Display) menu ................................................. 3-1
3.1.1 Howtorecongure .......................................................... 3-1
3.1.2 OSDFunctionIntroduction .............................................. 3-2
3.2 Specications ............................................................................. 3-10
3.3 Troubleshooting (FAQ) .............................................................. 3-12
3.4 Supported Timing List ............................................................... 3-12

iii
A third-party certification according to ISO 14024
Say hello
to a more sustainable product
IT products are associated with a wide range of sustainability risks
throughout their life cycle. Human rights violations are common in the
factories. Harmful substances are used both in products and their
manufacture. Products can often have a short lifespan because of poor
ergonomics, low quality and when they are not able to be repaired or
upgraded.
This product is a better choice. It meets all the criteria in TCO Certified,
the world’s most comprehensive sustainability certification for IT
products. Thank you for making a responsible product choice, that help
drive progress towards a more sustainable future!
Criteria in TCO Certified have a life-cycle perspective and balance
environmental and social responsibility. Conformity is verified by
independent and approved verifiers that specialize in IT products, social
responsibility or other sustainability issues. Verification is done both
before and after the certificate is issued, covering the entire validity
period. The process also includes ensuring that corrective actions are
implemented in all cases of factory non-conformities. And last but not
least, to make sure that the certification and independent verification is
accurate, both TCO Certified and the verifiers are reviewed regularly.
Want to know more?
Read information about TCO Certified, full criteria documents, news and
updates at tcocertified.com. On the website you’ll also find our Product
Finder, which presents a complete, searchable listing of certified
products.
Toward sustainable IT products

iv
Notices
Federal Communications Commission Statement
ThisdevicecomplieswithPart15oftheFCCRules.Operationissubject
tothefollowingtwoconditions:
• Thisdevicemaynotcauseharmfulinterference,and
• Thisdevicemustacceptanyinterferencereceivedincluding
interferencethatmaycauseundesiredoperation.
Thisequipmenthasbeentestedandfoundtocomplywiththelimitsfora
ClassBdigitaldevice,pursuanttoPart15oftheFCCRules.Theselimits
aredesignedtoprovidereasonableprotectionagainstharmfulinterference
inaresidentialinstallation.Thisequipmentgenerates,usesandcan
radiateradiofrequencyenergyand,ifnotinstalledandusedinaccordance
withmanufacturer’sinstructions,maycauseharmfulinterferencetoradio
communications.However,thereisnoguaranteethatinterferencewill
notoccurinaparticularinstallation.Ifthisequipmentdoescauseharmful
interferencetoradioortelevisionreception,whichcanbedeterminedby
turningtheequipmentoffandon,theuserisencouragedtotrytocorrect
theinterferencebyoneormoreofthefollowingmeasures:
• Reorientorrelocatethereceivingantenna.
• Increasetheseparationbetweentheequipmentandreceiver.
• Connecttheequipmenttoanoutletonacircuitdifferentfromthatto
whichthereceiverisconnected.
• Consultthedealeroranexperiencedradio/TVtechnicianforhelp.
AsanEnergyStar
®
Partner,ourcompanyhasdetermined
thatthisproductmeetstheEnergyStar
®
guidelinesforenergy
efciency.
ThisproductqualiesforENERGYSTARinthefactorydefaultsettings
whichcanberestoredby“FactoryReset”functionintheOSDmenu.
Changingthefactorydefaultsettingsorenablingotherfeaturesmay
increasepowerconsumptionthatcouldexceedtheENERGYSTAR
speciedlimit.
Canadian Department of Communications Statement
ThisdigitalapparatusdoesnotexceedtheClassBlimitsforradio
noiseemissionsfromdigitalapparatussetoutintheRadioInterference
RegulationsoftheCanadianDepartmentofCommunications.
ThisclassBdigitalapparatuscomplieswithCanadianICES-003.

v
Safety information
• Beforesettingupthemonitor,carefullyreadallthedocumentationthat
camewiththepackage.
• Topreventfireorshockhazard,neverexposethemonitortorainor
moisture.
• Nevertrytoopenthemonitorcabinet.Thedangeroushighvoltages
insidethemonitormayresultinseriousphysicalinjury.
• Ifthepowersupplyisbroken,donottrytofixitbyyourself.Contacta
qualifiedservicetechnicianoryourretailer.
• Beforeusingtheproduct,makesureallcablesarecorrectlyconnected
andthepowercablesarenotdamaged.Ifyoudetectanydamage,
contactyourdealerimmediately.
• Slotsandopeningsonthebackortopofthecabinetareprovidedfor
ventilation.Donotblocktheseslots.Neverplacethisproductnearor
overaradiatororheatsourceunlessproperventilationisprovided.
• Themonitorshouldbeoperatedonlyfromthetypeofpowersource
indicatedonthelabel.Ifyouarenotsureofthetypeofpowersupplyto
yourhome,consultyourdealerorlocalpowercompany.
• Usetheappropriatepowerplugwhichcomplieswithyourlocalpower
standard.
• Donotoverloadpowerstripsandextensioncords.Overloadingcan
resultinfireorelectricshock.
• Avoiddust,humidity,andtemperatureextremes.Donotplacethe
monitorinanyareawhereitmaybecomewet.Placethemonitorona
stablesurface.
• Unplugtheunitduringalightningstormorifitwillnotbeusedfora
longperiodoftime.Thiswillprotectthemonitorfromdamagedueto
powersurges.
• Neverpushobjectsorspillliquidofanykindintotheslotsonthe
monitorcabinet.
• Toensuresatisfactoryoperation,usethemonitoronlywithULlisted
computerswhichhaveappropriateconfiguredreceptaclesmarked
between100~240VAC.
• Thesocket-outletshallbeinstalledneartheequipmentandshallbe
easilyaccessible
• Ifyouencountertechnicalproblemswiththemonitor,contacta
qualifiedservicer.
• Provideanearthingconnectionbeforethemainsplugisconnectedto
themains.And,whendisconnectingtheearthingconnection,besure
todisconnectafterpullingoutthemainsplugfromthemains.

vi
WARNING
Usageofotherthanspeciedhead-orearphonescanresultinhearing
lossduetoexcessivesoundpressures.
vii
Care & Cleaning
• Beforeyouliftorrepositionyourmonitor,itisbettertodisconnectthe
cablesandpowercord.Followthecorrectliftingtechniqueswhen
positioningthemonitor.Whenliftingorcarryingthemonitor,graspthe
edgesofthemonitor.Donotliftthedisplaybythestandorthecord.
• Cleaning.Turnyourmonitoroffandunplugthepowercord.Cleanthe
monitorsurfacewithalint-free,non-abrasivecloth.Stubbornstains
mayberemovedwithaclothdampenedwithmildcleaner.
• Avoidusingacleanercontainingalcoholoracetone.Useacleaner
intendedforusewiththeLCD.Neverspraycleanerdirectlyonthe
screen,asitmaydripinsidethemonitorandcauseanelectricshock.
The following symptoms are normal with the monitor:
• Thescreenmayflickerduringtheinitialuseduetothenatureofthe
fluorescentlight.TurnoffthePowerSwitchandturnitonagainto
makesurethattheflickerdisappears.
• Youmayfindslightlyunevenbrightnessonthescreendependingon
thedesktoppatternyouuse.
• Whenthesameimageisdisplayedforhours,anafterimageofthe
previousscreenmayremainafterswitchingtheimage.Thescreenwill
recoverslowlyoryoucanturnoffthePowerSwitchforhours.
• Whenthescreenbecomesblackorflashes,orcannotworkanymore,
contactyourdealerorservicecentertofixit.Donotrepairthescreen
byyourself!
Conventions used in this guide
WARNING:Informationtopreventinjurytoyourselfwhentryingto
completeatask.
CAUTION:Informationtopreventdamagetothecomponents
whentryingtocompleteatask.
IMPORTANT:InformationthatyouMUSTfollowtocompletea
task.
NOTE:Tipsandadditionalinformationtoaidincompletingatask.

viii
Wheretondmoreinformation
Refertothefollowingsourcesforadditionalinformationandforproduct
andsoftwareupdates.
1. ASUS websites
TheASUSwebsitesworldwideprovideupdatedinformationonASUS
hardwareandsoftwareproducts.Refertohttp://www.asus.com
2. Optional documentation
Yourproductpackagemayincludeoptionaldocumentationthatmay
havebeenaddedbyyourdealer.Thesedocumentsarenotpartof
thestandardpackage.
1-1
ASUS LCD Monitor VA24E Series
1.1 Welcome!
ThankyouforpurchasingtheASUS
®
LCDmonitor!
ThelatestwidescreenLCDmonitorfromASUSprovidesacrisper,
broader,andbrighterdisplay,plusahostoffeaturesthatenhanceyour
viewingexperience.
Withthesefeatures,youcanenjoytheconvenienceanddelightfulvisual
experiencethatthemonitorbringsyou!
1.2 Package contents
Checkyourpackageforthefollowingitems:
LCD Monitor
Monitor Base
MonitorColumn(ForVA24EHEonly)
QuickStartGuide
WarrantyCard
1xPowerCord*
1xHDMICable(optional)*
1xVGACable(optional)*
1xDVICable(optional)*
1xAudioCable(optional)*
1xUSBCable(optional)*
1xMiniPCKit(optional)
• Ifanyoftheaboveitemsisdamagedormissing,contactyourretailer
immediately.
• * AlsotheReplaceablepartsrequiredbytheTCOCertified.
1-2
Chapter 1: Product Introduction
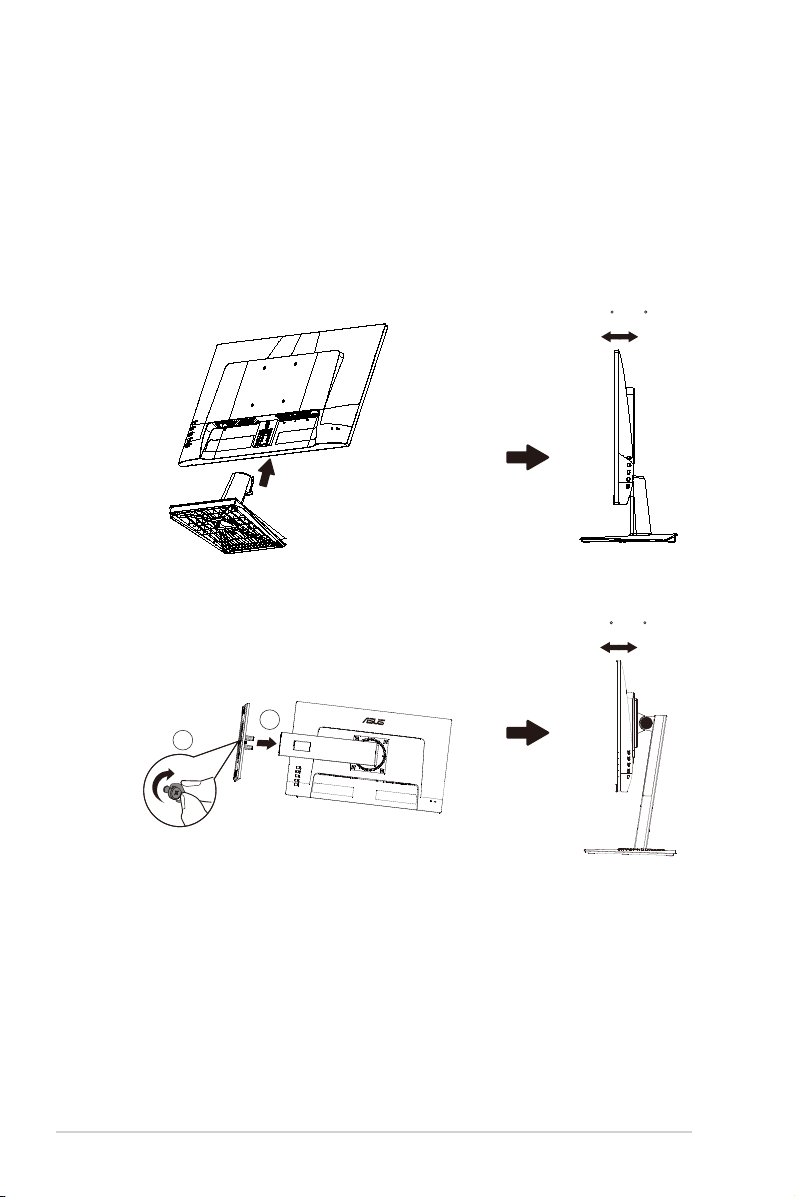
1.3 Assembling the monitor
To assemble the monitor:
1. Placethedisplayatonaclothonthetable,Thenattachthebase
tothearmandxwiththescrewtojointhemtightly.Youcaneasily
tightenthescrewbyngers.
2. Adjustthemonitortotheanglethatismostcomfortableforyou.
-5 ~ 23
-5 ~ 33
1
2
VA24EHE:
VA24EHLB/VA24EHEL/VA24EHL:
1-3
ASUS LCD Monitor VA24E Series
1.4 Connect cables
1.4.1 Rear of the LCD monitor
VA24EHE:
5
2
4
31
HDMI VGA
VA24EHE
DVI
1. AC-INPort
2. HDMIPort
3. DVIPort
4. VGAPort
5. KensingtonLock
1-4
Chapter 1: Product Introduction
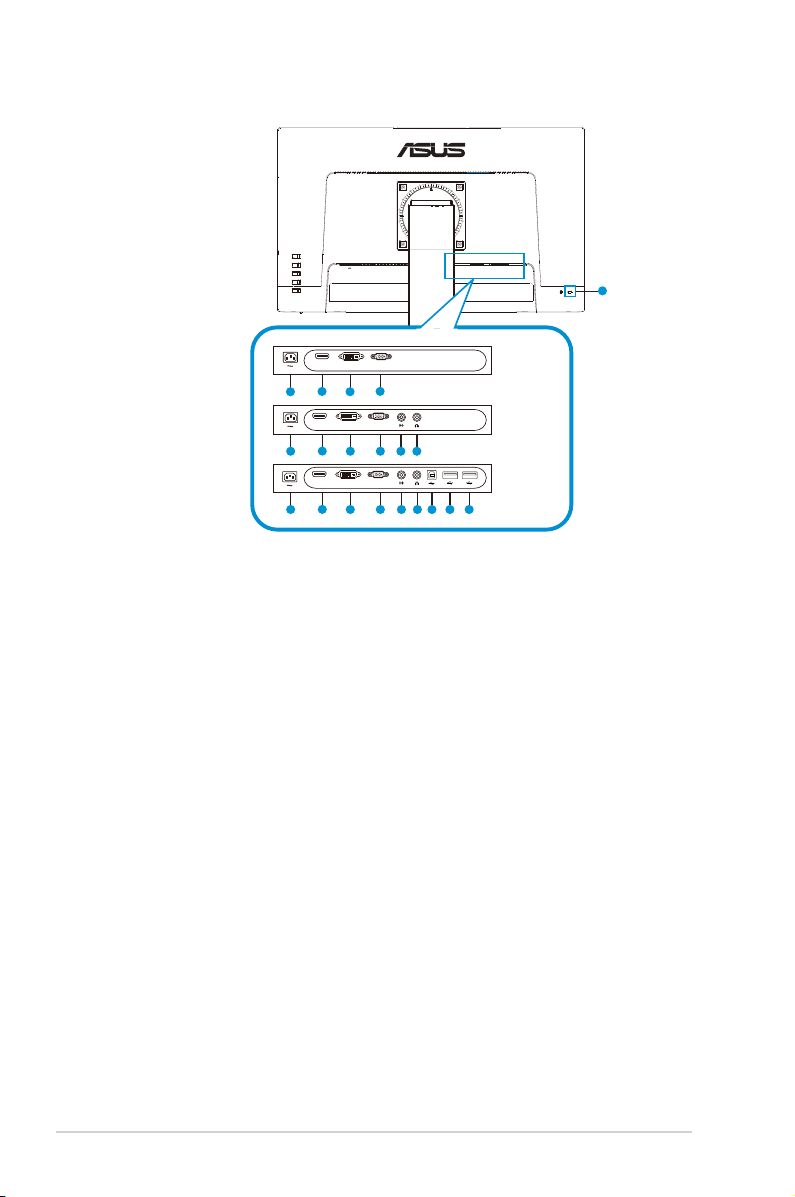
VA24EHLB/VA24EHEL/VA24EHL:
10
2
4
31
2 4 5 6
5 6 7 8 9
31
2 431
VGA
DVI
HDMI
VGA
DVI
HDMI
VGA
DVI
HDMI
VA24EHEL
VA24EHL
VA24EHLB
1. AC-INPort
2. HDMIPort
3. DVIPort
4. VGAPort
5. Audioin
6. Audioout
7. USBType-B2.0Port
8. USB2.0Port
9. USB2.0Port
10. KensingtonLock
1-5
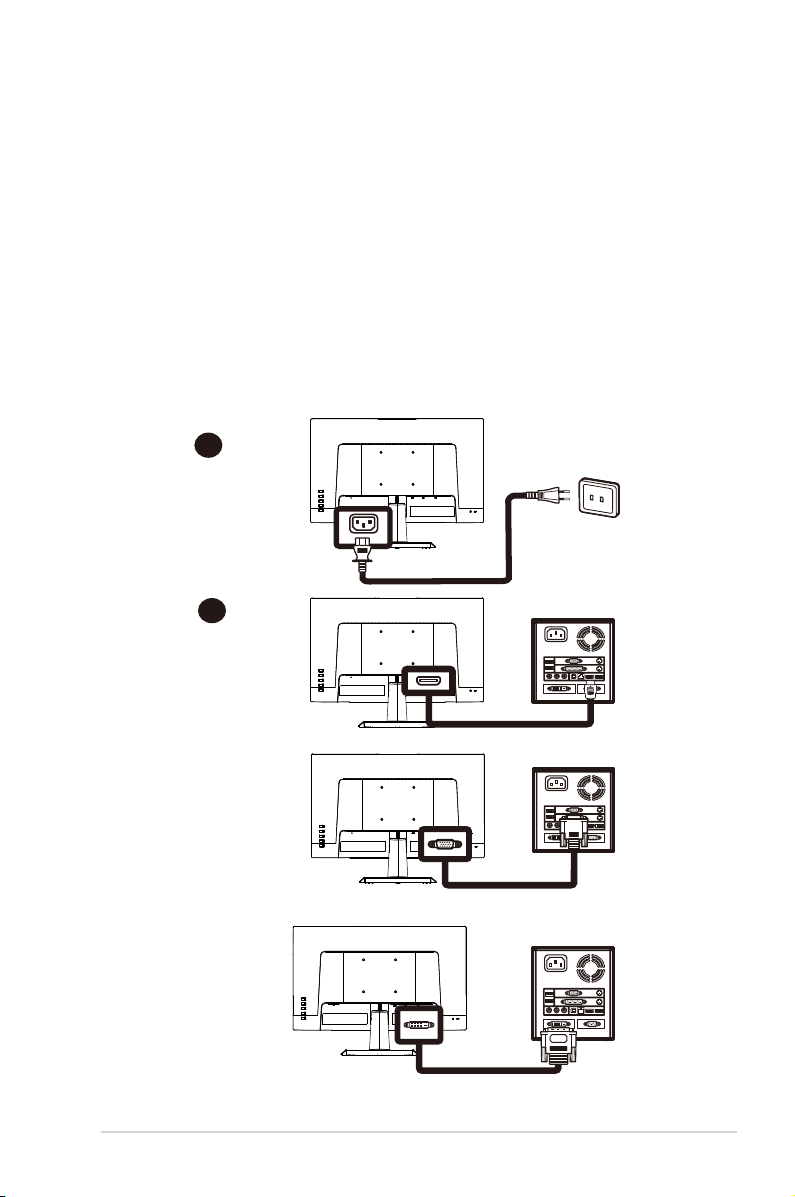
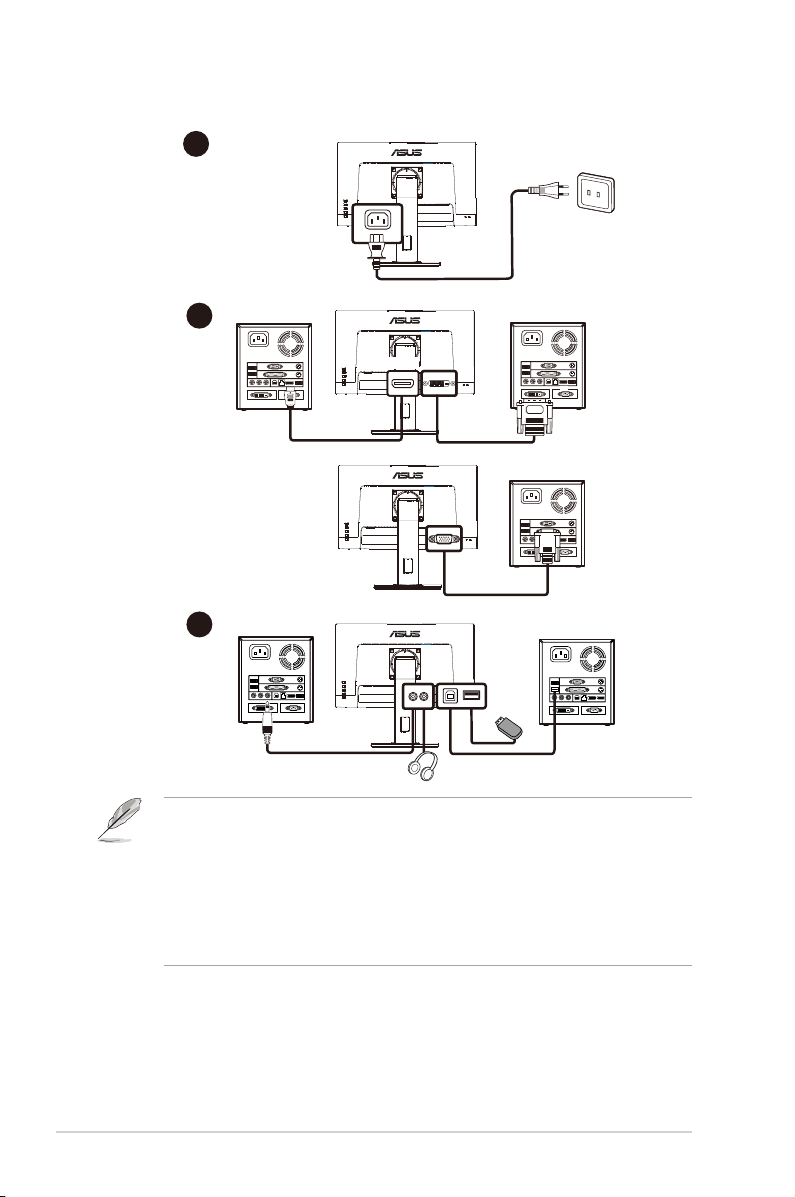
ASUS LCD Monitor VA24E Series
Installaion
1. Turnoffyourcomputerandunplugyourcomputer'spowercord.
2. ConnectthesignalcabletotheHDMI(optional)and/orVGA
(optional)and/orDVI(optional)inputsocketofthemonitor,and
theHDMI(optional)and/orVGA(optional)and/orDVI(optional)
outputsocketofthegraphicscardonthecomputer.Thentightenthe
thumbscrewsonthesignalcableconnector.
3. Optional:Connecttheaudioinputsocket(AUDIOIN)oftheLCD
monitorandtheline-outportonthecomputerwiththeaudiocable.
4. Insertthemonitorpowercableintothepowerportatthebackofthe
monitor.
5. Plugthepowercordsofyourcomputerandyourmonitorintoa
nearbyelectricaloutlet.
VA24EHE:
AC IN
D-SUB
A
B
or
or
HDMI
DVI
1-6
Chapter 1: Product Introduction
VA24EHLB/VA24EHEL/VA24EHL:
AC IN
A
B
C
HDMI
DVI
D-SUB
or
• POWERCORDspecificationsrefertopagev.
• Fortheinstallationofreplaceableparts,pleaserefertotheaboveinstallation
instructions.
• Usersmaygotothelocalservicenetworktoreplace/purchasethequalified
replaceableparts.
• Forlocalservicecentersandservicecontacts,pleasereferto
https://www.asus.com/support
1-7
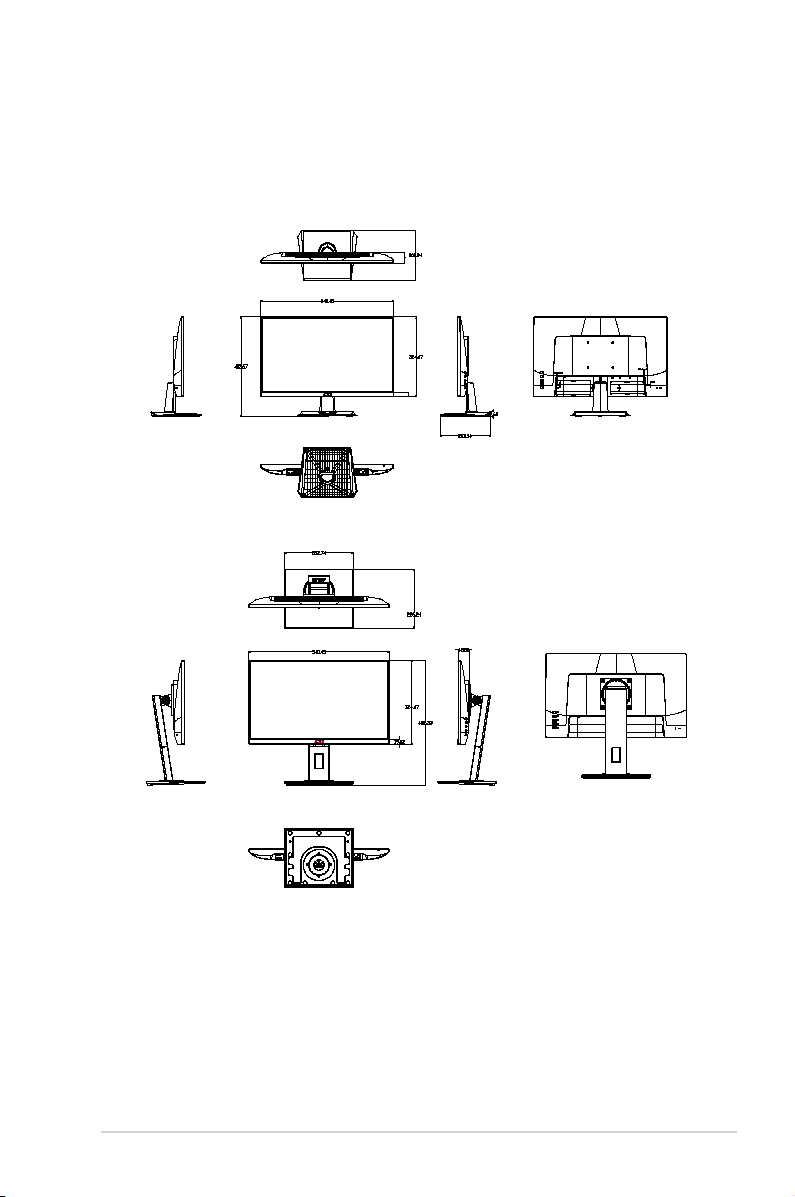
ASUS LCD Monitor VA24E Series
1.4.2 Sixsidesgure
ASUS VA24E Series
UNIT:mm(inch)
VA24EHLB/VA24EHEL/VA24EHL:
VA24EHE:
1-8
Chapter 1: Product Introduction
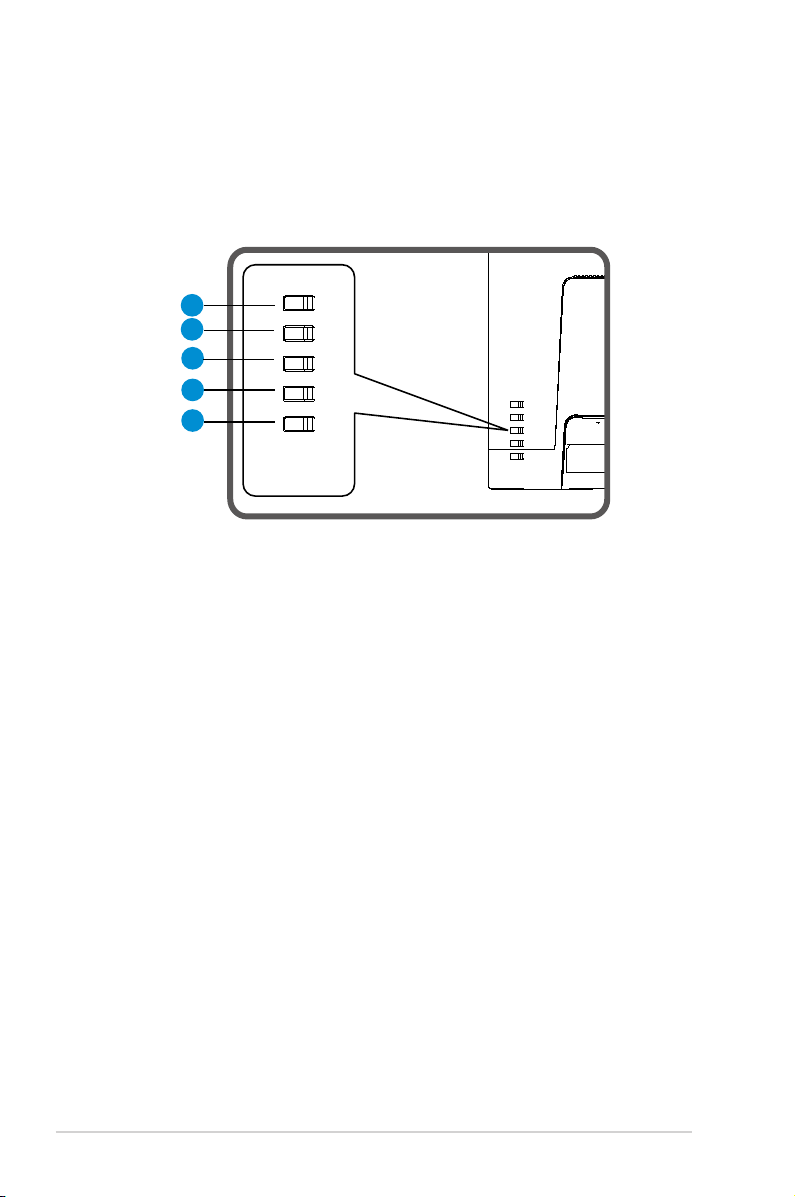
1.5 Monitor introduction
1.5.1 Using the Controls button
Usethecontrolbuttononthebackofthemonitortoadjusttheimage
settings.
1
2
3
4
5
1. MenuButton/Close:
• PressthisButtonentertheOSDmenu.
• ExittheOSDmenu
.
• Returntopreviousmenu.
• KeyLockedHotkey(*Note1)
2. Close/ReturnButton:
• ExittheOSDmenu
.
• Enter/selecttheicon(function)highlightedwhiletheOSDisactivated.
3. Inputsourcehotkey/Increasevalue:
• AddorIncreasevalue
• Inputsourcehotkey
4. Brightnesshotkey/Decreasevalue:
• NextItemorDecreasevalue
• Brightnesshotkey
5. PowerButton:
• Poweron/offmonitorwhenmonitorispoweroff/on.
2-1
ASUS LCD Monitor V
A24E
Series
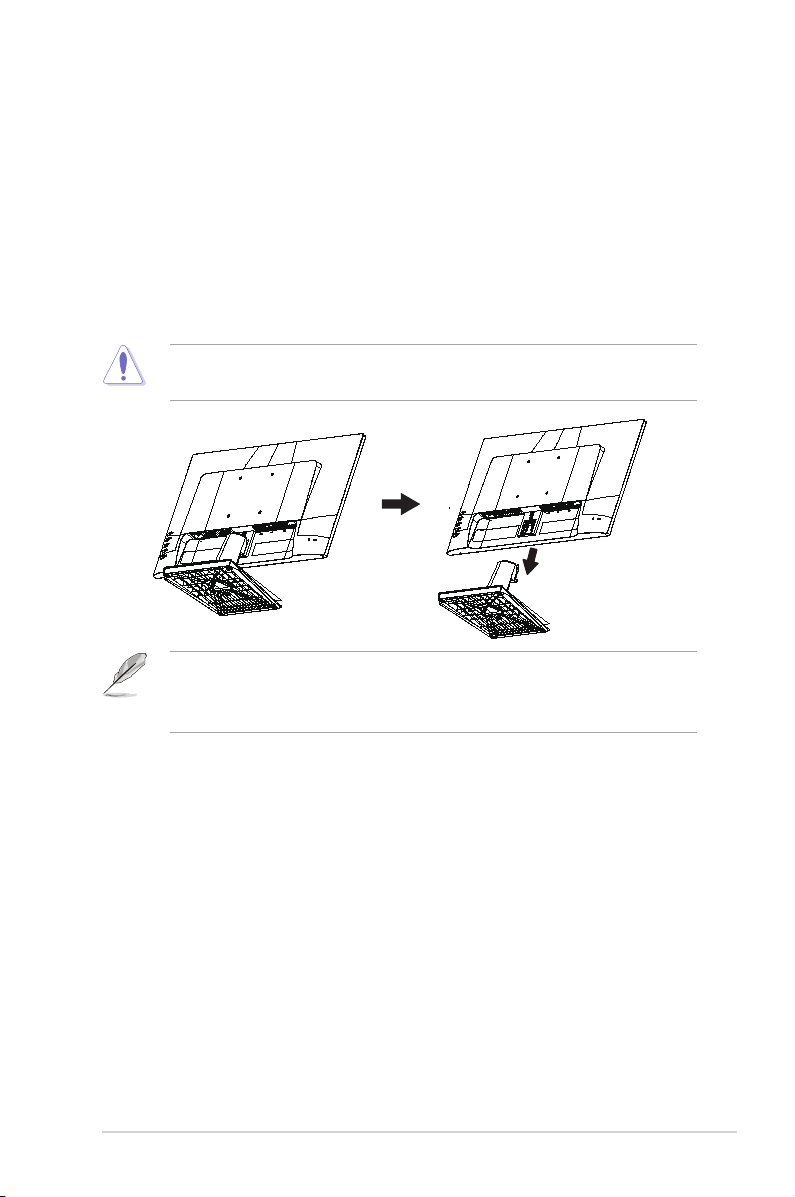
2.1 Detaching the arm/stand (for VESA wall
mount)
ThedetachablestandofthismonitorisspeciallydesignedforVESAwall
mount.
To detach the arm/stand
1. Disconnectpowerandsignalcables.Carefullyputthefrontofthe
monitorfacedownonacleantable.
2. Removethebase/standfromthemonitor.
• Werecommendthatyoucoverthetablesurfacewithsoftclothtoprevent
damagetothemonitor.
• TheVESAwallmountkit(100x100mm)ispurchasedseparately.
• UseonlytheULListedWallMountBracketwithminimumweight/load12kg
(Screwsize:M4x10mm).
2-2
Chapter 2: Setup
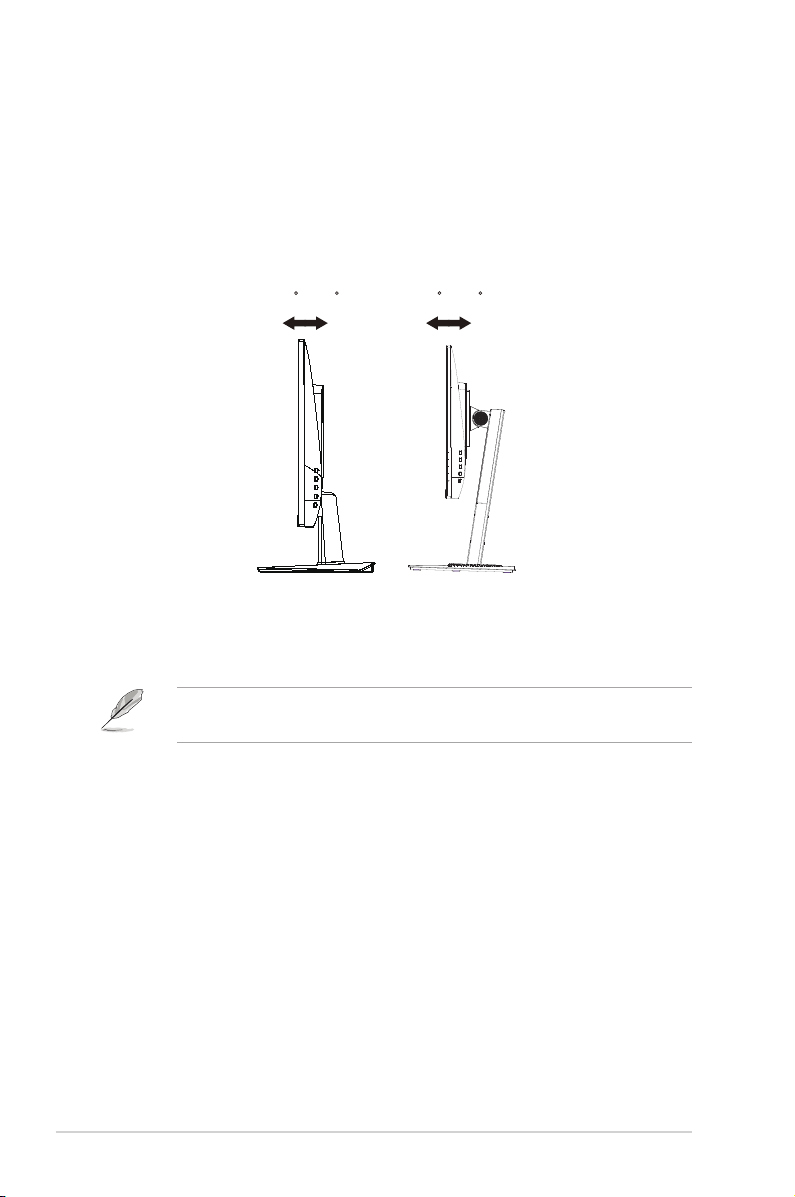
2.2 Adjusting the monitor
• Foroptimalviewing,werecommendthatyoulookatthefullfaceofthe
monitor,thenadjustthemonitortotheanglethatismostcomfortable
foryou.
• Holdthestandtopreventthemonitorfromfalling
whenyouchangeits
angle.
• Youcanadjustthemonitor’sanglefrom+23˚to-5˚/+33˚to-5˚
-5 ~ 23 -5 ~ 33
VA24EHE VA24EHLB
VA24EHEL
VA24EHL
Itisnormalthatthemonitorslightlyshakeswhileyouadjusttheviewing
angle.
3-1
ASUS LCD Monitor VA24E Series
3.1 OSD (On-Screen Display) menu
3.1.1 Howtorecongure
Reading Mode
Darkroom Mode
Splendid
Standard Mode
Night View Mode
Theater Mode
Game Mode
Scenery Mode
sRGB Mode
Standard Mode VGA 1920x1080@60Hz
ASUS VA24E
1. PresstheMENUbuttontoactivatetheOSDmenu.
2. Pressthe and buttonstotogglebetweenoptionsinthe
Menu.Asyoumovefromoneicontoanother,theoptionnameis
highlighted.
3. ToselectthehighlighteditemonthemenupresstheCenterkey.
4. Pressthe and buttonstoselectthedesiredparameter.
5. PresstheCenterkeytoentertheslidebarandthenusethe or
buttons,accordingtotheindicatorsonthemenu,tomakeyour
changes.
3-2
Chapter 3: General Instruction
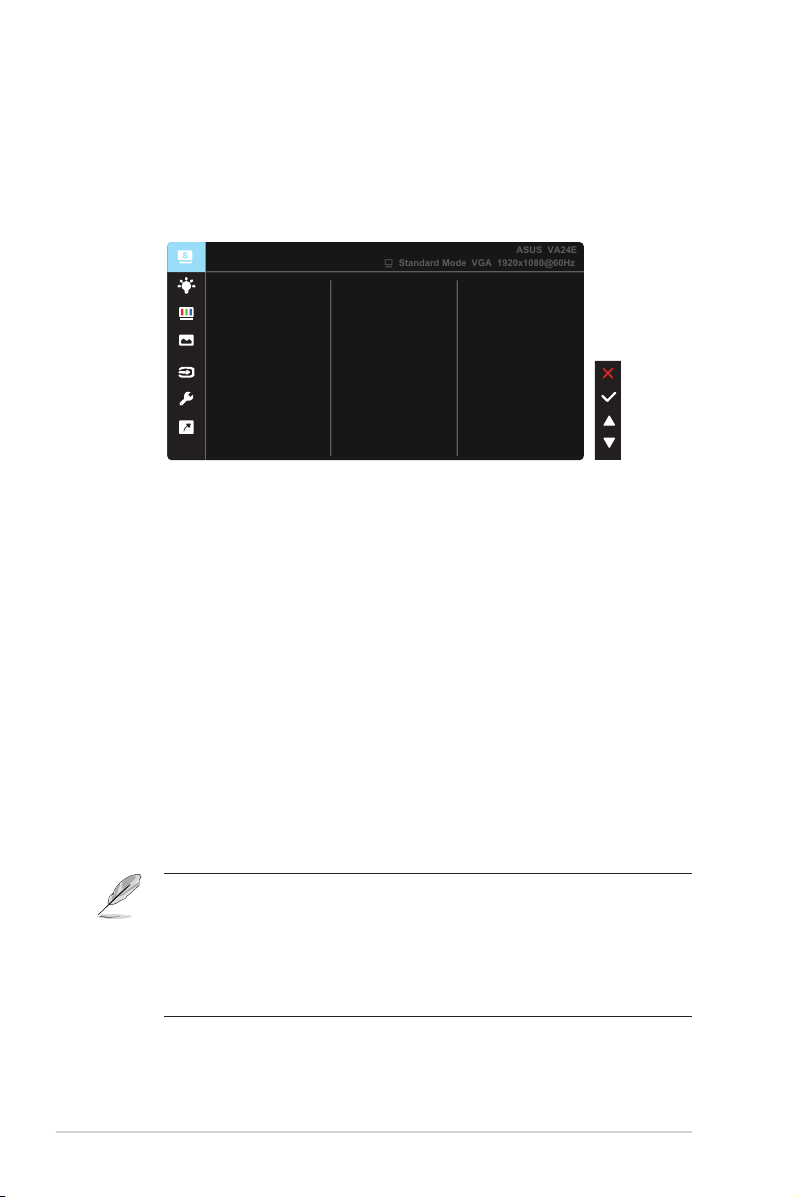
3.1.2 OSD Function Introduction
1. Splendid
Thisfunctioncontainseightsub-functionsthatyoucanselectfor
yourpreference.EachmodehastheResetselection,allowingyouto
maintainyoursettingorreturntothepresetmode.
Reading Mode
Darkroom Mode
Splendid
Standard Mode
Night View Mode
Theater Mode
Game Mode
Scenery Mode
sRGB Mode
Standard Mode VGA 1920x1080@60Hz
ASUS VA24E
• Standard Mode:Thisisthebestchoicefordocumenteditingwith
SPLENDID™VideoIntelligenceTechnology.
• sRGB Mode:Thisisthebestchoiceforviewingphotosandgraphics
fromPCs.
• Scenery Mode:Thisisthebestchoiceforsceneryphotodisplayingwith
SPLENDID™VideoIntelligenceTechnology.
• Theater Mode:Thisisthebestchoiceformoviewatchingwith
SPLENDID™VideoIntelligenceTechnology.
• Game Mode:ThisisthebestchoiceforgameplayingwithSPLENDID™
VideoIntelligenceTechnology.
• Night View Mode:Thisisthebestchoiceforplayingdark-scenegame
orwatchingdark-scenemoviewithSPLENDID™VideoIntelligence
Technology.
• Reading Mode :Thisisthebestchoiceforbookreading.
• Darkroom Mode :Thisisthebestchoiceforaweakambientlight
environmen.
• IntheStandardMode,theSaturation,SkinTone,Sharpness,andASCR
functionsarenotuser-configurable.
• InthesRGB,theSaturation,ColorTemp.,SkinTone,Sharpness,Brightness,
ContrastandASCRfunctionsarenotuser-configurable.
• IntheReadingMode,theSaturation,SkinTone,ASCR,contrast,andColor
Tempfunctionsarenotuser-configurable.
3-3
ASUS LCD Monitor VA24E Series
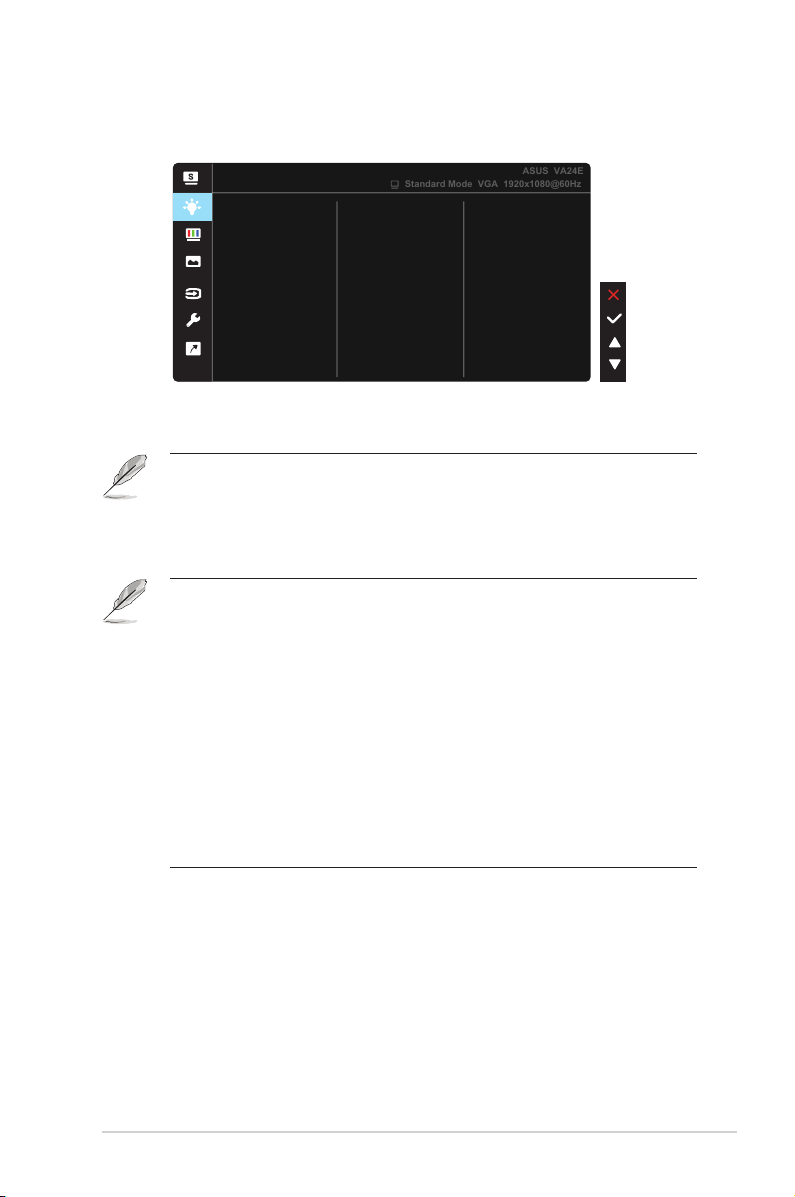
2. Blue Light Filter
AdjusttheenergylevelofbluelightemittedfromLEDbacklight.
Blue Light Filter
Level 0
Level 3
Level 4
Level 2
Level 1
Standard Mode VGA 1920x1080@60Hz
ASUS VA24E
• Level 0:Nochange.
• Level 1~4:Thehigherthelevel,themorebluelightwillbereduced.
• WhenBlueLightFilterisactivated,thedefaultsettingsofStandardModewill
beautomaticallyimported.
• BetweenLevel1toLevel3,theBrightnessfunctionisuser-configurable.
• Level4isoptimizedsetting.ItiscompliancewithTUVLowBlueLight
Certification.TheBrightnessfunctionisnotuser-configurable.
Pleaserefertothefollowingtoalleviateeyestrains:
• Usersshouldtakesometimeawayfromthedisplayifworkingforlonghours.
Itisadvisedtotakeshortbreaks(atleast5mins)afteraround1hourof
continuousworkingatthecomputer.Takingshortandfrequentbreaksismore
effectivethanasinglelongerbreak.
• Tominimizeeyestrainanddrynessinyoureyes,usersshouldresttheeye
periodicallybyfocusingonobjectsthatarefaraway.
• Eyeexercisescanhelptoreduceseyestrain.Repeattheseexercisesoften.If
eyestraincontinuespleaseconsultaphysician.Eyeexercises:(1)Repeating
lookupanddown(2)Slowlyrollyoureyes(3)Moveyoureyesdiagonal.
• HighenergybluelightmayleadtoeyestrainandAMD(Age-RelatedMacular
Degeneration).Bluelightfiltertoreduce70%(max.)harmfulbluelightto
avoidingCVS(ComputerVisionSyndrome).

3-4
Chapter 3: General Instruction
3. Color
Selecttheimagecoloryoulikefromthisfunction.
Color
Brightness
Color Temp.
Skin Tone
Saturation
Contrast
Standard Mode VGA 1920x1080@60Hz
ASUS VA24E
• Brightness:Theadjustingrangeisfrom0to100.
• Contrast:Theadjustingrangeisfrom0to100.
• Saturation:Theadjustingrangeisfrom0to100.
• Color Temp.:Containsthreepresetcolormodes(Cool,Normal,Warm)
and User Mode.
• Skin Tone:ContainsthreecolormodesincludingReddish,Natural,and
Yellowish.
• IntheUserMode,colorsofR(Red),G(Green),andB(Blue)areuser-
configurable;theadjustingrangeisfrom0~100.
3-5
ASUS LCD Monitor VA24E Series
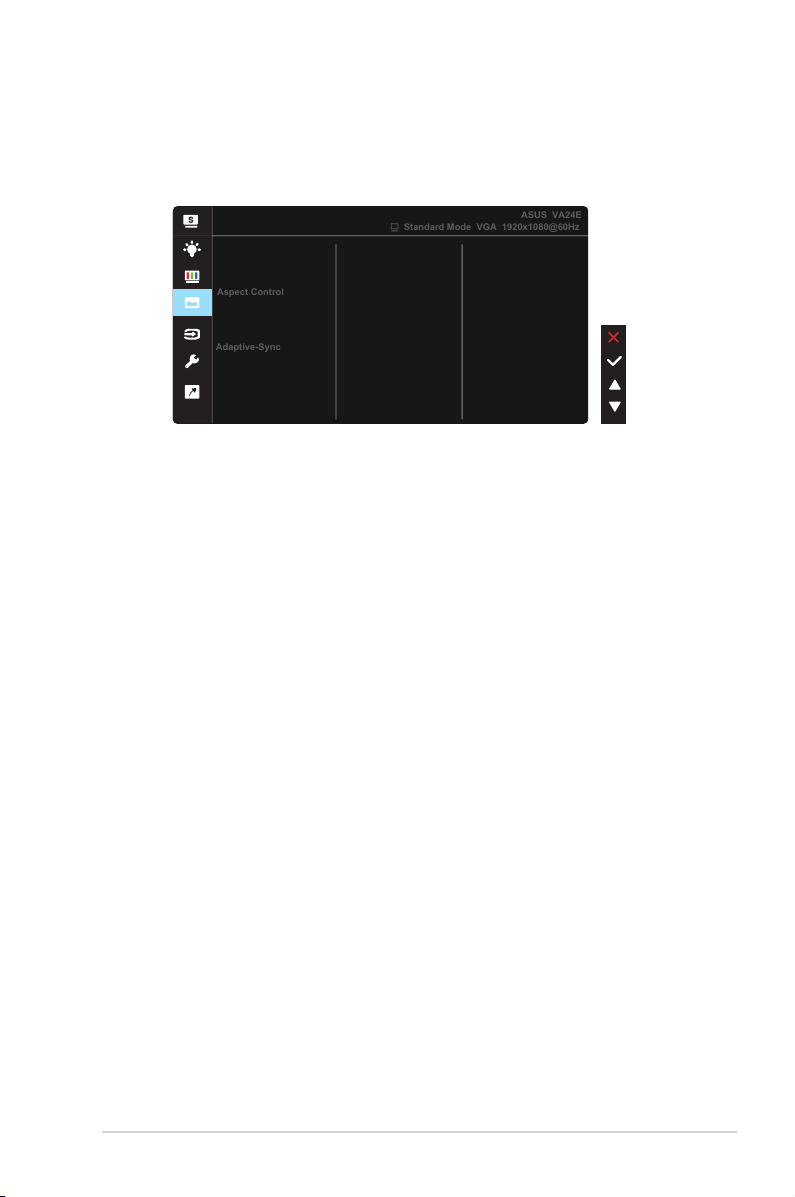
4. Image
YoucanadjusttheimageSharpness,TraceFree,AspectControl,
VividPixel,
ASCR,Position(VGAonly),Focus(VGAonly),andAuto
Adjust(VGAonly),fromthismainfunction.
Image
Sharpness
VividPixel
ASCR
Aspect Control
Trace Free
Standard Mode VGA 1920x1080@60Hz
ASUS VA24E
Focus
Auto Adjust
Position
Adaptive-Sync
• Sharpness:Adjuststhepicturesharpness.Theadjustingrangeisfrom
0to100.
• Trace Free:SpeedsuptheresponsetimebyOverDrivetechnology.The
adjustingrangeisfromlower0tofaster100.
• Aspect Control:Adjuststheaspectratioto“Full”,“4:3”.
• VividPixel:ASUSExclusiveTechnologythatbringslifelikevisualsfor
crystal-clearanddetail-orientedenjoyment.Theadjustingrangeisfrom
0to100.
• ASCR:SelectON or OFFtoenableordisabledynamiccontrastratio
function.
• Adaptive-Sync:ItcanallowaAdaptive-Syncsupportedgraphicssource
todynamicallyadjustdisplayrefreshratebasedontypicalcontentframe
ratesforpowerefficient,virtuallystutterfreeandlow-latencydisplay
update.
• Position:Adjuststhehorizontalposition(H-Position)andthevertical
position(V-Position)oftheimage.Theadjustingrangeisfrom0to100
(OnlyavailableforVGAinput).
• Focus:ReducesHorizonal-linenoiseandVertical-linenoiseoftheimage
byadjusting(Phase)and(Clock)separately.Theadjustingrangeisfrom
0to100(OnlyavailableforVGAinput).
• Auto Adjust.:Automaticallyadjusttheimagetoitsoptimizedposition,
clock,andphase.(OnlyavailableforVGAinput.)

3-6
Chapter 3: General Instruction
• 4:3isonlyavailablewheninputsourceisin4:3format。OverScan is only
availablefortheHDMIinputsource
• Phaseadjuststhephaseofthepixelclocksignal.Withawrongphase
adjustment,thescreenshowshorizontaldisturbances.
• Clock(pixelfrequency)controlsthenumberofpixelsscannedbyone
horizontalsweep.Ifthefrequencyisnotcorrect,thescreenshowsvertical
stripesandtheimageisnotproportional.
5. Sound (VA24EHL/VA24EHL only)
Adjustthesoundsettingstoyourpreference.
Sound
Volume
Source
Mute
Standard Mode VGA 1920x1080@60Hz
ASUS VA24E
• Volume: Adjuststheoutputvolumelevel.
• Mute: Mutetheoutputvolume.
• Source: Adjustsaudiosourceto“LineIn”or“HDMI”(onlyavailablefor
HDMIinput);Adjustsaudiosourceto“LineIn”or“DisplayPort”(only
availableforDisplayPortinput).
6. Input Select
SelecttheinputsourcefromVGA, HDMI, DVI inputsignal.
Input Select
VGA
HDMI
DVI
Standard Mode VGA 1920x1080@60Hz
ASUS VA24E
3-7
ASUS LCD Monitor VA24E Series
7. System Setup
Adjuststhesystemconguration.
System Setup
Splendid Demo Mode
QuickFit
GamePlus
ASUS VA24E
Standard Mode VGA 1920x1080@60Hz
More
Language
ECO Mode
OSD Setup
USB Charging
Key Lock
System Setup
Back
Information
Standard Mode VGA 1920x1080@60Hz
ASUS VA24E
Power Key Lock
Power Indicator
All Reset
• Splendid Demo Mode:ActivatethedemomodefortheSplendid
function.
• GamePlus:TheGamePlusFunctionprovidesatoolkitandcreatesa
bettergamingenvironmentforuserswhenplayingdifferenttypesof
games.Particularly,Aimpointfunctionisspeciallydesignedfornew
gamersorbeginnersinterestedinFirstPersonShooter(FPS)games.
ToactiveGamePlus:
• Select ON toentertheGamePlusmainmenu.
• Press and toselectbetween
Crosshair
,Timer,FPSCounter,
DisplayAlignment,SnellenChart,AmslterGridandAstigmatism
function.
• PressCenterkeytoconfirmthefunctionyouchoose.Press togo
back.Press togooff,andexit.
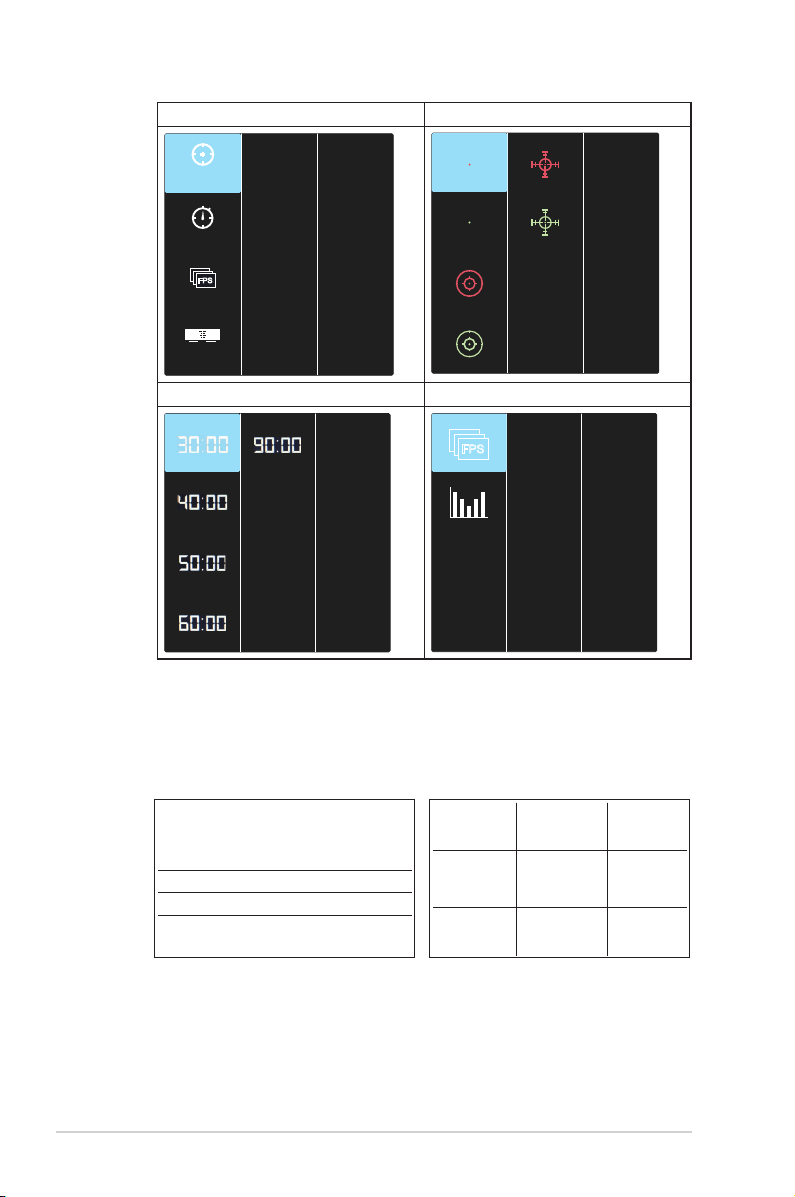
3-8
Chapter 3: General Instruction
GamePlusmainmenu GamePlus-Crosshair
Timer
FPS Counter
FPS
Display
Alignment
Crosshair
(Practice Mode)
GamePlusmain-Timer GamePlus-FPS
FPS
• QuickFit: containsthreepatterns:(1)Grid(2)Papersize(3)Photosize.
1. Gridpattern:Facilitatesdesignersanduserstoorganize
contentandlayoutononepageandachieveaconsistent
lookandfeel.
Alignment Grid 2
Alignment Grid 1
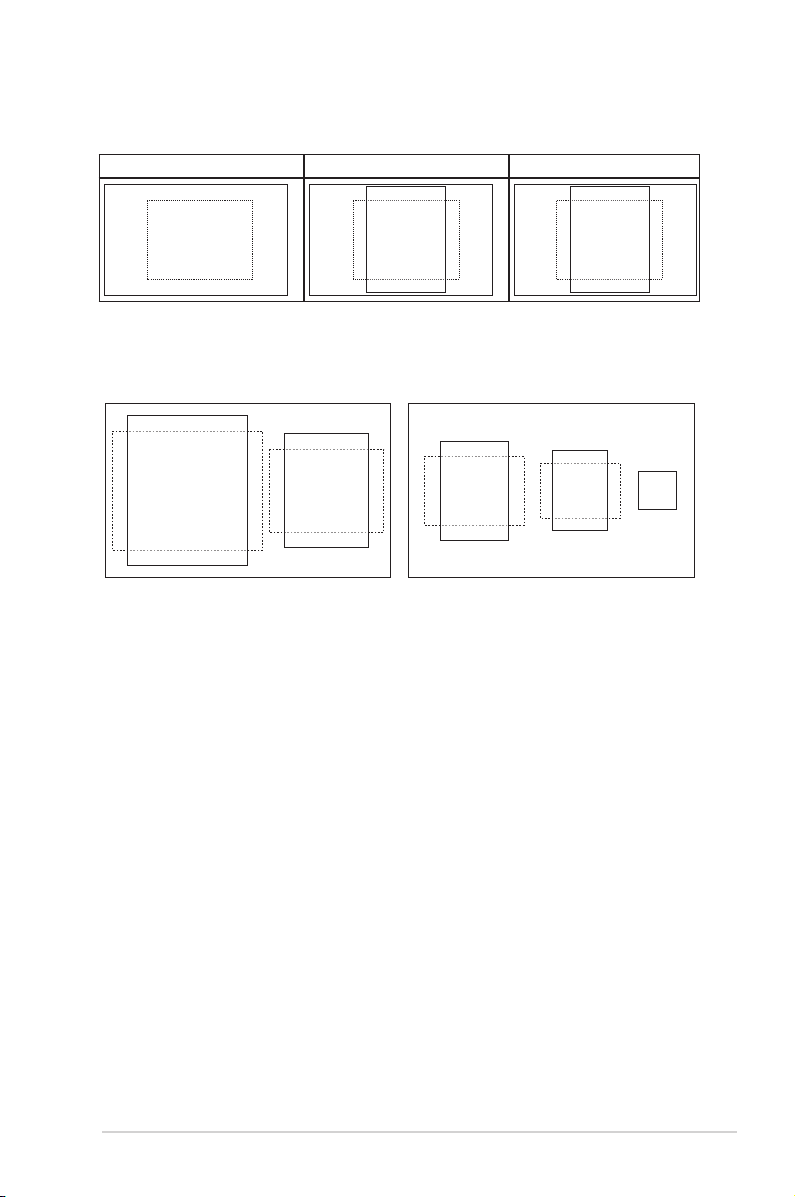
3-9
ASUS LCD Monitor VA24E Series
2. Papersize:Providesuserstoviewtheirdocumentsinreal
sizeonthescreen.
A4 B5 Letter
A4 B5
EXIT
Letter
EXIT
3. Photosize:Providesphotographersandotherusersto
accuratelyviewandedittheirphotosinrealsizeonthe
screen.
8x10
5x7
3x5
2x2
4x6
• ECO Mode:Activatetheecologymodeforpowersaving.
• USB Charging:
TurnOn/OffUSBchargingfunctionduringthe
standbymode.(VA24EHLBonly)
• OSD Setup:AdjuststheOSD Timeout,DDC/CI,andTransparency of
the OSD screen.
• Language:SelectOSDlanguage.Theselectionsare:English, French,
German, Spanish, Italian, Dutch, , Russian, Poland, Czech, Croacia,
Hungary, Romania, Portugal, Turkey, Simplified Chinese, Traditional
Chinese, Japanese, Korean, Persian, Thai, Indonesian.
• More:ReturnthenextpageofSystemSetting.
• Key Lock:Disableallkeyfunctions.Pressingthesecondbuttononthe
rightformorethanfivesecondstodisablekeylockfunction.
• Back:ReturnthepreviouspageofSystemSetting.
• Information:Displaysthemonitorinformation.
• Power Indicator:TurnthepowerLEDindicatoron/off.
• Power Key Lock:Todisable/enablepowerkey
• All Reset:Selects“Yes”torevertallsettingstothefactorydefaultmode.

3-10
Chapter 3: General Instruction
3.2 Specications
Model
VA24EHE VA24EHEL
PanelSize 23.8”W
Max.Resolution 1920x1080
Brightness(Typ.) 250cd/m
2
Intrinsic Contrast Ratio
(Typ.)
1000:1
ViewingAngle(CR>10) 178°(V)/178°(H)
Display Colors 16.7M(6bit+FRC)
Response Time 5ms(GToG)
SatelliteSpeaker No
SoundfromHDMI Yes
HDMIinput Yes
D-Subinput Yes
DVIinput Yes
AudioLine-in No
PowerONConsumption <13.2W
Note *BasedonEnergyStar8.0standard
Chassis Colors Black
Powersavingmode <0.5W
Poweroffmode <0.5W
Tilt -5°~+23° -5°~+33°
VESAWallMounting Yes(100mmx100mm)
Phys.Dimensionwith
stand(WxHxD)
540.45mmx403.67mmx
203.94mm
540.45mmx482.33mmx
226.24mm
Phys.Dimensionwithout
stand(WxHxD)
(ForVESAWallMount)
540.45mmx324.67mmx
44.4mm
540.45mmx324.67mmx
44.4mm
BoxDimension(WxHxD)
559mm x 415mm x
127mm
647mmx400mmx
181mm
NetWeight(Esti.) 3.6kg 5.69kg
GrossWeight(Esti.) 5.5kg 8.1kg
VoltageRating AC100~240V(Built-in) AC100~240V(Built-in)
3-11
ASUS LCD Monitor VA24E Series
Model
VA24EHLB/VA24EHL
PanelSize 23.8”W
Max.Resolution 1920x1080
Brightness(Typ.) 250cd/m
2
Intrinsic Contrast Ratio
(Typ.)
1000:1
ViewingAngle(CR>10) 178°(V)/178°(H)
Display Colors 16.7M(6bit+FRC)
Response Time 5ms(GToG)
SatelliteSpeaker Yes
SoundfromHDMI Yes
HDMIinput Yes
D-Subinput Yes
DVIinput Yes
AudioLine-in Yes
PowerONConsumption <14.5W
Note *BasedonEnergyStar8.0standard
Chassis Colors Black
Powersavingmode <0.5W
Poweroffmode <0.5W
Tilt -5°~+33°
VESAWallMounting Yes(100mmx100mm)
Phys.Dimensionwith
stand(WxHxD)
540.45mmx482.33mmx226.24mm
Phys.Dimensionwithout
stand(WxHxD)
(ForVESAWallMount)
540.45mmx324.67mmx44.4mm
BoxDimension(WxHxD) 647mmx400mmx181mm
NetWeight(Esti.) 5.69kg
GrossWeight(Esti.) 8.1kg
VoltageRating AC100~240V(Built-in)
3-12
Chapter 3: General Instruction
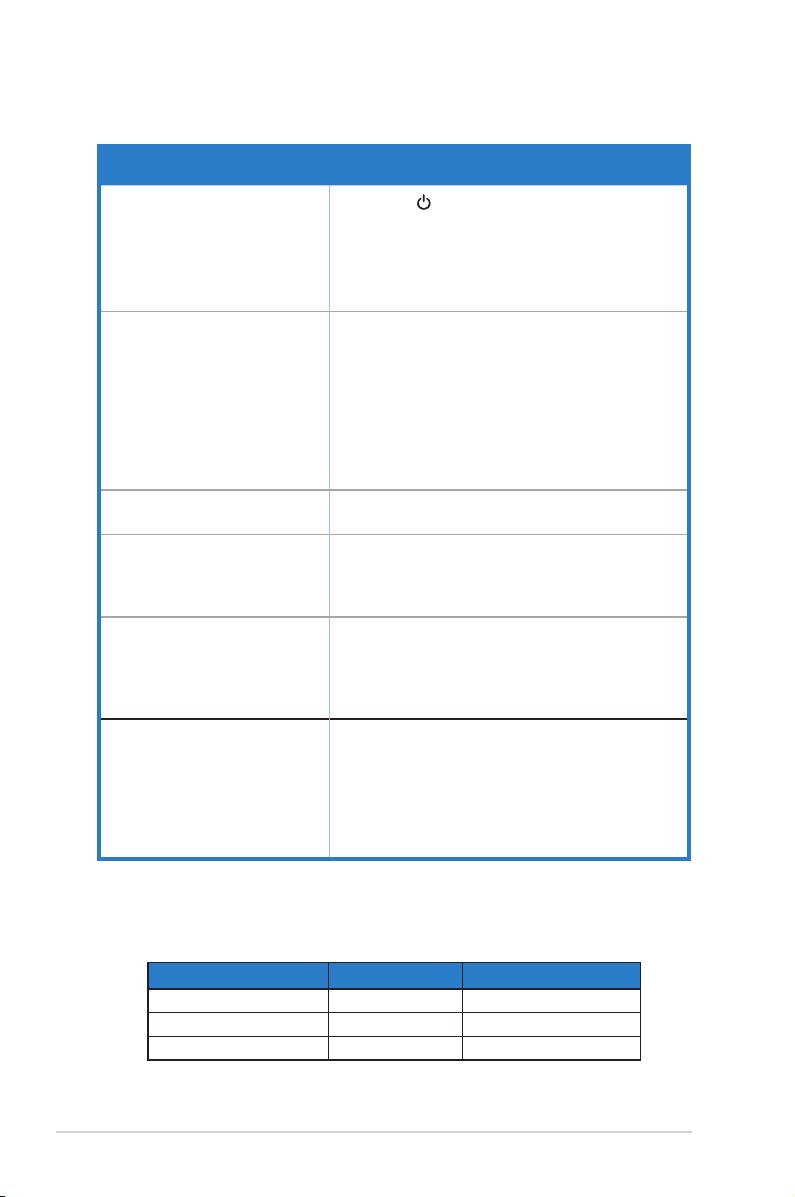
3.3 Troubleshooting (FAQ)
Problem Possible Solution
PowerLEDisnotON
• Pressthe buttontocheckifthemonitorisinthe
ONmode.
• Checkifthepowercordisproperlyconnectedto
themonitorandthepoweroutlet.
• CheckPowerIndicatorfunctioninmainmenuOSD.
Select“ON”toturnonpowerLED.
ThepowerLEDlightsamberand
thereisnoscreenimage
• Checkifthemonitorandthecomputerareinthe
ONmode.
• Makesurethesignalcableisproperlyconnected
themonitorandthecomputer.
• Inspectthesignalcableandmakesurenoneofthe
pinsarebent.
• Connectthecomputerwithanotheravailable
monitortocheckifthecomputerisproperly
working.
Screenimageistoolightordark • AdjusttheContrastandBrightnesssettingsvia
OSD.
Screenimagebouncesorawave
patternispresentintheimage
• Makesurethesignalcableisproperlyconnectedto
themonitorandthecomputer.
• Moveelectricaldevicesthatmaycauseelectrical
interference.
Screenimagehascolordefects
(whitedoesnotlookwhite)
• Inspectthesignalcableandmakesurethatnoneof
thepinsarebent.
• PerformResetviaOSD.
• AdjusttheR/G/BcolorsettingsorselecttheColor
TemperatureviaOSD.
Nosoundorsoundislow
(VA24EHLB/VA24EHLonly)
• Makesuretheaudiocableisproperlyconnectedto
the monitor.
• Adjustthevolumesettingsofbothyourmonitorand
computer.
• Makesurethecomputersoundcarddriveris
properly installed and activated.
• MakesuretheaudiosourceiscorrectontheOSD.
3.4 Supported Timing List
PC Supported Primary Timing
Resolution Refresh Rate Horizontal Frequency
640x480 60Hz 31.469kHz
640x480 72Hz 37.861kHz
640x480 75Hz 37.5kHz
3-13
ASUS LCD Monitor VA24E Series
800x600 56Hz 35.156kHz
800x600 60Hz 37.879kHz
800x600 72Hz 48.077kHz
800x600 75Hz 46.875kHz
1024x768 60Hz 48.363kHz
1024x768
70Hz 56.476kHz
1024x768 75Hz 60.023kHz
1152x864 75Hz 67.5kHz
1280x960 60Hz 60kHz
1280x1024 60Hz 63.981kHz
1280x1024
75Hz 79.976kHz
1440x900 60Hz 55.935kHz
1440x900 75Hz
70.635kHz
1680x1050 60Hz
65.29kHz
1920x1080
60Hz
67.5kHz
1920x1080
75Hz 83.894kHz
IBM Modes, Factory Preset Timing
Resolution Refresh Rate Horizontal Frequency
640x350 70Hz
31.469kHz
720x400 70Hz 31.469kHz
MAC Modes, Factory Preset Timing
Resolution Refresh Rate Horizontal Frequency
640x480 67Hz 35kHz
832x624 75Hz 49.725kHz
VESA Modes, User Available Timing
Resolution Refresh Rate Horizontal Frequency
848x480 60Hz 31.02kHz
1280x720(RB) 60Hz 44.444kHz
1280x720 60Hz 44.772kHz
1280x720 75Hz 56.456kHz
1280x768(RB) 60Hz 47.396kHz
1280x800(RB) 60Hz 49.306kHz
1280x800 60Hz 49.702kHz
1280x800 75Hz 62.795kHz
1366x768 60Hz 47.712kHz
1440x900(RB) 60Hz 55.469kHz
1440x900 75Hz 70.635kHz
1680x1050(RB) 60Hz 64.674kHz
1920x1080 60Hz 66.587kHz
3-14
Chapter 3: General Instruction
SD/HD Timings (HDMI input only)
HDMI 1.3,CEA-861B Formats, SD/HD Supported Primary Timings of (HDMI input only)
Resolution Refresh Rate Horizontal Frequency
640x480P 59.94/60Hz 31.469/31.5kHz
720x480P 59.94/60Hz 31.469/31.5kHz
720x576P 50Hz 31.25kHz
1280x720P 50Hz 37.5kHz
1280x720P 59.94/60Hz 44.955/45kHz
1920x1080i 50Hz 28.125kHz
1920x1080i 59.94/60Hz 33.716/33.75kHz
HDMI 1.3,CEA-861B Formats, SD/HD Supported Optional Timings of (HDMI input only)
Resolution Refresh Rate Horizontal Frequency
1440x480P 59.94/60Hz 31.469/31.5kHz
1440x576P 50Hz 31.25kHz
1920x1080P 50Hz 56.25kHz
1920x1080P 59.94/60Hz 67.433/67.5kHz
* The modes not listed in the above tables may not be supported. For optimal resolution, we
recommend that you choose a mode listed in the above tables.