Loading ...
Loading ...
Loading ...
EN
9
Troubleshooting
ATTENTION
Repairs must only be performed by specialized and
qualified personnel. Any repair work not performed
by professional personnel may cause damage to the
appliance for which the manufacturer will not be liable.
The following problems can be fixed by the consumer
without the assistance of the Service Department.
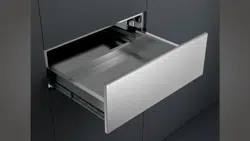
The drawer is not hot enough. Make sure that:
• The appliance is turned on;
• The correct temperature has been set;
• The opening of the ventilation fan is not blocked by plates
or other large obstructions;
• The drawers have had sufficient time to heat up.
The drawer is not hot at all. Make sure that:
• You hear the fan running;
• If the fan is turned on this means that the heating system
is working;
• If the fan does not work this means it is defective;
• The circuit fuse is blown.
INSTALLATION INSTRUCTIONS:
Appliance installation
IMPORTANT: Save these instructions for the local electrical
inspector use.
INSTALLER: Please leave this manual with owner for future
reference.
OWNER: Please keep this manual for future reference.
WARNING
If the information in this manual is not followed exactly,
a fire or explosion may result causing property damage,
personal injury or death.
Please read these instructions COMPLETELY AND
CAREFULLY. They will save you time and effort and help to
ensure optimum drawer performance.
Be sure to observe all WARNINGS. These installation
instructions are intended for use by a qualified installer.
• Assure that electrical installation is adequate and in
conformance with National Electrical Code, ANSI/
NFPA 70 - latest edition**, or Canadian Electrical Code,
part 1 C22.1 (latest edition)*** and all local codes and
ordinances.
These shall be carefully followed at all times.
Tools you will need
The following tools are needed to install your new warming
dreawer:
• Tape measure and straightedge or ruler
• Pencil
• Phillips screwdriver
• Level
• Wire cutters and wire stripper
• Hand or saber saw
• 1” (2,5cm) Hole saw
• Drill and drill bit
• Safety gloves and goggles
• Volt meter (0-250VAC)
Packaging
Remove all tape and packaging before using the warming
drawer.
Destroy the packaging after unpacking the drawer following
the rules in force in your town. Never allow children to play
with packaging material.
Power requirements
The warming drawer must be supplied with the proper
voltage and frequency. The drawer is manufactured to be
connected to a three-wire, single phase, 120 Volt, 60 Hz
AC electrical supply.
Choosing drawer location
Carefully select the location where the warming drawer will
be placed.
It should be located for convenient use in the kitchen.
Make sure that electrical power can be provided to the location
selected.
Steps for installation
The following pages provide the necessary information for
proper installation of the appliance and are arranged as
follows:
• Technical Data
• Installation Cutout Dimensions, Required Clearances and
Mounting instructions
• Electrical Supply and Wiring Requirements
• Final Checklist
Loading ...
Loading ...
Loading ...