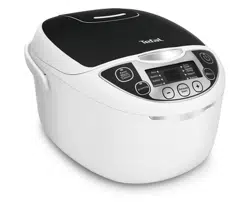
Spherical Pot Rice Cooker
www.tefal.com
EN
ZH
MS
TH
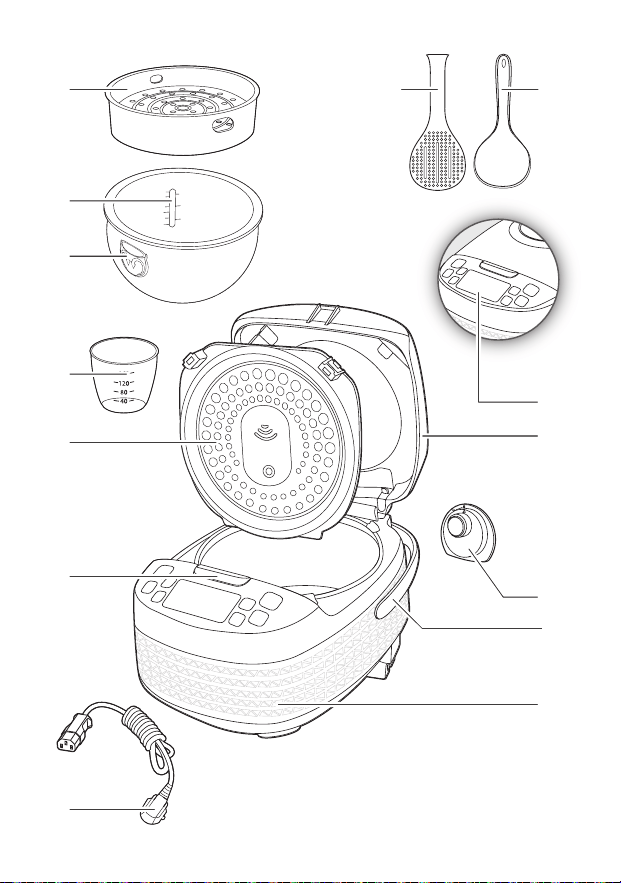
Fig.1Fig.2Fig.3a Fig.3b
Fig.4Fig.5Fig.6Fig.7
Fig.12 Fig.13 Fig.14 Fig.15
Fig.16 Fig.18 Fig.19
Fig.8Fig.9Fig.10 Fig.11
Fig.17
MAX.
8cups
8
cups
MAX.
a
b
a
b
1 5 6
7
13
9
2
3
4
10
14
8
12
11

Fig.1Fig.2Fig.3a Fig.3b
Fig.4Fig.5Fig.6Fig.7
Fig.12 Fig.13 Fig.14 Fig.15
Fig.16 Fig.18 Fig.19
Fig.8Fig.9Fig.10 Fig.11
Fig.17
MAX.
8cups
8
cups
MAX.
a
b
a
b
1 5 6
7
13
9
2
3
4
10
14
8
12
11
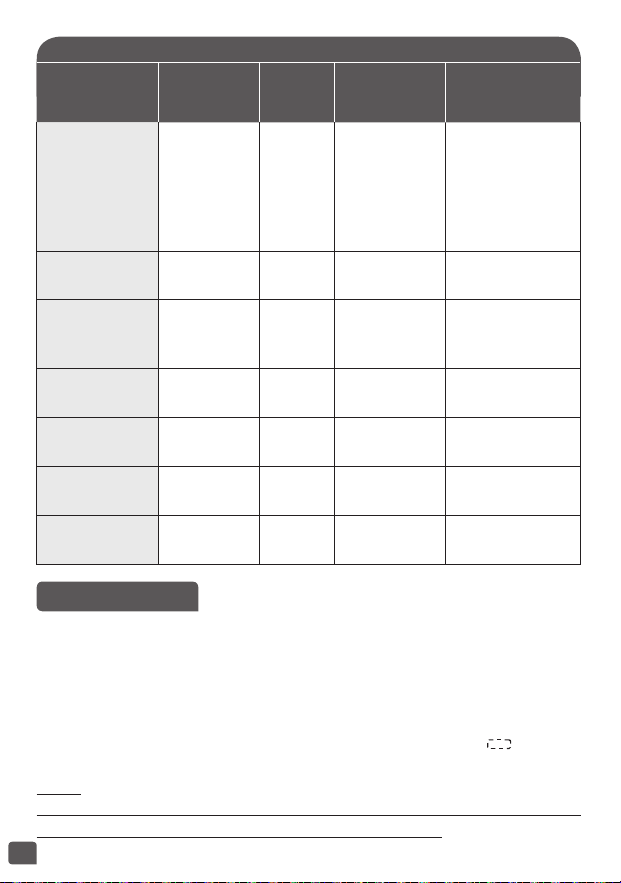
4
12c
12b
12a
12d
12e
12f
12i
12h
12g
12j
12k
12l
12m
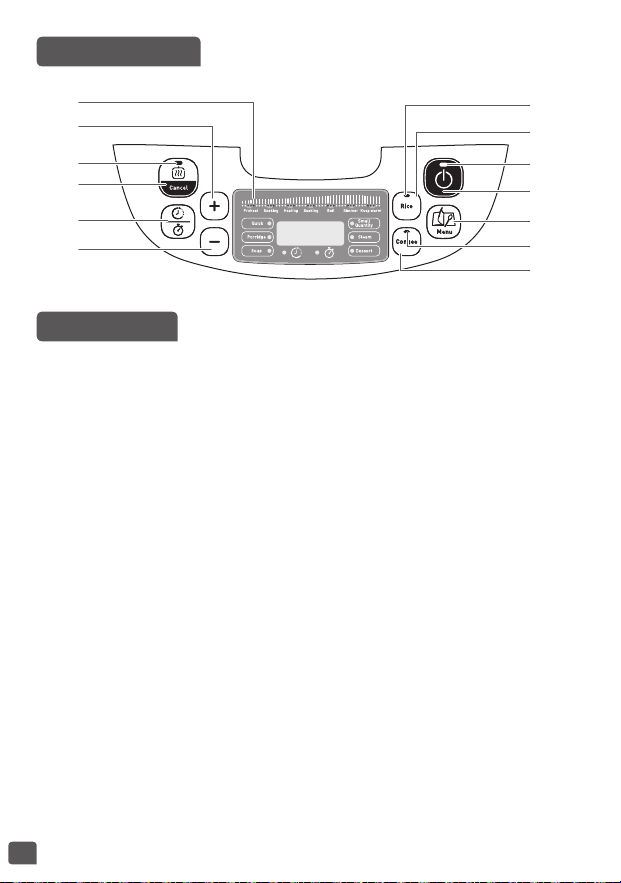
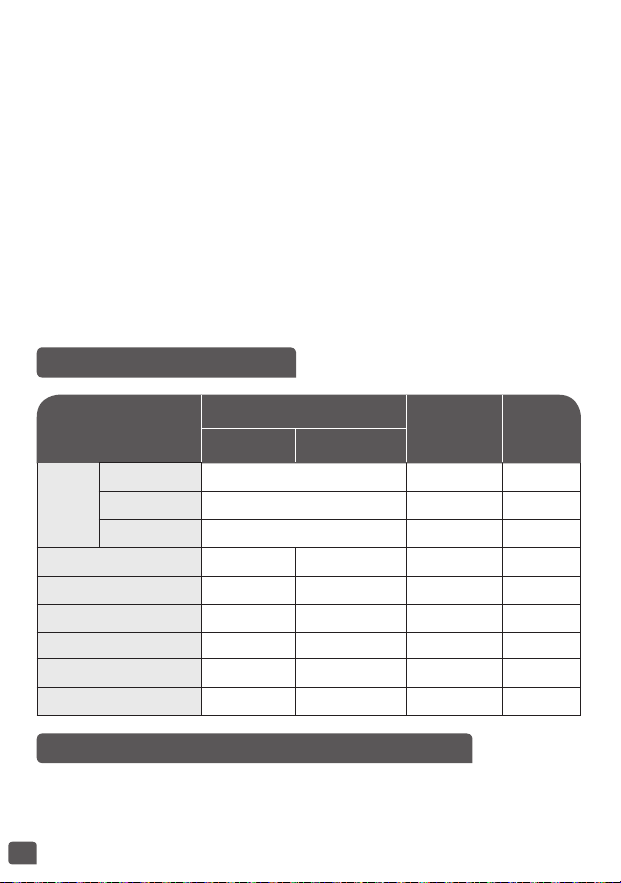
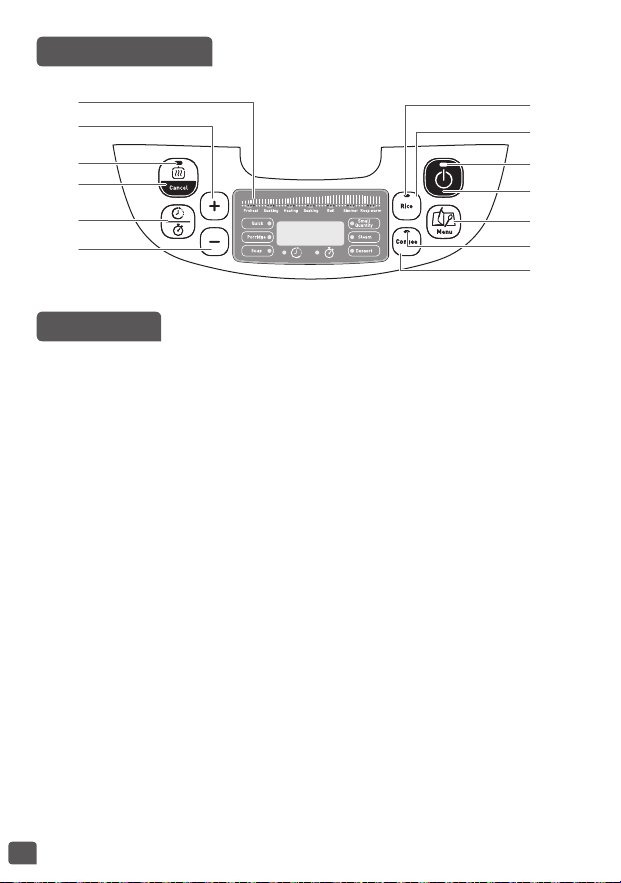
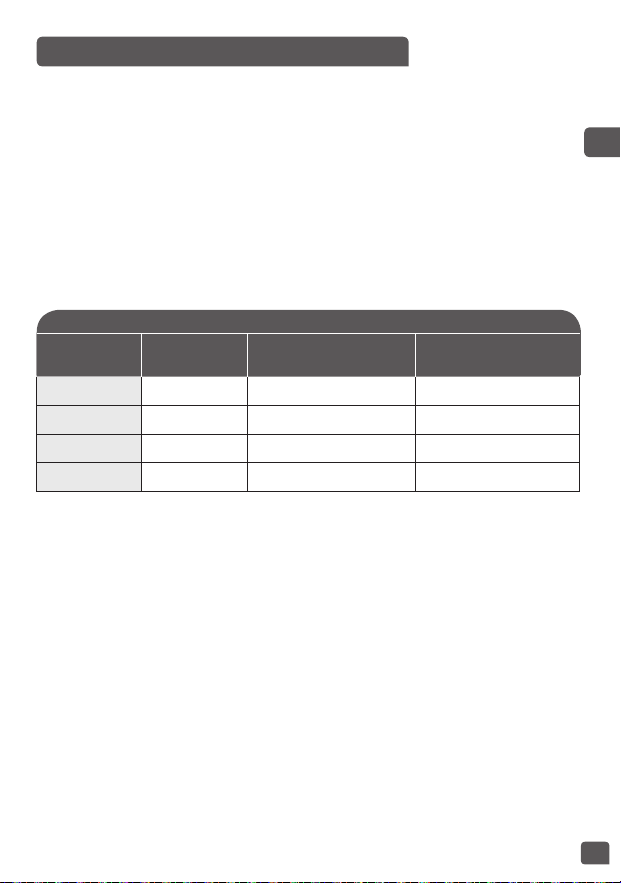
CONTROL PANEL
DESCRIPTION
1 Steam basket
2 Graduation for water and rice
3 Removable pot
4 Measuring cup
5 Rice spoon
6 Soup spoon
7 Lid
8 Removable inner lid
9 Micro pressure valve
10 Lid opening button
11 Handle
12 Control panel
a Cooking progress indicator
b “+” key
c “Keep warm / Cancel”
indicator
d “Keep warm / Cancel” key
e “Preset / Timer” key
f “-” key
g “Rice” indicator
h “Rice” key
i “Start” indicator
j “Start” key
k “Menu” key
l “Congee” indicator
m “Congee” key
13 Housing
14 Power cord

5
EN
IMPORTANT SAFEGUARDS
SAFETY INSTRUCTIONS
Read and follow the instructions for use. Keep
them safe.
• This appliance is not intended to be operated by
means of an external timer or a separate remote-
control system.
• This appliance can be used by children aged
from 8years and above if they have been given
supervision or instruction concerning use of the
appliance in a safe way and if they understand the
hazards involved.Cleaning and user maintenance
shall not be made by children unless they are
older than 8 years and supervised. Keep the
appliance and its cord out of reach of children
aged less than 8years.
• Appliances can be used by persons with reduced
physical, sensory or mental capabilities or lack
of experience and knowledge if they have been
given supervision or instruction concerning use of
the appliance in a safe way and understand the
hazards involved.
• Children shall not play with the appliance.
• This appliance is not intended for use by persons
(including children) with reduced physical, sensory

6
or mental capabilities, or lack of experience
and knowledge, unless they have been given
supervision or instruction concerning use of the
appliance by a person responsible for their safety.
• Children should be supervised to ensure that they
do not play with the appliance.
• As this appliance is for household use only, it is
not intended for use in the following applications
and the guarantee will not apply for:
– Staff kitchen areas in shops, offices and other
working environments
– Farm houses
– By clients in hotels, motels and other residential
type environments
– Bed and breakfast type environments
• If your appliance is fitted with a removable
power cord: if the power cord is damaged, it must
be replaced by a special cord or unit available
from a authorised service centre.
• If your appliance is fitted with fixed power
cord: a if the power supply cord is damage,
it must be replaced by the manufacturer, the
manufacturer’s after-sales service department
or similarly qualified person in order to avoid any
danger.
7
EN
• The appliance must not be immersed in water or
any other liquid.
• Use a damp cloth or sponge with diswashing liquid
to clean the accessories and parts in contact with
the aliments. Rince with a damp cloth or sponge.
Drying accessories and parts in contact with food
with a dry cloth.
• If the symbol is marked on the appliance, this
symbol means “Caution: surfaces may become
hot during use”.
• Caution: the surface of heating element is subject
to residual heat after use.
• Caution: risk of injury due to improper use of the
appliance.
• Caution: if your appliance has a removable power
cord, do not spill liquid on the connector.
• Always unplug the appliance:
– immediately after use
– when moving it
– prior to any cleaning or maintenance
– if it fails to function correctly
• Burns can occur by touching the hot surface of
the appliance, the hot water, steam or the food.
• During cooking, the appliance gives out heat and
steam. Keep face and hands away.

8
• Do not get face and hands close to the steam
outlet. Do not obstruct the steam outlet.
• For any problems or queries please contact our
Customer Relations Team or consult our web site.
• The appliance can be used up to an altitude of
4000m.
• For your safety, this appliance complies with the safety regulations and
directives in effect at the time of manufacture (Low-voltage Directive,
Electromagnetic Compatibility, Food Contact Materials Regulations,
Environment…).
• Check that the power supply voltage corresponds to that shown on the
appliance (alternating current).
• Given the diverse standards in effect, if the appliance is used in a country
other than that in which it is purchased, have it checked by an approved
service centre.
CONNECTING TO THE POWER SUPPLY
• Do not use the appliance if:
– the appliance or the cord is damaged
– the appliance has fallen or shows visible damage or does not work
properly
– In the event of the above, the appliance must be sent to an approved
Service Centre. Do not take the appliance apart yourself.
• Do not leave the cord hanging
• Always plug the appliance into an earthed socket.
• Do not use an extension lead. If you accept liability for doing so, only
use an extension lead which is in good condition, has an earthed plug
and is suited to the power of the appliance.
• Do not unplug the appliance by pulling on the cord.
USING
• Use a flat, stable, heat-resistant work surface away from any water
splashes.

9
EN
PROTECT THE ENVIRONMENT
• Your appliance has been designed to run for many years. However,
when you decide to replace it, remember to think about how you can
contribute to protecting the environment.
• Before discarding your appliance you should remove the battery from
the timer and dispose of it at a local civic waste collection centre
(according to model).
Environment protection first!
Your appliance contains valuable materials which can be recovered or
recycled.
Leave it at a local civic waste collection point.
• Do not allow the base of the appliance to come into contact with water
• Never try to operate the appliance when the bowl is empty or without
the bowl.
• The cooking function/knob must be allowed to operate freely. Do not
prevent or obstruct the function from automatically changing to the
keep warm function.
• Do not remove the bowl while the appliance is working.
• Do not put the appliance directly onto a hot surface, or any other source
of heat or flame, as it will cause a failure or danger.
• The bowl and the heating plate should be in direct contact. Any object or
food inserted between these two parts would with the correct operation.
• Do not place the appliance near a heat source or in a hot oven, as
serious damage could result.
• Do not put any food or water into the appliance until the bowl is in
place.
• Respect the levels indicated in the recipes.
• Should any part of your appliance catch fire, do not attempt to put it
out with water. To smother the flames use a damp teatowel.
• Any intervention should only be made by a service centre with original
spare parts.

10
BEFORE THE FIRST USE
Unpack the appliance
• Remove the appliance from the packaging and unpack all the accessories
and printed documents.
• Open the lid by pushing the opening button on the housing – fig.1.
Read the Instructions and carefully follow the operation method.
Clean the appliance
• Remove the pot – fig.2, the inner lid and the pressure valve – fig.3a and
3b.
• Clean the pot, the valve and the inner lid with a sponge and washing
up liquid.
• Wipe the outside of the appliance and the lid with a damp cloth.
• Dry off carefully.
• Put all the elements back in their original position. Install the inner lid
in the right positions on the top lid of machine. Then, put the inner
lid behind the 2 ribs and push it on the top until it’s fixed. Install the
detachable cord into the socket on the cooker base.
FOR THE APPLIANCE AND ALL FUNCTIONS
• Carefully wipe the outside of the pot (especially the bottom). Make sure
that there are no foreign residues or liquid underneath the pot and on
the heating element – fig.5.
• Place the pot into the appliance, making sure that it is correctly
positioned – fig.6.
• Make sure that the inner lid is correctly in position.
• Close the lid in place with a sound of “click”.
• Install the power cord into the socket of the multicooker base and then
plug into the power outlet. The appliance will ring a long sound “Bip”,
all the indicators on the control box will light up for an instant. The rice
cooking mode is set the default cooking program.
• Do not touch the heating element when the product is plugged or after
cooking. Do not carry the product in use or just after cooking.
• This appliance is only intended for indoor use.
11
EN
Never place your hand on the steam vent during cooking, as there is a
danger of burns – fig.10.
After start the cooking, if you wish to change the selected cooking
menu because of an error, press “Keep Warm / Cancel” key and re-
choose the menu you want.
You can stop the cooking by pressing “Keep warm / Cancel” or
“Start / Stop” key.
Only use the inner pot provided with the appliance.
Do not pour water or put ingredients in the appliance without the pot
inside.
The maximum quantity of water + ingredient should not exceed the
highest mark inside the pot - fig.7.
CONTROL PANEL
How to use the buttons on your Rice cooker:
1. “Start” button: Press to enable rice mode and start the cooking
process.
The cooking progress indicator shows the cooking progress (Preheat
Soaking Heating Soaking Boil Simmer Keep warm).
2. “Rice cooking” and “Congee” keys:
• Press the rice button to enable rice mode. Cooking will start after
approximately 5 seconds when you hear a beep.
• Press the congee button to enable congee mode. Cooking will start after
approximately 5 seconds when you hear a beep.
3. “Menu” key: Press to select the following modes:
“Quick Porridge Soup Small quantity Steam Dessert”.
The corresponding indicator will turn on.
4. “Preset / timer” key” button:
• Timer: You can adjust the cooking time for congee, porridge, soup, steam
and cake modes. When you select a cooking mode, the default cooking
time will be shown on the digital display. Press the “Preset/timer” key
once (the timer indicator will turn on), and then use the +/- buttons to
adjust the cooking time.
• Preset: Available for all cooking modes (except “Dessert” mode). After
selecting the desired cooking mode, press the “Preset / timer” key button
twice (the preset indicator will turn on), and then use the +/- buttons to
12
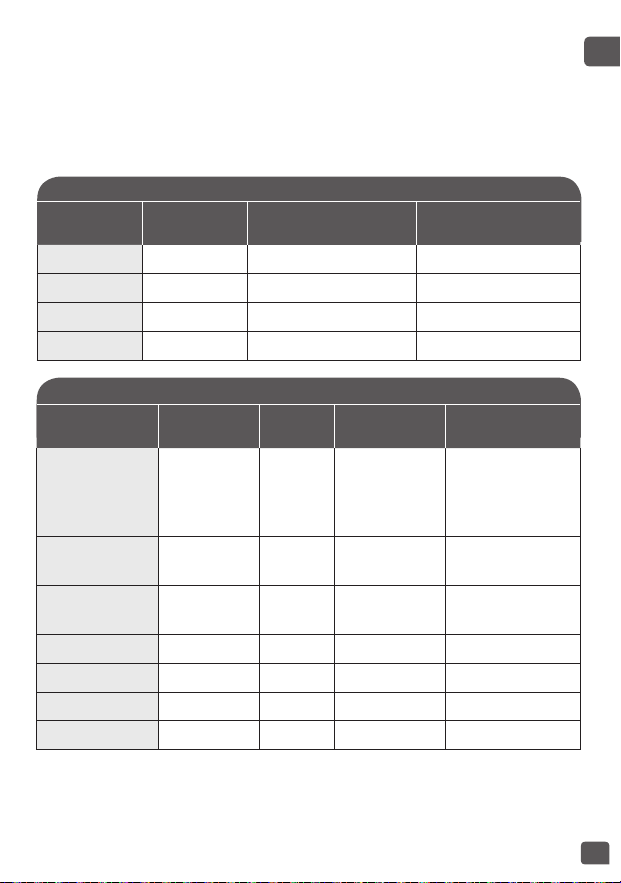
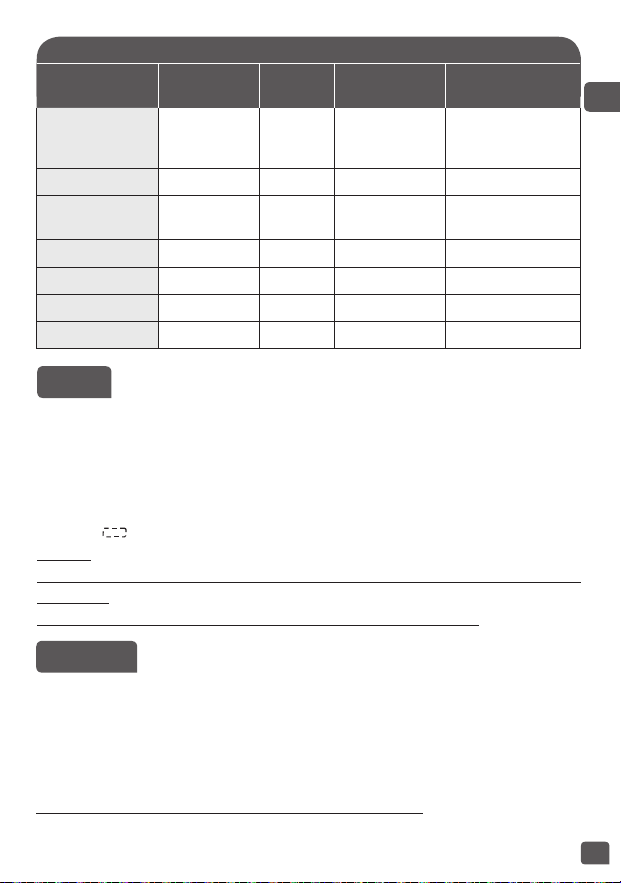
COOKING PROGRAM TABLE
set the timer. Cooking will begin after the preset time has elapsed.
The maximum start delay is 24 hours. If the preset time is shorter than
the cooking time, cooking will start immediately.
5. “+”/-” keys: Use these buttons to adjust the cooking time (+/- 1 min)
and preset time (+/- 10 mins). You cannot adjust the cooking time in
“Dessert” mode.
6. “Keep warm/cancel” key:
• In standby mode, press the keep warm/cancel key to heat your food and
keep it warm. The remaining heat time will be indicated on the display
and the keep warm indicator will turn on. The maximum keep warm
time is 24 hours.
• Press the keep warm/cancel key to stop the cooking process or cancel all
settings. The Rice cooker will return to standby mode.
• Before cooking, measuring the rice with measuring cup and rinse it
except risotto rice.
• Put the rinsed rice well distributed around the whole surface of the pot.
RECOMMENDATIONS FOR BEST RICE COOKING
Programs
Cooking time
Temperature
default(ºC)
Keep
warm
Default time Time setting
Rice
cooking
Rice auto auto *
Quick auto auto *
Small quantity auto auto *
Porridge 1h 45-1h10min auto *
Congee 1h30min 1h-2h auto *
Soup 2h 1h30min-3h auto *
Steam 1h 30min-1h30min auto *
Dessert 40min 40min-2h 130 ºC *
Keep warm auto auto 70 ºC *
13
EN
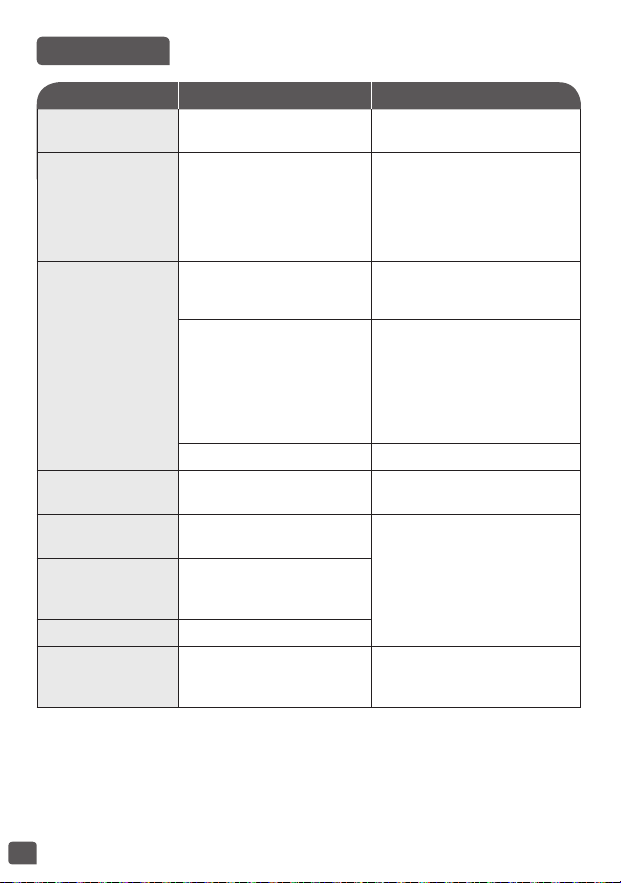
COOKING GUIDE FOR WHITE RICE - 8 cups
Measuring
cups
Weight of rice
Water level in the pot
(+ rice)
Serves
2 300 g 2 cup mark 3pers.-4pers.
4 600 g 4 cup mark 5pers.-6pers.
6 900 g 6 cup mark 8pers.-10pers.
8 1200 g 8 cup mark 13pers.-14pers.
COOKING GUIDE FOR OTHER TYPES OF RICE
Type of rice
Measuring
cup of rice
Weight
of rice
Water level in
the pot (+ rice)
Serves
Round white
rice (Italian
rice - often a
stickier rice)
6 870 g 6 cup mark 7per.-8per.
Whole grain
Brownrice
6 887 g 6 cup mark 7per.-8per.
Risotto rice
(Arboriotype)
6 870 g 6 cup mark 7per.-8per.
Glutinous rice 6 736 g 5 cup mark 7per.-8per.
Brown rice 6 840 g 6 cup mark 7per.-8per.
Japanese rice 6 900 g 6 cup mark 7per.-8per.
Fragrant rice 6 870 g 6 cup mark 7per.-8per.
Fill it with water to the corresponding water level (The graduations in
cups).
• When the rice is ready, when the “Keep Warm” indicator light is on, stir
the rice and then leave it in the rice cooker for a few minutes longer in
order to get perfect rice with separated grains.
This table below gives a guide to cook rice :
14
• When the appliance is plugged, the rice cooker is on rice cooking
function. When you press Menu key, the rice cooker select Quick
Porridge Soup Small quantity Steam Dessert
• The screen displays the default cooking time of each function (Rice
cooking, Quick rice and Small quantity cooking display “ ”), “Start”
key light flickers.
Note:
You can long press the “Menu” key to cancel the “bip” sound if needed
(until the long bip sound).
If you want to add bip , you have to press a second time on “Menu”
key.
MENU KEY
• Place the appliance on a flat, stable, heat-resistant work surface away
from water splashes and any other sources of heat.
• Press “Rice” key to enter into rice cooking function.
• Pour the required quantity of rice into the pot using the measuring cup
provided – fig.8. Then fill with cold water up to the corresponding “CUP”
mark printed in the pot – fig.9.
• Close the lid.
Note: Always add the rice first otherwise you will have too much water.
Press “Start” key, the rice cooker enters into “Rice” cooking status, the light
of “Start” lights up, the screen flickers “ ”.
• In rice mode, the cooking progress indicator will show the cooking
progress: Preheat Soaking Heating Soaking Boil Simme
Keep warm.
• At the end of cooking, the buzzer will ring three “bip”, the rice cooker will
enter keep warm status with the “Keep Warm” indicator turning on and
the screen will start to count the time of keeping warm.
RICE COOKING FUNCTION

15
EN
QUICK FUNCTION
• Press “Menu” key to select function “Quick”. The screen displays “ ”,
the light of “Start” flickers. Then press “Start” key. The rice cooker enters
into “Quick” cooking status, the light of “Start” lights up, the screen
flickers “--”.
• In quick mode, the cooking progress indicator will show the cooking
progress: Preheat Soaking Heating Soaking Boil Simmer
Keep warm
• At the end of cooking, the buzzer will ring three “bip”, the rice cooker will
enter keep warm status with the “Keep Warm” indicator turning on and
the screen will start to count the time of keeping warm.
SMALL QUANTITY
• Press «Menu» key to select function «Small quantity». The screen displays
“ ”, the light of “Start” flickers. Then press “Start” key. The rice cooker
enters into «Small quantity» cooking status, the light of “Start/Stop”
lights up, the screen flickers “ ”.
• In Small quantity mode, the cooking progress indicator will show the
cooking progress: Preheat Soaking Heating Soaking Boil
Simmer Keep warm
• At the end of cooking, the buzzer will ring three “bip”, the rice cooker will
enter keep warm status with the “Keep Warm” indicator turning on and
the screen will start to count the time of keeping warm.
Brown rice is not available for “Small quantity” function.
CONGEE FUNCTION
• Press “Congee” key to select function “Congee”. The screen displays the
default cooking time, the light of “Start” flickers.
• You can change the cooking time by pressing “Preset / Timer” key first
and then press “+” and “−” keys.
• Press “Start” key. The rice cooker enters into “Congee” cooking status
with the light of “Start” lighting up and the screen displaying the
remaining cooking time.
• At the end of cooking, the buzzer will ring three “bip”, the rice cooker will
enter keep warm status with the “Keep Warm” indicator turning on and
the screen will start to count the time of keeping warm.

16
PORRIDGE FUNCTION
• Press “Menu” key to select function “Porridge”. The screen displays the
default cooking time, the light of “Start” flickers red.
• You can change the cooking time by pressing “Preset / Timer” key first
and then press “+” and “−” keys.
• Press “Start” key. The rice cooker enters into “Porridge” cooking status
with the light of “Start” lighting up and the screen displaying the
remaining cooking time.
• At the end of cooking, the buzzer will ring three “bip”, the rice cooker will
enter keep warm status with the “Keep Warm” indicator turning on and
the screen will start to count the time of keeping warm.
SOUP FUNCTION
• Press “Menu” key to select function “Soup”. The screen displays the
default cooking time, the light of “Start” flickers red.
• You can change the cooking time by pressing “Preset / Timer” key first
and then press “+” and “−” keys.
• Press “Start” key. The rice cooker enters into “Soup” cooking status with
the light of “Start” lighting up and the screen displaying the remaining
cooking time.
• At the end of cooking, the buzzer will ring three “bip”, the rice cooker will
enter keep warm status with the “Keep Warm” indicator turning on and
the screen will start to count the time of keeping warm.
STEAM FUNCTION
• Press “Menu” key to select function “Steam”. The screen displays the
default cooking time, the light of “Start” flickers red.
• You can change the cooking time by pressing “Preset / Timer” key first
and then press “+” and “−” keys.
• Press “Start” key. The rice cooker enters into “Steam” cooking status with
the light of “Start” lighting up and the screen displaying the remaining
cooking time.
• At the end of cooking, the buzzer will ring three “bip”, the rice cooker will
enter keep warm status with the “Keep Warm” indicator turning on and
the screen will start to count the time of keeping warm.

17
ENDESSERT FUNCTION
• Press “Menu” key to select function “Dessert”. The screen displays the
default cooking time, the light of “Start” flickers red.
• You can change the cooking time by pressing “Preset / Timer” key first
and then press “+” and “−” keys.
• Press “Start” key. The rice cooker enters into “Dessert” cooking status
with the light of “Start” lighting up and the screen displaying the
remaining cooking time.
• At the end of cooking, the buzzer will ring three “bip”, the rice cooker will
enter keep warm status with the “Keep Warm” indicator turning on and
the screen will start to count the time of keeping warm.
• Press “Keep warm / Cancel” key under standby status, the light of “Keep
warm / Cancel” key flickers, the screen shows “00:00” and the screen will
start to count the time of keeping warm.
• Press “Keep warm / Cancel” key under function setting or cooking status
will cancel all setting data and back to standby status.
Recommendation: in order to keep the food in good taste, please limit
the holding time within 12h.
KEEP WARM/CANCEL FUNCTION
• The preset time corresponds to the time for end of cooking.
• This function is available for all functions except “Dessert”.
• To use the preset function, choose a cooking program. Then, press the
key “Preset / Timer” and choose the delayed time. Press “+” and “−” keys
to adjust the delayed start time. The default preset time will change
depending on the selected cooking time. The Range of preset is from 1
up to 24 hours.
• When you have chosen the required preset time, press the “Start” key to
enter cooking status, the light of “Start” lights up and screen will display
the number of time you have chosen and preset pictogram lights up.
• When preset pictogram disappears the rice cooker enters into cooking
Status and timer pictogram will lights up.
PRESET FUNCTION

18
• Open the lid – fig.1.
• Glove must be used when manipulating the cooking pot and steam
basket – fig.11.
• Serve the food using the spoon provided with your appliance and reclose
the lid.
• 24 hours is the maximum keeping warm time.
• Press “Keep warm / Cancel“ to stop the keep warm status.
• Unplug the appliance.
ON COMPLETION OF COOKING
• To ensure the rice cooker is unplugged and completely cooled down
before cleaning and maintenance.
• It is strongly advised to clean the appliance after each use with a
sponge – fig.12.
• The pot, the cup and the rice and soup spoons are dishwasher safe -
fig.13.
Pot, steam basket
• Scouring powders and metal sponges are not recommended.
• If food has stuck to the bottom, you may put water in the pot to soak
for a while before washing.
• Dry the pot carefully.
Taking care of the pot
For the pot, carefully follow the instructions below:
• To ensure the maintenance of pot quality, it is recommended not to cut
food in it.
• Make sure you put the pot back into the rice cooker.
• Use the plastic spoon provided or a wooden spoon and not a metal type
so as to avoid damaging the pot surface – fig.14.
• To avoid any risk of corrosion, do not pour vinegar into the pot.
• The color of the pot surface may change after using for the first time or
after longer use. This change in color is due to the action of steam and
water and does not have any effect on the use of the rice cooker, nor
is it dangerous for your health. It is perfectly safe to continue using it.
CLEANING AND MAINTENANCE

19
EN
Cleaning the micro pressure valve
• When clean the micro-pressure valve, please remove it from the lid –
fig.15 and open it by rotating in the direction of “open” – fig.16a and
16b. After cleaning it, please wipe dry it and meet the two triangle in
the two parts together and rotate it in the direction of “close”, then put
it back to the lid of the rice cooker – fig.18a and 18b.
Cleaning the inner lid
• Remove the inner lid by pushing outwards with both hands. Clean it with
a sponge and washing up liquid (fig.17). Then wipe dry and put it back
behind the 2 ribs and push it on the top until it’s fixed.
Cleaning and care of the other parts of the appliance
• Clean the outside of the Rice Cooker – fig.19, the inside of the lid and
the cord with a damp cloth and wipe dry. Do not use abrasive products.
• Do not use water to clean the interior of the appliance body as it could
damage the heat sensor.
20
Malfunction
description
Causes Solutions
Any indicator
lamp off and no
heating.
Appliance not plugged.
Check the power cord is
plugged in the socket and
on the Mains.
Any indicator
lamp off and
heating.
Problem of the
connection of the
indicator lamp or
indicator lamp is
damaged.
Send to authorized
service center for repair.
Steam leakage
during using
Lid is badly closed.
Open and close again
the lid.
Micro pressure valve
not well positioned or
uncomplete.
Stop the cooking (unplug
the product) and check
the valve is complete
(2parts locked together)
and well positioned.
Lid or micro pressure
valve gasket is
damaged.
Send to authorized
service center for repair.
Rice half cooked
or overtime
cooking.
Too much or not
enough water
compared to rice
quantity.
Refer to table for water
quantity.
TECHNICAL TROUBLESHOOTING GUIDE
21
EN
Malfunction
description
Causes
Solutions
Rice half cooked
or overtime
cooking
Not sufficient
simmered.
Send to the authorized
service center for repair.
Automatic
warm-keeping
fails (product
stay in cooking
position, or no
heating).
The keep warm
function has been
cancelled by user
during the setting.
See keep warm
function paragraph.
E0
The sensor on the top
open circuit or short
circuit.
E1
The sensor on the
bottom open or short
circuit.
Stop the appliance and
restart the program. Ifthe
problem repeats, please
send to the authorized
service center for repair.
Remark: If inner pot is deformed, do not use it anymore and get a
replacement from the authorized service center for repair.

22
TEFAL/T-FAL * INTERNATIONAL LIMITED GUARANTEE
: www.tefal.com
This product is repairable by TEFAL/T-FAL *, during and after the guarantee period.
Accessories, consumables and end-user replaceable parts can be purchased, if locally available, as described on the TEFAL/T-FAL
internet site www.tefal.com
The Guarantee**
TEFAL/T-FAL guarantees this product against any manufacturing defect in materials or workmanship during the guarantee period
within those countries*** as stated in the attached country list, starting from the initial date of purchase or delivery date. The
international manufacturer’s guarantee covers all costs related to restoring the proven defective product so that it conforms to its
original specifications, through the repair or replacement of any defective part and the necessary labour. At TEFAL/T-FAL’s choice,
a replacement product may be provided instead of repairing a defective product. TEFAL/T-FAL’s sole obligation and your exclusive
resolution under this guarantee are limited to such repair or replacement.
Conditions & Exclusions
TEFAL/T-FAL shall not be obliged to repair or replace any product which is not accompanied by a valid proof of purchase. The
product can be taken directly in person or must be adequately packaged and returned, by recorded delivery (or equivalent method
of postage), to a TEFAL/T-FAL authorised service centre. Full address details for each country’s authorised service centres are listed
on TEFAL/T-FAL website (www.tefal.com) or by calling the appropriate consumer Service centre set out in the attached country
list. In order to offer the best possible after-sales service and constantly improve customer satisfaction, TEFAL/T-FAL may send a
satisfaction survey to all customers who have had their product repaired or exchanged in a TEFAL/T-FAL authorised service centre.
This guarantee applies only for products purchased and used for domestic purposes and will not cover any damage which occurs
as a result of misuse, negligence, failure to follow TEFAL/T-FAL instructions, or a
modification or unauthorised repair of the product, faulty packaging by the owner or mishandling by any carrier. It also does not
cover normal wear and tear, maintenance or replacement of consumable parts, or the following:
− using the wrong type of water or consumable
− ingress of water, dust or insects into the product (excluding appliances with features specifically designed for insects)
− scaling (any de-scaling must be carried out according to the instructions for use)
− damage to any glass or porcelain ware in the product
− mechanical damages, overloading
− damage as a result of lightning or power surges
− accidents including fire, flood, etc
− professional or commercial use
− damages or poor results specifically due to wrong voltage or frequency as stamped on the product ID or specification
Consumer Statutory Rights
This international TEFAL/T-FAL guarantee does not affect the Statutory Rights a consumer may have or those rights that cannot
be excluded or limited, nor rights against the retailer from which the consumer purchased the product. This guarantee gives a
consumer specific legal rights, and the consumer may also have other legal rights which vary from State to State or Country to
Country. The consumer may assert any such rights at his sole discretion.
***Where a product purchased in a listed country and then used in another listed country, the international TEFAL/T-FAL guarantee
duration is the one in the country of usage, even if the product was purchased in a listed country with different guarantee
duration. The repair process may require a longer time if the product is not locally sold by TEFAL/T-FAL. If the product is not
repairable in the new country, the international TEFAL/T-FAL guarantee is limited to a replacement by a similar or alternative
product at similar cost, where possible.
*TEFAL household appliances appear under the T-FAL brand in some territories like America and Japan. TEFAL/T-FAL are registered
trademarks of Groupe SEB.
Please keep this document for your reference should you wish to make a claim under the guarantee.
**For Australia only:
Our goods come with guarantees that cannot be excluded under the Australian Consumer Law. You are entitled to a replacement
or refund for a major failure and compensation for any other reasonably foreseeable loss or damage. You are also entitled to have
the goods repaired or replaced if the goods fail to be of acceptable quality and the failure does not amount to a major failure.
**For India only: The guarantee length depends on the product and the State in India. Full guarantee terms must be checked at
the point of sale. Products purchased outside and used in India benefit from a 2 year guarantee.
The guarantee covers exclusively the repair of a defective product, but at TEFAL’s choice, a replacement product may be provided
instead of repairing a defective product. It is mandatory that the consumer, to have his product repaired, has to log a service
request on the dedicated Smartphone application TEFAL SERVICE APP or by calling TEFAL Consumer Care Center at 1860-200-
1232, Opening hours Mon-Sat 09 AM to 06 PM. Products returned by Post will not be covered by the guarantee. As a proof of
purchase consumer needs to provide both this stamped guarantee card and cash memo.
23
ZH
12c
12b
12a
12d
12e
12f
12i
12h
12g
12j
12k
12l
12m
控制面板
描述
1 蒸盤
2 水量及米量刻度
3 可拆式內鍋
4 量杯
5 飯勺
6 湯勺
7 蓋
8 可拆式內蓋
9 微壓閥
10 開蓋按鈕
11 把手
12 控制面板
a 烹調進度指示燈
b 「+」鍵
c 「Keep warm/Cancel 」(
保溫/取消) 指示燈
d 「Keep warm/Cancel 」(
保溫/取消) 鍵
e 「Preset」(預設時間)鍵
f 「-」鍵
g 「Rice」(飯)指示燈
h 「Rice」(飯)鍵
i 「Start」(開始)指示燈
j 「Start」(開始)鍵
k 「Menu」(選單)鍵
l 「Congee」(粥)指示
燈
m 「Congee」(粥)鍵
13 外殼
14 電源線

24
重要建議
安全指示
請閱讀本說明書並妥善保存。
• 本產品不得使用外部定時器或獨立遙控系統操
作。
• 此電器用品可由8歲或以上兒童使用, 但必須在
成人監督下, 或兒童曾受指導, 知道如何安全使
用本 產品, 亦明白當中所牽涉的風險。清潔及
保養工作不應由兒童進行, 除非他們已年滿8歲
或以上, 並有成人監督。請將本產品及相連電
線放置於8歲 以下兒童不能觸及的地方。
• 此產品亦可由身體、感官或心智障礙, 或經驗
及知識不足之人士使用, 但必須在使用時獲指
導, 確 保他們知道如何安全使用本產品, 並明白
當中的風險。
• 兒童不可將本產品當作玩具。
• 該電器產品不適合以下人士使用(包括兒童):身
體、感官或心智障礙的人士, 缺乏相關經驗或
知識的人士, 除非他們在負責其安全的人士給
予指導或監督下使用。
• 應照看好兒童, 確保他們不玩耍該電器產品。
• 本產品設計僅供家庭使用, 並非為以下用途而
設,且不會得到保養:
– 商店,辦公室或其他工作環境的員工廚房範
圍;
25
ZH
– 農舍;
– 酒店、汽車旅館及其他住宿性質環境的客戶
使用;
– 供住宿及早餐的旅館。
• 如果電器產品配備可拆卸電源線:如果電源線
損壞, 必須到授權服務中心更換其提供的電源
線。
• 如果電器產品配備固定電源線:如果電器產品
的電源線損壞, 為了您的安全, 必須由授權服務
中心或合資格的人士進行更換。
• 切勿將產品浸入水中。
• 請使用微濕的抹布或海棉及洗潔精, 清潔配件
及與食物有接觸的零件, 再用濕布或海棉沖
洗。用 乾布抹乾配件及與食物有接觸的零件。
• 若電器上印有 標記, 表示「小心:使用時表面
可能變熱」。
• 小心:加熱配件表面在使用後可能仍然燙熱。
• 小心:不正確使用產品可能導致損傷。
• 小心:若產品的電源線可拔除,切勿弄濕連接器。
• 以下情況下, 請務必斷開該電器產品的電源:
– 使用後,
– 移動時,
– 保養或清潔前,
– 不能正常運作時。
• 接觸產品的發熱部位、熱水、蒸汽及食物,可
能會被燙傷。

26
• 在烹調期間, 產品會產生高溫和蒸汽。請將手
和臉部遠離蒸汽孔。請勿陼塞蒸汽出口。
• 如有任何問題, 請聯繫售後服務部或瀏覽我們
的網站。
• 此產品最高可於海拔 4000 公尺使用。
• 該電器產品符合所有相關的安全法規, 包括低電壓指令、電磁相容性
法規、食品接觸材料立法及環境立法。
• 檢查產品銘牌上的電壓與供電電壓相符(交流電)。
• 如果您在購買地以外的國家使用本產品, 請先將產品送交到當地的授
權服務中心進行檢查。
接通電源
• 下列情況下請勿使用產品:
–產品或電源線受損。
–產品意外墜落, 造成損傷或不正常運作。
–在這些情況下, 為了您的安全, 必須將該電器產品送往授權服務中
心。切勿自行拆除該電器產品。
• 請勿讓電源線隨意懸垂。
• 務必確保該產品接在接地插座上。
• 請勿使用延長線。如果您自己承擔責任, 請只使用完好的及與該產品
功率相符的接地延長線。
• 不要拉扯電源線來拔取電源插頭。
使用時
• 請在平穩和耐熱的工作表面使用, 並避免被水濺濕。
• 在內鍋未放入主機中或內鍋為空的時候, 請勿啟動操作。
• 必須讓烹調功能/汽閥自由運作。請勿阻礙其切換至自動保溫功能。
• 當電器運作時, 請勿拿出內鍋。
• 請勿將產品直接放在燙熱的表面上、或其他熱源或火源上, 否則產品
會受到損壞或發生故障, 甚至發生危險。
• 內鍋應與加熱盤直接接觸。任何異物放在該兩者之間都將可能導致
故障。
• 請勿將產品放置於熱源附近或置於焗爐內, 以防對其造成嚴重損害。
• 在內鍋未放入主機中前, 請勿放任何食物或水在主機裡。

27
ZH
保護環境
• 該電器產品能夠持續使用多年。但當您決定更換時, 請記住, 您可以
幫助保護環境。
• 在丟棄電器產品前, 應拆除計時器的電池並將其棄置於廢物收集站或
授權服務中心(根據型號)。
• 授權服務中心接受廢舊電器產品後, 能夠依照環保法規對其進行處理。
請關愛我們的環境!
您的電器產品包含可回收或可循環再用的寶貴材料。
請將其置於當地的廢物收集站。
• 根據內鍋的刻度來調節米、水比例。
• 一旦產品某部份著火, 請勿直接用水撲滅, 您可以用一塊濕布蓋住著
火部位來滅火。
• 所有對產品作出之改動必須由授權服務中心進行, 並使用原裝配件。
• 本產品只能作為家用。任何專業性用途、不當使用或未遵照本說明
書使用引起的故障, 本公司均 不負任何責任, 此等故障損壞不在保養
範圍內。

28
初次使用前
拆開包裝
• 拆開包裝,取出電飯煲,並取出所有配件及印刷品。
• 按下煲外的開蓋按鈕,打開煲蓋– 圖1.
小心閱讀以下指引,並按照所示方法操作。
清洗電飯煲
• 拆出內鍋 - 圖2、內蓋及微壓閥– 圖3a及3b。
• 用海綿及梘液清洗內鍋、微壓閥及內蓋。
• 用濕布擦拭機身表面及蓋。
• 小心擦乾。
• 將所有組件放回原位。將內蓋裝在電飯煲頂蓋正確的位置。然後將
內蓋放在兩個勾位後,並向下按直至固定為止。將可拆式電線插入
電飯煲底座插頭。
本電器注意事項以及所有功能
• 小心擦拭內鍋外面部分(特別是底部)。確定內鍋底下或發熱元件
上無任何殘餘食材或液體– 圖5.
• 將內鍋放進電飯煲,確定位置妥當– 圖6.
• 確定內蓋已放置妥當。
• 關上煲蓋,確定飯煲有發出一下「咔」聲。
• 將電源線插入多功能電飯煲底座插頭;將另一端插上電源。電飯煲
會發出一聲長「嗶」,控制面板上所有指示燈會隨即亮起。預設烹
調程式為煮飯模式。
• 插上電源或烹調完成後,請勿觸摸電飯煲發熱元件。請勿在烹調進
行期間或剛好結束時拿起電飯煲。
• 本產品只適合室內使用。
切勿在烹調期間將手放近蒸汽排放口,以免燙傷-圖10。
如想更改誤選的烹調功能,請按「Keep Warm/Cancel」(保溫/取
消)鍵,然後重新選擇所需的功能。
按「Keep Warm/Cancel」(保溫/取消)或「START/STOP」(開
始/停止)鍵可停止烹調。
只適宜使用隨電飯煲提供的內鍋。
未裝置內鍋前請勿將水或食材放進電飯煲內。
米和水的總量最多不應超過內鍋內側最高水位線- 圖7.

29
ZH
控制面板
如何使用電飯煲上的按鍵﹕
1. 「Start」(開始)鍵﹕按此鍵會啟動煮飯模式及開始烹調程序。
烹調進度指示燈會顯示烹調的進度 (預熱 浸泡 加熱 浸泡 煮
沸 慢煮 保溫)。
2. 「Rice cooking」(煮飯)及「Congee」(粥)鍵﹕
• 按「rice」(飯)鍵啟動煑飯模式。烹調會在約5秒後開始;電飯煲
會發出一聲「嗶」。
• 按「congee」(粥)鍵啟動煲粥模式。烹調會在約5秒後開始;電
飯煲會發出一聲「嗶」。
3. 「Menu」(選單)鍵﹕按此鍵選擇以下模式﹕
「Quick(快煮) Porridge(麥皮粥) Soup(湯) Small
quantity(小量) Steam(蒸) Dessert(甜品)」。
相應的指示燈會亮起。
4. 「Preset/timer」(預設時間/計時)鍵﹕
• 計時﹕粥、麥皮粥、湯、蒸、蛋糕模式的烹調時間可以調校。當選
擇其中一種烹調模時,螢幕的會顯示預設烹調時間。按「Preset/
timer」(預設時間/計時)鍵一下(計時指示燈會亮起)後,可用
+/-鍵調校烹調時間。
• 預設時間﹕適用於所有烹調模式(除 「Dessert」(甜品) 模式
外)。選擇所需烹調模式後,可按「Preset/timer」(預設時間/計
時)鍵兩次(預設時間指示燈會亮起),再用+/-鍵調校計時功能。
到預設時間時烹調會開始。
最長延遲開始時間為24小時。如預設時間比烹調時間短,烹調會立刻
開始。
5. 「+/-」鍵﹕以上按鍵可調校烹調時間(+/-1分鐘)及預設時間
(+/-10分鐘)。「Dessert」(甜品)模式的烹調時間無法調
校。
6. 「Keep warm/Cancel 」(保溫/取消) 鍵
• 待機模式中,按「keep warm/Cancel 」(保溫/取消) 鍵可加熱食物
和保溫。螢幕會顯示剩餘加熱時間;保溫指示燈會亮起。最長保溫
時間為24小時。
• 按「Keep warm/Cancel 」(保溫/取消) 鍵可停止烹調程序或取消所
有設定。電飯煲會回到待機模式。
30
烹調程式資料表
• 除意大利飯外,煮飯前請先用量杯量米,然後洗米。
• 將洗好的米均勻地鋪滿整個內鍋表面。依照量杯數加水至相應高度(
內鍋有相應刻度)。
• 飯煮好後,「Keep Warm」(保溫)指示燈會亮起,為令飯粒分明,
請攪拌白飯,然後讓飯留在鍋中數分鐘。
下表提供煮飯指引﹕
達至最佳煮飯效果的建議
程式
烹調時間
預設溫度
(ºC)
保溫
預設時間 時間設定
煮飯
白飯 自動 自動 *
快煮 自動 自動 *
小量 自動 自動 *
麥皮粥 1小時 45-1小時10分 自動 *
粥 1小時30分 1小時 – 2小時 自動 *
湯 2小時
1小時30分 –
3小時
自動 *
蒸 1小時
30分鐘 - 1小時
30分鐘
自動 *
甜品 40分鐘 40分鐘 – 2小時 130 ºC *
保溫 自動 自動 70 ºC *
白米的烹調指引 - 8 量杯
量杯數 白米重量 內鍋中的水位(連米) 享用人數
2 300克 2杯刻度 3到4人
4 600克 4杯刻度 5到6人
6 900克 6杯刻度 8到10人
8 1200克 8杯刻度 13到14人
31
ZH
其他米的烹調指引
米類 量杯數 米重量
內鍋中的水位(
連米)
享用人數
圓粒白米(意大
利米 - 黏性一般
較強)
6 870克 6杯刻度 7到8人
全粒糙米 6 887克 6杯刻度 7到8人
意大利米
(Arborio米)
6 870克 6杯刻度 7到8人
糯米 6 736克 5杯刻度 7到8人
糙米 6 840克 6杯刻度 7到8人
日本米 6 900克 6杯刻度 7到8人
香米 6 870克 6杯刻度 7到8人
• 當插上電源,電飯煲會進入煮飯模式。按「Menu」(選單)鍵可選
擇「Quick」(快煮) 「Porridge」(麥皮粥) 「Soup」(湯)
「Small quantity」(小量) 「Steam」(蒸) 「Dessert」
(甜品)」
• 螢幕會顯示每項功能的預設烹調時間(煮飯、快煮 、小量烹調則會
顯示「 」),「Start」(開始)燈閃爍。
注意︰
如有需要,長按「Menu」(選單)鍵直至長「嗶」聲響起,可取消「
嗶」聲。
如欲開啟「嗶」聲,須再長按「Menu」(選單)鍵一次。
選單鍵
• 將產品放在穩固防熱的平坦工作面上,並遠離熱源及避免水濺。
• 按「飯」鍵進入煮飯功能。
• 用電飯煲附送的量杯將所需的米倒入內鍋中– 圖8。然後將凍水加入
至內鍋中相應的水位–圖9。
• 蓋上煲蓋。
注意: 煮飯時要先放米再放水,否則水量會太多。
按「Start」(開始)鍵,電飯煲進入「Rice」(煮飯)狀態,「Start」(開
煮飯功能:

32
快煮功能
• 按「Menu」(選單)鍵選取「Quick」(快煮)功能。螢幕會顯示「 」;
「Start」(開始)燈閃爍。然後按「Start」(開始)鍵。電飯煲進入 「Quick」
(快煮)狀態,「Start」(開始)燈會亮起, 螢幕會閃出 「--」。
• 快煮模式中,烹調進度指示燈會顯示烹調進度﹕預熱 浸泡 加熱
浸泡 煮沸 慢煮 保溫。
• 烹調完畢,會有三下「嗶」聲響起,電飯煲進入保溫狀態, 「Keep
Warm」(保溫)指示燈會亮起 ,螢幕開始計算保溫時間。
煲粥功能
• 按「Menu」(選單)鍵選擇「Congee」(粥)功能。螢幕會顯示預設
烹調時間,「Start」(開始)燈會閃爍。
• 按「Preset/Timer」(預設時間/計時)鍵後,可用「+」及「-」鍵
更改烹調時間。
• 按「Start」(開始)鍵。電飯煲進入「Congee」(煲粥)狀態,
「Start」(開始)燈會亮起,螢幕會顯示剩餘的烹調時間。
• 烹調完畢,會有三下「嗶」聲響起,電飯煲進入保溫狀態,「Keep
Warm」(保溫)指示燈會亮起 ,螢幕開始計算保溫時間。
始)燈會亮起,螢幕會閃出“ ”。
• 煮飯模式中,烹調進度指示燈會顯示烹調進度﹕預熱 浸泡 加熱
浸泡 煮沸 慢煮 保溫。
• 烹調完畢,會有三下「嗶」聲響起,電飯煲進入保溫狀態, 「Keep
Warm」(保溫)指示燈會亮起 ,螢幕開始計算保溫時間。
小量烹調
• 按「Menu」(選單) 鍵選取「Small quantity」(小量)功能。螢幕會
顯示「 」;「Start」(開始)燈閃爍。然後按「Start」(開始)
鍵。電飯煲進入 「Small quantity」(小量)狀態,「Start」(開始)燈
會亮起, 螢幕會閃出 「 」。
• 小量烹調模式中,烹調進度指示燈會顯示烹調進度﹕預熱 浸泡
加熱 浸泡 煮沸 慢煮 保溫。
• 烹調完畢,會有三下「嗶」聲響起,電飯煲進入保溫狀態, 「Keep
Warm」(保溫)指示燈會亮起 ,螢幕開始計算保溫時間。
「Small quantity」(小量)功能不適用於糙米。

33
ZH
麥皮粥功能
• 按「Menu」(選單)鍵選取「Porridge」(麥皮粥)功能。螢幕顯示預
設烹調時間,紅色「Start」(開始)燈閃爍。
• 按「Preset/Timer」(預設時間/計時)鍵後,可用「+」及「-」鍵
更改烹調時間。
• 按「Start」(開始)鍵。電飯煲進入「Porridge」(麥皮粥)狀態,
「Start」(開始)燈會亮起,螢幕會顯示剩餘的烹調時間。
• 烹調完畢,會有三下「嗶」聲響起,電飯煲進入保溫狀態, 「Keep
Warm」(保溫)指示燈會亮起 ,螢幕開始計算保溫時間。
煲湯功能
• 按「Menu」(選單)鍵選取「Soup」(湯)功能。螢幕顯示預設烹調時
間,紅色「Start」(開始)燈閃爍。
• 按「Preset/Timer」(預設時間/計時)鍵後,可用「+」及「-」鍵
更改烹調時間。
• 按「Start」(開始)鍵。電飯煲進入「Soup」(湯)狀態,「Start」
(開始)燈會亮起,螢幕會顯示剩餘的烹調時間。
• 烹調完畢,會有三下「嗶」聲響起,電飯煲進入保溫狀態, 「Keep
Warm」(保溫)指示燈會亮起 ,螢幕開始計算保溫時間。
蒸煮功能
• 按「Menu」(選單)鍵選取「Steam」(蒸)功能。螢幕顯示預設烹調
時間,紅色「Start」(開始)燈閃爍。
• 按「Preset/Timer」(預設時間/計時)鍵後,可用「+」及「-」鍵
更改烹調時間。
• 按「Start」(開始)鍵。電飯煲進入「Steam」(蒸)狀態,「Start」
(開始)燈會亮起,螢幕會顯示剩餘的烹調時間。
• 烹調完畢,會有三下「嗶」聲響起,電飯煲進入保溫狀態, 「Keep
Warm」(保溫)指示燈會亮起,螢幕開始計算保溫時間。
甜品功能
• 按「Menu」(選單)鍵選取「Dessert」(甜品)功能。螢幕顯示預設烹
調時間,紅色「Start」(開始)燈閃爍。
• 按「Preset/Timer」(預設時間/計時)鍵後,可用「+」及「-」鍵

34
• 在待機狀態下按「Keep warm/Cancel」(保溫/取消)鍵,該燈會閃
爍,螢幕會顯示「00:00」並開始計算保溫時間。
• 在功能設定或烹調狀態按「Keep warm/Cancel」(保溫/取消)鍵,
所有設定會消取並回到待機狀態。
建議:為保持食物美味可口,,請將保溫時間控制在十二個小時以內。
保溫/取消功能
• 烹調將在預設時間後結束。
• 此功能適用於「Dessert」(甜品)以外的所有功能。
• 使用預設時間功能功能前,先選擇一種烹調程度。然後按「Preset/
Timer」(預設時間/計時)鍵選取延遲烹調時間。按「+」及「-」鍵
調校延遲開始時間。預設的預定時間會因應所選的烹調時間而改
變。預設時間的範圍是由1到24小時。
• 當選好所需的預定時間後,請按「Start」(開始)鍵以進入烹調狀
態,「Start」(開始)指示燈會亮起;螢幕會顯示你所選的時間;預
設時間圖示會亮起。
• 當螢幕的預設時間圖示消失後,電飯煲會進入烹調狀態;計時圖示
會亮起。
預設時間功能
更改烹調時間。
• 按「Start」(開始)鍵。電飯煲進入「Dessert」(甜品)狀態,
「Start」(開始)燈會亮起,螢幕會顯示剩餘的烹調時間。
• 烹調完畢,會有三下「嗶」聲響起,電飯煲進入保溫狀態, 「Keep
Warm」(保溫)指示燈會亮起 ,螢幕開始計算保溫時間。
• 打開煲蓋– 圖1。
• 提取內鍋及蒸盤時必須使用隔熱手套– 圖11。
• 使用附送的膠勺提取食物,然後再關蓋。
• 最長保溫時間為24小時。
• 按「Keep warm/Cancel」(保溫/取消)鍵結束保溫狀態。
• 拔掉電器插頭。
烹調完畢時

35
ZH
• 清潔與保養電飯煲前,請確定電源已拔除,而且電飯煲已徹底冷卻。
• 建議每次使用後都用海綿清潔 – 圖12.
• 內鍋、量杯、飯勺及湯勺可用洗碗碟機清洗 – 圖13.
內鍋,蒸盤
• 不建議使用砂粉及鋼絲刷。
• 如有食物黏在鍋底,可在清洗前先浸水一段時間。
• 小心擦乾內鍋。
小心處置內鍋
請按照以下指示小心清洗內鍋:
• 為保養內鍋質素,建議避免在裏面切食物。
• 確保將內鍋放回電飯煲內。
• 使用附送的膠勺或木勺,盡量避免使用金屬器具,以免損壞內鍋表
面 – 圖14.
• 為防止腐蝕,請勿將醋加入內鍋中。
• 初次使用或多次使用後,內鍋表面的顏色可能會產生變化。這是由
蒸汽及水所造成,不會影響電飯煲的使用,亦不會對人體有害。可
放心繼續使用。
清理微壓閥
• 清洗時,請將微壓閥從煲蓋上取下 – 圖15,並沿「開啓」方向旋轉
以將其打開 – 圖16a 及 16b. 清洗完畢後,請擦乾微壓閥,並對準
兩個配件上的三角形,沿「關閉」方向旋轉,然後將其放回電飯煲
蓋。 – 圖18a 及 18b.
清理內蓋
• 雙手持內蓋向外拉,拆出內蓋,再用海綿及洗潔精清洗– 圖17;抺乾,
將內蓋放回煲蓋,扣入兩個勾位後再向上推,直至固定為止。
電飯煲其他配件的清洗及保養
• 用濕布擦拭電飯煲外部 – 圖19、煲蓋內側及電源線,然後擦乾。切
勿使用腐蝕性或具磨損性的清潔產品。
• 切勿用水清洗電飯煲內部,以免損壞熱力感應器。
清潔及保養
36
異常情況描述 原因 解決方法
有指示燈未亮而且
不加熱。
電飯煲未插上電源。
檢查電飯煲電源線是否已插上
底座插頭以及電源。
有指示燈未亮但加
熱。
顯示燈有連接問題或顯示燈
損壞。
送交授權服務中心維修。
使用時洩漏蒸汽。
未妥善關蓋。 打開蓋再蓋上。
微壓閥未放好或不完整。
停止烹調(拔掉電源線)並檢查閥
是否完整(兩部分互相緊鎖)和安
放妥當。
蓋或微壓閥墊片損壞。 送交授權服務中心維修。
飯半熟或烹調時間
過長。
相對於米量放水太多或太
少。
參閱使用水量表。
飯半熟或烹調
時間過長。
未充分燘煮。
送交授權服務中心維修。
自動保溫失靈
(電飯煲停留在烹調
狀態,或不加熱)
用家在設定期間取消保溫功
能。參閱有關保溫功能的
段落。
E0 頂部的感應器斷路或短路。
E1 底部的感應器斷路或短路。
停止使用電飯煲,重新啟動程
式。如問題持續,請送交授權
服務中心維修。
技術疑難排解
注意:如內鍋變形,切勿使用,請到授權服務中心替換維修。

37
ZH
TEFAL/T-FAL* 國際有限保用證
: www.tefal.com
在保用期內及後,TEFAL/T-FAL* 會為您提供產品的維修服務
附件,耗材 及 用戶可更換的零件, 可於當地購買(如有售),詳細請瀏覽 TEFAL/T-FAL internet 網站 www.tefal.com
保用證
TEFAL/T-FAL 根據所附國家列表中所載之國家***及保用期, 在保用期內(自產品購買日或購買交易日後之產品交付日起計)
提供產品因任何材料或工藝缺陷的保用。 此生產商國際保用證涵蓋已被證實為缺陷產品相關的修復費用, 包括通過維修或更
換任何缺陷零件以及必要的人力, 以使產品符合原本的規格。TEFAL/T-FAL 有權選擇更換產品而不維 修缺陷的產品。本保用
證下 TEFAL/T-FAL 的唯一責任及您專享的解決方法只限於維修或更換產品。
條款及免責
TEFAL/T-FAL 不會維修或更換未能出示有效購買證明的產品。客戶可親自將產品直接送交 TEFAL/T-FAL 授權的售後服務中
心,或必須妥善包裝並以掛號形式(或其他同等郵遞方式) 送交至 TEFAL/T-FAL 授權的售後服務中心。各國獲授權的售後
服務中心之詳細地址請見 TEFAL/T-FAL 網址,或可致電國家列表中合適的客戶服務中心查詢。為提供 最好的售後服務並繼
續增進客戶的滿意, TEFAL/T-FAL可能向曾經由TEFAL/T-FAL授權服務中心維修或更換其產品的客戶發出滿意程度的調查。
本保用證只適用於已被購買的產品並以家用為目的, 本保用證亦不包括任何因錯誤使用、疏忽、未有遵從 TEFAL/T-FAL 使用
說明、或更改或未經授權而維修產品所產生的損壞, 或產 品持有人的包裝不當或運送途中的處理不當所引起的損壞。保用證
亦不包括正常的磨損及耗損、耗材的維護或更換,及以下情況:
- 使用不適當的水或耗材
- 未遵從產品規格或產品上的指示,使用錯誤電壓或頻率而引起的損壞或不良結果
- 生銹(如需去銹,必須根據使用說明進行)
- 火災、水災等意外
- 機件故障,負荷過重
- 產品內入水、灰塵或昆蟲 (不包括專用於捕捉或驅趕昆蟲的電器)
- 產品上任何玻璃或瓷器的損壞
- 專業或商業用途
- 閃電,功率驟變造成的損壞
消費者法定權利
TEFAL/T-FAL 國際保用證並不影響消費者法定權利,這些權利不被排除或局限,亦不影響消費者對購自該產品的零售商的消費
者權利。本保用證給予消費者特定合法權益,而消費者在不 同州份或國 家,或可享有其他合法權利。消費者可根據個人判斷
維護任何有關權利。
* TEFAL 家電在一些地區如美洲及日本以T-FAL品牌出現. TEFAL/T-FAL 為SEB集團的註冊商標。
***倘產品購自國家列表內其中一個列舉的國家,而在另一個列舉的國家使用, TEFAL/T-FAL 國際保用證保用期按照使用產品
時所在的國家, 即使有別於購買該產品時所在列舉國家的保 用期。 倘產品不是購自當地的 TEFAL/T-FAL,可能需要較長的
維修時間。倘在使用產品的國家中不能修復該產品,TEFAL/T-FAL 國際保用證只限於更換同類產品或相近價錢的其他產品 (
如適用) 。
請保留此文件,供閣下提出保用要求時參考.
38
12c
12b
12a
12d
12e
12f
12i
12h
12g
12j
12k
12l
12m
PANEL KAWALAN
PERIHALAN
1 Bakul kukus
2 Penanda untuk air dan nasi
3 Periuk boleh tanggal
4 Cawan penyukat
5 Sudu nasi
6 Senduk sup
7 Tudung
8 Tudung dalaman mudah alih
9 Injap tekanan mikro
10 Butang pembuka tudung
11 Pemegang
12 Panel kawalan
a Penunjuk proses memasak
b Kekunci “+”
c Penunjuk “Keep warm
(Kekal panas)/Cancel
(Batal)"
d Kekunci “Keep warm (Kekal
Panas)/Cancel (Batal)"
e Kekunci "Preset (Praset)/
Timer (Pemasa)"
f Kekunci “-”
g Penunjuk “Rice (Nasi)”
h Kekunci "Rice (Nasi)"
i Penunjuk “Start (Mula)”
j Kekunci “Start (Mula)”
k Kekunci "Menu"
l Penunjuk “Congee (Bubur)”
m Kekunci “Congee (Bubur)”
13 Perumah
14 Kord kuasa

39
MS
PERLINDUNGAN PENTING
ARAHAN KESELAMATAN
Baca dan ikut arahan penggunaan. Pastikan ia
selamat.
• Perkakas ini bukannya untuk dikendalikan dengan
menggunakan pemasa luar atau sistem kawalan
jauh berasingan.
• Perkakas ini boleh digunakan oleh kanak-kanak
berumur 8 tahun dan lebih jika mereka dipantau
dan diberi arahan berkenaan penggunaan
perkakas dalam cara yang selamat dan jika mereka
memahami bahaya yang terlibat. Pembersihan
dan penyelenggaraan oleh pengguna tidak boleh
dilakukan oleh kanak-kanak melainkan mereka
berumur lebih 8 tahun dan diawasi. Pastikan
perkakas dan kordnya jauh daripada capaian kanak-
kanak berumur 8tahun ke bawah.
• Perkakas boleh digunakan oleh individu yang kurang
upaya fizikal, deria atau mental atau yang kekurangan
pengalaman dan pengetahuan sekiranya mereka
diselia atau diberi arahan berkaitan penggunaan
perkakas dalam cara yang selamat dan memahami
bahaya padanya.
• Kanak-kanak tidak boleh bermain dengan perkakas.
• Perkakas ini bukan untuk digunakan oleh individu
(termasuk kanak-kanak) yang kurang upaya fizikal,

40
deria atau mental, atau tidak berpengalaman,
melainkan mereka diselia atau diberi arahan
berkenaan penggunaan oleh individu yang
bertanggungjawab atas keselamatan mereka.
• Kanak-kanak perlu dipantau untuk memastikan
mereka tidak bermain dengan perkakas.
• Oleh kerana perkakas ini adalah untuk kegunaan
domestik sahaja, ia bukan untuk digunakan bagi
penggunaan berikut dan jaminan tidak akan
terpakai untuk :
– Kawasan dapur untuk kakitangan di kedai, pejabat
dan persekitaran bekerja yang lain ;
– Rumah ladang;
– Oleh klien di hotel, motel dan persekitaran jenis
kediaman yang lain;
– Persekitaran jenis inap-sarapan.
• Jika perkakas anda dipasang dengan kord kuasa
boleh tanggal: jika kord kuasa rosak, ia perlu
digantikan dengan kord khas atau unit yang tersedia
dari pusat servis yang sah.
• Jika perkakas anda dipasang dengan kord
kuasa tetap: jika kord bekalan kuasa rosak, ia
perlu digantikan oleh pusat servis Tefal yang sah
atau kakitangan yang berkelayakan setaraf bagi
mengelakkan sebarang bahaya.
• Perkakas tidak boleh direndam di dalam air.
• Guna kain atau span lembap dengan cecair basuh

41
MS
pinggan untuk membersihkan aksesori dan bahagian
yang terkena makanan. Bilas menggunakan kain
atau span lembap. Keringkan aksesori dan bahagian
yang terkena makanan menggunakan kain kering.
• Jika simbol ditandakan pada peranti, simbol ini
bermaksud “Berwaspada: permukaan mungkin
menjadi panas semasa penggunaan».
• Berwaspada: permukaan elemen pemanas adalah
bergantung kepada sisa haba selepas penggunaan.
• Berwaspada: risiko kecederaan disebabkan
penggunaan peranti yang tidak betul.
• Berwaspada : jika peranti anda mempunyai kord
kuasa boleh tanggal, jangan tumpahkan cecair pada
penyambung.
• Sentiasa cabut palam perkakas:
– serta-merta selepas digunakan,
– apabila mengalihkannya,
– sebelum sebarang pembersihan atau
penyelenggaraan
– jika ia gagal berfungsi dengan baik
• Lecur boleh berlaku apabila menyentuh permukaan
panas perkakas, air panas, wap atau makanan.
• Semasa memasak, perkakas mengeluarkan haba
dan wap. Jauhkan tangan dan muka.
• Jangan dekatkan muka dan tangan pada alur keluar
wap. Jangan halang alur keluar wap.
• Untuk sebarang masalah atau pertanyaan sila

42
hubungi Pasukan Hubungan Pelanggan kami atau
rujuk laman web kami.
• Untuk keselamatan anda, perkakas ini mematuhi peraturan dan arahan
keselamatan yang berkuat kuasa pada masa penghasilan (Arahan
Voltan Rendah, Keserasian Elektromagnet, Peraturan Bahan Sentuhan
Makanan, Alam Sekitar…).
• Pastikan bahawa voltan bekalan kuasa sepadan dengan yang
ditunjukkan pada perkakas (arus ulang alik).
• Oleh kerana pelbagai standard berkuat kuasa, jika perkakas digunakan
di negara selain daripada tempat ia dibeli, pastikan ia diperiksa oleh
pusat servis yang diperakui.
MENYAMBUNG KE BEKALAN KUASA
• Jangan gunakan perkakas jika:
– perkakas atau kord rosak.
– perkakas terjatuh atau menunjukkan kerosakan ketara atau tidak
berfungsi dengan baik.
Dalam keadaan di atas, perkakas perlu dihantar ke Pusat Servis yang
sah. Jangan mengendalikan perkakas sendiri.
• Jangan biarkan kord terjuntai.
• Sentiasa palam perkakas ke dalam soket yang dibumikan.
• Jangan gunakan dedawai sambungan. Jika anda menerima liabiliti
kerana berbuat demikian, gunakan dedawai sambungan yang dalam
keadaan baik sahaja, mempunyai palam terbumi dan sesuai dengan
kuasa perkakas.
• Jangan cabut palam perkakas dengan menarik kord.
MENGGUNAKAN
• Guna pada permukaan yang rata, stabil dan kalis haba serta jauh dari
sebarang percikan air…
• Jangan sesekali cuba untuk kendalikan perkakas apabila mangkuk
kosong atau tanpa mangkuk.
• Fungsi / tombol memasak perlu dibiarkan untuk dikendalikan secara
bebas. Jangan cegah atau halang fungsi daripada secara automatiknya
bertukar ke fungsi panas

43
MS
LINDUNGI ALAM SEKITAR
• Perkakas anda direka bentuk untuk bertahan selama beberapa
tahun. Bagaimanapun, apabila anda membuat keputusan untuk
menggantinya, ingat untuk fikirkan cara agar anda boleh menyumbang
bagi melindungi alam sekitar.
• Sebelum melupuskan perkakas anda, anda perlu mengeluarkan bateri
dari pemasa dan melupuskannya di pusat kutipan sisa masyarakat
tempatan (mengikut model).
Utamakan perlindungan alam sekitar !
Perkakas anda mengandungi bahan bernilai yang boleh dipulihkan
atau dikitar semula.
Tinggalkannya di stesen kutipan sisa masyarakat tempatan.
• Jangan keluarkan mangkuk semasa perkakas sedang berfungsi.
• Jangan letakkan perkakas secara terus atas permukaan panas, atau
sebarang sumber haba atau nyalaan yang lain, kerana ia akan
menyebabkan kegagalan atau membahayakan.
• Mangkuk dan plat pemanas perlu bersentuhan secara terus. Sebarang
objek atau makanan yang dimasukkan di antara dua bahagian ini akan
mengganggu pengendalian yang betul.
• Jangan letakkan perkakas berdekatan dengan sumber haba atau dalam
ketuhar panas, kerana kerosakan serius mungkin berlaku.
• Jangan letakkan sebarang makanan atau air ke dalam perkakas
sehingga mangkuk dimasukkan
• Ikuti tahap yang dinyatakan dalam resipi.
• Sekiranya mana-mana bahagian perkakas terbakar, jangan cuba untuk
memadamnya menggunakan air. Untuk memadam nyalaan gunakan
pengelap pinggan mangkuk yang lembap.
• Sebarang intervensi perlu dibuat hanya oleh pusat servis dengan alat
ganti tulen.
• Perkakas ini direka bentuk untuk kegunaan domestik sahaja. Sekiranya
digunakan untuk kegunaan profesional, kegunaan tidak wajar atau
kegagalan untuk mematuhi arahan, pengilang tidak bertanggungjawab
dan jaminan tidak terpakai.

44
SEBELUM PENGGUNAAN PERTAMA
Mengeluarkan perkakasan
• Keluarkan perkakasan dari bungkusan dan mengeluarkan semua
aksesori dan dokumen bercetak.
• Buka tudung dengan menekan butang pembuka di permukaan – rajah 1.
Baca Arahan dan berhati-hati mengikut kaedah operasi.
Bersihkan perkakasan
• Keluarkan periuk – rajah 2, tudung dalaman dan injap tekanan – rajah
3a dan 3b.
• Bersihkan periuk, injap dan tudung dalaman dengan span dan cecair
basuhan.
• Lap luaran perkakasan dan tudung dengan kain lembap.
• Keringkan dengan teliti.
• Masukkan semua elemen ke kedudukan asal. Pasang tudung dalaman
di posisi sebenar di atas tudung. Kemudian, masukkan tudung dalaman
di belakang 2 rusuk dan tekan di bahagian atas sehingga ia tetap.
Pasang kord boleh tanggal ke soket pada tapak pemasak.
UNTUK PERKAKASAN DAN SEMUA FUNGSI
• Berhati-hati apabila mengelap bahagian luar periuk (terutama
bahagian bawah). Pastikan tiada sisa asing atau cecair di bawah periuk
dan pada elemen pemanas – rajah 5.
• Masukkan periuk ke dalam perkakasan, pastikan berada pada
kedudukan yang betul – rajah 6.
• Pastikan tudung dalaman berada pada kedudukan yang betul.
• Tutup tudung di tempatnya dengan bunyi "klik".
• Pasang kod kuasa ke dalam soket tapak pemasak pelbagai dan
kemudian palam ke dalam alur keluar bekalan kuasa. Perkakasan akan
berdering dengan bunyi “Bip” yang lama, semua penunjuk pada kotak
kawalan akan menyala dengan segera. Mod memasak nasi ditetapkan
pada program memasak lalai.
• Jangan sentuh elemen pemanas apabila produk dipasang atau selepas
memasak. Jangan angkat produk semasa penggunaan atau baru lepas
memasak.
• Perkakasan ini hanya untuk kegunaan dalaman.
45
MS
Jangan letakkan tangan anda pada lubang kukus semasa memasak,
bahaya melecur – rajah 10.
Selepas memasak, jika anda hendak menukar pilihan menu masakan
kerana terdapat kesilapan, tekan kekunci “Keep Warm (Kekal Panas)/
Cancel (Batal)” dan pilih-semula menu yang anda mahu.
Anda boleh menghentikan proses memasak dengan menekan kekunci
“Keep warm (kekal panas) / Cancel (Batal)” atau “Start (Mula) /Stop
(Henti)”.
Hanya gunakan bekas yang disediakan dengan perkakasan.
Jangan tuang air atau masukkan bahan-bahan ke dalam perkakasan
tanpa periuk dimasukkan.
Kuantiti maksimum air + bahan tidak boleh melebihi penanda
tertinggi di dalam periuk - rajah 7.
PANEL KAWALAN
Cara untuk menggunakan butang pada pemasak Nasi anda:
1. Butang “Start (Mula)”: Tekan untuk mendayakan mod nasi dan
memulakan proses memasak.
Penunjuk proses memasak menunjukkan proses memasak (Preheat
(Panas Dahulu) Soaking (Merendam) Heating (Memanaskan)
Soaking (Merendam) Boil (Merebus) Simmer (Mereneh) Keep
warm (Kekal panas)).
2. Kekunci “Rice cooking (Memasak nasi)” dan “Congee (Bubur)”:
• Tekan butang nasi untuk mendayakan mod nasi. Memasak akan
bermula selepas kira-kira 5 saat apabila anda mendengar bunyi bip.
• Tekan butang bubur untuk mendayakan mod bubur. Memasak akan
bermula selepas kira-kira 5 saat apabila anda mendgar bunyi bip.
3. Kekunci “Menu”: Tekan untuk memilih mod berikut:
“Quick (Cepat) Porridge (Bubur) Soup (Sup) Small quantity (Kuantiti
Sedikit) Steam (Kukus) Dessert (Pencuci Mulut)”.
Penunjuk yang sepadan akan menyala.
4. Kekunci “Preset (Praset) / timer (pemasa)”:
• Pemasa: Anda boleh melaraskan masa memasak untuk mod bubur
nasi, bubur, sup, kukus dan kek. Apabila anda memilih mod memasak,
masa memasak lalai akan ditunjukkan pada paparan digital. Tekan
kekunci “Preset (Praset) / timer (pemasa)” sekali (penunjuk pemasa
akan menyala) dan kemudian gunakan butang +/- untuk melaraskan
masa memasak.

46
• Praset: Tersedia untuk semua mod memasak (kecuali mod “Dessert
(Pencuci mulut”). Selepas memilih mod memasak yang dikehendaki,
tekan kekunci “Preset (Praset) / timer (pemasa)” dua kali (penunjuk
praset akan menyala)dan kemudian gunakan butang +/- untuk
menetapkan pemasa. Memasak akan bermula selepas masa praset
berlalu.
Mula lengah maksimum ialah 24 jam. Jika masa praset lebih singkat
daripada masa memasak, proses memasak akan bermula dengan segera.
5. Kekunci “+”/-”: Gunakan butang ini untuk melaraskan masa memasak
(+/- 1 min) dan masa praset (+/- 10 min). Anda tidak boleh melaraskan
masa memasak dalam mod “Dessert (Pencuci mulut)”.
6. Kekunci “Keep warm (Kekal panas)/cancel (batal)":
• Dalam mod tunggu sedia, tekan kekunci kekal panas/batal untuk
memanaskan makanan anda dan memastikan ia kekal panas. Masa
pemanasan yang tinggal akan ditunjukkan pada paparan dan penunjuk
kekal panas akan menyala. Masa kekal panas maksimum ialah 24 minit.
• Tekan kekunci kekal panas/batal untuk memberhentikan proses
memasak atau membatalkan semua tetapan. Pemasak nasi akan
kembali kepada mod tunggu sedia.
JADUAL PROGRAM MASAKAN
Program
Masa memasak
Suhu lalai
(ºC)
Keep
warm
Waktu lalai Tetapan masa
Memasak
nasi
Beras auto auto *
Cepat auto auto *
Kuantiti
sedikit
auto auto *
Bubur 1h 45-1h10min auto *
Bubur Nasi 1h30min 1h-2h auto *
Sup 2h 1h30min-3h auto *
Stim 1h 30min-1h30min auto *
Pencuci mulut 40min 40min-2h 130 ºC *
Kekal hangat auto auto 70 ºC *
47
MS
PANDUAN MEMASAK UNTUK BERAS PUTIH - 8 cawan
Cawan
penyukat
Berat beras
Paras air dalam periuk
(+ beras)
Hidangan
2 300 g Penanda 2 cawan 3org.-4org.
4 600 g Penanda 4 cawan 5org.-6org.
6 900 g Penanda 6 cawan 8org.-10org.
8 1200 g Penanda 8 cawan 13org.-14org.
• Sebelum memasak, sukat beras dengan cawan penyukat dan bilas
kecuali beras risoto.
• Letak beras yang telah dibilas dengan disebarkan sebaiknya di seluruh
permukaan mangkuk. Isikan dengan air sehingga paras air yang
sepadan (Penanda dalam cawan).
• Apabila nasi sudah sedia, lampu penunjuk "Keep Warm (Kekal Panas)"
menyala, kacau nasi dan kemudian biarkan ia di dalam pemasak nasi
beberapa minit untuk mendapatkan nasi sempurna dengan butiran
yang berasingan.
Jadual di bawah ini memberikan panduan untuk memasak nasi :
SYOR UNTUK MEMASAK NASI TERBAIK
48
PANDUAN MEMASAK UNTUK JENIS BERAS YANG LAIN
Jenis beras
Cawan
sukatan
beras
Berat
beras
Paras air
dalam periuk
(+ beras)
Hidangan
Beras putih
penuh
(Beras Itali
- biasanya
beras yang
lebih melekit)
6 870 g
Penanda 6
cawan
7org.-8org.
Beras perang
bijian penuh
6 887 g
Penanda 6
cawan
7org.-8org.
Beras Risoto
(Jenis
Arborio)
6 870 g
Penanda 6
cawan
7org.-8org.
Beras pulut 6 736 g
Penanda 5
cawan
7org.-8org.
Beras perang 6 840 g
Penanda 6
cawan
7org.-8org.
Beras Jepun 6 900 g
Penanda 6
cawan
7org.-8org.
Beras wangi 6 870 g
Penanda 6
cawan
7org.-8org.
• Apabila perkakasan dipasang, pemasak nasi berada pada fungsi
memasak nasi. Apabila anda menekan kekunci Menu, pemasak nasi
memilih Quick (Cepat) Porridge (Bubur) Soup (Sup) Small
quantity (Kuantiti sedikit) Steam (Kukus) Dessert (Pencuci Mulut)
• Skrin memaparkan masa memasak lalai setiap fungsi (Memasak nasi,
memasak nasi segera dan kuantiti sedikit memaparkan “ ”), lampu
kekunci “Start (Mula)” berkelip.
Nota:
Anda boleh menekan lama kekunci “Menu” untuk membatalkan
bunyi “bip” jika perlu (sehingga bunyi bip panjang).
BUTANG MENU
49
MS
FUNGSI BUBUR NASI
• Tekan kekunci “Congee (Bubur Nasi)” untuk memilih fungsi “Congee
(Bubur Nasi)”. Skrin memaparkan masa memasak lalai, lampu “Start
(Mula)” berkelip merah.
• Anda boleh mengubah masa memasak dengan menekan kekunci
"Preset (Praset)/Timer (Pemasa)" terlebih dahulu dan kemudian tekan
kekunci “+” dan “−”.
• Tekan kekunci “Start (Mula)”. Periuk pemasak nasi bertukar kepada
status memasak “Congee (Bubur Nasi)”, lampu “Start (Mula)” akan
menyala, skrin memaparkan masa memasak yang tinggal.
• Pada penghujung memasak, pembaz akan berbunyi "bip" tiga kali,
periuk pemasak nasi akan memasuki status kekal panas dengan
penunjuk "Keep Warm (Kekal Panas)" menyala dan skrin akan mula
mengira masa mengekalkan panas.
• Letak perkakasan secara rata, stabil, permukaan tahan kepanasan jauh
dari percikan air dan sumber-sumber haba yang lain.
• Tekan kekunci "Rice (Nasi)" untuk memasuki fungsi memasak nasi.
• Tuang kuantiti beras yang diperlukan ke dalam periuk menggunakan
cawan penyukat yang disediakan – rajah 8. Kemudian isi dengan air
sejuk sehingga penanda "CAWAN" di dalam periuk – rajah 9.
• Tutup tudung.
Nota: Sentiasa menambah beras dahulu jika tidak anda akan terlebih
air.
Tekan kekunci “Start (Mula)”, pemasak nasi memasuki status memasak
“Rice (Nasi)”, lampu “Start (Mula)” menyala, skrin berkelip “ ”.
• Dalam mod nasi, penunjuk proses memasak akan menunjukkan proses
memasak: Preheat (Panas Dahulu) Soaking (Merendam) Heating
(Memanaskan) Soaking (Merendam) Boil (Merebus) Simmer
(Mereneh) Keep warm (Kekal panas).
• Pada penghujung memasak, pembaz akan berbunyi "bip" tiga kali,
periuk pemasak nasi akan memasuki status kekal panas dengan
penunjuk "Keep Warm (Kekal Panas)" menyala dan skrin akan mula
mengira masa mengekalkan panas.
FUNGSI MEMASAK NASI
Jika anda mahu menambah bunyi bip, anda perlu menekan masa
saat pada kekunci “Menu”.

50
FUNGSI SEGERA
• Tekan kekunci “Menu” untuk memilih fungsi “Quick (Cepat)”. Skrin
memaparkan “ ”, lampu “Start (Mula)” berkelip. Kemudian tekan
kekunci «Start (Mula)». Periuk pemasak nasi bertukar kepada status
memasak “Quick (Segera)”, lampu “Start (Mula)” akan menyala, skrin
berkelip “--”.
• Dalam mod nasi, penunjuk proses memasak akan menunjukkan proses
memasak: Preheat (Panas Dahulu) Soaking (Merendam) Heating
(Memanaskan) Soaking (Merendam) Boil (Merebus) Simmer
(Mereneh) Keep warm (Kekal panas)
• Pada penghujung memasak, pembaz akan berbunyi "bip" tiga kali,
periuk pemasak nasi akan memasuki status kekal panas dengan
penunjuk "Keep Warm (Kekal Panas)" menyala dan skrin akan mula
mengira masa mengekalkan panas.
KUANTITI SEDIKIT
• Tekan kekunci «Menu» untuk memilih fungsi «Kuantiti sedikit». Skrin
memaparkan “ ”, lampu “Start (Mula)” berkelip. Kemudian tekan
kekunci «Start (Mula)». Periuk pemasak nasi bertukar kepada status
memasak “Small quantity (Kuantiti sedikit)”, lampu “Start (Mula)/Stop
(Berhenti)” akan menyala, skrin berkelip “ ”.
• Dalam mod kuantiti sedikit, penunjuk proses memasak akan
menunjukkan proses memasak: Preheat (Panas Dahulu) Soaking
(Merendam) Heating (Memanaskan) Soaking (Merendam) Boil
(Merebus) Simmer (Mereneh) Keep warm (Kekal panas)
• Pada penghujung memasak, pembaz akan berbunyi "bip" tiga kali,
periuk pemasak nasi akan memasuki status kekal panas dengan
penunjuk "Keep Warm (Kekal Panas)" menyala dan skrin akan mula
mengira masa mengekalkan panas.
Beras perang tidak tersedia untuk fungsi “Small quantity (Kuantiti
sedikit)”.

51
MS
FUNGSI KUKUS
• Tekan kekunci “Menu” untuk memilih fungsi “Steam (Kukus)”. Skrin
memaparkan masa memasak lalai, lampu “Start (Mula)” berkelip
merah.
• Anda boleh mengubah masa memasak dengan menekan kekunci
FUNGSI BUBUR
• Tekan kekunci “Menu” untuk memilih fungsi “Porridge (Bubur)”. Skrin
memaparkan masa memasak lalai, lampu “Start (Mula)” berkelip
merah.
• Anda boleh mengubah masa memasak dengan menekan kekunci
"Preset (Praset)/Timer (Pemasa)" terlebih dahulu dan kemudian tekan
kekunci “+” dan “−”.
• Tekan kekunci “Start (Mula)”. Periuk pemasak nasi bertukar kepada
status memasak “Porridge (Bubur)”, lampu “Start (Mula)” akan menyala,
skrin memaparkan masa memasak yang tinggal.
• Pada penghujung memasak, pembaz akan berbunyi "bip" tiga kali,
periuk pemasak nasi akan memasuki status kekal panas dengan
penunjuk "Keep Warm (Kekal Panas)" menyala dan skrin akan mula
mengira masa mengekalkan panas.
FUNGSI SUP
• Tekan kekunci “Menu” untuk memilih fungsi “Soup (Sup)”. Skrin
memaparkan masa memasak lalai, lampu “Start (Mula)” berkelip
merah.
• Anda boleh mengubah masa memasak dengan menekan kekunci
"Preset (Praset)/Timer (Pemasa)" terlebih dahulu dan kemudian tekan
kekunci “+” dan “−”.
• Tekan kekunci “Start (Mula)”. Periuk pemasak nasi bertukar kepada
status memasak “Soup (Sup)”, lampu “Start (Mula)” akan menyala, skrin
memaparkan masa memasak yang tinggal.
• Pada penghujung memasak, pembaz akan berbunyi "bip" tiga kali,
periuk pemasak nasi akan memasuki status kekal panas dengan
penunjuk "Keep Warm (Kekal Panas)" menyala dan skrin akan mula
mengira masa mengekalkan panas.

52
FUNGSI PENCUCI MULUT
• Tekan kekunci “Menu” untuk memilih fungsi “Dessert (Pencuci Mulut)”.
Skrin memaparkan masa memasak lalai, lampu “Start (Mula)” berkelip
merah.
• Anda boleh mengubah masa memasak dengan menekan kekunci
"Preset (Praset)/Timer (Pemasa)" terlebih dahulu dan kemudian tekan
kekunci “+” dan “−”.
• Tekan kekunci “Start (Mula)”. Periuk pemasak nasi bertukar kepada
status memasak “Dessert (Pencuci Mulut)”, lampu “Start (Mula)” akan
menyala, skrin memaparkan masa memasak yang tinggal.
• Pada penghujung memasak, pembaz akan berbunyi "bip" tiga kali,
periuk pemasak nasi akan memasuki status kekal panas dengan
penunjuk "Keep Warm (Kekal Panas)" menyala dan skrin akan mula
mengira masa mengekalkan panas.
"Preset (Praset)/Timer (Pemasa)" terlebih dahulu dan kemudian tekan
kekunci “+” dan “−”.
• Tekan kekunci “Start (Mula)”. Periuk pemasak nasi bertukar kepada
status memasak “Steam (Kukus)”, lampu “Start (Mula)” akan menyala,
skrin memaparkan masa memasak yang tinggal.
• Pada penghujung memasak, pembaz akan berbunyi "bip" tiga kali,
periuk pemasak nasi akan memasuki status kekal panas dengan
penunjuk "Keep Warm (Kekal Panas)" menyala dan skrin akan mula
mengira masa mengekalkan panas.
• Tekan kekunci “Keep warm (Kekal panas) / Cancel (Batal)” di bawah
status tunggu sedia, lampu kekunci “Keep warm (Kekal panas)/Cancel
(Batal)” berkelip , skrin menunjukkan “00:00” dan skrin akan mula
mengira masa mengekalkan panas.
• Tekan kekunci “Keep warm (Kekal panas) / Cancel (Batal)” di bawah
tetapan fungsi atau status memasak akan membatalkan semua data
tetapan dan kembali kepada status tunggu sedia.
Pengesyoran: untuk mendapatkan rasa makanan yang segar, sila
hadkan masa menyimpan dalam tempoh 12 jam.
FUNGSI KEKAL PANAS/BATAL

53
MS
• Untuk memastikan periuk pemasak nasi telah dicabut palam dan
disejukkan sebelum pembersihan dan penyelenggaraan.
• Dinasihatkan untuk membersih perkakasan setiap penggunaan dengan
span. – rajah 12.
• Mangkuk, cawan dan senduk nasi dan senduk sup adalah selamat
diguna oleh pembasuh pinggan mangkuk – rajah 13.
Mangkuk, bekas kukus
• Serbuk kasar dan span logam tidak digalakkan.
PEMBERSIHAN DAN PENYELENGGARAAN
• Masa praset sepadan dengan masa untuk penghujung memasak.
• Fungsi ini tersedia untuk semua fungsi kecuali “Dessert (Pencuci Mulut)”.
• Untuk menggunakan fungsi praset, pilih program memasak. Kemudian,
tekan kekunci “Preset (Praset) / Timer (Pemasa)” dan pilih masa lengah.
Tekan kekunci “+” dan “−” untuk melaraskan masa mula lengah. Masa
praset lalai akan bertukar bergantung pada pilihan masa memasak.
Jarak praset ialah dari 1 sehingga ke 24 jam.
• Apabila anda telah memilih masa praset yang dikehendaki, tekan
kekunci “Start (Mula)” untuk memasuki status memasak, lampu “Start
(Mula)” menyala dan skrin akan memaparkan nombor masa yang telah
anda pilih dan piktogram praset menyala.
• Apabila piktogram praset hilang, pemasak nasi memasuki Status
memasak dan piktogram pemasa akan menyala.
FUNGSI PRASET
• Buka tudung – rajah1.
• Sarung tangan mesti digunakan apabila mengeluarkan periuk memasak
dan bakul stim – rajah 11.
• Hidang makanan menggunakan senduk yang disediakan bersama
perkakasan anda dan tutup semula tudung.
• 24 jam adalah masa mengekalkan hangat maksimum.
• Tekan "Keep warm (Kekal panas)/Cancel (Batal)" untuk menghentikan
status kekal panas.
• Tanggalkan palam perkakas.
PADA PENYELESAIAN MEMASAK

54
• Jika makanan melekat pada bahagian bawah, anda perlu masukkan air
ke dalam mangkuk untuk rendaman sebelum membasuh.
• Keringkan mangkuk dengan teliti.
Menjaga mangkuk
Untuk mangkuk, mengikut arahan berikut dengan berhati-hati:
• Untuk memastikan penyelenggaraan kualiti mangkuk, dicadangkan
tidak memotong makanan di dalamnya.
• Pastikan anda memasukkan mangkuk kembali ke dalam periuk pemasak
nasi.
• Guna senduk plastik yang disediakan atau senduk kayu dan bukan jenis
logam untuk mengelakkan kerosakan pada permukaan mangkuk –
rajah 14.
• Untuk mengelakkan risiko hakisan, jangan tuang cuka ke dalam
mangkuk.
• Warna permukaan mangkuk mungkin bertukar selepas menggunakan
kali pertama atau selepas penggunaan lama. Pertukaran warna ini
disebabkan oleh tindakan wap dan air serta tidak mengakibatkan
sebarang kesan ke atas penggunaan periuk pemasak nasi, juga tidak
membahayakan kesihatan. Ia adalah selamat untuk terus digunakan.
Pembersihan injap tekanan mikro
• Apabila membersih injap tekanan mikro, sila tanggalkannya dari
tudung periuk – rajah 15 dan buka ia dengan memutar pada arah
“buka” – rajah 16a dan 16b. Selepas membersihkannya, sila lap hingga
kering dan meletakkan dua segi tiga di dua bahagian bersama-sama
dan memutarkan ia pada arah “tutup”, kemudian meletakkan ia semua
pada tudung periuk pemasak nasi – rajah 18a dan 18b.
Membersihkan tudung dalaman
• Tanggalkan tudung dalaman dengan menolak keluar dengan kedua-
dua tangan. Bersihkannya dengan span dan cecair pencuci (rajah 17).
Kemudian, lap hingga kering dan masukkannya semula di belakang 2
rusuk dan tekan di bahagian atas sehingga ia tetap.
Pembersihan dan penjagaan bahagian lain perkakasan
• Bersihkan luaran Periuk Pemasak Nasi – rajah 19, di dalam tudung dan
kord dengan kain lembap dan lap kering. Jangan guna produk yang
kasar.
• Jangan guna air untuk membersih dalaman badan perkakasan kerana
ia akan merosakkan sensor pemanas.
55
MS
Penerangan
tidak berfungsi
Punca Penyelesaian
Sebarang
penunjuk lampu
tidak menyala
dan tiada
pemanasan.
Perkakasan tidak
dipasang dengan baik.
Periksa kord kuasa
dipasang pada soket dan
sesalur.
Sebarang
penunjuk lampu
tidak menyala
dan tiada
pemanasan.
Masalah sambungan
penunjuk lampu atau
penunjuk lampu rosak.
Hantar ke pusat servis
yang bertauliah untuk
diperbaiki.
Kebocoran
wap semasa
penggunaan
Tudung periuk ditutup
dengan tidak betul.
Buka dan tutup tudung
sekali lagi.
Injap tekanan mikro
tidak diletakkan
dengan betul atau
tidak lengkap.
Berhenti memasak
(cabut palam produk)
dan periksa injap lengkap
(2 bahagian terkunci
bersama) sama ada
berada pada kedudukan
baik.
Tudung periuk atau
gasket injap tekanan
mikro rosak.
Hantar ke pusat servis
yang bertauliah untuk
diperbaiki.
Nasi separuh
masak atau
terlebih masak.
Terlebih atau terkurang
air berbanding dengan
kuantiti beras.
Rujuk jadual kuantiti air.
PANDUAN PENYELESAIAN TEKNIKAL
56
Penerangan
tidak berfungsi
Punca Penyelesaian
Nasi separuh
masak atau
terlebih masak
Tidak cukup direneh.
Hantar ke pusat servis
yang bertauliah untuk
diperbaiki.
Kegagalan
mengekalkan
hangat
automatik
(produk
terus dalam
kedudukan
memasak, atau
tidak memanas)
Fungsi kekal hangat
telah dibatalkan oleh
pengguna semasa
tetapan. Rujukan
perenggan fungsi
kekal panas.
E0
Sensor di bahagian
atas litar terbuka atau
litar pintas
E1
Sensor pada
bahagian bawah
terbuka atau litar
pintas.
Hentikan perkakasan dan
mulakan program. Jika
masalah berulang, sila
hantar ke pusat servis
yang bertauliah untuk
diperbaiki.
Catatan: Jika mangkuk dalaman defektif, jangan guna dan dapatkan
penggantian dari pusat servis yang bertauliah untuk diperbaiki.

57
MS
TEFAL/T-FAL * INTERNATIONAL LIMITED GUARANTEE
: www.tefal.com
This product is repairable by TEFAL/T-FAL *, during and after the guarantee period.
Accessories, consumables and end-user replaceable parts can be purchased, if locally available, as described on the TEFAL/T-FAL
internet site www.tefal.com
The Guarantee**
TEFAL/T-FAL guarantees this product against any manufacturing defect in materials or workmanship during the guarantee period
within those countries*** as stated in the attached country list, starting from the initial date of purchase or delivery date. The
international manufacturer’s guarantee covers all costs related to restoring the proven defective product so that it conforms to its
original specifications, through the repair or replacement of any defective part and the necessary labour. At TEFAL/T-FAL’s choice,
a replacement product may be provided instead of repairing a defective product. TEFAL/T-FAL’s sole obligation and your exclusive
resolution under this guarantee are limited to such repair or replacement.
Conditions & Exclusions
TEFAL/T-FAL shall not be obliged to repair or replace any product which is not accompanied by a valid proof of purchase. The
product can be taken directly in person or must be adequately packaged and returned, by recorded delivery (or equivalent method
of postage), to a TEFAL/T-FAL authorised service centre. Full address details for each country’s authorised service centres are listed
on TEFAL/T-FAL website (www.tefal.com) or by calling the appropriate consumer Service centre set out in the attached country
list. In order to offer the best possible after-sales service and constantly improve customer satisfaction, TEFAL/T-FAL may send a
satisfaction survey to all customers who have had their product repaired or exchanged in a TEFAL/T-FAL authorised service centre.
This guarantee applies only for products purchased and used for domestic purposes and will not cover any damage which occurs
as a result of misuse, negligence, failure to follow TEFAL/T-FAL instructions, or a
modification or unauthorised repair of the product, faulty packaging by the owner or mishandling by any carrier. It also does not
cover normal wear and tear, maintenance or replacement of consumable parts, or the following:
− using the wrong type of water or consumable
− ingress of water, dust or insects into the product (excluding appliances with features specifically designed for insects)
− scaling (any de-scaling must be carried out according to the instructions for use)
− damage to any glass or porcelain ware in the product
− mechanical damages, overloading
− damage as a result of lightning or power surges
− accidents including fire, flood, etc
− professional or commercial use
− damages or poor results specifically due to wrong voltage or frequency as stamped on the product ID or specification
Consumer Statutory Rights
This international TEFAL/T-FAL guarantee does not affect the Statutory Rights a consumer may have or those rights that cannot
be excluded or limited, nor rights against the retailer from which the consumer purchased the product. This guarantee gives a
consumer specific legal rights, and the consumer may also have other legal rights which vary from State to State or Country to
Country. The consumer may assert any such rights at his sole discretion.
***Where a product purchased in a listed country and then used in another listed country, the international TEFAL/T-FAL guarantee
duration is the one in the country of usage, even if the product was purchased in a listed country with different guarantee
duration. The repair process may require a longer time if the product is not locally sold by TEFAL/T-FAL. If the product is not
repairable in the new country, the international TEFAL/T-FAL guarantee is limited to a replacement by a similar or alternative
product at similar cost, where possible.
*TEFAL household appliances appear under the T-FAL brand in some territories like America and Japan. TEFAL/T-FAL are registered
trademarks of Groupe SEB.
Please keep this document for your reference should you wish to make a claim under the guarantee.
**For Australia only:
Our goods come with guarantees that cannot be excluded under the Australian Consumer Law. You are entitled to a replacement
or refund for a major failure and compensation for any other reasonably foreseeable loss or damage. You are also entitled to have
the goods repaired or replaced if the goods fail to be of acceptable quality and the failure does not amount to a major failure.
**For India only: The guarantee length depends on the product and the State in India. Full guarantee terms must be checked at
the point of sale. Products purchased outside and used in India benefit from a 2 year guarantee.
The guarantee covers exclusively the repair of a defective product, but at TEFAL’s choice, a replacement product may be provided
instead of repairing a defective product. It is mandatory that the consumer, to have his product repaired, has to log a service
request on the dedicated Smartphone application TEFAL SERVICE APP or by calling TEFAL Consumer Care Center at 1860-200-
1232, Opening hours Mon-Sat 09 AM to 06 PM. Products returned by Post will not be covered by the guarantee. As a proof of
purchase consumer needs to provide both this stamped guarantee card and cash memo.

58
12c
12b
12a
12d
12e
12f
12i
12h
12g
12j
12k
12l
12m
แผงควบคุม
คำ�อธิบ�ย
1 ถาดนึ่ง
2 ระดับน้ำา
3 หม้อใบในทรงกลม
4 ถ้วยตวง
5 ทัพพีตักข้าว
6 ทัพพีตักซุป
7 ฝาปิด
8 ฝาชั้นในแบบถอดได้
9 ไมโครเพลสเชอร์ วาล์ว
10 ปุ่มเปิดฝา
11 หูหิ้ว
12 แผงควบคุม
a สถานะการทำาอาหาร
b ปุ่ม "+"
c สถานะ "อุ่น/ยกเลิก"
d ปุ่ม "อุ่น/ยกเลิก"
e ปุ่ม "ตั้งล่วงหน้า/ตั้งเวลา"
f ปุ่ม "-"
g สัญญาณ "ข้าว"
h ปุ่ม "ข้าว"
i สัญญาณ "เริ่ม"
j ปุ่ม "เริ่ม"
k ปุ่ม "เมนู"
l สัญญาณ "โจ๊ก"
m ปุ่ม "โจ๊ก"
13 ตัวเครื่อง
14 สายไฟ

59
TH
เกี่ยวกับก�รป้องกันที่สำ�คัญ
คู่มือก�รใช้ง�นเพื่อคว�มปลอดภัย
กรุณ�อ่�นและทำ�ต�มคู่มือก�รใช้ง�นฉบับนี้ เก็บคู่มือ
เหล่�นี้ไว้ให้ดี
• เครื่องใช้ไฟฟ้านี้ไม่ได้มีจุดมุ่งหมายให้ทำางานด้วยรูป
แบบของตัวจับเวลาภายนอก หรือระบบควบคุมทาง
ไกล (รีโมท คอนโทรล) แบบแยกต่างหาก.
• เครื่องใช้ไฟฟ้านี้สามารถใช้ได้โดยเด็กที่มีอายุ 8 ปีขึ้นไป
หากมีผู้ควบคุมดูแลหรือให้คำาแนะนำาในการใช้เครื่อง
อย่างปลอดภัยและหากเด็กเข้าใจถึงอันตรายที่เกี่ยวข้อง
การทำาความสะอาดและการซ่อมบำารุงโดยผู้ใช้งานจะต้อง
ไม่ให้เด็กเป็นผู้ดำาเนินการ เว้นเสียแต่ว่าเด็กจะมีอายุ
8ปีขึ้นไปและมีผู้ควบคุมดูแล จงเก็บเครื่องใช้ไฟฟ้าและ
สายไฟออกห่างจากเด็กที่มีอายุน้อยกว่า 8ปี
• เครื่องใช้ไฟฟ้านี้สามารถใช้งานได้โดยบุคคลใด ๆ ที่มี
ความบกพร่องทางร่างกาย ด้อยประสิทธิภาพด้านการ
รับรู้หรือด้านจิตใจ หรือโดยบุคคลที่ขาดประสบการณ์
และความรู้เกี่ยวกับเครื่องใช้ไฟฟ้าดังกล่าว หากพวกเขา
จะอยู่ภายใต้การควบคุมดูแล หรือได้รับคำาแนะนำาเกี่ยว
กับการใช้เครื่องอย่างปลอดภัยและเข้าใจถึงอันตรายที่
เกี่ยวข้อง
• ห้ามเด็กเล่นเครื่องใช้ไฟฟ้า
• เครื่องใช้ไฟฟ้านี้ไม่ได้ออกแบบมาสำาหรับการใช้งาน
โดยบุคคลใด ๆ (รวมถึงเด็ก) ที่มีความบกพร่องทาง
ร่างกาย ด้อยประสิทธิภาพด้านการรับรู้หรือด้านจิตใจ

60
หรือโดยบุคคลที่ขาดประสบการณ์และความรู้เกี่ยวกับ
เครื่องใช้ไฟฟ้าดังกล่าว เว้นเสียแต่ว่าพวกเขาจะอยู่ภาย
ใต้การควบคุมดูแล หรือได้รับคำาแนะนำาเกี่ยวกับการใช้
เครื่องอย่างปลอดภัยและเข้าใจถึงอันตรายที่เกี่ยวข้อง
• ควรควบคุมเด็กอย่างใกล้ชิดเพื่อให้แน่ใจว่าเด็กจะไม่
เล่นเครื่องใช้ไฟฟ้านี้
• เนื่องจากเครื่องใช้ไฟฟ้านี้ใช้สำาหรับในบ้านเท่านั้น ไม่
ได้มีจุดมุ่งหมายเพื่อการใช้งานดังต่อไปนี้ และการรับ
ประกันก็จะเป็นโมฆะด้วย
– บริเวณครัวในร้านค้า สำานักงาน และสภาพแวดล้อม
การทำางานแบบอื่น ๆ
– บ้านที่อยู่ในไร่นา
– โดยลูกค้าในโรงแรม โมเต็ล และสภาพแวดล้อม
สำาหรับที่พักประเภทอื่น ๆ
– สภาพแวดล้อมประเภทที่มีบริการที่พักพร้อมอาหาร
เช้า
• หากเครื่องใช้ไฟฟ้าของคุณใช้กับสายไฟแบบสามารถ
ถอดออกได้: หากสายไฟถูกทำาลาย จะต้องเปลี่ยนเป็น
สายไฟแบบพิเศษ หรืออะไหล่ที่มีพร้อมจากศูนย์บริการ
ที่ได้รับอนุญาต
• หากเครื่องใช้ไฟฟ้าของคุณใช้กับสายไฟแบบติดกับ
เครื่องถาวร: หากสายไฟเสียหาย จะต้องเปลี่ยนโดยศูนย์
บริการที่ได้รับอนุญาตของทีฟาวว์ หรือผู้ที่มีคุณสมบัติ
ใกล้เคียงกันเพื่อหลีกเลี่ยงความเสียหาย
• จะต้องไม่น้ำาเครื่องใช้ไฟฟ้านี้ไปแช่น้ำา:
• ใช้ผ้าชุบน้ำาหมาดหรือฟองน้ำา ชุบน้ำายาล้างจานเพื่อทำาความ

61
TH
สะอาดอุปกรณ์เสริมและอะไหล่ที่สัมผัสกับอาหาร ล้าง
ออกด้วยผ้าชุบน้ำาหมาดหรือฟองน้ำา เช็ดอุปกรณ์เสริมและ
อะไหล่ที่สัมผัสกับอาหารให้แห้งด้วยผ้าแห้ง
• หากมีสัญลักษณ์ อยู่บนอุปกรณ์ของคุณ สัญลักษณ์
นี้หมายความว่า “ข้อควรระวัง: พื้นผิวอาจเกิดความร้อน
ระหว่างการใช้งาน»
• ข้อควรระวัง: พื้นผิวของอุปกรณ์ที่ทำาให้เกิดความร้อน
นั้น ขึ้นอยู่กับความร้อนที่หลืออยู่หลังจากการใช้งาน
• ข้อควรระวัง: ความเสี่ยงต่อการบาดเจ็บอาจมีสาเหตุมา
จากการใช้อุปกรณ์ที่ไม่เหมาะสม
• ข้อควรระวัง: หากอุปกรณ์ของคุณมีสายไฟแบบสามารถ
ถอดออกได้ จงอย่าทำาของเหลวหกลงบนหัวต่อสายไฟ
(Connector)
• ถอดปลั๊กเครื่องใช้ไฟฟ้าออกเสมอ:
– หลังจากใช้งานทันที
– เมื่อเคลื่อนย้ายเครื่องใช้ไฟฟ้า
– ก่อนการทำาความสะอาดหรือซ่อมบำารุง
– หากเครื่องใช้ไฟฟ้าทำางานผิดพลาด
• การไหม้อาจเกิดขึ้นได้จากการสัมผัสพื้นผิวส่วนที่ร้อน
ของเครื่องใช้ไฟฟ้า, น้ำาร้อน, ไอน้ำาหรืออาหาร
• ในระหว่างการปรุงอาหาร เครื่องใช้ไฟฟ้าจะมีความ
ร้อนและไอน้ำา เอาหน้าและมือออกให้ห่างจากเครื่องใช้
ไฟฟ้า
• อย่าเอาหน้าและมือเข้าไปใกล้ช่องระบายไอน้ำา อย่าปิด
กั้นช่องระบายไอน้ำา

62
• หากมีปัญหาหรือคำาถามใด ๆ กรุณาติดต่อทีมลูกค้า
สัมพันธ์ หรือสอบถามจากเว็บไซต์ของเรา
• อุปกรณ์สามารถใช้งานได้ในความสูงสูงสุดถึง 4,000
เมตร
• เพื่อความปลอดภัยของคุณ เครื่องใช้ไฟฟ้านี้เป็นไปตามมาตรฐานและข้อบังคับด้าน
ความปลอดภัยที่มีผลบังคับใช้ในช่วงเวลาของการผลิต (ประกาศว่าด้วยแรงดันไฟฟ้า
ต่ำา, ความเข้ากันได้ของแม่เหล็กไฟฟ้า, วัสดุที่สัมผัสกับอาหาร, สิ่งแวดล้อม ฯลฯ)
• ตรวจสอบว่าแรงดันไฟฟ้าสัมพันธ์กับแรงดันไฟฟ้าที่แสดงไว้บนเครื่องใช้ไฟฟ้า
(ไฟฟ้ากระแสสลับ) หรือไม่
• ตามความเป็นจริงแล้ว เนื่องจากมีมาตรฐานที่หลากหลาย หากใช้เครื่องใช้ไฟฟ้า
ในประเทศอื่นนอกเหนือจากประเทศที่ซื้อ ซึ่งประเทศดังกล่าวมีมาตรฐานบังคับ
ใช้ที่แตกต่างกัน ควรนำาเครื่องใช้ไฟฟ้านั้นไปให้ตัวแทนศูนย์บริการที่ได้รับอนุญาต
ตรวจสอบก่อน
ก�รเชื่อมต่อกับแหล่งพลังง�น
• อย่าใช้เครื่องใช้ไฟฟ้า หาก:
- เครื่องใช้ไฟฟ้าหรือสายไฟเสียหาย
- ทำาเครื่องใช้ไฟฟ้าหล่น หรือมีร่องรอยความเสียหายที่เห็นได้อย่างชัดเจน หรือ
ทำางานผิดปกติ
หากอยู่ในสถานการณ์ที่กล่าวมา จะต้องส่งเครื่องใช้ไฟฟ้าไปยังตัวแทนศูนย์บริการ
ที่ได้รับอนุญาต อย่าถอดแยกชิ้นส่วนของเครื่องใช้ไฟฟ้าด้วยตัวคุณเอง
• อย่าแขวนสายไฟเอาไว้
• ให้เสียบปลั๊กของเครื่องใช้ไฟฟ้าในเต้าเสียบที่มีสายดินเสมอ
• อย่าใช้ปลั๊กต่อ หากคุณยอมรับความรับผิดชอบในการกระทำาดังกล่าว ให้ใช้เพียงสาย
ต่อที่อยู่ในสภาพที่ดีเท่านั้น โดยมีสายดินเสียบอยู่และเหมาะสมกับแรงดันไฟฟ้าของ
เครื่องใช้ไฟฟ้า
• ห้ามถอดปลั๊กไฟของเครื่องใช้ไฟฟ้านี้ด้วยการดึงที่บริเวณสายไฟ
ก�รใช้ง�น
• ให้ใช้งานบนพื้นผิวที่เรียบ คงที่และทนทานต่อความร้อน ซึ่งอยู่ห่างจากการ
กระเด็นของน้ำา
• อย่าพยายามใช้งานเครื่องใช้ไฟฟ้าเมื่อหม้อใบในว่างเปล่าหรือไม่มีหม้อใบใน
• ฟังก์ชัน/ปุ่ม ในการปรุงอาหารจะต้องทำางานได้อย่างเป็นอิสระ อย่าป้องกันหรือ
ขัดขวางฟังก์ชั่นจากการเปลี่ยนฟังก์ชั่นให้เปลี่ยนเป็นการอุ่นโดยอัตโนมัติ
• ห้ามถอดหม้อใบในออกขณะที่เครื่องใช้ไฟฟ้ากำาลังทำางานอยู่

63
TH
ปกป้องสิ่งแวดล้อม
• เครื่องใช้ไฟฟ้าของคุณได้รับการออกแบบให้สามารถใช้งานได้นานหลายปี แต่
อย่างไรก็ตาม เมื่อคุณตัดสินใจที่จะเปลี่ยนเครื่องใช้ไฟฟ้าดังกล่าว จงคิดถึงวิธีที่
คุณสามารถมีส่วนร่วมในการปกป้องสิ่งแวดล้อมได้
• ก่อนที่จะเลิกใช้งานเครื่องใช้ไฟฟ้าของคุณ คุณควรถอดแบตเตอรี่ออกจากตัวจับ
เวลาและทิ้งไว้ที่ศูนย์จัดเก็บขยะเทศบาลในท้องถิ่น (เป็นไปตามรุ่น)
ห่วงใยในสิ่งแวดล้อม!
เครื่องใช้ไฟฟ้าของคุณประกอบด้วยวัสดุที่สามารถแปรสภาพหรือนำากลับมาใช้
ใหม่ได้
ให้นำาส่งที่ศูนย์จัดเก็บขยะเทศบาลในท้องถิ่นของคุณ
• อย่าวางเครื่องใช้ไฟฟ้าบนพื้นผิวที่มีความร้อนโดยตรง หรือแหล่งความร้อน หรือ
เปลวไฟใด ๆ เพราะว่าจะก่อให้เกิดการทำางานผิดพลาดหรือเป็นอันตราย
• หม้อใบในและจานอุ่นร้อนจะต้องสัมผัสกันโดยตรง วัตถุหรืออาหารใด ๆ ที่สอด
แทรกเข้าไประหว่างอะไหล่ทั้งสองชิ้นนี้อาจขัดขวางการดำาเนินการได้อย่างถูก
ต้อง
• อย่าวางเครื่องใช้ไฟฟ้าใกล้กับแหล่งความร้อน หรือบนเตาที่ร้อน เพราะอาจส่ง
ผลให้เกิดความเสียหายที่รุนแรงได้
• อย่าใส่อาหารหรือน้ำาเข้าไปในเครื่องใช้ไฟฟ้าจนกว่าจะใส่หม้อใบในเข้าไป
• ใส่ใจต่อระดับต่าง ๆ ที่แสดงไว้ในตำารับอาหาร
• หากอะไหล่ชิ้นใดของเครื่องใช้ไฟฟ้าของคุณก่อให้เกิดไฟ อย่าพยายามจะดับด้วย
น้ำา สำาหรับการดับเปลวไฟ จะต้องใช้ผ้าเช็ดจานที่เปียกชื้น
• การเข้าไปแทรกแซงใด ๆ จะต้องดำาเนินการโดยศูนย์บริการที่มีอะไหล่แท้เท่านั้น
• เครื่องใช้ไฟฟ้านี้ได้รับการออกแบบให้ใช้ภายในบ้านเท่านั้น ในกรณีที่นำาไปใช้
เพื่อวิชาชีพใด ๆ , การใช้งานที่ไม่เหมาะสมหรือไม่สามารถปฏิบัติตามคำาแนะนำา
ได้ ผู้ผลิตไม่ต้องยอมรับความรับผิดชอบใด ๆ และการรับประกันจะเป็นโมฆะ

64
ก่อนก�รใช้ง�นครั้งแรก
ก�รแกะบรรจุภัณฑ์
• นำาเครื่อง อุปกรณ์เสริม และเอกสารสิ่งพิมพ์ทั้งหมดออกจากบรรจุภัณฑ์
• เปิดฝาโดยกดปุ่มเปิดบนตัวเครื่อง - รูป 1
อ่�นคำ�แนะนำ�และปฏิบัติต�มวิธีใช้ง�นด้วยคว�มระมัดระวัง
ทำ�คว�มสะอ�ดเครื่อง
• ถอดหม้อ - รูป 2 ฝาชั้นในและวาล์วแรงดัน - รูป 3a และ 3b
• ทำาความสะอาดหม้อ วาล์ว และฝาชั้นในด้วยฟองน้ำาและน้ำายาทำาความสะอาด
• ใช้ผ้าชุบน้ำาหมาด ๆ เช็ดด้านนอกของเครื่องและฝา
• เช็ดให้แห้งด้วยความระมัดระวัง
• ใส่องค์ประกอบทุกชิ้นกลับเข้าที่ตำาแหน่งเดิม ติดตั้งฝาชั้นในลงในตำาแหน่งที่ถูก
ต้องที่ฝาด้านบนของตัวเครื่อง จากนั้น ใส่ฝาชั้นในหลังโครงทั้ง 2 ข้าง แล้วกด
ลงจนกว่าจะเข้าที่ ติดตั้งสายแบบถอดได้ในช่องเสียบที่อยู่บนฐานหม้อทำาอาหาร
สำ�หรับเครื่องและฟังก์ชันทั้งหมด
• เช็ดด้านนอกของหม้ออย่างระมัดระวัง (โดยเฉพาะก้นหม้อ) ตรวจสอบให้แน่ใจ
ว่าไม่มีสิ่งตกค้างหรือของเหลวแปลกปลอมอยู่ใต้หม้อ และบนองค์ประกอบ
ทำาความร้อน - รูป 5
• วางหม้อลงในเครื่อง ตรวจสอบให้แน่ใจว่าวางหม้ออยู่ในตำาแหน่งที่ถูกต้อง - รูป
6
• ตรวจสอบให้แน่ใจว่าฝาชั้นในอยู่ในตำาแหน่งที่ถูกต้อง
• ปิดฝาให้สนิทโดยให้มีเสียง "คลิก"
• ติดตั้งสายไฟในช่องเสียบของฐานหม้ออเนกประสงค์ จากนั้นเสียบสายไฟใน
เต้าเสียบ เครื่องจะส่งเสียงเตือนยาวดัง "ปิ๊บ" และสัญญาณทั้งหมดในช่อง
ควบคุมจะสว่างขึ้นชั่วครู โหมดหุงข้าวเป็นโปรแกรมการทำาอาหารค่าเริ่มต้น
• ห้ามสัมผัสองค์ประกอบทำาความร้อนขณะเสียบปลั๊ก หรือหลังการทำาอาหาร
ห้ามยกผลิตภัณฑ์ระหว่างการใช้งาน หรือหลังจากทำาอาหารเสร็จใหม่ ๆ
• เครื่องนี้มีไว้สำาหรับใช้งานภายในเท่านั้น
ห้�มว�งมือบนช่องระบ�ยไอน้ำ�ระหว่�งก�รทำ�อ�ห�ร เพร�ะอ�จได้รับอันตร�ย
จ�กก�รลวก - รูป 10
หลังจ�กที่เครื่องเริ่มทำ�อ�ห�รแล้ว ห�กต้องก�รเปลี่ยนเมนูก�รทำ�อ�ห�รที่เลือก
ไว้เพร�ะเกิดคว�มผิดพล�ด กดปุ่ม "อุ่น/ยกเลิก" และเลือกเมนูที่ต้องก�ร
ส�ม�รถหยุดก�รทำ�อ�ห�รโดยกดปุ่ม "อุ่น/ยกเลิก" หรือปุ่ม "เริ่ม/หยุด"
ใช้หม้อชั้นในที่ให้ม�กับเครื่องเท่�นั้น

65
TH
ห้�มเทน้ำ�หรือใส่ส่วนผสมลงในเครื่องโดยที่ไม่มีหม้ออยู่ด้�นใน
ปริม�ณสูงสุดของน้ำ�และส่วนผสมไม่ควรเกินขีดระดับสูงสุดในหม้อ - รูป 7
แผงควบคุม
วิธีก�รใช้ง�นปุ่มบนหม้อหุงข้�ว:
1. ปุ่ม "เริ่ม": กดเพื่อเปิดใช้งานโหมดข้าวและเริ่มขั้นตอนการทำาอาหาร
สัญญาณระบุความคืบหน้าการทำาอาหารจะแสดงความคืบหน้าการทำาอาหาร
(เตรียมหุง แช่ข้าว เริ่มหุง ดูดซับน้ำา ไอน้ำาระเหย หุงสุก อุ่น)
2. ปุ่ม "หุงข้�ว" และ "โจ๊ก":
• กดปุ่มข้าวเพื่อเปิดใช้งานโหมดข้าว การทำาอาหารจะเริ่มหลังจากเสียงเตือนดังขึ้น
ประมาณ 5 วินาที
• กดปุ่มโจ๊กเพื่อเปิดใช้งานโหมดโจ๊ก การทำาอาหารจะเริ่มหลังจากเสียงเตือนดังขึ้น
ประมาณ 5 วินาที
3. ปุ่ม "เมนู": กดปุ่มเพื่อเลือกโหมดต่าง ๆ ต่อไปนี้
"เร็ว ข้าวต้ม ซุป ปริมาณน้อย นึ่ง ของหวาน"
สัญญาณระบุที่เกี่ยวข้องจะสว่างขึ้น
4. ปุ่ม "ตั้งล่วงหน้�/ตั้งเวล�":
• ตั้งเวล�: สามารถปรับเวลาการทำาอาหารสำาหรับโหมดโจ๊ก ข้าวต้ม ซุุป นึ่ง และ
เค้ก เมื่อเลือกโหมดการทำาอาหารแล้ว ค่าเริ่มต้นเวลาการทำาอาหารจะปรากฏใน
หน้าจอดิจิทัล กดปุ่ม "ตั้งค่าล่วงหน้า/ตัวจับเวลา" หนึ่งครั้ง (สัญญาณตัวจับเวลา
จะสว่างขึ้น) จากนั้นใช้ปุ่ม +/- เพื่อปรับเวลาการทำาอาหาร
• ตั้งล่วงหน้�: สามารถใช้งานได้กับทุกโหมดการทำาอาหาร (ยกเว้นโหมด "ของ
หวาน") หลังจากเลือกโหมดการทำาอาหารที่ต้องการแล้ว กดปุ่ม "ตั้งค่าล่วงหน้า/
ตัวจับเวลา" สองครั้ง (สัญญาณตั้งค่าล่วงหน้าจะสว่างขึ้น) จากนั้นใช้ปุ่ม +/-
เพื่อตั้งค่าตัวจับเวลา การทำาอาหารจะเริ่มหลังจากเสร็จสิ้นการนับถอยหลังเวลาที่
ตั้งค่าล่วงหน้า
ตั้งเวลาล่วงหน้าได้สูงสุด 24 ชั่วโมง หากเวลาที่ตั้งค่าล่วงหน้าสั้นกว่าเวลาการทำา
อาหาร การทำาอาหารจะเริ่มโดยทันที
5. ปุ่ม "+/-": ใช้ปุ่มเหล่านี้เพื่อปรับเวลาการทำาอาหาร (+/- 1 นาที) และเวลาที่
ตั้งค่าล่วงหน้า (+/- 10 นาที) ไม่สามารถปรับเวลาการทำาอาหารในโหมด "ของ
หวาน"
6. ปุ่ม "อุ่น/ยกเลิก":
• ในโหมดสแตนด์บาย กดปุ่มอุ่นต่อเนื่อง/ยกเลิกเพื่อทำาความร้อนและอุ่นอาหาร
อย่างต่อเนื่อง เวลาการทำาความร้อนที่เหลือจะแสดงในหน้าจอ และสัญญาณอุ่น
ต่อเนื่องจะสว่างขึ้น เวลาการอุ่นต่อเนื่องสูงสุดคือ 24 ชั่วโมง
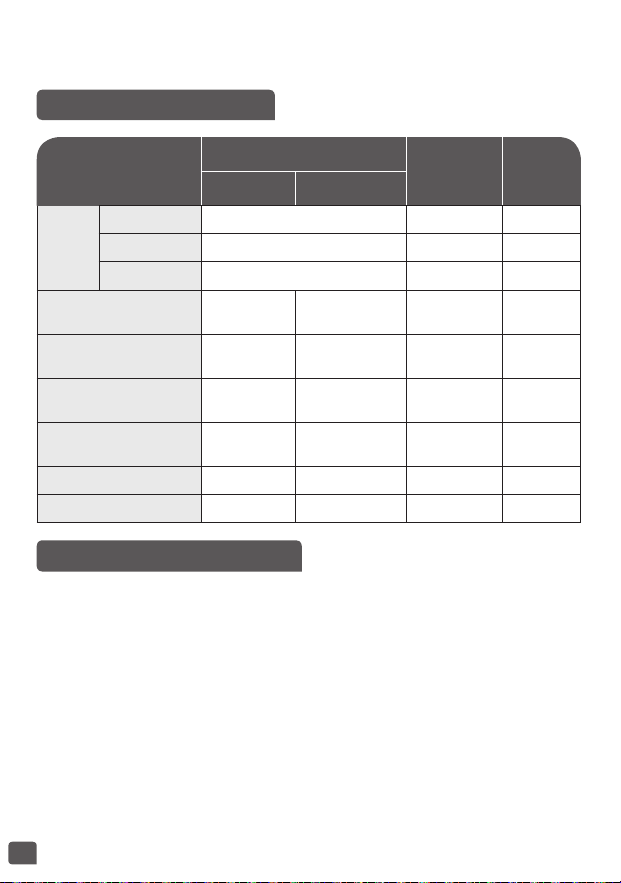
66
ต�ร�งโปรแกรมก�รทำ�อ�ห�ร
• กดปุ่มอุ่นต่อเนื่อง/ยกเลิกเพื่อหยุดขั้นตอนการทำาอาหารหรือยกเลิกการตั้งค่า
ทั้งหมด หม้อหุงข้าวจะกลับเข้าสู่โหมดสแตนด์บาย
• ก่อนการหุงข้าว ตวงข้าวด้วยถ้วยตวงแล้วซาวข้าว ยกเว้นข้าวรีซอตโต
• นำาข้าวที่ซาวแล้วใส่ลงในหม้อโดยเกลี่ยให้ทั่วพื้นผิวหม้อ เติมน้ำาในปริมาณที่
สัมพันธ์กัน (ระดับในถ้วยตวง)
• เมื่อข้าวสุกแล้วและสัญญาณ อุ่น สว่างขึ้น ให้คนข้าวและปล่อยไว้ในหม้อหุงข้าว
เป็นเวลาสักครู่ เพื่อให้ได้ข้าวที่สวยและไม่ติดกัน
ตารางด้านล่างนี้จะให้คำาแนะนำาในการหุงข้าว:
ข้อแนะนำ�เพื่อก�รหุงข้�วที่ดีที่สุด
โปรแกรม
เวล�ก�รทำ�อ�ห�ร
อุณหภูมิค่�เริ่ม
ต้น (ºC)
อุ่น
เวล�ค่�เริ่มต้น ก�รตั้งค่�เวล�
การหุง
ข้าว
ข้าว อัตโนมัติ อัตโนมัติ *
เร็ว อัตโนมัติ อัตโนมัติ *
ปริมาณน้อย อัตโนมัติ อัตโนมัติ *
ข้าวต้ม 1 ชม.
45 นาที - 1 ชม.
10 นาที
อัตโนมัติ *
โจ๊ก
1 ชม. 30
นาที
1 - 2 ชม. อัตโนมัติ *
ซุป 2 ชม.
1 ชม. 30 นาที -
3 ชม.
อัตโนมัติ *
นึ่ง 1 ชม.
30 นาที - 1 ชม.
30 นาที
อัตโนมัติ *
เค้ก 40 นาที 40 นาที - 2 ชม. 130 ºC *
อุ่น อัตโนมัติ อัตโนมัติ 70 ºC *
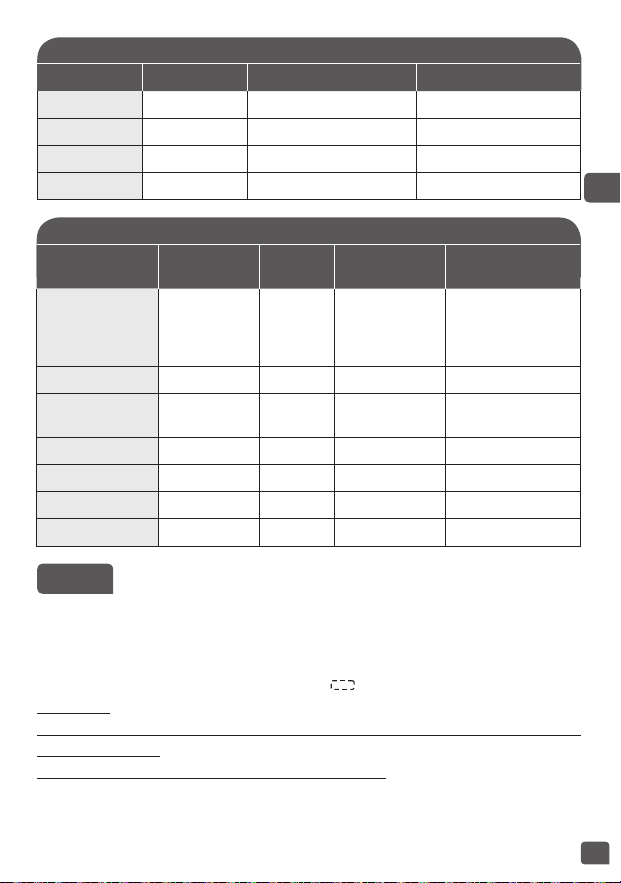
67
TH
คำ�แนะนำ�ในก�รหุงข้�วข�ว - 8 ถ้วย
ถ้วยตวง น้ำ�หนักข้�ว ระดับน้ำ�ในหม้อ (+ ข้�ว) ปริม�ณที่เสิร์ฟ
2 300 ก. ขีดที่ 2 3 - 4 ที่
4 600 ก. ขีดที่ 4 5 - 6 ที่
6 900 ก. ขีดที่ 6 8 - 10 ที่
8 1,200 ก. ขีดที่ 8 13 - 14 ที่
คำ�แนะนำ�ในก�รหุงข้�วประเภทอื่น ๆ
ประเภทข้�ว ถ้วยตวงข้�ว
น้ำ�หนัก
ข้�ว
ระดับน้ำ�ในหม้อ
(+ ข้�ว)
ปริม�ณที่เสิร์ฟ
ข้าวขาวกลม (ข้าว
อิตาลี - มักจะ
เป็นข้าวที่เหนียว
มากกว่า)
6 870 ก. ขีดที่ 6 7 - 8 ที่
ข้าวกล้องไม่ขัดสี 6 887 ก. ขีดที่ 6 7 - 8 ที่
ข้าวรีซอตโต (แบ
บอาร์โบริโอ)
6 870 ก. ขีดที่ 6 7 - 8 ที่
ข้าวเหนียว 6 736 ก. ขีดที่ 5 7 - 8 ที่
ข้าวกล้อง 6 840 ก. ขีดที่ 6 7 - 8 ที่
ข้าวญี่ปุ่น 6 900 ก. ขีดที่ 6 7 - 8 ที่
ข้าวหอมมะลิ 6 870 ก. ขีดที่ 6 7 - 8 ที่
• เมื่อเสียบปลั๊กเครื่อง หม้อหุงข้าวจะอยู่ในฟังก์ชันการหุงข้าว เมื่อกดปุ่มเมนู
หม้อหุงข้าวจะเลือก หุงด่วน ข้าวต้ม ซุป หุงเล็กน้อย นึ่ง เค้ก
• หน้าจอจะแสดงค่าเริ่มต้นเวลาการทำาอาหารสำาหรับแต่ละฟังก์ชัน (หุงข้าว หุง
ด่วน และทำาอาหารปริมาณน้อยจะแสดง " ") ไฟของปุ่ม "เริ่ม" จะกะพริบ
หม�ยเหตุ:
ส�ม�รถกดปุ่ม "เมนู" ค้�งไว้เพื่อยกเลิกเสียง "ปิ๊บ" ห�กจำ�เป็น (จนกว่�เสียง
จะดังย�วต่อเนื่อง)
ห�กต้องก�รเพิ่มเสียงปี๊บ ให้กดปุ่ม "เมนู" อีกครั้ง
ปุ่มเมนู

68
• วางเครื่องบนพื้นที่เรียบ มั่นคง และทนความร้อน โดยให้ห่างจากน้ำากระเด็นและ
แหล่งความร้อนอื่น ๆ
• กดปุ่ม "ข้าว" เพื่อเข้าสู่ฟังก์ชันการหุงข้าว
• เทข้าวในปริมาณที่ต้องการลงในหม้อ โดยใช้ถ้วยตวงที่มาพร้อมกับเครื่อง - รูป
8 จากนั้นเติมน้ำาเย็นโดยไม่เกินขีดของจำานวน "ถ้วย" ที่เหมาะสมซึ่งพิมพ์อยู่บน
หม้อ - รูป 9
• ปิดฝาหม้อ
หม�ยเหตุ: ใส่ข้�วก่อนเสมอ มิฉะนั้นจะมีน้ำ�ม�กเกินไป
กดปุ่ม "เริ่ม" หม้อหุงข้าวจะเข้าสู่สถานะการทำาอาหาร "ข้าว" ไฟของปุ่ม "เริ่ม" จะ
สว่างขึ้น หน้าจอจะกะพริบ " "
• ในโหมดข้าว สัญญาณระบุความคืบหน้าการทำาอาหารจะแสดงความคืบหน้าการ
ทำาอาหาร: เตรียมหุง แช่ข้าว เริ่มหุง ดูดซับน้ำา ไอน้ำาระเหย
หุงสุก อุ่น
• เมื่อทำาอาหารเสร็จแล้ว สัญญาณเตือนจะดัง "ปิ๊บ" สามครั้ง หม้อหุงข้าวจะเข้า
สู่สถานะอุ่นต่อเนื่องโดยมีสัญญาณ อุ่น สว่างขึ้น และหน้าจอจะเริ่มนับเวลาการ
อุ่นต่อเนื่อง
ฟังก์ชันก�รหุงข้�ว
ฟังก์ชันแบบเร็ว
• กดปุ่ม "เมนู" เพื่อเลือกฟังก์ชัน หุงด่วน หน้าจอจะแสดง " "
ไฟของปุ่ม "เริ่ม" จะกะพริบ จากนั้น กดปุ่ม "เริ่ม" หม้อหุงข้าวจะเข้าสู่สถานะ
การทำาอาหาร หุงด่วน ไฟของปุ่ม "เริ่ม" จะสว่างขึ้น หน้าจอจะกะพริบ "--"
• ในโหมดเร็ว สัญญาณระบุความคืบหน้าการทำาอาหารจะแสดงความคืบหน้าการ
ฟังก์ชันโจ๊ก
• กดปุ่ม "โจ๊ก" เพื่อเลือกฟังก์ชัน "โจ๊ก" หน้าจอจะแสดงค่าเริ่มต้นเวลาการทำา
อาหาร ไฟของปุ่ม "เริ่ม" จะกะพริบ
• สามารถเปลี่ยนเวลาการทำาอาหารโดยกดปุ่ม "ตั้งค่าล่วงหน้า/ตัวจับเวลา" เป็น
อันดับแรก จากนั้นกดปุ่ม "+" และ "-"
• กดปุ่ม "เริ่ม" หม้อหุงข้าวจะเข้าสู่สถานะการทำาอาหาร "โจ๊ก" โดยมีไฟของปุ่ม
"เริ่ม" สว่างขึ้น และหน้าจอจะแสดงเวลาการทำาอาหารที่เหลือ
• เมื่อทำาอาหารเสร็จแล้ว สัญญาณเตือนจะดัง "ปิ๊บ" สามครั้ง หม้อหุงข้าวจะเข้า
สู่สถานะอุ่นต่อเนื่องโดยมีสัญญาณ อุ่น สว่างขึ้น และหน้าจอจะเริ่มนับเวลาการ
อุ่นต่อเนื่อง

69
TH
ปริม�ณน้อย
• กดปุ่ม "เมนู" เพื่อเลือกฟังก์ชัน หุงเล็กน้อย หน้าจอจะแสดง " " ไฟของปุ่ม
"เริ่ม" จะกะพริบ จากนั้น กดปุ่ม "เริ่ม" หม้อหุงข้าวจะเข้าสู่สถานะการทำาอาหาร
หุงเล็กน้อย ไฟของปุ่ม "เริ่ม/หยุด" จะสว่างขึ้น หน้าจอจะกะพริบ " "
• ในโหมดปริมาณน้อย สัญญาณระบุความคืบหน้าการทำาอาหารจะแสดงความคืบ
หน้าการทำาอาหาร: เตรียมหุง แช่ข้าว เริ่มหุง ดูดซับน้ำา ไอน้ำา
ระเหย หุงสุก อุ่น
• เมื่อทำาอาหารเสร็จแล้ว สัญญาณเตือนจะดัง "ปิ๊บ" สามครั้ง หม้อหุงข้าวจะเข้า
สู่สถานะอุ่นต่อเนื่องโดยมีสัญญาณ อุ่น สว่างขึ้น และหน้าจอจะเริ่มนับเวลาการ
อุ่น
ข้�วกล้องไม่ส�ม�รถใช้ง�นฟังก์ชัน หุงเล็กน้อย
ฟังก์ชันข้�วต้ม
• กดปุ่ม "เมนู" เพื่อเลือกฟังก์ชัน "ข้าวต้ม" หน้าจอจะแสดงค่าเริ่มต้นเวลาการทำา
อาหาร ไฟของปุ่ม "เริ่ม" จะกะพริบเป็นสีแดง
• สามารถเปลี่ยนเวลาการทำาอาหารโดยกดปุ่ม "ตั้งล่วงหน้า/ตั้งเวลา" เป็นอันดับ
แรก จากนั้นกดปุ่ม "+" และ "-"
• กดปุ่ม "เริ่ม" หม้อหุงข้าวจะเข้าสู่สถานะการทำาอาหาร "ข้าวต้ม" โดยไฟของปุ่ม
"เริ่ม" จะสว่างขึ้น และหน้าจอจะแสดงเวลาการทำาอาหารที่เหลือ
• เมื่อทำาอาหารเสร็จแล้ว สัญญาณเตือนจะดัง "ปิ๊บ" สามครั้ง หม้อหุงข้าวจะเข้าสู่
สถานะอุ่นโดยมีสัญญาณ อุ่น สว่างขึ้น และหน้าจอจะเริ่มนับเวลาการอุ่น
ฟังก์ชันซุป
• กดปุ่ม "เมนู" เพื่อเลือกฟังก์ชัน "ซุป" หน้าจอจะแสดงค่าเริ่มต้นเวลาการทำา
อาหาร ไฟของปุ่ม "เริ่ม" จะกะพริบเป็นสีแดง
• สามารถเปลี่ยนเวลาการทำาอาหารโดยกดปุ่ม "ตั้งล่วงหน้า/ตั้งเวลา" เป็นอันดับ
แรก จากนั้นกดปุ่ม "+" และ "-"
ทำาอาหาร: เตรียมหุง แช่ข้าว เริ่มหุง ดูดซับน้ำา ไอน้ำาระเหย
หุงสุก อุ่น
• เมื่อทำาอาหารเสร็จแล้ว สัญญาณเตือนจะดัง "ปิ๊บ" สามครั้ง หม้อหุงข้าวจะเข้าสู่
สถานะอุ่นโดยมีสัญญาณ อุ่น สว่างขึ้น และหน้าจอจะเริ่มนับเวลาการอุ่น

70
ฟังก์ชันนึ่ง
• กดปุ่ม "เมนู" เพื่อเลือกฟังก์ชัน "นึ่ง" หน้าจอจะแสดงค่าเริ่มต้นเวลาการทำา
อาหาร ไฟของปุ่ม "เริ่ม" จะกะพริบเป็นสีแดง
• สามารถเปลี่ยนเวลาการทำาอาหารโดยกดปุ่ม "ตั้งล่วงหน้า/ตั้งเวลา" เป็นอันดับ
แรก จากนั้นกดปุ่ม "+" และ "-"
• กดปุ่ม "เริ่ม" หม้อหุงข้าวจะเข้าสู่สถานะการทำาอาหาร "นึ่ง" โดยไฟของปุ่ม
"เริ่ม" จะสว่างขึ้น และหน้าจอจะแสดงเวลาการทำาอาหารที่เหลือ
• เมื่อทำาอาหารเสร็จแล้ว สัญญาณเตือนจะดัง "ปิ๊บ" สามครั้ง หม้อหุงข้าวจะเข้า
สู่สถานะอุ่นต่อเนื่องโดยมีสัญญาณ อุ่น สว่างขึ้น และหน้าจอจะเริ่มนับเวลาการ
อุ่น
• กดปุ่ม "เริ่ม" หม้อหุงข้าวจะเข้าสู่สถานะการทำาอาหาร "ซุป" โดยไฟของปุ่ม
"เริ่ม" จะสว่างขึ้น และหน้าจอจะแสดงเวลาการทำาอาหารที่เหลือ
• เมื่อทำาอาหารเสร็จแล้ว สัญญาณเตือนจะดัง "ปิ๊บ" สามครั้ง หม้อหุงข้าวจะเข้า
สู่สถานะอุ่นต่อเนื่องโดยมีสัญญาณ อุ่น สว่างขึ้น และหน้าจอจะเริ่มนับเวลาการ
อุ่น
ฟังก์ชันเค้ก
• กดปุ่ม "เมนู" เพื่อเลือกฟังก์ชัน เค้ก หน้าจอจะแสดงค่าเริ่มต้นเวลาการทำา
อาหาร ไฟของปุ่ม "เริ่ม" จะกะพริบเป็นสีแดง
• สามารถเปลี่ยนเวลาการทำาอาหารโดยกดปุ่ม "ตั้งล่วงหน้า/ตั้งเวลา" เป็นอันดับ
แรก จากนั้นกดปุ่ม "+" และ "-"
• กดปุ่ม "เริ่ม" หม้อหุงข้าวจะเข้าสู่สถานะการทำาอาหาร เค้ก โดยไฟของปุ่ม "เริ่ม"
จะสว่างขึ้น และหน้าจอจะแสดงเวลาการทำาอาหารที่เหลือ
• เมื่อทำาอาหารเสร็จแล้ว สัญญาณเตือนจะดัง "ปิ๊บ" สามครั้ง หม้อหุงข้าวจะเข้า
สู่สถานะอุ่นต่อเนื่องโดยมีสัญญาณ อุ่น สว่างขึ้น และหน้าจอจะเริ่มนับเวลาการ
อุ่น
• กดปุ่ม "อุ่น/ยกเลิก" ภายใต้สถานะสแตนด์บาย ไฟของปุ่ม "อุ่นต่อเนื่อง/ยกเลิก"
จะกะพริบ หน้าจอจะแสดง "00:00" และเริ่มนับเวลาการอุ่นต่อเนื่อง
• กดปุ่ม "อุ่น/ยกเลิก" ภายใต้การตั้งค่าฟังก์ชันหรือสถานะการทำาอาหาร จะ
เป็นการยกเลิกข้อมูลการตั้งค่าทั้งหมด และกลับเข้าสู่สถานะสแตนด์บาย
คำ�แนะนำ�: ในก�รคงรสช�ติอ�ห�รให้อร่อย กรุณ�จำ�กัดเวล�ก�รเก็บอ�ห�ร
ภ�ยใน 12 ชั่วโมง
ฟังก์ชันอุ่น/ยกเลิก

71
TH
• เวลาที่ตั้งค่าล่วงหน้าจะสัมพันธ์กับเวลาเสร็จสิ้นการทำาอาหาร
• ฟังก์ชันนี้ใช้งานได้กับทุกฟังก์ชัน ยกเว้น เค้ก
• ในการใช้งานฟังก์ชันที่ตั้งค่าล่วงหน้า ให้เลือกโปรแกรมการทำาอาหาร จากนั้น
กดปุ่ม "ตั้งล่วงหน้า/ตั้งเวลา" และเลือกเวลาที่ต้องการตั้งล่วงหน้า กดปุ่ม "+"
และ "-" เพื่อปรับการเริ่มแบบตั้งล่วงหน้า ค่าเริ่มต้นของเวลาที่ตั้งค่าล่วงหน้าจะ
เปลี่ยนไปตามเวลาการทำาอาหารที่เลือก สามารถตั้งล่วงหน้าได้ตั้งแต่ช่วง 1 ถึง
24 ชั่วโมง
• เมื่อเลือกเวลาที่ตั้งล่วงหน้าตามต้องการแล้ว กดปุ่ม "เริ่ม" เพื่อเข้าสู่สถานะการ
ทำาอาหาร ไฟของปุ่ม "เริ่ม" จะสว่างขึ้นและหน้าจอจะแสดงตัวเลขของเวลาที่
เลือก และรูปการตั้งล่วงหน้าจะสว่างขึ้น
• เมื่อรูปการตั้งค่าล่วงหน้าหายไป หม้อหุงข้าวจะเข้าสู่สถานะการทำาอาหาร และรูป
ตัวจับเวลาจะสว่างขึ้น
ฟังก์ชันตั้งล่วงหน้�
• เปิดฝา - รูป 1
• ต้องใช้ถุงมือเมื่อเคลื่อนย้ายหม้อและตะกร้านึ่ง - รูป 11
• เสิร์ฟอาหารด้วยช้อนที่มาพร้อมกับเครื่องและปิดฝา
• เวลาการอุ่นสูงสุดคือ 24 ชั่วโมง
• กดปุ่ม "อุ่น/ยกเลิก" เพื่อหยุดสถานะอุ่นต่อเนื่อง
• ถอดปลั๊กเครื่อง
เมื่อทำ�อ�ห�รเสร็จ
• ตรวจสอบให้แน่ใจว่า หม้อหุงข้าวถอดปลั๊กออกและเย็นตัวลงแล้วอย่างสมบูรณ์
ก่อนการทำาความสะอาดและบำารุงรักษา
• แนะนำาให้ทำาความสะอาดอุปกรณ์ภายหลังการใช้งานในแต่ละครั้งด้วยฟองน้ำา –
รูป 12
• หม้อข้าว ถ้วย ช้อนข้าว และช้อนซุป สามารถนำาไปล้างในเครื่องล้างจานได้ – รูป 13
หม้อใบในและถ�ดนึ่ง
• ไม่แนะนำาให้ใช้ผงขัด และ ฟองน้ำาที่เป็นโลหะ
• หากมีอาหารติดบริเวณก้นหม้อ คุณอาจเติมน้ำาลงในหม้อเพื่อแช่สักครู่ ก่อนการ
ล้างทำาความสะอาด
• เช็ดหม้อให้แห้งด้วยความระมัดระวัง
ก�รทำ�คว�มสะอ�ด และ ก�รบำ�รุงรักษ�

72
ก�รดูแลรักษ�หม้อ
ปฏิบัติตามข้อแนะนำาต่อไปนี้เพื่อการดูแลรักษาหม้อ:
• เพื่อการบำารุงรักษาคุณภาพของหม้อ ไม่แนะนำาให้หั่นอาหารในหม้อ
• ตรวจสอบให้แน่ใจว่า คุณได้นำาหม้อกลับเข้าไปวางในหม้อหุงข้าว
• ใช้ช้อนพลาสติกที่เตรียมไว้ให้ หรือช้อนไม้ ที่ไม่ใช่ช้อนโลหะ เพื่อหลีกเลี่ยงความ
เสียหายที่อาจเกิดขึ้นกับพื้นผิวหม้อ – รูป 14
• เพื่อหลีกเลี่ยงความเสี่ยงของการผุกร่อน ห้ามเทน้ำาส้มสายชูลงในหม้อ
• สีของพื้นผิวหม้ออาจเปลี่ยนไป ภายหลังการใช้งานครั้งแรกหรือภายหลังการใช้
งานมายาวนาน การเปลี่ยนแปลงของสีบนพื้นผิวหม้อ เกิดจากปฏิกิริยาของไอ
น้ำาและน้ำา ซึ่งไม่มีผลต่อการใช้หม้อหุงข้าวแต่อย่างใด และไม่เป็นอันตรายต่อ
สุขภาพของคุณ คุณสามารถใช้หม้อต่อไปได้อย่างปลอดภัยแน่นอน
ก�รทำ�คว�มสะอ�ดไมโครเพลสเชอร์ ว�ล์ว
• เมื่อทำาความสะอาดไมโครเพลสเชอร์ วาล์ว โปรดถอดวาล์วออกจากฝาหม้อ – รูป
15 และเปิดวาล์วโดยหมุนไปในทิศทาง “เปิด” – รูป 16a และ 16b หลังจาก
ทำาความสะอาดแล้ว โปรดเช็ดให้แห้ง แล้วหมุนวาล์วไปในทิศทาง “ปิด” จากนั้น
นำากลับไปใส่บนฝาหม้อหุงข้าว – รูป 18a และ 18b.
ก�รทำ�คว�มสะอ�ดฝ�ชั้นใน
• ถอดฝาชั้นในโดยใช้มือทั้งสองข้างดันออกด้านนอก ทำาความสะอาดด้วยฟองน้ำา
และน้ำายาทำาความสะอาด (รูป 17) จากนั้น เช็ดให้แห้งและใส่กลับในตำาแหน่ง
เดิมที่ด้านหลังโครงทั้ง 2 ข้าง แล้วกดลงจนกว่าจะเข้าที่
ก�รทำ�คว�มสะอ�ด และ ก�รดูแลรักษ�ส่วนประกอบอื่นๆของ
อุปกรณ์
• ทำาความสะอาดด้านนอกหม้อหุงข้าว – รูป 19, ด้านในของฝาหม้อ และสายไฟ
ด้วยผ้าชุบน้ำาหมาด แล้วเช็ดให้แห้ง ห้ามใช้สารขัดสี
• ห้ามใช้น้ำาเพื่อทำาความสะอาดภายในตัวเครื่อง เพราะอาจทำาให้ตัวตรวจจับความ
ร้อนเกิดความเสียหายได้

73
TH
คำ�อธิบ�ยเกี่ยวกับคว�ม
ผิดปกติของอุปกรณ์
ส�เหตุ วิธีแก้ปัญห�
สัญญาณไฟไม่ติด
และ ไม่มีความ
ร้อน
ไม่ได้เสียบปลั๊กอุปกรณ์
ตรวจสอบว่าได้เสียบปลั๊ก
สายไฟในเต้ารับ และใน
ไฟฟ้ากระแสหลัก
สัญญาณไฟไม่ติด
และ มีความร้อน
ปัญหาด้านการเชื่อมต่อ
ของสัญญาณไฟ หรือ
สัญญาณไฟได้รับความ
เสียหาย
ส่งให้ศูนย์บริการที่ได้รับ
อนุญาตเพื่อซ่อมแซม
การรั่วซึมของไอ
น้ำาระหว่างการใช้
งาน
ฝาหม้อปิดไม่เข้าที่ เปิดและปิดฝาหม้ออีกครั้ง
ไมโครเพลสเชอร์ วาล์วไม่
อยู่ในตำาแหน่งที่ถูกต้อง
หรือไม่สมบูรณ์
หยุดการปรุงอาหาร (ถอด
ปลั๊กอุปกรณ์) และตรวจ
สอบว่าวาล์วอยู่ในสภาพที่
สมบูรณ์ (2 ส่วน ล๊อคเข้า
ด้วยกัน) และอยู่ในตำาแหน่ง
ที่ถูกต้อง
วงแหวนของฝาหม้อหรือ
ของวาล์วความดันขนาด
เล็ก ได้รับความเสียหาย
ส่งให้ศูนย์บริการที่ได้รับ
อนุญาตเพื่อซ่อมแซม
ข้าวสุกครึ่งเดียว
หรือ การหุงข้าว
เกินเวลา
ปริมาณน้ำามากเกินไปหรือ
ไม่เพียงพอ เมื่อเทียบกับ
ปริมาณข้าว
ดูตารางแสดงปริมาณน้ำา
คู่มือเพื่อก�รแก้ไขปัญห�ท�งเทคนิค
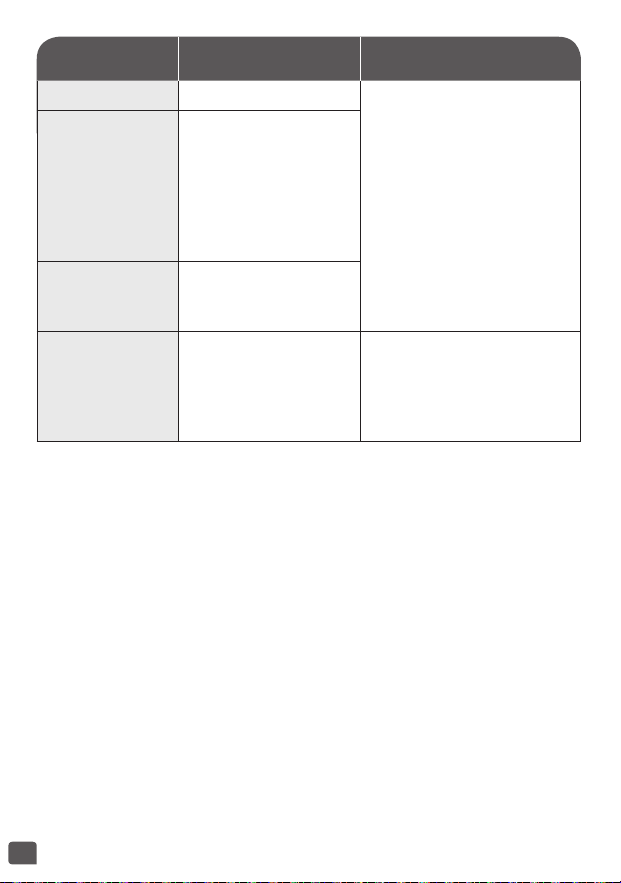
74
คำ�อธิบ�ยเกี่ยวกับคว�ม
ผิดปกติของอุปกรณ์
ส�เหตุ วิธีแก้ปัญห�
ข้าวสุกไม่ทั่้วถึง ความร้อนไม่เพียงพอ
ส่งให้ศูนย์บริการที่ได้รับ
อนุญาตเพื่อซ่อมแซม
ฟังก์ชั่นเก็บความ
ร้อนอัตโนมัติได้
รับความเสียหาย
(อุปกรณ์อยู่ใน
สถานะปรุงอาหาร
หรือไม่มีความ
ร้อน)
ฟังก์ชั่นอุ่นถูกยกเลิกโดย
ผู้ใช้ ในระหว่างการตั้งค่า
ดูรายละเอียดเกี่ยวกับฟัง
ก์ชั่นเก็บความร้อน
E0
ตัวตรวจจับความร้อนที่
ส่วนบน วงจรเปิดหรือ
ลัดวงจร
E1
ตัวตรวจจับความร้อนบน
ส่วนฐาน วงจรเปิดหรือ
ลัดวงจร
ปิดอุปกรณ์ แล้วเริ่มเปิด
โปรแกรมใหม่อีกครั้ง หากเกิด
ปัญหาเดิมซ้ำา โปรดส่งให้ศูนย์
บริการที่ได้รับอนุญาตเพื่อ
ซ่อมแซม
หม�ยเหตุ: ห�กหม้อชั้นในบิดเบี้ยวผิดรูปร่�ง ห้�มใช้หม้อนั้นอีกต่อไป แล้วนำ�
หม้อนั้นไปเปลี่ยนที่ศูนย์บริก�รที่ได้รับอนุญ�ตเพื่อซ่อมแซม

75
TH
รับประกันสินค้�ระหว่�งประเทศของผลิตภัณฑ์ TEFAL/T-FAL
: www.tefal.com
ผลิตภัณฑ์ของท่านสามารถรับการดูแลจากศูนย์บริการ TEFAL/T-FAL ระหว่างและหลังสิ้นสุดระยะเวลารับประกันตามเงื่อนไขที่กาหนด
ก�รรับประกัน
ผลิตภัณฑ์ TEFAL/T-FAL มีรับประกันสินค้าในกรณีที่เกิดจากข้อบกพร่องใด ๆ ของวัสดุหรือการผลิตในช่วงระยะเวลาการรับประกันภายใน
ประเทศเหล่านั้น *** ที่ระบุไว้ในรายชื่อประเทศในหน้าสุดท้ายของเอกสาร โดยการรับประกันเริ่มต้นนับจากวันที่ซื้อผลิตภัณฑ์หรือ วันที่จัดส่ง
สินค้า
การรับประกันสินค้าระหว่างประเทศ ครอบคลุมค่าใช้จ่ายทั้งหมดที่เกี่ยวข้องกับการเรียกคืนหรือซ่อมแซมผลิตภัณฑ์ที่บกพร่อง ให้สามารถใช้งาน
ได้ตามคุณสมบัติของสินค้า โดยอาจทาการซ่อมแซมหรือเปลี่ยนส่วนที่ชารุดใดๆ และค่าแรงงานที่จาเป็น โดย TEFAL/T-FAL ตัดสินใจ, สินค้า
ทดแทนอาจจะให้แทน การซ่อมสินค้า โดย TEFAL/T-FAL มีสิทธิ์แต่เพียงผู้เดียวในการจัดการภายใต้การรับประกัน เช่น ให้ซ่อมแซมหรือเปลี่ยน
ผลิตภัณฑ์ดังกล่าว
เงื่อนไขและก�รยกเว้น
TEFAL/T-FAL ไม่จาเป็นต้องซ่อมหรือเปลี่ยนผลิตภัณฑ์ที่ไม่ได้มาพร้อมกับหลักฐานการซื้อขายที่ถูกต้อง ผลิตภัณฑ์สามารถนามาโดยตรงหรือ
ต้องได้รับการบรรจุอย่างเหมาะสมและ มีการบันทึกการส่งคืน (หรือวิธีการเทียบเท่าของไปรษณีย์) เพื่อส่งถึง ศูนย์บริการที่ได้รับการ แต่งตั้งจาก
TEFAL/T-FAL รายละเอียดของที่ตั้งศูนย์บริการที่ได้รับการแต่งตั้งจาก TEFAL/T-FAL ระบุไว้บนเว็บไซต์ของ TEFAL/T-FAL หรือโทรติดต่อ
ศูนย์บริการผู้บริโภคที่กาหนดไว้ในรายชื่อของแต่ละประเทศ ที่แนบมาการรับประกันนี้ เพื่อที่จะเสนอที่ดีที่สุดที่เป็น ไปได้บริการหลังการขายอย่าง
ต่อเนื่องและเพิ่มความพึงพอใจของลูกค้า TEFAL/T-FAL อาจส่งสารวจความพึงพอใจให้กับลูกค้าทุกคนที่มีผลิตภัณฑ์ของพวกเขาซ่อมแซมหรือ
การแลกเปลี่ยนจาก TEFAL/T-FAL ศูนย์บริการที่ได้รับอนุญาต
การรับประกันมีผลเฉพาะสาหรับผลิตภัณฑ์ที่ซื้อและใช้ในประเทศเท่านั้น และไม่ครอบคลุมถึงความเสียหายที่อาจเกิดขึ้นเป็นผลมาจากการใช้งาน
ผิดประเภท, การไม่เอาใจใส่, การไม่ปฏิบัติตามคาแนะนาของ TEFAL/T-FAL, ซ่อมแซมแก้ไขผลิตภัณฑ์ โดยไม่ได้รับอนุญาต, บรรจุภัณฑ์ที่ผิด
พลาดโดยเจ้าของ หรือ เสียหายจากการขนส่ง นอกจากนี้ยังไม่ครอบคลุมการสึกหรอตามปกติและ การเสียหายจากการใช้งาน, การซ่อมบารุงและ
การเปลี่ยนวัสดุสิ้นเปลือง หรือต่อไปนี้
− การใช้ผลิตภัณฑ์กับน้าผิดประเภท
− กลไกเกิดความเสียหายจากการใช้งานมากเกินไป
− ความเสียหายที่เกิดจากน้า ฝุ่น หรือแมลงเข้าใปภายในตัวผลิตภัณฑ์ (ยกเว้นผลิตภัณฑ์ที่ออกแบบเฉพาะ)
− ความเสียหายที่เกิดจากอุบัติเหตุ ภัยธรรมชาติ ต่างๆ เช่น อัคคีภัย น้าท่วม ฟ้าผ่า ไฟกระชาก ไฟเกิน เป็นต้น
− การใช้งานที่นอกเหนือการใช้งานภายในครัวเรือนหรือเป็นการใช้งานเชิงพาณิชย์
− ความเสียหายของอุปกรณ์ที่มาพร้อมกับผลิตภัณฑ์ เช่นเครื่องแก้วหรือกระเบื้อง
− ความเสียหายหรือผลร้ายเนื่องจากการเชื่อมต่อที่ผิดแรงดันไฟฟ้าหรือผิดความถี่ที่ระบุในผลิตภัณฑ์หรือข้อกาหนดของผลิตภัณฑ์
− การปรับแต่งมาตร (การปรับแต่งมาตราใด ๆ จะต้องดาเนินการตามคาแนะนาสาหรับการใช้งาน)
สิทธิต�มกฎหม�ยของผู้บริโภค
รับประกันระหว่างประเทศของ TEFAL/T-FAL ไม่ส่งผลกระทบต่อสิทธิตามกฎหมายของผู้บริโภคอาจจะมีหรือสิทธิที่ไม่สามารถยกเว้นหรือ จากัด
หรือสิทธิกับผู้ค้าปลีก ที่ผู้บริโภคจากผลิตภัณฑ์ที่ซื้อ การรับประกันนี้จะช่วยให้ผู้บริโภคสิทธิตามกฎหมายที่ เฉพาะเจาะจงและผู้บริโภค ยังอาจมี
สิทธิทางกฎหมายอื่น ๆ ที่แตกต่างจากรัฐเพื่อให้รัฐหรือ ประเทศ ผู้บริโภคอาจยืนยันสิทธิดังกล่าว ขึ้นอยู่กับดุลยพินิจของผู้บริโภค
*** ระยะเวลาการรับประกันระหว่างประเทศของ TEFAL/T-FAL จะยึดตามประเทศที่ใช้งาน แม้ว่าผลิตภัณฑ์ ในประเทศที่ซื้อจะมีระยะเวลาการ
รับประกันที่แตกต่างกัน กระบวนการซ่อมแซมอาจต้องใช้เวลานานหากสินค้าไม่ได้ขายในพื้นที่โดย TEFAL/T-FAL หากผลิตภัณฑ์ไม่ได้ซ่อมแซม
ในประเทศใหม่ที่รับประกันระหว่างประเทศ TEFAL/T-FAL อาจการเปลี่ยนโดยผลิตภัณฑ์ที่คล้ายกันหรือทางเลือกที่ต้นทุนเท่ากันที่เป็นไปได้
โปรดเก็บเอกส�รนี้ส�หรับนี้เพื่ออ้�งอิงก�รรับประกัน

EN p. 4 – 22
EN p. 23 – 37
EN p. 38 – 57
EN p. 58 – 75
9100025122
EN
ZH
MS
TH