Use and Care Manual
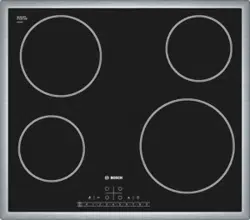
Cooktop
NET5466SC
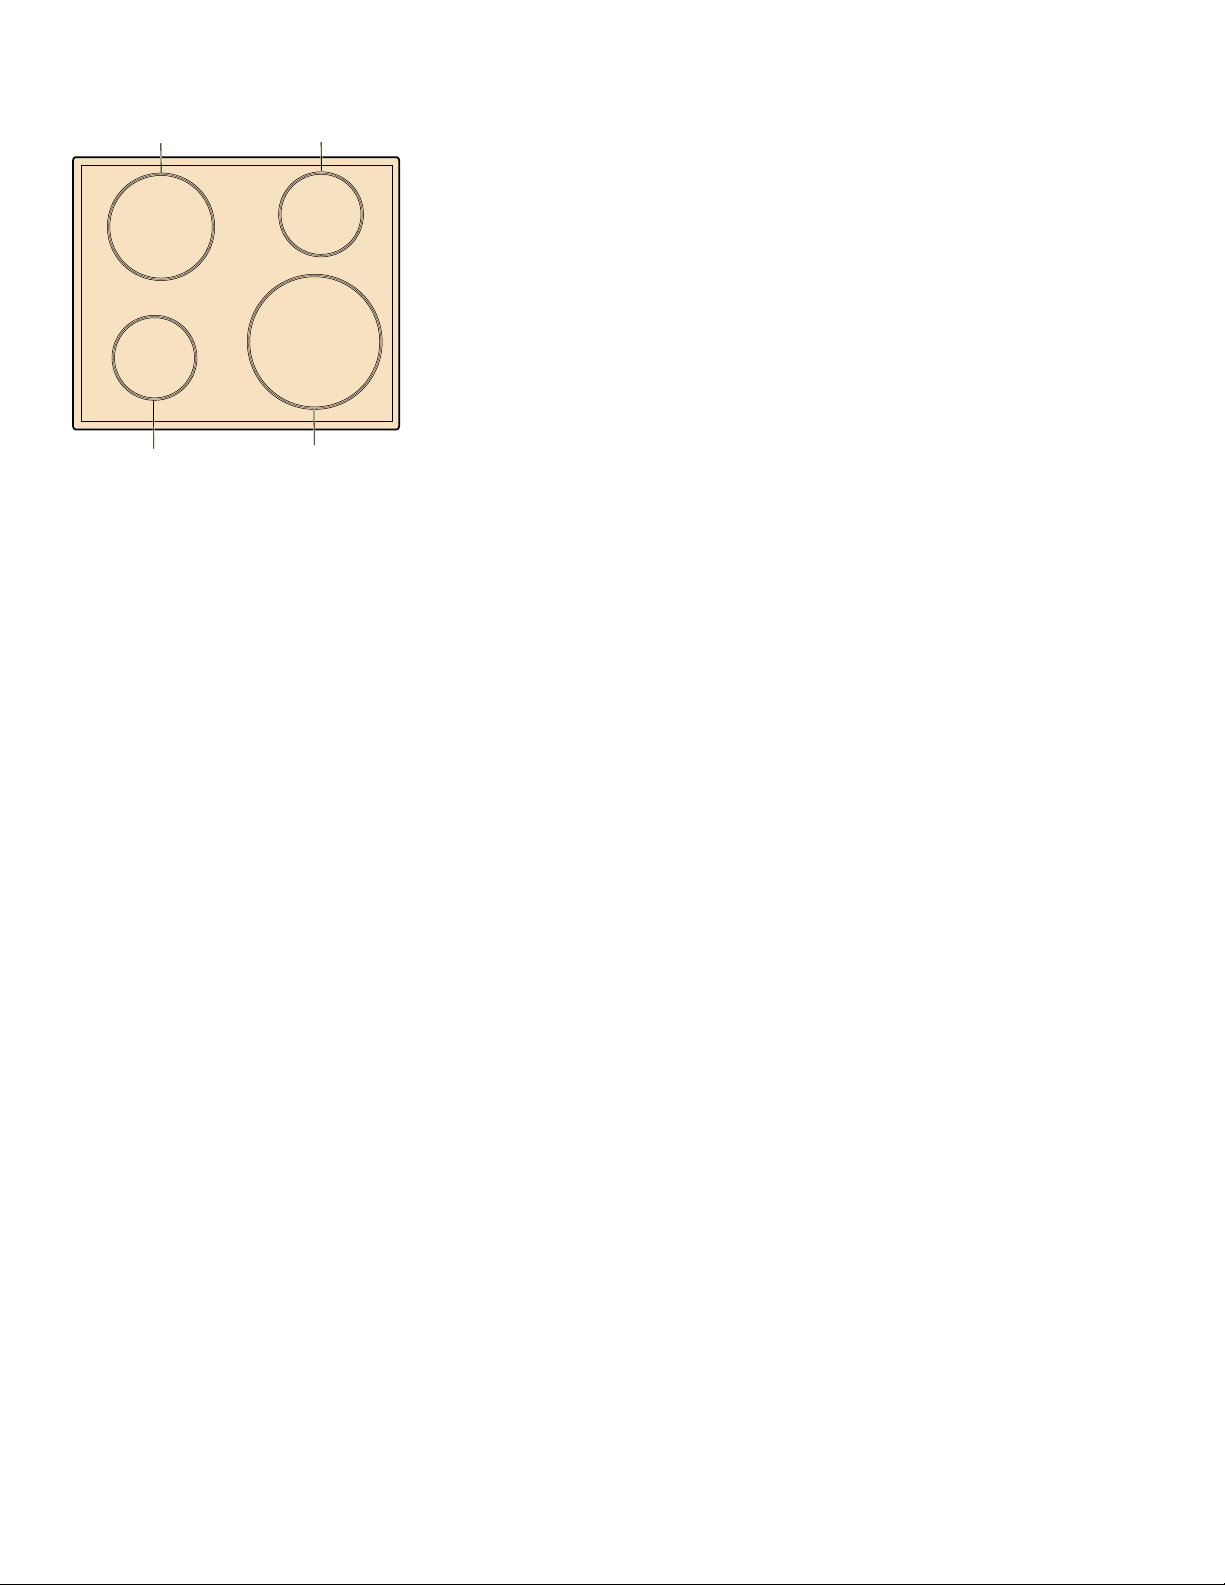
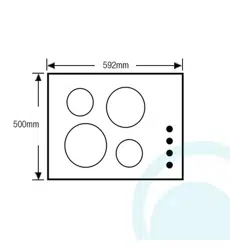
() = cm
1(76&

3
Table of Contents
Use and care manual
9 Safety Definitions ..................................................... 3
IMPORTANT SAFETY INSTRUCTIONS ........................ 4
Fire Safety .............................................................................. 4
Cooking Safety ...................................................................... 4
Burn Prevention .................................................................... 5
Child Safety ........................................................................... 5
Cleaning Safety ..................................................................... 5
Cookware Safety .................................................................. 5
Proper Installation and Maintenance ................................ 5
Proposition 65Warning ...................................................... 6
Causes of damage ......................................................... 7
Protecting the Environment ......................................... 7
Energy-saving advice ........................................................... 7
Getting familiar with the appliance .............................. 8
Control Panel ........................................................................ 8
Residual heat indicator ....................................................... 8
Operation ........................................................................ 9
Turning the cooktop on and off ......................................... 9
Setting the cooktop .............................................................. 9
PowerStart
®
feature ........................................................... 11
Timer .................................................................................... 12
Child lock ............................................................................ 12
Clean lock ........................................................................... 13
Automatic time limitation ................................................. 13.
Basic Settings .................................................................... 13
Cleaning and Maintenance ......................................... 14
Daily Cleaning .................................................................... 14
Cleaning guidelines .......................................................... 14
Cleaning chart ................................................................... 15
Maintenance ....................................................................... 15
Service ......................................................................... 16
Before Calling for Service ............................................... 16
How to Obtain Warranty Service .................................... 17
STATEMENT OF LIMITED PRODUCT WARRANTY .. 17
What this Warranty Covers & Who it Applies to ......... 17
How Long the Warranty Lasts ........................................ 17
Repair/Replace as Your Exclusive Remedy ................ 17
Out of Warranty Product .................................................. 18
Warranty Exclusions ......................................................... 18
Pr odukt i nf o.
Additional information on products, accessories,
replacement parts and services can be found at
www.bosch-home.com and in the online shop
www.bosch-home.com/us/store
9 Safety Definitions
Safety Defi nitions
9 WARNING
This indicates that death or serious injuries may
occur as a result of non-observance of this warning.
9 CAUTION
This indicates that minor or moderate injuries may
occur as a result of non-observance of this warning.
NOTICE: This indicates that damage to the appliance or
property may occur as a result of non-compliance with
this advisory.
Note: This alerts you to important information and/or
tips.

9 IMPORTANT SAFETY INSTRUCTIONS
READ AND SAVE THESE INSTRUCTIONS
4
IMPORTANT SAFET Y I NS T RU CT I ONS READ AND SAVE THESE INSTRUCTIONS
WARNING
When properly cared for, your new appliance has been
designed to be safe and reliable. Read all instructions
carefully before use. These precautions will reduce the
risk of burns, electric shock, fire, and injury to persons.
When using kitchen appliances, basic safety precautions
must be followed, including those in the following pages.
Examine the appliance after unpacking it. In the event of
transport damage, do not plug it in.
This appliance is not intended for operation with an
external clock timer or a remote control.
This appliance is not intended for use by persons
(including children) with reduced physical, sensory or
mental capabilities, or lack of experience and
knowledge, unless they have been given supervision or
instruction concerning use of the appliance by a person
responsible for their safety.
Fire Safety
Do not allow aluminum foil, plastic, paper or cloth to
come in contact with a hot surface element, burner or
grate. Do not allow pans to boil dry.
If the cooktop is near a window, forced air vent or fan, be
certain that flammable materials such as window
coverings do not blow over or near the burners or
elements. They could catch on fire.
Always have a working smoke detector near the kitchen.
Never leave the cooktop unattended when in use.
Boilovers cause smoking and greasy spillovers may
ignite.
WARNING
TO REDUCE THE RISK OF A GREASE FIRE:
a.
Never leave surface units unattended at high settings.
Boilovers cause smoking and greasy spillovers that
may ignite. Heat oils slowly on low or medium settings.
b.
Always turn hood ON when cooking at high heat.
c.
Clean ventilating fans frequently. Grease should not be
allowed to accumulate on fan or filter.
d.
Use proper pan size. Always use cookware
appropriate for the size of the surface element.
Do not flambé under the extractor hood or work with a
naked flame. When switched on, the extractor hood
draws flames into the filter. There is a risk of fire due to
deposits on the grease filter!
In the event that personal clothing or hair catches fire,
drop and roll immediately to extinguish flames.
Have an appropriate fire extinguisher available, nearby,
highly visible and easily accessible near the appliance.
Smother flames from food fires other than grease fires
with baking soda. Never use water on cooking fires.
WARNING
TO REDUCE THE RISK OF INJURY TO PERSONS IN
THE EVENT OF A GREASE FIRE, OBSERVE THE
FOLLOWING:
a.
SMOTHER FLAMES with a close-fitting lid, cookie
sheet, or metal tray, then turn off the burner. BE
CAREFUL TO PREVENT BURNS. If the flames do not
go out immediately, EVACUATE AND CALL THE FIRE
DEPARTMENT.
b.
NEVER PICK UP A FLAMING PAN – You may be
burned.
c.
DO NOT USE WATER, including wet dishcloths or
towels – a violent steam explosion will result.
d.
Use an extinguisher ONLY if:
- You know you have a Class ABC extinguisher, and
you already know how to operate it.
- The fire is small and contained in the area where it
started.
- The fire department is being called.
- You can fight the fire with your back to an exit.
Whenever possible, do not operate the ventilation system
during a cooktop fire. However, do not reach through fire
to turn it off.
Cooking Safety
WARNING
Use this appliance only for its intended use as described
in this manual. NEVER use this appliance as a space
heater to heat or warm the room. Doing so may result in
overheating the appliance. Never use the appliance for
storage.
When using the timer, always supervise the cooktop and
do not allow anything to boil over or burn. Boilovers can
cause smoke and some foods and oils may catch fire if
left on high temperature settings.
Never use the appliance if liquids or foods have spilled
around the control panel. Always turn off the cooktop
and dry the control panel.
Injury and damage to the appliance may occur if control
elements are not used properly.
If the cooktop turns off automatically and can no longer
be operated, it may turn itself on unintentionally at a later
point. Switch off the circuit breaker in the fuse box.
Contact Customer Support for service.
WARNING
If the surface is cracked, switch off the appliance to
avoid the possibility of electric shock.

5
9 IMPORTANT SAFETY INSTRUCTIONS
READ AND SAVE THESE INSTRUCTIONS
Burn Prevention
DO NOT TOUCH SURFACE UNITS OR AREAS NEAR
UNITS - Surface units may be hot even though they are
dark in color. Areas near surface units may become hot
enough to cause burns. During and after use, do not
touch, or let clothing, potholders, or other flammable
materials contact surface units or areas near units until
they have had sufficient time to cool. Among these areas
are the cooktop and areas facing the cooktop.
Do not heat or warm unopened food containers. Build-up
of pressure may cause the container to burst and cause
injury.
Always use dry potholders. Moist or damp potholders on
hot surfaces may result in burns from steam. Do not let
potholder touch hot heating elements. Do not use a towel
or other bulky cloth.
Use high heat settings on the cooktop only when
necessary. To avoid bubbling and splattering, heat oil
slowly, on no more than a low-medium setting. Hot oil is
capable of causing extreme burns and injury.
Never move a pan of hot oil, especially a deep fat fryer.
Wait until it is cool.
Secure all loose garments, etc., before beginning. Tie
long hair so that it does not hang loose, and do not wear
loose-fitting clothing or hanging garments, such as ties,
scarves, jewelry, or dangling sleeves.
If the display does not work when a cooking area is
heating up, disconnect the circuit breaker or fuse in the
electrical panel. Contact an authorized servicer.
Child Safety
When children become old enough to use the appliance,
it is the responsibility of the parents or legal guardians to
ensure that they are instructed in safe practices by
qualified persons.
Do not allow anyone to climb, stand, lean, sit, or hang on
any part of an appliance, especially a door, warming
drawer, or storage drawer. This can damage the
appliance, and the unit may tip over, potentially causing
severe injury.
Do not allow children to use this appliance unless closely
supervised by an adult. Children and pets should not be
left alone or unattended in the area where the appliance
is in use. They should never be allowed to play in its
vicinity, whether or not the appliance is in use.
CAUTION
Items of interest to children should not be stored in an
appliance, in cabinets above an appliance or on the
backsplash. Children climbing on an appliance to reach
items could be seriously injured.
Cleaning Safety
Do not clean the appliance while it is still hot. Some
cleaners produce noxious fumes when applied to a hot
surface. Wet clothes and sponges can cause burns from
steam.
Do not use steam cleaners to clean the appliance.
Cookware Safety
Hold the handle of the pan when stirring or turning food.
This helps prevent spills and movement of the pan.
Use Proper Pan Size.
The use of undersized cookware will expose a portion of
the heating element or burner to direct contact and may
result in ignition of clothing. Select cookware having flat
bottoms large enough to cover the surface heating unit.
This appliance is equipped with one or more surface
units of different sizes. Proper relationship of cookware to
heating element or burner will also improve efficiency.
Cookware not approved for use with ceramic cooktops
may break with sudden temperature changes. Use only
pans that are appropriate for ceramic cooktops (only
certain types of glass, heatproof glass, ceramic,
earthenware, or other glazed utensils are suitable).
Always position handles of utensils inward so they do not
extend over adjacent work areas, burners, or the edge of
the cooktop. This reduces the risk of fires, spills and
burns.
Always keep the cooktop and bases of pots dry. Liquid
between the potbase and the cooktop may build up
steam pressure, causing the pot to jump suddenly and
causing injury.
Proper Installation and Maintenance
Have the installer show you the location of the circuit
breaker or fuse. Mark it for easy reference.
This appliance must be properly installed and grounded
by a qualified technician. Connect only to properly
grounded outlet. Refer to Installation Instructions for
details.
This appliance is intended for normal family household
use only. It is not approved for outdoor use. See the
Statement of Limited Product Warranty. If you have any
questions, contact the manufacturer.
Do not store or use corrosive chemicals, vapors,
flammables or nonfood products on or near this
appliance. It is specifically designed for use when
heating or cooking food. The use of corrosive chemicals
in heating or cleaning will damage the appliance and
could result in injury.
Do not operate this appliance if it is not working properly,
or if it has been damaged. Contact an authorized
servicer.
Do not cook on a broken cooktop. Cleaning solutions
and spillovers may create a risk of electric shock.
Do not repair or replace any part of the appliance unless
specifically recommended in this manual. Refer all
servicing to a factory authorized service center.

9 IMPORTANT SAFETY INSTRUCTIONS
READ AND SAVE THESE INSTRUCTIONS
6
To avoid electrical shock hazard, before servicing the
appliance, switch power off at the service panel and lock
the panel to prevent the power from being switched on
accidentally.
Proposition 65Warning:
This product may contain a chemical known to the State
of California, which can cause cancer or reproductive
harm. Therefore, the packaging of your product may
bear the following label as required by California:
&DQFHUDQG5HSURGXFWLYH+DUPZZZ3:DUQLQJVFDJRY
67$7(2)&$/,)251,$352326,7,21:$51,1*
:$51,1*

7
Causes of damage
NOTICES
▯ Scratches on glass ceramic surface: Cookware with
rough bottoms will scratch the glass ceramic surface.
▯ Salt, sugar and sand: Salt, sugar or grains of sand will
scratch the glass ceramic surface. Never use the
cooktop as a working surface or for setting things
down.
▯ Overheated cookware: Avoid heating pots or pans
that are empty.
▯ Hot cookware: Never set down hot pans and pots on
the control panel or frame. This may cause damage.
▯ Hard and sharp objects: Hard or sharp objects falling
on the cooktop may damage it.
▯ Boiled-over food: Sugar and products containing
sugar may damage the cooktop. Immediately eliminate
spills of these products with a glass scraper.
▯ Foils and plastics: Aluminum foil and plastic will melt
on the hot cooking zones. Stove protective film isn't
suitable for your cooktop.
▯ Unsuitable cleaning agent: Shimmering metallic
discolorations on the glass ceramic surface result from
the use of inappropriate cleaning agents and abrasion
from cookware.
Protecting the Environment
Energy-saving advice
▯ Always place a fitting lid on cookware. Cooking with
an uncovered pan will increase energy consumption
considerably. Use a glass lid to provide visibility and
avoid having to lift the lid.
▯ Use cookware equipped with a solid, flat bottom.
Curved pan bases increase energy consumption.
▯ The diameter of the pan base must match the size of
the element. If not, energy may be wasted.
▯ Choose cookware of a size suited to the amount of
food you are going to cook. A large pan that is only
half full will use a lot of energy.
▯ Use a small amount of water when cooking. This
saves energy, and vegetables retain a larger
percentage of their vitamins and minerals.
▯ Select a lower power level.
8
Getting familiar with the appliance
In this section we describe the control panel, elements
and displays.
Page 2contains a list of models and dimensions.
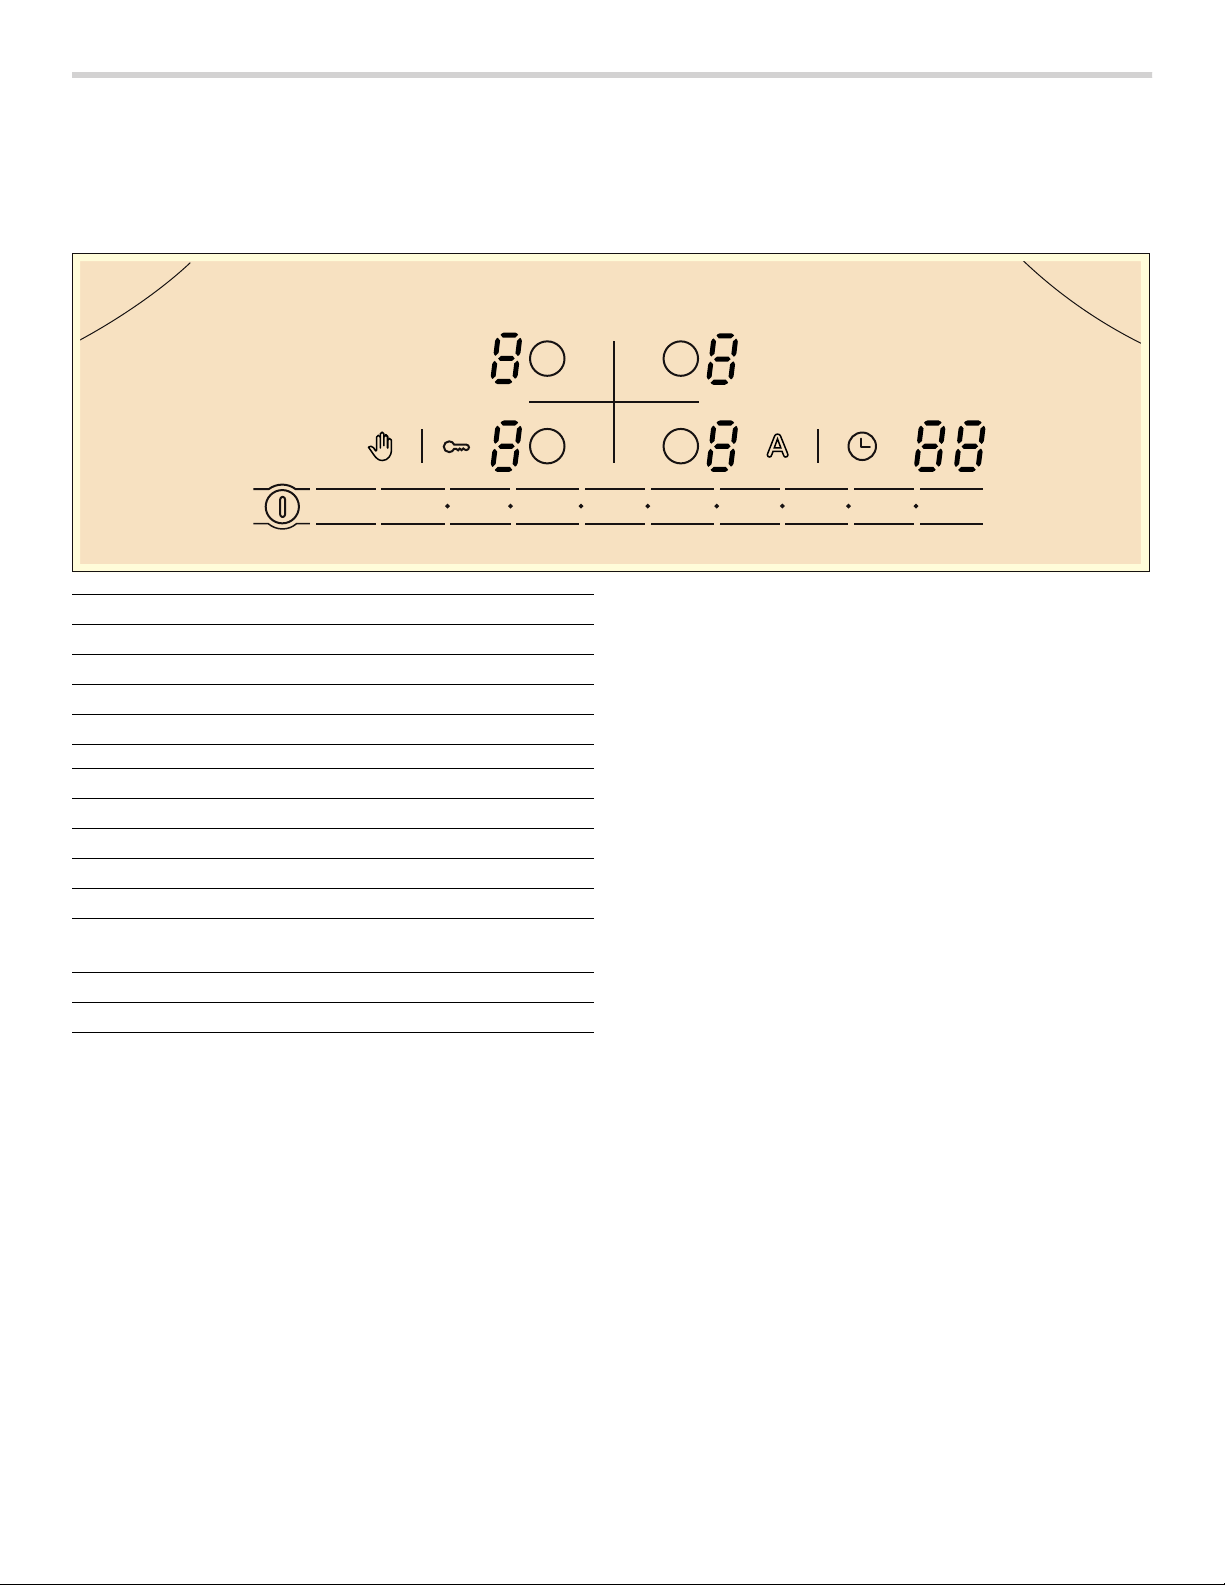
Control Panel
Touch control zone
When you touch a symbol, the corresponding function
will be activated.
NOTICE: Always keep the touch control zones clean
and dry. Moisture and dirt can affect proper functioning.
Residual heat indicator
The cooktop is equipped with a residual heat indicator
for each element. It shows you which elements are still
hot. Avoid touching the indicated elements.
If an • is shown on the display, the element is still hot.
You could use it, for example, to keep a small quantity of
food warm or to melt a chocolate coating. As the element
continues to cool, the display changes to œ. The display
goes out once the element has cooled sufficiently.
The residual heat indicator will automatically come on
after a power failure. The display lights up for
approximately 30 minutes.
Displays
‚-Š
Power levels
•/œ
Residual heat indicator
‘
Power Start
‰‰
Timer
Touch keys
#
Main power switch
-
Cleaning protection
D
Child safety
$
Select cooking zone
1û2û3û
4û
Temperature levels
w
Power Start
0
Timer
9
Operation
Turning the cooktop on and off
The main switch is used to turn the cooktop on and off.
To switch on: touch the # symbol. A signal sounds. The
display light above the main switch and the ‹ indicators
light up. The cooking zones are ready for use.
To switch off: Touch the # symbol until the display light
above the main switch and the displays go out. All
cooking zones are switched off. The residual heat
indicator remains lit up until the cooking zones are
sufficiently cooled off.
Notes
▯ The cooktop turns off automatically if all cooking
zones have been switched off for more than
20 seconds.
▯ The settings remain stored for 4seconds after the
cooktop has been switched off. If you switch it back on
in this time, the cooktop starts up with the previous
settings.
Setting the cooktop
This section will show you how to set the elements. The
table contains details on the heat settings for a variety of
dishes.
Setting a cooking zone
Set the desired heat setting on the control panel.
Heat setting 1= lowest power
Heat setting 9= highest power
Every heat setting has an intermediate setting. This is
marked in the control panel with the û symbol.
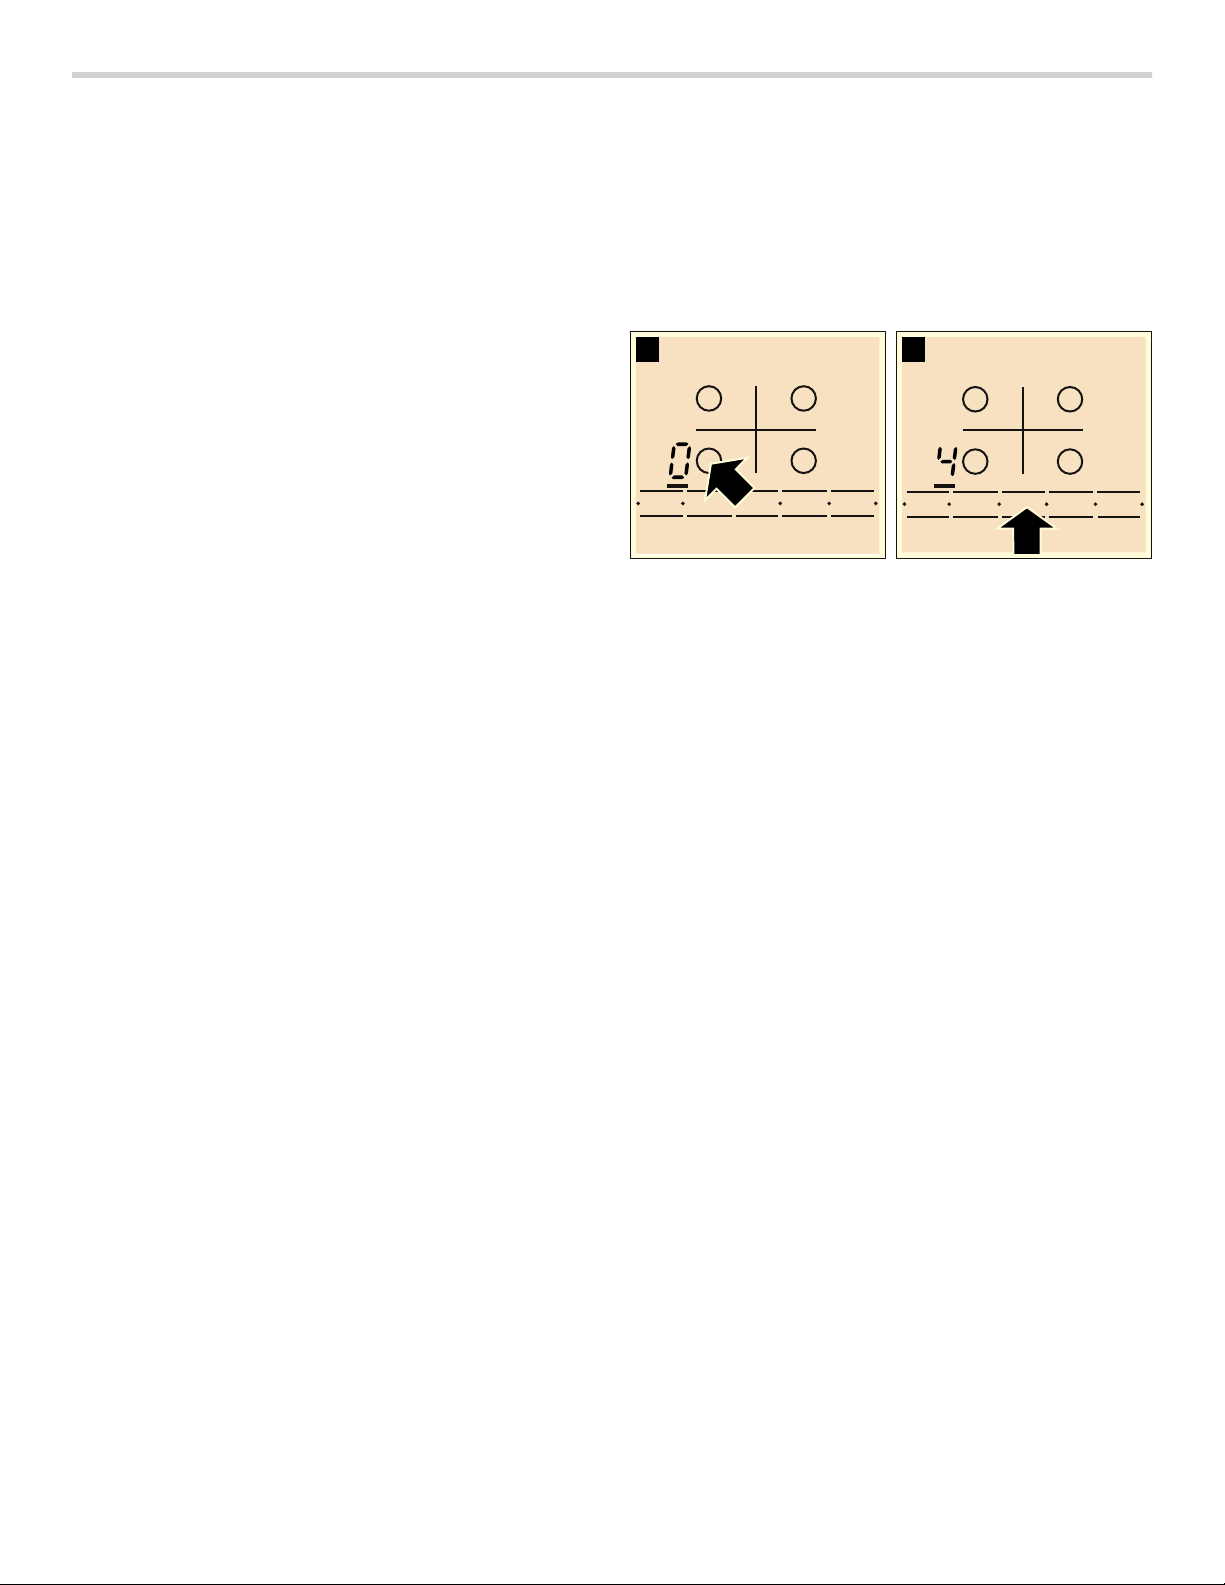
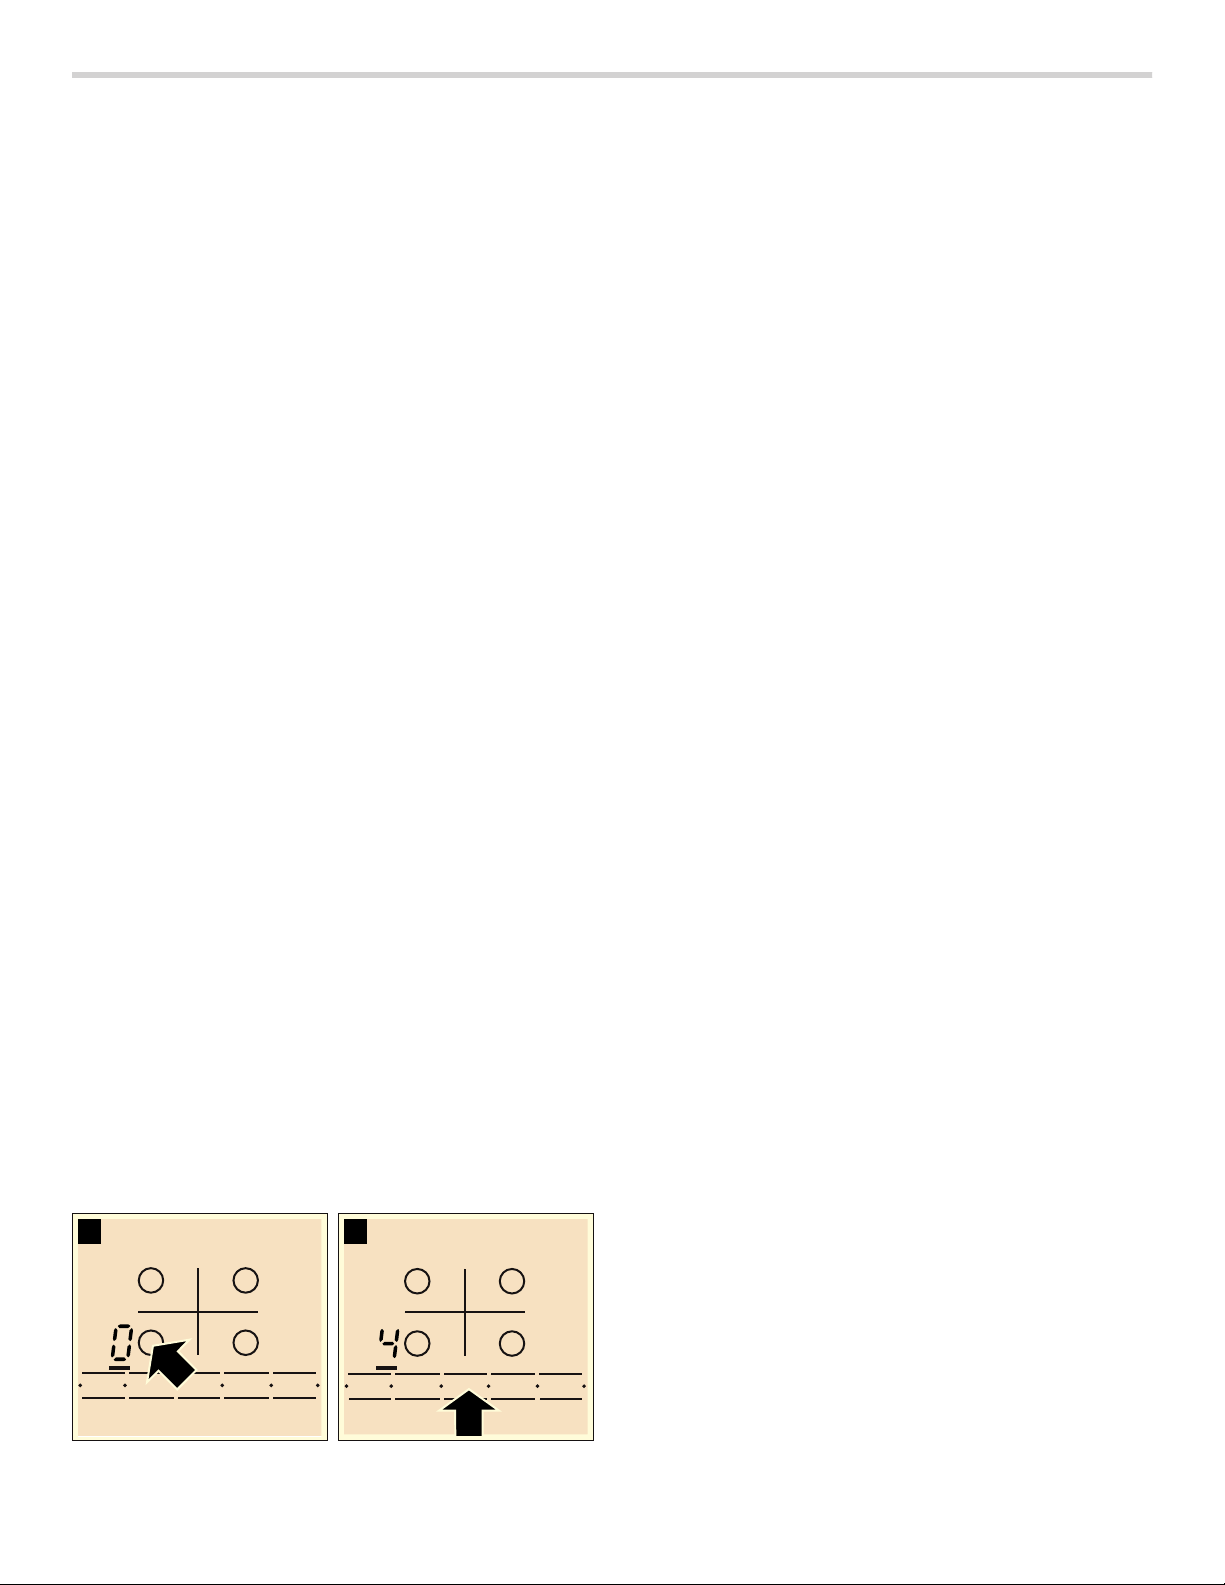
Selecting the heat level
The cooking zone must be turned on.
1.
Touch the $ symbol to select the cooking zone.
‹ lights up in the heat setting display, ¬ lights up
under the heat setting display.
2.
Set the required heat setting on the control panel.
Changing the heat level
Select the cooking zone and set the required heat setting
on the control panel.
Turning off the cooking zone
Use the $ symbol to select the cooking zone. Set the
control panel from to 0. After approximately 10seconds,
the residual heat indicator appears.
Notes
▯ The last selected cooking zone remains activated. You
can set the cooking zone without selecting it again.
▯ Cooking zone temperature is regulated by the heat
switching on and off. The heating can switch on and
off even at high power.
Note: The heat is turned on and off to regulate the
temperature of the element; this means that the red glow
below the element is not always visible. When you select
a low heat setting, the element turns off for longer
intervals, while at a higher setting these intervals are very
short. Even at the highest level, the element turns on and
off.

10
Settings table
The following table provides some examples. Cooking
times may vary depending on the type of food, its weight
and quality. Deviations are therefore possible.
Set the element to heat setting 9for bringing to the boil
or initial frying, then switch back to appropriate setting
(not for melting).
9 CAUTION
During cooking, stews or liquid meals such as
soups, sauces or drinks can heat up too quickly
unnoticed and overflow or spatter. For this reason
we recommend that you stir continuously, gradually
heating the food at a suitable power level.
Power levels
Melting
chocolate 1- 2
butter 1- 2
Heating
frozen vegetables (e.g. spinach) 2. - 3.
broth 7- 8
thick soup 1. - 2.
milk** 1- 2
Simmering
delicate sauce e.g. Béchamel sauce 4- 5
spaghetti sauce 2- 3
pot roast 4- 5
fish* 4- 5
Cooking
rice (with double amount of water) 2- 3
potatoes boiled in their skins with 1-2cups of water 4- 5
boiled potatoes with 1-2cups of water 4- 5
fresh vegetables with 1-2cups of water 2. - 3.
frozen vegetables with 1-2cups of water 3. - 4.
pasta (2-4qt. water)* 6- 7
pudding** 1- 2
cereals 2- 3
Frying
pork chop*** 5. - 6.
chicken breast*** 5- 6
bacon 6- 7
eggs 5- 6
fish 5- 6
pancakes 5. - 6.
Deep fat frying** (in 1-2 qt. oil)
deepfrozen foods, e.g. chicken nuggets (0.5lb per serving) 8- 9
other e.g. doughnuts (0.5lb per serving) 4. - 5.
* ongoing cooking without lid
** without lid
*** turn several times

11
PowerStart
®
feature
All heating elements are equipped with PowerStart
®
circuits. This feature heats up the element using the
highest power and then switches back to the continuous
cooking setting that you have selected.
How long it will take the element to heat up will depend
on the continuous cooking setting that you have
selected.
Setting the PowerStart™ feature
The PowerStart™ feature can only be activated in the first
30seconds after the cooktop has been turned on:
1.
Select the continuous cooking setting you want to use
for the cooking zone.
2.
Touch the w symbol.
PowerStart™ is activated.
‘ and the ongoing cooking
setting flash alternately on the display.
After the food has been brought to a boil, only the
ongoing cooking setting remains lit on the display.
Cooking table for the PowerStart™ feature
Refer to the following table to see the foods for which
PowerStart™ is suitable. The smaller amount refers to the
smaller heating elements, the larger amount refers to the
larger heating elements. The values stated in the table
are guideline values.
Tips for using PowerStart
®
--------
Foods for which PowerStart™ is appropriate Quantity Heat setting
Heating
frozen vegetables like spinach 10oz - 16oz 2. - 3.PS
broth 2-4cups 7- 8PS
thick soups 2-4cups 1. - 2. PS
milk* 1-2cups 1- 2PS
Simmering
pot roast 2lb. 4- 5PS
fish** 1lb. - 1.5lb. 4- 5PS
Boiling
rice (with double amount of water) 3/4cup - 2cups 2- 3PS
potatoes boiled in their skins with 1-2cups of water 5- 14medium potatoes 4- 5PS
boiled peeled potatoes with 1-2cups of water 5- 14medium potatoes 4- 5PS
fresh vegetables with 1-2cups of water 1lb. - 2lb. 2. - 3. PS
Frying
pork chop 1- 2servings 5. - 6. PS
pancakes 5. - 6. PS
* without lid
** ongoing cooking without lid
The PowerStart™ feature does not
bring foods to a boil
It is designed to conserve the food’s nutritional value while using little water for
cooking. Add only about 2cups of water to the food for the large elements and
about ¾ - 1cup of water for the small elements.
Cook rice in double the quantity of liquid.
The PowerStart™ feature is not suited for foods that are cooked in a large quan-
tity of water (e.g pasta).
Milk and foods that produce a lot of
froth will boil over
Use a tall pot.
Milk will stick Rinse the pan with cold water before filling it.
When frying, the food may stick to
the pan
Preheat the frying pan and oil before adding food. Do not turn the food too
soon. Food will separate from the bottom of the pan after cooking a short time.
12
Timer
The timer can be used in two different ways:
▯ A cooking zone should switch off automatically.
▯ As a kitchen timer.
Cook time
You can use the timer function to set a cook time for any
element. The element will turn off automatically once the
set time has elapsed.
9 CAUTION
▯ When using the timer, always keep an eye on the
cooktop and do not allow anything to boil over or
burn. Boilovers can cause smoke and foods and
oils may catch on fire if left on high temperature
settings.
▯ This function should not be used for long periods
of time, especially at high heat settings.
▯ Make sure the cooktop is turned off with the main
power switch after each use.
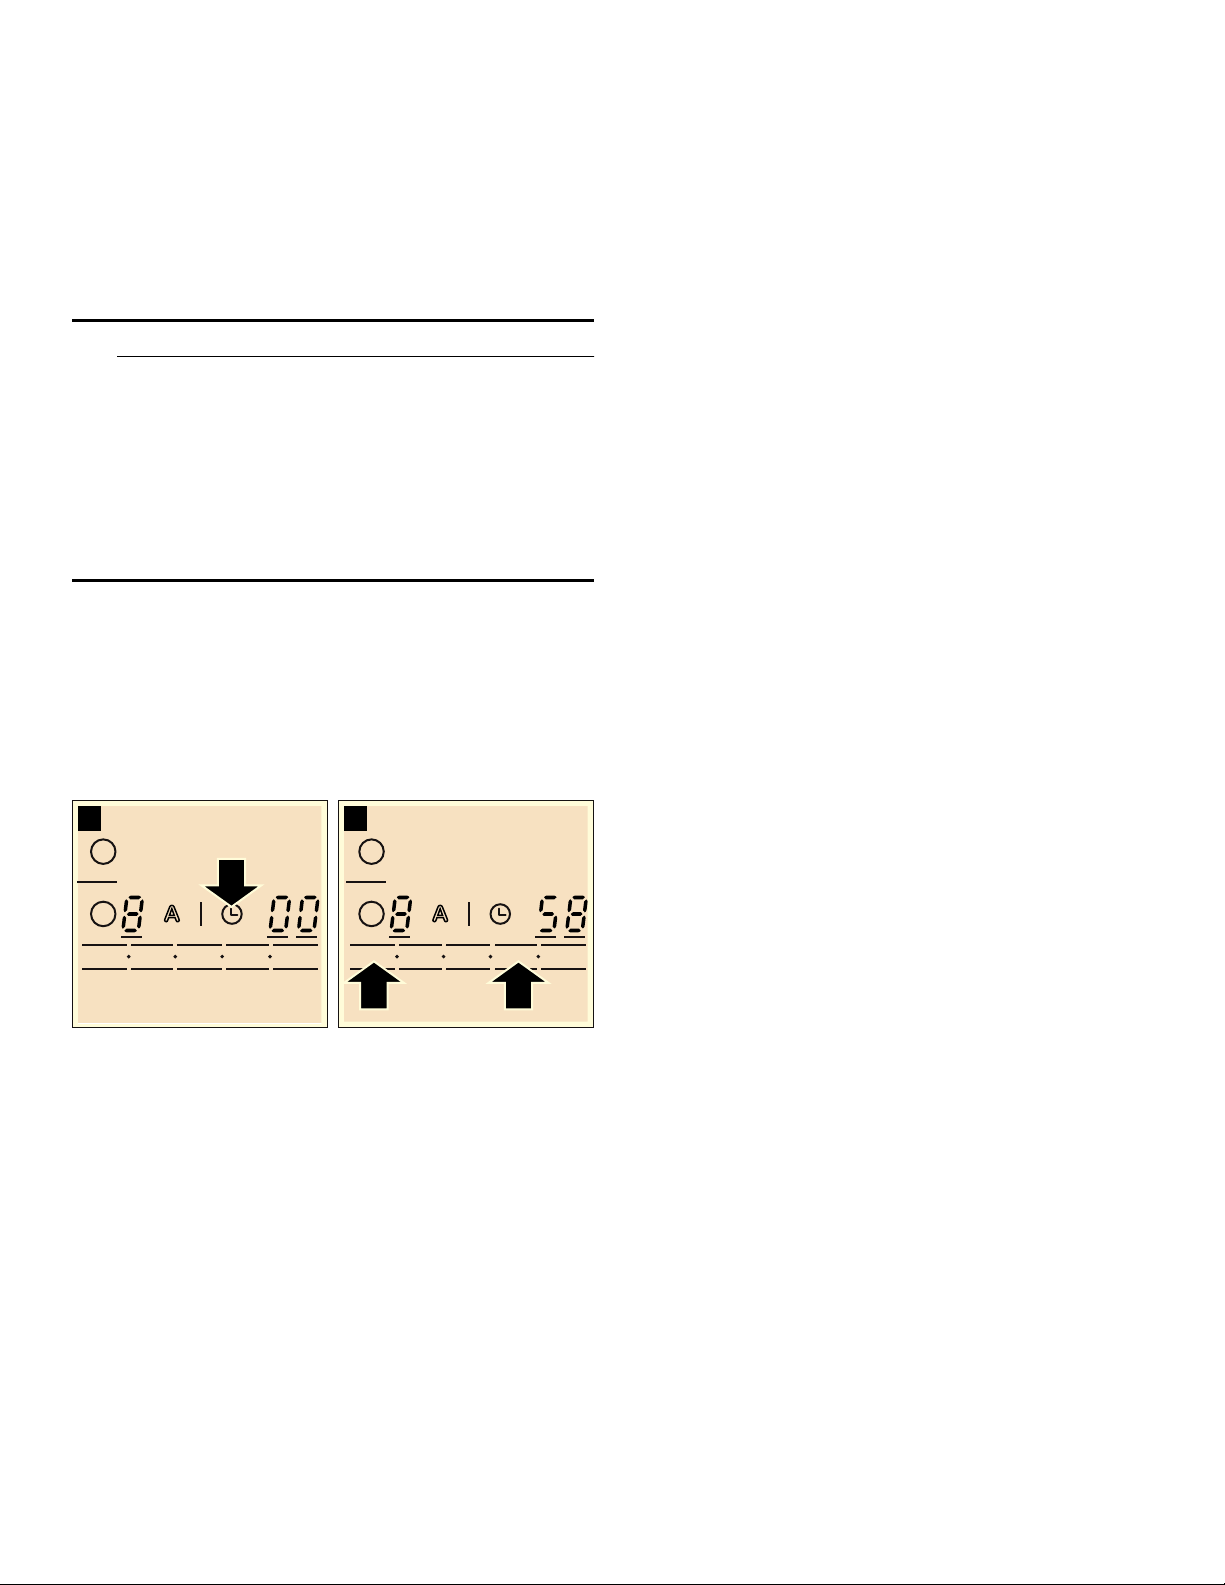
Setting the cook time
The cooking zone must be selected and set.
1.
Touch the 0 symbol. The x indicator for the desired
cooking zone lights up. ‹‹ lights up on the timer
display.
2.
Within the next 10seconds, set the desired cooking
time on the control panel.
The cook time counts down. If you have set a cook time
for more than one cooking zone, the cook time of the
selected cooking zone is always displayed.
Once the cook time has elapsed
When the cook time has elapsed, the cooking zone
turnes off. You will hear a beep and on the indicator, ‹‹
will light up for 10seconds. The x lights up. Touch any
indicator. The indicators go out and the audible signal
ceases.
Changing or canceling the cook time
Select the cooking zone and touch the 0 symbol. The
x indicator lights up. On the control panel, change the
cook time or set to ‹‹.
Note: You can set a cooking time of up to 99minutes.
Automatic timer
You can use this function to pre-select a cook time for all
cooking zones. Each time a cooking zone is turned on,
the pre-selected cook time then counts down. When the
cook time has elapsed, the cooking zone switches off
automatically.
You can find out how to turn on the automatic timer in the
Basic settings section.
Note: You can change the cook time for a cooking zone
or switch off the automatic timer for the cooking zones.
Select the cooking zone and touch the 0 symbol. The
desired indicator
x lights up. Change the cook time or
set to
‹‹ on the control panel.
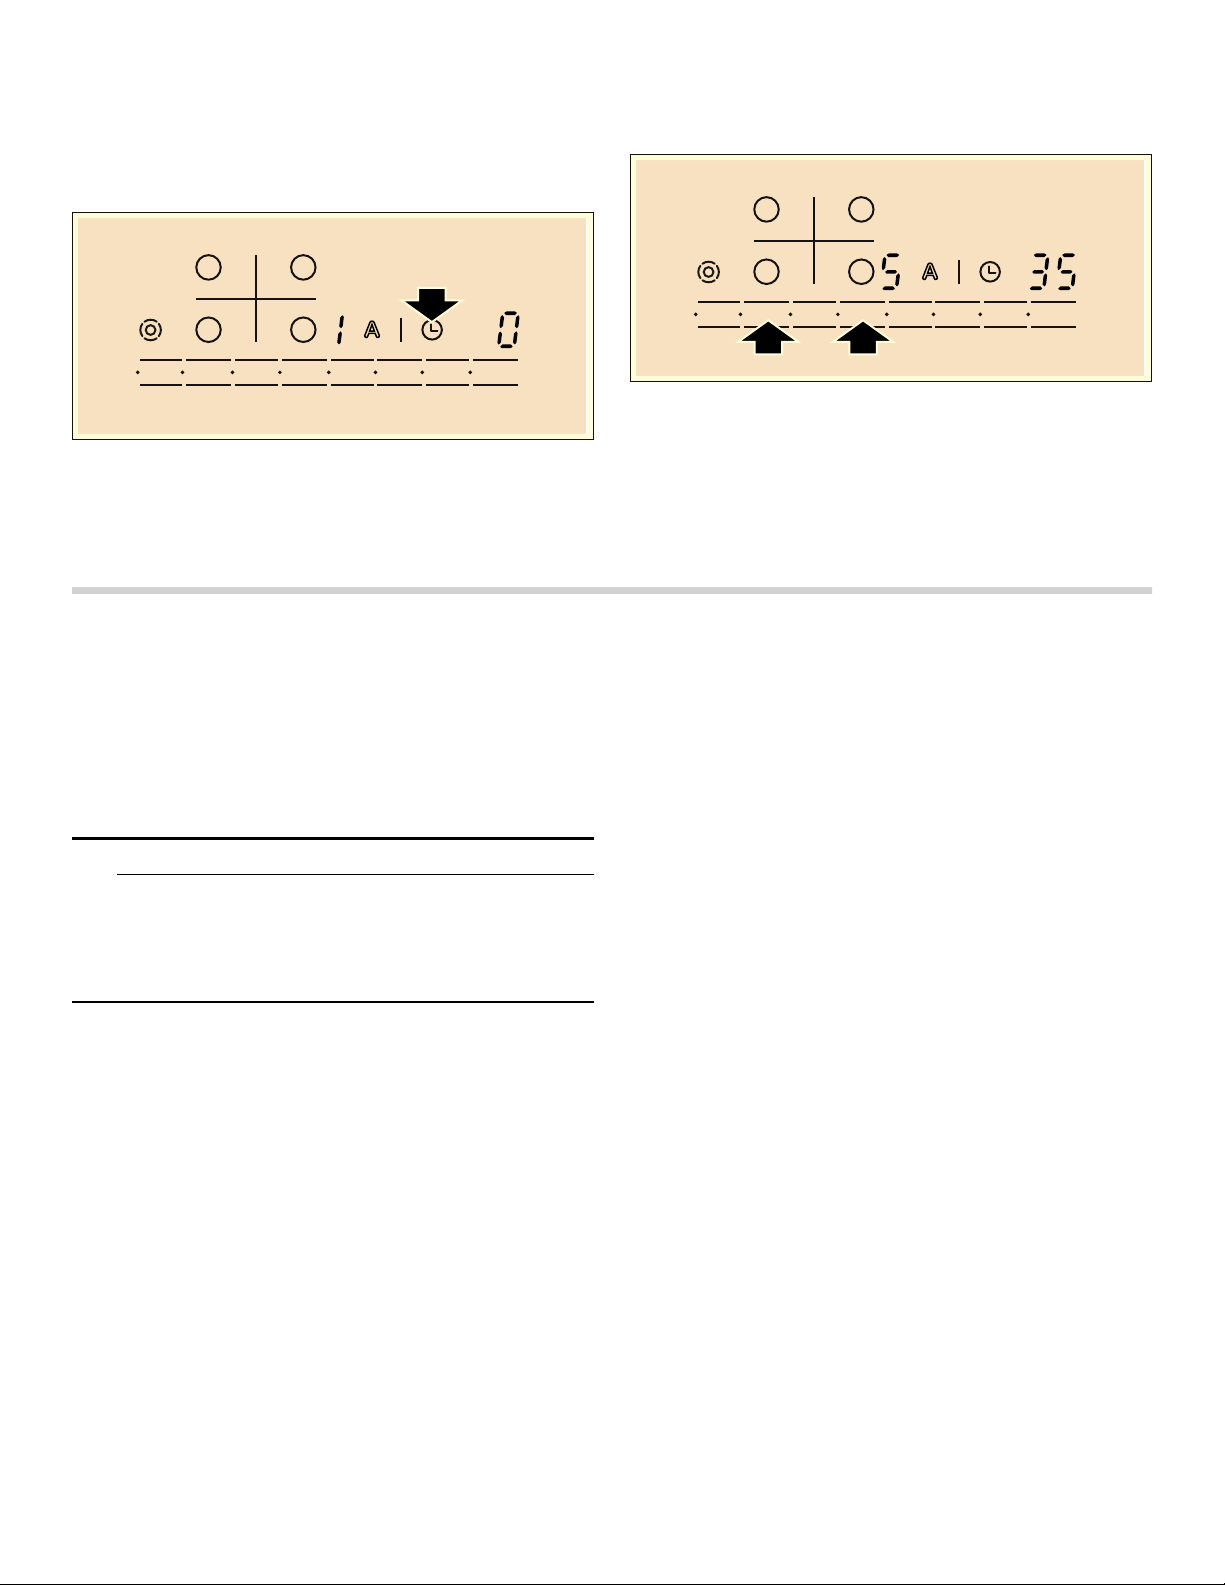
Kitchen timer
You can use the kitchen timer to set a time of up to
99minutes. It runs independently of all the other settings.
Switching on the kitchen timer
You can switch the kitchen timer on in 2different ways:
▯ If a cooking zone has been selected, touch the 0
symbol twice within 10seconds.
▯ If a cooking zone has not been selected, touch the 0
symbol.
The V indicator lights up.
Setting the kitchen timer
Set the desired time on the control panel.
Once the time has elapsed
After the time has elapsed, you will hear an audible
signal. ‹‹ lights up in the timer display. The V indicator
for the kitchen timer lights up. After 10seconds, the
indicator switches off.
Displaying the time
Use the 0 symbol to select the kitchen timer. The time is
displayed for 10seconds.
Setting the correct time
Use the 0 symbol to select the kitchen timer and reset
the time.
Child lock
You can use the child lock to prevent children from
turning on the cooktop.
Turning the child lock on and off
The cooktop must be turned off.
To turn on: Touch the D symbol for approx. 4 seconds.
The indicator light above the D symbol lights up for
10 seconds. The cooktop is locked.
To turn off: Touch the D symbol for approx. 4 seconds.
The cooktop is unlocked.
Automatic panel lock
With this function, the panel lock is automatically
activated whenever you switch off the cooktop.
Turning on and off
See "Basic settings" section.

13
Clean lock
If you wipe over the control panel while the cooking zone
is turned on, settings may be altered.
To prevent this from happening, your cooktop has a
clean lock function. Touch the - Dsymbol. A signal
sounds and the indicator light above the
- Dsymbol
lights up. The control panel is locked for 30seconds.
You can now wipe over the control panel without altering
any settings.
Note: The main switch is excluded from the clean lock
function. You can turn off the cooktop at any time.
Automatic time limitation
If the element is used for prolonged periods of time
without changes in the settings being made, the
automatic time limitation function is triggered.
The element stops heating. ”‰ and the residual heat
indicator
•/œ flash alternately in the display.
The indicator goes out when any symbol is pressed. The
element can now be reset.
When the automatic time limitation is activated depends
on the selected heat level (from 1to 10hours).
Basic Settings
The appliance has various basic settings. You can adjust
these settings to the way you usually cook.
Display Function
™‚
Automatic child lock
‹ Off*
‚ On
™ƒ
Sound signals
‹ Confirmation beep and error signal off
‚ Only error signal on
ƒ Only confirmation beep on
„ All signals on*
™†
Automatic timer
‹ Off*
‚-ŠŠ Automatic shut-off time
™‡
Duration of timer end signal
‚ 10seconds*
ƒ 30seconds
„ 1minute
™Š
Selection time for heating element
‹Unlimited*: You can adjust the settings of the last heating element used at any time without having to
select it again.
‚Restricted: You can adjust the settings for the last heating element used within 10seconds after
selecting it. After that you will have to reselect the heating element before setting it.
™‹
Reset to basic settings
‹ Off*
‚ Reset the appliance to basic settings
*factory settings
14
Changing the basic settings
The cooktop must be turned off.
1.
Turn on the cooktop.
2.
Within the next 10seconds, touch the 0 symbol for
4 seconds.
™ and ‚ flash alternately in the left-hand display; ‹ lights
up in the right-hand display.
3.
Touch the 0 symbol repeatedly until the required
indicator appears in the left-hand display.
4.
Set the required value on the control panel.
5.
Touch the 0 symbol for 4seconds.
The setting is activated.
Switching off
To exit the basic setting, turn off the cooktop with the
main switch and make new settings.
Cleaning and Maintenance
Daily Cleaning
Note: Recommended cleaners indicate a type of cleaner
and do not constitute an endorsement of a specific
brand.
Glass ceramic cooktop
9 CAUTION
Do not use any kind of cleaner on the glass while
the surface is hot; use only the razor blade scraper.
The resulting fumes can be hazardous to your
health. Heating the cleaner can chemically attack
and damage the surface.
Clean the surface when it is completely cool, with the
following exception: remove dry sugar, sugar syrup,
tomato products and milk immediately with the razor
blade scraper (see cleaning chart).
Wipe off spatters with a clean, damp sponge or a paper
towel. Rinse and dry. Use white vinegar if smudge
remains; rinse.
Apply a small amount of the glass ceramic cooktop
cleaner. When dry, buff surface with a clean paper towel
or cloth.
Stainless steel side trim
Wipe with the grain when cleaning. For moderate/heavy
soil, use BonAmi® or Soft Scrub® (no bleach).
Wipe using a damp sponge or cloth, rinse and dry.
Cleaning guidelines
When using a cleaner, use only a small amount; apply to
a clean paper towel or cloth. Wipe on the surface and
buff with a clean dry towel.
For best results, use cleaners such as glass ceramic
cooktop cleaner, BonAmi®, Soft Scrub® (without
bleach), and white vinegar.
Avoid these cleaners
▯ Glass cleaners which contain ammonia or chlorine
bleach. These ingredients may damage or
permanently stain the cooktop.
▯ Caustic cleaners - cleaners such as Easy Off® may
stain the cooktop surface.
▯ Abrasive cleaners.
▯ Metal scouring pads and scrub sponges such as
Scotch Brite® can scratch and/or leave metal marks.
▯ Soap-filled scouring pads such as SOS® can scratch
the surface.
▯ Powdery cleaners containing chlorine bleach can
permanently stain the cooktop.
▯ Flammable cleaners such as lighter fluid or WD-40.

15
Cleaning chart
Maintenance
This appliance requires no maintenance other than daily
cleaning. For best results, apply cooktop cleaning cream
daily.
Type of Soil Possible Solution
Dry sugar, sugar syrup, milk or tomato spills. Melted
plastic film or foil. All these items REQUIRE IMMEDIATE
REMOVAL. Failure to remove these immediatly can per-
manently damage the surface.
Remove these types of spills while the surface is hot
using the razor blade scraper. Use a new, sharp razor in
the scraper. Remove pan and turn off the element. Wear-
ing an oven mitt, hold scraper at 30° angle, using care
not to gouge or scratch the glass. Push soil off the
heated area. After the surface has cooled, remove the
residue and apply the glass ceramic cooktop cleaner.
9 WARNING
RISK OF INJURY
The blade is extremely sharp. Risk of cuts. Protect
the blade when not in use. Replace the blade imme-
diately when any imperfections are found. Follow
manufacturer’s instructions.
Burned-on food soil, dark streaks, and specks Soften by laying a damp paper towel or sponge on top of
soil for 30minutes. Use a plastic scrubber and glass
ceramic cooktop cleaner or use the razor blade scraper.
Rinse and dry.
Greasy spatters Use a soapy sponge or cloth to remove grease; rinse
thoroughly and dry. Apply glass ceramic cooktop
cleaner.
Metal marks: Iridescent stain Pans with aluminum, copper or stainless steel bases may
leave marks. Treat immediately after surface has cooled
with glass ceramic cooktop cleaner. If this does not
remove the marks, try a mild abrasive (Bon Ami®, Soft
Scrub® without bleach) with a damp paper towel. Rinse
and reapply glass ceramic cooktop cleaner. Failure to
remove metal marks before the next heating makes
removal very difficult.
Hard water spots:
Hot cooking liquids dripped on surface
Minerals in some water can be transferred onto the sur-
face and cause stains. Use undiluted white vinegar, rinse
and dry. Recondition with glass ceramic cooktop cleaner.
Remove boilovers and stains before using the cooktop
again.
Surface scratches:
Small scratches are common and do not affect cooking.
They become smoother and less noticeable with daily use
of the glass ceramic cooktop cleaner.
Apply glass ceramic cooktop cleaner before using to
remove sand-like grains and grit such as salt and sea-
soning. Scratches can be reduced by using pans with
bases that are smooth, clean, and dry before use. Use
recommended glass ceramic cooktop cleaner daily.
NOTICE: Diamond rings may scratch the surface.

16
Service
Before Calling for Service
Before calling Customer Service, consider the
suggestions and instructions below:
9 CAUTION
Repairs should only be done by an authorized
servicer.
Improper repair of your appliance may result in risk
of severe physical injury or death.
The electronics of your cooktop are underneath the
control panel. For various reasons, the temperature in
this area may rise sharply.
In order that the electronics do not overheat, the cooking
zones are switched off as and when necessary. The ”ƒ,
”… or ”† indicator appears alternately with the • or œ
residual heat indicator.
Notes
▯ The cooktop regulates the heating element
temperature by turning the heat source on and off; this
means that the reddish glow of the heat source
beneath the heating element may not always be
visible. If you select a low heat setting, the heat source
is frequently off; at higher settings it is seldom off. The
source turns on and off even at the highest settings.
▯ You may hear a quiet hum when the heating elements
are in the heating phase. The heating elements may
glow with different levels of brightness. Depending on
the angle from which you are looking at the heating
element, this glow may be visible over the marked
edge of the heating element. These are technical
characteristics. They have no effect on quality and
function.
▯ Glass ceramic may have uneven areas on the surface
due to the nature of the material itself. Because of the
mirror-like finish on the cooking surface, even
extremely small bubbles less than 1mm in diameter
may be visible. These bubbles will not have any
adverse effect on the operation of the cooktop nor on
the durability of the glass ceramic cooking surface.
▯ Depending on the countertop that is present in the
kitchen, an uneven gap between the cooktop unit and
the countertop can occur. For this reason, a flexible
seal is provided around the entire cooktop unit.
Indicator Error Task
None There is no power supply. Check the household fuse for the appliance. Check
whether there is a power outage by trying other electronic
appliances.
All indicators flash The touch controls are wet or an
object is resting on them.
Dry the controls or remove the object.
”ƒ
Several cooking zones have been
used over a prolonged period at high
power settings. To protect the elec-
tronics, the cooking zone has been
switched off.
Wait a while. Touch any control. When ”ƒ goes out, the
electronics have cooled down sufficiently. You can con-
tinue cooking.
”… Despite the switch-off by ”ƒ, the
electronics have become hot again.
All cooking zones have therefore
been switched off.
Wait a while. Touch any control. When ”… goes out, you
can continue cooking.
Ӡ and the heat
setting flash alter-
nately. An audible
signal can be
heard
Warning: There is a hot pot in the
area of the control panel. There is a
risk that the electronics will overheat.
Remove the pot. The fault display goes out shortly after-
wards. You can continue cooking.
Ӡ and audible
signal
There is a hot pot in the area of the
control panel. To protect the elec-
tronics, the cooking zone has been
switched off.
Remove the pot. Wait a while. Touch any control. When
Ӡ goes out, you can continue cooking.
”‰
The cooking zone was in operation
for too long and has switched itself
off.
You can switch the cooking zone back on again immedi-
ately.

17
How to Obtain Warranty Service
To obtain warranty service for your Product, you should
contact the nearest Bosch authorized servicer.
E number and FD number:
When you contact Service, please have the Model
(E) number and the FD number for your appliance
available. You can find the identification plate with these
numbers on the underside of the appliance and in the
appliance booklet. To avoid having to search for a long
time when you need it, you can enter your appliance data
and the customer support telephone number here.
Questions? Please contact us. We look forward to
hearing from you!
STATEMENT OF LIMITED PRODUCT WARRANTY
What this Warranty Covers & Who it
Applies to
The limited warranty provided by BSH Home Appliances
Corporation (“BSH“) in this Statement of Limited Product
Warranty applies only to the Bosch appliance (“Product“)
sold to you, the first using purchaser, provided that the
Product was purchased:
▯ For your normal, household (non-commercial) use,
and has in fact at all times only been used for normal
household purposes.
▯ New at retail (not a display, "as is", or previously
returned model), and not for resale, or commercial
use.
▯ Within the United States or Canada, and has at all
times remained within the country of original purchase.
The warranties stated herein apply only to the first
purchaser of the Product and are not transferable.
Please make sure to return your registration card; while
not necessary to effectuate warranty coverage, it is the
best way for BSH to notify you in the unlikely event of a
safety notice or product recall.
How Long the Warranty Lasts
BSH warrants that the Product is free from defects in
materials and workmanship for a period of three hundred
sixty-five (365) days from the date of purchase. The
foregoing timeline begins to run upon the date of
purchase, and shall not be stalled, tolled, extended, or
suspended, for any reason whatsoever.
This Product is also warranted to be free from cosmetic
defects in material and workmanship (such as scratches
of stainless steel, paint/porcelain blemishes, chip, dents,
or other damage to the finish of the Product), for a period
of thirty (30) days from the date of purchase or closing
date for new construction. This cosmetic warranty
excludes slight color variations due to inherent
differences in painted and porcelain parts, as well as
differences caused by kitchen lighting, product location,
or other similar factors. This cosmetic warranty
specifically excludes any display, floor, “As Is”, or “B”
stock appliances.
Repair/Replace as Your Exclusive Remedy
During this warranty period, BSH or one of its authorized
service providers will repair your Product without charge
to you (subject to certain limitations stated herein) if your
Product proves to have been manufactured with a defect
in materials or workmanship. If reasonable attempts to
repair the Product have been made without success,
then BSH will replace your Product (upgraded models
may be available to you, in BSH’s sole discretion, for an
additional charge). All removed parts and components
shall become the property of BSH at its sole option. All
replaced and/or repaired parts shall assume the identity
of the original part for purposes of this warranty and this
warranty shall not be extended with respect to such
parts. BSH's sole liability and responsibility hereunder is
to repair manufacturer-defective Product only, using a
BSH-authorized service provider during normal business
hours. For safety and property damage concerns, BSH
highly recommends that you do not attempt to repair the
Product yourself, or use an un-authorized servicer; BSH
will have no responsibility or liability for repairs or work
performed by a non-authorized servicer. If you choose to
have someone other than an authorized service provider
work on your Product, THIS WARRANTY WILL
AUTOMATICALLY BECOME NULL AND VOID. Authorized
service providers are those persons or companies that
have been specially trained on BSH products, and who
possess, in BSH's opinion, a superior reputation for
customer service and technical ability (note that they are
independent entities and are not agents, partners,
affiliates or representatives of BSH). Notwithstanding the
foregoing, BSH will not incur any liability, or have
responsibility, for the Product if it is located in a remote
area (more than 100miles from an authorized service
E-Nr. FD-Nr.
Customer Service O
0DLQ6WUHHW6XLWH
,UYLQH&$
ZZZERVFKKRPHFRP

18
provider) or is reasonably inaccessible, hazardous,
threatening, or treacherous locale, surroundings, or
environment; in any such event, if you request, BSH
would still pay for labor and parts and ship the parts to
the nearest authorized service provider, but you would
still be fully liable and responsible for any travel time or
other special charges by the service company, assuming
they agree to make the service call.
Out of Warranty Product
BSH is under no obligation, at law or otherwise, to
provide you with any concessions, including repairs, pro-
rates, or Product replacement, once this warranty has
expired.
Warranty Exclusions
The warranty coverage described herein excludes all
defects or damage that are not the direct fault of BSH,
including without limitation, one or more of the following:
▯ Use of the Product in anything other than its normal,
customary and intended manner (including without
limitation, any form of commercial use, use or storage
of an indoor product outdoors, use of the Product in
conjunction with air or water-going vessels).
▯ Any party's willful misconduct, negligence, misuse,
abuse, accidents, neglect, improper operation, failure
to maintain, improper or negligent installation,
tampering, failure to follow operating instructions,
mishandling, unauthorized service (including self-
performed "fixing" or exploration of the appliance's
internal workings).
▯ Adjustment, alteration or modification of any kind.
▯ A failure to comply with any applicable state, local,
city, or county electrical, plumbing and/or building
codes, regulations, or laws, including failure to install
the product in strict conformity with local fire and
building codes and regulations.
▯ Ordinary wear and tear, spills of food, liquid, grease
accumulations, or other substances that accumulate
on, in, or around the Product.
▯ Any external, elemental and/or environmental forces
and factors, including without limitation, rain, wind,
sand, floods, fires, mud slides, freezing temperatures,
excessive moisture or extended exposure to humidity,
lightning, power surges, structural failures surrounding
the appliance, and acts of God.
In no event shall BSH have any liability or responsibility
whatsoever for damage to surrounding property,
including cabinetry, floors, ceilings, and other structures
or objects around the Product. Also excluded from this
warranty are Products on which the serial numbers have
been altered, defaced, or removed; service visits to teach
you how to use the Product, or visits where there is
nothing wrong with the Product; correction of installation
problems (you are solely responsible for any structure
and setting for the Product, including all electrical,
plumbing or other connecting facilities, for proper
foundation/flooring, and for any alterations including
without limitation cabinetry, walls, floors, shelving, etc.);
and resetting of breakers or fuses.
TO THE EXTENT ALLOWED BY LAW, THIS WARRANTY
SETS OUT YOUR EXCLUSIVE REMEDIES WITH
RESPECT TO PRODUCT, WHETHER THE CLAIM ARISES
IN CONTRACT OR TORT (INCLUDING STRICT LIABILITY,
OR NEGLIGENCE) OR OTHERWISE. THIS WARRANTY
IS IN LIEU OF ALL OTHER WARRANTIES, WHETHER
EXPRESS OR IMPLIED. ANY WARRANTY IMPLIED BY
LAW, WHETHER FOR MERCHANTABILITY OR FITNESS
FOR A PARTICULAR PURPOSE, OR OTHERWISE,
SHALL BE EFFECTIVE ONLY FOR THE PERIOD THAT
THIS EXPRESS LIMITED WARRANTY IS EFFECTIVE. IN
NO EVENT WILL THE MANUFACTURER BE LIABLE FOR
CONSEQUENTIAL, SPECIAL, INCIDENTAL, INDIRECT,
"BUSINESS LOSS", AND/OR PUNITIVE DAMAGES,
LOSSES, OR EXPENSES, INCLUDING WITHOUT
LIMITATION TIME AWAY FROM WORK, HOTELS AND/
OR RESTAURANT MEALS, REMODELLING EXPENSES
IN EXCESS OF DIRECT DAMAGES WHICH ARE
DEFINITIVELY CAUSED EXCLUSIVELY BY BSH, OR
OTHERWISE. SOME STATES DO NOT ALLOW THE
EXCLUSION OR LIMITATION OF INCIDENTAL OR
CONSEQUENTIAL DAMAGES, AND SOME STATES DO
NOT ALLOW LIMITATIONS ON HOW LONG AN IMPLIED
WARRANTY LASTS, SO THE ABOVE LIMITATIONS MAY
NOT APPLY TO YOU. THIS WARRANTY GIVES YOU
SPECIFIC LEGAL RIGHTS, AND YOU MAY ALSO HAVE
OTHER RIGHTS WHICH VARY FROM STATE TO STATE.
No attempt to alter, modify or amend this warranty shall
be effective unless authorized in writing by an officer of
BSH.

19
Table des Matières
Notice d’uti li sati on
9 Définitions de sécurité ........................................... 19
CONSIGNES DE SÉCURITÉ IMPORTANTES ............. 20
Sécurité-incendie ............................................................... 20
Sécurité de cuisson .......................................................... 21
Prévention des brûlures ................................................... 21
Sécurité des enfants ......................................................... 21
Consignes en matière de nettoyage ............................. 21
Sécurité pour la batterie de cuisine ............................... 21
Installation et entretien corrects ..................................... 22
Avertissement issu de la proposition 65 ..................... 22
Éléments qui peuvent endommager l'appareil ......... 23
Protection de l'Environnement ................................... 23
Conseils d’économie l'énergie ....................................... 23
Faire connaissance avec l’appareil ........................... 24
Panneau de commande ................................................... 24
Indicateur de chaleur résiduelle ..................................... 24
Fonctionnement ........................................................... 25
Allumer et éteindre la table de cuisson ........................ 25
Allumage de la table de cuisson ................................... 25
Fonction PowerStart
®
...................................................... 27
Minuterie ............................................................................. 28
sécurité-enfants .................................................................. 28
Verrouillage temporaire .................................................... 29
Durée limitée automatique .............................................. 29
Réglages de base ............................................................. 29
Nettoyage et Entretien ................................................ 30
Nettoyage quotidien ......................................................... 30
Instructions de nettoyage ................................................ 30
Tableau de nettoyage ...................................................... 31
Entretien .............................................................................. 31
Entretien ....................................................................... 32
Dépannage ......................................................................... 32
Comment bénéficier du service de garantie ............... 33
ÉNONCÉ DE LA GARANTIE LIMITÉE ........................ 33
Couverture de la garantie : ............................................. 33
Durée de la garantie ......................................................... 33
Réparation ou remplacement comme solution
exclusive ............................................................................. 33
Produit hors garantie ........................................................ 34
Exclusions à la garantie ................................................... 34
Pr odukt i nf o.
Vous trouverez des informations supplementaires
concernant les produits, accessoires, pièces de
rechange et services sur Internet sous :
www.bosch-home.com et la boutique en ligne :
www.bosch-eshop.com
9 Définitions de sécurité
Définitions de sécurité
9 AVERTISSEMENT
Ceci indique que le non-respect de cet
avertissement peut entraîner des blessures graves,
voire la mort.
9 ATTENTION
Ceci indique que le non-respect de cet
avertissement peut entraîner des blessures légères
ou de gravité moyenne.
AVIS : Ceci indique que la non-conformité à cet avis de
sécurité peut entraîner des dégâts matériels ou
endommager l'appareil.
Remarque : Ceci vous signale des informations et/ou
indications importantes.

9 CONSIGNES DE SÉCURITÉ IMPORTANTES
LIRE ET CONSERVER CES INSTRUCTIONS
20
CONS I GNES DE SÉCURI T É IMPORTANTESLI RE ET CONSE RV E R CE S INSTRUCTIONS
AVERTISSEMENT
Votre nouvel appareil a été conçu pour un
fonctionnement sûr et fiable si vous en prenez bien soin.
Lire attentivement toutes les consignes avant l'emploi.
Ces précautions réduiront les risques de brûlures, de
choc électrique, d'incendie et de lésions corporelles.
Lors de l'utilisation d'un appareil électroménager,
quelques précautions de sécurité élémentaires doivent
être observées, y compris celles qui figurent aux pages
suivantes.
Contrôler l'appareil après l'avoir déballé. Si l'appareil a
été endommagé durant le transport, ne pas le brancher.
Cet appareil n'est pas destiné à être utilisé avec un
programmateur externe ou une télécommande.
Cet appareil n'est pas destiné à être utilisé par des
personnes (y compris des enfants) présentant des
capacités physiques, sensorielles ou mentales réduites,
à moins qu'elles n'aient été informées de la manière
d'utiliser l'appareil par une personne responsable de leur
sécurité.
Sécurité-incendie
Ne laissez pas le papier d'aluminium, le plastique, le
papier ou les tissus entrer en contact avec un élément
de surface, une grille ou un brûleur chaud. Ne laissez
pas les casseroles chauffer à sec.
Si la table de cuisson est près d'une fenêtre, d'un évent à
air forcé ou d'un ventilateur, s'assurer que les matériaux
inflammables tels les tentures/rideaux ne flottent pas au-
dessus ou près des brûleurs ou éléments. Ils
risqueraient de s'enflammer.
Toujours avoir un détecteur de fumée en état de marche
près de la cuisine.
Ne laissez jamais la table de cuisson sans surveillance
lorsqu'elle est en utilisation. Des débordements causant
de la fumée et des déversements graisseux peuvent
prendre feu.
AVERTISSEMENT
POUR RÉDUIRE LES RISQUES DE FEUX DE GRAISSE :
a.
Ne laissez jamais la surface de cuisson sans
surveillance à des températures élevées. Les
débordements causent de la fumée et les résidus
graisseux peuvent s'enflammer.. Faites chauffer les
huiles lentement à feu doux ou moyen.
b.
Faites toujours fonctionner la hotte lorsque vous
cuisinez à feu vif.
c.
Nettoyez les ventilateurs régulièrement. Ne laissez pas
la graisse s'accumuler sur le ventilateur ou sur le filtre.
d.
Utilisez des casseroles de taille appropriée. Utilisez
toujours des récipients adaptés à la taille de la surface
de cuisson.
Ne flambez jamais sous la hotte aspirante et ne travaillez
jamais avec une flamme nue. Une hotte aspirante en
marche aspire les flammes dans le filtre. Une hotte
aspirante en marche aspire les flammes dans le filtre. Ne
flambez jamais sous la hotte aspirante et ne travaillez
jamais avec une flamme nue. Une hotte aspirante en
marche aspire les flammes dans le filtre. Les dépôts de
graisse sur les filtre risquent alors de s'enflammer!
Si des vêtements s’enflamment, rouler par terre
immédiatement pour éteindre les flammes.
Veillez à avoir à portée de main un extincteur d'incendie
en bon état de marche, placé visiblement près de
l'appareil et facile d'accès.
Étouffez les flammes d'un feu d'aliments autre qu'un feu
de graisse à l'aide de bicarbonate de soude. Ne jamais
utiliser d'eau sur les feux de cuisson.
AVERTISSEMENT
POUR RÉDUIRE LE RISQUE DE LÉSIONS
CORPORELLES DANS L'ÉVENTUALITÉ D'UN FEU DE
GRAISSE, OBSERVER LES CONSIGNES SUIVANTES :
a.
ÉTOUFFER LES FLAMMES à l'aide d'un couvercle bien
hermétique, d'une tôle à biscuits ou d'un plateau en
métal, puis éteindre l'appareil. FAIRE ATTENTION À NE
PAS SE BRÛLER. Si les flammes ne s'éteignent pas
immédiatement, ÉVACUER LES LIEUX ET FAIRE
APPEL AU SERVICE D'INCENDIE.
b.
NE JAMAIS SAISIR UN RÉCIPIENT QUI BRÛLE. Vous
pourriez vous brûler.
c.
NE PAS UTILISER D'EAU, y compris les chiffons ou
serviettes mouillées. Une violente explosion de vapeur
risque de se produire.
d.
Utiliser un extincteur uniquement si :
- Vous savez que vous possédez un extincteur de
CLASSE ABC, et vous en connaissez déjà le
maniement.
- L'incendie est de petite ampleuret contenu dans la
zone où il s'est déclaré.
- Le service d'incendie est appelé.
- On peut combattre l'incendie le dos tourné vers la
sortie.
Dans la mesure du possible, ne pas faire fonctionner le
système de ventilation lorsqu'un feu se déclenche sur
une table de cuisson. Toutefois, ne pas passer la main à
travers le feu pour mettre le système de ventilation hors
tension.

21
9 CONSIGNES DE SÉCURITÉ IMPORTANTES
LIRE ET CONSERVER CES INSTRUCTIONS
Sécurité de cuisson
AVERTISSEMENT
Utiliser cet appareil uniquement dans le cadre de
l'utilisation prévue tel que décrit dans ce manuel. NE
JAMAIS utiliser pour chauffer ou réchauffer une pièce.
Ceci pourrait faire surchauffer l'appareil. L'appareil ne
doit jamais servir à entreposer quoi que ce soit.
Lorsque la minuterie est en utilisation, surveillez toujours
la table de cuisson et ne laissez rien brûler ou déborder.
Des débordements peuvent causer de la fumée et
certains aliments et huiles peuvent prendre feu s'ils sont
laissés sans surveillance à des températures élevées.
Ne jamais utiliser l’appareil en cas de projections de
liquides ou d’aliments autour du panneau de commande.
Toujours éteindre la plaque de cuisson et sécher le
panneau de commande.
Si les boutons ne sont pas utilisés correctement, des
lésions et des dommages peuvent survenir sur l’appareil.
Si la plaque s’éteint automatiquement et ne peut être
utilisée pendant un certain temps, il est possible qu’elle
se rallume plus tard par inadvertance. Pour éviter que
cela ne se produise, débrancher le coupe-circuit du
disjoncteur automatique. Contacter un technicien agréé.
AVERTISSEMENT
Si la surface est fissurée, éteignez l'appareil pour éviter
la possibilité d'électrocution.
Prévention des brûlures
NE PAS TOUCHER AUX ÉLÉMENTS DE SURFACE NI
AUX ZONES PRÈS DES ÉLÉMENTS. Les unités de
surface peuvent être chaudes même lorsqu'elles sont de
couleur foncée. Les zones près des unités de surface
peuvent devenir suffisamment chaudes pour causer des
brûlures. Pendant et après l'utilisation, ne pas toucher, ni
laisser vêtements, poignées isolantes ou autres
matériaux inflammables entrer en contact avec les
éléments de surface ni aux zones près des éléments tant
qu'ils n'ont pas refroidi. Citons notamment la table de
cuisson et les surfaces situées près de celle-ci.
Ne pas chauffer ou réchauffer des contenants d'aliments
non ouverts. L'accumulation de pression peut faire
exploser le contenant et provoquer des blessures.
Toujours utiliser des poignées isolantes sèches. Des
poignées mouillées ou humides entrant en contact avec
les surfaces chaudes peuvent provoquer des blessures
par dégagement de vapeur. Ne laissez pas les poignées
toucher les éléments chauffants chauds. Ne pas utiliser
de serviette ni de chiffon volumineux.
Utiliser les réglages élevés seulement lorsque
nécessaire. Pour éviter bulles et éclaboussures, chauffer
l'huile lentement à réglage faible ou moyen. L'huile
chaude peut causer des brûlures et blessures
extrêmement graves.
Ne déplacez jamais une poêle contenant de l'huile
chaude, en particulier une bassine à friture. Attendez
qu'elle se soit refroidie.
Attacher les vêtements lâches, etc. avant de commencer.
Attacher les cheveux longs de façon à ce qu'ils ne
pendent pas et ne pas porter de vêtements lâches ou
d'habits ou objets qui pendillent, tels que cravates,
foulards, bijoux ou manches.
Si l’afficheur ne fonctionne pas quand une zone de
cuisson se réchauffe, désarmer le disjoncteur ou retirer
le fusible dans le tableau de distribution. Communiquer
avec un réparateur autorisé.
Sécurité des enfants
Lorsque les enfants sont assez âgés pour utiliser
l'appareil, il incombe aux parents ou tuteurs légaux de
veiller à ce qu'ils soient formés aux pratiques sécuritaires
par des personnes qualifiées.
Ne permettre à personne de grimper, rester debout,
s'appuyer, s'asseoir ou se pencher sur toute partie d'un
appareil, notamment une porte, un tiroir-réchaud ou un
tiroir de rangement. Ceci peut endommager l'appareil qui
risque de basculer et causer des blessures sérieuses.
Ne pas permettre aux enfants d'utiliser cet appareil sauf
sous la surveillance attentive d'un adulte. Ne pas laisser
les enfants et les animaux seuls ou sans surveillance
lorsque l'appareil est en service. Ne jamais les laisser
jouer aux alentours de l'appareil, que ce dernier soit en
service ou non.
ATTENTION
Les articles d’intérêt pour les enfants ne doivent pas être
rangés dans un appareil électroménager, dans les
armoires au–dessus de l’appareil ou sur le dosseret. Les
enfants peuvent grimper sur l’appareil pour atteindre ces
objets et se blesser sérieusement.
Consignes en matière de nettoyage
Ne nettoyez pas l'appareil pendant qu'il est encore
chaud. Certains produits nettoyants produisent des
vapeurs nocives lorsqu'ils sont appliqués sur une surface
chaude. Chiffons ou éponges humides peuvent causer
des brûlures par dégagement de vapeur.
Ne pas utiliser de nettoyeur à vapeur pour nettoyer
l'appareil.
Sécurité pour la batterie de cuisine
Tenir la poignée de la casserole en brassant ou tournant
les aliments. Ceci l'empêche de bouger et évite les
déversements.
Utiliser des casseroles de taille adéquate.
L'utilisation de casseroles trop petites aura pour effet
d'exposer une partie de l'élément chauffant ou du brûleur
pouvant présenter un risque de contact direct et
d'incendie de vêtements. Sélectionner des ustensiles à
fond plat, suffisamment larges pour couvrir l'élément
chauffant. Cet appareil est doté de surfaces de différents

9 CONSIGNES DE SÉCURITÉ IMPORTANTES
LIRE ET CONSERVER CES INSTRUCTIONS
22
formats. Un bon rapport ustensile/élément chauffant ou
brûleur permet également d'améliorer le fonctionnement
de l'appareil.
Les ustensiles de cuisson non approuvés pour
l'utilisation avec les tables de cuisson en céramique
peuvent se briser lors d'un changement soudain de
température. Utiliser uniquement des casseroles qui sont
approuvés pour l'utilisation avec les tables de cuisson en
céramique (seuls certains types de verre, la céramique
vitriée à l'épreuve de la chaleur et la faïence peuvent être
utilisés).
Tourner toujours les poignées an qu'elles ne passent pas
au-dessus des zones adjacentes de cuisson ou du bord
de l'appareil. Ceci aide à diminuer le risque d' ignition de
matériaux inammables, de déversements et de brûlures.
Tenir toujours sec la table de cuisson et le dessous des
casseroles. Du liquide entre le dessous d'une casserole
et la table de cuisson peut générer de la vapeur et la
casserole risque de bondir soudain ce qui pourrait
provoquer des blessures.
Installation et entretien corrects
Demandez à l'installateur de vous montrer où se trouve
le disjoncteur ou le fusible. Identifier sa position pour
pouvoir le retrouver facilement.
Cet appareil doit être adéquatement installé et mis à la
terre par un technicien agréé. Branchez l'appareil
uniquement dans une prise correctement reliée à la
terre. Pour plus de détails, reportez-vous à la notice
d'installation.
Cet appareil est destiné uniquement à une utilisation
domestique normale. Il n'est pas homologué pour un
usage en extérieur. Voyez la Ènoncé de la Garantie
Limitée. Si vous avez des questions, communiquez avec
le fabricant.
Ne pas entreposer ni utiliser de produits chimiques
corrosifs, vapeurs, substances inflammables ou produits
non alimentaires sur ou à proximité de l'appareil. Il a été
spécialement conçu pour être utilisé pendant le
chauffage et la cuisson des aliments. L'emploi de
produits chimiques corrosifs pour chauffer ou nettoyer
l'appareil endommagera ce dernier et peut provoquer
des blessures.
Ne pas se servir de cet appareil s'il ne fonctionne pas
correctement ou s'il est endommagé. Communiquer
avec un réparateur autorisé.
Ne cuisinez pas sur une table de cuisson brisée. Les
solutions de nettoyage et les déversements peuvent
créer des risques de choc électrique.
Ne pas réparer ni remplacer toute pièce de l'appareil à
moins que cela ne soit spécifiquement recommandé par
ce manuel. Toute réparation doit être effectuée par un
centre de réparation autorisé par l'usine.
Pour éviter les risques d'électrocution, avant de réparer
l'appareil, mettre l'alimentation hors circuit au niveau du
panneau de service et le verrouiller pour éviter tout mise
en circuit accidentelle.
Avertissement issu de la proposition 65 :
Ce produit pourrait contenir un produit chimique reconnu
par l'État de la Californie comme cancérigène ou ayant
des effets nocifs sur la reproduction. Par conséquent,
l'emballage de votre produit pourrait porter l'étiquette
suivante, comme requis par la Californie :
&DQFHUHWGRPPDJHVjODUHSURGXFWLRQ
ZZZ3:DUQLQJVFDJRY
$9(57,66(0(17
$9(57,66(0(17,668'(/$352326,7,21â'(/e7$7'(
/$&$/,)251,(â

23
Éléments qui peuvent endommager l'appareil
AVIS
▯ Égratignures sur les surfaces en céramique : les
dessous rugueux des ustensiles de cuisine peuvent
endommager la céramique.
▯ Sel, sucre et sable : le sel, le sucre et le sable
peuvent égratigner la céramique. N'utilisez jamais la
table de cuisson comme surface de travail ou comme
endroit pour déposer des objets.
▯ Ustensiles de cuisine surchauffés : évitez de faire
chauffer des ustensiles vides.
▯ Ustensiles de cuisine chauds : placez les casseroles
et les chaudrons chauds sur la zone d'opération ou
sur les rebords. Cela peut causer des dommages.
▯ Objets durs ou coupants : des objets durs ou
coupants qui tombent sur la plaque chauffante
peuvent l'endommager.
▯ Plats qui débordent : du sucre ou des produits sucrés
peuvent endommager la plaque chauffante. Enlevez
immédiatement ces produits avec un grattoir en verre.
▯ Aluminium et plastique : le papier d'aluminium et les
plats en plastiques vont fondre sur des plaques
chauffantes en fonction. Le papier protecteur pour les
fours ne convient pas à votre table de cuisson.
▯ Nettoyants non appropriés : une décoloration
métallique et chatoyante de la céramique peut être
causée par l'utilisation de nettoyants non appropriés
ou de l'abrasion des ustensiles de cuisine.
Protection de l'Environnement
Conseils d’économie l'énergie
▯ Toujours poser le couvercle correspondant sur les
récipients. En cuisinant sans couvercle, la
consommation d'énergie est multipliée. Utiliser un
couvercle en verre qui permet de contrôler la cuisson
sans avoir à le soulever.
▯ Utilisez des récipients avec une base épaisse et plate.
Les fonds irréguliers font augmentent la
consommation d'énergie.
▯ Le diamètre de la base des récipients doit concorder
avec la taille de la zone de cuisson. Si ce n'est pas le
cas, il peut y avoir un gaspillage d'énergie.
▯ Choisiz des récipients de taille adaptée à la quantité
d'aliments à préparer. Un récipient de grandes
dimensions et à moitié plein consomme beaucoup
d'énergie.
▯ Faites cuire avec le minimum d'eau. Cela économise
de l’énergie. Dans le cas des légumes, les vitamines
et minéraux sont préservés.
▯ Abaissez à temps le niveau de cuisson.

24
Faire connaissance avec l’appareil
Cette section déctrit le panneau des touches, les
éléments chauffants et les affichages.
Voir la page 2pour une liste des modèles et leurs
dimensions.
Panneau de commande
Surfaces de commande
Lorsque vous touchez un symbole, la fonction respective
sera activée.
AVIS : Veillez à ce que les surfaces de commande
soient toujours sèches. L'humidité compromet le
fonctionnement.
Indicateur de chaleur résiduelle
La table de cuisson comprend un indicateur de chaleur
résiduelle pour chaque élément. Ils vous indiquent quels
éléments sont encore chauds. Évitez de toucher les
éléments indiqués.
Si un • est affiché à l'écran, l'élément est encore chaud.
Vous pouvez encore l'utiliser, par exemple, pour garder
une petite quantité d'aliments au chaud ou pour faire
fondre du chocolat. À mesure que l'élément se refroidi, le
symbole à l'écran deviendra œ. L'écran s'éteindra lorsque
l'élément sera suffisamment refroidi.
L'indicateur de chaleur résiduelle s'activera
automatiquement après une panne de courant. L'écran
restera allumé pendant environ 30 minutes.
Affichages
‚-Š
Niveaux de puissance
•/œ
Indicateur de chaleur résiduelle
‘
Power Start (Préchauffage rapide)
‰‰
Minuterie
Touches
#
Interrupteur d'alimentation principal
-
Protection contre le nettoyage
D
Sécurité des enfants
$
Sélectionnez l'élément de cuisson
1û2û3û
4û
Niveaux de température
w
Power Start (Préchauffage rapide)
0
Minuterie
25
Fonctionnement
Allumer et éteindre la table de cuisson
L'interrupteur principal vous permet d'allumer et
d'éteindre la table de cuisson.
Allumer : effleurez le symbole #. Un signal retentit. Le
voyant lumineux au-dessus de l'interrupteur principal et
les voyants
‹ s'allument. La table de cuisson est prête à
fonctionner.
Éteindre : effleurez le symbole #, jusqu'à ce que le
voyant lumineux au-dessus de l'interrupteur principal et
les voyants s'éteignent. Tous les foyers sont éteints.
L'indicateur de chaleur résiduelle reste allumé jusqu'à ce
que les foyers aient suffisamment refroidi.
Remarques
▯ La table de cuisson s'éteint automatiquement lorsque
tous les foyers sont éteints depuis plus de
20 secondes.
▯ Les réglages restent mémorisés pendant 4secondes
après la mise hors tension. Si vous rallumez la table
de cuisson pendant ce délai, celle-ci se remet en
service avec les réglages précédents.
Allumage de la table de cuisson
Ce chapitre explique comment procéder au réglage des
éléments chauffants. Le tableau ci-après répertorie les
réglages de chaleur pour différents aliments.
Régler un foyer
Dans la zone de réglage, réglez le niveau de cuisson
souhaité.
Niveau de cuisson 1= puissance minimale
Niveau de cuisson 9= puissance maximale
Chaque niveau de cuisson possède un niveau
intermédiaire. Il est marqué par le symbole û dans la
zone de réglage.
Régler le niveau de cuisson
La table de cuisson doit être allumée.
1.
Effleurez le symbole $ pour sélectionner le foyer.
Le symbole ‹ s'allume dans l'affichage du niveau de
cuisson, le symbole ¬ s'allume au dessous de
l'affichage du niveau de cuisson.
2.
Réglez le niveau de cuisson souhaité dans la zone de
réglage.
Modifier le niveau de cuisson
Sélectionnez le foyer et réglez le niveau de cuisson
souhaité dans la zone de réglage.
Éteindre le foyer
Sélectionnez le foyer au moyen du symbole
$. Réglez
sur 0dans la zone de réglage. Le voyant de chaleur
résiduelle apparaît au bout d'env. 10secondes.
Remarques
▯ Le dernier foyer réglé reste activé. Vous pouvez régler
le foyer sans le sélectionner de nouveau.
▯ Le foyer est régulé par l'allumage et l'arrêt du
chauffage. Même à la puissance maximale, le
chauffage peut s'allumer et s'éteindre.
Remarque : La chaleur est activée et désactivée pour
régler la température de l’élément; cela signifie que la
lumière rouge sous l’élément n’est pas toujours visible.
Lorsque vous séléctionnez un réglage de chauffage bas,
l’élément s’éteint aux périodes assez longues, tandis
qu’un réglage plus élevé s’éteint à l’occasion. Même à
niveau élevé, l’élément s’allume et s’éteint.

26
Tableau des réglages
Le tableau suivant fournit des exemples. Les temps de
cuisson peuvent varier selon le type d'aliment, sont poids
et sa qualité. Des écarts sont ainsi possibles.
Réglez l'élément au niveau de chaleur 9pour amener à
ébullition ou pour la friture initiale, puis revenez au
réglage approprié (pas pour fondre).
9 ATTENTION
Pendant la cuisson, les ragoûts ou les repas
liquides comme les soupes, les sauces ou les
boissons peuvent chauffer trop rapidement et
peuvent déborder ou éclabousser. Pour cette
raison, nous vous recommandons de remuer
constamment, en chauffant graduellement l'aliment
à un niveau convenable.
Niveaux de puissance
Fondre
chocolat 1- 2
beurre 1- 2
Réchauffage
légumes congelés (p. ex., épinards) 2. - 3.
bouillon 7- 8
soupe épaisse 1. - 2.
lait** 1- 2
Mijoter
sauce délicate p. ex., sauce béchamel 4- 5
sauce à spaghetti 2- 3
boeuf braisé 4- 5
poisson* 4- 5
Mode
riz (avec quantité double d'eau) 2- 3
pommes de terre cuites dans leur peau avec 1-2tasses d'eau 4- 5
pommes de terre bouillis dans 1à 2tasses d'eau 4- 5
légumes frais avec 1à 2tasses d'eau 2. - 3.
légumes congelés avec 1à 2tasses d'eau 3. - 4.
pâtes (2-4pintes d'eau)* 6- 7
pouding** 1- 2
céréales 2- 3
Friture
côtelette de porc*** 5. - 6.
poitrine de poulet*** 5- 6
bacon 6- 7
oeufs 5- 6
poisson 5- 6
crêpes 5. - 6.
Grande friture** (dans 1à 2pintes d'huile)
produits alimentaires surgelés, p. ex., croquettes de poulet (0,5lb par portion) 8- 9
autres, p. ex., beignes (0,5lb par portion) 4. - 5.
* cuisson continu sans couvercle
** sans couvercle
*** retournez plusieurs fois

27
Fonction PowerStart
®
(Préchauffage rapide)
Tous les éléments chauffants sont dotés d’un circuit de
PowerStart
®
. Cette fonction fait chauffer l’élément en
utilisant la puissance maximum jusqu’au réglage de
cuisson que vous avez sélectionné.
La durée du préchauffage de l’élément dépend du
réglage de cuisson que vous avez sélectionné.
Réglage de la fonction PowerStart™
La fonction PowerStart™ peut seulement être activée
dans les 30premières secondes suivant l'activation de la
table de cuisson :
1.
Choisissez le réglage de cuisson continue que vous
souhaitez utiliser pour la zone de cuisson
sélectionnée.
2.
Effleurez le symbole w.
PowerStart™ est maintenant activée. Le symbole ‘ et le
niveau de cuisson continue clignotent en alternance
dans l'affichage.
Après le préchauffage, seul le niveau de cuisson
continue est encore allumé dans l'affichage.
Tableau de cuisson pour la fonction PowerStart™
Consultez le tableau suivant pour les types d'aliments qui
conviennent avec la fonction PowerStart™. La quantité la
plus petite correspond aux éléments chauffants plus
petits, tandis que la quantité plus importante correspond
aux éléments chauffants plus volumineux. Les valeurs
indiquées dans ce tableau servent de lignes directrices
seulement.
Trucs pour utiliser PowerStart
®
--------
Aliments appropriés pour PowerStart™ Quantité Réglage de chaleur
Chauffer
légumes congelés comme les épinards 300à 600g (10oz à 16oz) 2. - 3.PS
bouillon 475à 950ml (2à 4tasses) 7- 8PS
soupes épaisses 475à 950ml (2à 4tasses) 1. - 2. PS
lait* 1à -2ml (2à 4tasses) 1- 2PS
Mijoter
braisé 900g (2lb) 4- 5PS
poisson** 450à 680g (1lb à 1,5lb) 4- 5PS
Bouillir
riz (avec le double de la quantité d'eau) 175à 475ml (3/4de tasse à
2tasses)
2- 3PS
pommes de terre bouillies avec leur peau et 235à
475 ml (1ou 2tasses) d'eau
5- 14pommes de terre moyennes 4- 5PS
pommes de terre épluchées et bouillies avec 235à
475 ml (1ou 2tasses) d'eau
5- 14pommes de terre moyennes 4- 5PS
légumes frais avec 235à 475ml (1ou 2tasses) d'eau 450g à 900g (1lb à 2lb) 2. - 3. PS
Frire
côtelette de porc 1- 2portions 5. - 6. PS
crêpes 5. - 6. PS
* sans couvercle
** poursuite de cuisson sans couvercle
La fonction PowerStart™ ne
fait pas bouillir les aliments
Elle est conçue pour préserver la valeur nutritive des aliments tout en consommant
un minimum d'eau pour la cuisson. Ajoutez environ 475ml (2tasses) d'eau aux ali-
ments pour les grands éléments et de 175à 235ml (¾ - 1tasse) d'eau pour les
petits éléments.
Faites cuire le riz dans le double de la quantité de liquide.
La fonction PowerStart™ ne convient pas aux aliments qui doivent être cuits dans
une grande quantité d'eau (par ex., les pâtes).
La lait et les aliments qui pro-
duisent beaucoup de mousse
pourraient déborder
Utilisez une casserole à rebords élévés.
Le lait colle Rincez la casserole à l'eau froide avant de la remplir.
Au cours de la friture, les ali-
ments peuvent coller à la cas-
serole
Faites préchauffer la casserole et l'huile avant d'ajouter les aliments. Ne retournez
pas les aliments trop rapidement. Les aliments se sépareront du fond de la casserole
après un court moment de cuisson.
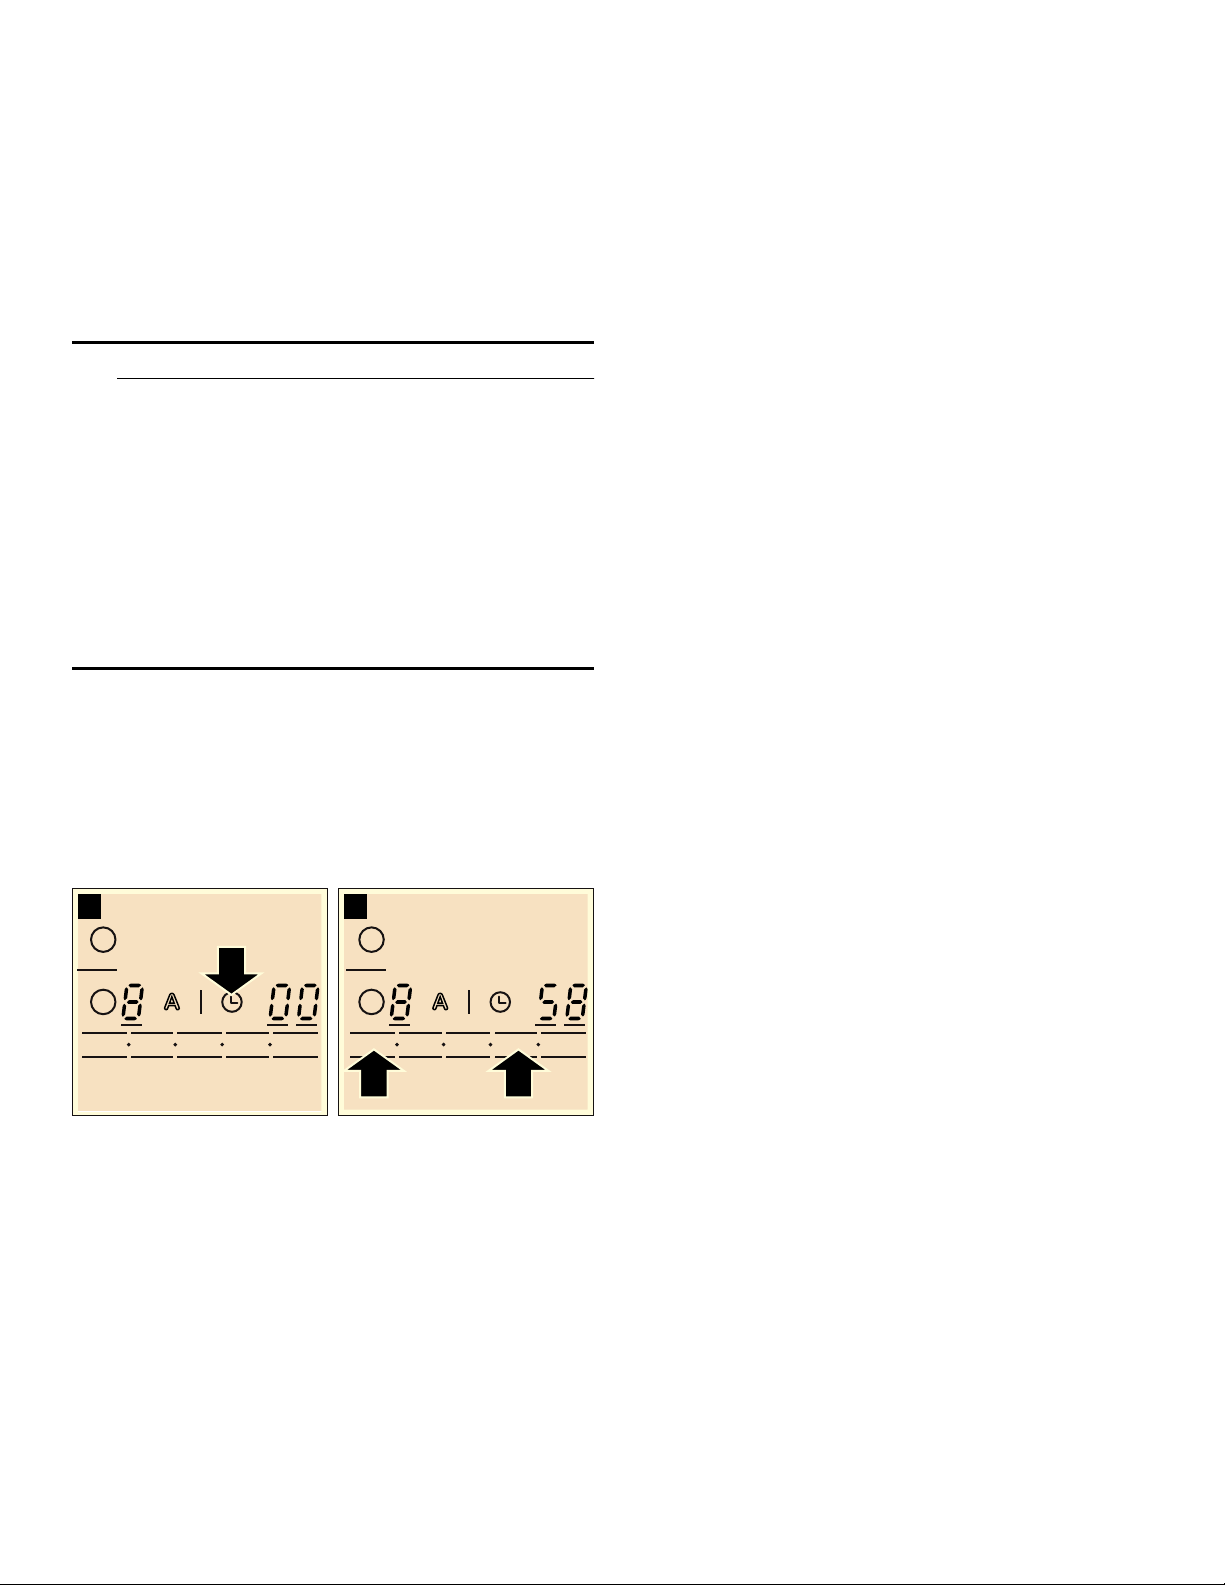
28
Minuterie
La minuterie peut être utilisée de 2façons différentes :
▯ Pour éteindre automatiquement un foyer.
▯ Comme minuteur.
Durée de cuisson
Vous pouvez utiliser la fonction de minuterie pour établir
une durée de cuisson pour n'importe quel élément. Une
fois la durée de cuisson écoulée, l'élément s'éteindra
automatiquement.
9 ATTENTION
▯ Lorsque la minuterie est en utilisation, gardez
toujours la table de cuisson sous surveillance et
ne laissez rien brûler ou déborder. Des
débordements peuvent causer de la fumée et les
aliments et les huiles peuvent prendre feu s'ils
sont laissés sans surveillance à des températures
élevées.
▯ Cette fonction ne devrait pas être utilisée pour
des durées prolongées, surtout à des
températures élevées.
▯ Assurez-vous d'éteindre la table de cuisson avec
l'interrupteur principal après chaque utilisation.
Régler la durée
Le foyer doit avoir été sélectionné et réglé.
1.
Effleurez le symbole 0. Le voyant x du foyer
s'allume. Le symbole ‹‹ s'affiche dans l'affichage de
minuterie.
2.
Dans les 10secondes suivantes, réglez la durée
souhaitée dans la zone de réglage.
La durée s'écoule. Si vous avez réglé une durée pour
plusieurs foyers, la durée du foyer sélectionné est
toujours affichée.
Après écoulement du temps sélectionné
Le foyer s'éteint lorsque la durée est écoulée. Un signal
retentit et le voyant s'allume ‹‹ pendant 10secondes.
Le voyant x s'allume intensément. Effleurez un symbole
quelconque. Les voyants s'éteignent et le signal sonore
s'arrête.
Corriger ou supprimer la durée
Sélectionnez le foyer et effleurez le symbole 0. Le
voyant
x s'allume intensément. Dans la zone de
réglage, modifiez la durée ou réglez sur
‹‹.
Remarque : Vous pouvez régler la durée de chauffe
jusqu'à 99minutes.
Minuterie automatique
Cette fonction permet de présélectionner une durée de
chauffe pour tous les foyers. Après chaque
enclenchement d'un foyer, ce dernier s'allumera pendant
la durée présélectionnée. Le foyer s'éteint
automatiquement après ce délai.
Pour savoir comment activer la minuterie automatique,
consultez le chapitre Réglages de base.
Remarque : Vous pouvez modifier la durée de chauffe
ou désactiver la minuterie automatique pour chaque
foyer :
Sélectionnez le foyer et effleurez le symbole 0. Le
voyant souhaité
x s'allume intensément. Modifiez la
durée dans la zone de réglage ou réglez sur
‹‹.
Minuteur
Le minuteur vous permet de régler une durée de chauffe
allant jusqu'à 99minutes. Il est indépendant des autres
réglages.
Mise en marche du minuteur
Vous pouvez activer le minuteur de 2façons différentes :
▯ Un foyer étant sélectionné, effleurez 2fois le symbole
0 dans un intervalle de 10 secondes.
▯ Sans foyer sélectionné, effleurez le symbole 0.
Le voyant V s'allume.
Régler le minuteur
Réglez le temps souhaité dans la zone de réglage.
Après écoulement du temps sélectionné
Un signal retentit une fois le temps écoulé. Le symbole
‹‹ s'allume dans l'affichage du minuteur. Le voyant V
du minuteur s'allume. Il s'éteint après 10 secondes.
Afficher le temps
Sélectionnez le minuteur au moyen du symbole 0. Le
temps s'affiche pendant 10 secondes.
Corriger le temps
Sélectionnez le minuteur a moyen du symbole 0 et
procédez à un nouveau réglage.
sécurité-enfants
La sécurité-enfants vous permet d'empêcher que des
enfants allument la table de cuisson.
Activer et désactiver la verrouillage à l’epreuve des
enfants
La table de cuisson doit être éteinte.
Activer : effleurez le symbole D pendant environ
4 secondes. Le voyant lumineux au-dessus du symbole
D s'allume pendant 10 secondes. La table de cuisson
est verrouillée.
Désactiver : effleurez le symbole D pendant environ
4 secondes. Le verrouillage est désactivé.

29
Verrouillage automatique du panneau
Cette fonction fait automatiquement activer le
verrouillage du panneau à chaque fois que l’on éteint la
table de cuisson.
Activation et désactivation
Consultez la section sur les « Réglages de base ».
Verrouillage temporaire
Si vous essuyez le bandeau de commande lorsque la
table de cuisson est allumée, vous risquez d'activer des
commandes et de modifier des réglages.
Pour éviter cela, votre table de cuisson est dotée d'une
fonction de verrouillage temporaire des commandes.
Effleurez le symbole - D. Un signal retentit et le voyant
lumineux au-dessus du symbole s'allume. Le bandeau de
commande est verrouillé pendant 30secondes. Vous
pouvez essuyer le bandeau de commande sans modifier
des réglages.
Remarque : L'interrupteur principal est exclu de la
fonction de verrouillage. Vous pouvez éteindre la table
de cuisson à tout moment.
Durée limitée automatique
Si un élément est utilisé pour une période prolongée
sans qu'aucun changement de réglage ne soit effectué,
la fonction de durée limitée automatique sera activée.
L'élément cessera de chauffer. ”‰ et l'indicateur de
chaleur résiduelle
•œ clignoteront en alternance à
l'écran.
L'indicateur s'éteindra lorsque n'importe quel symbole
est touché. L'élément peut ensuite être réinitialisé.
Le moment d'activation de la durée limitée automatique
dépend du niveau de chaleur choisi (de 1à 10heures).
Réglages de base
L'appareil a plusieurs réglages de base. Vous pouvez
modifier ces réglages selon vos préférences de cuisson.
Affichage Fonction
™‚
Verrouillage automatique à l'épreuve des enfants
‹ Off* (Arrêt)
‚ On (Marche)
™ƒ
Signaux sonores
‹ Signal sonore de confirmation et signal d'erreur désactivés
‚ Signal d'erreur seulement activé
ƒ Signal sonore de confirmation seulement activé
„ Tous les signaux activés*
™†
Minuterie automatique
‹ Off* (Arrêt)
‚-ŠŠ Temps d'arrêt automatique
™‡
Longueur du signal de fin de minuterie
‚ 10secondes*
ƒ 30secondes
„ 1minute
™Š
Temps sélectionné pour élément chauffant
‹ Unlimited* (Illimité): Vous pouvez régler les réglages du dernier élément chauffant utilisé en tout
temps sans avoir à le sélectionner de nouveau
‚Restricted (Restreint) : Vous pouvez régler les réglages du dernier élément chauffant utilisé dans les
10secondes suivant sa sélection. Après ce délail, il vous faudra resélectionner l'élément chauffant avant
de le régler.
™‹
Réinitialisation aux réglages de base
‹ Off* (Arrêt)
‚ Réinitialisation de l'appareil aux réglages de base
*réglages d'usine
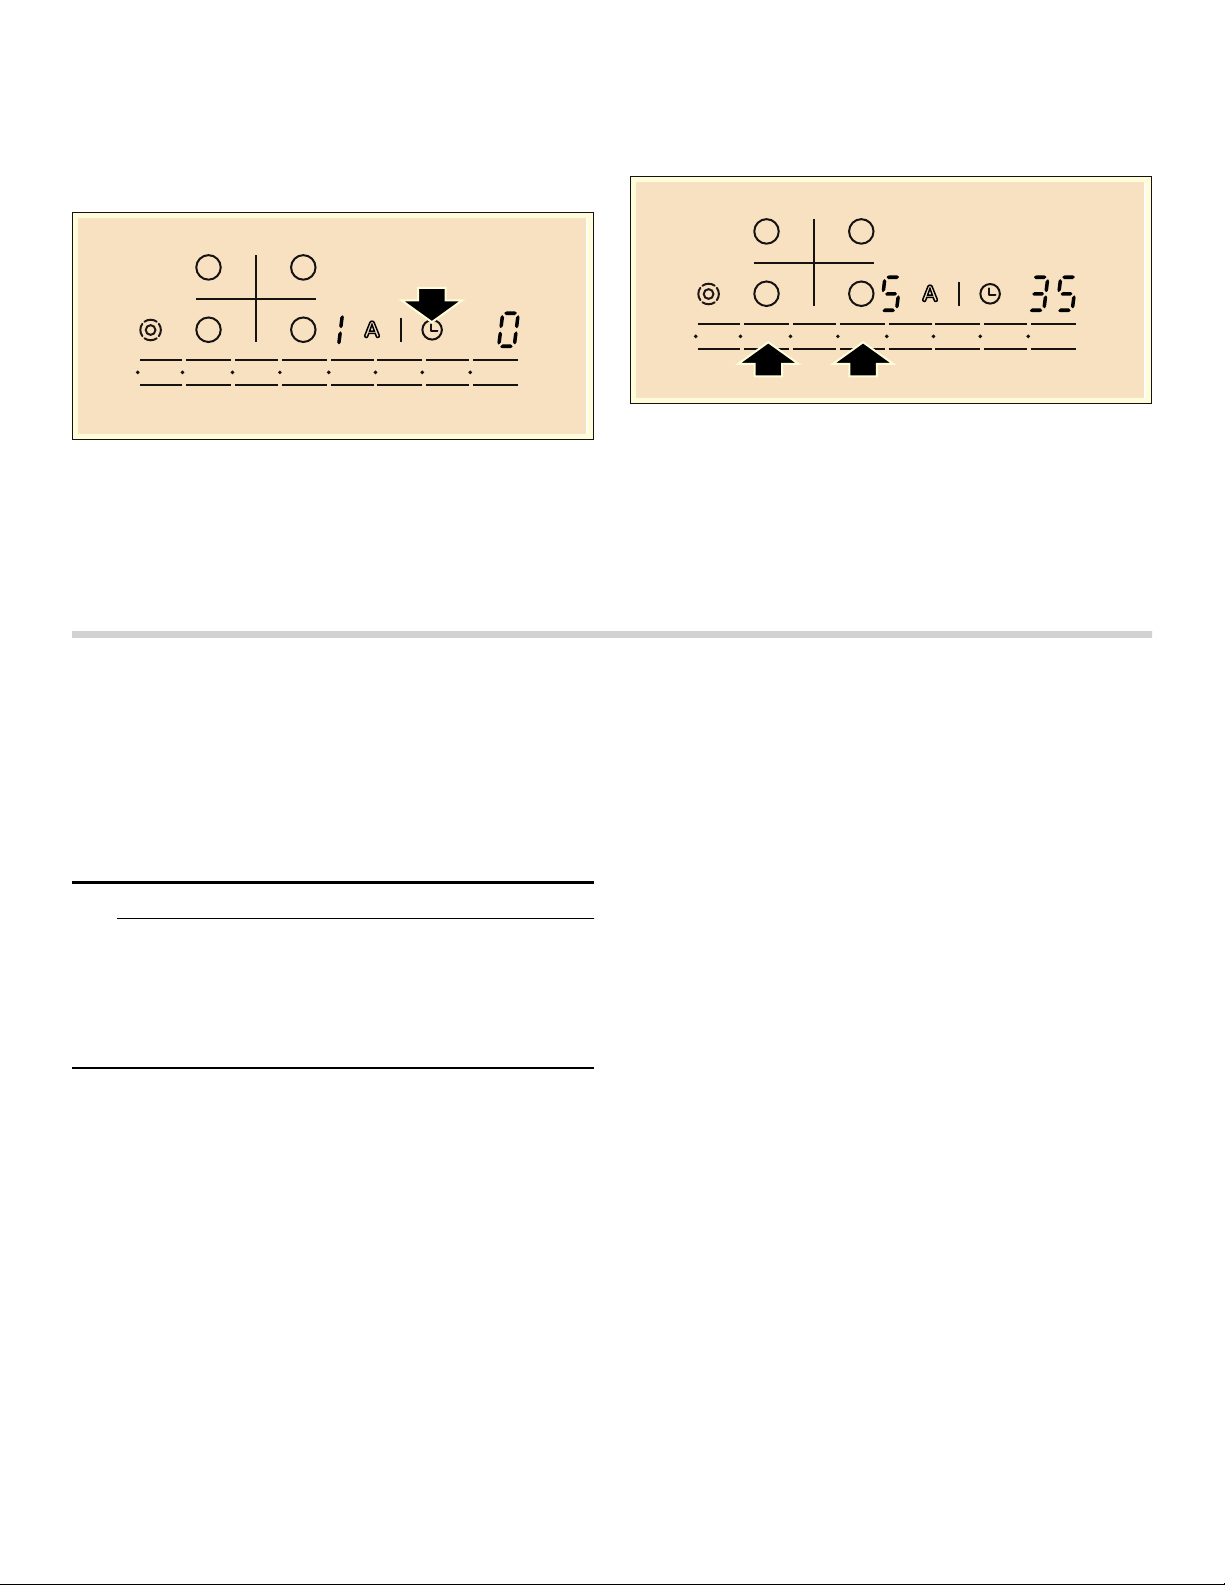
30
Modifier les réglages de base
La table de cuisson doit être éteinte.
1.
Allumez la table de cuisson.
2.
Dans les 10 secondes suivantes, effleurez le symbole
0 pendant 4secondes
™ et‚ clignotent en alternance dans l'affichage gauche et
‹ est allumé dans l'affichage droite.
3.
Effleurez à plusieurs reprises le symbole 0, jusqu'à ce
que le voyant souhaité apparaisse dans l'affichage
gauche.
4.
Réglez la valeur souhaitée dans la zone de réglage.
5.
Effleurez le symbole 0 pendant 4secondes.
Le réglage est activé.
Extinction
Pour quitter le réglage de base, éteignez la table de
cuisson avec l'interrupteur principal et procédez à un
nouveau réglage.
Nettoyage et Entretien
Nettoyage quotidien
Remarque : Les recommandations de nettoyants sont
fournies à titre indicatif et n'ont pas valeur de promotion
d'une marque particulière.
Table de cuisson vitrocéramique
9 ATTENTION
N'appliquez pas de nettoyant sur le verre lorsque la
surface est chaude, utilisez seulement le grattoir à
lame de rasoir. Les vapeurs générées à cette
occasion peuvent être nocives pour la santé.
L'échauffement du nettoyant peut provoquer une
attaque chimique de la surface.
Nettoyer la surface lorsqu'elle est parfaitement froide,
sauf dans les cas suivants : enlever immédiatement le
sucre sec, le sirop de sucre, les produits à base de
tomate et le lait au moyen du grattoir à lame de rasoir
(voir le tableau spécial d'entretien).
Essuyer les projections avec une éponge humide propre
ou du papier essuie-tout. Rincer et sécher. Utiliser du
vinaigre blanc s'il reste des taches ; rincer.
Appliquer une petite quantité du nettoyant pour tables de
cuisson en vitrocéramique. Si la surface est sèche, la
polir avec du papier essuie-tout ou un chiffon propre.
Moulures latérales en acier inoxydable
Lors du nettoyage, utiliser une éponge à récurer. Pour
les saletés modérées ou tenaces, utiliser un nettoyant en
poudre doux, tel que BonAmi® ou Soft Scrub® (sanse
chlore).
Essuyer avec une éponge humide ou un linge humide,
rincer et sécher.
Instructions de nettoyage
Utilisez les produits nettoyants en petites quantités ;
appliquez le nettoyant sur un papier essuie-tout ou un
chiffon propre et sec. Passez sur la surface et polissez
avec un chiffon sec et propre.
Pour obtenir les meilleurs résultats, utilisez des
nettoyants pour table de cuisson en vitrocéramique
comme BonAmi®, Soft Scrub®(sans eau de Javel), et
du vinaigre blanc.
Éviter ces nettoyants
▯ Nettoyants à vitres contenant de l'ammoniaque ou un
agent chloré de blanchiment. Ces ingrédients peuvent
endommager ou colorer durablement la table de
cuisson.
▯ Nettoyants caustique - les nettoyants comme Easy
Off® peuvent colorer la surface de la table de cuisson.
▯ Nettoyants abrasifs.
▯ Les tampons à récurer en métal et éponges à laver,
comme Scotch Brite®, peuvent rayer ou laisser des
marques dans le métal.
▯ Les tampons à récurer savonneux, comme SOS®,
peuvent rayer la surface.
▯ Les nettoyants en poudre contenant un agent chloré
de blanchiment peuvent colorer durablement la table
de cuisson.
▯ Les nettoyants inflammables, tels l'essence à briquet
ou WD-40.

31
Tableau de nettoyage
Entretien
Cet appareil ne requiert pas d'autre entretien qu'un
nettoyage quotidien. Pour obtenir les meilleurs résultats,
appliquer chaque jour une crème de nettoyage pour
tables de cuisson.
Type de salissures Solution possible
Sucre sec, sirop de sucre, lait ou morceaux de tomates.
Film ou feuille de plastique fondu. Il faut ENLEVER
IMMEDIATEMENT tous ces dépôts. Si vous ne les enle-
vez pas tout de suite, vous risquez d'endommager dura-
blement la surface.
Enlever ces salissures pendant que la surface est encore
chaude, à l'aide du grattoir à lame de rasoir. Mettre une
lame neuve et bien affûtée dans le grattoir. Enlever la
poêle et éteindre le foyer. Porter des gants de cuisinier,
tenir le grattoir avec un angle de 30°, veiller à ne pas
rayer le verre. Enlever les salissures de la zone chauffée.
Une fois que la surface a refroidi, enlever les résidus et
appliquer un nettoyant pour table de cuisson en vitrocé-
ramique.
9 AVERTISSEMENT
RISQUE DES LÉSIONS
La lame est très aiguisée. Risque de coupures. Pro-
téger la lame quand elle n'est pas utilisée. Rempla-
cer immédiatement la lame si elle présente des
imperfections.
Aliments brûlés, traînées foncées et taches Ramollir pendant 30minutes en plaçant un papier
essuie-tout ou une éponge humide sur la salissure. Utili-
ser un tampon à récurer en plastique et un nettoyant
pour tables de cuisson en vitrocéramique ou bien le grat-
toir à lame de rasoir. Rincer et sécher.
Projections de graisse Utiliser une éponge ou une lavette savonneuse pour
enlever la graisse ; rincer soigneusement et sécher.
Appliquer un nettoyant pour tables de cuisson en vitrocé-
ramique.
Marques laissées par le métal : Tache chatoyante Les poêles contenant de l'aluminium, du cuivre ou de
l'inox peuvent laisser des marques. Dans ce cas, il faut
traiter avec un nettoyant pour tables de cuisson en vitro-
céramique dès que la surface a refroidi. Si cela ne suffit
pas à enlever les marques, essayer avec un produit
abrasif doux (Bon Ami®, Soft Scrub® sans eau de Javel)
et du papier essuie-tout humide. Rincer et réappliquer du
nettoyant pour tables de cuisson en vitrocéramique. Si
vous n'enlevez pas avant la prochaine cuisson les
marques laissées par le métal, vous aurez beaucoup de
mal à le faire plus tard.
Taches d'eau calcaire :
Liquides de cuisson ayant débordé sur la surface
Les minéraux contenus dans certaines eaux peuvent être
transférés à la surface et générer des taches. Utiliser du
vinaigre blanc non dilué, rincer et sécher. Remettre en
état avec du nettoyant pour tables de cuisson en vitrocé-
ramique. Enlever les traces de débordement et les
taches avant de réutiliser la table de cuisson.
Rayures de surface :
Les petites rayures sont courantes et n'affectent pas la
cuisson. Elles se polissent et sont moins visibles si le net-
toyant pour tables de cuisson en vitrocéramique est appli-
qué quotidiennement.
Appliquer un nettoyant pour tables de cuisson en vitrocé-
ramique avant l'utilisation, afin d'éliminer les grains de
sable ou autres (sel et épices). Pour réduire les rayures,
utiliser des poêles à fonds lisses, propres, et les sécher
avant utilisation. Utiliser chaque jour le nettoyant pour
tables de cuisson en vitrocéramique recommandé.
AVIS : les anneaux en diamant peuvent rayer la surface.

32
Entretien
Dépannage
Avant de contacter le Service Après-Vente, veuillez
songer à suivre les suggestions et les instructions ci-
dessous :
9 ATTENTION
Les réparations devraient être effectuées
uniquement par un réparateur autorizé.
Des réparations inappropriées sur votre appareil
peuvent mener à des risques de blessures graves
ou de décès.
L'électronique de votre table de cuisson est située sous
le bandeau de commande. Dans cette zone, la
température peut fortement augmenter pour différentes
raisons.
Pour protéger l'électronique, les foyers seront
automatiquement coupés en cas de surchauffe. Dans ce
cas, le voyant ”ƒ, ”…, ou ”† apparaît en alternance
avec l'indicateur de chaleur résiduelle • ou œ.
Remarques
▯ La table de cuisson est dotée d’un dispositif
d’autorégulation qui allume et éteint la source de
chaleur. Cela signifie que la source de chaleur sous
l’élément, qui dégage un lueur rouge, n’est pas
toujours visible. Lorsque vous sélectionnez un réglage
bas de chaleur, l’élément s’éteint plus souvent tandis
qu’avec un réglage élevé de chaleur, il ne s’éteint
qu’occasionnellement. Même au réglage le plus élevé,
la source de chaleur s’allume et s’éteint.
▯ Un léger bourdonnement se fera peut-être entre
lorsque l’élément est en train de chauffer. La
luminosité de la lueur peut varier d’un élément à
l’autre. Selon la logne de vision, il se peut que la lueur
rouge dépasse le rebord marqué de l’élément
chauffant. Ce sont des caractéristiques techniques.
Elles n’ont pas d’impact sur la qualité ou le
fonctionnement.
▯ En raison des caractéristiques du matériau, certaines
irrégularités peuvent se trouver sur la surface de
vitrocéramique. En raison de la surface douce en
miroir de la table de cuisson, il est possible que des
petites bulles de moins de 1 mm de diamètre soient
visibles. Ces bulles ne nuisent pas à la fonctionnalité
ou à la durabilité de la surface de cuisson en
vitrocéramique.
Affichage Panne Solution
Aucun L'alimentation électrique est coupée. Vérifiez le disjoncteur général de l'appareil. À l'aide
d'autres appareils électroniques, vérifiez s'il y a une panne
de courant sur le circuit.
Tous les voyants
clignotent
La surface de commande est mouil-
lée ou un objet est posé dessus.
Séchez la surface de commande ou enlevez l'objet.
”ƒ
Plusieurs foyers ont été utilisés sur
une période prolongée avec une
puissance élevée. Le foyer a été
coupé pour protéger l'électronique.
Patientez quelques instants. Effleurez une surface de com-
mande quelconque. Lorsque ”ƒ s'éteint, l'électronique a
suffisamment refroidi. Vous pouvez continuer à cuisiner.
”… Malgré la coupure par ”ƒ, l'électro-
nique a continué à chauffer. C'est
pourquoi tous les foyers ont été cou-
pés.
Patientez quelques instants. Effleurez une surface de com-
mande quelconque. Lorsque ”… s'éteint, vous pouvez
continuer à cuisiner.
Ӡ et le niveau
de cuisson cli-
gnotent en alter-
nance. Un signal
sonore retentit.
Attention : un récipient chaud est
placé dans la zone du bandeau de
commande. L'électronique risque de
surchauffer.
Enlevez la casserole. Le signal dl'anomalie s'éteint peu de
temps après. Vous pouvez continuer à cuisiner.
Ӡ et signal
sonore
Un récipient chaud est placé dans la
zone du bandeau de commande. Le
foyer a été coupé pour protéger
l'électronique.
Enlevez la casserole. Patientez quelques instants. Effleu-
rez une surface de commande quelconque. Lorsque Ӡ
s'éteint, vous pouvez continuer à cuisiner.
”‰
Le foyer est resté trop longtemps
allumé et s'est coupé.
Vous pouvez immédiatement rallumer le foyer.

33
▯ Selon le type de comptoir de votre cuisine, un petit
intervalle irrégulier peut se former entre la table de
cuisson et le comptoir. C’est pour cette raison qu’un
joint d’étanchéité flexible est placé tout autour de la
table de cuisson.
Comment bénéficier du service de
garantie
Pour obtenir un service de garantie pour votre produit,
contactez le centre de service autorisé Bosch le plus
près de chez vous.
Numéro E et numéro FD:
Quand vous contactez notre service, veuillez avoir à
portée de main le numéro de modèle (E) et le numéro
FD de votre appareil. Vous pouvez trouver la plaque
signalétique avec ces numéros sur le dessous de
l'appareil et dans le livret de l'appareil. Pour ne pas avoir
à chercher longtemps en cas de besoin, vous pouvez
inscrire ici les références de l'appareil et le numéro de
téléphone du service après-vente.
Vous avez encore des questions? N'hésitez pas à nous
contacter. Nous nous ferons un plaisir de vous servir!
ÉNONCÉ DE LA GARANTIE LIMITÉE
Couverture de la garantie :
La garantie limitée fournie par BSH Home Appliances
Ltd. (« BSH ») dans le présent énoncé de garantie limitée
s’applique seulement aux Bosch appareil (« Produit »)
vendu au premier acheteur, en autant que le produit ait
été acheté :
▯ pour une utilisation normale résidentielle (non
commerciale), et qu’en fait en tout temps a été utilisé
pour un usage domestique normal ;
▯ nouveau au détail (non en montre, tel quel ou un
retour), qu’il n’est pas destiné à la revente ni à un
usage commercial et ;
▯ aux États-Unis ou au Canada et qu’il est demeuré en
tout temps dans le pays où l’appareil a été acheté.
Les garanties données ici s’appliquent seulement au
premier acheteur du produit et ne sont pas transférables.
S’assurer de retourner la carte d’enregistrement,
quoiqu’elle n’est pas nécessaire pour la garantie, c’est la
façon dont BSH peut vous aviser dans le cas d’un avis
de rappel ou de sécurité du produit.
Durée de la garantie
BSH garantit que le produit ne présente aucun défaut de
matériaux ou de fabrication pour une période trois cent
soixante cinq (365) jours à compter de la date d’achat.
La durée commence à la date d’achat et ne sera pas
allongée, prolongée, interrompue pour quelle que raison
que ce soit.
Ce Produit est également garanti contre tout défaut de
matériau et de fabrication apparent (tels les éraflures sur
l'acier inoxydable, les défauts d'aspect de la peinture ou
de la porcelaine, les ébréchures, les bosselures, ou
autres dégâts au fini du Produit), pendant une période de
trente (30) jours à compter de la date d'achat ou de la
date de clôture pour une nouvelle construction. Cette
garantie relative à l'apparence exclut les légères
variations de couleur découlant des différences
inhérentes aux pièces peintes et en porcelaine, ainsi que
découlant des différences causées par l'éclairage de
cuisine, l'emplacement du produit ou d'autres facteurs
similaires. Cette garantie relative à l'apparence exclut
plus particulièrement tout appareil électroménager en
exposition, de plancher, « En l'état » ou de stock « B ».
Réparation ou remplacement comme
solution exclusive
Pendant la période de garantie, BSH ou un de ses
centres de service autorisés réparera le produit sans
frais (sujet à certaines limitations indiquées dans le
présent document), si le produit présente un défaut de
fabrication ou de matériaux. Si des tentatives
raisonnables pour réparer le produit sont vaines, alors
BSH remplacera le produit (un modèle supérieur peut
être disponible, à la seule discrétion de BSH, moyennant
des frais additionnels). Toutes les pièces ou les
composants enlevés demeurent la seule propriété de
BSH. Toute pièce et tout composant réparés doit être
identique à la pièce d’origine à des fins de cette garantie
et la garantie ne sera pas prolongée en regard de telles
pièces. La seule responsabilité de BSH est de faire
réparer le produit défectueux par un centre de service
autorisé pendant les heures d’affaires normales. Pour la
sécurité et éviter des dommages à la propriété, BSH
N° E N° FD
Service après-vente O
0DLQ6WUHHW6XLWH
,UYLQH&$
ZZZERVFKKRPHFRP

34
recommande fortement de ne pas réparer le produit soi-
même, par une personne non qualifié ; BSH ne sera pas
tenu responsable des réparations ou du travail effectué
par une personne non autorisée. Si le consommateur
désire faire réparer par une personne autre qu’une
personne autorisée, CETTE GARANTIE EST
AUTOMATIQUEMENT NULLE ET NON AVENUE. Les
centres de service autorisés sont les personnes ou les
compagnies qui ont été spécialement formées sur les
produits BSH et qui possèdent, selon l’opinion de BSH,
une réputation supérieure pour le service à la clientèle et
la capacité technique (il est à noter qu’elles sont des
entités indépendantes et non des agents, partenaires,
affiliations ou représentants de BSH). Nonobstant ce qui
suit, BSH ne sera pas tenu responsable d’aucune façon
si le produit est situé dans une région éloignée
(supérieure à 100miles d’un centre de service autorisé)
ou n’est pas accessible de façon raisonnable, dans un
environnement hasardeux, dangereux ; dans une telle
éventualité, à la demande du consommateur, BSH
pourrait payer les frais de main-d’oeuvre et de pièces et
expédier les pièces à un centre de service autorisé le
plus près, mais le consommateur serait entièrement
responsable pour toute durée de déplacement et autres
frais spéciaux encourus par le centre de service, en
autant qu’il accepte l’appel de service.
Produit hors garantie
BSH n’a aucun obligation, par loi ou autre, d’offrir toute
concession, incluant réparation, prorata ou
remplacement de produit une fois la garantie expirée.
Exclusions à la garantie
La couverture de garantie décrite aux présentes exclut
tout défaut ou dommage qui n'est pas une faute directe
de BSH, y compris sans limitation, un ou plusieurs des
cas suivants :
▯ utilisation du produit autre qu’un usage normal,
habituel et de la façon destinée (incluant sans
limitation toute forme d’utilisation commerciale,
d’utilisation ou de rangement d’un produit pour
l’intérieur à l’extérieur, utilisation du produit de concert
avec un transporteur aérien ou marin) ;
▯ mauvaise conduite, négligence, mauvaise utilisation,
abus, accidents, fonctionnement inadéquat, mauvais
entretien, installation inadéquate ou négligente,
altération, manquement d’observer les instructions de
fonctionnement, mauvaise manipulation, service non
autorisé (incluant réparation par le consommateur ou
exploration du fonctionnement interne du produit) ;
▯ ajustement, modification ou altération de toute sorte ;
▯ manquement à la conformité des normes applicables
fédérales, provinciales, municipales ou électrique du
pays, codes de plomberie et/ou de construction,
réglementation ou lois, incluant le manquement
d’installer le produit en stricte conformité avec les
codes et réglementations de construction et
d’incendie locaux ;
▯ usure ordinaire, déversements d’aliments, liquide,
accumulation de graisse ou autres substances
accumulées dans, sur ou autour du produit ;
▯ toute force ou tout facteur externe, élémentaire et/ou
environnemental, incluant sans limitation, pluie, vent,
sable, inondation, incendie, coulée de boue, gel,
humidité excessive et exposition prolongée à
l’humidité, foudre, surtension, problème de structure
autour de l’appareil et actes de Dieu.
En aucun cas, BSH ne sera tenu responsable des
dommages survenus à la propriété, incluant les
armoires, planchers, plafonds et autres objets ou
structures autour du produit. Également exclus de la
garantie sont des produit sur lequel le numéro de série a
été modifié, altéré, effacé, enlevé ; appel de service pour
enseigner le fonctionnement du produit ou les visites où
il n’y a aucun problème avec le produit ; correction de
problèmes d’installation (le consommateur est seul
responsable pour toute structure et tout réglage du
produit, incluant l’électricité, la plomberie et autres
connexions nécessaires, pour un plancher/fondation
appropriée, et pour toute modification incluant, sans
limitation, armoire, mur, plancher, tablette, etc.) et la
remise de coupe-circuit ou remplacement de fusible.
SELON LA PORTÉE PERMISE PAR LA LOI, CETTE
GARANTIE DONNE DES SOLUTIONS EXCLUSIVE
RELATIVEMENT AU PRODUIT, QUE LA RÉCLAMATION
SURVIENNE PAR CONTRAT OU TORT (INCLUANT
RESPONSABILITÉ STRICTE OU NÉGLIGENCE) OU
AUTRE. CETTE GARANTIE EST EN LIEU DE TOUTE
AUTRE GARANTIE, EXPRESSE OU IMPLICITE, TOUTE
GARANTIE PAR LOI, À DES FINS DE
COMMERCIALISATION OU À DES FINS
PARTICULIÈRES, OU AUTRE, SERA EN VIGUEUR
SEULEMENT POUR LA PÉRIODE EFFECTIVE DE LA
GARANTIE LIMITÉE EXPRESSE. EN AUCUN CAS, LE
FABRICANT NE PEUT ÊTRE TENU RESPONSABLE DES
DOMMAGES ACCESSOIRES, SPÉCIAUX, INDIRECTS,
PERTES D’AFFAIRES, ET/OU DOMMAGES PUNITIFS,
PERTES, FRAIS INCLUANT SANS LIMITATION LE
MANQUEMENT AU TRAVAIL, REPAS À L’HÔTEL ET/OU
AU RESTAURANT, FRAIS DE REMODELAGE
SURVENUS À CAUSE DE DOMMAGES DIRECTS
DÉFINITIVEMENT CAUSÉS EXCLUSIVEMENT PAR BSH
OU AUTRE. CERTAINS ÉTATS NE PERMETTENT PAS
L’EXCLUSION OU LA LIMITATION DES DOMMAGES
ACCESSOIRES OU INDIRECTS ET NE PERMETTENT
PAS LA LIMITATION SUR LA DURÉE D’UNE GARANTIE
IMPLICITE, PAR CONSÉQUENT LES LIMITATIONS
SUSMENTIONNÉES PEUVENT NE PAS S’APPLIQUER.
CETTE GARANTIE DONNE DES DROITS SPÉCIFIQUES
ET IL PEUT Y EN AVOIR D’AUTRES QUI VARIENT D’UN
ÉTAT À L’AUTRE.
Aucune tentative de modifier, changer ou amender cette
garantie ne peut être effective sansle consentement écrit
autorisé par un officier de BSH.


1901 Main Street, Suite 600 • Irvine, CA 92614 • 800-944-2904
www.bosch-home.com • © 2018 BSH Home Appliances
*9000897470*
9000897470
981217