
DEHUMIDIFIER
OWNER'S
MANUAL
http://www.LGEservice.com
e-mail
http://www.LGEservice.com/techsup.html
As
an
ENERGY
STAR
Partner,
LG
Electronics
Inc.
has
Determined
that
this
product
meets
the
ENERGY
STAR
guidelines
for
energy
efficiency.
Please
read
the
operating
instructions
and
safety
precautions
carefully
and
tho
roughly
before
operating
your
dehumidifier.
You
can
refer
to
the
Energy
Star
program
in
detail
at
"www.energystar.gov"
MODEL:
DH3011B,
DH4010E,
DH5010E
(DH4010E/DH5010E)

2
Inside
you
will
find
many
helpful
hints
on
how
to
use
and
maintain
your
dehumidifier
properly.
Just
a
little
preventive
care
on
your
part
can
save
you
a
great
deal
of
time
and
money
over
the
life
of
your
dehumidifier.
You'll find
many
answers
to
common
problems
in
the
chart
of
Troubleshooting
Tips.
If
you
review
our
chart
of
Troubleshooting
Tips
first,
you
may
not
need
to
call
for
service
at
all.
READ
THIS
MANUAL
PRECAUTION
Safety
Precautions
.....3
Operating
Instructions.................5
Installation
Instructions.................8
Care
and
Maintenance
..............9
Troubleshooting
Tips............................10
Warranty.....Back
cover
Customer
Assistance
Numbers
....Back
cover
FOR
YOUR
RECORDS
Write
the
model
and
serial
numbers
here:
You
can
find
them
on
a
label
on
the
back
of
the
dehumidifier
behind
the
bucket.
Model
#
Serial
#
Dealer's
Name
Date
Purchased
Staple
your
receipt
here.
?
Contact
an
Authorized
Service
Center
for
repair
or
maintenance
of
this
unit.
?
The
dehumidifier
is
not
intended
for
use
by
young
children
or
invalids
without
supervision.
?
Young
children
should
be
supervised
to
ensure
that
they
do
not
play
with
the
dehumidifier.

3
WARNING
WARNING
Benzene
SCOURING
CLBARGER
SINNER
Safety
Precautions
Read
all
instruction
before
using.
To
prevent
injury
to
the
user
or
other
people
and
property
damage,
the
following
instructions
must
be
followed.
Incorrect
operation
due
to
ignoring
instructions
will
cause
harm
or
damage;
the
seriousness
is
classified
by
the
following
indications.
Meanings
of
symbols
used
in
this
manual
are
as
shown
below.
WARNING
This
symbol
indicates
the
possibility
of
death
or
serious
injury.
CAUTION
This
symbol
indicates
the
possibility
of
injury
or
damage
to
properties
only.
Be
sure
not
to
do.
Be
sure
to
follow
the
instruction.
Complete
all
grounding
and
installation
requirements
as
described
on
page
5.
?
Otherwise,
it
could
cause
electrical
shock
or
fire.
Disconnect
power
cord
from
receptacle
before
servicing
or
cleaning.
?
It
could
cause
electrical
shock
or
fire.
Do
not
use
flammable
fluids,
solvents,
abrasive
cleaners,
or
strong
detergents
to
clean
the
dehumidifier.
?
It
could
cause
fire
or
product
damage
hazard.
Do
not
plug
the
dehumidifier
in
until
the
outside
of
unit
is
completely
dry.
?
It
could
cause
electrical
shock
and
personal
injury
hazard.
Do
not
use
the
water
collected
in
the
bucket
for
drinking
purposes.
?
It
is
not
sanitary
and
could
cause
illness
or
personal
injury
hazard.
Do
not
clean
the
dehumidifier
while
it
is
plugged
in,
especially
if
it
is
wet.
?
It
may
cause
electrical
shock.

4
CAUTION
CAUTION
Be
sure
to
block
the
wheels
to
prevent
unit
from
falling
when
installed
on
a
table
or
shelf.
?
It
may
damage
the
dehumidifier
or
cause
other
damage
or
injury.
Be
sure
to
replace
bucket
properly
after
emptying
to
prevent
water
from
collecting
on
the
floor.
Make
sure
the
dehumidifier
is
the
correct
size
for
the
area
you
want
to
dehumidify.
Do
not
operate
switches
with
wet
hands.
?
It
may
cause
electrical
shock.
Install
the
dehumidifier
properly
on
a
floor,
table,
or
shelf
that
is
level
and
strong
enough
to
support
it
with
a
full
bucket
of
water.
?
It
should
withstand
around
90
lbs
(40kg)
weight.
Do
not
install
dehumidifier
in
an
area
where
temperatures
will
fall
below
65°F
(18°C.)
?
Low
temperatures
could
cause
coils
to
frost
and
unit
may
not
start.
Close
all
doors,
windows
and
other
outside
openings
to
the
room.
?
The
dehumidifier
must
be
operated
in
an
enclosed
area
to
be
most
effective.
When
the
unit
is
to
be
cleaned,
switch
it
off.
?
It
will
cause
electrical
shock
or
fire.
Do
not
put
a
pet
or
house
plant
where
it
will
be
exposed
to
direct
air
flow.
?
This
may
injure
the
pet
or
plant.

5
Air
Filter
Fan
Speed
Humidity
Control
Cabinet
Bucket
Auto
Shut-Off
Light
Front
Grille
3-prong
grounding
plug
Ground
prong
Power
supply
cord
3-prong
grounding
type
wall
receptacle
Operating
Instructions
Features
This
section
contains
captioned
illustrations
of
your
appliance.
Use
the
drawings
to
become
familiar
with
all
parts
and
features
and
what
they
look
like.
Electrical
requirements
OBSERVE
ALL
LOCAL
CODES
AND
ORDINANCES.
DO
NOT,
UNDER
ANY
CIRCUMSTANCES,
REMOVE
THE
POWER
SUPPLY
CORD
GROUND
PRONG.
Electrical
ground
is
required
on
this
appliance.
A
115-volt
60
Hz,
AC
only,
15A
fused
and
properly
grounded
electrical
supply
is
required.
A
time
delay
fuse
or
time
delay
circuit
breaker
is
recommended.
Use
a
dedicated
circuit,
serving
only
this
appliance.
Do
not
use
an
extension
cord.
Recommended
grounding
method
For
your
personal
safety,
this
appliance
must
be
grounded.
This
appliance
has
a
power
supply
cord
with
a
3-prong
grounding
plug.
To
minimize
possible
shock
hazard,
the
cord
must
be
plugged
into
a
mating
grounding
type
wall
receptacle,
grounded
in
accordance
with
the
National
Electrical
Code
(ANSI/NFPA
70)
latest
edition
and
all
local
codes
and
ordinances.
If
a
mating
wall
receptacle
is
not
available,
it
is
the
personal
responsibility
and
obligation
of
the
customer
to
have
a
properly
grounded
3-prong
wall
receptacle
installed
by
a
qualified
electrician.

6
High
Low
8
Humidity
Control
Fan
Speed
Auto
Shut-Off
Off
1
2
3
456
7
9
Max.
Off
1
2
3
45
6
7
8
9
Max.
Humidity
Control
Fan
Speed
Auto
Shut-Off
High
Low
Operating
your
dehumidifier
Control
Your
dehumidifier
has
a
control
panel
containing
an
indicator
and
two
controls
---
Auto
Shut-Off,
Fan
Speed,
and
Humidity
Control.
Auto
Shut-Off
---This
lamp
glows
when
the
bucket
fills
or
is
missing.
Fan
Speed
---
This
controls
the
speed
of
the
airflow.
Humidity
Control---
This
controls
the
moisture
in
the
room.
Unit
operation
1.
Turn
the
Humidity
Control
to
Off.
Plug
the
power
supply
cord
into
an
electrical
outlet.
2.
The
Humidity
Control
can
be
set
anywhere
between
Off
and
Max
for
normal
operation.
If
you
need
more
dehumidification,
turn
the
Humidity
Control
toward
Max.
If
you
need
less
dehumidification,
turn
the
Humidity
Control
toward
Off.
3.
Turn
the
Humidity
Control
to
Off
to
stop
the
unit
manually.
4.
If
you
want
to
control
the
speed
of
air
flow,
turn
the
Fan
Speed
toward
Low
or
High.
NOTE:
The
Fan
and
compressor
will
not
operate
for
two
minutes
to
protect
the
compressor
when
you
immediately
turn
on
the
unit
after
turning
off.
De-icer
control
(invisible)
The
Defrost
Control
senses
frost
build-up
on
the
evaporator
coil
and
automatically
shuts
off
the
compressor.
The
fan
continues
to
run,
drawing
air
across
the
coil,
and
melting
the
frost.
When
the
coil
is
defrosted,
the
compressor
automatically
restarts,
and
dehumidifying
resumes.
NOTE:
Do
not
operate
the
dehumidifier
at
temperature
below
65°F
(18°C.)
If
your
dehumidifier
runs
when
the
temperature
and
humidity
conditions
of
room
are
low,
frost
can
form
on
its
evaporator
coil.
This
interferes
with
proper
operation.
Therefore,
dehumidifying
performance
may
be
reduced.

7
Drill
Water
level
control
switch
Automatic
shut
off
The
dehumidifier
will
turn
off
automatically
when
the
bucket
is
full,
or
when
the
bucket
is
removed
or
not
replaced
in
the
proper
position.
The
bucket
must
be
replaced
in
the
proper
position
for
the
dehumidifier
to
work.
The
light
will
be
on
and
the
dehumidifier
will
not
run
if
the
bucket
is
not
in
the
proper
position.
Disposing
of
collected
water
1.
Empty
the
bucket
manually.
When
the
bucket
is
full,
pull
out
and
empty
it
into
a
large
sink
or
tub
and
then
replace
it
properly.
NOTE:
The
bucket
must
be
positioned
properly
making
sure
slots
on
the
back
of
bucket
are
positioned
correctly.
Do
not
overtighten
the
hose
when
connecting
it
to
the
bucket.
Use
a
rubber
washer
and
tighten
by
hand
firmly
without
stripping
the
plastic
threads.
2.
Place
the
dehumidifier
directly
over
drain.
The
bucket
has
a
threaded
hose
connection
which
can
be
left
open.
Drill
a
1/4"
(6.4
mm)
1/4"
is
big
enough
hole
in
the
center
of
the
hose
connection.
Once
opened,
the
hose
connection
will
continually
drain
water
from
the
bucket.
NOTE:
The
nozzle
cannot
be
fixed
after
puncture.
Use
an
ordinary
garden
hose
cap
to
reclose
if
necessary.
3.
Attach
a
length
of
garden
hose
to
the
threaded
bucket
drain
hose
connection
to
carry
water
to
the
drain.
When
being
attached
to
the
bucket
drain
hose
connection,
be
sure
the
hose
doesn't
kink
or
bend.
It
should
lie
flat
from
the
dehumidifier
to
the
drain.
NOTE:
The
hose
attachment
will
accept
a
standard
garden
hose
filling.
You
can
attach
a
screw-on
cap
to
use
the
bucket
without
a
hose.

8
12"
12"
Installation
Instructions
Installing
the
dehumidifier
properly
1.
Allow
at
least
12
inches
of
space
on
all
sides
of
the
unit
for
good
air
circulation.
2.
Install
your
dehumidifier
on
a
floor,
table,
or
shelf.
When
installing
the
dehumidifier
on
a
table
or
shelf,
make
sure
the
table
or
shelf
is
strong
enough
to
support
the
weight
of
the
dehumidifier
with
a
full
bucket.
Do
not
sit
or
stand
on
the
dehumidifier.
NOTE:
The
height
of
a
table
or
shelf
might
provide
a
better
position
from
which
to
handle
the
bucket
and
help
prevent
icing
of
the
coils
due
to
colder
air
near
the
floor
(such
as
in
a
basement).
3.
Lift
the
bucket
and
place
it
in
the
dehumidifier,
making
sure
the
slots
on
both
sides
of
the
bucket
are
positioned
correctly.
4.
Rollers
let
you
move
the
dehumidifier
easily.
Choosing
the
proper
location
for
your
dehumidifier
?
Use
the
dehumidifier
in
a
basement
to
help
prevent
moisture
damage.
?
Use
the
dehumidifier
in
laundry
drying,
bathing,
and
dishwashing
areas
which
have
excessive
moisture.
?
Use
the
dehumidifier
to
prevent
moisture
damage
anywhere
books
are
stored.

9
1
2
Care
and
Maintenance
Your
dehumidifier
is
designed
to
serve
you
year-
round.
It
needs
practically
no
attention.
However,
you
should
check
your
dehumidifier
and
inspect
the
coils
annually.
You
may
want
an
Authorized
Service
Center
to
perform
this
annual
checkup.
(Cost
of
the
inspection
is
the
owner's
responsibility.)
OR
If
you
are
familiar
with
electrical
appliances
and
their
functions,
listed
below
are
instructions
which
would
allow
you
to
perform
the
inspection
and
maintenance
for
yourself.
Cleaning
the
front
grille
and
case
Clean
the
front
grille
and
the
cabinet
with
a
soft
cloth,
warm
water,
and
a
mild
detergent.
Do
not
use
bleach
or
abrasives.
Cleaning
the
air
filter
1-1.
First,
flex
the
filter
at
the
lower
right
corner.
Second,
slide
the
upper
right
side
to
the
left.
Then,
release
all
of
the
tabs
and
remove
the
filter.
1-2.
Wash
air
filter
with
warm
water
and
a
mild
detergent.
Rinse
and
dry
it.
Replace
it
in
place.
Cleaning
the
coil
2-1.
Remove
air
filter
from
the
cabinet
regarding
to
the
above.
2-2.
Brush
the
coil
gently
like
arrow
in
the
figure,
if
necessary,
with
warm
water
and
a
mild
detergent.
Rinse
and
dry
them
thoroughly.
Be
careful
not
to
spray
the
coil
with
a
water
hose.
Be
careful!
Sharp
edges!
Electrical
Shock
Hazard
?
Disconnect
power
supply
cord
from
receptacle
before
performing
any
maintenance.
?
Be
careful
when
cleaning
the
coils.
Fins
are
sharp.
Failure
to
follow
the
above
precautions
could
result
in
electrical
shock
or
personal
injury.

10
Troubleshooting
Tips
Before
you
call
for
service,
review
this
list.
It
may
save
time
and
money.
The
list
includes
common
occurrences
that
are
not
the
result
of
defective
workmanship
or
materials
in
this
appliance.
FIND
YOUR
PROBLEM
HERE
DEHUMIDIFIER
DOES
NOT
OPERATE
DEHUMIDIFIER
RUNS
TOO
MUCH
FROST
APPEARS
ON
COILS
FAN
NOISE
Plug
is
disconnected
from
outlet.
The
fuse
is
blown/circuit
breaker
is
tripped.
The
dryness
level
you
selected
has
been
reached.
The
Auto
Shut-Off
light
is
on.
Dehumidifier
is
not
turned
on.
Humidity
Control
is
set
too
high.
Windows
or
doors
near
dehumidifier
are
open
to
outdoors.
Area
to
be
dehumidified
is
too
large.
Air
movement
through
dehumidifier
is
blocked.
Humidity
Control
is
set
at
Max.
Room
temperature
is
too
low.
(Room
temperature
is
below
65°F
(18°C.)
Air
is
moving
through
the
dehumidifier.
Push
plug
firmly
into
wall
outlet.
Check
the
house
fuse/circuit
breaker
box
and
replace
fuse
or
reset
the
breaker.
Dehumidifier
automatically
shuts
off
when
the
selected
amount
of
moisture
has
been
removed
from
the
air.
If
you
want
to
remove
more
moisture,
turn
the
humidity
Control
to
Max.
After
the
dehumidifier
starts,
reset
the
control
to
the
desired
setting.
Dehumidifier
automatically
shuts
off
when
the
bucket
is
full.
Empty
the
bucket
and
replace
it.
Turn
on
the
Humidity
Control.
Turn
the
Humidity
Control
to
a
lower
setting.
Close
all
windows
or
doors
to
outside.
Check
with
your
dealer
to
see
if
capacity
is
adequate.
Front
grille
may
be
dirty.
Use
a
brush
to
clean
the
grille.
Dehumidifier's
coils
on
the
back
of
unit
may
be
dirty.
Clean
the
soil
on
the
coils
of
the
back
of
the
unit.
Dehumidifier
must
be
placed
in
a
space
that
does
not
restrict
air
flowing
into
the
rear
coil
or
out
of
the
front
grille.
Dehumidifier
will
not
turn
off
if
Humidity
Control
is
at
Max.
Frost
will
usually
disappear
within
60
minutes.
This
is
a
normal
sound.
POSSIBLE
CAUSES
WHAT
TO
DO

11
DEHUMIDIFIER
DOES
NOT
DRY
THE
AIR
AS
IT
SHOULD
Dehumidifier
has
been
installed
or
restarted
recently.
Airflow
is
restricted.
The
control
may
not
be
set
high
enough.
Doors
and
windows
may
not
be
closed
tightly.
Clothes
dryer
may
be
blowing
moisture-laden
air
into
the
room.
Room
temperature
is
too
low.
?
The
more
moisture
in
the
room
air,
the
longer
it
takes
for
the
room
air
to
become
dry.
?
Make
sure
there
are
no
curtains,
blinds,
or
furniture
blocking
the
front
or
back
of
the
dehumidifier.
?
Turn
the
knob
to
a
higher
number.
?
Check
that
all
doors,
windows,
and
other
openings
are
securely
close.
?
Install
the
dehumidifier
away
from
the
dryer.
Dryer
should
be
vented
to
the
outside.
?
The
unit
will
not
operate
satisfactorily
if
the
room
temperature
is
below
65°F
(18°C.)
P/NO:3828A30059G
Printed
in
Korea
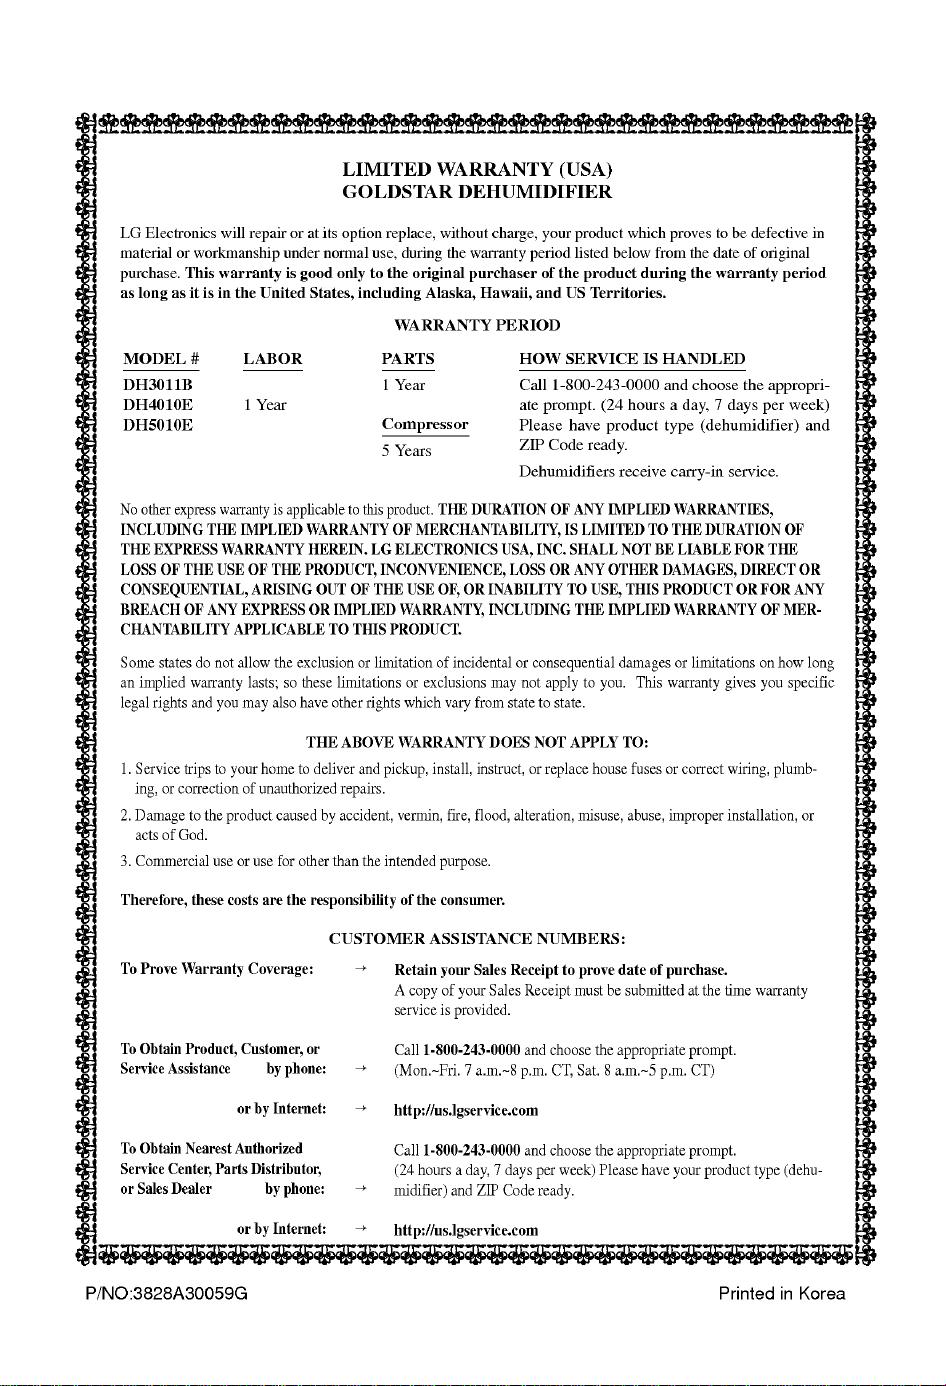
LIMITED
WARRANTY
(USA)
GOLDSTAR
DEHUMIDIFIER
LG
Electronics
will
repair
or
at
its
option
replace,
without
charge,
your
product
which
proves
to
be
defective
in
material
or
workmanship
under
normal
use,
during
the
warranty
period
listed
below
from
the
date of
original
purchase.
This
warranty
is
good
only
to
the
original
purchaser
of
the
product
during
the
warranty
period
as
long
as
it
is
in
the
United
States,
including
Alaska,
Hawaii,
and
US
Territories.
WARRANTY
PERIOD
No
other
express
warranty
is
applicable
to
this
product.
THE
DURATION
OF
ANY
IMPLIED
WARRANTIES,
INCLUDING
THE
IMPLIED
WARRANTY
OF
MERCHANTABILITY,
IS
LIMITED
TO
THE
DURATION
OF
THE
EXPRESS
WARRANTY
HEREIN.
LG
ELECTRONICS
USA,
INC.
SHALL
NOT
BE
LIABLE
FOR
THE
LOSS
OF
THE
USE
OF THE
PRODUCT,
INCONVENIENCE,
LOSS
OR
ANY
OTHER
DAMAGES,
DIRECT
OR
CONSEQUENTIAL,
ARISING
OUT
OF
THE
USE
OF,
OR
INABILITY
TO
USE,
THIS
PRODUCT
OR
FOR
ANY
BREACH
OF
ANY
EXPRESS
OR
IMPLIED
WARRANTY,
INCLUDING
THE
IMPLIED
WARRANTY
OFMER-
CHANTABILITY
APPLICABLE
TO
THIS
PRODUCT.
Some
states
do
not
allow
the
exclusion
or
limitation
of
incidental
or
consequential
damages
or
limitations
on
how
long
an
implied
warranty
lasts;
so
these
limitations
or
exclusions
may
not
apply
to
you.
This
warranty
gives
you
specific
legal
rights
and
you
may
also
have
other
rights
which
vary
from
state
to
state.
THE
ABOVE
WARRANTY
DOES
NOT
APPLY
TO:
1.
Service
trips
to
your
home
to
deliver
and
pickup,
install,
instruct,
or
replace
house
fuses
or
correct
wiring,
plumb-
ing,
or
correction
of
unauthorized
repairs.
2.
Damage
to
the
product
caused
by
accident,
vermin,
fire,
flood,
alteration,
misuse,
abuse,
improper
installation,
or
acts
of
God.
3.
Commercial
use
or
use
for
other
than
the
intended
purpose.
Therefore,
these
costs
are
the
responsibility
of the
consumer.
CUSTOMER
ASSISTANCE
NUMBERS:
To
Prove
Warranty
Coverage:
To
Obtain
Product,
Customer,
or
Service
Assistance
by
phone:
or
by
Internet:
To
Obtain
Nearest
Authorized
Service
Center,
Parts
Distributor,
or
Sales
Dealer
by
phone:
or
by
Internet:
Retain
your
Sales
Receipt
to
prove
date
of
purchase.
A
copy
of
your
Sales
Receipt
must
be
submitted
at
the
time
warranty
service
is
provided.
Call
1-800-243-0000
and
choose
the
appropriate
prompt.
(Mon.~Fri.
7
a.m.~8
p.m.
CT,
Sat. 8
a.m.~5
p.m.
CT)
http://us.lgservice.com
Call
1-800-243-0000
and
choose
the
appropriate
prompt.
(24
hours
a
day,
7
days
per
week)
Please
have
your
product
type
(dehu-
midifier)
and
ZIP
Code
ready.
http://us.lgservice.com
MODEL
#
DH3011B
DH4010E
DH5010E
LABOR
1
Year
PARTS
1
Year
Compressor
5
Years
HOW
SERVICE
IS
HANDLED
Call
1-800-243-0000
and
choose
the
appropri-
ate
prompt.
(24
hours
a
day,
7
days
per
week)
Please
have
product
type
(dehumidifier)
and
ZIP
Code
ready.
Dehumidifiers
receive
carry-in
service.


