
ASSEMBLY MANUAL / OWNER’S MANUAL
T628

2
Important Safety Instructions 3
Safety Warning Labels / Serial Number 6
Earthing Instructions 7
Emergency Stop Procedure 7
Speci¿cations
%efore $ssembly
Parts 9
Hardware 10
Tools 10
Assembly 11
Storage and Moving the Machine 23
Unfolding the Machine 24
Leveling the Machine 25
Features 26
Console Features 27
Bluetooth
®
Connectivity 30
Remote Heart Rate Monitor 31
Remote Speed and Incline Controls 32
Operations 33
Getting Started 33
Power Up / Idle Mode 34
Initial Setup 34
Quick Start Program 35
User Pro¿les 35
Pro¿le Programs 3
Compare Pacer Display 41
Fitness Score Display 42
Pausing or Stopping 43
Results / Cool Down Mode 43
GOAL TRACK Statistics 43
Console Setup Mode 45
Maintenance 46
Cleaning 46
Adjusting the Walking Belt 47
Aligning the Walking Belt 47
Lubricating the Walking Belt 4
Heart Rate Chest Strap Battery Replacement 49
Maintenance Parts 50
Troubleshooting 52
Nautilus, Inc., www.nautilusinternational.com | Nautilus, Inc., 5415 Centerpoint Parkway, Groveport, OH 43125 USA | Printed
in China | 2016 Nautilus, Inc. | Nautilus, the Cam logo, Nautilus T62, Nautilus Trainer, BowÀe[, Schwinn, and Universal
are trademarks owned by or licensed to Nautilus, Inc., which are registered or otherwise protected by common law in the
United States and other countries. Polar
®
, OwnCode
®
, Google
TM
, MyFitnessPal
®
, Under Armour
®
, WD-40
®
, and Lube-N-Walk
®
are trademarks of their respective owners. App Store is a service mark of Apple Inc. The Bluetooth
®
word mark and logos are
registered trademarks owned by Bluetooth SIG, Inc., and any use of such marks by Nautilus, Inc. is under license.
ORIGINAL MANUAL - ENGLISH VERSION ONLY
TABLE OF CONTENTS
To validate warranty support, keep the original proof of purchase and record the following information:
Serial Number __________________________
Date of Purchase ____________________
To register your product warranty, contact your local distributor.
For details regarding product warranty or if you have questions or problems with your product, please contact
your local Nautilus distributor. To ¿nd your local distributor, go to: www.nautilusinternational.com
3
IMPORTANT SAFETY INSTRUCTIONS
When using an electrical appliance, basic precautions should always be followed, including the following:
This icon means a potentially hazardous situation which, if not avoided, could result in death or serious
injury.
Obey the following warnings:
Read and understand all warnings on this machine.
Carefully read and understand the Assembly instructions. Read and understand the complete
Manual. Keep the Manual for future reference.
To reduce the risk of electrical shock or unsupervised usage of the equipment, always unplug this
machine from the electrical outlet immediately after using and before cleaning.
To decrease the risk of burns, electric shock, or injury to persons, read and understand the com-
plete Owner’s Manual. Failure to follow these guidelines can cause a serious or possibly fatal electrical shock or
other serious injury.
• Keep bystanders and children away from the product you are assembling at all times.
• Do not connect power supply to the machine until instructed to do so.
• The machine should never be left unattended when plugged in. Unplug from outlet when not in use, and before putting
on or taking off parts.
• Before each use, e[amine the machine for damage to power cord, loose parts or signs of wear. Do not use if found in
this condition. Contact your local distributor for repair information.
• Not intended for use by persons with medical conditions where those conditions may impact the safe operation of the
treadmill or pose a risk of injury to the user.
• Do not drop or put objects into any opening of the machine.
• Never operate this treadmill with the air openings blocked. Keep the air openings free of lint, hair and the like.
• Do not assemble this machine outdoors or in a wet or moist location.
• Make sure assembly is done in an appropriate work space away from foot traf¿c and e[posure to bystanders.
• Some components of the machine can be heavy or awkward. Use a second person when doing the assembly steps
involving these parts. Do not do steps that involve heavy lifting or awkward movements on your own.
• Set up this machine on a solid, level, horizontal surface.
• Do not try to change the design or functionality of this machine. This could compromise the safety of this machine and
will void the warranty.
• If replacement parts are necessary, use only genuine Nautilus replacement parts and hardware. Failure to use
genuine replacement parts can cause a risk to users, keep the machine from operating correctly and void the
warranty.
• Do not use until the machine has been fully assembled and inspected for correct performance in accordance with the
Manual.
• Use this machine only for its intended use as described in this manual. Do not use attachments not recommended by
the manufacturer.
• Do all assembly steps in the sequence given. Incorrect assembly can lead to injury or incorrect function.
• Connect this machine to a properly earthed outlet only (see Earthing Instructions).
• Keep the power cord away from heat sources and hot surfaces.
• Do not operate where aerosol products are being used.
• To disconnect, turn all controls to the off position, then remove plug from outlet.
• SAVE THESE INSTRUCTIONS.

4
Before using this equipment, obey the following warnings:
Read and understand the complete Manual. Keep the Manual for future reference.
Read and understand all warnings on this machine. If at any time the Warning labels become loose,
unreadable or dislodged, contact your local distributor for replacement labels.
To reduce the risk of electrical shock or unsupervised usage of the equipment, always unplug the
power cord from the wall outlet and the machine and wait 5 minutes before cleaning, maintaining or repairing the
machine. Place the power cord in a secure location.
• Children must not be let on or near to this machine. Moving parts and other features of the machine can be dangerous
to children.
• Not intended for use by anyone under 14 years of age.
• Consult a physician before you start an e[ercise program. Stop e[ercising if you feel pain or tightness in your
chest, become short of breath, or feel faint. Contact your doctor before you use the machine again. Use the values
calculated or measured by the machine’s computer for reference purposes only.
• Before each use, e[amine this machine for damage to power cord, power receptacle, loose parts or signs of wear. Do
not use if found in this condition. Contact your local distributor for repair information.
• Ma[imum user weight limit: 156. kg ( 350 lbs. ). Do not use if you are over this weight.
• Do not wear loose clothing or jewelry. This machine contains moving parts. Do not put ¿ngers or other objects into
moving parts of the e[ercise equipment.
• Always wear rubber soled athletic shoes when you use this machine. Do not use the machine with bare feet or only
wearing socks.
• Set up and operate this machine on a solid, level, horizontal surface.
• Use caution when you step on and off the machine. Use the supplied foot support platforms for stability before walking
on the moving belt.
• Disconnect all power before servicing this machine.
• Do not operate this machine outdoors or in moist or wet locations.
• To prevent injury, stand on the Foot Platforms before you start the machine or end a workout. Do not dismount the
machine by standing on the moving Walking Belts and e[iting off the rear of the unit (or machine).
• Keep at least 0.6 m ( 24” ) on each side of the machine and 2 m ( 79” ) behind the machine clear. This is the
recommended safe distance for access and passage around and emergency dismounts from the machine. Keep third
parties out of this space when machine is in use.
• Do not over e[ert yourself during e[ercise. Operate the machine in the manner described in this manual.
• Perform all regular and periodic maintenance procedures recommended in the Owner’s Manual.
• Read, understand, and test the Emergency Stop Procedure before use
• Keep the walking belt clean and dry.
• Do not drop or put objects into any opening of the machine.
• Do not stand on machine motor cover or front trim cover.
• Keep power cord away from heat source and hot surfaces.
• This machine must be connected to an appropriate, dedicated electrical circuit. Nothing else must be connected to the
circuit.
• Always connect the power cord to a circuit capable of handling at least 10 amperes with no other loads applied.
• Connect this machine to a correctly earthed outlet; consult a licensed electrician for assistance.
• Do not let liquids touch the electronic controller. If it does, the controller must be inspected and tested for safety by an
approved technician before it can be used again.
• Do not remove the machine motor cover or the rear roller cover, dangerous voltages and moving parts are present.
The components are serviceable only by approved service personnel.
• The electrical wiring for the residence in which the machine will be used must obey the applicable local and provincial
requirements.

5
• E[ercise on this machine requires coordination and balance. Be sure to anticipate that changes in belt speed and
incline angle of deck can occur during workouts, and be attentive in order to avoid loss of balance and possible injury
• A machine should never be left unattended when plugged in. Unplug from outlet when not in use, and before putting
on or taking off parts.
• Use this machine only for its intended use as described in this manual. Do not use attachments not recommended by
the manufacturer.
• This appliance is not intended for use by persons (including children) with reduced physical, sensory or mental
capabilities, or lack of e[perience and knowledge, unless they have been given supervision or instruction concerning
use of the appliance by a person responsible for their safety.
• Children should be supervised to ensure that they do not play with the appliance.
6
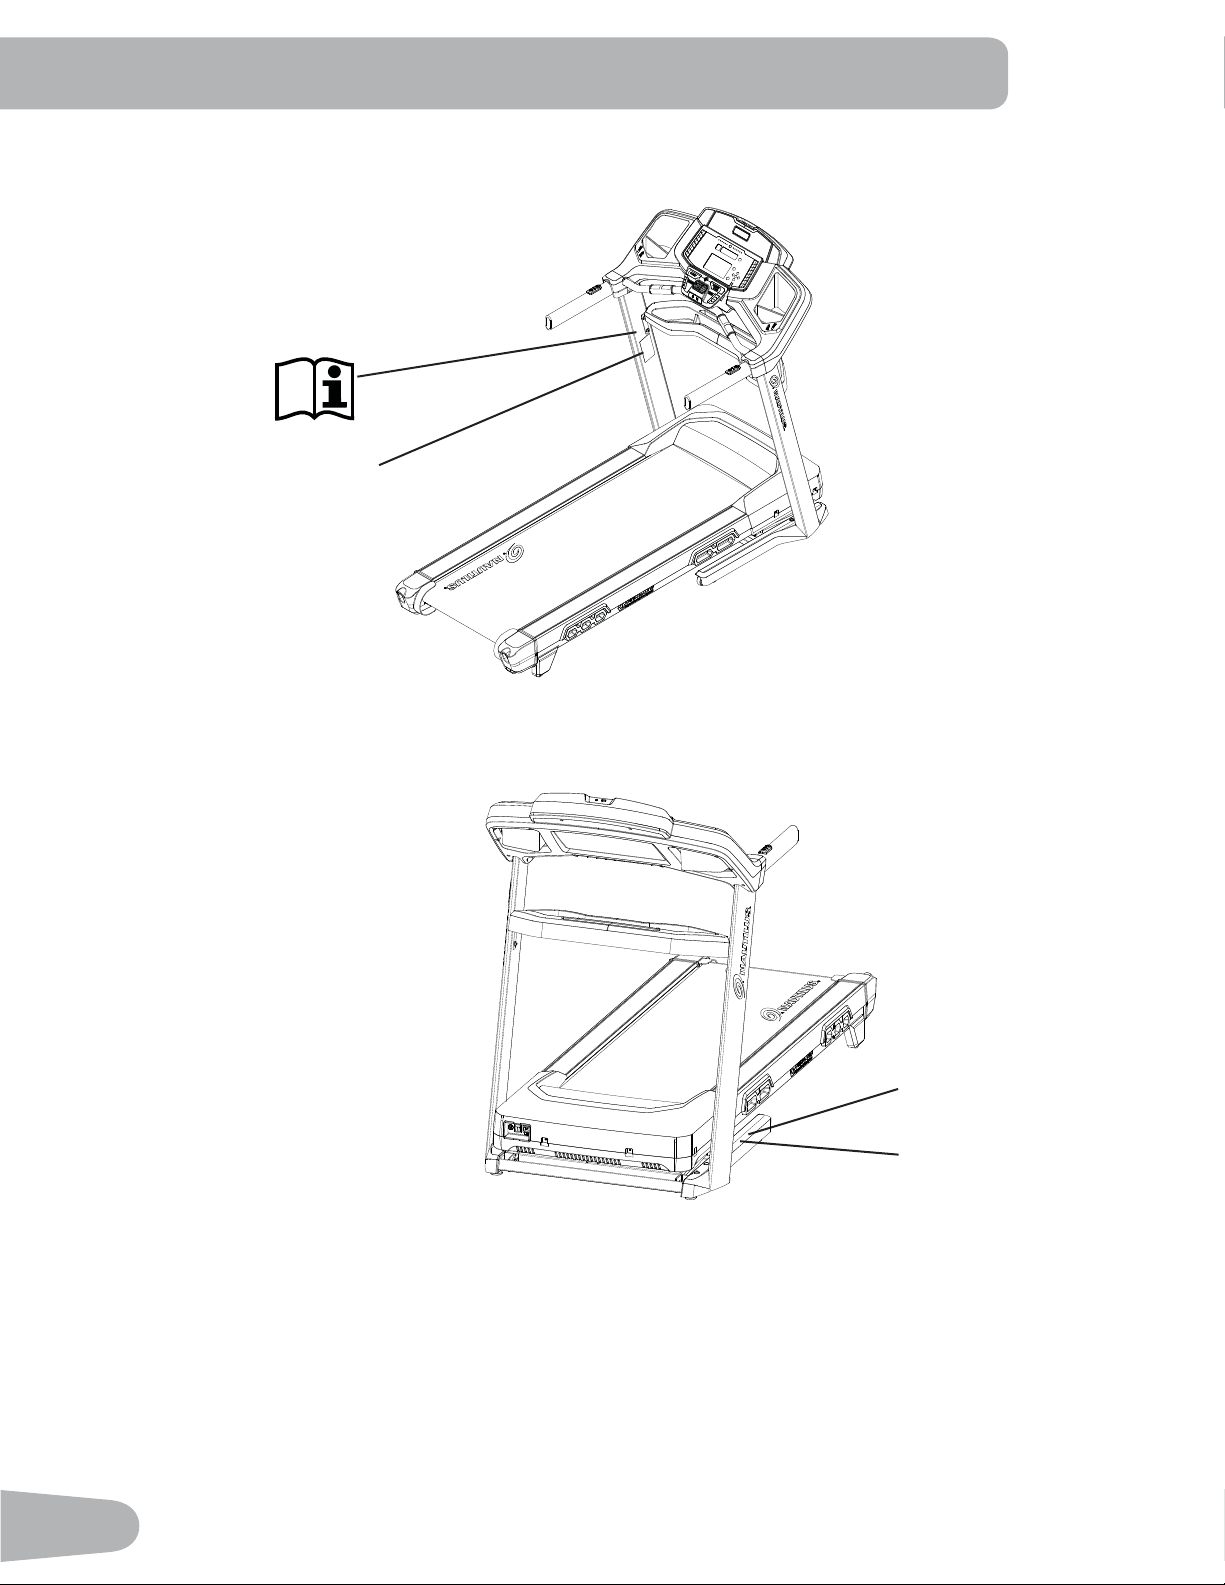
SAFETY WARNING LABELS AND
SERIAL NUMBER
Serial Number
Product
6SHFL¿FDWLRQ
WARNING: keep young children
away from this machine at all
times. Contact with the moving
surface may result in severe
friction burns.

7
Earthing Instructions
This product must be electrically earthed. If a malfunction occurs, correct earthing decreases the risk of electric shock.
The power cord is equipped with an equipment-earthing conductor, and must be connected to an outlet that is properly
installed and earthed.
The electrical wiring must comply with all applicable local and provincial standards and
requirements. Incorrect connection of the equipment-earthing conductor can result in a risk of
electric shock. Consult a licensed electrician if you are not sure that the machine is correctly
HDUWKHG'RQRWFKDQJHWKHSOXJRQWKHPDFKLQH±LILWGRHVQRW¿WWKHRXWOHWKDYHDFRUUHFWRXWOHW
installed by a licensed electrician.
If you connect the machine to an outlet with RCBO (Residual-Current circuit Breaker with Overload protection), machine
operation can cause the circuit to trip. A Surge Protector Device is recommended to protect the machine.
!
If a Surge Protector Device (SPD) is used with this machine, be sure that it matches the power rating of
this equipment (220-240V AC). Do not connect other appliances or devices to the surge protector in
combination with this machine.
0DNHVXUHWKDWWKHSURGXFWLVFRQQHFWHGWRDQRXWOHWKDYLQJWKHVDPHFRQ¿JXUDWLRQDVWKHSOXJ8VHWKH
appropriate adapter supplied with this product.
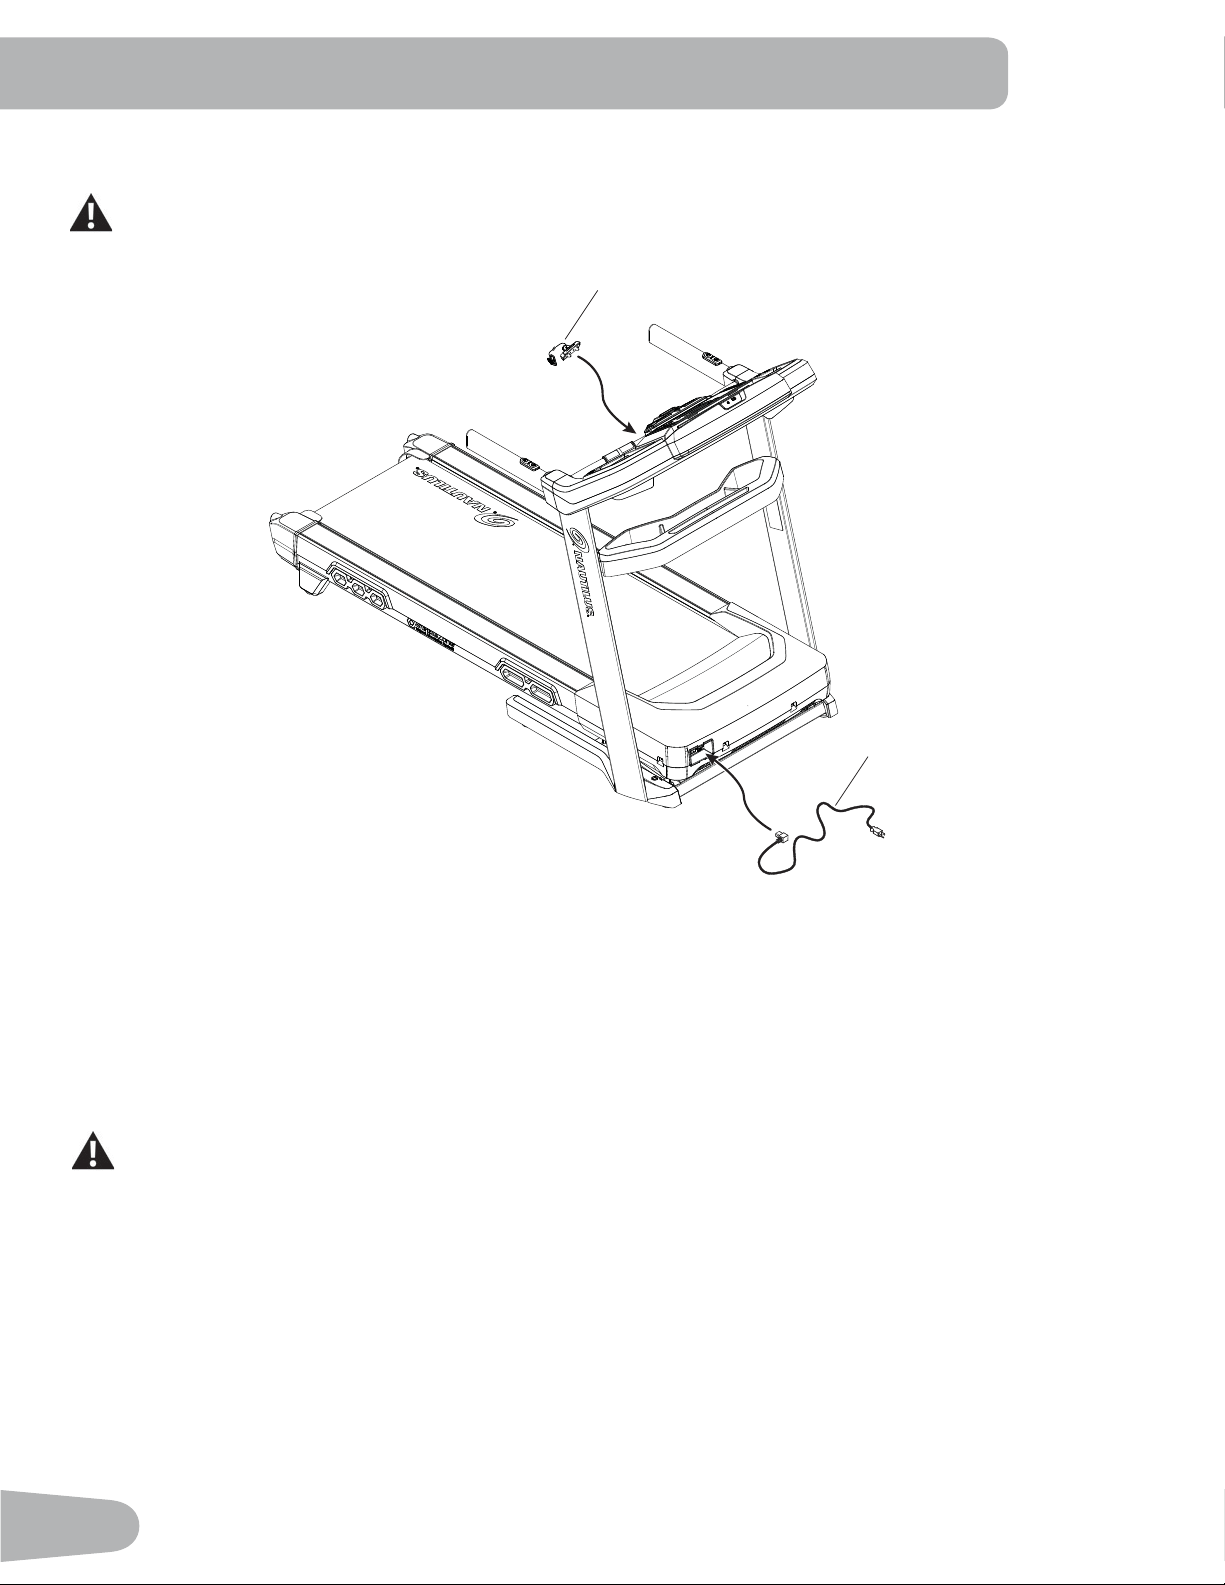
Emergency Stop Procedure
The Treadmill machine is equipped with a Safety Key that can prevent serious injury, as well as prevent children from
playing with and/or being injured on the machine. If the Safety Key is not correctly inserted into the Safety Key Port, the
belt will not operate.
!
Always attach the Safety Key Clip to your clothing during your workout.
When you use the machine, only remove the Safety Key in an emergency. When the key is removed while
the machine is in operation, it will stop quickly, which could cause the loss of balance and possible injury.
For safe storage of the machine, and to prevent unsupervised operation of the machine, always remove
the Safety Key and disconnect the power cord from the wall outlet and the AC input. Place the power cord
in a secure location.
The Console will display “ + SAFETY KEY ”, or add Safety Key, for a Safety Key fault. The Treadmill machine will not start
a Workout, or will end and clear an active Workout, when the Safety Key is removed. Inspect the Safety Key and be sure
it is connected to the Console correctly.
8
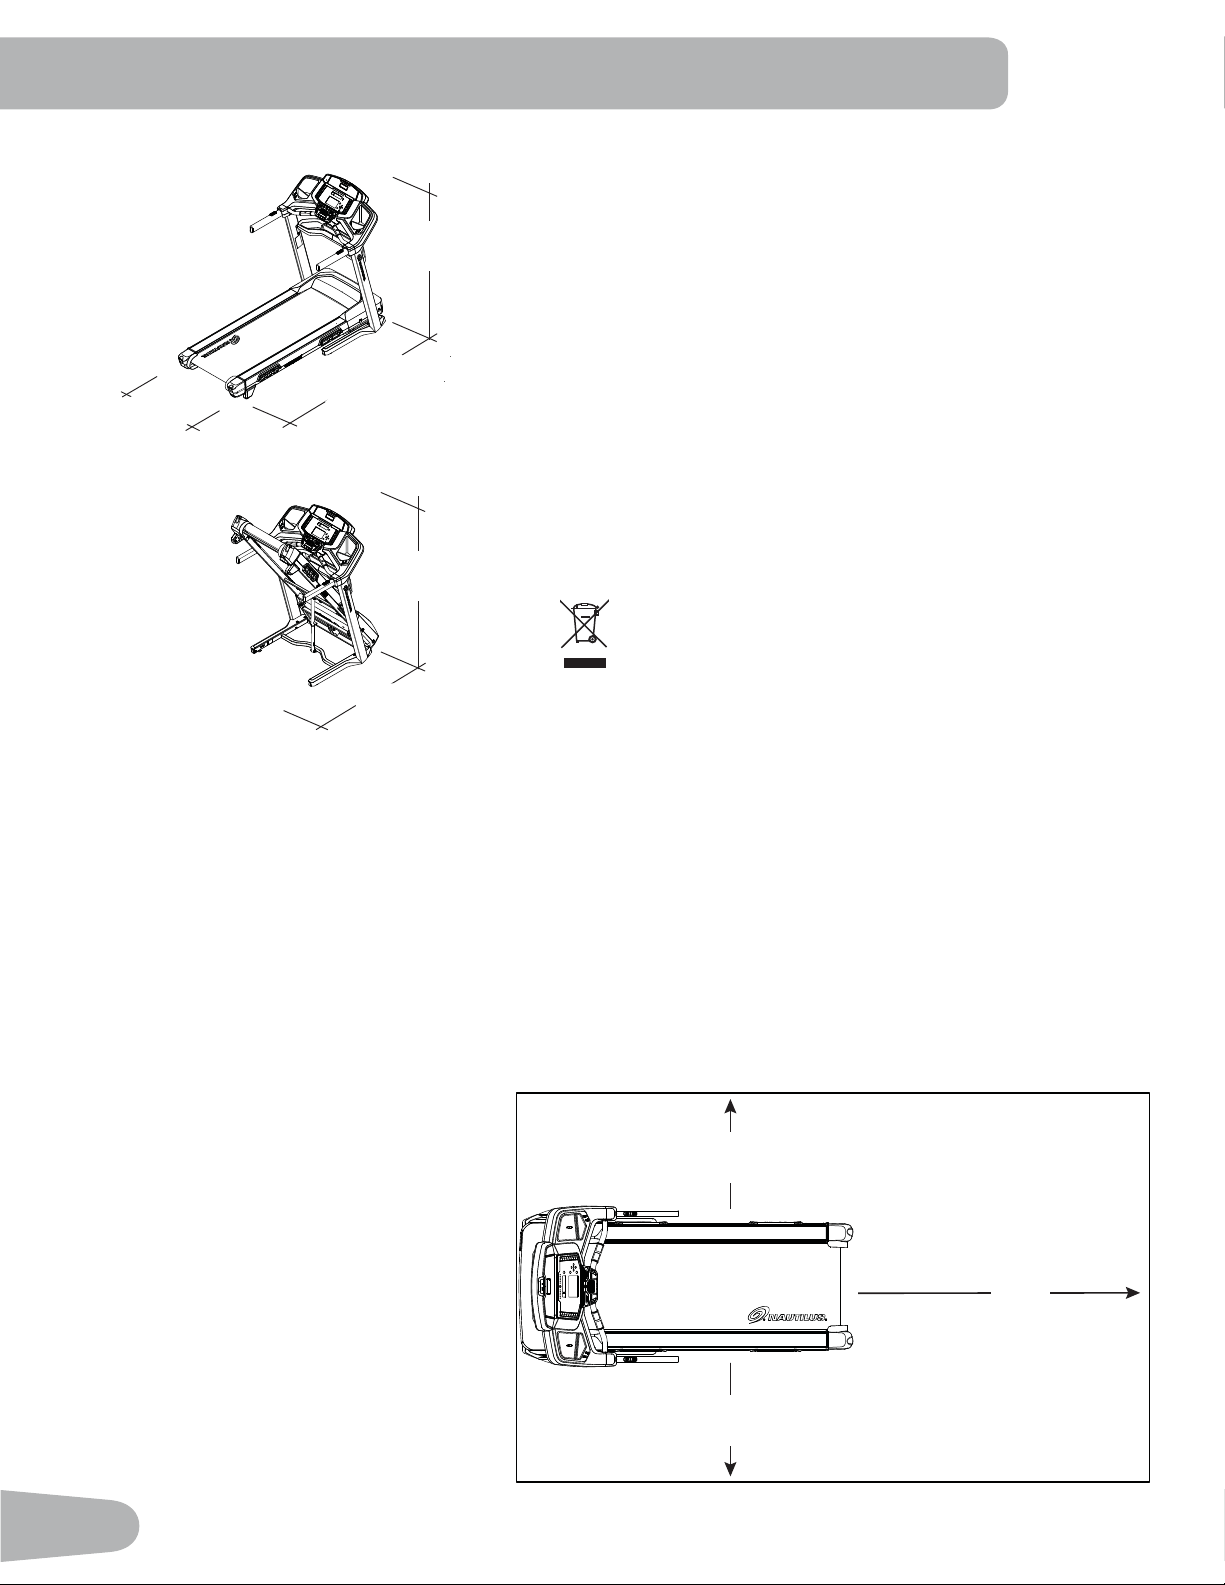
SPECIFICATIONS / BEFORE ASSEMBLY
159.5 cm
(62.8”)
95.5 cm
(37.6”)
198.1 cm
(78”)
169 cm
(66.6”)
139.3 cm
(54.9”)
Maximum User Weight: 15. kg. (350 lbs)
Total Surface Area (footprint) of equipment: 1,919 cm
2
Maximum Inclined Deck Height: 43.7 cm (17.2 inches)
Assembled Weight: appro[. 109.1 kg (240.5 lbs)
Power Requirements:
Operating Voltage: 220V - 240V AC, 50Hz
Operating Current: A
Heart Rate Chest Strap: 1 CR2032 battery
Sound Emission: Less than 70 db average without
load. Noise emission under load is higher than without load.
Before Assembly
Select the area where you are going to set up and operate your machine. For safe operation, the location must be on a
hard, level surface. Allow a workout area of a minimum 2.2 m [ 4 m (6” [ 157”). Be sure that the workout space you are
utilizing has adequate height clearance, taking into consideration the height of the user and the ma[imum incline of the
machine.
Basic Assembly Tips
Follow these basic points when you assemble your machine:
• Read and understand the “Important
Safety Instructions” before assembly.
• Collect all the pieces necessary for
each assembly step.
• Using the recommended wrenches,
turn the bolts and nuts to the right
(clockwise) to tighten, and the left
(counterclockwise) to loosen, unless
instructed otherwise.
• When attaching 2 pieces, lightly lift
and look through the bolt holes to help
insert the bolt through the holes.
• The assembly can require 2 people.
DO NOT dispose of this product as refuse. This product is
to be recycled. For proper disposal of this product, please
follow the prescribed methods at an approved waste
center.
4 m ( 157” )
2.2 m
( 86” )
2m
( 79” )
0.6m
( 24” )
0.6m
( 24” )

9
Item Qty Description Item Qty Description
1 1 Console Assembly 10 1 Crossbar
2 1 Console Backing 11 1 Crossbar Tray
3 1 Upright, Right 12 1 Handlebar Shroud, Left
4 1 Handlebar Shroud, Right 13 1 Heart Rate Chest Strap
5 1 Base Assembly ( * ) 14 1 Safety Key
6 1 Base Shroud, Right 15 1 Cupholder, Left
7 1 Base Shroud, Left 16 1 Cupholder, Right
1 Power Cord 17 1 Media Cable (not shown)
9 1 Upright, Left
'2127&87WKH6KLSSLQJ6WUDSRQWKH%DVH$VVHPEO\XQWLOLWKDVEHHQSODFHGIDFHXSDV
shown in the appropriate work space ( * ).
PARTS
*
3
1
2
4
5
6
7
8
9
10
11
12
13
14
15
16
10
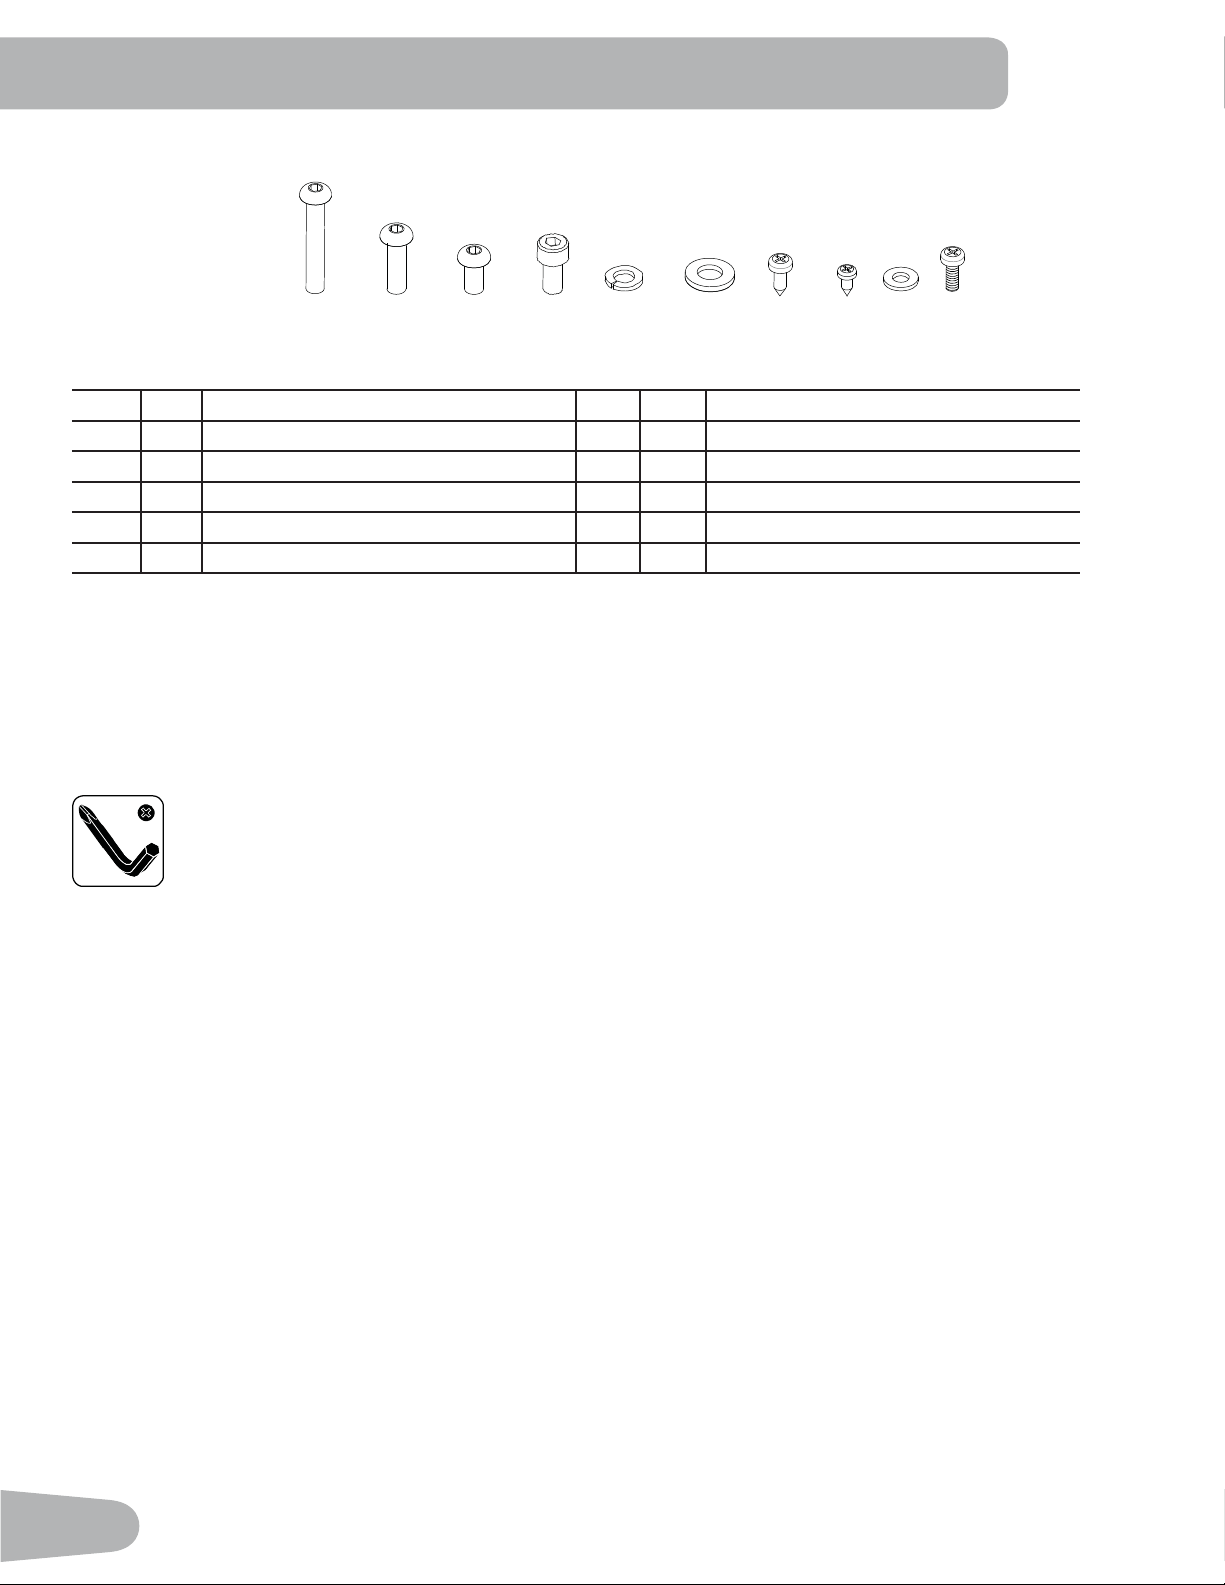
HARDWARE / TOOLS
Tools
Included
#2
6 mm
Item Qty Description Item Qty Description
A 4 Button Head He[ Screw, M[50 F 1 Flat Washer, M
B 4 Button Head He[ Screw, M[25 G 13 Self Tapping Screw, M4.2[16
C 6 Button Head He[ Screw, M[20 H 6 Self Tapping Screw, M3.9[9.5
D 4 Socket Head Cap Screw, M[16 I 2 Flat Washer, M4
E 18 Lock Washer, M J 4 Phillips Head Screw, M4[16
Note: Select pieces of Hardware have been provided as spares on the Hardware Card. Be aware that there may be remain-
ing Hardware after the proper assembly of your machine.
AB D
C EF
G
H
I J
11
'2127&87WKH6KLSSLQJ6WUDSRQWKH%DVH$VVHPEO\XQWLOLWKDVEHHQSODFHGIDFHXSDV
shown in the appropriate work space ( * ).
ASSEMBLY
1. Fold the Walking Deck on the Base Assembly
Once the Base Assembly has been properly placed in the workout area, cut the Shipping Strap. Press and hold the plastic
deck release handle (5a) under the end of the right side rail. Using the support bar (5b) found below the rear of the walk-
ing belt, lift the walking deck and continue to hold the deck handle for the ¿rst part of the fold process (0-15 degrees).
Release the deck handle and lift the walking deck fully upward to engage the hydraulic lift. Be sure that the hydraulic lift is
correctly locked in place.
8VHSURSHUVDIHW\SUHFDXWLRQVDQGOLIWLQJWHFKQLTXHV%HQG\RXUNQHHVDQGHOERZVNHHS\RXUEDFNVWUDLJKW
and pull up equally with both arms. Straighten your legs to lift. Make sure that your own physical strength is
FDSDEOHRIOLIWLQJWKHZDONLQJGHFNXQWLOLWHQJDJHVWKHORFNLQJPHFKDQLVP8VHDVHFRQGSHUVRQLI
necessary.
Do not use the walking belt or rear roller to lift the treadmill. These parts do not lock in place and can
abruptly move. Injury to you or damage to the machine can occur.
Make sure that the locking mechanism is engaged. Carefully pull back on the Walking Deck and make sure that it does
not move. When you do this, keep clear of movement path in case the treadmill lock is not engaged.
Do not lean against the treadmill when it is folded. Do not put items on it that could cause it to become
unstable or fall.
5
5a
5b
5a
15°
*
12
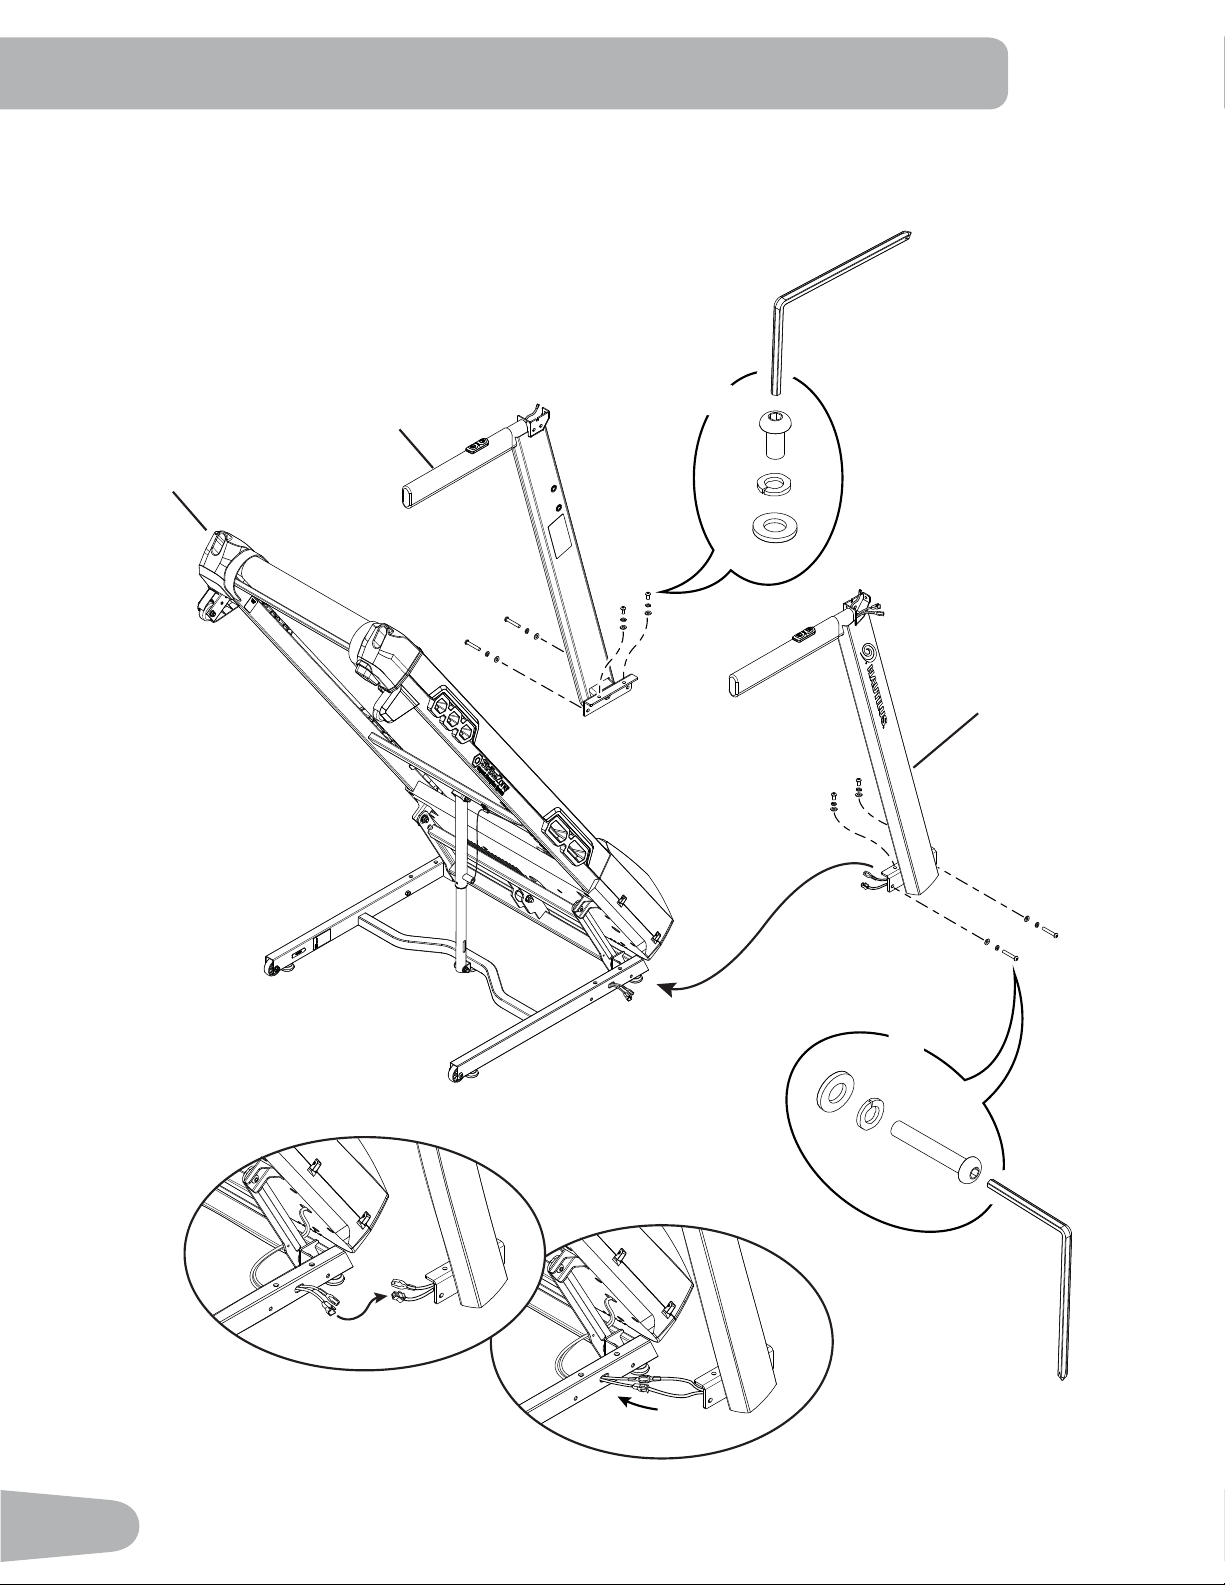
2. Connect the Input/Output (I/O) Cables and Earthing Cables, and Attach the Uprights to Frame
NOTICE: Do not crimp cables. Do not fully tighten Hardware until instructed.
A
F
X4
E
C
F
E
X4
5
9
3
13
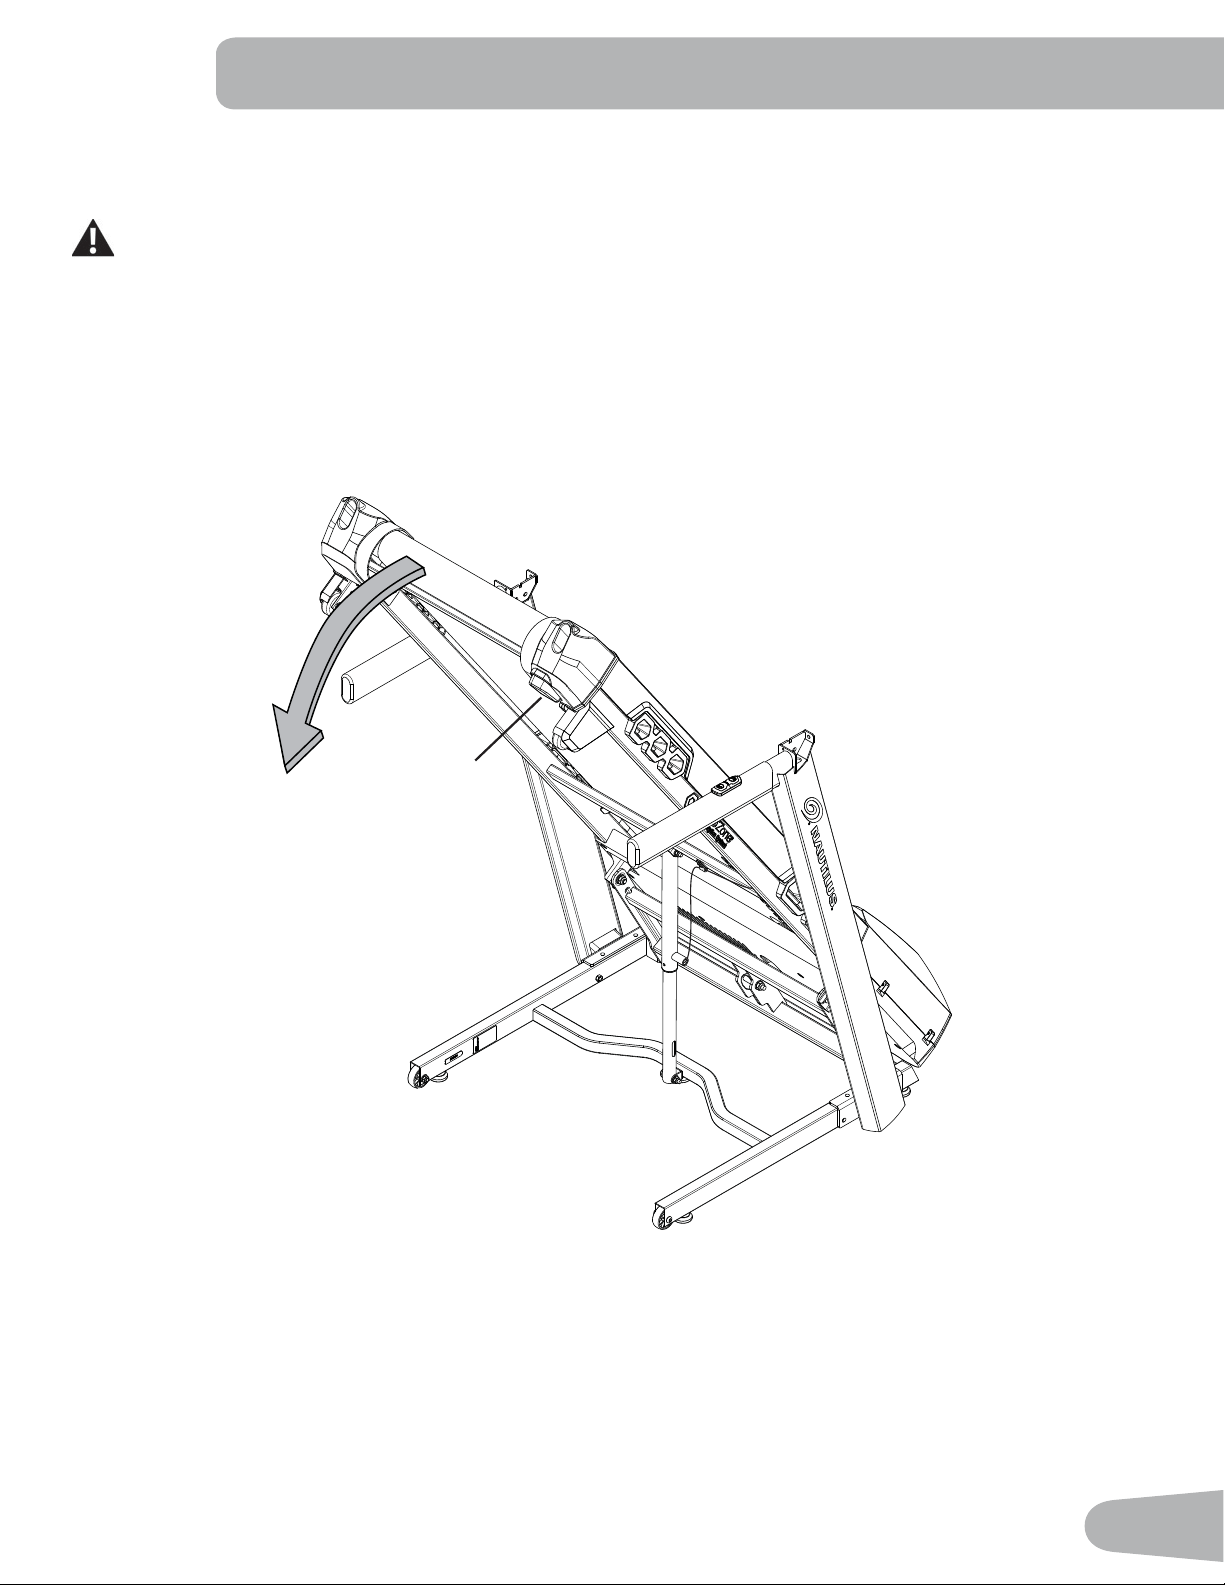
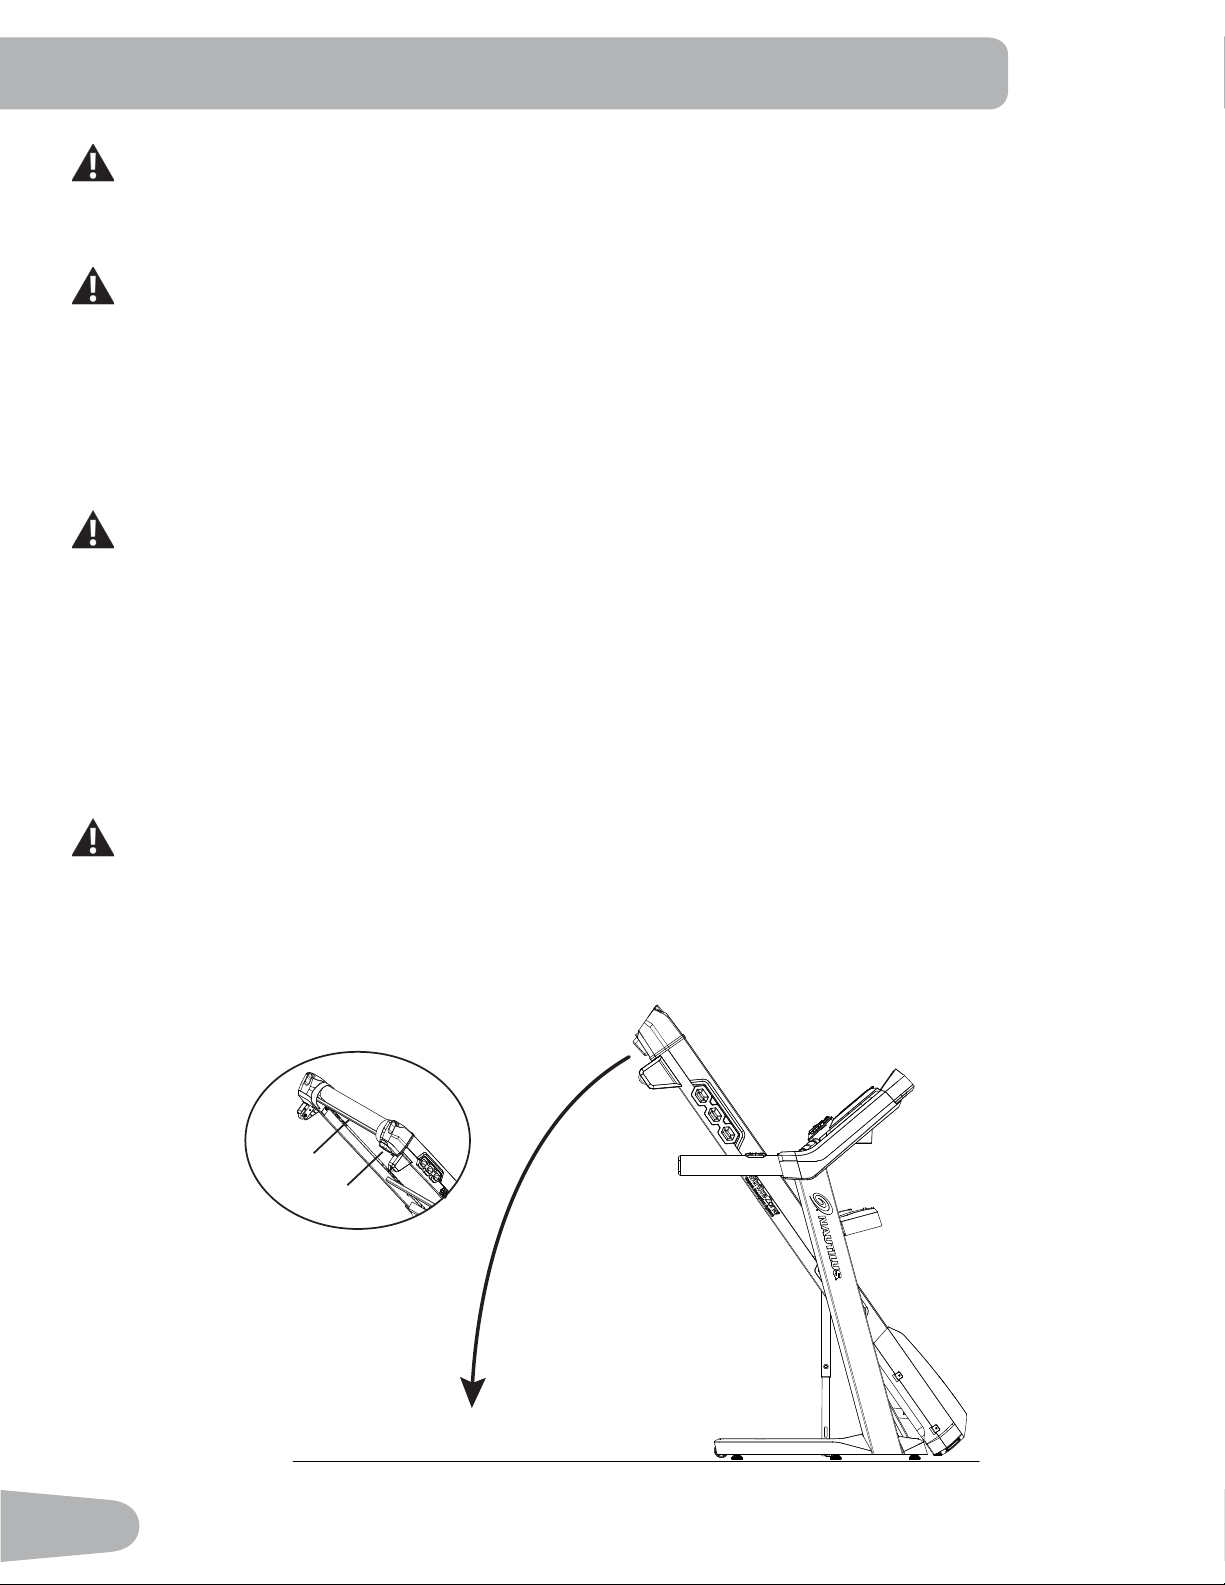
3. Unfold the Walking Deck
Move to the right side of the machine. Press and hold the plastic deck release handle (5a) under the end of the right side
rail. Hold up the rear of the walking deck, and release the deck handle.
Keep clear of the movement path of the walking deck.
The hydraulic lift is set up to drop lightly. Hold onto the walking deck until appro[imately 2/3 of the movement down. Make
sure that you use proper lifting technique; bend your knees and keep your back straight. Lower the weight with your legs.
The walking deck can possibly drop quickly in the last part of the movement.
5a
14
1
2
*
#2
X4
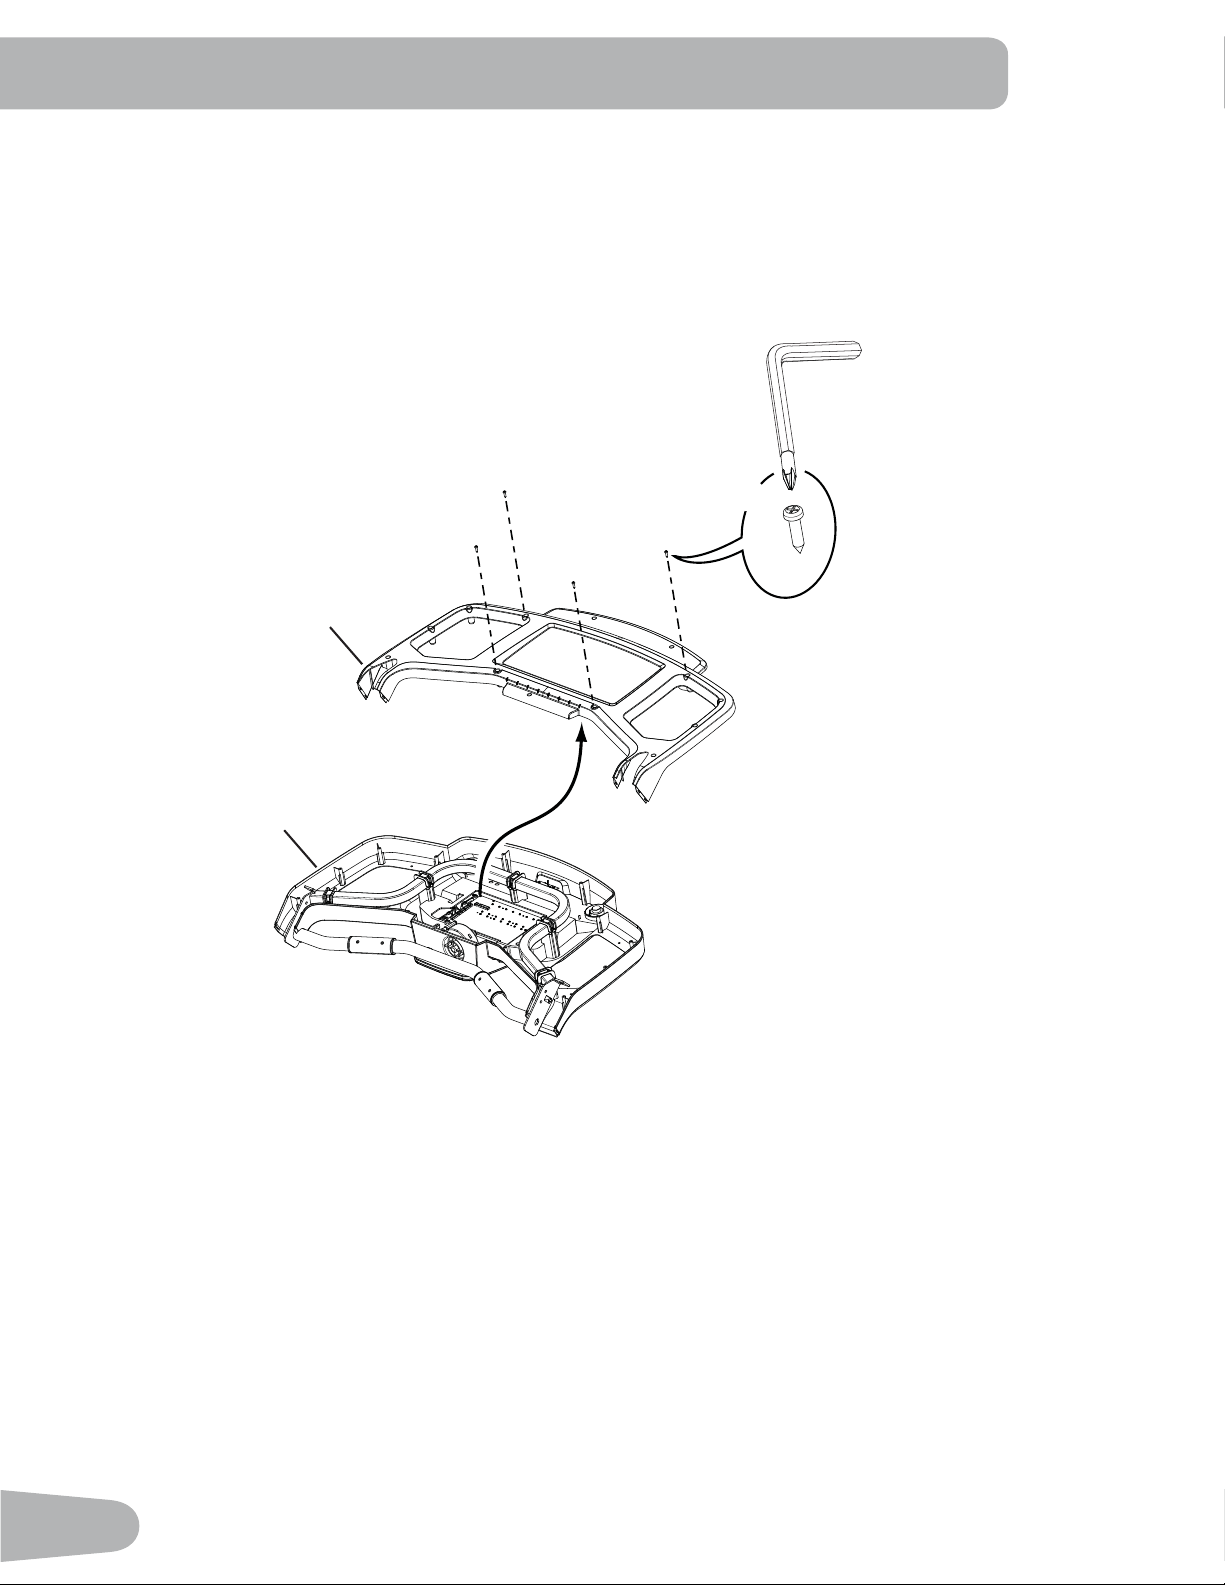
4. Remove the Console Backing from the Console Assembly
Note: Dispose of the pre-installed hardware (*).

15
5. Attach the Console to Frame Assembly
NOTICE: Be sure that the hooks (1a) on each side of the Console are seated in the notches on the Uprights. Remove
the ziptie and rubberbands that attach the Cables. Do not crimp the Cables.
Do not fully tighten Hardware until instructed.
1
6mm
F
D
E
X4
E
F
C
X2
1a
16
B
E
F
X4
10
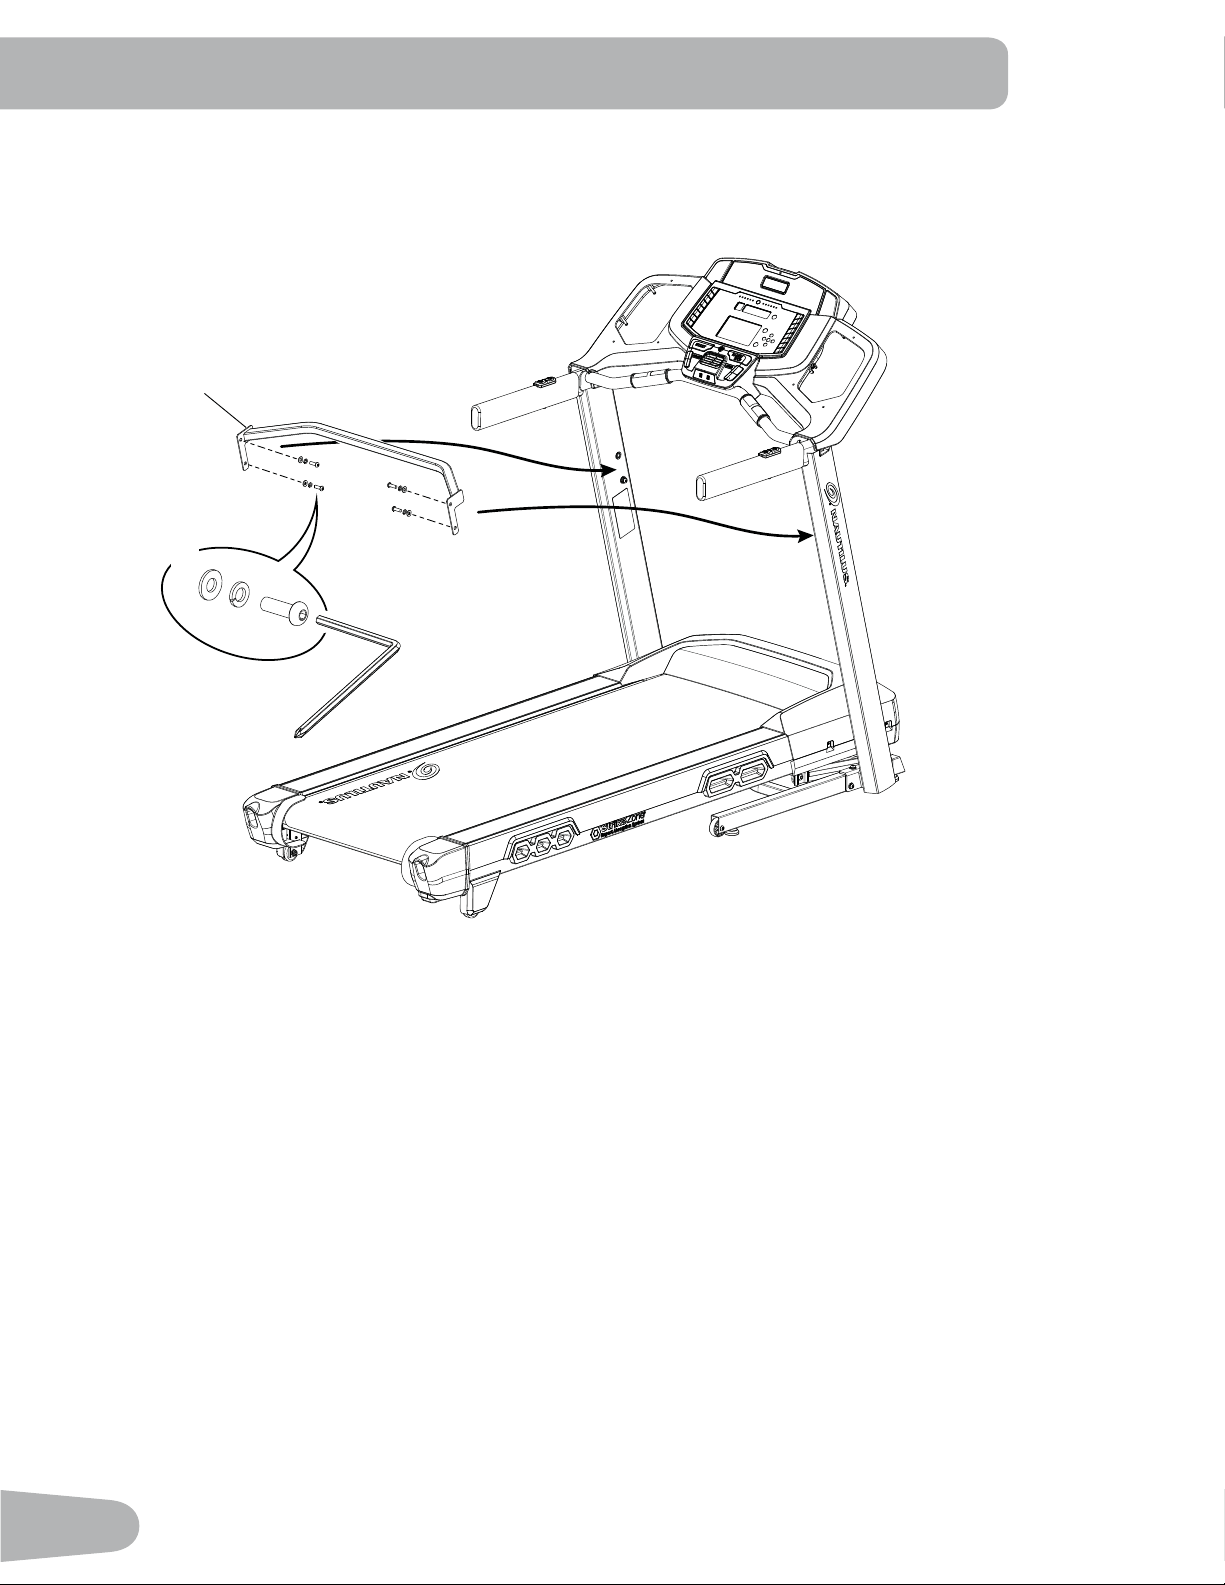
6. Attach the Crossbar to the Uprights
Note: If necessary, loosen the screws from Step 5 to make installation of the Crossbar easier.
17
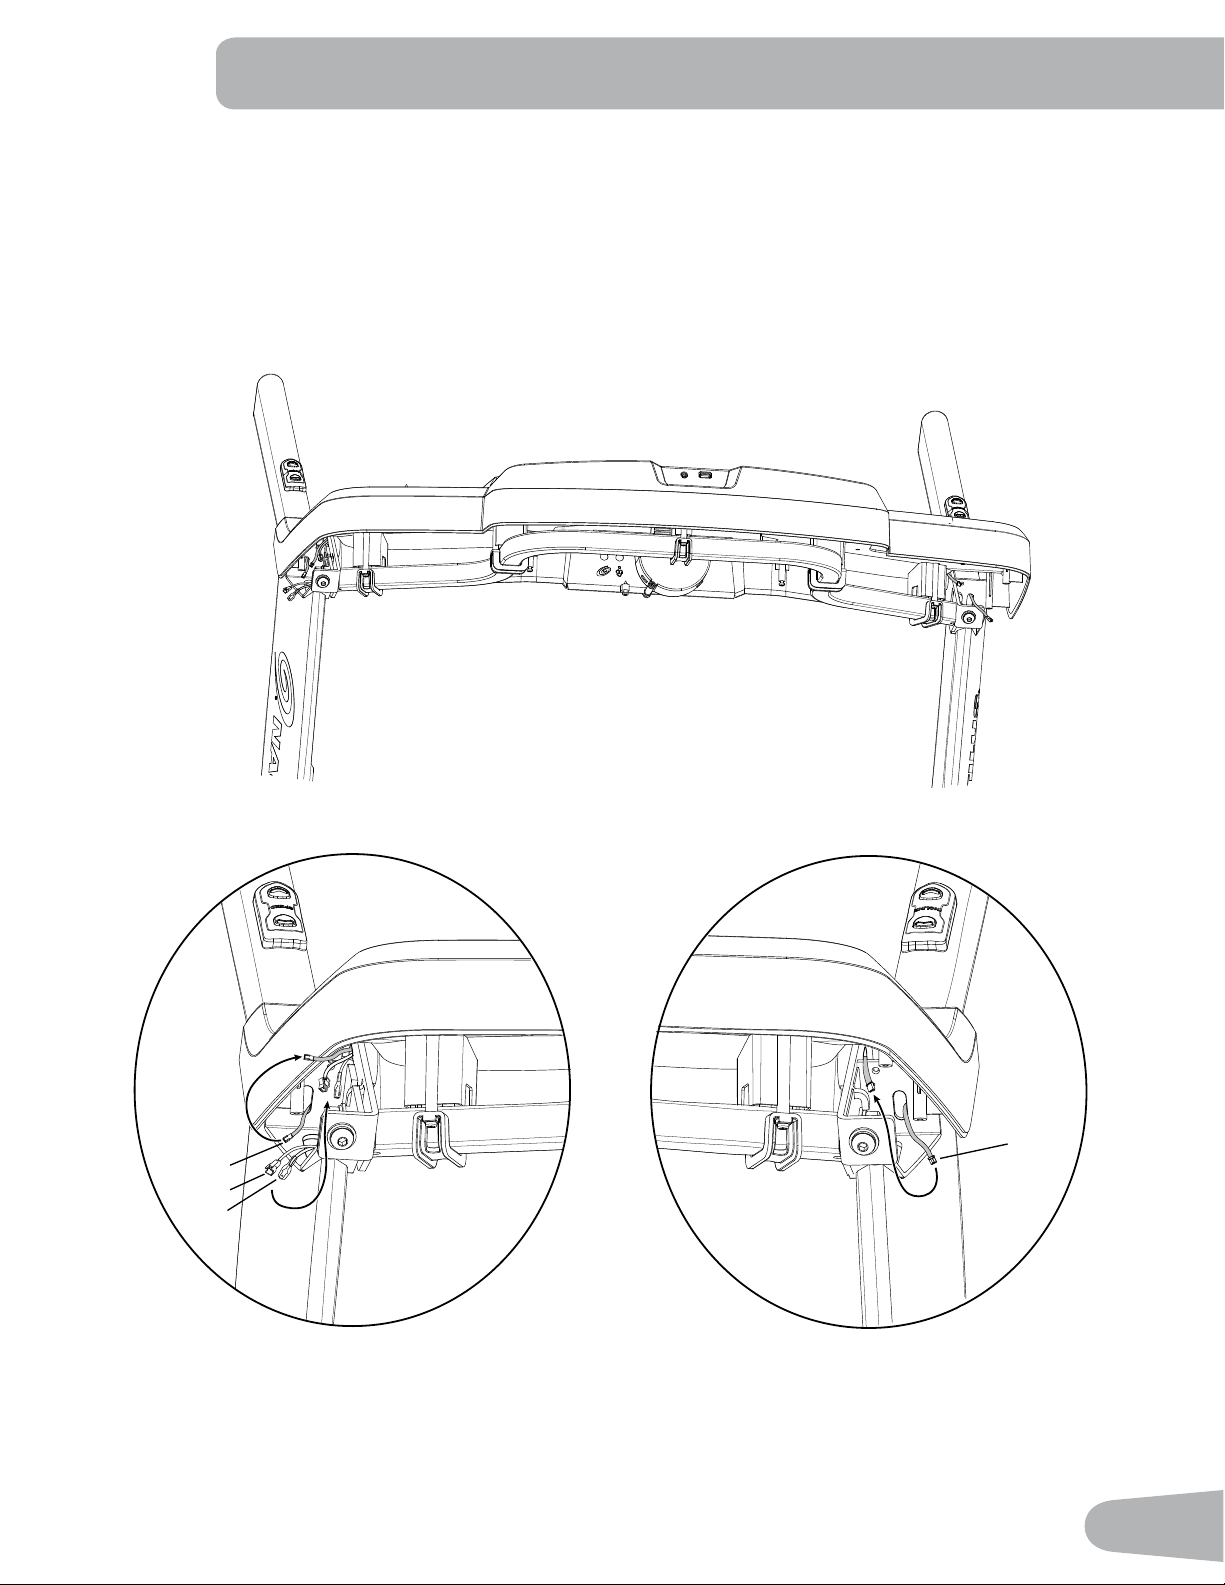
7. Connect the I/O Cables, the Earthing Cables and the Remote Speed and Incline Controls Cables
Left side: Connect the Incline remote control cable (9a) to the Console.
Right side: Connect the I/O cable (3b) and Earthing Cable (3c) from the Upright to the Console, and the Speed
remote control cable (3a) to the Console.
NOTICE: Do not crimp the Cables.
9a
9
3b
3a
3
3c
Right side Left side
18
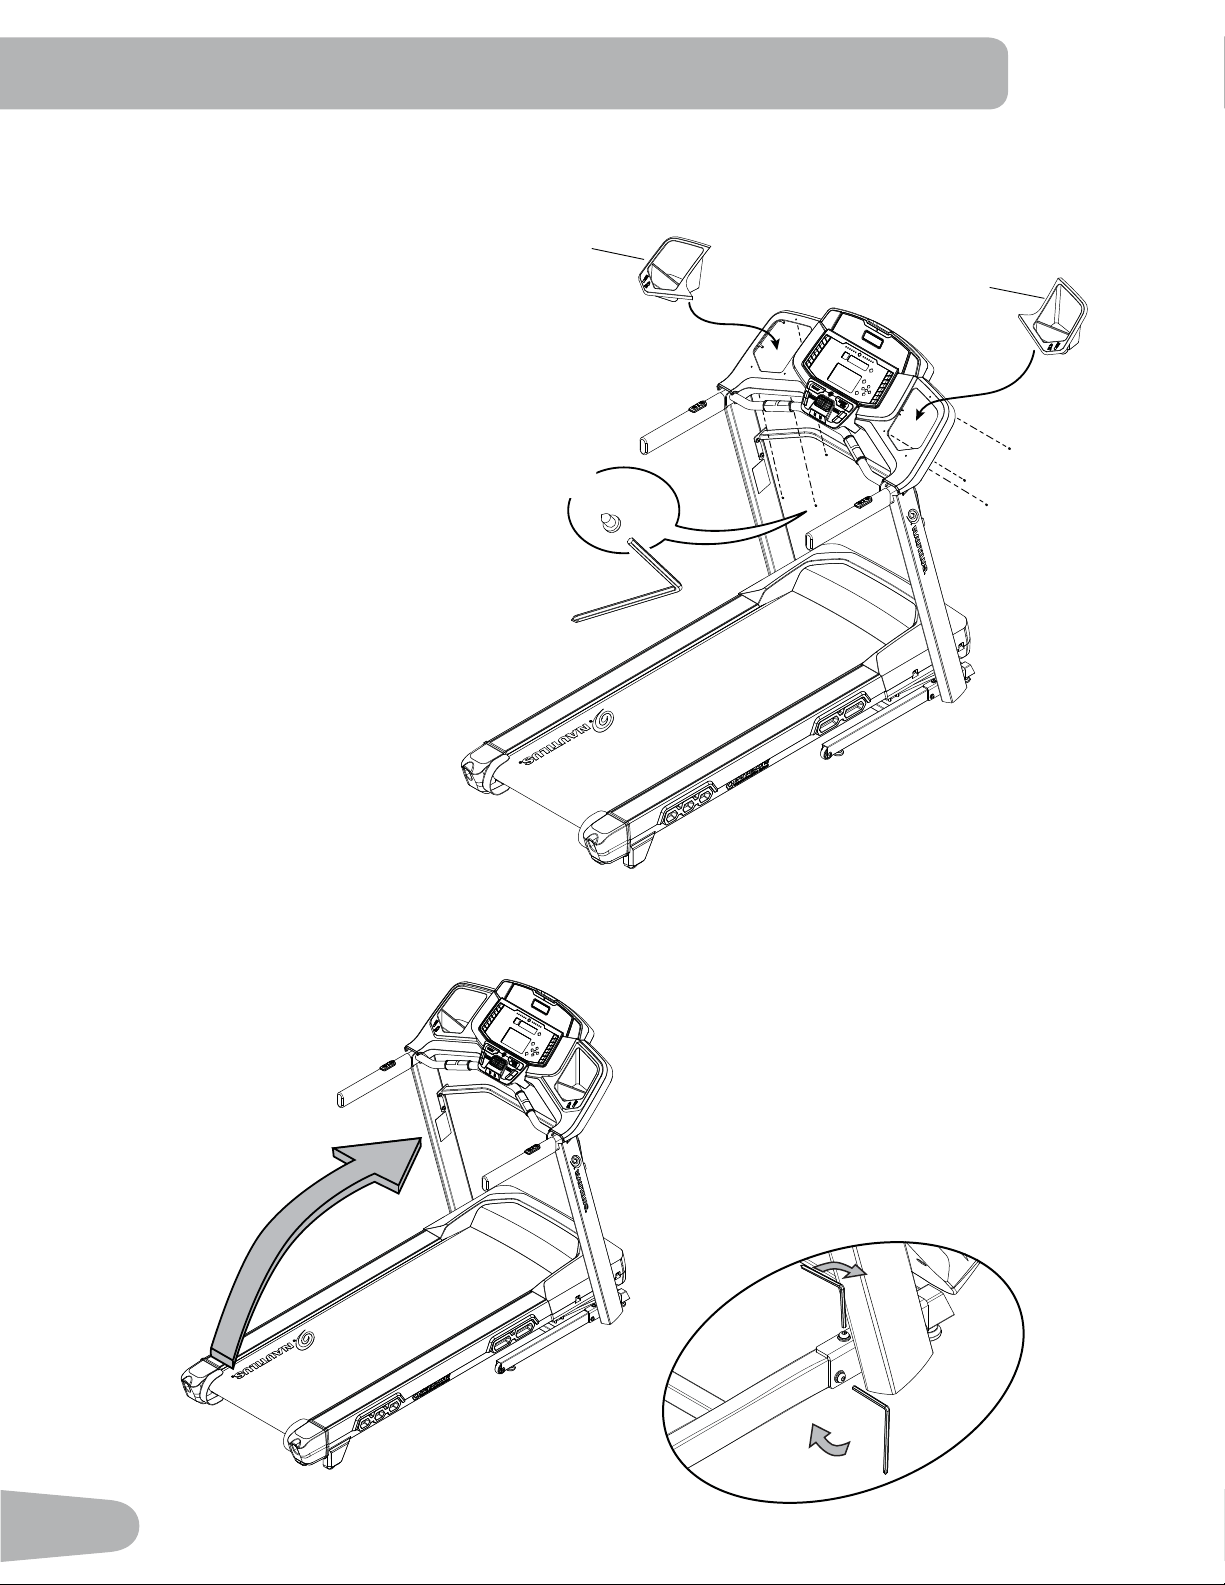
9. Fold the Walking Deck and tighten ALL Hardware from previous steps
8. Attach the Cupholders to the Console
NOTICE: Cupholder edges should be flush with the face of Console.
15
X6
H
16
19
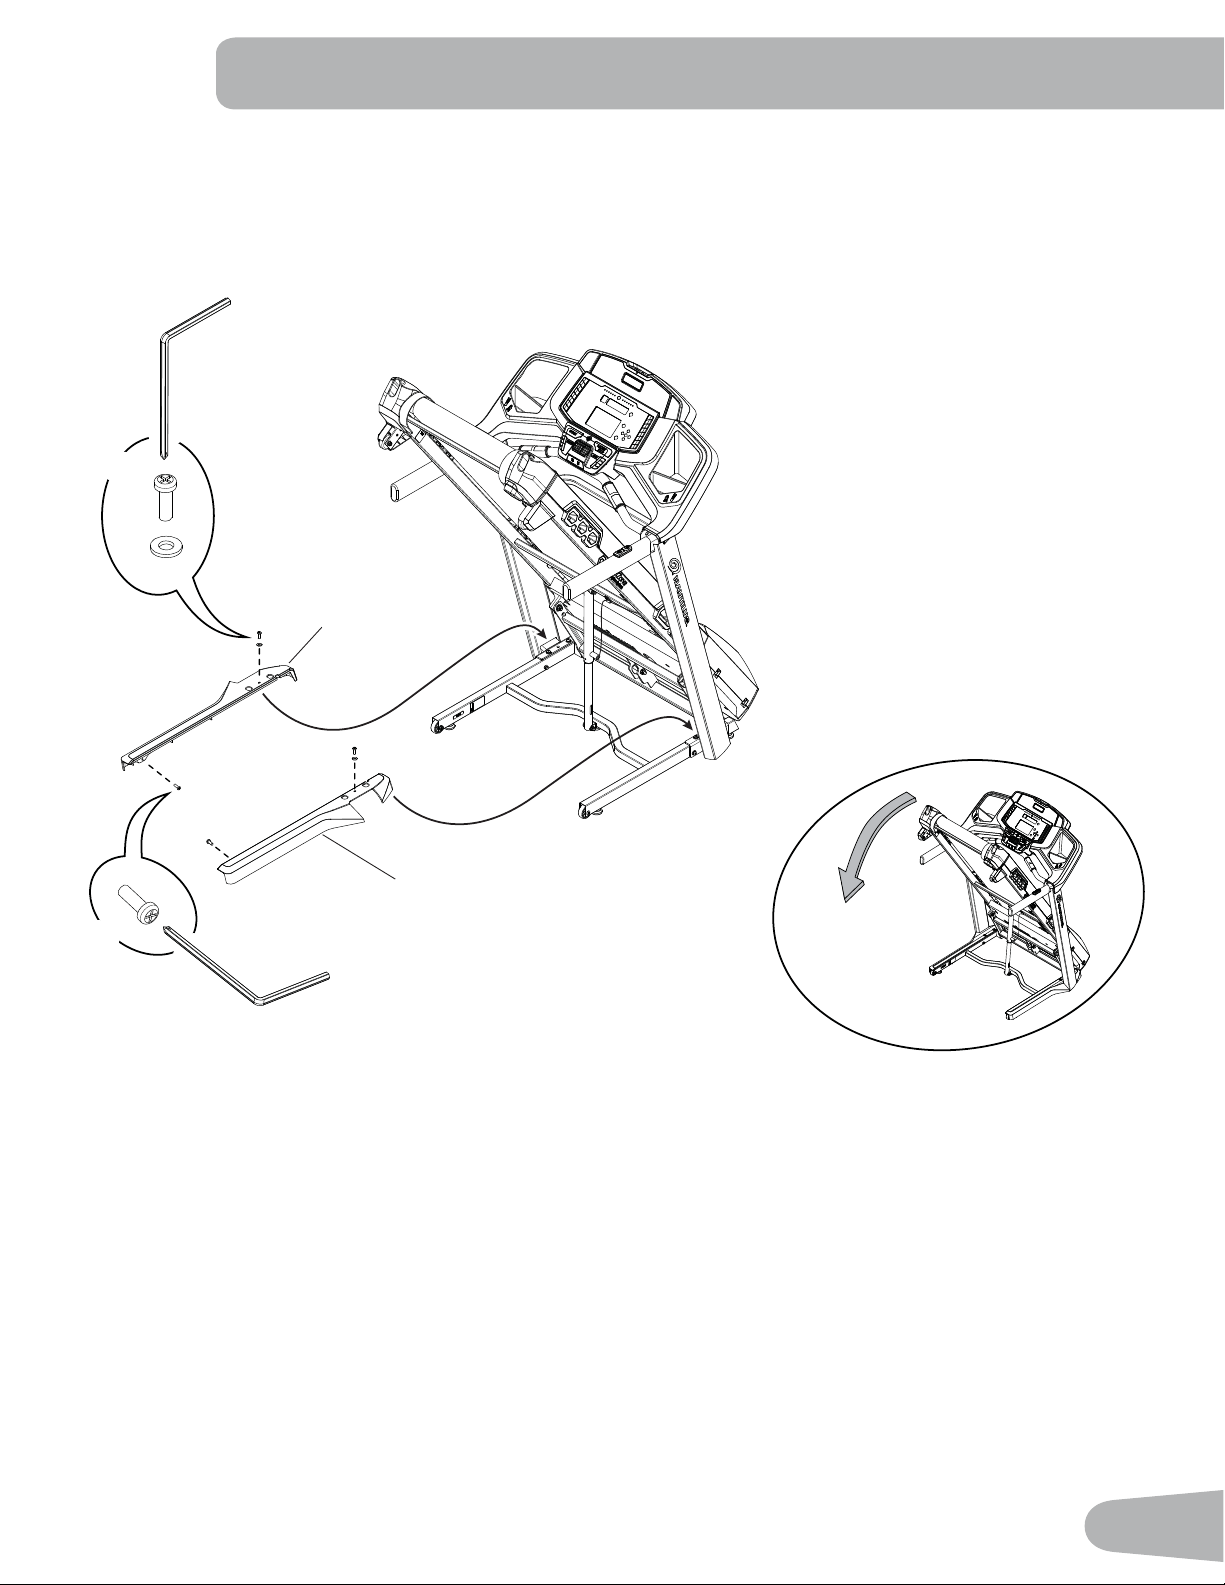
10. Attach the Base Shrouds to the Frame Assembly, and then unfold the Walking Deck
Note: Unfold the Walking Deck after the Base Shrouds have been installed.
7
6
J
#2
I
X2
#2
X2
J

20
11. Attach the Console Backing to the Console Assembly
NOTICE: Attach the hardware marked below with the ( * ) first, then the hardware with the ( ** ), followed by the
remaining hardware.
2
G
X13
#2
*
*
**
**
21
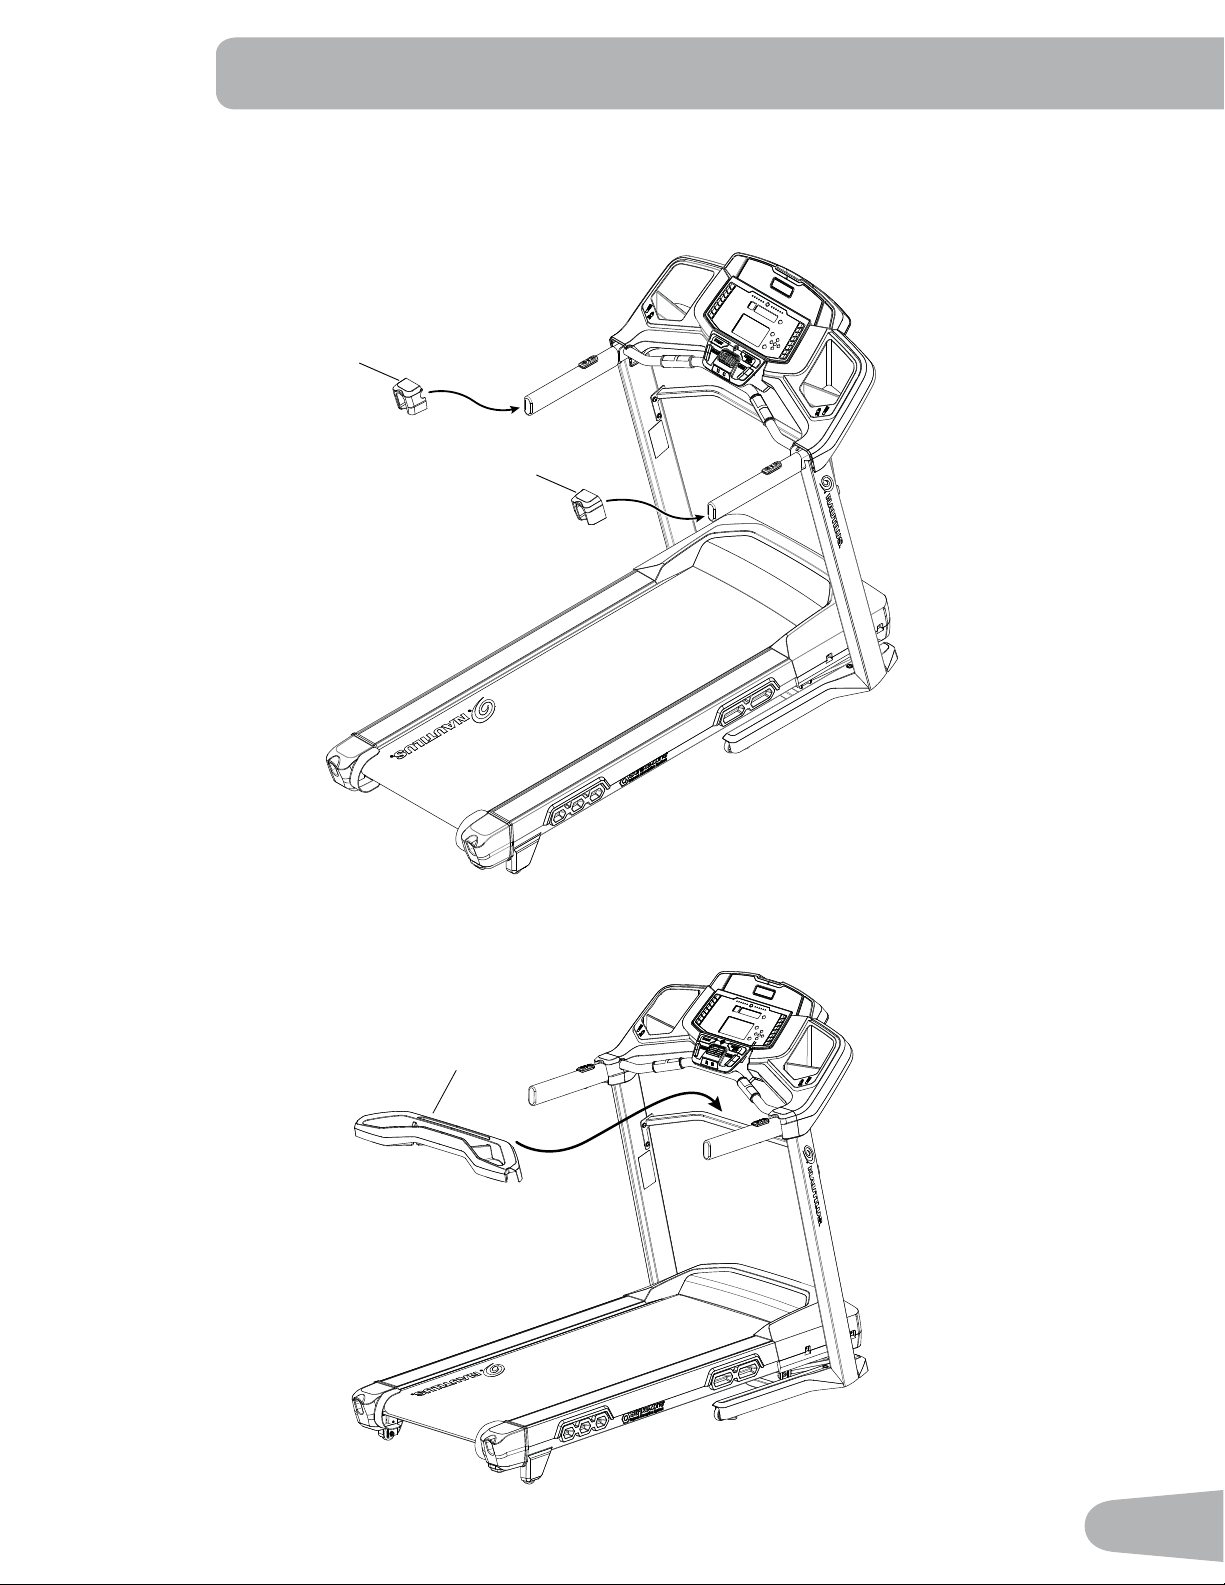
12. Attach the Handlebar Shrouds to the Frame Assembly
Note: Slide the Handlebar Shrouds onto the handlebars and tilt to pass over the remote control buttons. Be sure the
tabs on the shrouds snap into the Console.
12
4
13. Place the Tray on the Crossbar
11
22
14. Connect the Power Cord and Safety Key to the Frame Assembly
Connect this machine to a properly earthed outlet only (see Earthing Instructions).
15. Final Inspection
Inspect your machine to ensure that all hardware is tight and components are properly assembled.
Be sure to record the serial number in the ¿eld provided at the front of this manual.
Do not use until the machine has been fully assembled and inspected for correct performance in
accordance with the Owner’s Manual.
8
14

23
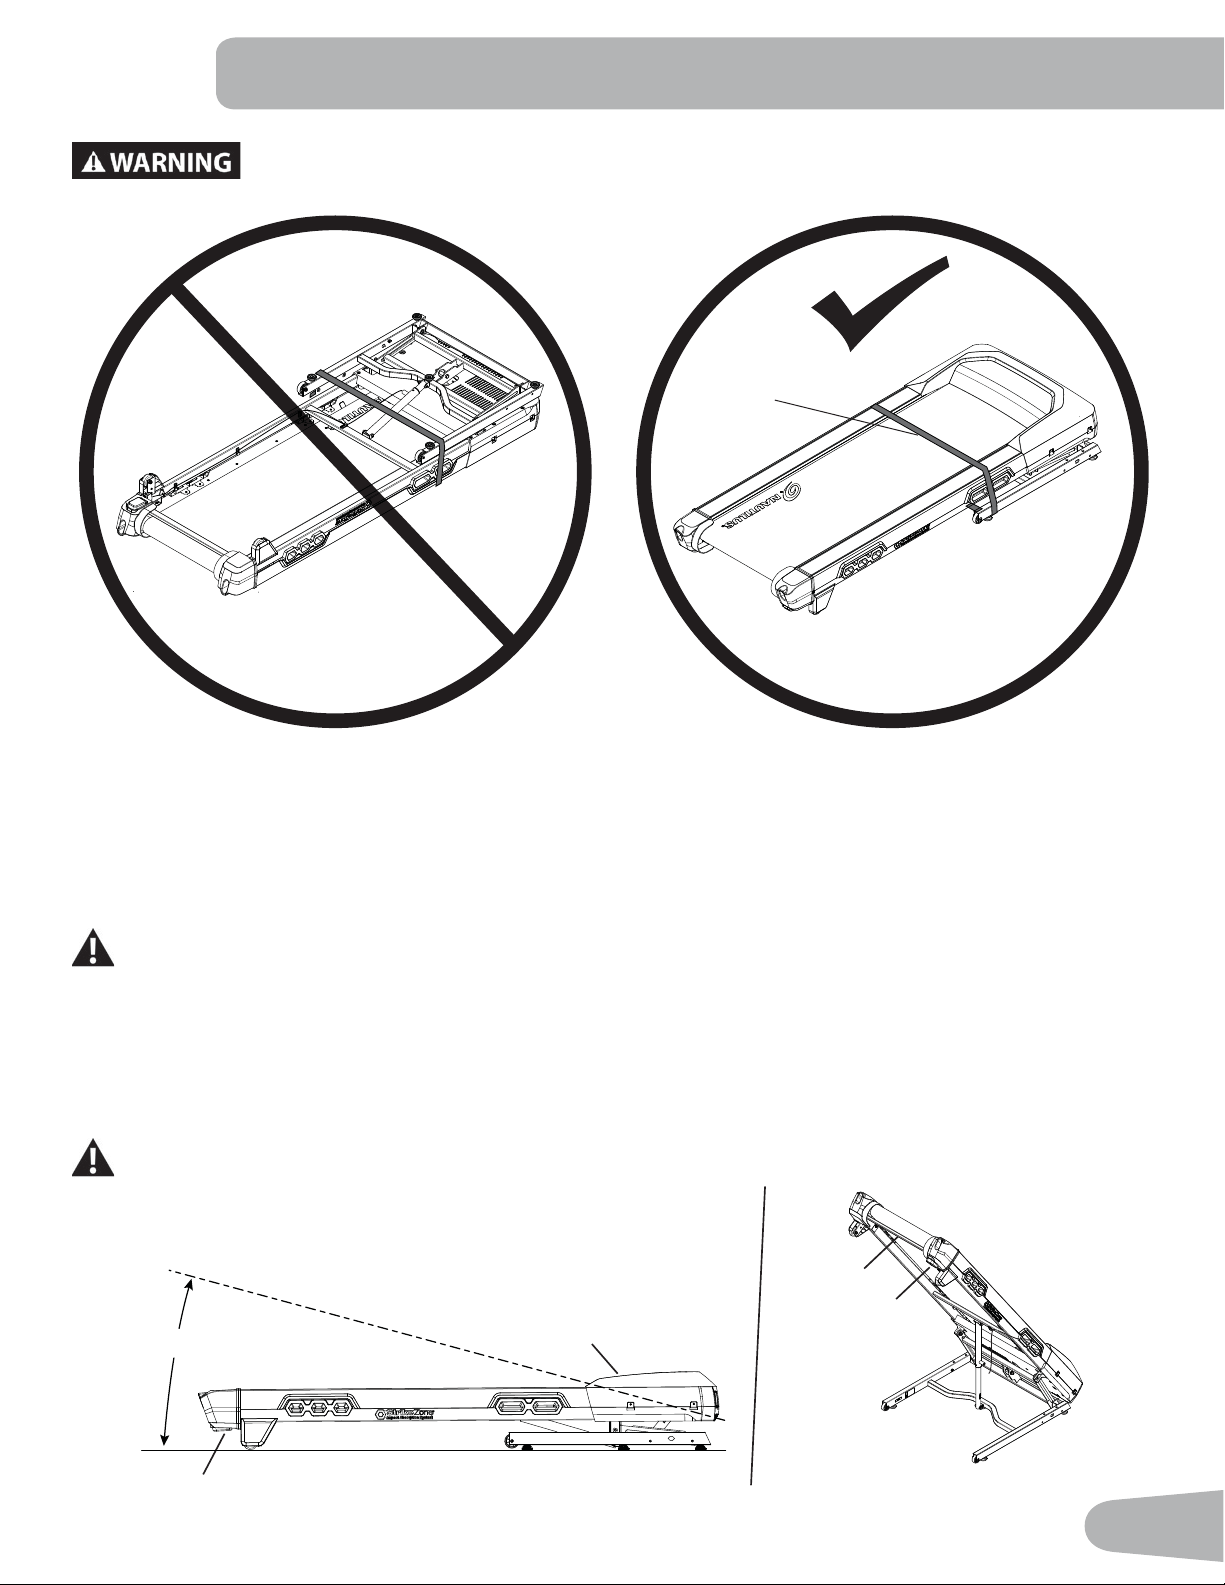
Storage and Moving the Machine
7KHPDFKLQHFDQEHPRYHGE\RQHRUPRUHSHUVRQV8VHFDXWLRQZKHQ\RXPRYHWKHPDFKLQH7KH
treadmill is heavy and can be awkward. Make sure that your own physical strength is capable of moving the
PDFKLQH8VHDVHFRQGSHUVRQLIQHFHVVDU\
1. Remove the Safety Key.
WARNING! When this machine is not in operation, remove the Safety Key and keep out of the reach of children.
2. Make sure that the power switch is turned Off, and the power cord is disconnected.
Never lift the front of the machine for moving or transport. Rotating or moving parts can pinch, resulting in
personal injury.
3. You must fold the treadmill before you move it. Never move the treadmill if it is not folded.
4. Make sure that there is safe clearance around, on and above your treadmill. Make sure there is no object to spill or
cause blockage from the fully folded position.
%HVXUHWKHUHLVDGHTXDWHKHLJKWFOHDUDQFHIRUWKHUDLVHGGHFN
5. Press and hold the plastic deck release handle (5a) under the end of the right side rail. Using the support bar (5b)
found below the rear of the walking belt, lift the walking deck and continue to hold the deck handle for the ¿rst part
of the fold process (0-15 degrees). Release the deck handle and lift the walking deck fully upward and engage
the hydraulic lift. Be sure that the hydraulic lift is correctly locked in place. You will hear an audible click when the
hydraulic lift shifts into the locked position.
8VHSURSHUVDIHW\SUHFDXWLRQVDQGOLIWLQJWHFKQLTXHV%HQG\RXUNQHHVDQGHOERZVNHHS\RXUEDFNVWUDLJKW
and pull up equally with both arms. Straighten your legs to lift. Make sure that your own physical strength is
FDSDEOHRIOLIWLQJWKHZDONLQJGHFNXQWLOLWHQJDJHVWKHORFNLQJPHFKDQLVP8VHDVHFRQGSHUVRQLI
necessary.
Do not use the walking belt or rear roller to lift the treadmill. These parts do not lock in place and can
abruptly move. Injury to you or damage to the machine can occur.
5a
15°
5b
5a
6. Make sure that the locking mechanism is engaged. Carefully pull back on the walking deck and make sure that it does
not move. When you do this, keep clear of movement path in case the treadmill lock is not engaged.
Do not lean against the treadmill when it is folded. Do not put items on it that could cause it to become
unstable or fall.
Do not connect the power cord or try to operate the treadmill in the folded position.
7. Carefully tilt the base frame of the folded treadmill a small distance back on the transport wheels (5c) while grasping
the support bar (5b).
BEFORE YOU START
5c
24
Do not use the Console, handlebars, or lifted walking deck to lift or move the treadmill. Damage to the
treadmill can occur.
Keep clear of the movement path of the lifted walking deck.
. Roll the machine on the transport wheels (5c) to its new location.
Do not put objects where the walking deck would be if lowered.
NOTICE: Move the machine carefully so that it does not hit other objects. This can damage the Console operation.
9. Prior to use, refer to the “Unfolding the Machine” procedure in this manual.
8QIROGLQJWKH0DFKLQH
1. Make sure there is suf¿cient space to lower the walking deck.
Keep a minimum clearance behind the machine of 2 m (79”) and 0.6 m (24”) on each side. This is the
recommended safe distance for access, movement and emergency dismounts from the machine.
Place the machine on a clean, hard, level surface, free from unwanted material or other objects that may
KDPSHU\RXUDELOLW\WRPRYHIUHHO\ZLWKDVXI¿FLHQWFOHDUZRUNRXWDUHD$UXEEHUPDWEHORZWKHPDFKLQHLV
UHFRPPHQGHGWRSUHYHQWHOHFWURVWDWLFGLVFKDUJHDQGSURWHFW\RXUÀRRU
%HVXUHWKDWWKHZRUNRXWVSDFH\RXDUHXWLOL]LQJKDVDGHTXDWHKHLJKWFOHDUDQFHWDNLQJLQWRFRQVLGHUDWLRQ
the height of the user and the maximum incline of the deck.
2. Make sure there is no object on or around the treadmill to spill or cause blockage from the fully unfolded position.
3. Move to the right side of the machine. Press and hold the plastic deck release handle (5a) under the end of the right
side rail. While grasping the support bar (5b), release the deck handle.
Keep clear of the movement path of the walking deck.
4. The hydraulic lift is set up to drop lightly. Hold onto the walking deck until appro[imately 2/3 of the movement down.
Make sure that you use proper lifting technique; bend your knees and keep your back straight. Lower the weight with
your legs. The walking deck can possibly drop quickly in the last part of the movement.
5b
5a
25
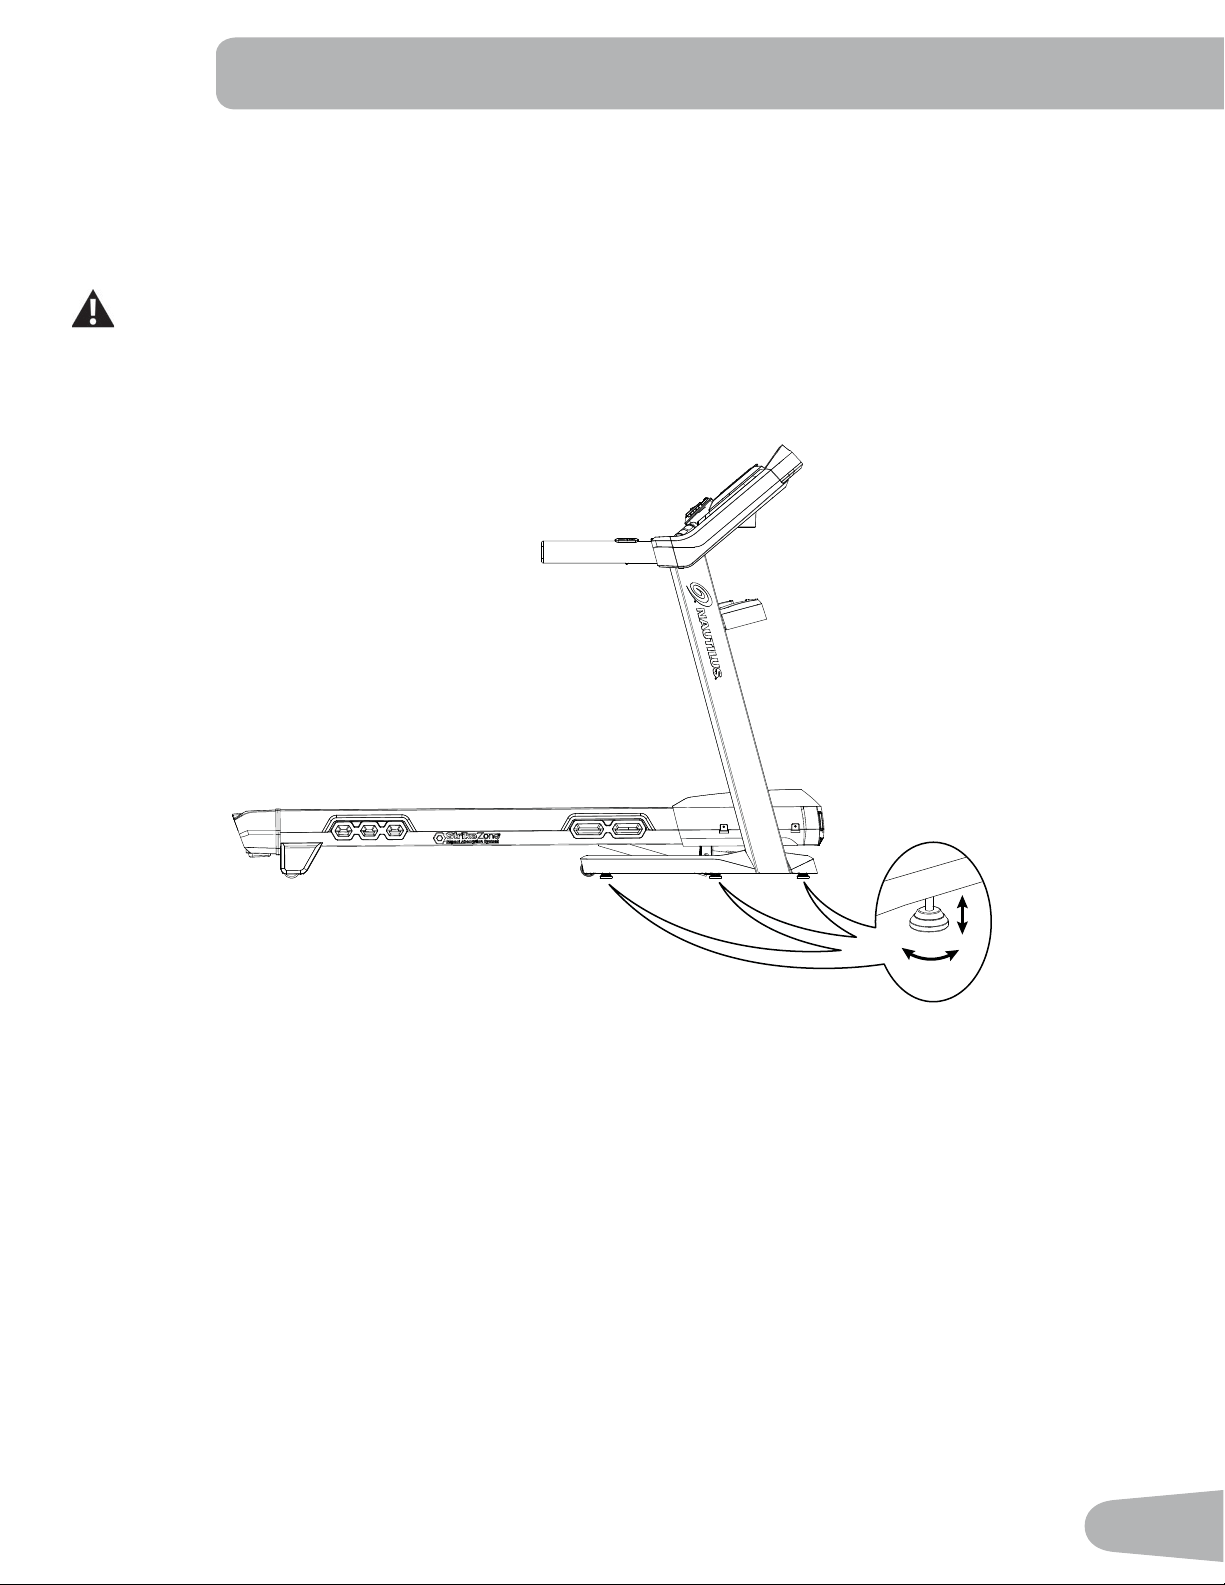
Leveling the Machine
The machine needs to be leveled if your workout area is uneven. To adjust:
1. Place the machine in your workout area.
2. Adjust the levelers until they all contact the Àoor.
Do not adjust the levelers to such a height that they detach or unscrew from the machine. Injury to you or
damage to the machine can occur.
3. Adjust until the machine is level.
Make sure the machine is level and stable before you e[ercise.
7UHDGPLOO%HOW
Your treadmill comes equipped with a durable, high quality walking belt designed to provide many hours of reliable ser-
vice. The walking belt on a treadmill that has not been operated for a length of time, either in factory packaging or after
assembly, can e[hibit a “thumping” noise when started. This is due to the belt taking on the curve of the front and rear roll-
ers. This is a common occurrence and does not indicate a problem with your machine. After the treadmill has been used
for a short period of time the thumping noise will discontinue. The amount of time will vary depending on the temperature
and humidity of the environment where the treadmill is placed.
26
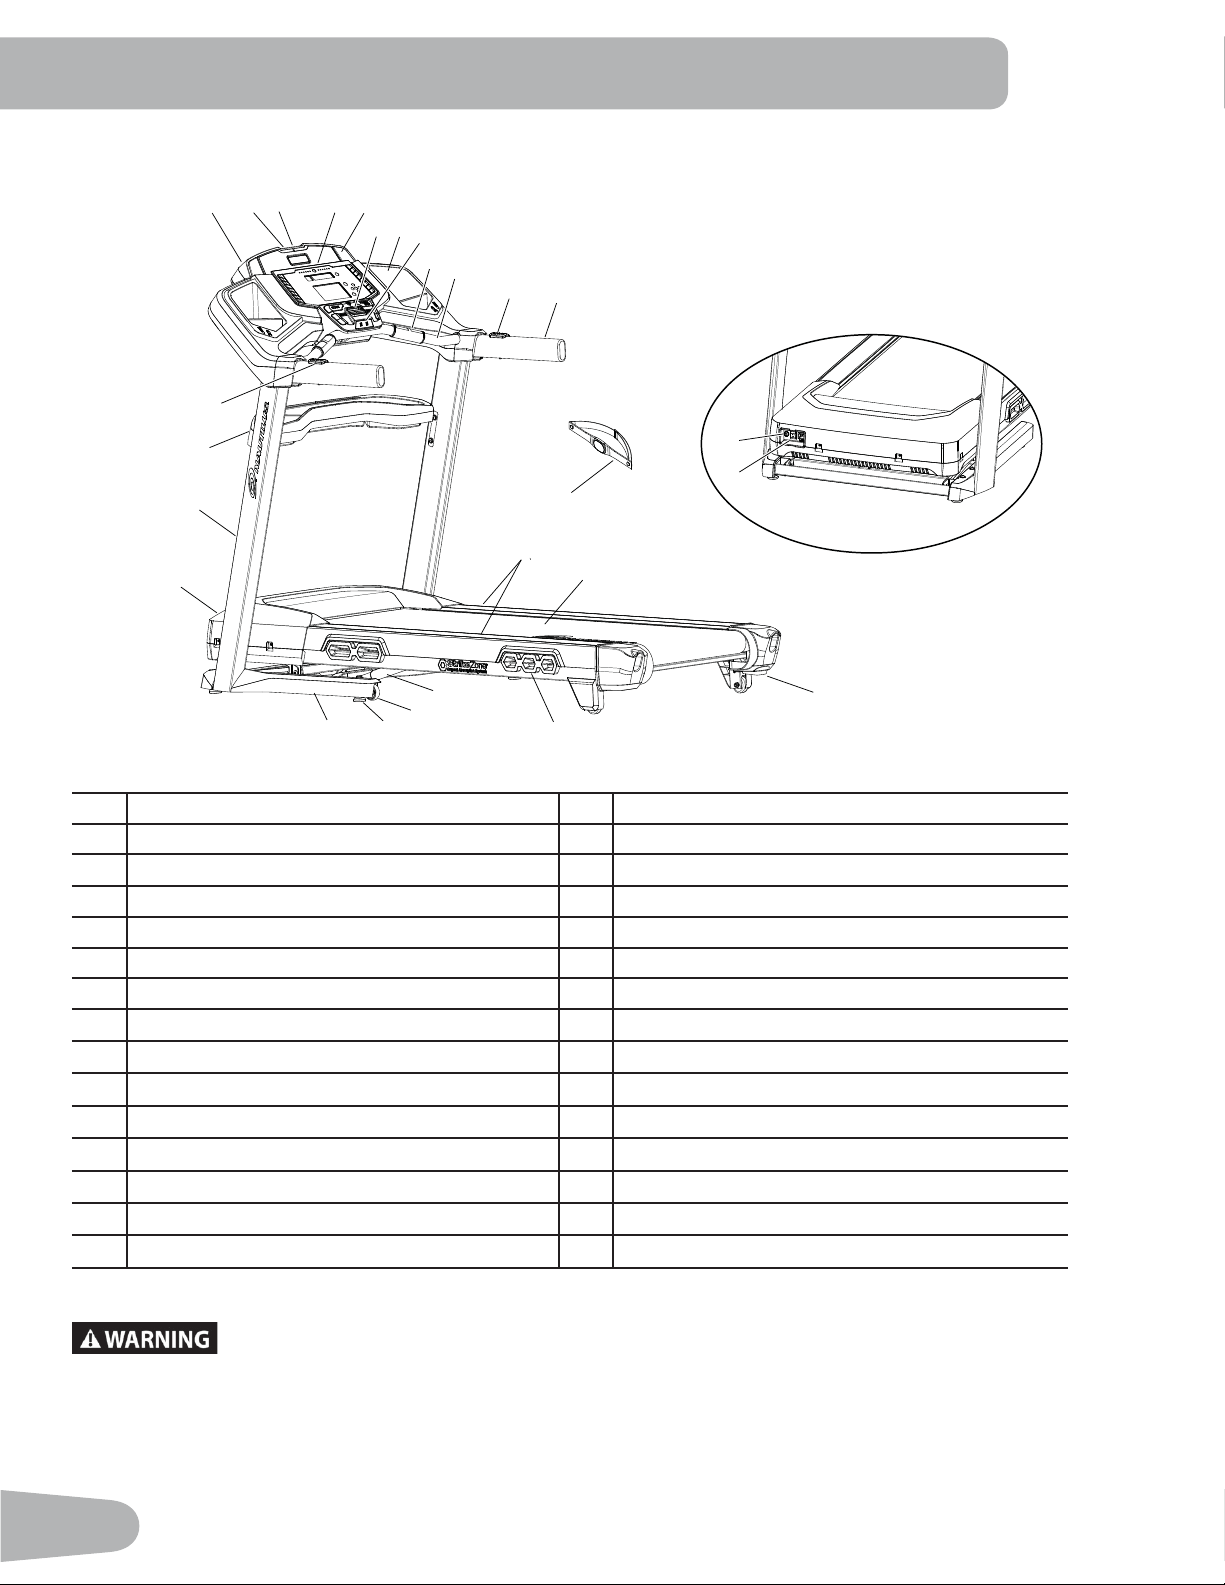
FEATURES
A Console P Deck Release Handle
B USB Port Q Dampener
C MP3 Input R Hydraulic Lift
D Media Tray S Transport Wheel
E Speaker T Leveler
F Fan U Base
G Cupholder V Motor Cover
H Emergency Safety Key Port W Uprights
I Contact Heart Rate (CHR) Sensors X Crossbar Tray
J Ergo Bar Y Remote Incline Control
K Remote Speed Control Z Power Switch
L Handlebar AA AC Inlet
M Heart Rate Chest Strap BB Telemetry Heart Rate (HR) Receiver (not shown)
N Side Foot Support Rails CC Bluetooth
®
Connectivity (not shown)
O Walking Belt and Deck DD Media Cable (not shown)
8VHWKHYDOXHVFDOFXODWHGRUPHDVXUHGE\WKHPDFKLQH¶VFRPSXWHUIRUUHIHUHQFHSXUSRVHVRQO\
The heart rate displayed is an approximation and should be used for reference only. Over
exercising may result in serious injury or death. If you feel faint stop exercising immediately.
A
B
C
D
E
F
G
H
I
J
K
L
M
N
O
P
Q
R
S
T
U
V
W
X
Y
Z
AA
27
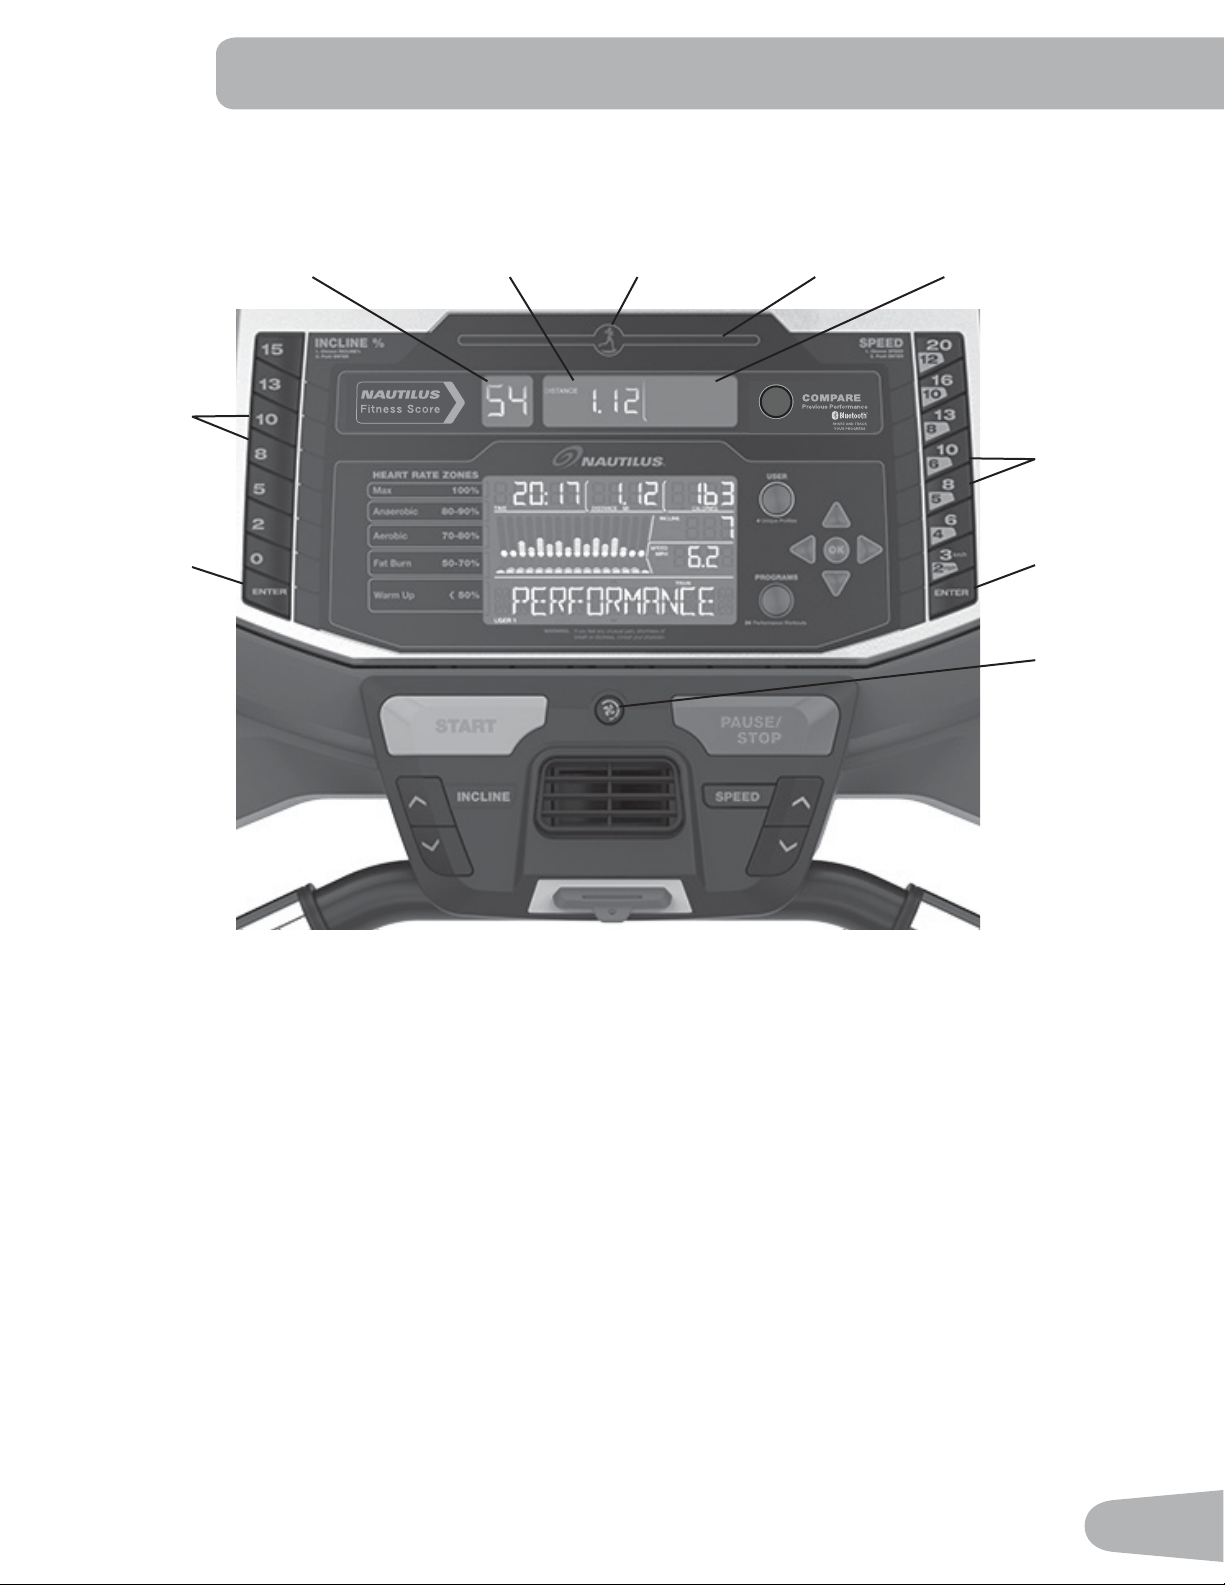
Console Features
The Console provides important information about your workout and lets you control the resistance levels while you
e[ercise. The Console features touch control buttons to navigate you through the e[ercise programs.
Console Display
Pacer Icon- represents the location of the Pacer during the Workout.
User Indicator Lights- The User indicator lights show where the User is in relation to the Pacer during the Workout.
Fitness Score Display- The Fitness Score Display shows the current Fitness Score of the selected User Pro¿ le.
Goal Display-The Goal Display shows the selected type of goal (Distance, Time or Calories) and the value for it.
User Placement Display- The User Placement Display shows the difference between the User and the Pacer. The arrows
tell if the User is in front (UP arrow) or behind (DOWN arrow) the Pacer.
COMPARE button- Push to select the desired Workout Pacer: Average, Best, or off.
USER button- Push to select the desired User Pro¿ le. The Active User Display will adjust
Increase (c) button- Increases the current value or moves through the options available
Left (e) button- Shifts the currently active segment, and moves through options
OK button- Con¿ rms information or a selection
Fan Button
Fitness Score Display Goal Display User Indicator
Lights
Pre-Set
Incline
Buttons
User Placement
Display
Incline Enter
Button
Pre-Set
Speed
Buttons
Speed Enter
Button
Pacer Icon
28
Decrease (d) button- Decreases the current value, or moves through the options available
Right (f) button- Shifts the currently active segment, and moves through options
PROGRAMS button- Selects a category of workout programs
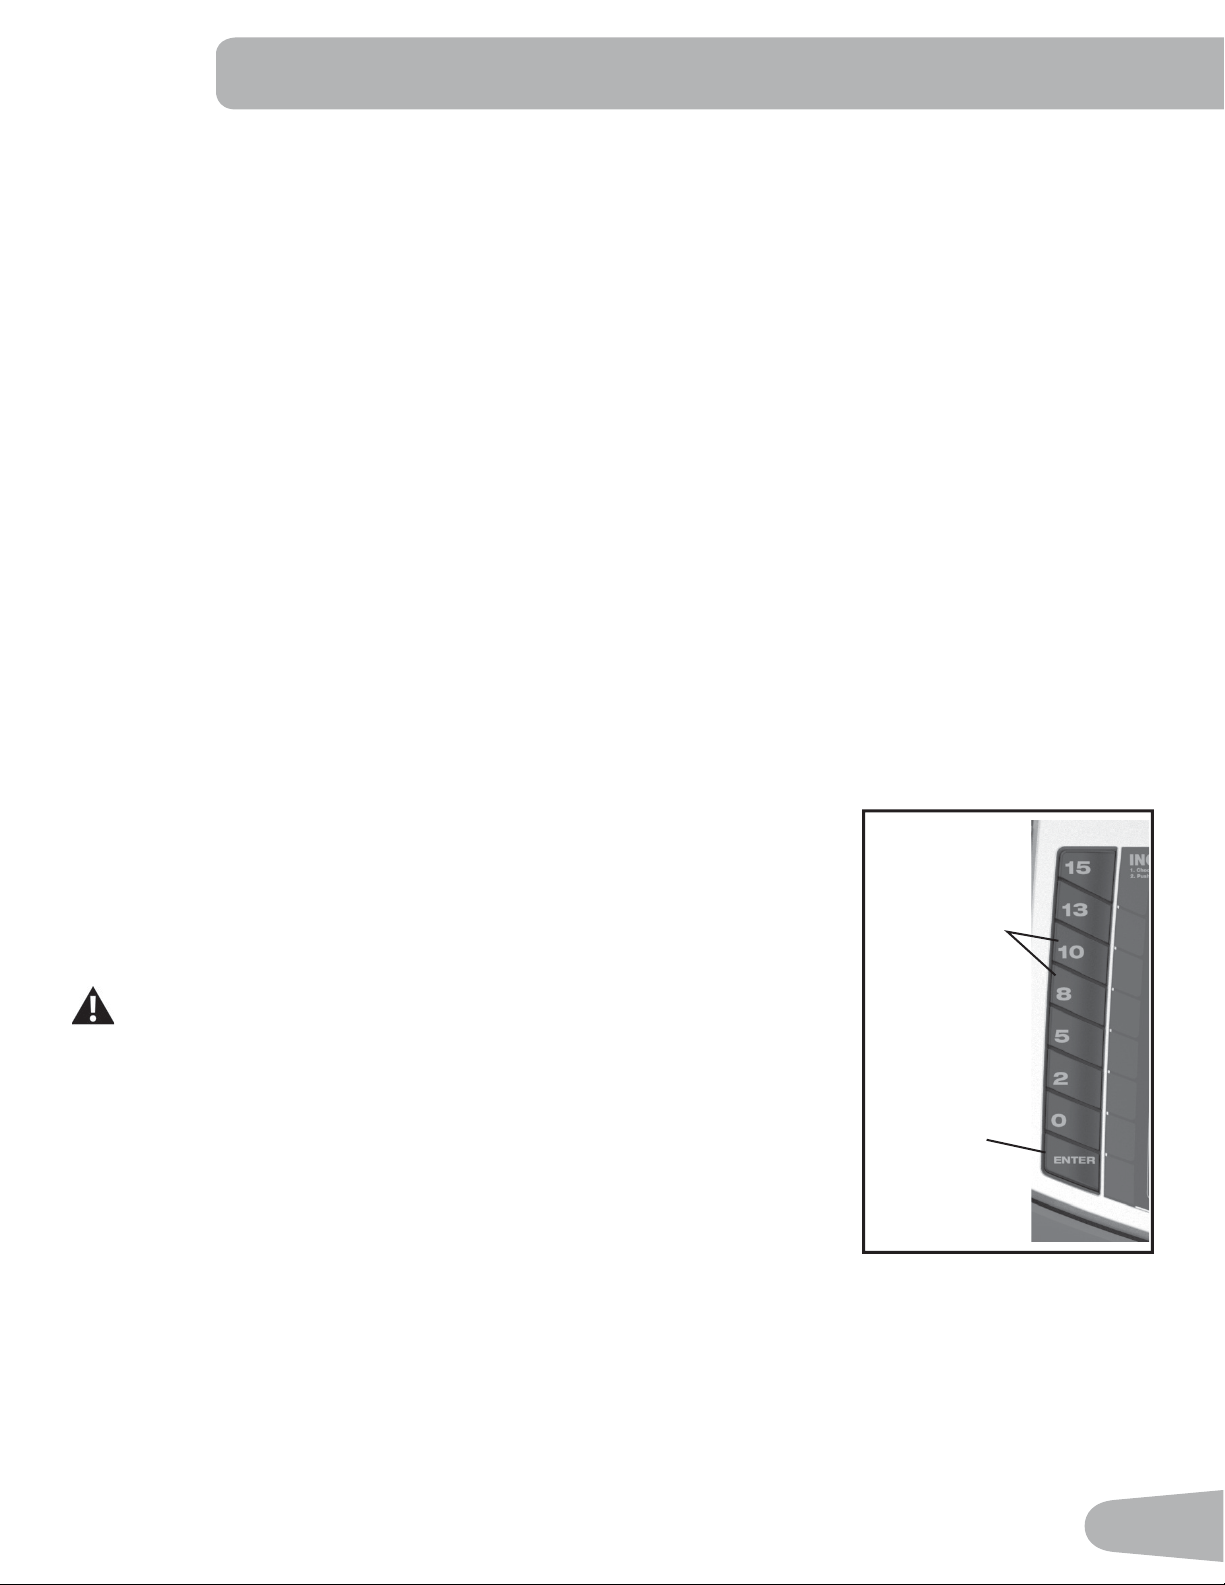
Pre-Set Incline buttons- Selects an incline value for the Walking Deck. After pushing a Pre-Set Incline button, push the
Incline Enter button within 12 seconds for the Walking Deck to be adjusted to the desired incline.
Incline Enter button- Activates the incline motor to adjust the Walking Deck to the selected Pre-Set Incline value.
START button- Begins a Quick Start workout, begins a Program Workout after customized for the User, or resumes a
paused workout.
FAN button- Controls 3-speed fan
PAUSE / STOP button- Pauses an active workout, ends a paused workout, or e[its to the previous menu
Pre-Set Speed buttons- Selects a speed value for the Walking Belt. After pushing a Pre-Set Speed button, push the
Speed Enter button within 12 seconds for the Walking Belt to be adjusted to the desired speed.
Note: The units can be set to kilometers per hour (km/h) or miles per hour (mph) in Console Setup Mode.
Speed Enter button- Adjusts the speed of the Walking Belt to the selected Pre-Set Speed value.
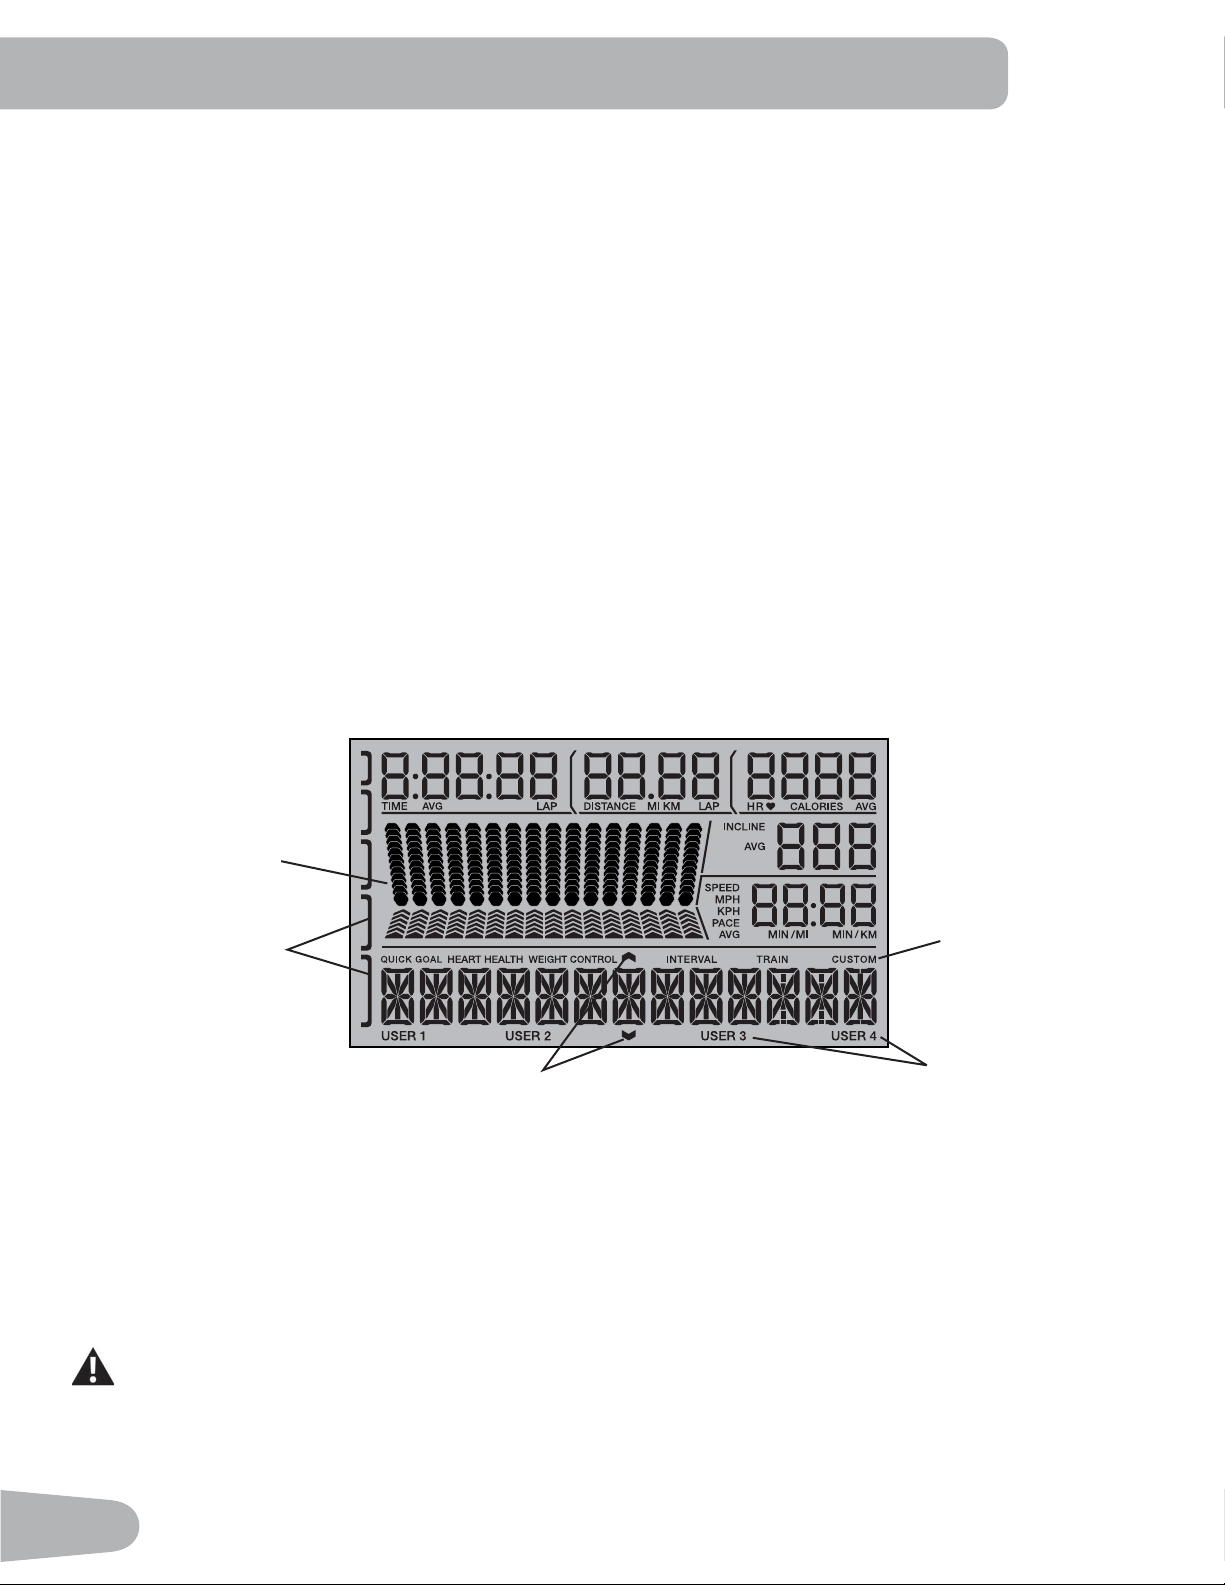
LCD Display Data
3URJUDP3URÀOH'LVSOD\
The Program Pro¿le Display shows the course pro¿le for the workout program. A course pro¿le has 16 columns, or
segments. The course pro¿le has two variables for each segment: incline (he[agons, upper) and speed (arrows, lower).
The more intense the incline or speed setting, the higher the level for that segment. The Àashing segment shows your
current interval.
Heart Rate Zone Display
The Heart Rate Zone shows which zone the current heart rate value falls into for the current User. These Heart Rate
Zones can be used as a workout guide for a certain target zone (ma[, anaerobic, aerobic, fat burn, and warm up).
Consult a physician before you start an exercise program. Stop exercising if you feel pain or tightness in
your chest, become short of breath, or feel faint. Contact your doctor before you use the machine again.
8VHWKHYDOXHVFDOFXODWHGRUPHDVXUHGE\WKHPDFKLQH¶VFRPSXWHUIRUUHIHUHQFHSXUSRVHVRQO\7KHKHDUW
rate displayed is an approximation and should be used for reference only.
Note: If no heart rate is detected, the Heart Rate Zone display will be blank.
Active User Display
Option Guides
Workout Category
Program Pro¿le
Display
Heart Rate
Zone Display

29
Option Guides
The Option Guides inform the User where they are in a list of options with the MORE and PREVIOUS Options.
If the MORE Options (decrease arrow) is active, then there are additional options that can be viewed by pushing the
Decrease (d) button. The MORE Options (decrease arrow) is active until the User reaches the end of the list. When the
User is at the end of the options list, the MORE Options (decrease arrow) will deactivate and the Decrease (d) button will
not provide further options.
The PREVIOUS Options (increase arrow) is active as soon as the User begins moving through the list. Use the Increase
(c) button to see the previous options.
Active User Display
The Active User Display shows which User Pro¿le is currently selected.
Time / Lap (Time)
The TIME display ¿eld shows the total time count of the workout, the average Time for the User Pro¿le, or the total opera-
tional time of the machine.
Note: The ma[imum time for a Quick Start workout is 9 hours, 59 minutes and 59 seconds (9:59:59).
The Lap (Time) display shows the time count for the just completed Lap. During a workout, this workout value is only dis-
played when a Lap is completed.
Distance / Lap (Count)
The Distance display shows the distance count (miles or km) in the workout.
The Lap (Count) display shows the total number of Laps completed during the workout. During a workout, this workout
value is only displayed when a Lap is completed, or during the Workout Results mode (completed Laps only, no deci-
mals).
Note: The distance of a Lap can be customized for each User in the Edit User Pro¿le mode. The default is 0.25 miles
(0.4 km).
Heart Rate (HR) / Calories
The Heart Rate display shows the beats per minute (BPM) from the heart rate monitor. When a heart rate signal is re-
ceived by the Console, the icon will Àash.
Consult a physician before you start an exercise program. Stop exercising if you feel pain or tightness in
your chest, become short of breath, or feel faint. Contact your doctor before you use the machine again.
The heart rate displayed is an approximation and should be used for reference only.
Calories
The Calories display ¿eld shows the estimated calories that you have burned during the workout.
Incline
The Incline display shows the current percent of Incline for the Walking Deck.
Speed / Pace
The Speed display ¿eld shows the belt speed in miles per hour (mph) or kilometers per hour (km/h).
The Pace display ¿eld shows the current time to complete a mile (or km) at the current Speed value.
Note: The ma[imum value for the Pace ¿eld is 99:59.
30
%OXHWRRWK
®
Connectivity with the “Nautilus Trainer™” Fitness App
This ¿tness machine is equipped with Bluetooth
®
connectivity and can wirelessly sync with the “Nautilus Trainer™”
Fitness App on supported devices. The Software App syncs with your ¿tness machine to track total calories burned, time,
distance, and more. It records and stores every workout for quick reference. Plus, it automatically syncs your workout data
with MyFitnessPal
®
, and Under Armour
®
Connected Fitness to make hitting your daily calorie goal easier than ever! Track
your results and share with friends and family.
1. Download the free Software App, named Nautilus Trainer™. The software app is available on App Store and Google
Play™.
Note: For a complete list of supported devices, review the software app on App Store or Google Play™.
2. Follow the instructions on the Software App to sync your device to your e[ercise machine.
3. To sync your workout data with MyFitnessPal
®
or Under Armour
®
Connected Fitness, click on the desired program and
login with your information.
Note: The “Nautilus Trainer™” Fitness App will automatically sync your workouts after the initial syncing.
Workout with Other Fitness Apps
This ¿tness machine has integrated Bluetooth
®
connectivity which allows it to work with a number of digital partners. For
our latest list of supported partners, please visit: www.nautilus.com/partners
86%&KDUJLQJ
If a USB Device is attached to the USB Port, the Port will attempt to charge the Device.
Note: Depending on the amperage of device, the power supplied from the USB Port may not be enough to operate the
Device and charge it at the same time.
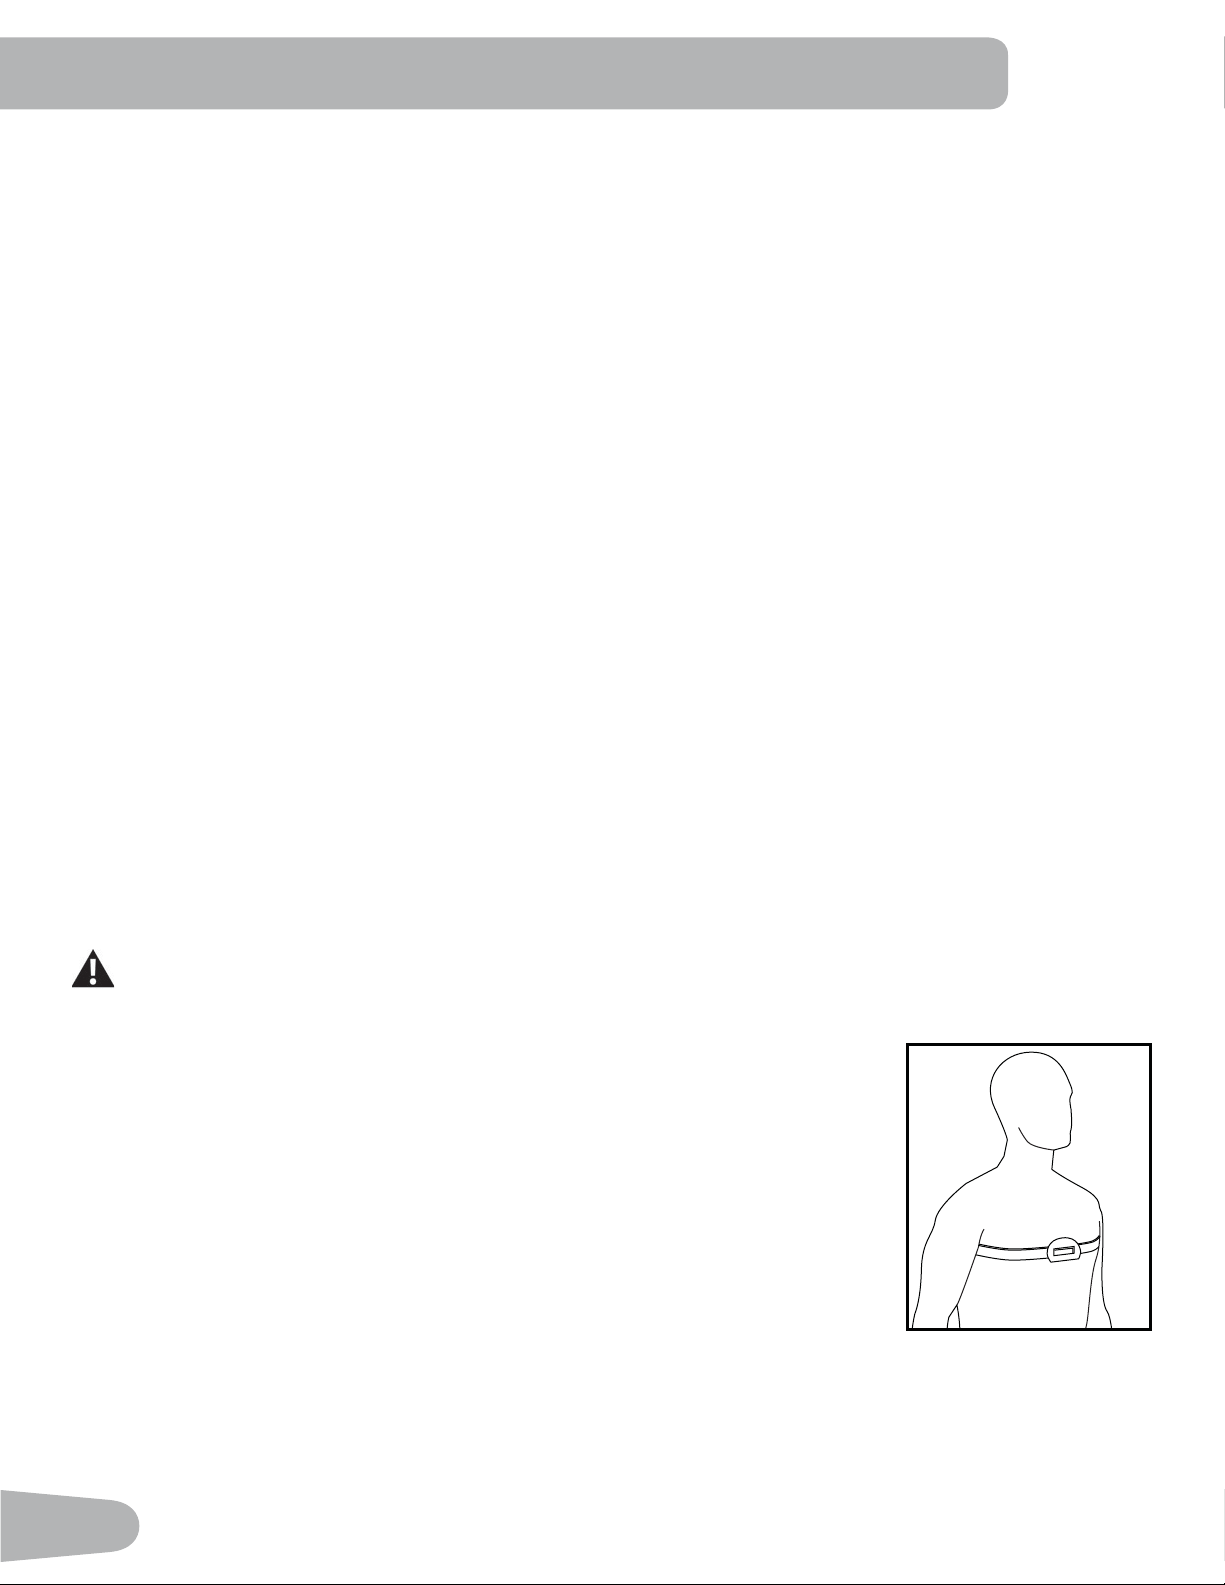
Chest Strap
Using the provided heart rate transmitter chest strap lets you monitor your heart rate at any time during your workout.
Consult a physician before you start an exercise program. Stop exercising if you feel pain or tightness in
your chest, become short of breath, or feel faint. Contact your doctor before you use the machine again.
The heart rate displayed is an approximation and should be used for reference only.
The heart rate transmitter is attached to a chest strap to keep your hands free during your
workout. To put on your chest strap:
1. Attach the transmitter to the elastic chest strap.
2. Secure the strap around your chest with the curve of the transmitter oriented upward,
just below the chest muscles.
3. Lift the transmitter off your chest and moisten the two Grooved Electrode Areas on the
back.
4. Check that the wet electrode areas are ¿rmly against your skin.
The transmitter will send your heart rate to the machine’s receiver and display your
estimated Beats Per Minute (BPM).
Always remove the transmitter before you clean the chest strap. Clean the chest strap regularly with mild soap and water,
and thoroughly dry it. Residual sweat and moisture may keep the transmitter active and drain the battery in the transmitter.
Dry and wipe clean the transmitter after each use.

31
Note: Do not use abrasives or chemicals such as steel wool or alcohol when you clean the chest strap, as they can
damage the electrodes permanently.
If the Console does not display a heart rate value, the transmitter may be at fault. Check that the te[tured contact
areas on the chest strap are making contact with your skin. You may need to lightly wet the contact areas. Check that
the curve of the transmitter is oriented upward. If no signal appears or you need further assistance, call your Nautilus
Representative.
%HIRUHGLVFDUGLQJDFKHVWVWUDSUHPRYHWKHEDWWHU\'LVSRVHRILQDFFRUGDQFHZLWKORFDOUHJXODWLRQVDQGRU
at approved recycling centers.
Remote Heart Rate Monitor
Monitoring your Heart Rate is one of the best procedures to control the intensity of your e[ercise. Contact Heart Rate
(CHR) sensors are installed to send your heart rate signals to the Console. The Console can also read telemetry HR sig-
nals from a Heart Rate Chest Strap Transmitter that operates in the 4.5kHz - 5.5kHz range.
Note: The heart rate chest strap must be an uncoded heart rate strap from Polar Electro or an uncoded POLAR
®
com-
patible model. (Coded POLAR
®
heart rate straps such as POLAR
®
OwnCode
®
chest straps will not work with this
equipment.)
If you have a pacemaker or other implanted electronic device, consult your doctor before using a wireless
chest strap or other telemetric heart rate monitor.
Contact Heart Rate Sensors
Contact Heart Rate (CHR) sensors send your heart rate signals to the Console. The CHR sensors are the stainless steel
parts of the Handlebars. To use, put your hands comfortably around the sensors. Be sure that your hands touch both the
top and the bottom of the sensors. Hold ¿rm, but not too tight or loose. Both hands must make contact with the sensors for
the Console to detect a pulse. After the Console detects four stable pulse signals, your initial pulse rate will be shown.
Once the Console has your initial heart rate, do not move or shift your hands for 10 to 15 seconds. The Console will now
validate the heart rate. Many factors inÀuence the ability of the sensors to detect your heart rate signal:
• Movement of the upper body muscles (including arms) produces an electrical signal (muscle artifact) that can interfere
with pulse detection. Slight hand movement while in contact with the sensors can also produce interference.
• Calluses and hand lotion may act as an insulating layer to reduce the signal strength.
• Some Electrocardiogram (EKG) signals generated by individuals are not strong enough to be detected by the sensors.
• The pro[imity of other electronic machines can generate interference.
If your heart rate signal ever seems erratic after validation, wipe off your hands and the sensors and try again.
Heart Rate Calculations
Your ma[imum heart rate usually decreases from 220 Beats Per Minute (BPM) in childhood to appro[imately 160 BPM by
age 60. This fall in heart rate is usually linear, decreasing by appro[imately one BPM for each year. There is no indication
that training inÀuences the decrease in ma[imum heart rate. Individuals of the same age could have different ma[imum
heart rates. It is more accurate to ¿nd this value by completing a stress test than by using an age related formula.
Your at-rest heart rate is inÀuenced by endurance training. The typical adult has an at rest heart rate of appro[imately 72
BPM, whereas highly trained runners may have readings of 40 BPM or lower.
The Heart Rate table is an estimate of what Heart Rate Zone (HRZ) is effective to burn fat and improve your cardiovas-
cular system. Physical conditions vary, therefore your individual HRZ could be several beats higher or lower than what is
shown.
32
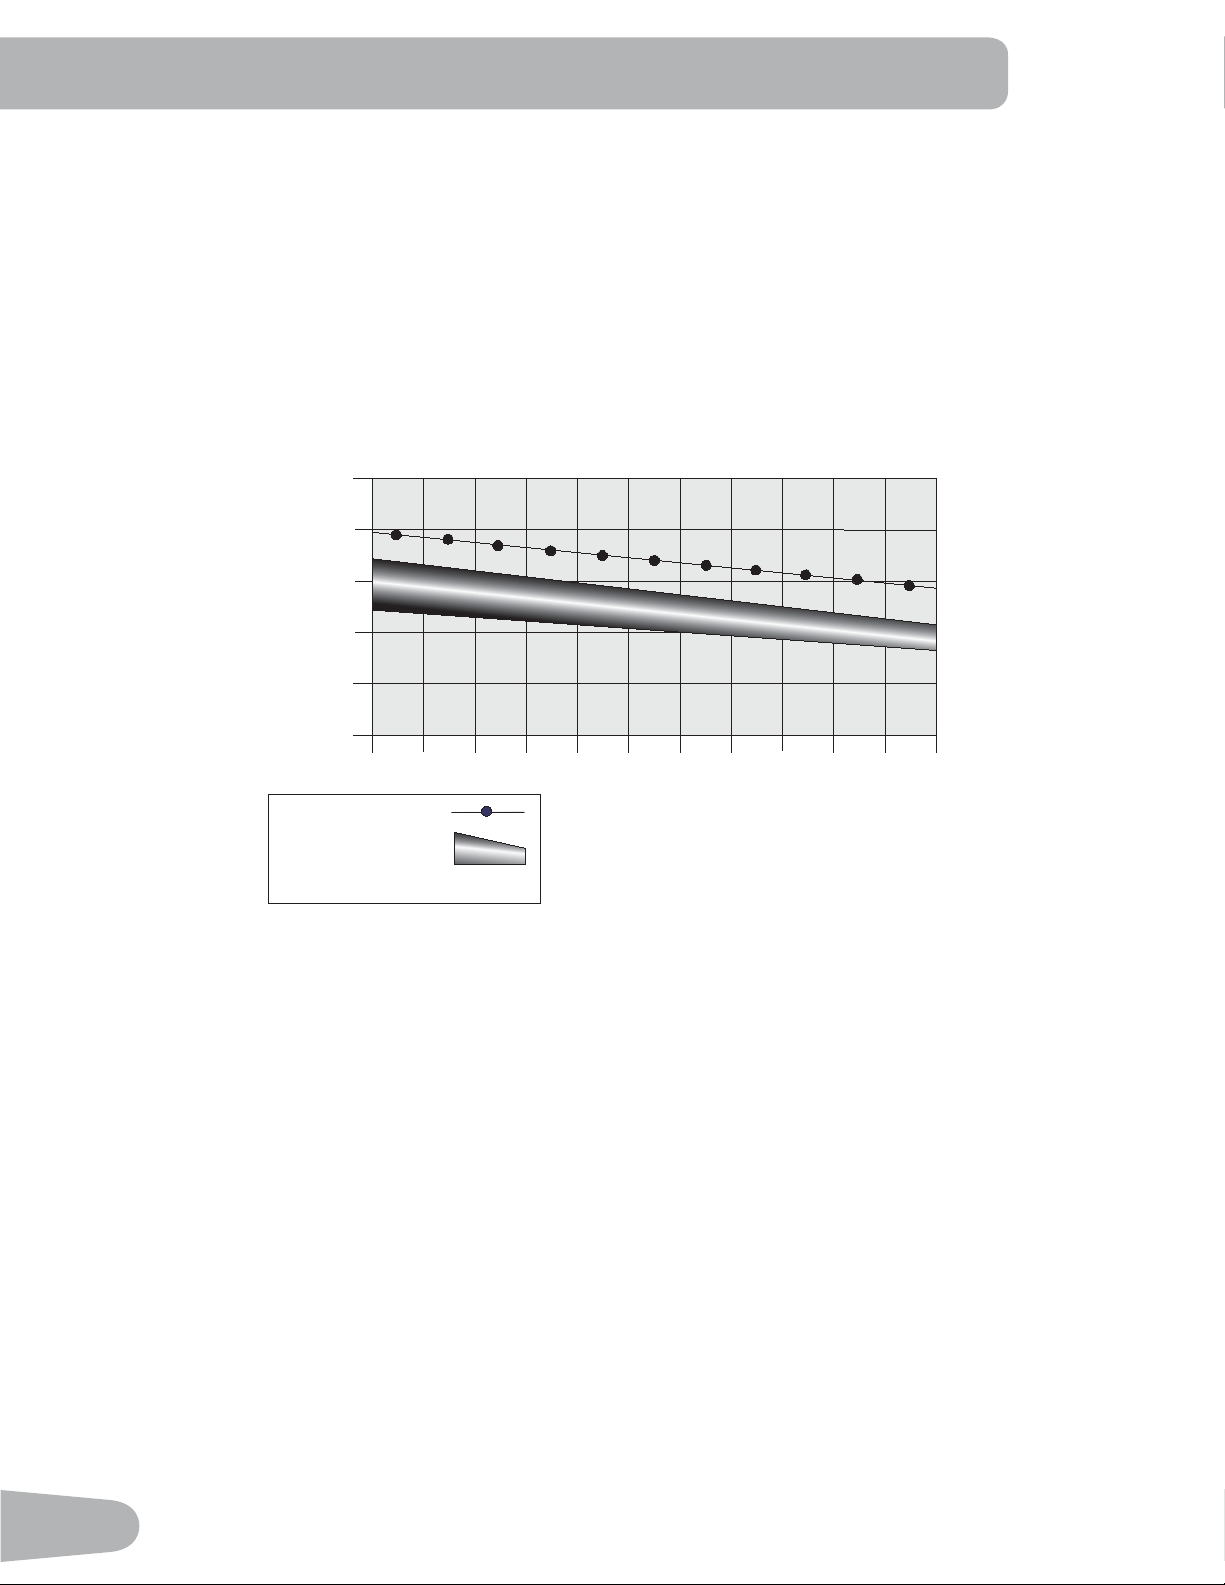
The most ef¿cient procedure to burn fat during e[ercise is to start at a slow pace and gradually increase your intensity un-
til your heart rate reaches between 50 ± 70 of your ma[imum heart rate. Continue at that pace, keeping your heart rate
in that target zone for over 20 minutes. The longer you maintain your target heart rate, the more fat your body will burn.
The graph is a brief guideline, describing the generally suggested target heart rates based on age. As noted above, your
optimal target rate may be higher or lower. Consult your physician for your individual target heart rate zone.
Note: As with all e[ercises and ¿tness regimens, always use your best judgment when you increase your e[ercise time
or intensity.
&!4"52.).'4!2'%4(%!242!4%
(EART2ATE"0-
BEATSPERMINUTE
!GE
-AXIMUM(EART2ATE
4ARGET(EART2ATE:ONE
KEEPWITHINTHISRANGE
FOROPTIMUMFATBURNING
Remote Speed and Incline Controls
The remote speed and incline controls are located on the handlebar arms. The keypad on the right handlebar arm
includes a Speed Increase key (c) and a Speed Decrease (d) key. The keypad on the left handlebar arm includes an
Incline Increase key (c) and a Incline Decrease (d) key. These keys work e[actly the same as the Speed and Incline
Increase and Decrease keys on the console.

33
OPERATIONS
What to Wear
Wear rubber-soled athletic shoes. You will need the appropriate clothes for e[ercise that allow you to move freely.
How Often Should You Exercise
Consult a physician before you start an exercise program. Stop exercising if you feel pain or tightness in
your chest, become short of breath, or feel faint. Contact your doctor before you use the machine again.
8VHWKHYDOXHVFDOFXODWHGRUPHDVXUHGE\WKHPDFKLQH¶VFRPSXWHUIRUUHIHUHQFHSXUSRVHVRQO\7KHKHDUW
rate displayed on the console is an approximation and should be used for reference only.
• 3 times a week for 30 minutes each day.
• Schedule workouts in advance and try to follow the schedule.
• Consider doing some warm-up stretches, which will help prepare your body, before your workouts.
Getting Started
Consult a physician before you start an exercise program. Stop exercising if you feel pain or tightness in
your chest, become short of breath, or feel faint. Contact your doctor before you use the machine again.
8VHWKHYDOXHVFDOFXODWHGRUPHDVXUHGE\WKHPDFKLQH¶VFRPSXWHUIRUUHIHUHQFHSXUSRVHVRQO\
Place the machine on a clean, hard, level surface, free from unwanted material or other objects that may
KDPSHU\RXUDELOLW\WRPRYHIUHHO\ZLWKDVXI¿FLHQWFOHDUZRUNRXWDUHD$UXEEHUPDWEHORZWKHPDFKLQHLV
UHFRPPHQGHGWRSUHYHQWHOHFWURVWDWLFGLVFKDUJHDQGSURWHFW\RXUÀRRU
%HVXUHWKDWWKHZRUNRXWVSDFH\RXDUHXWLOL]LQJKDVDGHTXDWHKHLJKWFOHDUDQFHWDNLQJLQWRFRQVLGHUDWLRQ
the height of the user and the maximum incline of the deck.
1. With the ¿tness machine in your workout area, inspect the walking belt to make sure it is centered and aligned. If
necessary, refer to the “Aligning the Walking Belt” Procedure in the Maintenance section of this manual.
7KHHGJHVRIWKH:DONLQJ%HOWVKRXOGEHXQGHUWKH6LGH)RRW6XSSRUW5DLOV,IDQHGJHRIWKH:DONLQJ%HOW
FDQEHYLHZHGGRQRWRSHUDWHWKHPDFKLQH$GMXVWWKH:DONLQJ%HOWXQWLOWKHHGJHVDUHQRWYLHZDEOHDQGDUH
XQGHUWKH6LGH)RRW6XSSRUW5DLOV5HIHUWRWKH$OLJQLQJWKH:DONLQJ%HOW3URFHGXUH
Note: This machine is for home use only.
2. E[amine below the walking belt for any objects. Be sure it is clear below the machine.
3. Connect the Power Cord to a correctly earthed AC wall outlet.
Do not step on the power cord and plug.
Note: The machine is designed to plug directly into a properly wired and earthed 220V outlet.
4. If you use the Remote Heart Rate Monitor, follow the Chest Strap directions.
5. Switch on the power. Power is now supplied to the machine.
6. Straddle the walking belt and stand on the Side Foot Support Platforms. Put the Safety Key into the Safety Key Port
and clip the Safety Key cord to your clothing.
Care should be used when mounting or dismounting the machine.
To prevent injury, stand on the Foot Platforms before you start the machine or end a workout. Do not
GLVPRXQWWKHPDFKLQHE\VWDQGLQJRQWKHPRYLQJ:DONLQJ%HOWVDQGH[LWLQJRIIWKHUHDURIWKHXQLWRU
machine).
• E[amine the Safety Key and be sure it is connected to the Console correctly.
Note: if the Safety Key is not installed, the machine will allow the User to perform all activities e[cept to activate the
Walking Belt. The Console will display the reminder to insert the Safety Key ( “ + SAFETY KEY” ).

34
• Always attach the Safety Key Clip to your clothing during workouts.
• If there is an emergency, pull out the Safety Key to shut off the power to the Belt and Incline Motors. This will quickly
stop the belt (brace yourself- this is an abrupt stop) and clear the workout. Push the PAUSE/STOP button to stop the
belt and pause the program.
7. Push the USER button to select the desired User for the workout.
. Select your workout using the PROGRAMS button and the Decrease/Increase buttons.
9. With your desired workout shown, push the OK button.
10. The Console will ask a series of questions to customize the workout. When the Console displays the “READY ?”
prompt, push the START button. The Console will display “RAMPING UP” as the Walking Belt gets up to speed. Be sure
to carefully step onto the walking belt.
The belt will only move after a 3 second, audible beep countdown.
Always use the handlebars to step on or off the treadmill, or when the incline or speed change.
,IWKH6RXQGKDVEHHQPXWHGWKH&RQVROHZLOOGLVSOD\WKH³$8',22))´SURPSWIRUDIHZVHFRQGV
To perform an emergency dismount, grab onto the Front or Side Handlebars and safely step onto the Side
)RRW3ODWIRUPV%ULQJWKH:DONLQJ%HOWWRDVWRSDQGFDUHIXOO\VWHSRIIWKHPDFKLQH
Note: Your treadmill comes equipped with a durable, high quality walking belt designed to provide many hours of
reliable service. The walking belt on a treadmill that has not been operated for a length of time, either in factory
packaging or after assembly, can e[hibit a “thumping” noise when started. This is due to the belt taking on the curve
of the front and rear rollers. This is a common occurrence and does not indicate a problem with your machine. After
the treadmill has been used for a short period of time the thumping noise will discontinue. The amount of time will vary
depending on the temperature and humidity of the environment where the treadmill is placed.
3RZHU8S,GOH0RGH
The Console will enter Power-Up / Idle Mode if it is plugged into a power source, the Power Switch turned on, and the
Safety Key is properly installed.
Note: if the Safety Key is not installed, the machine will allow the User to perform all activities e[cept to activate the
Walking Belt. The Console will display the reminder to insert the Safety Key ( “ + SAFETY KEY” ). Once the Safety key
is installed, the START button will need to be pushed again to begin the selected Workout.
Auto Shut-Off (Sleep Mode)
If the Console does not receive any input in appro[imately 5 minutes, it will automatically shut off unless in Demonstration
mode.
Push any button to start (wake up) the Console. If your machine is in Demonstration mode, hold down the PAUSE/STOP
button and Decrease button together for 3 seconds.
To disconnect, turn all controls to the off position, then remove plug from outlet.
Initial Setup
During the ¿rst power-up, the Console should be set up with the date, time, and the preferred units of measurement.
1. Date: Push the Increase/Decrease buttons to adjust the currently active value (Àashing). Push the Left/Right buttons
to change which segment is the currently active value (month / day / year).
2. Push OK to set.
3. Time: Push the Increase/Decrease buttons to adjust the currently active value (Àashing). Push the Left/Right buttons
to change which segment is the currently active value (AM or PM / hour / minute).
4. Push OK to set.

35
5. Units of Measurement: Push the Increase/Decrease buttons to adjust between “MILES” (Imperial English) or “KM”
(metric).
6. Push OK to set. The Console goes to the Power-Up Mode screen.
Note: To adjust these selections, consult the “Console Set-Up Mode” section.
Quick Start ( Manual ) Program
The Quick Start ( Manual ) program lets you start a workout without entering any information.
During a Manual Workout, each column represents a 2 minute time period. The active column will advance across the
screen every 2 minutes. If the workout lasts for more than 32 minutes, the active column is ¿[ed on the farthest column on
the right and pushes the previous columns off the display.
1. Stand on the Side Foot Support Platforms.
2. Push the User button to select the correct User pro¿le. If you do not have a User pro¿le set up, you can select a User
pro¿le that has no customized data (default values only).
3. Push the START button to start the Manual program.
Note: The Safety Key must be installed for a workout to begin. If not installed, the Console will display ” + SAFETY
KEY “. The Console will display “RAMPING UP” as the Walking Belt gets up to speed.
4. To change the Incline or Speed level, push the appropriate Increase or Decrease buttons. The time will count up from
00:00.
Note: The ma[imum time for a Quick Start workout is 9 hours, 59 minutes and 59 seconds (9:59:59).
5. When done with your workout, push PAUSE/STOP to pause the workout. Push PAUSE/STOP again to end the work-
out.
Note: The workout results are recorded to the current User Profile.
8VHU3URILOHV
The Console lets you store and use 4 User profiles. The User profiles automatically record the workout results for each
workout, and allow the workout data to be reviewed.
The User profile stores the following data:
• Name—up to 13 characters
• Weight
• Height
• Age
• Gender
• Lap Distance
• Scan
• Value (Customized Workout Display)
Select a User Profile
Every workout is saved to a User Pro¿le. Be sure to select the proper User Pro¿le before starting a workout. The last User
that completed a workout will be the default user.
User Pro¿les are assigned the default values until they are customized by editing. Be sure to edit the User Pro¿le for more
accurate calorie and heart rate information.
Edit User Profile
1. From the Power-Up Mode screen, push the User buttons to select one of the User Pro¿les.
2. Push the OK button to select the User Profile.
36
3. The Console display shows the GOAL TRACK prompt. Push the Increase(c) button.
4. The Console display shows the EDIT prompt and the current User Profile name. Push OK to start the Edit User Pro¿le
option.
To e[it the User Pro¿le options, push the PAUSE/STOP button and the console will go back to the Power-Up Mode
screen.
5. The Console display shows the NAME prompt and the current User Profile name.
Note: The User name will be blank if this is the first edit. The name of a User Profile is limited to 13 characters.
The currently active segment will flash. Use the Increase/Decrease buttons to move through the alphabet and blank
space (found between A and Z). To set each segment, use the Left(e) or Right(f) buttons to shift between segments.
Push the OK button to accept the displayed User name.
6. To edit the other User data (WEIGHT, HEIGHT, AGE, GENDER), use the Increase/Decrease buttons to adjust, and
push OK to set each entry.
Note: The User BMI is displayed on the HEIGHT prompt in the TIME display field.
The BMI Measurement is a useful tool that shows the relationship between weight and height that is associated with body
fat and health risk. The table below gives a general rating for the BMI score:
Underweight Below 1.5
Normal 1.5 ± 24.9
Overweight 25.0 – 29.9
Obesity 30.0 and above
Note: The rating may overestimate body fat in athletes and others who have a muscular build. It may also underesti-
mate body fat in older persons and others who have lost muscle mass.
&RQWDFW\RXUGRFWRUIRUPRUHLQIRUPDWLRQDERXW%RG\0DVV,QGH[%0,DQGWKHZHLJKWWKDWLVDSSURSULDWH
IRU\RX8VHWKHYDOXHVFDOFXODWHGRUPHDVXUHGE\WKHPDFKLQH¶VFRPSXWHUIRUUHIHUHQFHSXUSRVHVRQO\
7. The Console display shows the LAP DISTANCE prompt. This option controls the length of distance for a LAP during a
workout. Use the Increase/Decrease buttons to adjust the LAP distance value. The default is “0.25” miles (or 0.4 km).
Push the OK button to set the LAP distance value.
. The Console display shows the SCAN prompt. This option controls how the workout values are displayed during a
workout. The “ON” setting allows the Console to automatically display, or scan, between the workout values every 4
seconds. The “OFF” setting allows the user to push the RIGHT or LEFT buttons to view the other workout values when
desired.
The default is “ON”.
Push the OK button to set how the workout values are displayed.
9. The Console shows the workout display VALUE prompt. This option controls if a workout value is displayed during a
workout. The “ON” setting allows the Console to display the workout value, an “OFF” setting disables the workout value
during a workout.
The Console flashes the active workout value ( either Time, Lap (Time), Distance, Lap (Count), Heart Rate, Calories, or
Pace ) and states the current setting: “VALUE - ON” or “VALUE - OFF”. Push the Increase(c) or Decrease(d) buttons
to change the current setting, and push the Left(e) or Right(f) buttons to shift the active workout value.
Note: The Incline and Speed workout values cannot be disabled.
The default is “VALUE - ON” for all workout values. When done with modifying which workout values are displayed,
push the OK button to set the Console.
37
10. The Console display shows the WIRELESS HR prompt. If you are using the Console speakers at their higher settings
and / or using a larger sized personal electronic device, the Console may show Heart Rate interference. This option
allows the Telemetry Heart Rate Receiver to be deactivated blocking the interference.
The Display shows the current value setting: “ON” or “OFF”. Push the Increase(c) or Decrease(d) buttons to change
the value. The default is “ON”.
Push the OK button to set the Telemetry Heart Rate Receiver to active.
11. The Console will go to the Power-Up Mode screen with the user selected.
Reset a User Profile
1. From the Power-Up Mode screen, push the User button to select one of the User Pro¿ les.
2. Push the OK button to select the User Profile.
3. The Console display shows the GOAL TRACK prompt. Push the Decrease (d) button to change the prompt.
Note: To e[it the User Pro¿ le options, push the PAUSE/STOP button and the console will go back to the Power-Up
Mode screen.
4. The Console display shows the RESET prompt and the current User Profile name. Push OK to start the Reset User
Pro¿ le option.
5. The Console will now confirm the request to reset the User profile (the default selection is ‘RESET - NO’). Push the
Increase(c) or Decrease(d) buttons to adjust the selection.
6. Push OK to make your selection.
7. The Console will go to the Power-Up Mode screen.
Changing Incline Levels
Push the Incline Level Increase(c) or Decrease(d) buttons to change the incline angle
of the Deck at any time with the Safety Key installed. To rapidly change the incline level
push the desired Pre-Set Incline Button, and then the Incline Enter Button. The Deck will
adjust to the selected incline level.
Note: After a Pre-Set Incline Button is pushed, the Incline Enter Button must be
pushed within 12 seconds.
%HVXUHWKHDUHDEHORZWKHPDFKLQHLVFOHDUEHIRUHORZHULQJWKH'HFN)XOO\
lower the Deck after each workout.
([HUFLVHRQWKLVPDFKLQHUHTXLUHVFRRUGLQDWLRQDQGEDODQFH%HVXUHWR
anticipate that changes in belt speed and incline angle of deck can occur
during workouts, and be attentive in order to avoid loss of balance and
possible injury.
Be sure that the workout space you are utilizing has adequate height clearance, taking
into consideration the height of the user and the ma[imum height of the fully inclined
Deck.
Changing Speed Levels
Push the Speed Level Increase(c) or Decrease(d) buttons to change the Belt Speed at any time in a workout program.
To rapidly change the Speed level push the desired Pre-Set Speed Button, and then the Speed Enter Button. The Walking
Belt will adjust to the desired speed.
Note: After a Pre-Set Speed Button is pushed, the Speed Enter Button must be pushed within 12 seconds.
Pre-Set Incline
Buttons
Incline
Enter
Button
38
3UR¿OH3URJUDPV
These programs feature different incline angles of the deck and belt speeds based on the ma[imum and minimum speed
supplied by the user. The user can also manually adjust the incline and speed values at any time during a workout. The
Pro¿le Programs are organized into Categories (Quick Goal, Heart Health, Weight Control, Interval, Train, and Custom).
Each Pro¿le Program has 16 segments allowing for a variety of workouts.
'XULQJD3UR¿OH3URJUDPWKH&RQVROHZLOOPDNHDQDXGLREHHSLIWKHQH[WVHJPHQWRIWKHZRUNRXWKDVD
FKDQJHLQ,QFOLQHRU6SHHG%HSUHSDUHGIRUFKDQJHVLQ,QFOLQHDQG6SHHGZLWKHDFKVHJPHQWFKDQJH
The currently selected Category will be active on the Console, with the first Profile Program Workout within that Category
displayed. Use the Increase(c) or Decrease(d) buttons to select the desired Pro¿le Program Workout from the Category
of Workouts. At the end of the available Workouts for that Category, the More Options Guide (decrease arrow) will
deactivate, telling the User they have reached the end of the Category.
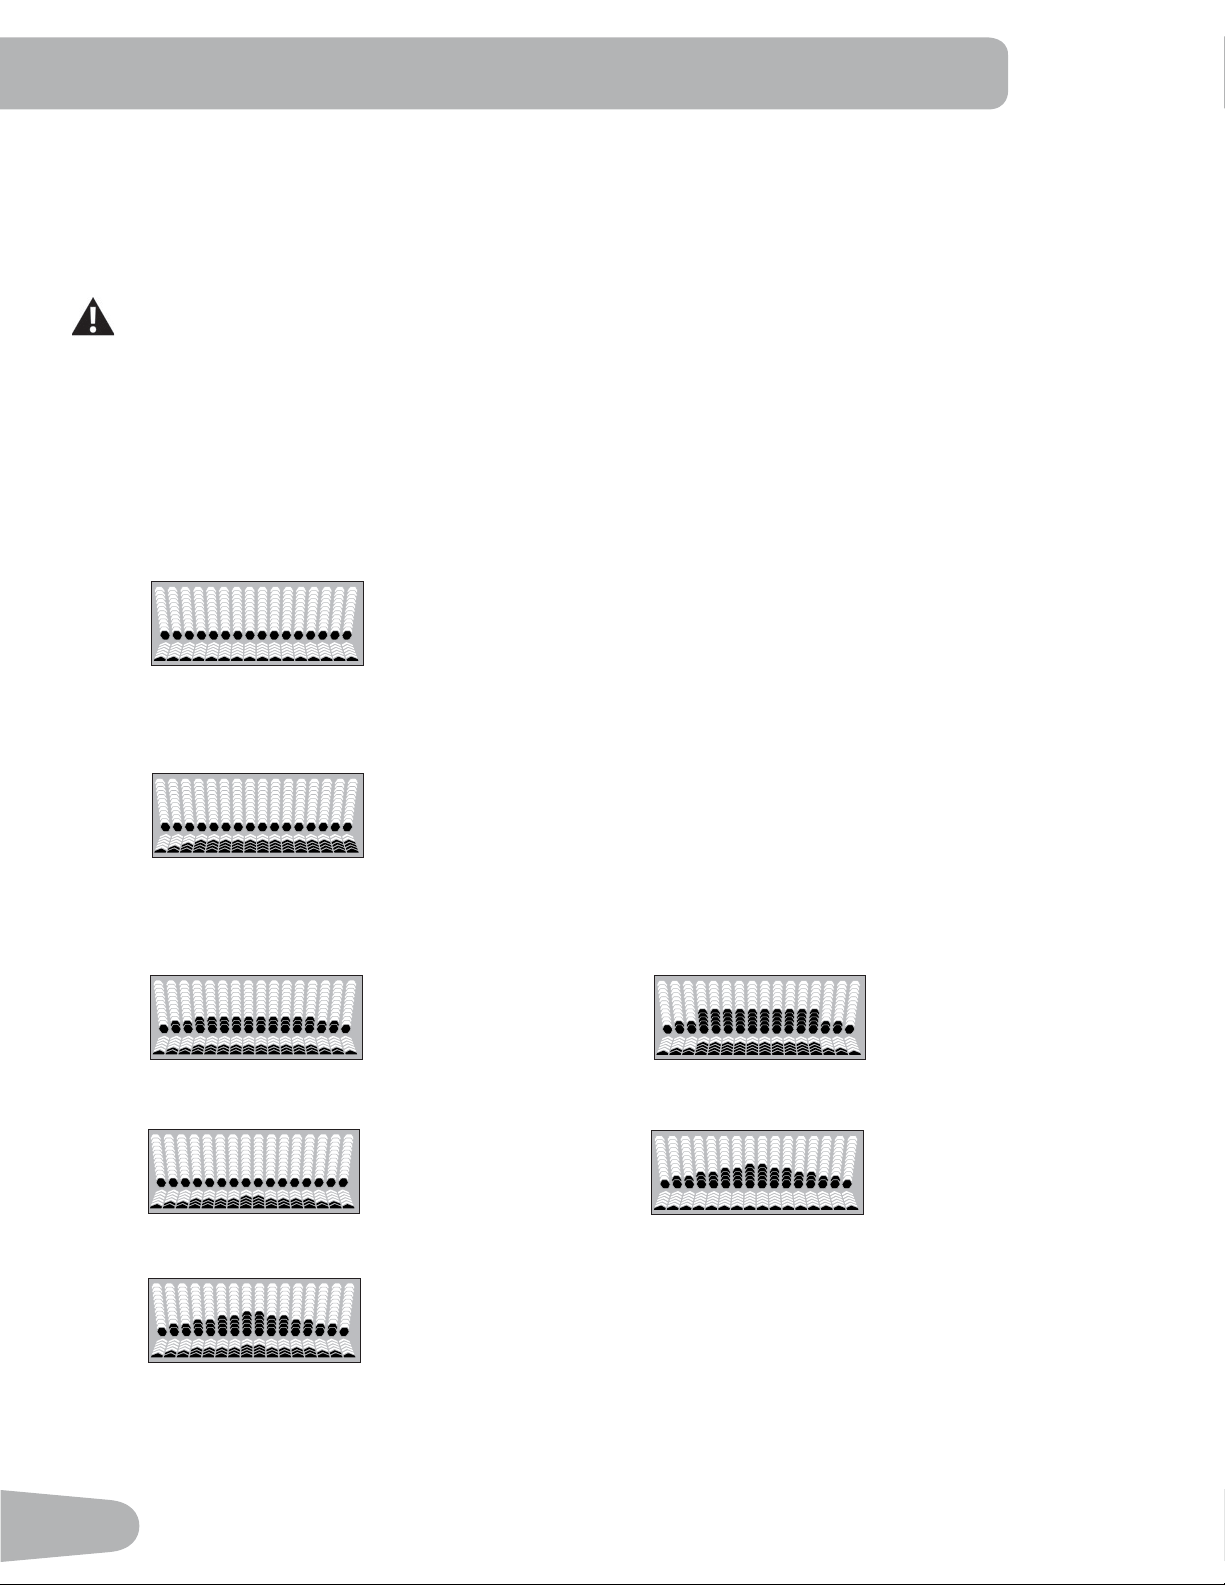
QUICK GOAL
DISTANCE, TIME, CALORIES
HEART HEALTH
HEALTHY- 55, FAT BURN - 65, AEROBIC - 75, ANAEROBIC - 5
WEIGHT CONTROL
FAT BURN 1 FAT BURN 2
SPEED BURN INCLINE BURN
DUAL BURN
39
INTERVAL
INTERVAL-INC (Incline) INTERVAL-SPD (Speed)
INTERVAL-DUAL (Incline and Speed)
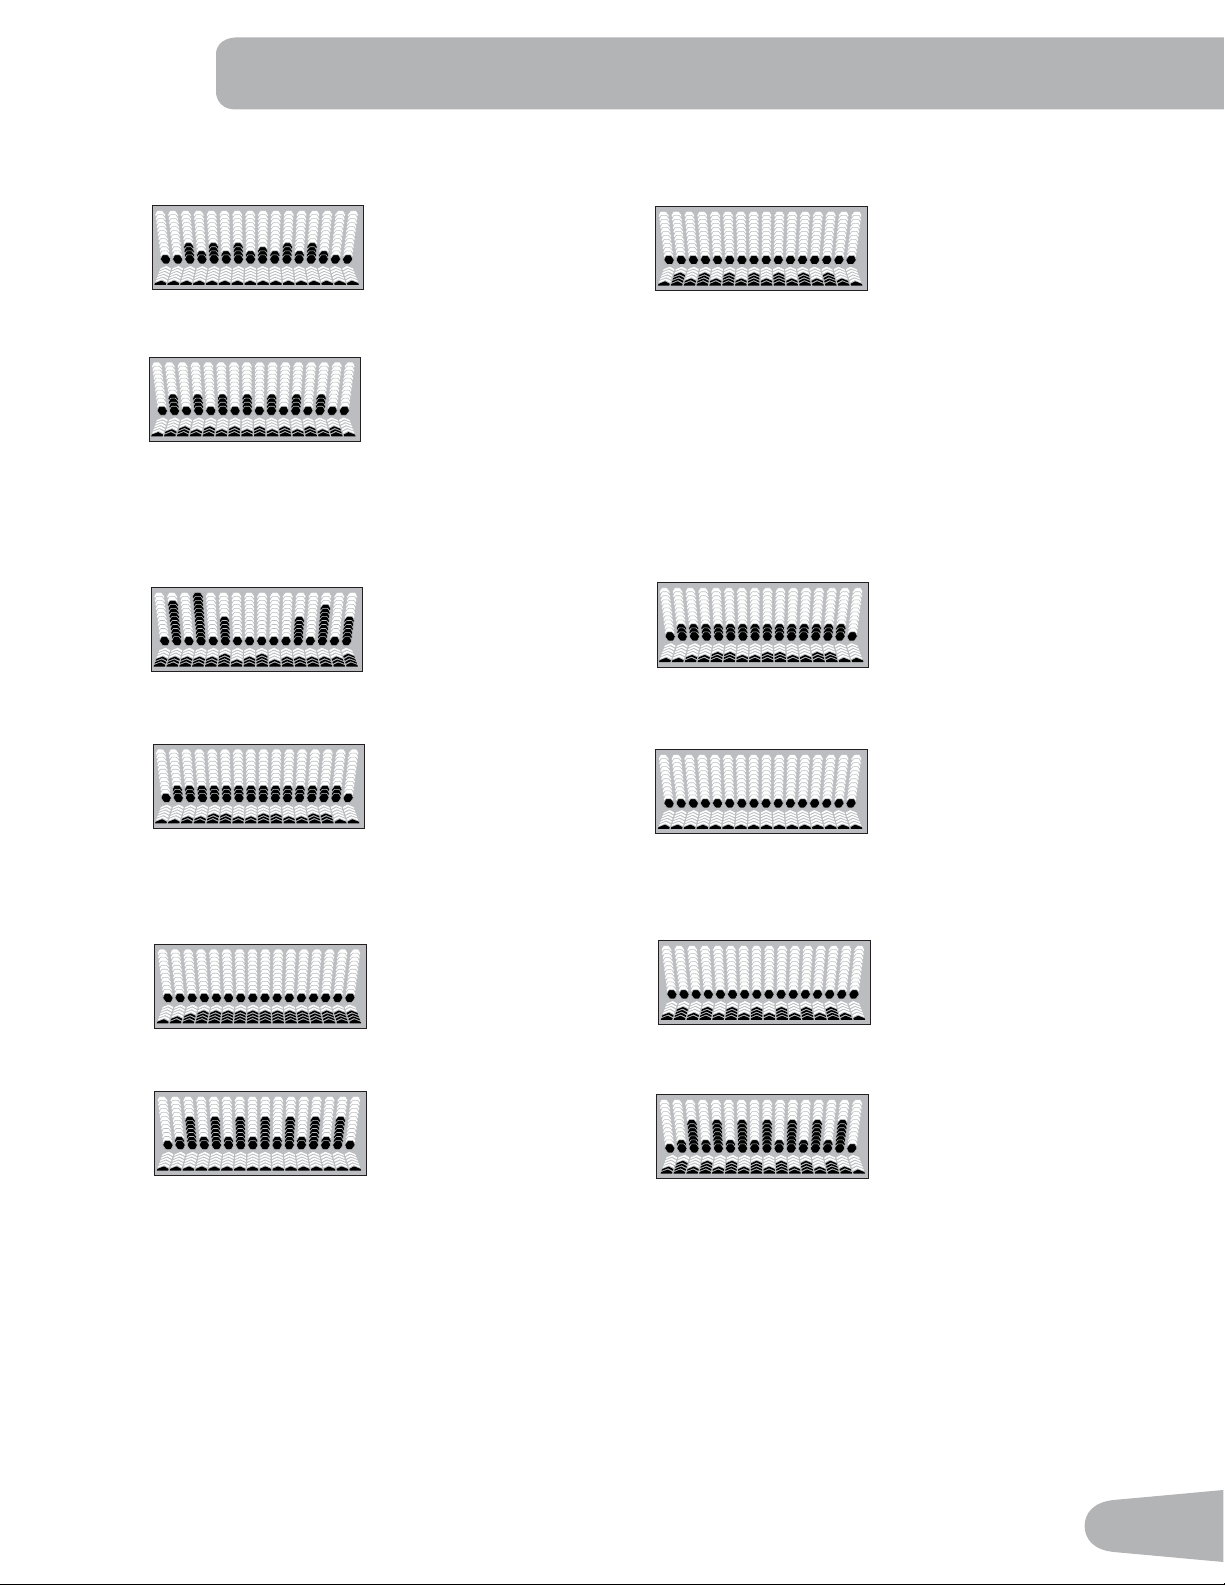
TRAIN
BOOT CAMP ENDURANCE
PERFORMANCE 1 MILE PACER, 5K PACER, 10K PACER
CUSTOM
HR (Heart Rate) TARGET CUSTOM-SPD (Speed)
CUSTOM-INC (Incline) USER DEFINED
:RUNRXW3UR¿OHDQG*RDO3URJUDP
The Console lets you select the Pro¿le Program and type of Goal for your workout (Distance, Time or Calories), and set
the Goal value.
Note: For certain Profile Programs, the Goal can not be adjusted ( e[ample: the 5K Pacer workout has a Distance Goal
of 5K).
1. Stand on the Side Foot Support Platforms.
2. Push the User button to select the desired User pro¿le.

40
3. Push the Programs buttons to select a Category of Workout.
4. Push the Increase(c) or Decrease(d) buttons to select a Profile Workout, and push OK.
If the selected Workout is Heart Rate Target, the Console will request the desired Beats Per Minute (BPM) for the
Workout. Use the Increase(c) or Decrease(d) buttons to adjust, and push OK.
If the selected Workout Program has Incline and/or Speed Pro¿le customization, the Console will prompt, “EDIT
INCLINE” screen. Push the Increase(c) or Decrease(d) buttons to change the current setting, and push the Left(e) or
Right(f) buttons to shift the active Profile segment. Push OK to accept the Incline Pro¿le.
Note: The “EDIT SPEED” screen operates the same way.
5. Use the Increase(c) or Decrease(d) buttons to adjust the Minimum Speed of the Belt, and push OK. The Profile
Program will adjust so the Minimum Speed value is the lowest Speed of the Profile Program when accepted.
6. Use the Increase(c) or Decrease(d) buttons to adjust the Ma[imum Speed of the Belt, and push OK. The Profile
Program will adjust so the Ma[imum Speed value is the highest Speed of the Profile Program when accepted.
'XULQJD:RUNRXWWKH8VHUFDQGLUHFWO\DGMXVWWKHVSHHGRIWKHEHOWDERYHWKH0D[LPXP6SHHGVHWWLQJLI
desired, by using the Increase(c) button.
7. Use the Increase(c) or Decrease(d) buttons to select a type of Goal (Distance, Time or Calories), and push OK.
. Use the Increase(c) or Decrease(d) buttons to adjust the workout value, and push OK.
9. The Console will display the “READY ?” prompt.
10. Push START to begin the goal-oriented workout. The workout will begin after a three second, audible countdown.
Note: The Console will display “RAMPING UP” as the Walking Belt gets up to speed.
Heart Rate Control Workout Programs
The Heart Rate Control programs let you set a heart rate goal for your workout. The program monitors your heart rate in
beats per minute (BPM) from the Contact Heart Rate (CHR) sensors on the machine or from a Heart Rate Monitor (HRM)
chest strap, and adjusts the incline during a workout to keep your heart rate in the selected zone.
Note: The console must be able to read the heart rate information from the CHR sensors or HRM for the Heart Rate
Control program to work correctly.
The Target Heart Rate programs use your age and other User information to set the Heart Rate Zone values for your
workout. The console display then gives prompts for you to set up your workout:
1. Push the PROGRAMS button until the HEART HEALTH Category is selected.
2. Push the Increase(c) or Decrease(d) buttons to select the percentage of ma[imum heart rate: HEALTHY 55, FAT
BURN 65, AEROBIC 75, ANAEROBIC 5.
Consult a physician before you start an exercise program. Stop exercising if you feel pain or tightness in
your chest, become short of breath, or feel faint. Contact your doctor before you use the machine again.
8VHWKHYDOXHVFDOFXODWHGRUPHDVXUHGE\WKHPDFKLQH¶VFRPSXWHUIRUUHIHUHQFHSXUSRVHVRQO\7KHKHDUW
rate displayed on the console is an approximation and should be used for reference only.
3. Push the Increase(c) or Decrease(d) buttons to set the Minimum Speed, and push OK.
4. Push the Increase(c) or Decrease(d) buttons to set the Ma[imum Speed, and push OK.
5. Push the Increase(c) or Decrease(d) buttons to select the Goal type, and push OK.
6. Push the Increase(c) or Decrease(d) buttons to set the goal value for the workout, and push OK.
Note: Be sure to allow time for your heart rate to reach the desired heart rate zone when setting the goal. The Console
will display the heart rate value based on the current User settings.
7. Push START to begin the workout.
41
A User can also set a Heart Rate Target value by selecting the HR TARGET program in the CUSTOM Category. The Con-
sole will adjust the incline during a workout to keep the User in the desired Heart Rate zone.
1. Push the PROGRAMS button until the CUSTOM Category is selected.
2. The Console shows the HR TARGET workout. Push OK.
3. Push the Increase(c) or Decrease(d) buttons to set the Heart Rate (HR) value for the workout, and push OK.
4. Push the Increase(c) or Decrease(d) buttons to set the Minimum Speed, and push OK.
5. Push the Increase(c) or Decrease(d) buttons to set the Ma[imum Speed, and push OK.
6. Push the Increase(c) or Decrease(d) buttons to select the Goal type, and push OK.
7. Push the Increase(c) or Decrease(d) buttons to set the goal value for the workout, and push OK.
Note: Be sure to allow time for your heart rate to reach the desired heart rate zone when setting the goal. The Console
will display the heart rate value based on the current User settings.
. Push START to begin the workout.
Compare Pacer Displays
The Compare Pacer Displays allow a User to focus, or train, on a set program and
distance, and see how they compare against past workouts while doing a workout.
The average, or best, past workout with the same distance goal are the pacers for
the currently selected workout.
The User Placement Display shows the User where they are in relation to the pacer, with a time value and an UP arrow
(in front) or DOWN arrow (behind the pacer).
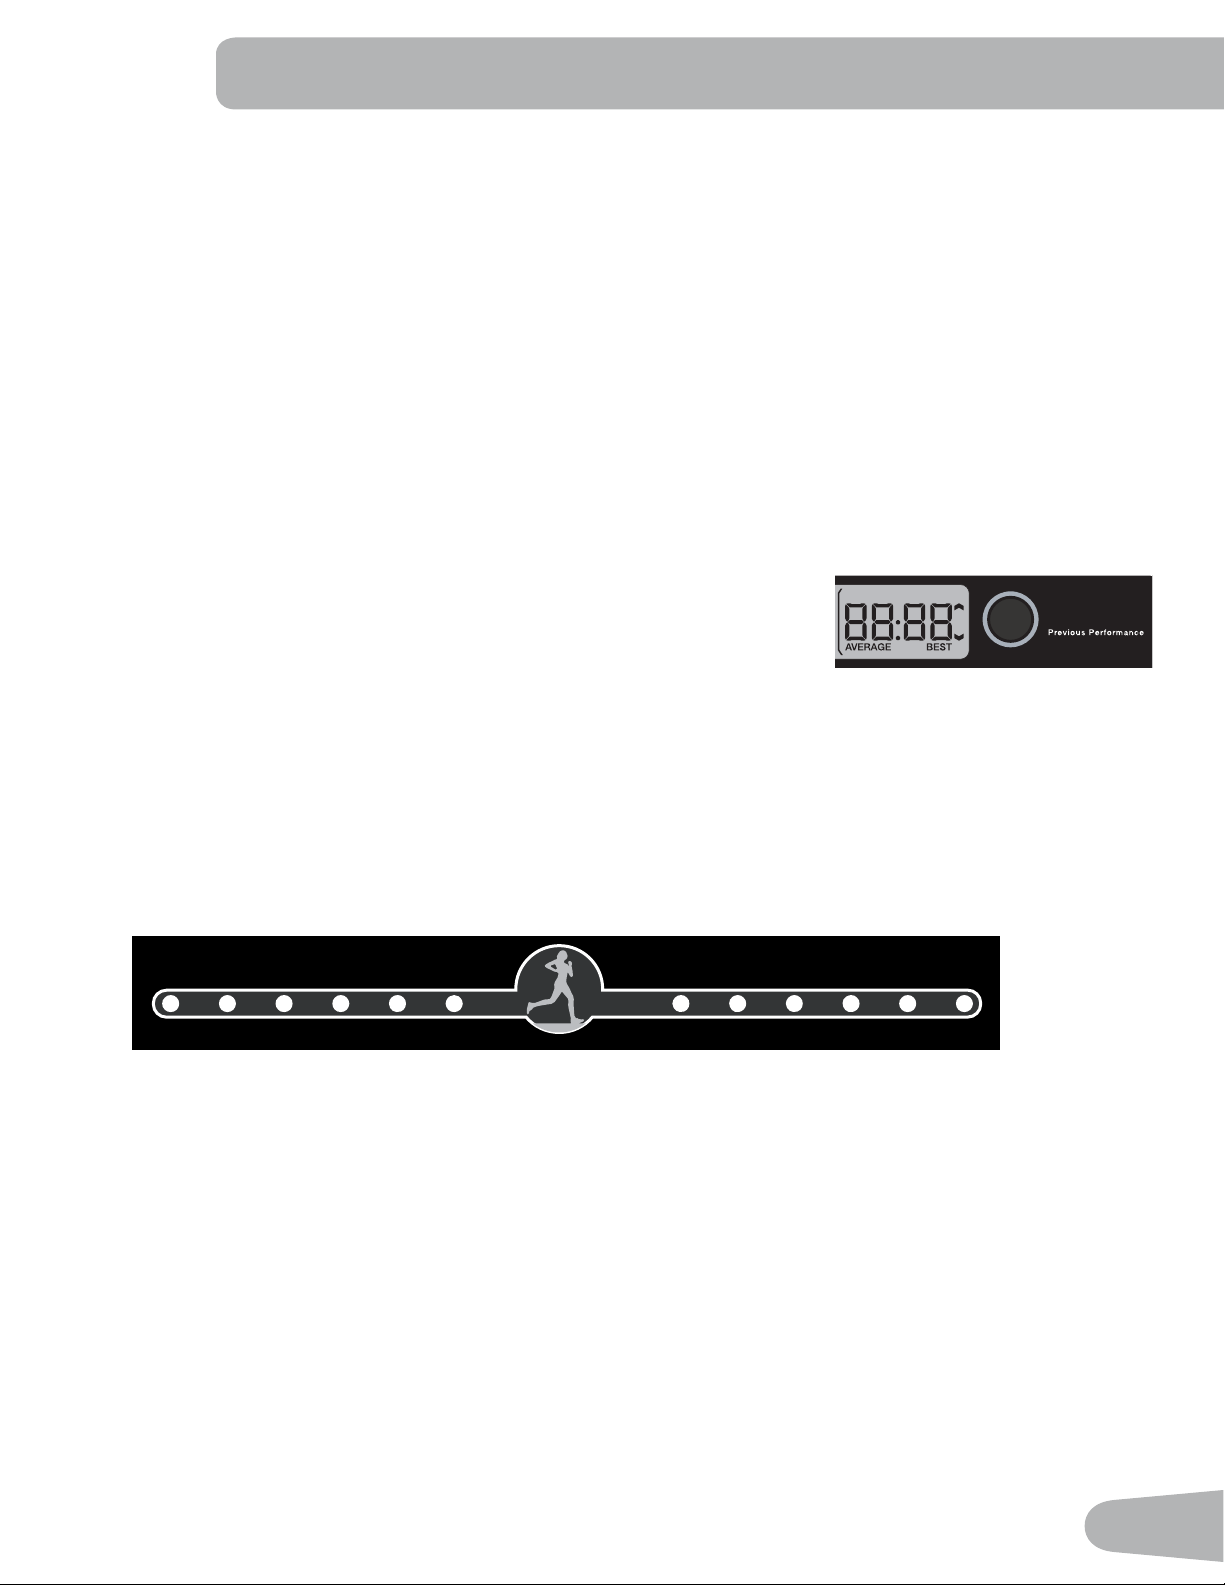
The User Indicator Lights across the top of the Console quickly show the location of the User in relation to the pacer. The
Pacer Icon (center of the User Indicator Lights) is the placement of the pacer, the Indicator Light is the User. The time dif-
ference between the User and the pacer is shown by which User Indicator Light is active (see the time scale below).
- -120 -60 -30 -15 -5 +5 +15 +30 +60 +120 +
(seconds)
Note: The values presented during the ¿rst workout are based on the default pace value of 12 minutes per mile.
When a workout is started, the Average Pacer will be active. To change the pacer during a workout, push the COMPARE
button. The pacer will shift to the Best Pacer, and the User Placement Window and appropriate User Indicator Light will
adjust. If the COMPARE button is pushed again, the feature is Off, and the User Placement Display and Indicator Light
will be deactivated.
Note: When the distance goal for the program is changed, it is a shift in the training focus of the program. The com-
pare display will use the default values until a workout with the new distance goal is completed.
During a Pacer workout (1 Mile Pacer, 5k Pacer, 10k Pacer), the User inputs the time it will take for the pacer to complete
the workout. The User Placement Window does not have an off option during a Pacer workout. The Compare button shifts
the pacer value from Input Pace, Average, or Best.
COMPARE
42
100
80
60
40
20
18-25 26-35 36-45 46-55 56-65 65+
100
80
60
40
20
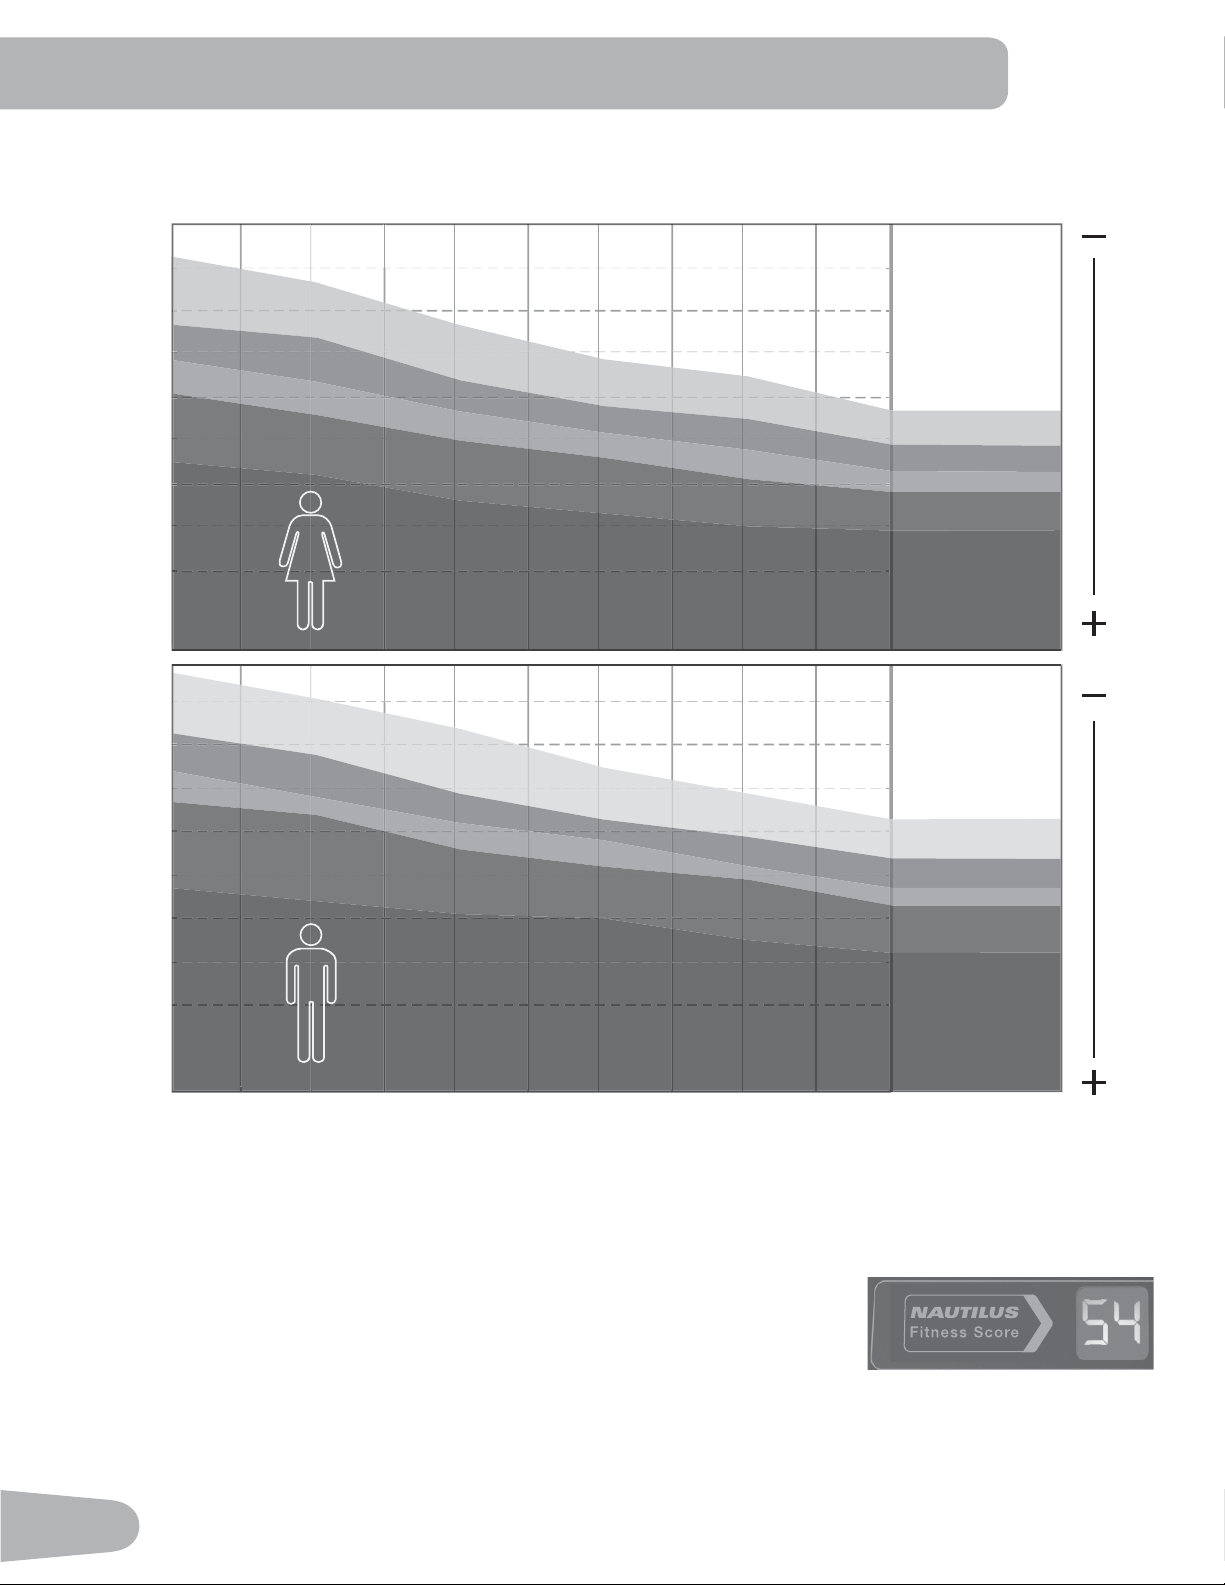
Fitness Score Display
The Fitness Score is based on an estimate of the User’s VO2 Ma[ and calorie burn over
their last five workouts.
VO2 Ma[ estimates are calculated using performance data (time, distance and average
heart rate or an estimate of average heart rate if that data is unavailable). VO2 Ma[ is the ma[imal o[ygen consumption
of the aerobic physical ¿ tness of the individual, and is a determinant of the endurance capacity of the User during pro-
longed e[ercise. ( V Volume, O2 O[ygen, and Ma[ ma[imum rate ).
Fitness Score
8VHU)LWQHVV/HYHO%DVHGRQ)LWQHVV6FRUH
poor
e[cellent
good
high average
average
low average
Age
Potential for Improvement
poor
e[cellent
good
high average
average
low average

43
For every workout completed that is longer than 10 minutes or a mile (1.6 km) in distance, the Console will apply those
workout values toward your Fitness Score. This value is displayed on the Fitness Score Display area of the Console.
Note: Using a Heart Rate Chest Strap provides the most accurate information to calculate the Fitness Score. A Fitness
Score is provided when a minimum of 10 minutes or 1 mile (1.6 km) of distance is done during a workout. If no
heart rate is supplied, an appro[imation based on the User Profile will be used to calculate the score.
The Fitness Score may change only slightly for a User that performs the same length of workout at a similar intensity level.
However, if that same User were to increase intensity over the same length of a workout, their score would increase. Since
the score is based on VO2 Ma[ (estimated), even a small score increase shows a significant shift in the User’s fitness level.
Note: A User’s score may drop slightly if fatigue is present. With the proper combination of e[ercise and rest, a User’s
Fitness Score will rise in a similar way to their VO2 Ma[. This will also be reflected in their ability to perform
longer or faster workouts. Fitness Scores should only be compared to your previous scores and not to other User
Profiles.
Pausing or Stopping
The Console will go into Pause Mode if the user pushes PAUSE/STOP during a workout.
1. Push the PAUSE/STOP button to pause your workout. The Console will display “ PAUSED “.
2. To continue your workout, push the START button.
To stop the workout, push the PAUSE/STOP button. The Console will go into Results / Cool Down mode.
Results / Cool Down Mode
All workouts e[cept Quick Start and the Heart Rate Control programs have a 3-minute Cool Down period. During this
Cool Down period, the Console shows the Workout Results. The Console will cycle through the workout results every 4
seconds.
During the Cool Down period, the speed of the walking belt will adjust to 2 mph (3.2 km/h) and the incline setting will ad-
just to zero. The User can adjust the belt speed and deck incline during the Cool Down period.
Push PAUSE/STOP to end the Results / Cool Down period and go back to Power-Up Mode. If there is no input to the
Console for 5 minutes, the Console automatically goes into Sleep Mode.
GOAL TRACK Statistics (and Achievements)
The statistics from every workout are recorded to a User Pro¿ le.
To view the GOAL TRACK statistics of a User Pro¿ le:
1. From the Power-Up screen, push the User button to select a User Profile.
2. Push the OK button to select the User Profile.
3. The Console display shows the GOAL TRACK prompt.
Note: To e[it the User Pro¿ le options, push the PAUSE/STOP button and the console will go back to the Power-Up
Mode screen.
4. Push the OK button. The Console will display the “LONGEST WORKOUT”, the workout values and activate the cor-
responding Achievement light. After 4 seconds, the Console will display the name of the workout, and then the date it
was performed (e[cept for “LAST 7 DAYS” and “LAST 30 DAYS”).
Note: To e[it the GOAL TRACK statistics, push the PAUSE/STOP button and the console will go back to the Power-Up
Mode screen.
5. Push the Decrease(d) button to move to the ne[t GOAL TRACK statistic, “CALORIE RECORD”. The Console will
display the workout results with the most Calories value. The Console will cycle between the workout results, the name
of the workout pro¿ le, and the date of the workout every 4 seconds. Use the Left(e) or Right(f) buttons to force the
cycle between the workout results.

44
6. Push the Decrease(d) button to move to “LAST 30 DAYS”. The Console will display the total values for the previous
thirty days. The Console will cycle between the workout results every 4 seconds. Use the Left(e) or Right(f) buttons
to force the cycle between the workout results.
7. Push the Decrease(d) button to move to the “LAST 7 DAYS”. The Console will display the calories burned on the dis-
play (50 calories per segment) for the previous seven days, along with the workout value totals. The Console will cycle
between the workout results every 4 seconds. Use the Left(e) or Right(f) buttons to force the cycle between the
workout results.
. Push the Decrease(d) button to move to the “LAST WORKOUT”. The Console will display the workout values from the
last workout. The Console will cycle between the workout results, the name of the workout pro¿le, and the date of the
workout every 4 seconds. Use the Left(e) or Right(f) buttons to force the cycle between the workout results.
9. When done viewing workout statistics, push the PAUSE/STOP button. The Console will display the Power-Up Mode
screen.
When a User performs a workout that surpasses the “LONGEST WORKOUT” or “CALORIE RECORD” of the previous
workouts, the Console will congratulate with an audible sound and tell the User the new achievement. The corresponding
Achievement Indicator Light will also be active.

45
CONSOLE SETUP MODE
The Console Setup Mode lets you control the sound settings ( on/off ), adjust the date and time, or see maintenance
statistics (Total Run Hours and Software Version– for service technician use only).
1. Hold down the PAUSE/STOP button and Right button together for 3 seconds while in the Power-Up Mode to go into
the Console Setup Mode.
Note: Push PAUSE/STOP to e[it the Console Setup Mode and return to the Power-Up Mode screen.
2. The Console display shows the Date prompt with the current setting. To change, push the Increase/Decrease buttons
to adjust the currently active value (Àashing). Push the Left/Right buttons to change which segment is the currently
active value (month / day / year).
3. Push OK to set.
4. The Console display shows the Time prompt with the current setting. Push the Increase/Decrease buttons to adjust
the currently active value (Àashing). Push the Left/Right buttons to change which segment is the currently active value
(AM or PM / hour / minute ).
5. Push OK to set.
6. The Console display shows the UNITS prompt with the current setting. Push the Increase/Decrease buttons to
change between “MILES” and “KM”.
7. Push OK to set.
. The Console display shows the Sound Settings prompt with the current setting. Push the Increase/Decrease buttons
to change between “ON” and “OFF”.
,IWKH6RXQGKDVEHHQPXWHGWKH&RQVROHZLOOGLVSOD\WKH³$8',22))´SURPSWEHIRUHD:RUNRXWVWDUWVDV
a reminder.
9. Push OK to set.
10. The Console display shows the TOTAL RUN HOURS for the machine.
11. For the ne[t prompt, push the OK button.
12. The Console display shows the BLE FW UPDATE prompt.
Note: If you have an update for the Bluetooth
®
Low Energy (also called Bluetooth
®
Smart) system, insert the USB
Flash Drive with the update ¿le into the Console. Push the Increase/Decrease buttons to select the “CONFIRM-YES”
option, and push OK.
The Console will display “SAVING”, and then “REMOVE USB” when it is safe to remove the USB Flash Drive.
13. For the ne[t prompt, push the OK button.
14. The Console display shows the Software Version code.
15. For the ne[t prompt, push the OK button.
16. The Console display shows the LOG prompt.
17. For the ne[t prompt, push the OK button.
1. The Console will display the Power-Up Mode screen.

46
MAINTENANCE
Read all maintenance instructions fully before you start any repair work. In some conditions, an assistant is required to do
the necessary tasks.
Equipment must be regularly examined for damage and repairs. The owner is responsible to make sure that
regular maintenance is done. Worn or damaged components must be repaired or replaced immediately.
Only manufacturer supplied components can be used to maintain and repair the equipment.
If at any time the Warning labels become loose, unreadable or dislodged, contact your local distributor for
replacement labels.
To reduce the risk of electrical shock or unsupervised usage of the equipment, always unplug the
power cord from the wall outlet and the machine and wait 5 minutes before cleaning, maintaining or repairing the
machine. Place the power cord in a secure location.
Daily: Before each use, e[amine the e[ercise machine for loose, broken, damaged, or worn parts. Do not
use if found in this condition. Repair or replace all parts at the ¿rst sign of wear or damage, e[cept
for the Walking Deck. The Walking Deck is designed for wear on both sides of it. If only one side of
the Walking Deck is worn, a replacement Deck is not required. It is recommended that a quali¿ed
service technician is used to Àip the Walking Deck. After each workout, use a damp cloth to wipe
your machine and Console free of moisture.
:LWKWKH:DONLQJ'HFNORZHUHGLIDQHGJHRIWKH:DONLQJ%HOWFDQEHVHHQDGMXVWLW
until the edge is not viewable.
Note: Avoid e[cessive moisture on the Console.
Weekly: Check for smooth roller operation. Wipe the machine to remove dust, dirt, or grime.
'RQRWUHPRYHWKH0RWRU&RQWURO%RDUG0&%&RYHU'DQJHURXVYROWDJHVDQGPRYLQJ
parts are present. The components are serviceable only by approved service personnel
or by following service procedures supplied by Nautilus, Inc.
Note: Do not use petroleum based products.
Monthly
or after 20 hours:
Make sure all bolts and screws are tight. Tighten as necessary.
Quarterly: Or after 25 hours—Lubricate the walking belt with a silicone-based lubricant.
Silicone lubricant is not intended for human consumption. Keep out of reach of
children. Store in a safe place.
NOTICE: Do not clean with a petroleum based solvent or an automotive cleaner. Be sure to keep the Console free
of moisture.
Cleaning
To reduce the risk of electrical shock, always unplug the power cord and wait 5 minutes before
cleaning, maintaining or repairing this machine.
Wipe the treadmill down after each use to keep the treadmill clean and dry. It may be necessary to use a mild detergent at
times to remove all dirt and salt from the belt, painted parts and the display.
NOTICE: To prevent damage to the ¿nish of the machine or Console, do not clean with a petroleum based solvent.
Do not apply too much moisture to the Console.
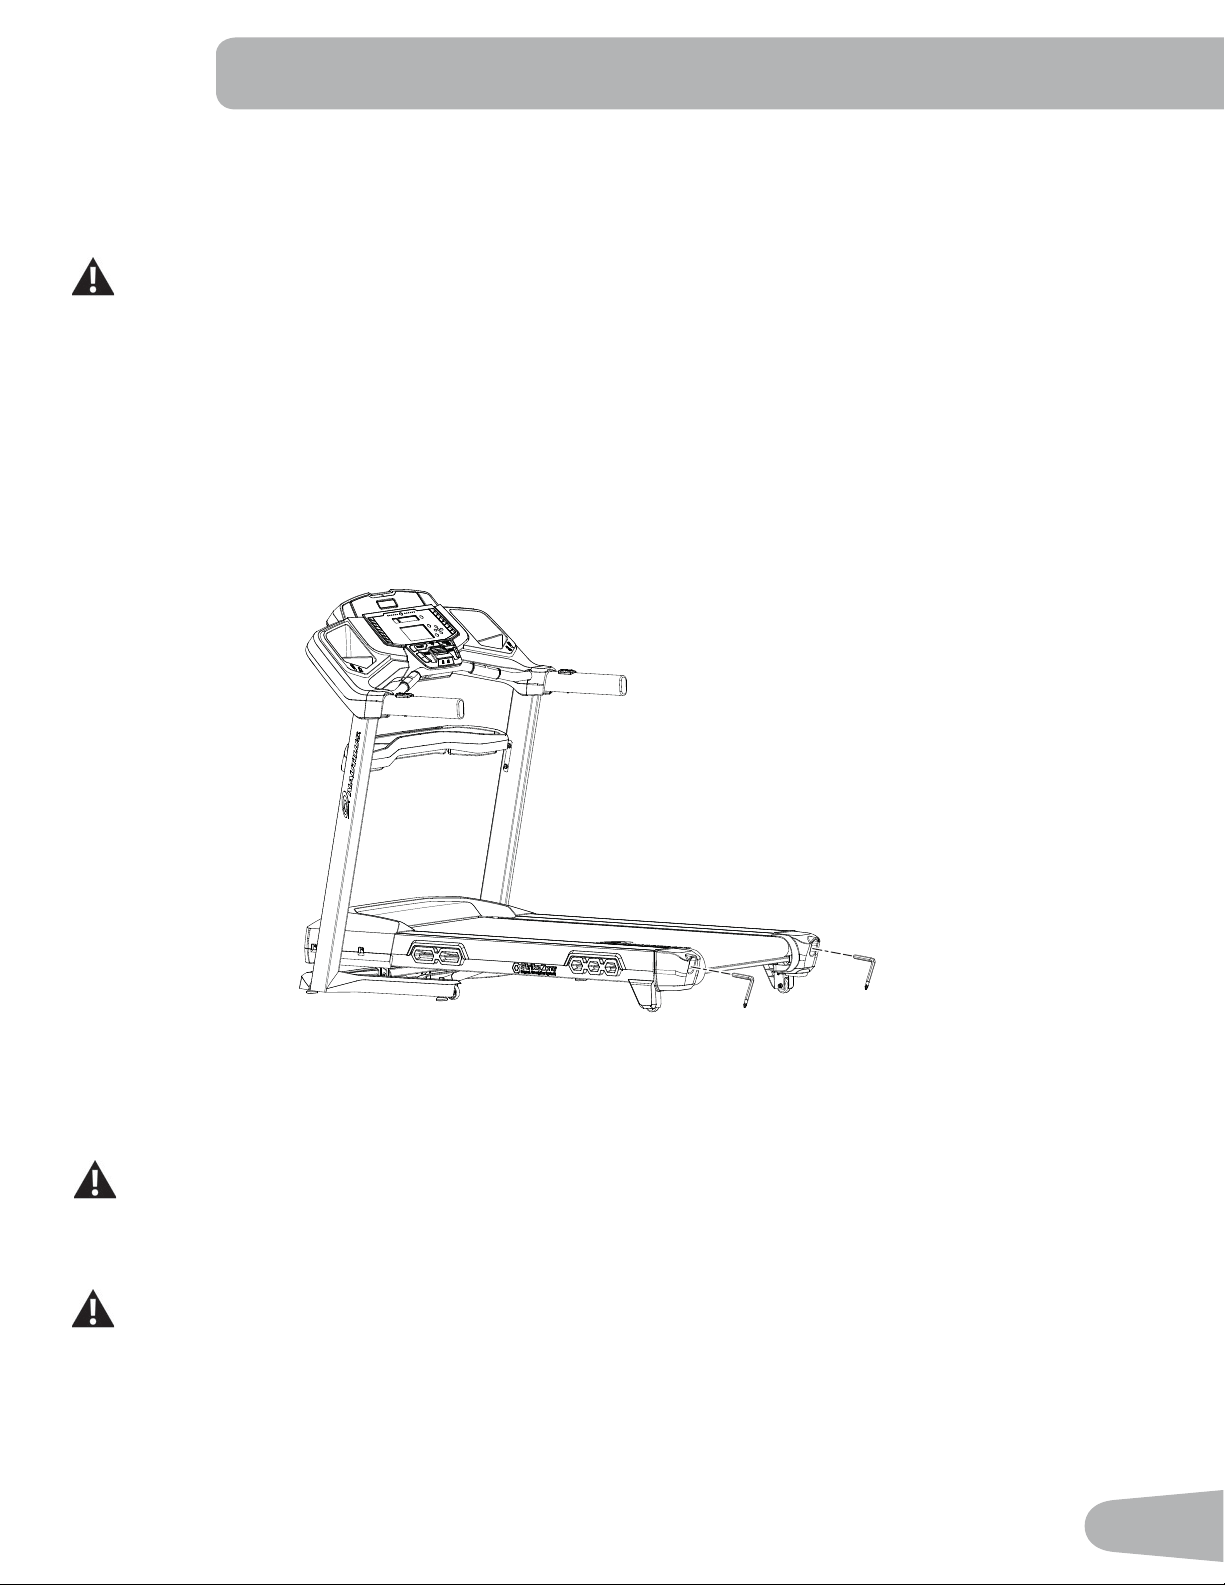
47
$GMXVWLQJWKH%HOW7HQVLRQ
If the walking belt starts to slip during use, it is necessary to adjust the tension. Your treadmill has tension bolts at the rear
of the treadmill.
1. Make sure that the walking belt is stopped and the power switch is turned Off.
%HVXUHQRWWRWRXFKDPRYLQJZDONLQJEHOWRUVWHSRQWKHSRZHUFRUG.HHSE\VWDQGHUVDQGFKLOGUHQDZD\
from the product you are servicing at all times.
2. Use a 6 mm he[ key to turn the right and left belt adjustment bolts clockwise a 1/2 turn, ¿rst one bolt and then the
other bolt.
3. After you adjust each side the 1/2 turn, start the belt and do a test to see if the belt stopped slipping. If the belt still
slips, return to step 1 and repeat the procedure.
If you turn one side more than the other, the belt will move away from that side of the treadmill and may need realignment.
NOTICE: Too much tension on the belt causes unnecessary friction and wears the belt, motor and electronics.
4. Push PAUSE/STOP twice to stop the walking belt and end the Quick Start workout.
6mm
6mm
$OLJQLQJWKH:DONLQJ%HOW
The walking belt should be centered on your treadmill at all times. Running style and a non-level surface can cause the
belt to move off center. Minor adjustments to the 2 bolts at the rear of the treadmill are necessary when the belt is off
center.
7KHHGJHVRIWKH:DONLQJ%HOWVKRXOGEHXQGHUWKH6LGH)RRW6XSSRUW5DLOV,IDQHGJHRIWKH:DONLQJ%HOW
FDQEHYLHZHGEHVXUHWRDGMXVWWKH:DONLQJ%HOWXQWLOWKHHGJHVDUHQRWYLHZDEOHDQGDUHXQGHUWKH6LGH
Foot Support Rails.
1. Push the START button to start the walking belt.
%HVXUHQRWWRWRXFKDPRYLQJZDONLQJEHOWRUVWHSRQWKHSRZHUFRUG.HHSE\VWDQGHUVDQGFKLOGUHQDZD\
from the product you are servicing at all times.
2. Stand at the rear of the treadmill to see which direction the belt moves.
3. If the belt moves to the left, turn the left belt adjustment bolt 1/4 turn clockwise and the right belt adjustment bolt 1/4
turn counterclockwise.
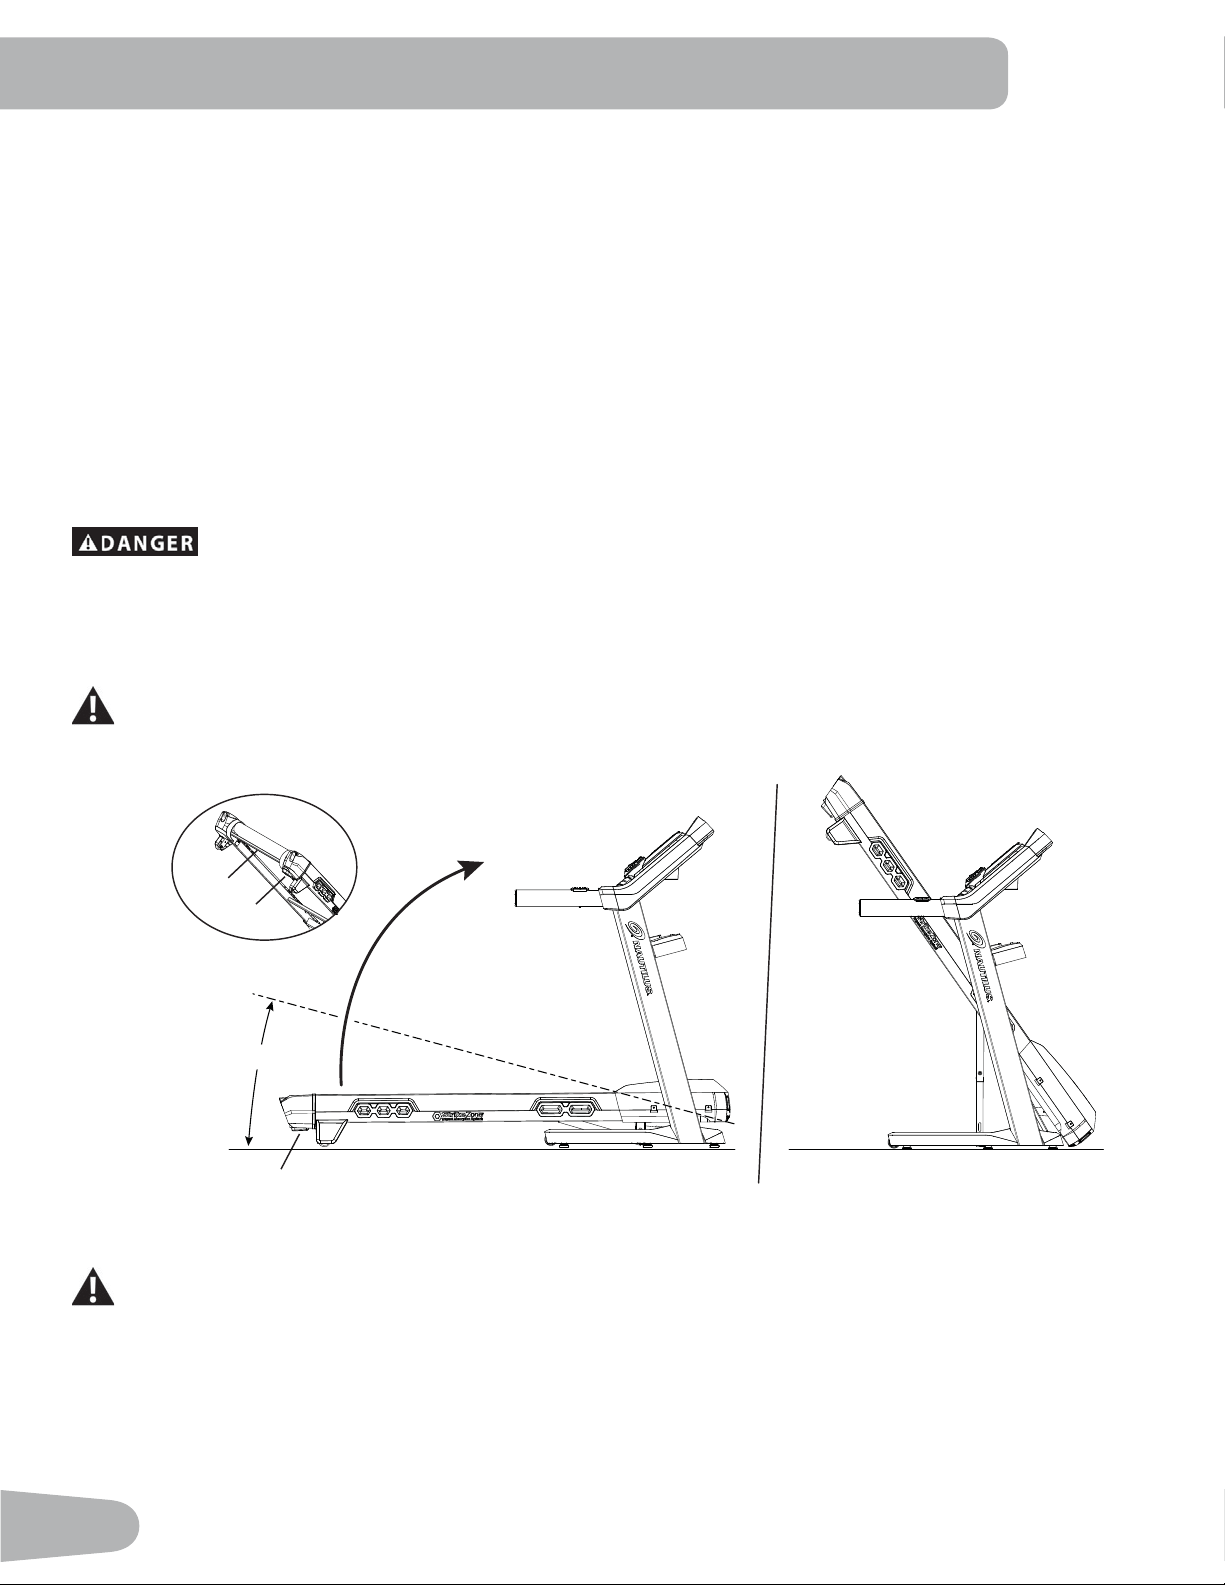
48
If the belt moves to the right, turn the left adjustment bolt 1/4 turn counterclockwise and the right adjustment bolt 1/4
turn clockwise.
4. Monitor the path of the belt for appro[imately 2 minutes. Continue to adjust the bolts until the walking belt is centered.
5. Push PAUSE/STOP twice to stop the walking belt and end the Quick Start workout.
/XEULFDWLQJWKH:DONLQJ%HOW
Your treadmill is equipped with a low maintenance deck and belt system. The Walking Belt is pre-lubricated. Belt friction
can affect the function and life of the machine. Lubricate the belt every 3 months or every 25 hours of use, whichever
comes ¿rst. Even if the treadmill is not in use, silicone will dissipate and the belt will dry out. For the best results lubricate
the deck periodically with 100% silicone lubricant, using the following instructions:
1. Turn off the power to the machine with the power switch.
2. Unplug the treadmill fully from the wall outlet, and remove the power cord from the machine.
To reduce the risk of electrical shock, always unplug the power cord and wait 5 minutes before
cleaning, maintaining or repairing this machine. Place the power cord in a secure location.
Note: Make sure the treadmill is located on a surface that is easy to clean.
3. Fold the treadmill. Refer to the “Moving the Machine” procedure in this manual. Be sure that the hydraulic lift is cor-
rectly locked in place
8VHSURSHUVDIHW\SUHFDXWLRQVDQGOLIWLQJWHFKQLTXHV8VHDVHFRQGSHUVRQLIQHFHVVDU\
Do not use the walking belt or rear roller to lift the treadmill. These parts do not lock in place and can
abruptly move. Injury to you or damage to the machine can occur.
5a
15°
5b
5a
4. Make sure that the locking mechanism is engaged. Carefully pull back on the walking deck and make sure that it does
not move. When you do this, keep clear of movement path in case the treadmill lock is not engaged.
Do not lean against the treadmill when it is folded. Do not put items on it that could cause it to become
unstable or fall.
Do not connect the power cord or try to operate the treadmill in the folded position.
5. Apply a few drops of the lubricant to the inner surface of the belt for the entire width of the belt. A very thin layer of
silicone lubricant on the entire deck below the belt is desired.
NOTICE: Always use a 100% silicone lubricant. Do not use a degreaser like WD-40
®
as this could seriously impact
performance. We can recommend that you use the following:
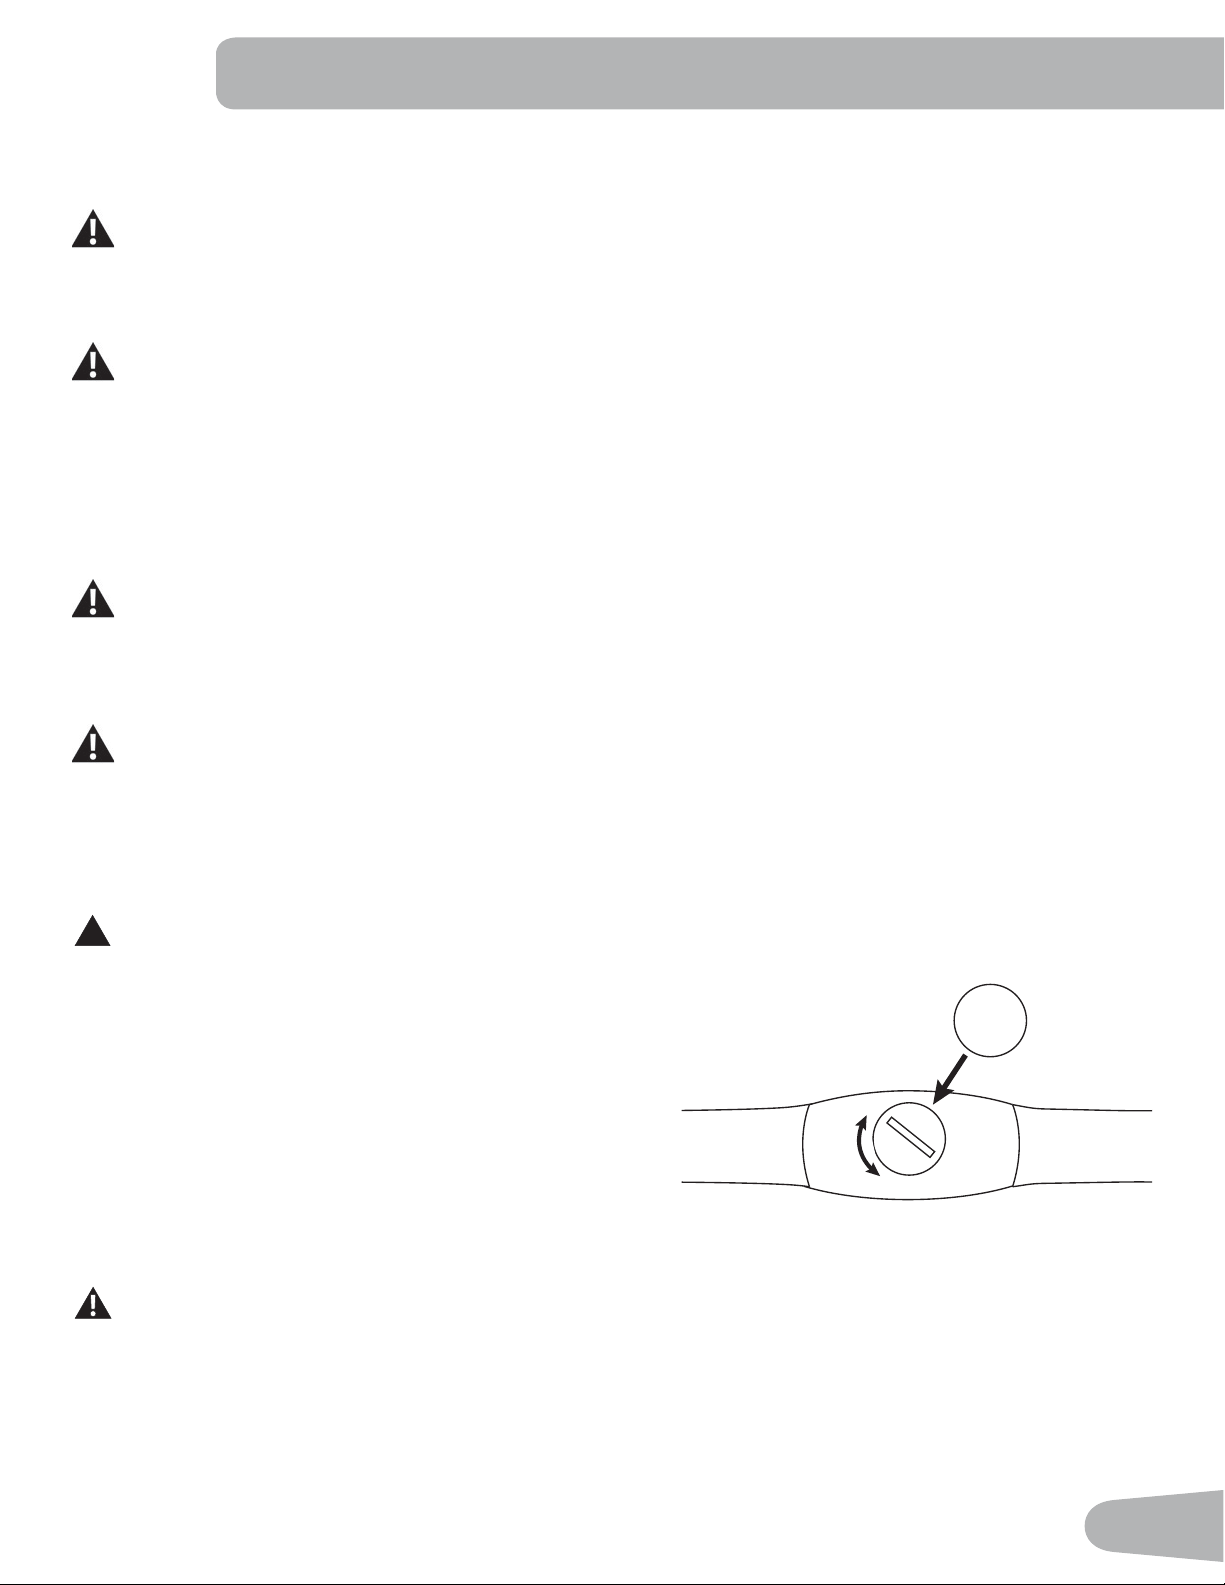
49
• 300 Silicone Spray, available at most Hardware and Auto Parts stores.
• Lube-N-Walk
®
Treadmill Lubrication Kit, available from your local specialty ¿tness dealer or Nautilus, Inc.
Store silicone lubricant in a safe place. Keep out of reach of children. Silicone lubricant is not intended for
human consumption.
6. Manually rotate the belt 1/2 of the length of the belt and apply lubricant again.
7. Unfold the machine. Refer to the “Unfolding the Machine” procedure in this manual.
Keep clear of the movement path of the walking deck. Hold onto the walking deck until approximately 2/3 of
the movement down. The walking deck can possibly drop quickly in the last part of the movement.
If you used spray lubricant, wait 5 minutes before turning on power to the machine to allow the aerosol to
dissipate.
. Connect the power cord back into the machine and then into the wall outlet.
9. Turn on the power to the machine with the power switch.
10. Stay to one side of your machine and start the belt at the slowest speed. Let the belt operate for appro[imately 15
seconds.
%HVXUHQRWWRWRXFKDPRYLQJZDONLQJEHOWRUVWHSRQWKHSRZHUFRUG.HHSE\VWDQGHUVDQGFKLOGUHQDZD\
from the product you are servicing at all times.
11. Switch off your machine.
12. Take care to clean up any e[cess lubricant from the deck.
To decrease the possibility of slipping, be sure the deck area is free from grease or oil. Clean off any excess
oil rom the machine surfaces.
+HDUW5DWH&KHVW6WUDS%DWWHU\5HSODFHPHQW
The heart rate (HR) chest strap uses a CR2032 battery.
!
Do not perform this procedure outdoors or in moist or wet locations.
1. Using a coin, loosen the slotted cover on the battery bay.
Remove the cover and battery.
2. When replacing the battery, insert it in the battery bay with the
+ symbol facing up.
3. Reinstall the cover on the strap.
4. Discard the old battery. Dispose of in accordance with local
regulations and/or at approved recycling centers.
5. Inspect your chest strap to ensure function.
Do not use until the equipment has been fully assembled and inspected for correct performance in
accordance with the Owner’s Manual.
CR2032
+
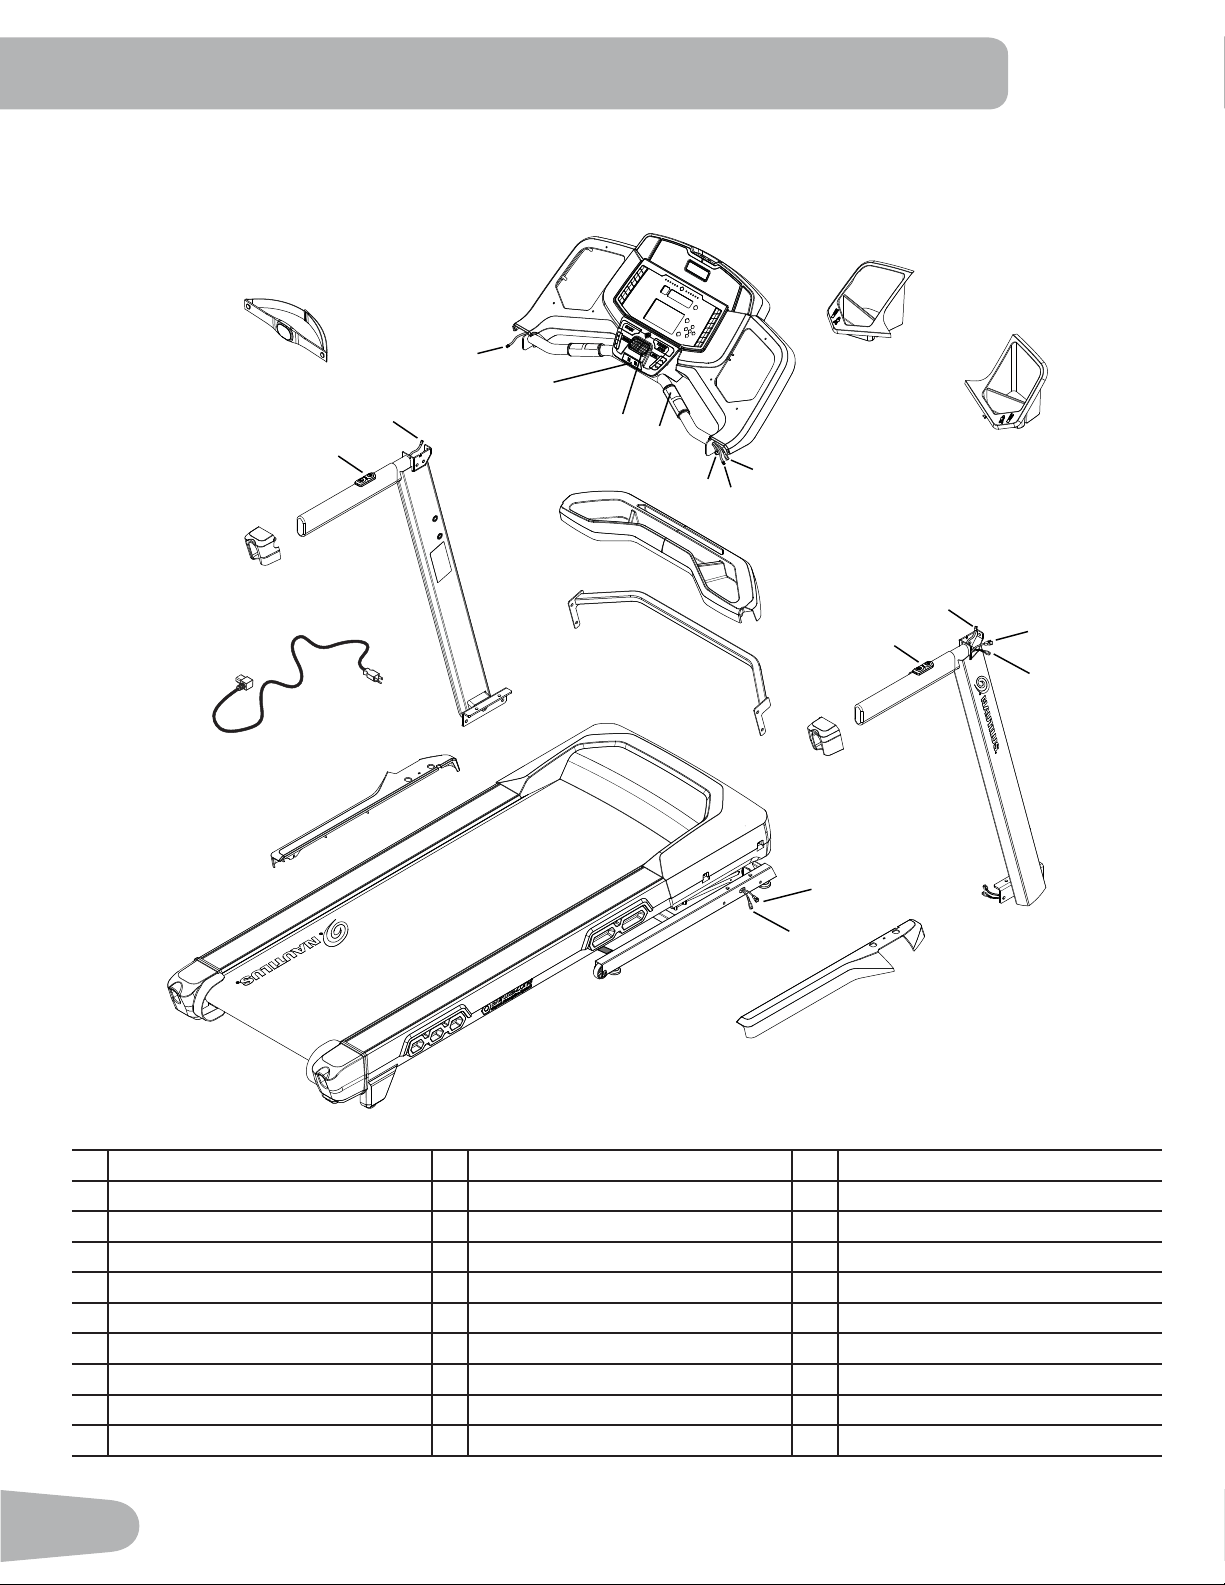
50
Maintenance Parts
A Console Assembly K Remote Speed Control Wire, Lower U Base Shroud, Left
B Safety Key Port L Right Upright Cable (I/O) V Crossbar
C Fan M Right Upright Earthing Cable W Crossbar Tray
D Contact Heart Rate Sensor N Upright, Right X Upright, Left
E Console Cable (I/O) O Remote Speed Control Y Handlebar Shroud, Left
F Remote Speed Control Wire, Upper P Handlebar Shroud, Right Z Remote Incline Control
G Console Earthing Cable Q Base Shroud, Right AA Remote Incline Control Wire, Lower
H Cupholder, Left R Base Cable (I/O) BB Power Cord
I Cupholder, Right S Base Earthing Cable CC Heart Rate Chest Strap
J Remote Incline Control Wire, Upper T Base Assembly
F
A
P
Q
K
X
V
W
Y
BB
T
CC
H
L
B
E
I
C
D
J
O
R
U
Z
AA
N
G
M
S
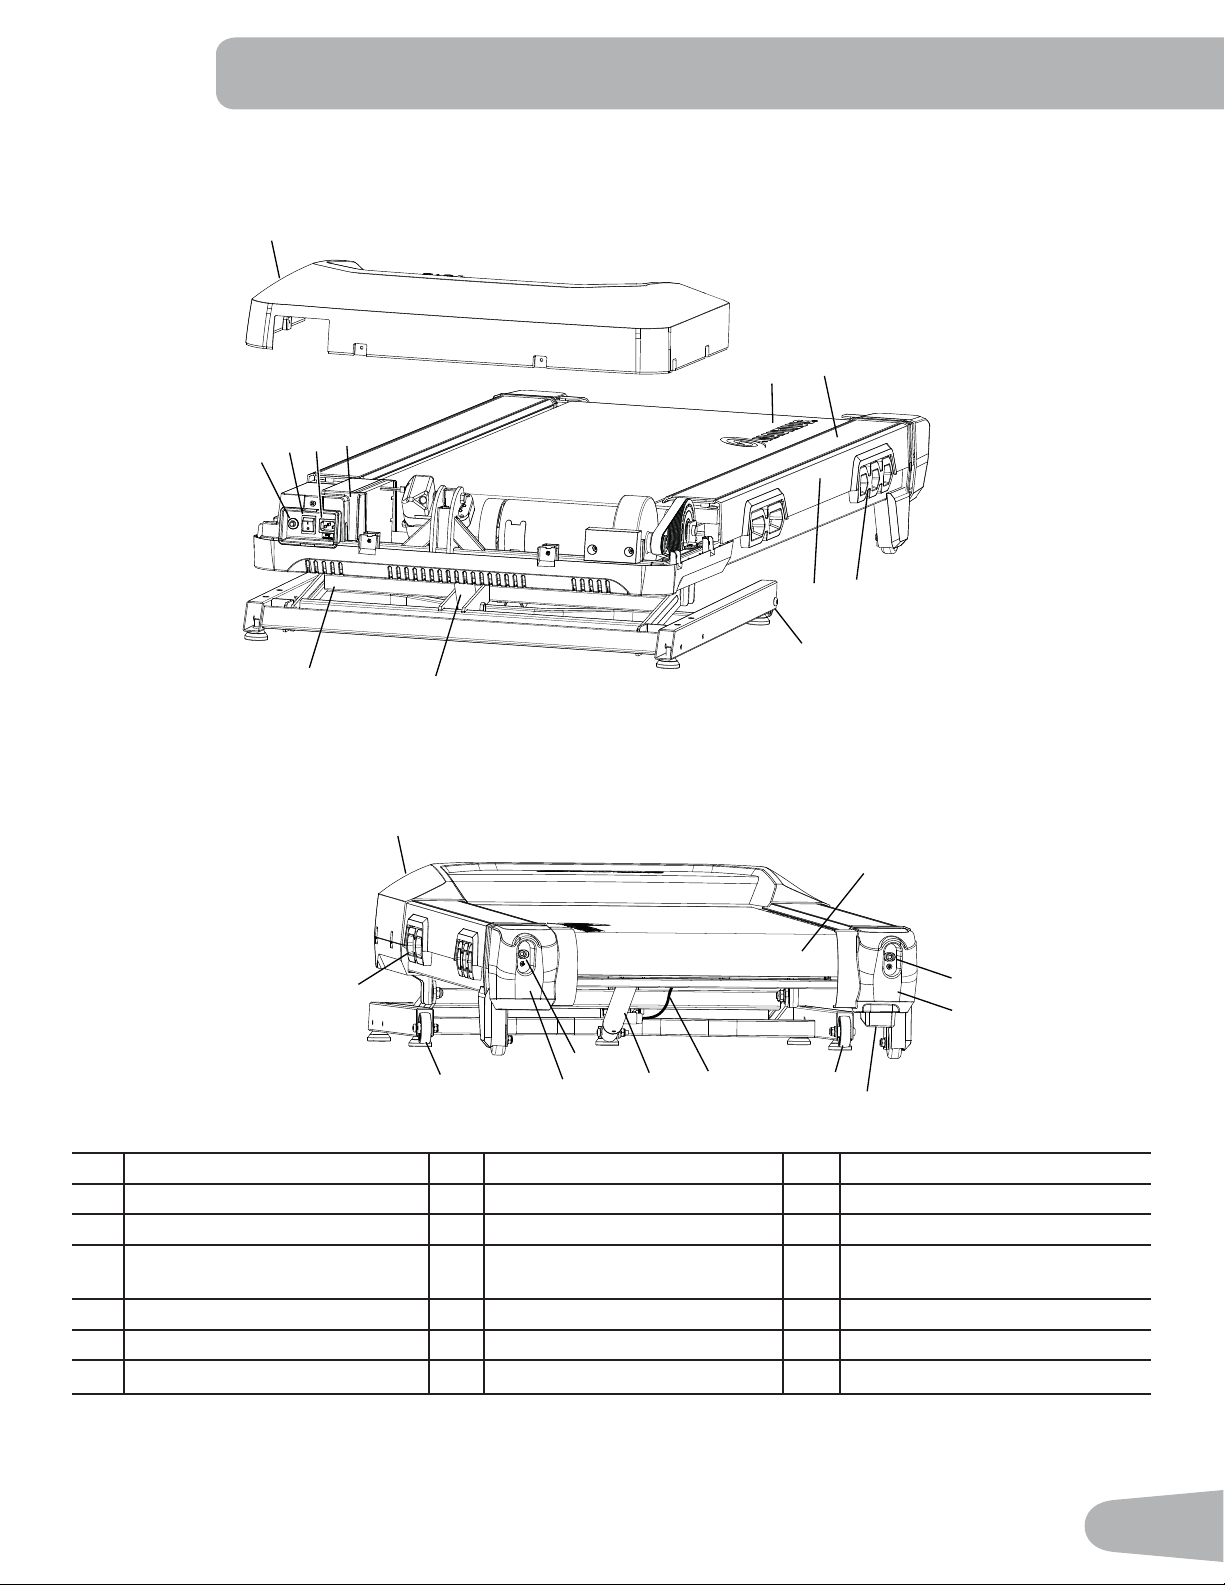
51
DD
EE
FF
GG
HH
HH
II
JJ
KK
NN
LL
PP
MM
OO
OO
PP
MM
QQ
OO
RR
UU
UU
VV
VV
WW
SS
TT
NN
PP
%DFN
Maintenance Parts ( Frame )
Front
DD Power Switch KK Rear Roller RR Deck Release Cable
EE Fuse LL Walking Deck SS Incline Adjuster
FF Power Input MM Base Support TT Pivot Assembly
GG Motor Control Board (MCB)
Cover
NN Deck Cushioners UU Belt Tensioner
HH Motor Cover OO Transport Wheel VV Rear Roller Cover
II Side Foot Support Rails PP Leveler WW Deck Release Handle
JJ Walking Belt QQ Deck Lift Shock Assembly

52
Condition/Problem Things to Check Solution
No display/partial display/
unit will not turn on
Check electrical (wall)
outlet
Make sure unit is plugged into a functioning wall outlet. Test the
outlet with a known functioning device such as a lamp.
Check connection at front
of unit
Connection should be secure and undamaged. Replace power
cord or connection at unit if either are damaged.
Check Power Switch Turn on the power with the Power Switch.
Check data cable integrity All wires in cable should be intact. If any are visibly crimped or
cut, replace cable.
Check data cable
connections/orientation
Be sure cable is connected securely and oriented properly.
Small latch on connector should line up and snap into place.
Check console display for
damage
Check for visual sign that console display is cracked or other-
wise damaged. Replace Console if damaged.
Console Display If Console only has partial display and all connections are ¿ne,
replace the Console.
If the above steps do not resolve the problem, contact your lo-
cal distributor for further assistance.
Unit operates but Contact
HR not displayed
Sensor grip Be sure hands are centered on HR sensors. Hands must be
kept still with relatively equal pressure applied to each side.
Dry or calloused hands Sensors may have dif¿culty with dried out or calloused hands.
A conductive electrode cream (heart rate cream) can help
make better conduct. These are available on the web or at
medical or some larger ¿tness stores.
If tests reveal no other issues, contact your local distributor for
further assistance.
Unit operates but
Telemetric HR not
displayed
Chest Strap Strap should be “POLAR
®
” compatible and uncoded. Make
sure strap is directly against skin and contact area is wet. Make
sure the transmitter has the curve oriented upward.
Chest Strap Batteries If strap has replaceable batteries, install new batteries.
Check User Pro¿le Select the Edit User Pro¿le option for the User Pro¿le. Go to
the WIRELESS HR setting and make sure that the current
value is set to ON.
Interference Try moving unit away from sources of interference (TV, Micro-
wave, etc).
Replace Chest Strap If interference is eliminated and HR does not function, replace
strap.
Replace Console If HR still does not function, contact your local distributor for
further assistance.
Speed display is not
accurate
Display set to wrong unit
of measure. (English/
Metric)
Change display to show correct units.
Console shuts off (enters
sleep mode) while in use
Check electrical (wall)
outlet
Make sure unit is plugged into a functioning wall outlet. Test the
outlet with a known functioning device such as a lamp.
Check connection at front
of unit
Connection should be secure and undamaged. Replace power
cord or connection at unit if either are damaged.
Check data cable integrity All wires in the cable should be intact. If any are cut or crimped,
replace cable.
TROUBLESHOOTING

53
Condition/Problem Things to Check Solution
Check data cable
connections/orientation
Be sure cable is connected securely and oriented properly.
Small latch on connector should line up and snap into place.
Reset machine Unplug unit from electrical outlet for 3 minutes. Reconnect to
outlet.
If the above steps do not resolve the problem, contact your lo-
cal distributor for further assistance.
Fan will not turn on or will
not turn off
Reset machine Unplug unit from electrical outlet for 5 minutes. Reconnect to
outlet.
Fan will not turn on, but
Console operates
Check for blockage of fan Unplug unit from electrical outlet for 5 minutes. Remove mate-
rial from fan. If necessary, detach the Console to help with
removal. Replace the Console if unable to remove blockage.
Unit rocks/does not sit
level
Check leveler adjustment Adjust levelers until machine is level.
Check surface under unit Adjustment may not be able to compensate for e[tremely un-
even surfaces. Move machine to level area.
Thumping sound when
belt operates
Walking belt Walking belt needs to be used for wear in period. Sound will go
away after the wear in period.
Walking belt not aligned Machine leveling Make sure the machine is level. Refer to the procedure for
leveling the machine in this manual.
Walking belt tension and
alignment
Make sure the walking belt is centered and tension is correct.
Refer to the procedures for adjusting tension and aligning the
belt in this manual.
Motor sounds strained Silicone lubrication on
walking belt
Apply silicone to the inner surface of the walking belt. Refer to
the belt lubrication procedure in this manual.
Hesitation or walking belt
slips when in use
Belt tension Adjust the belt tension at the rear of the machine. Refer to the
procedure for adjusting belt tension in this manual.
Belt stops moving while
in use
Safety key Plug Safety Key into Console. (See Emergency Stop Proce-
dure in the Important Safety Instructions section.)
Motor overload Unit may be overloaded and draw too much current, which
causes power to turn off to protect motor. Refer to maintenance
schedule for belt lubrication. Make sure the walking belt tension
is correct, and start unit again.
If the above steps do not resolve the problem, contact your
local distributor for further assistance.
Console continuously
cycles through program
screens
Console is in demonstra-
tion mode
Hold down the PAUSE/STOP button and Decrease button
together for 3 seconds.
Workout results will not
sync with Bluetooth
®
en-
abled device
Current console mode Machine must be in Idle Mode to sync. Push the PAUSE/STOP
button until the Power-Up Mode screen is displayed.
Total time of workout A workout must be longer than 1 minute to be saved and
posted by the Console.
Fitness machine Unplug unit from electrical outlet for 5 minutes. Reconnect to
outlet.
Bluetooth
®
enabled device Consult your device to be sure that the Bluetooth
®
wireless
feature has been enabled on it.

54
Condition/Problem Things to Check Solution
Fitness App Review Speci¿cations of Fitness App and con¿rm your device
is compatible.
Contact your local distributor for further assistance.
Workout results not post-
ing from Nautilus Train-
er™ to MyFitnessPal
®
/
Under Armour
®
Connect-
ed Fitness.
Sync accounts From the Menu icon on the Nautilus Trainer™ App, select the
Sync to MyFitnessPal
®
or Under Armour
®
Connected Fitness.
Sync fails Review account and password for MyFitnessPal
®
/ Under Ar-
mour
®
Connected Fitness.
Contact your local distributor for further assistance.

55

Nautilus® BowÀe[® Schwinn® Universal®
™
01207.11011.E
EN