Attention, Achtung, Attention, Attentie
- Please read this Owner’s manual before assembling this product.
- Bitte lesen Sie dieses Handbuch durch, bevor Sie mit er Montage dieses Produkts beginnen.
- Veuillez lire ce manuel avant de commencer le montage de ce produit.
- Leest u deze handleiding voordat u dit apparaat installeert.
www.tunturi.com
User manual
Benutzerhandbuch
Manuel de l’utilisateur
Gebruikershandleiding
Serial number
Seriennummer
Numéro de série
Serienummer
Serial number:
CE EN957
Class HC
MADE IN CHINA
MAX input: 9V-DC / 0.5 Amp
MAX USER WEIGHT: 110 KGS
HOME USE
FitCross 40

3
FitCross 40
A
4
FitCross 40
B
i
5
FitCross 40
C
100 cm
100 cm
100 cm
100 cm
D-0

6
FitCross 40
D-1A
7
FitCross 40
D-1B
8
FitCross 40
D-2
B
A
9
FitCross 40
D-3A
10
FitCross 40
D-3B
11
FitCross 40
D-4
12
FitCross 40
D-5
13
FitCross 40
D-6
14
FitCross 40
D-7
15
FitCross 40
E
16
FitCross 40
F-01 F-06
F-02 F-07
F-03 F-08
F-04 F-09
F-05 F-10

17
FitCross 40
F-11 F-16
F-12 F-017
F-13 F-18
F-14 F-19
F-15 F-20
18
FitCross 40
F-21
F-25
F-22
F-23
F-24
F-25
G-01
0
2
4
6
8
10
12
14
16
18
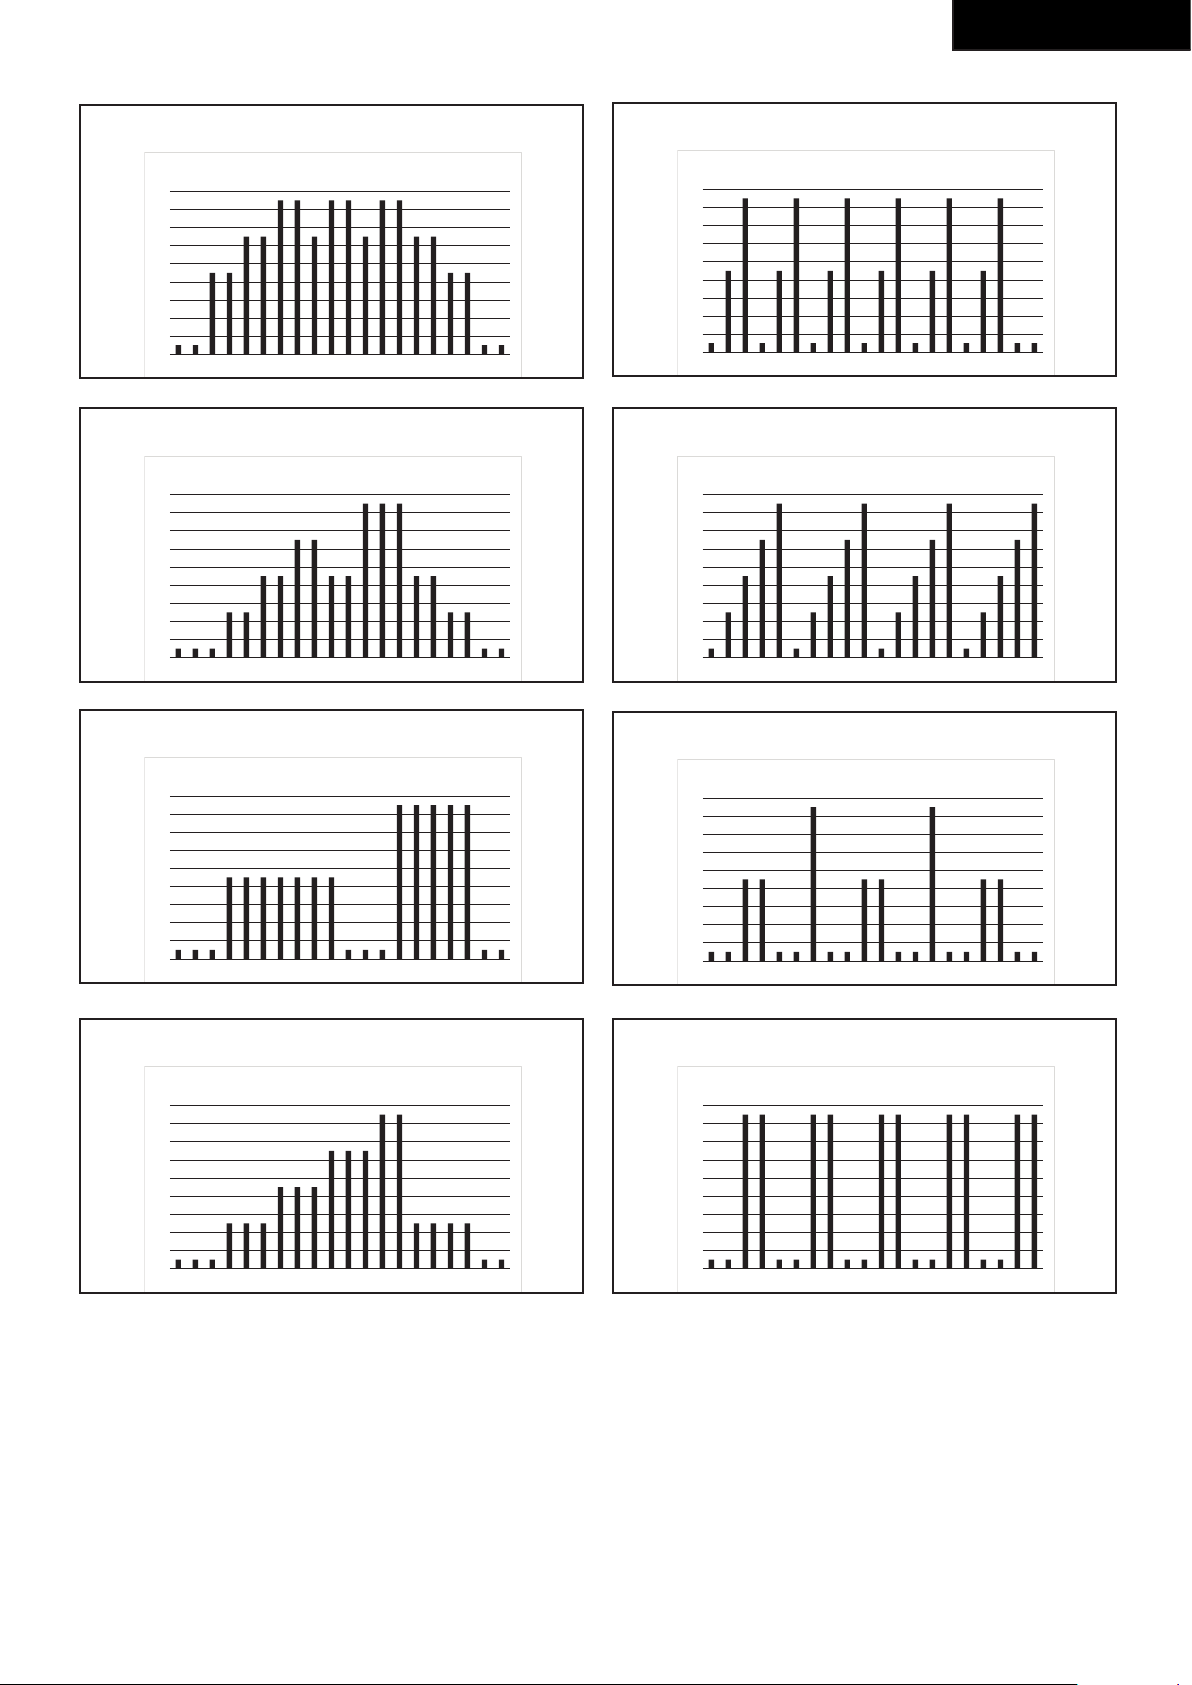
1 2 3 4 5 6 7 8 9 10 11 12 13 14 15 16 17 18 19 20
BEGINNER - 1
G-02
0
2
4
6
8
10
12
14
16
18
1 2 3 4 5 6 7 8 9 10 11 12 13 14 15 16 17 18 19 20
BEGINNER - 2
G-03
0
2
4
6
8
10
12
14
16
18
1 2 3 4 5 6 7 8 9 10 11 12 13 14 15 16 17 18 19 20
BEGINNER - 3
G-04
0
2
4
6
8
10
12
14
1 2 3 4 5 6 7 8 9 10 11 12 13 14 15 16 17 18 19 20
BEGINNER - 4
19
FitCross 40
G-05
0
2
4
6
8
10
12
14
16
18
1 2 3 4 5 6 7 8 9 10 11 12 13 14 15 16 17 18 19 20
ADVANCE-1
G-06
0
2
4
6
8
10
12
14
16
18
1 2 3 4 5 6 7 8 9 10 11 12 13 14 15 16 17 18 19 20
ADVANCE-2
G-07
0
2
4
6
8
10
12
14
16
18
1 2 3 4 5 6 7 8 9 10 11 12 13 14 15 16 17 18 19 20
ADVANCE-3
G-08
0
2
4
6
8
10
12
14
16
18
1 2 3 4 5 6 7 8 9 10 11 12 13 14 15 16 17 18 19 20
ADVANCE-4
G-09
0
2
4
6
8
10
12
14
16
18
1 2 3 4 5 6 7 8 9 10 11 12 13 14 15 16 17 18 19 20
SPORTY-1
G-10
0
2
4
6
8
10
12
14
16
18
1 2 3 4 5 6 7 8 9 10 11 12 13 14 15 16 17 18 19 20
SPORTY-2
G-11
0
2
4
6
8
10
12
14
16
18
1 2 3 4 5 6 7 8 9 10 11 12 13 14 15 16 17 18 19 20
SPORTY-3
G-12
0
2
4
6
8
10
12
14
16
18
1 2 3 4 5 6 7 8 9 10 11 12 13 14 15 16 17 18 19 20
SPORTY-4

20
English
Index
Crosstrainer ...................................................... 20
Safety warnings ................................................ 20
Electrical safety 21
Description (g. A) 21
Package contents (g. B & C) 21
Assembly (g. D) 21
Workouts ...........................................................21
Exercise Instructions 21
Heart rate 22
Use ..................................................................... 22
Power supply (Fig. E) 23
Console (g F) .................................................. 23
Explanation Display functions 23
Explanation of buttons 24
Opperation 24
Programs 24
Cleaning and maintenance .............................. 25
Defects and malfunctions 25
Transport and storage...................................... 26
Additional information 26
Technical data ................................................... 26
Warranty ............................................................ 26
Declaration of the manufacturer ..................... 27
Disclaimer ......................................................... 27
Crosstrainer
Welcome to the world of Tunturi!
Thank you for purchasing this piece of Tunturi
equipment. Tunturi offers a wide range of home fitness
equipment, including crosstrainers, treadmills, exercise
bikes and rowers. The Tunturi equipment is suitable for
the entire family, no matter what fitness level. For more
information, please visit our website
www.tunturi.com.
Safety warnings
WARNING
• Read the safety warnings and the instructions.
Failure to follow the safety warnings and the
instructions can cause personal injury or damage
to the equipment. Keep the safety warnings and
the instructions for future reference.
- The equipment is suitable for domestic use only.
The equipment is not suitable for commercial use.
- Max. usage is limited to 3 hrs a day.
- The use of this equipment by children or persons
with a physical, sensory, mental or motorial
disability, or lack of experience and knowledge can
give cause to hazards. Persons responsible for their
safety must give explicit instructions or supervise
the use of the equipment.
- Before starting your workout, consult a physician to
check your health.
- If you experience nausea, dizziness or other
abnormal symptoms, immediately stop your
workout and consult a physician.
- To avoid muscular pain and strain, start each
workout by warming up and finish each workout by
cooling down. Remember to stretch at the end of
the workout.
- The equipment is suitable for indoor use only. The
equipment is not suitable for outdoor use.
- Only use the equipment in environments with
adequate ventilation. Do not use the equipment in
draughty environments in order not to catch a cold.
- Only use the equipment in environments with
ambient temperatures between 10 °C and 35 °C.
Only store the equipment in environments with
ambient temperatures between 5 °C and 45 °C.
- Do not use or store the equipment in humid
surroundings. The air humidity must never be more
than 80%.
- Only use the equipment for its intended purpose.
Do not use the equipment for other purposes than
described in the manual.
- Do not use the equipment if any part is damaged or
defective. If a part is damaged or defective, contact
your dealer.
- Keep your hands, feet and other body parts away
from the moving parts.
- Keep your hair away from the moving parts.
- Wear appropriate clothing and shoes.
- Keep clothing, jewellery and other objects away
from the moving parts.
- Make sure that only one person uses the equipment
at a time. The equipment must not be used by
persons weighing more than 110 kg (242 lbs).
- Do not open equipment without consulting your
dealer.

21
English
Electrical safety
(Only for equipment with electric power)
- Before use, always check that the mains voltage is
the same as the voltage on the rating plate of the
equipment.
- Do not use an extension cable.
- Keep the mains cable away from heat, oil and sharp
edges.
- Do not alter or modify the mains cable or the mains
plug.
- Do not use the equipment if the mains cable or the
mains plug is damaged or defective. If the mains
cable or the mains plug is damaged or defective,
contact your dealer.
- Always fully unwind the mains cable.
- Do not run the mains cable underneath the
equipment. Do not run the mains cable underneath
a carpet. Do not place any objects on the mains
cable.
- Make sure that the mains cable does not hang over
the edge of a table.
- Make sure that the mains cable cannot be caught
accidentally or tripped over.
- Do not leave the equipment unattended when the
mains plug is inserted into the wall socket.
- Do not pull the mains cable to remove the mains
plug from the wall socket.
- Remove the mains plug from the wall socket when
the equipment is not in use, before assembly or
disassembly and before cleaning and maintenance.
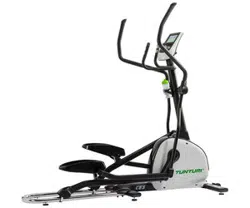
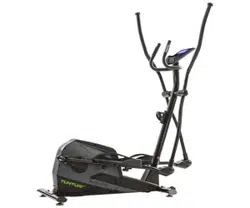
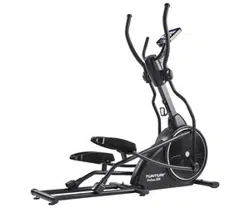
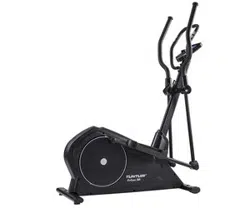
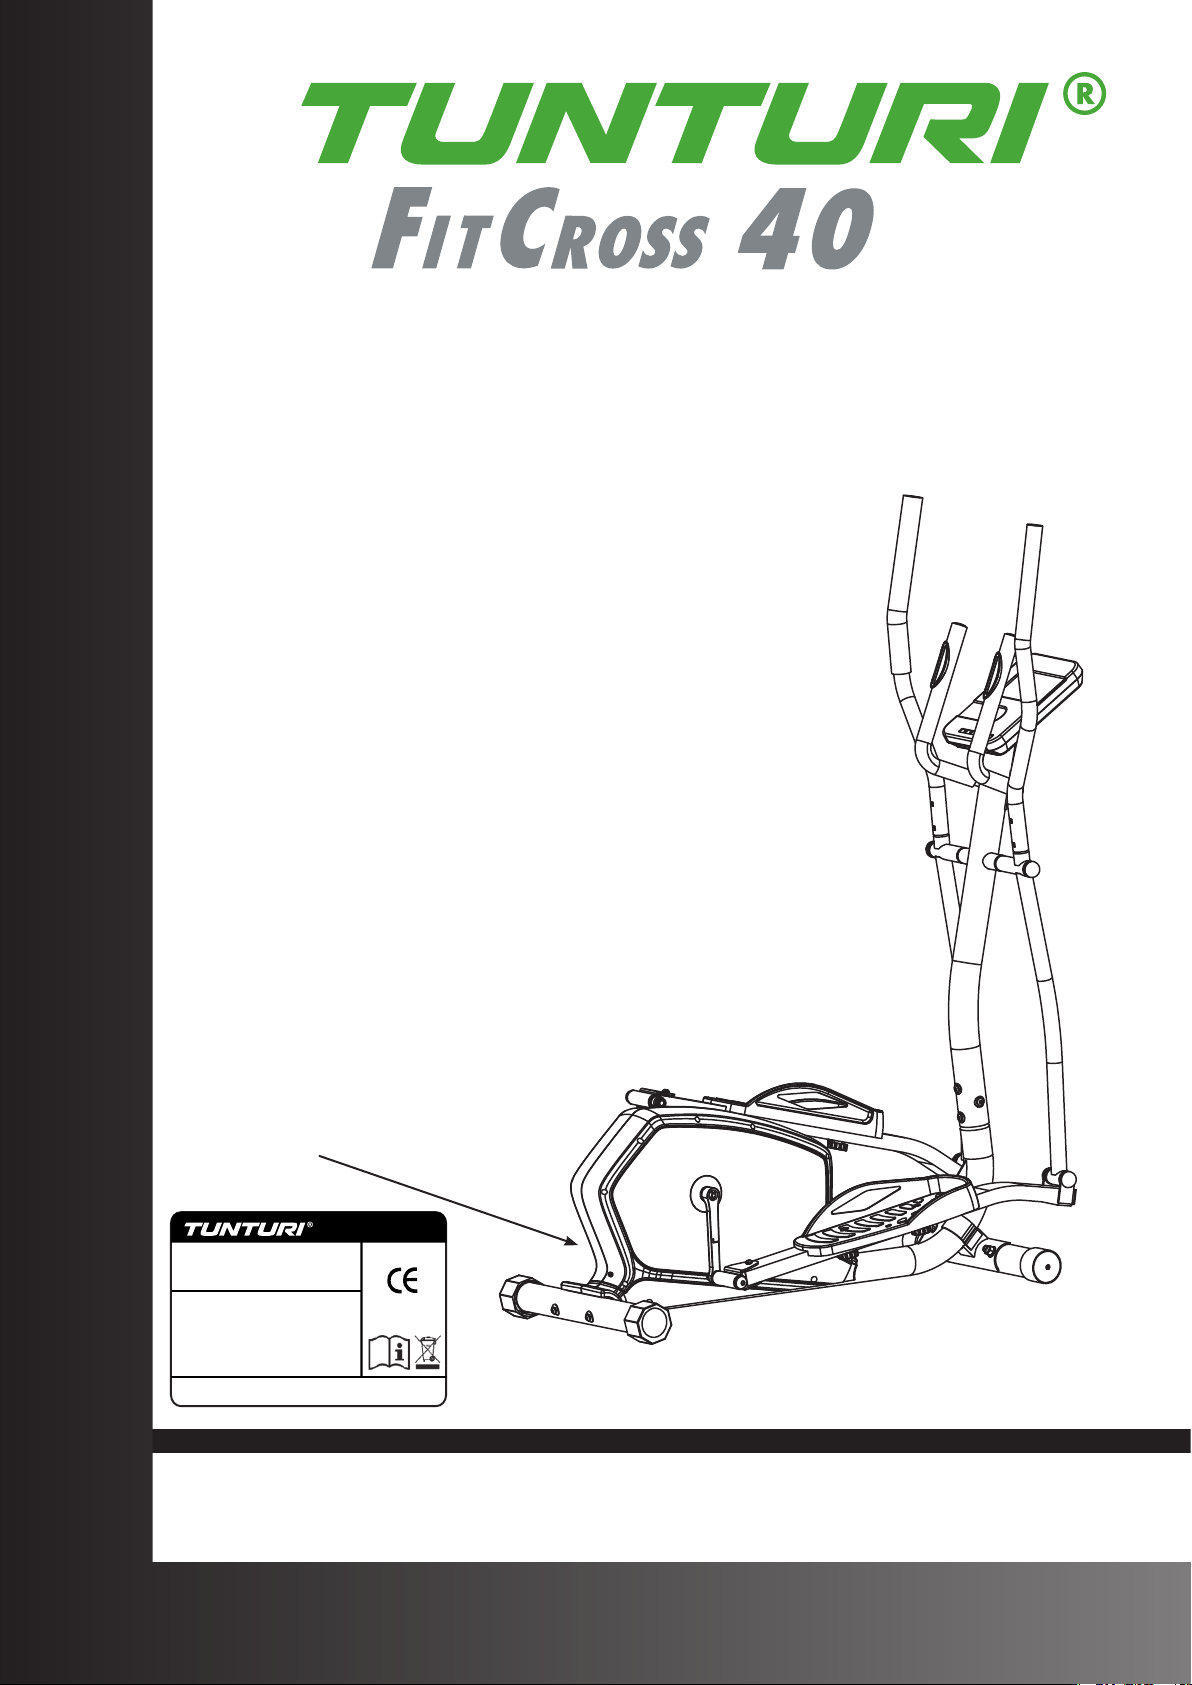
Description (fig. A)
Your Cross trainer is a piece of stationary fitness
equipment used to simulate walking
or running without causing excessive pressure to the
joints.
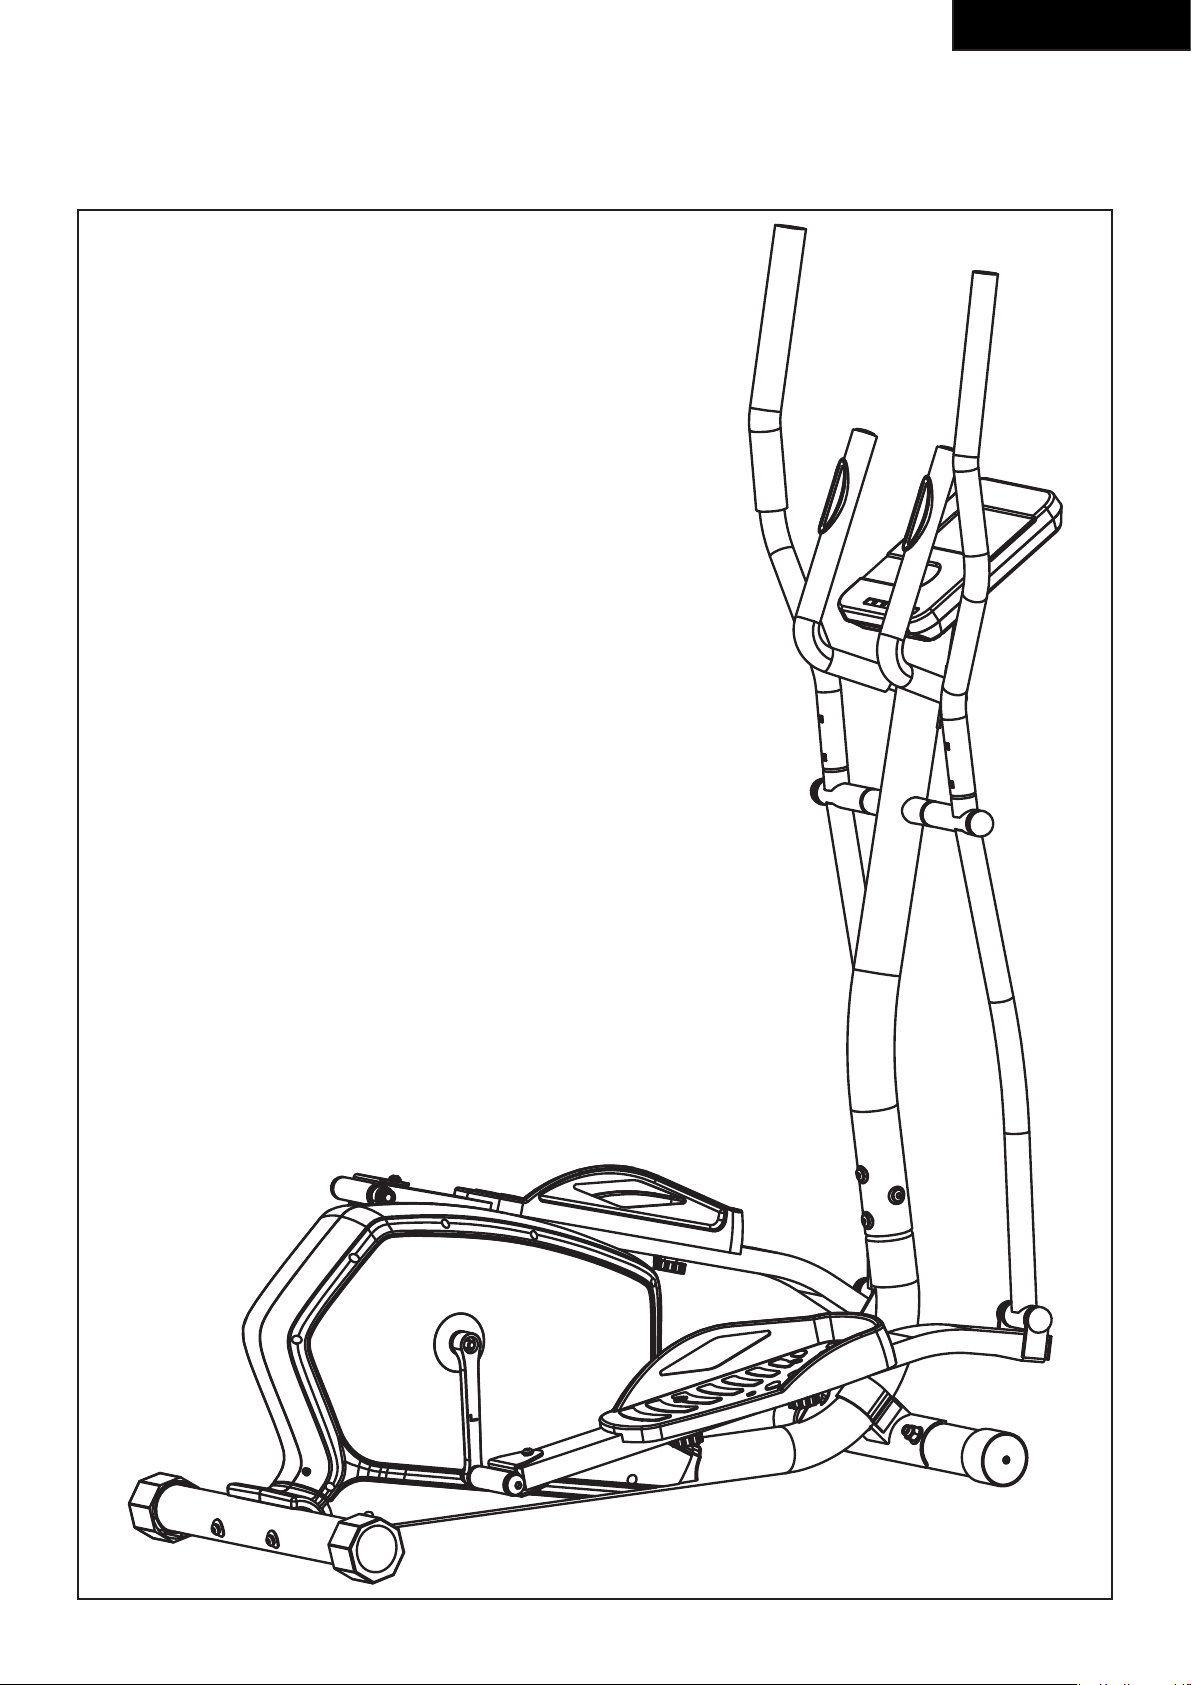
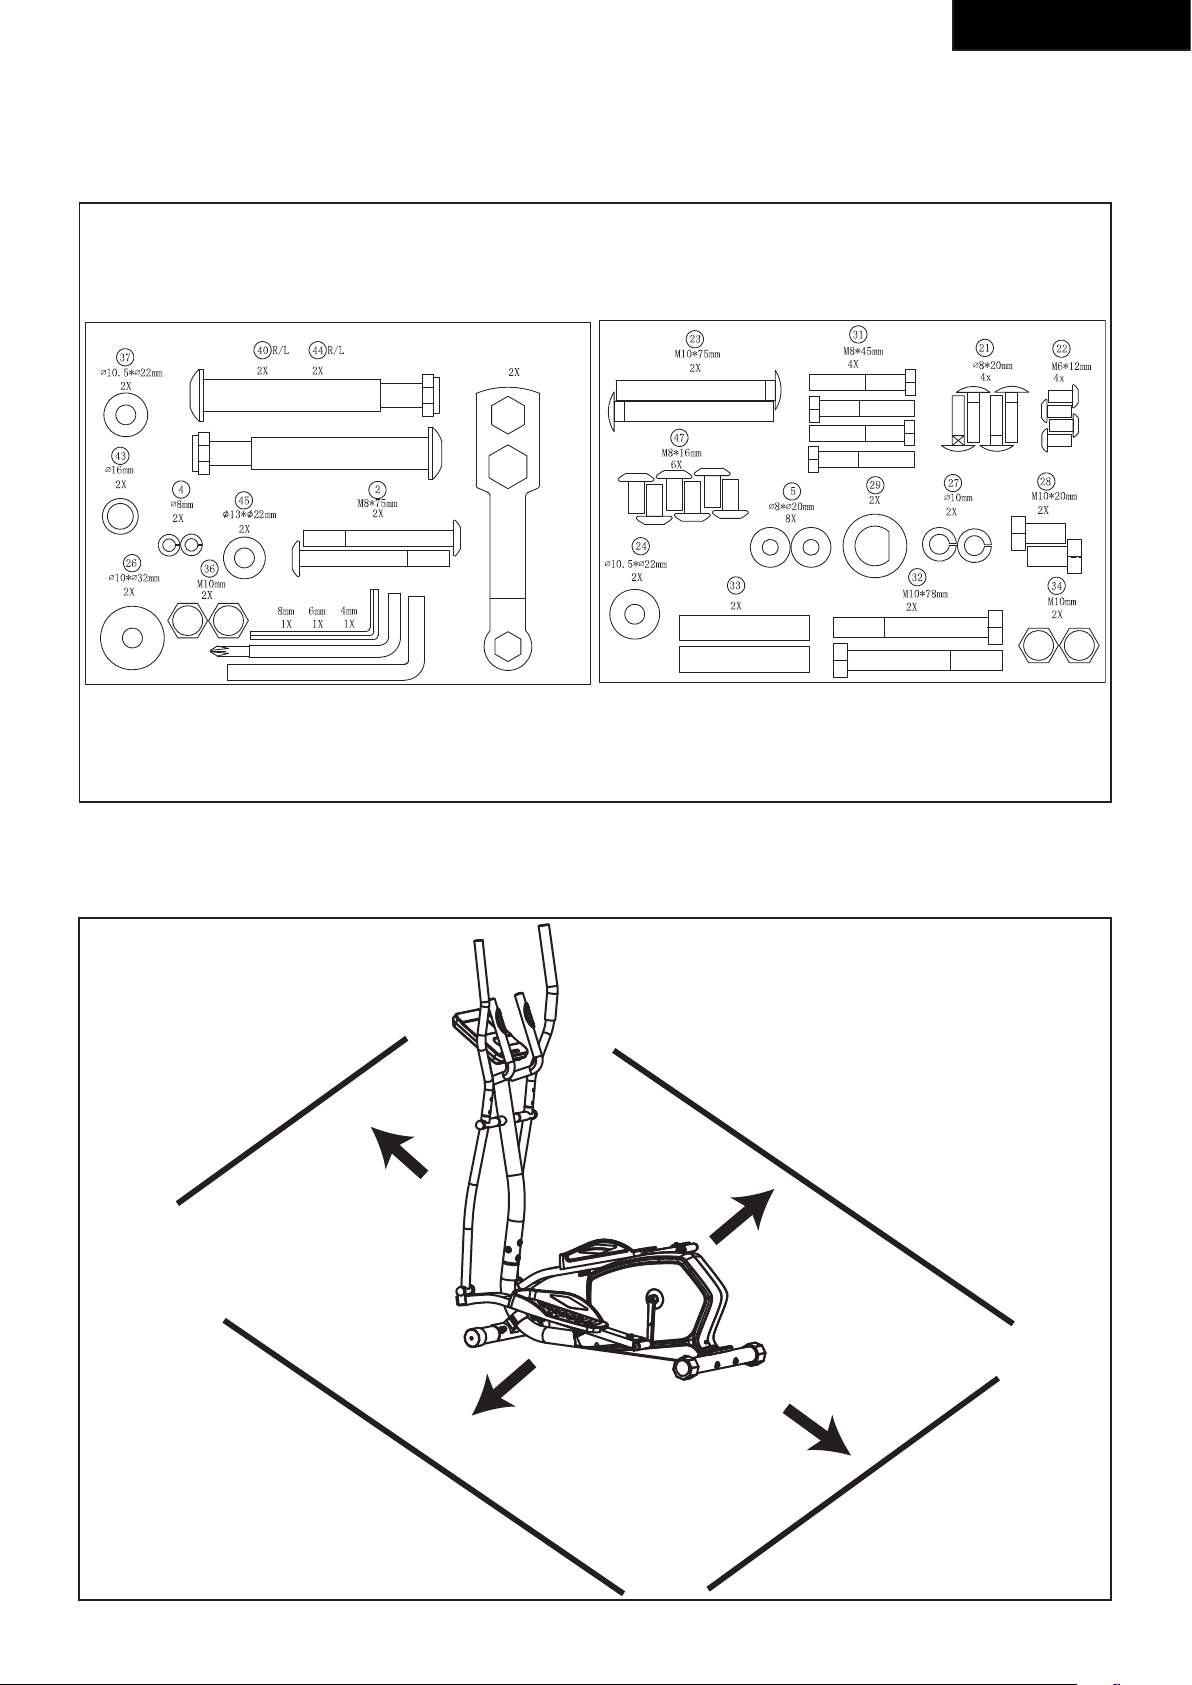
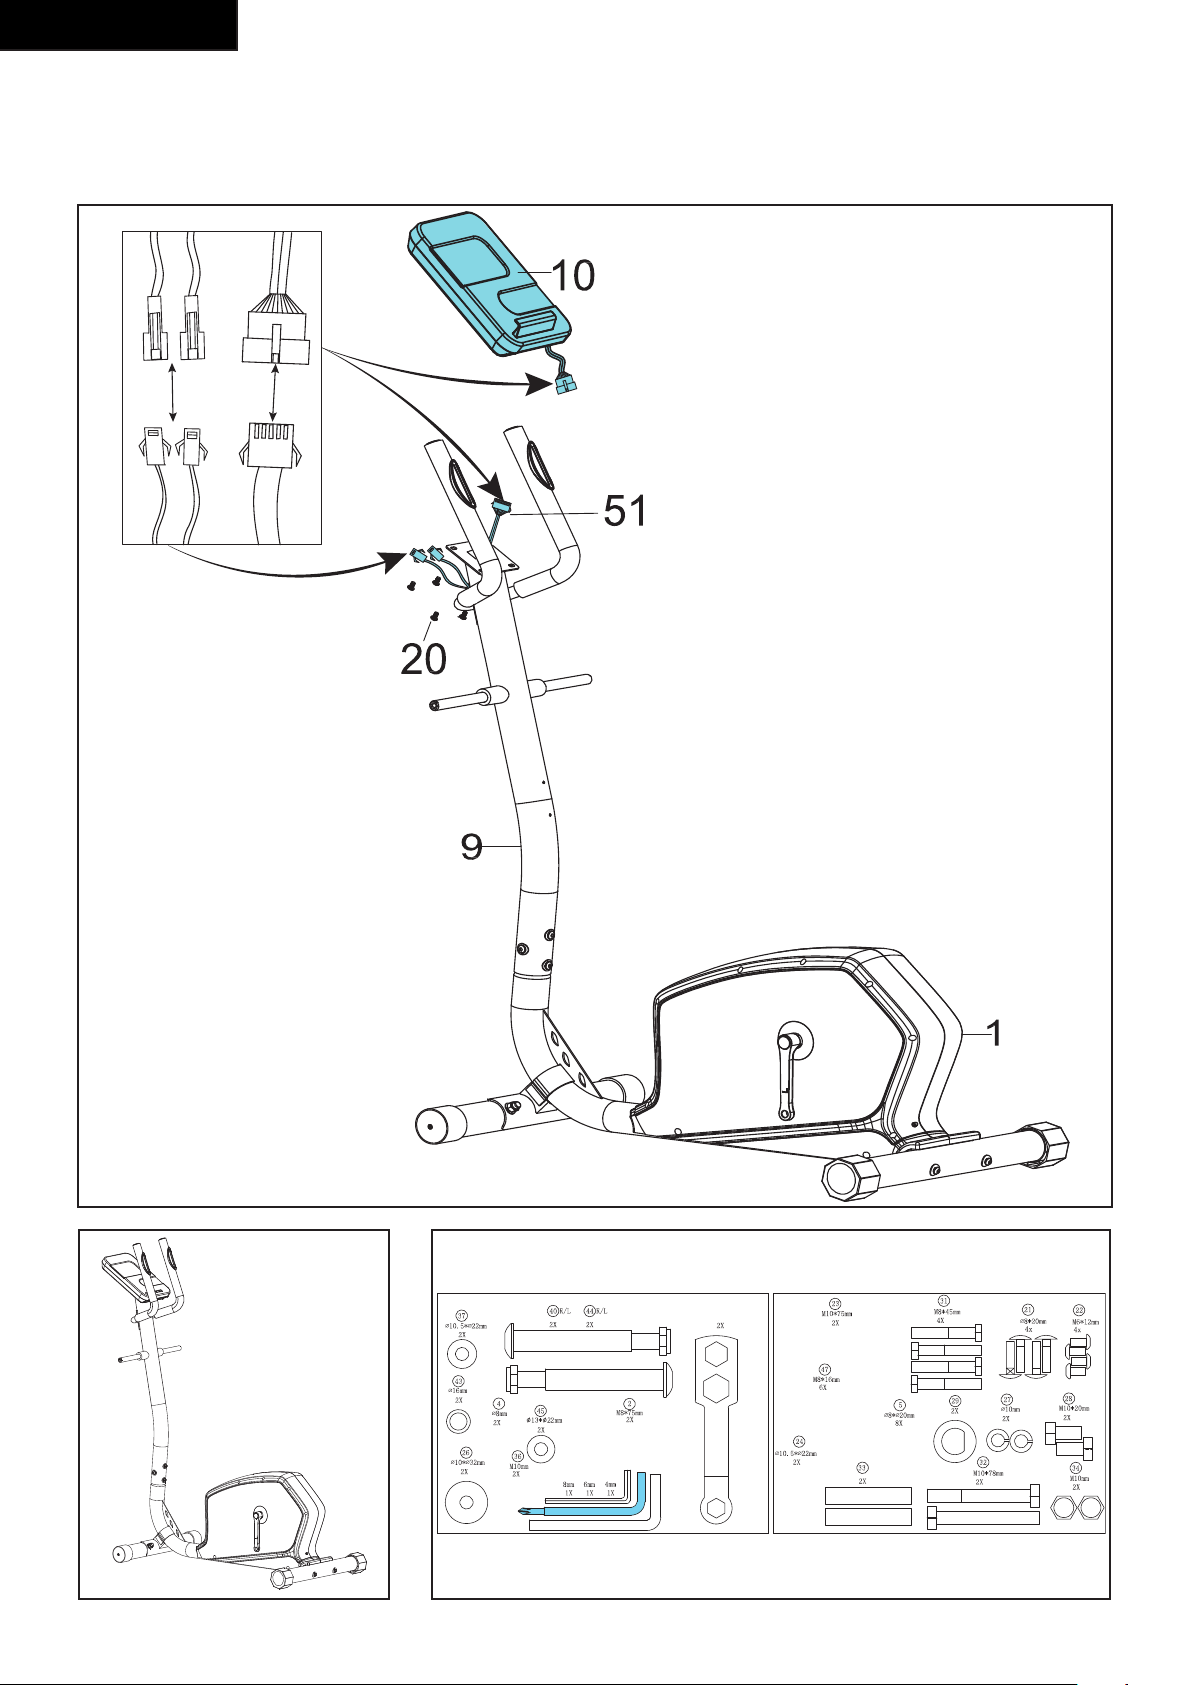
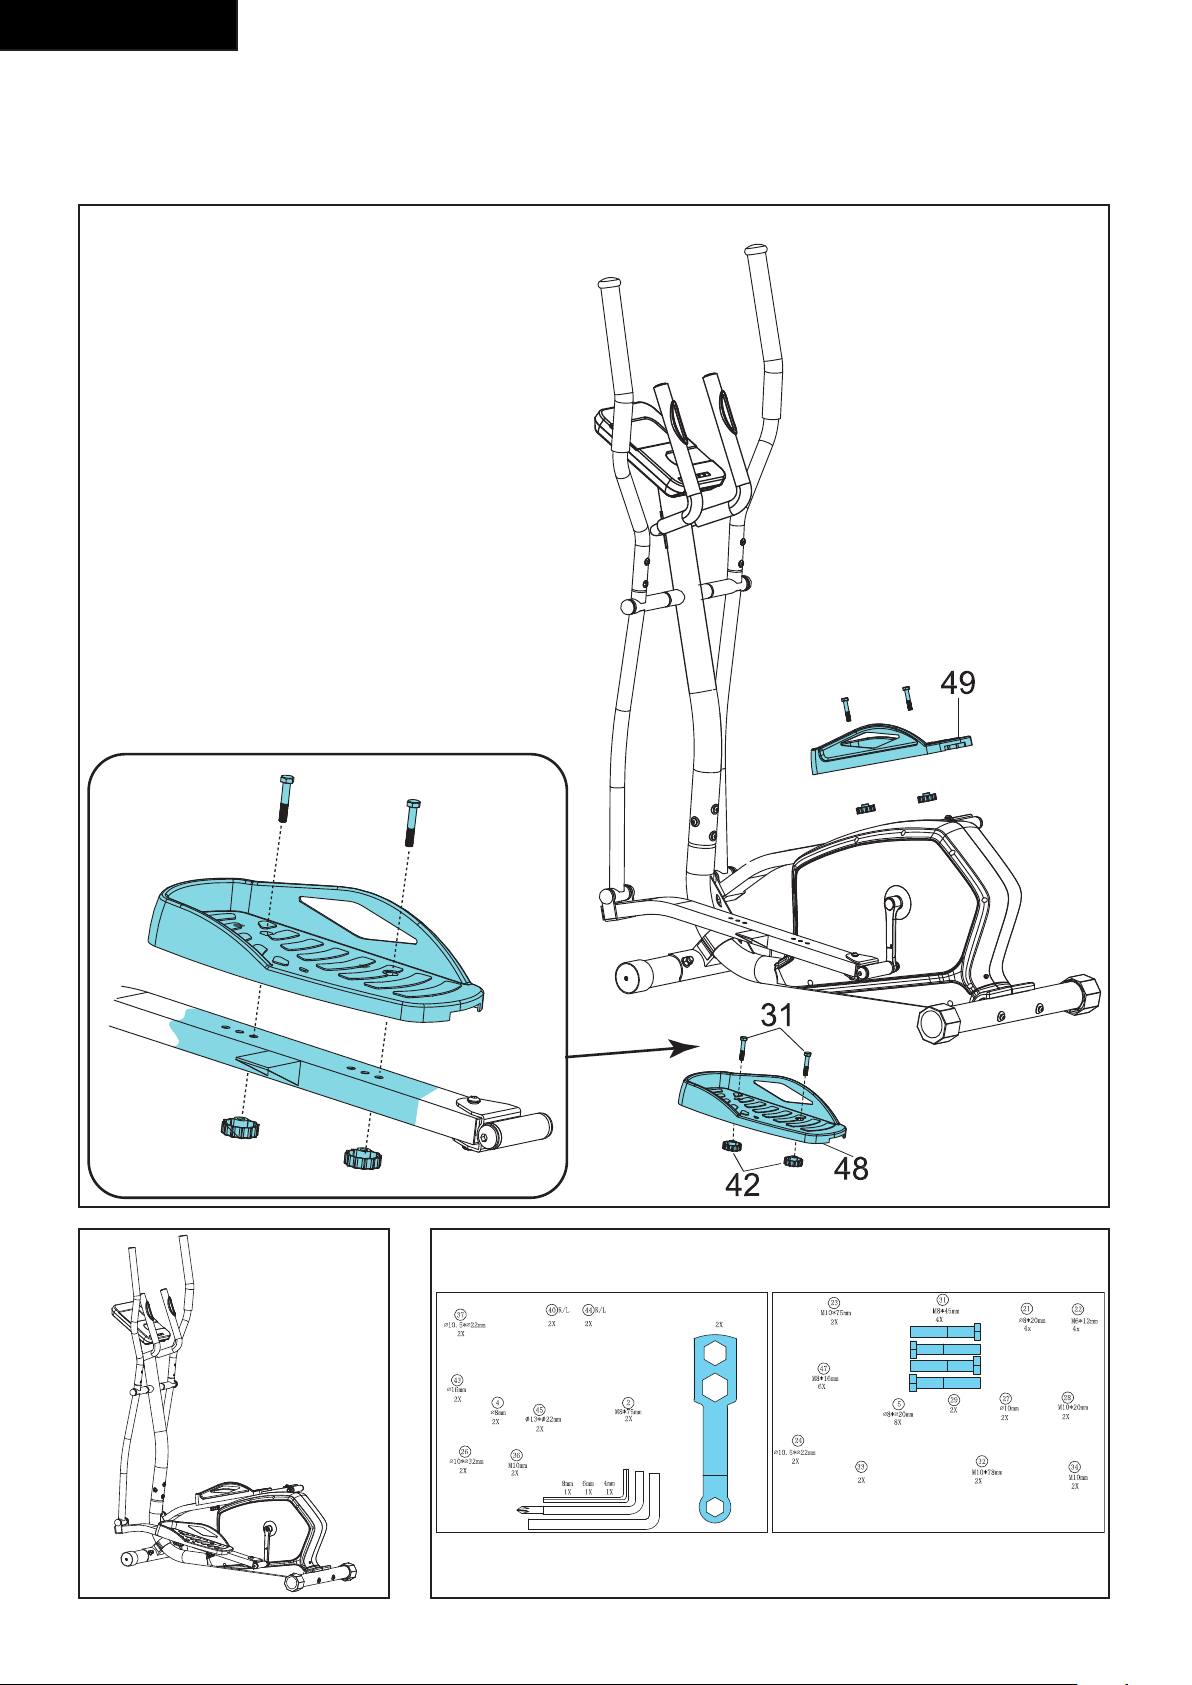
Package contents (fig. B & C)
- The package contains the parts as shown in
fig. B.
- The package contains the fasteners as shown in fig.
C. Refer to the section “Description”
NOTE
• If a part is missing, contact your dealer.
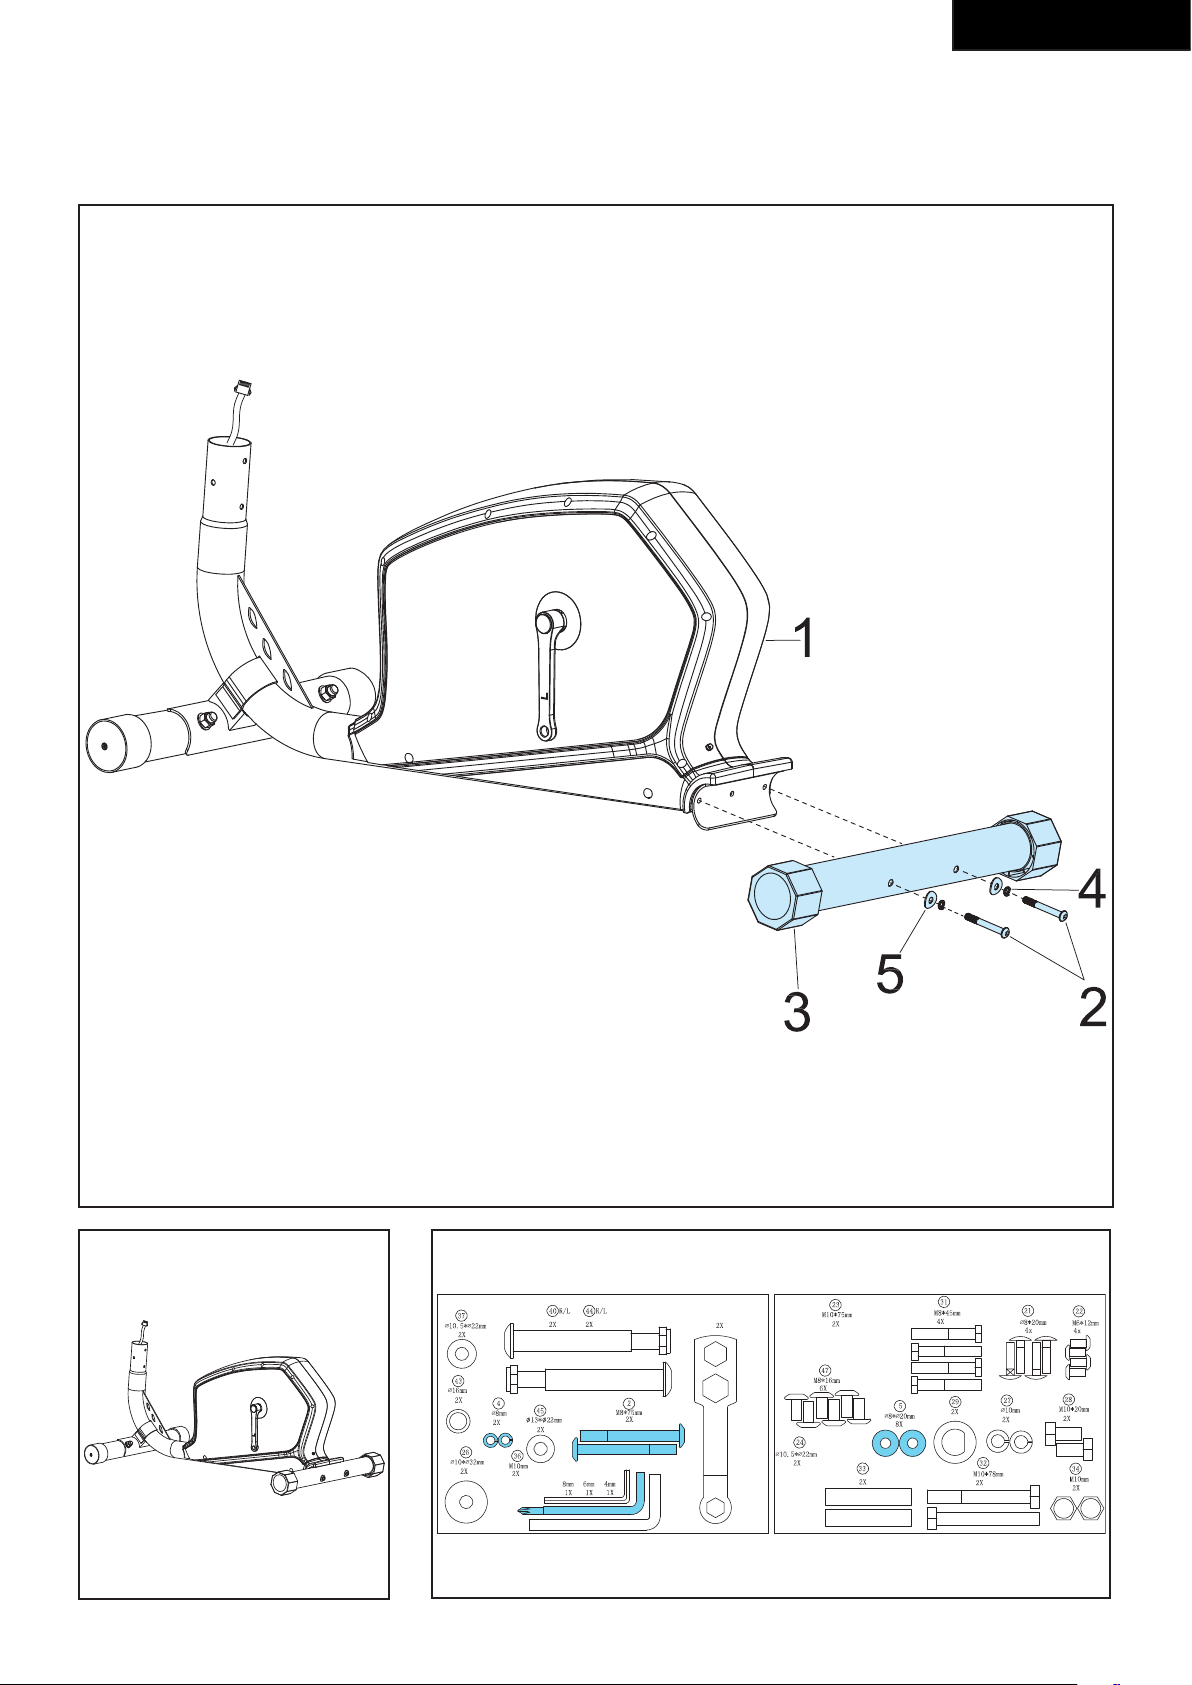
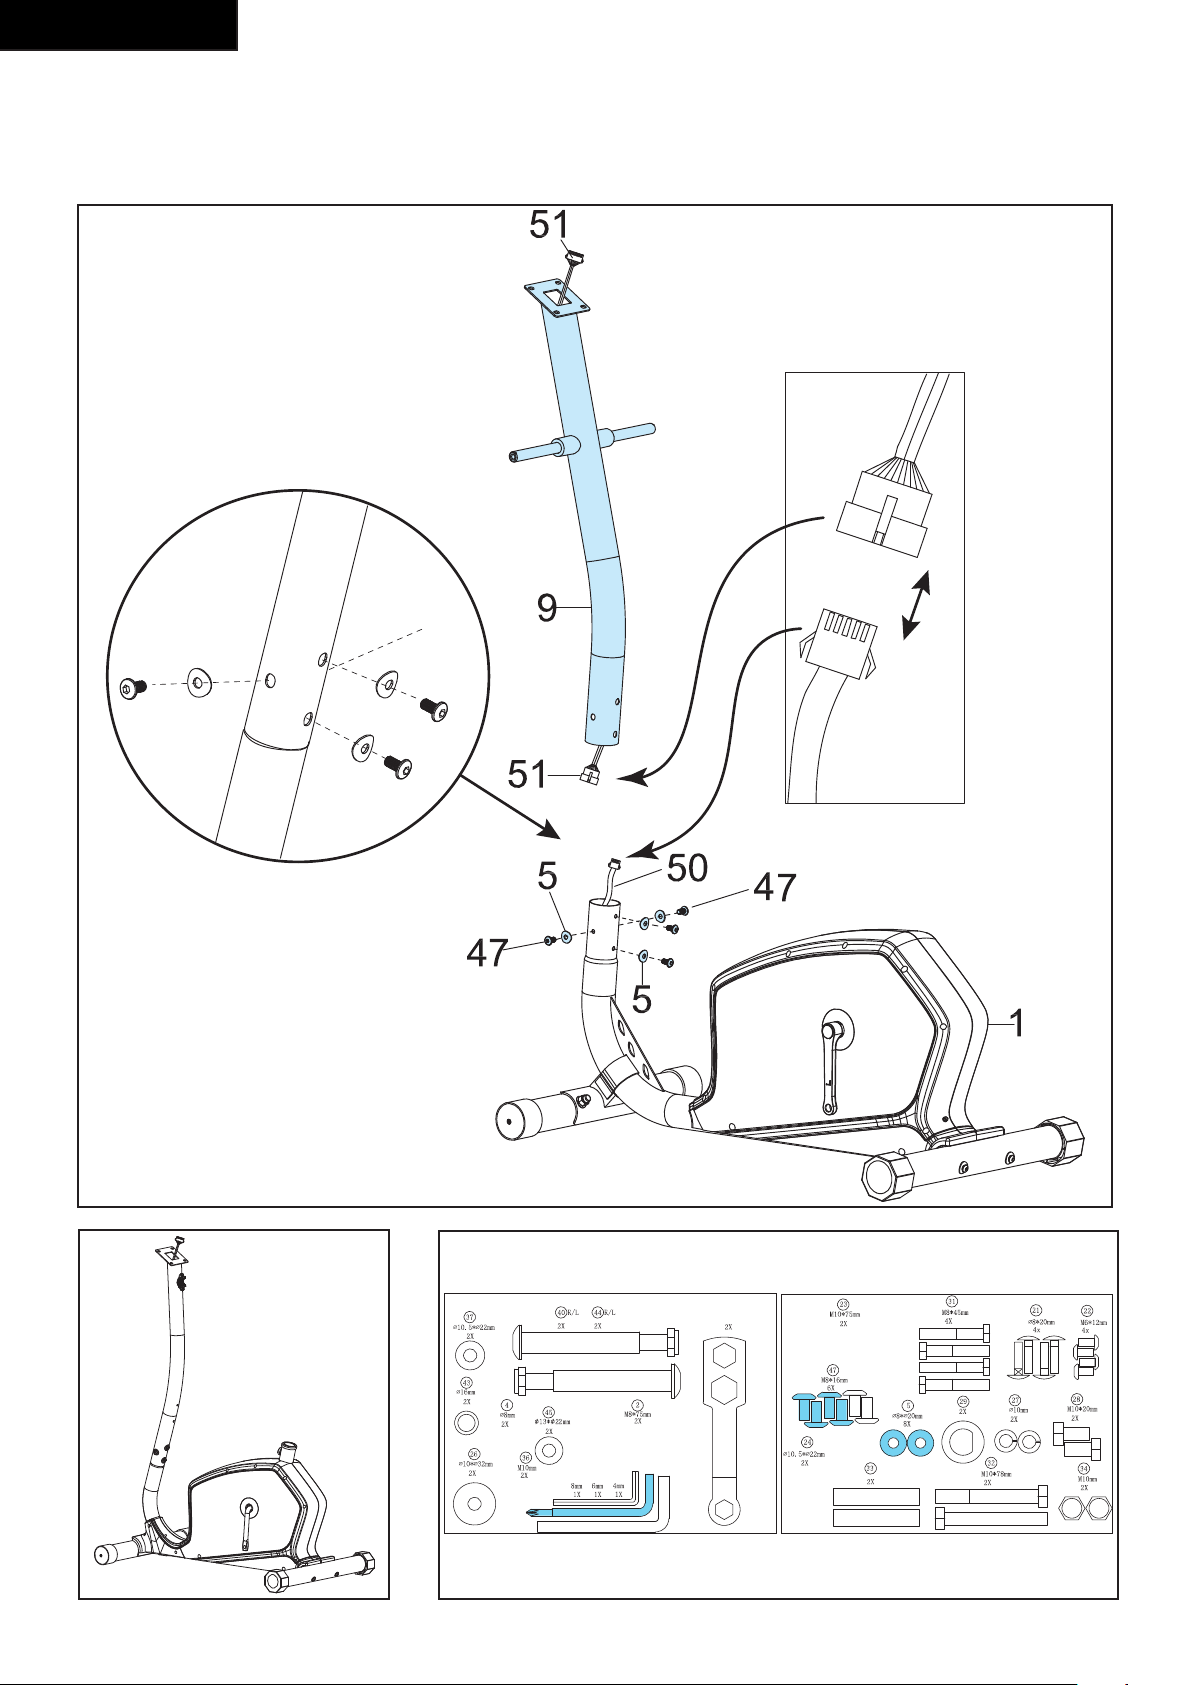
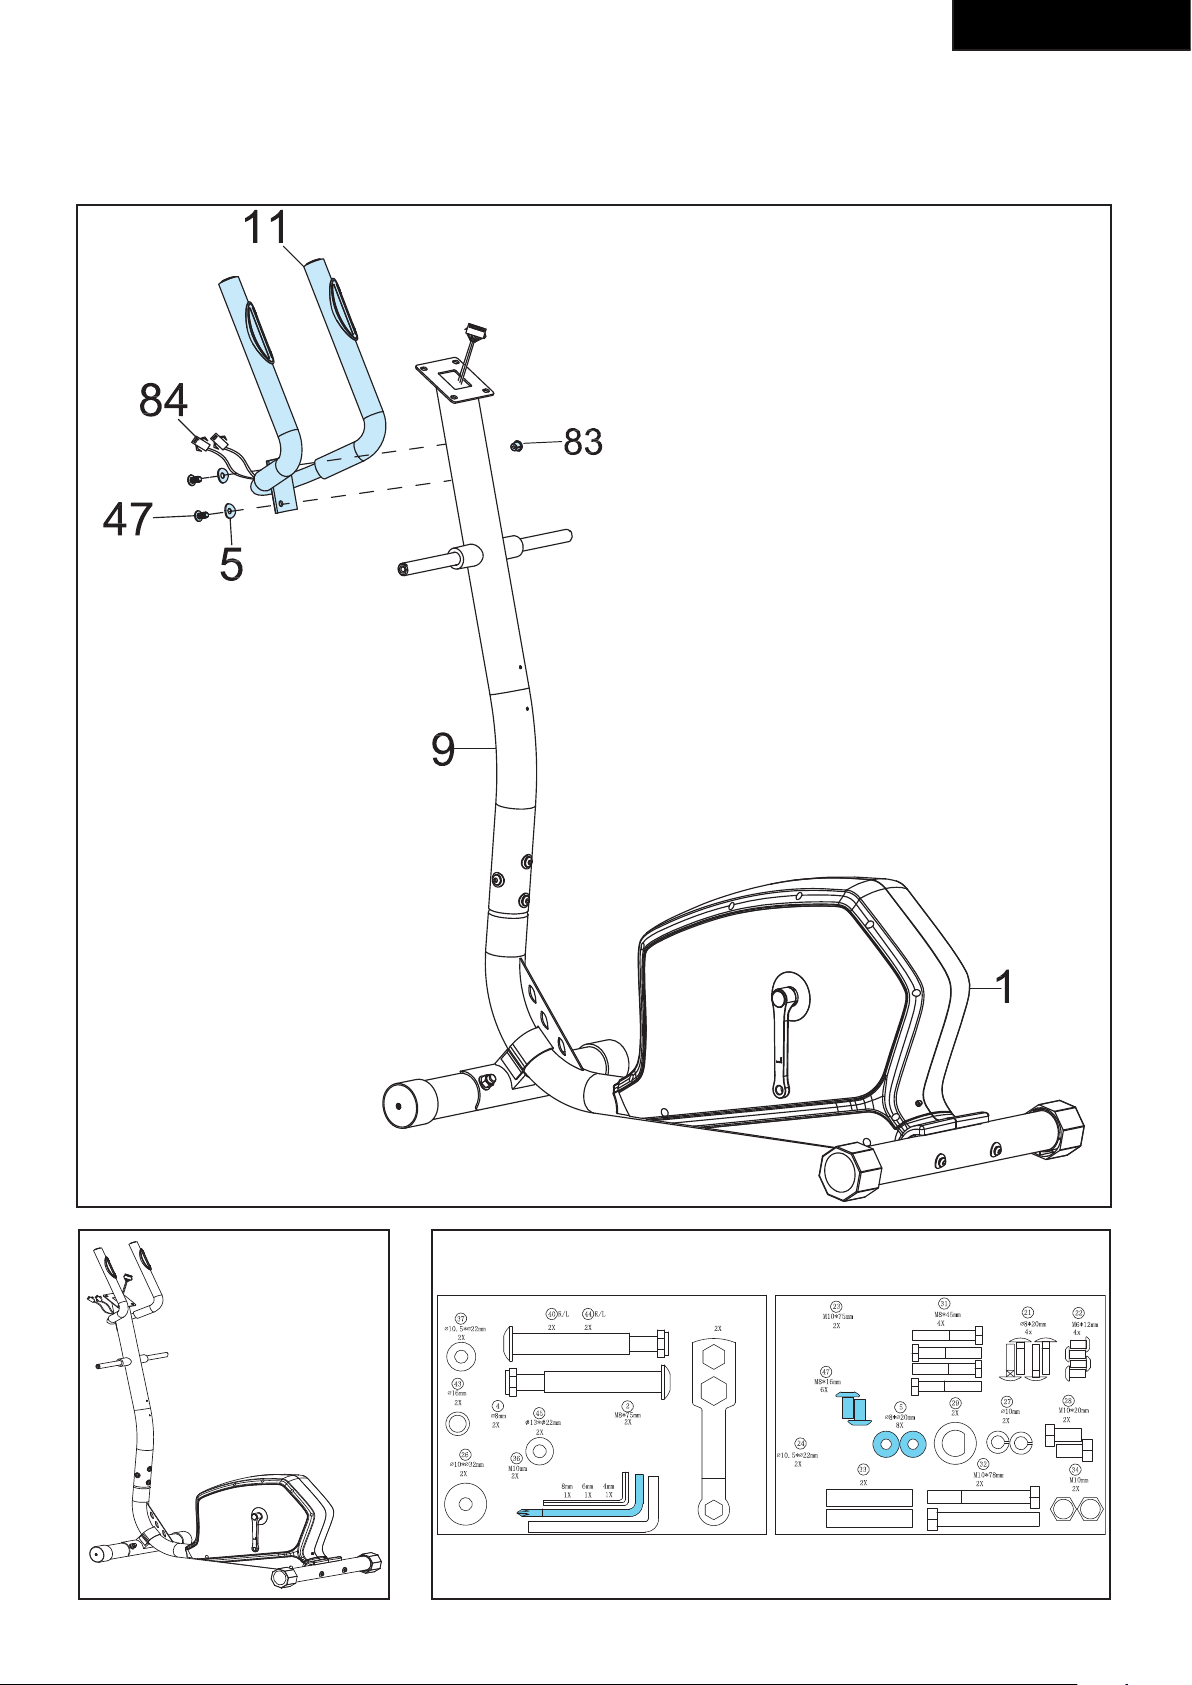
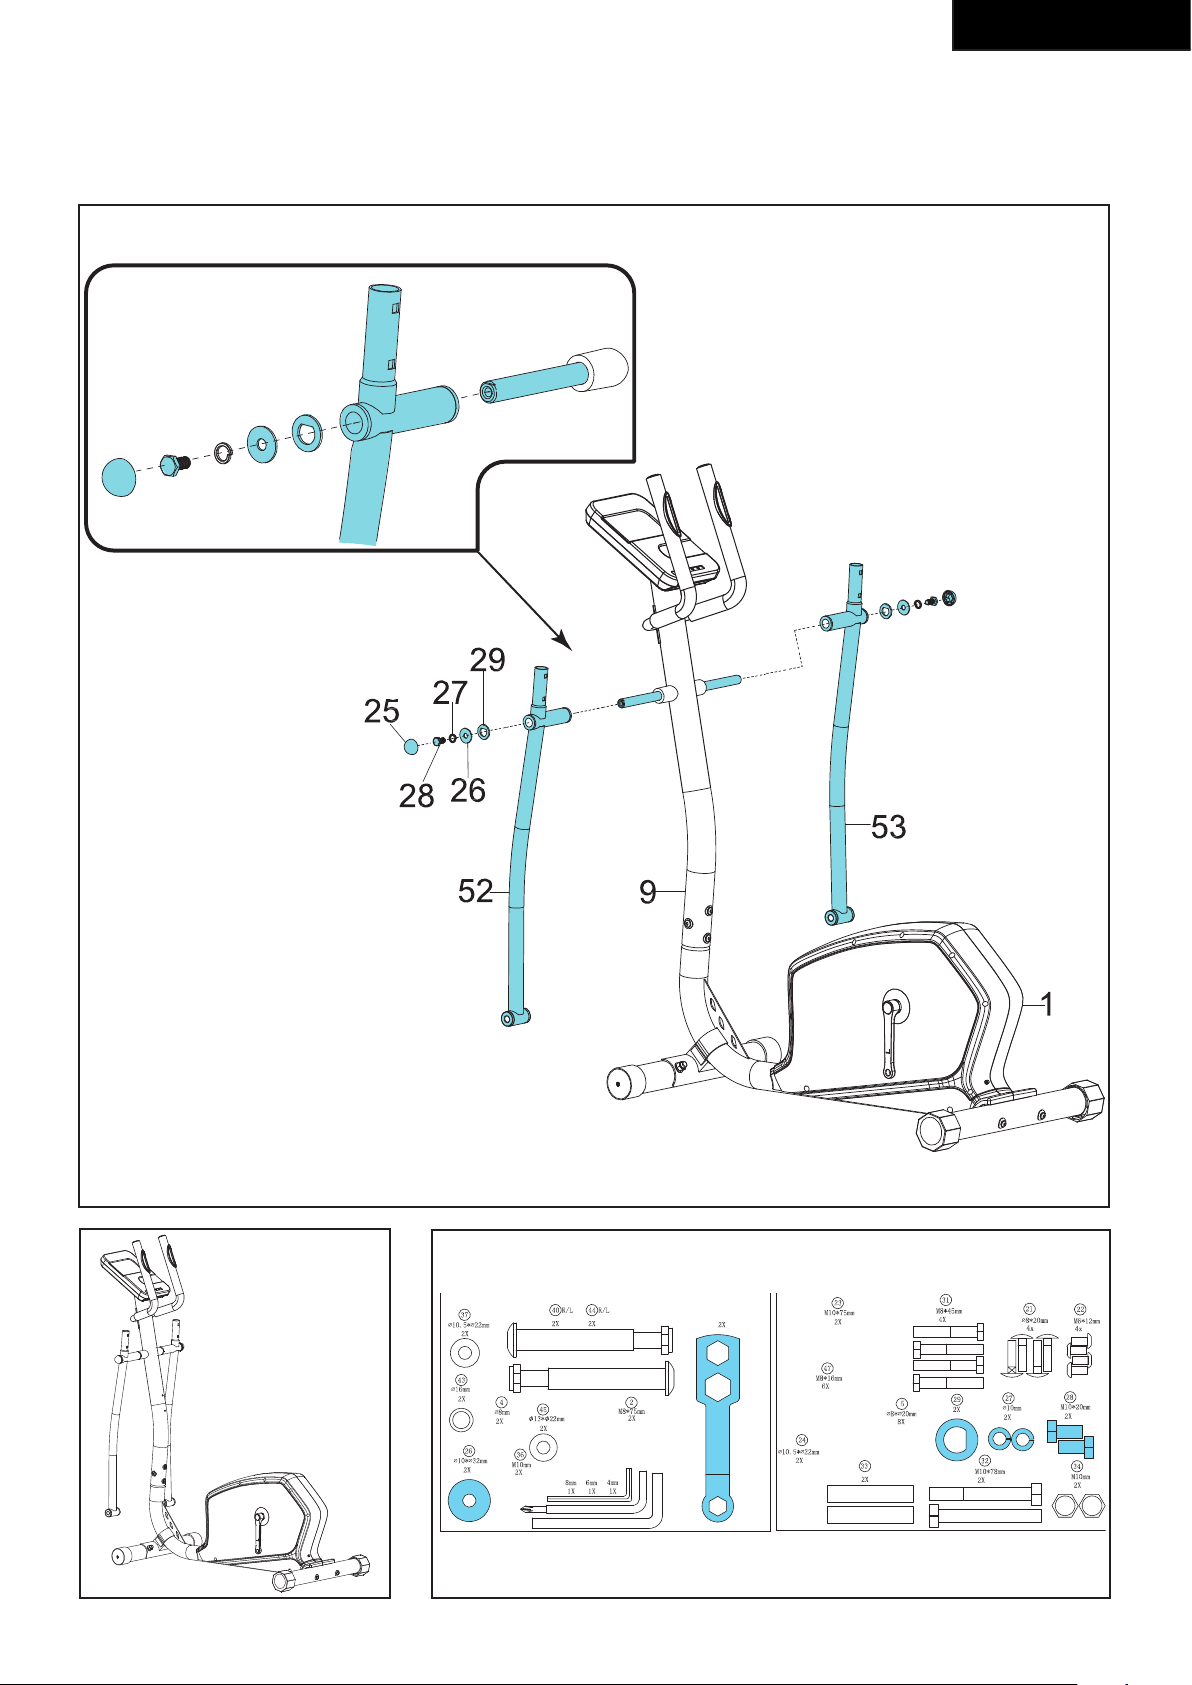
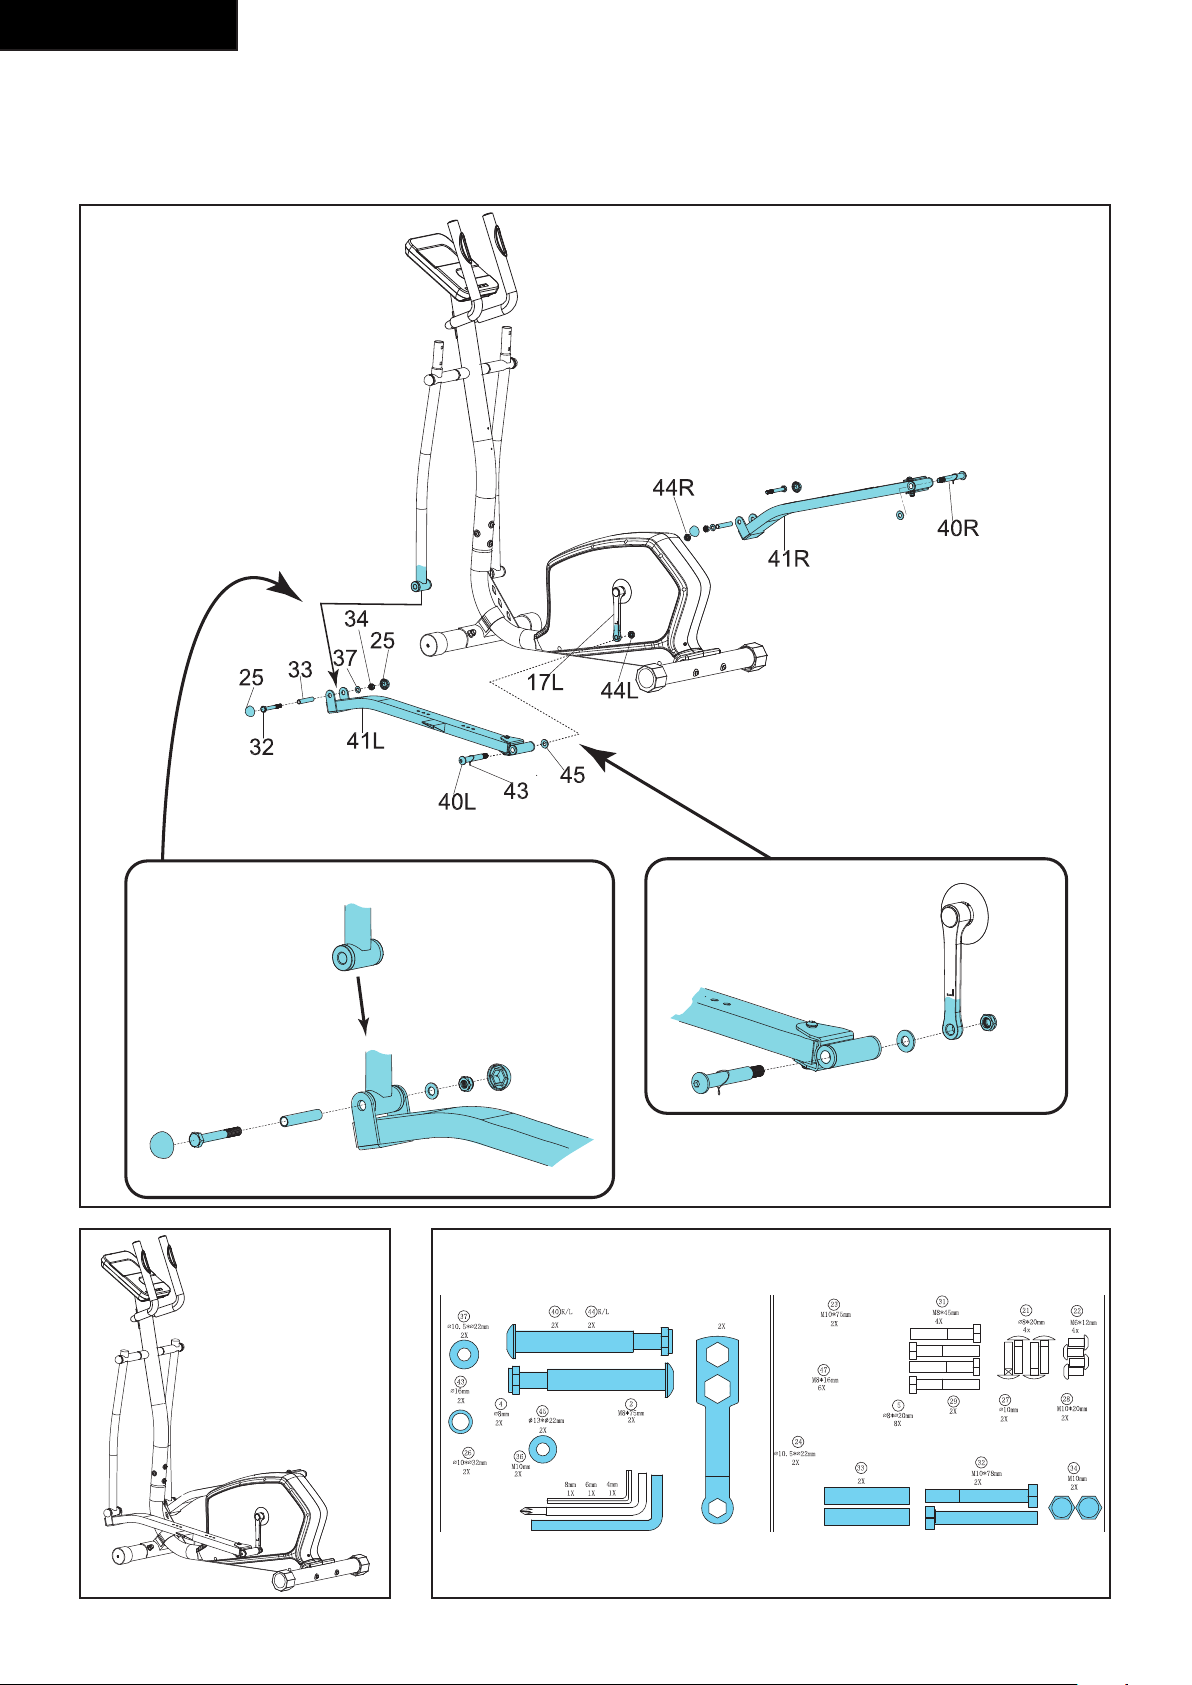
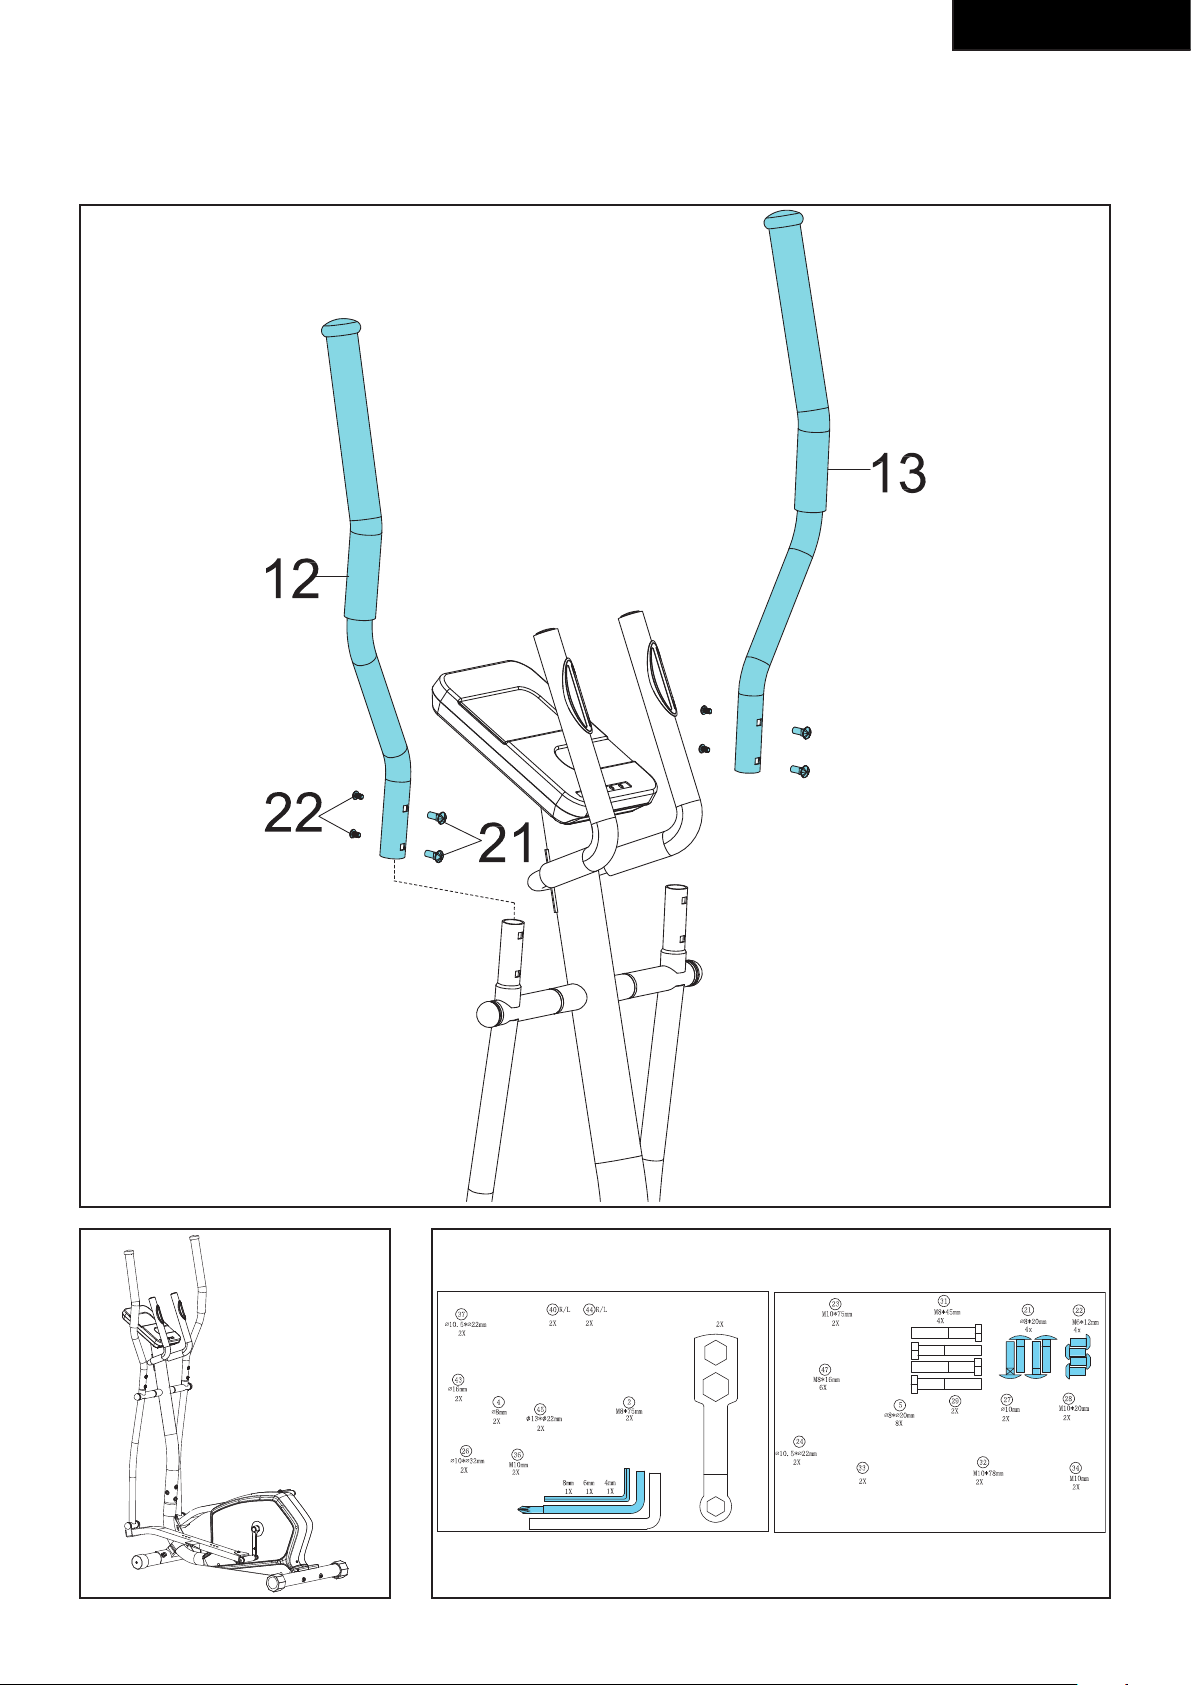
Assembly (fig. D)
WARNING
• Assemble the equipment in the given order.
• Carry and move the equipment with at least two
persons.
CAUTION
• Place the equipment on a firm, level surface.
• Place the equipment on a protective base to
prevent damage to the floor surface.
• Allow at least 100 cm of clearance around the
equipment.
• Refer to the illustrations for the correct assembly
of the equipment.
Workouts
The workout must be suitably light, but of long
duration. Aerobic exercise is based on improving
the body’s maximum oxygen uptake, which in turn
improves endurance and fitness. You should perspire,
but you should not get out of breath during the
workout.
To reach and maintain a basic fitness level, exercise at
least three times a week, 30 minutes at a time. Increase
the number of exercise sessions to improve your fitness
level. It is worthwhile to combine regular exercise with
a healthy diet. A person committed to dieting should
exercise daily, at first 30 minutes or less at a time,
gradually increasing the daily workout time to one hour.
Start your workout at low speed and low resistance to
prevent the cardiovascular system from being subjected
to excessive strain.
As the fitness level improves, speed and resistance can
be increased gradually. The efficiency of your exercise
can be measured by monitoring your heart rate and
your pulse rate.
Exercise Instructions
Using your fitness trainer will provide you with several
benefits, it will improve your physical fitness, tone
muscle and in conjunction with a calorie controlled diet
help you lose weight.
The warming up phase
This stage helps get the blood flowing around the body
and the muscles working properly. It will also reduce
the risk of cramp and muscle injury. It is advisable to do
a few stretching exercises as shown below. Each stretch
should be held for approximately 30 seconds, do not
force or jerk your muscles into a stretch - if it hurts,
STOP

22
English
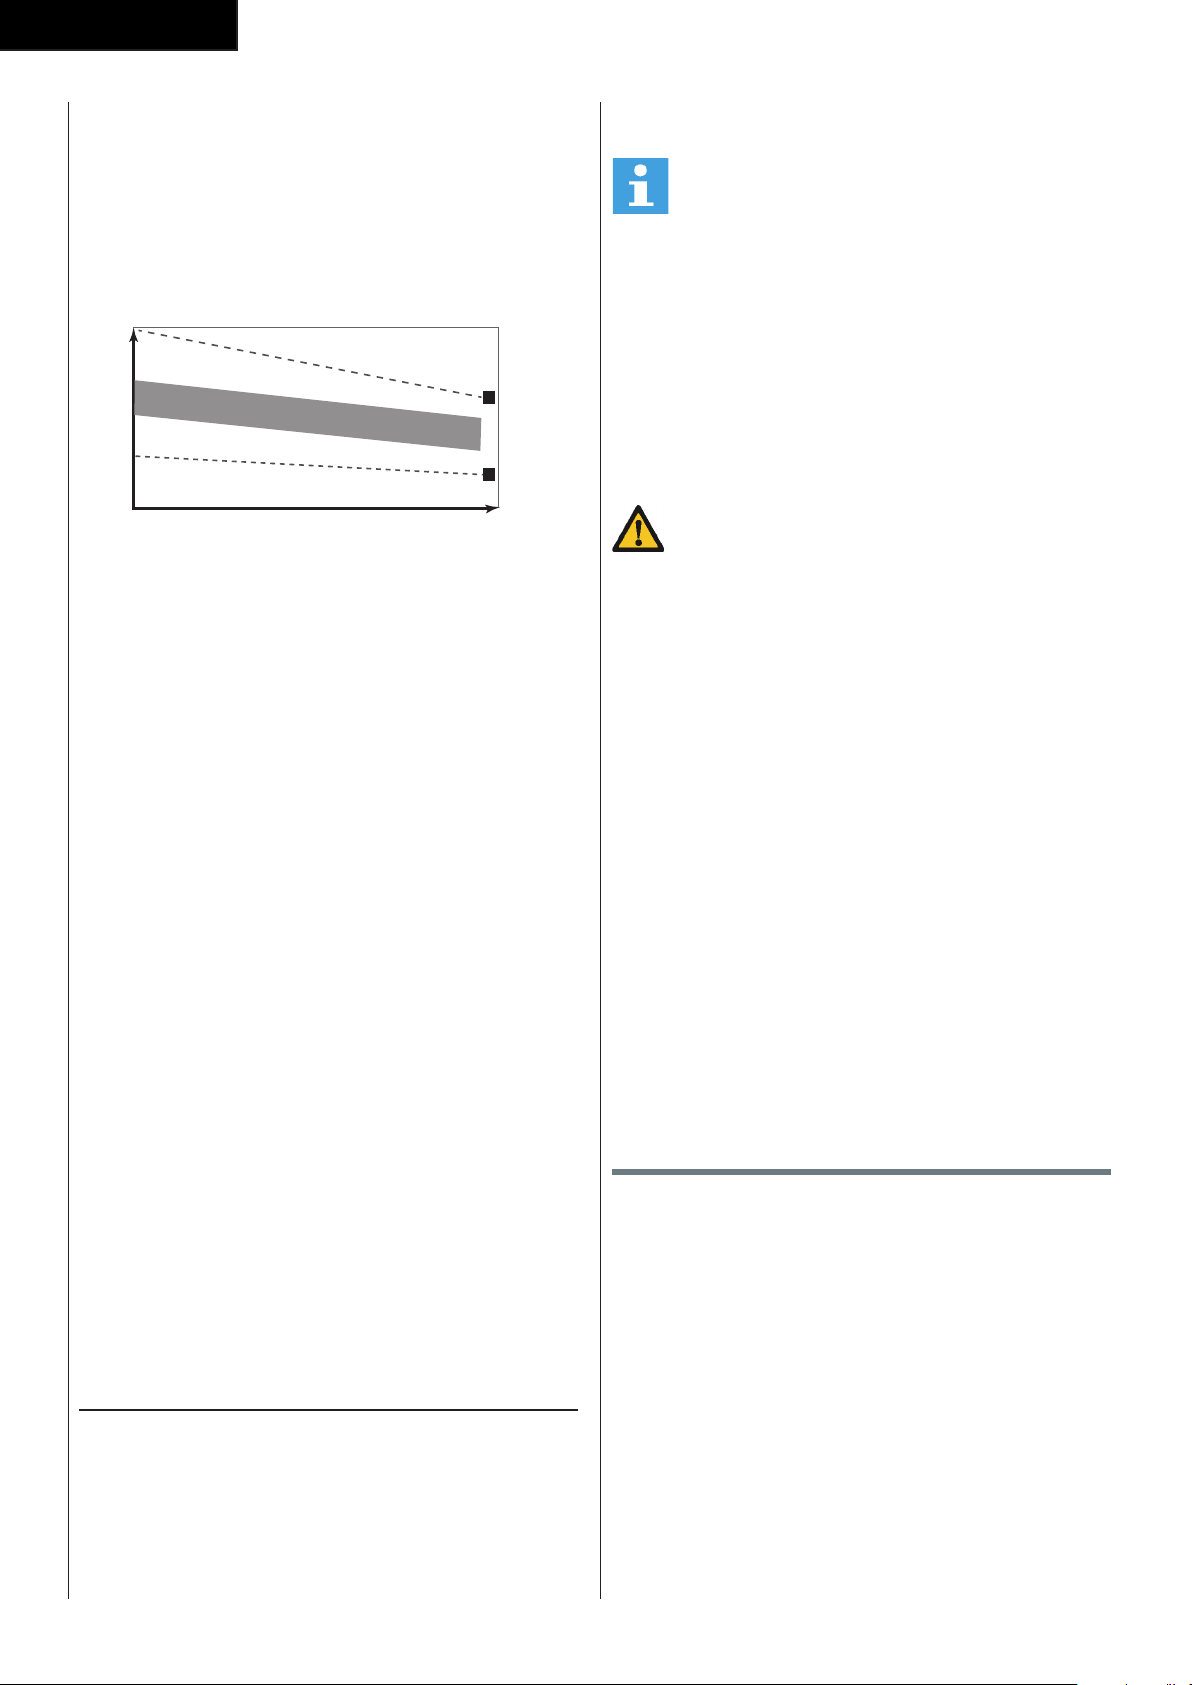
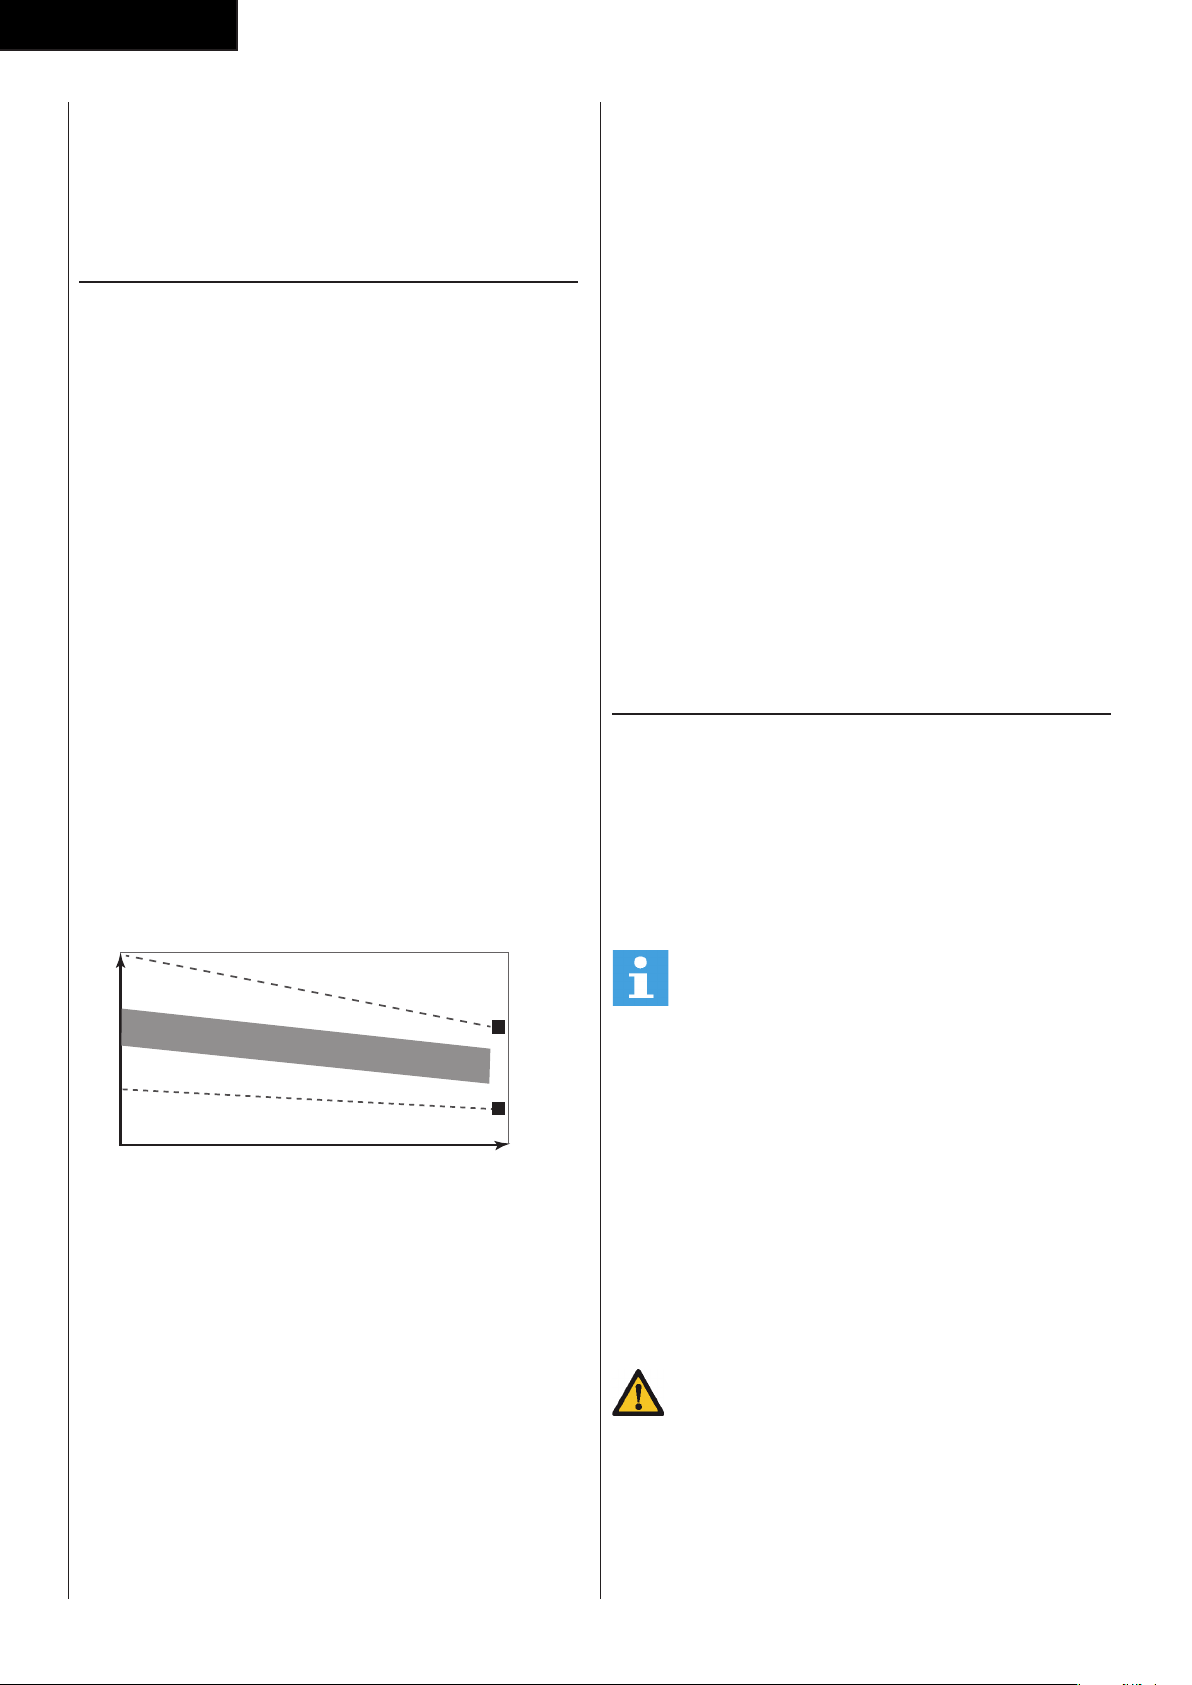
The exercise phase
This is the stage where you put the effort in. After
regular use, the muscles in your legs will become
more flexible. Work to your but it is very important to
maintain a steady tempo throughout. The rate of work
should be sufficient to raise your heart beat into the
target zone shown on the graph below.
200
180
160
140
120
100
80
20 25 30 35 40 45 50 55 60 65 70 75
85 %
70 %
AGE
MAXIMUM
COOL DOWN
HEART RATE
TARGET ZONE
This stage should last for a minimum of 12 minutes
though most people start at about 15-20 minutes
The cool down phase
This stage is to let your Cardiovascular System and
muscles wind down. This is a repeat of the warm
up exercise e.g. reduce your tempo, continue for
approximately 5 minutes. The stretching exercises
should now be repeated, again remembering not to
force or jerk your muscles into the stretch.
As you get fitter you may need to train longer and
harder. It is advisable to train at least three times a
week, and if possible space your workouts evenly
throughout the week.
Muscle toning
To tone muscle while on your fitness trainer you will
need to have the resistance set quite high. This will
put more strain on our leg muscles and may mean you
cannot train for as long as you would like. If you are also
trying to improve your fitness you need to alter your
training program. You should train as normal during the
warm up and cool down phases, but towards the end
of the exercise phase you should increase resistance
making your legs work harder. You will have to reduce
your speed to keep your heart rate in the target zone.
Weight loss
The important factor here is the amount of effort you
put in. The harder and longer you work the more
calories you will burn. Effectively this is the same as if
you were training to improve your fitness, the difference
is the goal.
Heart rate
Pulse rate measurement
(hand pulse sensors)
The pulse rate is measured by sensors in the handlebars
when the user is touching both sensors at the same
time. Accurate pulse measurement requires that the
skin is slightly moist and constantly touching the hand
pulse sensors. If the skin is too dry or too moist, the
pulse rate measurement will become less accurate.
NOTE
• Do not use the hand pulse sensors in
combination with a heart rate chest belt.
• If you set a heart rate limit for your workout, an
Maximum heart rate
(during training)
The maximum heart rate is the highest heart rate a
person can safely achieve through exercise stress. The
following formula is used to calculate the average
maximum heart rate: 220 - AGE. The maximum heart
rate varies from person to person.
WARNING
• Make sure that you do not exceed your
maximum heart rate during your workout. If you
belong to a risk group, consult a physician.
Beginner
50-60% of maximum heart rate
Suitable for beginners, weight-watchers, convalescents
and persons who have not exercised for a long time.
Exercise at least three times a week, 30 minutes at a
time.
Advanced
60-70% of maximum heart rate
Suitable for persons who want to improve and maintain
fitness. Exercise at least three times a week, 30 minutes
at a time.
Expert
70-80% of maximum heart rate
Suitable for the fittest of persons who are used to long-
endurance workouts.
Use
Adjusting the support feet
The equipment is equipped with 2 support feet. If
the equipment is not stable, the support feet can be
adjusted.
- Turn the support feet as required to put the
equipment in a stable position.
Adjusting the pedal position (Fig. D-7)
The both pedals can be adjusted according to the
height and the exercise position of the user.
- Loosen the 2 pedal fixing knobs.
- Move the pedal to the required position.
- Tighten the pedal fixing knobs.
23
English
NOTE
• Make sure the both pedals are fitted into similar
positions always.
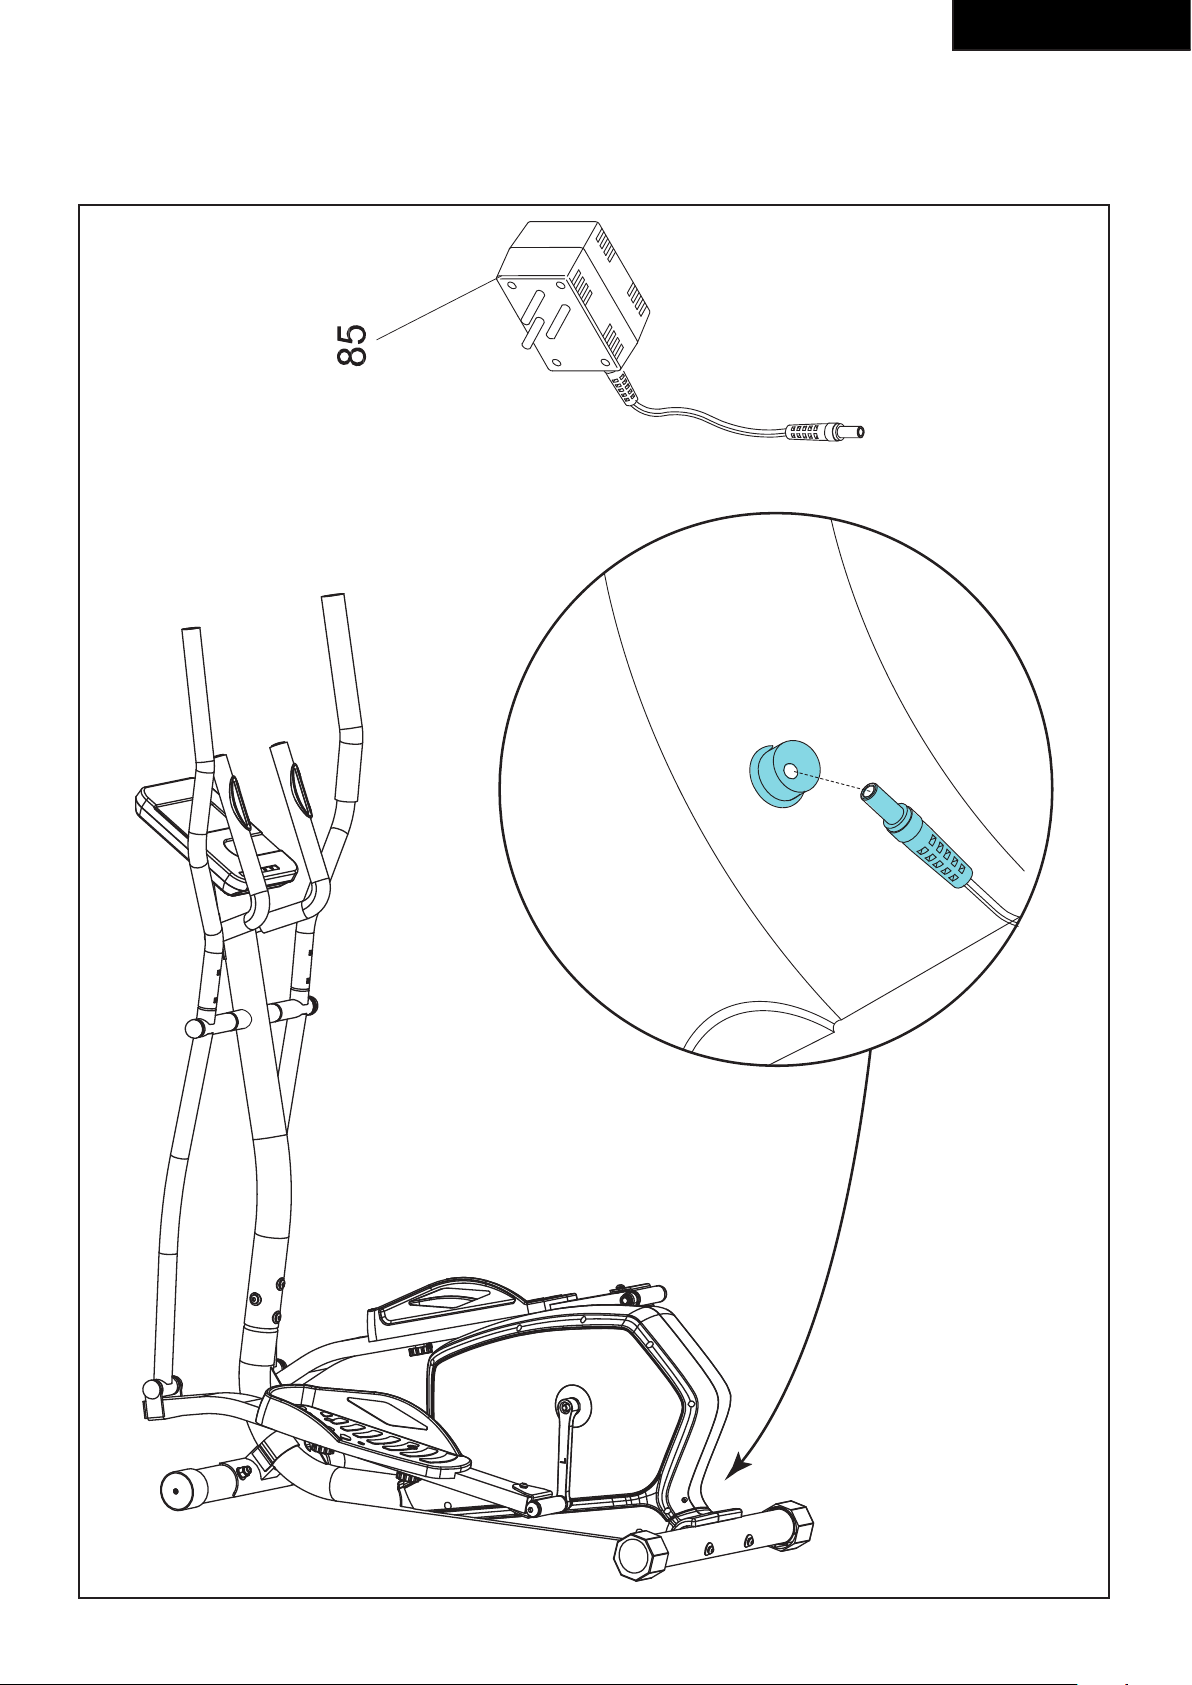
Power supply (Fig. E)
The trainer is powered by an external power supply.
Refer to the illustration to locate the trainer power
input.
NOTE
• Connect the power supply with the trainer
before connecting it to the wall outlet.
• Always remove power cord when
• machine is not in use.
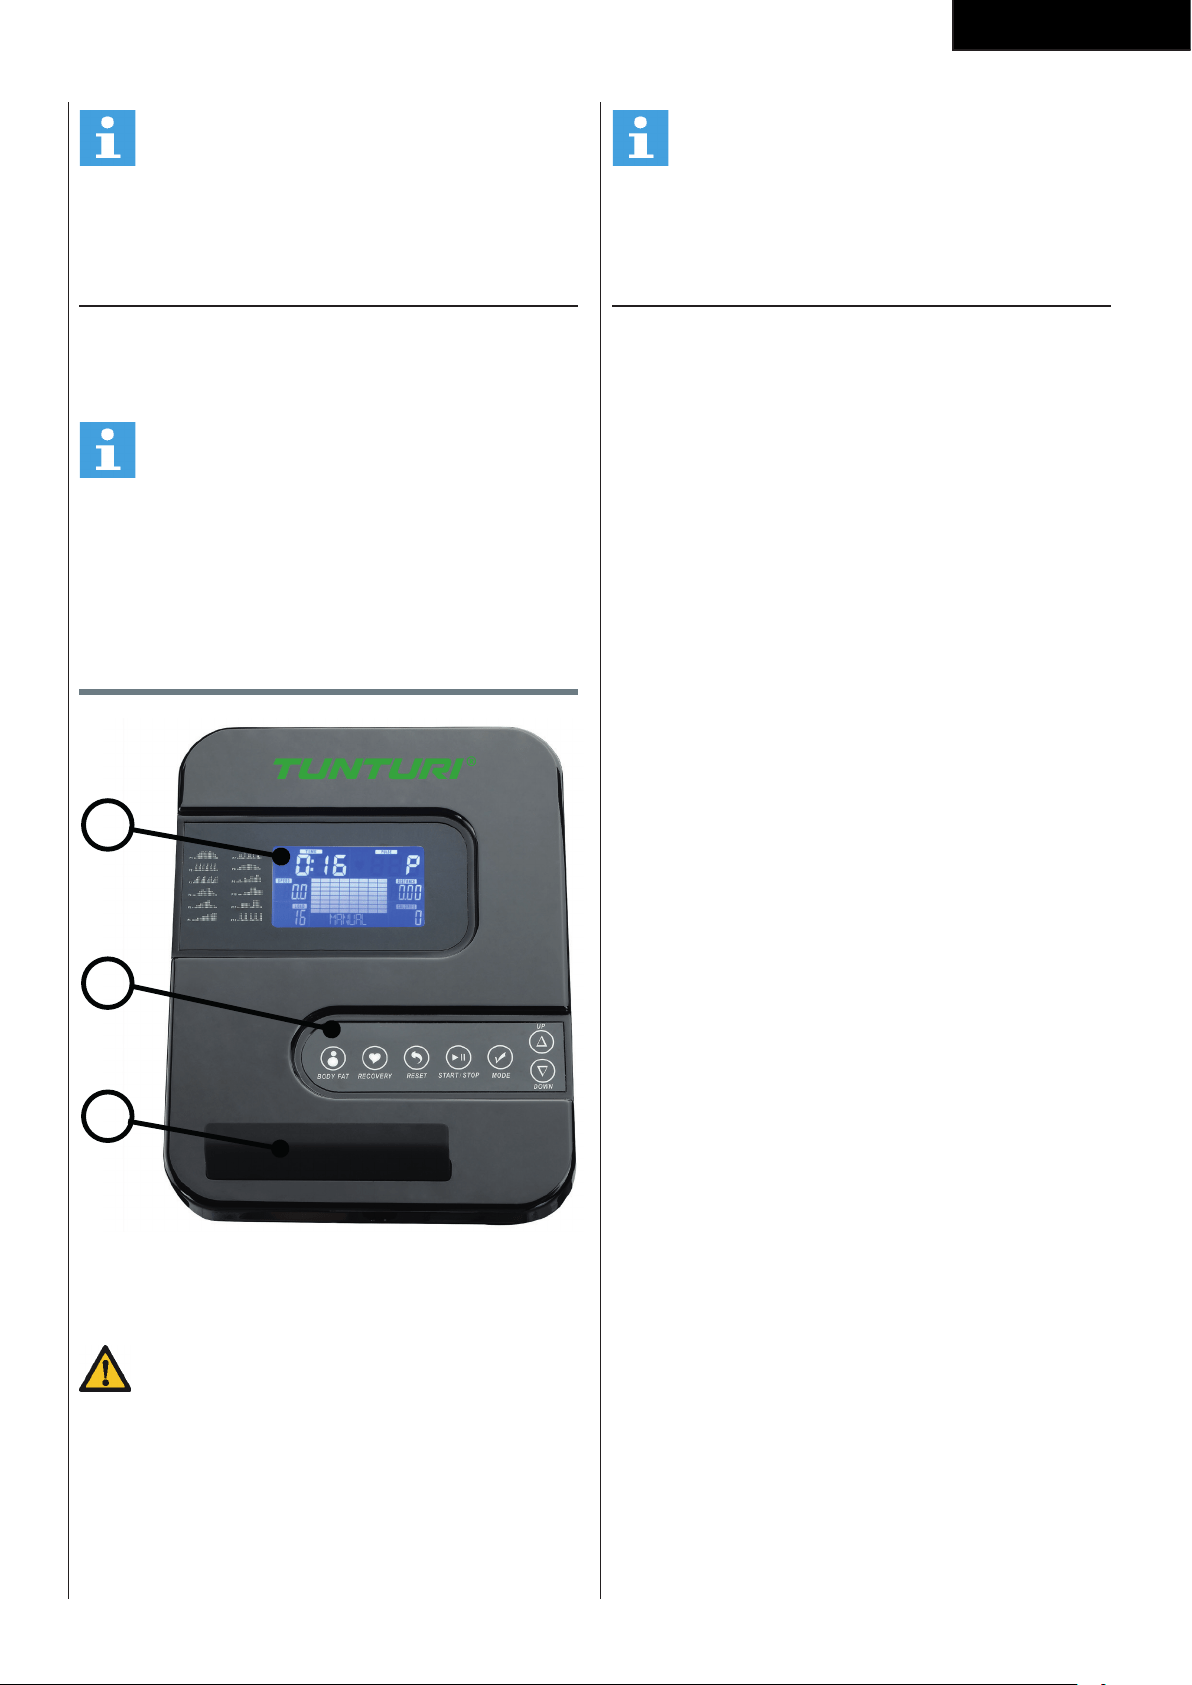
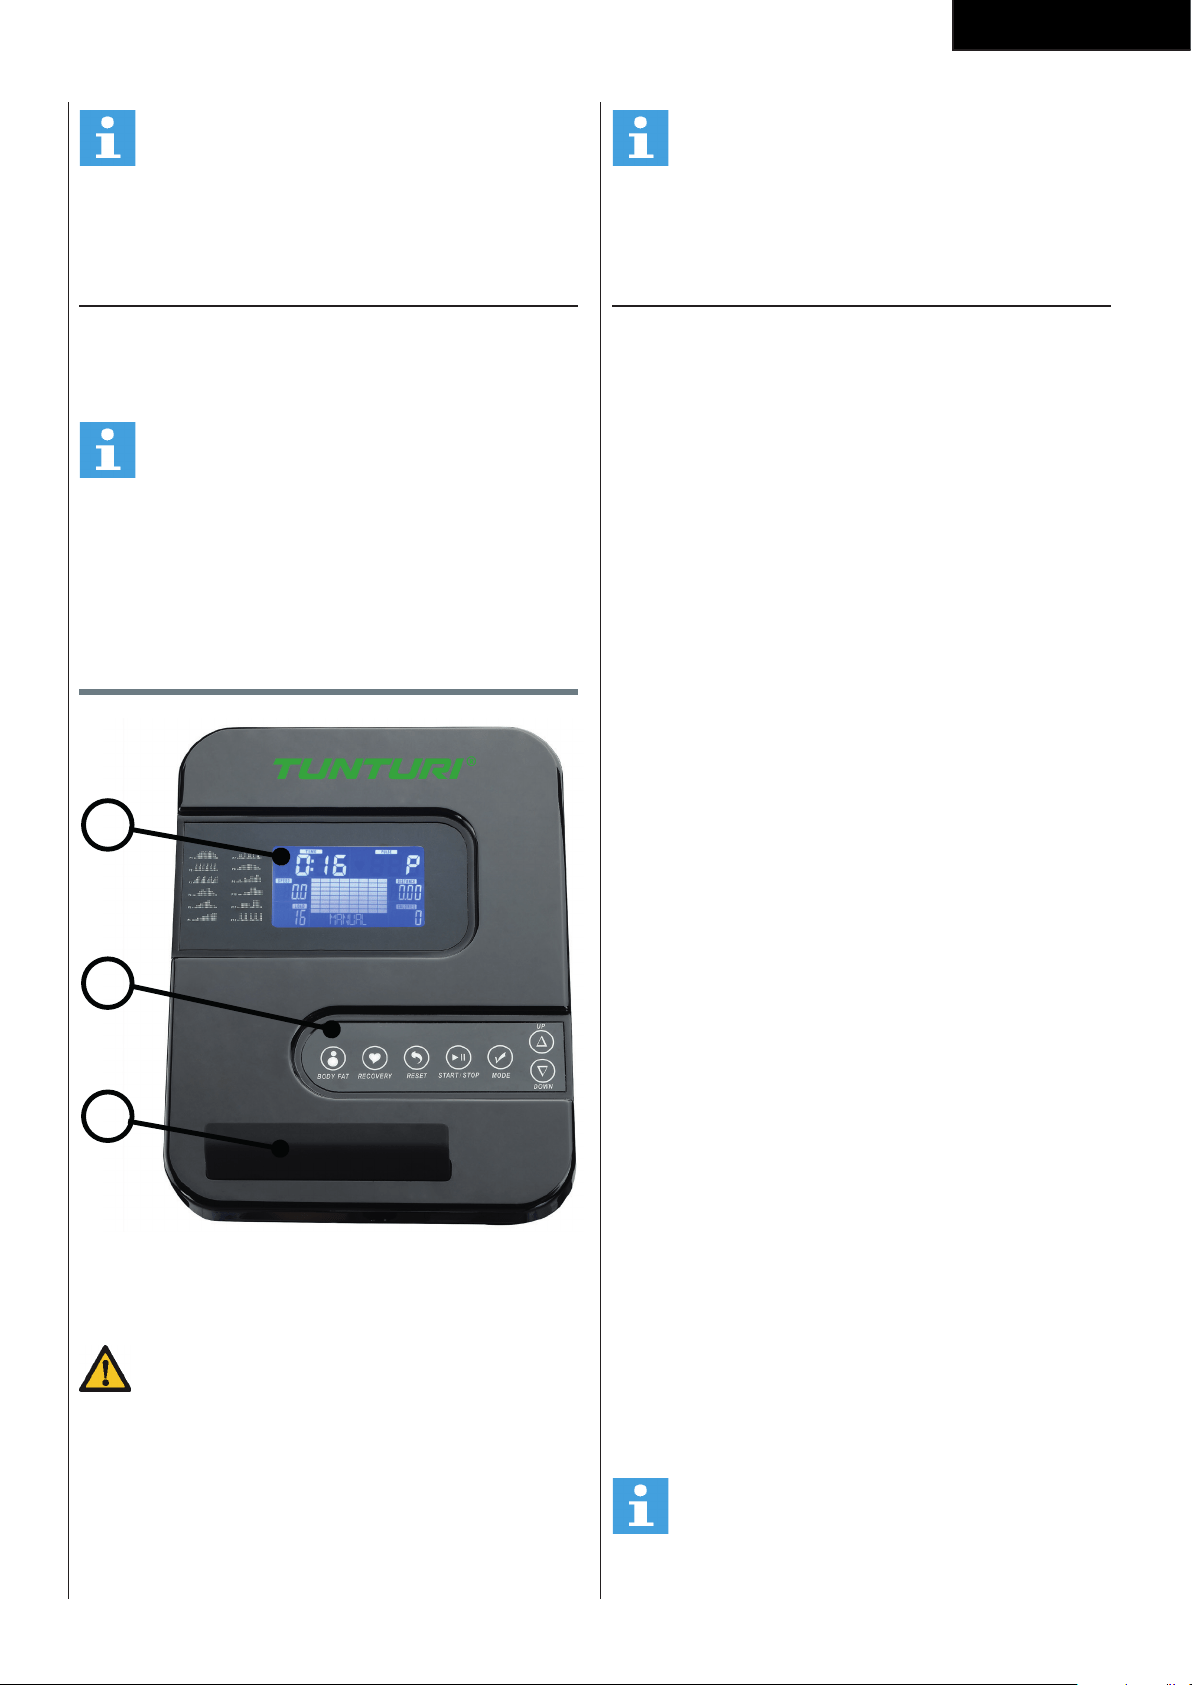
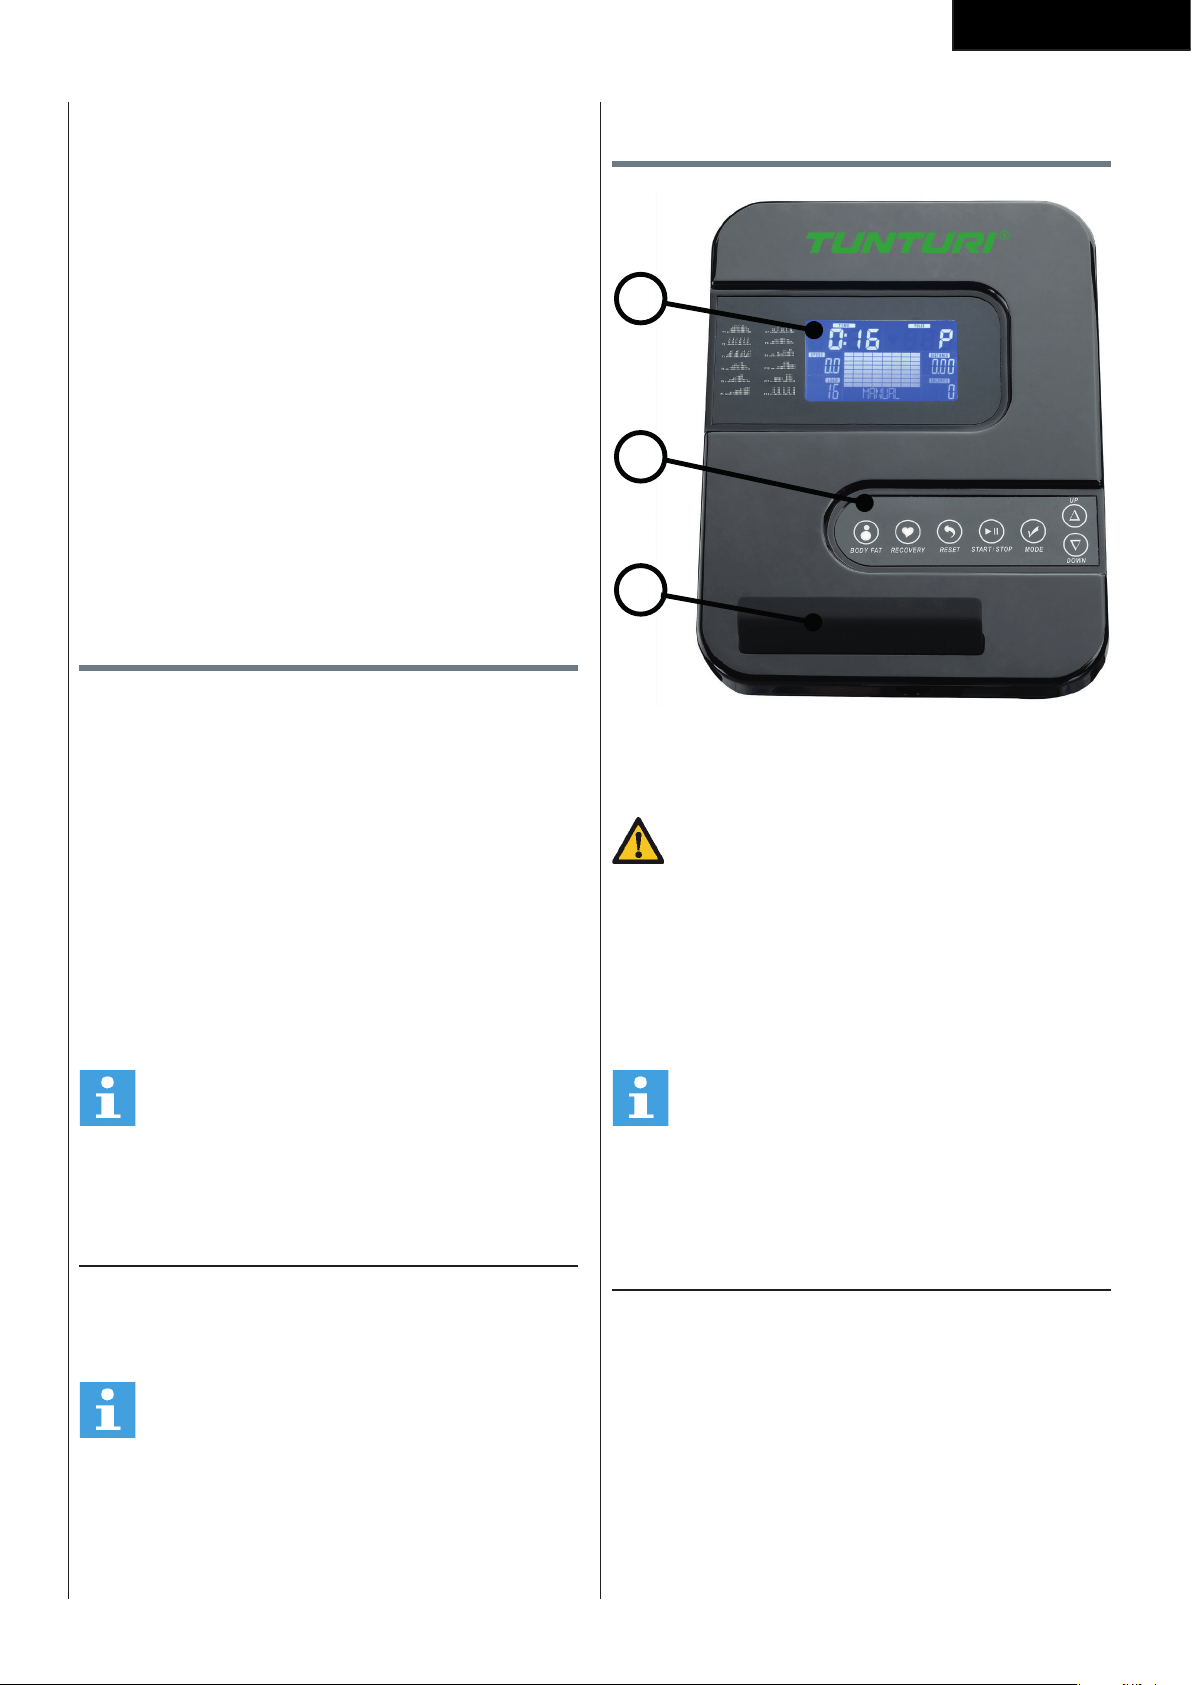
Console (fig F)
1
2
3
1. Display
2. Tablet/ book support
3. Buttons
CAUTION
• Keep the console away from direct sunlight.
• Dry the surface of the console when it is covered
with drops of sweat.
• Do not lean on the console.
• Only touch the display with the tip of your finger.
Make sure that your nails or sharp objects do not
touch the display.
NOTE
• The console switches to standby mode when the
equipment is not used for 4 minutes.
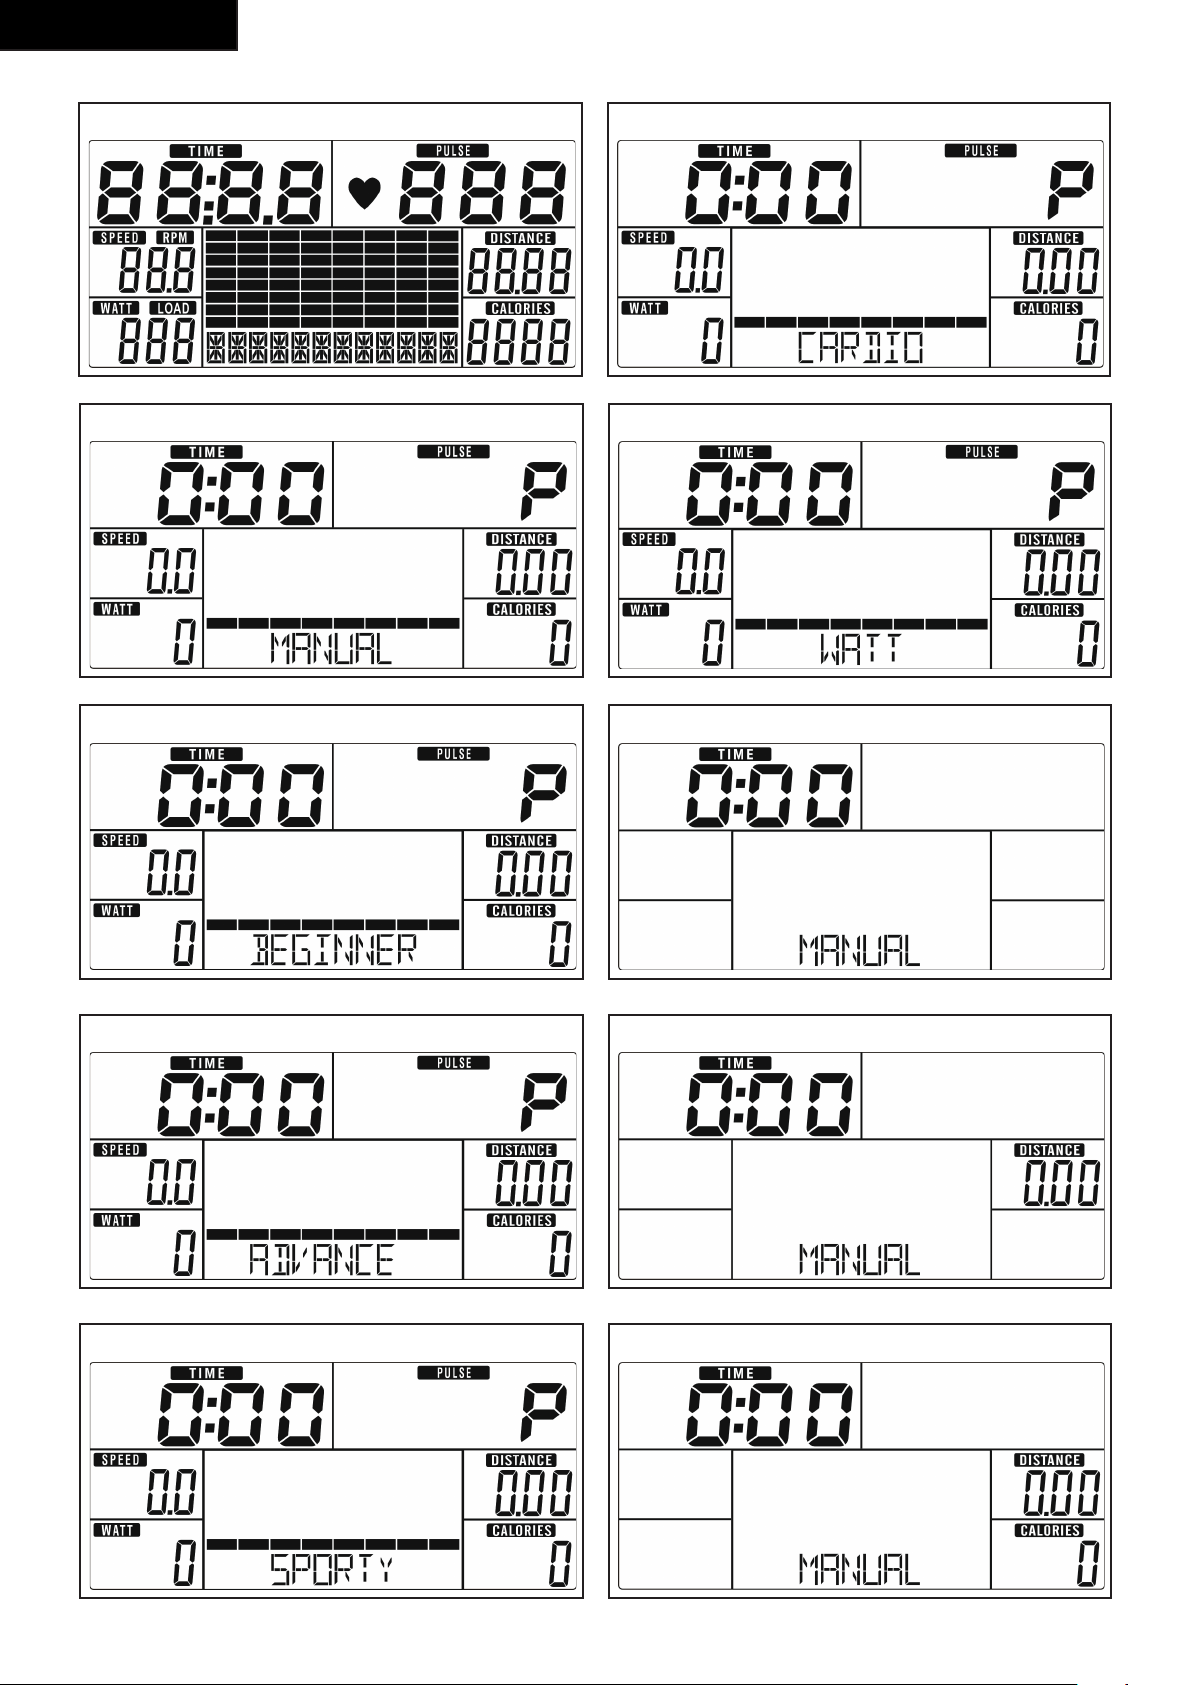
Explanation Display functions
Time
- Without setting the target value, time will count up.
- When setting the target value, time will count down
from your target time to 0 and alarm will sound or
flash.
- Without any signal being transmitted into the
monitor for 4 seconds during workout, time will
STOP
- Range 0:00~99:59
Speed
- Displays current training speed.
Maximum speed is 99.9 KM/H or ML/H.
- Without any signal being transmitted into the
monitor for 4 seconds during workout, SPEED will
display “0.0”
RPM
- Displays the Rotation Per Minute.
Display range 0~15~999
- Without any signal being transmitted into the
monitor for 4 seconds during workout, RPM will
display “0”
WATTS
- Display current workout watts.
- Range 0 ~ 999
LOAD
- Shows tension level setting, when adjusting
resistance, for 3 seconds.
Distance
- Without setting the target value, distance will count
up.
- When setting the target value, distance will count
down from your target distance to 0 with an alarm
sound or flash.
- Range 0.00~99.99
Calories
- Without setting the target value, calorie will count
up.
- When setting the target value, calories will count
down from your target calorie to 0 with an alarm
sound or flash.
- Range 0~9999.

24
English
NOTE
• This data is a rough guide for comparison of
different exercise sessions which cannot be used
in medical treatment
Pulse
- Current pulse will display after 6 seconds when
detected by the console.
- Without any pulse signal for 6 seconds, console will
display “P”.
- Pulse alarm will sound when current pulse is over
the target pulse.
- Range 0-30~230 BPM
Explanation of buttons
Up
- Increase resistance level
- Setting selection.
Down
- Decrease resistance level
- Setting selection.
Mode
- Confirm setting or selection.
Reset
- In setting mode, press RESET key once to reset the
current function figures.
- Press RESET key and hold for 2 seconds to reset all
function figures
Start/ Stop
- Start or Stop workout
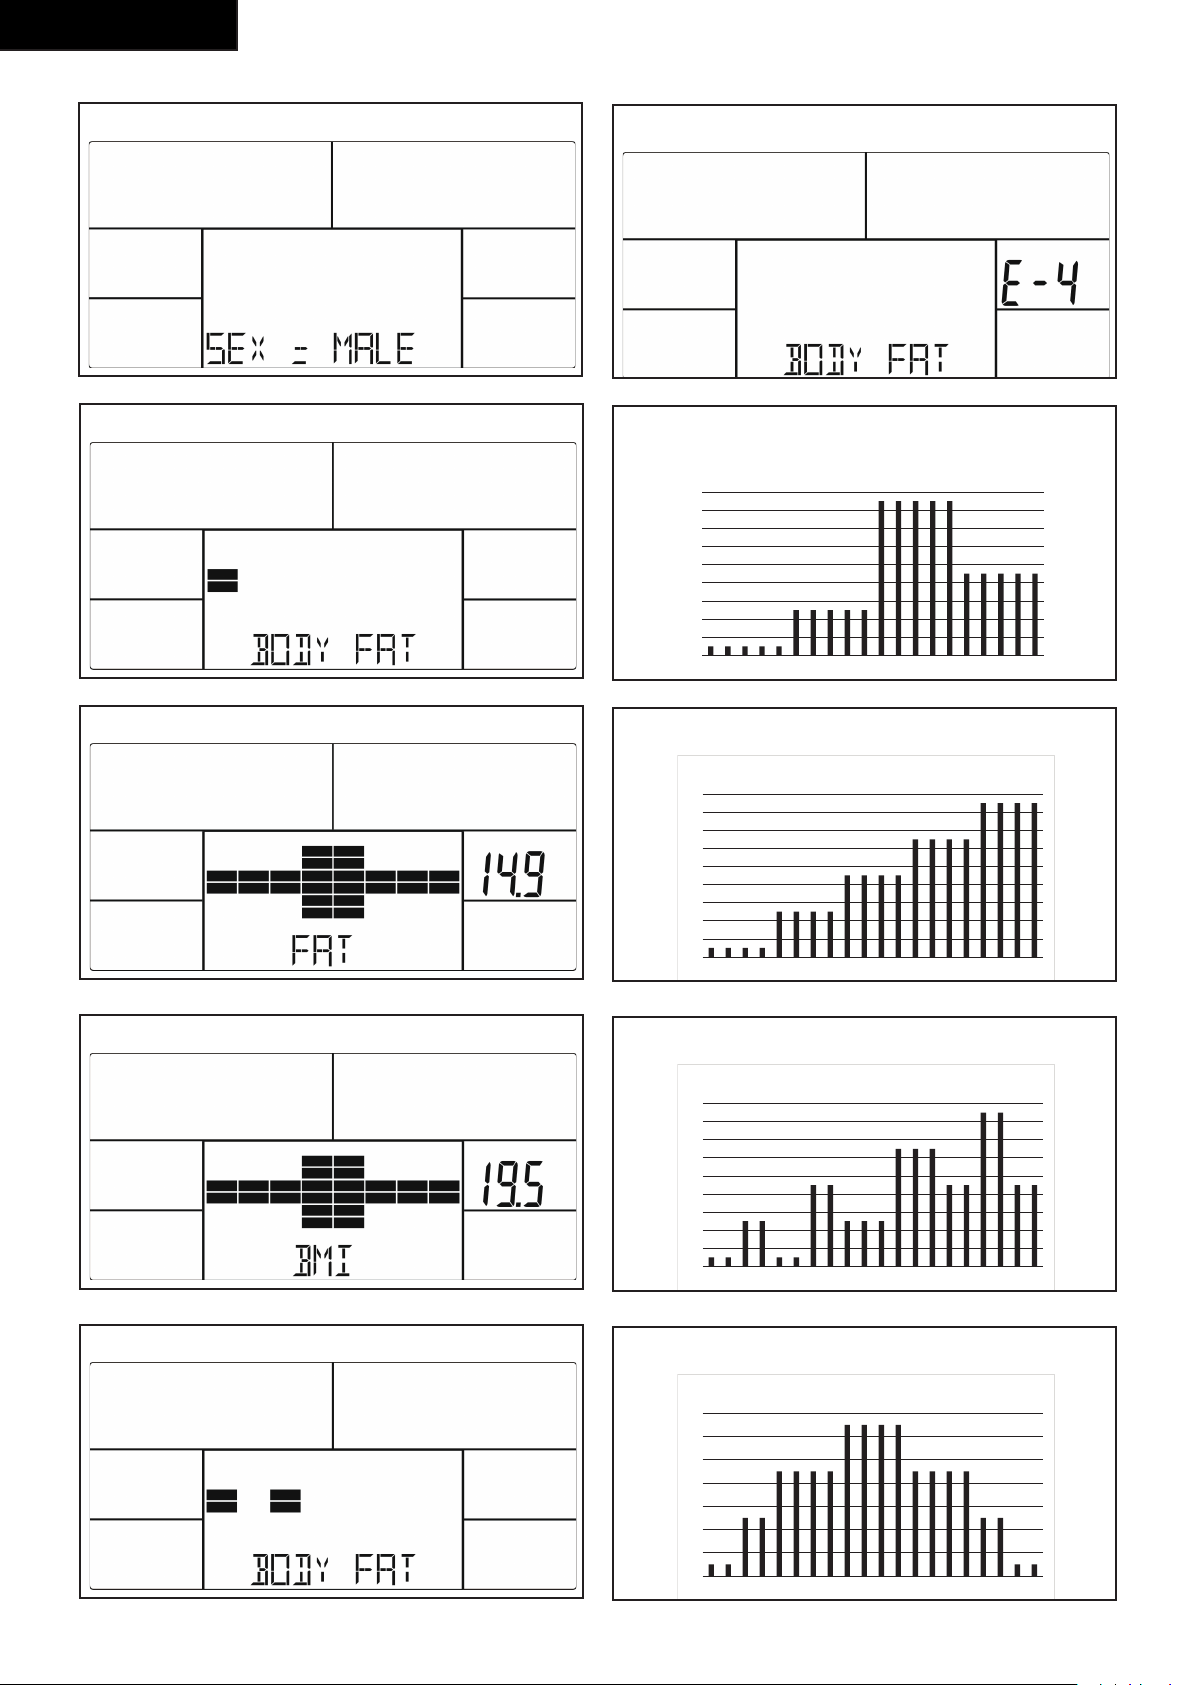
Body Fat
- Test body fat% and BMI in stop mode.
Recovery
- Test heart rate recovery status.
Opperation
Power on
- Plug in power supply to power on computer.
- Press any key to power on the console when being
in sleep mode..
- Start pedalling to power on the console when being
in sleep mode.
LCD will display all segments (fig. - F-01)
Power off
Without any signal being transmitted into the monitor
for 4 minutes the monitor will enter SLEEP mode
automatically. ( Active training data will be lost )
Workout selection
Use UP/ DOWN to select:
- Manual
- Program
- User Program
- H.R.C.
- Watt
Programs
Quick start
- Press START/ STOP key to start your workout
without any pre-set setting.
- Use UP/ DOWN to adjust resistant level during
workout.
End your workout
- Press START/ STOP in workout mode to stop/
pause your workout.
To resume your workout press START/ STOP button
in pause mode.
- Press and hold RESET key for over 2 seconds to
reset console. ( Active training data will be lost )
Manual mode
- Use UP/ DOWN key to select workout program,
choose MANUAL mode and press mode key to
enter next setting entry for manual mode program.
- Use UP/ DOWN key to pre-set training time, and
press M to confirm the setting.
- After confirm you can set also:
distance, Calories, and Pulse.
NOTE
• When setting more than one goal, the training
will end at first achieved goal.
• Leave a goal blank and it will not be seen as a
pre-set limit.
- Press START/ STOP key to start workout
- Use UP/ DOWN key to adjust resistance level. Load
level is shown in LOAD window.
Program mode
- Use UP/ DOWN key to select workout program, and
select MODE to confirm.
- Use UP/ DOWN key to select Program P1 ~ P12
and press MODE to confirm. ( fig. F-02)
- Use UP/ DOWN key to set TIME.
- Press START/ STOP key to start workout.
Press START/STOP key to pause workout.
- Use RESET to go back to main menu.
User Program
- Use UP/ DOWN key to select workout program, and
select MODE to confirm.
- Use UP/ DOWN key to create user profile.

25
English
- Set tension level for first of 20 colums, and confirm
with MODE to set second level, repeat this for all
colums.
- Press and hold MODE button for 2 seconds to
confirm program setting.
- Press START/ STOP key to start workout.
Press START/STOP key to pause workout.
- Use RESET to go back to main menu.
H.R.C. mode.
- Use UP/ DOWN key to select workout program,
choose H.R.C. mode and press mode key to enter
next setting entry for H.R.C. mode program.
- Use UP/ DOWN key to set age.
- Use UP/ DOWN key to select 55%, 75%, 90% or
TAG (Target H.R. _ Default 100)
- Use UP/ DOWN key to set time, press MODE to
confirm.
- Press START/ STOP key to start workout
- Use RESET, to go back to main menu.
Watt Mode.
- Use UP/ DOWN key to select workout program,
choose WATT and press MODE / ENTER key to
enter next setting entry for WATT mode program.
- Use UP/ DOWN to set WATT target.
(default: 120Watt)
- Use UP/ DOWN key to set TIME.
- Press START/ STOP key to start workout.
Use UP/ DOW) to adjust target Watt level.
- Press START/STOP key to pause workout.
- Use RESET to go back to main menu.
Recovery
- The RECOVERY key will only be valid if pulse is
detected.
- TIME will show „0:60“ (seconds) and counts down
to 0.
- Computer will show F1 to F6 after the countdown
to test heart rate recovery status. User can find the
heart rate recovery level based on the chart below.
- Press RECOVERY key again to return to the
beginning.
F1 Outstanding
F2 Excellent
F3 Good
F4 Fair
F5 Below average
F6 Poor
Body Fat
- Press the BODY FAT key to start body fat
measurement.
- During measuring, users have to hold both hands
on the hand grips. LCD display “-” “- -” “- - -” “- - -
-” for 8 seconds until computer finish measuring.
- LCD will display BMI and FAT %.
Body fat mode error codes
- *E-1
There is no heart rate signal input detected.
- *E-4
Occurs when FAT% and BMI result is below 5 or
exceeds 50.
Trouble shooting:
- If there is no signal when you pedal, please check if
the cable is well connected.
NOTE
• When stop training for 4 minutes, the main
screen will be off.
• If the computer displays abnormally, please re-
install the transformer and try again.
Cleaning and maintenance
The equipment does not require special maintenance.
The equipment does not require recalibration when
it is assembled, used and serviced according to the
instructions.
WARNING
• Do not use solvents to clean the equipment.
• Clean the equipment with a soft, absorbent cloth
after each use.
• Regularly check that all screws and nuts
are tight.
• If necessary, lubricate the joints.
Defects and malfunctions
Despite continuous quality control, defects and
malfunctions caused by individual parts can occur in the
equipment. In most cases, it will be sufficient to replace
the defective part.
- If the equipment does not function properly,
immediately contact the dealer.
- Provide the model number and the serial number of
the equipment to the dealer. State the nature of the
problem, conditions of use and purchase date.

26
English
Transport and storage
WARNING
• Carry and move the equipment with at least two
persons.
• Remain standing in front of the equipment
on each side and take a sturdy grip at the
handlebars. Tilt the front of the equipment
so as to lift the rear of the equipment on the
wheels. Move the equipment and carefully put
the equipment down. Place the equipment on a
protective base to prevent damage to the floor
surface.
• Move the equipment carefully over uneven
surfaces. Do not move the equipment upstairs
using the wheels, but carry the equipment by the
handlebars.
• Store the equipment in a dry place with as little
temperature variation as possible.
Additional information
Packaging disposal
Government guidelines ask that we reduce the amount
of waste material disposed of in land fill sites. We
therefore ask that you dispose of all packaging waste
responsibly at public recycling centres.
End of life disposal
We at Tunturi hope you enjoy many years of enjoyable
use from your fitness trainer. However, a time will come
when your fitness trainer will come to the end of its
useful life. Under ‘European WEEE Legislation you are
responsible for the appropriate disposal of your fitness
trainer to a recognised public collection facility.
Technical data
Parameter Unit of
measurement
Value
Length cm
inch
127
50.0
Width cm
inch
61
24.0
Height cm
inch
163
64.2
Weight kg
lbs
34.0
75.0
Max. user weight kg
lbs
110
242
Adapter
Voltage
Current
V
Ma.
9V-DC
0.5A
Warranty
Tunturi purchaser‘s warranty
Warranty terms
The consumer is entitled to the applicable legal
rights stated in the national legislation concerning the
commerce of consumer goods. This warranty does not
restrict these rights. The Purchaser’s Warranty is only
valid if the item is used in an environment approved by
Tunturi New Fitness BV for that particular equipment.
The product-specific approved environment is stated in
the Owner’s Manual provided with your equipment.
Warranty conditions
The warranty conditions commence from the date of
purchase. Warranty conditions may vary per country,
so please consult your local dealer for the warranty
conditions.
Warranty coverage
Under no circumstances shall Tunturi New Fitness
BV or the Tunturi Distributor be liable by virtue of
this warranty or otherwise for any special, indirect,
secondary or consequential damages of any nature
arising out of any use or inability to use this equipment.

27
English
Warranty limitations
This warranty covers manufacturing defects in the
fitness equipment as originally packed by Tunturi
New Fitness BV. The warranty shall apply only under
conditions of normal, recommended use of the product
as described in the Owner’s Manual and providing that
Tunturi New Fitness BV’s instructions for installation,
maintenance and use have been complied with. Neither
Tunturi New Fitness BV’s nor the Tunturi Distributors’
obligations apply to defects due to reasons beyond
their control. The warranty applies only to the original
purchaser and is valid only in countries where Tunturi
New Fitness BV has an authorised importer. The
warranty does not extend to fitness equipment or
components that have been modified without the
consent of Tunturi New Fitness BV. Defects resulting
from normal wear, misuse, abuse, corrosion, or damage
incurred during loading or transportation are not
covered.
The warranty does not cover sounds or noises emitted
during use where these do not substantially impede the
use of the equipment and where they are not caused
by a fault in the equipment. The warranty does not
cover defects arising from the failure to carry periodic
maintenance as outlined within the Owner’s Manual
for the product. Furthermore, the warranty does not
cover defects arising from usage and storage within
an unsuitable environment as described within the
Owner’s Manual which should be indoors, dry, dust
and grit free and within a temperature range of +15°C
to +35°C. The warranty does not cover maintenance
activities, such as cleaning, lubricating, and normal part
adjustments, nor installation
procedures that customers can accomplish themselves,
such as changing uncomplicated meters, pedals and
other similar parts not requiring any dismantling/
reassembling of the fitness equipment. Warranty
repairs carried out by other than authorised Tunturi
representatives are not covered.
Failure to follow the instructions given in the Owner’s
Manual will invalidate the product’s warranty.
Declaration of the
manufacturer
Tunturi New Fitness BV declares that the product is in
conformity with the following standards and directives:
EN 957 (HC), 89/336/EEC. The product therefore
carries the CE label.
04-2018
Tunturi New Fitness BV
Purmerweg 1
1311 XE Almere
The Netherlands
Disclaimer
© 2018 Tunturi New Fitness BV
All rights reserved.
The product and the manual are subject to change.
Specifications can be changed without further notice.

28
Deutch
Crosstrainer
Welcome to the world of Tunturi!
Thank you for purchasing this piece of Tunturi
equipment. Tunturi offers a wide range of home fitness
equipment, including crosstrainers, treadmills, exercise
bikes and rowers. The Tunturi equipment is suitable for
the entire family, no matter what fitness level. For more
information, please visit our website
www.tunturi.com.
Deutsch
Diese deutsche Bedienungsanleitung ist ine
Übersetzung des englischen Textes. Es können keine
Rechte auf diese Übersetzung abgeleitet werden.
Index
Crosstrainer ...................................................... 28
Safety warnings ................................................ 28
Electrical safety 29
Description (g. A) 29
Package contents (g. B & C) 29
Assembly (g. D) 29
Workouts ...........................................................29
Exercise Instructions 29
Heart rate 30
Use ..................................................................... 30
Power supply (Fig. E) 31
Console (g F) .................................................. 31
Explanation Display functions 31
Explanation of buttons 32
Opperation 32
Programs 32
Cleaning and maintenance .............................. 33
Defects and malfunctions 33
Transport and storage...................................... 34
Additional information 34
Technical data ................................................... 34
Warranty ............................................................ 34
Declaration of the manufacturer ..................... 35
Disclaimer ......................................................... 35
Safety warnings
WARNING
• Read the safety warnings and the instructions.
Failure to follow the safety warnings and the
instructions can cause personal injury or damage
to the equipment. Keep the safety warnings and
the instructions for future reference.
- The equipment is suitable for domestic use only.
The equipment is not suitable for commercial use.
- Max. usage is limited to 3 hrs a day.
- The use of this equipment by children or persons
with a physical, sensory, mental or motorial
disability, or lack of experience and knowledge can
give cause to hazards. Persons responsible for their
safety must give explicit instructions or supervise
the use of the equipment.
- Before starting your workout, consult a physician to
check your health.
- If you experience nausea, dizziness or other
abnormal symptoms, immediately stop your
workout and consult a physician.
- To avoid muscular pain and strain, start each
workout by warming up and finish each workout by
cooling down. Remember to stretch at the end of
the workout.
- The equipment is suitable for indoor use only. The
equipment is not suitable for outdoor use.
- Only use the equipment in environments with
adequate ventilation. Do not use the equipment in
draughty environments in order not to catch a cold.
- Only use the equipment in environments with
ambient temperatures between 10 °C and 35 °C.
Only store the equipment in environments with
ambient temperatures between 5 °C and 45 °C.
- Do not use or store the equipment in humid
surroundings. The air humidity must never be more
than 80%.
- Only use the equipment for its intended purpose.
Do not use the equipment for other purposes than
described in the manual.
- Do not use the equipment if any part is damaged or
defective. If a part is damaged or defective, contact
your dealer.
- Keep your hands, feet and other body parts away
from the moving parts.
- Keep your hair away from the moving parts.
- Wear appropriate clothing and shoes.
- Keep clothing, jewellery and other objects away
from the moving parts.
- Make sure that only one person uses the equipment
at a time. The equipment must not be used by
persons weighing more than 110 kg (242 lbs).
- Do not open equipment without consulting your
dealer.

29
Deutch
Electrical safety
(Only for equipment with electric power)
- Before use, always check that the mains voltage is
the same as the voltage on the rating plate of the
equipment.
- Do not use an extension cable.
- Keep the mains cable away from heat, oil and sharp
edges.
- Do not alter or modify the mains cable or the mains
plug.
- Do not use the equipment if the mains cable or the
mains plug is damaged or defective. If the mains
cable or the mains plug is damaged or defective,
contact your dealer.
- Always fully unwind the mains cable.
- Do not run the mains cable underneath the
equipment. Do not run the mains cable underneath
a carpet. Do not place any objects on the mains
cable.
- Make sure that the mains cable does not hang over
the edge of a table.
- Make sure that the mains cable cannot be caught
accidentally or tripped over.
- Do not leave the equipment unattended when the
mains plug is inserted into the wall socket.
- Do not pull the mains cable to remove the mains
plug from the wall socket.
- Remove the mains plug from the wall socket when
the equipment is not in use, before assembly or
disassembly and before cleaning and maintenance.
Description (fig. A)
Your Cross trainer is a piece of stationary fitness
equipment used to simulate walking
or running without causing excessive pressure to the
joints.
Package contents (fig. B & C)
- The package contains the parts as shown in
fig. B.
- The package contains the fasteners as shown in fig.
C. Refer to the section “Description”
NOTE
• If a part is missing, contact your dealer.
Assembly (fig. D)
WARNING
• Assemble the equipment in the given order.
• Carry and move the equipment with at least two
persons.
CAUTION
• Place the equipment on a firm, level surface.
• Place the equipment on a protective base to
prevent damage to the floor surface.
• Allow at least 100 cm of clearance around the
equipment.
• Refer to the illustrations for the correct assembly
of the equipment.
Workouts
The workout must be suitably light, but of long
duration. Aerobic exercise is based on improving
the body’s maximum oxygen uptake, which in turn
improves endurance and fitness. You should perspire,
but you should not get out of breath during the
workout.
To reach and maintain a basic fitness level, exercise at
least three times a week, 30 minutes at a time. Increase
the number of exercise sessions to improve your fitness
level. It is worthwhile to combine regular exercise with
a healthy diet. A person committed to dieting should
exercise daily, at first 30 minutes or less at a time,
gradually increasing the daily workout time to one hour.
Start your workout at low speed and low resistance to
prevent the cardiovascular system from being subjected
to excessive strain.
As the fitness level improves, speed and resistance can
be increased gradually. The efficiency of your exercise
can be measured by monitoring your heart rate and
your pulse rate.
Exercise Instructions
Using your fitness trainer will provide you with several
benefits, it will improve your physical fitness, tone
muscle and in conjunction with a calorie controlled diet
help you lose weight.
The warming up phase
This stage helps get the blood flowing around the body
and the muscles working properly. It will also reduce
the risk of cramp and muscle injury. It is advisable to do
a few stretching exercises as shown below. Each stretch
should be held for approximately 30 seconds, do not
force or jerk your muscles into a stretch - if it hurts,
STOP
30
Deutch
The exercise phase
This is the stage where you put the effort in. After
regular use, the muscles in your legs will become
more flexible. Work to your but it is very important to
maintain a steady tempo throughout. The rate of work
should be sufficient to raise your heart beat into the
target zone shown on the graph below.
200
180
160
140
120
100
80
20 25 30 35 40 45 50 55 60 65 70 75
85 %
70 %
AGE
MAXIMUM
COOL DOWN
HEART RATE
TARGET ZONE
This stage should last for a minimum of 12 minutes
though most people start at about 15-20 minutes
The cool down phase
This stage is to let your Cardiovascular System and
muscles wind down. This is a repeat of the warm
up exercise e.g. reduce your tempo, continue for
approximately 5 minutes. The stretching exercises
should now be repeated, again remembering not to
force or jerk your muscles into the stretch.
As you get fitter you may need to train longer and
harder. It is advisable to train at least three times a
week, and if possible space your workouts evenly
throughout the week.
Muscle toning
To tone muscle while on your fitness trainer you will
need to have the resistance set quite high. This will
put more strain on our leg muscles and may mean you
cannot train for as long as you would like. If you are also
trying to improve your fitness you need to alter your
training program. You should train as normal during the
warm up and cool down phases, but towards the end
of the exercise phase you should increase resistance
making your legs work harder. You will have to reduce
your speed to keep your heart rate in the target zone.
Weight loss
The important factor here is the amount of effort you
put in. The harder and longer you work the more
calories you will burn. Effectively this is the same as if
you were training to improve your fitness, the difference
is the goal.
Heart rate
Pulse rate measurement
(hand pulse sensors)
The pulse rate is measured by sensors in the handlebars
when the user is touching both sensors at the same
time. Accurate pulse measurement requires that the
skin is slightly moist and constantly touching the hand
pulse sensors. If the skin is too dry or too moist, the
pulse rate measurement will become less accurate.
NOTE
• Do not use the hand pulse sensors in
combination with a heart rate chest belt.
• If you set a heart rate limit for your workout, an
Maximum heart rate
(during training)
The maximum heart rate is the highest heart rate a
person can safely achieve through exercise stress. The
following formula is used to calculate the average
maximum heart rate: 220 - AGE. The maximum heart
rate varies from person to person.
WARNING
• Make sure that you do not exceed your
maximum heart rate during your workout. If you
belong to a risk group, consult a physician.
Beginner
50-60% of maximum heart rate
Suitable for beginners, weight-watchers, convalescents
and persons who have not exercised for a long time.
Exercise at least three times a week, 30 minutes at a
time.
Advanced
60-70% of maximum heart rate
Suitable for persons who want to improve and maintain
fitness. Exercise at least three times a week, 30 minutes
at a time.
Expert
70-80% of maximum heart rate
Suitable for the fittest of persons who are used to long-
endurance workouts.
Use
Adjusting the support feet
The equipment is equipped with 2 support feet. If
the equipment is not stable, the support feet can be
adjusted.
- Turn the support feet as required to put the
equipment in a stable position.
Adjusting the pedal position (Fig. D-7)
The both pedals can be adjusted according to the
height and the exercise position of the user.
- Loosen the 2 pedal fixing knobs.
- Move the pedal to the required position.
- Tighten the pedal fixing knobs.
31
Deutch
NOTE
• Make sure the both pedals are fitted into similar
positions always.
Power supply (Fig. E)
The trainer is powered by an external power supply.
Refer to the illustration to locate the trainer power
input.
NOTE
• Connect the power supply with the trainer
before connecting it to the wall outlet.
• Always remove power cord when
• machine is not in use.
Console (fig F)
1
2
3
1. Display
2. Tablet/ book support
3. Buttons
CAUTION
• Keep the console away from direct sunlight.
• Dry the surface of the console when it is covered
with drops of sweat.
• Do not lean on the console.
• Only touch the display with the tip of your finger.
Make sure that your nails or sharp objects do not
touch the display.
NOTE
• The console switches to standby mode when the
equipment is not used for 4 minutes.
Explanation Display functions
Time
- Without setting the target value, time will count up.
- When setting the target value, time will count down
from your target time to 0 and alarm will sound or
flash.
- Without any signal being transmitted into the
monitor for 4 seconds during workout, time will
STOP
- Range 0:00~99:59
Speed
- Displays current training speed.
Maximum speed is 99.9 KM/H or ML/H.
- Without any signal being transmitted into the
monitor for 4 seconds during workout, SPEED will
display “0.0”
RPM
- Displays the Rotation Per Minute.
Display range 0~15~999
- Without any signal being transmitted into the
monitor for 4 seconds during workout, RPM will
display “0”
WATTS
- Display current workout watts.
- Range 0 ~ 999
LOAD
- Shows tension level setting, when adjusting
resistance, for 3 seconds.
Distance
- Without setting the target value, distance will count
up.
- When setting the target value, distance will count
down from your target distance to 0 with an alarm
sound or flash.
- Range 0.00~99.99
Calories
- Without setting the target value, calorie will count
up.
- When setting the target value, calories will count
down from your target calorie to 0 with an alarm
sound or flash.
- Range 0~9999.
NOTE
• This data is a rough guide for comparison of
different exercise sessions which cannot be used
in medical treatment

32
Deutch
Pulse
- Current pulse will display after 6 seconds when
detected by the console.
- Without any pulse signal for 6 seconds, console will
display “P”.
- Pulse alarm will sound when current pulse is over
the target pulse.
- Range 0-30~230 BPM
Explanation of buttons
Up
- Increase resistance level
- Setting selection.
Down
- Decrease resistance level
- Setting selection.
Mode
- Confirm setting or selection.
Reset
- In setting mode, press RESET key once to reset the
current function figures.
- Press RESET key and hold for 2 seconds to reset all
function figures
Start/ Stop
- Start or Stop workout
Body Fat
- Test body fat% and BMI in stop mode.
Recovery
- Test heart rate recovery status.
Opperation
Power on
- Plug in power supply to power on computer.
- Press any key to power on the console when being
in sleep mode..
- Start pedalling to power on the console when being
in sleep mode.
LCD will display all segments (fig. - F-01)
Power off
Without any signal being transmitted into the monitor
for 4 minutes the monitor will enter SLEEP mode
automatically. ( Active training data will be lost )
Workout selection
Use UP/ DOWN to select:
- Manual
- Program
- User Program
- H.R.C.
- Watt
Programs
Quick start
- Press START/ STOP key to start your workout
without any pre-set setting.
- Use UP/ DOWN to adjust resistant level during
workout.
End your workout
- Press START/ STOP in workout mode to stop/
pause your workout.
To resume your workout press START/ STOP button
in pause mode.
- Press and hold RESET key for over 2 seconds to
reset console. ( Active training data will be lost )
Manual mode
- Use UP/ DOWN key to select workout program,
choose MANUAL mode and press mode key to
enter next setting entry for manual mode program.
- Use UP/ DOWN key to pre-set training time, and
press M to confirm the setting.
- After confirm you can set also:
distance, Calories, and Pulse.
NOTE
• When setting more than one goal, the training
will end at first achieved goal.
• Leave a goal blank and it will not be seen as a
pre-set limit.
- Press START/ STOP key to start workout
- Use UP/ DOWN key to adjust resistance level. Load
level is shown in LOAD window.
Program mode
- Use UP/ DOWN key to select workout program, and
select MODE to confirm.
- Use UP/ DOWN key to select Program P1 ~ P12
and press MODE to confirm. ( fig. F-02)
- Use UP/ DOWN key to set TIME.
- Press START/ STOP key to start workout.
Press START/STOP key to pause workout.
- Use RESET to go back to main menu.
User Program
- Use UP/ DOWN key to select workout program, and
select MODE to confirm.
- Use UP/ DOWN key to create user profile.
33
Deutch
- Set tension level for first of 20 colums, and confirm
with MODE to set second level, repeat this for all
colums.
- Press and hold MODE button for 2 seconds to
confirm program setting.
- Press START/ STOP key to start workout.
Press START/STOP key to pause workout.
- Use RESET to go back to main menu.
H.R.C. mode.
- Use UP/ DOWN key to select workout program,
choose H.R.C. mode and press mode key to enter
next setting entry for H.R.C. mode program.
- Use UP/ DOWN key to set age.
- Use UP/ DOWN key to select 55%, 75%, 90% or
TAG (Target H.R. _ Default 100)
- Use UP/ DOWN key to set time, press MODE to
confirm.
- Press START/ STOP key to start workout
- Use RESET, to go back to main menu.
Watt Mode.
- Use UP/ DOWN key to select workout program,
choose WATT and press MODE / ENTER key to
enter next setting entry for WATT mode program.
- Use UP/ DOWN to set WATT target.
(default: 120Watt)
- Use UP/ DOWN key to set TIME.
- Press START/ STOP key to start workout.
Use UP/ DOW) to adjust target Watt level.
- Press START/STOP key to pause workout.
- Use RESET to go back to main menu.
Recovery
- The RECOVERY key will only be valid if pulse is
detected.
- TIME will show „0:60“ (seconds) and counts down
to 0.
- Computer will show F1 to F6 after the countdown
to test heart rate recovery status. User can find the
heart rate recovery level based on the chart below.
- Press RECOVERY key again to return to the
beginning.
F1 Outstanding
F2 Excellent
F3 Good
F4 Fair
F5 Below average
F6 Poor
Body Fat
- Press the BODY FAT key to start body fat
measurement.
- During measuring, users have to hold both hands
on the hand grips. LCD display “-” “- -” “- - -” “- - -
-” for 8 seconds until computer finish measuring.
- LCD will display BMI and FAT %.
Body fat mode error codes
- *E-1
There is no heart rate signal input detected.
- *E-4
Occurs when FAT% and BMI result is below 5 or
exceeds 50.
Trouble shooting:
- If there is no signal when you pedal, please check if
the cable is well connected.
NOTE
• When stop training for 4 minutes, the main
screen will be off.
• If the computer displays abnormally, please re-
install the transformer and try again.
Cleaning and maintenance
The equipment does not require special maintenance.
The equipment does not require recalibration when
it is assembled, used and serviced according to the
instructions.
WARNING
• Do not use solvents to clean the equipment.
• Clean the equipment with a soft, absorbent cloth
after each use.
• Regularly check that all screws and nuts
are tight.
• If necessary, lubricate the joints.
Defects and malfunctions
Despite continuous quality control, defects and
malfunctions caused by individual parts can occur in the
equipment. In most cases, it will be sufficient to replace
the defective part.
- If the equipment does not function properly,
immediately contact the dealer.
- Provide the model number and the serial number of
the equipment to the dealer. State the nature of the
problem, conditions of use and purchase date.

34
Deutch
Transport and storage
WARNING
• Carry and move the equipment with at least two
persons.
• Remain standing in front of the equipment
on each side and take a sturdy grip at the
handlebars. Tilt the front of the equipment
so as to lift the rear of the equipment on the
wheels. Move the equipment and carefully put
the equipment down. Place the equipment on a
protective base to prevent damage to the floor
surface.
• Move the equipment carefully over uneven
surfaces. Do not move the equipment upstairs
using the wheels, but carry the equipment by the
handlebars.
• Store the equipment in a dry place with as little
temperature variation as possible.
Additional information
Packaging disposal
Government guidelines ask that we reduce the amount
of waste material disposed of in land fill sites. We
therefore ask that you dispose of all packaging waste
responsibly at public recycling centres.
End of life disposal
We at Tunturi hope you enjoy many years of enjoyable
use from your fitness trainer. However, a time will come
when your fitness trainer will come to the end of its
useful life. Under ‘European WEEE Legislation you are
responsible for the appropriate disposal of your fitness
trainer to a recognised public collection facility.
Technical data
Parameter Unit of
measurement
Value
Length cm
inch
127
50.0
Width cm
inch
61
24.0
Height cm
inch
163
64.2
Weight kg
lbs
34.0
75.0
Max. user weight kg
lbs
110
242
Adapter
Voltage
Current
V
Ma.
9V-DC
0.5A
Warranty
Tunturi purchaser‘s warranty
Warranty terms
The consumer is entitled to the applicable legal
rights stated in the national legislation concerning the
commerce of consumer goods. This warranty does not
restrict these rights. The Purchaser’s Warranty is only
valid if the item is used in an environment approved by
Tunturi New Fitness BV for that particular equipment.
The product-specific approved environment is stated in
the Owner’s Manual provided with your equipment.
Warranty conditions
The warranty conditions commence from the date of
purchase. Warranty conditions may vary per country,
so please consult your local dealer for the warranty
conditions.
Warranty coverage
Under no circumstances shall Tunturi New Fitness
BV or the Tunturi Distributor be liable by virtue of
this warranty or otherwise for any special, indirect,
secondary or consequential damages of any nature
arising out of any use or inability to use this equipment.

35
Deutch
Warranty limitations
This warranty covers manufacturing defects in the
fitness equipment as originally packed by Tunturi
New Fitness BV. The warranty shall apply only under
conditions of normal, recommended use of the product
as described in the Owner’s Manual and providing that
Tunturi New Fitness BV’s instructions for installation,
maintenance and use have been complied with. Neither
Tunturi New Fitness BV’s nor the Tunturi Distributors’
obligations apply to defects due to reasons beyond
their control. The warranty applies only to the original
purchaser and is valid only in countries where Tunturi
New Fitness BV has an authorised importer. The
warranty does not extend to fitness equipment or
components that have been modified without the
consent of Tunturi New Fitness BV. Defects resulting
from normal wear, misuse, abuse, corrosion, or damage
incurred during loading or transportation are not
covered.
The warranty does not cover sounds or noises emitted
during use where these do not substantially impede the
use of the equipment and where they are not caused
by a fault in the equipment. The warranty does not
cover defects arising from the failure to carry periodic
maintenance as outlined within the Owner’s Manual
for the product. Furthermore, the warranty does not
cover defects arising from usage and storage within
an unsuitable environment as described within the
Owner’s Manual which should be indoors, dry, dust
and grit free and within a temperature range of +15°C
to +35°C. The warranty does not cover maintenance
activities, such as cleaning, lubricating, and normal part
adjustments, nor installation
procedures that customers can accomplish themselves,
such as changing uncomplicated meters, pedals and
other similar parts not requiring any dismantling/
reassembling of the fitness equipment. Warranty
repairs carried out by other than authorised Tunturi
representatives are not covered.
Failure to follow the instructions given in the Owner’s
Manual will invalidate the product’s warranty.
Declaration of the
manufacturer
Tunturi New Fitness BV declares that the product is in
conformity with the following standards and directives:
EN 957 (HC), 89/336/EEC. The product therefore
carries the CE label.
04-2018
Tunturi New Fitness BV
Purmerweg 1
1311 XE Almere
The Netherlands
Disclaimer
© 2018 Tunturi New Fitness BV
All rights reserved.
The product and the manual are subject to change.
Specifications can be changed without further notice.

36
Français
Français
Ce manuel français est une traduction de la version
anglaise. Notez que la version anglaise est en tête dans
le contenu lorsque des différences sont trouvées.
Indice
Vélos elliptiqeus
Bienvenue dans l‘univers de Tunturi Fitness !
Merci pour votre achat de cet élément d‘équipement
Tunturi. Tunturi offre toute une gamme d‘équipements
de fitness professionnels, notamment des vélos
elliptiques, tapis de course, vélos d‘appartement,
rameurs et accessoires. Les équipements Tunturi sont
parfaits pour toute la famille, quel que soit le niveau
de forme de ses membres. Pour en savoir plus, visitez
notre site Web www.tunturi.com.
Vélos elliptiqeus ............................................... 36
Avertissements de sécurité ............................. 36
Sécurité électrique 37
Description (g. A) 37
Contenu de l’emballage (g. B & C) 37
Assemblage (g. D) 37
Exercices ........................................................... 37
Instructions d’entraînement 38
Fréquence cardiaque 38
Usage ................................................................. 39
Alimentation électrique (Fig. E) 39
Console (g F) .................................................. 39
Explication des fonctions à l’écran 39
Explication des boutons 40
Fonctionnement 40
Programmes 41
Nettoyage et maintenance ............................... 42
Défauts et dysfonctionnements 42
Transport et rangement ................................... 43
Informations supplémentaires 43
Données techniques ........................................ 43
Garantie ............................................................. 43
Déclaration du fabricant .................................. 44
Limite de responsabilité .................................. 44
Avertissements de sécurité
AVERTISSEMENT
• Lisez les avertissements de sécurité et les
instructions. Le non respect des avertissements
de sécurité et des instructions est une source
de blessure et de dégâts de l’équipement.
Conservez les avertissements de sécurité et les
instructions pour référence ultérieure.
AVERTISSEMENT
• Les systèmes de suivi de la fréquence cardiaque
peuvent être inexacts. Un exercice excessif peut
entraîner des blessures graves voire mortelles.
Si vous vous sentez défaillir, interrompez
immédiatement l’exercice.
- L’équipement est uniquement adapté à un usage
domestique. L’équipement ne convient pas à un
usage commercial.
- La durée d’utilisation maximum est
limitée à 3 heures par jour..
- L’emploi de cet équipement par des enfants ou
des personnes affectés d’un handicap physique,
sensoriel, mental ou moteur, voire dont l’expérience
ou les connaissances s’avèrent insuffisantes est
une source de risques. Les personnes chargées de
leur sécurité doivent leur fournir des instructions
explicites ou superviser leur usage de l’équipement.
- Avant de commencer vos exercices, effectuez un
bilan de santé auprès d’un médecin.
- Si vous êtes pris de nausées ou de vertiges ou
sentez d’autres symptômes normaux pendant
l’entraînement, interrompez immédiatement la
session et consultez votre médecin.
- Afin d’éviter toutes douleurs et tensions
musculaires, commencez vos séances par des
échauffements et terminez-les par une récupération.
N’oubliez pas de vous étirer après vos exercices.
- L’équipement est uniquement adapté à un usage
intérieur. L’équipement ne convient pas à un usage
extérieur.
- Utilisez l’équipement uniquement dans des
environnements correctement ventilés. N’utilisez
pas l’équipement dans des endroits exposés aux
courants d’air afin de ne pas vous enrhumer.
- Utilisez l’équipement uniquement à une
température ambiante entre 10 °C et 35 °C. Rangez
l’équipement uniquement à une température
ambiante entre 5 °C et 45 °C.
- N’utilisez et ne rangez pas l’équipement dans un
environnement humide. L’humidité de l’air ne doit
jamais dépasser 80 %.
- Utilisez l’équipement uniquement pour son usage
prévu. N’utilisez pas l’équipement pour d’autres
usages que ceux décrits dans le manuel.
- N’utilisez pas l’équipement si l’une de ses pièces
est endommagée ou défectueuse. Si une pièce
est endommagée ou défectueuse, contactez votre
revendeur.
37
Français
- Maintenez vos mains, vos pieds et les autres parties
de votre corps à l’écart des pièces mobiles.
- Maintenez votre chevelure à l’écart des pièces
mobiles.
- Portez des vêtements et des chaussures adaptés.
- Maintenez les vêtements, bijoux et autres objets à
l’écart des pièces mobiles.
- Assurez-vous qu’une seule personne utilise
l’équipement à la fois. L’équipement e doit pas être
utilisé par des personnes pesant plus de 110 kg
(242 lbs).
- N’ouvrez pas l’équipement sans consulter votre
revendeur.
Sécurité électrique
(Uniquement pour les équipements à alimentation
électrique)
- Avant usage, assurez-vous toujours que la
tension secteur est identique à celle de la plaque
signalétique de l’équipement.
- N’utilisez pas de rallonge.
- Maintenez le câble secteur à l’écart de la chaleur,
de l’huile et des bords coupants.
- N’altérez et ne modifiez aucunement le câble
secteur ou la fiche secteur.
- N’utilisez pas l’équipement si le câble secteur ou la
fiche secteur est endommagé ou défectueux. Si le
câble secteur ou la fiche secteur est endommagé
ou défectueux, contactez votre revendeur.
- Déroulez toujours complètement le câble secteur.
- Ne passez pas le câble secteur sous l’équipement.
Ne passez pas le câble secteur sous un tapis. Ne
placez aucun objet sur le câble secteur.
- Assurez-vous que le câble secteur ne pend pas
sur le bord d’une table. Assurez-vous que le câble
secteur ne peut pas être happé par accident ou
faire trébucher.
- Ne laissez pas l’équipement sans surveillance si la
fiche secteur est insérée dans la prise murale.
- Ne tirez pas sur le câble secteur pour retirer la fiche
secteur de la prise murale.
- Retirez la fiche secteur de la prise murale lorsque
l’équipement n’est pas utilisé, avant l’assemblage
et le démontage et avant le nettoyage et la
maintenance.
Description (fig. A)
Votre vélo elliptique est un élément d’équipement
de fitness stationnaire servant à simuler la marche ou
la course sans exercer de pression excessive sur les
jointures.
Contenu de l’emballage (fig. B & C)
- L’emballage contient les pièces illustrées en fig. B.
- L’emballage contient les fixations illustrées en fig.
C. Voir la section “Description”.
NOTE
• Si une pièce manque, contactez votre revendeur.
Assemblage (fig. D)
AVERTISSEMENT
• Assemblez l’équipement dans l’ordre indiqué.
• Deux personnes au moins sont nécessaires pour
transporter et déplacer l’équipement.
PRÉCAUTION
• Placez l’équipement sur une surface plane et
ferme.
• Placez l’équipement sur une base protectrice
pour éviter d’endommager la surface du sol.
• Prévoyez un dégagement d’au moins 100 cm
autour de l’équipement.
- Consultez les illustrations pour l’assemblage correct
de l’équipement.
NOTE
• Conservez les outils livrés avec ce produit après
son montage,
pour d’éventuels entretiens.
Exercices
Un exercice doit être suffisamment léger mais
prolongé. L’exercice aérobie repose sur l’amélioration
de l’absorption maximum d’oxygène par le corps,
améliorant à son tour l’endurance et la forme. Vous
devez transpirer mais sans jamais être à bout de souffle
durant l’exercice.
Pour atteindre et entretenir un niveau de forme
basique, exercez-vous au moins 3 fois par semaine,
par session de 30 minutes. Accroissez le nombre des
sessions d’exercice pour améliorer votre niveau de
forme. Il est profitable de combiner un exercice régulier
et un régime sain. Une personne suivant un régime
doit s’exercer au quotidien, au début 30 minutes ou
moins pour chaque session afin d’accroître ensuite
progressivement le temps d’exercice quotidien pour
atteindre une heure. Commencez vos exercices à
une vitesse lente et avec une faible résistance pour
éviter de soumettre le système cardiovasculaire à une
38
Français
contrainte excessive. À mesure de l’amélioration de
votre forme, accroissez progressivement la vitesse et la
résistance. L’efficience de votre exercice est mesurable
en suivant votre fréquence cardiaque et votre pouls.
Instructions d’entraînement
L’utilisation de votre appareil de fitness vous procurera
plusieurs avantages : il vous permettra d’améliorer
votre forme physique, de tonifier vos muscles et,
associé à un régime hypocalorique, de perdre du poids.
Phase d’échauffement
Cette étape favorise la circulation du sang dans tout le
corps et le bon fonctionnement des muscles. Elle réduit
également le
risque de crampes et de lésions musculaires. Il est
conseillé de faire quelques exercices d’étirement,
comme ceux qui sont indiqués ci-dessous. Chaque
étirement doit être maintenu pendant environ 30
secondes. Ne forcez pas ou n’étirez pas excessivement
un muscle. Si vous sentez qu’une position vous fait mal,
ARRÊTEZ.
Phase d’exercice
C’est l’étape principale de votre entraîne-ment. Après
une utilisation régulière de l’appareil, vous sentirez que
les muscles de vos jambes ont gagné en souplesse. Il
est très important de maintenir un rythme régulier tout
au long de la séance. Le rythme de travail doit être
suffisant pour faire monter votre rythme cardiaque dans
la zone cible indiquée sur le graphique ci-dessous.
200
180
160
140
120
100
80
20 25 30 35 40 45 50 55 60 65 70 75
85 %
70 %
ZONE CIBLE
RYTHME CARDIAQUE
REFROIDIR
MAXIMUM
ÂGE
Cette étape doit durer au moins 12 minutes, bien que
l’on commence généralement à environ 15-20 minutes.
Phase de refroidissement
Cette étape a pour objectif de laisser votre système
cardiovasculaire et vos muscles reprendre leur
rythme normal. Il s’agit d’une répétition de l’exercice
d’échauffement. Baissez le rythme et continuez
pendant environ 5 minutes. Vous devez ensuite refaire
les exercices d’étirement et souvenez-vous de ne
pas forcer ou trop étirer un muscle dans une certaine
position.
À mesure que vous améliorerez votre forme, vous
ressentirez peut-être le besoin de vous entraîner
plus longtemps ou de faire des entraînements plus
poussés. Il est conseillé de s’entraîner au moins trois
fois par semaine et, si possible, d’espacer les séances
régulièrement tout au long de la semaine.
Tonification musculaire
Pour tonifier vos muscles à l’aide de l’appareil de
fitness, vous devrez sélectionner une résistance assez
élevée. Les muscles de vos jambes seront davantage
sollicités et vous ne pourrez peut-être pas vous
entraîner aussi longtemps que vous le voudriez. Si
vous souhaitez également améliorer votre forme, vous
devrez modifier votre programme d’entraînement.
Entraînez-vous normalement pendant les phases
d’échauffement et de refroidissement, mais vers la
fin de l’exercice, augmentez la résistance en faisant
travailler vos jambes davantage. Vous devrez réduire la
vitesse pour maintenir votre rythme cardiaque dans la
zone cible.
Perte de poids
Ici, le facteur important est l’effort que vous déployez.
Plus vous entraînez longtemps et de manière soutenue,
plus vous brûlerez de calories. C’est en réalité le même
principe que pour l’entraînement d’amélioration
de la forme ; la différence est l’objectif recherché.
Fréquence cardiaque
Mesure du pouls
(pulsomètres)
Le pouls est mesuré par des capteurs dans les poignées
lorsque l’utilisateur touche les deux capteurs à la fois.
La mesure la plus précise du pouls nécessite une
peau légèrement humide et un contact constant des
pulsomètres. Si la peau est trop sèche ou humide, la
mesure du pouls peut devenir moins précise.
NOTE
• N’utilisez pas les pulsomètres en même
temps que la sangle thoracique de fréquence
cardiaque.
• – Si vous réglez une fréquence cardiaque limite
pour votre exercice, une alarme retentit dès
qu’elle est dépassée.
Fréquence cardiaque maximum
(durant l’exercice)
La fréquence cardiaque maximum est la fréquence
la plus élevée qu’une personne peut atteindre en
toute sécurité sous la contrainte de l’exercice. La
formule suivante sert à calculer la fréquence cardiaque
maximum moyenne : 220 - ÂGE La fréquence cardiaque
maximum varie d’une personne à l’autre.
AVERTISSEMENT
• Assurez-vous de ne pas dépasser votre
fréquence cardiaque aximum durant l’exercice. Si
vous appartenez à un groupe à risque, consultez
un médecin.
39
Français
Débutant
50-60% de fréquence cardiaque maximum
Adapté aux débutants, aux personnes suivant leur
poids, aux convalescents et aux personnes ne
s’exerçant pas depuis un certain temps. Exercez-vous
au moins trois fois par semaine, par session de 30
minutes.
Avancé
60-70% de fréquence cardiaque maximum
Adapté aux personnes souhaitant améliorer et
entretenir leur forme. Exercez-vous au moins trois fois
par semaine, par session de 30 minutes.
Expert
70-80% de fréquence cardiaque maximum
Adapté aux personnes les plus en forme, abituées aux
exercices d’endurance prolongés.
Usage
Réglage des pieds de support
L’équipement comporte 2 pieds de support. Si
l’équipement est instable, vous pouvez réglez les pieds
de support.
- Tournez les pieds de support, selon les besoins,
pour placer l’équipement en position stable.
Ajustement de la position
de la pédale (Fig. D-7)
Les deux pédales peuvent être réglées en fonction de
la taille et de la position d’exercice de l’utilisateur.
- Desserrez les 2 boutons fixant la pédale.
- Déplacez la pédale dans la position requise.
- Resserrez les 2 boutons fixant la pédale.
NOTE
• Veillez à ce que les deux pédales soient toujours
fixées dans des positions similaires.
Alimentation électrique (Fig. E)
L’alimentation de l’appareil d’entraînement est externe.
Reportez-vous à l’illustration pour situer l’entrée de
l’alimentation de l’appareil d’entraînement.
NOTE
• Fixer le transformateur sur la achine avant de le
brancher dans une prise murale.
• Toujours retirer le cordon d’alimentation lorsque
la machine n’est pas en fonctionnement
Console (fig F)
1
2
3
1. Écran
2. Assistance tablette/livre
3. Boutons
PRÉCAUTION
• Maintenez la console à l’écart de la lumière
directe du soleil.
• Séchez la surface de la console dès qu’elle est
couverte de gouttes de sueur.
• Ne vous appuyez pas sur la console.
• Touchez l’affichage uniquement avec le bout du
doigt. Assurez-vous de ne pas toucher l’affichage
avec vos ongles ou des objets coupants.
NOTE
• La console passe en mode de veille si
l’équipement n’est pas utilisé pendant 4 minutes.
Explication des fonctions à l’écran
Time (Durée)
- La durée est additionnée sans définir de valeur
cible.
- Lorsqu’une valeur cible est fixée, la durée est
comptée à rebours, de la valeur cible à 0 et l’alarme
résonnera ou clignotera.
La durée continuera à s’additionner si
l’entraînement n’est pas arrêté une fois l’objectif
atteint.

40
Français
- La durée s’arrête si aucun signal n’est transmis
au moniteur pendant 4 secondes au cours de
l’entraînement.
- Plage 0:00~99:59
Speed (Vitesse)
- Affiche la vitesse actuelle d’entraînement.
- Plage 0.0 ~ 99.9
- SPEED affiche « 0.0 » si aucun signal n’est transmis
au moniteur pendant 4 secondes au cours de
l’entraînement.
RPM (tr/min)
- Affichage des rotations par minute
- Plage 0 ~ 999
- RPM affiche « 0 » si aucun signal n’est transmis
au moniteur pendant 4 secondes au cours de
l’entraînement.
WATTS
- Affiche la puissance actuelle de l’entraînement.
- Portée 0 ~ 999
LOAD
- Indique le réglage du niveau de tension, lors du
réglage de la résistance, pendant 3 secondes
Distance
- La distance parcourue est additionnée sans définir
de valeur cible.
- Lorsqu’une valeur cible est fixée, la distance est
comptée à rebours, de la valeur cible à 0 avec une
alarme sonore ou clignotante.
La distance parcourue continuera à s’additionner
si l’entraînement n’est pas arrêté une fois l’objectif
atteint.
- Portée 0.00~99.99
Calories
- Les calories s’additionnent sans définir de valeur
cible.
- Lorsqu’une valeur cible est fixée, les calories sont
comptées à rebours, de la valeur cible à 0 avec une
alarme sonore ou clignotante.
Les calories continueront à s’additionner si
l’entraînement n’est pas arrêté une fois l’objectif
atteint.
- Portée 0~9999
NOTE
• Ces données sont fournies à titre indicatif
pour comparer entre différentes séances
d’entraînement ; elles ne doivent pas être
utilisées dans le cadre d’un traitement médical.
Pulse (Pouls)
- Le pouls actuel s’affiche après 6 secondes de la
détection par la console.
- La console affiche « P » s’il n’y a aucun signal de
pouls pendant 6 secondes.
- L’alarme de pouls résonne lorsque le pouls actuel
est supérieur au pouls cible.
- Plage 0-30~230 BPM
Explication des boutons
Haut
- Augmente le niveau de résistance pendant
l’entraînement.
- Tourner le bouton dans le sens des aiguilles d’une
montre pour augmenter la valeur
Bas
- Réduit le niveau de résistance pendant
l’entraînement.
- Tourner le bouton dans le sens contraire des
aiguilles d’une montre pour diminuer la valeur.
Mode (mode/entrée)
- Choisir chaque fonction en appuyant sur la touche
MODE.
Reset (Réinitialisation)
- En mode réglage, appuyer une fois sur la touche
RESET pour réinitialiser les chiffres actuels des
fonctions.
- Maintenir la touche RESET enfoncée pendant
2 secondes pour réinitialiser tous les chiffres des
fonctions.
Start/ Stop
- Démarrer ou arrêter ( pause ) l’exercice.
Body Fat (Masse grasse)
- Permet de mesurer la masse grasse en % et l’IMC.
Recovery (Récupération)
- Après la détection du signal d’impulsion par
la console, appuyer sur la touche RECOVERY
(récupération) pour passer en mode récupération
et suivre la capacité de récupération du rythme
cardiaque
Fonctionnement
Marche
- Branchez l’alimentation électrique : l’ordinateur se
met sous tension et affiche tous les segments sur
l’écran LCD pendant 2 secondes.
- Appuyer sur une touche pour mettre en marche la
console en mode veille.
- Commencer à pédaler pour mettre en marche la
console en mode veille.
L’écran LCD affichera tous les segments (Fig. F-01)
Mettre hors tension
Le moniteur passe automatiquement en mode SLEEP
(veille) si aucun signal n’est transmis au moniteur
pendant 4 minutes.

41
Français
Sélection de l’entraînement
Utiliser UP/DOWN (haut/bas) du bouton pour
sélectionner :
- Manual
- Program
- User Program
- H.R.C.
- Watt
Programmes
Quick start
- Appuyer sur la touche START/STOP pour
commencer votre entraînement sans configurer
aucun paramètre au préalable.
- Utiliser UP/DOWN (haut/bas) du bouton pour régler
le niveau de résistance pendant l’entraînement.
Fin de l’entraînement
- Appuyer sur START/STOP (marche/arrêt) en
mode entraînement pour arrêter/suspendre votre
entraînement.
Pour reprendre, appuyer sur le bouton START/STOP
(marche/arrêt) en mode pause.
- Maintenir la touche RESET enfoncée pendant plus
de 2 secondes pour réinitialiser la console. (Les
données d’entraînement actives seront perdues)
Manual (Mode manuel)
- Appuyer sur les flèches VERS LE HAUT/VERS
LE BAS pour sélectionner un programme
d’entraînement, choisir mode MANUEL et appuyer
sur la touche MODE pour définir le paramètre
suivant du programme en mode manuel.
- Appuyer sur la touche UP/DOWN (haut/bas) du
bouton pour prérégler la durée de l’entraînement,
puis appuyer sur MODE (mode/entrée) pour
confirmer le réglage.
- Après confirmation, vous pouvez aussi régler :
- la distance, les calories et le pouls.
NOTE
• Si vous vous fixez plusieurs objectifs,
l’entraînement s’arrêtera après chaque objectif
atteint.
• Si vous laissez un objectif vide, il ne sera pas
considéré comme une limite prédéfinie.
- Appuyer sur la touche START/STOP (marche/arrêt)
pour commencer l’entraînement
- Appuyer sur la touche UP/DOWN (haut/bas) du
bouton pour régler le niveau de résistance.
- La charge est indiquée à la fenêtre LOAD (niveau).
Program mode
- Appuyer sur la touche UP/DOWN (haut/bas)
du bouton pour sélectionner un programme
d’entraînement. Choisir le mode PROGRAM
et appuyer sur la touche Mode pour définir le
paramètre suivant du programme en mode
PROGRAM.
- Utilisez la touche UP/ DOWN pour sélectionner le
programme P1 ~ P12 et appuyez sur MODE pour
confirmer. ( fig. F-02)
- Appuyer sur la touche UP/DOWN (haut/bas) du
bouton pour régler TIME (durée).
- Appuyer sur la touche START/STOP (marche/arrêt)
pour commencer l’entraînement
- Utiliser RESET (réinitialiser) pour revenir au menu
principal.
User Program
- Appuyer sur la touche UP/DOWN (haut/bas)
du bouton pour sélectionner un programme
d’entraînement. Choisir le mode USER et appuyer
sur la touche Mode pour définir le paramètre
suivant du programme en mode USER
- Utilisez la touche UP / DOWN pour créer un profil
utilisateur.
- Réglez le niveau de tension pour le premier des
20 colums et confirmez avec MODE pour régler
le deuxième niveau, répétez ceci pour toutes les
colonnes.
- Maintenez la touche MODE enfoncée pendant 2
secondes pour confirmer le réglage du programme.
- Appuyer sur la touche START/STOP (marche/arrêt)
pour commencer l’entraînement
- Utiliser RESET (réinitialiser) pour revenir au menu
principal.
Mode H.R.C>
- Appuyer sur la touche UP/DOWN (haut/bas)
du bouton pour sélectionner un programme
d’entraînement. Choisir le mode H.R.C. et appuyer
sur la touche Mode pour définir le paramètre
suivant du programme en mode H.R.C.
- Appuyer sur la touche UP/ DOWN (haut/bas) du
bouton pour régler l’âge.
- Appuyer sur la touche UP/ DOWN (haut/bas) du
bouton pour sélectionner 55 %, 75 %, 90 % ou TAG
(objectif H.R.C. , 100 par défaut)
- Appuyer sur la touche UP/DOWN (haut/bas) du
bouton pour régler la durée, puis appuyer sur
MODE (mode/entrée) pour confirmer.
- Appuyer sur la touche START/STOP (marche/arrêt)
pour commencer l’entraînement
- Utiliser RESET (réinitialiser) pour revenir au menu
principal.
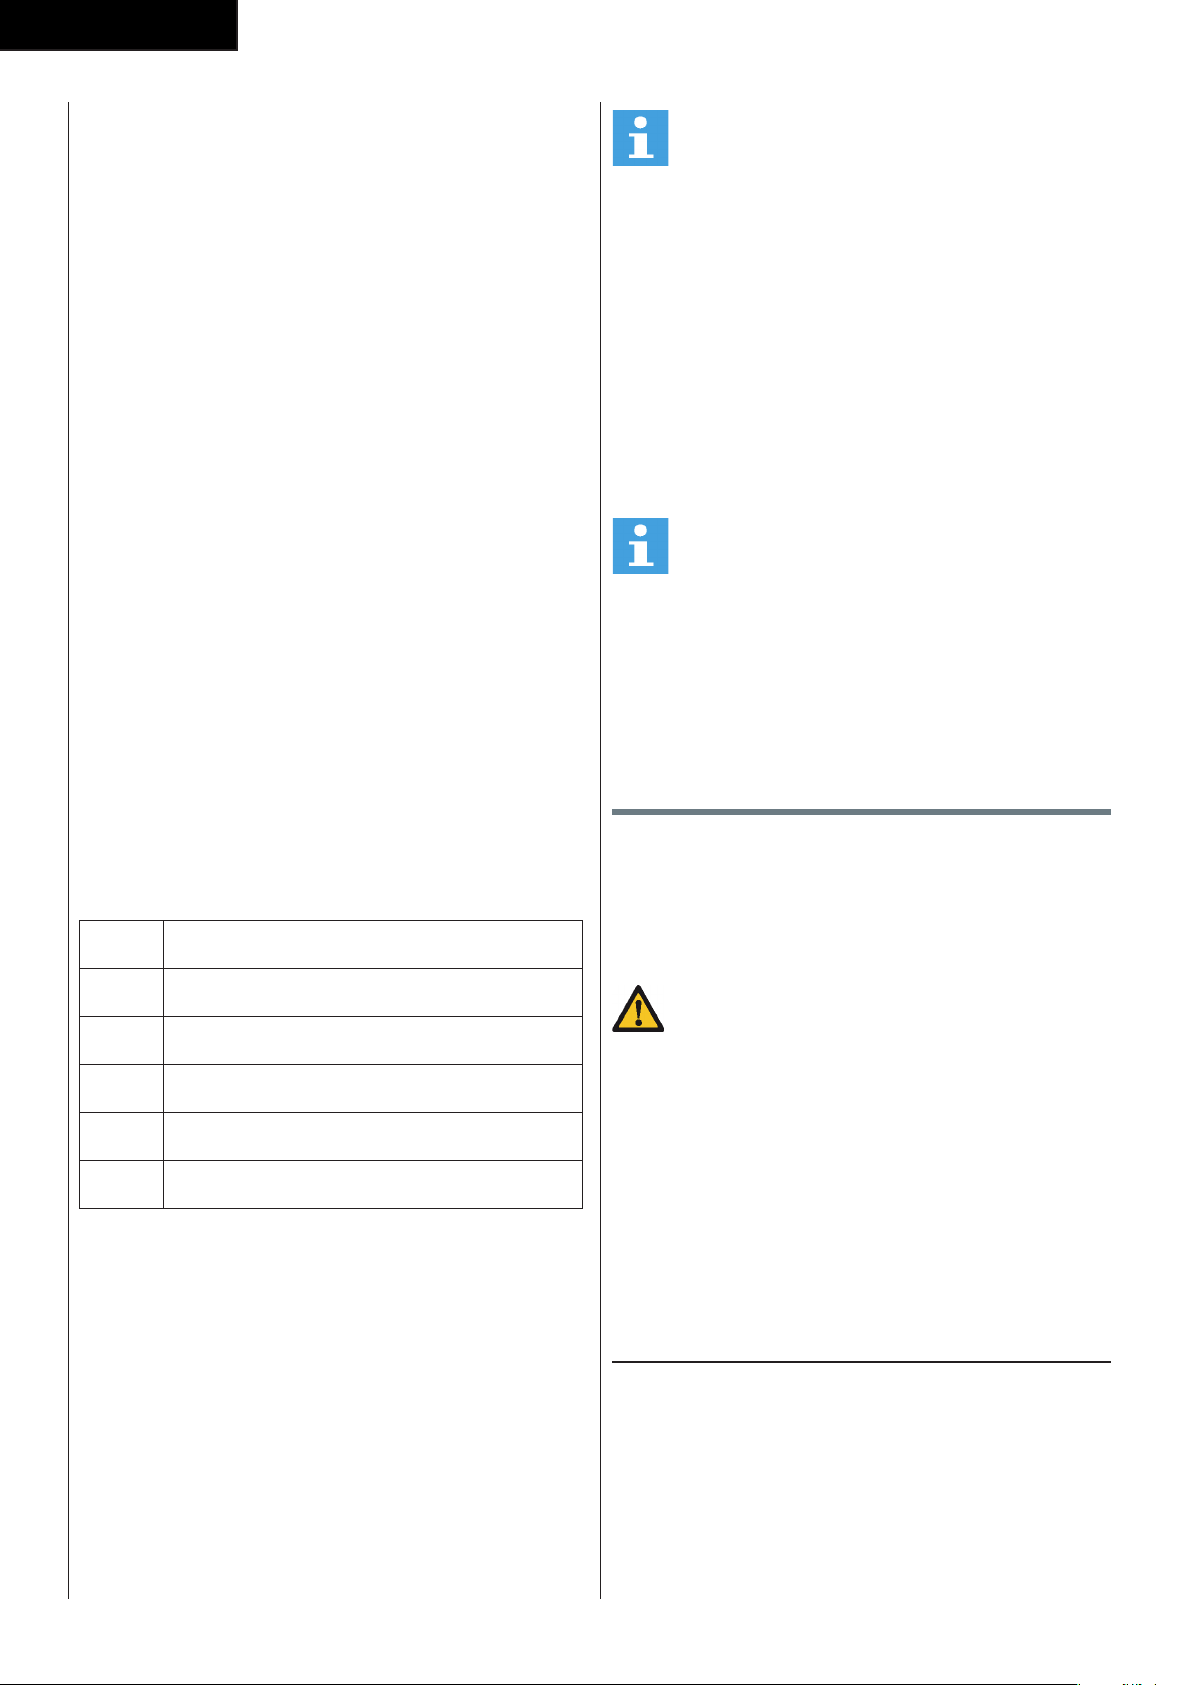
42
Français
Mode Watt (puissance).
- Appuyer sur la touche UP/DOWN (haut/bas)
du bouton pour sélectionner un programme
d’entraînement, choisir mode WATT (puissance) et
appuyer sur la touche MODE/ENTER (mode/entrée)
pour définir le paramètre suivant du programme en
mode WATT.
- Utiliser UP/DOWN (haut/bas) du bouton pour
définir l’objectif de puissance (WATT).
(par défaut : 120 Watt)
- Appuyer sur la touche UP/DOWN (haut/bas) du
bouton pour régler TIME (durée).
- Appuyer sur la touche START/STOP pour
commencer l’entraînement.
Utiliser UP/DOWN (haut/bas) du bouton pour régler
la puissance cible en Watt.
- Appuyez sur la touche START/STOP pour mettre
l’entraînement en pause.
- Utiliser RESET (réinitialiser) pour revenir au menu
principal.
Récupération
- La touche RECOVERY (récupération) est valide si un
pouls est décelé.
- TIME (durée) affiche « 0:60 » (secondes) et compte
à rebours jusqu’à 0.
- L’ordinateur affiche F1 à F6 après le compte à
rebours afin de tester l’état de récupération du
rythme cardiaque. Le niveau de récupération
du rythme cardiaque peut être retrouvé dans le
graphique ci-après.
- Appuyer à nouveau sur la touche RECOVERY
(récupération) pour revenir au début.
F1 Remarquable
F2 Excellent
F3 Bon
F4 Acceptable
F5 Inférieur à la moyenne
F6 Mauvais
Body Fat ( Masse grasse)
- Appuyer sur la touche BODY FAT (masse grasse)
pour démarrer la mesure de la masse grasse.
- Pendant la mesure, les utilisateurs doivent tenir les
poignées des deux mains. L’écran LCD affiche « - »
« - - » « - - - » « - - - - » pendant 8 secondes jusqu’à
ce que l’ordinateur finisse la mesure.
- L’écran LCD affichera le BMI (IMC) et le FAT % (%
de graisse).
REMARQUE
• Des réglages de profil utilisateur corrects sont
nécessaires pour cette fonction.
Code d’erreur du mode masse grasse
- *E-1
Aucun signal de rythme cardiaque n’est détecté.
- *E-4
Se produit lorsque FAT% (% de masse grasse) et le
résultat de BMI (indice de masse corporelle) sont
inférieurs à 5 ou supérieurs à 50.
Résolution des pannes :
- Vérifier que le câble est bien branché s’il n’y a
aucun signal lorsque vous pédalez.
NOTE
• L’écran principal s’éteindra si l’entraînement est à
l’arrêt pendant 4 minutes.
• Si l’ordinateur affiche des anomalies, débranchez
l’alimentation électrique pendant 5 secondes
avant de le rebrancher pour une remise à zéro.
Nettoyage et maintenance
Cet équipement ne nécessite aucune maintenance
spéciale. L’équipement n’a besoin d’aucune calibration
après son assemblage, son utilisation et son entretien
conformément aux instructions.
AVERTISSEMENT
• Avant le nettoyage et la maintenance, retirez
l’adaptateur.
• N’utilisez aucun solvant pour nettoyer
l’équipement.
- Nettoyez l’équipement avec un chiffon doux et
absorbant après chaque usage.
- Vérifiez régulièrement le serrage de tous les écrous
et vis.
- Si nécessaire, lubrifiez les joints.
Défauts et dysfonctionnements
Malgré un contrôle continu de la qualité, des défauts
ou des dysfonctionnements peuvent être occasionnés
par des composants individuels. La plupart du temps, il
vous suffit de remplacer la pièce défaillante.
- Si l’équipement ne fonctionne pas correctement,
contactez immédiatement le revendeur.

43
Français
- Fournissez le numéro de modèle et le numéro de
série de l’équipement au revendeur. Mentionnez
la nature du problème, les conditions d’usage et la
date d’achat.
Transport et rangement
AVERTISSEMENT
• Avant le transport et le stockage, retirez
l’adaptateur.
• Deux personnes au moins sont nécessaires pour
transporter et déplacer l’équipement.
- En vous tenant devant l’équipement de chaque
côté, saisissez fermement ses guidons. Levez
l’avant de l’équipement pour que l’arrière repose
sur les roues. Déplacez l’équipement et reposez-le
prudemment. Placez l’équipement sur une base
protectrice pour éviter d’endommager la surface du
sol.
- Déplacez prudemment l’équipement sur les
surfaces irrégulières. Ne déplacez pas l’équipement
sur ses roues pour monter des escaliers mais
transportez-le par les guidons.
- Rangez l’équipement dans un endroit sec exposé à
des variations de température minimes.
Informations supplémentaires
Élimination des emballages
Les réglementations gouvernementales nous
demandent de réduire la quantité de matériaux
déposés dans les décharges. C’est pour cela que nous
faisons appel à votre responsabilité et vous demandons
de déposer les emballages dans des centres de
recyclage publics.
Élimination du produit
Chez Tunturi, nous espérons que vous profiterez
longtemps de votre appareil de fitness. Cependant,
nous savons bien qu’un jour ou l’autre votre machine
arrivera au terme de sa vie utile. Selon la directive
européenne sur les DEEE, vous êtes responsable
de vous séparer correctement de votre appareil de
fitness en le déposant dans un site public agréé de
récupération des déchets.
Données techniques
Paramètre Unité de
mesure
Valeur
Longueur cm
inch
127
50.0
Largeur cm
inch
61
24.0
Hauteur cm
inch
163
64.2
Poids kg
lbs
34.0
75.0
Poids maxi.
utilisateur
kg
lbs
110
242
Adaptateur
V
Ma.
9V-DC
0.5A
Garantie
Garantie du propriétaire d‘un équipment de
Tunturi
Conditions de garantie
Le consommateur dispose des droits légaux accordés
par la législation nationale applicable au commerce des
produits de consommation courante et cette garantie
ne limite ces droits en aucun cas. La « Garantie du
propriétaire » est valable uniquement si l’équipement
est utilisé dans l’environnement correspondant à celui
déterminé par Tunturi New Fitness BV. L’environnement
d’utilisation de chaque appareil est mentionné dans le
mode d’emploi fourni avec l’appareil en question.
Conditions de garantie
Les conditions de garantie sont applicables à compter
de la date d’achat et peuvent varier selon les pays.
Demandez conseil à votre revendeur.
Étendue de la garantie
En aucun cas Tunturi New Fitness BV, le revendeur
ou le distributeur Tunturi ne répondra des éventuels
dommages spéciaux, indirects, secondaires ou
consécutifs, de quelque nature que ce soit, liés
à l’utilisation de ou à l’inaptitude à utiliser cet
équipement.

44
Français
Restrictions de garantie
La garantie couvre les défauts de fabrication et de
matériaux dans un équipement d’origine, sorti d’usine
et conditionné par Tunturi New Fitness BV. La garantie
couvre uniquement les défauts apparaissant lors d’une
utilisation normale et conforme aux instructions du
manuel du propriétaire, à condition que les instructions
de montage, de maintenance et d’utilisation établies
par Tunturi New Fitness BV aient été respectées. Tunturi
New Fitness BV et les revendeurs Tunturi ne répondent
pas des défauts occasionnés par des conditions indé
pendantes de leur volonté. La garantie est applicable
uniquement au premier acheteur et est valable
uniquement dans les pays où Tunturi New Fitness BV
dispose d’un distributeur agréé. La garantie ne s’étend
pas aux équipements de fitness ou aux pièces qui ont
été modifiées sans l’autorisation de Tunturi New Fitness
BV. La garantie ne s’applique pas aux défauts provenant
d’une usure normale, d’une utilisation inadaptée, d’une
utilisation dans des conditions non prévues par le
fabricant, de la corrosion ou d’un dommage intervenu
lors du chargement ou du transport.
La garantie ne couvre pas les sons ou les bruits émis
par l’équipement s’ils ne gênent pas son utilisation et
s’ils ne sont pas provoqués par un dysfonctionnement.
La garantie ne couvre pas non plus les mesures de
maintenance, telles que le nettoyage, la lubrification
ou la vérification normale des pièces, ni les actions que
le client peut effectuer lui-même et qui n’exigent pas
particulièrement de monter/ démonter l’équipement.
Ces actions sont par ex¬emple le changement des
compteurs, des pédales ou autres pièces similaires
faciles à changer. Seules les réparations sous garantie
effectuées par un revendeur ou par le distributeur
agréé Tunturi seront prises en charge. Le non-respect
des instructions décrites dans le Manuel de l’Utilisateur
entraînera l’annulation de la garantie.
Déclaration du fabricant
Tunturi Fitness BV déclare que le produit est conforme
aux directives et normes suivantes : EN 957 (HC),
89/336/CEE. Ce produit porte donc la marque CE.
04-2018
Tunturi New Fitness BV
Purmerweg 1
1311 XE Almere
Pays-Bas
Limite de responsabilité
© 2018 Tunturi New Fitness BV
Tous les droits réservés.
Le produit et le manuel sont sujets à modifications. Les
spécifications peuvent hanger sans préavis.

45
Nederlands
Nederlands
Deze Nederlandse handleiding is een vertaling van de
Engelse tekst. Aan deze vertaling kunnen geen rechten
ontleend worden. De originele Engelse tekst blijft
leidend.
Inhoud
Crosstrainer
Welkom in de wereld van Tunturi Fitness!
Hartelijk dank voor uw aankoop van dit Tunturi-
toestel. Tunturi biedt een grote verscheidenheid
aan professionele toestellen zoals crosstrainers,
loopbanden, fietstrainers, roeimachines en accessoires.
Het Tunturi-toestel is geschikt voor de hele familie,
onafhankelijk van de conditie. Meer informatie vindt u
op de website www.tunturi.com.
Crosstrainer ...................................................... 45
Veiligheidswaarschuwingen ............................ 45
Elektrische veiligheid 46
Beschrijving (g. A) 46
Inhoud van de verpakking (g. B & C) 46
Assemblage (g. D) 46
Trainingen ......................................................... 46
Instructies 47
Gebruik .............................................................. 48
Voeding (Fig. E) 48
Console (g F) .................................................. 48
Uitleg van de weergavefuncties 48
Werking van de knoppen 49
Bediening 49
Programma’s 50
Reiniging en onderhoud .................................. 51
Defecten en storingen 51
Transport en opslag ......................................... 51
Aanvullende informatie 52
Technische gegevens ...................................... 52
Garantie ............................................................. 52
Verklaring van de fabrikant.............................. 53
Disclaimer ......................................................... 53
Veiligheidswaarschuwingen
WAARSCHUWING
• Lees de veiligheid-waarschuwingen en
de instructies. Het niet opvolgen van de
veiligheid-waarschuwingen en de instructies
kan persoonlijk letsel of beschadiging van het
toestel veroorzaken. Bewaar de veiligheid-
waarschuwingen en instructies voor toekomstig
gebruik.
WAARSCHUWING
• Hartslag-bewakingssystemen kunnen
onnauwkeurig zijn. Overmatig trainen kan leiden
tot ernstig letsel of de dood. Als u zich duizelig
voelt, stop dan onmiddellijk met trainen.
- Het toestel is uitsluitend geschikt voor huishoudelijk
gebruik. Het toestel is niet geschikt voor
commercieel gebruik.
- Het maximum gebruik is beperkt
tot 3 uur per dag
- Het gebruik van dit toestel door kinderen of
personen met fysieke, sensorische, geestelijke of
motorische handicaps, of met gebrek aan ervaring
en kennis kan gevaar veroorzaken. De personen die
verantwoordelijk zijn voor hun veiligheid moeten
uitdrukkelijke instructies geven of toezicht houden
op het gebruik van het toestel.
- Laat uw gezondheid door een arts controleren
voordat u met uw training begint.
- Als u misselijkheid, duizeligheid of andere
abnormale symptomen ervaart, stop dan
onmiddellijk met uw training en raadpleeg een arts.
- Om spierpijn en te zware belasting te voorkomen,
moet u elke training beginnen met een warming-up
en eindigen met een cooling-down. Vergeet niet
om uw spieren te strekken aan het einde van de
training.
- Het toestel is uitsluitend geschikt voor gebruik
binnenshuis. Het toestel is niet geschikt voor
gebruik buitenshuis.
- Gebruik het toestel alleen in een omgeving met
voldoende ventilatie. Gebruik het toestel niet in een
tochtige omgeving om geen kou te vatten.
- Gebruik het toestel alleen in een omgeving met een
omgevingstemperatuur tussen 10 °C en 35 °C. Berg
het toestel alleen op bij een omgevingstemperatuur
tussen 5 °C en 45 °C.
- Gebruik het toestel niet in een vochtige omgeving.
Berg het toestel niet op in een vochtige omgeving.
De luchtvochtigheid mag nooit meer zijn dan 80%.
- Gebruik het toestel alleen voor het doel waarvoor
het gemaakt is. Gebruik het toestel niet voor
andere doelstellingen dan beschreven in de
handleiding.
- Gebruik het toestel niet als een onderdeel is
beschadigd of niet goed werkt. Raadpleeg uw
dealer als een onderdeel is beschadigd of niet
goed werkt.

46
Nederlands
- Houd uw handen, voeten en andere lichaamsdelen
uit de buurt van de bewegende delen.
- Houd uw haar uit de buurt van de bewegende
delen.
- Draag geschikte kleding en schoenen.
- Houd kleding, sieraden en andere voorwerpen uit
de buurt van de bewegende delen.
- Zorg ervoor dat het toestel slechts door één
persoon tegelijk wordt gebruikt. Het toestel mag
niet worden gebruikt door personen die meer dan
110 kg (242 lbs) wegen.
- Maak het toestel niet open zonder eerst uw dealer
te raadplegen.
Elektrische veiligheid
(Uitsluitend voor toestellen met elektrisch vermogen)
- Controleer voor gebruik altijd of de netspanning
gelijk is aan de spanning op het typeplaatje van het
toestel.
- Gebruik geen verlengsnoer.
- Houd het snoer uit de buurt van warmte, olie en
scherpe randen.
- Verander of wijzig het snoer of de stekker niet.
- Gebruik het toestel niet als het snoer of de stekker
beschadigd is of niet goed werkt. Als het snoer
of de stekker is beschadigd of niet goed werkt,
raadpleeg dan uw dealer.
- Rol het snoer altijd helemaal uit.
- Laat het snoer niet onder het toestel door lopen.
Laat het snoer niet onder een kleed door lopen.
Plaats geen voorwerpen op het snoer.
- Zorg ervoor dat het snoer niet over de rand van een
tafel hangt. Zorg ervoor dat niemand per ongeluk
achter het snoer kan blijven haken of erover kan
struikelen.
- Laat het toestel niet onbewaakt achter wanneer de
stekker in het stopcontact zit.
- Trek niet aan het snoer als u de stekker uit het
stopcontact wilt halen.
- Verwijder de stekker uit het stopcontact wanneer
het toestel niet in gebruik is, vóór montage of
demontage en vóór reiniging en onderhoud.
Beschrijving (fig. A)
Uw crosstrainer is een stationair fitnesstoestel dat wordt
gebruikt voor het nabootsen van lopen of hardlopen
zonder dat de gewrichten te veel belast worden.
Inhoud van de verpakking (fig. B & C)
- De verpakking bevat de onderdelen zoals
aangegeven in fig. B.
- De verpakking bevat de bevestigingsmiddelen
zoals aangegeven in fig. C. Raadpleeg het gedeelte
“Beschrijving”.
LET OP
• Raadpleeg uw dealer als een onderdeel
ontbreekt.
Assemblage (fig. D)
WAARSCHUWING
• Monteer het apparaat in de aangegeven
volgorde.
• Draag en verplaats het toestel met minstens
twee personen.
VOORZICHTIG
• Zet het toestel op een stevige, vlakke
ondergrond.
• Zorg voor een beschermende laag onder het
toestel om schade aan het vloeroppervlak te
voorkomen.
• Houd rondom de apparatuur ten minste een
bewegingsruimte van 100 cm.
- Raadpleeg de illustraties voor de juiste assemblage
van het toestel.
LET OP
• Bewaar, nadat u het apparaat in elkaar hebt
gezet, het gereedschap dat bij dit product is
geleverd. Dit met het oog op service op een
later tijdstip.
Trainingen
De training moet licht genoeg zijn, maar wel langdurig.
Aerobische training is gebaseerd op verbetering van de
maximale zuurstofopname van het lichaam, die dan het
uithoudingsvermogen en de conditie weer verbetert. U
moet tijdens de training wel transpireren, maar u mag
niet buiten adem raken.
Voor het bereiken en in stand houden van een
basisconditie moet u minstens drie keer per week
steeds 30 minuten trainen. Verhoog het aantal
trainingssessies ter verbetering van uw conditie. Het is
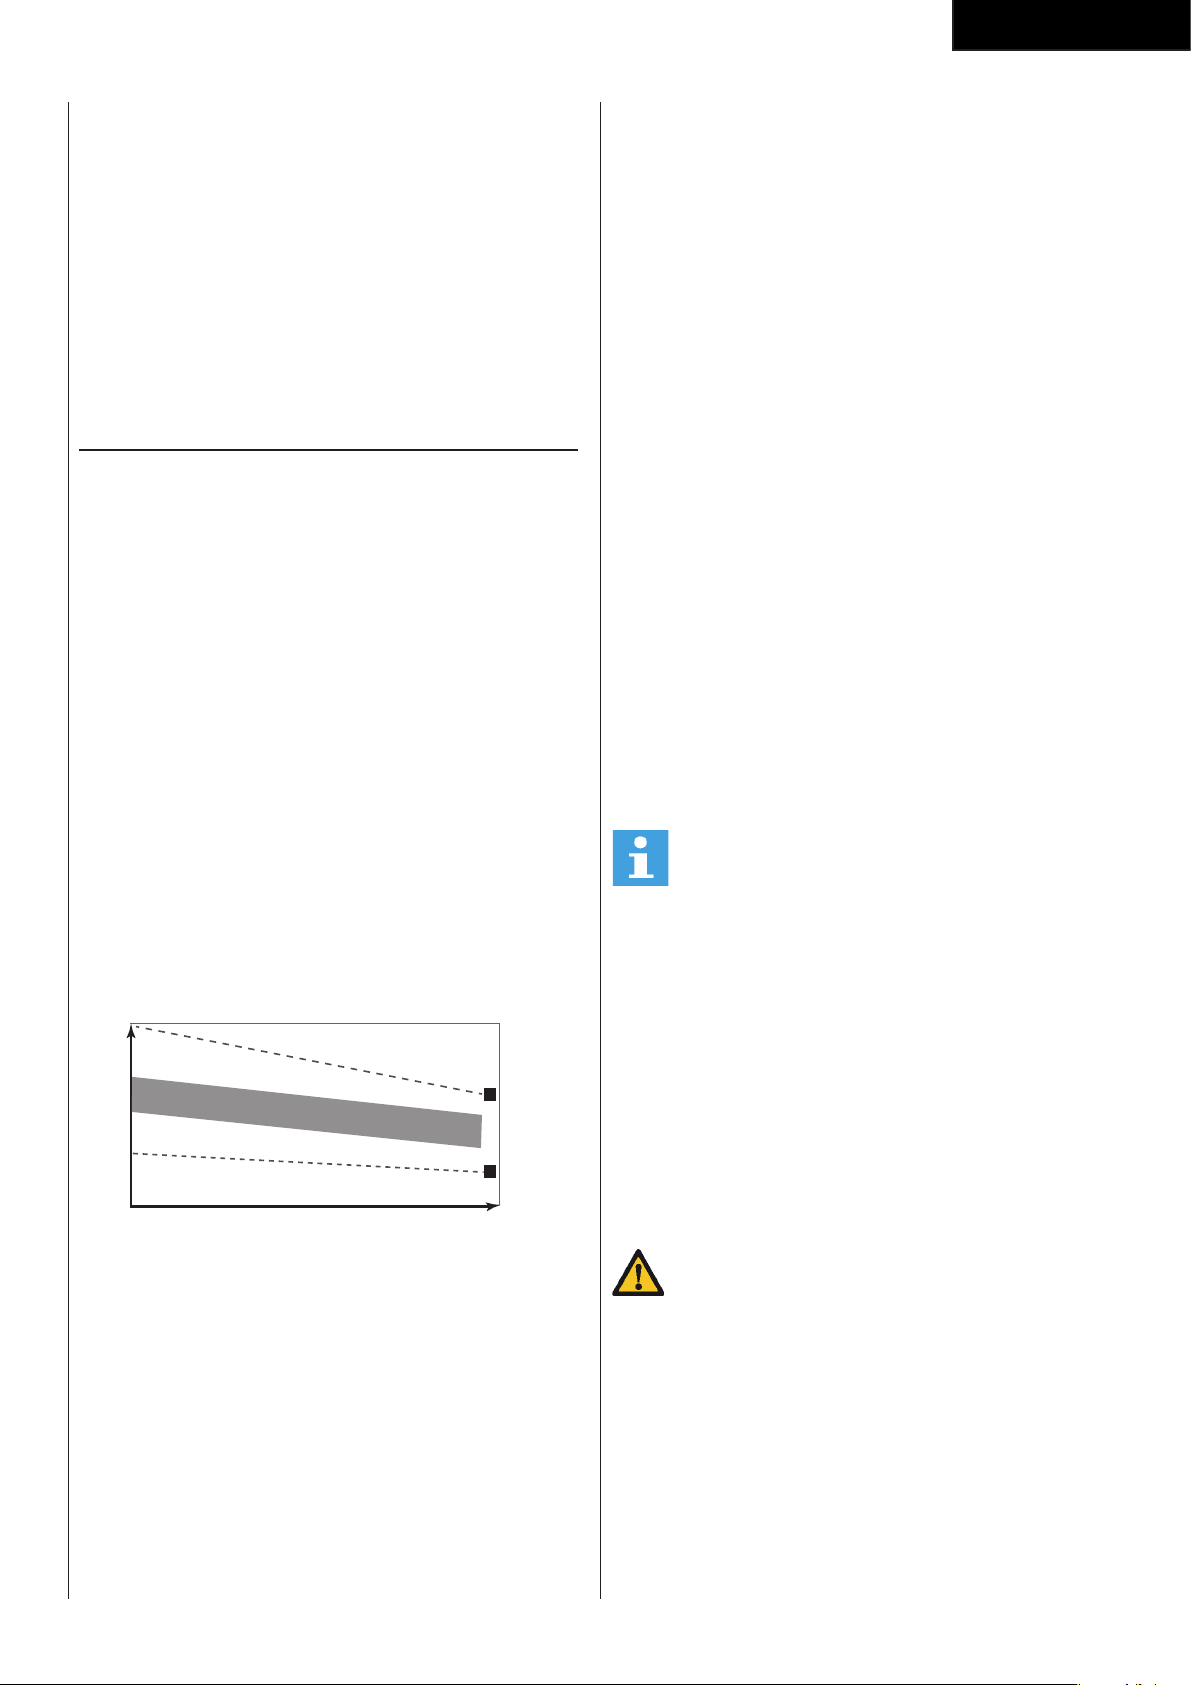
47
Nederlands
de moeite waard om regelmatige lichaamsbeweging
met gezonde voeding te combineren. Iemand die
zich goed aan een dieet houdt, zou elke dag moeten
trainen te beginnen met 30 minuten of korter, en de
dagelijkse trainingsduur geleidelijk opvoeren tot één
uur. Begin uw training bij een lage snelheid en een lage
weerstand om te voorkomen dat uw hart en bloedvaten
te sterk belast worden. Naarmate uw conditie verbetert,
kunnen snelheid en weerstand geleidelijk worden
verhoogd. De doelmatigheid van uw training kan
worden gemeten door uw hartslag.
Instructies
Het gebruik van dit fitness apparaat biedt meerdere
voordelen: u verbetert uw fysieke conditie, u versterkt
uw spieren en u valt in combinatie met een caloriearm
dieet af.
De warming-up
In deze fase wordt uw bloedsomloop gestimuleerd voor
een juiste werking van de spieren. Tevens wordt het
risico op kramp en spier-letsel verminderd. Wij raden u
aan enkele stretch oefeningen te doen, zoals hieronder
beschreven. Houd elke stretch oefening ongeveer 30
seconden vol. Forceer uw spieren niet bij het stretchen.
STOP als het pijn doet
De training fase
Dit is de fase waarin u de meeste inspanning levert.
Na regelmatig gebruik worden de spieren in uw benen
flexibeler. Het is in deze fase zeer belangrijk dat u
een gelijkmatig tempo aanhoudt. De snelheid moet
voldoende zijn om uw hartslag te laten stijgen naar de
doel zone die in de onderstaande grafiek te zien is.
200
180
160
140
120
100
80
20 25 30 35 40 45 50 55 60 65 70 75
85 %
70 %
LEEFTIJD
MAXIMUM
COOL DOWN
HARTSLAG
DOEL ZONE
Deze fase moet minimaal 12 minuten duren, maar
de meeste mensen beginnen met ongeveer 15-20
minuten.
De cooling down
In deze fase ontspant u uw cardiovascu-laire systeem
en spieren. Dit is een herhaling van de warming-
uptraining. Verlaag dus uw tempo en ga ongeveer
5 minuten door. Herhaal nu de stretch-oefeningen.
Forceer uw spieren niet tijdens het stretchen.
Naarmate u fitter wordt, moet u langer en harder
trainen. Het is raadzaam minstens drie keer per week te
trainen en zo nodig uw oefeningen gelijkmatig over de
week te verspreiden.
Spierversteviging
Als u uw spieren wilt verstevigen met
behulp van dit fitnessapparaat, stelt u de weerstand
in op hoog. Zo komt er meer spanning op uw
beenspieren. Mogelijk kunt u niet zo lang trainen als u
zou willen. Als u ook uw conditie wilt verbeteren,moet
u het trainingsprogramma aanpassen. Tijdens de
warming-up en cooling-down traint u zoals normaal,
maar tegen het eind van de trainingsfase verhoogt u
de weerstand zodat uw benen harder moeten werken.
Verlaag hierbij de snelheid zodat uw hartslag in de
doelzone blijft.
Gewichtverlies
Hierbij is het van belang hoeveel inspanning u levert.
Hoe harder en langer u werkt, hoe meer calorieën u
verbrandt. In feite is dit hetzelfde als wanneer u zou
trainen om uw conditie te verbeteren. Het doel is alleen
anders.
Hartslagmeting
(handgreepsensoren)
De hartslag wordt gemeten door sensoren in de
handgrepen wanneer de gebruiker beide sensoren
tegelijkertijd aanraakt. Voor de meest nauwkeurige
hartslagmeting moet de huid enigszins vochtig zijn
en moet u de handgreepsensoren voortdurend
aanraken. Bij een te droge of te vochtige huid kan de
hartslagmeting minder nauwkeurig worden.
LET OP
• Gebruik de handgreepsensoren niet in
combinatie met een hartslagborstband.
• Als u een hartslag-limiet hebt ingesteld voor uw
training, klinkt er een alarm wanneer deze wordt
overschreden.
Maximale hartslag
(tijdens de training)
De maximale hartslag is de hoogste hartslag die
iemand veilig kan bereiken door de belasting van de
training. De volgende formule wordt gebruikt voor het
berekenen van de gemiddelde maximale hartslag: 220
- LEEFTIJD. De maximale hartslag varieert van persoon
tot persoon.
WAARSCHUWING
• Zorg ervoor dat u tijdens uw training niet
boven uw maximale hartslag komt. Als u bij een
risicogroep hoort, moet u een arts raadplegen.
Beginner
50-60% van de maximale hartslag
Geschikt voor beginners, mensen die willen afvallen,
herstellende patiënten en personen die lange tijd niet
getraind hebben. Train minstens drie keer per week, 30
minuten per keer.
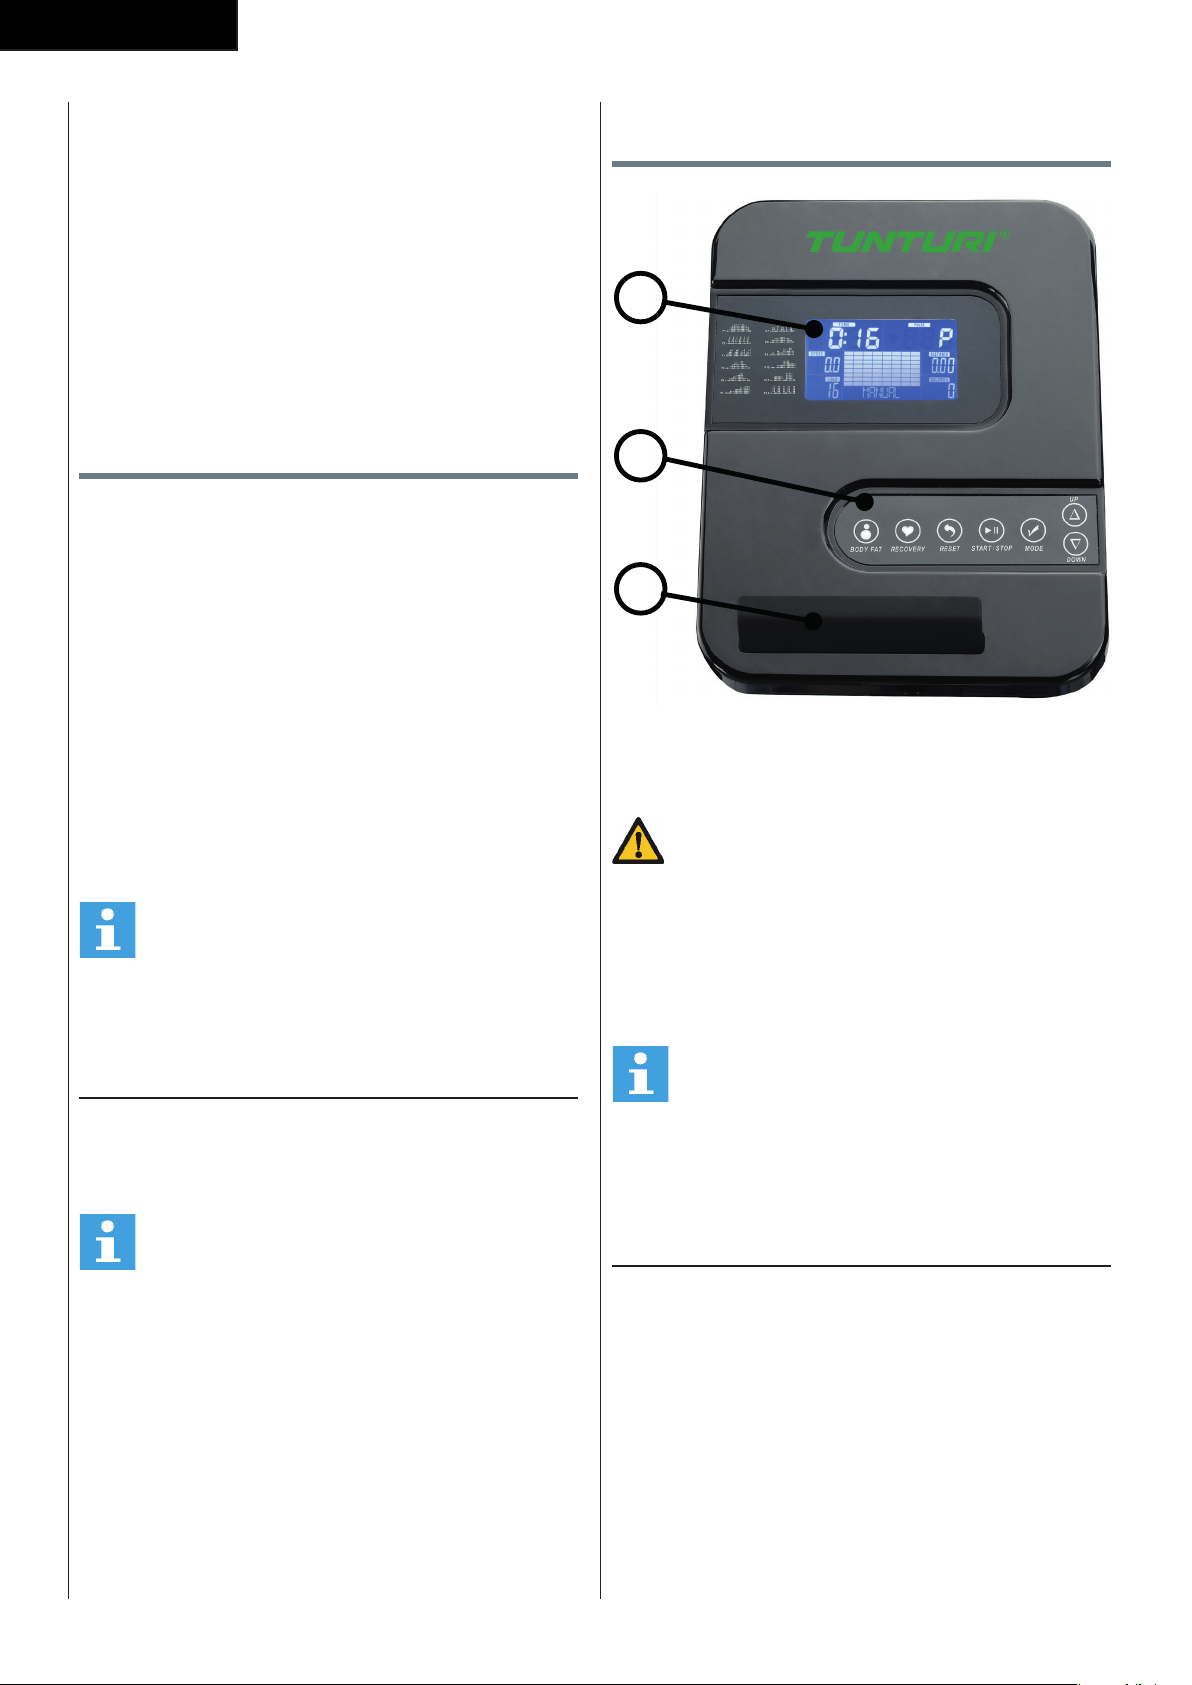
48
Nederlands
Gevorderd
60-70% van de maximale hartslag
Geschikt voor personen die hun conditie willen
verbeteren en in stand houden. Train minstens drie keer
per week, 30 minuten per keer.
Expert
70-80% van de maximale hartslag
Geschikt voor de fitste personen die gewend zijn aan
langdurige duurtraining.
Gebruik
Afstellen van de steunvoeten
Het toestel is voorzien van 2 steunvoeten. Als het
toestel niet stabiel is, kunnen de steunvoeten worden
versteld.
- Draai de steunvoeten zo ver in of uit als nodig is om
het toestel in een stabiele positie te krijgen.
De positie van de pedalen
aanpassen (Fig. D-7)
Beide pedalen kunnen worden aangepast aan de
lengte en de trainingspositie van de gebruiker.
- Draai de twee bevestigingsknoppen van de
pedalen los.
- Plaats de pedalen in de gewenste positie.
- Draai de bevestigingsknoppen vast.
LET OP
• Zorg ervoor dat beide pedalen altijd op gelijke
hoogte worden bevestigd.
Voeding (Fig. E)
De trainer werkt op stroom van een extern voedingsnet.
Op de illustratie wordt de plaats van de aansluiting op
de trainer weergegeven.
LET OP
• Sluit de adapter eerst aan op de trainer voordat
u deze aansluit op de wandcontactdoos.
• Verwijder altijd de stroomkabel wanneer e trainer
niet in gebruik is.
Console (fig F)
1
2
3
1. Display
2. Steun voor tablet/boek
3. Knoppen
VOORZICHTIG
• Houd de console uit de buurt van direct zonlicht.
• Droog het oppervlak van de console wanneer
het met zweetdruppels is bedekt.
• Leun niet op de console.
• Raak de display alleen met uw vingertop aan.
Raak de display niet aan met uw nagels of een
scherp voorwerp.
LET OP
• De console gaat naar standby wanneer het
toestel gedurende 4 minuten niet wordt
gebruikt.
Uitleg van de weergavefuncties
Time (Tijd)
- Wanneer u geen doelwaarde instelt, wordt de tijd
opgeteld.
- Wanneer u wel een doelwaarde instelt, wordt de
tijd terug geteld vanaf de doelwaarde. Zodra het
aantal op 0 komt, hoort u een alarm of gaat het
display knipperen.
De tijd wordt verder opgeteld als u niet stopt met
trainen nadat het doel is bereikt.
- Wanneer tijdens de workout gedurende 4 seconden
geen signaal naar de monitor wordt verzonden,
stopt de tijd
- Bereik 0:00 ~ 99:59

49
Nederlands
Speed
- Hier ziet u de huidige snelheid.
- Bereik 0.0 ~ 99.9
- Wanneer tijdens de workout gedurende 4 seconden
geen signaal naar de monitor wordt verzonden,
staat SPEED op ‘0.0’.
RPM
- Weergave van de rotaties per minuut
- Bereik 0 ~ 999
- Wanneer tijdens de workout gedurende 4 seconden
geen signaal naar de monitor wordt verzonden,
staat RPM op ‘0’.
WATTS
- Weergave van de huidige workoutwatt.
- Bereik 0 ~ 999
LOAD
- Toont de instelling van het weerstand nivo bij het
instellen van de weerstand voor de duur van 3
seconden
-
Distance (Afstand)
- Wanneer u geen doelwaarde instelt, wordt de
afstand opgeteld.
- Wanneer u wel een doelwaarde instelt, wordt de
afstand terug geteld vanaf de doelwaarde. Zodra
het aantal op 0 komt, hoort u een alarm of gaat het
display knipperen.
De afstand wordt verder opgeteld als u niet stopt
met trainen nadat het doel is bereikt.
- Bereik 0.00 ~ 99.99
Calories
- Wanneer u geen doelwaarde instelt, wordt het
aantal verbruikte calorieën opgeteld.
- Wanneer u wel een doelwaarde instelt, wordt het
aantal calorieën terug geteld vanaf de doelwaarde.
Zodra het aantal op 0 komt, hoort u een alarm of
gaat het display knipperen.
Het aantal calorieën wordt verder geteld als u niet
stopt met trainen nadat het doel is bereikt.
- Bereik 0 ~ 9999
LET OP
• Deze gegevens zijn een richtlijn voor de
vergelijking van verschillende trainingssessies
en kunnen niet voor medische behandelingen
worden gebruikt.
Pulse
- Wanneer uw hartslag door de console wordt
geregistreerd, ziet u na 6 seconden uw huidige
hartslag.
- Wanneer gedurende 6 seconden geen
hartslagsignaal wordt geregistreerd, wordt ‘P’
weergegeven.
- U hoort een hartslagalarm als uw huidige hartslag
de ingestelde hartslag overschrijdt.
- Bereik 0-3 0~ 230 BPM
Werking van de knoppen
Up
- Verhoog de weerstandswaarde tijdens training.
- Draai het keuzewiel naar rechts om de waarde te
verhogen.
Down
- Verlaag de weerstandswaarde tijdens training.
- Draai het keuzewiel naar links om de waarde te
verlagen.
Mode
- Druk op de toets MODE om een functie te kiezen.
Reset
- Druk in de modus Instellingen eenmaal op de toets
RESET om de huidige functiegetallen te resetten.
- Houd RESET 2 seconden ingedrukt om alle
functiegetallen te resetten
Start/ Stop
- Start of Stop ( pauzeer ) training
Body Fat
- Test van lichaamsvetpercentage en BMI.
Recovery
- Nadat de console het pulse-signaal registreert,
drukt u op de toets RECOVERY om de modus te
activeren waarin u uw hartslagherstel kunt volgen
Bediening
Inschakelen
- Steek de stekker in het stopcontact. De computer
start op en toont gedurende 2 seconden alle
onderdelen op het LCD-scherm.
- Wanneer het apparaat zich in de slaapmodus
bevindt, drukt u op een willekeurige toets op de
console om het apparaat in te schakelen.
- U kunt ook gaan fietsen om het apparaat te
activeren.
Op het LCD-display worden alle segmenten
weergegeven (fig. F-01)
Uitschakelen
Wanneer gedurende 4 minuten geen signaal naar
de monitor wordt verzonden, schakelt het apparaat
automatisch naar de slaapmodus.
Workout selecteren
Selecteer met UP/ DOWN:
- Manual
- Program
- User Program
- H.R.C.
- Watt

50
Nederlands
Programma’s
Quick start ( Snel starten)
- Druk op de toets START/STOP om uw workout
te beginnen zonder vooraf geprogrammeerde
instellingen.
- Met UP/ DOWN kunt u tijdens de workout het
weerstandsniveau aanpassen.
De workout stoppen
- Druk in de workoutmodus op START/STOP om uw
workout te stoppen of te pauzeren.
U hervat de workout door in de pauzemodus op
START/STOP te drukken.
- Houd de toets RESET ruim 2 seconden ingedrukt
om de console te resetten. (Gegevens van de
actieve training gaan verloren.)
Manual mode ( Manuele modus)
- Selecteer met het UP/ DOWN het
workoutprogramma, kies de modus MANUAL en
druk op de toets MODE om de volgende instelling
voor het handmatige programma in te voeren.
- Met UP/ DOWN kunt u de gewenste trainingstijd
instellen, druk op MODE om uw keuze te
bevestigen.
- Na de bevestiging kunt u ook:
Distance, Calories en Pulse instellen.
LET OP
• Wanneer u meer dan één doel instelt, stopt de
training na het eerste bereikte doel.
• Een leeg doel wordt niet beschouwd als een
vooraf ingestelde limiet.
- Druk op de toets START/STOP om uw workout te
beginnen
- Met UP/ DOWN kunt u het weerstandsniveau
aanpassen.
- Het belastingsniveau wordt in het venster LEVEL
weergegeven.
Program mode
- Selecteer met UP/ DOWN het workoutprogramma,
kies de modus PROGRAM en druk op de
modustoets om de volgende instelling voor de
modus PROGRAM in te voeren.
- Gebruik UP/ DOWN toets om Program P1 ~ P12
te selecteren en druk op MODE om te bevestigen.
( fig. F-02)
- Stel met UP/ DOWN de tijd in.
- Druk op de toets START/STOP om uw workout te
beginnen
- Met RESET keert u terug naar het hoofdmenu.
User Program
- Selecteer met UP/ DOWN het workoutprogramma,
kies de modus USER. en druk op de modustoets
om de volgende instelling voor de modus USER in
te voeren.
- Gebruik UP / DOWN toets om gebruikersprofiel te
maken.
- Stel spanningsniveau in voor de eerste, van de 20,
kolommen en bevestig met MODE om het tweede
niveau in te stellen, herhaal dit voor alle kolommen.
- Houd de MODE toets gedurende 2 seconden
ingedrukt om de programmafunctie te bevestigen.
- Druk op de toets START/STOP om uw workout te
beginnen
- Met RESET keert u terug naar het hoofdmenu.
Modus H.R.C.
- Selecteer met UP/ DOWN het workoutprogramma,
kies de modus H.R.C. en druk op de modustoets
om de volgende instelling voor de modus H.R.C. in
te voeren.
- Stel met UP/ DOWN uw leeftijd in.
- Selecteer met UP/ DOWN 55%., 75%, 90% of TAG
in (Doel H.R. _ Standaard 100)
- Stel met UP/ DOWN de tijd in; druk op MODE om
uw keuze te bevestigen.
- Druk op de toets START/STOP om uw workout te
beginnen
- Met RESET keert u terug naar het hoofdmenu.
Modus Watt
- Selecteer met het UP/ DOWN het
workoutprogramma, kies de modus WATT en druk
op de toets MODE/ENTERENTER om de volgende
instelling voor de modus WATT in te voeren.
- Stel met UP/ DOWN het doel in.
(standaard: 120 Watt)
- Stel met UP/ DOWN de tijd in.
- Druk op de toets START/STOP om de workout te
beginnen.
U kunt met UP/ DOWN het watt-doel aanpassen.
- Druk op de toets START/STOP om de workout te
pauzeren.
- Met RESET keert u terug naar het hoofdmenu.
Recovery
- De toets RECOVERY werkt alleen als een hartslag
wordt geregistreerd.
- Bij TIME wordt ‘0:60’ (seconden) weergegeven; er
wordt terug geteld naar 0.
- Na het aftellen om de status van het hartslagherstel
te testen, wordt op de computer F1 tot en
met F6 weergegeven. De gebruiker kan het
hartslagherstelniveau vinden in de onderstaande
tabel.
- Druk opnieuw op de toets RECOVERY om terug te
keren naar het begin.

51
Nederlands
F1 Voortreffelijk
F2 Uitstekend
F3 Goed
F4 Normaal
F5 Onder het gemiddelde
F6 Slecht
Body Fat
- Druk op de toets BODY FAT om te beginnen met
de meting van het lichaamsvetpercentage.
- Tijdens de meting moet de gebruiker met beide
handen de handgrepen vasthouden. Op het LCD-
display wordt gedurende 8 seconden “-” “- -” “- -
-” “- - - -” weergegeven, totdat de computer de
meting heeft afgerond.
- Op het LCD-display worden BMI en vetpercentage
weergegeven.
OPMERKING
• Voor deze functie moet het gebruikersprofiel
correct zijn ingesteld.
Foutmeldingen in de modus Body Fat
- *E-1
Er wordt geen hartslagsignaal geregistreerd.
- *E-4
Treedt op wanneer het vetpercentage en het BMI-
resultaat lager is dan 5 of hoger is dan 50.
Problemen oplossen
- Als er geen signaal is wanneer u fietst, controleer
dan of de kabel goed is aangesloten.
LET OP
• Wanneer u gedurende 4 minuten stopt met de
training, wordt het hoofdscherm uitgeschakeld.
• Als de computer weergave niet correct is, haalt u
de stekker 5 seconden uit het stopcontact zodat
u een algehele reset uitvoert.
Reiniging en onderhoud
Het toestel vereist geen speciaal onderhoud.
Het toestel behoeft geen kalibratie wanneer het
wordt geassembleerd, gebruikt en onderhouden
overeenkomstig de instructies.
WAARSCHUWING
• Verwijder voor reiniging of onderhoud de
adapter.
• Gebruik geen oplosmiddelen om het toestel te
reinigen.
- Reinig het toestel na elk gebruik met een zachte
absorberende doek.
- Controleer regelmatig of alle schroeven en moeren
goed vast zitten.
- Smeer indien nodig de draaipunten.
Defecten en storingen
Ondanks voortdurende kwaliteitscontrole kan het
gebeuren dat het toestel door ndividuele onderdelen
defect is of niet goed werkt. In de meeste gevallen
zal het voldoende zijn om het defecte onderdeel te
vervangen.
- Als het toestel niet goed werkt, neem dan
onmiddellijk contact op met de dealer.
- Geef het modelnummer en serienummer van het
toestel op aan de dealer. Vertel wat de aard van
het probleem is, hoe het toestel wordt gebruikt en
wanneer u het toestel heeft gekocht.
Transport en opslag
WAARSCHUWING
• Verwijder voor transport en opslag de adapter.
• Draag en verplaats het toestel met minstens
twee personen.
- Blijf aan weerskanten aan de voorkant van het
toestel staan en pak de handgrepen stevig vast.
Til de voorkant van het toestel op zodat de
achterkant van het toestel op de wielen komt te
rusten. Verplaats het toestel en zet het voorzichtig
neer. Zorg voor een beschermende laag onder
het toestel om schade aan het vloeroppervlak te
voorkomen.
- Verplaats het toestel voorzichtig over een ongelijke
ondergrond. Breng het toestel niet met behulp van
de wielen naar boven, maar draag het toestel bij de
handgrepen.
- Berg het toestel op een droge plaats op met zo
weinig mogelijk temperatuurwisselingen.

52
Nederlands
Aanvullende informatie
Afvoeren van verpakkingsmateriaal
Overheids-richtlijnen geven aan dat we de hoeveelheid
afvalmateriaal afgevoerd naar stortplaatsen moeten
verminderen. Daarom vragen we u al het afvalmateriaal
op verantwoordelijke wijze af te voeren naar openbare
recycling-centra.
Verrwijdering aan het eind van de
levensduur.
We hopen dat u jarenlang plezier hebt van uw
fitnessapparaat. Er komt echter een moment waarop
het fitnessapparaat het eind van de bruikbare
levensduur heeft bereikt. Onder de Europese AEEA-
wetgeving bent u verantwoordelijk voor het op de
juiste wijze afvoeren van uw fitnessapparaat naar een
erkend openbaar inzamelpunt.
Technische gegevens
Parameter Meeteenheid Waarde
Lengte cm
inch
127
50.0
Breedte cm
inch
61
24.0
Hoogte cm
inch
163
64.2
Gewicht kg
lbs
34.0
75.0
Max. gewicht
gebruiker
kg
lbs
110
242
Adapter
Spanning
Sterkte
V
Ma.
9V-DC
0.5A
Garantie
Garantie voor eigenaars van Tunturi
trainingsapparatuur
Garantievoorwaarden
De consument ontleent wettelijke rechten aan de van
toepassing zijnde nationale wetgeving aangaande de
handel in consumentengoederen en de garantie zal
deze rechten niet beperken.
De “Garantie voor de Eigenaar” geldt alleen dan
wanneer het toestel wordt gebruikt in de door
Tunturi New Fitness BV voor dat toestel toegestane
gebruiksomgeving. Voor elk toestel wordt de
toegestane gebruiksomgeving beschreven in de
gebruiksaanwijzing van het toestel.
Garantievoorwaarden
De garantievoorwaarden gaan in vanaf de datum van
aankoop. Deze kunnen per land verschillen. Vraag in de
winkel bij u in de buurt naar de garantievoorwaarden.
Garantiedekking
In geen enkele omstandigheid zal Tunturi New Fitness
BV of een wederverkoper van Tunturi aansprakelijk
zijn voor eventuele indirecte schade geleden
door de koper, zoals verlies van gebruiksnut of
inkomstenderving of andere indirecte economische
gevolgen.
Garantiebeperkingen
De garantie dekt defecten van het toestel die het
gevolg zijn van materiaalfouten of onjuist uitgevoerd
werk, mits het toestel zijn originele samenstelling heeft.
De garantie betreft alleen defecten die blijken tijdens
normaal gebruik overeenkomstig de meegeleverde
gebruiksaanwijzing, mits de montage-, onderhouds-
en gebruiksaanwijzingen van Tunturi zijn opgevolgd.
Tunturi New Fitness BV en zijn wederverkopers zijn niet
aansprakelijk voor defecten tengevolge van factoren
waarop zij geen invloed kunnen uitoefenen. De garantie
betreft alleen de eerste eigenaar van het toestel en
is alleen geldig in landen waar een geautoriseerde
importeur van Tunturi New Fitness BV is gevestigd. De
garantie betreft geen trainingstoestellen of onderdelen
die zijn gewijzigd zonder toestemming van Tunturi New
Fitness BV. De garantie dekt geen defecten tengevolge
van normale slijtage, onjuist gebruik, gebruik in
omstandigheden waarvoor het toestel niet is bedoeld,
corrosie of schade ontstaan tijdens laden of transport.
De garantie geldt niet voor geluiden die ontstaan door
het gebruik, als ze het gebruik van het apparaat niet
wezenlijk belemmeren en niet veroorzaakt zijn door een
defect aan het apparaat.

53
Nederlands
De garantie omvat ook geen onderhouds-
maatregelen, zoals reiniging, smering of normale
inspectie van onderdelen, noch dergelijke
montagewerkzaamheden die de klant zelf kan
uitvoeren en die geen speciale demontage en montage
van het toestel vereisen. Dit soort maatregelen
zijn bijv. vervanging van monitoren, pedalen of
andere vergelijkbare eenvoudige onderdelen.
Garantieherstel dat is uitgevoerd door een ander
dan de geautoriseerde Tunturi-vertegenwoordiger
wordt niet vergoed. De garantie geldt alleen voor
normaal, voorgeschreven gebruik van het product zoals
beschreven in de handleiding.
Verklaring van de fabrikant
Tunturi New Fitness BV verklaart dat het product
voldoet aan de volgende normen en richtlijnen: EN 957
(HC), 89/336/EEG. Het product is derhalve voorzien van
het CE-label.
04-2018
Tunturi New Fitness BV
Purmerweg 1
1311 XE Almere
The Netherlands
Disclaimer
© 2018 Tunturi New Fitness BV
Alle rechten voorbehouden.
Het product en de handleiding zijn aan veranderingen
onderhevig. Specificaties kunnen zonder verdere
kennisgeving worden veranderd.

54
FitCross 40
# Description Specs Qty
1 Main Frame 1
2 Allen Screw M8*75 2
3 Rear Stabilizer 1
4 Spring Washer Ø8 2
5 Curve Washer Ø8*Ø20*1.5 8
6 Front Stabilizer 1
7 End Cap For Front Stabilizer 2
8 End Cap For Rear Stabilizer 2
9 Front Post 1
10 Computer 1
11 Fixed Handlebar 1
12 Top Handlebar (L) 1
13 Top Handlebar (R) 1
14 End Cap 2
15 Fixed Handlebar Foam Grip 2
16 Foam Grip 2
17L Crank L 1
17R Crank R 1
18 Screw 2
19 Washer 2
20 Screw for Computer M5*10 4
21 Carriage Bolt Ø8*20 4
22 Allen Bolt M6*12 4
23 Carriage Bolt M10*75 2
24 Curve Washer Ø10.5*Ø22*1.5 2
25 End cover 6
26 Washer Ø10*Ø32 2
27 Spring Washer Ø10 2
28 Hex Head Bolt M10*20 2
29 D Type Washer 2
30 Sleeve 4
31 Hex Head Bolt M8*45 4
32 Hex Head Bolt M10*78 2
33 Sleeve Ø12.7*65 2
34 Nylon Nut M10 2
35 Sleeve 4
36 Domed Nut M10 2
37 Flat Washer Ø10.5*Ø22*1.5 2
38 End Cap Ø25.4 2
39 End Cap 60*30 2
40L Hinge Bolt L 1
40R Hinge Bolt R 1
41L Pedal Tube L 1
41R Pedal Tube R 1
42 Club Knob 4
43 Wave Washer 2

55
FitCross 40
44L Lock Nut for Hinge Bolt L 1
44R Lock Nut for Hinge Bolt R 1
45 Flat Washer Ø22*Ø13*2.5 2
46 Plastic Spacer 2
47 Allen Screw M8*16 6
48 Pedal (L) 1
49 Pedal (R) 1
50 Lower Computer Wire 1
51 Upper Computer Wire 1
52 Bottom Handlebar (L) 1
53 Bottom Handlebar (R) 1
54 Washer Ø8*Ø17 1
55 Nylon Nut M8 1
56 End Cap for Crank 2
57 Axle of Belt Pulley 1
58 Self Tapping Screw ST5*15 12
59 Magnet Assembly 1
60L Chain Cover L/R 1
60R Chain Cover L/R 1
61 Crank Cover 2
62 Self Tapping Screw 4
63 Hex Head Screw M8*105 1
64 Motor 1
65 Sensor Bracket 1
66 Hex Head Screw M6*25 1
67 Hex Head Nut M6 2
68 Flange Nut 4
69 Belt 1
70 BB Set 1 set
71 Motor Wire 1
72 Flywheel 1
73 Spring 1
74 Power Wire 1
75 Sensor Wire 1
76 Belt Pulley 1
77 Axle of Flywheel 1
78 C-Clip 2
79 Bearing 6001 1
80 Bearing 6901 1
81 Hand Pulse Sensor 2
82 Adjustable Set 2
83 Grommet 1
84 Hand Pulse Wire 2
85 Adaptor 9V/0.5 A 1
Hardware Kit 1
# Description Specs Qty
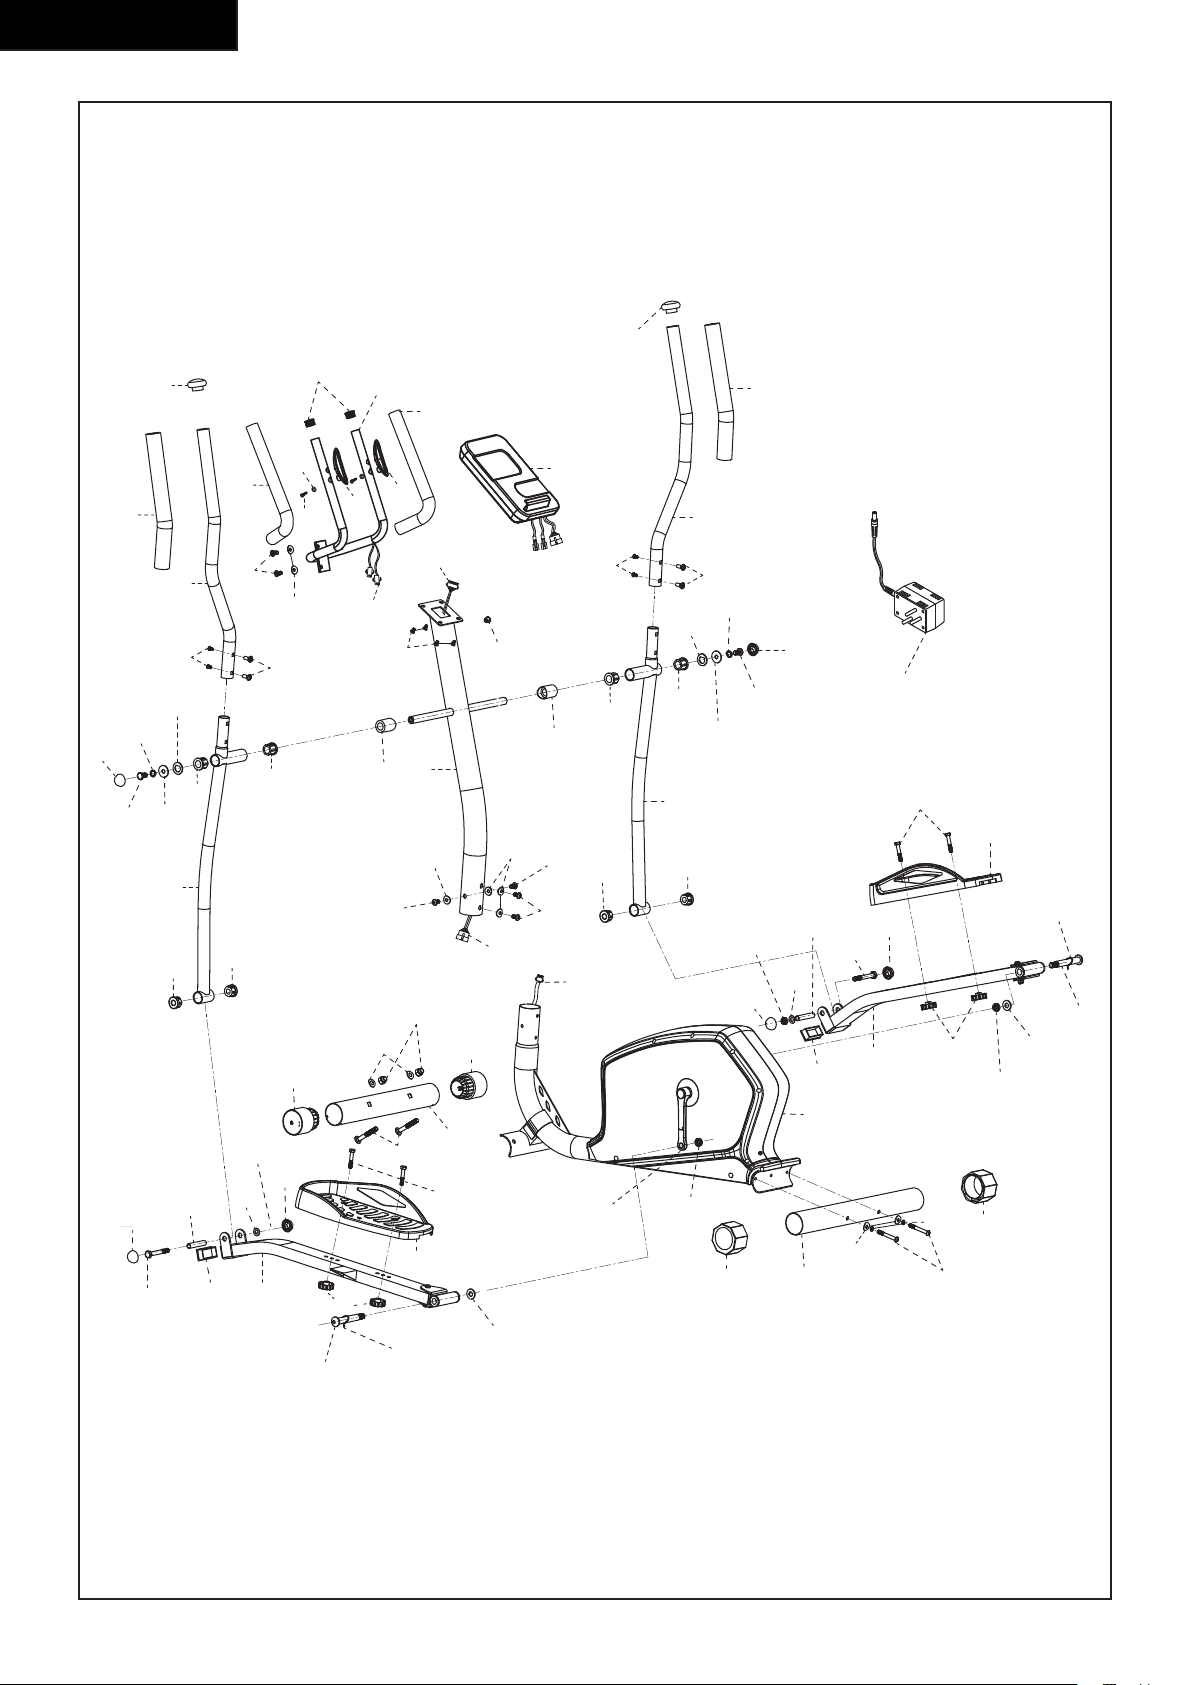
56
FitCross 40
14
38
11
15
19
15
16
12
22
21
29
27
25
30
30
26
28
52
35
35
46
9
47
20
83
51
84
5
47
18
81
81
10
14
16
13
22
21
27
25
29
28
26
30
30
46
85
31
49
43
25
32
33
34
25
37
35
53
35
47
47
5
5
51
50
36
7
6
23
31
25
34
37
33
25
32
39
41L
42
45
43
40L
48
24 7
17L
44L
1
8 3 2
5
4
8
39
41R
42
44R
45
40R
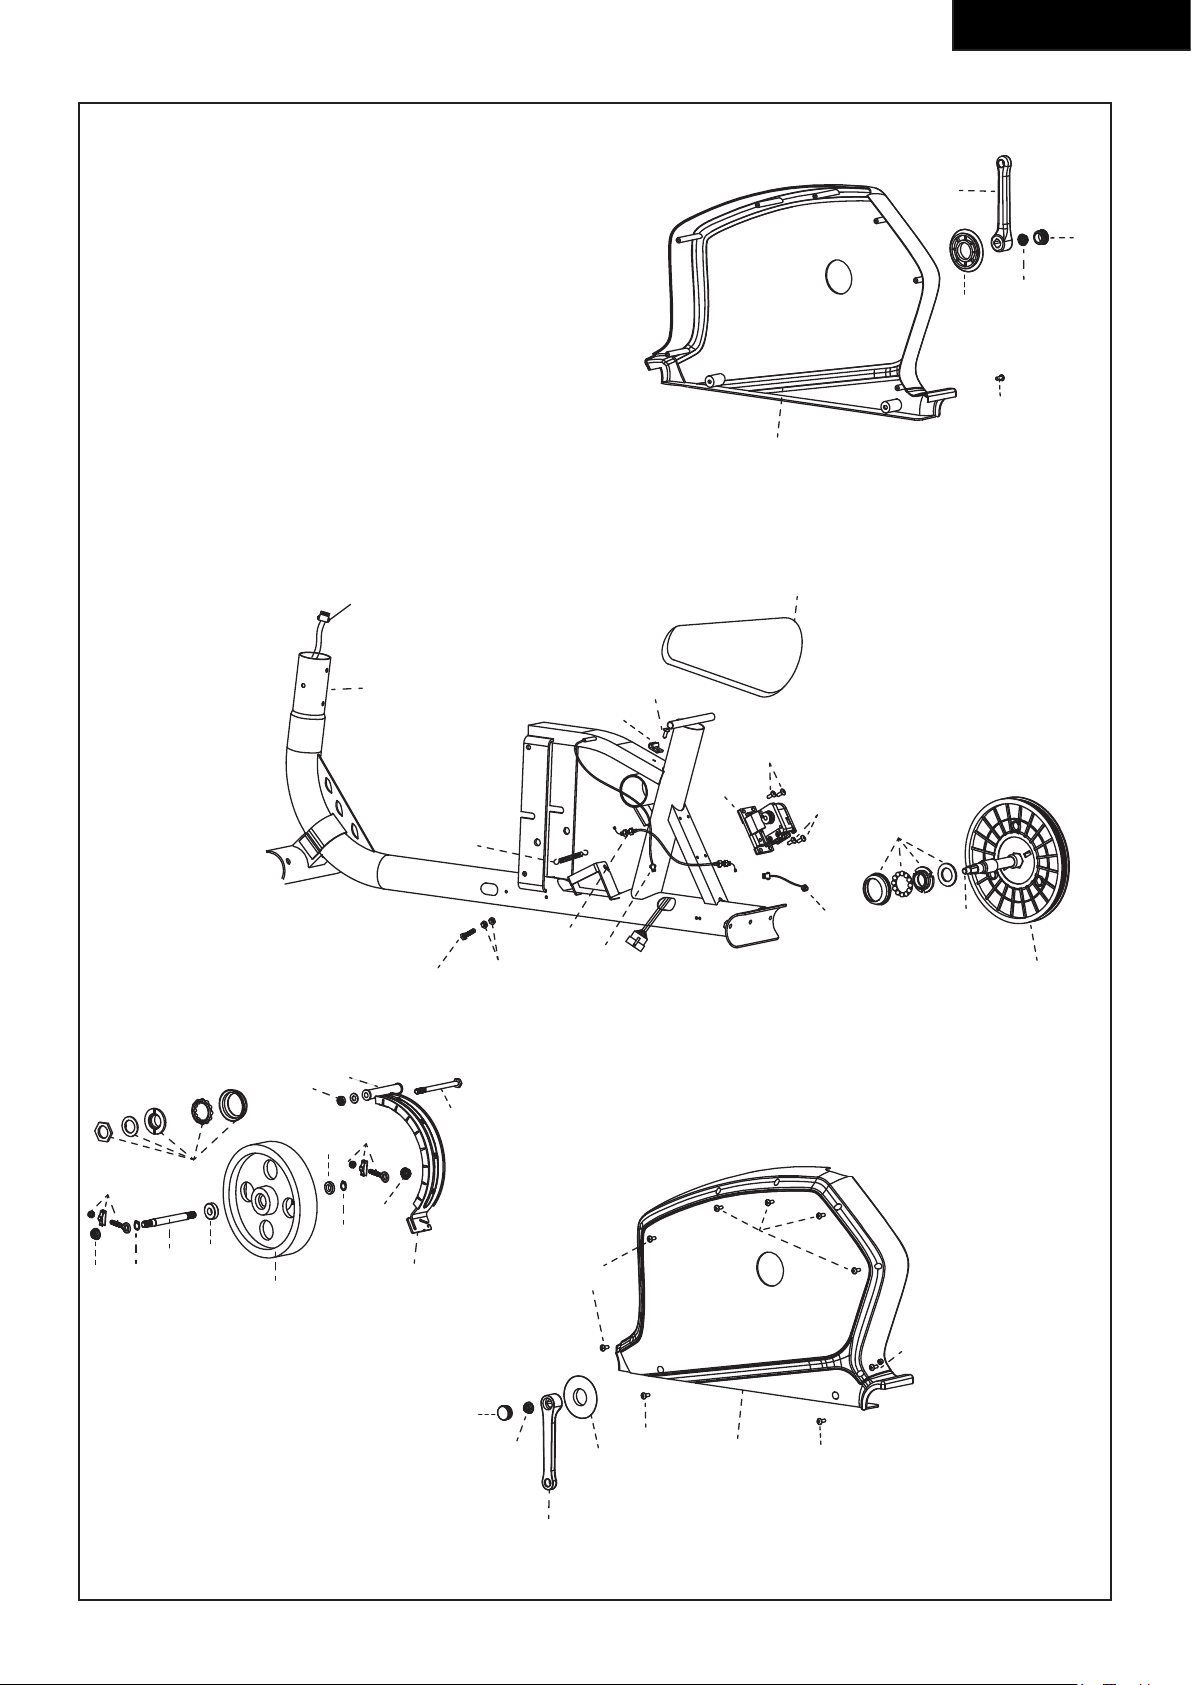
57
FitCross 40
50
69
58
58
56
68
61
62
17L
60L
62
58
82
70
68
78
77
79
72
59
78
68
80
82
55
54
63
66
67
71
73
75
65
58
58
64
58
70
74
57
76
62
60R
61
68
56
17R
1


www.tunturi.com
Tunturi New Fitness BV
Purmerweg 1 NL - 1311 XE Almere
P.O. Box 60001 NL - 1320 AA Almere
The Netherlands
www.tunturi-fitness.com
info@tunturi-fitness.com
20180418