
49-80695-2 10-14 GE
GEAppliances.com
Write the model and serial
numbers here:
Model # __________________
Serial # ___________________
You can find them on a label
behind the door or drawer.
Printed in the United States
Printed on
Recycled Paper
For a Spanish version of this
manual, visit our Website at
GEAppliances.com.
Para consultar una version
en español de este manual
de instrucciones, visite
nuestro sitio de internet
GEAppliances.com.
PHB920 - 30" Free-Standing Range
PHS920 - 30" Slide-In range
Owner’s Manual
Ranges
Electric Induction Free-Standing and Slide-In
Safety Information ..............2
Warranty .........................7
Assistance / Accessories .......8
Using The Range
Surface Units .......................9
Cookware for Induction Cooktop ....11
Oven Controls ......................12
Special Features ...................13
Oven Racks ........................14
Aluminum Foil and Oven Liners .....15
Cookware ..........................15
Cooking Modes ....................16
Cooking Guide .....................18
Warming Drawer ...................19
Care and Cleaning
Cleaning the Range – Exterior ......20
Cleaning the Range – Interior .......21
Cleaning the Glass Cooktop .........22
Probe ..............................23
Maintenance .......................24
Troubleshooting Tips ..........26

2
49-80695-2
SAVE THESE INSTRUCTIONS
Read all safety instructions before using the product. Failure to follow these instructions may result in fire,
electrical shock, serious injury or death.
STATE OF CALIFORNIA PROPOSITION 65 WARNING
ANTI-TIP DEVICE
WARNING
The California Safe Drinking Water and Toxic Enforcement Act requires the Governor of California to
publish a list of substances known to the state to cause cancer, birth defects or other reproductive harm,
and requires businesses to warn customers of potential exposure to such substances.
WARNING This product contains one or more chemical known to the State of California to
cause cancer, birth defects or other reproductive harm.
Self-clean ovens can cause low-level exposure to some of these substances, including carbon monoxide,
during the cleaning cycle. Exposure can be minimized by venting with an open window or using a
ventilation fan or hood.
IMPORTANT SAFETY INFORMATION.
READ ALL INSTRUCTIONS BEFORE USING.
SAFETY INFORMATION
To reduce the risk of tipping the range,
the range must be secured by a properly
installed anti-tip bracket. See installation
instructions shipped with the bracket for
complete details before attempting to install.
For Free-Standing and Slide-In Ranges
To check if the bracket is installed and
engaged properly, look underneath the
range to see that the rear leveling leg
is engaged in the bracket. On some models, the storage
drawer or kick panel can be removed for easy inspection.
If visual inspection is not possible, slide the range forward,
confirm the anti-tip bracket is securely attached to the floor
or wall, and slide the range back so the rear leveling leg is
under the anti-tip bracket.
If the range is pulled from the wall for any reason, always
repeat this procedure to verify the range is properly secured
by the anti-tip bracket.
Never completely remove the leveling legs or the range will
not be secured to the anti-tip device properly.
A child or adult can tip the range and be killed.
Verify the anti-tip bracket has been properly installed
and engaged.
Ensure the anti-tip bracket is re-engaged when the range
is moved.
Do not operate the range without the anti-tip bracket in
place and engaged.
Failure to follow these instructions can result in death or
serious burns to children or adults.
Tip-Over Hazard
WARNING
Anti-Tip
Bracket
Leveling Leg
Free-Standing and Slide-In Ranges
49-80695-2
3
This unit has been tested and found to comply with the limits for a class B digital device, pursuant to Part 18
of the FCC rules. These limits are designed to provide reasonable protection against harmful interference in a
residential installation. This unit generates, uses and can radiate radio frequency energy and, if not installed
and used in accordance with the instructions, may cause harmful interference to radio communications.
However, there is no guarantee that interference will not occur in a particular installation. If this unit does
cause harmful interference to radio or television reception, which can be determined by turning the unit off and
on, the user is encouraged to try to correct the interference by one or more of the following measures:
Ŷ
Reorient or relocate the receiving antennae.
Ŷ
Increase the distance between the unit and receiver.
Ŷ
Connect the unit into an outlet or a circuit different from that to which the receiver is connected.
SAVE THESE INSTRUCTIONS
SAFETY INFORMATION
Ŷ Use this appliance only for its intended purpose
as described in this Owner’s Manual.
Ŷ Be sure your appliance is properly installed and
grounded by a qualified installer in accordance
with the provided installation instructions.
Ŷ Do not attempt to repair or replace any part of
your range unless it is specifically recommended
in this manual. All other servicing should be
transferred to a qualified technician.
Ŷ Before performing any service, unplug the range
or disconnect the power supply at the household
distribution panel by removing the fuse or
switching off the circuit breaker.
Ŷ Do not leave children alone—children should not
be left alone or unattended in an area where an
appliance is in use. They should never be allowed
to climb, sit or stand on any part of the appliance.
Ŷ
CAUTION: Do not store items of
interest to children above a range or on the
backguard of a range—children climbing on the
range to reach items could be seriously injured.
Ŷ Use only dry pot holders—moist or damp pot
holders on hot surfaces may result in burns from
steam. Do not let pot holders touch hot surface
units or heating elements. Do not use a towel or
other bulky cloth in place of pot holders.
Ŷ Never use your appliance for warming or heating
the room.
Ŷ Do not touch the surface units, the heating
elements or the interior surface of the oven.
These surfaces may be hot enough to burn
even though they are dark in color. During and
after use, do not touch, or let clothing or other
flammable materials contact the surface units,
areas nearby the surface units or any interior
area of the oven; allow sufficient time for cooling
first. Other surfaces of the appliance may
become hot enough to cause burns. Potentially
hot surfaces include the cooktop, areas facing
the cooktop, oven vent opening, surfaces near
the opening and crevices around the oven door.
Ŷ Do not heat unopened food containers. Pressure
could build up and the container could burst,
causing an injury.
Ŷ 'RQRWXVHDQ\W\SHRIIRLORUOLQHUWRFRYHUWKH
oven bottom or anywhere in the oven, except as
described in this manual. Oven liners can trap
heat or melt, resulting in damage to the product
and risk of shock, smoke or fire.
Ŷ Avoid scratching or impacting glass doors, cook
tops or control panels. Doing so may lead to
glass breakage. Do not cook on a product with
broken glass. Shock, fire or cuts may occur.
Ŷ Cook meat and poultry thoroughly—meat to
at least an internal temperature of 160°F and
poultry to at least an internal temperature of
180°F. Cooking to these temperatures usually
protects against foodborne illness.
GENERAL SAFETY INSTRUCTIONS
WARNING
CAUTION
Persons with a pacemaker or similar medical device should exercise caution when using or standing
near an induction unit while it is in operation. The electromagnetic field may affect the working of
the pacemaker or similar medical device. It is advisable to consult your doctor or the pacemaker
manufacturer about your particular situation.
4
49-80695-2
IMPORTANT SAFETY INFORMATION.
READ ALL INSTRUCTIONS BEFORE USING.
SAFETY INFORMATION
Ŷ Do not use water on grease fires. Never pick up
a flaming pan. Turn the controls off. Smother a
flaming pan on a surface unit by covering the
pan completely with a well-fitting lid, cookie sheet
or flat tray. Use a multi-purpose dry chemical or
foam-type fire extinguisher.
Ŷ If there is a fire in the oven during baking,
smother the fire by closing the oven door and
turning the oven off or by using a multi-purpose
dry chemical or foam-type fire extinguisher.
Ŷ If there is a fire in the oven during self-clean, turn
the oven off and wait for the fire to go out. Do
not force the door open. Introduction of fresh air
at self-clean temperatures may lead to a burst
of flame from the oven. Failure to follow this
instruction may result in severe burns.
IN THE EVENT OF A FIRE, TAKE THE FOLLOWING
STEPS TO PREVENT INJURY AND FIRE SPREADING
WARNING
Ŷ
Never leave the surface units unattended at
medium or high heat settings. Boilovers cause
smoking and greasy spillovers that may catch
on fire.
Ŷ Never leave oil unattended while frying. If allowed
to heat beyond its smoking point, oil may ignite
resulting in fire that may spread to surrounding
cabinets. Use a deep fat thermometer whenever
possible to monitor oil temperature.
Ŷ
To avoid oil spillover and fire, use a minimum
amount of oil when shallow pan-frying and
avoid cooking frozen foods with excessive
amounts of ice.
Ŷ Only certain types of glass, glass/ceramic,
earthenware or other glazed containers are
suitable for cooktop service; others may break
because of the sudden change in temperature.
Ŷ To minimize the possibility of burns, ignition of
flammable materials and spillage, the handle of a
container should be turned toward the center of
the range without extending over nearby surface
units.
Ŷ When preparing flaming foods under a hood, turn
the fan on.
COOKTOP SAFETY INSTRUCTIONS
WARNING
SAVE THESE INSTRUCTIONS
Ŷ Do not store or use flammable materials in
an oven or near the cooktop, including paper,
plastic, pot holders, linens, wall coverings,
curtains, drapes and gasoline or other flammable
vapors and liquids.
Ŷ
Never wear loose-fitting or hanging garments while
using the appliance. These garments may ignite if
they contact hot surfaces causing severe burns.
Ŷ Do not let cooking grease or other flammable
materials accumulate in or near the range.
Grease in the oven or on the cooktop may ignite.
Ŷ Clean ventilating hoods frequently. Grease
should not be allowed to accumulate on the hood
or filter.
KEEP FLAMMABLE MATERIALS AWAY FROM THE RANGE
Failure to do so may result in fire or personal injury.
WARNING
49-80695-2
5
Ŷ Stand away from the range when opening the
oven door. Hot air or steam which escapes can
cause burns to hands, face and/or eyes.
Ŷ Do not use the oven if a heating element
develops a glowing spot during use or shows
other signs of damage. A glowing spot indicates
the heating element may fail and present a
potential burn, fire, or shock hazard. Turn the
oven off immediately and have the heating
element replaced by a qualified service
technician.
Ŷ Keep the oven vent unobstructed.
Ŷ Keep the oven free from grease buildup. Grease
in the oven may ignite.
Ŷ Place oven racks in desired location while oven
is cool. If rack must be moved while oven is hot,
do not let pot holder contact hot heating element
in oven.
Ŷ When using cooking or roasting bags in the
oven, follow the manufacturer’s directions.
Ŷ Pull the oven rack to the stop-lock position when
loading and unloading food from the oven. This
helps prevent burns from touching hot surfaces
of the door and oven walls.
Ŷ Do not leave items such as paper, cooking
utensils or food in the oven when not in use.
Items stored in an oven can ignite.
Ŷ 1HYHUSODFHFRRNLQJXWHQVLOVSL]]DRUEDNLQJ
stones, or any type of foil or liner on the oven
floor. These items can trap heat or melt, resulting
in damage to the product and risk of shock,
smoke or fire.
OVEN SAFETY INSTRUCTIONS
WARNING
SAVE THESE INSTRUCTIONS
SAFETY INFORMATION
Ŷ Use care when touching the cooktop. The glass
surface of the cooktop will retain heat after the
controls have been turned off.
Ŷ Do not cook on a broken cooktop. If glass
cooktop should break, cleaning solutions and
spillovers may penetrate the broken cooktop and
create a risk of electric shock. Contact a qualified
technician immediately.
Ŷ Avoid scratching the glass cooktop. The cooktop
can be scratched with items such as knives,
sharp instruments, rings or other jewelry, and
rivets on clothing.
Ŷ Use CERAMA BRYTE
®
ceramic Cooktop Cleaner
and CERAMA BRYTE
®
Cleaning Pad to clean
the cooktop. Wait until the cooktop cools and
the indicator light goes out before cleaning. A
wet sponge or cloth on a hot surface can cause
steam burns. Some cleaners can produce
noxious fumes if applied to a hot surface. Note:
Sugar spills are an exception. They should be
scraped off while still hot using an oven mitt and
a scraper. See the Cleaning the glass cooktop
section for detailed instructions.
Ŷ Read and follow all instructions and warnings on
the cleaning cream label.
GLASS COOKTOP SAFETY INSTRUCTIONS
WARNING

6
49-80695-2
SAVE THESE INSTRUCTIONS
IMPORTANT SAFETY INFORMATION.
READ ALL INSTRUCTIONS BEFORE USING.
SAFETY INFORMATION
The self-cleaning feature operates the oven at temperatures high enough to burn away food soils in the
oven. Follow these instructions for safe operation.
Ŷ Do not touch oven surfaces during self-clean
operation. Keep children away from the oven
during self-cleaning. Failure to follow these
instructions may cause burns.
Ŷ
Before operating the self-clean cycle, remove pans,
shiny metal oven racks and other utensils from the
oven. Only gray porcelain-coated oven racks may
be left in the oven. Do not use self-clean to clean
other parts, such as drip pans or bowls.
Ŷ Before operating the self-clean cycle, wipe
grease and food soils from the oven. Excessive
amount of grease may ignite leading to smoke
damage to your home.
Ŷ If the self-cleaning mode malfunctions, turn the
oven off and disconnect the power supply. Have
it serviced by a qualified technician.
Ŷ Do not clean the door gasket. The door gasket is
essential for a good seal. Care should be taken
not to rub, damage or move the gasket.
Ŷ Do not use oven cleaners. No commercial oven
cleaner or oven liner protective coating of any kind
should be used in or around any part of the oven.
Ŷ The purpose of the warming drawer is to hold hot
cooked foods at serving temperature. Bacteria
will grow in food while it is below 140°F. Do not
put cold food in warming drawer. Do not heat
food for more than 2 hours. Failure to follow
these instructions may result in foodborne illness.
Ŷ Do not leave paper products, plastics, canned
food or combustible materials in the drawer. They
may ignite.
Ŷ Do not touch the heating element or the interior
surface of the drawer. These surfaces may be
hot enough to cause burns.
Ŷ Use care when opening the drawer. Open the
drawer a crack and let hot air or steam escape
before removing or replacing food. Hot air or
steam that escapes can cause burns to hands,
face and/or eyes.
Ŷ Do not use aluminum foil to line the lower
drawer. The foil will trap heat below, and upset
the performance of the oven. Foil can melt
and permanently damage the drawer bottom.
Damage from improper use of aluminum foil is
not covered by the product warranty.
SELF-CLEANING OVEN SAFETY INSTRUCTIONS
WARMING DRAWER SAFETY INSTRUCTIONS
WARNING
WARNING

49-80695-2
7
GE Electric Range Warranty
GEAppliances.com
All warranty service is provided by our Factory Service Centers, or an authorized Customer Care
®
technician.
To schedule service, on-line, visit us at www.geappliances.com/service_and_support/, or call 800.GE.CARES
(800.432.2737). Please have serial number and model number available when calling for service.
Servicing your appliance may require the use of the onboard data port for diagnostics. This gives a GE factory
service technician the ability to quickly diagnose any issues with your appliance and helps GE improve its products
by providing GE with information on your appliance. If you do not want your appliance data to be sent to GE, please
advise your technician not to submit the data to GE at the time of service.
For the period of one year from the date of the original purchase. GE will provide any part of the range which fails due
to a defect in materials or workmanship. During this limited one-year warranty, GE will also provide, free of charge, all
labor and in-home service to replace the defective part.
What GE will not cover:
Ŷ Service trips to your home to teach you how to
use the product.
Ŷ Improper installation, delivery or maintenance.
Ŷ Failure of the product if it is abused, misused,
modified or used for other than the intended
purpose or used commercially.
Ŷ Damage to the glass cooktop caused by use of
cleaners other than the recommended cleaning
creams and pads.
Ŷ Damage to the glass cooktop caused by
hardened spills of sugary materials or melted
plastic that are not cleaned according to the
directions in the Owner's Manual.
Ŷ Replacement of house fuses or resetting of
circuit breakers.
Ŷ Damage to the product caused by accident, fire,
floods or acts of God.
Ŷ Incidental or consequential damage caused by
possible defects with this appliance.
Ŷ Damage caused after delivery.
Ŷ Product not accessible to provide required
service.
Ŷ Service to repair or replace light bulbs, except
for LED lamps.
EXCLUSION OF IMPLIED WARRANTIES
Your sole and exclusive remedy is product repair as provided in this Limited Warranty. Any implied warranties,
including the implied warranties of merchantability or fitness for a particular purpose, are limited to one year or the
shortest period allowed by law.
This warranty is extended to the original purchaser and any succeeding owner for products purchased for home use
within the USA. If the product is located in an area where service by a GE Authorized Servicer is not available, you
may be responsible for a trip charge or you may be required to bring the product to an Authorized GE Service location
for service. In Alaska, the warranty excludes the cost of shipping or service calls to your home.
Some states do not allow the exclusion or limitation of incidental or consequential damages. This warranty gives you
specific legal rights, and you may also have other rights which vary from state to state. To know what your legal rights
are, consult your local or state consumer affairs office or your state’s Attorney General.
Warrantor: General Electric Company. Louisville, KY 40225
Extended Warranties: Purchase a GE extended warranty and learn about special discounts that are available while
your warranty is still in effect. You can purchase it on-line anytime
www.geappliances.com/service_and_support/shop-for-extended-service-plans.htm
or call 800.626.2224 during normal business hours. GE Consumer Home Services will still be there after your
warranty expires.
Register Your Appliance: Register your new appliance on-line at your convenience!
www.geappliances.com/service_and_support/register/
Timely product registration will allow for enhanced communication and prompt service under the terms of your warranty,
should the need arise. You may also mail in the pre-printed registration card included in the packing material.
Staple your receipt here. Proof of the original purchase
date is needed to obtain service under the warranty.
WARRANTY
Thank You! ... for your purchase of a GE Brand appliance.

8
49-80695-2
Try the GE Appliances Website (www.geappliances.com/service_and_support/) 24 hours a day, any day of the
year! For greater convenience and faster service, you can now download Owner’s Manuals, order parts or even
schedule service on-line.
Schedule Service: Expert GE repair service is only one
step away from your door. Get on-line and schedule your
service at www.geappliances.com/service_and_support/
Or call 800.GE.CARES (800.432.2737) during normal
business hours.
Parts and Accessories: Individuals qualified to service their
own appliances can have parts or accessories sent directly
to their homes (VISA, MasterCard and Discover cards are
accepted).Order on-line today, 24 hours every day or by
phone at 800.626.2002 during normal business hours.
Instructions contained in this manual cover procedures
to be performed by any user. Other servicing generally
should be referred to qualified service personnel. Caution
must be exercised, since improper servicing may cause
unsafe operation.
Real Life Design Studio: GE supports the Universal
Design concept of products, services and environments
that can be used by people of all ages, sizes and
capabilities. We recognize the need to design for a wide
range of physical and mental abilities and impairments.
For details of GE’s Universal Design applications,
including kitchen design ideas for people with disabilities,
check out our Website today. For the hearing impaired,
please call 800.TDD.GEAC (800.833.4322).
Contact Us: If you are not satisfied with the service you
receive from GE, contact us on our Website with all the
details including your phone number, or write to:
General Manager, Customer Relations
GE Appliances, Appliance Park Louisville, KY 40225
Accessories
Looking For Something More?
GE offers a variety of accessories to improve your cooking and maintenance experiences!
To place an order visit us online at:
www.GEApplianceParts.com (U.S.) or www.GEAppliances.ca (Canada)
or call 800.626.2002 (U.S.) 800.661.1616 (Canada)
The following products and more are available:
How to Remove Protective Shipping Film and Packaging Tape
Carefully grasp a corner of the protective shipping film
with your fingers and slowly peel it from the appliance
surface. Do not use any sharp items to remove the film.
Remove all of the film before using the appliance for the
first time.
To assure no damage is done to the finish of the
product, the safest way to remove the adhesive from
packaging tape on new appliances is an application of
a household liquid dishwashing detergent. Apply with a
soft cloth and allow to soak.
NOTE: The adhesive must be removed from all parts. It
cannot be removed if it is baked on.
Accessories
Small Broiler Pan (8 ¾” x 1 ¼” x 13 ½“) WB48X10055 (US) 222D2097G001 (Canada)
Large* Broiler Pan (12 ¾” x 1 ¼” x 16 ½“) WB48X10056 (US) 222D2097G002 (Canada)
XL** Broiler Pan (17” x 1 ¼” x 19 ¼“) WB48X10057 (US) Not available in Canada
Parts
Oven racks Part numbers vary by model
Oven elements Part numbers vary by model
Light bulbs Part numbers vary by model
Cleaning Supplies
CitruShine Stainless Steel Wipes WX10X10007
CERAMA BRYTE
®
Stainless Steel Appliance Cleaner PM10X311
CERAMA BRYTE
®
Cleaning Pads for Ceramic Cooktops WX10X350
CERAMA BRYTE
®
Ceramic Cooktop Cleaner WX10X300
CERAMA BRYTE
®
Ceramic Cooktop Scraper WX10X0302
Kit (Kit includes cream and cooktop scraper) WB64X5027
*The large broiler pan does not fit in 20”/24” ranges.
**The XL broiler pan does not fit in 24” wall ovens, 27”drop ins or 20”/24” range
Have a question or need assistance with your appliance?
ASSISTANCE / ACCESSORIES
49-80695-2
9
USING THE RANGE: Surface Units
Surface Units
FIRE HAZARD: Never leave the range unattended with the cooktop on medium or high
settings. Keep flammable items away from the cooktop. Turn off all controls when done
cooking. Failure to follow these instructions can result in fire, serious injury or death.
WARNING
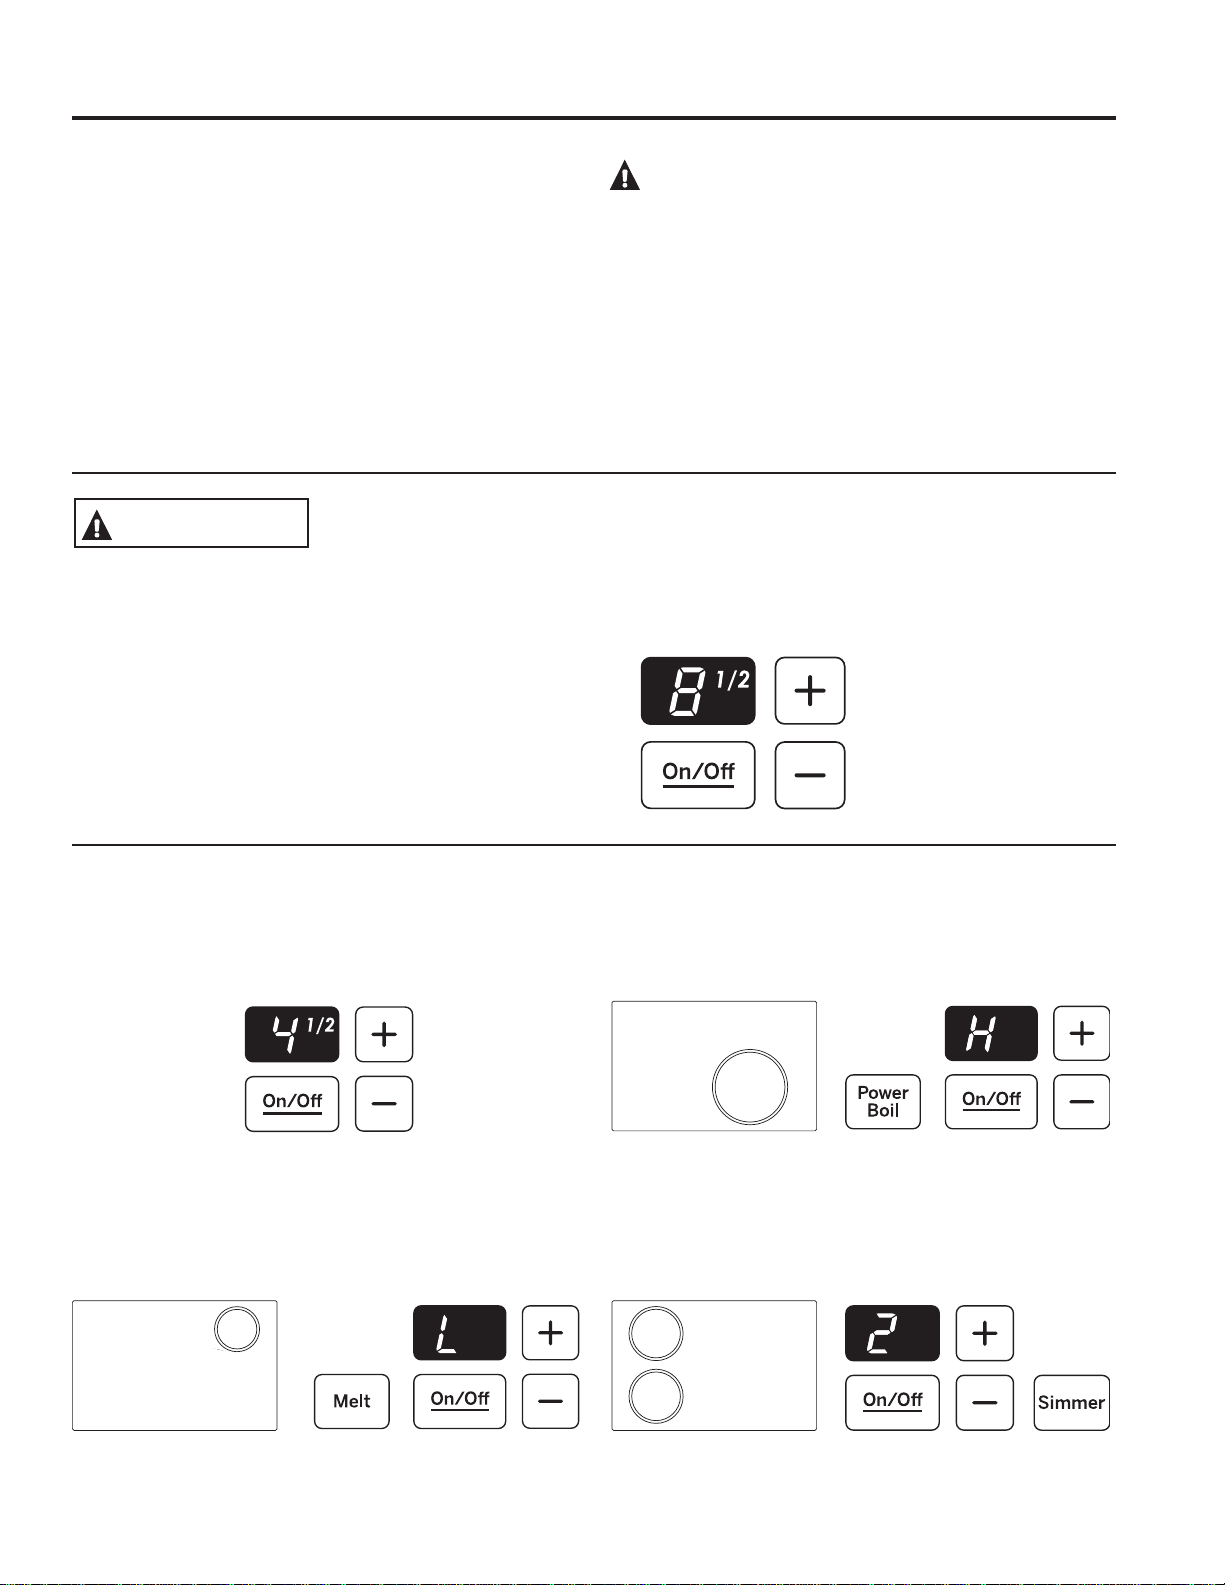
Surface Unit Cook Settings
The cooktop offers 19 power levels. Power levels
range from "L" (Low) to "H" (High) in precise half-step
increments. For example: L, 1, 1 ½, 2, 2 ½, and up to H.
Power Level “L”, the lowest setting, is recommended for
keeping food warm.
The power level increases one-half level with each touch.
How Induction Surface Cooking Works
Induction coils under the glass cooking surface produce
a magnetic field that generates heat in ferrous metals
that are in close proximity. The glass cooking surface is
not heated directly since it is not a ferrous metal, but the
glass may eventually become hot from the pan. Induction
surface coils are more efficient and will heat much faster
than conventional electric and gas cooking surface
cooking products.
CAUTION:
Ŷ The induction cooking elements may appear to be cool
while turned ON and after they have been turned OFF.
The glass surface may be HOT from residual heat
transferred from the cookware and burns may occur.
Ŷ DO NOT TOUCH HOT COOKWARE or PANS directly
with hands. Always use mitts or pot holders to protect
hands from burns.
Ŷ DO NOT SLIDE cookware across the cooktop surface.
Doing so may permanently damage the appearance
of the ceramic cooktop.
The power level with a fraction
indicates the additional half-
step setting. You may hear
clicking sounds indicating the
control is maintaining your
desired setting.
6LQJOH6XUIDFH8QLW³&RRN6HWWLQJV
To turn on a single surface unit:
1. Touch the On/Off pad; then touch the + or – pad.
2. Use the + or – pad to choose the desired power setting.
To use the Melt feature:
Touch the On/Off pad; then touch Melt. The element will
automatically set to a predetermined setting and “L” will
be displayed. To turn off a single surface unit, touch the
On/Off pad again.
To use the Power Boil feature:
Touch the On/Off pad; then touch Power Boil. The
element will automatically set to a predetermined setting.
To use the Simmer feature:
Touch the On/Off pad; then touch Simmer. The element will
automatically set to a predetermined setting. Adjust using
the + or – pad to increase or decrease the simmer rate.

10
49-80695-2
Surface Units (Cont.)
USING THE RANGE: Surface Units
Throughout this manual, features and appearance may vary from your model.
Using the Warming Zone
FOOD POISON HAZARD: Bacteria may grow in food at
temperatures below 140°F.
Ŷ $OZD\VVWDUWZLWKKRWIRRG'RQRWXVHZDUPVHWWLQJWR
heat cold food.
Ŷ 'RQRWXVHZDUPVHWWLQJIRUPRUHWKDQ
2 hours.
The Warming Zone is located in the back center of the
glass surface.
To use the Warming Zone:
1. Touch the Warming Zone On/Off pad.
2. To select the desired control setting, touch the Select
pad once for Low, twice for Medium or three times
for High.
To turn off the Warming Zone:
Touch the Warming Zone On/Off pad.
For best results, all foods on the Warming Zone should
be covered with a lid or aluminum foil.
Always use pot holders or oven mitts when removing
food from the Warming Zone, as cookware will be hot.
Ŷ 'RQRWXVHSODVWLFZUDSWRFRYHUIRRG3ODVWLFPD\
melt onto the surface and be very difficult to clean.
Ŷ 8VHRQO\FRRNZDUHUHFRPPHQGHGIRUWRSRIUDQJH
cooking.
WARNING

49-80695-2
11
Cookware for Induction Cooktop
USING THE RANGE: Cookware for Induction Cooktop
What Type of Pans Are Required?
You must use a ferrous pan when using the induction
coils on this range. The warming zone is not an induction
coil and will work with any type of cookware. You
can verify your pan is ferrous if a magnet sticks to it.
Quality cookware with heavy bottoms made of cast iron,
magnetic stainless steel and enameled steel work best.
For best results, use pans with flat bottoms. Woks that
do not have flat bottoms in close contact to the glass
surface will not work. Some pans are made especially for
induction cooking.
Place only dry pans on the surface elements. Do not
place lids on the surface elements, particularly wet lids.
Wet pans and lids may stick to the surface when cool.
Pan Size and Shape
The induction coils require a minimum pan size in order
for the element to turn on. In order for the induction coil
to correctly determine if the pan is large enough, it is
important that the pan be centered within the circular
graphics marked on the glass cooking surface. The
minimum pan size that will work for each induction coil
is shown on the left. Pans that are not ferrous or are too
small will not allow the induction coil to turn on, and the
power level display for that coil location will flash for 30
seconds and then turn off. If a pan is removed from the
induction coil for more than 30 seconds, the power will
be shut off. Square pans will work, although round pans
that match the induction coil sizes work best. Cookware
larger than the cooktop glass graphics will work. For
best results, match the pan size with the nearest-size
graphics on the glass cooking surface.
Cookware “Noise”
A low humming noise is normal when using induction
coils, especially on higher power settings. Heavy enamel
cast-iron pots produce less noise than lightweight steel
pans. The amount of food content in the pans can
also affect noise level. Pans that completely cover the
graphics on the glass will produce less noise. Water
trapped under pans can boil, causing the cookware
to vibrate or slide on the glass surface. Water under
pans may also cause the controls to reduce the power
delivered to the cookware. To try to reduce the noise,
move pans slightly and/or change power levels.
Power Sharing
For power level H (high), if a surface unit is on for an
extended period of time or if multiple surface units are
on, there may be a slight reduction in power to the
surface unit. Water under pans may also cause the
controls to reduce the power delivered to the cookware.
Use the minimum size pan shown for each
cooking element.
5-3/4” Min.
Dia. Pan
Size
5-3/4” Min.
Dia. Pan
Size
4-3/4”
Min. Dia.
Pan Size
8” Min. Dia.
Pan Size
Use a griddle.
Use a flat-bottomed wok.
Use flat-bottomed pans.

12
49-80695-2
1. Convection Cooking Mode: Convection
cooking mode uses increased air circulation to improve
performance. See the Cooking Modes section for more
information.
2. Traditional Cooking Modes: Your oven has
the following traditional cooking modes: Bake and
Broil Hi/Lo. See the Cooking Modes section for more
information.
3. Clean: Your oven has two cleaning modes: Self
Clean and Steam Clean. See the Cleaning the Oven
section for important information about using these
modes.
4. Start: Must be pressed to start any cooking,
cleaning, or timed function.
5. Cancel/Off: Cancels ALL oven operations except
the clock, timer and warming drawer.
6. Cook Time: Counts down cooking time and turns
off the oven when the cooking time is complete. Press
the Cook Time pad, use the number pads to program
a cooking time in hours and minutes, then press Start.
This can only be used with Bake and Convection Bake.
7. Clock: Sets the oven clock time. Press the Set
Clock pad, then use the number pads to program the
clock. Press Start to save the time.
8. Timer: Works as a countdown timer. Press the
Timer On pad and the number pads to program the
time in hours and minutes. Press the Start pad. The
timer countdown is complete. To turn the timer off
press the Timer Off pad.
9. Delay Time: Delays when the oven will turn on.
Use this to set a time when you want the oven to start.
Press the Delay Time pad and use the number pads
to program the time of day for the oven to turn on
then press Start. Press the desired cooking mode and
temperature then press Start. A Cook Time may also
be programmed if desired. Follow the directions under
Cook Time for setting this feature. This can only be
used with Bake and Convection Bake.
NOTE: When using the Delay Time feature, foods that
spoil easily—such as milk, eggs, fish, stuffings, poultry
and pork—should not be allowed to sit for more than
1 hour before or after cooking. Room temperature
promotes the growth of harmful bacteria. Be sure that
the oven light is off because heat from the bulb will
speed harmful bacteria growth.
10. Oven Light: Turns the oven light on or off.
11. Lock Controls: Locks out the control so that
pressing the pads does not activate the controls. Press
the Lock Controls pad, for three seconds to lock or
unlock the control. Cancel/Off is always active, even
when the control is locked.
12. Warming Drawer: Will keep hot, cooked foods
at serving temperature. Press the Warming Drawer
On/Off pad, Warming Drawer Setting pad begins
to blink. Press the Warming Drawer Setting pad to
set the warming drawer to "HI", "STD", or "LO". To
cancel, press the Warming Drawer On/Off pad.
See
the Cooking Modes section for more information.
NOTE: The Cancel/Off pad does not turn off the
Warming Drawer.
13. Probe
: Monitors internal food temperature and turns
the oven off when the food reaches the programmed
temperature. Insert the probe, program the cooking
mode, and program the probe temperature. See the
Cooking Modes section for more information. The
probe can only be used with Bake and Convection
Bake.
USING THE RANGE: Oven Controls
Oven Controls
1
8
23 69
475
13
12
1110

49-80695-2
13
Special Features
USING THE RANGE: Special Features
There are several different special features on your range. To change the settings of these special features:
Ŷ 3UHVVWKHBake and Broil pads at the same time and hold for three seconds.
Ŷ ³6)´ZLOODSSHDULQWKHGLVSOD\
Ŷ 6HOHFWWKHIHDWXUH\RXZDQWWRFKDQJH
Ŷ :KHQWKHFKDQJHKDVEHHQPDGHSUHVVWKHStart key to save the change and return to the time of day.
Adjust the Oven Temperature
This feature allows the oven baking and convection
baking temperature to be adjusted up to 35ºF hotter
or down to 35ºF cooler. Use this feature if you believe
your oven temperature is too hot or too cold and wish to
change it. This adjustment affects Bake and Convection
Bake modes. No other cooking modes are affected.
Press the Bake pad to enter the temperature adjustment
mode. A number between 35 and - 35 will display.
Use the number pads to set the desired temperature
adjustment and use the Bake pad to change between
negative and positive.
Press the Start pad to save the temperature adjustment.
End of Timer Signals
This is the tone that signals the end of a timer. The tone
can be continuous (Con bEEP) or one repeating beep
(bEEP). A continuous setting will continue to sound a
tone until a button on the control is pressed. Press the
Broil pad to view the current setting and then to change
the setting.
Fahrenheit or Celsius Temperature Display
The oven control is set to use Fahrenheit temperatures
(F), but you can change it to use Celsius temperatures
(C). Press the Cook Time and Broil Hi/Lo at the same
time to view the current setting, press again to change
the setting.
Clock Display
This feature specifies how the time of day will be
displayed or if no time of day will be displayed. You can
select a standard 12-hour clock (12 H), 24-hour military
time display (24 H), or no clock displayed (oFF). Press
the Clock pad to view the current setting, press again to
change the setting.
Auto Recipe Conversion
When using Convection Bake cooking, Auto Recipe
Conversion will automatically convert the regular baking
temperatures entered to convection bake cooking
temperatures when turned on. Note that this option
does not convert convection bake cooking times, it only
converts temperatures. Press the Convection Bake pad
to view the conversion settings, press again to toggle
between On (Con On) and Off (Con oFF).
Sound Volume
This feature allows the oven tone volume to be adjusted
between high (HI bEEP HI), medium (Std bEEP Std),
low (Lo bEEP Lo) and off (oFF bEEP oFF). Press the
Cook Time pad to view the current setting or to change
the setting. The control will sound the oven tone at the
new volume level each time the sound level is changed.
12-hour auto shut-off and Sabbath
Options for this feature are “12 SHdn”, “no SHdn” and
“SAbbAtH”.
12-hour auto shut-off turns off the oven after 12 hours of
continuous operations.
Sabbath mode disables the oven lights all sounds
(the control will not beep when a button is pressed),
Convection, Broil, Warm, Cook Time, Timer, Clock, and
Delay Time functions. Sabbath mode can only be used
with Bake. This feature conforms to the Star-K Jewish
Sabbath requirements.
NOTE: The oven light comes on automatically (on some
models) when the door is opened and goes off when the
door is closed. The bulb may be removed. See the Oven
Light Replacement section. On models with a light switch
on the control panel, the oven light may be turned on
and left on.
Press the Delay Time pad to view the current setting and
then to change the setting.
Press the Delay Time pad to view the current setting
and then to change the setting.
To use Sabbath mode, select “SAbbAtH” and press
Start. A ] will appear in the display and the clock will not
display.
Once in Sabbath mode, at any time you can press Bake,
use the number pads to enter a temperature between
170F and 550F, and press Start. No sound will be given
when the keys are pressed. At a random time between
30 seconds and 1 minute, ][, will appear in the display
indicating the oven is running.
If you need to adjust the temperature, press Bake, use
the number pads to enter a new temperature between
170F and 550F, and press Start.
To exit Sabbath mode, make sure that the oven is turned
off. To turn the oven off, press Cancel/Off. The oven will
immediately turn off and ][ will change to ] indicating that
the oven has turned off. Press and hold the Bake and
Broil pads for 3 seconds to enter special features then
press Delay Time until either "12 Shdn" or "no Shdn" is
in the display and press Start.
NOTE: If power outage occurs during Sabbath mode the
unit will remain in Sabbath mode but off when power is
restored.
If you wish to use the Cook Time feature (if available) to
bake in the oven and then have the oven automatically
turn off, you will need to press the Cook Time pad,
enter a cooking time duration, and press Start. Then
enter special features to start Sabbath mode as detailed
above.
14
49-80695-2
Recommended rack positions for various types of
foods are provided in the Cooking Guide. Adjusting
rack position is one way to impact cooking results. For
example, if you would prefer darker tops on cakes,
muffins, or cookies, try moving food one rack position
higher. If you find foods are too brown on top try moving
them down next time.
When baking with multiple pans and on multiple racks,
ensure there is at least 1½" between pans to allow
sufficient space for air to flow.
Your Oven may have extension racks and/or traditional
flat racks.
To avoid possible burns, place the racks in the desired
position before you turn the oven on.
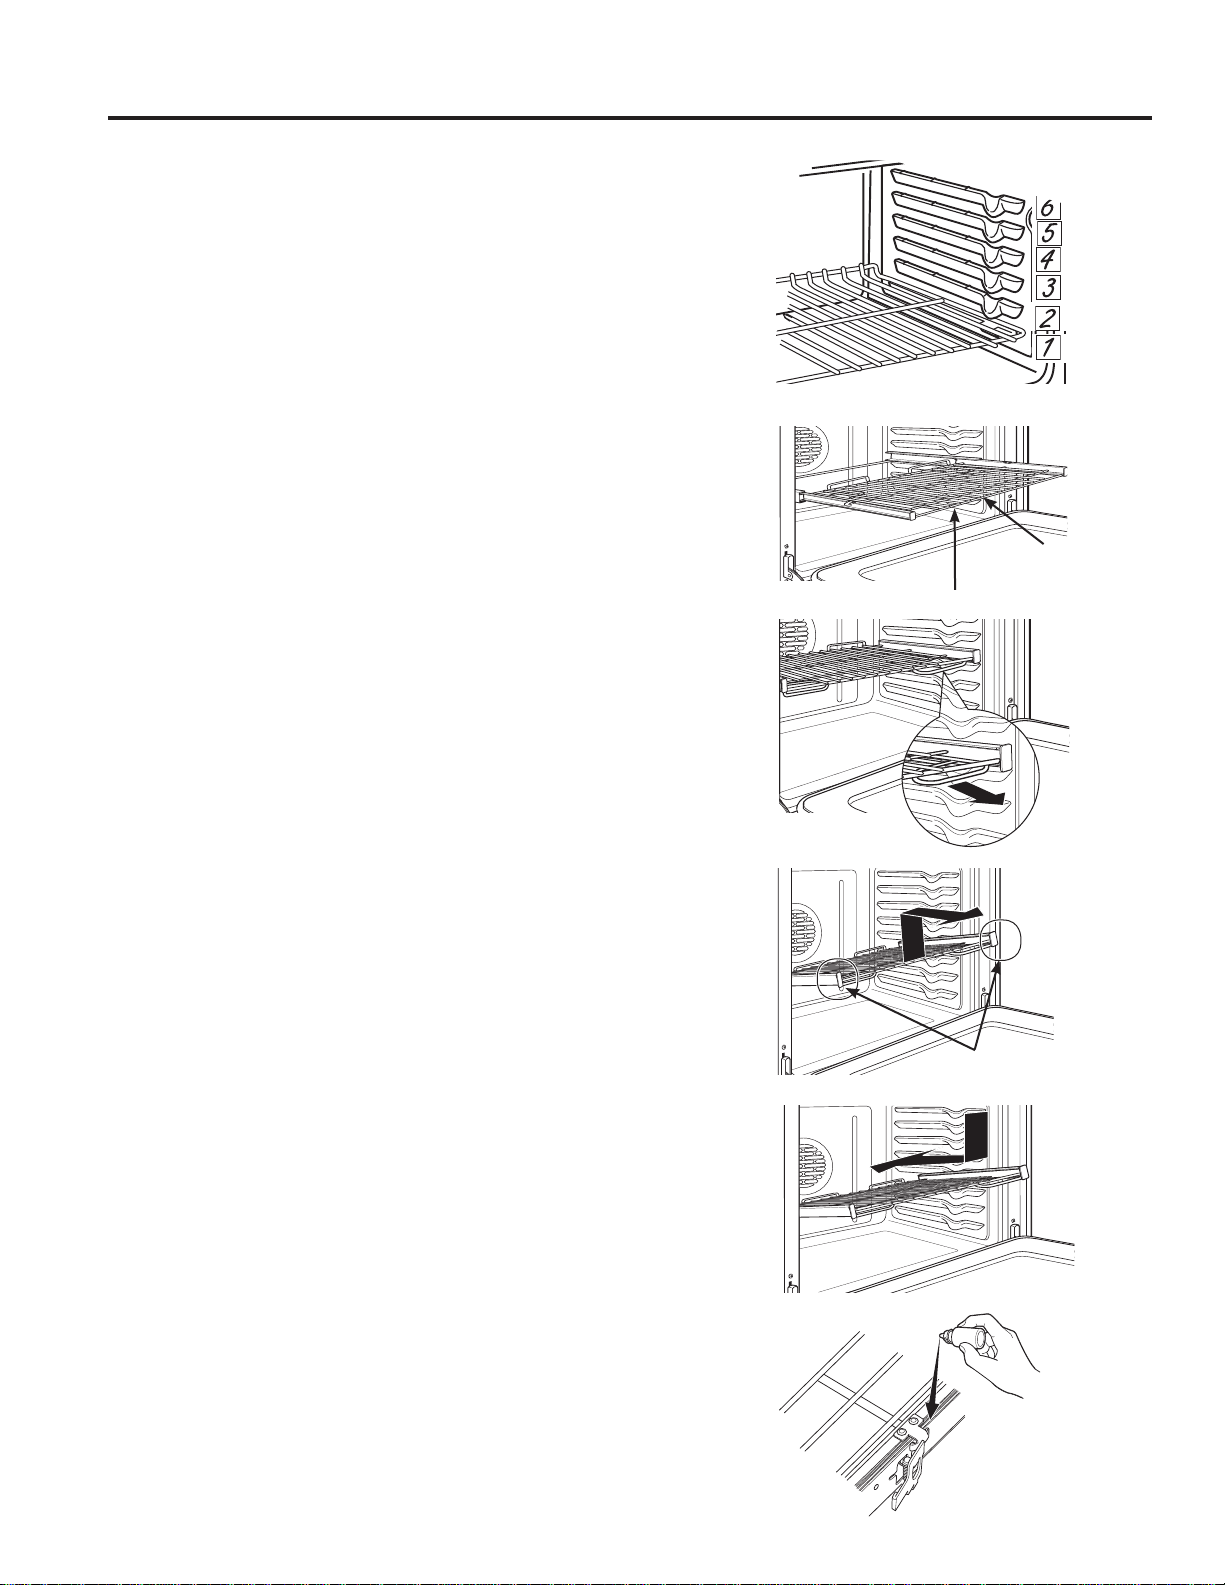
Extension Racks
Always pull the rack out by its upper front rail to its fully
open position, when placing or removing cookware.
If extension racks are difficult to extend, lubricate the
racks with the graphite lubricant provided with your
oven. Remove the rack from the oven, remove debris in
the side tracks with a paper towel, shake the graphite
lubricant and place 4 small drops on the two bottom
tracks of the left and right sides. Open and close the
rack several times to distribute the lubricant.
To order additional graphite lubricant, read the
Assistance and Accessories section at the beginning of
the manual.
To Remove An Extension Rack:
1. Make sure the rack is pushed all the way into the
oven so that side paddles on the rack disengage from
the oven support.
2. Slide the rack toward you to the bump (stop position)
on the rack support.
3. Firmly grasp both sides of the rack frame and the
sliding rack, tilt the front end up and pull it out.
To Replace An Extension Rack:
1. Firmly grasp both sides of the rack frame and the
sliding rack.
2. Place the curved end of the rack (stop-locks) onto the
oven supports, tilt up the front of the rack and push it
in as far as it will go.
If extension racks are difficult to replace or remove, wipe
the oven rack supports with cooking oil. Do not wipe oil
on the rack slides.
To Lubricate the Paddle:
Shake lubricant and apply to the moving parts of the
paddle mechanisms as shown.
The number of rack positions may vary by model.
Upper Front
Rail
Fully Open Position
Grasp here
USING THE RANGE: Oven Racks
Oven Racks

49-80695-2
15
USING THE RANGE: Aluminum Foil and Oven Liners / Cookware
Cookware
Cookware Guidelines
The material, finish, and size of cookware affect baking
performance.
Dark, coated and dull pans absorb heat more readily
than light, shiny pans. Pans that absorb heat more
readily can result in a browner, crisper, and thicker crust.
If using dark and coated cookware check food earlier
than minimum cook time. If undesirable results are
obtained with this type of cookware consider reducing
oven temperature by 25º F next time.
Shiny pans can produce more evenly cooked baked
goods such as cakes and cookies.
Glass and ceramic pans heat slowly but retain heat well.
These types of pans work well for dishes such as pies
and custards.
Air insulated pans heat slowly and can reduce bottom
browning.
Keep cookware clean to promote even heating.
CAUTION: Do not use any type of foil or oven liner to cover the oven bottom. These items can trap
heat or melt, resulting in damage to the product and risk of shock, smoke or fire. Damage from improper use
of these items is not covered by the product warranty.
Foil may be used to catch spills by placing a sheet on a lower rack, several inches below the food. Do not use more
foil than necessary and never entirely cover an oven rack with aluminum foil. Keep foil at least 1-1/2” from oven walls
to prevent poor heat circulation.
Aluminum Foil and Oven Liners

16
49-80695-2
Your new oven has a variety of cooking modes to help you get the best results. These modes are described below.
Refer to the Cooking Guide section for recommendations for specific foods. Remember, your new oven may perform
differently than the oven it is replacing.
Baking and Roasting Modes
Select a mode for baking and roasting based on the
type and quantity of food you are preparing. When
preparing baked goods such as cakes, cookies, and
pastries always preheat the oven first. Follow recipe
recommendations for food placement. If no guidelines
are provided, center food in the oven.
Bake
The bake mode is intended for single rack cooking. This
mode uses heat primarily from the lower element but
also from the upper element to cook food. To use this
mode press the Bake pad, enter a temperature, and
then press Start. Preheating is generally recommended
when using this mode.
Convection Bake Multi Rack
The Convection Bake Multi Rack mode is intended
for baking on multiple racks at the same time. This
mode uses heat primarily from the rear element, when
available, but also heat from the upper and lower
elements, along with air movement from the convection
fan to enhance cooking evenness. Your oven is
equipped with Auto Recipe Conversion, so it is not
necessary to convert the temperature when using this
mode. Baking time might be slightly longer for multiple
racks than what would be expected for a single rack. To
use this mode press the Convection Bake pad, enter a
temperature, and then press Start. Always preheat when
using this mode.
Broiling Modes
When broiling, the door should remain OPEN. Monitor
food closely while broiling. Use caution when broiling
on upper rack positions as placing food closer to the
broil element increases smoking, spattering, and the
possibility of fats igniting. For best performance center
food below the broil heating element. Broiling on the
highest rack position is not recommended.
Try broiling foods that you would normally grill. Adjust
rack positions to adjust the intensity of the heat to the
food. Place foods closer to the broil element when a
seared surface and rare interior is desired. Thicker foods
and foods that need to be cooked through should be
broiled on a rack position farther from the broiler or by
using Broil Lo.
Broil Hi
The Broil Hi mode uses intense heat from the upper
element to sear foods. Use Broil Hi for thinner cuts of
meat and/ or foods you prefer less done on the interior.
To use this mode press the Broil pad once and then
press Start. It is not necessary to preheat when using
this mode.
Broil Lo
The Broil Lo mode uses less intense heat from the upper
element to cook food thoroughly while also producing
surface browning. Use Broil Lo for thicker cuts of meat
and/or foods that you would like cooked all the way
through. To use this mode press the Broil pad twice and
then press Start. It is not necessary to preheat when
using this mode.
USING THE RANGE: Cooking Modes
Cooking Modes

49-80695-2
17
Probe
Internal food temperature is frequently used as an
indicator of doneness, especially for roasts and poultry.
The Probe mode monitors the internal food temperature
and turns the oven off when the internal food
temperature reaches the programmed temperature.
Minimum temperatures for food safety can be found at
www.IsItDoneYet.gov. The temperature probe can only
be used with Bake and Convection Bake.
To use the probe with preheating:
1. Press the desired cook mode (Bake or Convection
Bake) pad and enter the desired cooking temperature.
2. Insert the probe into the food (see Proper Probe
Placement Guidelines in this section).
3. Once the oven is preheated, place the food in the
oven and connect the probe to the probe outlet,
making sure it is fully inserted. Use caution, the oven
walls and probe outlet are hot.
4. Program the probe temperature by pressing
the Probe pad and entering the desired food
temperature. The maximum internal food temperature
that you can set is 200º F.
To use the probe without preheating:
1. Insert the probe into the food (see Proper Probe
Placement Guidelines in this section).
2. Place the food in the oven and connect the probe into
the probe outlet in the oven.
3. Program the desired probe and cooking mode
settings by pressing the Probe pad and entering the
desired food temperature, then pressing the cook
mode pad (Bake or Convection Bake) and entering
the desired cooking temperature and press Start.
Proper Probe Placement Guidelines
After preparing the meat and placing it on the cooking
pan follow these guidelines for proper probe placement.
Ŷ ,QVHUWWKHSUREHFRPSOHWHO\LQWRWKHPHDWXSWRWKH
handle, such that the point of the probe will rest in the
center of the thickest part of the meat.
Ŷ 7KHSUREHVKRXOGQRWWRXFKERQHIDWRUJULVWOH
Ŷ )RUZKROHSRXOWU\LQVHUWWKHSUREHLQWRWKHWKLFNHVW
part of the breast.
Ŷ )RUERQHOHVVURDVWVLQVHUWWKHSUREHLQWRWKHFHQWHU
of the roast.
Ŷ )RUERQHLQKDPRUODPELQVHUWWKHSUREHLQWRWKH
center of the lowest large muscle or joint.
Ŷ )RUFDVVHUROHVRUGLVKHVVXFKDVPHDWORDILQVHUWWKH
probe into the center of the dish.
Ŷ )RUILVKLQVHUWWKHSUREHIURPMXVWDERYHWKHJLOOLQWR
the meatiest area, parallel to the backbone.
Check the temperature at other locations in the food
with a food thermometer once the probe temperature
is reached to ensure that all portions of the food have
reached desired temperatures.
Probe Care Guidelines
Note: double oven models have a probe in one oven only.
Ŷ 8VHRISUREHVRWKHUWKDQWKHRQHSURYLGHGZLWKWKLV
product may result in damage to the probe.
Ŷ 8VHWKHKDQGOHVRIWKHSUREHDQGSOXJZKHQLQVHUWLQJ
and removing them from the meat and outlet
Ŷ 7RDYRLGGDPDJLQJ\RXUSUREHGRQRWXVHWRQJVWR
pull on the cable when removing it.
Ŷ 7RDYRLGEUHDNLQJWKHSUREHPDNHVXUHIRRGLV
completely defrosted before inserting the probe.
Ŷ 7RSUHYHQWSRVVLEOHEXUQVGRQRWXQSOXJWKHSUREH
from the outlet until the oven has cooled.
Ŷ 1HYHUOHDYHWKHSUREHLQVLGHWKHRYHQGXULQJDVHOIRU
steam clean cycle.
Ŷ 'RQRWVWRUHWKHSUREHLQWKHRYHQ
USING THE OVEN: Cooking Modes
Cooking Modes (Cont.)

18
49-80695-2
FOOD TYPE
RECOMMENDED
MODE(S)
RECOMMENDED
RACK POSITION(S) ADDITIONAL SUGGESTIONS
Baked Goods
Layer cakes, sheet cakes,
bundt cakes, muffins, quick
breads on a Single Rack
Bake 4 Use shiny cookware.
Layer cakes* on Multiple
Racks
Bake 3 and 5
Ensure adequate airflow
(see illustration below).
Chiffon cakes (angel food) Bake 1 Use shiny cookware.
Cookies, biscuits, scones
on a Single Rack
Bake 4 Use shiny cookware.
Cookies, biscuits, scones
on Multiple Racks
Bake
Convection Bake
3 and 5
2, 4, and 6 (3 rack
recommended only for
Convection Bake)
Ensure adequate airflow.
Beef & Pork
Hamburgers Broil Hi 6
Keep the door open when broiling in the lower oven. Use a broil pan; move
food down for more doneness/less searing. Watch food closely when broiling.
For best performance center food below the broil heating element.
Steaks & Chops Broil Hi 6
Keep the door open when broiling in the lower oven. Use a broil pan; move
food down for more doneness/less searing. Watch food closely when broiling.
For best performance center food below the broil heating element.
Roasts Bake 3 or 4 Use a low sided pan such as a broil pan. Preheating is not necessary.
Poultry
Whole chicken Bake 3 or 4 Use a low sided pan such as a broil pan.
Bone-in chicken breasts,
legs, thighs
Broil Hi 2 If breaded or coated in sauce avoid Broil Hi modes. Broil skin side down first.
Watch food closely when broiling. Keep the door open when broiling in the
lower oven. For best performance when broiling, center food below the broil
heating element.
Broil Lo
Bake
2 or 3
Boneless chicken breasts
Broil Lo
Bake
2 or 3
Keep the door open when broiling in the lower oven. Move food down for
more doneness/less searing and up for greater searing/browning when
broiling. For best performance when broiling, center food below the broil
heating element.
Whole turkey Bake 1 or 2 Use a low sided pan such as a broil pan.
Turkey Breast Bake 2 or 3 Use a low sided pan such as a broil pan.
Fish Broil Lo
6 (1/2 inch thick or less)
5 (>1/2 inch)
Keep the door open when broiling in the lower oven. Watch food closely when
broiling. For best performance center food below the broil heating element.
Casseroles Bake 3 or 4
Frozen Convenience Foods
Pizza, french fries, tator
tots, chicken nuggets,
appetizers on a Single Rack
Bake 3 or 4 Use shiny cookware.
Pizza, french fries, tator
tots, chicken nuggets,
appetizers on Multiple
Racks
Bake
Convection Bake
3 and 5 Use shiny cookware.
*When baking four cake layers at a time, use racks 3
and 5. Place the pans as shown so that one pan is not
directly above another.
Cook food thoroughly to help protect against food
borne illness. Minimum safe food temperature
recommendations for food safety can be found at
www.IsItDoneYet.gov. Make sure to use a food
thermometer to take food temperatures.
Rack position for baking 4 layer cakes.
Cooking Guide
USING THE RANGE: Cooking Guide

49-80695-2
19
When Using the Warming Drawer
The warming drawer will keep hot, cooked foods warm.
Always start with hot food. Do not use to heat cold food
other than crisping crackers, chips or dry cereal.
Do not line the warming drawer or pan with
aluminum foil. Foil is an excellent heat insulator
and will trap heat beneath it. This will upset the
performance of the drawer and could damage the
interior finish.
Allow approximately 25 minutes for the warming drawer
to preheat.
Ŷ 'RQRWSXWOLTXLGRUZDWHULQWKHZDUPLQJGUDZHU
Ŷ $OOIRRGVSODFHGLQWKHZDUPLQJGUDZHUVKRXOGEH
covered with a lid or aluminum foil. When warming
pastries or breads, the cover should be vented to
allow moisture to escape.
Ŷ )RRGVKRXOGEHNHSWKRWLQLWVFRRNLQJFRQWDLQHURU
transferred to a heat-safe serving dish.
NOTE: Plastic containers or plastic wrap will melt if
in direct contact with the drawer, pan or a hot utensil.
Melted plastic may not be removable and is not covered
under your warranty.
Ŷ 5HPRYHVHUYLQJVSRRQVHWFEHIRUHSODFLQJ
containers in warming drawer.
Temperature Selection Chart
To keep several different foods hot, set the control to the
food needing the highest setting.
Ŷ 7KHWHPSHUDWXUHW\SHDQGDPRXQWRIIRRGDQGWKH
time held will affect the quality of the food.
Ŷ 5HSHDWHGRSHQLQJRIWKHGUDZHUDOORZVWKHKRWDLUWR
escape and the food to cool.
Ŷ :LWKODUJHORDGVLWPD\EHQHFHVVDU\WRXVHDKLJKHU
warming drawer setting and cover some of the
cooked food items.
Ŷ 'RQRWXVHSODVWLFFRQWDLQHUVRUSODVWLFZUDS
To Warm Serving Bowls and Plates
Dishes will be hot. Use pot holders or mitts when
removing hot dishes.
To warm serving bowls and plates, set the control on LO.
Ŷ 8VHRQO\KHDWVDIHGLVKHV
Ŷ ,I\RXZDQWWRKHDWILQHFKLQDSOHDVHFKHFNZLWKWKH
manufacturer of the dishes for their maximum heat
tolerance.
Ŷ <RXPD\ZDUPHPSW\VHUYLQJGLVKHVZKLOHSUHKHDWLQJ
the drawer.
To Crisp Stale Items
Ŷ 3ODFHIRRGLQORZVLGHGGLVKHVRUSDQV
Ŷ 3UHKHDWRQLO setting.
Ŷ &KHFNFULVSQHVVDIWHUPLQXWHV$GGWLPHDV
needed.
Food Type Control Setting
Casserole STD
Chili HI
Pizza STD
Potatoes, baked HI
Tortilla Chips LO
Waffles LO
USING THE RANGE: Warming Drawer
Warming Drawer
CAUTION

20
49-80695-2
Cleaning the Range – Exterior
CARE AND CLEANING: Cleaning the Range – Exterior
If your range is removed for cleaning, servicing or any reason, be
sure the anti-tip device is reengaged properly when the range is
replaced. Failure to take this precaution could result in tipping of
the range and can result in death or serious burns to children or
adults. Do not use oven cleaners, abrasive cleansers, strong liquid
cleansers, steel wool, plastic scouring pads, or cleaning powders on
the interior or exterior of the range.
WARNING
Be sure all controls are off and all surfaces are cool before cleaning any part of the range.
Control Lockout
If desired, the touch pads may be deactivated before
cleaning.
See Lock Controls in the Oven Controls section in this
manual.
Clean up splatters with a damp cloth.
You may also use a glass cleaner.
Remove heavier soil with warm, soapy water. Do not use
abrasives of any kind.
Reactivate the touch pads after cleaning.
Control Panel
It’s a good idea to wipe the control panel after each use.
Clean with mild soap and water or vinegar and water,
rinse with clean water and polish dry with a soft cloth.
Do not use abrasive cleansers, strong liquid cleansers,
plastic scouring pads or oven cleaners on the control
panel—they will damage the finish.
Range Exterior
Clean with a mild soap and water or vinegar and water
solution. Rinse with clean water and dry with a soft cloth.
When cleaning surfaces, make sure that they are at
room temperature and not in direct sunlight.
If stain on the door vent trim is persistent, use a mild
abrasive cleaner and a sponge-scrubber for best results.
Spillage of marinades, fruit juices, tomato sauces and
basting liquids containing acids may cause discoloration
and should be wiped up immediately. Let hot surfaces
cool, then clean and rinse.
Painted Surfaces
Painted surfaces include the sides of the range and the
doors, and top of control panel. Clean these with soap and
water or a vinegar and water solution.
Do not use commercial oven cleaners, cleaning powders,
steel wool or harsh abrasives on any painted surface.
Stainless Steel Surfaces
Do not use a steel wool pad; it will scratch the surface.
To clean the stainless steel surface, use warm sudsy
water or a stainless steel cleaner or polish. Always wipe
the surface in the direction of the grain. Follow the cleaner
instructions for cleaning the stainless steel surface.
To inquire about purchasing cleaning products including
stainless steel appliance cleaner or polish read the
Assistance and Accessories sections at the beginning of
this manual.

49-80695-2
21
The interior of your new oven can be cleaned manually or by using Self Clean.
Spillage of marinades, fruit juices, tomato sauces and basting liquids containing acids may cause discoloration and
should be wiped up immediately. Let hot surfaces cool, then clean and rinse.
Manual Cleaning
Do not use oven cleaners, abrasive cleaners, strong
liquid cleansers, steel wool, scouring pads, or cleaning
powders on the interior of the oven. Clean with a mild
soap and water or vinegar and water solution. Rinse with
clean water and dry with a soft cloth. When cleaning
surfaces, make sure that they are at room temperature.
Self Clean Mode
Read Self-Cleaning Oven Safety Instructions at the
beginning of this manual before using Self Clean Mode.
Self clean uses very high temperatures to clean the oven
interior. The oven door will lock when using this feature.
Before operating the self-clean cycle, wipe up grease and
soils from the oven. Remove all items from the oven other
than enameled (dark color) racks. Shiny or silver racks
and any cookware or other items should all be removed
from the oven before initiating a self-clean cycle. Close
the door. Press the Self Clean pad and a default self-
clean time is displayed. The clean time can be changed
to any time between 3:00 and 5:00 hours by using the
number pads to enter a different time and pressing Start.
For heavily soiled ovens, the maximum 5 hour clean time
is recommended. If you wish to use the default time, press
the Start pad immediately after pressing the Clean pad.
The oven will turn off automatically when the self-clean
cycle is complete. The door will stay locked until the oven
has cooled down. After the oven has cooled down wipe
any ash out of the oven.
We recommend venting your kitchen with an open
window or using a ventilation fan or hood during the first
self-clean cycle.
Soil on the front frame of the range and outside the
gasket on the door will need to be cleaned by hand.
Clean these areas with hot water, soap-filled steel-wool
pads or cleansers such as Soft Scrub
®
. Rinse well with
clean water and dry.
Do not clean the gasket. The fiberglass material of
the oven door gasket cannot withstand abrasion. It is
essential for the gasket to remain intact. If you notice it
becoming worn or frayed, replace it.
Make sure the oven light bulb cover is in place and the
oven light is off.
IMPORTANT: The health of some birds is extremely
sensitive to the fumes given off during the self-cleaning
cycle of any range. Move birds to another well-
ventilated room.
On Some Models:
The surface units are automatically disabled during the
self-clean cycle. Wait until the self-clean cycle is finished
to set and use the surface units.
CARE AND CLEANING: Cleaning the Range – Interior
Cleaning the Range – Interior
Racks
All racks can be washed with warm, soapy water.
Enameled (not shiny) racks can be left in the cavity
during self clean.
Racks may be more difficult to slide, especially after
a self-clean. Put some vegetable oil on a soft cloth or
paper towel and rub onto the left and right edges.
Oven Heating Elements
Do not clean the bake element or the broil element. Any
soil will burn off when the elements are heated.
The bake element is not exposed and is under the oven
floor. Clean the oven floor with warm, soapy water.
Steam Clean Mode
Steam clean is intended to clean small spills using water
and a lower cleaning temperature than Self-Clean.
To use the Steam Clean feature, wipe grease and soils
from the oven. Pour one cup of water into the bottom of
the oven. Close the door. Press the Steam Clean pad
and then press Start. The oven door will lock. You can
not open the door during the 30 minute steam clean as
this will decrease the steam clean performance. At the
end of the steam clean cycle the door will unlock. Wipe
out any excess water and any remaining soil.
Wipe up heavy soil on the oven bottom.

22
49-80695-2
Use a CERAMA BRYTE
®
Cleaning
Pad for Ceramic Cooktops.
Cleaning the Glass Cooktop
Normal Daily Use Cleaning
ONLY use CERAMA BRYTE
®
Ceramic Cooktop Cleaner
on the glass cooktop. Other creams may not be as
effective.
To maintain and protect the surface of your glass
cooktop, follow these steps:
1. Before using the cooktop for the first time, clean it
with CERAMA BRYTE
®
Ceramic Cooktop Cleaner.
This helps protect the top and makes cleanup easier.
2. Daily use of CERAMA BRYTE
®
Ceramic Cooktop
Cleaner will help keep the cooktop looking new.
3. Shake the cleaning cream well. Apply a few drops of
CERAMA BRYTE
®
Ceramic Cooktop Cleaner directly
to the cooktop.
4. Use a paper towel or
CERAMA BRYTE
®
Cleaning
Pad for Ceramic Cooktops
to clean the entire cooktop
surface.
5. Use a dry cloth or paper towel
to remove all cleaning residue.
No need to rinse.
NOTE: It is very important that
you DO NOT heat the cooktop
until it has been cleaned
thoroughly.
Burned-On Residue
NOTE: DAMAGE to your glass surface may occur if you
use scrub pads other than those recommended.
1. Allow the cooktop to cool.
2. Spread a few drops of CERAMA BRYTE
®
Ceramic
Cooktop Cleaner on the entire burned residue area.
3. Using the included CERAMA BRYTE
®
Cleaning Pad
for Ceramic Cooktops, rub the residue area, applying
pressure as needed.
4. If any residue remains, repeat the steps listed above
as needed.
5. For additional protection, after all residue has been
removed, polish the entire surface with CERAMA
BRYTE
®
Ceramic Cooktop Cleaner and a paper towel.
Heavy, Burned-On Residue
1. Allow the cooktop to cool.
2. Use a single-edge razor blade scraper at approximately
a 45° angle against the glass surface and scrape the
soil. It will be necessary to apply pressure to the razor
scraper in order to remove the residue.
3. After scraping with the razor scraper, spread a few drops
of CERAMA BRYTE
®
Ceramic Cooktop Cleaner on the
entire burned residue area. Use the CERAMA BRYTE
®
Cleaning Pad to remove any remaining residue.
4. For additional protection, after all residue has been
removed, polish the entire surface with CERAMA
BRYTE
®
Ceramic Cooktop Cleaner and a paper towel.
Clean your cooktop after each
spill. Use CERAMA BRYTE
®
Ceramic Cooktop Cleaner.
The CERAMA BRYTE
®
Ceramic Cooktop Scraper and all
recommended supplies are available through our Parts Center.
See instructions under “Assistance / Accessories” section.
NOTE: Do not use a dull or nicked blade.
CARE AND CLEANING: Cleaning the Glass Cooktop

49-80695-2
23
Metal Marks and Scratches
1. Be careful not to slide pots and pans across your
cooktop. It will leave metal markings on the cooktop
surface.
These marks are removable using the CERAMA
BRYTE
®
Ceramic Cooktop Cleaner with the CERAMA
BRYTE
®
Cleaning Pad for Ceramic Cooktops.
2. If pots with a thin overlay of aluminum or copper
are allowed to boil dry, the overlay may leave black
discoloration on the cooktop.
This should be removed immediately before heating
again or the discoloration may be permanent.
NOTE: Carefully check the bottom of pans for roughness
that would scratch the cooktop.
Damage from Sugary Spills and Melted Plastic
Special care should be taken when removing hot substances to avoid permanent damage of the glass surface.
Sugary spillovers (such as jellies, fudge, candy, syrups) or melted plastics can cause pitting of the surface of your
cooktop (not covered by the warranty) unless the spill is removed while still hot. Special care should be taken when
removing hot substances.
Be sure to use a new, sharp razor scraper.
Do not use a dull or nicked blade.
1. Turn off all surface units. Remove hot pans.
2. Wearing an oven mitt:
a. Use a single-edge razor blade scraper (CERAMA
BRYTE
®
Ceramic Cooktop Scraper) to move the
spill to a cool area on the cooktop.
b. Remove the spill with paper towels.
3. Any remaining spillover should be left until the surface
of the cooktop has cooled.
4. Don’t use the surface units again until all of the
residue has been completely removed.
NOTE: If pitting or indentation in the glass surface has
already occurred, the cooktop glass will have to be
replaced. In this case, service will be necessary.
The temperature probe may be cleaned with soap and
water or a soap-filled scouring pad. Cool the temperature
probe before cleaning. Scour stubborn spots with a soap-
filled scouring pad, rinse and dry.
To order additional temperature probes read the
Assistance and Accessories sections at the beginning of
this manual.
Ŷ Do not immerse the temperature probe in water.
Ŷ Do not store the temperature probe in the oven.
Ŷ Do not leave the temperature probe inside the oven
during a self or steam clean cycle.
Cooktop Seal (on some models)
To clean the cooktop seal around the edges of the glass,
lay a wet cloth on it for a few minutes, then wipe clean
with nonabrasive cleaners.
CARE AND CLEANING: Cleaning the Glass Cooktop / Probe
Cleaning the Glass Cooktop (Cont.)
Probe
24
49-80695-2
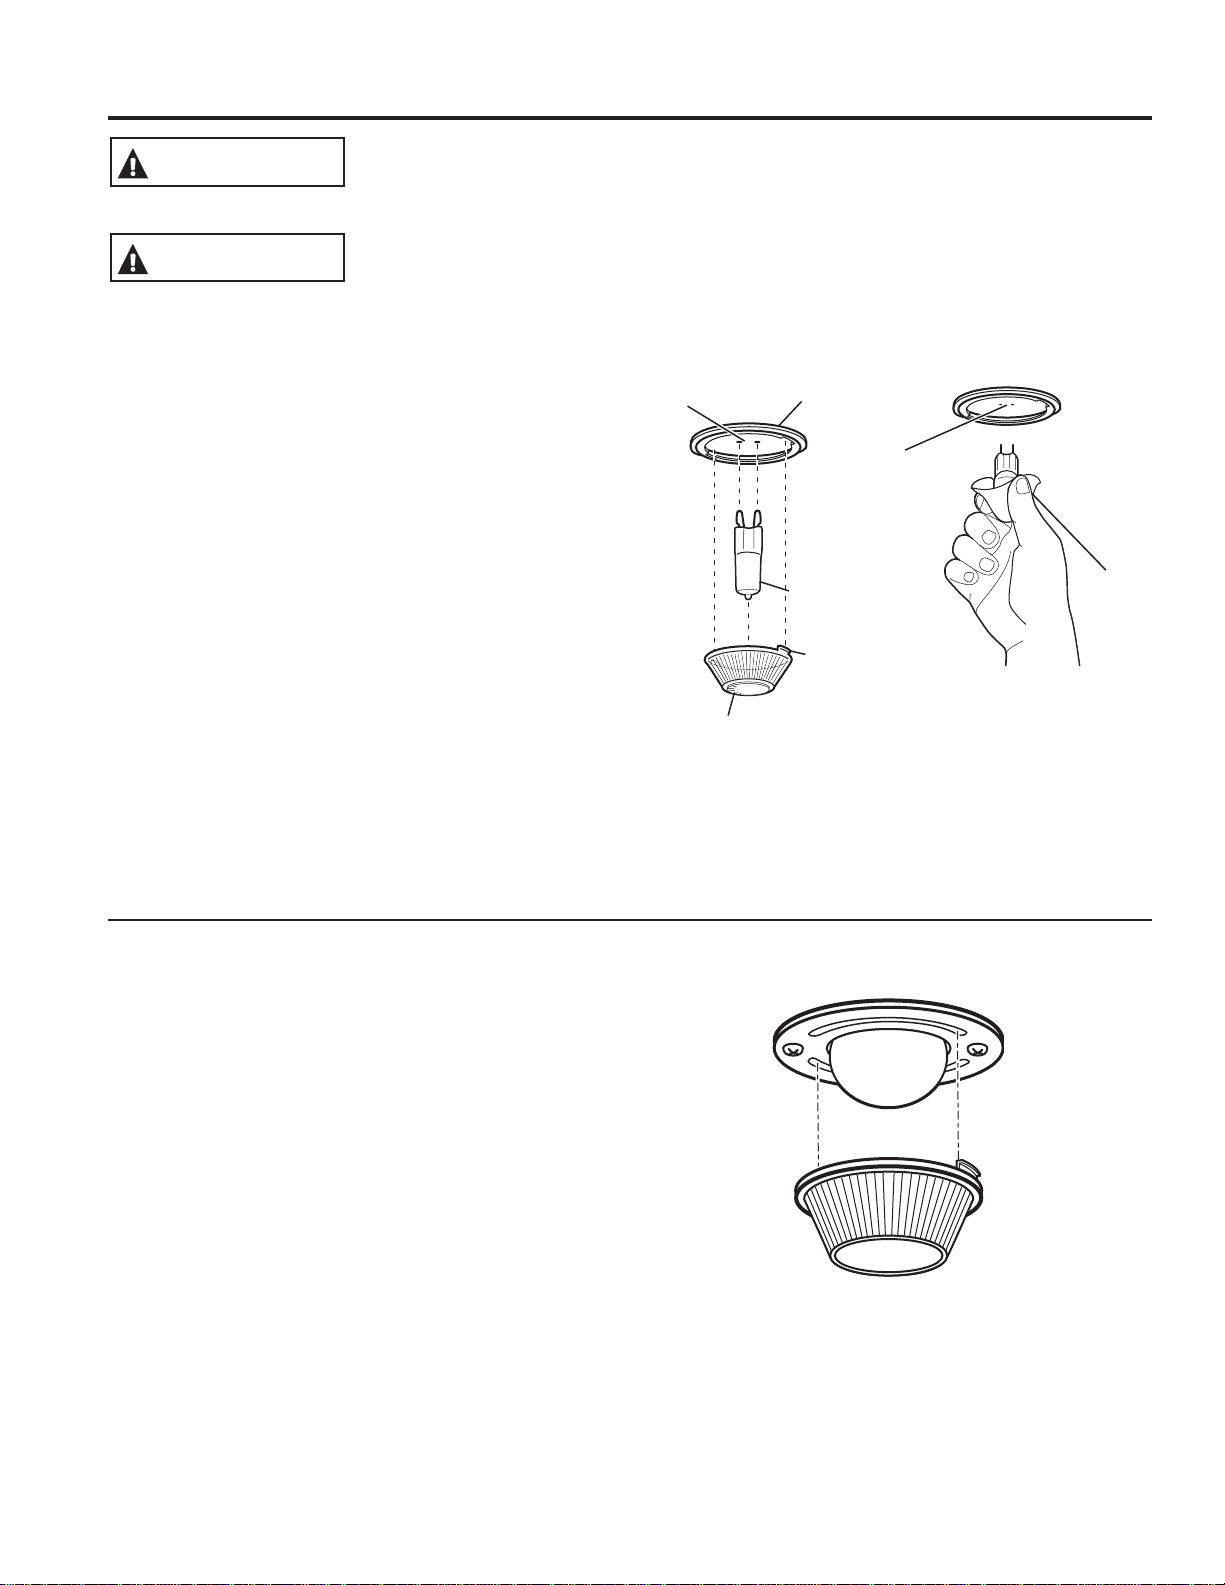
Use
gloves or
cloth
Receptacle
G9 Bulb
Socket
Tab
Glass cover
Receptacle
Maintenance
CARE AND CLEANING: Maintenance
SHOCK OR BURN HAZARD: Before replacing oven light bulb, disconnect the electrical
power to the range at the main fuse or circuit breaker panel. Failure to do so may result
in electric shock or burn.
WARNING
BURN HAZARD: The glass cover and bulb should be removed when cool. Touching hot
glass with bare hands or a damp cloth can cause burns.
CAUTION
Oven Light Replacement (on some models)
To remove:
1. Turn the glass cover counterclockwise 1/4 turn until
the tabs of the glass cover clear the grooves of the
socket. Wearing latex gloves may offer a better grip.
2. Using gloves or a dry cloth, remove the bulb by
pulling it straight out.
To replace:
1. Use a new 120/130-volt halogen bulb, not to exceed
50 watts. Replace the bulb with the same type of bulb
that was removed. Be sure the replacement bulb is
rated 120 volts or 130 volts (NOT 12 volts).
2. Using gloves or a dry cloth, remove the bulb from its
packaging. Do not touch the bulb with bare fingers.
Oil from skin will damage the bulb and shorten its life.
3. Push the bulb straight into the receptacle all the way.
4. Place the tabs of the glass cover into the grooves of
the socket. Turn the glass cover clockwise 1/4 turn.
For improved lighting inside the oven, clean the glass
cover frequently using a wet cloth. This should be
done when the oven is completely cool.
5. Reconnect electrical power to the oven.
Oven Light Replacement (on some models)
To remove:
1. Turn the glass cover counterclockwise 1/4 turn until
the tabs of the glass cover clear the grooves of the
socket. Wearing latex gloves may offer a better grip.
2. Remove the bulb by turning it counter-clockwise.
To replace:
1. Replace bulb with a new 40-watt appliance bulb.
Insert the bulb and turn it clockwise until it is tight.
2. Place the tabs of the glass cover into the grooves of
the socket. Turn the glass cover clockwise 1/4 turn.
For improved lighting inside the oven, clean the glass
cover frequently using a wet cloth. This should be
done when the oven is completely cool.
3. Reconnect electrical power to the oven.

49-80695-2
25
Lift-Off Oven Door
The door is very heavy. Be careful when removing and lifting the door.
Do not lift the door by the handle.
To remove the door:
1. Fully open the door.
2. Pull the hinge locks down toward the door frame, to
the unlocked position. A tool, such as a small flat-
blade screwdriver, may be required.
3. Firmly grasp both sides of the door at the top.
4. Close door to the door removal position. The door
should be open approximately 3" with no obstruction
above the door.
5. Lift door up and out until both hinge arms are clear of
the slots.
To replace the door:
1. Firmly grasp both sides of the door at the top.
2. Starting on the left side, with the door at the same
angle as the removal position, seat the indentation of
the hinge arm into the bottom edge of the hinge slot.
The notch in the hinge arm must be fully seated into
the bottom of the slot. Repeat for right side.
3. Fully open the door. If the door will not fully open, the
indentation is not seated correctly in the bottom edge
of the slot.
4. Push the hinge locks up against the front frame of the
oven cavity, to the locked position.
5. Close the oven door.
Removal position
Hinge lock
Slot
Pull hinge locks down to unlock
Push hinge locks up to lock
Hinge
lock
Hinge
arm
Indentation
Bottom
edge of
slot
Hinge arm
CARE AND CLEANING: Maintenance
Maintenance (Cont.)
Removable Warming Drawer Pan
NOTE: For models with an electric warming drawer
before performing any adjustments, cleaning or service,
disconnect the range electrical power supply at the
household distribution panel by removing the fuse or
switching off the circuit breaker. Make sure the drawer
heating element is cool.
NOTE: Allow warming drawer to cool before removing pan.
NOTE: Wipe spills promptly after each use.
Ŷ 1HYHUSODFHXVHRUVHOIFOHDQWKHGUDZHUSDQLQWKH
upper oven.
Ŷ :DUPLQJGUDZHUKDVDUHPRYDEOHSDQIRUHDV\
cleaning. Clean with hot, soapy water and a sponge
or dish towel. Dry with a clean cloth. Replace the pan
in the warming drawer.

26
49-80695-2
Save time and money! Review the charts on the following pages first and you may not need to call for service.
Problem Possible Cause What To Do
Surface units do not
work properly or
flashing power setting.
Improper cookware being used. Wrong pan type. Use a magnet to check that cookware is induction-
compatible. Use a flat induction-capable pan that meets the minimum
size for the element being used. See the Pan size and shape section.
Pan is too small. Pan size is below the minimum size for the element. See the Pan size
and shape section. Use smaller element.
Pan not positioned correctly. Center the pan in the cooking zone.
Pan is not in full contact with glass
surface.
Pan must be flat.
In some areas, the power (voltage)
may be low.
Cover pan with a lid until desired heat is obtained.
A fuse in your home may be blown
or the circuit breaker tripped.
Replace the fuse or reset the circuit breaker.
Cooktop controls improperly set. Check to see that the control is set properly. Press On then + or -
Surface unit setting
changed or turned off
unexpectedly.
High cooktop temperature. Allow the internal fan to cool the cooktop. Check if pan boiled dry.
Scratches (may appear
as cracks) on cooktop
glass surface.
Incorrect cleaning methods being
used.
Scratches are not removable. Tiny scratches will become less visible in
time as a result of cleaning.
Cookware with rough bottoms being
used or coarse particles (salt or
sand) were between the cookware
and the surface of the cooktop.
Cookware has been slid across the
cooktop surface.
To avoid scratches, use the recommended cleaning procedures. Make
sure bottoms of cookware are clean before use, and use cookware with
smooth bottoms.
Areas of discoloration
on the cooktop.
Food spillovers not cleaned before
next use.
See the Cleaning the glass cooktop section.
Hot surface on a model with a light-
colored cooktop.
This is normal. The surface may appear discolored when it is hot. This
is temporary and will disappear as the glass cools.
Plastic melted to the
surface.
Hot cooktop came into contact with
plastic placed on the hot cooktop.
See the Glass surface—potential for permanent damage section in the
Cleaning the glass cooktop section.
Pitting (or indentation)
of the cooktop.
Hot sugar mixture spilled on the
cooktop.
Call a qualified technician for replacement.
My new oven doesn't
cook like my old one.
Is something wrong
with the temperature
settings?
Your new oven has a different
cooking system from your old oven
and therefore may cook differently
than your old oven.
For the first few uses, follow your recipe times and temperatures
carefully. If you still think your new oven is too hot or too cold, you
can adjust the temperature yourself to meet your specific cooking
preference. NOTE: This adjustment affects Bake, and Convection Bake
temperatures; it will not affect Broil or Clean.
Food does not bake
properly.
Oven controls improperly set. See the Cooking Modes section.
Rack position is incorrect or rack is
not level.
See the Cooking Modes section and Cooking Guide.
Incorrect cookware or cookware of
improper size being used.
See the Cookware section.
Oven temperature needs adjustment. See the Special Features section.
Ingredient substitution. Substituting ingredients can change the recipe outcome.
Food does not broil
properly.
Oven controls improperly set. Make sure you select the appropriate broil mode.
Improper rack position being used.
See Cooking Guide for rack location suggestions.
Food being cooked in a hot pan. Make sure cookware is cool.
Cookware not suited for broiling. Use a pan specifically designed for broiling.
The probe is plugged into the outlet
in the oven. (on some models).
Unplug and remove the probe from the oven.
Aluminum foil used on the broiling
pan and grid has not been fitted
properly and slit as recommended.
If using aluminum foil conform to pan slits.
In some areas the power (voltage)
may be low.
Preheat the broil element for 10 minutes.
Oven temperature too
hot or too cold.
Oven temperature needs adjustment. See the Special Features section.
Troubleshooting tips ... Before you call for service
TROUBLESHOOTING TIPS

49-80695-2
27
Problem Possible Cause What To Do
Oven does not work or
appears not to work.
Plug on range is not completely inserted in
the electrical outlet.
Make sure electrical plug is plugged into a live, properly grounded
outlet.
A fuse in your home may be blown or the
circuit breaker tripped.
Replace the fuse or reset the circuit breaker.
Oven controls improperly set. See the Using the Oven section.
Oven is in Sabbath Mode. Verify, that the oven is not in Sabbath Mode. See the Special
Features section.
“Crackling” or “popping”
sound.
This is the sound of the metal heating
and cooling during both the cooking and
cleaning functions.
This is normal.
Why is my range making a
"clicking" noise when using
my oven?
Your range cycles the heating elements by
turning relays on and off to maintain the
oven temperature.
This is normal.
Clock and timer do not work. A fuse in your home may be blown or the
circuit breaker tripped.
Replace the fuse or reset the circuit breaker.
Plug on range is not completely inserted in
the electrical outlet.
Make sure electrical plug is plugged into a live, properly grounded
outlet.
Oven controls improperly set. See the Using the kitchen timer section.
Oven door is crooked. The door is out of position. Because the oven door is removable, it sometimes gets out of
position during installation. To straighten the door, re-install the
door. See the "Lift-Off Oven Door" instructions in the "Care and
Cleaning" section.
Oven light does not work. Light bulb is loose or defective. Tighten or replace bulb.
Pad operating light is broken. Call for service.
Oven will not self-clean. The temperature is too high to set a self-
clean operation.
Allow the oven to cool and reset the controls.
Oven controls improperly set. See the Cleaning the Oven section.
The probe is plugged into the outlet in the
oven.
Remove the probe from the oven.
Oven will not steam clean. Display flashes HOT. Allow the oven to cool to room temperature and reset the
controls.
Oven controls improperly set. See the Using Steam Clean section.
Oven door is not closed. Make sure you close the door to start steam clean cycle.
Excessive smoking during
clean cycle.
Excessive soil or grease. Press the Cancel/Off pad. Open the windows to rid the room of
smoke. Wait until the LOCKED light goes off. Wipe up the excess
soil and reset the clean cycle.
Excessive smoking during
broiling.
Food too close to burner element. Lower the rack position of the food.
Oven door will not open after
a clean cycle.
Oven too hot. Allow the oven to cool below locking temperature.
Oven not clean after a clean
cycle.
Oven controls improperly set. See the Cleaning the Oven section.
Oven was heavily soiled. Clean up heavy spillovers before starting the clean cycle.
Heavily soiled ovens may need to self-clean again or for a longer
period of time.
"LOCK DOOR" flashes in the
display.
The self-clean cycle has been selected but
the door is not closed.
Close the oven door.
DOOR LOCK
light is on
when you want to cook.
The oven door is locked because the
temperature inside the oven has not
dropped below the locking temperature.
Press the Cancel/Off pad. Allow the oven to cool.
“F— and a number or letter”
flash in the display.
You have a function error code. Press the Cancel/Off pad. Allow the oven to cool for one hour. Put
the oven back into operation.
If the function code repeats. Disconnect all power to the oven for at least 30 seconds and
then reconnect power. If the function error code repeats, call for
service.
Display goes blank. A fuse in your home may be blown or the
circuit breaker tripped.
Replace the fuse or reset the circuit breaker.
The clock is turned off. See the Special features section.
Oven is in Sabbath Mode. Verify that the oven is not in Sabbath Mode. See the Special
Features section.
Oven or cooktop will not stay
set.
Function error. Disconnect all power for at least 30 seconds and then reconnect
power. If repeating, call for service.
TROUBLESHOOTING TIPS
Troubleshooting tips (Cont.) ... Before you call for service

28
49-80695-2
Problem Possible Cause What To Do
Power outage, clock flashes. Power outage or surge. Reset the clock. If the oven was in use, you must reset it by
pressing the Cancel/Off pad, setting the clock and resetting
any cooking function.
“Burning” or “oily” odor
emitting from the vent.
This is normal in a new oven and will
disappear in time.
To speed the process, set a self-clean cycle for a minimum of
3 hours. See the Cleaning the Oven section.
Strong odor. An odor from the insulation around the
inside of the oven is normal for the first
few times the oven is used.
This is temporary and will go away after several uses or a
self-clean cycle.
Fan noise. A convection fan may automatically
turn on and off.
This is normal. The fan is designed to operate intermittently to
maximize cooking evenness. The convection fan will operate
during preheat of the bake cycle. The fan will turn off after the
oven is heated to the set temperature. This is normal.
A cooling fan may automatically turn on
and off.
This is normal on some models. The cooling fan will turn
off and on to cool internal parts. It may run after the oven is
turned off.
My oven door glass appears
to be "tinted" or have a
"rainbow" color. Is this
defective?
No. The inner oven glass is coated with
a heat barrier to reflect the heat back
into the oven to prevent heat loss and
keep the outer door cool while baking.
This is normal. Under certain light or angles, you may see this
tint or rainbow color.
Sometimes the oven takes
longer to preheat to the
same temperature.
Cookware or food in oven. The cookware or food in the oven will cause the oven to take
longer to preheat. Remove items to reduce preheat time.
Number of racks in oven. Adding more racks to the oven will cause the oven to take
longer to preheat. Remove some racks.
Different cooking modes. The different cooking modes use different preheat methods to
heat the oven for the specific cooking mode. Some modes will
take longer than others (i.e. convection bake).
Display flashes. Power failure. Reset the clock.
Unable to get the display to
show “SF”.
Oven control pads were not touched
properly.
The Broil Hi/Lo and Bake pads must be touched at the same
time and held for 3 seconds.
Control signals after
entering cooking time or
start time.
You forgot to enter a bake temperature
or cleaning time.
Touch the Bake pad and desired temperature or the Self
Clean pad and desired clean time.
Oven racks are difficult to
slide.
The shiny, silver-colored racks were
cleaned in a self-clean cycle.
Apply a small amount of vegetable oil to a paper towel and
wipe the edges of the oven racks with the paper towel. Do not
spray with Pam
®
or other lubricant sprays.
Steam from the vent. When using the ovens, it is normal
to see steam coming out of the
oven vents. As the number of racks
or amount of food being cooked
increases, the amount of visible steam
will increase.
This is normal.
Warming drawer will not
work.
A fuse in your home may be blown or
the circuit breaker tripped.
Replace the fuse or reset the circuit breaker.
Controls improperly set. See the Using the warming drawer section.
Excessive condensation in
the drawer.
Liquid in drawer. Remove liquid.
Uncovered foods. Cover food with lid or aluminum foil.
Temperature setting too high. Reduce temperature setting.
Food dries out in the
warming drawer.
Moisture escaping. Cover food with lid or aluminum foil.
Drawer not fully closed. Push drawer in until latch engages.
Water remaining on oven
floor after Steam Clean cycle.
This is normal. Remove any remaining water with a dry cloth or sponge.
“Probe” appears in the
display.
This is reminding you to enter a probe
temperature after plugging in the probe.
Enter a probe temperature.
TROUBLESHOOTING TIPS
Troubleshooting tips (Cont.) ... Before you call for service

49-80695-2 10-14 GE
GEAppliances.com
Escriba los números de modelo y
de serie aquí:
Nº de Modelo ______________
Nº de Serie ________________
Los encontrará en una etiqueta
detrás de la puerta o del cajón.
Impreso en Estados Unidos
Impreso en
Papel Reciclado
Cocina con Modo de Pie PHB920 de 30"
Cocina Deslizable PHS920 de 30”
Manual del Propietario
Cocinas
con Modo de Pie y Desmontables con Inducción Eléctrica
Información de Seguridad ...2
Garantía ........................7
Asistencia / Accesorios .......8
Uso de la Cocina
Unidades de superficie ............9
Utensilios de Cocina para
Cocción por Inducción .........11
Controles del Horno .............12
Funciones Especiales ............13
Estantes del Horno ..............14
Papel de Aluminio y Cobertores
del Horno .....................15
Utensilios .......................15
Modos de Cocción ..............16
Guía de Cocción ................18
Cajón para Calentar .............19
Cuidado y Limpieza
Limpieza de la Cocina - Exterior . . 20
Limpieza de la Cocina - Interior . . 21
Cómo limpiar la estufa de vidrio . 22
Sonda ..........................23
Mantenimiento ..................24
Consejos para la
Solución de Problemas .....26

2
49-80695-2
Lea todas las instrucciones de seguridad antes de utilizar este producto. No seguir estas instrucciones puede generar un
incendio, una descarga eléctrica, lesiones corporales o la muerte.
ADVERTENCIA DE LA PROPOSICIÓN 65 DEL ESTADO DE CALIFORNIA
DISPOSITIVO ANTI-VOLCADURAS
ADVERTENCIA
La Ley sobre Agua Potable Inocua y Tratamiento de Residuos Tóxicos de California (California Safe Drinking Water
and Toxic Enforcement Act) solicita al Gobernador de California que publique una lista de sustancias que el estado
reconoce que producen cáncer, defectos de nacimiento u otros daños reproductivos y solicita a los empresarios que
adviertan a sus clientes sobre la posible exposición a tales sustancias.
ADVERTENCIA
Este producto contiene uno o más químicos que el Estado de California entiende
que producen cáncer, defectos en el nacimiento u otros daños reproductivos.
Los hornos con limpieza automática pueden ocasionar exposiciones de bajo nivel a algunas de estas sustancias,
incluyendo monóxido de carbono, durante el ciclo de limpieza. La exposición puede ser minimizada si se ventila con
una ventana abierta o si se usa un ventilador o campana.
Para reducir el riesgo de volcar la cocina, ésta debe
sujetarse mediante un soporte anti-volcaduras con
una adecuada instalación. Ver las instrucciones de
instalación enviadas con el soporte para obtener
detalles completos antes de iniciar la instalación.
Para Cocinas Sin Apoyo y Deslizabless
Para controlar si el soporte es instalado y ajustado
de forma apropiada, mire que debajo de la cocina
la pata niveladora trasera esté ajustada al soporte.
En algunos modelos, el cajón de almacenamiento
o el panel de protección se pueden retirar para una fácil inspección. Si no
es posible realizar una inspección visual, deslice la cocina hacia adelante,
confirme que el soporte anti-volcaduras esté ajustado de forma segura
al piso o la pared, y deslice la cocina hacia atrás de modo que la pata
niveladora trasera se encuentre debajo del soporte anti-volcaduras.
Si la cocina es expulsada de la pared por alguna razón, siempre repita este
procedimiento a fin de verificar que esté asegurado de forma correcta con
un soporte anti volcaduras.
Nunca quite las patas de nivelación por completo ya que la cocina no
quedará bien sujeta al dispositivo anti-volcaduras.
Soporte
Anti-Volcaduras
Pata Niveladora
Cocinas Sin Apoyo y Deslizables
GUARDE ESTAS INSTRUCCIONES
INFORMACIÓN IMPORTANTE DE SEGURIDAD
LEA TODAS LAS INSTRUCCIONES ANTES DE USAR
INFORMACIÓN DE SEGURIDAD
Un niño o adulto pueden volcar la cocina y morir.
Verifique que el soporte anti-volcaduras se haya
instalado y ajustado correctamente.
Verifique que el soporte anti-volcaduras se haya
instalado y ajustado correctamente.
No utilice la cocina sin que el soporte anti-volcaduras
esté colocado y ajustado.
Si estas instrucciones no se siguen, como resultado se podrá
producir la muerte o quemaduras graves de niños y adultos.
Riesgo de Volcaduras
ADVERTENCIA
49-80695-2
3
INFORMACIÓN DE SEGURIDAD
INSTRUCCIONES GENERALES DE SEGURIDAD
ADVERTENCIA
Ŷ 8VHHVWHDSDUDWRVyORFRQHOREMHWLYRSDUDHOTXH
fue creado, como se describe en este Manual del
Propietario.
Ŷ $VHJ~UHVHGHTXHXQWpFQLFRFDOLILFDGRUHDOLFHXQD
correcta instalación y puesta a tierra del artefacto de
acuerdo con las instrucciones de instalación provistas.
Ŷ 1RLQWHQWHUHSDUDURFDPELDUQLQJXQDSLH]DGHVXFRFLQD
a menos que esté específicamente recomendado en
este manual. Cualquier otro servicio debe realizarlo un
técnico calificado.
Ŷ $QWHVGHUHDOL]DUFXDOTXLHUFODVHGHUHSDUDFLyQ
desenchufe la cocina o desconecte el suministro
eléctrico desde el panel de distribución doméstico
quitando el fusible o desconectando el interruptor de
circuitos.
Ŷ 1RGHMHDORVQLxRVVRORVpVWRVQRGHEHQTXHGDUVRORV
o sin atención en un área donde un aparato esté en uso.
Nunca debe permitirse que se suban, sienten o paren en
cualquier parte de este aparato.
Ŷ
PRECAUCIÓN: No almacene elementos
de interés para niños sobre una cocina o en la
protección trasera de una cocina: los niños que se
trepan a la cocina para alcanzar elementos pueden
resultar gravemente heridos.
Ŷ 6yORXVHDJDUUDGHUDVVHFDVODVDJDUUDGHUDVK~PHGDV
o mojadas colocadas en superficies calientes pueden
provocar quemaduras de vapor. No permita que las
agarraderas entren en contacto con unidades de
superficie o los elementos calentadores calientes. No
utilice toallas u otras telas gruesas en lugar de una
agarradera.
Ŷ 1XQFDXVHVXHOHFWURGRPpVWLFRSDUDFDOHQWDUOD
habitación.
Ŷ 1RWRTXHODVXQLGDGHVGHVXSHUILFLHORVHOHPHQWRV
calentadores o la superficie interior del horno. Estas
superficies pueden estar lo suficientemente calientes para
TXHPDUD~QFXDQGRWHQJDQXQFRORURVFXUR'XUDQWH
y después del uso, no toque o deje que su vestimenta
u otros materiales inflamables entren en contacto con
unidades de superficie, áreas cercanas a las unidades
GHVXSHUILFLHRFXDOTXLHUiUHDLQWHULRUGHOKRUQRGHMH
pasar un tiempo prudencial para que se enfríen. Otras
superficies del aparato pueden calentarse lo suficiente
como para provocar quemaduras. Las superficies
potencialmente calientes incluyen la estufa, las áreas
orientadas hacia la estufa, la abertura de ventilación
del horno, las superficies cercanas a la abertura y las
hendiduras ubicadas alrededor de la puerta del horno.
Ŷ 1RFDOLHQWHUHFLSLHQWHVFHUUDGRVGHDOLPHQWRV3RGUtD
haber una acumulación de presión en el recipiente y éste
podría explotar, provocando lesiones.
Ŷ 1RXVHQLQJ~QWLSRGHDOXPLQLRRFREHUWRUSDUDFXEULU
el fondo del horno o cualquier parte del horno, excepto
como se describe en este manual. Los cobertores de
horno pueden atrapar el calor o derretirse, ocasionando
daños sobre el producto y el riesgo de descargas, humo
o incendios.
Ŷ 7UDWHGHQRUD\DURJROSHDUODVSXHUWDVHVWXIDVR
paneles de control de vidrio. Si lo hace podría romperse
el vidrio. No cocine si un producto tiene un vidrio roto.
Puede provocarse una descarga, un incendio o heridas.
Ŷ &RFLQHFDUQHVGHUHV\GHDYHSRUFRPSOHWR/DVFDUQHV
de res hasta alcanzar una temperatura interna de por
lo menos 160°F (71°C) y las carnes de ave a una
temperatura interna de por lo menos 180°F (82°C). La
cocción a estas temperaturas generalmente protege de
enfermedades transmitidas por los alimentos.
Para su seguridad, la información de este manual debe seguirse al pie de la letra a fin de minimizar el riesgo de incendio o
explosión, descarga eléctrica, o para prevenir daños, lesiones personales o la muerte.
Esta unidad se ha puesto a prueba y se ha determinado que cumple con los límites de un dispositivo digital de clase B, de
conformidad con la Parte 18 de las normas de la FCC. Estos límites están diseñados para brindar una protección razonable
contra interferencia dañina dentro de una instalación residencial. Esta unidad genera, utiliza y puede irradiar energía de
frecuencia de radio y, si no se instala y usa de acuerdo con las instrucciones, puede provocar una interferencia dañina a las
comunicaciones de radio. Sin embargo, no hay garantía de que no haya interferencia en una instalación determinada. Si la
unidad provoca interferencia nociva a la recepción de radio y televisión, lo que puede determinarse encendiendo y apagando la
unidad, el usuario puede corregir la interferencia a través de una o más de las siguientes medidas:
Ŷ
Reoriente o cambie la posición de las antenas receptoras.
Ŷ
Incremente la distancia entre la unidad y el receptor.
Ŷ
Conecte la unidad a un tomacorriente o un circuito diferente del que está usando el receptor.
GUARDE ESTAS INSTRUCCIONES
¡PRECAUCIÓN!
Las personas que utilicen un marcapasos o un dispositivo médico similar deben tener cuidado cuando utilicen y se encuentren
cerca de una unidad por inducción. El campo electromagnético puede afectar el funcionamiento del marcapasos o del
dispositivo médico similar. Es recomendable consultar a su médico o al fabricante del marcapasos sobre su situación particular.
4
49-80695-2
INSTRUCCIONES DE SEGURIDAD DE LA ESTUFA
INFORMACIÓN IMPORTANTE DE SEGURIDAD
LEA TODAS LAS INSTRUCCIONES ANTES DE USAR
INFORMACIÓN DE SEGURIDAD
GUARDE ESTAS INSTRUCCIONES
Ŷ 1RXWLOLFHDJXDHQLQFHQGLRVGHJUDVD1XQFDOHYDQWH
una sartén en llamas. Apague los controles. Apague
una sartén en llamas sobre una unidad de superficie
cubriendo la sartén por completo con una tapa que
ajuste bien, una plancha para galletas o una bandeja
SODQD8WLOLFHXQTXtPLFRVHFRPXOWLXVRRXQH[WLQWRU
de incendios de espuma.
Ŷ 6LKD\XQLQFHQGLRHQHOKRUQRGXUDQWHHOKRUQHDGR
apáguelo cerrando la puerta del horno y apagando
el control o usando un químico seco multiuso o un
extintor de incendios de espuma.
Ŷ 6LKD\XQLQFHQGLRHQHOKRUQRGXUDQWHODDXWR
limpieza, apague el horno y espere a que el incendio
se consuma. No abra la puerta del horno a la fuerza.
El ingreso de aire fresco a temperaturas de auto-
limpieza puede provocar una explosión de llamas
desde el horno. No seguir esta instrucción puede
provocar quemaduras graves.
Ŷ 1XQFDGHMHODVXQLGDGHVGHVXSHUILFLHVLQDWHQFLyQHQ
configuraciones de calor media o alta. Los alimentos
que hierven y se derraman pueden provocar humo y
derrames grasosos que pueden prenderse fuego.
Ŷ 1XQFDGHMHDFHLWHVLQDWHQFLyQPLHQWUDVIUtH6LVH
deja calentar más allá del punto de humeo, el aceite
puede encenderse, provocando un incendio que
SRGUtDSURSDJDUVHDORVJDELQHWHVFHUFDQRV8WLOLFH
un termómetro para grasa cuando sea posible para
controlar la temperatura del aceite.
Ŷ 3DUDHYLWDUHOGHUUDPHGHDFHLWH\XQLQFHQGLRXWLOLFH
una cantidad mínima de aceite cuando fría en sartenes
poco profundas y evite la cocción de alimentos
congelados con una cantidad excesiva de hielo.
Ŷ 6yORFLHUWRVWLSRVGHUHFLSLHQWHVGHYLGULRYLGULR
cerámico, cerámica, u otros recipientes vidriados
SXHGHQXWLOL]DUVHVREUHODHVWXIDRWURVSXHGHQ
romperse debido al cambio repentino de temperatura.
Ŷ 3DUDPLQLPL]DUODSRVLELOLGDGGHTXHPDGXUDVHO
encendido de materiales inflamables y los derrames,
la manija de los recipientes deben girarse hacia el
centro de la cocina sin extenderse sobre ninguna
unidad de superficie cercana.
Ŷ 6LIODPEHDDOLPHQWRVEDMRODFDPSDQDHQFLHQGDHO
ventilador.
EN CASO DE INCENDIO, SIGA LOS SIGUIENTES PASOS PARA
EVITAR LA PROPAGACIÓN DEL FUEGO
ADVERTENCIA
ADVERTENCIA
Ŷ 1RDOPDFHQHRXWLOLFHPDWHULDOHVLQIODPDEOHVGHQWUR
de un horno o cerca de la estufa, tales como papel,
plástico, agarraderas, telas, recubrimientos de
pared, cortinas y gasolina u otros vapores y líquidos
inflamables.
Ŷ 1XQFDXVHYHVWLPHQWDVKROJDGDVRDPSOLDVPLHQWUDV
utilice el aparato. Estas vestimentas pueden
prenderse fuego si entran en contacto con superficies
calientes, provocando quemaduras graves.
Ŷ 1RSHUPLWDTXHODJUDVDGHODFRFFLyQXRWURV
materiales inflamables se acumulen dentro de la
cocina o en su cercanía. La grasa dentro del horno o
sobre la estufa puede encenderse.
Ŷ /LPSLHODVFDPSDQDVGHYHQWLODFLyQFRQIUHFXHQFLD
No debe permitirse la acumulación de grasa en la
campana o en el filtro.
MANTENGA LOS MATERIALES INFLAMABLES ALEJADOS DE LA COCINA
Si esto no se cumple, se podrán sufrir lesiones personales graves o incendios.
ADVERTENCIA
49-80695-2
5
Ŷ 0DQWpQJDVHDOHMDGRGHOKRUQRDODEULUODSXHUWDGHO
mismo. El aire caliente o el vapor que sale puede
FDXVDUTXHPDGXUDVHQODVPDQRVURVWUR\XRMRV
Ŷ 1RXVHHOKRUQRVLXQHOHPHQWRGHFDOHQWDPLHQWR
genera un punto brillante durante el uso o aparecen
RWURVVLJQRVGHGDxRV8QSXQWREULOODQWHLQGLFDTXH
el elemento para calentar puede fallar y generar una
posible quemadura, incendio o descarga eléctrica.
Apague el horno de inmediato y solicite a un técnico
calificado del servicio que reemplace el elemento
para calentar.
Ŷ 0DQWHQJDGHVREVWUXLGDODYHQWLODFLyQGHOKRUQR
Ŷ 0DQWHQJDHOKRUQROLEUHGHDFXPXODFLyQGHJUDVD/D
grasa del horno se puede incendiar.
Ŷ &RORTXHORVHVWDQWHVGHOKRUQRHQODXELFDFLyQ
deseada mientras éste se encuentra frío. Si es
necesario mover el estante mientras el horno está
caliente, evite que el mango de la olla tenga contacto
con el elemento calentador en el horno.
Ŷ $OXVDUODVEROVDVSDUDFRFLQDURGRUDUHQHOKRUQR
siga las instrucciones del fabricante.
Ŷ &RORTXHHOHVWDQWHGHOKRUQRHQODSRVLFLyQGH
bloqueo, al introducir y retirar comida del horno. Esto
ayuda a evitar quemaduras por tocar superficies
calientes de la puerta y las paredes del horno.
Ŷ 1RGHMHSURGXFWRVWDOHVFRPRSDSHOXWHQVLOLRVGH
cocina ni comida en el horno cuando éste no se
encuentre en uso. Los artículos guardados en el
horno se pueden incendiar.
Ŷ 1XQFDFRORTXHORVXWHQVLOLRVGHFRFLQDSLHGUDVSDUD
pizza u horneado o cualquier otro tipo de aluminio o
cobertor en la base del horno. Estos ítems pueden
atrapar el calor o derretirse, ocasionando daños
sobre el producto y el riesgo de descargas, humo o
incendios.
INSTRUCCIONES DE SEGURIDAD DEL HORNO
INSTRUCCIONES DE SEGURIDAD DE LA SUPERFICIE DE COCCIÓN DE VIDRIO
SAFETY INFORMATION
Ŷ Tenga cuidado al tocar la estufa. La superficie de
vidrio de la estufa retendrá calor después de que los
controles se hayan apagado.
Ŷ No cocine sobre una estufa rota. Si la estufa se
rompe, las soluciones de limpieza y los derrames
pueden penetrar en la estufa rota y crear un riesgo
de descarga eléctrica. Comuníquese con un técnico
calificado de inmediato.
Ŷ Evite rayar la estufa de vidrio. La estufa puede
rayarse con elementos tales como cuchillos,
instrumentos filosos, anillos u otras joyas, y remaches
de la ropa.
Ŷ 8VHHOOLPSLDGRUGHHVWXIDVFHUiPLFDV&(5$0$
BRYTE
®
y la esponjilla de limpieza CERAMA BRYTE
®
para limpiar la estufa. Espere hasta que la estufa se
enfríe y la luz indicadora se apague antes de limpiar.
8QDHVSRQMDRXQSDxRK~PHGRVVREUHXQDVXSHUILFLH
caliente pueden provocar quemaduras de vapor.
Algunos limpiadores pueden producir humos tóxicos
si se los aplica a una superficie caliente.
NOTA:/RVGHUUDPHVGHD]~FDUVRQODH[FHSFLyQ
Éstos deben quitarse mientras están calientes
utilizando una agarradera y un raspador. Para
instrucciones detalladas, ver la sección Cómo limpiar
la estufa de vidrio.
Ŷ Lea y cumpla con todas las instrucciones y
advertencias de la etiqueta de la crema de limpieza.
GUARDE ESTAS INSTRUCCIONES
ADVERTENCIA
ADVERTENCIA
6
49-80695-2
La función de limpieza automática usa el horno en temperaturas lo suficientemente altas como para consumir la
suciedad de comida que haya dentro del horno. Para un funcionamiento seguro, siga estas instrucciones.
Ŷ No toque las superficies del horno durante el ciclo de
limpieza automática. Mantenga a los niños alejados
del horno durante la limpieza automática. Si no
se siguen estas instrucciones, se podrán producir
quemaduras.
Ŷ
Antes de utilizar el ciclo de limpieza automática, retire
las ollas, estantes de metal brillante del horno y otros
utensilios que haya en el horno. Sólo se pueden dejar
dentro del horno los estantes para horno cubiertos de
porcelana. No use la función de limpieza automática
para limpiar otras partes, tales como ollas de goteo o
recipientes.
Ŷ Antes de utilizar el ciclo de limpieza automática, limpie
la grasa y restos de comida que haya en el horno.
8QDFDQWLGDGH[FHVLYDGHJUDVDVHSXHGHLQFHQGLDUOR
cual puede producir daños con humo en su hogar.
Ŷ Si el modo de limpieza automática funciona de
forma incorrecta, apague el horno y desconecte el
suministro de corriente. Solicite el servicio de un
técnico calificado.
Ŷ No limpie la junta de la puerta. La junta de la puerta
es esencial para un buen sellado. Se debe tener
cuidado de no frotar, dañar ni mover la junta.
Ŷ No use limpiadores para horno. No se deberá usar
limpiadores comerciales para horno ni revestimientos
GHSURWHFFLyQSDUDKRUQRVGHQLQJ~QWLSRHQR
alrededor de cualquier parte del horno.
Ŷ El objetivo del cajón calentador es mantener
alimentos cocidos calientes a la temperatura de
servicio. Por debajo de los 140°F (60°C) puede
producirse crecimiento de bacterias en los alimentos.
No coloque alimentos fríos en el cajón calentador.
No caliente alimentos por más de 2 horas. No seguir
estas instrucciones puede provocar enfermedades
transmitidas por los alimentos.
Ŷ No deje productos de papel, plásticos, comida
enlatada o materiales combustibles en el cajón.
Pueden prenderse fuego.
Ŷ No toque el elemento calentador o la superficie
interna del cajón. Estas superficies pueden estar
lo suficientemente calientes como para provocar
quemaduras.
Ŷ Tenga cuidado al abrir el cajón. Abra un poco el cajón
y deje salir el aire caliente y el vapor antes de quitar
o volver a colocar los alimentos. El aire y el vapor
calientes que salen pueden provocar quemaduras en
PDQRVURVWUR\RRMRV
Ŷ No use papel de aluminio para cubrir el cajón inferior.
El papel atrapará en calor del fondo y alterará el
funcionamiento del horno. El papel se podrá derretir
y dañar de forma permanente la parte inferior del
cajón. Cualquier daño por uso inadecuado del papel
de aluminio no estará cubierto por la garantía del
producto.
INFORMACIÓN IMPORTANTE DE SEGURIDAD
LEA TODAS LAS INSTRUCCIONES ANTES DE USAR
INFORMACIÓN DE SEGURIDAD
GUARDE ESTAS INSTRUCCIONES
ADVERTENCIA
ADVERTENCIA
INSTRUCCIONES DE SEGURIDAD DEL HORNO CON LIMPIEZA AUTOMÁTICA
CAJÓN CALENTADOR/CAJÓN DEL HORNO INFERIOR
INSTRUCCIONES DE SEGURIDAD

49-80695-2
7
¡Gracias! ... por su compra de un electrodoméstico de la Marca GE
GARANTÍA
Garantía de la Cocina Eléctrica de GE
GEAppliances.com
Todo el servicio de garantía es provisto por nuestros Centros de Servicio de Fabricación, o un técnico autorizado de Servicio al
Cliente (Customer Care®). Para programar una visita del servicio técnico a través de Internet, visítenos en www.geappliances.
FRPVHUYLFHBDQGBVXSSRUWROODPHDO*(&$5(6&XDQGROODPHSDUDVROLFLWDUHOVHUYLFLRWHQJDORVQ~PHURV
de serie y de modelo disponibles.
Para realizar el servicio técnico de su electrodoméstico se podrá requerir el uso de datos del puerto de abordaje para su
diagnóstico. Esto da al técnico del servicio de fábrica de GE la habilidad de diagnosticar de forma rápida cualquier problema con
su electrodoméstico, y de ayudar a GE a mejorar sus productos al brindarle a GE la información sobre su electrodoméstico. Si no
desea que los datos de su electrodoméstico sean enviados a GE, solicitamos que le indique a su técnico no entregar los datos a
GE en el momento del servicio.
Durante el período de un año desde la fecha original de compra. GE le brindará cualquier parte de la cocina que falle debido a
un defecto en los materiales o la fabricación. Durante esta garantía limitada de un año, GE también proveerá, sin costo, todo el
trabajo y el servicio en el hogar relacionado con el reemplazo de la parte que presente defectos.
Qué no cubrirá GE:
Ŷ 9LDMHVGHOWpFQLFRGHOVHUYLFLRDVXKRJDUSDUDHQVHxDUOH
sobre cómo usar el producto.
Ŷ ,QVWDODFLyQHQWUHJDRPDQWHQLPLHQWRLQDGHFXDGRV
Ŷ )DOODVGHOSURGXFWRHQFDVRGHDEXVRPDOXVRPRGLILFDFLyQ
o uso para propósitos diferentes al original o uso comercial.
Ŷ Daños a la estufa de vidrio provocados por el uso de
limpiadores distintos de las cremas y paños recomendados.
Ŷ Daños a la estufa de vidrio provocados por derrames
endurecidos de materiales azucarados o plástico derretido
que no se limpiaron de acuerdo con las instrucciones del
Manual del Propietario.
Ŷ 5HHPSOD]RGHIXVLEOHVGHODFDVDRUHLQLFLRGHGLV\XQWRUHV
Ŷ Daños ocasionados sobre el producto por accidente,
incendio, inundaciones o catástrofes naturales.
Ŷ Daños incidentales o consecuentes causados por posibles
defectos sobre este producto.
Ŷ Daño causado después de la entrega.
Ŷ Producto no accesible para brindar el servicio requerido.
Ŷ Solicite el servicio técnico para reparar o reemplazar las
lámparas, excepto las lámparas LED.
EXCLUSIÓN DE GARANTÍAS IMPLÍCITAS
6X~QLFD\H[FOXVLYDDOWHUQDWLYDHVODUHSDUDFLyQGHOSURGXFWRFRPRVHLQGLFDHQOD*DUDQWtD/LPLWDGD/DVJDUDQWtDVLPSOtFLWDV
incluyendo garantías implícitas de comerciabilidad o conveniencia sobre un propósito particular, se limitan a un año o al período
más corto permitido por la ley.
Esta garantía se extiende al comprador original y a cualquier dueño subsiguiente de productos comprados para uso hogareño
GHQWURGH((886LHOSURGXFWRHVWiHQXQiUHDGRQGHQRVHHQFXHQWUDGLVSRQLEOHXQ3URYHHGRU$XWRUL]DGRGHO6HUYLFLR7pFQLFR
de GE, usted será responsable por el costo de un viaje o se podrá requerir que traiga el producto a una ubicación del Servicio
Técnico de GE Autorizado para recibir el servicio. En Alaska, la garantía excluye el costo de envío o llamadas del servicio a su
hogar.
Algunos estados no permiten la exclusión o limitación de daños fortuitos o consecuentes. Esta garantía le da derechos legales
específicos y es posible que tenga otros derechos legales que varían entre un estado y otro. Para conocer cuáles son sus
derechos legales, consulte a la oficina de asuntos del consumidor local o estatal o al Fiscal de su estado.
Garante: General Electric Company. Louisville, KY 40225
Garantías Extendidas: Adquiera una garantía extendida de GE y aprenda sobre descuentos especiales que están disponibles
PLHQWUDVVXJDUDQWtDD~QHVWiYLJHQWH/DSXHGHDGTXLULUHQFXDOTXLHUPRPHQWRDWUDYpVGH,QWHUQHWHQ
ZZZJHDSSOLDQFHVFRPVHUYLFHBDQGBVXSSRUWVKRSIRUH[WHQGHGVHUYLFHSODQVKWP
ROODPDQGRDOGXUDQWHHOKRUDULRFRPHUFLDOKDELWXDO/RV6HUYLFLRVSDUDHO&RQVXPLGRU+RJDUHxRGH*(D~QHVWDUiQ
allí cuando su garantía caduque.
Registre su Electrodoméstico: £5HJLVWUHVXHOHFWURGRPpVWLFRQXHYRDWUDYpVGH,QWHUQHWVHJ~QVXFRQYHQLHQFLD
ZZZJHDSSOLDQFHVFRPVHUYLFHBDQGBVXSSRUWUHJLVWHU
8QUHJLVWURSXQWXDOGHVXSURGXFWRSHUPLWLUiXQDPHMRUFRPXQLFDFLyQ\XQVHUYLFLRPiVSXQWXDOGHDFXHUGRFRQORVWpUPLQRVGHVX
garantía, en caso de surgir la necesidad. También puede enviar una carta en la tarjeta de inscripción pre-impresa que se incluye con
el material embalado.
Abroche su recibo aquí. Para acceder al servicio técnico de acuerdo con
la garantía deberá contar con la prueba de la fecha original de compra.

8
49-80695-2
Servicio Programado: El servicio de reparación de expertos de
GE está a sólo un paso de su puerta. Entre a Internet y programe
VXVHUYLFLRHQZZZJHDSSOLDQFHVFRPVHUYLFHBDQGBVXSSRUWR
OODPHDO*(&$5(6GXUDQWHHOKRUDULRGH
atención comercial.
Piezas y Accesorios: Aquellas personas calificadas para realizar
el servicio técnico sobre sus propios electrodomésticos podrán
solicitar el envío de piezas o accesorios directamente a sus
KRJDUHVVHDFHSWDQODVWDUMHWDV9,6$0DVWHU&DUG\'LVFRYHU
Ordene a través de Internet hoy, durante las 24 horas o en forma
telefónica al 800.626.2002 durante el horario de atención comercial.
Las instrucciones que figuran en este manual cubren los
procedimientos que serán realizados por cualquier usuario.
Otros servicios técnicos generalmente deberían ser
derivados a personal calificado del servicio. Se deberá tener
cuidado, ya que una reparación indebida podrá hacer que el
funcionamiento no sea seguro.
Estudio de Diseño de la Vida Real: GE apoya el concepto
GH'LVHxR8QLYHUVDOHQSURGXFWRVVHUYLFLRV\DPELHQWHVTXH
pueden ser usados por personas de todas las edades, tamaños
y capacidades. Reconocemos la necesidad de realizar diseños
para una amplia gama de habilidades e incapacidades físicas y
mentales. Para más detalles sobre las aplicaciones de Diseño
8QLYHUVDOGH*(LQFOX\HQGRLGHDVGHGLVHxRGHFRFLQDVSDUD
personas con incapacidades, visite nuestro sitio web hoy. Sobre
casos de incapacidad auditiva, comuníquese al 800.TDD.GEAC
Contáctenos: Si no se encuentra satisfecho con el servicio
que recibió de GE, comuníquese con nosotros a través de
QXHVWURVLWLRZHEFRQWRGRVORVGHWDOOHVLQFOX\HQGRVXQ~PHUR
telefónico, o escriba a:
General Manager, Customer Relations
GE Appliances, Appliance Park Louisville, KY 40225
ASISTENCIA / ACCESORIOS
¡Consulte el Sitio Web de Electrodomésticos de GE (www.geappliances.com/service_and_support/) durante las 24 horas, cual-
TXLHUGtDGHODxR3DUDPD\RUFRQYHQLHQFLD\XQVHUYLFLRPiVUiSLGRDKRUDSXHGHGHVFDUJDUHO0DQXDOGHO3URSLHWDULRRUGHQDU
piezas o incluso programar el servicio técnico a través de Internet.
¿Desea realizar una consulta o necesita ayuda con su electrodoméstico?
Accesorios
¿Busca Algo Más?
¡GE ofrece una variedad de accesorios para mejorar sus experiencias de cocción y mantenimiento!
Para realizar una orden, visítenos a través de Internet en:
www.GEApplianceParts.com((88RHQwww.GEAppliances.ca (Canadá)
o llame al 800.626.2002((88800.661.1616 (Canadá)
Estos y otros productos están disponibles:
Cómo Retirar la Película Protectora de Envío y la Cinta de Embalaje
Con cuidado tome un extremo de la película protectora de envío
con los dedos y lentamente retire la misma de la superficie del
electrodoméstico.
1RXWLOLFHQLQJ~QSURGXFWRILORVRSDUDUHWLUDUOD
película. Retire toda la película antes de usar el electrodoméstico
por primera vez.
Para asegurar que no haya daños sobre el acabado del
producto, la forma más segura de retirar el adhesivo de la cinta
de embalaje en electrodomésticos nuevos es aplicando un
detergente líquido hogareño para lavar platos. Aplique con una
tela suave y deje que se seque.
NOTA: El adhesivo deberá ser eliminado de todas las partes.
No se puede retirar si se hornea con éste dentro.
Accesorios
2OODSDUD$VDU3HTXHxDô´[ó´[ò´ :%;((88'*&DQDGi
2OODSDUD$VDU*UDQGHô´[ó´[ò´ :%;((88'*&DQDGi
2OODSDUD$VDU([WUD*UDQGH´[ó´[ó´ :%;((881RGLVSRQLEOHHQ&DQDGi
Piezas
(VWDQWHVGHOKRUQR /RVQ~PHURVGHSLH]DYDUtDQVHJ~QHOPRGHOR
(OHPHQWRVGHOKRUQR /RVQ~PHURVGHSLH]DYDUtDQVHJ~QHOPRGHOR
/iPSDUDVGHOX] /RVQ~PHURVGHSLH]DYDUtDQVHJ~QHOPRGHOR
Suministros de Limpieza
/LPSLDGRUHVGH$FHUR,QR[LGDEOH&LWUL6KLQH :;;
Limpiador de Electrodomésticos de Acero Inoxidable CERAMA BRYTE
®
30;
Almohadillas de Limpieza CERAMA BRYTE
®
para Placas de Cocción Cerámicas
:;;
Limpiador de la Placa de Cocción de Cerámica CERAMA BRYTE
®
:;;
Espátula para Placa de Cocción Cerámica CERAMA BRYTE
®
:;;
.LWHONLWLQFOX\HFUHPD\HVSiWXODSDUDSODFDGHFRFFLyQ :%;27
/DROODSDUDDVDUJUDQGHQRHQWUDHQFRFLQDVGH´´
/DROOD;/QRHQWUDHQKRUQRVGHSDUHGGH´HPSRWUDEOHVGH´RFRFLQDVGH´´
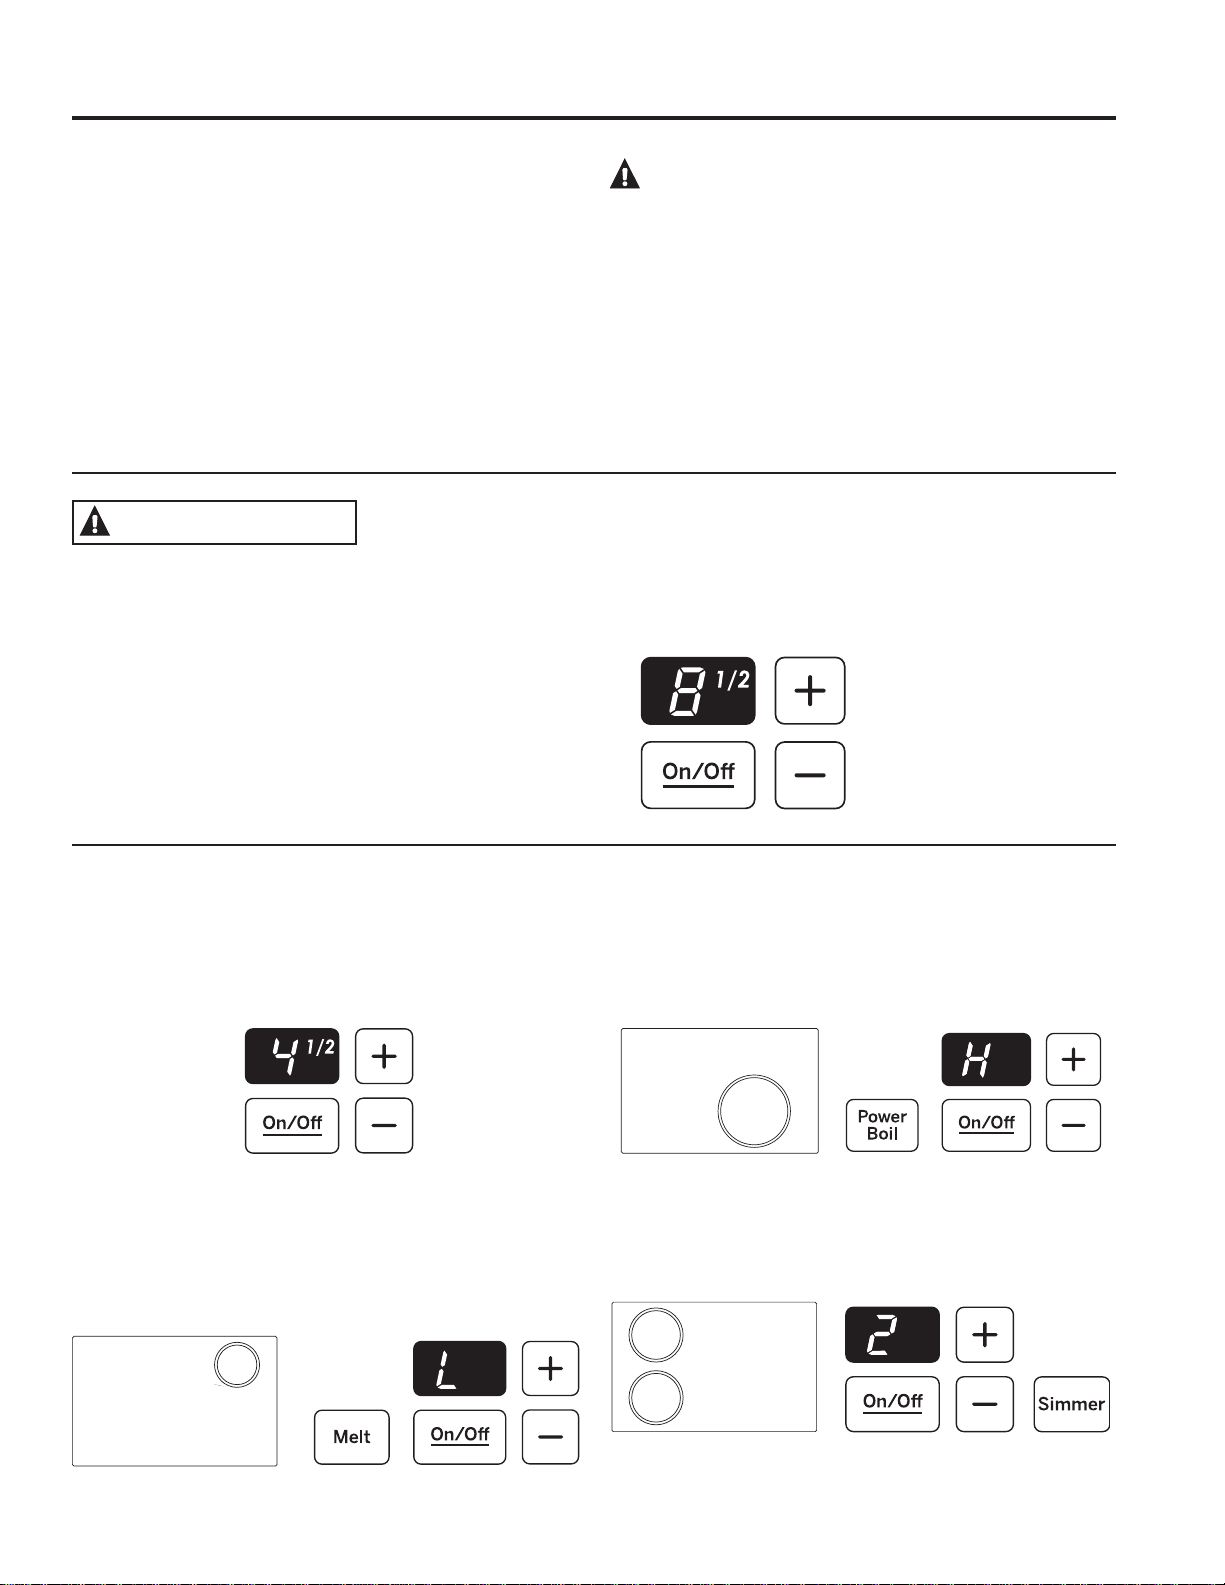
49-80695-2
9
USO DE LA COCINA: Unidades de superficie
Unidades de superficie
Configuraciones de cocción de las unidades de superficie
/DHVWXIDRIUHFHQLYHOHVGHHQHUJtD
Los niveles de energía van desde "L" (Baja) hasta "H" (alta) en
SUHFLVRVDXPHQWRVGHPHGLRSDVR3RUHMHPSOR/ò
ò\KDVWD+
Se recomienda el nivel de energía de “L”, la configuración más
baja, para “mantener caliente”.
El nivel de energía aumenta de a medio nivel con cada toque.
Cómo funciona la superficie de cocción por inducción
Las bobinas de inducción ubicadas debajo de la superficie de
cocción de vidrio producen un campo magnético que genera
calor en metales ferrosos que se encuentran muy cerca. La
superficie de cocción de vidrio no se calienta directamente ya
que no es un metal ferroso, pero el vidrio puede calentarse por
estar en contacto con el recipiente de cocción. Las bobinas de
la superficie de inducción son más eficientes y se calientan con
más rapidez que las cocinas eléctricas o a gas con superficies
de cocción convencionales.
PRECAUCIÓN:
Ŷ Los elementos de cocción por inducción pueden parecer
fríos cuando están encendidos (ON) y después de haber
sido apagados (OFF). La superficie de vidrio puede estar
CALIENTE debido a calor residual transferido del recipiente
de cocción y pueden provocarse quemaduras.
Ŷ 127248(5(&,3,(17(6'(&2&&,Ï1&$/,(17(6
directamente con sus manos. Siempre use guantes de cocina
o agarraderas para proteger las manos de quemaduras.
Ŷ 12'(6/,&(UHFLSLHQWHVGHFRFFLyQDWUDYpVGH
la superficie de la estufa. Hacerlo puede dañar
permanentemente la apariencia de la estufa de cerámica.
El nivel de energía con una
fracción indica la configuración
adicional de medio paso. Usted
puede oír chasquidos que indican
que el control está manteniendo
su configuración deseada.
8QLGDGGHVXSHUILFLH~QLFD³&RQILJXUDFLRQHVGHFRFFLyQ
Para encender una unidad de superficie única:
1. Presione el botón On/Off (encendido/apagado)OXHJR
presione el botón + o –.
8WLOLFHHOERWyQ+ o – para elegir la configuración de energía
deseada.
Para utilizar la característica “Melt” (derretir):
Presione el botón On/Off (encendido/apagado)OXHJR
presione Melt (derretir). El elemento automáticamente
quedará en una configuración predeterminada y aparecerá “L”.
3DUDDSDJDUXQDXQLGDGGHVXSHUILFLH~QLFDSUHVLRQHHOERWyQ
On/Off (encendido/apagado) de nuevo.
Para usar la función Power Boil (Hervir con Electricidad):
Presione la tecla On/Off (encendido/apagado)OXHJR
presione Power Boil (Hervir con Electricidad). El elemento
se configurará de forma automática en una configuración
predeterminada.
Para utilizar la característica “Simmer” (fuego lento):
Presione el botón On/Off (encendido/apagado)OXHJR
presione Simmer (fuego lento). El elemento automáticamente
quedará en una configuración predeterminada. Ajuste utilizando
el botón + o – para subir o bajar el nivel de fuego lento.
RIESGO DE INCENDIO: Nunca pierda de vista la cocina cuando la estufa esté en las
configuraciones medio o alto.Mantenga los ítems inflamables alejados de la estufa. Apague
todos los controles cuando finalice la cocción. Si no se siguen estas instrucciones se podrá
producir incendios, lesiones graves o la muerte.
ADVERTENCIA

10
49-80695-2
Unidades de superficie (Continúa)
USO DE LA COCINA: Unidades de superficie
Uso del Área para Calentar
RIESGO DE ENVENENAMIENTO CON COMIDA: Se pueden
desarrollar bacterias cuando la comida esté a una temperatura
inferior a los 140º.
Ŷ 6LHPSUHFRPLHQFHFRQFRPLGDFDOLHQWH1RXVHOD
configuración caliente para calentar comida fría.
Ŷ 1RXVHODFRQILJXUDFLyQFDOLHQWHGXUDQWHPiVGHKRUDV
La Warming Zone (zona de calentamiento) se encuentra en
la parte trasera central de la superficie de vidrio.
Para utilizar la Warming Zone (zona de calentamiento):
1. Presione la tecla Warming Zone On/Off (zona de
calentamiento encendido/apagado).
2. A fin de seleccionar la configuración del control deseada,
presione la tecla Select (Seleccionar) una vez para Low
(Bajo), dos veces para Medium (Medio) o tres veces para
High (Alto).
Para apagar la Warming Zone (zona de calentamiento):
Presione la tecla Warming Zone On/Off pad.
Para mejores resultados, todos los alimentos de la Warming
Zone (zona de calentamiento) deben cubrirse con una tapa o
con papel de aluminio.
Siempre utilice agarraderas o guantes de cocina cuando quite
alimentos de la Warming Zone (zona de calentamiento), ya
que los recipientes estarán calientes.
Ŷ 1RXWLOLFHHQYROWRULRVSOiVWLFRVSDUDFXEULUDOLPHQWRV(O
plástico puede derretirse en la superficie y será muy difícil
limpiarlo.
Ŷ 8WLOLFHVyORUHFLSLHQWHVGHFRFLQDUHFRPHQGDGRVSDUD
cocción sobre estufas.
ADVERTENCIA
Es posible que las funciones y apariencias varíen con relación a su modelo a lo largo del manual.
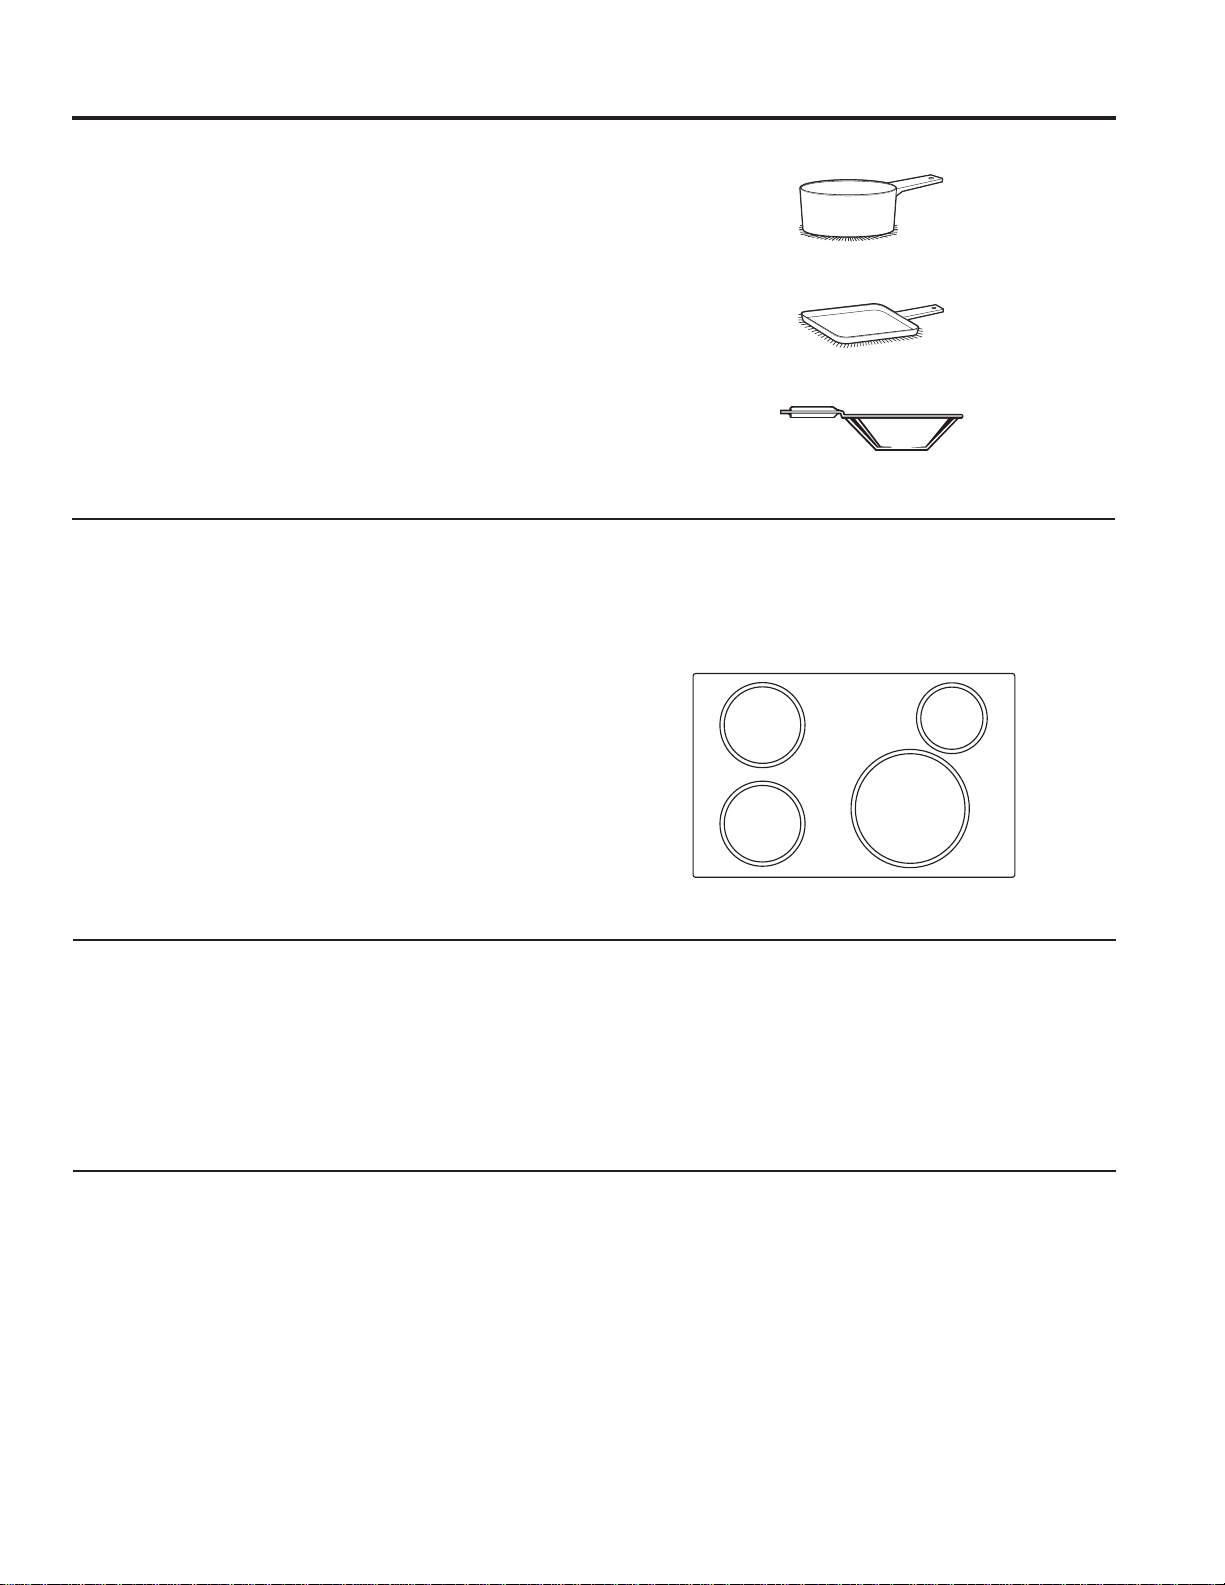
49-80695-2
11
Utensilios de Cocina para Cocción por Inducción
USO DE LA COCINA: Utensilios de Cocina para Cocción por Inducción
¿Qué clase de recipientes debe usarse?
Deben utilizarse recipientes ferrosos cuando se usen las
bobinas de inducción de esta cocina. La zona de calentamiento
no es una bobina de inducción y funciona con cualquier clase
GHUHFLSLHQWHGHFRFFLyQ8VWHGSXHGHYHULILFDUVLVXUHFLSLHQWH
es ferroso si un imán se adhiere a él. Los recipientes de cocción
de calidad con bases pesadas hechas de hierro fundido, acero
inoxidable magnético y acero esmaltado funcionan mejor. Para
mejores resultados, utilice recipientes con bases planas. Los
woks que no poseen bases planas en contacto con la superficie
de vidrio no funcionan. Algunos recipientes están fabricados
especialmente para cocción por inducción.
Coloque sólo ollas secas sobre los elementos superficiales.
No coloque tapas sobre los elementos superficiales,
particularmente tapas mojadas. Es posible que las ollas y
tapas mojadas se adhieran a la superficie cuando se enfríen.
Tamaño y forma de los recipientes
Las bobinas de inducción requieren un tamaño mínimo de
recipiente para que el elemento se encienda. Para que la
bobina de inducción pueda determinar correctamente si el
recipiente es lo suficientemente grande, resulta importante
que el recipiente se centre dentro de los gráficos circulares
marcados en la superficie de cocción de vidrio. El tamaño
mínimo de recipiente que funcionará en cada bobina de
inducción se indica a la izquierda. Los recipientes no ferrosos
y demasiado pequeños no permitirán el accionamiento de la
bobina de inducción y la pantalla del nivel de energía de la
XELFDFLyQGHHVDERELQDGHVWHOODUiGXUDQWHVHJXQGRV\
luego se apagará. Si un recipiente se retira de la bobina de
LQGXFFLyQSRUPiVGHVHJXQGRVODHQHUJtDVHGHVDFWLYDUi
Pueden utilizarse recipientes cuadrados, aunque funcionan
mejor los redondos que se ajustan a los tamaños de las
bobinas de inducción. Los recipientes de cocción de mayor
tamaño que los gráficos de vidrio de la estufa funcionarán.
Para mejores resultados, ajuste el tamaño del recipiente con
los gráficos de tamaño más cercano que se encuentran sobre
la superficie de cocción de vidrio.
“Ruidos” de los recipientes de cocción
8Q]XPELGREDMRHVQRUPDOFXDQGRVHXWLOL]DQERELQDVGH
inducción, especialmente en configuraciones de energía
mayores. Los recipientes pesados de hierro fundido esmaltado
producen menos ruido que los recipientes de acero liviano. La
cantidad de contenido dentro de los recipientes también puede
modificar el nivel de ruido. Los recipientes que cubren por
completo el gráfico del vidrio producen menos ruido. El agua
que queda atrapada debajo de los recipientes puede hervir, lo
que puede provocar que los recipientes vibren o se deslicen
sobre la superficie de vidrio. El agua debajo de las ollas
también hará que los controles reduzcan la potencia recibida
por el utensilio de cocina. A fin de reducir el ruido, mueva las
ROODVVXDYHPHQWH\RFDPELHORVQLYHOHVGHSRWHQFLD
Corriente Compartida
Para el nivel de corriente H (alta), si una unidad superficial está
DFWLYDGDSRUXQSHUtRGRGHWLHPSRSURORQJDGRRVLP~OWLSOHV
unidades superficiales están activadas, es posible que haya
una reducción de corriente en la unidad superficial. El agua
debajo de las ollas también hará que los controles reduzcan la
potencia recibida por el utensilio de cocina.
Utilice una plancha.
Utilice un wok de base plana.
Utilice recipientes de base plana.
Utilice el recipiente de tamaño mínimo
ilustrado para cada elemento de cocción.
Recipiente
de 5-3/4”
de diámetro
mínimo
Recipiente
de 4-3/4”
de diámetro
mínimo
Recipiente
de 8”
de diámetro
mínimo
Recipiente
de 5-3/4”
de diámetro
mínimo

12
49-80695-2
1. Convection Cooking Modes (Modos de Cocción por
Convección): Los modos de cocción por convección utilizan una
circulación de aire incrementada para mejorar el rendimiento. Para
más información, consulte la sección de Modos de Cocción.
2. Traditional Cooking Modes (Modos de Cocción
Tradicionales): Su horno cuenta con los siguientes modos
de cocción tradicionales: Bake (Hornear) y Broil Hi (Asar Alto).
Para más información, consulte la sección de Modos de Cocción.
3. Clean (Limpieza): El horno cuenta con dos modos de limpieza:
Self Clean (Limpieza Automática) y Steam Clean (Limpieza con
Vapor). Para acceder a información importante sobre el uso de estos
modos, consulte la sección de Limpieza del Horno.
4. Start (Iniciar): Se deberá presionar para comenzar cualquier
función de cocción, limpieza o por tiempo.
5. Cancel/Off (Cancelar/ Apagar): Cancela TODAS las
funciones del horno, excepto el reloj, el temporizador y el cajón
para calentar.
6. Cook Time (Tiempo de Cocción): Cuenta el tiempo
de cocción y apaga el horno cuando el tiempo de cocción está
completo. Presione la tecla Cook Time (Tiempo de Cocción),
use las teclas numéricas para programar un tiempo de cocción
en horas y minutos, y luego presione Start (Iniciar). Esto
sólo puede ser usado con Bake (Hornear) y Convection Bake
(Hornear por Convección).
7. Clock (Reloj): Configure el tiempo del reloj del horno.
Presione la tecla Set Clock (Configurar el Reloj)8VHODVWHFODV
numéricas para programar el reloj. Presione Start (Iniciar) para
guardar la configuración de la hora.
8. Timer (Temporizador): Funciona como un temporizador
con cuenta regresiva: Presione la tecla Timer On (Temporizador
Encendido) y las teclas numéricas para programar el tiempo
en horas y minutos. Presione la tecla Start (Iniciar). La cuenta
regresiva del temporizador se completó. Para apagar el
temporizador, presione la tecla Timer Off (Temporizador Apagado).
9. Delay Time (Tiempo de Retraso): Genera un retraso
FXDQGRHOKRUQRHVHQFHQGLGR8VHHVWDWHFODSDUDFRQILJXUDUHO
momento en que desea que el horno se inicie. Presione la tecla
Delay Time (Tiempo de Retraso) y use las teclas numéricas
para programar la hora del día en que desea que el horno se
encienda y presione Start (Iniciar). Presione el modo de cocción
deseado y la temperatura y luego presione Start (Iniciar). Si lo
desea, también puede ser programado un tiempo de cocción.
Siga las instrucciones de Cook Time (Tiempo de Cocción) para
configurar esta función. Esto sólo puede ser usado con Bake
(Hornear) y Convection Bake (Hornear por Convección).
NOTA: Al usar la función de tiempo de retraso, las comidas
que se echan a perder rápidamente, tales como leche, huevos,
pescado, rellenos, ave y cerdo, no se deberán dejar reposar por
más de 1 hora antes y después de la cocción. La temperatura
DPELHQWHHVWLPXODHOGHVDUUROORGHEDFWHULDVQRFLYDV$VHJ~UHVH
de que la luz del horno esté apagada, ya que el calor de la
lámpara acelerará el crecimiento de bacterias nocivas.
10. Oven Light (Luz del Horno): Enciende o apaga la
luz(es) del horno.
11. Lock Controls (Controles de Bloqueo): Bloquean
el control de modo que al presionar las teclas no se activen
los controles. Presione la tecla Lock Controls (Controles de
Bloqueo) durante tres segundos para bloquear o desbloquear
el control. Cancel/Off (Cancelar/ Apagar) siempre está activa,
incluso cuando el control está bloqueado.
12. Warming Drawer (Cajón para Calentar): Mantiene
las comidas calientes y cocinadas en la temperatura para servir.
Presione la tecla Warming Drawer (Cajón para Calentar), La
tecla Warming Drawer Setting (Configuración del Cajón para
Calentar) comienza a parpadear. Presione la tecla Warming
Drawer Setting (Configuración del Cajón para Calentar) para
configurar el cajón para calentar en “HI” (Alto), “STD” (Estándar)
o “LO” (Bajo). Para cancelar, presione la tecla Warming Drawer
On/Off (Cajón para Calentar Encendido/ Apagado). Para más
información, consulte la sección de Modos de Cocción.
NOTA: La tecla Cancel/Off (Cancelar/ Apagar) no apaga el
Warming Drawer (Cajón para Calentar).
13. Probe (Sonda): Monitorea la temperatura interna de
la comida y apaga el horno cuando la comida alcanza la
temperatura programada. Inserte la sonda, programe el modo
de cocción, y programe la temperatura de la sonda. Para más
información, consulte la sección de Modos de Cocción. La
sonda sólo puede ser usada con las funciones Bake (Hornear),
Convection Bake (Hornear por Convección) y Convection Roast
(Dorar por Convección).
USO DE LA COCINA: Controles del Horno
Controles del Horno
1
8
23 69
475
13
12
1110

49-80695-2
13
Funciones Especiales
USO DE LA COCINA: Funciones Especiales
Su cocina cuenta con varias funciones especiales diferentes. Para modificar las configuraciones de estas funciones especiales:
Ŷ 0DQWHQJDSUHVLRQDGDVODVWHFODVBake (Hornear) y Broil (Asar) al mismo tiempo durante tres segundos.
Ŷ ³6)´DSDUHFHUiHQODSDQWDOOD
Ŷ 6HOHFFLRQHODIXQFLyQTXHGHVHHPRGLILFDU
Ŷ &XDQGRHOFDPELRKD\DVLGRUHDOL]DGRSUHVLRQHODWHFODStart (Iniciar) para guardar el cambio y regrese a la hora del día.
Ajuste de la Temperatura del Horno
Esta función permite que la temperatura de horneado del horno
\GHKRUQHDGRSRUFRQYHFFLyQVHDQDMXVWDGDVKDVWD)PiV
FDOLHQWHR)PiVIUtD8VHHVWDIXQFLyQVLSLHQVDTXHOD
temperatura de su horno es demasiado caliente o demasiado fría
y desea modificarla. Este ajuste afecta los modos Bake (Hornear)
\&RQYHFWLRQ%DNH1LQJ~QRWURPRGRGHFRFFLyQVHYHDIHFWDGR
Presione la tecla Bake (Hornear) nuevamente para ingresar el
PRGRGHDMXVWHGHWHPSHUDWXUD6HH[KLELUiXQQ~PHURHQWUH
\8VHODVWHFODVQXPpULFDVSDUDFRQILJXUDUHODMXVWHGH
temperatura deseado y use la tecla Bake (Hornear) para realizar
cambios en forma descendente y ascendente. Presione la tecla
Start (Iniciar) para guardar el ajuste de temperatura.
Sonido de Finalización del Temporizador
Se trata de un tono que indica la finalización de un temporizador.
El tono puede ser continuo (bEEP Cont) o un pitido repetido
E((38QDFRQILJXUDFLyQFRQWLQXDVHJXLUiKDFLHQGRTXHXQ
tono suene hasta que un botón del control sea presionado.
Presione la tecla Broil (Asar) para visualizar la configuración
actual y luego modifique la configuración.
Selección de Temperatura Fahrenheit o Celsius
El control del horno está configurado para su uso con temperaturas
Fahrenheit (F), pero lo puede modificar a temperaturas Celsius
(C). Presione las teclas Cook Time (Tiempo de Cocción) y
Broil Hi/Lo (Asar en Alto/ Bajo) al mismo tiempo para visualizar
ODFRQILJXUDFLyQDFWXDOSUHVLRQHQXHYDPHQWHSDUDPRGLILFDUOD
configuración.
Pantalla del Reloj
Esta función especifica cómo la hora del día será exhibida o si
no se exhibirá la hora del día. Puede seleccionar el reloj con
hora estándar de 12 horas (12 H), la hora militar de 24 horas (24
+RTXHQRVHH[KLEDQLQJ~QUHORMR))$SDJDGR3UHVLRQH
la tecla Clock (Reloj) para visualizar la configuración actual, y
vuelva a presionar la misma para modificar la configuración.
Conversión de Auto Recipe
Al usar la cocción de Convection Bake (Hornear por Convección),
Auto Recipe Conversion (Conversión de Auto Receta) convertirá
de forma automática las temperaturas de horneado regular
ingresadas a temperaturas de cocción de horneado por
convección cuando se active. Se debe observar que esta opción
no convierte los tiempos de cocción del horneado por convección,
sino sólo las temperaturas. Presione la tecla Convection Bake
(Hornear por Convección) para visualizar la configuración de
FRQYHUVLyQYXHOYDDSUHVLRQDUSDUDDOWHUQDUHQWUH2Q&RQ2Q
(Encendido Continuo) y Off (Con Off) (Apagado Continuo).
Volumen del Sonido
Esta función permite que el volumen del tono del horno sea
ajustado entre alto (HI bEEP HI) (Pitido Alto), medio (Std bEEP
Std) (Pitido Estándar) y apagado (oFF bEEP oFF) (Pitido
Apagado). Presione la tecla Cook Time (Tiempo de Cocción)
para visualizar al configuración actual o para modificar la
configuración. El control hará que el tono del horno suene en
el nuevo nivel de volumen cada vez que el nivel de sonido sea
modificado.
Apagado automático de 12 horas y Modo
Sabático
Las opciones de esta función son “12 SHdn” (Apagar Luego de
12 Horas), “no SHdn” (No Apagar) y “SAbbAtH” (Sabático).
El apagado automático de 12 horas apaga el horno luego de 12
horas de operaciones continuas.
El modo sabático desactiva todos los sonidos (el control no
emitirá un pitido cuando se presione un botón), los modos de
Convección, los modos de Asado, Calentar, Tiempo de Cocción,
Temporizador, Reloj, y las funciones de Tiempo Retrasado.
El modo sabático sólo puede ser usado con la función Bake
(Hornear). Esta función se activa conforme con los requisitos
Sabáticos Judíos de la Estrella K.
NOTA: La luz interior del horno se enciende automáticamente
(en algunos modelos) cuando se abre la puerta y se apaga
cuando se la cierra. Puede quitarse la bombilla de luz. Ver la
sección de Reemplazo de bombilla de luz. En los modelos con
interruptor de luz en el panel de control, la luz del horno puede
encenderse y dejarse así.
Presione la tecla Delay Clock (Reloj Retrasado) para visualizar
la configuración actual y luego para modificar la configuración.
Para usar el modo Sabbath (Sabático), seleccione “SAbbAtH”
(Sabático) y presione Start (Iniciar). Aparecerá una ] en la
pantalla y el reloj no será exhibido.
8QDYH]HQHOPRGR6DEEDWK6DEiWLFRHQFXDOTXLHUPRPHQWR
puede presionar Bake (Hornear)XVHODVWHFODVQXPpULFDVSDUD
LQJUHVDUXQDWHPSHUDWXUDHQWUH)\)\SUHVLRQHStart
(Iniciar)1RVHHPLWLUiQLQJ~QVRQLGRFXDQGRODVWHFODVVHDQ
SUHVLRQDGDV(QXQPRPHQWRDOD]DUHQWUHORVVHJXQGRV\
minuto, ][, aparecerá en la pantalla indicando que el horno está
en funcionamiento.
Si necesita ajustar la temperatura, presione Bake (Hornear), use
las teclas numéricas para ingresar una nueva temperatura entre
)\)\SUHVLRQHStart (Iniciar).
3DUDVDOLUGHOPRGR6DEEDWK6DEiWLFRDVHJ~UHVHGHTXHHO
horno esté apagado. Para apagar el horno, presione Cancel/
Off (Cancelar/ Apagar). El horno se apagará inmediatamente
y el ícono, ][ cambiará a ], indicando que el horno fue
apagado. Mantenga presionadas las teclas Bake (Hornear) y
Broil (Asar)GXUDQWHVHJXQGRVSDUDLQJUHVDUDODVIXQFLRQHV
HVSHFLDOHVOXHJRSUHVLRQHDelay Time (Tiempo Retrasado)
hasta que “12 Shdn” o “no Shdn” aparezcan en la pantalla y
presione Start (Iniciar).
NOTA: Si se produce un corte de corriente durante el modo
Sabático, la unidad permanecerá en el modo Sabático pero
apagada cuando vuelva la corriente.
Si desea usar la función Cook Time (Tiempo de Cocción)
(si está disponible) para hornear en el horno y luego hacer
que éste se apague de forma automática, deberá presionar
el botón Cook Time (Tiempo de Cocción), ingresar una
duración del tiempo de cocción, y presionar Start (Iniciar).
Luego ingrese a las funciones especiales para iniciar el modo
Sabbath (Sabático), como se detalla más arriba.

14
49-80695-2
El horno cuenta con seis posiciones de estantes. En la Guía
de Cocción, se brindan recomendaciones de posiciones de
los estantes para diferentes tipos de comidas. Se ajusta
un estante en una dirección para afectar los resultados de
cocción. Por ejemplo, si se prefieren partes superiores más
oscuras en tartas, panecillos o galletas, pruebe moviendo
la comida a un estante que se encuentre una posición más
arriba. Si encuentra que las comidas están demasiado doradas
en la parte superior, pruebe moviendo las mismas más abajo
la próxima vez.
$OKRUQHDUFRQP~OWLSOHVROODV\HQP~OWLSOHVHVWDQWHV
DVHJ~UHVHGHTXHKD\DSRUORPHQRV´HQWUHODVROODVDILQ
de dejar suficiente espacio para que fluya el aire.
(VSRVLEOHTXHVXKRUQRFXHQWHFRQHVWDQWHVH[WHQVLEOHV\R
estantes planos tradicionales.
Para evitar posibles quemaduras, coloque los estantes en la
posición deseada antes de encender el horno.
Estantes Extensibles
Siempre empuje hacia afuera el estante desde el riel frontal
superior hasta la posición de detención en su máxima
extensión, al colocar o retirar utensilios.
Si resulta difícil extender estos estantes, lubrique los mismos
con lubricante de grafito, provisto con el horno. Retire el
estante del horno, retire cualquier obstrucción en el recorrido
deslizable con una toalla de papel, agite el lubricante de grafito
y coloque 4 gotitas en los dos recorridos inferiores de los lados
izquierdo y derecho. Abra y cierre el estante varias veces para
distribuir el lubricante.
Para ordenar más lubricante de grafito, lea la sección de
Asistencia y Accesorios en el comienzo de este manual.
Para Retirar un Estante Extensible:
$VHJ~UHVHGHLQWURGXFLUODSDUULOODKDVWDHOIRQGRGHOKRUQR
de modo que las paletas laterales del armazón de la parrilla
se desenganchen de la cavidad.
2. Deslice la parrilla hacia usted hasta que llegue al tope
(posición detenida) del soporte de la parrilla.
7RPHGHPDQHUDILUPHDPERVODGRVGHODHVWUXFWXUDGHO
HVWDQWH\GHVOL]DQGRHVWH~OWLPRLQFOLQHHOH[WUHPRGHO
frente hacia arriba y empuje hacia fuera.
Para Reemplazar un Estante Extensible:
1. Tome firmemente ambos lados del armazón de la parrilla y
la parrilla deslizable.
2. Coloque el extremo curvo del estante en la posición
deseada, incline el frente hacia arriba y presione la parrilla
hacia adentro.
Si resulta difícil reemplazar o retirar los estantes extensibles,
limpie los soportes de los estantes del horno con aceite
de cocina. No quite el aceite de cocina del espacio de
deslizamiento.
Para lubricar la paleta:
Agite el lubricante y aplique el mismo a las partes móviles de
los mecanismos de las paletas como se muestra.
Riel frontal
superior
Posición de apertura total
Tomar aquí
USO DE LA COCINA: Estantes del Horno
Estantes del Horno
La cantidad de posiciones de la bandeja puede
variar en relación al modelo.

49-80695-2
15
USO DE LA COCINA: Papel de Aluminio y Cobertores del Horno / Utensilios
Utensilios
Pautas de Uso de Utensilios
El material, el acabado y el tamaño de los utensilios afectan el
horneado.
Las ollas oscuras, revestidas y opacas absorben el calor más
rápidamente que las ollas claras y brillantes. Al usar ollas
que absorben el calor más rápidamente, las comidas podrán
resultar más doradas, crocantes y con una capa más gruesa.
Si utiliza utensilios oscuros y revestidos, controle la comida
antes del tiempo mínimo de cocción. Si se obtienen resultados
no deseados con este tipo de utensilios, considere la
SRVLELOLGDGGHUHGXFLUODWHPSHUDWXUDGHOKRUQRHQ)OD
próxima vez.
Las ollas brillantes pueden producir resultados de horneado
más parejos en tortas y galletas.
Las ollas de vidrio y cerámica calientan con lentitud, pero
retienen bien el calor.
Estos tipos de ollas funcionan bien con platos tales como
tartas y postres con natilla.
Las ollas con aislante de aire calientan lentamente y pueden
producir fondos dorados.
Mantenga los utensilios limpios para una cocción más pareja.
PRECAUCIÓN
:
No use ningún tipo de aluminio o cobertor de horno para cubrir el fondo del horno. Estos
ítems pueden atrapar el calor o derretirse, ocasionando daños sobre el producto y el riesgo de descargas, humo o incen-
dios. Los daños por uso inadecuado de estos ítems no están cubiertos por la garantía del producto.
Se podrá usar aluminio para evitar derrames, colocando una hoja sobre un estante inferior varias pulgadas debajo de la comida.
No use más aluminio que el necesario y nunca cubra totalmente el estante de un horno con papel de aluminio. Mantenga el
DOXPLQLRDSRUORPHQRV´GHODVSDUHGHVGHOKRUQRSDUDHYLWDUXQDFLUFXODFLyQGHILFLHQWHGHOFDORU
Papel de Aluminio y Cobertores del Horno

16
49-80695-2
Su nuevo horno posee una variedad de modos de cocción para que pueda obtener los mejores resultados. Estos modos
se describen a continuación. Para acceder a recomendaciones para comidas específicas, consulte la sección de la Guía de
Cocción. Recuerde que es posible que su nuevo horno funcione de manera diferente que aquel que está reemplazando.
Modos de Horneado y Dorado
Seleccione un modo para hornear y dorar basado en el tipo y
cantidad de comida que está preparando. Al preparar comidas
horneadas tales como tartas, galletas y masas, siempre
precaliente el horno primero. Siga las recomendaciones de
la receta sobre la colocación de la comida. Si no se brindan
pautas, centre la comida en el horno.
Hornear
El modo de hornear está pensado para la cocción en un
solo estante. Este modo usa el calor principalmente desde el
elemento inferior, pero también desde el elemento superior
para cocinar la comida. Para usar este modo, presione la
tecla Bake (Hornear), ingrese una temperatura, y luego
presione Start (Iniciar). El precalentamiento generalmente se
recomienda al usar este modo.
Honeado por Convección en Estantes Múltiples
El modo Convection Bake Multi Rack (Honeado por
&RQYHFFLyQHQ(VWDQWHV0~OWLSOHVHVWiSHQVDGRSDUDKRQHDU
HQP~OWLSOHVHVWDQWHVDOPLVPRWLHPSR(VWHPRGRXWLOL]DHO
calor principalmente desde el elemento trasero, cuando está
disponible, pero también calor de los elementos superior e
inferior, junto con el movimiento del aire del ventilador por
convección para que la cocción sea más pareja. El horno está
equipado con la función Auto Recipe Conversion (Conversión
GH5HFHWD$XWRPiWLFDGHPRGRTXHQRHVQHFHVDULRFRQYHUWLU
la temperatura al usar este modo. Es posible que el tiempo de
KRUQHDGRVHDXQSRFRPiVSURORQJDGRFRQHVWDQWHVP~OWLSOHV
en comparación con lo que se espera con un solo estante.
Para usar este modo, presione la tecla Convection Bake
(Hornear por Convección), ingrese una temperatura, y luego
presione Start (Iniciar). Siempre realice el precalentamiento al
usar este modo.
Modo para Asar
Al asar, la puerta deberá permanecer ABIERTA. Monitoree la
comida de cerca al asar. Tenga cuidado al asar en posiciones
de estantes superiores, ya que colocar la comida más cerca
del elemento para asar incrementa el humo, salpicaduras y la
posibilidad de que se incendien las grasas. No se recomienda
asar en la posición más alta de los estantes.
Intente asar las comidas que normalmente haría a la parrilla.
Ajuste las posiciones de los estantes para ajustar la intensidad
del calor a la comida. Coloque las comidas más cerca del
elemento para asar, cuando se desee una superficie más
cocinada y un interior poco cocido. Las comidas más gruesas
y las comidas cuyo interior debe ser cocinado deberían ser
asadas en un estante en una posición alejada del usado para
asar, o usando las funciones Broil Lo (Asar Bajo).
Asar Alto
El modo Traditional Broil Hi (Asado Tradicional Alto) usa calor
LQWHQVRGHOHOHPHQWRVXSHULRUSDUDVRDVDUODVFRPLGDV8VH
la función Broil Hi (Asado Alto) para cortes más delgados de
FDUQH\RFRPLGDVTXHSUHILHUDTXHTXHGDQPHQRVFRFLQDGDV
en su interior. Para usar este modo, presione la tecla Broil
(Asar) una vez y luego presione Start (Iniciar). No es
necesario realizar el precalentamiento al usar este modo.
Asar Bajo
El modo Traditional Broil Lo (Asado Tradicional Bajo) usa
menos calor intenso del elemento superior para cocinar la
comida completamente mientras también produce el dorado
VXSHUILFLDO8VHODIXQFLyQ%URLO/R$VDGR%DMRSDUDFRUWHV
GHFDUQHPiVJUXHVRV\RFRPLGDVTXHGHVHHTXHTXHGHQ
completamente cocinadas. Para usar este modo, presione la
tecla Broil (Asar) dos veces y luego presione Start (Iniciar).
No es necesario realizar el precalentamiento al usar este modo.
USO DE LA COCINA: Modos de Cocción
Modos de Cocción

49-80695-2
17
Sonda
La temperatura interna de la comida con frecuencia se usa
como indicador de que está lista, especialmente al dorar o
preparar carne de ave. El modo Probe (Sonda) monitorea la
temperatura interna de la comida y apaga el horno cuando esta
~OWLPDDOFDQ]DODWHPSHUDWXUDSURJUDPDGD3XHGHHQFRQWUDU
información sobre las temperaturas mínimas para una cocción
segura en www.IsItDoneYet.gov. La sonda de temperatura sólo
puede ser usada en los modos Bake (Hornear) y Convection
Bake (Horneado por Convección).
Para usar la sonda con precalentamiento:
1. Presione la tecla del modo de cocción deseado (Horneado
Tradicional o Horneado por Convección) e ingrese la
temperatura de cocción deseada.
2. Inserte la sonda en la comida (consulte las Pautas de
8ELFDFLyQGHOD6RQGD$SURSLDGDHQHVWDVHFFLyQ
8QDYH]TXHHOKRUQRIXHSUHFDOHQWDGRFRORTXHODFRPLGD
en el mismo y conecte la sonda en su correspondiente
tomacorriente, asegurándose de que esté completamente
insertada. Tenga cuidado, ya que las paredes del horno y
el tomacorriente de la sonda están calientes.
4. Programe la temperatura de la sonda presionando la tecla
Probe (Sonda) e ingresando la temperatura deseada para
la comida. La temperatura interna máxima de la comida
que se puede configurar es 200º F.
Para usar la sonda sin precalentamiento:
1. Inserte la sonda en la comida (consulte las Pautas de
8ELFDFLyQGHOD6RQGD$SURSLDGDHQHVWDVHFFLyQ
2. Coloque la comida en el horno y conecte la sonda en su
correspondiente tomacorriente en el horno.
3URJUDPHODFRQILJXUDFLyQGHVHDGDSDUDODVRQGD\HO
modo de cocción, presionando la tecla Probe (Sonda) e
ingresando la temperatura deseada para la comida, luego
presione la tecla de modo de cocción (Horneado Tradicional
o Horneado por Convección) e ingrese la temperatura de
cocción deseada y luego presione Start (Iniciar).
Pautas para una Ubicación Adecuada de la
Sonda
Luego de preparar la comida y de colocarla en la olla de cocción,
siga estas pautas para una ubicación adecuada de la sonda.
Ŷ ,QVHUWHODVRQGDFRPSOHWDPHQWHHQODFDUQHKDVWD
apoyarse en la manija, de modo que el punto de la sonda
descanse en el centro de la parte más gruesa de la comida.
Ŷ 1RGHEHUtDWRFDUHOKXHVRODJUDVDQLHOFDUWtODJR
Ŷ 3DUDFRFLQDUXQDYHHQWHUDLQVHUWHODVRQGDHQODSDUWH
más gruesa de la pechuga.
Ŷ 3DUDGRUDUVLQKXHVRVLQVHUWHODVRQGDHQHOFHQWURGHO
dorado.
Ŷ 3DUDFRFLQDUMDPyQRFRUGHURFRQKXHVRVLQVHUWHODVRQGD
HQHOFHQWURGHODDUWLFXODFLyQRGHOP~VFXORPiVEDMR\ODUJR
Ŷ 3DUDSUHSDUDUFD]XHODVRSODWRVWDOHVFRPRSDVWHOGH
carne, inserte la sonda en el centro del plato.
Ŷ 3DUDFRFLQDUSHVFDGRLQVHUWHODVRQGDMXVWRDUULEDGHOD
agalla en la zona más carnosa paralela a columna.
Controle la temperatura en otras ubicaciones de la comida con un
termómetro de comidas, una vez que se llegue a la temperatura
de la sonda, a fin de asegurar que todas las porciones de la
comida hayan alcanzado las temperaturas deseadas.
Pautas para el Cuidado de la Sonda
Nota: algunos modelos con horno doble cuentan con una sonda
sólo en el horno superior
Ŷ 6LVHXVDXQDVRQGDTXHQRVHDODSURYLVWDFRQHVWHSURGXFWR
se podrán producir daños sobre la sonda.
Ŷ 8VHODVPDQLMDVGHODVRQGDDOHQFKXIDU\GHVHQFKXIDUOD
misma, luego de insertar o de retirar la sonda de la carne o del
tomacorriente.
Ŷ 3DUDHYLWDUGDxRVVREUHODVRQGDQRXVHDJDUUDGHUDVSDUD
empujar el cable al retirarlo.
Ŷ 3DUDHYLWDUURPSHUODVRQGDDVHJ~UHVHGHTXHODFRPLGDKD\D
sido completamente descongelada antes de insertarla.
Ŷ 3DUDHYLWDUSRVLEOHVTXHPDGXUDVQRGHVHQFKXIHODVRQGD
GHOWRPDFRUULHQWHGHOKRUQRKDVWDTXHHVWH~OWLPRVHKD\D
enfriado.
Ŷ 1XQFDGHMHODVRQGDGHQWURGHOKRUQRGXUDQWHXQFLFORGH
limpieza automática o de limpieza con vapor.
Ŷ 1RJXDUGHODVRQGDGHQWURGHOKRUQR
Modos de Cocción (Cont.)
USO DEL HORNO: Modos de Cocción/ Utensilios

18
49-80695-2
TIPO DE COMIDA
MODO(S)
RECOMENDADO(S)
POSICIÓN(ES) DE ES-
TANTES RECOMENDADA SUGERENCIAS ADICIONALES
Productos Horneados
Tortas con capas, tortas rectan-
gulares, roscas, panecillos, pan
rápido en un Solo Estante
Hornear 4 8VHXWHQVLOLRVEULOODQWHV
7RUWDVFRQFDSDVHQ0~OWLSOHV
Estantes
Hornear \
$VHJ~UHVHGHTXHKD\DXQIOXMRGHDLUHDGHFXDGR
(Vea la ilustración).
Tortas de grasa (pastel de ángel) Hornear 1 8VHXWHQVLOLRVEULOODQWHV
Galletas, galletitas, bizcochitos
en un Solo Estante
Hornear 4 8VHXWHQVLOLRVEULOODQWHV
Galletas, galletitas, bizcochitos
HQ0~OWLSOHV(VWDQWHV
Hornear
Horneado por Convección
\
2,
\(OHVWDQWHVHUHFR-
mienda sólo para Convection
Bake (Hornear por Convección))
$VHJ~UHVHGHTXHKD\DXQIOXMRGHDLUHDGHFXDGR
Bife y Cerdo
Hamburguesas Asar Alto 6
0DQWHQJDODSXHUWDDELHUWDDODVDUHQHOKRUQRLQIHULRU8VHODSDUWHSDUD
DVDUPXHYDODFRPLGDPiVDEDMRSDUDTXHTXHGHPiVSUHSDUDGD\PHQRV
soasada. Preste atención a la comida al asarla. Para un mejor rendimiento,
centre la comida debajo del elemento que emite calor para asar.
Bifes y Chuletas Asar Alto 6
0DQWHQJDODSXHUWDDELHUWDDODVDUHQHOKRUQRLQIHULRU8VHODSDUWHSDUD
DVDUPXHYDODFRPLGDPiVDEDMRSDUDTXHTXHGHPiVSUHSDUDGD\PHQRV
soasada. Preste atención a la comida al asarla. Para un mejor rendimiento,
centre la comida debajo del elemento que emite calor para asar.
Dorados Hornear R
8VHXQDROODFKDWDWDOFRPRXQDROODSDUDDVDU
No se requiere precalentarla.
Ave
Pollo entero Hornear R 8VHXQDROODFKDWDWDOFRPRXQDROODSDUDDVDU
Pechugas, patas, muslos con
huesos
Asar Alto 2
Si se empanó o cubrió con salsa, evite los modos Broil Hi (Asar Alto). Ase
del lado de la piel hacia abajo primero. Preste atención a la comida al asar-
la. Mantenga la puerta abierta al asar en el horno inferior. Para un mejor
rendimiento, centre la comida debajo del elemento calentador para asar.
Asado Bajo
Hornear
R
Pechugas de pollo deshuesadas
Asado Bajo
Hornear
R
Mantenga la puerta abierta al asar en el horno inferior. Mueva la comida
más abajo para que quede más preparada y menos soasada y más arriba
para que quede más soasada y dorada al asar. Para un mejor rendimiento,
centre la comida debajo del elemento calentador para asar.
Pavo entero Hornear 1 o 2 8VDXQDROODFKDWDWDOFRPRXQDROODSDUDDVDU
Pechuga de Pavo Hornear R 8VDXQDROODFKDWDWDOFRPRXQDROODSDUDDVDU
Pescado Asado Bajo
6 (mitad del grosor o menos)
!SXOJDGD
Mantenga la puerta abierta al asar en el horno inferior. Preste atención a la
comida al asarla. Para un mejor rendimiento, centre la comida debajo del
elemento calentador para asar.
Cazuelas Hornear R
Comidas Congeladas a Conveniencia
Pizza, papas fritas, tator tots,
patitas de pollo fritas, aperitivos
en un Solo Estante
Hornear R 8VHXWHQVLOLRVEULOODQWHV
Pizza, papas fritas, tator tots,
patitas de pollo fritas, aperitivos
HQ0~OWLSOHV(VWDQWHV
Hornear
Horneado por Convección
\ 8VHXWHQVLOLRVEULOODQWHV
*Al hornear cuatro tortas con capas a la vez, use los estantes
\&RORTXHODVROODVFRPRVHPXHVWUDGHPRGRTXHQR
quede una olla encima de la otra.
Cocine la comida completamente para evitar que se produzcan
enfermedades a partir de la comida. Puede encontrar
recomendaciones sobre temperatura mínima para cocinar de
forma segura en www.IsItDoneYet.gov$VHJ~UHVHGHXVDU
un termómetro de comidas para medir la temperatura de las
mismas.
Posición del estante para hornear tortas de 4 capas.
Guía de Cocción
USO DE LA COCINA: Guía de Cocción

49-80695-2
19
Cuando use el cajón calentador
El cajón calentador mantendrá alimentos calientes y cocidos a
una temperatura de servicio. Siempre empiece con alimentos
calientes. No lo use para calentar alimentos fríos, con
excepción de secar galletas, papitas y cereal.
No recubra el cajón calentador o recipiente de cocción con
papel metálico. El papel metálico es un excelente aislante
de calor y atrapará el calor debajo de él. Esto alterará el
desempeño del cajón y podría dañar el acabado interior.
Permita que el cajón calentador se precaliente durante
DSUR[LPDGDPHQWHPLQXWRV
Ŷ 1RFRORTXHOtTXLGRRDJXDHQHOFDMyQFDOHQWDGRU
Ŷ 7RGRVORVDOLPHQWRVTXHVHFRORTXHQHQHOFDMyQ
calentador deben cubrirse con una tapa o papel metálico.
Cuando caliente pastelitos y panes, la tapa debe contar
con una ventilación para permitir la salida de humedad.
Ŷ /RVDOLPHQWRVGHEHQPDQWHQHUVHHQVXUHFLSLHQWHFDOLHQWH
o traspasarse a un plato de servicio resistente al calor.
NOTA: Los recipientes plásticos o los envoltorios plásticos se
derriten si entran en contacto directo con el cajón, recipiente
de cocción o utensilio caliente. El plástico derretido no puede
removerse y esto no se encuentra cubierto por la garantía.
Ŷ 4XLWHODVFXFKDUDVGHVHUYLFLRHWFDQWHVGHFRORFDU
recipientes en el cajón calentador.
Tabla de selección de temperatura
Para mantener calientes diferentes tipos de alimentos,
establezca el control con la configuración más elevada.
Ŷ /DWHPSHUDWXUDWLSRFDQWLGDGGHDOLPHQWRV\HOWLHPSRHQ
que se mantengan dentro del horno afectan la calidad de
los alimentos.
Ŷ $ODEULUHOFDMyQHQIRUPDUHLWHUDGDHODLUHFDOLHQWHVH
escapará y los alimentos se enfriarán.
Ŷ &RQJUDQGHVFDUJDVSXHGHVHUQHFHVDULRXWLOL]DUXQD
configuración del cajón calentador más elevada y cubrir
algunos de los alimentos cocidos.
Ŷ 1RXWLOLFHUHFLSLHQWHVRHQYROWRULRVSOiVWLFRV
Para calentar tazones y platos de servicio
/RVSODWRVHVWDUiQFDOLHQWHV8WLOLFHDJDUUDGHUDVRJXDQWHV
cuando quite platos calientes.
Para calentar tazones y platos de servicio, configure el control
en LO/1.
Ŷ8WLOLFHVyORUHFLSLHQWHVUHVLVWHQWHVDOFDORU
Ŷ Si desea calentar porcelana fina, consulte
al fabricante de la vajilla sobre su tolerancia máxima al
calor.
Ŷ8VWHGSXHGHFDOHQWDUSODWRVGHVHUYLFLRYDFtRVPLHQWUDV
precalienta el cajón.
Para volver crujientes productos no frescos
Ŷ Coloque los alimentos en platos o bandejas de lados bajos.
Ŷ Precaliente en la configuración LO/1.
Ŷ'HVSXpVGHPLQXWRVYHULILTXHVLHVWiQFUXMLHQWHV
Agregue tiempo si fuese necesario.
USO DE LA COCINA: Cajón para Calentar
Cajón para Calentar
PRECAUCIÓN
Configuración
Tipo de alimento Control Setting
Estofado STD
Chile HI
Pizza STD
Papas al horno HI
Totopos LO
Wafles LO

20
49-80695-2
Limpieza de la Cocina - Exterior
CUIDADO Y LIMPIEZA: Limpieza de la Cocina - Exterior
Si se quita la cocina para efectuar una limpieza, reparaciones o
cualquier otra razón, verifique que el dispositivo anti-volcaduras se
coloque de manera adecuada cuando vuelva a instalarse la cocina. Si
no toma esta precaución, la cocina puede volcarse y provocar lesiones.
No use limpiadores de horno, limpiadores abrasivos, limpiadores
líquidos fuertes, estropajos de acero, almohadillas para fregar de
plástico, ni polvos limpiadores en el interior o el exterior de la cocina.
ADVERTENCIA
$VHJ~UHVHGHTXHWRGRVORVFRQWUROHVHVWpQDSDJDGRV\TXHODVVXSHUILFLHVHVWpQIUtDVDQWHVGHOLPSLDUFXDOTXLHUSDUWHGHODFRFLQD
Bloqueo del Control
Si así lo desea, puede desactivar los botones de toque antes
de la limpieza.
Consulte Lock Controls (Controles de Bloqueo) en la sección
Oven Controls (Controles del Horno) en este manual.
/LPSLHORVGHUUDPHVFRQXQSDxRK~PHGR
También puede utilizar un limpiador de vidrios.
4XLWHVXFLHGDGHVPiVUHEHOGHVFRQDJXDWLELDMDERQRVD1R
utilice abrasivos de ninguna clase.
Vuelva a activar los botones de toque después de la limpieza.
Panel de control
8QDEXHQDLGHDHVOLPSLDUHOSDQHOGHFRQWUROOXHJRGHFDGD
uso. Limpie con un jabón suave y agua o vinagre y agua,
enjuague con agua limpia y pula en seco con una tela suave.
No use limpiadores abrasivos, limpiadores líquidos fuertes,
almohadillas para fregar de plástico ni limpiadores de horno en
HOSDQHOGHFRQWUROGDxDUiQHODFDEDGR
Exterior de la Cocina
Limpie el mismo con agua y jabón o una solución de vinagre
y agua. Enjuague con agua limpia y seque con una tela seca.
$OOLPSLDUVXSHILFLHVDVHJ~UHVHGHTXHHVWpQDWHPSHUDWXUD
ambiente y fuera del contacto con la luz solar.
Si las manchas en el borde de la ventana de la puerta son
persistentes, use un limpiador abrasivo suave o una esponja
con estropajo para obtener un mejor resultado. El derrame
de adobo, jugos de fruta, salsas de tomate y líquidos
para humedecer que contengan ácidos pueden ocasionar
descoloración y se deberán limpiar de inmediato. Deje que las
superficies calientes se enfríen, y luego limpie y enjuague.
Superficies pintadas
Las superficies pintadas incluyen los lados de la cocina y la
puerta, la parte superior del panel de control y el frente del cajón.
Límpielas con jabón y agua o con una solución de agua y vinagre.
No utilice limpiadores de horno comerciales, polvos
limpiadores, esponjillas de acero o abrasivos potentes sobre
cualquier superficie pintada.
Superficies de Acero Inoxidable
1RXVHYLUXWDVGHDFHURpVWDVGDxDUiQODVXSHUILFLH
Para limpiar la superficie de acero inoxidable, use agua tibia
con jabón o un limpiador o pulidor para acero inoxidable.
Siempre limpie la superficie en la dirección del veteado. Siga
las instrucciones del limpiador para limpiar la superficie de
acero inoxidable.
Para realizar consultas sobre la adquisición de productos,
incluyendo limpiadores o pulidores para electrodomésticos de
acero inoxidable, lea las secciones de Asistencia y Accesorios,
en el comienzo de este manual.

49-80695-2
21
El interior de su nuevo horno puede ser limpiado de forma manual o utilizando los modos Steam Clean (Limpieza con Vapor) o
Self Clean (Limpieza Automática).
El derrame de adobo, jugos de fruta, salsas de tomate y líquidos para humedecer que contengan ácidos pueden ocasionar
descoloración y se deberán limpiar de inmediato. Espere a que las superficies calientes se enfríen, y luego limpie y enjuague.
Limpieza Manual
No use limpiadores de horno, limpiadores abrasivos,
limpiadores líquidos fuertes, estropajos de acero, almohadillas
para fregar, ni polvos limpiadores en el interior del horno.
Limpie el mismo con agua y jabón o una solución de vinagre
y agua. Enjuague con agua limpia y seque con una tela seca.
$OOLPSLDUVXSHILFLHVDVHJ~UHVHGHTXHHVWpQDWHPSHUDWXUD
ambiente y fuera del contacto con la luz solar.
Modo de Limpieza con Vapor
La limpieza con vapor está pensada para limpiar pequeños
derrames usando agua y a una temperatura de limpieza más
baja que la función Self-Clean (Limpieza Automática).
Para usar la función Steam Clean (Limpieza con Vapor), limpie
las grasas y suciedades del horno. Vierta una taza de agua en
la parte inferior del horno. Cierre la puerta. Presione la tecla
Steam Clean (Limpieza con Vapor) y luego presione Start
(Iniciar). La puerta del horno se trabará. No podrá abrir la
SXHUWDGXUDQWHORVPLQXWRVGHODOLPSLH]DFRQYDSRU\DTXH
esto reducirá su rendimiento. Al finalizar el ciclo de limpieza
al vapor, la puerta se destrabará. Limpie cualquier exceso de
agua y cualquier suciedad que haya quedado.
Modo de Limpieza Automática
Lea las Instrucciones de Seguridad del Horno con Limpieza
Automática, en el comienzo de este manual antes de usar el modo
Self Clean (Limpieza Automática). Este modo usa temperaturas
muy altas para limpiar el interior del horno. Cuando use esta
función, la puerta del horno se trabará. Antes de utilizar el ciclo
de limpieza automática, limpie la grasa y restos de comida que
haya en el horno. Retire todos los artículos del horno, excepto los
estantes esmaltados (color oscuro). Los estantes brillantes o de
plata y cualquier utensilio u otros artículos deberían ser retirados
del horno antes de iniciar un ciclo de limpieza automática. Cierre
la puerta. Presione la tecla Self Clean (Limpieza Automática)
y se exhibirá un tiempo de limpieza automática por omisión. El
tiempo de limpieza puede ser modificado en cualquier momento
HQWUHODV\ODVKRUDVXVDQGRODVWHFODVQXPpULFDV
para ingresar un tiempo diferente y presionando Start (Iniciar).
Si desea usar el tiempo por omisión, presione la tecla Start
(Iniciar) inmediatamente luego de presionar la tecla Self Clean
(Limpieza Automática) El horno se apagará de forma automática
cuando el ciclo de limpieza automática sea completado. La puerta
SHUPDQHFHUiEORTXHDGDKDVWDTXHHOKRUQRVHKD\DHQIULDGR8QD
vez que el horno se haya enfriado, limpie cualquier ceniza que
haya quedado en el horno.
Recomendamos ventilar su cocina con una ventana abierta o
utilizando un ventilador o campana durante el primer ciclo de auto-
limpieza.
La suciedad ubicada en el marco frontal de la cocina y fuera de
la junta de la puerta deberá limpiarse a mano. Limpie estas áreas
con agua caliente, esponjillas de lana de acero embebidas en
jabón o limpiadores tales como Soft Scrub
®
. Enjuague bien con
agua limpia y seque.
No limpie la junta. El material de fibra de vidrio de la junta de la
puerta del horno no resiste productos abrasivos. Es esencial que
la junta se mantenga intacta. Si usted nota que está desgastada,
reemplácela.
Verifique que la tapa de la bombilla de luz del horno esté en su
lugar y que la luz del horno esté apagada.
IMPORTANTE: Las emanaciones producidas por el ciclo de
autolimpieza de cualquier horno afectan la salud de algunas aves
de manera notoria. Procure llevar sus aves a otra habitación bien
ventilada.
En Algunos Modelos:
Las unidades de superficie se desactivan automáticamente durante
el ciclo de auto-limpieza. Espere hasta que termine el ciclo de auto-
limpieza para configurar y usar las unidades de superficie.
CUIDADO Y LIMPIEZA: Limpieza de la Cocina - Interior
Limpieza de la Cocina - Interior
Estantes
Todos los estantes se pueden lavar con agua caliente y jabón.
Los estantes esmaltados (no brillosos) se pueden dejar en la
cavidad durante el ciclo de limpieza automática.
Es posible que resulte más difícil deslizar los estantes,
especialmente luego de la limpieza automática. Coloque aceite
YHJHWDOHQXQDWHODK~PHGDRWRDOODGHSDSHO\IURWHVREUHORV
extremos izquierdo y derecho.
Elementos calentadores del horno
No limpie los elementos para asar. Las suciedades se
quemarán cuando se calienten los elementos.
El elemento para hornear no está expuesto y se encuentra
debajo de la base del horno. Limpie la base del horno con
agua caliente y jabón.
Limpie con un paño los desechos rebeldes
acumulados en el piso del horno.
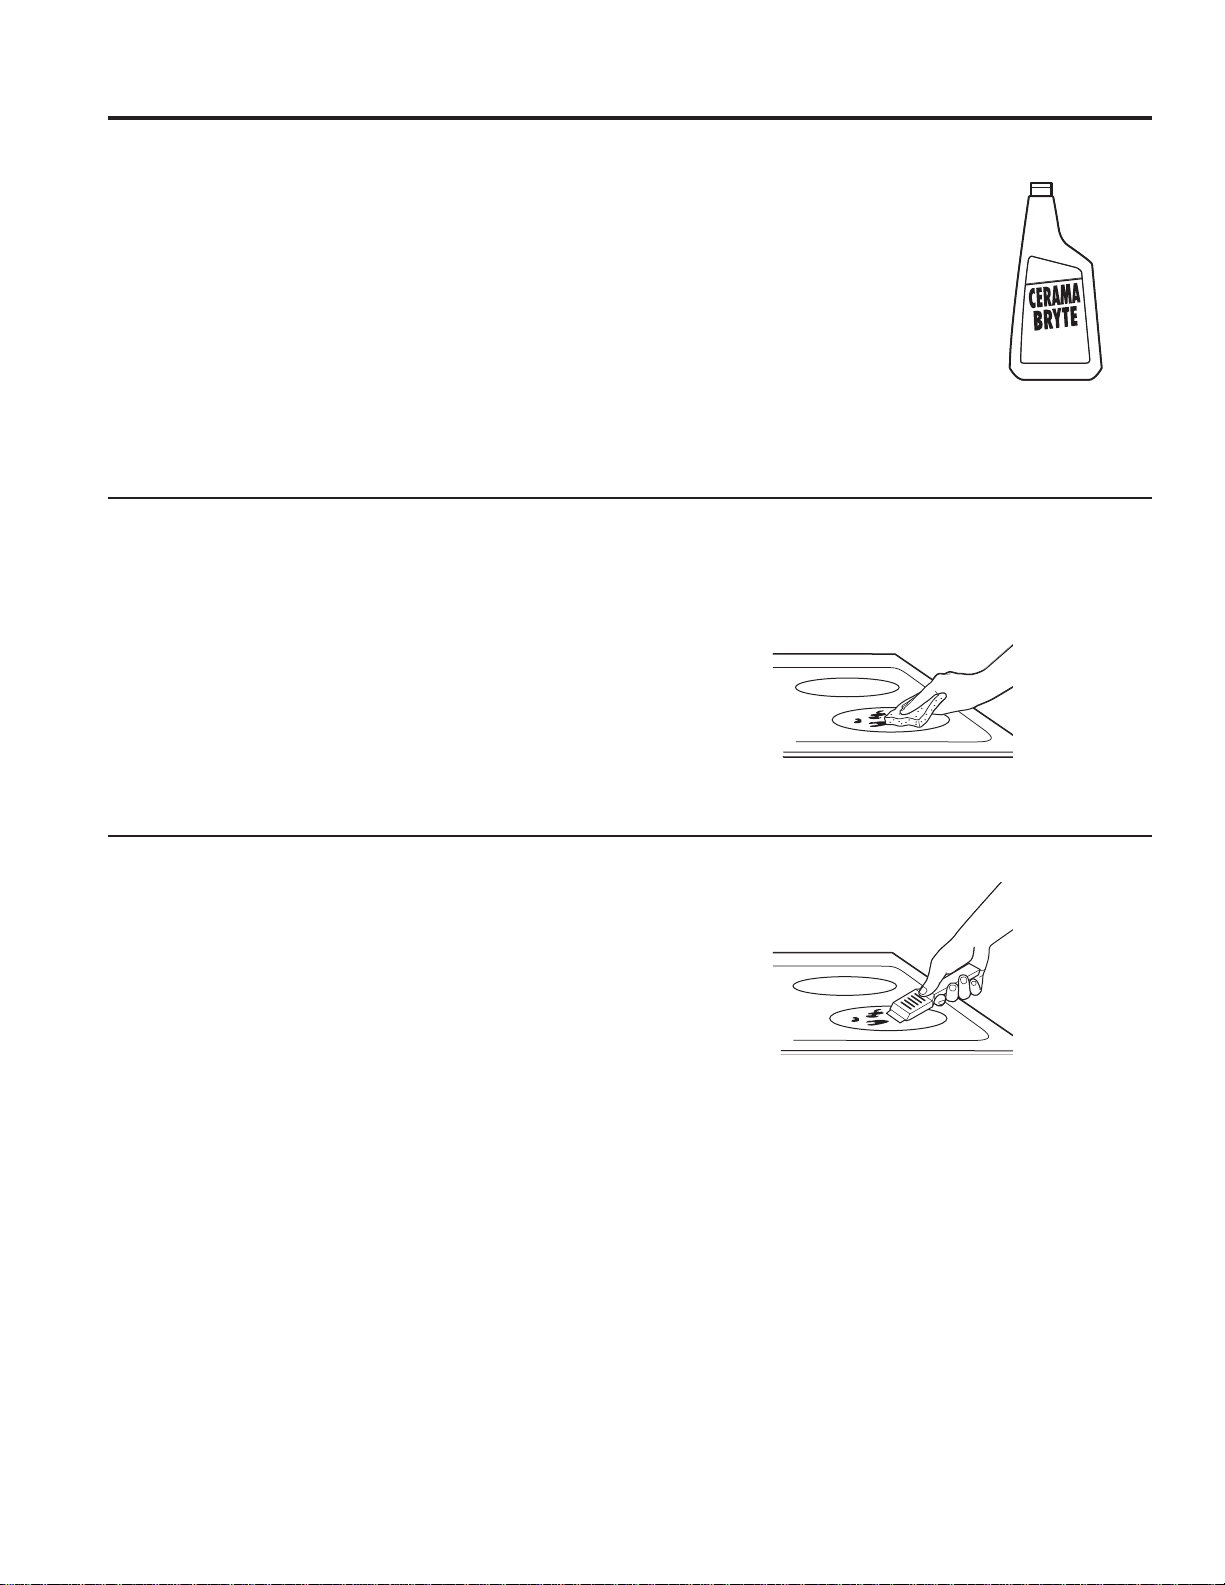
22
49-80695-2
Cómo limpiar la estufa de vidrio
Limpieza normal de uso diario
6Ï/2XWLOLFHHOOLPSLDGRUGHHVWXIDVFHUiPLFDV&(5$0$
BRYTE
®
en la estufa de vidrio. Otras cremas pueden no ser
tan efectivas.
Para mantener y proteger la superficie de su estufa de vidrio,
siga estos pasos:
1. Antes de usar la estufa por primera vez, límpiela con el
limpiador de estufas cerámicas CERAMA BRYTE
®
. Esto
ayuda a proteger la estufa y hace la limpieza más sencilla.
2. El uso diario del limpiador de estufas cerámicas CERAMA
BRYTE
®
ayudará a que la estufa quede como nueva.
$JLWHELHQODFUHPDGHOLPSLH]D$SOLTXHXQDVJRWDV
del limpiador de estufas cerámicas CERAMA BRYTE
®
directamente sobre la estufa.
8WLOLFHXQDWRDOODGHSDSHOR
un paño de limpieza CERAMA
BRYTE
®
para estufas cerámicas
para limpiar toda la superficie de la
estufa.
8VHXQSDxRVHFRRXQDWRDOODGH
papel para quitar los restos del
limpiador. No hace falta enjuagar.
NOTA: Es muy importante que NO
CALIENTE la estufa hasta que la
haya limpiado por completo.
Residuos pegados
NOTA: Se podrán producir DAÑOS sobre la superficie de
vidrio si utiliza estropajos que no sean los recomendados.
1. Deje enfriar la estufa.
2. Coloque unas gotas del limpiador de estufas cerámicas
CERAMA BRYTE
®
sobre toda el área de residuos pegados.
8WLOL]DQGRHOSDxRGHOLPSLH]D&(5$0$%5<7(
®
para
estufas cerámicas incluido, frote el área sucia aplicando
SUHVLyQVHJ~QVHDQHFHVDULR
4. Si quedan restos, repita los pasos indicados con
anterioridad.
3DUDSURWHFFLyQDGLFLRQDOGHVSXpVGHKDEHUTXLWDGRWRGRV
los restos, pula toda la superficie con limpiador de estufas
cerámicas CERAMA BRYTE
®
y una toalla de papel.
Residuos pegados rebeldes
1. Deje enfriar la estufa.
8WLOLFHHOUDVSDGRUGHILOR~QLFRDXQiQJXORDSUR[LPDGR
GHGHJUHHVFRQWUDODVXSHUILFLHGHOYLGULR\UDVSHOD
suciedad. Puede ser necesario aplicar presión al raspador
para quitar la suciedad.
'HVSXpVGHXWLOL]DUHOUDVSDGRUFRORTXHXQDVJRWDVGH
limpiador de estufas cerámicas CERAMA BRYTE
®
sobre
WRGDHOiUHDGHVXFLHGDGTXHPDGD8WLOLFHHOSDxRGH
limpieza CERAMA BRYTE® para quitar la suciedad restante.
4. Para protección adicional, después de haber quitado todos
los restos, pula toda la superficie con limpiador de estufas
cerámicas CERAMA BRYTE
®
y una toalla de papel.
El raspador de estufas cerámicas CERAMA BRYTE
®
y todos los insumos
recomendados se encuentran disponibles en nuestro Centro de
Repuestos. Consulte las instrucciones que aparecen en la sección
“Asistencia/ Accesorios”.
NOTA: No utilice hojas desafiladas o dañadas.
CUIDADO Y LIMPIEZA: Cómo limpiar la estufa de vidrio
Limpie la estufa después
de cada derrame. Utilice
el limpiador de estufas
cerámicas CERAMA BRYTE
®
.
Utilice un paño de limpieza CERAMA BRYTE
®
para estufas cerámicas.
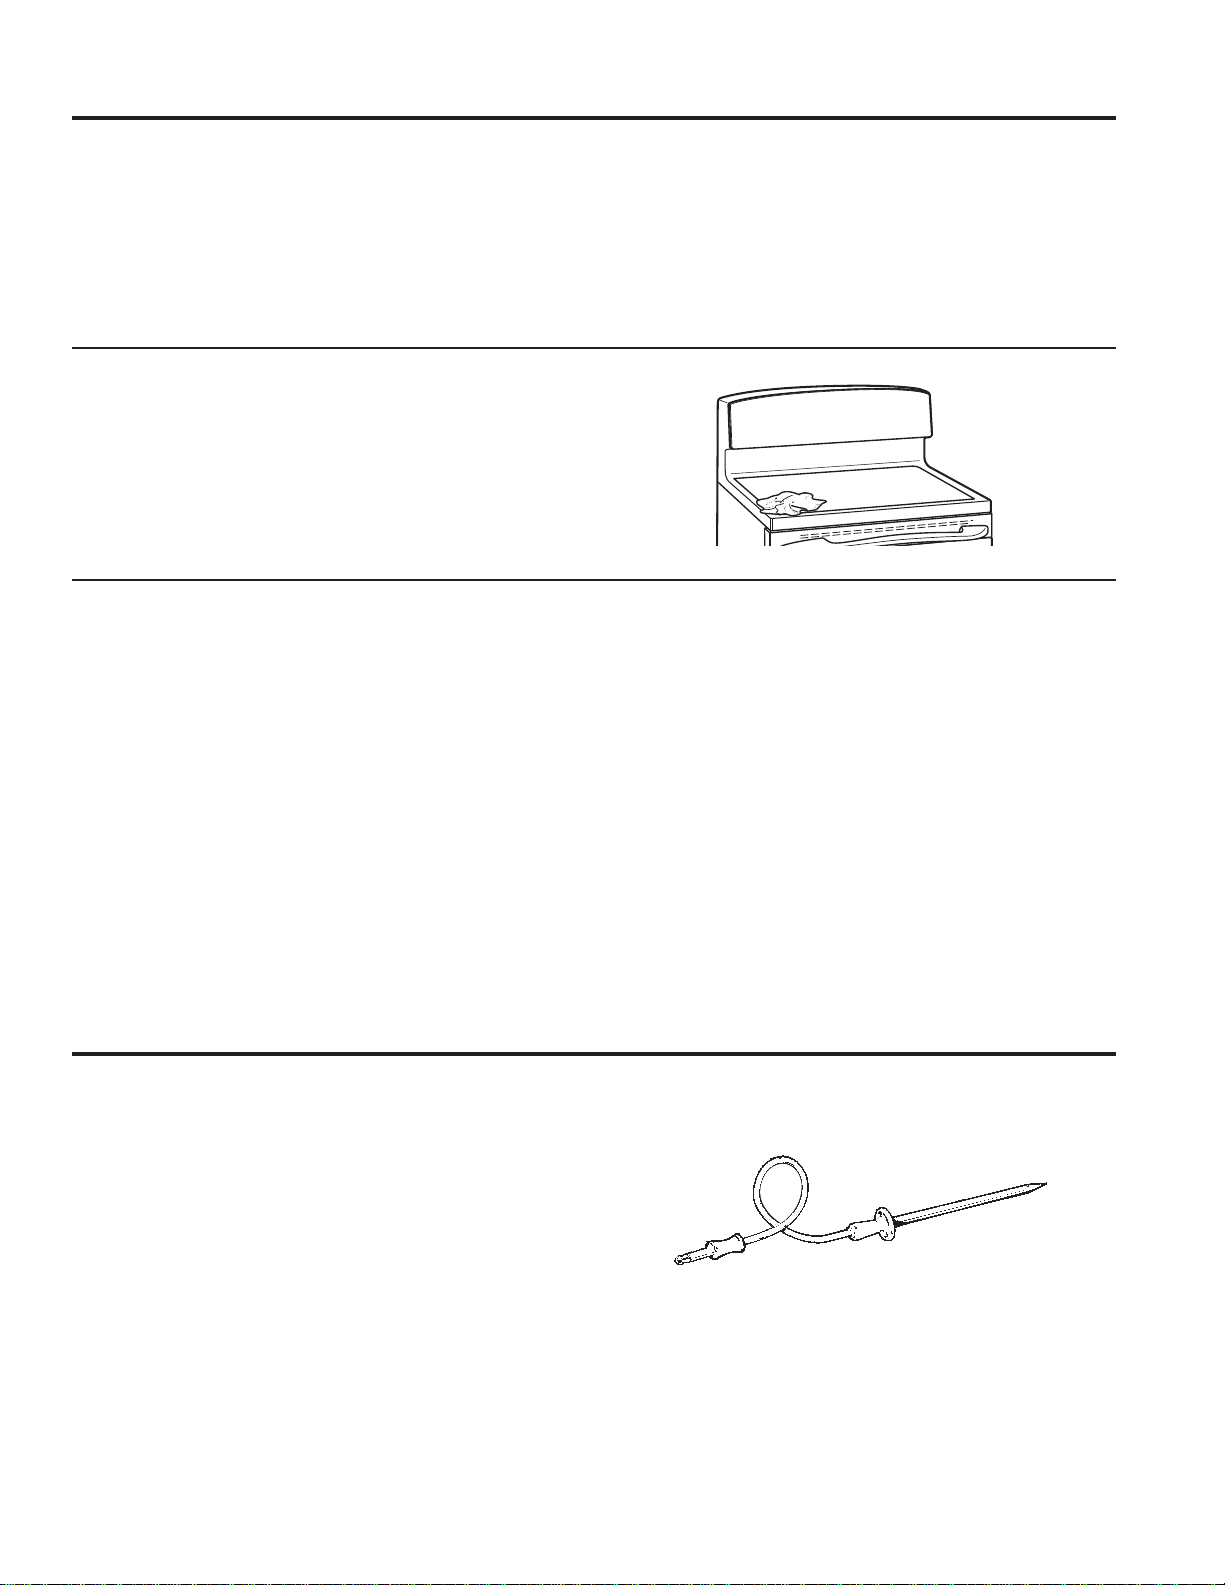
49-80695-2
23
CUIDADO Y LIMPIEZA: Cómo limpiar la estufa de vidrio / Sonda
Marcas de metal y rayones
1. Tenga cuidado de no deslizar ollas y sartenes a través de
su estufa. Dejará marcas de metal sobre la superficie de la
estufa.
Estas marcas pueden quitarse utilizando limpiador de
estufas cerámicas CERAMA BRYTE
®
con el paño de
limpieza CERAMA BRYTE
®
para estufas cerámicas.
2. Si se permite que ollas con una capa fina de aluminio
o cobre hiervan en seco, la capa puede dejar una
decoloración negra en la estufa.
Esto debe quitarse de inmediato antes de calentar de
nuevo o la decoloración puede llegar a ser permanente.
NOTA: Verifique con detenimiento que la base de las ollas no
sea áspera para no rayar la estufa.
Daños por derrames azucarados y plástico derretido
Se deberá tener especial cuidado al eliminar sustancias calientes, a fin de evitar daños permanentes sobre la superficie de
vidrio. Los derrames azucarados (como gelatinas, dulce, caramelo, jarabes) o plásticos derretidos pueden marcar la superficie
de la estufa (no cubierto por la garantía) a menos que el derrame se quite mientras está caliente. Debe tenerse mucho cuidado al
remover sustancias calientes.
$VHJ~UHVHGHXWLOL]DUXQUDVSDGRUQXHYR\DILODGR
No utilice hojas desafiladas o dañadas.
$SDJXHWRGDVODVXQLGDGHVGHVXSHUILFLH4XLWHODVROODV
calientes.
8WLOL]DQGRXQJXDQWHGHFRFLQD
D8VHXQUDVSDGRUGHILOR~QLFRUDVSDGRUSDUDHVWXIDV
cerámicas CERAMA BRYTE
®
) para desplazar el
derrame a un área fría de la estufa.
E4XLWHHOGHUUDPHFRQWRDOODVGHSDSHO
&XDOTXLHUGHUUDPHUHVWDQWHGHEHGHMDUVHKDVWDTXHOD
superficie de la estufa se haya enfriado.
4. No use las unidades de superficie de nuevo hasta que
todos los restos se hayan eliminado por completo.
NOTA: Si la superficie de vidrio ya ha sufrido marcas o
hendiduras, el vidrio de la estufa deberá cambiarse. En ese
caso, será necesaria la atención de un técnico.
Sellado de la estufa (en algunos modelos)
Para limpiar el sellado de la estufa alrededor de los bordes
GHYLGULRFRORTXHXQSDxRK~PHGRVREUHORVPLVPRVGXUDQWH
unos minutos y luego limpie con limpiadores no abrasivos.
Cómo limpiar la estufa de vidrio (Continúa)
La sonda de temperatura se puede limpiar con agua y jabón
o con una almohadilla de estropajo llena de jabón. Enfríe
la sonda de temperatura antes de su limpieza. Fregue las
manchas difíciles con una almohadilla de estropajo llena de
jabón, enjuague y seque.
Para ordenar más sondas de temperatura, lea la sección de
Asistencia y Accesorios en el comienzo de este manual.
Ŷ No sumerja la sonda de temperatura en agua.
Ŷ No guarde la sonda de temperatura dentro del horno.
Ŷ Nunca deje la sonda de temperatura dentro del horno durante
un ciclo de limpieza automática o de limpieza con vapor.
Sonda
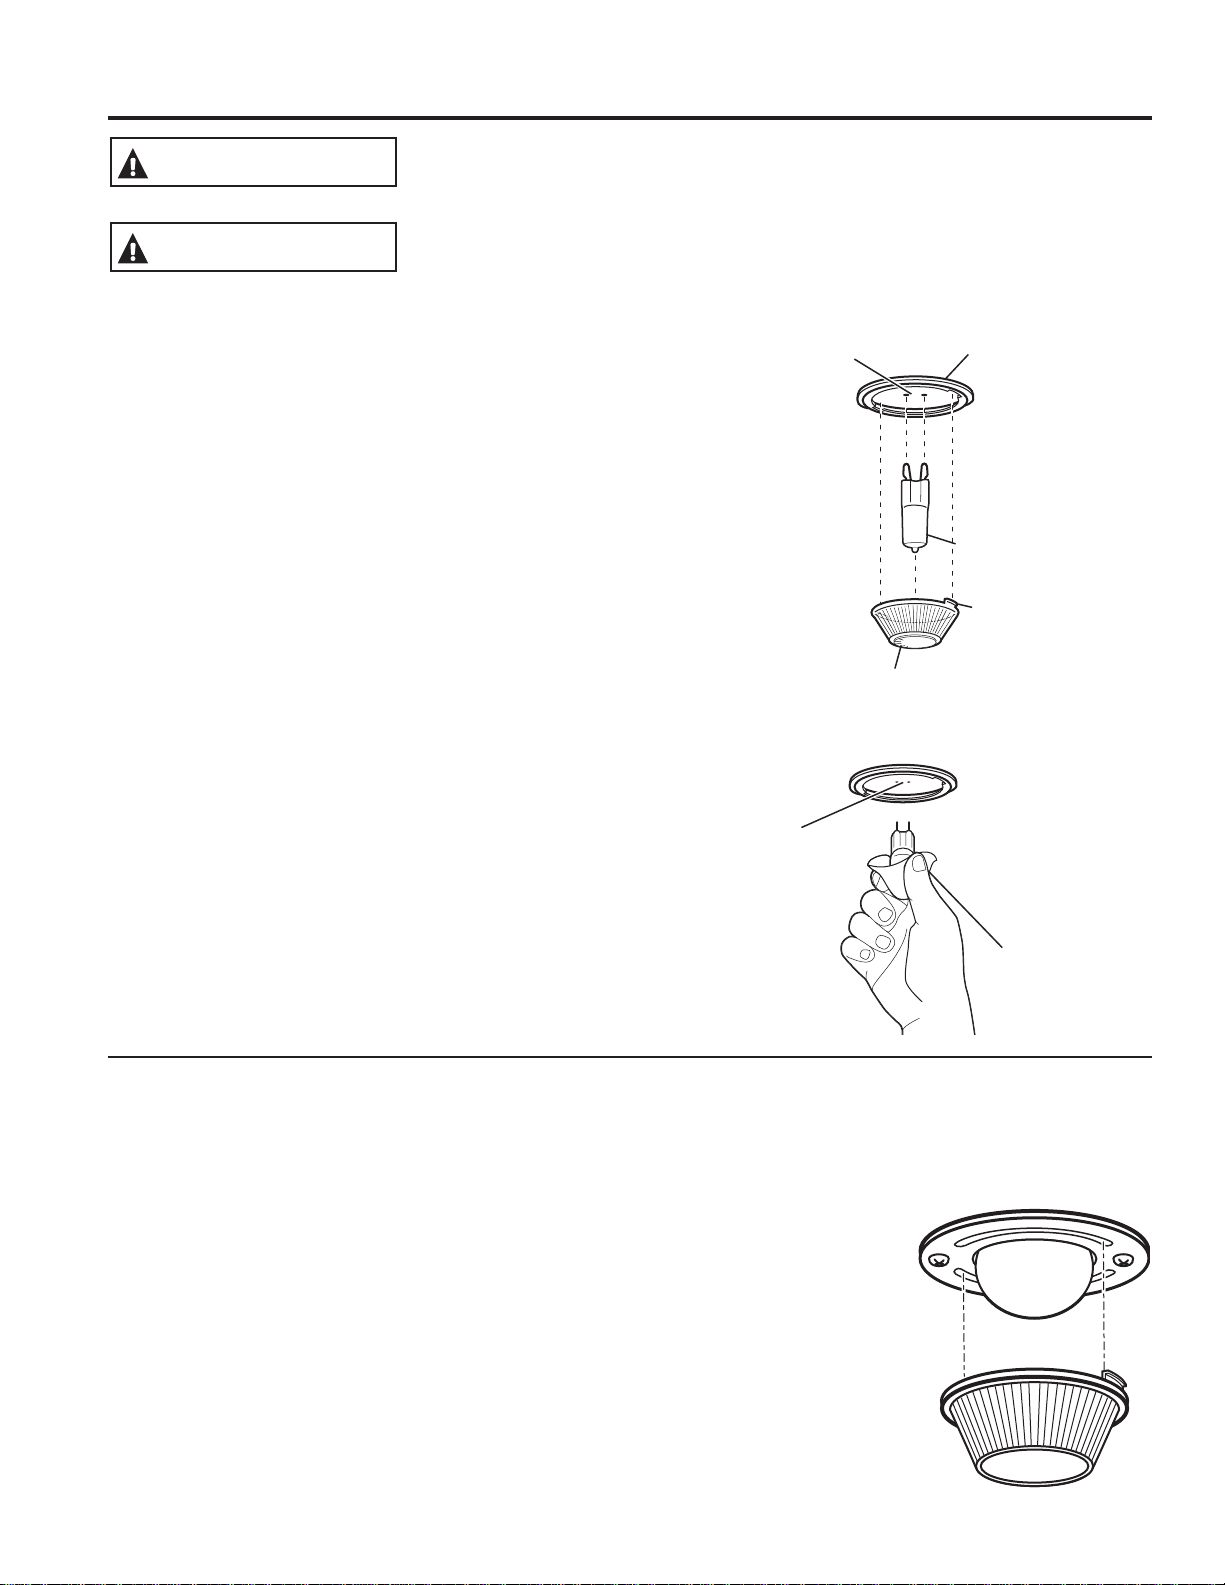
24
49-80695-2
Mantenimiento
PELIGRO DE DESCARGA ELÉCTRICA O QUEMADURAS: Antes de reemplazar la bombilla
del horno, desconecte la alimentación de energía al horno desde el panel principal de fusibles o
del interruptor de circuitos. No hacerlo puede provocar una descarga eléctrica o una quemadura.
ADVERTENCIA
Reemplazo de la bombilla del horno (en algunos modelos)
Para retirar:
1. Gire la cubierta de vidrio en sentido contrario a las
PDQHFLOODVGHOUHORMGHYXHOWDKDVWDTXHODV
lengüetas de la cubierta de vidrio liberen los surcos del
portalámparas. Colocarse guantes de látex puede brindar
un mejor agarre.
8WLOL]DQGRJXDQWHVRXQSDxRVHFRUHPXHYDODERPELOOD
jalándola en línea recta.
Para reemplazar:
8WLOLFHXQDQXHYDERPELOODKDOyJHQDGHYROWLRV
QRH[FHGDYDWLRV5HHPSODFHODOiPSDUDGHOX]FRQ
HOPLVPRWLSRGHOiPSDUDTXHVHUHWLUy$VHJ~UHVHDO
UHHPSOD]DUODOiPSDUDTXHVHDGHYROWVRYROWV
(NO de 12 volts).
8WLOL]DQGRJXDQWHVRXQSDxRVHFRUHPXHYDODERPELOODGH
su paquete. No toque la bombilla con los dedos desnudos.
El aceite para piel dañará la lámpara y acortará su tiempo
de duración.
(PSXMHODERPELOODHQOtQHDUHFWDGHQWURGHOUHFHSWiFXOR
hasta el tope.
4. Coloque las lengüetas de la cubierta de vidrio dentro de
los surcos del portalámparas. Gire la cubierta de vidrio en
VHQWLGRGHODVPDQHFLOODVGHOUHORMGHYXHOWD
Para una mejor iluminación dentro del horno, limpie
frecuentemente la cubierta de vidrio utilizando un paño
K~PHGR(VWRGHEHUtDKDFHUVHFXDQGRHOKRUQRHVWi
completamente frío.
&RQHFWHQXHYDPHQWHHOVXPLQLVWURHOpFWULFRDOKRUQR
CUIDADO Y LIMPIEZA: Mantenimiento
Use guantes
o un paño
Receptáculo
Bombilla
de G9
Portalámpara
Lengüeta
Cubierta de vidrio
Receptáculo
(en algunas modelos)
Reemplazo de la bombilla del horno (en algunos modelos)
Para quitar la tapa:
1. Dé a la tapa de vidrio un cuarto de giro en contra de las
agujas del reloj hasta que las lengüetas de la tapa de vidrio
limpien las ranuras de la ficha. Si usa guantes de látex
tendrá un mejor agarre.
2. Retire la lámpara girando la misma en dirección contraria a
las agujas del reloj.
Para volver a colocar la tapa:
1. Reemplace la lámpara por una para electrodoméstico de 40
watts. Inserte la lámpara y gire la misma en dirección de las
agujas del reloj, hasta que quede ajustada.
2. Coloque las lengüetas de la tapa de vidrio en las ranuras
de la ficha. Dé a la tapa de vidrio un cuarto de giro en
dirección de las agujas del reloj.
Para una mejor iluminación
dentro del horno, limpie la
tapa del vidrio en forma
frecuente utilizando una tela
K~PHGD(VWRVHGHEHUi
hacer cuando el horno esté
completamente frío.
9XHOYDDFRQHFWDUHOFDEOHGH
electricidad del horno.
RIESGO DE INCENDIO: La tapa de vidrio y la lámpara de luz se deberán retirar cuando
HVWpQIUtDV7RFDUHOYLGULRFDOLHQWHVLQSURWHFFLyQHQODVPDQRVRFRQXQWUDSRK~PHGR
puede ocasionar quemaduras.
PRECAUCIÓN
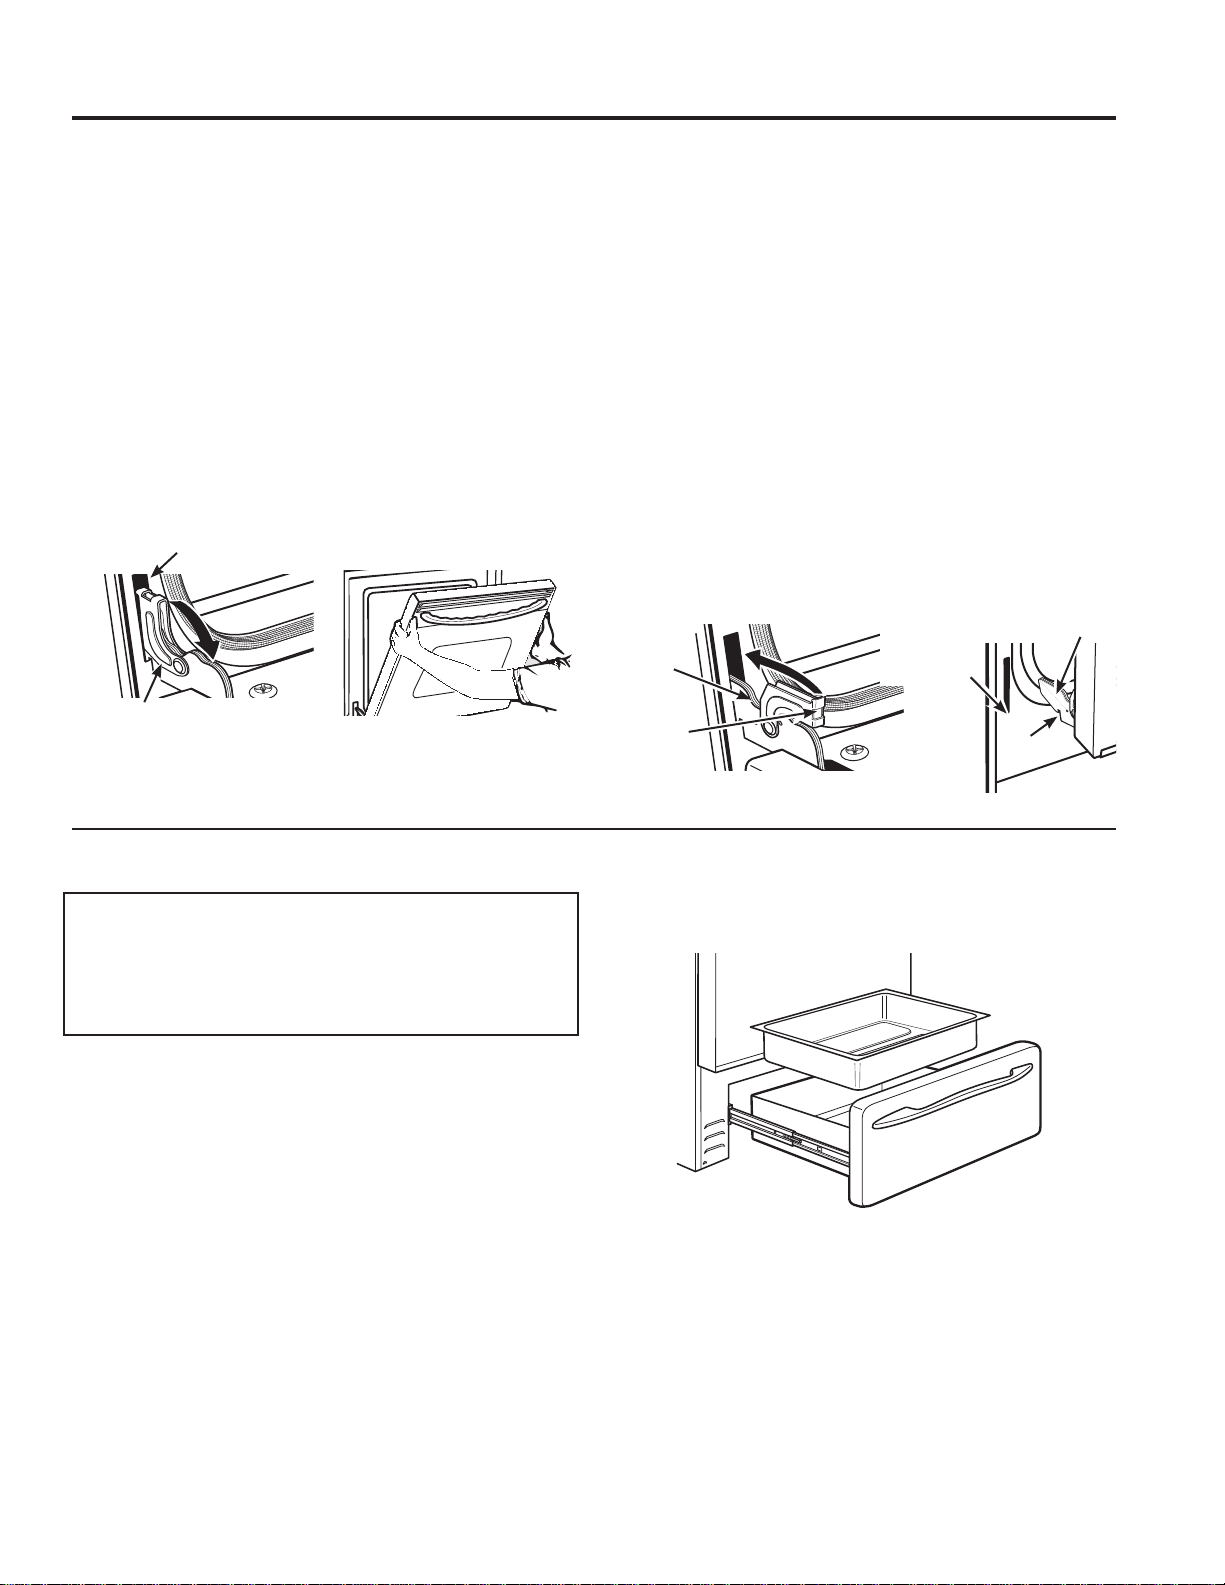
49-80695-2
25
Puerta del Horno Desmontable
La puerta es muy pesada. Tenga cuidado al retirar y levantar la puerta.
No levante la puerta usando la manija.
Para retirar la puerta:
1. Abra la puerta totalmente.
2. Empuje los bloqueos de la bisagra hacia abajo en
dirección a la estructura de la puerta, hasta la posición
desbloqueada. Es posible que necesite una herramienta tal
como un destornillador pequeño de punta plana.
)LUPHPHQWHWRPHDPERVODGRVGHODSXHUWDSRUODSDUWH
superior.
4. Cierre la puerta hasta la posición de retiro de la misma.
/DSXHUWDGHEHUtDVHUDELHUWDDSUR[LPDGDPHQWHD´VLQ
obstrucción sobre la misma.
/HYDQWHODSXHUWDKDFLDDUULED\DIXHUDKDVWDTXHORV
brazos de las bisagras queden fuera de las ranuras.
Para reemplazar la puerta:
1. Firmemente tome ambos lados de la puerta por la parte
superior.
2. Comenzando desde el lado izquierdo, con la puerta en el
mismo ángulo de la posición de retiro, apoye la hendidura
del brazo de la bisagra en el extremo inferior de la ranura
de la bisagra. La abertura en el brazo de la bisagra deberá
estar totalmente apoyada en la parte inferior de la ranura.
Repita el procedimiento del lado derecho.
$EUDODSXHUWDWRWDOPHQWH6LODSXHUWDQRVHDEUH
totalmente, la hendidura no está correctamente apoyada en
el extremo inferior de la ranura.
4. Empuje los bloqueos de la bisagra contra la estructura
frontal de la cavidad del horno, hasta la posición de
bloqueo.
&LHUUHODSXHUWDGHOKRUQR
CUIDADO Y LIMPIEZA: Mantenimiento
Mantenimiento (Continúa)
Posición de retiro
Bloqueo de la bisagra
Ranura
Empuje los bloqueos de la bisagra
hacia abajo para desbloquear
Extremo inferior de la ranura
Bloqueo de
la bisagra
Brazo de
la bisagra
Hendidura
Empuje el
bloqueo de la
bisagra hacia
arriba hasta
que quede
bloqueado
Brazo de la
bisagra
Cajón calentador desmontable/Olla del Cajón
NOTA: En los modelos con cajón calentador eléctrico, antes
de realizar cualquier clase de ajuste, limpieza o reparación,
desconecte la conexión eléctrica de la cocina desde el panel
de distribución doméstico quitando el fusible o desconectando
el interruptor de circuitos. Verifique que el elemento calentador
del cajón esté frío.
NOTA: Deje que el cajón calentador se enfríen antes de quitar
el recipiente.
NOTA: Limpie los derrames rápidamente después de cada uso.
Ŷ 1XQFDFRORTXHXWLOLFHROLPSLHPHGLDQWHODFDUDFWHUtVWLFD
de auto-limpieza el recipiente del cajón en el horno
superior.
Ŷ (OFDMyQFDOHQWDGRUFXHQWDQFRQXQUHFLSLHQWHGHVPRQWDEOH
para una limpieza fácil. Limpie con agua jabonosa
caliente y una esponja o repasador. Seque con un paño
suave y limpio. Vuelva a colocar el recipiente en el cajón
calentador.
26
49-80695-2
CONSEJOS PARA LA SOLUCIÓN DE PROBLEMAS
Problema Causa Posible Qué Hacer
Las unidades de superficie no
funcionan bien o destella la
configuración de energía.
Se están utilizando recipientes de cocción inadecuados. 5HFLSLHQWHLQFRUUHFWR8VHXQLPiQSDUDYHULILFDUTXHHO
UHFLSLHQWHVHDFRPSDWLEOHFRQODLQGXFFLyQ8VHXQUHFLSLHQWH
plano con capacidad de inducción que cumpla con el tamaño
mínimo para el elemento que se está usando. Ver la sección
Tamaño y forma de los recipientes.
El recipiente es muy pequeño. El tamaño del recipiente es menor al tamaño mínimo para el
elemento. Ver la sección Tamaño y forma de los recipientes.
8VHHOHOHPHQWRPiVSHTXHxR
La bandeja no están en contacto completo con la superficie
de vidrio.
La bandeja debe ser plana.
En algunas regiones la energía (voltaje) puede ser baja. Cubra el recipiente con una tapa hasta obtener el calo
deseado.
Es posible que un fusible de su hogar se haya quemado o
que el disyuntor se haya desconectado.
Reemplace el fusible o reinicie el disyuntor.
El recipiente no está bien colocado. El control de la estufa
está mal configurado.
Permita que el ventilador interno enfríe la estufa. Controle si la
bandeja se secó hasta quedar sin agua.
La configuración de la unidad
de superficie cambió o se
apagó de repente.
Temperatura elevada de la estufa. Ver la sección Superficie de vidrio: posibilidades de daño
permanente en la sección Cómo limpiar la estufa de vidrio.
Los elementos de superficie
no funcionan bien.
El fusible puede haberse quemado o el interruptor de
circuitos puede haber saltado.
Cambie el fusible o vuelva a configurar el interruptor de
circuitos.
Los controles de la estufa están mal configurados. Verifique que se haya configurado el control correcto para el
elemento de superficie que está utilizando.
Rayones (pueden parecer
como roturas) en la superficie
de vidrio de la estufa.
Se están usando métodos de limpieza incorrectos. Los rayones no pueden removerse. Los rayones más pequeños
se volverán menos visibles como resultado de la limpieza.
Se están usando recipientes con bases ásperas o hay
partículas gruesas (sal o arena) entre el recipiente y la
superficie de la estufa. Se ha deslizado un recipiente a
través de la superficie de la estufa.
Para evitar rayones, use los procedimientos de limpieza
recomendados. Verifique que las bases de los recipientes estén
limpias antes del uso, y utilice recipientes con bases lisas.
Áreas de decoloración en la
estufa.
No se limpiaron los derrames de alimentos antes del uso siguiente.
Ver la sección Cómo limpiar la estufa de vidrio.
Superficie caliente en un modelo con una estufa de color
claro.
Esto es normal. La superficie puede parecer decolorada cuando
está caliente. Esto es temporal y desaparecerá a medida que
se enfría el vidrio.
Plástico derretido sobre la
superficie.
La estufa caliente entró en contacto con plástico colocado
sobre la misma.
Ver la sección Superficie de vidrio: posibilidades de daño
permanente en la sección Cómo limpiar la estufa de vidrio.
Marcas (o hendiduras) en la estufa.
Se ha derramado una mezcla azucarada caliente en la estufa. Llame a un técnico calificado para el reemplazo.
Mi horno nuevo no cocina
como el anterior. ¿Hay
algún problema con
las configuraciones de
temperatura?
Su horno nuevo cuenta con un sistema de cocción
diferente con relación al anterior y, por lo tanto, es posible
que cocine de forma diferente.
En los primeros usos, use los tiempos y temperaturas de
VXUHFHWDFRQFXLGDGR6LD~QSLHQVDTXHVXKRUQRQXHYR
cocina con demasiado calor o demasiado frío, podrá ajustar el
termostato usted mismo para aplicar su preferencia de cocción
específica. NOTA: Este ajuste afecta las temperaturas de Bake
+RUQHDU\&RQYHFWLRQ%DNH+RUQHDUSRU&RQYHFFLyQQR
afectará las funciones Broil (Asar), o Clean (Limpiar).
La comida no se hornea de
forma apropiada.
Controles del horno configurados de forma incorrecta. Consulte la sección Modos de Cocción.
La posición del estante es incorrecta o el estante no está nivelado.
Consulte la sección Modos de Cocción y la Guía de Cocción.
Uso de una cacerola incorrecta o de una cacerola de
tamaño incorrecto.
&RQVXOWHODVHFFLyQ8WHQVLOLRV
La temperatura del horno debe ser ajustada. Consulte la sección Funciones Especiales.
Sustitución de ingredientes. Sustituir ingredientes puede modificar el resultado de la receta.
La comida no asa de forma
apropiada.
Controles del horno configurados de forma incorrecta. $VHJ~UHVHGHVHOHFFLRQDUHOPRGRFRUUHFWRSDUDDVDU
Se usó una posición incorrecta del estante. Para acceder a sugerencias de ubicación de estantes, consulte
la Guía de Cocción.
Se cocinó comida en una olla caliente. $VHJ~UHVHGHTXHHOXWHQVLOLRHVWpIUtR
Utensilio de cocina inadecuado para asar. 8VHXQDROODHVSHFtILFDPHQWHGLVHxDGDSDUDDVDU
El papel de aluminio usado para la olla y la rejilla para asar no
se ajustó ni cortó de forma apropiada, según lo recomendado.
Si usará papel de aluminio, deberá usarse conforme con las
aberturas de la olla.
En algunas áreas, es posible que el nivel de corriente
(voltaje) sea bajo.
Precaliente el elemento para asar durante 10 minutos.
La temperatura del horno
es demasiado caliente o
demasiado fría.
La temperatura del horno debe ser ajustada. Consulte la sección Funciones Especiales.
¡Ahorre tiempo y dinero! Primero revise los cuadros que aparecen en las siguientes páginas y es posible que no necesite
solicitar reparaciones.
Consejos para la Solución de Problemas... Antes de solicitar el servicio técnico
49-80695-2
27
Problema Causa Posible Qué Hacer
El horno no funciona o parece
no funcionar.
El enchufe de la cocina no está introducido del todo en
el tomacorriente.
Verifique que el enchufe eléctrico esté conectado a un tomacorriente
con tensión y adecuada conexión a tierra.
Es posible que un fusible de su hogar se haya
quemado o que el disyuntor se haya desconectado.
Reemplace el fusible o reinicie el disyuntor.
Controles del horno configurados de forma incorrecta. &RQVXOWHODVHFFLyQ8VRGHO+RUQR
El horno se encuentra en Sabbath Mode (Modo
Sabático).
Verifique que el horno no esté en Sabbath Mode (Modo Sabático).
Consulte la sección Funciones Especiales.
Sonido de “chisporroteo” o
“traqueo”.
Éste es el sonido de metal calentándose o enfriándose
durante las funciones de cocción y limpieza.
Esto es normal.
¿Por qué la estufa hace un sonido
de “clic” cuando uso el horno?
Su estufa fue diseñada para mantener un control más
ajustado sobre la temperatura del horno.
Esto es normal.
El reloj y el temporizador no
funcionan.
El fusible puede haberse quemado o el interruptor de
circuitos puede haber saltado.
Cambie el fusible o vuelva a configurar el interruptor de circuitos.
El enchufe de la cocina no está introducido del todo en
el tomacorriente.
Verifique que el enchufe eléctrico esté conectado a un tomacorriente
con tensión y adecuada conexión a tierra.
Los controles del horno están mal configurados. Ver la sección Cómo usar el temporizador de cocina.
La puerta del horno alineada. La puerta no está bien. Dado que la puerta del horno es desmontable, a veces está torcida
se desequilibra durante la instalación. Para alinear la puerta, vuelva a
instalar la misma. Consulte las instrucciones sobre “Cómo Retirar la
Puerta del Horno” en la sección “Cuidado y Limpieza”.
La luz del horno no funciona. La lámpara está floja o presenta defectos. Ajuste o reemplace la lámpara.
La luz de funcionamiento del interruptor está rota. Llame al servicio técnico.
El modo de limpieza automática
del horno no funciona.
La temperatura del horno es demasiado caliente como
para configurar la limpieza automática.
Espere a que el horno se enfríe y reinicie los controles.
Los controles del horno están configurados de forma
incorrecta.
Consulte la sección de Limpieza del Horno.
La sonda está enchufada dentro de la boca de salida
del horno.
4XLWHODVRQGDGHOKRUQR
El horno no realiza la limpieza
al vapor.
En la pantalla titila la palabra HOT (Caliente). Espere a que la cocina se enfríe a temperatura ambiente y reinicie los
controles.
Controles del horno configurados de forma incorrecta. &RQVXOWHODVHFFLyQ8VRGH/LPSLH]DDO9DSRU
La puerta del horno no está cerrada ni en la posición
bloqueada.
$VHJ~UHVHGHFHUUDUODSXHUWD3DUDORVPRGHORVFRQWUDEDDVHJ~UHVHGH
mover la manija de la traba de la puerta totalmente hacia la derecha.
Exceso de humo durante un
ciclo de limpieza.
Suciedad o grasa excesiva. Presione la tecla Cancel/Off (Cancelar/ Apagar) Abra las ventanas
para liberar el humo en la habitación. Espere hasta que la luz de la
función LOCKED (Bloqueado) desaparezca. Limpie el exceso de
suciedad y reinicie el ciclo de limpieza.
Humo excesivo al asar. La comida está demasiado cerca del quemador. Baje la posición del estante con comida.
La puerta del horno no se abrirá
luego de un ciclo de limpieza.
El horno está demasiado caliente.
Espere a que el horno se enfríe por debajo de la temperatura de bloqueo.
El horno no limpia luego de un
ciclo de limpieza.
Los controles del horno están configurados de forma
incorrecta.
Consulte la sección de Limpieza del Horno.
El horno estaba demasiado sucio. Limpie derrames excesivos antes de iniciar el ciclo de limpieza. Es
posible que, en hornos con mucha suciedad, sea necesario usar
la limpieza automática nuevamente o usarla durante un período de
tiempo más prolongado.
“LOCK DOOR” (Puerta
Trabada) titila en la pantalla.
El ciclo de limpieza automática fue seleccionado pero
la puerta no está cerrada.
Cierre la puerta del horno.
La luz de LOCKED DOOR (Puerta
Bloqueada)
está encendida
cuando desea cocinar.
La puerta del horno está bloqueada debido a que la
temperatura interior del horno no descendió por debajo
de la temperatura de bloqueo.
Presione la tecla Cancel/Off (Cancelar/ Apagar) Deje que el horno
se enfríe.
“F – y un número o letra” titila
en la pantalla.
Tiene un código de error de función. Presione la tecla Cancel/Off (Cancelar/ Apagar) Permita que
el horno se enfríe durante una hora. Vuelva a poner el horno en
funcionamiento.
Si el código de función se repite. Desconecte totalmente la corriente de la cocina durante por lo menos
PLQXWRV\YXHOYDDFRQHFWDUODPLVPD6LHOFyGLJRGHHUURUGH
función se repite, llame al servicio técnico.
La pantalla queda en blanco. Es posible que un fusible de su hogar se haya
quemado o que el disyuntor se haya desconectado.
Reemplace el fusible o reinicie el disyuntor.
El reloj está apagado. Consulte la sección Funciones Especiales.
El horno se encuentra en Sabbath Mode (Modo
Sabático).
Verifique que el horno no esté en Sabbath Mode (Modo Sabático).
Consulte la sección Funciones Especiales.
El horno o la placa de cocción
no permanecerán configurados.
Error de función. Desconecte totalmente la corriente de la cocina durante por lo menos
PLQXWRV\OXHJRYXHOYDDFRQHFWDUODPLVPD6LHVWRVHUHSLWH
llame al servicio técnico.
Consejos para la Solución de Problemas... Antes de solicitar el servicio técnico
CONSEJOS PARA LA SOLUCIÓN DE PROBLEMAS
28
49-80695-2
Problema Causa Posible Qué Hacer
Corte de corriente, el reloj
titila.
Corte o exceso de corriente. Reinicie el reloj. Si el horno estuvo en uso, deberá reiniciar el mismo
presionando la tecla Cancel/ Off (Cancelar/ Apagar) configurando el
reloj y reiniciando cualquier función de cocción.
Olor a “quemado” o “aceite”
desde la ventilación.
Esto es normal en un horno nuevo y
desaparecerá con el tiempo.
Para acelerar el proceso, configure un ciclo de limpieza automática
SRUXQPtQLPRGHKRUDV&RQVXOWHODVHFFLyQGH/LPSLH]DGHO+RUQR
Olor fuerte. Un olor en la aislación alrededor del interior del
horno es normal desde las primeras veces en que
el horno es usado.
Esto es temporario y desaparecerá luego de varios usos o de un ciclo
de limpieza automática.
Se oye un ventilador. Un ventilador de convección puede encenderse y
apagarse automáticamente.
Esto es normal. Para potenciar al máximo una cocción pareja, el
ventilador está diseñado para girar en ambas direcciones, con una
pausa entre ellas. El ventilador de convección funciona durante el
precalentamiento del ciclo de horneado. El ventilador se apagará
después de que el horno haya alcanzado la temperatura configurada.
Esto es normal.
Un ventilador de refrigeración puede encenderse
y apagarse automáticamente.
Esto es normal. Se encenderá y apagará un ventilador de refrigeración
SDUDHQIULDUODVSLH]DVLQWHUQDV3XHGHIXQFLRQDUD~QGHVSXpVGHTXH
el horno se haya apagado.
La puerta de vidrio del horno
parece estar “teñida” o tener
un color “arcoíris”. ¿Es esto
un defecto?
No. El vidrio del horno interno está cubierto
con una barrera de calor que refleja este último
nuevamente hacia el horno, a fin de evitar la
pérdida de calor y de mantener fría la puerta
externa mientras se hornea.
Esto es normal. Bajo ciertas luces y ángulos, es posible que visualice
esta tinta o arcoíris.
A veces el horno tarda más
en precalentarse a la misma
temperatura.
Utensilio o comida en el horno. El utensilio o la comida en el horno hará que éste tarde más en
precalentarse. Retire estos artículos para reducir el tiempo de
precalentamiento.
Número de estantes en el horno. Agregar más estantes al horno hará que éste tarde más en
precalentarse. Retire algunos estantes.
Diferentes modos de cocción. Los diferentes modos de cocción utilizan diferentes métodos de
precalentamiento para calentar el horno en un modo de cocción
específico. Algunos modos tardarán más que otros (tales como:
KRUQHDGRSRUFRQYHFFLyQP~OWLSOH
La pantalla destella. Corte de energía. Reconfigure el reloj.
La pantalla no muestra “SF”. Los botones de control del horno no se
presionaron correctamente.
Los botones Broil HI/LO (asar alto/bajo) y Bake (hornear) deben
SUHVLRQDUVHDOPLVPRWLHPSR\VRVWHQHUVHGXUDQWHVHJXQGRV
El control emite una señal
después de ingresar un
tiempo de cocción o de inicio.
Olvidó ingresar un temperatura de horneado o un
horario de limpieza.
Presione el botón Bake (hornear) y la temperatura deseada o el botón
Self Clean (auto-limpieza) y el tiempo de limpieza deseado.
Resulta difícil deslizar las
bandejas del horno.
Las parrillas de color plateado brillante se
limpiaron en un ciclo de auto limpieza.
Aplique una pequeña cantidad de aceite vegetal en una toalla de
papel y frote los bordes de las bandejas del horno. No rocíe con Pam
®
u otro lubricante en spray.
Emisión de vapor desde la
ventilación.
Cuando se utilizan los hornos, es normal ver una
emisión de vapor de la ventilación del horno. A
medida que el número de bandejas o la cantidad
de alimentos a cocinar se incrementa, la cantidad
de vapor visible se elevará.
Esto es normal.
No funcionan el cajón
calentador.
El fusible puede haberse quemado o el
interruptor de circuitos puede haber saltado.
Cambie el fusible o vuelva a configurar el interruptor de circuitos.
Los controles están mal configurados. Ver la sección Cómo usar el cajón calentador.
Condensación excesiva en
el cajón.
Líquido en el cajón 4XLWHHOOtTXLGR
Alimentos sin cubrir. Cubra los alimentos con una tapa o con papel de aluminio.
La configuración de temperatura está muy alta. Reduzca la configuración de la temperatura.
Los alimentos se secan en el
cajón calentador.
La humedad se escapa. Cubra los alimentos con una tapa o con papel de aluminio.
El cajón no está totalmente cerrado. Presione el cajón hacia adentro hasta que el sujetador enganche.
Quedan restos de agua en la
puerta del horno luego del
Ciclo de Limpieza al Vapor.
Esto es normal. Retire el agua restante con una esponja o tela seca.
“Probe” (Sonda) aparece en
la pantalla.
Esto le está recordando que debe ingresar una
temperatura de sonda luego de enchufar la misma.
Ingrese una temperatura de sonda.
Consejos para la Solución de Problemas... Antes de solicitar el servicio técnico
CONSEJOS PARA LA SOLUCIÓN DE PROBLEMAS