Loading ...
English Français
Español Português
Consulte o seu agente Sony mais próximo com relação ao produto com
problemas.
Remova a bateria recarregável deste aparelho e então instale a mesma
bateria novamente.
Caso a lâmpada CHARGE
volte a piscar:
Instale uma outra bateria
recarregável.
Caso a lâmpada CHARGE se acenda
e não mais volte a piscar:
Se a lâmpada CHARGE se apagar
porque o tempo de carregamento
terminou, não há nenhum problema.
Caso a lâmpada CHARGE
volte a piscar:
O problema está neste
aparelho.
Caso a lâmpada CHARGE se acenda
e não mais volte a piscar:
Se a lâmpada CHARGE se apagar
porque o tempo de carregamento
terminou, o problema está na
primeira bateria instalada.
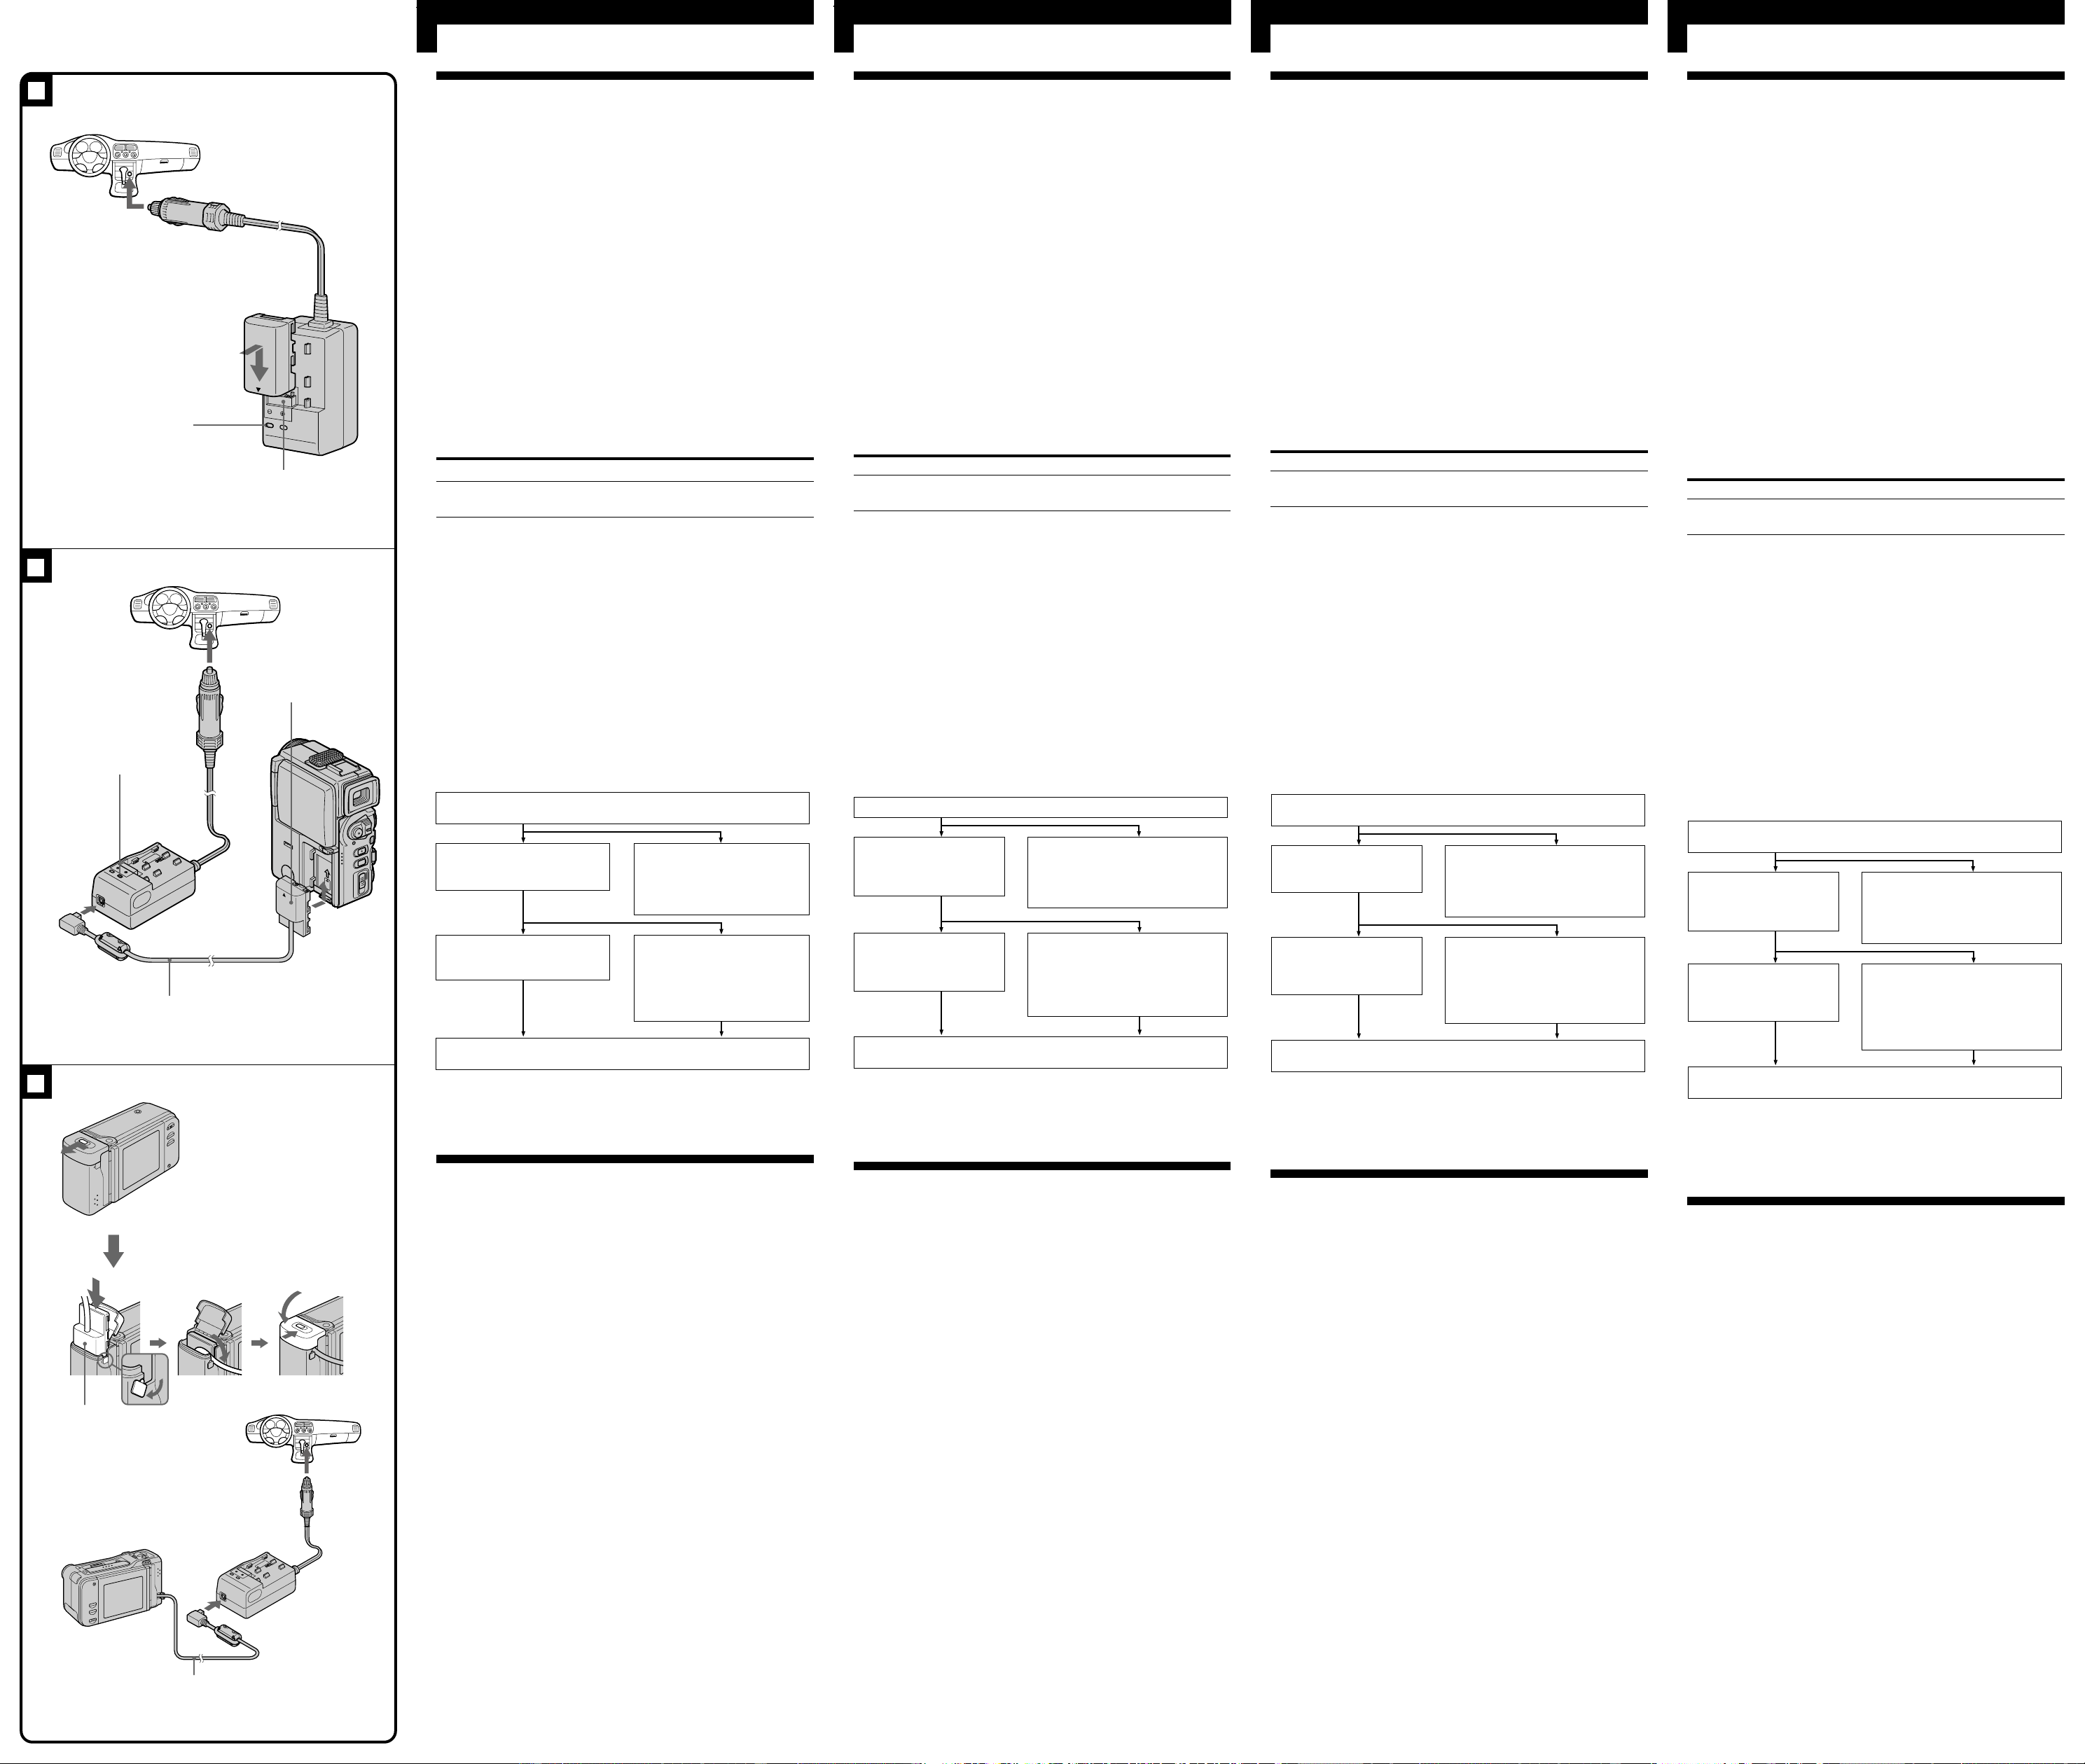
To Charge the Battery Pack
Charging by attaching the battery pack to this
unit
See illustration A.
1 Install the battery pack.
Align the end surface of the battery pack shown by the 4 mark to the
edge of the terminal shutter of this unit, then fit and slide the battery
pack in the direction of the arrow.
2 Connect the car battery cord to the cigarette lighter socket.
The CHARGE lamp (orange) will light and charging will begin.
When the CHARGE lamp goes out, normal charge is completed (Normal
charge). For a full charge, which allows you to use the battery longer than
usual, leave the battery pack in place for approximately one hour (Full
charge).
Remove the battery pack when required. It can be used even if the charging
is not completed.
To remove the battery pack
Slide it in the direction opposite to the arrow in the illustration A.
Charging time
The following table shows the charging time for the battery pack which is
discharged completely.
Battery pack NP-F10 NP-F20 NP-F30
Charging time (min.)
145 220 295
(85) (160) (235)
•Approximate minutes to charge an empty battery pack fully (Full charge).
•Numbers in parentheses indicate the time when you charge normally
(Normal charge).
•To ascertain the battery life, refer to the instruction manual of the video
equipment which you use.
•The charging time may differ depending on the condition of the battery
pack or the temperature of the environment.
Notes
•When a fully charged battery pack is installed, the CHARGE lamp will
once light, then go out.
•If the CHARGE lamp does not light or flash, check that the battery pack is
correctly attached to the DC Adaptor/Charger. If it is not attached, it will
not be charged.
•When you charge, disconnect the connecting cord DK-115, or turn off the
connected video equipment.
When the CHARGE lamp flashes
Check through the following chart.
Note
When the charging of the battery pack attached to this unit is completed, or
when you connect the car battery cord, the VTR/CAMERA lamp on this
unit may light for a moment. This is not a problem.
To Operate Video Equipment
In case of connection with a video camera which has no
built-in battery and battery power is externally supplied
to:
See illustration B.
1 Connect the connecting plate to the video equipment.
2 Connect the supplied DK-115 connecting cord to the DC OUT
connector of this unit.
3 Connect the car battery cord to the cigarette lighter socket.
The VTR/CAMERA lamp (green) will light.
4 Set the power switch of the video equipment to CAMERA or
VTR.
The VTR/CAMERA lamp (green) on this unit will light during
operation of the video equipment.
In case of connection with a video camera which has the
built-in battery:
See illustration C.
1 Open the lid of the battery compartment of the video
equipment.
2 Insert the connecting plate in the battery compartment. Pull out
the cover on the lid and pass the connecting cord through the
lid. Then close the lid.
3 Connect the supplied DK-115 connecting cord to the DC OUT
connector of this unit.
4 Connect the car battery cord to the cigarette lighter socket.
The VTR/CAMERA lamp (green) will light.
Note
Keep this unit away from the video equipment if the picture is disturbed.
Pour charger la batterie
Recharge avec la batterie sur l’appareil
Voir l’illustration A.
1 Installez la batterie rechargeable.
Alignez l’extrémité de la batterie indiquée par le repère 4 sur le bord de
l’obturateur de borne de cet appareil, puis insérez et poussez la batterie
dans le sens de la flèche.
2 Branchez le cordon allume-cigares sur la douille de
l’allume-cigares.
Le témoin CHARGE (orange) s’allume et la recharge commence.
Quand le témoin CHARGE s’éteint, la recharge normale est terminée
(Recharge normale). Pour une recharge complète, qui vous permettra
d’utiliser pendant plus longtemps la batterie, laissez la batterie rechargeable
en place pendant une heure environ (Recharge complète).
Enlevez la batterie rechargeable quand nécessaire. Elle peut être utilisée
même si elle n’est pas complètement rechargée.
Pour enlever la batterie rechargeable
Poussez-la dans le sens opposé à la flèche sur l’illustration A.
Temps de recharge
Le tableau suivant indique le temps de recharge quand la batterie est
complètement déchargée.
Batterie rechargeable NP-F10 NP-F20 NP-F30
Temps de recharge (min.)
145 220 295
(85) (160) (235)
•Temps de recharge approximatif en minutes pour recharger
complètement une batterie vide (Recharge complète).
•Les chiffres entre parenthèses indiquent le temps normal (Recharge
normale).
•Voir le mode d’emploi de l’appareil vidéo utilisé pour l’autonomie de la
batterie.
•Le temps de recharge varie selon l’état de la batterie et la température
ambiante.
Remarques
•Quand vous insérez une batterie pleine, le témoin CHARGE s’allume une
fois puis s’éteint.
•Si le témoin CHARGE ne s’allume ni ne clignote, vérifiez si la batterie est
correctement fixée à l’adaptateur/chargeur CC. Si elle n’est pas installée
correctement, elle ne sera pas rechargée.
•Lorsque vous rechargez la batterie, débranchez le cordon de liaison
DK-115 ou désactivez l’appareil vidéo raccordé.
Si le témoin CHARGE clignote
Consultez le tableau suivant.
Remarque
Quand la recharge de la batterie installée sur cet appareil est terminée, ou
quand vous raccordez le cordon allume-cigares, le témoin VTR/CAMERA
de l’appareil peut clignoter un instant. Cela n’indique pas un problème.
Pour utiliser l’appareil vidéo
Cas de liaison à un camescope sans batterie intégrée et
alimenté par une source externe:
Voir l’illustration B.
1 Raccordez la plaque de connexion à l’appareil vidéo.
2 Raccordez le cordon de liaison fourni DK-115 au connecteur DC
OUT de cet appareil.
3 Branchez le cordon allume-cigares sur la douille de l’allume-
cigares.
Le témoin VTR/CAMERA (vert) s’allume.
4 Réglez l’interrupteur de l’appareil vidéo sur CAMERA ou VTR.
Le témoin VTR/CAMERA (vert) de cet appareil s’allume pendant le
fonctionnement de l’appareil vidéo.
Cas d’une liaison à un camescope avec batterie intégrée:
Voir l’illustration C.
1 Ouvrez le couvercle du logement de batterie de l’appareil vidéo.
2 Insérez la plaque de connexion dans le logement de batterie.
Tirez le cache sur le couvercle et faites passer le cordon de
liaison par le couvercle. Fermez ensuite le couvercle.
3 Raccordez le cordon de liaison fourni DK-115 au connecteur DC
OUT de cet appareil.
4 Branchez le cordon allume-cigares sur la douille de l’allume-
cigares.
Le témoin VTR/CAMERA (vert) s’allume.
Remarque
Eloignez l’adaptateur/chargeur CC de l’appareil vidéo s’il perturbe
l’image.
Para cargar la batería
Carga fijando la batería a esta unidad
Consulte la ilustración A.
1 Instale la batería.
Alinee la superficie del extremo de la batería mostrado con la marca 4
en el borde del obturador de terminales de esta unidad, y después fije y
deslice la batería en el sentido de la flecha.
2 Conecte el cable para batería de automóvil a la toma para el
encendedor de cigarrillos del mismo.
La lámpara CHARGE (anaranjada) se encenderá y se iniciará la carga.
Cuand finalice la carga, la lámpara CHARGE se apagará (Carga normal).
Para realizar la carga completa, que le permitirá utilizar la batería durante
más tiempo que el normal, deje la batería en su lugar durante
aproximadamente una hora (Carga completa).
Extraiga la batería cuando lo requiera. Podrá utilizarse incluso aunque no
se haya completado la carga.
Para extraer la batería
Deslícela en el sentido opuesto al de la flecha de la ilustración A.
Tiempo de carga
En la tabla siguiente se muestra el tiempo de carga para una batería
completamente descargada.
Batería NP-F10 NP-F20 NP-F30
Tiempo de carga (min)
145 220 295
(85) (160) (235)
•Minutos aproximados para cargar completamente una batería vacía
(Carga completa).
•Los números entre paréntesis indican el tiempo cuando la cargue
normalmente (Carga normal).
•Para asegurar la duración útil de la batería, consulte el manual de
instrucciones del equipo de vídeo utilizado.
•El tiempo de carga puede diferir dependiendo de la condición de la
batería o de la temperatura ambiental.
Notas
•Cuando instale una batería completamente cargada, la lámpara CHARGE
parpadeará una vez y después se apagará.
•Si la lámpara CHARGE no se enciende ni parpadea, compruebe si la
batería está correctamente fijada en el adaptador de CC/cargador.
Si no lo está, no se cargará.
•Para cargar, desconecte el cable conector DK-115, o desconecte la
alimentación del equipo de vídeo conectado.
Cuando parpadee la lámpara CHARGE
Compruebe el organigrama siguiente.
Nota
Cuando finalice la carga de la batería fijada a esta unidad, o cuando haya
conectado el cable para batería de automóvil, la lámpara VTR/CAMERA de
esta unidad puede encenderse durante un momento.Esto no significa
ningún problema.
Para utilizar el equipo de vídeo
En el caso de conexión a una videocámara que no tenga
batería incorporada y la alimentación se suministre
externamente:
Consulte la ilustración B.
1 Conecte la placa conectora al equipo de vídeo.
2 Conecte el cable conector DK-115 suministrado al conector DC
OUT de esta unidad.
3 Conecte el cable para batería de automóvil a la toma para el
encendedor de cigarrillos.
La lámpara VTR/CAMERA (verde) se encenderá.
4 Ponga el selector de alimentación del equipo de vídeo en
CAMERA o en VTR.
la lámpara VTR/CAMERA (verde) de esta unidad permanecerá
encendida durante la operación del equipo de vídeo.
En el caso de conexión a una videocámara que posea
batería incorporada:
Consulte la ilustración C.
1 Abra la tapa del compartimiento de la batería del equipo de
vídeo.
2 Inserte la placa conectora en el compartimiento de la batería.
Extraiga la cubierta de la tapa y pase el cable conector a través
de la tapa. Después cierre la tapa.
3 Conecte el cable conector DK-115 al conector DC OUT de esta
unidad.
4 Conecte el cable para batería de automóvil a la toma para el
encendedor de cigarrillos.
La lámpara VTR/CAMERA (verde) se encenderá.
Nota
Si las imágenes se ven con perturbaciones, mantenga esta unidad alejada
del equipo de vídeo.
Para trocar a bateria recarregável
Recarga mediante o acoplamento da bateria
recarregável neste aparelho
Consulte a ilustração A.
1 Instale a bateria recarregável.
Alinhe a superfície terminal da bateria recarregável indicada pela marca
4 com a borda do protector de terminal deste aparelho, e então encaixe e
deslize a bateria recarregável no sentido indicado pela seta.
2 Ligue o cabo de bateria de automóvel à tomada do acendedor de
cigarros
A lâmpada CHARGE (alaranjada) acender-se-á e a recarga será iniciada.
Quando a lâmpada CHARGE se apaga, a recarga normal está concluída
(Carregamento normal). Para um carregamento completo, o qual lhe
permitirá utilizar a bateria por mais tempo do que o usual, deixe a bateria
recarregável no lugar por aproximadamente uma hora (Carregamento
completo).
Remova a bateria recarregável quando requerida. A bateria pode ser
utilizada, mesmo que o carregamento não esteja completo.
Para remover a bateria recarregável
Deslize-a ao sentido oposto da seta na ilustração A.
Tempo de carregamento
A tabela a seguir mostra o tempo de carregamento para uma bateria
recarregável completamente descarregada.
Bateria recarregável NP-F10 NP-F20 NP-F30
Tempo de recarga (min.)
145 220 295
(85) (160) (235)
•Tempo aproximado em minutos para o carregamento completo de uma
bateria recarregável vazia (Carregamento completo).
•Números entre parênteses indicam o tempo de recarga normal
(Carregamento normal).
•Para averiguar a duração da bateria, consulte o manual de instruções do
equipamento de vídeo em utilização.
•O tempo de recarga pode diferir conforme as condições da bateria
recarregável ou da temperatura do ambiente.
Notas
•Quando uma bateria recarregável completamente carregada é instalada, a
lâmpada CHARGE acende-se uma vez e então se apaga.
•Caso a lâmpada CHARGE não se acenda nem pisque, verifique se a
bateria recarregável está correctamente acoplada ao recarregador/
adaptador CC. Caso não esteja acoplada, a bateria não será recarregada.
•Durante a recarga, desligue o cabo de ligação DK-115 ou desactive o
equipamento de vídeo ligado.
Caso pisque a lâmpada CHARGE
Verifique a tabela abaixo.
Nota
Quando a recarga da bateria recarregável acoplada neste aparelho estiver
completada, ou quando for conectado o cabo da bateria de automóvel, a
lâmpada VTR/CAMERA neste aparelho poderá acender-se por um
momento. Isto não representa nenhum problema.
Para operar o equipamento de vídeo
No caso de ligação com uma videocâmara que não
possua bateria incorporada e a alimentação da bateria
seja externamente fornecida:
Consulte a ilustração B.
1 Ligue a placa de ligação ao equipamento de vídeo.
2 Ligue o cabo de ligação DK-115 fornecido ao conector DC OUT
deste aparelho.
3 Ligue o cabo da bateria de automóvel à tomada do acendedor
de cigarros.
A lâmpada VTR/CAMERA (verde) se acende.
4 Ajuste o interruptor de alimentação do equipamento de vídeo a
CAMERA ou VTR.
A lâmpada VTR/CAMERA (verde) neste aparelho acender-se-á durante
o funcionamento do equipamento de vídeo.
No caso de ligação com uma videocâmara que possua a
bateria incorporada:
Consulte a ilustração C.
1 Abra a tampa do compartimento de bateria do equipamento de
vídeo.
2 Insira a placa de ligação no compartimento de bateria. Extraia o
tampão da tampa e passe o cabo de ligação através da tampa. A
seguir, feche a tampa.
3 Ligue o cabo de ligação DK-115 fornecido ao conector DC OUT
deste aparelho.
4 Ligue o cabo da bateria de automóvel à tomada do acendedor
de cigarros.
A lâmpada VTR/CAMERA (verde) acender-se-á.
Nota
Mantenha este aparelho distante de equipamentos de vídeo, caso a imagem
seja prejudicada.
Please contact your nearest Sony dealer in connection with the product
with the problem.
Remove the battery pack from this unit, then install the same battery
pack again.
If the CHARGE lamp flashes
again:
Install another battery pack.
If the CHARGE lamp lights and
does not flash again:
If the CHARGE lamp goes out
because the charging time has
passed, there is no problem.
If the CHARGE lamp flashes
again:
The problem is with this unit.
If the CHARGE lamp lights and
does not flash again:
If the CHARGE lamp goes out
because the charging time has
passed, the problem is with the
battery pack first installed.
Veuillez contacter votre revendeur Sony et lui apporter l’appareil qui ne
fonctionne pas.
Retirez la batterie de l’adaptateur secteur, puis remettez-la en place.
Si le témoin CHARGE
clignote encore:
Installez une autre batterie
rechargeable.
Si le témoin CHARGE s’allume mais
ne clignote pas de nouveau:
Si le témoin CHARGE s’allume parce
que la recharge est terminée, il n’y a
aucun problème.
Si le témoin CHARGE
clignote de nouveau:
Le problème vient de
l’adaptateur secteur.
Si le témoin CHARGE s’allume mais
ne clignote pas de nouveau:
Si le témoin CHARGE s’éteint parce
que la recharge est terminée, le
problème vient de la première
batterie rechargeable installée.
Póngase en contacto con su proveedor Sony más cercano en relación con
el producto afectado.
Retire la batería de esta unidad y, a continuación, vuelva a instalar la
misma batería.
Si la lámpara CHARGE
vuelve a parpadear:
Instale otra batería.
Si la lámpara CHARGE se ilumina y
no vuelve a parpadear:
Si la lámpara CHARGE se apaga
porque ha transcurrido el tiempo
de carga, no hay problema.
Si la lámpara CHARGE
vuelve a parpadear:
El problema reside en este
cargador.
Si la lámpara CHARGE se ilumina y
no vuelve a parpadear:
Si la lámpara CHARGE se apaga
porque ha transcurrido el tiempo de
carga, el problema reside en la batería
instalada en primer lugar.
A
1
2
B
C
1
2
3
4
(base)
DC OUT
2
1
CHARGE lamp
(orange)
Témoin CHARGE
(orange)
Lámpara CHARGE
(anaranjada)
Lâmpada CHARGE
(alaranjada)
Terminal shutter
Obturateur de borne
Obturador de terminales
Protector de terminal
VTR/CAMERA lamp (green)
Témoin VTR/CAMERA (vert)
Lámpara VTR/CAMERA (verde)
Lâmpada VTR/CAMERA (verde)
Connecting plate
Plaque de connexion
Placa conectora
Placa de ligação
Connecting cord DK-115 (supplied)
Cordon de liaison DK-115 (fourni)
Cable conector DK-115 (suministrado)
Cabo de ligação DK-115 (fornecido)
Connecting plate
Plaque de connexion
Placa de conexión
Placa de ligaçãc
Connecting cord DK-115 (supplied)
Cordon de liaison DK-115 (fourni)
Cable conector DK-115 (suministrado)
Cabo de ligação DK-115 (fornecido)