
IT
EN DE FR PL

2
Grazie per aver scelto una lavatrice Candy
che, siamo certi, sarà un prezioso alleato
per lavare in tutta tranquillità la biancheria
di tutti i giorni, anche la più delicata.
È possibile registrare il prodotto su
www.registercandy.com per poter accedere
più rapidamente ai servizi integrativi riservati
solo ai clienti più fedeli.
La lettura completa di questo libretto
permetterà un utilizzo corretto e sicuro
dell’apparecchiatura e darà anche utili
consigli sulla manutenzione più efficiente.
Mettere in funzione la lavatrice solo
dopo aver letto attentamente le istruzioni. Si
consiglia di tenere sempre il manuale a
portata di mano e di conservarlo con cura
per eventuali futuri proprietari.
Si raccomanda di controllare che al
momento della consegna la macchina sia
dotata di libretto di istruzioni, certificato di
garanzia, indirizzi di assistenza ed etichetta
di efficienza energetica. Verificare inoltre di
avere tappi, curva per tubo di scarico e
bacinella per detersivo liquido o
candeggiante (presente solo su alcuni
modelli). Si consiglia di conservare tutti
questi componenti.
Ogni prodotto è identificato da un codice
univoco di 16 caratteri, definito anche
“numero di serie”, che si trova nell’adesivo
applicato sull’elettrodomestico (zona oblò) o
nella busta documenti posta all’interno del
prodotto. Questo codice è una sorta di carta
d’identità specifica per il prodotto che
servirà per registrare il prodotto e se fosse
necessario contattare il Centro Assistenza
Tecnica Candy.
Questo elettrodomestico è marcat
o
conformemente alla Direttiva Europe
a
2012/19/UE sui Rifiuti da
A
pparecchiature Elettriche ed
Elettroniche (RAEE).
I RAEE contengono sia sostanze inquinanti
(che possono cioè avere un impatto negativ
o
anche molto pesante sull’ambiente) sia materie
prime (che possono essere riutilizzate). E’ perciò
necessario sottoporre i RAEE ad apposite
operazioni di trattamento, per rimuovere e smaltire
in modo sicuro le sostanze inquinanti ed estrarre e
riciclare le materie prime. Ogni cittadino pu
ò
giocare un ruolo decisivo nell’assicurare che i
RAEE non diventino un problema ambientale;
basta seguire qualche semplice regola:
i RAEE non vanno mai buttati nella
spazzatura indifferenziata;
i RAEE devono essere consegnati ai Centri di
Raccolta (chiamati anche isole ecologiche,
riciclerie, piattaforme ecologiche ) allestiti dai
Comuni o dalle Società di igiene urbana; in
molte località viene anche effettuato il servizi
o
di ritiro a domicilio dei RAEE ingombranti.
In molte nazioni, quando si acquista una nuova
apparecchiatura, si può consegnare il RAEE al
negoziante, che è tenuto a ritirarlo gratuitamente
(ritiro "uno contro uno") a patto che il nuovo
apparecchio sia dello stesso tipo e svolga le
stesse funzioni di quello reso.
1. NORME GENERALI DI SICUREZZA
2. INSTALLAZIONE
3. CONSIGLI PRATICI
4. PULIZIA E MANUTENZIONE ORDINARIA
5. GUIDA RAPIDA ALL'USO
6. COMANDI E PROGRAMMI
7. CICLO DI ASCIUGATURA
8. CICLO AUTOMATICO DI
LAVAGGIO/ASCIUGATURA
9. CENTRO ASSISTENZA TECNICA
E
GARANZIA
Indicazioni ambientali
Indice

IT
3
1. NORME GENERALI DI
SICUREZZA
Questo apparecchio è destinato
ad uso in ambienti domestici e
simili come per esempio:
− aree di ristoro di negozi, uffici
o altri ambienti di lavoro;
− negli agriturismo;
− dai clienti di hotel, motel o
altre aree residenziali simili;
− nei bed & breakfast.
Un utilizzo diverso da quello tipico
dell’ambiente domestico, come
l’uso professionale da parte di
esperti o di persone addestrate, è
escluso anche dagli ambienti
sopra descritti. Un utilizzo non
coerente con quello riportato, può
ridurre la vita del prodotto e può
invalidare la garanzia del
costruttore. Qualsiasi danno
all’apparecchio o ad altro, derivante da
un utilizzo diverso da quello domestico
(anche quando l’apparecchio è
installato in un ambiente domestico)
non sarà ammesso dal costruttore
in sede legale.
Questo apparecchio può essere
utilizzato da bambini di 8 anni e
oltre e da persone con capacità
fisiche, sensoriali o mentali ridotte
o con mancanza di esperienza e
di conoscenza a patto che siano
supervisionate o che siano date
loro istruzioni in merito all’utilizzo
sicuro dell’apparecchio e che
capiscano i pericoli del suo utilizzo.
Evitare che i bambini giochino
con la lavatrice o che si occupino
della sua pulizia e manutenzione
senza supervisione.
I bambini dovrebbero essere
supervisionati per assicurarsi che
non giochino con l'apparecchio.
I bambini di età inferiore a 3 anni
devono essere tenuti lontano
dalla macchina, a meno che non
vengano continuamente sorvegliati.
Se il cavo di alimentazione risulta
danneggiato, deve essere sostituito
dal produttore, da un tecnico
specializzato o da una persona
qualificata per evitare qualsiasi
pericolo. Si consiglia di utilizzare un
componente originale, che può essere
richiesto al Centro Assistenza Tecnica.
Utilizzare unicamente il tubo di carico
fornito con l'apparecchio per il
collegamento alla rete idrica. I vecchi
tubi non devono essere riutilizzati.
La pressione idrica deve essere
compresa tra un minimo di 0,05
MPa ed un massimo di 0,8 Mpa.
Assicurarsi che nessun tappeto
ostruisca la base della lavatrice
né i condotti di ventilazione.
La lavatrice risulta “spenta” solo
se l’apposito segnale sulla
manopola o sul pannello di
controllo è in posizione verticale.
In qualsiasi altra posizione, la
macchina risulta ancora “accesa”
(solo per modelli con programmi
selezionabili con manopola).

4
La parte finale di un ciclo nella
lavasciuga avviene senza
calore (ciclo di raffreddamento)
per assicurarsi che gli articoli
siano sottoposti ad una
temperatura che garantisca
che non verranno danneggiati.
Dopo l’installazione, l’apparecchio
deve essere posizionato in modo
che la spina sia raggiungibile.
L’apparecchio non deve essere
installato dietro una porta
richiudibile a chiave, una porta
scorrevole o una porta con
cerniera sul lato opposto a
quello della lavasciuga che
impedirebbe la completa
apertura dello sportello.
La massima capacità di carico
di biancheria asciutta differisce
a seconda del modello (fare
riferimento al cruscotto).
La lavasciuga non deve essere
utilizzata se si sono impiegati
dei prodotti chimici per il
lavaggio.
Non asciugare capi non lavati
nella lavasciuga.
Conviene che i capi sporchi di
sostanze quali l'olio di cottura,
l'acetone, l'alcol, la benzina, il
cherosene, gli smacchiatori, la
trementina, la cera e le
sostanze per rimuoverla siano
lavati in acqua calda con una
quantità maggiore di detergente
prima di asciugarli nella lavasciuga.
Oggetti come gomma espansa
(schiuma di lattice), le cuffie
per la doccia, i materiali tessili
impermeabili, gli articoli con un
lato di gomma e i vestiti o i
cuscini che hanno delle parti
in schiuma di lattice non
dovrebbero essere asciugati
nella lavasciuga.
Ammorbidenti o prodotti simili,
dovrebbero essere usati
conformemente alle istruzioni
relative agli ammorbidenti.
I capi sporchi di olio, possono
bruciare spontaneamente quando
esposti a fonti di calore come
quella di un asciugatore. I capi
diventano caldi, causando un
processo di ossidazione dell’olio
che sviluppa calore. Se il calore
non può dissiparsi, i capi
diventano sufficientemente caldi
da poter innescare il fuoco.
ATTENZIONE:
Non arrestare mai la
lavasciuga prima della fine del
ciclo d'asciugatura, a meno
che tutti gli articoli non
vengano ritirati rapidamente e
stesi per dissipare il calore.

IT
5
Se non si può evitare di
usare l’asciugatore per tessuti
contenenti residui vegetali, oli
di cottura o prodotti per la cura
dei capelli, questi capi devono
essere lavati preventivamente
in acqua calda con appositi
detergenti. Questa operazione
riduce, ma non elimina, il pericolo.
Rimuovere tutti gli oggetti dalle
tasche come ad esempio
accendini e fiammiferi.
Per ulteriori informazioni sul
prodotto o per consultare la
scheda tecnica fare riferimento
al sito internet del produttore.
Prima di qualsiasi intervento di
pulizia e manutenzione della
lavatrice, togliere la spina e
chiudere il rubinetto dell’acqua.
Assicurarsi che l’impianto elettrico
sia provvisto di messa a terra, in
caso contrario richiedere l’intervento
di personale qualificato.
In generale è sconsigliabile
l’uso di adattatori, prese
multiple e/o prolunghe.
Prima di aprire l’oblò, assicurarsi
che non ci sia acqua nel cestello.
Non tirare il cavo di
alimentazione o l’apparecchio
stesso per staccare la spina
dalla presa di corrente.
Non lasciare la lavatrice
esposta a pioggia, sole o ad
altri agenti atmosferici.
In caso di trasloco, non sollevare
la lavatrice dalle manopole né
dal cassetto del detersivo;
durante il trasporto, non
appoggiare mai l’oblò al carrello.
Si consiglia di sollevare la
lavatrice in due persone.
In ogni caso di guasto e/o di
malfunzionamento, si consiglia
di spegnere la lavatrice,
chiudere il rubinetto dell’acqua e
non manomettere l’apparecchio.
Contattare immediatamente il
Centro Assistenza Tecnica,
richiedendo solo ricambi originali.
Il mancato rispetto di quanto
sopra, può compromettere la
sicurezza dell’apparecchio.
Questo apparecchio è conform
e
alle Direttive Europee:
2006/95/EC (LVD);
2004/108/EC (EMC);
2009/125/EC (ErP);
2011/65/EU (RoHS);
e a tutte le successive.
Prescrizioni di sicurezza
ATTENZIONE:
durante il lavaggio, l’acqua
può raggiungere temperature
molto elevate.
6
2. INSTALLAZIONE
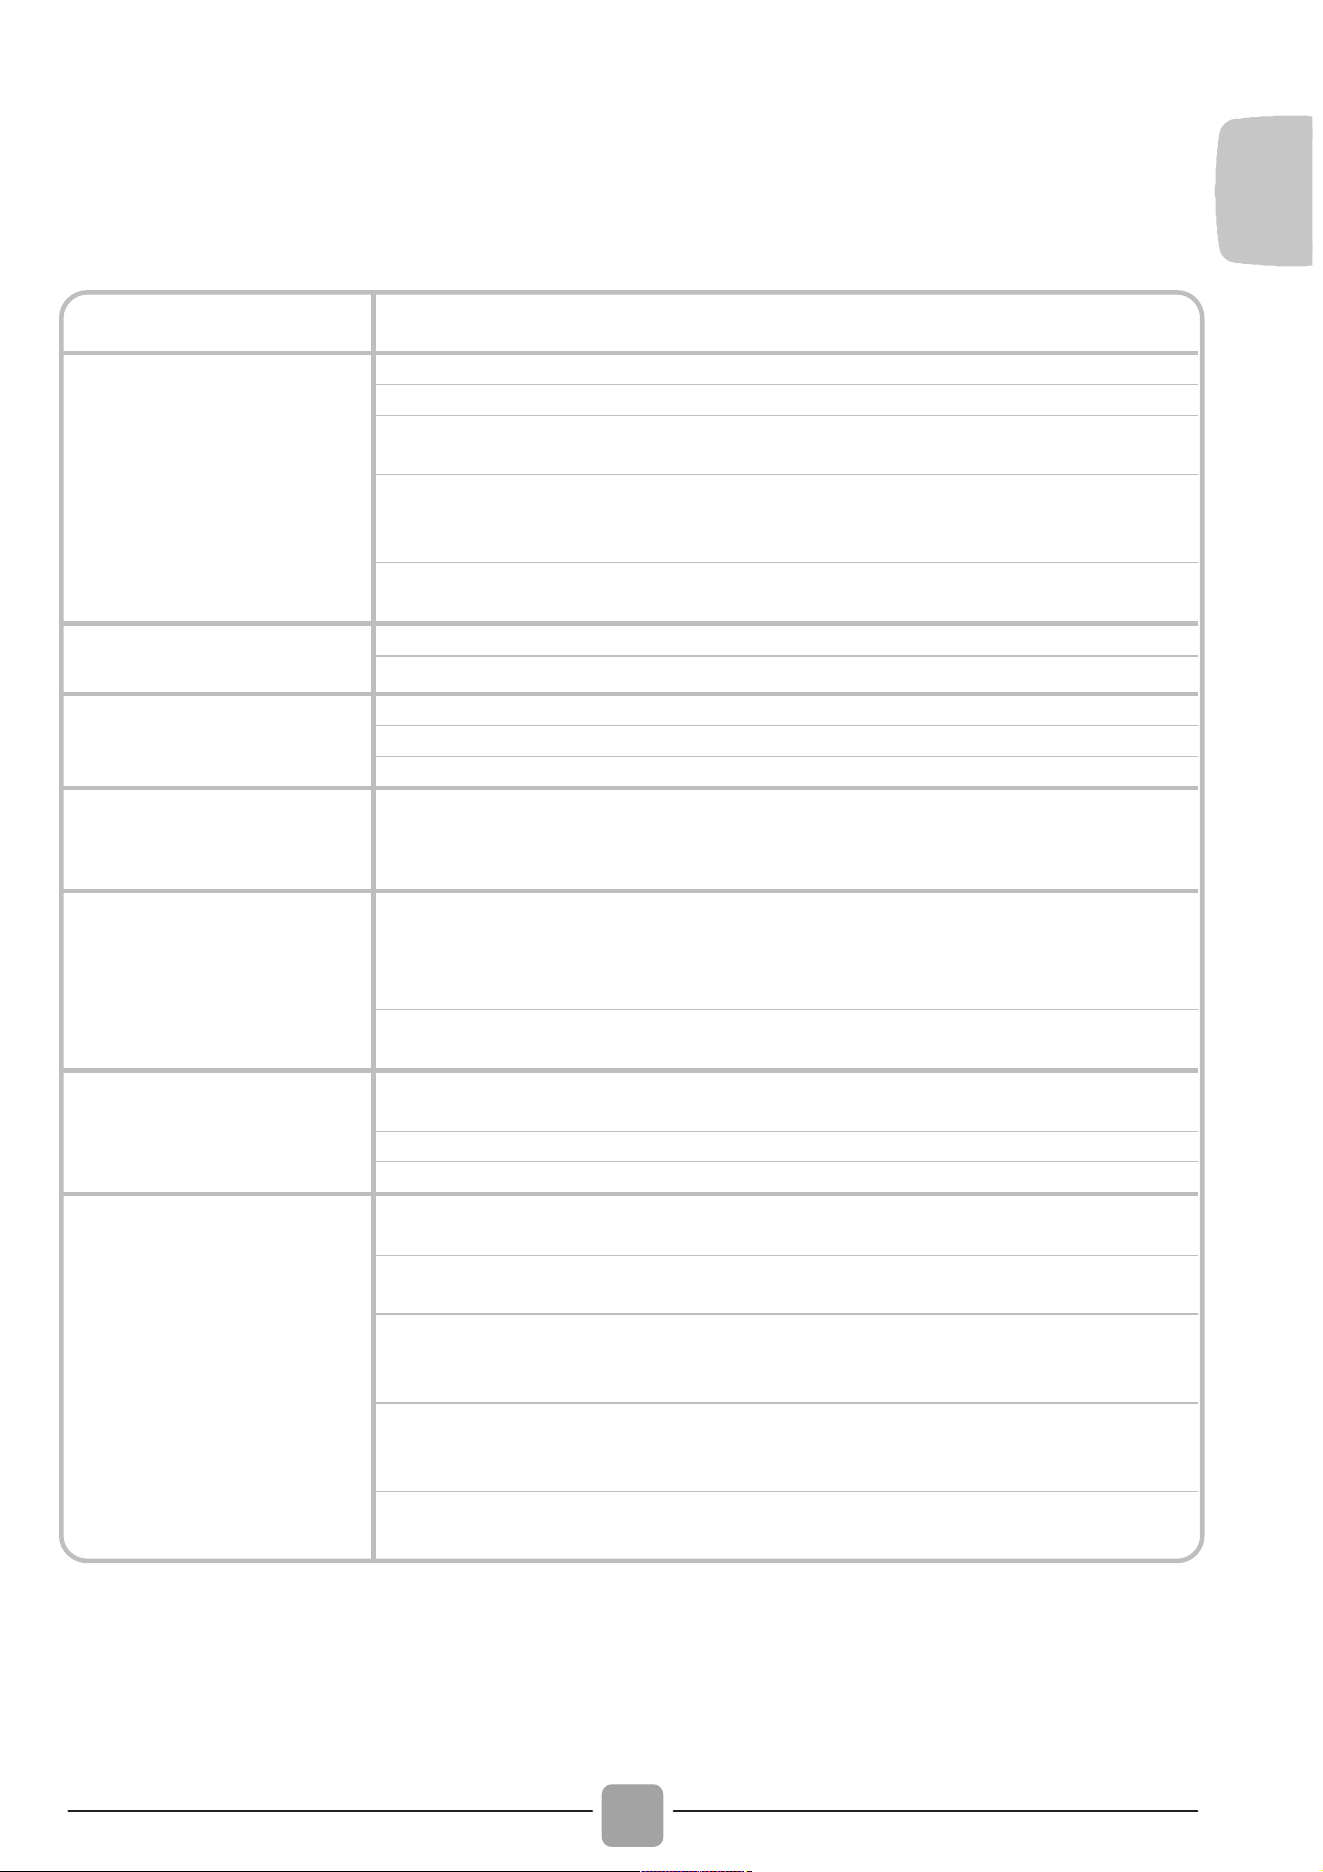
Tagliare le fascette ferma-tubo,
prestando attenzione a non
danneggiare il tubo e il cavo
elettrico.
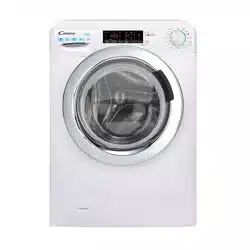
Svitare le 2 o 4 viti (A) sul lato
posteriore e rimuovere i 2 o 4
distanziali (B) come in figura 1.
Richiudere i 2 o 4 fori utilizzando
i tappi contenuti nella busta
istruzioni.
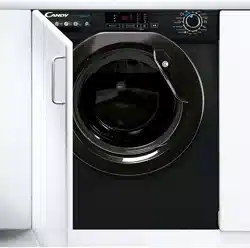
Se la lavatrice è da incasso,
dopo aver tagliato le fascette
ferma-tubo, svitare le 3 o 4 viti (A)
e rimuovere i 3 o 4 distanziali (B).
In alcuni modelli, 1 o più
distanziali cadranno all’interno
della macchina: inclinare avanti
la lavatrice per rimuoverli.
Richiudere i fori utilizzando i
tappi contenuti nella busta.
Applicare il foglio polionda sul
fondo come mostrato in figura 2
(a seconda del modello,
considerare la versione A, B o C).
A
A
A
A
B
B
B
B
1
3
2
1
3
1
2
A
C
B
2
ATTENZIONE:
non lasciare gli elementi
dell’imballaggio a portata dei
bambini.
IT
7
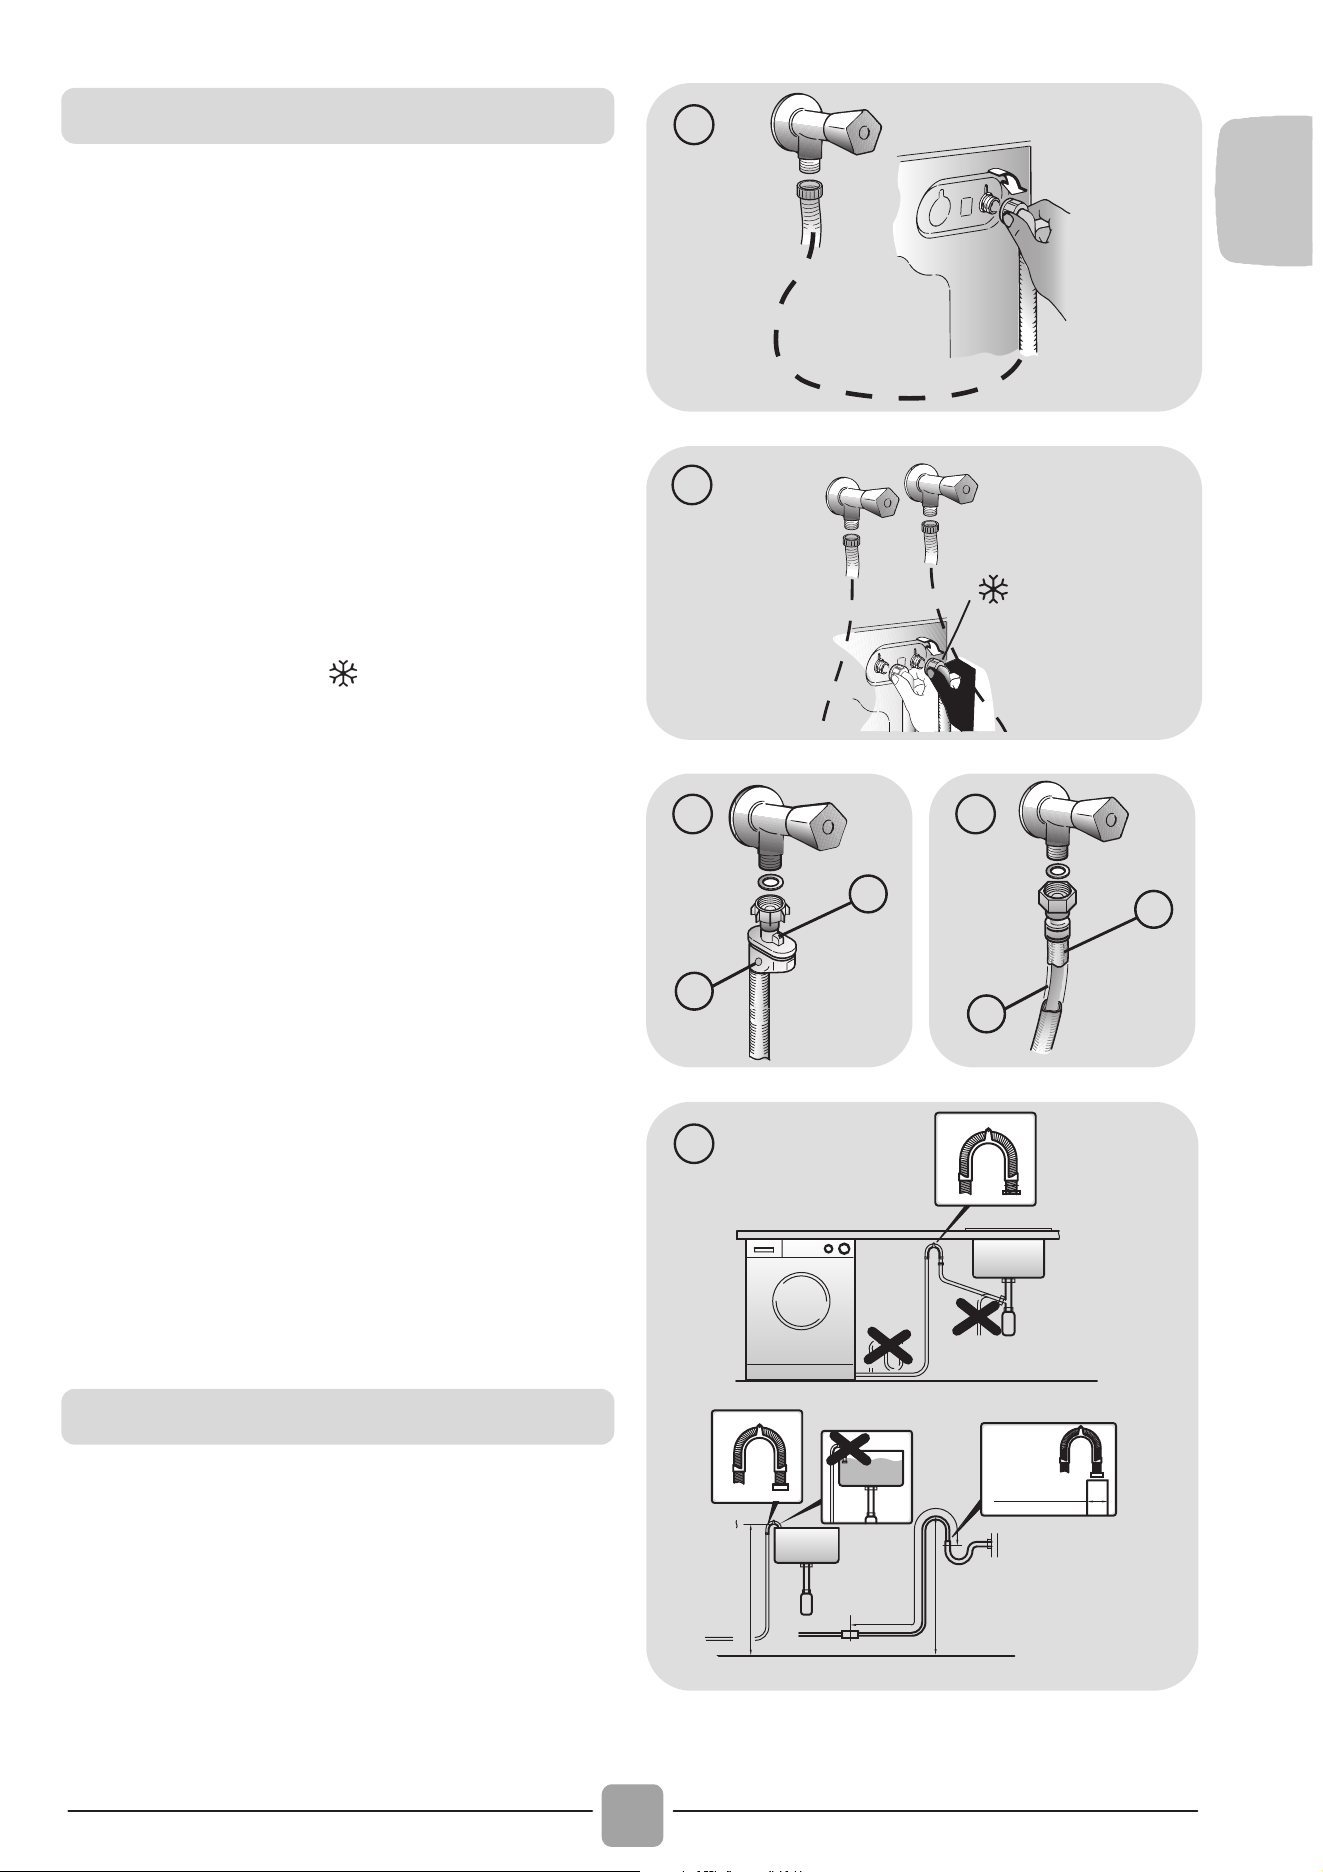
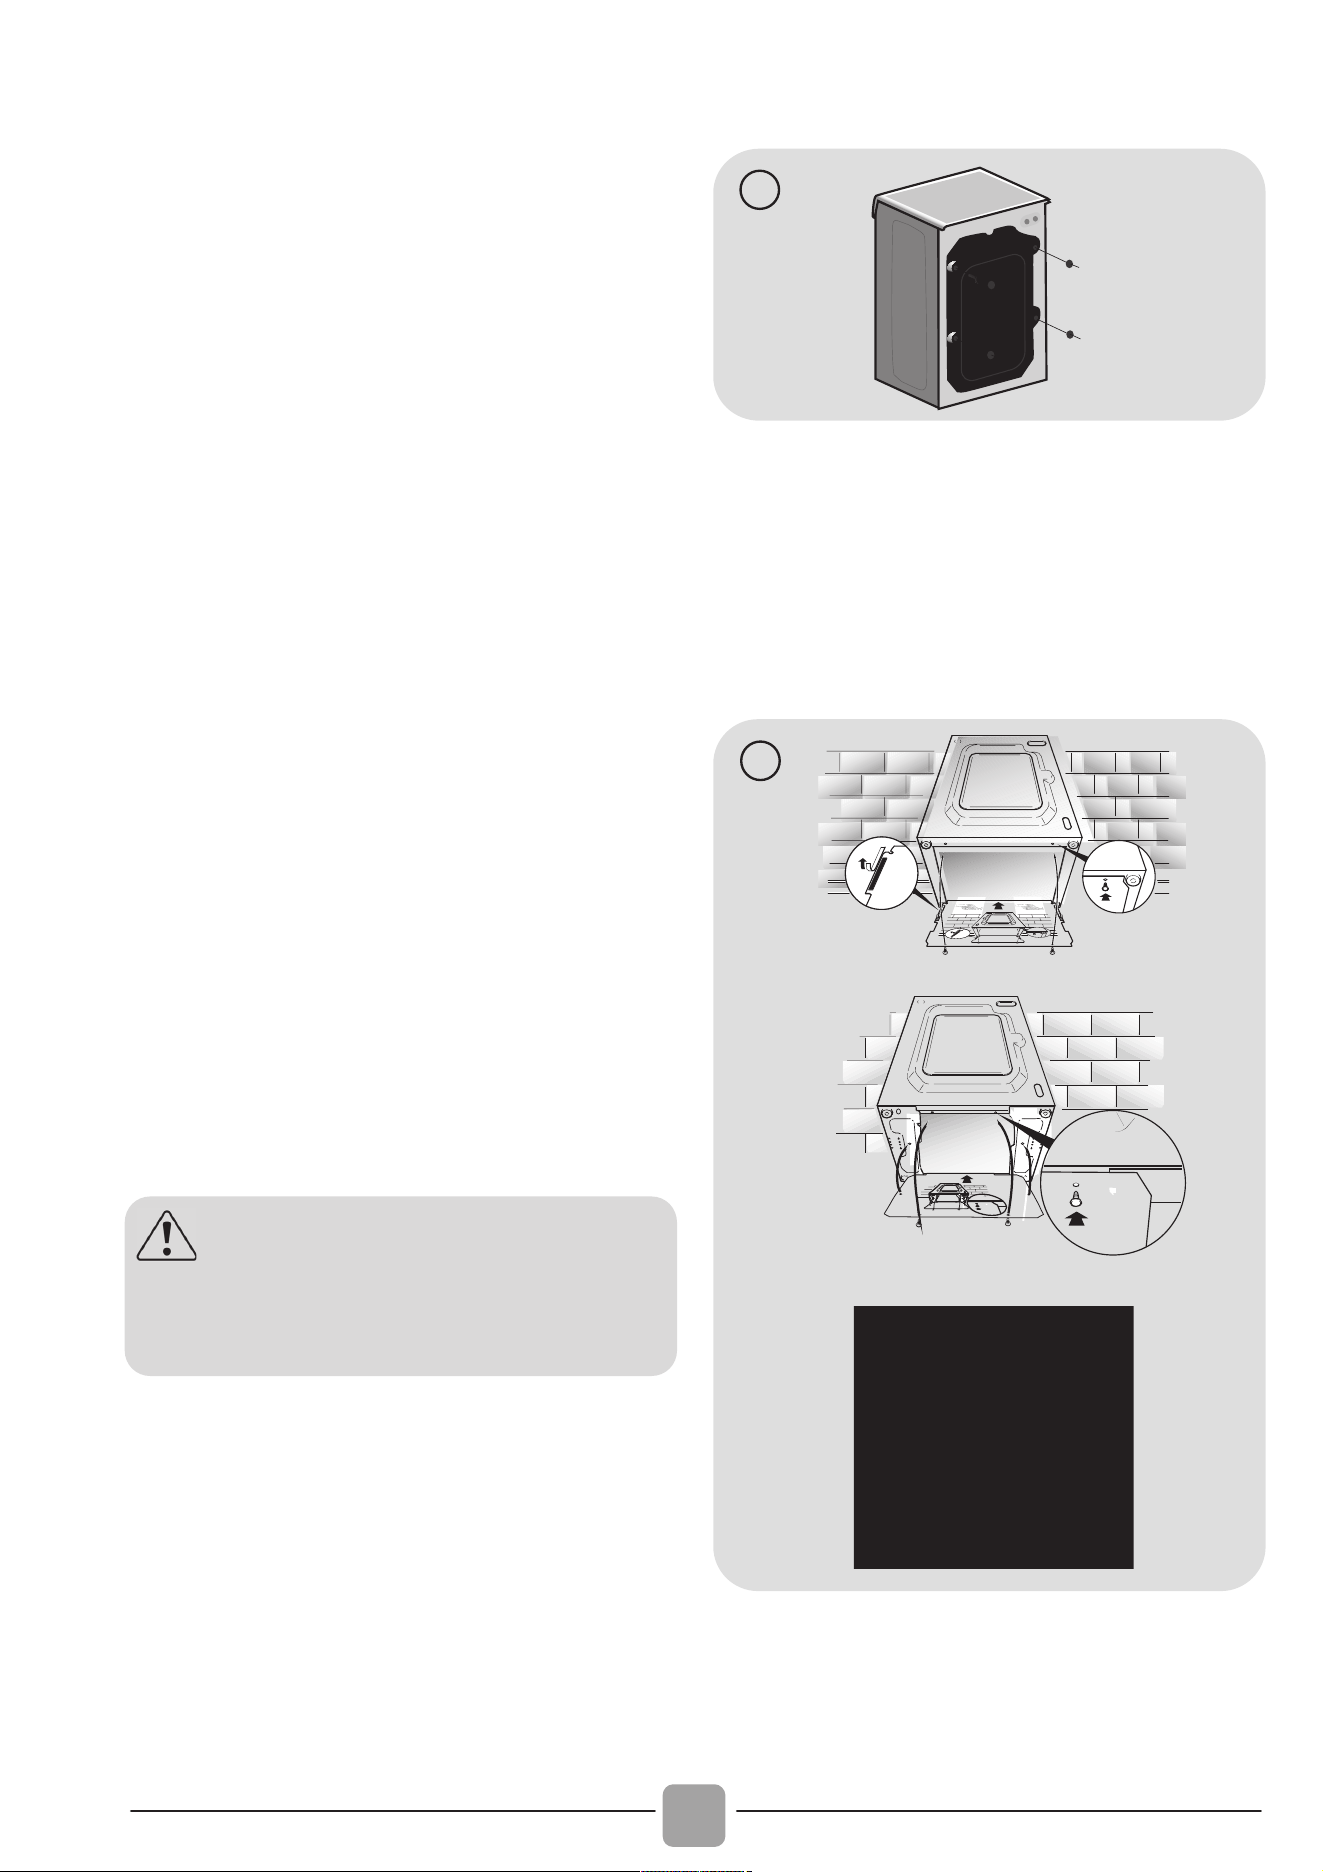
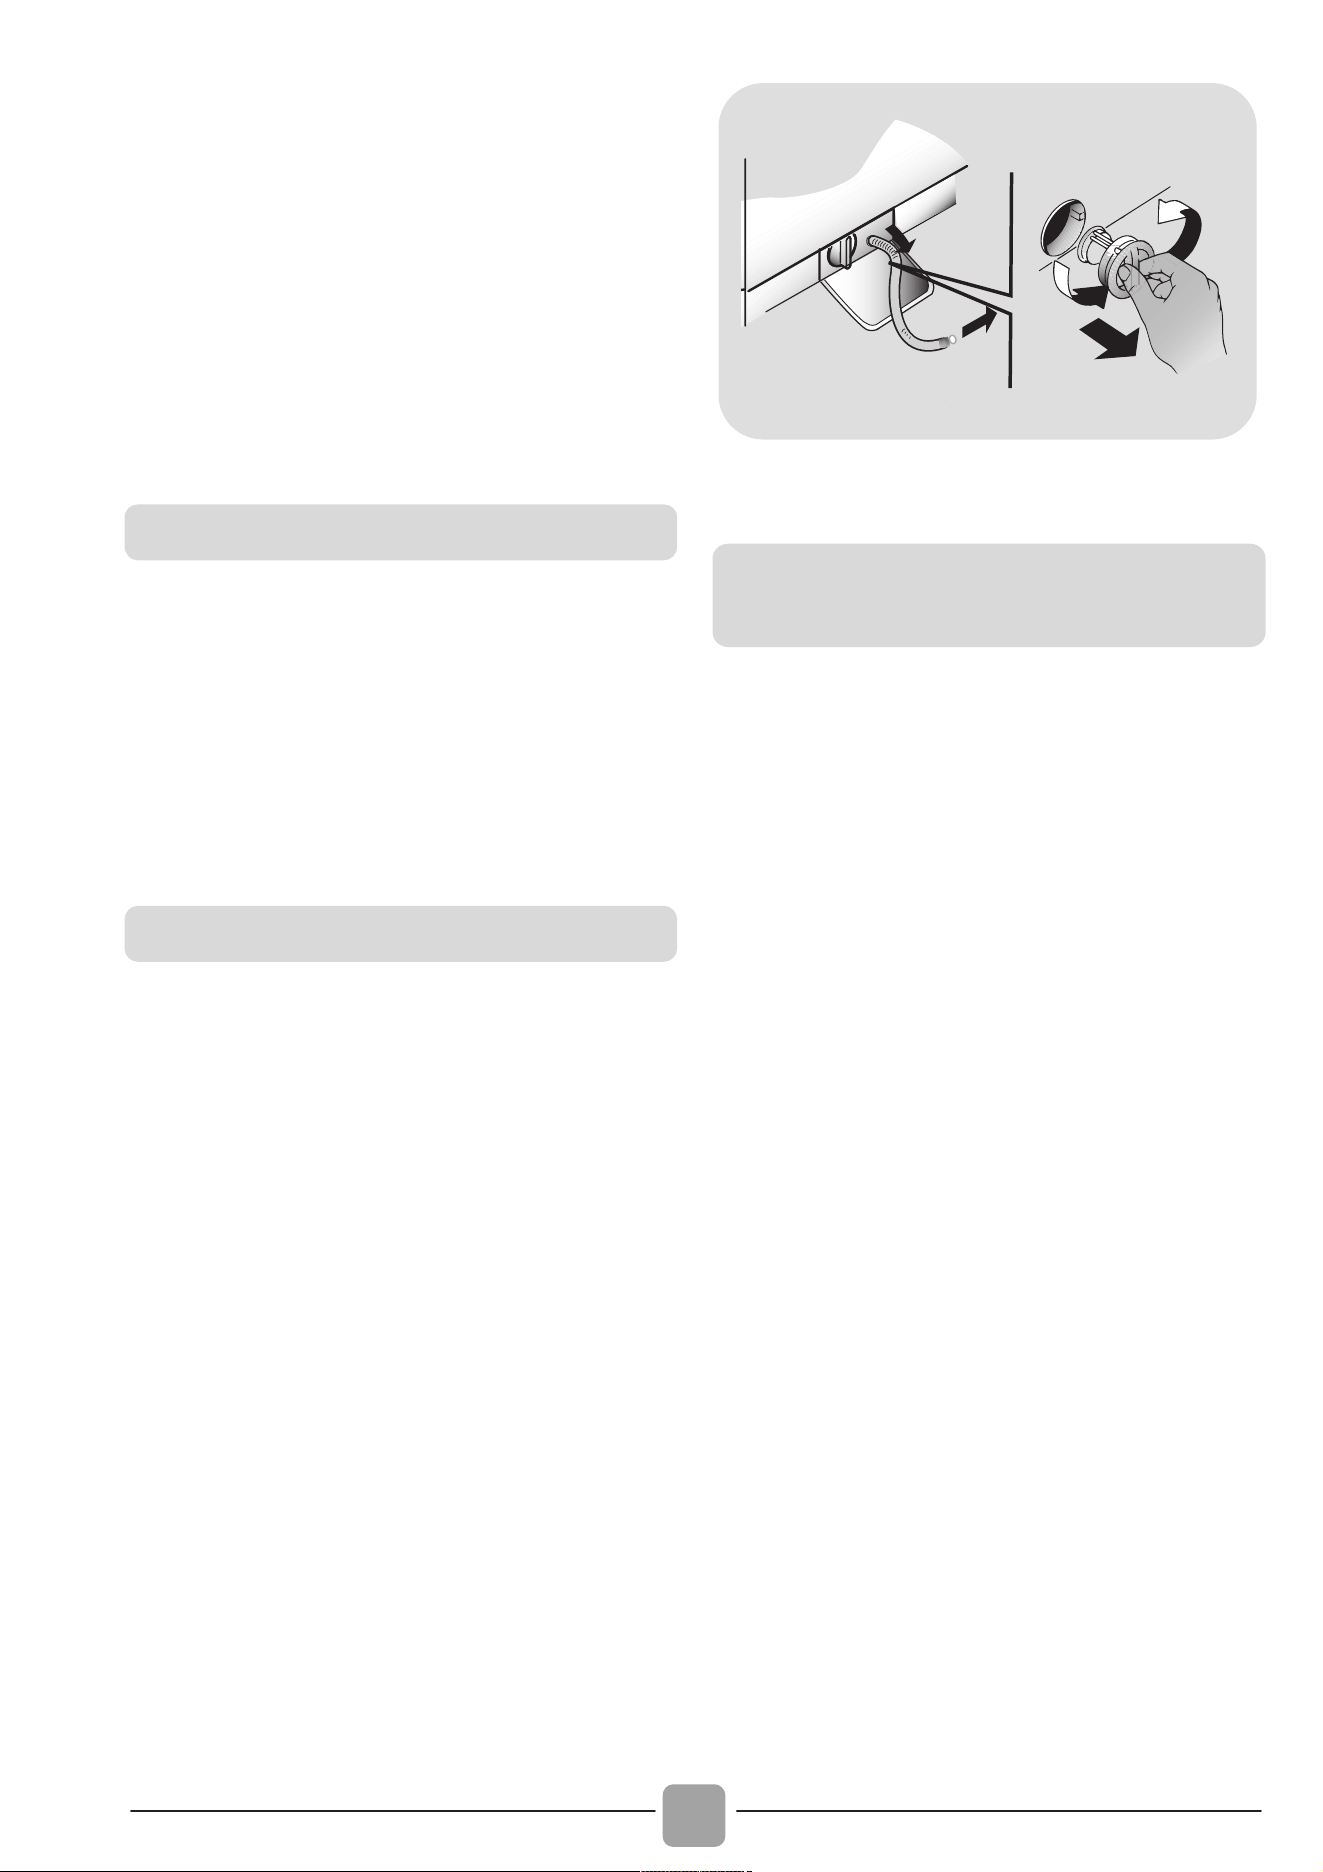
Allacciare il tubo dell’acqua al rubinetto,
utilizzando solamente il tubo di scarico in
dotazione con la lavatrice (fig. 3).
NON APRIRE IL RUBINETTO.
In alcuni modelli, potrebbero essere
presenti una o più delle seguenti
caratteristiche:
HOT&COLD (fig. 4): predisposizione al
collegamento alla rete idrica con acqua
calda e fredda per un maggiore risparmio
energetico.
Collegare il tubo grigio al rubinetto
dell’acqua fredda
e quello rosso al
rubinetto dell’acqua calda. La macchina può
essere comunque collegata anche solo
all’acqua fredda: in tal caso, l’inizio di alcuni
programmi sarà ritardato di alcuni minuti.
AQUASTOP (fig. 5): dispositivo posizionato
sul tubo di carico che blocca l’afflusso
dell’acqua se il tubo si deteriora; in tal caso,
apparirà una tacca rossa nella finestrella “A”
e sarà necessario sostituire il tubo. Per
svitare la ghiera, premere il dispositivo di
antisvitamento “B”.
AQUAPROTECT - TUBO DI CARICO
CON PROTEZIONE (fig. 6): in caso di
perdita d’acqua dal tubo primario interno
“A”, la guaina di contenimento trasparente
“B” conterrà l’acqua, permettendo di
terminare il lavaggio. Finito il ciclo,
sostituire il tubo di carico contattando il
Centro Assistenza Tecnica.
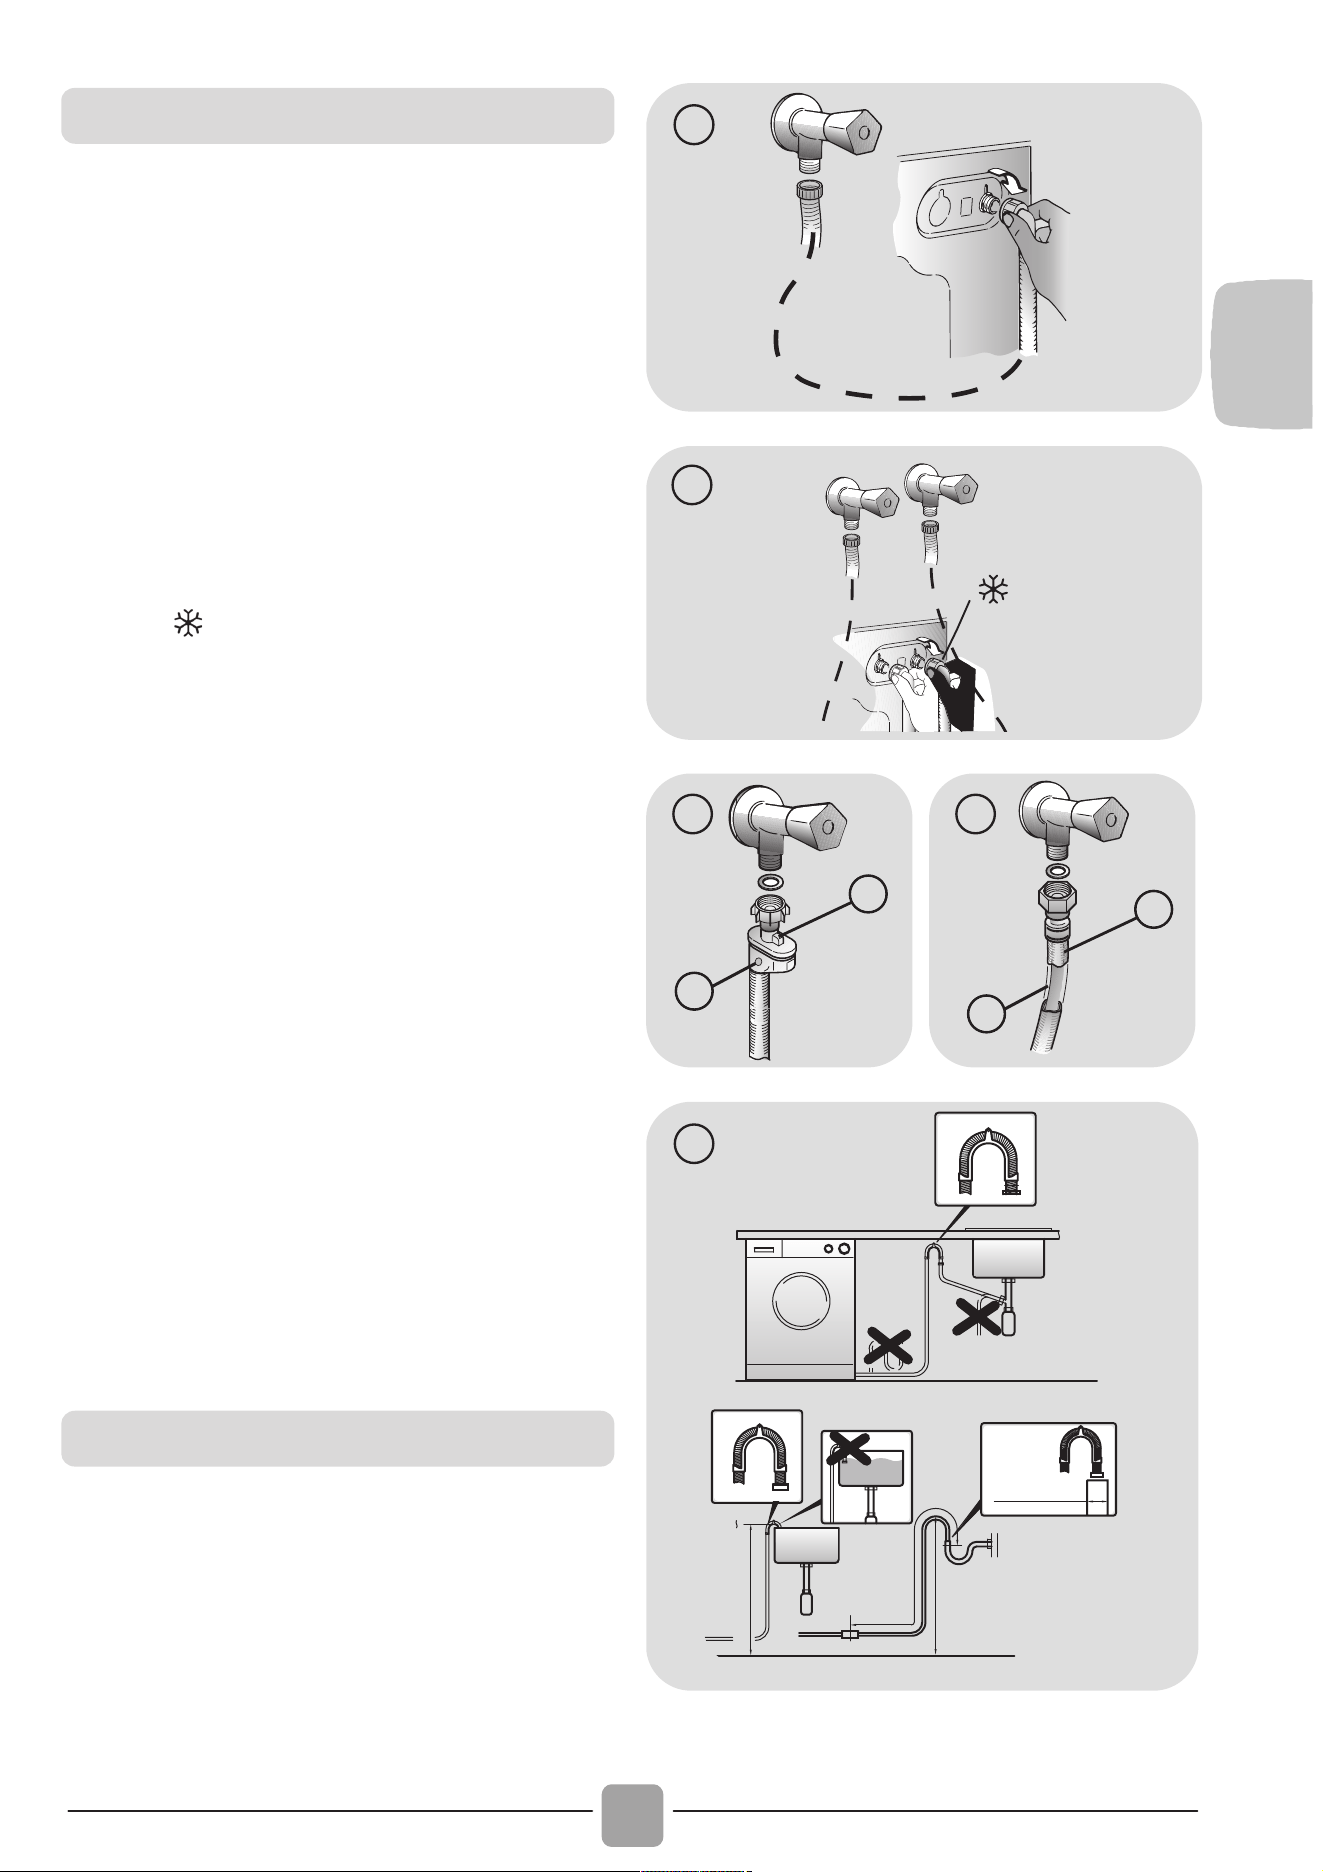
Accostare la lavatrice al muro, facendo
attenzione che il tubo non abbia curve o
strozzature e allacciare il tubo di scarico a
bordo della vasca o, preferibilmente, ad
uno scarico fisso di altezza minima 50 cm
e di diametro superiore al tubo della
lavatrice (fig. 7).
3
1
4
B
A
5
B
A
6
min 50 cm
max 85 cm
+2,6 mt
max
max 100 cm
min 4 cm
7
Collegamento idraulico
Posizionamento
8
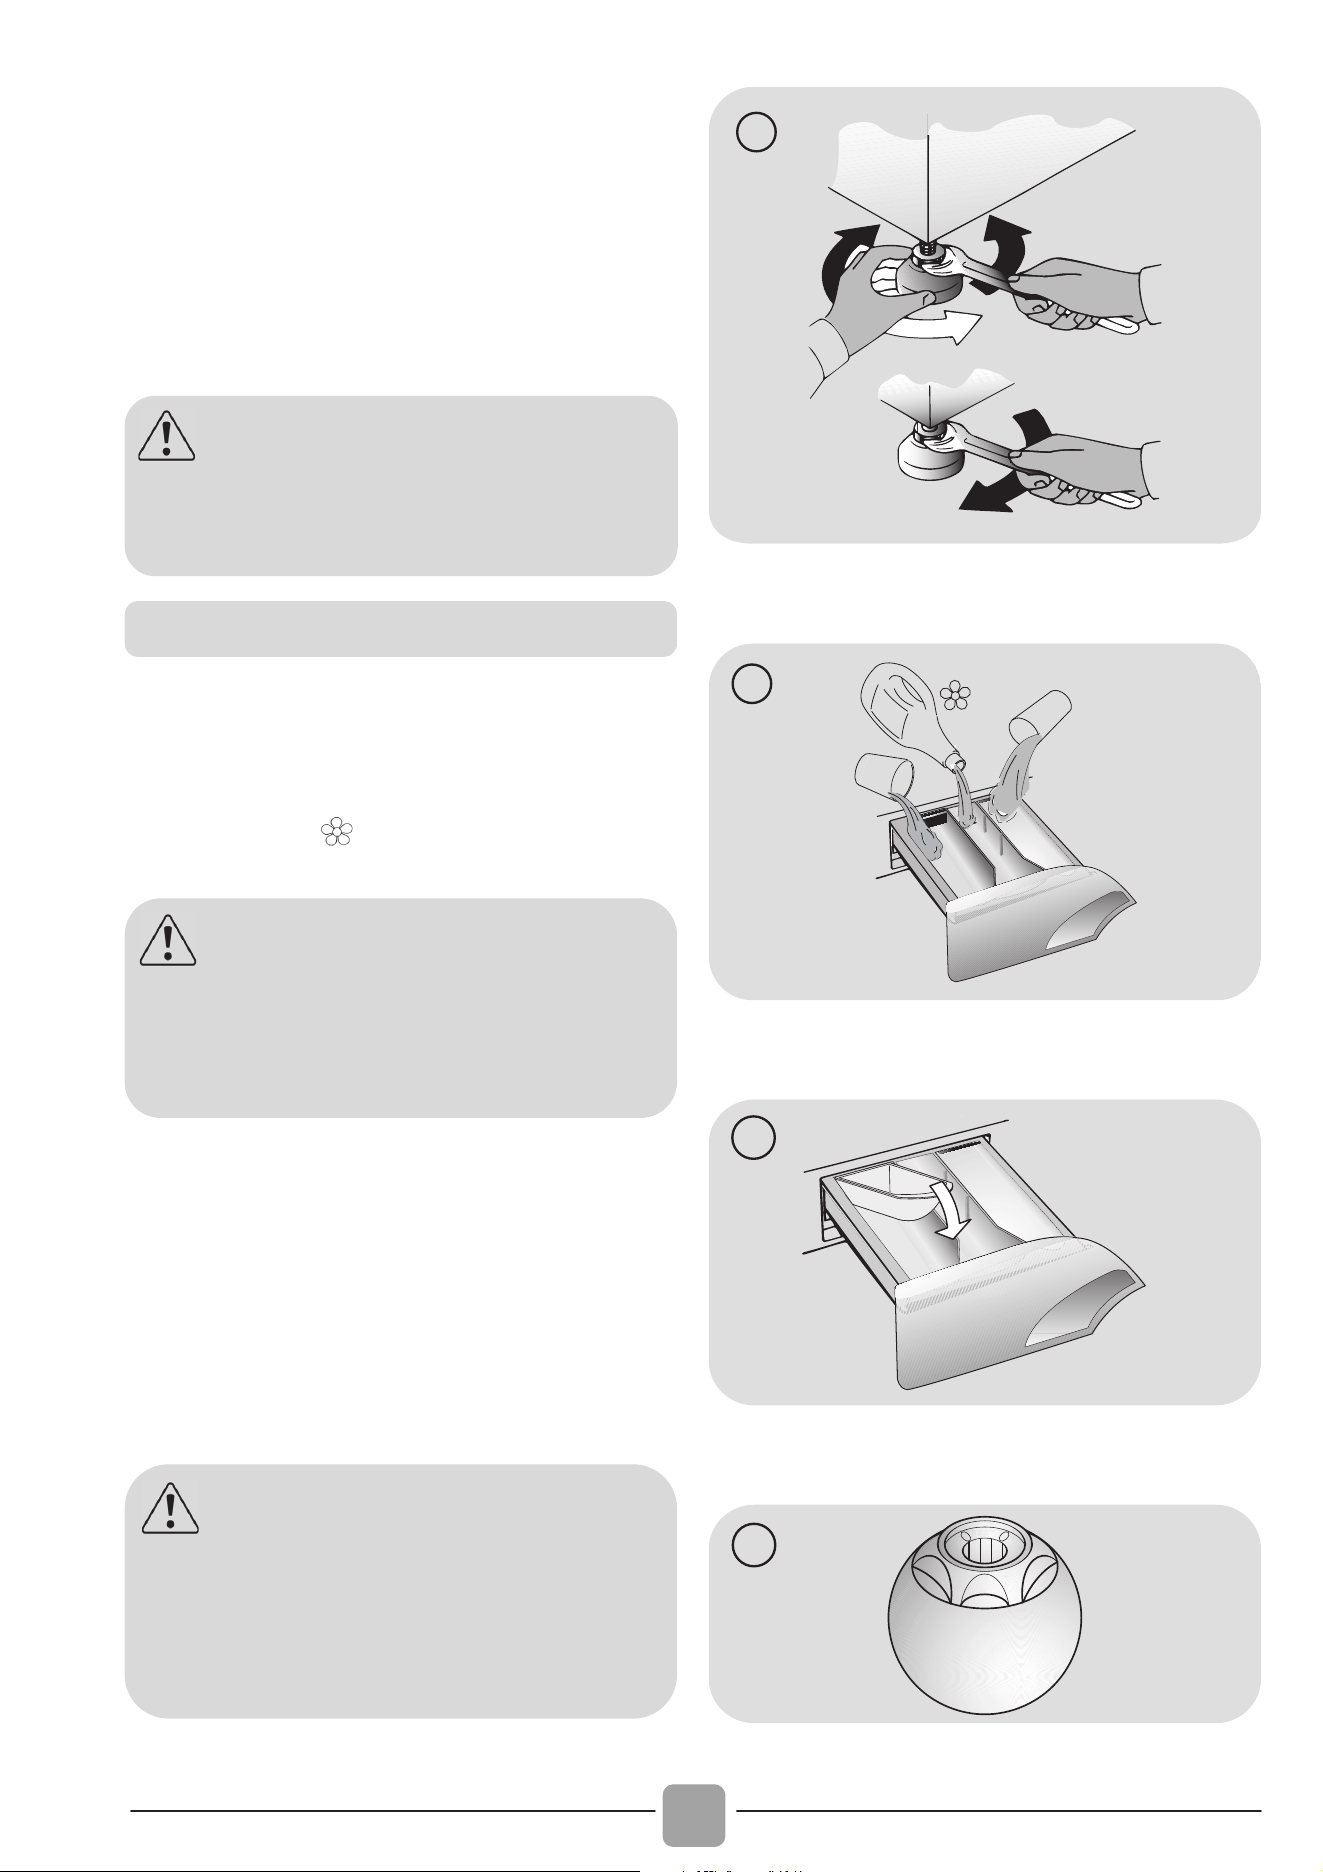
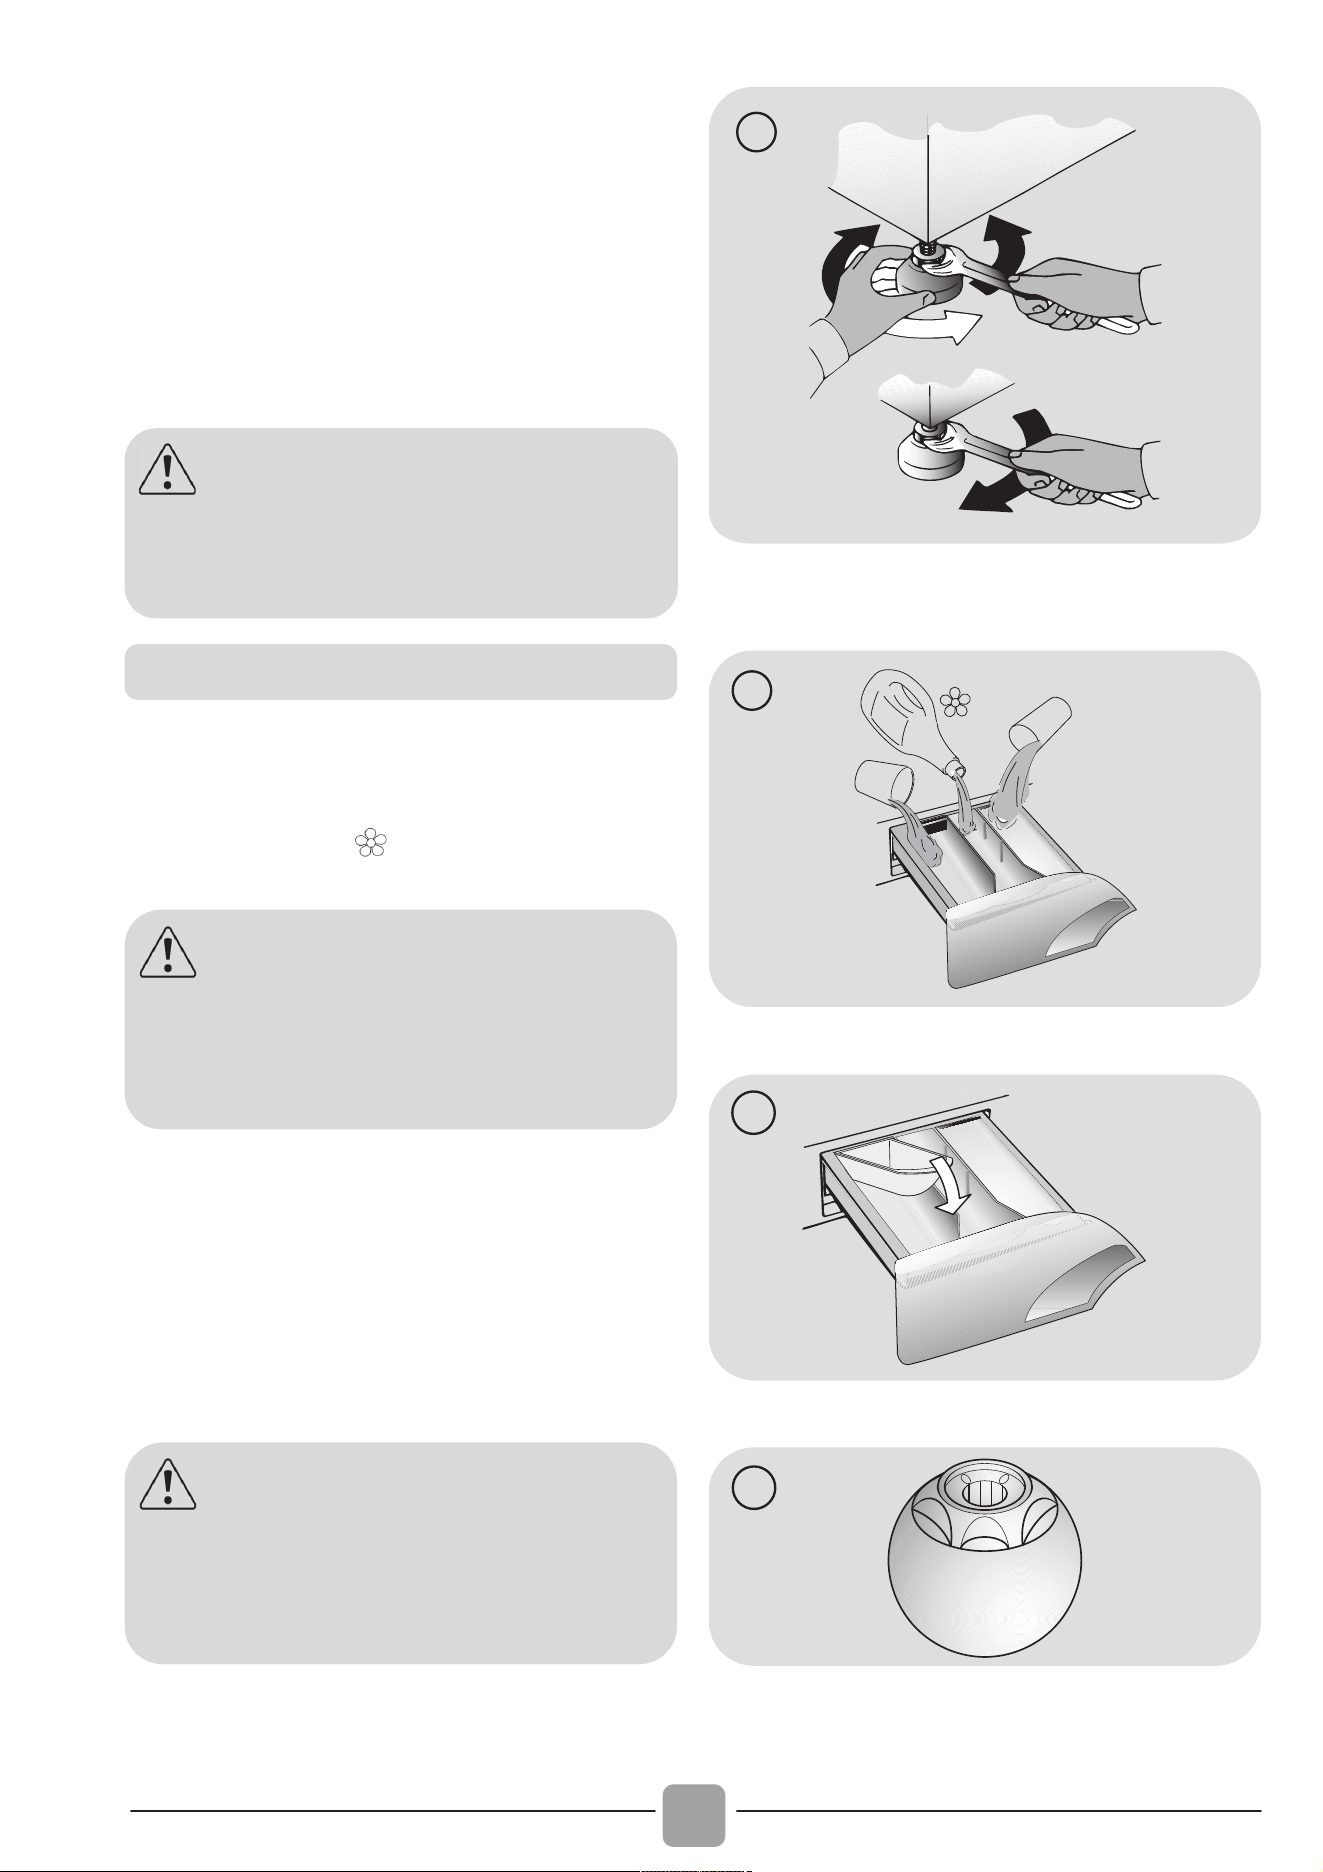
Livellare la macchina agendo sui piedini
come in figura 8:
a.girare in senso orario il dado pe
r
sbloccare la vite;
b.ruotare il piedino e farlo salire o
scendere finché non aderisce al suolo;
c.bloccare infine il piedino, riavvitando il dado,
fino a farlo aderire al fondo della lavatrice.
Inserire la spina.
A
B
C
8
Il cassetto detersivo è suddiviso in 3
vaschette come mostrato in figura 9:
vaschetta “1”: per il detersivo del
prelavaggio;
vaschetta “ ”: per additivi speciali,
ammorbidenti, profumi inamidanti, ecc;
vaschetta “2”: per il detersivo di lavaggio.
In alcuni modelli è presente anche la
bacinella per il detersivo liquido (fig. 10).
Per utilizzarla, introdurla nella vaschetta
“2”. In questo modo, il detersivo liquido
andrà nel cesto solo nel momento
opportuno. Questa bacinella è utile anche
se si desidera candeggiare, scegliendo il
programma “Risciacqui”.
2
1
9
10
11
ATTENZIONE:
nel caso si renda necessario sostituire il
cavo di alimentazione, si consiglia di
chiamare il Centro Assistenza Tecnica.
Cassetto detersivo
ATTENZIONE:
mettere solo prodotti liquidi; la
lavatrice è predisposta al prelievo
automatico degli additivi in ogni ciclo
durante l’ultimo risciacquo.
ATTENZIONE:
alcuni detersivi sono di difficile
asportazione. In questo caso è
consigliabile l’uso di un apposito
contenitore da porre nel cestello
(
esem
p
io in fi
g
ura 11
)
.

IT
9
3. CONSIGLI PRATICI
ATTENZIONE: durante la selezione del
bucato, assicurarsi:
- di avere eliminato dalla biancheria oggetti
metallici, come fermagli, spille, monete;
- di aver abbottonato federe, chiuso le
cerniere lampo, annodato cinghie sciolte e
lunghi nastri di vestaglie;
- di aver tolto dalle tendine anche i rulli di
scorrimento;
- di aver osservato attentamente le indicazioni
dei tessuti sulle etichette;
- di aver rimosso eventuali macchie persistenti
con un apposito detersivo.
In caso si debbano lavare tappeti,
copriletto o altri indumenti pesanti, si
consiglia di evitare la centrifuga.
In caso si debba lavare biancheria di
lana, assicurarsi che il capo sia idoneo
controllando che sia contrassegnato dal
simbolo “Pura Lana Vergine” e che sia
presente l’indicazione “Non infeltrisce”
oppure “Lavabile in lavatrice”.
Brevi suggerimenti per un utilizzo del
proprio elettrodomestico nel rispetto
dell’ambiente e con il massimo risparmio.
Caricare al massimo la propria
lavabiancheria
Per eliminare eventuali sprechi di energia,
acqua o detersivo si raccomanda di utilizzare
la massima capacità di carico della propria
lavabiancheria. È possibile infatti risparmiare
fino al 50% di energia con un carico pieno
effettuato con un unico lavaggio rispetto a
due lavaggi a mezzo carico.
Quando serve veramente il prelavaggio?
Solamente per carichi particolarmente
sporchi! Si risparmia dal 5 al 15% di energia
evitando di selezionare l’opzione prelavaggio
per biancheria normalmente sporca.
Quale temperatura di lavaggio
selezionare?
L’utilizzo di smacchiatori prima del lavaggio
in lavabiancheria riduce la necessità di lavare
a temperature superiori a 60°C. È possibile
risparmiare fino al 50% utilizzando la
temperatura di lavaggio di 60°C anziché 90°C.
Prima di utilizzare un programma di asciugatura
Selezionare un alto numero di giri prima
di un programma di asciugatura per
ridurre l’umidità residua nella biancheria.
Si ottengono così notevoli RISPARMI di
energia e acqua.
Di seguito, viene riportata una breve guida con
consigli e raccomandazioni sull’uso del
detersivo alle varie temperature. In ogni
caso, controllare sempre le indicazioni riportate
sul detersivo per il corretto uso e dosaggio.
Indicazioni sul carico
Consigli utili per gli utenti
Per lavaggi con programmi cotone a
temperature da 60°C in su di capi bianchi
resistenti molto sporchi, si consiglia
l’utilizzo di un detersivo in polvere normale
(heavy-duty) che contiene agenti
sbiancanti e che a temperature medio-alte
fornisce ottime prestazioni.
Per lavaggi con programmi a
temperature tra 60°C e 40°C, la scelta
del detersivo deve essere fatta in base
al tessuto, ai colori e al grado di sporco.
In generale, per capi bianchi resistenti
con un grado di sporco elevato, si
raccomanda un detersivo in polvere
normale; per capi colorati e in assenza
di macchie difficili, si consiglia un
detersivo liquido o in polvere indicato per
la protezione dei colori.
Per lavaggi a basse temperature fino
a 40°C, è consigliabile l’utilizzo di
detersivi liquidi o polvere specifici per le
basse temperature.
Per lana e seta, utilizzare
esclusivamente prodotti specifici.

10
4. PULIZIA E
MANUTENZIONE
ORDINARIA
Per la pulizia del mobile esterno della
lavatrice, utilizzare un panno umido,
evitando abrasivi, alcol e/o diluenti. La
lavatrice ha bisogno di poche accortezze
per una pulizia ordinaria: pulizia vaschette e
pulizia filtro; di seguito vengono indicati
anche suggerimenti in caso di traslochi o
lunghi periodi di fermo macchina.
E’ consigliabile pulire la vaschetta per
evitare l’accumulo di residui di detersivo e
additivi.
Per farlo, estrarre con leggera forza il
cassettino, pulirlo con un getto d’acqua e
reinserirlo nella propria sede.
La lavatrice è dotata di uno speciale filtro
in grado di trattenere i residui più grossi
che potrebbero bloccare lo scarico, come
ad esempio bottoni o monete.
Solo su alcuni modelli: estragga il
tubicino, tolga il tappo e raccolga l’acqua
in un contenitore.
Prima di svitare il filtro, è consigliabile
collocare sotto di esso un panno assorbente
onde evitare che l’acqua residua bagni il
pavimento.
Ruotare il filtro in senso antiorario fino
all’arresto, in posizione verticale.
Estrarre il filtro e pulirlo; successivamente
riposizionarlo e girarlo in senso orario.
Ripetere le precedenti istruzioni all’inverso
per rimontare tutti gli elementi.
Nel caso la lavatrice resti in un luogo non
riscaldato per molto tempo, è necessario
svuotare completamente i tubi da ogni
residuo d’acqua.
Scollegare la lavatrice dalla presa di
corrente.
Staccare il tubo dalla fascetta e portare il
tubo verso il basso, svuotando l’acqua
completamente in un catino.
Fissare infine il tubo di scarico
all’apposita fascetta.
Pulizia vaschetta
Pulizia filtro
Suggerimenti in caso di
traslochi o periodi di fermo
IT
11
5. GUIDA RAPIDA ALL'USO
Questa lavatrice è in grado di adattare
automaticamente il livello dell’acqua al tipo
e alla quantità della biancheria. Questo
sistema porta ad una diminuzione dei
consumi d’energia e ad una riduzione
sensibile dei tempi di lavaggio.
Accendere la lavatrice e selezionare il
programma desiderato.
Eventualmente modificare la temperatura
di lavaggio e premere i tasti “opzione”
desiderati.
Premere il tasto AVVIO/PAUSA per avviare
il programma.
Alla fine del programma, sul display viene
visualizzata la scritta “end” oppure si
illumina il led corrispondente.
Spegnere la lavatrice.
Per qualsiasi tipo di lavaggio consultare la
tabella dei programmi e seguire la
sequenza delle operazioni come indicato.
Pressione dell’impianto idraulico:
min 0,05 Mpa / max 0,8 Mpa
Giri di centrifuga: vedere targhetta dati.
Potenza Assorbita/ Ampere fusibile /
Tensione: vedere targhetta dati.
6. COMANDI E
PROGRAMMI
A
B
DCEFGHI
M
L
A Manopola programmi con
posizione di OFF
B Tasto AVVIO/PAUSA
C
Tasto SELEZIONE CENTRIFUGA
D
Tasto SELEZIONE TEMPERATURA
E Tasto PARTENZA DIFFERITA
F Tasto LIVELLO DI SPORCO
G Tasto EXTRA RISCIACQUI
H Tasto OPZIONI
I
Tasto SELEZIONE ASCIUGATURA
L Display
M Spia PORTA BLOCCATA
Selezione del programma
ASCIUGATURA
Se si vuole che alla fine del lavaggio
inizi automaticamente il ciclo di
asciugatura, selezionare il
programma desiderato tramite il
tasto SELEZIONE ASCIUGATURA.
Altrimenti è possibile terminare il
lavaggio e successivamente determinare
carico e programma di asciugatura.
Attendere lo spegnimento della spia
oblò bloccato: circa 2 minuti dalla fine
del programma.
Dati tecnici

12
Premere il tasto AVVIO/PAUSA per iniziare
il ciclo di lavaggio.
Il ciclo di lavaggio avverrà con la manopola
programmi ferma sul programma
selezionato sino alla fine del lavaggio.
A fine ciclo spegnere la lavabiancheria
portando la manopola programmi in
posizione OFF.
Premere per avviare il ciclo impostato con
la manopola programmi.
AGGIUNGERE O TOGLIERE CAPI DOPO
L'AVVIO DEL PROGRAMMA (PAUSA)
Tenere premuto il tasto AVVIO/PAUSA
per circa 2 secondi (alcune spie
e l'indicazione del tempo residuo
lampeggeranno, indicando che la macchina
è in pausa).
Attendere DUE minuti affinché il
dispositivo di sicurezza sblocchi l’oblò e
ne permetta l’apertura.
Dopo aver aggiunto o tolto i capi,
chiudere l’oblò e premere il tasto
AVVIO/PAUSA (il programma ripartirà
dal punto in cui era stato interrotto).
ATTENZIONE:
Non toccare il display all'inserimento
della spina perché la macchina, nei primi
secondi, effettua un'autocalibrazione
che potrebbe essere interrotta: se ciò
avvenisse la
macchina potrebbe non
funzionare in maniera ottimale. In tal
caso, togliere la spina e ripetere
l'operazione.
Apertura oblò
Uno speciale dispositivo di sicurezza
impedisce che l’oblò possa venire
aperto immediatamente dopo la fine
di un ciclo di lavaggio.
Dopo 2 minuti dalla fine del lavaggio
la spia si spegne per indicare che è
possibile aprire l’oblò.
Manopola programmi di lavaggio
con OFF
Ruotando la manopola il display si
illumina visualizzando i parametri del
programma scelto.
A fine ciclo o dopo un periodo di inattività,
la luminosità del display diminuisce per un
risparmio energetico.
N.B.: Per spegnere la macchina ruotare
la manopola programmi sulla posizione
OFF.
La manopola programmi deve essere
sempre portata in posizione di OFF
alla fine di un lavaggio e prima di
selezionarne uno nuovo.
Tasto AVVIO/PAUSA
Chiudere l'oblò PRIMA di premere il
tasto AVVIO/PAUSA.
Dopo avere avviato la lavabiancheria
con il tasto AVVIO/PAUSA si dovrà
attendere alcuni secondi affinché la
macchina inizi il programma.

IT
13
CANCELLAZIONE PROGRAMMA IMPOSTATO
Per annullare il programma, portare il
selettore in posizione OFF.
Premendo questo tasto, si può ridurre la
massima velocità di centrifuga possibile per
il programma selezionato, fino alla sua
completa esclusione.
Per riattivare la centrifuga, è sufficiente
premere nuovamente il tasto, fino al
raggiungimento della velocità scelta.
È possibile modificare la velocità della
centrifuga in qualsiasi momento, anche
senza portare la macchina in PAUSA.
Questo tasto permette di cambiare la
temperatura dei cicli di lavaggio.
Per la salvaguardia dei tessuti, non è
possibile aumentare la temperatura oltre
la massima prevista per ogni programma.
Questo tasto permette di programmare
l’avvio del ciclo di lavaggio con un ritardo
massimo di 24h.
Per impostare la partenza ritardata
procedere nel seguente modo:
- Impostare il programma desiderato.
- Premere il pulsante una prima volta per
attivarlo (sul display viene visualizzato
h00) e premere nuovamente per
impostare un ritardo di 1 ora (sul display
viene visualizzato h01). Ad ogni
pressione successiva il ritardo
impostato aumenta di 1 ora fino a h24
mentre con un ulteriore pressione si
azzera la partenza ritardata.
- Confermare premendo il tasto
AVVIO/PAUSA (la spia nel display
inizia a lampeggiare) per iniziare il
conteggio alla fine del quale il
programma inizierà automaticamente.
È possibile annullare la partenza ritardata,
portando la manopola programmi in
posizione OFF.
Se dovesse mancare la corrente durante
il funzionamento della lavabiancheria,
una speciale memoria conserverà
l’impostazione effettuata e, al ritorno
della corrente, la macchina ripartirà dal
punto in cui si era fermata.
Agendo sul tasto è possibile scegliere 3
livelli di intensità di lavaggio, a seconda
del grado di sporco dei tessuti (può
essere utilizzato solo in alcuni programmi
come riportato nella tabella programmi).
I tasti opzione devono essere selezionati
prima di premere il tasto AVVIO/PAUSA.
Nel caso sia stata selezionata
un’opzione non compatibile con il
programma scelto, la relativa spia
prima lampeggerà e poi si spegnerà.
Tasto SELEZIONE CENTRIFUGA
Per la salvaguardia dei tessuti, non è
possibile aumentare la velocità oltre
quella automaticamente indicata al
momento della selezione del
programma.
Il modello è dotato di un particolare
dispositivo elettronico che impedisce
la partenza della centrifuga con carichi
particolarmente sbilanciati. Questo serve
a ridurre le vibrazioni e a migliorare la
silenziosità, salvaguardando la durata
della lavabiancheria.
Tasto SELEZIONE TEMPERATURA
Tasto PARTENZA DIFFERITA
Tasto LIVELLO DI SPORCO

14
Al momento della selezione di un programma,
verrà automaticamente indicato il livello di
sporco impostato per quel programma tramite
l’accensione della relativa spia.
Scegliendo un livello di sporco differente
si illuminerà la spia corrispondente.
Questo tasto permette di aggiungere
alcuni risciacqui alla fine del ciclo di
lavaggio. Il numero massimo di risciacqui
dipende dal tipo di programma scelto.
Questa funzione è stata studiata
appositamente per le persone con pelle
delicata e sensibile, per le quali anche un
minimo residuo di detersivo può causare
irritazioni o allergie.
Si consiglia di utilizzare questa funzione
anche per i capi dei bambini e per i
delicati in generale, oppure nel lavaggio
di capi di spugna le cui fibre tendono
maggiormente a trattenere il detersivo.
Questo tasto permette di scegliere tra tre
differenti opzioni:
- PRELAVAGGIO
Questa opzione permette di effettuare un
prelavaggio ed è particolarmente utile per
la biancheria molto sporca (può essere
utilizzata solo in alcuni programmi come
riportato nella tabella programmi).
Si consiglia di utilizzare solo il 20% della
quantità consigliata sulla confezione del
detersivo.
- IGIENE
Questa opzione permette di igienizzare la
biancheria, raggiungendo la temperatura
di 60°C.
- CICLO NOTTE
Questa opzione limita le centrifughe
intermedie a 400 giri, dove previsto,
aumenta il livello d’acqua nei risciacqui e
lascia i capi immersi nell’acqua alla fine
dell’ultimo risciacquo, al fine di distendere
perfettamente le fibre.
Durante la fase di fermo acqua in vasca,
la relativa spia lampeggia ad indicare che
la macchina è in pausa.
Deselezionare l'opzione per terminare
il ciclo con la fase di centrifuga
(eventualmente riducibile o annullabile
tramite l’apposito tasto) e scarico.
Grazie ad un controllo elettronico lo
scarico dell’acqua nelle fasi intermedie
viene fatto in modo silenzioso rendendo
questa opzione molto utile per lavaggi
notturni.
Con il selettore dei programmi in
posizione differente da OFF, premere il
tasto per selezionare il programma di
asciugatura desiderato: ad ogni pressione
lampeggerà una spia ad indicare il
risultato di asciugatura selezionato.
In caso di annullamento della selezione
prima dell’avvio di un programma di
asciugatura, premere ripetutamente il
tasto fino allo spegnimento delle spie o
riportare il selettore programmi in
posizione di OFF.
Per annullare il ciclo durante la fase di
asciugatura tenere premuto il tasto per
circa 3 secondi fino all’ accensione della
spia di raffreddamento.
Data l’elevata temperatura all’interno del
cesto si consiglia di lasciare terminare il
ciclo di raffreddamento prima di riportare
il selettore dei programmi in posizione di
OFF ed estrarre la biancheria.
Tasto EXTRA RISCIACQUI
Tasto OPZIONI
Tasto SELEZIONE ASCIUGATURA
IT
15
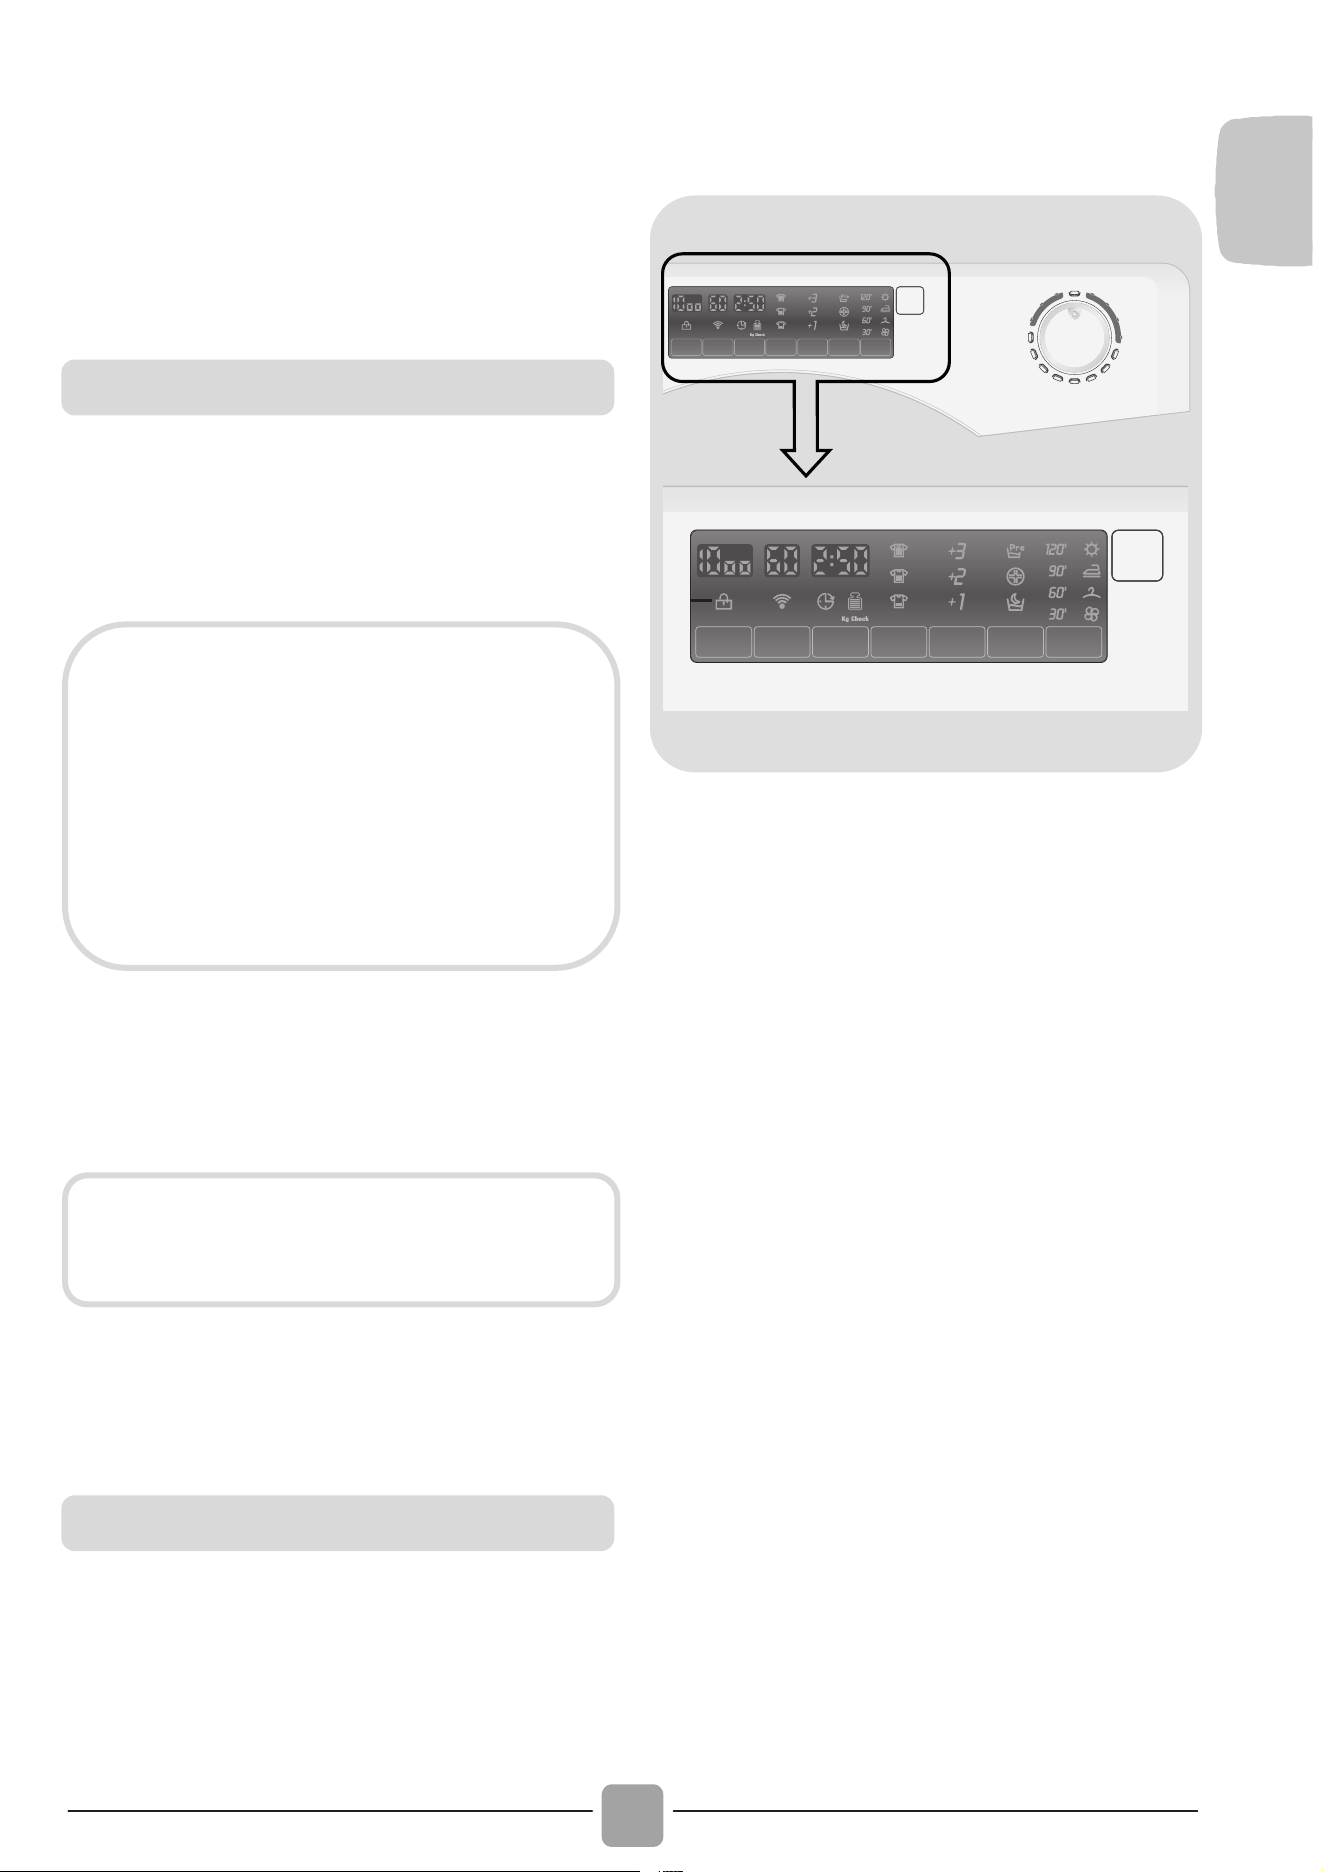
Il sistema di segnalazione del display
consente di essere costantemente informati
sul funzionamento dell’apparecchio.
2
1
8109
3 4 5 6 7 11
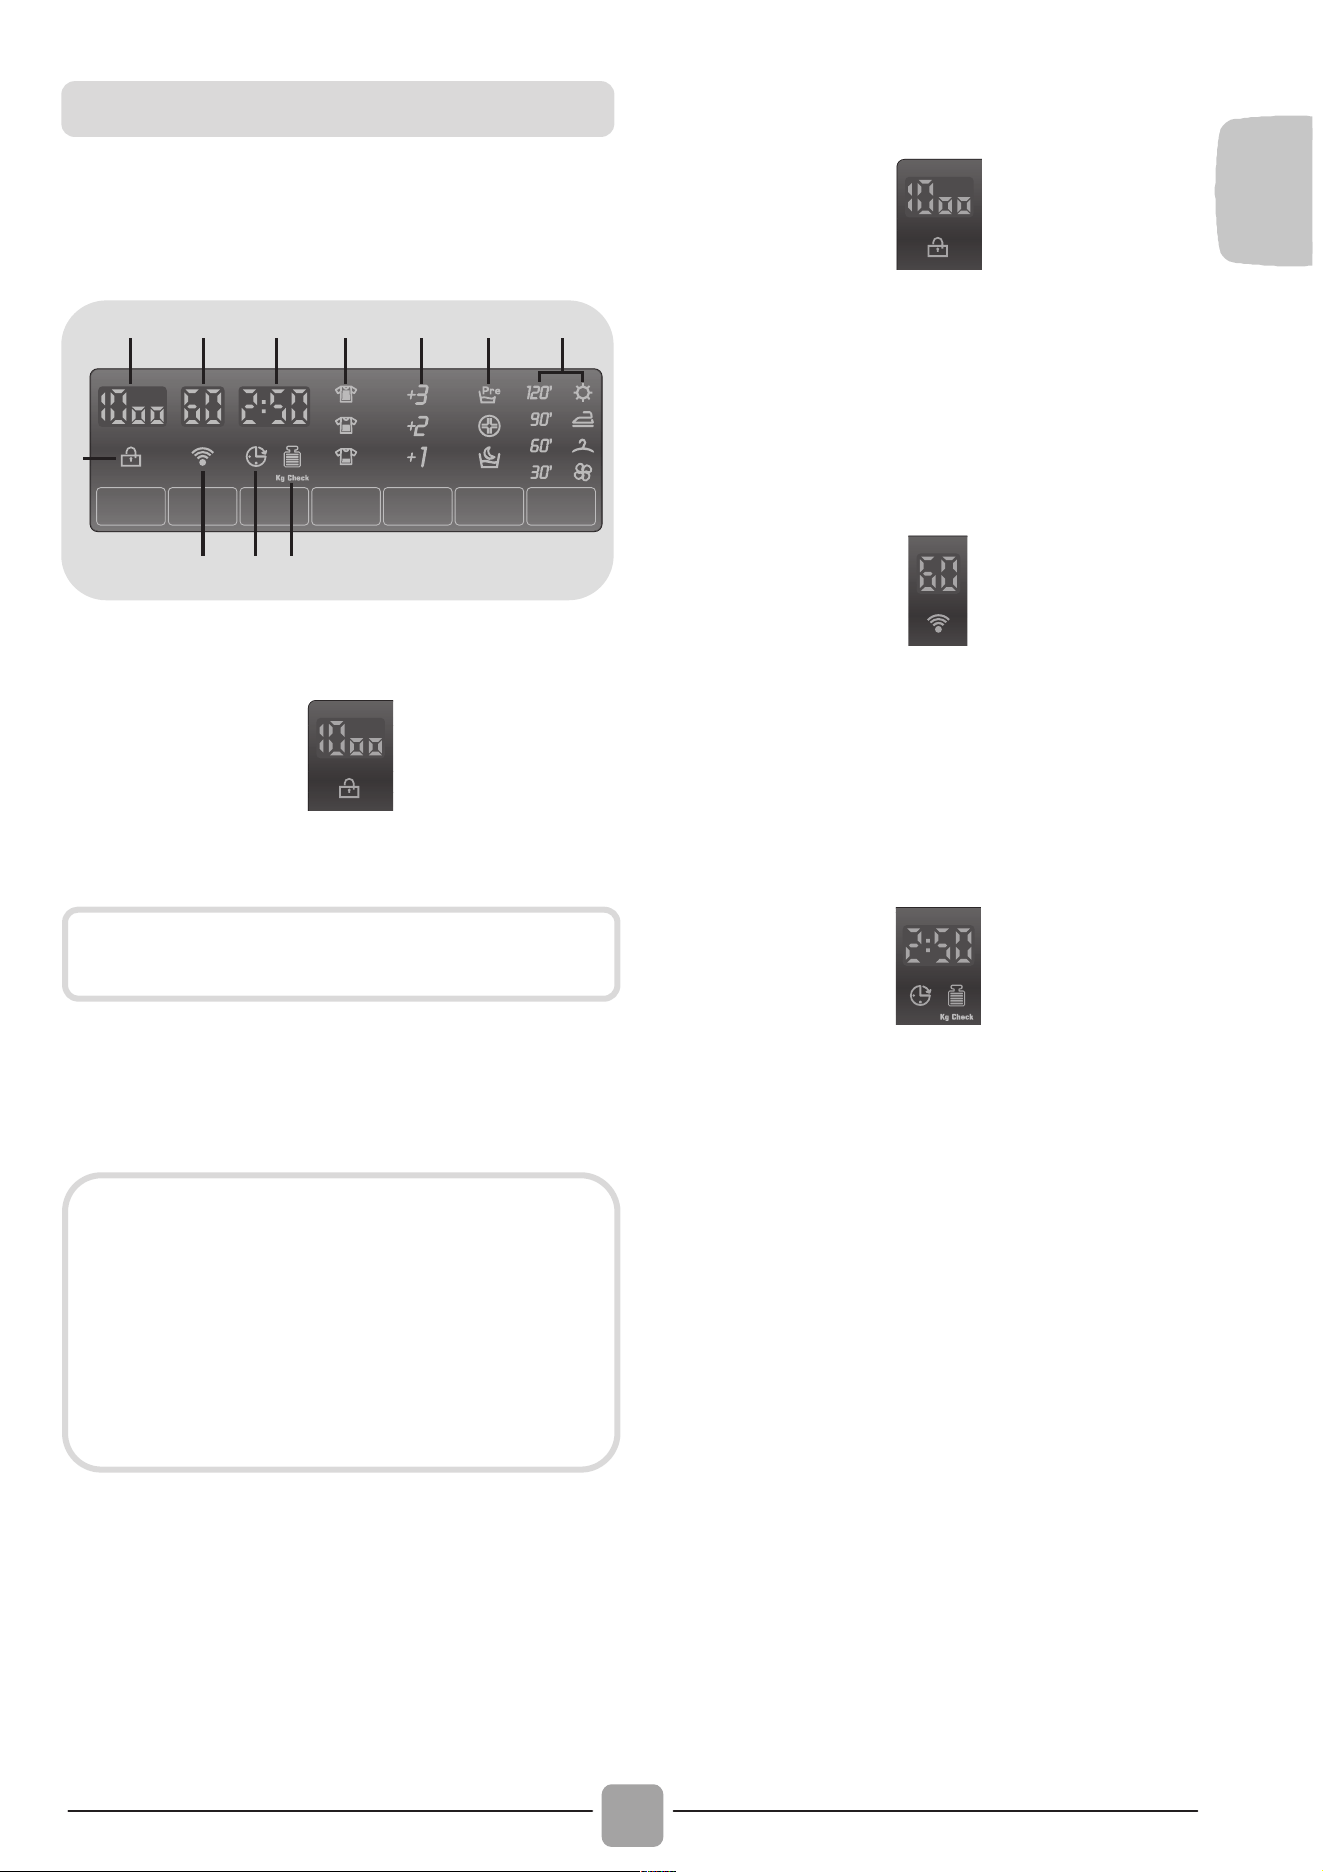
1) SPIA PORTA BLOCCATA
1
La spia indica la chiusura dell'oblò.
Dopo aver premuto il tasto AVVIO/PAUSA,
inizialmente la spia lampeggia per poi
diventare fissa sino alla fine del lavaggio.
Uno speciale dispositivo di sicurezza
impedisce che l’oblò possa venire aperto
immediatamente dopo la fine di un ciclo
di lavaggio. Attendere 2 minuti che la
spia si spenga e quindi spegnere
la macchina portando la manopola
programmi in posizione di OFF.
2) GIRI CENTRIFUGA
2
Indica la velocità di centrifuga del
programma selezionato che può essere
variata o annullata, tramite l'apposito tasto.
3) TEMPERATURA DI LAVAGGIO
3
Indica la temperatura di lavaggio del
programma selezionato che può essere
cambiata (dove previsto) tramite il relativo tasto.
4) DURATA CICLO
4
Al momento della selezione di un
programma, verrà automaticamente
indicata la durata del ciclo che potrà
variare a seconda delle opzioni che
verranno selezionate.
Dopo l’avvio del programma il display vi
terrà costantemente informati sul tempo
restante alla fine del lavaggio.
L’apparecchio calcola tale tempo in base
a un carico standard, ma durante il ciclo
la macchina corregge il tempo a seconda
del volume e della composizione del
carico.
Nel caso in cui sia stata impostata
l’asciugatura automatica, alla fine del
lavaggio verrà indicata la durata del
programma di asciugatura selezionato.
Display
Chiudere l'oblò PRIMA di premere il
tasto AVVIO/PAUSA.
Nel caso in cui l'oblò non venga chiuso
correttamente la spia continuerà a
lampeggiare per circa 7 secondi,
dopodiché il comando d'avvio si
cancellerà automaticamente. In tal
caso, chiudere correttamente l'oblò
e premere nuovamente il tasto
AVVIO/PAUSA.
16
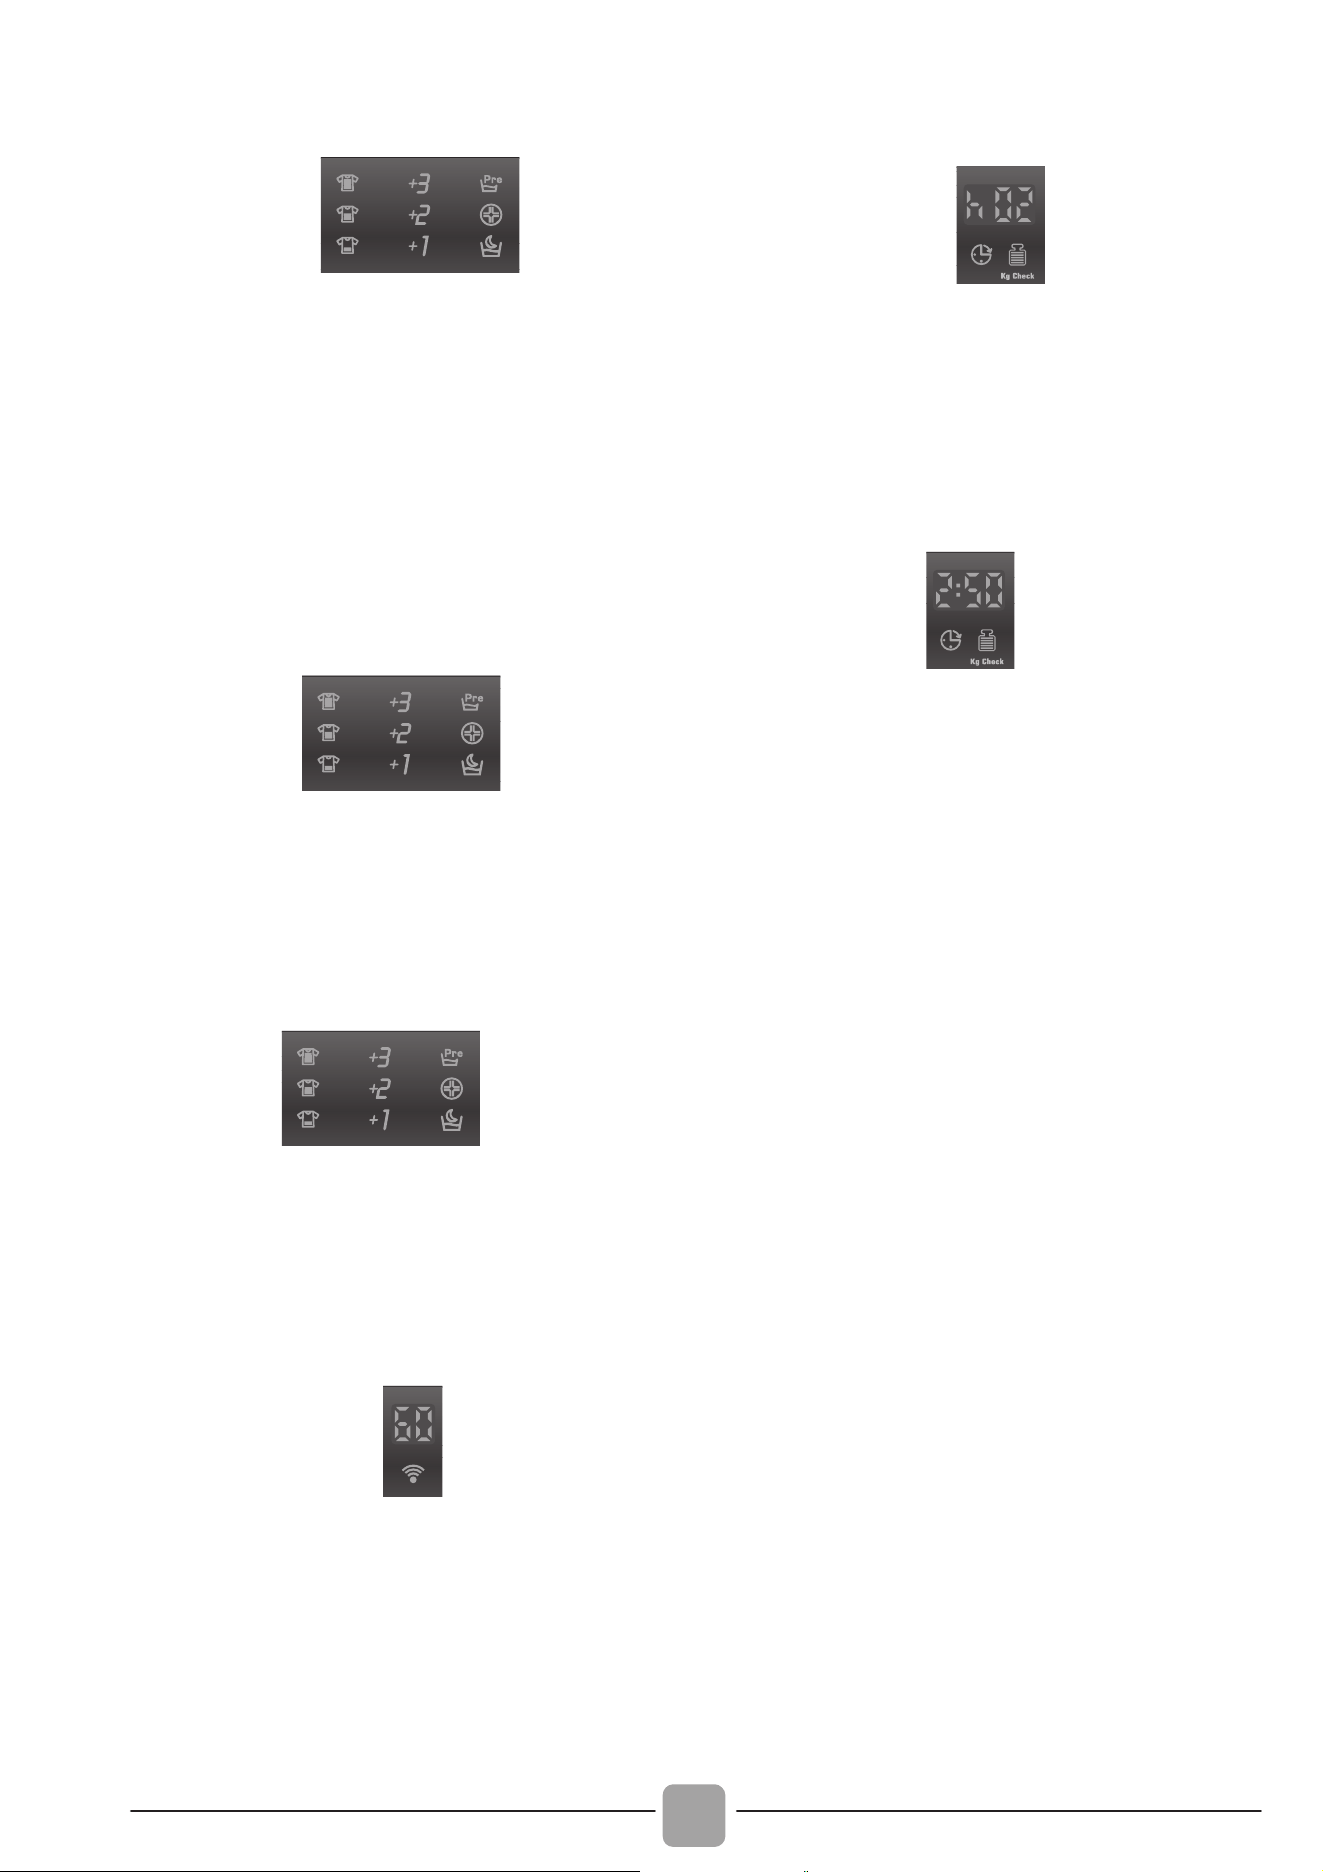
5) LIVELLO DI SPORCO
{
5
Al momento della selezione di un
programma, verrà automaticamente indicato
il livello di sporco impostato per quel
programma, tramite l’accensione della relativa
spia.
Scegliendo un livello di sporco differente
si illuminerà la spia corrispondente.
6) EXTRA RISCIACQUI
{
6
Le spie indicano i risciacqui aggiuntivi scelti
con l'apposito tasto.
7) OPZIONI
}
7
Indicano le opzioni selezionabili tramite
l'apposito tasto (PRELAVAGGIO, IGIENE e
CICLO NOTTE).
8) Wi-Fi (solo in alcuni modelli)
8
Nei modelli dotati di funzione Wi-Fi, ne
indica il funzionamento.
Per le impostazioni relative al Wi-Fi, fare
riferimento alle apposite istruzioni, allegate
al presente libretto.
9) PARTENZA DIFFERITA
9
Lampeggia quando è impostata la partenza
differita.
10) Kg Check (attiva solo nei programmi
Cotone e Sintetici)
10
Durante i primi minuti di funzionamento la
spia "Kg Check" rimane accesa mentre
la macchina calcola il tempo restante alla
fine del ciclo, in base alla quantità di
biancheria effettivamente introdotta all’
interno del cestello.
"Kg Check" consente di misurare
durante tutte le fasi del lavaggio una serie
di informazioni sulla biancheria inserita
all’ interno del cesto e nei primi minuti del
ciclo di lavaggio:
- regola la quantità di acqua necessaria;
- determina la durata del lavaggio;
- regola i risciacqui in base al carico e al
tipo di biancheria che si è scelto di
lavare;
- regola il ritmo di rotazione del cesto per
adattarlo al tipo di tessuto;
- riconosce la presenza di schiuma,
aumentando eventualmente il livello
dell’acqua durante i risciacqui;
- regola il numero di giri della centrifuga
in funzione del carico, evitando che ci
siano squilibri.
IT
17
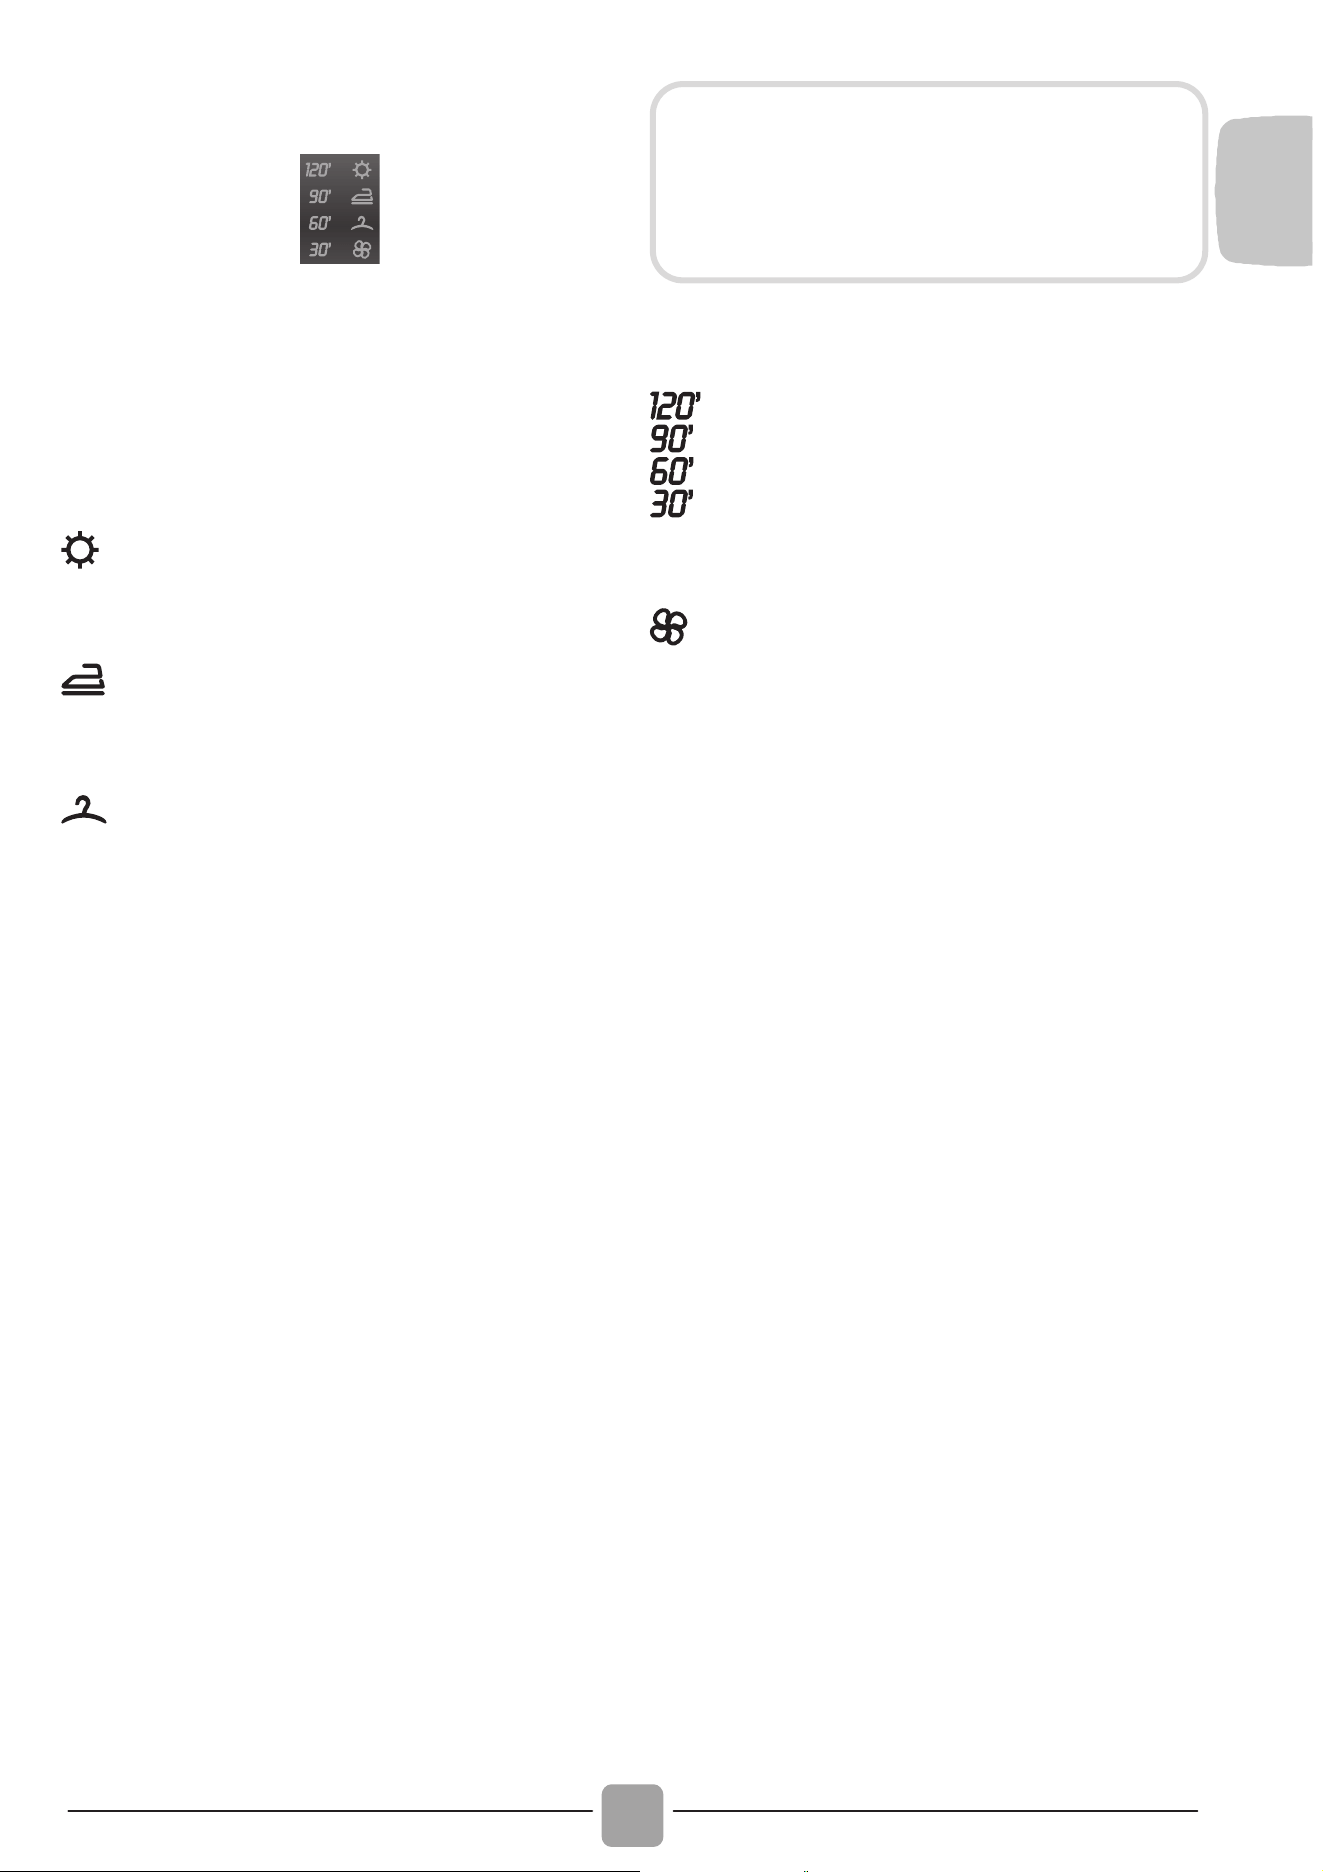
11)
SPIE PROGRAMMI DI ASCIUGATURA
}
11
Le spie indicano il tipo di programma di
asciugatura.
Programmi automatici di asciugatura
Programma di asciugatura extra
asciutto (consigliato per spugne,
accappatoi e carichi ingombranti).
Programma di asciugatura pronto
stiro (che lascia la biancheria pronta
per la stiratura).
Programma di asciugatura pronto
armadio (per capi che non è
necessario stirare).
Selezionando uno di questi programmi
automatici, la lavasciuga calcolerà in
base al carico e al tipo di asciugatura
scelto, il tempo necessario di asciugatura
ed il grado di umidità residua desiderata.
Dopo aver premuto il tasto
AVVIO/PAUSA sul display verrà indicato
il tempo di asciugatura restante.
Programmi a tempo
Possono essere utilizzati per impostare
dei programmi di asciugatura a tempo.
Fase raffreddamento
Si accende nella fase finale di
raffreddamento, negli ultimi 10/20
minuti di ogni asciugatura.
Consigli utili
Per piccoli carichi di biancheria (inferiori
ad 1 kg) o per carichi leggermente umidi
si consiglia di utilizzare il programma
asciugatura a tempo 30’.
La vostra lavasciuga conclude il ciclo
automaticamente al raggiungimento del
grado di asciugatura impostato.
Per un corretto funzionamento
dell’apparecchio è preferibile non
interrompere la fase di asciugatura se
non realmente necessario.
L’apparecchio calcola tale tempo in
base a un carico standard, ma durante
il ciclo la macchina corregge il tempo
a seconda del volume e della
composizione del carico.

18
2
1
PROGRAMMA
kg *
(MAX.)
TEMP.°C
DETERSIVO
Consigliata Max.
2
1
Rapido 14 Min
2)
1 1,5 1,5 1,5 1,5
30° 30°
Rapido 30 Min
2)
2 2,5 2,5 2,5 2,5
30° 30°
Rapido 44 Min
2)
3 3,5 3,5 3,5 3,5
30° 40°
Cotone
Resistente
1)
2)
6 8 9 10 11
60° 90°
(
)
Cotone**
1)
2)
6 8 9 10 11
40° 60°
()
EcoMix 20°
2)
6 8 9 10 11
20° 20°
Misti
1)
2)
3 4 4,5 5 5,5
40° 60°
(
)
Risciacqui
2)
- - - - -
- -
Scarico +
Centrifuga
2)
- - - - -
- -
Delicati
2 2,5 2,5 2,5 2,5
40° 40°
Baby
1)
2)
4 5,5 6 6,5 7
60° 60°
Lana / Mano
2 2 2 2 2
30° 30°
Misti
(asciugatura)
3 4 4,5 5 5,5
- -
Cotone
(asciugatura)
4 5 6 7 7
- -
Lavasciuga 59 Min
1,5 1,5 1,5 1,5 1,5
30° 30°
Tabella programmi
IT
19
Note da considerare
* La massima capacità di carico di
biancheria asciutta differisce a seconda
del modello (fare riferimento al cruscotto).
In tutti i programmi è possibile ridurre la
velocità della centrifuga secondo il consiglio
del fabbricante del tessuto, oppure per capi
molto delicati eliminare la fase di centrifuga.
Questa funzione è attivabile con il tasto
SELEZIONE CENTRIFUGA.
Se l’etichetta non riporta alcuna indicazione è
possibile centrifugare alla massima velocità
prevista dal programma.
Un sovradosaggio di detersivo può causare
un'eccessiva formazione di schiuma.
Se la lavatrice rileva un'eccessiva presenza
di schiuma, può escludere la centrifuga o
prolungare la durata del programma e
aumentare il consumo d'acqua.
( ) Solo con l’opzione PRELAVAGGIO
selezionata (programmi con opzione
PRELAVAGGIO disponibile).
(Solo per i modelli dotati di
bacinella per il detersivo liquido)
Quando solo alcuni capi presentano
macchie che richiedono un trattamento
con prodotti candeggianti liquidi, si
può procedere ad una smacchiatura
preliminare in lavatrice.
Introdurre nello scomparto "2" del
cassetto detersivo l'apposita vaschetta
in dotazione nella quale versare
il candeggiante ed impostare il
programma RISCIACQUI. Finito
questo trattamento, riportare la
manopola programmi in posizione
OFF, aggiungere ai capi candeggiati il
resto della biancheria e procedere al
bucato normale con il programma più
adatto.
1) Per i programmi indicati è possibile,
tramite il tasto LIVELLO DI SPORCO,
regolare il tempo e l’intensità del
lavaggio.
2) Programmi abilitati all’ asciugatura
automatica.
INFORMAZIONE PER I LABORATORI
DI PROVA (NORMA EN 50229)
Lavaggio
Utilizzare il programma ** selezionando il
massimo livello di sporco, massima
velocità di centrifuga e temperatura di 60°C.
Programma raccomandato anche per test
comparativi a più bassa temperatura.
Asciugatura
Prima asciugatura effettuata con A kg
(composizione carico biancheria: federe
e asciugamani) selezionando il
programma asciugatura cotone
( )
pronto armadio (
).
Seconda asciugatura effettuata con
B kg (composizione carico biancheria:
lenzuola e asciugamani) selezionando il
programma asciugatura cotone (
)
pronto armadio (
).
Capacità
(lavaggio)
(kg)
A (kg) B (kg)
Prima
asciugatura
Seconda
asciugatura
6 4 2
8 5 3
9 6 3
10 7 3
11 7 4

20
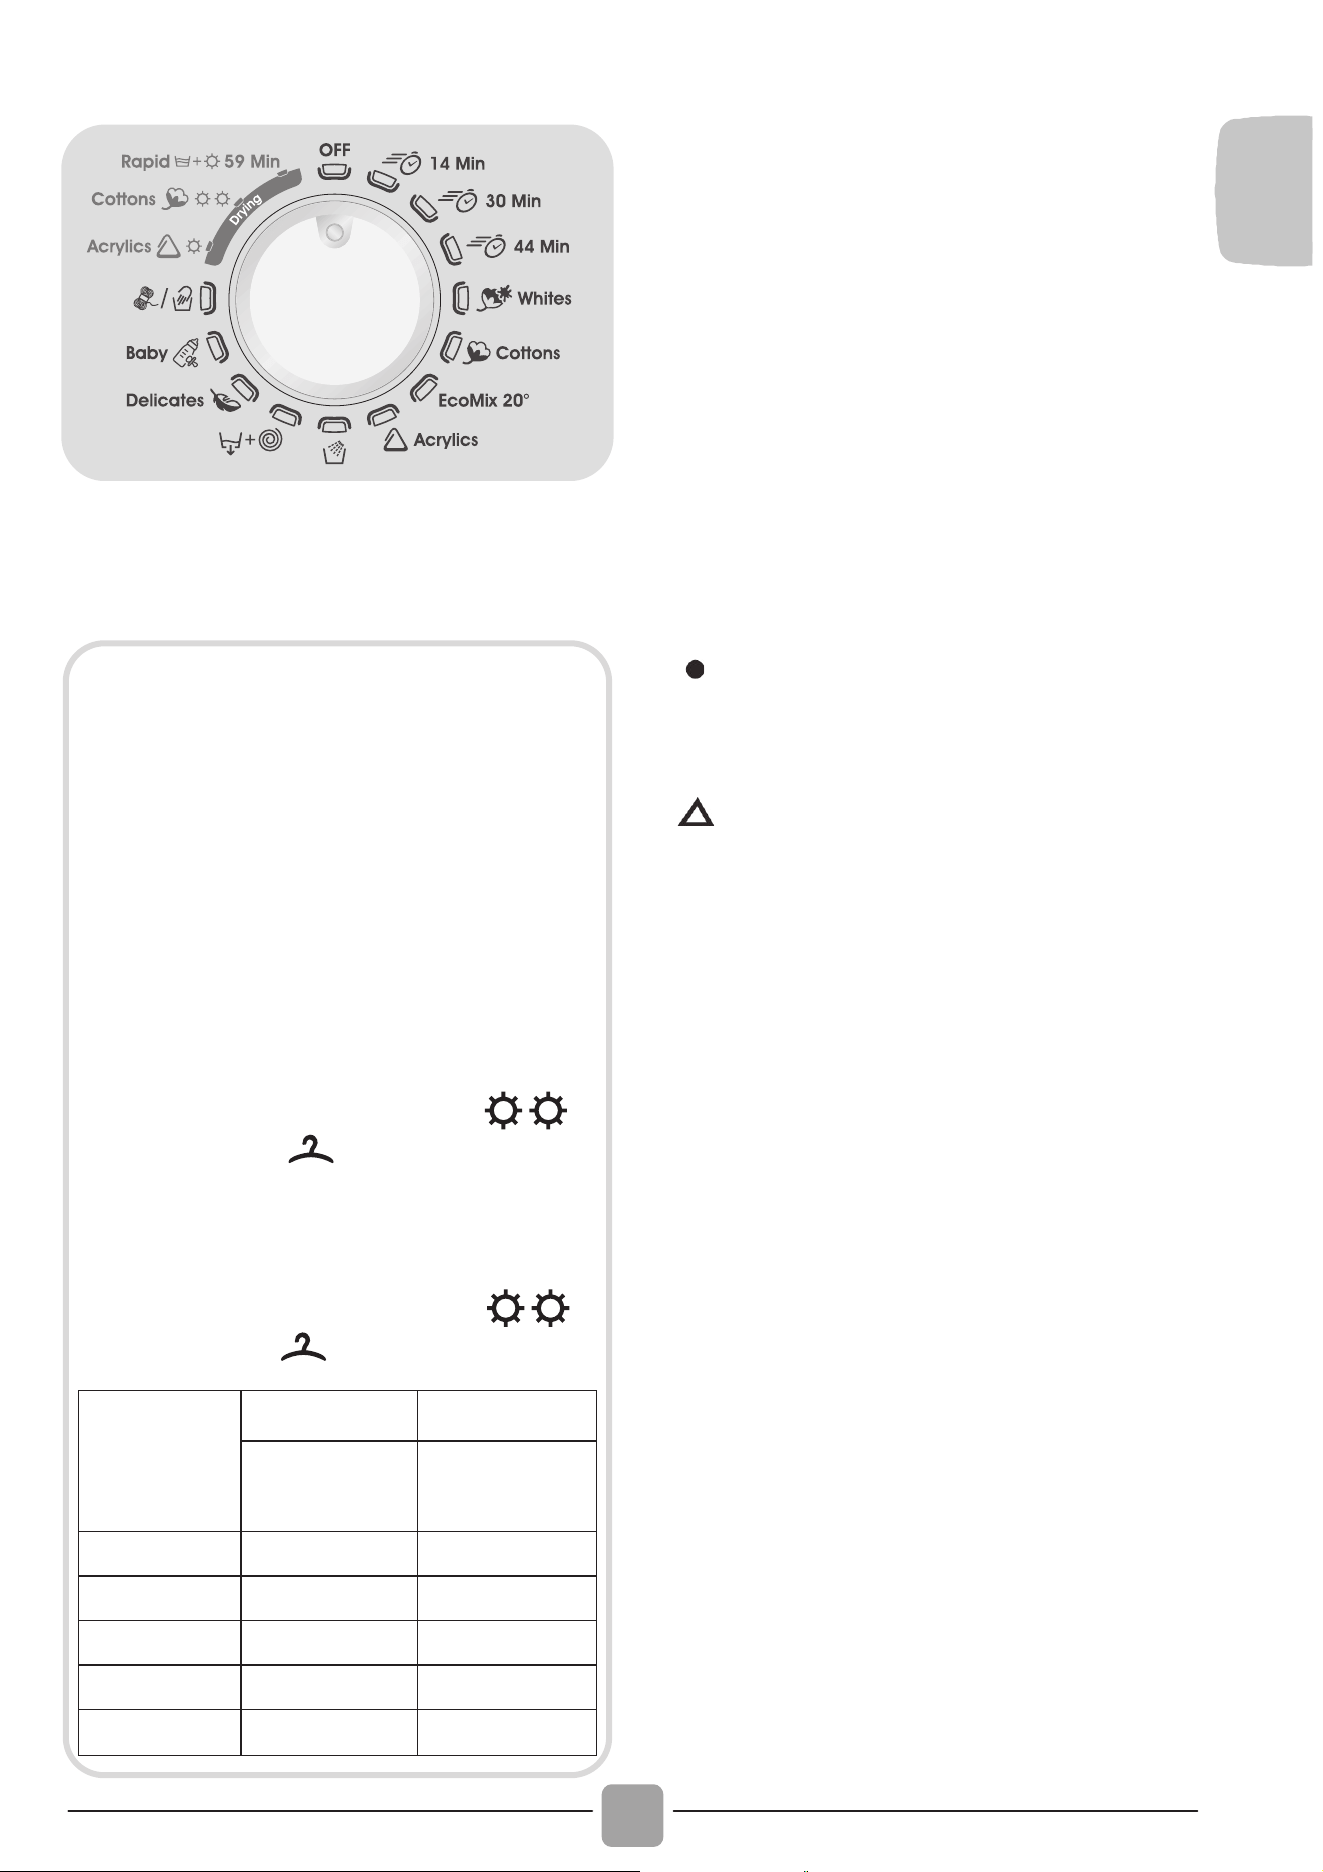
Per trattare i vari tipi di tessuto e le varie
gradazioni di sporco, la lavatrice è dotata di
programmi specifici, adatti ad ogni esigenza
di lavaggio (vedere tabella programmi).
Rapido 14 Min / 30 Min / 44 Min
Questo programma esegue un completo
ciclo di lavaggio (lavaggio, risciacquo e
centrifuga). È particolarmente indicato pe
r
capi di cotone e tessuti misti poco sporchi.
Con questo programma si raccomanda di
utilizzare solo il 20% della normale dose di
detersivo per evitare sprechi.
Cotone Resistente
Realizzato per sviluppare il massimo grado di
lavaggio.
La centrifuga finale alla massima velocità
assicura un’ottima strizzatura.
Cotone
Questo programma è indicato per lavare capi di
cotone normalmente sporchi ed è il più efficient
e
in termini di consumo combinato di acqua
e
energia per lavaggi di biancheria in cotone.
EcoMix 20°
Questo innovativo programma consente di
lavare insieme diversi tessuti quali cotone, misti
e sintetici alla temperatura di 20°C, con
prestazioni ottimali. Consente inoltre di trattare
diversi colori temporaneamente. Il consum
o
risulta essere circa il 40% di un programm
a
Cotone 40°C.
Misti
Il lavaggio ed il risciacquo sono ottimizzati nei
ritmi di rotazione del cesto e nei livelli di acqua.
La centrifuga ad azione delicata, assicura una
ridotta formazione di pieghe sui tessuti.
Risciacqui
Questo programma effettua 3 risciacqui
della biancheria con centrifuga intermedia
(eventualmente riducibile o annullabile tramite
l’apposito tasto). E’ utilizzabile per risciacquar
e
qualsiasi tipo di tessuto, ad esempio dopo un
lavaggio effettuato a mano.
Scarico + Centrifuga
Tramite questo programma la macchina
effettuerà direttamente lo scarico dell’acqua
e una centrifuga ad alta velocità. Qualora si
voglia effettuare solo lo scarico o ridurre
l’intensità della centrifuga, sarà sufficiente
agire sul tasto SELEZIONE CENTRIFUGA.
Delicati
Questo programma alterna momenti di lavoro a
momenti di pausa ed è particolarmente indicat
o
per il lavaggio di tessuti molto delicati. Il lavaggio
e i risciacqui sono eseguiti con alto livello di
acqua per assicurare le migliori prestazioni.
Baby
Questo programma permette di lavare i capi
del bambino, ottenendo un pulito perfetto e
igienizzando il bucato impostando una
temperatura di almeno 60°C.
Per ottimizzare il risultato igienizzante si
consiglia l’utilizzo di un detersivo in polvere.
Lana/Mano
Questo programma effettua un ciclo di
lavaggio dedicato ai tessuti in "Lana
lavabile in lavatrice" o per i capi da lavare
esclusivamente a mano.
ASCIUGATURA
Il cesto cambia direzione durante i cicli di
asciugatura per evitare che la biancheria si
aggrovigli, aumentando l’effetto dell'asciugatura.
Durante gli ultimi 10/20 minuti del ciclo di
asciugatura viene usata aria fresca pe
r
minimizzare le pieghe della biancheria.
Selezione programmi
ATTENZIONE:
prima di cominciare un programma di
asciugatura, i contenitori per detersivi
concentrati in polvere o liquidi devono
essere rimossi dal cesto.

IT
21
Misti
Programma di asciugatura a bassa
temperatura, consigliato per tessuti misti
(sintetici/cotone) e sintetici (fare sempre
riferimento alle etichette dei tessuti).
Cotone
Programma di asciugatura ad alta
temperatura, consigliato per tessuti di
cotone, spugna, lino, canapa (fare sempre
riferimento alle etichette dei tessuti).
Lavasciuga 59 Min
Un programma completo di lavaggio e
asciugatura rapida della durata di circa 59’.
È ideale per ottenere capi puliti ed asciutti
che desideriamo indossare immediatamente.
Indicato per piccoli carichi di max 1,5 kg (ad
esempio 4 camicie) o per capi poco sporchi
(cotone e misti).
Con questo programma raccomandiamo di
ridurre la dose di detersivo (rispetto a quella
normale) per evitare lo spreco dello stesso.
22
7. CICLO DI ASCIUGATURA
Le indicazioni fornite sono generali, sarà
necessaria un po’ di pratica per un
funzionamento ottimale dell’asciugatura.
Si consiglia all’inizio di impostare tempi
inferiori a quelli consigliati, in modo da
poter determinare il grado di essiccazione
desiderato.
Si consiglia di non asciugare
frequentemente tessuti filacciosi, tipo
tappetini o capi a pelo lungo, per non
intasare i condotti dell’aria.
Si consiglia di raggruppare la biancheria
con i seguenti metodi:
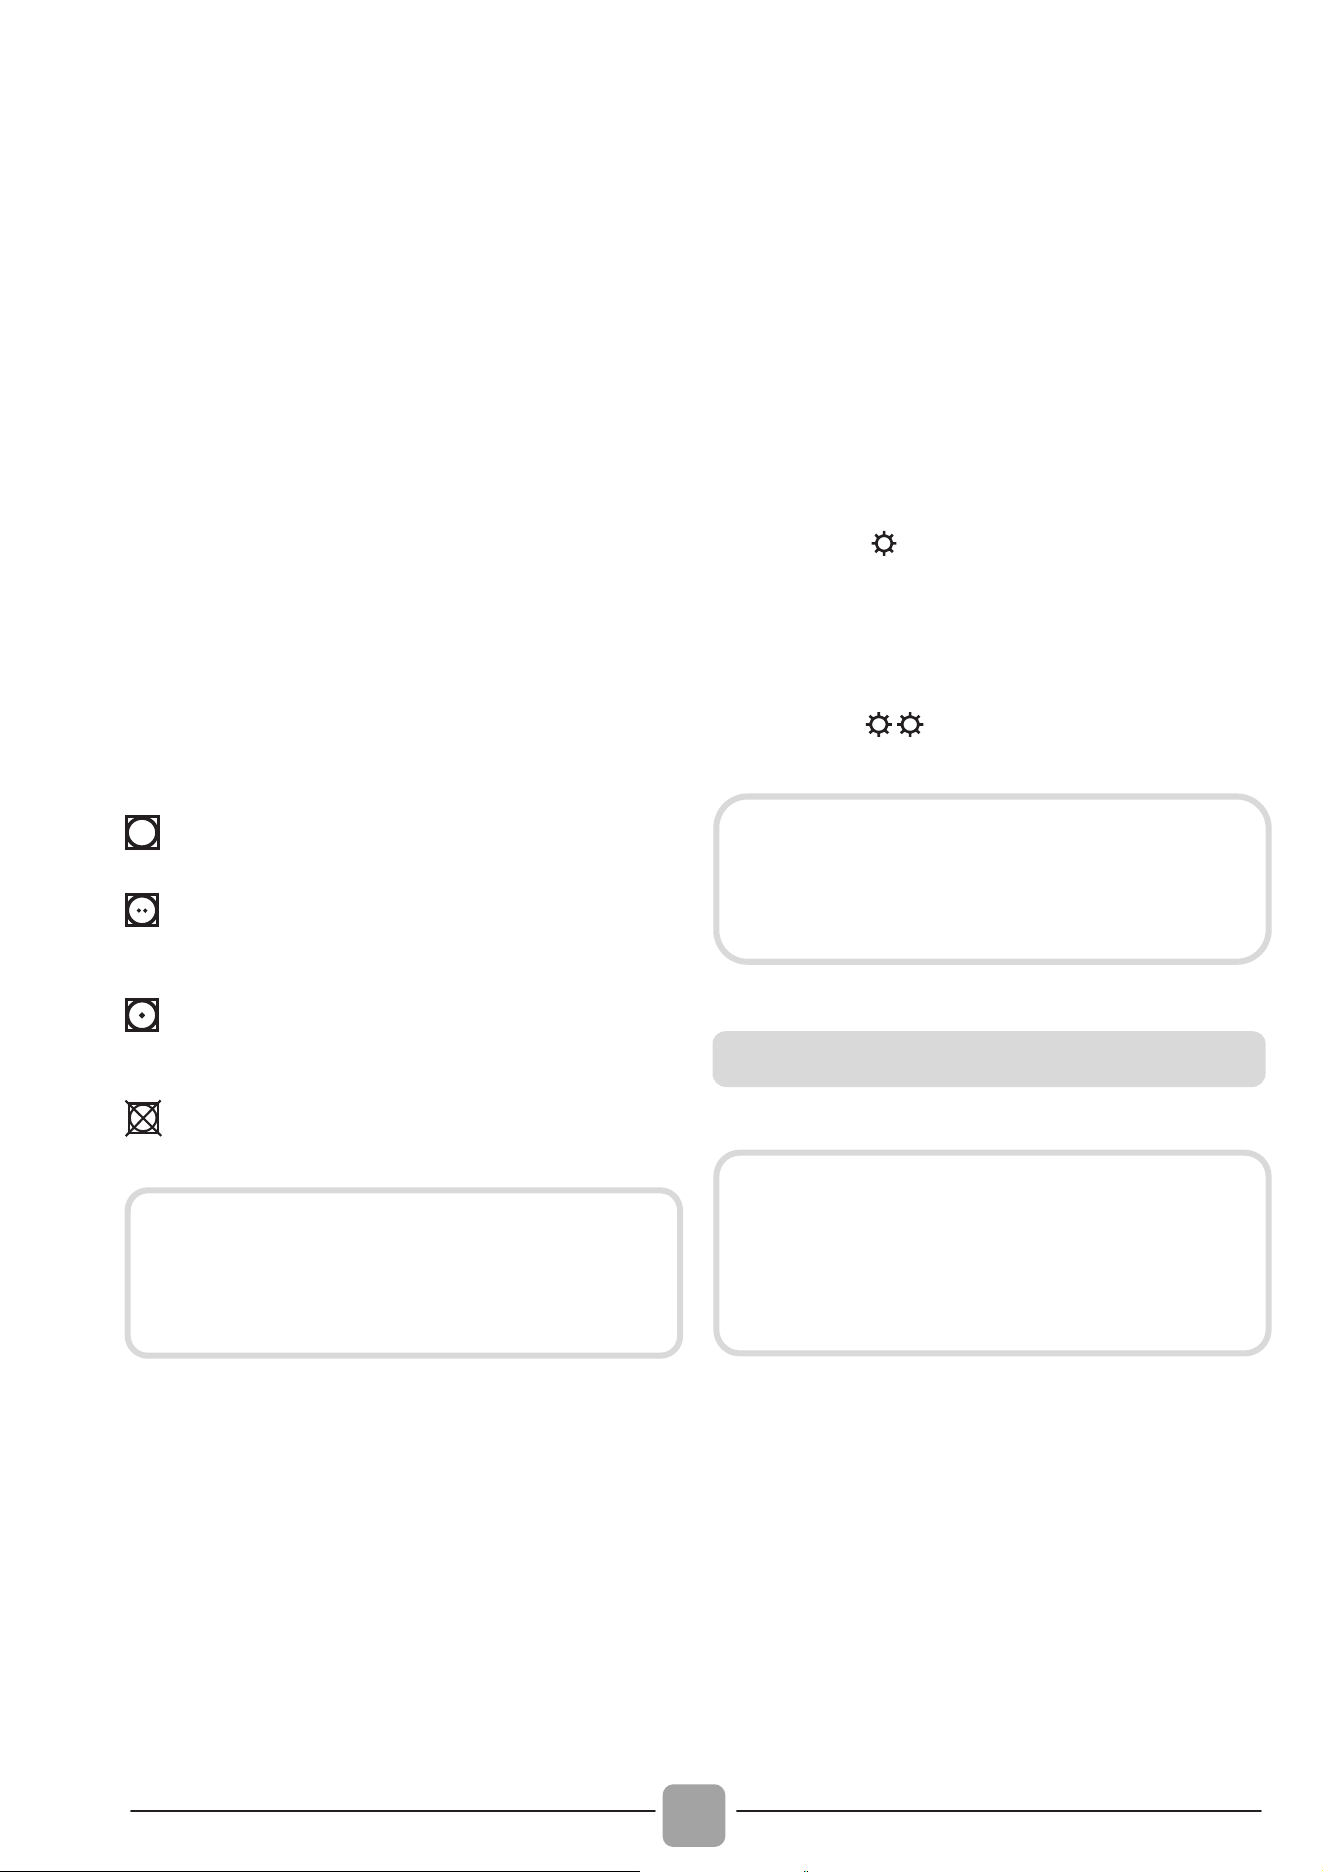
- In base ai simboli che si trovano
sulle etichette dei tessuti
A
sciugatura consentita.
A
sciugatura consentita anche ad
alta temperatura.
A
sciugatura consentita solo a
temperatura moderata.
A
sciugatura NON CONSENTITA.
- In base a dimensione e spessore
Ogni volta che il carico di lavaggio è più
grande della capacità di asciugatura,
si consiglia di separare i vestiti in base
al loro volume (ad esempio gli
asciugamani dalla biancheria leggera).
- In base al tipo di tessuto
Cotone/lino: asciugamani, magliette,
tovaglie e lenzuola.
Sintetici: camicette, camicie, tute, ecc
fatte di poliestere o poliammide, così
come per misti cotone/sintetici.
Asciugare solo biancheria già
centrifugata.
Con la lavasciuga si possono effettuare i
seguenti tipi di asciugatura:
- Programma di asciugatura a bassa
temperatura, consigliato per tessuti
misti (sintetici/cotone) e sintetici
(simbolo
sulla manopola programmi).
- Programma di asciugatura ad alta
temperatura, consigliato per tessuti
di cotone, spugna, lino, canapa
(simbolo sulla manopola programmi).
Aprire l’oblò.
Riempire il cesto, non superando il carico
massimo di biancheria asciugabile
indicato nella tabella dei programmi. In
caso di capi di grandi dimensioni (es.
lenzuola), o molto assorbenti (es.
accappatoi o jeans) é bene ridurre la
quantità di biancheria.
Se i capi non dovessero avere
l'etichetta dei tessuti, si presume che
non siano adatti ad essere asciugati
nella lavasciuga.
Durante la fase di asciugatura il
cestello esegue rotazioni ad alta
velocità per bilanciare il carico ed
ottimizzare il ciclo.
Il modo corretto di asciugare
La lavabiancheria dispone di uno
schermo protettivo al vetro oblò, che
durante la fase di asciugatura si
riscalda molto. Non è necessario
rimuoverlo durante l'uso normale.
IT
23
Chiudere l’oblò.
Ruotare la manopola programmi sul
programma di asciugatura più adatto alla
biancheria caricata.
Selezionare il grado di asciugatura
desiderato scegliendo uno dei 3
programmi automatici:
Programma di asciugatura extra
asciutto (consigliato per spugne,
accappatoi e carichi ingombranti).
Programma di asciugatura pronto
stiro (che lascia la biancheria pronta
per la stiratura).
Programma di asciugatura pronto
armadio (per capi che non è
necessario stirare).
Se vuole impostare un’ asciugatura a
tempo, prema il tasto SELEZIONE
ASCIUGATURA fino all’ accensione della
spia corrispondente alla durata
desiderata.
Assicurarsi che il rubinetto dell’acqua sia
aperto.
Assicurarsi che lo scarico sia in posizione
regolare.
Premere il tasto di AVVIO/PAUSA.
La fase di asciugatura avverrà con la
manopola programmi ferma sul
programma selezionato, fino a fine
asciugatura.
La spia del programma di asciugatura
rimarrà accesa fino alla fase di
raffreddamento che verrà segnalata con
l’accensione della relativa spia.
Alla fine del programma sul display viene
visualizzata la scritta "End". Dopo 5
minuti l'apparecchio andrà in standby (in
alcuni modelli verranno visualizzate due
linee).
Attendere lo spegnimento della spia
PORTA BLOCCATA (circa 2 minuti dalla
fine del programma) prima di aprire l'oblò.
Spegnere la lavabiancheria portando la
manopola programma in posizione OFF.
Aprire l’oblò e rimuovere la biancheria.
Chiudere il rubinetto dell’ acqua.
CANCELLAZIONE DEL PROGRAMMA DI
ASCIUGATURA
Per cancellare il programma di
asciugatura, tenere premuto il tasto
SELEZIONE ASCIUGATURA per circa 3
secondi.
ATTENZIONE:
non asciughi capi in lana, con
imbottiture particolari (piumini, giacche
a vento, etc...) capi delicatissimi.
Se i capi sono lava e indossa è bene
che riduca ulteriormente il carico per
evitare la formazione di pieghe.
ATTENZIONE:
dopo la cancellazione del programma
di asciugatura, inizierà una fase di
raffreddamento e bisognerà attendere
circa 10/20 minuti prima di aprire
l'oblò.

24
8. CICLO AUTOMATICO DI
LAVAGGIO/ASCIUGATURA
- Lavaggio
Aprire il cassetto e introdurre il detersivo
negli appositi scomparti.
Consultare la tabella dei programmi e, in
base ai tessuti da lavare, ruotare la
manopola dei programmi per selezionare
quello desiderato.
Eventualmente modificare la temperatura
di lavaggio.
Premere i tasti opzione (se desiderati).
Assicurarsi che il rubinetto dell’acqua sia
aperto e che lo scarico sia in posizione
regolare.
- Asciugatura
Selezionare il grado di asciugatura
desiderato scegliendo uno dei 3
programmi automatici di asciugatura:
Programma di asciugatura extra
asciutto (consigliato per spugne,
accappatoi e carichi ingombranti).
Programma di asciugatura pronto
stiro (che lascia la biancheria pronta
per la stiratura).
Programma di asciugatura pronto
armadio (per capi che non è
necessario stirare).
Se vuole impostare un’asciugatura a
tempo, premere il tasto SELEZIONE
ASCIUGATURA fino all’ accensione della
spia corrispondente alla durata desiderata.
Premere il tasto di AVVIO/PAUSA.
La manopola programmi rimarrà ferma
sul programma selezionato sino alla fine
del ciclo.
Al termine della fase di lavaggio, sul
display verrà mostrato il tempo rimanente
di asciugatura.
La lavasciuga eseguirà l'intero
programma di asciugatura.
La spia del programma di asciugatura
rimarrà accesa fino alla fase di
raffreddamento che verrà segnalata con
l’accensione della relativa spia.
Alla fine del programma, sul display verrà
visualizzata la scritta "End". Dopo 5
minuti l'apparecchio andrà in standby (in
alcuni modelli verranno visualizzate due
linee).
Attendere lo spegnimento della spia
PORTA BLOCCATA (circa 2 minuti dalla
fine del programma) prima di aprire l'oblò.
Spegnere la lavabiancheria portando la
manopola dei programmi in posizione
OFF.
Aprire l’oblò e rimuovere la biancheria.
Chiudere il rubinetto dell’acqua.
CANCELLAZIONE DEL PROGRAMMA DI
ASCIUGATURA
Per cancellare il programma di
asciugatura, tenere premuto il tasto
SELEZIONE ASCIUGATURA per circa 3
secondi.
Il ciclo completo può essere eseguito
solo con un carico di biancheria che
non ecceda il massimo asciugabile
indicato nella tabella dei programmi,
altrimenti il risultato dell’asciugatura
non sarà soddisfacente.
ATTENZIONE:
dopo la cancellazione del programma
di asciugatura, inizierà una fase di
raffreddamento e bisognerà attendere
circa 10/20 minuti prima di aprire
l'oblò.
IT
25
9. CENTRO ASSISTENZA TECNICA E GARANZIA
Nel caso si pensi che la lavatrice non funzioni in modo corretto, consultare la breve guida
sotto riportata, con alcuni suggerimenti pratici per risolvere le anomalie più comuni.
Problema Possibili cause e soluzioni pratiche
La lavatrice non
funziona / non parte
Verificare che la spina sia inserita in modo corretto.
Controllare che non manchi la corrente.
Verificare di aver selezionato correttamente il programma desiderato e
di aver avviato la lavatrice correttamente.
Appurare che il fusibile non sia bruciato e che la presa di corrente
funzioni, provandola con un altro apparecchio come ad esempio una
lampada.
E’ possibile che l’oblò non sia chiuso in modo corretto: aprirlo e
chiuderlo di nuovo.
La lavatrice non
carica acqua
Verificare che il rubinetto dell’acqua sia aperto.
Controllare che il timer sia posizionato in modo corretto.
La lavatrice non
scarica l’acqua
Verificare che il filtro non sia intasato.
Appurare che il tubo di scarico non sia piegato.
Verificare che non ci siano corpi estranei nel filtro.
Presenza di acqua
sul pavimento vicino
alla lavatrice
È possibile che sia dovuto ad una perdita nella guarnizione posta tra
rubinetto e tubo di carico; in tal caso, sostituirla e stringere bene tubo e
rubinetto.
La lavatrice non
centrifuga
Potrebbe essere dovuto al fatto che l’acqua non è ancora stata
scaricata completamente: attendere alcuni minuti.
In alcuni modelli, è presente la funzione “esclusione centrifuga”:
verificare che non sia stata azionata.
Un eccessivo utilizzo di detersivo può impedire l’esecuzione della
centrifuga: ridurre il quantitativo per i successivi lavaggi.
Si sentono forti
vibrazioni durante la
centrifuga
La lavatrice potrebbe non essere completamente in piano: in caso,
regolare i piedini come indicato nell’apposita sezione.
Verificare di aver eliminato le staffe di trasporto.
Assicurarsi che il carico sia distribuito in modo uniforme.
Nel caso lampeggi o
appaia un ERRORE
specifico
Se lampeggia o appare l’errore n. 0, 1, 5, 7 o 8, contattare
direttamente il Centro Assistenza Tecnica.
Se lampeggia o appare l’errore n. 2, la macchina non carica quindi
verificare che il rubinetto dell’acqua sia aperto.
Se lampeggia o appare l’errore n. 3, la macchina non scarica quindi
controllare che lo scarico sia libero e che il tubo di scarico non sia
piegato.
Se lampeggia o appare l’errore n. 4, la macchina è troppo piena
quindi chiudere il rubinetto dell’acqua e contattare il Centro Assistenza
Tecnica.
Se lampeggia o appare l’errore n. 9, spegnere la lavatrice, attendere
10-15 secondi ed eseguire nuovamente il programma.

26
L’utilizzo di detersivi ecologici senza fosfati
può produrre i seguenti effetti:
- acqua di scarico dei risciacqui più
torbida: è un effetto legato alla presenza
di zeoliti in sospensione che non ha effetti
negativi sull’efficacia del risciacquo.
- presenza di polvere bianca (zeoliti) sul
bucato al termine del lavaggio: è un
effetto normale, la polvere non si ingloba
nei tessuti e non ne altererà il loro colore.
- presenza di schiuma nell’acqua
dell’ultimo risciacquo: non è
necessariamente indice di un cattivo
risciacquo.
- vistosa formazione di schiuma: è
spesso dovuta ai tensioattivi anionici
presenti nella formulazione dei detersivi
che difficilmente sono allontanabili dalla
biancheria stessa.
In questi casi, non è necessario eseguire
più cicli di risciacquo per eliminare questi
effetti: non si otterrà alcun beneficio.
Se l’inconveniente persiste o se si pensi
che ci sia un malfunzionamento, contattare
immediatamente il Centro Assistenza
Tecnica Candy.
È inoltre possibile aderire al piano di
assistenza Candy, in modo da ricevere il
supporto di un operatore specializzato
gratuitamente a domicilio anche nel momento
in cui il prodotto risulti fuori dai termini legali di
garanzia.
Attenzione: la chiamata è a pagamento; il
costo verrà comunicato, tramite messaggio
vocale, dal Servizio Clienti dell’operatore
telefonico utilizzato.
Candy consiglia di utilizzare sempre
ricambi originali, disponibili presso il nostro
Centro Assistenza Tecnica.
La ditta costruttrice declina ogni
responsabilità per eventuali errori di stampa
contenuti nel libretto presente in questo
prodotto. Si riserva inoltre il diritto di
apportare le modifiche che si renderanno
utili ai proprio prodotti senza compromettere
le caratteristiche essenziali.
Garanzia
Il prodotto è garantito alle condizioni e nei
termini riportati sul certificato inserito nel
prodotto. Il certificato di garanzia dovrà
essere conservato, debitamente compilato,
per essere mostrato al Centro Assistenza
Tecnica Autorizzato Candy, in caso di
necessità.
Registra il tuo prodotto!
Non perdere tempo e registra subito la tua
lavatrice per scoprire una serie di vantaggi
a te riservati. Scopri come fare sul sito
www.registercandy.com o chiamando il
numero riportato sui materiali specifici.

IT
27

28
Thank-you for choosing a Candy washing
machine. We are confident it will loyally
assist you in safely washing your clothes,
even delicates, day after day.
You can register your product at
www.registercandy.com to gain faste
r
access to supplementary services solely
reserved to our most loyal customers.
Carefully read this manual for correct and
safe appliance use and for helpful tips on
efficient maintenance.
Only use the washing machine
after carefully reading these instructions.
We recommend you always keep this
manual on hand and in good conditions fo
r
any future owners.
Please check that the appliance is
delivered with this instruction manual,
warranty certificate, service centre address
and energy efficiency label. Also check that
plugs, curve for drain hose and liquid
detergent or bleach tray (only on some
models) are included. We recommend you
keep all these components.
Each product is identified by a unique 16-
character code, also called the “serial
number”, printed on the sticker affixed to
the appliance (porthole area) or in the
document envelope found inside the
product. This code is a sort of specific
product ID card that you will need to
register it and should you need to contact
the Candy Customer Service Centre.
This appliance is marked according to
the European directive 2012/19/EU
on Waste Electrical and Electroni
c
Equipment (WEEE).
WEEE contains both polluting substances (which
can cause negative consequences for th
e
environment) and basic components (which can
be re-used). It is important to have WEEE
subjected to specific treatments, in order t
o
remove and dispose properly all pollutants, and
recover and recycle all materials. Individuals can
play an important role in ensuring that WEEE
does not become an environmental issue; it is
essential to follow some basic rules:
WEEE should not be treated as household
waste;
WEEE should be handed over to the relevan
t
collection points managed by the municipality o
r
by registered companies. In many countries, fo
r
large WEEE, home collection could be present.
In many countries, when you buy a ne
w
appliance, the old one may be returned to the
retailer who has to collect it free of charge on a
one-to-one basis, as long as the equipment is o
f
equivalent type and has the same functions as
the supplied equipment.
1. GENERAL SAFETY RULES
2. INSTALLATION
3. PRACTICAL TIPS
4. MAINTENANCE AND CLEANING
5. QUICK USER GUIDE
6. CONTROLS AND PROGRAMS
7. DRYING CYCLE
8. AUTOMATIC WASHING/DRYING CYCLE
9. CUSTOMER SERVICE CENTRE AND
WARRANTY
Environmental conditions
Contents

EN
29
1. GENERAL SAFETY
RULES
This appliances is intended to
be used in household and
similar applications such as:
- Staff kitchen areas in shops, offices
and other working environments;
- Farm houses;
- By clients in hotels, motels and
other residential type environments;
- Bed and breakfast type environments.
A different use of this appliance
from household environment
or from typical housekeeping
functions, as commercial use by
expert or trained users, is excluded
even in the above applications. If
the appliance is used in a manner
inconsistent with this it may reduce
the life of the appliance and may
void the manufacturer’s warranty.
Any damage to the appliance or
other damage or loss arising
through use that is not consistent
with domestic or household use
(even if located in a domestic or
household environment) shall not
be accepted by the manufacturer to
the fullest extent permitted by law.
This appliance can be used by
children aged from 8 years and
above and persons with reduced
physical, sensory or mental
capabilities or lack of experience
and knowledge if they have been
given supervision or instruction
concerning use of the appliance
in a safe way and understand the
hazards involved.
Children shall not play with the
appliance. Cleaning and user
maintenance shall not be made
by children without supervision.
Children should be supervised
to ensure that they do not play
with the appliance.
Children of less than 3 years
should be kept away unless
continuously supervised.
If the supply cord is damaged, it
must be replaced by the
manufacturer, its service agent
or similarly qualified persons in
order to avoid a hazard.
Only use the hose-sets
supplied with the appliance for
the water supply connection
(do not reuse old hose-sets).
Water pressure must be between
0,05 MPa and 0,8 MPa.
Make sure that a carpet do not
obstruct the base of the machine
and ventilation openings.
The OFF condition is reached
by
placing the reference mark on
the programmes control/knob in
the vertical position. Any other
different position of such control
sets the machine in ON condition
(only for models with programmes
knob).

30
The final part of a washer dryer
cycle occurs without heat (cool
down cycle) to ensure that the
items are left at a temperature
that ensures that the items will
not be damaged.
After installation, the appliance
must be positioned so that the
plug is accessible.
The appliance must not be
installed behind a lockable
door, a sliding door or a door
with a hinge on the opposite
side to that of the washer
dryer, in such way that a full
opening of the washer dryer
door is restricted.
The maximum load capacity of
dry clothes depends on the
model used (see control panel).
The appliance is not to be used
if industrial chemicals have
been used for cleaning.
Do not dry unwashed items in
the washer dryer.
Items that have been soiled with
substances such as cooking oil,
acetone, alcohol, petrol, kerosene,
spot removers, turpentine, waxes
and wax removers should be
washed in hot water with an extra
amount of detergent before being
dried in the washer dryer.
Items such as foam rubber
(latex foam), shower caps,
waterproof textiles, rubber
backed articles and clothes or
pillows fitted with foam rubber
pads should not be dried in the
washer dryer.
Fabric softeners, or similar
products, should be used as
specified by the fabric softener
instructions.
Oil-affected items can ignite
spontaneously, especially when
exposed to heat sources such
as a washer dryer. The items
become warm, causing an
oxidation reaction in the oil,
Oxidation creates heat. If the
heat cannot escape, items can
become hot enough to catch
fire. Piling, stacking or storing
oil-effected items can prevent
heat from escaping and so
create a fire hazard.
If it is unavoidable that fabrics
contain vegetable or cooking
oil or have been contaminated
WARNING:
never stop a washer dryer before
the end of the drying cycle
unless all items are quickly
removed and spread out so that
the heat is dissipated.

EN
31
by hair care products be
placed in a washer dryer they
should first be washed in hot
water with extra detergent -
this will reduce, but not
eliminate, the hazard.
Remove all objects from
pockets such as lighters and
matches.
To consult the product fiche
please refer to the manufacturer
website.
Before cleaning or maintaining
the washing machine, unplug
the appliance and turn off the
water faucet.
Make sure the electrical
system is grounded. Otherwise,
seek qualified professional
assistance.
Please do not use converters,
multiple sockets or extension
cords.
Make sure there is no water in
the drum before opening the
porthole.
Do not pull on the power cord
or appliance to unplug the
machine.
Do not expose the washing
machine to rain, direct sunlight
or other weather elements.
When moving, do not lift the
washing machine by the knobs
or detergent drawer; during
transport, never rest the
porthole on the trolley. We
recommend two people lift the
washing machine.
In the event of fault and/or
malfunction, turn off the
washing machine, close the
water faucet and do not tamper
with the appliance.
Immediately contact the
Customer Service Centre and
only use original spare parts.
Failure to observe these
instruction may jeopardise
appliance safety.
Appliance complies with
European Directives:
2006/95/EC (LVD);
2004/108/EC (EMC);
2009/125/EC (ErP);
2011/65/EU (RoHS)
and subsequent amendments.
Safet
y
instructions
WARNING:
water may reach very high
temperatures during the
wash c
y
cle.
32
2. INSTALLATION
Cut the tube straps, being
careful not to damage the tube
and power cord.
Unscrew the 2 or 4 screws (A)
on the back and remove the 2
or 4 shims (B) as illustrated in
figure 1.
Close the 2 or 4 holes using
the plugs included in the
instruction envelope.
If the washing machine is built-in,
after cutting the hose straps,
unscrew the 3 or 4 screws (A) and
remove the 3 or 4 shims (B).
In some models, 1 or more
shims will fall inside the machine:
tilt the washing machine forward
to remove them. Close the holes
using the plugs found in the
envelope.
Place the polionda sheet on
the bottom as shown in figure
2 (according to the model,
consider version A, B or C).
A
A
A
A
B
B
B
B
1
3
2
1
3
1
2
A
C
B
2
WARNING:
keep packaging materials
away from children.
EN
33
Connect the water tube to the faucet, only
using the drain tube supplied with the
washing machine (fig. 3).
DO NOT OPEN THE FAUCET.
Some models may include one or more o
f
the following features:
HOT&COLD (fig. 4):
water mains connection settings with hot
and cold water for higher energy savings.
Connect the grey tube to the cold water
faucet
and the red one to the hot water
faucet. The machine can be connected to
the cold water faucet only: in this case,
some programs may start a few minutes
later.
AQUASTOP (fig. 5):
a device located on the supply tube that
stops water flow if the tube deteriorates;
in this case, a red mark will appear in the
window “A” and the tube must be
replaced. To unscrew the nut, press the
one-way lock device "B".
AQUAPROTECT – SUPPLY TUBE WITH
GUARD (fig. 6):
Should water leak from the primary
internal tube "A", the transparent
containment sheath "B" will contain water
to permit the washing cycle to complete.
At the end of the cycle, contact the
Customer Service Centre to replace the
supply tube.
Near the washing machine to the wall,
being careful that the tube is not bent or
crushed, and place the drain tube in the
tub or, preferably, connect it to a wall
drain at least 50 cm high with diameter
greater than the washing machine tube
(fig. 7).
3
1
4
B
A
5
B
A
6
min 50 cm
max 85 cm
+2,6 mt
max
max 100 cm
min 4 cm
7
Hydraulic connections
Setting
34
Level the appliance using the feet as
illustrated in figure 8:
a. turn the nut clockwise to release the
screw;
b. rotate the foot to raise or lower it until i
t
adheres to the floor;
c. lock the foot, screwing in the nut, until it
adheres to the bottom of the washing
machine.
Plug in the appliance.
A
B
C
8
The detergent draw is split into 3
compartments as illustrated in figure 9:
compartment "1": for prewash detergent;
compartment “ ”: for special additives,
softeners, starch fragrances, etc.;
compartment "2": for washing detergent.
A liquid detergent cup is also included in
some models (fig. 10). To use it, place it in
compartment "2". This way, liquid
detergent will only enter the drum at the
right time. The cup can also be used fo
r
bleach when the “Rinse” program is
selected.
2
1
9
10
11
WARNING:
contact the Customer Service Centre
should the power cord need
replacement.
Detergent drawer
WARNING:
only use liquid products; the washing
machine is set to automatically dose
additives at each cycle during the last
rinse.
WARNING:
some detergents are hard to remove.
In this case we recommend using the
specific container to be placed in the
drum (example in figure 11).

EN
35
3. PRACTICAL TIPS
WARNING: when sorting laundry, make
sure:
- have eliminated metallic objects such as
barrettes, pins, coins, from laundry;
- to have buttoned pillow cases, closed
zips, tied loose belts and long robe
ribbons;
- to have removed rollers from curtains;
- to have carefully read clothing washing
labels;
- to have removed any persistent stains
using specific detergents.
When washing rugs, bedcovers or other
heavy clothing, we recommend you avoid
centrifuging.
To wash wool, make sure the item can be
machine washed and marked by the
“Pure virgin wool” symbol with the “Does
not mat” or “Machine washable” label.
A guide environmentally friendly and
economic use of your appliance.
Maximise The Load Size
Achieve the best use of energy, water,
detergent and time by using the
recommended maximum load size.
Save up to 50% energy by washing a full
load instead of 2 half loads.
Do you need to pre-wash?
For heavily soiled laundry only!
SAVE detergent, time, water and
between 5 to 15% energy consumption
by NOT selecting Prewash for slight to
normally soiled laundry.
Is a hot wash required?
Pretreat stains with stain remover or soak
dried in stains in water before washing to
reduce the necessity of a hot wash
programme.
Save up to 50% energy by using a 60°C
wash programme.
Before using a drying programme
SAVE energy and time by selecting a
high spin speed to reduce the water
content in laundry before using a drying
programme.
Following is a quick guide with tips and
recommendations on detergent use at the
various temperatures. In any case, always
read the instructions on the detergent for
correct use and doses.
Load tips
Helpful suggestions for the user
When washing heavily soiled whites,
we recommend using cotton
programs of 60°C or above and a
normal washing powder (heavy duty)
that contains bleaching agents that at
medium/high temperatures provide
excellent results.
For washes between 40°C and 60°C
the type of detergent used needs to be
appropriate for the type of fabric and
level of soiling.
Normal powders are suitable for “white”
or colour fast fabrics with high soiling,
while liquid detergents or “colour
protecting” powders are suitable for
coloured fabrics with light levels of
soiling.
For washing at temperatures below
40°C we recommend the use of liquid
detergents or detergents specifically
labeled as suitable for low temperature
washing.
For washing wool or silk, only use
detergents specifically formulated for
these fabrics.
36
4. MAINTENANCE AND
CLEANING
To clean the washing machine exterior, use
a damp cloth, avoiding abrasives, alcohol
and/or solvents. The washing machine does
not require any special care for ordinary
cleaning: clean drawer compartments and
the filter; some tips on how to move the
machine or on long periods of disuse are
provided below.
We recommend you clean the drawer to
avoid accumulating detergent and
additive residue.
To do this, extract the drawer using slight
force, clean it with running water and
reinsert it in its housing.
The washing machine comes with a
special filter able to trap large residue,
such as buttons or coins, which could
clog the drain.
Only available on certain models: pull out
the corrugated hose, remove the stopper
and drain the water into a container.
Before unscrewing the filter, we
recommend you place an absorbent cloth
under it to keep the floor dry.
Turn the filter counter-clockwise to the
limit stop in the vertical position.
Remove and clean the filter; when
finished, replace it turning it clockwise.
Repeat the previous steps in reverse
order to reassemble all parts.
Should the washing machine be stored in
an unheated room for a long period of
time, drain all water from tubes.
Unplug the washing machine.
Detach the tube from the strap and lower
it, fully draining water into a bowl.
Secure the drain tube with the strap when
finished.
Drawer cleaning
Filter cleaning
Suggestions for moves or
prolonged disuse
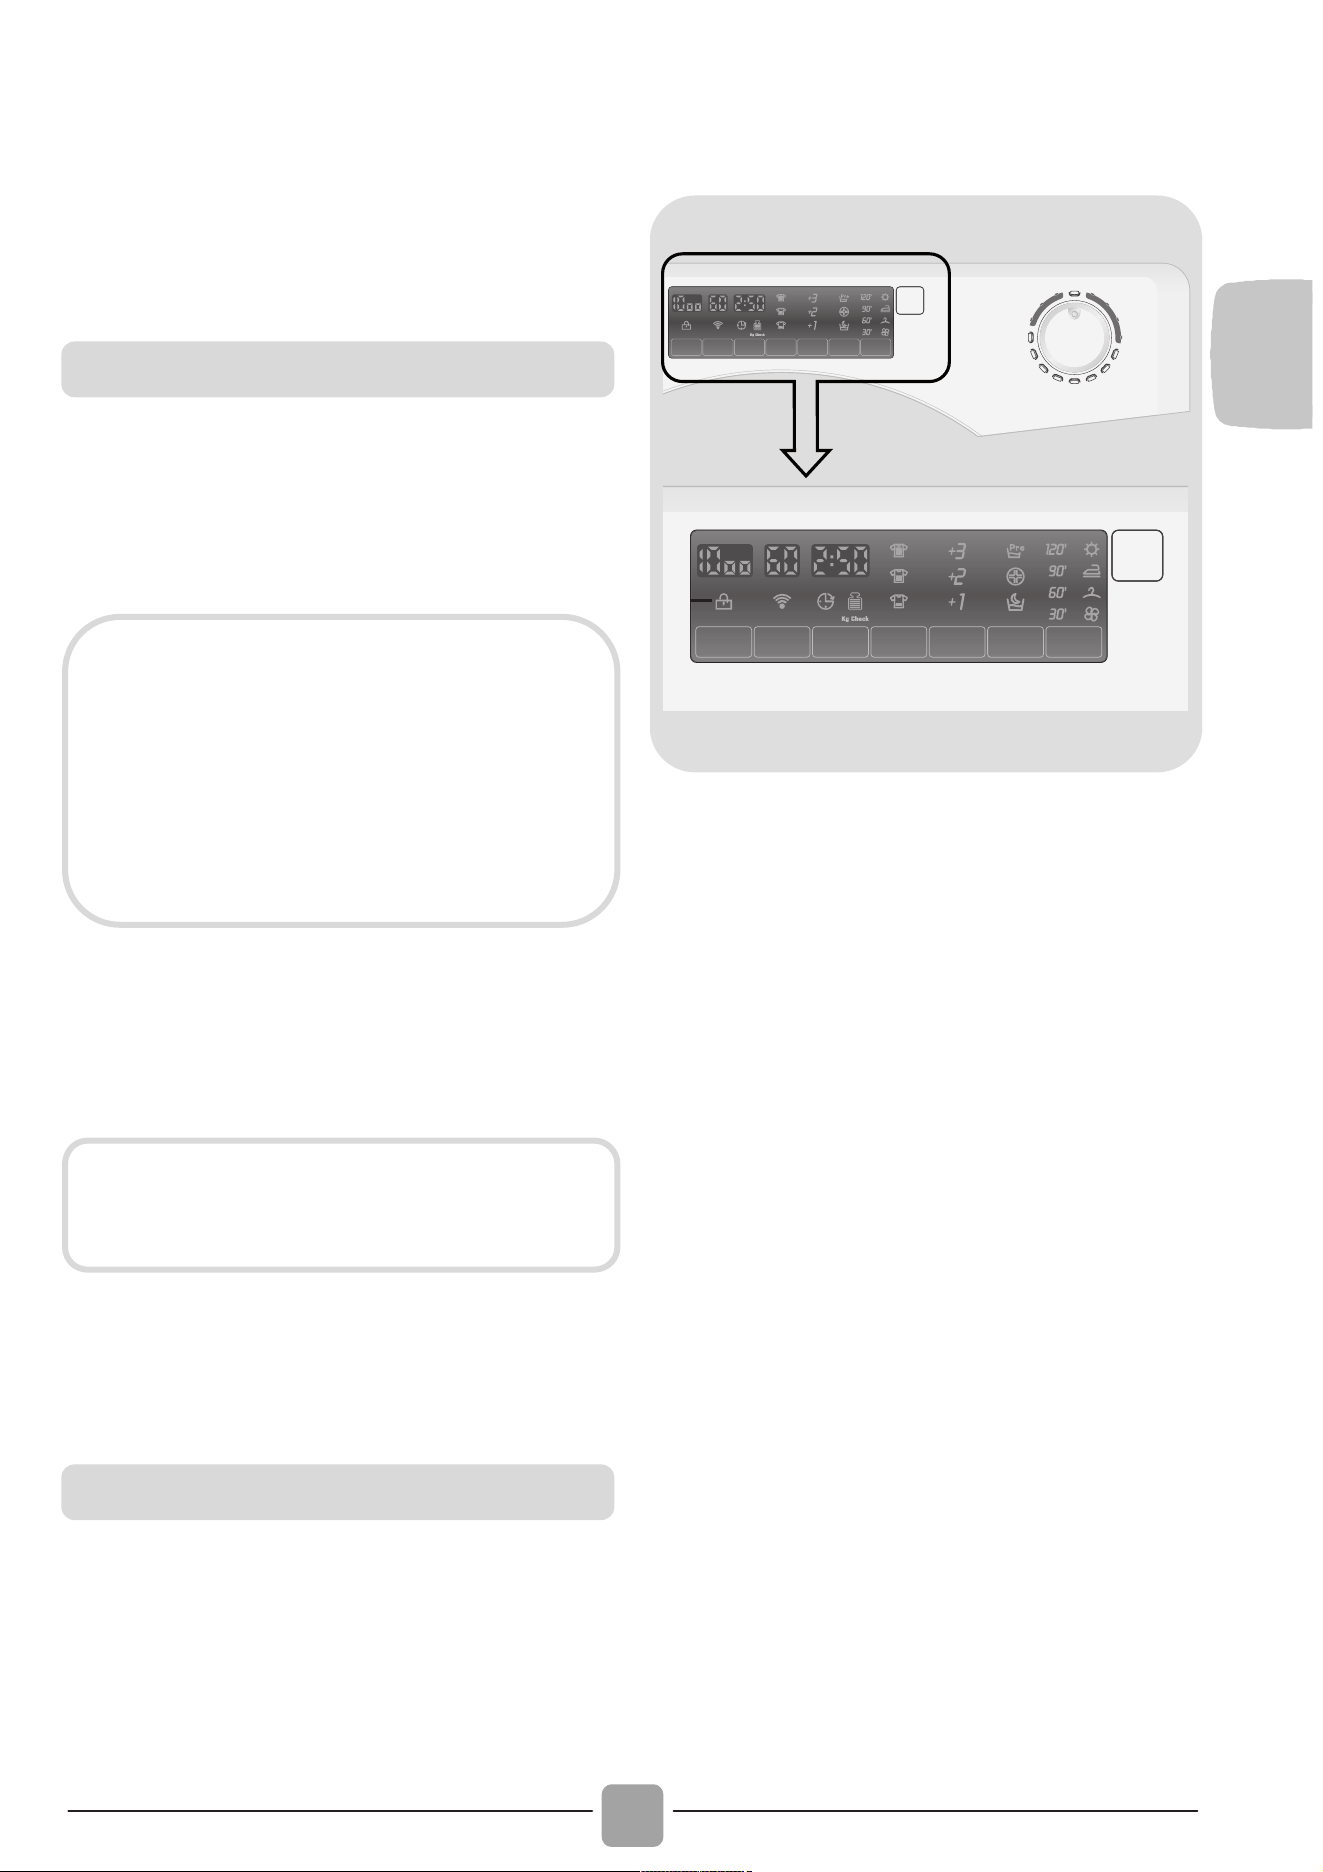
EN
37
5. QUICK USER GUIDE
This washing machine automatically adapts
the level of the water to the type and
quantity of washing. This system gives a
decrease in energy consumption and a
sensible reduction in washing times.
Turn on the washing machine and select
the required program.
Adjust the washing temperature if
necessary and press the required "option"
buttons.
Press the START/PAUSE button to start
washing.
The message "end" will appear on the
display or the corresponding led will turn
on at the end of the program.
Turn off the washing machine.
For any type of wash, see the program
table and follow the operating sequence
as indicated.
Water pressure: min 0,05 Mpa / max 0,8 Mpa
Spin r.p.m.: See rating plate.
Power input / Power current fuse amp /
Supply voltage: See rating plate.
6. CONTROLS AND
PROGRAMS
A
B
DCEFGHI
M
L
A Programme selector with OFF
position
B START/PAUSE button
C SPIN SELECTION button
D TEMPERATURE SELECTION
button
E DELAY START button
F STAIN LEVEL button
G EXTRA RINSE button
H OPTIONS button
I DRYING SELECTION button
L Digital display
M DOOR LOCKED indicator light
Program selection
DRYING
If you would like the drying cycle to
begin automatically after washing,
select the programme required using
the DRYING SELECTION button.
Or you can finish the wash and then
select the drying programme and
load size.
Wait until the porthole locked light
turns off: about 2 minutes after the
program ends.
Technical data

38
Press the START/PAUSE button to start
the selected cycle.
Once a programme is selected the
programme selector remains stationary on
the selected programme till cycle ends.
Switch off the washing machine by
turning the selector to OFF.
Press to start the selected cycle.
ADD OR REMOVE ITEMS AFTER THE
PROGRAMMES HAS STARTED (PAUSE)
Press and hold the START/PAUSE
button for about 2 seconds (some
indicator light and the time remaining
indicator will flash, showing that the
machine has been paused).
Wait 2 minutes until the safety device
unlocks the door.
After you have added or removed items,
close the door and press the
START/PAUSE button (the programme
will start from where it left off).
CANCELLING THE PROGRAMME
To cancel the programme, set the
selector to the OFF position.
WARNING:
Don’t touch the display while inserting
the plug because the machines
calibrates the systems during the first
seconds: touching the display, the
machine couldn’t work property. In
this case, remove the plug and repeat
the operation.
Opening the door
A special safety device prevents the
door from being opened immediately
after the end of the cycle.
Wait for 2 minutes after the wash
cycle has finished and the "Door
Security" light has gone out before
opening the door.
Programme selector with OFF
position
When the programme selector is turned
the display lights up to show the settings
for the programme selected.
For energy saving, at the end of the
cycle or with an inactivity period, the
display level contrast will decrease.
N.B.: To switch the machine off, turn the
programme selector to the OFF
position.
The programme selector must be
returned to the OFF position at the end
of each cycle or when starting a
subsequent wash cycle prior to the next
programme being selected and started.
START/PAUSE button
Close the door BEFORE selecting the
button START/PAUSE.
When the START/PAUSE button has
been pressed, the appliance can take
few seconds before it starts working.

EN
39
By pressing this button, it is possible to
reduce the maximum speed, and if you
wish, the spin cycle can be cancelled.
To reactivate the spin cycle press the button
until you reach the spin speed you would
like to set.
It is possible to modify the spin speed
without pausing the machine.
This button allows you to change the
temperature of the wash cycles.
It is not possible to raise the temperature
over the maximum allowed for every
programme, in order to save the fabrics.
This button allows you to pre-programme
the wash cycle to delay the start of the
cycle for up to 24 hours.
To delay the start use the following
procedure:
- Set the required programme.
- Press the button once to activate it (h00
appears on the display) and then press
it again to set a 1 hour delay (h01
appears on the display). The pre-set
delay increases by 1 hour each time the
button is pressed, until h24 appears on
the display, at which point pressing the
button again will reset the delay start to
zero.
- Confirm by pressing the START/PAUSE
button (the light on the display starts to
flash). The countdown will begin and
when it has finished the programme will
start automatically.
It is possible to cancel the delay start by
turning the programme selector to OFF.
If there is any break in the power supply
while the machine is operating, a special
memory stores the selected programme
and, when the power is restored, it
continues where it left OFF.
By selecting this button there is a choice
of 3 levels of wash intensity, depending
on how much the fabrics are soiled (can
be used only on some programmes as
shown in the table of programmes).
The option buttons should be selected
before pressing the START/PAUSE
button.
If an option is selected that is
not compatible with the selected
programme then the option indicator
first flashes and then goes off.
SPIN SELECTION button
To prevent damage to the fabrics, it is
not possible to increase the speed
over that which is automatically
suitable during the selection of the
program.
The machine is fitted with a special
electronic device, which prevents the
spin cycle should the load be
unbalanced.
This reduces the noise and vibration in
the machine and so prolongs the life of
y
our machine.
TEMPERATURE SELECTION button
DELAY START button
STAIN LEVEL button

40
Once the programme has been selected
the indicator light will automatically show
the stain level set for that programme.
Selecting a different stain level the
relevant indicator will light up.
This button allows you to add rinses at
the end of the washing cycle. The
maximum number of extra rinses is
related to the programme selected.
This function has been studied for the
people with delicate and sensitive skin,
for which also a least residue of detergent
can cause irritations or allergies.
It advises to also use this function for the
children items and in case of washings of
very dirty items, for which it is due to use
a lot of detergent, or in the washing of
toweling items whose fibres mostly have
the tendency to hold the detergent.
You can choose between three different
options:
- PREWASHING
This option allows you to make a prewash
and it is particularly useful for heavily
soiled loads (can be used only on some
programmes as shown in the table of
programmes).
We recommend you use only 20% of the
recommended quantities shown on the
detergent pack.
- HYGIENE
With this option it is possible to hygienize
the clothes, the washing programme
reach a temperature of 60°C.
- NIGHT CYCLE
This option reduces the intermediate spin
speed to 400 rpm, where applicable,
increase the water level during rinsing and
keep the laundry immersed in water after the
final rinse, in order to spread the fibre
sevenly.
During the phase in which the water is
held in the tub, the relevant indicator light
blink to show that the machine is at a
standstill.
Deselect the option to end the cycle with a
spin dry (which may be reduced or cancelled
using the appropriate button) and emptying
phase.
Thanks to electronic control, the water
in the intermediate phases is emptied
silently, making this option very useful for
washing at night.
Ensure that the programme selector is
not in the OFF position then press the
button to select the required drying
programme: an indicator will light to
display the drying result selected each
time you press the button.
To cancel the selection before the start of
a drying programme, press the button
repeatedly until the indicators go out or
return the programme selector to the OFF
position.
To cancel the cycle during the drying
phase, hold the button down for about 3
seconds until the cooling indicator lights
up.
Given the high temperature inside the
drum, we recommend that you allow the
dryer to complete the cool down period
before returning the programme selector
to the OFF position and removing the
laundry.
EXTRA RINSE button
OPTIONS button
DRYING SELECTION button
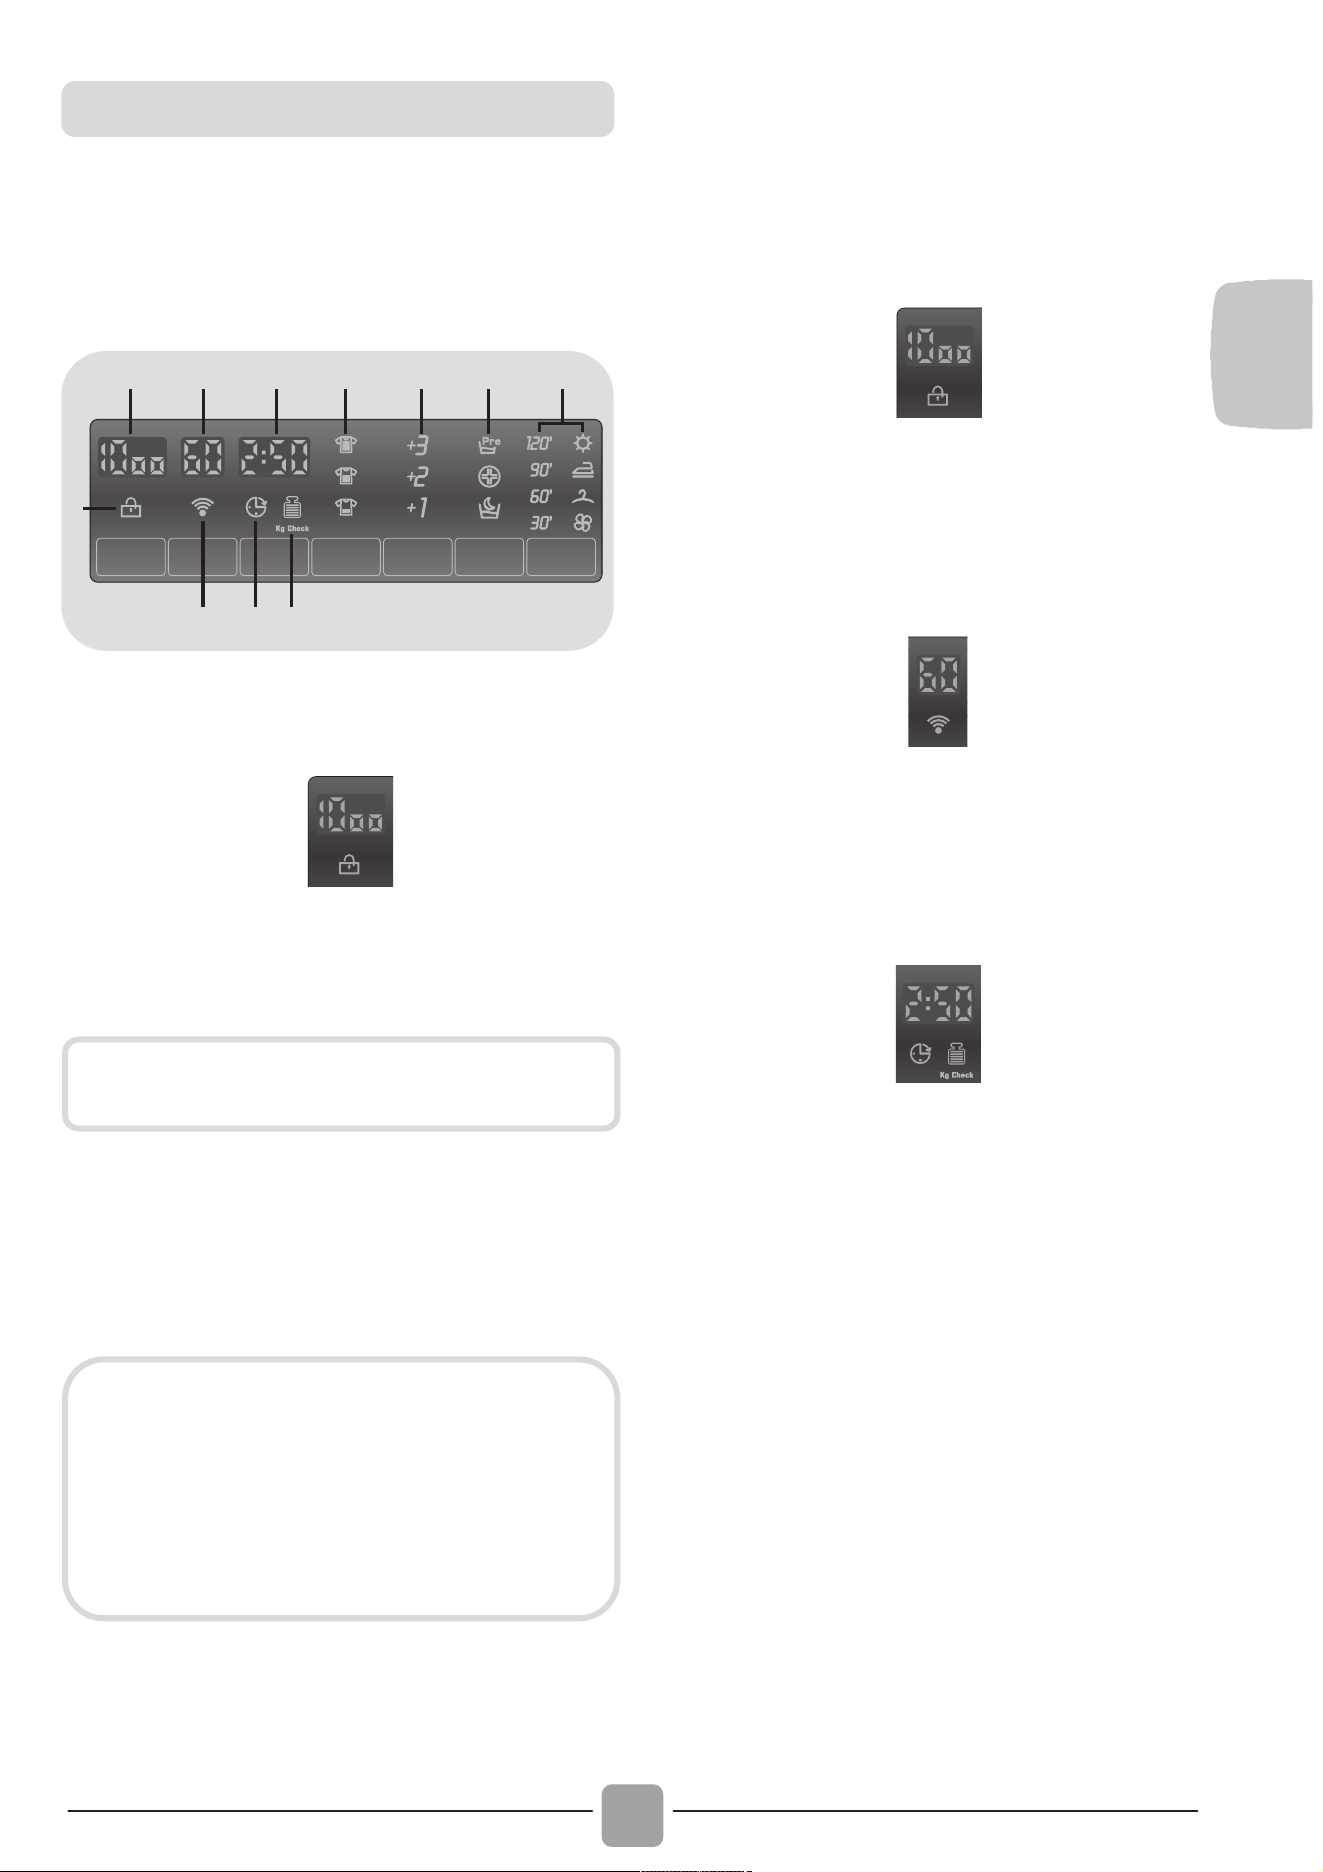
EN
41
The display’s indicator system allows you to
be constantly informed about the status of
the machine.
2
1
8109
3 4 5 6 7 11
1) DOOR LOCKED INDICATOR LIGHT
1
The indicator light is illuminated when the
door is fully closed.
When START/PAUSE is pressed on
the machine with the door closed, the
indicator will flash momentarily and then
illuminate.
A special safety device prevents the door
from being opened immediately after the
end of the cycle. Wait for 2 minutes after
the wash cycle has finished and the
DOOR LOCKED light has gone out before
opening the door. At the end of the cycle
turn the programme selector to OFF.
2) SPIN SPEED
2
This show the spin speed of the selected
programme that can be changed or omitted
by the relevant button.
3) WASH TEMPERATURE
3
This show the washing temperature of the
selected programme that can be changed
(where allowed) by the relevant button.
4) CYCLE DURATION
4
When a programme is selected the
display automatically shows the cycle
duration, which can vary, depending on
the options selected.
Once the programme has started you will
be kept informed constantly of the time
remaining to the end of the wash.
The appliance calculates the time to the
end of the selected programme based
upon a standard loading, during the cycle,
the appliance corrects the time to that
applicable to the size and composition of
the load.
If automatic washing/drying is selected, at
the end of the wash phase, the drying time
remaining to the end will be shown on the
display.
Digital Display
Close the door BEFORE selecting the
START/PAUSE button.
If the door is not properly closed,
the light will continue to flash for
about 7 seconds, after which the
start command will be automatically
delete. In this case, close the door
in the proper way and press the
START/PAUSE button.
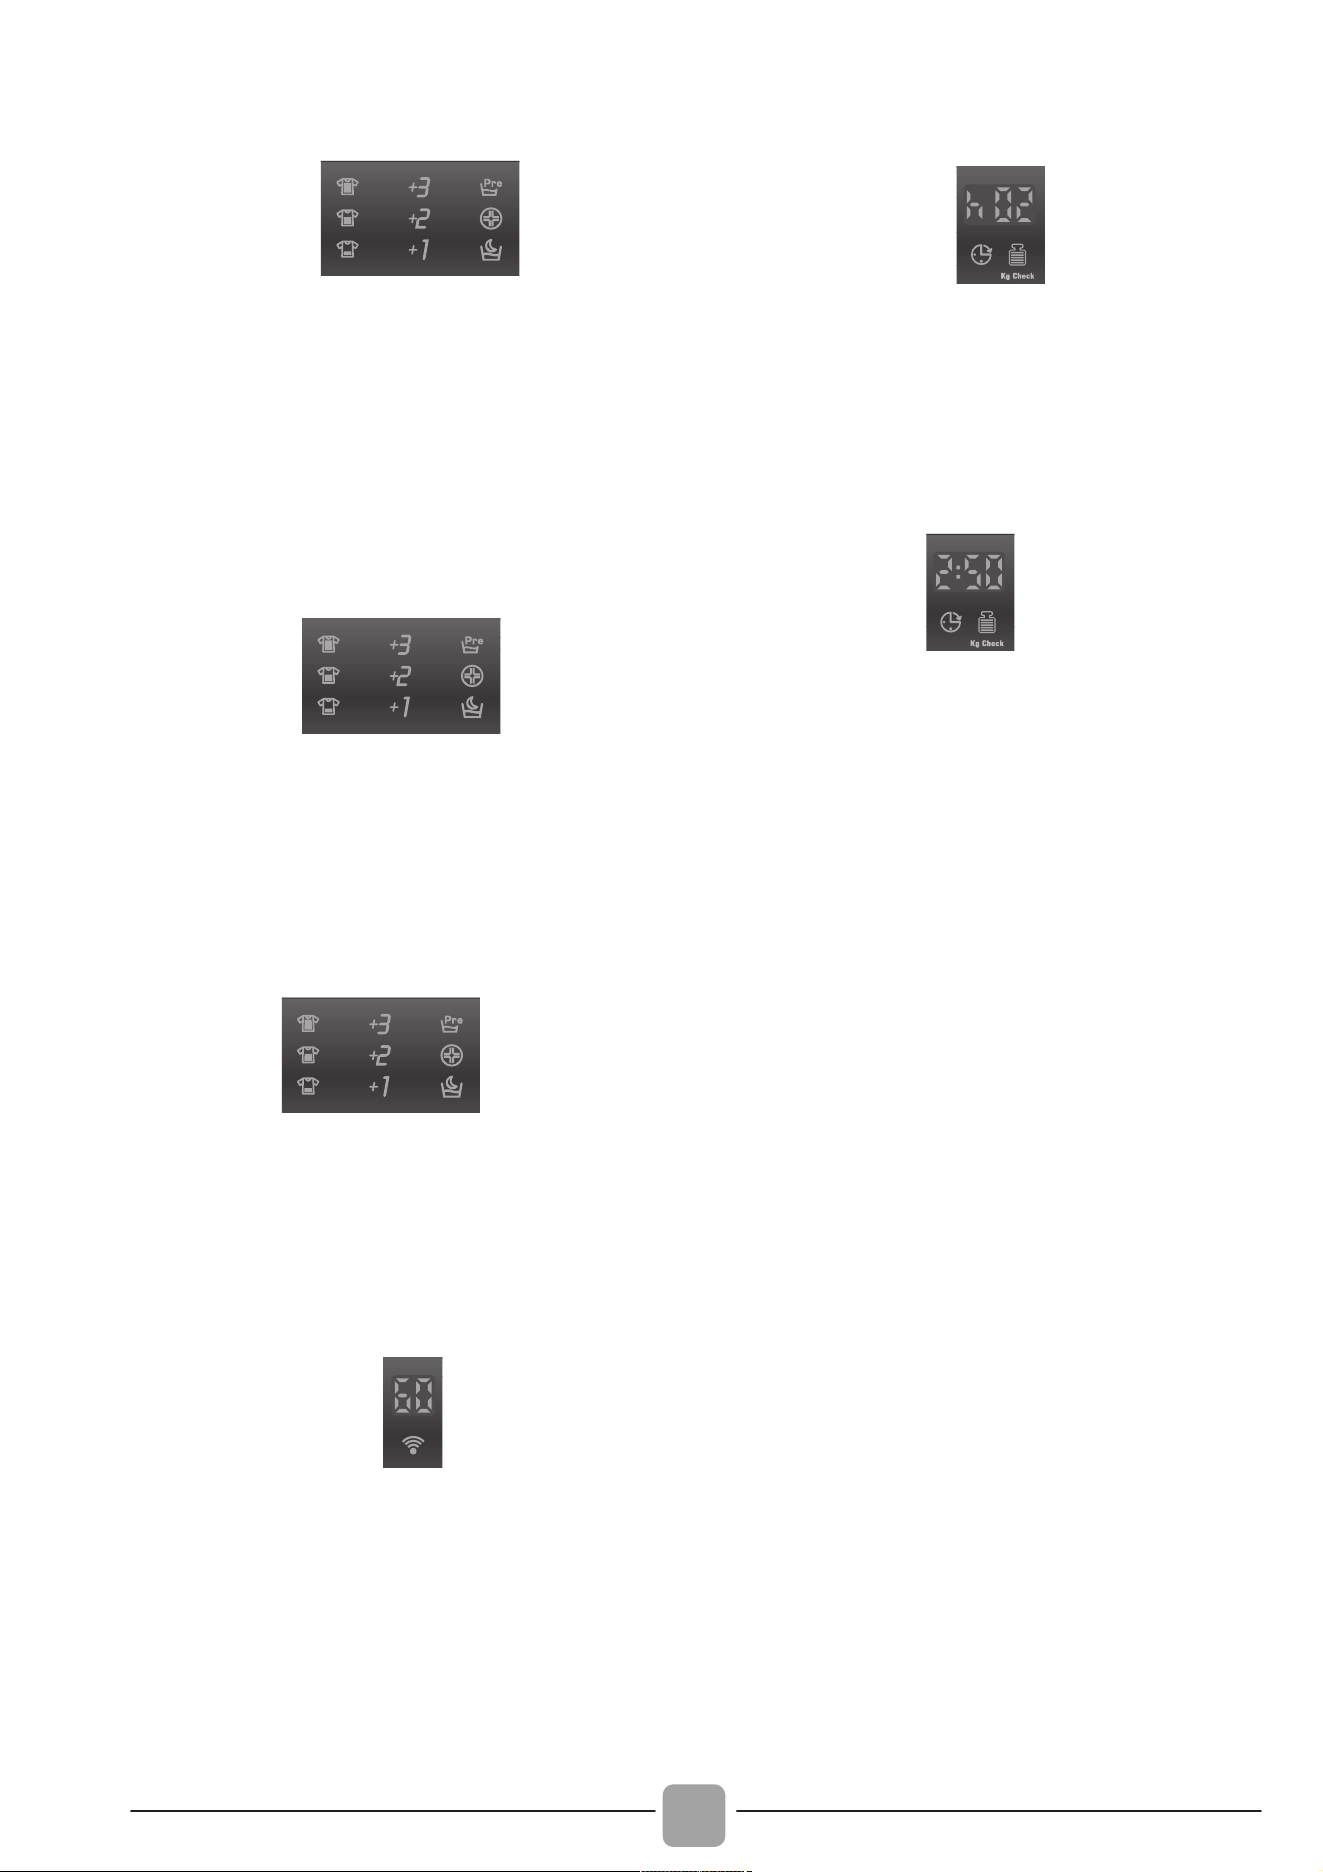
42
5) STAIN LEVEL
{
5
Once the programme has been selected,
the indicator light will automatically show
the stain level set for that programme.
Selecting a different stain level the
relevant indicator will light up.
6) EXTRA RINSES
{
6
The indicator lights show the extra rinses
selected by the relevant button.
7) OPTIONS
}
7
The indicator lights show the option that
can be selected by the relevant button
(PREWASH, HYGIENE and NIGHT CYCLE).
8) Wi-Fi (some models only)
8
In the models with the Wi-Fi option, the
icon indicates that the Wi-Fi system is
working.
For all other information in the Wi-Fi
system, there is a specific manual inside
the machine.
9) DELAY START
9
This flashes when delay start has been set.
10) Kg Check (function active only on
Cotton and Synthetics programmes)
10
During the first minutes of the cycle, the
"Kg Check" indicator remain on while the
intelligent sensor will weigh the laundry
and adjust the cycle time, water and
electricity consumption accordingly.
Through every wash phase "Kg Check"
allows to monitor information on the wash
load in the drum and in the first minutes
of the wash it:
- adjusts the amount of water required;
- determines the length of the wash cycle;
- controls rinsing according to the type of
fabric selected to be washed it;
- adjusts the rhythm of drum rotation for
the type of fabric being washed;
- recognizes the presence of lather,
increasing, if necessary, the amount of
water during rinsing;
- adjusts the spin speed according to the
load, thus avoiding any imbalance.
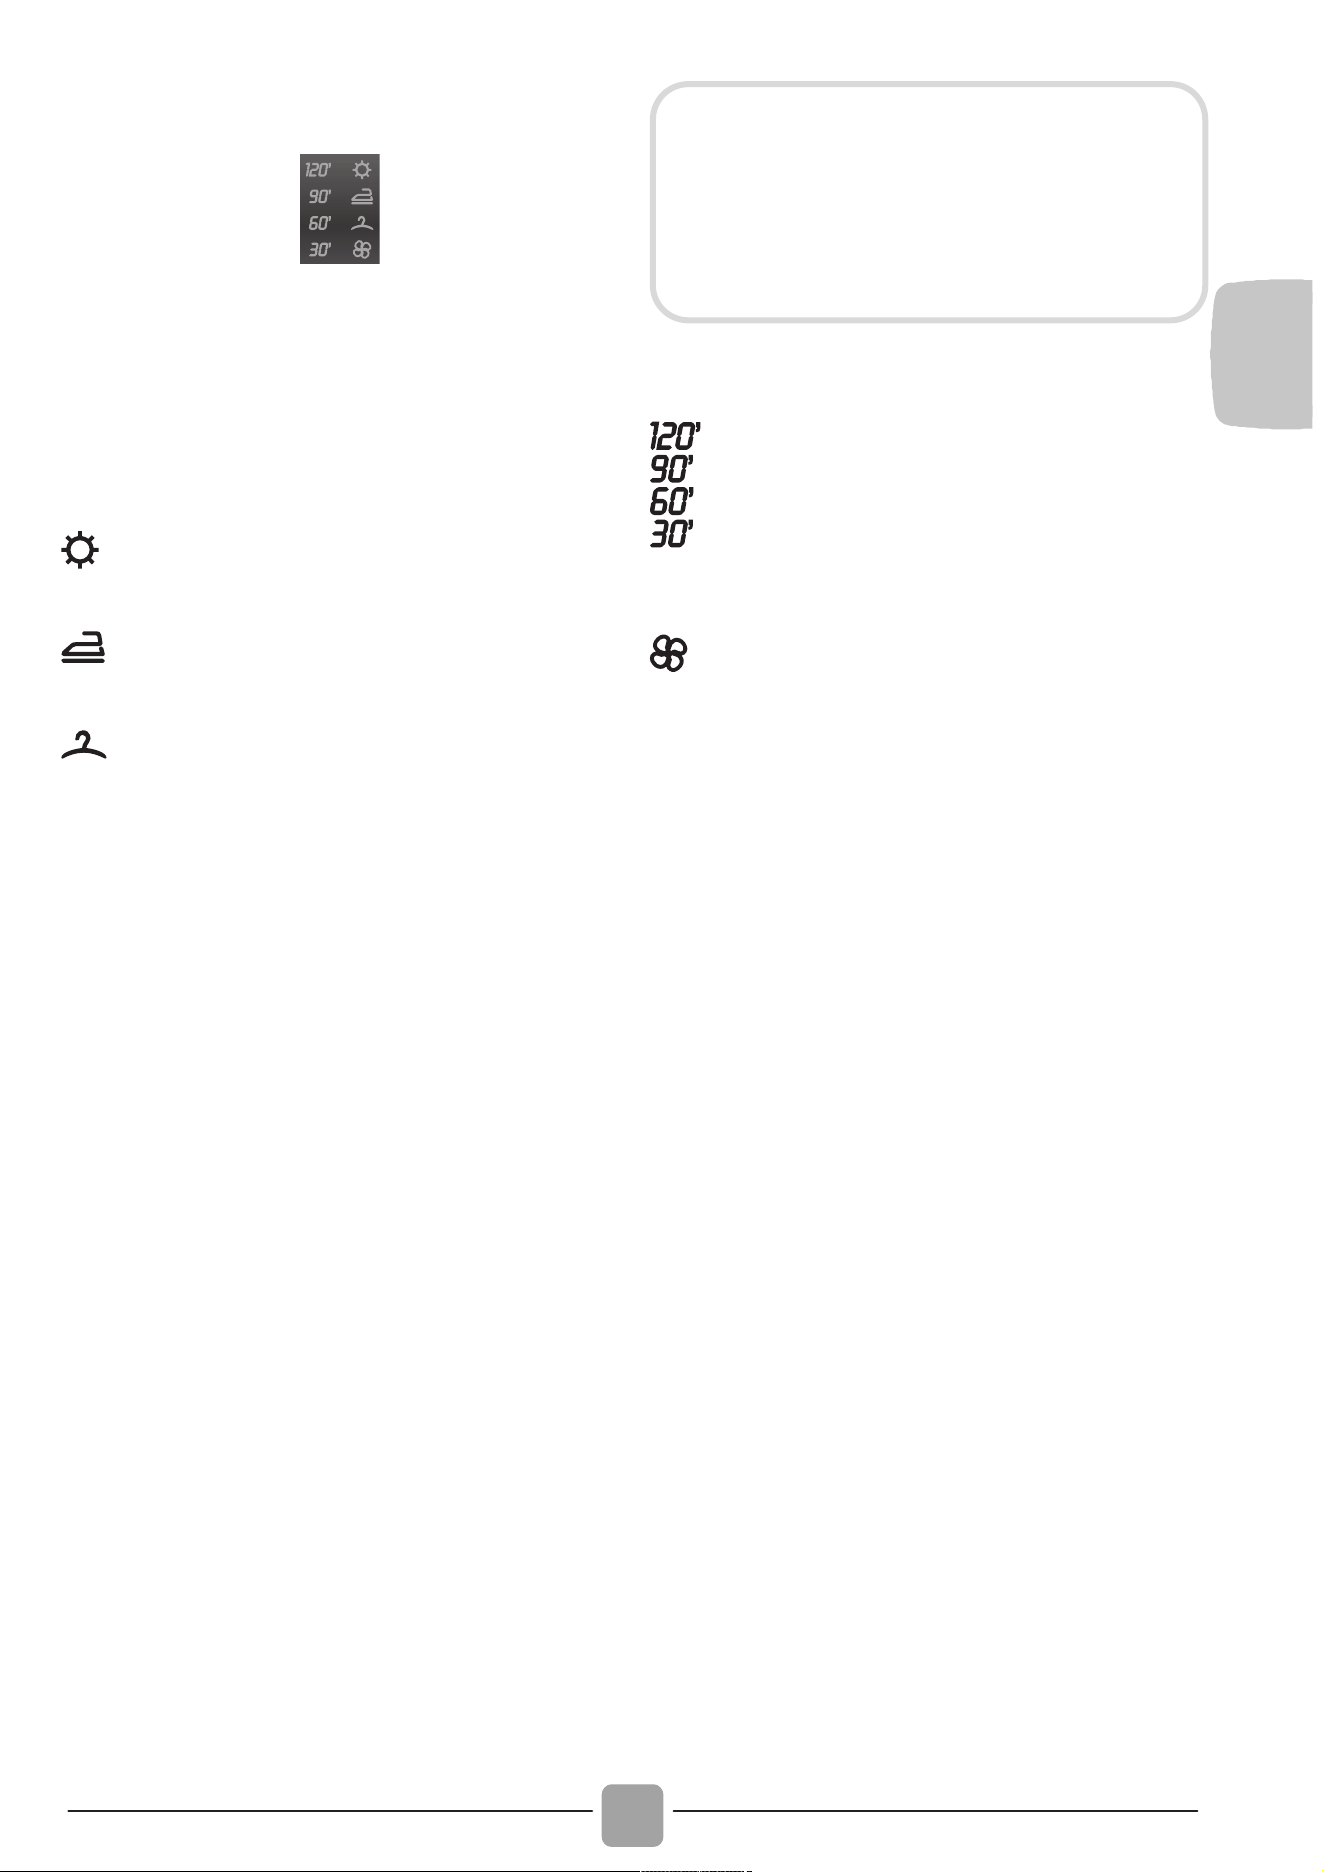
EN
43
11) DRYING PROGRAMME INDICATORS
}
11
The indicators display the type of the drying
programme.
Automatic drying programmes
Extra dry programme (suitable for
towels, bathrobes and bulky loads).
Iron dry programme (that leaves the
laundry ready for ironing).
Cupboard dry programme (for
items that will be put away without
ironing).
By selecting one of these automatic
programmes, the washer dryer will
calculate the time needed for drying and
the level of moisture remaining in the
laundry, according to the load and drying
type selected.
After pressing the START/PAUSE button,
the display will show the drying time
remaining.
Timed drying programmes
They may be used to select timed
drying programmes.
Cool down phase
A
ctivated during the final cool down
period, in the last 10/20 minutes o
f
each drying phase.
Useful tips
The 30 minute drying programme is
recommended for small loads (less than 1
kg) or only slightly damp loads.
Your washer dryer automatically ends the
cycle when it reaches the selected drying
level.
In order to ensure the correct operation of
the appliance, it is advisable not to
interrupt the drying phase unless it is
absolutely necessary.
The appliance calculates the time to
the end of the selected programme
based upon a standard loading.
During the cycle, the appliance
corrects the time according to the size
and composition of the load.

44
2
1
PROGRAM
kg *
(MAX.)
TEMP.°C
DETERGENT
Recommended
Max.
2
1
Rapid 14 Min
2)
1 1,5 1,5 1,5 1,5
30° 30°
Rapid 30 Min
2)
2 2,5 2,5 2,5 2,5
30° 30°
Rapid 44 Min
2)
3 3,5 3,5 3,5 3,5
30° 40°
Whites
1)
2)
6 8 9 10 11
60° 90°
(
)
Cottons**
1)
2)
6 8 9 10 11
40° 60°
()
EcoMix 20°
2)
6 8 9 10 11
20° 20°
Acrylics
1)
2)
3 4 4,5 5 5,5
40° 60°
(
)
Rinse
2)
- - - - -
- -
Drain + Spin
2)
- - - - -
- -
Delicates
2 2,5 2,5 2,5 2,5
40° 40°
Baby
1)
2)
4 5,5 6 6,5 7
60° 60°
Wool/Hand
2 2 2 2 2
30° 30°
Acrylics
(drying)
3 4 4,5 5 5,5
- -
Cottons
(drying)
4 5 6 7 7
- -
Rapid W&D 59 Min
1,5 1,5 1,5 1,5 1,5
30° 30°
Table of programmes
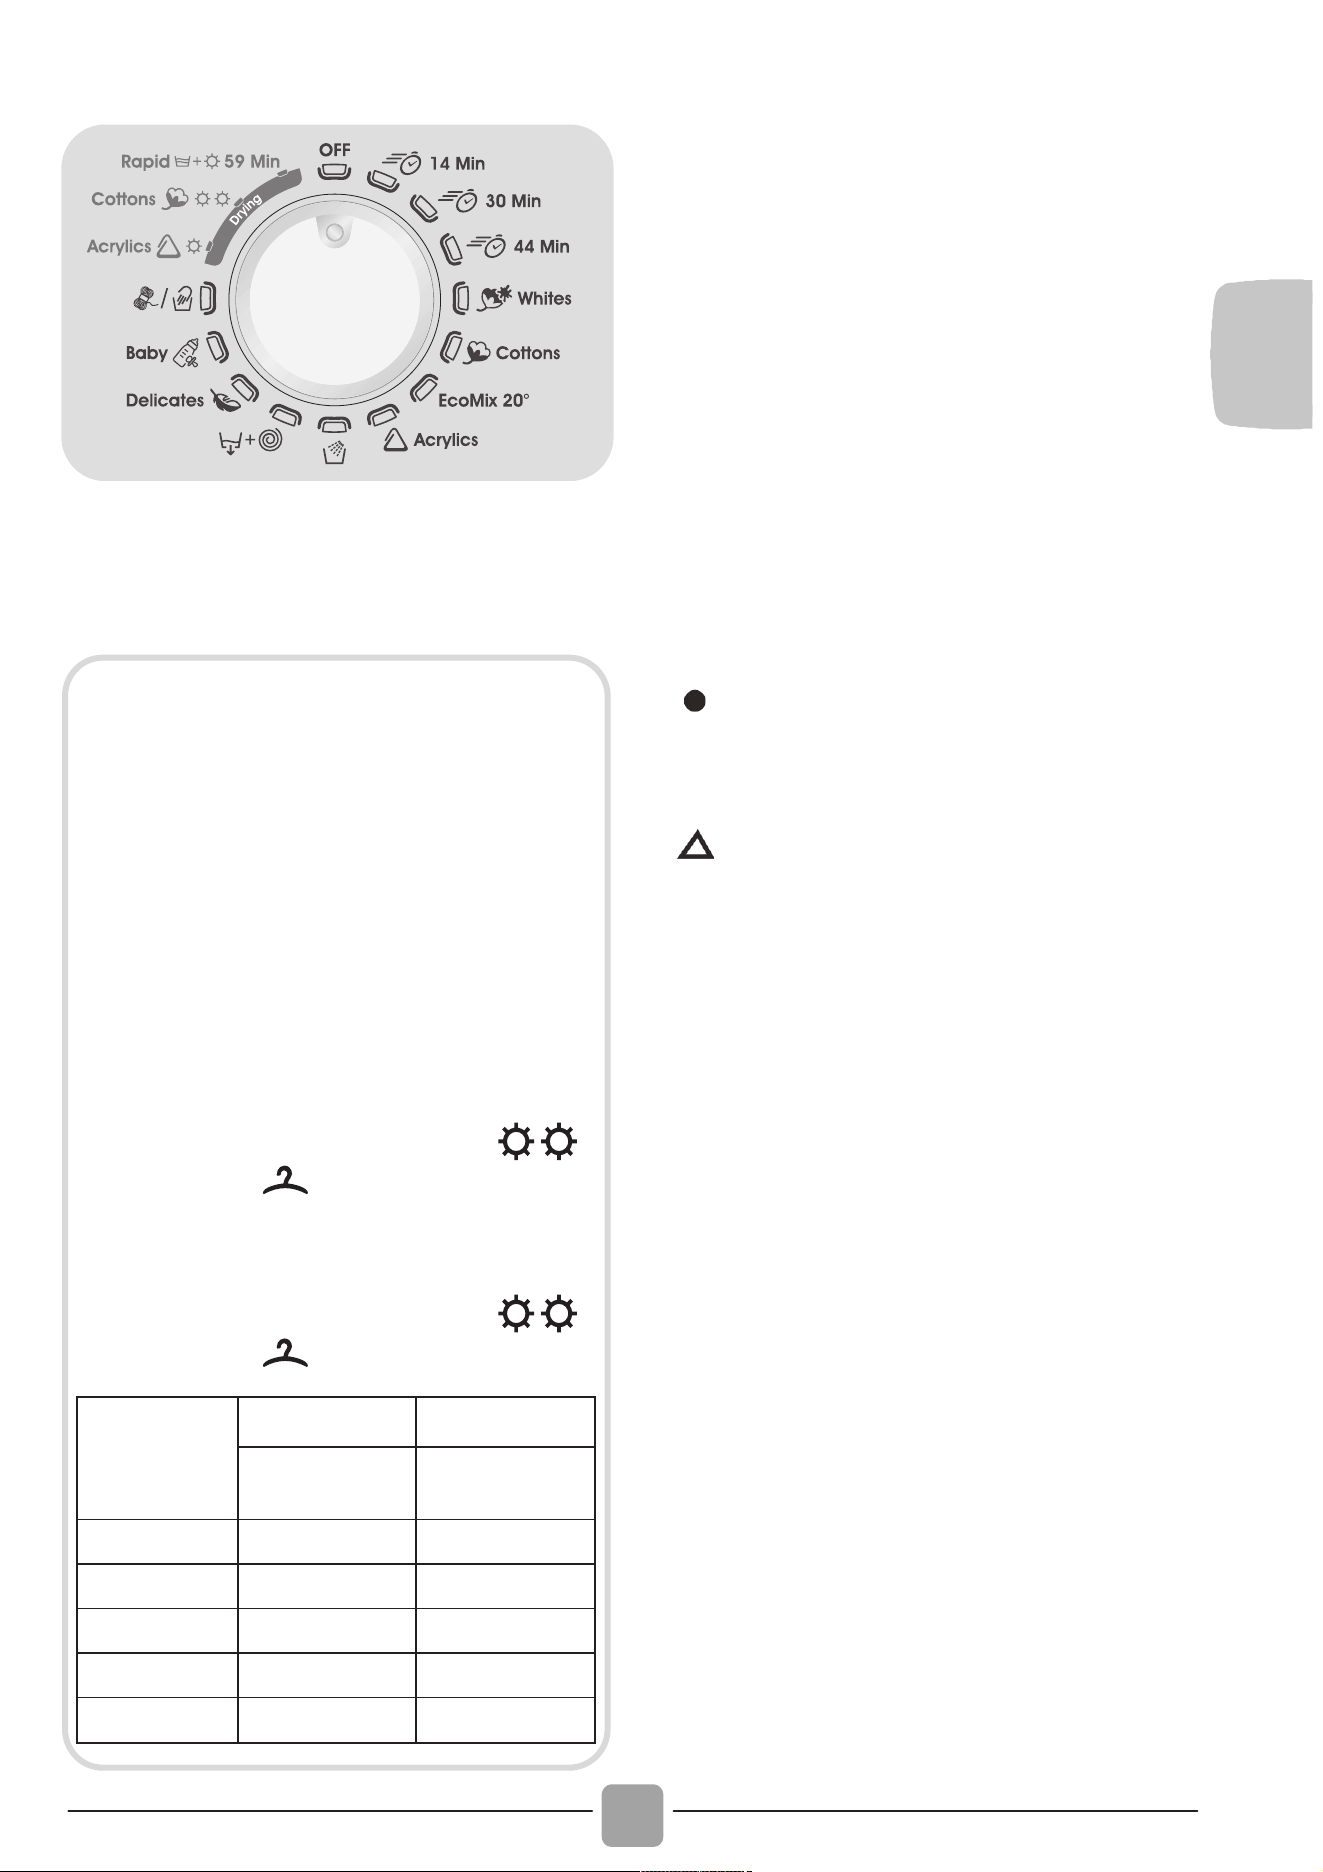
EN
45
Please read these notes:
* Maximum load capacity of dry clothes,
according to the model used (see control
panel).
The spin speed may also be reduced, to
match any guidelines suggested on the
fabric label, or for very delicate fabrics
cancel the spin completely this option is
available with a spin speed button. This
function can be activated with the button
SPIN SELECTION.
If the label does not indicate specific
information, it is possible to use the
maximum spin expected in the program.
A
n over dosing of detergent can cause
excessive foaming.
If the appliance detects the presence o
f
excessive foam, it may exclude the spinning
phase or extend the duration of the program
and increase water consumption.
( ) Only with PREWASH option
selected (programmes with
PREWASH option available).
(Only for models with liquid
detergent compartment)
When only a limited number of
articles have stains which require
treatment with liquid bleaching
agents, preliminary removal of
stain can be carried out in the
washing machine.
Pour the bleach into the liquid
bleach container, inserted into the
compartment marked "2" in the
detergent drawer, and set the
special programme RINSE.
When this phase has terminated,
turn the programme selector on
the OFF position, add the rest of
the fabrics and proceed with a
normal wash on the most suitable
programme.
1) For the programmes shown you
can adjust the duration and
intensity of the wash using the
STAIN LEVEL button.
2) Programmes for automatic drying.
INFORMATION FOR THE TEST
LABORATORIES (Ref. EN 50229
Standards)
Washing
Use the programme ** with the maximum
degree of soiling selected, maximum spin
speed and a temperature of 60°C.
Programme recommended also for test
with a lower temperature.
Drying
First drying with A kg (a load consist:
pillowcases and hand-towels) selecting
the cotton drying programme ( )
cupboard dry (
).
Second drying with B kg (a load consist:
sheets and hand towels) selecting the
cotton drying programme (
)
cupboard dry (
).
Capacity
(washing)
(kg)
A (kg) B (kg)
First
drying
Second
drying
6 4 2
8 5 3
9 6 3
10 7 3
11 7 4

46
To clean different types of fabrics and
various levels of dirt, the washing machine
has specific programs to meet every need
of washing (see table of programmes).
Rapid 14 Min / 30 Min / 44 Min
A
complete washing cycle (wash, rinse and
spin). This programme is particularly suited
to slightly dirty cottons and mixed fabrics.
With this programme it is recommended to
use only 20% of the detergent normall
y
used to avoid waste.
Whites
Made to have a perfect washing. The final
spin at maximum speed gives more efficien
t
removal.
Cottons
This program is suitable to clean normall
y
soiled cotton laundry and it is the most efficien
t
program in terms of combined energy and
water consumptions for washing cotton laundry.
EcoMix 20°
This innovative programme, allows you to wash
different fabrics and colours together, such a
s
cottons, synthetics and mixed fabrics at onl
y
20°C and provides an excellent cleaning
performance. Consumption on this program is
about 40% of a conventional 40°C cotton
s
wash.
Acrylics
The washing and rinsing are optimized in
the rhythms of rotation of the drum and to
the water levels. The gentle spin, ensures a
reduced formation of creases in the fabric.
Rinse
This program performs 3 rinses with an
intermediate spin (which can be reduced o
r
excluded by using the appropriate button). I
t
is used for rinsing any type of fabric, fo
r
example after a wash carried out by hand.
Drain + Spin
The program completes the drain and a
maximum spin. It is possible to delete o
r
reduce the spin with the SPIN SELECTION
button.
Delicates
This program alternates among moments o
f
work during breaks and is particularly suitable fo
r
washing delicate fabrics. The wash cycle and
rinses are carried out with a high level of water t
o
ensure the best performance.
Baby
This program allows you to wash all baby
clothes getting a perfect clean and
sanitizing effect, setting the temperature at
60°C minimum.
To optimize the result of the sanitizing effec
t
we recommend the use of powder detergent.
Wool/Hand
This program performs a wash cycle
dedicated to the wool fabrics that can be
washed in a washing machine, or the
articles to be washed by hand.
DRYING
The drum changes direction during the drying
cycle to prevent the laundry from tangling
and producing even more drying. Cool air is
used during the last 10/20 minutes of the
drying cycle to minimize creasing.
Acrylics
Low temperature drying programme
recommended for synthetics and mixed
fibres (always refer to the laundry care label).
Cottons
High temperature drying programme
recommended for cottons and linen items
(always refer to the laundry care label).
Rapid W&D 59 Min
When you only have a few items to wash and
dry in a hurry, this 59 minute cycle
is the ideal time saver! Suitable for a light 1,5 kg
load size (e.g. 4 shirts) or slightly dirty fabrics, this
cycle will wash, rinse, spin and dry you
r
garments in under an hour. We recommend tha
t
you reduce the detergent dosage when using
this programme to avoid wastage.
Programmes selection
WARNING:
Dispensers used for concentrated powders
and liquid detergents must be removed
from the drum before commencing the
tumble drying programmes.
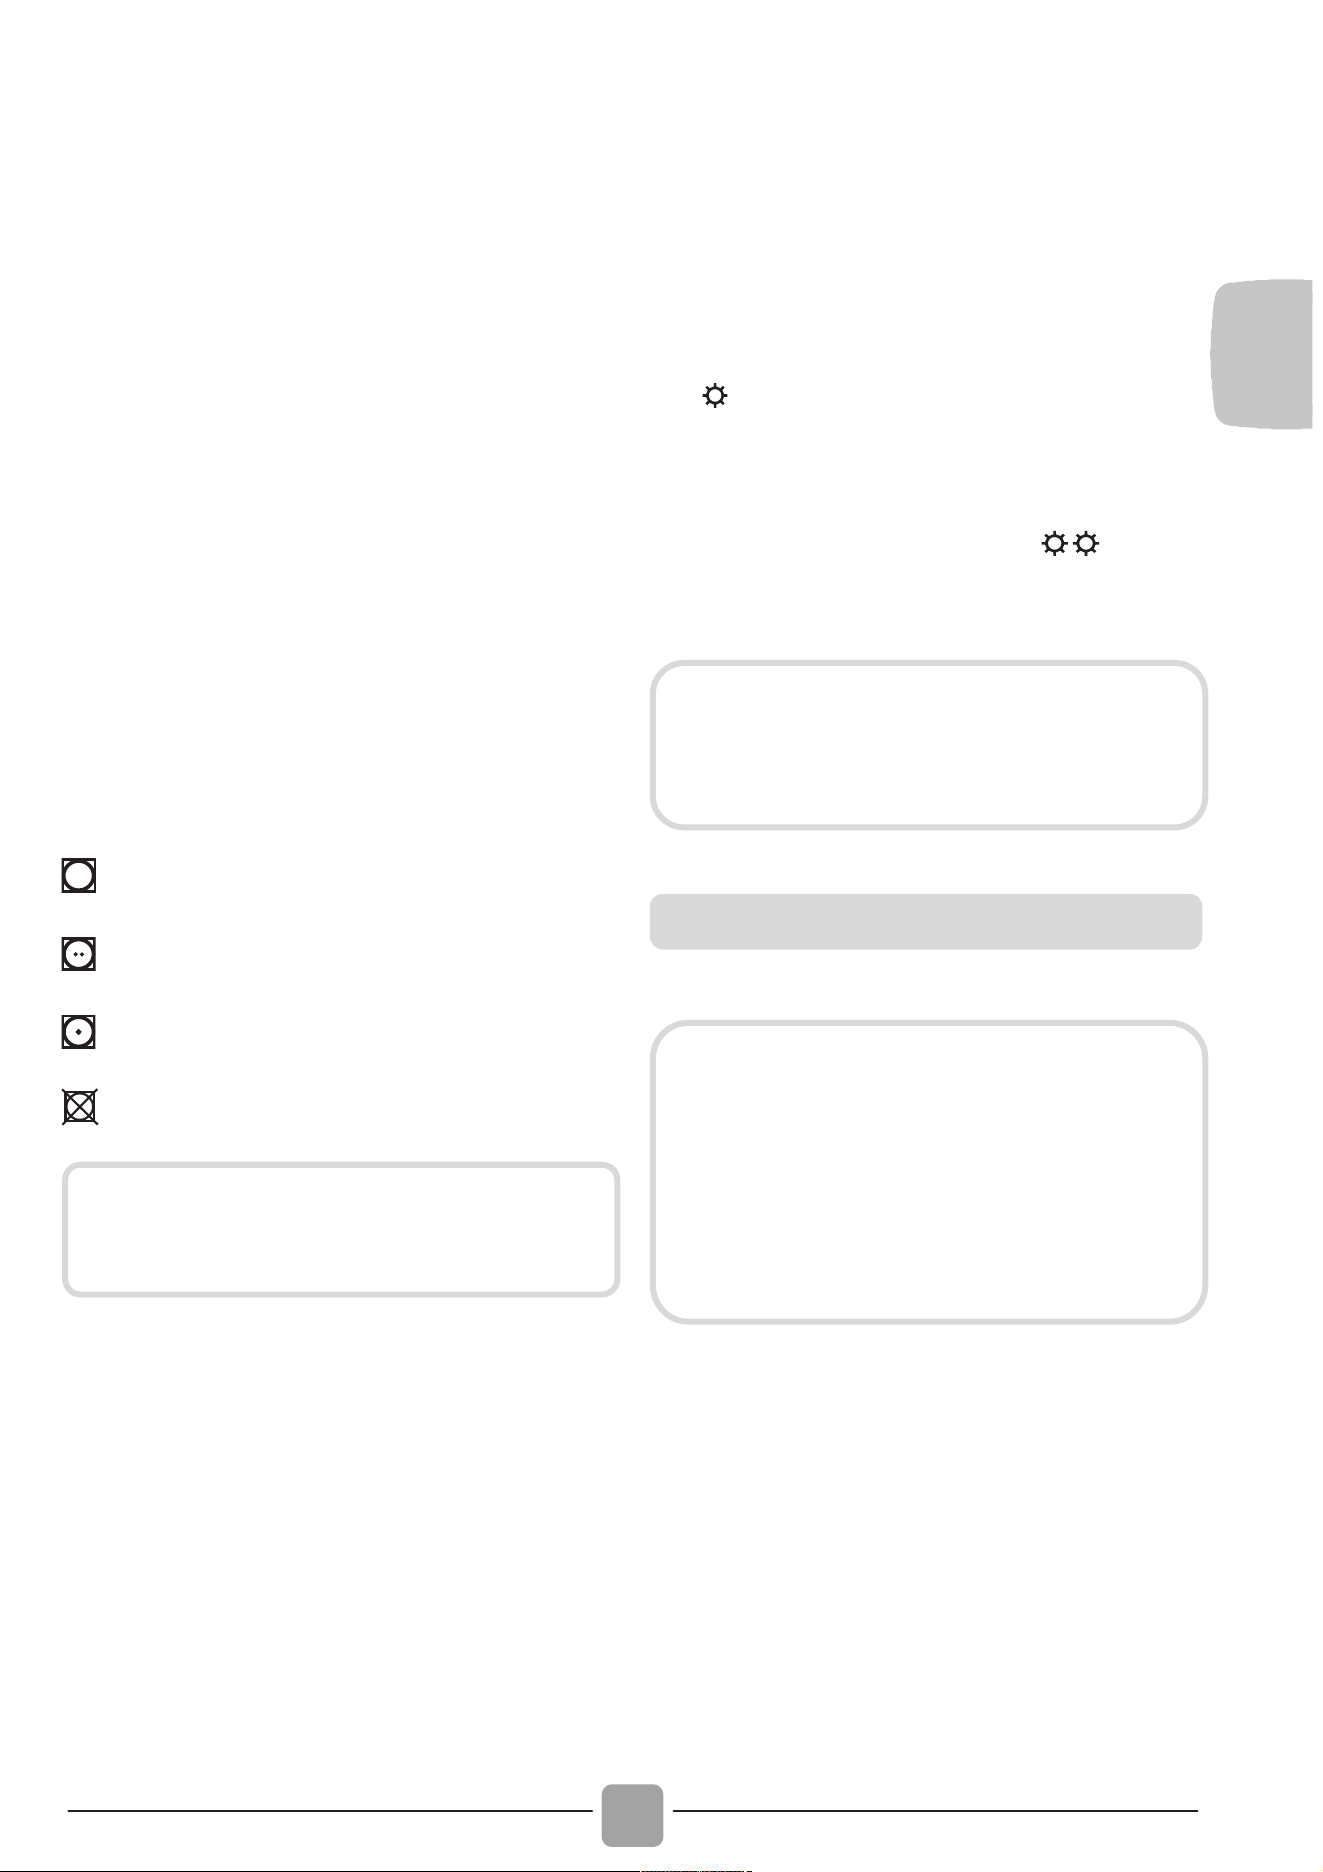
EN
47
7. DRYING CYCLE
Drying guidance advice is general, but
practical experience of using the product
will help you to achieve the best drying
results.
We recommend setting a lower drying
time than indicated, when first using the
appliance in order to establish the degree
of dryness required.
We recommend not drying fabrics that
fray easily, such as rugs or garments with
a deep pile, in order to avoid air duct
clogging.
We recommend that you sort the laundry
by the following methods:
- By drying care symbols, which are
displayed on the clothing labels
Suitable for tumble drying.
Tumble dry at high temperature.
Tumble dry at low temperature only.
DO NOT tumble dry.
- By size and thickness
Whenever the wash load is bigger than
the drying capacity, separate the clothes
according to thickness (e.g. towels from
thin underwear).
- By fabric type
Cottons/linen: towels, cotton jersey, bed
and table linen.
Synthetics: blouses, shirts, overalls, etc.
made of polyester or polyamide, as well
as for cotton/synthetic mixes.
Only dry pre-spun laundry.
The washer dryer can perform the
following types of drying:
- Low temperature drying programme
recommended for mixed fabrics
(synthetics/cotton) synthetic fabrics
(
symbol on programme dial).
- High temperature drying programme
recommended for cotton, terry toweling,
linen, hemp fabrics, etc... (
symbol
on programme dial).
Open the door.
Fill with the laundry, not exceeding the
maximum drying load indicated in the
programme table. For large items (e.g.
sheets) or very absorbent items (e.g.
towels or jeans), it is a good idea to
reduce the load.
Close the door.
If the fabric does not have a care label,
you should assume that it is not
suitable for drying.
During the drying phase the drum will
accelerate to a higher speed to
distribute the load and to optimize the
drying performance.
The correct way to dry
The appliance door is fitted with a
protective shield to prevent contact
with the glass door which can reach
high temperatures, during the drying
cycle.
It should not be necessary to remove
the shield from the machine during
the normal course of use.

48
Turn the programme dial to the more
suitable drying programme for your laundry.
Select the degree of dryness that you
require choosing one of 3 automatic
programmes:
Extra dry programme (suitable fo
r
towels, bathrobes and bulky loads).
Iron dry programme (that leaves the
laundry ready for ironing).
Cupboard dry programme (fo
r
items that will be put away withou
t
ironing).
If you wish to select a timed drying
programme, press the DRYING
SELECTION button until the required
time indicator lights up.
Make sure that the water inlet valve is
open.
Make sure water drain is correctly
positioned.
Press the START/PAUSE button.
The drying phase will begin with the
programme dial fixed on the selected
programme until the end of drying.
The drying programme indicator will be
on, until the cool down phase begins and
the corresponding indicator is on.
When the programme is finished the word
"End" will appear on the display. After
5 minutes the appliance will go into
standby mode (on certain models, the
display will show two lines).
After the programme has finished please
wait for about 2 minutes until the DOOR
LOCKED indicator has gone out before
opening the door.
Switch off the machine by turning the
programme selector to the OFF position.
Open the door and remove the laundry.
Turn off the tap.
CANCELLING THE DRYING PROGRAMME
To cancel the drying programme, press
and hold the DRYING SELECTION
button for about 3 seconds.
WARNING:
Do not dry woollen garments or
articles with special padding (e.g.
quilts, quilted anoraks, etc.) and very
delicate fabrics. If garments are
drip/dry, load less items as to prevent
creasing.
WARNING:
After cancelling the drying programme,
the cool down phase will begin and you
must wait for about 10/20 minutes
before opening the door.

EN
49
8. AUTOMATIC
WASHING/DRYING
CYCLE
- Washing
Open the drawer and put in the correct
amount of detergent.
Refer to the list of washing programmes
for the fabrics to be washed (e.g. very
dirty cotton) and turn the selector knob to
the required programme.
Adjust the wash temperature if
necessary.
Press the option buttons (if required).
Check that the tap is turned on and that
the discharge hose is positioned
correctly.
- Drying
Select the degree of dryness that you
require choosing one of 3 automatic
programmes:
Extra dry programme (suitable fo
r
towels, bathrobes and bulky loads).
Iron dry programme (that leaves the
laundry ready for ironing).
Cupboard dry programme (for
items that will be put away without
ironing).
If you wish to select a timed drying
programme, press the "DRYING
SELECTION" button until the required
time indicator lights up.
Press the START/PAUSE button.
The programme selector remains in the
same stationery position throughout the
cycle until it ends.
At the end of the wash phase the display
will show the drying time remaining.
The washer dryer will then complete the
entire drying programme.
The drying programme indicator will be
on, until the cool down phase begins and
the corresponding indicator is on.
When the programme is finished the word
"End" will appear on the display. After 5
minutes the appliance will go into
standby mode (on certain models, the
display will show two lines).
After the programme has finished please
wait for about 2 minutes until the DOOR
LOCKED indicator has gone out before
opening the door.
Switch off the machine by turning the
programme selector to the OFF position.
Open the door and remove the laundry.
Turn off the tap.
CANCELLING THE DRYING PROGRAMME
To cancel the drying programme, press
and hold the DRYING SELECTION
button for about 3 seconds.
You cannot exceed the maximum
dryable load of laundry indicated in
the programme table, otherwise the
laundry will not be dried satisfactory.
WARNING:
After cancelling the drying programme,
the cool down phase will begin and you
must wait for about 10/20 minutes
before opening the door.
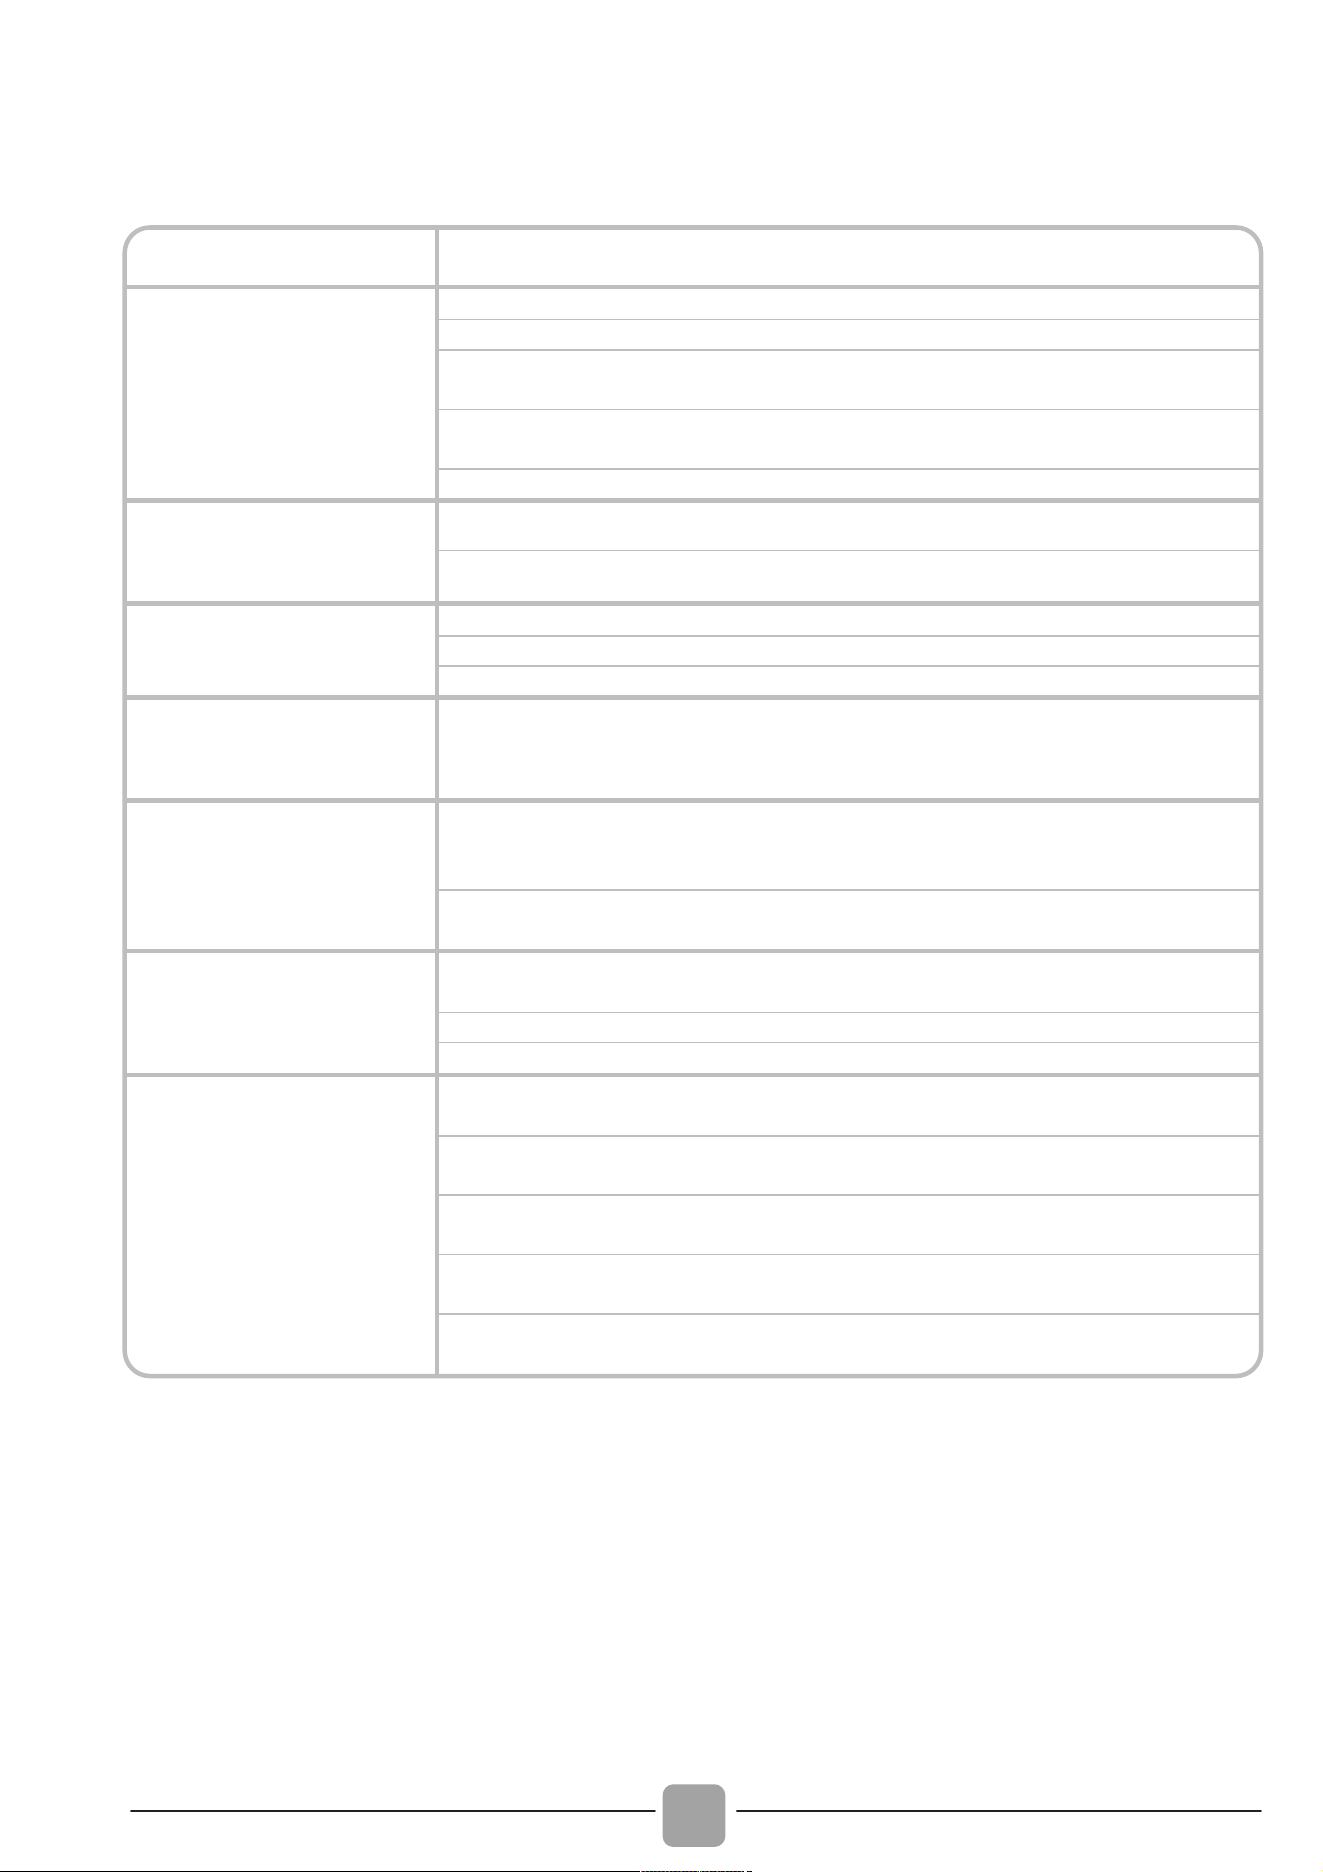
50
9. CUSTOMER SERVICE CENTRE AND WARRANTY
If you believe the washing machine is not working correctly, consult the quick guide
provided below with some practical tips on how to fix the most common problems.
Problem Possible causes and practical solutions
The washing machine
does not work/start
Make sure it is correctly plugged in.
Make sure power is on.
Check whether the required program was correctly selected and to
have correctly started the machine.
Make sure the fuse has not blown and that the wall socket is working,
testing it with another appliance such as a lamp.
The porthole may not be correctly closed: open and close it again.
The washing machine
does not fill with
water
Make sure the water faucet is open.
Make sure the timer is correct set.
The washing machine
does not drain water
Make sure the filter is not clogged.
Make sure the drain hose is not bent.
Make sure there are no foreign objects in the filter.
Water leaked on the
floor near the washing
machine
This may be due to a leak in the gasket between the faucet and supply
tube; in this case, replace it and tighten the tube and faucet.
The washing machine
does not centrifuge
This could be due to the fact that water has not been completely
drained: wait a few minutes.
Some models include a "no centrifuge" function: make sure it is not on.
An excessive amount of detergent could prevent centrifuge: reduce the
amount at the next wash.
Strong vibrations are
heard during centrifuge
The washing machine may not be fully levelled: if necessary, adjust
the feet as indicated in the specific section.
Make sure transport brackets were removed.
Make sure the load is evenly distributed.
If a specific ERROR
appears of blinks
If error no. 0, 1, 5, 7 or 8 appears or blinks, contact the Customer
Service Centre directly.
If error no. 2 appears or blinks, the machine does not load water.
Make sure the water faucet is open.
If error no. 3 appears or blinks, the machine does not correctly drain.
Make sure the drain is free and that the drain hose is not bent.
If error no. 4 appears or blinks, the machine is too full. Close the
water faucet and contact the Customer Service Centre.
If error no. 9 appears or blinks, turn off the washing machine, wait 10
– 15 seconds and restart the program.

EN
51
The use of ecological detergents without
phosphates may cause the following effects:
- cloudier rinse drain water: This effect is
tied to the suspended zeolites which do
not have negative effects on rinse
efficiency.
- white powder (zeolites) on laundry at
the end of the wash: this is normal, the
powder is not absorbed by fabric and
does not change its colour.
- foam in the water at last rinse: this
does not necessary indicate poor rinsing.
- abundant foam: This is often due to the
anionic surfactants found in the
detergents which are hard to eliminate
from laundry.
In this case, do not re-rinse to eliminate
these effects: it will not help at all.
If the problem persists or if you suspect a
malfunction, immediately contact the
Candy Customer Service Centre.
You can also register for the Candy
service plan to receive free home service
after the warranty expires.
Attention: the call is not toll-free. The cost
will be communicated in a voice message
by your telephone operator's customer
service.
Candy recommends you always use
original spare parts available at our
Customer Service Centre.
The manufacturer declines all
responsibility for any printing errors in
the booklet included with this product.
Moreover, it also reserves the right to
make any changes deemed useful to its
products without changing their essential
characteristics.
Warranty
The product is guaranteed under the
terms and conditions stated on the
certificate included with the product. The
warranty certificate must be duly filled in
and stored, so as to be shown to the
Authorised Candy Service Centre in
case of need.
Register your product!
Don’t waste time. Register your washing
machine at once, and discover the
benefits to which you are entitled.
Discover how at www.registercandy.com
or by calling the number stated on the
related material.

52
Wir freuen uns, dass Sie sich für ein Gerä
t
aus unserem Hause entschieden haben –
es soll die tägliche Arbeit im Haushalt und
damit Ihren Alltag erleichtern. Wi
r
wünschen Ihnen allzeit viel Freude mit Ihre
r
Candy Waschmaschine.
Sie können Ihr Gerät unter
www.registercandy.com kostenpflichtig
registrieren, um auch nach Ablauf de
r
Garantie einen erweiterten Schutz sowie
umfangreichen und schnellen Service zu
genießen.
Bitte nehmen Sie sich vor de
r
Installation und vor dem ersten Gebrauch
unbedingt ausreichend Zeit, um die vorliegende
Gebrauchsanleitung aufmerksam zu lesen und
sich in Ruhe mit der Bedienung des Geräte
s
vertraut zu machen. Dadurch schützen Sie
sich und verhindern Schäden an de
r
Waschmaschine. Die Anleitung enthält wichtig
e
Hinweise - bitte daher für evtl. Rückfragen
unbedingt aufbewahren bzw. bei de
r
Weitergabe des Gerätes an Nachbesitze
r
mitgeben.
Bitte überprüfen Sie weiterhin nach dem
A
uspacken des Gerätes, ob das komplette
Zubehör wie z.B. die passende
Gebrauchsanleitung, die Garantiebescheinigung,
das Energielabel, der Einsatz fü
r
Flüssigwaschmittel (nur einige Modelle) und de
r
Bogen für die ordnungsgemäße Anbringung des
A
blaufschlauchs mitgeliefert wurden.
Jedes unserer Geräte verfügt über eine 16-
stellige Matrikelnummer, die sich auf dem
Typenschild im Innenbereich des Bullauges
befindet. Bitte notieren Sie sich diese
unbedingt, damit Ihnen der Candy
Kundendienst bei Fragen oder im Servicefall
schneller und gezielter helfen kann.
Dieses Gerät ist entsprechend de
r
europäischen Richtlinie 2012/19/EU
als elektrisches / elektronisches
A
ltgerät (WEEE) gekennzeichnet.
Elektrische und elektronische Altgeräte enthalten
vielfach noch wertvolle Materialien. Sie enthalten abe
r
auch schädliche Stoffe, die für ihre Funktion und
Sicherheit notwendig waren. Im Restmüll oder bei
falscher Behandlung können diese der menschlichen
Gesundheit und der Umwelt schaden. Es ist daher seh
r
wichtig, dass elektrische und elektronische Altgerät
e
(WEEE) einer speziellen Verwertung zugeführt werden,
damit die schädlichen Stoffe ordnungsgemäß entfern
t
und entsorgt werden bzw. wertvolle Rohstoffe de
r
Wiederverwertung zugeführt werden können.
Sie können mit der Beachtung der folgenden simplen
Hinweise einen wichtigen Beitrag dazu leisten, dass
elektrische und elektronische Altgeräte (WEEE) de
r
menschlichen Gesundheit und der Umwelt nicht schaden:
Elektrische- und elektronische Altgeräte
(WEEE) sollten keinesfalls wie Rest- ode
r
Haushaltsmüll behandelt werden.
Nutzen Sie stattdessen die an Ihrem Wohnort
eingerichteten kommunalen oder gewerblichen
Sammelstellen zur Rückgabe und Verwertung
elektrischer und elektronischer Altgeräte
(WEEE). Informieren Sie sich, ob ggf. in Ihrem
Land bzw. Ihrer Region für große/sperrige
elektrische und elektronische Altgeräte (WEEE)
eine Abholung angeboten wird. Sorgen Sie in
jedem Falle dafür, dass Ihr Altgerät bis zum
Abtransport kindersicher aufbewahrt wird.
In einigen Ländern sind Händler unterbestimmten
Voraussetzungen beim Geräteneukauf auch zu
r
Rücknahme des Altgerätes verpflichtet, wenn da
s
A
ltgerät dem neuen Fabrikat in der Funktion entspricht.
1. GENERELLE SICHERHEITSHINWEISE
2. INSTALLATION
3. PRAKTISCHE TIPPS
4. WARTUNG UND REINIGUNG
5. KURZANLEITUNG
6. STEUERUNG UND PROGRAMME
7. TROCKNEN
8. AUTOMATISCHER WASCH- UND
TROCKENGANG
9. HINWEISE ZUM KUNDENDIENST UN
D
ZUR GARANTIE
Umweltbedingungen
Inhalt

DE
53
1. GENERELLE
SICHERHEITSHINWEISE
Dieses Gerät ist ausschließlich
für den Haushaltsgebrauch konzipiert
bzw. für den haushaltsnahen
Gebrauch, wie z.B:
- Teeküchen für das Personal von
Büros, Geschäften oder ähnlichen
Arbeitsbereichen;
- Ferienhäuser;
- Gäste von Hotels, Motels und
anderen Wohneinrichtungen;
- Gäste von Apartments/
Ferienwohnungen, Bed and
Breakfast Einrichtungen
Eine andere Nutzung als die
normale Haushaltsnutzung, wie z.B.
gewerbliche oder professionelle
Nutzung durch Fachpersonal, ist
auch im Falle der oben erwähnten
Einrichtungen ausgeschlossen.
Sollte das Gerät entgegen diesen
Vorschriften betrieben werden,
kann dies die Lebensdauer des
Gerätes beeinträchtigen und den
Garantieanspruch gegenüber dem
Hersteller verwirken.
Eventuelle Schäden am Gerät oder
andere Schäden oder Verluste, die
durch eine nicht haushaltsnahe
Nutzung hervorgerufen werden
sollten (selbst wenn sie in einem
Haushalt erfolgen), werden, so weit
vom Gesetz ermöglicht, vom
Hersteller nicht anerkannt.
Kinder unter 8 Jahren sowie
Personen, die aufgrund ihrer
physischen, sensorischen oder
geistigen Fähigkeiten oder ihrer
Unerfahrenheit oder Unkenntnis
nicht in der Lage sind, die
Waschmaschine sicher zu bedienen,
dürfen die Waschmaschine nicht
ohne Aufsicht oder Anweisung durch
eine verantwortliche Person benutzen,
sich in der Nähe aufhalten oder das
Gerät saubermachen. Kinder sollten
nicht mit dem Gerät spielen. Reinigung und
Benutzerwartung sollten nicht von Kindern
ohne Einführung, ausgeführt werden.
Kinder sollten über das Gerät
aufgeklärt werden, damit Sie
nicht mit dem gerät spielen.
Kinder unter 3 Jahren dürfen sich
nicht unbeaufsichtigt in der Nähe des
Gerätes aufhalten oder spielen.
Wenn das Netzkabel beschädigt ist,
muss das Gerät zum Hersteller gebracht
werden und von zuständigen Personen
repariert werden, um eventuelle
Gefahren zu vermeiden.
Verwenden Sie nur die mit dem
Gerät zusammen gelieferten
Schläuche.
Für einen ordnungsgemäßen Betrieb
muss der Wasserleitungsdruck
konstant zwischen min. 0,05 MPa
und max. 0,8 MPa liegen.
Vergewissern Sie sich, dass ein
Teppich nicht die Maschine und
Ventilatorenöffnungen, behindert.
Das Gerät ist abgeschaltet, wenn
sich der Referenzpunkt auf dem

54
Bedienknauf in der Position
AUS/OFF befindet. In jeder anderen
Stellung ist das Gerät eingeschaltet
und betriebsbereit (nur für Modelle
mit Bedienknebel).
Der letzte Teil eines kombinierten
Wasch-/Trockenprogrammes erfolgt
ohne Wärmezufuhr (Abkühlungsvogang),
um sicherzustellen, dass die
Kleidungsstücke im Gerät nicht
beschädigt werden.
Nach der Installation, sollte das
Gerät so positioniert sein, dass
der Stecker frei zugänglich ist.
Das Gerät darf nicht hinter
einer verschließbaren Tür, einer
Schiebetür oder einer Tür mit
entgegengesetzt zum Scharnier der
Gerätetür angebrachten Scharnier
aufgestellt werden, da sonst ein
vollständiges Öffnen und Schließen
der Gerätetür nicht oder nur
eingeschränkt möglich wird.
Die maximale Beladungskapazität
(trockene Kleidung lt. Normtest)
hängt von dem jeweiligen
Gerätemodell ab (s. Bedienblende).
Das Gerät darf nicht verwendet
werden, wenn zum Reinigen
zuvor industrielle Chemikalien
verwendet werden.
Trocknen Sie keine ungewaschenen
Kleidungsstücke im Gerät.
Kleidungsstücke, die mit Substanzen
wie Speiseöl, Aceton, Alkohol, Benzin,
Kerosin, Fleckenentferner, Terpentin,
Wachsen und Wachsentfernern
verschmutzt sind, sollten mit zunächst
heißem Wasser und einem
geeigneten Waschmittel vorgereinigt
werden, bevor sie im Waschtrockner
getrocknet werden.
Kleidungsstücke mit Schaumstoffanteil
(z.B. Latexschaum), Duschvorhänge,
wasserfeste Textilien, Wäschestücke
mit Gummibesatz sowie Kleidung oder
Kissen mit Schaumgummieinsätzen
dürfen nicht im Waschtrockner
getrocknet werden.
Weichspüler oder ähnliche Produkte
sollten nur speziell nach den vom
jeweiligen Hersteller angegebenen
Gebrauchsanweisungen und
Warnhinweisen verwendet werden.
Mit Öl verschmutze Kleidungsstücke
können sich plötzlich entzünden,
wenn Sie einer Wärmequellen wie
z.B. in einem Waschtrockner
ausgesetzt werden. Durch eine
Oxidationsreaktion im Öl wird Wärme
erzeugt. Wenn diese Hitze nicht
entweichen kann, können sich die
Wäschestücke dabei so erhitzen,
dass sie Feuer fangen können.
WARNUNG:
Beenden Sie das kombinierte
Wasch-/Trockenprogramm niemals
vorzeitig, es sei denn, alle
Kleidungsstücke werden unmittelbar
aus dem Gerät entnommen und so
ausgebreitet, dass die entstandene
Hitze schnell entweichen kann.

DE
55
Flusen und das Stapeln von mit
Öl verunreinigten Wäschestücken
können zudem das Entweichen der
Hitze verhindern und so eine
Brandgefahr darstellen.
Bevor mit Speiseöl oder
Haarpflegprodukten verschmutze
Wäschestücke im Waschtrockner
gereinigt und getrocknet werden,
sollten diese zunächst mit heißem
Wasser und einem geeigneten
Waschmittel vorgereinigt werden -
dies reduziert das Brandrisiko.
Entfernen Sie vor dem Einfüllen
in das Gerät unbedingt alle Gegenstände
aus den Taschen – insbesondere
Feuerzeuge und Streichhölzer.
Für die technischen Daten des
Produktes schauen Sie bitte auf der
Internetseite des
Herstellers nach.
Bevor Sie die Waschmaschine
reinigen, ziehen Sie das Gerät vor
und drehen Sie die Wasserzufuhr ab.
Überprüfen Sie, ob der Strom
abgeschaltet ist oder holen Sie
sich professionelle Hilfe dazu.
Gebrauchen Sie keine Wandler,
Mehrfachsteckdosen oder erweiterte
Kabel.
Stellen Sie sicher, dass sich kein
Wasser mehr in der Trommel befindet,
wenn Sie das Bullauge öffnen.
Bringen Sie keine Schnur an,
um die Maschine vorzuziehen.
Setzen Sie das Gerät keinem
Regen, direktem Sonnenlicht oder
anderen Wetterelementen aus.
Heben Sie die Maschine nicht
an den Drehknöpfen oder dem
Bullauge an; lassen Sie das
Bullauge nicht im Wagen. Wir
empfehlen, die Maschine, immer
zu zweit anzuheben.
Im Falle einer Störung schalten
Sie die Maschine aus, schließen
Sie die Wasserzufuhr und ändern
Sie nichts mehr an dem Gerät.
Kontaktieren Sie umgehend den
Kundendienst und verwenden Sie
nur Originale als Ersatzteile.
Geräte erfüllen die
europäischen Richtlinien
:
2006/95/EC (LVD);
2004/108/EC (EMC);
2009/125/EC (ErP);
2011/65/EU (RoHS);
sowie die folgenden.
Sicherheitsanweisungen
WARNUNG:
Wasser kann eine hohe
Temperatur während des
Waschvorgangs annehmen.
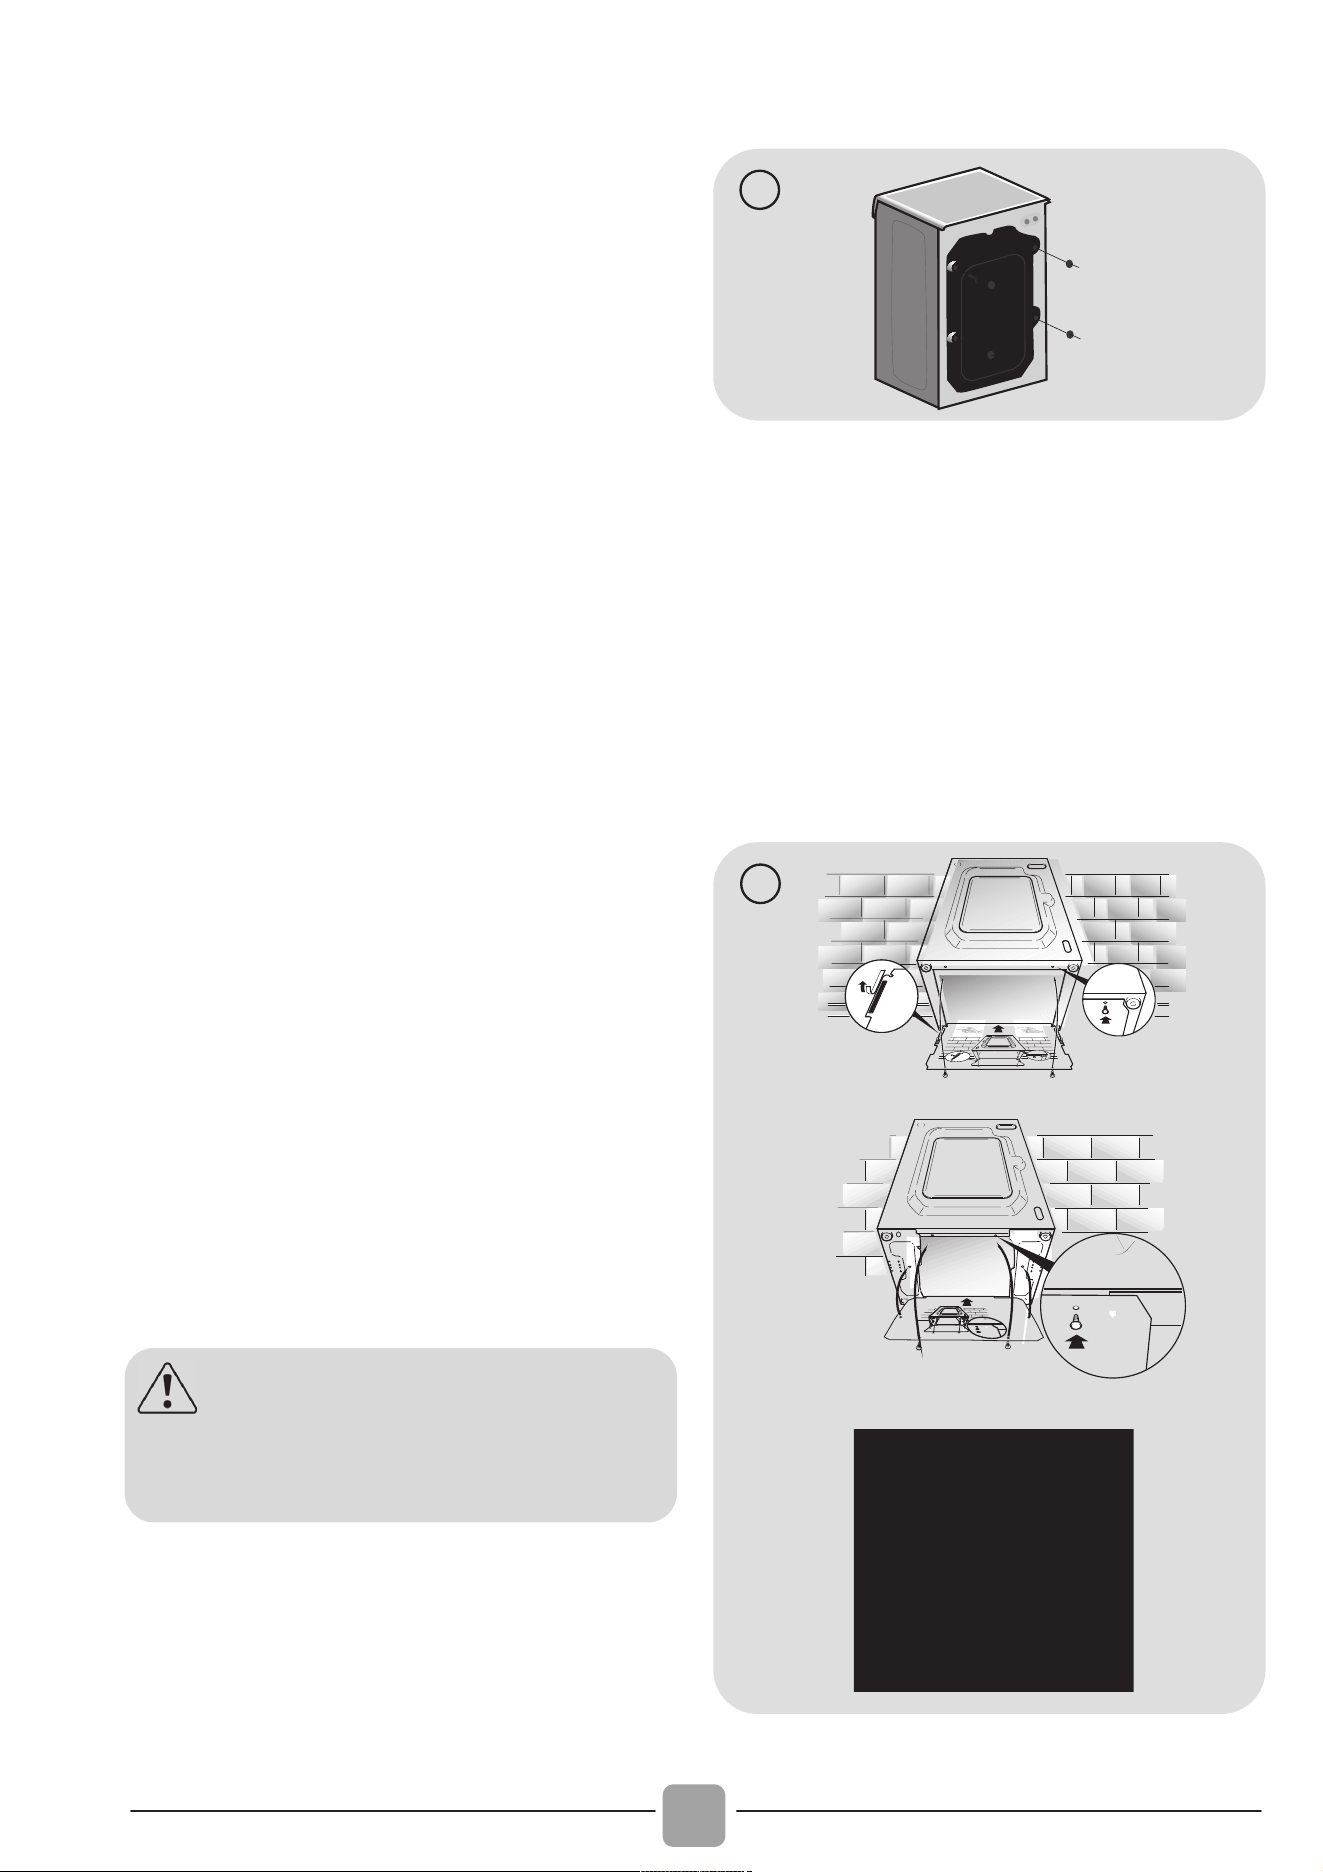
56
2. INSTALLATION
Schneiden Sie die Transportbefestigunge
n
der beiden Schläuche und de
s
Netzkabels vorsichtig durch und
achten darauf, dass diese dabei
nicht versehentlich beschädigt werden.
Lösen Sie die 2 bzw. 4 Schrauben
(A) auf der Geräterückseite und
entfernen die 2 bzw. 4 Distanzstück
e
(B) wie in Abbildung 1 gezeigt.
Schließen Sie 2 bzw. 4 Öffnungen
anschließend mit den beigefügten
Abdeckungen.
Wenn es sich bei Ihrem Gerät
um ein Einbaumodell handelt,
bitte nach dem Entfernen de
r
Schlauchtransportbefestigunge
n die 3 bzw. Schrauben (A) lösen
und die 3 bzw. 4 Distanzstücke
(B) entfernen.
Je nach Modell fallen eine ode
r
mehrere der Distanzstücke in das
Gerät. Das Gerät dann vorsichtig
nach vorne neigen und di
e
Distanzstücke entfernen. Di
e
Öffnungen anschließend mit den
beigefügten Abdeckungen schließen.
Bringen Sie die Kunststoffabdeckung
wie in Abb. 2 beschrieben unter dem
Gerät an (je nach Modell wählen Sie
die Variante A, B oder C).
A
A
A
A
B
B
B
B
1
3
2
1
3
1
2
A
C
B
2
WARNUNG:
Bewahren Sie die Verpackung
abseits von Kindern auf.
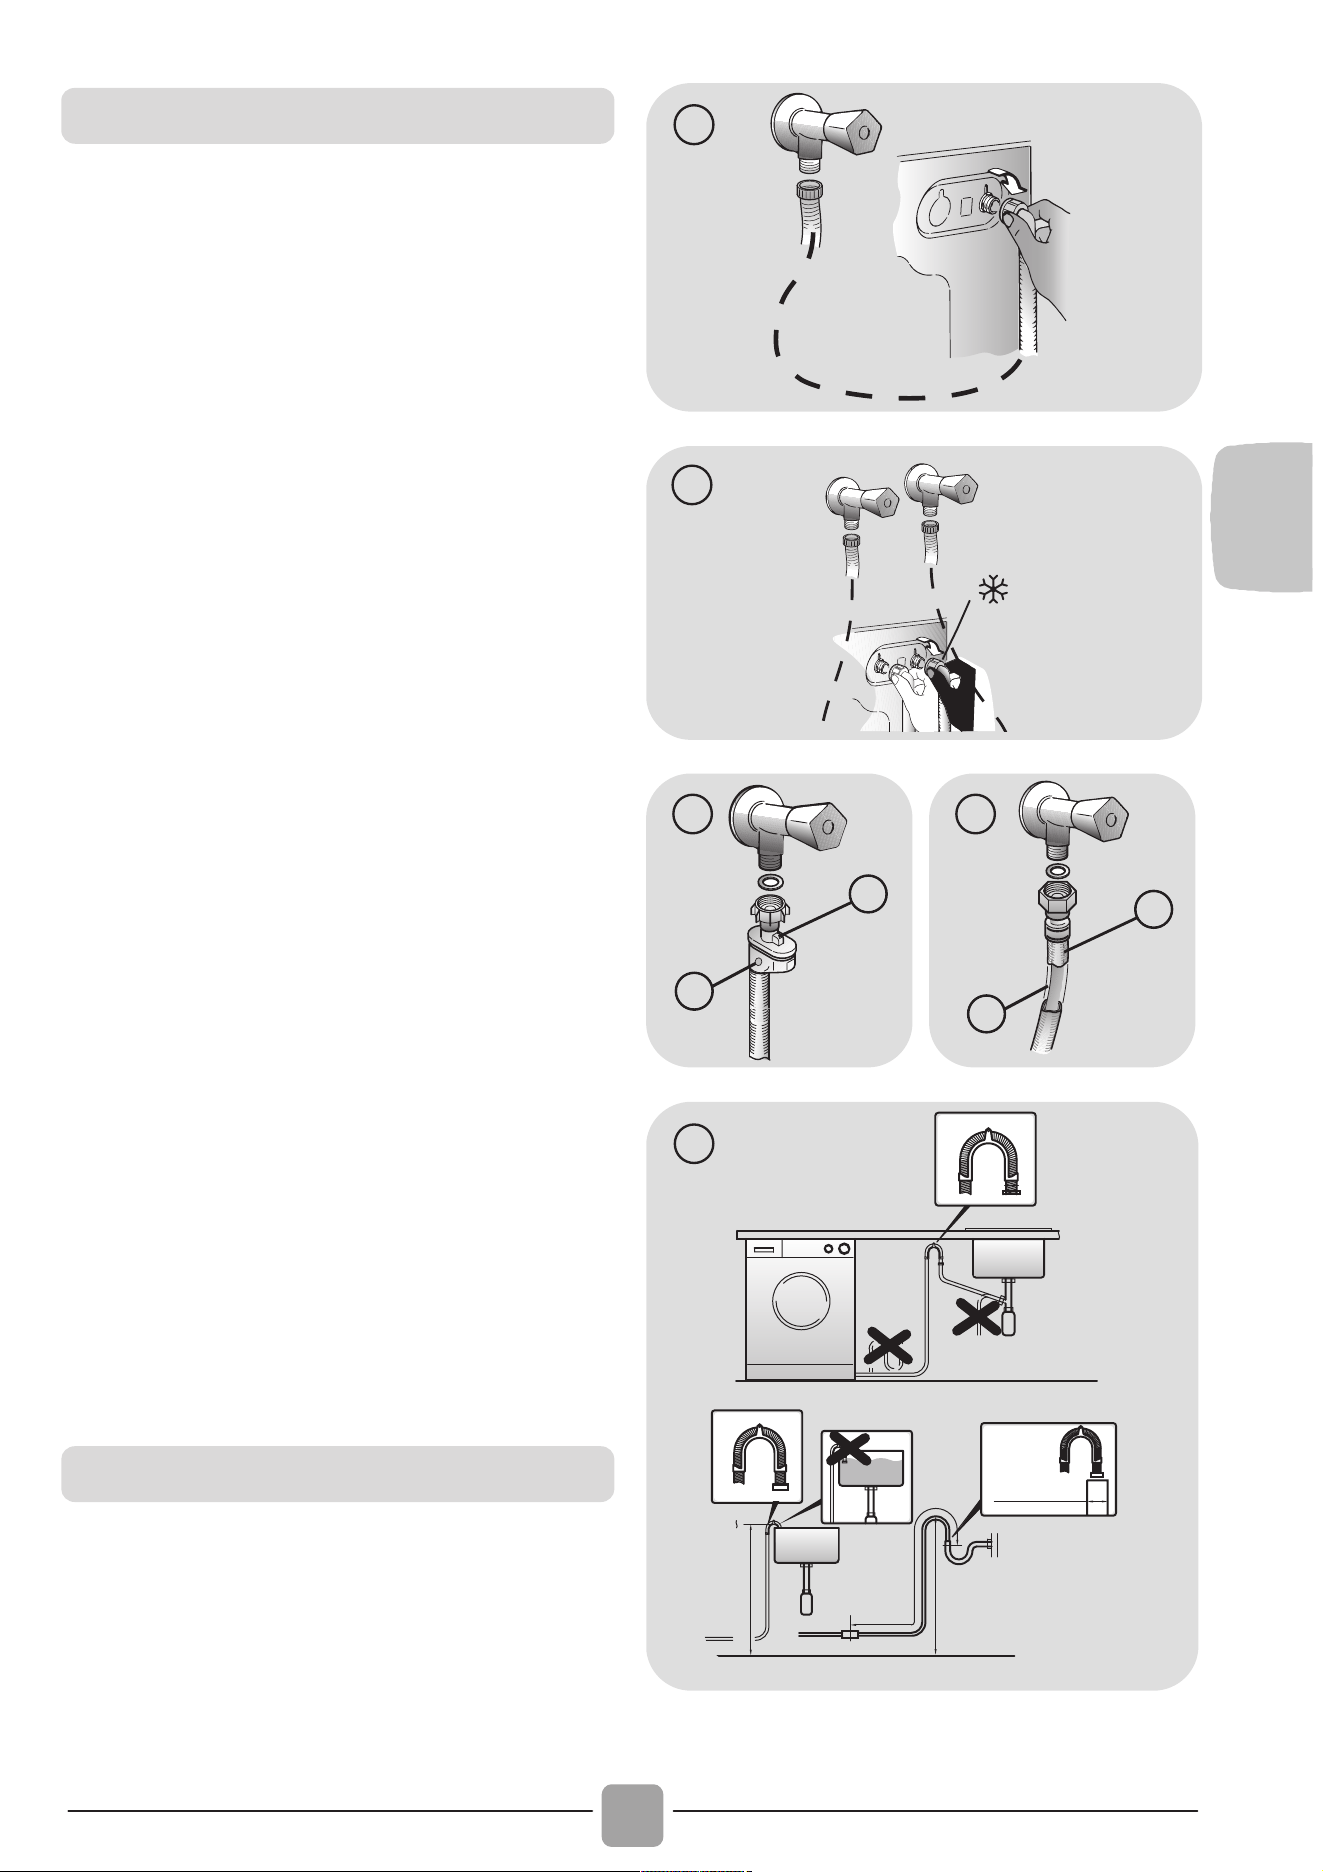
DE
57
Verbinden Sie den Wasserzulaufschlauch
mit dem Wasserhahn (Abbildung 3) und
bringen den Wasserablaufschlauch wie in
Abbildung 7 beschrieben an.
ÖFFNEN SIE KEINESFALLS DEN
WASSERHAHN OHNE DEN SCHLAUCH
ANGEBRACHT ZU HABEN!
Einige Modelle enthalten ein oder
mehrere der folgenden Eigenschaften:
HEIß&KALT (Abbildung 4):
Wasserverbindungseinstellungen mit heiß
und kalt für höhere Energieeinsparungen.
Verbinden Sie den grauen Schlauch mit
dem Wasserhahn und den roten mit dem
Heißwasserhahn. Die Waschmaschine
kann auch nur mit dem Kaltwasserhahn
verbunden werden: In diesem Fall brauche
einige Programme etwas länger, um zu
starten.
WASSERSTOP (Abbildung 5): Im Falle
eines defekten Schlauches stoppt die
Wasserzufuhr. In diesem Fall erscheint au
f
dem Fenster „A“ ein rotes Feld und de
r
Schlauch muss entfernt werden. Um die
Schraubenmutter zu lösen, drücken Sie den
Entsicherungsknopf „B“.
WASSERSCHUTZ (Abbildung 6): Sollte
Wasser aus dem Hauptschlauch „A“
austreten, schützt die Hülle „B“ vor
kompletten Wasseraustritt.
Am Ende dieses Vorganges kontaktieren
Sie den Kundenservice, damit der
Schlauch ausgewechselt wird.
Seien Sie mit dem Abstand zwischen
Waschmaschine und Wand vorsichtig, da
der Schlauch eingequetscht werden
könnte. Es sollte ein Mindestabstand von
50 cm eingehalten werden (Abbildung 7).
3
1
4
B
A
5
B
A
6
min 50 cm
max 85 cm
+2,6 mt
max
max 100 cm
min 4 cm
7
Wasseranschluss
Aufstellung des Gerätes
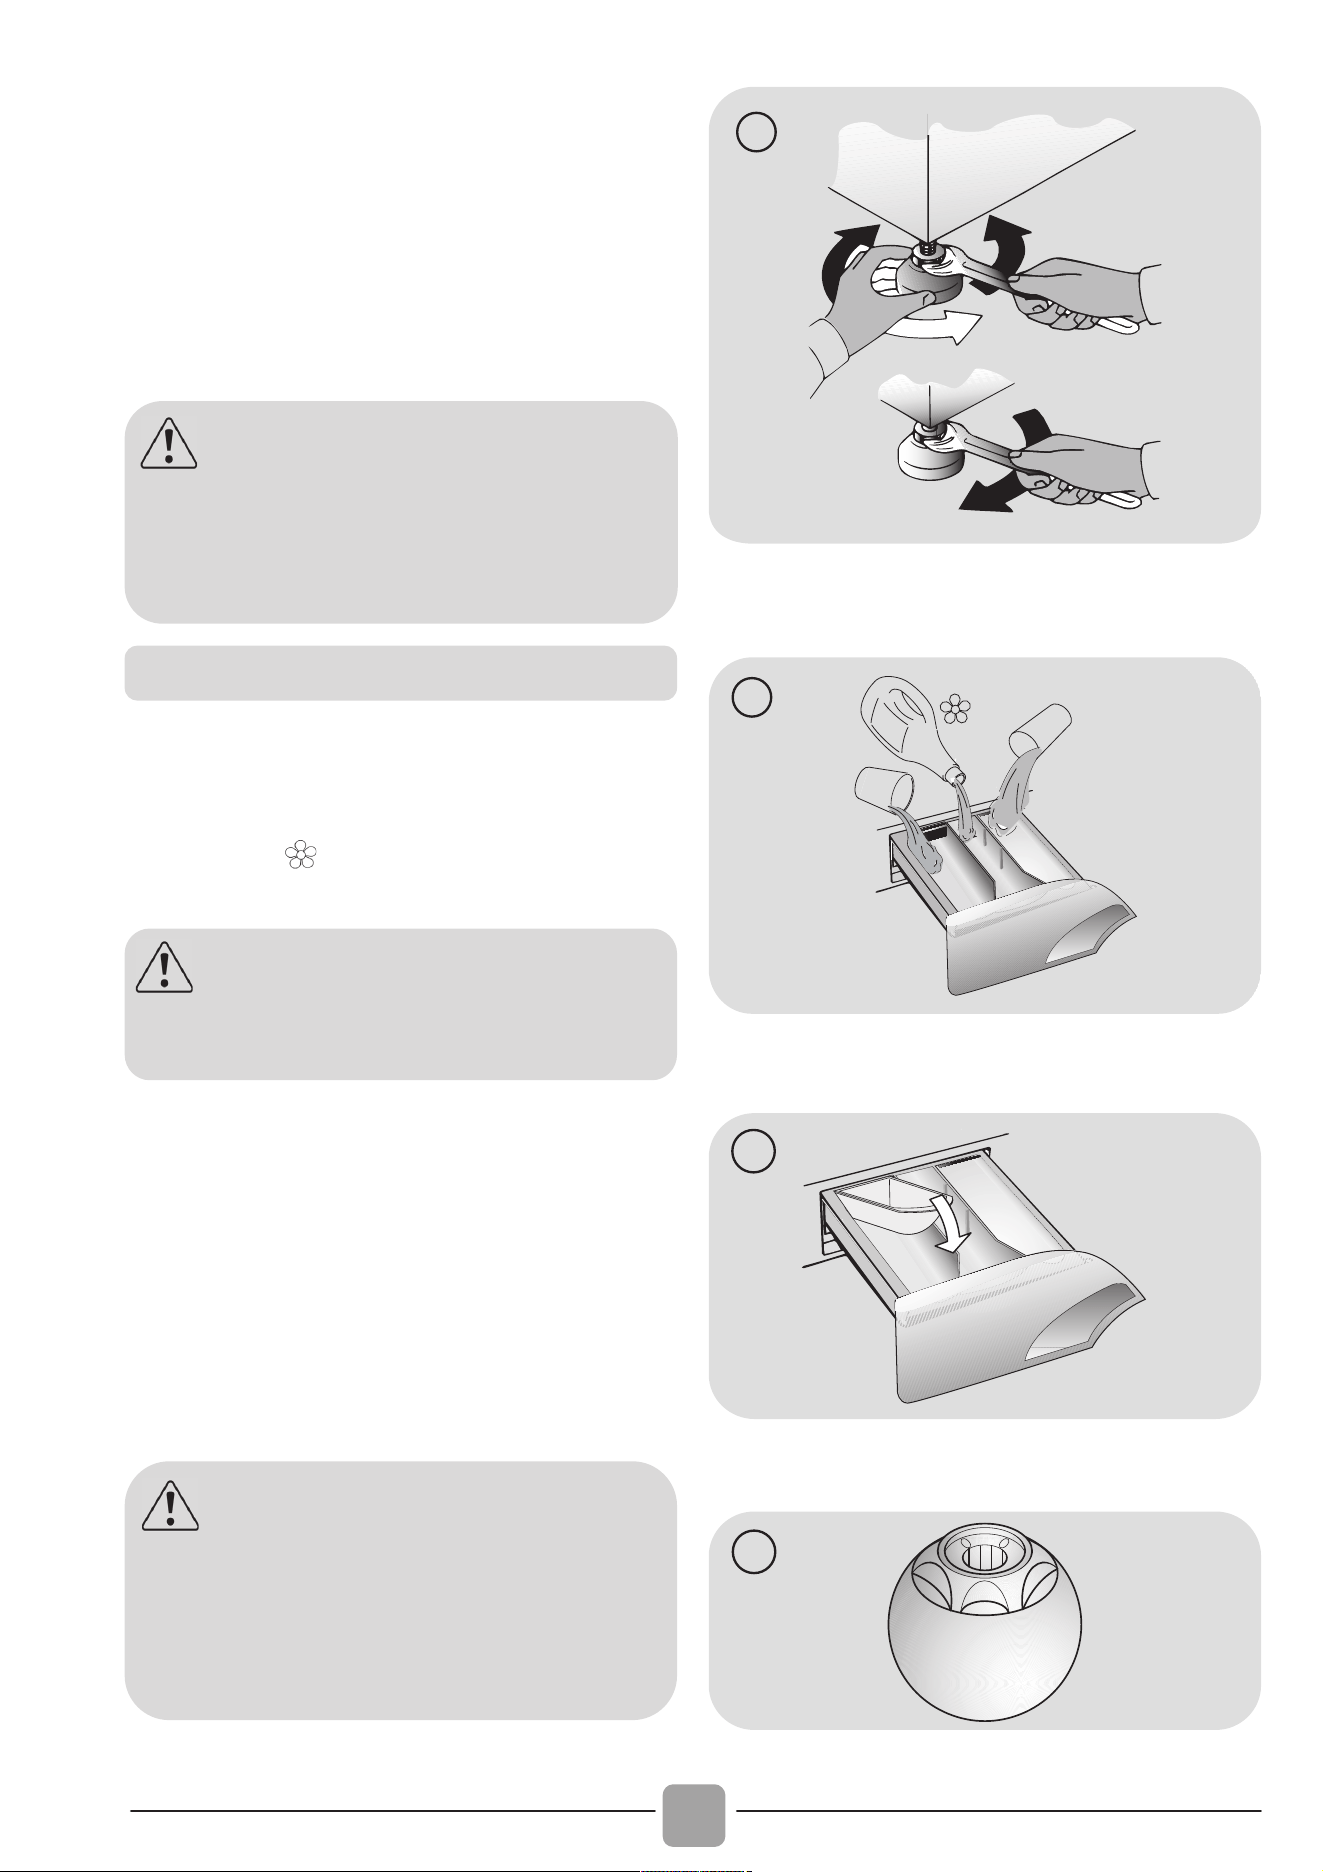
58
Justieren Sie die Höhe der Standfüße wie
in Abbildung 8 beschrieben:
a. Drehen Sie die Schraubenmuttern im
Uhrzeigersinn, um diese zu lösen.
b. Drehen Sie den Standfuß, um die
Höhe einzustellen.
c. Sichern Sie den Standfuß durch
Drehen der Schraubmuttern gegen den
Uhrzeigersinn bis zum festen Sitz.
A
B
C
8
Die Waschmittelschublade ist in drei Fäche
r
aufgeteilt (Abbildung 9):
Fach "1": ist für das in der Vorwäsche
benötige Waschmittel vorgesehen;
Fach "": ist für spezielle
Wäschezusatzstoffe wie Weichspüler etc.
Fach "2": ist für das in der Hauptwäsche
benötige Waschmittel vorgesehen.
Je nach Modell ist im Lieferumfang des Geräte
s
ein spezieller Einsatz für Flüssigwaschmittel
enthalten (Abbildung 10), der die Einspülung de
s
Waschmittels in die Trommel richtig reguliert. Be
i
Einsatz von flüssigen Waschmitteln den Einsatz in
Fach "2" einlegen. In Kombination mit dem
Programm "Spülen" kann dieser Einsatz auch fü
r
den Bleichvorgang genutzt werden (s. Beschreibung).
2
1
9
10
11
WARNUNG:
Bitte versuchen Sie keinesfalls
den Wasserablaufschlauch selber zu
wechseln, sondern setzen sich hierfür
mit dem Kundendienst in Verbindung.
Waschmittelschublade
WARNUNG:
Benutzen Sie im mittleren Fach
ausschließlich Flüssigprodukte!
WARNUNG:
Einige flüssige Waschmittel verteilen
sich nur schwer oder langsam in der
Waschladung . Bitte nutzen Sie ggf. Die
vom Waschmittelhersteller zur Verfügung
gestellten Dosiervorrichtungen (Abbildung 11).

DE
59
3. PRAKTISCHE TIPPS
WARNUNG: Beim Sortieren der Wäsche,
beachten Sie folgende Punkte:
- Wurden metallische Objekte aus der
Wäsche entfernt;
- Reißverschlüsse geschlossen;
- Kissen auf links gezogen;
- Clips von Vorhängen entfernt;
- Waschanweisungen auf Schildchen in der
Kleidung gelesen.
Wir empfehlen beim Waschen von
Teppichen/Läufern, Oberbetten und
anderen schweren Textilien den
Schleudervorgang gänzlich abzustellen,
um mögliche Schäden am Gerät zu
vermeiden.
Beim Waschen von Wolle unbedingt vorher
prüfen, ob diese waschmaschinengeeignet
ist (s. Pflegesymbol in der Wäsche).
Einen umweltfreundlichen und ökonomischen
Gebrauch Ihres Gerätes schaffen.
Maximieren Sie die Füllmenge
Erzielen Sie den besten Energie-, Wasser-
und Waschmittelverbrauch, in dem sie Ihre
Waschmaschine immer voll füllen. Sichern
Sie 50% Energie beim Waschen einer vollen
Ladung im Gegensatz zu zwei halben
Ladungen.
Wann ist eine Vorwäsche wirklich notwendig?
In der Regel nur für stark verschmutzte
Wäsche!
Wenn Sie normal oder wenig
verschmutzte Wäsche waschen, sparen
Sie zwischen 5% und 15% Strom, wenn
Sie keine Vorwäsche wählen.
Ist heißes Waschen erforderlich?
Das Vorbehandeln von Flecken kann ein
heißes Waschen ersetzen und man kann
bis zu 50% Energie bei einem 60 Grad
Waschgang sparen.
Bevor Sie ein Trockenprogramm
starten
Sie SPAREN Energie und Zeit, indem Sie
eine hohe Schleuderdrehzahl auswählen,
um den Restfeuchtegehalt in der Wäsche
bereits vor der Trockenprogramms zu
reduzieren.
Nachfolgend ein kurzer Ratgeber mit
Tipps
und Empfehlungen für den
Waschmittelgebrauch in den verschiedenen
Programmen/Temperatureinstellungen.
Beachten Sie jedoch unbedingt die Angaben des
Waschmittelherstellers zur Dosierung und
korrekten Anwendung.
Beladungstipps
Hilfreiche Empfehlungen für den
Nutzer
Beim Waschen von weißen Sachen,
empfehlen wir das 60 Grad
Baumwollprogramm und ein normales
Waschpulver.
Für Waschvorgänge zwischen 40 und
60 Grad muss ein für die Verschmutzung
der Wäsche passendes Waschmittel
ausgewählt werden. Normale
Waschpulver können für weiße oder
leichte Farben verwendet werden,
während flüssige Waschmittel für
Farbschutz geeignet sind.
Für Waschvorgänge unter 40 Grad
empfehlen wir den Gebrauch von
flüssigen Waschmitteln, die für niedrige
Temperaturen geeignet sind.
Zum Waschen von Wolle oder Seide
empfehlen wir nur den Gebrauch von
Spezial- und Feinwaschmitteln.
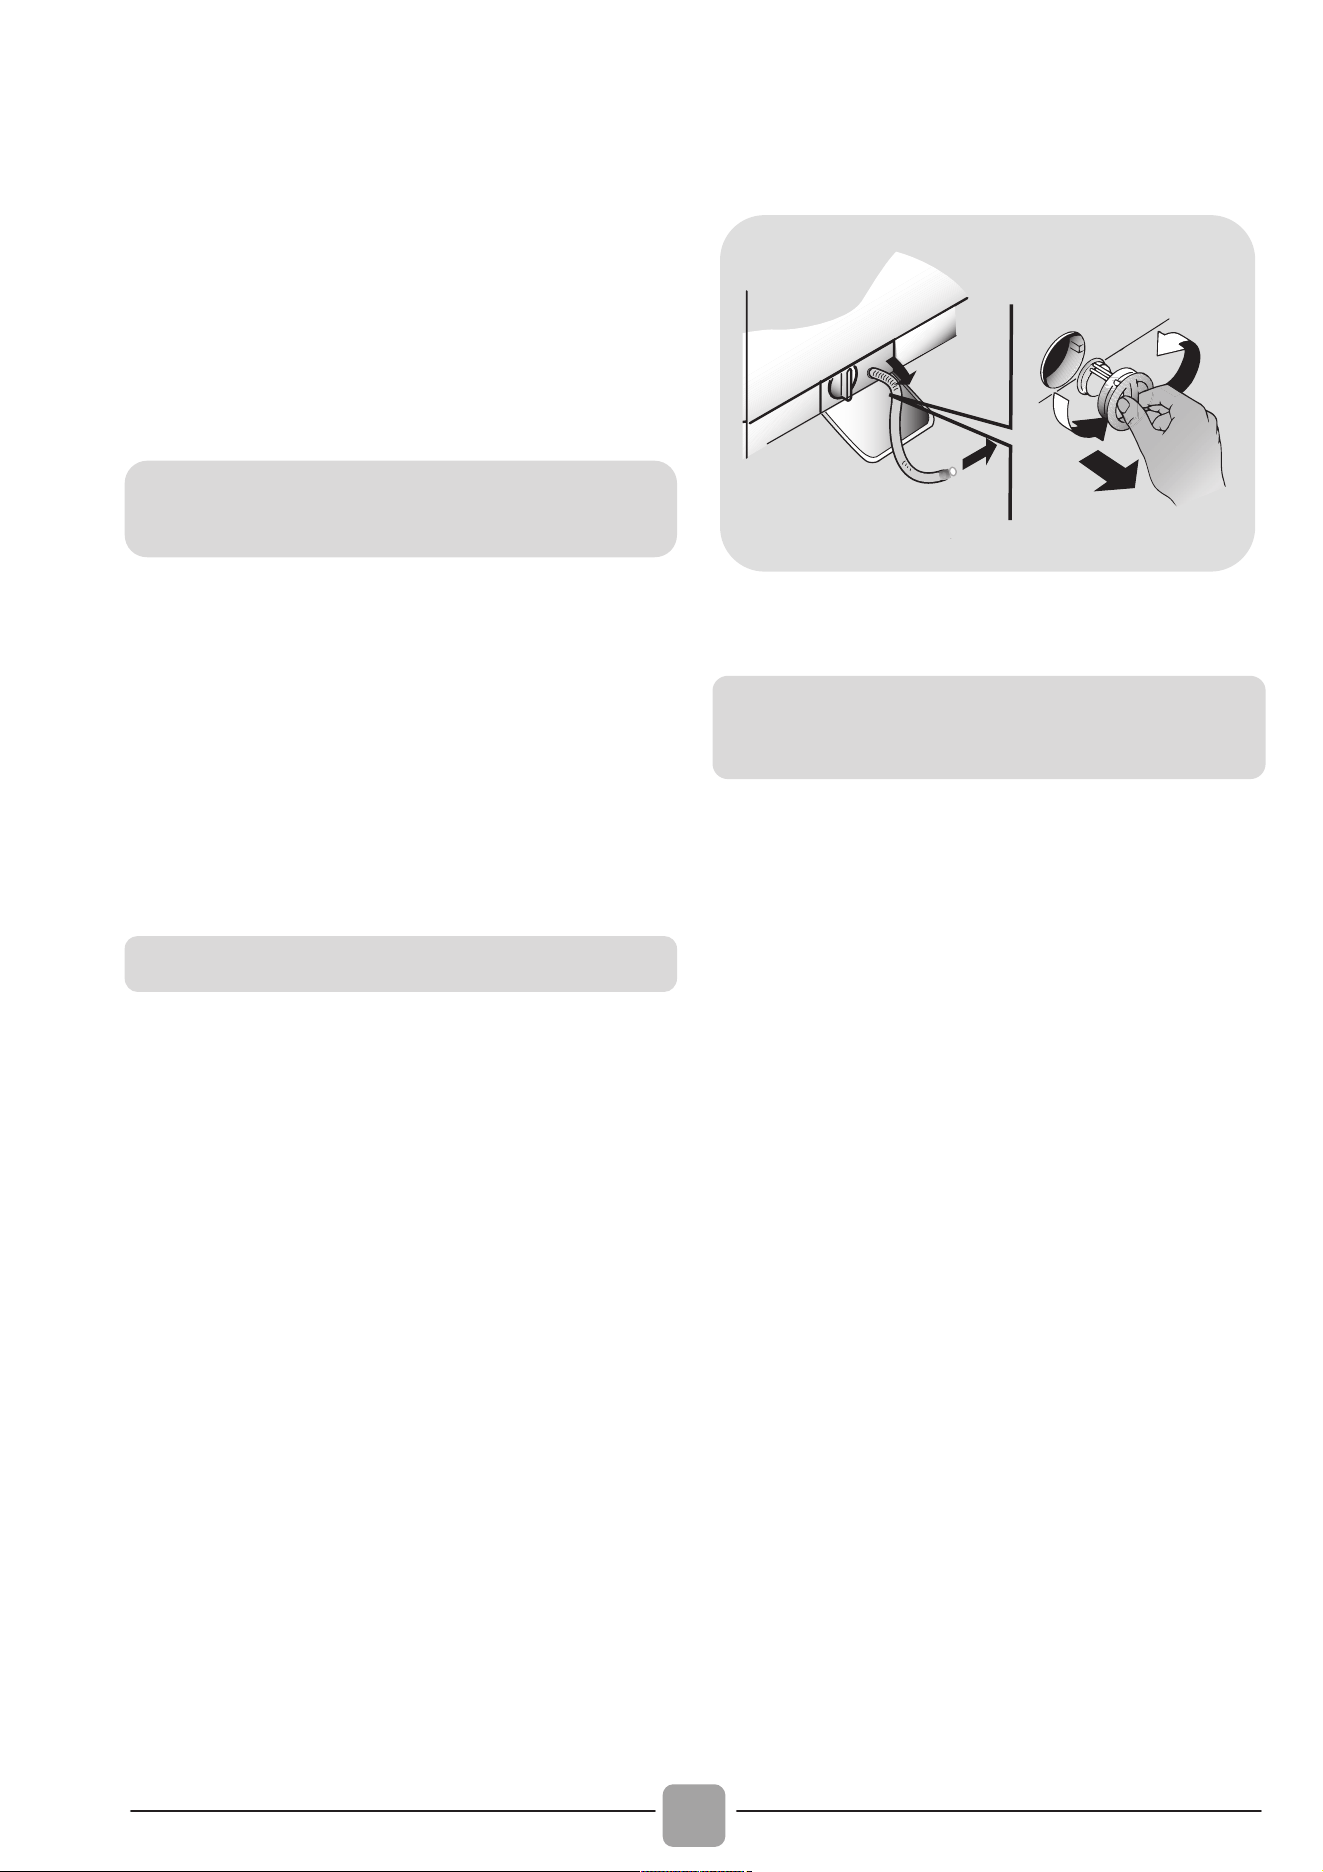
60
4. WARTUNG UND
REINIGUNG
Um die Waschmaschine von außen zu
reinigen, nutzen Sie ein feuchtes Tuch mit
leichten Reinigungsmitteln. Das Gerät
erfordert keine besondere Reinigung
von außen: reinigen Sie lediglich die
Schubladen für Waschmittel und den Filter.
Wir empfehlen die Schubladen zu reinigen,
um Restmengen und Rückstände von
Zusatzstoffen zu vermeiden.
Der Filter ist dafür ausgelegt, Rückstände
und Ablagerungen von der Wäsche
fernzuhalten. Reinigen Sie diesen wenn
möglich von Hand.
Die Waschmaschine besitzt eine
spezielle Vorrichtung zum Auffangen
von größeren Gegenständen (z.B.
Knöpfe/Münzen), welche die Pumpe oder
den Ablaufschlauch verstopfen könnten.
Nur bei einigen Modellen: Schlauch
herausziehen, Stöpsel entfernen und
Restwasser in einem Behälter auffangen.
Bevor Sie die Klammerfalle öffnen,
empfehlen wir, den Boden mit einer
saugfähigen Unterlage auszulegen.
Drehen Sie den Verschluss gegen den
Uhrzeigersinn.
Entnehmen und Reinigen Sie die
Abdeckung mit dem Grobschmutzfilter
und drehen sie anschließend im
Uhrzeigersinn wieder ein.
Wiederholen Sie die restlichen Schritte in
umgekehrter Reihenfolge, um die Teile
wieder einzubauen.
Sollte die Maschine in einem überhitzten
Raum gelagert sein, lassen Sie das
gesamte Wasser aus den Schläuchen.
Ziehen Sie alle Stecker aus der
Maschine.
Trennen Sie den Schlauch von dem
Riegel und füllen Sie das gesamte
Wasser in eine Schüssel.
Sichern Sie den Schlauch wieder mit den
Riegeln.
Reinigung der
Waschmittelschublade
Reinigung der Klammerfalle
V
orschläge für anhaltenden
Nichtgebrauch
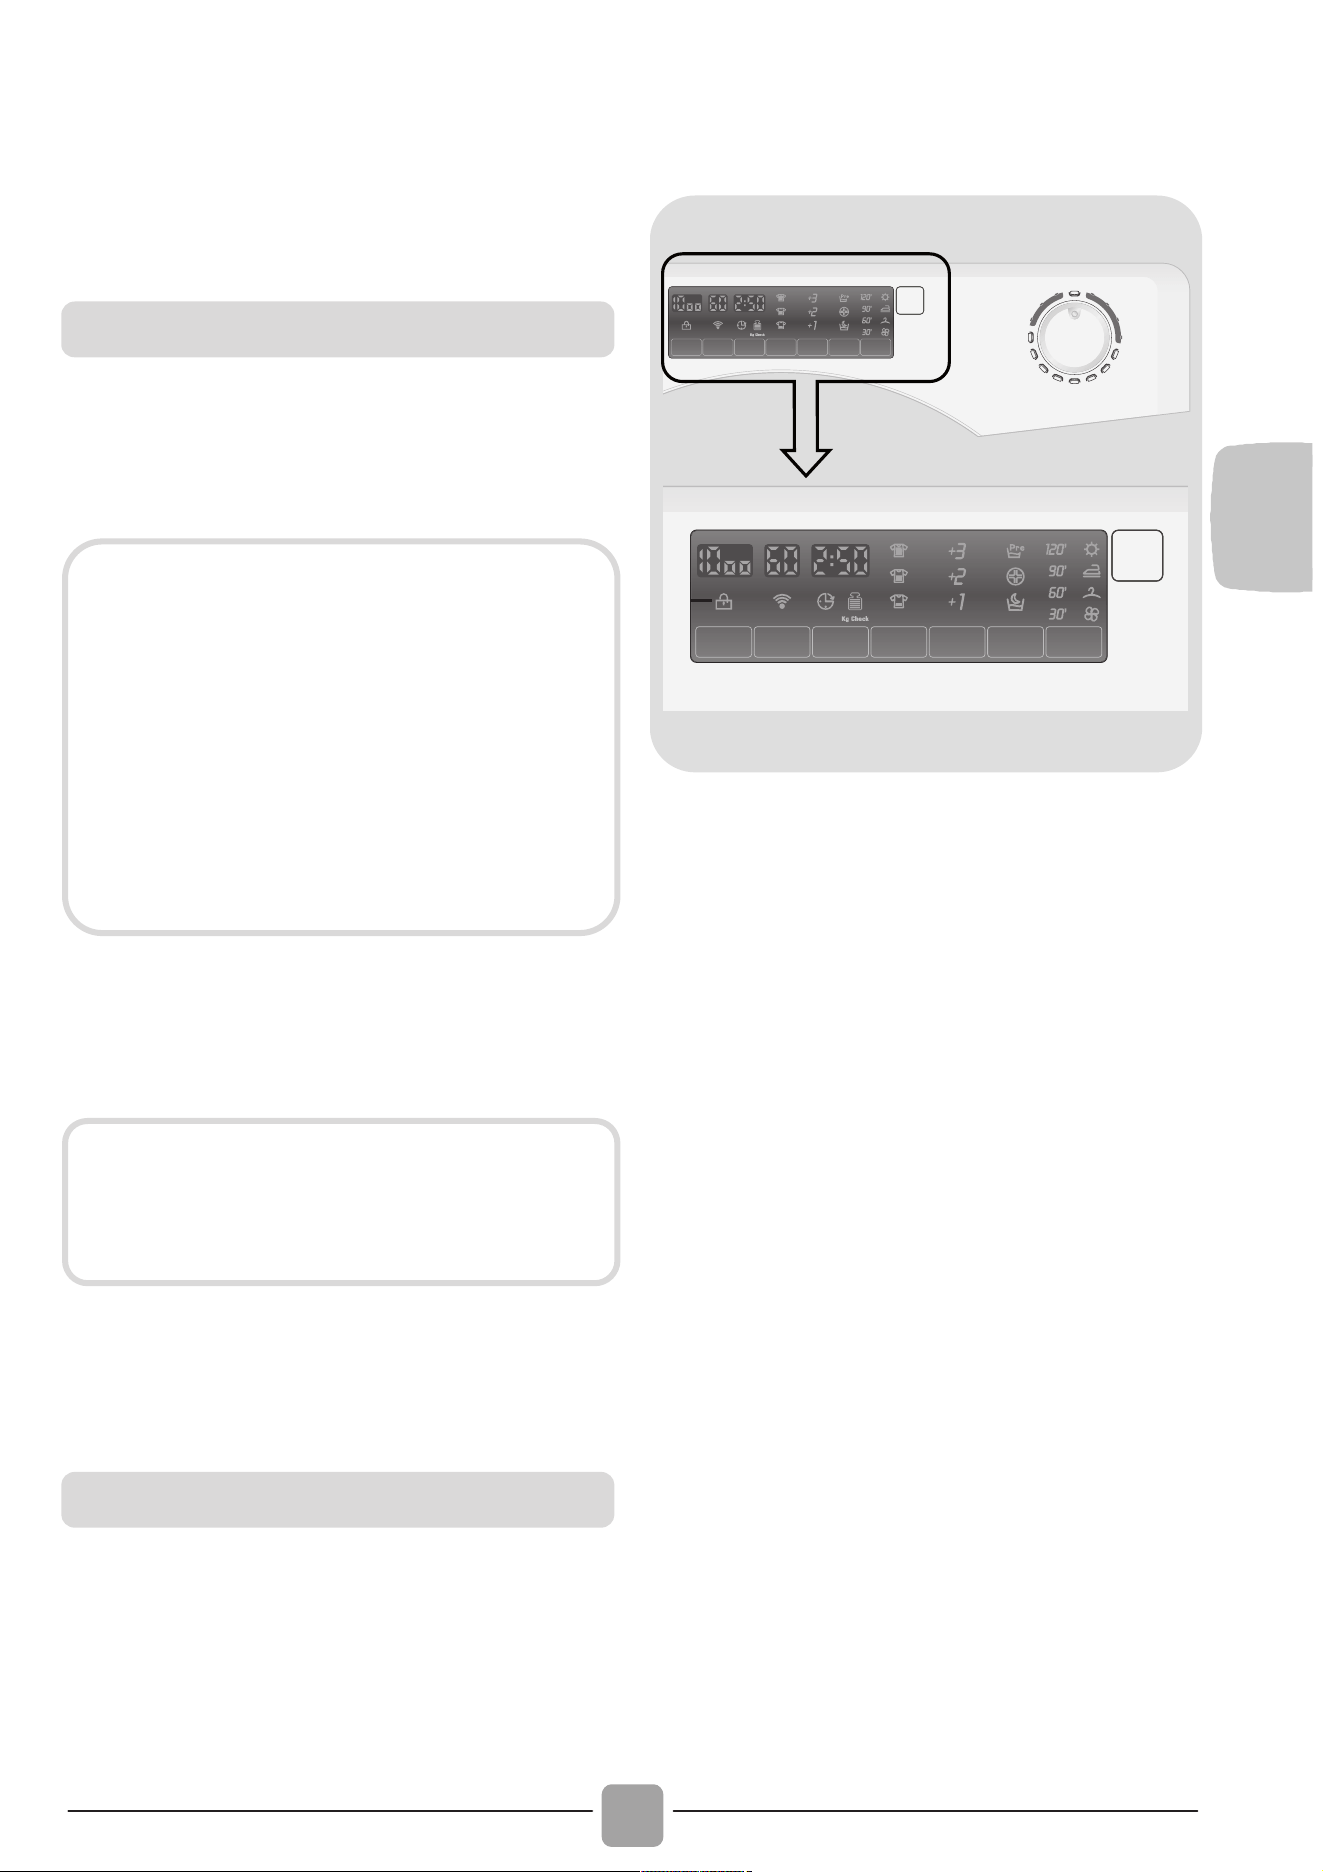
DE
61
5. KURZANLEITUNG
Dieses Gerät verfügt über eine moderne
Mengenautomatik, die automatisch die benötigte
Wassermenge, den Energieverbrauch und die
Waschdauer anpasst.
Schalten Sie Ihr Gerät ein und wählen Sie
das benötigte Programm aus.
Stellen Sie wenn nötig eine
Waschtemperatur ein.
Drücken Sie den Button START/PAUSE
um den Waschvorgang zu starten.
Am Ende des Waschvorgangs erscheint
auf dem Display das Wort „Ende“.
Schalten Sie die Waschmaschine nun
aus..
Für jeden Waschtyp sehen Sie in der
Tabelle die passenden Sequenzen.
Wasserdruck:
min 0,05 Mpa / max 0,8 Mpa
Schleuderdrehzahl: Siehe Typenschild.
Gesamtanschlußwert/Absicherung/
Spannung: Siehe Typenschild.
6. STEUERUNG UND
PROGRAMME
A
B
DCEFGHI
M
L
A Programmwahlschalter mit
Position AUS (OFF)
B Taste START/PAUSE
C
Taste SCHLEUDERDREHZAHLWAHL
D
Taste WASCHTEMPERATURWAHL
E Taste STARTZEITVORWAHL
F
Taste VERSCHMUTZUNGSGRADWAHL
G Taste EXTRA SPÜLEN
H OPTIONSTASTEN
I Taste TROCKENPROGRAMM
L Anzeigebereich
M
Kontrolleuchte TÜRVERRIEGELUNG
Programmauswahl
TROCKNEN
Wenn Sie möchten, dass das
Trockenprogramm direkt nach dem
Waschen automatisch beginnt,
wählen Sie über die entsprechende
Taste auf der Bedienblende das
gewünschte Trockenprogramm aus.
Es ist auch möglich, den Waschgang
zunächst zu beenden und anschließend
separat ein Trockenprogramm
auszuwählen.
Warten Sie bis die Sicherung des
Bullauges aufgeht; dies kann bis zu
zwei Minuten nach Beendigung des
Waschvorgangs passieren.
Technische Daten

62
Drücken Sie die Taste START/PAUSE, um
das gewählte Waschprogramm zu
beginnen.
Die Position des Programmwahlschalters
ändert sich während des kompletten
Programmablaufs nicht.
Um das Gerät auszuschalten, bitte den
Programmwahlschalter auf die Position
AUS stellen.
Drücken Sie die Taste START/PAUSE,
um das gewählte Waschprogramm zu
beginnen.
WÄSCHE NACHLEGEN ODER ENTNEHMEN,
NACHDEM DAS PROGRAMM BEGONNEN
HAT (PAUSE)
Die Taste START/PAUSE für mindestens
2 Sekunden gedrückt halten (einige der
Anzeigeleuchten sowie die
Restlaufzeitanzeige beginnen zu blinken,
während das Programm unterbrochen
ist).
Nach 2 Minuten wird die Türverriegelung
automatisch deaktiviert und das Bullauge
kann geöffnet werden.
Nachdem Entnehmen oder Nachlegen
von Wäsche das Bullauge wieder
schließen und die Taste START/PAUSE
erneut drücken (Programm wird an der
ursprünglichen Stelle fortgesetzt).
WASCHPROGRAMM ABBRECHEN
Um ein Programm zu beenden, den
Programmwahlschalter auf die Position
AUS stellen.
WARNUNG:
Berühren beim Einstecken des
Geräts in keinem Fall das Display, da
sich die Maschine in den ersten
Sekunden kalibriert. Sollte dies
dennoch passieren, nehmen Sie das
Gerät vom Netz und Wiederholen Sie
den Vorgang.
Bullauge öffnen
Eine Sicherheitsvorrichtung verhindert,
dass das Bullauge unmittelbar nach
Beendigung des Waschvorganges
geöffnet werden kann. Nach zwei
Minuten erlischt die Kontrollleuchte
“Türverriegelung” und das Bullauge
kann
g
eöffnet werden.
Programmwahlschalter mit
Position AUS
(
OFF
)
Im Displaybereich werden die gewählten
Programmparameter und Optionen
angezeigt. Um Energie zu sparen wird
die Helligkeit des Displays während des
Waschvorganges und wenn längere Zeit
keine Eingaben vorgenommen wurden
verringert.
Um das Gerät auszuschalten, bitte den
Programmwahlschalter auf die Position
AUS stellen.
Der Programmwahlschalter muss am
Ende jedes Waschvorganges oder vor
der Wahl eines neuen Waschprogramms
auf die Position AUS gedreht werden.
Taste START/PAUSE
ZUERST das Bullauge schliessen und
dann die Taste START/PAUSE drücken.
Wenn die Taste START/PAUSE gedrückt
wurde, kann es einige Sekunden dauern,
bevor der Waschvorgang beginnt.

DE
63
Die Schleuderdrehzahl kann in jedem
Programm angepasst oder sogar ganz
ausgeschaltet werden.
Nach Auswahl eines Waschprogramms
wird die maximale Schleuderdrehzahl
angezeigt und diese kann in Schritten nach
unten korrigiert werden.
Die Schleuderdrehzahl lässt sich auch während
eines laufenden Waschprogramms noch
jederzeit ändern.
Mit dieser Taste wählen Sie die gewünschte
Temperatur des Waschvorgangs aus.
Um Ihre Textilien zu schützen, ist es nicht
möglich die Temperatur höher einzustellen, als
das jeweilige Programm es zulässt (s.
Programmtabelle).
Der Programmstart kann zwischen 1
Stunde und 24 Stunden verzögert
werden.
Um den Programmstart zu verzögern,
bitte diesen Schritten folgen:
- Stellen Sie das gewünschte Programm ein.
-
Drücken Sie die Taste STARTZEITVORWAHL
einmal, um die Funktion zu aktivieren
(es erscheint die Anzeige h00 auf dem Display).
Für eine einstündige Verzögerung drücken Sie
die Taste erneut (im Display erscheint die
Anzeige h01). Wiederholen Sie diesen Vorgang
so oft, bis die gewünschte Verzögerung im
Display erscheint. Zum Zurücksetzen der
Startzeitvorwahl die Taste so oft drücken, bis im
Display wieder die Anzeige h00 erscheint.
- Durch das Drücken der Taste
START/PAUSE bestätigen Sie Ihre
Auswahl. Der Countdown beginnt und
das Programm startet automatisch.
Die eingestellte Startzeitvorwahl kann
unterbrochen werden, indem der
Programmwähler auf AUS gestellt wird.
Sollte es eine Unterbrechung der
Stromversorgung während eines laufenden
Waschvorgangs geben, werden die
Einstellungen gespeichert, um das Programm
bei Wiederinbetriebnahme automatisch
fortzusetzen.
Diese Taste erlaubt Ihnen eine
Vorauswahl des Verschmutzungsgrades
Ihrer Wäsche in drei verschiedenen
Stufen.
Diese Option lässt sich nur in
bestimmten Programmen zuwählen (s.
Programmtabelle).
Der gewählte Verschmutzungsgrad wird
über eine Kontrollleuchte angezeigt.
Die gewünschten Optionen sollten
ausgewählt werden, bevor die Taste
START/PAUSE betätigt wird.
Wird eine Option gewählt, welche
nicht kompatibel mit dem
ausgewählten Programm ist, wird
die Optionsanzeigemehrfach kurz
aufblinken und anschließend wieder
erlöschen.
Taste SCHLEUDERDREHZAHLWAHL
Jedem Programm ist eine max.
Schleuderdrehzahl zugewiesen. Um
Schäden an Textilien zu verhindern,
ist diese nur nach unten abänderbar.
Dieses Gerät ist mit einem automatischen
Unwuchtkontrollsystem ausgestattet,
dass den Schleudervorgang bei einer
ungleichmäßigen Verteilung der Wäsche
in der Trommel verhindert.
Taste WASCHTEMPERATURWAHL
Taste STARTZEITVORWAHL
Taste VERSCHMUTZUNGSGRADWAHL

64
Mit dieser Optionstaste fügen Sie am
Ende des Waschvorgangs zusätzliche
Spülgänge ein, deren Anzahl vom
jeweiligen Programm abhängig ist.
Diese Funktion wurde für Personen mit
sensibler Haut entwickelt, bei denen
selbst kleinste Rückstände des
Waschmittels Hautirritationen oder
Allergien auslösen können.
Zudem empfiehlt sich die Zuwahl dieser
Option beim Waschen von stark
verschmutzter Kinderkleidung, die eine
große Menge an Waschmittel erfordert,
bzw. bei sehr saugfähigen Textilien wie
Handtüchern etc.
Je nach Programm können Sie
verschiedene Optionen hinzuwählen:
- VORWÄSCHE
Diese Option erlaubt es Ihnen bei stark
verschmutzter vor dem Hauptwaschgang
eine Vorwäsche durchzuführen (nur in
bestimmten Programmen; s. Programmtabelle).
Es wird empfohlen hierfür 20% der
vom Waschmittelhersteller empfohlenen
Waschmitteldosis im angegebenen
Waschmittelfach zu verwenden.
- HYGIENE
Mit dieser Option ist es möglich Ihre
Wäsche bei einer Waschtemperatur von
60°C zu hygienisieren.
- NIGHT&DAY
Diese Option reduziert alle auftretenden
Waschgeräusche auf ein Minimum,
indem die Geschwindigkeit der
Zwischenschleudergänge auf 400 U/Min.
reguliert wird, je nach Programm der
Wäscheposten nach dem letzten Spülgang
komplett im sauberen Spülwasser liegenbleibt,
bis der Waschvorgang durch erneute
Betätigung der Optionstaste mit einem
Endschleudergang beendet wird.
Während der Spülstoppphase blinkt die
entsprechende Anzeigeleuchte im
Display, um den Betriebszustand
anzuzeigen.
Durch erneute Betätigung der
Optionstaste wir der Waschvorgang mit
einem Endschleudergang in der
gewünschten Schleuderdrehzahl beendet
und das Spülwasser abgepumpt.
Diese Option eignet sich durch die
elektronische, sehr geräuscharme
Überwachung ideal für den nächtlichen
Betrieb des Gerätes.
Schalten Sie das Gerät zunächst ein und
wählen dann durch Drücken das
gewünschte Trockenprogramm – im Display
wird das ausgewählte Programm mit dem
entsprechenden Symbol angezeigt.
Um die Auswahl vor dem Start eines
Trocknungsprogramms abzubrechen,
drücken Sie die Taste so oft, bis die
Anzeige für das Trockenprogramm
wieder erlischt oder stellen Sie den
Programmwahlschalter auf die Position
AUS.
Um ein bereits gestartetes Programm
während der Trocknungsphase zu
unterbrechen, halten Sie die Taste für 3
Sekunden gedrückt, bis die Anzeige für
die Abkühlphase aufleuchtet.
Angesichts der hohen Temperatur in der
Trommel, empfehlen wir, dass Sie
zunächst den kompletten
Trockenvorgang abwarten, bevor Sie die
Programmwahlschalter auf die AUS-
Position stellen und die Wäsche
entnehmen.
Taste EXTRA SPÜLEN
OPTIONSTASTEN
Taste TROCKENPROGRAMM
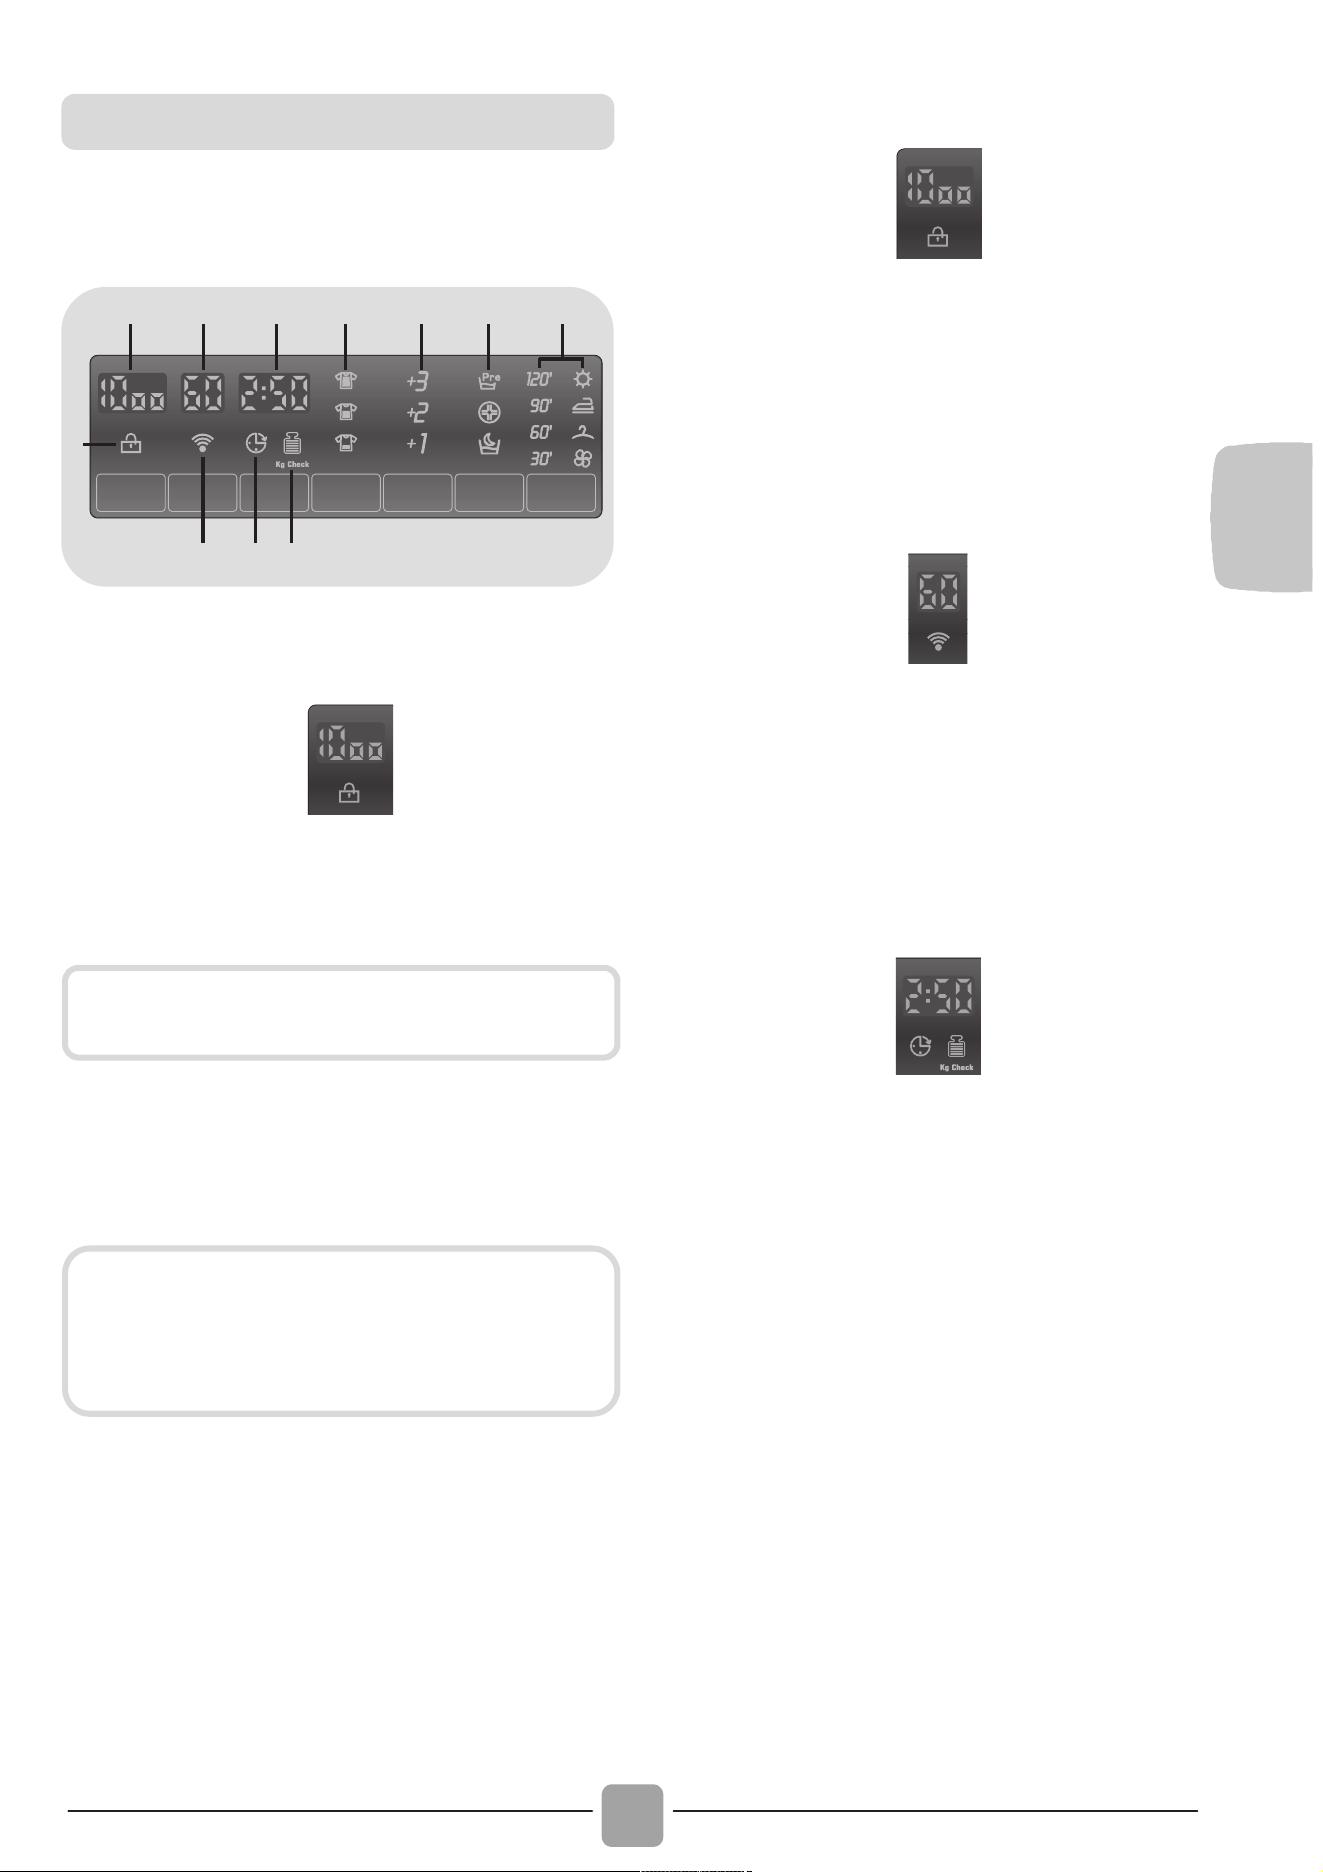
DE
65
Im Displaybereich werden wichtige
Informationen für den Benutzer angezeigt.
2
1
8109
3 4 5 6 7 11
1)
KONTROLLEUCHTE TÜRVERRIEGELUNG
1
Die Kontrollleuchte beginnt zu leuchten,
sobald das Bullauge richtig geschlossen.
Wenn die Taste START/PAUSE gedrückt
wird blinkt die Kontrollleuchte zuerst kurz
auf und leuchtet dann permanent.
Eine Sicherheitsvorrichtung verhindert,
dass das Bullauge unmittelbar nach
Beendigung des Waschvorganges geöffnet
werden kann. Nach zwei Minuten erlischt
die Kontrollleuchte TÜRVERRIEGELUNG
und das Bullauge kann geöffnet werden.
Drehen Sie am Ende des Waschvorganges
den Programmwahlschalter auf die Position
AUS.
2)
Anzeige SCHLEUDERDREHZAHLWAHL
2
In der Anzeige erscheint die gewählte
Schleuderdrehzahl des Programmes. Diese
kann je nach Programm über die
entsprechende Taste nach oben/unten
geändert werden.
3) Anzeige WASCHTEMPERATUR
3
In der Anzeige erscheint die gewählte
Waschtemperatur des Programmes.
Diese kann je nach Programm (s.
Programmtabelle) über die entsprechende
Taste nach oben/unten geändert werden.
4) PROGRAMMDAUER
4
Sobald ein Waschprogramm ausgewählt wurde,
wird automatisch die Standardprogrammlaufzeit
im Display angezeigt.
Nachdem das Programm gestartet wurde, wird
die Programmlaufzeit nach einigen Minuten den
jeweiligen Programmbedingungen angepasst.
Die Mengenautomatik berechnet die
Programmlaufzeit anhand diverser Parameter
wie Wasserdruck, -härte, -einlauftemperatur,
Raumtemperatur, Wäscheart, -menge und -
verschmutzung, verwendetem Waschmittel,
Schwankungen in der Netzspannung und
gewählten Optionen etc.
Wenn ein durchgehendes Waschen- und
Trockenprogramm ausgewählt haben,
wird zunächst die reine Waschzeit und
am Ende des Waschvorgangs dann die
Trocknungszeit im Display angezeigt.
Anzeigebereich
ZUERST das Bullauge schliessen und
dann die Taste START/PAUSE drücken.
Wird die START/PAUSE Taste nicht
innerhalb von 7 Sekunden nach dem
Schließen des Bullauges gedrückt, muss
das Programm neu gestartet werden.
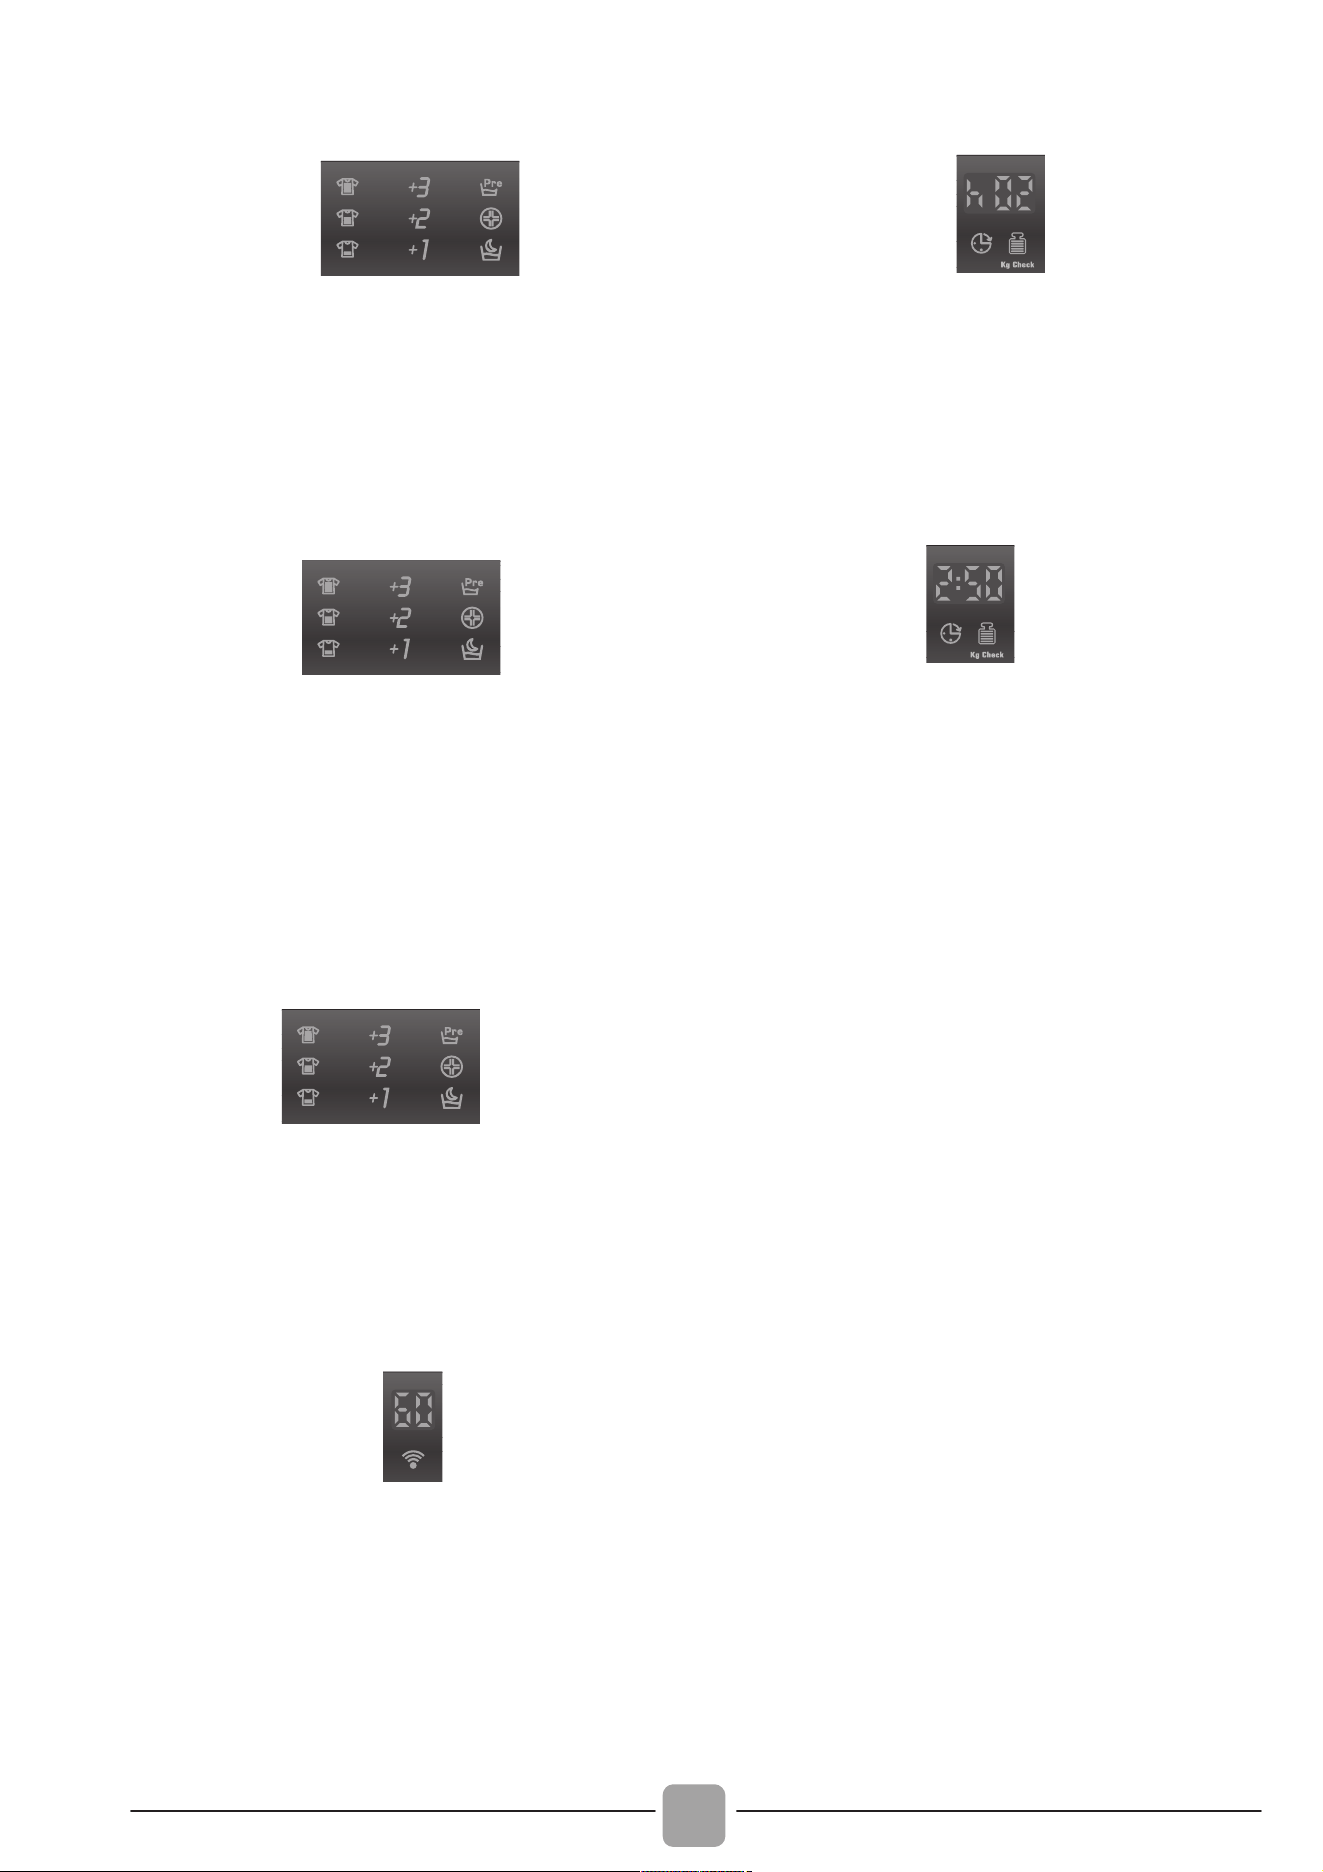
66
5)
Anzeige VERSCHMUTZUNGSGRADWAHL
{
5
In der Anzeige erscheint der vorgewählte
Verschmutzungsgrad. Dieser kann je nach
Programm über die entsprechende Taste
angepasst werden.
6) Anzeige EXTRA SPÜLEN
{
6
Die Anzeige zeigt die Anzahl der
ausgewählten Zusatzspülgänge an. Diese
können je nach Programm über die
entsprechende Taste angepasst werden.
7) OPTIONSTASTEN
}
7
Die Anzeige zeigt die ausgewählten
Zusatzoptionen an (VORWÄSCH, HYGIENE
und
NIGHT&DAY
).
8) WiFi-Funktion (nur bestimmte Modelle)
8
Bei Modellen mit WiFi-Funktion zeigt
diese Anzeige die Aktivität des Signals
an.
Für weitere Informationen zum Wi-Fi
System, schauen Sie in die beigelegte
Anleitung zu dem Thema.
9) Anzeige STARTZEITVORWAHL
9
Diese Anzeige blinkt, wenn eine Startzeit
voreingestellt wurde.
10)
"Kg Check" - Anzeige MENGENAUTOMATIK
(nur in Baumwoll- und Synthetikprogrammen)
10
Während der ersten Minuten des
Waschprogramm ermittelt die moderne
Mengenautomatik alle Waschparameter
Verbrauchswerte Dieses wird durch die
Anzeige "Kg Check" im Display
visualisiert.
Alle Verbrauchswerte und Programmschritte
werden dahingehend automatisch optimiert
und angepasst:
- Benötigte Wassermenge nach Art und
Menge der eingefüllten Wäsche
- Programmdauer nach Art und Menge
des eingefüllten Wäsche
- Anzahl und Intensität der Spülgänge
nach Art und Menge des eingesetzten
Waschmittels
- Trommeldrehrhythmus nach Art und
Menge der eingefüllten Wäsche
- Zusätzliche Spülgänge bei übermäßiger
Schaumbildung
- Schleuderdrehzahl nach Art und Menge
der eingefüllten Wäsche, um
Unwuchten zu vermeiden.
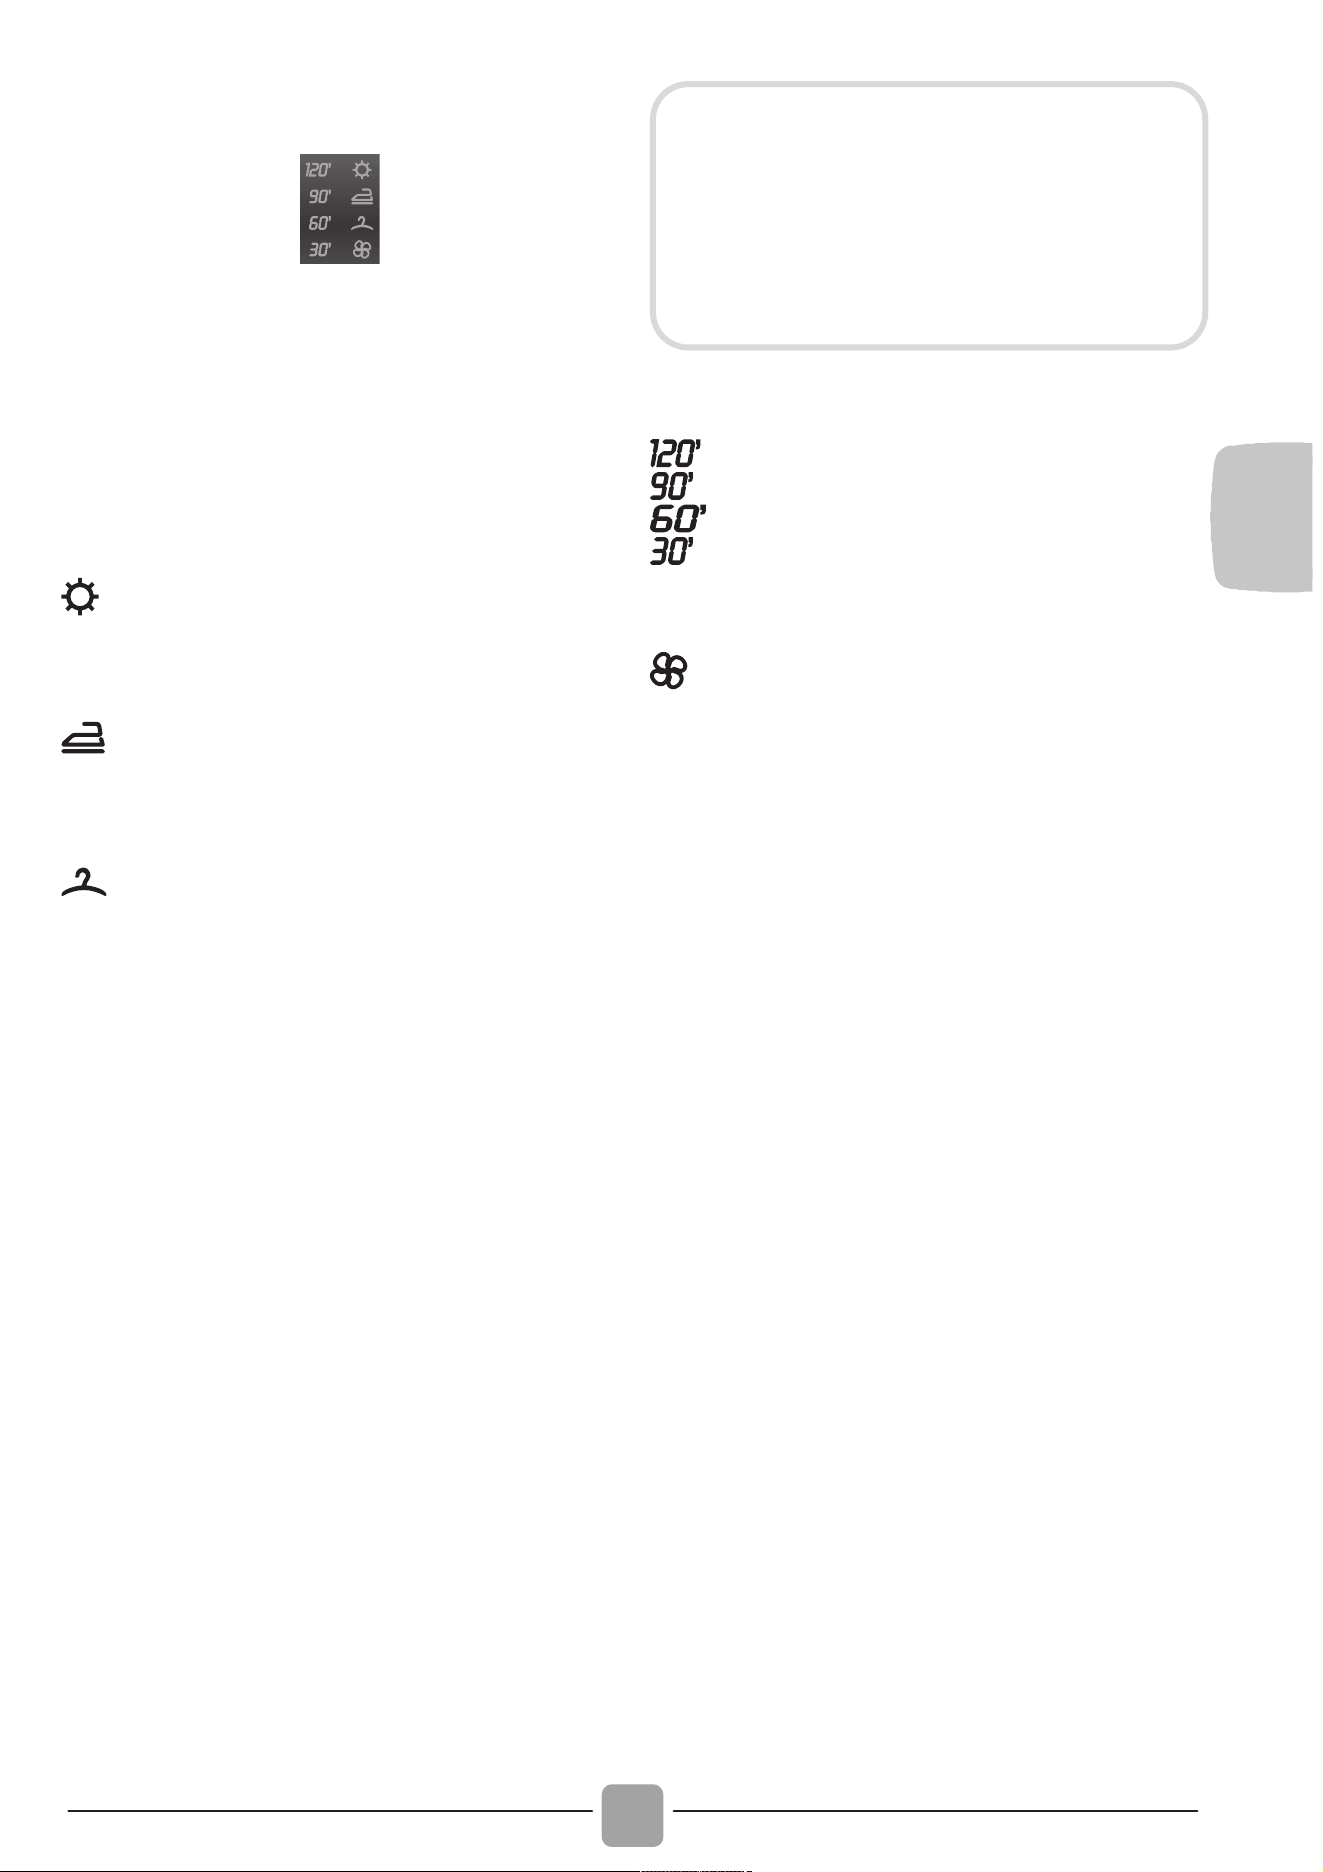
DE
67
11)
ANZEIGE FÜR DAS TROCKENPROGRAMM
}
11
Im Display wird das ausgewählte
Trockenprogramm angezeigt.
Automatische Trocknungsprogramme
(sensorgesteuert)
Extratrocken-Programm (empfohlen
für Handtücher, dicke Textilien und
größere Wäscheposten).
Bügeltrocken-Programm (die Wäsche
bleibt nach dem Trocknen leicht feucht
und ist somit ideal zum Bügeln).
Schranktrocken-Programm (für Teile,
die nach dem Trocknen nicht gebügelt
werden müssen).
Nach der Auswahl eines dieser
Trockenprogramme läuft der Trockenvorgang
automatisch bis zum Erreichen der
gewünschten Restfeuchte ab.
Nach Drücken der Taste START/PAUSE,
wird im Display die erforderliche
ungefähre Trockenzeit angegeben.
Zeitgesteuerte Trockenprogramme
A
nzeige zu Auswahl von rein
zeitgesteuerten Trockenprogrammen.
Abkühlphase
Leuchtet während der abschließenden
A
bkühlphase ca. in den letzten 10-20
Minuten jedes Trockenprogrammes auf.
Nützliche Hinweise
Das 30 Minuten Trockenprogramm wird
für kleine Wäscheladungen (weniger als
1 kg Wäsche) oder zum Nachtrocknen
von noch leicht feuchten Wäscheposten
empfohlen.
Das Gerät beendet das Programm
automatisch, wenn der gewählte
Trocknungsgrad erreicht wurde.
Für den korrekten Betrieb des Gerätes,
ist es besser, die Trocknungsphase nicht
zu unterbrechen, außer wenn es dringend
notwendig ist.
Das Gerät berechnet die Zeit bis zum
Ende des ausgewählten Programms
zunächst auf der Basis einer
Standardbeladung. Während des
Trockenvorgangs korrigiert das Gerät
die Zeit je nach Menge und Art des
eingefüllten Wäschepostens.
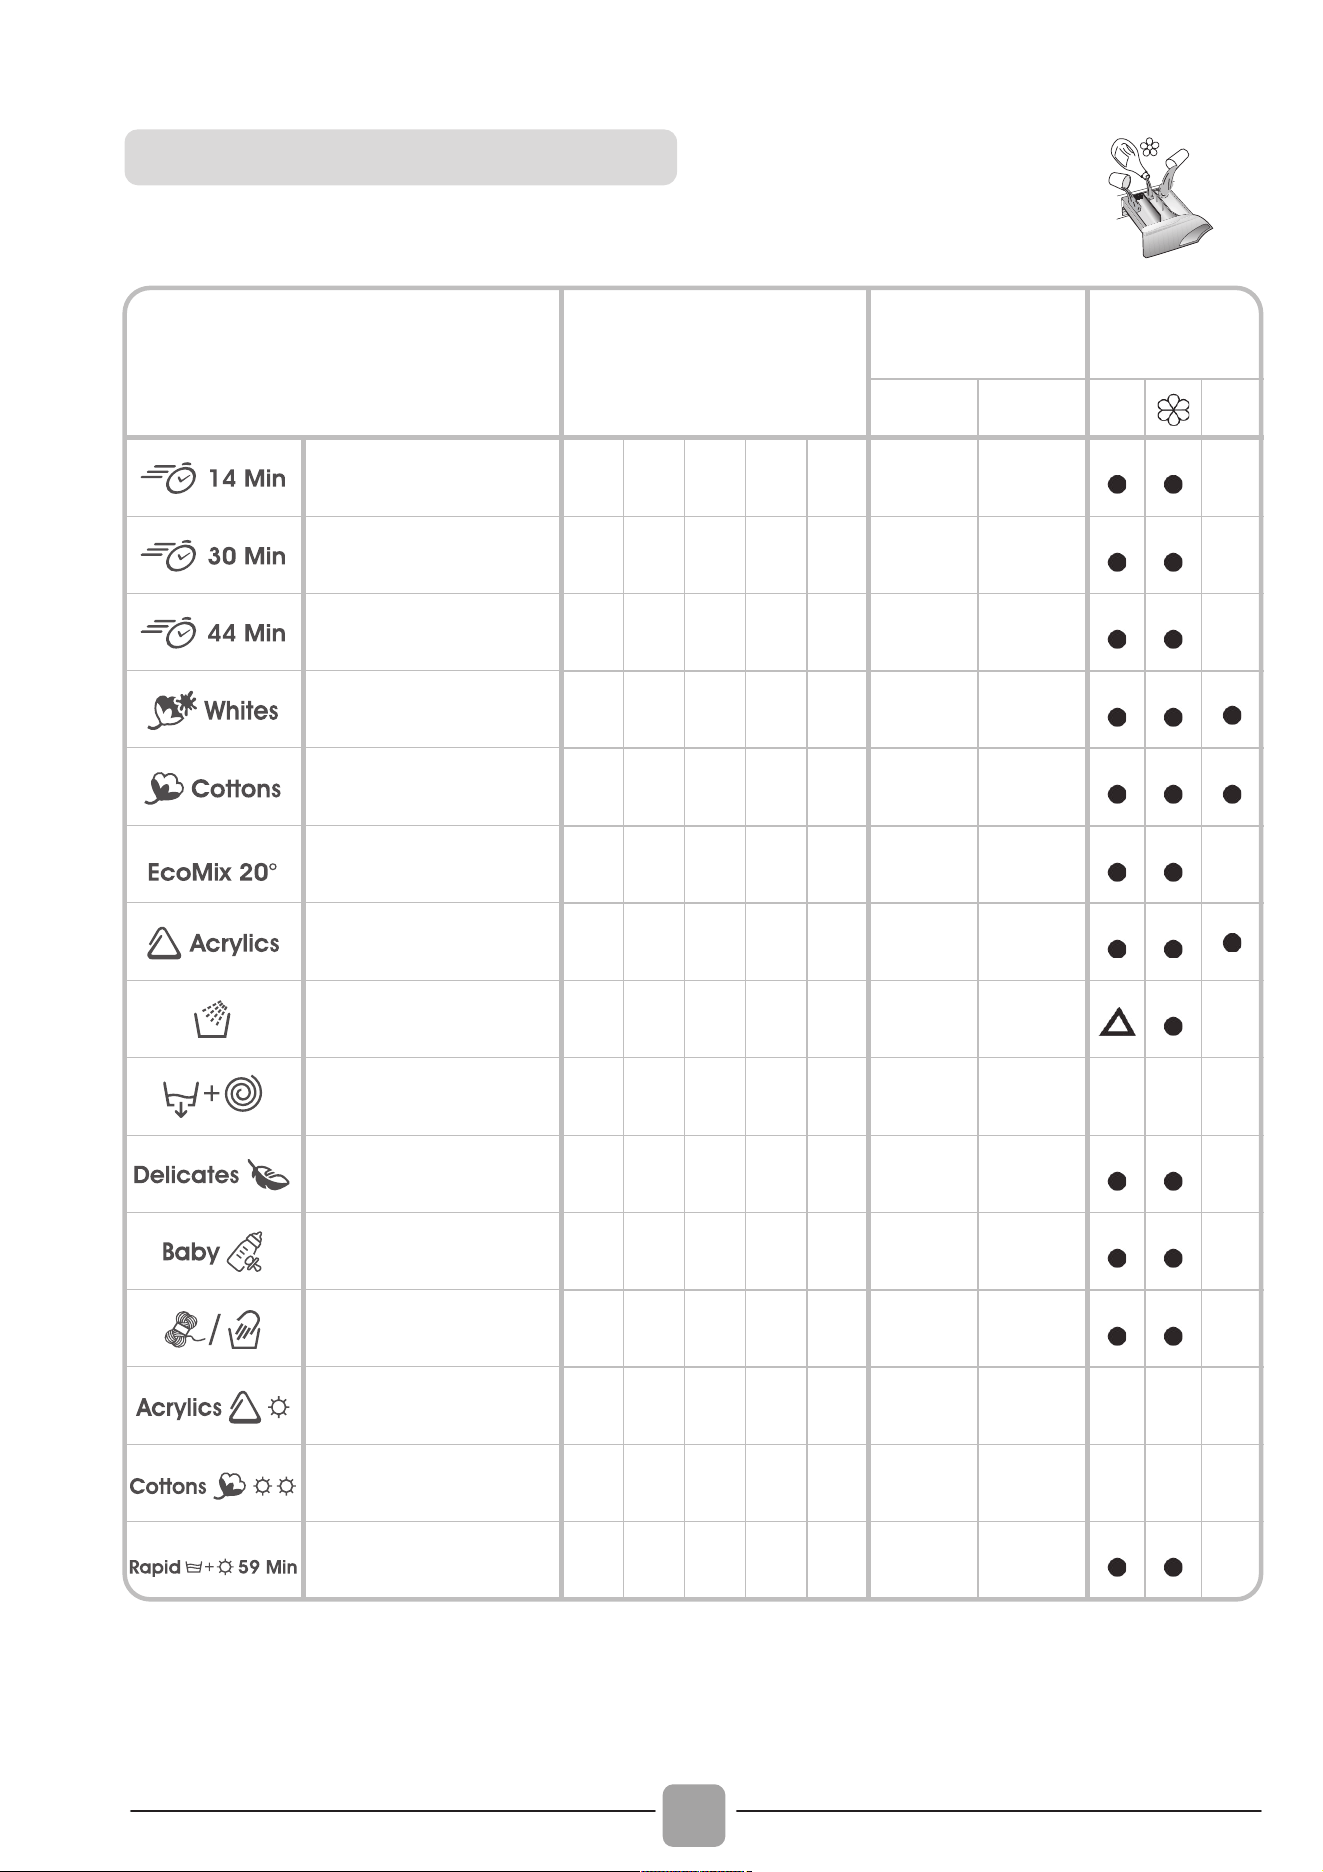
68
2
1
PROGRAM
MAX. BELADUNG*
(kg)
WASCHTEM-
PERATUR °C
WASCHMITTEL
Empfohlen
Maximal
2
1
Kurz 14 Min.
2)
1 1,5 1,5 1,5 1,5
30° 30°
Kurz 30 Min.
2)
2 2,5 2,5 2,5 2,5
30° 30°
Kurz 44 Min.
2)
3 3,5 3,5 3,5 3,5
30° 40°
Baumwollgewebe
1)
2)
6 8 9 10 11
60° 90°
(
)
Baumwolle**
1)
2)
6 8 9 10 11
40° 60°
()
EcoMix 20°
2)
6 8 9 10 11
20° 20°
Pflegeleicht
1)
2)
3 4 4,5 5 5,5
40° 60°
(
)
Spülen
2)
- - - - -
- -
Abpumpen &
Schleudern
2)
- - - - -
- -
Feinwäsche
2 2,5 2,5 2,5 2,5
40° 40°
Baby
1)
2)
4 5,5 6 6,5 7
60° 60°
Wolle/
Handwäsche
2 2 2 2 2
30° 30°
Mischwäsche
(Trocknen)
3 4 4,5 5 5,5
- -
Buntwäsche
(Trocknen)
4 5 6 7 7
- -
W&T in nur 59 Min.
1,5 1,5 1,5 1,5 1,5
30° 30°
Programmübersicht
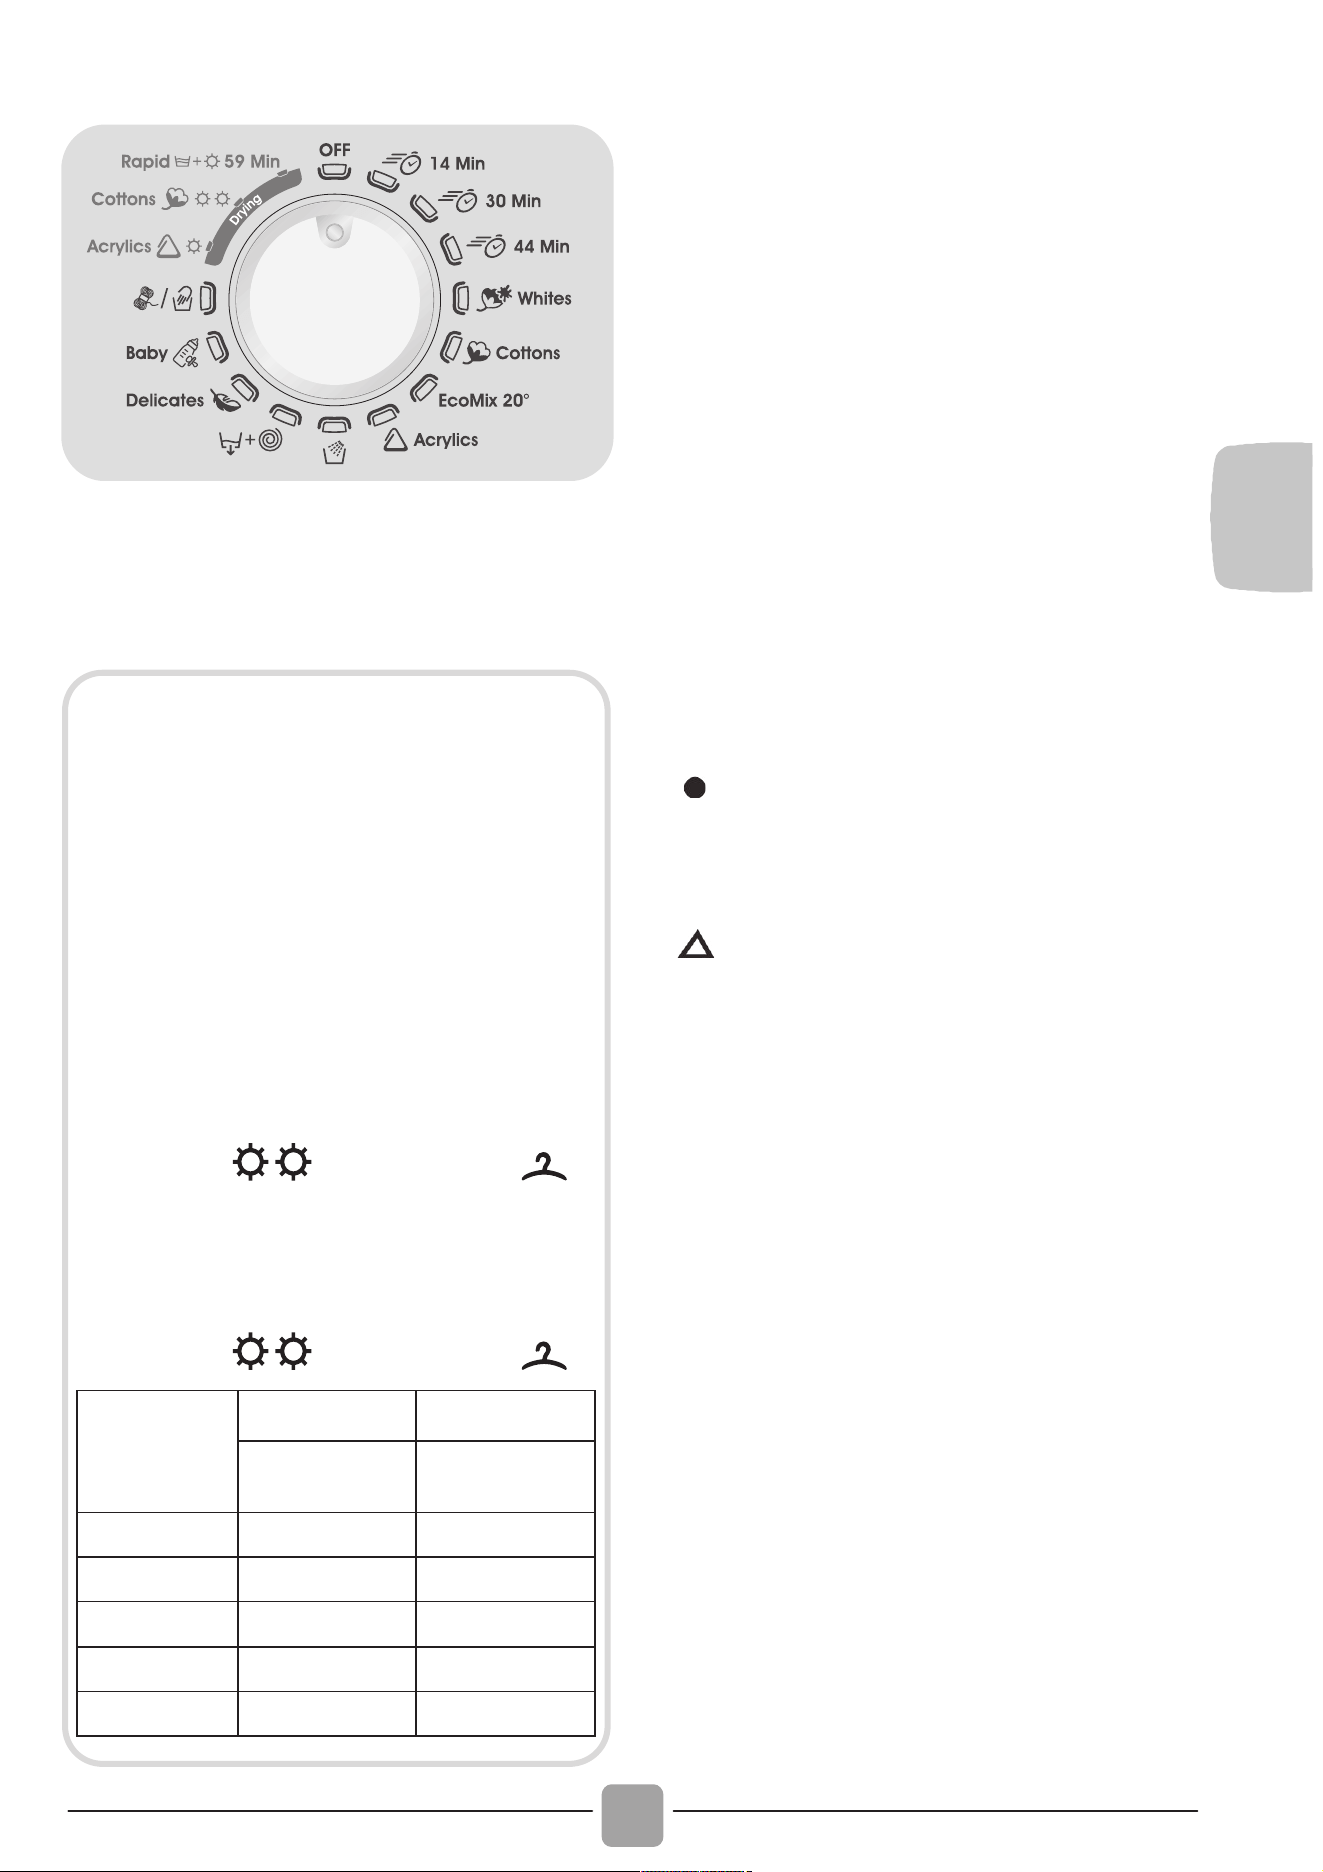
DE
69
Bitte beachten Sie folgende Hinweise:
*
Die maximale Beladungskapazität (trockene
Kleidung lt. Normtest) hängt von dem
jeweiligen Gerätemodell ab (s. Bedienblende).
Die Schleuderdrehzahl kann je nach Modell
und den Angaben auf dem Wäscheetikett
auch angepasst bzw. das Endschleudern
komplett unterbunden werden. Die
Steuerung geschieht dabei über die Taste
SCHLEUDERDREHZAHLWAHL. Werden
auf dem Wäscheetikett keine Angaben
hierzu gemacht, kann jeweils die maximal
mögliche Schleuderdrehzahl genutzt
werden.
Waschmittel bitte immer nach
Herstellerangabe und Wasserhärte dosieren.
Eine Überdosierung des verwendeten
Waschmittels bzw. der Waschzusätze kann zu
übermäßiger Schaumbildung führen. Erkenn
t
das Gerät eine vermehrte Schaumbildung,
beendet es ggf. automatisch den
Schleudervorgang vorzeitig, die Programmlaufzei
t
wird entsprechend verlängert und der
Wasserverbrauch angepasst.
( )
Nur bei gewählter VORWÄSCHE-
Option verfügbar (Nur bei
Programmen verfügbar, in denen die
VORWÄSCHE-Option zuwählbar ist).
(Nur für Modelle mit
entsprechendem Waschmittelfach für
Flüssigwaschmittel)
Wenn nur eine begrenzte Menge von
Textilien mit Flecken behaftet ist, die mit
einem flüssigen Vorreinigungs- oder
Bleichmittel behandelt werden soll, kann
eine entsprechende Fleckenbehandlung mit
dem Gerät durchgeführt werden. Gießen
Sie das Vorreinigungs-/Bleichmittel in die
Vorrichtung für Flüssigwaschmittel und
setzen diese in das mit der Ziffer "2"
markierte Fach der Waschmittelschublade.
Wählen Sie anschließend das Programm
SPÜLEN aus und starten den Vorgang.
Wenn der Spülvorgang beendet ist, den
Programmwähler auf die Position AUS
stellen, die restliche Wäsche hinzufügen,
das gewünschte Waschprogramm
auswählen und starten.
1)
Für die aufgeführten Programme
kann über die Optionstaste
VERSCHMUTZUNGSGRADWAHL
die Dauer und Intensität des
Waschprogramms angepasst werden.
2)
Automatische Trockenprogramme.
INFORMATIONEN FÜR PRÜFLABORE
(Ref. EN 50229 Standards)
Waschen
Nutzen Sie das Programm** mit dem maximalen
Verschmutzungsgrad, der maximalen
Schleuderzahl und einer Temperatur von 60°C.
Dieses Programm wird auch für den Test mit
einer niedrigeren Temperatur empfohlen.
Trocknen
Den ersten Trockenvorgang mit der in
der Spalte
A angegebenen Füllmenge
(die Ladung enthält: Kissenbezüge und
Handtücher). Auswahl des Baumwolle-
Programms ( ) schranktrocken ( ).
Den zweiten Trockenvorgang mit der in
der Spalte
B angegebenen Füllmenge
(die Ladung enthält: Leinentücher und
Handtücher). Auswahl des Baumwolle-
Programms ( ) schranktrocken ( ).
Kapazität
(Waschen)
(kg)
A (kg) B (kg)
Erstes
Trocknen
Zweites
Trocknen
6 4 2
8 5 3
9 6 3
10 7 3
11 7 4

70
Das Gerät bietet eine Vielzahl an
Programmen und Optionen, um
verschiedene Textilarten in allen
Verschmutzungsgraden optimal zu reinigen.
Kurz 14 Min. / 30 Min. / 44 Min.
Ein kompletter Waschzyklus (Waschen,
Spülen, Schleudern) für einen kleinen
Wäscheposten. Dieses Programm eigne
t
sich insbesondere für leicht verschmutz
e
Textilien aus Baumwolle oder Mischgeweben.
U
m eine Überdosierung zu vermeiden
empfehlen wir nur 20% der vom Herstelle
r
empfohlenen Waschmittelmenge zu verwenden.
Baumwollgewebe
Für die gründliche Pflege von
strapazierfähigen Textilien.
Baumwolle
Effizientestes Waschprogramm (kombinierte
r
Energie-/Wasserverbrauch) für die Reinigung
normal verschmutzter Baumwollwäsche.
EcoMix 20°
Dieses Programm ermöglicht es, bei
einer Waschtemperatur von nur
20°C verschiedene Textilarten und-farben
gemeinsam und besonders sparsam in einem
Waschgang zu waschen. Verwendung von
Waschmittel mit Kaltwaschfunktion notwendig.
Pflegeleicht
Für pflegeleichte Textilien aus Baumwolle,
Leinen, Synthetik oder Mischgewebe bei reduzierte
r
Waschtemperatur bzw. Schleuderdrehzahl.
Spülen
Es werden 3 Spülgänge mit Zwischenschleudern
(Schleuderdrehzahl kann mit der Tast
e
SCHLEUDERDREHZAHLWAHL reduziert ode
r
ganz abgestellt werden) durchgeführt.
Abpumpen & Schleudern
Zum nachträglichen Schleudern. Mit de
r
Taste SCHLEUDERDREHZAHLWAHL kann die
gewünschte Schleuderdrehzahl eingestellt werden.
Feinwäsche
Lange Einweichphasen in Kombination
mit sanften Trommelbewegungen und
hohem Wasserstand bei verringerte
r
Waschtemperatur und Schleuderdrehzahl
garantieren optimale Pflege für Feinwäsche.
Baby
Dieses Programm mit einer Waschtemperatur von
mindestens 60°C eignet sich ideal zur porentiefen
und hygienischen Reinigung von Babybekleidung.
Zur Erzielung von optimalen Waschergebnissen
empfehlen wir die Verwendung von Pulverwaschmittel.
Wolle/Handwäsche
Für die besonders schonende Reinigung
aller maschinenwaschbaren Wolltextilien (s.
Wäscheetikett) mit langen Programmpausen.
TROCKNEN
Die Trommel wechselt während des
Trockenvorgangs die Richtung um zu
verhindern, dass sie sich die Textilien
verheddern und um eine gleichmäßige
Trocknung zu erzielen. In den letzten 10-20
Minuten des Trockenvorgangs wird kalte Luf
t
verwendet, um die Faltenbildung zu minimieren.
Mischwäsche
Trockenprogramme mit niedriger Hitze
werden für Synthetik und Mischstoffe
empfohlen (bitte immer auf das
Pflegeetikett des Textilherstellers achten).
Buntwäsche
Trockenprogramme mit hoher Temperatu
r
werden für Baumwoll- und Leinenstoffe
empfohlen (bitte immer auf das
Pflegeetikett des Textilherstellers achten).
W&T in nur 59 Min. (Waschen & Trocknen)
Wenn Sie nur wenige Wäschestücke
Waschen und Trocknen möchten, ist dieses
Programm der ideale Zeitsparer!. Es ist fü
r
einen kleinen, leicht verschmutzten
Wäscheposten für bis zu 1, 5 kg (z.B. 4 Hemden
)
geeignet. In diesem
Programm wird die
Wäsche in nur 59 Minuten gewaschen,
gespült und getrocknet. Wir empfehlen die
Waschmitteldosierung bei diesem Programm
zu reduzieren, um Überdosierung zu vermeiden.
Programmauswahl
WARNUNG:
Dosierhilfen für Waschmittelkonzentrate
oder Flüssigwaschmittel müssen vor
Beginn des Trockenprogramms aus der
Trommel entfernt werden.
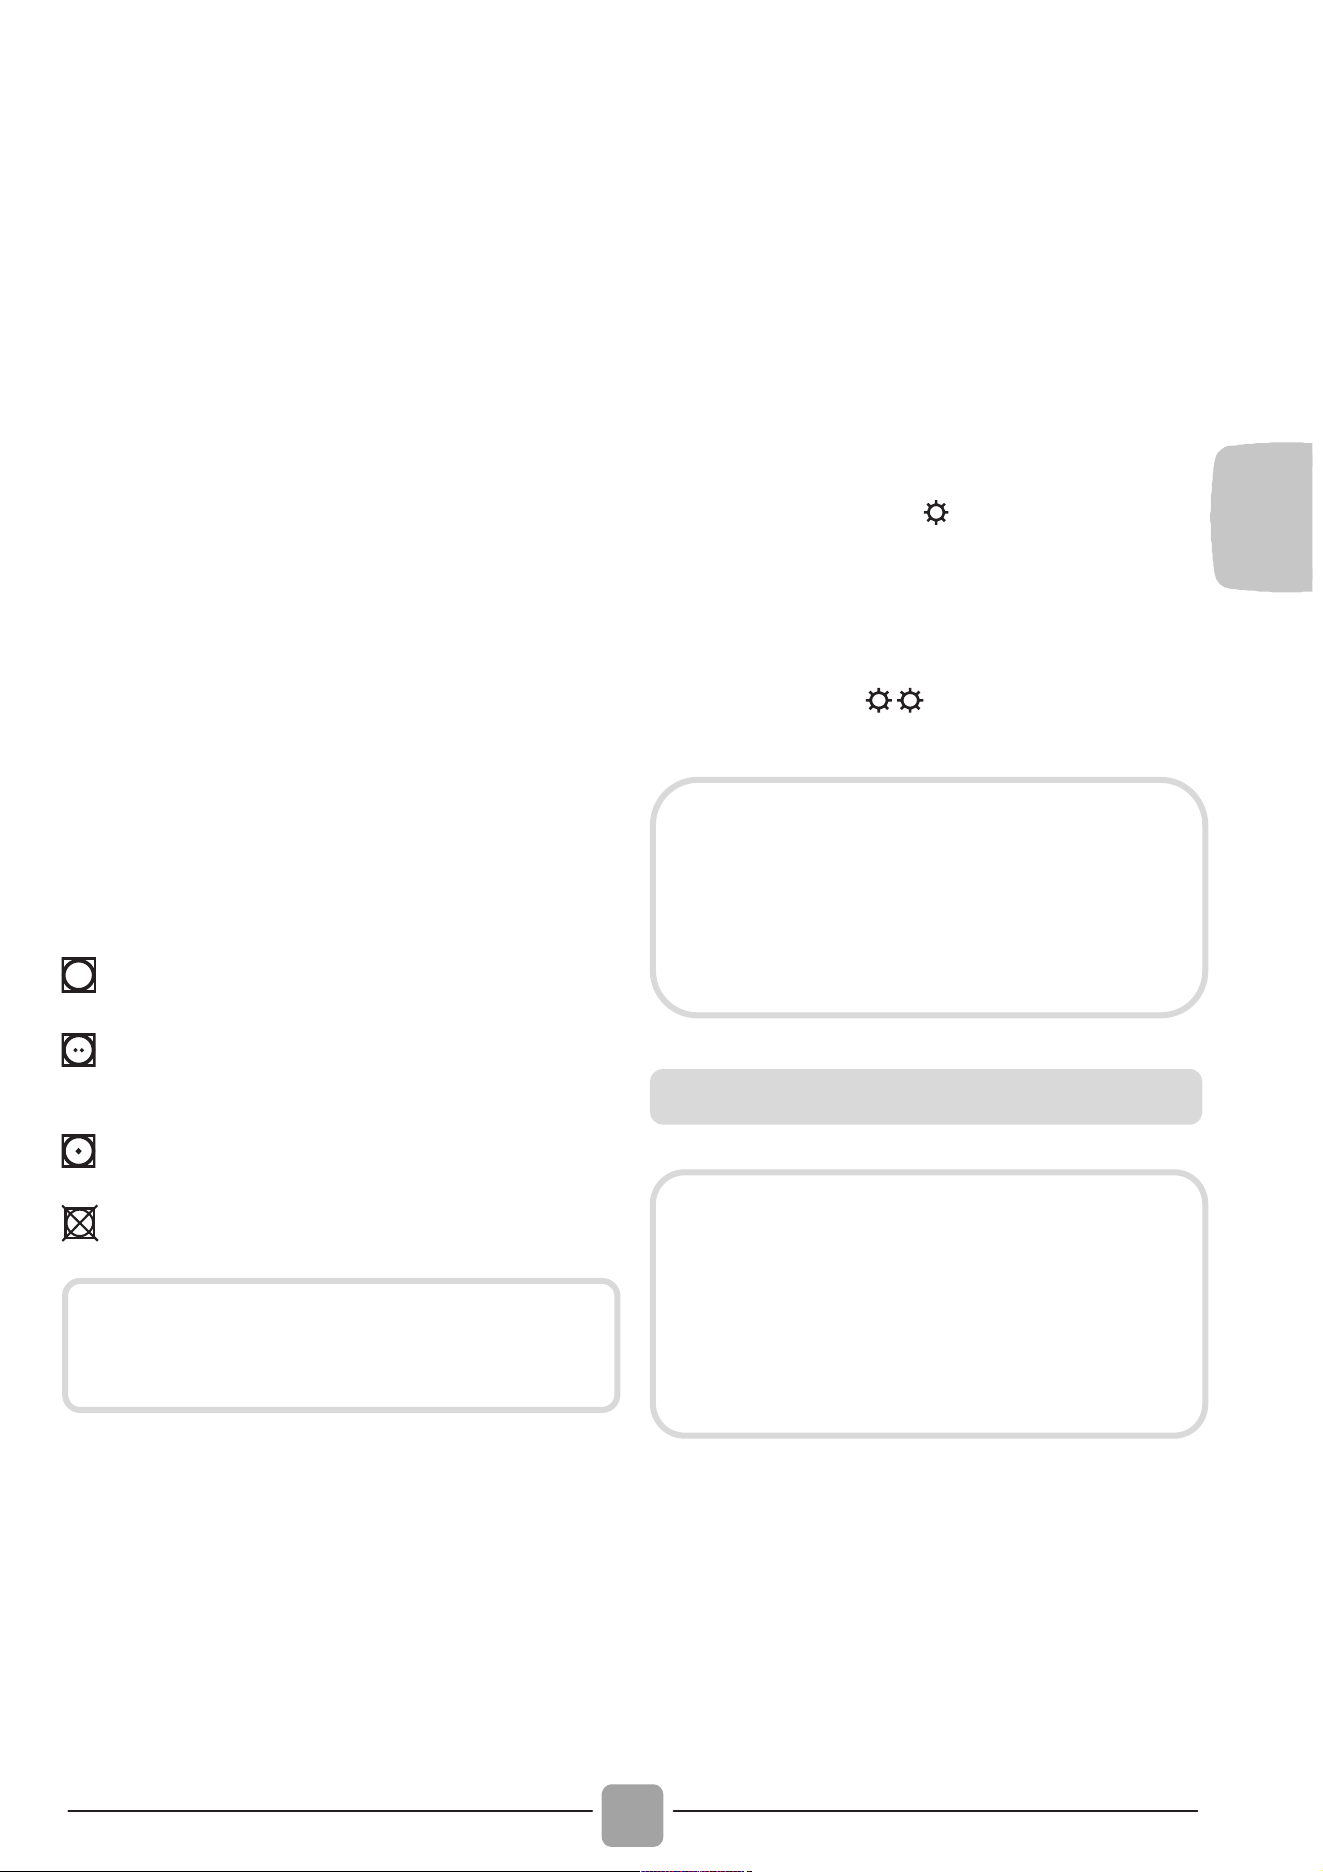
DE
71
7. TROCKNEN
Die nachfolgenden Angaben sind nur
Empfehlungen und können im täglichen
Betrieb unter haushaltsüblichen Bedingungen
abweichen.
Wir empfehlen bei den ersten Trockenvorgängen
und bei neuen Kleidungsstücken immer
zunächst eine niedrigere Trocknungszeit, als
angegeben auszuwählen, um so den
erforderlichen Trocknungsgrad zu ermitteln.
Wir empfehlen Stoffe, die leicht ausfransen
(z.B. Teppiche oder stark flusende
Wäschestücke) nicht im Waschtrockner zu
trocknen, um Verstopfungen im Luftkanal zu
vermeiden.
Wir empfehlen die Wäsche wie folgt
vorzusortieren:
- Nach Trockenpflege-Symbolen, die in den
Etiketten der Kleidung vorhanden sind
Für Trockner geeignet.
Trocknen im Wäschetrockner bei
hoher Temperatur.
Nur bei niedriger Temperatur trocknen.
NICHT im Wäschetrockner trocknen.
- Größe und Dicke
Immer wenn die Beladung die max.
Beladungskapazität des Gerätes übersteigt,
die Kleidung nach Dicke trennen (z.B.
Handtücher von dünnen Wäschestücken).
- Gewebeart
Baumwolle/ Leinen: Handtücher, Baumwolljersey,
Bett- und Tischwäsche.
Synthetik: Blusen, Hemden, Overalls,
usw. aus Polyester oder Polyamid sowie
für Baumwolle/Synthetik- Mischgewebe.
Trocknen Sie nur gut vorgeschleuderte
Wäsche.
Der Waschtrockner kann die folgenden
Arten von Trocknungen durchführen:
- Trockenprogramme mit niedriger
Temperatur werden für Mischgewebe
empfohlen (Synthetik/Baumwolle)
Synthetic-Stoffe (
Symbol auf dem
Programmwahlschalter).
- Trockenprogramme mit hoher
Temperatur werden für Baumwolle,
Frottee, Leinen, Hanf-Textilien usw.
empfohlen (
Symbol auf dem
Programmwahlschalter).
Öffnen Sie die Tür.
Bitte bei der Beladung die max.
Füllmengen lt. Programmtabelle beachten.
Bei großen Gegenständen, (z.B.
Betttüchern), sehr saugfähigen Textilien
(z.B. Handtüchern oder Jeansstoffen), ist
es besser die Beladung zu reduzieren.
Wenn der Stoff nicht über ein
Pflegeetikett verfügt, ist er nicht für die
maschinelle Trocknung geeignet.
Während der Trocknungsphase
beschleunigt die Trommel die
Drehgeschwindigkeit, um den
Wäscheposten gleichmässiger zu
verteilen und die Trocknungsleistung
zu optimieren.
Die richtige Art zu Trocknen
Die Tür des Gerätes ist mit einem
Schutz versehen, um den Kontakt mit
der Glastür, die während des
Trockenvorgangs hohe Temperaturen
erreichen kann, zu verhindern. Bei
normalem Gebrauch sollte es nicht
möglich sein, diesen Schutz zu entfernen.

72
Schließen Sie die Tür.
Mit dem Programmwahlschalter das
passende Trockenprogramm auswählen.
Wählen Sie eines der drei
sensorgesteuerten Programme aus:
Extratrocken-Programm (empfohlen
für Handtücher, dicke Textilien und
größere Wäscheposten).
Bügeltrocken-Programm (die Wäsche
bleibt nach dem Trocknen leicht feuch
t
und ist somit ideal zum Bügeln).
Schranktrocken-Programm (für Teile,
die nach dem Trocknen nicht
gebügelt werden müssen).
Wenn Sie ein zeitgesteuertes
Trocknungsprogramm auswählen möchten
drücken Sie die Taste TROCKENPROGRAMM
bis die gewünschte Programmdauer im
Display erscheint.
Stellen Sie sicher, dass der Wasserzulauf
geöffnet ist.
Stellen Sie sicher, dass der
Wasserablaufschlauch korrekt positioniert
ist.
Drücken Sie die START/PAUSE-Taste.
Der Trockenzyklus beginnt mit dem
Programmwählknopf in der ausgewählten
Programmposition und verbleibt auch bis
zum Ende dort.
Die Programmanzeige bleibt eingeschaltet,
bis die Abkühlphase beginnt und
entsprechende Anzeige im Display
aufleuchtet.
Wenn das Programm beendet ist,
erscheint das Wort "End" im Display.
Nach 5 Minuten schaltet das Gerät
automatisch in den Stand-by-Modus (bei
bestimmten Modellen zeigt das Display
dann zwei Striche im Display an).
Warten Sie etwa 2 Minuten nachdem das
Programm beendet ist und die TÜR
GESCHLOSSEN Anzeige erlischt, bis Sie
die Tür öffnen.
Schalten Sie das Gerät aus, indem Sie
die Programmwahlschalter auf die
Position AUS Position stellen.
Öffnen Sie die Tür und entnehmen Sie
die Wäsche.
Drehen Sie den Wasserzulauf ab.
ABBRUCH DES TROCKENPROGRAMMS
Um das Trockenprogramm abzubrechen,
drücken und halten Sie die Taste
TROCKENPPROGRAMM für etwa 3
Sekunden gedrückt.
WARNUNG:
Trocknen Sie keine Wollgegenstände
oder aufgepolsterte Gegenstände
(z.B. Decken, Steppanoraks etc.) und
sehr empfindliche Textilien im Gerät.
Wenn Kleidungsstücke noch
tropfnass sind die Beladung
verringern, um übermäßiges
Verknittern zu vermeiden.
WARNUNG:
Nach dem Abbruch des Programms
wird zunächst die Abkühlphase
beginnen und Sie müssen für 10-20
Minuten warten, bevor Sie die Tür
öffnen können.

DE
73
8.
AUTOMATISCHER WASCH-
UND TROCKENGANG
- Waschen
Öffnen Sie die Waschmittelschublade und
füllen die vom Hersteller empfohlene
Dosiermenge ein.
Wählen Sie das passende
Waschprogramm laut Wäscheetikett aus
und drehen den Programmwahlschalter
auf das gewünschte Programm.
Verändern Sie, wenn nötig, die
Waschtemperatur.
Wählen Sie ggf. zusätzlich gewünschte
Optionen per Taste aus.
Stellen Sie sicher, dass der Wasserzulauf
geöffnet ist und der Ablaufschlauch
korrekt positioniert ist.
- Trocknen
Wählen Sie eines der drei
sensorgesteuerten Programme aus:
Extratrocken-Programm (empfohlen
für Handtücher, dicke Textilien und
größere Wäscheposten).
Bügeltrocken-Programm (die Wäsche
bleibt nach dem Trocknen leicht feucht
und ist somit ideal zum Bügeln).
Schranktrocken-Programm (für Teile,
die nach dem Trocknen nicht
gebügelt werden müssen).
Wenn Sie ein zeitgesteuertes
Trocknungsprogramm auswählen möchten
drücken Sie die Taste TROCKENPROGRAMM
bis die gewünschte Programmdauer im
Display erscheint.
Drücken Sie die START/PAUSE-Taste.
Der Programmwählknopf bleibt während
des kompletten Wasch- und Trockenzyklus
in derselben Position und bewegt sich nicht.
Am Ende des Waschprogrammes
erscheint im Display die verbleibende
Restlaufzeit für den Trockenvorgang.
Der Waschtrockner wird darauf den
kompletten Trockenzyklus durchführen.
Die Programmanzeige bleibt eingeschaltet,
bis die Abkühlphase beginnt und die
entsprechende Anzeige im Display
aufleuchtet.
Wenn das Programm beendet ist,
erscheint das Wort "End" im Display.
Nach 5 Minuten schaltet das Gerät
automatisch in den Stand-by-Modus (bei
bestimmten Modellen zeigt das Display
dann zwei Striche im Display an).
Warten Sie etwa 2 Minuten nachdem das
Programm beendet ist und die TÜR
GESCHLOSSEN Anzeige erlischt, bis Sie
die Tür öffnen.
Schalten Sie das Gerät aus, indem Sie
die Programmwahlschalter auf die
Position AUS Position stellen.
Öffnen Sie die Tür und entnehmen Sie
die Wäsche.
Drehen Sie den Wasserzulauf ab.
ABBRUCH DES TROCKENPROGRAMMS
Um das Trockenprogramm abzubrechen,
drücken und halten Sie die Taste
TROCKENPPROGRAMM für etwa 3
Sekunden gedrückt.
Bei Überschreitung der angegebenen
max. Füllmengen in den
Trockenprogrammen wird die Wäsche
ggf. ungleichmäßig oder nicht
kom
p
lett
g
etrocknet.
WARNUNG:
Nach dem Abbruch des Programms wird
zunächst die Abkühlphase beginnen und
Sie müssen für 10-20 Minuten warten,
bevor Sie die Tür öffnen können.
74
9. HINWEISE ZUM KUNDENDIENST UND ZUR GARANTIE
Wenn Sie der Meinung sind, Ihre Waschmaschine läuft nicht einwandfrei, nutzen Sie das
“schnelle Benutzerhandbuch”, in dem erklärt wird, wie einige Probleme schnell behoben
werden können.
Problem Mögliche Ursachen und praktische Lösungen
Die Waschmaschine startet
nicht
Überprüfen Sie, ob die Maschine richtig angeschlossen ist.
Überprüfen Sie ob Strom auf dem Gerät ist.
Überprüfen Sie, ob das Programm richtig ausgewählt wurde und
ob die Maschine vorschriftsmäßig gestartet wurde.
Vergewissern Sie sich, dass keine Sicherung durchgebrannt ist
und ob die Steckdose noch funktioniert.
Schauen Sie nach, ob das Bullauge richtig verschlossen wurde.
Die Waschmaschine füllt
sich nicht mit Wasser
Schauen Sie ob der Wasserhahn offen ist.
Stellen Sie sicher, dass der Timer richtig eingestellt wurde.
Die Waschmaschine lässt
kein Wasser ab
Schauen Sie nach, ob der Filter verstopft ist.
Vergewissern Sie sich, dass der Abtropfschlauch nicht verbogen
ist.
Schauen Sie, ob irgendwelche Gegenstände in den Filter
gerutscht sind.
Wasserlarche neben der
Waschmaschine
Die Ursache hier für könnte bei der Dichtung liegen. Dies ist der
Bereich zwischen dem Wasserhahn und dem Schlauch. In
diesem Falle ziehen Sie diesen Bereich mit einer Zange enger
bzw. nach.
Die
Waschmaschinentrommel
schleudert nicht
Dies kann zur Ursache haben, dass das Wasser nicht
vollständig abgelaufen ist. Warten Sie ein paar Minuten.
Manche Modelle verfügen über eine „NichtSchleudernFunktion“.
Vergewissern Sie sich, dass diese nicht angeschaltet ist.
Laute Geräusche während
des Waschvorgangs
Stellen Sie sicher, dass alle Transportklammern entfernt
wurden.
Vergewissern Sie sich, dass die Last gleichmäßig verteilt ist.
Wenn ein ERROR auf
dem Display blinkt
Wenn die Nummern 0,1,5,7 oder 8 erscheinen, kontaktieren Sie
umgehend den Kundenservice.
Wenn Nummer 2 blinkt, wird kein Wasser geladen. Prüfen Sie,
ob der Wasserhahn aufgedreht ist.
Wenn Nummer 3 blinkt, tropft die Maschine nicht richtig ab.
Wenn Nummer 4 blinkt, ist die Maschine zu voll beladen.
Schließen Sie die Wasserzufuhr am Hahn und kontaktieren Sie
den Kundenservice.
Wenn Nummer 9 blinkt, schalten Sie die Maschine umgehend
aus und warten 10 bis 15 Sekunden, bevor Sie die Maschine
erneut starten.

DE
75
Bei der Nutzung von phosphatfreien
Waschmitteln können folgende Dinge
resultieren:
- Trüberes Abwasser: Dieser Effekt
ist bedingt durch die suspendierten
Zeolithe, was jedoch keine negativen
Auswirkungen auf die Wascheffizienz hat.
- Weißer Schleier auf der Kleidung am
Ende des Waschvorgangs: Dies ist
normal, da das Waschmittel nicht von der
Wäsche aufgenommen wird.
- Schaumbildung im letzten Spülgang:
Dies ist nicht zwingend ein Zeichen für
ein schlechtes Spülergebnis.
- Übermäßige Schaumbildung: Dies tritt
häufig beim Einsatz von anionischen
Tensiden in Waschmitteln auf.
Starten Sie in den vorgenannten Fällen
keinen erneuten Waschvorgang, da dies
nicht helfen wird.
Sollte das Problem weiterhin bestehen,
wenden Sie sich umgehend an den
Kundenservice.
Sie können sich auch für einen Serviceplan
registrieren, um kostenlosen Service auch
nach Ablauf der Garantie zu genießen.
Achtung: De Anruf ist nicht gebührenfrei.
Die Kosten werden durch eine
automatische Bandansage genannt.
Candy empfiehlt, immer Originalersatzteile
bei einer Reparatur verwenden zu lassen.
Wir schließen die Haftung für alle evtl.
Druckfehler aus.
Kleinere Änderungen und technische
Weiterentwicklungen im Detail vorbehalten.
Garantie
Die Garantiezeit des Gerätes entspricht
den jeweiligen gesetzlichen Vorschriften.
Nähere Angaben zu Art und Umfang
der Garantiebedingungen finden
Sie im Garantieheft. Bitte das
Original der Kaufrechnung für die
Garantieersatzansprüche aufbewahren,
um diese im Bedarfsfall unserem
Werkskundendienst vorzulegen. Ohne
diese Nachweise können wir und unser
Werkskundendienst den Anspruch nicht
anerkennen
Registrieren Sie ihr Produkt!
Sie können Ihr Gerät unter
www.registercandy.com kostenpflichtig
registrieren, um auch nach Ablauf der
Garantie einen erweiterten Schutz sowie
umfangreichen und schnellen Service zu
genießen.

76
Merci d’avoir choisi une machine à lave
r
Candy. Nous sommes certains qu’elle vous
donnera entière satisfaction et prendra soin
de votre linge, même délicat, jour après
j
our.
Vous pouvez enregistrer votre produit su
r
www.registercandy.com pour accéde
r
plus rapidement à des services
supplémentaires réservés à nos clients les
plus fidèles.
Lisez attentivement ce manuel pour une
utilisation de votre produit en toute sécurité
et bénéficier de conseils pratiques pou
r
l’entretenir efficacement.
Nous vous recommandons de
toujours garder ce manuel à portée de main
et dans de bonnes conditions afin qu’il
puisse également servir aux éventuels
futurs propriétaires.
Cette machine est livrée avec un certifica
t
de garantie qui permet de contacte
r
gratuitement l’assistance technique.
Veuillez garder votre ticket d’achat et le
mettre dans un endroit sûr en cas de
besoin.
Chaque produit est identifié par un code à
16 caractères unique également appelé
« numéro de série », imprimé sur l’étiquette
apposée sur l’appareil ou dans l’enveloppe
du document se trouvant à l’intérieur du
produit.
Ce code est nécessaire pour inscrire le
produit ou bien pour prendre contact avec
notre service clientèle Candy.
Cet appareil est commercialisé
en accord avec la directive
européenne 2012/19/EU su
r
les déchets des équipements
électriques et électroniques (DEEE).
Les déchets des équipements électriques et
électroniques (DEEE) contiennent des
substances polluantes (ce qui peu
t
entraîner des conséquences négatives pou
r
l’environnement) et des composants de
base (qui peuvent être réutilisés). Il est
important de traiter ce type de déchets de
manière appropriée afin de pouvoir élimine
r
correctement tous les polluants et de
recycler les matériaux. Les particuliers
peuvent jouer un rôle important en veillant à
ce que les DEEE ne deviennent pas un
problème environnemental. Il est essentiel
de suivre quelques règles simples:
Les DEEE ne doivent pas être traités
comme les déchets ménagers;
Les DEEE doivent être remis aux points
de collecte enregistrés. Dans de
nombreux pays, la collecte des produits
gros électroménagers peut être effectuée
à domicile.
Dans de nombreux pays, lorsque vous
achetez un nouvel appareil, l’ancien peut
être retourné au détaillant qui doit collecte
r
gratuitement sur la base un contre un.
L’équipement repris doit être équivalent
ou bien avoir les mêmes fonctions que le
produit acquis.
1. RÈGLES GÉNÉRALES DE SÉCURITÉ
2. INSTALLATION
3. CONSEILS PRATIQUES
4. ENTRETIEN ET NETTOYAGE
5. GUIDE D'UTILISATION RAPIDE
6. CONTRÔLES ET PROGRAMMES
7. CYCLE DE SECHAGE
8. CYCLE AUTOMATIQUE LAVAGE +
SECHAGE
9. SERVICE CLIENT ET GARANTIE
Règles environnementales
Index

FR
77
1. RÈGLES GÉNÉRALES
DE SÉCURITÉ
Le produit est conçu pour être
utilisé dans un foyer domestique,
comme:
- Le coin cuisine dans des
magasins ou des lieux de
travail,
- Employés et clients dans
un hôtel, un motel ou
résidence de ce type,
- Dans des bed and
breakfast,
- Service de stock ou
similaire, mais pas pour de
la vente au détail.
La durée de vie de l’appareil
peut être réduite ou la garantie
du fabricant annulée si
l’appareil n’est pas utilisée
correctement. Tout dommage
ou perte résultant d'un usage qui
n'est pas conforme à un usage
domestique (même s'ils sont
situés dans un environnement
domestique ou un ménage) ne
sera pas acceptée par le
fabricant dans toute la mesure
permise par la loi.
Cet appareil peut être utilisé
par des enfants âgés de 8 ans
et plus, ou des personnes
présentant un handicap physique,
moteur ou mental, et manquant
de connaissance sur l’utilisation
de
l’appareil, si elles sont sous la
surveillance d’une personne, donnant
des instructions pour une utilisation
en toute sécurité de l’appareil.
Les enfants ne doivent pas
jouer avec l'appareil.
Le nettoyage et l’entretien de
l’appareil ne doit pas être fait par
des enfants sans surveillance
d’un adulte.
Les enfants doivent être
surveillés pour être sûr qu’ils
ne jouent pas avec l’appareil.
Les enfants de moins de 3 ans
doivent être tenus à l’écart ou
bien être sous surveillance de
manière continue.
Si le cordon d’alimentation
électrique est endommagé, il
doit être remplacé par le
fabricant, son agent de service
ou un technicien qualifié afin
d’éviter tout danger
.
N’utilisez que les colliers
fournis avec l’appareil pour la
connexion de l’alimentation en
eau.
La pression hydraulique doit être
comprise d'un minimum de 0,05
MPa à un maximum de 0,8 MPa.
Assurez-vous qu’aucun tapis
n’obstrue la base de la
machine et les ventilations.
La mise OFF est obtenue en
positionnant le sélecteur en
position verticale, tout autre
positionnement met la machine

78
en fonction (uniquement pour
les modèles équipés d’un
sélecteur)
.
La phase finale du cycle d’un lave-
linge séchant se fait sans chaleur
(phase de refroidissement) afin de
s’assurer que les articles sont
laissés à une température ne les
endommageant pas.
Le positionnement de l’appareil
doit permettre un accès facile à
la prise de courant après
installation.
L’appareil ne doit pas être
installé derrière une porte
fermée, une porte coulissante
ou une porte avec une
charnière positionnée sur le
côté opposé à celle de la
machine, de telle façon que
l’ouverture de la porte de
l’appareil puisse être limitée.
Capacité de chargement
maximale de vêtements secs
selon le modèle utilisé (voir le
bandeau de commande).
L’appareil ne doit pas être utilisé si
des produits chimiques ont été
utilisés pour le nettoyage.
Ne séchez pas d’articles n’ayant
pas été lavés préalablement.
Les articles ayant été souillés par
des substances telles que: de
l’huile de cuisson, de l’acétone,
de l’alcool, de l’essence, du
kérosène, du détachant, de la
térébenthine, de la cire et du
décapant pour cire doivent être
lavés à l’eau chaude avec une
quantité supplémentaire de
détergent avant d’être séchés
dans le lave-linge séchant.
Les articles à base de
caoutchouc,
latex, textiles
imperméables
, articles doublés
de caoutchouc ou des oreillers
fabriqués avec du caoutchouc
ne doivent pas être séchés
dans la machine.
Les assouplissants ou les
produits similaires doivent être
utilisés comme spécifié dans
leurs instructions.
Les textiles touchés par du
pétrole ou de l’huile peuvent
s’enflammer spontanément,
surtout lorsqu’ils sont exposés à
des sources de chaleur telles
qu’un lave-linge. Si la chaleur
ne peut pas se dissiper, les
articles peuvent alors devenir
chauds et s’enflammer.
ATTENTION:
N’arrêtez jamais un lave-linge
séchant avant la fin du cycle de
séchage; à moins que tous les
articles ne soient retirés et
étendus immédiatement de
manière à ce que la chaleur se
dissipe rapidement.

FR
79
S’il est inévitable que les tissus
contiennent de l’huile végétale
ou de l’huile de cuisson ou bien
qu’ils ont été contaminés par
des produits de type « soins
capillaires », ils doivent d’abord
être lavés à l’eau chaude avec
du détergent avant d’être placés
dans un lave-linge séchant; cela
va permettre de réduire le
risque mais pas de l’éliminer
complètement.
Retirez tous les objets des
poches tels que les briquets et
les allumettes.
Consulter le site web du fabricant
pour plus d’informations.
Eteignez la machine avant
nettoyage: débranchez l’appareil
et fermer l’arrivée d’eau.
Assurez-vous que le système
électrique est raccordé à la
terre.
Merci de ne pas utiliser des
convertisseurs, des prises
multiples ou des rallonges.
Assurez-vous qu’il n’y a pas
d’eau dans le tambour avant
d’ouvrir le hublot.
Ne tirez pas sur le cordon
d’alimentation pour débrancher
l’appareil.
N’exposez pas la machine à la
pluie, au soleil ou aux
intempéries.
Lors d’un déplacement, ne
soulevez pas la machine à
laver par les boutons ou par le
tiroir à détergent, ne jamais
faire reposer l’appareil sur le
hublot. Nous recommandons
d’être 2 personnes pour
soulever la machine.
En cas de panne ou de
dysfonctionnement: éteindre la
machine, fermer le robinet d’eau
et ne pas toucher la machine.
Appelez immédiatement le
service client et n’utilisez que des
pièces de rechange d’origine. Le
non-respect de ces consignes
peut compromettre la sécurité de
l’appareil.
Le produit a été conçu e
t
fabriqué en avec les directive
s
Européenne suivantes:
2006/95/EC (LVD);
2004/108/EC (EMC);
2009/125/EC (ErP);
2011/65/EU (RoHS);
Consi
g
nes de sécurité
ATTENTION:
l’eau peut atteindre des
températures très élevées
pendant le lavage.
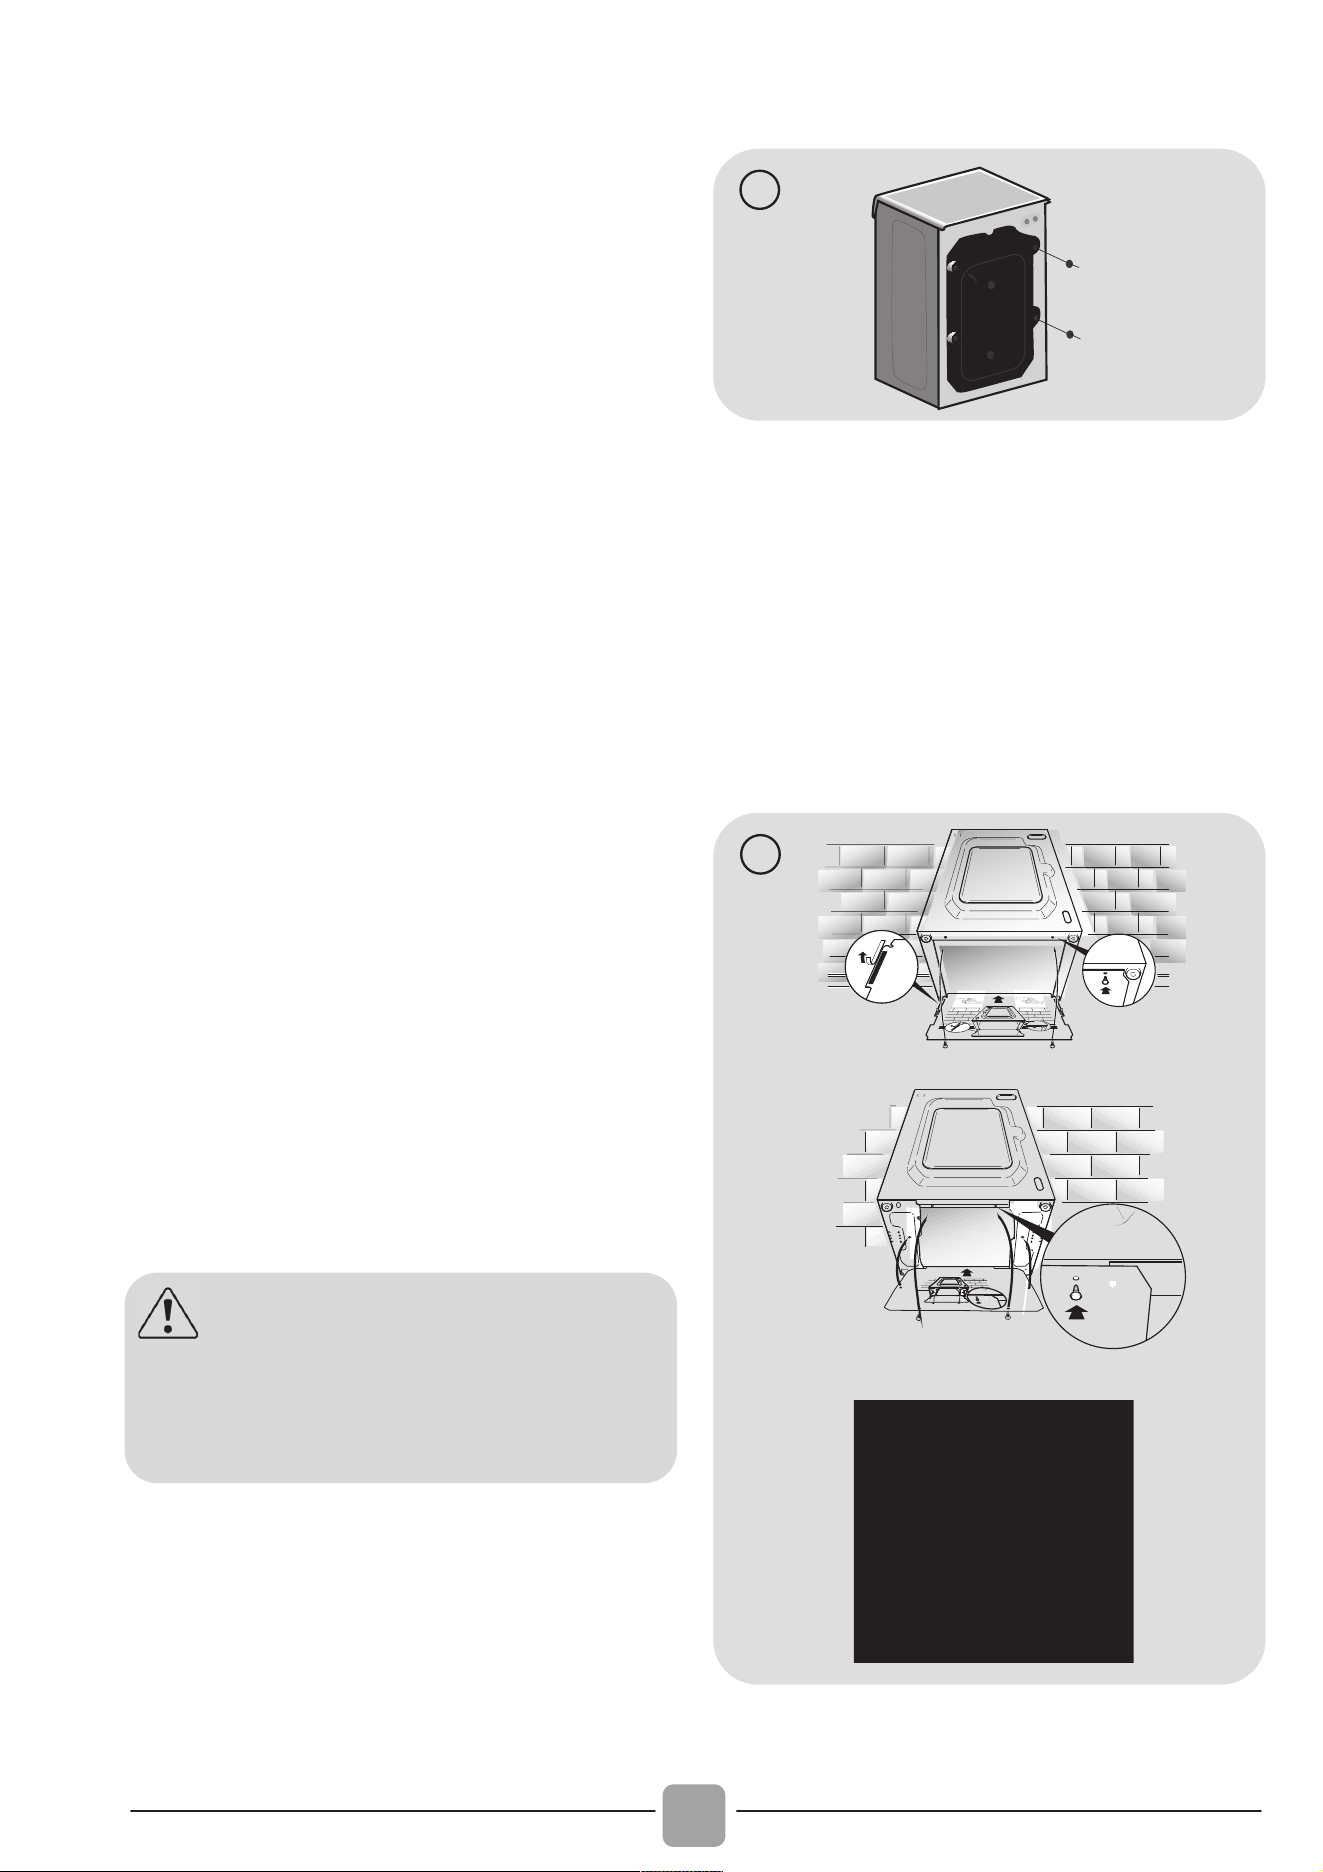
80
2. INSTALLATION
Coupez avec précaution le
cordon en faisant attention à
ne rien endommager.
Dévissez les 2 ou 4 vis (A) su
r
le dos de l’appareil et retirer les
2 ou 4 cales (B) comme illustré
sur la figure 1.
Fermez les 2 ou 4 trous en
utilisant les connecteurs inclus
dans l'enveloppe ou se trouve
la notice.
Si la machine à laver est
intégrée, après avoir coupé les
sangles de serrage, dévisse
r
les 3 ou 4 vis (A) et retirer 3 ou
4 cales (B).
Dans certains modèles, une
ou plusieurs cales vont
tomber à l'intérieur de la
machine: inclinez la machine à
laver avant de les enlever.
Bouchez les trous à l'aide des
fiches trouvées dans l'enveloppe.
Placez la feuille sous la
machine comme présenté su
r
le schéma numéro 2 (selon le
modèle, figure A, B ou C).
A
A
A
A
B
B
B
B
1
3
2
1
3
1
2
A
C
B
2
ATTENTION:
maintenez les matériaux
d'emballage hors de portée
des enfants.
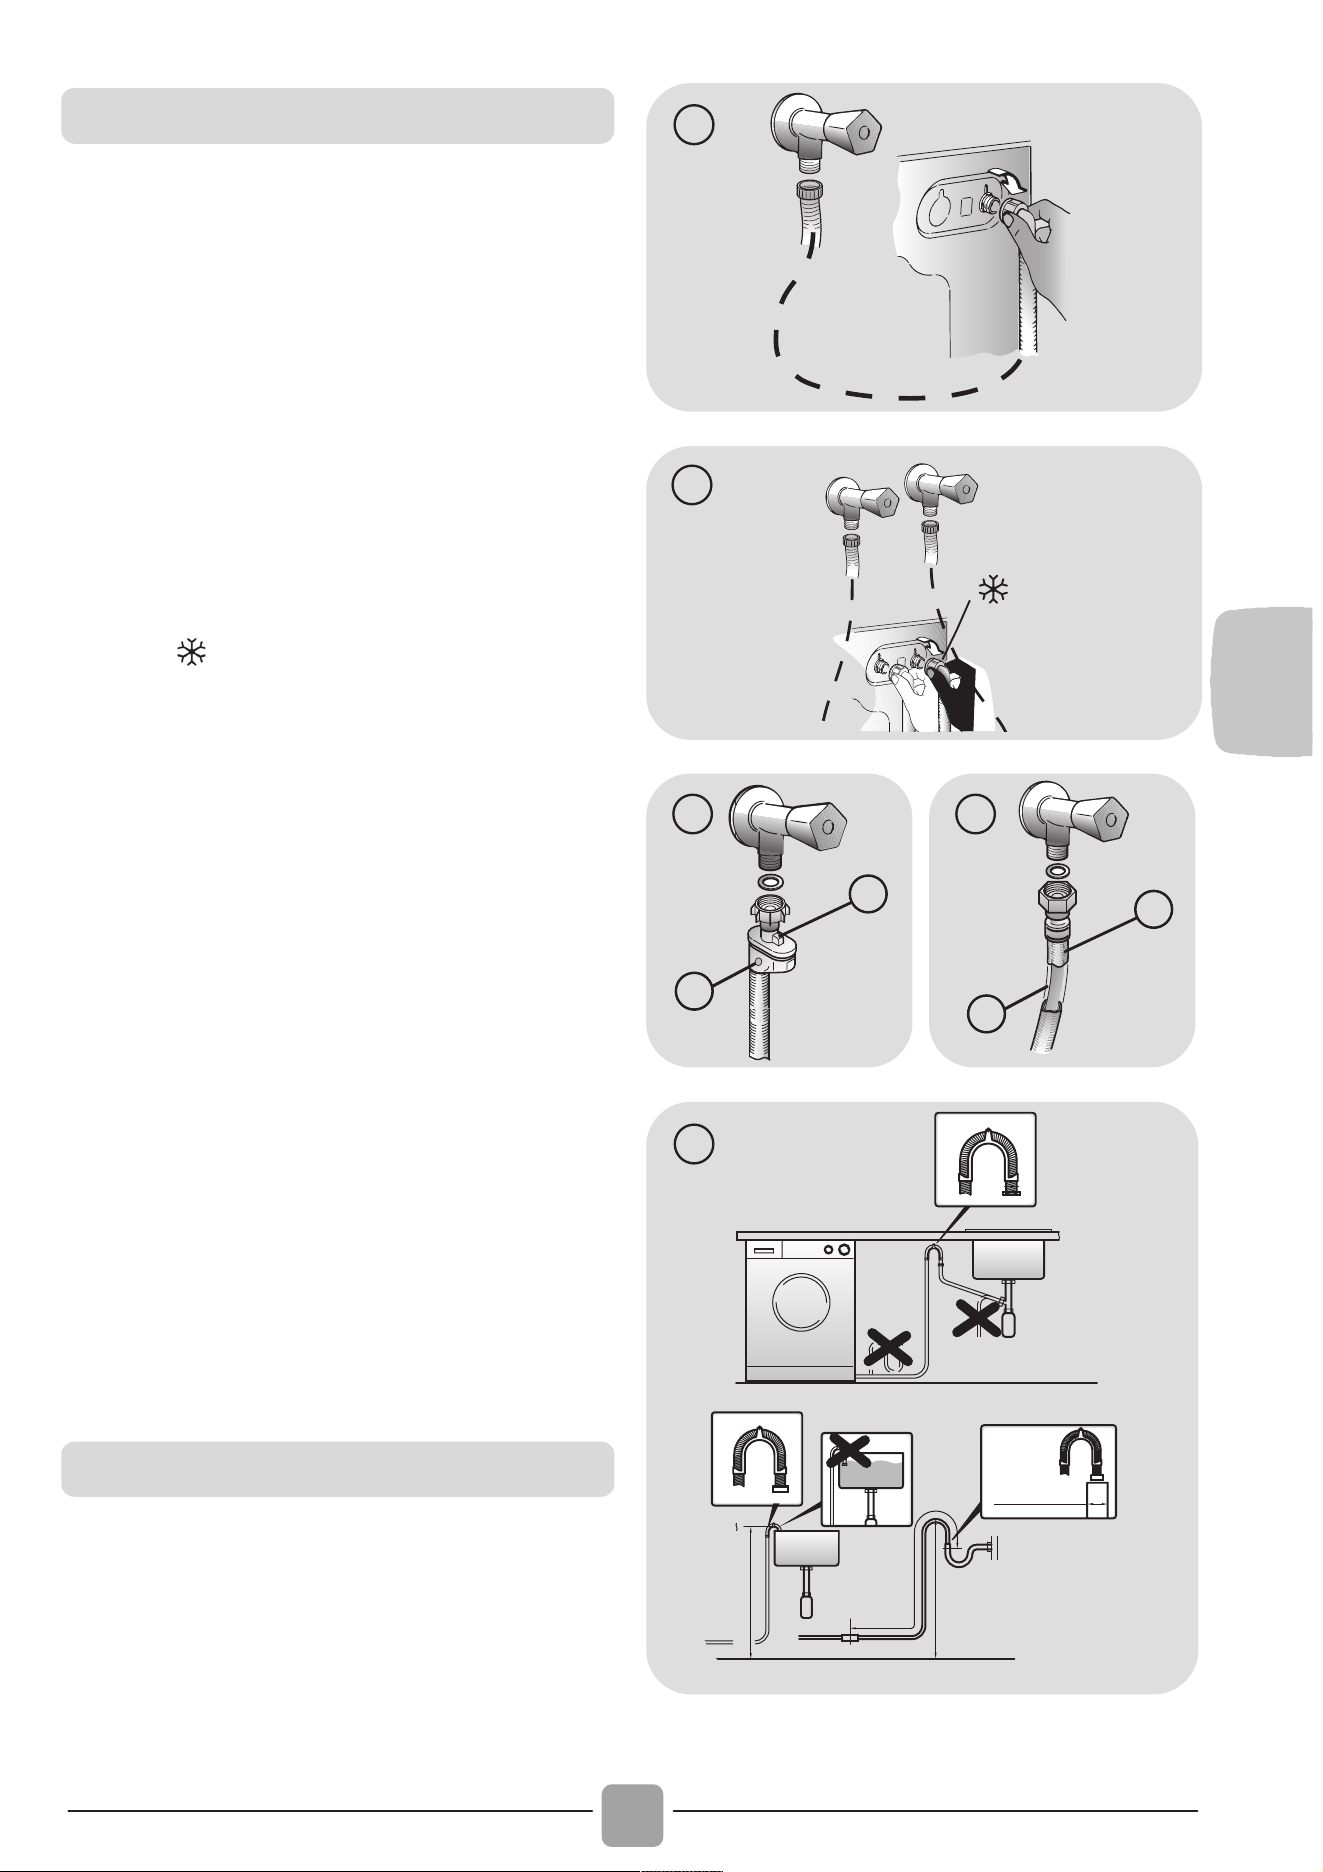
FR
81
Raccorder le tuyau d'eau au robinet, en
utilisant seulement le tuyau de vidange
fourni avec la machine à laver (fig. 3).
NE PAS OUVRIR LE ROBINET.
Certains modèles peuvent inclure une ou
plusieurs des caractéristiques suivantes:
CHAUD ET FROID (fig. 4): conduites
d’eau avec connexion eau chaude et eau
froide pour réaliser des économies
d’énergie.
Connectez le tuyau gris au robinet d'eau
froide
et le rouge au robinet d'eau
chaude. L'appareil peut être connecté au
robinet d'eau froide: dans ce cas, certains
programmes peuvent démarrer quelques
minutes plus tard..
AQUASTOP
(fig. 5):
un dispositif situé sur
le tube d'alimentation qui arrête le débit
d'eau si le tube se détériore; dans ce cas,
une marque rouge apparaît dans la
fenêtre "A" et le tube doit être remplacé.
Pour dévisser l'écrou, appuyez sur le
sens unique dispositif de verrouillage "B".
AQUAPROTECT–TUBE D’ALIMENTATION
AVEC PROTECTION (fig. 6):
si de l’eau fuit
à partir du tuyau "A", la gaine de
confinement transparent "B" va contenir
de l'eau pour permettre le cycle de lavage
de se terminer. À la fin du cycle,
contactez le service à la clientèle pour
remplacer le tuyau d'alimentation.
Au niveau du mur, faîtes attention à ce
que le tuyau ne soit pas plié ou écrasé.
Connectez-le de préférence à une
évacuation murale d’au moins 50 cm de
haut avec un diamètre plus grand que le
tuyau de la machine à laver (fig. 7).
3
1
4
B
A
5
B
A
6
min 50 cm
max 85 cm
+2,6 mt
max
max 100 cm
min 4 cm
7
Raccordement à l’eau
Positionnement
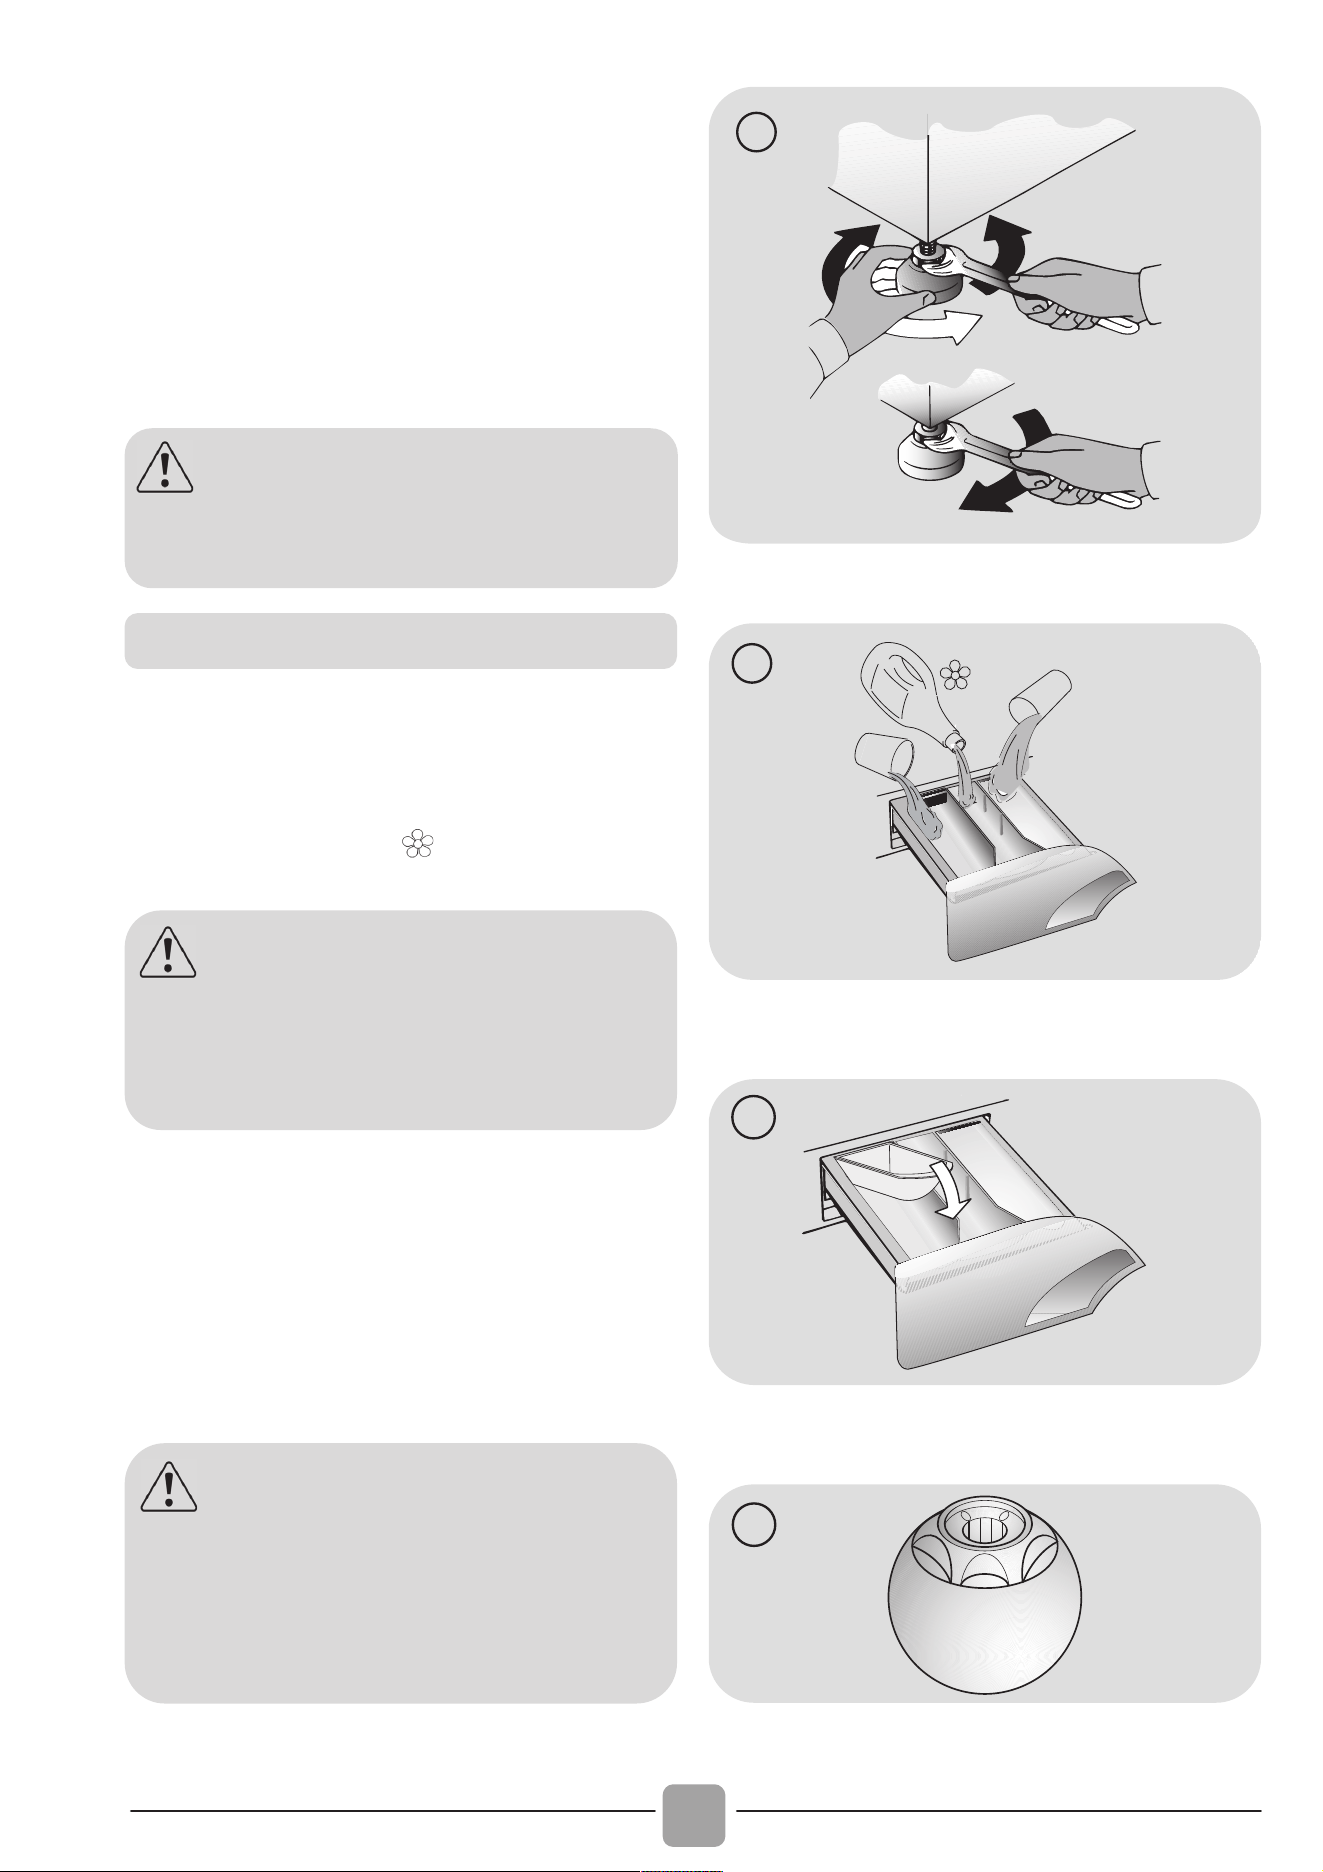
82
Utilisez les pieds comme en figure 8
pour régler la hauteur de l’appareil:
a. Tournez dans le sens horaire pou
r
libérer la vis;
b. Faire pivoter le pied pour élever ou
abaisser jusqu'à ce qu'elle adhère au sol;
c. Verrouillez le pied en revissant l’écrou dans
le sens inverse des aiguilles d’une montre
et le faire adhérer au fond de la machine.
Branchez l'appareil.
A
B
C
8
Le tiroir est divisé en 3 compartiments
comme illustré en figure 9:
compartiment « 1 »: pour la lessive
destinée au prélavage;
compartiment « »: des additifs
spéciaux: adoucisseurs, parfums, etc ;
compartiment « 2 » sert pour la lessive
destinée au lavage..
Un récipient pour détergent liquide est
également inclus dans certains modèles
(fig. 10). Pour l'utiliser, placez-le dans le
compartiment "2". Grâce à ce système, la
lessive s’écoulera dans le tambou
r
seulement au bon moment.
2
1
9
10
11
ATTENTION:
contactez l’assistance technique si le
cordon d’alimentation doit être changé.
Tiroir à détergent
ATTENTION:
utilisez uniquement des produits
liquides; la machine est programmée
pour doser les additifs à chaque cycle
durant le dernier rinçage.
ATTENTION:
Certains détergents sont difficiles à
enlever. Dans ce cas, nous vous
recommandons d'utiliser le doseur
spécifique pour être placé dans le
tambour (par exemple dans la figure 11).

FR
83
3. CONSEILS PRATIQUES
ATTENTION : Lorsque vous triez le linge,
assurez-vous:
- avoir éliminé objets métalliques tels que
barrettes, épingles, pièces de monnaie;
- avoir boutonné les taies d’oreiller, fermez
les fermetures éclair, accrochez les œillets
et crochets, nouez les ceintures et les
cordes des peignoirs de bain;
- avoir enlevé les crochets de rideaux;
- avoir lu attentivement les étiquettes
d’entretien;
- d’avoir enlevé les tâches tenaces pendant
le tri du linge à l’aide d’un détergent ou
d’un détachant spécial.
Lors du lavage des tapis, des couvertures
ou des vêtements lourds, nous vous
recommandons d’éviter l’essorage.
Pour laver la laine, veuillez vous assurer
que l’article peut être lavé en machine
(veuillez vous reporter à l’étiquette de
l’article).
Utilisez votre appareil dans le respect de
l’environnement tout en réalisant des
économies d’énergie.
Maximisez le volume de chargement
Utilisez la capacité maximale de
chargement de votre appareil.
Economisez jusqu'à 50% d'énergie en
lavant une charge complète au lieu de 2
demi-charges.
Avez-vous besoin d’effectuer un
prélavage?
Pour le linge très sale seulement!
Economisez du temps, de l’eau et de
l’énergie jusqu’à 15% en ne sélectionnant
pas le prélavage pour un linge
normalement sale.
Un lavage chaud est-il nécessaire?
Eliminer les taches avec un détachant ou
faire tremper les taches dans l'eau avant
de la laver réduit la nécessité d'un
programme de lavage à chaud.
Economisez jusqu'à 50% d'énergie en
utilisant un programme de lavage à 60°C.
Avant d’utiliser un programme de séchage
Economisez de l’énergie et du temps en
sélectionnant une vitesse d’essorage
élevée et ainsi réduire l’eau résiduelle
contenue dans les textiles avant un
programme de séchage.
Voici un mini guide avec des conseils et
des recommandations sur l'utilisation des
détergents aux différentes températures.
Dans tous les cas, toujours lire les
instructions sur le détergent à utiliser et les
doses recommandées.
Conseils de chargement
Suggestions d’utilisation
Lorsque vous lavez des blancs très
sales, nous vous recommandons
d’utiliser le programme coton à 60°C
ou au-dessus et d’utiliser une lessive
en poudre contenant des agents blanchissants.
Pour les lavages entre 40°C et 60°C,
le type de détergent utilisé doit être
adapté au type de tissu et au degré de
salissure. Poudres normales sont
adaptés pour des "blancs" à forte
salissures, alors que les détergents
liquides ou "protection des couleurs"
sont adaptés pour les tissus colorés
avec des niveaux faibles de salissures.
Pour le lavage à des températures
inférieures à 40°C, nous recommandons
l'utilisation de détergents ou de détergents
liquides spécifiquement étiquetés comme
approprié pour lavage de basse température.
Pour lavage de la laine ou de la soie,
utilisez uniquement des produits de lavage
spécialement formulés pour ces tissus.

84
4. ENTRETIEN ET
NETTOYAGE
Pour nettoyer l’extérieur de la machine,
utilisez un chiffon humide en évitant les
produits abrasifs, alcool et/ou solvants. La
machine ne requiert pas de soins particuliers
pour un lavage ordinaire ; pensez à nettoyer
régulièrement le tiroir à produits et le filtre.
Quelques conseils pour déplacer la machine
ou pour la préparer à une longue période
d’inactivité sont donnés ci-dessous.
Nous recommandons de nettoyer les
bacs pour éviter l’accumulation de
produit.
Il suffit de tirer légèrement sur le tiroir
pour l’extraire, nettoyer le tiroir sous un
jet d’eau et remettre le tiroir.
Le nettoyage mensuel du filtre est conseillé.
Ce filtre peut retenir les résidus plus gros
qui pourraient bloquer le tuyau d’évacuation
(pièces de monnaie, boutons).
Disponible sur certains modèles
uniquement: sortez le tuyau, ôtez le
bouchon et videz l’eau dans un récipient.
Avant de dévisser le filtre, nous vous
recommandons de disposer un chiffon
absorbant sur le sol afin de garder le sol
sec.
Tournez le filtrer dans le sens antihoraire
jusqu’à la limite en position verticale.
Retirez et nettoyez le filtre; lorsque vous
avez terminé, repositionnez le filtre en
tournant dans le sens horaire.
Répétez les étapes précédentes dans
l’ordre inverse pour remonter les pièces.
Si la machine doit être stockée dans une
pièce non chauffée pendant une longue
période, vidangez toute l’eau avant votre
départ.
Débranchez la machine à laver.
Enlevez la bague sur le tuyau et le plier
vers le bas afin de vider le reste d’eau.
Fixez le tuyau de vidange à l’aide de
l’attache lorsque vous avez terminé.
Nettoyage des bacs
Nettoyage filtre
Suggestions lors d’un déménagemen
t
ou une absence prolongée
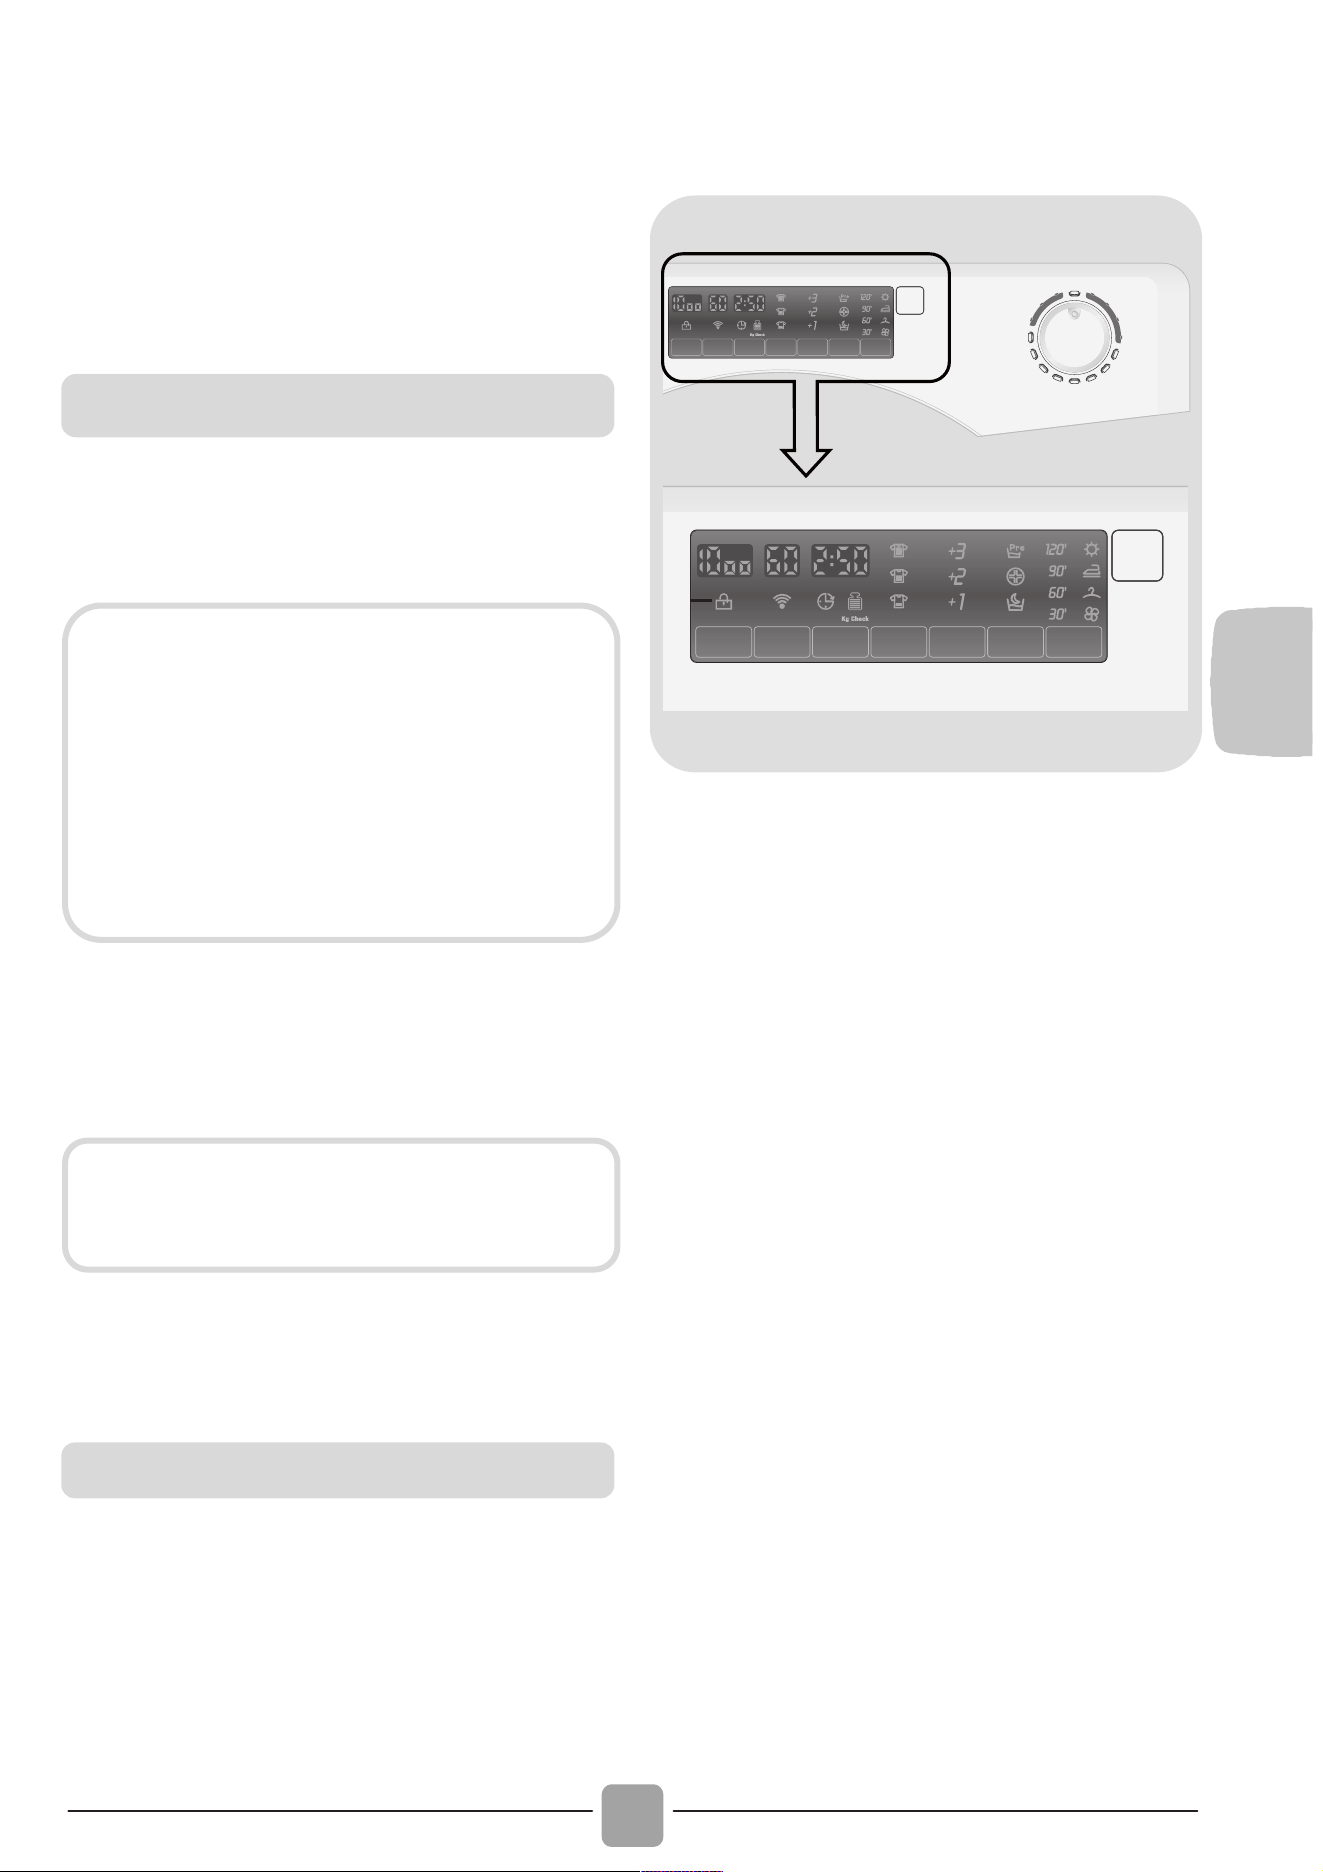
FR
85
5. GUIDE D'UTILISATION
RAPIDE
Cette machine adapte automatiquement le
niveau de l'eau en fonction du type et de la
quantité de linge. Ce système permet de
diminuer la consommation d'énergie et
réduit nettement les temps de lavage.
Mettez le lave-linge en fonction et
sélectionnez le programme souhaité.
Ajustez la température de lavage si besoin et
sélectionnez les options nécessaires.
Pressez le bouton DEBUT/PAUSE pour
commencer le cycle de lavage.
Le message "End" apparaîtra sur l'écran
ou la LED correspondante s'allume à la
fin du programme.
Mettez la machine à l’arrêt.
Pour tout type de lavage, voir le tableau
des programmes et suivez la séquence
de fonctionnement comme indiqué.
Pression de l’eau: min 0,05 Mpa / max 0,8 Mpa
Essorage (Tours par minute):
voir la plaque signalétique.
Puissance / Ampérage / Tension
d’alimentation:
voir la plaque signalétique.
6. CONTRÔLES ET
PROGRAMMES
A
B
DCEFGHI
M
L
A Sélecteur de programmes
avec position OFF
B Touche DEBUT/PAUSE
C Touche SELECTION ESSORAGE
D Touche SELECTION
TEMPERATURE
E Touche DEPART DIFFERE
F
Touche DEGRE DE SALISSURE
G Touche EXTRA RIN
Ç
AGE
H Touche OPTIONS
I
Touche SELECTION DU SECHAGE
L Afficheur Digital
M
Indicateur de PORTE SECURISEE
Sélection du programme
SECHAGE
Si vous désirez que le cycle de
séchage commence automatiquement
à l’issue du lavage, sélectionnez le
programme désiré à l’aide su bouton
SELECTION DU SECHAGE.
Sinon, il est possible de terminer le
lavage et ensuite de sélectionner le
programme de séchage.
Attendez environ deux minutes que le
verrou de porte se désactive. Le
témoin « Porte sécurisée » s’éteint.
Caractéristiques techniques

86
Pressez la touche DEBUT/PAUSE pour
démarrer le cycle sélectionné.
Une fois le programme sélectionné, le
sélecteur de programmes reste positionné
sur le programme sélectionné jusqu’ à la fin
du cycle.
Positionnez le sélecteur sur OFF pour
éteindre la machine.
Appuyez sur cette touche pour démarrer
le programme sélectionné.
AJOUTEZ OU SUPPRIMEZ DES ARTICLES
LORSQUE LE PROGRAMME A DEJA
COMMENCE (PAUSE)
Maintenez enfoncée la touché
DEBUT/PAUSE pendant environ deux
secondes (lorsque l’affichage clignote,
ceci indique que le cycle a été mis en
pause).
Attendez 2 minutes pour que la porte se
dévérouille.
Une fois vos articles ajoutés ou retirés,
fermez la porte et appuyez de nouveau
sur le bouton DEBUT/PAUSE (le
programme reprend là où il s’est arrêté).
ANNULATION DU PROGRAMME
Pour annuler le programme, positionnez
le sélecteur sur OFF.
ATTENTION:
Ne touchez pas l’écran lors du
branchement de la machine car elle
étalonne le système durant les
premières secondes. Ceci pourrait
engendrer un mauvais fonctionnement.
Si tel est le cas, veuillez débrancher puis
brancher de nouveau la machine.
Ouverture de la porte
Un dispositif de sécurité empêche
d’ouvrir la porte immédiatement
après la fin du cycle.
Il faut attendre 2 minutes après que
celui-ci soit terminé et attendre que
l’indicateur lumineux s’éteigne pour
pouvoir ouvrir la porte.
Sélecteur de programmes avec
position OFF
Lorsque le sélecteur de programme est
activé, l’affichage s’allume pour
visualiser les réglages de chacun des
programmes. Pour des raisons
d’économie d’énergie, à la fin du cycle
ou lors d’une période d’inactivité, le
niveau de contraste de l’afficheur
diminue.
N.B.:Pour éteindre la machine, il faut
positionner le sélecteur sur la position
OFF.
Le sélecteur de programmes doit être
positionné sur OFF à l’issue de chaque
cycle ou avant le début du cycle
suivant pour sélectionner un nouveau
programme.
Touche DEBUT/PAUSE
Fermez la porte avant d’appuyer sur la
touche DEBUT/PAUSE.
Lorsque la touche DEBUT/PAUSE a
été enfoncée, le démarrage du cycle
peut prendre quelques secondes.
Les Options de lavage doivent être
choisies avant d’appuyer sur la
touche DEBUT/PAUSE.
Si une option sélectionnée n’est pas
compatible avec le programme désiré,
l’indicateur clignote dans un premier
temps avant de s’éteindre.

FR
87
En appuyant sur cette touche, il est possible
de réduire la vitesse d’essorage voir
d’annuler totalement l’essorage.
Vous pouvez ré-activer l’essorage en
pressant de nouveau le bouton jusqu’à
atteindre la vitesse désirée.
Il est possible d’augmenter la vitesse
d’essorage sans pause.
Ce bouton permet de modifier la
température des cycles de lavage.
Il n'est pas possible d'élever la
température au-dessus de la valeur
maximale autorisée pour chaque
programme, de manière à préserver les
textiles.
Cette touche vous permet de différé le
départ du cycle choisi jusqu’à 24h.
Voici comment retarder le départ du
cycle:
- Sélectionnez le programme.
- Appuyez sur la touche DÉPART
DIFFÉRÉ pour activer la fonction puis
appuyez de nouveau pour définir un
délai de 1 heure. Chaque pression
supplémentaire retarde d’une heure
jusqu’à 24h. Au delà, le retardateur se
réinitialise.
- Validez en appuyant sur la touche
DEBUT/PAUSE (La lumière à l’écran
commence à clignoter). Le programme
débutera à l’issue du compte à rebours.
Il est possible d’annuler le départ
différé en positionnant le sélecteur de
programme sur OFF.
Si une coupure d’alimentation intervient
lorsque la machine est en marche, la
mémoire restaure automatiquement le
programme sélectionné lorsque
l’alimentation revient et reprend là il
s’est arrêté.
En sélectionnant ce bouton, vous pouvez
choisir entre trois niveaux d’intensité de
lavage, en fonction de la salissure des
textiles (cette fonction ne peut être
utilisée qu’avec certains programmes,
comme indiqué dans le tableau
récapitulatif des programmes).
Une fois le programme sélectionné, le
voyant affichera automatiquement le
degré de salissure lié au programme.
Appuyez sur le bouton pour faire varier le
degré de salissure.
Touche SELECTION ESSORAGE
Pour éviter d’endommager les textiles,
il n’est pas possible d’augmenter la
vitesse d’essorage au delà de celle
adaptée automatiquement lors de la
sélection du programme.
La machine est équipée d’un dispositif
électronique qui empêche l’essorage si
la charge est déséquilibrée. Ceci a
pour but de réduire le bruit et les
vibrations et prolonge la durée de vie
de votre a
pp
areil.
Touche SELECTION TEMPERATURE
Touche DEPART DIFFERE
Touche DEGRE DE SALISSURE

88
Ce bouton vous permet d’ajouter des
rinçages à la fin du cycle de lavage. Le
nombre maximum de rinçages
supplémentaires varie en fonction du
programme sélectionné.
Cette fonction a été spécialement étudiée
pour les personnes à la peau délicate et
sensible et permet d’éliminer au mieux
les traces de détergent qui peuvent
causer des irritations ou des allergies.
Il est également conseillé d’utiliser cette
fonction pour les articles à destination
des enfants et dans le cas de textiles très
sales, pour lesquels il est nécessaire
d’utiliser plus de détergent, ou dans le
cas d’articles en tissu éponge dont les
fibres ont la plupart du temps tendance à
conserver le détergent dans les fibres.
Vous pouvez choisir entre trois options:
- PRELAVAGE
Cette option vous permet d’effectuer un
prélavage et il est particulièrement utile
pour les charges très sales (cette fonction
ne peut être utilisée qu’avec certains
programmes, comme indiqué dans le
tableau récapitulatif des programmes).
Nous vous recommandons de n’utiliser
que 20% des quantités recommandées
sur l’emballage du détergent.
- HYGIENE
Avec cette option, il est possible
« d’hygiéniser » les textiles, la
température de lavage peut alors
atteindre 60°C.
- NUIT CALME
Cette option réduit la vitesse d’essorage
intermédiaire de 400 tours par minute et
augmente, lorsque c’est possible, le
niveau de l’eau lors du rinçage pour
conserver le linge immergé après le
rinçage final afin d’étendre les fibres.
Lors de cette phase ou le linge est
immergé dans le tambour, le voyant
clignote pour montrer que la machine est
en attente.
Désactivez alors l’option pour terminer le
cycle avec un essorage et une phase de
vidange.
Grâce au contrôle électronique, l’eau est
vidangée en silence ce qui rend cette
option très utile pour une utilisation
nocturne.
Appuyez sur la touche pour sélectionner
le programme de séchage requis : un
témoin s’allume alors pour montrer le
résultat de séchage sélectionné à chaque
pression sur le bouton (le sélecteur ne
doit pas être en position verticale).
Pour annuler la sélection avant le départ
du cycle, appuyez de nouveau sur la
touche de sélection autant de fois que
nécessaire ou bien positionnez le
sélecteur de programme sur OFF.
Pour annuler le cycle durant la phase de
séchage, maintenez la touche enfoncé
pendant environ 3 secondes jusqu’à ce
que l’indicateur de refroidissement
s’allume.
Compte-tenu de la température élevée à
l’intérieur du tambour, nous vous
recommandons de laisser l’appareil
terminer la phase de refroidissement
avant d’éteindre la machine et de retirer
le linge.
Touche EXTRA RINÇAGE
Touche OPTIONS
Touche SELECTION DU
SECHAGE

FR
89
L’affichage Digital vous permet de visualiser
en permanence l’état de la machine.
2
1
8109
3 4 5 6 7 11
1) PORTE SECURISEE
1
L’icône indique que la porte est
verrouillée.
Lorsque la touche DEBUT/PAUSE est
pressé sur la machine avec la porte
fermée, l’icône clignote temporairement
puis s’allume.
Un dispositif de sécurité empêche
l’ouverture immédiatement après la fin du
cycle. Il faut attendre 2 minutes à l’issue
du cycle de lavage avant d’ouvrir la porte.
A la fin du cycle, tournez le sélecteur de
programmes sur OFF.
2) VITESSE D’ESSORAGE
2
Vous pouvez voir la vitesse d’essorage liée
au programme sélectionné, vitesse qui peut
être modifiée ou supprimée à l’aide de la
touche correspondant.
3) TEMPERATURE DE LAVAGE
3
Vous pouvez voir la température de lavage
correspondante au programme sélectionné,
température qui peut être modifiée à l’aide
de la touche correspondant.
4) DUREE DU CYCLE
4
Lorsqu’un programme est sélectionné, la
durée du cycle est automatiquement
affichée sur l’écran. Elle peut varier en
fonction des options choisies.
Une fois le programme démarré, l’écran
affiche le temps restant jusqu’à la fin de
ce dernier.
L’appareil calcule le temps restant sur la
base d’une charge “standard”. La
machine corrige le temps restant une fois
le poids et la composition de la charge
détectés.
Si le programme automatique lavage +
séchage est sélectionné, le temps de
séchage restant s’affichera alors sur
l’écran.
Afficheur DIGITAL
Fermez la porte avant d’appuyer sur la
touche DEBUT/PAUSE.
Si la porte n’est pas bien fermée, la
lumière continue à clignoter pendant
environ 7 secondes, ce après quoi
la commande de démarrage sera
supprimée automatiquement. Dans ce
cas, fermez la porte de manière
correcte puis appuyez de nouveau
su
r l
a
touc
h
e
DEB
U
T
/
PA
US
E.
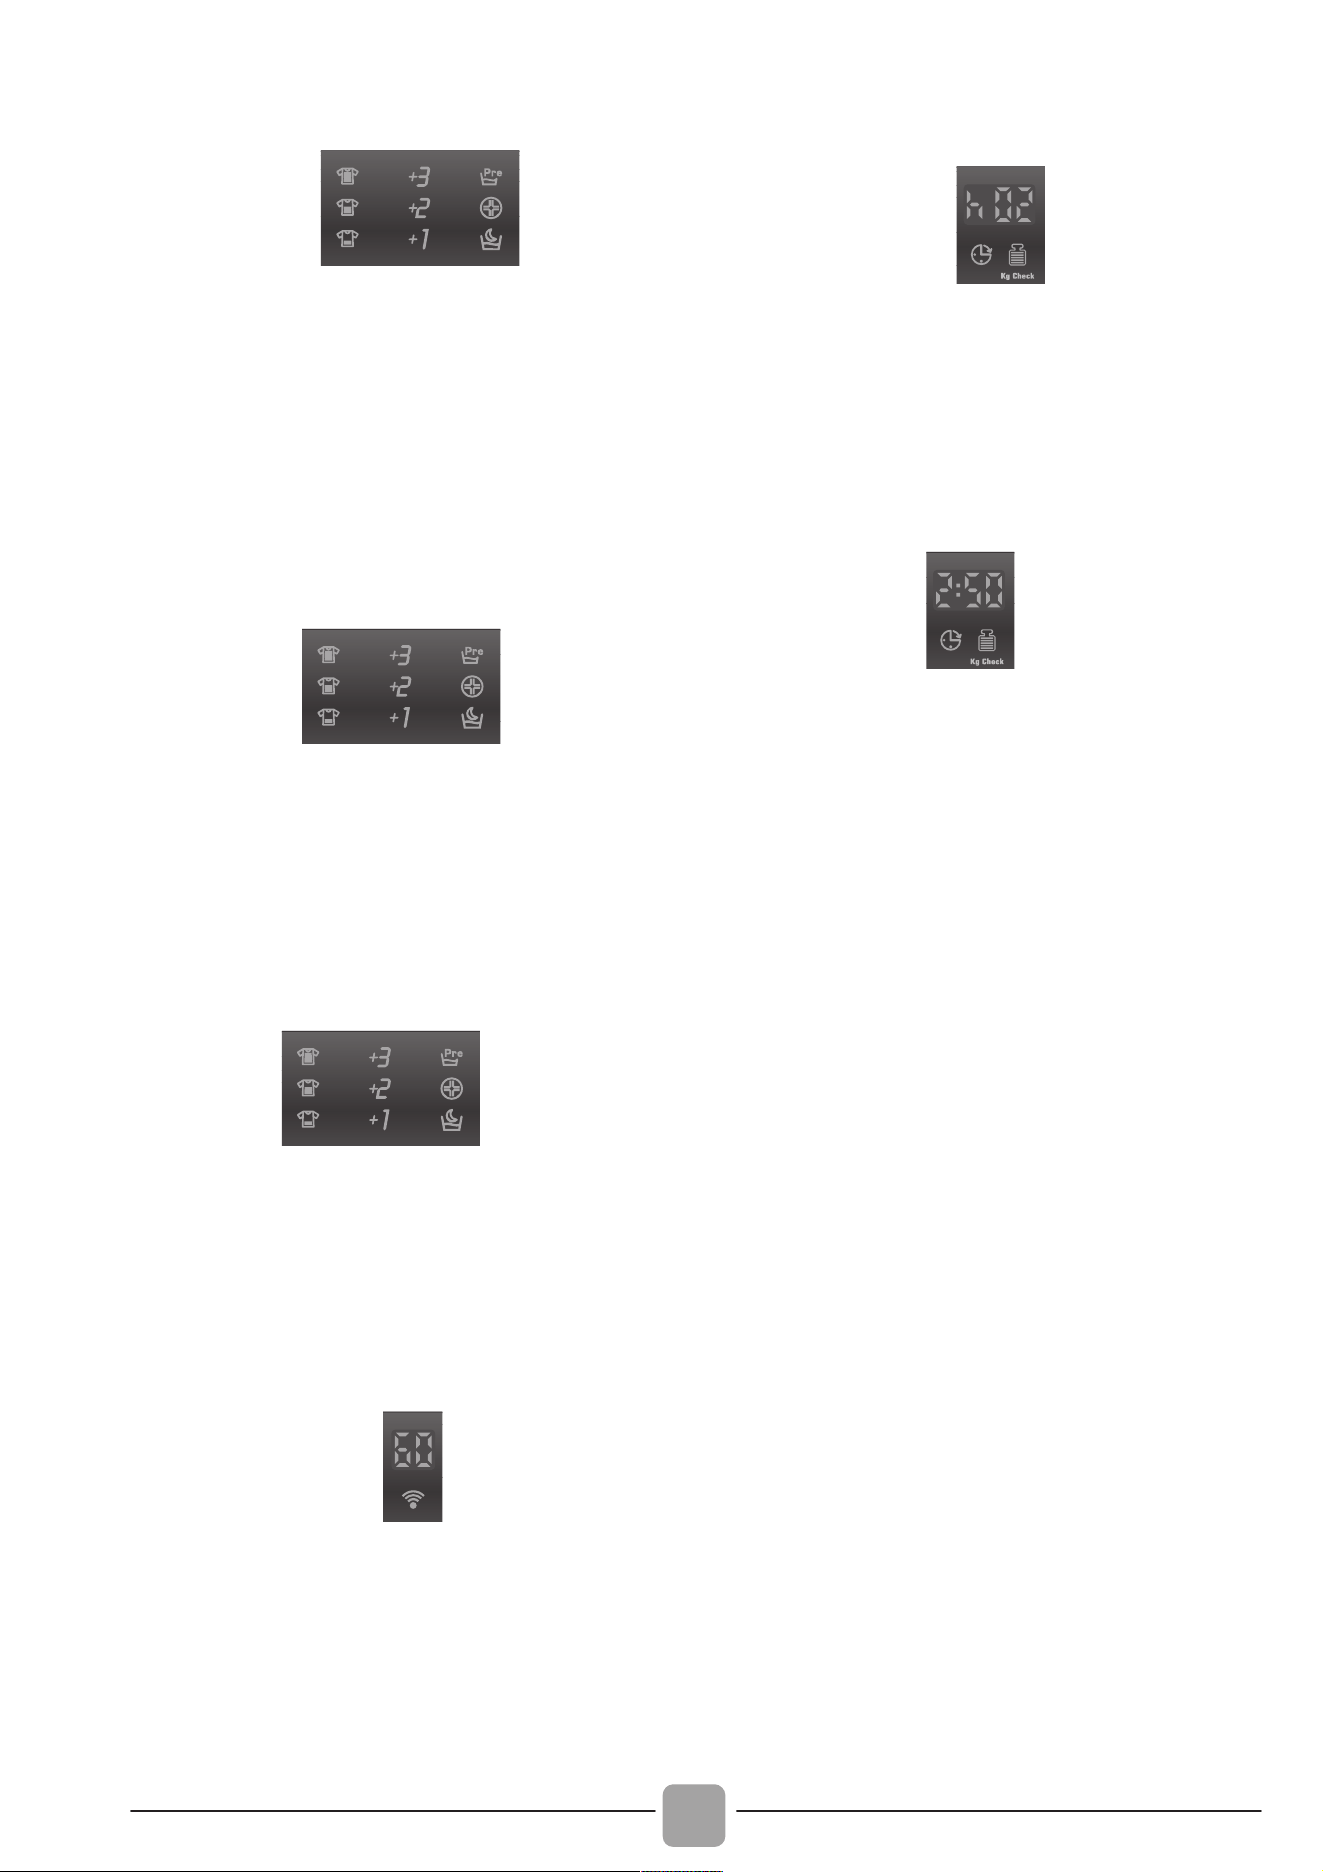
90
5) DEGRE DE SALISSURE
{
5
Une fois que le programme a
été sélectionné, le voyant affiche
automatiquement le degré de salissure
associé à ce programme.
Sélectionnez alors, si vous le souhaitez,
un degré de salissure différent.
6) EXTRA RINÇAGE
{
6
Les icônes indiquent les rinçages
supplémentaires qui peuvent être
sélectionnées par la touche correspondant.
7) OPTIONS
}
7
Les icônes indiquent les options qui
peuvent être sélectionnées par la touche
correspondante (PRELAVAGE, HYGIENE,
NUIT CALME).
8) Wi-Fi (sur certains modèles uniquement)
8
Sur les modèles munis du Wifi, l’icône
indique que le Wifi est en fonction.
Pour toute autre information sur le
système Wifi, reportez-vous au manuel
spécifique des modèles concernés.
9) DEPART DIFFERE
9
L’icône clignote lorsque le départ différé a
été sélectionné.
10) Kg Check (fonction active sur les
programmes Coton et Synthétique)
10
Pendant les premières minutes du cycle,
l’indication "Kg Check" reste allumé le
temps pour le capteur intelligent de peser
le linge et d’ajuster le temps du cycle, la
quantité d’eau et la consommation
d’électricité en conséquence.
A chaque phase de lavage, la fonction
"Kg Check" permet de contrôler les
informations sur la charge dans le
tambour et dans les premières minutes
du cycle:
- ajuste la quantité d’eau nécessaire;
- détermine la durée du cycle de lavage;
- contrôle du rinçage en fonction du type
de textile qui doit être lavé;
- ajuste le rythme de la rotation du
tambour en fonction du type de textile;
- reconnaît la présence de mousse,
augmentant la quantité d’eau au rinçage
au besoin;
- ajuste la vitesse d’essorage en fonction
de la charge, évitant ainsi tout
déséquilibre.

FR
91
11) INDICATIONS DES PROGRAMMES
DE SECHAGE
}
11
Les icônes indiquent le type de séchage.
Programmes de séchage automatiques
Extra sec (recommandé pour les
serviettes, peignoirs et les charges
volumineuses).
Prêt à repasser
Prêt à ranger (pour les articles
n’ayant pas besoin d’être repassés).
En sélectionnant l’un de ces programmes
automatiques, le lave-linge séchant
calcule le temps nécessaire, en fonction
de la charge et du résultat de séchage
souhaité.
Après avoir pressé la touche
DEPART/PAUSE, l’écran indiquera le
temps restant.
Programmes de séchage minutés
Ils peuvent être utilisés pou
r
sélectionner des programmes
minutés.
Phase de refroidissement
L’icône s’allume durant la phase de
refroidissement, dans les dernières
10/20 minutes de chaque cycle de
séchage.
Conseils utiles
Le programme de séchage de 30 minutes
est recommandé pour les petites charges
(moins de 1 kg) ou des charges
légèrement humides.
Votre lave-linge séchant arête
automatiquement le cycle lorsque le
niveau de séchage souhaité est atteint.
Pour le bon fonctionnement de l’appareil,
il est préférable de ne pas interrompre la
phase de séchage à moins que cela ne
soit vraiment nécessaire.
L’appareil calcule le temps restant du
programme sélectionné sur la base
d’une charge standard, elle ajuste
ensuite pendant le cycle le temps
nécessaire en fonction de la charge et
du taux d’humidité qu’elle détecte.

92
2
1
PROGRAMME
kg *
(MAX.)
TEMP.°C
DÉTERGENT
Recommandée
Max.
2
1
Rapide 14 Min
2)
1 1,5 1,5 1,5 1,5
30° 30°
Rapide 30 Min
2)
2 2,5 2,5 2,5 2,5
30° 30°
Rapide 44 Min
2)
3 3,5 3,5 3,5 3,5
30° 40°
Blanc
1)
2)
6 8 9 10 11
60° 90°
(
)
Coton**
1)
2)
6 8 9 10 11
40° 60°
()
EcoMix 20°
2)
6 8 9 10 11
20° 20°
Mixtes
1)
2)
3 4 4,5 5 5,5
40° 60°
(
)
Rinçage
2)
- - - - -
- -
Vidange +
Essorage
2)
- - - - -
- -
Délicats
2 2,5 2,5 2,5 2,5
40° 40°
Baby
1)
2)
4 5,5 6 6,5 7
60° 60°
Laine/Main
2 2 2 2 2
30° 30°
Mixtes
(séchage)
3 4 4,5 5 5,5
- -
Coton
(séchage)
4 5 6 7 7
- -
Lavage et Séchage
59 Min
1,5 1,5 1,5 1,5 1,5
30° 30°
Tableau des programmes
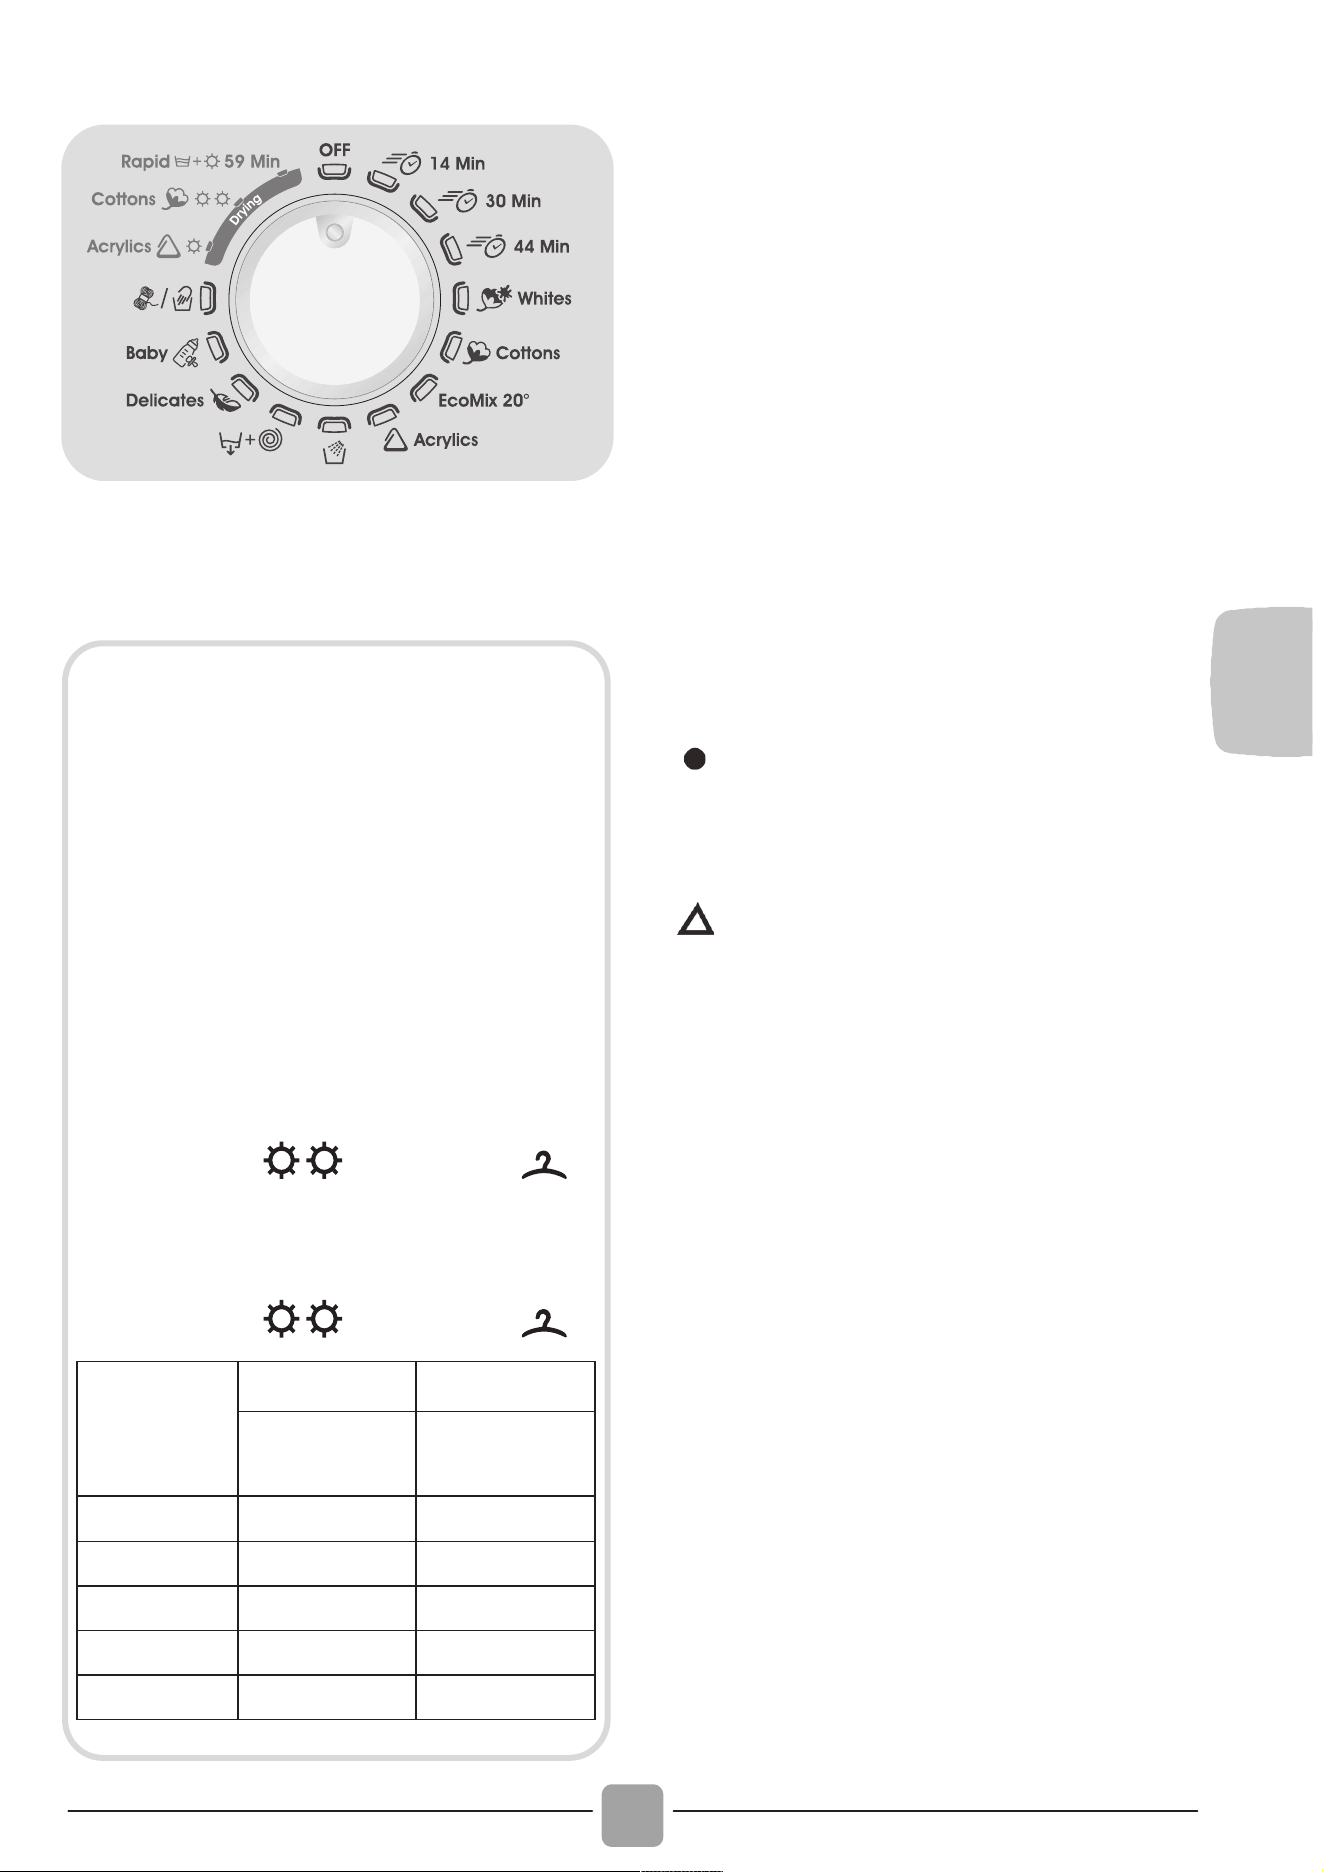
FR
93
V
euillez lire ces informations
* Capacité de chargement maximale de
vêtements secs selon le modèle utilisé
(voir le bandeau de commande).
La vitesse d’essorage peut également être
réduite pour correspondre aux exigences
de certaines étiquettes de tissu ou dans le
cas de tissus très délicats pour annuler
complètement l’essorage. Cette option est
disponible avec la touche SELECTION
ESSORAGE.
Si l’étiquette ne mentionne pas
d’informations spécifiques, il est possible
d’utiliser la vitesse de rotation maximale
prévue dans le programme.
Un surdosage du detergent peut causer un
excès de mousse. Si l’appareil détecte une
présence excessive de mousse, il peut
exclure la phase d’essorage ou étendre la
durée du programme et ainsi augmenter la
consommation d’eau pour faciliter son
élimination.
( )
Seulement avec l'option PRÉLAVAGE
sélectionnée (programmes pouvant
être utilisés avec l'option
PRÉLAVAGE).
(Seulement pour les modèles
équipés d’un compartiment
pour détergent liquide)
Lorsqu’un nombre limité d’articles
sont tâchés et qu’ils nécessitent
un traitement avec des agents de
blanchiment liquides, l’élimination
préalable de la tâche peut être
effectuée dans la machine.
Versez l’eau de javel dans le
récipient prévu à cet effet dans le
compartiment « 2 » et sélectionnez
le programme spécial RINÇAGE.
Lorsque cette phase est terminée,
positionnez le sélecteur sur OFF,
ajoutez le reste de linge et
procédez au lavage avec le
programme le plus approprié.
1) Pour les programmes présents,
vous pouvez ajuster la durée et
l’intensité du lavage à l’aide de la
touche DEGRE DE SALISSURE.
2) Programmes pour un séchage
automatique.
INFORMATIONS POUR LES TESTS
EN LABORATOIRE (Ref. Standards
EN 50229)
Lavage
Utilisation du programme ** avec le degré
de salissure maximum sélectionné, la
vitesse d’essorage maximale et une
température de 60°C. Programme également
recommandé pour le test avec une
température plus basse.
Séchage
Premier séchage avec A kg (charge
composée de taies d’oreillers et de
serviettes), sélection du programme de
séchage coton ( ) prêt à ranger ( ).
Second séchage avec B kg (charge
composée de taies d’oreillers et de
serviettes), sélection du programme de
séchage coton ( ) prêt à ranger ( ).
Capacité
(lavage)
(kg)
A (kg) B (kg)
Premier
séchage
Second
séchage
6 4 2
8 5 3
9 6 3
10 7 3
11 7 4

94
La machine dispose de différents
programmes et d’options pour répondre à
tous vos besoins et nettoyer différents types
de textiles à des degrés de salissure différents.
Rapide 14 Min / 30 Min / 44 Min
Un cycle de lavage complet (lavage,
rinçage, essorage). Ce programme est
particulièrement adapté aux cotons peu
sales et aux tissus mixtes. Avec ce
programme, il est recommandé d’utilise
r
seulement 20% du détergent normalemen
t
utilisé pour éviter le gaspillage.
Blanc
Pour un lavage parfait. Essorage final à
vitesse maximale pour plus d’efficacité.
Coton
Ces programmes sont adaptés pour nettoye
r
du linge coton normalement sale et sont les
plus efficaces en termes de consommation
d’eau et d’énergie pour ce type de textile.
EcoMix 20°
Ce programme innovant permet de lave
r
ensemble différents types de textiles e
t
différentes couleurs à seulement 20°C tou
t
en offrant d’excellentes performances de
lavage. La consommation de ce programme
représente environ 40% d’un programme
coton classique à 40°C.
Mixtes
Le programme de séchage à basse
température est recommandé pour les
fibres synthétiques ou mixtes (toujours se
référer à l’étiquette de l’article).
Rinçage
Ce programme effectue trois rinçages ave
c
un essorage intermédiaire. Il peut être utilisé
pour le rinçage de tous types de tissus, après
un lavage à la main par exemple.
V
idange + Essorage
Ce programme complète le rinçage e
t
essore à vitesse maximale. Il est possible
de réduire la vitesse d’essorage avec la
touche Vitesse d’essorage.
Délicats
Ce programme alterne des périodes d
e
lavage avec des pauses. Il est particulièremen
t
adpaté pour le lavage des tissus délicats.
Le lavage et le rinçage sont effectués avec
un niveau d’eau élevé.
Baby
Ce programme vous permet de laver tous le
s
vêtements pour bébé et d’obtenir un résultat de
lavage parfait tout en désinfectant les textiles
avec une température de lavage à 60°C au minimum.
A
fin d’optimiser la désinfection des textiles, nous
vous recommandons d’utiliser du détergent en
poudre.
Laine/Main
Ce programme est destiné aux textiles en
laine qui peuvent être lavés en machine.
SECHAGE
Le tambour change de sens au cours du
cycle de séchage pour empêcher au linge
de s’emmêler et rendre le séchage
uniforme. L’air froid est utilisé au cours des
10/20 dernières minutes du cycle de séchage
de manière à minimiser le froissage.
Mixtes
Le programme de séchage à basse
température est recommandé pour les
fibres synthétiques ou mixtes (toujours se
référer à l’étiquette de l’article).
Coton
Le programme de séchage à haute
température est recommandé pour les
articles en coton (toujours se référer à
l’étiquette de l’article).
Lavage et Séchage 59 Min
Lorsque vous n’avez que quelques articles
à laver et à sécher rapidement, ce cycle est
idéal pour économiser du temps!
Vous pouvez laver et sécher jusqu’à 1,5 kg
de linge ou des textiles légèrement sales.
Ce cycle lave, rince, essore et sèche vos
vêtements en moins d’une heure.
Nous vous recommandons de diminuer la
dose de détergent lors de l’utilisation de ce
cycle afin de diminuer le gaspillage.
Sélection des programmes
ATTENTION:
Les distributeurs utilisés pour les
poudres concentrées et les détergents
liquides doivent être retirés du tambour
avant de commencer les programmes
de séchage.
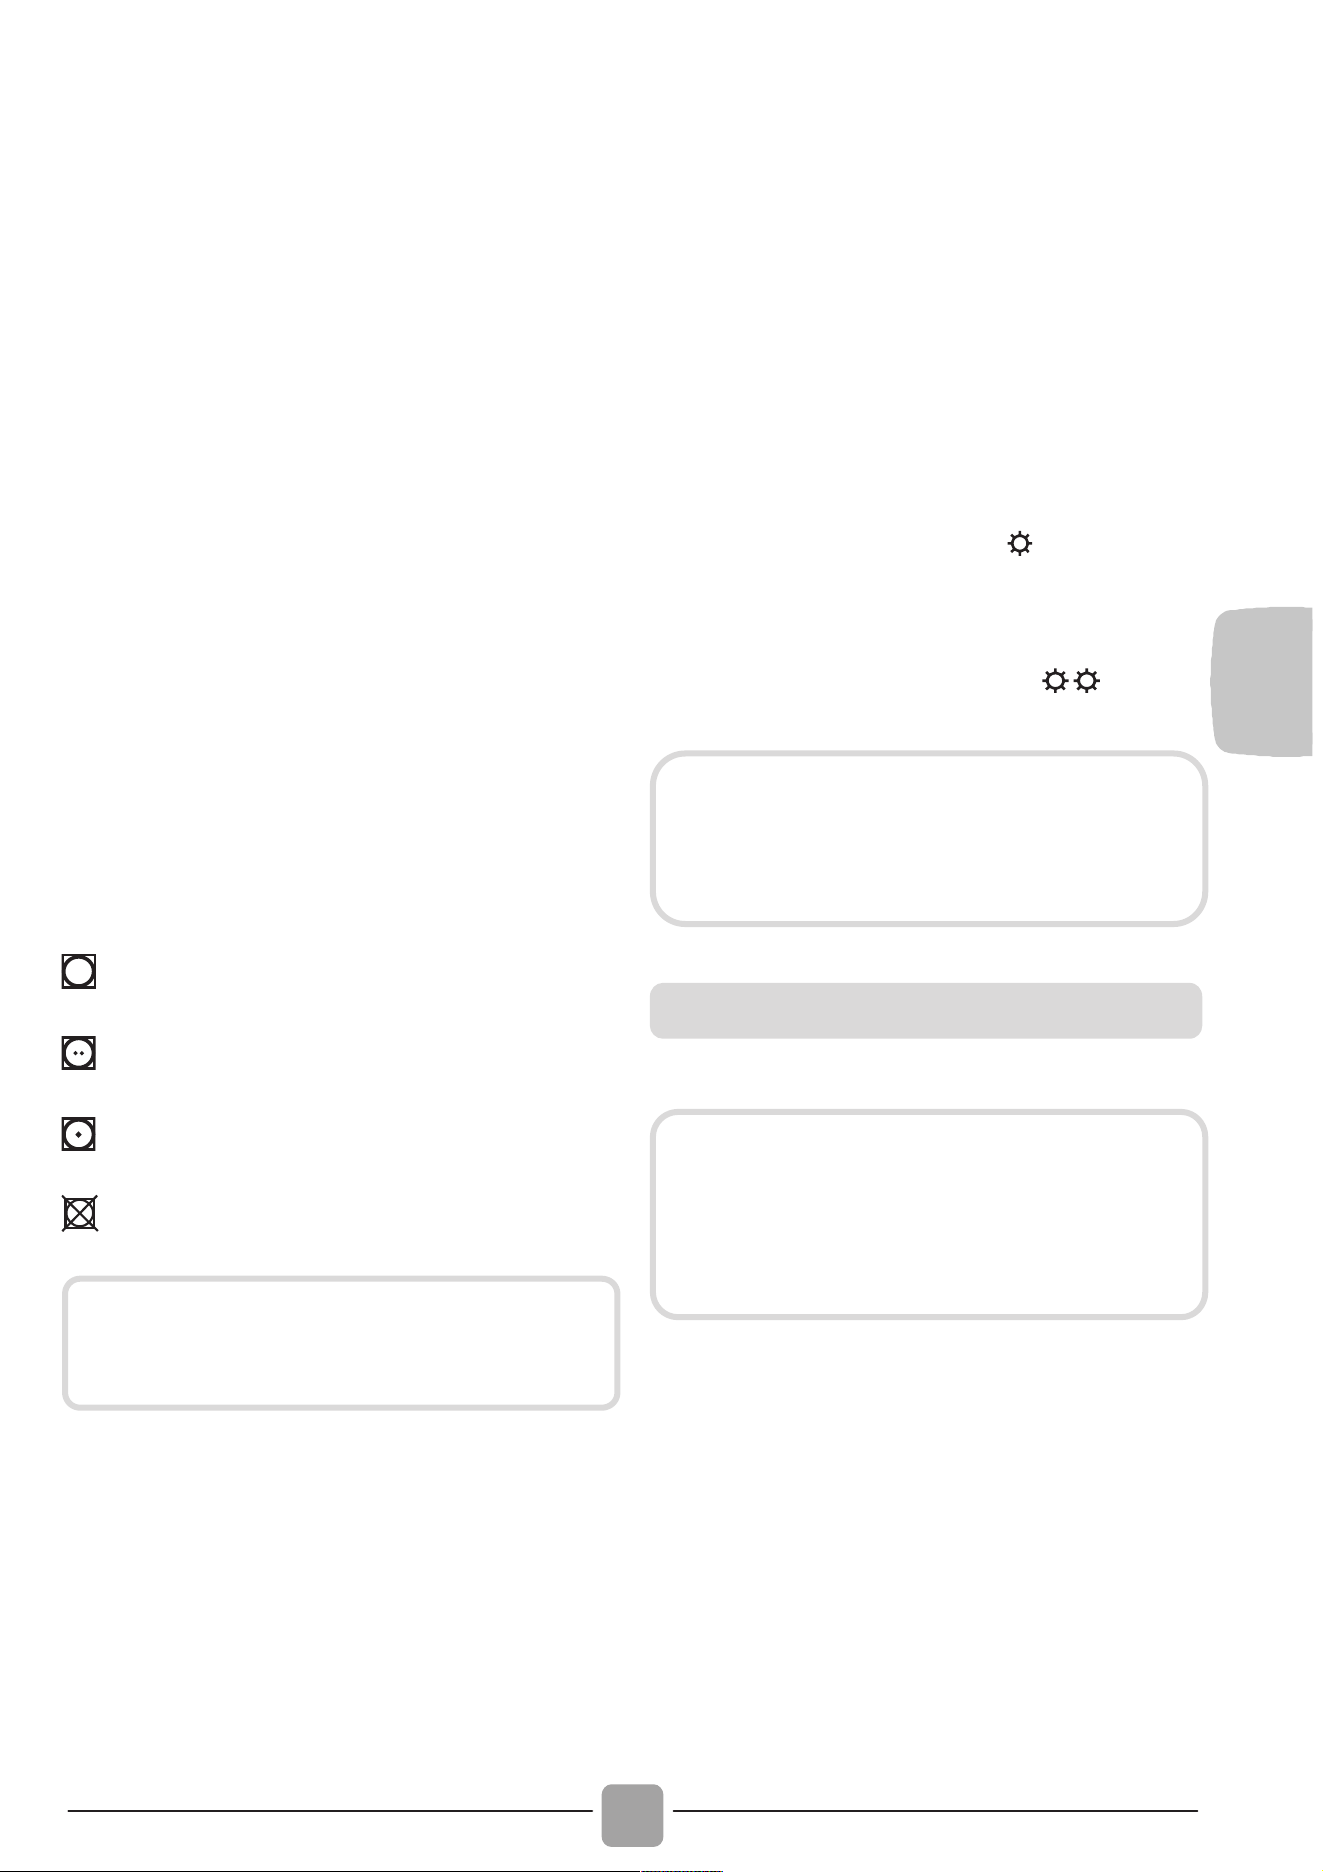
FR
95
7. CYCLE DE SECHAGE
Les indications données sont d’ordre
général, un peu de pratique est
nécessaire pour de meilleures résultats
de séchage.
Lors de la première utilisation, il est
recommandé de fixer un temps de
séchage inférieur à celui indiqué de
manière à établir le degré de séchage
souhaité.
Nous vous recommandons de ne pas
sécher des tissus qui s’effilochent
facilement comme des tapis par exemple.
Nous vous recommandons de trier le
linge comme suit:
- Par type de symboles de séchage
présent sur les étiquettes des
vêtements
Convient au séchage en machine.
Séchage à haute température.
Séchage à basse température.
NE PAS sécher en machine.
- Selon la taille et l’épaisseur
Lorsque la charge à laver est plus
grande que la charge à sécher, séparez
les articles en fonction de leur
épaisseur.
- Par type de textile
Coton/Lin: Serviettes, linge de lit et de
table.
Synthétique: chemisiers, chemises,
combinaisonsfabriqués en polyamide
en polyester ainsi que pour les textiles
mélangés.
Il est possible de sécher uniquement le
linge qui a déjà été essoré.
Le lave-linge séchant peut effectuer le
type de séchages suivants:
- Programme de séchage basse
température recommandé pour les
textiles mixtes (symbole
).
- Programme de séchage haute
température recommandé pour les textiles
coton, éponge, lin(symbole
).
Ouvrez la porte.
Assurez-vous que la quantité de linge
chargée ne dépasse pas la charge
maximale de séchage indiquée dans le
tableau des programmes. Pour de gros
articles ou bien pour des articles très
absorbants comme des serviettes ou des
jeans, il est bon de réduire la charge.
Fermez la porte.
Si les articles n’ont pas d’étiquette, il
est à supposer qu’ils ne doivent pas
être séchés en machine.
Lors de la phase de séchage, le tambour
va accélérer jusqu’à une vitesse élevée
de manière à répartir la charge et
optimiser les performances de séchage.
La bonne manière de sécher
La porte de l’appareil est équipée d’un
«bouclier» de protection pour éviter le
contact avec le verre qui peut
atteindre des températures élevées au
cours du cycle de séchage.
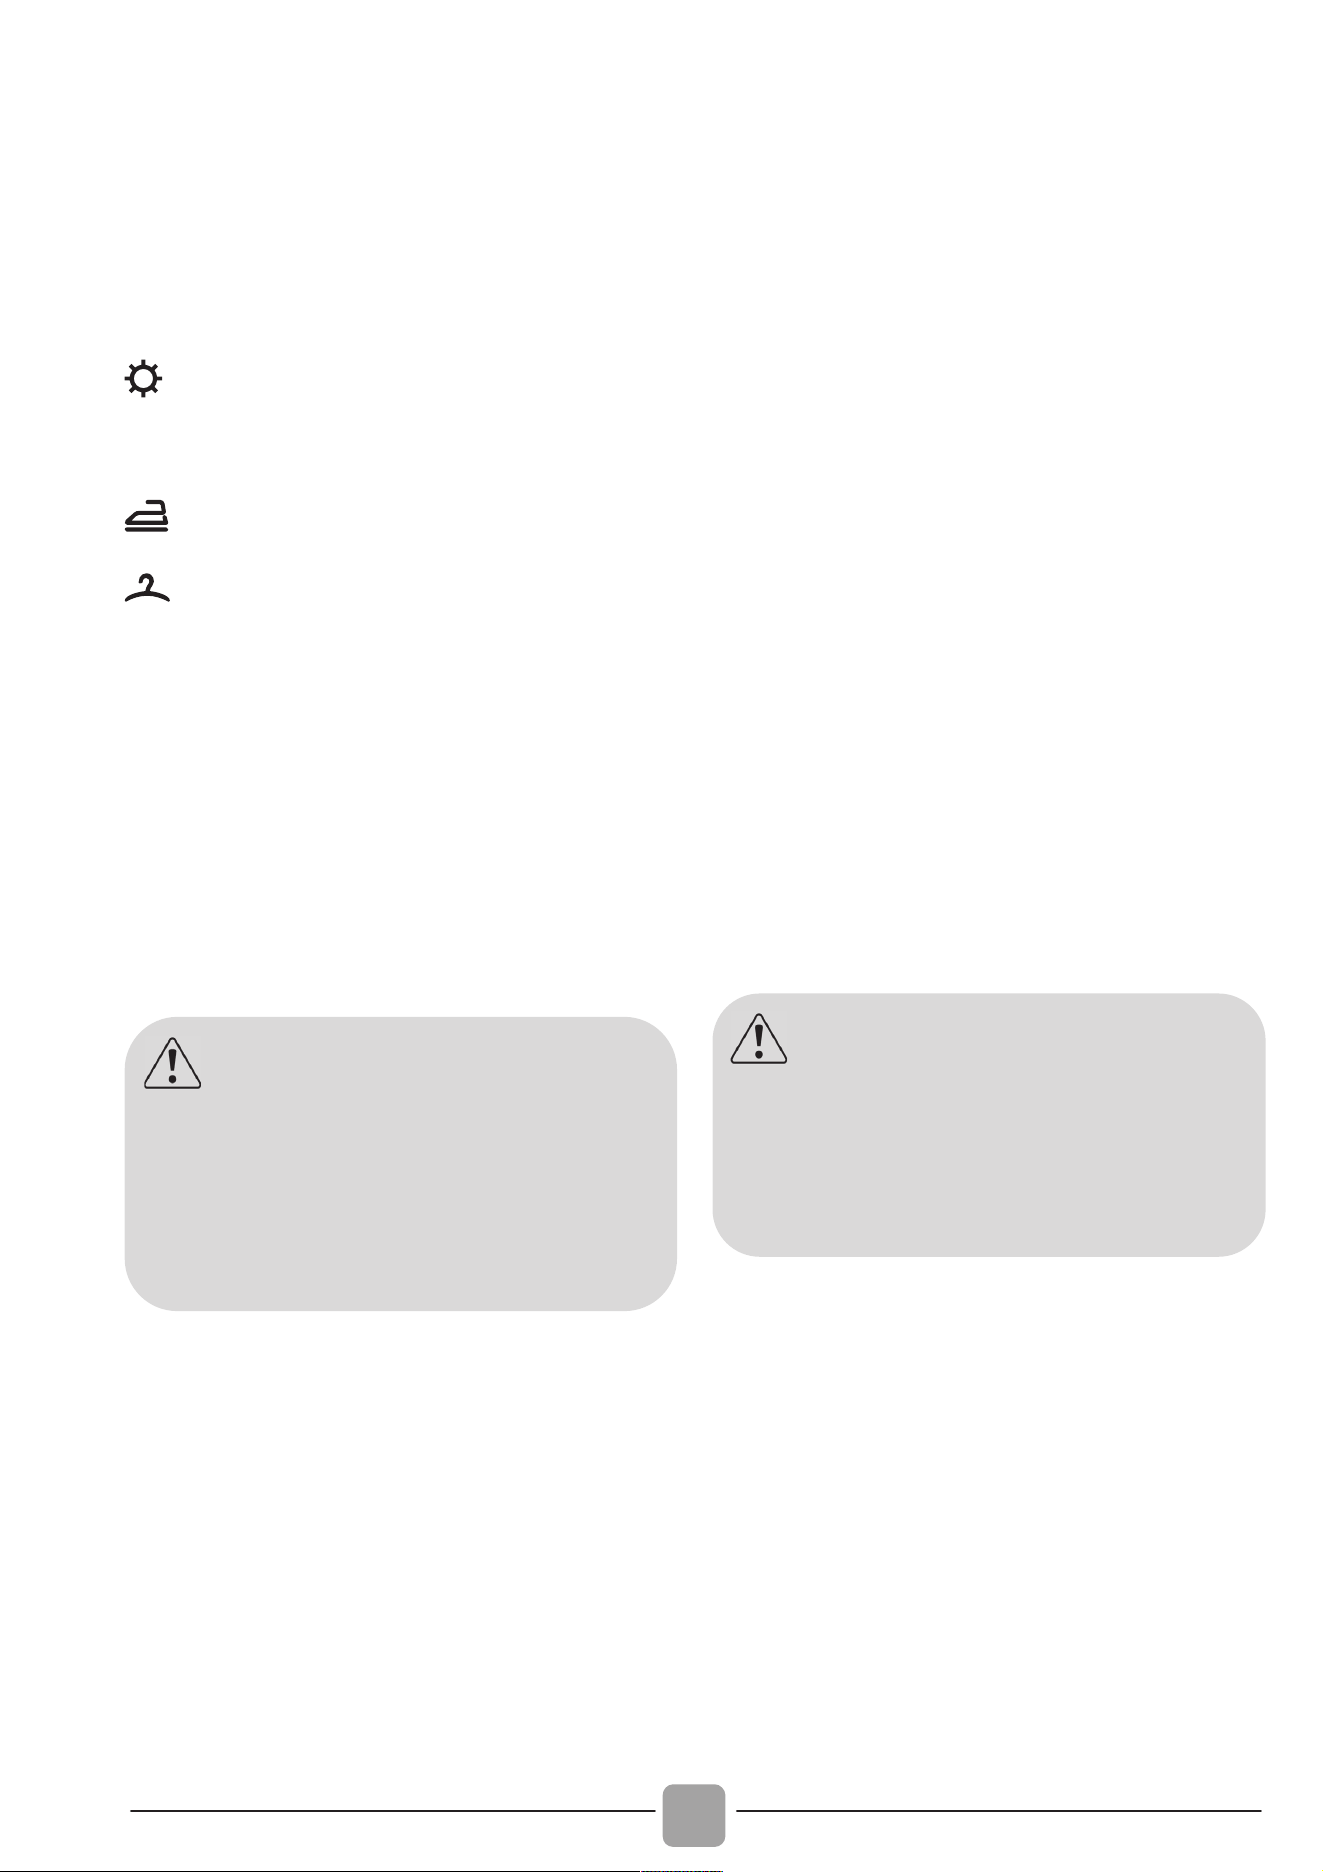
96
Utilisez le sélecteur afin de sélectionner
le programme de séchage le plus adapté
à votre linge.
Sélectionnez ensuite le degré de séchage
souhaité parmi l’un des trois programmes
automatiques:
Extra sec (recommandé pour les
serviettes, peignoirs et les charges
volumineuses).
Prêt à repasser.
Prêt à ranger (pour les articles
n’ayant pas besoin d’être repassés).
Vous pouvez sélectionner un temps de
séchage si vous le souhaitez.
Assurez-vous que le robinet d’arrivée
d’eau est correctement ouvert.
Assurez-vous que l’évacuation d’eau est
correctement positionnée.
Appuyez sur la touche DEPART/PAUSE.
La phase de séchage commence avec le
programme sélectionné à l’aide du
sélecteur et ce, jusqu’à la fin du cycle.
L’indicateur du programme de séchage
sera allumé jusqu’à ce que la phase de
refroidissement commence et que
l’indicateur correspondant s’allume.
Lorsque le programme est terminé, le mot
"End" s’affiche sur l’écran. Après 5
minutes, l’appareil se met en mode veille
(sur certains modèles, l’écran affiche
deux lignes).
L’indicateur de PORTE SECURISEE
s’éteint environ deux minutes après la
fin du programme, vous pouvez alors
ouvrir la porte.
Eteignez la machine en positionnant le
sélecteur verticalement sur OFF.
Ouvrez la porte et retirez le linge.
Fermez le robinet d’arrivée d’eau.
ANNULATION D’UN PROGRAMME DE
SECHAGE
Pour annuler le programme de séchage,
maintenez enfoncée la touche
SELECTION DU SECHAGE pendant 3
secondes.
ATTENTION:
Ne séchez pas des vêtements avec un
rembourrage spécial (par exemple les
couettes, anoraks matelassés) et
les tissus très délicats comme la
laine. Charger moins d’articles aide à
prévenir les plis.
ATTENTION:
Après l’annulation du programme de
séchage, la phase de refroidissement
va commencer et vous devez attendre
10/20 minutes avant de pouvoir ouvrir
la porte.

FR
97
8. CYCLE AUTOMATIQUE
LAVAGE + SECHAGE
- Lavage
Ouvrez le bac à produits, choisissez le
détergent et mettez-le dans le bon
emplacement.
Reportez-vous au tableau des
programmes en fonction du type de tissus
qui doit être lavé et tournez le sélecteur
sur le programme souhaité.
Ajustez la température de lavage si c’est
nécessaire.
Appuyez sur la touche Options (si
nécessaire).
Assurez-vous que le robinet d’arrivée
d’eau est correctement ouvert.
- Séchage
Sélectionnez ensuite le degré de séchage
souhaité parmi l’un des trois programmes
automatiques:
Extra sec (recommandé pour les
serviettes, peignoirs et les charges
volumineuses).
Prêt à repasser.
Prêt à ranger (pour les articles
n’ayant pas besoin d’être repassés).
Vous pouvez sélectionner un temps de
séchage si vous le souhaitez.
Appuyez sur la touche DEPART/PAUSE.
Le cycle commence avec le programme
sélectionné à l’aide du sélecteur et ce,
jusqu’à la fin.
A la fin de la phase de lavage, l’écran
indiquera le temps de séchage restant.
Le lave-linge séchant va ensuite entamer
la phase de séchage.
L’indicateur de séchage s’allume, et ce,
jusqu’à la phase de refroidissement.
Lorsque le programme est terminé, le mot
"End" s’affiche sur l’écran. Après 5
minutes, l’appareil se met en mode veille
(sur certains modèles, l’écran affiche
deux lignes).
L’indicateur de PORTE SECURISEE
s’éteint environ deux minutes après la
fin du programme, vous pouvez alors
ouvrir la porte.
Eteignez la machine en positionnant le
sélecteur verticalement sur OFF.
Ouvrez la porte et retirez le linge.
Fermez le robinet d’arrivée d’eau.
ANNULATION D’UN PROGRAMME DE
SECHAGE
Pour annuler le programme de séchage,
maintenez enfoncée la touche
SELECTION DU SECHAGE pendant 3
secondes.
Si la charge de linge excède le
maximum indiqué dans le tableau des
programmes, le séchage des textiles
ne sera pas satisfaisant.
ATTENTION:
Après l’annulation du programme de
séchage, la phase de refroidissement
va commencer et vous devez attendre
10/20 minutes avant de pouvoir ouvrir
la porte.

98
9. SERVICE CLIENT ET GARANTIE
Si vous pensez que le lave-linge ne fonctionne pas correctement, consultez le guide rapide
ci-dessous quelques conseils pratiques sur la façon de résoudre les problèmes les plus
courants.
Problèmes Causes possibles et solutions pratiques
La machine à laver
ne fonctionne pas
Assurez-vous que le branchement est correct.
Assurez-vous que le courant passe.
Vérifiez si le programme désiré a été sélectionné correctement et
assurez-vous d'avoir correctement démarré la machine.
Assurez-vous que le fusible n'a pas sauté et que la prise murale
fonctionne, testant avec un autre appareil, comme une lampe.
Le hublot n’est peut pas être correctement fermé: ouvrir et fermer à
nouveau.
La machine ne se
remplit pas d’eau
Assurez-vous que le robinet d'eau est ouvert.
Assurez-vous que l'horloge est réglée correctement.
La machine ne vidange
pas l’eau
Assurez-vous que le filtre n'est pas obstrué.
Assurez-vous que le tuyau de vidange n'est pas plié.
Assurez-vous qu'il n'y a pas d'objets dans le filtre.
Il y a une fuite d'eau
sur le sol près de la
machine à laver
Cela peut être dû à une fuite au niveau du joint entre le robinet et le
tuyau d'alimentation, dans ce cas, remplacez-le et serrez le tuyau et le
robinet.
La machine n’essore
pas
Cela pourrait être dû au fait que l'eau n'a pas été complètement vidée:
attendre quelques minutes.
Certains modèles incluent une fonction «aucun essorage": assurez-
vous qu’elle n’est pas allumée.
Une quantité excessive de détergent pourrait empêcher l’essorage :
réduire la quantité au prochain lavage.
Fortes vibrations
pendant l’essorgae
Ajustez les pieds comme indiqué dans la section spécifique.
Assurez-vous que les protections de transport ont été enlevées.
Assurez-vous que la charge est répartie uniformément.
L’affichage indique
une ERREUR
Si l’affichage indique l’erreur 0,1,5,7 ou 8, contactez le service
technique.
S’il s’agit de l’erreur 2, vérifiez que les robinets sont bien ouverts.
S’il s’agit de l’erreur 3, verifiez que le tuyau d’évacuation n’est pas
obstrué, verifiez que le tuyau d’évacuation n’est pas coudé.
S’il s’agit de l’erreur 4, coupez l’alimentation en eau de la machine et
appelez le service technique.
S’il s’agit de l’erreur 9, éteignez l’appareil puis redémarrez le
programme.

FR
99
L'utilisation de détergents écologiques
sans phosphates (voir les informations qui
figurent sur le paquet) peut provoquer les
effets suivants:
- Les eaux sales du rinçage peuvent être
plus opaques à cause de la présence
d’une poudre blanche (zéolithes)
maintenue en suspension, sans toutefois
que la performance de rinçage ne soit
affectée.
- Présence d’une poudre blanche sur le
linge après le lavage, qui n’est pas
absorbée par les tissus et qui ne
changent pas la couleur des tissus.
- Mousse dans l’eau au dernier rinçage.
- Mousse abondante: ceci est le plus
souvent dû à des agents présents dans la
lessive qui sont difficiles à éliminer.
Dans ces cas, il est inutile de
recommencer les cycles de rinçage.
Si le problème persiste ou si vous
soupçonnez un dysfonctionnement,
contactez immédiatement le service client
de Candy.
Vous pouvez également enregistrer votre
produit pour recevoir un service à domicile
gratuit après l'expiration de la garantie.
Attention: l'appel n'est pas sans frais. Le
coût sera communiqué dans un message
vocal par le service client de votre
opérateur téléphonique.
Candy recommande de toujours utiliser
des pièces d'origines.
Le fabricant décline toute responsabilité
pour les erreurs d'impression dans le
livret fourni avec ce produit. En outre,
elle se réserve également le droit
d'apporter toute modification jugée utile
à ses produits sans modifier leurs
caractéristiques essentielles.
Garantie
Le produit est garanti selon les termes et
conditions énoncées dans le certificat
fourni avec le produit.
Le certificat de garantie doit être dûment
rempli et conservé, de façon à être
montré en cas de besoin.
Enregistrez votre produit!
Ne perdez pas de temps, inscrivez votre
machine à laver sur www.registercandy.com
ou en appelant le numéro indiqué sur le
matériel.

100
Dziękujemy za dokonany wybór przy zakupie
pralki Candy. Jesteśmy przekonani, że będzie
ona Waszym wartościowym sprzymierzeńcem
w codziennym, bezproblemowym praniu
bielizny, nawet najdelikatniejszej.
Rejestracji zakupionego przez Ciebie produkt
u
możesz dokonać na stronie www.registercandy.com,
co daje możliwość szybszego dostępu do
pełnych usług, zarezerwowanych wyłącznie dla
najwierniejszych klientów.
Przeczytanie całości niniejszej Instrukcji
pozwoli na prawidłowe i bezpieczne
użytkowanie urządzenia oraz dostarczy
przydatnych porad dla poprawnej konserwacji.
Pralkę można uruchomić wyłącznie
po uważnym przeczytaniu Instrukcji. Zaleca się
przechowywanie Instrukcji w dostępnym
miejscu oraz zachowanie jej dla ewentualnych
przyszłych właścicieli urządzenia.
Przypominamy o sprawdzeniu, czy prz
y
odbiorze urządzenia dołączone do niego są:
Instrukcja obsługi, dowód gwarancji, lista
adresów serwisów i etykieta wydajności
energetycznej. Dodatkowo sprawdzić należy
czy w opakowaniu znajdują się zatyczki,
kolanko węża wylewkowego i pojemnik na
płyn do prania lub wybielacz (tylko dla
wybranych modeli). Zaleca się przechowywani
e
wszystkich wymienionych przedmiotów.
Każdy produkt posiada unikatowy kod
składający się z 16 znaków, określany jako
“numer seryjny”. Można go odnaleźć na
etykiecie naklejonej na sprzęcie AGD (
w
okolicy okienka załadunku) lub w woreczku z
dokumentami znajdującym się wewnątrz
urządzenia. Taki kod jest swego rodzaju
dowodem osobistym, innym dla każdego
produktu, służącym do rejestracji urządzenia
oraz w razie potrzeby skontaktowania się z
Centrum Serwisu Technicznego Candy.
To urządzenie jest oznakowane zgodni
e
z Dyrektywą Europejską 2012/19/UE
on dotyczącą Zużytego Sprzętu
Elektrycznego i Elektronicznego (WEEE).
WEEE zawiera zarówno substancje
zanieczyszczające (co może spowodować
negatywne skutki dla środowiska
naturalnego) oraz podstawowe elementy
(które mogą być ponownie wykorzystane).
Ważne jest, aby dokonać wszelkich starań
w celu usunięcia i pozbycia się właściwie
wszystkich zanieczyszczeń oraz odzyskania i
recyklingu wszystkich materiałów. Osoby
fizyczne mogą odgrywać ważną rolę w
zapewnieniu, że WEEE nie stanie się
problemem dla środowiska naturalnego;
istotne jest, aby przestrzegać kilku
podstawowych zasad:
WEEE nie powinien być traktowany jako
odpad komunalny;
WEEE należy przekazać do odpowiednich
punktów zbiórki prowadzonych przez
gminy lub przez zarejestrowane firmy. W
wielu krajach duży sprzęt AGD może być
odbierany z domu.
W wielu krajach, przy zakupie nowego
urządzenia, stary może być zwrócony do
sprzedawcy, który musi zebrać go
bezpłatnie na zasadzie jeden do jednego,
tak długo, jak sprzęt jest właściwego
rodzaju i ma takie same funkcje, co sprzęt
dostarczony.
1. OGÓLNE ZASADY BEZPIECZEŃSTWA
2. INSTALACJA
3. PRAKTYCZNE PORADY
4. CZYSZCZENIE I RUTYNOWA
KONSERWACJA
5. SKRÓCONA INSTRUKCJA OBSŁUGI
6. STEROWANIE I PROGRAMY
7. SUSZENIE
8. PRANIE/SUSZENIE AUTOMATYCZNE
9. CENTRUM SERWISU TECHNICZNEG
O
I GWARANCJA
Uwagi dotyczące środowiska
Spis treści

PL
101
1. OGÓLNE ZASADY
BEZPIECZEŃSTWA
Urządzenie to przeznaczone jest do
użytku domowego i w podobnych
warunkach, dla przykładu:
− w strefach wypoczynku, na
terenie sklepów, w biurach lub
innych miejscach pracy;
− w gospodarstwach agroturystycznych;
− dla klientów hoteli, moteli lub
innych podobnych centrach
pobytowych;
−
w ośrodkach typu Bed & Breakfast.
Użytkowanie sprzętu odmienne niż
typowe dla domowego, jak na
przykład profesjonalne użytkowanie
przez osoby przeszkolone i specjalistów,
jest zabronione także w miejscach wyżej
opisanych. Użytkowanie niezgodne z
opisanym może zredukować trwałość
produktu i spowodować utratę gwarancji
producenta. Wszelkie uszkodzenia
urządzenia czy innych elementów,
wynikające z użytkowania innego niż
domowego (także, kiedy sprzęt
zainstalowany jest w środowisku
domowym) w oparciu o istniejące prawo
nie będą uznane przez Producenta.
Urządzenie to może być użytkowane
przez dzieci 8-letnie i starsze oraz przez
osoby o ograniczonych zdolnościach
fizycznych, czuciowych i umysłowych
lub niemające doświadczenia i wiedzy,
pod warunkiem, że będą nadzorowane
lub pouczone odnośnie bezpiecznego
użytkowania i że rozumieją
niebezpieczeństwa, jakie wynikają z
użytkowania takiego sprzętu.
Należy
unikać możliwości zabawy przez
dzieci przy użyciu pralki lub jej
czyszczenia czy konserwacji bez
nadzoru.
Dzieci powinny być pilnowane tak,
aby nie bawiły się urządzeniem.
Dzieci poniżej trzeciego roku
życia mogą obsługiwać pralkę
wyłącznie pod stałym nadzorem.
Jeśli przewód zasilania
elektrycznego zostanie uszkodzony
należy wymienić go na oryginalny
Producenta, przez specjalistę lub
osobę do tego przygotowaną, dla
uniknięcia jakichkolwiek zagrożeń.
Do odprowadzenia wody stosować
wyłącznie przewód dostarczony z
urządzeniem. Nie używać starych
przewodów.
Wymagane ciśnienie wody:
0,05-0,8 Mpa
Upewnić się, że podłoże pralki
oraz przewody wentylacyjne
znajdujące się od spodu nie są
zablokowane np dywanikiem.
Pralka jest “wyłączona” jedynie,
kiedy właściwy znacznik na
pokrętle lub na panelu sterowania
znajduje się w pozycji pionowej.
Każda jego inna pozycja oznacza,
że pralka jest nadal “włączona”
(wyłącznie dla modeli wyposażonych
w pokrętło programatora).

102
Ostatni etap cyklu suszenia w
pralko-suszarce odbywa się bez
udziału wysokiej temperatury (cykl
chłodzenia), co chroni suszoną
odzież przed uszkodzeniem.
Przy montażu urządzenie
powinno być umieszczone w
sposób umożliwiający dostęp do
kontaktu zasilania.
Nie instalować urządzenia
bezpośrednio za zamykanymi
drzwiami, drzwiami przesuwnymi
lub drzwiami z zawiasami po stronie
przeciwnej względem urządzenia w
sposób uniemożliwiający całkowite
otwarcie drzwiczek.
Maksymalny wsad prania
suchego zależy od modelu pralki
(patrz panel sterowania).
Nie należy suszyć odzieży,
która została wcześniej poddana
działaniu płynów do czyszczenia
chemicznego.
W pralko-suszarce nie należy
suszyć brudnych (niewypranych)
wyrobów.
Przed wysuszeniem w pralko
suszarce odzież zabrudzoną
olejem spożywczym, acetonem,
alkoholem, benzyną, naftą, środkiem
do odplamiania, terpentyną,
woskiem lub substancjami do
usuwania wosku należy wyprać w
gorącej wodzie z dużą ilością
detergentu.
W urządzeniu nie należy
suszyć wyrobów z pianki
gumowej
(lateksowej), czepków
kąpielowych, tkanin nieprzemakalnych,
podgumowanych oraz odzieży i
poduszek z wkładkami z gumy
piankowej.
Płyny do płukania tkanin i podobne
produkty należy stosować zgodnie
z instrukcją producenta podaną na
opakowaniu produktu.
Tkaniny zabrudzone olejem mogą
zapalić się samoistnie pod wpływem
wysokiej temperatury, również
podczas suszenia w pralko-
suszarce. Pod wpływem ciepła
zachodzi reakcja utleniania z olejem
i wytwarza się ciepło. Jeżeli ciepło
nie może się rozproszyć, tkaniny te
mogą nagrzewać się do bardzo
wysokiej temperatury i ulec
samozapłonowi. Układanie w stosy
lub przechowywanie wyrobów
poplamionych olejem może
uniemożliwić rozpraszanie się ciepła
i stwarzać zagrożenie pożarowe.
Przed włożeniem do suszarki
tkanin poplamionych olejem
(w tym olejem spożywczym)
lub tkanin zanieczyszczonych
UWAGA:
nie wyłączać urządzenia przed
zakończeniem cyklu suszenia.
Jeśli jest to konieczne należy
szybko wyjąć pranie z bębna, aby
umożliwić rozproszenia ciepła.

PL
103
produktami do pielęgnacji włosów
należy je wcześniej wyprać w
gorącej wodzie z dodatkiem dużej
ilości detergentu tak aby ograniczyć
ryzyko samozapłonu (nie da się go
jednak całkowicie wyeliminować).
W kieszeniach odzieży przeznaczonej
do suszenia nie należy pozostawiać
żadnych przedmiotów, w
szczególności zapalniczek i
zapałek.
Odnośnie dodatkowych informacji
dotyczących produktu lub w
celu uzyskania danych z karty
technicznej należy zaznajomić się
ze stroną internetową Producenta.
Przed wykonaniem jakichkolwiek
prac (czyszczenie i konserwacja)
należy odłączyć z gniazdka przewód
zasilania elektrycznego oraz
zamknąć kranik z dopływem wody.
Upewnić się, że instalacja
elektryczna posiada uziemienie.
W razie jego braku zlecić jego
wykonanie przez specjalistów.
Nie zaleca się stosowania
adapterów, rozgałęźników i/lub
przedłużaczy.
Przed otwarciem drzwiczek upewnić
się, że w bębnie nie ma wody.
Nie ciągnąć przewodu zasilania
lub samego urządzenia w celu
odłączenia wtyku z gniazda
elektrycznego.
Nie pozostawiać pralki na działanie
deszczu, słońca czy innych
czynników atmosferycznych.
W przypadku przewozu nie
unosić pralki za pokrętła czy
szufladkę na płyn do prania;
podczas transportu nie opierać
nigdy drzwiczek pralki na wózku.
Zaleca się, aby pralkę podnosiły
dwie osoby.
W każdym przypadku uszkodzenia
i/lub złego funkcjonowania pralki,
zaleca się jej wyłączenie, zamknięcie
dopływu wody i nie dokonywanie
żadnych czynności w urządzeniu.
Skontaktować się natychmiast z
Centrum Serwisu Technicznego,
zamawiając wyłącznie oryginalne
części zamienne. Brak zachowania
powyższego może spowodować
narażenie stanu bezpieczeństwa
urządzenia.
Urządzenie to zgodne jest z
następującymi Dyrektywami
Europejskimi:
2006/95/EC (LVD);
2004/108/EC (EMC);
2009/125/EC (ErP);
2011/65/EU (RoHS);
wraz ze wszystkimi późniejszymi
zmianami.
Przepisy bezpieczeństwa
UWAGA:
podczas prania woda może
osiągać bardzo wysokie
temperatury.
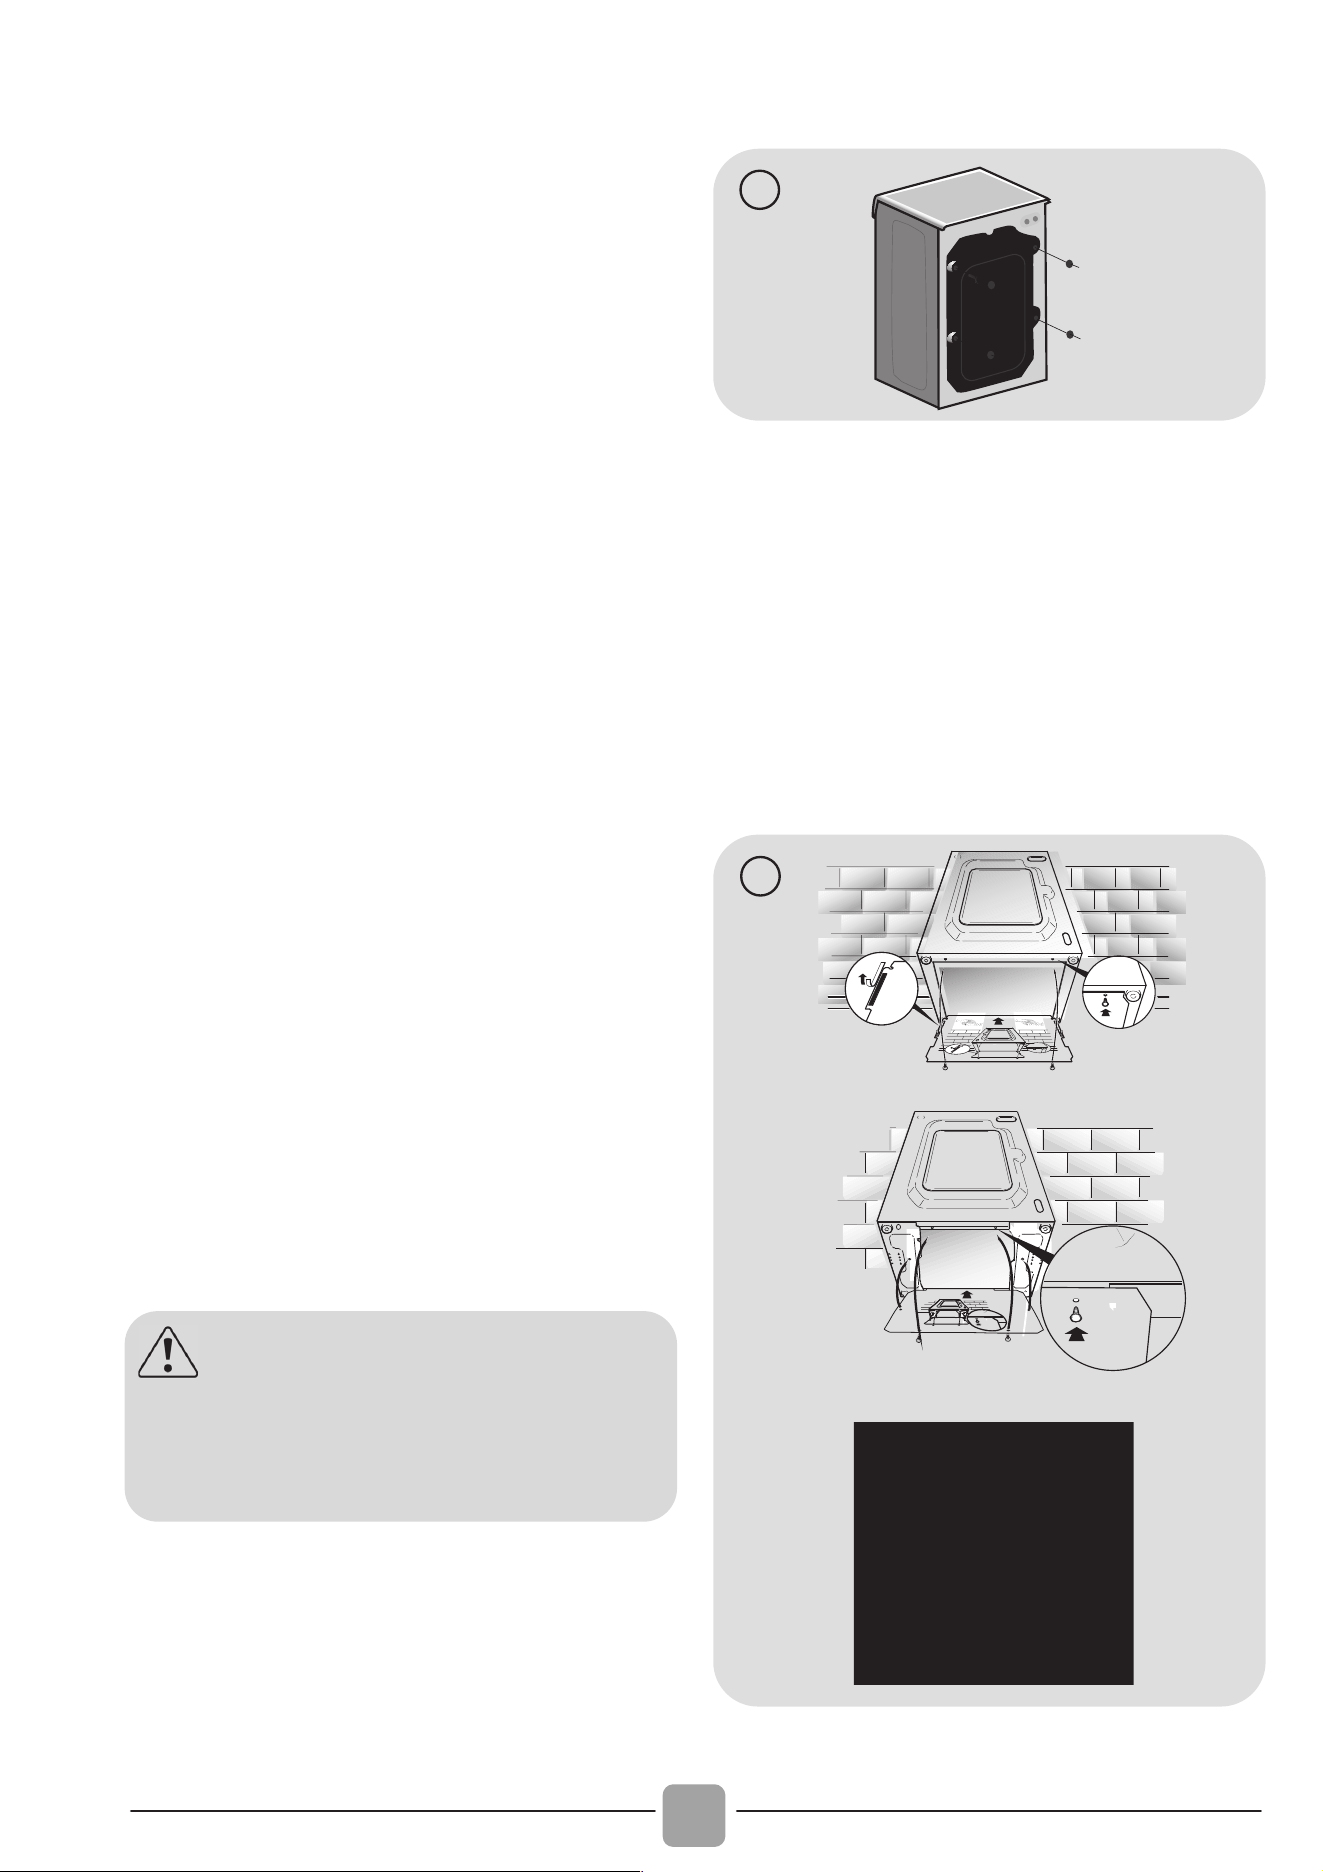
104
2. INSTALACJA
Przeciąć opaski podtrzymujące
przewód wody, zachowując
ostrożność, aby nie uszkodzić
rurki czy kabla elektrycznego.
Odkręcić śruby szt. 2 lub 4 (A)
na tylnej ścianie i usunąć
podkładki dystansowe szt. 2
lub 4 (B), patrz rysunek 1.
Zabezpieczyć otwory szt. 2 lub
4 stosując w tym celu zatyczki
dostarczonych w woreczku z
Instrukcją.
Jeśli pralka jest pod zabudowę,
po przecięciu opasek przy
przewodzie należy odkręcić śrub
y
szt. 3 lub 4 (A) i usunąć podkładki
dystansowe szt. 3 lub 4 (B).
W niektórych modelach, 1 lub
więcej podkładek dystansowych
wpadnie do wnętrza urządzenia:
w
celu ich usunięcia należ
y
przechylić pralkę do przodu.
Zaślepić otwory używając w tym
celu zatyczki dostarczone
w
woreczku.
Zastosować materiał wyciszając
y
jak pokazano na rysunku 2 (
w
zależności od modelu, wykona
ć
zgodnie z wersją A, B lub C).
A
A
A
A
B
B
B
B
1
3
2
1
3
1
2
A
C
B
2
UWAGA:
nie należy pozostawić elementów
opakowania dostępnych dla
dzieci.
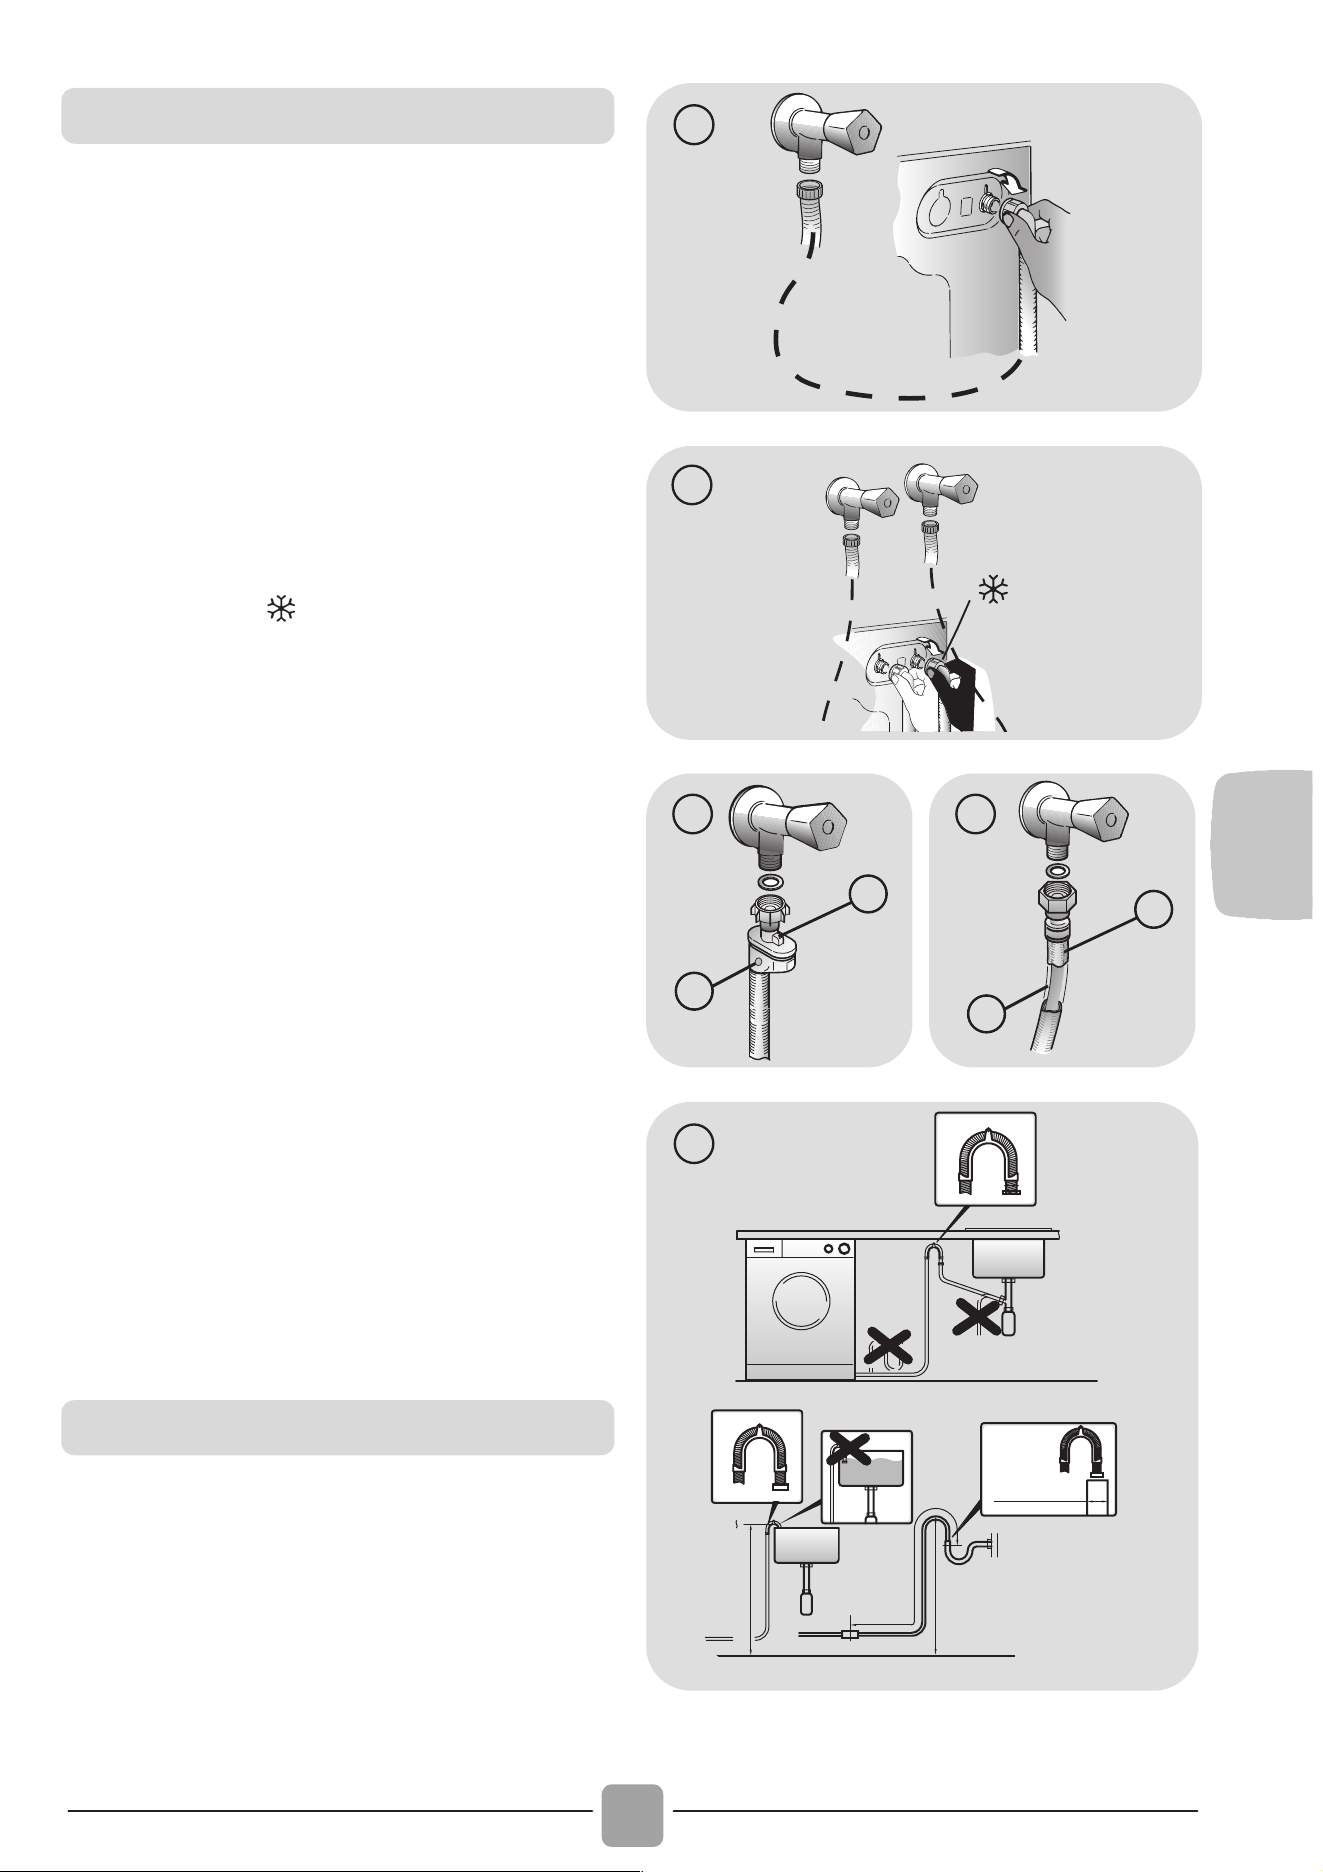
PL
105
Podłączyć przewód wody do kranu z
wodą używając w tym celu wyłącznie
rurkę dostarczoną z pralką (rys. 3).
NIE ODKRĘCAĆ KRANU.
Poszczególne modele mogą posiadać
niektóre z poniższych funkcji:
HOT&COLD (rys. 4): możliwość
połączenia do sieci wody ciepłej i zimnej
dla większej oszczędności energii.
Podłączyć szary przewód do kraniku z
zimną wodą
i czerwony przewód do
kranu wody gorącej. Urządzenie może też
być podłączone tylko do zimnej wody: w
takim przypadku rozpoczęcie niektórych
programów będzie opóźnione o kilka minut.
AQUASTOP (rys. 5): urządzenie znajdujące
się na przewodzie doprowadzającym wodę i
blokujące dopływ wody w sytuacji, gdy
przewód jest uszkodzony; w takim wypadku
pojawi się czerwone oznaczenie w okienku
"A", niezbędna będzie wymiana przewodu.
Aby odkręcić tulejkę nacisnąć przycis
k
blokujący odkręcenie "B".
AQUAPROTECT - PRZEWÓD WODY Z
ZABEZPIECZENIEM (rys. 6): W przypadku
wycieku wody z głównej rury wewnętrznej
"A" jego przezroczysta osłona zewnętrzna
"B" będzie wypełniona wodą, co pozwoli na
ukończenie bieżącego prania. Po
zakończeniu cyklu wymienić przewód
kontaktując się z Centrum Serwisu
Technicznego.
Przysunąć pralkę do ściany zachowując
ostrożność, aby przewód wody nie był
zagięty lub zgnieciony i przyłączyć przewód
odprowadzający wodę do wanny, zalecamy
podłączenie do stałego odpływu na
minimalnej wysokości 50 cm i o średnicy
większej niż rurka od pralki (rys. 7).
3
1
4
B
A
5
B
A
6
min 50 cm
max 85 cm
+2,6 mt
max
max 100 cm
min 4 cm
7
Połączenie hydrauliczne
Ustawienie
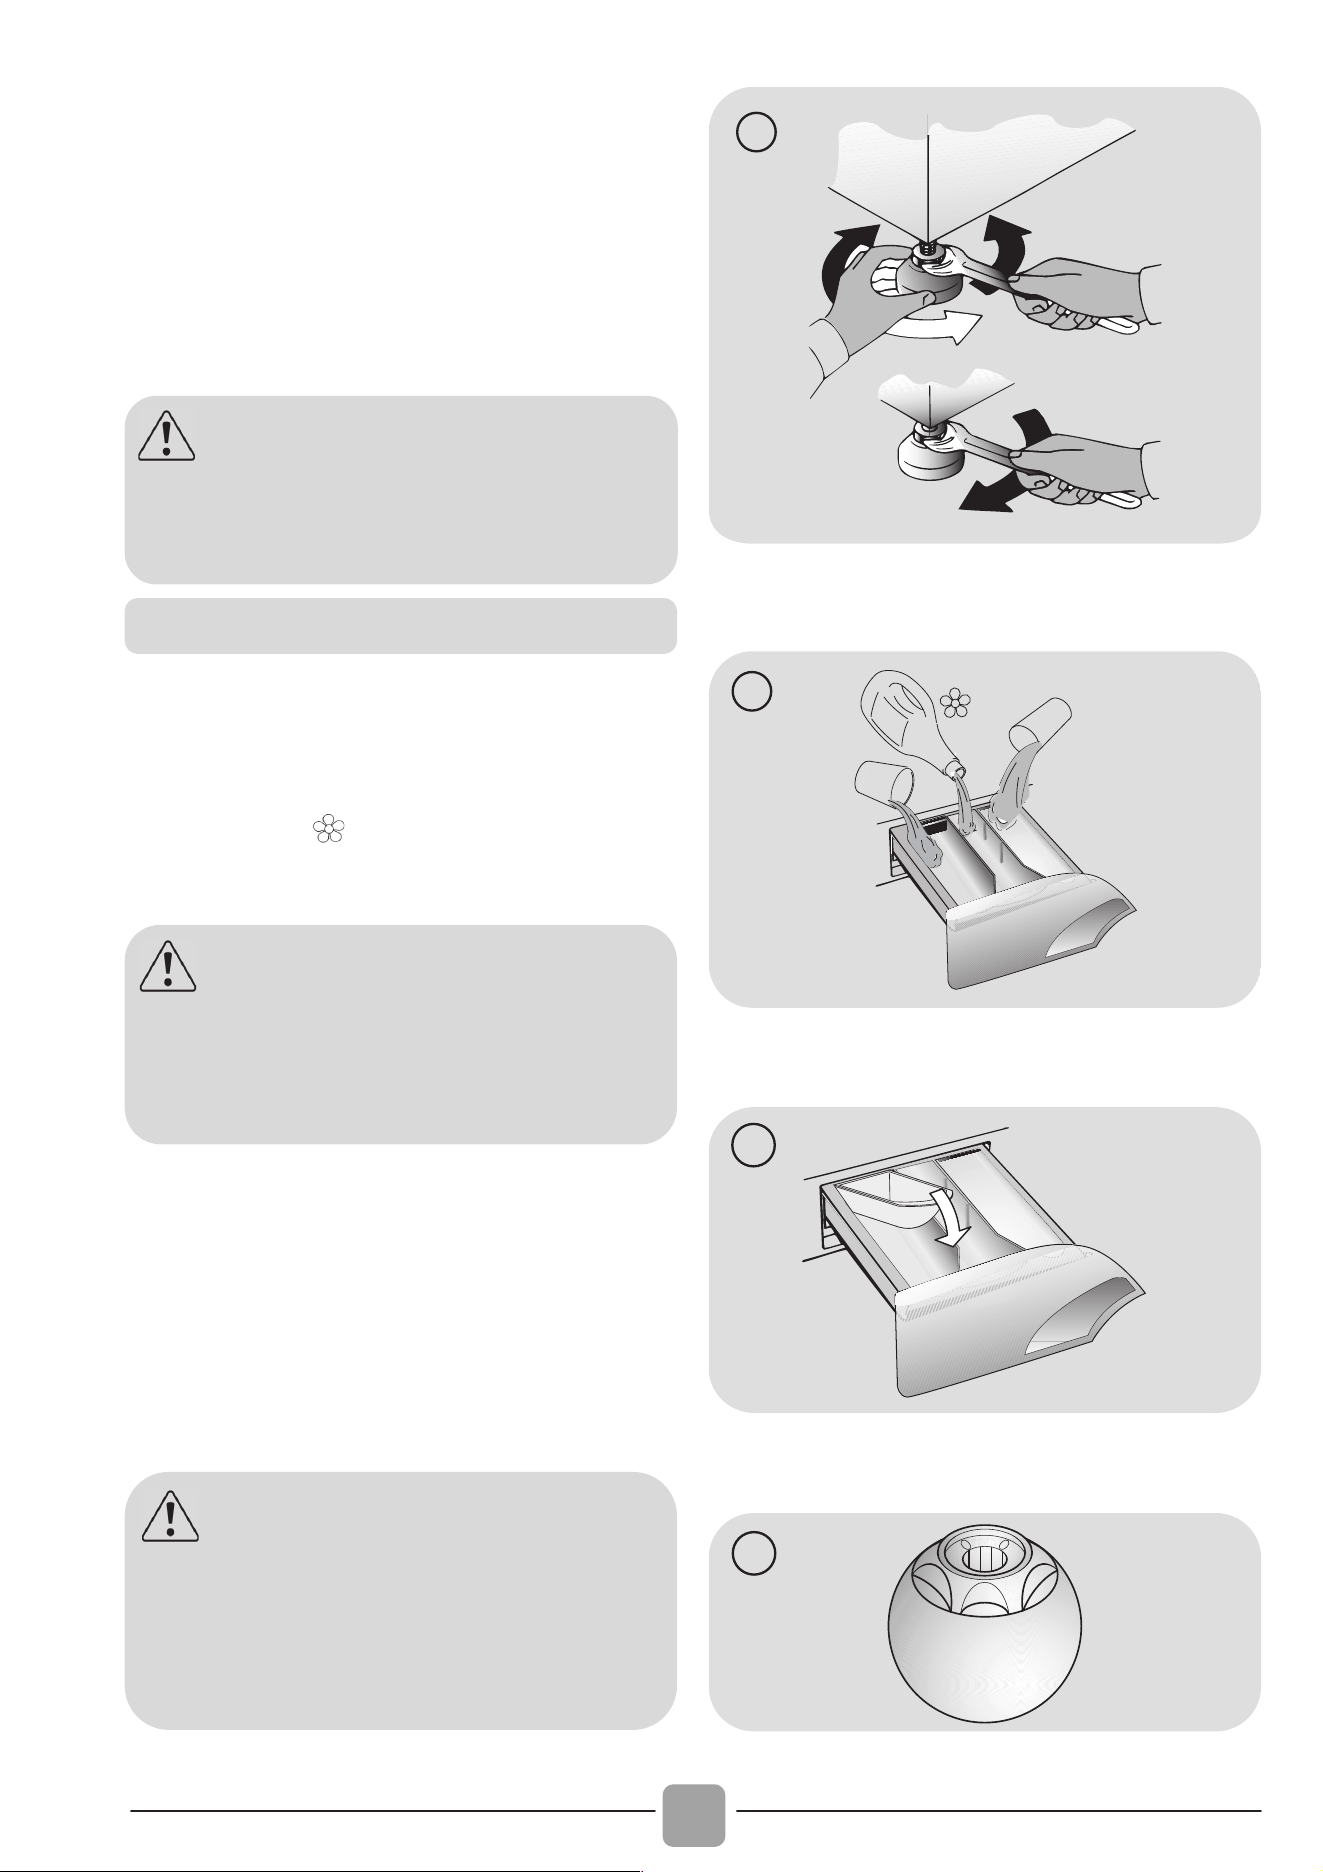
106
Wypoziomować pralkę za pomocą
obrotowych nóżek, jak na rysunku 8:
a.odkręcić nakrętkę zgodnie z ruchem
wskazówek zegara dla odblokowania śruby;
b.obracać nóżkę obniżając ją lub unosząc, ta
k
aby przylegała do podłoża;
c.zablokować nóżkę ponownie dokręcają
c
nakrętkę aż do dna pralki.
Włożyć wtyk do kontaktu zasilania.
A
B
C
8
Szufladka na proszek podzielona jest na 3
przegródki, jak pokazano na rysunku 9:
przegródka “1”: przeznaczona jest na
proszek do prania wstępnego;
przegródka “ ”:przeznaczona na specjalne
dodatki do prania, środki zmiękczające wodę,
zapachowe, krochmal, itp.;
przegródka “2”: przeznaczona na
proszek do prania zasadniczego.
W niektórych modelach dołączone zostało takż
e
naczynko do środków piorących w płynie (rys. 10).
Stosujemy je poprzez wprowadzenie do przegródk
i
"2". W ten sposób płynny środek zostani
e
wprowadzony do bębna w odpowiednim momencie.
Naczynko to będzie także przydatne, jeśli chcem
y
wykonać wybielanie wybierając program "Płukanie".
2
1
9
10
11
UWAGA:
w razie konieczności wymiany przewodu
zasilania elektrycznego należy skontaktować
się z Centrum Serwisu Technicznego.
Szufladka na detergent
UWAGA:
stosować wyłącznie produkty płynne; pralka
przystosowana jest do automatycznego
pobierania dodatków podczas ostatniego
płukania przy każdym cyklu prania.
UWAGA:
Niektóre środki piorące są trudne do
usunięcia. W takim wypadku zaleca się
zastosowanie pojemniczka ze środkiem
wkładanego bezpośrednio do bębna
pralki (przykład na rysunku 11).

PL
107
3. PRAKTYCZNE PORADY
UWAGA: Przy sortowaniu odzieży przed
praniem należy dopilnować, aby:
- usunąć z pranej bielizny przedmioty
metalowe, takie jak agrafki, spinki, monety;
- zapiąć pościel, zasunąć zamki błyskawiczne,
zawiązać luźne paski i długie tasiemki przy
ubraniach;
- usunąć z zasłonek rolki do ich przesuwania;
- uważnie przestrzegać wskazań dotyczących
prania zamieszczonych na etykietach przy
ubraniach;
- usunąć przed praniem ewentualne uporczywe
plamy przy użyciu specjalnego środka.
W przypadku prania dywanów, narzut lub
innej ciężkiej odzieży, zaleca się nie
stosować wirowania.
W przypadku prania wyrobów wełnianych
upewnić się, że produkt nadaje się do
prania w pralce, sprawdzając czy posiada
znak “Czysta żywa wełna” oraz informacja
“nie filcuje się” lub “można prać w pralce”.
Oto kilka wskazówek dotyczących
ekonomicznego i przyjaznego środowisku
użytkowania własnego urządzenia.
Załadowanie do maksimum bębna pralki
Najlepsze wykorzystanie energii, wody,
środków piorących i czasu uzyskać można
przez użycie zalecanej, maksymalnej
wielkości załadunku. Możliwe jest
zaoszczędzenie do 50% energii piorąc
jeden pełny załadunek zamiast prać dwa
razy połowę wsadu.
Kiedy potrzebne jest pranie wstępne?
Wyłącznie dla bardzo zabrudzonych ubrań!
Można zaoszczędzić od 5 do 15% energii
nie wybierając opcji prania wstępnego dla
odzieży normalnie zabrudzonej.
Jaką wybrać temperaturę prania?
Użycie odplamiacza przed praniem w
pralce zmniejsza potrzebę zastosowania
temperatury wyższej niż 60°C. Można
zaoszczędzić do 50% energii stosując
temperaturę prania 60°C zamiast 90°C.
Przed rozpoczęciem programu suszenia...
Aby zaoszczędzić czas i energię
elektryczną wyroby przeznaczone do
suszenia w pralko-suszarce należy
wcześniej odwirować na najwyższej
zalecanej prędkości wirowania, tak aby
usunąć z nich nadmiar wody.
Poniżej zamieszczamy krótki przewodnik
z poradami i zaleceniami dotyczącymi
stosowania środków piorących w zależności
od temperatury prania. Zawsze należy
śledzić wskazania znajdujące się na proszku,
odnośnie właściwego stosowana i dozowania.
Wskazówki dotyczące załadunku
bębna
Porady dla użytkowników
W przypadku prania z programem
bawełna, temperatura od 60°C w górę,
dla ubrań białych, trwałych i bardzo
zabrudzonych, zaleca się zastosowanie
zwyczajnego środka piorącego w proszku
(heavy-duty), zawierającego elementy
wybielające i który przy średnich-wysokich
temperaturach daje najlepsze rezultaty.
W przypadku użycia programów o
temperaturze pomiędzy 60°C a 40°C,
wybór środka piorącego musi być
dokonany w zależności od rodzaju
pranego materiału, jego koloru i stopnia
zabrudzenia. Zwykle dla białej, trwałej i
bardzo zabrudzonej odzieży poleca się
zwyczajny środek w proszku; dla
odzieży kolorowej i bez poważnych plam
zaleca się środek płynny lub w proszku,
polecany do ochrony kolorów.
W przypadku prania w niskich
temperaturach do 40°C, doradzamy
używanie środków płynnych lub w proszku,
specjalnie polecanych do niskich temperatur.
W przypadku wełny i jedwabiu,
używać wyłącznie specjalnych produktów
przeznaczonych do ich prania.

108
4. CZYSZCZENIE I
RUTYNOWA
KONSERWACJA
Do czyszczenia zewnętrznej obudowy pralki
zastosuj wilgotną ściereczkę, nie używaj środków
trących, alkoholu i/lub rozpuszczalników. Pralka
wymaga czyszczenia w niewielkim stopniu:
czyszczenie szufladki i czyszczenie filtru; poniżej
wskazane są także sugestie odnośnie
przypadków przewożenia lub długich okresów nie
używania urządzenia.
Zalecane jest czyszczenie szufladki dla
uniknięcia zbierania w jej wnętrzu resztek
proszku czy dodatków.
Wyjąć delikatnie szufladkę, wyczyścić
strumieniem wody i wprowadzić ponownie
na miejsce.
Pralka posiada specjalny filtr, który
zatrzymuje większe odpady mogące
zatkać odpływ wody, np. guziki czy
monety.
Tylko w niektórych modelach: wyciągnij
filtr, zdejmij jego korek i zbierz wodę do
pojemnika.
Przed odkręceniem filtru dobrze jest
umieścić pod nim ściereczkę dla uniknięcia
rozlania na podłogę pozostałości wody.
Obrócić filtr w kierunku odwrotnym do
ruchu wskazówek zegara, do zatrzymania
na pozycji pionowej.
Wyjąć filtr i oczyścić go; następnie
umieścić na swoim miejscu i obrócić
zgodnie z ruchem wskazówek zegara.
Zamontować wszystkie usunięte elementy
powtarzając w odwrotnej kolejności
wszystkie wcześniejsze czynności.
W przypadku, kiedy pralka pozostaje
przez dłuższy czas w miejscu
nieogrzewanym niezbędne jest całkowite
usunięcie resztek wody z przewodów.
Odłączyć pralkę od zasilania elektrycznego.
Rozłączyć opaskę przytrzymującą przewód
wody obniżając go do posadzki, aby
usunąć całkowicie wodę.
Ponownie zamocować opaską przewód
odprowadzenia wody.
Czyszczenie szufladki
Czyszczenie filtru
Sugestie dotyczące przewożenia
i okresów nie używania pralki
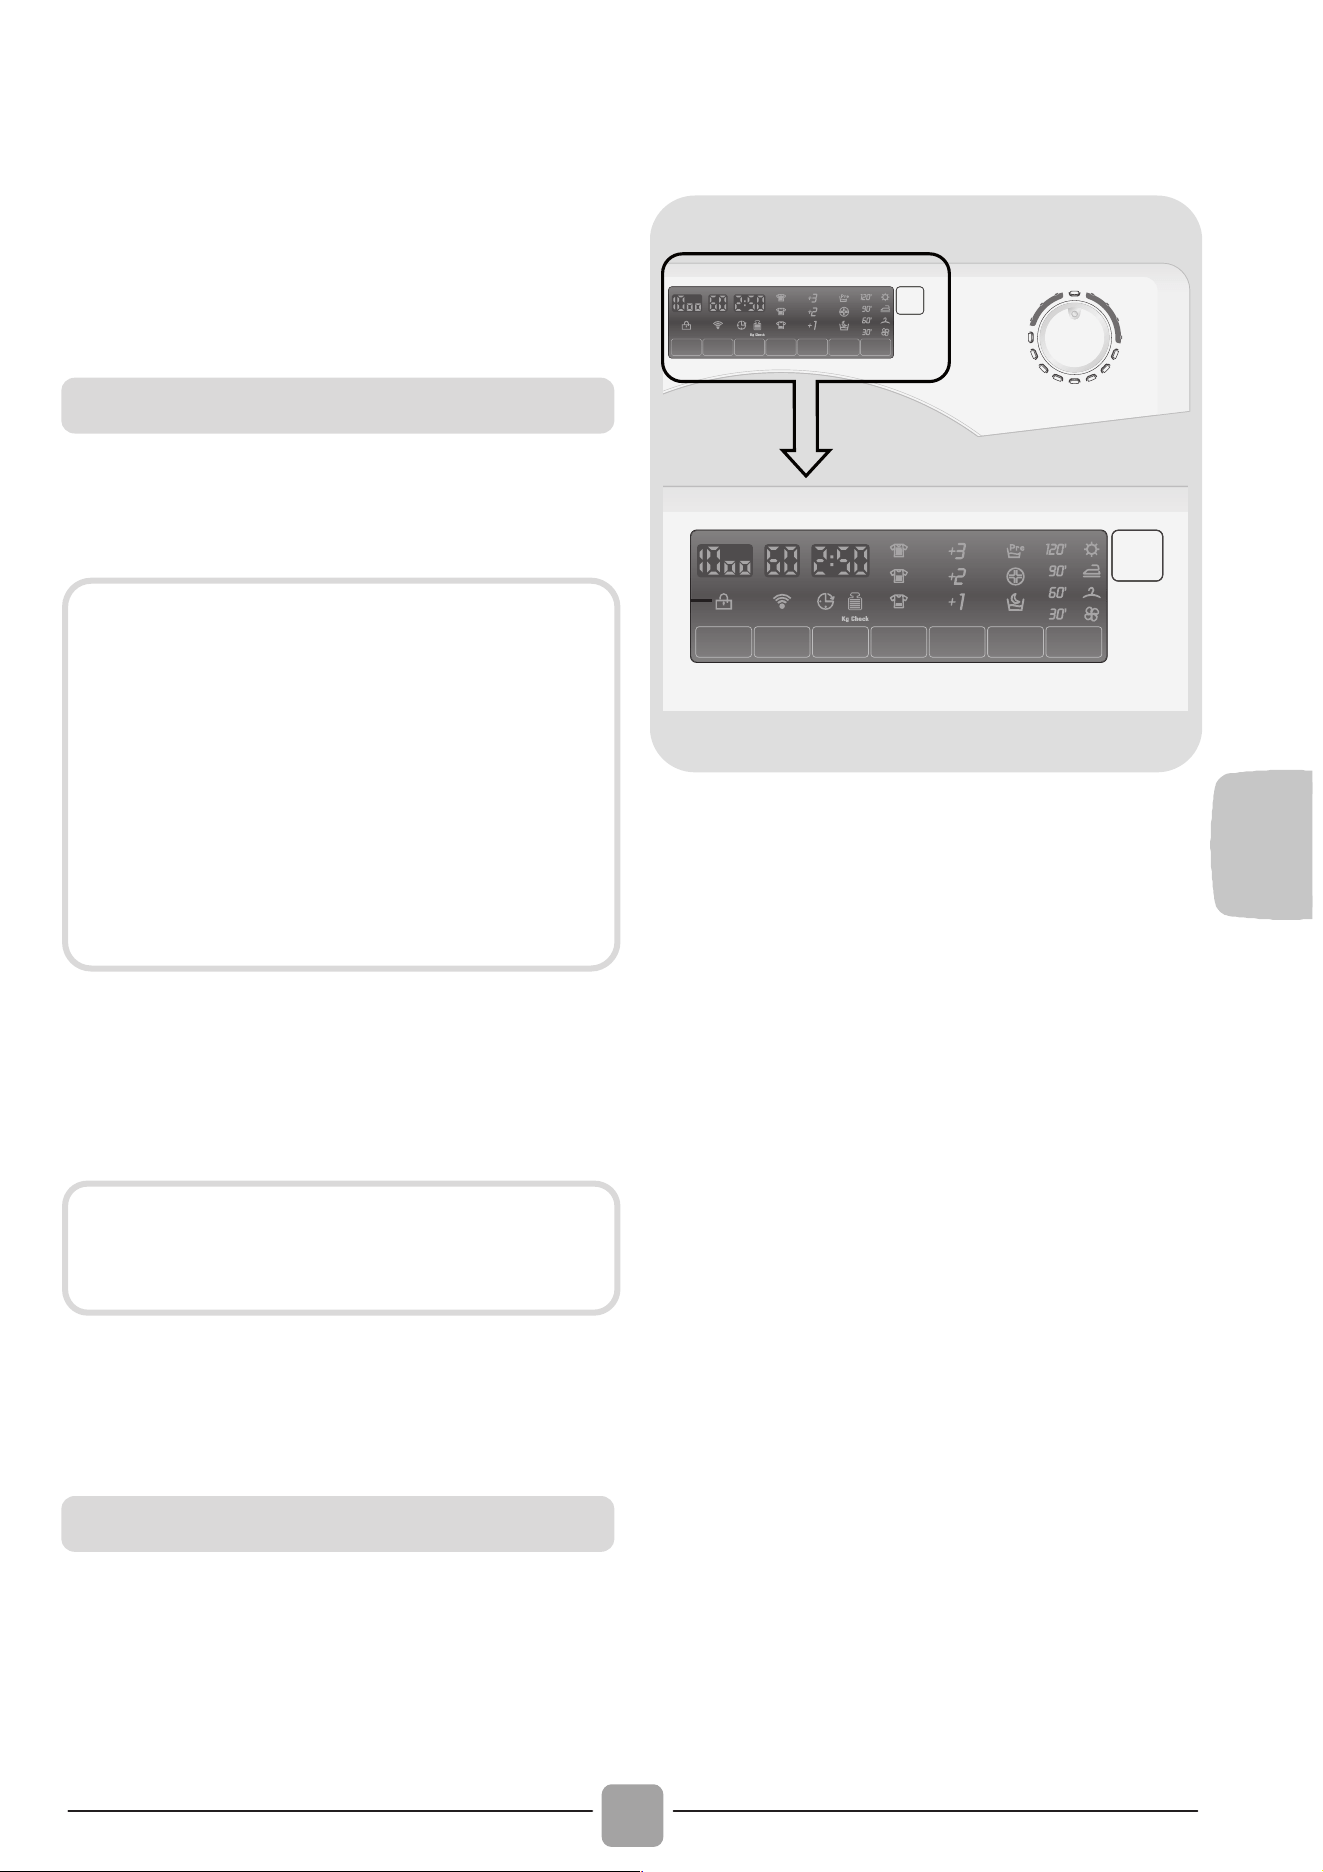
PL
109
5. SKRÓCONA
INSTRUKCJA OBSŁUGI
Nasza pralka posiada system
automatycznego dostosowania poziomu
wody do rodzaju i ilości prania. System ten
prowadzi do zredukowania zużycia energii i
znacznego skrócenia czasu prania.
Włączyć pralkę i wybrać potrzebny program.
Zmienić ewentualnie wartość temperatury
prania i załączyć potrzebne opcje.
Nacisnąć przycisk START/PAUZA, aby
uruchomić program prania.
Po zakończeniu programu na ekranie
pojawi się napis “end” lub zapali się
odpowiednia dioda led.
Wyłączyć pralkę.
Dla każdego rodzaju prania sprawdź tabelę
programów i postępuj zgodnie ze wskazaną
procedurą.
Ciśnienie wody: min 0,05 Mpa / max 0,8 Mpa
Wirowanie (obr/min):
(patrz tabliczka znamionowa)
Moc przyłączeniowa / Bezpiecznik zasilania /
Napięcie zasilania: (patrz tabliczka znamionowa)
6. STEROWANIE I
PROGRAMY
A
B
DCEFGHI
M
L
A Pokrętło programów prania z
pozycją OFF
(WYŁĄCZ)
B Przycisk START/PAUZA
C Przycisk WYBORU WIROWANIA
D
Przycisk WYBORU TEMPERATURY
E
Przycisk OPÓŹNIONEGO STARTU
F Przycisk WYBORU STOPNIA
ZABRUDZENIA
G Przycisk DODATKOWEGO
PŁUKANIA
H Przycisk FUNKCJI
DODATKOWYCH
I Przycisk WYBÓR PROGRAMU
SUSZENIA
L Wyświetlacz cyfrowy
M
Kontrolka BLOKADY DRZWICZEK
Wybór programu
SUSZENIE
Aby zaprogramować automatyczne
rozpoczęcie programu suszenia po
zakończeniu cyklu prania należy
wybrać
odpowiedni program posługując się
przyciskiem WYBÓR PROGRAMU SUSZENIA.
Jeśli program suszenia nie został wybrany
należy odczekać aż urządzenie zakończy
cykl prania a następnie samodzielnie
wybrać program suszenia odpowiednio
dostosowan
y
do wsadu.
Poczekać aż zgaśnie kontrolka
blokady drzwiczek: około 2 min po
zakończeniu programu.
Dane techniczne

110
Nacisnąć przycisk START/PAUZA w celu
uruchomienia wybranego programu.
Podczas wykonywania programu pokrętło
wyboru programów pozostaje ustawione
na wybranym programie do czasu
zakończenia programu.
Po zakończeniu programu należy
wyłączyć pralkę ustawiając pokrętło
wyboru programów w pozycji OFF.
Nacisnąć przycisk START/PAUZA, aby
uruchomić wybrany program prania.
DODAWANIE LUB USUWANIE ELEMENTÓW
PO URUCHOMIENIU PROGRAMU (PAUZA)
Naciśnij i przytrzymaj przycisk
START/PAUZA na około 2 sekundy
(niektóre wskaźniki jak kontrolka czasu
prania zaczną migać, oznacza to że
działanie urządzenia zostało
wstrzymane).
Odczekaj 2 minuty aż odblokują się
drzwi.
Po dodaniu lub usunięciu elementów,
zamknij drzwi i naciśnij przycisk
START/PAUZA (program rozpocznie się
od miejsca zatrzymania).
ANULOWANIE PROGRAMU
Aby anulować program należy ustawić
pokrętło wyboru programów w pozycji
OFF.
UWAGA:
Nie dotykać wyświetlacza podczas
podłączania pralki do zasilania,
ponieważ przez pierwsze klika sekund
pralka przeprowadza kalibrację
systemów. Dotknięcie wyświetlacza
spowoduje błąd i w takiej sytuacji
należy odłączyć pralkę od zasilania i
powtórzyć operację.
Otwieranie drzwiczek
Specjalne zabezpieczenie zapobiega
otwarciu drzwiczek bezpośrednio po
zakończeniu programu prania. Należy
odczekać 2 minuty od zakończenia
programu i po zgaśnięciu wskaźnika
blokady otworzyć drzwiczki.
Pokrętło programów prania z
p
oz
y
c
ją
OFF
(
WYŁ
Ą
CZ
)
Po przekręceniu pokrętła na
wyświetlaczu pojawiają się ustawienia
aktualnie wybranego programu.
Pod koniec każdego cyklu prania oraz w
czasie, gdy urządzenie nie pracuje,
kontrast wyświetlacza zmniejsza się ze
względu na oszczędność energii.
Uwaga: Aby wyłączyć urządzenie
należy ustawić pokrętło wyboru
programów w pozycji OFF.
Pokrętło wyboru programów należy
ustawić w pozycji OFF po
zakończeniu każdego programu lub
przed wyborem i uruchomieniem
kolejnego programu prania.
Przycisk START/PAUZA
Drzwiczki należy zamknąć PRZED
naciśnięciem przycisku START/PAUZA.
Po naciśnięciu przycisku START/PAUZA
urządzenie po upływie kilku sekund
rozpocznie program prania.
Funkcje dodatkowe należy wybrać przed
naciśnięciem przycisku START/PAUZA.
W przypadku wyboru funkcji
niekompatybilnej z danym programem,
wskaźnik funkcji najpierw miga a
następnie gaśnie.

PL
111
Przyciśnięcie przycisku powoduje
zmniejszenie maksymalnej prędkości
wirowania. Cykl wirowania może również
zostać wyłączony.
Aby ponownie włączyć cykl wirowania
należy naciskać przycisk do czasu
ustawienia odpowiedniej prędkości
wirowania.
Prędkość wirowania można zmienić bez
konieczności wstrzymania urządzenia
(pauzy).
Przycisk służy do zmiany temperatury
cykli prania.
W celu ochrony tkanin przez
zniszczeniem nie jest możliwe ustawienie
temperatury wyższej niż temperatura
maksymalna przewidziana dla danego
programu.
Przycisk ten umożliwia uruchomienie
programu prania z opóźnieniem
wynoszącym maksymalnie 24 godziny.
Aby zaprogramować opóźniony start,
należy:
- Wybrać program prania.
- Nacisnąć jednokrotnie przycisk
opóźnionego startu (wyświetlacz pokaże
h00). Kolejne naciśnięcie przycisku
powoduje opóźnienie uruchomienia
programu o godzinę (na wyświetlaczy
pojawi się h01). Każde kolejne
naciśnięcie przycisku powoduje
opóźnienie uruchomienia programu o
godzinę. Po osiągnięciu wartości 24
godzin (wyświetlacz pokaże h24),
kolejne naciśnięcie przycisku spowoduje
powrót do 0.
- Nacisnąć przycisk START/PAUZA w
celu rozpoczęcia odliczania czasu
pozostałego do uruchomienia programu
(wskaźnik zacznie migać na
wyświetlaczu). Po upływie zaprogramowanego
czasu opóźnienia program zostanie
automatycznie uruchomiony.
Możliwe jest skasowanie ustawionego
wcześniej opóźnienia startu programu
przez ustawienie pokrętła w pozycji
OFF (WYŁĄCZ).
Jeśli podczas pracy urządzenia wystąpi
przerwa w zasilaniu, specjalny moduł
pamięci zapamięta parametry przerwanego
programu. Po przywróceniu zasilania
program zostanie wznowiony od miejsca, w
którym został przerwany.
Przycisk umożliwia wybór trzech
poziomów intensywności prania, w
zależności od stopnia zabrudzenia tkanin
(funkcja jest dostępna z wybranymi
programami – patrz tabela programów).
Po wybraniu danego programu
automatycznie zaświeci się odpowiednia
kontrolka stopnia zabrudzenia.
Po wybraniu innego stopnia zabrudzenia
zaświeci się odpowiednia kontrolka.
Przycisk WYBORU WIROWANIA
Aby zapobiec uszkodzeniu tkanin nie
można zwiększyć prędkości ponad
maksymalną prędkość wirowania
właściwą dla danego programu.
Pralka jest wyposażona w specjalną
elektroniczną blokadę cyklu wirowania w
sytuacji, gdy pranie jest nierównomiernie
rozłożone w bębnie.
Dzięki temu obniżony zostaje poziom
hałasu i wibracji, co zwiększa żywotność
p
ralki.
Przycisk WYBORU TEMPERATURY
Przycisk OPÓŹNIONEGO STARTU
Przycisk WYBORU STOPNIA
ZABRUDZENIA

112
Przycisk służy do ustawienia
dodatkowych cykli płukania na koniec
cyklu prania. Maksymalna liczba
dodatkowych cykli płukania zależy od
wybranego programu.
Funkcja ta jest przeznaczona zwłaszcza
do prania odzieży dzieci i niemowląt oraz
osób dorosłych o delikatnej i wrażliwej
skórze, w przypadku których najmniejsza
pozostałość środków piorących może
spowodować podrażnienie lub uczulenie.
Funkcja ta jest również zalecana do
prania mocno zabrudzonych ubrań
dziecięcych, wymagającego dużej ilości
środka piorącego, oraz do prania tkanin
ręcznikowych (frotowych), ponieważ
środek piorący może się z nich ciężko
wypłukiwać.
Dostępne są trzy funkcje dodatkowe:
- PRANIE WSTĘPNE
Funkcja umożliwia pranie wstępne i jest
przydatna zwłaszcza w przypadku mocno
zabrudzonych tkanin (funkcja jest dostępna
z wybranymi programami – patrz tabela
programów).
Zaleca się stosowanie 1/5 zalecanej ilości
środka piorącego podanego na opakowaniu.
- STERYLIZACJA
Program higieniczny umożliwia pozbycie
się większości bakterii podczas prania.
Temperatura prania dochodzi do 60°C.
Szczególnie przeznaczony do prania
ubrań niemowlęcych oraz odzieży osób z
obniżoną odpornością.
- TRYB PRACY NOCNEJ
Umożliwia zmniejszenie prędkości
wirowania do 400 obr./min, zwiększenie
ilości wody podczas fazy płukania oraz
pozostawienie wody w bębnie po
końcowym płukaniu, dzięki czemu tkaniny
nie pogniotą się.
Gdy woda nadal znajduje się w bębnie
odpowiednia kontrolka miga, informując
że pralka jest w stanie pauzy.
Należy wyłączyć tryb pracy nocnej, by
zakończyć pranie fazą odwirowania
(wirowanie można wyłączyć lub
zmniejszyć jego prędkość odpowiednim
przyciskiem) oraz wypompowania wody.
Dzięki elektronicznemu sterowaniu
wypompowanie wody podczas faz
pośrednich odbywa się w sposób cichy,
przez co funkcja ta jest szczególnie
przydatna do prania nocą.
Ustawić pokrętło programatora w
dowolnej pozycji (z wyjątkiem OFF) i
wybrać program suszenia, naciskając
przycisk WYBÓR PROGRAMU
SUSZENIA. Po każdym naciśnięciu
przycisku zaświeci się kontrolka
odpowiadająca wybranemu programowi
suszenia.
Aby anulować program suszenia przed
jego rozpoczęciem należy kilkukrotnie
nacisnąć przycisk wyboru programu
suszenia do momentu wyłączenia
wszystkich kontrolek lub ustawić pokrętło
wyboru programu w pozycji OFF.
Aby anulować rozpoczęty program
suszenia należy nacisnąć przycisk
wyboru programu suszenia i przytrzymać
go przez około 3 sekundy, aż zaświeci
się kontrolka cyklu chłodzenia.
Ponieważ temperatura wewnątrz bębna
jest bardzo wysoka, przed wyjęciem
prania należy odczekać do zakończenia
cyklu chłodzenia, a następnie ustawić
pokrętło programatora w pozycji OFF.
Przycisk DODATKOWEGO PŁUKANIA
Przycisk FUNKCJI DODATKOWYCH
Przycisk WYBÓR PROGRAMU
SUSZENIA
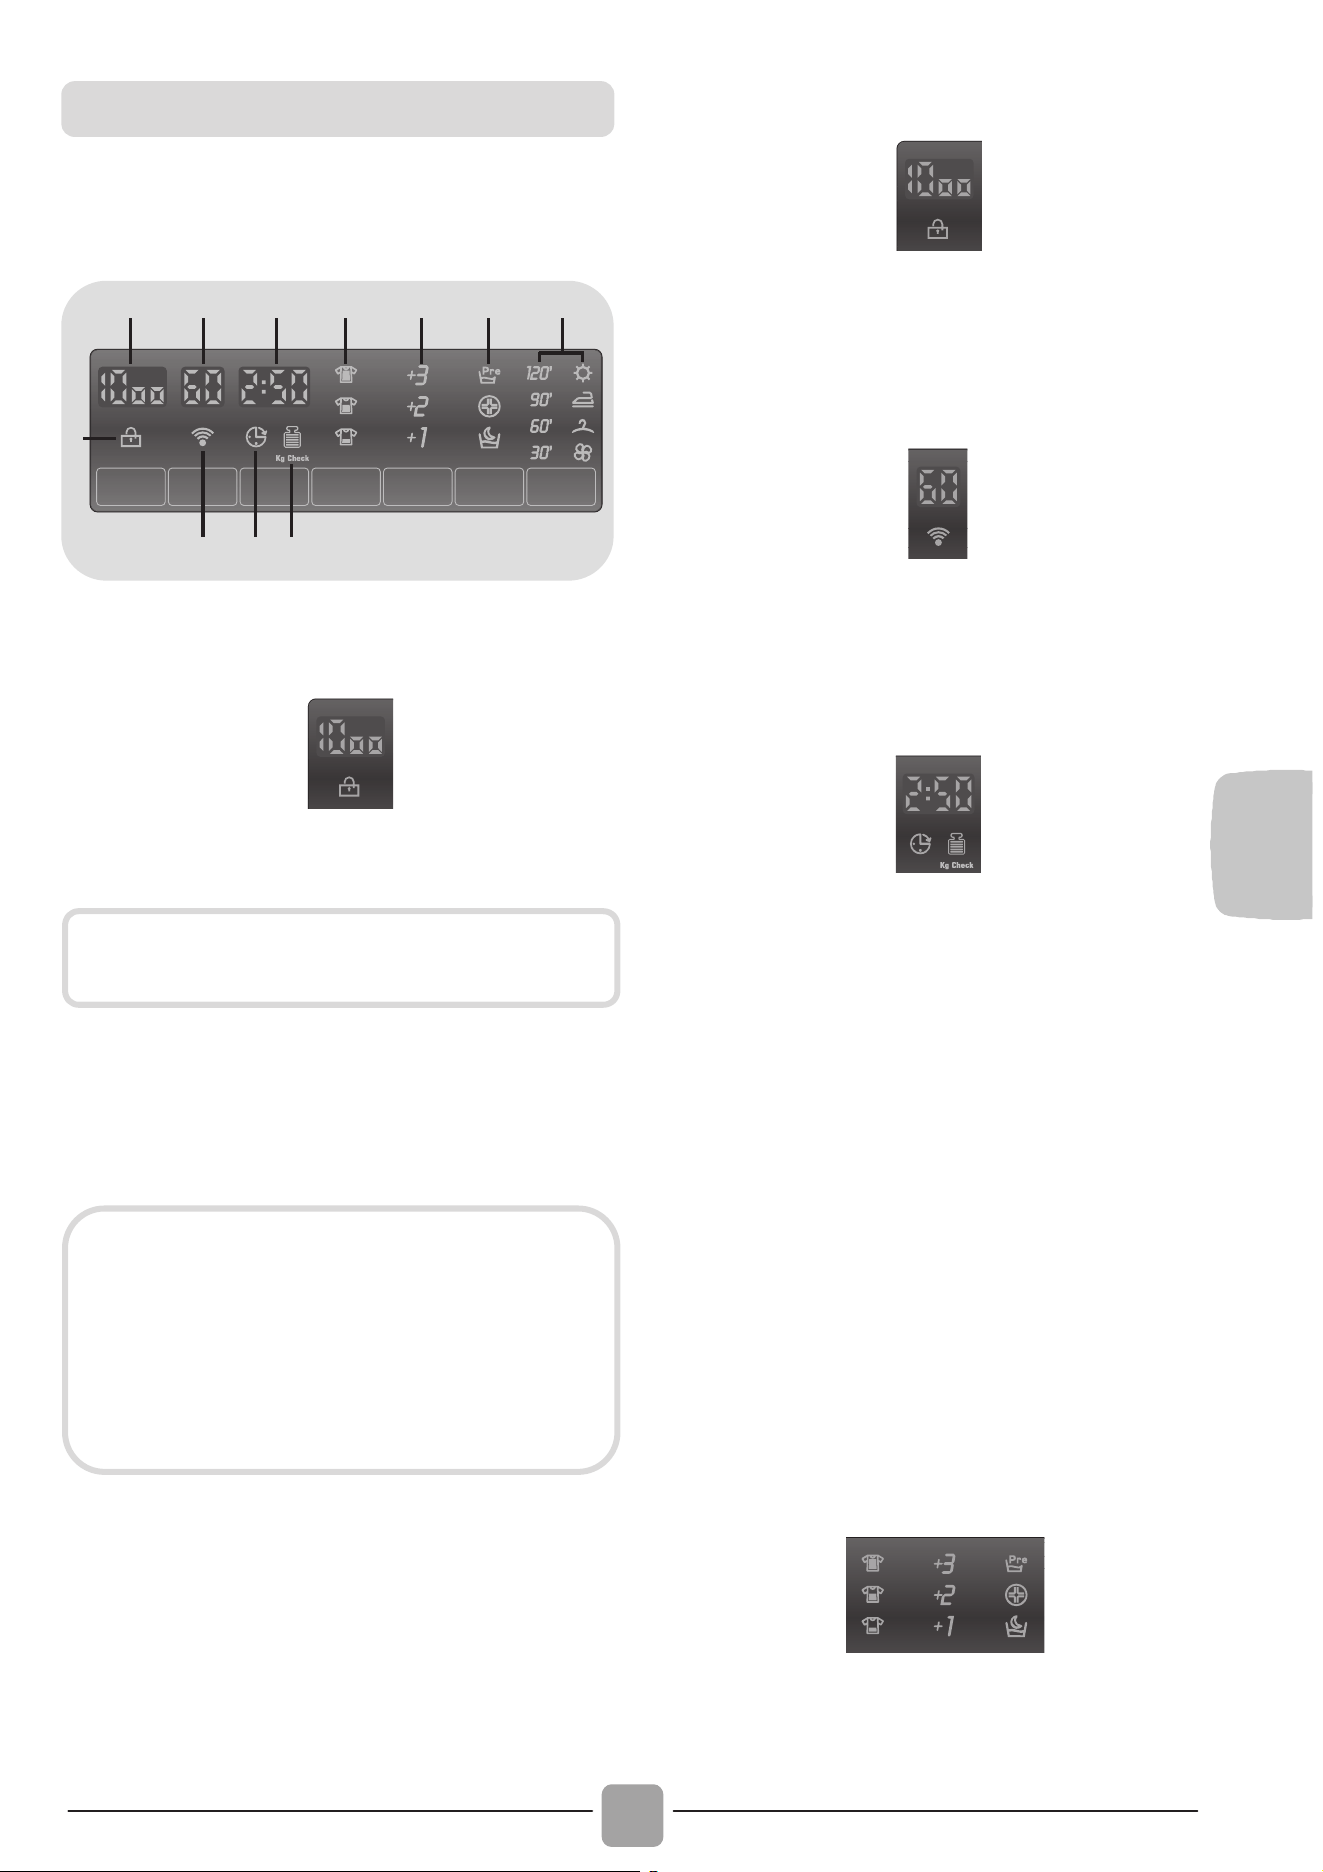
PL
113
Wyświetlacz w sposób ciągły informuje
użytkownika o statusie urządzenia.
2
1
8109
3 4 5 6 7 11
1) KONTROLKA BLOKADY DRZWICZEK
1
Ikona informuje o blokadzie drzwiczek.
Po naciśnięciu przycisku START/PAUZA
przy zamkniętych drzwiczkach kontrolka
będzie przez chwilę migała a następnie
zaświeci się.
Specjalna blokada zabezpiecza drzwiczki
przed otwarciem bezpośrednio po
zakończeniu cyklu. Po zakończeniu cyklu,
przed otwarciem drzwiczek należy
odczekać 2 minuty aż kontrolka blokady
zgaśnie. Po zakończeniu cyklu ustawić
pokrętło wyboru programu w pozycji OFF.
2) PRĘDKOŚĆ WIROWANIA
2
Pokazuje prędkość wirowania wybranego
programu, która może zostać zmieniona lub
wyłączona odpowiednim przyciskiem.
3) TEMPERATURA PRANIA
3
Pokazuje temperaturę prania wybranego
programu, która może zostać zmieniona (tam
gdzie to możliwe) odpowiednim przyciskiem.
4) CZAS CYKLU
4
Po wyborze programu na wyświetlaczu
automatycznie wyświetlony zostanie czas
cyklu (może on się różnić w zależności od
wybranych opcji).
Po rozpoczęciu programu na wyświetlaczu
podawana jest przez cały czas informacja
o czasie pozostałym do końca prania.
Pralka oblicza czas do końca wybranego
programu w oparciu o standardowy wsad.
Podczas cyklu pralka dokonuje korekty
czasu na podstawie ilości i rodzaju wsadu.
W przypadku zaprogramowania
automatycznego programu suszenia, po
zakończeniu prania wyświetlacz pokaże
czas pozostały do zakończenia suszenia.
5) POZIOM ZABRUDZENIA
{
5
Po wybraniu danego programu
automatycznie zaświeci się kontrolka
Wyświetlacz cyfrowy
Drzwiczki należy zamknąć PRZED
naciśnięciem przycisku START/PAUZA
Jeśli drzwiczki są nieprawidłowo
zamknięte kontrolka miga przez ok. 7
sekund. Po upływie tego czasu komenda
start zostanie automatycznie anulowana.
W takim przypadku należy zamknąć
prawidłowo drzwiczki i nacisnąć
p
rz
y
cisk START/PAUZA.
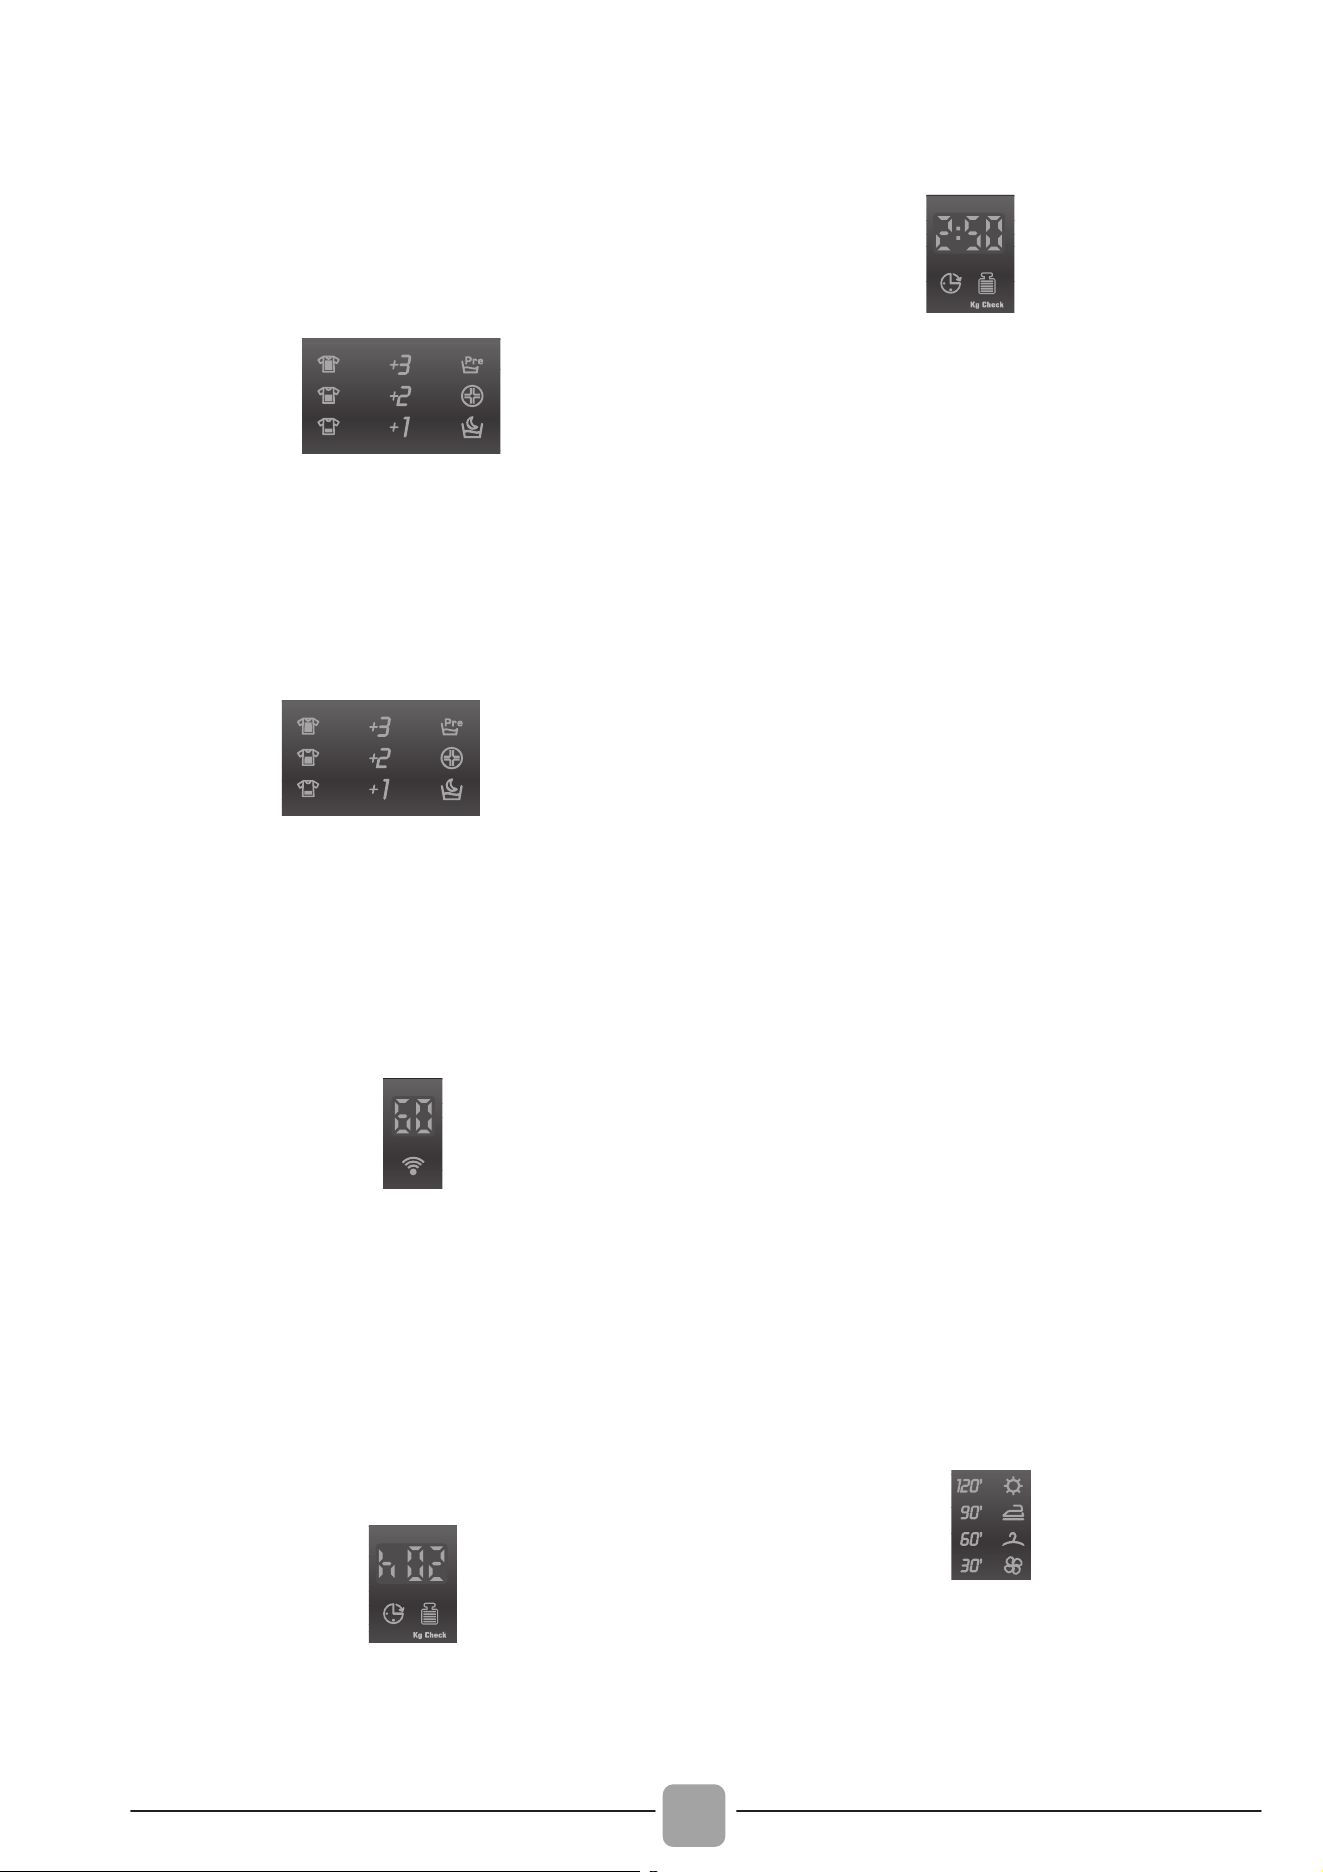
114
stopnia zabrudzenia ustawionego dla
takiego programu.
Po wybraniu innego stopnia zabrudzenia
zaświeci się odpowiednia kontrolka.
6) DODATKOWE PŁUKANIE
{
6
Kontrolka pokazuje dodatkowe płukania
wybrane odpowiednim przyciskiem.
7) FUNKCJE DODATKOWE
}
7
Kontrolki pokazują funkcje, które mogą być
wybrane odpowiednim przyciskiem
(PRANIE WSTĘPNE, STERYLIZACJA i
TRYB PRACY NOCNEJ).
8) Funkcja Wi-Fi (tylko wybrane modele)
8
W modelach z funkcją Wi-Fi stosowna
ikona informuje o działaniu systemu Wi-Fi.
Opis działania systemu Wi-Fi znajduje się
w osobnej instrukcji, umieszczonej
wewnątrz bębna pralki.
9) DODATKOWE PŁUKANIE
9
Ikona miga po ustawieniu opóźnionego
startu.
10) Kg Check (funkcja dostępna tylko z
programami "bawełniane" i "syntetyczne")
10
W pierwszych minutach cyklu kontrolka
"Kg Check" świeci się, a inteligentny
czujnik waży pranie i dostosowuje
odpowiedni czas trwania cyklu oraz ilość
wody i prądu.
Podczas każdej fazy prania funkcja
"Kg Check" umożliwia sprawdzenie
informacji dotyczących wsadu w bębnie i
podczas pierwszych minut prania:
- dostosowuje ilość wymaganej wody;
- oblicza czas trwania cyklu prania;
- dostosowuje płukanie do wybranego
rodzaju tkaniny;
- dostosowuje rytm obrotów bębna do
wybranego rodzaju tkaniny;
- wykrywa obecność piany i w razie
potrzeby zwiększa ilość wody podczas
płukania;
- dostosowuje prędkość wirowania do
wsadu (nierównomierny rozkład prania
wewnątrz bębna).
11)
KONTROLKI PROGRAMÓW SUSZENIA
}
11
Kontrolki pokazują wybrany programu
suszenia.

PL
115
Programy automatyczne
Program Ekstra Suche (przeznaczony
do suszenia ręczników, szlafroków i
dużych wsadów).
Program Suche Do Prasowania
(pranie gotowe do prasowania
bezpośrednio po wyjęciu z bębna).
Program Suche Do Szafy (pranie
może zostać odłożone do szafy bez
konieczności prasowania).
Po wybraniu automatycznego programu
suszenia urządzenie obliczy czas
potrzebny do zakończenia suszenia i
uzyskania żądanego stopnia wilgotności
tkanin na podstawie wielkości wsadu i
parametrów programu suszenia.
Po naciśnięciu przycisku START/PAUZA
wyświetlacz pokaże czas pozostały do
zakończenia programu suszenia.
Programy czasowe
Służą do wyboru czasowych
programów suszenia.
Faza chłodzenia
Kontrolka zapala się po rozpoczęciu
fazy chłodzenia, w ostatnich 10/20
minutach każdego programu suszenia.
Przydatne wskazówki
Program suszenia w 30 minut zalecany
jest do suszenia małych wsadów (poniżej
1 kg) lub lekko wilgotnego prania.
Pralko-suszarka automatycznie zakończy
program suszenia po osiągnięciu
wymaganego stopnia wysuszenia.
Aby zapewnić prawidłowe działanie
pralko-suszarki nie należy bez
konieczności przerywać cyklu suszenia.
Urządzenie podaje czas pozostały do końca
programu suszenia dla standardowego
wsadu. Podczas suszenia urządzenie
koryguje ten czas w oparciu o rzeczywistą
wielkość i rodzaj wsadu.

116
2
1
PROGRAM
kg *
(Maks.)
TEMP.°C
DETERGENT
Zalecana
Maks.
2
1
Szybkie pranie
w 14 minut
2)
1 1,5 1,5 1,5 1,5
30° 30°
Szybkie pranie
w 30 minut
2)
2 2,5 2,5 2,5 2,5
30° 30°
Szybkie pranie
w 44 minut
2)
3 3,5 3,5 3,5 3,5
30° 40°
Białe
1)
2)
6 8 9 10 11
60° 90°
(
)
Bawełna **
1)
2)
6 8 9 10 11
40° 60°
()
EcoMix 20°
2)
6 8 9 10 11
20° 20°
Mieszane
1)
2)
3 4 4,5 5 5,5
40° 60°
(
)
Płukanie
2)
- - - - -
- -
Wypompowanie
wody i wirowanie
2)
- - - - -
- -
Delikatne
2 2,5 2,5 2,5 2,5
40° 40°
Baby
1)
2)
4 5,5 6 6,5 7
60° 60°
Wełna/Ręczne
2 2 2 2 2
30° 30°
Mieszane
(suszenie)
3 4 4,5 5 5,5
- -
Bawełna
(suszenie)
4 5 6 7 7
- -
Prania i Suszenia w
59 minut
1,5 1,5 1,5 1,5 1,5
30° 30°
Tabela programów
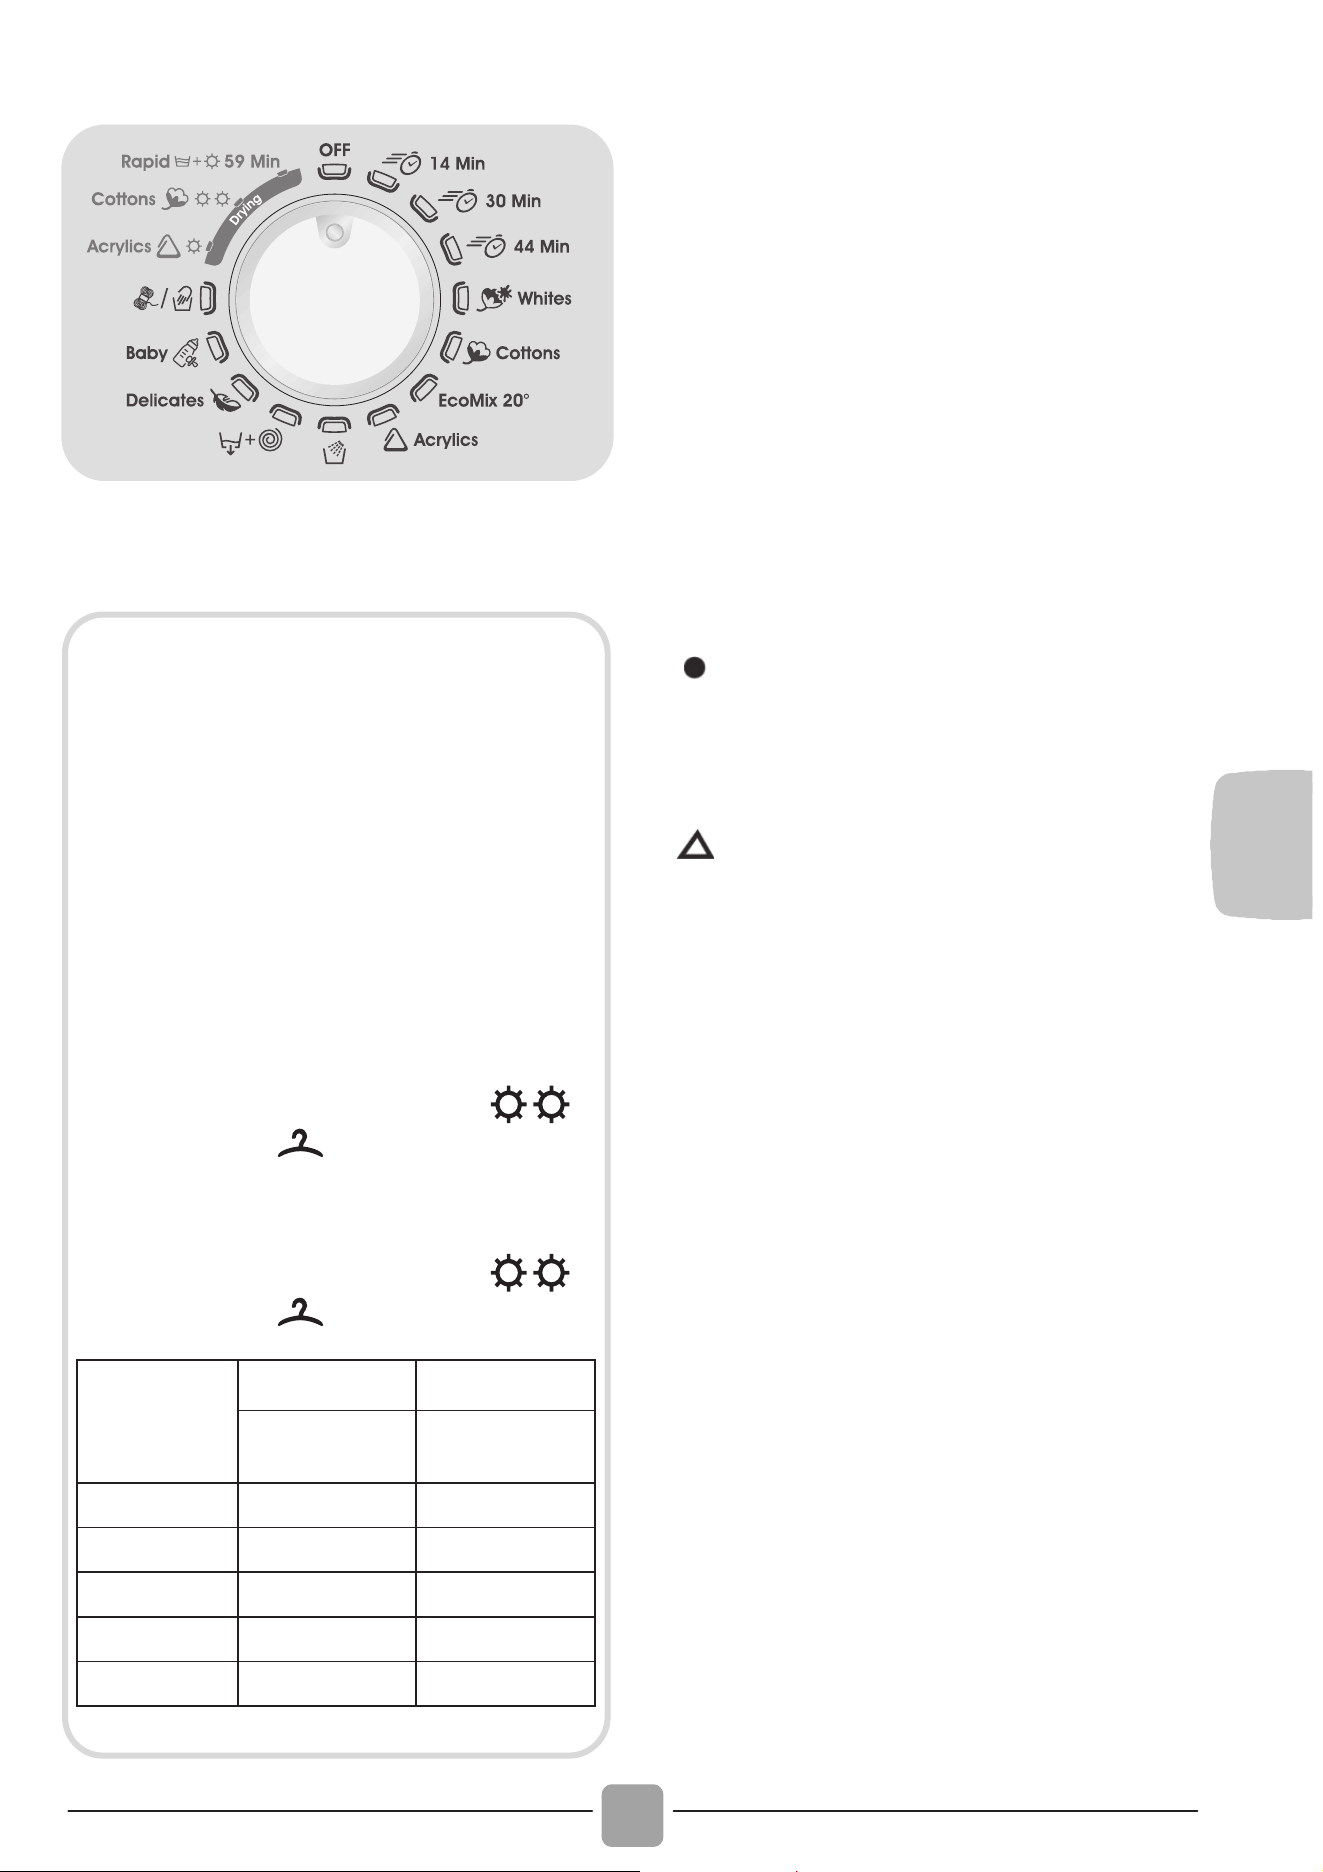
PL
117
* Maksymalny wsad prania suchego zależy
od modelu pralki (patrz panel sterowania).
Prędkość wirowania może zostać
zmniejszona tak aby odpowiadała zaleceniom
na metkach ubrań. Dla tkanin delikatnych
możliwe jest również całkowite wyłączenie
wirowania przyciskiem prędkości wirowania.
Funkcję tę można włączyć przyciskiem
WIBORU WIROWANIA.
Jeśli metka nie podaje konkretnych zaleceń
możliwe jest zastosowanie maksymalnej
prędkości wirowania dla programu.
Dodanie zbyt dużej ilości środka piorącego
może spowodować nadmierne pienienie.
Jeśli pralka wykryje nadmierne pienienie
może pominąć wirowanie lub wydłużyć
program i zwiększyć pobór wody.
( ) Tylko kiedy włączona jest opcja
PRANIA WSTĘPNEGO (dotyczy
tylko programów z dostępną opcją
PRANIA WSTĘPNEGO).
(Tylko modele z komorą na
środek piorący w płynie)
Jeśli tylko niektóre rzeczy do
prania mają plamy, które
wymagają użycia wybielacza w
płynie, możliwe jest wstępne
usunięcie plam w pralce.
Nalać wybielacza do pojemnika
na wybielacz w płynie w komorze
oznaczonej 2 w szufladzie na
środki piorące i ustawić program
specjalny PŁUKANIE.
Po zakończeniu cyklu ustawić
programator w pozycji OFF, włożyć
resztę prania i kontynuować
standardowe pranie z wykorzystaniem
wybranego programu.
1) Dla wybranych programów
możliwe jest dostosowanie czasu
trwania i intensywności prania
przyciskiem WYBORU STOPNIA
ZABRUDZENIA.
2)
Programy suszenia automatycznego.
INFORMACJA DLA LABORATORIÓW
BADAWCZYCH (zgodnie z normami
EN 50229)
Pranie
Zastosować program** wybierając maksymalny
stopień zabrudzenia, maksymalne obroty
wirowania i temperaturę 60˚C. Program ten
zalecany jest również do testów w niższych
temperaturach.
Suszenie
Pierwsze suszenie, wsad A kg
(poszewki i ręczniki do rąk). Wybrać
program suszenia bawełny (
),
suche do szafy (
).
Drugie suszenie, wsad B kg
(prześcieradła i ręczniki do rąk). Wybrać
program suszenia bawełny (
),
suche do szafy (
).
Pojemność
(pranie)
(kg)
A (kg) B (kg)
Pierwsze
suszenie
Drugie
suszenie
6 4 2
8 5 3
9 6 3
10 7 3
11 7 4

118
Pralka posiada specjalne program
y
umożliwiające pranie rożnych rodzajów tkanin
przy różnych stopniach zabrudzenia (patrz tabela).
Szybkie pranie w 14 minut / 30 minut / 44 minut
Pełny cykl prania (pranie, płukanie,
wirowanie). Program jest przeznaczony
zwłaszcza do prania nieznacznie
zabrudzonych tkanin bawełnianych i
mieszanych. Zaleca się stosowanie 1/5 ilości
standardowo stosowanego środka do prania.
Białe
Program do prania tkanin białych. Ostatnie
wirowanie jest przeprowadzane prz
y
maksymalnej prędkości.
Bawełna
Program do prania średnio zabrudzonych
tkanin bawełnianych. Najbardziej efektywn
y
pod względem łącznego zużycia energii i wody.
EcoMix 20°
Innowacyjny program do prania razem różnych
kolorowych tkanin (np. bawełny, tkanin
syntetycznych i mieszanych) przy zaledwi
e
20°C. Zużycie wynosi ok. 40% zużycia dla
tradycyjnego prania bawełny w 40°C.
Mieszane
Cykle prania i płukania są dostosowane do rytmu
obrotu bębna oraz poziomu wody. Dzięki
delikatnemu wirowaniu tkaniny nie gniotą się.
Płukanie
Program trzech płukań przy średniej prędkości
wirowania (odpowiednim przyciskiem płukanie
można wyłączyć lub zmniejszyć jego
prędkość). Program do płukania wszelkiego
rodzaju tkanin, na przykład po praniu ręcznym.
Wypompowanie wody i wirowanie
Program wypompowuje wodę i wiruje
pranie przy maksymalnej prędkości.
Możliwe jest wyłączenie wirowania i
zmniejszenie prędkości wirowania
przyciskiem WYBÓR WIROWANIA.
Delikatne
Program przeznaczony do prania tkanin
delikatnych. Łączy naprzemiennie cykle prac
y
i przerw. Cykle prania i płukania są
przeprowadzane przy wysokim poziomie wody.
Baby
Program ten gwarantuje idealną czystoś
ć
oraz higienę prania wszystkich dziecięcych
ubrań, dzięki dodatkowym cyklom podczas
prania i płukania oraz wysokiej temperaturze
60°C. By zapewnić jak najlepsze efekty prania,
rekomendujemy użycie detergentu w proszku.
Wełna/Ręczne
Program do prania tkanin wełnianych
nadających się do prania w pralce lub do
prania rzeczy wymagających prania ręcznego.
SUSZENIE
W trakcie suszenia bęben urządzenia
okresowo zmienia kierunek obrotów, aby
nie dopuścić do splątania się suszonych
wyrobów i zapewnić ich równomierne
wysuszenie. Końcowa faza cyklu suszenia
(ostatnie 10-20 minut) odbywa się bez
udziału wysokiej temperatury, aby
zminimalizować zagniecenia.
Mieszane
Program suszenia w niskiej temperaturze
zalecany do suszenia tkanin z włókien
syntetycznych i mieszanych (należy sprawdzi
ć
zalecenia producenta na metce wyrobu).
Bawełna
Program suszenia w wysokiej temperaturze
zalecany do suszenia tkanin bawełnianych i
lnianych (należy sprawdzić zalecenia
producenta na metce wyrobu).
Prania i Suszenia w 59 minut
Idealny do szybkiego prania i suszenia
niewielkiej ilości wyrobów (wielkość wsadu
nie powinna przekraczać 1,5 kg-np. 4
koszule) lub lekko zabrudzonego prania.
Program obejmuje pranie, płukanie i
wirowanie w niespełna 60 minut. Ze względu
na krótki czas trwania programu zaleca się
użycie mniejszej ilość środka piorącego.
Wybór programu
UWAGA:
Przed rozpoczęciem suszenia z bębna
urządzenia należy wyjąć dozowniki na
skoncentrowane proszki i płyny do prania.
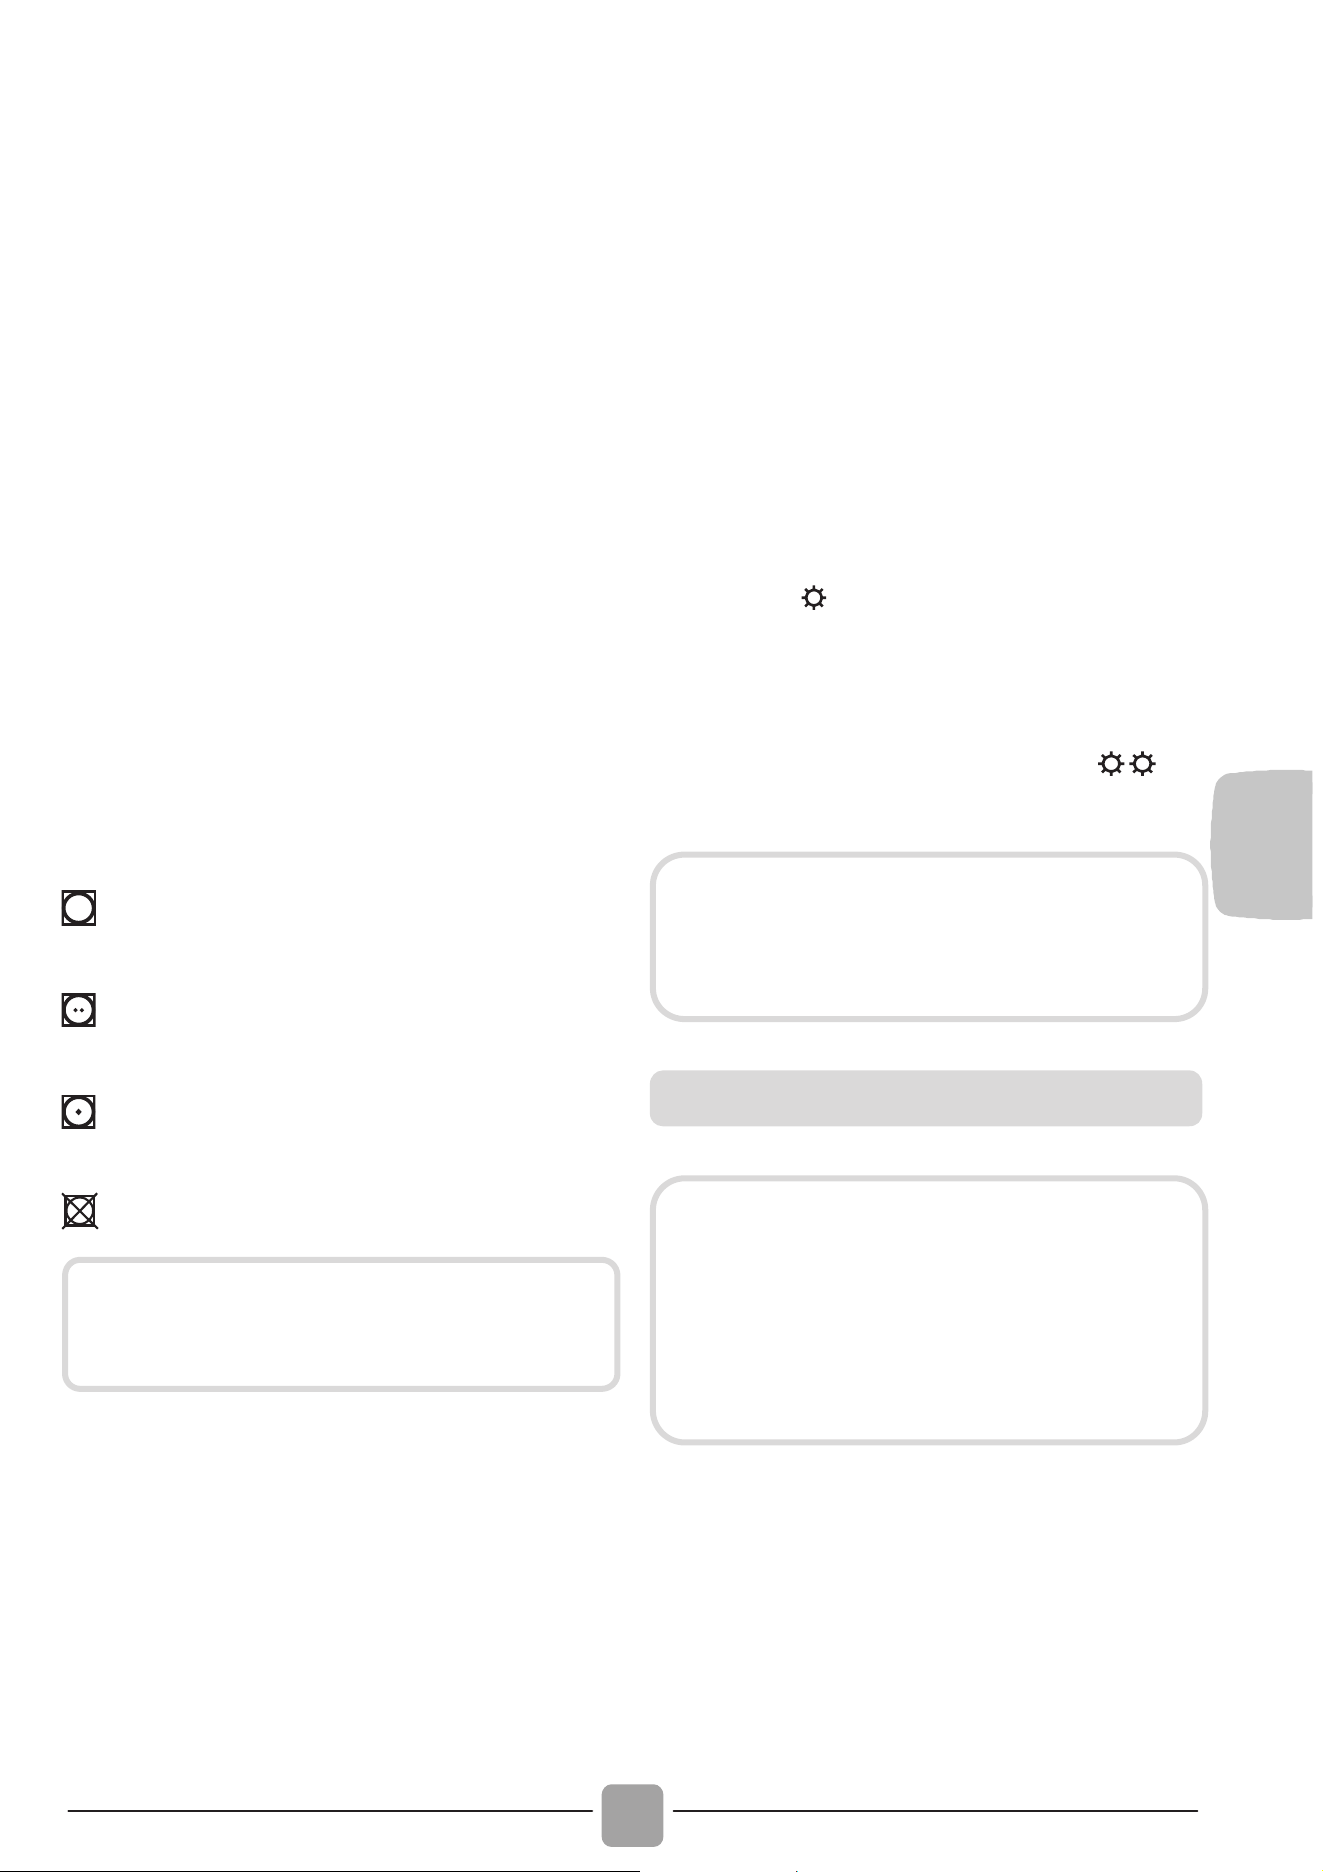
PL
119
7. SUSZENIE
Wskazówki podane w instrukcji
urządzenia mają charakter ogólny.
Osiągnięcie optymalnego efektu suszenia
wymaga praktyki w obsłudze urządzenia.
Zaleca się, aby we wstępnej fazie
eksploatacji urządzenia wybierać czasy
suszenia krótsze niż podano w instrukcji,
tak aby samodzielnie dobrać optymalny
stopień wysuszenia.
Nie należy suszyć materiałów łatwo
strzępiących się (np. dywaników) ani
materiałów z długim włosiem, aby nie
dopuścić do zatkania przewodu
wentylacyjnego.
Zalecane sposoby sortowania prania:
- Sortowanie według zaleceń
podanych na metkach
Nadaje się do suszenia w suszarce
bębnowej.
Suszyć w suszarce bębnowej w
wysokiej temperaturze.
Suszyć w suszarce bębnowej w
niskiej temperaturze.
NIE SUSZYĆ w suszarce bębnowej.
- Sortowanie według wielkości wyrobu
i grubości tkaniny
Jeśli wielkość wsadu przekracza
pojemność urządzenia należy podzielić
odzież według grubość tkanin
(np. oddzielić ręczniki od bielizny).
- Sortowanie według rodzaju tkaniny
Len/bawełna: ręczniki, bluzy bawełniane,
pościel i obrusy.
Syntetyki: bluzki, koszule, kombinezony
itp. wykonane z poliestru lub poliamidu,
jak również mieszanki bawełny z
włóknem syntetycznym.
Przed rozpoczęciem suszenia pranie
należy odwirować.
Urządzenie oferuje możliwość suszenia w
niskiej i wysokiej temperaturze.
- Program suszenia w niskiej
temperaturze zalecany jest do
suszenia wyrobów z tkanin mieszanych
(syntetyki/bawełna) i syntetycznych
(symbol
na pokrętle programatora).
- Program suszenia w wysokiej
temperaturze zalecany jest do
suszenia wyrobów z bawełny, ręczników
frotte, lnu, konopi itp. (symbol
na
pokrętle programatora).
Otworzyć drzwiczki.
Załaduj pranie, nie przekraczając
maksymalnego załadunku wskazanego w
tabeli programów. W przypadku dużych
wyrobów (np. prześcieradeł) lub wyrobów
pochłaniających duże ilości wody (np.
ręczniki, dżinsy itp.) należy zmniejszyć
wielkość wsadu.
Jeśli wyrób nie posiada metki należy
założyć, że nie nadaje się do suszenia
w suszarce bębnowej.
Podczas suszenia prędkość obrotów
bębna zwiększa się, aby równomiernie
rozprowadzić wsad i zapewnić
optymalne efekty suszenia.
Prawidłowy sposób suszenia
Drzwiczki urządzenia posiadają osłonę
uniemożliwiającą kontakt ze szklanym
elementem, który może nagrzewać się do
wysokiej temperatury podczas suszenia.
Podczas normalnego użytkowania
urządzenia nie ma konieczności
demontowania osłony.
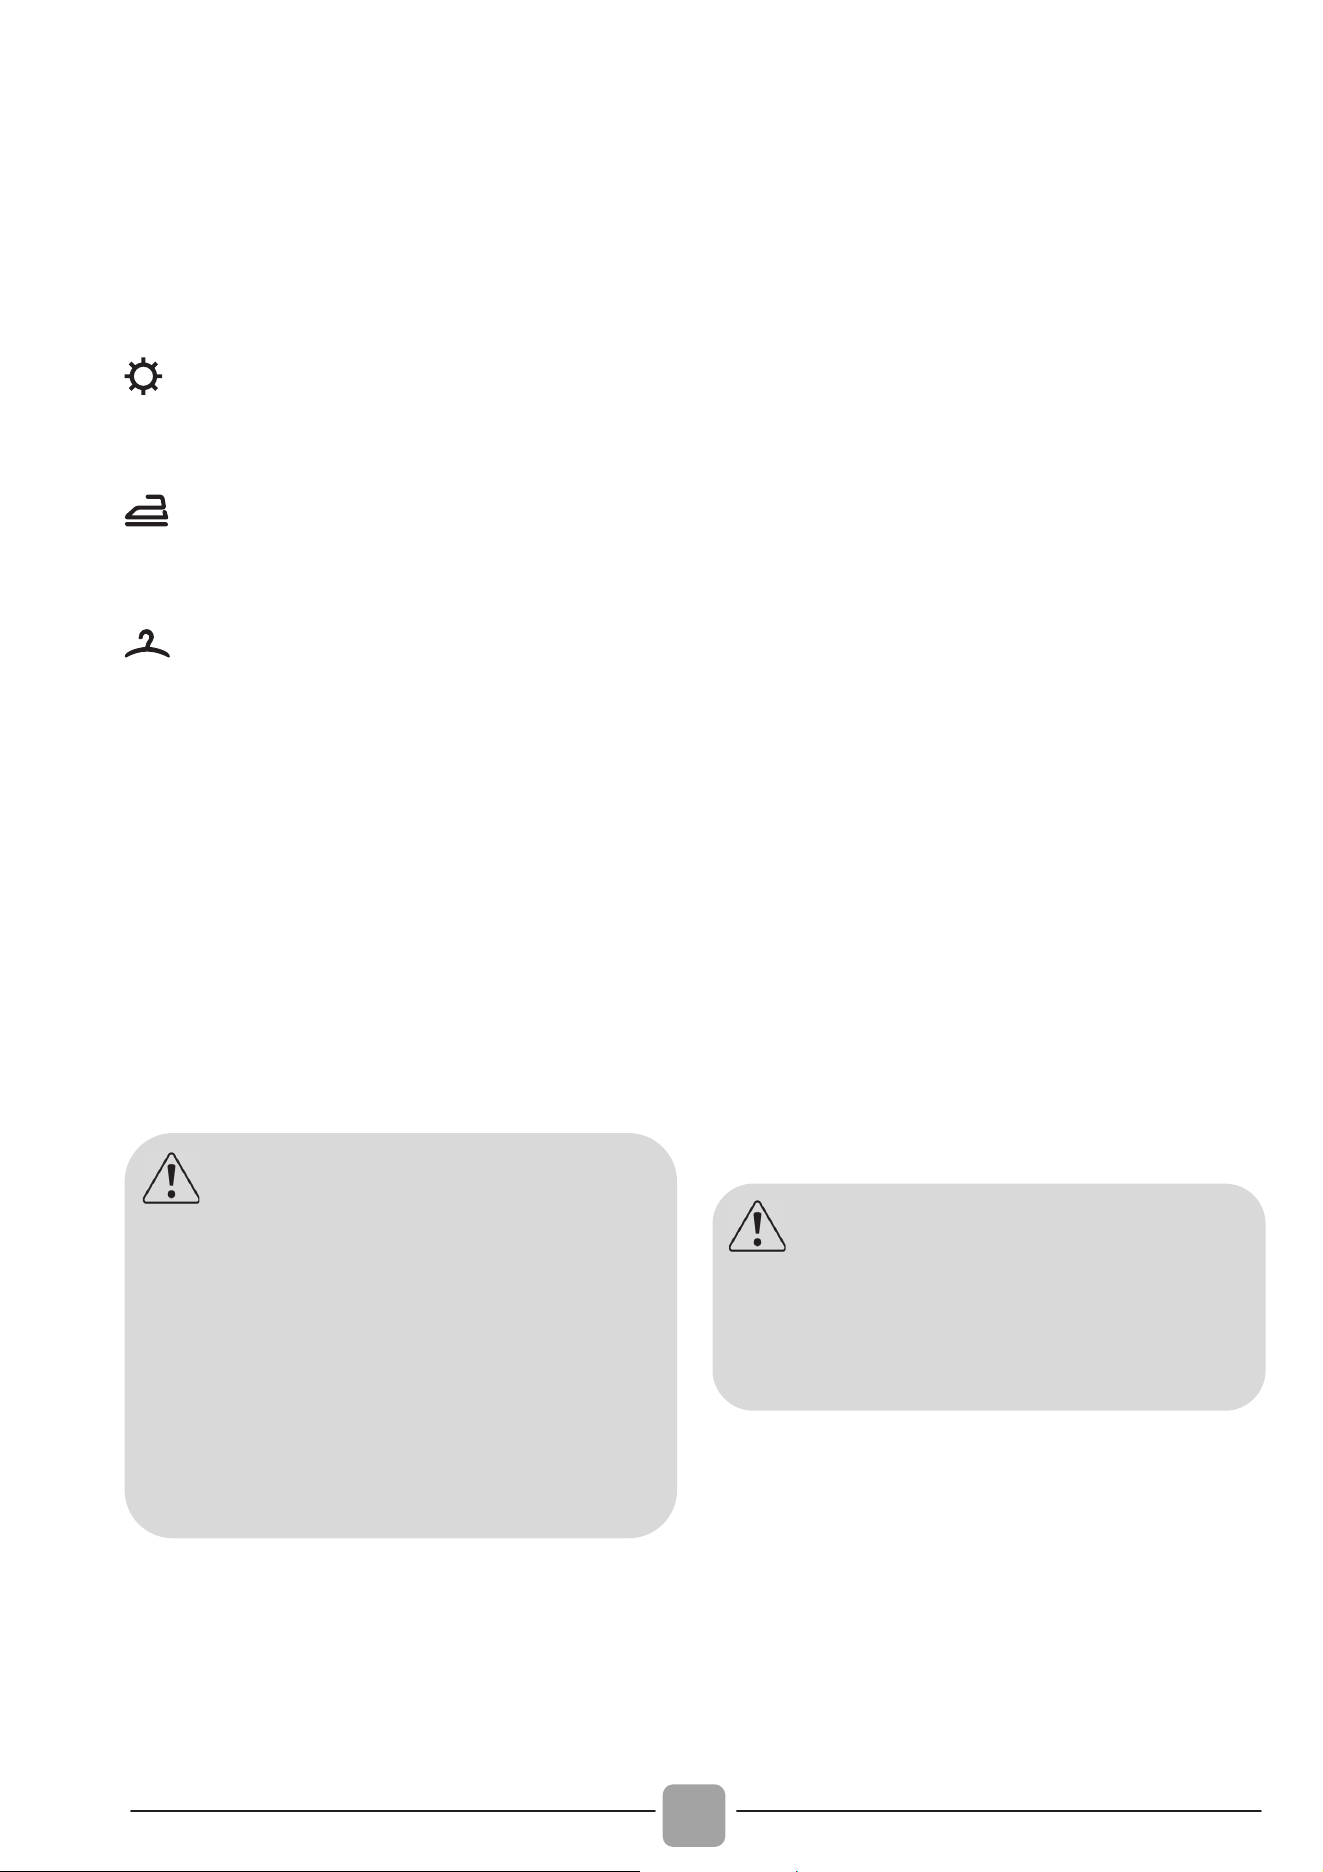
120
Zamknąć drzwiczki.
Wybierz program suszenia najbardziej
odpowiedni dla danego prania.
Wybrać stopień wysuszenia. Dostępne są
trzy programy automatycznego suszenia:
Program Ekstra Suche
(przeznaczony do suszenia ręczników,
szlafroków i dużych wsadów).
Program Suche Do Prasowania
(pranie gotowe do prasowania
bezpośrednio po wyjęciu z bębna).
Program Suche Do Szafy (pranie
może zostać odłożone do szafy bez
konieczności prasowania).
Aby wybrać program suszenia
czasowego, naciskać przycisk WYBORU
PROGRAMU SUSZENIA aż zapali się
odpowiednia kontrolka czasu.
Upewnić się, że zawór doprowadzający
wodę jest otwarty.
Sprawdzić, czy wąż odpływowy jest
prawidłowo założony.
Nacisnąć przycisk START/PAUZA.
Wybrać program suszenia za pomocą
pokrętła programatora. Pokrętło
programatora pozostanie w tej pozycji do
końca programu suszenia.
Kontrolka programu suszenia będzie
świecić przez cały czas trwania
programu, po czym włączy się kontrolka
sygnalizująca rozpoczęcie fazy
chłodzenia.
Po zakończeniu programu suszenia na
wyświetlaczu pokaże się komunikat
"End". Po 5 minutach urządzenie
przejdzie w stan wstrzymania (w
niektórych modelach na wyświetlaczu
pokażą się dwie linie).
Po zakończeniu programu odczekać ok. 2
minuty, aż zgaśnie kontrolka BLOKADY
DRZWICZEK.
Wyłączyć urządzenie, ustawiając pokrętło
programatora w pozycji OFF (WYŁĄCZ).
Otworzyć drzwiczki i wyjąć pranie z
bębna.
Zamknąć zawór doprowadzający wodę.
ANULOWANIE PROGRAMU SUSZENIA
Aby anulować program suszenia należy
nacisnąć przycisk WYBÓR PROGRAMU
SUSZENIA i przytrzymać przez 3
sekundy.
UWAGA:
Nie należy suszyć tkanin
delikatnych, wyrobów wełnianych
ani odzieży posiadającej specjalną
warstwę ocieplającą (np. odzieży
pikowanej, kurtek puchowych itp.).
W przypadku suszenia tkanin
niewymagających prasowania należy
dodatkowo zmniejszyć wsad, aby
zapobiec powstaniu zagnieceń.
UWAGA:
Po anulowaniu programu suszenia
urządzenie rozpocznie cykl chłodzenia.
Przed otwarciem drzwiczek należy
odczekać 10/20 minut.

PL
121
8. PRANIE/SUSZENIE
AUTOMATYCZNE
- Pranie
Otworzyć szufladkę i dodać odpowiednią
ilość środka piorącego.
Zapoznać się listą programów prania w
celu właściwego doboru programu w
zależności od rodzaju tkaniny (np. bardzo
zabrudzone tkaniny bawełniane). Ustawić
pokrętło programatora na wybranym
programie prania.
Dostosować temperaturę prania
(opcjonalne).
Wybrać opcje dodatkowe, naciskając
odpowiednie przyciski (opcjonalne).
Sprawdzić czy zawór doprowadzający
wodę jest otwarty i czy wąż odpływowy
jest prawidłowo założony.
- Suszenie
Wybrać stopień wysuszenia. Dostępne są
trzy programy automatycznego suszenia:
Program Ekstra Suche
(przeznaczony do suszenia ręczników,
szlafroków i dużych wsadów).
Program Suche Do Prasowania
(pranie gotowe do prasowania
bezpośrednio po wyjęciu z bębna).
Program Suche Do Szafy (pranie
może zostać odłożone do szafy bez
konieczności prasowania).
Aby wybrać program suszenia
czasowego, naciskać przycisk WYBORU
PROGRAMU SUSZENIA aż zapali się
odpowiednia kontrolka czasu.
Nacisnąć przycisk START/PAUZA.
Pokrętło programatora pozostanie w
ustawionej pozycji do końca programu
suszenia.
Pod zakończeniu programu prania na
wyświetlaczu pokaże się czas pozostały
do zakończenia programu suszenia.
Urządzenie wykona program suszenia.
Kontrolka programu suszenia będzie świecić
przez cały czas trwania programu, po czym
włączy się kontrolka sygnalizująca
rozpoczęcie fazy chłodzenia.
Po zakończeniu programu suszenia na
wyświetlaczu pokaże się komunikat
"End". Po 5 minutach urządzenie
przejdzie w stan wstrzymania (w
niektórych modelach na wyświetlaczu
pokażą się dwie linie).
Po zakończeniu programu odczekać ok. 2
minuty, aż zgaśnie kontrolka BLOKADY
DRZWICZEK.
Wyłączyć urządzenie, ustawiając pokrętło
programatora w pozycji OFF (WYŁĄCZ).
Otworzyć drzwiczki i wyjąć pranie z
bębna.
Zamknąć zawór doprowadzający wodę.
ANULOWANIE PROGRAMU SUSZENIA
Aby anulować program suszenia należy
nacisnąć przycisk WYBÓR PROGRAMU
SUSZENIA i przytrzymać przez 3
sekundy.
Nie przekraczaj dopuszczalnego
załadunku suszenia wskazanego w
tabeli programów, w przeciwnym
wypadku pranie nie będzie
w
y
starcza
ją
co suche.
UWAGA:
Po anulowaniu programu suszenia
urządzenie rozpocznie cykl chłodzenia.
Przed otwarciem drzwiczek należy
odczekać 10/20 minut.
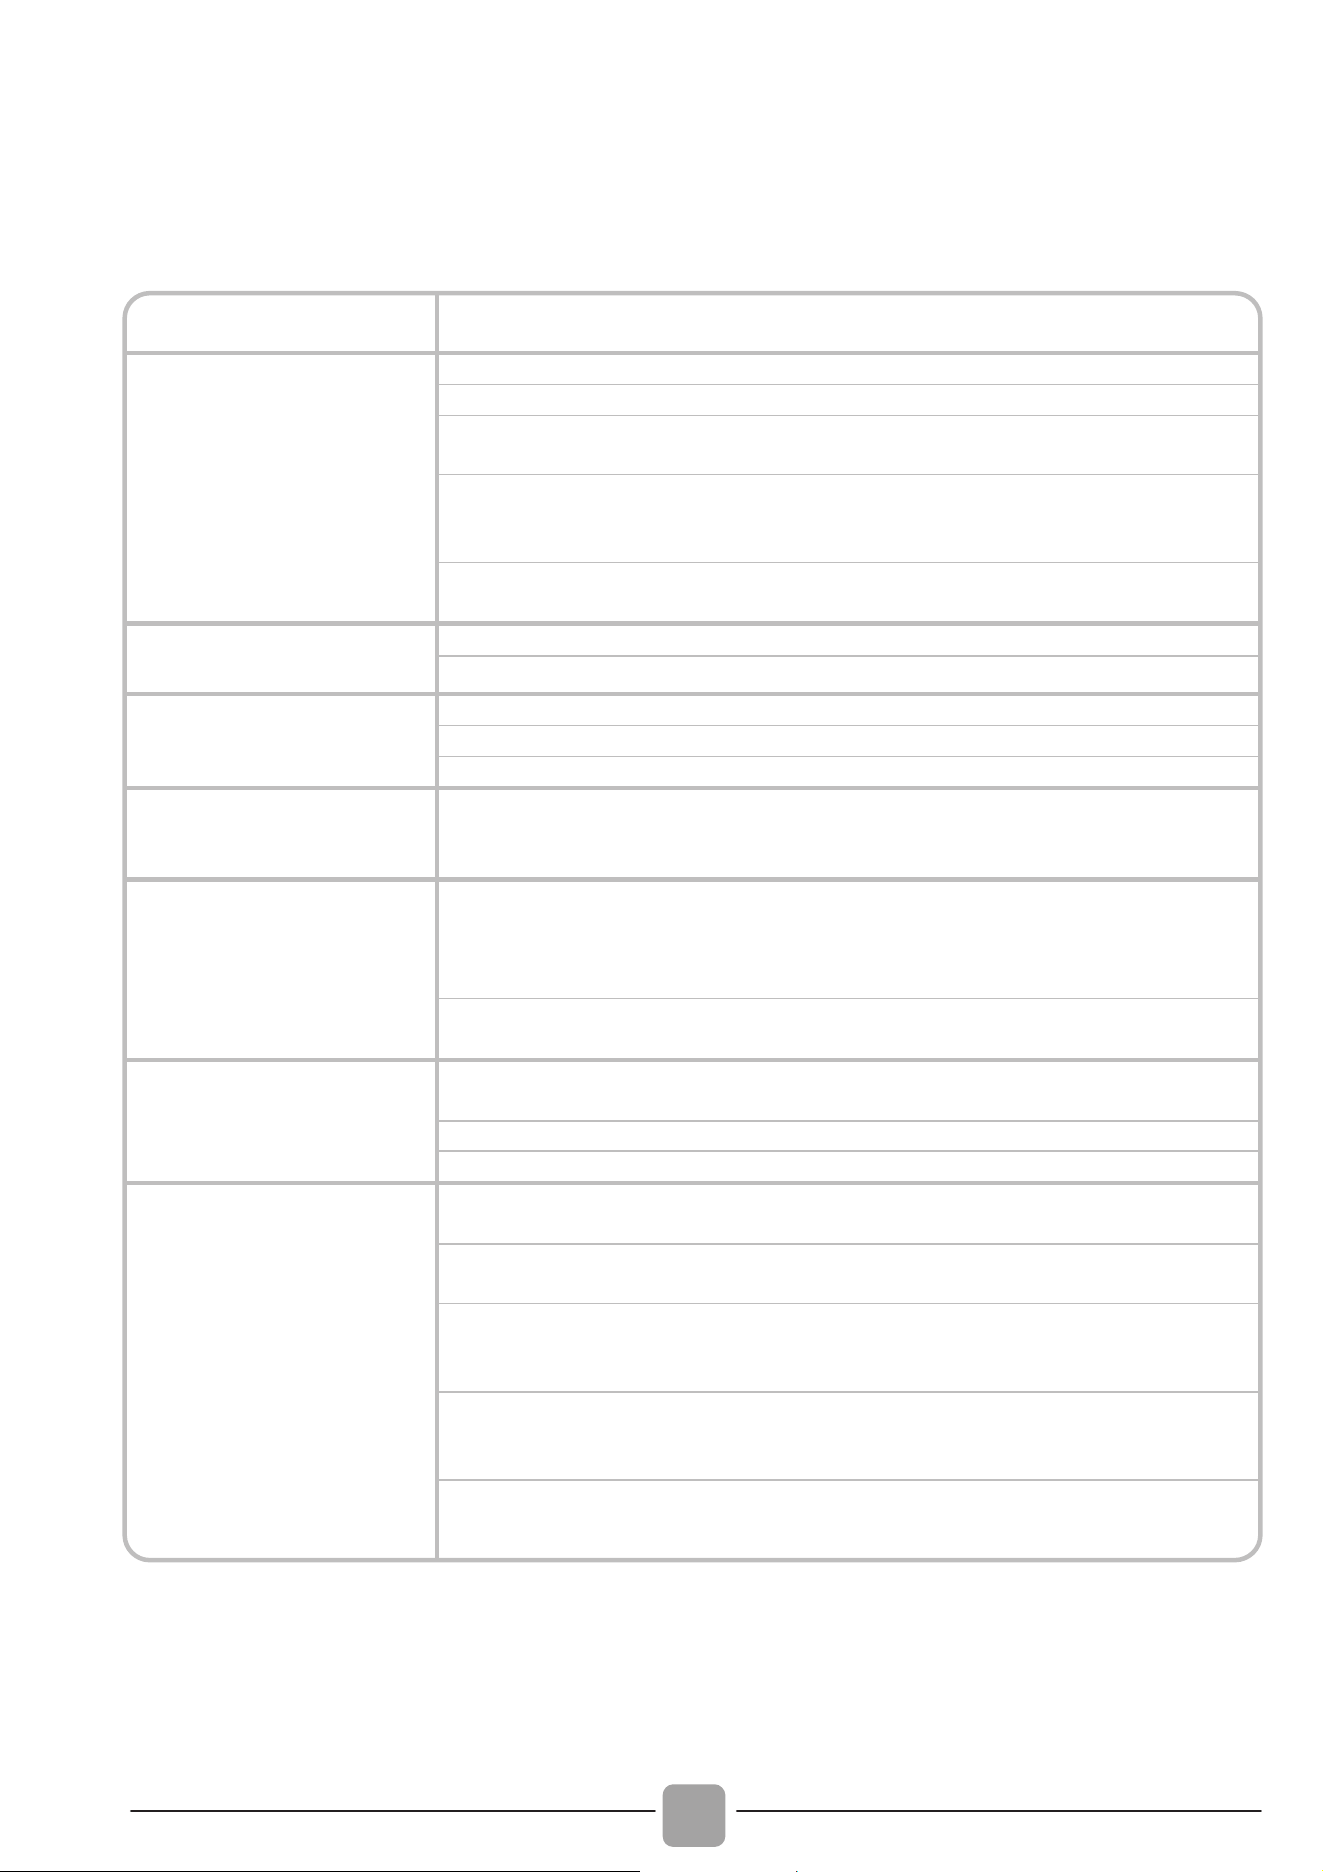
122
9. CENTRUM SERWISU TECHNICZNEGO I GWARANCJA
W przypadku podejrzenia, że pralka nie działa poprawnie przeczytać poniższy krótki
przewodnik zawierający kilka praktycznych sugestii, mających na celu pomóc w
rozwiązaniu najczęstszych awarii.
Problem Możliwe przyczyny i praktyczne rozwiązania
Pralka nie działa / nie
rozpoczyna pracy
Sprawdzić, czy wtyk został poprawnie umieszczony w kontakcie.
Upewnić się, że nie brakuje zasilania.
Sprawdzić czy poprawnie wybrano potrzebny program pracy oraz
uruchomiono pralkę.
Upewnić się, czy bezpiecznik nie został spalony i czy kontakt zasilania
nie jest uszkodzony przy pomocy innego urządzenia elektrycznego,
np. lampki.
Możliwe jest, że drzwiczki pralki nie są domknięte prawidłowo:
otworzyć je i ponownie zamknąć.
Pralka nie pobiera
wody
Skontrolować, czy kranik z wodą jest otwarty.
Sprawdzić, czy programator jest poprawnie wyregulowany.
Pralka nie
odprowadza wody
Zweryfikować czy filtr nie jest zatkany.
Upewnić się, ze przewód odprowadzania wody nie jest zagięty.
Sprawdzić, czy wewnątrz filtra nie ma obcych ciał.
Woda na posadzce
wokół pralki
Możliwe, że przyczyną jest uszkodzenie uszczelki znajdującej się
pomiędzy kranikiem a przewodem wody; w takim przypadku wymienić
uszczelkę i dokładnie przykręcić przewód do kranika.
Nie działa wirówka
Przyczyną być może jest fakt, że woda nie została jeszcze usunięta w
całości: odczekać kilka minut.
Niektóre modele posiadają funkcję “wyłączenie wirowania”: sprawdzić
czy nie została uruchomiona.
Zbyt duża ilość środka piorącego może uniemożliwić wykonanie
wirowania: zmniejszyć ilość przy następnych praniach.
Podczas wirowania
odczuwalne są silne
wibracje
Pralka być może nie jest prawidłowo wypoziomowana: w takim
przypadku wyregulować nóżki (patrz właściwy rozdział).
Sprawdzić czy usunięte zostały listwy zabezpieczające w transporcie.
Sprawdzić czy załadunek pralki rozłożony jest równomiernie.
W przypadku
pulsowania kontrolki
lub pojawienia się
jakiegoś BŁĘDU
Jeśli pulsuje lub pojawia się błąd nr 0, 1, 5, 7 lub 8, skontaktować się
bezpośrednio z Centrum Serwisowym.
Jeśli pulsuje lub pojawia się błąd nr 2, urządzenie nie pobiera wody,
sprawdzić czy kranik jest otwarty.
Jeśli pulsuje lub pojawia się błąd nr 3, urządzenie nie odprowadza
wody, sprawdzić czy wypust wody nie jest zablokowany i czy przewód
nie jest zagięty.
Jeśli pulsuje lub pojawia się błąd nr 4, urządzenie jest przepełnione
wodą; zakręcić kran z wodą i skontaktować się z Centrum
Serwisowym.
Jeśli pulsuje lub pojawia się błąd nr 9, wyłączyć pralkę, odczekać 10-
15 sekund i ponownie załączyć program.

PL
123
Stosowanie środków piorących bez
fosforanów może spowodować następujące
rezultaty:
- woda z płukania może być bardziej
mętna: jest to wynik obecności zawiesiny
zeolitów, która nie powoduje negatywnych
efektów dla skuteczności płukania.
- obecność białego proszku (zeolitów) na
praniu po jego zakończeniu: jest to
normalne zjawisko, proszek nie przyczepia
się do materiału, ani nie zmienia jego
koloru.
- obecność piany w wodzie z ostatniego
płukania: nie musi to oznaczać
nieskutecznego płukania.
- tworzenie się znacznej ilości piany: często
spowodowane obecnością anionowych
środków powierzchniowo czynnych w
składzie środków piorących, które są trudne
do usunięcia z pranych materiałów.
W takim wypadku nie jest konieczne
wykonywanie dodatkowych cyklów płukania
dla usunięcia tego zjawiska: nie spowoduje
to żadnej zmiany.
Jeśli utrudnienie nie ustępuje lub wydaje
się, że jest to jakieś uszkodzenie pralki,
należy bezzwłocznie skontaktować się z
Centrum Serwisu Technicznego Candy.
Istnieje też możliwość skorzystania z
programu pomocowego Candy, uzyskując
w ten sposób darmową pomoc naszego
specjalisty we własnym domu, także w
okresie pogwarancyjnym.
Uwaga: połączenie telefoniczne jest
odpłatne; o jego koszcie zostaniecie
poinformowani w komunikacie głosowym
przez Obsługę Klienta używanego przez
was operatora sieci telefonicznej.
Candy zaleca używanie zawsze oryginalnych
części zamiennych, które dostępne są w
naszym Centrum Serwisu Technicznego.
Producent nie jest odpowiedzialny z
a
ewentualne błędy wynikające z druku
niniejszej Instrukcji załączonej do urządzenia.
Dodatkowo Producent pozostawia sobie
prawo do wprowadzania zmian, jakie okaż
ą
się konieczne we własnych produktach, be
z
naruszania zasadniczej ich charakterystyki.
Gwarancja
Urządzenie posiada gwarancję na
warunkach i w granicach określonych w
karcie gwarancyjnej, dostarczonej wraz z
produktem. Karta gwarancyjna powinna
być przechowywana i odpowiednio
wypełniona, aby móc ją w razie potrzeby
przedstawić w autoryzowanym Centrum
Serwisu Technicznego Candy.
Zarejestruj Twoje urządzenie!
Nie trać czasu i zarejestruj jak najszybciej
Twoją pralkę, by móc odkryć całą serię
korzyści, jakie czekają tylko na Ciebie.
Przeczytaj jak to zrobić na stronie
www.registercandy.com lub telefonując
pod numer telefonu znajdujący się we
właściwych materiałach.

- GVWT -
15.08 - 41041882.B - Canon Italia - Business Services Channel - Printed in Italy