Home
Bookmarks
Home
Neff
Neff T40B31X2GB/03 User Manual
Page 5
User Manual - Page 5
For T40B31X2GB/03.
Page 5/52
Page 1
Page 2
Page 3
Page 4
Page 5
Page 6
Page 7
Page 8
Page 9
Page 10
Page 11
Page 12
Page 13
Page 14
Page 15
Page 16
Page 17
Page 18
Page 19
Page 20
Page 21
Page 22
Page 23
Page 24
Page 25
Page 26
Page 27
Page 28
Page 29
Page 30
Page 31
Page 32
Page 33
Page 34
Page 35
Page 36
Page 37
Page 38
Page 39
Page 40
Page 41
Page 42
Page 43
Page 44
Page 45
Page 46
Page 47
Page 48
Page 49
Page 50
Page 51
Page 52
Contents
Table of Contents
Search
Previous
Next
Bookmarks
Loading ...
Loading ...
Loading ...
5
PLQ
PLQ
PLQ
PLQ
D
E
PLQ
PLQ
PLQ
Loading ...
Loading ...
Loading ...
<
2
3
4
5
6
7
>
File type: PDF
File name: 55167725_t40b31x2gb-03.pdf
File size: 1.84 MB
File Language: English
Pages: 52
Author: Neff
Published: 2021-03-15
Updated: 2023-06-16
Download File
Table of Contents
×
[es] Instrucciones de uso y montaje 3
1
T..B3...
2
Û Índice[es] Instrucciones de uso y montaje
3
Instrucciones de montaje
4
Montaje
4
Observaciones importantes
6
Nota
6
Preparación de los muebles de montaje, figuras 1/2/3/4
6
Superficies de corte: sellar con material resistente al calor.
6
Montaje sobre el cajón, figura 2a
6
Montaje sobre horno, figura 2b
6
Nota
6
Montaje sobre lavavajillas
6
Ventilación, figura 4
6
Instalar el aparato, figuras 5/6
6
Nota
6
Desmontar el aparato
6
¡Atención!
6
Instrucciones de uso
7
Produktinfo
7
: Consejos y advertencias de seguridad
7
Leer con atención las siguientes instrucciones. Conservar las instrucciones de uso y montaje, así como la tarjeta del aparato para un uso posterior o para posibles compradores en un futuro.
7
Comprobar el aparato tras sacarlo del embalaje. En caso de que haya sufrido daños durante el transporte, no conectar el aparato, ponerse en contacto con el Servicio Técnico y dejar constancia por escrito de los daños ocasionados, de lo contrario s...
7
Este aparato tiene que ser instalado según las instrucciones de montaje incluidas.
7
Este aparato ha sido diseñado para uso doméstico. Utilizar el aparato exclusivamente para preparar alimentos y bebidas.Vigilarlo mientras está funcionando y emplearlo exclusivamente en espacios cerrados.
7
No usar cubiertas. Estas pueden provocar accidentes, p. ej. debido al sobrecalentamiento, ignición o desprendimiento de fragmentos de materiales.
7
No usar protectores inadecuados de seguridad para niños o guardas. Estos pueden causar accidentes.
7
Este aparato no está previsto para el funcionamiento con un reloj temporizador externo o un mando a distancia.
7
Este aparato puede ser utilizado por niños a partir de 8 años y por personas con limitaciones físicas, sensoriales o psíquicas, o que carezcan de experiencia y conocimientos, siempre y cuando sea bajo la supervisión de una persona responsable de...
7
No dejar que los niños jueguen con el aparato. La limpieza y el mantenimiento rutinario no deben encomendarse a los niños a menos que sean mayores de 8 años y lo hagan bajo supervisión.
7
Mantener los niños menores de 8 años alejados del aparato y del cable de conexión.
7
En el caso de llevar implantado un marcapasos o dispositivo médico similar deberá tener especial precaución al utilizar o acercarse a las placas de cocción de inducción cuando estén en funcionamiento. Consulte a su médico o al fabricante del d...
7
¡Peligro de incendio!
7
■ El aceite caliente y la grasa se inflaman con facilidad. Estar siempre pendiente del aceite caliente y de la grasa. No apagar nunca con agua un fuego. Apagar la zona de cocción. Sofocar con cuidado las llamas con una tapa, una tapa extintora u o...
7
¡Peligro de incendio!
7
■ Las zonas de cocción se calientan mucho. No colocar objetos inflamables sobre la placa de cocción. No almacenar objetos sobre la placa de cocción.
7
¡Peligro de incendio!
7
■ El aparato se calienta mucho. No guardar objetos inflamables o aerosoles en los cajones directamente debajo de la placa de cocción.
7
¡Peligro de incendio!
7
■ La placa de cocción se desconecta de forma automática y no se puede seguir utilizando. Se puede conectar posteriormente de forma involuntaria. Desconectar el fusible de la caja de fusibles. Avisar al Servicio de Asistencia Técnica.
7
¡Peligro de quemaduras!
8
■ Las zonas de cocción y adyacentes, en especial el marco de la placa de cocción (si lo hay), se calientan mucho. No tocar nunca las superficies calientes. No dejar que los niños que acerquen.
8
¡Peligro de quemaduras!
8
■ La zona de cocción calienta, pero el indicador no funciona. Desconectar el fusible de la caja de fusibles. Avisar al Servicio de Asistencia Técnica.
8
¡Peligro de quemaduras!
8
■ Los objetos de metal se calientan rápidamente al entrar en contacto con la placa de cocción. No depositar nunca sobre la placa de cocción objetos metálicos como cuchillos, tenedores, cucharas o tapas.
8
¡Peligro de incendio!
8
■ Después de cada uso, apagar siempre la placa de cocción con el interruptor principal. No esperar a que la placa de cocción se apague automáticamente por falta de recipiente.
8
¡Peligro de descarga eléctrica!
8
■ Las reparaciones inadecuadas son peligrosas. Las reparaciones y la sustitución de cables de conexión defectuosos solo pueden ser efectuadas por personal del Servicio de Asistencia Técnica debidamente instruido. Si el aparato está averiado, de...
8
¡Peligro de descarga eléctrica!
8
■ La humedad interior puede provocar una descarga eléctrica. No utilizar ni limpiadores de alta presión ni por chorro de vapor.
8
¡Peligro de descarga eléctrica!
8
■ Un aparato defectuoso puede ocasionar una descarga eléctrica. No conectar nunca un aparato defectuoso. Desenchufar el aparato de la red o desconectar el fusible de la caja de fusibles. Avisar al Servicio de Asistencia Técnica.
8
¡Peligro de descarga eléctrica!
8
■ Las fisuras o roturas en la vitrocerámica conllevan riesgo de electrocución. Desconectar el fusible de la caja de fusibles. Avisar al Servicio de Asistencia Técnica.
8
¡Peligro de avería!
8
Esta placa está dotada de un ventilador situado en la parte inferior. En caso de encontrarse un cajón debajo de la placa de cocción no deberán guardarse objetos pequeños o papeles, al ser absorbidos, podrían estropear el ventilador o perjudicar...
8
Entre el contenido del cajón y la entrada del ventilador debe dejarse una distancia mínima de 2 cm.
8
¡Peligro de lesiones!
8
■ Al cocer al baño María, la placa de cocción y el recipiente para cocinar podrían fragmentarse debido al sobrecalentamiento. El recipiente para cocer al baño María no debe tocar directamente la base del cazo que contiene agua. Utilizar exclu...
8
¡Peligro de lesiones!
8
■ Las ollas pueden saltar hacia arriba de forma repentina por la presencia de líquido entre la base del recipiente y la zona de cocción. Mantener siempre secas la zona de cocción y la base del recipiente.
8
Causas de los daños
8
¡Atención!
8
Vista general
9
Protección del medio ambiente
9
Eliminación de residuos respetuosa con el medio ambiente
9
Consejos para ahorrar energía
9
La Cocción por Inducción
10
Ventajas de la Cocción por Inducción
10
Recipientes
10
Para saber si los recipientes son adecuados comprobar que la base del recipiente es atraída por un imán.
10
Existe otro tipo de recipientes para inducción, cuya base no es ferromagnética en su totalidad.
10
Recipientes no apropiados
10
Características de la base del recipiente
10
Las características de la base de los recipientes pueden influir en la homogeneidad del resultado de la cocción. Recipientes fabricados con materiales que ayudan a difundir el calor, como recipientes "sandwich" de acero inoxidable, reparten el calo...
10
Ausencia de recipiente o tamaño no adecuado
10
Si no se coloca un recipiente sobre la zona de cocción seleccionada, o éste no es del material o tamaño adecuado, el nivel de cocción que se visualiza en el indicador de la zona de cocción, parpadeará. Colocar el recipiente adecuado para que de...
10
Recipientes vacíos o con base fina
10
No calentar recipientes vacíos, ni utilizar recipientes con base fina. La placa de cocción está dotada de un sistema interno de seguridad, pero un recipiente vacío puede calentarse tan rápidamente que la función “desactivación automática" n...
10
Detección de recipiente
10
Cada zona de cocción tiene un límite mínimo de detección de recipiente, que varía en función del material del recipiente que se está utilizando. Por este motivo, se debe utilizar la zona de cocción que más se adecue al diámetro de su recipi...
10
Presentación del aparato
11
En la página 2 encontrará información sobre las medidas y potencias de las zonas de cocción.
11
El panel de mando
11
Superficies de mando
11
Nota
11
Las zonas de cocción
11
Indicador de calor residual
11
Al retirar el recipiente antes de haber apagado la zona de cocción, aparecerán alternativamente el indicador œ o • y el nivel de potencia seleccionado.
11
Programar la placa de cocción
12
En este capítulo se muestra cómo ajustar una zona de cocción. En la tabla figuran los niveles de potencia y tiempos de cocción para distintos platos.
12
Encender y apagar la placa de cocción
12
Notas
12
Ajustar la zona de cocción
12
Cada nivel de potencia dispone de un ajuste intermedio. Está señalado con un punto.
12
Seleccionar la zona de cocción y el nivel de potencia
12
1. Seleccionar la zona de cocción con el símbolo $.
12
2. En los 10 segundos siguientes, pulsar el símbolo + ó -. Se muestra el ajuste básico:
12
Símbolo + nivel de potencia 9
12
Símbolo - nivel de potencia 4
12
Modificar el nivel de potencia
12
Apagar la zona de cocción
12
La zona de cocción se apaga y aparece el indicador de calor residual.
12
Notas
12
Tabla de cocción
12
Seguro para niños
13
La placa de cocción se puede asegurar contra una conexión involuntaria para impedir que los niños enciendan las zonas de cocción.
13
Activar y desactivar el seguro para niños
13
Seguro automático para niños
13
Con esta función, el seguro para niños se activa automáticamente siempre que se apaga la placa de cocción.
13
Activar y desactivar
13
En el capítulo Ajustes básicos se presenta la información relativa a la conexión del seguro automático para niños.
13
Función Powerboost
14
Toda las zonas de cocción disponen de esta función.
14
Activar
14
1. Seleccionar una zona de cocción.
14
2. Pulsar el símbolo ›.
14
Nota
14
Desactivar
14
1. Seleccionar una zona de cocción.
14
2. Pulsar el símbolo ›.
14
Nota
14
Función programación del tiempo
14
Apagar automáticamente una zona de cocción
14
Programar el tiempo de cocción.
14
1. Seleccionar la zona de cocción y el nivel de potencia deseado.
14
2. Pulsar el símbolo 3. El indicador Ú de la zona de cocción se ilumina. En la indicación visual de la función programación del tiempo se muestra ‹‹.
14
3. Pulsar el símbolo + ó -. Se muestra el ajuste básico:
14
Símbolo +: 30 minutos.
14
Símbolo -: 10 minutos.
14
4. Pulsar los símbolo + ó - hasta que aparezca el tiempo de cocción deseado.
14
Nota
14
Modificar o cancelar el tiempo
14
Una vez transcurrido el tiempo
14
La zona de cocción se apaga. Suena una señal de aviso y en la indicación visual de la función programación del tiempo se muestra ‹‹ durante 10 segundos. El indicador Ú de la zona de cocción se ilumina. Pulsar el símbolo 3, los indicadores...
14
Notas
14
El reloj avisador
14
El reloj avisador de cocina permite programar un tiempo de hasta 99 minutos. No depende de los otros ajustes. Esta función no apaga automáticamente una zona de cocción.
14
Así se programa
14
1. El reloj avisador de cocina se puede seleccionar de dos formas distintas:
14
2. Pulsar el símbolo + ó -. Se muestra el ajuste básico.
14
Símbolo +: 10 minutos.
14
3. Ajustar el tiempo deseado con los símbolos + ó -.
14
Modificar o cancelar el tiempo
15
Pulsar varias veces el símbolo 3 hasta que el indicador Ú situado junto al símbolo W se ilumine. Modificar el tiempo o ajustar a ‹‹ con los símbolos + ó -.
15
Una vez transcurrido el tiempo
15
Al pulsar el símbolo 3, los indicadores se apagan y la señal acústica finaliza.
15
Limitación automática de tiempo
15
Ajustes básicos
15
Acceder a los ajustes básicos
16
1. Encender la placa de cocción.
16
2. En los siguientes 10 segundos, mantener pulsado el símbolo ‚ durante 4 segundos.
16
3. Pulsar varias veces el símbolo ‚ hasta que aparezca el indicador de la función deseada.
16
4. A continuación seleccionar el ajuste deseado con los símbolos + y -.
16
5. Volver a pulsar el símbolo ‚ durante más de 4 segundos.
16
Salir
16
Para salir de los ajustes básicos, apagar la placa de cocción con el interruptor principal.
16
Cuidados y limpieza
16
Los consejos y advertencias que se mencionan en este capítulo sirven de ayuda para la limpieza y el mantenimiento óptimos de la placa de cocción
16
Placa de cocción
16
Limpieza
16
Se puede adquirir rascadores adecuados para vidrio a través del Servicio de Asistencia Técnica o en nuestra tienda online.
16
Marco de la placa de cocción
16
Reparar averías
16
Ruido normal durante el funcionamiento del aparato
17
Los ruidos que se han descrito son normales, forman parte de la tecnología de inducción y no indican que se trate de una avería.
17
Servicio de Asistencia Técnica
18
Solicitud de reparación y asesoramiento en caso de averías
18
Platos testados
18
Ø 14,5 cm
18
Ú Table of contents[en] Instructions for installation and use
20
Installation instructions
21
Assembly
21
Important notes
23
Note
23
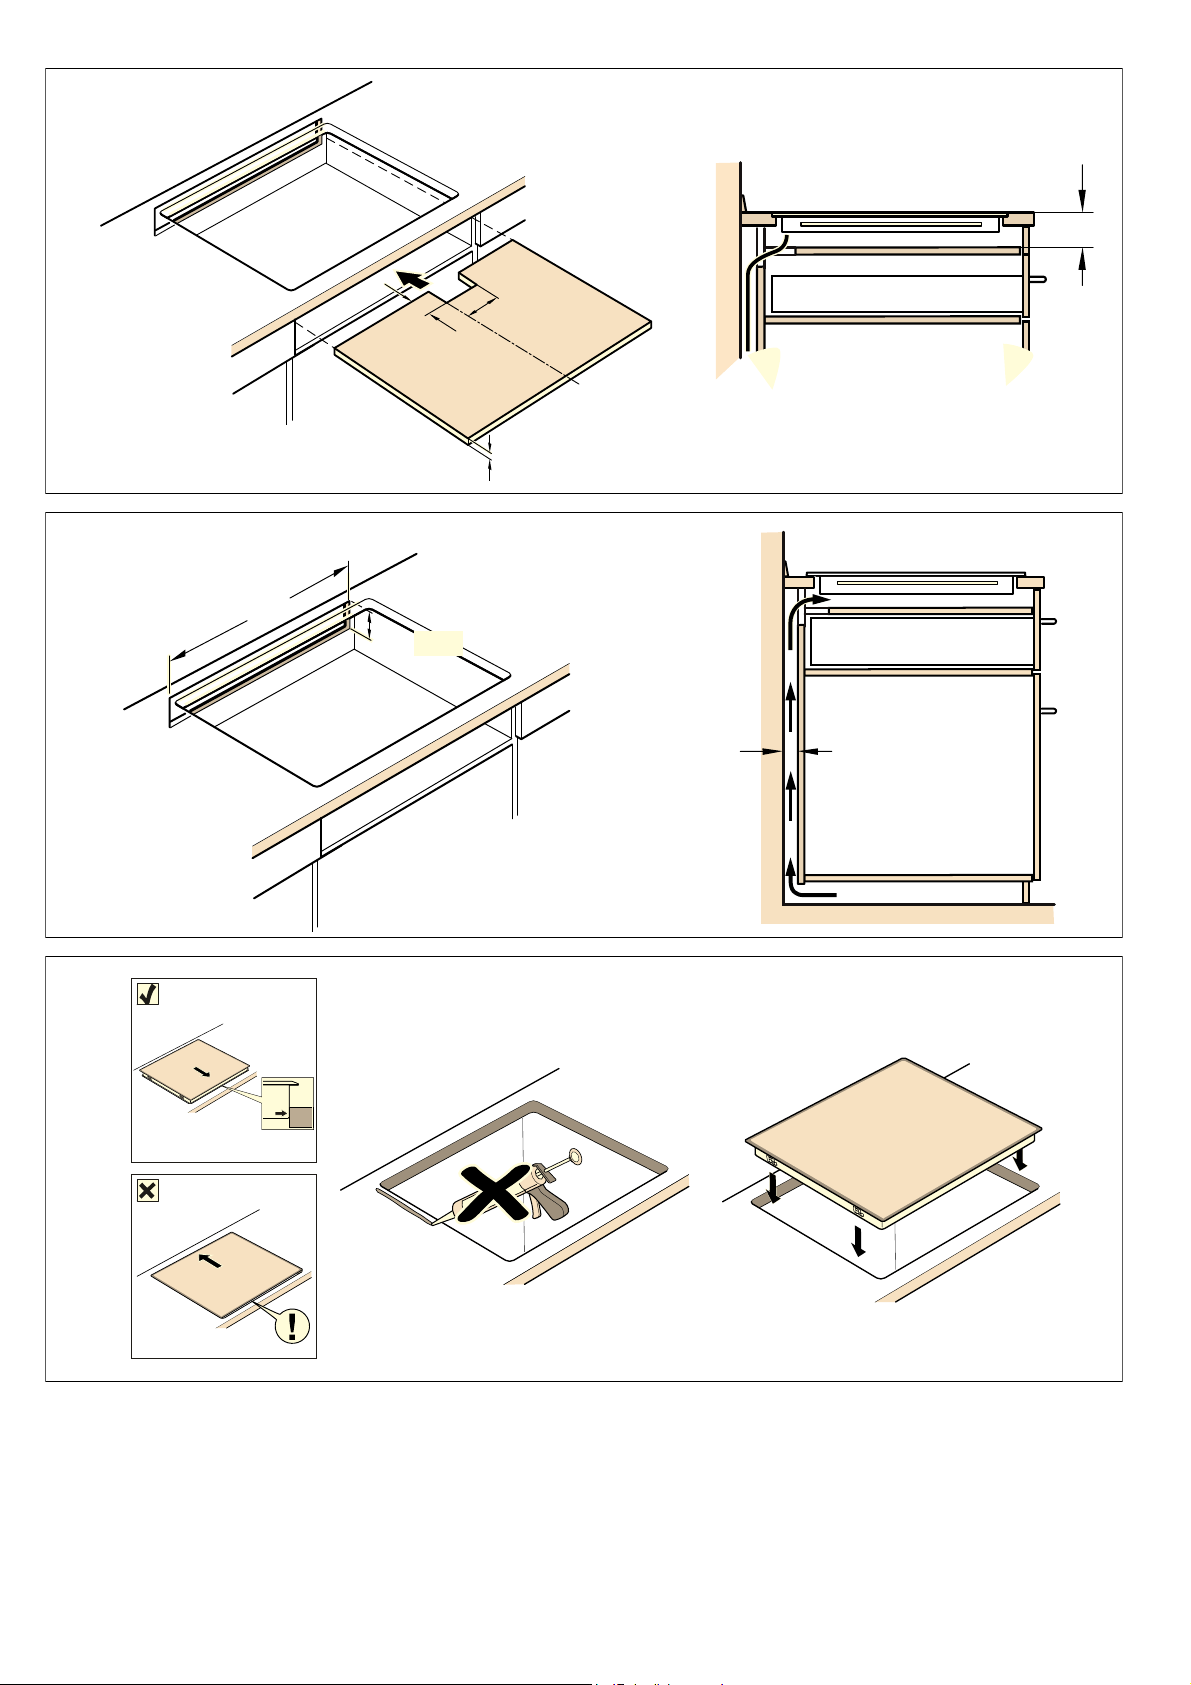
Preparation of assembly kitchen units, figures 1/2/3/4
23
Cut surfaces: Seal with heat resistant material.
23
Assembly over drawer, figure 2a
23
Assembly over oven, figure 2b
23
Note
23
Installation above the dishwasher
23
Ventilation, figure 4
23
Installing the appliance, figures 5/6
23
Note
23
Uninstalling the appliance
23
Caution!
23
Instruction manual
24
Produktinfo
24
: Safety precautions
24
Please read this manual carefully. Please keep the instruction and installation manual as well as the appliance certificate in a safe place for later use or for subsequent owners.
24
Check the appliance after removing it from the packaging. If it has suffered any damage in transport, do not connect the appliance, contact the Technical Assistance Service and provide written notification of the damage caused, otherwise you will los...
24
This appliance must be installed according to the installation instructions included.
24
This appliance is intended for domestic use only. The appliance must only be used for the preparation of food and drink. The appliance must be supervised during operation. Only use this appliance indoors.
24
Do not use covers. These can cause accidents, due to overheating, catching fire or materials shattering, for example.
24
Do not use inappropriate child safety shields or hob guards. These can cause accidents.
24
This appliance is not intended for operation with an external clock timer or a remote control.
24
This appliance may be used by children over the age of 8 years old and by persons with reduced physical, sensory or mental capabilities or by persons with a lack of experience or knowledge if they are supervised or are instructed by a person responsi...
24
Children must not play with, on, or around the appliance. Children must not clean the appliance or carry out general maintenance unless they are at least 8 years old and are being supervised.
24
Keep children below the age of 8 years old at a safe distance from the appliance and power cable.
24
We advise that you exercise caution using or standing near an induction hob while it is in operation, if you wear a pacemaker or a similar medical device. Consult your doctor or the device manufacturer concenring its conformity or any possible incomp...
24
Risk of fire!
24
■ Hot oil and fat can ignite very quickly. Never leave hot fat or oil unattended. Never use water to put out burning oil or fat. Switch off the hotplate. Extinguish flames carefully using a lid, fire blanket or something similar.
24
Risk of fire!
24
■ The hotplates become very hot. Never place combustible items on the hob. Never place objects on the hob.
24
Risk of fire!
24
■ The appliance gets hot. Do not keep combustible objects or aerosol cans in drawers directly underneath the hob.
24
Risk of fire!
24
■ The hob switches off automatically and can no longer be operated. It may switch on unintentionally at a later point. Switch off the circuit breaker in the fuse box. Contact the after-sales service.
24
Risk of burns!
24
■ The hotplates and surrounding area (particularly the hob surround, if fitted) become very hot. Never touch the hot surfaces. Keep children at a safe distance.
24
Risk of burns!
24
■ The hotplate heats up but the display does not work. Switch off the circuit breaker in the fuse box. Contact the after-sales service.
24
Risk of burns!
24
■ Metal objects on the hob quickly become very hot. Never place metal objects (such as knives, forks, spoons and lids) on the hob.
24
Risk of fire!!
24
■ After each use, always turn off the hob at the main switch. Do not wait until the hob turns off automatically after the pan is removed.
25
Risk of electric shock!
25
■ Incorrect repairs are dangerous. Repairs may only be carried out and damaged power cables replaced by one of our trained after-sales technicians. If the appliance is defective, unplug the appliance from the mains or switch off the circuit breaker...
25
Risk of electric shock!
25
■ Do not use any high-pressure cleaners or steam cleaners, which can result in an electric shock.
25
Risk of electric shock!
25
■ A defective appliance may cause electric shock. Never switch on a defective appliance. Unplug the appliance from the mains or switch off the circuit breaker in the fuse box. Contact the after-sales service.
25
Risk of electric shock!
25
■ Cracks or fractures in the glass ceramic may cause electric shocks. Switch off the circuit breaker in the fuse box. Contact the after-sales service.
25
Malfunction risk!
25
The hob is equipped with a fan in the lower section. If there is a drawer under the hob it should not be used to store small objects or paper, since they could damage the fan or interfere with the cooling if they are sucked into it.
25
There should be a minimum of 2 cm between the contents of the drawer and fan intake.
25
Risk of injury!
25
■ When cooking in a bain marie, the hob and cooking container could shatter due to overheating. The cooking container in the bain marie must not directly touch the bottom of the water-filled pot. Only use heat-resistant cookware.
25
Risk of injury!
25
■ Saucepans may suddenly jump due to liquid between the pan base and the hotplate. Always keep the hotplate and saucepan bases dry.
25
Elements that may damage the appliance
25
Caution!
25
Overview
25
Protecting the environment
26
Environmentally-friendly disposal
26
Energy-saving advice
26
Induction cooking
26
Advantages of induction cooking
26
Cookware
26
To determine whether a pan is suitable, check to see if a magnet will stick to its base.
26
There are other types of cookware for induction whose base is not entirely ferromagnetic.
26
Unsuitable pans
26
Characteristics of the pan base
26
The characteristics of the pan base may affect the uniformity of the cooking results. Pans made from materials which help diffuse heat, such as stainless steel sandwich pans, distribute heat uniformly, saving time and energy.
26
Absence of pan or unsuitable size
26
If no pan is placed on the selected hotplate, or if it is made of unsuitable material or is not the correct size, the power level displayed on the hotplate indicator will flash. Place a suitable pan on the hotplate to stop the flashing. If this takes...
26
Empty pans or those with a thin base
26
Do not heat empty pans, nor use pans with a thin base. The hob is equipped with an internal safety system. However, an empty pan may heat up so quickly that the "automatic switch off" function may not have time to react and the pan may reach very hig...
26
Pan detection
26
Each hotplate has a minimum limit for detecting pans, which varies depending on the material of the pan being used. You should therefore use the hotplate that is most suitable for the diameter of your pan.
26
Getting to know your appliance
27
On page 2, you will find information on the dimensions and power of the hotplates.
27
The control panel
27
Control panels
27
Note
27
The hotplates
27
Residual heat indicator
27
If the pan is removed before the hotplate is turned off, the indicator œ or • and the selected power level will appear alternately.
27
Programming the hob
28
This section will show you how to program the hotplates. The table contains power levels and cooking times for several dishes.
28
Turning the hob on and off
28
Notes
28
Set the hotplate
28
Each power level has an intermediate setting. This is marked with a dot.
28
Selecting the hotplate and power level
28
1. Select the hotplate with the $ symbol.
28
2. In the following 10 seconds, press the + or - symbol. The basic setting appears:
28
+ symbol = power level 9
28
- symbol = power level 4
28
Changing the power level
28
To switch off the hotplate
28
The hotplate turns off and the residual heat indicator appears.
28
Notes
28
Cooking guidelines table
28
Childproof lock
29
The hob can be protected against being accidentally turned on, to ensure that children do not switch on the hotplates.
29
Activating and deactivating the childproof lock
29
Childproof lock
29
With this function, the childproof lock automatically activates when a hob is switched off.
29
Activating and deactivating
29
All of the relevant information on the automatic childproof lock connection can be found in the Basic settings chapter.
29
Powerboost function
30
All the hotplates have this function.
30
To activate
30
1. Select a hotplate.
30
2. Press the › symbol.
30
Note
30
To deactivate
30
1. Select a hotplate.
30
2. Press the › symbol.
30
Note
30
Time program function
30
Turning off a hotplate automatically
30
Programming the cooking time.
30
1. Selecting the required hotplate and power level.
30
2. Press the 3 symbol. The Ú indicator on the hotplate lights up. ‹‹ is displayed on the time program function display.
30
3. Press the + or - symbol. The basic setting appears:
30
+ symbol: 30 minutes.
30
- symbol: 10 minutes.
30
4. Press the + or - symbol until the required cooking time appears.
30
Note
30
Changing or cancelling the time
30
Once the time has elapsed
30
The hotplate switches off. A beep sounds and in the time program function display ‹‹ appears for 10 seconds. The Ú indicator on the hotplate lights up. Pressing the 3 symbol turns off the indicators and stops the beeping.
30
Notes
30
The timer
30
The timer can be set for periods of up to 99 minutes. It is independent of the other settings. This function does not automatically switch off a hotplate.
30
How to program
30
1. The timer can be selected in two different ways:
30
2. Press the + or - symbol. The basic setting appears.
30
+ symbol: 10 minutes.
30
3. Set the desired time using the + or - symbols.
30
Changing or cancelling the time
30
Press the 3 symbol various times until the Ú indicator next to the W symbol lights up. Change the time or set to ‹‹ with the + or - symbols.
30
Once the time has elapsed
30
Pressing the 3 symbol turns off the indicators and stops the beeping.
30
Automatic time limitation
31
Basic settings
31
Accessing the basic settings
32
1. Switch on the hob.
32
2. Within the next 10 seconds, press the ‚ symbol for 4 seconds.
32
3. Press the ‚ symbol several times until the required function appears.
32
4. Next select the required setting using the + and - symbols.
32
5. Press the ‚ symbol again for more than 4 seconds.
32
Quit
32
To leave the basic settings, turn off the hob at the main switch.
32
Care and cleaning
32
The advice and warnings contained in this section aim to guide you in cleaning and maintaining the hob, so that it is kept in the best possible condition
32
Hob
32
Cleaning
32
Suitable glass scrapers can be obtained through the Technical Assistance Service or from our online shop.
32
Hob frame
32
Fixing malfunctions
32
Normal noise while the appliance is working
33
The noises described are normal, they are part of induction heating technology and not a sign of malfunction.
33
After-sales service
33
To book an engineer visit and product advice
33
Tested dishes
34
Ø 14.5 cm
34
Ù Πίνακας περιεχομένων[el] Οδηγίες χρήσης και συναρμολόγησης
36
Οδηγίες εγκατάστασης
37
Συναρμολόγηση
37
Σημαντικές υποδείξεις
39
Υπόδειξη
39
Προετοιμασία των επίπλων συναρμολόγησης, σχήματα 1/2/3/4
39
Επιφάνειες κοπής: μονώστε με υλικό ανθεκτικό στη θερμότητα.
39
Συναρμολόγηση πάνω στο συρτάρι, σχήμα 2a
39
Συναρμολόγηση πάνω σε φούρνο, σχήμα 2b
39
Υπόδειξη
39
Τοποθέτηση πάνω από το πλυντήριο πιάτων
39
Εξαερισμός, σχήμα 4
39
Εγκατάσταση της συσκευής, σχήματα 5/6
39
Υπόδειξη
39
Αποσυναρμολόγηση της συσκευής
39
Προσοχή!
39
Οδηγíες χρήσης
40
Produktinfo
40
: Υποδείξεις ασφαλείας
40
Διαβάστε προσεκτικά αυτές τις οδηγίες. Φυλάξτε τις οδηγίες χρήσης και συναρμολόγησης καθώς επίσης και την κάρτα συσκευής για μια αργότε...
40
Ελέγχτε τη συσκευή πρίν αφαιρέσετε το περιτύλιγμα. Σε περίπτωση που έχει υποστεί ζημία κατα τη διάρκεια της μεταφοράς, μη συνδέσετε τη σ...
40
Η παρούσα συσκευή πρέπει να εγκατασταθεί σύμφωνα με τις οδηγίες εγκατάστασης που περιλαμβάνονται.
40
Αυτή η συσκευή προορίζεται μόνο για την οικιακή χρήση και το οικιακό περιβάλλον. Χρησιμοποιείτε τη συσκευή μόνο για την παρασκευή φαγητ...
40
Μη χρησιμοποιείτε καλύμματα της βάσης εστιών. Τα καλύμματα μπορεί να οδηγήσουν σε ατυχήματα, π.χ. από υπερθέρμανση, ανάφλεξη ή θραύση υλι...
40
Μη χρησιμοποιείτε ακατάλληλες διατάξεις προστασίας ή ακατάλληλα προστατευτικά πλέγματα παιδιών. Μπορεί να οδηγήσουν σε ατυχήματα.
40
Αυτή η συσκευή δεν προορίζεται για τη λειτουργία με έναν εξωτερικό χρονοδιακόπτη ή ένα τηλεχειριστήριο.
40
Αυτή η συσκευή επιτρέπεται να χρησιμοποιηθεί από παιδιά άνω των 8 ετών και από άτομα με μειωμένες φυσικές, αισθητήριες ή πνευματικές ικα...
40
Τα παιδιά δεν επιτρέπεται να παίζουν με τη συσκευή. Ο καθαρισμός και η συντήρηση από το χρήστη δεν επιτρέπεται να πραγματοποιηθούν από π...
40
Κρατάτε τα παιδιά που είναι κάτω των 8 ετών μακριά από τη συσκευή και το καλώδιο σύνδεσης.
40
Σε περίπτωση εμφυτευμένου βηματοδότη ή κάποιας παρόμοιας ιατρικής συσκευής χρειάζεται ιδιαίτερη προσοχή κατά τη χρήση ή όταν πλησιάζε...
40
Κίνδυνος πυρκαγιάς!
40
■ Το καυτό λάδι και λίπος παίρνουν γρήγορα φωτιά. Μην αφήνετε ποτέ χωρίς επιτήρηση το καυτό λάδι και λίπος. Μη σβήνετε ποτέ τη φωτιά με νε...
40
Κίνδυνος πυρκαγιάς!
40
■ Οι εστίες μαγειρέματος ζεσταίνονται πάρα πολύ. Μην ακουμπάτε ποτέ εύφλεκτα αντικείμενα πάνω στη βάση εστιών. Μην τοποθετείτε αντικεί...
40
Κίνδυνος πυρκαγιάς!
40
■ Η συσκευή ζεσταίνεται πολύ. Μην αποθηκεύετε εύφλεκτα αντικείμενα ή κουτιά σπρέι σε συρτάρια απευθείας κάτω από τη βάση εστιών.
40
Κίνδυνος πυρκαγιάς!
40
■ Η βάση εστιών απενεργοποιείται από μόνη της και ο χειρισμός της δεν είναι πλέον δυνατός. Αργότερα μπορεί να ενεργοποιηθεί αθέλητα. Κατ...
40
Κίνδυνος εγκαύματος!
41
■ Οι εστίες μαγειρέματος και το περιβάλλον τους, ιδιαίτερα ένα πλαίσιο του πεδίου μαγειρέματος που ενδεχομένως υπάρχει, ζεσταίνονται π...
41
Κίνδυνος εγκαύματος!
41
■ Η εστία μαγειρέματος θερμαίνει, αλλά η ένδειξη δε λειτουργεί. Κατεβάστε την ασφάλεια στο κιβώτιο των ασφαλειών. Καλέστε την υπηρεσία τ...
41
Κίνδυνος εγκαύματος!
41
■ Τα αντικείμενα από μέταλλο ζεσταίνονται πάνω στη βάση εστιών πολύ γρήγορα. Μην τοποθετείτε ποτέ μεταλλικά αντικείμενα, όπως π.χ. μαχαί...
41
Κίνδυνος πυρκαγιάς!
41
■ Μετά από κάθε χρήση, πάντα να σβήνετε τη βάση εστιών με τον κύριο διακόπτη. Μην περιμένετε να σβήσει αυτόματα η βάση εστιών επειδή δεν υ...
41
Κίνδυνος ηλεκτροπληξίας!
41
■ Οι ακατάλληλες επισκευές είναι επικίνδυνες. Μόνο ένας τεχνικός του τμήματος εξυπηρέτησης πελατών, εκπαιδευμένος από εμάς, επιτρέπετα...
41
Κίνδυνος ηλεκτροπληξίας!
41
■ Μια εισχώρηση υγρασίας μπορεί να προκαλέσει μια ηλεκτροπληξία. Μη χρησιμοποιείτε συσκευές καθαρισμού υψηλής πίεσης ή συσκευές εκτόξ...
41
Κίνδυνος ηλεκτροπληξίας!
41
■ Μια ελαττωματική συσκευή μπορεί να προκαλέσει μια ηλεκτροπληξία. Μην ενεργοποιείτε ποτέ μια χαλασμένη συσκευή. Τραβήξτε το ρευματολή...
41
Κίνδυνος ηλεκτροπληξίας!
41
■ Τα σπασίματα ή τα ραγίσματα στην υαλοκεραμική πλάκα μπορούν να προκαλέσουν ηλεκτροπληξία. Κατεβάστε την ασφάλεια στο κιβώτιο των ασφ...
41
Κίνδυνος βλάβης!
41
Αυτή η βάση εστιών διαθέτει έναν ανεμιστήρα στο κάτω τμήμα της. Σε περίπτωση που υπάρχει κάποιο συρτάρι κάτω από τη βάση εστιών, δεν πρέπ...
41
Ανάμεσα στο περιεχόμενο του συρταριού και στην είσοδο του ανεμιστήρα πρέπει να αφήσετε μια απόσταση τουλάχιστον 2 cm.
41
Κίνδυνος τραυματισμού!
41
■ Κατά το μαγείρεμα στο λουτρό νερού μπορεί η βάση εστιών και το μαγειρικό σκεύος να ραγίσουν από την υπερθέρμανση. Το μαγειρικό σκεύος ...
41
Κίνδυνος τραυματισμού!
41
■ Οι κατσαρόλες μπορεί να πεταχτούν ξαφνικά ψηλά, όταν υπάρχει υγρό μεταξύ του πάτου της κατσαρόλας και της εστίας μαγειρέματος. Κρατάτ...
41
Αιτίες βλαβών
41
Προσοχή!
41
Γενική άποψη
41
Προστασία του περιβάλλοντος
42
Απόσυρση σύμφωνα με τους κανόνες προστασίας του περιβάλλοντος
42
Συμβουλές για την εξοικονόμηση ενέργειας
42
Επαγωγικό Μαγείρεμα
42
Πλεονεκτήματα του Επαγωγικού Μαγειρέματος
42
Σκεύη
42
Για να καταλάβετε αν τα σκεύη είναι κατάλληλα, ελέγξτε αν η βάση του σκεύους έλκεται από ένα μαγνήτη.
42
Υπάρχει άλλο είδος σκευών ειδικά για επαγωγικό μαγείρεμα, των οποίων η βάση δεν είναι πλήρως σιδηρομαγνητική.
42
Μη κατάλληλα σκεύη
42
Χαρακτηριστικά της βάσης του σκεύους
42
Τα χαρακτηριστικά της βάσης των σκευών μπορεί να επηρεάσουν την ομοιομορφία στα αποτελέσματα του μαγειρέματος. Σκεύη κατασκευασμένα απ...
42
Απουσία σκεύους ή μη κατάλληλο μέγεθος
42
Αν δεν τοποθετείται ένα σκεύος πάνω στην εστία, ή αυτό δεν είναι από κατάλληλο υλικό ή μέγεθος, το επίπεδο μαγειρέματος που εμφανίζεται σ...
42
Άδεια σκεύη ή με λεπτή βάση
43
Μην θερμαίνετε άδεια σκεύη, ούτε να χρησιμοποιείτε σκεύη με λεπτή βάση. Η βάση εστιών διαθέτει ένα εσωτερικό σύστημα ασφαλείας, αλλά ένα ...
43
Ανίχνευση σκεύους
43
Κάθε εστία έχει ένα ελάχιστο όριο για ανίχνευση του σκεύους, το οποίο διαφέρει ανάλογα με το υλικό του σκεύους που χρησιμοποιείται. Για α...
43
Για να γνωρίσετε τη συσκευή
43
Στη σελίδα 2 θα βρείτε πληροφορίες για τις διαστάσεις και την ισχύ των εστιών μαγειρέματος.
43
Το πεδίο χειρισμού
43
Επιφάνειες χειρισμού
43
Υπόδειξη
43
Οι εστίες
43
Ένδειξη παραμένουσας θερμότητας
43
Αν απομακρύνετε το σκεύος πριν σβήσετε την εστία, εμφανίζεται εναλλάξ η ένδειξη œ ή • καθώς και το επιλεγόμενο επίπεδο ισχύος.
43
Προγραμματισμός της βάσης εστιών
44
Σ'αυτό το κεφάλαιο σας παρουσιάζεται ο τρόπος ρύθμισης μιας εστίας. Στον πίνακα υπάρχουν τα επίπεδα ισχύος και οι χρόνοι μαγειρέματος γι...
44
Άναμμα και σβήσιμο της βάσης εστιών
44
Υποδείξεις
44
Ρύθμιση της εστίας
44
Κάθε επίπεδο ισχύος διαθέτει ενδιάμεση ρύθμιση. Εμφανίζεται με τη μορφή τελείας.
44
Επιλογή εστίας και επίπεδο ισχύος
44
1. Επιλέξτε την εστία με το σύμβολο $.
44
2. Μέσα στα επόμενα 10 δευτερόλεπτα, πατήστε το σύμβολο + ή -. Εμφανίζεται η βασική ρύθμιση:
44
Σύμβολο + επίπεδο ισχύος 9
44
Σύμβολο - επίπεδο ισχύος 4
44
Αλλαγή του επιπέδου ισχύος
44
Σβήσιμο της εστίας
44
Η εστία σβήνει και εμφανίζεται η ένδειξη της παραμένουσας θερμότητας.
44
Υποδείξεις
44
Πίνακας μαγειρέματος
44
Ασφάλεια για παιδιά
45
Η βάση εστιών μπορεί να διασφαλιστεί ενάντια μιας ακούσιας σύνδεσης στο ηλεκτρικό ρεύμα για να εμποδίζει τα παιδιά να ανάβουν τις εστίες.
45
Ενεργοποίηση και απενεργοποίηση της ασφάλειας για παιδιά
45
Αυτόματη ασφάλεια για παιδιά
45
Με αυτήν τη λειτουργία, η ασφάλεια για παιδιά ενεργοποιείται αυτόματα όταν σβήνει η βάση εστιών.
45
Ενεργοποίηση και απενεργοποίηση
45
Στο κεφάλαιο Βασικές ρυθμίσεις παρουσιάζονται οι σχετικές με τη σύνδεση αυτόματης ασφάλεια για τα παιδιά πληροφορίες
45
Λειτουργία Powerboost
46
Όλες οι εστίες διαθέτουν αυτή την λειτουργία.
46
Ενεργοποίηση
46
1. Επιλέξτε μια εστία.
46
2. Πατήστε το σύμβολο ›.
46
Υπόδειξη
46
Απενεργοποίηση
46
1. Επιλέξτε μια εστία.
46
2. Πατήστε το σύμβολο ›.
46
Υπόδειξη
46
Λειτουργία προγραμματισμός χρόνου
46
Αυτόματο σβήσιμο μιας εστίας
46
Προγραμματισμός του χρόνου μαγειρέματος.
46
1. Επιλέξτε την εστία και το επίπεδο ισχύος που θέλετε.
46
2. Πατήστε το σύμβολο 3. Η ένδειξη Úτης εστίας φωτίζεται. Στην οπτική ένδειξη της λειτουργίας προγραμματισμός χρόνου εμφανίζεται ‹‹.
46
3. Πατήστε το σύμβολο + ή -. Εμφανίζεται η βασική ρύθμιση:
46
Σύμβολο +: 30 λεπτά.
46
Σύμβολο -: 10 λεπτά.
46
4. Πατήστε το σύμβολο + ή - μέχρι να εμφανιστεί ο χρόνος μαγειρέματος που θέλετε.
46
Υπόδειξη
46
Αλλαγή ή ακύρωση χρόνου
46
Μόλις παρέλθει ο χρόνος
46
Η εστία σβήνει. Ακούγεται μια ηχητική ειδοποίηση και στην οπτική ένδειξη της λειτουργίας προγραμματισμός χρόνου εμφανίζεται ‹‹ για 10 δ...
46
Υποδείξεις
46
Υπενθυμιστής χρόνου
46
Ο υπενθυμιστής χρόνου της κουζίνας σας επιτρέπει να ρυθμίσετε χρόνο μαγειρέματος μέχρι 99 λεπτά. Δεν εξαρτάται από τις άλλες ρυθμίσεις. Η...
46
Προγραμματισμός
46
1. Η επιλογή του υπενθυμιστή χρόνου της κουζίνας μπορεί να γίνει με δυο διαφορετικούς τρόπους:
46
2. Πατήστε το σύμβολο + ή -. Εμφανίζεται η βασική ρύθμιση.
46
Σύμβολο +: 10 λεπτά.
46
3. Ρυθμίστε το χρόνο που θέλετε με τα σύμβολα + ή -.
46
Αλλαγή ή ακύρωση χρόνου
46
Πατήστε αρκετές φορές το σύμβολο 3 έως ότου φωτιστεί η ένδειξη Ú που βρίσκεται δίπλα από το σύμβολο W. Τροποποιήστε ή ρυθμίστε τον χρόνο σ...
46
Μόλις παρέλθει ο χρόνος
46
Μόλις πατήσετε το σύμβολο 3, οι ενδείξεις σβήνουν και το ηχητικό σήμα σταματάει.
46
Αυτόματος περιορισμός χρόνου
47
Βασικές ρυθμίσεις
47
Πρόσβαση στις βασικές ρυθμίσεις
48
1. Ανάψτε τη βάση εστιών.
48
2. Μέσα στα επόμενα 10 δευτερόλεπτα, κρατήστε πατημένο το σύμβολο ‚ για 4 δευτερόλεπτα.
48
3. Πατήστε αρκετές φορές το σύμβολο ‚ μέχρι να εμφανιστεί η ένδειξη της λειτουργίας που θέλετε.
48
4. Στη συνέχεια επιλέξτε τη ρύθμιση που θέλετε με τα σύμβολα + και -.
48
5. Πατήστε ξανά το σύμβολο ‚ για πάνω από 4 δευτερόλεπτα.
48
Έξοδος
48
Για την έξοδο από τις βασικές ρυθμίσεις, σβήστε τη βάση εστιών με τον κύριο διακόπτη.
48
Φροντίδα και Καθαριότητα
48
Οι συμβουλές και υποδείξεις που αναφέρονται σ'αυτό το κεφάλαιο θα σας βοηθήσουν για την καθαριότητα και τη βέλτιστη συντήρηση της βάσης ...
48
Βάση εστιών
48
Καθαριότητα
48
Μπορείτε να προμηθευτείτε τις κατάλληλες ξύστρες εστίας μέσω του τεχνικού σέρβις ή από το κατάστημά μας στο διαδίκτυο.
48
Πλαίσιο της βάσης εστιών
48
Επιδιόρθωση βλαβών
48
Φυσιολογικός θόρυβος κατά τη διάρκεια λειτουργίας της συσκευής
49
Οι θόρυβοι που περιγράφονται είναι φυσιολογικοί, αποτελούν μέρος της επαγωγικής τεχνολογίας και δεν είναι ένδειξη βλάβης.
49
Υπηρεσία τεχνικής εξυπηρέτησης πελατών
49
Εντολή επισκευής και συμβουλές σε περίπτωση βλάβης
49
Δοκιμασμένες συνταγές
50
Ø 14,5 cm
50
Search:
×
Search