Do not store explosive substances such as aerosol cans with a flammable propellant in or near this appliance.
This appliance is intended to be used in household and similar applications such as:
Small offices and other working environments
Farm houses and other residential type environments
Bed and breakfast type environments
All components need to be installed in accordance with the user manual instructions for correct performance of unit.
To reduce the risk of fire or electric shock, turn off power and unplug before replacing filter and for cleaning the unit.
Do not filter hot or boiling water through the unit.
You may see small amounts of black particles at times; these are small pieces of carbon from the filter. These carbon particles are food grade and are not harmful. They will not impair the performance of your filter or unit.
Do not leave water in the filter bottle for extended periods of time. If water has been left in the water filter bottle for an extended period of time we recommend that you empty the water filter bottle and repeat the steps in the Operation Instruction section.
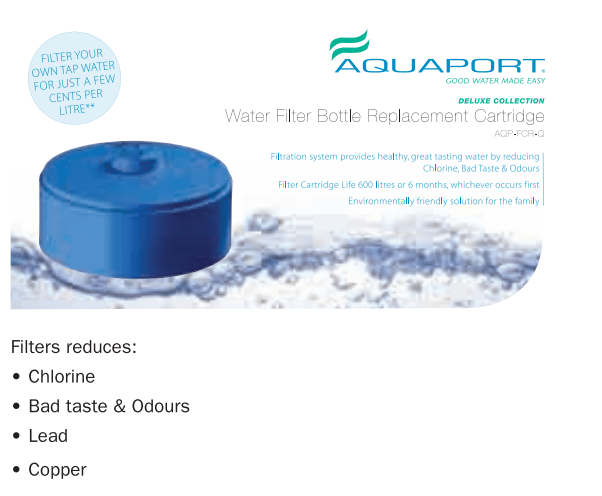
Replace filter cartridge every 600 litres or 6 months, whichever occurs first, or whenever you detect a change in taste, odour or a decrease in flow.
Please disassemble and clean the unit every 1- 2 months.
Liquid sanitisers are available on 1300 764 325.
Never clean with scouring powders or abrasives.
Filter bottle not dishwasher safe.
Unplug from outlet when not in use and before cleaning.
To protect against fire, electric shock and personal injury, do not immerse cord, plugs, or appliance in water or other liquid.
This appliance is not intended for use by persons (including children) with reduced physical, sensory or mental capabilities, or lack of experience and knowledge, unless they have been given supervision or instruction concerning use of the appliance by a person responsible for their safety. Children should be supervised to ensure that they do not play with the appliance.
Do not operate any appliance with a damaged cord or plug or after the appliance malfunctions, or has been damaged in any manner.
If the supply cord is damaged, it must be replaced by the manufacturer, its service agent or similarly qualified persons in order to avoid a hazard.
The use of accessory attachments not recommended by the appliance manufacturer may result in fire, electric shock or personal injury. Warranty will be void.
Keep the product away from direct sunlight.
Do not use outdoors.
Do not use appliance for other than intended use.
This appliance should always be used in conjunction with a safety switch.
Ensure unit is properly grounded.
A power outlet is required to operate the water cooler.
Do not immerse water cooler base in water or try to disassemble.
Ventilation - The water cooler air vents must not be obstructed at any time and free from dust accumulation, air flow is required for unit to operate effectively. Place unit in a flat well-ventilated location at least 100mm from wall or other appliances.
For best performance, do not place the unit near an oven, heater, direct sunlight or any other heat source and keep vents clear of dust.
INSTALLATION INSTRUCTIONS
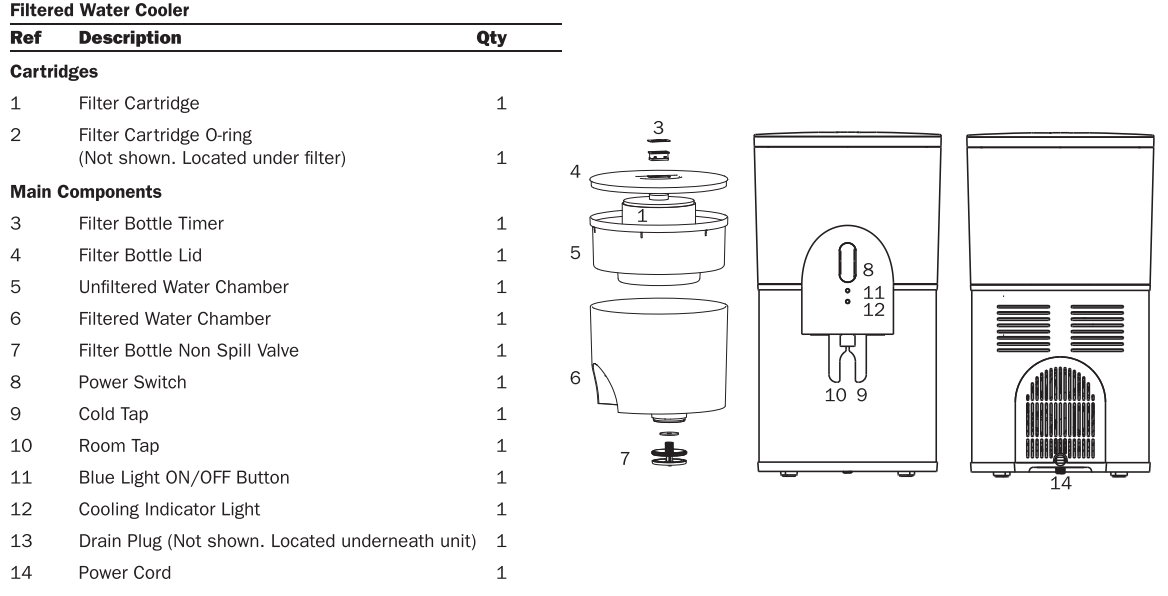
A. Component identification and content check list:
B. INSTALLATION INSTRUCTIONS
Unpacking Note: When unpacking the unit you will find a black foam spacer pad between the water spout and the metal taps at the front of the machine. This black foam spacer pad, which assists in keeping the waterways open during transportation needs to be removed, otherwise your taps may leak.
1. Wash all filter bottle parts (except Filter Cartridge) with warm water and detergent and rinse thoroughly.
2. Ensure Drain Plug is secure on the unit and tighten in place.
3. Ensure that the Filter Bottle Non Spill Valve has been installed at the bottom of the Filtered Water Chamber. (Filter Bottle Non Spill Valve should come preassembled on the Filtered Water Chamber.)
4. Place Filtered Water Chamber onto the water cooler unit and push down. There should be no gap between the cooling unit and the Filtered Water Chamber.
Note: If Filtered Water Chamber is not pushed down hard against the unit, the Filter Bottle Non Spill Valve may not open up to allow water to flow from the water bottle into the internal water tank. Therefore no water will flow from either the room or cold water tap as a result.
5. Place Unfiltered Water Chamber into the Filtered Water Chamber.
C. SANITISING INSTRUCTIONS PRIOR TO USE - RECOMMENDED
Your 24 Series desktop has been manufactured using FDA
approved materials and has been tested to comply with
regulatory requirements for use in Australia and New Zealand.
Notwithstanding the above, it is recommended to follow the
flushing procedure below to prime your system ready for use.
FLUSHING PROCEDURE
1. Combine two tablespoons of baking soda; bicarbonate soda, with 2 litres of luke-warm water into a separate jug
or container and set aside.
2. Remove the Unfiltered Water Chamber from the cooler (part 5, pg 4 of user manual)
3. Pour the bicarbonate mixture into the Filtered Water Chamber (part 6, pg 4 of user manual).
4. Hold the right hand side tap lever ("chilled water tap”) in for 30 seconds, or until water comes out from the tap. This ensures the bicarbonate mixture has entered the internal water tank.
5. Cycle the bicarbonate mixture through the front taps and re-pour back into the top reservoir. Repeat this process a couple of times.
6. Turn power on and allow the bicarbonate mixture to sit in the cooler for a minimum of 4 hours (ideally leave overnight).
7. Drain all the bicarbonate mixture out through the front taps until you can no longer drain any water.
8. Remove the Drain Plug cap (part 13, pg 4 of user manual) from underneath the unit to drain any excess water in the cooling tank. This Is Important to ensure all of the bicarbonate mixture Is removed from the cooler.
9. While the Drain Plug cap is open, pour 2L of water through to remove any excess bicarbonate mixture from the system. Reinstate drain cap and Unfiltered Water Chamber.
10. Flush clean water through the unit and drain out via taps. Tilt the unit back and forth to remove trapped water from unit.
D. OPERATION INSTRUCTIONS
Note: It is recommended that the Flushing Procedure is completed prior to commencing the Operation Instructions
Note: The taps have been designed to provide chilled (right hand side tap), ambient (left hand side tap) and cool (both taps together) water.
1. Remove Filter Cartridge from plastic, make sure not to lose the Filter Cartridge O-Ring. Immerse filter in ambient water for 20 minutes. Shake filter under water to remove any excess black carbon particles and trapped air.
Note: You may see small amounts of black particles at times; these are small pieces of carbon from the filter. These carbon particles are food grade and are not harmful. They will not impair the performance of your filter or unit.
2. Install Filter Cartridge O-Ring onto the Unfiltered Water Chamber filter thread then screw the Filter Cartridge into place.
3. Pour water into the Unfiltered Water Chamber; allow water to filter through to the Filtered Water Chamber.
Note: This unit is designed with a wet system. There will always be a small amount of water left in the Unfiltered Water Chamber to ensure the Filter Cartridge doesn’t dry out. If the unit is not used for an extended period of time the water in the Unfiltered Water Chamber should be discarded and replaced.
4. Once the Filtered Water Chamber is full of water, push the Cold Tap (right hand side tap) down to ensure that water has entered into the internal water tank. Hold the Cold Tap down until water runs out of the tap.
Note: Water flow rate is dependent on the volume of water in the filter bottle. For optimum flow rate keep filter bottle full of water.
5. Place lid on top of filter bottle.
6. Push the button on the Filter Bottle Timer (for approximately 10 seconds) to set filter replacement count down from 180 days.
Note: Filter Bottle Timer will start flashing when timer has counted down from 180 days. Replace Filter Cartridge.
Note: To reset Filter Bottle Timer, press button for more than 10 seconds. Timer should stop flashing and start count down from 180 days.
7. Plug unit into mains power. Switch on Power Switch located at front of unit and allow time for the unit to chill the water.
Note: Once the cooler is switched on the blue Cooling Indicator Light will illuminate. When the unit is in cooling mode the cooling indicator light will illuminate brighter, blue light will dim (but not turn off completely) when cooling is complete.
8. If you do not want the blue LED lights on the unit to illuminate, push the Blue Light On/Off Button to turn off.
E. CLEANING AND SANITATION
WARNING: Turn off power and unplug unit before cleaning. The Filter Cartridge should be replaced every 600 litres or 6 months, whichever occurs first, to ensure filters performs as stated. If water has been left sitting in unit for more than 3 days, discard water and flush out unit.
CLEANING
It is recommended that the unit is disassembled and cleaned periodically (every 2-3 months).
To clean:
Remove the filter and disassemble the water chamber.
Wash the Unfiltered Water Chamber and Filtered Water Chamber with warm soapy water.
Use a damp non-abrasive cloth to wipe down the outside of the unit. Do not immerse body of unit in water.
Dry unit and parts with a soft dry cloth.
Repeat Sanitising Instructions (see section C. page 6).
Replace the Filter Cartridge if necessary.
SANITATION
It is recommended that the unit is sanitised using Aquaport Liquid Sanitiser at least every 6 months when changing the filter. This is to ensure the optimum hygienic integrity of the water cooler. Aquaport Liquid Sanitisers (Product code: AQP-LSAN) are available on 1300 764 325.
F. FILTERED WATER COOLER NOT USED FOR LONG PERIODS
If the unit will not be used for a long period of time unplug the unit from the wall socket. Remove the filter bottle from the unit and clean with warm soapy water. Empty the water cooler by draining all water from the taps and via the drain plug and dry the unit.
G. FILTER BOTTLE TIMER
1. Push the button on the Filter Bottle Timer (for approximately 10 seconds) to set filter replacement count down from 180 days.
2. Filter Bottle Timer will start flashing when timer has counted down from 180 days. Replace Filter Cartridge.
3. To reset Filter Bottle Timer, press button for more than 10 seconds. Timer should stop flashing and start count down from 180 days.
H. REPLACEMENT FILTERS
Replacement filter cartridge models compatible with filter bottle. AQP-FCR-Q
TROUBLE SHOOTING
BEFORE YOU CALL FOR SERVICE PLEASE REVIEW THE TROUBLE SHOOTING TIPS FIRST.
Problem Possible Causes
What To Do
No or limited water flow
Filtered Water Chamber not placed properly on unit.
Press Filtered Water Chamber firmly onto unit to allow opening of Filter Bottle Non Spill Valve. Ensure no gap is present between chamber and unit.
No water inside cold water tank.
Ensure water is inside the Filtered Water Chamber, hold Cold Tap down for 10 seconds to open Non Spill Valve and allow water to travel into internal cold water tank and until water flows out from tap.
Water Level in Filtered Water Chamber is too low.
Rate of flow from tap depends on level of water in Filtered Water Chamber. Fill Unfiltered Water Chamber with water.
Filtered Water Chamber Is empty.
Fill Unfiltered Water Chamber with water.
Internal cold water tank frozen up water.
Turn unit off for 24hrs, after 24hrs check water flow from Cold Tap. Turn unit power on. If unit continues to freeze call 1300 764 325.
Filter is too old, not allowing water to filter through and enter Filtered Water Chamber.
Replace filter cartridge.
Air bubble/Air lock inside tubing or unit.
Call customer care for instructions 1300 764 325.
Leaking from taps
1. Black rubber foam pad has not been removed
2. Silicone in tap is not sealing properly - or tap cracked.
1. Remove the black rubber foam from between the metal taps Leaking from taps and water outlet at the front of the machine.
2. Call customer care 1300 764 325.
If Filter Bottle O-Ring is not correctly
Reinstall the Filter Bottle.
Leaking from top/bottom of unit
installed leaking may occur.
Call customer care on 1300 764 325 for instructions.
Drain Plug underneath unit not closed fully.
Check Drain Plug located underneath unit is closed and sealed completely.
Not cooling
Unit not plugged into wall socket or wall socket not switched on.
Check connection to wall socket.
Check power switch in front of unit is on.
Unit uses a thermoelectric chip to chill water, performance of unit is dependent on room temperature. Cooling light will remain on (brighter mode) when unit is attempting to cool water to optimal temperature.
Noise from fan
Due to transport or knock to side panel, the fan may have moved to a different position - this will cause a noise.