
English
029687 - 13/03
Please read these instructions carefully and keep for future reference.
PRIMA
10
What water to use?
Your appliance has been designed to function with tap water.
However, it is necessary to operate the Self-Clean function regularly to clean the steam chamber and eliminate hard water
deposits. If your water is very hard you may mix tap water with distilled water in the following proportions:
50% tap water, 50% distilled water.
Types of water not to use:
Heat concentrates the elements contained in water during evaporation.The types of water listed below contain organic waste or
mineral elements that can cause spitting, brown staining, or premature wear of the appliance: water from clothes dryers, scented
or softened water, water from refrigerators, batteries, or air conditioners, pure distilled water, or rain water.
Warning!
Before using your iron with the steam function for the first time, we recommend that you operate it in
horizontal position for a few moments, away from your linen, ie press several times on the double steam button.
During the first few uses, a harmless odour and smoke may be given off. This has no effect on the use of the
iron and will disappear quickly.
WARNING ! Remove the soleplate protector before heating up the iron (depending on the model).
1- STEAM IRONING
- Unplug your iron before filling it.
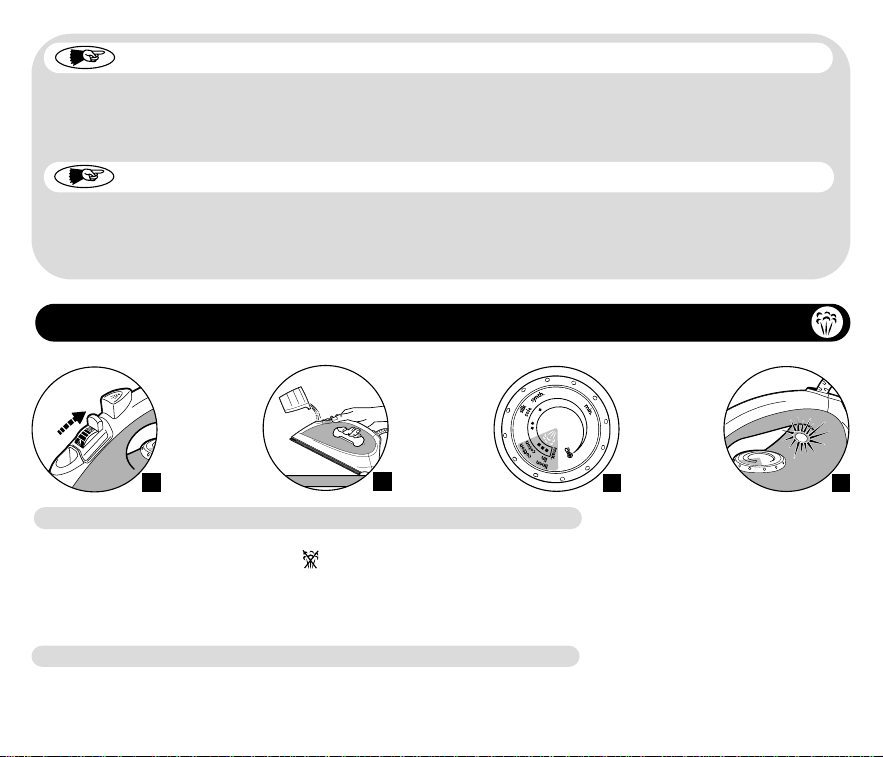
- Set the steam control dial on DRY (A).
- Place your iron on a stable, horizontal heat-resistant surface shown in the diagram (B) below,
and fill with water through the water tank filler inlet.
- Do not exceed the MAX line indicated on the water tank.
Filling the water tank
- Set the temperature control dial shown in the diagram below (C) referring to the table (or on the heel).
- The thermostat light comes on.
It goes out as soon as the soleplate is hot enough (D).
Setting the temperature
FABRIC
POSITION OF TEMPERATURE
CONTROL DIAL
STEAM SETTING
POSITION
LINEN
COTTON
WOOL
SILK
SYNTHETIC
Polyester,Acetate,Acrylic, Nylon
MAX
●●●
●●
●
●
= STEAM ZONE
Recommendations:
Fabrics and ironing temperatures:
• Your iron heats up quickly : begin by ironing those fabrics that are ironed at low temperatures,
then go on to those requiring a higher temperature;
• If you turn down the thermostat, wait until the thermostat light comes back on before ironing again.
• When ironing fabrics with mixed fibres, set the ironing temperature for the most delicate of the fabrics.
- In order to avoid water dripping from the iron onto the linen:
• Turn off the steam when ironing silk or synthetic fabrics.
• Set it at the minimum position for wool.
- When steam or dry ironing, press several times on the Spray Button to moisten the linen (G) and to remove
stubborn creases.
- Make sure that there is water in the tank before using this button.
What temperature and which steam setting to use?
Setting the steam level (E)
Moistening the linen (Spray)
FOR YOUR SECURITY
•
Warning! The voltage of your electrical installation must correspond to that of the iron
(220V-240V). Connecting to the wrong voltage may cause irreversible damage to the iron and will invalidate the guarantee.
•
This iron must always be plugged into an earthed socket.
•
If using a mains extension lead, ensure that it is correctly rated (10A), with an earth.
•
If the electrical cord becomes damaged, it must be immediately replaced by an Approved Service Centre
to avoid any danger.
•
Never immerse your iron in water!
•
The appliance must be unplugged before filling or emptying the water tank.
•
If the appliance falls, have it checked by a professional before using it again; unseen damage may be dangerous.
•
The soleplate may be very hot:
- Never touch it.
- Always let it cool down before putting it away.
- Never leave your iron unattended when it is plugged in or while the soleplate is still hot.
- Always keep your iron out of the reach of children.
NEVER DISMANTLE YOUR IRON YOURSELF AS THIS WILL
NEGATE THE GUARANTEE; ALWAYS CONTACT
AN APPROVED SERVICE CENTRE.
- Press the Double Steam button from time to time (F).
- Steam flow is increased.
Obtaining more steam
5- IS THERE A PROBLEM ?
Problems Possible causes Solutions
• Water drips from the holes in the
soleplate
•
Brown streaks come through the holes
in the soleplate and stain the fabrics.
• The soleplate is dirty or brown and
can stain the linen.
• There is little or no steam.
• The sole plate is scratched or
damaged.
•
The chosen temperature is too low and does not
allow for the formation of steam.
•
You are using steam while the iron is not hot
enough.
•
The steam flow is too high.
•
You have stored the iron horizontally, without
emptying it and without setting it to DRY.
•
You are using chemical descaling agents.
•
You are using pure distilled water.
•
Fabric fibres have accumulated in the holes of the
soleplate and are burning
•
Your linen is not rinsed sufficiently or you have
ironed a new garment before washing it.
•
You are using too high a temperature.
•
You are using starch.
•
The water tank is empty.
•
The anti-calc valve is dirty.
•
Your iron has a build-up of scale.
•
Your iron has been used dry for too long.
•
You have placed your iron flat on a metallic
rest-plate
•
Set the temperature control dial in the coloured
zone
(from ●● to MAX)
•
Wait until the indicator light goes out.
•
Reduce the steam flow.
•
See the section "Storing your iron".
•
Do not add any descaling agents to the water in
the water tank.
•
Do a self-cleaning and use tap water.
•
Do a self-cleaning. Clean the soleplate with a
non-metallic sponge. Vacuum the holes of the
soleplate from time to time.
•
Ensure linen is rinsed thoroughly to remove any
soap deposits or chemicals on new garments
which have been sucked up by the iron.
•
Clean the soleplate as indicated above.
See the temperature table to correctly set the
thermostat.
•
Clean the soleplate as indicated above. Always
spray starch onto the reverse side of the fabric to
be ironed.
•
Fill it with tap water.
•
Clean the anti-calc valve.
•
Clean the anti-calc valve and do a self-cleaning
•
Do a self-cleaning.
•
Always set your iron on its heel.
4- STORING YOUR IRON
• Unplug it and wait until the soleplate has cooled.
• Empty the water tank and set the steam control to DRY ( ).
• Store the iron on its heel.
2- DRY IRONING
- Set the temperature.
- Set the steam control on DRY (see diagram A) ( ).
- You may start ironing when the thermostat light goes out.
3- MAINTAINING YOUR IRON
BE CAREFUL !
Unplug your iron and let it cool off before cleaning it.
• CLEANING THE ANTI-CALC VALVE
(Once per month) :
- Unplug your iron and empty the water tank.
- Set the steam control slide on DRY.
- To remove the anti-calc valve, pull it up using the tabs located on each side (H)
NEVER TOUCH THE END OF THE VALVE
- Soak the valve in a cup of white spirit vinegar or plain lemon juice for 4 hours (I).
- Rinse the valve in tap water.
- Replace the anti-calc valve into position
THE IRON WILL NOT FUNCTION WITHOUT THE ANTI-CALC VALVE.
H
I
• CLEANING THE SOLE PLATE
- While the soleplate is still just warm, clean it by rubbing it with a moist, non-metallic pad.
Recommendation :
The self-cleaning function helps to delay the scaling of your iron.
DO NOT USE CHEMICAL DESCALING AGENTS
• USING THE SELF-CLEANING FUNCTION
In order to extend the life of your iron, use the Self-Cleaning function once per month.
- Unplug your iron and set the steam control slide on DRY ( ).
- Fill the water tank up to the Max level (see recommendations for the types of water to use).
- Place your iron on its heel and set the temperature control dial on MAX.
- Plug in your iron and wait until the thermostat light goes out.
- Unplug the iron and hold it over a sink in the horizontal position.
- Raise the anti-calc valve.
- Shake the iron gently, over the sink, until all of the water in the water tank (with the impurities) has flowed out via the soleplate.
- At the end of the operation, put the anti-calc valve back into position.
- Turn the iron back on for 2 minutes, setting it on its heel, to dry the soleplate.
- Unplug the iron, and when the soleplate is just warm, wipe it with a soft cloth.
THIS PRODUCT HAS BEEN DESIGNED FOR DOMESTIC USE ONLY.ANY PROFESSIONAL USE,
INAPPROPRIATE USE OR FAILURE TO COMPLY WITH THE INSTRUCTIONS,
THE MANUFACTURER ACCEPTS NO RESPOSIBILITY AND THE GUARANTEE WILL NOT APPLY.
1
2
4
5
6
7
8
9
10
3
Max
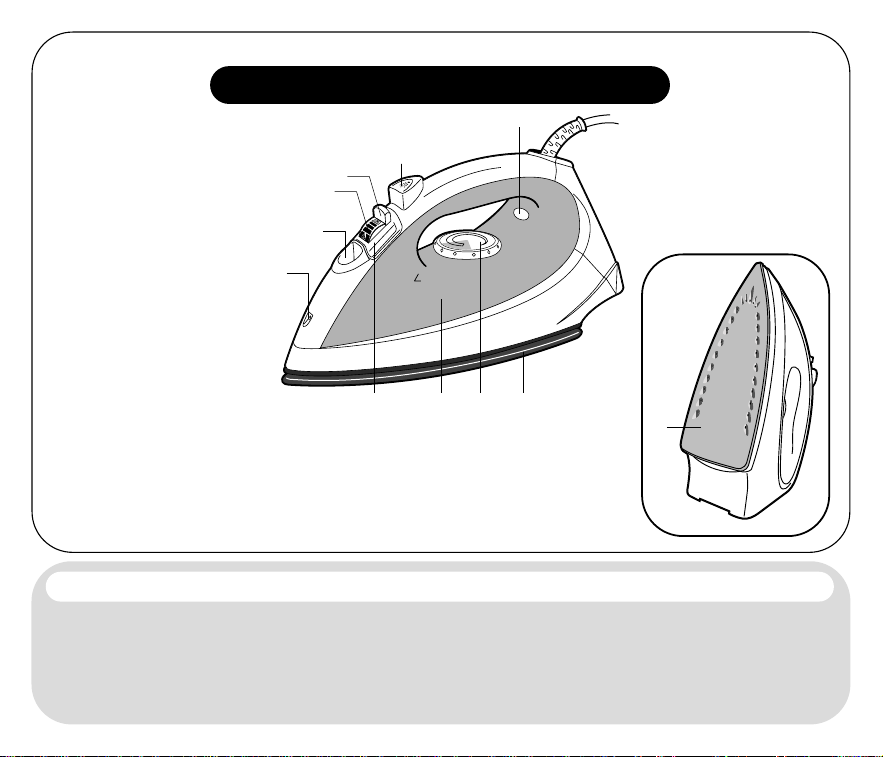
1. Spray nozzle
2. Water tank filler inlet. Only use tap water
3. Double steam button.To obtain more steam.
4. Steam control slide. To control steam flow.
5. Spray button.To moisten linen
6. Thermostat indicator light.Goes out when the temperature has been reached.
7. Anti-calc valve.To be cleaned once per month
8. Water tank maximum fill line. Do not exceed this limit.
9. Temperature control dial
10. Soleplate
A
C D
E
F
G
B

English
029687 - 13/03
Please read these instructions carefully and keep for future reference.
PRIMA
10
What water to use?
Your appliance has been designed to function with tap water.
However, it is necessary to operate the Self-Clean function regularly to clean the steam chamber and eliminate hard water
deposits. If your water is very hard you may mix tap water with distilled water in the following proportions:
50% tap water, 50% distilled water.
Types of water not to use:
Heat concentrates the elements contained in water during evaporation.The types of water listed below contain organic waste or
mineral elements that can cause spitting, brown staining, or premature wear of the appliance: water from clothes dryers, scented
or softened water, water from refrigerators, batteries, or air conditioners, pure distilled water, or rain water.
Warning!
Before using your iron with the steam function for the first time, we recommend that you operate it in
horizontal position for a few moments, away from your linen, ie press several times on the double steam button.
During the first few uses, a harmless odour and smoke may be given off. This has no effect on the use of the
iron and will disappear quickly.
WARNING ! Remove the soleplate protector before heating up the iron (depending on the model).
1- STEAM IRONING
- Unplug your iron before filling it.
- Set the steam control dial on DRY (A).
- Place your iron on a stable, horizontal heat-resistant surface shown in the diagram (B) below,
and fill with water through the water tank filler inlet.
- Do not exceed the MAX line indicated on the water tank.
Filling the water tank
- Set the temperature control dial shown in the diagram below (C) referring to the table (or on the heel).
- The thermostat light comes on.
It goes out as soon as the soleplate is hot enough (D).
Setting the temperature
FABRIC
POSITION OF TEMPERATURE
CONTROL DIAL
STEAM SETTING
POSITION
LINEN
COTTON
WOOL
SILK
SYNTHETIC
Polyester,Acetate,Acrylic, Nylon
MAX
●●●
●●
●
●
= STEAM ZONE
Recommendations:
Fabrics and ironing temperatures:
• Your iron heats up quickly : begin by ironing those fabrics that are ironed at low temperatures,
then go on to those requiring a higher temperature;
• If you turn down the thermostat, wait until the thermostat light comes back on before ironing again.
• When ironing fabrics with mixed fibres, set the ironing temperature for the most delicate of the fabrics.
- In order to avoid water dripping from the iron onto the linen:
• Turn off the steam when ironing silk or synthetic fabrics.
• Set it at the minimum position for wool.
- When steam or dry ironing, press several times on the Spray Button to moisten the linen (G) and to remove
stubborn creases.
- Make sure that there is water in the tank before using this button.
What temperature and which steam setting to use?
Setting the steam level (E)
Moistening the linen (Spray)
FOR YOUR SECURITY
•
Warning! The voltage of your electrical installation must correspond to that of the iron
(220V-240V). Connecting to the wrong voltage may cause irreversible damage to the iron and will invalidate the guarantee.
•
This iron must always be plugged into an earthed socket.
•
If using a mains extension lead, ensure that it is correctly rated (10A), with an earth.
•
If the electrical cord becomes damaged, it must be immediately replaced by an Approved Service Centre
to avoid any danger.
•
Never immerse your iron in water!
•
The appliance must be unplugged before filling or emptying the water tank.
•
If the appliance falls, have it checked by a professional before using it again; unseen damage may be dangerous.
•
The soleplate may be very hot:
- Never touch it.
- Always let it cool down before putting it away.
- Never leave your iron unattended when it is plugged in or while the soleplate is still hot.
- Always keep your iron out of the reach of children.
NEVER DISMANTLE YOUR IRON YOURSELF AS THIS WILL
NEGATE THE GUARANTEE; ALWAYS CONTACT
AN APPROVED SERVICE CENTRE.
- Press the Double Steam button from time to time (F).
- Steam flow is increased.
Obtaining more steam
5- IS THERE A PROBLEM ?
Problems Possible causes Solutions
• Water drips from the holes in the
soleplate
•
Brown streaks come through the holes
in the soleplate and stain the fabrics.
• The soleplate is dirty or brown and
can stain the linen.
• There is little or no steam.
• The sole plate is scratched or
damaged.
•
The chosen temperature is too low and does not
allow for the formation of steam.
•
You are using steam while the iron is not hot
enough.
•
The steam flow is too high.
•
You have stored the iron horizontally, without
emptying it and without setting it to DRY.
•
You are using chemical descaling agents.
•
You are using pure distilled water.
•
Fabric fibres have accumulated in the holes of the
soleplate and are burning
•
Your linen is not rinsed sufficiently or you have
ironed a new garment before washing it.
•
You are using too high a temperature.
•
You are using starch.
•
The water tank is empty.
•
The anti-calc valve is dirty.
•
Your iron has a build-up of scale.
•
Your iron has been used dry for too long.
•
You have placed your iron flat on a metallic
rest-plate
•
Set the temperature control dial in the coloured
zone
(from ●● to MAX)
•
Wait until the indicator light goes out.
•
Reduce the steam flow.
•
See the section "Storing your iron".
•
Do not add any descaling agents to the water in
the water tank.
•
Do a self-cleaning and use tap water.
•
Do a self-cleaning. Clean the soleplate with a
non-metallic sponge. Vacuum the holes of the
soleplate from time to time.
•
Ensure linen is rinsed thoroughly to remove any
soap deposits or chemicals on new garments
which have been sucked up by the iron.
•
Clean the soleplate as indicated above.
See the temperature table to correctly set the
thermostat.
•
Clean the soleplate as indicated above. Always
spray starch onto the reverse side of the fabric to
be ironed.
•
Fill it with tap water.
•
Clean the anti-calc valve.
•
Clean the anti-calc valve and do a self-cleaning
•
Do a self-cleaning.
•
Always set your iron on its heel.
4- STORING YOUR IRON
• Unplug it and wait until the soleplate has cooled.
• Empty the water tank and set the steam control to DRY ( ).
• Store the iron on its heel.
2- DRY IRONING
- Set the temperature.
- Set the steam control on DRY (see diagram A) ( ).
- You may start ironing when the thermostat light goes out.
3- MAINTAINING YOUR IRON
BE CAREFUL !
Unplug your iron and let it cool off before cleaning it.
• CLEANING THE ANTI-CALC VALVE
(Once per month) :
- Unplug your iron and empty the water tank.
- Set the steam control slide on DRY.
- To remove the anti-calc valve, pull it up using the tabs located on each side (H)
NEVER TOUCH THE END OF THE VALVE
- Soak the valve in a cup of white spirit vinegar or plain lemon juice for 4 hours (I).
- Rinse the valve in tap water.
- Replace the anti-calc valve into position
THE IRON WILL NOT FUNCTION WITHOUT THE ANTI-CALC VALVE.
H
I
• CLEANING THE SOLE PLATE
- While the soleplate is still just warm, clean it by rubbing it with a moist, non-metallic pad.
Recommendation :
The self-cleaning function helps to delay the scaling of your iron.
DO NOT USE CHEMICAL DESCALING AGENTS
• USING THE SELF-CLEANING FUNCTION
In order to extend the life of your iron, use the Self-Cleaning function once per month.
- Unplug your iron and set the steam control slide on DRY ( ).
- Fill the water tank up to the Max level (see recommendations for the types of water to use).
- Place your iron on its heel and set the temperature control dial on MAX.
- Plug in your iron and wait until the thermostat light goes out.
- Unplug the iron and hold it over a sink in the horizontal position.
- Raise the anti-calc valve.
- Shake the iron gently, over the sink, until all of the water in the water tank (with the impurities) has flowed out via the soleplate.
- At the end of the operation, put the anti-calc valve back into position.
- Turn the iron back on for 2 minutes, setting it on its heel, to dry the soleplate.
- Unplug the iron, and when the soleplate is just warm, wipe it with a soft cloth.
THIS PRODUCT HAS BEEN DESIGNED FOR DOMESTIC USE ONLY.ANY PROFESSIONAL USE,
INAPPROPRIATE USE OR FAILURE TO COMPLY WITH THE INSTRUCTIONS,
THE MANUFACTURER ACCEPTS NO RESPOSIBILITY AND THE GUARANTEE WILL NOT APPLY.
1
2
4
5
6
7
8
9
10
3
Max
1. Spray nozzle
2. Water tank filler inlet. Only use tap water
3. Double steam button.To obtain more steam.
4. Steam control slide. To control steam flow.
5. Spray button.To moisten linen
6. Thermostat indicator light.Goes out when the temperature has been reached.
7. Anti-calc valve.To be cleaned once per month
8. Water tank maximum fill line. Do not exceed this limit.
9. Temperature control dial
10. Soleplate
A
C D
E
F
G
B
Español
029687 - 13/03
Lea detenidamente este manual de instrucciones y guárdelo.
PRIMA
10
¿ Qué agua hay que utilizar ?
Este aparato ha sido diseñado para funcionar con agua del grifo. Sin embargo, hay que realizar regularmente una limpieza
automática de la cámara de vaporización, para eliminar la cal libre. Si el agua tiene mucha cal (pregunte al ayuntamiento o al
servicio de suministro de agua), puede mezclarse agua del grifo con agua desmineralizada de venta en cualquier droguería y
respetando las siguientes proporciones : - 50% de agua del grifo, - 50% de agua desmineralizada.
¿ Qué agua hay que evitar ?
Durante la evaporación, el calor concentra los elementos que hay en el agua. La siguiente lista detalla la clase de agua que
contiene residuos orgánicos o elementos minerales susceptibles de provocar salpicaduras, colores amarillentos o un
envejecimiento prematuro del aparato: agua desmineralizada pura de venta en droguerías, agua de las secadoras, agua perfumada,
agua descalcificada, agua de las neveras, agua de las baterías, agua de los aires acondicionados, agua destilada, agua de lluvia.
¡ Atención !
Antes de utilizar la plancha por primera vez en posición vapor, le aconsejamos que la haga funcionar algunos
momentos en posición horizontal y sin ropa debajo. En estas mismas condiciones, accione varias veces el mando
golpe de vapor.
Las primeras veces puede que salga algo de humo y se desprenda olor, pero no son nocivos. Este fenómeno que
no afecta al uso del aparato desaparece rápidamente.
¡ Atención ! Retire el protector de la suela antes de calentar la plancha (según el modelo).
1- PLANCHADO CON VAPOR
- Desconecte la plancha antes de proceder al llenado.
- Coloque el mando de vapor en SECO (A).
- Ponga la plancha encima de una mesa tal y como se indica en el dibujo (B) y proceda al llenado.
- No exceda del nivel “MAX” indicado en el depósito
Llene el depósito
- Ajuste el mando del termostato siguiendo el dibujo (C), de acuerdo con la tabla que aparece más abajo (o en el talón de la plancha).
- El indicador luminoso se encenderá. Se apagará cuando la suela haya alcanzado la temperatura programada (D).
Ajuste la temperatura
TEJIDO
POSICIÓN DEL MANDO
DEL TERMOSTATO
POSICIÓN DEL MANDO
REGULADOR DEL VAPOR
LINO
ALGODÓN
LANA
SEDA
SINTÉTICOS
Poliéster,Acetato,Acrílico, Poliamida
MAX
●●●
●●
●
●
= ZONA VAPOR
Nuestro consejo :
Tejidos y temperatura de planchado:
• La plancha se calienta rápidamente : planche primero los tejidos que se planchan a una temperatura baja, y luego
los que requieren una temperatura más elevada ;
• Si baja el termostato, espere a que el indicador luminoso vuelva a encenderse antes de volver a planchar.
• Si debe planchar un tejido hecho de fibras mezcladas : ajuste la temperatura de planchado basándose en la fibra
más frágil.
- No se aconseja utilizar vapor sobre seda o ropa sintética. Podría manchar la ropa.
- Para planchar lana, ajuste el termostato al máximo.
- Pulse de vez en cuando el mando golpe de vapor (F)
- Se ha aumentado el caudal de vapor
¿ Qué temperatura y qué vapor hay que utilizar ?
Ajuste el vapor (E)
Para obtener mayor cantidad de vapor
ADVERTENCIAS DE SEGURIDAD
•
¡ Atención ! La tensión de la instalación eléctrica debe corresponder con la de la plancha (220-240V).
Cualquier error de conexión puede causar daños irreversibles en la plancha y la garantía quedaría anulada.
•
Esta plancha debe conectarse obligatoriamente a una toma de corriente con conexión a tierra.
•
Si utiliza un alargador, compruebe que sea de tipo bipolar (10A) con un conductor de tierra.
•
Si el cable eléctrico está dañado, cámbielo en un servicio técnico oficial para evitar riesgos.
•
¡ No sumerja nunca la plancha en agua!
•
Hay que desenchufar el aparato antes de llenar o vaciar el depósito.
•
En el caso de que la plancha caiga al suelo, hágala revisar por un técnico profesional antes de volver a ponerla en marcha,
ya que pueden haberse ocasionado daños no visibles susceptibles de ser peligrosos para la seguridad.
•
La suela de la plancha puede alcanzar temperaturas muy elevadas :
- No la toque nunca.
- Deje que la plancha se enfríe antes de guardarla.
- Vigile siempre la plancha cuando esté enchufada o cuando la suela todavía esté caliente.
- Mantenga siempre la plancha fuera del alcance de los niños.
NO DESMONTE NUNCA LA PLANCHA ; ACUDA SIEMPRE A UN SERVICIO TÉCNICO OFICIAL.
Este aparato ha sido diseñado para uso doméstico únicamente. Un uso profesional, inadecuado o en
desacuerdo con las instrucciones de uso anula la responsabilidad y la garantía del fabricante.
- Cuando planche con vapor o en seco, pulse varias veces seguidas el botón pulverizador para
humedecer la ropa (G) y eliminar las arrugas más resistentes.
- Compruebe que hay agua dentro del depósito antes de utilizar esta función.
Humedezca la ropa (pulverizador)
5- RESOLUCIÓN DE PROBLEMAS
Problemas Causas posibles Soluciones
• Sale agua por los agujeros de la suela
•
Un liquido amarillento sale por la suela
y ensucia la ropa.
• La suela está sucia o amarillenta y
puede ensuciar la ropa.
• La plancha no produce vapor o
produce muy poco.
• La suela está rayada o dañada.
•
La temperatura elegida es demasiado baja y no
permite crear vapor.
•
Utiliza vapor sin que la plancha esté
suficientemente caliente.
•
El caudal de vapor es demasiado grande.
•
Ha guardado la plancha con la suela hacia abajo, sin
vaciarla y sin poner el mando en SECO.
•
Utiliza productos químicos antical
•
Utiliza agua desmineralizada pura.
•
Fibras de ropa se han acumulado en los agujeros de
la suela y se carbonizan.
•
Utiliza una temperatura demasiado elevada.
•
La ropa no está suficientemente aclarada o utiliza
almidón.
•
El depósito está vacío.
•
La varilla anticalcárea está sucia.
•
La plancha tiene cal.
•
La plancha se ha utilizado demasiado tiempo en
posición en seco.
•
Ha guardado la plancha con la suela hacia abajo
sobre un reposa-planchas metálico.
•
Coloque el termostato en la zona coloreada
(de ●● a MAX)
•
Espere a que el indicador luminoso se apague.
•
Reduzca el caudal de vapor.
•
Consulte el capítulo "Almacenamiento".
•
No añada ningún producto antical en el agua del
depósito.
•
Utilice la función limpieza automática y utilice
agua del grifo.
•
Utilice la función limpieza automática.
•
Limpie la suela con un trapo que no sea metálico.
•
Limpie de vez en cuando los agujeros de la
suela.
• Limpie la suela como se indica más arriba.
Consulte la tabla de temperaturas para ajustar
el termostato.
•
Limpie la suela como se indica más arriba.
Pulverice el almidón por la cara del tejido que no
va a planchar.
•
Rellénelo con agua del grifo.
•
Limpie la varilla anticalcárea.
•
Limpie la varilla anticalcárea y utilice la función
limpieza automática.
•
Utilice la función limpieza automática
•
Apoye siempre la plancha encima del talón.
4- ALMACENAMIENTO
• Desenchufe la plancha y espere a que la suela se enfríe.
• Vacíe el contenido del depósito y coloque el mando de planchado en SECO ( ).
• Guarde la plancha apoyada encima del talón.
2- PLANCHADO EN SECO
- Ajuste la temperatura.
- Coloque el mando de vapor en SECO (vea el dibujo A)
- Puede empezar a planchar cuando el indicador luminoso del termostato se haya apagado.
3- - MANTENIMIENTO DE LA PLANCHA
¡ ATENCIÓN !
Desenchufe la plancha y deje que se enfríe antes de limpiarla.
• LIMPIEZA DE LA VARILLA ANTICALCÁREA
(una vez al mes) :
- Desenchufe la plancha y vacíe el depósito.
- Coloque el mando de vapor en SECO
- Para quitar la varilla anticalcárea, tire de ella hacia arriba mediante las pestañas situadas a cada lado (H).
NO TOQUE NUNCA EL EXTREMO DE LA VARILLA.
- Deje la varilla en remojo durante 4 horas dentro de un vaso con vinagre de alcohol
blanco o con jugo de limón natural (I).
- Aclare la varilla con agua del grifo.
- Coloque nuevamente la varilla anticalcárea en su lugar.
LA PLANCHA NO FUNCIONA SIN LA VARILLA ANTICALCÁREA.
H
I
• LIMPIEZA DE LA SUELA
- Cuando la suela esté todavía tibia, límpiela frotándola con un trapo húmedo que no sea metálico.
Nuestro consejo : la limpieza automática retarda la formación de incrustaciones de cal dentro de la plancha.
• FUNCIÓN LIMPIEZA AUTOMÁTICA
Para alargar la vida de la plancha, utilice la función limpieza automática una vez al mes.
- Desenchufe la plancha y coloque el mando de vapor en SECO ( ).
- Llene el depósito hasta alcanzar el nivel máximo (lea nuestros consejos sobre el agua que hay que utilizar).
- Apoye la plancha encima del talón y coloque el mando del termostato en MAX.
- Enchufe la plancha y espere a que el indicador luminoso se apague.
- Desenchufe la plancha y colóquela encima de un fregadero en posición horizontal.
- Levante la varilla anticalcárea.
- Sacuda ligeramente la plancha, encima del fregadero, hasta que toda el agua del depósito (con las impurezas) haya salido por la
suela.
- Al final de la operación, coloque nuevamente la varilla anticalcárea en su lugar.
- Apoye la plancha sobre el talón y enchúfela de nuevo durante 2 minutos para que la suela se seque.
- Desenchufe la plancha y, cuando la suela esté tibia, séquela con un trapo suave.
PARA CALQUIER OTRO TIPO DE PROBLEMA,
ACUDA A UN SERVICIO TECNICO OFICIAL PARA QUE REVISE EL APARATO
1
2
4
5
6
7
8
9
10
3
Max
1. Pulverizador.
2. Orificio de llenado del depósito.
3. Mando golpe de vapor. Para obtener mayor cantidad de vapor.
4. Mando regulador de vapor.
5. Tecla Pulverizador. Para humedecer la ropa.
6. Indicador luminoso del termostato.
Se apaga cuando se alcanza la temperatura deseada.
7. Varilla anticalcárea. Límpiela una vez al mes.
8. Nivel máximo del depósito.No sobrepase este límite.
9. Mando del termostato.
10. Suela.
A
C D
E
F
G
B
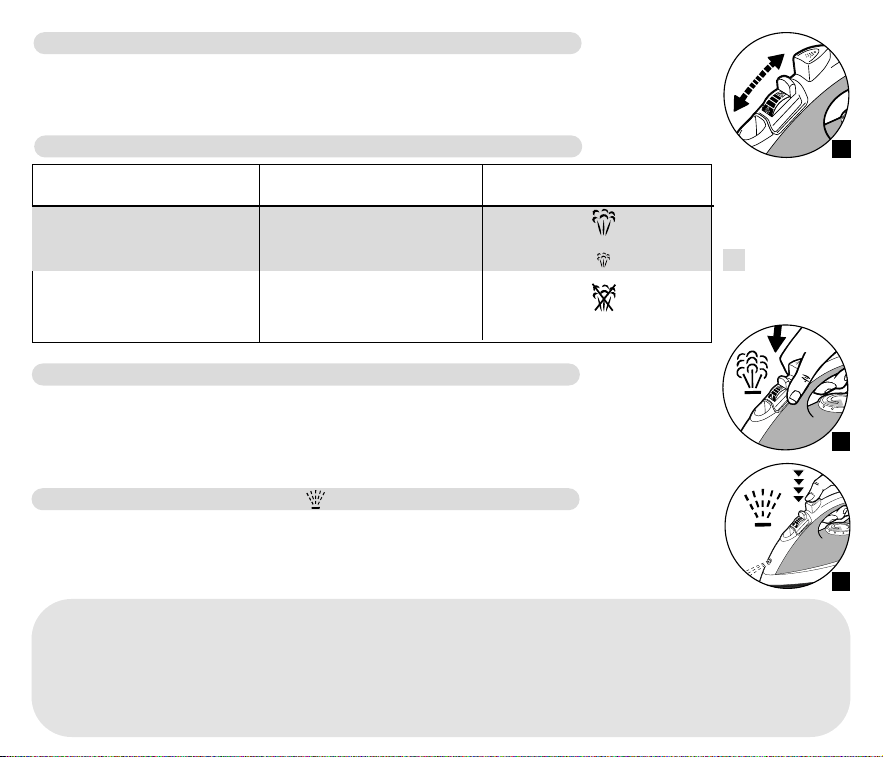
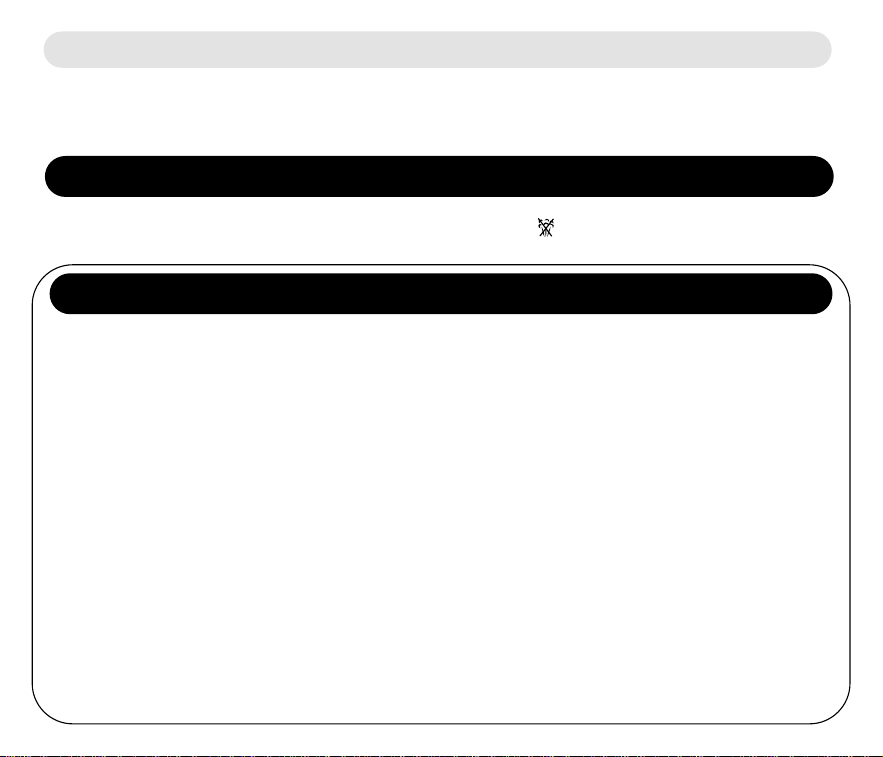

Português
029687 - 13/03
Leia atentamente o manual de instruções e guarde-o para futuras utilizações.
PRIMA
10
Que tipo de água utilizar ?
Este aparelho foi concebido para funcionar com água da torneira. No entanto, é necessário proceder regularmente à auto-limpeza
dos orifícios de vaporização para eliminar o calcário solto. Se a água que utiliza contém um elevado teor de calcário (poderá
informar-se na Câmara Municipal ou nos Serviços Municipalizados de Água e Saneamento), misture 50% de água da torneira e
50% de água desmineralizada disponível no mercado.
Que tipo de água evitar ?
Durante a evaporação, o calor concentra os elementos contidos na água.As águas abaixo indicadas podem conter resíduos
orgânicos ou substâncias minerais passíveis de provocar salpicos, corrimento de água acastanhada ou a deterioração prematura
do aparelho: água desmineralizada pura disponível no mercado, água própria para secadores de roupa, água perfumada, água
amaciada, água dos frigoríficos, água de baterias, água dos climatizadores, água destilada, água da chuva.
Atenção !
Antes de utilizar o seu ferro na posição vapor pela primeira vez, recomendamos que o ponha em
funcionamento durante alguns minutos em posição horizontal, longe da sua roupa. Nas mesmas condições,
accione várias vezes o comando Vapor Duplo.
Aquando das primeiras utilizações, o aparelho poderá libertar fumos e odores inofensivos. Este fenómeno sem
consequências desaparecerá rapidamente.
Atenção ! Retire a protecção da base do ferro antes de o ligar (consoante modelo).
1- ENGOMAR COM VAPOR
- Antes de encher o depósito, desligue o ferro.
- Coloque o comando do vapor na posição SECO (A)
- Coloque o ferro numa mesa consoante esquema (B) abaixo e encha o depósito pela abertura de enchimento.
- Não exceda a marca "MÁX." indicada no depósito.
Encha o depósito
- Regule o botão de controlo da temperatura em função do esquema abaixo (C), e conforme a seguinte tabela (ou na vertical)
.
- A luz piloto acende.Apagar-se-á quando a base estiver suficientemente quente (D).
Regule a temperatura
TECIDOS
POSIÇÃO DO BOTÃO DE
CONTROLO DA TEMPERATURA
POSIÇÃO DE REGULAÇÃO
DO VAPOR
LINHO
ALGODÃO
LÃ
SEDA
SINTÉTICOS
Poliester,Acetato,Acrílico, Poliamida
MAX
●●●
●●
●
●
Os nossos conselhos:
Tecidos e temperaturas:
• O seu ferro aquece rapidamente: comece pelos tecidos que só podem ser engomados a baixas temperaturas e termine
com os tecidos resistentes a temperaturas elevadas.
• Se diminuir a temperatura, espere que a luz piloto do termóstato volte a acender para engomar novamente.
• Se desejar engomar um tecido com fibras mistas, regule a temperatura na fibra mais delicada
- Para que não escorra água para a roupa:
• Desligue o vapor para engomar tecidos de seda ou sintéticos.
• Regule o vapor no mínimo para a lã.
- De vez em quando, pressione o botão de Vapor Duplo (F).
- O débito de vapor aumenta.
Que temperatura e vapor utilizar ?
Regule o vapor (E)
Para obter mais vapor
CONSELHOS DE SEGURANÇA
•
Atenção ! A voltagem da sua instalação eléctrica deve corresponder à do ferro (220-240V). Qualquer erro de ligação pode
causar danos irreversíveis no ferro e anular a garantia.
•
Este ferro deve ser obrigatoriamente ligado a uma tomada com ligação à terra. Se utilizar uma extensão, certifique-se de
que é do tipo bipolar (10A) com condutor de terra.
•
Se o cabo de alimentação estiver danificado, deverá ser imediatamente substituído num Serviço de Assistência Técnica Tefal,
para evitar qualquer perigo.
•
Nunca mergulhe o ferro na água!
•
O aparelho deve estar desligado sempre que encher ou esvaziar o depósito.
•
Em caso de queda do ferro, mande-o verificar por um profissional antes de voltar a utilizá-lo : os danos invisíveis podem
ser perigosos para a sua segurança.
•
A base do ferro pode atingir temperaturas elevadas:
- Nunca a toque.
- Deixe sempre arrefecer o ferro antes de o arrumar.
- Nunca deixe o ferro sem vigilância quando estiver ligado ou enquanto a base estiver quente.
- Mantenha sempre o ferro fora do alcance das crianças.
NUNCA DESMONTE O FERRO; DIRIJA-SE A UM SERVIÇO DE ASSISTÊNCIA TÉCNICA TEFAL
.
- Quando estiver a engomar com vapor ou a seco, carregue repetidamente no comando do Spray para
humedecer a roupa (G) e eliminar os vincos persistentes.
- Certifique-se de que o depósito tem água antes de utilizar esse comando.
Humedeça a roupa (spray)
5- PROBLEMAS COM O SEU FERRO
Problemas Possíveis causas Soluções
• A água escorre pelos orifícios da
base.
•
Dos orifícios da base, escorre água
castanha que mancha a sua roupa.
• A base está suja ou castanha,
podendo manchar a roupa.
• O vapor é insuficiente ou nulo.
• A base está riscada ou danificada.
•
A temperatura seleccionada não permite criar
vapor.
• Utiliza o vapor antes do ferro estar
suficientemente quente.
•
O débito de vapor é demasiado elevado.
•
Arrumou o ferro na horizontal sem esvaziar o
depósito e sem colocar o comando na posição
SECO.
•
Tem utilizado produtos químicos para eliminar o
calcário.
•
Tem utilizado água desmineralizada pura.
•
Os orifícios da base acumularam fibras da roupa
que queimaram.
•
Tem utilizado uma temperatura demasiado alta.
•
A sua roupa não está bem enxaguada ou costuma
utilizar goma.
•
O depósito está vazio.
•
A vareta anti-calcário está suja.
•
O ferro tem calcário.
•
Utilizou o ferro a seco durante demasiado tempo.
•
Pousou o ferro num suporte metálico.
•
Rode o botão de comando da temperatura até à
zona colorida
(de ●● até MÁX.).
•
Aguarde até que a luz-piloto se apague
•
Diminua o débito de vapor.
•
Consulte o capítulo
"Como arrumar o seu ferro".
•
Nunca deite qualquer tipo de produto químico
no depósito para eliminar o calcário.
•
Accione a Auto-limpeza e utilize água da torneira.
•
Accione a Auto-limpeza. Limpe a base com uma
esponja não metálica.Aspire os orifícios da base
de vez em quando.
•
Limpe a base conforme indicado anteriormente.
Consulte o quadro sobre a regulação das
temperaturas.
•
Limpe a base conforme indicado anteriormente.
Pulverize sempre a goma no avesso do lado a
engomar.
•
Encha o depósito com água da torneira.
•
Limpe a vareta anti-calcário.
•
Limpe a vareta anti-calcário e accione a
auto-limpeza.
•
Accione a auto-limpeza.
•
Coloque sempre o ferro na vertical.
4- COMO ARRUMAR O SEU FERRO
• Desligue-o e aguarde que a base arrefeça.
• Esvazie o depósito e coloque o comando de engomar na posição SECO ( ).
• Arrume-o na vertical.
2- ENGOMAR A SECO
- Regule a temperatura.
- Coloque o comando do vapor na posição SECO (ver esquema A) ( ).
- Pode engomar quando a luz piloto se apagar.
3- MANUTENÇÃO DO FERRO
ATENÇÃO !
Desligue o ferro e deixe-o arrefecer antes de o limpar.
• LIMPE A VARETA ANTI-CALCÁRIO
(uma vez por mês) :
- Desligue o ferro e esvazie o depósito.
- Coloque o comando do vapor na posição seco ( ).
- Para retirar a vareta anti-calcário, puxe-a para cima (H).
NUNCA TOQUE NA EXTREMIDADE DA VARETA.
- Mergulhe a vareta num copo com vinagre branco, ou sumo de limão natural,
durante 4 horas (I).
- Passe a vareta por água da torneira.
- volte a colocar a vareta anti-calcário
O FERRO NÃO FUNCIONA SEM A VARETA ANTI-CALCÁRIO.
H
I
• LIMPEZA DA BASE
- Limpe a base ainda morna com uma esponja não metálica húmida.
O nosso conselho :A auto-limpeza permite retardar a formação de calcário no seu ferro.
• ACTIVE A FUNÇÃO AUTO-LIMPEZA
Active a função de auto-limpeza uma vez por mês, para prolongar a vida do seu ferro.
- Desligue o ferro e coloque o comando de vapor na posição SECO ( ).
- Encha o depósito ao maximo (veja os nossos conselhos sobre o tipo de água a utilizar).
- Coloque o ferro na vertical e rode o botão de comando da temperatura até à posição MAX.
- Ligue o ferro e aguarde que a luz piloto se apague.
- Desligue o ferro e coloque-o na horizontal sobre o lava-loiça.
- Retire a vareta anti-calcário
.
- Agite ligeiramente o ferro sobre o lava-loiça até que toda a água do depósito (Com os resíduos) escorra pela base.
- Após a operação, volte a colocar a vareta anti-calcário.
- Volte a ligar o ferro durante 2 minutos, colocando-o na vertical, para secar a base.
- Desligue o ferro e, quando a base estiver morna, limpe-a com um pano macio.
PARA OUTROS PROBLEMAS, DIRIJA-SE A UM SERVIÇO DE ASSISTÊNCIA TÉCNICA TEFAL
1
2
4
5
6
7
8
9
10
3
Max
1. Spray
2. Abertura de enchimento. Utilize apenas água da torneira.
3. Botão Vapor Duplo.Para obter mais vapor.
4. Cursor de regulação do vapor. Para regular o débito de vapor.
5. Botão Spay. Para humedecer a roupa.
6. Luz-piloto do termóstato.Apaga-se ao atingir a temperatura desejada.
7. Vareta anti-calcário. Limpe-a uma vez por mês.
8. Marca do nível máximo do depósito de água. Não ultrapasse este limite.
9. Botão de controlo da temperatura.
10. Base. Pouse o ferro na vertical.
A
C D
E
F
G
B
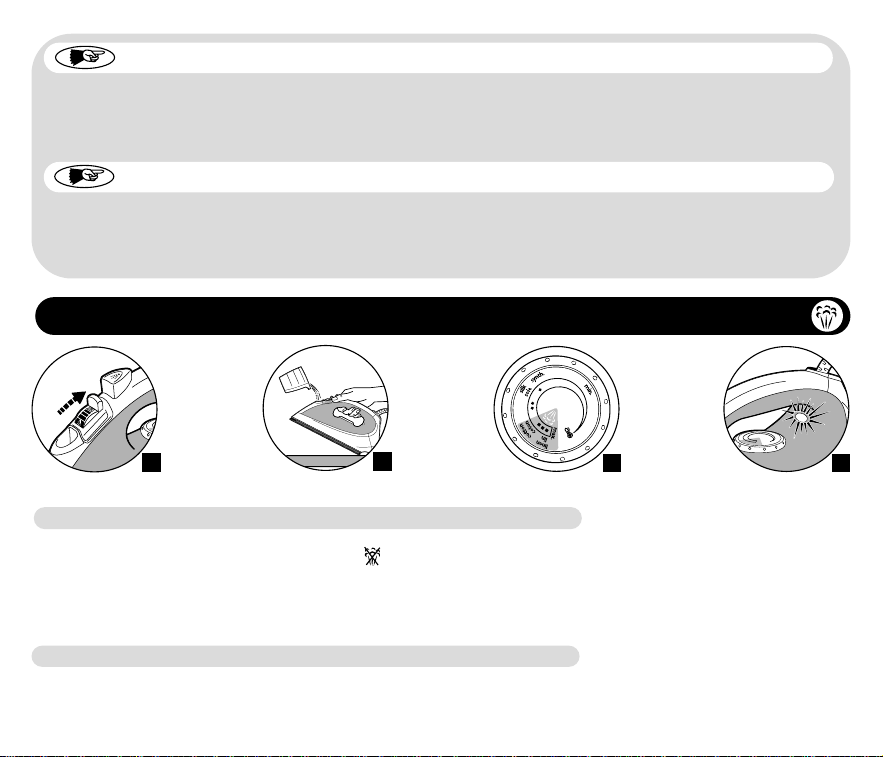
Português
029687 - 13/03
Leia atentamente o manual de instruções e guarde-o para futuras utilizações.
PRIMA
10
Que tipo de água utilizar ?
Este aparelho foi concebido para funcionar com água da torneira. No entanto, é necessário proceder regularmente à auto-limpeza
dos orifícios de vaporização para eliminar o calcário solto. Se a água que utiliza contém um elevado teor de calcário (poderá
informar-se na Câmara Municipal ou nos Serviços Municipalizados de Água e Saneamento), misture 50% de água da torneira e
50% de água desmineralizada disponível no mercado.
Que tipo de água evitar ?
Durante a evaporação, o calor concentra os elementos contidos na água.As águas abaixo indicadas podem conter resíduos
orgânicos ou substâncias minerais passíveis de provocar salpicos, corrimento de água acastanhada ou a deterioração prematura
do aparelho: água desmineralizada pura disponível no mercado, água própria para secadores de roupa, água perfumada, água
amaciada, água dos frigoríficos, água de baterias, água dos climatizadores, água destilada, água da chuva.
Atenção !
Antes de utilizar o seu ferro na posição vapor pela primeira vez, recomendamos que o ponha em
funcionamento durante alguns minutos em posição horizontal, longe da sua roupa. Nas mesmas condições,
accione várias vezes o comando Vapor Duplo.
Aquando das primeiras utilizações, o aparelho poderá libertar fumos e odores inofensivos. Este fenómeno sem
consequências desaparecerá rapidamente.
Atenção ! Retire a protecção da base do ferro antes de o ligar (consoante modelo).
1- ENGOMAR COM VAPOR
- Antes de encher o depósito, desligue o ferro.
- Coloque o comando do vapor na posição SECO (A)
- Coloque o ferro numa mesa consoante esquema (B) abaixo e encha o depósito pela abertura de enchimento.
- Não exceda a marca "MÁX." indicada no depósito.
Encha o depósito
- Regule o botão de controlo da temperatura em função do esquema abaixo (C), e conforme a seguinte tabela (ou na vertical)
.
- A luz piloto acende.Apagar-se-á quando a base estiver suficientemente quente (D).
Regule a temperatura
TECIDOS
POSIÇÃO DO BOTÃO DE
CONTROLO DA TEMPERATURA
POSIÇÃO DE REGULAÇÃO
DO VAPOR
LINHO
ALGODÃO
LÃ
SEDA
SINTÉTICOS
Poliester,Acetato,Acrílico, Poliamida
MAX
●●●
●●
●
●
Os nossos conselhos:
Tecidos e temperaturas:
• O seu ferro aquece rapidamente: comece pelos tecidos que só podem ser engomados a baixas temperaturas e termine
com os tecidos resistentes a temperaturas elevadas.
• Se diminuir a temperatura, espere que a luz piloto do termóstato volte a acender para engomar novamente.
• Se desejar engomar um tecido com fibras mistas, regule a temperatura na fibra mais delicada
- Para que não escorra água para a roupa:
• Desligue o vapor para engomar tecidos de seda ou sintéticos.
• Regule o vapor no mínimo para a lã.
- De vez em quando, pressione o botão de Vapor Duplo (F).
- O débito de vapor aumenta.
Que temperatura e vapor utilizar ?
Regule o vapor (E)
Para obter mais vapor
CONSELHOS DE SEGURANÇA
•
Atenção ! A voltagem da sua instalação eléctrica deve corresponder à do ferro (220-240V). Qualquer erro de ligação pode
causar danos irreversíveis no ferro e anular a garantia.
•
Este ferro deve ser obrigatoriamente ligado a uma tomada com ligação à terra. Se utilizar uma extensão, certifique-se de
que é do tipo bipolar (10A) com condutor de terra.
•
Se o cabo de alimentação estiver danificado, deverá ser imediatamente substituído num Serviço de Assistência Técnica Tefal,
para evitar qualquer perigo.
•
Nunca mergulhe o ferro na água!
•
O aparelho deve estar desligado sempre que encher ou esvaziar o depósito.
•
Em caso de queda do ferro, mande-o verificar por um profissional antes de voltar a utilizá-lo : os danos invisíveis podem
ser perigosos para a sua segurança.
•
A base do ferro pode atingir temperaturas elevadas:
- Nunca a toque.
- Deixe sempre arrefecer o ferro antes de o arrumar.
- Nunca deixe o ferro sem vigilância quando estiver ligado ou enquanto a base estiver quente.
- Mantenha sempre o ferro fora do alcance das crianças.
NUNCA DESMONTE O FERRO; DIRIJA-SE A UM SERVIÇO DE ASSISTÊNCIA TÉCNICA TEFAL
.
- Quando estiver a engomar com vapor ou a seco, carregue repetidamente no comando do Spray para
humedecer a roupa (G) e eliminar os vincos persistentes.
- Certifique-se de que o depósito tem água antes de utilizar esse comando.
Humedeça a roupa (spray)
5- PROBLEMAS COM O SEU FERRO
Problemas Possíveis causas Soluções
• A água escorre pelos orifícios da
base.
•
Dos orifícios da base, escorre água
castanha que mancha a sua roupa.
• A base está suja ou castanha,
podendo manchar a roupa.
• O vapor é insuficiente ou nulo.
• A base está riscada ou danificada.
•
A temperatura seleccionada não permite criar
vapor.
• Utiliza o vapor antes do ferro estar
suficientemente quente.
•
O débito de vapor é demasiado elevado.
•
Arrumou o ferro na horizontal sem esvaziar o
depósito e sem colocar o comando na posição
SECO.
•
Tem utilizado produtos químicos para eliminar o
calcário.
•
Tem utilizado água desmineralizada pura.
•
Os orifícios da base acumularam fibras da roupa
que queimaram.
•
Tem utilizado uma temperatura demasiado alta.
•
A sua roupa não está bem enxaguada ou costuma
utilizar goma.
•
O depósito está vazio.
•
A vareta anti-calcário está suja.
•
O ferro tem calcário.
•
Utilizou o ferro a seco durante demasiado tempo.
•
Pousou o ferro num suporte metálico.
•
Rode o botão de comando da temperatura até à
zona colorida
(de ●● até MÁX.).
•
Aguarde até que a luz-piloto se apague
•
Diminua o débito de vapor.
•
Consulte o capítulo
"Como arrumar o seu ferro".
•
Nunca deite qualquer tipo de produto químico
no depósito para eliminar o calcário.
•
Accione a Auto-limpeza e utilize água da torneira.
•
Accione a Auto-limpeza. Limpe a base com uma
esponja não metálica.Aspire os orifícios da base
de vez em quando.
•
Limpe a base conforme indicado anteriormente.
Consulte o quadro sobre a regulação das
temperaturas.
•
Limpe a base conforme indicado anteriormente.
Pulverize sempre a goma no avesso do lado a
engomar.
•
Encha o depósito com água da torneira.
•
Limpe a vareta anti-calcário.
•
Limpe a vareta anti-calcário e accione a
auto-limpeza.
•
Accione a auto-limpeza.
•
Coloque sempre o ferro na vertical.
4- COMO ARRUMAR O SEU FERRO
• Desligue-o e aguarde que a base arrefeça.
• Esvazie o depósito e coloque o comando de engomar na posição SECO ( ).
• Arrume-o na vertical.
2- ENGOMAR A SECO
- Regule a temperatura.
- Coloque o comando do vapor na posição SECO (ver esquema A) ( ).
- Pode engomar quando a luz piloto se apagar.
3- MANUTENÇÃO DO FERRO
ATENÇÃO !
Desligue o ferro e deixe-o arrefecer antes de o limpar.
• LIMPE A VARETA ANTI-CALCÁRIO
(uma vez por mês) :
- Desligue o ferro e esvazie o depósito.
- Coloque o comando do vapor na posição seco ( ).
- Para retirar a vareta anti-calcário, puxe-a para cima (H).
NUNCA TOQUE NA EXTREMIDADE DA VARETA.
- Mergulhe a vareta num copo com vinagre branco, ou sumo de limão natural,
durante 4 horas (I).
- Passe a vareta por água da torneira.
- volte a colocar a vareta anti-calcário
O FERRO NÃO FUNCIONA SEM A VARETA ANTI-CALCÁRIO.
H
I
• LIMPEZA DA BASE
- Limpe a base ainda morna com uma esponja não metálica húmida.
O nosso conselho :A auto-limpeza permite retardar a formação de calcário no seu ferro.
• ACTIVE A FUNÇÃO AUTO-LIMPEZA
Active a função de auto-limpeza uma vez por mês, para prolongar a vida do seu ferro.
- Desligue o ferro e coloque o comando de vapor na posição SECO ( ).
- Encha o depósito ao maximo (veja os nossos conselhos sobre o tipo de água a utilizar).
- Coloque o ferro na vertical e rode o botão de comando da temperatura até à posição MAX.
- Ligue o ferro e aguarde que a luz piloto se apague.
- Desligue o ferro e coloque-o na horizontal sobre o lava-loiça.
- Retire a vareta anti-calcário
.
- Agite ligeiramente o ferro sobre o lava-loiça até que toda a água do depósito (Com os resíduos) escorra pela base.
- Após a operação, volte a colocar a vareta anti-calcário.
- Volte a ligar o ferro durante 2 minutos, colocando-o na vertical, para secar a base.
- Desligue o ferro e, quando a base estiver morna, limpe-a com um pano macio.
PARA OUTROS PROBLEMAS, DIRIJA-SE A UM SERVIÇO DE ASSISTÊNCIA TÉCNICA TEFAL
1
2
4
5
6
7
8
9
10
3
Max
1. Spray
2. Abertura de enchimento. Utilize apenas água da torneira.
3. Botão Vapor Duplo.Para obter mais vapor.
4. Cursor de regulação do vapor. Para regular o débito de vapor.
5. Botão Spay. Para humedecer a roupa.
6. Luz-piloto do termóstato.Apaga-se ao atingir a temperatura desejada.
7. Vareta anti-calcário. Limpe-a uma vez por mês.
8. Marca do nível máximo do depósito de água. Não ultrapasse este limite.
9. Botão de controlo da temperatura.
10. Base. Pouse o ferro na vertical.
A
C D
E
F
G
B
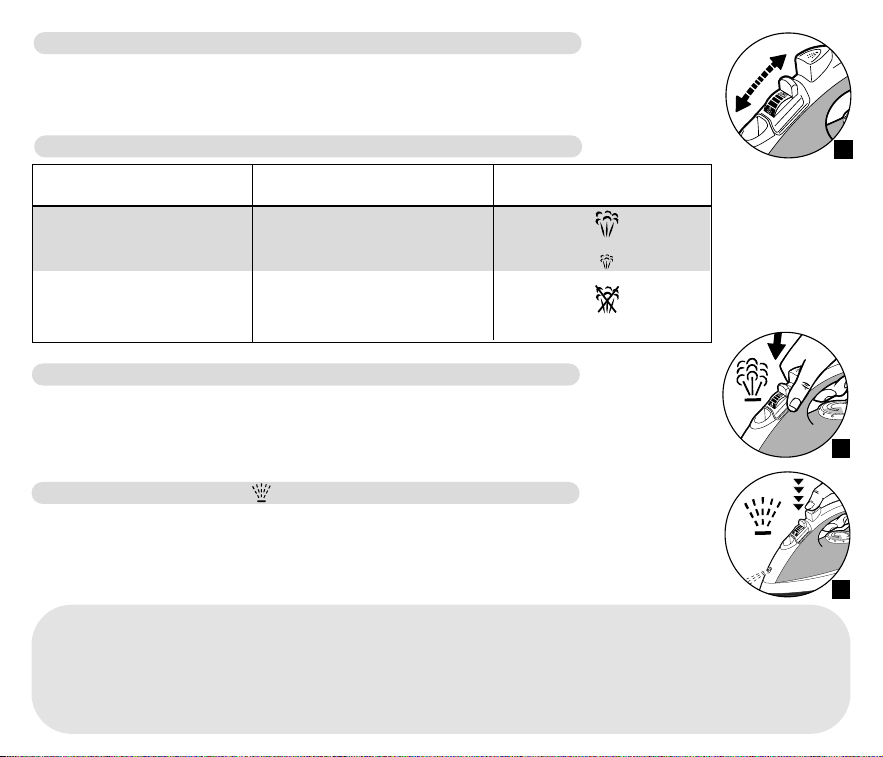
Português
029687 - 13/03
Leia atentamente o manual de instruções e guarde-o para futuras utilizações.
PRIMA
10
Que tipo de água utilizar ?
Este aparelho foi concebido para funcionar com água da torneira. No entanto, é necessário proceder regularmente à auto-limpeza
dos orifícios de vaporização para eliminar o calcário solto. Se a água que utiliza contém um elevado teor de calcário (poderá
informar-se na Câmara Municipal ou nos Serviços Municipalizados de Água e Saneamento), misture 50% de água da torneira e
50% de água desmineralizada disponível no mercado.
Que tipo de água evitar ?
Durante a evaporação, o calor concentra os elementos contidos na água.As águas abaixo indicadas podem conter resíduos
orgânicos ou substâncias minerais passíveis de provocar salpicos, corrimento de água acastanhada ou a deterioração prematura
do aparelho: água desmineralizada pura disponível no mercado, água própria para secadores de roupa, água perfumada, água
amaciada, água dos frigoríficos, água de baterias, água dos climatizadores, água destilada, água da chuva.
Atenção !
Antes de utilizar o seu ferro na posição vapor pela primeira vez, recomendamos que o ponha em
funcionamento durante alguns minutos em posição horizontal, longe da sua roupa. Nas mesmas condições,
accione várias vezes o comando Vapor Duplo.
Aquando das primeiras utilizações, o aparelho poderá libertar fumos e odores inofensivos. Este fenómeno sem
consequências desaparecerá rapidamente.
Atenção ! Retire a protecção da base do ferro antes de o ligar (consoante modelo).
1- ENGOMAR COM VAPOR
- Antes de encher o depósito, desligue o ferro.
- Coloque o comando do vapor na posição SECO (A)
- Coloque o ferro numa mesa consoante esquema (B) abaixo e encha o depósito pela abertura de enchimento.
- Não exceda a marca "MÁX." indicada no depósito.
Encha o depósito
- Regule o botão de controlo da temperatura em função do esquema abaixo (C), e conforme a seguinte tabela (ou na vertical)
.
- A luz piloto acende.Apagar-se-á quando a base estiver suficientemente quente (D).
Regule a temperatura
TECIDOS
POSIÇÃO DO BOTÃO DE
CONTROLO DA TEMPERATURA
POSIÇÃO DE REGULAÇÃO
DO VAPOR
LINHO
ALGODÃO
LÃ
SEDA
SINTÉTICOS
Poliester,Acetato,Acrílico, Poliamida
MAX
●●●
●●
●
●
Os nossos conselhos:
Tecidos e temperaturas:
• O seu ferro aquece rapidamente: comece pelos tecidos que só podem ser engomados a baixas temperaturas e termine
com os tecidos resistentes a temperaturas elevadas.
• Se diminuir a temperatura, espere que a luz piloto do termóstato volte a acender para engomar novamente.
• Se desejar engomar um tecido com fibras mistas, regule a temperatura na fibra mais delicada
- Para que não escorra água para a roupa:
• Desligue o vapor para engomar tecidos de seda ou sintéticos.
• Regule o vapor no mínimo para a lã.
- De vez em quando, pressione o botão de Vapor Duplo (F).
- O débito de vapor aumenta.
Que temperatura e vapor utilizar ?
Regule o vapor (E)
Para obter mais vapor
CONSELHOS DE SEGURANÇA
•
Atenção ! A voltagem da sua instalação eléctrica deve corresponder à do ferro (220-240V). Qualquer erro de ligação pode
causar danos irreversíveis no ferro e anular a garantia.
•
Este ferro deve ser obrigatoriamente ligado a uma tomada com ligação à terra. Se utilizar uma extensão, certifique-se de
que é do tipo bipolar (10A) com condutor de terra.
•
Se o cabo de alimentação estiver danificado, deverá ser imediatamente substituído num Serviço de Assistência Técnica Tefal,
para evitar qualquer perigo.
•
Nunca mergulhe o ferro na água!
•
O aparelho deve estar desligado sempre que encher ou esvaziar o depósito.
•
Em caso de queda do ferro, mande-o verificar por um profissional antes de voltar a utilizá-lo : os danos invisíveis podem
ser perigosos para a sua segurança.
•
A base do ferro pode atingir temperaturas elevadas:
- Nunca a toque.
- Deixe sempre arrefecer o ferro antes de o arrumar.
- Nunca deixe o ferro sem vigilância quando estiver ligado ou enquanto a base estiver quente.
- Mantenha sempre o ferro fora do alcance das crianças.
NUNCA DESMONTE O FERRO; DIRIJA-SE A UM SERVIÇO DE ASSISTÊNCIA TÉCNICA TEFAL
.
- Quando estiver a engomar com vapor ou a seco, carregue repetidamente no comando do Spray para
humedecer a roupa (G) e eliminar os vincos persistentes.
- Certifique-se de que o depósito tem água antes de utilizar esse comando.
Humedeça a roupa (spray)
5- PROBLEMAS COM O SEU FERRO
Problemas Possíveis causas Soluções
• A água escorre pelos orifícios da
base.
•
Dos orifícios da base, escorre água
castanha que mancha a sua roupa.
• A base está suja ou castanha,
podendo manchar a roupa.
• O vapor é insuficiente ou nulo.
• A base está riscada ou danificada.
•
A temperatura seleccionada não permite criar
vapor.
• Utiliza o vapor antes do ferro estar
suficientemente quente.
•
O débito de vapor é demasiado elevado.
•
Arrumou o ferro na horizontal sem esvaziar o
depósito e sem colocar o comando na posição
SECO.
•
Tem utilizado produtos químicos para eliminar o
calcário.
•
Tem utilizado água desmineralizada pura.
•
Os orifícios da base acumularam fibras da roupa
que queimaram.
•
Tem utilizado uma temperatura demasiado alta.
•
A sua roupa não está bem enxaguada ou costuma
utilizar goma.
•
O depósito está vazio.
•
A vareta anti-calcário está suja.
•
O ferro tem calcário.
•
Utilizou o ferro a seco durante demasiado tempo.
•
Pousou o ferro num suporte metálico.
•
Rode o botão de comando da temperatura até à
zona colorida
(de ●● até MÁX.).
•
Aguarde até que a luz-piloto se apague
•
Diminua o débito de vapor.
•
Consulte o capítulo
"Como arrumar o seu ferro".
•
Nunca deite qualquer tipo de produto químico
no depósito para eliminar o calcário.
•
Accione a Auto-limpeza e utilize água da torneira.
•
Accione a Auto-limpeza. Limpe a base com uma
esponja não metálica.Aspire os orifícios da base
de vez em quando.
•
Limpe a base conforme indicado anteriormente.
Consulte o quadro sobre a regulação das
temperaturas.
•
Limpe a base conforme indicado anteriormente.
Pulverize sempre a goma no avesso do lado a
engomar.
•
Encha o depósito com água da torneira.
•
Limpe a vareta anti-calcário.
•
Limpe a vareta anti-calcário e accione a
auto-limpeza.
•
Accione a auto-limpeza.
•
Coloque sempre o ferro na vertical.
4- COMO ARRUMAR O SEU FERRO
• Desligue-o e aguarde que a base arrefeça.
• Esvazie o depósito e coloque o comando de engomar na posição SECO ( ).
• Arrume-o na vertical.
2- ENGOMAR A SECO
- Regule a temperatura.
- Coloque o comando do vapor na posição SECO (ver esquema A) ( ).
- Pode engomar quando a luz piloto se apagar.
3- MANUTENÇÃO DO FERRO
ATENÇÃO !
Desligue o ferro e deixe-o arrefecer antes de o limpar.
• LIMPE A VARETA ANTI-CALCÁRIO
(uma vez por mês) :
- Desligue o ferro e esvazie o depósito.
- Coloque o comando do vapor na posição seco ( ).
- Para retirar a vareta anti-calcário, puxe-a para cima (H).
NUNCA TOQUE NA EXTREMIDADE DA VARETA.
- Mergulhe a vareta num copo com vinagre branco, ou sumo de limão natural,
durante 4 horas (I).
- Passe a vareta por água da torneira.
- volte a colocar a vareta anti-calcário
O FERRO NÃO FUNCIONA SEM A VARETA ANTI-CALCÁRIO.
H
I
• LIMPEZA DA BASE
- Limpe a base ainda morna com uma esponja não metálica húmida.
O nosso conselho :A auto-limpeza permite retardar a formação de calcário no seu ferro.
• ACTIVE A FUNÇÃO AUTO-LIMPEZA
Active a função de auto-limpeza uma vez por mês, para prolongar a vida do seu ferro.
- Desligue o ferro e coloque o comando de vapor na posição SECO ( ).
- Encha o depósito ao maximo (veja os nossos conselhos sobre o tipo de água a utilizar).
- Coloque o ferro na vertical e rode o botão de comando da temperatura até à posição MAX.
- Ligue o ferro e aguarde que a luz piloto se apague.
- Desligue o ferro e coloque-o na horizontal sobre o lava-loiça.
- Retire a vareta anti-calcário
.
- Agite ligeiramente o ferro sobre o lava-loiça até que toda a água do depósito (Com os resíduos) escorra pela base.
- Após a operação, volte a colocar a vareta anti-calcário.
- Volte a ligar o ferro durante 2 minutos, colocando-o na vertical, para secar a base.
- Desligue o ferro e, quando a base estiver morna, limpe-a com um pano macio.
PARA OUTROS PROBLEMAS, DIRIJA-SE A UM SERVIÇO DE ASSISTÊNCIA TÉCNICA TEFAL
1
2
4
5
6
7
8
9
10
3
Max
1. Spray
2. Abertura de enchimento. Utilize apenas água da torneira.
3. Botão Vapor Duplo.Para obter mais vapor.
4. Cursor de regulação do vapor. Para regular o débito de vapor.
5. Botão Spay. Para humedecer a roupa.
6. Luz-piloto do termóstato.Apaga-se ao atingir a temperatura desejada.
7. Vareta anti-calcário. Limpe-a uma vez por mês.
8. Marca do nível máximo do depósito de água. Não ultrapasse este limite.
9. Botão de controlo da temperatura.
10. Base. Pouse o ferro na vertical.
A
C D
E
F
G
B
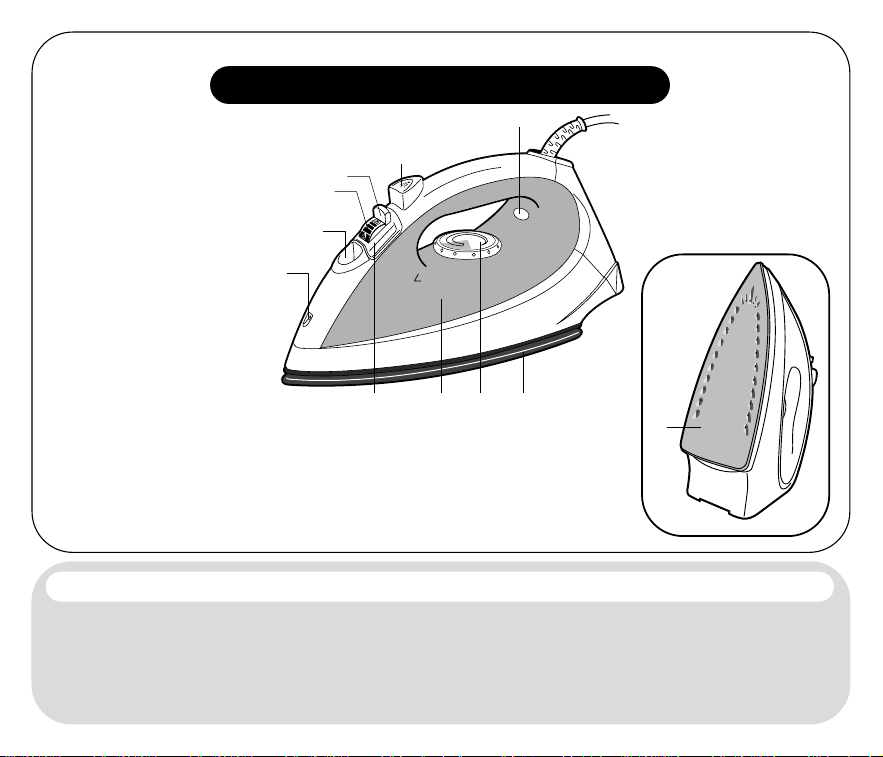
Suomi
029687 - 13/03
Lue käyttöohje huolellisesti ja säilytä se myöhempää käyttöä varten.
PRIMA
10
Mitä vettä tulisi käyttää ?
Voit käyttää vesijohtovettä. Jotta vesijohtoveden kalkki ei kertyisi silitysrautaan, rauta tulisi puhdistaa säännöllisesti automaattisella
kalkinpoistotoiminnolla. Jos vesi on erittäin kalkkipitoista (tarkista asia paikallisilta viranomaisilta), voit sekoittaa vesijohtovettä
kaupasta saatavaan suodatettuun veteen. Sekoitussuhde on 50 % vesijohtovettä ja 50 % suodatettua vettä.
Mitä vesiä ei tulisi käyttää ?
Kuumuus aiheuttaa haihtumista, jolloin vedessä olevat mineraalit tiivistyvät. Seuraavat vedet sisältävät orgaanisia jätteitä tai
mineraaleja, jotka voivat aiheuttaa roiskeita ja ruskeita valumia tai kuluttaa silitysrautaa ennenaikaisesti: kaupasta saatava puhdas
suodatettu vesi, kuivauskoneiden vesi, hajustettu vesi, pehmennetty vesi, jääkaappien, pattereiden ja tuulettimien vesi, tislattu vesi ja
sadevesi.
Huomio!
Kun käytät silitysraudan höyrytoimintoa ensimmäistä kertaa, kytke silitysrauta verkkovirtaan, valitse höyrytoiminto
ja anna raudan toimia hetki, ennen kuin ryhdyt silittämään vaatetta. Paina samalla lisähöyrypainiketta useita
kertoja.
Ensimmäisellä käyttökerralla silitysraudasta saattaa lähteä savua tai hajua.Tämä ei kuitenkaan ole vaarallista ja
lakkaa pian. Huomio! Poista pohjan suojakelmu (mallikohtainen) ennen raudan lämmittämistä.
Poista suojakelmu (mallikohtainen) ennen raudan lämmittämistä.
1- HÖYRYSILITYS
- Irrota virtajohto pistorasiasta ennen säiliön täyttämistä.
- Aseta höyrynsäädin asentoon KUIVA (A)
- Aseta silitysrauta pöydälle alla olevan kuvan (B) mukaisesti ja täytä säiliö.
- Älä ylitä säiliön MAX-merkkiä täyttäessäsi säiliötä pystyasennossa.
Säiliön täyttö
- Säädä lämpötilanvalitsinta alla olevan kuvan (C) mukaisesti ja valitse oikea lämpötila alla olevasta taulukosta.
- Merkkivalo syttyy. Merkkivalo sammuu, kun silitysrauta on kuumentunut valittuun lämpötilaan (D).
Lämpötilan säätö
KANGAS
LÄMPÖTILANSÄÄTIMEN
ASENTO
HÖYRYNSÄÄTIMEN
ASENTO
PELLAVA
PUUVILLA
VILLA
SILKKI
SYNTEETTINEN
Polyesteri, asetaatti, akryyli, polyamidi
MAX
●●●
●●
●
●
= STEAM ZONE
Vinkki :
Kangas ja silityslämpötila:
•
Rauta lämpenee nopeasti.Aloita ensin matalaa lämpötilaa vaativista vaatteista ja silitä lopuksi kuumempaa lämpötilaa
vaativat vaatteet.
•
Kun muutat lämpötilan säätöä, odota valon syttymistä, ennen kuin jatkat silitystä.
•
Kun silität erilaisia kuituja sisältävää kangasta, säädä silityslämpötila matalinta lämpötilaa vaativan kankaan mukaan.
- Jotta silitettävä kangas ei tahrautuisi vesiroiskeista
• kytke höyry pois päältä, kun silität silkkiä tai synteettisiä kankaita.
• säädä höyry minimiasentoon, kun silität villakangasta.
- Kun käytät höyrytoimintoa tai silität ilman höyryä, kostuta kangas painamalla suihkutuspainiketta useita
kertoja peräkkäin (G) ja silitä rypyt.
- Varmista, että säiliössä on vettä ennen kuin käytät suihkutustoimintoa.
Oikean lämpötilan ja höyryn määrän valinta ?
Höyryn säätö (E)
Kankaan kostutus (suihkutussuutin)
TURVALLISUUSOHJEET
•
Huomio! Käytettävän verkkovirran voimakkuuden on vastattava silitysraudan verkkovirtaa (220-240 V).Kytkentävirhe voi
aiheuttaa korjaamatonta vahinkoa ja mitätöidä takuun.
•
Silitysrauta on ehdottomasti kytkettävä maadoitettuun pistorasiaan. Jos käytät jatkojohtoa, tarkista, että johto on
kaksinapainen (10A) ja että siinä on maadoitusjohdin.
•
Jos virtajohto on vahingoittunut, vaihdata se välittömästi uuteen valtuutetussa huoltoliikkeessä.
•
Älä koskaan upota silitysrautaa veteen!
•
Silitysrauta ei saa olla kytkettynä verkkovirtaan ennen säiliön täyttöä tai tyhjennystä.
•
Jos silitysrauta on pudonnut, tarkistuta se ammattilaisella ennen käyttöä. Näkymättömät vauriot voivat olla hengenvaarallisia.
•
Silitysraudan pohja voi olla erittäin kuuma:
- Älä koskaan kosketa kuumaa pohjaa.
- Anna silitysraudan jäähtyä, aina ennen kuin asetat sen säilytyspaikalleen.
- Älä koskaan jätä silitysrautaa valvomatta, kun se on kytkettynä pistorasiaan tai sen pohja on vielä kuuma.
- Pidä silitysrauta pois lasten ulottuvilta.
ÄLÄ KOSKAAN YRITÄ ITSE KORJATA TAI AVATA SILITYSRAUTAA,
VAAN VIE SE VALTUUTETTUUN HUOLTOLIIKKEESEEN.
- Paina lisähöyrypainiketta aika ajoin (F).
- Höyryä tulee voimakkaammin
Lisähöyryn käyttö ryppyjen silitykseen
5- ONGELMATILANTEET
Ongelma Mahdollisia syitä Ratkaisu
• Pohjan rei’istä vuotaa vettä.
•
Pohjan rei’istä valuu ruskeaa nestettä,
joka likaa silitettävän kankaan.
• Silitysraudan pohja on likainen tai
ruskea ja tahraa silitettävän kankaan.
• Höyryä syntyy vähän tai ei ollenkaan.
• Pohja on naarmuuntunut tai
vahingoittunut.
•
Valitussa lämpötilassa ei muodostu höyryä.
•
Höyrytoiminto on käytössä,mutta rauta ei ole
riittävän kuuma.
•
Höyryteho on liian suuri.
•
Silitysrauta on asetettu vaakatasoon,mutta sitä ei
ole tyhjennetty eikä höyrynsäädintä ole asetettu
KUIVA-asentoon.
•
Olet käyttänyt kemiallista kalkinpoistoainetta.
•
Olet käyttänyt puhdasta suodatettua vettä.
•
Kankaan kuidut ovat kerääntyneet pohjan reikiin ja
hiiltyneet.
•
Lämpötila on liian korkea.
•
Kangas ei ole riittävän hyvin huuhdeltu tai siinä on
tärkkiä.
•
Vesisäiliö on tyhjä.
•
Kalkinpoistopuikko on likainen.
•
Silitysrauta on kalkkeutunut.
•
Silitysrautaa on käytetty liian kauan kuivana.
•
Silitysrauta on laskettu silityslaudan
metallipidikkeelle.
•
Aseta lämpötilanvalitsin värilliselle alueelle
(asento
●● - MAX)
•
Odota, että merkkivalo syttyy.
•
Vähennä tehoa.
•
Katso lisätietoja kappaleesta
"Silitysraudan säilytys".
•
Älä lisää veteen kalkinpoistoaineita.
•
Tee automaattinen puhdistus ja käytä
vesijohtovettä
•
Automaattinen puhdistus :
Puhdista pohja pehmeällä liinalla.Tyhjennä
pohjan reiät säännöllisesti.
•
Puhdista pohja yllä olevan ohjeen mukaisesti.
Valitse oikea lämpötila lämpötilataulukosta.
•
Puhdista pohja yllä olevan ohjeen mukaisesti.
Sirottele tärkki vaatteen nurjalle puolelle.
•
Täytä säiliö vesijohtovedellä.
•
Puhdista kalkinpoistopuikko.
•
Puhdista kalkinpoistopuikko ja tee
automaattinen puhdistus.
•
Tee automaattinen puhdistus.
•
Aseta silitysrauta aina pystyasentoon.
4- SILITYSRAUDAN SÄILYTYS
• Irrota johto pistorasiasta ja odota, että pohja on jäähtynyt.
• Tyhjennä säiliö ja käännä höyrynsäädin KUIVA-asentoon ( ).
• Aseta silitysrauta pystyasentoon.
2- KUIVASILITYS
- Säädä lämpötila.
- Aseta höyrynsäädin asentoon KUIVA (katso kuvaa A) ( ).
- Voit aloittaa silityksen, kun merkkivalo on sammunut.
3- SILITYSRAUDAN HOITO
HUOMIO :
Irrota johto pistorasiasta ja anna silitysraudan jäähtyä ennen puhdistusta.
• KALKINPOISTOPUIKON PUHDISTAMINEN
(kerran kuukaudessa) :
- Irrota johto pistorasiasta ja tyhjennä vesisäiliö.
- Aseta höyrynsäädin asentoon KUIVA
- Vedä kalkinpoistopuikko ylös sen reunoissa olevista pidikkeistä (H).
ÄLÄ KOSKAAN KOSKETA PUIKON PÄÄTÄ.
- Anna puikon liota neljän tunnin ajan etikassa tai sitruunamehussa (I).
- Huuhtele puikko juoksevan veden alla.
- Vaihda kalkinestoventtiili
SILITYSRAUTA EI TOIMI ILMAN KALKINPOISTOPUIKKOA.
H
I
• POHJAN PUHDISTUS
- Kun pohja on vielä lämmin, puhdista se kostealla ja pehmeällä liinalla.
Vinkki :Automaattinen puhdistus vähentää silitysraudan kalkkeutumista
• AUTOMAATTINEN PUHDISTUS:
Jotta silitysrautasi kestäisi pidempään, sinun tulisi tehdä automaattinen puhdistus kerran kuukaudessa.
- Irrota johto pistorasiasta ja käännä höyrynsäädin asentoon KUIVA .
- Täytä säiliö MAX-merkkiin asti (ks. ohjeet veden käytöstä).
- Aseta silitysrauta pystyasentoon ja käännä lämpötilansäädin MAX-asentoon.
- Irrota johto pistorasiasta ja odota kunnes merkkivalo sammuu.
- Irrota johto pistorasiasta ja pidä silitysrautaa vaakatasossa tiskialtaan yläpuolella.
- Nosta kalkinpoistotikku ylös,mutta älä vedä sitä kokonaan ulos.
- Liikuta silitysrautaa kevyesti vaakatasossa tiskialtaan yläpuolella kunnes säiliö on täysin tyhjentynyt vedestä ja epäpuhtauksista
silitysraudan pohjan kautta.
- Lopuksi, laita kalkinpoistotikku takaisin paikoilleen.
- Kuivaa silitysraudan pohja kytkemällä silitysrauta muutamaksi minuutiksi pistorasiaan.
- Irrota johto pistorasiasta, ja kun pohja on jäähtynyt riittävästi, kuivaa se pehmeällä liinalla.
MUIDEN ONGELMIEN ILMETESSÄ OTA YHTEYTTÄ VALTUUTETTUUN HUOLTOLIIKKEESEEN
1
2
4
5
6
7
8
9
10
3
Max
1. Suihkutustoiminto.
2. Säiliön täyttölokero : Käytä vain vesijohtovettä.
3. Lisähöyrypainike :Ryppyjen silitykseen.
4. Höyrynsäädin : Säätää höyryn määrää.
5. Suihkutuspainike kankaan kostuttamiseen.
6. Lämpötilan merkkivalo : Valo sammuu, kun silitysrauta on kuumentunut valittuun
lämpötilaan.
7. Kalkinpoistopuikko : Puhdistus kerran kuukaudessa
8. Vesisäiliön enimmäistäytön merkki : Älä ylitä MAX-merkkiä.
9. Lämpötilansäädin.
10. Pohja : Säilytä rauta pystyasennossa.
A
C D
E
F
G
B

Suomi
029687 - 13/03
Lue käyttöohje huolellisesti ja säilytä se myöhempää käyttöä varten.
PRIMA
10
Mitä vettä tulisi käyttää ?
Voit käyttää vesijohtovettä. Jotta vesijohtoveden kalkki ei kertyisi silitysrautaan, rauta tulisi puhdistaa säännöllisesti automaattisella
kalkinpoistotoiminnolla. Jos vesi on erittäin kalkkipitoista (tarkista asia paikallisilta viranomaisilta), voit sekoittaa vesijohtovettä
kaupasta saatavaan suodatettuun veteen. Sekoitussuhde on 50 % vesijohtovettä ja 50 % suodatettua vettä.
Mitä vesiä ei tulisi käyttää ?
Kuumuus aiheuttaa haihtumista, jolloin vedessä olevat mineraalit tiivistyvät. Seuraavat vedet sisältävät orgaanisia jätteitä tai
mineraaleja, jotka voivat aiheuttaa roiskeita ja ruskeita valumia tai kuluttaa silitysrautaa ennenaikaisesti: kaupasta saatava puhdas
suodatettu vesi, kuivauskoneiden vesi, hajustettu vesi, pehmennetty vesi, jääkaappien, pattereiden ja tuulettimien vesi, tislattu vesi ja
sadevesi.
Huomio!
Kun käytät silitysraudan höyrytoimintoa ensimmäistä kertaa, kytke silitysrauta verkkovirtaan, valitse höyrytoiminto
ja anna raudan toimia hetki, ennen kuin ryhdyt silittämään vaatetta. Paina samalla lisähöyrypainiketta useita
kertoja.
Ensimmäisellä käyttökerralla silitysraudasta saattaa lähteä savua tai hajua.Tämä ei kuitenkaan ole vaarallista ja
lakkaa pian. Huomio! Poista pohjan suojakelmu (mallikohtainen) ennen raudan lämmittämistä.
Poista suojakelmu (mallikohtainen) ennen raudan lämmittämistä.
1- HÖYRYSILITYS
- Irrota virtajohto pistorasiasta ennen säiliön täyttämistä.
- Aseta höyrynsäädin asentoon KUIVA (A)
- Aseta silitysrauta pöydälle alla olevan kuvan (B) mukaisesti ja täytä säiliö.
- Älä ylitä säiliön MAX-merkkiä täyttäessäsi säiliötä pystyasennossa.
Säiliön täyttö
- Säädä lämpötilanvalitsinta alla olevan kuvan (C) mukaisesti ja valitse oikea lämpötila alla olevasta taulukosta.
- Merkkivalo syttyy. Merkkivalo sammuu, kun silitysrauta on kuumentunut valittuun lämpötilaan (D).
Lämpötilan säätö
KANGAS
LÄMPÖTILANSÄÄTIMEN
ASENTO
HÖYRYNSÄÄTIMEN
ASENTO
PELLAVA
PUUVILLA
VILLA
SILKKI
SYNTEETTINEN
Polyesteri, asetaatti, akryyli, polyamidi
MAX
●●●
●●
●
●
= STEAM ZONE
Vinkki :
Kangas ja silityslämpötila:
•
Rauta lämpenee nopeasti.Aloita ensin matalaa lämpötilaa vaativista vaatteista ja silitä lopuksi kuumempaa lämpötilaa
vaativat vaatteet.
•
Kun muutat lämpötilan säätöä, odota valon syttymistä, ennen kuin jatkat silitystä.
•
Kun silität erilaisia kuituja sisältävää kangasta, säädä silityslämpötila matalinta lämpötilaa vaativan kankaan mukaan.
- Jotta silitettävä kangas ei tahrautuisi vesiroiskeista
• kytke höyry pois päältä, kun silität silkkiä tai synteettisiä kankaita.
• säädä höyry minimiasentoon, kun silität villakangasta.
- Kun käytät höyrytoimintoa tai silität ilman höyryä, kostuta kangas painamalla suihkutuspainiketta useita
kertoja peräkkäin (G) ja silitä rypyt.
- Varmista, että säiliössä on vettä ennen kuin käytät suihkutustoimintoa.
Oikean lämpötilan ja höyryn määrän valinta ?
Höyryn säätö (E)
Kankaan kostutus (suihkutussuutin)
TURVALLISUUSOHJEET
•
Huomio! Käytettävän verkkovirran voimakkuuden on vastattava silitysraudan verkkovirtaa (220-240 V).Kytkentävirhe voi
aiheuttaa korjaamatonta vahinkoa ja mitätöidä takuun.
•
Silitysrauta on ehdottomasti kytkettävä maadoitettuun pistorasiaan. Jos käytät jatkojohtoa, tarkista, että johto on
kaksinapainen (10A) ja että siinä on maadoitusjohdin.
•
Jos virtajohto on vahingoittunut, vaihdata se välittömästi uuteen valtuutetussa huoltoliikkeessä.
•
Älä koskaan upota silitysrautaa veteen!
•
Silitysrauta ei saa olla kytkettynä verkkovirtaan ennen säiliön täyttöä tai tyhjennystä.
•
Jos silitysrauta on pudonnut, tarkistuta se ammattilaisella ennen käyttöä. Näkymättömät vauriot voivat olla hengenvaarallisia.
•
Silitysraudan pohja voi olla erittäin kuuma:
- Älä koskaan kosketa kuumaa pohjaa.
- Anna silitysraudan jäähtyä, aina ennen kuin asetat sen säilytyspaikalleen.
- Älä koskaan jätä silitysrautaa valvomatta, kun se on kytkettynä pistorasiaan tai sen pohja on vielä kuuma.
- Pidä silitysrauta pois lasten ulottuvilta.
ÄLÄ KOSKAAN YRITÄ ITSE KORJATA TAI AVATA SILITYSRAUTAA,
VAAN VIE SE VALTUUTETTUUN HUOLTOLIIKKEESEEN.
- Paina lisähöyrypainiketta aika ajoin (F).
- Höyryä tulee voimakkaammin
Lisähöyryn käyttö ryppyjen silitykseen
5- ONGELMATILANTEET
Ongelma Mahdollisia syitä Ratkaisu
• Pohjan rei’istä vuotaa vettä.
•
Pohjan rei’istä valuu ruskeaa nestettä,
joka likaa silitettävän kankaan.
• Silitysraudan pohja on likainen tai
ruskea ja tahraa silitettävän kankaan.
• Höyryä syntyy vähän tai ei ollenkaan.
• Pohja on naarmuuntunut tai
vahingoittunut.
•
Valitussa lämpötilassa ei muodostu höyryä.
•
Höyrytoiminto on käytössä,mutta rauta ei ole
riittävän kuuma.
•
Höyryteho on liian suuri.
•
Silitysrauta on asetettu vaakatasoon,mutta sitä ei
ole tyhjennetty eikä höyrynsäädintä ole asetettu
KUIVA-asentoon.
•
Olet käyttänyt kemiallista kalkinpoistoainetta.
•
Olet käyttänyt puhdasta suodatettua vettä.
•
Kankaan kuidut ovat kerääntyneet pohjan reikiin ja
hiiltyneet.
•
Lämpötila on liian korkea.
•
Kangas ei ole riittävän hyvin huuhdeltu tai siinä on
tärkkiä.
•
Vesisäiliö on tyhjä.
•
Kalkinpoistopuikko on likainen.
•
Silitysrauta on kalkkeutunut.
•
Silitysrautaa on käytetty liian kauan kuivana.
•
Silitysrauta on laskettu silityslaudan
metallipidikkeelle.
•
Aseta lämpötilanvalitsin värilliselle alueelle
(asento
●● - MAX)
•
Odota, että merkkivalo syttyy.
•
Vähennä tehoa.
•
Katso lisätietoja kappaleesta
"Silitysraudan säilytys".
•
Älä lisää veteen kalkinpoistoaineita.
•
Tee automaattinen puhdistus ja käytä
vesijohtovettä
•
Automaattinen puhdistus :
Puhdista pohja pehmeällä liinalla.Tyhjennä
pohjan reiät säännöllisesti.
•
Puhdista pohja yllä olevan ohjeen mukaisesti.
Valitse oikea lämpötila lämpötilataulukosta.
•
Puhdista pohja yllä olevan ohjeen mukaisesti.
Sirottele tärkki vaatteen nurjalle puolelle.
•
Täytä säiliö vesijohtovedellä.
•
Puhdista kalkinpoistopuikko.
•
Puhdista kalkinpoistopuikko ja tee
automaattinen puhdistus.
•
Tee automaattinen puhdistus.
•
Aseta silitysrauta aina pystyasentoon.
4- SILITYSRAUDAN SÄILYTYS
• Irrota johto pistorasiasta ja odota, että pohja on jäähtynyt.
• Tyhjennä säiliö ja käännä höyrynsäädin KUIVA-asentoon ( ).
• Aseta silitysrauta pystyasentoon.
2- KUIVASILITYS
- Säädä lämpötila.
- Aseta höyrynsäädin asentoon KUIVA (katso kuvaa A) ( ).
- Voit aloittaa silityksen, kun merkkivalo on sammunut.
3- SILITYSRAUDAN HOITO
HUOMIO :
Irrota johto pistorasiasta ja anna silitysraudan jäähtyä ennen puhdistusta.
• KALKINPOISTOPUIKON PUHDISTAMINEN
(kerran kuukaudessa) :
- Irrota johto pistorasiasta ja tyhjennä vesisäiliö.
- Aseta höyrynsäädin asentoon KUIVA
- Vedä kalkinpoistopuikko ylös sen reunoissa olevista pidikkeistä (H).
ÄLÄ KOSKAAN KOSKETA PUIKON PÄÄTÄ.
- Anna puikon liota neljän tunnin ajan etikassa tai sitruunamehussa (I).
- Huuhtele puikko juoksevan veden alla.
- Vaihda kalkinestoventtiili
SILITYSRAUTA EI TOIMI ILMAN KALKINPOISTOPUIKKOA.
H
I
• POHJAN PUHDISTUS
- Kun pohja on vielä lämmin, puhdista se kostealla ja pehmeällä liinalla.
Vinkki :Automaattinen puhdistus vähentää silitysraudan kalkkeutumista
• AUTOMAATTINEN PUHDISTUS:
Jotta silitysrautasi kestäisi pidempään, sinun tulisi tehdä automaattinen puhdistus kerran kuukaudessa.
- Irrota johto pistorasiasta ja käännä höyrynsäädin asentoon KUIVA .
- Täytä säiliö MAX-merkkiin asti (ks. ohjeet veden käytöstä).
- Aseta silitysrauta pystyasentoon ja käännä lämpötilansäädin MAX-asentoon.
- Irrota johto pistorasiasta ja odota kunnes merkkivalo sammuu.
- Irrota johto pistorasiasta ja pidä silitysrautaa vaakatasossa tiskialtaan yläpuolella.
- Nosta kalkinpoistotikku ylös,mutta älä vedä sitä kokonaan ulos.
- Liikuta silitysrautaa kevyesti vaakatasossa tiskialtaan yläpuolella kunnes säiliö on täysin tyhjentynyt vedestä ja epäpuhtauksista
silitysraudan pohjan kautta.
- Lopuksi, laita kalkinpoistotikku takaisin paikoilleen.
- Kuivaa silitysraudan pohja kytkemällä silitysrauta muutamaksi minuutiksi pistorasiaan.
- Irrota johto pistorasiasta, ja kun pohja on jäähtynyt riittävästi, kuivaa se pehmeällä liinalla.
MUIDEN ONGELMIEN ILMETESSÄ OTA YHTEYTTÄ VALTUUTETTUUN HUOLTOLIIKKEESEEN
1
2
4
5
6
7
8
9
10
3
Max
1. Suihkutustoiminto.
2. Säiliön täyttölokero : Käytä vain vesijohtovettä.
3. Lisähöyrypainike : Ryppyjen silitykseen.
4. Höyrynsäädin : Säätää höyryn määrää.
5. Suihkutuspainike kankaan kostuttamiseen.
6. Lämpötilan merkkivalo : Valo sammuu, kun silitysrauta on kuumentunut valittuun
lämpötilaan.
7. Kalkinpoistopuikko : Puhdistus kerran kuukaudessa
8. Vesisäiliön enimmäistäytön merkki : Älä ylitä MAX-merkkiä.
9. Lämpötilansäädin.
10. Pohja : Säilytä rauta pystyasennossa.
A
C D
E
F
G
B
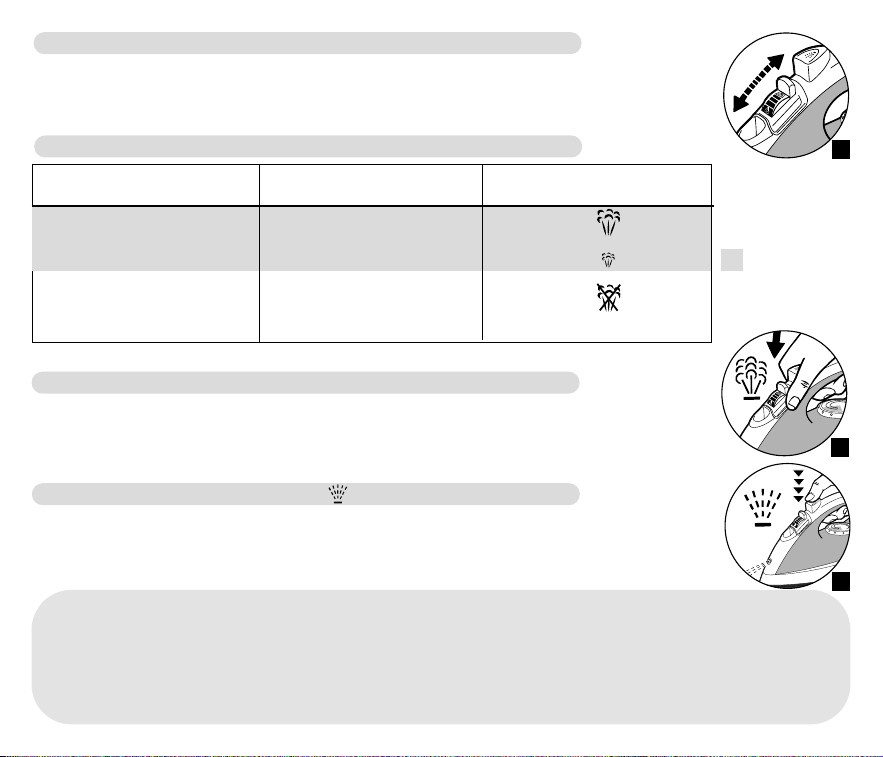
Suomi
029687 - 13/03
Lue käyttöohje huolellisesti ja säilytä se myöhempää käyttöä varten.
PRIMA
10
Mitä vettä tulisi käyttää ?
Voit käyttää vesijohtovettä. Jotta vesijohtoveden kalkki ei kertyisi silitysrautaan, rauta tulisi puhdistaa säännöllisesti automaattisella
kalkinpoistotoiminnolla. Jos vesi on erittäin kalkkipitoista (tarkista asia paikallisilta viranomaisilta), voit sekoittaa vesijohtovettä
kaupasta saatavaan suodatettuun veteen. Sekoitussuhde on 50 % vesijohtovettä ja 50 % suodatettua vettä.
Mitä vesiä ei tulisi käyttää ?
Kuumuus aiheuttaa haihtumista, jolloin vedessä olevat mineraalit tiivistyvät. Seuraavat vedet sisältävät orgaanisia jätteitä tai
mineraaleja, jotka voivat aiheuttaa roiskeita ja ruskeita valumia tai kuluttaa silitysrautaa ennenaikaisesti: kaupasta saatava puhdas
suodatettu vesi, kuivauskoneiden vesi, hajustettu vesi, pehmennetty vesi, jääkaappien, pattereiden ja tuulettimien vesi, tislattu vesi ja
sadevesi.
Huomio!
Kun käytät silitysraudan höyrytoimintoa ensimmäistä kertaa, kytke silitysrauta verkkovirtaan, valitse höyrytoiminto
ja anna raudan toimia hetki, ennen kuin ryhdyt silittämään vaatetta. Paina samalla lisähöyrypainiketta useita
kertoja.
Ensimmäisellä käyttökerralla silitysraudasta saattaa lähteä savua tai hajua.Tämä ei kuitenkaan ole vaarallista ja
lakkaa pian. Huomio! Poista pohjan suojakelmu (mallikohtainen) ennen raudan lämmittämistä.
Poista suojakelmu (mallikohtainen) ennen raudan lämmittämistä.
1- HÖYRYSILITYS
- Irrota virtajohto pistorasiasta ennen säiliön täyttämistä.
- Aseta höyrynsäädin asentoon KUIVA (A)
- Aseta silitysrauta pöydälle alla olevan kuvan (B) mukaisesti ja täytä säiliö.
- Älä ylitä säiliön MAX-merkkiä täyttäessäsi säiliötä pystyasennossa.
Säiliön täyttö
- Säädä lämpötilanvalitsinta alla olevan kuvan (C) mukaisesti ja valitse oikea lämpötila alla olevasta taulukosta.
- Merkkivalo syttyy. Merkkivalo sammuu, kun silitysrauta on kuumentunut valittuun lämpötilaan (D).
Lämpötilan säätö
KANGAS
LÄMPÖTILANSÄÄTIMEN
ASENTO
HÖYRYNSÄÄTIMEN
ASENTO
PELLAVA
PUUVILLA
VILLA
SILKKI
SYNTEETTINEN
Polyesteri, asetaatti, akryyli, polyamidi
MAX
●●●
●●
●
●
= STEAM ZONE
Vinkki :
Kangas ja silityslämpötila:
•
Rauta lämpenee nopeasti.Aloita ensin matalaa lämpötilaa vaativista vaatteista ja silitä lopuksi kuumempaa lämpötilaa
vaativat vaatteet.
•
Kun muutat lämpötilan säätöä, odota valon syttymistä, ennen kuin jatkat silitystä.
•
Kun silität erilaisia kuituja sisältävää kangasta, säädä silityslämpötila matalinta lämpötilaa vaativan kankaan mukaan.
- Jotta silitettävä kangas ei tahrautuisi vesiroiskeista
• kytke höyry pois päältä, kun silität silkkiä tai synteettisiä kankaita.
• säädä höyry minimiasentoon, kun silität villakangasta.
- Kun käytät höyrytoimintoa tai silität ilman höyryä, kostuta kangas painamalla suihkutuspainiketta useita
kertoja peräkkäin (G) ja silitä rypyt.
- Varmista, että säiliössä on vettä ennen kuin käytät suihkutustoimintoa.
Oikean lämpötilan ja höyryn määrän valinta ?
Höyryn säätö (E)
Kankaan kostutus (suihkutussuutin)
TURVALLISUUSOHJEET
•
Huomio! Käytettävän verkkovirran voimakkuuden on vastattava silitysraudan verkkovirtaa (220-240 V).Kytkentävirhe voi
aiheuttaa korjaamatonta vahinkoa ja mitätöidä takuun.
•
Silitysrauta on ehdottomasti kytkettävä maadoitettuun pistorasiaan. Jos käytät jatkojohtoa, tarkista, että johto on
kaksinapainen (10A) ja että siinä on maadoitusjohdin.
•
Jos virtajohto on vahingoittunut, vaihdata se välittömästi uuteen valtuutetussa huoltoliikkeessä.
•
Älä koskaan upota silitysrautaa veteen!
•
Silitysrauta ei saa olla kytkettynä verkkovirtaan ennen säiliön täyttöä tai tyhjennystä.
•
Jos silitysrauta on pudonnut, tarkistuta se ammattilaisella ennen käyttöä. Näkymättömät vauriot voivat olla hengenvaarallisia.
•
Silitysraudan pohja voi olla erittäin kuuma:
- Älä koskaan kosketa kuumaa pohjaa.
- Anna silitysraudan jäähtyä, aina ennen kuin asetat sen säilytyspaikalleen.
- Älä koskaan jätä silitysrautaa valvomatta, kun se on kytkettynä pistorasiaan tai sen pohja on vielä kuuma.
- Pidä silitysrauta pois lasten ulottuvilta.
ÄLÄ KOSKAAN YRITÄ ITSE KORJATA TAI AVATA SILITYSRAUTAA,
VAAN VIE SE VALTUUTETTUUN HUOLTOLIIKKEESEEN.
- Paina lisähöyrypainiketta aika ajoin (F).
- Höyryä tulee voimakkaammin
Lisähöyryn käyttö ryppyjen silitykseen
5- ONGELMATILANTEET
Ongelma Mahdollisia syitä Ratkaisu
• Pohjan rei’istä vuotaa vettä.
•
Pohjan rei’istä valuu ruskeaa nestettä,
joka likaa silitettävän kankaan.
• Silitysraudan pohja on likainen tai
ruskea ja tahraa silitettävän kankaan.
• Höyryä syntyy vähän tai ei ollenkaan.
• Pohja on naarmuuntunut tai
vahingoittunut.
•
Valitussa lämpötilassa ei muodostu höyryä.
•
Höyrytoiminto on käytössä,mutta rauta ei ole
riittävän kuuma.
•
Höyryteho on liian suuri.
•
Silitysrauta on asetettu vaakatasoon,mutta sitä ei
ole tyhjennetty eikä höyrynsäädintä ole asetettu
KUIVA-asentoon.
•
Olet käyttänyt kemiallista kalkinpoistoainetta.
•
Olet käyttänyt puhdasta suodatettua vettä.
•
Kankaan kuidut ovat kerääntyneet pohjan reikiin ja
hiiltyneet.
•
Lämpötila on liian korkea.
•
Kangas ei ole riittävän hyvin huuhdeltu tai siinä on
tärkkiä.
•
Vesisäiliö on tyhjä.
•
Kalkinpoistopuikko on likainen.
•
Silitysrauta on kalkkeutunut.
•
Silitysrautaa on käytetty liian kauan kuivana.
•
Silitysrauta on laskettu silityslaudan
metallipidikkeelle.
•
Aseta lämpötilanvalitsin värilliselle alueelle
(asento
●● - MAX)
•
Odota, että merkkivalo syttyy.
•
Vähennä tehoa.
•
Katso lisätietoja kappaleesta
"Silitysraudan säilytys".
•
Älä lisää veteen kalkinpoistoaineita.
•
Tee automaattinen puhdistus ja käytä
vesijohtovettä
•
Automaattinen puhdistus :
Puhdista pohja pehmeällä liinalla.Tyhjennä
pohjan reiät säännöllisesti.
•
Puhdista pohja yllä olevan ohjeen mukaisesti.
Valitse oikea lämpötila lämpötilataulukosta.
•
Puhdista pohja yllä olevan ohjeen mukaisesti.
Sirottele tärkki vaatteen nurjalle puolelle.
•
Täytä säiliö vesijohtovedellä.
•
Puhdista kalkinpoistopuikko.
•
Puhdista kalkinpoistopuikko ja tee
automaattinen puhdistus.
•
Tee automaattinen puhdistus.
•
Aseta silitysrauta aina pystyasentoon.
4- SILITYSRAUDAN SÄILYTYS
• Irrota johto pistorasiasta ja odota, että pohja on jäähtynyt.
• Tyhjennä säiliö ja käännä höyrynsäädin KUIVA-asentoon ( ).
• Aseta silitysrauta pystyasentoon.
2- KUIVASILITYS
- Säädä lämpötila.
- Aseta höyrynsäädin asentoon KUIVA (katso kuvaa A) ( ).
- Voit aloittaa silityksen, kun merkkivalo on sammunut.
3- SILITYSRAUDAN HOITO
HUOMIO :
Irrota johto pistorasiasta ja anna silitysraudan jäähtyä ennen puhdistusta.
• KALKINPOISTOPUIKON PUHDISTAMINEN
(kerran kuukaudessa) :
- Irrota johto pistorasiasta ja tyhjennä vesisäiliö.
- Aseta höyrynsäädin asentoon KUIVA
- Vedä kalkinpoistopuikko ylös sen reunoissa olevista pidikkeistä (H).
ÄLÄ KOSKAAN KOSKETA PUIKON PÄÄTÄ.
- Anna puikon liota neljän tunnin ajan etikassa tai sitruunamehussa (I).
- Huuhtele puikko juoksevan veden alla.
- Vaihda kalkinestoventtiili
SILITYSRAUTA EI TOIMI ILMAN KALKINPOISTOPUIKKOA.
H
I
• POHJAN PUHDISTUS
- Kun pohja on vielä lämmin, puhdista se kostealla ja pehmeällä liinalla.
Vinkki :Automaattinen puhdistus vähentää silitysraudan kalkkeutumista
• AUTOMAATTINEN PUHDISTUS:
Jotta silitysrautasi kestäisi pidempään, sinun tulisi tehdä automaattinen puhdistus kerran kuukaudessa.
- Irrota johto pistorasiasta ja käännä höyrynsäädin asentoon KUIVA .
- Täytä säiliö MAX-merkkiin asti (ks. ohjeet veden käytöstä).
- Aseta silitysrauta pystyasentoon ja käännä lämpötilansäädin MAX-asentoon.
- Irrota johto pistorasiasta ja odota kunnes merkkivalo sammuu.
- Irrota johto pistorasiasta ja pidä silitysrautaa vaakatasossa tiskialtaan yläpuolella.
- Nosta kalkinpoistotikku ylös,mutta älä vedä sitä kokonaan ulos.
- Liikuta silitysrautaa kevyesti vaakatasossa tiskialtaan yläpuolella kunnes säiliö on täysin tyhjentynyt vedestä ja epäpuhtauksista
silitysraudan pohjan kautta.
- Lopuksi, laita kalkinpoistotikku takaisin paikoilleen.
- Kuivaa silitysraudan pohja kytkemällä silitysrauta muutamaksi minuutiksi pistorasiaan.
- Irrota johto pistorasiasta, ja kun pohja on jäähtynyt riittävästi, kuivaa se pehmeällä liinalla.
MUIDEN ONGELMIEN ILMETESSÄ OTA YHTEYTTÄ VALTUUTETTUUN HUOLTOLIIKKEESEEN
1
2
4
5
6
7
8
9
10
3
Max
1. Suihkutustoiminto.
2. Säiliön täyttölokero : Käytä vain vesijohtovettä.
3. Lisähöyrypainike : Ryppyjen silitykseen.
4. Höyrynsäädin : Säätää höyryn määrää.
5. Suihkutuspainike kankaan kostuttamiseen.
6. Lämpötilan merkkivalo : Valo sammuu, kun silitysrauta on kuumentunut valittuun
lämpötilaan.
7. Kalkinpoistopuikko : Puhdistus kerran kuukaudessa
8. Vesisäiliön enimmäistäytön merkki : Älä ylitä MAX-merkkiä.
9. Lämpötilansäädin.
10. Pohja : Säilytä rauta pystyasennossa.
A
C D
E
F
G
B

Dansk
029687 - 13/03
De bedes læse denne betjeningsvejledning omhyggeligt og opbevare den.
PRIMA
10
Hvilken slags vand skal der bruges ?
Apparatet er beregnet til at fungere med vand fra hanen. Der skal dog jævnligt foretages en selvrensning af vandbeholderen for at
fjerne kalk. Hvis vandet er meget kalkholdigt (det kan vandværket eller kommunen oplyse om), kan vandet fra hanen blandes med
demineraliseret vand i følgende forhold : 50% vand fra hanen, 50% demineraliseret vand.
Hvilken slags vand bør ikke benyttes ?
Varmen koncentrerer de partikler vandet indeholder, når der sendes damp ud. Følgende vandtyper indeholder organiske
affaldsstoffer eller mineraler, der kan forårsage udspyning af damp, brunlig væske som løber ud af apparatet, eller for tidlig slitage :
Ufortyndet demineraliseret vand, vand fra tørretumbler, parfumeret vand, blødgjort vand, vand fra køleskabet, batterivand, vand fra
aircondition anlæg, destilleret vand eller regnvand.
Advarsel!
Inden du bruger dit strygejern for første gang med damp, anbefaler vi at lade det virke et øjeblik i lodret stilling
og væk fra dit strygetøj. Super-Damp knappen benyttes et par gange på samme måde
De første gange strygejernet benyttes kan der forekomme lidt ubetydelig røg eller lugt, som snart vil forsvinde
igen.
Advarsel ! Fjern beskyttelsen på strygesålen, inden strygejernet varmes op første gang (afhængigt af model).
1- STRYGNING MED DAMP
- Træk stikket ud af stikkontakten, inden der påfyldes vand.
- Indstil dampfunktionen på TØR (A).
- Strygejernet anbringes på bordet som vist på tegningen (B) og det fyldes op med vand.
- Der må ikke fyldes vand over maksimumsafmærkningen.
Fyld vandbeholderen
- Stil termostatknappen på den stoftype, der skal stryges, ifølge strygeanvisningen i nedenstående skema (C) eller på hælen.
- Lampen lyser. Der kan stryges, når lampen slukker (D).
Indstilling af temperatur
STOF
INDSTILLING AF
TERMOSTATKNAP
INDSTILLING AF
DAMP
HØR/LINNED
BOMULD
ULD
SILKE
SYNTETISK
Polyester,Acetat,Akryl, Polyamid
MAX
●●●
●●
●
●
= DAMP OMRÅDE
TIPS
Stoftyper og strygetemperatur:
• Strygejernet varmer hurtigt op. Start med stoftyper, som stryges ved lav temperatur og slut af med stoftyper, som kan
tåle en højere temperatur.
• Hvis der skrues ned for termostaten, skal man vente med at stryge, til lampen tænder igen.
• Hvis der stryges stof med blandede fibre, skal strygetemperaturen indstilles på den mest sarte stoftype.
- Det kan undgås at dryppe på strygetøjet ved at:
• Lukke for dampen, når der stryges silke eller syntetiske stoffer
• Indstille dampen på minimum, når der stryges uld stoffer.
- Når der stryges med eller uden damp, kan man trykke på Spray knappen (G) et par gange for at fugte
strygetøjet.
- Inden denne knap bruges, skal det først undersøges, om der er vand i Vandbeholderen.
Stil termostat- og dampknappen på den stoftype, der skal stryges.
Indstilling af damp (E)
Fugtning af strygetøjet (spray)
SIKKERHEDSREGLER
•
Advarsel! El-installationens spænding skal svare til strygejernets (220 -240V). Forkerte tilslutninger kan forårsage
uoprettelige skader på strygejernet og annullerer garantien.
•
Strygejernet skal altid tilsluttes en stikkontakt med ekstrabeskyttelse. Hvis der benyttes forlængerledning, skal det
undersøges, om den er to-polet (10 A), og om den er ekstrabeskyttet.
•
Hvis ledningen er beskadiget, skal den straks skiftes ud af en autoriseret serviceforretning for at undgå fare.
•
Kom aldrig strygejernet i vand!
•
Træk stikket ud af stikkontakten, inden beholderen fyldes med eller tømmes for vand.
•
Hvis strygejernet er faldet ned, skal det undersøges af en fagmand, inden der tændes for det igen : Der kan være opstået
usynlige skader, som er farlige for brugeren.
•
Strygesålen kan blive meget varm:
- Rør aldrig ved den.
- Lad altid strygejernet køle af, inden det sættes på plads.
- Gå aldrig fra strygejernet, når det er tændt, eller så længe strygesålen stadig er varm.
- Strygejernet skal altid befinde sig utilgængeligt for børn.
FORSØG ALDRIG SELV AT SKILLE STRYGEJERNET AD :
HENVEND DEM ALTID TIL EN AUTORISERET SERVICEFORRETNING
- Tryk på Super-Damp knappen en gang imellen (F)
- Dampmængden øges.
Sådan opnås mere damp til glatning af tøj
5- PROBLEMER
Problemer Mulige årsager Løsninger
• Der løber vand ud af damphullerne.
•
Der løber en brunlig væske ud af
hullerne i strygesålen, som pletter
strygetøjet.
• Strygesålen er snavset eller brun og
kan plette strygetøjet.
• Strygejernet producerer kun lidt eller
slet ingen damp.
• Strygesålen er ridset eller beskadiget.
•
Der kan ikke stryges med damp ved den valgte
temperatur.
•
Der bruges damp, inden strygejernet er varmt nok
•
Der er for stort damppres.
•
Strygejernet har været opbevaret stående på
strygesålen, ikke været tømt for vand og ikke
indstillet på TØR positionen.
•
Der benyttes kemiske afkalkningsmidler.
•
Der benyttes ufortyndet demineraliseret vand.
•
Stoffibre fra strygetøjet har brændt sig fast i
strygesålens huller.
•
Der stryges ved for høj temperatur.
•
Vasketøjet er ikke skyllet ordentligt, eller der er
benyttet stivelse.
•
Vandbeholderen er tom
•
Kalkmagneten er kalket til.
•
Strygejernet er kalket til.
•
Strygejernet har været brugt for længe uden vand.
•
Strygejernet har været anbragt på en metalholder
på strygesålen.
•
Stil termostaten på det farvede område (fra
●●
til MAX)
•
Vent til lampen slukker.
•
Nedsæt damp mængden
•
Se afnittet "Opbevaring af strygejernet".
•
Der må ikke kommes afkalkningsmidler i vandet
i vandbeholderen.
•
Foretag en selvrensning, og brug vand fra
vandhanen.
•
Foretag en selvrensning.
Gør strygesålen ren med en svamp, som ikke
må være af metal.
Støvsug en gang imellem hullerne i strygesålen.
•
Gør strygesålen ren som beskrevet i det
ovenstående.
Se skemaet over indstilling af termostaten.
•
Gør strygesålen ren som beskrevet i det
ovenstående.
Stivelse skal sprøjtes på den side af stoffet, som
ikke stryges.
•
Fyld vandbeholderen med vand fra vandhanen.
•
Gør kalkmagneten ren.
•
Gør kalkmagneten ren, og foretag en
selvrensning.
•
Foretag en selvrensning.
•
Stil altid strygejernet på hælen.
4- OPBEVARING AF STRYGEJERNET
• Træk stikket ud af stikkontakten, og vent indtil strygesålen er kølet af.
• Tom beholderen for vand, og indstil strygejernet på TØR positionen ( ).
• Strygejernet opbevares stående på hælen.
2- STRYGNING UDEN DAMP
- Indstil temperaturen.
- Indstil dampknappen på TØR (se tegning A) ( ).
- Der kan stryges, når lampen er slukket
3- VEDLIGEHOLDELSE AF STRYGEJERNET
ADVARSEL!
Træk stikket ud af stikkontakten, og lad strygejernet køle af, inden det rengøres.
• RENGØRING AF KALKMAGNETEN
(én gang om måneden) :
- Træk stikket ud af stikkontakten, og tøm strygejernet for vand.
- Indstil dampknappen på TØR ( ).
- Træk kalkmagneten op ved hjælp af grebene på hver side (H).
RØR ALDRIG VED KALKMAGNETENS SPIDS.
- Sæt den i blød i eddike eller ren citronsaft i 4 timer (I).
- Skyl den godt under hanen.
- Sæt kalkmagneten i igen.
STRYGEJERNET KAN IKKE FUNGERE UDEN KALKMAGNETEN
H
I
• GØR STRYGESÅLEN REN
- Når strygesålen er håndvarm, gøres den ren med en fugtig grydesvamp, som ikke må være af metal.
Tips : Selvrensning forhindrer, at strygejernets huller hurtigt kalker til.
• FORETAG EN SELVRENSNING
En selvrensning en gang om måneden vil forlænge strygejernets levetid.
- Træk strygejernets stik ud af stikkontakten, og indstil det på TØR.
- Fyld beholderen med vand fra hanen op til maksimums stregen (se afsnittet Hvilken slags vand skal der bruges)
- Stil strygejernet på hælen, og indstil termostaten på MAX
- Sæt stikket i stikkontakten, og vent til termostatlampen slukker.
- Træk stikket ud af stikkontakten, og hold strygejernet hen over vaskekummen i vandret position.
- Træk kalkmagneten et strykke op af holderen uden at tage den helt op
- Ryst strygejernet let over vaskekummen, indtil al vandet (samt urenhederne) i beholderen er løbet ud gennem damphullerne.
- Derefter trykkes kalkmagneten på plads igen.
- Tænd for strygejernet igen i 2 minutter, og lad det stå på hælen, så strygesålen kan tørre.
- Træk stikket ud af stikkontakten igen, og når strygesålen er håndvarm, tørres strygejernet af med en blød klud.
HVIS DER OPSTÅR ANDRE PROBLEMER,
DEBES DE HENVENDE DEM TIL EN AUTORISERET SERVICEFORRETNING
1
2
4
5
6
7
8
9
10
3
Max
1. Spray.
2. Glidelåg til vandbeholderen. Brug kun vand fra hanen.
3. Super-Damp knap. For ekstra damp.
4. Dampindstillingsknap.Til kontrol af damp mængde.
5. Spray knap.Til at fugte strygetøjet.
6. Termostat lampe. Slukker, når strygejernet er nået op på den indstillede temperatur.
7. Kalkmagnet. Skal rengøres én gang om måneden.
8. Maksimums afmærkning på vandbeholderen. Der må ikke fyldes vand over denne streg.
9. Termostatknap.
10. Strygesål. Strygejernet opbevares stående på hælen.
A
C D
E
F
G
B
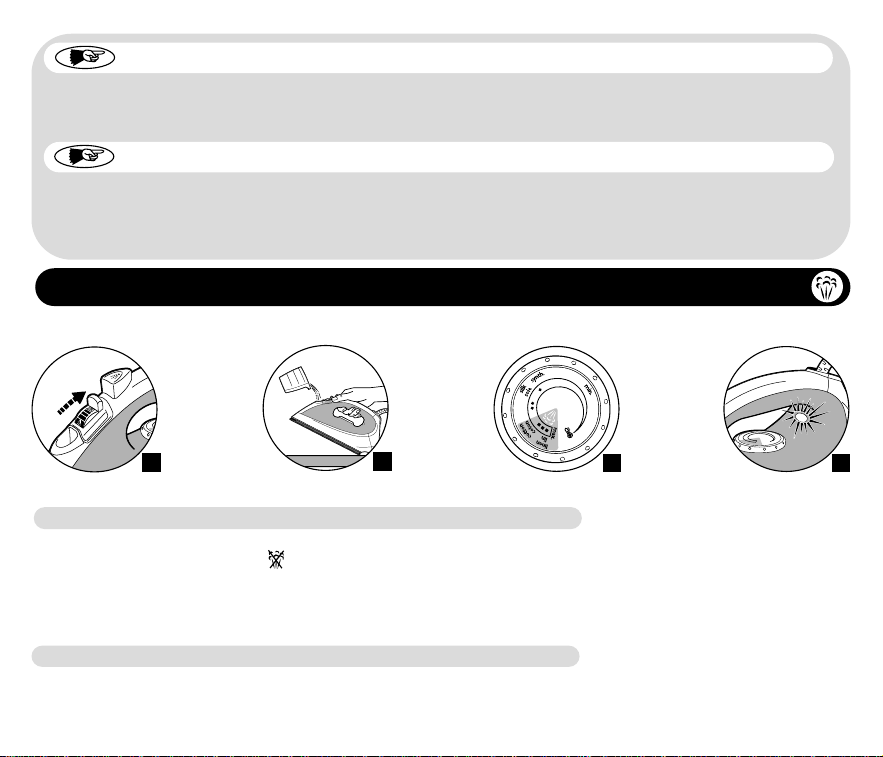
Dansk
029687 - 13/03
De bedes læse denne betjeningsvejledning omhyggeligt og opbevare den.
PRIMA
10
Hvilken slags vand skal der bruges ?
Apparatet er beregnet til at fungere med vand fra hanen. Der skal dog jævnligt foretages en selvrensning af vandbeholderen for at
fjerne kalk. Hvis vandet er meget kalkholdigt (det kan vandværket eller kommunen oplyse om), kan vandet fra hanen blandes med
demineraliseret vand i følgende forhold : 50% vand fra hanen, 50% demineraliseret vand.
Hvilken slags vand bør ikke benyttes ?
Varmen koncentrerer de partikler vandet indeholder, når der sendes damp ud. Følgende vandtyper indeholder organiske
affaldsstoffer eller mineraler, der kan forårsage udspyning af damp, brunlig væske som løber ud af apparatet, eller for tidlig slitage :
Ufortyndet demineraliseret vand, vand fra tørretumbler, parfumeret vand, blødgjort vand, vand fra køleskabet, batterivand, vand fra
aircondition anlæg, destilleret vand eller regnvand.
Advarsel!
Inden du bruger dit strygejern for første gang med damp, anbefaler vi at lade det virke et øjeblik i lodret stilling
og væk fra dit strygetøj. Super-Damp knappen benyttes et par gange på samme måde
De første gange strygejernet benyttes kan der forekomme lidt ubetydelig røg eller lugt, som snart vil forsvinde
igen.
Advarsel ! Fjern beskyttelsen på strygesålen, inden strygejernet varmes op første gang (afhængigt af model).
1- STRYGNING MED DAMP
- Træk stikket ud af stikkontakten, inden der påfyldes vand.
- Indstil dampfunktionen på TØR (A).
- Strygejernet anbringes på bordet som vist på tegningen (B) og det fyldes op med vand.
- Der må ikke fyldes vand over maksimumsafmærkningen.
Fyld vandbeholderen
- Stil termostatknappen på den stoftype, der skal stryges, ifølge strygeanvisningen i nedenstående skema (C) eller på hælen.
- Lampen lyser. Der kan stryges, når lampen slukker (D).
Indstilling af temperatur
STOF
INDSTILLING AF
TERMOSTATKNAP
INDSTILLING AF
DAMP
HØR/LINNED
BOMULD
ULD
SILKE
SYNTETISK
Polyester,Acetat,Akryl, Polyamid
MAX
●●●
●●
●
●
= DAMP OMRÅDE
TIPS
Stoftyper og strygetemperatur:
• Strygejernet varmer hurtigt op. Start med stoftyper, som stryges ved lav temperatur og slut af med stoftyper, som kan
tåle en højere temperatur.
• Hvis der skrues ned for termostaten, skal man vente med at stryge, til lampen tænder igen.
• Hvis der stryges stof med blandede fibre, skal strygetemperaturen indstilles på den mest sarte stoftype.
- Det kan undgås at dryppe på strygetøjet ved at:
• Lukke for dampen, når der stryges silke eller syntetiske stoffer
• Indstille dampen på minimum, når der stryges uld stoffer.
- Når der stryges med eller uden damp, kan man trykke på Spray knappen (G) et par gange for at fugte
strygetøjet.
- Inden denne knap bruges, skal det først undersøges, om der er vand i Vandbeholderen.
Stil termostat- og dampknappen på den stoftype, der skal stryges.
Indstilling af damp (E)
Fugtning af strygetøjet (spray)
SIKKERHEDSREGLER
•
Advarsel! El-installationens spænding skal svare til strygejernets (220 -240V). Forkerte tilslutninger kan forårsage
uoprettelige skader på strygejernet og annullerer garantien.
•
Strygejernet skal altid tilsluttes en stikkontakt med ekstrabeskyttelse. Hvis der benyttes forlængerledning, skal det
undersøges, om den er to-polet (10 A), og om den er ekstrabeskyttet.
•
Hvis ledningen er beskadiget, skal den straks skiftes ud af en autoriseret serviceforretning for at undgå fare.
•
Kom aldrig strygejernet i vand!
•
Træk stikket ud af stikkontakten, inden beholderen fyldes med eller tømmes for vand.
•
Hvis strygejernet er faldet ned, skal det undersøges af en fagmand, inden der tændes for det igen : Der kan være opstået
usynlige skader, som er farlige for brugeren.
•
Strygesålen kan blive meget varm:
- Rør aldrig ved den.
- Lad altid strygejernet køle af, inden det sættes på plads.
- Gå aldrig fra strygejernet, når det er tændt, eller så længe strygesålen stadig er varm.
- Strygejernet skal altid befinde sig utilgængeligt for børn.
FORSØG ALDRIG SELV AT SKILLE STRYGEJERNET AD :
HENVEND DEM ALTID TIL EN AUTORISERET SERVICEFORRETNING
- Tryk på Super-Damp knappen en gang imellen (F)
- Dampmængden øges.
Sådan opnås mere damp til glatning af tøj
5- PROBLEMER
Problemer Mulige årsager Løsninger
• Der løber vand ud af damphullerne.
•
Der løber en brunlig væske ud af
hullerne i strygesålen, som pletter
strygetøjet.
• Strygesålen er snavset eller brun og
kan plette strygetøjet.
• Strygejernet producerer kun lidt eller
slet ingen damp.
• Strygesålen er ridset eller beskadiget.
•
Der kan ikke stryges med damp ved den valgte
temperatur.
•
Der bruges damp, inden strygejernet er varmt nok
•
Der er for stort damppres.
•
Strygejernet har været opbevaret stående på
strygesålen, ikke været tømt for vand og ikke
indstillet på TØR positionen.
•
Der benyttes kemiske afkalkningsmidler.
•
Der benyttes ufortyndet demineraliseret vand.
•
Stoffibre fra strygetøjet har brændt sig fast i
strygesålens huller.
•
Der stryges ved for høj temperatur.
•
Vasketøjet er ikke skyllet ordentligt, eller der er
benyttet stivelse.
•
Vandbeholderen er tom
•
Kalkmagneten er kalket til.
•
Strygejernet er kalket til.
•
Strygejernet har været brugt for længe uden vand.
•
Strygejernet har været anbragt på en metalholder
på strygesålen.
•
Stil termostaten på det farvede område (fra
●●
til MAX)
•
Vent til lampen slukker.
•
Nedsæt damp mængden
•
Se afnittet "Opbevaring af strygejernet".
•
Der må ikke kommes afkalkningsmidler i vandet
i vandbeholderen.
•
Foretag en selvrensning, og brug vand fra
vandhanen.
•
Foretag en selvrensning.
Gør strygesålen ren med en svamp, som ikke
må være af metal.
Støvsug en gang imellem hullerne i strygesålen.
•
Gør strygesålen ren som beskrevet i det
ovenstående.
Se skemaet over indstilling af termostaten.
•
Gør strygesålen ren som beskrevet i det
ovenstående.
Stivelse skal sprøjtes på den side af stoffet, som
ikke stryges.
•
Fyld vandbeholderen med vand fra vandhanen.
•
Gør kalkmagneten ren.
•
Gør kalkmagneten ren, og foretag en
selvrensning.
•
Foretag en selvrensning.
•
Stil altid strygejernet på hælen.
4- OPBEVARING AF STRYGEJERNET
• Træk stikket ud af stikkontakten, og vent indtil strygesålen er kølet af.
• Tom beholderen for vand, og indstil strygejernet på TØR positionen ( ).
• Strygejernet opbevares stående på hælen.
2- STRYGNING UDEN DAMP
- Indstil temperaturen.
- Indstil dampknappen på TØR (se tegning A) ( ).
- Der kan stryges, når lampen er slukket
3- VEDLIGEHOLDELSE AF STRYGEJERNET
ADVARSEL!
Træk stikket ud af stikkontakten, og lad strygejernet køle af, inden det rengøres.
• RENGØRING AF KALKMAGNETEN
(én gang om måneden) :
- Træk stikket ud af stikkontakten, og tøm strygejernet for vand.
- Indstil dampknappen på TØR ( ).
- Træk kalkmagneten op ved hjælp af grebene på hver side (H).
RØR ALDRIG VED KALKMAGNETENS SPIDS.
- Sæt den i blød i eddike eller ren citronsaft i 4 timer (I).
- Skyl den godt under hanen.
- Sæt kalkmagneten i igen.
STRYGEJERNET KAN IKKE FUNGERE UDEN KALKMAGNETEN
H
I
• GØR STRYGESÅLEN REN
- Når strygesålen er håndvarm, gøres den ren med en fugtig grydesvamp, som ikke må være af metal.
Tips : Selvrensning forhindrer, at strygejernets huller hurtigt kalker til.
• FORETAG EN SELVRENSNING
En selvrensning en gang om måneden vil forlænge strygejernets levetid.
- Træk strygejernets stik ud af stikkontakten, og indstil det på TØR.
- Fyld beholderen med vand fra hanen op til maksimums stregen (se afsnittet Hvilken slags vand skal der bruges)
- Stil strygejernet på hælen, og indstil termostaten på MAX
- Sæt stikket i stikkontakten, og vent til termostatlampen slukker.
- Træk stikket ud af stikkontakten, og hold strygejernet hen over vaskekummen i vandret position.
- Træk kalkmagneten et strykke op af holderen uden at tage den helt op
- Ryst strygejernet let over vaskekummen, indtil al vandet (samt urenhederne) i beholderen er løbet ud gennem damphullerne.
- Derefter trykkes kalkmagneten på plads igen.
- Tænd for strygejernet igen i 2 minutter, og lad det stå på hælen, så strygesålen kan tørre.
- Træk stikket ud af stikkontakten igen, og når strygesålen er håndvarm, tørres strygejernet af med en blød klud.
HVIS DER OPSTÅR ANDRE PROBLEMER,
DEBES DE HENVENDE DEM TIL EN AUTORISERET SERVICEFORRETNING
1
2
4
5
6
7
8
9
10
3
Max
1. Spray.
2. Glidelåg til vandbeholderen. Brug kun vand fra hanen.
3. Super-Damp knap. For ekstra damp.
4. Dampindstillingsknap.Til kontrol af damp mængde.
5. Spray knap.Til at fugte strygetøjet.
6. Termostat lampe. Slukker, når strygejernet er nået op på den indstillede temperatur.
7. Kalkmagnet. Skal rengøres én gang om måneden.
8. Maksimums afmærkning på vandbeholderen. Der må ikke fyldes vand over denne streg.
9. Termostatknap.
10. Strygesål. Strygejernet opbevares stående på hælen.
A
C D
E
F
G
B

