Loading ...
Loading ...
Loading ...
ENGLISH
15
HOOD PRO WALL 30"36"48"
Phase N on page 10
Fig.
1
- Rest the support bar (A) against the wall at a height from the cooktop determined
by the sum of the distance X+Y.
Fig.
2
- Check the horizontal alignment with a spirit level and mark the 2 holes to be drilled
at the ends of the bar.
Fig.
3
- Drill the holes, insert 2 x 8mm diameter screw anchors, and fasten the bar using
the corresponding
screws (V1).
The fixing kit (screws, plugs, and brackets) supplied with the hood can only be
used on masonry walls: should it be necessary to install the hood onto walls in a
different material, assess other fixing systems keeping the wall resistance and
weight of the hood in mind.
Phase
O on page 10
Fig.
1
- Hook the range hood to the support bar.
Fig.
2
- Adjust the alignment of the range hood using the screws on the brackets:
- the top screw (B) adjust the distance from the wall,
- the bottom screw (C) adjust the height.
Phase P on page 11
Fig.
1
- To avoid hood unhooking due to underneath pressure, fix it to the wall with a
screw anchor and related screw (V2), by using the appropriate holes at the back of the hood.
Fig.
2
- Carry out the electrical connections after having disconnected the hood power
supply.
Fig.
3
- In case of the suction version, connect the outlet fitting of the fan to the external
discharge with appropriate pipes (E).
Phase
P on page 11 (in case of using optional duct cover)
Place the duct cover on the top of hood and fix it to the hood body using the screws (V3).
Power the hood in compliance with the regulations in force (section D).
OPERATION
WHEN SHOULD THE HOOD BE SWITCHED ON AND OFF?
Switch on the hood at least one minute before starting to cook: this enhances the airflow to
convey fumes and vapours towards the suction surface. After cooking, leave the hood oper-
ating until complete extraction of all vapours and odours. If required, by means of the Timer
function, it is possible to set hood auto switch-off after 15 minutes of operation.
WHICH SPEED IS TO BE SELECTED?
The first speed is a low consumption energy-saving way of keeping the air clean, the sec-
ond speed is used in normal conditions, and the third speed is used when there are strong
odours and vapours.
WHEN SHOULD THE FILTERS BE WASHED OR REPLACED?
The hood is assembled with two different types of filters: metal ones (washable) and active
carbon ones (non-washable). The former must be cleaned every 30 hours of use (for versions
with electronic push button control panel, the fixed red light indicates that they need to be
washed), the latter are to be replaced every 3-4 months, depending on the use of the hood.
For further information, please read the chapter regarding "MAINTENANCE" on page 15.
USE OF SLIDER
01 0123
HOOD LIGHT
0
By placing the slider in position 0, the hood light is off
1
By placing the slider in position 1, the hood light is on
MOTOR SWITCH
0
By placing the slider in position 0, the hood motor is off
1
By placing the slider in position 1, the hood motor is on
2
By placing the slider in position 2, the motor is set at medium speed
3
By placing the slider in position 3, the motor is set at high speed
The motor activation is signalled by the switching on of the red LED on the slider
ONLY FOR HOODS WITH TWO MOTORS
There are two sliders in hoods equipped with double motor: each slider is associated with
a single motor.
As for lighting, in hoods with two spotlights a slider controls them both, while the light
switch of the other slider is inhibited; in the presence of three or more spotlights, each slider
controls a part of it.
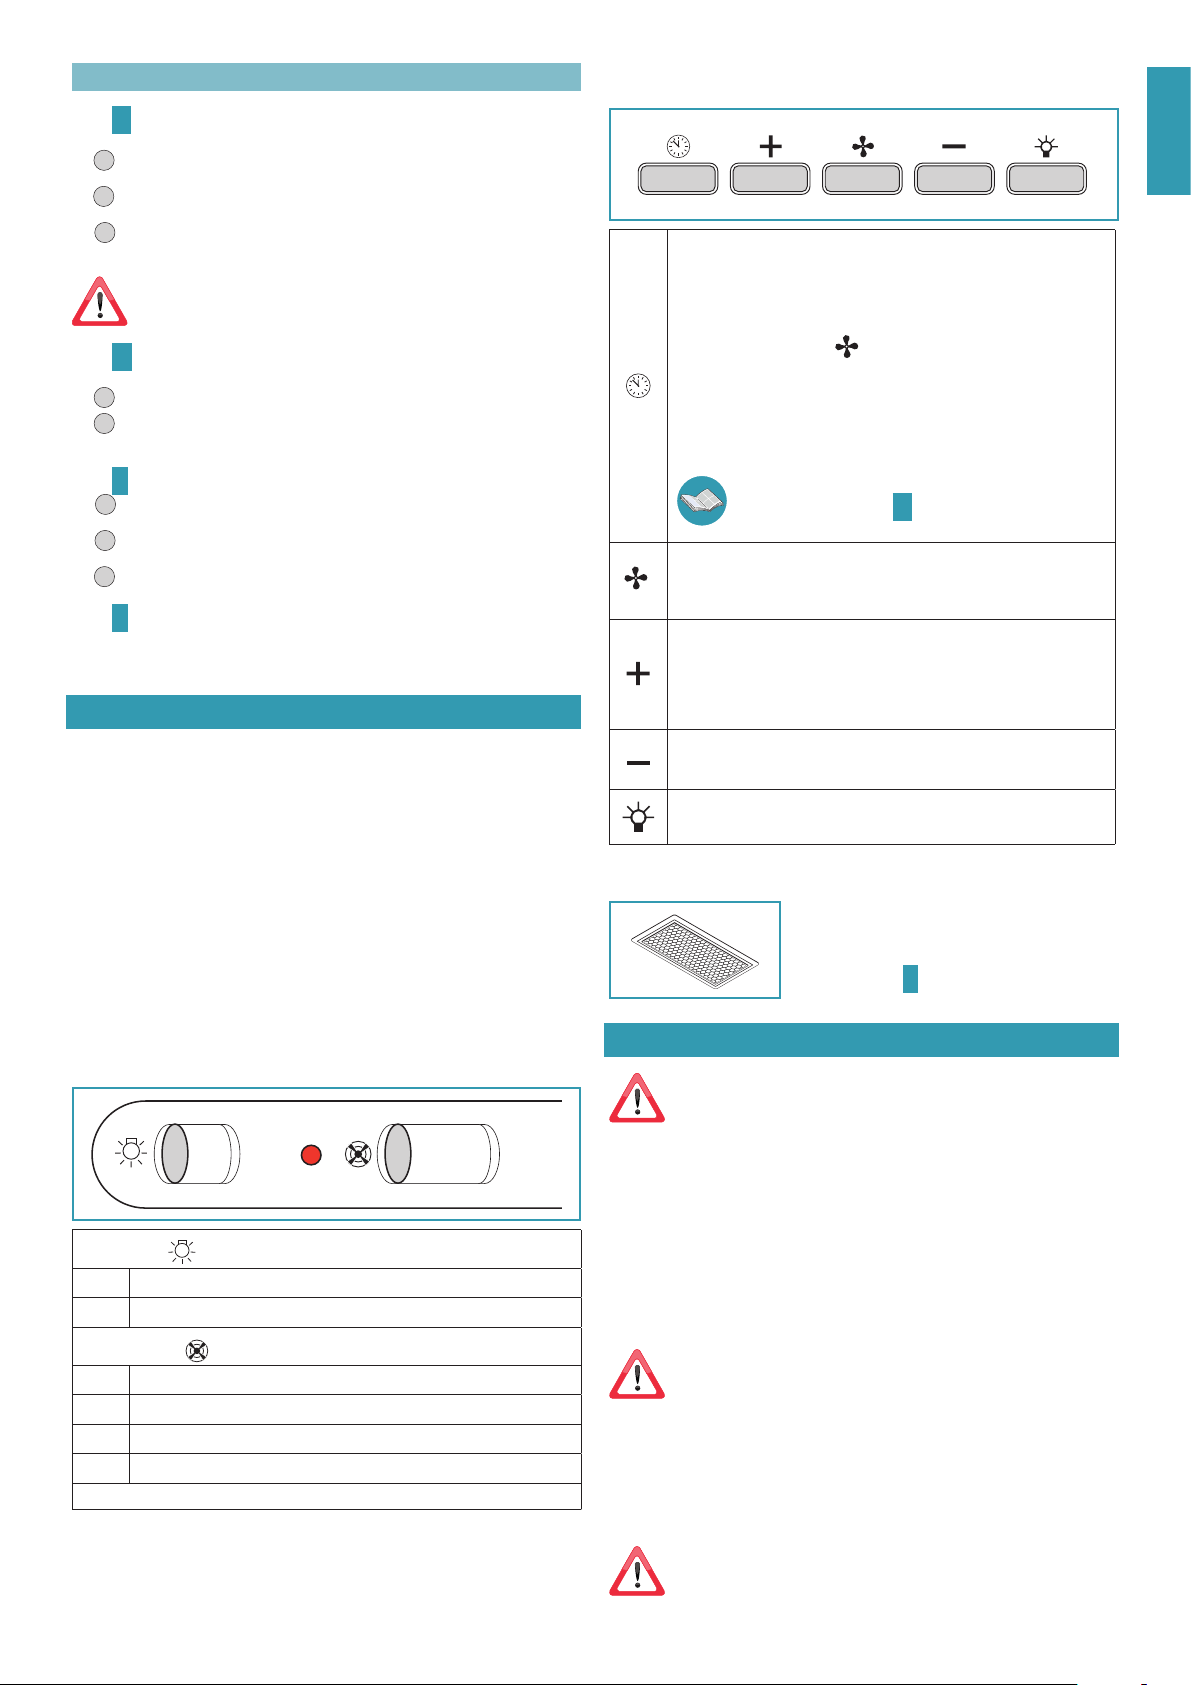
USE OF ELECTRONIC PUSH BUTTON CONTROL PANEL
Timer/Filters alarm
Pressing the key with the motor active at any speed activates the Timer func-
tion: this function determines the auto switch-o of the hood after 15 min-
utes of operation. Activation of the function is signalled by a RED ashing
light.
With the Timer function active, the hood can still be switched off by the user at
any time by pressing the key
: the function will be automatically disabled
and the RED light will turn off. Should the speed be changed with the Timer
function active, the latter will be automatically disabled.
On the other hand, ignition of the xed RED light indicates a grease lter
alarm: this alarm notifies that it is time to wash the metal anti-grease filters
(the alarm is triggered after approximately 30 hours of use). After cleaning the
filters, disable the alarm and reset the counters by keeping the key pressed
for 3 seconds.
To disassemble and assemble the anti-grease metal filters, refer to
the instructions on drawing Q on page 10.
Mode button (ON/OFF)
Pressing the key switches on (or off) the hood motor: it starts at the previously
selected speed prior to switching it off (desired speed function). Should you
wish to use a different speed, set if by using the + and - keys.
Button +
By pressing the key, the motor speed increases. Speeds 1, 2 and 3 are displayed
by the number of LEDs switched on, excluding the light and timer LEDs.
The + key in the version with 4 speeds has an intermittent light: the 4th speed
or intensity is timed and after approximately 7 minutes the motor automati-
cally switches to 3rd speed.
Button -
By pressing the key, the motor speed reduces. Speeds 1, 2 and 3 are displayed
by the number of LEDs switched on, excluding the light and timer LEDs.
Light button
ON: light on (lit button) OFF: light off
LIGHTING
The range hood is equipped with high efficiency, low con-
sumption LED spotlights with extremely long duration un-
der normal use conditions.
Should the LED spotlight need to be replaced, proceed as
shown in the figure S on page 12.
MAINTENANCE
Before cleaning or carrying out maintenance operations, disconnect the
equipment by removing the plug or switching o the main switch.
Regular maintenance guarantees proper operation and good performance over
time.
Special attention is to be paid to the metal anti-grease filters and active carbon filters. In fact,
frequent cleaning of the filters and their supports ensures that no grease is accumulated on
the hood, which is dangerous and can cause fires.
EXTERNAL CLEANING
You are advised to clean the external surfaces of the hood at least once every 15 days to
prevent oily substances and grease from sticking to them.
To clean the brushed stainless steel hood, the Manufacturer recommends using "Magic
Steel" wipes. Alternatively, it can be cleaned using a damp cloth, slightly moistened with
neutral, liquid detergent or denatured alcohol. Finish off cleaning by rinsing well and drying
with soft cloths.
Do not use too much water next to the push button control panel and
lighting devices in order to prevent humidity from reaching electronic
parts. You must not use detergents containing abrasive, acid or corrosive
substances or abrasive cloths: a direct consequence of not complying with
these warnings will result in irreversible deterioration of the hood's surface.
The Manufacturer declines all responsibility for failure to comply with these instructions.
CLEANING OF INTERNAL PARTS
It is forbidden to clean electrical parts, or parts related to the motor inside the hood, with
liquids or solvents.
Do not use abrasive products. All these operations are to be carried out
after having disconnected the equipment from the electrical mains power
supply.
Loading ...
Loading ...
Loading ...