
SHARP ELECTRONICS CORPORATION
1 Sharp Plaza, Suite 1, Mahwah, New Jersey 07495-1123
OPERATION MANUAL MANUAL DE OPERACIÓN
LC-32LE551U
LC-32LE451U
LC-39LE551U
LC-43LE551U
LC-48LE551U
TM
(Except LC-32LE451U)
ENGLISHESPAÑOL
LIQUID CRYSTAL TELEVISION
TELEVISOR CON PANTALLA DE
CRISTAL LÍQUIDO
OPERATION MANUAL
MANUAL DE OPERACIÓN
IMPORTANT : Please read this operation manual before
starting operating the equipment.
IIMPORTANTE : Lea este manual de operación antes de
comenzar a operar el equipo.
1
IMPORTANT INFORMATION
INFORMATION:
This equipment has been tested and found to comply with the limits for a Class B digital device,
pursuant to Part 15 of the FCC Rules. These limits are designed to provide reasonable protection
against harmful interference in a residential installation. This equipment generates, uses and can
radiate radio frequency energy and, if not installed and used in accordance with the instructions, may
cause harmful interference to radio communications. However, there is no guarantee that interference
will not occur in a particular installation. If this equipment does cause harmful interference to radio
or television reception, which can be determined by turning the equipment off and on, the user is
encouraged to try to correct the interference by one or more of the following measures:
—
Reorient or relocate the receiving antenna.
—
Increase the separation between the equipment and receiver.
—
Connect the equipment into an outlet on a circuit different from that to which the receiver is connected.
—
Consult the dealer or an experienced radio/TV technician for help.
FCC Compliance Statement
This device complies with part 15 of the FCC Rules. Operation is subject to the following two conditions:
(1) This device may not cause harmful interference, and (2) this device must accept any interference
received, including interference that may cause undesired operation.
Wireless Radio
For product available in the USA/Canada market, only channel 1–11 can be operated. Selection of
other channels is not possible. This device is going to be operated in 5.15–5.25GHz frequency range,
it is restricted in indoor environment only.
Important: Any changes or modi cations not expressly approved by the party responsible for
compliance could void the user’s authority to operate the equipment.
FCC Radiation Exposure Statement: This equipment complies with FCC radiation exposure limits set
forth for an uncontrolled environment. This equipment should be installed and operated with minimum
distance 20cm between the radiator & your body.
Industry Canada Statement
This Class B digital apparatus complies with CAN ICES-003(B)/NMB-3(B)
Wireless Radio
For product available in the USA/Canada market, only channel 1–11 can be operated. Selection of
other channels is not possible.
The device could automatically discontinue transmission in case of absence of information to transmit,
or operational failure.
Note that this is not intended to prohibit transmission of control or signaling information or the use of
repetitive codes where required by the technology.
Important: Any changes or modi cations not expressly approved by the party responsible for
compliance could void the user’s authority to operate the equipment.
IC Radiation Exposure Statement: This device complies with IC RSS-210 rules; Operation is subject
to the following two conditions:
(1) This device may not cause harmful interference, and (2) this device must accept interference
recieved, including interference that may cause undesired operation.
"Note to CATV system installer: This reminder is provided to call the CATV system installer's attention
to Article 820 of the National Electrical Code that provides guidelines for proper grounding and, in
particular, speci es that the cable ground shall be connected to the grounding system of the building,
as close to the point of cable entry as practical."
This product quali es for ENERGY STAR when "Home Mode" is selected for "Easy Setup".
Setting "Easy Setup" to "Home Mode" allows the TV to achieve an energy-saving status for household
use.
IMPORTANT:
To aid reporting in case of loss or theft, please record the
TV's model and serial numbers in the space provided.
The numbers are located at the rear and left side of the TV.
WARNING: TO REDUCE THE RISK OF FIRE OR ELECTRIC SHOCK, DO NOT EXPOSE THIS
PRODUCT TO RAIN OR MOISTURE.
CAUTION: TO REDUCE THE RISK OF ELECTRIC SHOCK,
DO NOT REMOVE COVER (OR BACK).
NO USER-SERVICEABLE PARTS INSIDE.
REFER SERVICING TO QUALIFIED SERVICE
PERSONNEL.
The lightning ash with arrow-
head symbol, within an equilateral
triangle, is intended to alert
the user to the presence of
uninsulated "dangerous voltage"
within the product's enclosure that
may be of suf cient magnitude to
constitute a risk of electric shock
to persons.
The exclamation point within a
triangle is intended to alert the
user to the presence of important
operating and maintenance
(servicing) instructions in the
literature accompanying the
product.
RISK OF ELECTRIC SHOCK
DO NOT OPEN
CAUTION
Model No. :
Series No.
:
CAUTION: TO PREVENT ELECTRIC SHOCK, MATCH WIDE BLADE OF PLUG TO WIDE SLOT, FULLY
INSERT.
WARNING: FCC Regulations state that any unauthorized changes or modi cations to this equipment
not expressly approved by the manufacturer could void the user's authority to operate this
equipment.
CAUTION: This product satis es FCC regulations when shielded cables and connectors are used
to connect the unit to other equipment. To prevent electromagnetic interference with
electric appliances such as radios and televisions, use shielded cables and connectors for
connections.
DECLARATION OF CONFORMITY:
SHARP LIQUID CRYSTAL TELEVISION, MODEL LC-32LE551U / LC-32LE451U / LC-39LE551U /
LC-43LE551U / LC-48LE551U
This device complies with Part 15 of the FCC Rules. Operation is subject to the following two
conditions:
(1) This device may not cause harmful interference, and (2) this device must accept any interference
received, including interference that may cause undesired operation.
RESPONSIBLE PARTY:
SHARP ELECTRONICS CORPORATION
1 Sharp Plaza, Suite 1, Mahwah, New Jersey 07495-1123
TEL: 1-800-BE-SHARP
For Business Customers: URL http://www.sharpusa.com
ENGLISH
2
Thank you for your purchase of the Sharp Liquid Crystal Television. To ensure safety and many
years of trouble-free operation of your product, please read the Important Safety Instructions
carefully before using this product.
IMPORTANT SAFETY INSTRUCTIONS
DEAR SHARP CUSTOMER IMPORTANT SAFETY INSTRUCTIONS
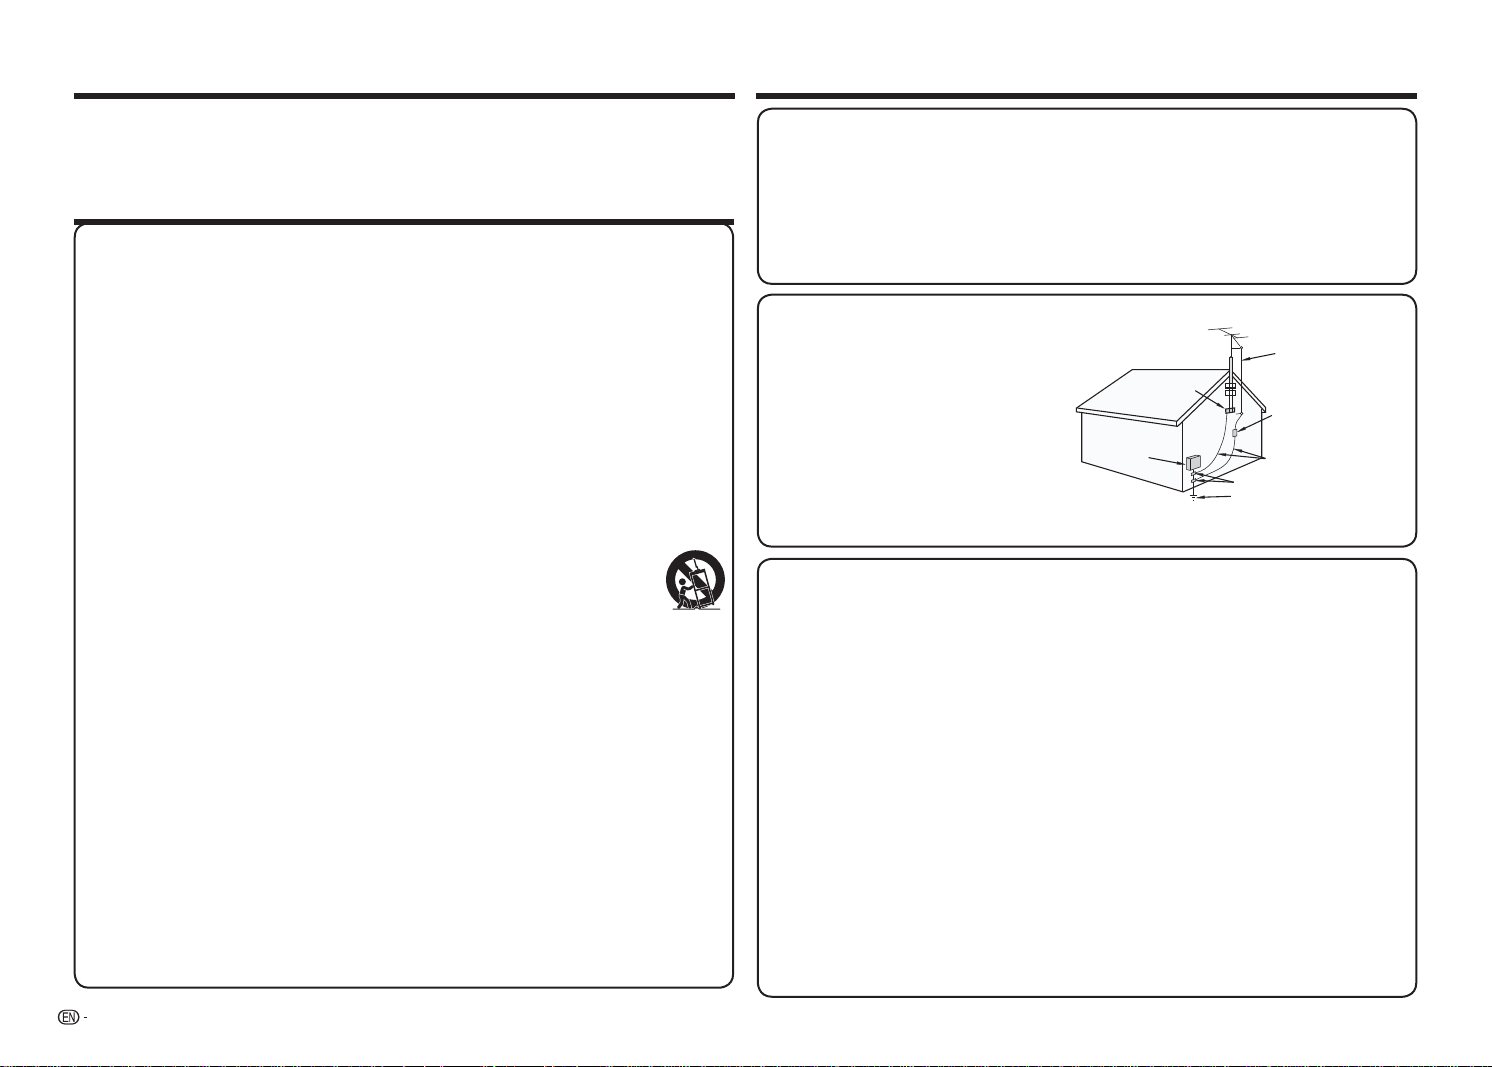
• Outdoor Antenna Grounding — If an outside
antenna is connected to the television
equipment, be sure the antenna system is
grounded so as to provide some protection
against voltage surges and built-up static
charges.
Article 810 of the National Electrical Code,
ANSI/NFPA 70, provides information with
regard to proper grounding of the mast and
supporting structure, grounding of the lead-
in wire to an antenna discharge unit, size of
grounding conductors, location of antenna-
discharge unit, connection to grounding
electrodes, and requirements for the
grounding electrode.
EXAMPLE OF ANTENNA GROUNDING AS PER
NATIONAL ELECTRICAL CODE, ANSI/NFPA 70
ANTENNA LEAD
IN WIRE
GROUND
CLAMP
NEC — NATIONAL ELECTRICAL CODE
GROUNDING CONDUCTORS
(NEC SECTION 810-21)
GROUND CLAMPS
POWER SERVICE GROUNDING
ELECTRODE SYSTEM
(NEC ART 250)
ELECTRIC
SERVICE
EQUIPMENT
ANTENNA
DISCHARGE UNIT
(NEC SECTION 810-20)
• Water and Moisture — Do not use this product near water - for example, near a bath tub, wash bowl,
kitchen sink, or laundry tub; in a wet basement; or near a swimming pool; and the like.
• Stand — Do not place the product on an unstable cart, stand, tripod or table. Placing the product on an
unstable base can cause the product to fall, resulting in serious personal injuries as well as damage to the
product. Use only a cart, stand, tripod, bracket or table recommended by the manufacturer or sold with
the product. When mounting the product on a wall, be sure to follow the manufacturer's instructions. Use
only the mounting hardware recommended by the manufacturer.
• Selecting the location — Select a place with no direct sunlight and good ventilation.
• Ventilation — The vents and other openings in the cabinet are designed for ventilation. Do not cover
or block these vents and openings since insuffi cient ventilation can cause overheating and/or shorten
the life of the product. Do not place the product on a bed, sofa, rug or other similar surface, since they
can block ventilation openings. This product is not designed for built-in installation; do not place the
product in an enclosed place such as a bookcase or rack, unless proper ventilation is provided or the
manufacturer's instructions are followed.
• The front panel used in this product is made of glass. Therefore, it can break when the product is dropped
or applied with impact. Be careful not to be injured by broken glass pieces in case the panel breaks.
• Heat — The product should be situated away from heat sources such as radiators, heat registers,
stoves, or other products (including amplifi ers) that produce heat.
• Lightning — For added protection for this television equipment during a lightning storm, or when it is
left unattended and unused for long periods of time, unplug it from the wall outlet and disconnect the
antenna. This will prevent damage to the equipment due to lightning and power-line surges.
• Power Lines — An outside antenna system should not be located in the vicinity of overhead power
lines or other electric light or power circuits, or where it can fall into such power lines or circuits. When
installing an outside antenna system, extreme care should be taken to keep from touching such power
lines or circuits as contact with them might be fatal.
• To prevent fi re, never place any type of candle or fl ames on the top or near the TV set.
Electricity is used to perform many useful functions, but it can also cause personal injuries and
property damage if improperly handled. This product has been engineered and manufactured with
the highest priority on safety. However, improper use can result in electric shock and/or re. In order
to prevent potential danger, please observe the following instructions when installing, operating
and cleaning the product. To ensure your safety and prolong the service life of your Liquid Crystal
Television, please read the following precautions carefully before using the product.
1) Read these instructions.
2) Keep these instructions.
3) Heed all warnings.
4) Follow all instructions.
5) Do not use this apparatus near water.
6) Clean only with dry cloth.
7) Do not block any ventilation openings. Install in accordance with the manufacturer's instructions.
8) Do not install near any heat sources such as radiators, heat registers, stoves, or other apparatus
(including ampli ers) that produce heat.
9)
Do not defeat the safety purpose of the polarized or grounding-type plug. A polarized plug has two
blades with one wider than the other. A grounding type plug has two blades and a third grounding
prong. The wide blade or the third prong are provided for your safety. If the provided plug does not t
into your outlet, consult an electrician for replacement of the obsolete outlet.
10) Protect the power cord from being walked on or pinched particularly at plugs, convenience
receptacles, and the point where they exit from the apparatus.
11) Only use attachments/accessories speci ed by the manufacturer.
12) Use only with the cart, stand, tripod, bracket, or table speci ed by the manufacturer,
or sold with the apparatus. When a cart is used, use caution when moving the cart/
apparatus combination to avoid injury from tip-over.
13) Unplug this apparatus during lightning storms or when unused for long periods of
time.
14) Refer all servicing to quali ed service personnel. Servicing is required when the apparatus has
been damaged in any way, such as power-supply cord or plug is damaged, liquid has been
spilled or objects have fallen into the apparatus, the apparatus has been exposed to rain or
moisture, does not operate normally, or has been dropped.
Additional Safety Information
15)
Power Sources—This product should be operated only from the type of power source indicated
on the marking label. If you are not sure of the type of power supply to your home, consult your
product dealer or local power company. For products intended to operate from battery power, or
other sources, refer to the operating instructions.
16) Overloading—Do not overload wall outlets, extension cords, or integral convenience receptacles
as this can result in a risk of re or electric shock.
17) Object and Liquid Entry—Never push objects of any kind into this product through openings as
they may touch dangerous voltage points or short-out parts that could result in a re or electric
shock. Never spill liquid of any kind on the product.
18) Damage Requiring Service—Unplug this product from the wall outlet and refer servicing to
quali ed service personnel under the following conditions:
a) When the AC cord or plug is damaged,
b) If liquid has been spilled, or objects have fallen into the product,
c) If the product has been exposed to rain or water,
d)
If the product does not operate normally by following the operating instructions.
Adjust only those controls that are covered by the operating instructions as an improper
adjustment of other controls may result in damage and will often require extensive work by a quali ed
technician to restore the product to its normal operation,
e) If the product has been dropped or damaged in any way, and
f ) When the product exhibits a distinct change in performance - this indicates a need for
service.
19) Replacement Parts—When replacement parts are required, be sure the service technician has
used replacement parts speci ed by the manufacturer or have the same characteristics as the
original part. Unauthorized substitutions may result in re, electric shock, or other hazards.
20) Safety Check—Upon completion of any service or repairs to this product, ask the service
technician to perform safety checks to determine that the product is in proper operating
condition.
21) Wall or ceiling mounting—When mounting the product on a wall or ceiling, be sure to install the
product according to the method recommended by the manufacturer.

3
IMPORTANT SAFETY INSTRUCTIONS
Caring for the cabinet
• Use a soft cloth (cotton, fl annel, etc.) and gently wipe the surface of the cabinet.
• Using a chemical cloth (wet/dry sheet type cloth, etc.) may deform the components of the main unit cabinet
or cause cracking.
• Wiping with a hard cloth or using strong force may scratch the surface of the cabinet.
• If the cabinet is very dirty, wipe with a soft cloth (cotton, fl annel, etc.) soaked in neutral detergent diluted
with water and thoroughly wrung out, and then wipe with a soft dry cloth.
• Avoid using benzene, thinner, and other solvents, as these may deform the cabinet and cause the paint
to peel off.
• Do not apply insecticides or other volatile liquids.
Also, do not allow the cabinet to remain in contact with rubber or vinyl products for a long period of time.
Plasticizers inside the plastic may cause the cabinet to deform and cause the paint to peel off.
Caring for the front panel
• Turn off the main power and unplug the AC cord from the wall outlet before handling.
• Gently wipe the surface of the front panel with a soft cloth (cotton, fl annel, etc.).
To protect the front panel, do not use a dirty cloth, liquid cleaners, or a chemical
cloth (wet/dry sheet type cloth, etc.). This may damage the surface of the front
panel.
• Wiping with a hard cloth or using strong force may scratch the surface of the front
panel.
• Use a soft damp cloth to gently wipe the front panel when it is really dirty.(It may scratch the surface of
the front panel when wiped strongly.)
• If the front panel is dusty, use an anti-static brush, which is commercially available, to clean it.
• To avoid scratching the frame or screen, please use a soft, lint free cloth for cleaning. Approved cleaning
cloths are available directly from Sharp in single (00Z-LCD-CLOTH) or triple (00Z-LCD-CLOTH-3) packs.
Call 1-800-BE-SHARP for ordering.
CHILD SAFETY:
PROPER TELEVISION PLACEMENT MATTERS
• To prevent fi re or shock hazard, do not place the AC cord under the TV set or other heavy items.
• Do not display a still picture for a long time, as this could cause an afterimage to remain.
• To prevent fi re or shock hazard, do not expose this product to dripping or splashing.No
objects fi lled with liquids, such as vases, should be placed on the product.
• Do not insert foreign objects into the product. Inserting objects in the air vents or other
openings may result in fi re or electric shock. Exercise special caution when using the
product around children.
THE CONSUMER ELECTRONICS INDUSTRY CARES
• Manufacturers, retailers and the rest of the consumer electronics industry are
committed to making home entertainment safe and enjoyable.
• As you enjoy your television, please note that all televisions – new and old- must
be supported on proper stands or installed according to the manufacturer’s
recommendations. Televisions that are inappropriately situated on dressers,
bookcases, shelves, desks, speakers, chests, carts, etc., may fall over, resulting in
injury.
TUNE IN TO SAFETY
• ALWAYS
follow the manufacturer’s recommendations for the safe installation of
your television.
• ALWAYS
read and follow all instructions for proper use of your television.
• NEVER
allow children to climb on or play on the television or the furniture on which
the television is placed.
• NEVER
place the television on furniture that can easily be used as steps, such as a
chest of drawers.
• ALWAYS
install the television where it cannot be pushed, pulled over or knocked
down.
• ALWAYS
route cords and cables connected to the television so that they cannot
be tripped over, pulled or grabbed.
WALL OR CEILING MOUNT YOUR TELEVISION
• ALWAYS
contact your retailer about professional installation if you have any doubts
about your ability to safely mount your television.
• ALWAYS
use a mount that has been recommended by the television manufacturer
and has a safety certifi cation by an independent laboratory (such as UL, CSA, ETL).
• ALWAYS
follow all instructions supplied by the television and mount manufacturers.
• ALWAYS
make sure that the wall or ceiling where you are mounting the television is
appropriate.
Some mounts are not designed to be mounted to walls and ceilings with steel studs
or cinder block construction. If you are unsure, contact a professional installer.
• Televisions can be heavy. A minimum of two people is required for a wall or ceiling
mount installation.
MOVING AN OLDER TELEVISION TO A NEW PLACE IN YOUR HOME
• Many new television buyers move their older CRT televisions into a secondary room
after the purchase of a fl at-panel television. Special care should be made in the
placement of older CRT televisions.
• ALWAYS
place your older CRT television on furniture that is sturdy and appropriate
for its size and weight.
• NEVER
place your older CRT television on a dresser where children may be
tempted to use the drawers to climb.
• ALWAYS
make sure your older CRT television does not hang over the edge of your
furniture.
CE.org/safety
WARNING
DO NOT INGEST BATTERY, CHEMICAL BURN HAZARD
“This product contains a coin/button cell battery. If the coin/button cell battery is swallowed, it can cause
severe internal burns in just 2 hours and can lead to death. Keep new and used batteries away from
children. If the battery compartment does not close securely, stop using the product and keep it away
from children. If you think batteries might have been swallowed or placed inside any part of the body, seek
immediate medical attention.”
4
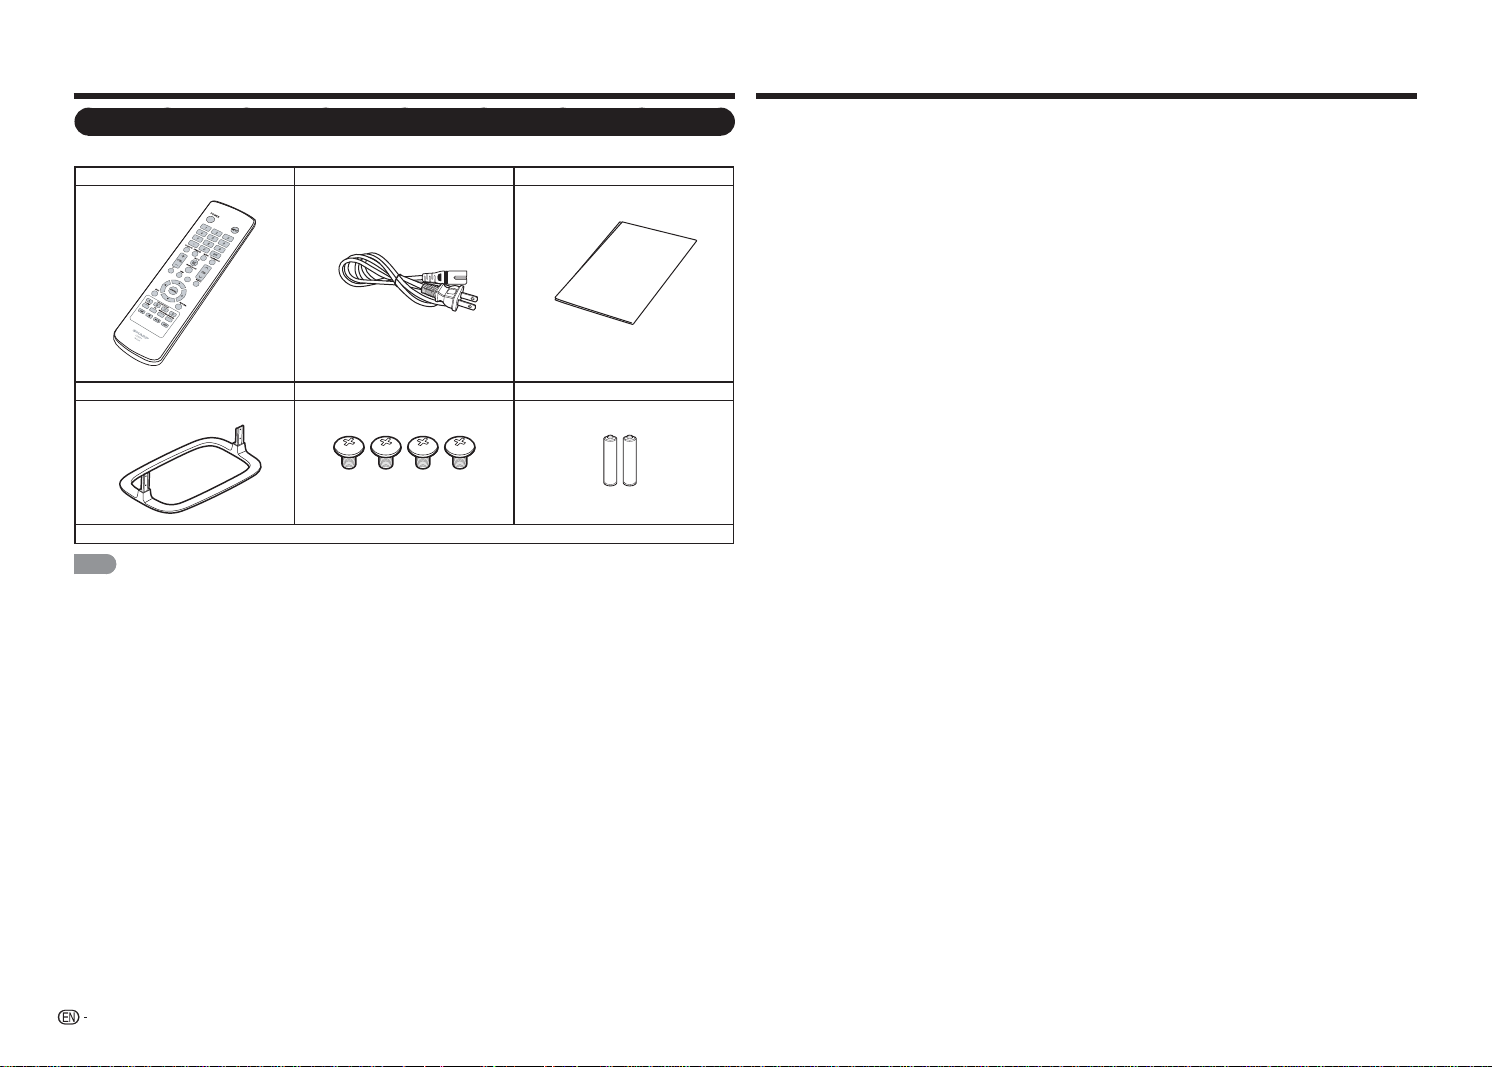
Accessories Contents
Supplied Accessories
Make sure the following accessories are provided with the product.
Remote control unit AC cord Connection guide
Stand unit Stand screws (4 pieces) AAA batteries (2 pieces)
■
Operation manual (this publication)
NOTE
• Always use the AC cord supplied with the TV.
• The illustrations above are for explanation purposes and may vary slightly from the actual accessories.
Connection
Guide
IMPORTANT INFORMATION .............................. 1
DEAR SHARP CUSTOMER ................................. 2
IMPORTANT SAFETY INSTRUCTIONS .............. 2
Accessories.......................................................... 4
Supplied Accessories .................................... 4
Contents ............................................................... 4
QUICK REFERENCE ............................................ 5
Attaching the Stand ....................................... 5
QUICK INSTALLATION TIPS .......................... 5
Installing Batteries in the Remote Control
Unit ................................................................ 6
Preparation .......................................................... 6
Using the Remote Control Unit....................... 6
Antennas ....................................................... 6
Part Names ..........................................................7
TV (Front) .......................................................7
TV (Control Panel) .......................................... 7
TV (Rear) ........................................................ 7
Remote Control Unit ......................................8
Introduction to Connections .............................. 9
Experiencing HD Images ................................ 9
Types of Connection ...................................... 9
Displaying an External Equipment Image ........ 9
One Key Function ..........................................9
Connecting to External Equipment .................. 10
Connecting a Blu-ray Disc/DVD Player or
HD Cable/Satellite Set-top Box ................... 10
Connecting a VCR, Game Console,
Camcorder or Cable/Satellite Set-top Box ... 10
Connecting a Surround System/Audio
System ........................................................ 11
Connecting a PC/Smartphone ..................... 11
Watching TV .......................................................12
Turning On/Off the Power ............................ 12
Initial Installation ...........................................12
Direct Button Operation .................................... 14
On-Screen Display Menu .................................. 17
On-Screen Display Menu (Main menu) ......... 17
On-Screen Display Menu Operation ............. 17
Menu Operation Buttons .............................. 17
Menu Items .................................................. 18
Picture menu ............................................... 19
Audio menu .................................................20
Setup menu .................................................21
Closed Caption menu .................................. 23
Channel menu ............................................. 23
Sleep Timer menu ........................................ 23
Enjoying Photo/Music/Movie Playback ........... 24
Connecting a USB Memory Device/USB
Hard Drive ................................................... 24
Selecting the Folders to Play Back ...............24
Viewing Photos ............................................25
Playing Music ............................................... 26
Watching Movies ......................................... 26
Appendix ............................................................ 27
Troubleshooting ........................................... 28
Specifi cations .................................................... 30
TV ................................................................ 30
Dimensional Drawings ...................................... 31
Trademarks ........................................................ 32
Dimensional Drawings
• The dimensional drawings for the LCD TV set are shown on the inside back cover.
• The illustrations and on-screen displays in this operation manual are for explanation purposes and may vary
slightly from the actual operations.
• The examples used throughout this manual are based on the LC-48LE551U model.
5
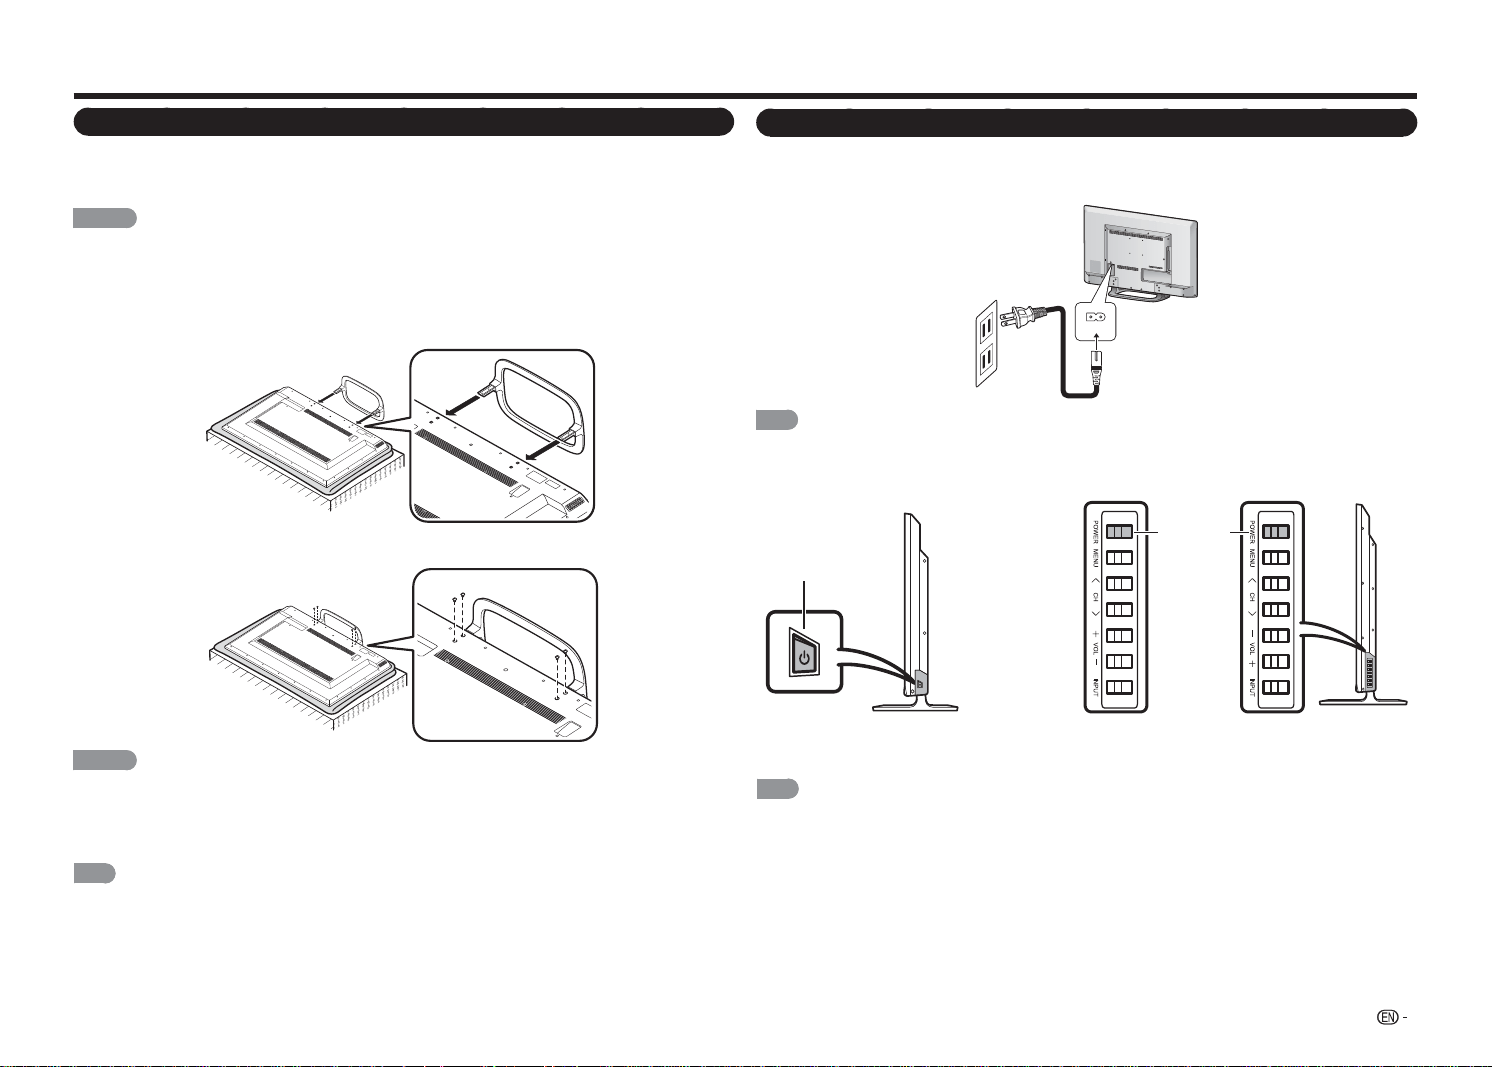
QUICK REFERENCE
Attaching the Stand
• Before attaching (or detaching) the stand, unplug the AC cord.
• Before performing work spread cushioning over the base area to lay the TV on. This will prevent it from
being damaged.
CAUTION
• Be sure to follow the instructions. Incorrect installation of the stand may result in the TV falling over.
1
Confi rm that there are 4 screws supplied with the stand unit.
2
Put the TV face down on a safe surface that is covered by a soft and smooth cloth.
3
Attach the TV stand to the bottom of the TV.
4
Fasten the 4 screws by using a crosshead screwdriver.
CAUTION
• Do not push too hard or put excessive pressure to the stand neck to avoid damage to the TV.
• Do not remove the stand from the TV unless using an optional wall mount bracket to mount it.
• After attaching the stand to the TV, do not hold the stand when you put up, set up, move or lay down the
TV.
NOTE
• To detach the stand, perform the steps in reverse order.
QUICK INSTALLATION TIPS
1
Attach your antenna to the back of the television. (See page 6.)
2
Connect the AC plug for the television into the AC outlet.
• Place the TV close to the AC outlet, and keep the power plug within reach.
AC IN
NOTE
• TO PREVENT RISK OF ELECTRIC SHOCK, DO NOT TOUCH UN-INSULATED PARTS OF ANY CABLES
WITH THE AC CORD CONNECTED.
3
When turning on the TV for the fi rst time, press
POWER
on the TV.
4
Insert the batteries into the remote control unit. (See page 6.)
NOTE
• Speakers cannot be detached from the TV.
• The TV angle cannot be adjusted.
* for LC-32LE551U/LC-32LE451U/LC-39LE551U * for LC-48LE551U
POWER
POWER
* for LC-43LE551U
6
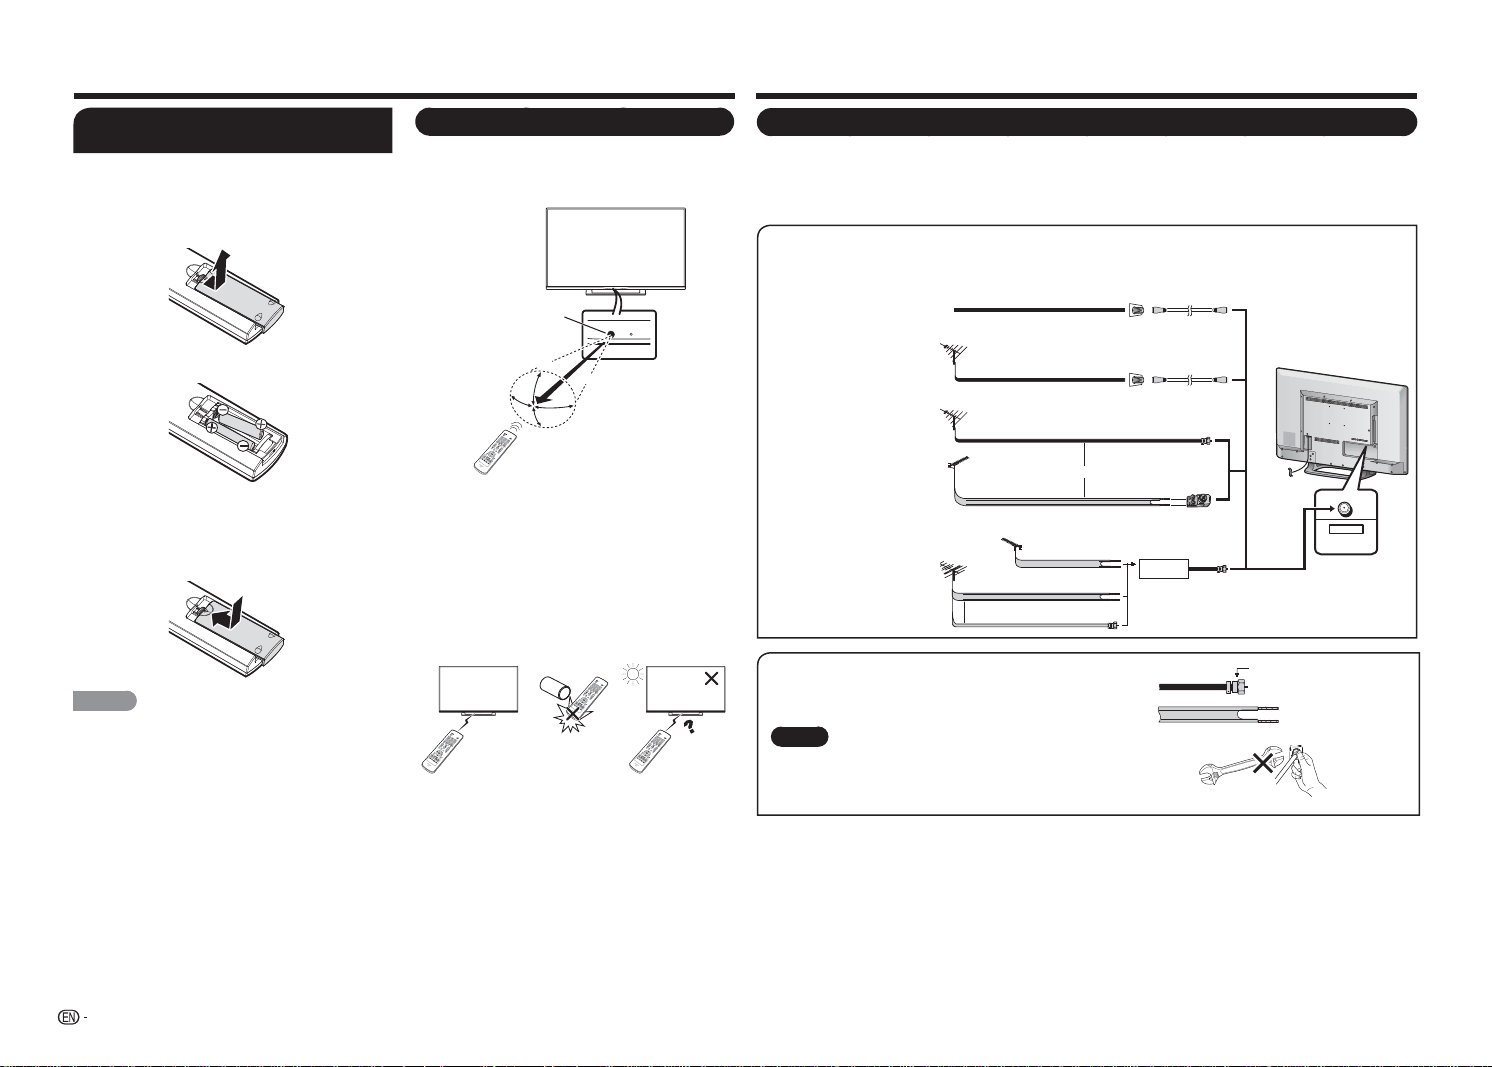
Antennas
To enjoy a clearer picture, use an outdoor antenna. The following is a brief explanation of the types of
connections that are used for a coaxial cable. If your outdoor antenna uses a 75-ohm coaxial cable with an
F-type connector, plug it into the antenna terminal at the rear of the TV set. For connecting the antenna cable to
the TV, use commercially available cables.
CABLE / ANTENNA
DTV / TV
IN
OUT
Connecting Antenna Cable
• Connect the antenna cable to the TV using one of the methods in the illustration as shown (
1
,
2
,
3
or
4
).
1
Cable without a
CATV converter
3
Combination VHF/
UHF antenna
4
Separate VHF/UHF
antenna
2
VHF/UHF antenna
Cable TV lead-In
75-ohm coaxial cable (round)
75-ohm coaxial cable (round)
300-ohm twin-lead
cable
Home Antenna
terminal (75-ohm)
Home Antenna
terminal (75-ohm)
300/75-ohm
adapter
Combiner
To TV antenna
terminal
300-ohm twin-lead
cable
300-ohm twin-lead cable
or
75-ohm coaxial cable (round)
Coaxial cable
Coaxial cable
VHF
ANTENNA
UHF
ANTENNA
or
1. A 75-ohm system is generally a round cable with F-type connector
that can easily be attached to a terminal without tools.
2. A 300-ohm system is a fl at "twin-lead" cable that can be attached
to a 75-ohm terminal through a 300/75-ohm adapter.
NOTICE
F-type connector should be nger-tightened only.
When connecting the RF cable to the TV set, do not tighten
F-type connector with tools.
If tools are used, it may cause damage to your TV set. (The
breaking of internal circuit, etc.)
F-type connector
300-ohm twin-lead cable (fl at)
F-type connector
75-ohm coaxial cable (round)
75-ohm coaxial cable
Preparation
Using the Remote Control Unit
Use the remote control unit by pointing it towards the
remote control sensor on the TV. Objects between
the remote control unit and the remote control
sensor may prevent proper operation.
30°
30°
30°
*
30°
17´ (5 m)
Remote control sensor
■ Cautions regarding the remote control unit
• Do not expose the remote control unit to shock. In
addition, do not expose the remote control unit to
liquids, and do not place it in an area with high humidity.
• Do not install or place the remote control unit under
direct sunlight. The heat may cause deformation of the
remote control unit.
• The remote control unit may not work properly if
the remote control sensor on the TV is under direct
sunlight or strong lighting. In such cases, change the
angle of the lighting or the TV, or operate the remote
control unit closer to the remote control sensor.
IMPORTANT:
IF THE UNIT DOES NOT POWER ON - UNPLUG
THE TELEVISION FROM THE OUTLET AND REPEAT
THE INSTALLATION STEPS.
IF YOU STILL ENCOUNTER NO POWER, PLEASE
CONTACT US AT 1-800-BE-SHARP.
QUICK REFERENCE
Installing Batteries in the Remote
Control Unit
If the remote control fails to operate TV functions,
replace the batteries in the remote control unit.
1
Open the battery cover.
2
Insert two "AAA" size batteries.
• Place the batteries with their terminals
corresponding to the (
e
) and (
f
) indications
in the battery compartment.
3
Close the battery cover.
CAUTION
Improper use of batteries can result in chemical leakage
or explosion. Be sure to follow the instructions below.
• Do not mix batteries of different types. Different types
of batteries have different characteristics.
• Do not mix old and new batteries. Mixing old and new
batteries can shorten the life of new batteries or cause
chemical leakage in old batteries.
• Remove batteries as soon as they are worn out.
Chemicals that leak from batteries that come in contact
with skin can cause a rash. If you fi nd any chemical
leakage, wipe thoroughly with a cloth.
• The batteries supplied with this product may have a
shorter life expectancy due to storage conditions.
• If you will not be using the remote control unit for an
extended period of time, remove batteries from it.
* The angle is 6º when the
stand is attached.

7
Part Names
TV (Front)
TV (Control Panel)
NOTE
• For more information on
One Key Function
, please refer to page 9.
TV (Rear)
1
ARC
2 Y/V Pb/Cb CABLE / ANTENNAPr/Cr
COMPONENT / VIDEO
DTV / TV
AUDIO
LR
L R OPTICAL MHL
(DC 5V, 900mA)
USB
AUDIO OUT
AC IN
*1 See pages 9 to 11 for external equipment connection.
NOTE
• The OSD illustrations of the terminals are for explanation purposes and may vary slightly from the actual products.
For 43" & 48" TV model (LC-43LE551U / LC-48LE551U) is equipped with 3 HDMI(HDMI-1, HDMI-2 and
HDMI-3(Side).
For 32" & 39" TV models (LC-32LE551U/ LC-32LE451U/ LC-39LE551U) are equipped with 2 HDMI(HDMI-1 and
HDMI-2(Side).
POWER indicator
Remote control sensor
* for LC-32LE551U/LC-32LE451U/LC-39LE551U
* for LC-48LE551U
POWER
button
POWER
button
MENU
button
INPUT
button
Channel
buttons
(
CH
r
/
s
)
Volume
buttons
(
VOL
k
/
l
)
USB terminal
AC IN jack
HDMI 3 terminal
MHL: Mobile High-De nition Link
HDMI 1/2 terminal
ARC: Audio Return Channel
COMPONENT/VIDEO IN terminal
DIGITAL AUDIO OUT terminal
CABLE/ANTENNA IN
(DC 5V, 500mA)
ANALOG AUDIO OUT terminal
POWER
button
MENU
button
INPUT
button
Channel
buttons
(
CH
r
/
s
)
Volume
buttons
(
VOL
k
/
l
)
* for LC-43LE551U
8
Part Names
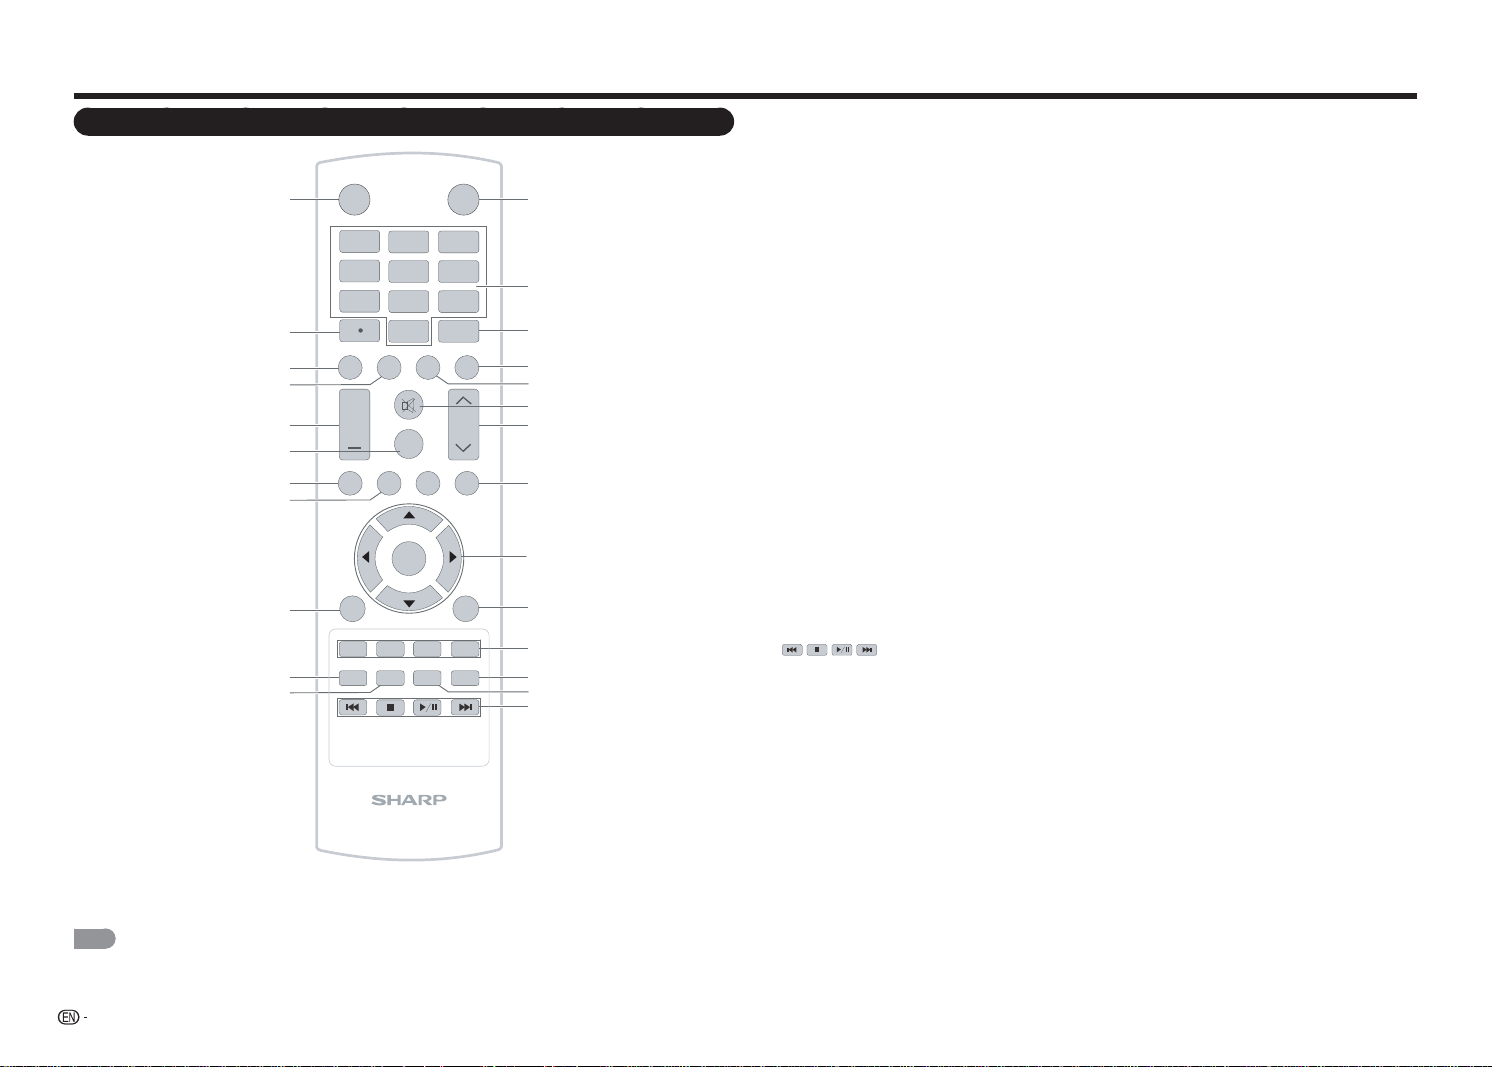
Remote Control Unit
1
INPUT
3
4
5
6
7
8
9
0
ENT
1
2
DISPLAY FREEZE
FLASHBACK
MUTE
SURROUND
TV USB
MENU
FAVORITE CH
SLEEP CC VIEWMODEAVMODE
AUDIO
VOL
CH
+
RETURNEXIT
LCDTV
GJ221
ABCD
ENTER
2
3
4
5
6
7
8
9
10
11
12
13
14
15
16
17
18
19
20
21
22
23
24
25
POWER
1
INPUT: Select a TV input source.
(See page
9.)
2
0
–
9:
Set the channel.
3
ENT:
Jump to a channel after selecting with
the
0
–
9
buttons.
4
FLASHBACK:
Press to switch to the previously
tuned channel or external input mode. Press
again to switch back to the currently tuned
channel or external input mode.
5
AUDIO:
Select the sound mode. (See page
15.)
6
MUTE:
Mute the sound.
7
CH
r
/
s
:
Select the channel.
8
MENU:
Display the menu screen. (See page
17.)
9
a
/
b
/
c
/
d
,
ENTER:
Select a desired item on
the screen.
10
RETURN:
Return to the previous menu screen.
11
FAVORITE CH:
Select to view the preset
favorite channels. While watching, you can
toggle the selected channels by pressing
A
,
B
,
C
and
D
.
12
AV MODE:
Select the picture mode. (See page
19.)
13
VIEW MODE:
Select the aspect ratio. (See
page 16.)
14
:
Only for USB.
15
POWER:
Switch the power on or enters
standby mode. (See page 12.)
16
•
(DOT):
(See page 14.)
17
DISPLAY:
Display the current channel (or input
source) information on the screen.
18
FREEZE:
Set the still image. Press again to
return to normal screen.
19
VOL
k
/
l
:
Set the volume. (See page 14.)
20
SURROUND:
Direct select the surround
setting: "Movie", "News" or "Off". (See page
20.)
21
TV:
Direct switch TV source.
22
USB:
Direct switch USB source.
23
EXIT:
Turn off the menu screen.
24
SLEEP:
Set a time when the TV automatically
switches to standby. (See page 23.)
25
CC:
Select the closed caption mode. (See page
23.)
NOTE
• When using the remote control unit, point it at the TV.
9
Introduction to Connections
Experiencing HD Images
In HDTV without an HD source is just an ordinary TV.To enjoy HD images on the TV, you should get HD
programming from the following:
• Over-the-air broadcasting via HD quality antenna
• HD cable/satellite subscription
• HD compatible external equipment.
NOTE
• For information on updating to HD programming, ask your cable/satellite service provider.
Types of Connection
For connecting the TV to external equipment, use commercially available cables.
• The illustrations of the terminals are for explanation purposes and may vary slightly from the actual products.
■ Connecting to video equipment or PC
Image quality differs depending on the terminal used. To enjoy clearer images, check the output terminals of
your external equipment and use its appropriate terminals for higher quality images.
Pages
10, 11
Terminal
on the TV
Cable
Terminal on external
equipment
Image
Quality
AV cable
Component video cable
Audio cable
HDMI-certified cable
RCA audio to Ø 3.5 mm stereo minijack cable
DVI-HDMI conversion cable
HD
Quality
Standard
Quality
AUDIO
DVI OUT
12
Y/V Pb/Cb Pr/Cr
COMPONENT / VIDEO
AUDIO
LR
Y/V
Pb
/C
b
P
r
/Cr
COMPONENT / VIDEO
AUDIO
LR
Y
/V
Pb
/C
b
P
r
/Cr
COMPONENT / VIDEO
AUDIO
LR
MHL
12
MHL
Page 10
Page 10
Pages
10, 11
■ Connecting to audio equipment
Cable
Terminal on external
equipment
Optical fiber cable
Audio cable
Terminal on the TV
DIGITAL AUDIO INPUT
OPTICAL
ANALOG AUDIO IN
L
R
OPTICAL
AUDIO OUT
LR
O
PTICA
L
AUDIO OUT
Page 11
Page 11
1
Press
INPUT
.
• The INPUT list screen displays.
2
Press
a
/
b
to select the input source.
• You can also select the input source by pressing
INPUT
. Each time
INPUT
is pressed, the input source
toggles.
TV AV IN Component HDMI-1
HDMI-2(Side)
• An image from the selected source automatically
displays.
• If the corresponding input is not plugged in, you cannot
change the input. Be sure to connect the equipment
beforehand.
Input
TV
AV IN
Component
HDMI-1
HDMI-2(Side)
Example
Displaying an External Equipment Image
To view external source images, select the input source by pressing
INPUT
on the remote control unit or on the TV.
NOTE
• The
INPUT
button is only available on LC-43LE551U / LC-48LE551U control panel.
One Key Function
Besides powering the TV on and off ("Turning On/Off the Power" on page 12), you can also use
POWER
to
directly access the INPUT menu, select the channel, and adjust the volume level.
1
Press
POWER
on the control panel to turn on the TV.
2
Press
POWER
again to display the ONE KEY menu.
3
Do one of the following:
• To change the input source, press
POWER
repeatedly to select the
desired input source. Then press and hold
POWER
to confi rm the
selection.
• To change the channel, press
POWER
repeatedly to highlight Channel.
Then press and hold
POWER
to display the Channel Up/Channel
Down submenu and press
POWER
repeatedly to toggle the selection.
Once selected, press and hold
POWER
to select the desired channel.
• To adjust the volume level, press
POWER
repeatedly to highlight Volume.
Then press and hold
POWER
to display the Volume Up/Volume Down
submenu and press
POWER
repeatedly to toggle the selection.
Once selected, press and hold
POWER
to adjust the volume level at your preference.
NOTE
• For One Key function, the channel selection option is only available when the input source is set to "TV".
• The OSD illustrations of the terminals are for explanation purposes and may vary slightly from the actual products.
For 43" & 48" TV model (LC-43LE551U / LC-48LE551U) is equipped with 3 HDMI(HDMI-1, HDMI-2 and
HDMI-3(Side).
For 32" & 39" TV models (LC-32LE551U/ LC-32LE451U/ LC-39LE551U) are equipped with 2 HDMI(HDMI-1 and
HDMI-2(Side).
Input
TV
AV IN
Component
HDMI-1
HDMI-2(Side)
Channel
Volume 1

10
Connecting to External Equipment
You can connect many types of external equipment to your TV. To view external source images, select the
input source from
INPUT
on the remote control unit or on the TV. (See pages 9 and 14.)
For connecting the TV to external equipment, use commercially available cables.
CAUTION
• To protect equipment, always turn off the TV before connecting any external equipment.
• Please read the relevant operation manual (Blu-ray disc player, etc.) carefully before making connections.
Connecting a Blu-ray Disc/DVD Player or HD Cable/Satellite Set-top Box
■ When using an HDMI cable (HDMI IN 1, 2, or 3):
• The HDMI (High Defi nition Multimedia Interface) terminal is an audio-video interface that enables a connection for
audio and video signals using a single cable. The HDMI IN terminal supports high-resolution video input.
• Blu-ray disc player • DVD player • HD cable/satellite set-top box
HDMI OUT
MHL
(DC 5V, 900mA)
1
ARC
2
NOTE
• To enjoy 1080p display capability, connect your external equipment using an HDMI-certifi ed cable or a component
cable and set the equipment to 1080p output.
• Supported Audio format: Linear PCM, Dolby Digital, DTS, sampling rate 32/44.1/48kHz.
• When you connect ARC-compatible equipment, use HDMI IN 1.
■ When using a DVI-HDMI conversion cable (HDMI IN 1, 2, or 3):
• Blu-ray disc player • DVD player • HD cable/satellite set-top box
AUDIO OUT
DVI OUT
MHL
(DC 5V, 900mA)
1
ARC
2
Y/V
Pb/Cb
C
Pr/Cr
COMPONENT / VIDEO
AUDIO
LR
NOTE
• When using a DVI-HDMI conversion cable, you should make an analog audio connection. In this case, in addition
to connecting a DVI-HDMI conversion cable to the HDMI IN 2 terminal, connect an audio cable to the AUDIO IN
terminal.
■ When using a Component cable (COMPONENT IN):
• Blu-ray disc player • DVD player • HD cable/satellite set-top box
COMPONENT OUT
Y/V Pb/Cb Pr/Cr
COMPONENT / VIDEO
AUDIO
LR
NOTE
• To enjoy 1080p display capability, connect your external equipment using an HDMI-certifi ed cable or a component
cable and set the equipment to 1080p output.
Connecting a VCR, Game Console, Camcorder or Cable/Satellite Set-top Box
■ When using a Composite cable (COMPONENT/VIDEO):
• Game console • VCR
• Camcorder • Cable/Satellite set-top box
Y/V
Pb/Cb
Pr/Cr
COMPONENT / VIDEO
AUDIO
LR
HDMI-certifi ed cable
DVI-HDMI conversion cable
Audio cable
Audio cable
A
UDIO-L (White)
A
UDIO-R (Red)
P
R
(Red)
P
B
(Blue)
Y (Green)
AV cable
A
UDIO-L (White)
A
UDIO-R (Red)
V
IDEO (Yellow)
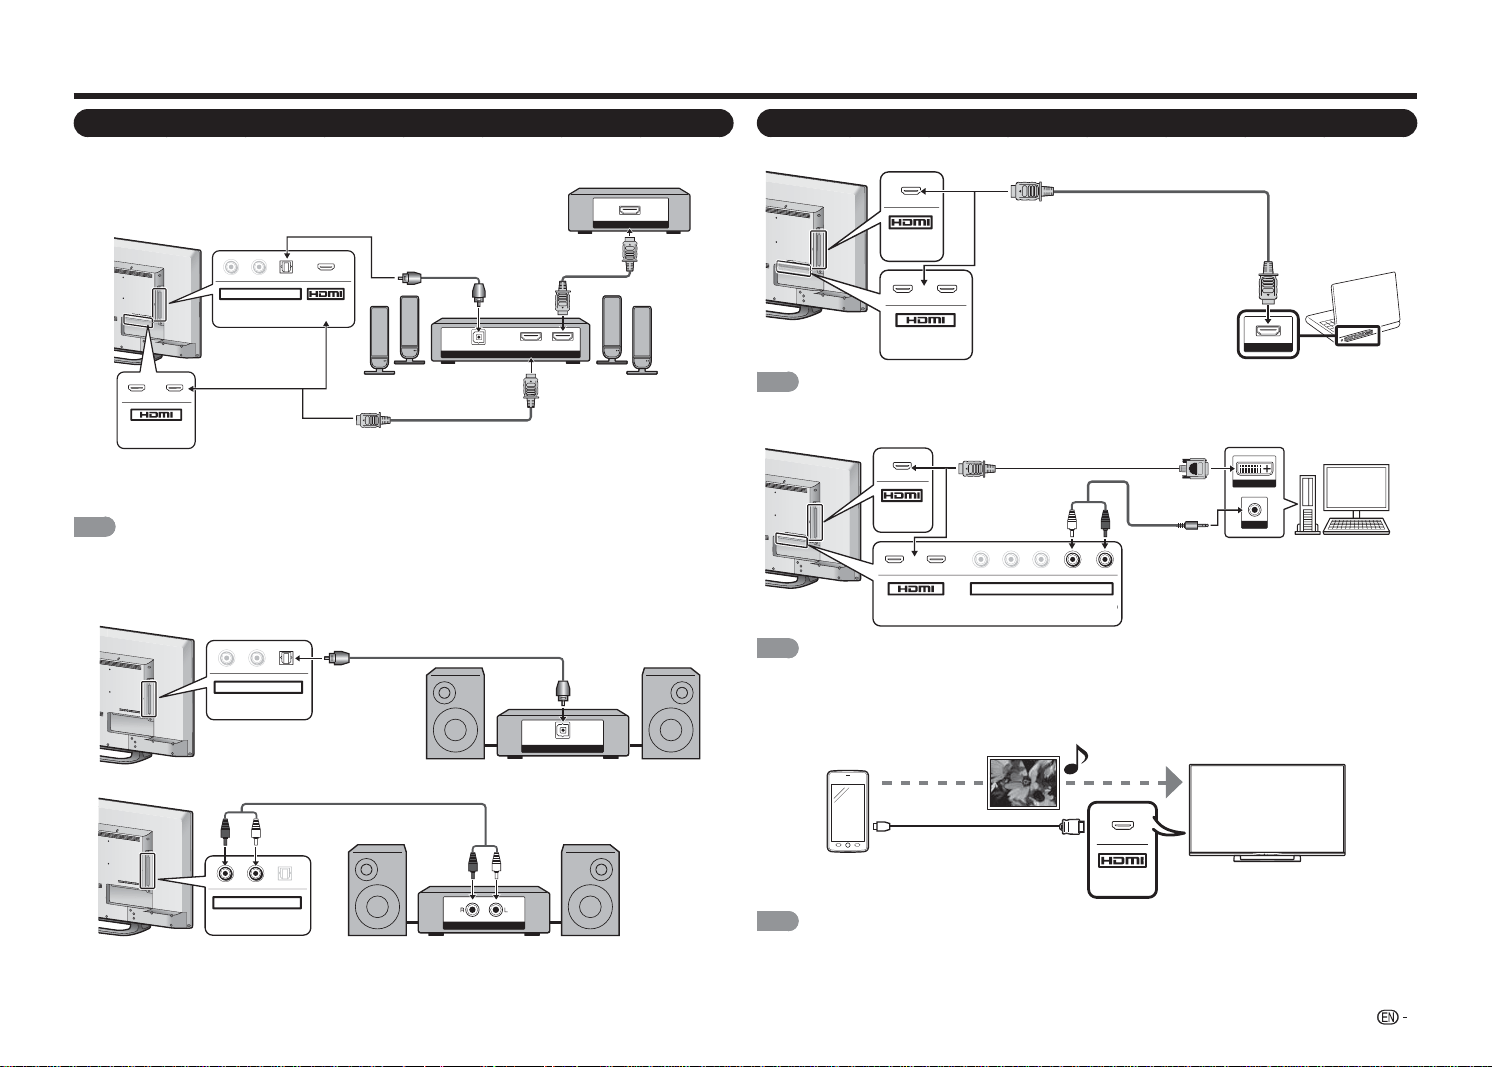
11
Connecting to External Equipment
Connecting a Surround System/Audio System
■ When connecting an AV ampli er for a surround system
DIGITAL AUDIO INPUT
OPTICAL
HDMI INHDMI OUT
HDMI OUT
L
R
OPTICAL MHL
(DC 5V, 900mA)
AUDIO OUT
1
ARC
2
• Letting the TV output the audio to an AV amplifi er:
*1 When you connect ARC-compatible equipment, use the HDMI IN 1 terminal.
*2 If the equipment to be connected is not compatible with the ARC, connect an optical fi ber cable.
NOTE
• If the image is not in sync with the audio, check the settings of the connected surround system.
■ When connecting an audio ampli er
It is possible to output audio through the DIGITAL AUDIO OUT terminal.
DIGITAL AUDIO INPUT
OPTICAL
L
R
OPTICAL
AUDIO OUT
ANALOG AUDIO IN
LR
OPTICAL
AUDIO OUT
Connecting a PC/Smartphone
■ When using an HDMI cable (HDMI IN 1, 2, or 3):
MHL
(DC 5V, 900mA)
1
ARC
2
HDMI OUT
NOTE
• The HDMI IN terminals only support digital signal.
■ When using a DVI-HDMI conversion cable (HDMI IN 1, 2, or 3):
DVI OUT
AUDIO
MHL
(DC 5V, 900mA)
1
ARC
2
Y/V
Pb/Cb
C
Pr/Cr
COMPONENT / VIDEO
AUDIO
LR
NOTE
• When using a DVI-HDMI conversion cable, you should make an analog audio connection. In this case, in addition
to connecting a DVI-HDMI conversion cable to the HDMI IN 2 terminal, connect an audio cable to the AUDIO IN
terminal.
■ When using a MHL cable (HDMI IN Side):
MHL
NOTE
• With Mobile High-Defi nition Link (MHL) technology, it allows you to display your smartphone’s content to your TV,
while charging your mobile device.
HDMI-certifi ed cable *1
HD Cable/Satellite set-top box
Optical fi ber cable *2
Optical fi ber cable
Audio cable
MHL cable
Smartphone
Multimedia
fi les
HDMI-certifi ed cable
DVI-HDMI conversion cable
Audio cable
12
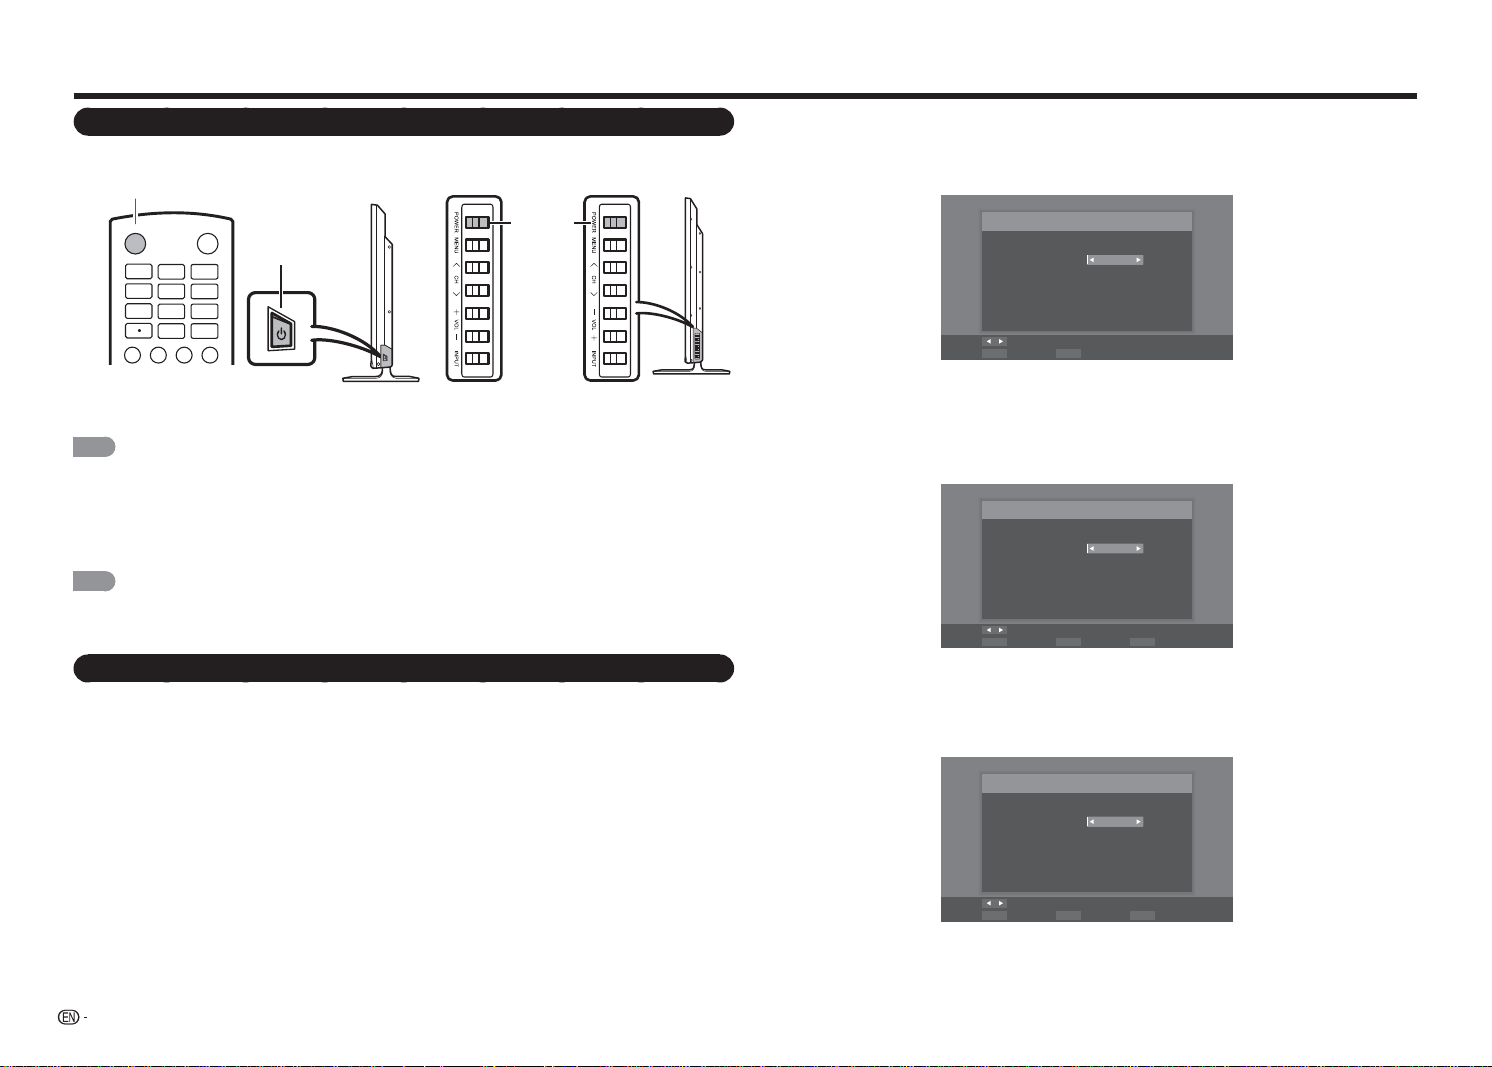
Watching TV
Turning On/Off the Power
Press
POWER
on the TV, or
POWER
on the remote control unit to turn the power on.
Language Setting
Select from among 3 languages: English, French and Spanish.
1
Press
/
to select the desired language listed on the screen, and then press
ENTER
to continue to the
next step.
Menu Language
Language selection
Language: English
Change
Select
ENTER ExitEXIT
TV Location Setting
Select "Home Mode" or "Store Mode" for the location where you plan to install the TV. This product qualifes
for ENERGY STAR in Home mode default setting.
2
Press
c
/
d
to select "Home Mode" or "Store Mode".
Press
ENTER
to continue to the next step.
TV Mode
Mode selection
Mode: Home Mode
Change
Select
ENTER Previous StepRETURN ExitEXIT
Time Zone and Daylight Saving Time Settings
Make settings for the time zone and daylight saving time where you use the TV.
3
Press
c
/
d
to select the time zone where you are using the TV, and then press
ENTER
to continue to
the next step.
Time Zone
Set your time zone
Time Zone: Alaska
Change
Select
ENTER Previous StepRETURN ExitEXIT
• The time zone differs depending on the selected country.
• The factory preset value is the time zone for the capital of the selected country.
POWER button
* for LC-48LE551U
POWER
button
INPUT
3
4
5
6
7
8
9
0
ENT
1
2
DISPLAY FREEZE
FLASHBACK
AUDIO
POWER
NOTE
• The Initial Installation starts when the TV powers on for the fi rst time. If the TV has been turned on before, the Initial
Installation will not be invoked. For changing the settings of the Initial Installation, perform "Easy setup" on the Initial
Setup menu on page 22.
Press
POWER
on the TV, or
POWER
on the remote control unit again to turn the power off.
• The TV enters standby and the image on the screen disappears.
NOTE
• If you are not going to use this TV for a long period of time, be sure to remove the AC cord from the AC outlet.
• Weak electric power is still consumed even when the TV is turned off.
Initial Installation
When you turn on the TV for the fi rst time, the Easy Setup will guide you through the setup process. Perform
the following steps before you press
POWER
on the remote control unit.
1.
Insert the batteries into the remote control unit. (See page 6.)
2.
Connect the antenna cable to the TV. (See page 6.)
3.
Plug in the AC cord to the AC outlet. (See page 5.)
* for LC-32LE551U/LC-32LE451U/
LC-39LE551U
POWER
button
* for LC-43LE551U

13
Watching TV
4
Press
c
/
d
to enable/disable the Daylight Saving Time, and then press
ENTER
to continue to the next
step.
Daylight Saving
Daylight Saving selection
Daylight Saving: On
Change
Select
ENTER Previous StepRETURN ExitEXIT
Antenna Setting
Make sure what kind of connection is made with your TV when selecting "Cable" or "Antenna".
5
Press
c
/
d
to select "Cable" or "Antenna", and then press
ENTER
to continue to the next step.
Auto Scan
Select the Signal Type of your TV input and start auto scan.
Signal Type: Cable
Start Scan
Move Change
Select
ENTER Previous StepRETURN ExitEXIT
Channel Scanning
Channel auto search makes the TV look for all channels viewable in the set area.
6
When "Cable" or "Antenna" is selected in Tuner setting, press
/
/
ENTER
to highlight "Start Scan", and
then press
ENTER
to start auto search.
Auto Scan
Select the Signal Type of your TV input and start auto scan.
Signal Type: Cable
Start Scan
Move
Select
ENTER Previous StepRETURN ExitEXIT
During channel searching:
• Wait until the channel scan to complete.
• If you press
ENTER
, the TV will exit Easy Setup.
• If you skip this step, the channel search can be performed in the Setup Menu. (See page 22.)
Scanning
Channel scan in process, if you want to stop scanning, please
press “Stop Scan”.
Scan Status:
Analog Channel : 89
Digital Channel : 0
70%
Stop Scan
Select
ENTER
Completed
7
After setting complete, the screen will show "Channel scan completed" message on the screen, and then
press
ENTER
to continue to the next step.
Scan Finish
Channel scan completed.
Analog Channel : 100
Digital Channel : 0
OK
Select
ENTER Previous StepRETURN ExitEXIT
8
Press
ENTER
to fi nish the Easy Setup.The TV will then switch to the fi rst channel found.
Finish
Initial Setup has finished, please press “OK” to exit Easy Setup.
OK
Select
ENTER Previous StepRETURN ExitEXIT
NOTE
• The channel scanning may take a while to complete.
• If no channel is found, confi rm the type of connection made with your TV and try "Easy Setup" again. (See page
22
.)
14
Changing Channels
You can change channels in several ways.
Method 1
Using
CH
r
/
s
on the remote control unit.
Method 2
Using remote control buttons
0
-
9
, • (DOT).
Examples:
To select a 1 or 2-digit channel number
(e. g., Channel 5):
Press
5
ENTER
.
To select a 3-digit channel number
(e. g., Channel 115):
Press
1
1
5
ENTER
.
To select a 4-digit channel number
(e. g., Channel 22.1):
Press
2
2
•
(DOT)
1
ENTER
.
NOTE
• When selecting a 1-digit channel number, it is not
necessary to press
0
before the number.
• When you enter
0
-
9
only, channel selection will be
made if there is no operation within a few seconds.
• If you push "0" by itself, nothing will happen.
• Complete the above steps within a few seconds.
• When you enter
0
-
9
and • (DOT), channel selection will
be made if there is no operation within a few seconds.
Changing Volume
You can change the volume by pressing
VOL
k
/
l
on the remote control unit.
• To increase the volume, press
VOL
k
.
• To decrease the volume, press
VOL
l
.
INPUT
3
4
5
6
7
8
9
0
ENT
1
2
DISPLAY FREEZE
FLASHBACK
MUTE
SURROUND
TV USB
MENU
FAVORITE CH
SLEEP CC VIEWMODEAV MODE
AUDIO
VOL
CH
+
RETURNEXIT
LCDTV
GJ221
ABCD
ENTER
POWER
INPUT
To view external source images, select the input
source by pressing
INPUT
on the remote control
unit.
1
Press
INPUT
.
• The INPUT list screen displays.
2
Press
/
or press
INPUT
again to select the
input source.
• An image from the selected source
automatically displays.
• Each time
INPUT
is pressed, the input source
toggles.
• If you press
/
to select the input source,
press
ENTER
to confi rm your selection.
NOTE
• See pages 9 to 11 for external equipment
connection.
MUTE
Mutes the current sound output.
Press
MUTE
.
NOTE
• Mute can be cancelled if you press
VOL
k
/
l
or
MUTE
.
SLEEP
Allows you to set a time when the TV automatically
switches to standby.
Press
SLEEP
.
• The remaining time displays when the sleep timer
has been set.
• Each time you press
SLEEP
, the remaining time
switches as shown below.
Off 30 Minutes 60 Minutes
180 Minutes 120 Minutes 90 Minutes
• When set, the time automatically starts counting
down.
• If you want to adjust the sleep timer, you can press
SLEEP
twice then change the time setting.
NOTE
• Select "Off" by pressing
SLEEP
to cancel the sleep timer.
• The TV will enter standby when the remaining time
reaches 0.
Direct Button Operation
FLASHBACK
Press
FLASHBACK
to switch to the previously
tuned channel or previous input mode.
• Press
FLASHBACK
again to switch back to the
currently tuned channel.
NOTE
• FLASHBACK
will not work if no channel has been
changed after the TV is turned on.
SURROUND
The surround function produces Surround effect
from the speakers. Press
SURROUND
to select the
desired Surround effect.
FREEZE
Allows you to capture and freeze a moving image
that you are watching.
Press
FREEZE
.
• A moving image is captured.
• Press
FREEZE
again to cancel the function.
AV MODE
AV MODE gives you several viewing options
to choose from to best match the surrounding
environment of the TV, which can vary due to factors
like room brightness, type of program watched or
the type of image input from external equipment.
Press
AV MODE
repeatedly to select desired setting:
Standard (Energy Star):
For a highly defi ned
image in a normal lighting.
Movie:
For a movie.
Game:
Suitable for game playing. You can
confi gure the settings according to the type of
the game.
DYNAMIC:
For viewing vivid and clear images.
Sport:
For a clear-cut image emphasizing high
contrast, useful for sports viewing.
User:
Allows the user to customize settings as
desired. You can set the mode for each input
source.
• Press
AV MODE
again before the mode displayed
on the screen disappears.
15
AUDIO
Allows you to select a preset audio option optimized
for different sounding conditions.
Press
AUDIO
repeatedly to select desired setting:
SAP, Mono, or Stereo.
You can enjoy Hi-Fi stereo sound or SAP
broadcasts where available.
• Stereo broadcasts:
View programs like live sporting
events, shows and concerts in dynamic stereo sound.
• SAP broadcasts:
Receive TV broadcasts in either
MAIN or SAP sound.
MAIN sound: The normal program soundtrack (either in
mono or stereo).
SAP sound: Listen to a second language,
supplementary commentary or other information. (SAP
is mono sound.)
If stereo sound is dif cult to hear.
• Obtain a clearer sound by manually switching to fi xed
mono-sound mode.
FAVORITE CH (Favorite Channel Setting)
This function allows you to program up to 4 favorite
channels. By setting the favorite channels in advance,
you can select your favorite channel easily.
To register your favorite channel
1
Press
MENU
to display the MENU screen.
2
Press
c
/
d
to select the Channel menu.
3
Press
/
to select the Skip/Favorite
Channel menu and press
/
ENTER
to enter
its submenu.
4
Press
/
select the channel and press one of
the
FAVORITE CH
buttons (
A
,
B
,
C
, or
D
) on
the remote control unit to register this channel to
the favorite channel for the selected button.
16
19
21
24
25
26
27
28
29
30
• Set other favorite channels the same way.
5
Press
MENU
to exit.
To watch your favorite channel
Press one of the
FAVORITE CH
buttons (
A
,
B
,
C
, or
D
) to watch the preset channel.
Closed Captions and Digital Closed
Captions
Your TV is equipped with an internal Closed Caption
decoder. It allows you to view conversations,
narration and sound effects as subtitles on your TV.
Closed Captions are available on some TV programs
and on some VHS home video tapes at the
discretion of the program provider.
Digital Closed Caption service is a new caption
service available only on digital TV programs
(also at the discretion of the service provider). It
is a more fl exible system than the original Closed
Caption system, because it allows for a variety
of caption sizes and font styles. When the Digital
Closed Caption service is in use, it will be indicated
by the appearance of a 3-letter abbreviation that
also indicates the language of the Digital Closed
Captions: ENG (English), SPA (Spanish), FRA (French)
or other language codes.
Not all programs and VHS videotapes offer closed
captions.
In the Closed Caption system, there can be more
than one caption service provided. Each is identifi ed
by its own number. The “CC1” to “CC4” services
display subtitles of TV programs superimposed over
the program's picture.
In the Closed Caption system, the “TEXT1” to
“TEXT4” services display text that is unrelated to the
program being viewed (e.g., weather or news). These
services are also superimposed over the program
currently being viewed.
1
Press
CC
.
• This will present the Closed Caption
information display.
2
Press
CC
while the Closed Caption information
is still on the screen.
• Press repeatedly until you select the desired
closed caption service.
Direct Button Operation
Example:
Analog:
Off CC1 CC2 CC3 CC4
TEXT4 TEXT3 TEXT2 TEXT1
Digital:
Off CC1 CC2 CC3 CC4
CS4 CS3 CS2 CS1
CS5 CS6
• The
CC
button keeps a record of the last service
selected in its memory.
NOTE
• See page 23 for detailed closed caption settings.
• Caption Display will not work when viewing a
480i, 480p, 720p, 1080i or 1080p input via the
COMPONENT: Y-PbPr or HDMI inputs.
• Closed Captions availability and content depends on
the broadcaster. Closed Caption are available when
the Closed Caption icon is displayed on screen.
• Closed Captions and Digital Captions availability
and content depends on the broadcaster. Closed
Caption are available when the Closed Caption icon is
displayed on screen.

16
VIEW MODE
You can select the screen size.
1
Press
VIEW MODE
.
• The View Mode menu displays.
• The menu lists the View Mode options selectable for the type of video signal currently being received.
2
Press
VIEW MODE
or
/
while the View Mode menu is displayed to select a desired item on the menu.
3
Press
ENTER
to confi rm the setting.
NOTE
• You can have the same settings by choosing "View Mode" on the menu items. (See page 16.)
■ For 4:3 programs
Normal Wide Zoom Panoramic
Keeps the original aspect
ratio in a full screen
display. The original
4:3 aspect ratio (1.33:1
source) is preserved, so
black bars are added to
the left and right of the
display image.
Stretches a 4:3 aspect
ratio picture to the
edges of the screen.
Expands images with
black bars to fi t the
screen.
Expands the display
image horizontally on
the left and right sides
to fi ll the screen.
Images may appear
wider than intended.
If you are watching
widescreen (1.85:1 or
2.35:1) content, black
bars will still appear on
the top and bottom of
the display image.
■ For 16:9 programs
Normal
Wide Zoom Stretch
Keeps the original aspect
ratio in a full screen
display.
Stretches
proportionately to fi ll the
TV screen.
Expands images with
black bars to fi t the
screen.
Expands the display
image to fi ll the screen.
Images may appear
wider than intended.
NOTE
• Selectable screen size may vary with input signal type.
Direct Button Operation
17
On-Screen Display Menu
Menu Operation Buttons
Using the remote control
Use the following buttons on the remote control to
operate the menu.
On-Screen Display Menu Operation
Audio Setup Channel
Closed
Caption
View
Mode
Sleep
Timer
Surround
Auto Volume Control
Bass
Treble
Balance
Lip Sync
TV Speakers
Audio Only
Digital Audio Out
Analog Audio Out
Equalizer Settings
Reset Audio Mode
Off
Movie
News
[Movie]
[On]
0
0
0
0
[On]
[PCM]
[Fixed]
Example
1
Press
MENU
to display the MENU screen.
2
Press
c
/
d
to select the desired menu.
3
Press
/
to select the desired menu option and press
/
ENTER
to enter its submenu.
• Additional related adjustment items may be displayed. Press
a
/
b
to select the desired item.
4
Press
/
or
c
/
d
to select/adjust the desired setting and press
ENTER
to confi rm.
• Operations vary depending on the function or item.
5
Press
MENU
to exit.
NOTE
• Menu options differ in the selected input modes, but the operating procedures are the same.
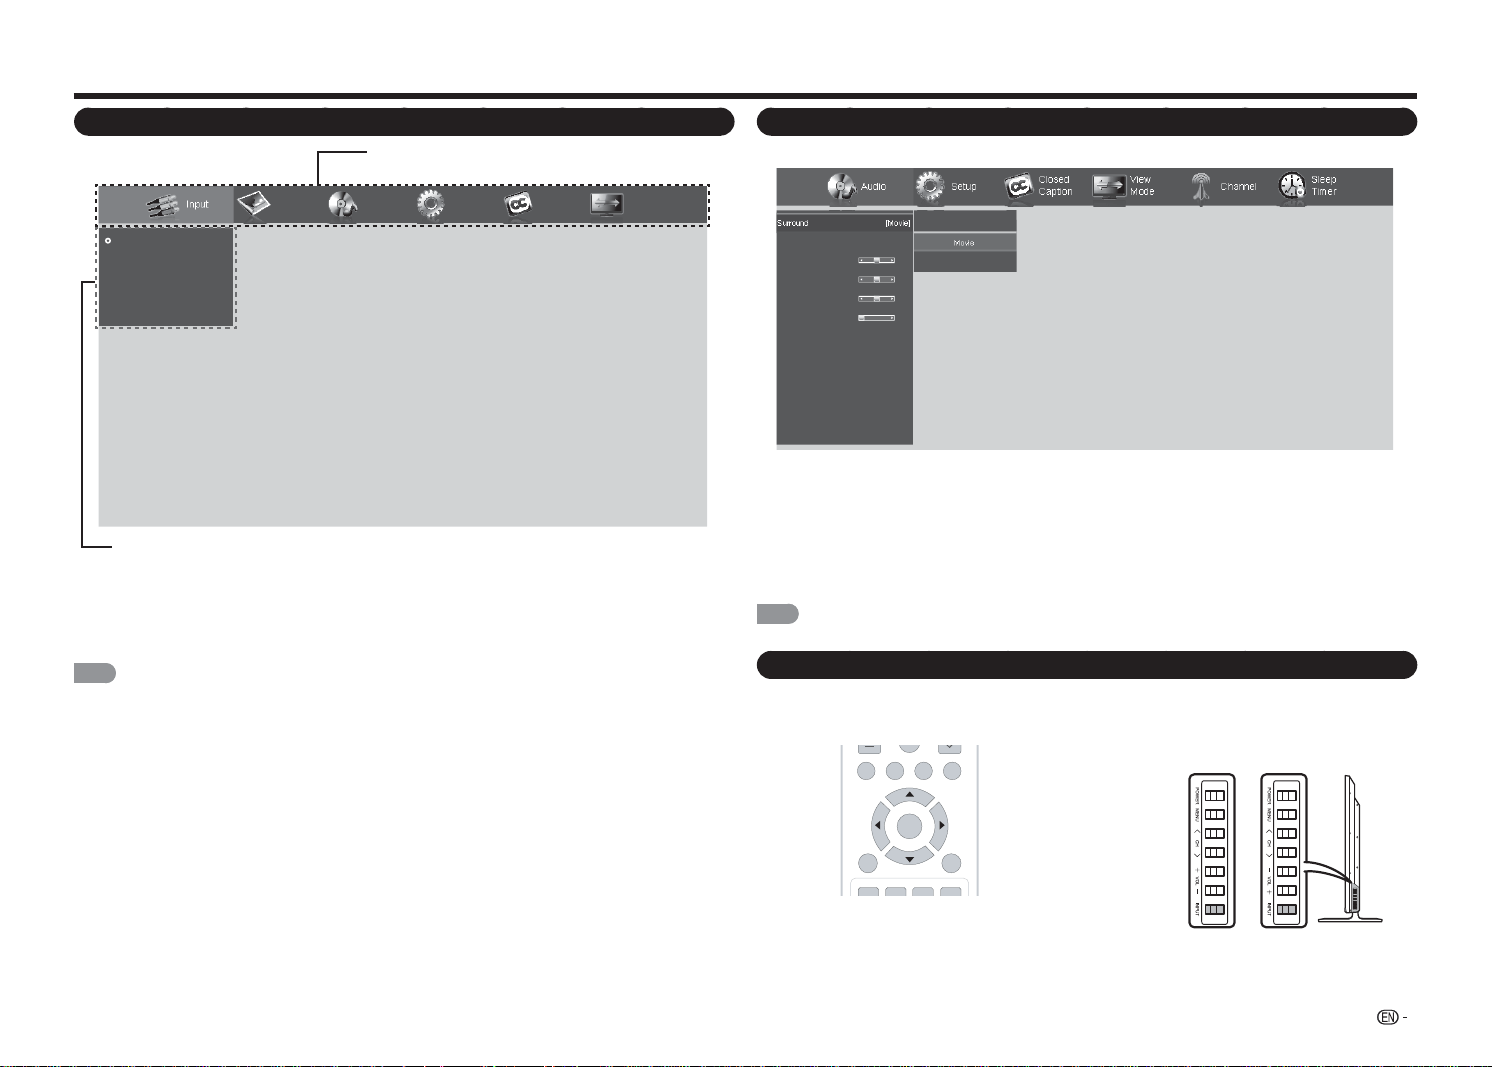
On-Screen Display Menu (Main menu)
Input Picture Audio
TV
AV IN
Component
HDMI-1
HDMI-2(Side)
Setup
Closed
Caption
View
Mode
■ About Menu Items
• Item displayed in gray indicates that the item cannot be selected.
• Some menu items may not be displayed depending on the selected input source.
NOTE
• The screens in the operation manual are for explanation purposes (some are enlarged, others cropped) and may
vary slightly from the actual screens.
• The order of explanations for each menu item in the following pages is not necessarily in accordance with the
alignment of the items on the screen.
Main Menu
Submenu/Menu options
MENU:
Press to open or close the menu screen.
a
/
b
/
c
/
d
:
Press to select a desired item on the
screen or adjust a selected item.
ENTER:
Press to go to the next step or
complete the setting.
RETURN:
Press to return to the previous step.
TV USB
MENU
FAVORITE CH
RETURNEXIT
ABCD
ENTER
Using the control panel of the TV
You can also operate the menu with the control
panel of the TV.
Button operations on the control panel correspond
to the ones on the remote control as shown below.
MENU:
MENU
on the remote control.
INPUT:
ENTER
on the remote control.
CH
r
/
s
:
Cursor
a
/
b
on the remote control.
VOL
k
/
l
:
Cursor
c
/
d
on the remote control.
* for LC-48LE551U* for LC-43LE551U
18
Picture menu
Picture
AV Mode
Backlight
Contrast
Brightness
Color
Tint
Sharpness
Size & Position
Color Temperature
Advanced Picture
Reset AV Mode
[Standard (Energy Star)]
80
52
50
60
0
2
Example
AV Mode .....................................................Page 19
Backlight .....................................................Page 19
Contrast ......................................................Page 19
Brightness ...................................................Page 19
Color ...........................................................Page 19
Tint ..............................................................Page 19
Sharpness ...................................................Page 19
Size & Position .............................................Page 19
Horiz. Position ..................................Page 19
Vertical Position ...............................Page 19
Horizontal Size .................................Page 19
Vertical Size .....................................Page 19
Color Temperature ......................................Page 19
Color Temperature ...........................Page 19
Red/Green/Blue Gain .......................Page 19
Red/Green/Blue Offset .....................Page 19
Reset Color Temperature .................Page 19
Advanced Picture ........................................Page 20
Enhance Color .................................Page 20
Active Contrast ................................Page 20
Power Saving ...................................Page 20
Noise Reduction ..............................Page 20
Digital NR ........................................Page 20
Film Mode ........................................Page 20
Reset AV Mode ...........................................Page 20
Menu Items
Audio menu
Audio
Surround
Auto Volume Control
Bass
Treble
Balance
Lip Sync
TV Speakers
Audio Only
Digital Audio Out
Analog Audio Out
Equalizer Settings
Reset Audio Mode
[Movie]
[On]
0
0
0
0
[On]
[PCM]
[Fixed]
Example
Surround .....................................................Page 20
Auto Volume Control ...................................Page 20
Bass ............................................................ Page 20
Treble ..........................................................Page 20
Balance .......................................................Page 20
Lip Sync ......................................................Page 20
TV Speakers ................................................Page 20
Audio Only ...................................................Page 20
Digital Audio Out ..........................................Page 21
Analog Audio Out ........................................Page 21
Equalizer Settings ........................................Page 21
Reset Audio Mode .......................................Page 21
Setup menu
Setup
Name Input
CEC Link Settings
Menu Language
Time & Local Settings
Parental Control
Power Indicator
Easy Setup
System Information
Reset All Settings
[English]
[On]
Example
Name Input .................................................Page 21
Input Source ....................................Page 21
Input Labels .....................................Page 21
CEC Link Settings .......................................Page 21
CEC Link Function ...........................Page 21
System Audio Control ......................Page 21
Device Search ..................................Page 21
Menu Language ..........................................Page 21
Time & Local Settings ..................................Page 21
Time Zone........................................Page 21
Daylight Saving ................................Page 21
Parental Control ...........................................Page 21
Enable Rating ..................................Page 21
Channel Lock ...................................Page 21
USA-TV ...........................................Page 21
USA-Movie ......................................Page 22
CAN-English ....................................Page 22
CAN-French .....................................Page 22
Alt. Region Rating ............................Page 22
Blocked Unrated Shows ..................Page 22
New Password ................................Page 22
Reset Parental Settings ....................Page 22
Power Indicator ...........................................Page 22
Easy Setup ..................................................Page 22
System Information ......................................Page 22
Reset All Settings ........................................Page 22
On-Screen Display Menu
Closed Caption menu (TV input signal only)
Closed
Caption
Analog Closed Caption
Digital Closed Caption
Digital CC Options
[Off]
[Off]
Example
Analog Closed Caption ................................Page 23
Digital Closed Caption .................................Page 23
Digital CC Options .......................................Page 23
Channel menu (TV input signal only)
TV Mode
Auto Channel Scan
Partial Channel Scan
Find Channel
Skip/ Favorite Channel
Analog MTS
Digital MTS
[Cable]
[Mono]
Channel
Example
TV Mode .....................................................Page 23
Auto Channel Scan ......................................Page 23
Partial Channel Scan ...................................Page 23
Find Channel ...............................................Page 23
Skip/Favorite Channel ..................................Page 23
Analog MTS .................................................Page 23
Digital MTS ..................................................Page 23

19
Brightness
Adjust the brightness level.
Press
c
for less brightness or press
d
for more
brightness.
Color
Adjust the color intensity level.
Press
c
for less color intensity or press
d
for more
color intensity.
Tint
Adjust the skin tones level.
Press
c
to let the skin tones become reddish or
press
d
to let the skin tones become reddish.
Sharpness
Adjust the sharpness level.
Press
c
for less sharpness or press
d
for more
sharpness.
Size & Position
When displaying an image, the size and position of
the display image can be adjusted.
Horiz. Position
Vertical Position
Horizontal Size
Vertical Size
31
16
0
0
• Horiz. Position: Adjusts the horizontal position of
the display image.
• Vertical Position: Adjusts the vertical position of
the display image.
• Horizontal Size: Adjusts the width of the display
image.
• Vertical Size: Adjusts the height of the display
image.
Picture menu
Adjusts the picture to your preference with the
following picture settings.
NOTE
• For operating the on-screen display menu, see page
17.
AV Mode (Changing Pic.Quality)
The audio and video settings can be changed to suit
the program or input content being watched.
Select from the following AV modes:
Standard (Energy
Star), Movie, Game, DYNAMIC, Sport, or User.
• Standard (Energy Star):
For a highly defi ned
image in a normal lighting.
• Movie:
For a movie.
• Game:
Suitable for game playing. You can
confi gure the settings according to the type of the
game.
• DYNAMIC:
For viewing vivid and clear images.
• Sport:
For a clear-cut image emphasizing high
contrast, useful for sports viewing.
• User:
Allows the user to customize settings as
desired. You can set the mode for each input source.
NOTE
• Standard(Energy Star) is the default setting, if you select
some other options, the power consumption may
change.
• The selectable items vary depending on the input
source.
• You can select AV MODE by pressing
AV MODE
on
the remote control unit. See Page 14 for details of
AV MODE settings.
Backlight
Adjusts the screen brightness.
Press
c
to let the screen dims or press
d
to let the
screen brightens.
Contrast
Adjusts the contrast level.
Press
c
for less contrast or press
d
for more
contrast.
Color Temperature
Adjusting the color temperature will change the
“warmness” or “coolness” of the white areas of the
picture.
Color Temperature
Red Gain
Green Gain
Blue Gain
Red Offset
Green Offset
Blue Offset
Reset Color Temperature
[Cool]
128
128
128
128
128
128
Color Temperature
Select a preset color temperature setting.
• Custom: Manually change each of the color
temperature settings.
• Cool: Produces a blue-hued picture.
• Natural: Optimized for television viewing.
• Warm: Produces a yellow-hued picture.
Red/Green/Blue Gain
Adjusts the amount of each color in the display.
Red/Green/Blue Offset
Adjusts the position of each color in the display.
Reset Color Temperature
Reset all color temperature adjustment items to the
factory preset values.
Input menu
Input
TV
AV IN
Component
HDMI-1
HDMI-2(Side)
Example
Selecting input source ..................................Page 9
View Mode menu
Normal
Wide
Zoom
Panoramic
View
Mode
Example
Selecting aspect ratio .................................Page 16
Sleep Timer menu
Off
30 Minutes
60 Minutes
90 Minutes
120 Minutes
180 Minutes
Sleep
Timer
OffSleep Timer
Example
Setting sleep timer ......................................Page 23
On-Screen Display Menu

20
On-Screen Display Menu
Advanced Picture Settings
This TV provides various advanced functions for
optimizing the picture quality.
Enhance Color
Active Contrast
Power Saving
Noise Reduction
Digital NR
Film Mode
[Normal]
[Medium]
[On]
[Low]
[Low]
[Auto]
Echance Color
Reduces over saturation of some colors and
improves fl esh tones.
• Off: No adjustment.
• Normal/Rich: Selects a desired level for
enhancing the white levels in the picture.
Active Contrast
Adjusts the image contrast according to the scene.
• Off: No adjustment.
• High/Middle/Low: Selects a desired level for
producing high contrast image.
Power Saving
Adjusts the average brightness of the picture to
compensate for large areas of brightness.
• Off: The brightness is fi xed at the value set in
"Backlight".
• On: Automatically adjusts the brightness of the
screen.
Noise Reduction
Produces a clearer video image.
• Off: No adjustment.
• High/Middle/Low: Selects a desired level for
viewing a clearer video image.
Digital NR
Diminishes artifacts in the image caused by the
digitizing of image motion content.
• Off: No adjustment.
• High/Middle/Low: Selects a desired level for
viewing a clearer video image.
Film Mode
Optimizes the picture for watching fi lm.
• Auto: Produces smoother motion picture when
viewing movies.
• Off: Normal viewing mode.
Reset AV Mode
Restores the Picture settings to the factory defaults.
Audio menu
Adjusts the sound quality to your preference with the
following settings.
NOTE
• For operating the on-screen display menu, see page
17.
Surround
The surround function produces Surround effect
from the speakers.
• Off:
Outputs the normal sound.
• Movie:
Reproduces movie theater experience
with realistic live surround sound using measured
reverberant sound in the movie theater.
• News:
Provides mild surround sound.
NOTE
• For some discs, setup may be required on your BD/
DVD player. In this case, please refer to the operation
manual of your BD/DVD player.
Auto Volume Control
Different sound sources sometimes do not have
the same loudness level, such as a program and its
commercial breaks. The Automatic Volume Control
(Auto
Volume) reduces this problem by equalizing
levels.
• Off:
No adjustment.
• On: Reduces the loudness gaps among different
sound sources.
Bass
Adjusts the bass level.
Press
c
for weaker bass or press
d
for stronger
bass.
NOTE
• The Bass menu is grayed out when "Surround" is set
to "Movie" or "News". (See page 20.)
Treble
Adjusts the treble level.
Press
c
for weaker treble or press
d
for stronger
treble.
NOTE
• The Bass menu is grayed out when "Surround" is set
to "Movie" or "News". (See page 20.)
Balance
Adjusts the sound balance between the left and right
speakers.
Press
c
to decrease audio from the right speaker, or
press
d
to decrease audio from the left speaker.
Lip Sync
Adjusts the synchronization between the display
image and the accompanying audio track.
Press
c
/
d
to adjust the audio in relation to the
display image.
TV Speakers
Turns the built-in speakers on or off.
• Off: Disables the internal speakers. This is only
necessary when you have an external speaker
system connected to your TV.
• On: Turns the internal speakers on.
NOTE
• The audio output signals will not be turned off enven
though the TV speaker is off.
Audio Only
Output audio from the TV speakers but temporarily
display a black screen.
The TV has entered Audio Only Mode.
The Backlight will turn off soon. Press
any key to wake up again.
In Audio Only mode, press any key to display the
display image.
21
Digital Audio Out
You can output digital audio to an AV amplifi er
or similar device whose DIGITAL AUDIO INPUT
terminal is connected to the DIGITAL AUDIO
OUTPUT terminal on the TV. Please select an audio
output format compatible with the audio format of
the program you are watching and the equipment
connected.
• Dolby Digital: The digital audio output terminal
outputs audio signal in Dolby Digital form. It
reproduces sound from surround program of
digital.
• PCM: The digital audio output terminal outputs
audio signal in PCM form. If your digital audio
system does not support Dolby Digital (AC3),
select "PCM".
Analog Audio Out
Sets the volume control properties for the analog
RCA (red/ white) connectors when connected to a
home theater audio system.
• Fixed: Control the external speakers’ volume from
your home theater system controls.
• Variable: Control the external speakers’ volume
from the TV’s volume controls.
Equalizer Settings
The fi ve-band equalizer allows you to adjust the
audio frequency settings.Choose a band and make
adjustments.
Press
c
/
d
to select the desired frequency (120Hz,
500Hz, 1.5KHz, 5KHz, 10KHz) you wish to adjust.
Use
a
/
b
to adjust the level.
When you have fi nished adjusting the levels, press
MENU
to exit.
NOTE
• The Bass menu is grayed out when "Surround" is set
to "Movie" or "News". (See page 20.)
Reset Audio Mode
Restores the Audio settings to the factory defaults.
Setup menu
Confi gures the TV operational setup and other
general settings.
NOTE
• For operating the on-screen display menu, see page
17.
Name Input
Customizes the input label of different devices
attached to the inputs on your TV to make it easier
to identify.
Input Source
Input Labels
[TV]
[TV]
TV
• Select Input Source to specify the input source.
• To use a preset input label, highlight Input Labels
and select one of the available options.
• To customize the name the input, select the fi eld
below Input Labels and press
ENTER
. Enter
your custom label using the on-screen keyboard.
Highlight OK and press
ENTER
.
CEC Link Settings
The CEC function on your TV enables you to control
HDMI-connected devices with the included remote
without any additional programming.
CEC Link Function
System Audio Control
Device Search
[Enable]
[Off]
• To enable the CEC function, select CEC Link
Function and set its setting to Enable.
• When the System Audio Control setting is set
On, you can control your device’s audio using the
TV’s remote control.
• Use the Device Search function to determine if
your device is connected and supports CEC.
Menu Language
Selects the on-screen menu language. Select from
the following available options:
English, French, or
Spanish.
Time & Local Settings
Sets the time settings.
Time Zone
Daylight Saving
[Alaska]
[On]
• Time Zone: Selects the correct time zone
according to your location.
• Daylight Saving: Sets the Daylight Saving
setting to On if it is applicable in your region.
Parental Control
The TV’s parental controls allow you to prevent the
TV from displaying certain channels or programs.
NOTE
• To gain access and select your preferences within the
Parental menu, make certain your input is set to TV.
To access Parental Control menu, you have to enter
the password.
Please enter password.
****
OK Cancel
• Enter your password using the on-screen
keyboard. Highlight OK and press
ENTER
. The
Parental menu is displayed on the screen.
Enable Rating
Channel Lock
USA-TV
USA-Movie
CAN-English
CAN-French
Alt. Region Rating
Block Unrated Shows
New Password
Reset Parental Settings
[Off]
[Off]
NOTE
• The default password is "0000".
Enable Rating
To manage program content according to its rating,
set the Program Rating settings to On.
Channel Lock
When a channel is locked, it will be inaccessible.
Locking a channel is a good way to prevent children
from viewing inappropriate material.
16
19
21
24
25
26
27
28
29
30
A icon indicates the channel is locked. The
channel is not accessible unless the parental
password is entered.
USA-TV
Sets which USA TV rating to lock for viewing.
TV-Y
TV-Y7
TV-G
TV-PG
TV-14
TV-MA
ALL FV D L S V
A icon indicates the rating type is blocked.
Content with this rating and all higher ratings cannot
be viewed.
The TV ratings level and content are defi ned as
following:
TV ratings level TV ratings content
• TV-Y: All children.
• TV-Y7: Directed to
older children.
• TV-G: General
audience.
• TV-PG: Parental
Guidance suggested.
• TV-14: Parents strongly
cautioned.
• TV-MA: Mature
audience only.
• FV: Fantasy violence.
• V: Violence.
• S: Sexual situation.
• L: Adult language.
• D: Sexually suggestive
dialog.
On-Screen Display Menu
22
On-Screen Display Menu
USA-Movie
Sets which USA movie rating to lock for viewing.
G
PG
PG-13
R
NC-17
X
The movie ratings levels are defi ned as following:
• G: General audience.
• PG: Parental guidance suggested.
• PG-13: Unsuitable for children under 13.
• R: Restricted, under 17 requires companying
parent or adult guardian.
• NC-17: No one under 17 admitted.
• X: Mature audience only.
A
icon indicates the rating type is blocked.
Content with this rating and all higher ratings cannot
be viewed.
CAN-English
Sets which Canadian English TV rating to lock for
viewing.
The TV rating systems in Canada are based on the
Canadian Radio-Television and Telecommunications
Commission (CRTC) policy on violence in television
programming.
C
C8+
G
PG
14+
18+
The Canadian English rating levels are defi ned as
following:
• C: Intended for younger children under the age of 8
years. Pays careful attention to themes that could
threaten their sense of security and well-being.
• C8+: Contains no portrayal of violence as the
preferred, acceptable, or only way to resolve
confl ict; nor encourage children to imitate
dangerous acts which they may see on the screen.
• G: Considered acceptable for all age groups.
Appropriate viewing for the entire family, contains
very little violence, physical, verbal or emotional.
• PG: Intended for a general audience, but may not
be suitable for younger children (under the age of
8) because it could contain controversial themes or
issues.
• 14+: Could contain themes where violence is one
of the dominant elements of the storyline, but it
must be integral to the development of plot or
character. Language usage could be profane and
nudity present within the context of the theme.
• 18+: Intended for viewers 18 years and older and
might contain depictions of violence, which while
related to the development of plot, character or
themes, are intended for adult viewing. Could
contain graphic language and portrayals of sex and
nudity.
A
icon indicates the rating type is blocked.
Content with this rating and all higher ratings cannot
be viewed.
CAN-French
Set which Canadian French TV rating to lock for
viewing.
G
8ans+
13ans+
16ans+
18ans+
• G: All ages and children, contains minimal direct
violence, but maybe integrated into the plot in a
humorous or unrealistic manner.
• 8ans+: May be viewed by a wide public audience,
but could contain scenes disturbing to children
under 8 who cannot distinguish between imaginary
and real situations. Recommended for viewing with
parent.
• 13ans+: Could contain scenes of frequent violent
scenes and therefore recommended for viewing
with parent.
• 16ans+: Could contain frequent violent scenes and
intense violence.
• 18ans+: Only for adult viewing. Could contain
frequent violent scenes and extreme violence.
A
icon indicates the rating type is blocked.
Content with this rating and all higher ratings cannot
be viewed.
Alt. Region Rating
Sets which alternative region rating standard to lock
for viewing.
Blocked Unrated Shows
Sets the setting to On to block all unrated programs.
New Password
Change the Parental Control password
.
New Password
Re-Enter Password
In the
New Password
fi eld, enter your new 4-digit
parental control password.
Then, in the
Re-Enter Password
fi eld, re-enter your
new 4-digit parental control password.
Reset Parental Settings
Restores the Parental Control settings to the
factory defaults.
Power Indicator
The Power Indicator on the front of your TV normally
does not glow when the TV is on. You can change
this setting if you prefer the light to be on.
• Off: Turns the Power Indicator light off.
• On: Turns the Power Indicator light on.
Easy Setup
You can run Easy Setup again, even after setting up
the preset channels. Refer to "Initial Installation" on
page 12 for more information.
NOTE
• If no channel is found, confi rm the type of connection
made with your TV and try "Easy Setup" again.
System Information
Views the TV model name, fi rmware version, revision
number, source type, resolution, and version
frequency information.
Reset All Settings
Restores the TV to its factory default settings.
NOTE
• If you restore the TV to the factory default settings, all
changes you have made to the settings will be lost.
• The default password is "0000".

23
Closed Caption menu
Confi gures the settings for closed captioning in TV
programs.
NOTE
• For operating the on-screen display menu, see page
17.
• This menu is only available if your input is set to TV.
Analog Closed Caption
This option lets you select the captioning mode used
for displaying caption information, when available. If
you are unsure of the differences among the modes,
you may prefer to leave the closed captioned mode
set to CC1, which displays complete text of the
program in the primary language in your area.
Select from the following options: Off / CC1 / CC2 /
CC3 / CC4 / TEXT1 / TEXT2 / TEXT3 / TEXT4.
Digital Closed Caption
If available, this allows you to select a closed caption
service mode (1-6) for digital channels.
Select from the following options: Off / CC1 / CC2 /
CC3 / CC4 / CS1 / CS2 / CS3 / CS4 / CS5 / CS6.
Digital CC Options
This function allows you to adjust the closed caption
screen appearance to suit your preference.
• Caption Style: Sets the setting to "As
Broadcaster" or "Custom" mode. If Custom mode
is selected, user can modify the detail styles
described below.
• Text Size: Selects this option to choose a caption
font size according to your own preference.
• Font: Selects a character design for the digital
closed caption text.
• Color: Selects the color for the digital closed
caption text.
• Opacity: Selects the transparency of the digital
closed caption text.
• BG Color: Sets the color of the background
behind the digital closed caption text.
• BG Opacity: Sets the transparency of the
background behind the digital closed caption text.
• Window Color: Sets the color of the digital closed
caption box.
• Window Opacity: Sets the transparency of the
digital closed caption box.
Channel menu
Confi gures the channel settings.
NOTE
• For operating the on-screen display menu, see page
17.
• This menu is only available if your input is set to TV.
TV Mode
Selects the tuner mode type.
Select from the following options: Antenna / Cable.
Auto Channel Scan
Automatically scans the channel search based on
the selected tuner mode.
Highlight Start Scan and press
ENTER
to start
scanning the avaiable channels.
Partial Channel Scan
Searches the specifi ed channels based on the
selected tuner mode.
Scan Mode
From Channel
To Channel
Start Scan
[Analog/Digital]
1
135
Select the tuner mode type and the specify the range
of channels. Then highlight Start Scan and press
ENTER
to start scanning the avaiable channels.
Find Channel
Adds a single new analog channel based on the
selected tuner mode.
In the
Enter Channel Number
fi eld, enter the number
of the channel you are adding. Then highlight Add
Channel and press
ENTER
to start scanning the
specifi c channel.
Skip/Favorite Channel
This function allows you to skip viewing the selected
channel or program 4 favorite channels. By setting
the favorite channels in advance, you can select your
favorite channels easily.
To skip viewing the selected channel, select the
channel(s) that you want to remove and press
ENTER
.
16
19
21
24
25
26
27
28
29
30
A icon indicates the channel is removed.
To set the favorite channels, refer to "FAVORITE CH
(Favorite Channel Setting)" on page 15 for more
information.
NOTE
• You can view the preset favorite channel by pressing
one of the
FAVORITE CH
buttons on the remote
control unit.
Analog MTS
This option controls the manner in which the sound
comes through your speakers. Options available vary
according to the input selected.
NOTE
• The Analog TV Sound option is only available for
analog channels.
• Mono (available for regular TV viewing only): This
option plays the sound in mono only. Use this
setting when receiving broadcasts with weak
stereo signals.
• Stereo: This option splits the incoming stereo
audio signal into left and right channels. Most TV
programs and recorded materials have stereo
audio. The word “Stereo” appears in the Channel
Banner when you tune to a program that is
broadcast in stereo.
• SAP (Second Audio Program): This option plays
the program’s audio in a second language, if
available. The letters “SAP” appear in the channel
banner when you tune to a program that is
broadcast with SAP information. SAP audio is
broadcast in mono only. SAP is also used to
broadcast a program’s audio with descriptions of
the video for the visually impaired.
Digital MTS
This option allows you to specify the audio language.
Select from the following options:
English, French, or
Spanish.
Sleep Timer menu
Sets the TV to turn off after a given amount of time.
Select from the following options: Off / 30 Minutes /
60 Minutes / 90 Minutes /120 Minutes /180 Minutes.
NOTE
• For operating the on-screen display menu, see page
17.
On-Screen Display Menu
24
Enjoying Photo/Music/Movie Playback
You can connect the TV to a USB memory device or USB hard drive to enjoy viewing pictures, listening to
music, and watching movies.
NOTE
• Depending on the USB memory device/USB hard drive, the TV may not be able to recognize the recorded data.
• It may take time to read the recorded data if the USB memory device/USB hard drive contains many fi les or folders.
• Only suppport FAT format and unpartitioned USB device.
Connecting a USB Memory Device/USB Hard Drive
Insert the USB memory device with recorded photos, music or movies into the USB terminal on the TV.
MHL
(DC 5V, 900mA)
USB
USB Device Compatibility
Container Extensions A/V CODEC/Profi le
AVI .avi Movie MPEG2: MP@HL
MPEG2 - TS
.ts
Movie MPEG2: MP@HL.trp
.tp
MPEG2 - PS .vob Movie MPEG2: MP@HL
MP3 .mp3 Audio
MPEG1 Layer2
32Kbps ~ 448Kbps(Bit rate)
32KHz ~ 48KHz(Sampling rate)
MPEG1 Layer3
32Kbps ~ 320Kbps(Bit rate)
32KHz ~ 48KHz(Sampling rate)
WAVE/WAV .wav Audio 8 bit, 16 bit PCM
JPEG
.jpeg
Photo
Base-line: 15360*8640 (Max Resolution)
.jpg Progressive: 1024*768 (Max Resolution)
• To play back data on a USB memory device, insert the USB memory device on the TV. A pop-out message
appears on the screen.
USB media detected. Enter multimedia menu?
Yes No
Highlight Yes and press
ENTER
to enter USB mode.
• Use the following procedure to switch back to USB mode after switching from USB mode to another mode.
1
Press
USB
to enter USB mode and press
ENTER
.
USB:
2
Press
a
/
b
to select the fi le category ("PHOTO", "MUSIC", or "MOVIE"), and then press
ENTER
.
PHOTO
MUSIC
MOVIE
3
Press
a
/
b
/
c
/
d
to select the desired folder, and then press
ENTER
.
Selecting the Folders to Play Back
(DC 5V, 500mA)
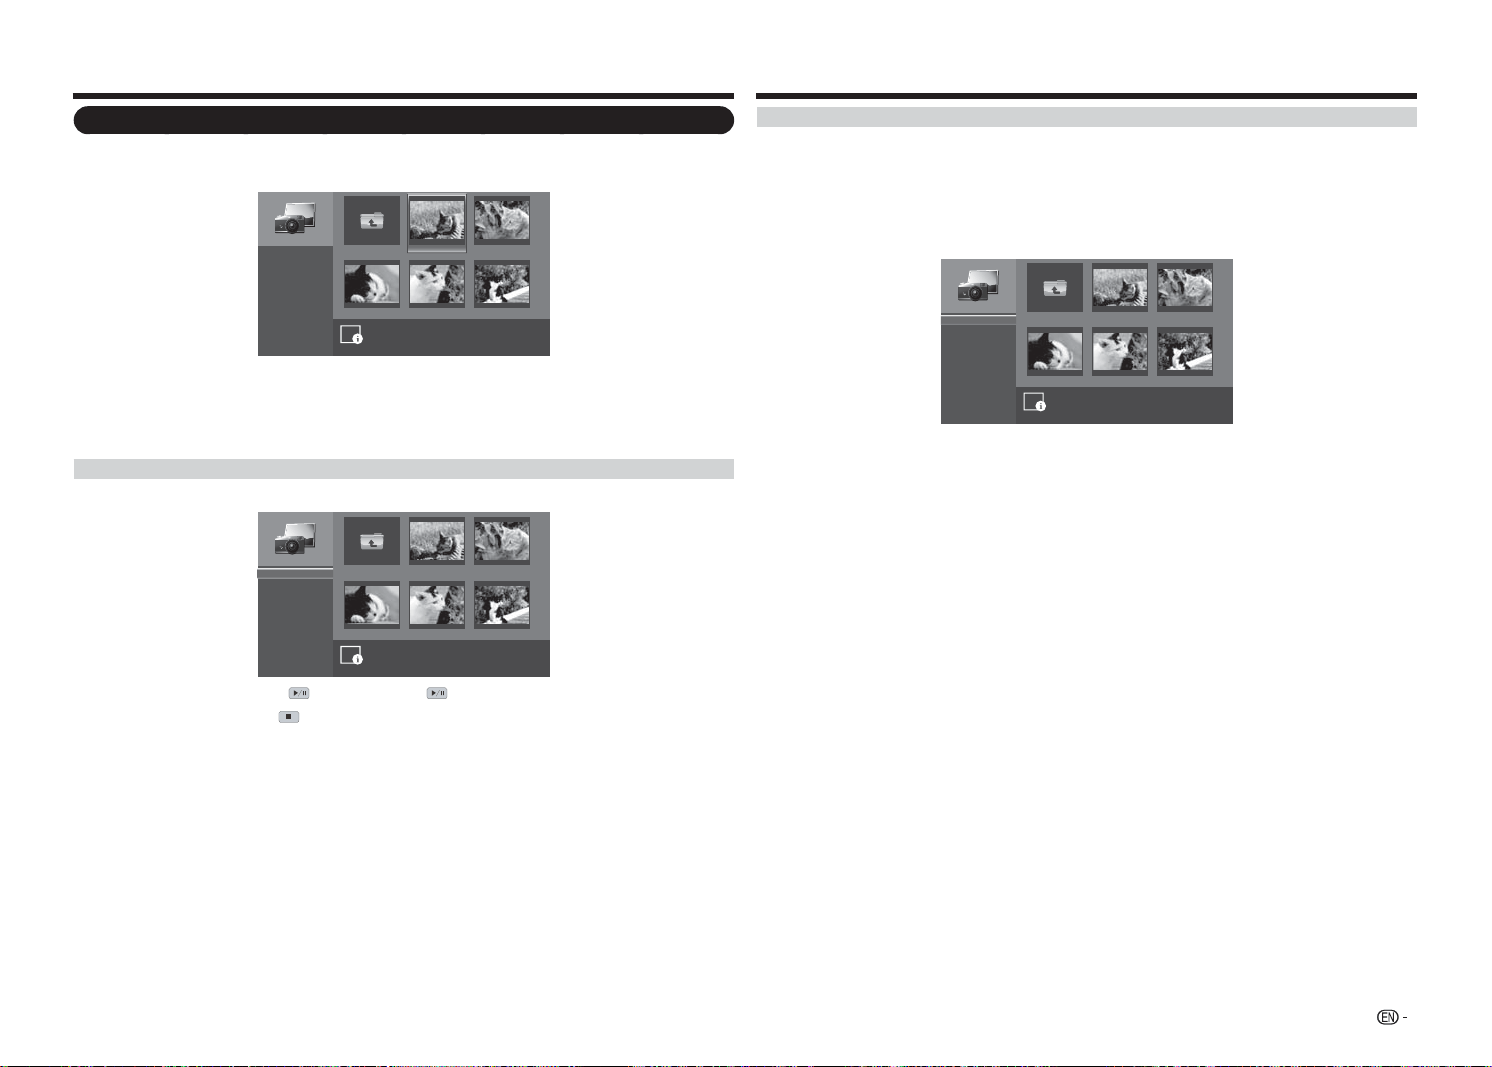
25
Viewing Photos
1
Press
a
/
b
to select the PHOTO and then press
ENTER
.
2
Press
a
/
b
/
c
/
d
to select the desired folder, and then press
ENTER
.
image001.jpg image002.jpg
image004.jpgimage003.jpg image005.jpg
Up Folder
Start Slideshow
Sort:
View:
Setting
\photo\
File Name:image001.jpg
Resolution: 725x510 File Size: 965 KBytes
1
/
3
Name A-Z
Folders
3
Press
a
/
b
/
c
/
d
to select the desired photo, and then press
ENTER
to view in full screen.
4
In full screen mode, press
c
/
d
to view previous or next photo in the same folder.
5
Press
ENTER
to return to thumbnail view.
Viewing Photos in a Slide Show
1
In thumbnail mode, highlight Start Slideshow and press
ENTER
to begin the slide show.
image001.jpg image002.jpg
image004.jpgimage003.jpg image005.jpg
Up Folder
Start Slideshow
Sort:
View:
Setting
\photo\
1
/
3
Name A-Z
Folders
2
To pause the slide show, press . To resume, press
again.
3
To stop the slide show, press .
Enjoying Photo/Music/Movie Playback
Customizing Photo Settings
In thumbnail view, do the following:
• Highlight Sort and press
ENTER
to specify the fi le sorting type. Select one of the sort options and press
ENTER
to confi rm the setting.
• Highlight View and press
ENTER
to specify the view display. Select one of the view options and press
ENTER
to confi rm the setting.
• Highlight Setting and press
ENTER
to customize the slide show settings.
image001.jpg image002.jpg
image004.jpgimage003.jpg image005.jpg
Up Folder
Shuffle:
Speed:
Effect:
\photo\
1
/
3
Shuffle On
5 seconds
Random
Press
a
/
b
to select one of the available options and press
ENTER
to confi rm the setting.
• Shuffl e: Enables/Disables the slide show photo in random order.
• Speed: Sets the length of time before the next image appears.
• Effect: Selects the transition effect between slides.
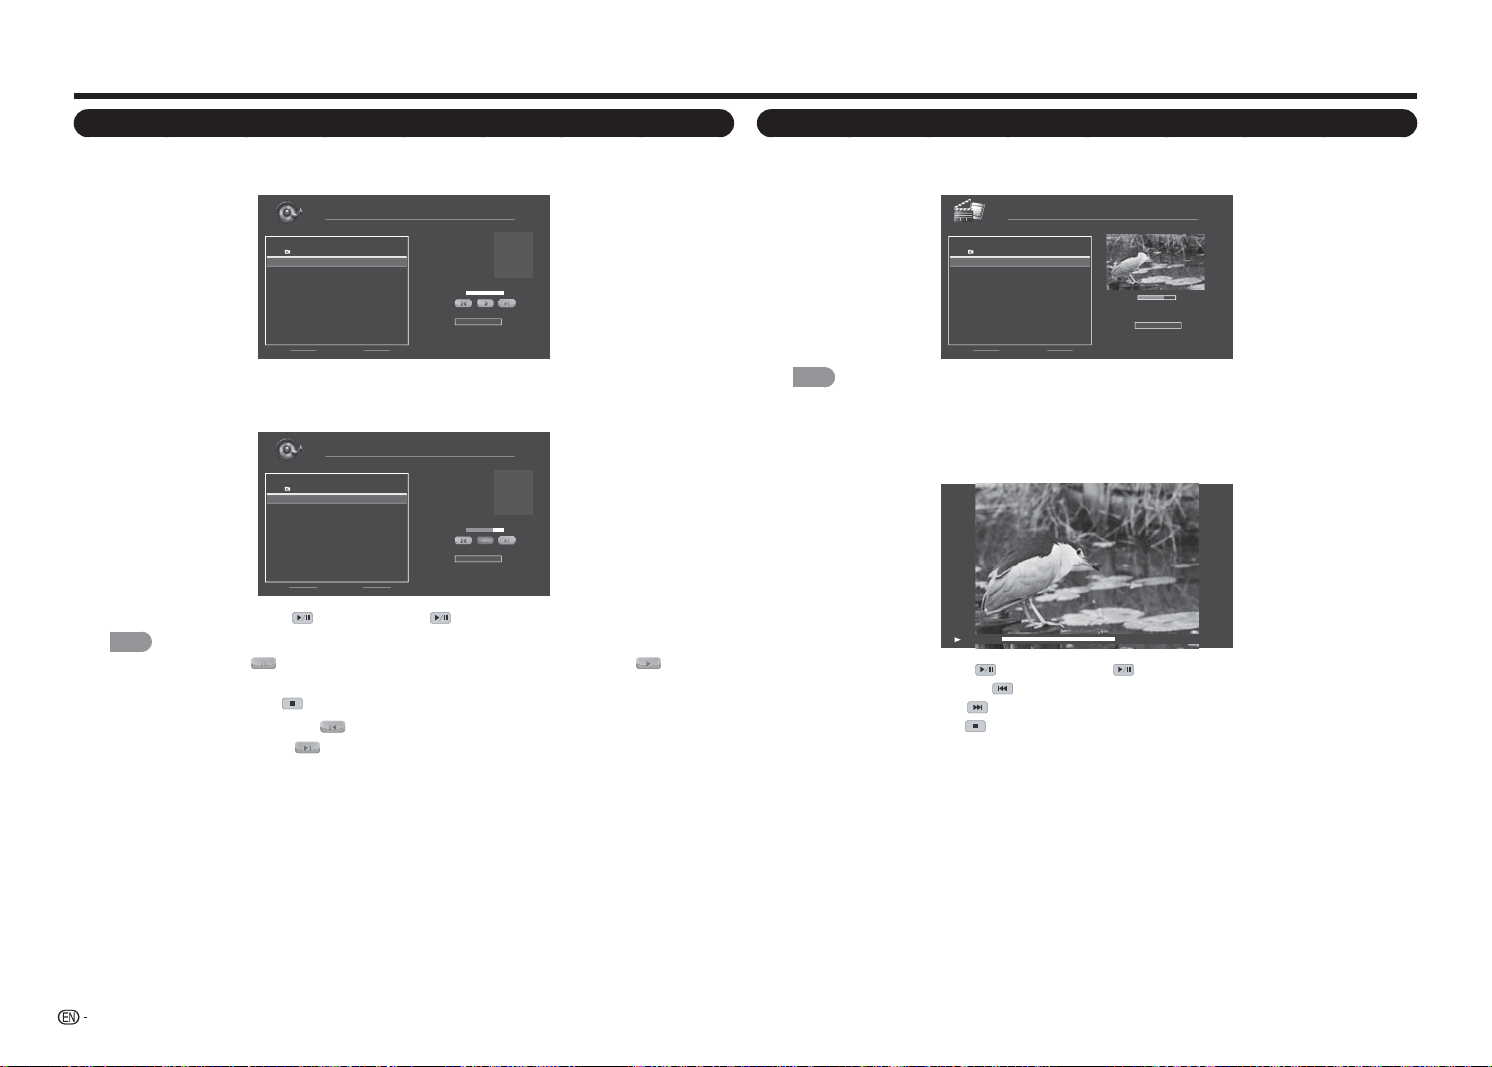
26
Enjoying Photo/Music/Movie Playback
Playing Music
1
Press
a
/
b
to select the MUSIC and then press
ENTER
.
2
Press
a
/
b
to select the desired folder, and then press
ENTER
.
File Name:
Artist:
Album:
MUSIC
\music
1 / 1
# Track Duration
1. Up Folder
2. song001.mp3 00:03:15
3. song002.mp3 00:03:12
4. song003.mp3 00:03:10
Sort:
Name A-Z
00:00:00 00:00:00
3
Press
a
/
b
to select the desired song, and then press
ENTER
to play. An automatic playback begins
from the selected song.
4
Do the following:
File Name:
Artist:
Album:
song001.mp3
Unknow
Unknow
MUSIC
\music
1 / 1
# Track Duration
1. Up Folder
2. song001.mp3 00:03:15
3. song002.mp3 00:03:12
4. song003.mp3 00:03:10
Sort:
Name A-Z
00:02:07 00:03:15
• To pause the playback, press . To resume, press
again.
NOTE
• You can also highlight
and press
ENTER
to pause the playback. To resume, highlight
and press
ENTER
.
• To stop the playback, press .
• To skip to previous song, highlight
and then press
ENTER
repeatedly to select the desired song.
• To skip to next song, highlight
and then press
ENTER
repeatedly to select the desired song.
• To specify the fi le sorting type, highlight Sort and press
ENTER
. Select one of the sort options and
press
ENTER
to confi rm the setting.
Watching Movies
1
Press
a
/
b
to select the MOVIE and then press
ENTER
.
2
Press
a
/
b
to select the desired folder, and then press
ENTER
.
00:06:07
Sort:
00:08:07
MOVIE
\movie
1 / 1
# File Duration
1. Up Folder
2. movie001.avi 00:08:15
3. movie002.avi - -:- -:- -
4. movie003.avi - -:- -:- -
Name A-Z
NOTE
• To specify the fi le sorting type, highlight
SORT
and press
ENTER
. Select one of the sort options and press
ENTER
to confi rm the setting.
3
Press
a
/
b
to select the desired movie and press
ENTER
to play the movie in full screen.
4
Do the following:
00:06:07 00:08:15
• To pause the playback, press . To resume, press
again.
• To skip to previous movie, press
.
• To skip to next movie, press
.
• To stop the playback, press
.
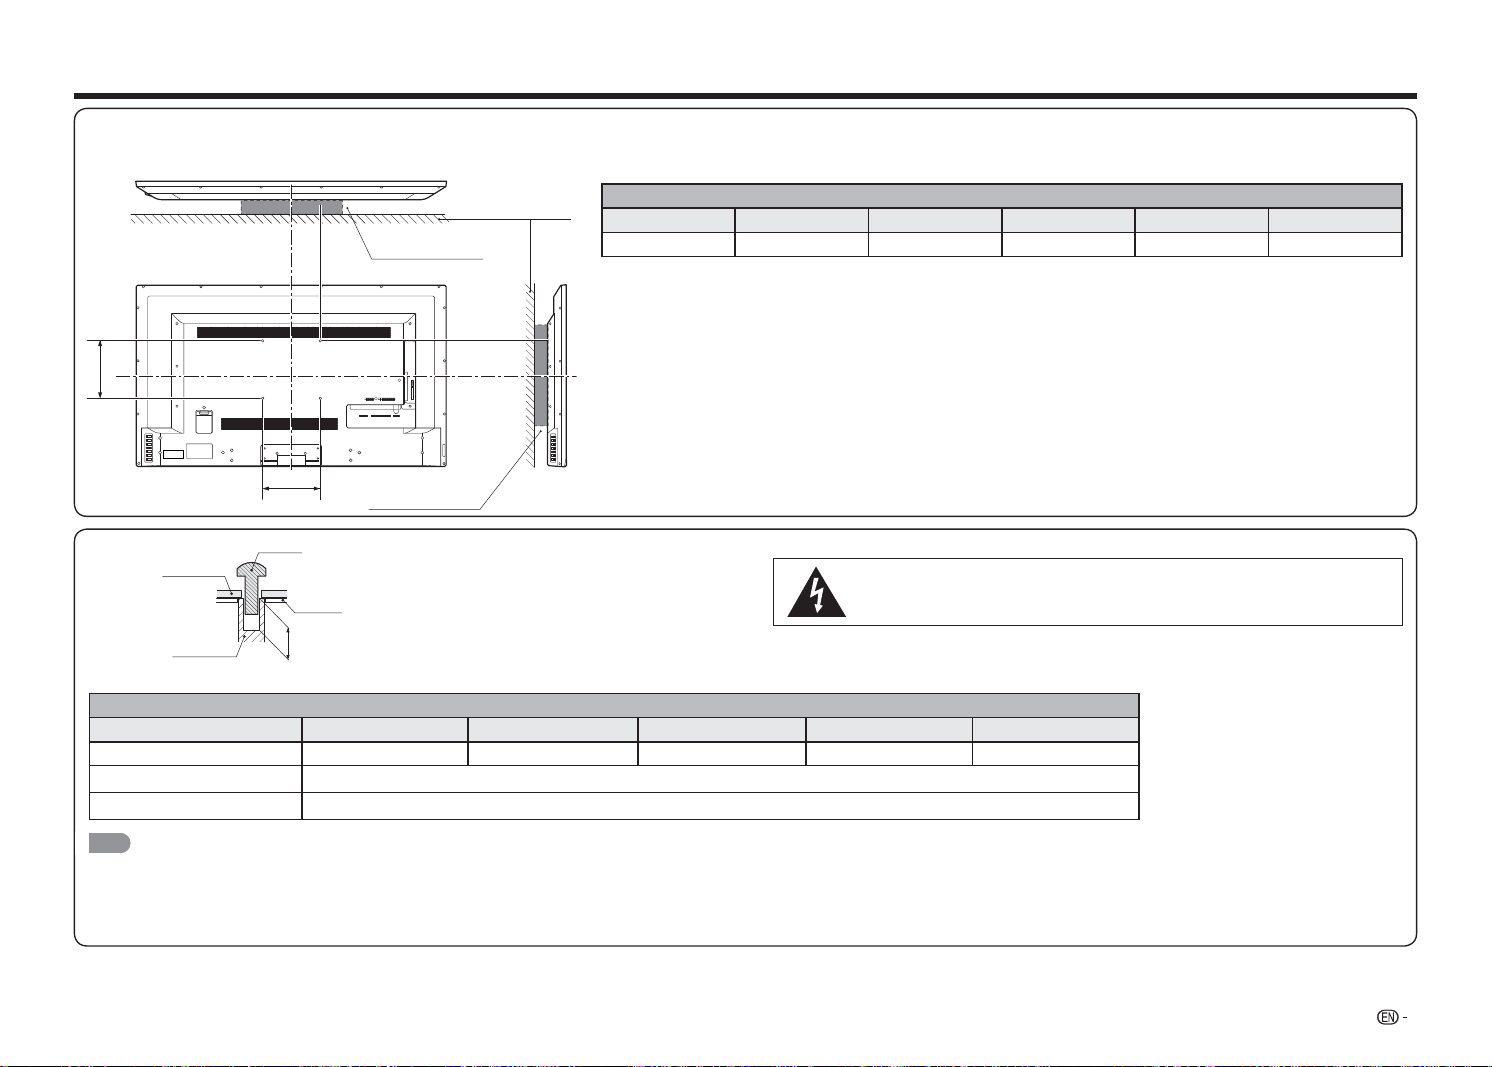
27
Wall Mount Kit Speci cations
Standard dimensions for wall mount kits are shown below.
• The illustration is based on the LC-48LE551U model as an example.
1 2 Y/V Pb/Cb
AC IN
CABLE / ANTENNAPr/Cr
COMPONENT / VIDEO
L R OPTICAL MHL USB
AUDIO OUT
DTV / TV
AUDIO
LR
A
B
Model
Item LC-32LE551U LC-32LE451U LC-39LE551U LC-43LE551U LC-48LE551U
Wallmount Footprint 100mm x 100mm 100mm x 100mm 100mm x 100mm 200mm x 200mm 200mm x 200mm
The mounting means should be strong enough to bear the weight of the display.
The wall mounting bracket should have UL or related approval.
Do not install the wall mount kit while your TV is turned on. It may result in personal injury due
to electric shock.
DEPTH OF
MOUNTING HOLES
SCREW
WALL MOUNT
UNIT
MOUNTING
HOLES
CABINET
For the screws, refer to the table shown below.
Model
Item LC-32LE551U LC-32LE451U LC-39LE551U LC-43LE551U LC-48LE551U
Standard Screws M4 (Use 0.7 pitch screws) M4 (Use 0.7 pitch screws) M4 (Use 0.7 pitch screws) M6 (Use 1.0 pitch screws) M6 (Use 1.0 pitch screws)
Length(Depth of mounting holes) 15/32 (12mm)
Quantity 4pcs
NOTE
• Do not mount the TV at a tilt.
• Do not use screws that do not comply with the VESA standard screw specifi cations.
• Do not use screws that are longer than the standard length. Screws that are too long may cause damage to the inside of the TV.
• Do not fasten the screws too fi rmly or loosely. This may damage the product or cause the product to fall, leading to personal injury. SHARP is not liable for these kinds of accidents.
• SHARP is not liable for product damage or personal injury when a non-VESA or non-specifi ed wall mount is used or the consumer fails to follow the product installation instructions.
Appendix
WALL MOUNT KIT
WALL MOUNT KIT
WALL

28
Troubleshooting
The TV displays “No Signal.”
• Press
INPUT
on the remote control to select a different input source.
• If you are using cable TV, satellite, or an antenna connected directly to the TV, scan for channels. See "Auto
Channel Scan" on page 23.
There is no power.
• Ensure the TV is plugged into a working electrical outlet.
• Ensure the power cable is securely attached to the TV.
• Press
POWER
on the remote or on the side of the TV to turn the TV on. The power is on, but there is no
image on the screen.
• Ensure all cables are securely attached to the TV.
• Ensure all devices are connected correctly. Devices differ; see your device’s user manual for details.
• Adjust Brightness, Contrast, or Backlight. See "Picture menu" on page 19.
• Press
INPUT
on the remote to select a different input source.
There is no sound.
• Press
VOL
k
on the remote control unit.
• Press
MUTE
on the remote to ensure mute is off.
• Check the audio settings. See "Audio menu" on page 20.
• Ensure the speakers are set to On. See "TV Speakers" on page 20.
• Ensure no headphones are connected to the TV.
• Check the audio connections of external devices (Blu-ray player, game console, cable/satellite box) that are
connected to the TV.
• If you are using an antenna, the signal strength of the channel may be low. Ensure your antenna is
connected securely to the TV and move the antenna around the room or close to a window for the best
signal.
The colors on the TV don’t look right.
• Adjust the Color and Tint settings in the Picture menu. See "Picture menu" on page 19.
• Reset the picture settings. See "Advanced Picture Settings" on page 20.
• Check all cables to ensure they are securely attached. The buttons on the remote aren’t working.
• Ensure you are only pressing one button at a time.
• Point the remote directly at the TV when pressing a button.
• Replace the remote batteries with new ones. See "Installing Batteries in the Remote Control Unit" on page
6.
Appendix
The image quality is not good.
• For the best image quality, view high-defi nition programs using digital sources. Connect your devices with
HDMI cables.
• If you are using an antenna, the signal strength of the channel may be low. Ensure your antenna is
connected securely to the TV and move the antenna around the room or close to a window for the best
signal.
The picture is distorted.
• Nearby electrical devices may be interfering with the TV. Move the TV away from electrical appliances, cars,
and fl uorescent lights.
• Ensure all cables are securely attached.
The display image does not cover the entire screen.
• Set the TV image mode so that the picture fi lls the screen. Press
VIEW MODE
on the remote control unit
and select the appropriate aspect ratio.
The TV has pixels (dots) that are always dark or always lit.
• Your HDTV is precision-manufactured using an extremely high level of technology. However, sometimes
pixels may not display correctly. These types of occurrences are inherent to this type of product and do not
constitute a defective product.
I see “noise” or static on the screen.
• When your TV’s digital capabilities exceed a digital broadcast signal, the signal is up-converted (improved) to
match your TV’s display capabilities. This up-converting can sometimes cause irregularities in the image.
• If you are using an antenna, the signal strength of the channel may be low. Ensure your antenna is
connected securely to the TV and move the antenna around the room or close to a window for the best
signal.
When I change input source, the volume changes.
• The TV remembers the volume level on each input source. If the volume level on the new input source is
higher or lower than the level on the source you switch from, the difference may be noticeable.
• Use
VOL
k
/
l
on the remote control unit to adjust the volume.
When I change input source, the display image changes size.
• The TV remembers the viewing mode on each input source. If the viewing mode on the new input source
differs from the one on the input source you switch from, the difference may be noticeable.
• See"VIEW MODE" on page 16.
29
Cautions regarding use in high and low temperature environments
• When the unit is used in a low temperature space (e.g. room, offi ce), the picture may leave trails or appear
slightly delayed. This is not a malfunction, and the unit will recover when the temperature returns to normal.
• Do not leave the unit in a hot or cold location. Also, do not leave the unit in a location exposed to direct sunlight
or near a heater, as this may cause the cabinet to deform and the front panel to malfunction.
IF YOU HAVE FURTHER INQUIRIES, PLEASE CONTACT OUR CUSTOMER SERVICE FOR
ASSISTANCE.
Appendix
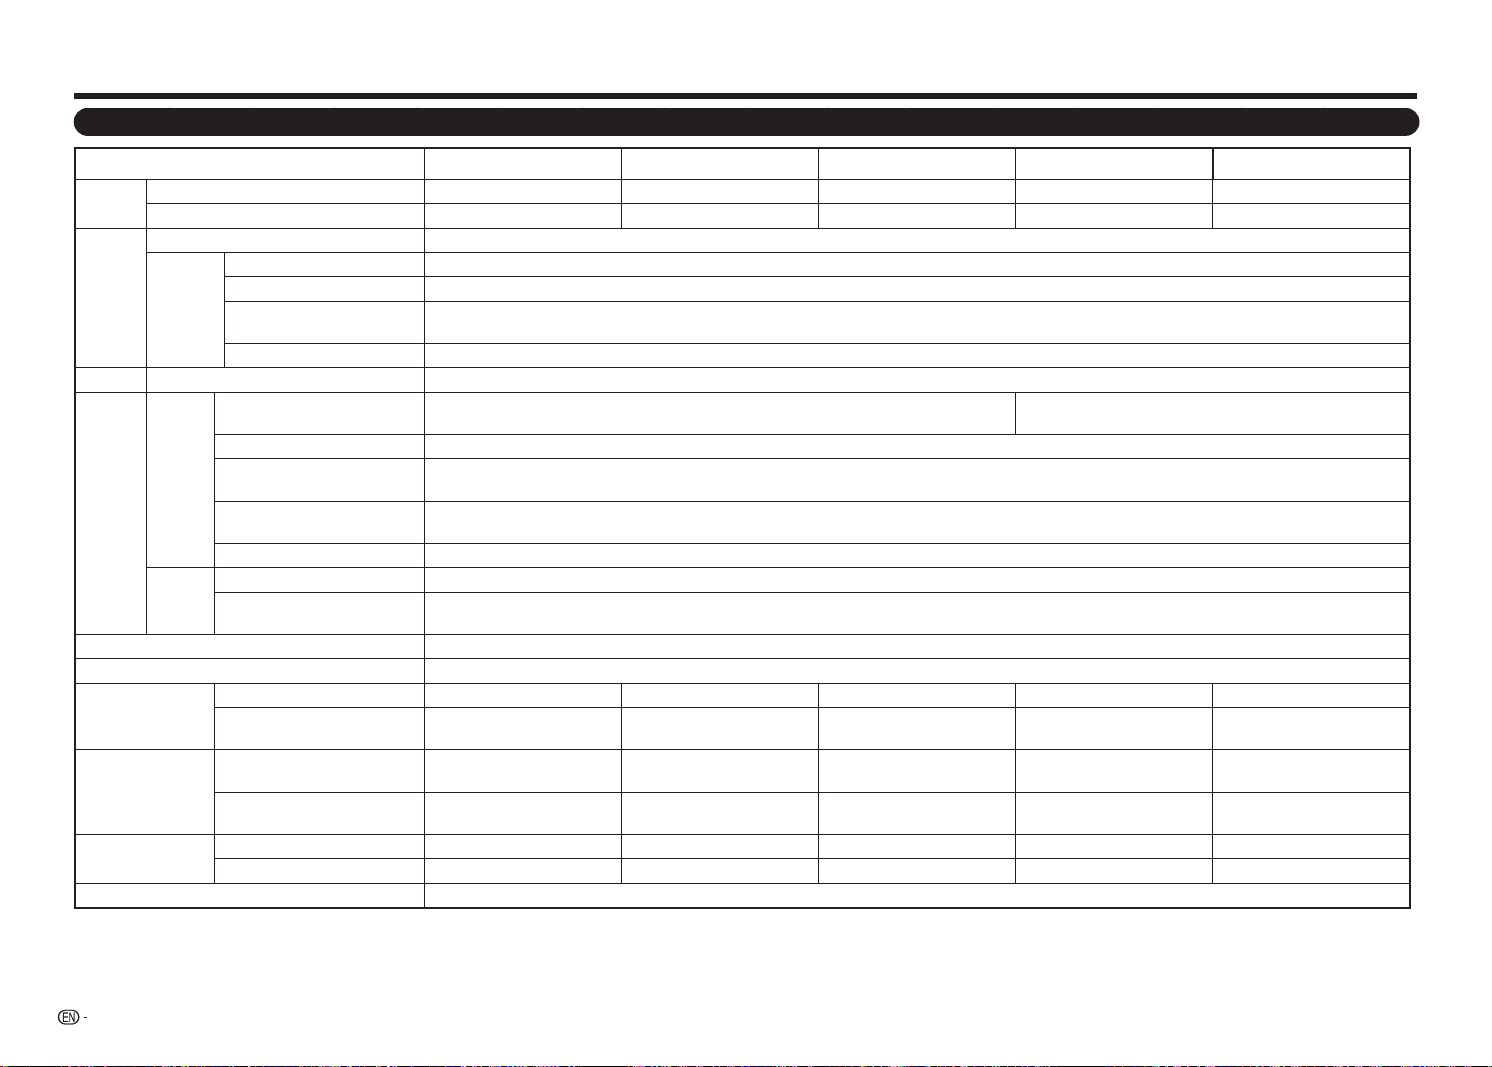
TV
Item
Model: LC-32LE551U Model: LC-32LE451U Model: LC-39LE551U
Model: LC-43LE551U Model: LC-48LE551U
LCD
panel
Actual Diagonal Viewable Size 31
1/2
31
1/2
38
9/16
42
1/2
47
39/64
Resolution 1920 x 1080 1366 x 768 1920 x 1080 1920 x 1080 1920 x 1080
TV
Function
TV-standard (CCIR) American TV Standard ATSC/NTSC System
Receiving
Channel
VHF/UHF VHF 2-13ch, UHF 14-69ch
CATV 1-135ch (non-scrambled channel only)
Digital Terrestrial Broadcast
(8VSB)
2-69ch
Digital cable*1 (64/256 QAM) 1-135ch (non-scrambled channel only)
Audio Speaker Watt 10w x 2
Terminals
Inputs
HDMI 1.4 with HDCP
(fast switching, CEC, 1 ARC)
2 (1 bottom and 1 side), HDMI 1.4, CEC, port 1 ARC, port 2 MHL (DC 5V; 900mA)
3 (2 bottom and 1 side), HDMI 1.4, CEC, port 1 ARC, port 3 MHL
(DC 5V; 900mA)
RF (F Connector for internal tuner) 1 (bottom)
Component YPbPr plus Stereo
Audio
1 (bottom)
Composite Video and Stereo
Audio
1 (bottom) (shared with Y RCA connector of component input)
USB 1 (side) (USB 2.0 with charging capability, 0.5A)
Outputs
Digital Audio Output (5.1)
1 (side)
Analog Stereo Output (Fixed/
Variable)
1 (side) (RCA)
OSD language English/French/Spanish
Power Requirement AC 120V, 60Hz
Power Consumption
On Mode Power 40W 35W 54W 58W 74W
Power Consumption
55W
(0.5W Standby)
50W
(0.5W Standby)
75W
(0.5W Standby)
83W
(0.5W standby)
104W
(0.5W Standby)
Weight
TV with stand
11.7 lbs
5.3 kg
11.7 lbs
5.3 kg
15.2 lbs
6.9 kg
24.3 lbs
11.0 kg
30.9 lbs
14 kg
TV without stand
10.6 lbs
4.8 kg
10.6 lbs
4.8 kg
13.5 lbs
6.1 kg
21.2 lbs
9.6 kg
27.6 lbs
12.5 kg
Dimensions
(W
x
H
x
D)
TV with stand 28
7/16
x 18
33/64
x 6
21/32
28
7/16
x 18
33/64
x 6
21/32
34
21/32
x 22
1/64
x 8
45/64
38
1/16
x 24
3/32
x 11
17/32
42
9/16
x 26
47/64
x 11
35/64
TV without stand 28
7/16
x 16
55/64
x 2
31/64
28
7/16
x 16
55/64
x 2
31/64
34
21/32
x 22
23/64
x 2
31/64
38
1/16
x 22
23/64
x 2
53/64
42
9/16
x 24
59/64
x 2
19/32
Operating temperature
+
32°F to
+
104°F (0°C to
+
40°C)
• As part of policy of continuous improvement, SHARP reserves the right to make design and specifi cation changes for product improvement without prior notice. The performance specifi cation fi gures indicated are nominal values of
production units. There may be some deviations from these values in individual units.
• On Mode Power Consumption is measured according to Energy Star program requirements for televisions.
30
Speci cations

31
1 2 Y/V Pb/Cb
AC IN
CABLE / ANTENNAPr/Cr
COMPONENT / VIDEO
L R OPTICAL MHL USB
AUDIO OUT
DTV / TV
AUDIO
LR
42
9/16
(1081)
38
1/16
(967)
41
11/16
(1059)
*1
2
19/32
(66)
1
49/64
(45)
*2
11
35/64
(293)
4
57/64
(124)
2
53/64
(72)
1
31/32
(50)
*2
11
35/64
(293)
4
17/32
(115)
26
47/64
(679)
24
59/64
(633)
23
35/64
(598)
*1
24
3/32
(612)
22
23/64
(568)
20
63/64
(533)
*1
18
15/64
(463)
37
13/64
(945)
*1
18
15/64
(463)
7
7/8
(200)
7
7/8
(200)
4
3/4
(121)
7
7/8
(200)
7
7/8
(200)
3
15/16
(100)
14
31/64
(368)
13
3/16
(335)
AC IN
1 Y/V Pb/Cb CABLE / ANTENNAPr/Cr
COMPONENT / VIDEO
L R OPTICAL MHL USB
AUDIO OUT
DTV / TV
AUDIO
LR
34
21/32
(880)
33
55/64
(860)
*1
2
31/64
(63)
1
39/64
(41)
*2
20
23/64
(517)
22
1/64
(559)
19
3/32
(485)
*1
15
23/32
(399)
8
45/64
(221)
3
5/8
(92)
10
31/32
(279)
3
15/16
(100)
3
15/16
(100)
4
13/32
(112)
HDMI 1 Y/V Pb/Cb CABLE / ANTENNAPr/Cr
COMPONENT / VIDEO
L R OPTICAL HDMI SIDE USB
AUDIO OUT
DTV / TV
AUDIO
LR
AC IN
28
7/16
(722)
27
41/64
(702)
*1
2
31/64
(63)
1
39/64
(41)
*2
18
33/64
(470)
16
55/64
(428)
15
9/16
(395 )
*1
11
41/64
(296)
6
21/32
(169)
3
15/16
(100)
3
15/16
(100)
4
7/32
(107)
2
21/64
(59)
10
5/64
(256 )
LC-43LE551U
Dimensional Drawings
LC-32LE551U / LC-32LE451U
LC-39LE551U
Unit: inch (mm)
Unidad: pulgada (mm)
*1 Display size / Tamaño de la pantalla
*2 Thinnest part / Partie la plus mince
LC-48LE551U
32
• Products that have earned the ENERGY STAR
®
are designed to protect the environment through superior
energy ef ciency.
• Manufactured under license from Dolby Laboratories. Dolby and the double-D symbol are trademarks of
Dolby Laboratories.
• The terms HDMI and HDMI High-De nition Multimedia Interface, and the HDMI Logo are trademarks or
registered trademarks of HDMI Licensing LLC in the United States and other countries.
• MHL, the MHL Logo, and Mobile High-De nition Link are trademarks or registered trademarks of MHL LLC
in the United States and other countries.
• MHL
TM
ENERGY STAR
®
User Information
Ɣ)RUPRUHLQIRUPDWLRQRQWKH(1(5*<67$5SURJUDP\RXFDQUHIHUWRHQHUJ\VWDUJRY
Ɣ/HDYLQJWKH(1(5*<67$5KRPHPRGHRUHQDEOLQJRSWLRQDOIHDWXUHVZLOOFDXVHDQLQFUHDVH
SRZHUFRQVXPHG
Ɣ7KLVSURGXFWTXDOLILHVIRU(1(5*<67$5ZKHQ+RPHLVVHOHFWHGIRU(DV\6HWXS
6HWWLQJ(DV\6HWXSWR+RPHDOORZVWKH79WRDFKLHYHDQHQHUJ\VDYLQJVWDWXVIRUKRXVHKROGXVH
3URGXFWVWKDWKDYHHDUQHGWKH(1(5*<67$5
®
DUHGHVLJQHGWRSURWHFWWKH
HQYLURQPHQWWKURXJKVXSHULRUHQHUJ\HIILFLHQF\
Trademarks
CONSUMER LIMITED WARRANTY
SHARP ELECTRONICS CORPORATION warrants to the fi rst consumer purchaser that this Sharp brand Liquid Crystal
Display product (the “Product”), when shipped in its original container, will be free from defective workmanship and
materials, and agrees that it will, at its option, either repair the defect or replace the defective Product or part thereof with a
new or remanufactured equivalent at no charge to the purchaser for parts or labor for the period(s) set forth below.
This warranty does not apply to any appearance items of the Product or if the serial number or model number affi xed to the
Product has been removed, defaced, changed, altered or tampered with. This warranty does not cover installation or signal
reception problems. This limited warranty will not apply if the Product has been or is being used in a commercial setting or
application; this warranty is meant solely for the non-commercial, household use of the Product by consumers in their home or
residence. If you intend to or already use this Product for commercial purposes or in a commercial setting, there are warranties
available to cover your use of this Product, the terms of which may vary. Please contact 1-800-BE-SHARP for further information.
In order to enforce your rights under this limited warranty, you should follow the steps set forth below. You must be able to
provide proof of purchase to the servicer, which proof must include the date of purchase.
To the extent permitted by applicable state law, the warranties set forth are in lieu of, and exclusive of, all other warranties,
express or implied. Specifi cally ALL OTHER WARRANTIES OTHER THAN THOSE SET FORTH ABOVE ARE EXCLUDED,
ALL EXPRESS AND IMPLIED WARRANTIES INCLUDING THE WARRANTIES OF MERCHANTABILITY, FITNESS FOR
USE, AND FITNESS FOR A PARTICULAR PURPOSE ARE SPECIFICALLY EXCLUDED. IF, UNDER APPLICABLE STATE
LAW, IMPLIED WARRANTIES MAY NOT VALIDLY BE DISCLAIMED OR EXCLUDED, THE DURATION OF SUCH IMPLIED
WARRANTIES IS LIMITED TO THE PERIOD(S) FROM THE DATE OF PURCHASE SET FORTH BELOW. THIS WARRANTY
GIVES YOU SPECIFIC LEGAL RIGHTS. YOU MAY ALSO HAVE OTHER RIGHTS WHICH VARY FROM STATE TO STATE.
The warranties given herein shall be the sole and exclusive warranties granted by Sharp and shall be the sole and exclusive remedy
available to the purchaser and only for the time periods set forth herein. No other representations or promises made by anyone
are permitted. Correction of defects, in the manner and for the period of time described herein, shall constitute complete fulfi llment
of all liabilities and responsibilities of Sharp to the purchaser with respect to the Product, and shall constitute full satisfaction of all
claims, whether based on contract, negligence, strict liability or otherwise. Sharp does not warrant nor shall Sharp be liable, or in any
way responsible, for Products which have been subject to abuse (including, but not limited to, improper voltage), accident, misuse,
negligence, lack of reasonable care, alteration, modifi cation, tampering, improper operation or maintenance, or any damages or defects
in the Product which were caused by repairs or attempted repairs performed by anyone other than a Sharp authorized servicer. Nor
shall Sharp be liable or in any way responsible for any incidental or consequential economic or property damage. Some states do not
allow limits on warranties or on remedies for breach in certain transactions; in such states, the limits herein may not apply.
THIS LIMITED WARRANTY IS VALID ONLY IN THE FIFTY (50) UNITED STATES, THE DISTRICT OF COLUMBIA. AND PUERTO RICO
Model Speci c Section
Your Product Model Number & Description:
LC-32LE551U / LC-32LE451U / LC-39LE551U / LC-43LE551U /
LC-48LE551U LCD Color Television
(Be sure to have this information and Proof of Purchase available when you
need service for your Product.)
Warranty Period for this Product:
One (1) year parts and labor from the date of purchase.
Additional Exclusions from
Warranty Coverage (if any):
Image Retention resulting from a fi xed image being displayed for long periods of
time is not covered by this Limited Warranty (see Operation Manual on how to
prevent this).
What to do to Obtain Service:
Service is provided by a Sharp Authorized Service Center in the United
States. To fi nd the location of the nearest Sharp Authorized Service Center,
call Sharp toll free at 1-800-BE-SHARP (1-800-237-4277). Sharp will provide
instructions on service options available for your Product.
If it is deemed the Product is to be shipped for servicing, be sure it is insured
and packaged securely. Please use two persons to carry the Product,
transport it in original packaging, or packaging that provides comparable
protection of the Product, and ensure the Product is covered to avoid
scratches and damage. Sharp shall not be responsible for lost, stolen or
misdirected mail or for damage to the product incurred during shipping.
For Products that are deemed in home service, a servicer will come to your
location. If necessary, the servicer may remove the unit for repair at the
service facility and return it once completed. In home service is not available
in all areas and Sharp may, at our option, elect to provide transportation of
the Product to and from an Authorized Service Center in those areas.
TO OBTAIN PRODUCT INFORMATION OR PURCHASE ACCESSORIES, CALL 1-800-BE-SHARP
OR VISIT www.SharpUSA.com
ES
1
INFORMACIÓN IMPORTANTE
INFORMACIÓN:
Este equipo ha sido probado, hallándose que satisface los límites de un dispositivo digital de Clase
B de acuerdo con los requisitos de nidos en la Sección 15 de la normativa FCC. Estos límites se
establecieron con el n de proporcionar una protección razonable contra interferencias perjudiciales
en una instalación residencial. Este equipo genera, utiliza y puede irradiar energía de radiofrecuencia
y, si no se instala y utiliza de acuerdo a las instrucciones, puede causar interferencias perjudiciales a
las comunicaciones de radio. Sin embargo, no se puede garantizar que la interferencia no ocurrirá en
una instalación en particular. En el caso de que el equipo causara interferencias perjudiciales para la
recepción de radio o TV, lo que puede determinarse encendiendo y apagando el equipo, se sugiere
que el usuario lleve a cabo una o varias de las siguientes medidas para corregir dichas interferencias:
—
Reorientar o reubicar la antena receptora.
—
Aumentar la separación entre el equipo y el receptor.
—
Conectar el equipo a una toma de corriente de un circuito diferente al que está conectado el receptor.
—
Consultar al proveedor o a un técnico especialista en radio/televisión.
Declaración de cumplimiento de las normas FCC
Este dispositivo cumple con la Parte 15 de las Reglas de la FCC. Su funcionamiento está sujeto a dos
condiciones:
(1) Este dispositivo no debe causar interferencias perjudiciales y (2) este dispositivo debe aceptar
cualquier interferencia recibida, incluidas aquellas que provoquen un funcionamiento no deseado.
Radio inalámbrica
En el caso de un producto disponible en el mercado de EE.UU. y Canadá, solo se pueden utilizar los
canales del 1 al 11. No es posible seleccionar otros canales. Si este dispositivo se va a utilizar en la
banda de frecuencia de 5,15 ~ 5,25 GHz, su uso se debe restringir a interiores únicamente.
Importante: Los cambios o modi caciones no aprobados expresamente por la parte responsable del
cumplimiento anularán la autorización del usuario para trabajar con el equipo.
Declaración FCC sobre la exposición a la radicación: Este equipo cumple los límites FCC de
exposición a la radicación jados para un entorno no controlado. Este equipo debe ser instalado y
operado a una distancia mínima de 20cm entre el dispositivo radiador y su cuerpo.
Declaración de Industry Canada
Este aparato digital de Clase B cumple el estándar CAN ICES-003(B)/NMB-3(B)
Radio inalámbrica
En el caso de un producto disponible en el mercado de EE.UU. y Canadá, solo se pueden utilizar los
canales del 1 al 11. No es posible seleccionar otros canales.
El dispositivo podría suspender la trasmisión automáticamente en el caso de que no haya información
para transmitir o se produzca un error de funcionamiento.
Tenga en cuenta que no está diseñado para prohibir la transmisión de información de control o
señalización o el uso de códigos repetitivos donde la tecnología lo requiera.
Importante: Los cambios o modi caciones no aprobados expresamente por la parte responsable del
cumplimiento anularán la autorización del usuario para trabajar con el equipo.
Declaración de exposición a la radiación IC: Este dispositivo cumple las reglas IC RSS-210 y su uso
está sujeto a las dos condiciones siguientes:
(1) Este dispositivo no debe causar interferencias perjudiciales y (2) este dispositivo debe aceptar las
interferencias recibidas, incluidas aquellas que provoquen un funcionamiento no deseado.
"Nota para el instalador del sistema CATV: este recordatorio pretende llamar la atención del instalador
del sistema CATV en relación al Artículo 820 del Código Eléctrico Nacional (NEC) en el que se
proporcionan instrucciones para realizar una conexión a tierra adecuada y, en particular, especi ca
que el cable de tierra se debe conectar al sistema de tierra del edi cio tan cerca del punto de entrada
del cable como sea posible."
Este producto utiliza el programa ENERGY STAR cuando se selecciona "Modo Casa" para "Asistente
de instalación".
Al establecer "Asistente de instalación" en "Modo Casa", el televisor logrará un estado de ahorro de
energía para uso doméstico.
IMPORTANTE:
Para facilitar el procedimiento de información en caso de
pérdida o robo, anote el modelo y los números de serie del
televisor en el espacio proporcionado.
Los números se encuentran en la parte posterior e izquierda
del televisor.
ADVERTENCIA: PARA REDUCIR EL RIESGO DE INCENDIO O DESCARGAS ELÉCTRICAS, NO
EXPONGA ESTE PRODUCTO A LA LLUVIA NI A LA HUMEDAD.
PRECAUCIÓN: PARA REDUCIR EL RIESGO DE DESCARGAS
ELÉCTRICAS, NO RETIRE LA CARCASA (O LA PARTE POSTERIOR).
EN EL INTERIOR NO HAY NINGUNA PIEZA QUE NECESITE
MANTENIMIENTO POR PARTE DEL USUARIO.
PÓNGASE EN CONTACTO CON PERSONAL DE SERVICIO
CUALIFICADO CUANDO TENGA PROBLEMAS CON EL EQUIPO.
El símbolo de rayo dentro de
un triángulo equilátero pretende
alertar al usuario de la existencia
de "voltaje peligroso" no aislado
en el interior del producto
cuya magnitud puede ser lo
su cientemente grande como para
constituir un riesgo de descarga
eléctrica para las personas.
El símbolo de exclamación dentro
de un triángulo pretende alertar
al usuario de la existencia de
importantes instrucciones de
funcionamiento y mantenimiento
(servicio técnico) en la
documentación que acompaña al
producto.
RIESGO DE DESCARGA
ELÉCTRICA
NO ABRIR
PRECAUCIÓN
Nº de modelo:
Nº de serie
:
PRECAUCIÓN: PARA EVITAR DESCARGAS ELÉCTRICAS, HAGA COINCIDIR LA CLAVIJA ANCHA DEL
ENCHUFE CON LA RANURA ANCHA, E INSÉRTELA EN ESTA COMPLETAMENTE.
ADVERTENCIA: Las normas FCC establecen que cualquier cambio o modi cación no autorizados en
este equipo no aprobado expresamente por el fabricante podría anular la autorización
del usuario para utilizarlo.
PRECAUCIÓN: Este producto cumple las normas FCC cuando se utilizan conectores y cables apantallados
para conectar la unidad a otro equipo. Para evitar interferencias electromagnéticas con
aparatos eléctricos, como radios y televisores, utilice conectores y cables apantallados
para las conexiones.
DECLARACIÓN DE CONFORMIDAD:
TELEVISOR DE CRISTAL LÍQUIDO DE SHARP, MODELOS LC-32LE551U, LC-32LE451U,
LC-39LE551U, LC-43LE551U, LC-48LE551U
Este dispositivo cumple la Parte 15 de las Reglas de la FCC. Su funcionamiento está sujeto a dos
condiciones:
(1) Este dispositivo no debe causar interferencias perjudiciales y (2) este dispositivo debe aceptar
cualquier interferencia recibida, incluidas aquellas que provoquen un funcionamiento no deseado.
PARTE RESPONSABLE:
SHARP ELECTRONICS CORPORATION
1 Sharp Plaza, Suite 1, Mahwah, New Jersey 07495-1123
TELÉFONO: 1-800-BE-SHARP
Para clientes profesionales: Dirección URL: http://www.sharpusa.com
ESPAÑOL
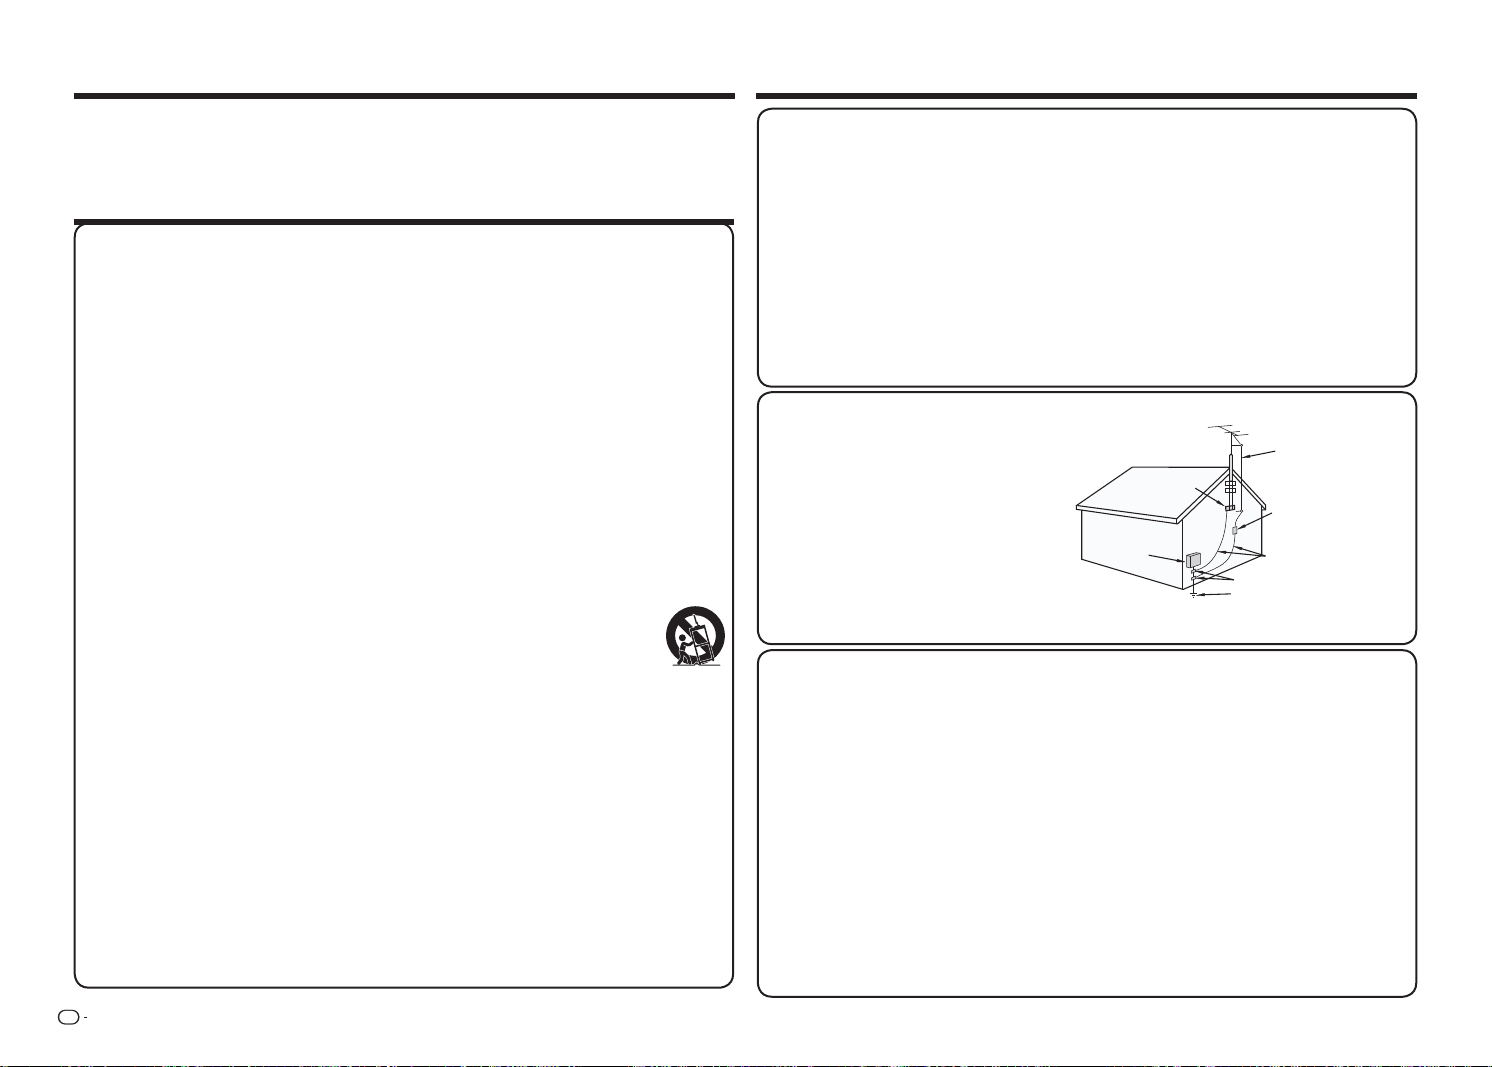
ES
2
Gracias por adquirir el televisor de cristal líquido Sharp. Para garantizar la seguridad del producto
y que este funcione sin problemas durante muchos años, lea atentamente estas instrucciones de
seguridad importantes antes de utilizarlo.
INSTRUCCIONES DE SEGURIDAD IMPORTANTES
ESTIMADO CLIENTE DE SHARP
INSTRUCCIONES DE SEGURIDAD IMPORTANTES
• Conexión a tierra de la antena exterior. Si
conecta una antena exterior al equipo de
televisión, asegúrese de que el sistema
de la misma tiene conexión a tierra para
proporcionar protección contra subidas de
tensión y cargas estáticas.
El Artículo 810 del Código Eléctrico Nacional
ANSI/NFPA 70, proporciona información
sobre las siguientes cuestiones: conexión
adecuada a toma de tierra de postes y
estructuras de soporte, conexión de toma
de tierra del cable de entrada a una unidad
de descarga de antena, tamaño de los
conductores de toma de tierra, ubicación de
la unidad de descarga de antena, conexión a
electrodos de toma de tierra y requisitos para
el electrodo de toma de tierra.
EJEMPLO DE CONEXIÓN DE LA ANTENA A TIERRA SEGÚN
EL CÓDIGO ELÉCTRICO NACIONAL, ANSI/NFPA 70
CABLE DE ENTRADA
A LA ANTENA
ABRAZADERA DE
TOMA DE TIERRA
CÓDIGO ELÉCTRICO NACIONAL (NEC, NATIONAL ELECTRICAL CODE)
CONDUCTORES DE TOMA
DE TIERRA (SECCIÓN 810-21
DEL NEC)
ABRAZADERAS DE TOMA DE TIERRA
SISTEMA DE ELECTRODOS DE
CONEXIÓN A TIERRA DEL SERVICIO DE
ALIMENTACIÓN
(ART. 250 DEL NEC)
EQUIPO DE
SERVICIO
ELÉCTRICO
ANTENA
UNIDAD DE DESCARGA
(SECCIÓN 810-20 DEL NEC)
• Agua y humedad. No utilice este producto en presencia de agua, por ejemplo junto a una bañera, una
pila de lavar, un fregadero o un lavadero, en un sótano húmedo o en una piscina y lugares por el estilo.
• Base. No coloque el producto en un carro, base, trípode o mesa inestable. Si lo hace, el televisor se
puede caer, lo que puede provocar graves daños al usuario y al propio producto. Utilice únicamente un
carro, base, trípode, soporte o mesa recomendados por el fabricante o suministrado con el producto.
Cuando monte el producto en una pared, siga las instrucciones del fabricante. Utilice únicamente los
accesorios de montaje recomendados por el fabricante.
• Selección de la ubicación. Seleccione un lugar en el que no incida directamente la luz del y tenga una
ventilación adecuada.
• Ventilación. Los conductos de ventilación y otras aberturas de la carcasa están diseñados para
proporcionar una ventilación adecuada. No tape ni bloquee dichos conductos de ventilación ni aberturas
ya que una ventilación insufi ciente podría sobrecalentar y/o acortar la vida del producto. No coloque
el producto sobre una cama, sofá, alfombra o superfi cie de similares características, ya que podrían
obturar las aberturas de ventilación. Este producto no está diseñado para instalaciones integradas; no lo
coloque en un lugar cerrado, como una estantería o bastidor, a menos que se proporcione la ventilación
adecuada o que se cumplan las instrucciones del fabricante.
• El panel frontal utilizado en este producto está hecho de vidrio. Por tanto, puede romperse si el producto
se deja caer o se golpea fuertemente. Tenga cuidado para que no sufrir ningún daño con cristales rotos
si el panel se rompe.
• Calor. El producto no debe situarse cerca de ninguna fuente de calor, como por ejemplo, radiadores,
suministros de calor, hornillos u otros aparatos (incluidos amplifi cadores) que produzcan calor.
• Iluminación. Si desea proporcionar protección adicional a este equipo de televisión durante una tormenta
o cuando no se utilice durante un prolongado período de tiempo, desenchúfelo de la toma de corriente y
Muchas de las funciones útiles funcionan gracias a la electricidad pero esta también puede causar
daños al producto y al usuario si se manipula de forma inadecuada. Este producto se ha diseñado y
fabricado teniendo en cuenta la seguridad como prioridad máxima. No obstante, el uso inapropiado
puede provocar descargas eléctricas o un incendio. Para evitar daños potenciales, tenga en cuenta
las siguientes instrucciones cuando instale, utilice y limpie el producto. Para garantizar la seguridad
y prolongar la vida del Televisor de cristal líquido, lea atentamente las siguientes precauciones antes
de utilizarlo.
1) Lea estas instrucciones.
2) Guarde estas instrucciones.
3) Preste atención a todas las advertencias.
4) Siga todas las instrucciones.
5) No utilice este aparato cerca del agua.
6) Limpie el producto solamente con un paño seco.
7) No bloquee las aberturas de ventilación. Realice la instalación siguiendo las instrucciones del
fabricante.
8) No coloque el aparato cerca de fuentes de calor, como por ejemplo radiadores, hornillos u otros
aparatos (incluidos ampli cadores) que produzcan calor.
9) No desarme el dispositivo de seguridad del enchufe polarizado o con conexión a tierra. Un
enchufe polarizado tiene dos clavijas, una más ancha que la otra. Un enchufe con toma de tierra
tiene dos clavijas y una tercera clavija de toma de tierra. La clavija ancha del enchufe polarizado
y la clavija de conexión a tierra del enchufe polarizado son dispositivos de seguridad. Si el
enchufe suministrado con el aparato no encaja en la toma de corriente donde desea conectarlo,
diríjase a un electricista para sustituir sus tomas de corriente obsoletas.
10) Proteja el cable de corriente para que no se pise ni se pellizque, especialmente en los enchufes,
las tomas de corriente y el punto donde salen del aparato.
11) Utilice únicamente los accesorios especi cados por el fabricante.
12) Utilice el aparato sólo con un carro, base, trípode, soporte o mesa especi cado por el
fabricante o vendido conjuntamente con dicho aparato. Si utiliza un carro, preste
atención cuando lo desplace para evitar daños por caída.
13) Desconecte este aparato durante las tormentas eléctricas o cuando no se utilice
durante un prolongado período de tiempo.
14) Pida todo tipo de servicio a personal de servicio cali cado. El aparato deberá ser reparado
siempre que sufra cualquier tipo de daño, por ejemplo si el cable o la clavija de alimentación
están en mal estado, si se derrama líquido sobre el mismo, en caso de caída de objetos sobre el
aparato, en caso de exposición a la lluvia o la humedad, en caso de funcionamiento incorrecto o
en caso de caída del aparato.
Información de seguridad adicional
15) Fuentes de alimentación. Solo se debe aplicar al producto el tipo de alimentación indicado en el
etiquetado. Si no está seguro del tipo de alimentación de su domicilio, póngase en contacto con
su distribuidor o con la compañía eléctrica local. Para productos diseñados para que funcionen
con batería u otras fuentes de alimentación, consulte las instrucciones de funcionamiento.
16) Sobrecarga. No sobrecargue las tomas de corriente ni los alargadores ya que se puede provocar
un incendio o descargas eléctricas.
17) Inserción de objetos y líquidos. Nunca coloque objetos de ningún tipo en este producto de
forma que obturen sus aberturas, ya que pueden entrar en contacto con componentes de alto
voltaje o cortocircuitar éstos, lo que podría dar lugar a un incendio o descargas eléctricas.
Nunca derrame líquidos de ningún tipo sobre el producto.
18) Daños que requieren servicio técnico. Desenchufe el producto de la toma de corriente y remita
todas las reparaciones al personal de servicio técnico cuali cado cuando se den las siguientes
condiciones:
a) El enchufe o el cable de CA está dañado,
b) Se ha derramado líquido o han caído objetos sobre el producto,
c) El producto se ha expuesto a la lluvia o al agua,
d) El producto no funciona con normalidad y, sin embargo, se han seguido las instrucciones
de funcionamiento,
Ajuste sólo los controles descritos en las instrucciones de funcionamiento; el ajuste inadecuado
de otros controles puede provocar daños y obligar al personal técnico cuali cado a realizar un
trabajo exhaustivo para que el producto vuelva a funcionar con normalidad,
e) El producto se ha dejado caer o ha sufrido daños de alguna manera, y
f) El producto muestra un cambio claro de rendimiento, lo que indica la necesidad de tareas
de mantenimiento.
19) Reemplazar piezas. Cuando sea necesario reemplazar piezas, asegúrese de que el técnico
ha empleado piezas de repuesto especi cadas por el fabricante o que tienen las mismas
características que las originales. Las sustituciones no autorizadas pueden provocar un
incendio, descargas eléctricas o constituir otros riesgos.
20) Comprobación de seguridad. Después de realizar cualquier tarea de mantenimiento o
reparación de este producto, pida al técnico que realice comprobaciones de seguridad para
determinar si el producto funciona perfectamente.
21) Montaje en la pared o el techo. Cuando monte el producto en la pared o el techo, asegúrese de
instalarlo siguiendo el método recomendado por el fabricante.

ES
3
desconecte la antena. De esta forma evitará que las subidas de corriente lo dañen.
• Líneas de alta tensión. Un sistema de antena exterior no se debe colocar junto a líneas eléctricas
elevadas u otros circuitos de potencia o de iluminación eléctricos, ni en lugares donde puedan caer
sobre tales líneas o circuitos eléctricos. Cuando instale un sistema de antena exterior, extreme las
precauciones para no tocar las líneas o circuitos eléctricos, pues las consecuencias pueden ser fatales.
• Para evitar un incendio, no coloque nunca ningún tipo de vela o llamas sobre el televisor o cerca de él.
• Para evitar incendios y descargas eléctricas, no coloque el cable de CA bajo el televisor ni otros objetos
pesados.
• No muestre una imagen estática durante prolongados períodos de tiempo ya que podrían quedar
imágenes residentes.
• Para evitar incendios o descargas eléctricas, no exponga el monitor al agua,
salpicaduras, lluvia o humedad. No coloque recipientes que contengan líquido (como
jarrones o fl oreros) en el producto.
• No insertar objetos en el proyector. La inserción de objetos en las ranuras de
ventilación u otras aberturas puede provocar un incendio o descargas eléctricas.
Preste especial atención cuando utilice el producto en presencia de niños.
INSTRUCCIONES DE SEGURIDAD IMPORTANTES
Mantenimiento de la carcasa
• Utilice un paño suave (algodón, franela, etc.) y páselo suavemente por la superfi cie de la carcasa.
• El uso de paños químicos (paños delgados húmedos o secos) puede deformar los componentes de la
carcasa principal de la unidad o provocar grietas.
• La limpieza con un paño duro o empleando mucha fuerza puede dañar la superfi cie de la carcasa.
• Si la carcasa está muy sucia, pase un paño suave (algodón, franela, etc.) humedecido en detergente
neutro diluido con agua y completamente escurrido y, a continuación, pase un paño suave y seco.
• Evite utilizar benceno, diluyente u otros disolventes, ya que pueden deformar la carcasa y despegar la
pintura.
• No aplique insecticidas u otros líquidos volátiles.
Asimismo, no deje que la carcasa permanezca en contacto con productos de goma o vinilo durante
un prolongado período de tiempo. Los plastifi cantes que se encuentran dentro del plástico pueden
deformar la carcasa y despegar la pintura.
Mantenimiento del panel frontal
• Desconecte la alimentación principal y desenchufe el cable de CA de la toma de corriente eléctrica antes
de manipular el producto.
• Pase un paño suave (algodón, franela, etc.) con cuidado por la superfi cie del
panel frontal.
Para proteger el panel frontal, no utilice un paño sucio, limpiadores líquidos o
un paño químico (paños delgados húmedos o secos, etc.). Si no sigue esta
recomendación, la superfi cie del panel frontal podría resultar dañada.
• La limpieza con un paño duro o empleando mucha fuerza puede dañar la superfi cie del panel frontal.
• Utilice un paño suave y húmedo para limpiar con cuidado el panel frontal cuando esté realmente sucio.
La superfi cie del panel frontal puede arañarse si el paño se pasa con mucha fuerza.
• Si el panel frontal tiene polvo, utilice un cepillo antiestático (que puede adquirir en cualquier tienda) para
limpiarlo.
• Para evitar arañar el marco o la pantalla, utilice un paño suave sin pelusas para la limpieza. Puede
adquirir paños de limpieza solicitándolos directamente a Sharp en paquetes sencillos (00Z-LCD-CLOTH)
o triples (00Z-LCD-CLOTH-3). Llame al 1-800-BE-SHARP para realizar los pedidos.
SEGURIDAD PARA LOS NIÑOS
CUESTIONES RELACIONADAS CON LA UBICACIÓN APROPIADA DEL TELEVISOR
LOS CUIDADOS DE LA INDUSTRIA DE ELECTRÓNICA DE CONSUMO
•
Los fabricantes, minoristas y el resto de la industria de electrónica de consumo
tienen el compromiso de hacer que el entretenimiento doméstico sea seguro y
agradable.
•
Mientras disfruta de su televisor, tenga en cuenta que todos los televisores (nuevos
y antiguos) deben sustentarse en bases adecuadas o instalarse conforme a las
recomendaciones del fabricante. Los televisores que se coloquen inadecuadamente
en aparadores, librerías, estanterías, escritorios, altavoces, arcones, carros, etc.,
pueden caerse y causar lesiones personales.
EN BUSCA DE LA SEGURIDAD
•
SIEMPRE siga las recomendaciones del fabricante para la instalación segura del
televisor.
•
SIEMPRE lea y siga las instrucciones para utilizar el televisor adecuadamente.
•
NUNCA permita que los niños se suban al televisor o jueguen en él o en el mueble
en el que está colocado.
•
NUNCA coloque el televisor en un mueble que se pueda utilizar fácilmente como
peldaño, como por ejemplo un cajón.
•
SIEMPRE instale el televisor donde no se pueda empujar, desplazar o tirar.
•
SIEMPRE dirija los cables de alimentación y los cables conectados al televisor
de forma que no se pueda tropezar con ellos, no se pueda tirar de ellos o no se
puedan agarrar.
INSTALACIÓN DEL TELEVISOR EN LA PARED O EL TECHO
•
SIEMPRE póngase en contacto con su proveedor para obtener información sobre
la instalación profesional si no está seguro de si va a poder instalar el televisor de
forma segura.
•
SIEMPRE use un soporte recomendado por el fabricante del televisor y que tenga
una certificación de seguridad de un laboratorio independiente (como por ejemplo
UL, CSA o ETL).
•
SIEMPRE siga todas las instrucciones proporcionadas por los fabricantes del
televisor y del soporte.
•
SIEMPRE asegúrese de que la pared o el techo donde instale el televisor es
apropiado.
Algunos soportes no están diseñados para instalarse en paredes o techos con
varillas de acero o bloques. Si no está seguro, póngase en contacto con un
instalador profesional.
•
Los televisores pueden pesar bastante. Se necesitan al menos dos personas para
realizar la instalación en la pared o el techo.
TRASLADAR UN TELEVISOR ANTIGUO A UNA NUEVA UBICACIÓN DE
SU HOGAR
•
Muchos compradores de televisores nuevos trasladan sus televisores CRT antiguos
a una sala secundaria después de adquirir un televisor de pantalla plana. Debe
tenerse especial cuidado en la ubicación de los televisores CRT antiguos.
•
SIEMPRE coloque el televisor CRT antiguo en un mueble que sea resistente y
apropiado para su tamaño y peso.
•
NUNCA coloque el televisor CRT antiguo en un aparador donde los niños tengan la
tentación de usar los cajones para subir más alto.
•
SIEMPRE asegúrese de que el televisor CRT antiguo no se cuelga del borde del
mueble.
CE.org/safety
ADVERTENCIA
NO TRAGARSE LAS PILAS. EXISTE EL RIESGO DE QUEMADURAS QUÍMICAS
“Este producto contiene una pila de tipo moneda o botón. Si la pila de tipo moneda o botón se traga,
puede causar quemaduras internas graves en tan solo 2 horas y puede provocar la muerte. Mantenga las
pilas nuevas y usadas fuera del alcance de los niños. Si el compartimento de las pilas no se cierra de forma
segura, deje de utilizar el producto y manténgalo alejado de los niños. Si cree que las pilas pueden haberse
tragado o colocado dentro de cualquier parte del cuerpo, acuda inmediatamente a un médico.”
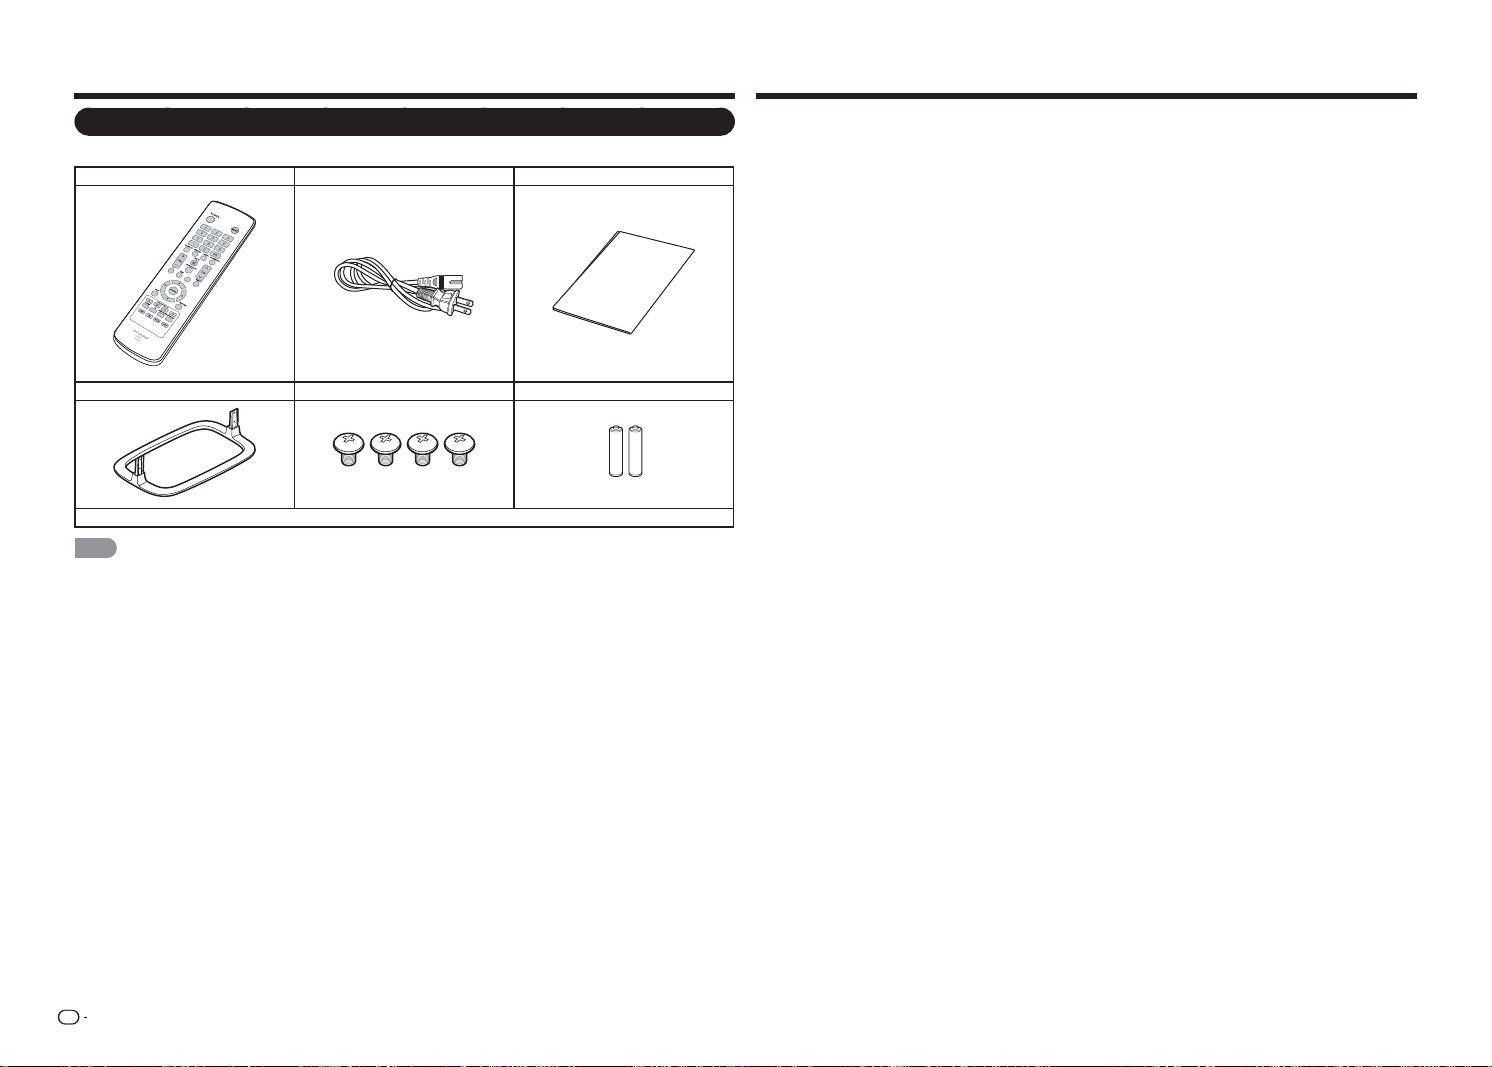
ES
4
Accesorios Contenido
Accesorios suministrados
Asegúrese de que los siguientes accesorios se proporcionan con el producto.
Mando a distancia Cable de CA Guía de conexiones
Connection
Guide
Base Tornillos de la base (4 unidades) Pilas AAA (2)
■
Manual de funcionamiento (esta publicación)
NOTA
• Utilice únicamente el cable de CA suministrado con el televisor.
• Las ilustraciones anteriores solamente sirven de referencia y pueden variar ligeramente de los accesorios reales.
INFORMACIÓN IMPORTANTE ........................... 1
ESTIMADO CLIENTE DE SHARP ........................ 2
INSTRUCCIONES DE SEGURIDAD
IMPORTANTES ................................................. 2
Accesorios ........................................................... 4
Accesorios suministrados .............................. 4
Contenido ............................................................. 4
REFERENCIA RÁPIDA ......................................... 5
Acoplar la base ..............................................5
SUGERENCIA PARA UNA
INSTALACIÓN RÁPIDA .................................. 5
Instalar las pilas en el mando a distancia ........ 6
Preparación .......................................................... 6
Usar el mando a distancia .............................. 6
Antenas ......................................................... 6
Nombre de los componentes ............................. 7
Televisor (parte frontal) ...................................7
Televisor (panel de control) ............................ 7
Televisor (parte posterior) ............................... 7
Mando a distancia ......................................... 8
Introducción a las conexiones ........................... 9
Disfrutar de imágenes en alta
defi nición (HD) ............................................... 9
Tipos de conexión .........................................9
Mostrar una imagen de un equipo externo ..... 9
Función de un botón .................................... 10
Conectar un equipo externo ............................. 11
Conectar un reproductor de discos
Blu-ray o DVD o un descodifi cador
de satélite o cable HD ................................. 11
Conectar una unidad VCR, una
consola de juegos, una videocámara
o un descodifi cador de cable o satélite ........ 12
Conectar un sistema envolvente o
de audio ...................................................... 12
Conectar un PC o teléfono inteligente .......... 12
Ver la televisión.................................................. 14
Encender y apagar la alimentación ............... 14
Instalación inicial .......................................... 14
Funcionamiento de los botones directos ........ 16
Menú en pantalla ............................................... 19
Menú en pantalla (menú principal) ................19
Funcionamiento de los menús en
pantalla ........................................................ 19
Botones de funcionamiento de menú ........... 20
Elementos de menú .....................................20
Menú Imagen ............................................... 21
Menú Audio ................................................. 23
Menú Confi guración ..................................... 23
Menú Subtítulos ........................................... 25
Menú Canal ................................................. 26
Menú Temporizador de apagado ................. 26
Disfrutar de la reproducción de
fotografías, música y películas...................... 27
Conectar un dispositivo de memoria
USB o una unidad de disco duro USB .........27
Seleccionar las carpetas para reproducir ..... 27
Ver fotografías ............................................. 28
Reproducir música ....................................... 29
Ver películas ................................................ 29
Apéndice ............................................................ 30
Solución de problemas ................................ 31
Especifi caciones ............................................... 33
TV ................................................................ 33
Marcas comerciales .......................................... 34
Planos
• Los planos del televisor LCD se muestran en la tapa posterior interior.
• Las ilustraciones y presentaciones en pantalla que aparecen en este manual de uso son una mera
explicación y pueden variar ligeramente del aspecto real.
• Los ejemplos utilizados en este manual están basados en el modelo LC-48LE551U.
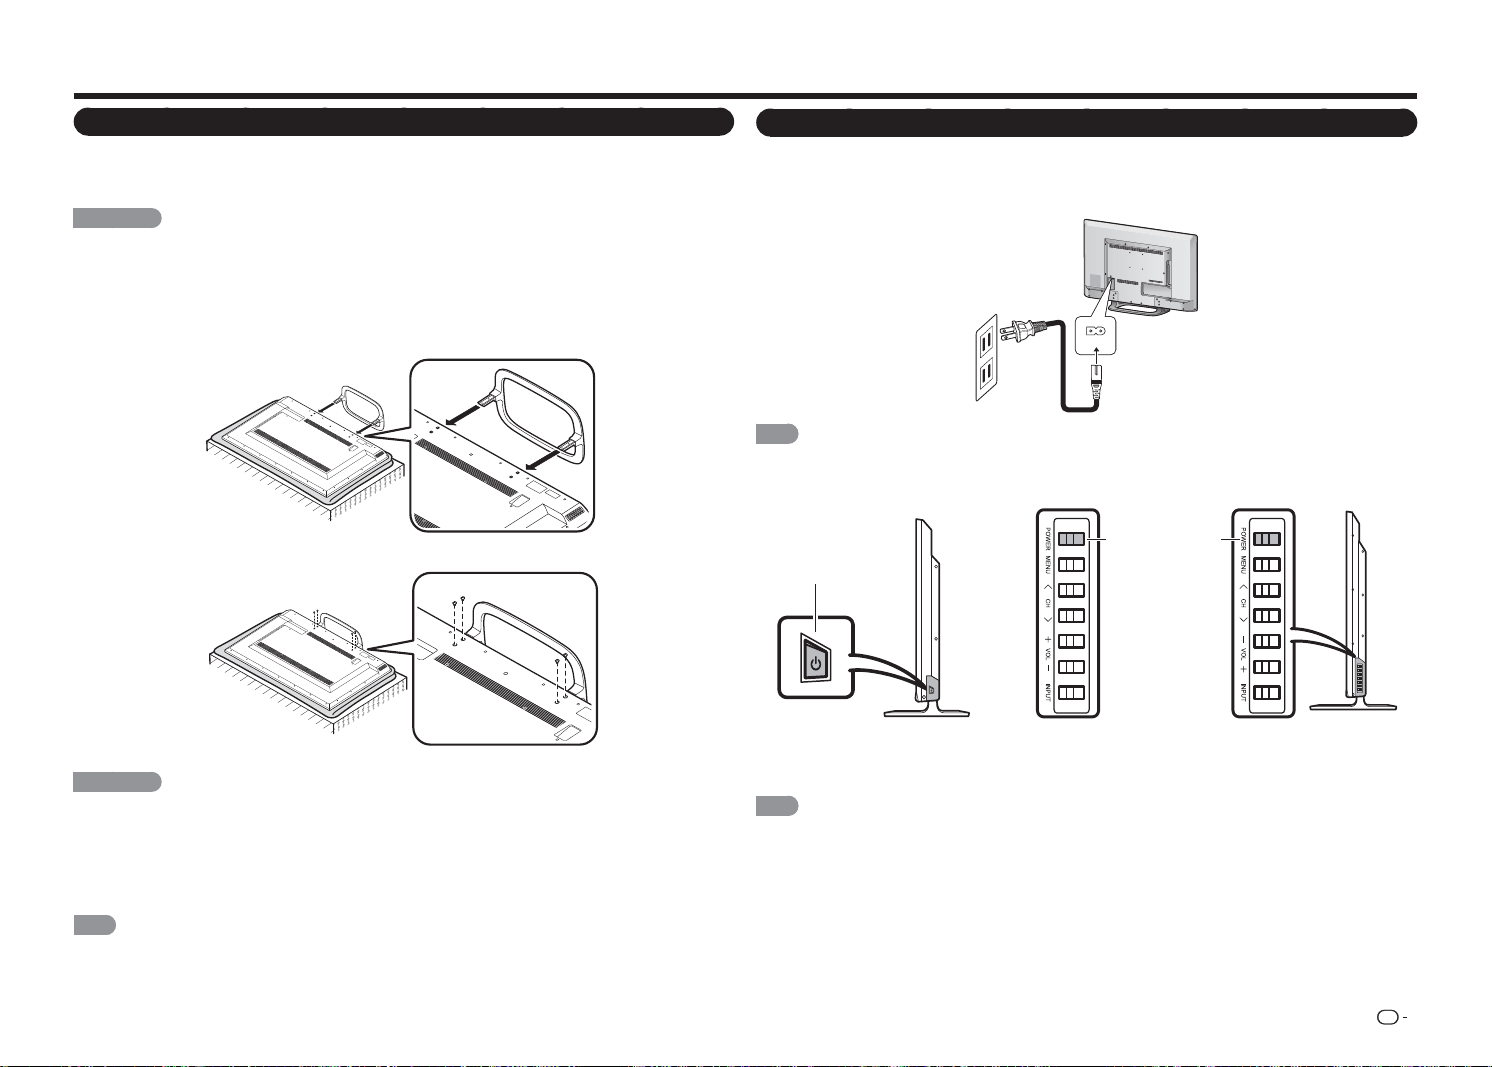
ES
5
REFERENCIA RÁPIDA
Acoplar la base
• Antes de acoplar (o desmontar) la base, desenchufe el cable de CA.
• Antes de realizar el trabajo, extienda el acolchado por el área de la base para tumbar el televisor. De esta
forma, evitará que se dañe.
PRECAUCIÓN
• Asegúrese de seguir las instrucciones que se indican a continuación: La instalación incorrecta de la
base puede provocar la caída del televisor.
1
Asegúrese de que se han suministrado 4 tornillos con la base.
2
Coloque el televisor boca abajo en una superfi cie segura cubierta con un paño.
3
Acople la base del televisor en la parte inferior del mismo.
4
Apriete los 4 tornillos mediante un destornillador de estrella.
PRECAUCIÓN
• Para no dañar el televisor, no empuje con demasiada fuerza ni ejerza mucha presión en el cuello de la
base.
• No quite la base del televisor a menos que utilice un soporte para instalación en pared opcional para
montarlo.
• Después de acoplar la base al televisor, no la sujete cuando levante, coloque, traslade o tumbe el
televisor.
NOTA
• Para desmontar la base, realice los pasos en orden inverso.
SUGERENCIA PARA UNA INSTALACIÓN RÁPIDA
1
Acople la antena a la parte posterior del televisor. (Consulte la página 6.)
2
Conecte el enchufe de CA del televisor a una toma de corriente eléctrica de CA.
• Coloque el televisor cerca de la toma de corriente eléctrica de CA y mantenga el enchufe de
alimentación al alcance.
AC IN
NOTA
• PARA EVITAR RIESGOS DE DESCARGAS ELÉCTRICAS, NO TOQUE LAS PARTES NO AISLADAS DE
NINGÚN CABLE CUANDO EL CABLE DE CA ESTÉ CONECTADO.
3
Cuando encienda el televisor por primera vez, presione el botón
ALIMENTACIÓN
del televisor.
* para LC-32LE551U/LC-32LE451U/
LC-39LE551U
* para LC-48LE551U
ALIMENTACIÓN
ALIMENTACIÓN
4.
Inserte las pilas en el mando a distancia. (Consulte la página 6.)
NOTA
NOTA
• Los altavoces no se pueden desmontar del televisor.
• El ángulo del televisor no se puede ajustar.
* para LC-43LE551U

ES
6
Antenas
Para disfrutar de una imagen más clara, utilice una antena exterior. A continuación se expone una breve
explicación de los tipos de conexión utilizados para un cable coaxial. Si la antena exterior utiliza un cable
coaxial de 75 ohmios con un conector de tipo F, enchúfelo al terminal de antena situado en la parte posterior
del televisor. Para conectar el cable de antena al televisor, utilice cables que puede adquirir en cualquier tienda
especializada.
CABLE / ANTENNA
DTV / TV
IN
OUT
Conectar un cable de antena
• Conecte el cable de antena al televisor mediante uno de los métodos de la ilustración mostrada (
1
,
2
,
3
o
4
).
1
Cable sin
convertidor CATV
3
Antena combinada
de VHF/UHF
4
Antena de VHF/UHF
independiente
2
Antena de VHF/
UHF
Entrada de terminal de
televisión por cable
Cable coaxial de 75
ohmios (redondeado)
Cable coaxial de 75
ohmios (redondeado)
Cable de dos conductores
de 300 ohmios
Terminal de antena
doméstico (75 ohmios)
Terminal de antena
doméstico (75 ohmios)
Adaptador de
300/75 ohmios
Combinador
Al terminar de
antena del televisor
Cable de dos conductores
de 300 ohmios
Cable de dos conductores
de 300 ohmios
o cable coaxial de 75
ohmios (redondeado)
Cable coaxial
Cable coaxial
ANTENA DE
VHF
ANTENA DE
UHF
o
Conector de tipo F
Cable de dos conductores de 300 ohmios (plano)
Conector de tipo F
Cable coaxial de 75 ohmios
(redondeado)
Cable coaxial de 75 ohmios
1. Un sistema de 75 ohmios generalmente es un cable redondeado
con un conector de tipo F que se puede acoplar fácilmente a un
terminal sin necesidad de herramientas.
2. Un sistema de 300 ohmios es un cable plano de dos terminales
que se puede acoplar a un terminal de 75 ohmios a través de un
adaptador de 300/75 ohmios.
AVISO
El conector tipo F solamente se debe ajustar con
los dedos.
Cuando conecte el cable de RF al televisor, no ajuste el conector
de tipo F con ninguna herramienta.
Si utiliza alguna herramienta, el televisor puede resultar dañado.
(Se pueden romper los circuitos internos, etc.)
Preparación
Usar el mando a distancia
Utilice el mando a distancia apuntando con él hacia
el sensor de control remoto del televisor. Es posible
que el mando a distancia no funcione correctamente
si hay objetos entre él y el sensor de control remoto.
30°
30°
30°
*
30°
17´ (5 m)
Remote control sensor
■ Precauciones relacionadas con el mando a
distancia
• Impida que el mando a distancia sufra golpes. Además,
no lo exponga a líquidos y no lo deje en zonas con
mucha humedad.
• No instale ni coloque el mando a distancia donde
reciba la luz directa del sol. El calor puede deformar el
mando a distancia.
• Es posible que el mando a distancia no funcione
correctamente si el sensor de control remoto del
televisor está bajo la infl uencia de la luz directa del sol
o de una iluminación intensa. En tales casos, cambie el
ángulo de iluminación del televisor o utilice el mando a
distancia más cerca del sensor de control remoto.
IMPORTANTE:
SI LA UNIDAD NO SE ENCIENDE, DESENCHUFE
EL TELEVISOR DE LA TOMA DE CORRIENTE
ELÉCTRICA Y REPITA LOS PASOS DE
INSTALACIÓN.
SI SIGUE SIN ENCENDERSE, PÓNGASE EN
CONTACTO CON NOSOTROS LLAMANDO AL
1-800-BE-SHARP.
REFERENCIA RÁPIDA
Instalar las pilas en el mando a
distancia
Si el mando a distancia no activa las funciones del
televisor, reemplace las pilas de dicho mando.
1
Abra la tapa de las pilas.
2
Inserte dos pilas de tamaño "AAA".
• Coloque las pilas con sus terminales
correspondientes en las indicaciones (
e
) y (
f
)
del compartimento de las mismas.
3
Cierre la tapa de las pilas.
PRECAUCIÓN
El uso inadecuado de las pilas puede provocar la fuga de
sustancias químicas o explosiones. Asegúrese de seguir
las instrucciones siguientes.
• No mezcle tipos diferentes de pilas. Las pilas tienen
diferentes características en función del tipo de las
mismas.
• No mezcle pilas nuevas y usadas. Si mezcla pilas
nuevas y usadas se acortará la vida de las mismas
o se producirán fugas de sustancias químicas en las
pilas usadas.
• Retire las pilas tan pronto como se agoten. Los
productos químicos fugados de las pilas que entren
en contacto con la piel pueden provocar sarpullidos
Si detecta alguna de estas fugas, limpie todo con un
paño.
• Las pilas suministradas con este producto pueden
tener una esperanza de vida más corta debido a las
condiciones de almacenamiento.
• Si no va a usar el mando a distancia durante un
prolongado período de tiempo, extraiga las pilas del
mismo.
* El ángulo es de 6º cuando
la base está acoplada.
Sensor del mando a
distancia
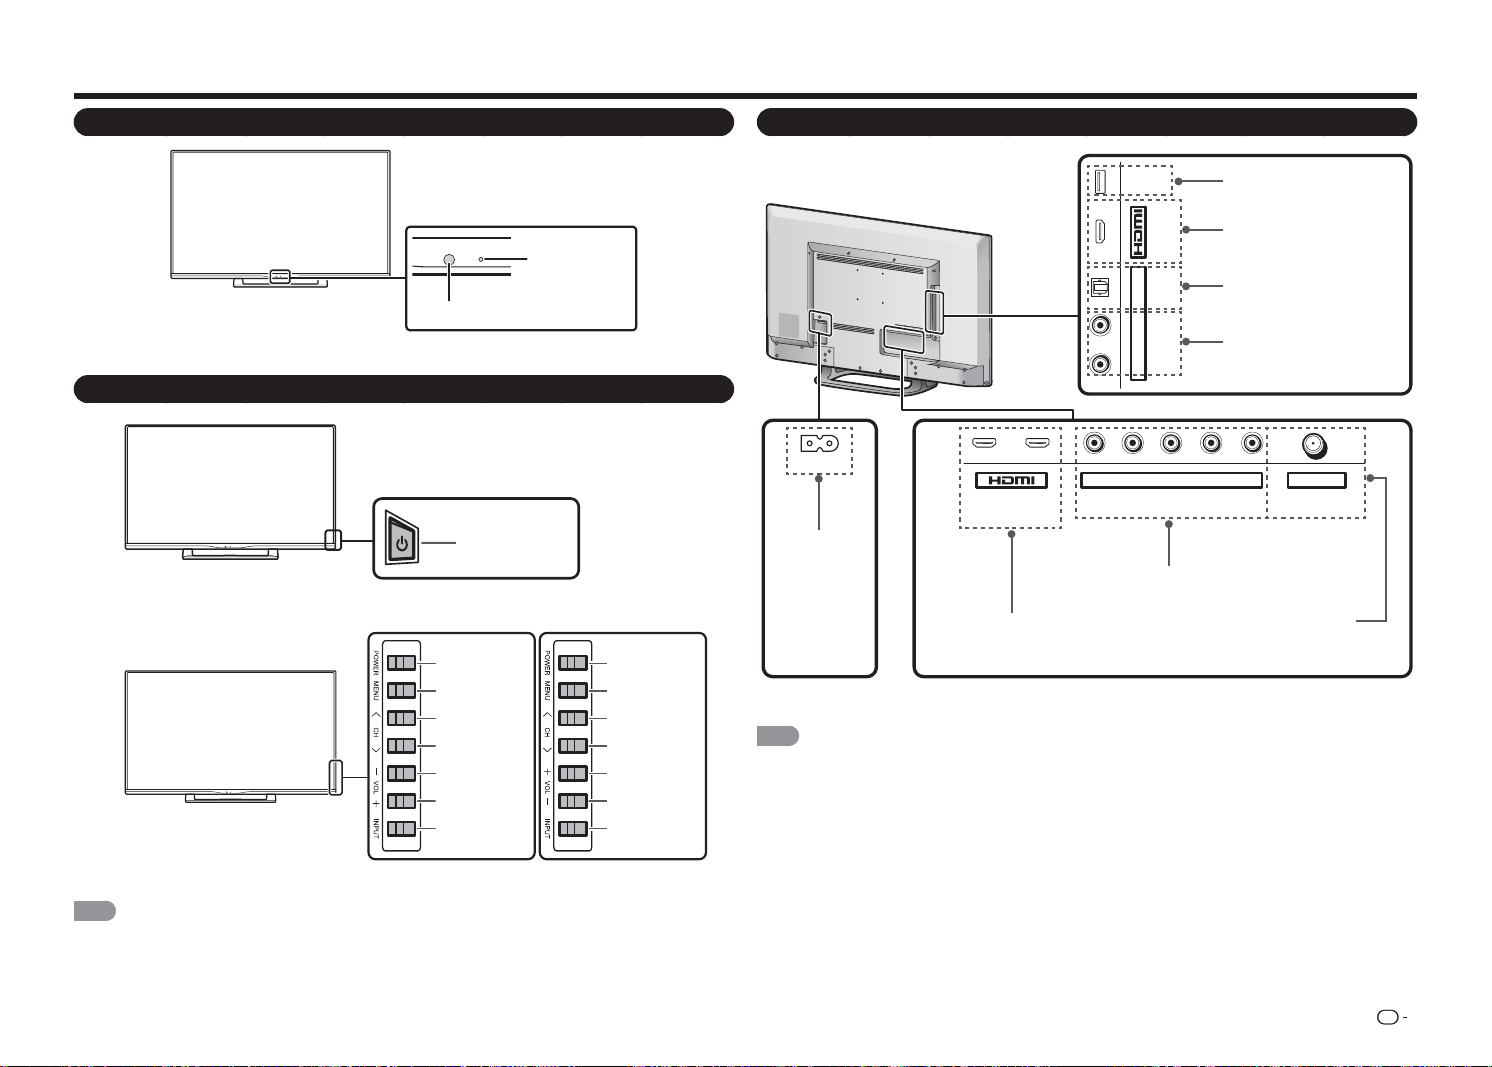
ES
7
Nombre de los componentes
Televisor (parte frontal)
Televisor (panel de control)
NOTA
• Para obtener más información acerca de la
Función de un botón
, consulte la página 10.
Televisor (parte posterior)
1
ARC
2 Y/V Pb/Cb CABLE / ANTENNAPr/Cr
COMPONENT / VIDEO
DTV / TV
AUDIO
LR
L R OPTICAL MHL
(DC 5V, 900mA)
USB
AUDIO OUT
AC IN
*1 Consulte las páginas 9 a 12 para obtener información sobre la conexión de equipos externos.
NOTA
• Las ilustraciones OSD de los terminales solamente sirven de referencia y pueden variar ligeramente en función de la
situación real.
El modelo de televisor de 43" y 48" (LC-43LE551U y LC-48LE551U) está equipado con 3 HDMI (HDMI-1,
HDMI-2 y HDMI-3 (lateral).
Los modelos de televisor de 32" y 39" (LC-32LE551U, LC-32LE451U y LC-39LE551U) están equipados con 2
HDMI (HDMI-1 y HDMI-2 (lateral).
Indicador
ALIMENTACIÓN
Sensor del mando a distancia
* para LC-32LE551U/LC-32LE451U/LC-39LE551U
* para LC-48LE551U
Botón
ALIMENTACIÓN
Botón
ALIMENTACIÓN
Botón
MENÚ
Botón
ENTRADA
Botones de canal
(
CANAL
r
/
s
)
Botones de
volumen
(
VOL
k
/
l
)
Terminal USB
Conector
ENTRADA DE CA
Terminal HDMI 3
MHL: Mobile High-De nition Link,
es decir, Enlace de alta de nición
móvil
Terminal HDMI 1/2
ARC: Audio Return Channel, es
decir, Canal de retorno de audio
Terminal ENTRADA DE
COMPONENTES/VÍDEO
Terminal SALIDA DE AUDIO
DIGITAL
ENTRADA DE
CABLE Y ANTENA
(5 VCC, 500 mA)
Terminal SALIDA DE AUDIO
ANALÓGICA
Botón
ALIMENTACIÓN
Botón
MENÚ
Botón
ENTRADA
Botones de canal
(
CANAL
r
/
s
)
Botones de
volumen
(
VOL
k
/
l
)
* para LC-43LE551U

ES
8
Nombre de los componentes
Mando a distancia
1
INPUT
3
4
5
6
7
8
9
0
ENT
1
2
DISPLAY FREEZE
FLASHBACK
MUTE
SURROUND
TV USB
MENU
FAVORITE CH
SLEEP CC VIEWMODEAV MODE
AUDIO
VOL
CH
+
RETURNEXIT
LCDTV
GJ221
ABCD
ENTER
2
3
4
5
6
7
8
9
10
11
12
13
14
15
16
17
18
19
20
21
22
23
24
25
POWER
1 ENTRADA: permite seleccionar la fuente de
entrada de TV.
(Consulte la página 9.)
2 0
–
9:
permite establecer el canal.
3 ENT:
permite saltar a un canal después de
seleccionarlo con los botones
0
–
9
.
4 ANTERIOR:
presione este botón para cambiar
al canal sintonizado anteriormente o al modo
de entrada externa. Presiónelo de nuevo para
volver al canal sintonizado anteriormente o al
modo de entrada externa.
5 AUDIO:
permite seleccionar el modo de
sonido. (Consulte la página 17.)
6 SILENCIO:
permite desactivar el sonido.
7 CANAL
r
/
s
:
permite seleccionar el canal.
8 MENÚ:
permite mostrar la pantalla de menús.
(Consulte la página 19.)
9
a
/
b
/
c
/
d
,
ENTRAR:
permite seleccionar el
elemento deseado en la pantalla.
10 VOLVER:
permite volver a la pantalla de menú
anterior.
11 CANAL FAVORITO:
seleccione este botón
para ver los canales favoritos predefi nidos.
Mientras ve la televisión, puede alternar los
canales seleccionados presionando
A
,
B
,
C
y
D
.
12 MODO AV:
permite seleccionar el modo de
imagen. (Consulte la página 21.)
13 MODO DE VISUALIZACIÓN:
permite
seleccionar la relación de aspecto. (Consulte
la página 18.)
14
:
solo para USB.
15 ALIMENTACIÓN:
permite encender el
televisor o entrar en el modo de espera.
(Consulte la página 14.)
16 • (PUNTO):
(Consulte la página 16.)
17 INFORMACIÓN:
permite mostrar información
sobre el canal (o la fuente de entrada) actual
en la pantalla.
18 CONGELAR:
permite establecer la imagen
estática. Presione de nuevo el botón para
volver a la pantalla normal.
19 VOL
k
/
l
:
permite establecer el volumen.
(Consulte la página 16.)
20 ENVOLVENTE:
permite seleccionar la
confi guración envolvente: "Película", "Noticias"
o "Apagado". (Consulte la página 23.)
21 TV:
conmutación directa a la fuente TV.
22 USB:
conmutación directa a la fuente USB.
23 SALIR:
permite desactivar la pantalla de menús.
24 APAGADO AUTOMÁTICO:
permite establecer
un tiempo al cabo del cual el televisor pasará
automáticamente al modo de espera. (Consulte
la página 26.)
25 SUBTÍTULOS:
permite seleccionar el modo de
subtítulos ocultos. (Consulte la página 25.)
NOTA
• Cuando utilice el mando a distancia, apunte con él al televisor.
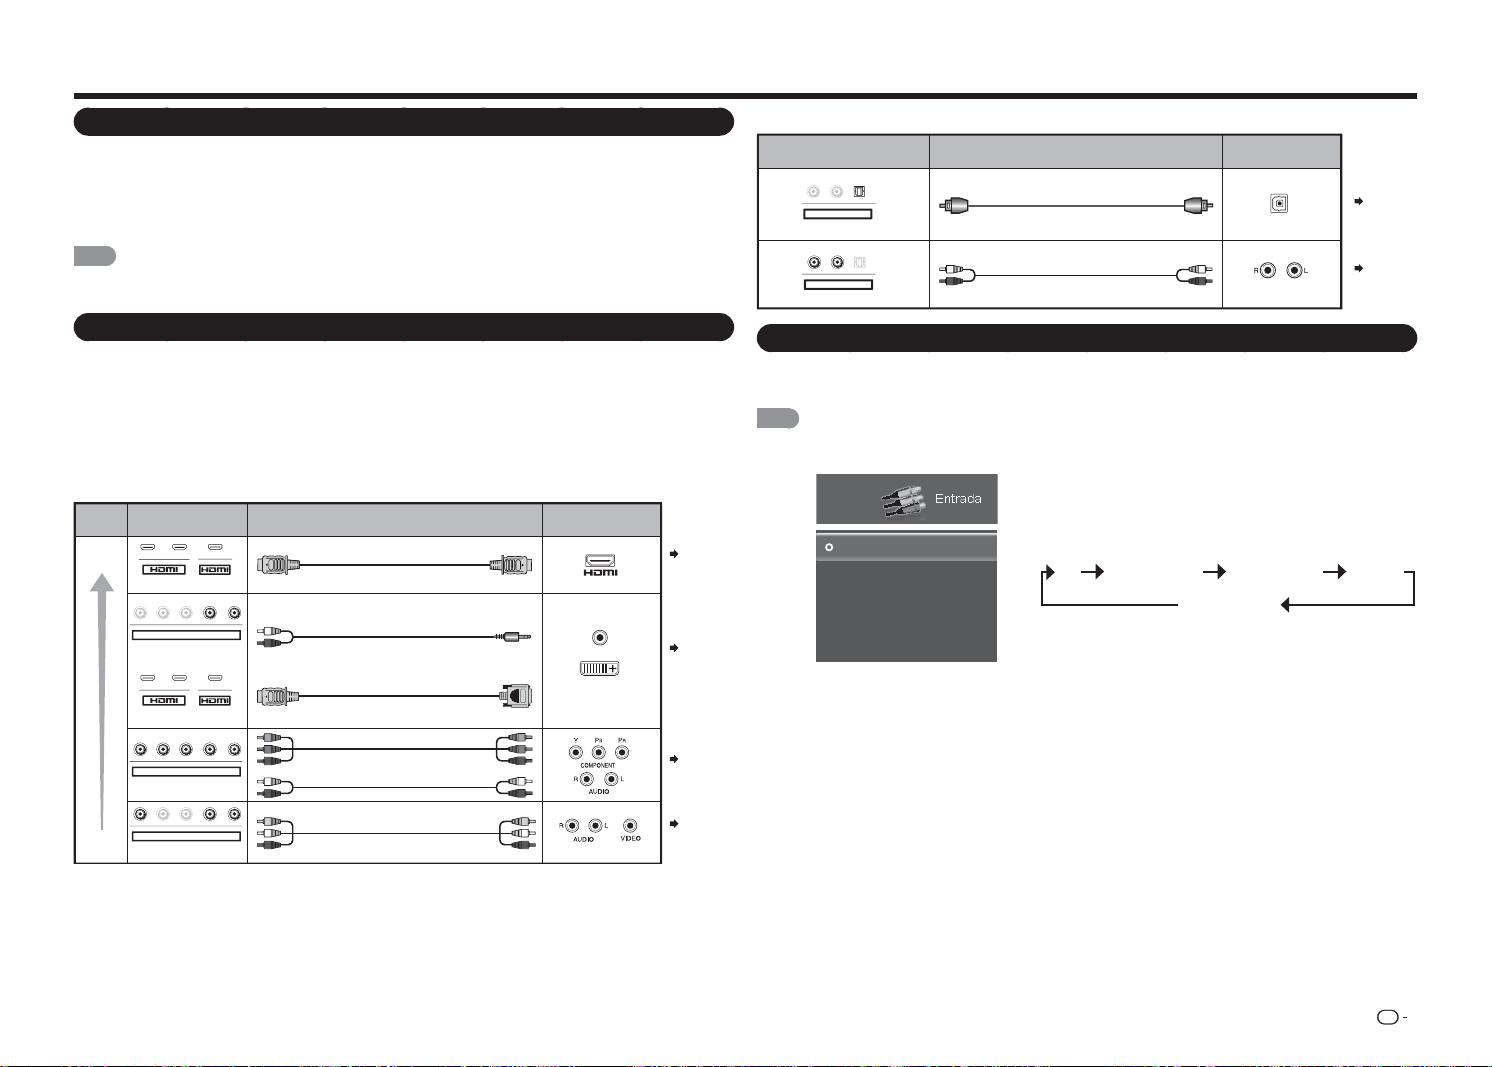
ES
9
Introducción a las conexiones
Disfrutar de imágenes en alta defi nición (HD)
Un televisor HD (HDTV) sin una fuente HD es simplemente un televisor convencional. Para disfrutar de
imágenes HD en el televisor, debe ver programas en HD de las siguientes maneras:
•
Transmisión a través de ondas mediante una antena con calidad HD
•
Suscripción al servicio de satélite o cable HD
•
Equipo externo compatible con HD.
NOTA
• Para obtener información acerca de la actualización a programas HD, pregunte a su proveedor de servicio de cable
o satélite.
Tipos de conexión
Para conectar el televisor a un equipo externo, utilice cables que puede adquirir en cualquier
tienda especializada.
• Las ilustraciones de los terminales solamente sirven de referencia y pueden variar ligeramente en función de la
situación actual.
■ Conectar un equipo de vídeo o PC
La calidad de la imagen difi ere en función del terminal utilizado. Para disfrutar de imágenes más nítidas,
compruebe los terminales de salida del equipo externo y utilice sus terminales apropiados para imágenes con
calidad más alta.
Páginas
11, 12
Terminal
on the TV
Cable
Terminal on external
equipment
Image
Quality
AV cable
Component video cable
Audio cable
HDMI-certified cable
RCA audio to Ø 3.5 mm stereo minijack cable
DVI-HDMI conversion cable
HD
Quality
Standard
Quality
AUDIO
DVI OUT
12
Y/V Pb/Cb Pr/Cr
COMPONENT / VIDEO
AUDIO
LR
Y/V
Pb
/C
b
P
r
/Cr
COMPONENT / VIDEO
AUDIO
LR
Y
/V
Pb
/C
b
P
r
/Cr
COMPONENT / VIDEO
AUDIO
LR
MHL
12
MHL
Página 11
Página 11
Páginas
11, 12
1
Presione el botón
ENTRADA
.
• Se mostrará la pantalla con la lista ENTRADA.
2
Presione
a
/
b
para seleccionar la fuente de entrada.
• También puede seleccionar la fuente de entrada
presionando
ENTRADA
. Cada vez que se presiona
ENTRADA
, la fuente de entrada cambia.
TV ENTRADA AV Componentes HDMI-1
HDMI-2 (lateral)
• Se mostrará automáticamente una imagen de la fuente
seleccionada.
• Si la entrada correspondiente no está enchufada, no
se podrá cambiar la entrada. Asegúrese de conectar el
equipo previamente.
Entrada
TV
ENTRADA AV
Componentes
HDMI-1
HDMI-2(Lateral)
Ejemplo
■ Conectar un equipo de audio
Cable
Terminal on external
equipment
Optical fiber cable
Audio cable
Terminal on the TV
DIGITAL AUDIO INPUT
OPTICAL
ANALOG AUDIO IN
L
R
OPTICAL
AUDIO OUT
LR
O
PTICA
L
AUDIO OUT
Página 12
Página 12
Mostrar una imagen de un equipo externo
Para ver imágenes de fuente externas, seleccione la fuente de entrada presionando el botón
ENTRADA
del mando
a distancia o del televisor.
NOTA
• El botón
ENTRADA
solamente está disponible en el panel de control del modelo LC-43LE551U / LC-48LE551U.

ES
10
Función de un botón
Además de encender y apagar el televisor ("Encender y apagar la alimentación" en la página 14), también
puede utilizar el botón
ALIMENTACIÓN
para acceder directamente al menú ENTRADA, seleccionar el canal y
ajustar el nivel de volumen.
1
Presione el botón
ALIMENTACIÓN
del mando a distancia para encender
el televisor.
2
Presione de nuevo el botón
ALIMENTACIÓN
para mostrar el menú UN
BOTÓN.
3
Lleve a cabo alguna de las acciones siguientes:
• Para cambiar la fuente de entrada, presione repetidamente el botón
ALIMENTACIÓN
para seleccionar la fuente de entrada que desee.
A continuación, presione sin soltar el botón
ALIMENTACIÓN
para
confi rmar la selección.
• Para cambiar el canal, presione repetidamente el botón
ALIMENTACIÓN
para resaltar Canal.
A continuación, presione sin soltar el botón
ALIMENTACIÓN
para
mostrar el submenú Subir canal/Bajar canal y presione el botón
ALIMENTACIÓN
repetidamente para alternar la selección.
Cuando se haya seleccionado, presione sin soltar el botón
ALIMENTACIÓN
para seleccionar el canal
que desee.
• Para ajustar el nivel de volumen, presione repetidamente el botón
ALIMENTACIÓN
repetidamente para
resaltar Volumen.
A continuación, presione sin soltar el botón
ALIMENTACIÓN
para mostrar el submenú Subir volumen/
Bajar volumen y presione el botón
ALIMENTACIÓN
repetidamente para alternar la selección.
Cuando se haya seleccionado, presione sin soltar el botón
ALIMENTACIÓN
para ajustar el nivel de
volumen según sus preferencias.
NOTA
• Para la función Un botón, la opción de selección de canal solamente está disponible cuando la fuente de entrada se
establece en "TV".
• Las ilustraciones OSD de los terminales solamente sirven de referencia y pueden variar ligeramente en función de la
situación real.
El modelo de televisor de 43" y 48" (LC-43LE551U y LC-48LE551U) está equipado con 3 HDMI (HDMI-1, HDMI-
2 y HDMI-3 (lateral).
Los modelos de televisor de 32" y 39" (LC-32LE551U, LC-32LE451U y LC-39LE551U) están equipados con 2
HDMI (HDMI-1 y HDMI-2 (lateral).
Entrada
TV
ENTRADA AV
Componentes
HDMI-1
HDMI-2(Lateral)
Canales
Volúmen 1
Introducción a las conexiones
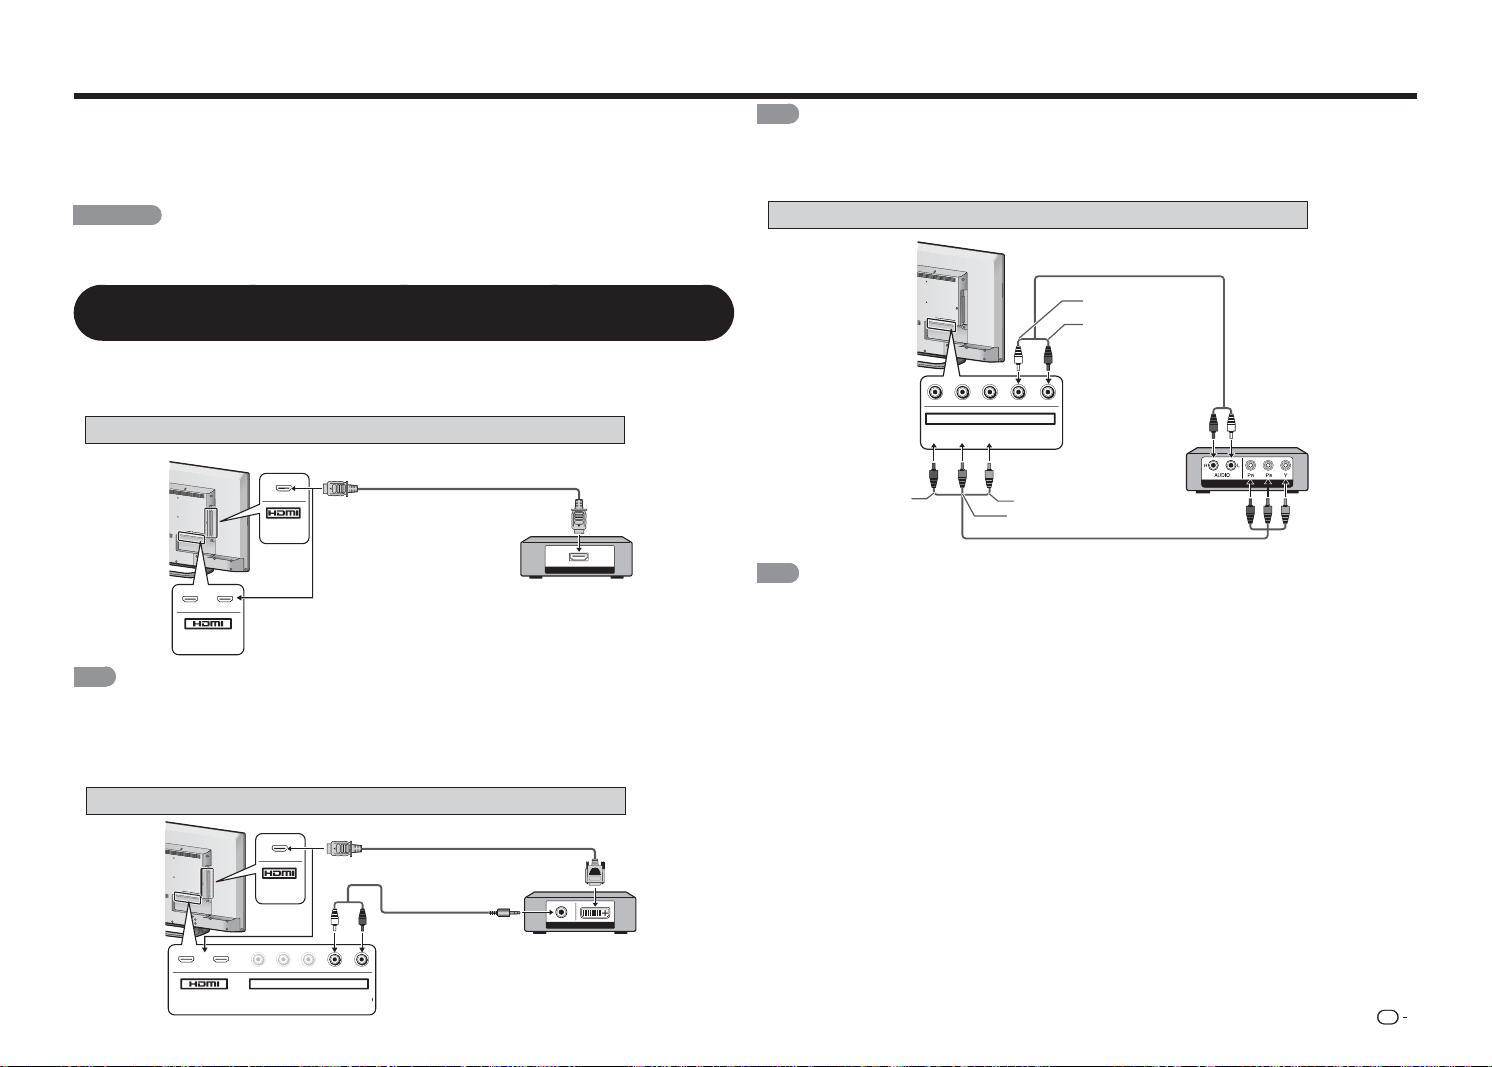
ES
11
Conectar un equipo externo
Puede conectar numerosos tipos de equipos externos para su televisor. Para ver imágenes de fuente
externas, seleccione la fuente de entrada utilizando el botón
ENTRADA
del mando a distancia o del televisor.
(Consulte las páginas 9 y 16.)
Para conectar el televisor a un equipo externo, utilice cables que puede adquirir en cualquier tienda
especializada.
PRECAUCIÓN
• Para proteger el equipo, apague siempre el televisor antes de conectar un equipo externo.
• Lea el manual de funcionamiento pertinente (reproductor de discos Blu-ray, etc.) atentamente antes de realizar las
conexiones.
Conectar un reproductor de discos Blu-ray o DVD o un descodifi cador de
satélite o cable HD
■ Cuando utilice un cable HDMI (ENTRADA HDMI 1, 2 o 3):
• El terminal HDMI (High Defi nition Multimedia Interface, es decir, Interfaz multimedia de alta defi nición) es una interfaz
de audio y vídeo que permite una conexión para señales de audio y vídeo que utilicen un cable de señal. El terminal
ENTRADA HDMI admite entrada de vídeo de alta resolución.
• Reproductor de discos Blu-ray • Reproductor de DVD • Descodifi cador de satélite o cable HD
Cable con la certifi cación HDMI
HDMI OUT
MHL
(DC 5V, 900mA)
1
ARC
2
NOTA
• Para disfrutar de capacidad de visualización 1080p, conecte el equipo externo utilizando un cable HDMI o un cable
de componentes y establezca el equipo en la salida 1080p.
• Formato de audio admitido: PCM lineal, Dolby Digital, DTS, tasa de muestreo de 32/44,1/48 KHz.
• Cuando conecte un equipo compatible con ARC, utilice el terminal ENTRADA HDMI 1.
■ Cuando utilice un cable de conversión DVI-HDMI (ENTRADA HDMI 1, 2 o 3):
Cable de conversión DVI-HDMI
Cable de audio
AUDIO OUT
DVI OUT
MHL
(DC 5V, 900mA)
1
ARC
2
Y/V
Pb/Cb
C
Pr/Cr
COMPONENT / VIDEO
AUDIO
LR
NOTA
• Cuando utilice un cable de conversión DVI-HDMI, debe realizar una conexión de audio analógica. En este caso,
además de conectar el cable de conversión DVI-HDMI al terminal ENTRADA HDMI 2, conecte un cable de audio al
terminal ENTRADA DE AUDIO.
■ Cuando utilice un cable de componentes (ENTRADA DE COMPONENTES):
COMPONENT OUT
Y/V Pb/Cb Pr/Cr
COMPONENT / VIDEO
AUDIO
LR
Cable de audio
A
UDIO-I (blanco)
A
UDIO-D (rojo)
P
R
(rojo)
P
B
(azul)
Y (verde)
NOTA
• Para disfrutar de capacidad de visualización 1080p, conecte el equipo externo utilizando un cable HDMI o un cable
de componentes y establezca el equipo en la salida 1080p.
• Reproductor de discos Blu-ray • Reproductor de DVD • Descodifi cador de satélite o cable HD
• Reproductor de discos Blu-ray • Reproductor de DVD • Descodifi cador de satélite o cable HD

ES
12
Conectar una unidad VCR, una consola de juegos, una videocámara o un
descodifi cador de cable o satélite
■ Cuando utilice un cable compuesto (COMPONENTES/VÍDEO):
• Consola de juegos • VCR
• Videocámara
• Descodifi cador de cable o
satélite
Y/V
Pb/Cb
Pr/Cr
COMPONENT / VIDEO
AUDIO
LR
Cable de AV
AUDIO-I (blanco)
VÍDEO (amarillo) AUDIO-D (rojo)
Conectar un sistema envolvente o de audio
■ Cuando conecte un amplifi cador de AV para un sistema envolvente
DIGITAL AUDIO INPUT
OPTICAL
HDMI INHDMI OUT
HDMI OUT
L
R
OPTICAL MHL
(DC 5V, 900mA)
AUDIO OUT
1
ARC
2
• Permitir que el televisor transmita el audio a un amplifi cador de AV:
*1 Cuando conecte un equipo compatible con ARC, utilice el terminal ENTRADA HDMI 1.
*2 Si el equipo que desea conectar no es compatible con ARC, conecte un cable de fi bra óptica.
Cable con la certifi cación HDMI *1
Descodifi cador de satélite o cable HD
Cable de fi bra óptica *2
NOTA
• Si la imagen no está sincronizada con el audio, compruebe la confi guración del sistema envolvente conectado.
■ Cuando conecte un amplifi cador de audio
Es posible transmitir el audio a través del terminal SALIDA DE AUDIO DIGITAL.
DIGITAL AUDIO INPUT
OPTICAL
L
R
OPTICAL
AUDIO OUT
ANALOG AUDIO IN
LR
OPTICAL
AUDIO OUT
Conectar un PC o teléfono inteligente
■ Cuando utilice un cable HDMI (ENTRADA HDMI 1, 2 o 3):
Cable con la certifi cación HDMI
MHL
(DC 5V, 900mA)
1
ARC
2
HDMI OUT
NOTA
• Los terminales ENTRADA HDMI solamente admiten señal digital.
Cable de fi bra óptica
Cable de audio
Conectar un equipo externo
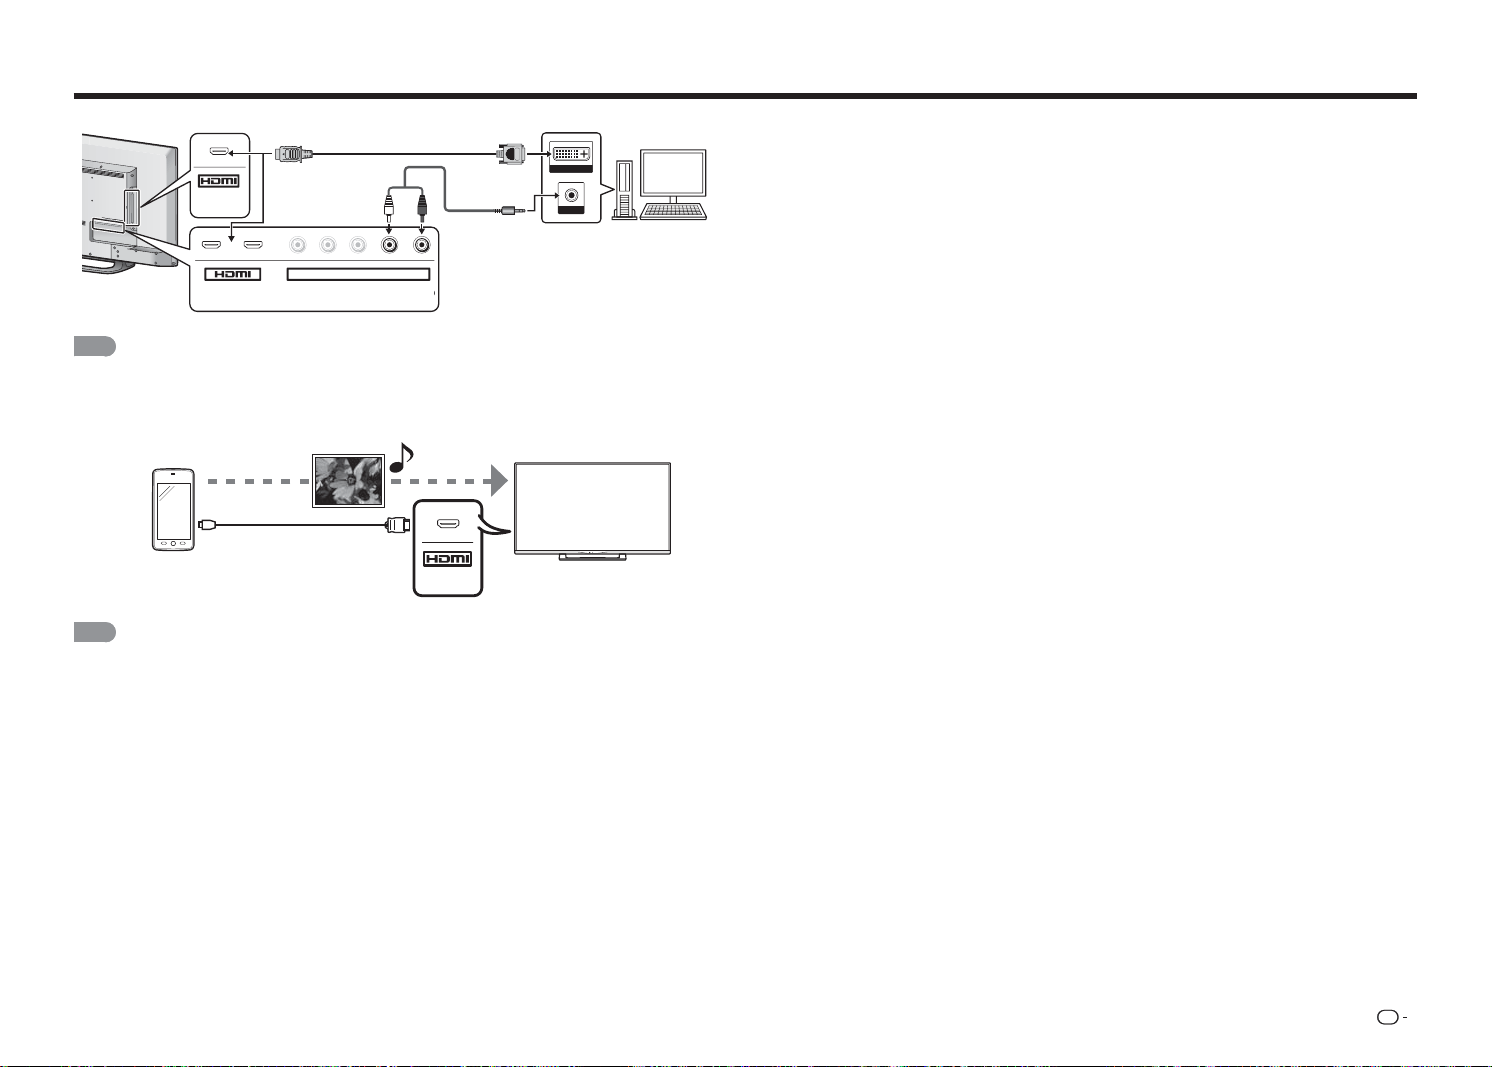
ES
13
Conectar un equipo externo
■ Cuando utilice un cable de conversión DVI-HDMI (ENTRADA HDMI 1, 2 o 3):
DVI OUT
AUDIO
MHL
(DC 5V, 900mA)
1
ARC
2
Y/V
Pb/Cb
C
Pr/Cr
COMPONENT / VIDEO
AUDIO
LR
Cable de conversión DVI-HDMI
Cable de audio
NOTA
• Cuando utilice un cable de conversión DVI-HDMI, debe realizar una conexión de audio analógica. En este caso,
además de conectar el cable de conversión DVI-HDMI al terminal ENTRADA HDMI 2, conecte un cable de audio al
terminal ENTRADA DE AUDIO.
■ Cuando utilice un cable MHL (lateral ENTRADA HDMI):
Cable MHL
Teléfono
inteligente
Archivos
multimedia
MHL
NOTA
• Con la tecnología de enlace de alta defi nición móvil (MHL, Mobile High-Defi nition Link), puede mostrar el contenido
de su teléfono inteligente en el televisor, mientras carga el dispositivo móvil al mismo tiempo.
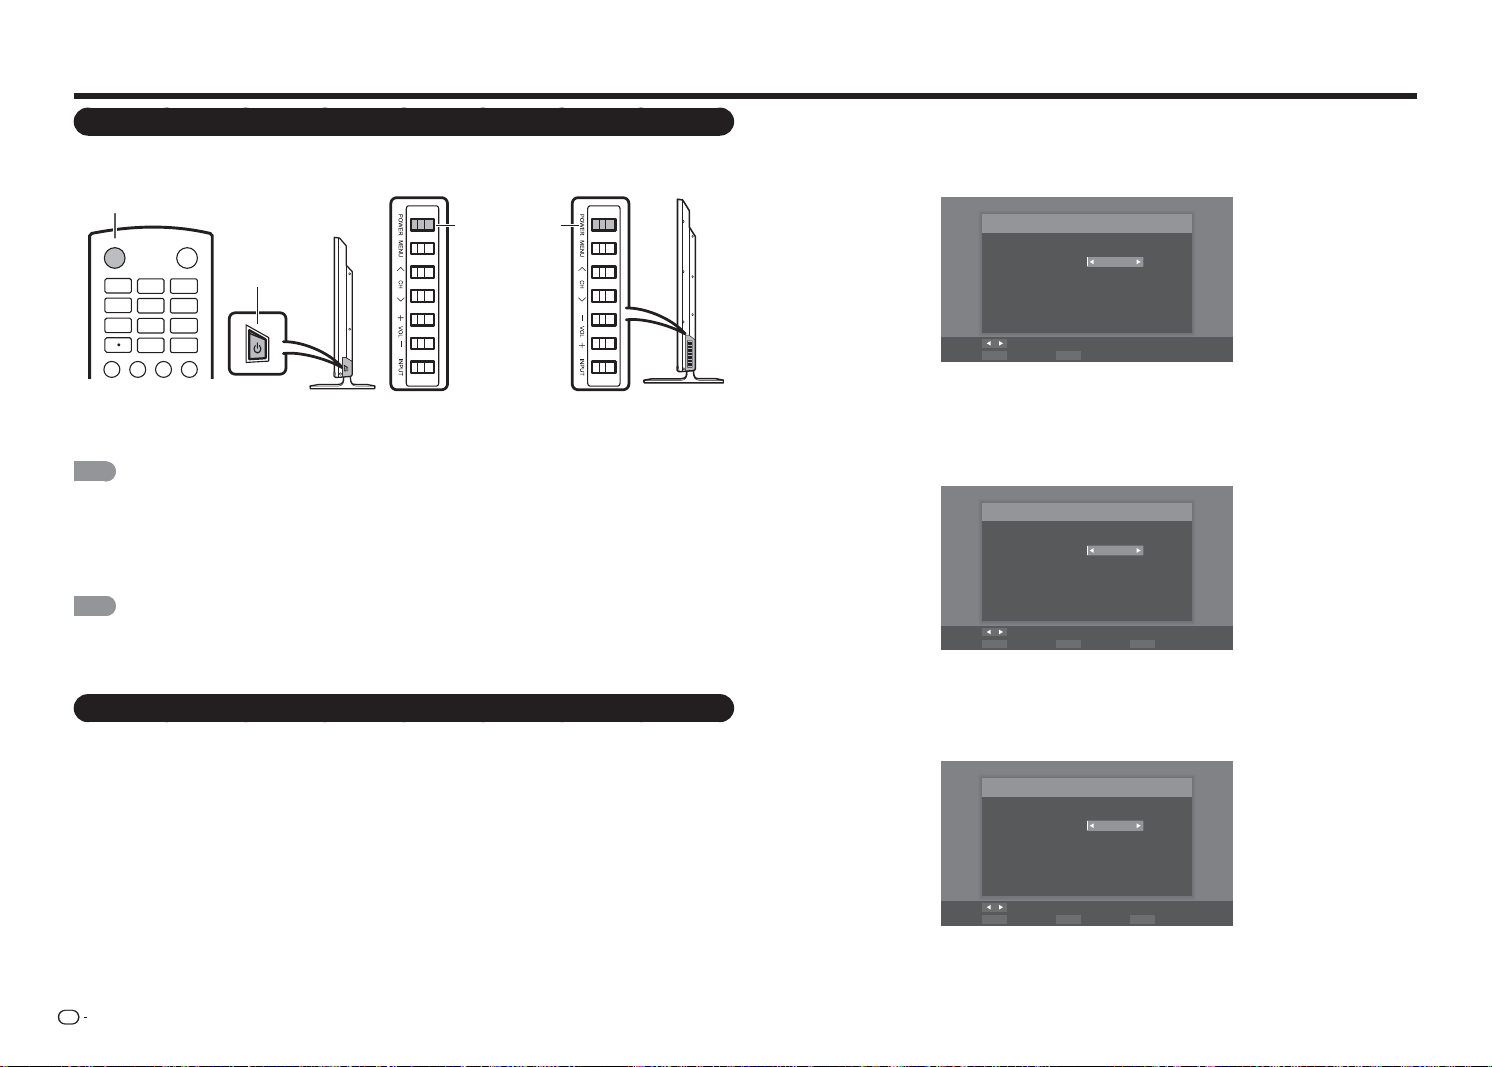
ES
14
Ver la televisión
Encender y apagar la alimentación
Presione el botón
ALIMENTACIÓN
del televisor, o el botón
ALIMENTACIÓN
del mando a distancia para
conectar la alimentación.
Botón ALIMENTACIÓN
* para LC-48LE551U
Botón
ALIMENTACIÓN
INPUT
3
4
5
6
7
8
9
0
ENT
1
2
DISPLAY FREEZE
FLASHBACK
AUDIO
PO W E R
* para LC-32LE551U/LC-32LE451U/
LC-39LE551U
Botón
ALIMENTACIÓN
NOTA
• La instalación inicial se inicia cuando el televisor se enciende por primera vez. Si el televisor ha estado encendido
antes, la instalación inicial no se invocará. Para cambiar la confi guración de la instalación inicial, ejecute la opción
"Asistente de instalación" en el menú Confi guración inicial de la página 25.
Presione el botón
ALIMENTACIÓN
del televisor o del mando a distancia para desconectar la alimentación.
• El televisor entrará en el modo de espera y la imagen de la pantalla desaparecerá.
NOTA
• Si no va a usar el televisor durante un prolongado período de tiempo, asegúrese de desconectar el cable de CA de
la toma de corriente eléctrica.
• Cuando el televisor está apagado, sigue consumiéndose una pequeña cantidad de energía eléctrica.
Instalación inicial
Cuando encienda el televisor por primera vez, la función Asistente de instalación le guiará a través del proceso
de confi guración. Realice los siguientes pasos antes de presionar el botón
ALIMENTACIÓN
en el mando a
distancia.
1.
Inserte las pilas en el mando a distancia. (Consulte la páginaPage 6.)
2.
Conecte el cable de antena al televisor. (Consulte la página 6.)
3.
Conecte el cable de alimentación de CA a la toma de CA. (Consulte la página 5.)
Confi guración de idioma
Los 3 idiomas disponibles son: Inglés, Francés y Español.
1
Presione
/
para seleccionar el idioma que desee de los que aparecen en la pantalla y, a continuación,
presione
ENTRAR
para continuar con el paso siguiente.
Idioma del menú
Selección del idioma
Idioma: Español
Cambiar
ENTER SalirEXITSeleccione
Confi guración de la ubicación del televisor
Seleccione "Modo Casa" o "Modo Tienda" para la ubicación en la que pretende instalar el televisor. Este
producto cuenta con la certifi cación ENERGY STAR en la confi guración predeterminada Modo Fácil.
2
Presione
c
/
d
para seleccionar "Modo Casa" o "Modo Tienda".
Presione
ENTRAR
para continuar con el paso siguiente.
Modo TV
Modo de selección
Modo: Modo Casa
Cambiar
ENTER RETURN EXITSeleccione Paso anterior Salir
Confi guración de la zona horaria y el horario de verano
Realice la confi guración para la zona horaria y el horario de verano donde utilice el televisor.
3
Presione
c
/
d
para seleccionar la zona horaria donde esté utilizando el televisor y, a continuación,
presione
ENTRAR
para continuar con el paso siguiente.
Zona horaria
Configure la zona horaria
Zona horaria: Alaska
Cambiar
ENTER RETURN EXITSeleccione Paso anterior Salir
• La zona horaria difi ere en función del país seleccionado.
• El valor predefi nido de fábrica es la zona horaria para la capital del país seleccionado.
* para LC-43LE551U
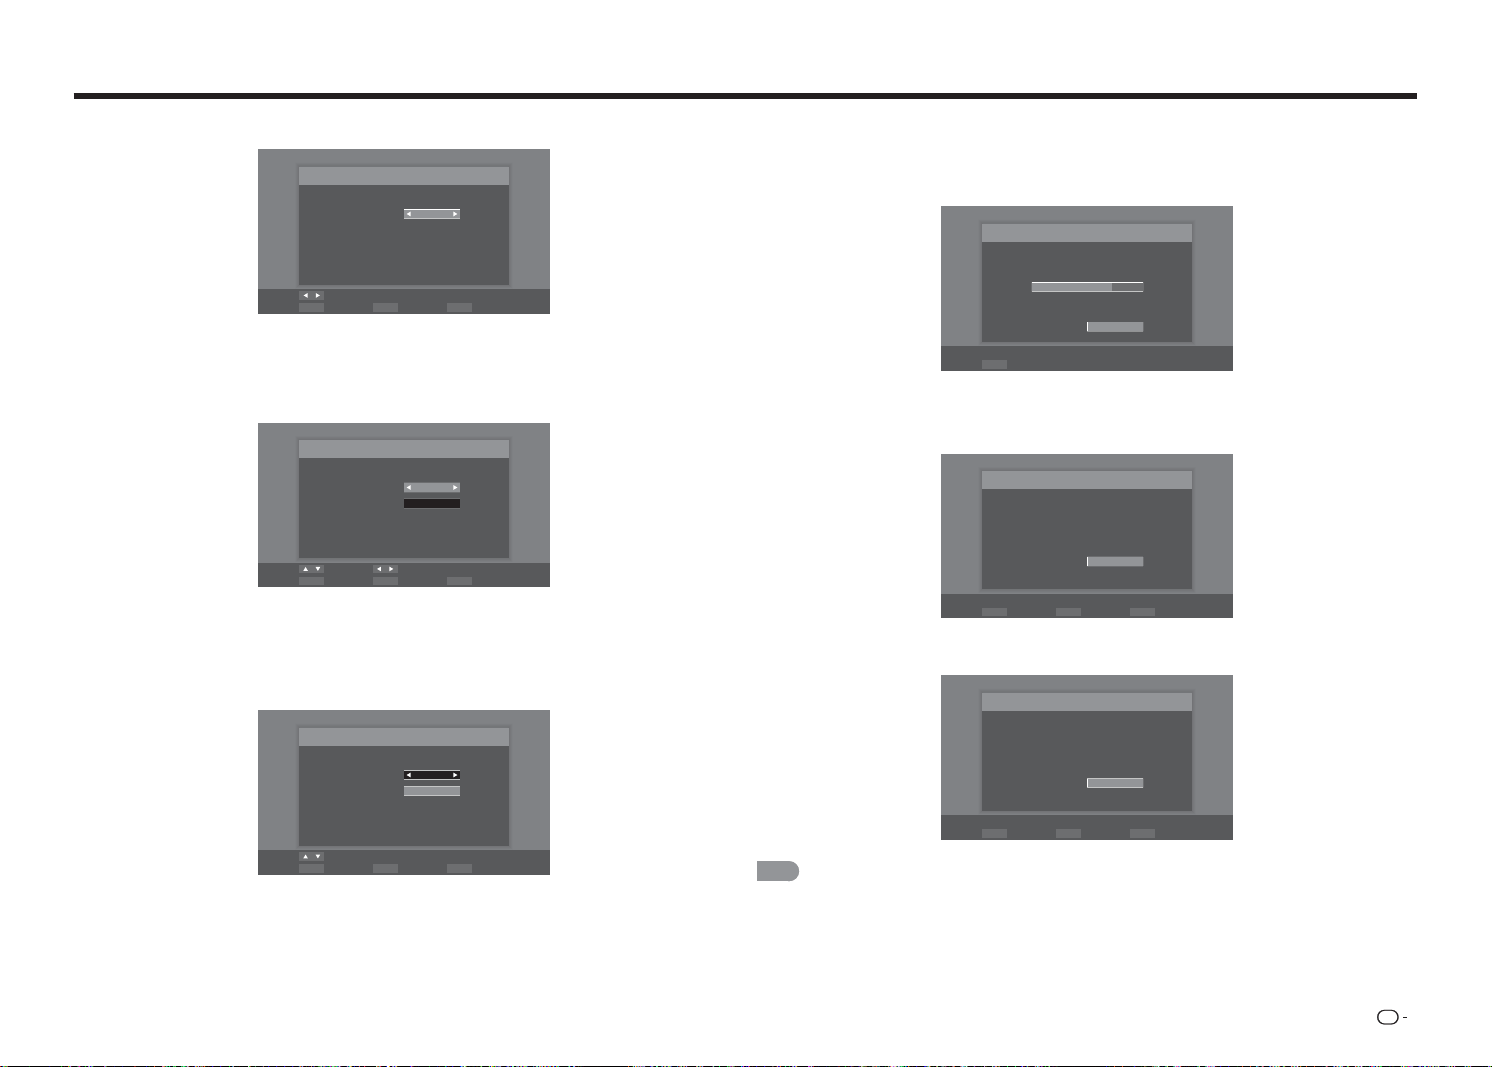
ES
15
Ver la televisión
4
Presione
c
/
d
para habilitar o deshabilitar el horario de verano y, a continuación, presione
ENTRAR
para
continuar con el paso siguiente.
Horario de verano
Selección de Horario de Verano
Horario de verano: Activado
Cambiar
ENTER RETURN EXITSeleccione Paso anterior Salir
Confi guración de la antena
Asegúrese de qué tipo de conexión se realiza con el televisor cuando seleccione "Cable" o "Antena".
5
Presione
c
/
d
para seleccionar "Cable" o "Antena" y, a continuación, presione
ENTRAR
para continuar
con el paso siguiente.
Búsqueda automática
Seleccione el tipo de señal de entrada de su televisor e inicie la búsqueda
Tipo de señal: Cable
Iniciar búsqueda
Mover Cambiar
ENTER RETURN EXITSeleccione Paso anterior Salir
Búsqueda de canales
Cuando la búsqueda automática de canales está en curso, el televisor bloquea todos los canales visualizables
en el área establecida.
6
Cuando seleccione "Cable" o "Antena" en la confi guración del sintonizador, presione
/
/
ENTRAR
para
resaltar "Iniciar búsqueda" y, a continuación, presione
ENTRAR
para iniciar la búsqueda automática.
Cable
Iniciar búsqueda
Mover
ENTER RETURN EXITSeleccione Paso anterior Salir
Búsqueda automática
Seleccione el tipo de señal de entrada de su televisor e inicie la búsqueda
Tipo de señal:
Durante la búsqueda de canales:
• Espere hasta que la búsqueda de canales se complete.
• Si presiona
ENTRAR
, el televisor saldrá de la función Asistente de instalación.
• Si pasa por alto este paso, la búsqueda de canales puede realizarse en el menú Confi guración. (Consulte
la página"Asistente de instalación" en la página 25.)
Búsqueda
Búsqueda de canales en el proceso, si desea detener la
búsqueda, por favor, pulse "Detener búsqueda".
Scan Status:
Analógico : 89
Digital : 0
70%
Detener búsqueda
ENTER Seleccione
Completada
7
Después de completar la confi guración, la pantalla mostrará el mensaje "Búsqueda de canales
completa.". A continuación, presione
ENTRAR
para continuar con el paso siguiente.
Búsqueda finalizada
Búsqueda de canales completa.
Analógico : 100
Digital : 0
OK
ENTER RETURN EXITSeleccione Paso anterior Salir
8
Presione
ENTRAR
para dar fi n a la función Asistente de instalación. A continuación, el televisor cambiará
al primer canal encontrado.
Finalizar
La configuración inicial ha terminado, por favor, pulse el botón
"Aceptar" para salir del Asistente de Instalación.
OK
Seleccione
ENTER Paso anteriorRETURN SalirEXIT
NOTA
• La búsqueda de canales puede tardar un tiempo en completarse.
• Si no se encuentra ningún canal, confi rme el tipo de conexión realizada con el televisor y vuelva a probar la función
"Asistente de instalación". (Consulte la página"Asistente de instalación" en la página 25.)

ES
16
Cambiar de canal
Puede cambiar los canales de varias formas.
Método 1
Mediante los botones
CANAL
r
/
s
del mando a
distancia.
Método 2
Mediante los botones del mando a distancia
0
-
9
, •
(PUNTO).
Ejemplos:
Para seleccionar un número de canal de 1 o 2
dígitos (por ejemplo el canal 5):
Presione
5
ENTRAR
.
Para seleccionar un número de canal de 3
dígitos (por ejemplo el canal 115):
Presione
1
1
5
ENTRAR
.
Para seleccionar un número de canal de 4
dígitos (por ejemplo el canal 22,1):
Presione
2
2
•
(PUNTO)
1
ENTRAR
.
NOTA
• Cuando seleccione un número de canal de 1 dígito, no
será necesario presionar
0
antes del número.
• Cuando solamente introduzca
0
-
9
, la selección
de canal se realizará si no se lleva a cabo ninguna
operación transcurridos unos segundos.
• Si presiona "0" usted mismo, no ocurrirá nada.
• Complete los pasos anteriores antes de que
transcurran unos segundos.
• Cuando introduzca
0
-
9
y • (PUNTO), la selección
de canal se realizará si no se lleva a cabo ninguna
operación transcurridos unos segundos.
Cambiar el volumen
Puede cambiar el volumen presionando el botón
VOL
k
/
l
del mando a distancia.
• Para subir el volumen, presione
VOL
k
.
• Para bajar el volumen, presione
VOL
l
.
ENTRADA
Para ver imágenes de fuentes externas, seleccione
la fuente de entrada presionando
ENTRADA
en el
mando a distancia.
1
Presione el botón
ENTRADA
.
• Se mostrará la pantalla con la lista ENTRADA.
2
Presione
/
o
ENTRADA
de nuevo para
seleccionar la fuente entrada.
INPUT
3
4
5
6
7
8
9
0
ENT
1
2
DISPLAY FREEZE
FLASHBACK
MUTE
SURROUND
TV USB
MENU
FAVORITE CH
SLEEP CC VIEWMODEAV MODE
AUDIO
VOL
CH
+
RETURNEXIT
LCDTV
GJ221
ABCD
ENTER
POWER
• Se mostrará automáticamente una imagen de
la fuente seleccionada.
• Cada vez que se presiona
ENTRADA
, la
fuente de entrada cambia.
• Si presiona
/
para seleccionar la fuente de
entrada, presione
ENTRAR
para confi rmar la
selección.
NOTA
• Consulte las páginas 9 a 12 para obtener
información sobre la conexión de equipos externos.
SILENCIO
Silencia la salida de sonido actual.
Presione
SILENCIO
.
NOTA
• El silencio se puede cancelar si presiona
VOL
k
/
l
o
SILENCIO
.
APAGADO AUTOMÁTICO
Permite establecer un tiempo al cabo del cual
el televisor pasará automáticamente al modo de
espera.
Presione
APAGADO AUTOMÁTICO
.
• El tiempo restante aparecerá en pantalla cuando la
función de apagado automático se haya establecido.
• Cada vez que presione
APAGADO AUTOMÁTICO
,
el tiempo restante cambiará tal y como se muestra
a continuación.
Apagado 30 minutos 60 minutos
180 minutos
120 minutos 90 minutos
• Una vez establecido, el tiempo iniciará
automáticamente la cuenta atrás.
• Si desea ajustar el temporizador de apagado
automático, puede presionar
APAGADO
AUTOMÁTICO
dos veces y, a continuación,
cambiar la confi guración del tiempo.
NOTA
• Seleccione "Apagado" presionando
APAGADO
AUTOMÁTICO
para cancelar el temporizador de
apagado automático.
• El televisor entrará en el modo de espera cuando el
tiempo restante llegue a 0.
Funcionamiento de los botones directos
ANTERIOR
Presione
ANTERIOR
para cambiar al canal
sintonizado anteriormente o al modo de entrada
anterior.
• Presione
ANTERIOR
de nuevo para volver al canal
sintonizado actualmente.
NOTA
• El botón
ANTERIOR
no funcionará si no se ha
cambiado de canal después de encender el televisor.
ENVOLVENTE
La función envolvente produce el efecto envolvente
en los altavoces. Presione
ENVOLVENTE
para
seleccionar el efecto Envolvente.
CONGELAR
Permite capturar y congelar una imagen en
movimiento que esté viendo.
Presione
CONGELAR
.
• Se captura una imagen en movimiento.
• Presione el botón
CONGELAR
de nuevo para
cancelar la función.
MODO AV
MODO AV proporciona varias opciones de visualización
entre las que puede elegir para encontrar el entorno
más aproximado que rodea al televisor, que puede
variar en función de factores como la luminosidad de la
sala, el tipo de programa que se esté viendo o el tipo
de entrada de imagen procedente del equipo externo.
Presione
MODO AV
repetidamente para seleccionar
la confi guración que desee:
Estándar (Energy Star):
para una imagen de
alta defi nición en una iluminación normal.
Película:
para una película.
Juego:
opción adecuada para juegos. Puede
defi nir la confi guración conforme al tipo de juego.
DINÁMICO:
para ver imágenes intensas y nítidas.
Deporte:
para lograr una imagen netamente
defi nida que realce el alto contraste, de gran
utilidad para ver deportes.
Usuario:
permite al usuario personalizar la
confi guración a su gusto. Puede establecer el modo
de cada fuente de entrada.
• Presione
MODO AV
de nuevo antes de que el
modo mostrado en la pantalla desaparezca.

ES
17
AUDIO
Permite seleccionar una opción de audio predefi nida
optimizada para diferentes condiciones de sonido.
Presione
AUDIO
repetidamente para seleccionar la
confi guración que desee:
SAP, Mono o Estéreo.
Puede disfrutar de sonido estéreo Hi-Fi o de
difusiones SAP donde estén disponibles.
• Transmisiones estéreo:
vea programas como
eventos deportivos en directo, espectáculos y
conciertos en sonido estéreo dinámico.
• Transmisiones SAP:
reciba transmisiones de
televisión en sonido PRINCIPAL o SAP.
Sonido PRINCIPAL: banda sonora del programa
normal (en mono o estéreo).
Sonido SAP: escuche un idioma secundario, comentarios
suplementarios u otra información. (SAP es sonido mono.)
Si el sonido estéreo es difícil de escuchar.
• Obtenga un sonido más nítido cambiando
manualmente al modo de sonido mono fi jo.
CANAL FAVORITO (confi guración de
canal favorito)
Esta función permite programar hasta 4 canales
favoritos. Al establecer los canales favoritos por
adelantado, puede seleccionar su canal favorito
fácilmente.
Para registrar su canal favorito
1
Presione
MENÚ
para mostrar la pantalla de
MENÚS.
2
Presione
c
/
d
para seleccionar el menú Canal.
3
Presione
/
para seleccionar el menú Saltar/
Canales Favoritos y presione
/
ENTRAR
para entrar en su submenú.
4
Presione
/
para seleccionar el canal
y presione uno de los botones CANAL
FAVORITO (
A
,
B
,
C
o
D
) del mando a distancia
para registrar este canal en el canal favorito para
el botón seleccionado.
16
19
21
24
25
26
27
28
29
30
• Establezca otros canales favoritos de la misma
manera.
5
Presione
MENÚ
para salir.
Para ver su canal favorito
Presione uno de los botones
CANAL FAVORITO
(
A
,
B
,
C
o
D
) para ver el canal predefi nido.
Subtítulos ocultos y subtítulos ocultos
digitales
El televisor está equipado con un descodifi cador
interno de subtítulos ocultos. Permite ver
conversaciones, narraciones y efectos de sonido
como subtítulos en el televisor.
Los subtítulos ocultos están disponibles en algunos
programas de televisión y en algunas cintas de vídeo
domésticas VHS a discreción del proveedor del
programa.
El servicio de subtítulos ocultos digitales es un
nuevo servicio disponible solamente en programas
de televisión digital (también a discreción del
proveedor del servicio). Es un sistema más fl exible
que el sistema de subtítulos ocultos original, porque
permite una gran variedad de tamaños de subtítulos
y estilos de fuente. Cuando el servicio de subtítulos
ocultos digitales está en uso, se indicará mediante
una abreviación de tres letras que también indica el
idioma de dichos títulos: ENG (inglés), SPA (español)
y FRA (francés) u otros códigos de idioma.
No todos los programas y cintas de vídeos VHS
ofrecen subtítulos ocultos.
En el sistema de subtítulos ocultos, se pueden
proporcionar varios servicios de subtítulos. Cada
uno se identifi ca mediante su propio número. Los
servicios “CC1” a “CC4” muestran subtítulos de
programas de TV superpuestos a través de la
imagen del programa.
En el sistema de subtítulos ocultos, los servicios
“TEXTO1” a “TEXTO4” muestran texto no
relacionado con el programa que se está
visualizando (por ejemplo, el tiempo o noticias). Estos
servicios también se superponen sobre el programa
que se está viendo actualmente.
1
Presione
Subtítulos
.
• Esta acción presentará la información de los
subtítulos ocultos.
2
Presione
Subtítulos
mientras la información de
subtítulos ocultos sigue en pantalla.
• Presione repetidamente hasta que seleccione
el servicio de subtítulos ocultos que desee.
Funcionamiento de los botones directos
Ejemplo:
Analógico:
Apagado Subtítulos1 Subtítulos2 Subtítulos3
Texto4 Texto3 Texto2 Texto1
Subtítulos4
Digital:
Apagado Subtítulos1 Subtítulos2 Subtítulos3
CS4
CS3 CS2 CS1 Subtítulos4
CS5
CS6
• El botón
Subtítulos
mantiene un registro del último
servicio seleccionado en su memoria.
NOTA
• Consulte la página 25 para obtener información
detallada sobre la confi guración de subtítulos.
• Los subtítulos ocultos no funcionarán cuando se vea
una entrada de 480i, 480p, 720p, 1080i o 1080p a
través de COMPONENTES: entradas Y-PbPr o HDMI.
• La disponibilidad y el contenido de los subtítulos
ocultos depende de la cadena de televisión. Los
subtítulos ocultos están disponibles cuando el icono
Subtítulos ocultos se muestran en la pantalla.
• La disponibilidad y el contenido de los subtítulos
ocultos y de los subtítulos digitales depende de la
cadena de televisión. Los subtítulos ocultos están
disponibles cuando el icono Subtítulos ocultos se
muestran en la pantalla.
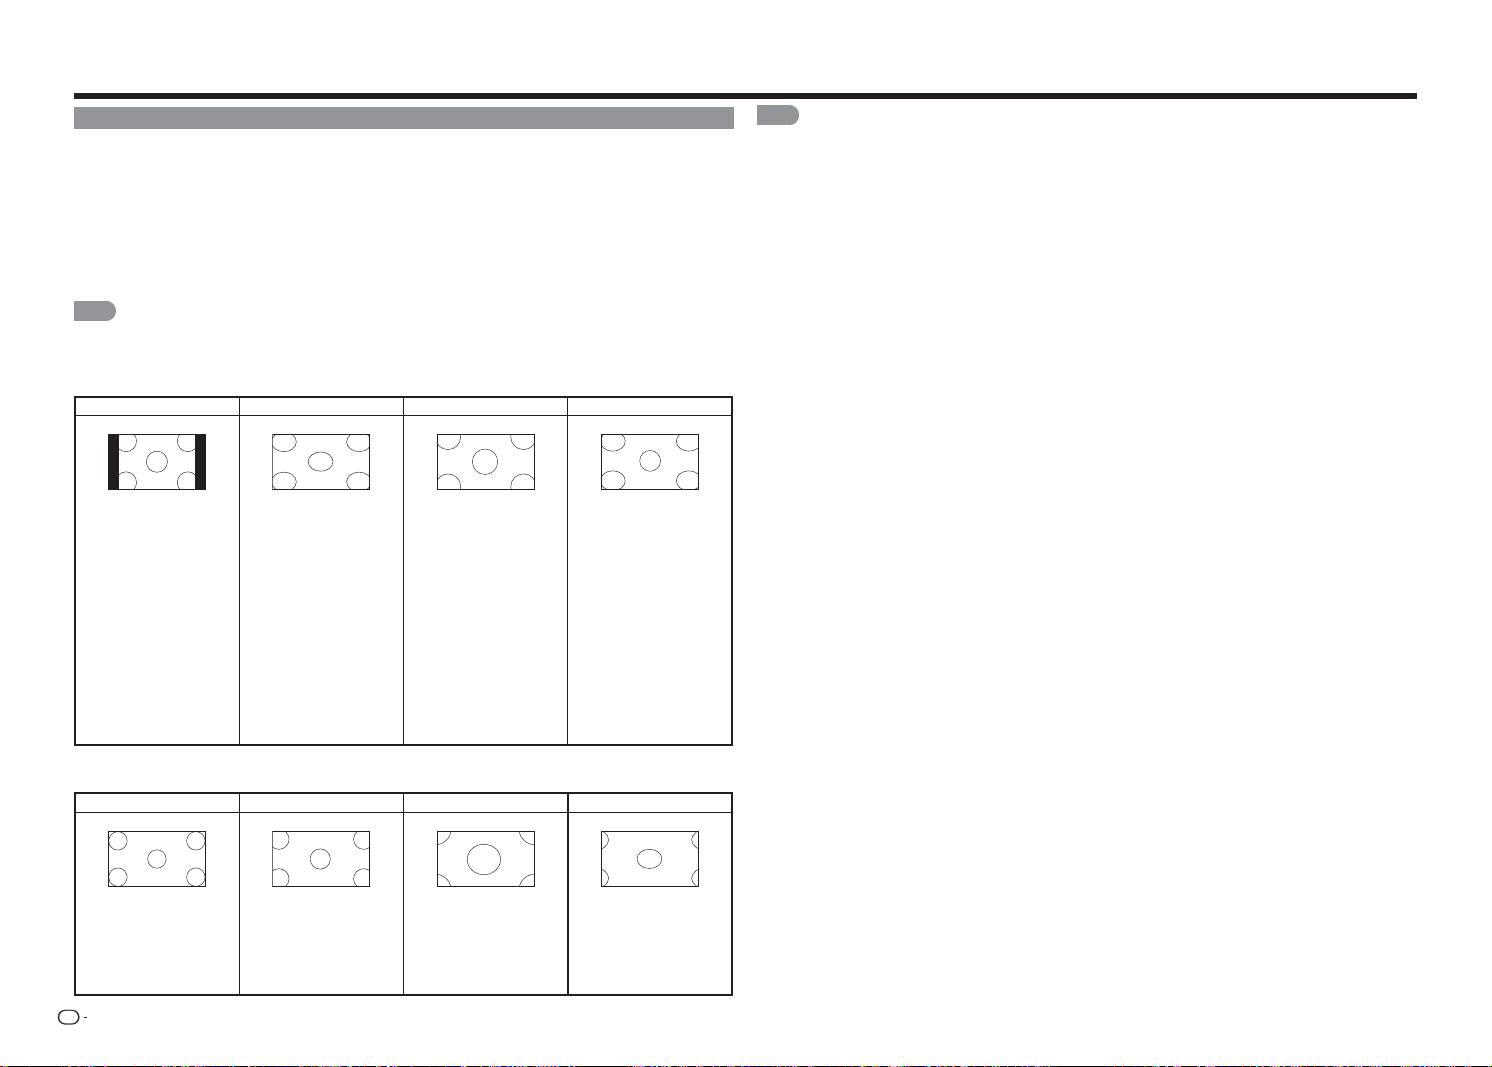
ES
18
MODO DE VISUALIZACIÓN
Puede seleccionar el tamaño de la pantalla.
1
Presione
MODO DE VISUALIZACIÓN
.
• Aparecerá el menú Modo de visualización.
• El menú enumera las opciones del menú Modo de visualización que puede seleccionar en función del
tipo de señal de vídeo que se esté recibiendo.
2
Presione
MODO DE VISUALIZACIÓN
o
/
mientras el menú Modo de visualización se muestra en
pantalla para seleccionar el elemento del menú que desee.
3
Presione
ENTRAR
para confi rmar la confi guración.
NOTA
• Puede tener la misma confi guración eligiendo "Modo de visualización" en los elementos de menú. (Consulte la
página 18.)
■ Para programas 4:3
Normal Alargamiento Zoom Panorámica
Mantiene la relación de
aspecto original en una
visualización a pantalla
completa. La relación
de aspecto 4:3 original
(fuente 1,33:1) se
conserva, por lo que se
añaden barras negras a
la izquierda y derecha de
la imagen visualizada.
Estira una imagen con
relación de aspecto
4:3 a los bordes de la
pantalla.
Expande las imágenes
con barras negras para
ajustarse a la pantalla.
Expande la
imagen visualizada
horizontalmente en
los lados izquierdo y
derecho para rellenar la
pantalla.
Las imágenes pueden
aparecer más anchas
de lo que se esperaba.
Si está viendo contenido
en pantalla panorámica
(1,85:1 o 2,35:1), las
barras negras seguirán
apareciendo en la parte
superior e inferior de la
imagen visualizada.
■ Para programas 16:9
Normal
Alargamiento Zoom Estirar
Mantiene la relación de
aspecto original en una
visualización a pantalla
completa.
Estira
proporcionalmente la
imagen para rellenar la
pantalla del televisor.
Expande las imágenes
con barras negras para
ajustarse a la pantalla.
Expande la imagen
visualizada para rellenar
la pantalla. Las imágenes
pueden aparecer más
anchas de lo que se
esperaba.
Funcionamiento de los botones directos
NOTA
• El tamaño de la pantalla que se puede seleccionar puede variar en función del tipo de señal de entrada.

ES
19
Menú en pantalla
Funcionamiento de los menús en pantalla
Audio
Configura
ción
CanalSubtítulos
Modo de
visualización
Temporizador de
Apagado
Rodear
Control Automático de Volúmen
Graves
Agudos
Balance
Sinc. de Audio
Altavoces TV
Sólo audio
Salida audio digital
Salida audio analóg
Parámetros del ecualizador
Restablecer modo de audio
Apagado
Película
Noticias
[Película]
[Activado]
0
0
0
0
[Activado]
[PCM]
[Fijo]
Ejemplo
1
Presione
MENÚ
para mostrar la pantalla de MENÚS.
2
Presione
c
/
d
para seleccionar el menú que desee.
3
Presione
/
para seleccionar el menú que desee y presione
/
ENTRAR
para entrar en su submenú.
• Se puede mostrar elementos de ajuste relacionados adicionales. Presione el botón
a
/
b
para
seleccionar el elemento que desee.
4
Presione
/
o
c
/
d
para seleccionar o ajustar la confi guración que desee y, a continuación, presione
ENTRAR
para confi rmar.
• Las operaciones pueden variar dependiendo de la función o elemento.
5
Presione
MENÚ
para salir.
NOTA
• Las opciones de menú son diferentes en función del modo de entrada seleccionado, pero los procedimientos de
funcionamiento son los mismos.
Menú en pantalla (menú principal)
Entrada Imagen Audio
TV
ENTRADA AV
Componentes
HDMI-1
HDMI-2(Lateral)
Configura
ción
Subtítulos
Modo de
visualización
Menú principal
Opciones de submenú y menú
■ Acerca de los elementos de menú
• Cuando un elemento se muestra en gris, signifi ca que no se puede seleccionar.
• Dependiendo de la fuente de entrada seleccionada, algunos elementos de menú no se pueden mostrar.
NOTA
• Las pantallas del manual de funcionamiento solamente sirven de referencia (algunas están ampliadas, otras
recortadas) y pueden variar ligeramente de las pantallas reales.
• El orden de las explicaciones para cada elemento de menú en las páginas siguientes, no tiene por qué coincidir
necesariamente con la alineación de los elementos en la pantalla.

ES
20
Menú Imagen
Imagen
Modo AV
Luz de fondo
Contraste
Brillo
Color
Tono
Nitidez
Tamaño y posición
Temp. del color
Imagen avanzada
Reiniciar modo AV
[Estándar(Energy Star)]
80
52
50
60
0
2
Ejemplo
Modo AV .................................................. Página 21
Luz de fondo ............................................ Página 21
Contraste ................................................. Página 21
Brillo ......................................................... Página 22
Color ........................................................ Página 22
Tono ......................................................... Página 22
Nitidez ...................................................... Página 22
Tamaño y posición ................................... Página 22
Posición horiz. .............................. Página 22
Posición vertical ............................ Página 22
Tamaño horiz. ............................... Página 22
Tamaño vertical ............................Página 22
Temp. del color ........................................ Página 22
Temp. del color ............................. Página 22
Ganancia de rojo, verde o azul ...... Página 22
Saturación de rojo, verde o azul .... Página 22
Restablecer temperatura de
color ............................................. Página 22
Imagen avanzada ..................................... Página 22
Realzar color ................................. Página 22
Contraste activo ............................ Página 22
Ahorro de energía ......................... Página 22
Reducción de ruido ....................... Página 22
NR digital ..................................... Página 22
Modo de película .......................... Página 22
Reiniciar modo AV .................................... Página 22
Menú Audio
Audio
Rodear
Ctrl. Volúmen Auto.
Graves
Agudos
Balance
Sinc. de Audio
Altavoces TV
Sólo audio
Salida audio digital
Salida audio analóg
Parámetros del ecualizador
Restablecer modo de audio
[Película]
[Activado]
0
0
0
0
[Activado]
[PCM]
[Fijo]
Ejemplo
Rodear ..................................................... Página 23
Ctrl. Volúmen Auto. .................................. Página 23
Graves ...................................................... Página 23
Agudos ..................................................... Página 23
Balance .................................................... Página 23
Sinc. de audio .......................................... Página 23
Altavoces TV ............................................Página 23
Sólo audio ................................................ Página 23
Salida audio digital .................................... Página 23
Salida audio analóg .................................. Página 23
Parámetros del ecualizador ......................Página 23
Restablecer modo de audio ...................... Página 23
Menú en pantalla
Botones de funcionamiento de menú
Usar el mando a distancia
Utilice los siguientes botones del mando a distancia
para utilizar el menú.
MENÚ:
Presione este botón para abrir o cerrar
el menú en pantalla.
a
/
b
/
c
/
d
:
Presione estos botones para seleccionar
el elemento que desee en la pantalla o
para ajustar un elemento seleccionado.
ENTRAR:
Presione este botón para ir al paso
siguiente o completar la confi guración.
VOLVER:
Presione este botón para volver al paso
anterior.
TV USB
MENU
FAVORITE CH
RETURNEXIT
ABCD
ENTER
Utilizar el panel de control del televisor
También puede utilizar el menú con el panel de
control del televisor.
Las operaciones de los
botones del panel de control
se corresponden con las del
mando a distancia según se
indica a continuación.
MENÚ:
Botón
MENÚ
del mando a distancia.
ENTRADA:
Botón
ENTRAR
del mando a distancia.
CANAL
r
/
s
:
Cursor
a
/
b
del mando a distancia.
VOL
k
/
l
:
Cursor
c
/
d
del mando a distancia.
* para LC-48LE551U
Elementos de menú
* para LC-43LE551U
ES
21
Elementos de menú
Menú Confi guración
Configura
ción
Nombre de la Entrada
Ajustes Link CEC
Idioma del menú
Ajustes locales y hora
Control Parental
Indicador de alimentación
Asistente de Instalación
Información del sistema
Restaurar todos los ajustes
[Español]
[Activado]
Ejemplo
Nombre de la entrada ............................... Página 23
Fuente de entrada ......................... Página 23
Etiqueta de entrada....................... Página 23
Ajustes Link CEC ...................................... Página 23
Función Enlace CEC ..................... Página 23
Control de sistema de audio ......... Página 23
Búsqueda de dispositivos ............. Página 23
Idioma del menú ....................................... Página 23
Ajustes locales y hora ............................... Página 24
Zona horaria .................................Página 24
Horario de verano ......................... Página 24
Control parental ........................................ Página 24
Activar clasif. ................................. Página 24
Bloqueo de canales ...................... Página 24
EE.UU. - TV .................................. Página 24
EE.UU. - Película ........................... Página 24
CAN - Inglés ................................. Página 24
CAN - Francés .............................. Página 25
Valoración región alternativa.......... Página 25
Bloquear no clasif. ........................ Página 25
Nueva contraseña ......................... Página 25
Restablecer conf. parental ............ Página 25
Indicador de alimentación ......................... Página 25
Asistente de instalación ............................ Página 25
Información del sistema ............................ Página 25
Restaurar todos los ajustes ......................Página 25
Menú en pantalla
Menú Subtítulos (solo señal de entrada de
TV)
Subtítulos
Subtítulo analógico
Subtítulo digital
Estilo SD
[Apagado]
[Apagado]
Ejemplo
Subtítulo analógico ................................... Página 25
Subtítulo digital ......................................... Página 25
Estilo SD ................................................... Página 25
Menú Canal (solo señal de entrada de TV)
Modo TV
Búsqueda automática de canales
Búsqueda parcial de canales
Añadir canal analógico
Saltar/ Canales Favoritos
MTS analógico
[Cable]
[Mono]
Canal
Ejemplo
Modo TV .................................................. Página 26
Búsqueda automática de canales ............. Página 26
Búsqueda parcial de canales .................... Página 26
Añadir canal analógico .............................. Página 26
Saltar/Canales Favoritos ........................... Página 26
MTS analógico .........................................Página 26
MTS digital ............................................... Página 26
Menú Entrada
Entrada
TV
ENTRADA AV
Componentes
HDMI-1
HDMI-2(Lateral)
Ejemplo
Seleccionar fuente de entrada .................... Página 9
Menú Modo de visualización
Normal
Alargamiento
Zoom
Panorámico
Modo de
visualización
Ejemplo
Seleccionar la relación de aspecto ............ Página 18
Menú Temporizador de apagado
Apagado
30 Minutos
60 Minutos
90 Minutos
120 Minutos
180 Minutos
Temporizador de
Apagado
ApagadoTemporizador de Apagado
Ejemplo
Establecer el temporizador de apagado .... Página 26
Menú Imagen
Permite ajustar la imagen según las preferencias
del usuario conforme a las siguientes opciones de
confi guración.
NOTA
• Para obtener información sobre el funcionamiento de
los menús en pantalla, consulte la página 19.
Modo AV (cambiar la calidad de la imagen)
La confi guración de audio y vídeo se puede cambiar
conforme al programa o contenido de entrada que
se está viendo.
Seleccione uno de los siguientes modos de AV:
Estándar (Energy Star), Película, Juego, DINÁMICO,
Deportes o Usuario.
• Estándar (Energy Star):
para una imagen de alta
defi nición en una iluminación normal.
• Película:
para una película.
• Juego:
opción adecuada para juegos. Puede
defi nir la confi guración conforme al tipo de juego.
• DINÁMICO:
para ver imágenes intensas y nítidas.
• Deporte:
para lograr una imagen netamente
defi nida que realce el alto contraste, de gran
utilidad para ver deportes.
• Usuario:
permite al usuario personalizar la
confi guración a su gusto. Puede establecer el
modo de cada fuente de entrada.
NOTA
• Estándar (Energy Star) es la confi guración
predeterminada. Si selecciona otras opciones, el
consumo de energía puede cambiar.
• Los elementos que se pueden seleccionar, pueden
variar en función de la fuente de entrada.
• Puede seleccionar MODO AV presionando el botón
MODO AV
del mando a distancia. Consulte la página
16 para obtener detalles sobre la confi guración de
MODO AV.
Luz de fondo
Permite ajustar el brillo de la pantalla.
Presione
c
para permitir que la pantalla se atenúe o
d
para que la pantalla se ilumine.
Contraste
Permite ajustar el nivel de contraste.
Presione
c
para reducir el contraste o
d
para
aumentarlo.
ES
22
Temp. del color
Al ajustar la temperatura de color cambiará la
“calidez” o “frialdad” de las áreas blancas de la
imagen.
Temp. del color
Ganancia de rojo
Ganancia verde
Ganancia de azul
Saturación de rojo
Saturación de verde
Saturación de azul
Restablecer temperatura de color
[Frio]
128
128
128
128
128
128
Temp. del color
Seleccione una opción de temperatura de color
predefi nida.
• Personalizar: permite cambiar manualmente cada
una de las confi guraciones de temperatura de color.
• Frío: produce una imagen con tonos azules.
• Natural: optimizado para ver la televisión.
• Cálido: produce una imagen con tonos amarillos.
Ganancia de rojo, verde o azul
Permite ajustar la cantidad de cada color en la
visualización.
Saturación de rojo, verde o azul
Permite ajustar la posición de cada color en la
visualización.
Restablecer temperatura de color
Permite restablecer los valores preestablecidos de
fábrica de todos los elementos de ajuste.
Brillo
Permite ajustar el nivel de brillo.
Presione
c
para reducir el brillo o
d
para
aumentarlo.
Color
Permite ajustar el nivel de intensidad del color.
Presione
c
para reducir la intensidad de color o
d
para aumentarla.
Tono
Permite ajustar el nivel de los tonos de piel.
Presione
c
para que los tonos de piel se hagan más
rojizos o
d
para que dichos tonos se hagan menos
rojizos.
Nitidez
Permite ajustar el nivel de nitidez.
Presione
c
para reducir la nitidez o
d
para
aumentarla.
Tamaño y posición
Cuando se muestra una imagen, se puede ajustar el
tamaño y posición de la misma.
Posición horiz.
Posición vertical
Tamaño horiz.
Tamaño vertical
31
16
0
0
• Posición horiz.: permite ajustar la posición
horizontal de la imagen de visualización.
• Posición vertical: permite ajustar la posición
vertical de la imagen de visualización.
• Tamaño horiz.: permite ajustar el ancho de la
imagen de visualización.
• Tamaño vertical: permite ajustar el alto de la
imagen de visualización.
Confi guración avanzada de imagen
Este televisor proporciona varias funciones
avanzadas para optimizar la calidad de la imagen.
Realzar color
Contraste activo
ahorro de energía
Reducción de ruido
NR Digital
Modo de película
[Normal]
[Medio]
[Activado]
[Bajo]
[Bajo]
[Auto]
Realzar color
Permite reducir el exceso de saturación de algunos
colores y mejora los tonos de piel.
• Apagado: no se realiza ningún ajuste.
• Normal/Enriquecido: permite seleccionar el nivel
deseado para mejorar los niveles de blanco de la
imagen.
Contraste activo
Permite ajustar el contraste de la imagen conforme a
la escena.
• Apagado: no se realiza ningún ajuste.
• Alto/Medio/Bajo: permite seleccionar un nivel
deseado para producir una imagen de alto contraste.
Ahorro de energía
Permite ajustar el brillo medio de la imagen para
compensar las áreas grandes de brillo.
• Apagado: el brillo se fi ja en el valor establecido en
la opción "Luz de fondo".
• Activado: permite ajustar el brillo de la pantalla
automáticamente.
Reducción de ruido
Produce una imagen de vídeo más nítida.
• Apagado: no se realiza ningún ajuste.
• Alto/Medio/Bajo: permite seleccionar el nivel
deseado para ver una imagen de vídeo más nítida.
Menú en pantalla
NR digital
Reduce los artefactos de la imagen provocados por
la digitalización del contenido de movimiento de la
imagen.
• Apagado: no se realiza ningún ajuste.
• Alto/Medio/Bajo: permite seleccionar el nivel
deseado para ver una imagen de vídeo más nítida.
Modo de película
Optimiza la imagen para ver películas.
• Automático: genera una imagen en movimiento
más suave cuando se ven películas.
• Apagado: modo de visualización normal.
Reiniciar modo AV
Permite restaurar los valores predeterminados de
fábrica de la confi guración Imagen.

ES
23
Menú en pantalla
Menú Audio
Puede ajustar la calidad del sonido según estime
oportuno conforme a las siguientes opciones de
confi guración.
NOTA
• Para obtener información sobre el funcionamiento de
los menús en pantalla, consulte la página 19.
Rodear
La función envolvente produce el efecto envolvente
en los altavoces.
• Apagado:
transmite sonido normal.
• Película:
reproduce la experiencia de cine con
sonido envolvente en directo utilizando sonido que
retumba en el cine.
• Noticias:
proporciona sonido envolvente suave.
NOTA
• Para algunos discos, puede ser necesaria la
confi guración en el reproductor de BD/DVD. En
este caso, consulte el manual de funcionamiento del
reproductor de BD/DVD.
Ctrl. Volúmen Auto.
Las diferentes fuentes de sonido a veces no tienen
el mismo nivel de volumen, como por ejemplo
un programa y sus anuncios publicitarios. La
opción Control automático de volumen (volumen
automático) reduce este problema ecualizando los
niveles.
• Apagado:
no se realiza ningún ajuste.
• Activado: reduce las diferencias de volumen entre
diferentes fuentes de sonido.
Graves
Permite ajustar el nivel de graves.
Presione
c
para debilitar los graves o
d
para
fortalecerlos.
NOTA
• El menú Graves está atenuado cuando la opción
"Rodear" está establecida en "Película" o "Noticias".
(Consulte la página 23.)
Agudos
Permite ajustar el nivel de agudos.
Presione
c
para debilitar los agudos o
d
para
fortalecerlos.
NOTA
• El menú Graves está atenuado cuando la opción
"Rodear" está establecida en "Película" o "Noticias".
(Consulte la página 23.)
Balance
Permite ajustar el balance entre los altavoces
izquierdo y derecho.
Presione
c
o
d
para reducir el audio del altavoz
derecho o del altavoz izquierdo, respectivamente.
Sinc. de audio
Permite ajustar la sincronización entre la imagen de
visualización y la pista de audio que la acompaña.
Presione
c
/
d
para ajustar el audio en relación a la
imagen de visualización.
Altavoces TV
Permite activar o desactivar los altavoces integrados.
• Apagado: deshabilitar los altavoces internos.
Esta opción solamente es necesaria cuando tiene
un sistema de altavoces externos conectado al
televisor.
• Activado: permite activar los altavoces internos.
NOTA
• Las señales de salida de audio no se desactivarán
aunque el altavoz del televisor esté apagado.
Sólo audio
Transmite el audio desde los altavoces del televisor
pero temporalmente se muestra una pantalla en
blanco.
La televisión ha entrado en modo de
sólo audio. La Iluminación se apagará
pronto. Pulse cualquier tecla para
despertar de nuevo.
En el modo Sólo audio, presione cualquier tecla para
mostrar la imagen de visualización.
Salida audio digital
Puede trasmitir audio digital a un amplifi cador de AV
o a un dispositivo similar cuyo terminal ENTRADA
DE AUDIO DIGITAL esté conectado al terminal
SALIDA DE AUDIO DIGITAL del televisor. Seleccione
un formato de salida de audio compatible con el
formato de audio del programa que esté viendo y el
equipo conectado.
• Dolby Digital: el terminal de salida de audio digital
transmite la señal de audio en formato Dolby
Digital. Reproduce sonido desde el programa
envolvente digital.
• PCM: el terminal de salida de audio digital
transmite la señal de audio en formato PCM. Si el
sistema de audio digital no admite Dolby Digital
(AC3), seleccione "PCM".
Salida audio analóg
Establece las propiedades del control de volumen
para conectores RCA (rojos/blancos) analógicos
cuando se conecta a un sistema de audio de cine en
casa.
• Fijo: permite controlar el volumen de los altavoces
externos desde los controles del sistema de cine
en casa.
• Variable: permite controlar el volumen de los
altavoces externos desde los controles de volumen
del televisor.
Parámetros del ecualizador
El ecualizador de cinco bandas permite ajustar
la confi guración de frecuencia de audio. Elija una
banda y realice los ajustes.
Presione
c
/
d
para seleccionar la frecuencia que
desee ajustar (120 Hz, 500 Hz, 1,5 KHz, 5 KHz o
10 KHz).
Utilice
a
/
b
para ajustar el nivel.
Cuando haya terminado de ajustar los niveles,
presione
MENÚ
para salir.
NOTA
• El menú Graves está atenuado cuando la opción
"Rodear" está establecida en "Película" o "Noticias".
(Consulte la página 23.)
Restablecer modo de audio
Permite restaurar los valores predeterminados de
fábrica del menú Audio.
Menú Confi guración
Permite defi nir la confi guración de funcionamiento y
otras confi guraciones generales del televisor.
NOTA
• Para obtener información sobre el funcionamiento de
los menús en pantalla, consulte la página 19.
Nombre de la entrada
Permite personalizar la etiqueta de entrada de
diferentes dispositivos conectados a las entradas del
televisor para facilitar la identifi cación.
Fuente de entrada
Etiqueta de Entrada
[TV]
[TV]
TV
• Seleccione Fuente de entrada para especifi car la
fuente de entrada.
• Para utilizar una etiqueta de entrada predefi nida,
resalte Etiqueta de entrada y seleccione una de
las opciones disponibles.
• Para personalizar el nombre de la entrada,
seleccione el campo situado debajo de Etiqueta
de entrada y presione
ENTRAR
. Introduzca
la etiqueta personalizada usando el teclado en
pantalla. Resalte OK y presione
ENTRAR
.
Ajustes Link CEC
La función CEC del televisor permite controlar los
dispositivos conectados mediante HDMI con el
mando a distancia incluido sin ninguna programación
adicional.
Función Enlace CEC
Control de Sistema de Audiol
Búsqueda de Dispositivos
[Activar]
[Apagado]
• Para habilitar la función CEC, seleccione Función
Enlace CEC y establezca su confi guración en
Activar.
• Cuando la opción Control de sistema de audio
esté establecida en Activado, podrá controlar
el audio del dispositivo mediante el mando a
distancia del televisor.
• Utilice la función Búsqueda de dispositivos
para determinar si el dispositivo está conectado y
admite CEC.
Idioma del menú
Permite seleccionar el idioma de los menús en
pantalla. Seleccione una de las siguientes opciones
disponibles:
Inglés, Francés o Español.
ES
24
Ajustes locales y hora
Permite establecer la confi guración de la hora.
Zona horaria
Horario de verano
[Alaska]
[Activado]
• Zona horaria: permite seleccionar la zona horaria
correcta conforme a su ubicación.
• Horario de verano: permite establecer la opción
Horario de verano en Activado si se aplica en su
región.
Control parental
Los controles parentales del televisor permiten evitar
que este muestre ciertos canales o programas.
NOTA
• Para acceder y seleccionar sus preferencias dentro del
menú Control parental, asegúrese de que su entrada
está establecida en el televisor.
Para acceder al menú Control parental, es necesario
introducir una contraseña.
Introduzca la contraseña
****
OK Cancelar
• Inserte su contraseña mediante el teclado que
aparece en pantalla. Resalte OK y presione
ENTRAR
. Aparecerá el menú Control parental en
la pantalla.
Activar clasif.
Bloqueo de canales
EE.UU. - TV
EE.UU. - Película
CAN - Inglés
CAN - Francés
Valoración región alternativa
Bloquear no clasif.
Nueva Contraseña
Restablecer conf. Parental
[Apagado]
[Apagado]
NOTA
• La contraseña predeterminada es "0000".
Activar clasif.
Para administrar el contenido conforme a su
clasifi cación, establezca la opción Clasifi cación de
programa en Activado.
Bloqueo de canales
Cuando un canal está bloqueado, no se podrá
acceder a él. Bloquear un canal es una buena forma
de impedir que los niños vean material inapropiado.
16
19
21
24
25
26
27
28
29
30
El icono indica que el canal está bloqueado.
No se podrá acceder al canal a menos que se
introduzca la contraseña parental.
EE.UU. - TV
Permite establecer la clasifi cación de TV de EE.UU.
para impedir la visualización.
TV-Y
TV-Y7
TV-G
TV-PG
TV-14
TV-MA
ALL FV D L S V
El icono indica que el tipo de clasifi cación está
bloqueado.
El contenido que tenga esta clasifi cación y todas las
clasifi caciones por encima de ella no se podrá ver.
El nivel y contenido de clasifi cación de TV se defi ne
de la siguiente manera:
Nivel de clasifi cación
de TV
Contenido de
clasifi cación de TV
• TV-Y: Todos los niños.
• TV-Y7: Dirigida a niños
mayores.
• TV-G: Público en
general.
• TV-PG: Control paterno
recomendado.
• TV-14: Advertencia
para los padres.
• TV-MA: Solo para
público adulto.
• FV: Violencia fi cticia.
• V: Violencia.
• S: Escenas de sexo.
• L: Lenguaje para adultos.
• D: Conversaciones de
sexo provocativas.
EE.UU. - Película
Permite establecer la clasifi cación de películas de
EE.UU. para impedir la visualización.
G
PG
PG-13
R
NC-17
X
Los niveles de clasifi cación de película se defi nen de
la siguiente manera:
• G: Público en general.
• PG: Control paterno recomendado.
• PG-13: Inadecuado para niños menores de 13
años.
• R: Restringido. Los niños menores de 17 años
deben estar acompañados de sus padres o un
adulto.
• NC-17: No autorizada para menores de 17 años.
• X: Solo para público adulto.
El icono
indica que el tipo de clasifi cación está
bloqueado.
El contenido que tenga esta clasifi cación y todas las
clasifi caciones por encima de ella no se podrá ver.
CAN - Inglés
Permite establecer la clasifi cación de TV de inglés de
Canadá para impedir la visualización.
Los sistemas de clasifi cación de TV de Canadá
se basan en la política de la Comisión de
Telecomunicaciones, Radio y Televisión de Canadá
sobre la violencia en la programación de televisión.
C
C8+
G
PG
14+
18+
Los niveles de clasifi cación de inglés de Canadá se
defi nen de la siguiente manera:
• C: Pensado para niños menores de 8. Este nivel
de clasifi cación presta especial atención a temas
que podrían amenazar su sentido de seguridad y
bienestar.
• C8+: No contiene representación de violencia
como el tema preferido, aceptable o la única forma
de resolver confl ictos; no anima a los niños a imitar
los actos peligrosos que pueden ver en la pantalla.
• G: Se considera aceptable para todas las edades. Es
apropiado para que lo vea toda la familia, contiene
muy poca violencia, ya sea física, verbal o emocional.
• PG: Pensado para público en general pero no
adecuado para niños (menores de 8 años) porque
podría contener temas controvertidos o problemas.
• 14+: Podría contener temas donde la violencia
es uno de los elementos dominantes de la línea
argumental, pero que debe ser esencial para
el desarrollo del argumento o personaje. El uso
del idioma podría ser blasfemo y podría haber
desnudos en el contexto del tema.
• 18+: Pensado para telespectadores de 18 años
y mayores; podría contener escenas de violencia
que, aunque relacionadas con el desarrollo del
argumento, el personaje o los temas, están
dirigidas al público adulto. Podría contener
lenguaje gráfi co y escenas de sexo y desnudos.
El icono
indica que el tipo de clasifi cación está
bloqueado.
El contenido que tenga esta clasifi cación y todas las
clasifi caciones por encima de ella no se podrá ver.
Menú en pantalla

ES
25
Menú en pantalla
CAN - Francés
Permite establecer la clasifi cación de TV de francés
de Canadá para impedir la visualización.
G
8ans+
13ans+
16ans+
18ans+
• G: Todas las edades y niños; contiene violencia
directa mínima, pero puede ser integrada en
el argumento de una manera humorística y
fantasiosa.
• 8ans+: Puede ser vista por la inmensa mayoría
del público, pero podría contener escenas que
inquietaran a los niños con una edad inferior a 8
años, que no pueden distinguir entre situaciones
imaginarias y reales. Recomendado para ver en
compañía de los padres.
• 13ans+: Podría contener escenas frecuentes de
violencia y, por lo tanto, se recomienda ver en
compañía de los padres.
• 16ans+: Podría contener escenas frecuentes de
violencia y violencia intensa.
• 18ans+: Solamente para adultos. Podría contener
escenas frecuentes de violencia y violencia extrema.
El icono indica que el tipo de clasifi cación está
bloqueado.
El contenido que tenga esta clasifi cación y todas las
clasifi caciones por encima de ella no se podrá ver.
Valoración región alternativa
Permite establecer el estándar de clasifi cación de
región alternativa para impedir la visualización.
Bloquear no clasif.
Permite establecer la opción en Activado para
bloquear todos los programas sin clasifi car.
Nueva contraseña
Permite cambiar la contraseña del control parental.
Nueva Contraseña
Volver a introducir contraseña
En el campo
Nueva contraseña
, escriba la contraseña
de control parental de 4 dígitos.
A continuación, en el campo
Volver a introducir
contraseña
, vuelva a escribir la contraseña de control
parental de 4 dígitos.
Restablecer conf. parental
Permite restablecer los valores de fábrica de la
opción Control parental.
Indicador de alimentación
El indicador de alimentación situado en la parte
frontal del televisor normalmente no se ilumina
cuando el televisor está encendido. Puede cambiar
esta confi guración si prefi ere que la luz se ilumine.
• Apagado: permite apagar la luz del indicador de
alimentación.
• Activado: permite encender la luz del indicador de
alimentación.
Asistente de instalación
Puede ejecutar de nuevo la función Asistente de
instalación, después de confi gurar los canales
predefi nidos. Consulte la sección "Instalación inicial"
en la página 14 para obtener más información.
NOTA
• Si no se encuentra ningún canal, confi rme el tipo de
conexión realizada con el televisor y vuelva a probar la
función "Asistente de instalación".
Información del sistema
Permite ver el nombre de modelo, la versión de
fi rmware, el número de revisión, el tipo de fuente,
la resolución e información sobre la frecuencia de
versiones del televisor.
Restaurar todos los ajustes
Permite restaurar la confi guración predeterminada
de fábrica del televisor.
NOTA
• Si restaura la confi guración predeterminada de fábrica
del televisor, todos los cambios realizados en la
confi guración se perderán.
• La contraseña predeterminada es "0000".
Menú Subtítulos
Permite defi nir la confi guración para subtítulos
ocultos en programas de televisión.
NOTA
• Para obtener información sobre el funcionamiento de
los menús en pantalla, consulte la página 19.
• Este menú solamente está disponible si la entrada se
establece en TV.
Subtítulo analógico
Esta opción permite seleccionar el modo de
subtítulos utilizado para mostrar información de
subtítulos (en caso de estar disponible). Si no está
seguro de las diferencias entre los modos, puede
ser preferible dejar el modo de subtítulos ocultos
establecido en Subtítulos1, que muestra el texto
completo del programa en el idioma principal de su
área.
Seleccione una de las siguientes opciones: Apagado,
Subtítulos1, Subtítulos2, Subtítulos3, Subtítulos4,
TEXTO1, TEXTO2, TEXTO3 o TEXTO4.
Subtítulo digital
Si está disponible, esta opción permite seleccionar
un modo de servicio de subtítulos ocultos (1-6) para
canales digitales.
Seleccione una de las siguientes opciones: Apagado,
Subtítulos1, Subtítulos2, Subtítulos3, Subtítulos4,
CS1, CS2, CS3, CS4, CS5 o CS6.
Estilo SD
Esta función permite ajustar la apariencia de la
pantalla de subtítulos ocultos conforme a sus
preferencias.
• Estilo subtítulos: permite establecer el modo
"Según difusión" o "Personalizar". Si se selecciona
el modo Personalizar, el usuario puede modifi car el
estilo de detalles descritos a continuación.
• Tamaño del texto: seleccione esta opción para
elegir un tamaño de fuente de subtítulos conforme
a sus preferencias.
• Caracteres: permite seleccionar un diseño de
caracteres para el texto de los subtítulos ocultos
digitales.
• Color: permite seleccionar el color para el texto de
los subtítulos ocultos digitales.
• Opacidad: permite seleccionar la transparencia
del texto de los subtítulos ocultos digitales.
• Color BG: permite establecer el color del fondo
detrás del texto de los subtítulos ocultos digitales.
• Opacidad BG: permite establecer la transparencia
del fondo detrás del texto de los subtítulos ocultos
digitales.
• Color de ventana: permite establecer el color de
la caja de los subtítulos ocultos digitales.
• Opacidad de ventana: permite establecer la
transparencia de la caja de los subtítulos ocultos
digitales.
ES
26
Menú Canal
Permite defi nir la confi guración de los canales.
NOTA
• Para obtener información sobre el funcionamiento de
los menús en pantalla, consulte la página 19.
• Este menú solamente está disponible si la entrada se
establece en TV.
Modo TV
Permite seleccionar el tipo de modo de sintonizador.
Seleccione una de las siguientes opciones: Antena o
Cable.
Búsqueda automática de canales
Permite buscar los canales automáticamente
basándose en el modo de sintonizador seleccionado.
Resalte Iniciar búsqueda y presione
ENTRAR
para
iniciar la búsqueda de los canales disponibles.
Búsqueda parcial de canales
Permite buscar los canales especifi cados basándose
en el modo de sintonizador seleccionado.
Modo Buscar
Del canal
Al canal
Iniciar búsqueda
[Analógico/Digital]
1
135
Seleccione el tipo de modo de sintonizador y el
intervalo de canales. A continuación, resalte Iniciar
búsqueda y presione
ENTRAR
para iniciar la
búsqueda de los canales disponibles.
Añadir canal analógico
Permite agregar un nuevo canal analógico
basándose en el modo de sintonizador seleccionado.
En el campo
Ingresar # canal
, escriba el número del
canal que está agregando. A continuación, resalte
Añadir canal y presione
ENTRAR
para iniciar la
búsqueda del canal especifi cado.
Saltar/Canales Favoritos
Esta función permite omitir la visualización del canal
seleccionado o programar 4 canales favoritos. Al
establecer los canales favoritos por adelantado,
puede seleccionar sus canales favoritos fácilmente.
Para omitir la visualización del canal seleccionado,
elija los canales que desea quitar y presione
ENTRAR
.
16
19
21
24
25
26
27
28
29
30
El icono indica que el canal se ha quitado.
Para establecer los canales favoritos, consulte
la sección "CANAL FAVORITO (confi guración de
canal favorito)" en la página 17 para obtener más
información.
NOTA
• Puede ver el canal favorito predefi nido presionando
uno de los botones
CANAL FAVORITO
del mando a
distancia.
MTS analógico
Esta opción controla la manera en la que el sonido
se emite desde los altavoces. Las opciones
disponibles pueden variar en función de la entrada
seleccionada.
NOTA
• La opción Sonido de TV analógica solamente está
disponible para canales analógicos.
• Mono (solo disponible para visualización de TV
convencional): esta opción solo reproduce el
sonido en mono. Utilice esta confi guración cuando
reciba transmisiones con señales estéreo débiles.
• Estéreo: esta opción divide la señal de audio
estéreo en los canales izquierdo y derecho. La
mayoría de los programas de TV y materiales
grabados tienen audio estéreo. La palabra
“Estéreo” aparece en el título del canal cuando
se sintoniza un programa que se transmite en
estéreo.
• SAP (Second Audio Program, es decir, Segundo
programa de audio): esta opción reproduce
el audio del programa en un segundo idioma,
en caso de estar disponible. Las letras “SAP”
aparece en el título del canal cuando se sintoniza
un programa que se transmite con información
SAP. El audio SAP solo se transmite en mono.
SAP también se utiliza para transmitir el audio de
un programa con descripciones del vídeo para
personas con problemas de visión.
MTS digital
Esta opción permite especifi car el idioma de audio.
Seleccione una de las siguientes opciones:
Inglés,
Francés o Español.
Menú Temporizador de apagado
Permite establecer el televisor para que se
apague automáticamente una vez transcurrido un
determinado período de tiempo.
Seleccione una de las siguientes opciones: Apagado,
30 minutos, 60 minutos, 90 minutos, 120 minutos o
180 minutos.
NOTA
• Para obtener información sobre el funcionamiento de los
menús en pantalla, consulte la página"Funcionamiento
de los menús en pantalla" en la página 19.
Menú en pantalla
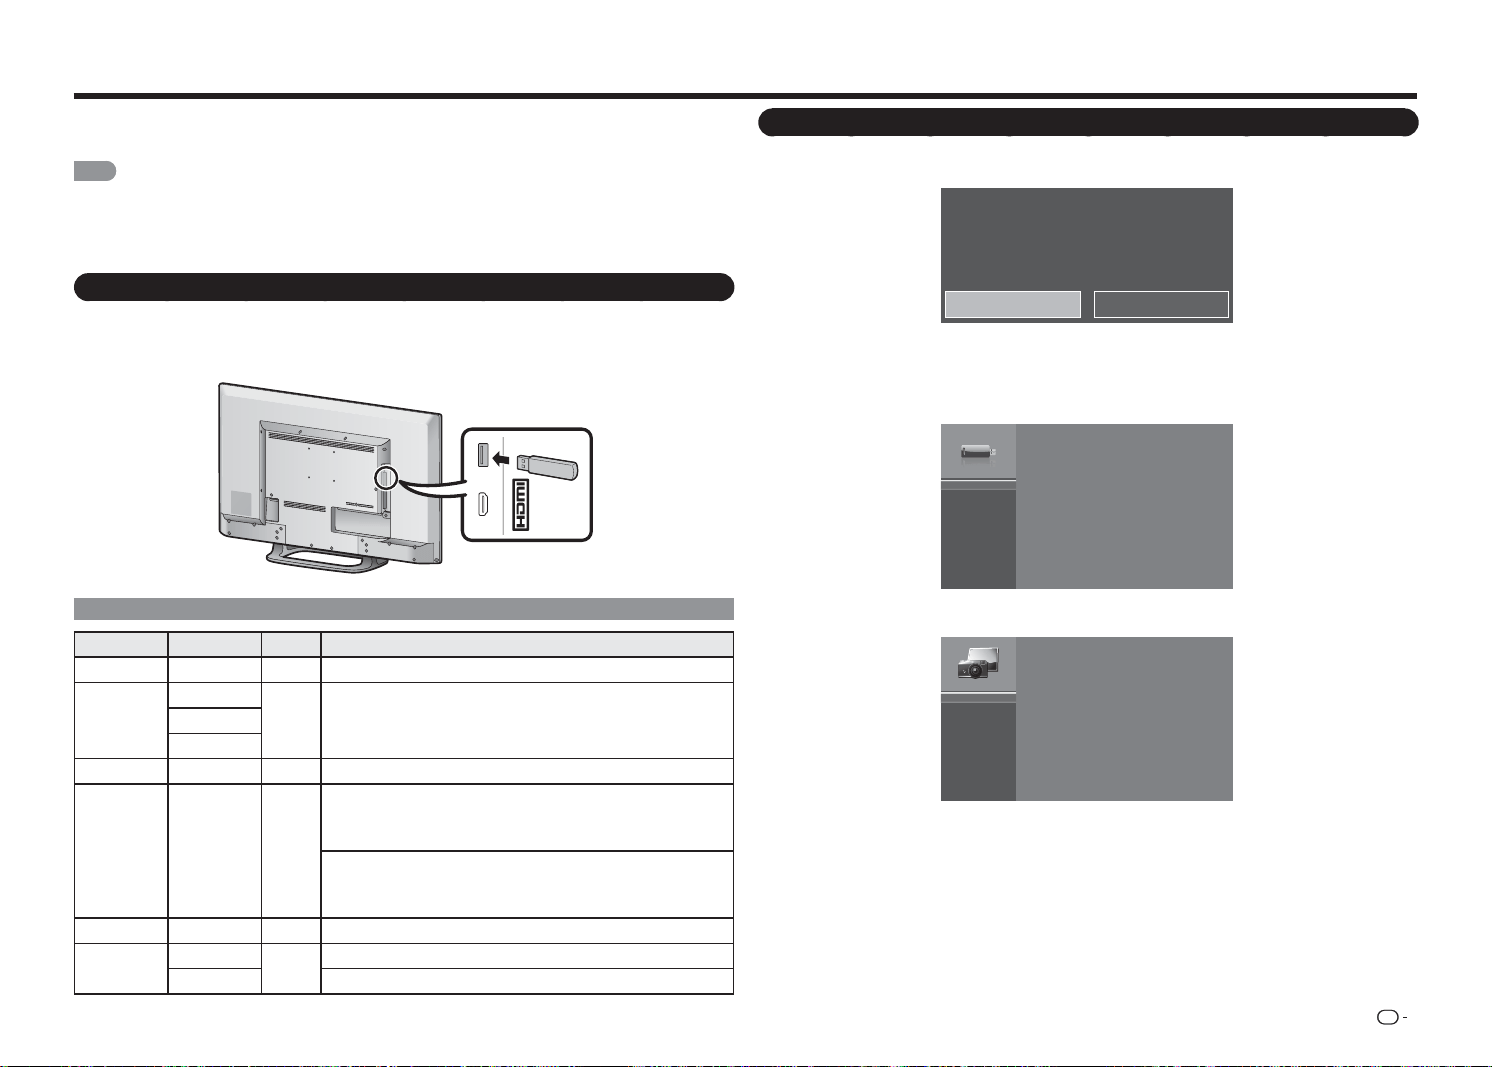
ES
27
Disfrutar de la reproducción de fotografías, música y películas
Puede conectar el televisor a un dispositivo de memoria USB o a una unidad de disco duro USB para
disfrutar viendo imágenes y películas y escuchando música.
NOTA
• Dependiendo del dispositivo de memoria USB o la unidad de disco duro USB, el televisor puede no ser capaz de
reconocer los datos almacenados.
• La lectura de los datos grabados puede tardar tiempo si el dispositivo de memoria USB o la unidad de disco duro
USB contiene muchos archivos o carpetas.
• Solamente se admite un dispositivo USB sin particiones y con el formato FAT.
Conectar un dispositivo de memoria USB o una unidad de disco duro USB
Inserte en el terminal USB del televisor el dispositivo de memoria USB con las fotografías, música o películas
grabadas.
MHL
(DC 5V, 900mA)
USB
Compatibilidad con dispositivos USB
Contenedor Extensiones A/V CÓDEC/Perfi l
AVI .avi Película MPEG2: MP@HL
MPEG2 - TS
.ts
Película MPEG2: MP@HL.trp
.tp
MPEG2 -PS .vob Película MPEG2: MP@HL
MP3 .mp3 Audio
MPEG1 Capa 2
32 Kbps ~ 448 Kbps (tasa de bits)
32 KHz ~ 48 KHz (tasa de muestreo)
MPEG1 Capa 3
32 Kbps ~ 320 Kbps (tasa de bits)
32 KHz ~ 48 KHz (tasa de muestreo)
WAVE y WAV .wav Audio PCM de 8 y 16 bits
JPEG
.jpeg
Foto
Línea de base: 15360*8640 (resolución máxima)
.jpg Progresivo: 1024*768 (resolución máxima)
• Para reproducir datos en un dispositivo de memoria USB, inserte dicho dispositivo en el televisor. Aparecerá
un mensaje emergente en la pantalla.
USB de medios detectada. ¿Entrar al menú multimedia?
Sí No
Resalte Sí y presione el botón
ENTRAR
para entrar en el modo USB.
• Utilice el siguiente procedimiento para volver a cambiar al modo USB después de cambiar de este modo a
otro.
1
Presione
USB
para entrar en el modo USB y, a continuación, presione
ENTRAR
.
USB:
2
Presione
a
/
b
para seleccionar la categoría de archivo ("FOTO", "MÚSICA" o "PELÍCULA") y, a
continuación, presione
ENTRAR
.
Foto
Música
Película
3
Presione
a
/
b
/
c
/
d
para seleccionar la carpeta que desee y, a continuación, presione
ENTRAR
para
confi rmar.
Seleccionar las carpetas para reproducir
(5 VCC, 500 mA)
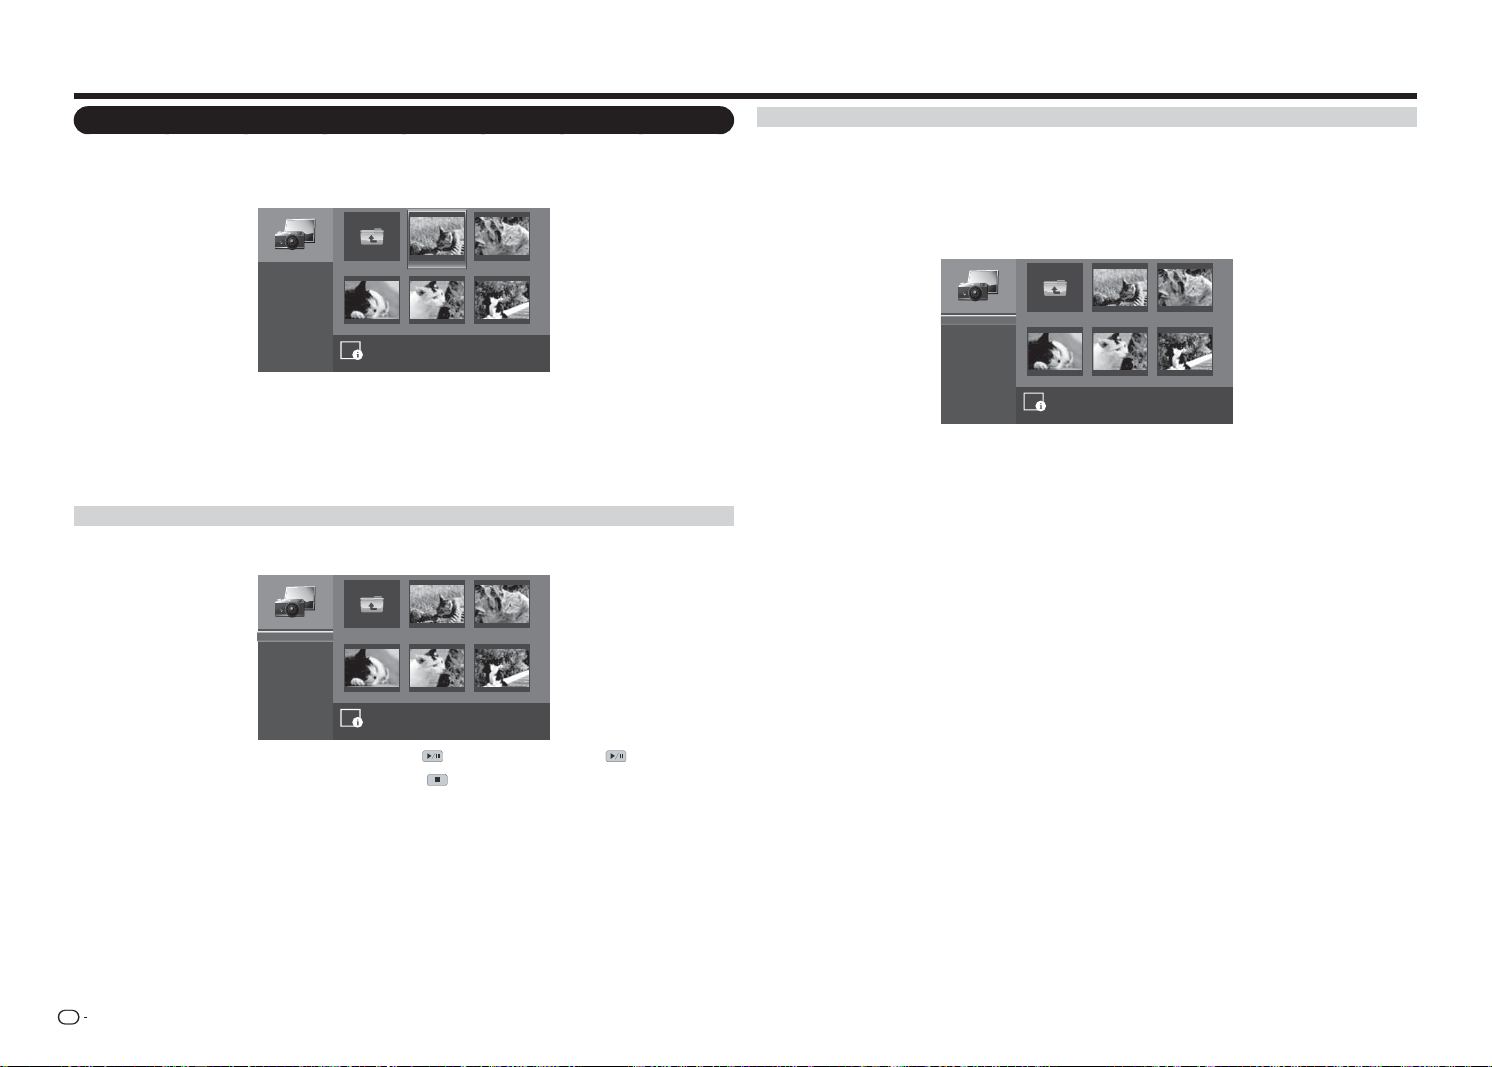
ES
28
Ver fotografías
1
Presione
a
/
b
para seleccionar FOTO y, a continuación, presione
ENTRAR
.
2
Presione
a
/
b
/
c
/
d
para seleccionar la carpeta que desee y, a continuación, presione
ENTRAR
para
confi rmar.
image001.jpg image002.jpg
image004.jpgimage003.jpg image005.jpg
Folder siguiente
Iniciar presentación
Orden:
Ver:
Parámetros
\foto\
Nomb. archivo:image001.jpg
Resolución: 725x510 Tamaño de arc.: 965 KBytes
1
/
3
Nombre A-Z
Archivos
3
Presione
a
/
b
/
c
/
d
para seleccionar la foto que desee y, a continuación, presione
ENTRAR
para
confi rmar.
4
En el modo de pantalla completa, presione
c
/
d
para ver la fotografía anterior o siguiente en la misma
carpeta.
5
Presione
ENTRAR
para volver a la vista de miniaturas.
Ver fotografías en una presentación de diapositivas
1
El modo de miniatura, resalte Iniciar presentación y, a continuación, presione
ENTRAR
para iniciar la
presentación de diapositivas.
image001.jpg image002.jpg
image004.jpgimage003.jpg image005.jpg
Folder siguiente
\foto\
1
/
3
Iniciar presentación
Orden:
Ver:
Parámetros
Nombre A-Z
Archivos
2
Para pausar la presentación de diapositivas, presione . Para reanudarla presione de nuevo.
3
Para detener la presentación de diapositivas, presione .
Disfrutar de la reproducción de fotografías, música y películas
Personalizar la confi guración de fotografías
En el modo de miniatura, realice el siguiente procedimiento:
• Resalte Orden y presione
ENTRAR
para especifi car el tipo de ordenación de archivos. Seleccione una de
las opciones de ordenación y presione
ENTRAR
para confi rmar la confi guración.
• Resalte Ver y presione
ENTRAR
para especifi car el tipo vista. Seleccione una de las opciones de vista y
presione
ENTRAR
para confi rmar la confi guración.
• Resalte Parámetros y presione
ENTRAR
para personalizar la confi guración de presentación de diapositivas.
image001.jpg image002.jpg
image004.jpgimage003.jpg image005.jpg
Folder siguiente
Aleatorio:
Velocidad:
Efecto:
\foto\
1
/
3
Aleatorio activado
5 segundos
Al azar
Presione
a
/
b
para seleccionar una de las opciones disponibles y presione
ENTRAR
para confi rmar la
confi guración.
• Aleatorio: habilita o deshabilita el orden aleatorio en la presentación de diapositivas de las fotografías.
• Velocidad: establece la cantidad de tiempo antes de que aparezca la imagen siguiente.
• Efecto: permite seleccionar el efecto de transición entre diapositivas.
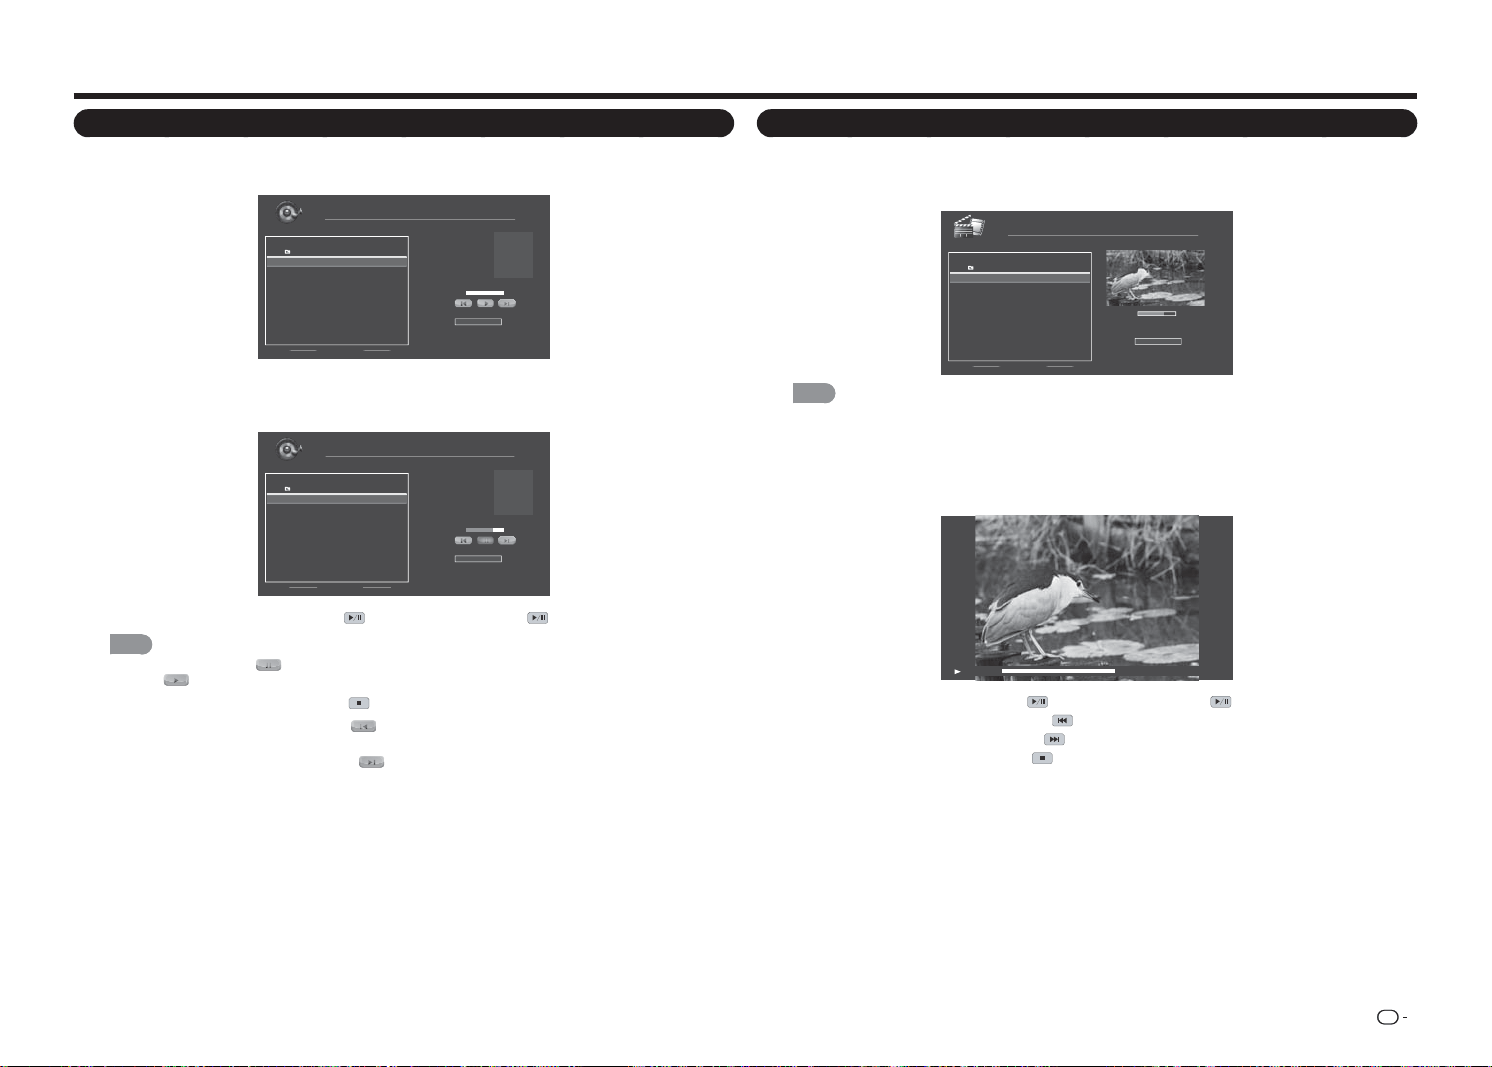
ES
29
Disfrutar de la reproducción de fotografías, música y películas
Reproducir música
1
Presione
a
/
b
para seleccionar MÚSICA y, a continuación, presione
ENTRAR
.
2
Presione
a
/
b
para seleccionar la carpeta que desee y, a continuación, presione
ENTRAR
para confi rmar.
Nomb. archivo:
Artista:
Álbum:
Música
\música
1 / 1
# Pista Duración
1. Folder siguiente
2. song001.mp3 00:03:15
3. song002.mp3 00:03:12
4. song003.mp3 00:03:10
Orden:
Nombre A-Z
00:00:00 00:00:00
3
Presione
a
/
b
para seleccionar la canción que desee y, a continuación, presione
ENTRAR
para llevar a
cabo la reproducción. Se iniciará una reproducción automática a partir de la canción seleccionada.
4
Haga lo siguiente:
song001.mp3
Unknow
Unknow
1 / 1
Orden:
Nombre A-Z
00:02:07 00:03:15
Nomb. archivo:
Artista:
Álbum:
Música
\música
# Pista Duración
1. Folder siguiente
2. song001.mp3 00:03:15
3. song002.mp3 00:03:12
4. song003.mp3 00:03:10
• Para pausar la reproducción, presione . Para reanudarla presione de nuevo.
NOTA
• También puede resaltar y presionar
ENTRAR
para pausar la reproducción. Para reanudar la reproducción,
resalte
y presione
ENTRAR
.
• Para detener la reproducción, presione .
• Para saltar a la canción anterior, resalte y, a continuación, presione
ENTRAR
repetidamente para
seleccionar la canción que desee.
• Para saltar a la canción siguiente, resalte
y, a continuación, presione
ENTRAR
repetidamente para
seleccionar la canción que desee.
• Para especifi car el tipo de ordenación de archivos, resalte Orden y presione
ENTRAR
. Seleccione una
de las opciones de ordenación y presione
ENTRAR
para confi rmar la confi guración.
Ver películas
1
Presione
a
/
b
para seleccionar PELÍCULA y, a continuación, presione
ENTRAR
.
2
Presione
a
/
b
para seleccionar la carpeta que desee y, a continuación, presione
ENTRAR
para
confi rmar.
00:06:07
Orden:
00:08:07
Película
\película
1 / 1
# Archivo Duración
1. Folder siguiente
2. movie001.avi 00:08:15
3. movie002.avi - -:- -:- -
4. movie003.avi - -:- -:- -
Nombre A-Z
NOTA
• Para especifi car el tipo de ordenación de archivos, resalte
ORDEN
y presione
ENTRAR
. Seleccione una de
las opciones de ordenación y presione
ENTRAR
para confi rmar la confi guración.
3
Presione
a
/
b
para seleccionar la película que desee y presione
ENTRAR
para reproducir dicha película
a pantalla completa.
4
Haga lo siguiente:
00:06:07 00:08:15
• Para pausar la reproducción, presione . Para reanudarla presione de nuevo.
• Para saltar a la película siguiente, presione
.
• Para saltar a la película anterior, presione
.
• Para detener la reproducción, presione
.
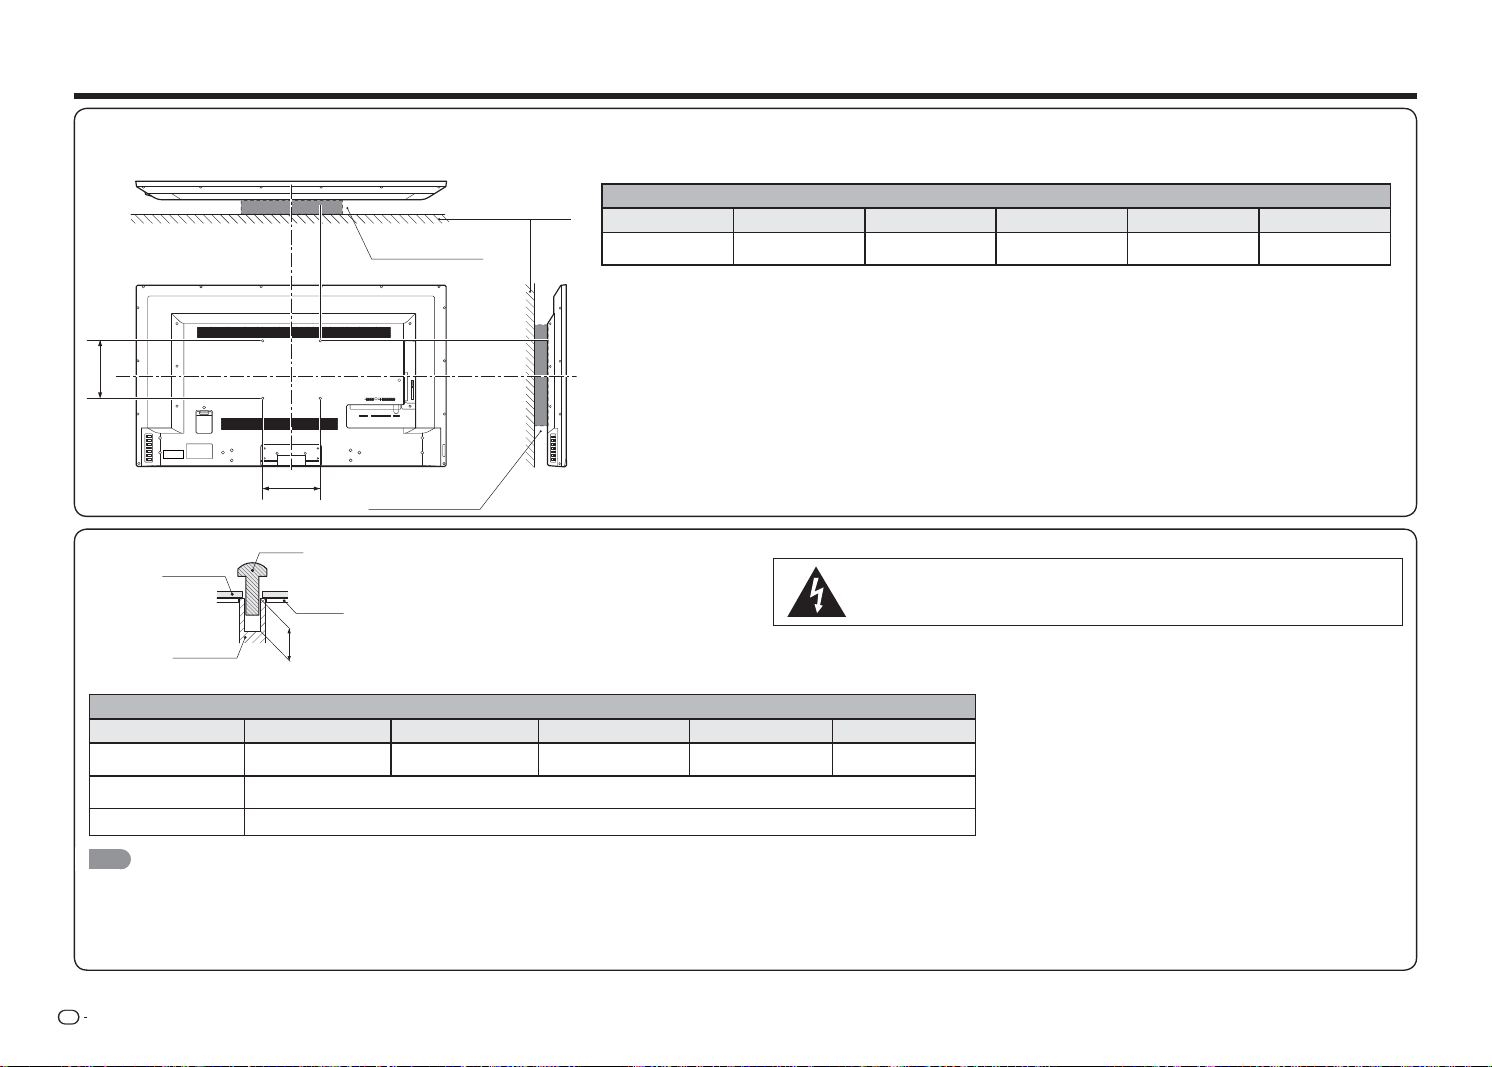
ES
30
Especifi caciones del kit para instalación en pared
A continuación se muestran las dimensiones estándar para los kits para instalación en pared.
• La ilustración utiliza el modelo LC-48LE551U como ejemplo.
Modelo
Elemento LC-32LE551U LC-32LE451U LC-39LE551U LC-43LE551U LC-48LE551U
Espacio para la
instalación en pared
100mm x 100mm 100mm x 100mm 100mm x 100mm 200mm x 200mm 200mm x 200mm
Los medios de montaje deben ser lo sufi cientemente resistentes como para soportar el peso de la pantalla.
El soporte para instalación en pared debe contar con la homologación UL o similar.
No instale el kit para instalación en pared si el televisor está encendido. Se puede producir un
incendio o lesiones personales por descargas eléctricas.
DEPTH OF
MOUNTING HOLES
SCREW
WALL MOUNT
UNIT
MOUNTING
HOLES
CABINET
Para obtener información sobre los tornillos, consulte la tabla que se muestra a continuación.
Modelo
Elemento LC-32LE551U LC-32LE451U LC-39LE551U LC-43LE551U LC-48LE551U
Tornillo estándar
M4 (Utilisez 0.7mm
pas d'hélice)
M4 (Utilisez 0.7mm pas
d'hélice)
M4 (Utilisez 0.7mm pas
d'hélice)
M6 (Utilisez 1.0mm
pas d'hélice)
M6 (Utilisez 1.0mm
pas d'hélice)
La longitud (Depth of
mounying holes)
15/32 (12mm)
Cantidad 4 unidades
NOTA
• No instale el televisor inclinado.
• No utilice tornillos que no cumplan las especifi caciones de tornillos estándar de VESA.
• No utilice tornillos que sean más largos que la longitud estándar. Los tornillos que sean demasiado largos pueden dañar el interior del televisor.
• No apriete los tornillos de forma que queden demasiado apretados o demasiado sueltos. Si no sigue esta recomendación, el producto podría resultar dañado o podría caerse, lo que podría dar lugar a lesiones personales. SHARP no
asumirá ninguna responsabilidad por este tipo de accidentes.
• SHARP no asumirá ninguna responsabilidad por daños causados al producto o lesiones personales cuando se utilice un soporte que no sea VESA o no especifi cado, o el cliente no siga las instrucciones de instalación del producto.
Apéndice
1 2 Y/V Pb/Cb
AC IN
CABLE / ANTENNAPr/Cr
COMPONENT / VIDEO
L R OPTICAL MHL USB
AUDIO OUT
DTV / TV
AUDIO
LR
A
B
KIT PARA INSTALACIÓN
EN PARED
KIT PARA INSTALACIÓN
EN PARED
PARED

ES
31
Solución de problemas
El televisor muestra el mensaje “No hay señal.”.
• Presione
ENTRADA
en el mando a distancia para seleccionar una fuente de entrada diferente.
• Si utiliza un televisor por cable, satélite o antena conectado directamente al televisor, busque los canales.
Consulte la sección "Búsqueda automática de canales" en la página 26.
No hay alimentación.
• Asegúrese de que el televisor está enchufado a una toma de corriente eléctrica que funcione.
• Asegúrese de que el cable de alimentación está acoplado de forma segura al televisor.
• Presione el botón
ALIMENTACIÓN
del mando a distancia o del lateral del televisor para encender este. La
alimentación está conectada, pero no se muestra ninguna imagen en la pantalla.
• Compruebe que todos los cables están conectados de forma segura al televisor.
• Asegúrese de que todos los dispositivos están conectados correctamente. Los dispositivos son diferentes.
Consulte el manual del usuario del dispositivo para obtener detalles.
• Ajuste las opciones Brillo, Contraste y Luz de fondo. Consulte la sección "Menú Imagen" en la página 21.
• Presione
ENTRADA
en el mando a distancia para seleccionar una fuente de entrada diferente.
No hay sonido.
• Presione el botón
VOL
k
del mando a distancia.
• Presione el botón
SILENCIO
del mando distancia para asegurarse de que el silencio está desactivado.
• Compruebe la confi guración de audio. Consulte la sección "Menú Audio" en la página 23.
• Asegúrese de que los altavoces están establecidos en Activado. Consulte la sección "Altavoces TV" en la
página 23.
• Asegúrese de que no hay auriculares conectados al televisor.
• Compruebe las conexiones de audio de los dispositivos externos (reproductor Blu-ray, consola de juegos,
descodifi cador de cable o satélite) que estén conectados al televisor.
• Si utiliza una antena, la intensidad de la señal del canal puede ser baja. Asegúrese de que la antena está
conectada de forma segura al televisor y muévala por la sala o cerca de una ventana para conseguir la
mejor señal.
Los colores del televisor no se muestran correctamente.
• Ajuste las opciones Color y Tono del menú Imagen. Consulte la sección "Menú Imagen" en la página 21.
• Restablezca la confi guración de la imagen. Consulte la sección "Confi guración avanzada de imagen" en la
página 22.
• Compruebe todos los cables para asegurarse de que están conectados de forma segura. Los botones del
mando a distancia no funcionan.
• Asegúrese de que solamente presiona un botón en cada momento.
• Apunte con el mando a distancia directamente al televisor cuando presione un botón.
• Cambie las pilas del mando a distancia por otras nuevas. Consulte la sección "Instalar las pilas en el mando
a distancia" en la página 6.
Apéndice
La calidad de la imagen no es buena.
• Para obtener la mejor calidad de imagen, vea programas de alta defi nición utilizando fuentes digitales.
Conecte los dispositivos mediante cables HDMI.
• Si utiliza una antena, la intensidad de la señal del canal puede ser baja. Asegúrese de que la antena está
conectada de forma segura al televisor y muévala por la sala o cerca de una ventana para conseguir la
mejor señal.
La imagen está distorsionada.
• Los dispositivos eléctricos cercanos pueden causar interferencias al televisor. Aleje el televisor de los
aparatos eléctricos, vehículos y luces fl uorescentes.
• Asegúrese de que todos los cables están conectados de forma segura.
La imagen de visualización no ocupa toda la pantalla.
• Establezca el modo de imagen del televisor de forma que la imagen rellene toda la pantalla. Presione
MODO DE VISUALIZACIÓN
en el mando a distancia y seleccione la relación de aspecto apropiada.
El televisor tiene píxeles (puntos) que siempre permanecen oscuros o iluminados.
• Su televisor de alta defi nición es un producto fabricado con gran precisión utilizando alta tecnología. Sin
embargo, algunos píxeles puede que no se muestren correctamente. Estos tipos de casos son inherentes a
este tipo de producto y no constituyen un defecto del mismo.
Veo “ruido” o electricidad estática en la pantalla.
• Cuando las funcionalidades digitales del televisor sean superiores a una señal de difusión digital, la señal se
convertirá a un nivel superior (mejorada) para coincidir con las funcionalidades de visualización del televisor.
Esta conversión a un nivel superior algunas veces puede provocar irregularidades en la imagen.
• Si utiliza una antena, la intensidad de la señal del canal puede ser baja. Asegúrese de que la antena está
conectada de forma segura al televisor y muévala por la sala o cerca de una ventana para conseguir la
mejor señal.
Cuando cambio la fuente de entrada, el volumen también cambia.
• El televisor recuerda el nivel de volumen de cada fuente de entrada. Si el nivel de volumen de la nueva
fuente de entrada es superior o inferior al nivel de la fuente de origen, la diferencia puede apreciarse.
• Utilice el botón
VOL
k
/
l
del mando a distancia para ajustar el volumen.
Cuando cambio la fuente de entrada, el tamaño de la imagen de visualización también cambia.
• El televisor recuerda el modo de visualización de cada fuente de entrada. Si el modo de visualización de la
nueva fuente de entrada es diferente al de la fuente de entrada original, la diferencia puede apreciarse.
• Consulte la sección "MODO DE VISUALIZACIÓN" en la página 18.

ES
32
Precauciones relacionadas con el uso en entornos con altas y bajas temperaturas
• Cuando use la unidad en un espacio donde la temperatura sea baja (por ejemplo una habitación, ofi cina, etc.),
la imagen puede dejar estelas o puede aparecer ligeramente retrasada. Este comportamiento no supone una
avería y la unidad recuperará su estado de funcionamiento normal cuando la temperatura alcance valores
normales.
• No deje la unidad en una ubicación caliente o fría. Asimismo, no deje la unidad en una ubicación expuesta a la
luz directa del sol o cerca de un calefactor, ya que la carcasa podría deformarse y podrían producirse averías
en el panel frontal.
SI TIENE MÁS PREGUNTAS, PÓNGASE EN CONTACTO CON NUESTRO SERVICIO DE ATENCIÓN
AL CLIENTE PARA OBTENER AYUDA.
Apéndice
TV
Elemento
Modelo: LC-32LE551U Modelo: LC-32LE451U Modelo: LC-39LE551U
Modelo: LC-43LE551U Modelo: LC-48LE551U
Panel LCD
Tamaño visualizable diagonal real 31
1/2
31
1/2
38
9/16
42
1/2
47
39/64
Resolución 1920 x 1080 1366 x 768 1920 x 1080 1920 x 1080 1920 x 1080
Función de
TV
Estándar de TV (CCIR) Sistema ATSC/NTSC estándar de TV americano
Recepción
de canales
VHF/UHF VHF 2-13 canales, UHF 14-69 canales
CATV 1-135 canales (solo canal no codifi cado)
Transmisión terrestre digital
(8VSB)
2-69 canales
Cable digital*1 (64/256 QAM) 1-135 canales (solo canal no codifi cado)
Audio Vatios del altavoz 10 W x 2
Terminales
Entradas
HDMI 1.4 con HDCP
(cambio rápido, CEC, 1 ARC)
2 (1 inferiores y 1 lateral), HDMI 1.4, CEC, puerto 1 ARC, puerto 2 MHL (5 VCC; 900 mA)
3 (2 inferiores y 1 lateral), HDMI 1.4, CEC, puerto 1 ARC, puerto 3
MHL (5 VCC; 900 mA)
RF (conector F para sintonizador
interno)
1 (inferior)
Componentes YPbPr más audio
estéreo
1 (inferior)
Vídeo compuesto y audio estéreo 1 (inferior) (compartido con el conector RCA Y de la entrada de componentes)
USB 1 (lateral) (USB 2.0 con capacidad de carga 0,5 A)
Salidas
Salida de audio digital (5.1)
1 (lateral)
Salida estéreo analógica (fi ja/
variable)
1 (lateral) (RCA)
Idioma OSD Inglés, Francés y Español
Requisitos de alimentación 120 VCA, 60 Hz
Consumo de energía
Energía en el modo de encendido 40 W 35 W 54 W 58W 74 W
Consumo de energía
55 W
(0,5 W en espera)
50 W
(0,5 W en espera)
75 W
(0,5 W en espera)
83W
(0.5W standby)
104 W
(0,5 W en espera)
Peso
Televisor con base
11,7 lb
5,3 kg
11,7 lb
5,3 kg
15,2 lb
6,9 kg
24,3 lb
11,0 kg
30,9 lb
14 kg
Televisor sin base
10,6 lb
4,8 kg
10,6 lb
4,8 kg
13,5 lb
6,1 kg
21,2 lb
9,6 kg
27,6 lb
12,5 kg
Dimensiones
(AN
g
AL
g
FO)
Televisor con base 28
7/16
x 18
33/64
x 6
21/32
28
7/16
x 18
33/64
x 6
21/32
34
21/32
x 22
1/64
x 8
45/64
38
1/16
x 24
3/32
x 11
17/32
42
9/16
x 26
47/64
x 11
35/64
Televisor sin base 28
7/16
x 16
55/64
x 2
31/64
28
7/16
x 16
55/64
x 2
31/64
34
21/32
x 20
23/64
x 2
31/64
38
1/16
x 22
23/64
x 2
53/64
42
9/16
x 24
59/64
x 2
19/32
Temperatura de funcionamiento 0 °C a +40 °C (+32 °F a +104 °F)
• Como parte de la política de mejora continua, SHARP se reserva el derecho a realizar cambios en el diseño y las especifi caciones sin previo aviso para mejorar el producto. Las cifras de las especifi caciones de rendimiento indicadas son
valores nominales de las unidades de producción. Puede que las unidades individuales sean ligeramente diferentes de estos valores.
• El consumo de energía en el modo de encendido se mide conforme a los requisitos del programa Energy Star para televisores.
ES
33
Especifi caciones

ES
34
• Los productos que han obtenido la homologación ENERGY STAR
®
están diseñados para proteger el medio
ambiente a través de una e ciencia energética superior.
• Fabricado con licencia de Dolby Laboratories. Dolby y el símbolo de la doble D son marcas comerciales de
Dolby Laboratories.
• Los términos HDMI, HDMI High-De nition Multimedia Interface y el logotipo de HDMI son marcas
comerciales o marcas registradas de HDMI Licensing, LLC en Estados Unidos y otros países.
• MHL, el logotipo de MHL y Mobile High-De nition Link son marcas comerciales o marcas registradas de
MHL LLC en Estados Unidos y otros países.
• MHL
TM
Información para el usuario sobre ENERGY STAR®
Ɣ3DUDREWHQHUPiVLQIRUPDFLyQDFHUFDGHOSURJUDPD(1(5*<67$5SXHGHFRQVXOWDUHOVLWLR:HE
HQHUJ\VWDUJRY
Ɣ6LGHMDHOPRGRGRPpVWLFR(1(5*<67$5RKDELOLWDIXQFLRQHVRSFLRQDOHVHOFRQVXPRGHHQHUJtD
DXPHQWDUi
Ɣ(VWHSURGXFWRXWLOL]DHOSURJUDPD(1(5*<67$5FXDQGRVHVHOHFFLRQD&DVDSDUD)iFLO
FRQILJXUDFLyQ$OHVWDEOHFHU)iFLOFRQILJXUDFLyQHQ&DVDHOWHOHYLVRUORJUDUiXQHVWDGRGH
DKRUURGHHQHUJtDSDUDXVRGRPpVWLFR
/RVSURGXFWRVTXHKDQREWHQLGRODKRPRORJDFLyQ(1(5*<67$5HVWiQ
GLVHxDGRVSDUDSURWHJHUHOPHGLRDPELHQWHDWUDYpVGHXQDHILFLHQFLD
HQHUJpWLFDVXSHULRU
Marcas comerciales
GARANTÍA LIMITADA DEL CLIENTE
SHARP ELECTRONICS CORPORATION garantiza al primer comprador consumidor que esta Pantalla de cristal líquido de la
marca Sharp (el “Producto”), cuando se envían en su caja original, no presentará defectos de fabricación ni materiales, y acepta,
según estime oportuno, reparar el defecto o cambiar el producto defectuoso o parte del mismo por uno nuevo o uno equivalente
remanufacturado sin cargo alguno para el comprador en lo que a piezas o mano de obra se refi ere durante los períodos indicados
a continuación.
Esta garantía no se aplica a ningún elemento ornamental del producto o si el número de serie o número de modelo adherido al
producto se ha quitado, desfi gurado, modifi cado, alterado o manipulado. Esta garantía no cubre los problemas de instalación
o recepción de la señal. Esta garantía limitada no se aplicará si el Producto ha sido o está siendo utilizado en un entorno o
aplicación comercial; esta garantía se aplicará únicamente si los consumidores hacen un uso doméstico y no comercial del
Producto en su casa o residencia. Si pretende utilizar el Producto o ya lo utiliza con fi nes comerciales o en un entorno comercial,
hay garantías disponibles para cubrir este tipo de uso del Producto, cuyos términos pueden variar. Póngase en contacto con
1-800-BE-SHARP para obtener más información.
Para hacer valer sus derechos contemplados en esta garantía limitada, debe seguir los pasos que se indican a continuación. Debe
proporcionar una prueba de compra al centro de servicio, que debe incluir la fecha de dicha compra.
En la medida en la que lo permita ley estatal aplicable, las garantías establecidas reemplazan y excluyen a cualquier otra garantía,
ya sea expresa o implícita. Específi camente SE EXCLUYEN TODAS LAS DEMÁS GARANTÍAS DISTINTAS A LAS ESTABLECIDAS
ANTERIORMENTE, Y SE EXCLUYEN ESPECÍFICAMENTE TODAS LAS GARANTÍAS EXPRESAS O IMPLÍCITAS, INCLUIDAS
LAS GARANTÍAS DE COMERCIALIZACIÓN, IDONEIDAD PARA EL USO E IDONEIDAD PARA UNA FINALIDAD PARTICULAR. SI,
BAJO LA LEY ESTATAL APLICABLE, LAS GARANTÍAS IMPLÍCITAS NO SE PUEDEN RECHAZAR O EXCLUIR, LA DURACIÓN DE
DICHAS GARANTÍAS IMPLÍCITAS SE LIMITARÁ A LO PERÍODO A PARTIR DE LA FECHA DE COMPRA QUE SE ESTABLECE A
CONTINUACIÓN. ESTA GARANTÍA LE PROPORCIONA DERECHOS LEGALES ESPECÍFICOS. TAMBIÉN PUEDE TENER OTROS
DERECHOS QUE PUEDEN VARIAR DE UN ESTADO A OTRO.
Las garantías proporcionadas por el presente documento son las únicas y exclusivas garantías otorgadas por Sharp, y son el único
y exclusivo remedio a disposición del comprador y solamente durante los periodos de tiempo aquí establecidos. No se permiten
otras representaciones o promesas realizadas por nadie. La corrección de defectos, en la forma y durante el período de tiempo
descrito en el presente documento, constituirá el cumplimiento completo de todas las obligaciones y responsabilidades de Sharp
hacia el comprador con respecto al Producto, y constituirá la plena satisfacción de todas las reclamaciones, ya sean por contrato,
negligencia, responsabilidad estricta o de cualquier otro tipo. Sharp no garantiza ni asume ninguna responsabilidad de ninguna forma,
por los Productos que han sido objeto de abuso (lo que incluye, sin limitación, voltaje incorrecto), accidente, mal uso, negligencia,
falta de cuidado razonable, alteración, modifi cación, manipulación, uso o mantenimiento inadecuados o cualquier daño o defecto
en el Producto causado por reparaciones o intentos de reparación realizados por cualquier persona que no sea un proveedor de
servicio autorizado de Sharp. Sharp no asumirá ninguna responsabilidad, de ninguna forma, por cualquier daño económico o material
incidental o derivado. Algunos estados no permiten limitaciones en las garantías o en remedios por incumplimiento en determinadas
transacciones; en tales estados, no se aplican los límites del presente documento.
ESTA GARANTÍA LIMITADA ES VÁLIDA ÚNICAMENTE EN LOS CINCUENTA (50) ESTADOS UNIDOS, EN EL DISTRITO DE
COLUMBIA Y EN PUERTO RICO.
ES
35
Sección específi ca del modelo
Su descripción y número de modelo de
producto:
LC-32LE551U / LC-32LE451U / LC-39LE551U / LC-43LE551U /
LC-48LE551U
Televisor en color LCD
(Asegúrese de tener esta información y la prueba de compra disponibles
cuando necesite llevar a cabo tareas de servicio en el producto.)
Período de garantía para este producto:
Un (1) año para las piezas y mano de obra a partir de la fecha de compra.
Exclusiones adicionales de la
cobertura de la garantía (si las hay):
El problema de retención de imagen provocado por una imagen fi ja mostrada
durante largos períodos de tiempo no está cubierta por esta Garantía limitada
(consulte el Manual de funcionamiento para obtener información sobre la forma de
evitar este problema).
Qué hacer para obtener servicio térmico:
Las tareas de servicio las proporciona un Centro de servicio autorizado por
Sharp en Estados Unidos. Para encontrar la ubicación del Centro de servicio
autorizado de Sharp más cercano, llame al teléfono gratuito de Sharp
1-800-BE-SHARP (1-800-237-4277). Sharp proporcionará instrucciones
sobre las opciones de servicio disponibles para su producto.
Si se va a enviar el producto para realizar tareas de servicio en él, cerciórese
de que se empaqueta de forma segura. El producto debe ser transportado
por dos personas y en el paquete original, o en un paquete que proporcione
una protección similar del producto; asimismo, asegúrese de que este está
cubierto para protegerlo contra arañazos y daños. Sharp no asumirá ninguna
responsabilidad por pérdida, robo o dirección de correo equivocada, o por
cualquier daño causado al producto durante el transporte.
Para productos que se considere que se deben reparar a domicilio, pronto
se desplazará el personal de servicio correspondiente al punto en el que se
encuentre. Si es necesario, el personal de servicio puede llevarse la unidad
para reparar a las instalaciones de servicio y devolverla una vez fi nalizadas
dicha reparación. El servicio a domicilio no está disponible en todas las
áreas y Sharp puede, según estime oportuno, proporcionar el transporte del
producto al Centro de servicio autorizado o desde este en todas las áreas.
PARA OBTENER INFORMACIÓN SOBRE EL PRODUCTOO ADQUIRIR ACCESORIOS Y GARANTÍAS EXTENDIDAS,
LLAME AL 1-800-BE-SHARP
O VISITE EL SITIO WEB
www.SharpUSA.com