Troubleshooting
How to Use
Windows 8: The Basics
Parts Description
Setup
Network / Internet
Connections
Settings
Backup / Recovery
Security
Other Operations
Notifications
VAIO User Guide
VAIO Duo 11
SVD1122
Use this manual if you encounter any problems, or have any questions about your VAIO
computer.
Read This First
Visit the VAIO support website that provides up-to-date information on your VAIO computer.
http://esupport.sony.com/US/VAIO/ (USA)
http://www.sony.ca/support/ (Canada: English)
http://fr.sony.ca/support/ (Canada: French)
http://esupport.sony.com/LA/VAIO/ (Latin American area)
http://esupport.sony.com/BR/VAIO/ (Brazil)
© 2013 Sony Corporation
1
Search

VAIO User Guide Back | Back to Top
Apps
Help and Support
Menu
Store
Display
Internet
Power
Windows
Troubleshooting
How to Use
Windows 8: The Basics
Parts Description
Setup
Network / Internet
Connections
Settings
Backup / Recovery
Security
Other Operations
Notifications
Windows 8: The Basics
© 2013 Sony Corporation
2
Search


VAIO User Guide Back | Back to Top
Audio
CD/DVD/BD
HDMI
Internet
Noise canceling headphones
Peripheral device
Speakers
VAIO computer
BLUETOOTH
Display
Headphones
LAN
Optical digital output
Power
USB
Wi-Fi
Troubleshooting
How to Use
Windows 8: The Basics
Parts Description
Setup
Network / Internet
Connections
Settings
Backup / Recovery
Security
Other Operations
Notifications
Connections
© 2013 Sony Corporation
6
Search

VAIO User Guide Back | Back to Top
Audio
Battery
CD/DVD/BD
Display
HDMI
Memory card
Menu
Optical digital output
Peripheral device
Recovery
Sensor
Speakers
Touch panel
BIOS
Button
Camera
Encryption
Keyboard
Memory module
Noise canceling headphones
Password
Power
Security
Service and support
TPM
VAIO computer
Troubleshooting
How to Use
Windows 8: The Basics
Parts Description
Setup
Network / Internet
Connections
Settings
Backup / Recovery
Security
Other Operations
Notifications
Settings
© 2013 Sony Corporation
7
Search

VAIO User Guide Back | Back to Top
BIOS
Built-in storage device
CD/DVD/BD
Recovery
Service and support
Backup
Button
Partition
Refresh
VAIO computer
Troubleshooting
How to Use
Windows 8: The Basics
Parts Description
Setup
Network / Internet
Connections
Settings
Backup / Recovery
Security
Other Operations
Notifications
Backup / Recovery
© 2013 Sony Corporation
8
Search

VAIO User Guide Back | Back to Top
BIOS
Built-in storage device
Display
Keyboard
Memory card
NFC/One-touch functions
Partition
Power
USB
Windows
Battery
Camera
Help and Support
LAN
Mouse
Optical Trackpad
Pen
Touch panel
VAIO computer
Troubleshooting
How to Use
Windows 8: The Basics
Parts Description
Setup
Network / Internet
Connections
Settings
Backup / Recovery
Security
Other Operations
Notifications
Other Operations
© 2013 Sony Corporation
10
Search

VAIO User Guide Back | Back to Top
Care and maintenance
Product registration
Security
Supplied items
Important notice
Read this first
Service and support
VAIO computer
Troubleshooting
How to Use
Windows 8: The Basics
Parts Description
Setup
Network / Internet
Connections
Settings
Backup / Recovery
Security
Other Operations
Notifications
Notifications
© 2013 Sony Corporation
11
Search

How to Use
Troubleshooting
Hardware
Apps
Network / Internet
Backup / Recovery
Security
Peripheral Devices
VAIO User Guide
VAIO Duo 11
SVD1122
Use this manual if you encounter any problems, or have any questions about your VAIO
computer.
Visit the VAIO support website that provides up-to-date information on your VAIO computer.
http://esupport.sony.com/US/VAIO/ (USA)
http://www.sony.ca/support/ (Canada: English)
http://fr.sony.ca/support/ (Canada: French)
http://esupport.sony.com/LA/VAIO/ (Latin American area)
http://esupport.sony.com/BR/VAIO/ (Brazil)
© 2013 Sony Corporation
12
Search

VAIO User Guide Back | Back to Top
Troubleshooting
How to Use
Windows 8: The Basics
Parts Description
Setup
Network / Internet
Connections
Settings
Backup / Recovery
Security
Other Operations
Notifications
Read This First
Congratulations on your purchase of this VAIO(R) computer.
About your VAIO computer’s configuration
To find out about the configuration of your VAIO computer, visit the Sony online support
website. [Details]
Some features, options, and supplied items may not be available on your VAIO computer.
Features
Available features vary depending on the model or options you selected. Not all features
described in this manual are available depending on your model.
Illustrations
Illustrations, photos, or screenshots in this manual may look slightly different depending on
the model or options you selected.
Apps
The preinstalled apps may vary depending on the model or options you selected. The apps
described in this manual may not be preinstalled on your VAIO computer.
Supplied manuals
The following manuals are supplied with your VAIO computer.
On-screen documentation
User Guide - Introduction Version [Details]
A preinstalled manual with limited information of your VAIO computer, focused on
support and Internet connection. The User Guide - Introduction Version is
replaced with a complete version of the User Guide (this manual), after update.
User Guide (this manual)
General information and operation instructions about your VAIO computer including
support and troubleshooting information
Printed documentation
Quick Start Guide
An overview of how to set up and get started with your VAIO computer
Recovery, Backup and Troubleshooting Guide
Information on how to recover and back up your VAIO computer, as well as
troubleshooting information
Safety Regulations
Read carefully before activating the wireless functions such as the wireless LAN and
BLUETOOTH technology.
13
Search

Other references
Windows Help and Support [Details]
A comprehensive resource for practical advice, tutorials, and demonstrations to help you
learn to use your VAIO computer.
App help files
App help files may be included with the preinstalled apps on your VAIO computer. You
may be able to access the help files from the help menu.
Notice
Copyright 2013 Sony Corporation. All rights reserved.
This manual and the software described herein, in whole or in part, may not be
reproduced, translated, or reduced to any machine-readable form without prior written
approval.
Sony Corporation provides no warranty with regard to this manual, the software, or other
information contained herein and hereby expressly disclaims any implied warranties or
merchantability or fitness for any particular purpose with regard to this manual, the
software, or such other information. In no event shall Sony Corporation be liable for any
incidental, consequential, or special damages, whether based on tort, contract, or
otherwise, arising out of or in connection with this manual, the software, or other
information contained herein or the use thereof.
In the manual, the (TM) or (R) marks are not specified.
Sony Corporation reserves the right to make any modification to this manual or the
information contained herein at any time without notice.
The software described herein is governed by the terms of a separate user license
agreement.
Sony Corporation is not liable and will not compensate for any lost recordings made to
your VAIO computer, external recording media, or recording devices or any relevant
losses, including when recordings are not made due to reasons including the computer
failure, or when the contents of a recording are lost or damaged as a result of the
computer failure or repair undertaken to the computer. Sony Corporation will not restore,
recover, or replicate the recorded contents made to the computer, external recording
media, or recording devices under any circumstances.
Features and specifications are subject to change without notice.
Related Topic
About Online Support Website
© 2013 Sony Corporation
14
Search

VAIO User Guide Back | Back to Top
Troubleshooting
How to Use
Windows 8: The Basics
Parts Description
Setup
Network / Internet
Connections
Settings
Backup / Recovery
Security
Other Operations
Notifications
Apps
Closing Apps
You can close currently running apps by following the instruction below.
Installing Apps from Windows Store
You can install apps from Windows Store.
Opening the App Menu
Many apps have app menus that you can use to control your app. Follow the instructions
below to open the app menu.
Searching/Starting Apps, Settings, or Files
You can search apps, files, or settings on the charms, and then start your desired apps, files,
or settings.
Switching Apps
You can switch between apps that are currently running.
Switching User Accounts
You can switch to another user account by following these steps.
Viewing Running Apps
You can view running apps by displaying the list on the Start screen. [Details]
© 2013 Sony Corporation
15
Search

VAIO User Guide Back | Back to Top
Troubleshooting
How to Use
Windows 8: The Basics
Parts Description
Setup
Network / Internet
Connections
Settings
Backup / Recovery
Security
Other Operations
Notifications
Help and Support
Opening Windows Help and Support
You can open Windows Help and Support by following these steps.
© 2013 Sony Corporation
16
Search

VAIO User Guide Back | Back to Top
Troubleshooting
How to Use
Windows 8: The Basics
Parts Description
Setup
Network / Internet
Connections
Settings
Backup / Recovery
Security
Other Operations
Notifications
Menu
About the Start Screen and Menu
You can add shortcuts to apps, the desktop, and websites that you use the most.
Opening Control Panel
You can open Control Panel by following these steps.
Opening the Charms
You can open the charms to search for apps and files, share content, play content on other
devices or print, and set up your VAIO computer.
Opening the Desktop
You can access the desktop from a tile, just like an app. Open the desktop by following the
instruction below.
© 2013 Sony Corporation
17
Search

VAIO User Guide Back | Back to Top
Troubleshooting
How to Use
Windows 8: The Basics
Parts Description
Setup
Network / Internet
Connections
Settings
Backup / Recovery
Security
Other Operations
Notifications
Store
Installing Apps from Windows Store
You can install apps from Windows Store.
Switching User Accounts
You can switch to another user account by following these steps.
© 2013 Sony Corporation
18
Search

VAIO User Guide Back | Back to Top
Troubleshooting
How to Use
Windows 8: The Basics
Parts Description
Setup
Network / Internet
Connections
Settings
Backup / Recovery
Security
Other Operations
Notifications
Display
About the Start Screen and Menu
You can add shortcuts to apps, the desktop, and websites that you use the most.
Opening the Desktop
You can access the desktop from a tile, just like an app. Open the desktop by following the
instruction below.
You might be looking for the following topics:
About the Touch Screen<Touch screen equipped models>
Adjusting the LCD Brightness Automatically
Changing the LCD Brightness
Changing the Resolution (Size) of the Screen Image
Changing the Resolution (Size) of the Screen Image on an HDMI-Connected Device
Connecting a TV with an HDMI Input Port
Connecting an External Display or Projector
Enlarging the Text Size (DPI)<Touch screen equipped models>
How to Use the Touch Screen<Touch screen equipped models>
Notes on Using the Touch Screen<Touch screen equipped models>
Notes on the LCD screen
Raising the LCD Screen
Selecting Display Modes
Using the Multiple Monitors Function
© 2013 Sony Corporation
19
Search

VAIO User Guide Back | Back to Top
Troubleshooting
How to Use
Windows 8: The Basics
Parts Description
Setup
Network / Internet
Connections
Settings
Backup / Recovery
Security
Other Operations
Notifications
Internet
Installing Apps from Windows Store
You can install apps from Windows Store.
You might be looking for the following topics:
About a Security Key for Wi-Fi(R) (Wireless LAN)
About the Internet Connection Services
About the Network (LAN)
About the Wi-Fi(R) (Wireless LAN) Standards
Connecting to the Internet with a Wired Connection
Disabling the Wi-Fi(R) (Wireless LAN) Function
Notes on Using the Wi-Fi(R) (Wireless LAN) Function
Starting Wi-Fi(R) (Wireless LAN) Communications
Stopping Wi-Fi(R) (Wireless LAN) Communications
Using the Antivirus App for Your VAIO Computer
© 2013 Sony Corporation
20
Search

VAIO User Guide Back | Back to Top
Troubleshooting
How to Use
Windows 8: The Basics
Parts Description
Setup
Network / Internet
Connections
Settings
Backup / Recovery
Security
Other Operations
Notifications
Power
Entering Sleep Mode, Shutting Down, or Restarting
You can place your VAIO computer into Sleep mode or shut down/restart the computer by
following these steps.
You might be looking for the following topics:
Changing the Rapid Wake (Sleep Mode) Settings
Charge Indicator Status List
Charging the Battery Pack
Connecting a Power Source
Notes on Sleep Mode
Notes on Using the Power Source
Notes on an Extended Battery Pack
Restarting Your VAIO Computer
Selecting a Power Plan
Shutting Down Your VAIO Computer
Turning on Your VAIO Computer
Using Sleep Mode
© 2013 Sony Corporation
21
Search

VAIO User Guide Back | Back to Top
Troubleshooting
How to Use
Windows 8: The Basics
Parts Description
Setup
Network / Internet
Connections
Settings
Backup / Recovery
Security
Other Operations
Notifications
Windows
Opening Windows Help and Support
You can open Windows Help and Support by following these steps.
© 2013 Sony Corporation
22
Search
VAIO User Guide Back | Back to Top
Troubleshooting
How to Use
Windows 8: The Basics
Parts Description
Setup
Network / Internet
Connections
Settings
Backup / Recovery
Security
Other Operations
Notifications
VAIO computer
Parts and Controls on the Back
Describes the features on the back of the VAIO computer, such as connection ports.
Parts and Controls on the Bottom
Describes the features on the bottom of the VAIO computer.
Parts and Controls on the Front
Describes the features on the front of the VAIO computer, such as buttons and indicator
lights.
Parts and Controls on the Sides
Describes the features on the sides of the VAIO computer, such as connection ports.
You might be looking for the following topics:
About the ASSIST Button
Booting Your VAIO Computer from External Devices
Checking Supplied Items
Customizing Your VAIO Computer
Keeping Your VAIO Computer in Optimum Condition (VAIO Care)
Raising the LCD Screen
Restricting the Use of Built-in Devices
Setting Up an Appropriate Work Environment
Updating Your VAIO Computer
Using VAIO Update
Using the LAN Port
Using the Tilt Feet
Viewing the System Information
© 2013 Sony Corporation
23
Search

VAIO User Guide Back | Back to Top
Troubleshooting
How to Use
Windows 8: The Basics
Parts Description
Setup
Network / Internet
Connections
Settings
Backup / Recovery
Security
Other Operations
Notifications
Battery
Charging the Battery Pack
The battery pack can be charged even while you are using your VAIO computer when the
computer is connected to a power source.
You might be looking for the following topics:
Changing the Rapid Wake (Sleep Mode) Settings
Charge Indicator Status List
Checking the Battery Charge Capacity
Extending the Battery Life
Notes on Using the Battery Pack
Notes on an Extended Battery Pack
© 2013 Sony Corporation
24
Search

VAIO User Guide Back | Back to Top
Troubleshooting
How to Use
Windows 8: The Basics
Parts Description
Setup
Network / Internet
Connections
Settings
Backup / Recovery
Security
Other Operations
Notifications
Keyboard
Raising the LCD Screen
To use the keyboard, you need to raise the LCD screen.
You might be looking for the following topics:
Changing the Keyboard Backlight Settings<Keyboard backlight equipped models>
Combinations and Functions with the Fn Key
Entering Characters with Touch Screen Operations<Touch screen equipped models>
© 2013 Sony Corporation
25
Search

VAIO User Guide Back | Back to Top
Troubleshooting
How to Use
Windows 8: The Basics
Parts Description
Setup
Network / Internet
Connections
Settings
Backup / Recovery
Security
Other Operations
Notifications
Supplied items
Checking Supplied Items
Check all items packed with the product before use.
© 2013 Sony Corporation
26
Search

VAIO User Guide Back | Back to Top
Troubleshooting
How to Use
Windows 8: The Basics
Parts Description
Setup
Network / Internet
Connections
Settings
Backup / Recovery
Security
Other Operations
Notifications
Display
Raising the LCD Screen
To use the keyboard, you need to raise the LCD screen.
You might be looking for the following topics:
About the Start Screen and Menu
About the Touch Screen<Touch screen equipped models>
Adjusting the LCD Brightness Automatically
Changing the LCD Brightness
Changing the Resolution (Size) of the Screen Image
Changing the Resolution (Size) of the Screen Image on an HDMI-Connected Device
Connecting a TV with an HDMI Input Port
Connecting an External Display or Projector
Enlarging the Text Size (DPI)<Touch screen equipped models>
How to Use the Touch Screen<Touch screen equipped models>
Notes on Using the Touch Screen<Touch screen equipped models>
Notes on the LCD screen
Opening the Desktop
Selecting Display Modes
Using the Multiple Monitors Function
© 2013 Sony Corporation
27
Search
VAIO User Guide Back | Back to Top
Troubleshooting
How to Use
Windows 8: The Basics
Parts Description
Setup
Network / Internet
Connections
Settings
Backup / Recovery
Security
Other Operations
Notifications
Power
Charging the Battery Pack
The battery pack can be charged even while you are using your VAIO computer when the
computer is connected to a power source.
Connecting a Power Source
Connect your VAIO computer to an AC power source. Carefully read the precautions in
Notes on Using the Power Source before connection. [Details]
Shutting Down Your VAIO Computer
Properly shut down your VAIO computer to avoid losing unsaved data.
Turning on Your VAIO Computer
Turn on your VAIO computer to start Windows. Carefully read the precautions in Notes on
Using the Power Source before turning on. [Details]
You might be looking for the following topics:
Changing the Rapid Wake (Sleep Mode) Settings
Charge Indicator Status List
Entering Sleep Mode, Shutting Down, or Restarting
Notes on Sleep Mode
Notes on Using the Power Source
Notes on an Extended Battery Pack
Restarting Your VAIO Computer
Selecting a Power Plan
Using Sleep Mode
© 2013 Sony Corporation
28
Search

VAIO User Guide Back | Back to Top
Troubleshooting
How to Use
Windows 8: The Basics
Parts Description
Setup
Network / Internet
Connections
Settings
Backup / Recovery
Security
Other Operations
Notifications
VAIO computer
Checking Supplied Items
Check all items packed with the product before use.
Raising the LCD Screen
To use the keyboard, you need to raise the LCD screen.
Setting Up an Appropriate Work Environment
This topic describes where to or not to place your VAIO computer and ergonomic
instructions.
Using the Tilt Feet
When using a LAN port [Details] or monitor port [Details], unfold the tilt feet.
You might be looking for the following topics:
About the ASSIST Button
Booting Your VAIO Computer from External Devices
Customizing Your VAIO Computer
Keeping Your VAIO Computer in Optimum Condition (VAIO Care)
Parts and Controls on the Back
Parts and Controls on the Bottom
Parts and Controls on the Front
Parts and Controls on the Sides
Restricting the Use of Built-in Devices
Updating Your VAIO Computer
Using VAIO Update
Using the LAN Port
Viewing the System Information
© 2013 Sony Corporation
29
Search

VAIO User Guide Back | Back to Top
Troubleshooting
How to Use
Windows 8: The Basics
Parts Description
Setup
Network / Internet
Connections
Settings
Backup / Recovery
Security
Other Operations
Notifications
Apps
Installing Apps from Windows Store
You can install apps from Windows Store.
You might be looking for the following topics:
Closing Apps
Opening the App Menu
Searching/Starting Apps, Settings, or Files
Switching Apps
Switching User Accounts
Viewing Running Apps
© 2013 Sony Corporation
30
Search

VAIO User Guide Back | Back to Top
Troubleshooting
How to Use
Windows 8: The Basics
Parts Description
Setup
Network / Internet
Connections
Settings
Backup / Recovery
Security
Other Operations
Notifications
LAN
About the Internet Connection Services
The following types of Internet connection services are available.
About the Network (LAN)
The network (LAN) enables you to connect your VAIO computer to the Internet and transfer
data between the computer and other devices.
About the Wi-Fi(R) (Wireless LAN) Standards
Wi-Fi allows your VAIO computer to connect to a network through a wireless connection.
Connecting to the Internet with a Wired Connection
Before using the Internet, you need to sign up with an Internet Service Provider (ISP) and
set up devices required for connecting your VAIO computer to the Internet.
You might be looking for the following topics:
Using the LAN Port
© 2013 Sony Corporation
31
Search

VAIO User Guide Back | Back to Top
Troubleshooting
How to Use
Windows 8: The Basics
Parts Description
Setup
Network / Internet
Connections
Settings
Backup / Recovery
Security
Other Operations
Notifications
Wi-Fi
About a Security Key for Wi-Fi(R) (Wireless LAN)
A security key is a security protocol for a wireless LAN that encrypts data transmitted on the
wireless LAN.
About the Internet Connection Services
The following types of Internet connection services are available.
About the Wi-Fi(R) (Wireless LAN) Standards
Wi-Fi allows your VAIO computer to connect to a network through a wireless connection.
Disabling the Wi-Fi(R) (Wireless LAN) Function
You can disable the Wi-Fi function by following these steps.
Notes on Using the Wi-Fi(R) (Wireless LAN) Function
Before using the Wi-Fi function, read the following precautions for correct use.
Starting Wi-Fi(R) (Wireless LAN) Communications
You can establish Wi-Fi communications between your VAIO computer and an access point
(not supplied).
Stopping Wi-Fi(R) (Wireless LAN) Communications
You can stop Wi-Fi communications by following these steps.
© 2013 Sony Corporation
32
Search

VAIO User Guide Back | Back to Top
Troubleshooting
How to Use
Windows 8: The Basics
Parts Description
Setup
Network / Internet
Connections
Settings
Backup / Recovery
Security
Other Operations
Notifications
Internet
About a Security Key for Wi-Fi(R) (Wireless LAN)
A security key is a security protocol for a wireless LAN that encrypts data transmitted on the
wireless LAN.
About the Internet Connection Services
The following types of Internet connection services are available.
About the Network (LAN)
The network (LAN) enables you to connect your VAIO computer to the Internet and transfer
data between the computer and other devices.
About the Wi-Fi(R) (Wireless LAN) Standards
Wi-Fi allows your VAIO computer to connect to a network through a wireless connection.
Connecting to the Internet with a Wired Connection
Before using the Internet, you need to sign up with an Internet Service Provider (ISP) and
set up devices required for connecting your VAIO computer to the Internet.
Disabling the Wi-Fi(R) (Wireless LAN) Function
You can disable the Wi-Fi function by following these steps.
Installing Apps from Windows Store
You can install apps from Windows Store.
Notes on Using the Wi-Fi(R) (Wireless LAN) Function
Before using the Wi-Fi function, read the following precautions for correct use.
Starting Wi-Fi(R) (Wireless LAN) Communications
You can establish Wi-Fi communications between your VAIO computer and an access point
(not supplied).
Stopping Wi-Fi(R) (Wireless LAN) Communications
You can stop Wi-Fi communications by following these steps.
Using the Antivirus App for Your VAIO Computer
Protect your VAIO computer against computer viruses by using the antivirus app.
© 2013 Sony Corporation
33
Search

VAIO User Guide Back | Back to Top
Troubleshooting
How to Use
Windows 8: The Basics
Parts Description
Setup
Network / Internet
Connections
Settings
Backup / Recovery
Security
Other Operations
Notifications
Store
Installing Apps from Windows Store
You can install apps from Windows Store.
You might be looking for the following topics:
Switching User Accounts
© 2013 Sony Corporation
34
Search

VAIO User Guide Back | Back to Top
Troubleshooting
How to Use
Windows 8: The Basics
Parts Description
Setup
Network / Internet
Connections
Settings
Backup / Recovery
Security
Other Operations
Notifications
Audio
Changing the Sound Output Device
If there is no sound coming from an external device connected to your VAIO computer, you
need to change the device for sound output.
Connecting External Speakers or Headphones
You can connect external sound output devices (such as speakers or headphones) to your
VAIO computer.
Connecting a High-Quality Digital Sound Output Device between Your VAIO
Computer and a TV
You can connect a high-quality home theater receiver or other surround sound decoder
devices between your VAIO computer and a TV using an HDMI connection.
Connecting the Noise Canceling Headphones<Noise canceling headphones
supplied models>
You can enjoy music by connecting the noise canceling headphones which reduce ambient
noise to your VAIO computer.
Notes on Using the Noise Canceling Headphones<Noise canceling
headphones supplied models>
Before using the noise canceling headphones, read the following precautions for correct use.
You might be looking for the following topics:
Adjusting the Speakers Volume
Adjusting the Volume in Windows
© 2013 Sony Corporation
35
Search

VAIO User Guide Back | Back to Top
Troubleshooting
How to Use
Windows 8: The Basics
Parts Description
Setup
Network / Internet
Connections
Settings
Backup / Recovery
Security
Other Operations
Notifications
CD/DVD/BD
Connecting an External Drive
Connect an external disc drive or hard disk drive to a USB port on your VAIO computer.
You might be looking for the following topics:
Booting Your VAIO Computer from External Devices
Restricting the Use of Built-in Devices
© 2013 Sony Corporation
36
Search

VAIO User Guide Back | Back to Top
Troubleshooting
How to Use
Windows 8: The Basics
Parts Description
Setup
Network / Internet
Connections
Settings
Backup / Recovery
Security
Other Operations
Notifications
HDMI
Changing the Resolution (Size) of the Screen Image on an HDMI-Connected
Device
You can change the screen resolution or size of your VAIO computer’s screen image
displayed on an external display, such as a TV, connected to the computer with an HDMI
cable (not supplied).
Connecting a TV with an HDMI Input Port
You can connect a TV with an HDMI input port to your VAIO computer with an HDMI cable
(not supplied).
© 2013 Sony Corporation
37
Search
VAIO User Guide Back | Back to Top
Troubleshooting
How to Use
Windows 8: The Basics
Parts Description
Setup
Network / Internet
Connections
Settings
Backup / Recovery
Security
Other Operations
Notifications
Internet
About a Security Key for Wi-Fi(R) (Wireless LAN)
A security key is a security protocol for a wireless LAN that encrypts data transmitted on the
wireless LAN.
About the Internet Connection Services
The following types of Internet connection services are available.
About the Network (LAN)
The network (LAN) enables you to connect your VAIO computer to the Internet and transfer
data between the computer and other devices.
About the Wi-Fi(R) (Wireless LAN) Standards
Wi-Fi allows your VAIO computer to connect to a network through a wireless connection.
Connecting to the Internet with a Wired Connection
Before using the Internet, you need to sign up with an Internet Service Provider (ISP) and
set up devices required for connecting your VAIO computer to the Internet.
Disabling the Wi-Fi(R) (Wireless LAN) Function
You can disable the Wi-Fi function by following these steps.
Notes on Using the Wi-Fi(R) (Wireless LAN) Function
Before using the Wi-Fi function, read the following precautions for correct use.
Starting Wi-Fi(R) (Wireless LAN) Communications
You can establish Wi-Fi communications between your VAIO computer and an access point
(not supplied).
Stopping Wi-Fi(R) (Wireless LAN) Communications
You can stop Wi-Fi communications by following these steps.
Using the Antivirus App for Your VAIO Computer
Protect your VAIO computer against computer viruses by using the antivirus app.
You might be looking for the following topics:
Installing Apps from Windows Store
© 2013 Sony Corporation
38
Search

VAIO User Guide Back | Back to Top
Troubleshooting
How to Use
Windows 8: The Basics
Parts Description
Setup
Network / Internet
Connections
Settings
Backup / Recovery
Security
Other Operations
Notifications
Noise canceling headphones
Connecting the Noise Canceling Headphones<Noise canceling headphones
supplied models>
You can enjoy music by connecting the noise canceling headphones which reduce ambient
noise to your VAIO computer.
Notes on Using the Noise Canceling Headphones<Noise canceling
headphones supplied models>
Before using the noise canceling headphones, read the following precautions for correct use.
© 2013 Sony Corporation
39
Search

VAIO User Guide Back | Back to Top
Troubleshooting
How to Use
Windows 8: The Basics
Parts Description
Setup
Network / Internet
Connections
Settings
Backup / Recovery
Security
Other Operations
Notifications
Peripheral device
Changing the Sound Output Device
If there is no sound coming from an external device connected to your VAIO computer, you
need to change the device for sound output.
Connecting a High-Quality Digital Sound Output Device between Your VAIO
Computer and a TV
You can connect a high-quality home theater receiver or other surround sound decoder
devices between your VAIO computer and a TV using an HDMI connection.
Connecting a TV with an HDMI Input Port
You can connect a TV with an HDMI input port to your VAIO computer with an HDMI cable
(not supplied).
Connecting an External Display or Projector
You can connect an external display (such as a computer display or a projector) to your
VAIO computer with a display cable (not supplied).
Notes on the LCD screen
Read the following precautions for correct use of the LCD screen.
Selecting Display Modes
You can switch the display output between the computer screen and an external display
connected to your VAIO computer.
Using the Multiple Monitors Function
The Multiple Monitors function allows you to distribute portions of your desktop across
separate displays.
© 2013 Sony Corporation
40
Search

VAIO User Guide Back | Back to Top
Troubleshooting
How to Use
Windows 8: The Basics
Parts Description
Setup
Network / Internet
Connections
Settings
Backup / Recovery
Security
Other Operations
Notifications
Speakers
Connecting External Speakers or Headphones
You can connect external sound output devices (such as speakers or headphones) to your
VAIO computer.
You might be looking for the following topics:
Adjusting the Speakers Volume
© 2013 Sony Corporation
41
Search

VAIO User Guide Back | Back to Top
Troubleshooting
How to Use
Windows 8: The Basics
Parts Description
Setup
Network / Internet
Connections
Settings
Backup / Recovery
Security
Other Operations
Notifications
VAIO computer
Using the LAN Port
Before connecting a LAN cable to the LAN port, pull the port cover down as illustrated below.
You might be looking for the following topics:
About the ASSIST Button
Booting Your VAIO Computer from External Devices
Checking Supplied Items
Customizing Your VAIO Computer
Keeping Your VAIO Computer in Optimum Condition (VAIO Care)
Parts and Controls on the Back
Parts and Controls on the Bottom
Parts and Controls on the Front
Parts and Controls on the Sides
Raising the LCD Screen
Restricting the Use of Built-in Devices
Setting Up an Appropriate Work Environment
Updating Your VAIO Computer
Using VAIO Update
Using the Tilt Feet
Viewing the System Information
© 2013 Sony Corporation
42
Search

VAIO User Guide Back | Back to Top
Troubleshooting
How to Use
Windows 8: The Basics
Parts Description
Setup
Network / Internet
Connections
Settings
Backup / Recovery
Security
Other Operations
Notifications
BLUETOOTH
About BLUETOOTH(R) Security
The BLUETOOTH wireless technology has an authentication function, which allows you to
control communication with other devices.
About the BLUETOOTH(R) Function
You can establish wireless communications between your VAIO computer and other
BLUETOOTH devices, such as another computer, a smartphone, a mobile phone, a headset,
or a mouse.
Communicating with Another BLUETOOTH(R) Device such as a Mouse
You can connect BLUETOOTH devices to your VAIO computer.
Notes on Using the BLUETOOTH(R) Function
Before using the BLUETOOTH function, read the following precautions for correct use.
Stopping BLUETOOTH(R) Communications
You can stop BLUETOOTH communications by following these steps.
© 2013 Sony Corporation
43
Search
VAIO User Guide Back | Back to Top
Troubleshooting
How to Use
Windows 8: The Basics
Parts Description
Setup
Network / Internet
Connections
Settings
Backup / Recovery
Security
Other Operations
Notifications
Display
Changing the Resolution (Size) of the Screen Image on an HDMI-Connected
Device
You can change the screen resolution or size of your VAIO computer’s screen image
displayed on an external display, such as a TV, connected to the computer with an HDMI
cable (not supplied).
Connecting a TV with an HDMI Input Port
You can connect a TV with an HDMI input port to your VAIO computer with an HDMI cable
(not supplied).
Connecting an External Display or Projector
You can connect an external display (such as a computer display or a projector) to your
VAIO computer with a display cable (not supplied).
Notes on the LCD screen
Read the following precautions for correct use of the LCD screen.
Selecting Display Modes
You can switch the display output between the computer screen and an external display
connected to your VAIO computer.
Using the Multiple Monitors Function
The Multiple Monitors function allows you to distribute portions of your desktop across
separate displays.
You might be looking for the following topics:
About the Start Screen and Menu
About the Touch Screen<Touch screen equipped models>
Adjusting the LCD Brightness Automatically
Changing the LCD Brightness
Changing the Resolution (Size) of the Screen Image
Enlarging the Text Size (DPI)<Touch screen equipped models>
How to Use the Touch Screen<Touch screen equipped models>
Notes on Using the Touch Screen<Touch screen equipped models>
Opening the Desktop
Raising the LCD Screen
© 2013 Sony Corporation
44
Search

VAIO User Guide Back | Back to Top
Troubleshooting
How to Use
Windows 8: The Basics
Parts Description
Setup
Network / Internet
Connections
Settings
Backup / Recovery
Security
Other Operations
Notifications
Headphones
Connecting External Speakers or Headphones
You can connect external sound output devices (such as speakers or headphones) to your
VAIO computer.
© 2013 Sony Corporation
45
Search
VAIO User Guide Back | Back to Top
Troubleshooting
How to Use
Windows 8: The Basics
Parts Description
Setup
Network / Internet
Connections
Settings
Backup / Recovery
Security
Other Operations
Notifications
LAN
About the Internet Connection Services
The following types of Internet connection services are available.
About the Network (LAN)
The network (LAN) enables you to connect your VAIO computer to the Internet and transfer
data between the computer and other devices.
About the Wi-Fi(R) (Wireless LAN) Standards
Wi-Fi allows your VAIO computer to connect to a network through a wireless connection.
Connecting to the Internet with a Wired Connection
Before using the Internet, you need to sign up with an Internet Service Provider (ISP) and
set up devices required for connecting your VAIO computer to the Internet.
Using the LAN Port
Before connecting a LAN cable to the LAN port, pull the port cover down as illustrated below.
© 2013 Sony Corporation
46
Search

VAIO User Guide Back | Back to Top
Troubleshooting
How to Use
Windows 8: The Basics
Parts Description
Setup
Network / Internet
Connections
Settings
Backup / Recovery
Security
Other Operations
Notifications
Optical digital output
Connecting a High-Quality Digital Sound Output Device between Your VAIO
Computer and a TV
You can connect a high-quality home theater receiver or other surround sound decoder
devices between your VAIO computer and a TV using an HDMI connection.
© 2013 Sony Corporation
47
Search

VAIO User Guide Back | Back to Top
Troubleshooting
How to Use
Windows 8: The Basics
Parts Description
Setup
Network / Internet
Connections
Settings
Backup / Recovery
Security
Other Operations
Notifications
Power
Connecting a Power Source
Connect your VAIO computer to an AC power source. Carefully read the precautions in
Notes on Using the Power Source before connection. [Details]
You might be looking for the following topics:
Changing the Rapid Wake (Sleep Mode) Settings
Charge Indicator Status List
Charging the Battery Pack
Entering Sleep Mode, Shutting Down, or Restarting
Notes on Sleep Mode
Notes on Using the Power Source
Notes on an Extended Battery Pack
Restarting Your VAIO Computer
Selecting a Power Plan
Shutting Down Your VAIO Computer
Turning on Your VAIO Computer
Using Sleep Mode
© 2013 Sony Corporation
48
Search
VAIO User Guide Back | Back to Top
Troubleshooting
How to Use
Windows 8: The Basics
Parts Description
Setup
Network / Internet
Connections
Settings
Backup / Recovery
Security
Other Operations
Notifications
USB
Charging a USB Device
You can charge a USB device even while your VAIO computer is off, in Hibernate mode, or
Sleep mode by enabling the USB charging settings.
Connecting a USB Device
You can connect a Universal Serial Bus (USB) device such as a mouse, floppy disk drive,
speaker or printer to your VAIO computer.
© 2013 Sony Corporation
49
Search

VAIO User Guide Back | Back to Top
Troubleshooting
How to Use
Windows 8: The Basics
Parts Description
Setup
Network / Internet
Connections
Settings
Backup / Recovery
Security
Other Operations
Notifications
Wi-Fi
About a Security Key for Wi-Fi(R) (Wireless LAN)
A security key is a security protocol for a wireless LAN that encrypts data transmitted on the
wireless LAN.
About the Internet Connection Services
The following types of Internet connection services are available.
About the Wi-Fi(R) (Wireless LAN) Standards
Wi-Fi allows your VAIO computer to connect to a network through a wireless connection.
Disabling the Wi-Fi(R) (Wireless LAN) Function
You can disable the Wi-Fi function by following these steps.
Notes on Using the Wi-Fi(R) (Wireless LAN) Function
Before using the Wi-Fi function, read the following precautions for correct use.
Starting Wi-Fi(R) (Wireless LAN) Communications
You can establish Wi-Fi communications between your VAIO computer and an access point
(not supplied).
Stopping Wi-Fi(R) (Wireless LAN) Communications
You can stop Wi-Fi communications by following these steps.
© 2013 Sony Corporation
50
Search

VAIO User Guide Back | Back to Top
Troubleshooting
How to Use
Windows 8: The Basics
Parts Description
Setup
Network / Internet
Connections
Settings
Backup / Recovery
Security
Other Operations
Notifications
Audio
Adjusting the Speakers Volume
You can change the volume level of the speakers and headphones.
Adjusting the Volume in Windows
You can adjust the volume on each device and app from Control Panel.
Changing the Sound Output Device
If there is no sound coming from an external device connected to your VAIO computer, you
need to change the device for sound output.
Connecting a High-Quality Digital Sound Output Device between Your VAIO
Computer and a TV
You can connect a high-quality home theater receiver or other surround sound decoder
devices between your VAIO computer and a TV using an HDMI connection.
Notes on Using the Noise Canceling Headphones<Noise canceling
headphones supplied models>
Before using the noise canceling headphones, read the following precautions for correct use.
You might be looking for the following topics:
Connecting External Speakers or Headphones
Connecting the Noise Canceling Headphones<Noise canceling headphones supplied
models>
© 2013 Sony Corporation
51
Search

VAIO User Guide Back | Back to Top
Troubleshooting
How to Use
Windows 8: The Basics
Parts Description
Setup
Network / Internet
Connections
Settings
Backup / Recovery
Security
Other Operations
Notifications
Battery
Notes on Using the Battery Pack
Before using the battery pack, read the following precautions for correct use.
You might be looking for the following topics:
Changing the Rapid Wake (Sleep Mode) Settings
Charge Indicator Status List
Charging the Battery Pack
Checking the Battery Charge Capacity
Extending the Battery Life
Notes on an Extended Battery Pack
© 2013 Sony Corporation
52
Search

VAIO User Guide Back | Back to Top
Troubleshooting
How to Use
Windows 8: The Basics
Parts Description
Setup
Network / Internet
Connections
Settings
Backup / Recovery
Security
Other Operations
Notifications
CD/DVD/BD
Booting Your VAIO Computer from External Devices
You can boot your VAIO computer from external devices, such as an optical disc drive, a
USB floppy disk drive, or a USB flash drive by using the BIOS function.
Restricting the Use of Built-in Devices
The BIOS function enables you to disable the built-in devices such as those listed below.
You can use this function to prohibit external connections and communications
You might be looking for the following topics:
Connecting an External Drive
© 2013 Sony Corporation
53
Search

VAIO User Guide Back | Back to Top
Troubleshooting
How to Use
Windows 8: The Basics
Parts Description
Setup
Network / Internet
Connections
Settings
Backup / Recovery
Security
Other Operations
Notifications
Display
Adjusting the LCD Brightness Automatically
Your VAIO computer measures ambient light intensity to adjust the LCD brightness
automatically.
Changing the LCD Brightness
You can adjust the LCD brightness.
Changing the Resolution (Size) of the Screen Image
You can change the screen resolution to adjust the size of the characters and images on the
computer screen.
Changing the Resolution (Size) of the Screen Image on an HDMI-Connected
Device
You can change the screen resolution or size of your VAIO computer’s screen image
displayed on an external display, such as a TV, connected to the computer with an HDMI
cable (not supplied).
Connecting a TV with an HDMI Input Port
You can connect a TV with an HDMI input port to your VAIO computer with an HDMI cable
(not supplied).
Connecting an External Display or Projector
You can connect an external display (such as a computer display or a projector) to your
VAIO computer with a display cable (not supplied).
Enlarging the Text Size (DPI)<Touch screen equipped models>
Changing the DPI to enlarge the text and icon size enables you to operate the touch screen
easier.
How to Use the Touch Screen<Touch screen equipped models>
You can tap the touch screen or make a simple motion with your fingers to operate your
VAIO computer.
Notes on Using the Touch Screen<Touch screen equipped models>
Before using the touch screen, read the following precautions for correct use.
Notes on the LCD screen
Read the following precautions for correct use of the LCD screen.
Selecting Display Modes
You can switch the display output between the computer screen and an external display
connected to your VAIO computer.
Using the Multiple Monitors Function
The Multiple Monitors function allows you to distribute portions of your desktop across
separate displays.
You might be looking for the following topics:
About the Start Screen and Menu
About the Touch Screen<Touch screen equipped models>
54
Search


VAIO User Guide Back | Back to Top
Troubleshooting
How to Use
Windows 8: The Basics
Parts Description
Setup
Network / Internet
Connections
Settings
Backup / Recovery
Security
Other Operations
Notifications
HDMI
Changing the Resolution (Size) of the Screen Image on an HDMI-Connected
Device
You can change the screen resolution or size of your VAIO computer’s screen image
displayed on an external display, such as a TV, connected to the computer with an HDMI
cable (not supplied).
Connecting a TV with an HDMI Input Port
You can connect a TV with an HDMI input port to your VAIO computer with an HDMI cable
(not supplied).
© 2013 Sony Corporation
56
Search

VAIO User Guide Back | Back to Top
Troubleshooting
How to Use
Windows 8: The Basics
Parts Description
Setup
Network / Internet
Connections
Settings
Backup / Recovery
Security
Other Operations
Notifications
Memory card
Restricting the Use of Built-in Devices
The BIOS function enables you to disable the built-in devices such as those listed below.
You can use this function to prohibit external connections and communications
You might be looking for the following topics:
About “Memory Stick”
Compatible “Memory Stick”
Formatting “Memory Stick”
Inserting SD Memory Cards
Inserting “Memory Stick”
Notes on Using SD Memory Cards
Notes on Using “Memory Stick”
Removing SD Memory Cards
Removing “Memory Stick”
© 2013 Sony Corporation
57
Search

VAIO User Guide Back | Back to Top
Troubleshooting
How to Use
Windows 8: The Basics
Parts Description
Setup
Network / Internet
Connections
Settings
Backup / Recovery
Security
Other Operations
Notifications
Menu
Opening Control Panel
You can open Control Panel by following these steps.
You might be looking for the following topics:
About the Start Screen and Menu
Opening the Charms
Opening the Desktop
© 2013 Sony Corporation
58
Search

VAIO User Guide Back | Back to Top
Troubleshooting
How to Use
Windows 8: The Basics
Parts Description
Setup
Network / Internet
Connections
Settings
Backup / Recovery
Security
Other Operations
Notifications
Optical digital output
Connecting a High-Quality Digital Sound Output Device between Your VAIO
Computer and a TV
You can connect a high-quality home theater receiver or other surround sound decoder
devices between your VAIO computer and a TV using an HDMI connection.
© 2013 Sony Corporation
59
Search
VAIO User Guide Back | Back to Top
Troubleshooting
How to Use
Windows 8: The Basics
Parts Description
Setup
Network / Internet
Connections
Settings
Backup / Recovery
Security
Other Operations
Notifications
Peripheral device
Changing the Sound Output Device
If there is no sound coming from an external device connected to your VAIO computer, you
need to change the device for sound output.
Connecting a High-Quality Digital Sound Output Device between Your VAIO
Computer and a TV
You can connect a high-quality home theater receiver or other surround sound decoder
devices between your VAIO computer and a TV using an HDMI connection.
Connecting a TV with an HDMI Input Port
You can connect a TV with an HDMI input port to your VAIO computer with an HDMI cable
(not supplied).
Connecting an External Display or Projector
You can connect an external display (such as a computer display or a projector) to your
VAIO computer with a display cable (not supplied).
Notes on the LCD screen
Read the following precautions for correct use of the LCD screen.
Selecting Display Modes
You can switch the display output between the computer screen and an external display
connected to your VAIO computer.
Using the Multiple Monitors Function
The Multiple Monitors function allows you to distribute portions of your desktop across
separate displays.
© 2013 Sony Corporation
60
Search

VAIO User Guide Back | Back to Top
Troubleshooting
How to Use
Windows 8: The Basics
Parts Description
Setup
Network / Internet
Connections
Settings
Backup / Recovery
Security
Other Operations
Notifications
Recovery
About the ASSIST Button
Press the ASSIST button to perform regular maintenance of your VAIO computer or to solve
problems you might encounter when using the computer.
You might be looking for the following topics:
About Recovery
Checking the Volume of the Recovery Area
Creating Recovery Media
Notes on Recovery
Recovering from Recovery Media
Recovering from the Recovery Area
Refreshing Your VAIO Computer
Removing Recovery Content to Free up Disk Space
© 2013 Sony Corporation
61
Search

VAIO User Guide Back | Back to Top
Troubleshooting
How to Use
Windows 8: The Basics
Parts Description
Setup
Network / Internet
Connections
Settings
Backup / Recovery
Security
Other Operations
Notifications
Sensor
About Built-In Sensors
A built-in accelerometer, digital compass (magnetometer), and gyro sensor enable you to
use the following functions.
Notes on Built-In Sensors
Before using built-in sensors, read the following precautions for correct use.
© 2013 Sony Corporation
62
Search

VAIO User Guide Back | Back to Top
Troubleshooting
How to Use
Windows 8: The Basics
Parts Description
Setup
Network / Internet
Connections
Settings
Backup / Recovery
Security
Other Operations
Notifications
Speakers
Adjusting the Speakers Volume
You can change the volume level of the speakers and headphones.
You might be looking for the following topics:
Connecting External Speakers or Headphones
© 2013 Sony Corporation
63
Search

VAIO User Guide Back | Back to Top
Troubleshooting
How to Use
Windows 8: The Basics
Parts Description
Setup
Network / Internet
Connections
Settings
Backup / Recovery
Security
Other Operations
Notifications
Touch panel
Enlarging the Text Size (DPI)<Touch screen equipped models>
Changing the DPI to enlarge the text and icon size enables you to operate the touch screen
easier.
How to Use the Touch Screen<Touch screen equipped models>
You can tap the touch screen or make a simple motion with your fingers to operate your
VAIO computer.
Notes on Using the Touch Screen<Touch screen equipped models>
Before using the touch screen, read the following precautions for correct use.
You might be looking for the following topics:
About the Touch Screen<Touch screen equipped models>
Clipping an Image Displayed on the Computer Screen (Active Clip)
Entering Characters with Touch Screen Operations<Touch screen equipped models>
© 2013 Sony Corporation
64
Search

VAIO User Guide Back | Back to Top
Troubleshooting
How to Use
Windows 8: The Basics
Parts Description
Setup
Network / Internet
Connections
Settings
Backup / Recovery
Security
Other Operations
Notifications
BIOS
About the ASSIST Button
Press the ASSIST button to perform regular maintenance of your VAIO computer or to solve
problems you might encounter when using the computer.
Booting Your VAIO Computer from External Devices
You can boot your VAIO computer from external devices, such as an optical disc drive, a
USB floppy disk drive, or a USB flash drive by using the BIOS function.
Removing the Power-on Password
If power-on password input for booting up your VAIO computer is no longer necessary,
follow these steps to remove the machine password and user password.
Setting/Changing the Power-on Password
You can set a password (power-on password) for booting up your VAIO computer, using the
BIOS function. Entry of the power-on password will be prompted after the VAIO logo appears
to start the computer.
Using Intel(R) Anti-Theft Technology<Intel(R) Anti-Theft Technology supported
models>
You can change the Intel(R) Anti-Theft Technology settings in the BIOS setup screen.
© 2013 Sony Corporation
65
Search

VAIO User Guide Back | Back to Top
Troubleshooting
How to Use
Windows 8: The Basics
Parts Description
Setup
Network / Internet
Connections
Settings
Backup / Recovery
Security
Other Operations
Notifications
Button
About the ASSIST Button
Press the ASSIST button to perform regular maintenance of your VAIO computer or to solve
problems you might encounter when using the computer.
© 2013 Sony Corporation
66
Search

VAIO User Guide Back | Back to Top
Troubleshooting
How to Use
Windows 8: The Basics
Parts Description
Setup
Network / Internet
Connections
Settings
Backup / Recovery
Security
Other Operations
Notifications
Camera
Using the Built-in Camera<Built-in camera equipped models>
You can make a video call through the Internet using the built-in camera and communication
apps.
You might be looking for the following topics:
Notes on the Built-in Camera<Built-in camera equipped models>
© 2013 Sony Corporation
67
Search

VAIO User Guide Back | Back to Top
Troubleshooting
How to Use
Windows 8: The Basics
Parts Description
Setup
Network / Internet
Connections
Settings
Backup / Recovery
Security
Other Operations
Notifications
Encryption
Encrypting Your Data with the TPM (BitLocker)<TPM security chip equipped
models><BitLocker supported models>
You can use BitLocker included with Windows 8 Pro to encrypt the data on the built-in
storage device.
Notes on Using the TPM<TPM security chip equipped models>
Before using the Trusted Platform Module (TPM), read the following precautions for correct
use.
© 2013 Sony Corporation
68
Search

VAIO User Guide Back | Back to Top
Troubleshooting
How to Use
Windows 8: The Basics
Parts Description
Setup
Network / Internet
Connections
Settings
Backup / Recovery
Security
Other Operations
Notifications
Keyboard
Changing the Keyboard Backlight Settings<Keyboard backlight equipped
models>
You can turn on and off the keyboard backlight by changing the keyboard backlight settings.
You might be looking for the following topics:
Combinations and Functions with the Fn Key
Entering Characters with Touch Screen Operations<Touch screen equipped models>
Raising the LCD Screen
© 2013 Sony Corporation
69
Search

VAIO User Guide Back | Back to Top
Troubleshooting
How to Use
Windows 8: The Basics
Parts Description
Setup
Network / Internet
Connections
Settings
Backup / Recovery
Security
Other Operations
Notifications
Memory module
Viewing the System Information
You can view the system information of your VAIO computer.
© 2013 Sony Corporation
70
Search

VAIO User Guide Back | Back to Top
Troubleshooting
How to Use
Windows 8: The Basics
Parts Description
Setup
Network / Internet
Connections
Settings
Backup / Recovery
Security
Other Operations
Notifications
Noise canceling headphones
Notes on Using the Noise Canceling Headphones<Noise canceling
headphones supplied models>
Before using the noise canceling headphones, read the following precautions for correct use.
You might be looking for the following topics:
Connecting the Noise Canceling Headphones<Noise canceling headphones supplied
models>
© 2013 Sony Corporation
71
Search
VAIO User Guide Back | Back to Top
Troubleshooting
How to Use
Windows 8: The Basics
Parts Description
Setup
Network / Internet
Connections
Settings
Backup / Recovery
Security
Other Operations
Notifications
Password
Creating/Changing/Removing Your Windows Password
Setting a Windows password allows you to protect your VAIO computer from unauthorized
access by requiring password entry when the computer is turned on or returns from power
saving mode to Normal mode.
Removing the Power-on Password
If power-on password input for booting up your VAIO computer is no longer necessary,
follow these steps to remove the machine password and user password.
Setting/Changing the Power-on Password
You can set a password (power-on password) for booting up your VAIO computer, using the
BIOS function. Entry of the power-on password will be prompted after the VAIO logo appears
to start the computer.
© 2013 Sony Corporation
72
Search

VAIO User Guide Back | Back to Top
Troubleshooting
How to Use
Windows 8: The Basics
Parts Description
Setup
Network / Internet
Connections
Settings
Backup / Recovery
Security
Other Operations
Notifications
Power
Notes on Sleep Mode
Read the following precautions before using Sleep mode.
Notes on Using the Power Source
Read the following precautions before plugging your VAIO computer into an AC power
source.
Selecting a Power Plan
Power management helps you set up power plans to suit your requirements for power
consumption.
Using Sleep Mode
In Sleep mode, all unnecessary devices of your VAIO computer are turned off, though some
devices stay on to retain the computer’s state including data you are working on. Sleep
mode is useful when you take a short rest, for example.
You might be looking for the following topics:
Changing the Rapid Wake (Sleep Mode) Settings
Charge Indicator Status List
Charging the Battery Pack
Connecting a Power Source
Entering Sleep Mode, Shutting Down, or Restarting
Notes on an Extended Battery Pack
Restarting Your VAIO Computer
Shutting Down Your VAIO Computer
Turning on Your VAIO Computer
© 2013 Sony Corporation
73
Search

VAIO User Guide Back | Back to Top
Troubleshooting
How to Use
Windows 8: The Basics
Parts Description
Setup
Network / Internet
Connections
Settings
Backup / Recovery
Security
Other Operations
Notifications
Security
Updating Your VAIO Computer
Be sure to update your VAIO computer by installing the following apps to enhance its
efficiency, security and functionality.
© 2013 Sony Corporation
74
Search

VAIO User Guide Back | Back to Top
Troubleshooting
How to Use
Windows 8: The Basics
Parts Description
Setup
Network / Internet
Connections
Settings
Backup / Recovery
Security
Other Operations
Notifications
Service and support
Keeping Your VAIO Computer in Optimum Condition (VAIO Care)
With VAIO Care, you can perform the following operations to keep your VAIO computer
running at an optimum level.
Updating Your VAIO Computer
Be sure to update your VAIO computer by installing the following apps to enhance its
efficiency, security and functionality.
Using VAIO Update
VAIO Update provides a service that informs you of available update information, such as
important notices or update programs, to keep your VAIO computer up to date.
You might be looking for the following topics:
About Online Support Website
Solving Common Problems with Your VAIO Computer
© 2013 Sony Corporation
75
Search

VAIO User Guide Back | Back to Top
Troubleshooting
How to Use
Windows 8: The Basics
Parts Description
Setup
Network / Internet
Connections
Settings
Backup / Recovery
Security
Other Operations
Notifications
TPM
Encrypting Your Data with the TPM (BitLocker)<TPM security chip equipped
models><BitLocker supported models>
You can use BitLocker included with Windows 8 Pro to encrypt the data on the built-in
storage device.
Notes on Using the TPM<TPM security chip equipped models>
Before using the Trusted Platform Module (TPM), read the following precautions for correct
use.
© 2013 Sony Corporation
76
Search

VAIO User Guide Back | Back to Top
Troubleshooting
How to Use
Windows 8: The Basics
Parts Description
Setup
Network / Internet
Connections
Settings
Backup / Recovery
Security
Other Operations
Notifications
VAIO computer
About the ASSIST Button
Press the ASSIST button to perform regular maintenance of your VAIO computer or to solve
problems you might encounter when using the computer.
Booting Your VAIO Computer from External Devices
You can boot your VAIO computer from external devices, such as an optical disc drive, a
USB floppy disk drive, or a USB flash drive by using the BIOS function.
Customizing Your VAIO Computer
VAIO Control Center allows you to access system information and to change settings of
various kinds of functions such as display and sounds.
Keeping Your VAIO Computer in Optimum Condition (VAIO Care)
With VAIO Care, you can perform the following operations to keep your VAIO computer
running at an optimum level.
Restricting the Use of Built-in Devices
The BIOS function enables you to disable the built-in devices such as those listed below.
You can use this function to prohibit external connections and communications
Updating Your VAIO Computer
Be sure to update your VAIO computer by installing the following apps to enhance its
efficiency, security and functionality.
Using VAIO Update
VAIO Update provides a service that informs you of available update information, such as
important notices or update programs, to keep your VAIO computer up to date.
Viewing the System Information
You can view the system information of your VAIO computer.
You might be looking for the following topics:
Checking Supplied Items
Parts and Controls on the Back
Parts and Controls on the Bottom
Parts and Controls on the Front
Parts and Controls on the Sides
Raising the LCD Screen
Setting Up an Appropriate Work Environment
Using the LAN Port
Using the Tilt Feet
© 2013 Sony Corporation
77
Search

VAIO User Guide Back | Back to Top
Troubleshooting
How to Use
Windows 8: The Basics
Parts Description
Setup
Network / Internet
Connections
Settings
Backup / Recovery
Security
Other Operations
Notifications
BIOS
About the ASSIST Button
Press the ASSIST button to perform regular maintenance of your VAIO computer or to solve
problems you might encounter when using the computer.
Booting Your VAIO Computer from External Devices
You can boot your VAIO computer from external devices, such as an optical disc drive, a
USB floppy disk drive, or a USB flash drive by using the BIOS function.
You might be looking for the following topics:
Removing the Power-on Password
Setting/Changing the Power-on Password
Using Intel(R) Anti-Theft Technology<Intel(R) Anti-Theft Technology supported models>
© 2013 Sony Corporation
78
Search

VAIO User Guide Back | Back to Top
Troubleshooting
How to Use
Windows 8: The Basics
Parts Description
Setup
Network / Internet
Connections
Settings
Backup / Recovery
Security
Other Operations
Notifications
Built-in storage device
Checking the Volume of the Recovery Area
Your built-in storage device contains the recovery area where the data for the system
recovery is stored.
Creating Other Drives (Modifying Partitions)
Partitions are divided areas on your built-in storage device. Dividing the built-in storage
device into more than one partition may have various advantages, such as separating the
system files from your data files.
Creating Partitions
This topic describes how to create partitions.
Removing Recovery Content to Free up Disk Space
Your built-in storage device contains the recovery area where the data for system recovery
is stored. If your VAIO computer includes a solid state drive (SSD), you might want to
minimize the recovery area by removing such data to free up disk space on the C: drive (or
the last drive in your drive list, for example D: drive).
© 2013 Sony Corporation
79
Search
VAIO User Guide Back | Back to Top
Troubleshooting
How to Use
Windows 8: The Basics
Parts Description
Setup
Network / Internet
Connections
Settings
Backup / Recovery
Security
Other Operations
Notifications
CD/DVD/BD
Booting Your VAIO Computer from External Devices
You can boot your VAIO computer from external devices, such as an optical disc drive, a
USB floppy disk drive, or a USB flash drive by using the BIOS function.
You might be looking for the following topics:
Connecting an External Drive
Restricting the Use of Built-in Devices
© 2013 Sony Corporation
80
Search

VAIO User Guide Back | Back to Top
Troubleshooting
How to Use
Windows 8: The Basics
Parts Description
Setup
Network / Internet
Connections
Settings
Backup / Recovery
Security
Other Operations
Notifications
Recovery
About Recovery
Recovery is the process of restoring the built-in storage device back to its original factory
condition. Refresh is the process of reinstalling the operating system with the main settings
and personal data retained.
About the ASSIST Button
Press the ASSIST button to perform regular maintenance of your VAIO computer or to solve
problems you might encounter when using the computer.
Checking the Volume of the Recovery Area
Your built-in storage device contains the recovery area where the data for the system
recovery is stored.
Creating Recovery Media
Follow the instructions below to create Recovery Media.
Notes on Recovery
Read the following notes thoroughly before recovering your VAIO computer.
Recovering from Recovery Media
If the recovery area data has been corrupted or erased, you can use Recovery Media to
recover your VAIO computer. However, recovering the computer using the Recovery Media
will take longer than using the recovery area.
Recovering from the Recovery Area
You can recover your VAIO computer from the recovery area on the built-in storage device.
This recovery method is faster than using Recovery Media.
Refreshing Your VAIO Computer
If your VAIO computer has become unstable, it is recommended that you use the refresh
function provided by Windows. Refresh the computer by following these steps.
Removing Recovery Content to Free up Disk Space
Your built-in storage device contains the recovery area where the data for system recovery
is stored. If your VAIO computer includes a solid state drive (SSD), you might want to
minimize the recovery area by removing such data to free up disk space on the C: drive (or
the last drive in your drive list, for example D: drive).
© 2013 Sony Corporation
81
Search

VAIO User Guide Back | Back to Top
Troubleshooting
How to Use
Windows 8: The Basics
Parts Description
Setup
Network / Internet
Connections
Settings
Backup / Recovery
Security
Other Operations
Notifications
Service and support
Keeping Your VAIO Computer in Optimum Condition (VAIO Care)
With VAIO Care, you can perform the following operations to keep your VAIO computer
running at an optimum level.
You might be looking for the following topics:
About Online Support Website
Solving Common Problems with Your VAIO Computer
Updating Your VAIO Computer
Using VAIO Update
© 2013 Sony Corporation
82
Search
VAIO User Guide Back | Back to Top
Troubleshooting
How to Use
Windows 8: The Basics
Parts Description
Setup
Network / Internet
Connections
Settings
Backup / Recovery
Security
Other Operations
Notifications
Backup
About Backup
The backup process creates a backup copy of your data stored on the built-in storage device
and saves it to another location.
About Types of Backup
You can use the Windows Backup and Restore feature to back up your valuable data.
Backing Up Your Data when You cannot Start Windows
If you cannot start Windows, back up your data with VAIO Care (Rescue Mode) : Recover or
maintain your system.
Creating a Restore Point
A restore point enables you to restore your computer system files to a previous state,
depending on when the restore point was created.
Restoring System Files Using the Restore Point when You cannot Start
Windows
When you cannot start Windows, follow these steps to restore computer system files.
Restoring Your Data with VAIO Data Restore Tool
You can use VAIO Data Restore Tool to restore files previously backed up using VAIO Care
(Rescue Mode) : Recover or maintain your system.
© 2013 Sony Corporation
83
Search
VAIO User Guide Back | Back to Top
Troubleshooting
How to Use
Windows 8: The Basics
Parts Description
Setup
Network / Internet
Connections
Settings
Backup / Recovery
Security
Other Operations
Notifications
Button
About the ASSIST Button
Press the ASSIST button to perform regular maintenance of your VAIO computer or to solve
problems you might encounter when using the computer.
© 2013 Sony Corporation
84
Search

VAIO User Guide Back | Back to Top
Troubleshooting
How to Use
Windows 8: The Basics
Parts Description
Setup
Network / Internet
Connections
Settings
Backup / Recovery
Security
Other Operations
Notifications
Partition
Creating Other Drives (Modifying Partitions)
Partitions are divided areas on your built-in storage device. Dividing the built-in storage
device into more than one partition may have various advantages, such as separating the
system files from your data files.
Creating Partitions
This topic describes how to create partitions.
© 2013 Sony Corporation
85
Search

VAIO User Guide Back | Back to Top
Troubleshooting
How to Use
Windows 8: The Basics
Parts Description
Setup
Network / Internet
Connections
Settings
Backup / Recovery
Security
Other Operations
Notifications
Refresh
About Recovery
Recovery is the process of restoring the built-in storage device back to its original factory
condition. Refresh is the process of reinstalling the operating system with the main settings
and personal data retained.
Refreshing Your VAIO Computer
If your VAIO computer has become unstable, it is recommended that you use the refresh
function provided by Windows. Refresh the computer by following these steps.
© 2013 Sony Corporation
86
Search

VAIO User Guide Back | Back to Top
Troubleshooting
How to Use
Windows 8: The Basics
Parts Description
Setup
Network / Internet
Connections
Settings
Backup / Recovery
Security
Other Operations
Notifications
VAIO computer
About the ASSIST Button
Press the ASSIST button to perform regular maintenance of your VAIO computer or to solve
problems you might encounter when using the computer.
Booting Your VAIO Computer from External Devices
You can boot your VAIO computer from external devices, such as an optical disc drive, a
USB floppy disk drive, or a USB flash drive by using the BIOS function.
Keeping Your VAIO Computer in Optimum Condition (VAIO Care)
With VAIO Care, you can perform the following operations to keep your VAIO computer
running at an optimum level.
You might be looking for the following topics:
Checking Supplied Items
Customizing Your VAIO Computer
Parts and Controls on the Back
Parts and Controls on the Bottom
Parts and Controls on the Front
Parts and Controls on the Sides
Raising the LCD Screen
Restricting the Use of Built-in Devices
Setting Up an Appropriate Work Environment
Updating Your VAIO Computer
Using VAIO Update
Using the LAN Port
Using the Tilt Feet
Viewing the System Information
© 2013 Sony Corporation
87
Search

VAIO User Guide Back | Back to Top
Troubleshooting
How to Use
Windows 8: The Basics
Parts Description
Setup
Network / Internet
Connections
Settings
Backup / Recovery
Security
Other Operations
Notifications
BIOS
Removing the Power-on Password
If power-on password input for booting up your VAIO computer is no longer necessary,
follow these steps to remove the machine password and user password.
Setting/Changing the Power-on Password
You can set a password (power-on password) for booting up your VAIO computer, using the
BIOS function. Entry of the power-on password will be prompted after the VAIO logo appears
to start the computer.
You might be looking for the following topics:
About the ASSIST Button
Booting Your VAIO Computer from External Devices
Using Intel(R) Anti-Theft Technology<Intel(R) Anti-Theft Technology supported models>
© 2013 Sony Corporation
88
Search

VAIO User Guide Back | Back to Top
Troubleshooting
How to Use
Windows 8: The Basics
Parts Description
Setup
Network / Internet
Connections
Settings
Backup / Recovery
Security
Other Operations
Notifications
Internet
Using the Antivirus App for Your VAIO Computer
Protect your VAIO computer against computer viruses by using the antivirus app.
You might be looking for the following topics:
About a Security Key for Wi-Fi(R) (Wireless LAN)
About the Internet Connection Services
About the Network (LAN)
About the Wi-Fi(R) (Wireless LAN) Standards
Connecting to the Internet with a Wired Connection
Disabling the Wi-Fi(R) (Wireless LAN) Function
Installing Apps from Windows Store
Notes on Using the Wi-Fi(R) (Wireless LAN) Function
Starting Wi-Fi(R) (Wireless LAN) Communications
Stopping Wi-Fi(R) (Wireless LAN) Communications
© 2013 Sony Corporation
89
Search

VAIO User Guide Back | Back to Top
Troubleshooting
How to Use
Windows 8: The Basics
Parts Description
Setup
Network / Internet
Connections
Settings
Backup / Recovery
Security
Other Operations
Notifications
Service and support
Keeping Your VAIO Computer in Optimum Condition (VAIO Care)
With VAIO Care, you can perform the following operations to keep your VAIO computer
running at an optimum level.
Using VAIO Update
VAIO Update provides a service that informs you of available update information, such as
important notices or update programs, to keep your VAIO computer up to date.
You might be looking for the following topics:
About Online Support Website
Solving Common Problems with Your VAIO Computer
Updating Your VAIO Computer
© 2013 Sony Corporation
90
Search

VAIO User Guide Back | Back to Top
Troubleshooting
How to Use
Windows 8: The Basics
Parts Description
Setup
Network / Internet
Connections
Settings
Backup / Recovery
Security
Other Operations
Notifications
VAIO computer
Keeping Your VAIO Computer in Optimum Condition (VAIO Care)
With VAIO Care, you can perform the following operations to keep your VAIO computer
running at an optimum level.
Using VAIO Update
VAIO Update provides a service that informs you of available update information, such as
important notices or update programs, to keep your VAIO computer up to date.
You might be looking for the following topics:
About the ASSIST Button
Booting Your VAIO Computer from External Devices
Checking Supplied Items
Customizing Your VAIO Computer
Parts and Controls on the Back
Parts and Controls on the Bottom
Parts and Controls on the Front
Parts and Controls on the Sides
Raising the LCD Screen
Restricting the Use of Built-in Devices
Setting Up an Appropriate Work Environment
Updating Your VAIO Computer
Using the LAN Port
Using the Tilt Feet
Viewing the System Information
© 2013 Sony Corporation
91
Search

VAIO User Guide Back | Back to Top
Troubleshooting
How to Use
Windows 8: The Basics
Parts Description
Setup
Network / Internet
Connections
Settings
Backup / Recovery
Security
Other Operations
Notifications
Encryption
Encrypting Your Data with the TPM (BitLocker)<TPM security chip equipped
models><BitLocker supported models>
You can use BitLocker included with Windows 8 Pro to encrypt the data on the built-in
storage device.
Notes on Using the TPM<TPM security chip equipped models>
Before using the Trusted Platform Module (TPM), read the following precautions for correct
use.
© 2013 Sony Corporation
92
Search
VAIO User Guide Back | Back to Top
Troubleshooting
How to Use
Windows 8: The Basics
Parts Description
Setup
Network / Internet
Connections
Settings
Backup / Recovery
Security
Other Operations
Notifications
Password
Creating/Changing/Removing Your Windows Password
Setting a Windows password allows you to protect your VAIO computer from unauthorized
access by requiring password entry when the computer is turned on or returns from power
saving mode to Normal mode.
Removing the Power-on Password
If power-on password input for booting up your VAIO computer is no longer necessary,
follow these steps to remove the machine password and user password.
Setting/Changing the Power-on Password
You can set a password (power-on password) for booting up your VAIO computer, using the
BIOS function. Entry of the power-on password will be prompted after the VAIO logo appears
to start the computer.
© 2013 Sony Corporation
93
Search

VAIO User Guide Back | Back to Top
Troubleshooting
How to Use
Windows 8: The Basics
Parts Description
Setup
Network / Internet
Connections
Settings
Backup / Recovery
Security
Other Operations
Notifications
TPM
Encrypting Your Data with the TPM (BitLocker)<TPM security chip equipped
models><BitLocker supported models>
You can use BitLocker included with Windows 8 Pro to encrypt the data on the built-in
storage device.
Notes on Using the TPM<TPM security chip equipped models>
Before using the Trusted Platform Module (TPM), read the following precautions for correct
use.
© 2013 Sony Corporation
94
Search

VAIO User Guide Back | Back to Top
Troubleshooting
How to Use
Windows 8: The Basics
Parts Description
Setup
Network / Internet
Connections
Settings
Backup / Recovery
Security
Other Operations
Notifications
BIOS
Using Intel(R) Anti-Theft Technology<Intel(R) Anti-Theft Technology supported
models>
You can change the Intel(R) Anti-Theft Technology settings in the BIOS setup screen.
You might be looking for the following topics:
About the ASSIST Button
Booting Your VAIO Computer from External Devices
Removing the Power-on Password
Setting/Changing the Power-on Password
© 2013 Sony Corporation
95
Search

VAIO User Guide Back | Back to Top
Troubleshooting
How to Use
Windows 8: The Basics
Parts Description
Setup
Network / Internet
Connections
Settings
Backup / Recovery
Security
Other Operations
Notifications
Built-in storage device
Creating Other Drives (Modifying Partitions)
Partitions are divided areas on your built-in storage device. Dividing the built-in storage
device into more than one partition may have various advantages, such as separating the
system files from your data files.
Creating Partitions
This topic describes how to create partitions.
You might be looking for the following topics:
Checking the Volume of the Recovery Area
Removing Recovery Content to Free up Disk Space
© 2013 Sony Corporation
96
Search

VAIO User Guide Back | Back to Top
Troubleshooting
How to Use
Windows 8: The Basics
Parts Description
Setup
Network / Internet
Connections
Settings
Backup / Recovery
Security
Other Operations
Notifications
Display
About the Touch Screen<Touch screen equipped models>
The touch screen enables direct interaction with your VAIO computer using your finger(s).
You can perform various gestures on the touch screen.
How to Use the Touch Screen<Touch screen equipped models>
You can tap the touch screen or make a simple motion with your fingers to operate your
VAIO computer.
Notes on Using the Touch Screen<Touch screen equipped models>
Before using the touch screen, read the following precautions for correct use.
You might be looking for the following topics:
About the Start Screen and Menu
Adjusting the LCD Brightness Automatically
Changing the LCD Brightness
Changing the Resolution (Size) of the Screen Image
Changing the Resolution (Size) of the Screen Image on an HDMI-Connected Device
Connecting a TV with an HDMI Input Port
Connecting an External Display or Projector
Enlarging the Text Size (DPI)<Touch screen equipped models>
Notes on the LCD screen
Opening the Desktop
Raising the LCD Screen
Selecting Display Modes
Using the Multiple Monitors Function
© 2013 Sony Corporation
97
Search

VAIO User Guide Back | Back to Top
Troubleshooting
How to Use
Windows 8: The Basics
Parts Description
Setup
Network / Internet
Connections
Settings
Backup / Recovery
Security
Other Operations
Notifications
Keyboard
Combinations and Functions with the Fn Key
Press and hold down the Fn key and another key simultaneously to perform a keyboard
shortcut action.
Entering Characters with Touch Screen Operations<Touch screen equipped
models>
You can operate the on-screen Touch Keyboard with touch screen operations for text entry.
You might be looking for the following topics:
Changing the Keyboard Backlight Settings<Keyboard backlight equipped models>
Raising the LCD Screen
© 2013 Sony Corporation
98
Search

VAIO User Guide Back | Back to Top
Troubleshooting
How to Use
Windows 8: The Basics
Parts Description
Setup
Network / Internet
Connections
Settings
Backup / Recovery
Security
Other Operations
Notifications
Memory card
About “Memory Stick”
“Memory Stick” is a compact, portable, and versatile IC recording media especially designed
for exchanging and sharing digital data with compatible products, such as digital cameras
and other devices. Because it is removable, it can be used for external data storage.
Compatible “Memory Stick”
The “Memory Stick” slot on your VAIO computer can accommodate the following sizes and
types of media:
Formatting “Memory Stick”
“Memory Stick” is formatted in the specific FAT format by default and is ready for use.Be
sure to use the device that is designed to format the media and supports “Memory Stick”
when formatting the media.
Inserting SD Memory Cards
Your VAIO computer is equipped with an SD memory card slot. You can use this slot to
transfer data among digital cameras, camcorders, music players, and other audio/video
devices.
Inserting “Memory Stick”
This topic explains how to insert “Memory Stick”.
Notes on Using SD Memory Cards
Before using SD memory cards, read the following precautions for correct use.
Notes on Using “Memory Stick”
Before using “Memory Stick”, read the following precautions for correct use.
Removing SD Memory Cards
This topic explains how to remove an SD memory card.
Removing “Memory Stick”
This topic explains how to remove “Memory Stick”.
You might be looking for the following topics:
Restricting the Use of Built-in Devices
© 2013 Sony Corporation
99
Search

VAIO User Guide Back | Back to Top
Troubleshooting
How to Use
Windows 8: The Basics
Parts Description
Setup
Network / Internet
Connections
Settings
Backup / Recovery
Security
Other Operations
Notifications
NFC/One-touch functions
About NFC<NFC supported models>
Near Field Communication (NFC) is a short-range wireless technology.
About One-touch functions<NFC supported models>
One-touch functions are Sony original functions which use NFC.
Disabling NFC/One-touch functions<NFC supported models>
You can disable NFC/One-touch functions by following these steps.
Notes on NFC/One-touch functions<NFC supported models>
Using NFC/One-touch functions<NFC supported models>
Easily connect an NFC/One-touch functions supported device to your VAIO computer by
simply touching the computer with the device.
© 2013 Sony Corporation
100
Search

VAIO User Guide Back | Back to Top
Troubleshooting
How to Use
Windows 8: The Basics
Parts Description
Setup
Network / Internet
Connections
Settings
Backup / Recovery
Security
Other Operations
Notifications
Partition
Creating Other Drives (Modifying Partitions)
Partitions are divided areas on your built-in storage device. Dividing the built-in storage
device into more than one partition may have various advantages, such as separating the
system files from your data files.
Creating Partitions
This topic describes how to create partitions.
© 2013 Sony Corporation
101
Search

VAIO User Guide Back | Back to Top
Troubleshooting
How to Use
Windows 8: The Basics
Parts Description
Setup
Network / Internet
Connections
Settings
Backup / Recovery
Security
Other Operations
Notifications
Power
Changing the Rapid Wake (Sleep Mode) Settings
You can change the Rapid Wake settings in VAIO Control Center.
Charge Indicator Status List
The charge indicator light turns on or blinks differently according to conditions.
Charging the Battery Pack
The battery pack can be charged even while you are using your VAIO computer when the
computer is connected to a power source.
Notes on an Extended Battery Pack
This topic explains battery charging behavior when an extended battery pack (not supplied)
is attached to your VAIO computer in addition to the installed battery pack (the primary
battery pack).
Restarting Your VAIO Computer
After changing the settings or installing an app on your VAIO computer, you may be required
to restart the computer.
Shutting Down Your VAIO Computer
Properly shut down your VAIO computer to avoid losing unsaved data.
Turning on Your VAIO Computer
Turn on your VAIO computer to start Windows. Carefully read the precautions in Notes on
Using the Power Source before turning on. [Details]
Using Sleep Mode
In Sleep mode, all unnecessary devices of your VAIO computer are turned off, though some
devices stay on to retain the computer’s state including data you are working on. Sleep
mode is useful when you take a short rest, for example.
You might be looking for the following topics:
Connecting a Power Source
Entering Sleep Mode, Shutting Down, or Restarting
Notes on Sleep Mode
Notes on Using the Power Source
Selecting a Power Plan
© 2013 Sony Corporation
102
Search

VAIO User Guide Back | Back to Top
Troubleshooting
How to Use
Windows 8: The Basics
Parts Description
Setup
Network / Internet
Connections
Settings
Backup / Recovery
Security
Other Operations
Notifications
USB
Charging a USB Device
You can charge a USB device even while your VAIO computer is off, in Hibernate mode, or
Sleep mode by enabling the USB charging settings.
Connecting a USB Device
You can connect a Universal Serial Bus (USB) device such as a mouse, floppy disk drive,
speaker or printer to your VAIO computer.
© 2013 Sony Corporation
103
Search

VAIO User Guide Back | Back to Top
Troubleshooting
How to Use
Windows 8: The Basics
Parts Description
Setup
Network / Internet
Connections
Settings
Backup / Recovery
Security
Other Operations
Notifications
Windows
Opening Windows Help and Support
You can open Windows Help and Support by following these steps.
© 2013 Sony Corporation
104
Search

VAIO User Guide Back | Back to Top
Troubleshooting
How to Use
Windows 8: The Basics
Parts Description
Setup
Network / Internet
Connections
Settings
Backup / Recovery
Security
Other Operations
Notifications
Battery
Changing the Rapid Wake (Sleep Mode) Settings
You can change the Rapid Wake settings in VAIO Control Center.
Charge Indicator Status List
The charge indicator light turns on or blinks differently according to conditions.
Charging the Battery Pack
The battery pack can be charged even while you are using your VAIO computer when the
computer is connected to a power source.
Checking the Battery Charge Capacity
The battery pack is consumable. The capacity gradually declines through repeated cycles of
recharging and discharging. As a result, the battery life becomes short even if it is fully
charged and eventually the battery pack reaches the end of its life.
Extending the Battery Life
When your VAIO computer is running on battery power, you can extend the battery life using
the following methods.
Notes on an Extended Battery Pack
This topic explains battery charging behavior when an extended battery pack (not supplied)
is attached to your VAIO computer in addition to the installed battery pack (the primary
battery pack).
You might be looking for the following topics:
Notes on Using the Battery Pack
© 2013 Sony Corporation
105
Search

VAIO User Guide Back | Back to Top
Troubleshooting
How to Use
Windows 8: The Basics
Parts Description
Setup
Network / Internet
Connections
Settings
Backup / Recovery
Security
Other Operations
Notifications
Camera
Notes on the Built-in Camera<Built-in camera equipped models>
Using the Built-in Camera<Built-in camera equipped models>
You can make a video call through the Internet using the built-in camera and communication
apps.
© 2013 Sony Corporation
106
Search

VAIO User Guide Back | Back to Top
Troubleshooting
How to Use
Windows 8: The Basics
Parts Description
Setup
Network / Internet
Connections
Settings
Backup / Recovery
Security
Other Operations
Notifications
Help and Support
Opening Windows Help and Support
You can open Windows Help and Support by following these steps.
© 2013 Sony Corporation
107
Search
VAIO User Guide Back | Back to Top
Troubleshooting
How to Use
Windows 8: The Basics
Parts Description
Setup
Network / Internet
Connections
Settings
Backup / Recovery
Security
Other Operations
Notifications
LAN
Using the LAN Port
Before connecting a LAN cable to the LAN port, pull the port cover down as illustrated below.
You might be looking for the following topics:
About the Internet Connection Services
About the Network (LAN)
About the Wi-Fi(R) (Wireless LAN) Standards
Connecting to the Internet with a Wired Connection
© 2013 Sony Corporation
108
Search

VAIO User Guide Back | Back to Top
Troubleshooting
How to Use
Windows 8: The Basics
Parts Description
Setup
Network / Internet
Connections
Settings
Backup / Recovery
Security
Other Operations
Notifications
Mouse
Clipping an Image Displayed on the Computer Screen (Active Clip)
With Active Clip, you can easily clip an image displayed on the computer screen.
© 2013 Sony Corporation
109
Search

VAIO User Guide Back | Back to Top
Troubleshooting
How to Use
Windows 8: The Basics
Parts Description
Setup
Network / Internet
Connections
Settings
Backup / Recovery
Security
Other Operations
Notifications
Optical Trackpad
Adjusting the Optical Trackpad Sensitivity
You can change the pointer speed by adjusting the Optical Trackpad sensitivity according to
your preference.
Disabling the Tapping Function on the Optical Trackpad
You can disable the tapping function to avoid unintentional clicks caused by a light touch on
the Optical Trackpad during the keyboard operations.
Enabling/Disabling the Optical Trackpad
You can enable/disable the Optical Trackpad on your VAIO computer.
Using the Optical Trackpad
By moving your finger on the Optical Trackpad, you can move the pointer on the computer
screen.
© 2013 Sony Corporation
110
Search

VAIO User Guide Back | Back to Top
Troubleshooting
How to Use
Windows 8: The Basics
Parts Description
Setup
Network / Internet
Connections
Settings
Backup / Recovery
Security
Other Operations
Notifications
Pen
Clipping an Image Displayed on the Computer Screen (Active Clip)
With Active Clip, you can easily clip an image displayed on the computer screen.
How to Use the Pen<Digitizer Stylus supplied models>
Using the supplied pen (Digitizer Stylus), you can operate your VAIO computer intuitively, by
touching the screen softly or tracing something on the screen.
Replacing the Battery of the Pen<Digitizer Stylus supplied models>
Replace the battery when the pen (Digitizer Stylus) begins to function incorrectly.
Replacing the Nib<Digitizer Stylus supplied models>
Replace with a new nib (supplied) if the writing is not smooth, or you wish to try another
shape nib.
© 2013 Sony Corporation
111
Search

VAIO User Guide Back | Back to Top
Troubleshooting
How to Use
Windows 8: The Basics
Parts Description
Setup
Network / Internet
Connections
Settings
Backup / Recovery
Security
Other Operations
Notifications
Touch panel
About the Touch Screen<Touch screen equipped models>
The touch screen enables direct interaction with your VAIO computer using your finger(s).
You can perform various gestures on the touch screen.
Clipping an Image Displayed on the Computer Screen (Active Clip)
With Active Clip, you can easily clip an image displayed on the computer screen.
Entering Characters with Touch Screen Operations<Touch screen equipped
models>
You can operate the on-screen Touch Keyboard with touch screen operations for text entry.
How to Use the Touch Screen<Touch screen equipped models>
You can tap the touch screen or make a simple motion with your fingers to operate your
VAIO computer.
Notes on Using the Touch Screen<Touch screen equipped models>
Before using the touch screen, read the following precautions for correct use.
You might be looking for the following topics:
Enlarging the Text Size (DPI)<Touch screen equipped models>
© 2013 Sony Corporation
112
Search

VAIO User Guide Back | Back to Top
Troubleshooting
How to Use
Windows 8: The Basics
Parts Description
Setup
Network / Internet
Connections
Settings
Backup / Recovery
Security
Other Operations
Notifications
VAIO computer
Using the LAN Port
Before connecting a LAN cable to the LAN port, pull the port cover down as illustrated below.
Using the Tilt Feet
When using a LAN port [Details] or monitor port [Details], unfold the tilt feet.
You might be looking for the following topics:
About the ASSIST Button
Booting Your VAIO Computer from External Devices
Checking Supplied Items
Customizing Your VAIO Computer
Keeping Your VAIO Computer in Optimum Condition (VAIO Care)
Parts and Controls on the Back
Parts and Controls on the Bottom
Parts and Controls on the Front
Parts and Controls on the Sides
Raising the LCD Screen
Restricting the Use of Built-in Devices
Setting Up an Appropriate Work Environment
Updating Your VAIO Computer
Using VAIO Update
Viewing the System Information
© 2013 Sony Corporation
113
Search

VAIO User Guide Back | Back to Top
Troubleshooting
How to Use
Windows 8: The Basics
Parts Description
Setup
Network / Internet
Connections
Settings
Backup / Recovery
Security
Other Operations
Notifications
Care and maintenance
Cleaning Your VAIO computer/LCD screen
Before cleaning your VAIO computer, read the following precautions for the correct cleaning
procedure.
© 2013 Sony Corporation
114
Search

VAIO User Guide Back | Back to Top
Troubleshooting
How to Use
Windows 8: The Basics
Parts Description
Setup
Network / Internet
Connections
Settings
Backup / Recovery
Security
Other Operations
Notifications
Product registration
About Online Support Website
The online support website provides information concerning your VAIO computer, as well as
a selection of frequently asked questions.
© 2013 Sony Corporation
115
Search

VAIO User Guide Back | Back to Top
Troubleshooting
How to Use
Windows 8: The Basics
Parts Description
Setup
Network / Internet
Connections
Settings
Backup / Recovery
Security
Other Operations
Notifications
Security
Updating Your VAIO Computer
Be sure to update your VAIO computer by installing the following apps to enhance its
efficiency, security and functionality.
© 2013 Sony Corporation
116
Search

VAIO User Guide Back | Back to Top
Troubleshooting
How to Use
Windows 8: The Basics
Parts Description
Setup
Network / Internet
Connections
Settings
Backup / Recovery
Security
Other Operations
Notifications
Supplied items
Checking Supplied Items
Check all items packed with the product before use.
© 2013 Sony Corporation
117
Search

VAIO User Guide Back | Back to Top
Troubleshooting
How to Use
Windows 8: The Basics
Parts Description
Setup
Network / Internet
Connections
Settings
Backup / Recovery
Security
Other Operations
Notifications
Important notice
About the International ENERGY STAR(R) Program
The following information is applicable to ENERGY STAR qualified products only.
About the Software License
This product contains software owned by Sony and licensed by third parties. Use of such
software is subject to the terms and conditions of license agreements enclosed with this
product.
Handling the Built-in Storage Device
The built-in storage device (hard disk drive or solid state drive) has a high storage density
and reads or writes data in a short time. However, it can be easily damaged if improperly
used.
Safety Information
Refer to the supplied safety manual for detailed safety information.
Trademarks
© 2013 Sony Corporation
118
Search

VAIO User Guide Back | Back to Top
Troubleshooting
How to Use
Windows 8: The Basics
Parts Description
Setup
Network / Internet
Connections
Settings
Backup / Recovery
Security
Other Operations
Notifications
Read this first
Read This First
Congratulations on your purchase of this VAIO(R) computer.
© 2013 Sony Corporation
119
Search
VAIO User Guide Back | Back to Top
Troubleshooting
How to Use
Windows 8: The Basics
Parts Description
Setup
Network / Internet
Connections
Settings
Backup / Recovery
Security
Other Operations
Notifications
Service and support
About Online Support Website
The online support website provides information concerning your VAIO computer, as well as
a selection of frequently asked questions.
Solving Common Problems with Your VAIO Computer
If you have any problem operating your VAIO computer, try these suggestions before
contacting an authorized Sony service/support center or your local Sony dealer directly.
Updating Your VAIO Computer
Be sure to update your VAIO computer by installing the following apps to enhance its
efficiency, security and functionality.
You might be looking for the following topics:
Keeping Your VAIO Computer in Optimum Condition (VAIO Care)
Using VAIO Update
© 2013 Sony Corporation
120
Search
VAIO User Guide Back | Back to Top
Troubleshooting
How to Use
Windows 8: The Basics
Parts Description
Setup
Network / Internet
Connections
Settings
Backup / Recovery
Security
Other Operations
Notifications
VAIO computer
Checking Supplied Items
Check all items packed with the product before use.
Setting Up an Appropriate Work Environment
This topic describes where to or not to place your VAIO computer and ergonomic
instructions.
Updating Your VAIO Computer
Be sure to update your VAIO computer by installing the following apps to enhance its
efficiency, security and functionality.
You might be looking for the following topics:
About the ASSIST Button
Booting Your VAIO Computer from External Devices
Customizing Your VAIO Computer
Keeping Your VAIO Computer in Optimum Condition (VAIO Care)
Parts and Controls on the Back
Parts and Controls on the Bottom
Parts and Controls on the Front
Parts and Controls on the Sides
Raising the LCD Screen
Restricting the Use of Built-in Devices
Using VAIO Update
Using the LAN Port
Using the Tilt Feet
Viewing the System Information
© 2013 Sony Corporation
121
Search

VAIO User Guide Back | Back to Top
Audio
BLUETOOTH
Camera
Display
Keyboard
Memory card
NFC/One-touch functions
Password
Sensor
USB
BIOS
Battery
Computer
HDMI
LAN
Microphone
Optical Trackpad
Power
Software
Wi-Fi
How to Use
Troubleshooting
Hardware
Apps
Network / Internet
Backup / Recovery
Security
Peripheral Devices
Hardware
© 2013 Sony Corporation
122
Search


VAIO User Guide Back | Back to Top
Troubleshooting
How to Use
Windows 8: The Basics
Parts Description
Setup
Network / Internet
Connections
Settings
Backup / Recovery
Security
Other Operations
Notifications
About Online Support Website
The online support website provides information concerning your VAIO computer, as well as
a selection of frequently asked questions.
Sony online support website
USA
http://esupport.sony.com/US/VAIO/
Canada
http://www.sony.ca/support/ (English)
http://fr.sony.ca/support/ (French)
Spanish-speaking Latin American countries or areas
http://esupport.sony.com/LA/VAIO/
Brazil
http://esupport.sony.com/BR/VAIO/
Hint
If you experience any problem or have a technical question about your VAIO computer,
launch VAIO Care first, which offers you various options to help you solve the
problem.[Details]
When you contact VAIO support, you may be asked for the serial number and the model
number of your VAIO computer. The serial number is a 15-digit number that can be
found:
in the VAIO Care window;
on the bottom, on the back panel of the computer, inside the back panel or inside the
battery compartment;
on the original VAIO box.
The model number is located at the lower right corner of the display on the VAIO
computer.
Other websites
You can also find useful information at the following Web sites.
Sony products
http://www.sony.net/
http://www.sony.net/electronics/
Operating system online support website
For Microsoft Windows operating system support, visit the Microsoft customer support site.
http://support.microsoft.com/
In Store Service & Support (available in USA only)
Make an appointment with a Sony certified technician at a U.S. Sony Store and get
personalized service and support for your VAIO computer. Sony Technicians can assist with
the setup of your new VAIO computer, system optimization, data rescue, and any repair
service you might need.
http://www.sony.com/store/
Environmental sustainability
128
Search

For Sony’s environmental initiatives and recycling of your products, visit our sustainability
site.
http://www.sony.com/green/
Hint
You can find a link to register your computer online in VAIO Care. [Details]
Related Topic
Read This First
Keeping Your VAIO Computer in Optimum Condition (VAIO Care)
© 2013 Sony Corporation
129
Search

VAIO User Guide Back | Back to Top
Troubleshooting
How to Use
Windows 8: The Basics
Parts Description
Setup
Network / Internet
Connections
Settings
Backup / Recovery
Security
Other Operations
Notifications
Welcome
Congratulations on the purchase of this VAIO computer.
This User Guide - Introduction Version provides you with limited information about
your VAIO computer. To update this file to the complete version of the User Guide, see
Updating the User Guide to the Latest Version [Details] for more information.
Your VAIO computer may not support touch screen operations depending on the model you
purchased. In such a case, use a touch pad or a mouse for computer operations.
Content in this guide is subject to change without notice.
Read this first
Updating the User Guide to the Latest Version
Connecting to the Internet
Updating Your VAIO Computer
Solving Problems on Your VAIO Computer Using VAIO Care
Finding Support Information
Windows 8 : How to Start
About the Start Screen and Menu
Opening the Charms
Searching/Starting Apps, Settings, or Files
Viewing Running Apps
Switching Apps
Opening the Apps Menu
Closing Apps
Installing Apps from Windows Store
Opening Windows Help and Support
Entering Sleep or Shutting Down
Read This First
130
Search
Updating the User Guide to the Latest Version
By updating this User Guide - Introduction Version through the Internet, you can get
the complete version of the User Guide with detailed information on your VAIO computer.
Once the User Guide is updated to the complete version, you can access it anytime even
if you are offline.
With the complete version of the User Guide, you can view information about:
Parts description
Feature and operating instructions
Precautions
Troubleshooting information
Windows 8 basic operations
To get the complete version of the User Guide
1. Connect your VAIO computer to the Internet. [Details]
2. Exit this User Guide - Introduction Version.
3. Open the charms [Details] and select the
Search charm.
4. Select Apps.
5. Enter “VAIO Manual” in the search box.
6. Select VAIO Manual from the list.
7. After a window prompting you to update the manual appears, follow the on-screen
instructions to complete the updates.
This file will automatically update to the complete version of the User Guide.
If the window prompting you to update the User Guide does not appear, make sure
your VAIO computer is connected to the Internet and repeat the above steps.
If the update window still does not appear, start VAIO Update [Details] so you can
find and download the User Guide manually.
Hint
It may take some time to complete the update.
To view help files for Windows OS and app operations
When you have trouble operating your VAIO computer, try referring to Windows Help
and Support or help files included with your apps.
To access Windows Help and Support, open the charms and enter “Help and Support”
in the search box. [Details]
^ Go to top
Connecting to the Internet
You will need to connect your VAIO computer to the Internet before updating to the complete
version of the User Guide.
Before connecting to the Internet
Before using the Internet, you will need to sign up with an Internet Service Provider (ISP)
and set up devices required for connecting your VAIO computer to the Internet.
The following types of Internet connection services may be available from your ISP:
131
Search

Fiber to the Home (FTTH)
Digital Subscriber Line (DSL)
Cable modem
Satellite
Dial-up
For more information on devices required for Internet access and how to connect your VAIO
computer to the Internet, ask your ISP.
The following is one of the Internet connection methods as an example.
1. Internet
2. Modem
3. Router/access point
4. LAN cable (not supplied)
5. Wi-Fi(R) (Wireless LAN)
To use the network (LAN)
You can connect your VAIO computer to networks with a LAN cable. Connect one end of a
LAN cable to the LAN port on the computer and the other end to your network. For detailed
settings and devices required for LAN access, ask your network administrator.
Note
The connection, setting method, or required devices may vary depending on your
network environment.
To use the Wi-Fi network
1. Open the charms [Details] and select the Settings charm.
2. Select
(the network icon).
3. Select your desired network (SSID) from the list and Connect.
Note
For detailed information on network settings and devices, refer to the information from
your Internet Service Provider (ISP) or the manuals that came with your network
devices.
^ Go to top
Updating Your VAIO Computer
Be sure to update your VAIO computer to enhance the computer’s efficiency, security, and
132
Search
functionality.
Note
Your VAIO computer must be connected to the Internet to download the updates.
To use Windows Update
Windows Update enables you to make your VAIO computer more stable.
1. Open the charms [Details] and select the
Search charm.
2. Select Settings.
3. Enter “Windows Update” in the search box.
4. Select Windows Update from the list.
5. Follow the on-screen instructions to complete the updates.
To use VAIO Update
VAIO Update automatically notifies you of new updates available on the Internet then
downloads and installs them on your VAIO computer.
1. Open the charms [Details] and select the
Search charm.
2. Select Apps.
3. Enter “VAIO Update” in the search box.
4. Select VAIO Update from the list.
5. Follow the on-screen instructions to complete the updates.
To update the antivirus app
The antivirus app helps protect your VAIO computer against security threats by keeping the
app current with the latest updates. You can download and install the updates from the
website of the manufacturer.
1. Open the charms [Details] and select the
Search charm.
2. Select Apps.
3. Enter the antivirus app name in the search box.
4. Select the antivirus app from the list.
5. Follow the on-screen instructions to complete the updates.
^ Go to top
Solving Problems on Your VAIO Computer Using
VAIO Care
With VAIO Care, you can regularly conduct performance checks and system tune-ups on
your VAIO computer to keep it running at optimum level. Start VAIO Care whenever a
problem arises. VAIO Care will provide appropriate measures and support information to
solve the problem.
To start VAIO Care
Press the ASSIST button while your VAIO computer is on.
Below is an example of a screenshot in English.
133
Search
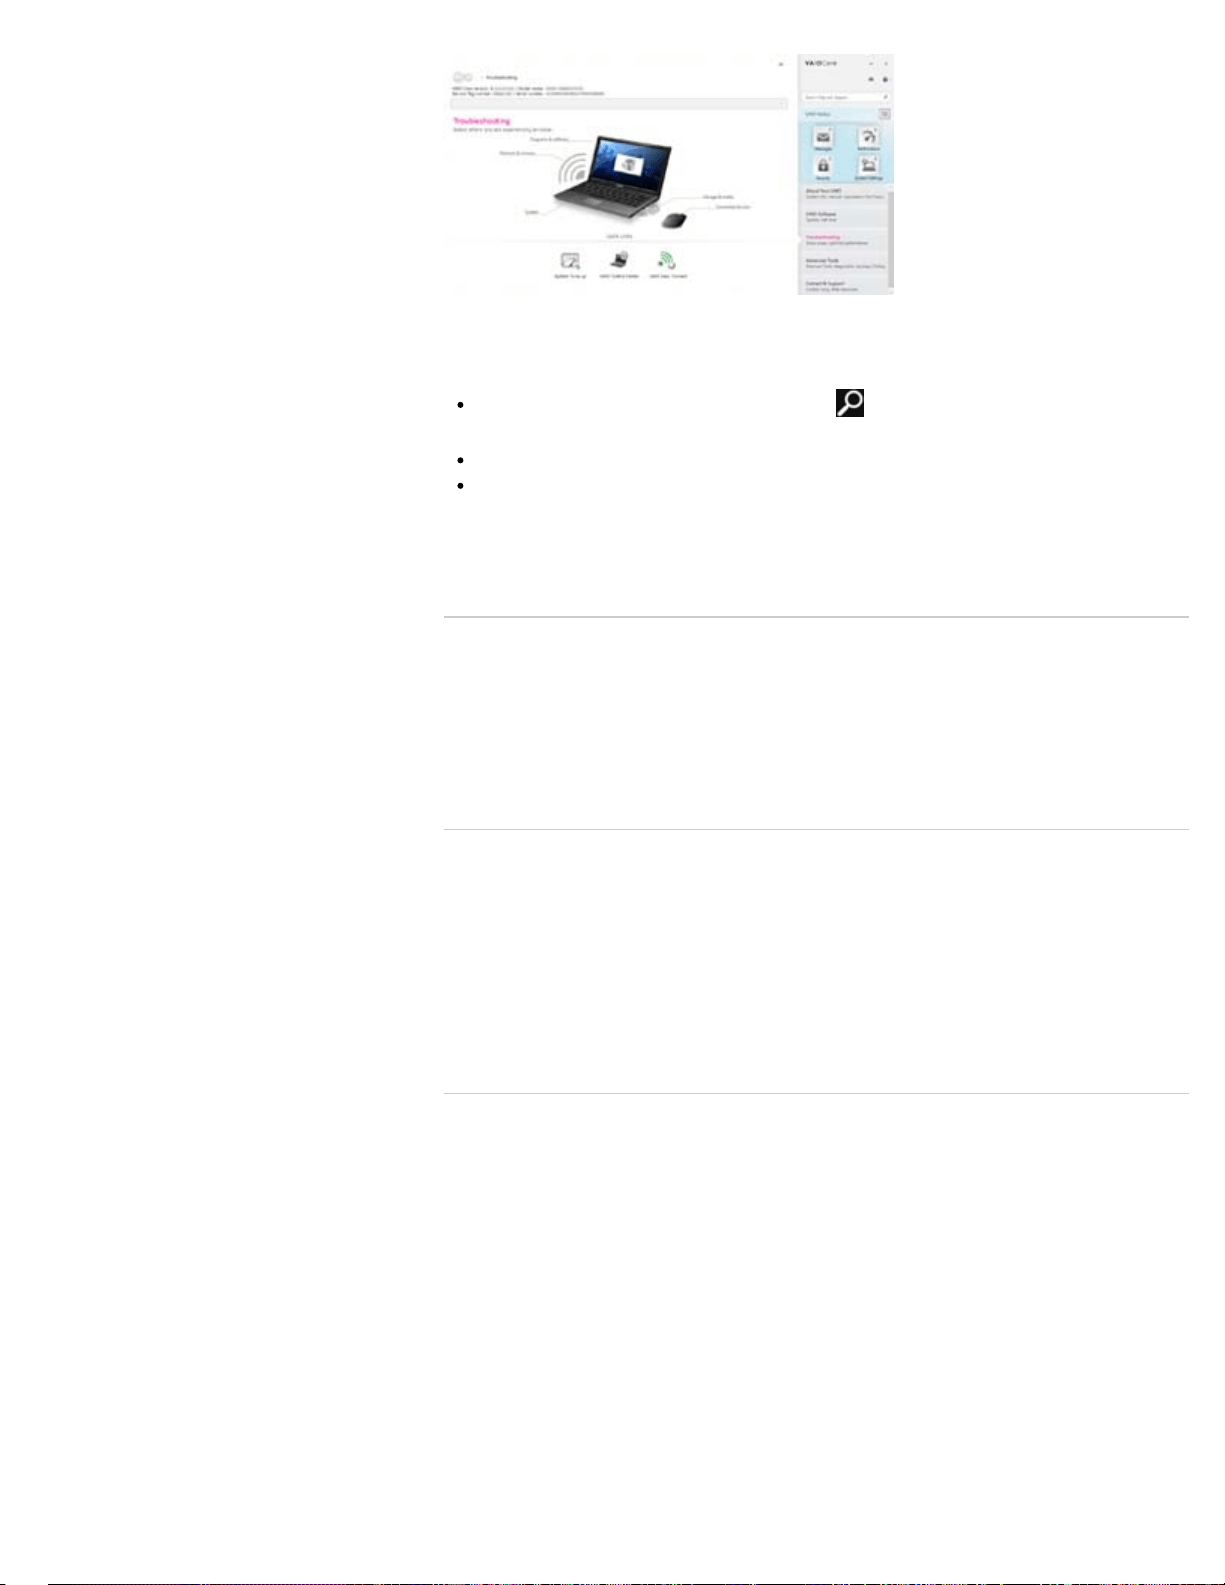
* Design and content of the screen are subject to change.
Hint
Alternatively, search for VAIO Care on the Search charm to start VAIO Care.
[Details]
Refer to the help file included with VAIO Care for more information.
Pressing the ASSIST button while your VAIO computer is off displays the VAIO Care
Rescue Mode screen. You can recover the computer by selecting Recover or
maintain your system in case of emergency, for example, when Windows does not
start.
^ Go to top
Finding Support Information
The Sony online support website provides instant access to information on commonly
encountered problems. You can find support information such as the support website URL in
Contact & Support on VAIO Care or the supplied Quick Start Guide. [Details]
^ Go to top
Windows 8 : How to Start
About the Start Screen and Menu
You can place the shortcuts to apps, the desktop, and websites that you use the most.
Overview
134
Search
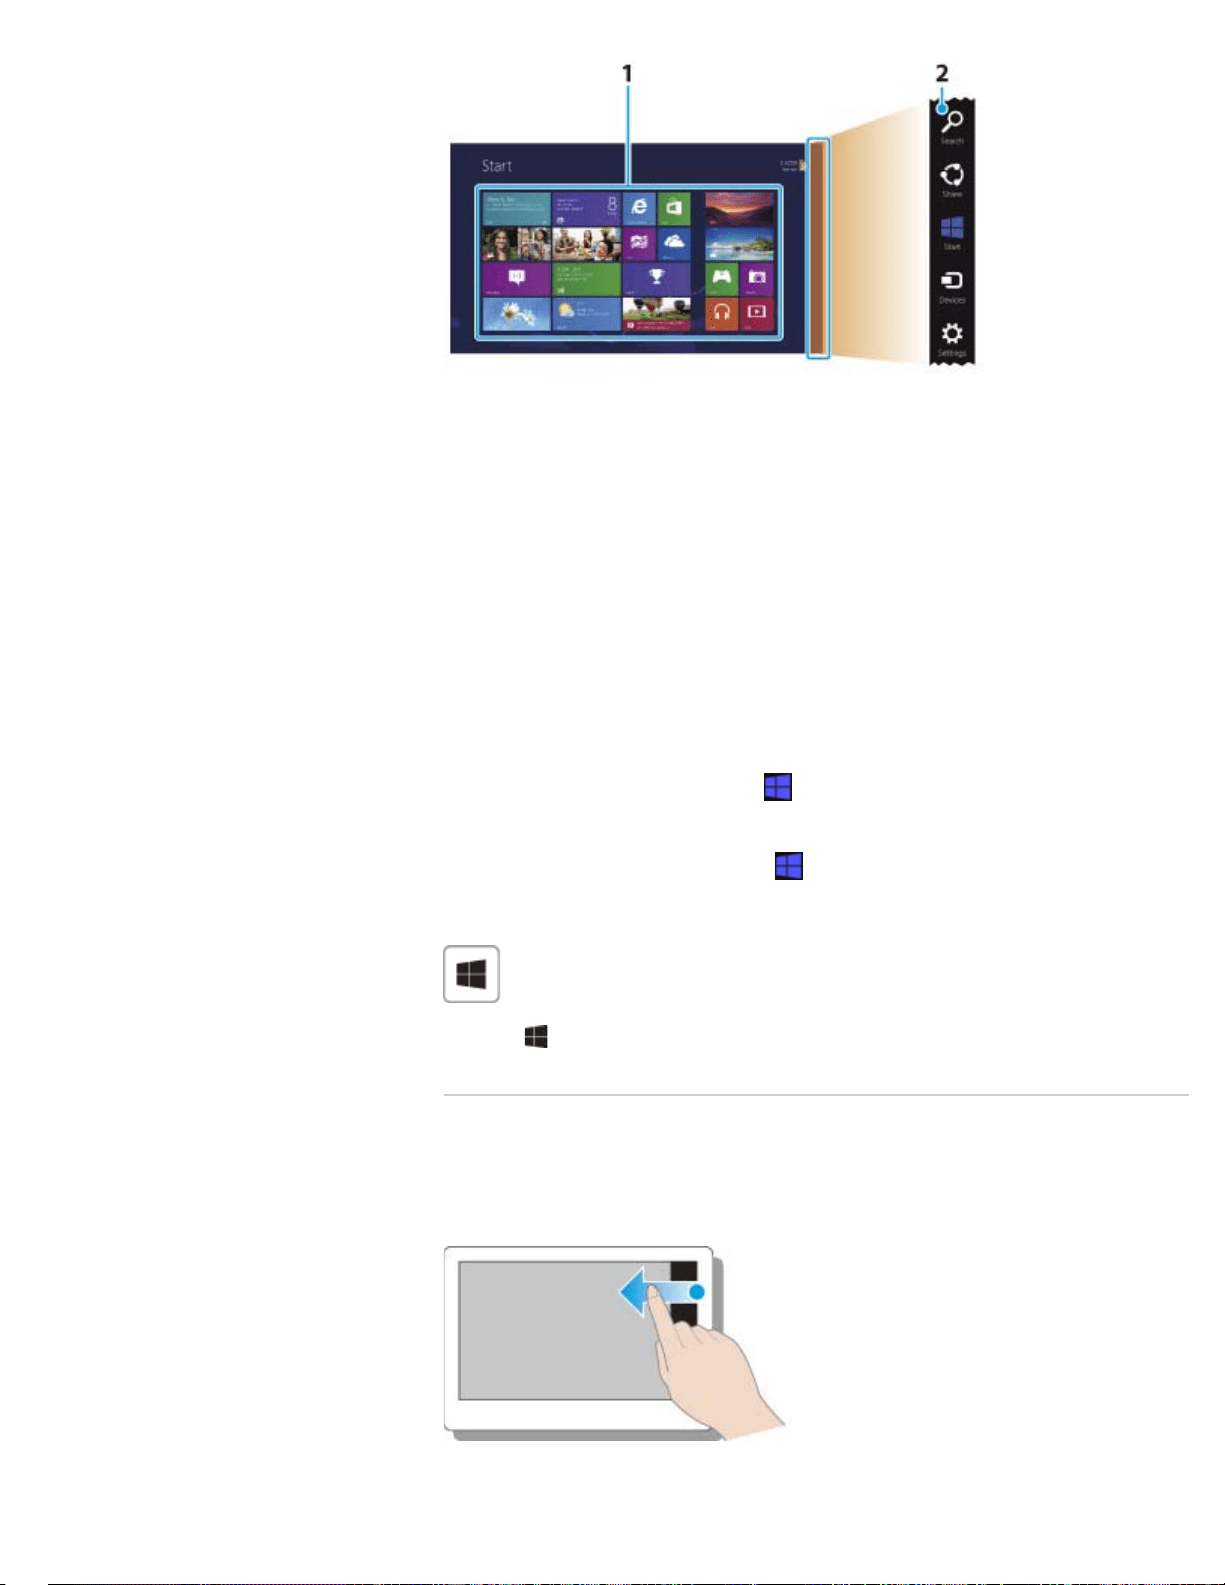
1. Tiles
Touch operation
Tap a tile to start an app and personalize the Start screen by adding and rearranging
tiles.
Mouse operation
Click a tile to start an app and personalize the Start screen by adding and
rearranging tiles.
2. Charms [Details]
Search for apps and files, share content, play content on other devices or print, and
set up your VAIO computer.
To open the Start screen
Touch operation
Open the charms [Details], then tap the
Start charm.
Mouse operation
Open the charms [Details], then click the
Start charm.
Keyboard operation
Press the (Windows) key.
^ Go to top
Opening the Charms
Touch operation
Swipe in from the right edge.
135
Search
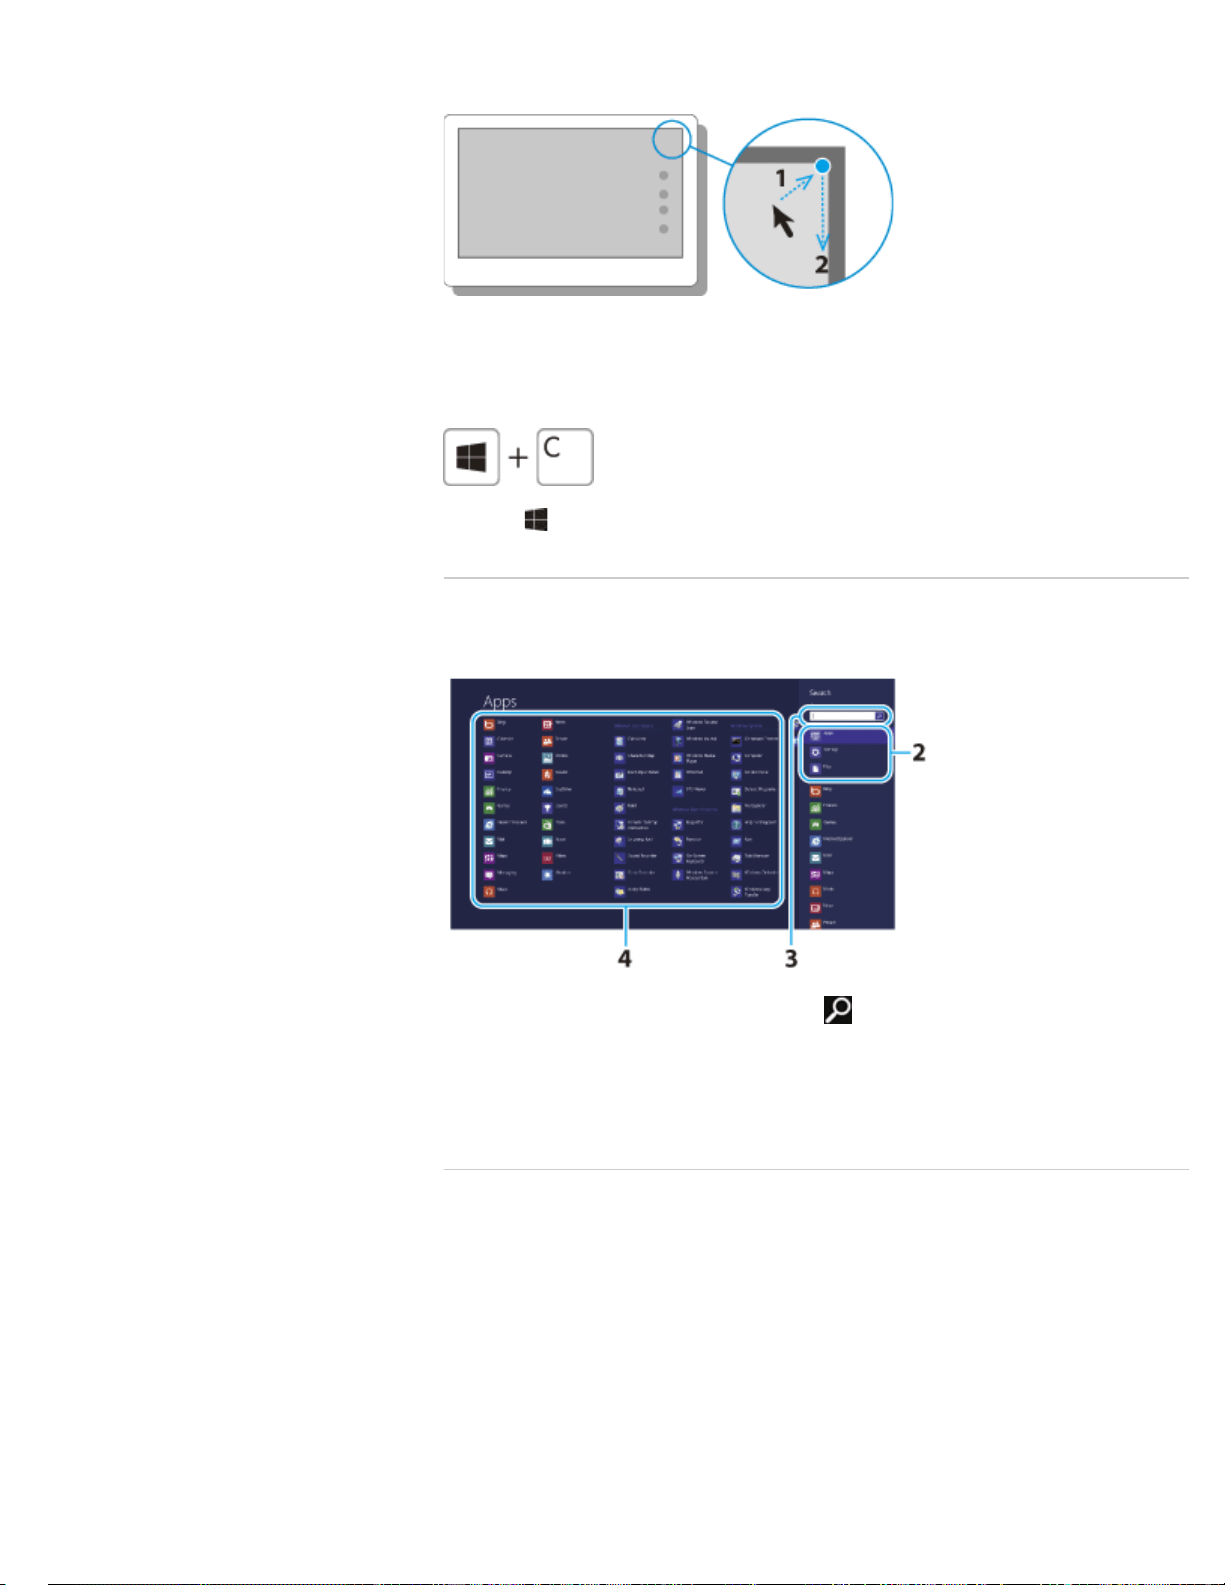
Mouse operation
Point to the upper-right corner, then move downward.
Keyboard operation
Press the (Windows) key and the C key at the same time.
^ Go to top
Searching/Starting Apps, Settings, or Files
1. Open the charms [Details] and select the Search charm.
2. Select Apps, Settings, or Files.
3. Enter a keyword (e.g. Control Panel) in the search box.
4. Select your desired app, setting, or file.
^ Go to top
Viewing Running Apps
Touch operation
136
Search
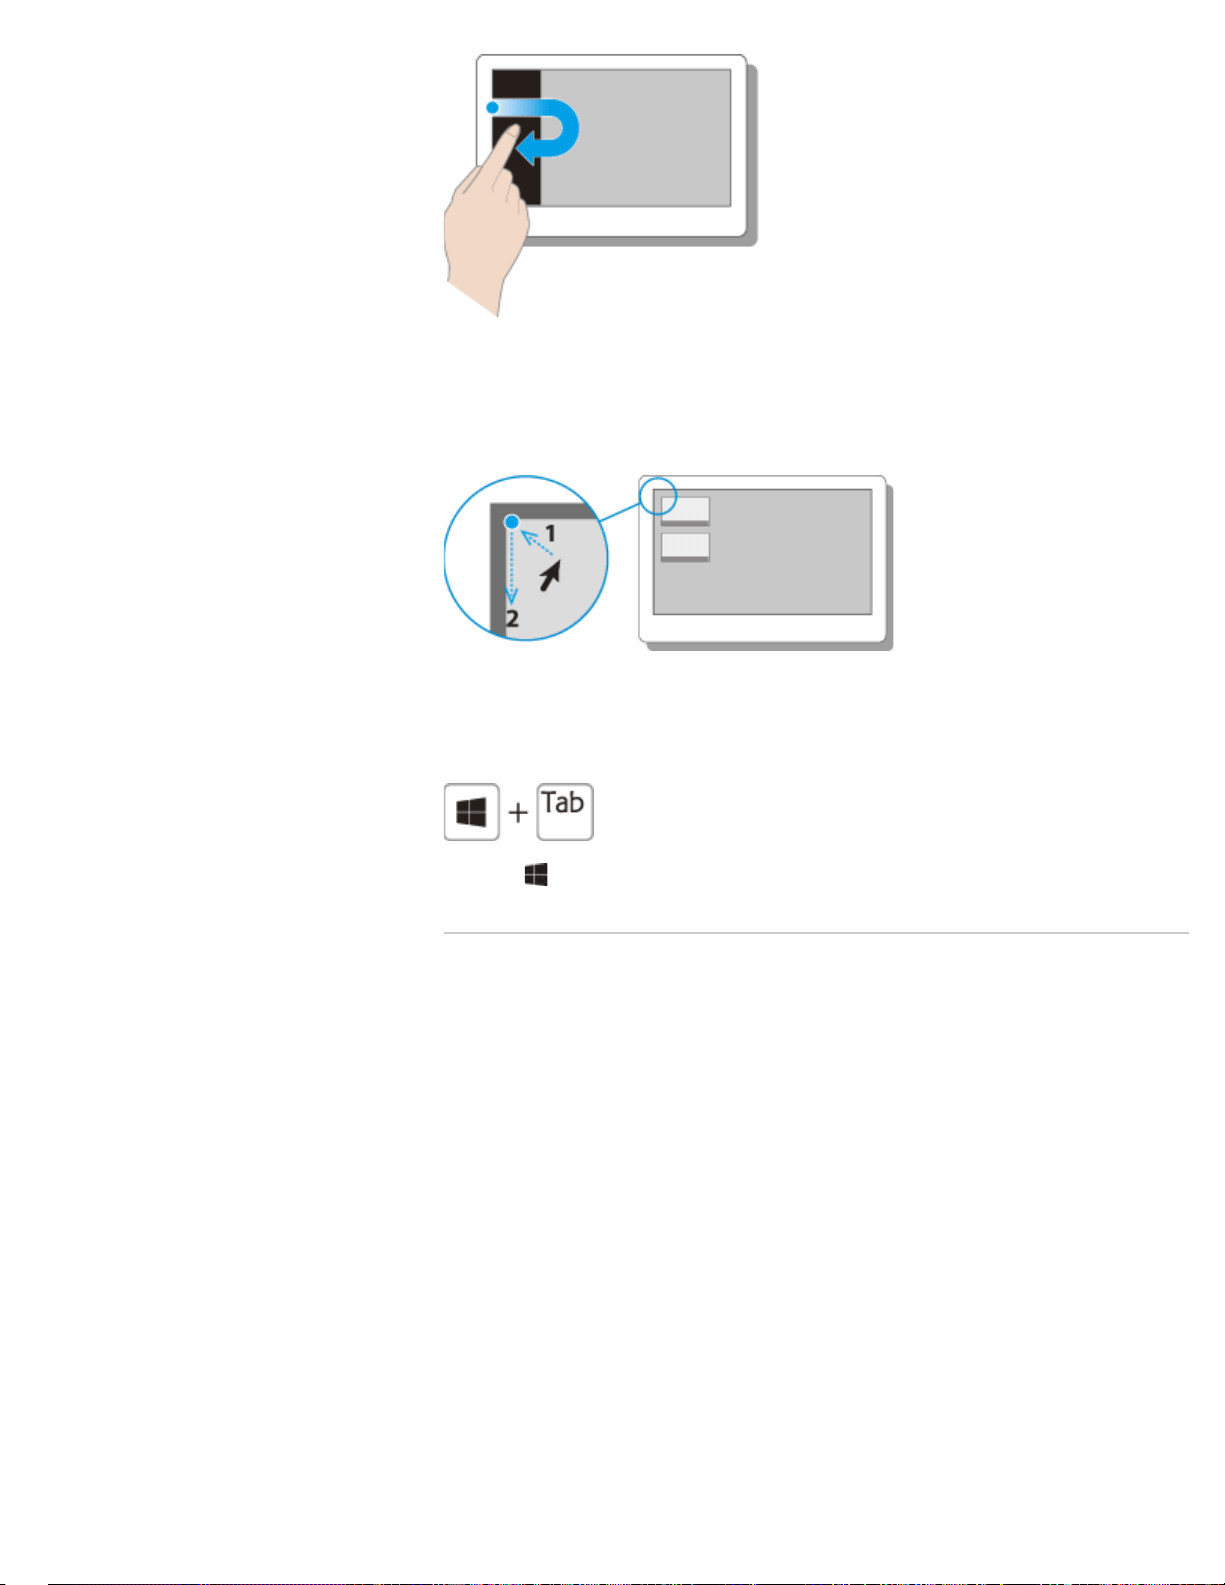
Swipe in from the left edge until a small app icon appears. Then, drag the icon back towards
the left edge.
Mouse operation
Point to the upper-left corner, then move downward.
Keyboard operation
Press the (Windows) key and the Tab key at the same time.
^ Go to top
Switching Apps
You can switch between apps that are currently running.
137
Search
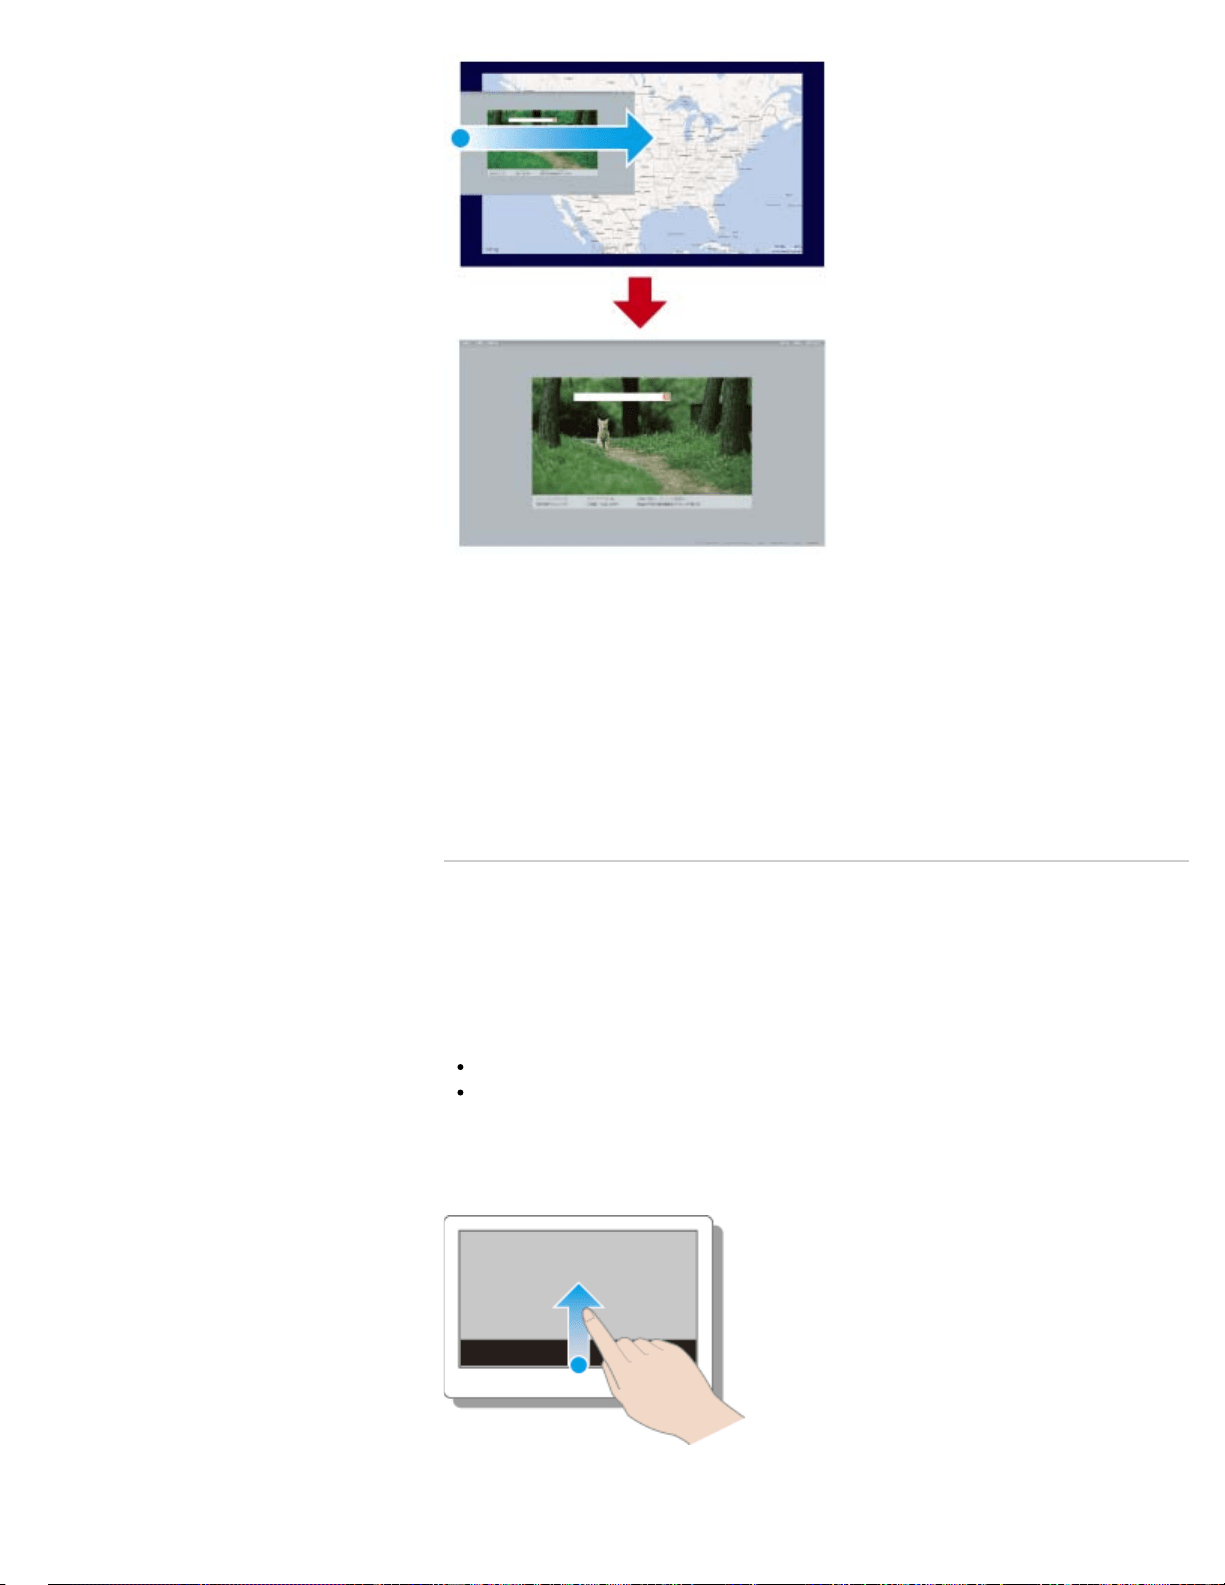
Touch operation
Display currently running apps [Details], touch your desired app icon, and swipe in from the
left edge.
Mouse operation
Display currently running apps [Details] and drag your desired app icon from the left edge to
the center.
^ Go to top
Opening the Apps Menu
Many apps have app menus that you can use to control your app. Follow the instructions
below to open the app menu.
Hint
Open the app menu when an app is displayed on the computer screen.
App commands vary depending on the app that is currently displayed on the computer
screen.
Touch operation
Swipe up from the bottom edge.
138
Search
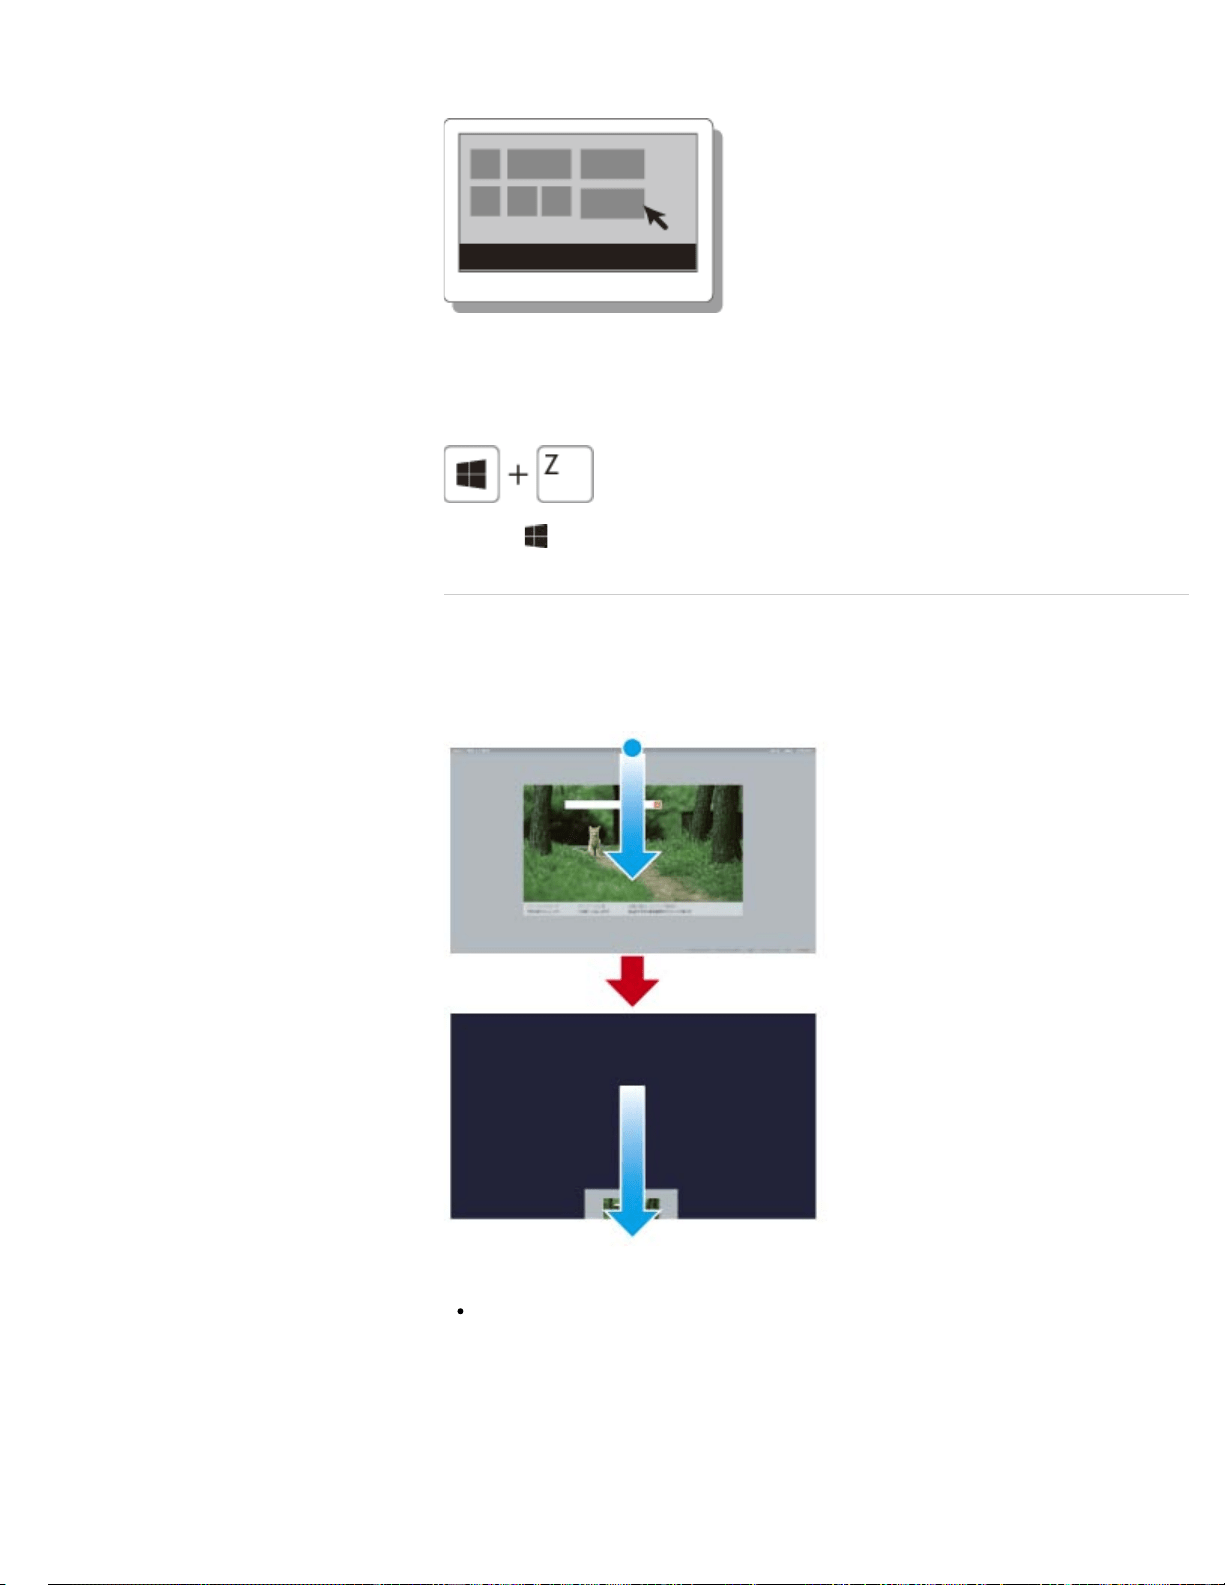
Mouse operation
Right-click within an app.
Keyboard operation
Press the (Windows) key and the Z key at the same time.
^ Go to top
Closing Apps
You can close currently running apps by following the instruction below.
Hint
The app window becomes smaller in the bottom of the screen.
Drag the window to the bottom-center edge.
Touch operation
1. When an app is open, point to the top-center of the screen.
2. Drag the app to the bottom of the screen until the app disappears from the screen.
139
Search
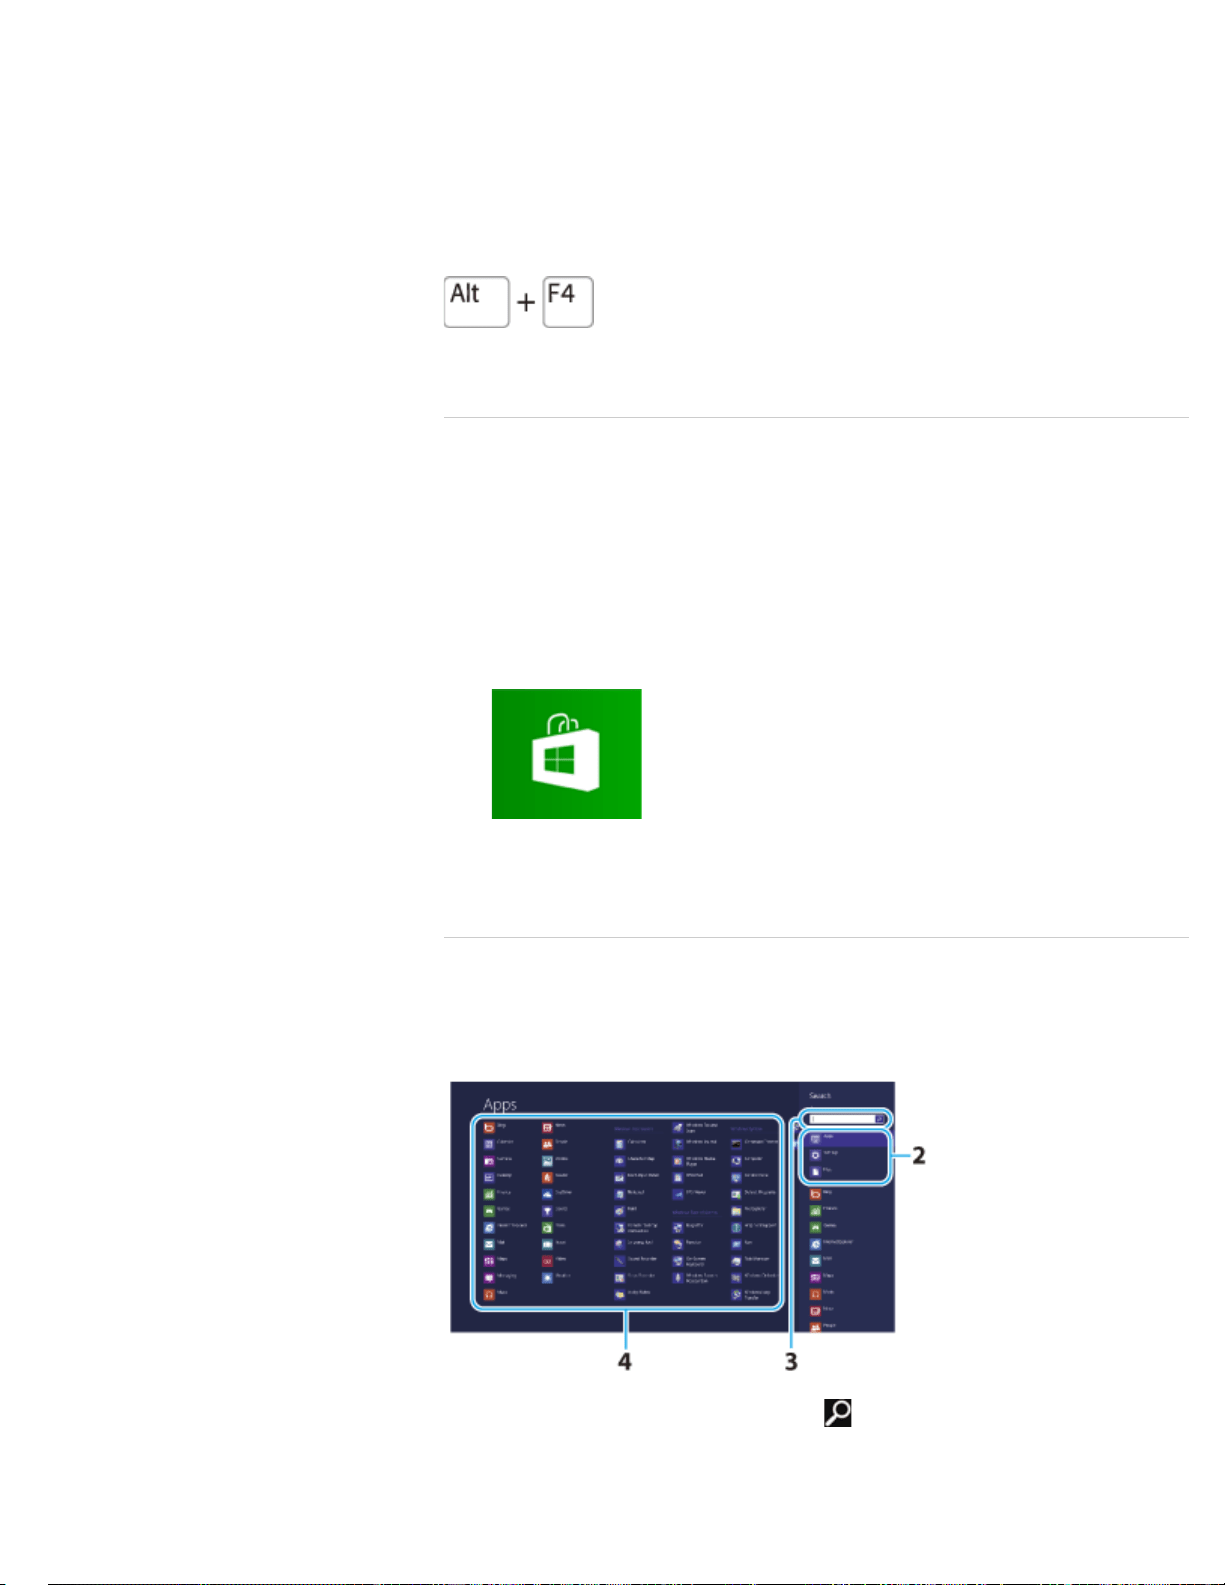
Mouse operation
1. When an app is open, move the cursor to the top-center of the screen until the hand
icon appears.
2. Drag the app to the bottom of the screen until the app disappears from the screen.
Keyboard operation
Press the Alt key and the F4 key at the same time.
^ Go to top
Installing Apps from Windows Store
You can add apps from Windows Store.
Internet connection is necessary to access Windows Store. You also need to sign in with
a Microsoft account.
On how to create and what you can do with the Microsoft account, refer to Windows Help
and Support. [Details]
1. Open the Start screen [Details], select the Store tile, and then find an app to install.
2. Select your desired app.
3. Follow the on-screen instructions to download and install the app.
^ Go to top
Opening Windows Help and Support
You can open Windows Help and Support by following these steps.
1. Open the charms [Details] and select the Search charm.
2. Select Apps.
3. Enter “Help and Support” in the search box.
140
Search
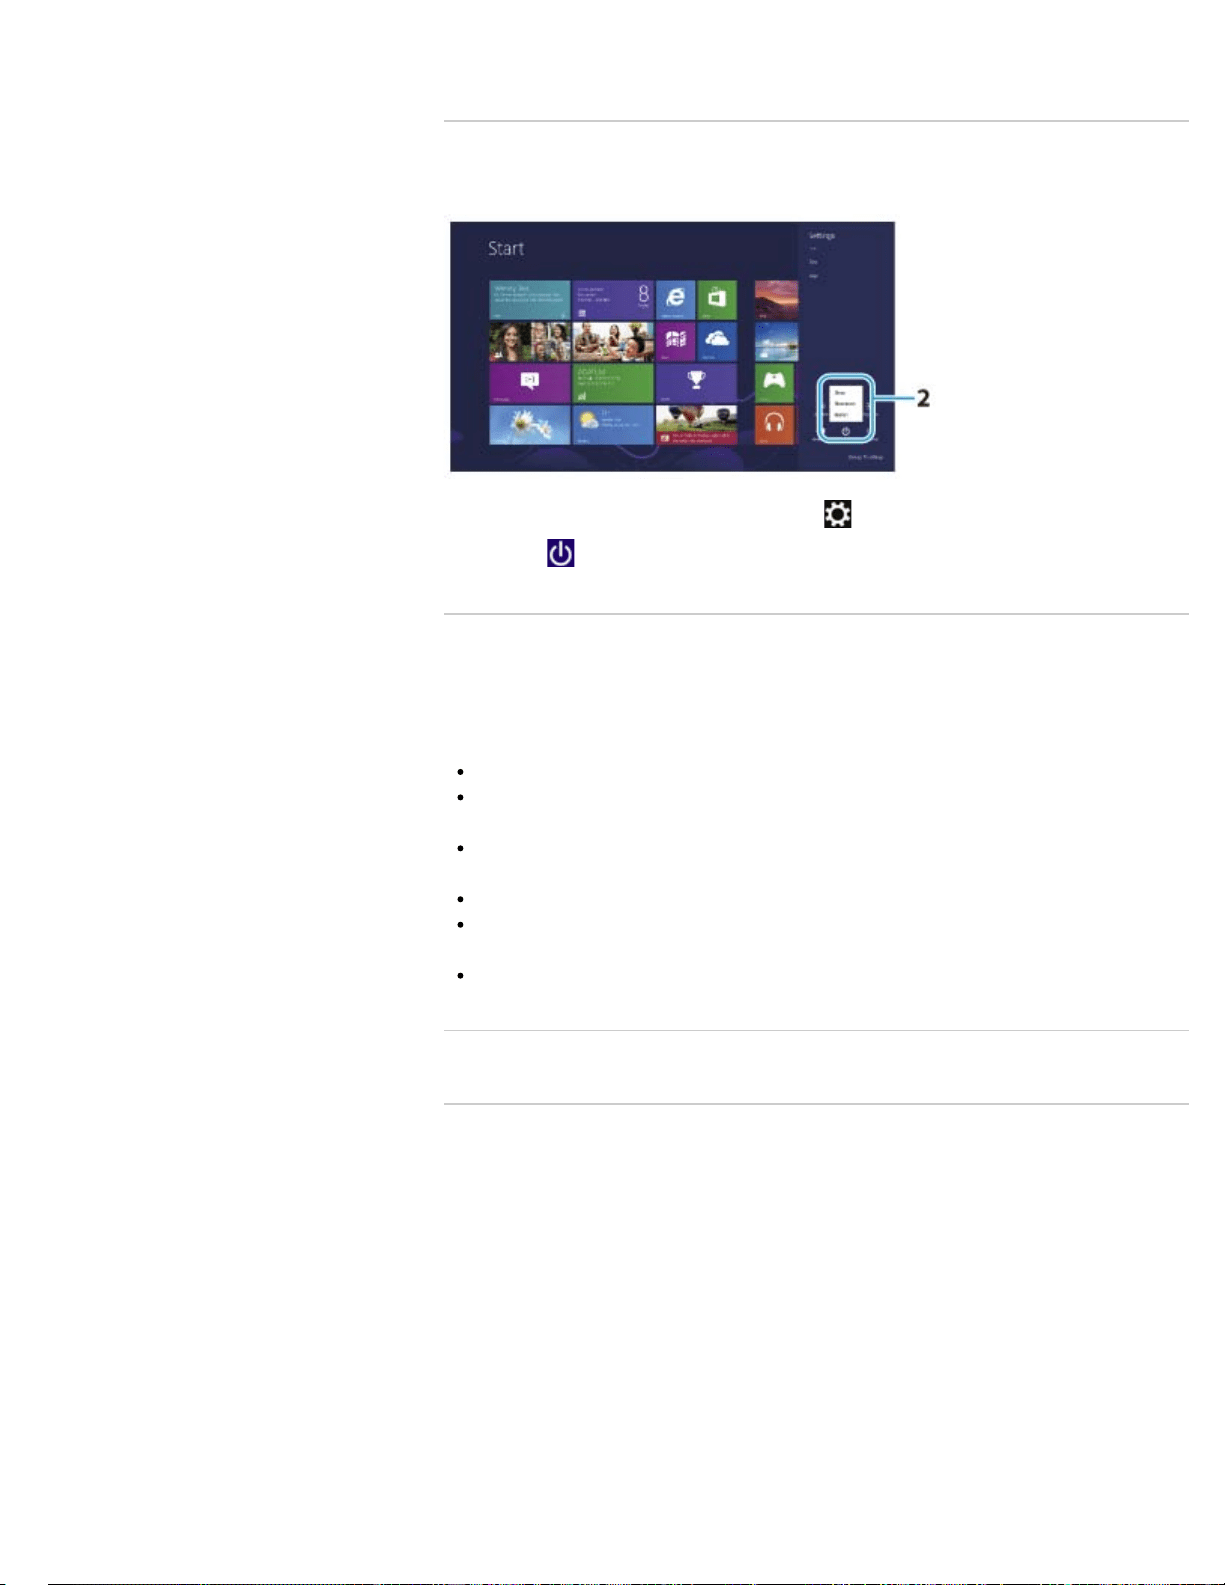
4.
Select
Help and Support
.
^ Go to top
Entering Sleep or Shutting Down
1. Open the charms [Details] and select the Settings charm.
2. Select
Power, then select Sleep, Shut down, or Restart.
^ Go to top
Trademarks
SONY and the SONY logo are registered trademarks of Sony Corporation.
VAIO, the VAIO logo, and other Sony product or service names are trademarks or
registered trademarks of Sony Corporation or any of its affiliates.
Windows and the Windows logo are either registered trademarks or trademarks of
Microsoft Corporation in the United States and/or other countries.
Wi-Fi is a trademark or registered trademark of Wi-Fi Alliance.
All other names of system, products, and services are trademarks of their respective
owners.
In the manual, the TM or (R) marks are not specified.
^ Go to top
Copyright 2013 Sony Corporation
© 2013 Sony Corporation
141
Search

VAIO User Guide Back | Back to Top
Troubleshooting
How to Use
Windows 8: The Basics
Parts Description
Setup
Network / Internet
Connections
Settings
Backup / Recovery
Security
Other Operations
Notifications
Opening Windows Help and Support
You can open Windows Help and Support by following these steps.
1. Open the charms [Details] and select the Search charm.
2. Select Apps.
3. Enter “Help and Support” in the search box.
4. Select Help and Support.
© 2013 Sony Corporation
142
Search
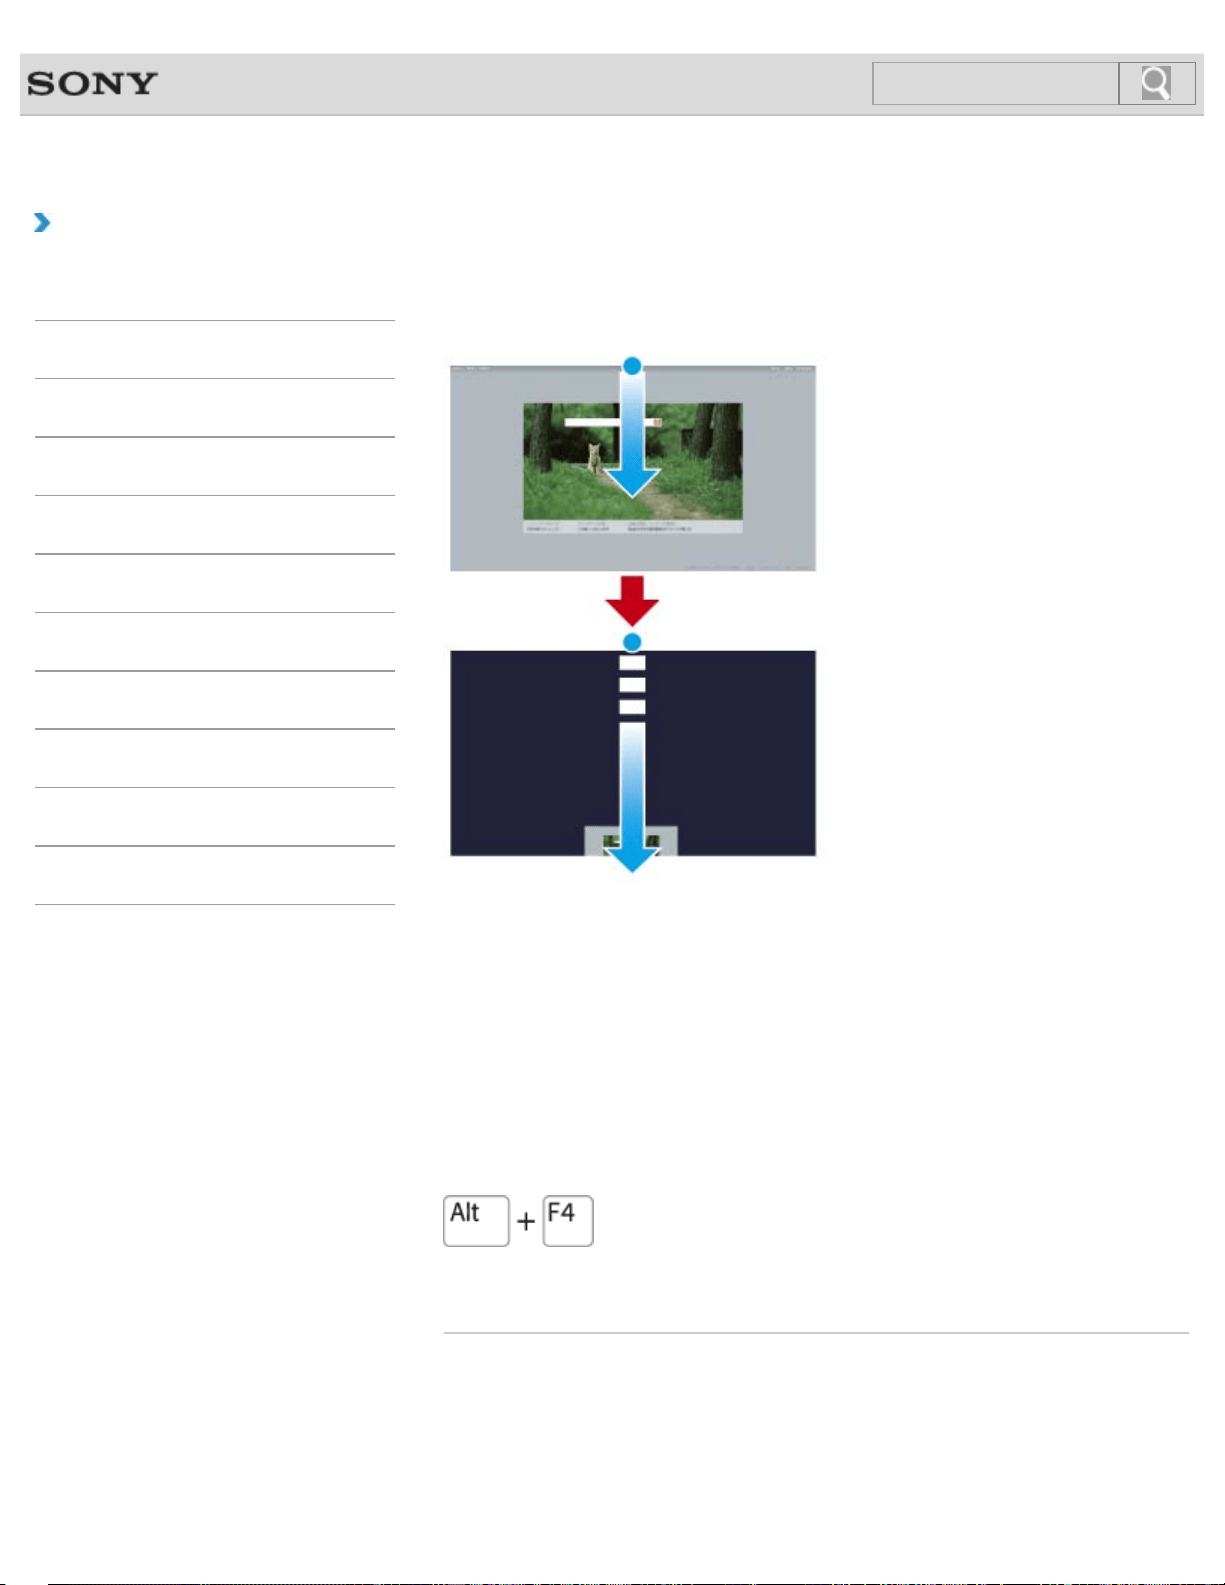
VAIO User Guide Back | Back to Top
Troubleshooting
How to Use
Windows 8: The Basics
Parts Description
Setup
Network / Internet
Connections
Settings
Backup / Recovery
Security
Other Operations
Notifications
Closing Apps
You can close currently running apps by following the instruction below.
Touch operation (Touch screen equipped models)
1. When an app is open, point to the top-center of the screen.
2. Drag the app to the bottom of the screen until the app disappears from the screen.
Mouse/Touch pad operation
1. When an app is open, move the cursor to the top-center of the screen until the hand
icon appears.
2. Drag the app to the bottom of the screen until the app disappears from the screen.
Keyboard operation
Press the Alt key and the F4 key at the same time.
Related Topic
Searching/Starting Apps, Settings, or Files
Viewing Running Apps
Opening the App Menu
Switching Apps
Installing Apps from Windows Store
143
Search

© 2013 Sony Corporation
144
Search
VAIO User Guide Back | Back to Top
Troubleshooting
How to Use
Windows 8: The Basics
Parts Description
Setup
Network / Internet
Connections
Settings
Backup / Recovery
Security
Other Operations
Notifications
Installing Apps from Windows Store
You can install apps from Windows Store.
You will need a Microsoft account to use certain apps or services, including Windows
Store.
On how to create and what you can do with the Microsoft account, refer to Windows Help
and Support. [Details]
1. Connect to the Internet. [Details]
2. Open the Start screen [Details] and select the Store tile.
3. Find an app to install.
4. Follow the on-screen instructions to install the app.
Related Topic
Searching/Starting Apps, Settings, or Files
Opening the App Menu
Closing Apps
Switching Apps
© 2013 Sony Corporation
145
Search
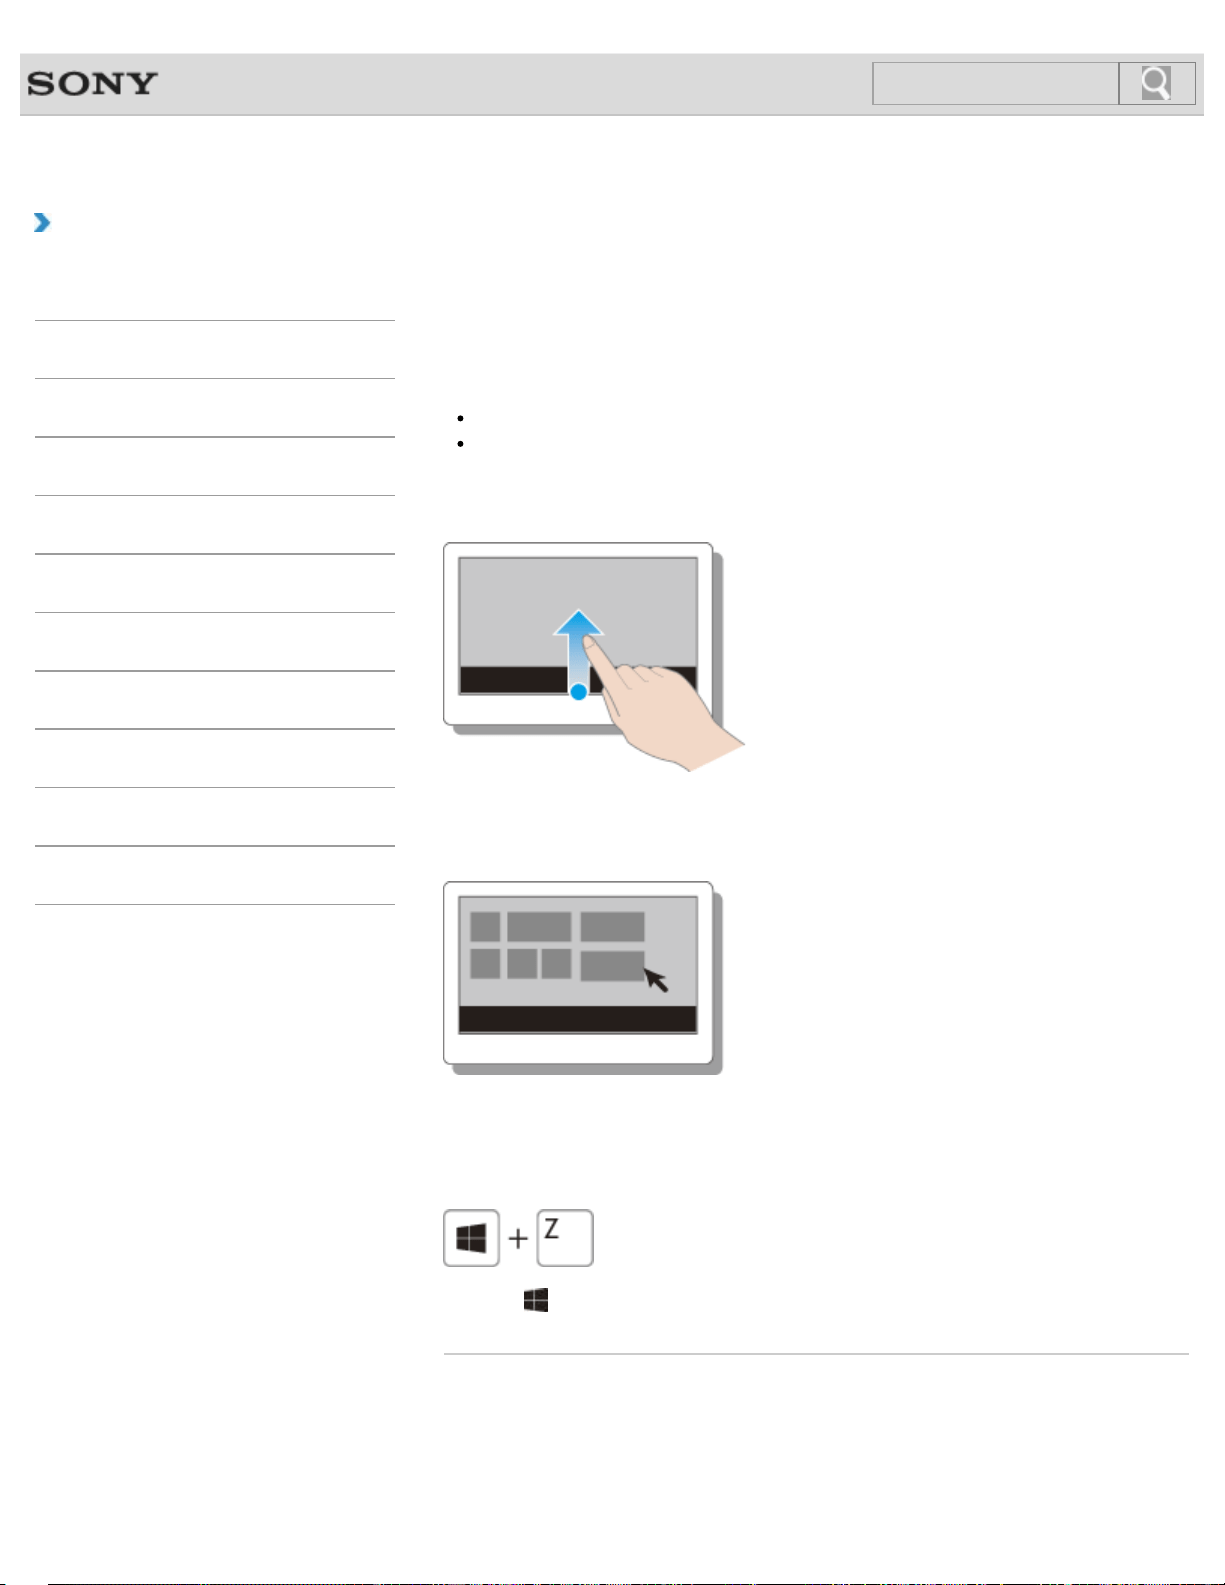
VAIO User Guide Back | Back to Top
Troubleshooting
How to Use
Windows 8: The Basics
Parts Description
Setup
Network / Internet
Connections
Settings
Backup / Recovery
Security
Other Operations
Notifications
Opening the App Menu
Many apps have app menus that you can use to control your app. Follow the instructions
below to open the app menu.
Hint
Open the app menu when an app is displayed on the computer screen.
App commands vary depending on the app that is currently displayed on the computer
screen.
Touch operation (Touch screen equipped models)
Swipe up from the bottom edge.
Mouse/Touch pad operation
When an app is open, right-click anywhere on the screen. On a touch pad, click the bottom-
right corner.
Keyboard operation
Press the (Windows) key and the Z key at the same time.
Related Topic
Searching/Starting Apps, Settings, or Files
Viewing Running Apps
Closing Apps
Switching Apps
146
Search

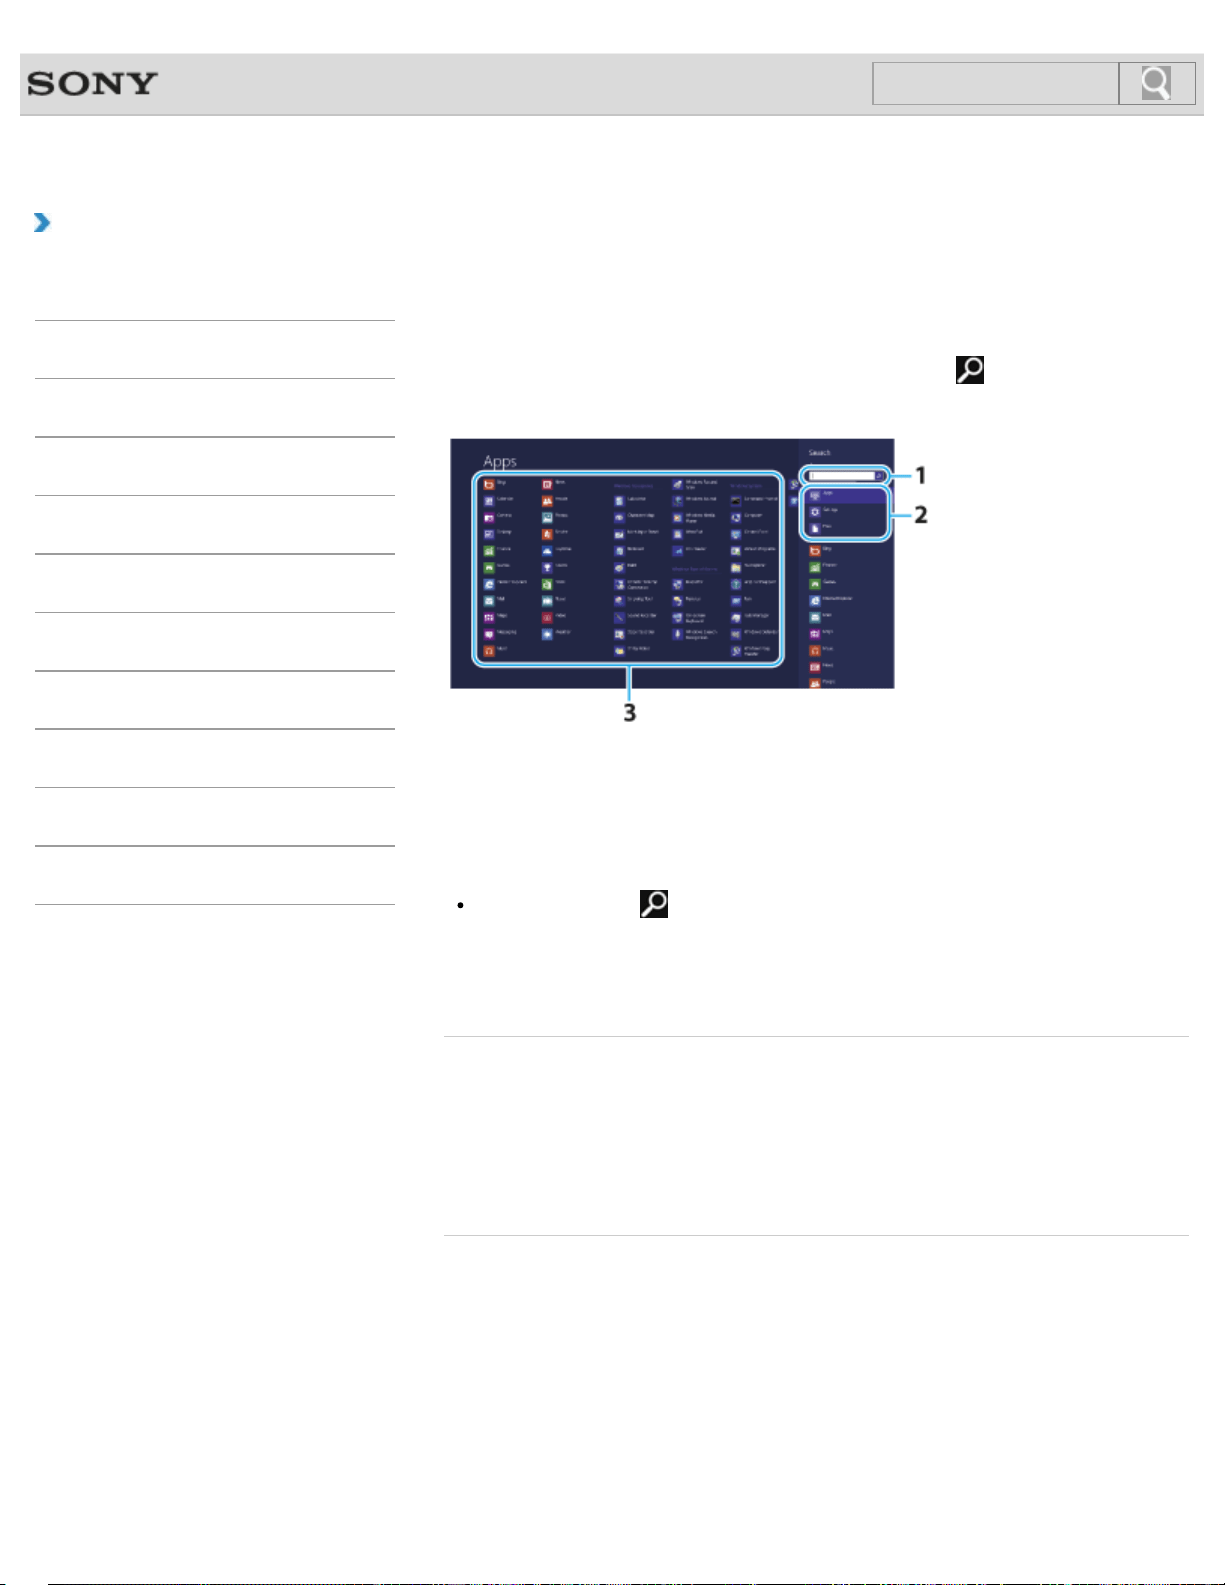
VAIO User Guide Back | Back to Top
Troubleshooting
How to Use
Windows 8: The Basics
Parts Description
Setup
Network / Internet
Connections
Settings
Backup / Recovery
Security
Other Operations
Notifications
Searching/Starting Apps, Settings, or Files
You can search apps, files, or settings on the charms, and then start your desired apps, files,
or settings.
To search and start them, open the charms [Details], select the
Search charm, and
follow these steps.
1. Enter a keyword in the search box.
2. Select Apps, Settings, or Files to narrow the search result.
3. Select your desired app or file.
Note
When you open the Search charm with certain Windows Store apps running,
you can search from within the running apps.
If no apps are running, you can also search from within the apps by selecting Apps
below the search box in step 2.
Related Topic
Opening the App Menu
Viewing Running Apps
Closing Apps
Switching Apps
Installing Apps from Windows Store
© 2013 Sony Corporation
148
Search
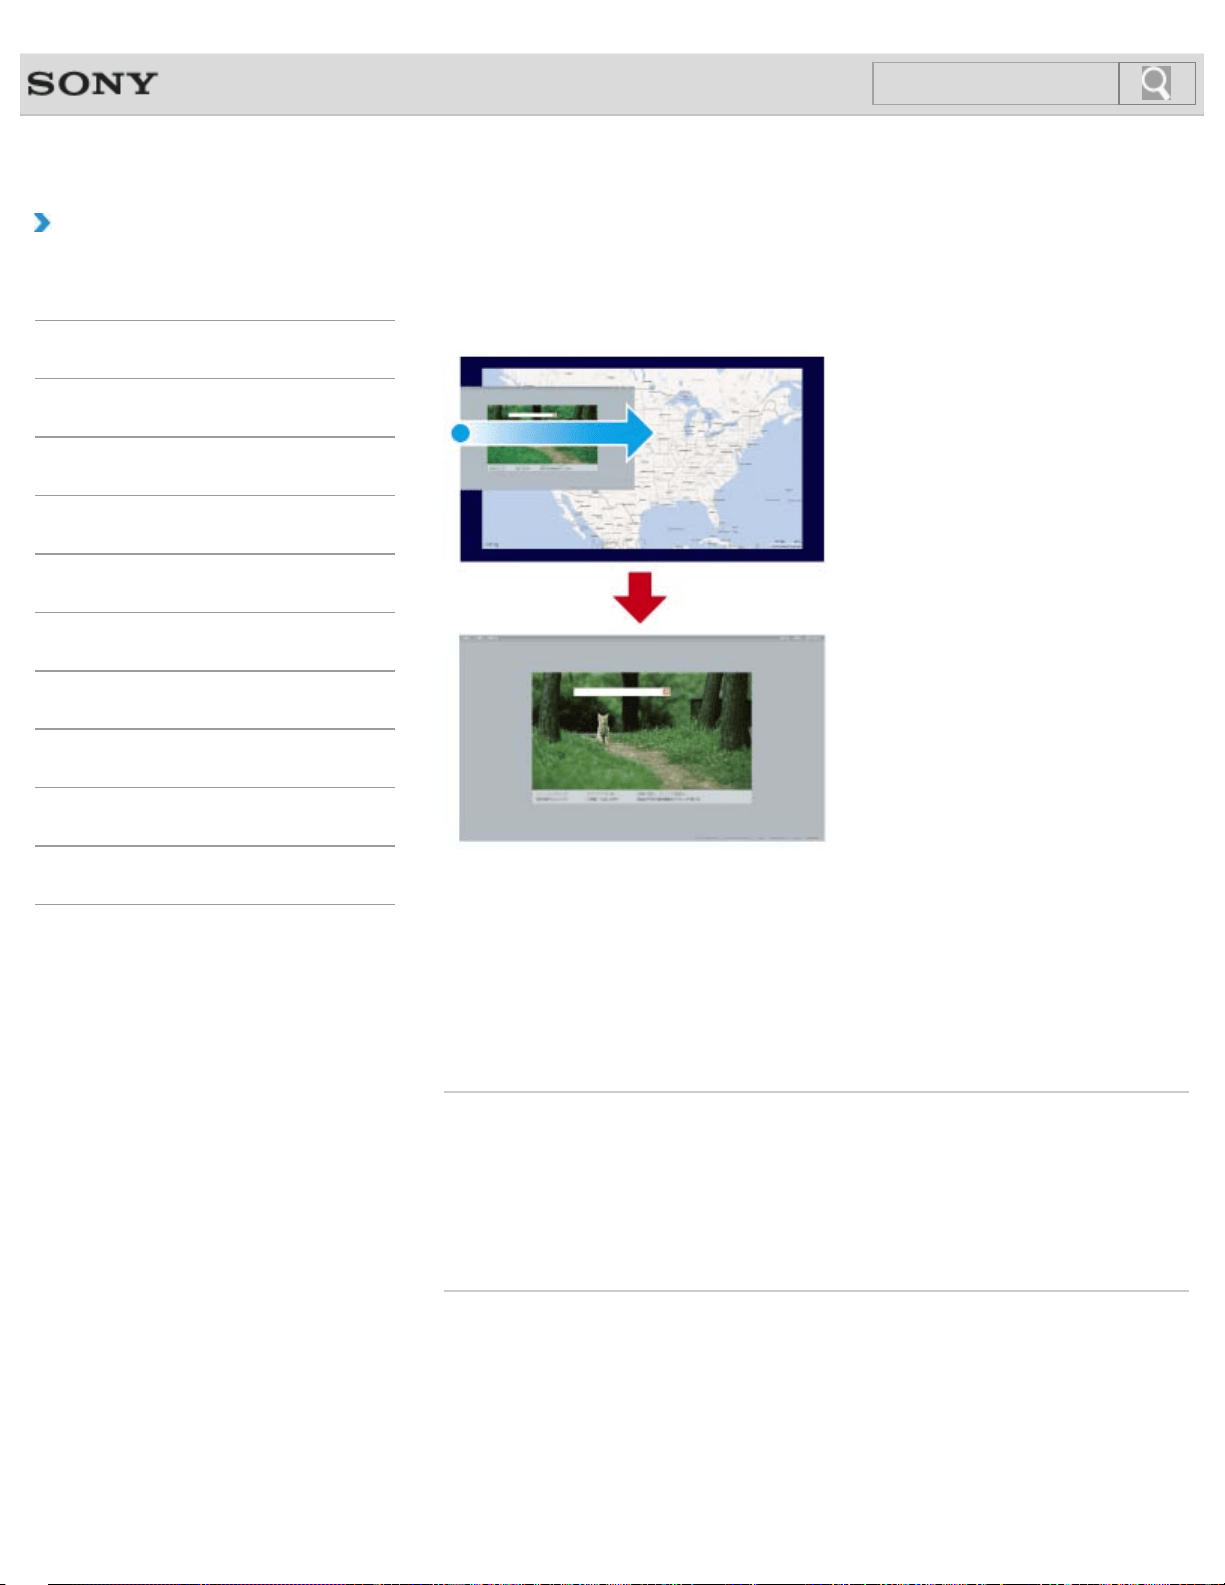
VAIO User Guide Back | Back to Top
Troubleshooting
How to Use
Windows 8: The Basics
Parts Description
Setup
Network / Internet
Connections
Settings
Backup / Recovery
Security
Other Operations
Notifications
Switching Apps
You can switch between apps that are currently running.
Touch operation (Touch screen equipped models)
Display currently running apps [Details], touch and swipe in your desired app icon from the
left edge.
Mouse/Touch pad operation
Display currently running apps [Details] and drag your desired app icon from the left edge to
the center.
Related Topic
Searching/Starting Apps, Settings, or Files
Opening the App Menu
Viewing Running Apps
Closing Apps
Installing Apps from Windows Store
© 2013 Sony Corporation
149
Search
VAIO User Guide Back | Back to Top
Troubleshooting
How to Use
Windows 8: The Basics
Parts Description
Setup
Network / Internet
Connections
Settings
Backup / Recovery
Security
Other Operations
Notifications
Switching User Accounts
You can switch to another user account by following these steps.
1. Open the Start screen [Details] and select an account name at the upper-right corner
of the computer screen.
2. Select your desired account name.
Hint
To create a new user account, you need to sign in as an administrator. Then, open the
charms [Details] and select the Settings charm. Select Change PC settings in
the lower right corner, and select Users in the left pane.
© 2013 Sony Corporation
150
Search
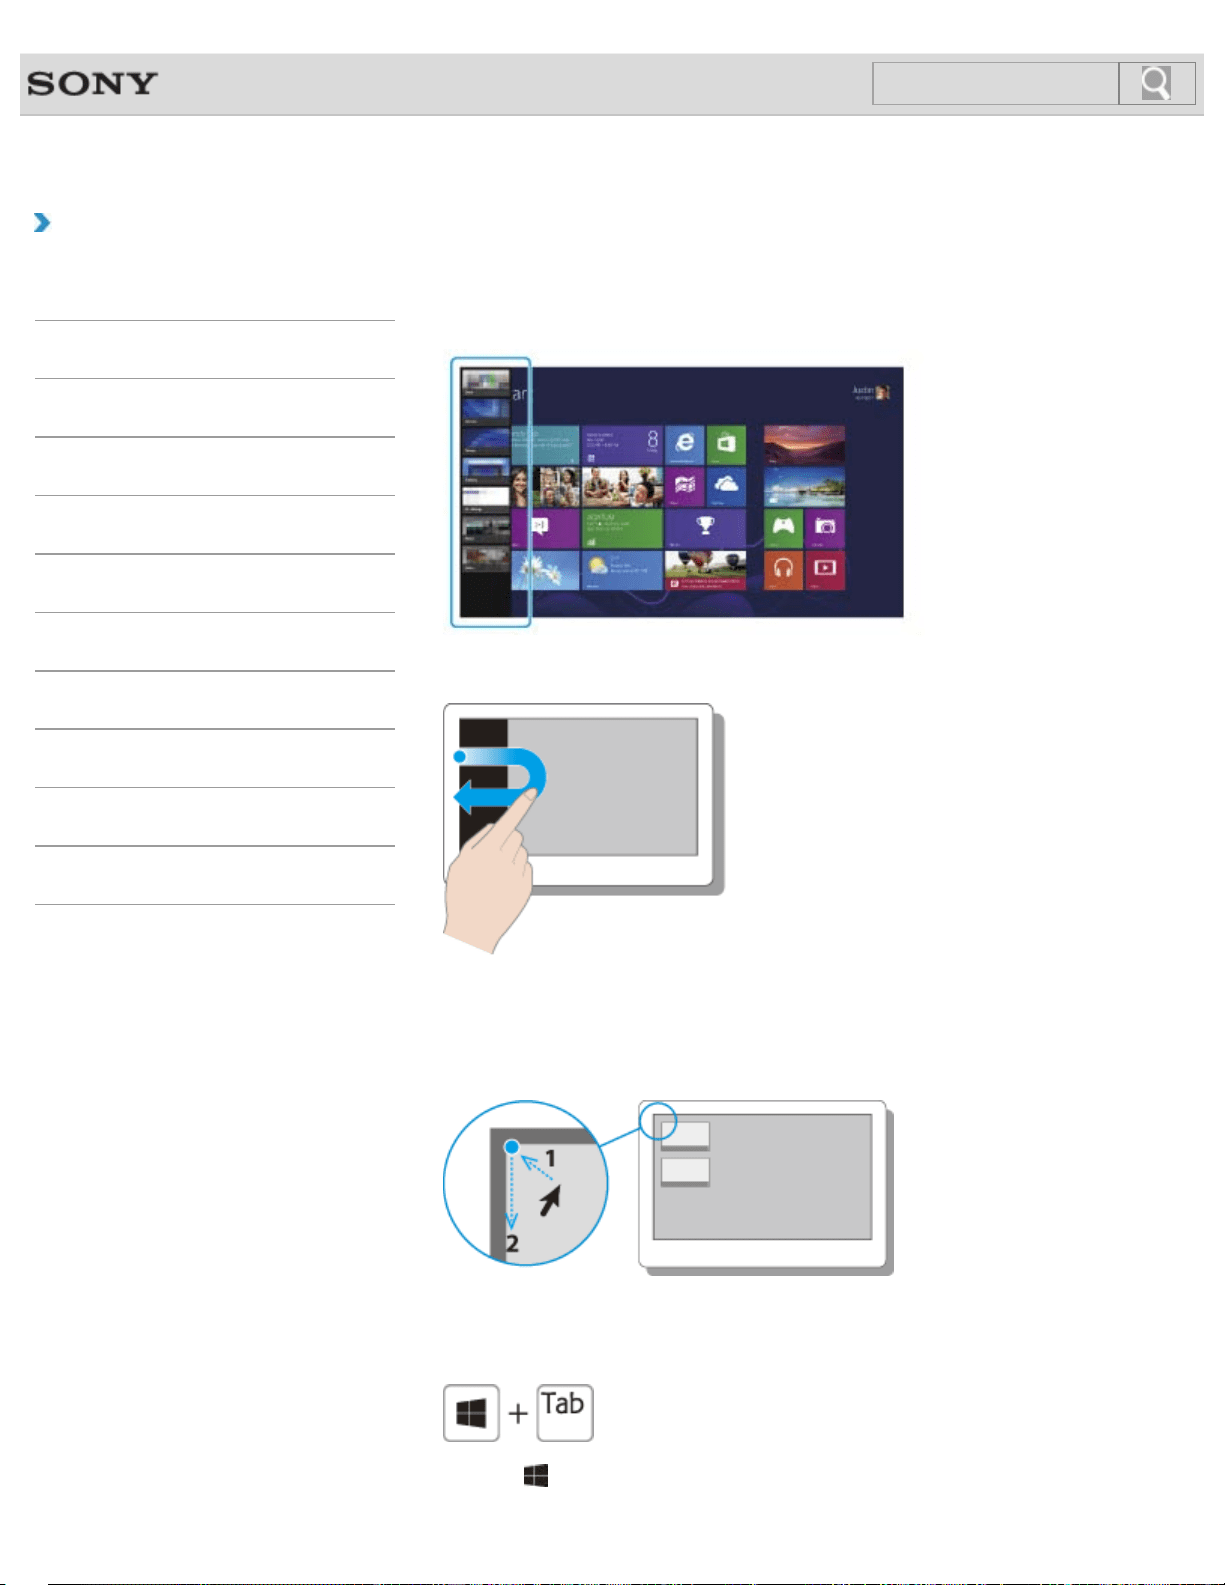
VAIO User Guide Back | Back to Top
Troubleshooting
How to Use
Windows 8: The Basics
Parts Description
Setup
Network / Internet
Connections
Settings
Backup / Recovery
Security
Other Operations
Notifications
Viewing Running Apps
You can view running apps by displaying the list on the Start screen. [Details]
Touch operation (Touch screen equipped models)
Swipe in from the left edge until a small app icon appears, then drag the icon back towards
the left edge.
Mouse/Touch pad operation
Point to the upper-left corner, then move downward.
Keyboard operation
Press the (Windows) key and the Tab key at the same time.
151
Search

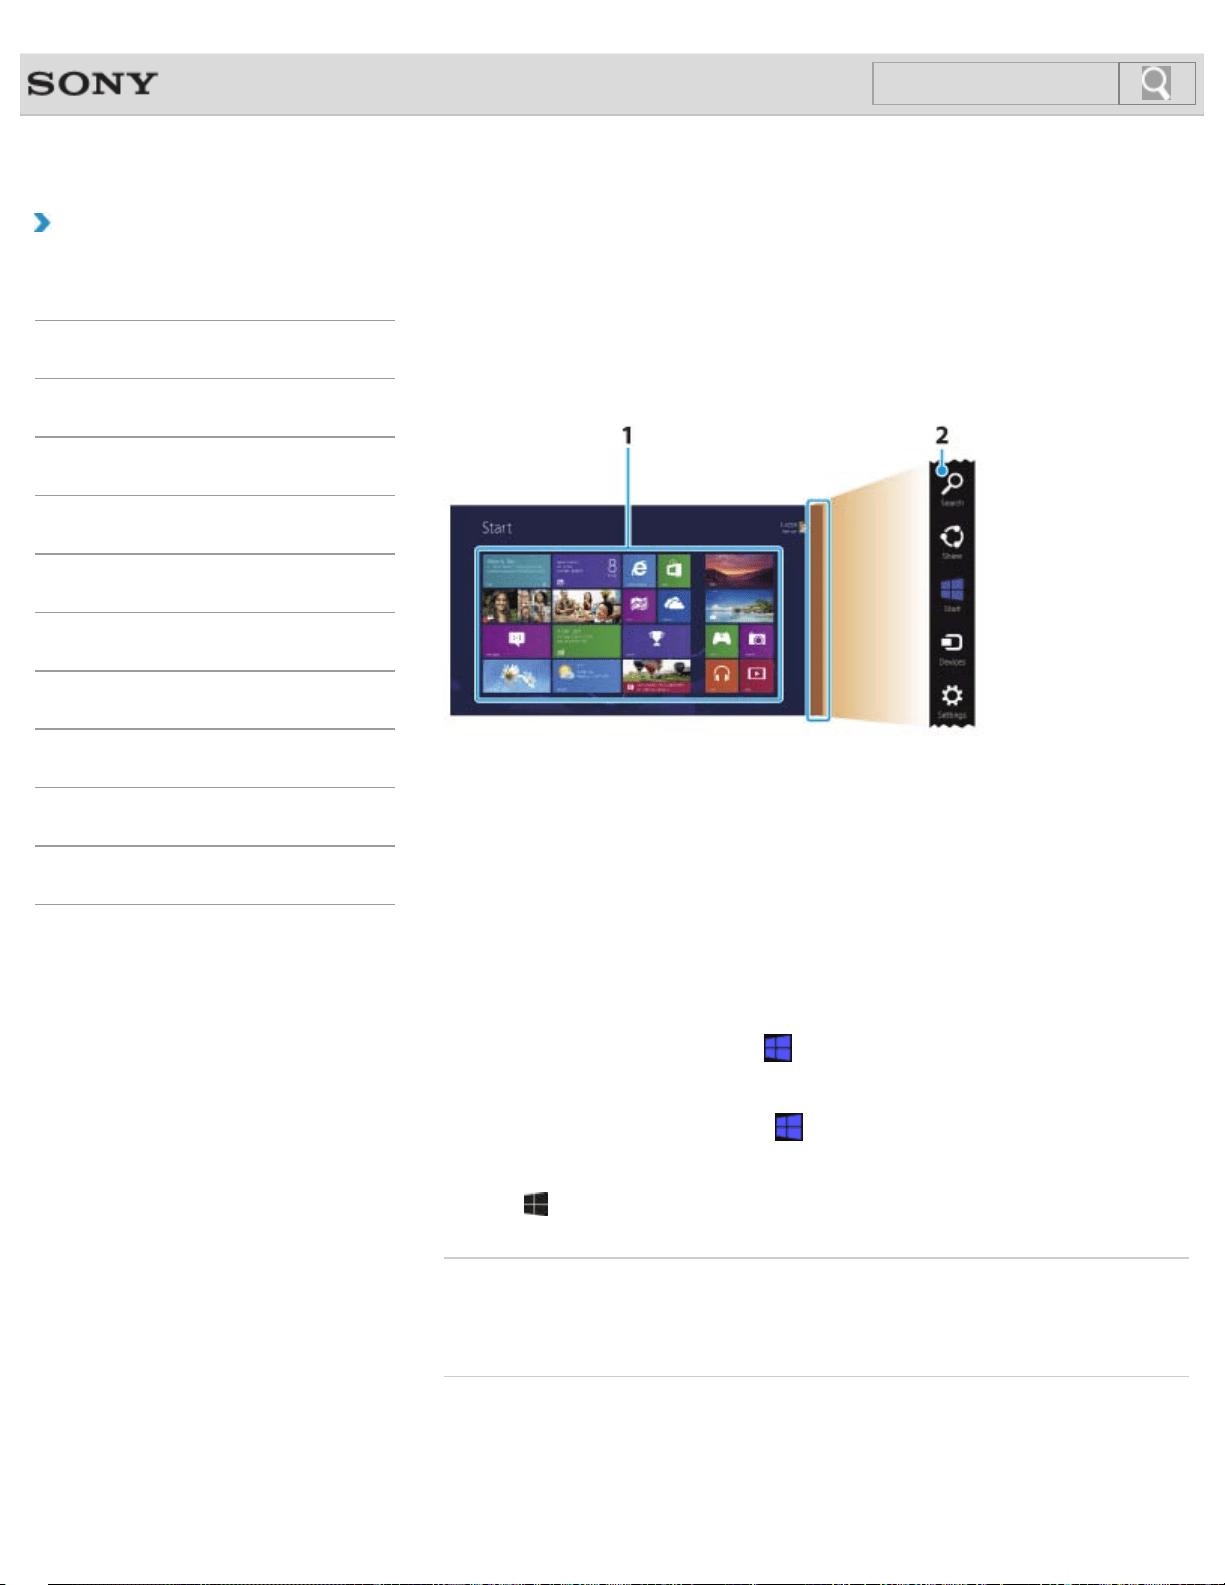
VAIO User Guide Back | Back to Top
Troubleshooting
How to Use
Windows 8: The Basics
Parts Description
Setup
Network / Internet
Connections
Settings
Backup / Recovery
Security
Other Operations
Notifications
About the Start Screen and Menu
You can add shortcuts to apps, the desktop, and websites that you use the most.
Overview
1. Tiles
Select a tile to start an app and personalize the Start screen by adding and
rearranging tiles.
2. Charms
Search for apps and files, share content, play content on other devices or print, and
set up your VAIO computer.
To open the Start screen
Touch operation (Touch screen equipped models)
Open the charms [Details], then tap the
Start charm.
Mouse/Touch pad operation
Open the charms [Details], then click the
Start charm.
Keyboard operation
Press the
(Windows) key.
Related Topic
Opening the Charms
Opening the Desktop
© 2013 Sony Corporation
153
Search

VAIO User Guide Back | Back to Top
Troubleshooting
How to Use
Windows 8: The Basics
Parts Description
Setup
Network / Internet
Connections
Settings
Backup / Recovery
Security
Other Operations
Notifications
Opening Control Panel
You can open Control Panel by following these steps.
1. Open the charms [Details] and select the Search charm.
2. Select Apps.
3. Enter “Control Panel” in the search box.
4. Select Control Panel.
© 2013 Sony Corporation
154
Search
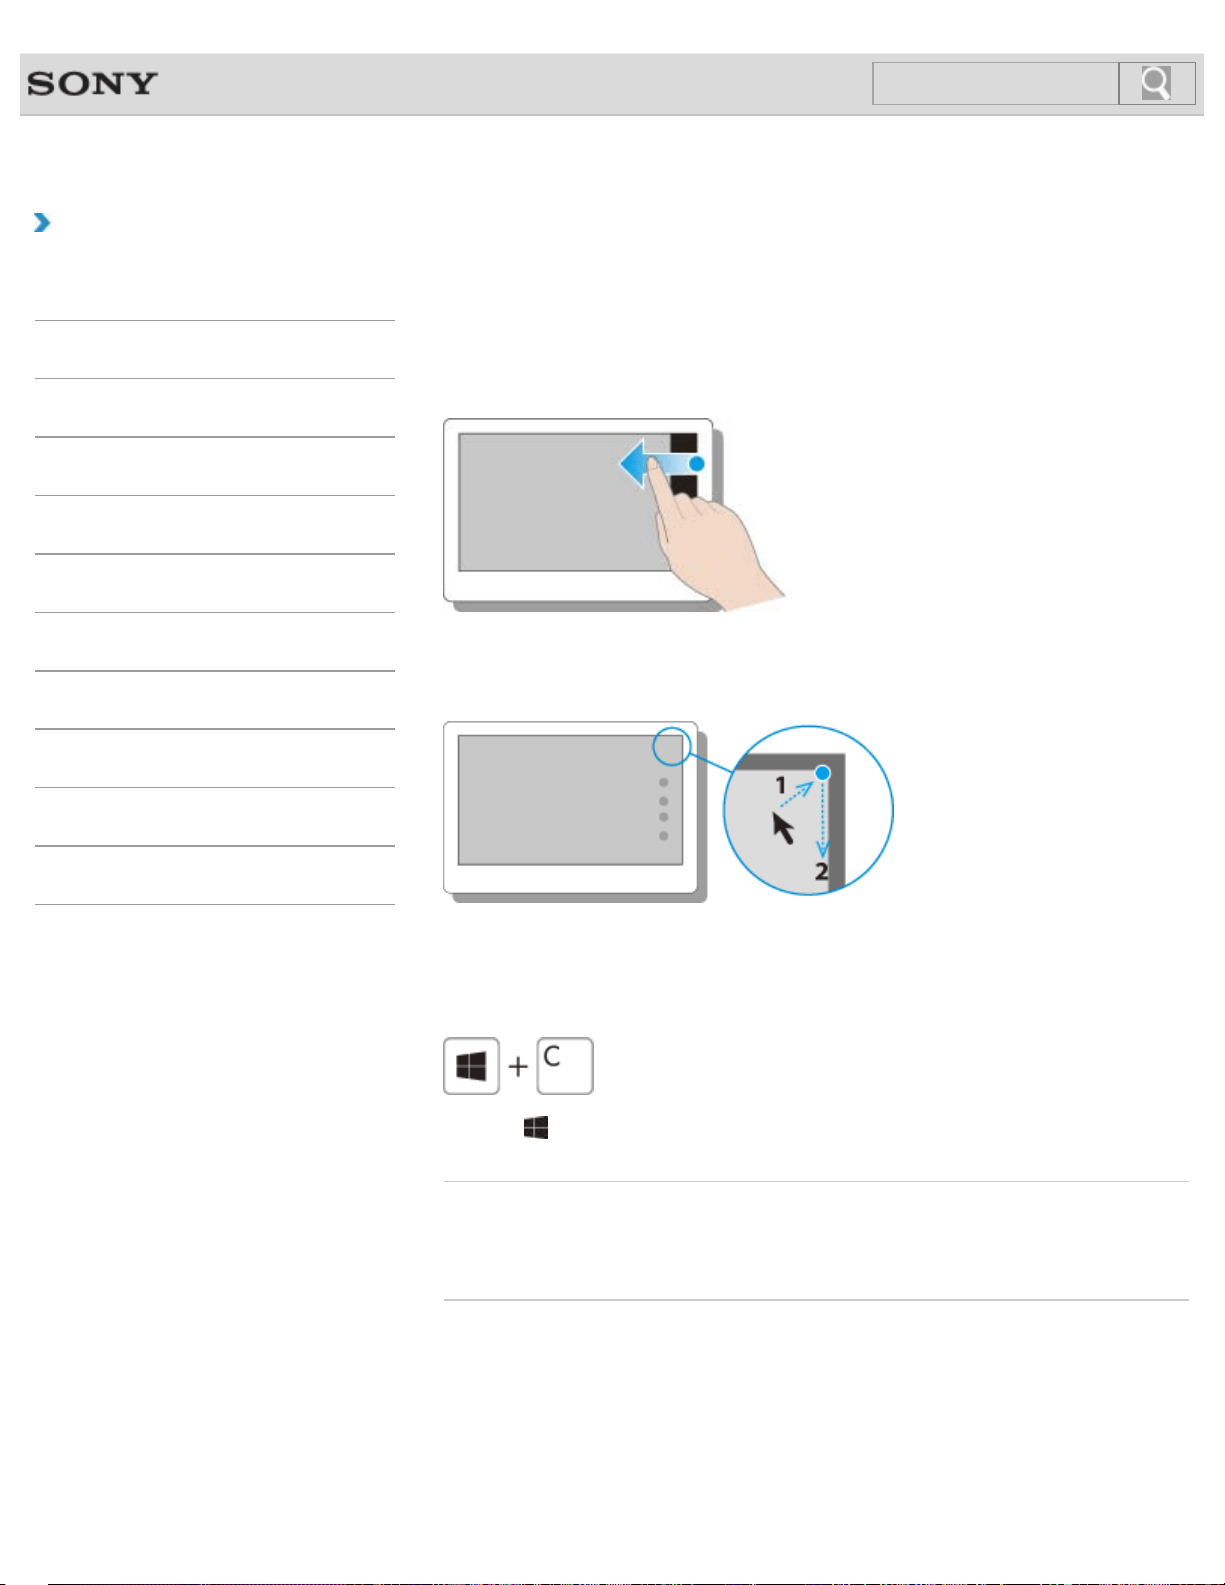
VAIO User Guide Back | Back to Top
Troubleshooting
How to Use
Windows 8: The Basics
Parts Description
Setup
Network / Internet
Connections
Settings
Backup / Recovery
Security
Other Operations
Notifications
Opening the Charms
You can open the charms to search for apps and files, share content, play content on other
devices or print, and set up your VAIO computer.
Touch operation (Touch screen equipped models)
Swipe in from the right edge.
Mouse/Touch pad operation
Point to the upper-right corner, then move downward.
With a touch pad, you can also swipe in from the right edge.
Keyboard operation
Press the (Windows) key and the C key at the same time.
Related Topic
About the Start Screen and Menu
Searching/Starting Apps, Settings, or Files
© 2013 Sony Corporation
155
Search

VAIO User Guide Back | Back to Top
Troubleshooting
How to Use
Windows 8: The Basics
Parts Description
Setup
Network / Internet
Connections
Settings
Backup / Recovery
Security
Other Operations
Notifications
Opening the Desktop
You can access the desktop from a tile, just like an app. Open the desktop by following the
instruction below.
1. Open the Start screen [Details] and select the Desktop tile.
Related Topic
About the Start Screen and Menu
© 2013 Sony Corporation
156
Search

VAIO User Guide Back | Back to Top
Troubleshooting
How to Use
Windows 8: The Basics
Parts Description
Setup
Network / Internet
Connections
Settings
Backup / Recovery
Security
Other Operations
Notifications
About the Touch Screen
<Touch screen equipped models>
The touch screen enables direct interaction with your VAIO computer using your finger(s).
You can perform various gestures on the touch screen.
Your VAIO computer supports multi-touch input.
Note
Your VAIO computer is equipped with a capacitive touch screen. When using it, note the
following characteristics of the capacitive touch screen.
The touch screen will not work if you touch it with fingernails, or if you wear gloves.
If tapping triggers an unintentional operation, make sure that no other parts of your
body are in contact with the touch screen.
The surface of the touch screen may get hot. This is normal and does not indicate a
malfunction.
Even though the surface of the touch screen is tempered glass, it could still become
damaged. Treat it with adequate care. If it breaks, small granular shards may scatter
and cause injury.
Do not drop the touch screen or subject it to a strong impact. Do not scratch the
surface. A surface flaw may cause the glass to break.
A protection sheet may be attached to the LCD screen frame at the factory. Remove
the sheet before use; otherwise the touch screen may not work correctly.
Some apps do not accept touch screen operations.
Related Topic
How to Use the Touch Screen<Touch screen equipped models>
© 2013 Sony Corporation
157
Search

VAIO User Guide Back | Back to Top
Troubleshooting
How to Use
Windows 8: The Basics
Parts Description
Setup
Network / Internet
Connections
Settings
Backup / Recovery
Security
Other Operations
Notifications
Adjusting the LCD Brightness Automatically
Your VAIO computer measures ambient light intensity to adjust the LCD brightness
automatically.
1. Start VAIO Control Center [Details] and select Image Quality.
2. Enable/disable the automatic adjustment setting in Display Brightness.
Hint
During the setup or recovery process, the automatic brightness adjustment function may
not work and the LCD brightness may change regardless of ambient light intensity.
Ambient light intensity is measured by the ambient light sensor. Blocking the ambient
light sensor may decrease the LCD brightness.
Related Topic
Parts and Controls on the Front
Changing the LCD Brightness
© 2013 Sony Corporation
158
Search

VAIO User Guide Back | Back to Top
Troubleshooting
How to Use
Windows 8: The Basics
Parts Description
Setup
Network / Internet
Connections
Settings
Backup / Recovery
Security
Other Operations
Notifications
Changing the LCD Brightness
You can adjust the LCD brightness.
1. Press the Fn+F5 keys or Fn+F6 keys.
To decrease lighting intensity, keep pressing the Fn+F5 keys. To increase lighting
intensity, keep pressing the Fn+F6 keys.
Hint
The LCD brightness setting is retained even after your VAIO computer is turned off and
restarted.
Related Topic
Adjusting the LCD Brightness Automatically
Combinations and Functions with the Fn Key
© 2013 Sony Corporation
159
Search

VAIO User Guide Back | Back to Top
Troubleshooting
How to Use
Windows 8: The Basics
Parts Description
Setup
Network / Internet
Connections
Settings
Backup / Recovery
Security
Other Operations
Notifications
Changing the Resolution (Size) of the Screen
Image
You can change the screen resolution to adjust the size of the characters and images on the
computer screen.
Refer to Windows Help and Support [Details] for more information.
1. Right-click on the desktop [Details] and select Screen resolution.
2. Select the current screen resolution next to Resolution and move the slider to
change the screen resolution.
Note
You may not be able to play high-resolution videos depending on the amount of video
memory on your VAIO computer. In such a case, lower the screen resolution.
Do not change the display resolution while using video/image apps or playing DVDs, as
it may cause unsuccessful playback/display or unstable system operations.
Related Topic
Connecting an External Display or Projector
Connecting a TV with an HDMI Input Port
Notes on the LCD screen
© 2013 Sony Corporation
160
Search

VAIO User Guide Back | Back to Top
Troubleshooting
How to Use
Windows 8: The Basics
Parts Description
Setup
Network / Internet
Connections
Settings
Backup / Recovery
Security
Other Operations
Notifications
Changing the Resolution (Size) of the Screen
Image on an HDMI-Connected Device
You can change the screen resolution or size of your VAIO computer’s screen image
displayed on an external display, such as a TV, connected to the computer with an HDMI
cable (not supplied).
1. Connect your VAIO computer to an HDMI equipped TV with an HDMI cable. [Details]
2. Turn on the TV.
3. Start VAIO Control Center [Details] and select Image Quality.
4. Select Details in External Display Resolution.
5. On the Select Resolution tab, select the desired resolution.
After a few seconds, the selected resolution is applied.
6. If the computer image does not fit the displayable region of the TV, select the Adjust
Resolution tab to adjust the display size.
Note
Some resolution options may not be available, depending on the model or the HDMI-
connected device.
The function to adjust the screen resolution may be disabled depending on the selected
resolution.
Related Topic
Connecting a TV with an HDMI Input Port
Selecting Display Modes
© 2013 Sony Corporation
161
Search
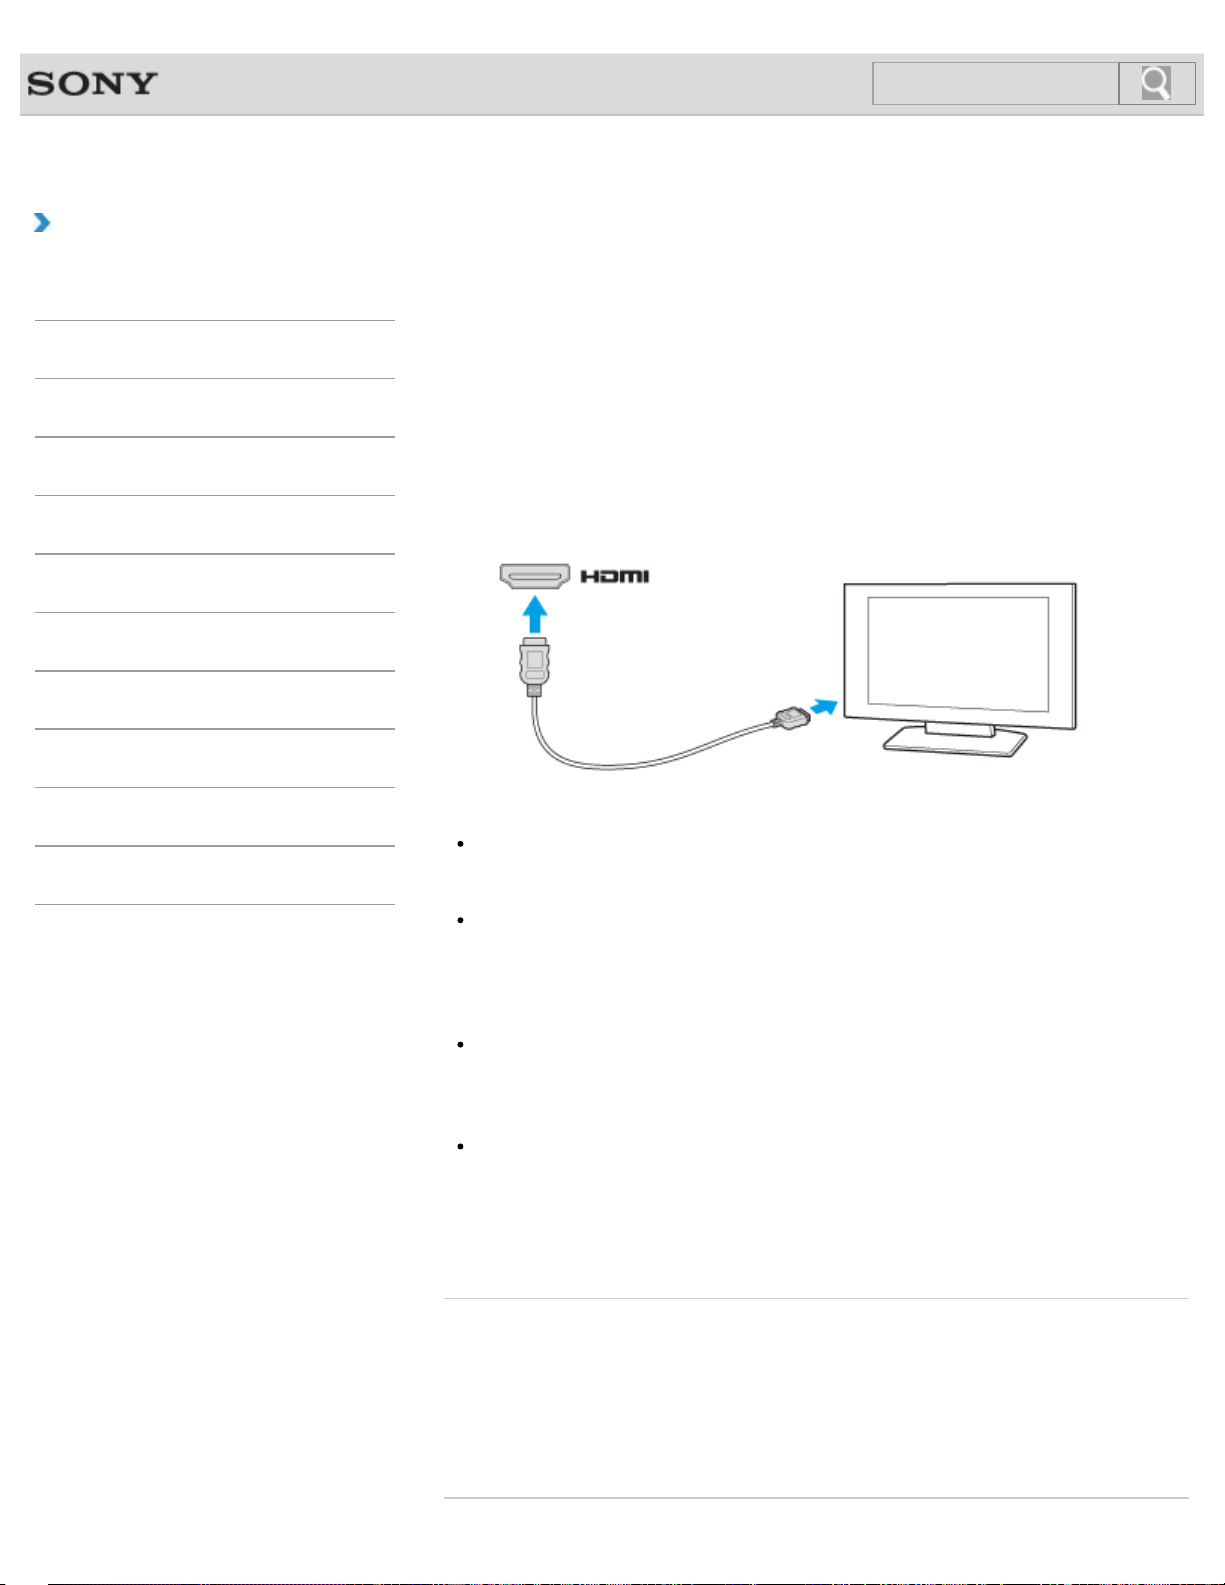
VAIO User Guide Back | Back to Top
Troubleshooting
How to Use
Windows 8: The Basics
Parts Description
Setup
Network / Internet
Connections
Settings
Backup / Recovery
Security
Other Operations
Notifications
Connecting a TV with an HDMI Input Port
You can connect a TV with an HDMI input port to your VAIO computer with an HDMI cable
(not supplied).
Refer to the manual that came with your TV for more information on installation and use.
1. Plug the power cord of your TV into an AC outlet and turn it on.
2. Connect one end of an HDMI cable to the HDMI output port [Details] on your VAIO
computer and the other end to the TV.
3. Set the TV input to the external input.
The screen image of your VAIO computer is displayed on the TV.
Note
If a device driver other than the one provided by Sony is used, the image will not be
displayed and audio will not be heard. Always use the device driver provided by Sony
for updates.
To hear sound from a device connected to the HDMI output port, you need to change
the sound output device. For detailed instructions, see Changing the Sound
Output Device. [Details]
Hint
The HDMI output port on your VAIO computer is compliant with the High-bandwidth
Digital Content Protection (HDCP) standard and capable of encrypting the transmission
channel of digital video signals for the purpose of copyright protection, which enables
you to view a wide variety of copyright protected and high-quality content.
You can display images on your external display and TV at the same time using the
HDMI output port and the monitor port on your VAIO computer.
To display images, right-click on the desktop [Details], select Graphics Properties,
and change the multiple display settings in the Intel graphics control panel.
Refer to the help file of the Intel graphics for more information.
Related Topic
Selecting Display Modes
Using the Multiple Monitors Function
Changing the Resolution (Size) of the Screen Image
Changing the Resolution (Size) of the Screen Image on an HDMI-Connected Device
Connecting an External Display or Projector
162
Search

© 2013 Sony Corporation
163
Search
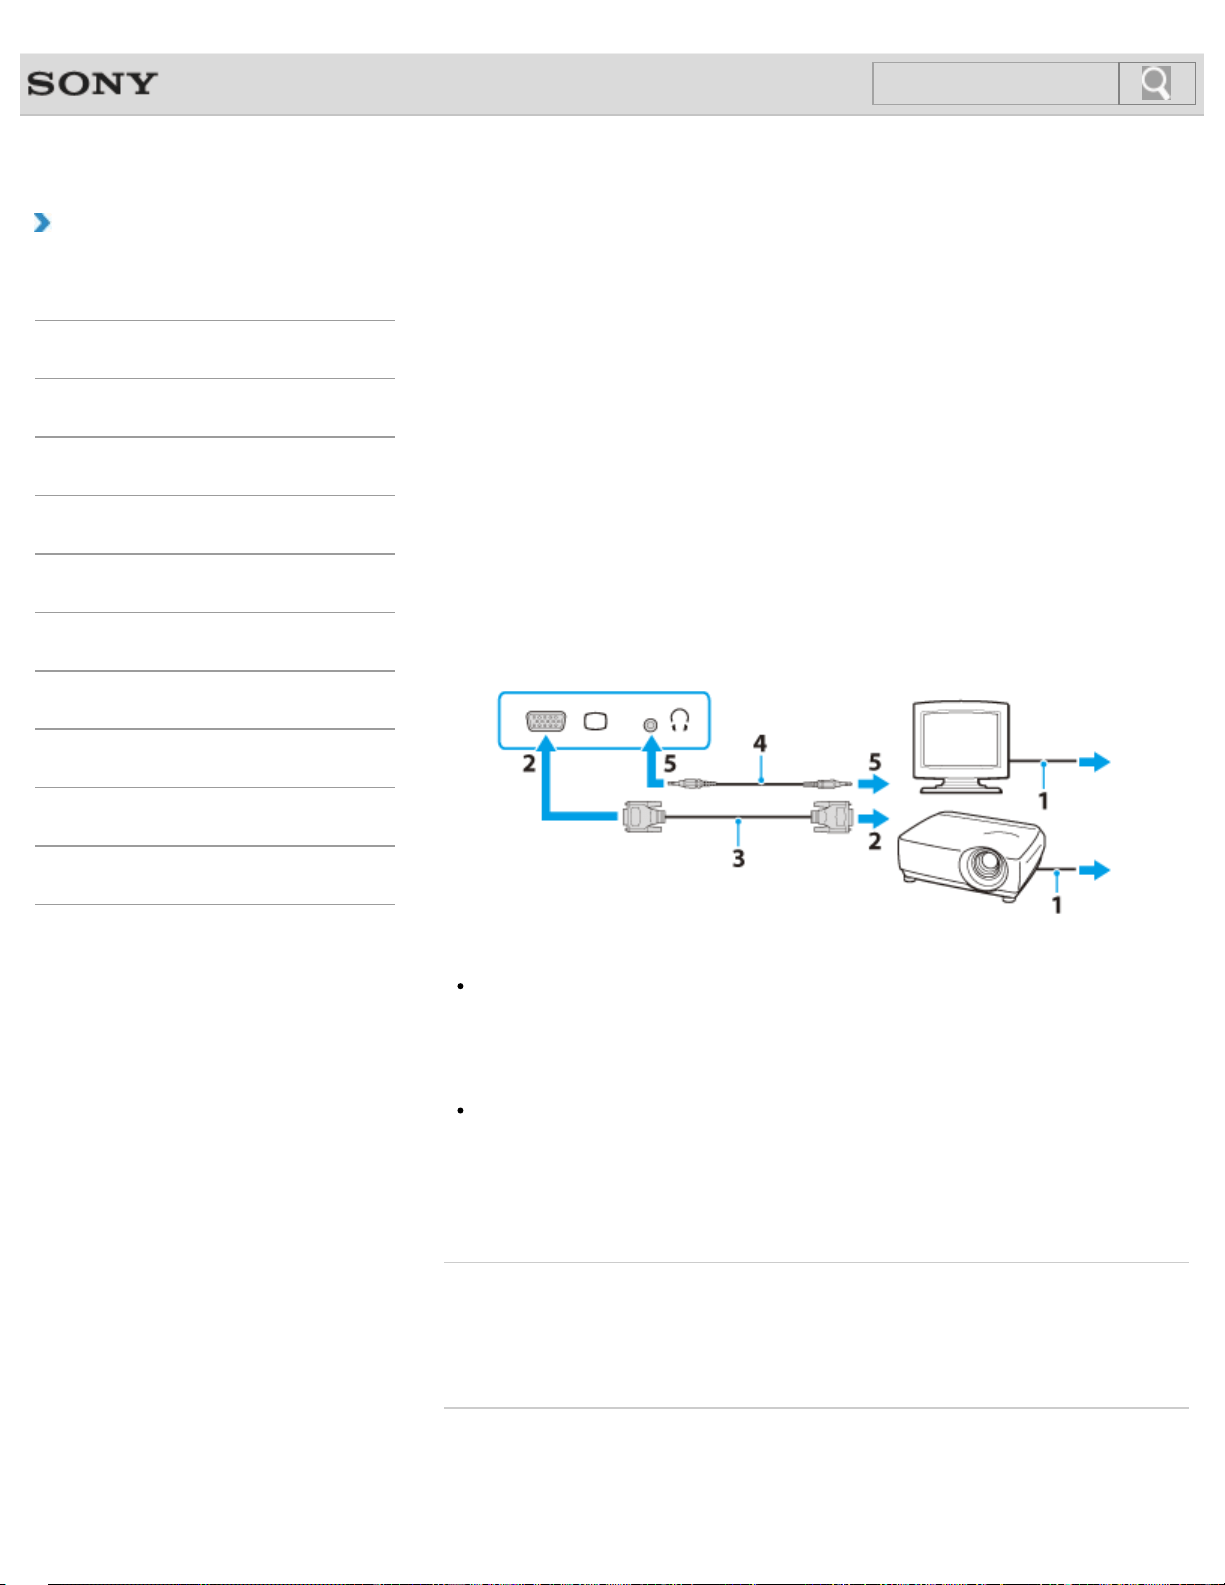
VAIO User Guide Back | Back to Top
Troubleshooting
How to Use
Windows 8: The Basics
Parts Description
Setup
Network / Internet
Connections
Settings
Backup / Recovery
Security
Other Operations
Notifications
Connecting an External Display or Projector
You can connect an external display (such as a computer display or a projector) to your
VAIO computer with a display cable (not supplied).
Refer to the manual that came with your external display or projector for more information on
installation and use.
1. Plug the power cord (1) of your external display or the projector into an AC outlet and
turn it on.
2. Connect the external display or the projector to the monitor port [Details] on your VAIO
computer (2) with a display cable (3) (not supplied).
3. Press the Fn+F7 keys several times to select the external display or the projector,
and then press the Enter key. [Details]
The screen image of the computer is displayed on the external display or the projector.
4. If necessary, connect the external display or the projector to the headphones jack on
your VAIO computer (5) with a speaker cable (4) (not supplied).
Note
Some external displays and projectors may not support some of the resolutions your
VAIO computer can use. If your computer display does not support the selected
resolution, lower the resolution setting of the computer [Details].
Hint
You can display images on your external display and TV at the same time using the
HDMI output port and the monitor port on your VAIO computer.
To display images, right-click on the desktop [Details], select Graphics Properties,
and change the multiple display settings in the Intel graphics control panel.
Refer to the help file of the Intel graphics for more information.
Related Topic
Selecting Display Modes
Using the Multiple Monitors Function
Connecting a TV with an HDMI Input Port
© 2013 Sony Corporation
164
Search

VAIO User Guide Back | Back to Top
Troubleshooting
How to Use
Windows 8: The Basics
Parts Description
Setup
Network / Internet
Connections
Settings
Backup / Recovery
Security
Other Operations
Notifications
Enlarging the Text Size (DPI)
<Touch screen equipped models>
Changing the DPI to enlarge the text and icon size enables you to operate the touch screen
easier.
1. Open Control Panel [Details] and select Appearance and Personalization
and Make text and other items larger or smaller.
2. Select the desired settings from the options on the screen and Apply.
3. If a message appears and recommends signing out, select Sign out now.
4. Sign in again.
The text font size for Windows changes.
© 2013 Sony Corporation
165
Search

VAIO User Guide Back | Back to Top
Troubleshooting
How to Use
Windows 8: The Basics
Parts Description
Setup
Network / Internet
Connections
Settings
Backup / Recovery
Security
Other Operations
Notifications
How to Use the Touch Screen
<Touch screen equipped models>
You can tap the touch screen or make a simple motion with your fingers to operate your
VAIO computer.
Basic operations
To click (tap)
Tap on the touch screen once with a finger. You can select a button, such as OK and
Cancel, or an item in a menu by tapping it.
To double-click (double-tap)
Tap on the touch screen twice in quick succession with a finger. You can start an app, such
as a word processor or a spreadsheet program, or open a file by double-tapping its icon.
To drag
Put a finger on the desired point on the touch screen and slide the finger. You can move a
file or change the window size with this motion.
To drag and drop
Touch the desired file icon, slide to another folder, window or app icon, and then lift your
finger off the screen. You can move or copy a file with this motion.
Advanced operations
You can make a simple motion (gesture) with your fingers on the touch screen to operate
your VAIO computer.
The response to a gesture varies depending on the apps.
To right-click (touch and hold)
Touch and hold the desired point on the touch screen for a few seconds and lift your finger
off the screen. Depending on the point you touch, you can display various menus.
To scroll
Touch and slide a scrollable area of a window, such as an Internet Explorer window.
You can also drag the slider on the vertical scroll bar of the selected window to scroll the
window.
To zoom in or out on an image such as a photo (zoom)
Pinch on the touch screen with two fingers for zooming on an image, such as a photo on
Photos. Pinch open to zoom in or pinch close to zoom out.
166
Search
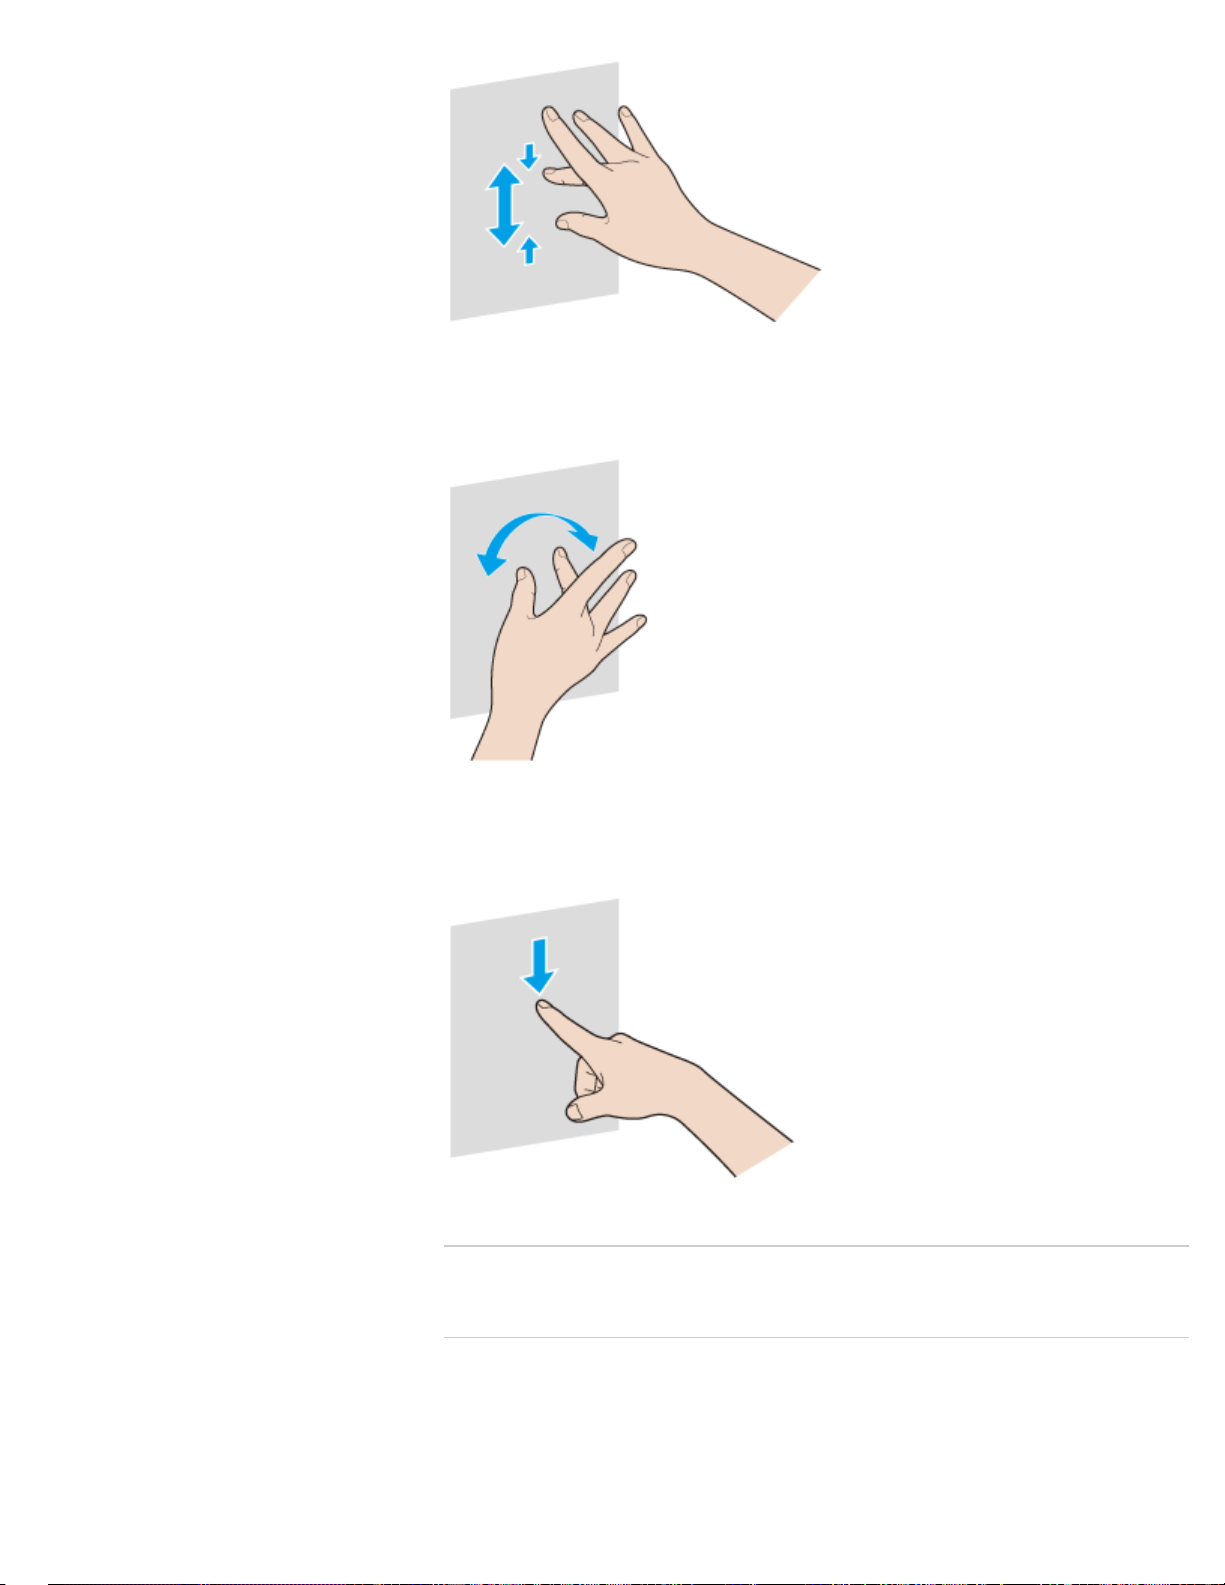
To rotate an image such as a photo (rotate)
Put two fingers on the touch screen and slide them in circles to rotate an image, such as a
photo. You cannot rotate images depending on the apps you are using.
To select by swiping
Slide your finger in short distance in the direction that the screen does not scroll.
You can select an item, such as an app tile or a picture.
Related Topic
How to Use the Pen<Digitizer Stylus supplied models>
© 2013 Sony Corporation
167
Search

VAIO User Guide Back | Back to Top
Troubleshooting
How to Use
Windows 8: The Basics
Parts Description
Setup
Network / Internet
Connections
Settings
Backup / Recovery
Security
Other Operations
Notifications
Notes on Using the Touch Screen
<Touch screen equipped models>
Before using the touch screen, read the following precautions for correct use.
Do not push the touch screen roughly.
Gentle touches always work as your VAIO computer is equipped with a capacitive touch
screen.
The touch screen may not work properly if you turn on your VAIO computer while
touching the screen. In such a case, restart the computer.
The touch screen may not work for several seconds after your VAIO computer returns to
Normal mode from Sleep mode. In such a case, wait for a while before using the touch
screen.
Keep the touch screen clean for good touch sensitivity. Dirt may cause damage or a
malfunction.
© 2013 Sony Corporation
168
Search

VAIO User Guide Back | Back to Top
Troubleshooting
How to Use
Windows 8: The Basics
Parts Description
Setup
Network / Internet
Connections
Settings
Backup / Recovery
Security
Other Operations
Notifications
Notes on the LCD screen
Read the following precautions for correct use of the LCD screen.
The LCD screen is manufactured using high-precision technology. You may, however,
see tiny black points and/or bright points (red, blue, or green) that continuously appear
on the LCD screen. This is a normal result of the manufacturing process and does not
indicate a malfunction.
Do not scratch the surface of the LCD screen or exert pressure on it. This could cause
damage.
Do not exert pressure on the LCD screen lid with the lid closed as it may scratch the
LCD screen or soil it.
The LCD screen may become warm during operation. This is normal and does not
indicate a malfunction.
Due to the mechanical design of your VAIO computer’s LCD screen/touch screen, the
screen surface may become warm while you are using the computer for an extended
period of time. This is normal and does not indicate a malfunction. (Touch screen
equipped models)
The LCD screen/touch screen is made of reinforced glass to implement high durability,
however, treat the screen with care as it is not 100% unbreakable. In case the screen
breaks into small pieces, be careful not to cut yourself on the pieces of broken glass.
(Touch screen equipped models)
Do not leave the LCD screen facing the sun. This could damage the LCD screen. Be
sure to block direct sunlight when using your VAIO computer near a window.
Do not exert pressure on the LCD screen or its edges when raising the LCD Screen or
lifting your VAIO computer. The LCD screen may be sensitive to pressure or added
stress, and exerting pressure may damage the screen or cause it to malfunction. To
carry the computer with the LCD screen raised, be sure to hold the computer with both
hands.
Using your VAIO computer in low temperature conditions may produce a residual image
on the LCD screen. This does not indicate a malfunction. When the computer returns to
normal temperature, the screen returns to normal.
A residual image may appear on the LCD screen if the same image is displayed for an
extended period of time. The residual image disappears after a while. You can use a
screen saver to prevent residual images.
© 2013 Sony Corporation
169
Search
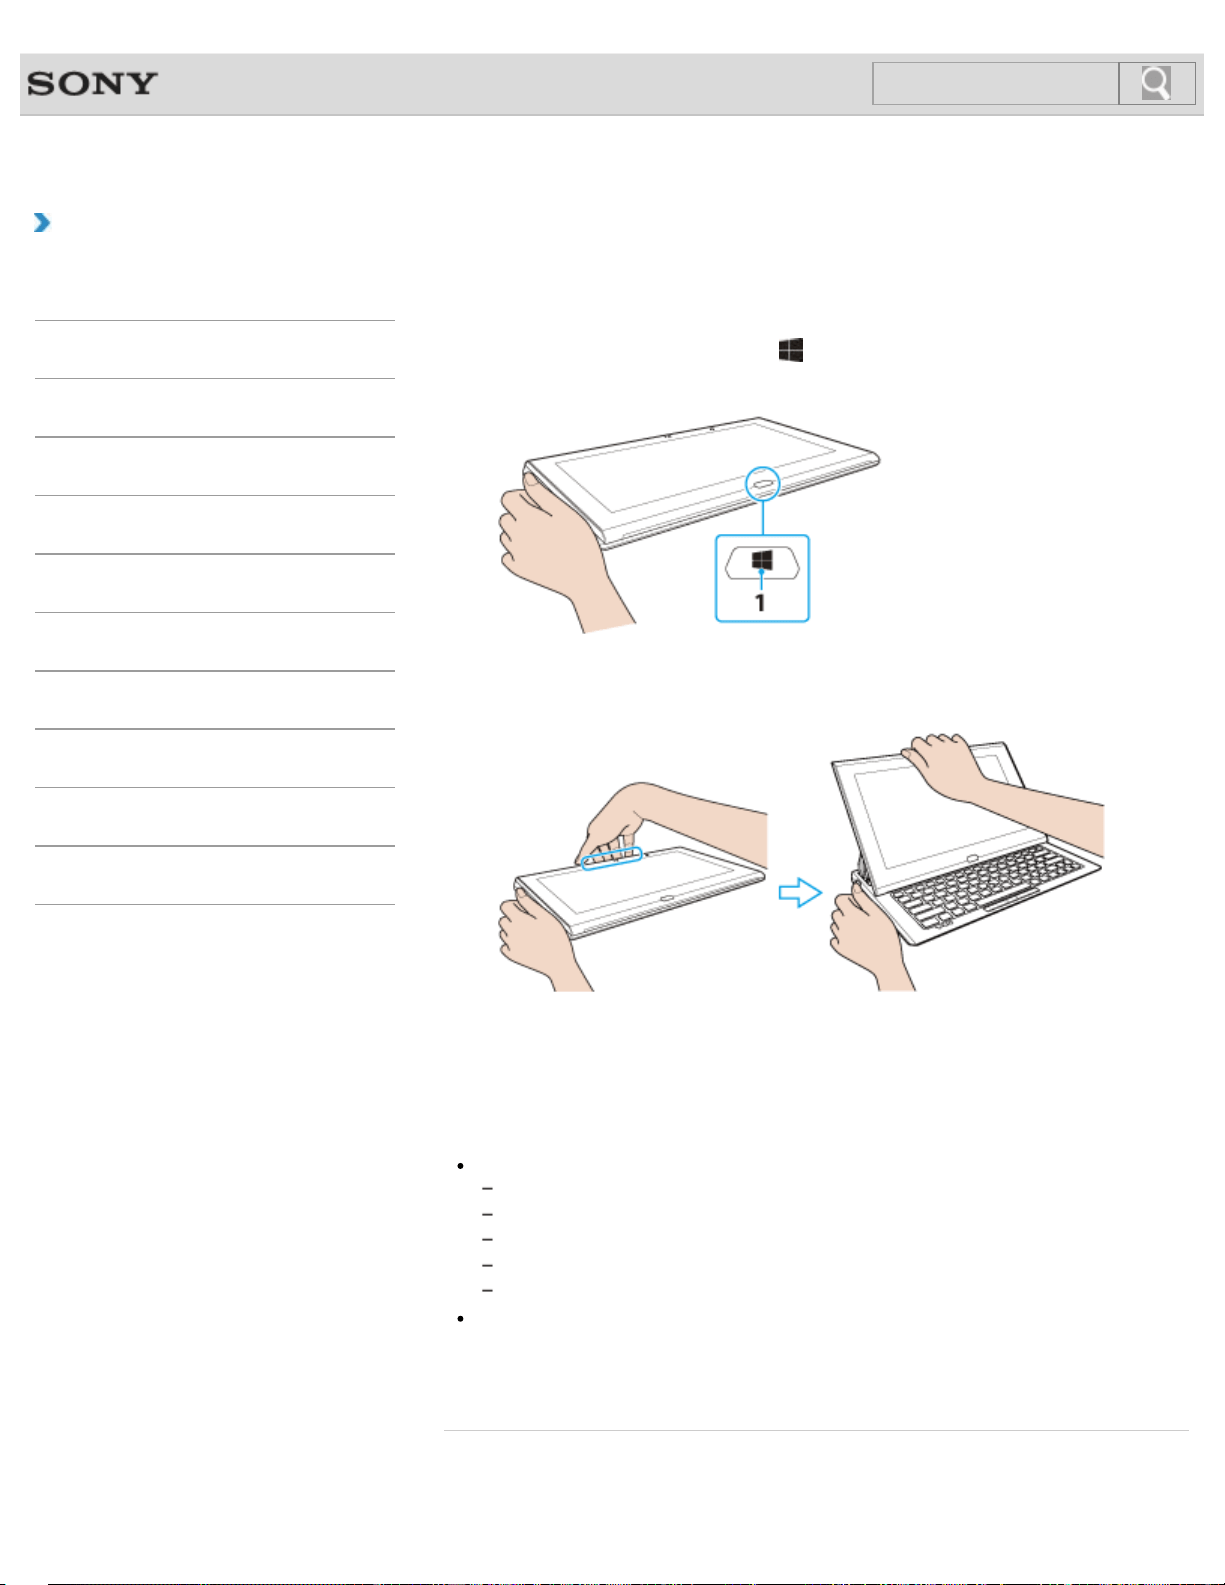
VAIO User Guide Back | Back to Top
Troubleshooting
How to Use
Windows 8: The Basics
Parts Description
Setup
Network / Internet
Connections
Settings
Backup / Recovery
Security
Other Operations
Notifications
Raising the LCD Screen
To use the keyboard, you need to raise the LCD screen.
1. Place your VAIO computer with the
(Windows) button (1) on your side and hold the
edge of the computer with your hand.
2. Grasp the top-center edge of the LCD screen with the other hand and raise the LCD
screen.
To fold the LCD screen
1. Grasp the top-center edge of the LCD screen with your hand and gently push it down
to the end.
Note
Observe the following when raising or folding the LCD screen.
Be careful not to catch your finger in the LCD screen.
Make sure other people and objects are out of range of slide motion.
Do not exert excessive pressure on the LCD screen.
Do not fold the LCD screen by pushing the VAIO logo stand behind the LCD screen.
Do not raise the LCD screen forcibly from the bottom edge of the LCD screen.
The LCD screen may unfold abruptly if you lift your VAIO computer with the back side
up.
Be sure to hold the computer from both the front and back sides with your hands when
lifting the computer.
© 2013 Sony Corporation
170
Search
VAIO User Guide Back | Back to Top
Troubleshooting
How to Use
Windows 8: The Basics
Parts Description
Setup
Network / Internet
Connections
Settings
Backup / Recovery
Security
Other Operations
Notifications
Selecting Display Modes
You can switch the display output between the computer screen and an external display
connected to your VAIO computer.
1. Turn on an external display.
2. Press the Fn+F7 keys several times to select your desired display output, and then
press the Enter key.
Note
If you disconnect a display cable (not supplied) while only an external display is selected
as the display output, it is hard to operate your VAIO computer because the computer
screen is blank.
To switch the display output to the computer screen, press the Fn+F7 keys twice, then
the Enter key.
The display switch may become unavailable or your VAIO computer may become
unstable during video playback. Exit the video playback app before switching the display
output.
The display switch may not be available depending on the type of external display or
projector.
Related Topic
Using the Multiple Monitors Function
Connecting a TV with an HDMI Input Port
Connecting an External Display or Projector
© 2013 Sony Corporation
171
Search
VAIO User Guide Back | Back to Top
Troubleshooting
How to Use
Windows 8: The Basics
Parts Description
Setup
Network / Internet
Connections
Settings
Backup / Recovery
Security
Other Operations
Notifications
Using the Multiple Monitors Function
The Multiple Monitors function allows you to distribute portions of your desktop across
separate displays.
For example, if you have an external display connected to the monitor port, the computer
screen and the external display can function as a single desktop.
1. Right-click on the desktop [Details] and select Screen resolution.
2. Select Extend these displays from the drop-down list next to Multiple
Displays and OK.
The setting options vary depending on the number of the connected external displays.
Note
Your external display may not support the Multiple Monitors function.
Certain apps may not be compatible with the Multiple Monitors settings.
Do not change the display settings while using video/image apps or playing DVDs, as it
may cause unsuccessful playback/display or unstable system operations.
Change the display settings after you exit the video/image app.
Hint
You can set the screen resolution for each display used for the Multiple Monitors
function.
Related Topic
Changing the Resolution (Size) of the Screen Image
Selecting Display Modes
Connecting a TV with an HDMI Input Port
Connecting an External Display or Projector
© 2013 Sony Corporation
172
Search
VAIO User Guide Back | Back to Top
Troubleshooting
How to Use
Windows 8: The Basics
Parts Description
Setup
Network / Internet
Connections
Settings
Backup / Recovery
Security
Other Operations
Notifications
About a Security Key for Wi-Fi(R) (Wireless LAN)
A security key is a security protocol for Wi-Fi that encrypts data transmitted on Wi-Fi. It is
also referred to as an encryption key or a WEP (Wired Equivalent Privacy) key.
The security key allows wireless devices that have the same key, such as a Wi-Fi access
point and a computer, to communicate with each other on Wi-Fi.
The security key is assigned to each access point by default. (Make sure the default security
key has been changed to protect data from unauthorized use.) If you cannot find the default
security key, refer to the manual that came with your access point.
If you enter a wrong security key, follow these steps to re-enter the security key.
1. Open the charms [Details] and select the
Settings charm.
2. Select
(the network icon).
3. Right-click the desired network and select View connection properties.
4. Select the Security tab.
5. Enter a security key in the Network security key field and select OK.
Related Topic
About the Wi-Fi(R) (Wireless LAN) Standards
Starting Wi-Fi(R) (Wireless LAN) Communications
Notes on Using the Wi-Fi(R) (Wireless LAN) Function
© 2013 Sony Corporation
173
Search

VAIO User Guide Back | Back to Top
Troubleshooting
How to Use
Windows 8: The Basics
Parts Description
Setup
Network / Internet
Connections
Settings
Backup / Recovery
Security
Other Operations
Notifications
About the Internet Connection Services
The following types of Internet connection services are available.
You can select from among the services according to your preference, for example,
communication speed or a usage fee. For detailed information on a variety of connection
services, contact Internet Service Providers (ISPs).
Fiber to the Home (FTTH)
Cable modem
Digital Subscriber Line (DSL)
Satellite
Dial-up
Related Topic
Connecting to the Internet with a Wired Connection
Starting Wi-Fi(R) (Wireless LAN) Communications
© 2013 Sony Corporation
174
Search
VAIO User Guide Back | Back to Top
Troubleshooting
How to Use
Windows 8: The Basics
Parts Description
Setup
Network / Internet
Connections
Settings
Backup / Recovery
Security
Other Operations
Notifications
About the Network (LAN)
The network (LAN) enables you to connect your VAIO computer to the Internet and transfer
data between the computer and other devices.
You can connect your VAIO computer to 1000BASE-T/100BASE-TX/10BASE-T type
networks with a LAN cable (not supplied). Connect one end of a LAN cable to the LAN port
on the computer and the other end to your network.
For information on peripheral devices required for LAN access, ask your Internet Service
Provider (ISP) or refer to the manual that came with your modem.
For information on how to connect your VAIO computer to the network, refer to your ISP’s
instructions or the manual that came with the modem and other peripheral devices. If you
require information on the network settings at your workplace, ask the network administrator.
Related Topic
About the Internet Connection Services
Starting Wi-Fi(R) (Wireless LAN) Communications
© 2013 Sony Corporation
175
Search

VAIO User Guide Back | Back to Top
Troubleshooting
How to Use
Windows 8: The Basics
Parts Description
Setup
Network / Internet
Connections
Settings
Backup / Recovery
Security
Other Operations
Notifications
About the Wi-Fi(R) (Wireless LAN) Standards
Wi-Fi allows your VAIO computer to connect to a network through a wireless connection.
Wi-Fi uses the following IEEE 802.11a/b/g/n standard, which specifies the type of technology
used.
Refer to the specifications to find out about the configuration of the computer.
IEEE 802.11a (Frequency band:5 GHz)
Exclusive to models compliant with the IEEE 802.11a/b/g/n standard.
IEEE 802.11b/g (Frequency band:2.4 GHz)
The IEEE 802.11g standard provides higher-speed communications than the IEEE 802.11b.
IEEE 802.11n (Frequency band:2.4 GHz/5 GHz)
For models compliant with the IEEE 802.11b/g/n standard, only 2.4 GHz band can be used.
Related Topic
Starting Wi-Fi(R) (Wireless LAN) Communications
Stopping Wi-Fi(R) (Wireless LAN) Communications
Notes on Using the Wi-Fi(R) (Wireless LAN) Function
© 2013 Sony Corporation
176
Search
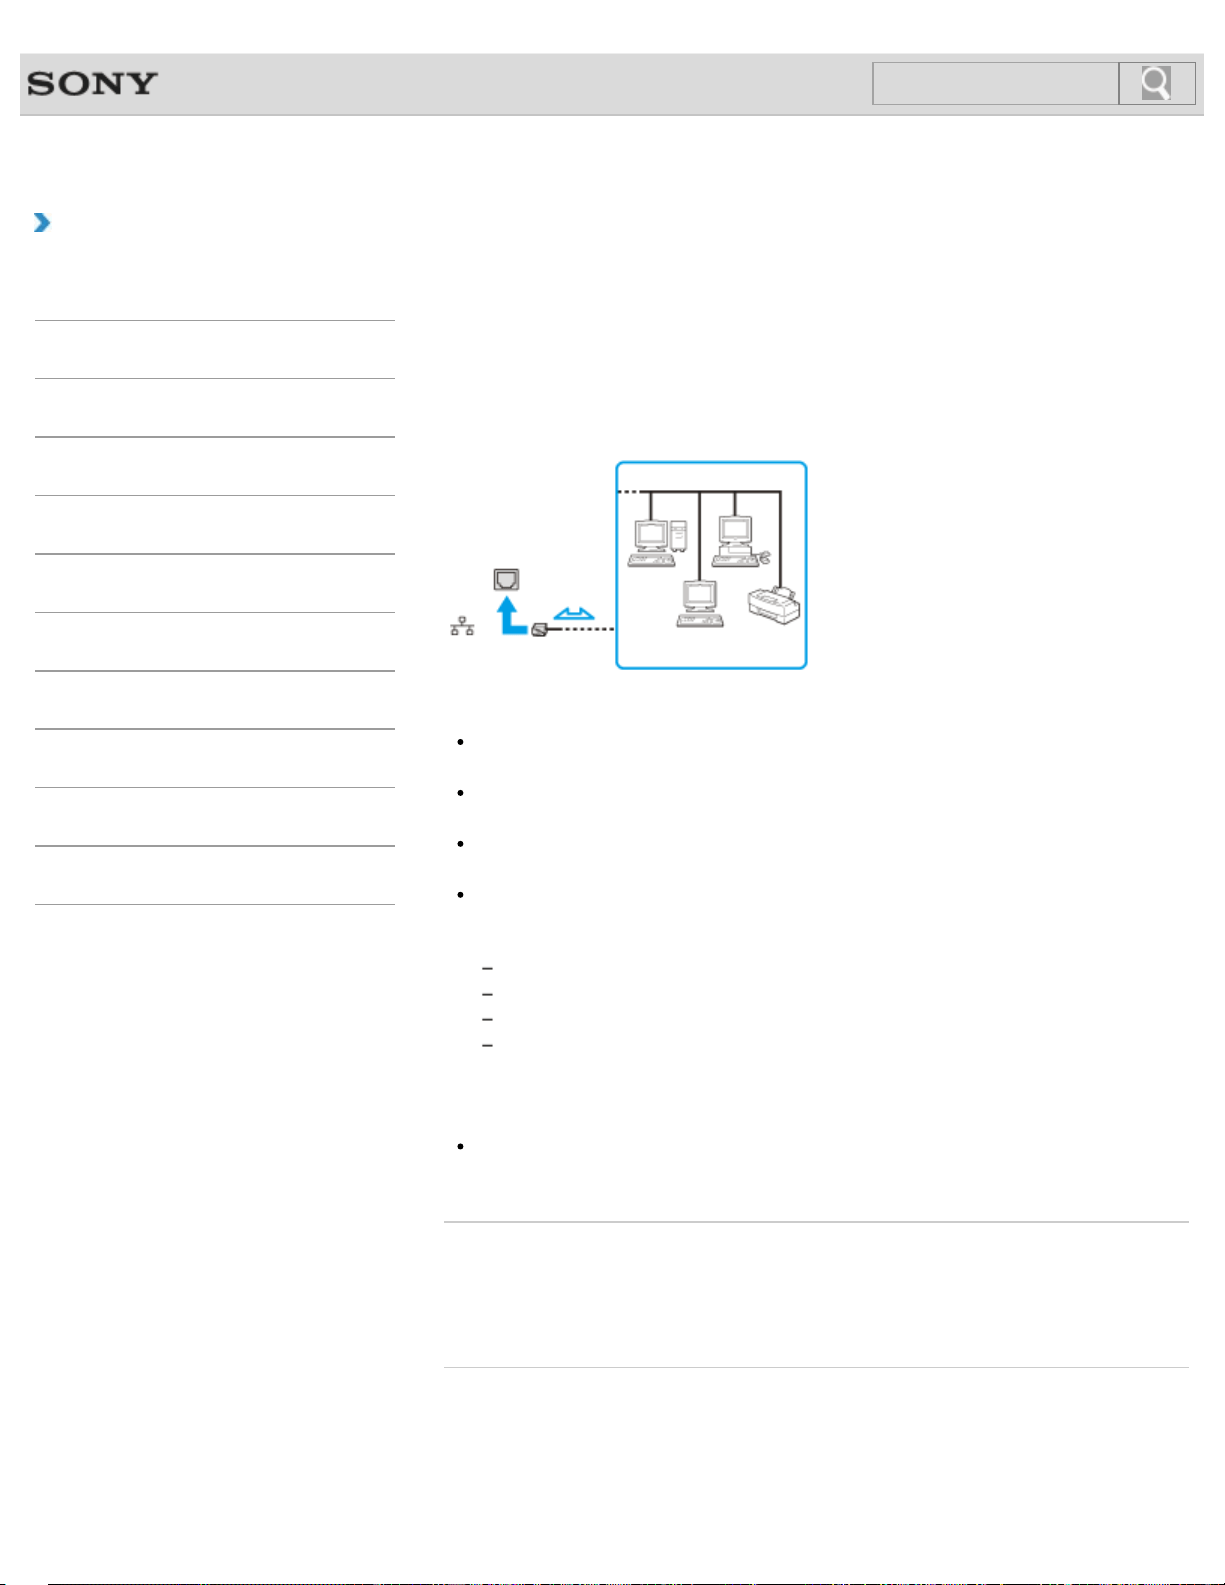
VAIO User Guide Back | Back to Top
Troubleshooting
How to Use
Windows 8: The Basics
Parts Description
Setup
Network / Internet
Connections
Settings
Backup / Recovery
Security
Other Operations
Notifications
Connecting to the Internet with a Wired
Connection
Before using the Internet, you need to sign up with an Internet Service Provider (ISP) and
set up devices required for connecting your VAIO computer to the Internet.
Connect one end of a LAN cable (not supplied) to the LAN port on your VAIO computer and
the other end to your network.
Note
For detailed information on devices required for Internet access and how to connect
your VAIO computer to the Internet, ask your ISP.
When connecting your VAIO computer to the Internet, be sure to use a cable with
“Network” or “Ethernet” writing on it.
You cannot access LAN networks if Disabled is selected for the LAN port in the BIOS
setup screen. In such a case, change the BIOS setting. [Details]
Do not plug a telephone cable into the LAN port on your VAIO computer.
If the LAN port is connected to the following networks or telephone lines, high electric
current to the port may cause damage, overheating, or fire.
Any network, except 1000BASE-T/100BASE-TX/10BASE-T type networks
Public telephone subscriber line
Private branch exchange (PBX)
Home (intercom speakerphone) or business-use telephone lines (multi-line business
telephone)
Hint
To connect your VAIO computer to the Internet using the Wi-Fi(R) (Wireless LAN)
function, you need to set up the Wi-Fi settings. [Details]
Related Topic
About the Internet Connection Services
About the Network (LAN)
Starting Wi-Fi(R) (Wireless LAN) Communications
© 2013 Sony Corporation
177
Search
VAIO User Guide Back | Back to Top
Troubleshooting
How to Use
Windows 8: The Basics
Parts Description
Setup
Network / Internet
Connections
Settings
Backup / Recovery
Security
Other Operations
Notifications
Disabling the Wi-Fi(R) (Wireless LAN) Function
You can disable the Wi-Fi function by following these steps.
1. Open the charms [Details] and select the
Settings charm.
2. Select Change PC settings in the lower right corner.
3. Select Wireless in the left pane of the PC settings screen.
4. Change the Wi-Fi setting under Wireless devices to Off.
Hint
To enable the Wi-Fi function, turn off Airplane mode and change the Wi-Fi setting
under Wireless devices to On.
To disable all wireless functions, turn on Airplane mode. The WIRELESS indicator
light will be turned off.
The wireless function(s) whose setting is on will be enabled when you turn off Airplane
mode. When any wireless function is enabled, the WIRELESS indicator light turns on.
Refer to Windows Help and Support for more information on Airplane mode.
[Details]
Related Topic
About the Wi-Fi(R) (Wireless LAN) Standards
Starting Wi-Fi(R) (Wireless LAN) Communications
Notes on Using the Wi-Fi(R) (Wireless LAN) Function
© 2013 Sony Corporation
178
Search

VAIO User Guide Back | Back to Top
Troubleshooting
How to Use
Windows 8: The Basics
Parts Description
Setup
Network / Internet
Connections
Settings
Backup / Recovery
Security
Other Operations
Notifications
Notes on Using the Wi-Fi(R) (Wireless LAN)
Function
Before using the Wi-Fi function, read the following precautions for correct use.
In some countries or regions, using the Wi-Fi products may be restricted by the local
regulations.
Wi-Fi devices work on the 2.4 GHz band, which is used by a variety of devices. They
use the technology to minimize radio interference from other devices that use the same
band; however, radio interference may still slow communication speeds, reduce
communication range, or cause communication failure.
If both the BLUETOOTH function and the 2.4 GHz Wi-Fi function of your VAIO computer
are enabled, interference may occur and cause slower communication speeds or other
problems.
To communicate via Wi-Fi while you are on the road, you may need to contract with a
Wi-Fi connection service provider.
If your VAIO computer is equipped with the IEEE 802.11a/b/g/n standard, outdoor use of
the 5 GHz Wi-Fi function is prohibited by law.
The communication speed and range may vary depending on the following conditions:
Distance between devices
Existence of obstacles between devices
Device configuration
Radio conditions
Ambient environment (including wall material, etc.)
Apps in use
Communications may be cut off depending on radio conditions.
The data transfer rate specified in the specification is the theoretical maximum, and may
not reflect actual data transfer rate.
Actual communication speed may not be as fast as the one displayed on your VAIO
computer.
The 2.4 GHz and 5 GHz Wi-Fi frequency bands are not communicable with one another.
The data transfer rate of IEEE 802.11g and IEEE 802.11n (2.4 GHz) may be affected by
interference when used with an IEEE 802.11b product. Also, IEEE 802.11g and IEEE
802.11n automatically lower the transfer rate to maintain compatibility with an IEEE
802.11b product. The transfer rate may be regained by changing the channel settings of
your access point.
To stop the Wi-Fi function abruptly, turn off your VAIO computer.
The WLAN standard includes the encryption methods: Wired Equivalent Privacy (WEP),
which is a security protocol, Wi-Fi Protected Access 2 (WPA2), and Wi-Fi Protected
Access (WPA). Proposed jointly by the IEEE and Wi-Fi Alliance, both WPA2 and WPA
are specifications of standards based on interoperable security enhancements that
increase the level of data protection and access control for existing Wi-Fi networks.
WPA is designed to be forward compatible with the IEEE 802.11i specification. It utilizes
the enhanced data encryption Temporal Key Integrity Protocol (TKIP) in addition to user
authentication using 802.1X and Extensible Authentication Protocol (EAP). Data
encryption protects the vulnerable wireless link between clients and access points.
Besides that, there are other typical LAN security mechanisms to ensure privacy, such
as: password protection, end-to-end encryption, virtual private networks, and
authentication. WPA2, the second generation of WPA, provides stronger data protection
and network access control and is also designed to secure all versions of 802.11
179
Search

devices, including 802.11b, 802.11a, 802.11g, and 802.11n standards, multi-band and
multi-mode. In addition, based on the ratified IEEE 802.11i standard, WPA2 provides
government grade security by implementing the National Institute of Standards and
Technology (NIST) FIPS 140-2 compliant AES encryption algorithm and 802.1X-based
authentication. WPA2 is backward compatible with WPA.
Related Topic
About the Wi-Fi(R) (Wireless LAN) Standards
Starting Wi-Fi(R) (Wireless LAN) Communications
Stopping Wi-Fi(R) (Wireless LAN) Communications
Notes on Using the BLUETOOTH(R) Function
© 2013 Sony Corporation
180
Search

VAIO User Guide Back | Back to Top
Troubleshooting
How to Use
Windows 8: The Basics
Parts Description
Setup
Network / Internet
Connections
Settings
Backup / Recovery
Security
Other Operations
Notifications
Starting Wi-Fi(R) (Wireless LAN) Communications
You can establish Wi-Fi communications between your VAIO computer and an access point
(not supplied).
Before using Wi-Fi, make sure a Wi-Fi access point is on and operating.
1. Connect an access point to your VAIO computer.
Refer to Windows Help and Support [Details] and the manual that came with the
access point for more information.
2. Open the charms [Details] and select the
Settings charm.
3. Select Change PC settings in the lower right corner.
4. Select Wireless in the left pane of the PC settings screen.
5. Change Airplane mode to Off and the Wi-Fi setting under Wireless devices to
On.
Hint
Refer to Windows Help and Support for more information on Airplane
mode. [Details]
6. Open the charms [Details] and select the
Settings charm.
7. Select
(the network icon).
8. Select the desired access point and Connect.
After the connection is established, Connected appears in the selected wireless
access point field.
If a security key [Details] entry window appears, enter the security key as required and
select OK.
Note that security keys are case-sensitive.
Note
On IEEE 802.11a/b/g/n equipped models, when only the 2.4 GHz Wi-Fi function is
enabled, your VAIO computer cannot connect to a 5 GHz Wi-Fi access point. Also, when
only the 5 GHz Wi-Fi function is enabled, the computer cannot connect to a 2.4 GHz Wi-
Fi access point.
On IEEE 802.11b/g/n equipped models, when the 2.4 GHz Wi-Fi function is disabled, the
computer cannot connect to an access point. Also, the computer cannot connect to a 5
GHz Wi-Fi access point.
It may take some time to find and connect to a Wi-Fi access point before starting
communications via Wi-Fi.
Hint
Once you connect your VAIO computer to the access point by entering the security key,
the access point will be registered in the computer. You do not have to enter the security
key for subsequent connections.
To check Wi-Fi connection status
Open the desktop [Details] and move the mouse pointer over (the Network icon) in the
desktop notification area to check the Wi-Fi connection status, such as the access point
currently connected to your VAIO computer.
181
Search

VAIO User Guide Back | Back to Top
Troubleshooting
How to Use
Windows 8: The Basics
Parts Description
Setup
Network / Internet
Connections
Settings
Backup / Recovery
Security
Other Operations
Notifications
Stopping Wi-Fi(R) (Wireless LAN) Communications
You can stop Wi-Fi communications by following these steps.
1. Open the charms [Details] and select the
Settings charm.
2. Select
(the network icon).
3. Select the desired access point and Disconnect.
Note
Do not disable the Wi-Fi function while accessing remote documents, files, or resources,
as it may result in data loss.
Related Topic
About the Wi-Fi(R) (Wireless LAN) Standards
Starting Wi-Fi(R) (Wireless LAN) Communications
Notes on Using the Wi-Fi(R) (Wireless LAN) Function
Disabling the Wi-Fi(R) (Wireless LAN) Function
© 2013 Sony Corporation
183
Search

VAIO User Guide Back | Back to Top
Troubleshooting
How to Use
Windows 8: The Basics
Parts Description
Setup
Network / Internet
Connections
Settings
Backup / Recovery
Security
Other Operations
Notifications
Using the Antivirus App for Your VAIO Computer
Protect your VAIO computer against computer viruses by using the antivirus app.
You can keep the antivirus app current with the latest updates by downloading and installing
the updates from the website of the app publisher. To update the antivirus app, find the
antivirus app installed on your VAIO computer from the following and follow these steps.
1. Make sure your VAIO computer is connected to the Internet.
2. Perform any of these operations according to the preinstalled antivirus app.
For Trend Micro:
Start Trend Micro Titanium Maximum Security. [Details]
For McAfee:
Start McAfee Internet Security or McAfee Total Protection. [Details]
For Kaspersky Internet Security:
Start Kaspersky Internet Security. [Details]
3. Follow the on-screen instructions.
Note
The actual procedure may be different from the above depending on the version of the
app installed on your VAIO computer. In such a case, follow the on-screen instructions.
Hint
Refer to the help file included with your app for more information.
© 2013 Sony Corporation
184
Search
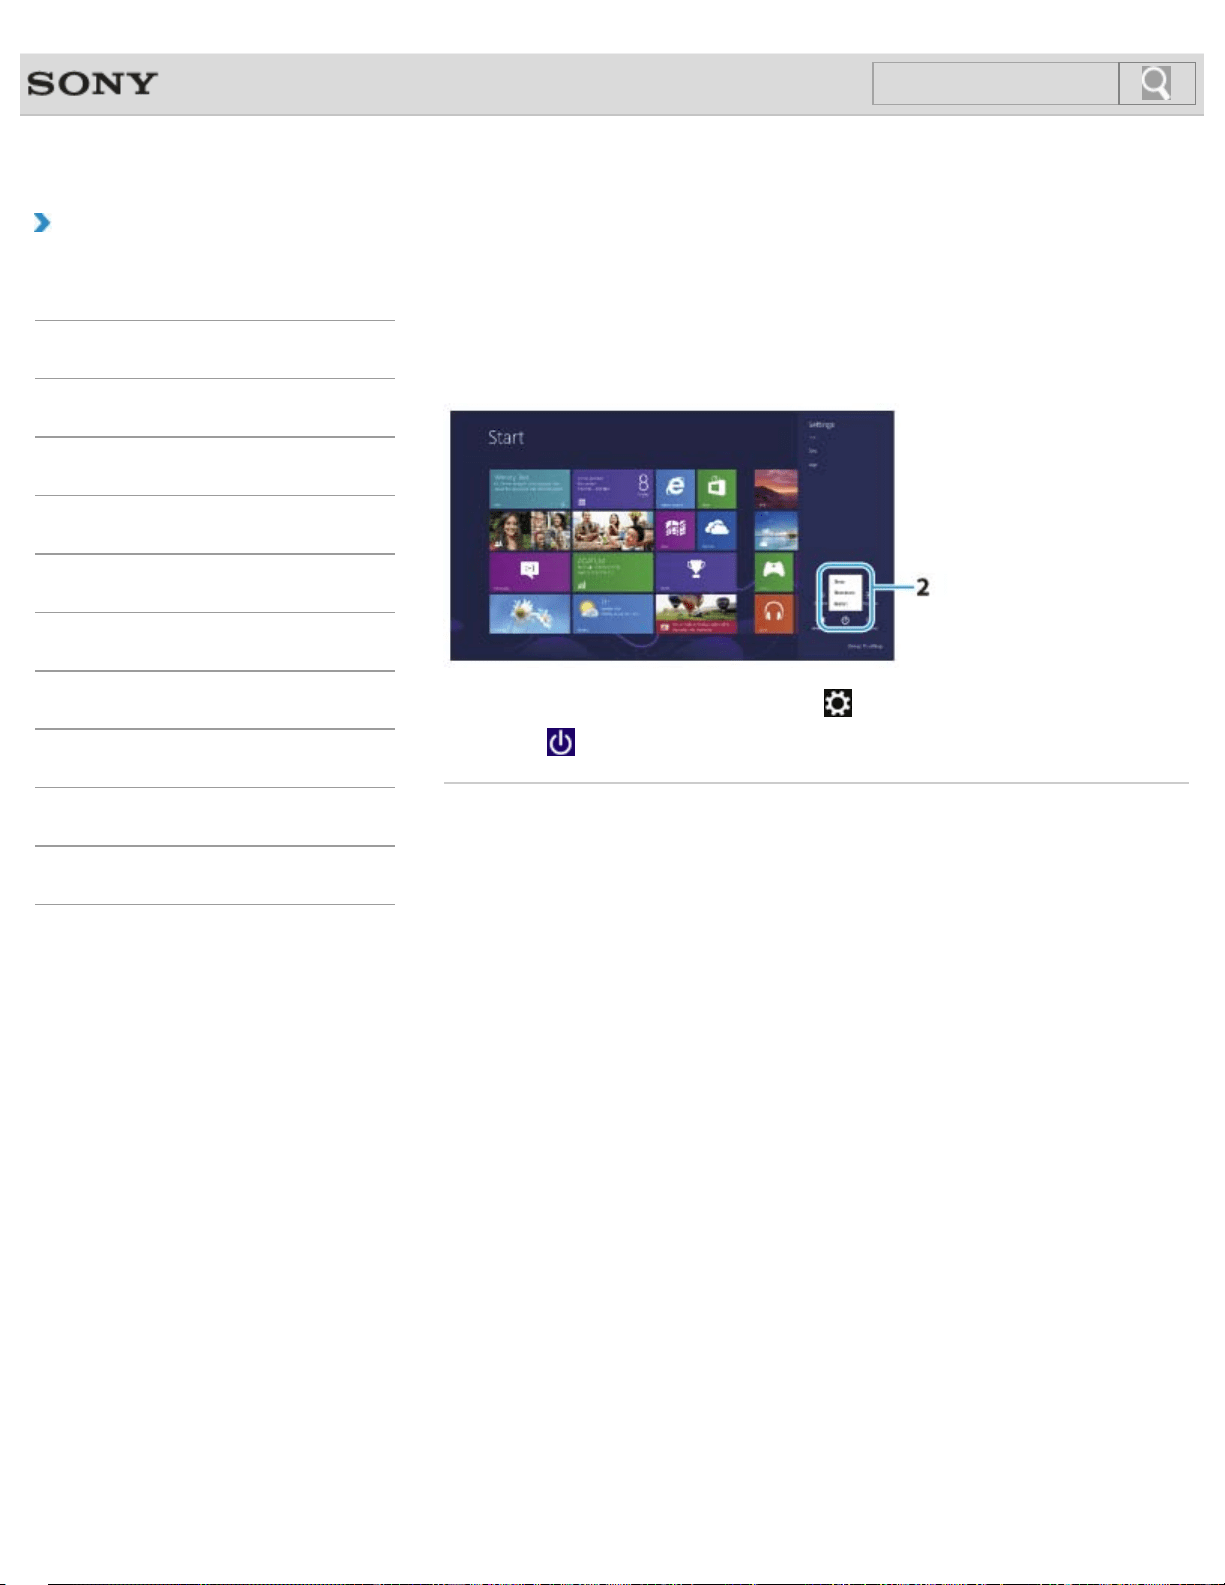
VAIO User Guide Back | Back to Top
Troubleshooting
How to Use
Windows 8: The Basics
Parts Description
Setup
Network / Internet
Connections
Settings
Backup / Recovery
Security
Other Operations
Notifications
Entering Sleep Mode, Shutting Down, or
Restarting
You can place your VAIO computer into Sleep mode or shut down/restart the computer by
following these steps.
1. Open the charms [Details] and select the Settings charm.
2. Select
Power and Sleep, Shut down, or Restart.
© 2013 Sony Corporation
185
Search

VAIO User Guide Back | Back to Top
Troubleshooting
How to Use
Windows 8: The Basics
Parts Description
Setup
Network / Internet
Connections
Settings
Backup / Recovery
Security
Other Operations
Notifications
Changing the Rapid Wake (Sleep Mode) Settings
You can change the Rapid Wake settings in VAIO Control Center.
Rapid Wake is enabled by default. With this function, you can keep your VAIO computer in
Sleep mode without risk of data loss because the computer enters Sleep mode after your
working data is saved on the built-in storage device.
For models that support Rapid Wake + ECO, you can conserve more battery power by
reducing power consumption when the computer is in Sleep mode.
1. Start VAIO Control Center [Details] and select Hardware.
2. Enable/disable the setting in Rapid Wake.
Note
With Rapid Wake disabled, your working data is not saved on the built-in storage device
when the computer enters Sleep mode. Therefore, if the computer is turned off during
Sleep mode because, for example, the battery pack runs out of power or the computer is
disconnected from an AC power source, the working data will be lost and cannot be
restored. To avoid data loss, be sure to save the data before the computer enters Sleep
mode. With Rapid Wake disabled, the power indicator light blinks slowly in orange during
Sleep mode, and the charge and power indicator lights blink simultaneously when the
battery pack runs out of power during Sleep mode.
When you use the Hibernate mode, you need to disable Rapid Wake.
Related Topic
Using Sleep Mode
Notes on Sleep Mode
© 2013 Sony Corporation
186
Search

VAIO User Guide Back | Back to Top
Troubleshooting
How to Use
Windows 8: The Basics
Parts Description
Setup
Network / Internet
Connections
Settings
Backup / Recovery
Security
Other Operations
Notifications
Charge Indicator Status List
The charge indicator light turns on or blinks differently according to conditions.
Lit in orange
The battery pack is charging. (Turns off when charging is completed.)
Blinks in orange along with the green power indicator
The battery pack is running out of power. (Normal mode)
Blinks fast in orange
A battery error has occurred due to a failed battery pack, etc.
Related Topic
Charging the Battery Pack
Checking the Battery Charge Capacity
Extending the Battery Life
© 2013 Sony Corporation
187
Search
VAIO User Guide Back | Back to Top
Troubleshooting
How to Use
Windows 8: The Basics
Parts Description
Setup
Network / Internet
Connections
Settings
Backup / Recovery
Security
Other Operations
Notifications
Charging the Battery Pack
The battery pack can be charged even while you are using your VAIO computer when the
computer is connected to a power source. The charging time may vary depending on
operating conditions.
1. Plug your VAIO computer into an AC outlet. [Details]
Hint
The charging time varies depending on ambient temperature.
Note that at a low ambient temperature, it takes longer time to charge the battery pack.
Open the desktop [Details] and select the battery icon, such as (on battery) or
(plugged in), in the desktop notification area to check the built-in battery status of your
VAIO computer.
On rare occasions, the battery icon indicates that the battery pack is completely
discharged even though the battery pack still has battery power left. Wait for a while until
the actual remaining battery capacity is displayed.
Related Topic
Charge Indicator Status List
Checking the Battery Charge Capacity
Extending the Battery Life
© 2013 Sony Corporation
188
Search
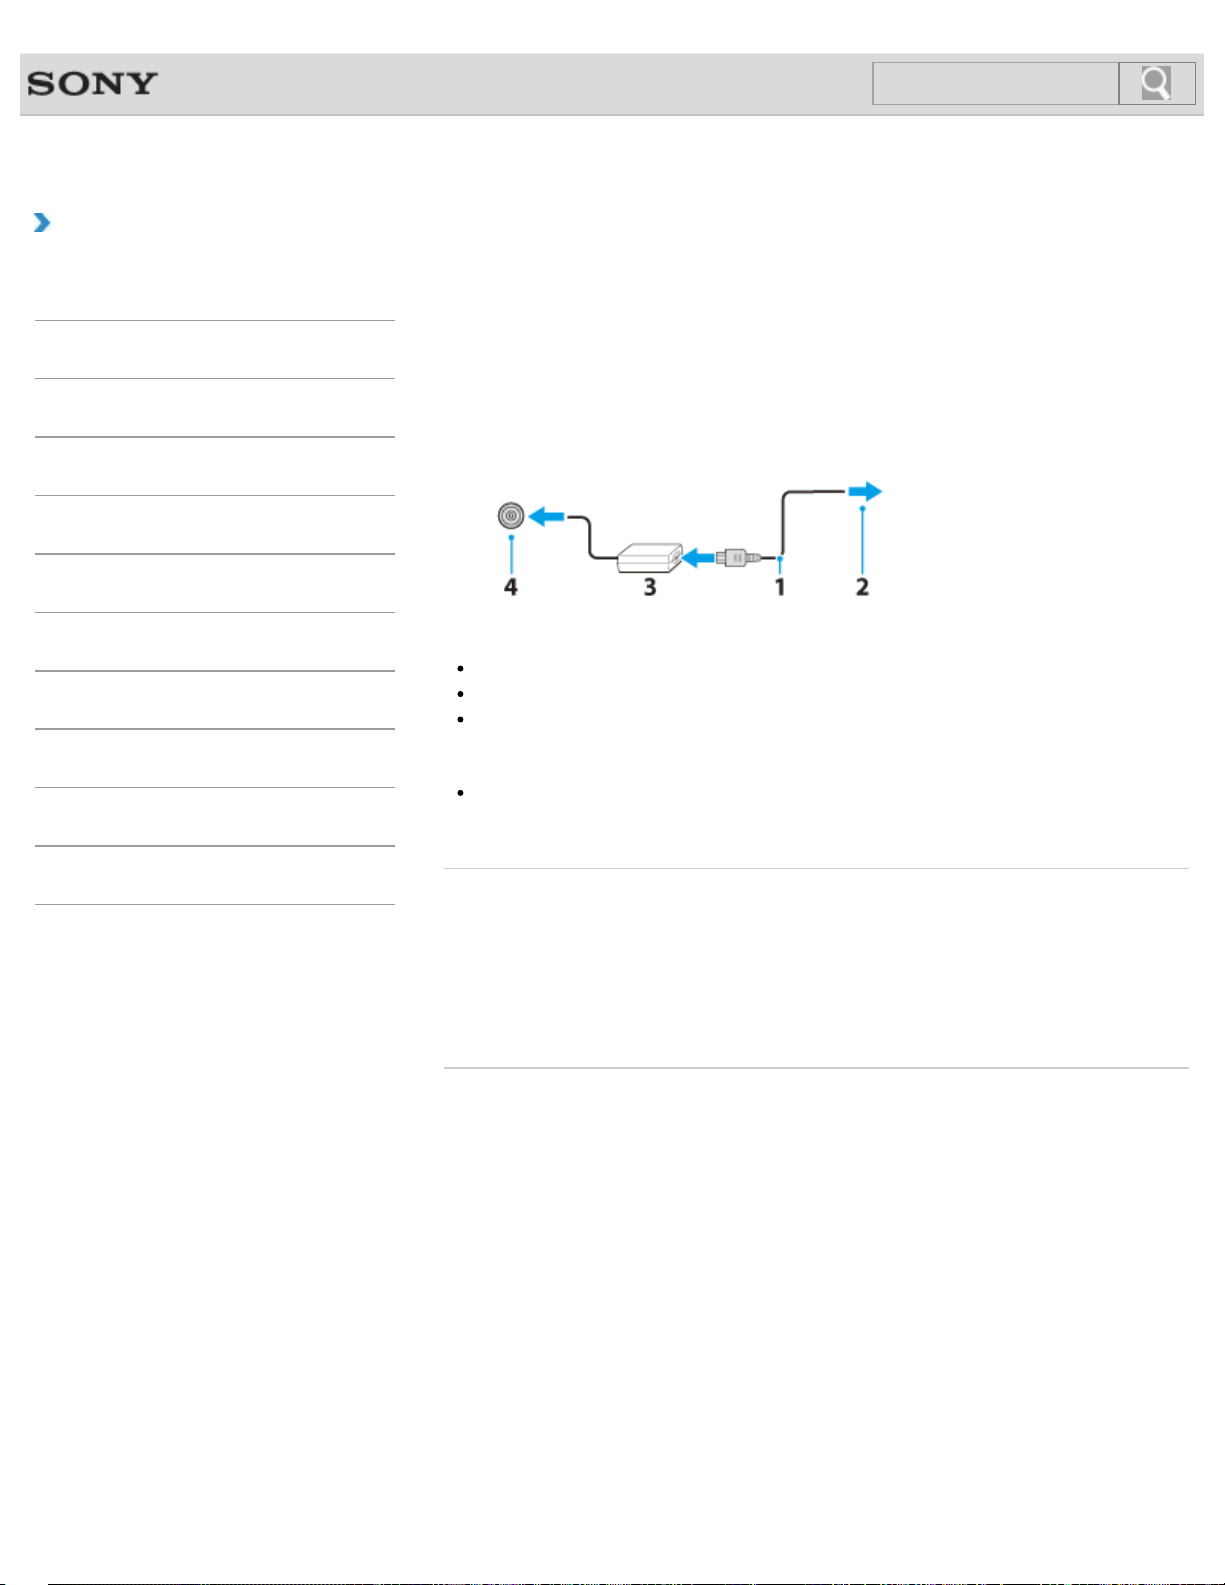
VAIO User Guide Back | Back to Top
Troubleshooting
How to Use
Windows 8: The Basics
Parts Description
Setup
Network / Internet
Connections
Settings
Backup / Recovery
Security
Other Operations
Notifications
Connecting a Power Source
Connect your VAIO computer to an AC power source. Carefully read the precautions in
Notes on Using the Power Source before connection. [Details]
1. Plug one end of the power cord (1) into the AC adapter (3).
2. Plug the other end of the power cord into an AC outlet (2).
3. Plug the cable from the AC adapter (3) into the DC IN port (4) on your VAIO computer.
Note
Do not plug more than one device into the same AC outlet.
The shape of the AC adapter varies depending on the model you purchased.
Make sure that the power plug is firmly plugged into your VAIO computer.
Hint
You can purchase a power strip with a surge protector to help prevent damage to your
VAIO computer caused by sudden power surges (in an electrical storm, for example).
Related Topic
Charging the Battery Pack
Notes on Using the Battery Pack
Turning on Your VAIO Computer
Shutting Down Your VAIO Computer
Notes on Using the Power Source
© 2013 Sony Corporation
189
Search
VAIO User Guide Back | Back to Top
Troubleshooting
How to Use
Windows 8: The Basics
Parts Description
Setup
Network / Internet
Connections
Settings
Backup / Recovery
Security
Other Operations
Notifications
Notes on Sleep Mode
Read the following precautions before using Sleep mode.
Some apps may not support Sleep mode. When running such apps, exit them before
placing your VAIO computer into Sleep mode.
Some USB devices may not support Sleep mode. When your VAIO computer resumes
from Sleep mode, the computer may not recognize such USB devices, depending on the
type and number of connected USB devices.
If you cannot place the computer into Sleep mode, disconnect all USB devices and try
again.
If your VAIO computer enters Sleep mode when Windows or the computer is unstable, it
may not resume from Sleep mode. The following operations are recommended:
Before placing your VAIO computer into Sleep mode, save your files and exit all
running apps.
Shut down your VAIO computer periodically.
Depending on the condition of Windows, your VAIO computer cannot enter Sleep mode.
If your VAIO computer enters Sleep mode while running a task, such as DVD writing,
the task may be suspended.
Related Topic
Using Sleep Mode
Notes on Using the Power Source
Notes on Using the Battery Pack
© 2013 Sony Corporation
190
Search

VAIO User Guide Back | Back to Top
Troubleshooting
How to Use
Windows 8: The Basics
Parts Description
Setup
Network / Internet
Connections
Settings
Backup / Recovery
Security
Other Operations
Notifications
Notes on Using the Power Source
Read the following precautions before plugging your VAIO computer into an AC power
source.
If you leave your VAIO computer without connecting it to an AC power source for an
extended period of time, turn off the computer.
Notes on the AC adapter
Use the AC adapter supplied with your VAIO computer or with genuine Sony products.
Do not use any other AC adapter as it may cause a malfunction.
Do not connect the AC adapter to a power conversion device such as a travel power
converter. It may cause overheating or a malfunction.
If the AC adapter cable becomes damaged or broken, do not use it.
Notes on turning on your VAIO computer
Because your VAIO computer contains magnetic components, keep magnetic storage
media, such as floppy disks, away from the computer, as it may cause data corruption.
Your VAIO computer will automatically enter Sleep mode (with the default settings)
when you move magnetic devices closer to the computer. Keep magnetic devices away
from the computer.
Related Topic
Connecting a Power Source
Turning on Your VAIO Computer
Shutting Down Your VAIO Computer
Restarting Your VAIO Computer
© 2013 Sony Corporation
191
Search

VAIO User Guide Back | Back to Top
Troubleshooting
How to Use
Windows 8: The Basics
Parts Description
Setup
Network / Internet
Connections
Settings
Backup / Recovery
Security
Other Operations
Notifications
Notes on an Extended Battery Pack
This topic explains battery charging behavior when an extended battery pack (not supplied)
is attached to your VAIO computer in addition to the installed battery pack (the primary
battery pack).
With the extended battery pack attached, the battery packs charge in the following sequence.
(When the battery care function is disabled)
1. The primary battery pack charges to about 80% of its battery capacity, then the
extended battery pack starts charging.
2. The extended battery pack charges to about 80% of its battery capacity, then the
primary battery pack starts charging to 100%.
3. The extended battery pack starts charging to 100%.
The battery power of the extended battery pack is used first.
Note
When the extended battery pack is attached to your VAIO computer with the remaining
battery power low, the extended battery pack status may not be displayed on the
computer screen or the charge indicator light status may be a battery error. In such a
case, detach the extended battery pack and charge the extended battery pack with the
AC adapter.
© 2013 Sony Corporation
192
Search
VAIO User Guide Back | Back to Top
Troubleshooting
How to Use
Windows 8: The Basics
Parts Description
Setup
Network / Internet
Connections
Settings
Backup / Recovery
Security
Other Operations
Notifications
Restarting Your VAIO Computer
After changing the settings or installing an app on your VAIO computer, you may be required
to restart the computer.
1. Save your data and close all running apps.
2. Open the charms [Details] and select the
Settings charm.
3. Select
Power and Restart.
Your VAIO computer will restart.
Related Topic
Turning on Your VAIO Computer
Shutting Down Your VAIO Computer
© 2013 Sony Corporation
193
Search

VAIO User Guide Back | Back to Top
Troubleshooting
How to Use
Windows 8: The Basics
Parts Description
Setup
Network / Internet
Connections
Settings
Backup / Recovery
Security
Other Operations
Notifications
Selecting a Power Plan
Power management helps you set up power plans to suit your requirements for power
consumption.
1. Open Control Panel. [Details]
2. Select Hardware and Sound and Power Options.
3. Select your desired power plan.
4. If you want to change the power plan settings, select Change plan settings on the
right of your desired power plan in the Power Options window.
By selecting Change advanced power settings, you can change the advanced
settings.
Refer to Windows Help and Support for more information on the power plan
settings. [Details]
Hint
The power status icon indicates what kind of power source your VAIO computer is
currently using, and you can see the computer’s power status by selecting this icon.
© 2013 Sony Corporation
194
Search
VAIO User Guide Back | Back to Top
Troubleshooting
How to Use
Windows 8: The Basics
Parts Description
Setup
Network / Internet
Connections
Settings
Backup / Recovery
Security
Other Operations
Notifications
Shutting Down Your VAIO Computer
Properly shut down your VAIO computer to avoid losing unsaved data.
1. Save your data and close all running apps.
2. Turn off any peripherals connected to your VAIO computer.
3. Open the charms [Details], and then select the
Settings charm.
4. Select
Power and Shut down.
After a short time, your VAIO computer automatically turns off and the green power
indicator light turns off.
Note
An improper shutdown may cause loss of unsaved data or cause your VAIO computer
to malfunction.
To disconnect your VAIO computer completely from an AC power source, turn off the
computer, and then unplug the power cord from the AC outlet.
To fully shut down your VAIO computer
Fully shut down your VAIO computer by placing the computer into ACPI S5 mode. This
mode will take more time during the start-up process than usual.
1. Save your data and close all running apps.
2. Turn off any peripherals connected to your VAIO computer.
3. Open the charms [Details], and then select the
Settings charm.
4. Select
Power, press and hold down the Shift key, and then select Shut down.
After a short time, your VAIO computer automatically turns off and the green power
indicator light turns off.
Hint
ACPI (Advanced Configuration and Power Interface) is an open industry specification for
power management of PC/AT compatible devices and device configuration. In S5 mode,
your VAIO computer is in a system sleep and soft off state.
Related Topic
Turning on Your VAIO Computer
Restarting Your VAIO Computer
Using Sleep Mode
Notes on Using the Power Source
© 2013 Sony Corporation
195
Search
VAIO User Guide Back | Back to Top
Troubleshooting
How to Use
Windows 8: The Basics
Parts Description
Setup
Network / Internet
Connections
Settings
Backup / Recovery
Security
Other Operations
Notifications
Turning on Your VAIO Computer
Turn on your VAIO computer to start Windows. Carefully read the precautions in Notes on
Using the Power Source before turning on. [Details]
1. Plug your VAIO computer into an AC outlet. [Details]
2. Press and hold down the
(Power) button until the power indicator light turns on in
green.
Your VAIO computer is turned on, and Windows starts after a while.
Note
If you press and hold down the (Power) button for more than four seconds, your VAIO
computer will not turn on.
Press the
(Power) button lightly, and release it immediately when the power indicator
light turns on.
Do not touch the touch screen when turning on your VAIO computer as it may cause the
computer to malfunction. (Touch screen equipped models)
Hint
By default, your VAIO computer automatically enters Sleep mode after a certain period
of inactivity while the computer is connected to an AC outlet. [Details]
Related Topic
Charging the Battery Pack
Notes on Using the Battery Pack
Connecting a Power Source
Shutting Down Your VAIO Computer
Restarting Your VAIO Computer
Notes on Using the Power Source
© 2013 Sony Corporation
196
Search
VAIO User Guide Back | Back to Top
Troubleshooting
How to Use
Windows 8: The Basics
Parts Description
Setup
Network / Internet
Connections
Settings
Backup / Recovery
Security
Other Operations
Notifications
Using Sleep Mode
In Sleep mode, all unnecessary devices of your VAIO computer are turned off, though some
devices stay on to retain the computer’s state including data you are working on. Sleep
mode is useful when you take a short rest, for example.
With the default Sleep mode settings, Rapid Wake is enabled and the computer’s state is
saved to the built-in storage device.
To activate Sleep mode
1. Open the charms [Details] and select the Settings charm.
2. Select
Power and Sleep.
The power indicator light turns off when your VAIO computer enters Sleep mode.
Hint
By default, your VAIO computer enters Sleep mode automatically after about 30
minutes of inactivity while running on AC power.
The operations below also place your VAIO computer into Sleep mode.
Press the
(Power) button (with the default setting).
Note that if you press and hold down the
(Power) button for more than four
seconds, your VAIO computer will turn off automatically. Doing this will erase all
unsaved data.
To return to Normal mode
1. Press the (Power) button.
Note
Your VAIO computer does not return to Normal mode with the (Windows) button.
By default, your VAIO computer automatically enters Hibernate mode when the battery
pack is running out of power. However, depending on the operating conditions, the
computer may fail to enter Hibernate mode.
If this occurs and the battery pack is running out of power, the computer will be turned
off, resulting in loss of unsaved data.
While the computer is running on battery power, save data frequently.
Before moving your VAIO computer, make sure that the power indicator light is off to
avoid impact or vibration to the running hard disk drive.
Hint
If you press and hold down the (Power) button for more than four seconds, your VAIO
computer will turn off automatically. Doing this will erase all unsaved data.
You can set to restore your VAIO computer from Sleep mode to Normal mode by raising
the slide-up display. Start VAIO Control Center [Details] and change the settings in
Power and Battery.
Related Topic
Notes on Using the Power Source
197
Search

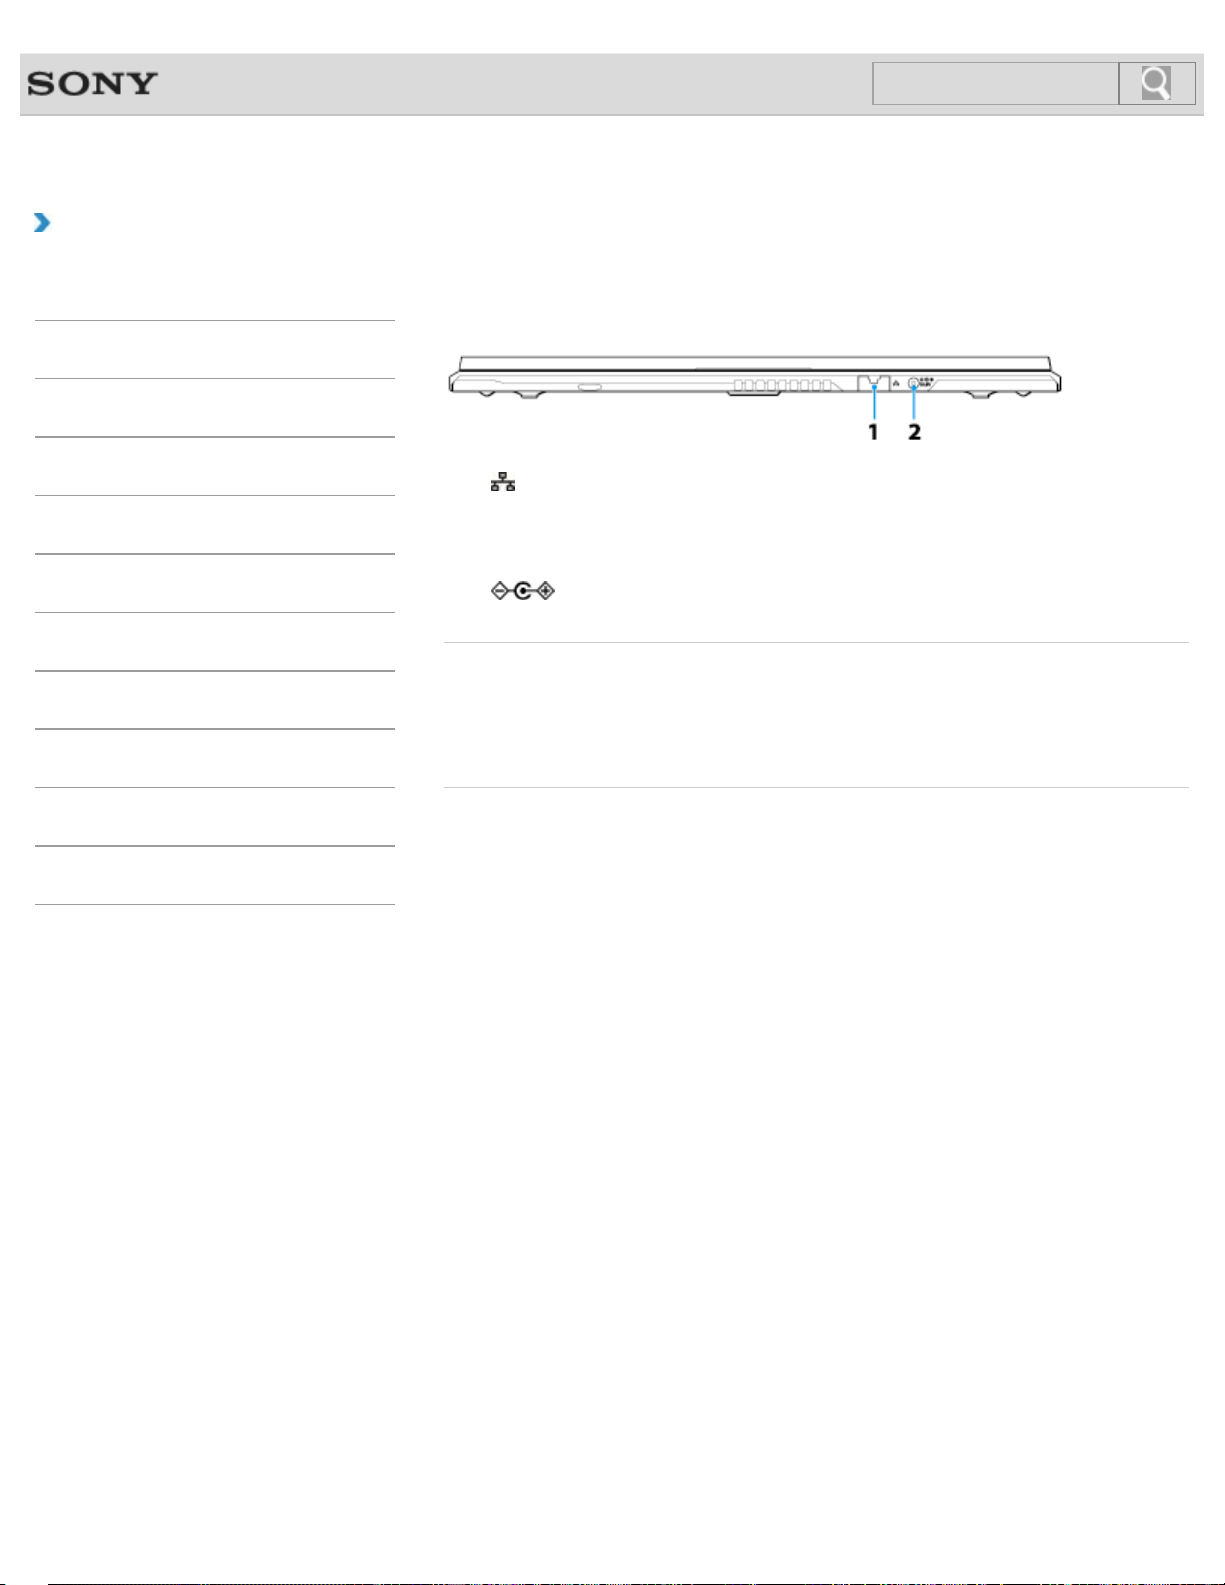
VAIO User Guide Back | Back to Top
Troubleshooting
How to Use
Windows 8: The Basics
Parts Description
Setup
Network / Internet
Connections
Settings
Backup / Recovery
Security
Other Operations
Notifications
Parts and Controls on the Back
Describes the features on the back of the VAIO computer, such as connection ports.
1. LAN port [Details]
For details on the LAN port, see “Using the LAN Port” [Details].
Before connecting the cable to the LAN port, unfold the tilt feet on the bottom of the
computer. [Details]
2.
DC IN port [Details]
Related Topic
Parts and Controls on the Front
Parts and Controls on the Sides
Parts and Controls on the Bottom
© 2013 Sony Corporation
199
Search
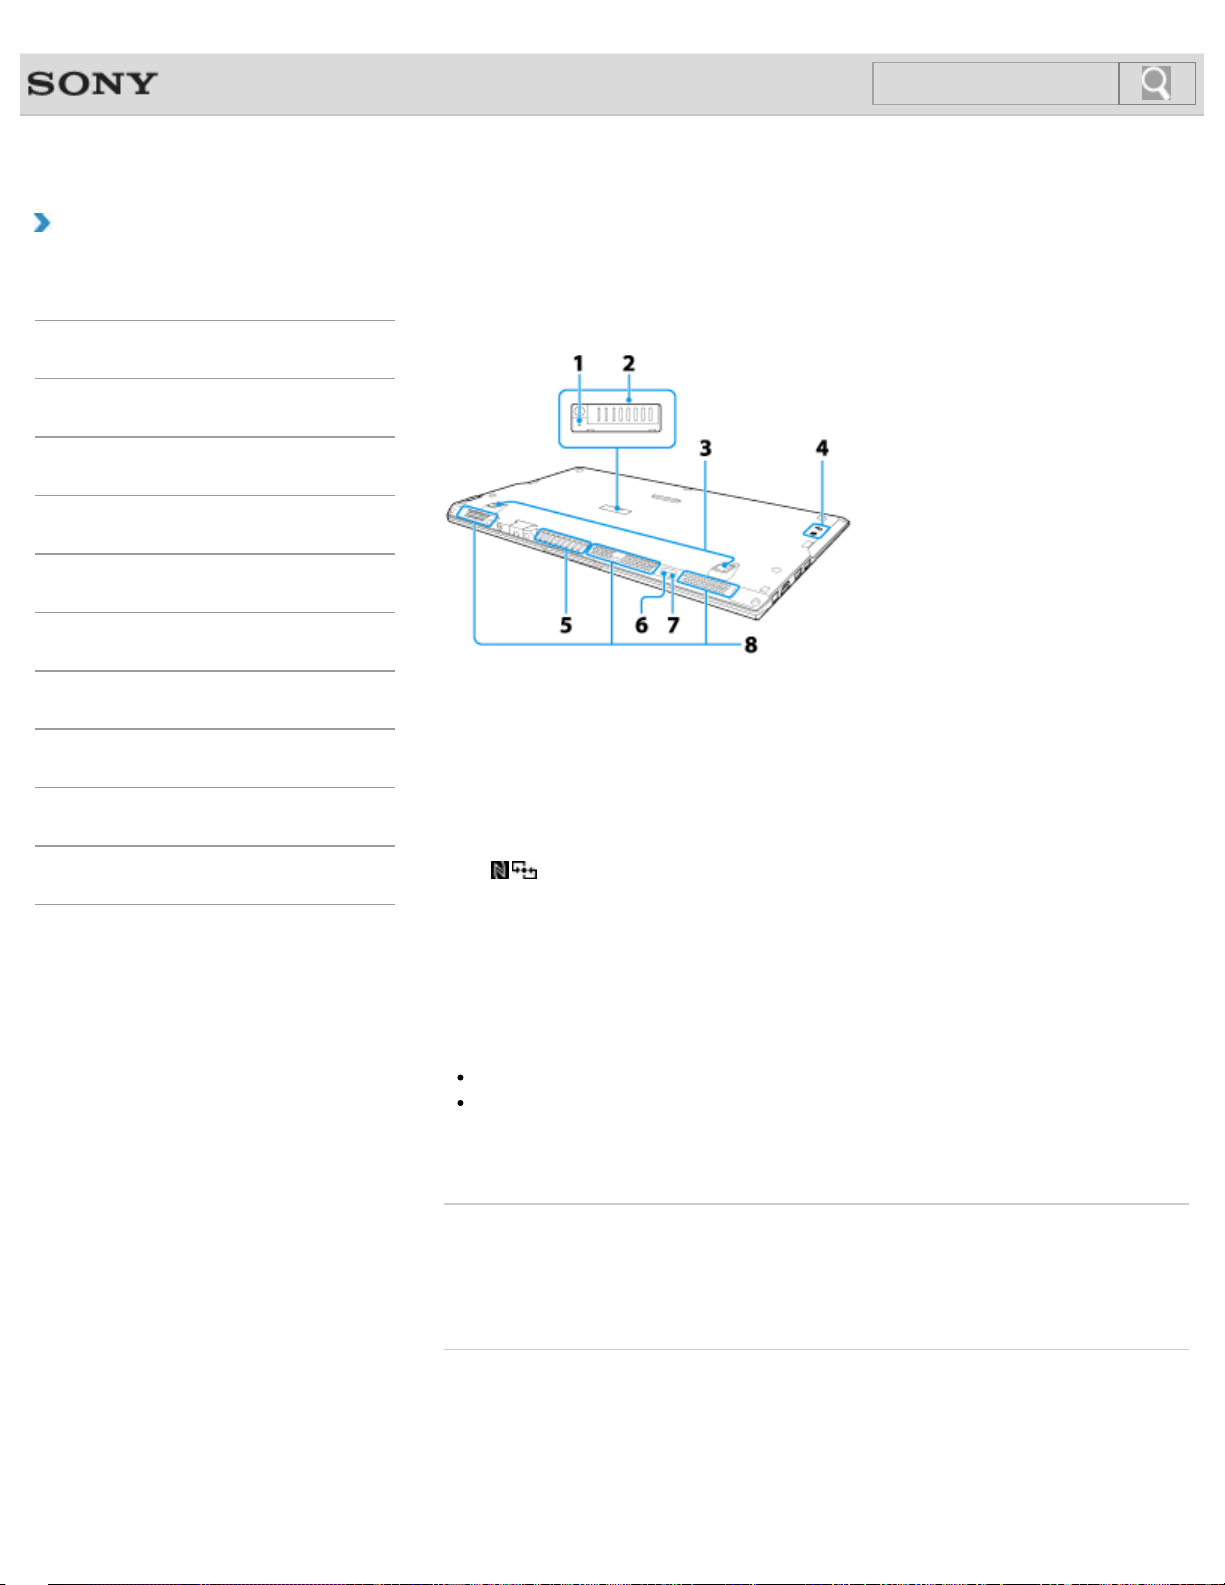
VAIO User Guide Back | Back to Top
Troubleshooting
How to Use
Windows 8: The Basics
Parts Description
Setup
Network / Internet
Connections
Settings
Backup / Recovery
Security
Other Operations
Notifications
Parts and Controls on the Bottom
Describes the features on the bottom of the VAIO computer.
1. Battery off button
2. Extended battery pack connector
Remove the extended battery pack connector cover and connect an extended battery
pack to the connector. Attach the removed connector cover to the extended battery
pack to keep the cover for future use.
3. Tilt feet [Details]
4.
Touch mark (NFC supported models) [Details]
5. Air exhaust vent
6. Built-in rear camera indicator (Rear camera equipped models) [Details]
7. Built-in rear camera (Rear camera equipped models) [Details]
8. Air intake vents
Note
The memory of your VAIO computer cannot be replaced.
If the battery off button is pressed while the VAIO computer is running, unsaved data
may be lost. Be sure to save your working data and turn off the VAIO computer before
pressing the battery off button.
Related Topic
Parts and Controls on the Front
Parts and Controls on the Sides
Parts and Controls on the Back
© 2013 Sony Corporation
200
Search
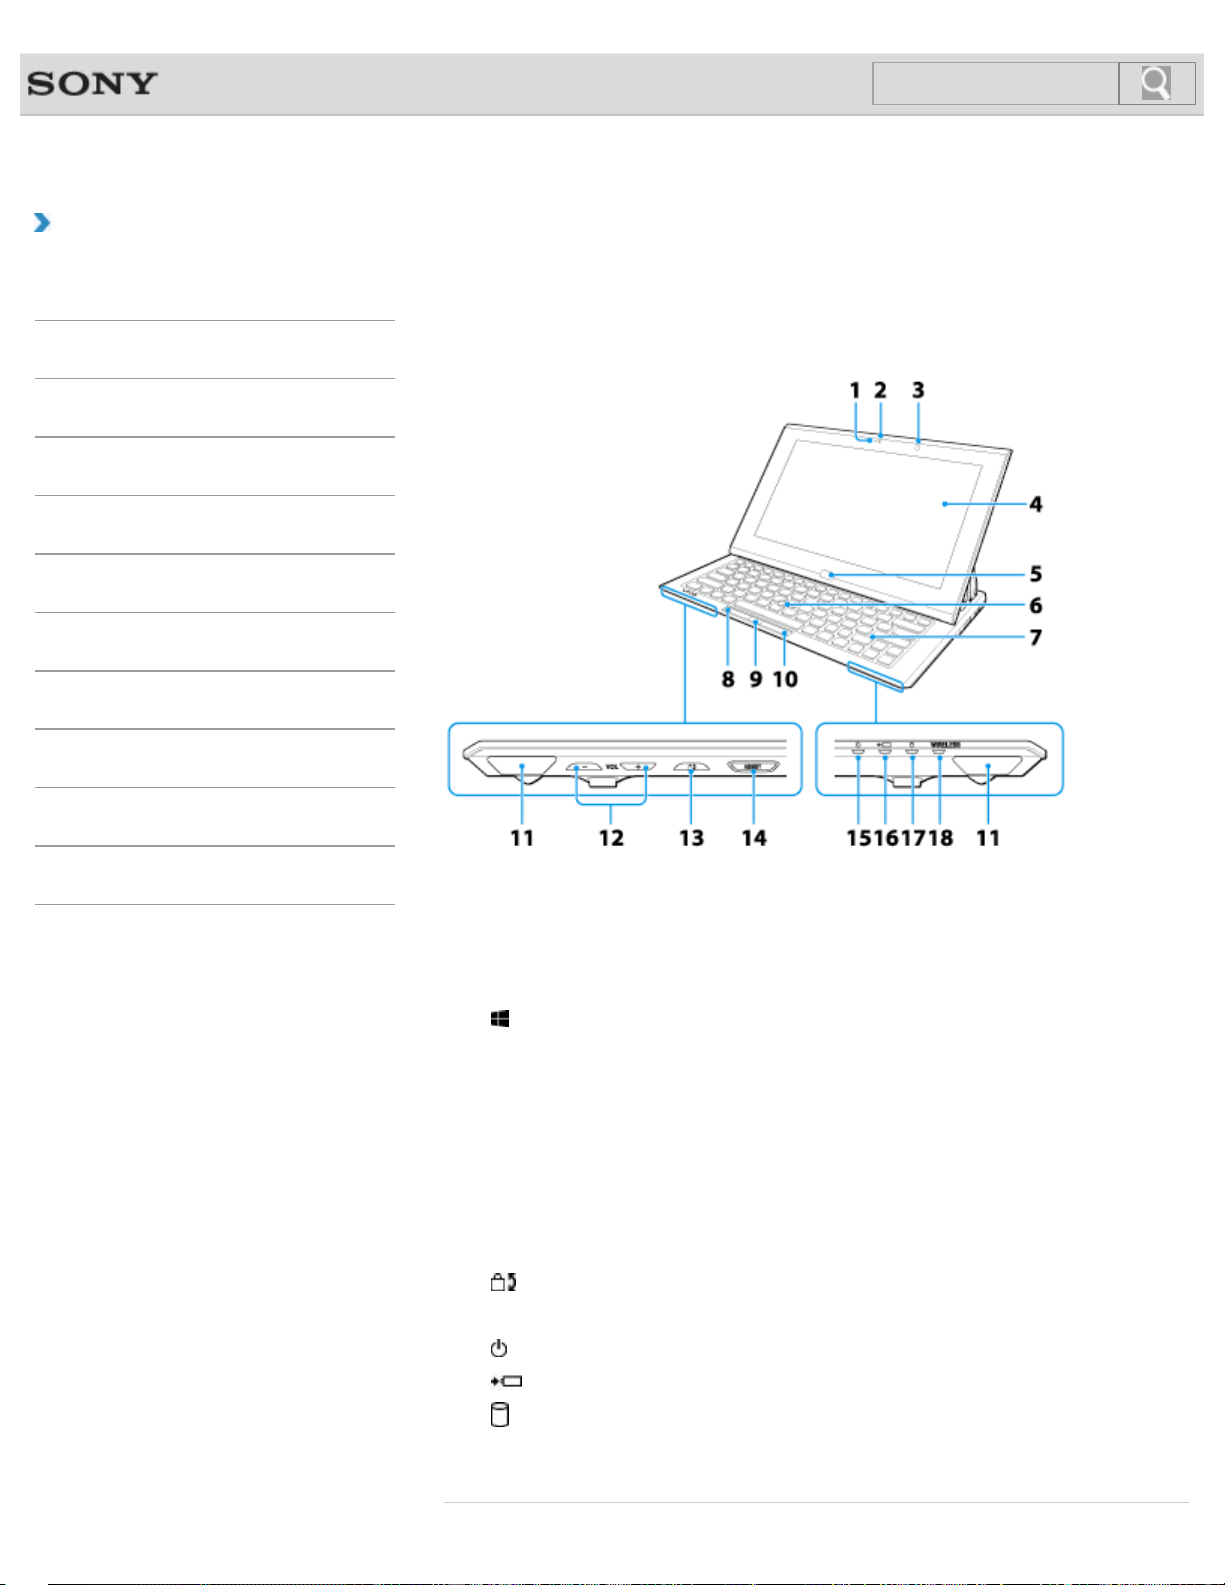
VAIO User Guide Back | Back to Top
Troubleshooting
How to Use
Windows 8: The Basics
Parts Description
Setup
Network / Internet
Connections
Settings
Backup / Recovery
Security
Other Operations
Notifications
Parts and Controls on the Front
Describes the features on the front of the VAIO computer, such as buttons and indicator
lights.
1. Built-in front camera indicator [Details]
2. Built-in front camera [Details]
3. Ambient light sensor [Details]
4. LCD screen or touch screen [Details]
5.
Windows button
6. Optical Trackpad [Details]
7. Keyboard
8. Left button [Details]
9. Center button [Details]
10. Right button [Details]
11. Built-in speakers (stereo)
12. VOL (Volume) buttons
13.
Rotation lock button
14. ASSIST button [Details]
15.
Power indicator [Details]
16.
Charge indicator [Details]
17.
Disc drive indicator
18. WIRELESS indicator [Details]
201
Search

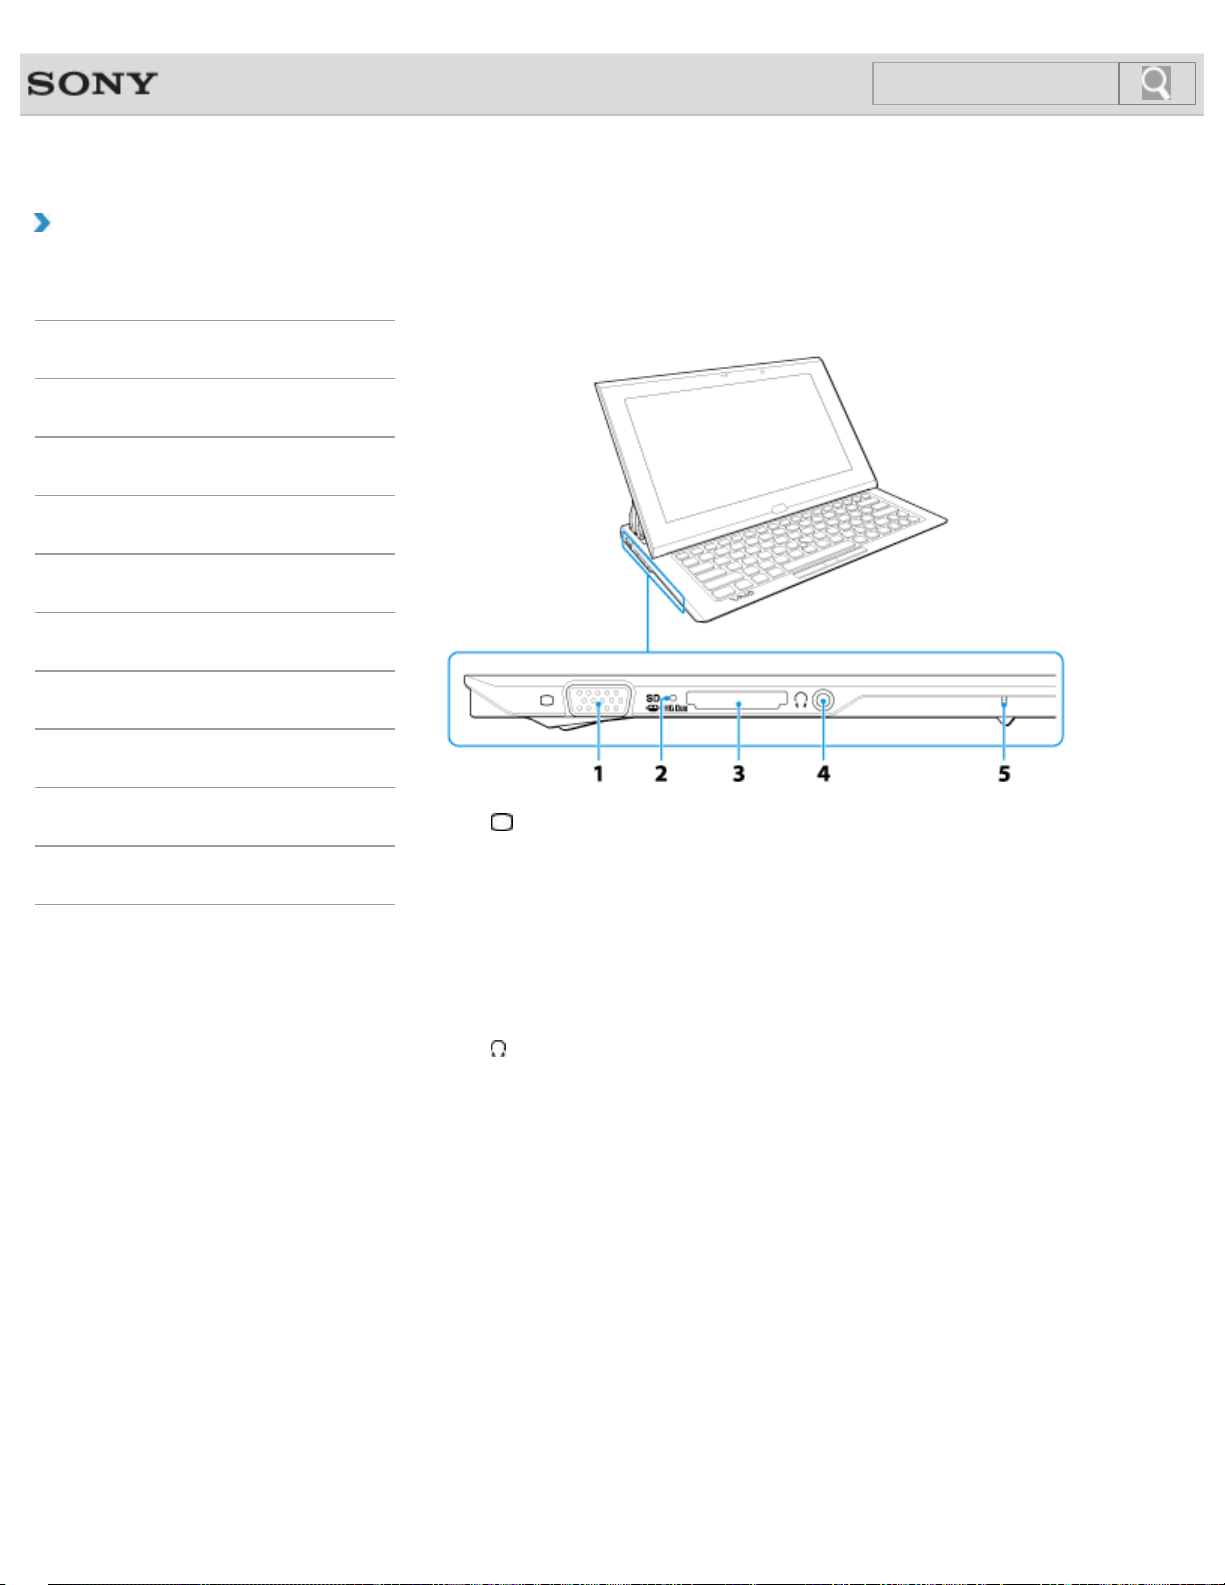
VAIO User Guide Back | Back to Top
Troubleshooting
How to Use
Windows 8: The Basics
Parts Description
Setup
Network / Internet
Connections
Settings
Backup / Recovery
Security
Other Operations
Notifications
Parts and Controls on the Sides
Describes the features on the sides of the VAIO computer, such as connection ports.
1. Monitor port [Details]
Before connecting the cable to the monitor port, unfold the tilt feet on the bottom of the
computer. [Details]
2. Media access indicator (“Memory Stick Duo” [Details], SD memory card [Details])
3. “Memory Stick Duo” / SD memory card combined slot (“Memory Stick Duo” [Details],
SD memory card [Details])
“Memory Stick Duo” and an SD memory card cannot be inserted into the slot
simultaneously.
4.
Headphones jack [Details]
5. Built-in microphone (monaural)
203
Search
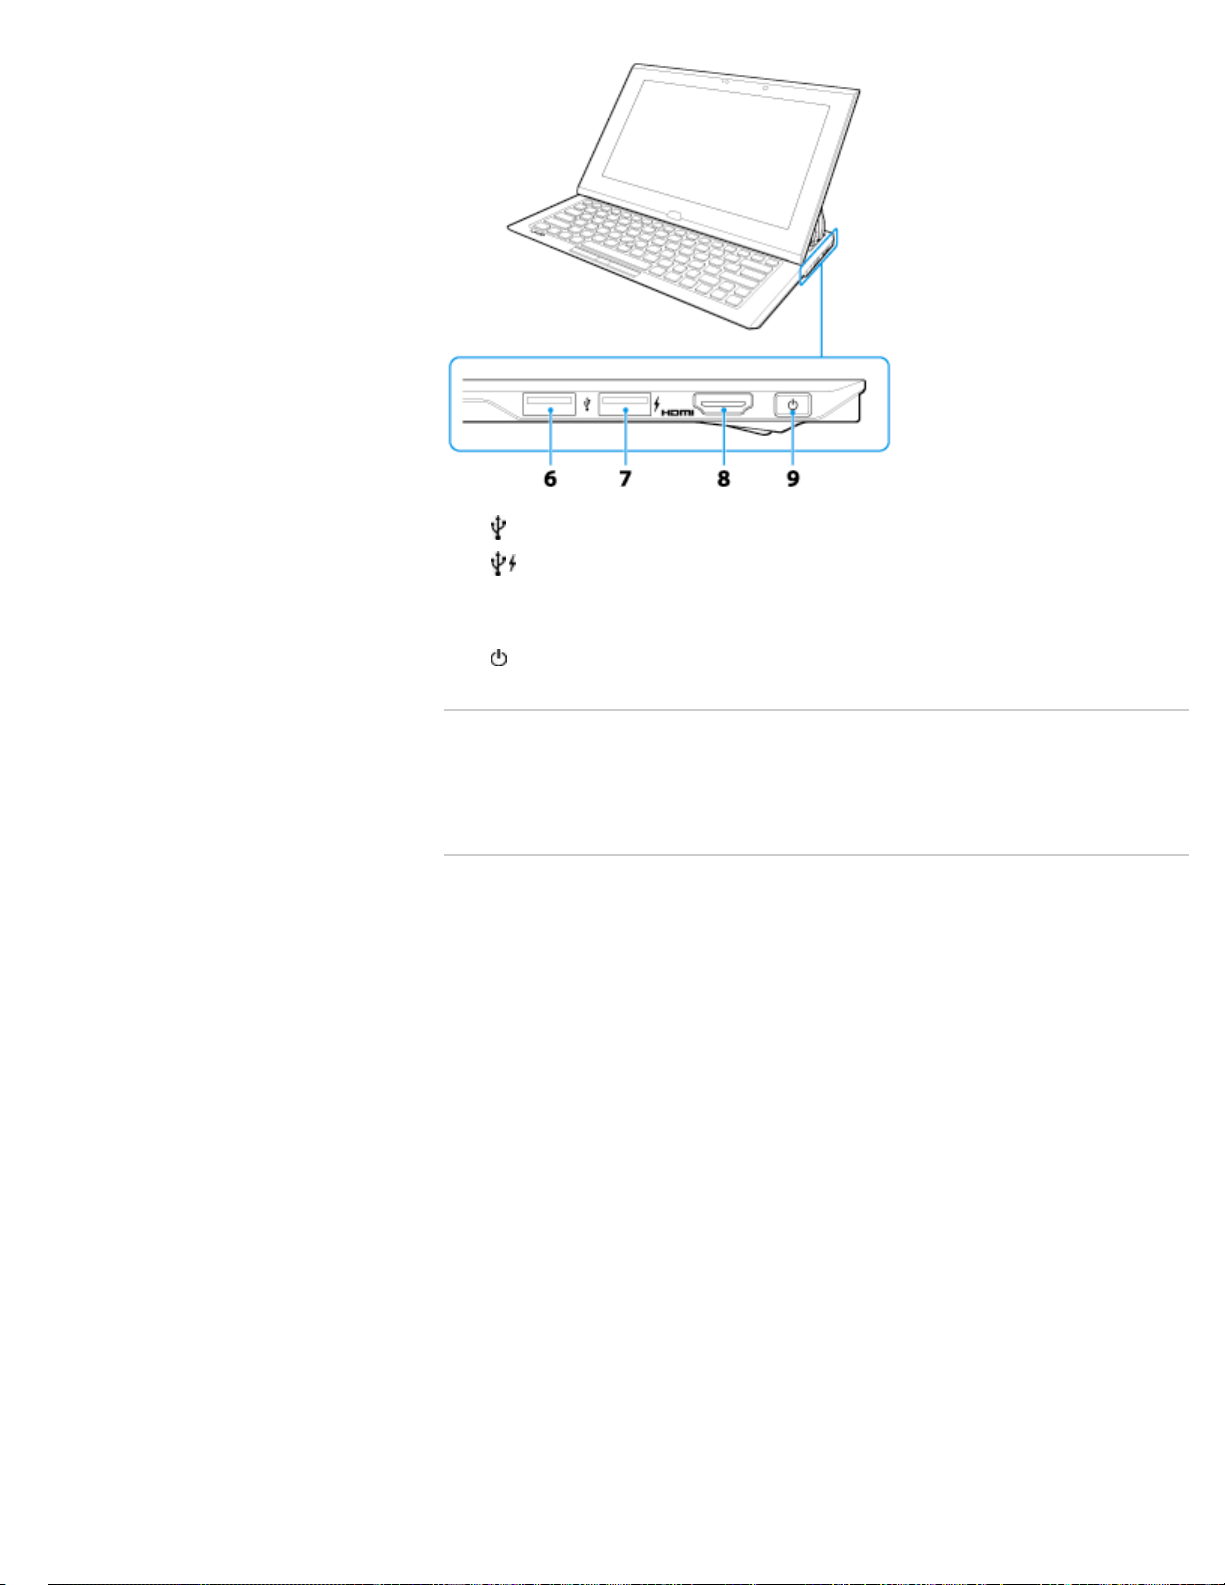

VAIO User Guide Back | Back to Top
Troubleshooting
How to Use
Windows 8: The Basics
Parts Description
Setup
Network / Internet
Connections
Settings
Backup / Recovery
Security
Other Operations
Notifications
About the ASSIST Button
Press the ASSIST button to perform regular maintenance of your VAIO computer or to
solve problems you might encounter when using the computer.
While the computer is on, the ASSIST button starts VAIO Care.
While the computer is off, the ASSIST button starts VAIO Care Rescue Mode.
VAIO Care (Rescue Mode) : Recover or maintain your system can be used to
recover the computer in case of emergency, for example, when Windows does not start.
Note
If the VAIO Care Rescue Mode screen is displayed and five minutes pass without
any operation, your VAIO computer automatically turns off.
Related Topic
Keeping Your VAIO Computer in Optimum Condition (VAIO Care)
Recovering from the Recovery Area
Backing Up Your Data when You cannot Start Windows
Restoring Your Data with VAIO Data Restore Tool
© 2013 Sony Corporation
205
Search

VAIO User Guide Back | Back to Top
Troubleshooting
How to Use
Windows 8: The Basics
Parts Description
Setup
Network / Internet
Connections
Settings
Backup / Recovery
Security
Other Operations
Notifications
Booting Your VAIO Computer from External
Devices
You can boot your VAIO computer from external devices, such as an optical disc drive, a
USB floppy disk drive, or a USB flash drive by using the BIOS function.
1. Connect an external device to your VAIO computer.
2. Press the ASSIST button while your VAIO computer is off.
The VAIO Care Rescue Mode screen appears.
3. Select Start from media (USB device/optical disc).
The booting process from the external device starts.
Note
Disconnect all devices from your VAIO computer except for the external device from
which you intend to boot up. Some devices cannot be used to boot the computer, or
cannot be used with the computer.
If an AC adapter is supplied with the external device, be sure to connect it to an AC
power source in advance.
© 2013 Sony Corporation
206
Search

VAIO User Guide Back | Back to Top
Troubleshooting
How to Use
Windows 8: The Basics
Parts Description
Setup
Network / Internet
Connections
Settings
Backup / Recovery
Security
Other Operations
Notifications
Checking Supplied Items
Check all items packed with the product before use.
AC adapter
Power cord
Digitizer Stylus*
Extended battery pack*
Noise canceling headphones*
* Not supplied with all models. Availability depends on your computer’s specifications.
Hint
No Recovery Media is included because your VAIO computer can be recovered using
data stored in the hard disk drive or SSD. See Recovering from the Recovery
Area for more information. [Details]
© 2013 Sony Corporation
207
Search

VAIO User Guide Back | Back to Top
Troubleshooting
How to Use
Windows 8: The Basics
Parts Description
Setup
Network / Internet
Connections
Settings
Backup / Recovery
Security
Other Operations
Notifications
Customizing Your VAIO Computer
VAIO Control Center allows you to access system information and to change settings of
various kinds of functions such as display and sounds.
1. Start VAIO Control Center. [Details]
2. Select your desired item and change the settings.
Hint
Some of the items will not be visible if you sign in as a user without administrative rights.
© 2013 Sony Corporation
208
Search
VAIO User Guide Back | Back to Top
Troubleshooting
How to Use
Windows 8: The Basics
Parts Description
Setup
Network / Internet
Connections
Settings
Backup / Recovery
Security
Other Operations
Notifications
Keeping Your VAIO Computer in Optimum
Condition (VAIO Care)
With VAIO Care, you can perform the following operations to keep your VAIO computer
running at an optimum level.
Conduct regular performance checks and tune-ups.
Find support information (the support website URL, the contact information phone
number, etc.).
Start VAIO Care just by pressing the ASSIST button and search for appropriate
measures if you have any problem.
1. Press the ASSIST button while your VAIO computer is on.
VAIO Care starts.
Refer to the help file included with VAIO Care for more information.
Hint
Pressing the ASSIST button while your VAIO computer is off starts VAIO Care
Rescue Mode. VAIO Care Rescue Mode can be used to recover the computer in
case of emergency, for example, if Windows does not start.
Alternatively, open the charms [Details], select the Search charm and Apps, and
enter “VAIO Care (Desktop)” in the search box to start VAIO Care.
Related Topic
Recovering from the Recovery Area
Backing Up Your Data when You cannot Start Windows
Restoring Your Data with VAIO Data Restore Tool
© 2013 Sony Corporation
209
Search
VAIO User Guide Back | Back to Top
Troubleshooting
How to Use
Windows 8: The Basics
Parts Description
Setup
Network / Internet
Connections
Settings
Backup / Recovery
Security
Other Operations
Notifications
Restricting the Use of Built-in Devices
The BIOS function enables you to disable the built-in devices such as those listed below.
You can use this function to prohibit external connections and communications
USB Ports
Memory Card Slot (“Memory Stick Duo” slot and SD memory card slot)
Wireless Device
LAN Device (LAN port)
1. Press the ASSIST button while your VAIO computer is off.
The VAIO Care Rescue Mode screen appears.
2. Select Start BIOS setup.
Enter a password if it has already been set.
The BIOS setup screen appears.
3. Press the
or key to select the Advanced tab.
4. Press the
or key to select your desired built-in device and press the Enter key.
5. Press the
or key to select Disabled or Enabled and press the Enter key.
When you select Disabled:
The selected device is disabled.
When you select Enabled:
The selected device is enabled and can be used on your VAIO computer.
6. Press the
or key to select the Exit tab, select Exit Setup, and then press the
Enter key.
At the confirmation prompt, press the Enter key.
Note
Devices you can disable vary depending on the model.
© 2013 Sony Corporation
210
Search
VAIO User Guide Back | Back to Top
Troubleshooting
How to Use
Windows 8: The Basics
Parts Description
Setup
Network / Internet
Connections
Settings
Backup / Recovery
Security
Other Operations
Notifications
Setting Up an Appropriate Work Environment
This topic describes where to or not to place your VAIO computer and ergonomic
instructions.
Where to place your VAIO computer
When placing your VAIO computer, ensure that:
You have easy access to a power source and necessary ports.
You leave enough space around the computer.
The computer is placed on a flat surface that is wide enough and you can face the
computer screen as you operate it.
You can place the computer in front of you where you can sit upright and keep your
forearms parallel to the floor.
Where not to place your VAIO computer
Placing your VAIO computer in an inappropriate location may cause damage or a
malfunction. Do not place the computer in a location subject to:
Direct sunlight
Magnetic items or sources
Heat sources, such as residential heating equipment
Excessive dust
High humidity
Poor ventilation
Note
The area around the air exhaust vent may become extremely hot while your VAIO
computer is on. Be careful before touching the area.
Do not place any object near the air exhaust vent that may block the vent.
Hint
Your VAIO computer uses high-frequency radio signals and may cause interference to
radio or TV reception. If this occurs, move the computer a suitable distance away from
the radio or TV.
Ergonomic considerations
Whenever possible, you should attempt to take account of the following ergonomic
considerations.
Furniture and posture
Sit in a chair with good back support. Adjust the level of the chair so your feet are flat on the
floor. A footrest may make you more comfortable.
Sit in a relaxed, upright posture and avoid slouching forward or leaning far backwards.
Viewing angle of the computer screen
Use the screen tilting feature to find the best position. Make sure the computer screen is at
or slightly below eye level when you are sitting in front of your VAIO computer. Adjust the
211
Search
brightness level of the display as well.
You can reduce eye strain and muscle fatigue by adjusting the tilt and brightness level of the
computer screen to the proper position.
Lighting
Choose a location where windows and lights do not cause glare and reflection on the
computer screen. Use indirect lighting to avoid bright spots on the computer screen. Proper
lighting adds to your comfort and work efficiency.
Note
While adjusting the viewing angle, do not exert excessive pressure on your VAIO
computer to eliminate a risk of mechanical damage.
Hint
The same considerations apply when you use an external display.
Notes on handling your VAIO computer
Observe the following to avoid malfunctions and damage to your VAIO computer.
Place your VAIO computer gently on a flat surface to avoid a mechanical shock.
Be sure to turn off your VAIO computer before moving the computer. Moving the
computer that is turned on may cause a hard disk malfunction. Be sure to disconnect all
cables connected to the computer before moving it.
Do not drop or hit your VAIO computer. Even a slight shock or vibration may cause a
hard disk malfunction.
Do not place your VAIO computer in an unstable position.
© 2013 Sony Corporation
212
Search
VAIO User Guide Back | Back to Top
Troubleshooting
How to Use
Windows 8: The Basics
Parts Description
Setup
Network / Internet
Connections
Settings
Backup / Recovery
Security
Other Operations
Notifications
Updating Your VAIO Computer
Be sure to update your VAIO computer by installing the following apps to enhance its
efficiency, security and functionality.
Note
To perform the update settings below, your VAIO computer must be connected to the
Internet.
Windows Update
Windows Update enables you to make your VAIO computer more stable.
1. Open the charms [Details] and select the
Search charm.
2. Select Settings and enter “Windows” in the search box.
3. Select Windows Update from the list and follow the on-screen instructions to
complete the updates.
VAIO Update
VAIO Update automatically notifies you of new updates available on the Internet, and
downloads and installs them on your VAIO computer.
1. Start VAIO Update [Details] and follow the on-screen instructions.
To update Windows Store apps
Be sure to update the Windows Store app. If an update is available, a number will appear
in the Store tile of the Start screen.
1. Select the Store tile to open it.
2. Select Updates in the upper right of the screen.
The number in the bracket shows the number of programs you can update.
3. Set a check mark for the apps you want to update, then select Install.
To update the apps later, remove the check mark.
Related Topic
Using VAIO Update
Installing Apps from Windows Store
© 2013 Sony Corporation
213
Search

VAIO User Guide Back | Back to Top
Troubleshooting
How to Use
Windows 8: The Basics
Parts Description
Setup
Network / Internet
Connections
Settings
Backup / Recovery
Security
Other Operations
Notifications
Using VAIO Update
VAIO Update provides a service that informs you of available update information, such as
important notices or update programs, to keep your VAIO computer up to date.
Through the Internet, VAIO Update automatically detects the update programs that are
necessary for enhancing your computer’s performance or new software that is available, and
let you download and install with simple steps.
1. Start VAIO Update [Details] and follow the on-screen instructions.
Hint
You can also start VAIO Update from VAIO Care (Desktop).
Related Topic
Keeping Your VAIO Computer in Optimum Condition (VAIO Care)
© 2013 Sony Corporation
214
Search

VAIO User Guide Back | Back to Top
Troubleshooting
How to Use
Windows 8: The Basics
Parts Description
Setup
Network / Internet
Connections
Settings
Backup / Recovery
Security
Other Operations
Notifications
Using the LAN Port
Before connecting a LAN cable to the LAN port, pull the port cover down as illustrated below.
If the port cover has disengaged:
If the port cover has disengaged, follow the instruction below to re-attach it.
1. Align the cover with the edge of the port.
2. Push the cover down until it clicks into place.
Related Topic
Parts and Controls on the Back
Connecting to the Internet with a Wired Connection
© 2013 Sony Corporation
215
Search
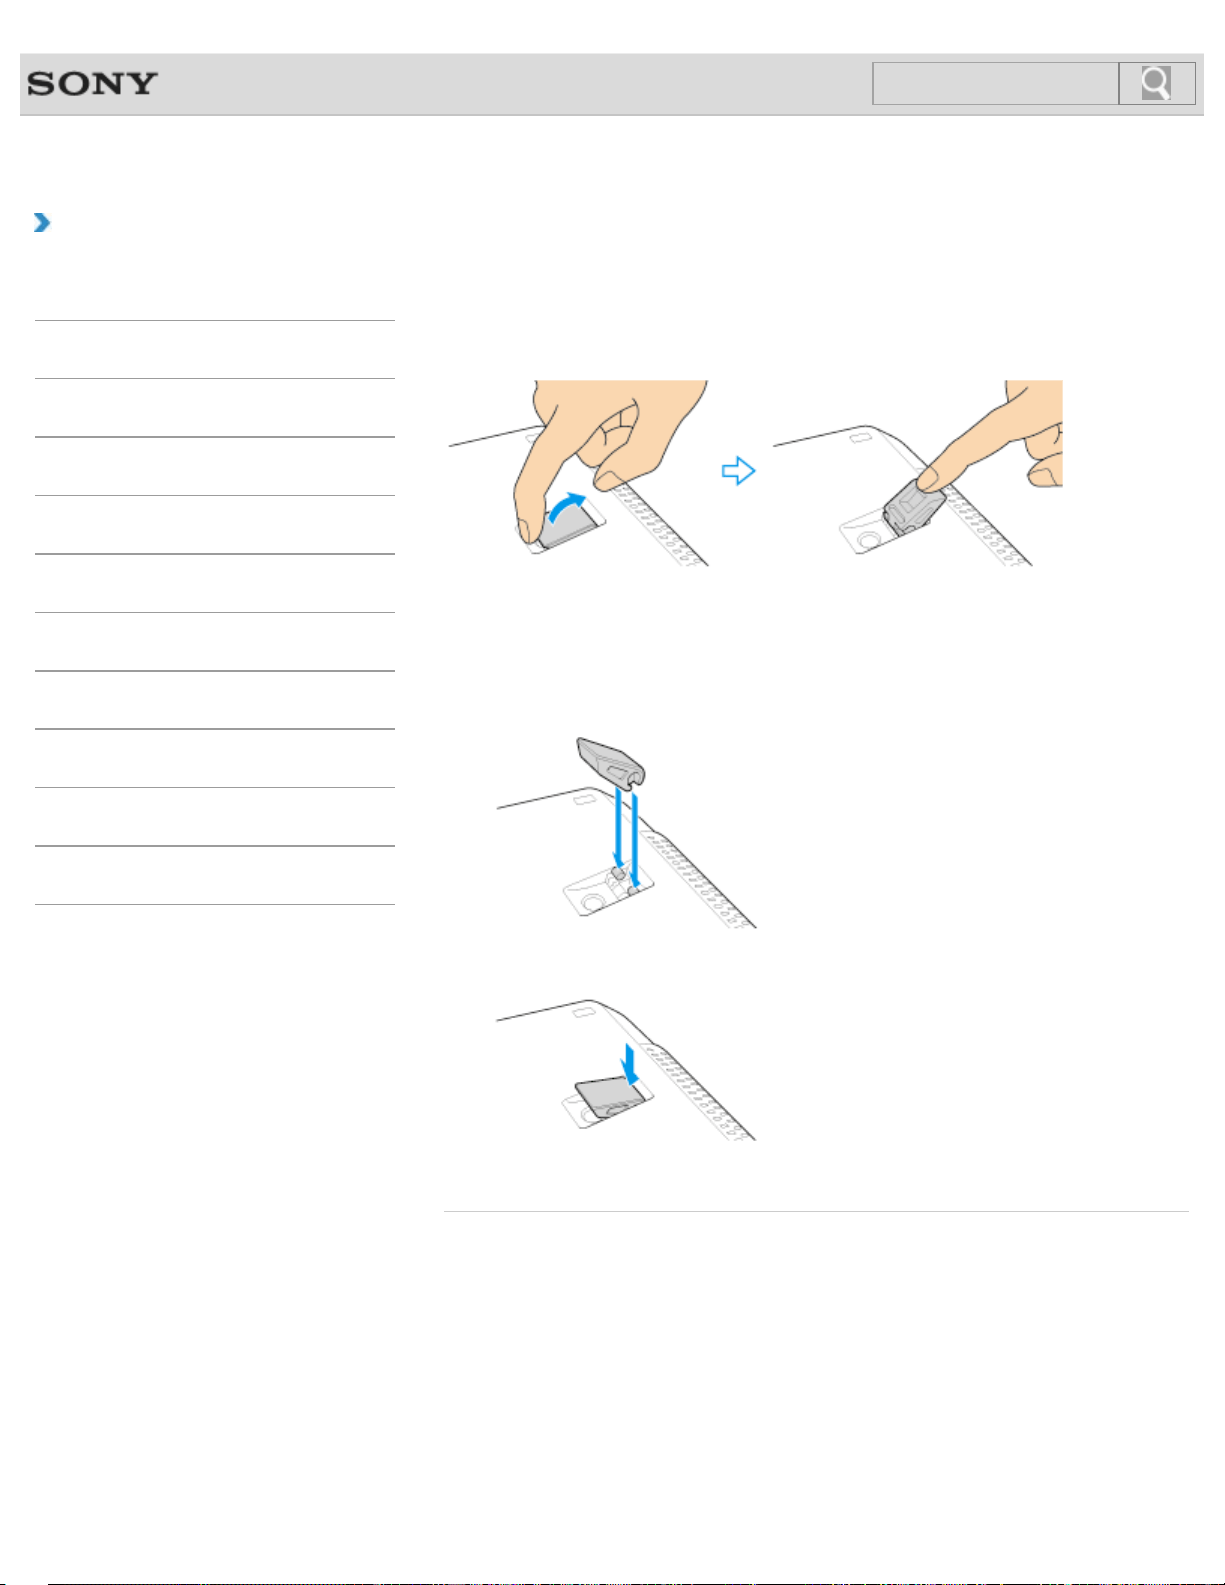
VAIO User Guide Back | Back to Top
Troubleshooting
How to Use
Windows 8: The Basics
Parts Description
Setup
Network / Internet
Connections
Settings
Backup / Recovery
Security
Other Operations
Notifications
Using the Tilt Feet
When using a LAN port [Details] or monitor port [Details], unfold the tilt feet.
With your fingertip, pull up gently in the direction of the arrow, as shown below.
If the tilt foot are detached
Re-attach the tilt foot as described below.
1. Align the holes of the tilt foot with the hinges in the bottom of the computer.
2. Push the tilt foot onto the hinges.
© 2013 Sony Corporation
216
Search
VAIO User Guide Back | Back to Top
Troubleshooting
How to Use
Windows 8: The Basics
Parts Description
Setup
Network / Internet
Connections
Settings
Backup / Recovery
Security
Other Operations
Notifications
Viewing the System Information
You can view the system information of your VAIO computer.
1. Start VAIO Care (Desktop). [Details]
2. Select About Your VAIO and System information.
The system information of your VAIO computer is displayed.
Related Topic
Keeping Your VAIO Computer in Optimum Condition (VAIO Care)
© 2013 Sony Corporation
217
Search

VAIO User Guide Back | Back to Top
Troubleshooting
How to Use
Windows 8: The Basics
Parts Description
Setup
Network / Internet
Connections
Settings
Backup / Recovery
Security
Other Operations
Notifications
Checking the Battery Charge Capacity
The battery pack is consumable. The capacity gradually declines through repeated cycles of
recharging and discharging. As a result, the battery life becomes short even if it is fully
charged and eventually the battery pack reaches the end of its life.
If the battery life has become short, replace the battery pack with a new one specified by
Sony. Refer to the help file for more information on battery charge status and capacity
decrease.
1. Start VAIO Control Center [Details] and select Power and Battery.
2. Select Details in Battery.
Detailed battery pack information, such as charging capacity, is displayed.
Hint
Enable the battery care function to maximize the battery lifespan. With this function, you
can reduce battery degradation by limiting the maximum charging capacity.
Related Topic
Extending the Battery Life
Notes on Using the Battery Pack
Charging the Battery Pack
© 2013 Sony Corporation
218
Search
VAIO User Guide Back | Back to Top
Troubleshooting
How to Use
Windows 8: The Basics
Parts Description
Setup
Network / Internet
Connections
Settings
Backup / Recovery
Security
Other Operations
Notifications
Extending the Battery Life
When your VAIO computer is running on battery power, you can extend the battery life using
the following methods.
Use Sleep mode. [Details]
When you do not need to use your VAIO computer temporarily, you can use Sleep
mode. To extend the battery life, use Sleep mode frequently. If you do not intend to use
the computer for an extended period of time, turn off the computer.
Resuming the computer from Sleep mode is faster than from booting up the computer.
Decrease the LCD brightness of the computer screen. [Details]
Turn down the volume of the speakers and headphones. [Details]
Disconnect peripheral devices that are not in use.
Related Topic
Checking the Battery Charge Capacity
Charging the Battery Pack
Notes on Using the Battery Pack
Using Sleep Mode
© 2013 Sony Corporation
219
Search
VAIO User Guide Back | Back to Top
Troubleshooting
How to Use
Windows 8: The Basics
Parts Description
Setup
Network / Internet
Connections
Settings
Backup / Recovery
Security
Other Operations
Notifications
Notes on Using the Battery Pack
Before using the battery pack, read the following precautions for correct use.
About the battery pack
The battery pack built in your VAIO computer is not removable.
For safety reasons, battery charging may be suspended at higher or lower temperatures.
While your VAIO computer is connected to an AC outlet with the AC adapter, it runs on
AC power.
The battery pack is not fully charged at the time of delivery.
While the battery pack is in use or being charged, heat builds up in the battery pack.
This is normal and is not cause for concern.
About battery discharge
After battery charge, the battery pack will gradually discharge over time even while not in
use. If it is left unused for an extended period of time, the battery power may be depleted. It
is recommended that you recharge the battery pack before use.
About battery life
Battery life varies depending on usage and settings.
About battery deterioration and replacement
The battery pack is consumable. The capacity gradually declines through repeated
cycles of recharging and discharging. As a result, the battery life becomes short even if it
is fully charged and eventually the battery pack reaches the end of its life.
If the battery pack quickly runs out of power after being fully charged or it has reached
the end of its life, replace it with a new one.
Contact an authorized Sony service/support center and replace the battery pack with a
new one specified by Sony.
When the battery pack is running out of power
If the battery pack runs out during your absence, power will be cut off and any data you are
working on will be lost.
While your VAIO computer is running on battery power, save data frequently.
Related Topic
Notes on Using the Power Source
© 2013 Sony Corporation
220
Search

VAIO User Guide Back | Back to Top
Troubleshooting
How to Use
Windows 8: The Basics
Parts Description
Setup
Network / Internet
Connections
Settings
Backup / Recovery
Security
Other Operations
Notifications
Changing the Keyboard Backlight Settings
<Keyboard backlight equipped models>
You can turn on and off the keyboard backlight by changing the keyboard backlight settings.
1. Start VAIO Control Center [Details] and select Mouse and Keyboard.
2. Change the keyboard backlight settings in Keyboard Backlight.
The settings window appears. Follow the on-screen instructions to change the settings.
Hint
You can set the keyboard backlight to automatically turn on and off according to
ambient light intensity.
If you enable this function, you can also set a time period to turn off the keyboard
backlight after inactivity of keyboard operations.
Ambient light intensity is measured by the ambient light sensor. Blocking the ambient
light sensor may turn on the keyboard backlight.
Related Topic
Parts and Controls on the Front
© 2013 Sony Corporation
221
Search
VAIO User Guide Back | Back to Top
Troubleshooting
How to Use
Windows 8: The Basics
Parts Description
Setup
Network / Internet
Connections
Settings
Backup / Recovery
Security
Other Operations
Notifications
Combinations and Functions with the Fn Key
Press and hold down the Fn key and another key simultaneously to perform a keyboard
shortcut action.
For example, to turn off the sound: Fn+F2 → Press and hold down the Fn key, then press
the F2 key.
Some keyboard functions can only be used while Windows is running.
Fn +
(F1)
Disables and enables the Optical Trackpad. [Details]
Fn +
(F2)
Turns on and off the built-in speakers or the headphones.
Fn +
/ (F3/F4)
Press the button repeatedly to adjust the volume level of the built-in speakers and the
headphones. [Details]
To decrease the volume, press the Fn+F3 keys.
To increase the volume, press the Fn+F4 keys.
Fn +
/ (F5/F6)
Press the button repeatedly to adjust the LCD brightness of your computer screen. [Details]
To decrease lighting intensity, press the Fn+F5 keys.
To increase lighting intensity, press the Fn+F6 keys.
Fn +
(F7)
Switches the display output to an external display.
Press the Fn+F7 keys several times to select the desired display output destination, and
then press the Enter key to confirm. [Details]
Fn + 1
Starts Active Clip. [Details]
Fn + Scr Lk (Scroll Lock)
Works differently depending on the apps you use. Refer to the help file included with the app
for more information.
Fn + Pg Up (Page Up)
Goes to the previous page.
Fn + End (End)
Moves the cursor to the end of a line or page.
Fn + Pg Dn (Page Down)
Goes to the next page.
Fn + Home (Home)
Moves the cursor to the top of a line or page.
Hint
222
Search

VAIO User Guide Back | Back to Top
Troubleshooting
How to Use
Windows 8: The Basics
Parts Description
Setup
Network / Internet
Connections
Settings
Backup / Recovery
Security
Other Operations
Notifications
Entering Characters with Touch Screen
Operations
<Touch screen equipped models>
You can operate the on-screen Touch Keyboard with touch screen operations for text entry.
1. Open the desktop [Details] and select
(the Touch Keyboard icon) in the desktop
notification area.
Hint
The on-screen Touch Keyboard appears automatically when you touch a text field.
© 2013 Sony Corporation
224
Search

VAIO User Guide Back | Back to Top
Troubleshooting
How to Use
Windows 8: The Basics
Parts Description
Setup
Network / Internet
Connections
Settings
Backup / Recovery
Security
Other Operations
Notifications
Changing the Sound Output Device
If there is no sound coming from an external device connected to your VAIO computer, you
need to change the device for sound output.
1. Open Control Panel [Details] and select Hardware and Sound.
2. Select Sound.
3. Select the Playback tab.
4. Ensure there is a check mark next to the icon of the device you intend to output
computer sound from.
If there is no check mark next to the icon, select it and Set Default.
5. Select OK.
To change the sound rate and bit depth
The sound rate and bit depth of the digital audio output signal should be set according to
your digital audio device.
Follow the above steps 1 to 3, and then select the HDMI device or OPTICAL OUT (optical
digital audio output) icon and Properties. On the Advanced tab, select the sample rate
and bit depth (for example, 16 bit, 48000 Hz (DVD quality)) which the device supports, and
then OK.
Related Topic
Connecting External Speakers or Headphones
Connecting a High-Quality Digital Sound Output Device between Your VAIO Computer and a
TV
© 2013 Sony Corporation
225
Search
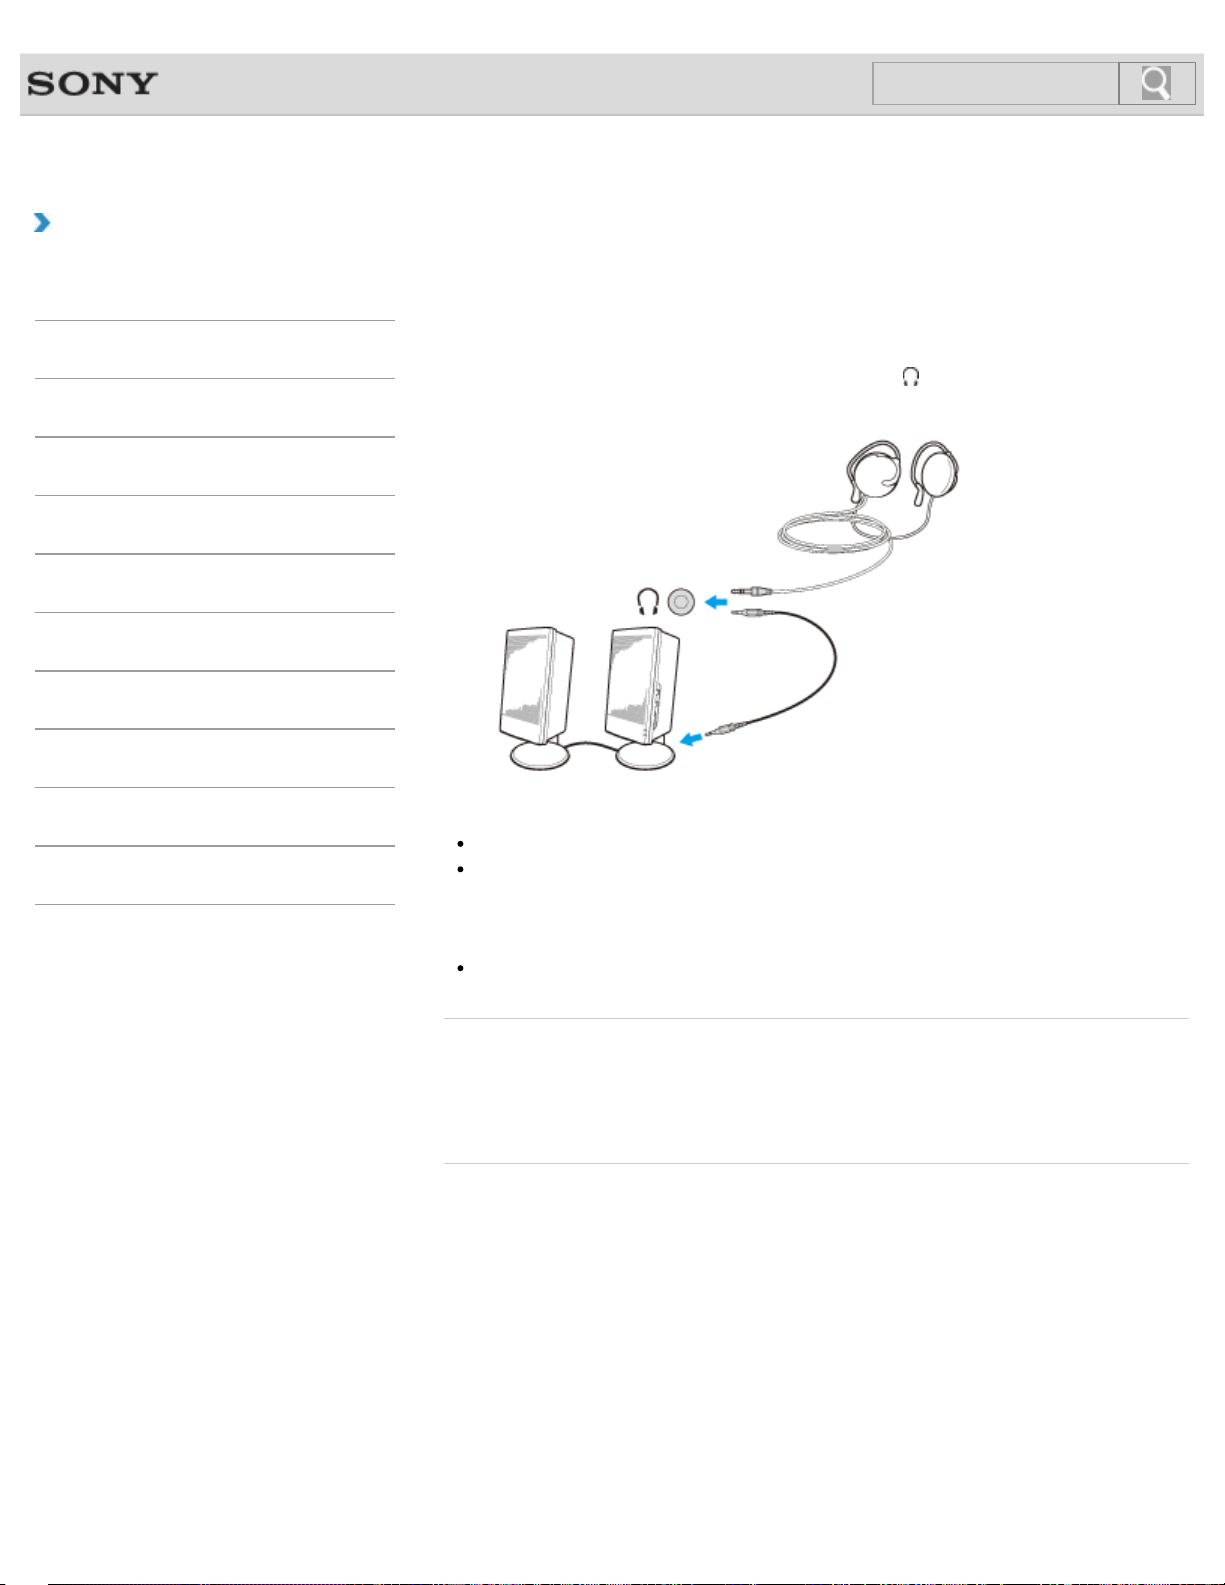
VAIO User Guide Back | Back to Top
Troubleshooting
How to Use
Windows 8: The Basics
Parts Description
Setup
Network / Internet
Connections
Settings
Backup / Recovery
Security
Other Operations
Notifications
Connecting External Speakers or Headphones
You can connect external sound output devices (such as speakers or headphones) to your
VAIO computer.
1. Connect external speakers to the headphones jack
[Details] with a speaker cable
(not supplied).
Note
Turn down the volume of the speakers before turning them on.
The noise canceling function is not effective for sound output through external speakers
or third-party headphones.
Hint
Refer to the manual that came with your speakers or headphones.
Related Topic
Adjusting the Speakers Volume
Changing the Sound Output Device
Adjusting the Volume in Windows
© 2013 Sony Corporation
226
Search

VAIO User Guide Back | Back to Top
Troubleshooting
How to Use
Windows 8: The Basics
Parts Description
Setup
Network / Internet
Connections
Settings
Backup / Recovery
Security
Other Operations
Notifications
Connecting a High-Quality Digital Sound Output
Device between Your VAIO Computer and a TV
You can connect a high-quality home theater receiver or other surround sound decoder
devices between your VAIO computer and a TV using an HDMI connection.
1. Make sure the HDMI connection has been set up between the TV and the home
theater receiver or surround sound decoder device.
2. Change the device for sound output to the HDMI output. [Details]
3. Turn on the TV and set its input to the HDMI input.
4. Turn on the home theater receiver or surround sound decoder device and set its input
to the HDMI input.
5. Plug one end of an HDMI cable to the HDMI input port on the home theater receiver or
surround sound decoder device and the other end to the HDMI output port on your
VAIO computer.
Hint
You can adjust the screen resolution of the connected TV with your VAIO computer.
[Details]
With the HDMI connection, the volume can be adjusted by the connected audio device
only. Your VAIO computer has no control over the output volume of any connected
devices.
Related Topic
Changing the Sound Output Device
Changing the Resolution (Size) of the Screen Image
Connecting a TV with an HDMI Input Port
© 2013 Sony Corporation
227
Search
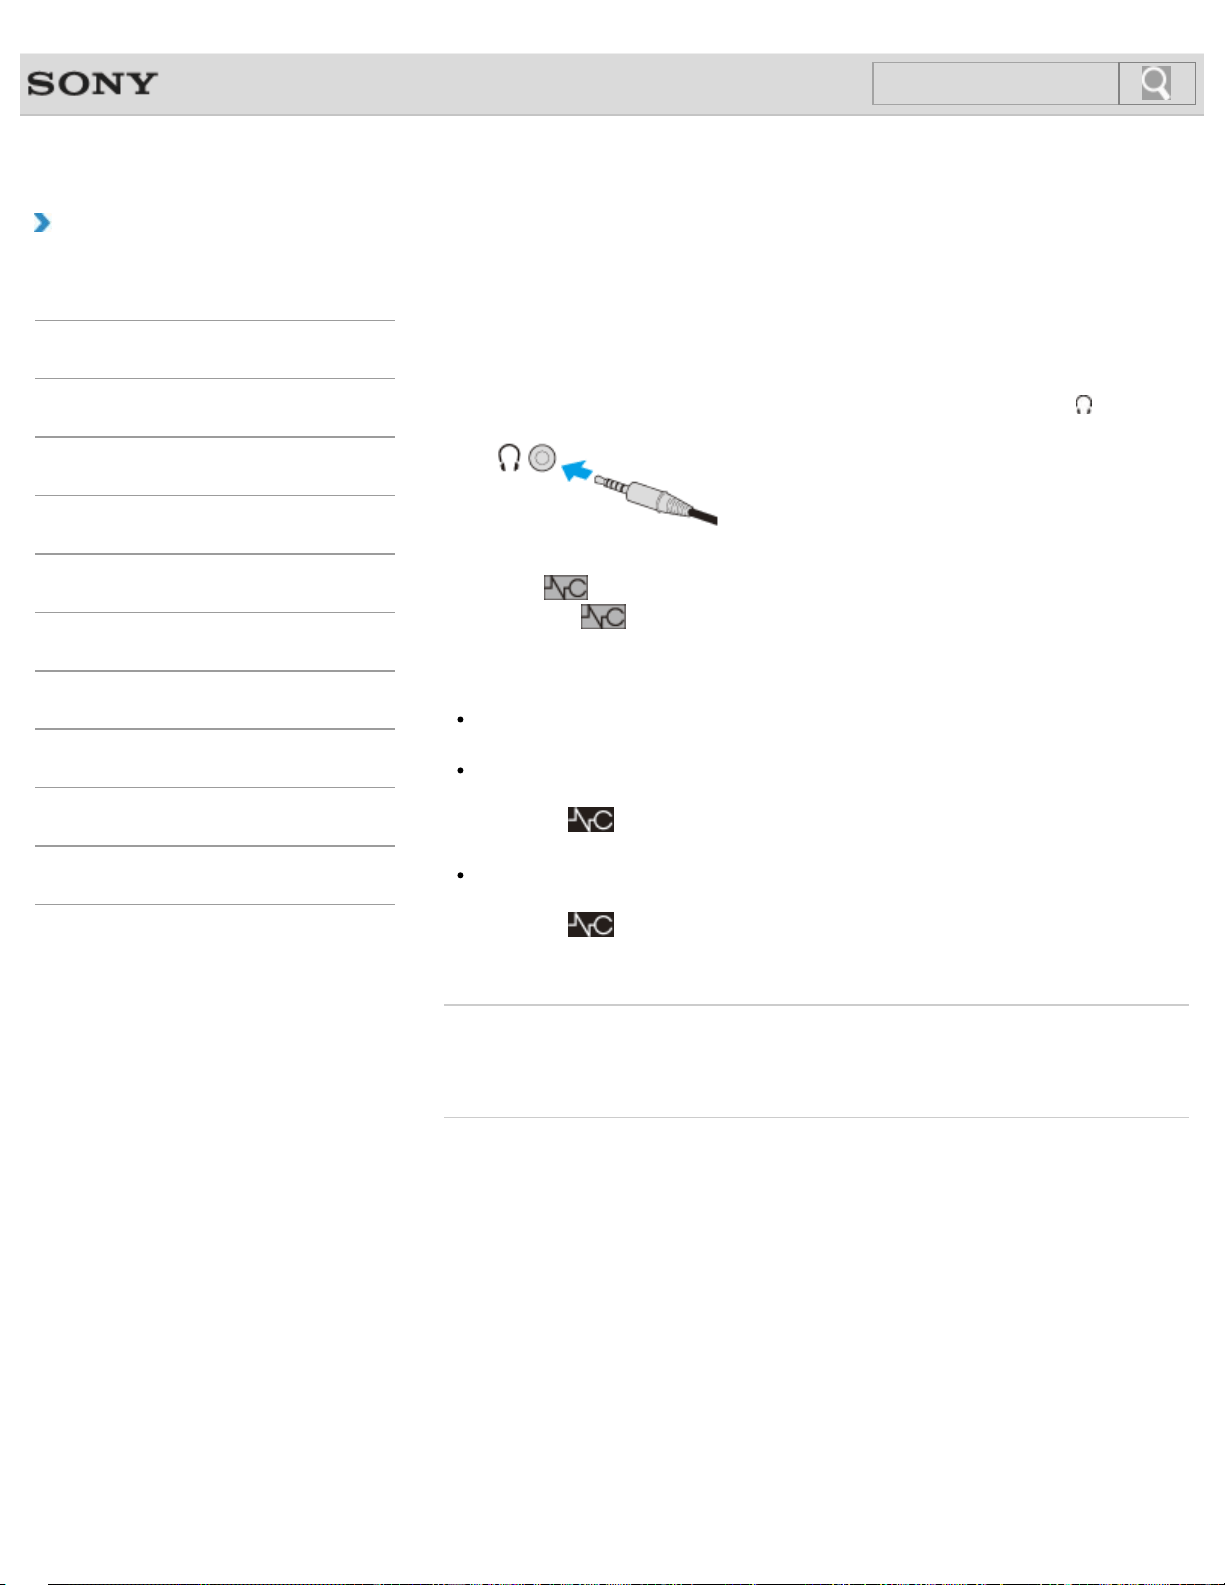
VAIO User Guide Back | Back to Top
Troubleshooting
How to Use
Windows 8: The Basics
Parts Description
Setup
Network / Internet
Connections
Settings
Backup / Recovery
Security
Other Operations
Notifications
Connecting the Noise Canceling Headphones
<Noise canceling headphones supplied models>
You can enjoy music by connecting the noise canceling headphones which reduce ambient
noise to your VAIO computer.
1. Plug the supplied noise canceling headphones into the headphones jack
. [Details]
A balloon message pops up from the desktop notification area.
When
(off) is displayed in the message, the noise canceling function is disabled.
Right-click
(off) in the desktop notification area, and enable the noise canceling
function.
Hint
When the noise canceling function does not seem to be working, unplug the noise
canceling headphones and then plug them back again.
If you feel that the noise canceling function is less effective, you can adjust the effect of
the function.
Right-click
(on) in the desktop notification area, and adjust the effect in the
settings window.
You can pick up mainly your voice and sounds coming from your front and rear using
the built-in microphones on the noise canceling headphones.
Right-click
(on) in the desktop notification area, and enable the microphone
directivity function in the settings window.
Related Topic
Notes on Using the Noise Canceling Headphones<Noise canceling headphones supplied
models>
© 2013 Sony Corporation
228
Search
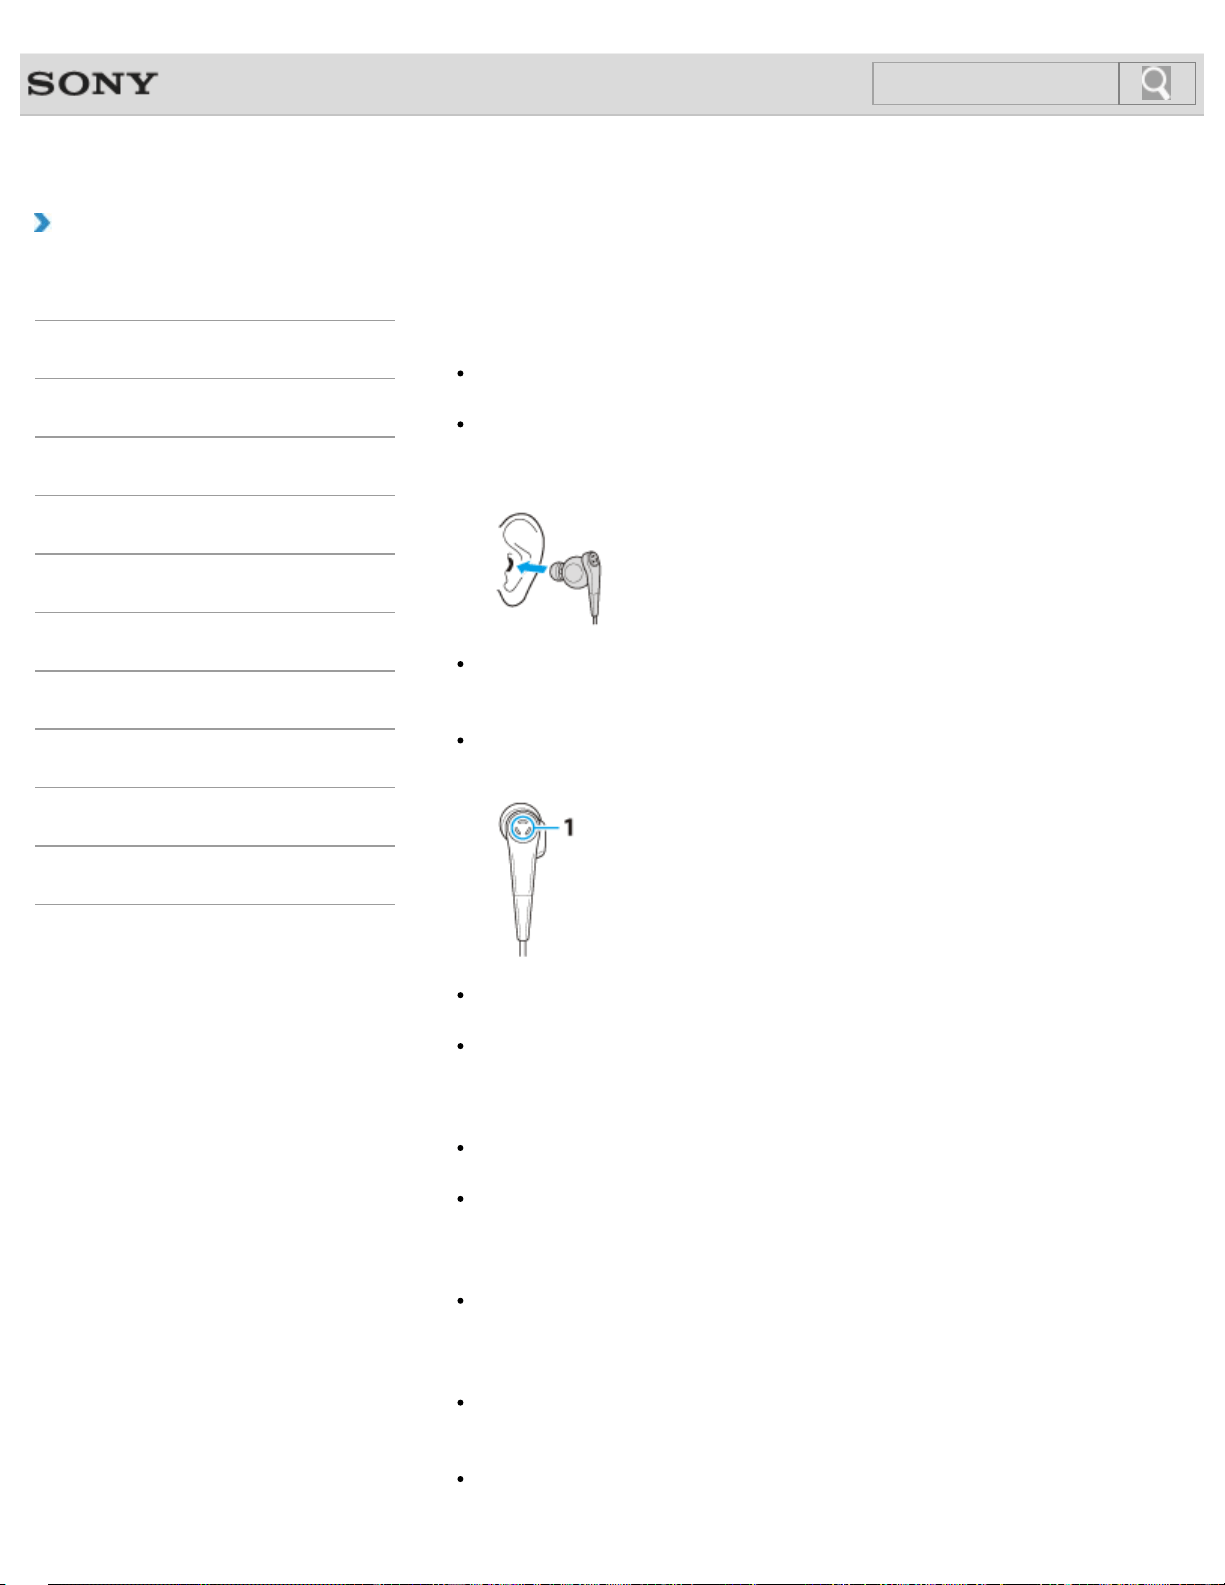
VAIO User Guide Back | Back to Top
Troubleshooting
How to Use
Windows 8: The Basics
Parts Description
Setup
Network / Internet
Connections
Settings
Backup / Recovery
Security
Other Operations
Notifications
Notes on Using the Noise Canceling Headphones
<Noise canceling headphones supplied models>
Before using the noise canceling headphones, read the following precautions for correct use.
The noise canceling function does not work on sound output through speakers, standard
headphones, and devices via BLUETOOTH communication.
The noise canceling function is less effective unless you properly wear the noise
canceling headphones. Be sure to fit the headphones snugly into your ears by replacing
the earbuds or adjusting the position of the headphones.
The noise canceling function is to mainly reduce low-frequency noise in the ambient
environment but not high-frequency noise.
Nor is it to implement a 100% noise-free audio environment.
Do not cover the built-in microphones (1) on the noise canceling headphones with your
hands, etc., as it may cause the microphone directivity function to be less effective.
You may hear a slight hissing noise while the noise canceling function is enabled. This is
the operating noise of the noise canceling function and does not indicate a malfunction.
You may feel that the noise canceling function is less effective or that ambient noise is
even louder, depending on the type of noise or the degree of quietness in your
environment.
In such a case, disable the noise canceling function.
Use of a mobile phone may cause radio interference to the noise canceling headphones.
When using the headphones, keep mobile phones away from the headphones.
Be sure to take off the noise canceling headphones from your ears before plugging or
unplugging the headphones.
Plugging or unplugging the headphones generates noise. This is normal and does not
indicate a malfunction.
If you configure the noise canceling headphones settings to pick up sounds using the
built-in microphones on the noise canceling headphones and output them through the
headphones, the sound will be amplified. Be careful of the volume when changing the
settings.
In certain situations, such as when ambient noise is loud, the microphone directivity
function may be less effective or the volume level of the noise may fluctuate at short
intervals.
If the earbuds do not fit in your ears, you may not hear the bass sound. To enjoy better
229
Search

quality sound, fit the earbuds snugly into your ears by adjusting their position or pushing
them deep into the ears.
A pair of medium-size earbuds is attached to the headphones at the time of delivery. If
you feel that the earbuds do not fit in your ears, replace them with an extra pair in small
or large size.
Related Topic
Connecting the Noise Canceling Headphones<Noise canceling headphones supplied
models>
© 2013 Sony Corporation
230
Search
VAIO User Guide Back | Back to Top
Troubleshooting
How to Use
Windows 8: The Basics
Parts Description
Setup
Network / Internet
Connections
Settings
Backup / Recovery
Security
Other Operations
Notifications
Adjusting the Speakers Volume
You can change the volume level of the speakers and headphones.
To adjust the volume using the Fn key
Press the F3 key while holding down the Fn key to turn down the volume. Press the F4 key
while holding down the Fn key to turn up the volume.
Hint
You can also press the VOL (Volume) buttons on the front of your VAIO computer to
adjust the volume. [Details]
To turn off the volume using the Fn key
Press the F2 key while holding down the Fn key to turn off the volume of the speakers and
headphones.
Press the Fn+F2 keys again to turn on the volume.
Alternatively, press the Fn+F3 or Fn+F4 keys to turn on the volume.
Related Topic
Adjusting the Volume in Windows
Connecting External Speakers or Headphones
© 2013 Sony Corporation
231
Search
VAIO User Guide Back | Back to Top
Troubleshooting
How to Use
Windows 8: The Basics
Parts Description
Setup
Network / Internet
Connections
Settings
Backup / Recovery
Security
Other Operations
Notifications
Adjusting the Volume in Windows
You can adjust the volume on each device and app from Control Panel.
1. Open Control Panel [Details] and select Hardware and Sound.
2. Select Adjust system volume under Sound.
3. Move the slider under Device or Applications up and down to your desired volume
level.
When the volume is turned off (
), select (Deactivate muting) to turn on the
volume (
). When the volume is low, turn the volume up with the slider.
Hint
If the built-in headphone amplifier supports S-Master, adjust the Device volume
and the Applications volume to approximately the same level for optimum sound
quality when using headphones.
Related Topic
Adjusting the Speakers Volume
Connecting External Speakers or Headphones
© 2013 Sony Corporation
232
Search

VAIO User Guide Back | Back to Top
Troubleshooting
How to Use
Windows 8: The Basics
Parts Description
Setup
Network / Internet
Connections
Settings
Backup / Recovery
Security
Other Operations
Notifications
Connecting an External Drive
Connect an external disc drive or hard disk drive to a USB port on your VAIO computer.
1. Plug the power cord of your external drive into an AC outlet (1).
2. Plug one end of a USB cable (3) (not supplied) into the USB port (2), and the other
end to the external drive. [Details]
Note
Be sure to connect an external drive to a power source with an AC adapter (if supplied).
Hint
You may need to install a driver depending on the external drive you use.
In addition, procedures to connect and use an external drive vary depending on the
drive you use. Refer to the manual that came with your external drive for more
information.
Related Topic
Connecting a USB Device
© 2013 Sony Corporation
233
Search

VAIO User Guide Back | Back to Top
Troubleshooting
How to Use
Windows 8: The Basics
Parts Description
Setup
Network / Internet
Connections
Settings
Backup / Recovery
Security
Other Operations
Notifications
About BLUETOOTH(R) Security
The BLUETOOTH wireless technology has an authentication function, which allows you to
control communication with other devices.
The authentication function helps you prevent unwanted anonymous BLUETOOTH devices
from accessing your VAIO computer. The first time two BLUETOOTH devices communicate,
a common passcode (a password required for authentication) should be identified to register
both devices. Once a device is registered, there is no need to re-enter the passcode.
For details, open Windows Help and Support [Details], and enter “BLUETOOTH” in the
search box.
Related Topic
About the BLUETOOTH(R) Function
Communicating with Another BLUETOOTH(R) Device such as a Mouse
Stopping BLUETOOTH(R) Communications
Notes on Using the BLUETOOTH(R) Function
© 2013 Sony Corporation
234
Search
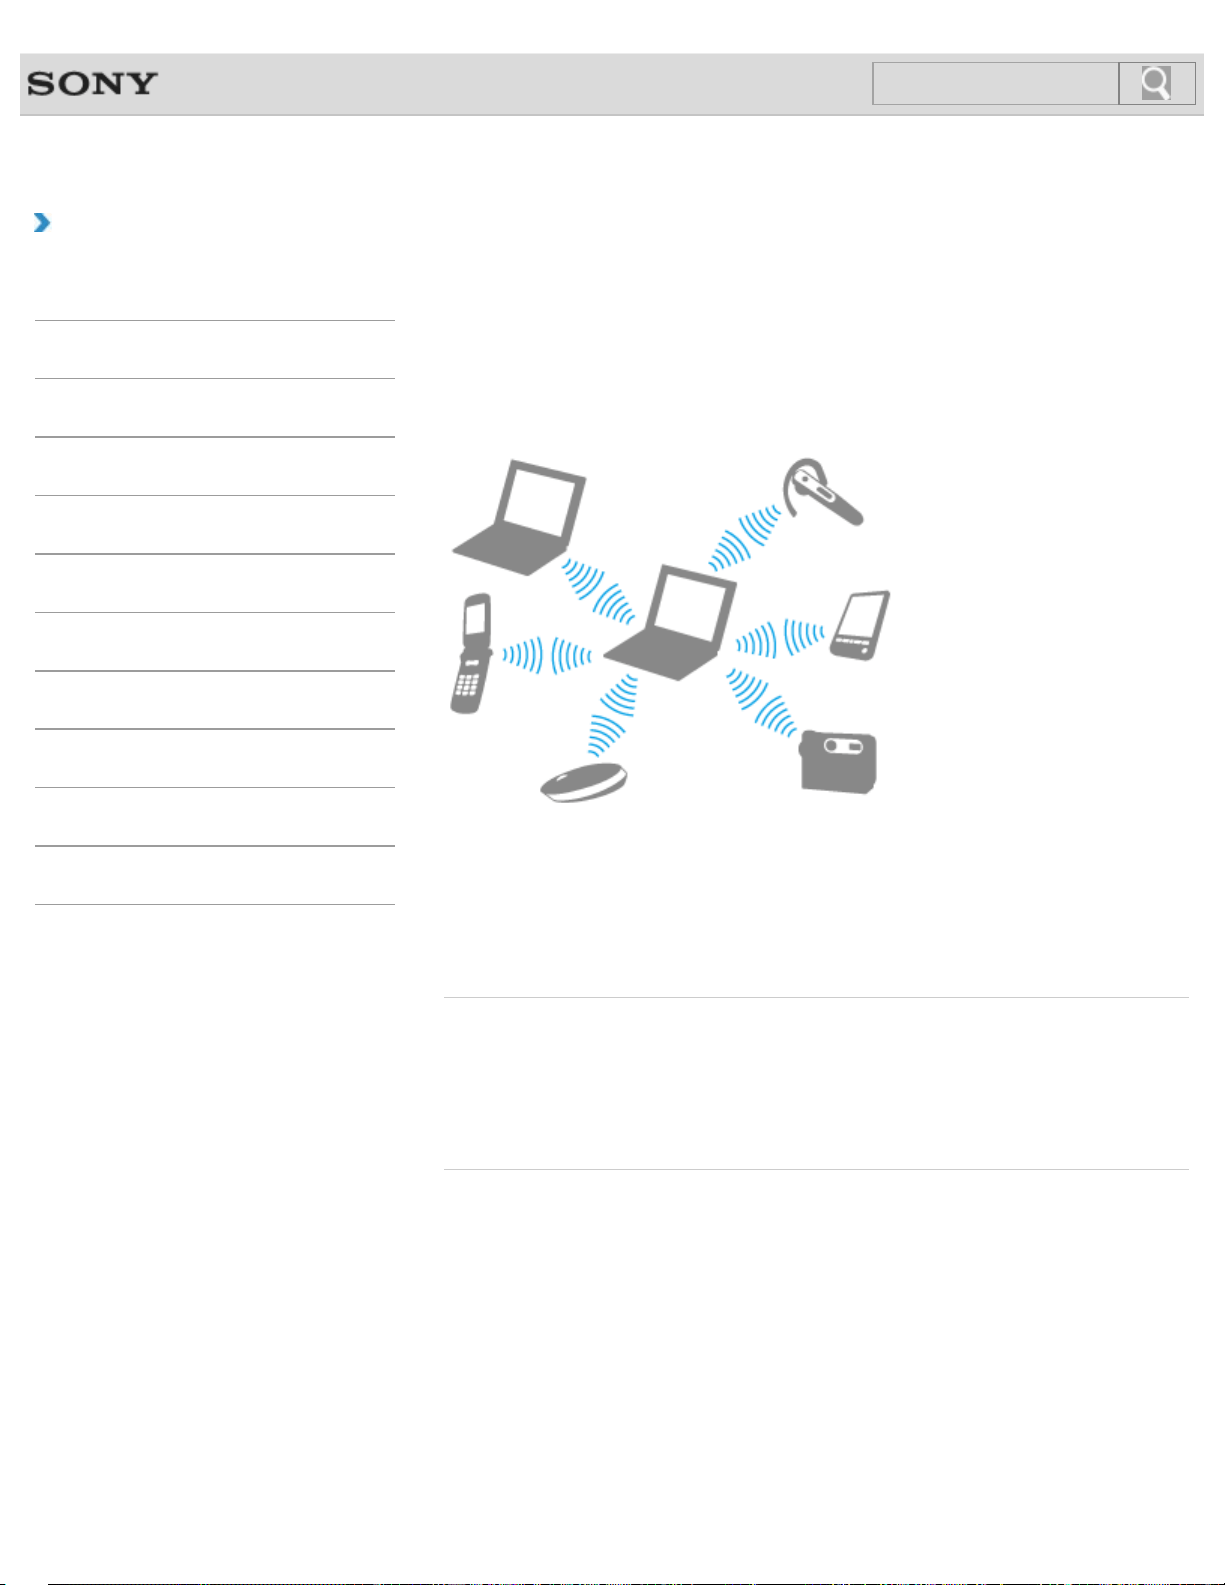
VAIO User Guide Back | Back to Top
Troubleshooting
How to Use
Windows 8: The Basics
Parts Description
Setup
Network / Internet
Connections
Settings
Backup / Recovery
Security
Other Operations
Notifications
About the BLUETOOTH(R) Function
You can establish wireless communications between your VAIO computer and other
BLUETOOTH devices, such as another computer, a smartphone, a mobile phone, a headset,
or a mouse.
You can transfer data between these devices without cables at a range of up to 33 feet / 10
meters in an open area.
One BLUETOOTH device can connect with up to seven devices via wireless network to
exchange data.
When a device requires connection to another device, it sends out an inquiry to neighboring
BLUETOOTH devices. If any device responds to the inquiry, the two devices can connect
with each other.
Related Topic
Communicating with Another BLUETOOTH(R) Device such as a Mouse
Stopping BLUETOOTH(R) Communications
Notes on Using the BLUETOOTH(R) Function
About BLUETOOTH(R) Security
© 2013 Sony Corporation
235
Search
VAIO User Guide Back | Back to Top
Troubleshooting
How to Use
Windows 8: The Basics
Parts Description
Setup
Network / Internet
Connections
Settings
Backup / Recovery
Security
Other Operations
Notifications
Communicating with Another BLUETOOTH(R)
Device such as a Mouse
You can connect BLUETOOTH devices to your VAIO computer.
For details on BLUETOOTH communication, see About the BLUETOOTH Function.
[Details]
1. Open the charms [Details] and select the
Settings charm.
2. Select Change PC settings in the lower right corner.
3. Select Wireless in the left pane of the PC settings screen.
4. Change Airplane mode to Off and the Bluetooth setting to On.
Hint
If your VAIO computer is compliant with BLUETOOTH high speed technology and
you intend to use it for high-speed communications, change the Wi-Fi setting
under Wireless devices to On, too.
5. Select Devices in the left pane of the PC settings screen.
6. When connecting a BLUETOOTH mouse, turn it on and press the button to connect
the mouse.
Hint
Refer to the manual that came with your BLUETOOTH device for the procedure to
ready the device for connection.
7. Select Add a device.
Your VAIO computer searches for devices and displays a device list. Follow the on-
screen instructions to register your device.
Note
Depending on the BLUETOOTH device, it may take some time for your VAIO computer
to find the device. If your device does not appear in the list, repeat the procedure to
ready the device for connection (for example, pressing the button for connection).
Depending on the BLUETOOTH device, the procedure to establish connection may
vary. Refer to the manual that came with the device for the procedure.
Hint
For details on the operations, open Windows Help and Support [Details], and enter
“BLUETOOTH” in the search box.
A window appears for passcode input if a BLUETOOTH device is requesting
authentication to establish connection. Follow the on-screen instructions to share the
passcode between the BLUETOOTH device and your VAIO computer. If you do not wish
to connect, select the Cancel button in the window.
A passcode is a secret number that is entered by a user to use for the authentication
process to allow two BLUETOOTH devices to communicate with each other. Enter
the same alphanumeric string (case-sensitive) for both devices to allow them to
communicate with each other. You can change the passcode every time you perform
authentication, providing you enter the same passcode for both devices during the
authentication process. For details on the passcode of a BLUETOOTH device, refer
to the manual that came with the device. If no BLUETOOTH passcode is entered for
a certain time, the connection process will be terminated for security. In this case, try
again.
236
Search

VAIO User Guide Back | Back to Top
Troubleshooting
How to Use
Windows 8: The Basics
Parts Description
Setup
Network / Internet
Connections
Settings
Backup / Recovery
Security
Other Operations
Notifications
Notes on Using the BLUETOOTH(R) Function
Before using the BLUETOOTH function, read the following precautions for correct use.
In some countries or regions, using the BLUETOOTH function may be restricted by the
local regulations.
The BLUETOOTH function may not work with some devices, depending on the
manufacturer or the app version employed by the manufacturer. Check the system
requirements of the BLUETOOTH device before purchasing.
For information on BLUETOOTH devices, visit the VAIO Support website.
Some BLUETOOTH devices require authentication (pairing) before establishing
connection with another device. Perform the authentication process before connecting to
such devices.
BLUETOOTH devices work on the 2.4 GHz band, which is used by a variety of devices.
BLUETOOTH devices use the technology to minimize radio interference from other
devices that use the same band; however, radio interference may still cause slower
communication speeds, reduce communication range, or in some cases, cause
communication failure.
Communication speed and range may vary depending on the following conditions:
Distance between communication devices
Existence of obstacles between devices
Ambient environment that includes existence of walls and materials of such walls
Device configuration
Apps in use
Radio conditions
Communications may be cut off depending on radio conditions.
If your VAIO computer is compliant with BLUETOOTH high speed technology and you
intend to use it for high-speed communications, enable both the wireless LAN and
BLUETOOTH functions on the computer.
Large files may occasionally be corrupted during continuous transfer due to limitations of
the BLUETOOTH standard and electromagnetic interference in the environment.
Connecting multiple BLUETOOTH devices to your VAIO computer may cause channel
congestion, resulting in poor device performance. This is normal with BLUETOOTH
technology and does not indicate a malfunction.
Video and audio may not be synchronized if you play videos on your VAIO computer
with audio output from a connected BLUETOOTH device. This is a frequent occurrence
with BLUETOOTH technology and does not indicate a malfunction.
All BLUETOOTH devices must be certified through the procedure stipulated by
Bluetooth SIG to ensure that they are compliant with the BLUETOOTH standard.
Even if the BLUETOOTH devices are compliant with the BLUETOOTH standard,
individual device performance, specifications, and operation procedures may vary. Data
exchange may not be possible in all situations.
Not all BLUETOOTH devices are guaranteed of compatibility with your VAIO computer.
If you urgently need to disable the BLUETOOTH function, turn off your VAIO computer.
Related Topic
About the BLUETOOTH(R) Function
Communicating with Another BLUETOOTH(R) Device such as a Mouse
Stopping BLUETOOTH(R) Communications
238
Search

VAIO User Guide Back | Back to Top
Troubleshooting
How to Use
Windows 8: The Basics
Parts Description
Setup
Network / Internet
Connections
Settings
Backup / Recovery
Security
Other Operations
Notifications
Stopping BLUETOOTH(R) Communications
You can stop BLUETOOTH communications by following these steps.
1. Open the charms [Details] and select the
Settings charm.
2. Select Change PC settings in the lower right corner.
3. Select Wireless in the left pane of the PC settings screen.
4. Change the Bluetooth setting under Wireless devices to Off.
Hint
When Airplane mode is Off, the WIRELESS indicator light on your VAIO computer
stays on.
Related Topic
About the BLUETOOTH(R) Function
Communicating with Another BLUETOOTH(R) Device such as a Mouse
Notes on Using the BLUETOOTH(R) Function
© 2013 Sony Corporation
240
Search
VAIO User Guide Back | Back to Top
Troubleshooting
How to Use
Windows 8: The Basics
Parts Description
Setup
Network / Internet
Connections
Settings
Backup / Recovery
Security
Other Operations
Notifications
Charging a USB Device
You can charge a USB device even while your VAIO computer is off, in Hibernate mode, or
Sleep mode by enabling the USB charging settings.
Change the settings while the USB device is disconnected from the USB port that supports
USB charging.
1. Start VAIO Control Center [Details] and select Hardware.
2. Enable the USB Charging setting.
3. Connect a USB device to the USB port with the
mark printed around it.
If charging does not start even when you connect a USB device to the USB port that
supports USB charging, disconnect and connect the device.
Note
With the USB charging settings enabled, power consumption when your VAIO computer
is off or in Hibernate mode or Sleep mode increases because the computer supplies
power to the USB port even when a USB device is not connected to the port.
When the USB charging settings are enabled, you cannot use the remote wake-up
function on the USB device connected to the USB port that supports USB charging.
Hint
The USB charging settings are disabled by default.
© 2013 Sony Corporation
241
Search
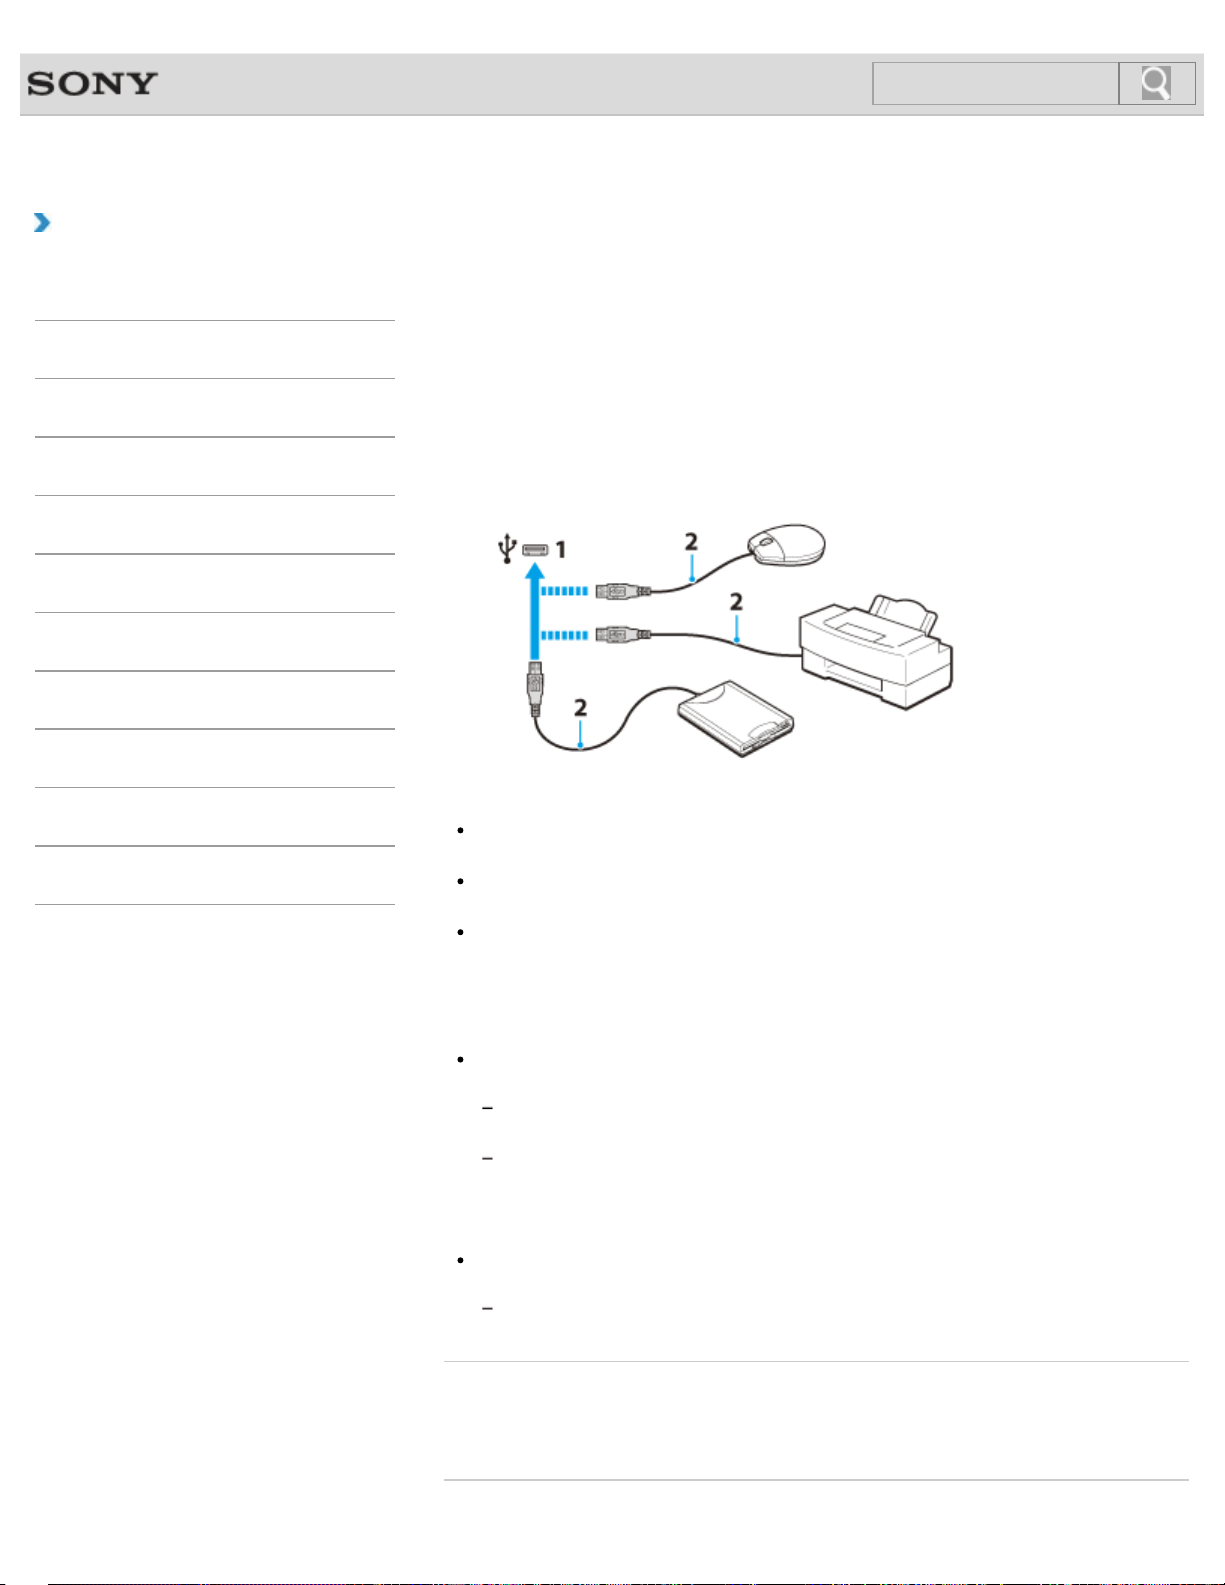
VAIO User Guide Back | Back to Top
Troubleshooting
How to Use
Windows 8: The Basics
Parts Description
Setup
Network / Internet
Connections
Settings
Backup / Recovery
Security
Other Operations
Notifications
Connecting a USB Device
You can connect a Universal Serial Bus (USB) device such as a mouse, floppy disk drive,
speaker or printer to your VAIO computer.
Installation of the device driver supplied with the USB device may be required when
connecting.
Refer to the manual that came with the device for more information.
1. Choose the USB port (1) you prefer to use.
2. Plug the USB device cable (2) (not supplied) into the USB port.
Note
You may need to install the driver supplied with your USB device before use. Refer to
the manual that came with the USB device for more information.
In order to print documents, be sure the USB printer is compatible with your version of
Windows.
Before disconnecting USB speakers from your VAIO computer, stop DVD or music
playback or turn off the computer. If you disconnect the USB speakers during playback, it
may cause a malfunction.
For information on how to remove a USB device, refer to the manual that came with the
device.
To protect your VAIO computer and/or USB devices from damage, observe the
following:
When moving your VAIO computer with USB devices connected, avoid exposing the
USB ports to shock or impact.
Do not put your VAIO computer in a bag or carrying case with USB devices
connected.
Hint
In addition to the USB 2.0 standard transfer modes, the USB 3.0 standard specifies the
following transfer mode:
SuperSpeed: Transfer rate of 5 Gbps.
Related Topic
Connecting an External Drive
Charging a USB Device
242
Search

© 2013 Sony Corporation
243
Search

VAIO User Guide Back | Back to Top
Troubleshooting
How to Use
Windows 8: The Basics
Parts Description
Setup
Network / Internet
Connections
Settings
Backup / Recovery
Security
Other Operations
Notifications
About “Memory Stick”
“Memory Stick” is a compact, portable, and versatile IC recording media especially designed
for exchanging and sharing digital data with compatible products, such as digital cameras
and other devices. Because it is removable, it can be used for external data storage.
For the latest information about “Memory Stick”, visit http://www.sony.net/memorycard/.
Related Topic
Compatible “Memory Stick”
Inserting “Memory Stick”
Removing “Memory Stick”
Formatting “Memory Stick”
Notes on Using “Memory Stick”
© 2013 Sony Corporation
244
Search

VAIO User Guide Back | Back to Top
Troubleshooting
How to Use
Windows 8: The Basics
Parts Description
Setup
Network / Internet
Connections
Settings
Backup / Recovery
Security
Other Operations
Notifications
Compatible “Memory Stick”
The “Memory Stick” slot on your VAIO computer can accommodate the following sizes and
types of media:
“Memory Stick Duo”
“Memory Stick PRO Duo”
“Memory Stick PRO-HG Duo”
“Memory Stick Micro”
About “MagicGate”
“MagicGate” refers to copyright protection technology developed by Sony. An authentication
process is performed between the “MagicGate” compatible device and “Memory Stick” to
check whether they can correctly store and play back data, and the data will be encrypted.
The authentication is also performed before the data is played back, and only when they are
properly authenticated, the data is decrypted and played back. The copyright protected data
can be played back by authenticated devices only.
Note
Your VAIO computer supports only Duo-size “Memory Stick”, and does not support
standard-size “Memory Stick”.
Before using “Memory Stick Micro” (“M2”), be sure to insert it into an “M2” Duo adaptor.
If you insert the media directly into the “Memory Stick Duo” slot without the adaptor, you
may not be able to remove it from the slot.
Your VAIO computer has been tested and found compatible with any Sony branded
“Memory Stick” of up to 32 GB, available as of September 2012. However, “Memory
Stick” compatibility is not guaranteed in all cases.
Except for personal use, it is against copyright law to use any audio and/or image data
you record without prior consent from the respective copyright holder(s). Accordingly,
“Memory Stick” with such copyrighted data can be used only within the law.
Use “Memory Stick” with the “MagicGate” logo to take advantage of this technology.
The “Memory Stick” slot on your VAIO computer does not support “MagicGate”
technology of “Memory Stick” with capacity of up to 256 MB.
If you use “Memory Stick” in a place subject to static electricity or electrical noise, stored
data may be lost.
The maximum possible size for a file on “Memory Stick PRO Duo” or “Memory Stick
PRO-HG Duo” is less than 4 GB, as defined in the file system specification.
Related Topic
About “Memory Stick”
Inserting “Memory Stick”
Removing “Memory Stick”
Formatting “Memory Stick”
Notes on Using “Memory Stick”
© 2013 Sony Corporation
245
Search
VAIO User Guide Back | Back to Top
Troubleshooting
How to Use
Windows 8: The Basics
Parts Description
Setup
Network / Internet
Connections
Settings
Backup / Recovery
Security
Other Operations
Notifications
Formatting “Memory Stick”
“Memory Stick” is formatted in the specific FAT format by default and is ready for use.
Be sure to use the device that is designed to format the media and supports “Memory Stick”
when formatting the media.
If you want to reformat the media with your VAIO computer, follow these steps.
Note
Formatting “Memory Stick” erases the entire data stored on the media. Be sure to make
a backup copy of important data to avoid erasing it.
Do not remove “Memory Stick” from the slot while formatting. This could cause a
malfunction.
1. Locate the “Memory Stick” slot.
Hint
The “Memory Stick” slot on your computer also works as an SD memory card slot.
2. Carefully slide “Memory Stick” into the slot until it clicks into place. [Details]
3. Open Computer. [Details]
4. Right-click the “Memory Stick” icon and select Format.
5. Select Restore device defaults.
The size of the allocation unit and file system will change to default settings.
Note
Do not select NTFS from the File system drop-down list as it may cause a
malfunction.
Hint
The formatting process will be completed more quickly if you select Quick
Format in Format options.
6. Select Start.
Follow the on-screen instructions.
Note
It may take time to format “Memory Stick” depending on the media type.
Related Topic
About “Memory Stick”
Compatible “Memory Stick”
Inserting “Memory Stick”
Removing “Memory Stick”
Notes on Using “Memory Stick”
© 2013 Sony Corporation
246
Search
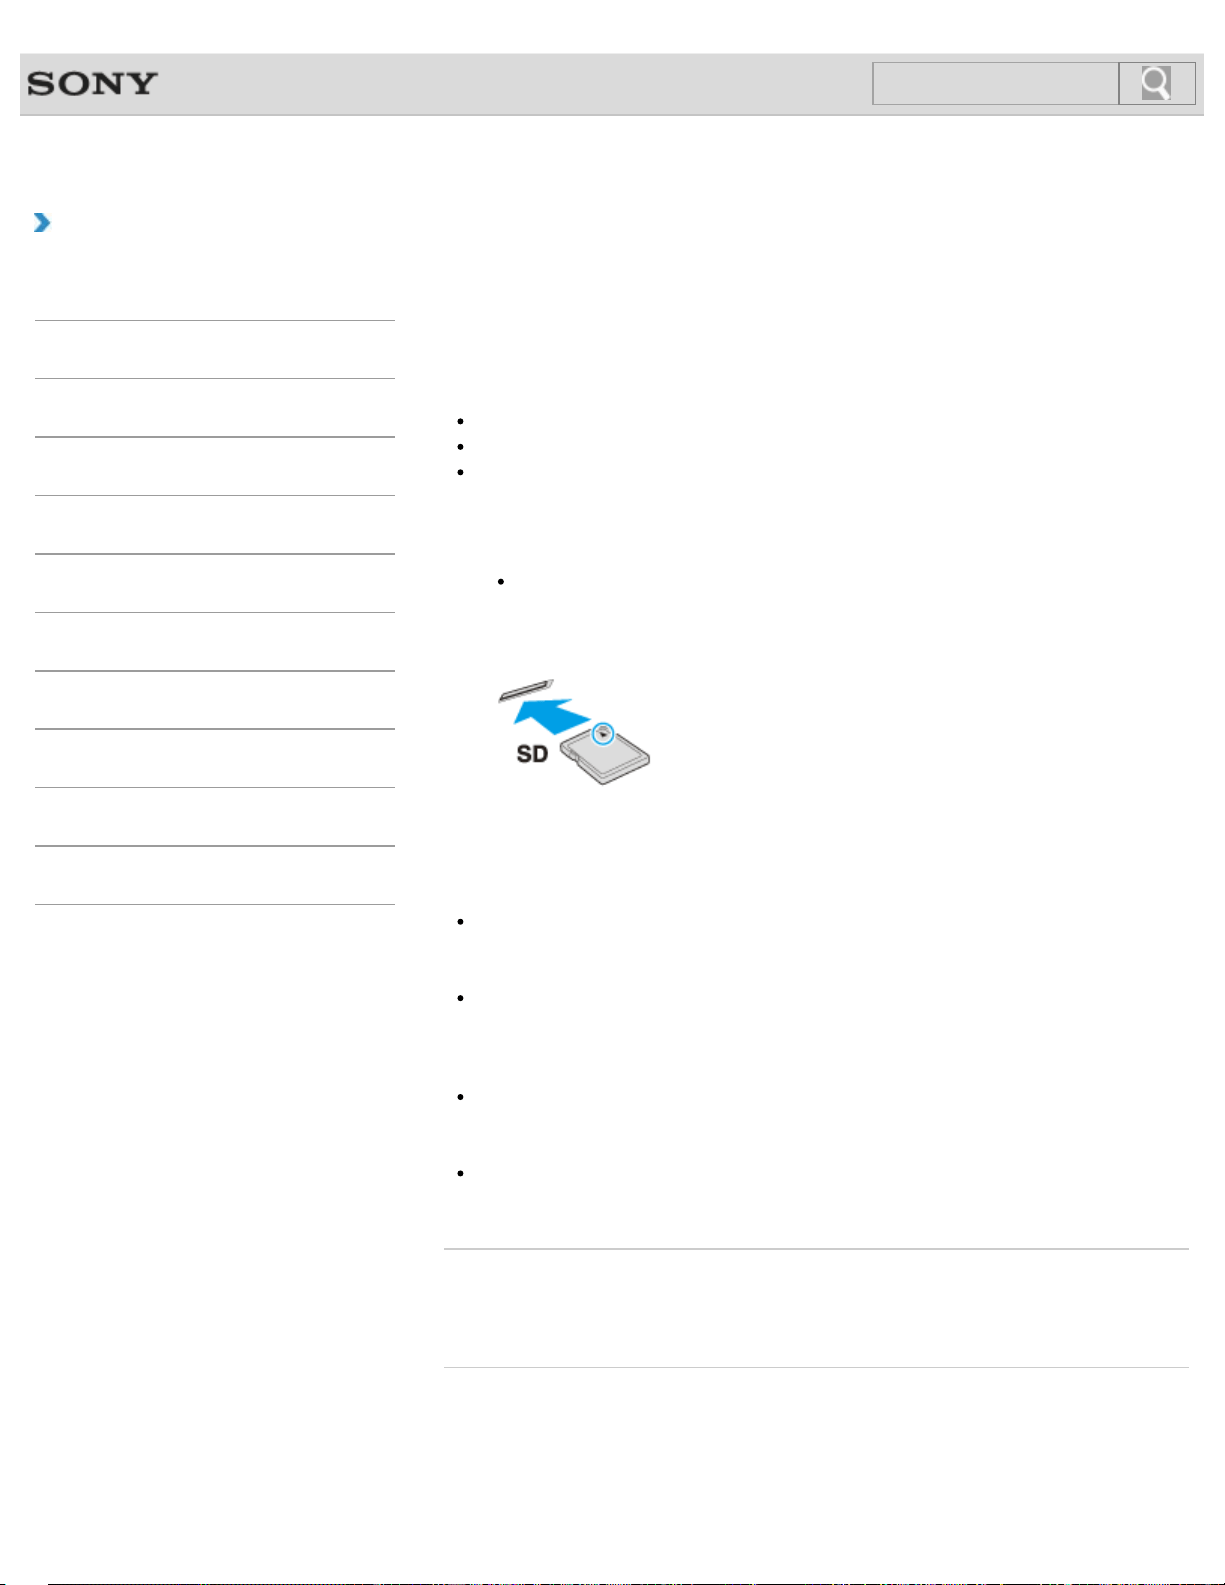
VAIO User Guide Back | Back to Top
Troubleshooting
How to Use
Windows 8: The Basics
Parts Description
Setup
Network / Internet
Connections
Settings
Backup / Recovery
Security
Other Operations
Notifications
Inserting SD Memory Cards
Your VAIO computer is equipped with an SD memory card slot. You can use this slot to
transfer data among digital cameras, camcorders, music players, and other audio/video
devices.
The SD memory card slot on the computer can accommodate the following memory cards:
SD memory card
SDHC memory card
SDXC memory card
To insert an SD memory card, follow these steps.
1. Locate the SD memory card slot.
Hint
The SD slot on your computer also works as a “Memory Stick” slot.
2. Hold the SD memory card with the arrow pointing toward the slot, and carefully slide it
into the slot until it clicks into place.
The SD memory card icon will appear in the Computer window [Details] after you insert
the card into the slot.
Note
Be careful not to insert an SD memory card in the wrong orientation. If you force it into
the slot upside down, the slot may be damaged. Refer to the manual that came with the
SD memory card for more information.
The SD memory card icon will not appear in the Computer window [Details] until you
insert the card into the slot.
Hint
When you insert the SD memory card into the slot for the first time, you may be
prompted to install a driver. If prompted, follow the on-screen instructions to install the
driver.
While data is being read from or written to the SD memory card, the media access
indicator light is on.
Related Topic
Removing SD Memory Cards
Notes on Using SD Memory Cards
© 2013 Sony Corporation
247
Search
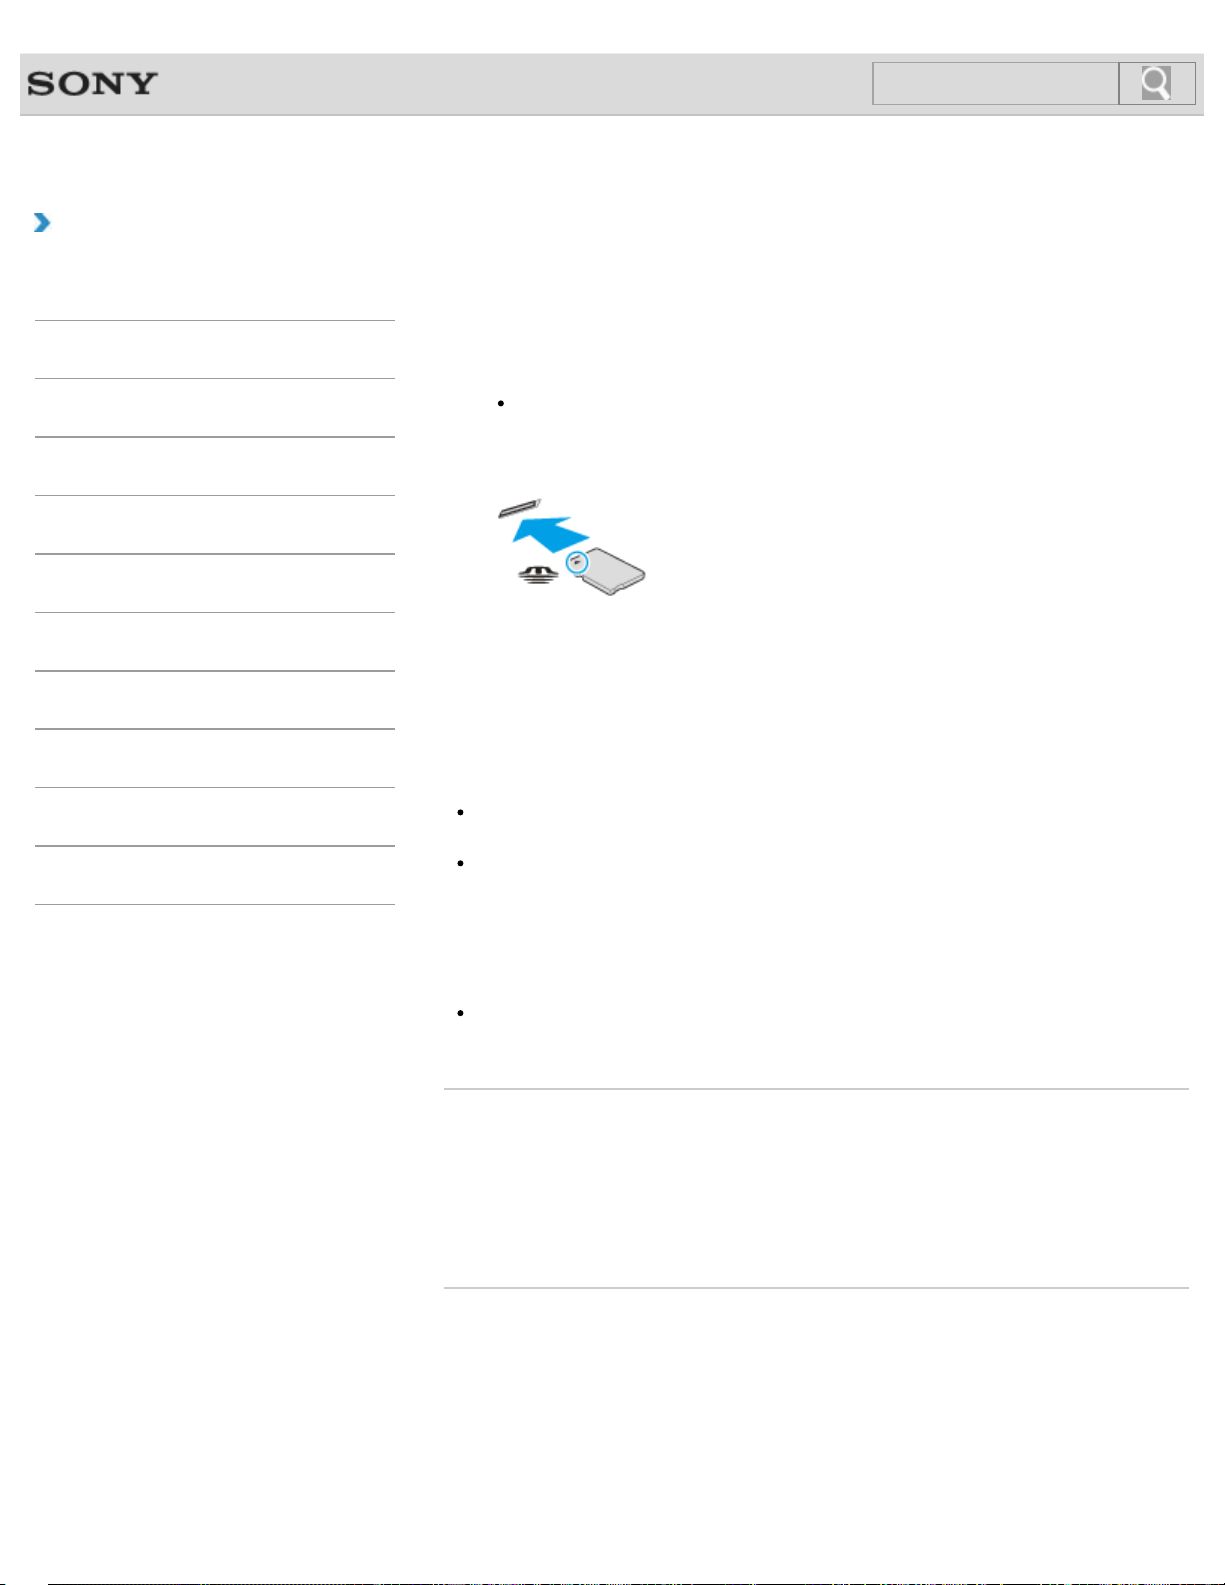
VAIO User Guide Back | Back to Top
Troubleshooting
How to Use
Windows 8: The Basics
Parts Description
Setup
Network / Internet
Connections
Settings
Backup / Recovery
Security
Other Operations
Notifications
Inserting “Memory Stick”
This topic explains how to insert “Memory Stick”.
1. Locate the “Memory Stick” slot.
Hint
The “Memory Stick” slot on your computer also works as an SD memory card slot.
2. Hold “Memory Stick” with the arrow pointing toward the slot, and carefully slide it into
the slot until it clicks into place.
“Memory Stick” is automatically detected by your system and the contents of “Memory Stick”
are displayed*. If nothing appears on the desktop, open Computer [Details] and double-
click the “Memory Stick” icon*.
* The drive letter for the “Memory Stick” slot, such as “E:”, may vary depending on the
system configuration of your VAIO computer.
Note
The “Memory Stick” icon will appear in the Computer window [Details] after you insert
“Memory Stick” into the slot.
If “Memory Stick” cannot be inserted easily, remove it gently, and verify you are inserting
it in the proper direction. Be sure to hold “Memory Stick” with the arrow pointing in the
correct direction as you insert it into the slot. To avoid damaging your VAIO computer or
the media, do not force “Memory Stick” into the slot if you cannot insert it smoothly.
Hint
When you insert “Memory Stick” into the slot for the first time, you may be prompted to
install a driver. If prompted, follow the on-screen instructions to install the driver.
Related Topic
About “Memory Stick”
Compatible “Memory Stick”
Removing “Memory Stick”
Formatting “Memory Stick”
Notes on Using “Memory Stick”
© 2013 Sony Corporation
248
Search
VAIO User Guide Back | Back to Top
Troubleshooting
How to Use
Windows 8: The Basics
Parts Description
Setup
Network / Internet
Connections
Settings
Backup / Recovery
Security
Other Operations
Notifications
Notes on Using SD Memory Cards
Before using SD memory cards, read the following precautions for correct use.
Keep an SD memory card out of reach of children. There is a risk of swallowing it.
Do not touch the SD memory card connector with your finger or metal objects.
An SD memory card contains delicate electronic components. Do not impact, bend or
drop it.
Do not disassemble or modify an SD memory card.
Do not wet an SD memory card.
Do not use or store in a location subject to:
Extremely high temperature, such as in a car parked in the sun
Direct sunlight
High humidity or corrosive substances
Excessive dust
Be sure to use SD memory cards and adaptors that are compliant with the standards
supported by your VAIO computer. Incompatible cards and adaptors may get stuck in
the slot, causing damage to the computer.
You cannot write data to an SD memory card that is write-protected.
It is recommended that you make a backup copy of important data.
Stored data may be lost or corrupted if:
You remove an SD memory card or turn off your VAIO computer while the media
access indicator light is on.
You use an SD memory card at a place where static electricity or electrical noise may
disturb the card.
When carrying an SD memory card, be sure to put it in its case to avoid static electricity.
Before using an SD memory card with a device other than a computer, such as a digital
camera or a portable audio, format (initialize) the SD memory card using the device.
Some devices may not support the file format for computers and show you a message
that recommends you to format the SD memory card. In this case, copy data from the
card to your VAIO computer and format the card using the device. All data in the SD
memory card will be deleted when you format it.
Refer to the manual that came with the device for more information.
Do not insert foreign objects into the SD memory card slot.
The SD memory card slot can be used for reading/writing supported memory cards only,
and cannot be used for other purposes.
SD memory cards (up to 2 GB), SDHC memory cards (up to 32 GB) and SDXC memory
cards (up to 64 GB) available as of September 2012 have been tested and found
compatible with your VAIO computer. However, it is not guaranteed that all SD memory
cards, SDHC memory cards or SDXC memory cards will be compatible with the
computer.
Do not attempt to insert a memory card or memory card adaptor of a different type into
the memory card slot. An incompatible memory card or memory card adaptor may get
stuck in the slot, causing damage to your VAIO computer.
Some types of SD memory cards, for example ones with the UHS (Ultra High Speed
data transfer feature), may become extremely hot due to continuous access to the
memory cards. In such a case, wait for a while before removing the memory card until it
cools down.
249
Search

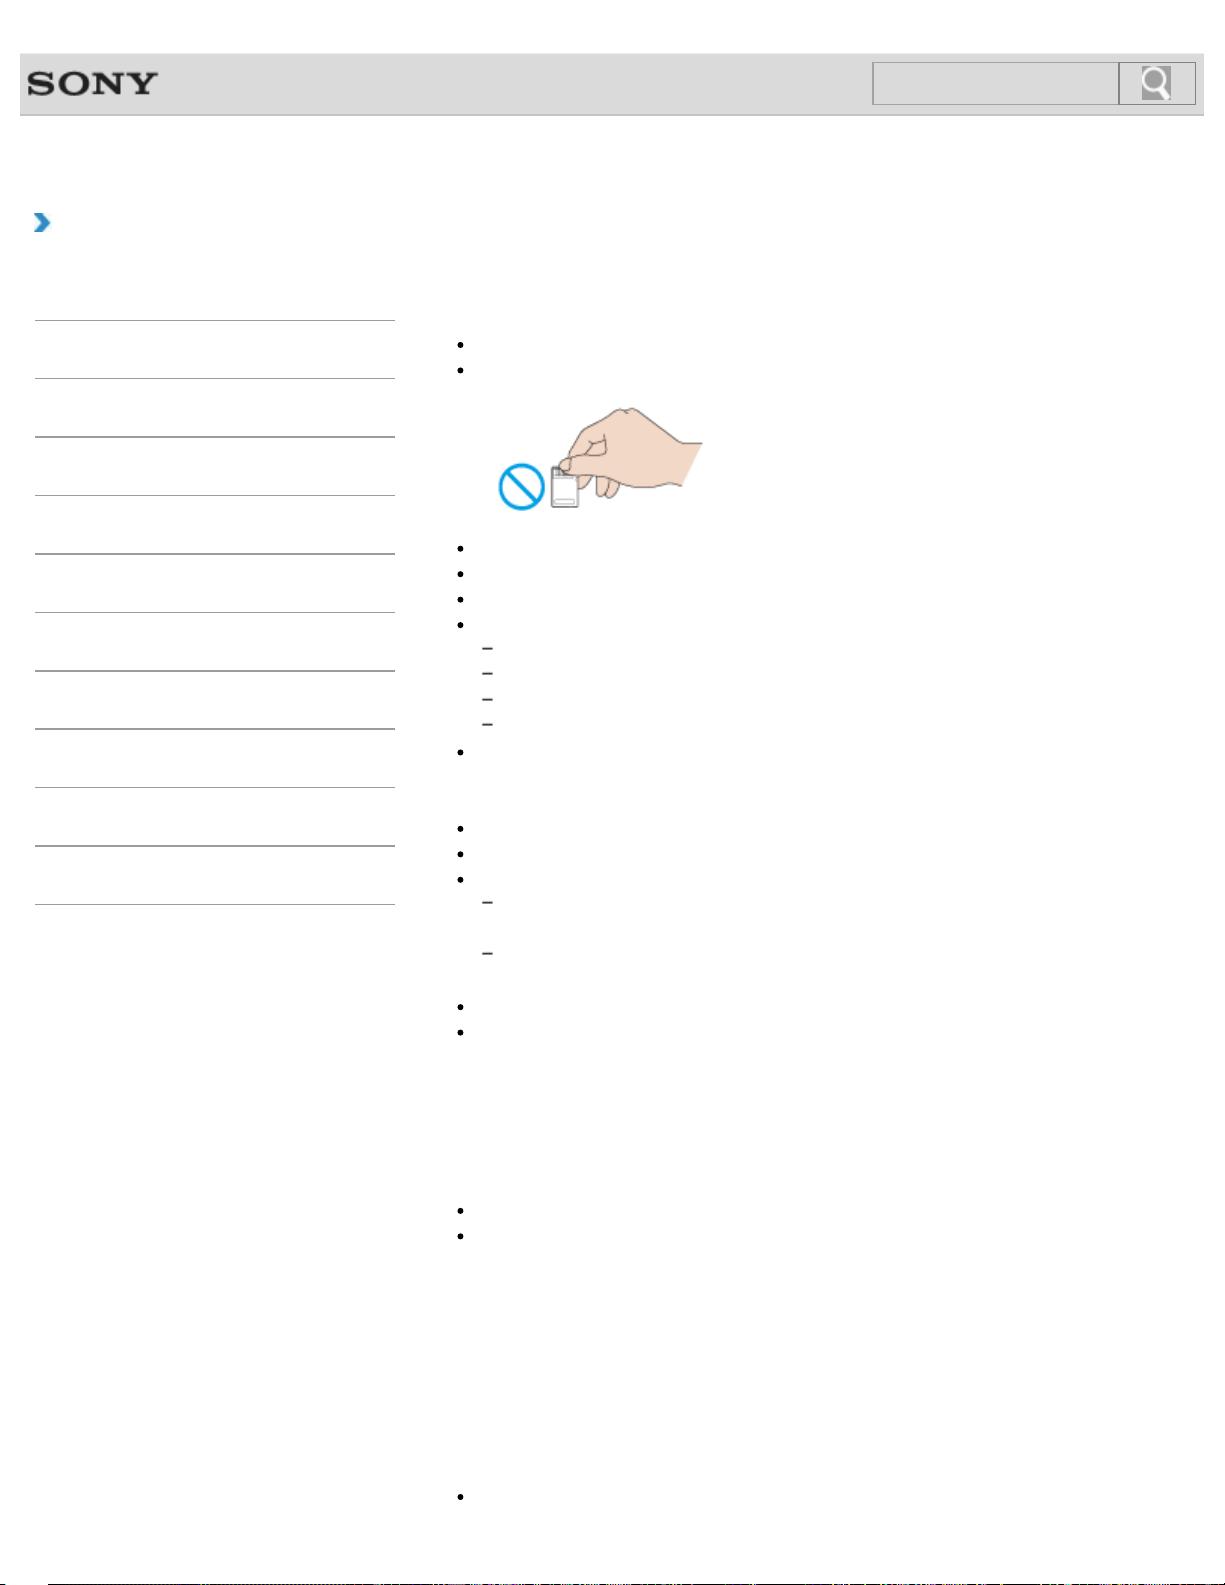
VAIO User Guide Back | Back to Top
Troubleshooting
How to Use
Windows 8: The Basics
Parts Description
Setup
Network / Internet
Connections
Settings
Backup / Recovery
Security
Other Operations
Notifications
Notes on Using “Memory Stick”
Before using “Memory Stick”, read the following precautions for correct use.
Keep “Memory Stick” out of reach of children. There is a risk of swallowing it.
Do not touch the “Memory Stick” connector with your finger or metal objects.
“Memory Stick” contains delicate electronic components. Do not impact, bend or drop it.
Do not disassemble or modify “Memory Stick”.
Do not wet “Memory Stick”.
Do not use or store in a location subject to:
Extremely high temperature, such as in a car parked in the sun
Direct sunlight
High humidity or corrosive substances
Excessive dust
Be sure to use “Memory Stick” and adaptors that are compliant with the standards
supported by your VAIO computer. Incompatible cards and adaptors may get stuck in
the slot, causing damage to the computer.
You cannot write data to “Memory Stick” that is write-protected.
It is recommended that you make a backup copy of important data.
Stored data may be lost or corrupted if:
You remove “Memory Stick” or turn off your VAIO computer while the media access
indicator light is on.
You use “Memory Stick” at a place where static electricity or electrical noise may
disturb the card.
When carrying “Memory Stick”, be sure to put it in its case to avoid static electricity.
Before using “Memory Stick” with a device other than a computer, such as a digital
camera or a portable audio, format (initialize) “Memory Stick” using the device.
Some devices may not support the file format for computers and show you a message
that recommends you to format “Memory Stick”. In this case, copy data from “Memory
Stick” to your VAIO computer and format “Memory Stick” using the device. All data in
“Memory Stick” will be deleted when you format it.
Refer to the manual that came with the device for more information.
Do not insert foreign objects into the “Memory Stick” slot.
The “Memory Stick” slot can be used for reading/writing supported “Memory Stick” only,
and cannot be used for other purposes.
Notes on Using “Memory Stick Duo”
When using “Memory Stick Duo”, do not use a fine-tipped pen to write on the label adhered
to “Memory Stick Duo”. Exerting pressure on the media may damage internal components.
Notes on Using “Memory Stick Micro”
Before using “Memory Stick Micro” (“M2”), be sure to insert it into an “M2” Duo adaptor.
251
Search

If you insert the media directly into the “Memory Stick Duo” slot without the adaptor, you
may not be able to remove it from the slot.
Keep “Memory Stick Micro” and “M2” Duo adaptors away from children. They are
harmful if swallowed.
Related Topic
About “Memory Stick”
Compatible “Memory Stick”
Inserting “Memory Stick”
Removing “Memory Stick”
Formatting “Memory Stick”
© 2013 Sony Corporation
252
Search

VAIO User Guide Back | Back to Top
Troubleshooting
How to Use
Windows 8: The Basics
Parts Description
Setup
Network / Internet
Connections
Settings
Backup / Recovery
Security
Other Operations
Notifications
Removing SD Memory Cards
This topic explains how to remove an SD memory card.
1. Locate the SD memory card slot.
Hint
The SD slot on your computer also works as a “Memory Stick” slot.
2. Check that the media access indicator light is off.
3. Push in the SD memory card toward your VAIO computer and release.
4. Pull the SD memory card out of the slot.
Related Topic
Inserting SD Memory Cards
Notes on Using SD Memory Cards
© 2013 Sony Corporation
253
Search

VAIO User Guide Back | Back to Top
Troubleshooting
How to Use
Windows 8: The Basics
Parts Description
Setup
Network / Internet
Connections
Settings
Backup / Recovery
Security
Other Operations
Notifications
Removing “Memory Stick”
This topic explains how to remove “Memory Stick”.
1. Locate the “Memory Stick” slot.
Hint
The “Memory Stick” slot on your computer also works as an SD memory card slot.
2. Check that the Media Access indicator light is off.
3. Push in “Memory Stick” toward your VAIO computer and release.
4. Pull “Memory Stick” out of the slot.
Note
Do not remove “Memory Stick” while the Media Access indicator light is on. If you do,
you may lose data. Large volumes of data may take time to load, so make sure the
indicator light is off before removing “Memory Stick”.
Be sure to remove “Memory Stick” gently, or it may pop out unexpectedly.
Related Topic
About “Memory Stick”
Compatible “Memory Stick”
Inserting “Memory Stick”
Formatting “Memory Stick”
Notes on Using “Memory Stick”
© 2013 Sony Corporation
254
Search
VAIO User Guide Back | Back to Top
Troubleshooting
How to Use
Windows 8: The Basics
Parts Description
Setup
Network / Internet
Connections
Settings
Backup / Recovery
Security
Other Operations
Notifications
About Recovery
Recovery is the process of restoring the built-in storage device back to its original factory
condition. Refresh is the process of reinstalling the operating system with the main settings
and personal data retained.
Refresh your VAIO computer first if the computer becomes unstable. If the problem persists,
recover the computer.
There are two ways to recover the computer:
From Recovery Media
From the recovery area
Note
The 64 GB or 128 GB SSD equipped models do not support the refresh function. If you
check the capacity of the SSD, press the ASSIST button while your VAIO computer is
off to display the VAIO Care Rescue Mode screen, and select Start BIOS setup.
When do I have to perform recovery or refresh?
If your VAIO computer has become unstable
If your VAIO computer has been infected with a computer virus
If your VAIO computer is experiencing problems which cannot be solved through
troubleshooting
If you have formatted the C: drive by mistake
Which apps should I use to recover or refresh my VAIO
computer or create Recovery Media?
Use the following apps.
VAIO Care
Creating Recovery Media
Checking your computer hardware
VAIO Care (Rescue Mode) : Recover or maintain your system
Recovering your VAIO computer
Rescuing (backing up) your data
Erasing all the data on your built-in storage device
Windows Recovery Environment (Windows RE)
Refresh
Hint
Refer to the help file included with VAIO Care and VAIO Care (Rescue Mode) :
Recover or maintain your system for more information.
You can also recover your VAIO computer from Windows Recovery Environment
(Windows RE).
What is a recovery area?
The recovery area on the built-in storage device contains data for system and app recovery.
255
Search

Typically, you cannot modify or delete data in this area, however, there are commercially
available apps designed for this purpose.
Why do I have to create Recovery Media?
Recovery Media are used to restore your VAIO computer back to its original factory
condition. If Windows does not start and you have deleted the recovery area, you will need
the Recovery Media to perform recovery.
Create the Recovery Media immediately after the computer is ready for use.
Related Topic
Creating Recovery Media
Refreshing Your VAIO Computer
Recovering from the Recovery Area
Recovering from Recovery Media
Notes on Recovery
© 2013 Sony Corporation
256
Search
VAIO User Guide Back | Back to Top
Troubleshooting
How to Use
Windows 8: The Basics
Parts Description
Setup
Network / Internet
Connections
Settings
Backup / Recovery
Security
Other Operations
Notifications
Checking the Volume of the Recovery Area
Your built-in storage device contains the recovery area where the data for the system
recovery is stored.
To check the volume of the recovery area, follow these steps:
1. Open the charms [Details] and select the
Search charm.
2. Select Apps and enter “Computer“ in the search box.
3. Select Computer.
4. Select Computer on the menu bar and Manage.
5. Select Disk Management under Storage in the left pane.
The volume of the recovery area and the total volume of the C: drive are displayed in
the Disk 0 row in the center pane.
© 2013 Sony Corporation
257
Search

VAIO User Guide Back | Back to Top
Troubleshooting
How to Use
Windows 8: The Basics
Parts Description
Setup
Network / Internet
Connections
Settings
Backup / Recovery
Security
Other Operations
Notifications
Creating Recovery Media
Follow the instructions below to create Recovery Media.
To create Recovery Media
Hint
You can use DVDs, Blu-ray Disc, or a USB flash drive as Recovery Media. However, it is
recommended that you use DVD-R media, because data can be accidently deleted from
a USB flash drive. You can also use BD-R/BD-R DL/DVD-R DL/DVD+R/DVD+R DL
media; however, the type of media your VAIO computer supports and the number of
discs you need vary depending on the model you purchased. You will be notified of such
information during the creation process.
USB ports that are compliant with the USB 3.0 standard do not support recovery with a
USB flash drive that is compliant with the USB 3.0 standard. On models without the USB
ports that are compliant with only the USB 2.0 standard, be sure to create Recovery
Media using the USB flash drive that is not compliant with the USB 3.0 standard.
1. Connect your VAIO computer to the Internet and download and install the latest
updates using VAIO Update.
2. On the model without a built-in optical disc drive, connect an external optical disc drive
(not supplied) to your VAIO computer. [Details]
If an AC adapter or a power cable is supplied, plug it into a power source.
3. Press the ASSIST button while your VAIO computer is on to start VAIO Care.
If the User Account Control window appears, select Yes.
The VAIO Care window appears.
Hint
If you are signed in to your VAIO computer as a standard user, you may be
prompted to enter an administrator name and a password.
4. Select Advanced Tools, Restore and recovery, and Create Recovery
Media.
5. Read the on-screen instructions carefully, and then select Next.
6. Follow the on-screen instructions.
Note
It may take some time for the current status of the process to display.
Do not eject or disconnect the media while creating Recovery Media, as doing so may
result in a failure.
Keep Recovery Media in a secure place.
Notes on creating Recovery Media
Recovery Media is specific to your VAIO computer of which it was created.
You cannot refresh your VAIO computer using Recovery Media.
Create Recovery Media immediately after your VAIO computer is ready for use. In the
following cases, you may not be able to recover the computer from the recovery area
and Recovery Media will be necessary:
You have modified the recovery area with apps designed for data modification.
258
Search

You have installed an operating system different from the preinstalled operating
system on the computer.
You have formatted your built-in storage device without using VAIO Care (Rescue
Mode) : Recover or maintain your system.
Do not touch or allow the surface of the discs to become dirty. Fingerprints or dust on
the surface may cause read/write errors.
To create Recovery Media, you may need to use the free space on your C: drive more
than double capacity of media you use. Depending on your model, you cannot create
Recovery Media even at the time of purchase due to the shortage of free space,
regardless if the optical disc drive supports Blu-ray Disc or Double/Dual Layer DVD
media.
Refer to the help file included with VAIO Care before using a USB flash drive as
Recovery Media.
Related Topic
About Recovery
Recovering from the Recovery Area
Recovering from Recovery Media
Notes on Recovery
© 2013 Sony Corporation
259
Search

VAIO User Guide Back | Back to Top
Troubleshooting
How to Use
Windows 8: The Basics
Parts Description
Setup
Network / Internet
Connections
Settings
Backup / Recovery
Security
Other Operations
Notifications
Notes on Recovery
Read the following notes thoroughly before recovering your VAIO computer.
Important notes on recovery
Recovering your VAIO computer will delete all the data on the built-in storage device
and restore all the settings to the original factory settings. Make sure you have a backup
copy of your valuable data.
If you want to retain the main settings and personal data, refresh the computer. [Details]
Disconnect all peripherals from your VAIO computer except the power cord, the AC
adapter, or devices required for recovery before recovering the computer.
Keep the power cord or the AC adapter connected to your VAIO computer during the
recovery process.
Do not stop the recovery process until the process is complete.
If you have forgotten the password and cannot start the recovery process, contact an
authorized Sony service/support center to reset it. A reset fee will be charged.
Notes on apps
Recovering your VAIO computer can restore only the preinstalled apps. The app(s) that
has been installed on your own or the data you have created since purchase cannot be
restored. In addition, you cannot restore only Windows.
Certain preinstalled apps include options that allow the apps to uninstall or install
themselves. However, the apps may not work properly on your VAIO computer if such
options are used.
Installing apps to modify partition sizes may disable recovery or Recovery Media
creation. To avoid this, create the Recovery Media immediately after your VAIO
computer is ready for use. [Details]
Related Topic
About Recovery
Creating Recovery Media
Recovering from the Recovery Area
Recovering from Recovery Media
© 2013 Sony Corporation
260
Search
VAIO User Guide Back | Back to Top
Troubleshooting
How to Use
Windows 8: The Basics
Parts Description
Setup
Network / Internet
Connections
Settings
Backup / Recovery
Security
Other Operations
Notifications
Recovering from Recovery Media
If the recovery area data has been corrupted or erased, you can use Recovery Media to
recover your VAIO computer. However, recovering the computer using the Recovery Media
will take longer than using the recovery area.
On the model without a built-in optical disc drive, connect an external optical disc drive (not
supplied) to the computer. [Details]
If an AC adapter or a power cable is supplied, plug it into a power source.
1. Insert Recovery Media (optical discs) into the optical disc drive or connect a USB flash
drive to the USB port on your VAIO computer while the computer is in Normal mode.
2. Turn off your VAIO computer.
3. Press the ASSIST button to display the VAIO Care Rescue Mode screen and
select Start from media (USB device/optical disc).
Follow the on-screen instructions until the Choose an option screen appears.
4. Select Troubleshoot, then Recovery and maintenance.
Follow the on-screen instructions until the VAIO Care (Rescue Mode) : Recover
or maintain your system screen appears.
Hint
If the display language selection window appears, select your desired language,
then OK.
5. Select Start recovery wizard.
6. Follow the on-screen instructions.
Hint
To perform custom recovery, select Tools and Start advanced recovery wizard.
If you cannot recover your VAIO computer using the USB flash drive, connect the drive
to another USB port on the computer, and then try recovering the computer again.
Related Topic
About Recovery
Creating Recovery Media
Recovering from the Recovery Area
Notes on Recovery
© 2013 Sony Corporation
261
Search

VAIO User Guide Back | Back to Top
Troubleshooting
How to Use
Windows 8: The Basics
Parts Description
Setup
Network / Internet
Connections
Settings
Backup / Recovery
Security
Other Operations
Notifications
Recovering from the Recovery Area
You can recover your VAIO computer from the recovery area on the built-in storage device.
This recovery method is faster than using Recovery Media.
See Notes on Recovery [Details] before recovering the computer.
1. Press the ASSIST button while your VAIO computer is off.
The VAIO Care Rescue Mode screen appears.
2. Select Recover or maintain your system.
Follow the on-screen instructions until the Choose an option screen appears.
3. Select Troubleshoot, then Recovery and maintenance.
Follow the on-screen instructions until the VAIO Care (Rescue Mode) : Recover
or maintain your system screen appears.
Hint
If the display language selection window appears, select your desired language,
then OK.
4. Select Start recovery wizard.
5. Follow the on-screen instructions.
Hint
To perform custom recovery, select Tools and Start advanced recovery
wizard.
Related Topic
About Recovery
Creating Recovery Media
Recovering from Recovery Media
Notes on Recovery
© 2013 Sony Corporation
262
Search
VAIO User Guide Back | Back to Top
Troubleshooting
How to Use
Windows 8: The Basics
Parts Description
Setup
Network / Internet
Connections
Settings
Backup / Recovery
Security
Other Operations
Notifications
Refreshing Your VAIO Computer
If your VAIO computer has become unstable, it is recommended that you use the refresh
function provided by Windows. Refresh the computer by following these steps.
Note
The 64 GB or 128 GB SSD equipped models do not support the refresh function. If you
check the capacity of the SSD, press the ASSIST button while your VAIO computer is
off to display the VAIO Care Rescue Mode screen, and select Start BIOS setup.
1. Press the ASSIST button while your VAIO computer is off.
The VAIO Care Rescue Mode screen appears.
2. Select Recover or maintain your system.
Follow the on-screen instructions until the Choose an option screen appears.
3. Select Troubleshoot and Refresh your PC.
Most user data saved on your built-in storage device, some Windows settings and all apps
downloaded from Windows Store will be retained even after you refresh your VAIO
computer. However, some app settings or files in the specific folders may not be retained.
Confirm the following list for details of which settings are retained, and which data is erased
after you refresh the computer.
Settings retained after you refresh your VAIO computer
The following settings will be retained after you refresh your VAIO computer.
Library settings
User accounts (local, domain, Microsoft account), and group memberships
Domain settings
Windows Update settings
Start screen and lock screen background
Desktop themes
International settings
Wireless network profiles
Settings configured in Windows Welcome
Data erased after you refresh your VAIO computer
The data in the folders specified below will be erased after you refresh your VAIO computer.
\Windows
\Program Files
\Program Files(x86)
\ProgramData
\Users\<User name>\AppData
Note
Save important data in advance.
Copyright protected data, such as digital broadcast data or music files organized by
digital media playback apps may not be available, even if the data is retained in the
same location after you refresh your VAIO computer.
Refer to the help file included with the app you are using for instructions.
Hint
263
Search

The apps installed at the time of delivery and installed from
Windows Store
are
retained, whereas all Desktop apps that you installed after the purchase will be erased.
Related Topic
About Recovery
Recovering from the Recovery Area
Recovering from Recovery Media
Notes on Recovery
© 2013 Sony Corporation
264
Search

VAIO User Guide Back | Back to Top
Troubleshooting
How to Use
Windows 8: The Basics
Parts Description
Setup
Network / Internet
Connections
Settings
Backup / Recovery
Security
Other Operations
Notifications
Removing Recovery Content to Free up Disk
Space
Your built-in storage device contains the recovery area where the data for system recovery
is stored. If your VAIO computer includes a solid state drive (SSD), you might want to
minimize the recovery area by removing such data to free up disk space on the C: drive (or
the last drive in your drive list, for example D: drive).
You need Recovery Media to remove the data for system recovery or to recover the
computer after you remove the data.
Note that removing recovery content makes it impossible to use the refresh function.
On the model without a built-in optical disc drive, connect an external optical disc drive (not
supplied) to the computer. [Details]
If an AC adapter or a power cable is supplied, plug it into a power source.
1. Create Recovery Media if you have not yet created it. [Details]
2. Insert the Recovery Media into the optical disc drive or connect a USB flash drive (not
supplied) to the USB port on your VAIO computer while the computer is in Normal
mode.
3. Turn off your VAIO computer.
4. Press the ASSIST button to display the VAIO Care Rescue Mode screen and
select Start from media (USB device/optical disc).
Follow the on-screen instructions until the Choose an option screen appears.
5. Select Troubleshoot and Recovery and maintenance.
Follow the on-screen instructions until the VAIO Care (Rescue Mode) : Recover
or maintain your system screen appears.
6. Select Tools and Remove recovery partition.
7. Follow the on-screen instructions.
Related Topic
Creating Other Drives (Modifying Partitions)
Creating Partitions
© 2013 Sony Corporation
265
Search

VAIO User Guide Back | Back to Top
Troubleshooting
How to Use
Windows 8: The Basics
Parts Description
Setup
Network / Internet
Connections
Settings
Backup / Recovery
Security
Other Operations
Notifications
About Built-In Sensors
A built-in accelerometer, digital compass (magnetometer), and gyro sensor enable you to
use the following functions.
Screen rotation using the built-in accelerometer
When you rotate your VAIO computer, the built-in accelerometer automatically detects the
movement and rotates the computer screen to portrait or landscape orientation depending
on the computer orientation.
Navigation assistance using the built-in digital compass
The built-in digital compass provides navigation assistance on compatible apps by detecting
the direction your VAIO computer is facing.
App operation using the built-in gyro sensor
The built-in gyro sensor detects angular movement of your VAIO computer, which allows
you to perform actions with apps, such as a game app.
Hint
You need to calibrate the built-in digital compass when the app does not show the
direction correctly. [Details]
© 2013 Sony Corporation
266
Search
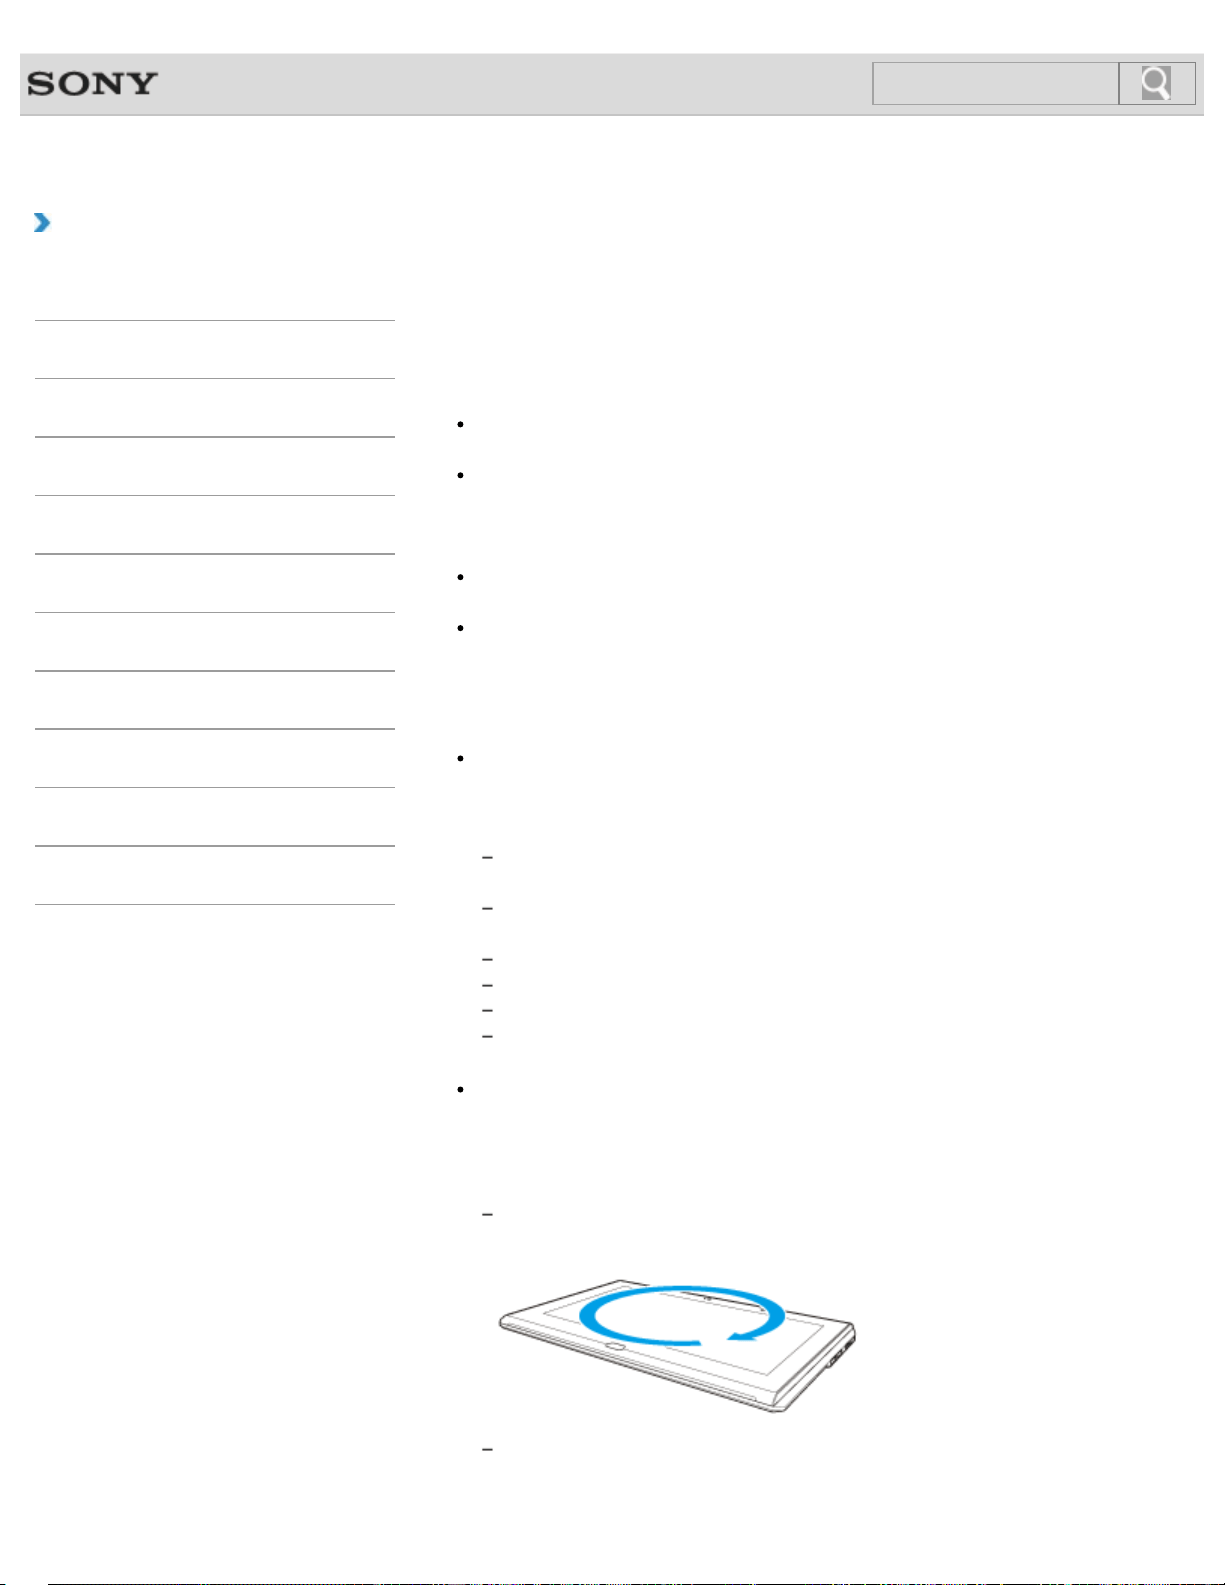
VAIO User Guide Back | Back to Top
Troubleshooting
How to Use
Windows 8: The Basics
Parts Description
Setup
Network / Internet
Connections
Settings
Backup / Recovery
Security
Other Operations
Notifications
Notes on Built-In Sensors
Before using built-in sensors, read the following precautions for correct use.
Notes on using the built-in accelerometer
If you change the computer screen orientation without closing running apps, such as a
video playback app, all unsaved data may be lost.
You cannot change the computer screen orientation while your VAIO computer is
connected to an external display. If you connect the computer to an external display
while using the computer in portrait orientation, the computer screen will automatically
change to landscape (horizontal) orientation.
The computer screen may become distorted if you change the computer screen
orientation while the screen saver is activated.
Some apps do not support portrait orientation and may not work correctly. In this case,
use your VAIO computer in landscape orientation.
Notes on using the built-in digital compass
The built-in digital compass works by detecting a magnetic direction. Do not rely solely
on the location information the built-in digital compass provides.
The accuracy of the digital compass can be easily affected by magnetic interference and
may not work properly, particularly in the following locations:
Inside an elevator or a room built with ferrous materials, such as iron frames or
reinforced concrete
Near a reinforced concrete structure, such as a footbridge or a concourse of an
airport or train station
Near or inside a train or a car
Near a transformer on the ground or high-voltage power lines
Near a metallic product, such as a metal frame desk or metallic furniture
Near a material that has a high level of magnetic interference, such as a magnet, a
magnetic holder, or speakers
Adjusting the angle of the LCD screen may reduce the accuracy of the built-in digital
compass; however, this is normal and does not indicate a malfunction. In such a case,
you need to calibrate the digital compass. Move away from materials that cause
magnetic interference, such as metallic products or magnets, and perform the following
operations while running an app that uses the digital compass.
Place your VAIO computer on a flat surface, hold the computer with both hands, then
rotate it 360 degrees clockwise once with the LCD screen up.
Place your VAIO computer on a flat surface, hold the computer with both hands, then
rotate it 360 degrees lengthwise once.
267
Search
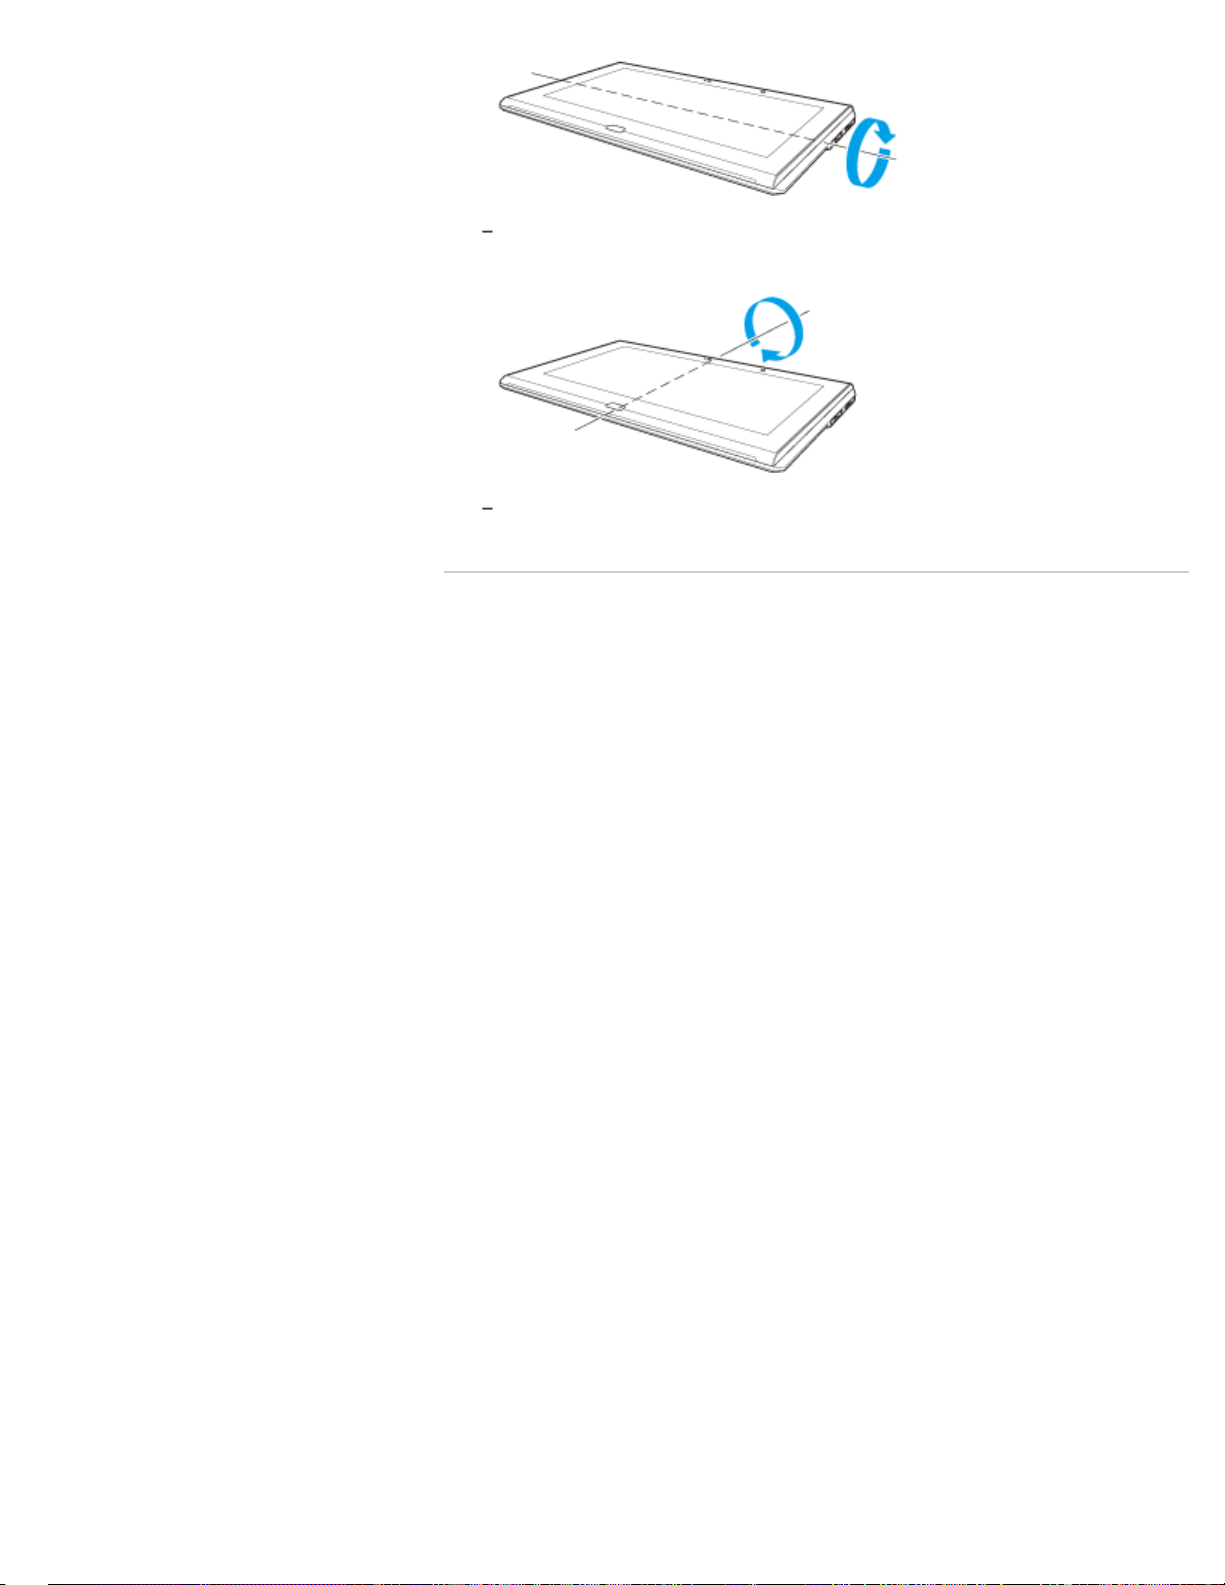
Place your VAIO computer on a flat surface, hold the computer with both hands, then
rotate it 360 degrees crosswise once.
If the problem persists, use your VAIO computer in a location with less magnetic
interference.
© 2013 Sony Corporation
268
Search

VAIO User Guide Back | Back to Top
Troubleshooting
How to Use
Windows 8: The Basics
Parts Description
Setup
Network / Internet
Connections
Settings
Backup / Recovery
Security
Other Operations
Notifications
Clipping an Image Displayed on the Computer
Screen (Active Clip)
With Active Clip, you can easily clip an image displayed on the computer screen.
You can save the image you clipped and use it in the document you are editing with other
apps.
1. Press and hold down the Fn key and press the numeric 1 key to start Active Clip.
Hint
Alternatively, put the supplied pen (Digitizer Stylus) close to the LCD screen and press
the lower button of the pen to start Active Clip.
Related Topic
How to Use the Pen<Digitizer Stylus supplied models>
© 2013 Sony Corporation
269
Search
VAIO User Guide Back | Back to Top
Troubleshooting
How to Use
Windows 8: The Basics
Parts Description
Setup
Network / Internet
Connections
Settings
Backup / Recovery
Security
Other Operations
Notifications
Removing the Power-on Password
If power-on password input for booting up your VAIO computer is no longer necessary,
follow these steps to remove the machine password and user password.
1. Press the ASSIST button while your VAIO computer is off.
The VAIO Care Rescue Mode screen appears.
2. Select Start BIOS setup.
Enter a password if it has already been set.
The BIOS setup screen appears.
3. Press the
or key to select the Security tab, select Set Machine Password
or Set User Password, and then press the Enter key.
The password entry screen appears.
4. Leave the Enter New Password and Confirm New Password fields blank and
press the Enter key.
5. Press the
or key to select the Exit tab, select Exit Setup, and then press the
Enter key.
At the confirmation prompt, press the Enter key.
Related Topic
Setting/Changing the Power-on Password
What should I do if I forget the power-on password to start my VAIO computer?
© 2013 Sony Corporation
270
Search
VAIO User Guide Back | Back to Top
Troubleshooting
How to Use
Windows 8: The Basics
Parts Description
Setup
Network / Internet
Connections
Settings
Backup / Recovery
Security
Other Operations
Notifications
Setting/Changing the Power-on Password
You can set a password (power-on password) for booting up your VAIO computer, using the
BIOS function. Entry of the power-on password will be prompted after the VAIO logo appears
to start the computer.
There are two types of passwords. Set the machine password first.
Machine password (for administrators):
Allows users with administrative rights to change all the setup options in the BIOS setup
screen, as well as to start your VAIO computer.
User password (for users without administrative rights):
Allows standard users to change some of the BIOS setup options, as well as to start
your VAIO computer. To set the user password, you must first set the machine
password.
1. Press the ASSIST button while your VAIO computer is off.
The VAIO Care Rescue Mode screen appears.
2. Select Start BIOS setup.
Enter a password if it has already been set.
The BIOS setup screen appears.
3. Press the
or key to select the Security tab, select Set Machine Password
or Set User Password, and then press the Enter key.
The password entry screen appears.
4. Enter the password and press the Enter key.
To change the password, enter the current password and a new password. The
password can be set up to 32 alphanumeric characters long (including spaces) and it
is case-sensitive.
5. Press the
or key to select Password when Power On, press the Enter key,
and select Enabled.
6. Press the
or key to select the Exit tab, select Exit Setup, and then press the
Enter key.
7. At the confirmation prompt, press the Enter key.
Note
Be sure to write down the password to avoid forgetting it.
If you forget the password, you cannot boot up your VAIO computer.
You can reset the user password at the BIOS setup screen by entering the machine
password.
If you forget the machine password, the password must be reset by authorized Sony
service/support center. (The reset fee will be charged.)
Related Topic
Removing the Power-on Password
Creating/Changing/Removing Your Windows Password
What should I do if I forget the power-on password to start my VAIO computer?
271
Search

© 2013 Sony Corporation
272
Search
VAIO User Guide Back | Back to Top
Troubleshooting
How to Use
Windows 8: The Basics
Parts Description
Setup
Network / Internet
Connections
Settings
Backup / Recovery
Security
Other Operations
Notifications
Using Intel(R) Anti-Theft Technology
<Intel(R) Anti-Theft Technology supported
models>
You can change the Intel(R) Anti-Theft Technology settings in the BIOS setup screen.
Follow these steps to enable Intel(R) Anti-Theft Technology.
1. Press the ASSIST button while your VAIO computer is off.
The VAIO Care Rescue Mode screen appears.
2. Select Start BIOS setup.
Enter a password if it has already been set.
The BIOS setup screen appears.
3. Press the
or key to select the Advanced tab.
4. Select Intel(R) AT Support System, and then press the Enter key.
5. Press the
or key to select Enabled, and then press the Enter key.
6. Press the
or key to select the Exit tab, select Exit Setup, and then press the
Enter key.
At the confirmation prompt, press the Enter key.
© 2013 Sony Corporation
273
Search
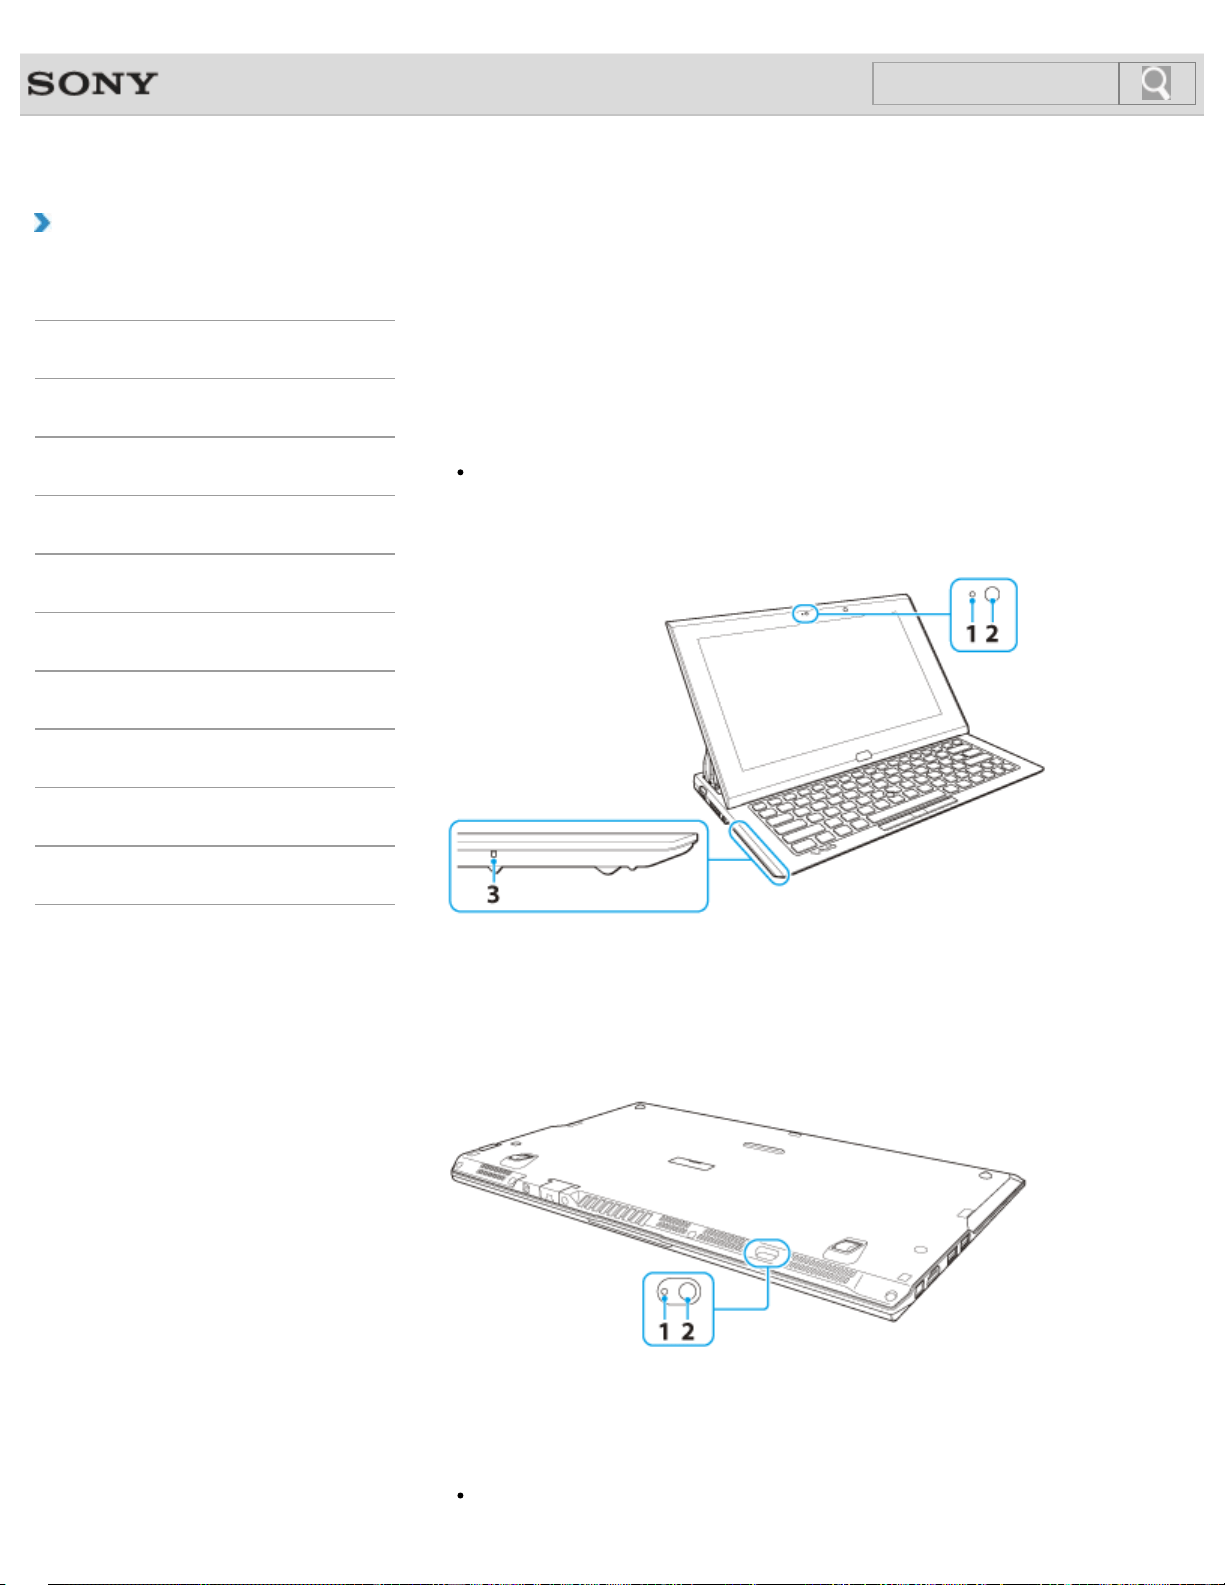
VAIO User Guide Back | Back to Top
Troubleshooting
How to Use
Windows 8: The Basics
Parts Description
Setup
Network / Internet
Connections
Settings
Backup / Recovery
Security
Other Operations
Notifications
Using the Built-in Camera
<Built-in camera equipped models>
You can make a video call through the Internet using the built-in camera and communication
apps.
The built-in camera indicator light is on while the built-in camera is in use.
Hint
The apps installed on your VAIO computer vary depending on the computer’s
configurations.
Front
1. Front camera indicator
2. Front camera
3. Built-in microphone (monaural)
Bottom
1. Rear camera indicator (Rear camera equipped models)
2. Rear camera (Rear camera equipped models)
Note
Using the front camera and the rear camera at the same time may limit the resolution.
274
Search


VAIO User Guide Back | Back to Top
Troubleshooting
How to Use
Windows 8: The Basics
Parts Description
Setup
Network / Internet
Connections
Settings
Backup / Recovery
Security
Other Operations
Notifications
Notes on the Built-in Camera
<Built-in camera equipped models>
Do not scratch or soil the area on and around the built-in camera, as it may cause poor-
quality images.
Do not let direct sunlight enter the lens of the built-in camera regardless of your VAIO
computer’s power state, as it may cause the camera to malfunction.
Care and cleaning of the built-in camera
If the area on and around the built-in camera is soiled, gently wipe it with a soft cloth, such
as a lens cleaning cloth. Do not rub the area too hard, as it can be easily scratched.
Related Topic
Using the Built-in Camera<Built-in camera equipped models>
© 2013 Sony Corporation
276
Search
VAIO User Guide Back | Back to Top
Troubleshooting
How to Use
Windows 8: The Basics
Parts Description
Setup
Network / Internet
Connections
Settings
Backup / Recovery
Security
Other Operations
Notifications
Encrypting Your Data with the TPM (BitLocker)
<TPM security chip equipped models>
<BitLocker supported models>
You can use BitLocker included with Windows 8 Pro to encrypt the data on the built-in
storage device.
Refer to Windows Help and Support for more information on the BitLocker settings and
operations. [Details]
To unlock the BitLocker-protected drive with a USB flash drive, follow these steps:
1. Press the ASSIST button while your VAIO computer is off.
The VAIO Care Rescue Mode screen appears.
2. Select Start BIOS setup.
Enter a password if it has already been set.
The BIOS setup screen appears.
3. Press the
or key to select the Security tab and change the Change TPM
State setting to Enable.
4. Press the
or key to select Boot and change the External Device Boot
setting to Enabled.
5. Change the boot device order to put Internal Hard Disk Drive in Boot Priority
before External Device.
6. Press the or key to select Exit, select Exit Setup, and then press the Enter
key.
7. When the confirmation prompt appears after your VAIO computer restarts, select
Execute.
8. Refer to Windows Help and Support to enable BitLocker.
9. Save a password on the USB flash drive in the recovery password save window.
Then, follow the on-screen instructions to restart your VAIO computer. After the
computer restarts, the BitLocker encryption starts.
Note
After you update the BIOS settings using VAIO Update, the BIOS settings are
restored to the default. In this case, you need to repeat the above steps.
It takes several hours to complete the BitLocker encryption.
Do not encrypt an external device containing the recovery password, such as a USB
flash drive, using Windows BitLocker Drive Encryption.
© 2013 Sony Corporation
277
Search

VAIO User Guide Back | Back to Top
Troubleshooting
How to Use
Windows 8: The Basics
Parts Description
Setup
Network / Internet
Connections
Settings
Backup / Recovery
Security
Other Operations
Notifications
Notes on Using the TPM
<TPM security chip equipped models>
Before using the Trusted Platform Module (TPM), read the following precautions for correct
use.
Notes on the BIOS settings
Resetting the TPM settings in the BIOS setup screen makes your TPM-encrypted data
inaccessible. If you have the TPM-encrypted data, make a backup copy before resetting
the settings, if needed.
Before enabling the TPM in the BIOS setup screen, set the BIOS password [Details] to
prevent unauthorized users from changing the TPM settings.
Notes on data management with the TPM
The TPM security feature on your VAIO computer does not ensure complete security of
your data and hardware.
Sony assumes no liability for any problems and damage arising out of your use of or
inability to use the TPM.
Back up your data on the TPM or the built-in storage device before sending your VAIO
computer for repair, and keep your backup data private from other users.
Sony assumes no liability for any data loss arising out of repairs.
The TPM will also be replaced if your computer motherboard needs replacement during
the course of repair.
Perform the operation and maintenance of the TPM-related data at your own risk. Sony
assumes no liability for any problems arising out of your operation and maintenance.
© 2013 Sony Corporation
278
Search
VAIO User Guide Back | Back to Top
Troubleshooting
How to Use
Windows 8: The Basics
Parts Description
Setup
Network / Internet
Connections
Settings
Backup / Recovery
Security
Other Operations
Notifications
Creating/Changing/Removing Your Windows
Password
Setting a Windows password allows you to protect your VAIO computer from unauthorized
access by requiring password entry when the computer is turned on or returns from power
saving mode to Normal mode.
Refer to Windows Help and Support for more information on the Windows password.
[Details]
1. Open the charms [Details] and select the
Settings charm.
2. Select Change PC settings in the lower right corner.
3. Select Users in the left pane of the PC settings screen.
4. Select Create a password or Change your password.
5. Follow the on-screen instructions to enter your password.
Note
Do not forget your password. Write down the password and keep it in a secure place.
Hint
You can enter a hint in order to recall your password if you forget it. You can also create
a password reset disc that can be used to create a new password. Refer to Windows
Help and Support for more information on the Windows password. [Details]
Related Topic
Setting/Changing the Power-on Password
© 2013 Sony Corporation
279
Search

VAIO User Guide Back | Back to Top
Troubleshooting
How to Use
Windows 8: The Basics
Parts Description
Setup
Network / Internet
Connections
Settings
Backup / Recovery
Security
Other Operations
Notifications
Solving Common Problems with Your VAIO
Computer
If you have any problem operating your VAIO computer, try these suggestions before
contacting an authorized Sony service/support center or your local Sony dealer directly.
1. See other sections in this on-screen manual.
2. Start VAIO Care (Desktop) [Details] and perform necessary operations.
3. Visit the VAIO online support website and find necessary information.
Related Topic
Keeping Your VAIO Computer in Optimum Condition (VAIO Care)
Read This First
About Online Support Website
© 2013 Sony Corporation
280
Search

VAIO User Guide Back | Back to Top
Troubleshooting
How to Use
Windows 8: The Basics
Parts Description
Setup
Network / Internet
Connections
Settings
Backup / Recovery
Security
Other Operations
Notifications
Creating Other Drives (Modifying Partitions)
Partitions are divided areas on your built-in storage device. Dividing the built-in storage
device into more than one partition may have various advantages, such as separating the
system files from your data files.
Your VAIO computer has only one partition (C: drive) as the factory default setting.
If you want to store data in another partition, such as D: drive, change the partition size and
create a new partition.
For more information on how to create partitions, see Creating Partitions. [Details]
Hint
Some models may have D: drive as the factory default setting.
Related Topic
Creating Partitions
Removing Recovery Content to Free up Disk Space
© 2013 Sony Corporation
281
Search
VAIO User Guide Back | Back to Top
Troubleshooting
How to Use
Windows 8: The Basics
Parts Description
Setup
Network / Internet
Connections
Settings
Backup / Recovery
Security
Other Operations
Notifications
Creating Partitions
This topic describes how to create partitions.
Note
If you reduce the volume of the C: drive partition, you may not create Recovery Media or
complete the recovery process successfully because the free space on the built-in
storage device is not sufficient.
1. Open Control Panel [Details], select System and Security, and select Create
and format hard disk partitions under Administrative Tools.
If the User Account Control window appears, select Yes.
Hint
If you are signed in to your VAIO computer as a standard user, you may be
prompted to enter an administrator name and password.
2. Right-click the C: drive and select Shrink Volume.
3. Enter the size of the partition to be created in Enter the amount of space to
shrink in MB and select Shrink.
4. Right-click Unallocated and select New Simple Volume.
5. Follow the on-screen instructions.
Related Topic
Creating Other Drives (Modifying Partitions)
Removing Recovery Content to Free up Disk Space
© 2013 Sony Corporation
282
Search

VAIO User Guide Back | Back to Top
Troubleshooting
How to Use
Windows 8: The Basics
Parts Description
Setup
Network / Internet
Connections
Settings
Backup / Recovery
Security
Other Operations
Notifications
About Backup
The backup process creates a backup copy of your data stored on the built-in storage device
and saves it to another location.
Due to unexpected events or computer viruses, you might lose various data stored on your
built-in storage device. To restore the lost data, its backup copy is needed.
It is strongly recommended that you back up your data regularly.
If you can start Windows, back up and restore your data with the Windows feature.
To use the feature, open Control Panel and select System and Security and File
History.
Related Topic
About Types of Backup
Backing Up Your Data when You cannot Start Windows
Restoring Your Data with VAIO Data Restore Tool
Creating a Restore Point
Restoring System Files Using the Restore Point when You cannot Start Windows
© 2013 Sony Corporation
283
Search

VAIO User Guide Back | Back to Top
Troubleshooting
How to Use
Windows 8: The Basics
Parts Description
Setup
Network / Internet
Connections
Settings
Backup / Recovery
Security
Other Operations
Notifications
About Types of Backup
You can use the Windows Backup and Restore feature to back up your valuable data.
There are several types of backup to meet your needs, as described below.
Backing up files
You can select and back up folders and files stored on your VAIO computer to an external
hard disk drive. For details on how to back up data, refer to Windows Help and
Support. [Details]
Backing up system images
You can create a backup copy of the whole system of your VAIO computer. If the built-in
storage device or the computer ever stops working, you can use the system image to restore
the computer as it was when backed up.
To create a system image, you need an optional hard disk drive formatted in NTFS format.
You can also back up a system image to optical discs such as Blu-ray Disc or DVD disc.
For details on how to create a system image, refer to Windows Help and Support.
[Details]
Note
We will not restore or compensate for any lost or damaged data under any
circumstances including failure of your VAIO computer.
Create Recovery Media soon after purchasing your VAIO computer. In the event that
you cannot make a backup copy of your data with the Windows feature due to computer
malfunctions, you can use the backup tool included in the Recovery Media to back up
your data.
For information on how to create the Recovery Media, see Creating Recovery
Media. [Details]
Hint
If your VAIO computer is equipped with no disc drive, you need to connect an external
device, such as an external hard disk drive or DVD drive, to the computer before
backup, or you need to resize the partition of your C: drive and create another partition
before backup. [Details]
Related Topic
About Backup
Backing Up Your Data when You cannot Start Windows
Restoring Your Data with VAIO Data Restore Tool
Restoring System Files Using the Restore Point when You cannot Start Windows
© 2013 Sony Corporation
284
Search

VAIO User Guide Back | Back to Top
Troubleshooting
How to Use
Windows 8: The Basics
Parts Description
Setup
Network / Internet
Connections
Settings
Backup / Recovery
Security
Other Operations
Notifications
Backing Up Your Data when You cannot Start
Windows
If you cannot start Windows, back up your data with VAIO Care (Rescue Mode) :
Recover or maintain your system.
To rescue your data
1. Press the ASSIST button while your VAIO computer is off.
The VAIO Care Rescue Mode screen appears.
2. Select Recover or maintain your system.
Follow the on-screen instructions until the Choose an option screen appears.
3. Select Troubleshoot and Recovery and maintenance.
Follow the on-screen instructions until the VAIO Care (Rescue Mode) : Recover
or maintain your system screen appears.
Hint
If the display language selection window appears, select your desired language,
then OK.
4. Select Tools and Rescue Data.
5. Follow the on-screen instructions.
Hint
Alternatively, you can start VAIO Care (Rescue Mode) : Recover or maintain
your system with Recovery Media. [Details]
It is recommended that you select an external hard disk drive as a location to save
rescued files if you select Custom rescue.
Notes on using VAIO Care (Rescue Mode) : Recover or maintain
your system
Handle rescued files with care to protect from unauthorized access.
Disable the Windows hard disk drive encryption feature before using VAIO Care
(Rescue Mode) : Recover or maintain your system to back up and restore
your data.
However, rescued files which are not encrypted on the built-in storage device can be
easily accessed by unauthorized users using Recovery Media and this app. Therefore,
after using the app, be sure to set the power-on or hard disk password, enable the
Windows hard disk drive encryption feature, and keep the Recovery Media in a secure
place to protect rescued files from unauthorized access.
To restore copyright protected data, such as music files organized by digital media
playback apps, use a backup tool specified by the app you used to import such data.
Sony does not guarantee the playback compatibility of data which is not restored with
the specified backup tool.
Using VAIO Care (Rescue Mode) : Recover or maintain your system does
not guarantee backup of all the data on your built-in storage device.
Sony assumes no liabilities for any loss of your data arising out of the backup process.
Use the power cord or the AC adapter to power your VAIO computer while using VAIO
Care (Rescue Mode) : Recover or maintain your system.
285
Search

Your VAIO computer automatically restarts 72 hours after VAIO Care (Rescue
Mode) : Recover or maintain your system starts. If 72 hours have passed
during the backup process, the process will be stopped and the computer will restart.
There is no way to resume the process.
Rescued files may be divided into two or more files and saved in a specified location or
renamed, depending on the location you select. Use VAIO Data Restore Tool to
restore the rescued files. [Details]
If an external hard disk drive or optical disc drive does not support the USB connection,
you need to install a driver.
Related Topic
About Backup
About Types of Backup
Restoring Your Data with VAIO Data Restore Tool
Creating a Restore Point
Restoring System Files Using the Restore Point when You cannot Start Windows
© 2013 Sony Corporation
286
Search

VAIO User Guide Back | Back to Top
Troubleshooting
How to Use
Windows 8: The Basics
Parts Description
Setup
Network / Internet
Connections
Settings
Backup / Recovery
Security
Other Operations
Notifications
Creating a Restore Point
A restore point enables you to restore your computer system files to a previous state,
depending on when the restore point was created.
Typically, restore points are created automatically, for example when you install a driver.
However, we recommend that you create a new restore point manually before installing any
apps or drivers on your VAIO computer.
Refer to Windows Help and Support for information on creating a restore point.
[Details]
Related Topic
Restoring Your Data with VAIO Data Restore Tool
Restoring System Files Using the Restore Point when You cannot Start Windows
© 2013 Sony Corporation
287
Search

VAIO User Guide Back | Back to Top
Troubleshooting
How to Use
Windows 8: The Basics
Parts Description
Setup
Network / Internet
Connections
Settings
Backup / Recovery
Security
Other Operations
Notifications
Restoring System Files Using the Restore Point
when You cannot Start Windows
When you cannot start Windows, follow these steps to restore computer system files.
On the model without a built-in optical disc drive, connect an external optical disc drive (not
supplied) to the computer. [Details]
If an AC adapter or a power cable is supplied, plug it into a power source.
1. Insert Recovery Media (optical discs) into the optical disc drive or connect a USB flash
drive to the USB port on your VAIO computer while the computer is in Normal mode.
2. Turn off your VAIO computer.
3. Press the ASSIST button to display the VAIO Care Rescue Mode screen and
select Start from media (USB device/optical disc).
Follow the on-screen instructions until the Choose an option screen appears.
4. Select Troubleshoot, Advanced options, and System Restore.
5. Select your operating system.
The System Restore window appears.
6. Select Next.
7. Select a restore point and Next.
The confirmation window of the selected restore point appears.
8. Select Finish to confirm the restore point.
Your VAIO computer restarts after system files are restored.
Related Topic
About Backup
About Types of Backup
Backing Up Your Data when You cannot Start Windows
Restoring Your Data with VAIO Data Restore Tool
Creating a Restore Point
© 2013 Sony Corporation
288
Search

VAIO User Guide Back | Back to Top
Troubleshooting
How to Use
Windows 8: The Basics
Parts Description
Setup
Network / Internet
Connections
Settings
Backup / Recovery
Security
Other Operations
Notifications
Restoring Your Data with VAIO Data Restore Tool
You can use VAIO Data Restore Tool to restore files previously backed up using VAIO
Care (Rescue Mode) : Recover or maintain your system.
For instructions on how to use the app, refer to the help file included with the app.
1. Open the charms [Details] and select the
Search charm.
2. Select Apps and enter “VAIO Data Restore Tool“ in the search box.
3. Select VAIO Data Restore Tool.
The VAIO Data Restore Tool window appears.
4. Select Next.
If the User Account Control window appears, select Yes.
Hint
If you are signed in to your VAIO computer as a standard user, you may be
prompted to enter an administrator name and password.
5. Follow the on-screen instructions.
Note
To restore copyright protected data, such as music files organized by digital media
playback apps, use a backup tool specified by the app you used to import such data.
Sony does not guarantee the playback compatibility of data which is not restored with
the specified backup tool.
Hint
If necessary, move the restored files to the original location.
Related Topic
About Backup
About Types of Backup
Backing Up Your Data when You cannot Start Windows
Creating a Restore Point
Restoring System Files Using the Restore Point when You cannot Start Windows
© 2013 Sony Corporation
289
Search

VAIO User Guide Back | Back to Top
Troubleshooting
How to Use
Windows 8: The Basics
Parts Description
Setup
Network / Internet
Connections
Settings
Backup / Recovery
Security
Other Operations
Notifications
About NFC
<NFC supported models>
Near Field Communication (NFC) is a short-range wireless technology.
The communication distance of NFC is approximately 4 inches / 10 cm.
Related Topic
About One-touch functions<NFC supported models>
Using NFC/One-touch functions<NFC supported models>
Disabling NFC/One-touch functions<NFC supported models>
Notes on NFC/One-touch functions<NFC supported models>
© 2013 Sony Corporation
290
Search

VAIO User Guide Back | Back to Top
Troubleshooting
How to Use
Windows 8: The Basics
Parts Description
Setup
Network / Internet
Connections
Settings
Backup / Recovery
Security
Other Operations
Notifications
About One-touch functions
<NFC supported models>
One-touch functions are Sony original functions which use NFC.
Simply touch two One-touch functions supported devices to easily establish communication,
without complicated settings.
Related Topic
About NFC<NFC supported models>
Using NFC/One-touch functions<NFC supported models>
Disabling NFC/One-touch functions<NFC supported models>
Notes on NFC/One-touch functions<NFC supported models>
© 2013 Sony Corporation
291
Search
VAIO User Guide Back | Back to Top
Troubleshooting
How to Use
Windows 8: The Basics
Parts Description
Setup
Network / Internet
Connections
Settings
Backup / Recovery
Security
Other Operations
Notifications
Disabling NFC/One-touch functions
<NFC supported models>
You can disable NFC/One-touch functions by following these steps.
1. Open the charms [Details] and select the
Settings charm.
2. Select Change PC settings in the lower right corner.
3. Select Wireless in the left pane of the PC settings screen.
4. Change the NFC setting under Wireless devices to Off.
Hint
To use NFC/One-touch functions, change Airplane mode to Off and the NFC setting
under Wireless devices to On.
When Airplane mode is Off, the wireless function setting is enabled and the
WIRELESS indicator light is on.
For detailed information on Airplane mode, refer to Windows Help and Support.
[Details]
Related Topic
About NFC<NFC supported models>
About One-touch functions<NFC supported models>
Using NFC/One-touch functions<NFC supported models>
Notes on NFC/One-touch functions<NFC supported models>
© 2013 Sony Corporation
292
Search

VAIO User Guide Back | Back to Top
Troubleshooting
How to Use
Windows 8: The Basics
Parts Description
Setup
Network / Internet
Connections
Settings
Backup / Recovery
Security
Other Operations
Notifications
Notes on NFC/One-touch functions
<NFC supported models>
In some countries or regions, using NFC/One-touch functions may be restricted by local
regulations.
If you urgently need to disable NFC/One-touch functions, turn off your VAIO computer.
Related Topic
About NFC<NFC supported models>
About One-touch functions<NFC supported models>
Using NFC/One-touch functions<NFC supported models>
Disabling NFC/One-touch functions<NFC supported models>
© 2013 Sony Corporation
293
Search
VAIO User Guide Back | Back to Top
Troubleshooting
How to Use
Windows 8: The Basics
Parts Description
Setup
Network / Internet
Connections
Settings
Backup / Recovery
Security
Other Operations
Notifications
Using NFC/One-touch functions
<NFC supported models>
Easily connect an NFC/One-touch functions supported device to your VAIO computer by
simply touching the computer with the device.
Before using NFC/One-touch functions, follow these steps to enable NFC.
1. Open the charms [Details] and select the
Settings charm.
2. Select Change PC settings in the lower right corner.
3. Select Wireless in the left pane of the PC settings screen.
4. Change Airplane mode to Off and the NFC setting under Wireless devices to
On.
Hint
For detailed information on Airplane mode, refer to Windows Help and
Support. [Details]
5. When touching your VAIO computer with an NFC/One-touch functions supported
device, ensure that the touch marks on each device face each other. [Details]
A message will appear the moment the device is recognized.
Follow the on-screen instructions.
Hint
You may need to change the device settings depending on the NFC/One-touch
functions supported device you use. For detailed information, refer to the manual that
came with your device.
Related Topic
About NFC<NFC supported models>
About One-touch functions<NFC supported models>
Disabling NFC/One-touch functions<NFC supported models>
Notes on NFC/One-touch functions<NFC supported models>
© 2013 Sony Corporation
294
Search

VAIO User Guide Back | Back to Top
Troubleshooting
How to Use
Windows 8: The Basics
Parts Description
Setup
Network / Internet
Connections
Settings
Backup / Recovery
Security
Other Operations
Notifications
Adjusting the Optical Trackpad Sensitivity
You can change the pointer speed by adjusting the Optical Trackpad sensitivity according to
your preference.
The more you decrease the sensitivity, the slower the pointer speed becomes.
The more you increase the sensitivity, the faster the pointer speed becomes.
1. Start VAIO Control Center [Details] and select Mouse and Keyboard.
2. Select Details under Built-in Pointing Devices.
3. Select the Pointer tab.
4. Drag the Pointer Speed slider to adjust the speed.
5. Select OK.
Related Topic
Using the Optical Trackpad
Disabling the Tapping Function on the Optical Trackpad
Enabling/Disabling the Optical Trackpad
© 2013 Sony Corporation
295
Search

VAIO User Guide Back | Back to Top
Troubleshooting
How to Use
Windows 8: The Basics
Parts Description
Setup
Network / Internet
Connections
Settings
Backup / Recovery
Security
Other Operations
Notifications
Disabling the Tapping Function on the Optical
Trackpad
You can disable the tapping function to avoid unintentional clicks caused by a light touch on
the Optical Trackpad during the keyboard operations.
1. Start VAIO Control Center [Details] and select Mouse and Keyboard.
2. Select Details under Built-in Pointing Devices.
3. Select the Button tab.
4. Clear the Enable Tapping check box.
5. Select OK.
Related Topic
Using the Optical Trackpad
Enabling/Disabling the Optical Trackpad
Adjusting the Optical Trackpad Sensitivity
© 2013 Sony Corporation
296
Search

VAIO User Guide Back | Back to Top
Troubleshooting
How to Use
Windows 8: The Basics
Parts Description
Setup
Network / Internet
Connections
Settings
Backup / Recovery
Security
Other Operations
Notifications
Enabling/Disabling the Optical Trackpad
You can enable/disable the Optical Trackpad on your VAIO computer.
1. Press and hold down the Fn key and press the F1 key.
Each time you press the keys, the Optical Trackpad is enabled/disabled.
Related Topic
Using the Optical Trackpad
Disabling the Tapping Function on the Optical Trackpad
Adjusting the Optical Trackpad Sensitivity
© 2013 Sony Corporation
297
Search

VAIO User Guide Back | Back to Top
Troubleshooting
How to Use
Windows 8: The Basics
Parts Description
Setup
Network / Internet
Connections
Settings
Backup / Recovery
Security
Other Operations
Notifications
Using the Optical Trackpad
By moving your finger on the Optical Trackpad, you can move the pointer on the computer
screen.
With the pointer on your desired item or object, press the left button or the right button to
execute various commands or display menus.
To click
With the pointer on your desired item or object, press the left button (2) once.
Alternatively, tap on the Optical Trackpad (1) once.
To double-click
With the pointer on your desired item or object, press the left button twice quickly.
Alternatively, tap on the Optical Trackpad twice quickly.
To right-click
With the pointer on your desired item or object, press the right button (4) once.
Depending on the location of the pointer, you can display various shortcut menus.
To drag
With the pointer on your desired item or object, press the left button once, and while holding
down the button, move your finger on the Optical Trackpad.
To drag and drop
Drag an icon, such as a file, to your desired location and release your finger from the left
button.
To scroll
Move your finger back and forth on the Optical Trackpad while pressing the center button (3)
to scroll vertically.
Note
The scroll function may not work depending on the operating condition of your VAIO
computer or the Optical Trackpad settings.
Related Topic
Disabling the Tapping Function on the Optical Trackpad
Enabling/Disabling the Optical Trackpad
Adjusting the Optical Trackpad Sensitivity
298
Search

© 2013 Sony Corporation
299
Search
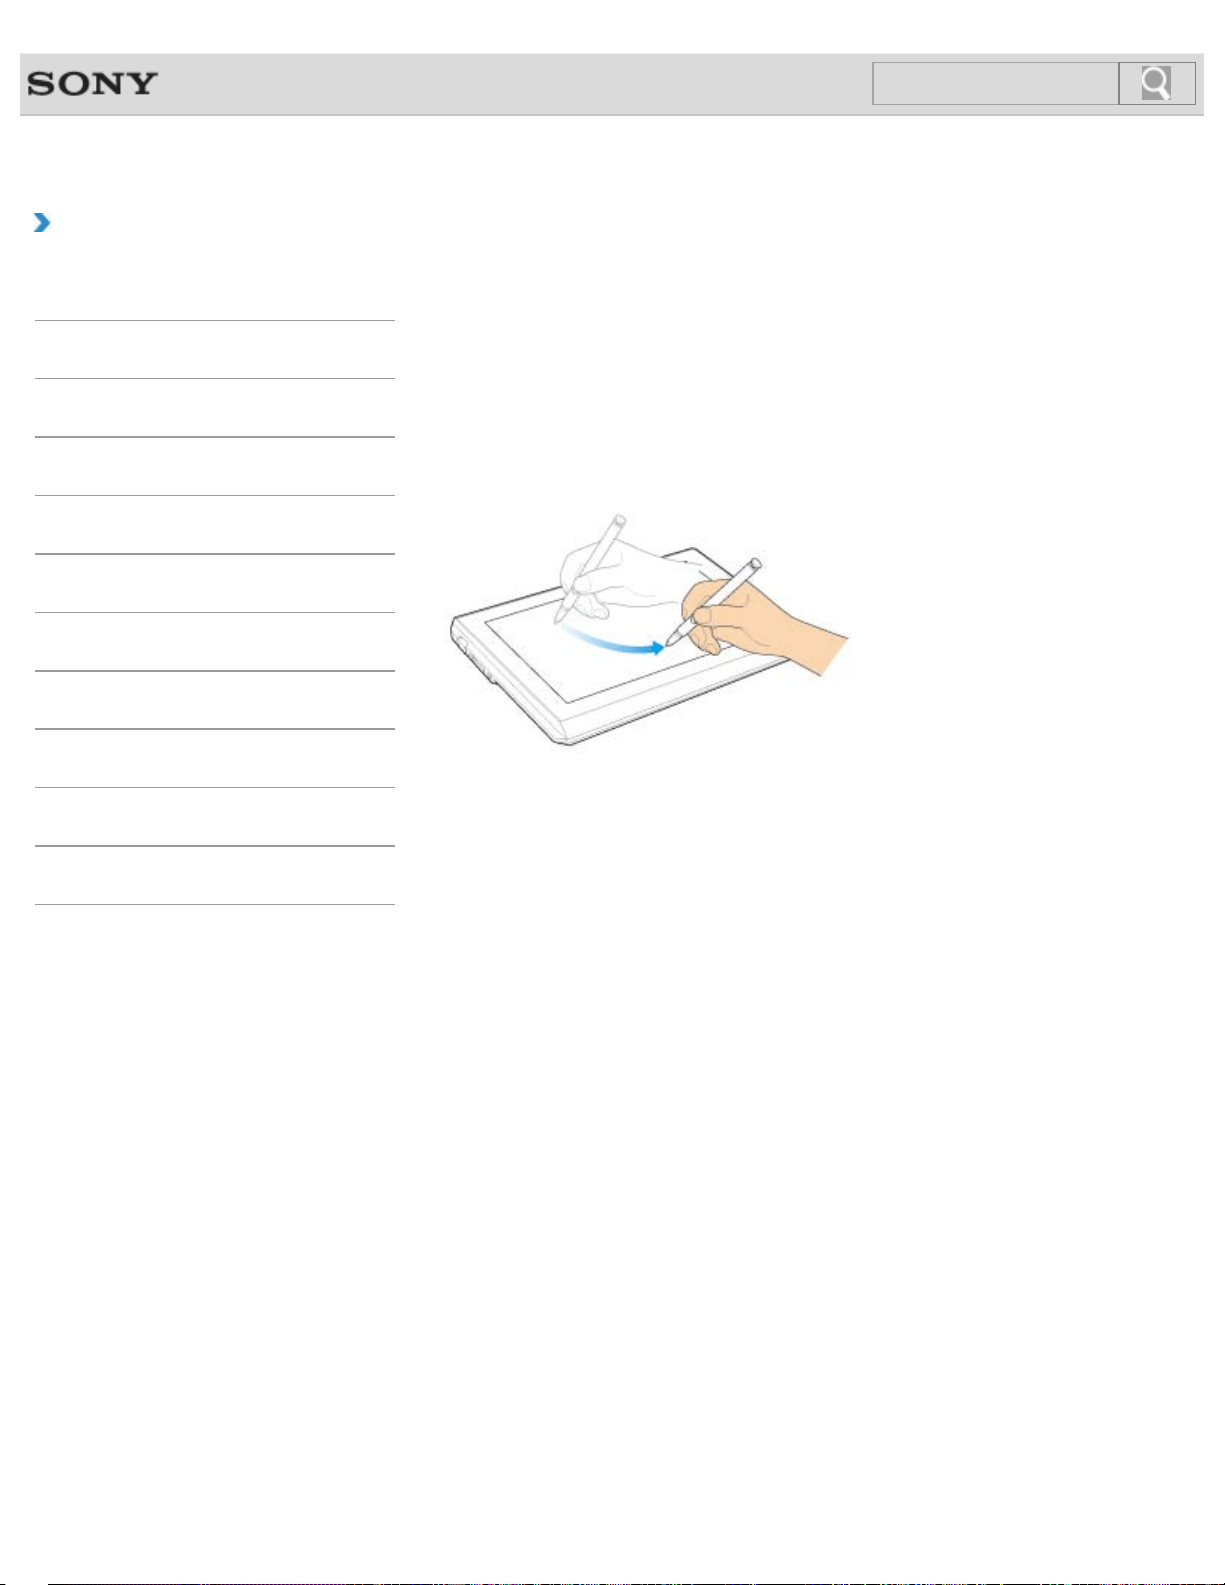
VAIO User Guide Back | Back to Top
Troubleshooting
How to Use
Windows 8: The Basics
Parts Description
Setup
Network / Internet
Connections
Settings
Backup / Recovery
Security
Other Operations
Notifications
How to Use the Pen
<Digitizer Stylus supplied models>
Using the supplied pen (Digitizer Stylus), you can operate your VAIO computer intuitively, by
touching the screen softly or tracing something on the screen.
To move the pointer on the screen
Hold the pen over the screen without touching it, then move the pen in the desired direction.
To click (tap)
Tap the desired point on the screen with the pen.
This is used to select an option, such as OK or Cancel, to select a menu item, or other
operations.
To double-click (double-tap)
Tap the desired point on the screen twice in quick succession with the pen.
You can start an app, such as a word processor or a spreadsheet program, or open a file by
double-tapping its icon.
To right-click (press and hold down)
Press and hold down the lower button of the pen, then tap at the desired point once. Drop-
down menus appear, depending on where you tapped the screen.
300
Search
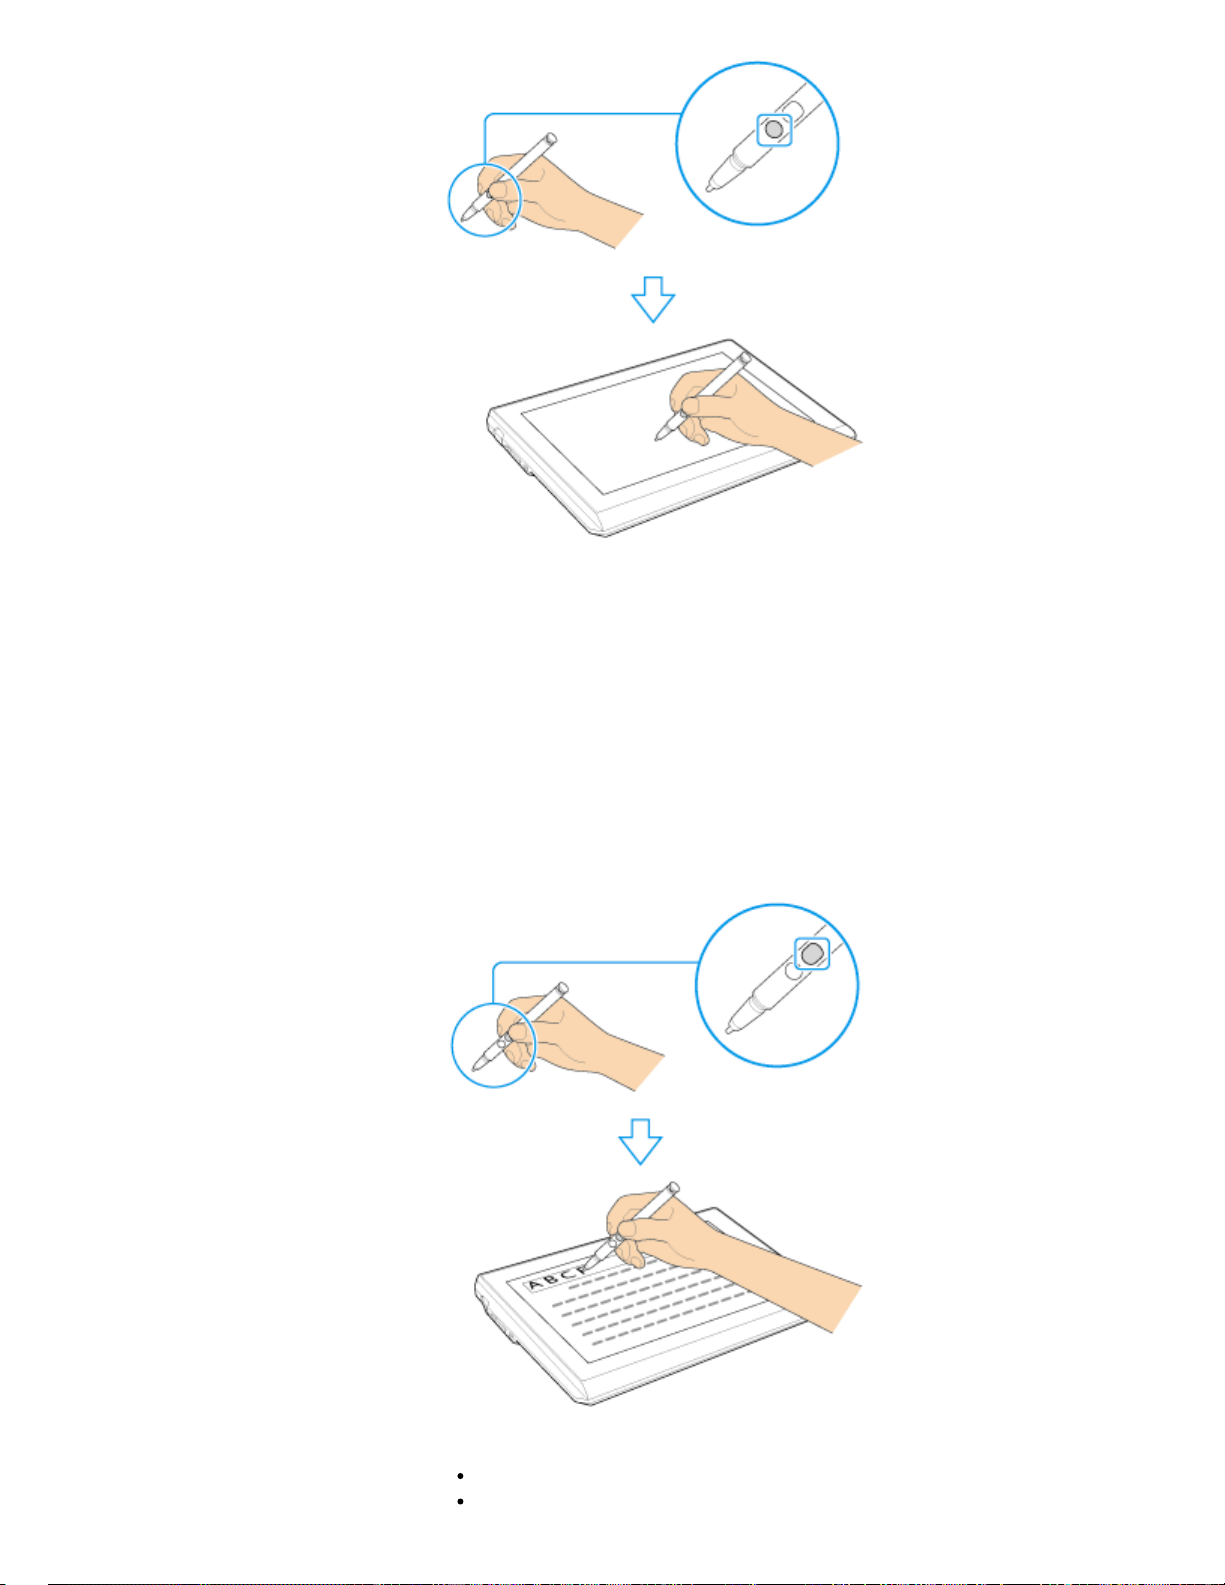
You can also do the same operation by holding the pen at the desired point for a few
seconds.
To drag
Gently place the pen on the item to be moved, then trace on the screen to move it.
To erase text
Depending on the app, you can erase text.
Press and hold down the upper button of the pen, gently place the pen on the first text item
to be erased, then trace the pen over the text to the last text item to be erased.
Note
Use the supplied pen or an optionally specified pen.
This pen does not have a power supply switch. Insert the necessary battery in the pen to
301
Search
operate.
You can use the pen with your hand resting on the screen. If you move the pen towards
the touch screen, you cannot control the touch screen with fingers.
Depending on the screen, you cannot use the pen to scroll the screen.
If the pen does not function correctly, replace the battery. [Details]
Replace the pen’s nib if the writing is not smooth, or you wish to try another shape nib.
[Details]
To prevent them from being swallowed, keep the pen’s nib and cap out of children’s
reach.
Hint
Some apps sense the pressure of the pen and will change the thickness of the line
accordingly.
Push the button of the pen near the screen to start an app. (Active Clip [Details])
Related Topic
How to Use the Touch Screen<Touch screen equipped models>
Clipping an Image Displayed on the Computer Screen (Active Clip)
© 2013 Sony Corporation
302
Search
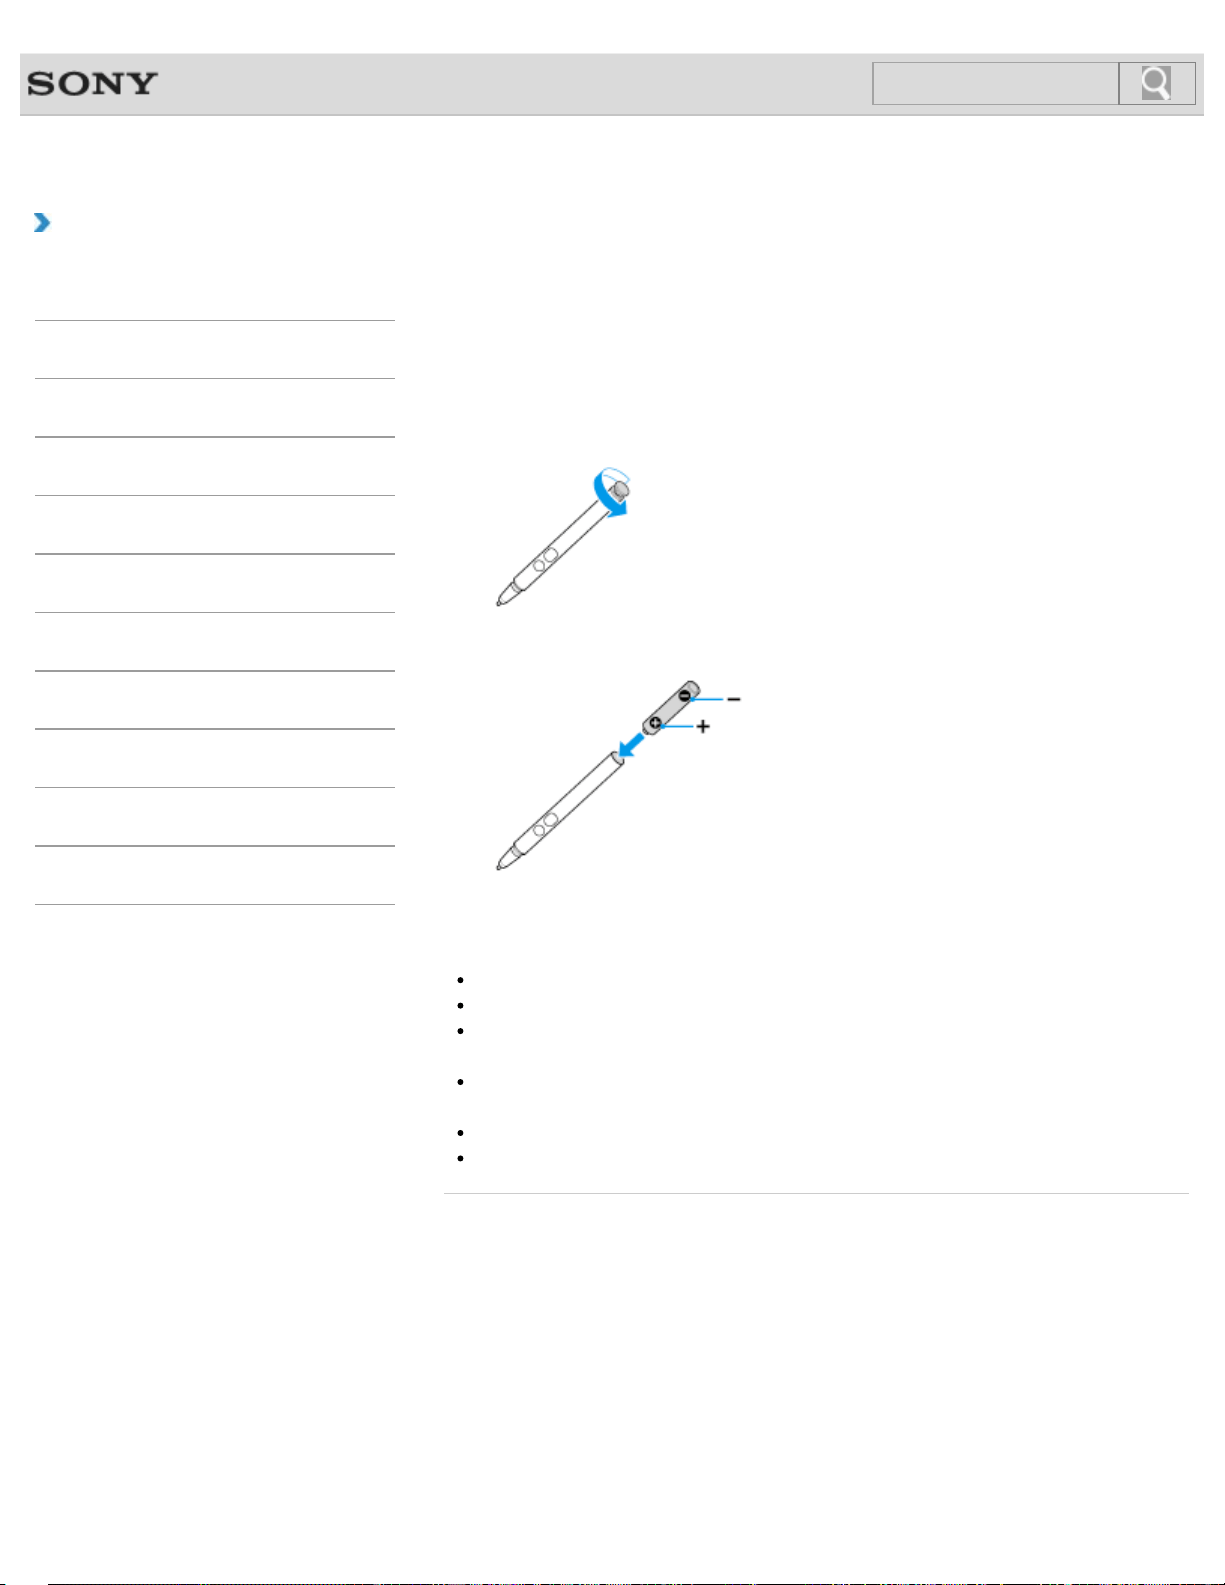
VAIO User Guide Back | Back to Top
Troubleshooting
How to Use
Windows 8: The Basics
Parts Description
Setup
Network / Internet
Connections
Settings
Backup / Recovery
Security
Other Operations
Notifications
Replacing the Battery of the Pen
<Digitizer Stylus supplied models>
Replace the battery when the pen (Digitizer Stylus) begins to function incorrectly.
Based on usage of approximately 4 hours a day, expect to replace the battery every 18
months. Use an LR61 (LR8D425) alkaline battery.
1. Remove the Tail cap from the barrel of the pen, then pull out the battery.
2. Insert the battery into the pen with the + side toward the nib.
3. Reattach the Tail cap.
Note
Do not remove the Tail cap except for when replacing the battery.
If you do not intend to use the pen for a while, remove the battery.
The pen should not be used with a commercially available rechargeable battery. Using a
rechargeable battery may result in battery leakage and malfunction.
When the battery power becomes low, replace with a new battery promptly. Keeping a
depleted battery in the pen may cause battery leakage.
Do not attempt to recharge a battery.
Refer to the supplied safety manual.
© 2013 Sony Corporation
303
Search
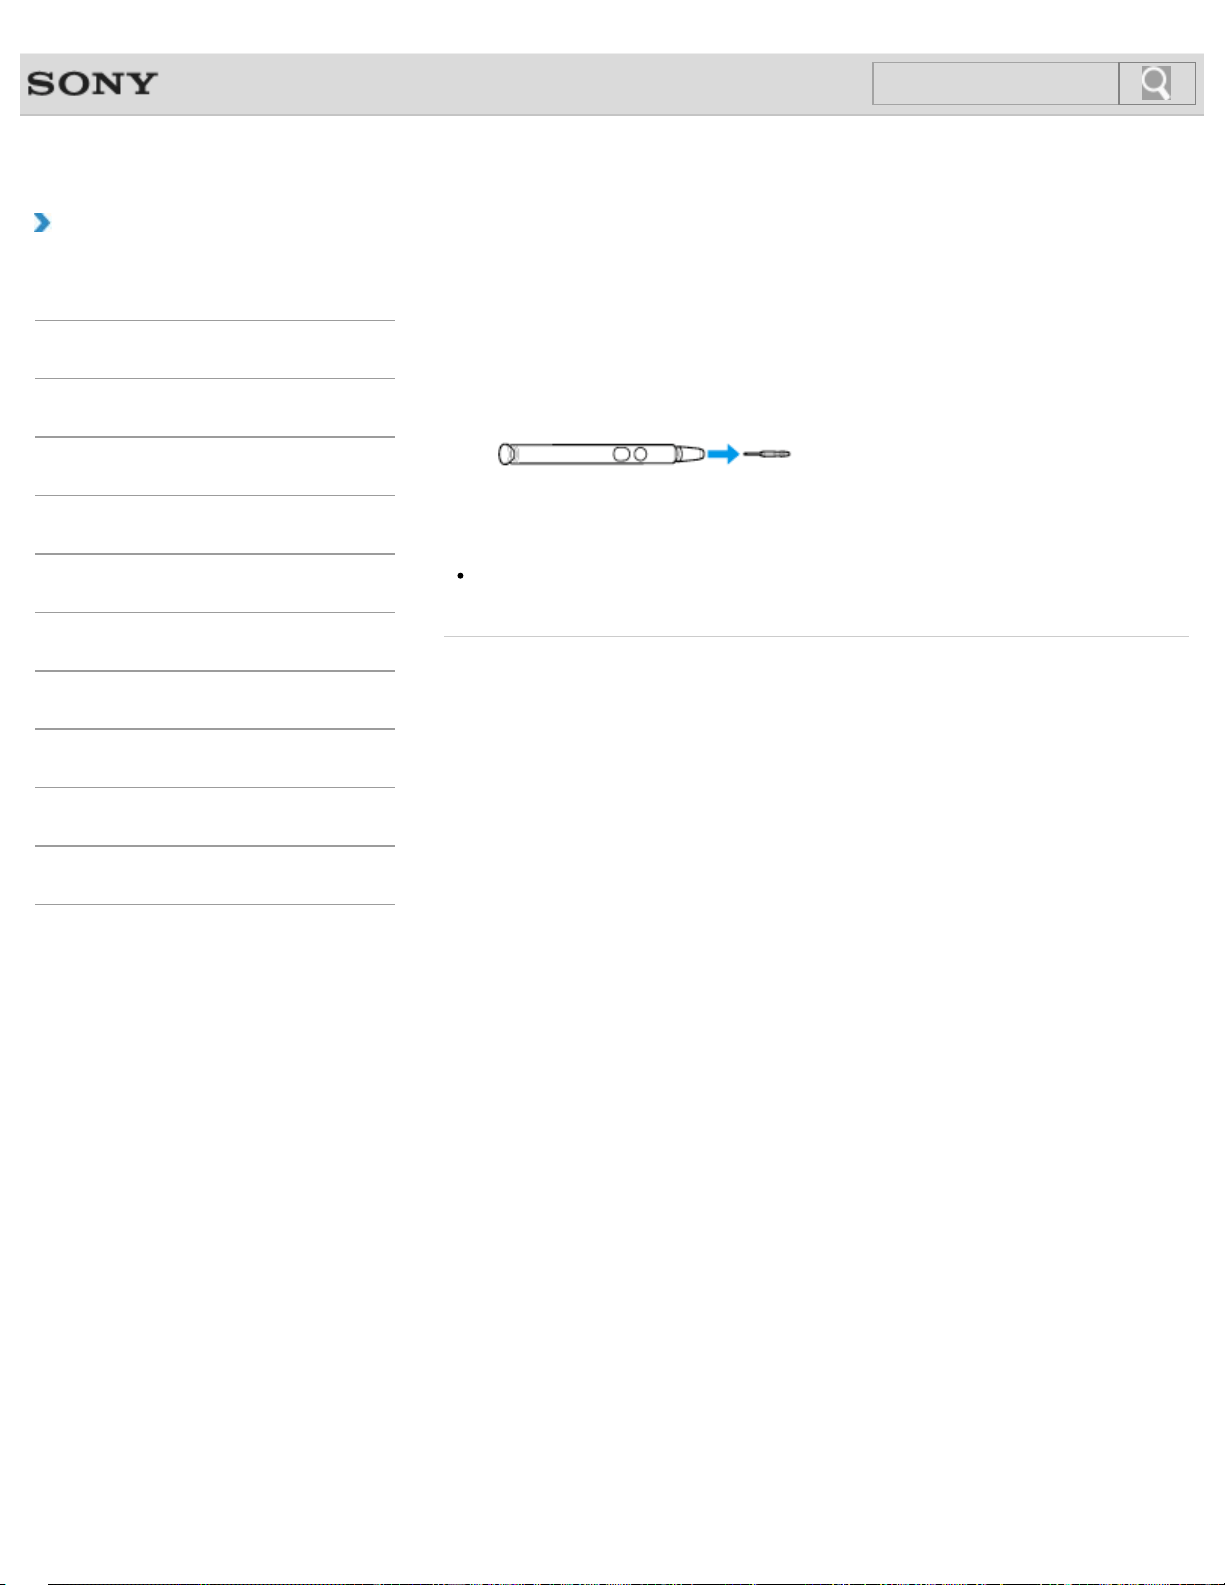
VAIO User Guide Back | Back to Top
Troubleshooting
How to Use
Windows 8: The Basics
Parts Description
Setup
Network / Internet
Connections
Settings
Backup / Recovery
Security
Other Operations
Notifications
Replacing the Nib
<Digitizer Stylus supplied models>
Replace with a new nib (supplied) if the writing is not smooth, or you wish to try another
shape nib.
1. Grasp the tip of the pen, then pull out straight.
2. Check the direction of the new nib and insert it into the barrel of the pen.
Note
If the pen’s nib is lost or broken, contact an authorized Sony service/support center.
© 2013 Sony Corporation
304
Search

VAIO User Guide Back | Back to Top
Troubleshooting
How to Use
Windows 8: The Basics
Parts Description
Setup
Network / Internet
Connections
Settings
Backup / Recovery
Security
Other Operations
Notifications
Cleaning Your VAIO computer/LCD screen
Before cleaning your VAIO computer, read the following precautions for the correct cleaning
procedure.
When cleaning your VAIO computer
Use a soft, dry cloth to wipe debris and dust off your VAIO computer.
Be sure to use a soft, dry cloth when cleaning your VAIO computer. If the computer is
badly soiled, fog the surface of the computer with your breath and wipe off the dirt, or
clean off with a lightly wet cloth and then wipe remaining moisture away with a dry cloth.
Do not use solvents such as benzine, acetone, alcohol, thinner, or commercially
available cleaners, as these may cause damage to the surface or coating of your VAIO
computer.
Use a blower to blow off debris and dust underneath the keys (keycaps). Do not remove
any keycap from the keyboard.
Do not use a vacuum cleaner, as it may cause a malfunction.
When cleaning your LCD screen
Be sure to use a soft, dry cloth when cleaning your VAIO computer. If the LCD screen is
badly soiled, fog the surface of the LCD screen with your breath and wipe off the dirt, or
clean off with a lightly wet cloth and then wipe remaining moisture away with a dry cloth.
Do not use solvents such as benzine, acetone, alcohol, thinner, or commercially
available cleaners, as these may cause damage to the LCD screen.
© 2013 Sony Corporation
305
Search
VAIO User Guide Back | Back to Top
Troubleshooting
How to Use
Windows 8: The Basics
Parts Description
Setup
Network / Internet
Connections
Settings
Backup / Recovery
Security
Other Operations
Notifications
About the International ENERGY STAR(R)
Program
The following information is applicable to ENERGY STAR qualified products only.
As an ENERGY STAR Partner, Sony confirmed that this product meets the ENERGY STAR
standards for energy efficiency.
The International ENERGY STAR Office Equipment Program is an international program that
promotes energy saving through the use of computers and office equipment. The program
backs the development and dissemination of products with functions that effectively reduce
energy consumption.
For detailed information on the ENERGY STAR Program, visit the following websites:
http://www.energystar.gov/ (USA)
http://www.eu-energystar.org/ (Europe)
This computer is designed in compliance with the ENERGY STAR standards and delivered
with the following power saving settings that apply to the computer running on AC power:
The LCD backlight is turned off automatically after no more than 15 minutes of inactivity.
The computer enters Sleep mode automatically after no more than 30 minutes of
inactivity.
Press the
(Power) button to bring the computer back into Normal mode.
© 2013 Sony Corporation
306
Search

VAIO User Guide Back | Back to Top
Troubleshooting
How to Use
Windows 8: The Basics
Parts Description
Setup
Network / Internet
Connections
Settings
Backup / Recovery
Security
Other Operations
Notifications
About the Software License
This product contains software owned by Sony and licensed by third parties. Use of such
software is subject to the terms and conditions of license agreements enclosed with this
product.
Related Topic
Read This First
© 2013 Sony Corporation
307
Search
VAIO User Guide Back | Back to Top
Troubleshooting
How to Use
Windows 8: The Basics
Parts Description
Setup
Network / Internet
Connections
Settings
Backup / Recovery
Security
Other Operations
Notifications
Handling the Built-in Storage Device
The built-in storage device (hard disk drive or solid state drive) has a high storage density
and reads or writes data in a short time. However, it can be easily damaged if improperly
used.
If the built-in storage device is damaged, the data cannot be restored. To prevent losing
data, you should be careful when handling your VAIO computer.
To avoid damaging your built-in storage device
Do not subject your VAIO computer to sudden movements.
Keep your VAIO computer away from magnets.
Do not place your VAIO computer in a location subject to mechanical vibration or in an
unstable position.
Do not turn off the power or restart your VAIO computer while reading or writing data to
the storage device.
Do not use your VAIO computer in a place subject to extreme changes in temperature.
Do not remove the storage device from your VAIO computer.
© 2013 Sony Corporation
308
Search

VAIO User Guide Back | Back to Top
Troubleshooting
How to Use
Windows 8: The Basics
Parts Description
Setup
Network / Internet
Connections
Settings
Backup / Recovery
Security
Other Operations
Notifications
Safety Information
Refer to the supplied safety manual for detailed safety information.
Computer
If you drop a solid object or any liquid onto your VAIO computer, shut down the
computer, unplug it, and remove the battery pack if it is removable. You may want to
have the computer checked by qualified personnel before operating it again.
Use only specified peripheral equipment and interface cables.
Keep small parts such as “Memory Stick” and “Memory Stick” adaptors out of reach of
children. There is a risk of swallowing them.
The temperature of the surface and the bottom of your VAIO computer, the AC adapter,
and the battery may rise due to the CPU load or an electric current generated while the
battery is being charged. This is normal and does not indicate a malfunction. The
amount of heat generation varies depending on external devices or apps in use.
If your VAIO computer or the AC adapter becomes extraordinarily hot, turn off the
computer, unplug the AC adapter, remove the battery pack if it is removable, and then
contact an authorized Sony service/support center.
Power source
Do not place heavy objects on the power cord, or this could cause a fire.
To disconnect the power cord, pull it out by holding the plug. Never pull the cord itself.
Do not use cut or damaged connection cables.
Unplug your VAIO computer from the AC outlet if you are not planning to use the
computer for an extended period of time.
Headphones
Do not use headphones while driving, cycling, or operating any motorized vehicle. It may
create a traffic hazard and is illegal in some areas. It can also be potentially dangerous
to play loud music while walking, especially at pedestrian crossings.
Avoid using headphones at high volume. Hearing experts advise against continuous,
loud and extended play. If you experience a ringing in your ears, reduce the volume or
discontinue use.
© 2013 Sony Corporation
309
Search
VAIO User Guide Back | Back to Top
Troubleshooting
How to Use
Windows 8: The Basics
Parts Description
Setup
Network / Internet
Connections
Settings
Backup / Recovery
Security
Other Operations
Notifications
Trademarks
© 2013 Sony Electronics Inc. All rights reserved. Reproduction in whole or in part
without written permission is prohibited.
Sony and the Sony logo are trademarks or registered trademarks of Sony Corporation.
VAIO, the VAIO logo and other Sony product or service names are trademarks or
registered trademarks of Sony Corporation or any of its affiliates.
i.LINK is a name to denote IEEE 1394.
Intel, Intel Inside, Intel Core, Pentium, Intel SpeedStep, and Atom are trademarks or
registered trademarks of Intel Corporation in the United States and/or other countries.
Windows and the Windows logo are either registered trademarks or trademarks of
Microsoft Corporation in the United States and/or other countries.
Blu-ray Disc™, Blu-ray™, Blu-ray 3D™, the Blu-ray Disc logo, and the Blu-ray 3D logo
are trademarks of the Blu-ray Disc Association.
The BLUETOOTH word mark and logos are registered trademarks owned by Bluetooth
SIG, Inc. and any use of such marks by Sony Corporation is under license. Other
trademarks and trade names are those of their respective owners.
Power2Go is trademark of CyberLink.Inc.
PowerDVD is trademark of CyberLink.Inc.
NVIDIA and 3D Vision are registered trademarks and/or trademarks of NVIDIA
Corporation in the United States and other countries.
ArcSoft and the ArcSoft logo are registered trademarks of ArcSoft, Inc. ArcSoft
WebCam Companion is a trademark of ArcSoft, Inc.
AMD, the AMD Arrow logo, ATI, and combinations thereof, Radeon, AMD Phenom, AMD
Turion, AMD Athlon, AMD Virtualization, AMD-V are trademarks of Advanced Micro
Devices, Inc.
SD Logo is a trademark.
SDHC Logo is a trademark.
SDXC Logo is a trademark.
The ExpressCard word mark and logos are owned by the PCMCIA and any use of such
marks by Sony Corporation is under license. Other trademarks and trade names are
those of their respective owners.
The terms HDMI and HDMI High-Definition Multimedia Interface, and the HDMI Logo are
trademarks or registered trademarks of HDMI Licensing LLC in the United States and
other countries.
CompactFlash® is a trademark of SanDisk Corporation.
“PlaceEngine” is a registered trademark of Koozyt, Inc.
“PlaceEngine” was developed by Sony Computer Science Laboratories, Inc. and is
licensed by Koozyt, Inc.
“AVCHD” is a trademark of Panasonic Corporation and Sony Corporation.
Manufactured under license from Dolby Laboratories. Dolby and the double-D symbol
are trademarks of Dolby Laboratories.
ENERGY STAR and the ENERGY STAR mark are registered U.S. marks.
The N Mark is a trademark or registered trademark of NFC Forum, Inc. in the United
States and in other countries.
Wi-Fi is a trademark or registered trademark of Wi-Fi Alliance.
All other names of systems, products, and services are trademarks of their respective
310
Search

owners. In the manual, the ™ or ® marks are not specified.
Features and specifications are subject to change without notice.
All other trademarks are trademarks of their respective owners.
Not all the software listed above may be delivered with your model.
© 2013 Sony Corporation
311
Search

VAIO User Guide Back | Back to Top
How to Use
Troubleshooting
Hardware
Apps
Network / Internet
Backup / Recovery
Security
Peripheral Devices
Audio
What should I do if I do not hear sound from a digital audio device connected
to the digital output port, such as the HDMI output port?
What should I do if I do not hear sound from speakers or headphones?
What should I do if I hear microphone feedback from speakers when using my
microphone?
What should I do if my microphone does not work?
What should I do if sound interruptions occur during video or audio playback?
© 2013 Sony Corporation
312
Search

VAIO User Guide Back | Back to Top
How to Use
Troubleshooting
Hardware
Apps
Network / Internet
Backup / Recovery
Security
Peripheral Devices
BLUETOOTH
What should I do if I cannot find the BLUETOOTH(R) device I want to
communicate with?
What should I do if I cannot use the BLUETOOTH(R) function?
What should I do if other BLUETOOTH(R) devices cannot connect to my VAIO
computer?
What should I do if the BLUETOOTH(R) icon is not displayed in the desktop
notification area?
Why can’t I use BLUETOOTH(R) devices when I switch users?
Why can’t I use the BLUETOOTH(R) function when I sign in to my VAIO
computer as a user with a standard user account?
Why is my BLUETOOTH(R) connection slow?
© 2013 Sony Corporation
313
Search

VAIO User Guide Back | Back to Top
How to Use
Troubleshooting
Hardware
Apps
Network / Internet
Backup / Recovery
Security
Peripheral Devices
Camera
What should I do if captured images contain dropped frames and audio
interruptions?
What should I do if captured images flicker?
Why are captured images poor in quality?
Why does the viewfinder show no images or poor-quality images?
Why is the video input from the built-in camera suspended momentarily?
© 2013 Sony Corporation
314
Search

VAIO User Guide Back | Back to Top
How to Use
Troubleshooting
Hardware
Apps
Network / Internet
Backup / Recovery
Security
Peripheral Devices
Display
How do I change the LCD brightness?
What should I do if captured images contain dropped frames and audio
interruptions?
What should I do if captured images flicker?
What should I do if my computer screen goes blank?
What should I do if no image is displayed on my TV screen or external display
connected to the HDMI output port?
What should I do if no image is displayed on my external display or TV
screen?
What should I do if some items do not fit on the computer screen?
What should I do if videos are not displayed on the computer screen?
What should I do if videos are not displayed smoothly?
Why do sound interruptions and/or dropped frames occur when I play high-
definition videos, such as those recorded with the AVCHD digital video
camcorder?
Why does the viewfinder show no images or poor-quality images?
© 2013 Sony Corporation
315
Search

VAIO User Guide Back | Back to Top
How to Use
Troubleshooting
Hardware
Apps
Network / Internet
Backup / Recovery
Security
Peripheral Devices
Keyboard
What should I do if I cannot enter certain characters with my keyboard?
What should I do if my VAIO computer screen freezes?
What should I do if my keyboard configuration is wrong?
What should I do if the pointer does not move?
© 2013 Sony Corporation
316
Search

VAIO User Guide Back | Back to Top
How to Use
Troubleshooting
Hardware
Apps
Network / Internet
Backup / Recovery
Security
Peripheral Devices
Memory card
Why can’t I write data to a memory card?
Why can’t I write data to an SD memory card?
Why can’t I write data to “Memory Stick”?
© 2013 Sony Corporation
317
Search


VAIO User Guide Back | Back to Top
How to Use
Troubleshooting
Hardware
Apps
Network / Internet
Backup / Recovery
Security
Peripheral Devices
Password
What should I do if I forget the Windows password?
What should I do if I forget the power-on password to start my VAIO
computer?
What should I do if the Enter Onetime Password message appears and
Windows does not start after I enter a wrong power-on password three times
consecutively?
© 2013 Sony Corporation
319
Search

VAIO User Guide Back | Back to Top
How to Use
Troubleshooting
Hardware
Apps
Network / Internet
Backup / Recovery
Security
Peripheral Devices
USB
What should I do if I cannot charge the device connected to the USB port that
supports USB charging?
You might be looking for the following topics:
What should I do if I cannot print a document?
What should I do if my VAIO computer does not recognize the USB device?
© 2013 Sony Corporation
321
Search


VAIO User Guide Back | Back to Top
How to Use
Troubleshooting
Hardware
Apps
Network / Internet
Backup / Recovery
Security
Peripheral Devices
LAN
How can I find the physical address (MAC address) of the built-in wireless
network interface of my VAIO computer?
What should I do if I cannot connect my VAIO computer to an access point (or
the Internet)?
What should I do if I cannot play back movies or audio tracks received via Wi-
Fi(R) (Wireless LAN), or their playback is interrupted? Why is the data transfer
speed slow?
What should I do if I cannot use the Wi-Fi(R) (Wireless LAN) function?
What should I do if I do not know the SSID or security key for the access
point?
© 2013 Sony Corporation
326
Search

VAIO User Guide Back | Back to Top
How to Use
Troubleshooting
Hardware
Apps
Network / Internet
Backup / Recovery
Security
Peripheral Devices
Microphone
What should I do if I hear microphone feedback from speakers when using my
microphone?
What should I do if my microphone does not work?
© 2013 Sony Corporation
327
Search

VAIO User Guide Back | Back to Top
How to Use
Troubleshooting
Hardware
Apps
Network / Internet
Backup / Recovery
Security
Peripheral Devices
Optical Trackpad
How do I avoid unintentional clicks caused by a light touch on the Optical
Trackpad?
How do I disable the Optical Trackpad?
What should I do if my VAIO computer screen freezes?
What should I do if the pointer does not move?
Why can’t I use the Optical Trackpad?
© 2013 Sony Corporation
328
Search
VAIO User Guide Back | Back to Top
How to Use
Troubleshooting
Hardware
Apps
Network / Internet
Backup / Recovery
Security
Peripheral Devices
Power
What should I do if I cannot turn off my VAIO computer?
What should I do if VAIO Care Rescue Mode starts when I turn on my VAIO
computer?
What should I do if my VAIO computer does not enter Hibernate mode?
What should I do if my VAIO computer does not turn on (the power indicator
light does not turn on in green)?
What should I do if my VAIO computer does not turn on or the power button
does not work (the power indicator light blinks fast)?
What should I do if the power indicator light turns on in green when I press the
power button but the screen remains blank?
Why does a message appear and Windows fail to start when I turn on my
VAIO computer?
Why does my VAIO computer automatically turn off?
© 2013 Sony Corporation
329
Search

VAIO User Guide Back | Back to Top
How to Use
Troubleshooting
Hardware
Apps
Network / Internet
Backup / Recovery
Security
Peripheral Devices
Software
Why do sound interruptions and/or dropped frames occur when I play high-
definition videos, such as those recorded with the AVCHD digital video
camcorder?
You might be looking for the following topics:
What should I do if my game software does not work or it keeps crashing?
© 2013 Sony Corporation
330
Search

VAIO User Guide Back | Back to Top
How to Use
Troubleshooting
Hardware
Apps
Network / Internet
Backup / Recovery
Security
Peripheral Devices
Wi-Fi
How can I find the physical address (MAC address) of the built-in wireless
network interface of my VAIO computer?
What should I do if I cannot connect my VAIO computer to an access point (or
the Internet)?
What should I do if I cannot play back movies or audio tracks received via Wi-
Fi(R) (Wireless LAN), or their playback is interrupted? Why is the data transfer
speed slow?
What should I do if I cannot use the Wi-Fi(R) (Wireless LAN) function?
What should I do if I do not know the SSID or security key for the access
point?
© 2013 Sony Corporation
331
Search

VAIO User Guide Back | Back to Top
How to Use
Troubleshooting
Hardware
Apps
Network / Internet
Backup / Recovery
Security
Peripheral Devices
Display
Why do sound interruptions and/or dropped frames occur when I play high-
definition videos, such as those recorded with the AVCHD digital video
camcorder?
You might be looking for the following topics:
How do I change the LCD brightness?
What should I do if captured images contain dropped frames and audio interruptions?
What should I do if captured images flicker?
What should I do if my computer screen goes blank?
What should I do if no image is displayed on my TV screen or external display connected to
the HDMI output port?
What should I do if no image is displayed on my external display or TV screen?
What should I do if some items do not fit on the computer screen?
What should I do if videos are not displayed on the computer screen?
What should I do if videos are not displayed smoothly?
Why does the viewfinder show no images or poor-quality images?
© 2013 Sony Corporation
332
Search

VAIO User Guide Back | Back to Top
How to Use
Troubleshooting
Hardware
Apps
Network / Internet
Backup / Recovery
Security
Peripheral Devices
Software
What should I do if my game software does not work or it keeps crashing?
Why do sound interruptions and/or dropped frames occur when I play high-
definition videos, such as those recorded with the AVCHD digital video
camcorder?
© 2013 Sony Corporation
333
Search

VAIO User Guide Back | Back to Top
How to Use
Troubleshooting
Hardware
Apps
Network / Internet
Backup / Recovery
Security
Peripheral Devices
BLUETOOTH
What should I do if I cannot find the BLUETOOTH(R) device I want to
communicate with?
What should I do if I cannot use the BLUETOOTH(R) function?
What should I do if other BLUETOOTH(R) devices cannot connect to my VAIO
computer?
What should I do if the BLUETOOTH(R) icon is not displayed in the desktop
notification area?
Why can’t I use BLUETOOTH(R) devices when I switch users?
Why can’t I use the BLUETOOTH(R) function when I sign in to my VAIO
computer as a user with a standard user account?
Why is my BLUETOOTH(R) connection slow?
© 2013 Sony Corporation
334
Search

VAIO User Guide Back | Back to Top
How to Use
Troubleshooting
Hardware
Apps
Network / Internet
Backup / Recovery
Security
Peripheral Devices
Wi-Fi
How can I find the physical address (MAC address) of the built-in wireless
network interface of my VAIO computer?
What should I do if I cannot connect my VAIO computer to an access point (or
the Internet)?
What should I do if I cannot play back movies or audio tracks received via Wi-
Fi(R) (Wireless LAN), or their playback is interrupted? Why is the data transfer
speed slow?
What should I do if I cannot use the Wi-Fi(R) (Wireless LAN) function?
What should I do if I do not know the SSID or security key for the access
point?
© 2013 Sony Corporation
335
Search
VAIO User Guide Back | Back to Top
How to Use
Troubleshooting
Hardware
Apps
Network / Internet
Backup / Recovery
Security
Peripheral Devices
LAN
How can I find the physical address (MAC address) of the built-in wireless
network interface of my VAIO computer?
What should I do if I cannot connect my VAIO computer to an access point (or
the Internet)?
What should I do if I cannot play back movies or audio tracks received via Wi-
Fi(R) (Wireless LAN), or their playback is interrupted? Why is the data transfer
speed slow?
What should I do if I cannot use the Wi-Fi(R) (Wireless LAN) function?
What should I do if I do not know the SSID or security key for the access
point?
© 2013 Sony Corporation
336
Search
VAIO User Guide Back | Back to Top
How to Use
Troubleshooting
Hardware
Apps
Network / Internet
Backup / Recovery
Security
Peripheral Devices
Recovery
How can I reinstall the original apps and drivers?
How can I restore my VAIO computer system to its factory default settings?
How do I create Recovery Media?
What should I do if I cannot create Recovery Media?
What should I do if I cannot recover my VAIO computer from the recovery
area?
What should I do if I cannot start/complete the recovery process?
What should I do if my VAIO computer becomes unstable (Windows does not
start)?
What should I do if my VAIO computer becomes unstable (Windows starts)?
© 2013 Sony Corporation
337
Search

VAIO User Guide Back | Back to Top
How to Use
Troubleshooting
Hardware
Apps
Network / Internet
Backup / Recovery
Security
Peripheral Devices
Password
What should I do if I forget the Windows password?
What should I do if I forget the power-on password to start my VAIO
computer?
What should I do if the Enter Onetime Password message appears and
Windows does not start after I enter a wrong power-on password three times
consecutively?
© 2013 Sony Corporation
339
Search


VAIO User Guide Back | Back to Top
How to Use
Troubleshooting
Hardware
Apps
Network / Internet
Backup / Recovery
Security
Peripheral Devices
USB
What should I do if I cannot print a document?
What should I do if my VAIO computer does not recognize the USB device?
You might be looking for the following topics:
What should I do if I cannot charge the device connected to the USB port that supports USB
charging?
© 2013 Sony Corporation
341
Search

VAIO User Guide Back | Back to Top
How to Use
Troubleshooting
Hardware
Apps
Network / Internet
Backup / Recovery
Security
Peripheral Devices
What should I do if I forget the power-on
password to start my VAIO computer?
If you forget the password [Details], you cannot start your VAIO computer.
When you forget your user password:
Enter the machine password to reset the user password at the BIOS setup screen.
When you forget your machine password:
The password needs to be reset and a fee will be charged. To reset the password,
contact an authorized Sony service/support center.
© 2013 Sony Corporation
342
Search

VAIO User Guide Back | Back to Top
How to Use
Troubleshooting
Hardware
Apps
Network / Internet
Backup / Recovery
Security
Peripheral Devices
What should I do if I do not hear sound from a
digital audio device connected to the digital
output port, such as the HDMI output port?
To output sound from a digital audio device connected to the digital output port on your
VAIO computer, you need to change the sound output to the digital audio device.
[Details]
© 2013 Sony Corporation
343
Search
VAIO User Guide Back | Back to Top
How to Use
Troubleshooting
Hardware
Apps
Network / Internet
Backup / Recovery
Security
Peripheral Devices
What should I do if I do not hear sound from
speakers or headphones?
Check if the volume from speakers or headphones is not minimized.
Keep pressing the Fn+F4 keys to turn up the volume loud enough to hear sound.
[Details]
Check if the volume in Windows is not turned off or minimized. [Details]
When the volume is turned off (
), select (Deactivate muting) to turn on the
volume (
). When the volume is minimized, turn up the volume.
When connecting external speakers or headphones, check the following:
Make sure external speakers or headphones are properly connected to your VAIO
computer. [Details]
If external speakers require external power, make sure the speakers are securely
connected to an AC outlet.
Make sure external speakers are turned on.
Make sure the volume from external speakers is not minimized.
Make sure the sound output device is correctly selected. [Details]
Check the volume on the playback app you are using.
© 2013 Sony Corporation
344
Search

VAIO User Guide Back | Back to Top
How to Use
Troubleshooting
Hardware
Apps
Network / Internet
Backup / Recovery
Security
Peripheral Devices
What should I do if I hear microphone feedback
from speakers when using my microphone?
Microphone feedback may occur when your microphone receives the sound from a sound
output device, such as speakers.
Keep the microphone away from a sound output device.
Turn down the volume of the speakers and the microphone.
© 2013 Sony Corporation
345
Search

VAIO User Guide Back | Back to Top
How to Use
Troubleshooting
Hardware
Apps
Network / Internet
Backup / Recovery
Security
Peripheral Devices
What should I do if my microphone does not
work?
Check if your microphone is selected as a recording device.
Open Control Panel [Details] and select Hardware and Sound.
Select Sound and check if there is a check mark on your desired microphone icon on
the Recording tab.
If not, select the icon and Set Default.
If the icon is not displayed, make sure the microphone is properly connected to your
VAIO computer.
© 2013 Sony Corporation
346
Search

VAIO User Guide Back | Back to Top
How to Use
Troubleshooting
Hardware
Apps
Network / Internet
Backup / Recovery
Security
Peripheral Devices
What should I do if sound interruptions occur
during video or audio playback?
Sound interruptions may occur when the CPU load is high. In this case, reduce the CPU
load by exiting all running apps other than a playback app, or by disabling unnecessary
audio effects applied to playback.
© 2013 Sony Corporation
347
Search

VAIO User Guide Back | Back to Top
How to Use
Troubleshooting
Hardware
Apps
Network / Internet
Backup / Recovery
Security
Peripheral Devices
What should I do if I cannot find the
BLUETOOTH(R) device I want to communicate
with?
Shorten the distance between your VAIO computer and the BLUETOOTH device within
33 feet/10 meters.
If the computer is more than 33 feet/10 meters away from the BLUETOOTH device,
communication will not be possible.
The computer may not be able to communicate with the BLUETOOTH device even within
33 feet/10 meters due to obstacles between the devices, radio wave quality, ambient
environment that includes existence of walls and materials of such walls, or apps in use.
In such a case, move the computer away from obstructions or closer to the device.
Check that the BLUETOOTH function of the device you want to communicate with is on,
and the device is not in the power saving mode.
Check that the BLUETOOTH function of the device you want to communicate with is
enabled.
Refer to the manual that came with the device for more information.
If the device you want to communicate with is already communicating with another
BLUETOOTH device, it may not be found or it may not be able to communicate with your
VAIO computer.
© 2013 Sony Corporation
348
Search
VAIO User Guide Back | Back to Top
How to Use
Troubleshooting
Hardware
Apps
Network / Internet
Backup / Recovery
Security
Peripheral Devices
What should I do if I cannot use the
BLUETOOTH(R) function?
Make sure the WIRELESS indicator light on your VAIO computer is on.
When the WIRELESS indicator light is off, you cannot use the BLUETOOTH function.
Make sure the BLUETOOTH function is enabled.
Open the charms [Details] and select the
Settings charm.
Select Change PC settings in the lower right corner, then select Wireless in the left
pane.
Turn off Airplane mode and change the Bluetooth setting under Wireless
devices to On.
© 2013 Sony Corporation
349
Search
VAIO User Guide Back | Back to Top
How to Use
Troubleshooting
Hardware
Apps
Network / Internet
Backup / Recovery
Security
Peripheral Devices
What should I do if other BLUETOOTH(R) devices
cannot connect to my VAIO computer?
See What should I do if I cannot find the BLUETOOTH device I want to
communicate with?. [Details]
Make sure that the authentication (pairing) between the device and your VAIO computer
has been properly performed.
Some BLUETOOTH devices require authentication (pairing) before establishing
connection with another device. Perform the authentication process before connecting to
such devices.
Make sure that your VAIO computer allows BLUETOOTH devices to find the computer.
Select
(arrow) in the desktop notification area [Details], right-click (the
BLUETOOTH icon), and select Open Settings to open the settings window.
Select the Options tab and make sure that the Allow Bluetooth devices to find
this computer check box is selected.
© 2013 Sony Corporation
350
Search

VAIO User Guide Back | Back to Top
How to Use
Troubleshooting
Hardware
Apps
Network / Internet
Backup / Recovery
Security
Peripheral Devices
What should I do if the BLUETOOTH(R) icon is not
displayed in the desktop notification area?
Make sure the BLUETOOTH function is enabled.
Open the charms [Details] and select the Settings charm.
Select Change PC settings in the lower right corner, then select Wireless in the left
pane.
Turn off Airplane mode and change the Bluetooth setting under Wireless
devices to On.
Check the BLUETOOTH settings.
Open Control Panel [Details] and select Hardware and Sound and Devices and
Printers.
Right-click the computer icon and select Bluetooth settings and the Show the
Bluetooth icon in the notification area check box.
© 2013 Sony Corporation
351
Search

VAIO User Guide Back | Back to Top
How to Use
Troubleshooting
Hardware
Apps
Network / Internet
Backup / Recovery
Security
Peripheral Devices
Why can’t I use BLUETOOTH(R) devices when I
switch users?
If you switch users without signing out from your system, BLUETOOTH devices will not
work.
Be sure to sign out before switching users.
© 2013 Sony Corporation
352
Search

VAIO User Guide Back | Back to Top
How to Use
Troubleshooting
Hardware
Apps
Network / Internet
Backup / Recovery
Security
Peripheral Devices
Why can’t I use the BLUETOOTH(R) function
when I sign in to my VAIO computer as a user
with a standard user account?
The BLUETOOTH function may not be available to a user with a standard user account
on your VAIO computer.
Sign in to the computer as a user with administrative rights.
© 2013 Sony Corporation
353
Search

VAIO User Guide Back | Back to Top
How to Use
Troubleshooting
Hardware
Apps
Network / Internet
Backup / Recovery
Security
Peripheral Devices
Why is my BLUETOOTH(R) connection slow?
Data transfer speed depends on obstructions and/or the distance between the two
devices, radio wave quality, and the device configuration or apps in use.
Move your VAIO computer and BLUETOOTH device closer to each other.
If a version of a BLUETOOTH standard employed on the BLUETOOTH device with which
you want to communicate is not the same version as the one employed on your VAIO
computer, the communication speed may become slower.
If your VAIO computer is compliant with BLUETOOTH high speed technology and the
following two conditions are met, high-speed communications are available. However,
some BLUETOOTH profiles do not support high-speed communications.
The BLUETOOTH device with which you want to communicate supports BLUETOOTH
high speed technology.
Both the Wi-Fi(R) (Wireless LAN) and BLUETOOTH functions on the computer are
enabled.
© 2013 Sony Corporation
354
Search

VAIO User Guide Back | Back to Top
How to Use
Troubleshooting
Hardware
Apps
Network / Internet
Backup / Recovery
Security
Peripheral Devices
What should I do if captured images contain
dropped frames and audio interruptions?
The effect settings on your app may cause dropped frames. Refer to the help file
included with the app for more information.
There may be more app running than your VAIO computer can handle. Exit the apps that
you are not currently using.
This problem may occur while your VAIO computer is running on the power saving plan,
which reduces the CPU performance. Check the current power plan. [Details]
© 2013 Sony Corporation
355
Search

VAIO User Guide Back | Back to Top
How to Use
Troubleshooting
Hardware
Apps
Network / Internet
Backup / Recovery
Security
Peripheral Devices
What should I do if captured images flicker?
This problem occurs when you use the built-in camera under fluorescent lights and is due
to a mismatch between the lighting output frequency and the shutter speed.
To reduce flicker noise, change the direction of your VAIO computer so that you can
adjust the direction of the built-in camera. Some apps offer adjustable parameters, such
as brightness or power frequencies, to eliminate flicker noise.
© 2013 Sony Corporation
356
Search
VAIO User Guide Back | Back to Top
How to Use
Troubleshooting
Hardware
Apps
Network / Internet
Backup / Recovery
Security
Peripheral Devices
Why are captured images poor in quality?
Images captured under fluorescent light may contain light reflections.
A dark portion in captured images may contain noise.
The area on and around the built-in camera is soiled. Clean the area. [Details]
© 2013 Sony Corporation
357
Search

VAIO User Guide Back | Back to Top
How to Use
Troubleshooting
Hardware
Apps
Network / Internet
Backup / Recovery
Security
Peripheral Devices
Why does the viewfinder show no images or poor-
quality images?
Some camera apps may not work correctly when another camera app is running. Exit the
current app before starting another.
You may not be able to use another camera app that uses the built-in camera while
using the gesture function.
The viewfinder may show some noise, for example horizontal streaks, when you are
viewing a rapid-moving object. This is normal and does not indicate a malfunction.
If the problem persists, restart your VAIO computer.
© 2013 Sony Corporation
358
Search

VAIO User Guide Back | Back to Top
How to Use
Troubleshooting
Hardware
Apps
Network / Internet
Backup / Recovery
Security
Peripheral Devices
Why is the video input from the built-in camera
suspended momentarily?
The video input may be suspended momentarily if:
A shortcut key with the Fn key is used.
The CPU load increases.
© 2013 Sony Corporation
359
Search

VAIO User Guide Back | Back to Top
How to Use
Troubleshooting
Hardware
Apps
Network / Internet
Backup / Recovery
Security
Peripheral Devices
How do I change the LCD brightness?
Press the Fn+F5 or Fn+F6 keys to adjust the LCD brightness of your VAIO computer.
[Details]
To adjust the LCD brightness of the connected external display, such as a computer
display or a TV, use the brightness control on the external display.
© 2013 Sony Corporation
360
Search
VAIO User Guide Back | Back to Top
How to Use
Troubleshooting
Hardware
Apps
Network / Internet
Backup / Recovery
Security
Peripheral Devices
What should I do if my computer screen goes
blank?
Make sure your VAIO computer is on and not in a power saving mode. [Details]
Make sure your VAIO computer is securely plugged into an AC outlet [Details] and the
power indicator light is on.
The computer screen may be off.
Press any key on the keyboard.
The display output may be set to an external display.
Press the Fn+F7 keys several times to select your desired display output, and then
press the Enter key. [Details]
If you wait for a while and the computer screen remains blank, follow the procedures
below:
Press and hold down the (Power) button for more than four seconds, check if the
power indicator light is off, and then turn on your VAIO computer.
If the problem persists, press and hold down the (Power) button for more than four
seconds and check if the power indicator light is off. Disconnect all cables and
peripheral devices, such as the power cord and the USB device, and wait about five
minutes. Then, put them back in place and turn on your VAIO computer again.
© 2013 Sony Corporation
361
Search

VAIO User Guide Back | Back to Top
How to Use
Troubleshooting
Hardware
Apps
Network / Internet
Backup / Recovery
Security
Peripheral Devices
What should I do if no image is displayed on my
TV screen or external display connected to the
HDMI output port?
Reconnect the HDMI cable (not supplied). [Details]
Make sure you are using an HDCP-compliant display. The copyright protected content is
not displayed on a non-HDCP compliant display.
Change the screen resolution of the connected TV or external display. [Details] Images
may appear on the screen.
© 2013 Sony Corporation
362
Search

VAIO User Guide Back | Back to Top
How to Use
Troubleshooting
Hardware
Apps
Network / Internet
Backup / Recovery
Security
Peripheral Devices
What should I do if no image is displayed on my
external display or TV screen?
Press the Fn+F7 keys several times to select your desired display output, and then
press the Enter key. [Details]
© 2013 Sony Corporation
363
Search

VAIO User Guide Back | Back to Top
How to Use
Troubleshooting
Hardware
Apps
Network / Internet
Backup / Recovery
Security
Peripheral Devices
What should I do if some items do not fit on the
computer screen?
Check that the text size is set to 100%. If not, some items, for example an app menu,
may not be displayed correctly, depending on the apps you are using.
Refer to Windows Help and Support for more information on how to change the
text size. [Details]
© 2013 Sony Corporation
364
Search

VAIO User Guide Back | Back to Top
How to Use
Troubleshooting
Hardware
Apps
Network / Internet
Backup / Recovery
Security
Peripheral Devices
What should I do if videos are not displayed on
the computer screen?
Your VAIO computer may not have sufficient video memory to display high resolution
videos. In such a case, lower the resolution of the LCD screen. [Details]
If you have selected to use an external display using the Fn+F7 keys and the external
display is disconnected from your VAIO computer, the computer screen may be unable to
display the video.
In such a case, stop video playback, press the Fn+F7 keys to select the computer
screen as the display output, and then press the Enter key. Then, restart video
playback.
© 2013 Sony Corporation
365
Search
VAIO User Guide Back | Back to Top
How to Use
Troubleshooting
Hardware
Apps
Network / Internet
Backup / Recovery
Security
Peripheral Devices
What should I do if videos are not displayed
smoothly?
It is recommended you disable your screen saver.
If the screen saver is enabled, it may be activated during DVD playback and prevent the
playback from running successfully.
If you have set the display output to both the computer screen and an external display,
change the display output to either of them.
Some videos may not be displayed smoothly depending on the type or bit rate of videos.
Lowering the screen resolution may improve video playback performance. [Details]
If data access to a memory card is in progress (the media access indicator light is on),
wait until the data access ends and then start playback again.
If you are playing a video stored on the memory card, copy it to the built-in storage
device and then play the copied video.
© 2013 Sony Corporation
366
Search

VAIO User Guide Back | Back to Top
How to Use
Troubleshooting
Hardware
Apps
Network / Internet
Backup / Recovery
Security
Peripheral Devices
Why do sound interruptions and/or dropped
frames occur when I play high-definition videos,
such as those recorded with the AVCHD digital
video camcorder?
Playing high-definition videos requires substantial hardware resources, such as CPU,
GPU, or system memory performance on your VAIO computer. During the video
playback, some operations and/or functions may become unavailable, and sound
interruptions, dropped frames, and playback failure may occur depending on the
configuration of the computer.
© 2013 Sony Corporation
367
Search

VAIO User Guide Back | Back to Top
How to Use
Troubleshooting
Hardware
Apps
Network / Internet
Backup / Recovery
Security
Peripheral Devices
What should I do if I cannot enter certain
characters with my keyboard?
Check if the Caps Lock indicator light on the Caps Lock key is on or off.
When the indicator light is on, characters typed will appear in uppercase (or lowercase if
you also hold down the Shift key).
When the indicator light is off, characters typed will appear in lowercase (or uppercase if
you also hold down the Shift key).
Press the Shift+Caps Lock keys to turn the Caps Lock indicator light on or off.
© 2013 Sony Corporation
368
Search
VAIO User Guide Back | Back to Top
How to Use
Troubleshooting
Hardware
Apps
Network / Internet
Backup / Recovery
Security
Peripheral Devices
What should I do if my VAIO computer screen
freezes?
Restart your VAIO computer.
Press the Ctrl+Alt+Delete keys, select (Shut down) in the lower right corner of
the computer screen, and then select Restart.
If the problem persists, press and hold down the
(Power) button for more than four
seconds, or slide the
(Power) switch to the right for more than four seconds.
© 2013 Sony Corporation
369
Search

VAIO User Guide Back | Back to Top
How to Use
Troubleshooting
Hardware
Apps
Network / Internet
Backup / Recovery
Security
Peripheral Devices
What should I do if my keyboard configuration is
wrong?
The language layout of your keyboard is labeled on the packaging box. If you choose a
different regional keyboard when you complete the Windows setup, the key configuration
will be mismatched. To change the keyboard configuration, refer to Windows Help
and Support.
© 2013 Sony Corporation
370
Search
VAIO User Guide Back | Back to Top
How to Use
Troubleshooting
Hardware
Apps
Network / Internet
Backup / Recovery
Security
Peripheral Devices
What should I do if the pointer does not move?
The pointer may not move temporarily as expected depending on the condition of your
VAIO computer.
In such a case, wait for a while before moving the pointer again.
If the pointer still does not move, press the Ctrl+Alt+Delete keys, select
(Shut
down) in the lower right corner of the computer screen, and then select Shut down.
If the problem persists, press and hold down the
(Power) button or slide the (Power)
switch to the right for more than four seconds.
Turning off the computer with the Ctrl+Alt+Delete keys, the
(Power) button, or the
(Power) switch may cause loss of unsaved data.
The Optical Trackpad may be disabled. [Details]
© 2013 Sony Corporation
371
Search

VAIO User Guide Back | Back to Top
How to Use
Troubleshooting
Hardware
Apps
Network / Internet
Backup / Recovery
Security
Peripheral Devices
Why can’t I write data to a memory card?
Some types of memory cards are equipped with an erasure prevention switch to protect
data from unintentional erasure or overwriting. Make sure the erasure prevention switch is
off.
© 2013 Sony Corporation
372
Search

VAIO User Guide Back | Back to Top
How to Use
Troubleshooting
Hardware
Apps
Network / Internet
Backup / Recovery
Security
Peripheral Devices
Why can’t I write data to an SD memory card?
You cannot use SD memory cards if Disabled is selected for the SD memory card slot
in the BIOS setup screen.
In such a case, change the BIOS setting. [Details]
© 2013 Sony Corporation
373
Search

VAIO User Guide Back | Back to Top
How to Use
Troubleshooting
Hardware
Apps
Network / Internet
Backup / Recovery
Security
Peripheral Devices
Why can’t I write data to “Memory Stick”?
You cannot use “Memory Stick” if Disabled is selected for the “Memory Stick” slot in the
BIOS setup screen.
In such a case, change the BIOS setting. [Details]
© 2013 Sony Corporation
374
Search
VAIO User Guide Back | Back to Top
How to Use
Troubleshooting
Hardware
Apps
Network / Internet
Backup / Recovery
Security
Peripheral Devices
What should I do if I cannot use NFC/One-touch
functions?
Bring your NFC/One-touch functions supported device toward your VAIO computer so
that both Touch marks are as close as possible.
If the NFC/One-touch functions still do not work, slightly move the device up or down, or
separate the device from the computer for about 10 seconds, and then touch the
computer with the device again.
Make sure that NFC/One-touch functions are enabled on the supported device.
You may need to change the device settings depending on the device you use. For
detailed information, refer to the manual that came with your device.
Enable NFC/One-touch functions.
Open the charms [Details] and select the Settings charm. Select Change PC
settings in the lower-right corner, and select Wireless in the left pane. Turn off
Airplane mode and change the NFC setting under Wireless devices to On.
Do not bring metal objects other than devices supported with the NFC/One-touch
functions close to the Touch mark on your VAIO computer.
Do not touch your VAIO computer with more than one device supported with the
NFC/One-touch functions at a time.
If NFC/One-touch functions still do not work after you perform above operations, restart
your VAIO computer.
© 2013 Sony Corporation
375
Search
VAIO User Guide Back | Back to Top
How to Use
Troubleshooting
Hardware
Apps
Network / Internet
Backup / Recovery
Security
Peripheral Devices
What should I do if I forget the Windows
password?
The Windows password is case-sensitive. Check your password and enter again.
Log on using a user account that has system administrator privileges to reset your
password.
If you forget all passwords for system administrator accounts, you cannot reset any
Windows passwords. You need to perform system recovery. [Details]
© 2013 Sony Corporation
376
Search
VAIO User Guide Back | Back to Top
How to Use
Troubleshooting
Hardware
Apps
Network / Internet
Backup / Recovery
Security
Peripheral Devices
What should I do if the Enter Onetime Password
message appears and Windows does not start
after I enter a wrong power-on password three
times consecutively?
Press and hold down the (Power) button for more than four seconds and check if the
power indicator light is off. Then, restart your VAIO computer and enter the correct
password.
The password is case-sensitive, so be sure to check letters for the current case before
you enter the password.
If you forget the power-on password, you cannot start your VAIO computer. [Details]
© 2013 Sony Corporation
377
Search

VAIO User Guide Back | Back to Top
How to Use
Troubleshooting
Hardware
Apps
Network / Internet
Backup / Recovery
Security
Peripheral Devices
Why doesn’t the built-in digital compass show the
correct direction?
The built-in digital compass works by detecting a magnetic direction. Do not rely solely on
the location information the built-in digital compass provides.
Especially at the following locations, the accuracy of the digital compass can be easily
affected by magnetic interference and it may not work correctly.
Inside an elevator or a room built with ferrous materials, such as iron frames or
reinforced concrete
Near a reinforced concrete structure, such as a footbridge or an airport or a train
station concourse
Near or inside a train or a car
Near a transformer on the ground or high-voltage power lines
Near a metallic product, such as a metal frame desk or metallic furniture
Near a material that has a high level of magnetic interference, such as a magnet, a
magnetic holder, or speakers
Calibrating the built-in digital compass may correct the direction. [Details]
© 2013 Sony Corporation
378
Search
VAIO User Guide Back | Back to Top
How to Use
Troubleshooting
Hardware
Apps
Network / Internet
Backup / Recovery
Security
Peripheral Devices
Why doesn’t the computer screen rotate?
The screen rotation may be disabled.
Press
(the rotation lock button) on your VAIO computer to enable/disable the rotation.
The screen rotation is disabled while your VAIO computer is connected to an external
display.
If you connect the computer to an external display while using the computer in portrait
orientation, the computer screen automatically changes to landscape (horizontal)
orientation.
© 2013 Sony Corporation
379
Search

VAIO User Guide Back | Back to Top
How to Use
Troubleshooting
Hardware
Apps
Network / Internet
Backup / Recovery
Security
Peripheral Devices
What should I do if I cannot charge the device
connected to the USB port that supports USB
charging?
Make sure that the USB Charging setting is enabled. [Details]
© 2013 Sony Corporation
380
Search
VAIO User Guide Back | Back to Top
How to Use
Troubleshooting
Hardware
Apps
Network / Internet
Backup / Recovery
Security
Peripheral Devices
What should I do if I cannot print a document?
Make sure the printer settings are correctly configured.
For information on the printer settings, refer to the manual that came with your printer.
Make sure your printer is on.
Refer to the manual that came with your printer for more information.
Make sure the connections between the printer’s power cord and AC adapter and
between the AC adapter and an AC outlet are securely made.
Make sure the appropriate printer driver is installed.
When you connect a new printer, you first need to set up the printer driver.
For information on how to set up the printer driver, refer to the manual that came with
your printer, or visit the website of the manufacturer.
Make sure the status of your printer is displayed as online or ready.
Then, make sure the printer settings are correctly configured as instructed in the manual
that came with the printer.
Make sure your printer is set to Set as Default Printer.
Refer to Windows Help and Support for more information. [Details]
Make sure your printer is compatible with Windows installed on your VAIO computer.
Make sure your printer is connected to your network (LAN).
If the printer is directly connected to the network (LAN), make sure a router or a hub is
on.
If the printer is connected to a printer server, make sure an error message is not
displayed on the printer server.
Make sure your app is working properly.
The app may not support your document format. In such a case, your document will not
be printed properly.
Contact the app publisher or the manufacturer of your printer.
Make sure the correct printer port for your printer is selected.
For more information on the printer port settings, refer to the manual that came with the
printer, or contact the manufacturer.
© 2013 Sony Corporation
381
Search
VAIO User Guide Back | Back to Top
How to Use
Troubleshooting
Hardware
Apps
Network / Internet
Backup / Recovery
Security
Peripheral Devices
What should I do if my VAIO computer does not
recognize the USB device?
Check if the USB device is on and using its own power supply.
If you are using a digital camera, check if the battery is charged.
If you are using a printer, check if the power cable is connected properly to an AC
outlet.
You may need to install a USB driver for the USB device before connecting the device.
Refer to the manual that came with the USB device for more information.
Try using another USB port on your VAIO computer. The USB driver could be installed to
the specific port you used the first time you connected the device.
USB hubs may prevent the USB device from working because of a power distribution
failure. We recommend you connect the device directly to your VAIO computer without a
hub.
Check if a USB storage device is available.
The USB ports are disabled if Disabled is selected for the USB ports in the BIOS setup
screen. In such a case, change the BIOS setting. [Details]
© 2013 Sony Corporation
382
Search

VAIO User Guide Back | Back to Top
How to Use
Troubleshooting
Hardware
Apps
Network / Internet
Backup / Recovery
Security
Peripheral Devices
Why is my VAIO computer running slowly and the
CPU clock frequency low while the computer is
running on battery power?
While your VAIO computer is running on battery power, the CPU clock frequency is
reduced for power conserving purposes, which causes the computer to run slowly. This is
normal and does not indicate a malfunction.
© 2013 Sony Corporation
383
Search

VAIO User Guide Back | Back to Top
How to Use
Troubleshooting
Hardware
Apps
Network / Internet
Backup / Recovery
Security
Peripheral Devices
How can I find the physical address (MAC
address) of the built-in wireless network interface
of my VAIO computer?
If MAC address filtering of your access point is enabled, register the MAC address of
your VAIO computer in the setup screen of the access point. Otherwise, the computer
cannot connect to the access point.
Open Command Prompt [Details], enter “ipconfig /all”, and then press the Enter key.
You can find the physical address (MAC address) in the Physical Address field under
Wireless LAN adapter Wi-Fi.
© 2013 Sony Corporation
384
Search
VAIO User Guide Back | Back to Top
How to Use
Troubleshooting
Hardware
Apps
Network / Internet
Backup / Recovery
Security
Peripheral Devices
What should I do if I cannot connect my VAIO
computer to an access point (or the Internet)?
See What should I do if I cannot use the Wi-Fi(R) (Wireless LAN)
function?. [Details]
Make sure the access point is on.
Check the access point settings.
In the following settings, your VAIO computer may fail to connect to an access point, or
the connection may be unstable.
When the access point is set to refuse communication with a device whose SSID is
set to “ANY,” and the SSID of your VAIO computer or the access point is set to “ANY.”
When the access point is in stealth mode.
For more information, refer to the manual that came with your access point, or consult
your Wi-Fi service provider.
Make sure your VAIO computer and access point are connected to one another. [Details]
Connection capability is affected by distance, obstructions, device configuration, radio
wave strength/interference, wall materials, running apps, etc.
Move your VAIO computer away from obstructions or closer to any access point you may
be using.
Open the charms [Details] and select the Settings charm and (the network
icon).
Check that your access point is displayed.
© 2013 Sony Corporation
385
Search

VAIO User Guide Back | Back to Top
How to Use
Troubleshooting
Hardware
Apps
Network / Internet
Backup / Recovery
Security
Peripheral Devices
What should I do if I cannot play back movies or
audio tracks received via Wi-Fi(R) (Wireless LAN),
or their playback is interrupted? Why is the data
transfer speed slow?
Move your VAIO computer away from obstructions, or closer to any access point you
may be using.
Connection capability is affected by distance, obstructions, device configuration, radio
wave strength/interference, wall materials, running apps, etc.
If you are using an access point, the device may be temporarily overloaded depending on
how many other devices are communicating via the access point.
Wait for a while and try again.
Change the channel setting of your access point. By changing the channel, interference
on your wireless network may be reduced and data transfer speed may improve.
If access point channel interference occurs, data transfer speed may be reduced.
If your access point interferes with other access points, change the access point channel.
Refer to the manual that came with your access point for more information.
Make sure that a microwave oven is not operating near your Wi-Fi devices.
The 2.4 GHz frequency band, on which Wi-Fi operates, is used by various devices and
apparatus. If you use a microwave oven while communicating via Wi-Fi, data transfer rate
may slow down, communication range may narrow, or communication may be
interrupted.
© 2013 Sony Corporation
386
Search
VAIO User Guide Back | Back to Top
How to Use
Troubleshooting
Hardware
Apps
Network / Internet
Backup / Recovery
Security
Peripheral Devices
What should I do if I cannot use the Wi-Fi(R)
(Wireless LAN) function?
Enable the Wi-Fi function.
Open the charms [Details] and select the Settings charm.
Select Change PC settings in the lower right corner, and select Wireless in the left
pane.
Turn off Airplane mode and change the Wi-Fi setting under Wireless devices to
On.
To use the Wi-Fi function on your VAIO computer, you need to configure the Wi-Fi
settings.
Check the Wi-Fi settings of the computer. [Details]
Make sure the wireless device is enabled in the BIOS setup screen. If Disabled is
selected for the wireless device in the BIOS setup screen, you cannot use the wireless
function. In such a case, select Enable. [Details]
If a connection utility app supplied with a third-party Wi-Fi product is installed, uninstall it.
If a connection utility app is installed, Windows may fail to configure the Wi-Fi settings. Be
sure to take a note of your settings, (such as security keys) before uninstalling.
© 2013 Sony Corporation
387
Search

VAIO User Guide Back | Back to Top
How to Use
Troubleshooting
Hardware
Apps
Network / Internet
Backup / Recovery
Security
Peripheral Devices
What should I do if I do not know the SSID or
security key for the access point?
You can find the key in the setting screen of your access point.
Refer to the manual that came with your access point for more information.
© 2013 Sony Corporation
388
Search
VAIO User Guide Back | Back to Top
How to Use
Troubleshooting
Hardware
Apps
Network / Internet
Backup / Recovery
Security
Peripheral Devices
How do I avoid unintentional clicks caused by a
light touch on the Optical Trackpad?
To avoid unintentional operation, disable the tapping function. [Details]
© 2013 Sony Corporation
389
Search

VAIO User Guide Back | Back to Top
How to Use
Troubleshooting
Hardware
Apps
Network / Internet
Backup / Recovery
Security
Peripheral Devices
How do I disable the Optical Trackpad?
Press the Fn+F1 keys to disable the Optical Trackpad. [Details]
Alternatively, start VAIO Control Center [Details], then disable the Optical Trackpad.
© 2013 Sony Corporation
390
Search

VAIO User Guide Back | Back to Top
How to Use
Troubleshooting
Hardware
Apps
Network / Internet
Backup / Recovery
Security
Peripheral Devices
Why can’t I use the Optical Trackpad?
The Optical Trackpad is disabled.
Press the Fn+F1 keys to enable the Optical Trackpad. [Details]
Alternatively, start VAIO Control Center [Details], then enable the Optical
Trackpad.
Make sure that the Enable Tapping check box is selected in the settings window.
[Details]
© 2013 Sony Corporation
391
Search
VAIO User Guide Back | Back to Top
How to Use
Troubleshooting
Hardware
Apps
Network / Internet
Backup / Recovery
Security
Peripheral Devices
What should I do if I cannot turn off my VAIO
computer?
Follow any of these procedures to exit all running apps and then turn off your VAIO
computer again.
Drag the app from the top center of the screen to the bottom center. [Details]
Press the Alt+F4 keys.
If there is unsaved data, save it at the confirmation prompt.
Press the Alt+F4 keys until the Shut Down Windows window appears and select
Shut down from the drop-down list and OK.
If you have installed a new app on your VAIO computer, check if the app is working
properly, its data is normal, and you have operated it correctly.
Contact the app publisher or designated provider for technical support.
If you connect peripheral devices, such as a printer or a USB device, to your VAIO
computer or connect the computer to your network, disconnect all peripheral devices or
the computer’s network connection and then turn off the computer.
While the computer is communicating with a peripheral device or the network, Windows
does not allow you to turn off the computer. In addition, some peripheral device drivers
for the peripheral devices do not support the feature to force the computer to shut down.
If the computer screen freezes, press the Ctrl+Alt+Delete keys, select (Shut
down) in the lower right corner of the computer screen, and then select Shut down.
If your VAIO computer freezes with a message indicating the settings are being saved or
the computer is shutting down displayed, follow these procedures in order.
Press the Enter key.
Wait for a while.
If the problem persists, press the Ctrl+Alt+Delete keys.
Wait for a while.
If you still cannot turn off your VAIO computer even after you follow all the above
procedures in this topic, perform the following operations.
Note that performing these operations may cause working data to become corrupted. Be
sure to disconnect the computer from the network before performing the following
operations.
Press the Ctrl+Alt+Delete keys, select (Shut down) in the lower right corner
of the computer screen, and then select Shut down.
Press and hold down the (Power) button for more than four seconds.
Unplug the AC adapter and push and hold the battery off button for three to five
seconds with a thin, straight object (such as a paper clip).
© 2013 Sony Corporation
392
Search
VAIO User Guide Back | Back to Top
How to Use
Troubleshooting
Hardware
Apps
Network / Internet
Backup / Recovery
Security
Peripheral Devices
What should I do if VAIO Care Rescue Mode
starts when I turn on my VAIO computer?
You may have accidently pressed the ASSIST button rather than the (Power) button.
Exit VAIO Care Rescue Mode and locate the
(Power) button on your VAIO
computer.
© 2013 Sony Corporation
393
Search

VAIO User Guide Back | Back to Top
How to Use
Troubleshooting
Hardware
Apps
Network / Internet
Backup / Recovery
Security
Peripheral Devices
What should I do if my VAIO computer does not
enter Hibernate mode?
Select Choose what the power button does in the Power Options window.
[Details] Select Change settings that are currently unavailable, the
Hibernate check box, and Save changes.
© 2013 Sony Corporation
394
Search
VAIO User Guide Back | Back to Top
How to Use
Troubleshooting
Hardware
Apps
Network / Internet
Backup / Recovery
Security
Peripheral Devices
What should I do if my VAIO computer does not
turn on (the power indicator light does not turn
on in green)?
Make sure all cables are securely connected to devices, such as between your VAIO
computer and the AC adapter; the AC adapter and the power cord; and the power cord
and an AC outlet. [Details]
If you plug the power cord of your VAIO computer into a power strip with a switch, make
sure the switch is turned on and the power cord of the power strip is securely plugged
into an AC outlet.
If you do not turn off your VAIO computer through the normal procedure, the power
controller may be suspended due to a program error.
Disconnect all cables and peripheral devices, such as the power cord and the USB
device, and push and hold the battery off button for three to five seconds with a thin,
straight object (such as a paper clip).
Wait about five minutes and then put all cables and devices back in place and turn on the
computer again.
Before using your VAIO computer for the first time, you need to connect the computer to
a power source with the AC adapter.
Check that you are using the supplied Sony AC adapter.
For your safety, use only the genuine Sony AC adapter, which is supplied by Sony for
your VAIO computer.
The battery pack may have run out of power.
Make sure your VAIO computer is not in Hibernate mode by pressing the (Power)
button on the computer.
Note that if you press and hold down the
(Power) button for more than four seconds,
the computer will turn off.
If you bring your VAIO computer directly from a cold location to a warm one, or use it in a
high humidity location, moisture may condense inside the computer.
In such a case, allow at least one hour before turning on the computer.
Do not use the computer in a high humidity location (a relative humidity of more than 80
%), as it may cause the computer to malfunction.
© 2013 Sony Corporation
395
Search

VAIO User Guide Back | Back to Top
How to Use
Troubleshooting
Hardware
Apps
Network / Internet
Backup / Recovery
Security
Peripheral Devices
What should I do if my VAIO computer does not
turn on or the power button does not work (the
power indicator light blinks fast)?
Your VAIO computer may not recognize the battery pack.
In this case, push and hold the battery off button for three to five seconds with a thin,
straight object (such as a paper clip).
If the problem persists, contact an authorized Sony service/support center and replace
the battery pack with a new one specified by Sony.
© 2013 Sony Corporation
396
Search
VAIO User Guide Back | Back to Top
How to Use
Troubleshooting
Hardware
Apps
Network / Internet
Backup / Recovery
Security
Peripheral Devices
What should I do if the power indicator light turns
on in green when I press the power button but
the screen remains blank?
Make sure the brightness and contrast controls are adjusted correctly.
An external display may be selected as the display output.
Press the Fn+F7 keys several times to select your desired display output, and then
press the Enter key.
If you are using an external display, make sure it is plugged into an AC outlet and is on.
Make sure the brightness and contrast controls are adjusted correctly.
Refer to the manual that came with your display for information on how to change the
settings.
Press the Alt+F4 keys several times to close the app window.
An app error may have occurred.
If you wait for a while and the computer screen remains blank, restart your VAIO
computer by following the procedures below in order. Note that following these
procedures may cause working data to become corrupted.
Disconnect all peripheral devices, such as a printer or a USB device, and your VAIO
computer from the network, if any.
Press and hold down the (Power) button for more than four seconds and make sure
the power indicator light is off. Then, turn on your VAIO computer again.
If the problem persists, reset the battery pack.
Press and hold down the
(Power) button for more than four seconds and make sure
the power indicator light is off. Disconnect all cables connected to your VAIO computer,
such as the AC adapter, and push and hold the battery off button for three to five
seconds with a thin, straight object (such as a paper clip).
Wait about five minutes and then put all cables back in place and turn on the computer
again.
If you bring your VAIO computer directly from a cold location to a warm one, or use it in a
high humidity location, moisture may condense inside the computer.
In such a case, allow at least one hour before turning on the computer.
Do not use the computer in a high humidity location (a relative humidity of more than 80
%), as it may cause the computer to malfunction.
© 2013 Sony Corporation
397
Search
VAIO User Guide Back | Back to Top
How to Use
Troubleshooting
Hardware
Apps
Network / Internet
Backup / Recovery
Security
Peripheral Devices
Why does a message appear and Windows fail to
start when I turn on my VAIO computer?
The BIOS boot options may have been incorrectly configured.
Press the ASSIST button while your VAIO computer is off to display the VAIO Care
Rescue Mode screen, select Start BIOS setup, and change the Boot Mode
setting, then restart the computer.
If a message such as “Secure Boot Fail” appears, check the following:
Your VAIO computer may be booting from an external device that the computer does
not support. When an external drive or a USB device is connected to the computer,
disconnect it and restart the computer.
The BIOS boot options may have been changed from the factory default settings.
Press the ASSIST button while your VAIO computer is off to display the VAIO Care
Rescue Mode screen, then select Start BIOS setup.
Press the
or key to select the Security tab, select Factory Default, and then
press the Enter key.
When the confirmation prompt appears, press the Enter key and restart the
computer.
If a message appears even after you restart your VAIO computer, recover the
computer using the recovery data on the built-in hard disk drive or SSD, or using the
Recovery Media you have created. [Details]
The BIOS boot options may have been incorrectly configured.
If the operating system on your VAIO computer is other than the preinstalled system,
press the ASSIST button while the computer is off to display the VAIO Care
Rescue Mode screen, then select Start BIOS setup.
Press the
or key to select the Security tab, change the Secure Boot setting
to Disabled, and then restart the computer.
© 2013 Sony Corporation
398
Search

VAIO User Guide Back | Back to Top
How to Use
Troubleshooting
Hardware
Apps
Network / Internet
Backup / Recovery
Security
Peripheral Devices
Why does my VAIO computer automatically turn
off?
When the battery pack is running out of power, your VAIO computer automatically enters
Hibernate mode and eventually turns off.
Connect the AC adapter to the computer or charge the battery pack.
© 2013 Sony Corporation
399
Search

VAIO User Guide Back | Back to Top
How to Use
Troubleshooting
Hardware
Apps
Network / Internet
Backup / Recovery
Security
Peripheral Devices
What should I do if my game software does not
work or it keeps crashing?
Check the website of the game if there are any patches or updates to download.
Make sure you have installed the latest video driver software.
On some VAIO computer models, the graphics memory is shared with the system. The
optimal graphics performance in such a case is not guaranteed.
© 2013 Sony Corporation
400
Search

VAIO User Guide Back | Back to Top
How to Use
Troubleshooting
Hardware
Apps
Network / Internet
Backup / Recovery
Security
Peripheral Devices
How can I reinstall the original apps and drivers?
You can restore the preinstalled apps and drivers using VAIO Care. To restore them,
start VAIO Care [Details] and then select Advanced Tools, Restore and
recovery, and Reinstall Applications and Drivers.
Refer to the help file included with VAIO Care for more information.
© 2013 Sony Corporation
401
Search

VAIO User Guide Back | Back to Top
How to Use
Troubleshooting
Hardware
Apps
Network / Internet
Backup / Recovery
Security
Peripheral Devices
How can I restore my VAIO computer system to
its factory default settings?
There are two ways to recover your VAIO computer system: from Recovery Media
[Details] and from the recovery area [Details].
© 2013 Sony Corporation
402
Search

VAIO User Guide Back | Back to Top
How to Use
Troubleshooting
Hardware
Apps
Network / Internet
Backup / Recovery
Security
Peripheral Devices
What should I do if I cannot create Recovery
Media?
Try the suggestions below:
Download and install the latest updates using VAIO Update. [Details]
Restart your VAIO computer. And then, try to create Recovery Media again.
If an AC adapter is supplied with an external optical disc drive, plug the AC adapter
into a power source.
Try other reliable media.
If the problem persists, visit the VAIO online support website for further assistance.
© 2013 Sony Corporation
404
Search

VAIO User Guide Back | Back to Top
How to Use
Troubleshooting
Hardware
Apps
Network / Internet
Backup / Recovery
Security
Peripheral Devices
What should I do if I cannot recover my VAIO
computer from the recovery area?
Recover your VAIO computer from Recovery Media if you have used apps to modify the
recovery area, installed a different operating system from the preinstalled one, or
formatted the built-in storage device without using VAIO Care (Rescue Mode) :
Recover or maintain your system.
If the problem persists, visit the VAIO online support website for further assistance.
© 2013 Sony Corporation
405
Search

VAIO User Guide Back | Back to Top
How to Use
Troubleshooting
Hardware
Apps
Network / Internet
Backup / Recovery
Security
Peripheral Devices
What should I do if I cannot start/complete the
recovery process?
Disconnect all unnecessary external devices from your VAIO computer.
Try the suggestions below:
Check the condition of Recovery Media. If you are using optical discs, check the discs
for dirt or damage. If the discs are not clean, clean them and try recovering your VAIO
computer again.
If you cannot recover your VAIO computer from the recovery area, restart the
computer and recover the computer from the recovery area again, or use Recovery
Media.
If you cannot recover your VAIO computer using a USB optical drive or USB flash
drive, connect the drive to another USB port or to the USB port that is compliant with
the USB 2.0 standard (if any). Then, turn off the computer and try recovering it again.
[Details]
If the problem persists, visit the VAIO online support website for further assistance.
© 2013 Sony Corporation
406
Search
VAIO User Guide Back | Back to Top
How to Use
Troubleshooting
Hardware
Apps
Network / Internet
Backup / Recovery
Security
Peripheral Devices
What should I do if my VAIO computer becomes
unstable (Windows does not start)?
Try the suggestions below:
Restore computer system files. [Details]
Use the restore point that you created before your VAIO computer becomes unstable.
Restore your VAIO computer from a system image backup if you have created the
backup. Refer to Windows Help and Support for more information. [Details]
Any file you have created or changed after you created the system image backup will
not be restored.
You need to back up such a file with VAIO Care (Rescue Mode) : Recover or
maintain your system. [Details]
Use VAIO Hardware Diagnostics to identify problems on your VAIO computer.
With the app, you can check if the computer hardware (a CPU, a memory module, and
a built-in storage device) needs to be replaced.
To start VAIO Hardware Diagnostics, select Tools and VAIO Hardware
Diagnostics in VAIO Care (Rescue Mode) : Recover or maintain your
system.
Follow the instructions in Recovering from the Recovery Area to recover your
VAIO computer. [Details]
If you have not backed up your data, be sure to make a backup copy of your valuable
data using VAIO Care (Rescue Mode) : Recover or maintain your system
before recovering your VAIO computer. [Details]
If you have a backup created with the Windows backup feature before your VAIO
computer becomes unstable, but you have created or changed the file after that, back
up such a file with VAIO Care (Rescue Mode) : Recover or maintain your
system.
Note
Recovering your VAIO computer will delete all the data on the built-in storage
device.
© 2013 Sony Corporation
407
Search

VAIO User Guide Back | Back to Top
How to Use
Troubleshooting
Hardware
Apps
Network / Internet
Backup / Recovery
Security
Peripheral Devices
What should I do if my VAIO computer becomes
unstable (Windows starts)?
Try the suggestions below:
Start VAIO Care to search for a solution. [Details]
Restore computer system files. [Details]
Use the restore point that you created before your VAIO computer becomes unstable.
Uninstall an app or a driver if your VAIO computer has become unstable after you
installed the app or the driver.
Reinstall the preinstalled apps or drivers on your VAIO computer if such apps or
drivers have not been working properly. [Details]
Restore your VAIO computer from a system image backup if you have created the
backup. Refer to Windows Help and Support for more information. [Details]
If the problem persists, follow the instructions in Refreshing Your VAIO Computer
to reinstall the operating system. [Details]
If the problem persists after you refresh your VAIO computer, follow the instructions in
Recovering from the Recovery Area to recover the computer. [Details]
The computer may not support the refresh function depending on the model you
purchased.
If you have not yet created Recovery Media, create the Recovery Media. [Details]
Be sure to make a backup copy of your valuable data before recovering your VAIO
computer. Refer to Windows Help and Support for more information. [Details]
Note
Recovering your VAIO computer will delete all the data on the built-in storage
device.
© 2013 Sony Corporation
408
Search