
GB
MICROWAVE OVENS
IT
FORNI A MICROONDE
MANUALE DI ISTRUZIONI
USER INSTRUCTIONS
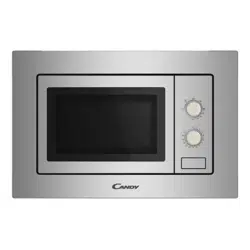
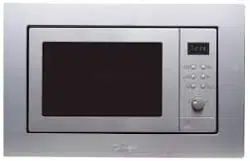
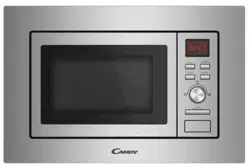
MIS1730X

(a) Do not attempt to operate this oven with the door
open since this can result in harmful exposure to
microwave energy. It is important not to break or tamper
with the safety interlocks.
(b) Do not place any object between the oven front face
and the door or allow soil or cleaner residue to accumulate
on sealing surfaces.
(c) WARNING: If the door or door seals are damaged, the
oven must not be operated until it has been repaired by
a competent person.
ADDENDUM
If the apparatus is not maintained in a good state of
cleanliness, its surface could be degraded and affect the
lifespan of the apparatus and lead to a dangerous situation.
PRECAUTIONS TO AVOID POSSIBLE EXPOSURE
TO EXCESSIVE MICROWAVE ENERGY
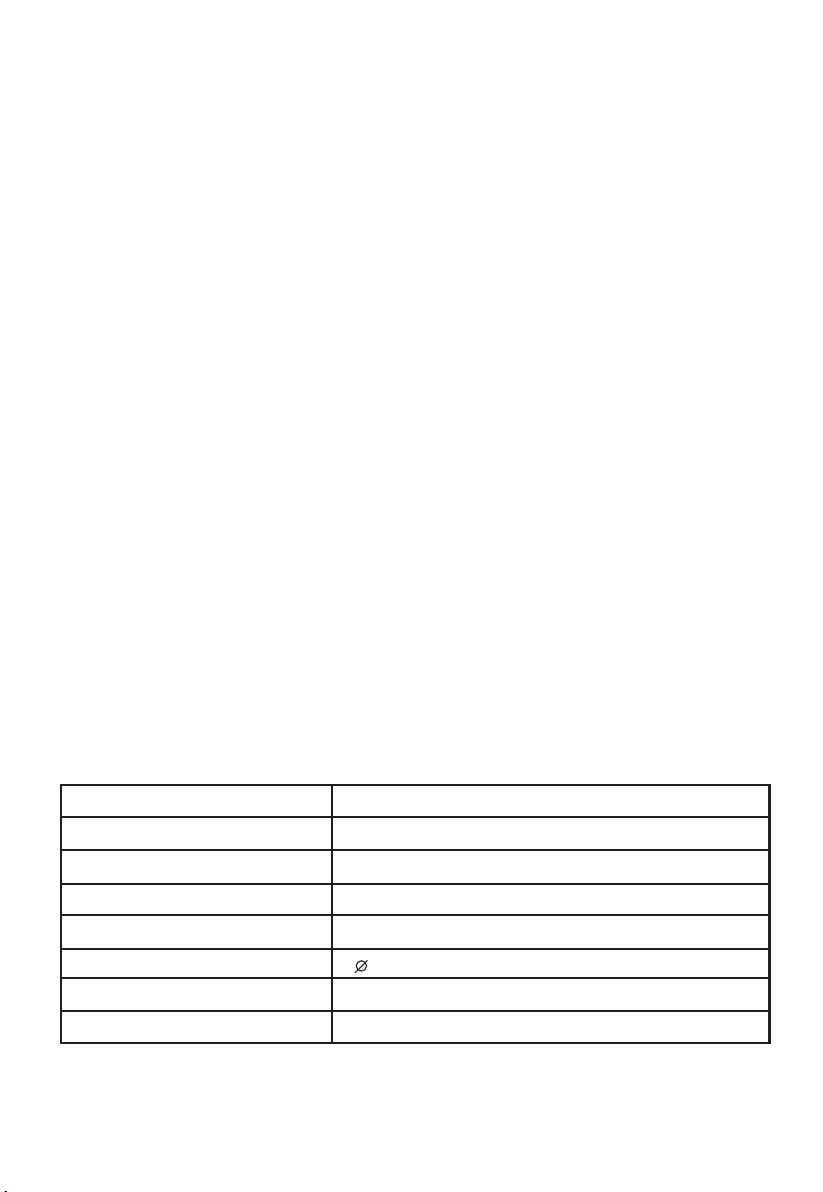
Specifications
Model:
Rated Voltage:
Rated Input Power(Microwave):
Rated Output Power(Microwave):
Oven Capacity:
Turntable Diameter:
External Dimensions:
Net Weight:
230V~ 50Hz
1050 W
245 mm
59 X320X382 mm
14.5 kg
5
700 W
17L
MIS1730X
2

To reduce the risk of fire, electric shock, injury to
persons or exposure to excessive microwave oven
energy when using your appliance, follow basic
precautions, including the following:
IMPORTANT SAFETY INSTRUCTIONS
WARNING
the manufacturer, its service agent or similarly qualified
persons in order to avoid a hazard.( For appliance with
type Y attachment)
AVOID POSSIBLE EXPOSURE TO EXCESSIVE
MICROWAVE ENERGY".
4. If the supply cord is damaged, it must be replaced by
1. Read and follow the specific:"PRECAUTIONS TO
years and above and persons with reduced physical,
sensory or mental capabilities or lack of experience
and knowledge if they have been given supervision or
instruction concerning use of the appliance in a safe way
and understand the hazards involved. Children shall not
play with the appliance. Cleaning and user maintenance
shall not be made by children unless they are older than 8
2. This appliance can be used by children aged from 8
3. Keep the appliance and its cord out of reach of children
less than 8 years.
and supervised. Children less than 8 years of age shall be
kept away unless continuously supervised.
3

.ovens
and keep the door closed in order to stifle any flames.
delayed eruptive boiling, therefore care must be taken
when handling the container.
shall be stirred or shaken and the temperature checked
before consumption, in order to avoid burns.
12.The contents of feeding bottles and baby food jars
13. Eggs in their shell and whole hard-boiled eggs should
not be heated in microwave ovens since they may
explode, even after microwave heating has ended.
deposits removed.
14. The oven should be cleaned regularly and any food
11. Microwave heating of beverages can result in
keep an eye on the oven due to the possibility of ignition.
in sealed containers since they are liable to explode.
could lead to deterioration of the surface that could
15. Failure to maintain the oven in a clean condition
7. WARNING: Liquids and other foods must not be heated
10. If smoke is emitted, switch off or unplug the appliance
competent person to carry out any service or repair
operation that involves the removal of a cover which
gives protection against exposure to microwave energy.
before replacing the lamp to avoid the possibility of
electric shock.
5. WARNING: Ensure that the appliance is switched off
6. WARNING: It is hazardous for anyone other than a
8. When heating food in plastic or paper containers,
9. Only use utensils that are suitable for use in microwave
4

-by clients in hotels, motels and other residential type
environments;
-farm houses;
-bed and breakfast type environments.
beverages. Drying of food or clothing and heating of
warming pads, slippers, sponges, damp cloth and similar
may lead to risk of injury, ignition or fire.
and similar applications such as:
-staff kitchen areas in shops, offices and other working
environments;
decorative door open. (for ovens with a decorative door.)
this oven.(for ovens provided with a facility to use a
16.Only use the temperature probe recommended for
temperature-sensing probe.)
adversely affect the life of the appliance and possibly
result in a hazardous situation.
allowed during microwave cooking.
cleaner.
17.The microwave oven must be operated with the
20. Metallic containers for food and beverages are not
21. The appliance shall not be cleaned with a steam
18.This appliance is intended to be used in household
19.The microwave oven is intended for heating food and
5

READ CAREFULLY AND KEEP FOR FUTURE
REFERENCE
24. Care should be taken not to displace the turntable
when removing containers from the appliance. (For fixed
appliances and built-in appliances being used equal or
higher than 900mm above the floor and having detacha le
turntables. But this is not applicable for appliances with
horizontal bottom hinged door.)
22. The appliance must not be installed behind a
decorative door in order to avoid overheating. (This is not
applicable for appliances with decorative door.)
23. The microwave oven is intended to be used built-in.
b
6

To Reduce the Risk of Injury to Persons
Grounding Installation
DANGER
Electric Shock Hazard
Touching some of the
internal components can
cause serious personal
injury or death. Do not
disassemble this
appliance.
WARNING
Electric Shock Hazard
Improper
use of the grounding
can
result in electric shock.
Do not plug into an outlet
until appliance is properly
installed and grounded.
This appliance must be
grounded. In the event of
an electrical short circuit,
grounding reduces the
risk of electric shock by
providing an escape wire
for the electric current.
This appliance is equipped
with a cord having a
grounding wire with
a grounding plug. The
plug must be plugged into
an outlet that is properly
installed and grounded.
Consult a qualified
electrician or serviceman
if the grounding instructions
are not completely
understood or if doubt exists
as to whether the appliance
is properly grounded.
If it is necessary to use an
extension cord, use only
a 3-wire
1. A short power-supply cord
is provided to reduce the risks
resulting from becoming
entangled in or tripping over a
longer cord.
2. If a long cord set
or extension
cord is used:
1)The marked electrical rating
of the cord set or extension cord
should be at least as great as
the electrical rating of the
appliance.
2)The extension cord must be
a grounding-type 3-wire cord.
3)The long cord should be
arranged so that it will not drape
over the counter top or tabletop
where it can be pulled o
n
by children or tripped over
unintentionally.
extension cord.
7

CLEANING
Be sure to unplug the appliance from the power supply.
1. Clean the cavity of the oven after using with a slightly damp
cloth.
2. Clean the accessories in the usual way in soapy water.
3. The door frame and seal and neighbouring parts must be
cleaned carefully with a damp cloth when they are dirty.
4. Do not use harsh abrasive cleaners or sharp metal scrapers
to clean the oven door glass since they can scratch the surface,
which may result in shattering of the glass.
5. Cleaning Tip---For easier cleaning of the cavity walls that the
food cooked can touch: Place half a lemon in a bowl, add 300m
l
(1/2 pint) water and heat on 100% microwave power for 10
minutes. Wipe the oven clean using a soft, dry cloth.
UTENSILS
CAUTION
Personal Injury Hazard
It is hazardous for
anyone other than a
competent person to
carry out any service
or repair operation that
involves the removal of
a cover which gives
protection against
exposure to microwave
energy.
Utensil Test:
1. Fill a microwave-safe container with 1 cup of cold
water (250ml) along with the utensil in question.
2. Cook on maximum power for 1 minute.
3. Carefully feel the utensil. If the empty utensil is
warm, do not use it for microwave cooking.
4. Do not exceed 1 minute cooking time.
See the instructions on "Materials you can use in
microwave oven or to be avoided in microwave oven."
There may be certain non-metallic utensils that are not
safe to use for microwaving. If in doubt, you can test the
utensil in question following the procedure below.
8

Materials you can use in microwave oven
Utensils Remarks
Follow manufacturer’s instructions. The bottom of browning dish must be
at least 3/16 inch (5mm) above the turntable. Incorrect usage may cause
the turntable to break.
Microwave-safe only. Follow manufacturer's instructions. Do not use
cracked or chipped dishes.
Always remove lid. Use only to heat food until just warm. Most glass jars
are not heat resistant and may break.
Heat-resistant oven glassware only. Make sure there is no metallic trim.
Do not use cracked or chipped dishes.
Follow manufacturer’s instructions. Do not close with metal tie. Make
slits to allow steam to escape.
Use for short–term cooking/warming only. Do not leave oven unattended
while cooking.
Use to cover food for reheating and absorbing fat. Use with supervision
for a short-term cooking only.
Use as a cover to prevent splattering or a wrap for steaming.
Microwave-safe only. Follow the manufacturer’s instructions. Should be
labeled "Microwave Safe". Some plastic containers soften, as the food
inside gets hot. "Boiling bags" and tightly closed plastic bags should be
slit, pierced or vented as directed by package.
Microwave-safe only. Use to cover food during cooking to retain
moisture. Do not allow plastic wrap to touch food.
Thermometers Microwave-safe only (meat and candy thermometers).
Wax paper Use as a cover to prevent splattering and retain moisture.
Browning dish
Glass jars
Glassware
Oven cooking
bags
Paper plates
and cups
Paper towels
Parchment
paper
Plastic
Plastic wrap
Dinnerware
Materials to be avoided in microwave oven
Utensils Remarks
Aluminum tray
Food carton with
metal handle
Metal or metal-
trimmed utensils
Metal twist ties
Paper bags
Plastic foam
Wood
Metal shields the food from microwave energy. Metal trim may
cause arcing.
May cause a fire in the oven.
Plastic foam may melt or contaminate the liquid inside when exposed
to high temperature.
Wood will dry out when used in the microwave oven and may split
or crack.
May cause arcing. Transfer food into microwave-safe dish.
May cause arcing. Transfer food into microwave-safe dish.
May cause arcing and could cause a fire in the oven.
9
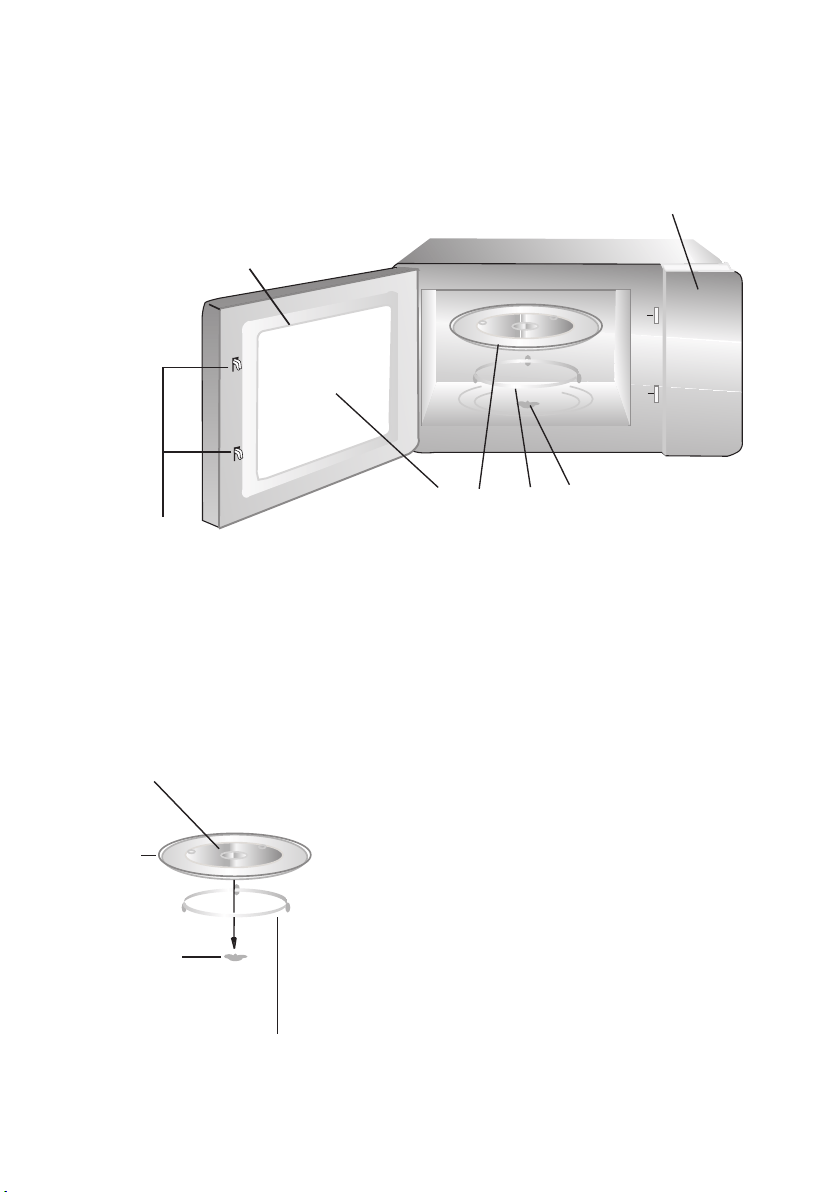
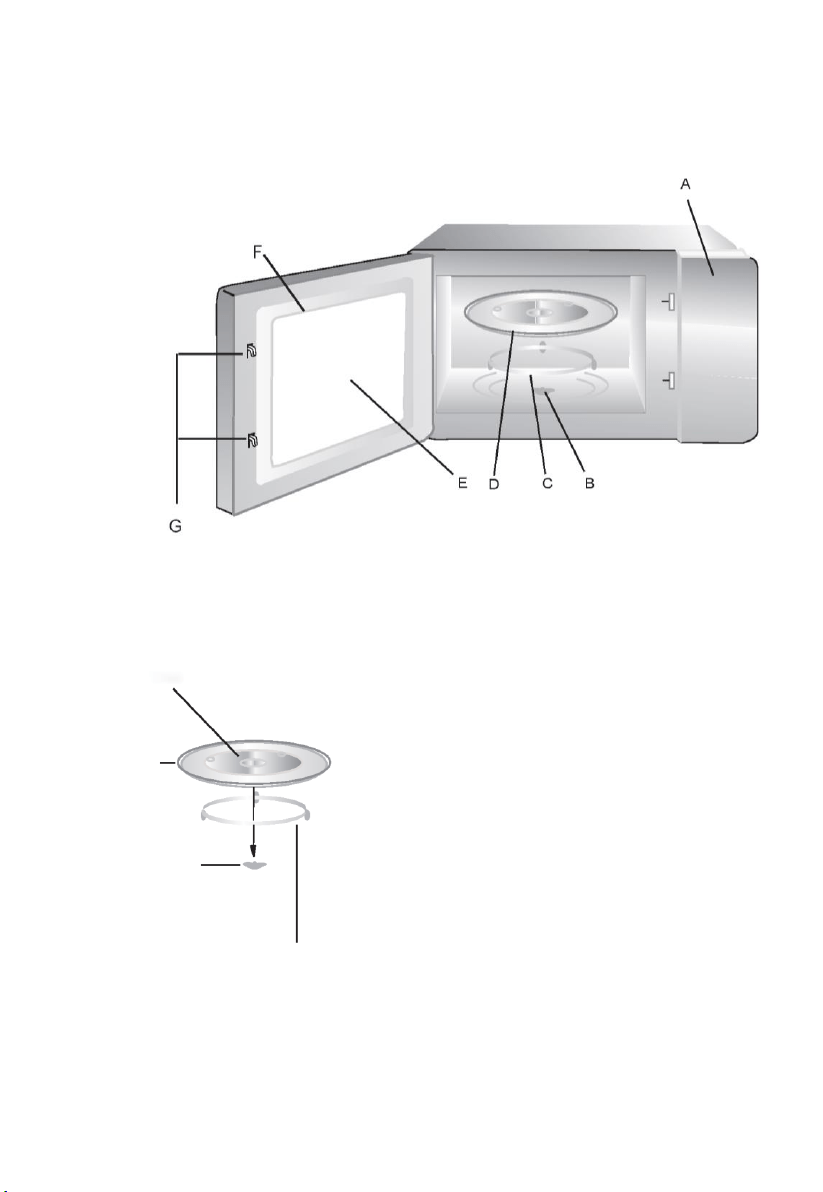
A) Control panel
B) Turntable shaft
C) Turntable ring assembly
D) Glass tray
E) Observation window
F) Door assembly
G) Safety interlock system
F
G
A
C B
E
D
SETTING UP YOUR OVEN
Names of Oven Parts and Accessories
Remove the oven and all materials from the carton and oven cavity.
Your oven comes with the following accessories:
Glass tray 1
Turntable ring assembly 1
Instruction Manual 1
Hub (underside)
Glass tray
Turntable ring assembly
a. Never place the
glass tray
upside down. The glass
tray should never be restricted.
b. Both
glass tray
and
turntable ring assembly
must
always be used during cooking.
c. All food and containers of food are always placed
on the
glass tray
for cooking.
d. If
glass tray
or
turntable ring assembly
cracks or
breaks, contact your nearest authorized service
center.
Turntable Installation
Turntable shaft
10
Installation and connection
1.This appliance is only intended for domestic use.
2.This oven is intended for built-in use only. It is not intended
for counter-top use or for use inside a cupboard.
3. Please observe the special installation instructions.
4.The appliance can be installed in a 60cm wide wall-
mounted cupboard.
5.The appliance is fitted with a plug and must only be
connected to a properly installed earthed socket.
6.The mains voltage must correspond to the voltage
specified on the rating plate.
7.The socket must be installed and connecting cable must
only be replaced by a qualified electrician. If the plug is no
longer to accessible following installation, an all-pole
disconnecting device must be present on the installation
side with a contact gap of at least 3mm.
8.Adapters, multi-way strips and extension leads must not
be used. Overloading can result in a risk of fire.
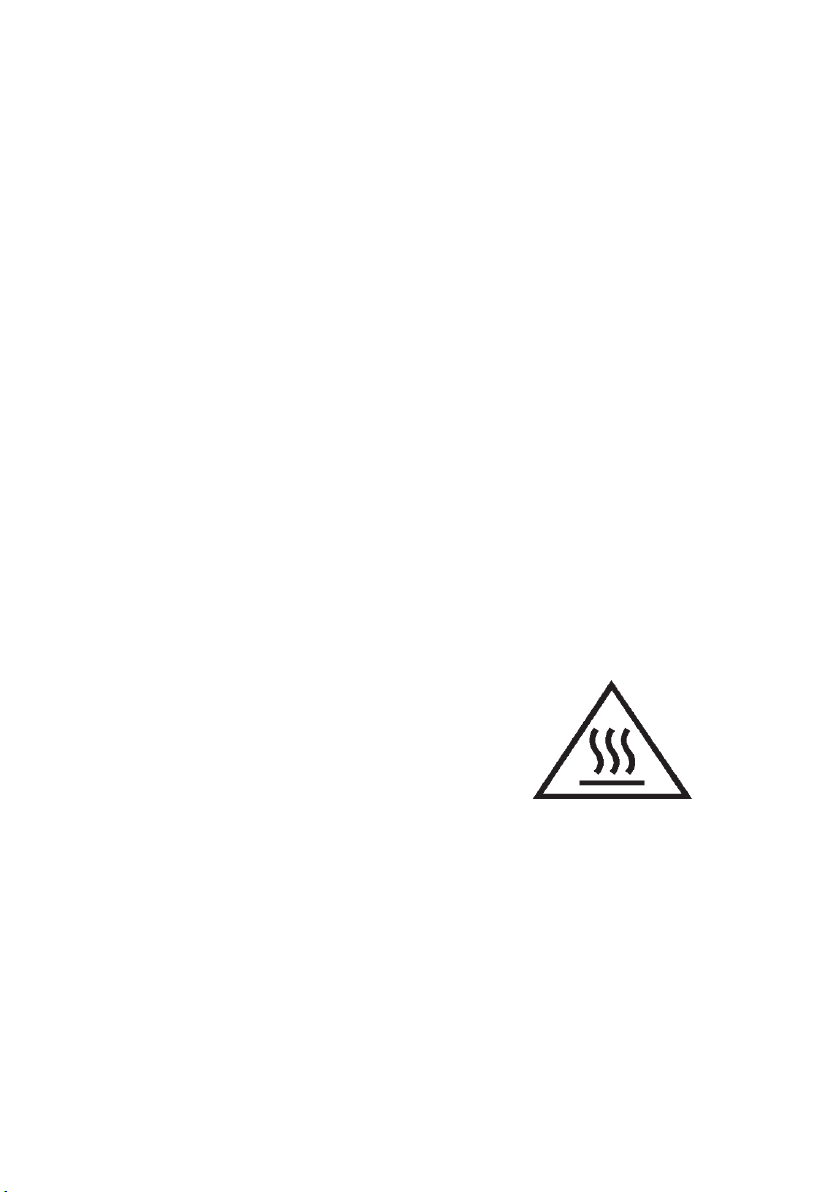
The accessible surface may
be hot during operation.
11
Installation Instructions
Please Read the Manual Carefully Before Installation
Please Note
Electrical connection
The oven is fitted with a plug and must be only connected to a properly installed earthed
socket. In accordance with the appropriate regulations, the socket must only be installed and
the connecting cable must only be replaced by a qualified electrician.
If the plug is no longer accessible following installation and all-pole isolating switch must
be present on the installation side with a contact gap of at least 3mm.
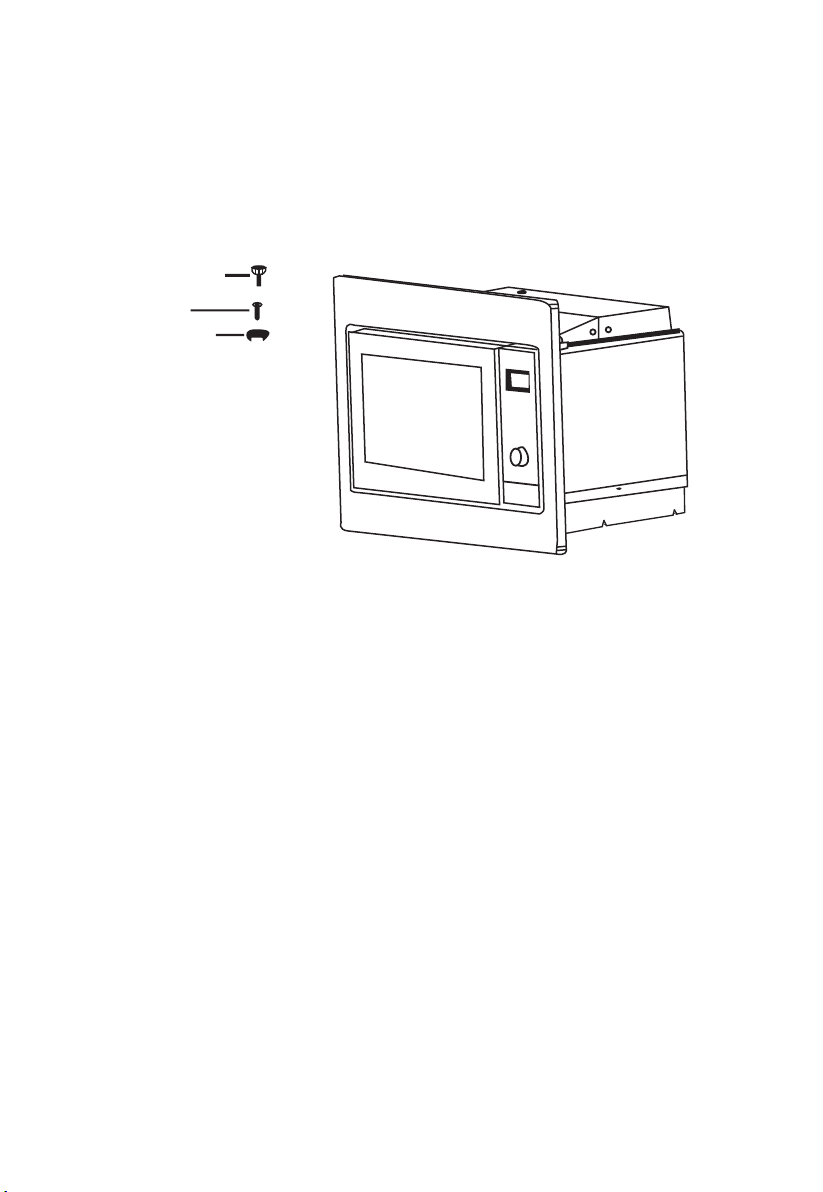
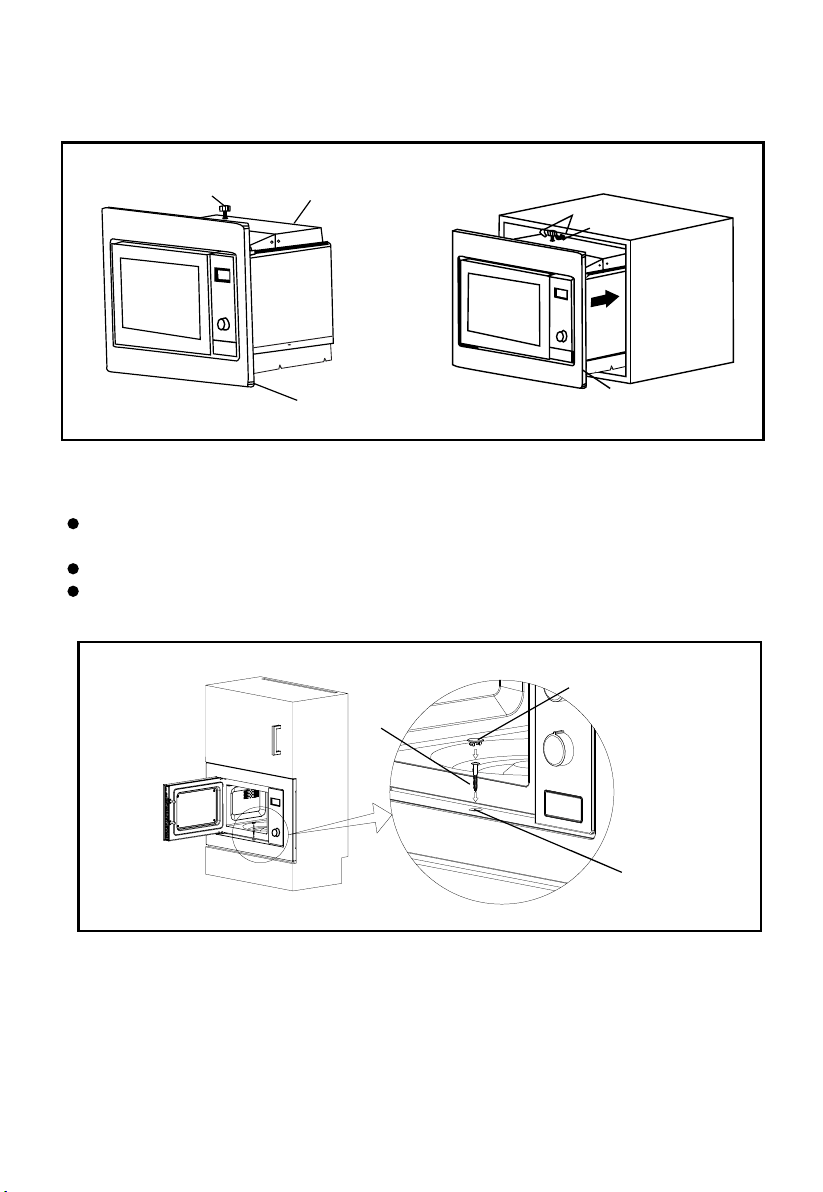
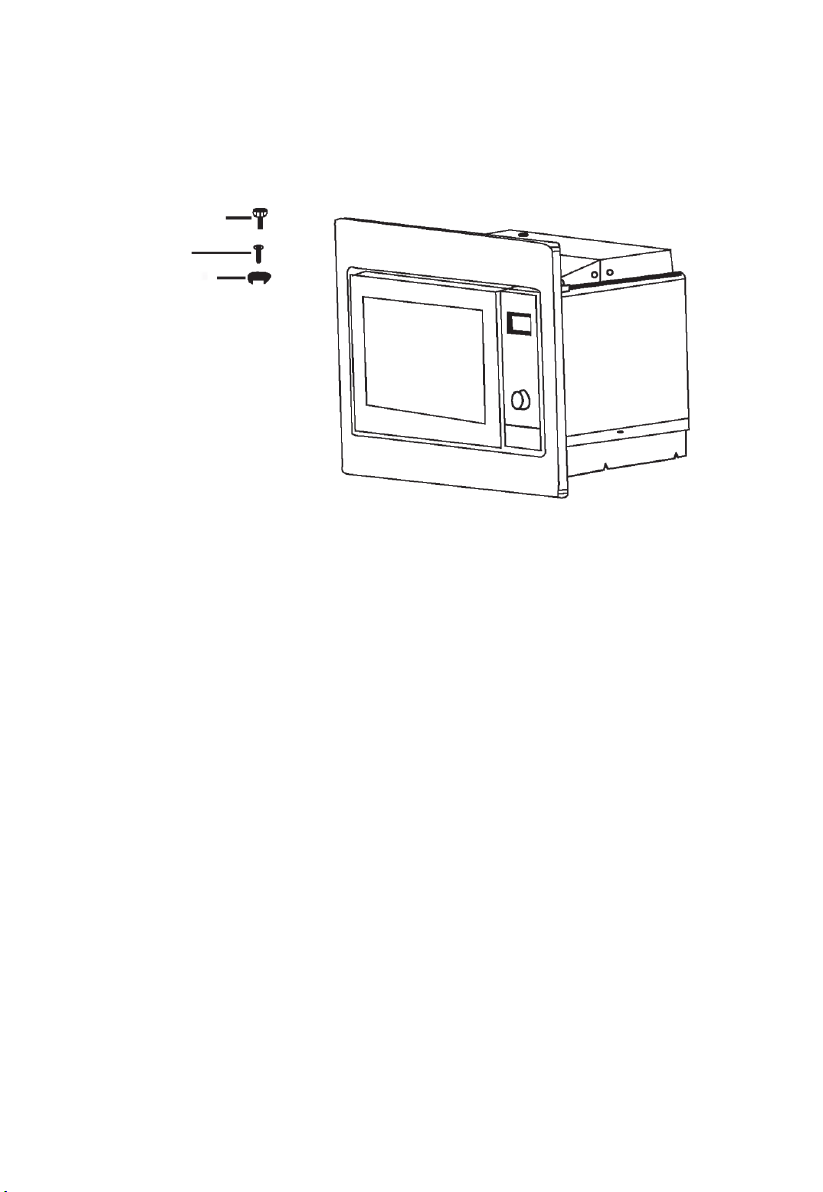
ADJUST SCREW A
SCREW B
TRIM-KIT PLASTIC
COVER
12
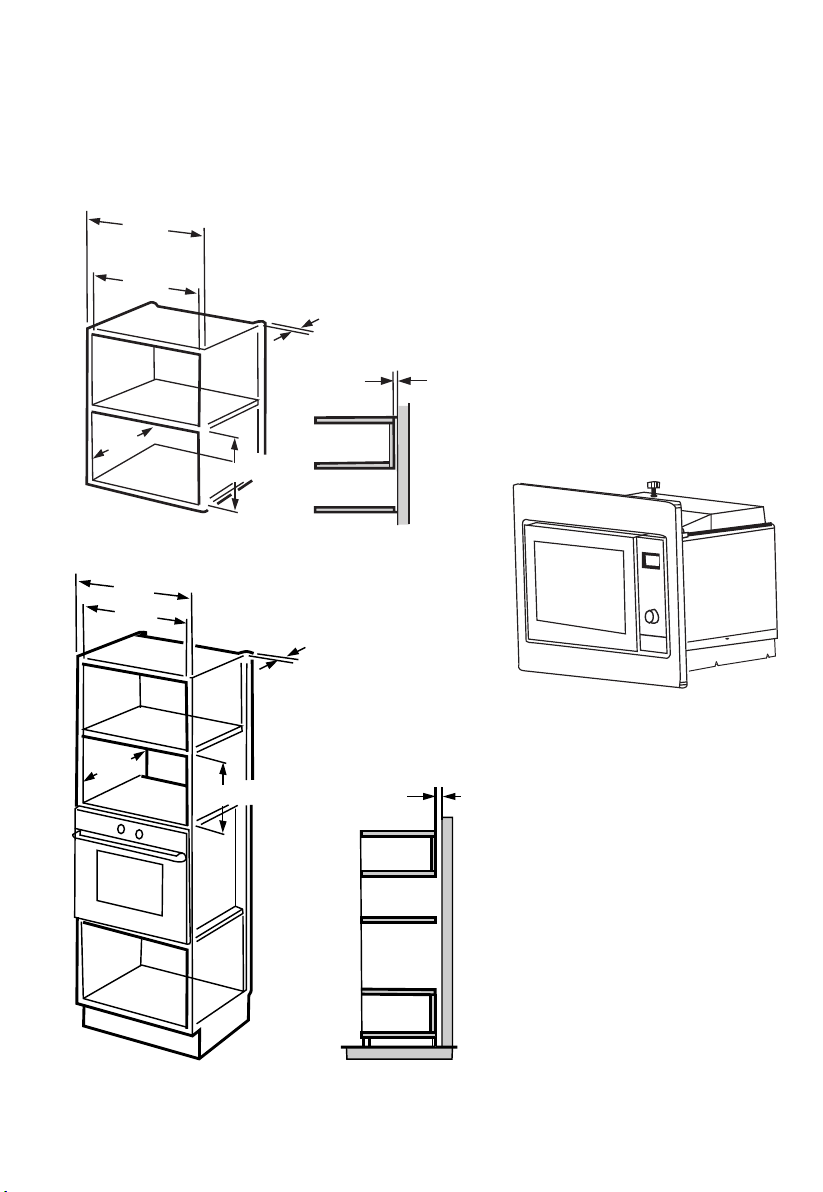
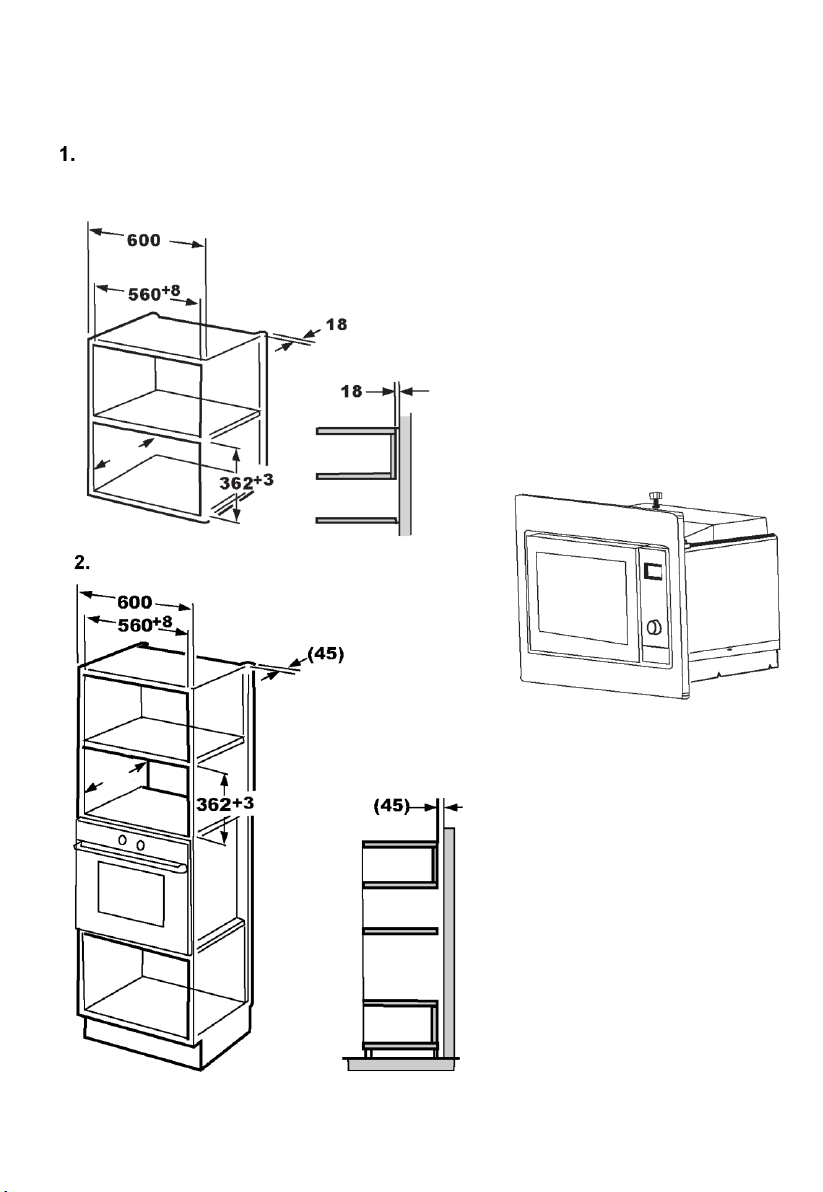
A. Built-in furniture
The built-in cabinet shall not have a rear wall behind the appliance.
Minimum installation height is 85cm.
Do not cover ventilation slots and air intake points.
1.
2.
362
600
560
+8
18
18
+3
min
600
560
+8
(45)
(45)
500
362
+3
min
3 00
13
B. Install the Oven
1. Fix ADJSUTSCREW A on the UPPER AIR TUNNEL of the oven, and then
install the oven into the cabinet.
Adjust the height of ADJUST SCREW A to keep 1mm gap between the
ADJUST SCREW A and the top plane of cabinet.
Do not trap or kink the power cord.
Make sure that the oven is installed in the center of the cabinet.
2. Open the door; fix the oven to the cabinet with SCREW B at t
he
to the INSTALLATION HOLE.
TRIM-KIT
UPPER AIR TUNNEL
ADJUST SCREW A
ADJUST HEIGHT
ADJUST SCREW A
TRIM KIT
INSTALLATION HOLE of TRIM KIT. Then fix the TRIM-KIT PLASTIC COVER
SCREW B
TRIM-KIT PLASTIC COVER
INSTALLATION HOLE
14
Operation Instructions
1) Press " " once, the screen display "P100".
2) Turn " " to adjust the hour figures, the input time should be within 0--23.
3) Press " ", the minute figures will flash.
3) Press "
" to confirm, and the screen displays "P 80".
4) Turn " " to adjust the cooking time until the oven displays
"20:00".
5) Press " " to start cooking .
1. Clock Setting
When the microwave oven is electrified, the screen will display "0:00", buzzer will ring once.
1) Press " " to select clock function, the hour figures will flash.
4) Turn " " to adjust the minute figures, the input time should be within 0--59.
5) Press " " to finish clock setting. ":" will flash, and the time will light.
Note: the step quantities for the adjustment time of the coding switch are as follow:
0---1 min : 5 seconds
1---5 min : 10 seconds
5---10 min : 30 seconds
10---30 min : 1 minute
30---95 min : 5 minutes
2) Press "
" once again or turn" " to choose 80% microwave
power.
Note: 1) If the clock is not set, it would not function when powered.
2) During the process of clock setting, if you press " ", the oven
will go back to the previous status automatically.
2. Microwave Cooking
Press "
times or turn " "to choose the power you want, and "P100", "P80" "P50", "P30" or
"P10" will display for each added press. Then press" " to
confirm, and turn " " to set cooking time from 0:05to 95:00. Press
" " again to start cooking.
Example: If you want to use 80% microwave power to cook for 20 minutes, you can
operate the oven as the following steps.
Start/+30Sec./Confirm
Kitchen Timer/Clock
Start/+30Sec./Confirm
Start/+30Sec./Confirm
Stop/Clear
Start/+30Sec./Confirm
Kitchen Timer/Clock
Kitchen Timer/Clock
twice
Microwave
" he will display "P100".Press " " for
Microwave
once, t screen
Microwave
Microwave
15

Order
Microwave
Power
Display
1
2
3
4
5
100%
80%
50%
30%
10%
"
P100
P80
P50
P30
P10
" Pad instructions
Microwave
1) Press " " once, and the oven will display "dEF1".
2) Turn " " to select the weight of food from 100 to 2000 g.
3) Press " " to start defrosting.
1) In waiting state, Press " " to start cooking with 100% power,
each added press will increase 30 seconds cooking time up to 95 minutes.
2) In microwave cooking or time defrost state, each press of
" " can increase 30 seconds of cooking time.
3) In waiting state, turn " " left to set cooking time with 100%
microwave power, then press " " to start cooking.
Weight/Time Defrost
Start/+30Sec./Confirm
Start/+30Sec./Confirm
Start/+30Sec./Confirm
Start/+30Sec./Confirm
1) Press " " twice, and the oven will display "dEF2".
2) Turn " " to select the defrost time. The MAX time is 95 minutes.
3) Press " " to start defrosting.The defrost power is P30 , and
it will not be changed.
Start/+30Sec./Confirm
Weight/Time Defrost
3. Quick Start
4
. Defrost By Weight
5
. Defrost By Time
16
(1) Press " " e,
(2) Turn " " to enter the correct timer.(The maximum cooking time is 95 minutes.)
.gnittes mrifnoc ot "" sserP)3(
If the clock be set (24-hour system), the screen will display the current time.
Start/+30Sec./Confirm
Kitchen Timer/Clock
(4) When the kitchen time is reached, timer indicator will go out. The buzzer will ring 5 times.
on
c
Note: The kitchen Time is different from 24-hour system, Kitchen Timer is a timer.
1) Turn " " clockwise till "A-6" display.
Example: If you want to use "Auto Menu" to cook fish for 350g.
2) Press " " to confirm.
1)
In the standby state
, t
urn " " right to choose the menu, and "A-1" to "A-8" will
displa
y, which
means pizza, meat, vegetable, pasta, potato, fish, beverage and popcorn.
2) Press " " to confirm
.
3) Turn " " to choose the default weight as the menu chart.
4) Press " " to start cooking
.
3) Turn " " to select the weight of fish till "350" display.
4) Press " " to start cooking
.
Start/+30Sec./Confirm
Start/+30Sec./Confirm
Start/+30Sec./Confirm
Start/+30Sec./Confirm
6. Kitchen Timer
7. Auto Menu
the
will display 00:00.screen
17

The menu chart:
Menu
Weight
Display
A-2
Meat
A-3
Vegetable
A-5
Potato
A-4
Pasta
A-6
Fish
A-8
Popcorn
200 g
400 g
250 g
350 g
450 g
200 g
300 g
400 g
50g(with 450 g cold water)
100g(with 800 g cold water)
200 g
400 g
600 g
250 g
350 g
450 g
1 cup(120 ml)
2 cups(240 ml)
3 cups(360ml)
50 g
100 g
A-1
Pizza
A-7
Beverage
200
400
250
350
450
200
300
400
50
100
200
400
600
250
350
450
1
2
3
50
100
18
7) Press " " to start cooking, and buzzer will sound once for the
first section, defrosting time counts down; buzzer will sound once again entering
the second cooking. when cooking finish, buzzer sounds five times.
1) Press "
" twice, and the oven will display "dEF2".
2) Turn " " to select the defrost time till "5:00" display.
3) Press " " once, the screen display "P100".
5) Press " " to confirm, and the screen displays "P 80".
6) Turn " " to adjust the cooking time till the oven displays "7:00".
4) Press " " once again or turn " " to choose 80% microwave
power.
nquiring Function
(1) In states of microwave cooking, press "
current power will be
to the former state;
(2) In cooking state, press " " to inquire the time and the time will
display for 3 seconds.
10. Lock-out Function for Children
Lock: In waiting state, press " " for 3 seconds, there will be a long beep
denoting entering the children-lock state and the current time will diplay if the time
Lock quitting: In locked state, press " " for 3 seconds, there will be a long
"beep" denoting that the lock is released.
At most 2 sections can be set for cooking. In multi-section cooking, if one section is
defrosting, then defrosting shall be placed in the first section.
Example: If you want to defrost food for 5 minutes and then cook with 80% microwave
power for 7 minutes, operate it as the following:
Start/+30Sec./Confirm
Start/+30Sec./Confirm
Stop/Clear
Stop/Clear
Kitchen Timer
Weight/Time Defrost
Microwave
/Clock
has been set, otherwise, the screen will display " ". And lock indicator lights .
Microwave
Microwave
", the
displayed for 3 seconds. After 3 seconds, the oven will turn back
8. Multi-section cooking
9
. I
19

1
(1) "
" must be pressed to continue cooking if the door is opened
(2) Once the cooking programme has been set , " " is not pressed
in 1
minute .
The current time will be displayed. The setting will be cancelled.
(3) The buzzer sounds once by efficient press, inefficient press will be no responce.
s
Start/+30Sec./Confirm
during cooking;
Start/+30Sec./Confirm
1. Specifications
20

2
PRECAUZIONI PER EVITARE LA POSSIBILE
ESPOSIZIONE A UN'ECCESSIVA ENERGIA A
MICROONDE
(a) Per evitare esposizioni nocive all'energia a microonde, non
provare a utilizzare questo forno con lo sportello aperto.
Prestare particolare attenzione a non danneggiare
o manomettere gli interblocchi di sicurezza.
(b) Non collocare alcun oggetto tra il lato anteriore del forno
e lo sportello. Evitare l'accumulo di sporcizia o residui di
detersivo sulle superfici di tenuta.
(c) AVVERTENZA: in caso di danni allo sportello alle guarnizioni
dello sportello, utilizzare il forno solo dopo che è stato riparato
da una persona competente.
ALTRE ISTRUZIONI
Se l'apparecchio non viene mantenuto pulito, la superficie
potrebbe danneggiarsi, l'apparecchio potrebbe durare meno
e potrebbe causare situazioni pericolose.
Specifiche
Modello:
MIS1730X
Tensione nominale:
230 V ~ 50 Hz
Potenza nominale in ingresso (microonde):
1050 W
Potenza nominale in uscita (microonde):
700 W
Capacità del forno:
17 litri
Diametro del piatto girevole:
Ø 245 mm
Dimensioni esterne:
595×320×382 mm
Peso netto:
14,5 kg

3
ISTRUZIONI IMPORTANTI PER LA SICUREZZA
AVVERTENZE
Per ridurre il rischio di incendi, scosse elettriche, lesioni
personali o esposizione a un'energia eccessiva del forno a
microonde durante l'uso, attenersi alle precauzioni basilari
e alle seguenti avvertenze:
1. Leggere e rispettare le specifiche "PRECAUZIONI PER
EVITARE LA POSSIBILE ESPOSIZIONE A UN'ECCESSIVA
ENERGIA A MICROONDE".
2. Questo elettrodomestico può essere utilizzato da bambini di
almeno 8 anni, da persone con ridotte capacità fisiche, sensoriali
o mentali e da persone inesperte solo sotto stretta sorveglianza
o se hanno appreso le modalità di utilizzo sicuro dell'elettro-
domestico e sono consapevoli dei relativi pericoli. Impedire ai
bambini di giocare con l'elettrodomestico. La pulizia e la
manutenzione non devono essere effettuate da bambini di età
inferiore a 8 anni senza supervisione. Tenere lontani i bambini
di età inferiore a 8 anni se non sono sorvegliati continuamente.
3. Tenere l'elettrodomestico e il cavo lontano dalla portata di
bambini di età inferiore a 8 anni.
4. Se il cavo di alimentazione è danneggiato, deve essere
sostituito dal fabbricante, da un tecnico dell'assistenza o da
una persona con analoga qualifica per evitare rischi (per
elettrodomestici con attacco a Y).

4
5. AVVERTENZA: per evitare scosse elettriche, accertarsi che
l'elettrodomestico sia spento prima di sostituire la lampadina.
6. AVVERTENZA: Le operazioni di manutenzione e riparazione
che implicano la rimozione degli involucri possono essere
pericolose se non effettuate da personale competente, dal
momento che causano l'esposizione all'energia a microonde.
7. AVVERTENZA: non riscaldare liquidi o altri alimenti in
contenitori sigillati perché potrebbero esplodere.
8. Quando si riscaldano alimenti contenuti in una vaschetta in
plastica o carta, controllare frequentemente il forno perché
i contenitori potrebbero incendiarsi.
9. Adoperare solo utensili da cucina idonei all'uso nei forni
a microonde.
10. Se il formo emette fumo, spegnerlo o scollegarlo
dall'alimentazione elettrica e mantenere chiuso lo sportello per
evitare la propagazione alle fiamme.
11. Il riscaldamento di bevande nel forno a microonde può
provocare una violenta ebollizione ritardata, per cui
manipolare il contenitore con cautela.
12. Per evitare ustioni, mescolare e agitare il contenuto di
biberon e barattoli contenenti alimenti per neonati,
e controllare la temperatura prima del consumo.
13. Non riscaldare uova racchiuse nel guscio o bollite per
lunghi periodi di tempo nel microonde poiché potrebbero
esplodere anche dopo la fine della cottura.
14. È indispensabile pulire regolarmente il forno e rimuovere
tutti i residui di alimenti.
15. Se il forno non viene tenuto sempre pulito, le superfici
potrebbero deteriorarsi, riducendo la durata
dell'elettrodomestico e causando situazioni pericolose.

5
16. Utilizzare solo la sonda di temperatura consigliata per
questo forno (per i forni dotati di apparecchiature per l'uso di
una sonda di rilevamento della temperatura).
17. Il forno a microonde deve essere utilizzato con lo sportello
decorativo aperto (per i forni dotati di sportello decorativo).
18. Questo elettrodomestico è destinato all'uso domestico
e a utilizzi simili a quelli di seguito indicati:
˗ Zone cucina per il personale di negozi, uffici e altri ambienti
lavorativi.
˗ Clienti di hotel, motel e altri ambienti residenziali.
˗ Case coloniche.
˗ Bed & breakfast.
19. Il forno a microonde è progettato per riscaldare alimenti e
bevande. L'asciugatura di alimenti o indumenti e il riscaldamento
di cuscinetti scaldanti, pantofole, spugne, panni bagnati e simili
può provocare lesioni o innescare incendi.
20. Non è consentito utilizzare contenitori metallici per alimenti
e bevande durante la cottura a microonde.
21. Non pulire l'apparecchio con elettrodomestici a vapore.

6
22. Per evitare che l'elettrodomestico si surriscaldi, non
installarlo dietro uno sportello decorativo. (non riguarda
elettrodomestici dotati di sportello decorativo).
23. Il forno a microonde deve essere utilizzato a incasso.
24. Quando i contenitori vengono rimossi dall'elettro-
domestico, non spostare il piatto girevole. (per gli elettro-
domestici fissi e a incasso, dotati di piatti girevoli staccabili,
utilizzati a un'altezza minima di 90 cm dal pavimento; non
riguarda elettrodomestici dotati di sportello incernierato
orizzontale).
LEGGERE ATTENTAMENTE QUESTE ISTRUZIONI
E CONSERVARLE PER FUTURI RIFERIMENTI

7
Installazione del collegamento a terra
per ridurre il rischio di lesioni personali
PERICOLO
Per evitare scosse elettriche e
lesioni personali gravi o fatali,
non toccare gli elementi interni.
Non smontare questo
elettrodomestico.
AVVERTENZA
Eventuali difetti del
collegamento a terra potrebbero
provocare scosse elettriche.
Se l'elettrodomestico non
è installato e collegato
correttamente a terra, non
collegarlo alla presa elettrica.
L’elettrodomestico deve essere
dotato di messa a terra. In caso
di cortocircuito, il collegamento
a terra limita il rischio di scosse
elettriche in quanto il conduttore
di terra garantisce un percorso
per la dissipazione della
corrente elettrica.
Questo elettrodomestico è
fornito con un cavo dotato di un
conduttore di terra e di una
spina di messa a terra. La spina
deve essere collegata a una
presa correttamente installata
e dotata di messa a terra.
In caso di dubbi relativi al
collegamento a terra
dell'elettrodomestico,
consultare un tecnico o un
elettricista qualificato.
Se è necessario adoperare
una prolunga, utilizzare un
cavo tripolare.
1. Il cavo di alimentazione
fornito è corto per ridurre i
rischi di intrappolamento e
inciampo.
2. Se si utilizza un cavo o una
lunga prolunga:
1) Le caratteristiche elettriche
nominali del cavo o della
prolunga devono essere
idonee alle caratteristiche
elettriche dell'elettrodomestico.
2) L'eventuale prolunga deve
essere costituita da un cavo
tripolare dotato di conduttore di
terra.
3) I cavi lunghi devono essere
sistemati in modo che non
ciondolino sul top della cucina,
per evitare che vengano tirati
dai bambini o possano far
inciampare.

8
PULIZIA
Accertarsi che l'elettrodomestico sia scollegato dalla fonte di
alimentazione.
1. Pulire la cavità del forno con un panno lievemente bagnato.
2. Pulire gli accessori con acqua e sapone.
3. La cornice dello sportello, la guarnizione e i componenti vicini
devono essere puliti attentamente con un panno bagnato se sono
sporchi.
4. Non adoperare detersivi aggressivi e abrasivi o raschietti metallici
affilati per pulire il vetro dello sportello del forno, altrimenti la superficie
potrebbe graffiarsi e il vetro potrebbe frantumarsi.
5. Suggerimento per la pulizia: per facilitare la pulizia delle pareti
della cavità che potrebbero entrare a contatto con gli alimenti cotti,
collocare mezzo limone in una scodella, aggiungere 300 ml d'acqua
e riscaldarla per 10 minuti con il forno a microonde al 100% della
potenza. Per pulire il forno, strofinarlo con un panno morbido
e asciutto.
UTENSILI DA CUCINA
ATTENZIONE
Rischio di lesioni
personali
Le operazioni di
manutenzione e riparazione
che implicano la rimozione
degli involucri possono
essere pericolose se non
effettuate da personale
competente, dal momento
che causano l'esposizione
all'energia a microonde.
Consultare le istruzioni che indicano i "Materiali
utilizzabili e non utilizzabili nel forno a
microonde". L'uso di determinati utensili da
cucina non metallici non è sicuro per la cottura a
microonde. In caso di dubbi, provare l'utensile da
cucina effettuando la procedura indicata di seguito.
Prova dell'utensile da cucina:
1. Riempire un contenitore utilizzabile nel forno
a microonde con una tazza d'acqua fredda
(250 ml) assieme all'utensile da cucina da
provare.
2. Accendere il forno alla massima potenza per
1 minuto.
3. Toccare con attenzione l'utensile da cucina.
Se l'utensile da cucina vuoto è caldo, non deve
essere utilizzato per la cottura a microonde.
4. Non superare il tempo di cottura di 1 minuto.
9
Materiali utilizzabili nel forno a microonde
Utensili da cucina
Note
Piatto per
doratura
Seguire le istruzioni del fabbricante. Il fondo del piatto per doratura deve
trovarsi ad almeno 5 mm al di sopra del piatto girevole. Utilizzi errati
potrebbero causare la rottura del piatto girevole.
Stoviglie
Solo quella utilizzabile nei forni a microonde. Seguire le istruzioni del
fabbricante. Non adoperare piatti screpolati o scheggiati.
Barattoli di vetro
Rimuovere sempre il coperchio. Adoperarli solo per riscaldare lievemente gli
alimenti. La maggior parte dei barattoli di vetro non resistono al calore e
possono rompersi.
Cristalleria
Adoperare solo cristalleria che resiste nei forni a microonde. Accertarsi che
non siano presenti finiture metalliche. Non adoperare piatti screpolati o
scheggiati.
Sacchetti per la
cottura in forno
Seguire le istruzioni del fabbricante. Non chiuderli con fascette metalliche.
Creare qualche feritoia per lasciare uscire il vapore.
Piatti e bicchieri
di carta
Adoperarli solo per cottura o riscaldamento breve. Non lasciare il forno
incustodito durante la cottura.
Carta
assorbente
Adoperarla per coprire gli alimenti per riscaldarli e assorbire i grassi.
Adoperarla solo per cotture brevi, senza lasciare incustodito il forno.
Carta da forno
Adoperarla come coperchio per evitare schizzi o per la cottura a vapore.
Plastica
Solo quella utilizzabile nei forni a microonde. Seguire le istruzioni del
fabbricante. Deve essere presente un'apposita etichetta indicante che è
possibile utilizzarla nei forni a microonde. Alcuni contenitori in plastica si
ammorbidiscono quando gli alimenti diventano caldi. Se si utilizzano
sacchetti per la cottura e sacchetti in plastica chiusi ermeticamente,
praticare piccoli tagli o fori come indicato sulla confezione.
Pellicola di
plastica
Solo quella utilizzabile nei forni a microonde. Utilizzarla per coprire gli
alimenti durante la cottura per trattenere l'umidità. Evitare il contatto della
plastica con gli alimenti.
Termometri
Solo quelli utilizzabili nei forni a microonde (termometri per la carne e i
dolci).
Carta cerata
Adoperarla come coperchio per evitare schizzi o per trattenere l'umidità.
Materiali da evitare nel forno a microonde
Utensili da cucina
Note
Vaschette di
alluminio
Possono causare archi elettrici. Trasferire gli alimenti in un piatto adatto alla
cottura a microonde.
Cartone per
alimenti con
maniglie
metalliche
Possono causare archi elettrici. Trasferire gli alimenti in un piatto adatto alla
cottura a microonde.
Utensili da cucina
in metallo o con
finiture metalliche
Il metallo scherma gli alimenti dall'energia a microonde. Le finiture metalliche
possono causare archi elettrici.
Fascette
metalliche
Possono causare archi elettrici e incendi nel forno.
Sacchetti di carta
Possono causare incendi nel forno.
Materiale
espanso plastico
Il materiale espanso plastico può fondere o contaminare il liquido interno
quando viene esposto ad alte temperature.
legno
Quando viene utilizzato nel forno a microonde, il legno si secca e potrebbe
creparsi o rompersi.
10
IMPOSTAZIONE DEL FORNO
Nomi dei componenti e degli accessori del forno
Togliere il forno e tutti i materiali dal cartone e dalla cavità del forno. Il forno viene fornito con
i seguenti accessori:
Installazione del piatto girevole
Vassoio di vetro
1
Anello di supporto del piatto girevole
1
Manuale di istruzioni
1
A) Pannello di controllo
B) Alberino del piatto girevole
C) Anello di supporto del piatto girevole
D) Vassoio di vetro
E) Finestra di ispezione
F) Sportello
G) Sistema di interblocco di sicurezza
Centro (lato inferiore)
Vassoio
di vetro
Alberino del
piatto girevole
a. Non capovolgere il vassoio di vetro. Il vassoio di vetro
non deve mai bloccarsi.
b. Durante la cottura, utilizzare sia il vassoio di vetro che
l'anello di supporto del piatto girevole.
c. Tutti gli alimenti e i contenitori devono essere collocati
sempre sul vassoio di vetro per la cottura.
d. Se il vassoio di vetro o l'anello di supporto del piatto
girevole si crepa o si rompe, rivolgersi al centro
assistenza autorizzato più vicino.
Anello di supporto
del piatto girevole
11
Installazione e collegamento
1. Questo elettrodomestico è progettato solo per usi domestici.
2. Questo forno è destinato solo per il montaggio a incasso. Non è
progettato per utilizzarlo sul top di cucina o all'interno di una
credenza.
3. Attenersi scrupolosamente alle istruzioni particolari per
l'installazione.
4. L'elettrodomestico può essere installato in una credenza
montata a parete larga 60 cm.
5. La spina dell'elettrodomestico deve essere collegata solo a una
presa dotata di messa a terra.
6. La tensione della rete elettrica deve corrispondere a quella
specificata sulla targhetta dei dati.
7. L'installazione della presa e la sostituzione del cavo di
collegamento devono essere effettuati solo da un elettricista
qualificato. Se non è possibile accedere alla spina dopo
l'installazione, predisporre un dispositivo di scollegamento
omnipolare dal lato dell'installazione con un margine di contatto
di almeno 3 mm.
8. Non adoperare adattatori, prese multiple e prolunghe. Eventuali
sovraccarichi possono causare incendi.
La superficie accessibile può essere
calda durante il funzionamento.
12
Istruzioni per l'installazione
Consultare attentamente il manuale prima dell'installazione
Nota
Collegamento elettrico
Il forno è dotato di una spina e deve essere collegato solo a una presa dotata di messa a terra.
In conformità alle normative pertinenti, l'installazione della presa e la sostituzione del cavo di colle-
gamento devono essere effettuati solo da un elettricista qualificato.
Se non è possibile accedere alla spina dopo l'installazione, predisporre un interruttore di isolamento
omnipolare dal lato dell'installazione con un margine di contatto di almeno 3 mm.
VITE DI
REGOLAZIONE A
VITE B
COPERTURA DI
FINITURA IN PLASTICA
13
A. Mobile da incasso
Il vano da incasso deve essere sprovvisto di fondo posteriore dietro l'elettrodomestico.
L'altezza minima di installazione è 85 cm.
Non coprire le feritoie di ventilazione e i punti di ingresso dell'aria.
min
300
min
500

14
B. Installazione del forno
1. Fissare la VITE DI REGOLAZIONE A sul CANALE DELL'ARIA SUPERIORE del
forno e installare il forno nel mobile.
● Regolare l'altezza della VITE DI REGOLAZIONE A in modo da lasciare 1 mm
di spazio tra la VITE DI REGOLAZIONE A e il piano superiore del mobile.
● Non incastrare o piegare il cavo di alimentazione.
● Accertarsi che il forno sia installato al centro del mobile.
2. Aprire lo sportello e fissare il forno al mobile inserendo la VITE B nel FORO DI
INSTALLAZIONE della COPERTURA DI FINITURA. Fissare la COPERTURA DI
FINITURA IN PLASTICA al FORO DI INSTALLAZIONE.
VITE DI REGOLAZIONE A
CANALE DELL'ARIA
SUPERIORE
ALTEZZA DI
REGOLAZIONE
VITE DI REGOLAZIONE A
COPERTURA
DI FINITURA
COPERTURA
DI FINITURA
VITE B
COPERTURA DI FINITURA IN PLASTICA
FORO DI INSTALLAZIONE
15
Istruzioni per l'uso
1. Impostazione dell'orologio
Quando il forno a microonde è alimentato, lo schermo visualizza "0:00" e viene emesso un singolo segnale
acustico.
1) Premere due volte " Kitchen Timer/Clock " per selezionare la funzione orologio; in tal modo, le cifre
dell'ora lampeggiano.
2) Ruotare “ " per regolare le cifre dell'ora (da 0 a 23).
3) Premere " Kitchen Timer/Clock "; in tal modo, le cifre dei minuti lampeggiano.
4) Ruotare “ " per regolare le cifre dei minuti (da 0 a 59).
5) Premere " Kitchen Timer/Clock " per terminare l'impostazione dell'orologio. In tal modo, lampeggia ":" e
l'ora si illumina.
Nota:
1) Se l'orologio non è impostato, quando si accende il forno non funziona.
2) Durante il processo di impostazione dell'orologio, se si preme “ Stop/Clear ", il forno torna
automaticamente allo stato precedente.
2. Cottura a microonde
Premere una sola volta “ Microwave "; in tal modo, lo schermo visualizza "P100". Ruotare “ Microwave " o
“ “ per scegliere la potenza desiderata; in tal modo, il display visualizza "P100", "P80" "P50",
"P30" o "P10" per ogni pressione ulteriore. A questo punto, premere “ Start/+30Sec./Confirm " per
confermare e ruotare “ " per impostare il tempo di cottura (da 0:05 a 95:00).
Premere nuovamente " Start/+30Sec./Confirm " per avviare la cottura.
Esempio: per utilizzare il microonde all'80% della potenza per 20 minuti, impostare il forno in base
alla procedura seguente.
1) Premere una sola volta " Microwave "; in tal modo, lo schermo visualizza "P100".
2) Premere un'altra volta “ Microwave " o ruotare " " per scegliere la cottura a microonde all'80%
della potenza.
3) Premere " Start/+30Sec./Confirm " per confermare; in tal modo, lo schermo visualizza "P 80".
4) Ruotare “ " per regolare il tempo di cottura fino a quando il forno visualizza "20:00".
5) Premere " Start/+30Sec./Confirm " per avviare la cottura.
Nota: di seguito è indicato il numero di passaggi per il tempo di regolazione dell'interruttore di codifica:
0---1 min
:
5 secondi
1---5 min
:
10 secondi
5---10 min
:
30 secondi
10---30 min
:
1 minuto
30---95 min
:
5 minuti
16
Istruzioni per il selettore " Microwave "
Ordine
Display
Potenza delle microonde
1
P100
100%
2
P80
80%
3
P50
50%
4
P30
30%
5
P10
10%
3. Avvio rapido
1) In stato di attesa, premere " Start/+30Sec./Confirm " per avviare la cottura al 100%; ad ogni
pressione, il tempo di cottura aumenta di 30 secondi, fino a 95 minuti.
2) Durante la cottura a microonde o in stato di scongelamento, ogni pressione di
" Start/+30Sec./Confirm " aumenta di 30 secondi il tempo di cottura.
3) In stato di attesa, ruotare “ " a sinistra per impostare il tempo di cottura al 100% della potenza
delle microonde, quindi premere “ Start/+30Sec./Confirm " per avviare la cottura.
4. Scongelamento in base al peso
1) Premere una sola volta " Weight/Time Defrost "; in tal modo, il forno visualizza "dEF1".
2) Ruotare “ " per selezionare il peso degli alimenti (da 100 g a 2 kg).
3) Premere " Start/+30Sec./Confirm " per avviare lo scongelamento.
5. Scongelamento in base al tempo
1) Premere due volte " Weight/Time Defrost "; in tal modo, il forno visualizza "dEF2".
2) Ruotare " " per selezionare il tempo di scongelamento. Il tempo massimo è 95 minuti.
3) Premere " Start/+30Sec./Confirm " per avviare lo scongelamento. La potenza di scongelamento
è P30 e non cambia.
17
6. Timer per cottura
(1) Premere una sola volta “Kitchen Timer/Clock "; in tal modo, lo schermo visualizza 00:00.
(2) Ruotare “ " per regolare il timer (il tempo massimo di cottura è 95 minuti).
(3) Premere " Start/+30Sec./Confirm " per confermare l'impostazione.
(4) Una volta regolato il tempo di cottura, l'indicatore del timer si spegne. Vengono emessi 5 segnali
acustici.
Se l'orologio è stato impostato (sistema 24 ore), lo schermo visualizza l'ora corrente.
Nota: il tempo di cottura è diverso dal sistema 24 ore, dal momento che Kitchen Timer è un timer.
7. Menu Auto
1) In stato di attesa, ruotare “ " a destra per scegliere il menu; in tal modo, il display visualizza da
"A-1" a "A-8", ossia pizza, carne, verdura, pasta, patate, pesce, bevande e pop-corn.
2) Premere " Start/+30Sec./Confirm " per confermare.
3) Ruotare " " per scegliere il peso predefinito in base al grafico del menu.
4) Premere " Start/+30Sec./Confirm " per avviare la cottura.
Esempio: utilizzare il menu "Auto" per cuocere un pesce di 350 g.
1) Ruotare " " in senso orario fino a visualizzare "A-6".
2) Premere " Start/+30Sec./Confirm " per confermare.
3) Ruotare " " per selezionare il peso del pesce fino a visualizzare "350".
4) Premere “ Start/+30Sec./Confirm " per avviare la cottura.
18
Grafico del menu
Menu
Peso
Display
A-1
Pizza
200 g
200
400 g
400
A-2
Carne
250 g
250
350 g
350
450 g
450
A-3
Verdure
200 g
200
300 g
300
400 g
400
A-4
Pasta
50 g (con 450 g di acqua fredda)
50
100 g (con 800 g di acqua fredda)
100
A-5
Patate
200 g
200
400 g
400
600 g
600
A-6
Pesce
250 g
250
350 g
350
450 g
450
A-7
Bevande
1 tazza (120 ml)
1
2 tazze (240 ml)
2
3 tazze (360 ml)
3
A-8
Pop-corn
50 g
50
100 g
100
19
8. Cottura multisezione
È possibile impostare fino a 2 sezioni per la cottura. Nella cottura multisezione, se una sezione viene
utilizzata per scongelare, lo scongelamento deve essere effettuato nella prima sezione.
Esempio: per scongelare alimenti per 5 minuti e cuocerli a microonde all'80% della potenza per 7
minuti, effettuare le seguenti operazioni:
1) Premere due volte " Weight/Time Defrost "; in tal modo, il forno visualizza "dEF2".
2) Ruotare " " per selezionare il tempo di scongelamento fino a visualizzare "5:00".
3) Premere una sola volta " Microwave "; in tal modo, lo schermo visualizza "P100".
4) Premere un'altra volta " Microwave " o ruotare " " per scegliere la cottura a microonde all'80%
della potenza.
5) Premere " Start/+30Sec./Confirm " per confermare; in tal modo, lo schermo visualizza "P 80".
6) Ruotare " " per regolare il tempo di cottura fino a quando il forno visualizza "7:00".
7) Premere " Start/+30Sec./Confirm " per avviare la cottura; a questo punto, viene emesso un solo
segnale acustico per la prima sezione e si avvia il conto alla rovescia dello sbrinamento, quindi
viene emesso un altro segnale acustico quando si passa alla seconda cottura; alla fine della
cottura, vengono emessi 5 segnali acustici.
9. Funzione di interrogazione
(1) In stato di cottura a microonde, premere " Microwave "; in tal modo, viene visualizzata per
3 secondi la potenza attuale. Dopo 3 secondi, il forno torna allo stato precedente.
(2) In stato di cottura, premere " Kitchen Timer/Clock " per controllare la durata della cottura, che
verrà visualizzata per 3 secondi.
10. Funzione di blocco bambini
Blocco: in stato di attesa, premere “ Stop/Clear " per 3 secondi; verrà emesso un lungo segnale
acustico indicante l'accesso allo stato di blocco bambini e verrà visualizzata l'ora corrente, se
è stata impostata, altrimenti lo schermo visualizzerà “ " e si accenderà la spia del blocco.
Annullamento del blocco: in stato bloccato, premere " Stop/Clear " per 3 secondi; verrà emesso lungo
segnale acustico indicante che il blocco è stato annullato.

20
11. Specifiche
(1) Se viene aperto lo sportello durante la cottura, è necessario premere “ Start/+30Sec./Confirm "
per continuare la cottura.
(2) Dopo aver impostato il programma di cottura, se non si preme " Start/+30Sec./Confirm " entro
1 minuto, verrà visualizzata l'ora corrente e l'impostazione verrà annullata.
(3) Se la pressione ha effetto, viene emesso un segnale acustico, altrimenti no.

According to Waste of Electrical and Electronic Equipment
(WEEE) directive, WEEE should be separately collected and
treated. If at any time in future you need to dispose of this
product please do NOT dispose of this product with household
waste. Please send this product to WEEE collecting points
where available.
It is forbidden to run the unit without any food inside.
It is very dangerous.
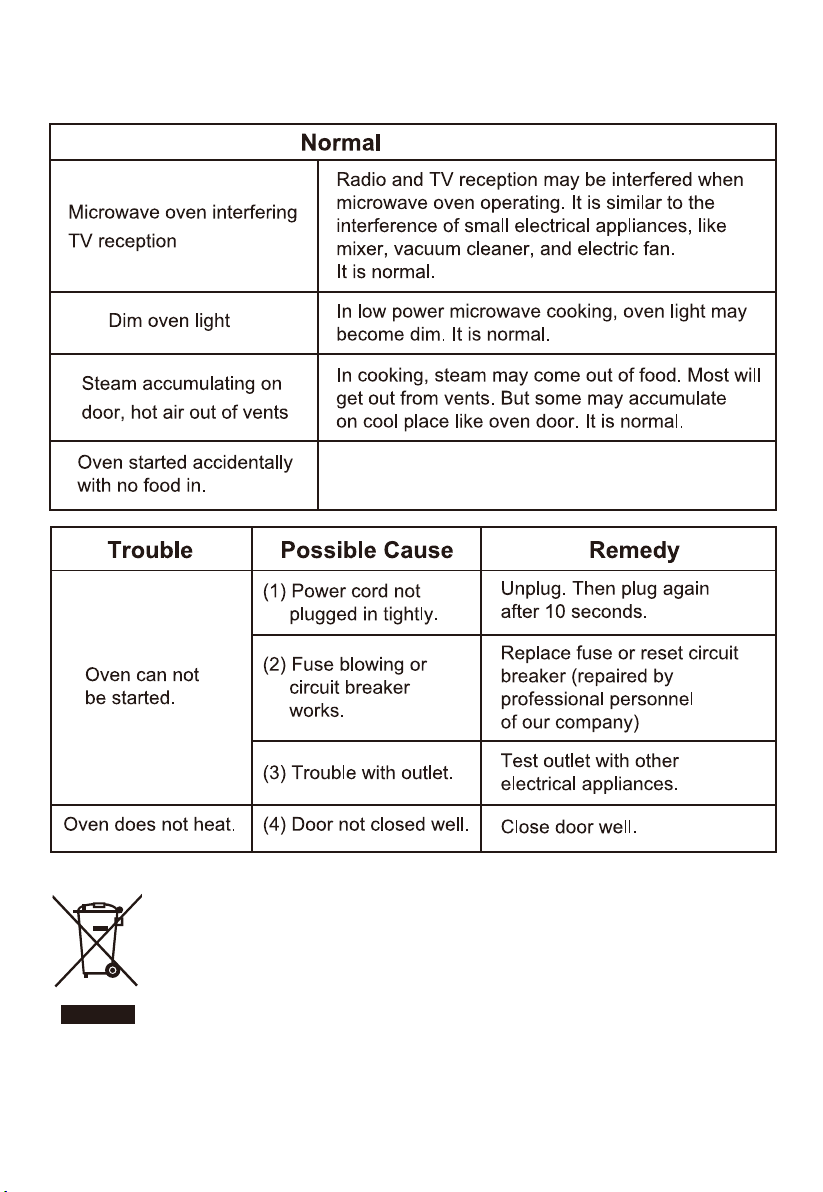
Trouble shooting
Soluzione dei problemi
Normale
Il forno a microonde
interferisce con la ricezione
del segnale televisivo
Quando il forno a microonde è in funzione, potrebbe
interferire sulla ricezione del segnale radio e televisivo.
Il fenomeno è simile alle interferenze di piccoli
elettrodomestici (ad es. frullatore, aspirapolvere,
ventilatori elettrici). È normale.
La spia del forno è debole
Se la cottura a microonde avviene a bassa potenza, la
spia del forno potrebbe diventare debole. È normale.
Accumulo di vapore sullo
sportello, fuoriuscita di aria
calda dagli sfiati
Durante la cottura, potrebbe fuoriuscire vapore dagli
alimenti. La maggior parte viene estratto dagli sfiati.
Parte, però, potrebbe accumularsi su una zona fresca,
ad esempio lo sportello del forno. È normale.
Il forno si è avviato
accidentalmente senza
alimenti.
Non azionare l'elettrodomestico senza alimenti
all'interno. È molto pericoloso.
Problema
Causa possibile
Soluzione
Il forno non si avvia.
(1) Il cavo di alimenta-
zione non è collegato
saldamente.
Staccare il cavo Ricollegare il
cavo dopo 10 secondi.
(2) Il fusibile si brucia
o entra in azione il
salvavita.
Sostituire il fusibile o resettare
il salvavita (riparato da un
professionista della società
elettrica).
(3) Problema con la
presa elettrica.
Provare la presa elettrica con altri
elettrodomestici.
Il forno non si
riscalda.
(4) Lo sportello non
è chiuso correttamente.
Chiudere bene lo sportello.
In conformità alla direttiva RAEE (Rifiuti di Apparecchiature Elettriche ed
Elettroniche), le apparecchiature elettriche ed elettroniche di scarto
devono essere smaltite e gestite separatamente. Se in futuro occorre
smaltire questo prodotto, NON smaltirlo assieme i rifiuti domestici.
Conferire questo prodotto nei punti disponibili alla raccolta delle
apparecchiature elettriche ed elettroniche di scarto.