Loading ...
Loading ...
Loading ...

SB-T-TACDC12/10TW3 INSTR_SKU# 011350
Page 4 • JL Audio, Inc., 2013
MID/HIGH FREQUENCY DRIVER FITMENT
A variety of JL Audio coaxial and component systems will t in the factory speaker locations of you vehicle.
Front Speaker Size / Location: 6x9”- Front Doors
Fits JL Audio Models: TR690-TXi, C2-690tx
Rear Speaker Size / Location: 6-1/2”- Rear Door
Fits JL Audio Models: TR650-CXi, TR650-CSi, C2-650x, C2-650,
C3-650, C5-650x, C5-650 & ZR650-CSi
All specifications are subject to change without notice. “JL Audio®” and the JL Audio logo, “Stealthbox” and the Stealthbox logo are registered
trademarks of JL Audio, Inc.,. “Ahead of the Curve” and its respective logo is a trademark of JL Audio, Inc.,.
JLA-SKU# 94557 03.15.2013 • Printed in USA • ©2011 JL Audio, Inc.,. • U.S. PATENTS: #5,734,734 #5,949,898 #6,118,884 #6,229,902 #6,243,479
#6,294,959 #6,501,844 #6,496,590 #6,441,685 #5,687,247 #6,219,431 #6,625,292 #D472,891 #D480,709 Other U.S. & Foreign patents pending.
For more detailed information please visit us online at www.jlaudio.com.
(954) 443-1100
www.jlaudio.com
10369 NORTH COMMERCE PARKWAY • MIRAMAR, FLORIDA • 33025 • USA
CONGRATULATIONS!
You have completed the installation for this model. Enjoy your new Stealthbox®!
STEP 12
Attach speaker cable to the Stealthbox® and place the
enclosure back into position. Secure the enclosure using a
pair of 1/4 - 20 x 1” Hex Bolts, 1/4” Lock Washers, and 1/4” Flat
Washers as illustrated.
ST EP 11
Pictured is a Bracket attached to the Stealthbox®.
STEP 10
Attach each Bracket to the threaded inserts in the top of the
enclosure using a 1/4 - 20 x 1” Hex Bolt, a 1/4” Lock Washer,
and a 1/4” Flat Washer as illustrated.
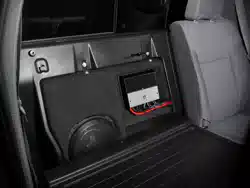
STEP 9
If an amplifier will be mounted into the recess in the front of
the Stealthbox®, set the enclosure into position and mark the
location of the wire channel. Remove the enclosure, and drill
a 1” hole in the panel. Reinstall the panel into the vehicle.
Note: This step is not necessary if the amplifier will be
mounted elsewhere.