Loading ...
Loading ...
Loading ...
EN-4
Part Names
1 2
4
5
3
6
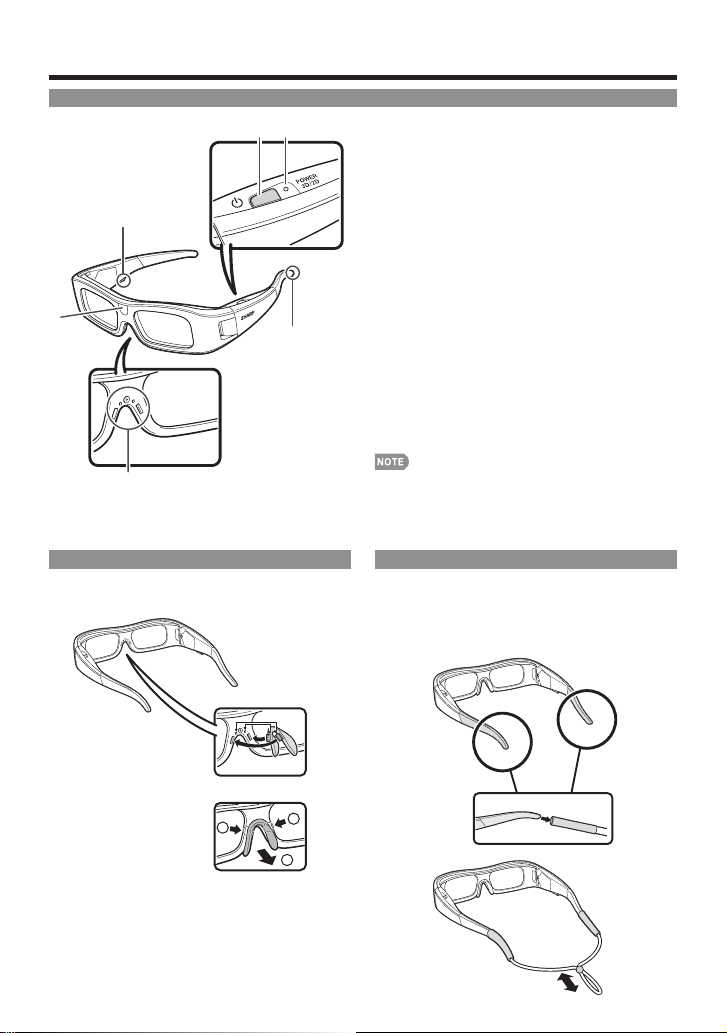
1 Power button
Press for at least 2 seconds to turn on and off the 3D
Glasses.
When the 3D Glasses are turned on, pressing this
button switches between 2D and 3D modes.
2 LED light
Blinks 3 times when the power is turned on.
Blinks 2 times when 2D mode is selected.
Blinks 3 times when 3D mode is selected.
Blinks 6 times when the battery power is low.
Lights for 2 seconds when the power is turned off.
3 Service terminal
This terminal is for service use only.
Please do not connect any other device to this terminal.
4 Infrared receiver
Receives an infrared signal sent from the TV. The 3D
Glasses turn off automatically after 3 minutes if no signal
is received from the TV.
5 Nose pad mount
The dedicated nose pad can be mounted here.
6 3D Glasses band mount
The dedicated 3D Glasses band can be mounted here.
• Do not soil or apply stickers or other obstacles to the
infrared receiver. Doing so may block signals from the TV
and prevent the 3D Glasses from working correctly.
• Interference from other infrared communications equipment
may prevent you from viewing 3D images correctly.
•
•
•
•
•
•
•
Attaching the Nose Pad
Attach either of the supplied nose pads as needed
(such as when the glasses do not fi t properly). The
glasses come with a large and small nose pad.
Attaching the nose pad
2
1
1
Removing the nose pad
Attaching the 3D Glasses Band
Attach the supplied 3D Glasses band strap as needed
(such as when the glasses do not fi t properly).
Insert the ends of the 3D Glasses into the 3D Glasses
band until they are secure.
Pull the cord stopper on the strap to adjust the strap
length.
•
Using the 3D Glasses
AN-3DG10E01.indd4AN-3DG10E01.indd4 2010/07/1213:32:232010/07/1213:32:23
Loading ...
Loading ...
Loading ...