PRODUCT OVERVIEW
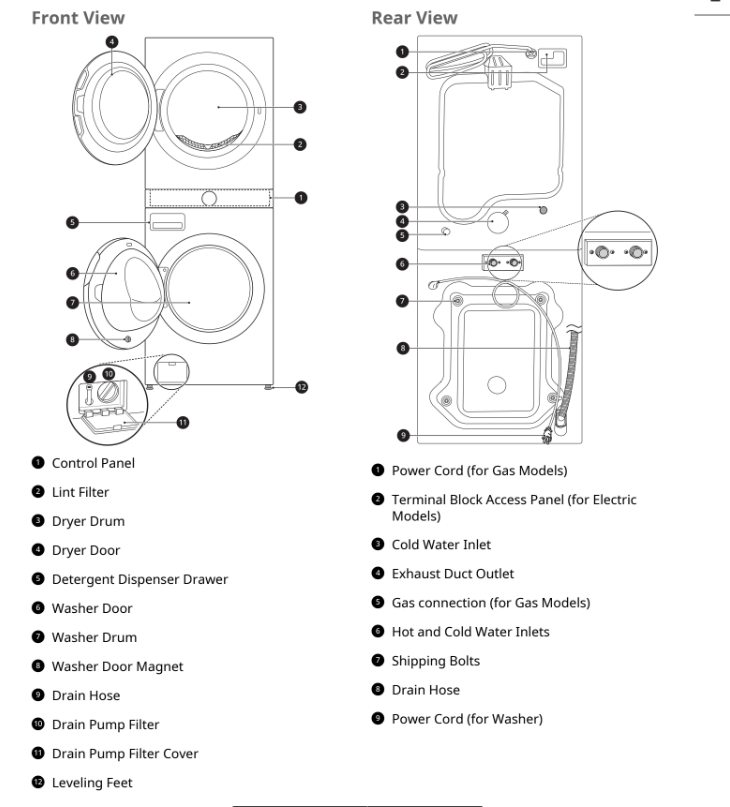
Product Features
The images in this guide may be different from the actual components and accessories, which are subject to change by the manufacturer without prior notice for product improvement purposes.
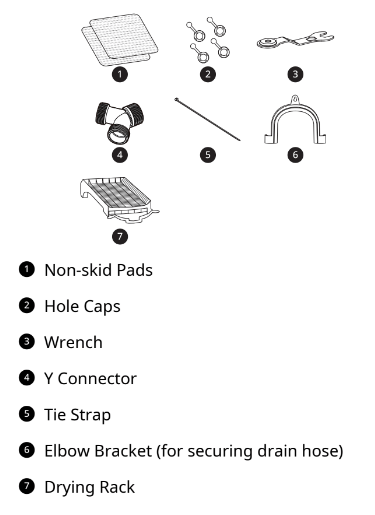
Accessories
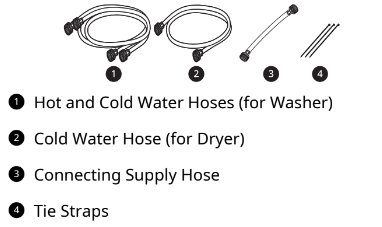
Included Accessories
Required Accessories
WARNING: For your safety and for extended product life, use only authorized components. The manufacturer is not responsible for product malfunction, property damage or bodily injury caused by the use of separately purchased unauthorized components, parts, or non-LG products.
INSTALLATION
Before Installing
Installation Overview
Please read the following installation instructions first after purchasing this appliance or transporting it to another location.
- Choosing the Proper Location
- Unpacking and Removing Shipping Material
- Connecting the Electric Dryer
- Connecting the Gas Dryer
- Venting the Dryer
- Connecting the Inlet Hoses
- Connecting the Drain Hose
- Leveling the Appliance
- Final Installation Check
WARNING
- Read all installation instructions completely before installing and operating the appliance. It is important that you review this entire manual before installing and using the appliance. Detailed instructions concerning electrical connections and additional requirements are provided on the following pages.
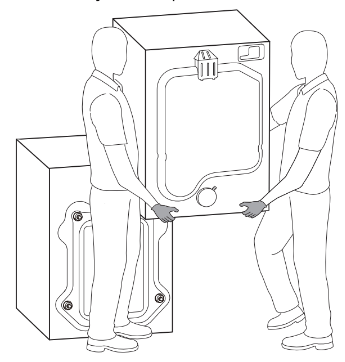
- Moving or installation of the appliance requires two or more people. Failure to follow these instructions may result in injury.
WARNING
- Store and install the appliance where it will not be exposed to temperatures below freezing or exposed to outdoor weather conditions. Failure to follow this warning can cause product or part failure, serious injury, fire, electric shock, or death.
- Properly ground the appliance to conform with all governing codes and ordinances. Failure to follow this warning can cause serious injury, fire, electric shock, or death.
- To ensure proper airflow, do not block the large opening on the bottom of the appliance with carpeting or other materials.
- Do not remove the ground prong from the power cord. Do not use an adapter or extension cord. Plug into a grounded 3-prong outlet.
- Failure to follow this warning can cause serious injury, fire, electric shock, or death.
- Certain internal parts are intentionally not grounded and may present a risk of electric shock only during servicing. Service personnel- Do not contact the following parts while the appliance is energized: pump, valve, motor, control board.
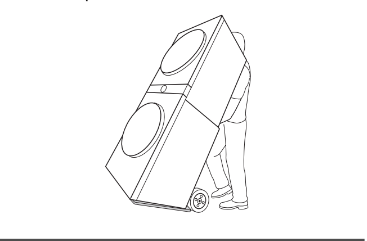
NOTE: When moving the product, tilt it toward the back of the product. Do not transport the product in a horizontal position.
Choosing the Proper Location
Check the following requirements for the install location before installing the appliance.
- Allow for sufficient space between the walls and the appliance for installation.
- Make sure that the floor is clean, dry and free of dust, dirt, water and oil so the leveling feet cannot slide easily. Leveling feet that can move or slide on the floor can contribute to excess vibration and noise.
- If the floor has too much flex, reinforce it to make it more rigid. If the floor is not solid, it may cause severe vibration and noise.
- If a drain pan must be used, take extra care to follow the instructions provided with the drain pan and make sure the leveling feet are adjusted for firm and even contact with the pan. Use of drain pans and failure to properly level the appliance may result in increased vibration and noise during operation.
Flooring
- To minimize noise and vibration, install the washer on a level, solidly constructed floor capable of supporting the appliance without flexing or bouncing.
- The appliance must be installed on firm flooring to minimize vibration during the spin cycle.
- Concrete flooring is best, but a wood floor is sufficient, provided it is built to FHA standards.
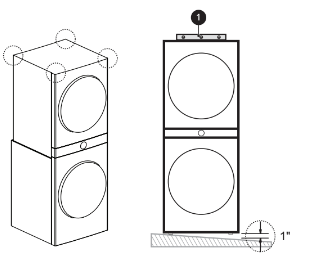
- The floor under the appliance must not slope more than 1 inch (2.5 cm) from front to back or side to side.
- Installing on carpeting and soft tile surfaces is not recommended.
- Never install the appliance on a platform or weakly supported structure.
Floor Installation
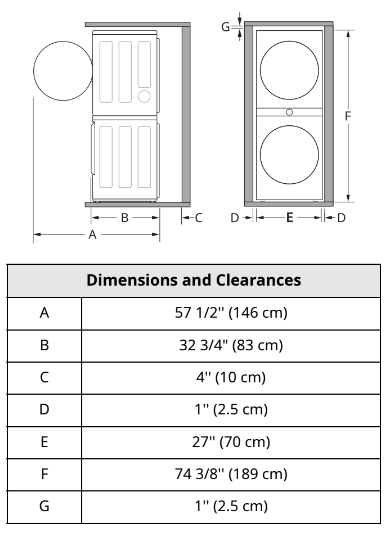
To ensure sufficient clearance for water inlet hoses, drain hose and airflow, allow minimum clearances of at least 1'' (2.5 cm) at the sides and 4'' (10 cm) behind the appliance. Be sure to allow for wall, door, or floor moldings that may increase the required clearances.
Exhaust
A location that allows for proper exhaust installation. A gas dryer must be exhausted to the outdoors.
Power Outlet
- The power outlet must be within 60 inches (1.5 m) of either side of the appliance.
- Position the appliance so that the outlet and plug are easily accessible.
- Do not overload the outlet with more than one appliance.
- The outlet must be grounded in accordance with current electrical wiring codes and regulations.
- Use a time-delay fuse or circuit breaker.
- It is the personal responsibility and obligation of the appliance owner to have a proper outlet installed by a qualified electrician.
NOTE: Check code requirements that limit, or do not permit, installation of the appliance in garages, mobile homes or sleeping quarters. Contact your local building inspector.
Clearances
The following clearances are recommended for the appliance.
- Additional clearances should be considered for ease of installation and servicing.
- Additional clearances should be considered on all sides of the appliance to reduce noise transfer.
Installation spacing for Recessed Area or Closet Installation
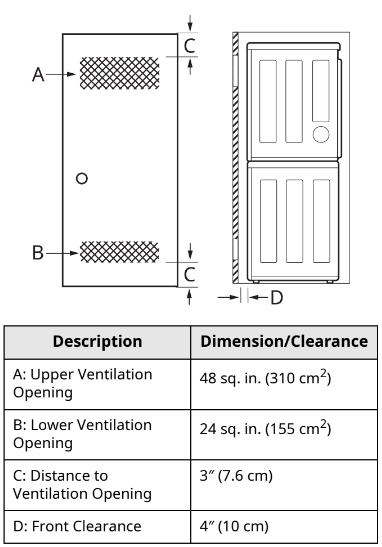
Closet Ventilation Requirements
Closets with doors must have both an upper and lower vent to prevent heat and moisture buildup in the closet. One upper vent opening with a minimum opening of 48 sq. in. (310 cm2) must be installed no lower than 6 feet above the floor. One lower vent opening with a minimum opening of 24 sq. in. (155 cm2) must be installed no more than one foot above the floor. Install vent grills in the door or cut down the door at the top and bottom to form openings. Louvered doors with equivalent ventilation openings are also acceptable.
NOTE
- There should be at least a little space around the appliance (or any other appliance) to eliminate the transfer of vibration from one appliance to another. If there is enough vibration, it could cause appliances to make noise or come into contact, causing paint damage and further increasing noise.
- No other fuel-burning appliance can be installed in the same closet as an appliance.
Unpacking and Removing Shipping Material
Unpacking Shipping Material
This feature is only available on some models.
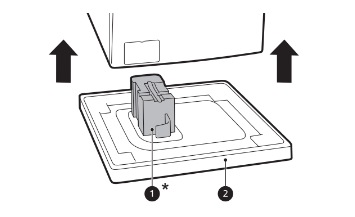
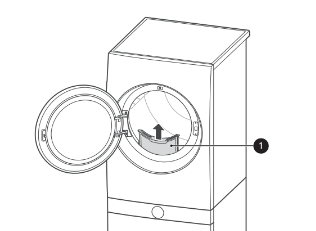
Lifting the Appliance off the Foam Base
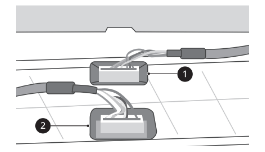
- After removing the carton and shipping material, lift the appliance off the foam base.
- Make sure the plastic drum support 1* comes off with the base and is not stuck to the bottom of the appliance.
- If you must lay the appliance down to remove the carton base 2, always protect the side of the appliance and lay it carefully on its side. Do not lay the appliance on its front or back.
CAUTION: Remove all shipping materials from the appliance for proper operation and inspect it for shipping damage. Failure to remove shipping materials can cause excessive noise and vibration.
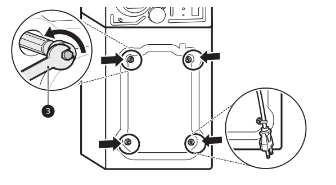
Removing Shipping Material
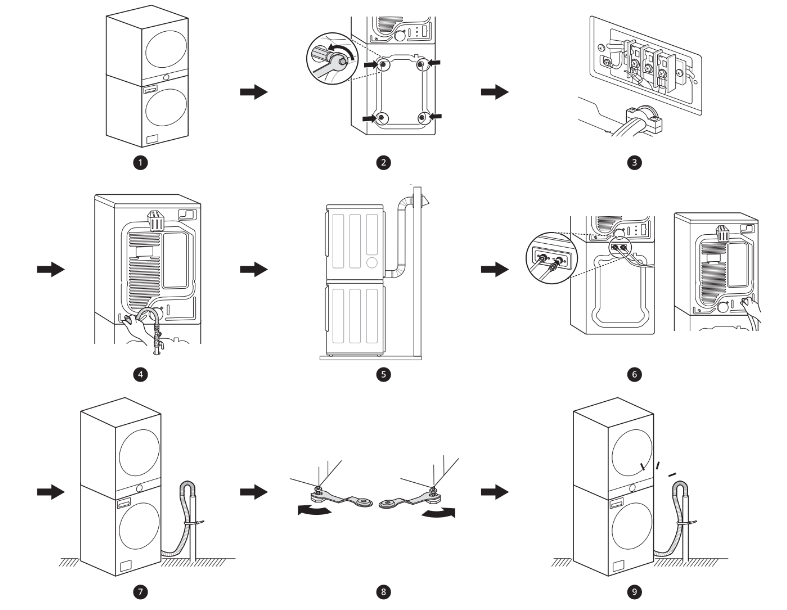
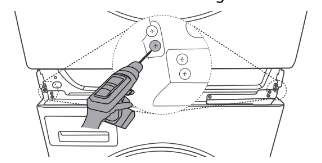
1. Remove the bolt assemblies.
- Starting with the bottom two shipping bolts, use the included wrench 3 to fully loosen all 4 shipping bolts by turning them counterclockwise.
- Remove the bolt assemblies (bolts and retainers) by wiggling them slightly while pulling them out.
- The power cord is secured to the back of the washer with a shipping bolt to help prevent operation with shipping bolts in place.
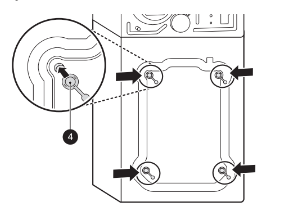
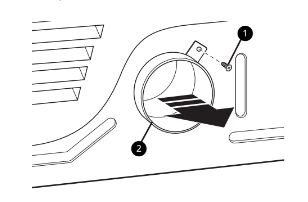
2. Install the hole caps.
- Locate the hole caps 4 included in the accessory pack or attached to the back of the washer. Install the caps in the holes left by the bolt assemblies.
CAUTION: Once removed, save the bolt assemblies for future use. To prevent damage to internal components, do not transport the appliance without reinstalling the shipping bolts. Failure to remove shipping bolts and retainers may cause severe vibration and noise, which can lead to permanent damage to the appliance.
Connecting Electric Dryers
WARNING: To reduce the risk of fire or explosion, electric shock, property damage, injury to persons, or death when using this appliance, fulfill the following requirements.
Electrical Requirements for Electric Models Only
WARNING
- The wiring and grounding must conform to the latest edition of the National Electrical Code, ANSI/NFPA 70 and all applicable local regulations. Please contact a qualified electrician to check your home’s wiring and fuses to ensure that your home has adequate electrical power to operate the dryer.
- This dryer must be connected to a grounded metal, permanent wiring system, or an equipment-grounding conductor must be run with the circuit conductors and connected to the equipment-grounding terminal or lead on the dryer.
- The dryer has its own terminal block that must be connected to a separate 240 VAC, 60-Hertz, single-phase circuit, fused at 30 amperes (the circuit must be fused on both sides of the line). ELECTRICAL SERVICE FOR THE DRYER SHOULD BE OF THE MAXIMUM RATE VOLTAGE LISTED ON THE NAMEPLATE. DO NOT CONNECT THE DRYER TO 110-, 115-, OR 120-VOLT CIRCUIT.
- If the branch circuit to dryer is 15 ft. (4.5 m) or less in length, use UL (Underwriters Laboratories) listed No.-10 AWG wire (copper wire only), or as required by local codes. If over ft. (4.5 m), use UL-listed No.-8 AWG wire copper wire only), or as required by local codes. Allow sufficient slack in wiring so the dryer can be moved from its normal location when necessary.
- The power cord (pigtail) connection between the wall receptacle and the dryer terminal block IS NOT supplied with the dryer. Type of pigtail and gauge of wire must conform to local codes and with instructions on the following pages.
- Do not modify the plug and internal wire provided with the dryer.
- The dryer should be connected to a 4-hole outlet.
- If the plug does not fit the outlet, a proper outlet will need to be installed by a qualified electrician.
WARNING
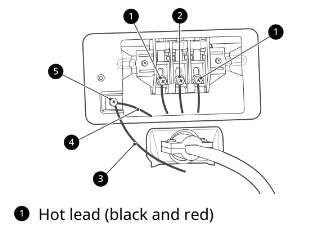
- Connect the power cord to the terminal block. Each colored wire should be connected to the same color screw. Wire color indicated on manual is connected to the same color screw in the block.
- Grounding through the neutral conductor is prohibited for: (1) new branch-circuit installations and (2) areas where local codes prohibit grounding through the neutral conductor.
- This dryer is supplied with the neutral wire grounded. This white ground wire MUST BE MOVED to the neutral terminal when a 4-wire cord is to be used, or where grounding through the neutral conductor is prohibited.
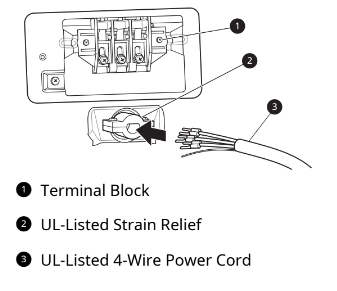
Four-Wire Power Cord

- A UL-listed strain relief is required.
- Use a 30-amp, 240-volt, 4-wire, UL-listed power cord with #10 AWG-minimum copper conductor and closed loop or forked terminals with upturned ends.
1. Remove the terminal block access cover on the upper back of the appliance.
2. Install UL-listed strain relief into the power cord through-hole.
3. Thread a 30-amp, 240-volt, 4-wire, UL-listed power cord with #10 AWG-minimum copper conductor through the strain relief.
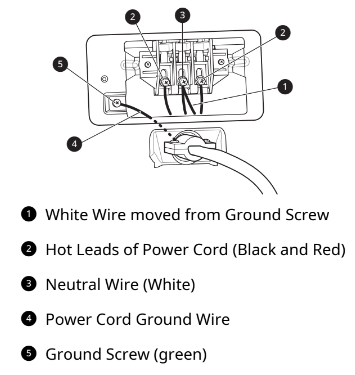
4. Transfer the appliance's ground wire from behind the green ground screw to the center screw of the terminal block.
5. Attach the two hot leads (black and red) of the power cord to the outer terminal block screws.
6. Attach the neutral (white) wire to the center screw of the terminal block
7. Attach the power cord ground wire to the green ground screw.
8. Tighten all screws securely.
9. Reinstall the terminal block access cover.
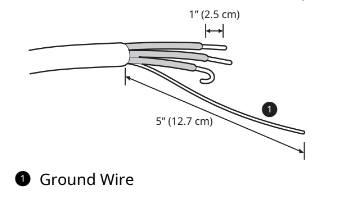
Four-Wire Direct Wire

- A UL-listed strain relief is required.
- Use UL-listed 4-wire #10 AWG minimum copper conductor cable. Allow at least 5 ft. (1.5 m) of wire to allow for removal and reinstallation of the dryer.
1. Remove 5 inches (12.7 cm) of the outer covering from the wire and remove 5 inches of insulation from the ground wire. Cut off approximately 1.5 inches (3.8 cm) from the other three wires and strip 1 inch (2.5 cm) insulation from each wire. Bend the ends of the three shorter wires into a hook shape.
2. Remove the terminal block access cover on the upper back of the appliance.
3. Install UL-listed strain relief into the power cord through-hole.
4. Thread the 4-wire #10 AWG minimum copper power cable prepared in step 1 through the strain relief.

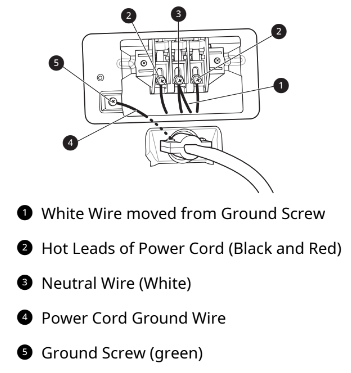
5. Transfer the appliance's ground wire from behind the green ground screw to the center of the terminal block.
6. Attach the two hot leads (black and red) of the power cord to the outer terminal block screws.
7. Attach the neutral (white) wire to the center screw of the terminal block.
8. Attach the power cord ground wire to the green ground screw.
9. Tighten all screws securely.
10. Reinstall the terminal block access cover.
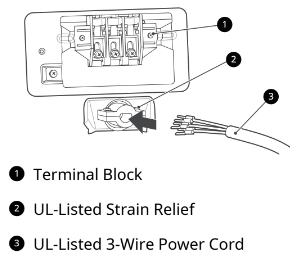
Three-Wire Power Cord

- A 3-wire connection is NOT permitted on new construction after January 1, 1996.
- A UL-listed strain relief is required.
- Use a 30-amp, 240-volt, 3-wire, UL-listed power cord with #10 AWG-minimum copper conductor and closed loop or forked terminals with upturned ends.
1. Remove the terminal block access cover on the upper back of the appliance.
2. Install the UL-listed strain relief into the power cord through-hole.
3. Thread a 30-amp, 240 volt, 3-wire, UL-listed power cord with #10 AWG-minimum copper conductor through the strain relief.
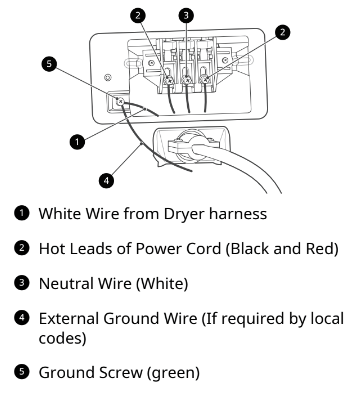
4. Attach the two hot leads (black and red) of the power cord to the outer terminal block screws.
5. Attach the neutral (white) wire to the center terminal block screw.
6. Connect the external ground (if required by local codes) to the green ground screw.
7. Tighten all screws securely.
8. Reinstall the terminal block access cover.
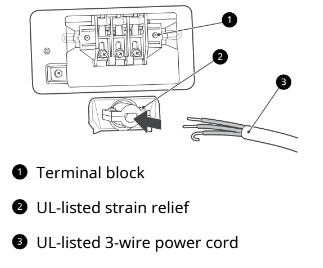
Three-Wire Direct Wire

- A 3-wire connection is NOT permitted on new construction after January 1, 1996.
- A UL-listed strain relief is required.
- Use UL-listed 3-wire, #10 AWG minimum copper conductor cable. Allow at least 5 ft. (1.5 m) length to allow for removal and installation of dryer.
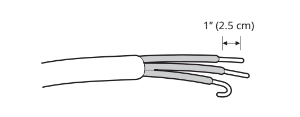
1. Remove 3.5 inches (8.9 cm) of the outer covering from the wire. Strip 1 inch (2.5 cm) insulation from each wire. Bend the ends of the three wires into a hook shape.
2. Remove the terminal block access cover on the upper back of the appliance.
3. Install UL-listed strain relief into the power cord through-hole.
4. Thread the 3-wire, #10 AWG minimum copper conductor power cable prepared in step 1 through the strain relief.
5. Attach the two hot leads (black and red) of the power cord to the outer terminal block screws.
6. Attach the neutral (white) wire to the center terminal block screw.
7. Connect the external ground (if required by local codes) to the green ground screw.
8. Tighten all screws securely.
9. Reinstall the terminal block access cover.
Installing the Dryer Side Vent Kit
The appliance is configured to vent to the rear. It can also vent to the side.
WARNING
- Use long-sleeved gloves and safety glasses.
- Use a heavy metal vent.
- Do not use plastic or thin foil ducts.
- Clean old ducts before installing the appliance.
NOTE
- An adapter kit, part number 383EEL9001B, may be purchased from your LG retailer. This kit contains duct components necessary to change the appliance vent location.
- Right-side venting is not available on gas models.
- Bottom venting is not available on stacked or integrated stacked models.
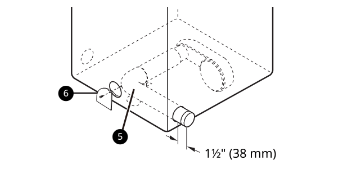
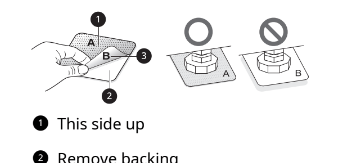
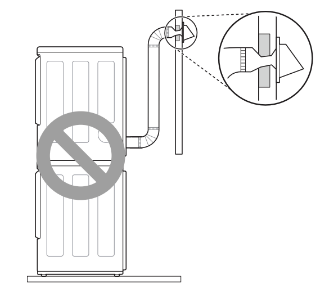
Side Venting
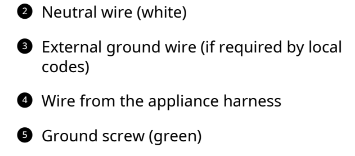
1. Remove the rear exhust duct retaining screw and pull out the exhaust duct 2.
2. Press the tabs on the knockout 3 and carefully remove the knockout for the desired vent opening. (Right-side venting is not available on gas models.) Press the adapter duct onto the blower housing and secure to the base of the dryer as shown.
3. Preassemble a 4" (10 cm) elbow 5 to the next 4" (10 cm) duct section, and secure all joints with duct tape. Be sure that the male end of the elbow faces AWAY from the dryer. Insert the elbow/duct assembly through the side opening and press it onto the adapter duct. Secure it in place with duct tape. Be sure that the male end of the duct protrudes 1 1/2" (3.8 cm) to connect the remaining ductwork. Attach the cover plate 6 to the back of the dryer with the included screw.
Venting the Dryer
WARNING
- Gas dryers MUST exhaust to the outdoors.
- DO NOT use sheet metal screws or other fasteners which extend into the duct that could catch lint and reduce the efficiency of the exhaust system. Secure all joints with duct tape.
- To reduce the risk of fire, combustion, or accumulation of combustible gases, DO NOT exhaust dryer air into an enclosed and unventilated area, such as an attic, wall, ceiling, crawl space, chimney, gas vent, or concealed space of a building.
- To reduce the risk of fire, DO NOT exhaust the dryer with plastic or thin foil ducting.
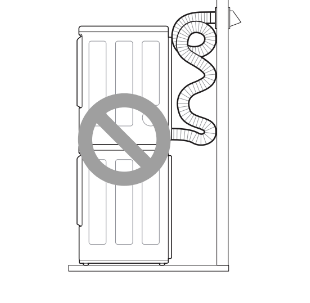
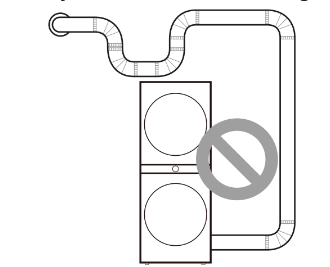
- Do not exceed the recommended duct length limitations noted in the chart. Failure to follow these instructions may result in extended drying times, fire or death.
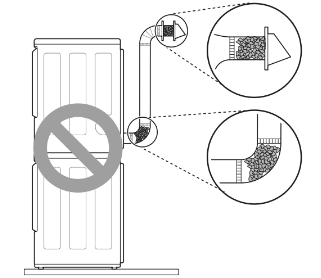
- Do not crush or collapse ductwork.
- Do not allow ductwork to rest on or contact sharp objects.
- If connecting to existing ductwork, make sure it is suitable and clean before installing the dryer.
WARNING
- Venting must conform to local building codes.
- Use only 4 '' (10 cm) rigid, semi-rigid or flexible metal ductwork inside the dryer cabinet and for venting outside.
- The exhaust duct must be 4 '' (10 cm) in diameter with no obstructions. The exhaust duct should be kept as short as possible. Make sure to clean any old ducts before installing your new dryer.
- Rigid, semi-rigid or flexible metal ducting is recommended for use between the dryer and the wall. All non-rigid metal transition duct must be UL-listed. Use of other materials for transition duct could affect drying time.
- Ductwork is not provided with the dryer. You should obtain the necessary ductwork locally. The vent hood should have hinged dampers to prevent backdraft when the dryer is not in use.
- The total length of flexible metal duct must not exceed 8 ft. (2.4 m).
Ductwork
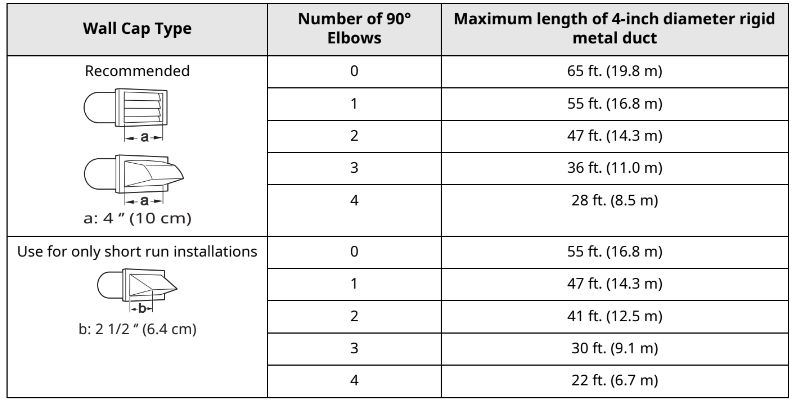
NOTE
- Deduct 6 ft. (1.8 m) for each additional elbow. Do not use more than four 90° elbows.
- In Canada, only those foil-type flexible ducts, if any, specifically identified for use with the appliance by the manufacturer should be used. In the United States, only those foil-type flexible ducts, if any, specifically identified for use with the appliance by the manufacturer and that comply with the Outline for Clothes Dryer Transition Duct, Subject 2158A, should be used.
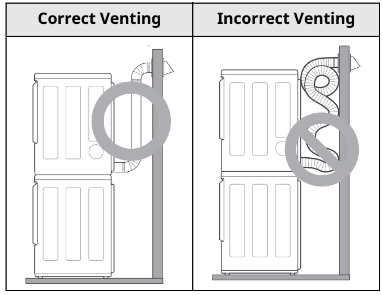
Routing and Connecting Ductwork
Follow the guidelines below to maximize drying performance and reduce lint buildup and condensation in the ductwork. Ductwork and fittings are NOT included and must be purchased separately.
- Use 4'' (10 cm) diameter rigid, semi-rigid or flexible metal ductwork.
- The exhaust duct run should be as short as possible.
- Use as few elbow joints as possible.
- The male end of each section of exhaust duct must point away from the dryer.
- Use duct tape on all duct joints.
- Insulate ductwork that runs through unheated areas in order to reduce condensation and lint buildup on duct surfaces.
- Incorrect or inadequate exhaust systems are not covered by the dryer warranty. Dryer failures or service required because of such exhaust systems will not be covered by the dryer warranty.
Connecting Gas Dryers
WARNING: To reduce the risk of fire or explosion, electric shock, property damage, injury to persons, or death when using this appliance, follow requirements including the following:
Electrical Requirments for Gas Models
WARNING
- This dryer is equipped with a three-prong grounding plug for protection against shock hazard and should be plugged directly into a properly grounded three-prong receptacle. Do not cut or remove the grounding prong from this plug.
- Do not, under any circumstances, cut or remove the third (ground) prong from the power cord.
- For personal safety, this dryer must be properly grounded.
- This dryer must be plugged into a 120-VAC, 60-Hz. grounded outlet protected by a 15-ampere fuse or circuit breaker.
- Where a standard 2-prong wall outlet is encountered, it is your personal responsibility and obligation to have it replaced with a properly grounded 3-prong wall outlet.
Gas Supply Requirements
WARNING
- DO NOT attempt any disassembly of the dryer; disassembly requires the attention and tools of an authorized and qualified service technician or company.
- DO NOT use an open flame to inspect for gas leaks. Use a noncorrosive leak detection fluid.
- Gas pressure must not exceed 8-inch (20.4 cm) water column for NG, or 13-inch (33.1 cm) water column for LP.
- Isolate the dryer from the gas supply system by closing its individual manual shutoff valve during any pressure testing of the gas supply at pressures greater than 1/2 psi (3.5 kPa).
- Supply line requirements: Your laundry room must have a rigid gas supply line to your dryer. In the United States, an individual manual shutoff valve MUST be installed within at least 6 ft. (1.8 m) of the dryer, in accordance with the National Fuel Gas Code ANSI Z223.1 or Canadian gas installation code CSA B149.1. A 1/8-inch NPT pipe plug must be installed.
- If using a rigid pipe, the rigid pipe should be 0.5- inch IPS. If acceptable under local codes and ordinances and when acceptable to your gas supplier, 3/8-inch approved tubing may be used where lengths are less than 20 ft. (6.1 m). Larger tubing should be used for lengths in excess of 20 ft. (6.1 m).
- To prevent contamination of the gas valve, purge the gas supply of air and sediment before connecting the gas supply to the dryer. Before tightening the connection between the gas supply and the dryer, purge remaining air until the odor of gas is detected.
- Use only a new AGA- or CSA-certified gas supply line (in compliance with the Standard for Connectors for Gas Appliances, ANSI Z21.24 • CSA 6.10) with flexible stainless steel connectors.
- Use Teflon tape or a pipe-joint compound that is insoluble in propane (LP) gas on all pipe threads.
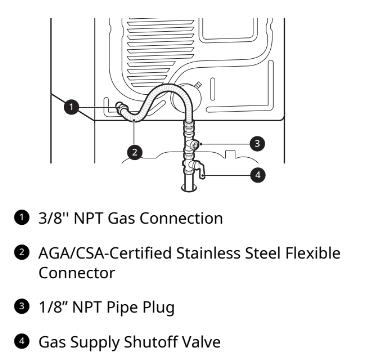
Connecting the Gas Supply
NOTE
- In the Commonwealth of Massachusetts: This product must be installed by a licensed plumber or gas fitter. When using ball-type gas shut off valves, they must be T-handle-type. A flexible gas connector, when used, must not exceed 3 feet.
- Installation and service must be performed by a qualified installer, service agency, or the gas supplier.
- The dryer is configured for natural gas when shipped from the factory. Make sure that the dryer is equipped with the correct burner nozzle for the type of gas being used (natural gas or propane gas).
- Use only a new stainless steel flexible connector and a new AGA-certified connector.
- A gas shutoff valve must be installed within 6 ft. m) of the dryer.
- If necessary, the correct nozzle (for the LP nozzle kit, order part number 383EEL3002D) should be installed by a qualified technician and the change should be noted on the dryer.
- All connections must be in accordance with local codes and regulations. Gas dryers MUST exhaust to the outdoors.
1. Make sure that the gas supply to the laundry room is turned OFF and the dryer is unplugged. Confirm that the type of gas available in your laundry room is appropriate for the dryer.
2. Remove the shipping cap from the gas fitting at the back of the dryer. Be careful not to damage the threads of the gas connector when removing the shipping cap.
3. Connect the dryer to your laundry room’s gas supply using a new flexible stainless steel connector with a 3/8-inch NPT fitting.
WARNING
- DO NOT use old connectors.
4. Securely tighten all connections between the dryer and your laundry room’s gas supply.
5. Turn on your laundry room’s gas supply.
6. Check all pipe connections (both internal and external) for gas leaks with a noncorrosive leak-detection fluid.
7. Proceed to Venting the Dryer.
High-Altitude Installations
The BTU rating of this dryer is AGA-certified for elevations below 10,000 feet.
If your gas dryer is being installed at an elevation above 10,000 feet, it must be derated by a qualified technician or gas supplier.
Connecting the Water Inlet Hoses
How to Connect the Water Inlet Hoses
To avoid the risk of costly water damage, purchase and install new water inlet hoses when installing the appliance.
WARNING
- Do not overtighten the hoses or cross-thread the hose fittings. Overtightening or cross-threading can damage the valves or couplings, resulting in leaking and property damage.
- Do not reuse old hoses. Use only new hoses when installing the appliance. Old hoses could leak or burst causing flooding and property damage. Contact an LG Customer Information Center for assistance in buying hoses.
NOTE
- Periodically check the hoses for cracks, leaks, and wear, and replace the hoses every five years.
- Do not stretch the water hoses intentionally, and make sure that they are not pinched, crushed or kinked by other objects.
- Water supply pressure must be between 20 psi and 120 psi (138 - 827 kPa). If the water supply pressure is more than 120 psi, a pressure reducing valve must be installed.
- Your hot water heater should be set to deliver water at 120–135 °F (48–57 °C) to allow the appliance to properly control wash temperatures.
- Do not store or install the appliance in a location subject to freezing temperatures. Damage to the water inlet hoses and internal mechanisms of the appliance can result. If the appliance was exposed to freezing temperatures prior to installation, allow it to stand at room temperature for several hours before use and check for leaks prior to operation.
- Do not use flood-preventing hoses with auto shut off devices. The devices can be tripped during fill and prevent the appliance from filling properly.
Required Accessories
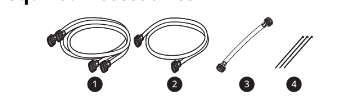
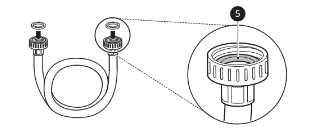
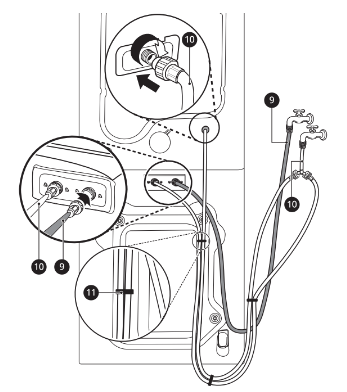
1. Check the fittings and seals. Inspect the threaded fitting on each hose and make sure there is a rubber seal 5 in place in both ends of each hose to prevent leaking.
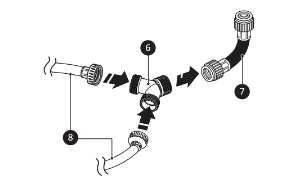
2. Connect the Y connector 6 to the short hose 7. Connect the 2 blue hoses 8 to the Y connector.
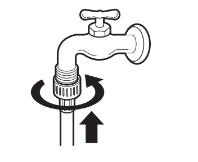
3. Connect the water supply hoses.
- Connect the water inlet hoses to the hot and cold water faucets tightly by hand and then tighten another 2/3 turn with pliers.
- Connect the short blue hose to the cold water faucet and the red hose to the hot water faucet.
4. Flush out the inlet hoses.
- After the hoses are connected, turn on the water faucets and flush out any foreign substances such as dirt, sand, or sawdust.
- Let the water drain into a bucket, and check the water temperature to make sure you’ve connected the hoses to the correct faucets.
5. Attach the inlet hoses to the back of the appliance and secure the cold water inlet hoses with tie straps 11.
For the Washer
- Attach the hot water inlet hose 9 to the hot water inlet on the back of the washer. Attach the cold water inlet hose 10 to the cold water inlet on the back of the washer.
For the Dryer
- Attach the cold water inlet hose 10 to the cold water inlet on the back of the dryer.
- Tighten the fittings securely. Turn on both faucets all the way and check for leaks at both ends of the hoses.
Connecting the Drain Hose
Connect the drain hose to either a standpipe or laundry tub.
WARNING: The drain hose should always be properly secured. Failure to properly secure the drain hose can result in flooding and property damage.
NOTE
- The drain must be installed in accordance with any applicable local codes and regulations.
- Make sure that the drain hose is not stretched, pinched, crushed, or kinked.
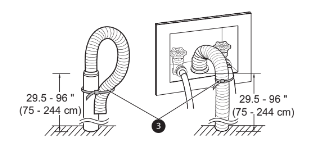
- The end of the drain hose should be located a minimum of 24" (61 cm) and a maximum of 96" cm) above the bottom of the washer.
- For best results, locate the end of the drain hose no higher than 66" (168 cm) above the bottom of the washer. As the drain outlet is raised beyond 66" (168 cm), the drain function will be increasingly affected.
- Never create an airtight seal between the hose and the drain with tape or other means. If no air gap is present, water can be siphoned out of the drum resulting in poor wash/rinse performance or clothing damage.
Using a Standpipe to Drain
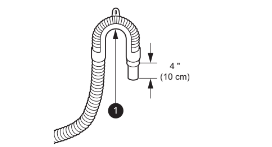
1. Clip the end of the hose into the elbow bracket.
- Connect the elbow bracket 1 within 4 inches (10 cm) of the end of the drain hose. If the drain hose is extended more than 4 inches (10 cm) beyond the end of the elbow bracket, mold or microorganisms could spread to the inside of the washer.
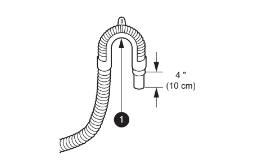
2. Insert the end of the drain hose into the standpipe.
3. Use the provided tie strap 2 to secure the drain hose in place.
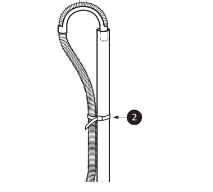
4. If the water valves and drain are built into the wall, fasten the drain hose to one of the water hoses with the provided tie strap 3 (ribbed side on inside).
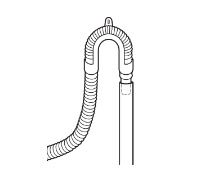
Using the Laundry Tub to Drain
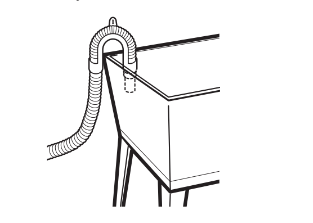
1. Clip the end of the hose into the elbow bracket.
- Connect the elbow bracket 1 within 4 inches (10 cm) of the end of the drain hose. If the drain hose is extended more than 4 inches (10 cm) beyond the end of the elbow bracket, mold or microorganisms could spread to the inside of the washer.
2. Hang the end of the drain hose over the side of the laundry tub.
3. Use the provided tie strap to secure the drain hose in place.
Leveling the Appliance
The drum of the washer spins at very high speeds.
To minimize vibration, noise, and unwanted movement, the floor must be a solid, level surface.
CAUTION:
- Using the appliance without leveling it may cause excess vibration and noise, leading to an appliance malfunction.
- Adjust the leveling feet only as far as necessary to level the appliance. Extending the leveling feet more than necessary can cause the appliance to vibrate.
NOTE: Before installing the appliance, make sure that the floor is clean, dry and free of dust, dirt, water and oil so the appliance feet cannot slide easily. Feet that move or slide on the floor can contribute to excessive vibration and noise.
How to Level the Appliance
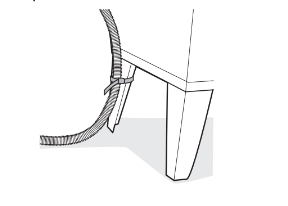
1. Position the appliance in its final location.
Take special care not to pinch, strain, or crush the water and drain hoses. If you have a carpenter’s level 1, you can use it to check that the appliance is level. The slope beneath the appliance should not exceed 1 inch, and all 4 leveling feet must rest firmly on the floor.
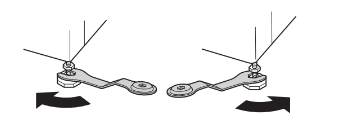
2. Adjust the leveling feet.
Turn all 4 leveling feet in one direction to raise the appliance or the other direction to lower it.
3. Check the level again.
- Push or rock the top edges of the appliance gently to make sure the appliance does not rock. If the appliance rocks, readjust the leveling feet.
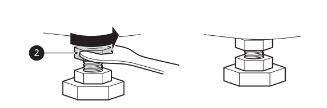
4. Tighten the locknuts 4.
- Turn the locknuts counterclockwise and tighten them when the appliance is level.
WARNING: Do not raise the front of the appliance with a wood block or similar object. Doing so can cause serious injury or death.
Using Non-Skid Pads
If you install the appliance on a slippery surface, it may move because of excessive vibration. Incorrect leveling may cause malfunction through noise and vibration. If this occurs, install the non- skid pads under the leveling feet and adjust the level.
1. Clean the floor to attach the non-skid pads.
- Use a dry rag to remove and clean foreign objects or moisture. If moisture remains, the non-skid pads may slip.
2. Adjust the level after placing the appliance in the installation area.
3. Place the adhesive side 3 of the non-skid pad on the floor.
- It is most effective to install the non-skid pads under the front leveling feet. If it is hard to place the pads under the front leveling feet, place them under the back leveling feet.
4. Recheck the appliance’s levelness.
- Push or rock the top edges of the appliance gently to make sure the appliance does not rock. If the appliance rocks, level the appliance again.
Final Installation Check
Connecting the Washer to the Power Supply
Plug the washer into a 120 VAC, 60 Hz grounded 3- prong outlet.
WARNING
- Do not use a worn or damaged power cord or power plug. Replace or repair it immediately.
- Failure to do so may result in death, fire, electric shock, or malfunction.
- Do not modify the power cord and plug provided with the appliance. Do not damage it when installing or moving the appliance. Doing so may result in death, fire, electric shock, or malfunction.
- Make sure that the appliance is grounded.
- Connect this appliance to a grounded outlet conforming to the rating prior to use. Failure to do so may result in fire, electric shock, or malfunction.
- Do not damage or cut off the ground prong of the power cord. Doing so may cause death, fire, electric shock, or product malfunction.
- Improper connection of the equipment grounding conductor can result in risk of electric shock. Check with a qualified electrician or service technician if you are in doubt as to whether the appliance is properly grounded. If the plug does not fit the outlet, have a proper outlet installed by a qualified electrician.
- The appliance and outlet must be positioned so that the plug is easily accessible.
- Do not use an adapter or extension cord. Doing so may result in serious injury, fire, electric shock, or death.
- For best performance, plug the appliance into its own individual outlet. This helps prevent overloading house wiring circuits which could cause a fire hazard from overheated wires.
- If necessary, use a new, UL-listed 3-prong (grounding) plug rated at no less than the branch circuit. Do not use an extension cord longer than 3 feet. Failure to follow these warnings may result in serious injury, fire, electric shock, or death.
Testing the Washer
Check if the washer is properly installed and run a test cycle.
- Load the washer with 6 thick bath towels (approximately 6 pounds).
- Press the Power button.
- Press the Speed Wash button.
- Select the Start/Pause button to start the wash cycle.
- Make sure that water is supplied, that the washer does not rock or vibrate excessively, and that it drains well during the spin cycle.
NOTE
- If water leaks during water supply, see Connecting the Water Inlet Hoses to connect them properly.
- If the appliance rocks and vibrates excessively, see Leveling the Appliance to level it again.
- If the drain does not work, see Connecting the Drain Hose to install the hose properly.
Testing the Dryer
Once you have completed the installation of the appliance, use this test to make sure the condition of the exhaust system is adequate for proper operation of the appliance. This test should be performed to alert you to any serious problems in the exhaust system of your home.
- Your appliance features Flow Sense(
 ), an innovative sensing system that automatically detects blockages and restrictions in dryer ductwork. Keeping ductwork clean of lint buildup and free of restrictions allows clothes to dry faster and reduces energy use.
Testing Dryer Heating
Gas Models
Close the dryer door and press the Power button to turn the dryer on. Press the Time Dry and Start/Pause buttons to start the test. When the dryer starts, the igniter should ignite the main burner.
NOTE: If all air is not purged from the gas line, the gas igniter may turn off before the main burner ignites. If this happens, the igniter will reattempt gas ignition after approximately two minutes.
Electric Models
Close the dryer door and press the Power button to turn the dryer on. Press the Time Dry and Start/Pause buttons to start the test. The exhaust air should be warm after the dryer has been operating for 3 minutes.
Checking Airflow
Effective dryer operation requires proper airflow. The adequacy of the airflow can be measured by evaluating the static pressure. Static pressure in the exhaust duct can be measured with a manometer, placed on the exhaust duct approximately 2 ft. (60.9 cm) from the dryer. Static pressure in the exhaust duct should not exceed 0.6 inch (1.5 cm). The dryer should be checked while the dryer is running with no load.
Activating the Installation Test
1. Do not load anything in the drum for this test, as it may affect the accuracy of the results.
2. Press the Power button and then press and hold the Reduce Static and Energy Saver buttons.
- This button sequence activates the installation test. The code 1Ns will display if the activation is successful.
3. Press the Start/Pause button.
- The appliance will start the test, which will last a few minutes. The heat will be turned on and the temperatures in the drum will be measured.
4. Check the display for results.
- During the test cycle, monitor the Flow Sense() display on the control panel. If the Flow Sense() indicator has not turned on when the cycle ends, the exhaust system is adequate. If the exhaust system is severely restricted, the Flow Sense() indicator will turn on. Other problems may also be shown with error codes. See the chart on the next page for error code details and solutions.
- If the Flow Sense() display indicates that the exhaust system is severely restricted, have the system checked immediately, as performance will be poor.
5. End of cycle.
- At the end of the test cycle, ENd will display. The test cycle will end and the appliance will shut off automatically after a short delay.
Check the Duct Condition
If the
Flow Sense(
) indicator is turned on, check the exhaust system for restrictions and damage.
Repair or replace the exhaust system as needed.
NOTE
- When the appliance is first installed, this test should be performed to alert you to any existing problems with the exhaust duct in your home. However, since the test performed during normal operation provides more accurate information on the condition of the exhaust duct than the installation test, the number of bars displayed during the two tests may not be the same.
- Do not interrupt the test cycle, as this could result in inaccurate results.
- Even if no bars are displayed during the test cycle, some restrictions may still be present in the exhaust system. Refer to the Venting the Dryer section of this manual for complete exhaust system and venting requirements.
Error Codes
Check the error code before you call for service.

Temperature sensor failure.
- Turn off the appliance and call for service.

Humidity sensor failure.
- Turn off the appliance and call for service.

Electric dryer power cord is not connected correctly, or house power supply is incorrect.
- Reset circuit breaker or replace fuse. Do not increase the fuse capacity.
House fuse is blown, circuit breaker has tripped, or power outage has occurred.
- If the problem is a circuit overload, have it corrected by a qualified electrician.

Gas supply or service turned off. (Gas Model only.)
- Confirm that house gas shutoff and the dryer gas shutoff are both fully open.
Restricted or Blocked Airflow
Avoid long runs or runs with multiple elbows or bends.
Excess or crushed transition duct
Too many elbows or exhaust too long
Check for blockages and lint buildup.
Make sure the ductwork is not crushed or restricted.
APPENDIX
Disassembly
Disassembling the Washer and Dryer
The washer and dryer cannot be disassembled and installed for use side by side. If it is necessary to disassemble the appliance in order to move or reinstall it, follow these instructions.
WARNING: Protect your hands and arms from sharp edges. To reduce the risk of injury to persons, adhere to all industry recommended safety procedures including the use of long-sleeved gloves and safety glasses.
1. Be sure to unplug the appliance.
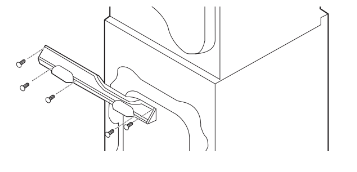
2. Loosen screws assembled on the stack bracket on the back of the appliance.
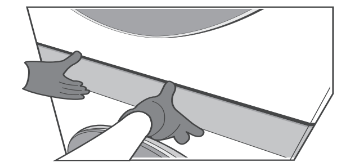
3. Push open the caps at the left and right sides of the control panel on the front of the appliance. Loosen the screws under the caps.
4. Pull the control panel forward to remove it.
5. Disconnect the wire harnesses from the washer 1 and dryer to the control panel.
CAUTION: Always ground yourself before touching the PCB or wiring. Discharge of static electricity may cause product malfunction.
NOTE: Tuck the wire harnesses to the side to avoid pinching them.
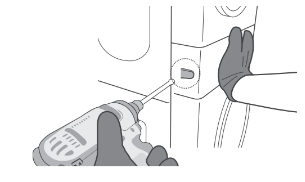
6. Unscrew the second screw from the top of the four screws on the left and right.
7. Lift the dryer and separate it from the washer.
WARNING
- Protect your hands and arms from sharp edges of the panel frame exposed on the top of the washer.
- To avoid strain injuries, use 2 or more people to lift the dryer.
NOTE: When assembling the appliance, proceed in reverse order.
OPERATION-WASHER
Using the Washer
WARNING: To reduce the risk of fire, electric shock, or injury to persons, read the SAFETY INSTRUCTIONS before operating this appliance.
Operation Overview
1. Sort laundry and load the washer.
- Sort laundry by fabric type, soil level, color and load size as needed. Open the door and load items into the washer.
- If using single-use detergent packs, or gel or tablet detergents, place them in the drum before loading the laundry.
2. Add cleaning products.
- Add the proper amount of HE (High-Efficiency) detergent to the detergent dispenser.
- If desired, add bleach or fabric softener to the appropriate areas of the dispenser drawer.
- Do not place liquid or powdered detergent packs, or gel or tablet detergents in the dispenser.
3. Turn on the washer.
- Press the Power button to turn on the washer.
4. Select a cycle.
- Turn the cycle selector knob or press the cycle buttons repeatedly until the desired cycle is selected.
- The preset wash temperature, spin speed, soil level and option settings for the selected cycle are shown.
- The Normal cycle must be selected in order to change its default settings.
- Pressing the Start/Pause button without selecting a cycle immediately starts the Normal cycle with the default settings.
5. Adjust settings.
- Default settings for the selected cycle can be changed, if desired, using the cycle modifier and option buttons.
- Not all modifiers and options are available on all cycles. A different chime sounds and the LED does not light up if the selection is not allowed.
6. Begin cycle.
- Press the Start/Pause button to begin the cycle. The door locks, and the washer agitates briefly without water to measure the weight of the load.
- If the Start/Pause button is not pressed within a certain time, the washer shuts off and all settings are lost.
7. End of cycle.
- When the cycle is finished, a melody sounds. Immediately remove the clothing from the washer to reduce wrinkling.
- Check around the door seal when removing the load for small items that may be caught in the seal.
NOTE: The washer rotates the laundry in a way that allows it to use less water while still fully saturating the clothing. It is normal to be unable to see water during the wash cycle.
Sorting Laundry
CAUTION
- Clothing or articles that are waterproof or water-resistant must be washed in the Waterproof, Bedding, Bulky/Large, or Jumbo Wash cycle only. (Examples include water resistant clothing, mattress covers, outdoor clothes, and plastic mats.) Failure to do so may result in personal injury or damage to the washer, clothes, walls, floor, and surrounding objects due to abnormal vibration.
- Remove the stuffing from pillows and cushions before washing the covers. Failure to do so can cause excessive vibration, resulting in damage to the washer, clothes, nearby objects, walls, and floor.
Grouping Similar Items
For the best washing results, and to reduce the possibility of damage to clothing, sort clothing into loads made up of similar items.
Mixing different fabric types and/or soil levels can result in poor wash performance, color transfer, discoloration, fabric damage or linting. Fabrics should be sorted into groups as described below.
Colors
Sort articles by color. Wash dark clothes separately from light colors or whites. Mixing dark clothes with light clothes can result in dye transfer or discoloration of the lighter clothes.
Soil Level
Wash heavily soiled clothing together. Washing lightly soiled clothing in the same load with heavily soiled clothing could result in poor wash performance for the lightly soiled clothing.
Fabric Type
Delicate articles should not be mixed with heavy or sturdy fabric types. Washing heavy fabrics with delicates can result in poor wash performance for the heavy fabrics and possible damage to the delicates.
Lint Type
Some fabrics attract and bind lint to them while others give off lint in the laundry process. Avoid mixing these lint collectors and lint producers in the same load. Mixing these fabrics will result in pilling and linting on the lint collectors. (For example, lint collector - knit sweater; lint producer - terry cloth towels.)
How to Sort Laundry

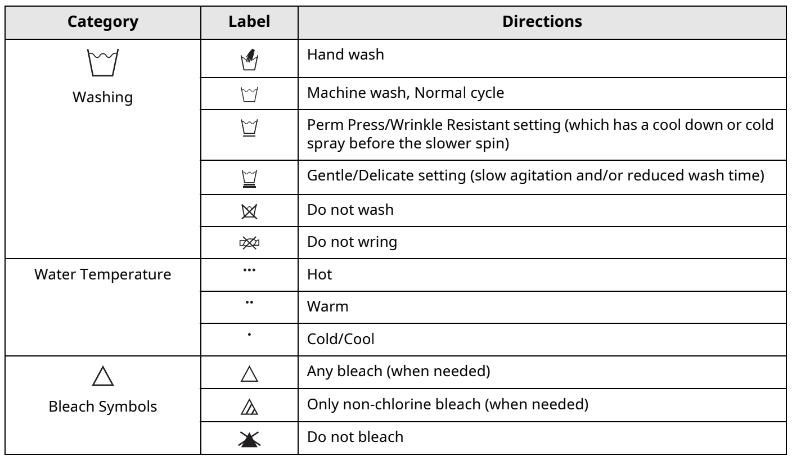
Fabric Care Labels
Many articles of clothing include a fabric care label. Using the chart below, adjust the cycle and option selections to care for your clothing according to the manufacturer’s recommendations.
Loading the Washer
WARNING: Clothing or articles that are waterproof or water- resistant must be washed in the Waterproof, Bedding, Bulky/Large, or Jumbo Wash cycle only. (Examples include water resistant clothing, mattress covers, outdoor clothes, and plastic mats.) Failure to do so may result in personal injury or damage to the washer, clothes, walls, floor, and surrounding objects due to abnormal vibration.
General Tips
- Check and empty pockets. Paper clips, coins, matches, etc.can damage clothing and the washer.
- Close zippers and hooks, and tie drawstrings to prevent snagging or tangling of clothes.
- Pretreat heavily stained areas for best results.
- Brush off heavy soil, dust, and hair from items before washing. Excess dirt or sand can abrade other fabrics and lead to poor wash performance.
- For best performance, load clothes as shown.
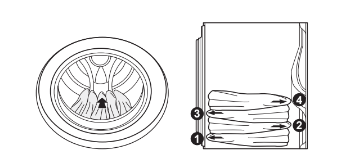
- Do not press down on items while stacking them in the drum.
- Load clothes loosely, and do not overfill the drum. Clothes need room to circulate in order to get clean.
- Combine large and small items in the drum. Load large items first. Large items should not be more than half of the total load.
- The washer can be fully loaded, but the drum should not be tightly packed with items. The door of the washer must close easily.
- The washer will not fill or operate with the door open.
Bulky Items
- Wash thick, bulky items individually. Heavy blankets, comforters, bedspreads, or pet beds can get tangled or cause an unbalanced load if combined with other items.
Small Items
- Do not wash a single small item. Add enough similar items to the load to prevent an out-of- balance load.
- Wash small, light items in a mesh bag. Small items can get caught in the impeller at the bottom of the drum, and brassiere hooks can snag on other clothing or the drum.
Adding Cleaning Products
About Detergent Use
This washer is designed for use with only HE (High- Efficiency) detergents.

- HE detergents produce fewer suds, dissolve more efficiently to improve washing and rinsing performance, and help to keep the interior of the washer clean. Using detergent that is not HE may cause oversudsing and unsatisfactory performance which could result in error codes, cycle failure, and washer damage.
- Detergents designated as HE-compatible may not provide optimal results.
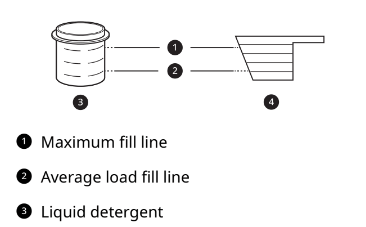
- For proper wash performance, always measure detergent using the measuring device provided by the detergent manufacturer. For an average load, use less than half of the recommended maximum. Use less detergent for soft water, light soil, or smaller loads.
- Use extra care when measuring 2X and 3X concentrated detergents because even a small amount of extra detergent can lead to problems.
- Never use more than the maximum amount of detergent recommended by the manufacturer. Using too much detergent can lead to oversudsing, poor rinsing, detergent buildup in clothing, and residue buildup that can contribute to odors in the washer. a Maximum fill line b Average load fill line c Liquid detergent d Powdered detergent
Single-Use Detergent Packs / Gel or Tablet Detergents
- Do not use more than one single-use detergent pack in the washer. Using too much detergent may cause oversudsing and unsatisfactory performance. Reduce detergent amount or add an extra rinse if detergent residue is left on fabrics. To add an extra rinse, select the Extra Rinse option.
- Place liquid or powdered detergent packs, or gel or tablet detergents in the tub before loading laundry. Do not place these detergents in the dispenser.
Using the Dispenser
To add cleaning products to the automatic dispenser:
1. Open the dispenser drawer.
2. Load the laundry products into the appropriate compartments.
- Follow the manufacturer’s recommendations when adding cleaning products.
3. Gently close the detergent dispenser drawer before starting the cycle.
- Slamming the drawer closed may result in the detergent overflowing into another compartment or dispensing into the drum earlier than programmed.
- Be careful not to get a hand caught in the drawer while closing.
- It is normal for a small amount of water to remain in the dispenser compartments at the end of the cycle.
CAUTION: Do not place or store laundry products, such as detergent, bleach, or liquid fabric softener, on top of your washer. These products can damage the washer’s finish and controls.
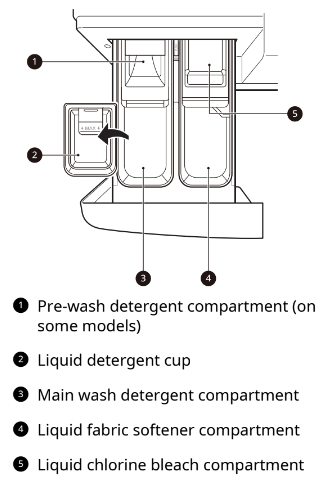
Pre-wash Detergent Compartment
Add liquid or powdered detergent to this compartment when using the Pre-wash option. Always use HE (High-Efficiency) detergent with your washer.
- When using the Pre-wash option, liquid detergent for the main wash needs to be loaded in the liquid detergent cup accessory in the main wash dispenser (where applicable), to prevent it from being dispensed with the pre-wash detergent.
- The amount of detergent added for the Pre- wash option is 1/2 the amount recommended for the main wash cycle. For example, if the main wash cycle requires one measure of detergent, add 1/2 measure for the Pre-wash option.
Main Wash Detergent Compartment
This compartment holds laundry detergent for the main wash cycle. Either powdered or liquid detergent may be used in this compartment.
- The detergent is added to the load at the beginning of the cycle. Always use HE (High-Efficiency) detergent with your washer.
- Do not exceed the maximum fill line. Using too much detergent can result in detergent buildup in clothing and the washer.
- Liquid or powdered color-safe bleach may be added to the main wash compartment with detergent of the same type. Do not mix liquids and powders
- If the dispenser has a liquid detergent cup and insert:
- Make sure they are in place when using liquid detergent.
- Make sure to remove them when using powdered detergent. Powdered detergent will not dispense with the liquid detergent cup and insert in place.
- If you use a detergent that does not dissolve easily or a detergent with high viscosity, it will leave a residue and clog the dispenser.
Liquid Bleach Compartment
This compartment holds liquid bleach, which is dispensed automatically at the proper time during the wash cycle. The dispenser is activated twice to ensure complete dispensing of the bleach. Any liquid remaining in the dispenser at the end of the cycle is water, not bleach.
WARNING
- Do not mix chlorine bleach with ammonia or acids such as vinegar or rust/scale remover.
- Mixing chemicals like these can produce a lethal gas, resulting in severe injury or death.
NOTE
- Do not add powdered bleach to this compartment. The bleach compartment is designed to dispense liquid chlorine bleach only.
- Powdered or liquid color-safe bleach will not dispense properly.
- Follow the manufacturer’s recommendations when adding bleach. Never add more than one cup, and do not exceed the maximum fill line or the bleach may be dispensed immediately and damage fabrics. Using too much bleach can also damage fabrics.
- Never pour undiluted liquid chlorine bleach directly onto the load or into the drum. Fabric damage can occur.
- Do not use color-safe bleach or oxygen bleach in the same cycle with liquid chlorine bleach.
Fabric Softener Compartment
This compartment holds fabric softener, which is automatically dispensed during the final rinse cycle. Either powdered or liquid fabric softener may be used.
- Do not exceed the maximum fill line. Using too much fabric softener may stain clothes or cause buildup on fabrics or in the washer.
- Dilute concentrated fabric softeners with warm water.
- Never pour fabric softener directly onto the load or into the drum.
Control Panel
Control Panel Features for the Washer
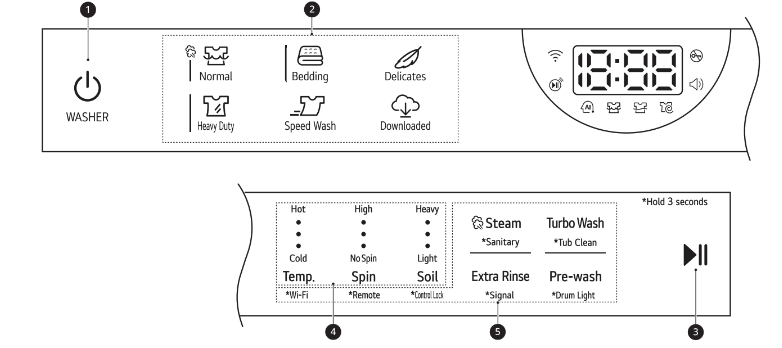
1. Power On/Off Button
- Press this button to turn the washer on or off.
- Pressing this button during a cycle will cancel that cycle and any load settings will be lost.
- The door will unlock after a brief pause.
NOTE: If there is any water remaining in the drum after the washer shuts off, it will drain after a delay. The washer can be restarted at any time before the drain begins. However, once the water begins to drain, all functions will be suspended until the water has been completely drained and the washer shuts off.
2. Cycles
- Press a button to select the desired cycle.
- Once the desired cycle has been selected, the standard presets will appear in the display. These settings can be adjusted using the Cycle Modifier buttons at any time before starting the cycle.
3. Start/Pause Button
- Press and hold this button to start the selected cycle.
- If the washer is running, use this button to pause the cycle without losing the current settings.
NOTE: If the Start/Pause button is not pressed to start the selected cycle, after a delay the washer automatically turns off and all cycle settings are lost. Any water remaining in the drum will be drained.
4. Cycle Modifier Buttons
- Use these buttons to adjust the wash temperature, spin speed and soil level settings for the selected cycle.
- The current settings are shown in the display.
- Press the button for that option to select other settings.
5. Option and Extra Function Buttons
- These buttons allow you to select additional cycle options. Certain buttons also allow you to activate special functions by pressing and holding the button for 3 seconds.
Remote Start
Use a smartphone to control your washer remotely.
- For more information, see SMART FUNCTIONS in this manual.
Wi-Fi
When the washer is connected to a home Wi-Fi network, the f icon on the control panel is lit.
- To connect the washer to the LG ThinQ application, press and hold the Temp. button for 3 seconds.
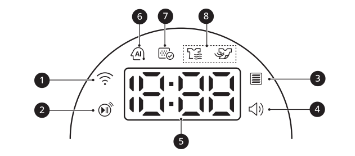
Time and Status Display
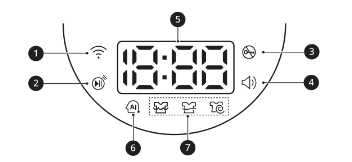
1. Wi-Fi Indicator
- This indicator is lit when the product is connected to a home Wi-Fi network.
2. Remote Start Indicator
- This indicator lights up when the Remote Start feature is activated.
3. Door Lock Indicator
- This indicator lights up when the cycle starts and the door is locked.
- The indicator light stays on until the cycle is paused, stopped or has finished.
4. Signal Indicator
- This indicator lights up when the end-of-cycle and button tones are turned on.
5. Estimated Time Remaining
- When a cycle is selected, the default time for that cycle is displayed. This time will change as modifiers or options are selected.
- If the display shows -I--, then the time will be displayed after the load sensing has detected the load size.
- The time shown is only an estimate. This time is based on normal operating conditions. Several external factors (load size, room temperature, incoming water temperature, etc.) can affect the actual time.
NOTE: Once the Start/Pause button is pressed, the washer will measure the size of the load. The estimated time may change once the load size has been measured.
6. AI DD Indicator
- This feature offers optimized washing by detecting the load size and laundry characteristics. The indicator lights up when the Normal cycle is selected with a Warm wash temperature setting.
NOTE: The AI DD functionality may vary depending on the environment and model.
7. Cycle Status Indicators
- These LEDs will blink when a cycle is selected to indicate which stages will run.
- When a cycle is running, the LED for the active stage will blink, and the LEDs for the remaining stages will remain steady. Once a stage is complete, the LED will turn off. If a cycle is paused, the active stage LED will stop blinking.
Cycle Modifiers
About Modifier Buttons
Each cycle has default settings that are selected automatically. You can also customize these settings using the cycle modifier buttons.
- Repeatedly press the button for the desired modifier until the indicator light for the desired setting is lit.
- The washer automatically adjusts the water level for the type and size of wash load for best results and maximum efficiency.
- This is a high-efficiency washer, and the water levels may be much lower than you expect. This is normal, and cleaning/rinsing performance will not be compromised.
NOTE
- The LED next to the setting lights up when the setting is selected.
- To protect your garments, not every wash temperature, spin speed, soil level, or option is available with every cycle.
- A chime will sound twice and the LED will not light if the desired setting is not allowed for the selected cycle.
- Follow the fabric care labels on the garment for best results.
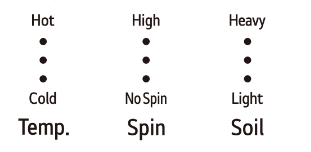
Temp.
Make sure the wash temperature is suitable for the type of load you are washing.
- Press the Temp. button repeatedly to select the wash and rinse temperature combination for the selected cycle.
- All rinses use unheated cold water.
- Cold rinses use less energy. The actual cold rinse temperature depends on the temperature of the cold water at the faucet.
Spin
Higher spin speeds extract more water from clothes, reducing drying time and saving energy.
- Press the Spin button repeatedly until the desired speed is selected.
- Some fabrics, such as delicates, require a slower spin speed.
Soil
Adjusting the soil level setting will modify the cycle times and/or wash actions.
- Press the Soil button repeatedly until the desired soil level is selected.
- The Heavy soil setting may increase cycle times. he Light soil setting may decrease cycle times.
Options and Extra Functions
Your washer includes several additional cycle options to customize cycles to meet your individual needs.
- Select the desired option after selecting the desired cycle and settings.
NOTE
- The LED for the option will light when the option is selected.
- To protect your garments, not every option is available with every cycle.
- A chime will sound twice and the LED will not light if the selected option is not allowed for the selected cycle.
Special Cycles
Sanitary
This cycle washes clothes at a high temperature.
Tub Clean
This is a special cycle designed to clean the inside of the washer.
Steam
Adding this option to a wash cycle helps provide superior cleaning performance. Using steam gives fabrics the cleaning benefits of a very hot wash.
- Steam may not be clearly visible during steam cycles. This is normal. Too much steam could damage clothing.
- Do not use steam with delicate fabrics such as wool and silk, or easily discolored fabrics.
WARNING
- Do not touch the door during steam cycles. The door surface can become very hot and can cause severe burns. Allow the door lock to release before opening the door.
- Do not attempt to override the door lock mechanism or reach into the washer during a steam cycle. Steam can cause severe burns.
Turbo Wash
Adding this option reduces the cycle time while still providing similar wash performance to the same cycle without Turbo Wash.
NOTE
- This option cannot be used with all cycles.
- This option defaults to on for Normal and Heavy Duty wash cycles.
Extra Rinse
This option adds an extra rinse to the selected cycle. Use this option to help ensure the removal of detergent or bleach residue from fabrics.
- Press the Extra Rinse button to add additional rinses to the cycle.
Using the Pre-wash Option
This option adds a pre-wash (for about 15 - 17 minutes) for improved cleaning of heavily soiled or stained clothing.
NOTE: If you select Pre-wash after putting the detergent directly in the drum, the detergent may be washed away, reducing the washing performance.
Control Lock
Use this function to disable the controls. This function can prevent children from changing cycles or operating this washer.
NOTE
- The function does not lock the door.
- Once this function is set, all buttons are locked except the Power button.
- When the controls are locked, CL and the remaining time are alternately shown on the display during the wash cycle.
- Turning off the power will not reset this function. You must deactivate this function before you can access any other options and functions.
Locking/Unlocking the Control Panel
- Turn on the power.
- Press and hold the Soil button for 3 seconds to activate/deactivate this function.
- When the function is deactivated, a chime will sound and the remaining time for the current cycle will reappear on the display.
Signal
The washer plays a melody when the wash cycle is finished. The buttons make a sound each time a button is pressed. Use this button to turn the melody and button tones on or off.
- To turn the function on/off, press and hold the Extra Rinse button for 3 seconds.
Drum Light
The drum is equipped with a white LED light that illuminates when the washer is turned on. This light automatically turns off when the door is closed and the cycle starts.
- Press and hold the Pre-wash button for 3 seconds during the cycle to turn on the drum light.
- The drum light will turn off automatically after 4 minutes.
OPERATION-DRYER
Using the Dryer
WARNING: To reduce the risk of fire, electric shock, or injury to persons, read the SAFETY INSTRUCTIONS before operating this appliance.
Operation Overview
1. Clean the Lint Filter.
- If the lint filter has not already been cleaned, lift out the filter and remove the lint from the last load. This will help ensure the fastest and most efficient drying performance. Make sure to reinstall the filter, pressing down until it clicks firmly into place.
2. Load the Dryer.
- Load the dryer with the wet laundry from the washer. If the load is extra large, you may need to divide it into smaller loads for proper performance and fabric care.
3. Turn on the Dryer.
- Press the Power button to turn on the dryer. The cycle LEDs will illuminate and a chime will sound.
4. Select a Cycle.
- Press a cycle button to select a cycle. The preset temperature, dry level, and option settings for that cycle will be shown.
5. Adjust Settings.
Default settings for the selected cycle can now be changed, if desired, using the cycle modifier and option buttons.
- Not all modifiers and options are available on all cycles. A different chime will sound and the LED will not come on if the selection is not allowed.
6. Begin Cycle.
- Press the Start/Pause button to begin the cycle. The cycle can be paused at any time either by opening the door or by pressing the Start/Pause button.
- If the Start/Pause button is not pressed within a certain time, the dryer shuts off and all settings are lost.
7. End of Cycle
- When the cycle is finished, the chime will sound. Immediately remove your clothing from the dryer to reduce wrinkling. If Wrinkle Care is selected, the dryer will tumble briefly every few minutes to help prevent wrinkles from setting in the clothes.
Check the Lint Filter Before Every Load
Always make sure the lint filter 1 is clean before starting a new load; a clogged lint filter will increase drying time. To clean, pull the lint filter straight up and roll any lint off the filter with your fingers. Push the lint filter firmly back into place. See Regular Cleaning for more information.
Always ensure the lint filter is properly installed before running the dryer. Running the dryer with a loose or missing lint filter will damage the dryer and articles in the dryer.
Loading the Dryer
General Tips
- Combine large and small items in the same load.
- Close zippers, hooks and drawstrings to prevent these items from snagging or tangling on other clothes.
NOTE: Damp clothes will expand as they dry. Do not overload the dryer; clothes require room to tumble and dry properly.
Grouping Similar Items
For the best drying results, and to reduce the possibility of damage to clothing, sort clothes into loads that can be dried with the same drying cycle.
Different fabrics have different care requirements, and some fabrics will dry more quickly than others.
Woolen Items
Always follow fabric care labels before drying woolen items in a dryer. After the cycle, the items may still be damp. Do not repeat the cycle. Pull the items to their original shape if needed and lay them flat to finish drying.
Woven and Loopknit Materials
Some woven and loopknit materials may shrink, depending on quality.
Permanent Press and Synthetics
Do not overload your dryer. Take out permanent press items as soon as the dryer stops to reduce wrinkles.
Baby Clothes and Nightgowns
Always check the manufacturer’s instructions.
Rubber and Plastics
Do not dry any items made from or containing rubber or plastics such as:
- Aprons, bibs and chair covers
- Curtains and tablecloths
- Bath mats
Fiberglass
Do not dry fiberglass articles in your dryer. Glass particles left in the dryer could be picked up by your clothes the next time you use the dryer and irritate your skin.
Fabric Care Labels
Sort and dry laundry according to care labels, size, and fabric type. Do not overload the dryer. This will save energy and time and give the best drying performance.
Control Panel
Control Panel Features for the Dryer
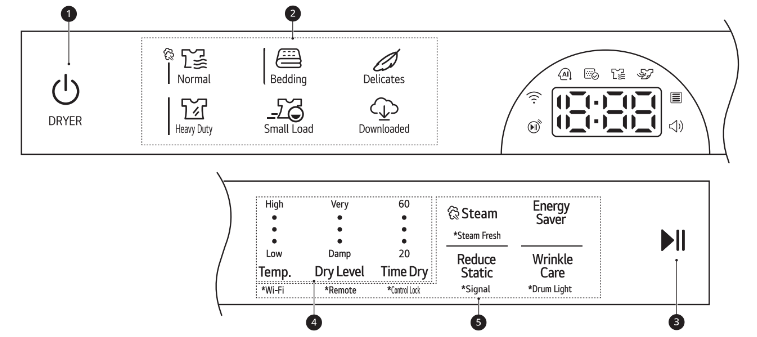
1. Power Button
- Press the button to turn the appliance on. Press again to turn the appliance off.
NOTE: Pressing the Power button during a cycle will cancel that cycle and any load settings will be lost.
2. Cycles
- Press a button to select the desired cycle. Once the desired cycle has been selected, the standard presets will be shown in the display.
3. Start/Pause Button
- Press and hold this button to start the selected cycle. If the appliance is running, use this button to pause the cycle without losing the current settings.
NOTE: If you do not press the Start/Pause button to resume a cycle within a certain time, the appliance turns off automatically and all cycle settings are lost.
4. Cycle Modifier Buttons
- Press these buttons to select additional cycle options. Press and hold any button marked with an asterisk for 3 seconds to activate a special function.
5. Extra Options and Functions
- Use these buttons to select the desired options for the selected cycle. Not all options are available for each cycle.
- Remote Start
- With the LG ThinQ app, you can use a smartphone to control your appliance remotely.
- Press and hold the Temp. button for 3 seconds to initiate the connection of the appliance to the LG ThinQ application.
Time and Status Display
1. Wi-Fi Indicator
- This indicator is lit when the product is connected to a home Wi-Fi network.
2. Remote Start Indicator
- This indicator lights up when the Remote Start feature is activated.
3. Flow Sense Indicator
- The Flow Sense duct blockage sensing system detects and alerts you to blockages in the ductwork that reduce exhaust flow from the dryer. Maintaining a clean exhaust system improves operating efficiency and helps minimize service calls, saving you money.
4. Signal Indicator
- This indicator lights up when the end-of-cycle and button tones are turned on.
5. Estimated Time Remaining
- When a drying cycle is selected, the estimated drying time for the selected cycle is displayed. This time will change if you select extra options for the cycle.
- The cycle time on Sensor Dry cycles may fluctuate as the appliance recalculates drying time for optimal results.
6. AI Sensor Dry Indicator
- This feature optimizes drying times and temperatures by detecting the laundry's characteristics.
The indicator lights up when the Normal cycle is selected with the Normal dry level, except when the Energy Saver option is turned on.
7. Lint Filter Status Indicator
 lights up at the beginning of the cycle to remind you to check the lint filter. It also lights up if the lint filter needs to be cleaned or is missing.
- If the lint filter is not inserted, the icon will light up and the appliance will not operate.
8. Cycle Status Indicators
 lights up when the appliance is in the drying stage.
 lights up when the appliance is in the cool down stage.
Cycle Modifiers
About Modifier Buttons
Each cycle has default settings that are selected automatically. Customize these settings using the cycle modifier buttons. Press the button for the desired modifier to open the modifier’s screen.
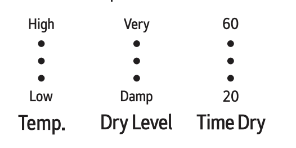
Temp.
Use this button to adjust the temperature setting.
This allows precise care of fabrics and garments.
Press the Temp. button repeatedly to scroll through available settings.
Dry Level
Use this button to select the dryness level for the cycle. Press the Dry Level button repeatedly to scroll through available settings.
- The appliance will automatically adjust the cycle time according to the selected dryness level. Selecting More or Very will increase the cycle time, while Less or Damp will decrease the cycle time.
- Use a Less or Damp setting for items that you wish to iron.
Time Dry
Use this button to manually select the drying time, from 20 to 60 minutes, in 10-minute increments.
- Use this for small loads or to remove wrinkles.
Options and Extra Functions
Your dryer includes several additional cycle options to customize cycles to meet your individual needs.
Select the desired option after selecting the desired cycle and settings.
NOTE
- The LED for the option will light up when the option is selected.
- To protect your garments, not every option is available with every cycle.
- A chime will sound twice and the LED will not light up if the selected option is not allowed for the selected cycle.
Steam
Adding the Steam option to a dry cycle helps reduce wrinkles and odor in fabrics.
WARNING
- Do not touch the door during steam cycles. The door surface can become very hot.
- Do not attempt to reach into the dryer during a steam cycle. Steam can cause severe burns.
NOTE
- Steam may not be clearly visible during steam cycles. This is normal.
- Do not use steam with delicate fabrics such as wool, silk, or easily discolored fabrics.
- When the filter/duct is clogged, this option may not have optimal results.
- When the steam function is operating, the drum will stop to allow steam to stay in the drum.
Steam Fresh
This cycle uses the power of steam to quickly reduce wrinkles and odors in fabrics. It brings new life to wrinkled clothes that have been stored for an extended time and makes heavily wrinkled clothes easier to iron. It can also be used to help reduce odors in fabrics.
- Press the Power button to turn on the dryer.
- Press and hold the Steam button for 3 seconds.
- To add an option, select Wrinkle Care.
- Press Start/Pause to start the cycle.
NOTE
- Steam may not be clearly visible during the steam cycles. This is normal.
- Do not use Steam Fresh with items such as wool, wool blankets, leather jackets, silk, wet clothes, lingerie, foam products, or electric blankets.
Wrinkle Care
Selecting this option will tumble the load periodically for up to 3 hours after the selected cycle, or until the door is opened. This is helpful in preventing wrinkles when you are unable to remove items from the dryer immediately.
Press the Wrinkle Care button before you start a drying cycle.
NOTE
- When the option is set, a rectangle with a dashed line and ENd appears on the display until the feature is off.
- When the option is set, only the Power button works after the drying cycle ends.
- When a drying cycle is running, pause the cycle first to set the option.
- Always turn off the appliance before unloading the clothes.
Reduce Static
This option injects steam late in the drying cycle to reduce the static electricity caused by dry fabrics rubbing together.
Energy Saver
This option helps to reduce the energy consumption of the Normal cycle, depending on the load size. When the Energy Saver option is selected, the cycle begins with an air dry section and the drying time is increased.
Control Lock
Use this function to disable the controls. This function can prevent children from changing cycles or operating this dryer.
NOTE
- The function does not lock the door.
- Once this function is set, all buttons are locked except the Power button.
- When the controls are locked, CL and the remaining time are alternately shown on the display during the dry cycle.
- Turning off the power will not reset this function. You must deactivate this function before you can access any other options and functions.
Locking/Unlocking the Control Panel
- Turn on the power.
- Press and hold the Time Dry button for 3 seconds to activate/deactivate this function.
- When the function is deactivated, a chime will sound and the remaining time for the current cycle will reappear on the display.
Signal
The dryer plays a melody when the dry cycle is finished. The buttons make a sound each time a button is pressed. Use this button to turn the melody and button tones on or off.
- To turn the function on/off, press and hold the Reduce Static button for 3 seconds.
Drum Light
The drum is equipped with a white LED light that illuminates when the dryer is turned on. This light automatically turns off when the door is closed and the cycle starts.
- Press and hold the Wrinkle Care button for 3 seconds during the cycle to turn on the drum light.
- The drum light will turn off automatically after 4 minutes.
SMART FUNCTIONS
Using LG ThinQ Application
The LG ThinQ application allows you to communicate with the appliance using a smartphone.
LG ThinQ Application Features
- Control the appliance remotely from the LG ThinQ application.
- Download new and specialized cycles that are not included in the standard cycles on the appliance. Once cycle download is completed in the appliance, the product keeps the downloaded cycle until a new cycle is downloaded.
- The Cloud cycles include many cycles which are started from the Cloud and offer various options. However, the downloaded cycle is deleted from the appliance when the power is turned off.
- Find out how many cycles remain before it is time to run the Tub Clean cycle.
- Access tips for optimizing dryer ventilation.
- Keep track of the appliance's power consumption and how it is affected by your selected wash cycles and options.
- This function provides useful information for diagnosing and solving issues with the appliance based on the pattern of use.
- When the cycle is complete or the appliance has problems, you will receive a push message.
- Set various options on the appliance and in the application.
NOTE
- If you change your wireless router, Internet service provider, or password, delete the connected appliance from the LG ThinQ application and connect it again.
- This information is current at the time of publication. The application is subject to change for product improvement purposes without notice to users.
Before Using LG ThinQ Application
1. Check the distance between the appliance and the wireless router (Wi-Fi network).
- If the appliance is too far from the router, the signal strength becomes weak. It may take a long time to connect or installation may fail.
2. Turn off the Mobile data or Cellular Data on your smartphone.
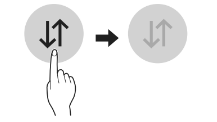
3. Connect your smartphone to the wireless router.

NOTE
- To verify the Wi-Fi connection, check that the f icon on the control panel is lit.
- The appliance supports 2.4 GHz Wi-Fi networks only. To check your network frequency, contact your Internet service provider or refer to your wireless router manual.
- LG ThinQ is not responsible for any network connection problems or any faults, malfunctions, or errors caused by network connection.
- If the appliance is having trouble connecting to the Wi-Fi network, it may be too far from the router. Purchase a Wi-Fi repeater (range extender) to improve the Wi-Fi signal strength.
- The Wi-Fi connection may not connect or may be interrupted because of the home network environment.
- The network connection may not work properly depending on the Internet service provider.
- The surrounding wireless environment can make the wireless network service run slowly.
- If the appliance cannot be registered due to problems with the wireless signal transmission, unplug the appliance and wait about a minute before trying again.
- If the firewall on your wireless router is enabled, disable the firewall or add an exception to it.
- The wireless network name (SSID) should be a combination of English letters and numbers. (Do not use special characters.)
- Smartphone user interface (UI) may vary depending on the mobile operating system (OS) and the manufacturer.
- If the security protocol of the router is set to WEP, network setup may fail. Change the security protocol (WPA2 is recommended) and connect the product again.
Installing the LG ThinQ Application
Search for the LG ThinQ application from the Google Play Store or Apple App Store on a smartphone. Follow instructions to download and install the application.
Using the Washer/Dryer Remotely
Remote Start
Use a smartphone to control your appliance remotely. You can also monitor your cycle operation so you know how much time is left in the cycle.
Using Remote Start
- Load the laundry.
- Press the Power button.
- Press and hold the Remote button for 3 seconds to enable the remote control function.
- Start a cycle from the LG ThinQ application on your smartphone.
NOTE
- Once this function is enabled, you can only start a cycle from the LG ThinQ smartphone application. If the cycle is not started, the appliance will wait to start the cycle until it is turned off remotely from the application or this function is disabled.
- If the door has been opened, you cannot start a cycle remotely.
Disabling Remote Start Manually
When the function is activated, press and hold the Remote button for 3 seconds.
Downloaded Cycle
You can download new and specialized cycles that are not included in the standard cycles on the appliance.
Appliances that have been successfully connected can download a variety of specialty cycles specific to the appliance.
Once cycle download is completed in the appliance, the product keeps the downloaded cycle until a new cycle is downloaded.
NOTE: Only one downloaded cycle can be stored on the appliance at a time.
Cloud Cycle
Use the LG ThinQ app to start cycles with various options. Cloud cycles are deleted from the appliance once the power is turned off.
Smart DiagnosisTM Function
Use this feature to help you diagnose and solve problems with your appliance.
NOTE
- For reasons not attributable to LGE’s negligence, the service may not operate due to external factors such as, but not limited to, Wi-Fi unavailability, Wi-Fi disconnection, local app store policy, or app unavailability.
- The feature may be subject to change without prior notice and may have a different form depending on where you are located.
Using LG ThinQ to Diagnose Issues
If you experience a problem with your Wi-Fi equipped appliance, it can transmit troubleshooting data to a smartphone using the LG ThinQ application.
- Launch the LG ThinQ application and select the Smart DiagnosisTM feature in the menu. Follow the instructions provided in the LG ThinQ application.
Using Audible Diagnosis to Diagnose Issues
Follow the instructions below to use the audible diagnosis method.
- Launch the LG ThinQ application and select the Smart DiagnosisTM feature in the menu. Follow the instructions for audible diagnosis provided in the LG ThinQ application.
1. Press the Power button to turn on the appliance.
- Do not press any other buttons.
2. Hold the mouthpiece of your phone in front of the appliance.
- Washer: Hold the phone to the right of the Start/Pause button.
- Dryer: Hold the phone to the left of the Power button.
3. Press and hold the Steam + Extra Rinse (Washer) / Steam + Reduce Static (Dryer) buttons for 3 seconds or until the audible tones start. Hold the smartphone mouthpiece to the logo until the data transfer is complete.
- Keep the smartphone in place until the data transfer has finished. Time remaining for data transfer is displayed.
4. After the data transfer is complete, the diagnosis will be displayed in the application.
NOTE: For best results, do not move the smartphone while the tones are being transmitted.
MAINTENANCE
WARNING
- To reduce the risk of fire, electric shock, or injury to persons, read this entire owner’s manual, including the SAFETY INSTRUCTIONS, before operating this appliance.
- Unplug the appliance before cleaning to avoid the risk of electric shock. Failure to follow this warning can cause serious injury, fire, electric shock, or death.
- Do not use volatile substances (benzene, paint thinner, alcohol, acetone, etc.), abrasive cleaners, or detergents with strong chemical components when cleaning the appliance. Doing so may cause discoloration or damage to the appliance, or may cause a fire.
- Certain internal parts are intentionally not grounded and may present a risk of electric shock only during servicing. Service personnel - Do not contact the following parts while the appliance is energized: pump, valve, motor, control board.
Washer
Regular Cleaning
Care after Wash
After the cycle is finished, wipe the door and the inside of the door seal to remove any moisture.
- Wipe the body of the washer with a dry cloth to remove any moisture.
- Leave the door open to dry the drum interior.
WARNING: Make sure children and pets do not climb into the drum. Engage the Control Lock feature if needed to prevent children from accidentally starting a wash cycle.
Cleaning the Exterior
Proper care of your washer can extend its life.
Door:
- Wash with a damp cloth on the outside and inside and then dry with a soft cloth.
Exterior:
- Immediately wipe off any spills.
- Wipe with a damp cloth.
- Do not touch the surface or the display with sharp objects.
Cleaning the Drum
Over time, residue may build up in the drum, leading to mildew or a musty odor. Run the Tub Clean cycle monthly to remove residue and prevent odor.
NOTE
- Make sure to run the Tub Clean cycle only when the drum is empty. Never load laundry while using this cycle. The laundry may be damaged or contaminated with cleaning products.
- Run the cycle more often under heavy use conditions or if odor is already present.
- If mildew or musty smell already exists, run this cycle once a week for three consecutive weeks.
1. Remove any clothing from the drum.
2. Add cleaning agents.
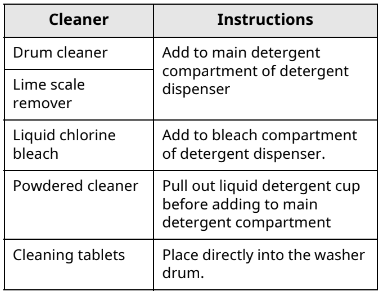
- For other drum cleaning products, follow the cleaner manufacturer’s instructions and recommendations.
- Do not exceed the maximum fill line when adding bleach or powdered cleaners. Powdered cleaners may remain in the drum after cleaning.
3. Close the door and press the Power button.
4. Select the Tub Clean cycle and press the Start/Pause button to begin the cycle.
5. After the cycle ends, open the door and allow the drum interior to dry completely.
WARNING: Make sure children and pets do not climb into the drum. Engage the Control Lock feature if needed to prevent children from accidentally starting a wash cycle.
NOTE
- If you use a descaler or drum cleaner during the Tub Clean cycle, use the Speed Wash option to rinse the washer drum before running your next wash cycle.
Automatic Alert for Tub Clean
When the power is on and the tcL message blinks on the display, it means the washer drum needs cleaning. Use the Tub Clean cycle to clean the washer drum. The frequency of the automatic alert’s appearance depends on how often the washer is used. However, the message will generally appear every one to two months.
Removing Mineral Buildup
In areas with hard water, mineral scale can form on internal components of the washer. Periodically clean the mineral buildup on the internal components to extend the lifespan of the washer.
- Use of a water softener is recommended in areas with hard water.
- Use a descaler to remove visible mineral buildup on the washer drum.
- After descaling, always run the Tub Clean cycle before washing clothing.
- Mineral scale and other spots may be removed from the stainless steel drum using a soft cloth soaked in stainless steel cleaner.
- Do not use steel wool or abrasive cleaners.
Leaving the Door Open
After you finish using the washer, leave the door open overnight to allow air to circulate and dry the drum. This helps prevent odors.
Cleaning the Dispenser Drawer
Leaving detergent in the detergent dispenser drawer for an extended period of time or using the washer for a long period of time may cause the build-up of residue in the detergent dispenser drawer. Remove and clean the detergent dispenser drawer once or twice a month.
WARNING: Do not spray water inside the washer. Doing so may cause fire or electric shock.
1. Turn off the washer, and unplug the power cord.
2. Pull the drawer straight out until it stops.
3. Press down hard on the disengage button 1 and pull the drawer completely out.
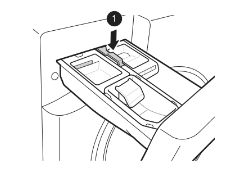
4. Remove the inserts from the drawer.
5. Clean the inserts and drawer with warm water.
- Use a soft cloth or brush to clean and to remove any residue.
- Do not use soap when cleaning the drawer and inserts.
6. Wipe off any moisture with a dry towel or cloth after cleaning.
7. To clean the drawer opening, use a small, non-metal brush to clean the recess. Remove all residue from the upper and lower parts of the recess.
8. Replace the drawer.

Cleaning the Door Seal
Clean the door seal once a month to prevent build-up of dirt.
CAUTION: Cleaning the door seal with undiluted bleach may cause malfunction of the door seal and washer parts. You must add water to the bleach before using it.
1. Wear rubber gloves and protective goggles.
2. Dilute 3/4 cup (177 mL) of liquid chlorine bleach in 1 gallon (3.8 L) of water.
3. Wipe around the door seal.
- Soak a sponge or a soft cloth in this diluted solution and wipe all around the door seal.
4. Wipe up any moisture with a dry towel or cloth after cleaning.
5. Leave the door open to allow the door seal to dry completely.
Cleaning the Water Inlet Filters
If the washer does not fill properly, an error message will appear on the display. The inlet valve filter screens could be clogged by hard water scale, sediment in the water supply, or other debris.
WARNING: The inlet screens protect the delicate parts of the inlet valve from being damaged by particles that could enter the valves with the water supply. Operating the washer with these filters removed could cause a valve to open continuously, resulting in flooding and/or property damage.
CAUTION
- Do not use the washer without the inlet filters. Doing so will cause leaks and malfunction.
- If you use the washer in an area with hard water, the inlet filter may clog due to lime buildup and require more frequent cleaning.
1. Turn off the washer, and unplug the power cord.
2. Turn off hot and cold water faucets.
3. Unscrew the hot and cold water hoses from the back of the washer.
4. Remove the filters from the water valves carefully.
- Use pliers to pull out the filters from the water valves.
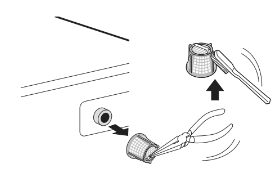
5. Remove foreign objects and soak the filters in white vinegar or a lime scale remover.
- If using a lime scale remover, follow the manufacturer’s instructions. Be careful not to damage the filters while cleaning them.
6. Rinse filters thoroughly and press them back into place.
7. Flush then reattach the water hoses.
- Before reattaching the water inlet hoses, flush them by running several gallons of water through them into a bucket or drain,preferably with the faucets wide open for maximum flow.
NOTE: An IE error message may blink on the display when the water pressure is low or an inlet filter is clogged with dirt. Clean the inlet filter.
Cleaning the Drain Pump Filter
The washer fails to drain if the drain pump filter is clogged. Periodically clean the drain filter to prevent clogging with foreign objects.
WARNING
- Opening the drain filter will result in water overflowing if there is water in the drum. Use a bucket if the drum is not completely drained before you open the drain filter.
- Using the washer without the drain filter or with an incorrectly assembled drain filter may cause leaks or malfunction of the washer.
1. Turn off the washer, and unplug the power cord.
2. Open the drain pump filter cover.
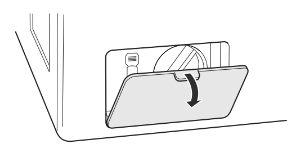
3. Drain any remaining water.
- Unclip the drain hose and remove the plug from the drain hose to drain the remaining water.
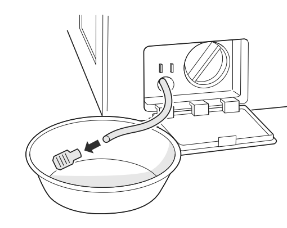
4. Remove the pump filter.
- Twist the pump filter counterclockwise to remove.
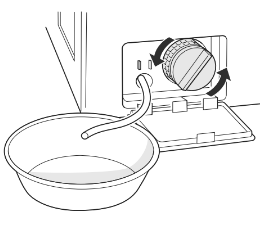
5. Clean the pump filter and opening.
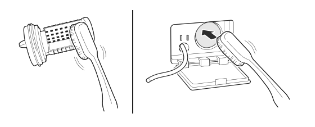
6. Reassemble the plug onto the drain hose and reclip the drain hose.
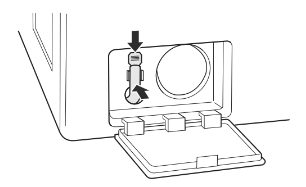
7. Insert the drain pump filter and twist it clockwise.
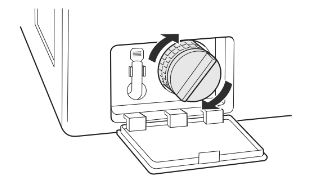
8. Close the drain pump filter cover.
NOTE: An OE message blinks on the display when the drain pump filter is clogged with dirt. Clean the drain pump filter.
Care in Cold Climates
Storing the Appliance
If the washer will not be used for an extended period of time and is in an area that could be exposed to freezing temperatures, follow these steps to protect the washer from damage.
NOTE: Make sure the drum is empty before following these steps.
1. Turn off the washer, and unplug the power cord.
2. Turn off the water faucets.
3. Disconnect the water inlet hoses. Drain any water from the hoses.
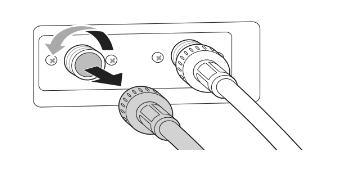
4. Plug the power cord into a properly grounded electrical outlet.
5. Add 1 gallon of nontoxic recreational vehicle (RV) antifreeze to the empty drum and close the door.
- Never use automotive antifreeze.
6. Turn on the washer and press the Spin button.
7. Press the Start/Pause button to start the drain pump for 1 minute.
- This will expel some of the antifreeze, leaving enough to protect the washer from damage.
8. Turn off the washer and unplug the power cord.
9. Dry the drum interior with a soft cloth, and close the door.
10. Store the washer in an upright position.
11. Remove the inserts from the dispenser. Drain any water in the compartments and let them dry.
12. To remove the antifreeze from the washer after storage, run the Speed Wash cycle using detergent.
- Do not add laundry to this cycle.
When the Water Inlet Hoses Are Frozen
- Turn off the washer, and unplug the power cord.
- Turn off the faucets connected to the water inlet hoses.
- Pour hot water on the frozen faucets to thaw the water inlet hoses and remove the water inlet hoses.
- Immerse the water inlet hoses in hot water to thaw them.
- Reconnect the water inlet hoses to the water inlets of the washer and to the faucets. See Connecting the Water Inlet Hoses for details.
- Turn on the faucets.
- Press the Power button to turn on the washer.
- Press the Spin button to operate spin only cycle for draining and spinning.
- Press the Start/Pause button.
When the Drain Hose is Frozen
- Pour hot water in the washer drum and close the door.
- Wait for 1 - 2 hours.
- Press the Power button.
- Press the Spin button to operate spin only cycle for draining and spinning.
- Press the Start/Pause button to make sure the water drains.
Dryer
Regular Cleaning
Cleaning the Exterior
Proper care of your appliance can extend its life. The outside of the appliance can be cleaned with warm water and a mild, nonabrasive household detergent. Immediately wipe off any spills with a soft, damp cloth.
NOTE
- Do not use methylated spirits, solvents, or similar products.
- Never use steel wool or abrasive cleansers; they can damage the surface.
Cleaning the Interior
- Wipe around the door opening and seal with a soft, damp cloth to prevent lint and dust buildup that could damage the door seal.
- Clean the window with a soft cloth dampened with warm water and a mild, nonabrasive household detergent. Then wipe dry.
- The stainless steel drum can be cleaned with a conventional stainless steel cleaner, used according to the manufacturer’s specifications. Never use steel wool or abrasive cleansers; they may scratch or damage the surface.
Cleaning Around and Under the Appliance
Vacuum lint and dust from around the dryer and underneath it regularly.
Maintaining Ductwork
Vent ductwork should be checked for lint build up once per month and cleaned at least once per year. If any noticeable reduction in airflow or drying performance occurs, immediately check ductwork for obstructions and blockages and contact a qualified technician or service provider.
Cleaning the Lint Filter
Always clean the lint from the filter after every cycle.
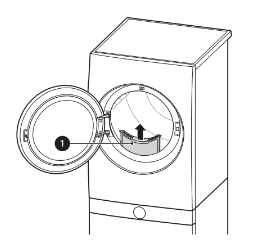
1 Lint Filter
To clean the lint filter, open the dryer door and pull the lint filter straight up. Then:
1. For everyday cleaning, roll any lint off the filter with your fingers, or
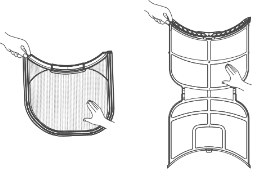
2. Vacuum the lint filter.
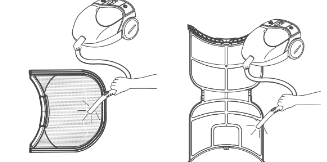
3. If the lint filter has become very dirty or clogged with fabric softener, wash the lint filter in warm, soapy water and allow it to dry thoroughly before reinstalling.
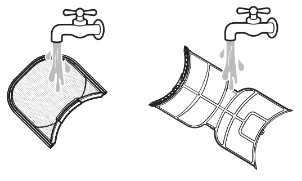
NOTE: NEVER operate the appliance without the lint filter in place.
TROUBLESHOOTING
The appliance is equipped with an automatic error-monitoring system to detect and diagnose problems at an early stage. If the appliance does not function properly or does not function at all, check the following before you call for service.
Washer
Error Messages
 INLET ERROR
Water supply faucets are not fully open.
- Make sure that the water faucets are fully open.
Water inlet hoses are kinked, pinched, or crushed.
- Make sure that the hoses are not kinked, pinched or crushed behind or under the washer. Be careful when moving the washer during cleaning or maintenance.
Water inlet filters are clogged.
- Clean the inlet filters. See MAINTENANCE.
Water supply pressure to faucet or house is too low.
- Check another faucet in the house to make sure that household water pressure is adequate and flow is not restricted.
- Disconnect the water inlet hoses from the washer and run a few gallons of water through the hoses to flush out any dirt.
- If flow is too low, contact a plumber to have the water supply lines repaired.
Water supply connected with leak-limiting hoses.
- The use of hoses designed to limit leaks is not recommended. Leak limiting hoses can trip falsely and prevent the washer from filling.
 UNBALANCE ERROR
The load is too small.
- Add additional items to allow the washer to balance the load.
Heavy articles are mixed with lighter items.
- Always try to wash articles of somewhat similar weight to allow the washer to evenly distribute the weight of the load for spinning.
The load is out of balance.
- Manually redistribute the load if articles have become tangled, preventing the automatic rebalancing from working properly.
 DOOR OPEN ERROR
The door is not secured.
- Close and secure the door. If the message keeps appearing, unplug the power cord and call for service.
 WATER OUTLET ERROR
Drain hose is kinked, pinched, or clogged.
- Make sure that the drain hose is free of clogs or kinks and is not pinched behind or under the washer.
The end of the drain hose is more than 96 inches (2.4 m) above the bottom of the washer.
- Move the end of the drain hose so that it is lower than 96 inches (2.4 m).
 TEMPERATURE SENSOR ERROR
Control error.
- Unplug the washer and wait 60 minutes. Reconnect power and try again.
- If the error code is still displayed, call for service
 OVERFLOW ERROR
Water level is too high due to a faulty water valve.
- Close the water faucets, unplug the washer, and call for service.
 PRESSURE SENSOR ERROR
The water level sensor is not working correctly.
- Close the water faucets, unplug the washer, and call for service.
 MOTOR LOCKED ERROR
A motor error has occurr ed.
- Allow the washer to stand for 30 minutes and then restart the cycle.
- If the error code is still displayed, call for service. svd
 OVERSUDSING DETECTION
Oversudsing of detergent
- Do not add more than the manufacturer’s recommended amount of detergent.
- If too many suds are detected during spinning, the washer stops to help prevent leaking.
 WATER LEVEL SENSOR ERROR
Water level is too low or high compared to the load.
- Unplug the washer and wait for 60 minutes. Reconnect power and try again.
- If the error code is still displayed, call for service.
 FROZEN ERROR
Inlet hose, drain hose or drain pump is frozen.
- See Care in Cold Climates.
 CONTROL LOCK FUNCTION
The Control Lock function is on to prevent anyone from changing cycles or operating the washer.
- Turn off the Control Lock function in the control panel. See Control Lock under Options and Extra Functions. tcL
 TUB CLEAN ALARM
It is time to run the Tub Clean cycle.
- This is not an error code. It indicates that the Tub Clean cycle is running or needs to be run to clean the washer drum.
 VIBRATION SENSOR ERROR
Vibration sensor malfunctions.
Noises
Clicking
Door lock sounds when the door locks or unlocks.
Spraying or hissing
Water spraying or circulating during the cycle
Humming or Gurgling
Drain pump is pumping water from the washer at times during a cycle.
Water sloshing
A liquid in the balance ring around the pulsator helps the basket spin smoothly.
Water being added after the washer has already begun to operate
The washer adapts to the load size and type to add more water to the cycle as needed.
The wash load may be unbalanced. If the washer senses that the load is unbalanced, it will stop and refill to redistribute the load.
The washer may be diluting laundry additives to add to the wash load.
Rattling and clanking noise
Foreign objects, such as keys, coins, or safety pins may be in drum or pump.
- Stop the washer, check the drum and the drain filter for foreign objects.
- If noise continues after the washer is restarted, call for service.
Thumping sound
Heavy wash loads may produce a thumping sound.
- This is normal, but if the sound continues, the washer is probably out of balance. Stop and redistribute wash load.
Wash load may be out of balance.
- Pause the cycle and redistribute the load after the door unlocks.
Vibrating noise
Packaging materials were not removed.
- See Unpacking and Removing Shipping Material in INSTALLATION.
Wash load may be unevenly distributed in the drum.
- Pause the cycle and redistribute the load after the door unlocks.
Not all leveling feet are resting firmly and evenly on the floor.
- See Leveling the Appliance in INSTALLATION.
Floor is not rigid enough.
- Make sure that the floor is solid and does not flex. See Flooring in INSTALLATION.
Squeaking noise
Packaging materials were not removed.
- See Unpacking and Removing shipping Material in INSTALLATION.
Banging noise when the washer is filling with water. (Water hammer)
Plumbing in the home moves or flexes when the water valves in the washer shut off.
- Water hammer is not caused by a defect in the washer. Install water hammer arrestors purchased separately at hardware or home improvement store) between the fill hose and the washer for best results.
Household water supply pressure is very high.
- Adjust household water supply regulator to a lower pressure or contact a plumber.
Operation
Water Leaking
Hoses are not connected correctly.
- Check hoses and connectors for leaks, cracks, and splits.
- Check and tighten hose connections.
House drain pipes are clogged.
- The washer pumps out water very rapidly. Check for water backing up out of the drain pipe during drain. If water is seen coming out of the drain, check for proper drain hose installation and check for restrictions in the drain.
- Contact a plumber to repair drain pipe.
Drain hose has come out of the drain connector or is not inserted far enough.
- Tie drain hose to inlet hose or standpipe to prevent it from coming out during drain.
- For smaller drain pipes, insert the drain hose into the pipe as far as the drain hose flange. For larger drain pipes, insert the drain hose into the pipe 1 - 2 inches past the flange.
Oversudsing of detergent
- Oversudsing may create leaks, and may be caused by the type and amount of detergent used. HE (High-Efficiency) detergent is the only detergent recommended. The normal amount of detergent to use is 1/4 to 1/2 of the maximum amount recommended by the detergent manufacturer.
- Always reduce the amount of detergent if the load is small or lightly soiled, or if the water is very soft.
- Never use more than the maximum amount recommended by the detergent manufacturer.
Excessive sudsing Too much detergent or incorrect detergent
- HE detergents are formulated specifically for HE (High-Efficiency) washers and contain suds reducing agents. Only use detergent with the HE (High-Efficiency) logo.
- For detergent quantities refer to Detergent Use in OPERATION. If sudsing or detergent residue continues to be an issue, add an extra rinse.
Washer will not turn on.
Power cord is not properly plugged in.
- Make sure that the plug is plugged securely into a grounded, 3-prong, 120-VAC, 60 Hz outlet.
House fuse is blown, circuit breaker has tripped, or power outage has occurred.
- Reset circuit breaker or replace fuse. Do not increase fuse capacity. If the problem is a circuit overload, have it corrected by a qualified election.
Wash cycle time is longer than usual.
The washer automatically adjusts the wash time for the amount of laundry, water pressure and other operating conditions.
- This is normal. The washer adjusts cycle time automatically to provide optimal results for the selected cycle. The time remaining shown in the display is only an estimate. Actual time may vary.
Incomplete or no dispensing of detergent
Detergent compartments clogged from incorrect filling.
- Make sure that detergent and additives are put into the correct dispenser compartments.
- For all detergent types, always make sure that the dispenser drawer is fully closed before the start of the cycle.
Too much detergent used.
- Make sure that the suggested amount of detergent is used according to the manufacturer’s recommendations. You may also dilute the detergent with water to the maximum fill line on the compartment to avoid clogging. Use only HE (High-Efficiency) detergent.
NOTE: Always use as little detergent as possible. HE (High-Efficiency) washers need very little detergent to achieve optimum results. Using too much detergent will cause poor wash and rinse performance and may contribute to odors in the washer.
Insufficient water supply
- Make sure that both hot and cold water faucets are turned on all the way.
Normal residue
- It is normal for a small amount of detergent to remain in the dispenser. If this residue builds up, it can interfere with normal dispensing of detergents. Refer to the cleaning instructions.
Washer will not operate.
Control panel has powered off due to inactivity.
- This is normal. Press the Power button to turn on the washer.
Washer is unplugged.
- Make sure that the power cord is plugged securely into an electrical outlet.
Water supply is turned off.
- Turn both hot and cold faucets fully on.
Controls are not set properly.
- Make sure that the cycle was set correctly, close the door and press the Start/Pause button to start the wash cycle.
Door is open.
- Close the door and make sure that nothing is caught under the door preventing it from closing completely.
Circuit breaker/fuse is tripped/blown.
- Check house circuit breakers/fuses. Replace fuses or reset breaker. The washer should be on a dedicated branch circuit.
Start/Pause button was not pressed after the cycle was set.
- Press the Power button then reselect the desired cycle and press the Start/Pause button. If the Start/Pause button is not pressed within a certain time, the washer will be turned off. (The time varies by model, from 4 to 60 minutes.).
Extremely low water pressure.
- Check another faucet in the house to make sure that household water pressure is adequate.
Washer is too cold.
- If the washer has been exposed to temperatures below freezing for an extended period of time, allow it to warm up before pressing the Power button. Otherwise, the display will not come on.
Washer is not filling properly.
Filter is clogged.
- Make sure that inlet filters on the fill valves are not clogged. Refer to Cleaning the Water Inlet Filters in MAINTENANCE.
Inlet hoses may be kinked.
- Check that inlet hoses are not kinked or clogged.
Energy efficiency
- This is a High-Efficiency (HE) washer. As a result, the water level settings for this washer may be different than for conventional washer.
Insufficient water supply
- Make sure that both hot and cold water faucets are turned on all the way.
Washer door is open.
- Close the door and make sure that nothing is caught under the door preventing it from closing completely.
Water level is too low.
- The water will not normally cover the clothes. The fill level is optimized for the wash motion to achieve the best wash performance.
Water in the washer does not drain or drains slowly.
Drain hose is kinked, pinched, or clogged.
- Make sure that the drain hose is free of clogs or kinks and is not pinched behind or under the washer.
The end of the drain hose is more than 96 inches (2.4 m) above the bottom of the washer.
- Move the end of the drain hose so that it is lower than 96 inches (2.4 m).
Bleach does not dispense.
Bleach dispenser cover is not properly installed (on some models).
- Make sure that the bleach cover is properly installed and snapped into place before the beginning of the cycle.
Bleach dispenser is dirty or clogged.
- Lift out the bleach dispenser cover and clean out the reservoir. Lint and other foreign debris that are collected inside the dispenser may prevent proper dispensing of the bleach.
Premature dispensing of bleach
Bleach dispenser filled for future load.
- You cannot store bleach in the dispenser for future use. The bleach will be dispensed every load.
Overfilling the bleach dispenser
- Overfilling the bleach dispenser will cause the bleach to dispense immediately, which will damage the laundry or the washer. Always measure bleach, but never fill above the max line on the dispenser. A half cup of bleach is sufficient for most loads. Never use more than 1 cup of bleach.
Performance
Wrinkling
Washer is not unloaded promptly.
- Always remove items from the washer as soon as the cycle is complete.
Washer is overloaded.
- The washer can be fully loaded, but the drum should not be tightly packed with items. The door of the washer should close easily.
Hot and cold water inlet hoses are reversed.
- Hot water rinse can set wrinkles in garments. Check the inlet hose connectors.
Staining
Bleach or softener dispensed too soon.
- Dispenser compartment was overfilled or closed too quickly, causing the bleach or softener to dispense immediately. Always measure bleach, and never use more than 1 cup.
Bleach or softener was added directly to the wash load in the drum.
- Always use the dispensers to ensure that laundry products are properly dispensed at the right time in the cycle.
Washer was not unloaded promptly.
- Always remove items from the washer as soon as possible after the cycle is completed.
Clothes were not properly sorted.
- Always wash dark colors separately from light colors and whites to prevent discoloration.
- Never wash heavily soiled items with lightly soiled items.
Poor stain removal
Proper options are not selected.
- Heavier soils and tougher stains may require extra cleaning power. Select the Heavy Soil feature to boost the cleaning power of the selected cycle.
Previously set stains.
- Articles that have previously been washed may have stains that have been set. These stains may be difficult to remove and may require hand washing or pre-treating to aid in stain removal.
Musty or mildewy odor in the washer
Incorrect or too much detergent has been used.
- Use only HE (High-Efficiency) detergent in accordance with the manufacturer’s instructions.
Inside of the drum was not cleaned properly.
- Run the Tub Clean cycle regularly.
Odor
Odor
Some odor is caused by the rubber attached to the washing machine.
- This odor is normal for new rubber and will disappear after the machine has been run a few times.
If the rubber door gasket and door seal area are not cleaned regularly, odors can occur from mold or foreign substances.
- Be sure to clean the gasket and door seal regularly and check under the door seal for small items when unloading the washer.
Odors can occur if foreign substances are left in the drainage pump filter.
- Be sure to clean the drainage pump filter regularly.
Odors can occur if the drainage hose is not properly installed, causing siphoning (water flowing back inside the washing machine).
- When installing the drainage hose, be sure that it doesn’t become kinked or blocked.
Dryer
 TEMPERATURE SENSOR ERROR
Temperature sensor failure.
- Turn off the appliance and call for service.
 POWER ERROR
Power cord is connected incorrectly.
- Check the connection of the power cord to the terminal block. d7s, d8O, dGO, dGs
 DUCT BLOCK ERROR
The duct work is about 75% - 95% blocked. (The error code is displayed for 2 hours only.)
- Do not use the appliance until the exhaust system has been cleaned and/or repaired. Using the appliance with a severely restricted exhaust is dangerous and could result in a fire or other property damage.
- Check the outside dryer vent while the appliance is operating to make sure there is strong airflow. If the exhaust system is extremly long, have it repaired or rerouted.
House exhaust system blocked.
- Keep the area around the dryer clean and free of clutter. Check vent hood for damage or lint clogging. Make sure the area around the vent hood is clear.
 CONTROL LOCK FUNCTION
The Control Lock function is on to prevent anyone from changing cycles or operating the dryer.
- Turn off the Control Lock function in the control panel. See Control Lock under Options and Extra Functions.
Operation
The Flow SenseTM ( ) indicator remains active after clearing the restriction in the venting.
After clearing the restrictions, the Flow SenseTM () system requires multiple, consecutive cycles to determine that the performance value has improved before the Flow SenseTM () indicator is reset.
- If the Flow SenseTM (
 ]) indicator remains active for more than five cycles after the restriction has been cleared, call for service.
Clothes take too long to dry.
Exhaust ducts are blocked, dirty, or duct run is too long.
- Confirm that the exhaust duct is properly configured and free of debris, lint, and obstructions. Make sure that the outside wall damper can open properly and is not blocked, jammed, or clogged.
Load is not properly sorted
- Separate heavy items from lightweight items. Larger and heavier items take longer to dry. Light items in a load with heavy items can fool the sensor because the light items dry faster.
Large and heavy fabrics are loaded.
- Heavy fabrics take longer to dry because they tend to retain more moisture. To help reduce and maintain more consistent drying times for large and heavy fabrics, separate these items into smaller loads of a consistent size.
Dryer controls are not set properly.
- Use the appropriate control settings for the type of load you are drying. Some loads may require an adjustment of the dry level setting for proper drying.
Lint filter needs to be cleaned.
- Remove the lint from the filter before every load. With the lint removed, hold the filter up to a light to see if it is dirty or clogged. With some loads that produce high amounts of lint, such as new bath towels, it may be necessary to pause the cycle and clean the filter during the cycle.
House fuse is blown, circuit breaker has tripped, or power outage has occurred.
- Reset circuit breaker or replace fuse. Do not increase fuse capacity. If the problem is a circuit overload, have it corrected by a qualified electrician.
The appliance is overloaded.
- Divide extra large loads into smaller loads for better drying performance and efficiency.
Energy Saver option is selected. (on some models)
- If using the Normal cycle, deselect the Energy Saver option that is selected by default. This option reduces enery use by adding an air dry section to the beginning of the cycle. It is normal to feel no heat at the beginning of the cycle while in Energy Saver mode.
The appliance will not turn on.
Power cord is not properly plugged in.
- Make sure that the plug is securely plugged into a grounded outlet matching the appliance's rating plate.
House fuse is blown, circuit breaker has tripped, or power outage has occurred.
- Reset circuit breaker or replace fuse. Do not increase fuse capacity. If the problem is a circuit overload, have it corrected by a qualified electrician.
The appliance does not heat.
House fuse is blown, circuit breaker has tripped, or power outage has occurred.
- Reset circuit breaker or replace fuse. Do not increase fuse capacity. If the problem is a circuit overload, have it corrected by a qualified electrician.
Gas supply or service is turned off.
- Confirm that the house gas shutoff and the shutoff valves of the dryer are both fully open. Even if gas is not supplied to the appliance, it will run and no error codes will display. Verify that other gas appliances in the home are working normally.
Energy Saver option is selected. (on some models)
- If using the Normal cycle, deselect the Energy Saver option that is selected by default. This option reduces energy use by adding an air dry section to the beginning of the cycle. It is normal to feel no heat at the beginning of the cycle while in Energy Saver mode.
Drying time is not consistent.
Heat settings, load size, or dampness of clothing is not consistent.
- The drying time for a load will vary depending on the size of the load, the type of fabrics, the wetness of the clothes and the condition of the lint filter. An unbalanced load in the washer can cause poor spinning, resulting in wetter clothes which will take longer to dry.
Performance
Clothes are wrinkled.
Clothes dried too long (overdried).
- Overdrying a load of laundry can lead to wrinkled clothes. Try a shorter drying time or use a lower dry level setting and remove items while they still retain a slight amount of moisture.
Clothes left in dryer too long after cycle ends.
- Use the Wrinkle Care option. This option will tumble the clothes briefly every few minutes for up to 3 hours to help prevent wrinkling.
Greasy or dirty spots on clothes.
Fabric softener used incorrectly.
- Check and follow the instructions provided with your fabric softener.
Clean and dirty clothes are being dried together.
- Use your dryer to dry only clean items. Soil from dirty clothes can transfer to the clean clothes in the same or later loads.
Clothes were not properly cleaned or rinsed before being placed in the dryer.
- Stains on dried clothes could be stains that were not removed during the washing process.Make sure that clothes are being completely cleaned or rinsed according to the instructions for your washer and detergent. Some difficult soils may require pre-treating prior to washing.
Clothes are shrinking.
Garment care instructions are not being followed.
- To avoid shrinking your clothes, always consult and follow fabric care instructions. Some fabrics will naturally shrink when washed. Other fabrics can be washed but will shrink when dried in a dryer. Use a low or no heat setting.
Lint on clothes.
Lint filter not cleaned properly.
- Remove the lint from the filter before every load. With the lint removed, hold the filter up to a light to see if it is dirty or clogged. If it looks dirty, follow the cleaning instructions in the MAINTENANCE section. With some loads that produce high amounts of lint, it may be necessary to clean the filter during the cycle.
Laundry not sorted properly.
- Some fabrics are lint producers (i.e., a fuzzy white cotton towel) and should be dried separately from clothes that are lint trappers (i.e., a pair of black linen pants).
Excess static in clothes.
- Use a fabric softener to reduce static electricity. Be sure to follow the manufacturer’s instructions. Overdrying a load of laundry can cause a buildup of static electricity.
The appliance is overloaded.
- Divide extra large loads into smaller loads for drying.
Tissue, paper, etc., left in pockets.
- Check pockets thoroughly before washing and drying clothes.
Excess static in clothes after drying.
Fabric softener is not used or is used incorrectly.
- Use a fabric softener or the Reduce Static option, if available, to reduce static electricity. Be sure to follow the manufacturer’s instructions.
Clothes dried too long (overdried).
- Overdrying a load of laundry can cause a buildup of static electricity. Adjust settings and use a shorter drying time. Select a lower dry level setting, if necessary.
Drying synthetics, permanent press, or synthetic blends.
- These fabrics are naturally more prone to static buildup. Try using fabric softener, or use a lower dry level setting and/or shorter time settings.
Clothes have damp spots after a dry cycle.
Very large load or very small load. Single large item such as a blanket or comforter.
- If items are too tightly packed or too sparse the sensor may have trouble reading the dryness level of the load. Use a Time Dry cycle for very small loads.
- Large, bulky items such as blankets or comforters can sometimes wrap themselves into a tight ball of fabric. The outside layers will dry and register on the sensors, while the inner core remains damp. When drying a single bulky item, it may help to pause the cycle once or twice and rearrange the item to unwrap and expose any damp areas.
- To dry a few remaining damp items from a very large load or a few damp spots on a large item after a sensor cycle has completed, empty the lint trap, and then set a Time Dry cycle to finish drying the item(s).
Steam Function
Water drips from nozzle when Steam cycle starts.
This is normal.
- This is steam condensation when Steam cycle starts. The dripping water will stop after a short time.
Steam does not generate, but no error code is shown.
Water level error.
- Unplug dryer and call for service.
Water drips from door during Steam cycle.
This is normal.
- Condensation will normally form on the inside of the dryer door during steam operation. Some condensation may drip out the bottom of the door.
Steam is not visible during Steam cycle.
This is normal.
- Steam vapor is difficult to see when the door is closed. However, condensation will normally form on the inside of the dryer door if the steam system is operating normally.
Drum does not turn during Steam cycle.
This is normal.
- The drum is turned off so that the steam vapor remains in the drum. The drum will normally turn for about 2 seconds once a minute.
Cannot see steam vapor at the beginning of cycle.
This is normal.
- Steam is released at different stages of the cycle for each option.
Indicator Messages
Flow Sense indicator () shows four bars during the drying cycle or the display shows  after drying.
Exhaust system is too long or has too many turns/restrictions.
- Install a shorter or straighter duct run. See the Installation Instructions for details.
Partial blockage of the ductwork due to lint buildup or other foreign object.
- Ductwork should be checked/cleaned immediately. Dryer can be used in this condition, but drying times will be longer and energy consumption will increase.
The appliance has detected a restriction in the external dryer venting.
- If exhaust restrictions are sensed by the Flow Sense system, the indicator will remain on for 2 hours after the end of the cycle. Opening the door or pressing the Power button will turn off the display.
- This warning light is not a dryer failure and is not covered by the dryer warranty. Contact a duct cleaning service to set up an appointment to have your exhaust system cleaned and inspected.
The Flow Sense indicator () remains active after clearing the restriction in the venting.
After clearing the restriction, the Flow Sense system requires multiple, consecutive cycles to determine that the performance value has improved before the Flow Sense indicator is reset.
- If the Flow Sense indicator remains active for more than five cycles after the restriction has been cleared, call for service.
Check filter indicator ( ) is on during the drying cycle.
Lint filter not cleaned properly.
- Remove the lint from the filter before every load. With the lint removed, hold the filter up to a light to see if it is dirty or clogged. If it looks dirty, follow the cleaning instructions. With some loads that produce high amounts of lint, it may be necessary to clean the filter during the cycle.
Common
Wi-Fi
Trouble connecting appliance and smartphone to Wi-Fi network
The password for the Wi-Fi network was entered incorrectly.
- Delete your home Wi-Fi network and begin the connection process again.
Mobile data for your smartphone is turned on.
- Turn off the Mobile data on your smartphone before connecting the appliance.
The wireless network name (SSID) is set incorrectly.
- The wireless network name (SSID) should be a combination of English letters and numbers. (Do not use special characters.)
The router frequency is not 2.4 GHz.
- Only a 2.4 GHz router frequency is supported. Set the wireless router to 2.4 GHz and connect the appliance to the wireless router. To check the router frequency, check with your Internet service provider or the router manufacturer.
The appliance and the router are too far apart.
- If the appliance is too far from the router, the signal may be weak and the connection may not be configured correctly. Move the router closer to the appliance or purchase and install a Wi-Fi repeater.