To fry food with less oil or without baking paper.
Maximum load: 10 kg.
Trivet
For roasting and grilling.
Use the trivet only with the Grill- / roasting pan.
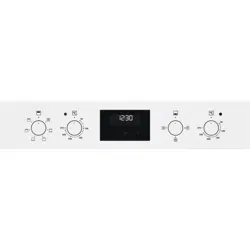
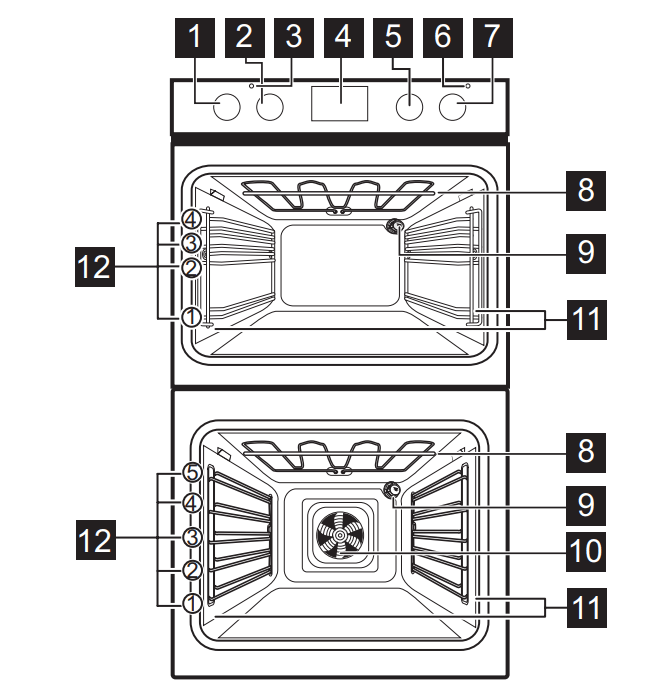
CONTROL PANEL
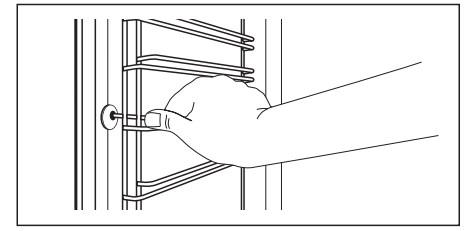
RETRACTABLE KNOBS
To use the appliance press the knob. The knob comes out.
SENSOR FIELDS / BUTTONS
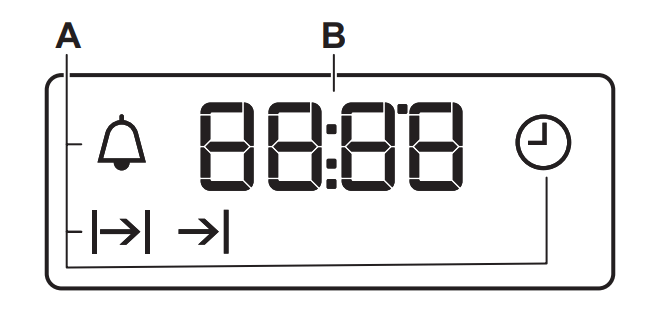
DISPLAY
The display works only with the main oven.
A. Clock functions
B. Timer
BEFORE FIRST USE
WARNING! Refer to Safety chapters.
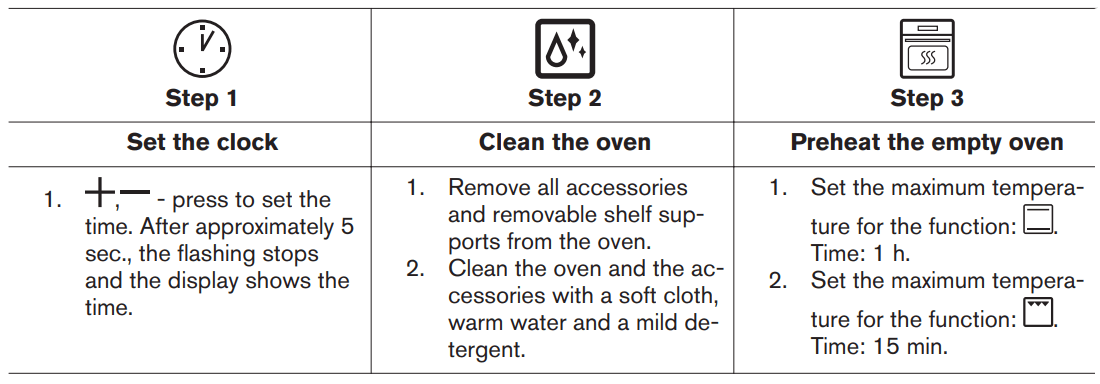
BEFORE FIRST USE
The oven can emit an odour and smoke during preheating. Make sure that the room is ventilated. Preheat both ovens. Heat up one oven at a time.
Turn off the oven and wait until it is cold. Place the accessories and the removable shelf supports in the oven.
DAILY USE
WARNING! Refer to Safety chapters
HOW TO SET: HEATING FUNCTION
Step 1
Turn the knob for the heating functions to select a heating function
Step 2
Turn the control knob to select the temperature.
Step 3
When the cooking ends, turn the knobs to the off position to turn off the oven.
TOP OVEN FUNCTIONS
Heating function
Application
To turn on the lamp.
Conventional Cooking
To bake and roast food on one shelf position.
Top Heat
To brown bread, cakes and pastries. To finish cooked dishes.
Bottom Heat
To bake cakes with crispy bottom and to preserve food
Grill
To grill thin pieces of food and to toast bread.
Fast Grilling
To grill thin pieces of food in large quantities and to toast bread.
MAIN OVEN FUNCTIONS
Heating function
Application
To turn on the lamp.
True Fan Cooking / AirFry
To bake on up to two shelf positions at the same time and to dry food. Set the temperature 20 - 40 °C lower than for Conventional Cooking. To fry food with less oil or without baking paper. For dishes like french fries or pizza.
Pizza Function
To bake pizza. To make intensive browning and a crispy bottom
Conventional Cooking
To bake and roast food on one shelf position.
Bottom Heat
To bake cakes with crispy bottom and to preserve food.
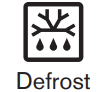
To defrost food (vegetables and fruit). The defrosting time depends on the amount and size of the frozen food.
This function is designed to save energy during cooking. When you use this function, the temperature in the cavity may differ from the set temperature. The heating power may be reduced. For more information refer to "Daily Use" chapter, Notes on: Moist Baking.
To grill thin pieces of food and to toast bread.
To roast large meat joints or poultry with bones on one shelf position. To make gratins and to brown.
NOTES ON: MOIST BAKING
This function was used to comply with the energy efficiency class and ecodesign requirements according to EU 65/2014 and EU 66/2014. Tests according to EN 60350-1.
The oven door should be closed during cooking so that the function is not interrupted and the oven operates with the highest energy efficiency possible.
When you use this function the lamp automatically turns off.
For the cooking instructions refer to "Hints and tips" chapter, Moist Baking. For general energy saving recommendations refer to "Energy Efficiency" chapter, Energy Saving
CLOCK FUNCTIONS
CLOCK FUNCTIONS
Clock function
Application
To set, change or check the time of day. Only the top oven works without the set time.
To set how long the oven works.
The function works only for the main oven
To set when the oven turns off.
The function works only for the main oven.
To combine functions: Duration and End Time.
The function works only for the main oven.
To set a countdown. This function has no effect on the operation of the oven. You can set this function at any time, also when the oven is off.
HOW TO SET: CLOCK FUNCTIONS
How to set: Time of Day
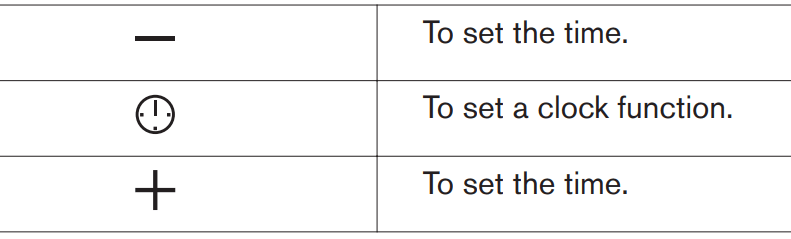
- flashes when you connect the oven to the electrical supply, when there was a power cut or when the timer is not set.
- press to set the time.
After approximately 5 sec., the flashing stops and the display shows the time.
How to change: Time of Day
Step 1
- press repeatedly to change the time of day. - starts to flash.
Step 2
- press to set the time.
After approximately 5 sec., the flashing stops and the display shows the time
How to set: Duration
Step 1
Set an oven function and the temperature.
Step 2
- press repeatedly. - starts to flash.
Step 3
- press to set the duration.
The display shows:
- flashes when the set time ends. The signal sounds and the oven turns off
Step 4
Press any button to stop the signal.
Step 5
Turn the knobs to the off position.
How to set: End Time
Step 1
Set an oven function and the temperature.
Step 2
- press repeatedly. - starts to flash
Step 3
- press to set the time.
The display shows: - flashes when the set time ends.
- The signal sounds and the oven turns off.
Step 4
Press any button to stop the signal.
Step 5
Turn the knobs to the off position.
How to set: Time Delay
Step 1
Set an oven function and the temperature.
Step 2
- press repeatedly. - starts to flash.
Step 3
- press to set the time for: Duration.
Step 4
Press
Step 5
- press to set the time for: End Time.
Step 6
Press: .
At the set time the signal sounds and the oven turns off.
Step 7
Press any button to stop the signal.
Step 8
Turn the knobs to the off position.
How to set: Minute Minder
Step 1
- press repeatedly. - starts to flash.
Step 2
- press to set the time.
The function starts automatically after 5 sec.
When the set time ends, the signal sounds.
Step 3
Press any button to stop the signal.
Step 4
Turn the knobs to the off position.
How to cancel: Clock functions
Step 1
- press repeatedly until the clock function symbol starts to flash
Step 2
Press and hold: .
The clock function turns off after few seconds.
USING THE ACCESSORIES
WARNING! Refer to Safety chapters.
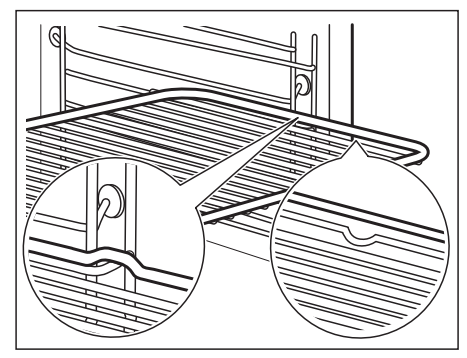
INSERTING ACCESSORIES
A small indentation at the top increases safety. The indentations are also anti-tip devices. The high rim around the shelf prevents cookware from slipping of the shelf.
Wire shelf:
Push the shelf between the guide bars of the shelf support.
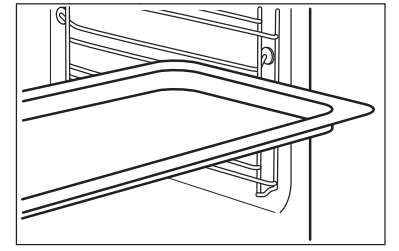
Deep pan:
Push the tray between the guide bars of the shelf support.
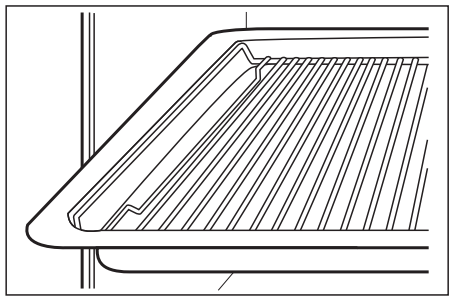
Wire shelf, Deep pan:
Push the tray between the guide bars of the shelf support and the wire shelf on the guide bars above.
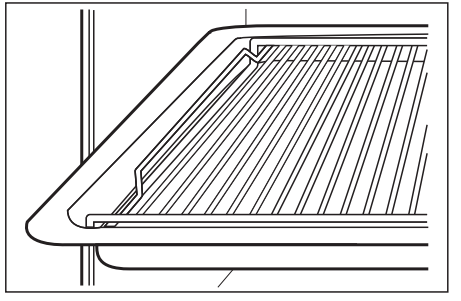
AirFry -Wire shelf:
Place the wire shelf on the third shelf position.
Place the baking tray on the second shelf position.
TRIVET AND GRILL- / ROASTING PAN
Step 1
Put the trivet into a deep pan.
Step 2
Put the deep pan on the recommended shelf position.
Roasting larger pieces of meat or poultry on one shelf position.
Make sure the supports of the wire shelf point up.
Grilling and toasting thin pieces of food in large quantities.
Make sure the supports of the wire shelf point down.
ADDITIONAL FUNCTIONS
COOLING FAN
When the oven operates, the cooling fan turns on automatically to keep the surfaces of the oven cool.
If you turn off the oven, the cooling fan can continue to operate until the oven cools down.
CARE AND CLEANING
WARNING! Refer to Safety chapters.
NOTES ON CLEANING
Cleaning Agents
Clean the front of the oven with a soft cloth with warm water and a mild detergent.
Use a cleaning solution to clean metal surfaces.
Clean stains with a mild detergent. Do not apply it on the catalytic surfaces.
Everyday Use
Clean the cavity after each use. Fat accumulation or other residue may cause fire.
Do not store the food in the oven for longer than 20 minutes. Dry the cavity with a soft cloth after each use.
Accessories
Clean all accessories after each use and let them dry. Use a soft cloth with warm water and a mild detergent. Do not clean the accessories in a dishwasher.
Do not clean the non-stick accessories using abrasive cleaner or sharp-edged objects.
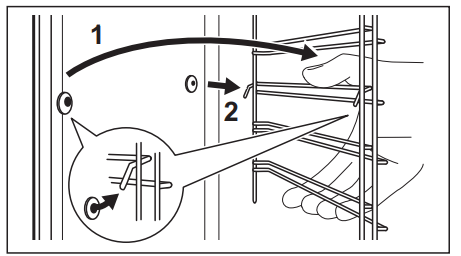
HOW TO REMOVE: SHELF SUPPORTS
Remove the shelf supports to clean the oven.
Step 1
Turn off the oven and wait until it is cold
Step 2
Pull the front of the shelf support away from the side wall.
Step 3
Pull the rear end of the shelf support away from the side wall and remove it.
Step 4
Install the shelf supports in the opposite sequence.
HOW TO USE: CATALYTIC CLEANING
The cavity is coated with catalytic enamel. It absorbs fat during catalysis.
Spots or discolouration of the catalytic coating have no effect on the cleaning.
Clean one oven at a time.
Before the catalytic cleaning
Turn off the oven and wait until it is cold.
Remove all accessories and removable shelf supports.
Clean the oven floor and the inner door glass with warm water, soft cloth and mild detergent.
Clean the oven with catalytic cleaning
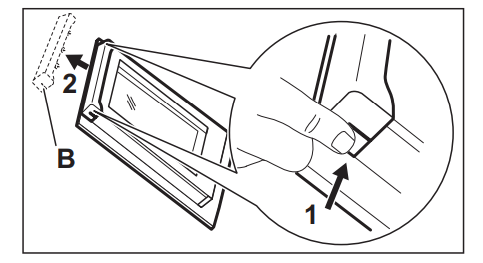
HOW TO REMOVE AND INSTALL: DOOR
You can remove the door and the internal glass panels to clean it. The number of glass panels is different for different models.
CAUTION! Carefully handle the glass, especially around the edges of the front panel. The glass can break.
WARNING! The door is heavy.
Step 1
Fully open the door.
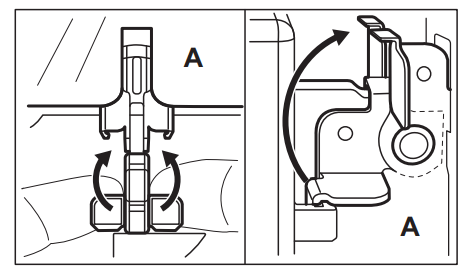
Step 2
Lift and press the clamping levers (A) on the two door hinges.
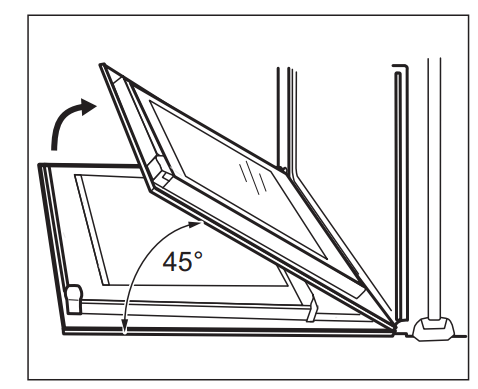
Step 3
Close the oven door to the first opening position (approximately 45° angle). Hold the door with one hand on each side and pull it away from the oven at an upwards angle. Put the door with the outer side down on a soft cloth on a stable surface.
Step 4
Hold the door trim (B) on the top edge of the door at the two sides and push inwards to release the clip seal.
Step 5
Pull the door trim to the front to remove it.
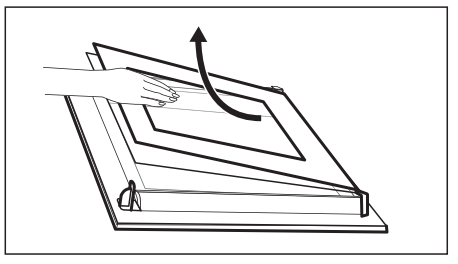
Step 6
Hold the door glass panels on their top edge one by one and pull them up out of the guide.
Step 7
Clean the glass panel with water and soap. Dry the glass panel carefully. Do not clean the glass panels in the dishwasher
Step 8
After cleaning, do the above steps in the opposite sequence.
Step 9
Install the smaller panel first, then the larger and the door.
Make sure that the glasses are inserted in the correct position otherwise the surface of the door may overheat.
HOW TO REPLACE: LAMP
WARNING! Risk of electric shock. The lamp can be hot.
Before you replace the lamp:
Step 1
Step 2
Step 3
Turn off the oven. Wait until the oven is cold.
Disconnect the oven from the mains.
Put a cloth on the bottom of the cavity.
Back lamp
Step 1
Turn the glass cover to remove it.
Step 2
Clean the glass cover.
Step 3
Replace the lamp with a suitable 300 °C heat-resistant lamp.
Step 4
Install the glass cover
TROUBLESHOOTING
WARNING! Refer to Safety chapters.
WHAT TO DO IF...
In any cases not included in this table please contact with an Authorised Service Centre.
Q: I want to bake a cake on a fan setting but don’t know which setting it is on the large oven because the manual is not explicit. Please could you advise me. Reply
Q: Can you tell me whether this oven has a timer to set your meals to? Reply


 - flashes when you connect the oven to the electrical supply, when there was a power cut or when the timer is not set.
 - press to set the time.
  - press repeatedly to change the time of day.
  - starts to flash.
 - starts to flash
 - starts to flash.
 .
.