Ultimate Handheld
Vacuum
Important!
Read this manual carefully, and keep for future reference.
User’s
Guide
1600 Series

2
Other Oreck accessories available at:
Other Oreck accessories available at:
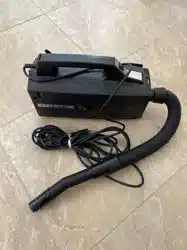
Thank You for purchasing our Ultimate Handheld Vacuum.
The Ultimate Handheld Vacuum weighs about five pounds and
comes with a variety of accessories for any cleaning need. The
installed HEPA filter helps keep dust and dirt from escaping as
you vacuum.
Welcome to our Call, Click customer service program.
To contact Oreck Call or Click using the information below.
Enjoy
Click
Call
USA: 1•800•989•3535
Canada: 1•888•676•7325
On the web, point and click at: www.oreck.com
and click locate a store on the top right.

3
Contents
Safety ..................................4
General Warnings .........................4
Polarized Plug ...........................5
Parts & Features..........................6
Assemble ...............................8
Attach the Tool Caddy.....................8
Attach the Slinky Hose and Tools ............9
Attach the Adjustable Shoulder Strap . . . . . . . . 10
Use . . . . . . . . . . . . . . . . . . . . . . . . . . . . . . . . . . . 11
Using the Vacuum . . . . . . . . . . . . . . . . . . . . . . . 11
After Using the Vacuum ..................11
Maintain ...............................12
Replacing the Disposable Inner Bag . . . . . . . . . 12
Replacing the Micro Filter.................13
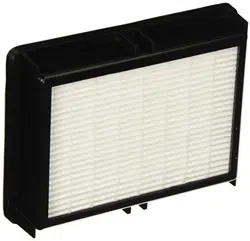
Replacing the HEPA Filter . . . . . . . . . . . . . . . . 14
Trouble shoot . . . . . . . . . . . . . . . . . . . . . . . . . . . 15
Parts..................................16
Warranty...............................17

4
Safety
IMPORTANT SAFETY INSTRUCTIONS
!
General Warnings
Read all instructions before using the vacuum cleaner.
WARNING! To reduce the risk of fire, electric shock, or injury
when using an electrical appliance, basic precautions should
always be followed, including the following:
• Donotleaveapplianceunattendedwhenpluggedin.Unplug
from outlet when not in use and before servicing.
• Donotuseoutdoorsoronwetsurfaces.
• Donotallowtobeusedasatoy.Closeattentionisnecessary
when used by or near children.
• Useonlyasdescribedinthismanual.Useonlymanufac-
turer’s recommended attachments.
• Donotusewithdamagedcordorplug.Ifapplianceisnot
working as it should, has been dropped, damaged, left out-
doors, or dropped into water, return it to a service center or
call customer service at: US: 1-800-989-3535
Canada: 1-888-676-7325
• Donotpullorcarrybycord,usecordasahandle,closedoor
on cord, or pull cord around sharp edges or corners.
• Keepcordawayfromheatedsurfaces.
• Donotrunapplianceovercord.
• Donotunplugbypullingoncord.Tounplug,grasptheplug,
not the cord.
• Donothandleplugorappliancewithwethands.
• Donotputanyobjectintoopenings.Donotusewithany
opening blocked; keep free of dust, lint, hair and anything
that may reduce air flow.
• Keephair,looseclothing,ngersandallpartsofbodyaway
from openings and moving parts.
• Donotusetopickupanythingthatisburningorsmoking,
such as cigarettes, matches, or hot ashes.
• Donotusewithoutlterbagassemblyinplace.
• Turnoffallcontrolsbeforeunplugging.
• Useextracarewhencleaningonstairs.
5
• Donotusetopickupammableorcombustibleliquids,such
as gasoline or lighter fluid, or use in areas where they may
be present.
• Donotuseapplianceinanenclosedspacewhereammable,
explosiveortoxicvaporsaregivenoffbyoilbasepaint,paint
thinner, some mothproofing substances, or in an area where
flammable dust is present.
• Donotpickuptoxicmaterialsuchaschlorinebleach,drain
cleaner, gasoline, etc. with this appliance.
• Usecautionwhenvacuumingoverarearugedgesandfringe.
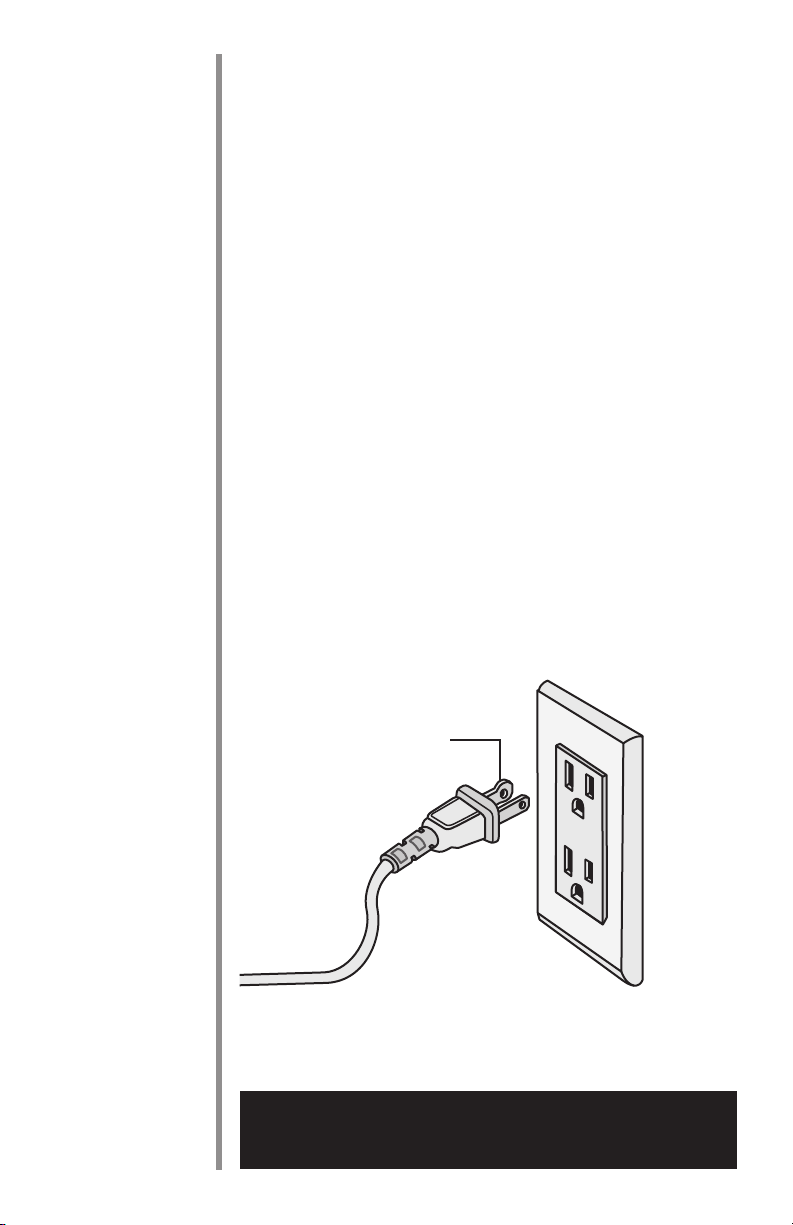
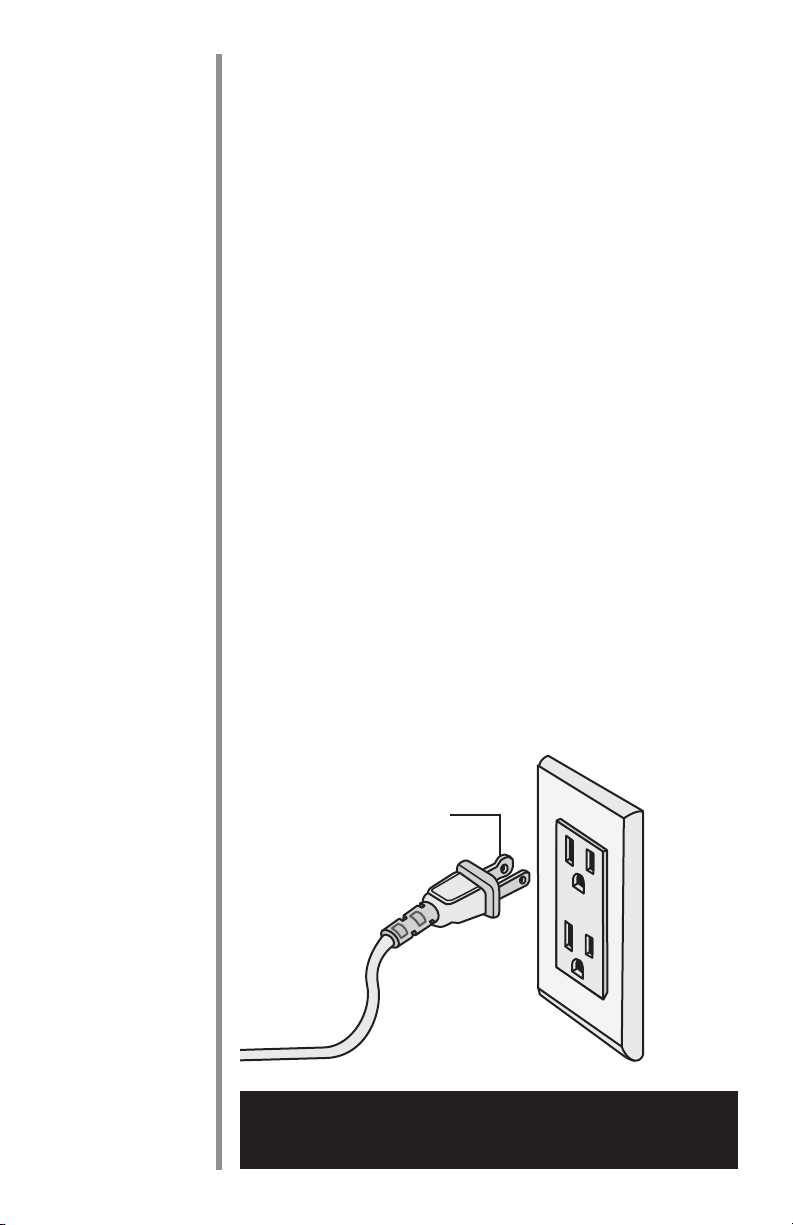
Polarized Plug
A polarized plug has one rounded prong and one straight
prong. The rounded end goes into the longest socket slot. To
reducetheriskofelectricshock,thisequipmenthasapolar-
ized plug (one blade is wider than the other). This plug will fit
in a polarized outlet only one way. If the plug does not fit fully
in the outlet, reverse the plug. If it still does not fit, contact
qualiedpersonneltoinstalltheproperoutlet.Donotalterthe
plug in any way.
SAVE THESE INSTRUCTIONS
For household use only
Rounded prong
6
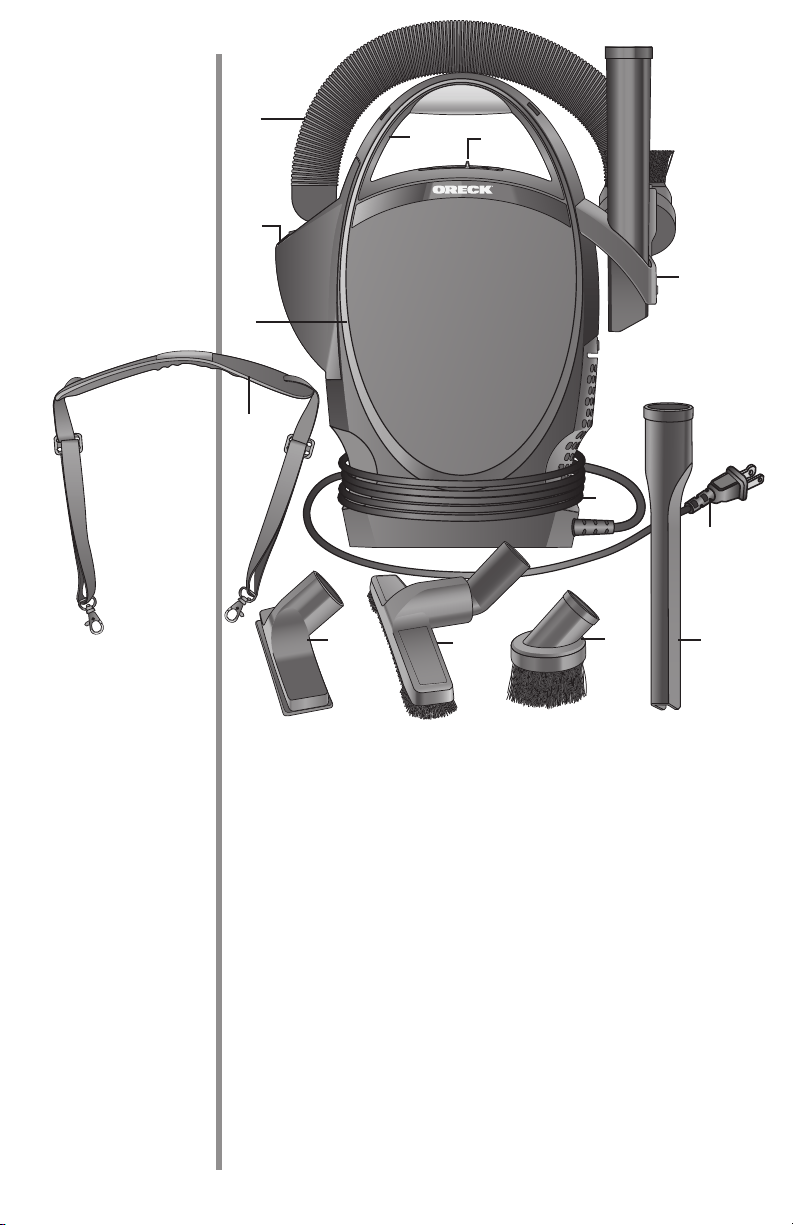
Parts
&
Features
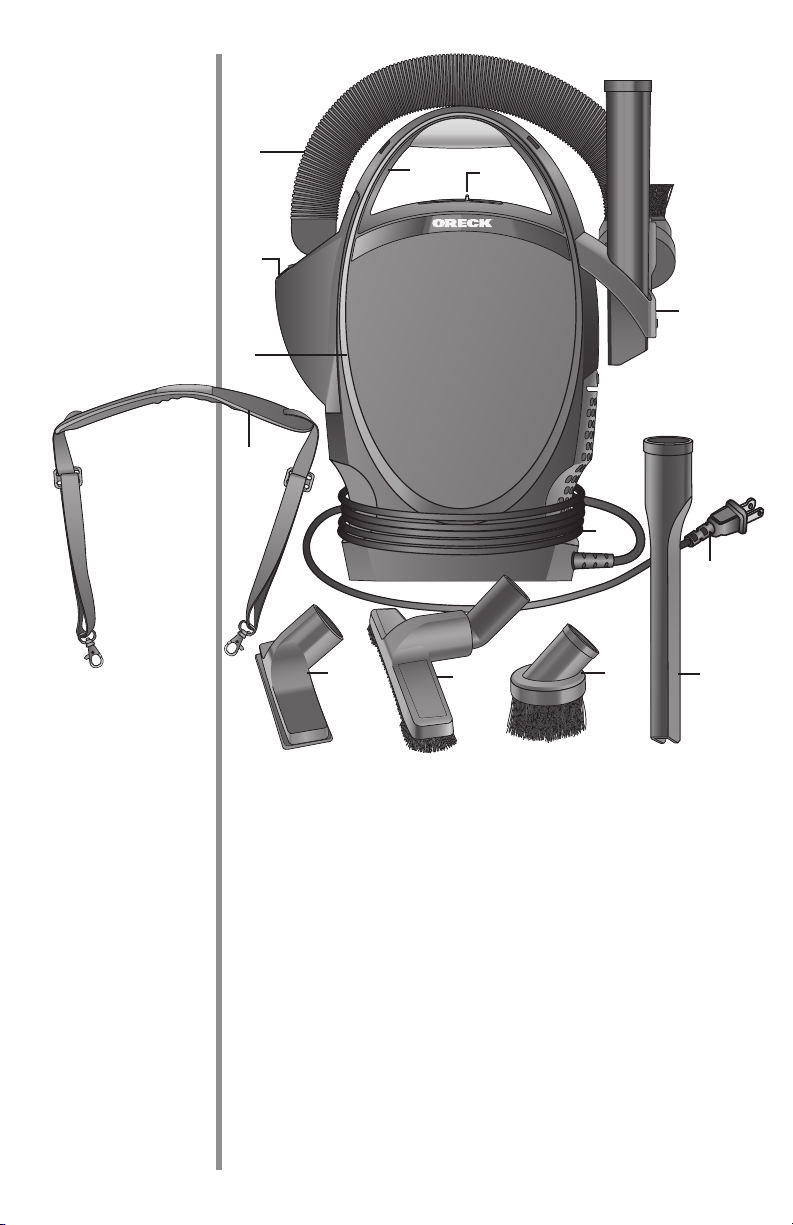
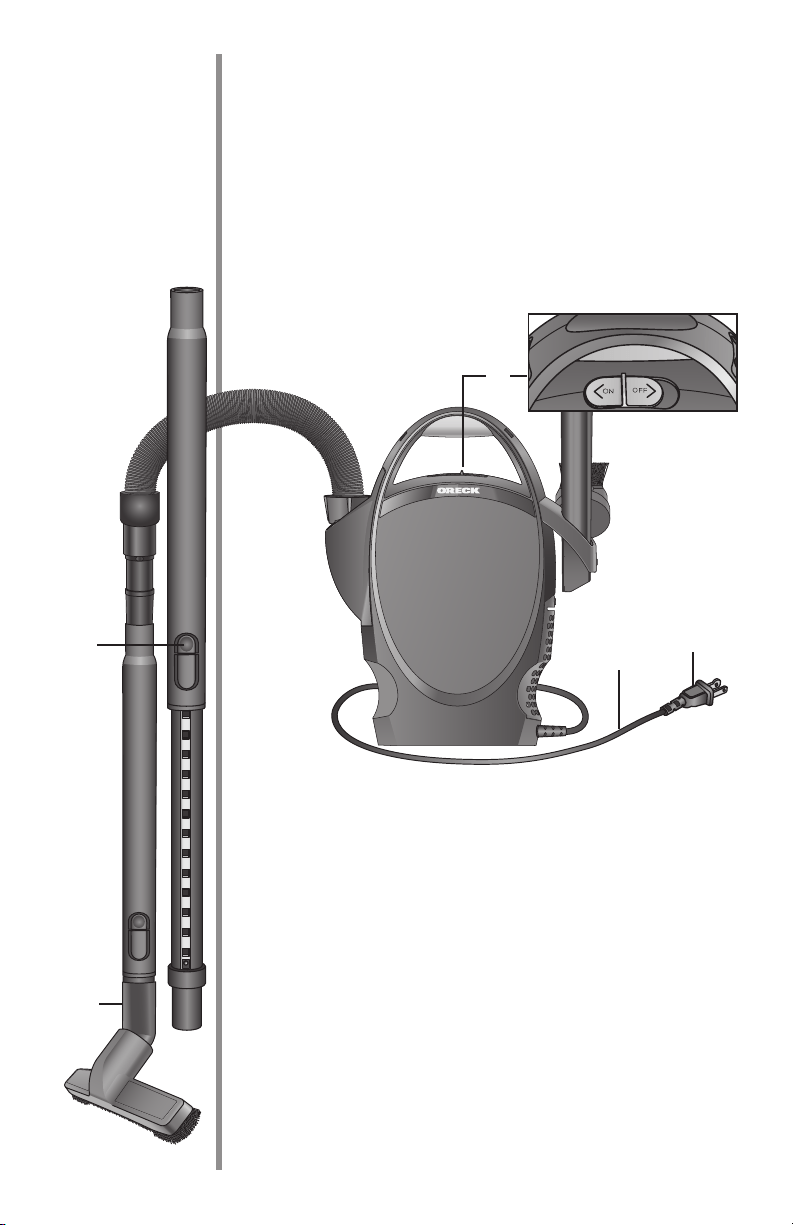
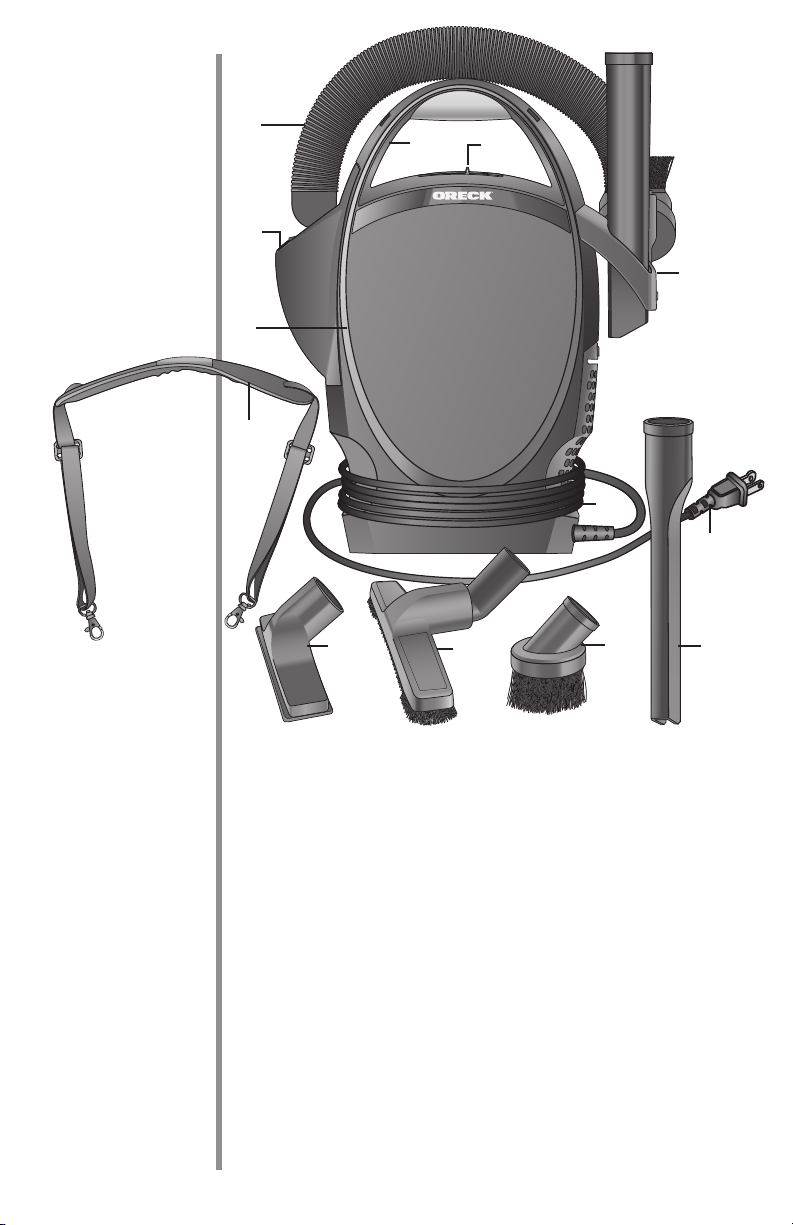
1. Ultimate handheld
vacuum: Core canister
vacuum unit.
2. Adjustable shoulder
strap: Attaches to the
canister in both horizon-
tal and vertical positions.
3. Upholsterytool: Cleans
upholstered furniture and
drapery.
4. Large floor tool: Hand-
held tool for cleaning
bare floors and walls.
5. Dustingbrush: Best for
delicate surfaces.
6. Crevicetool: Cleans tight
areas such as cracks and
crevices.
7. Powercord:Twenty foot
cord for long distances.
8. Cordwrap: Power cord
storage area.
9. Toolcaddy: Stores tools on
board the vacuum.
10.On/Offswitch: Turns the
vacuum on and off.
11. Carry handle with strap
hooks: Use to carry the
vacuum and attach the straps.
2
1
13
5
12
43 6
9
7
11
8
10
shown with
hose, crevice
tool and
dusting brush
installed
7
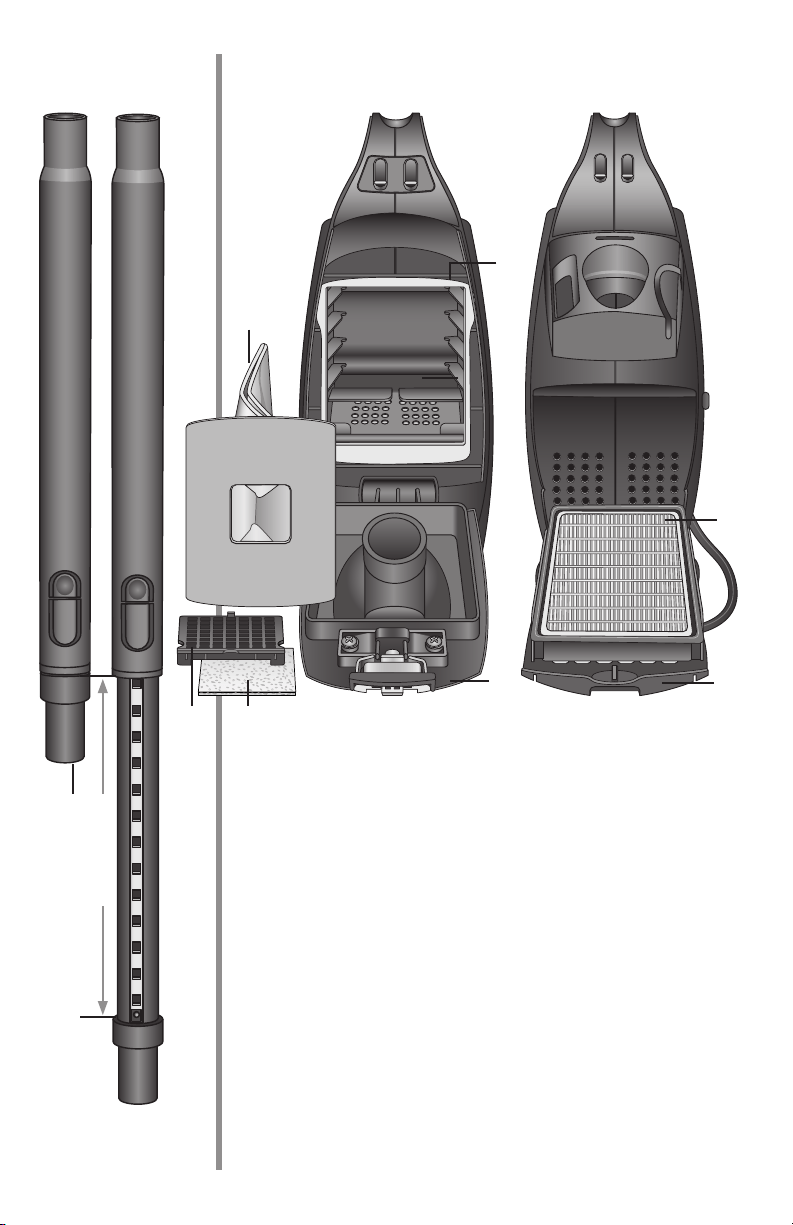
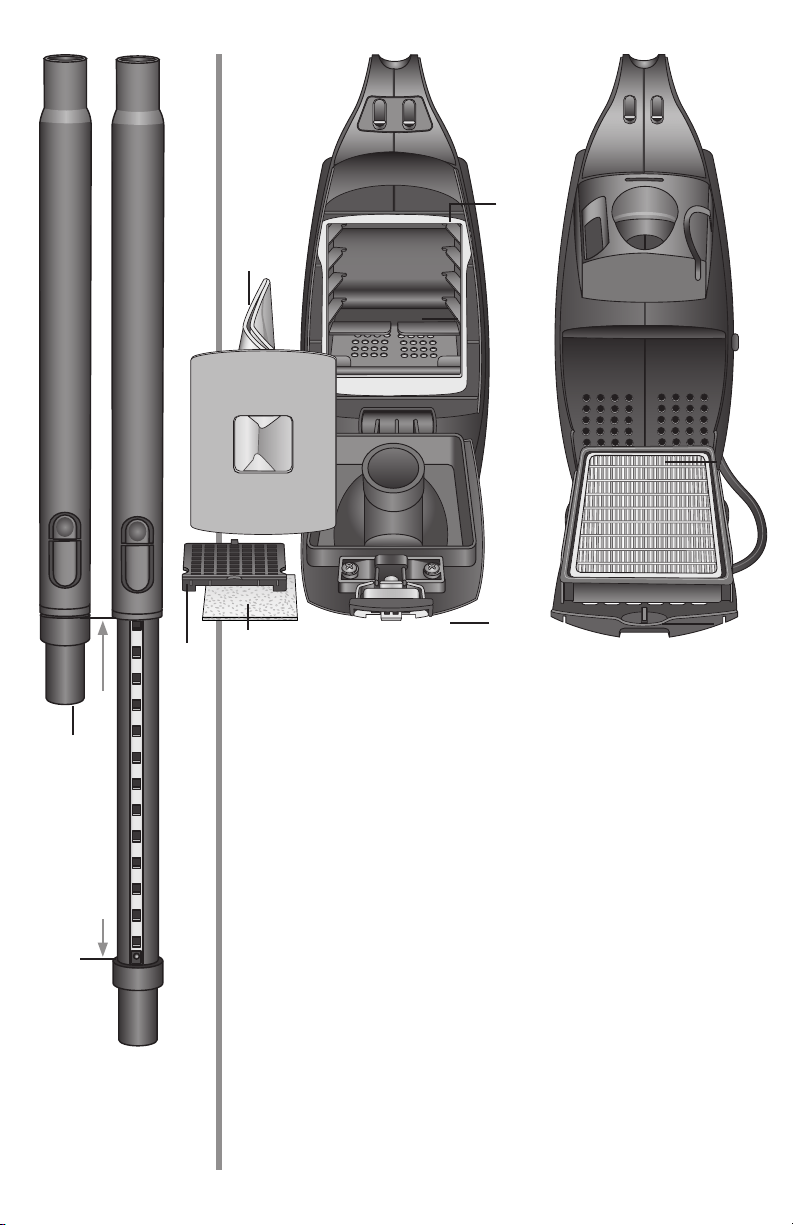
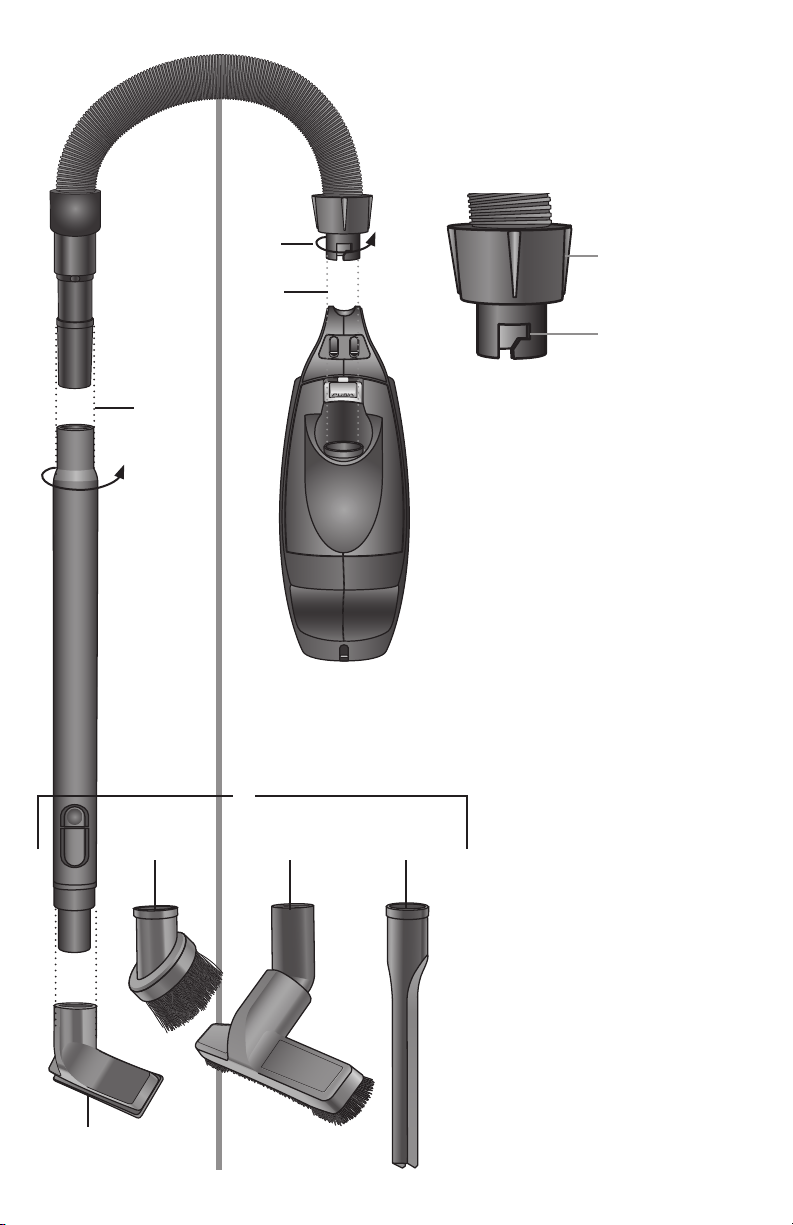
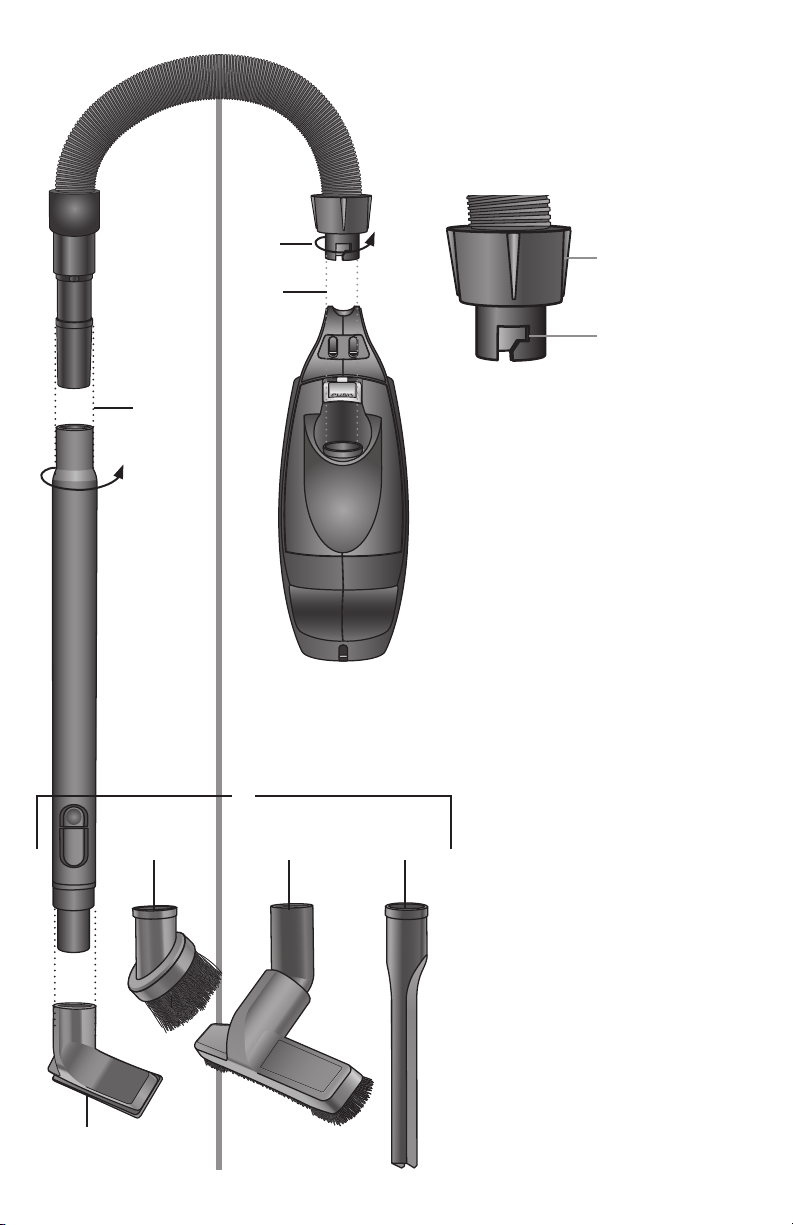
12. Slinky hose: Easy to use
exiblehose.
13.Hoseinlet: Hose connec-
tion location.
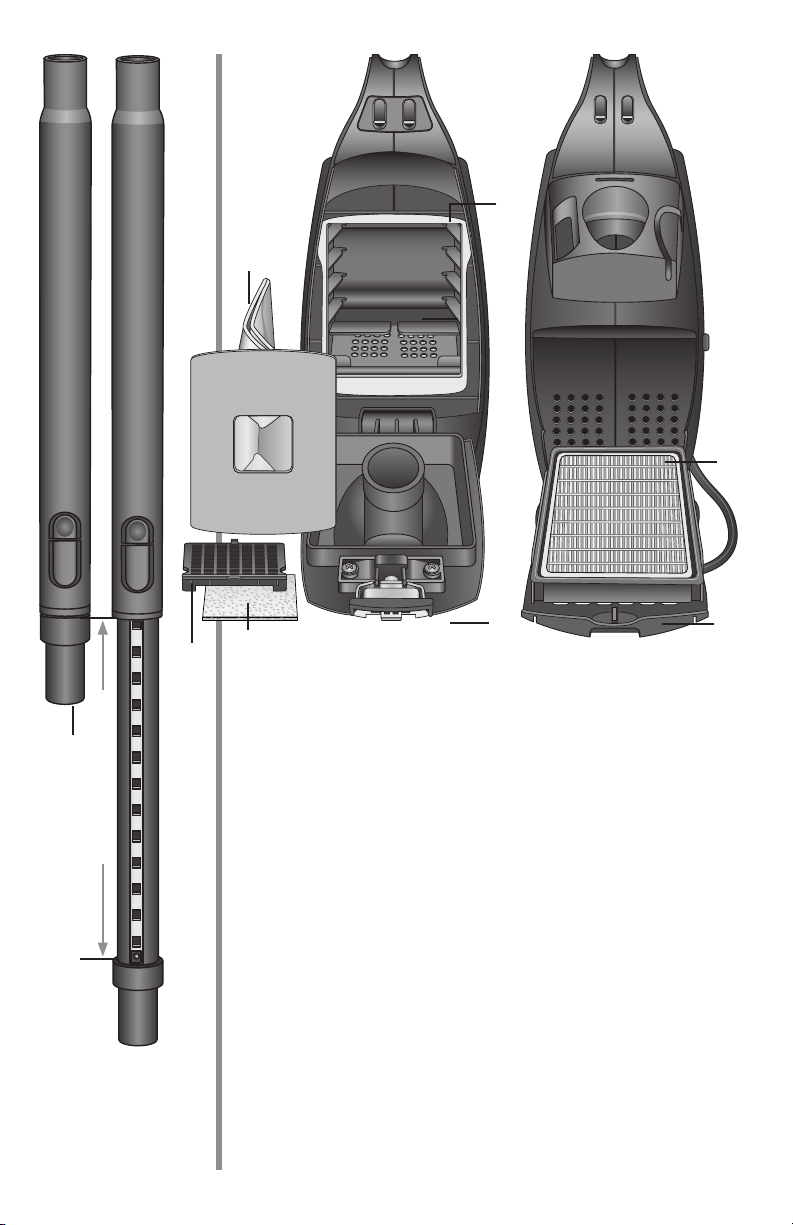
14. Extension wand:
Extendsanadditional
ten inches with the push
of a button.
15. MicroFilter:Keepsdirt
and dust from entering
the vacuum motor.
16. Innerbagdoor: Allows
access to the inner bag.
17. BagGasket: Creates a tight
seal to guard against air
leaks. Do not remove.
18. Disposableinnerbag:
Collects debris from the
vacuuming process.
19.HEPAFilter: Helps keep
dust and dirt inside the
vacuum as you clean.
20.HEPAFilterdoor: The HEPA
filter is secured to this door.
21. Micro Filter Frame: Holds
the Micro Filter.
14
17
18
1521
19
Hose inlet side HEPA filter side
10”extension
2016
8
Assemble
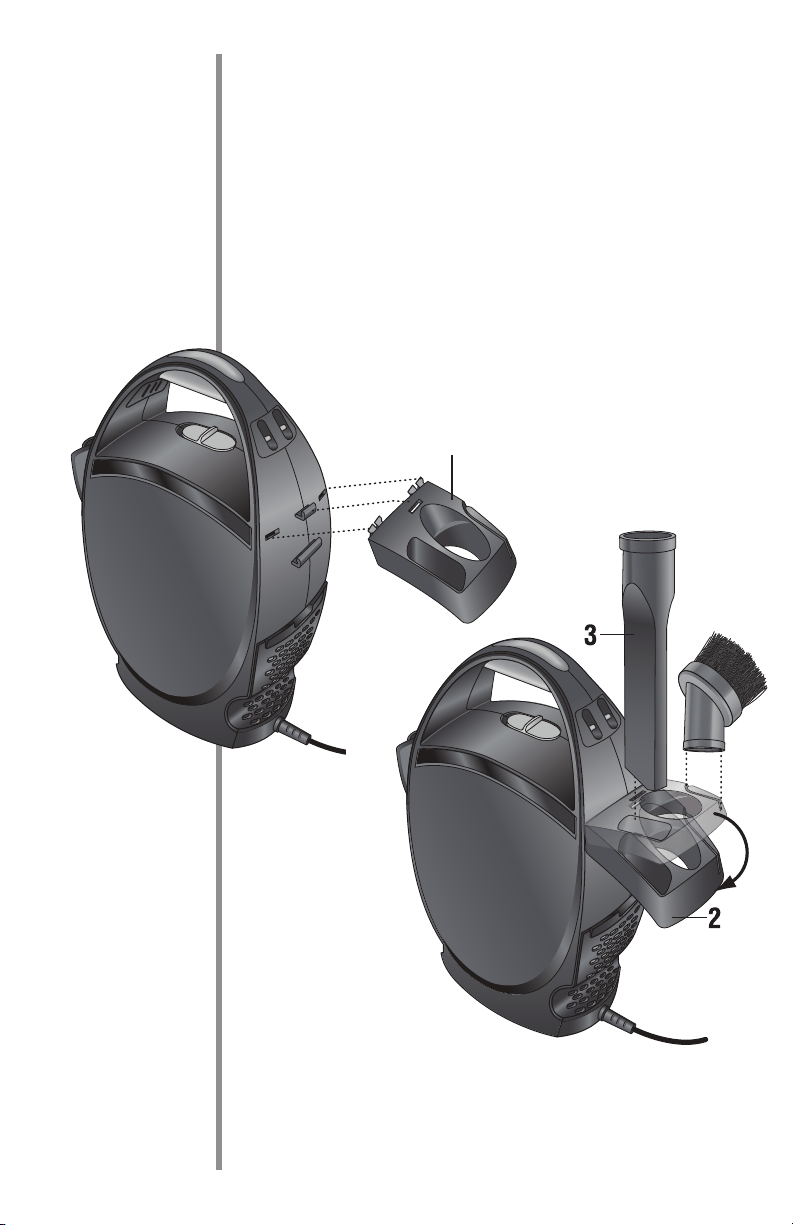
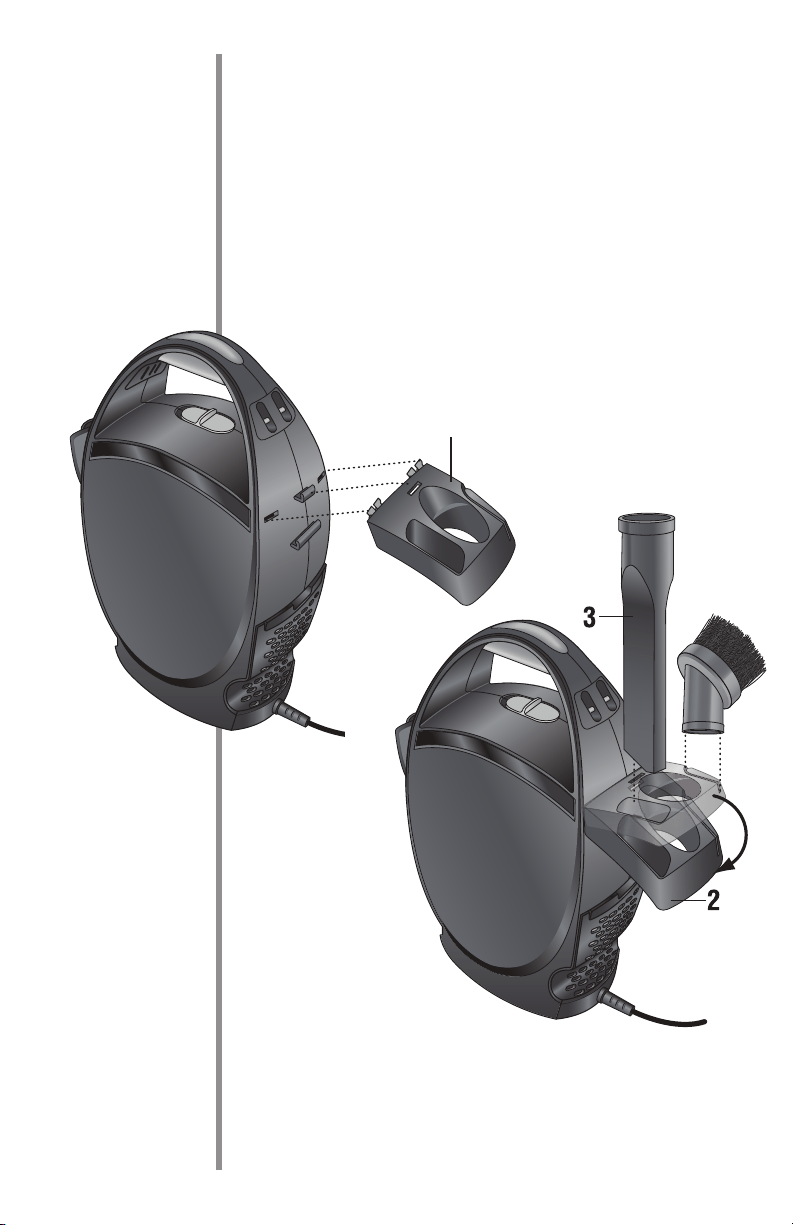
Attach the Tool Caddy
Before you attach the hose or any tools onto your vacuum,
you will first want to attach the tool caddy.
1. Align the middle slot and two pronged tabs on the tool
caddy with the middle tab and two slots on the side of
the vacuum.
2. Rotate and snap the tool caddy down into place.
3. Load the tools onto the tool caddy in the designated
outside slots.
1

9
AttachtheSlinkyHoseandTools
1. Align the J-shaped slot at the end
of the hose with the tab inside the
hose inlet.
2. Turn the hose collar clockwise to
lock into place. To unlock, turn the
collar counterclockwise.
3.Attachtheadjustableextension
wand. The wand and all cleaning
tools supplied with the vacuum lock
together with friction. Twist and
push to lock tightly when attaching.
Twist and pull to remove.
4. Choose the tool you would like to
use for your cleaning job.
5. Attach the tool onto the end of the
extensionwandbyusingthetwist
and push friction method described
in step three.
Cleans
upholstery
1
J-shaped slot
hose collar
Cleans delicate
surfaces
3
5
4
Cleans tight
areas
Cleans bare
floors and walls
2
10
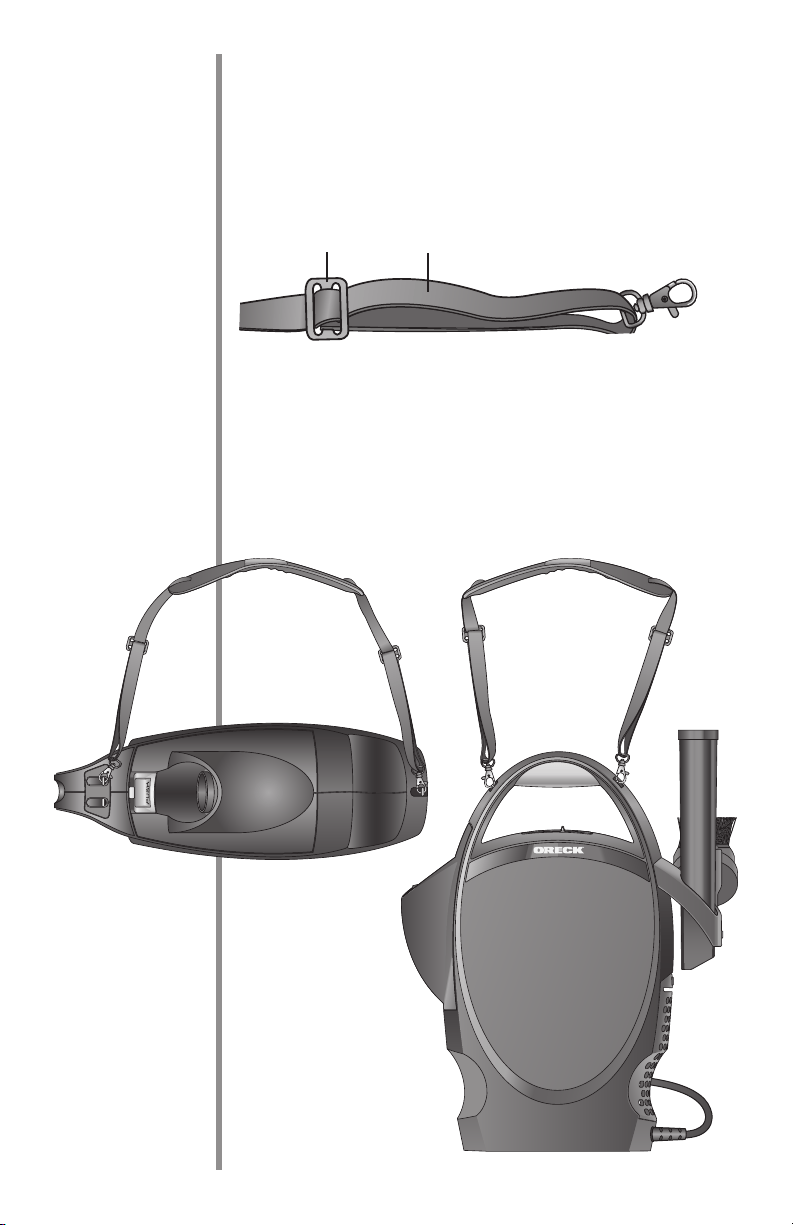
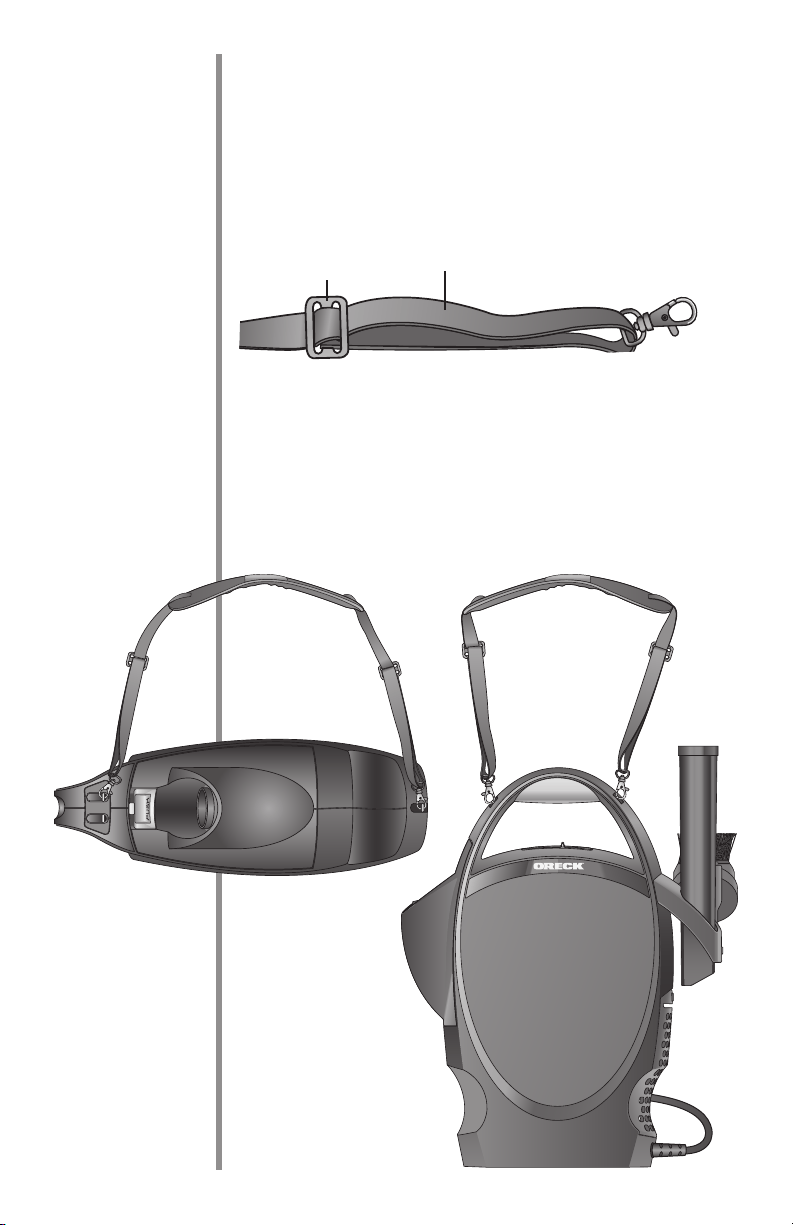
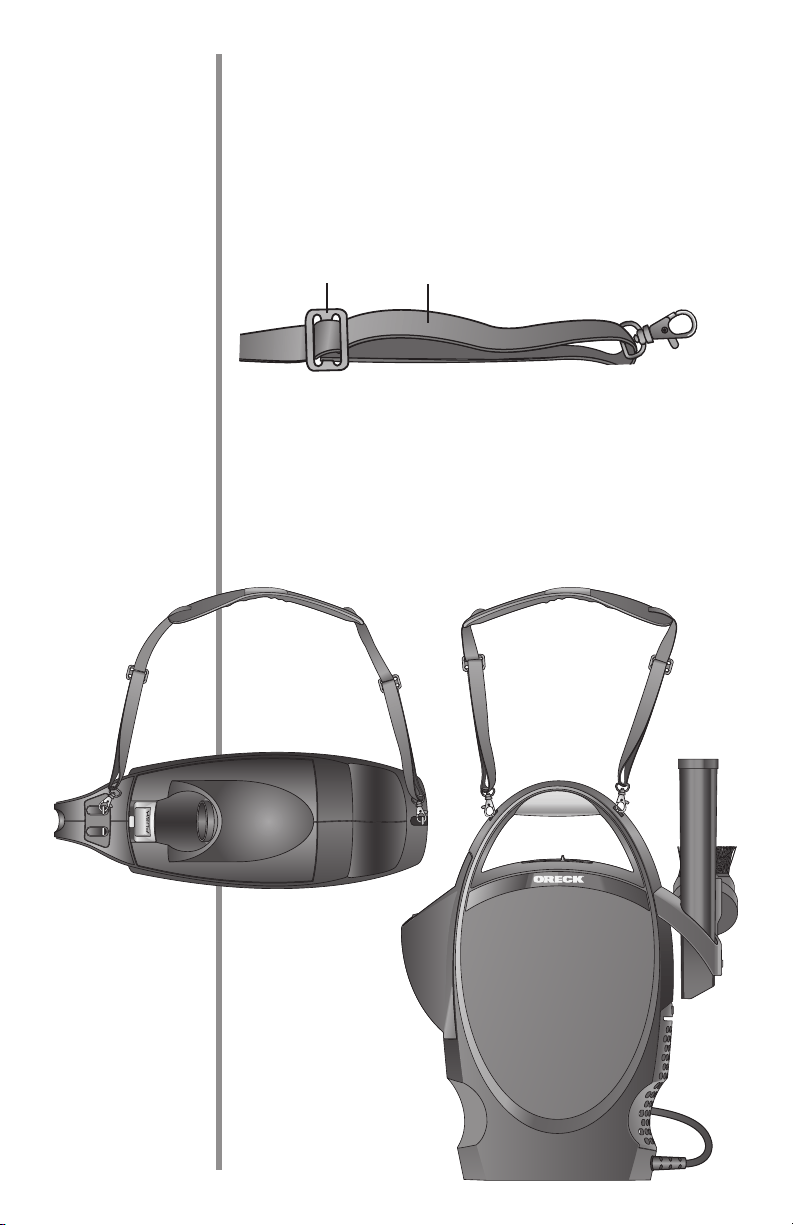
Attach the Adjustable Shoulder Strap
The shoulder strap can be attached to use the vacuum in the
horizontal or vertical position depending on what is most
comfortable for your use.
1. To adjust the shoulder strap length, loosen the straps, and
slide the clip up or down depending on the length you desire.
2. To carry the vacuum in the vertical position: clip each end of
the shoulder strap into the two slots on the sides of the carry
handle.
3. To carry the vacuum in the horizontal position: clip one end
of the shoulder strap into the slot of the carry handle, on the
hose inlet side. Clip the opposite end of the strap into the
slot on the bottom of the vacuum on the hose inlet side.
slide clip
loosen strap
vertical position
horizontal position
11
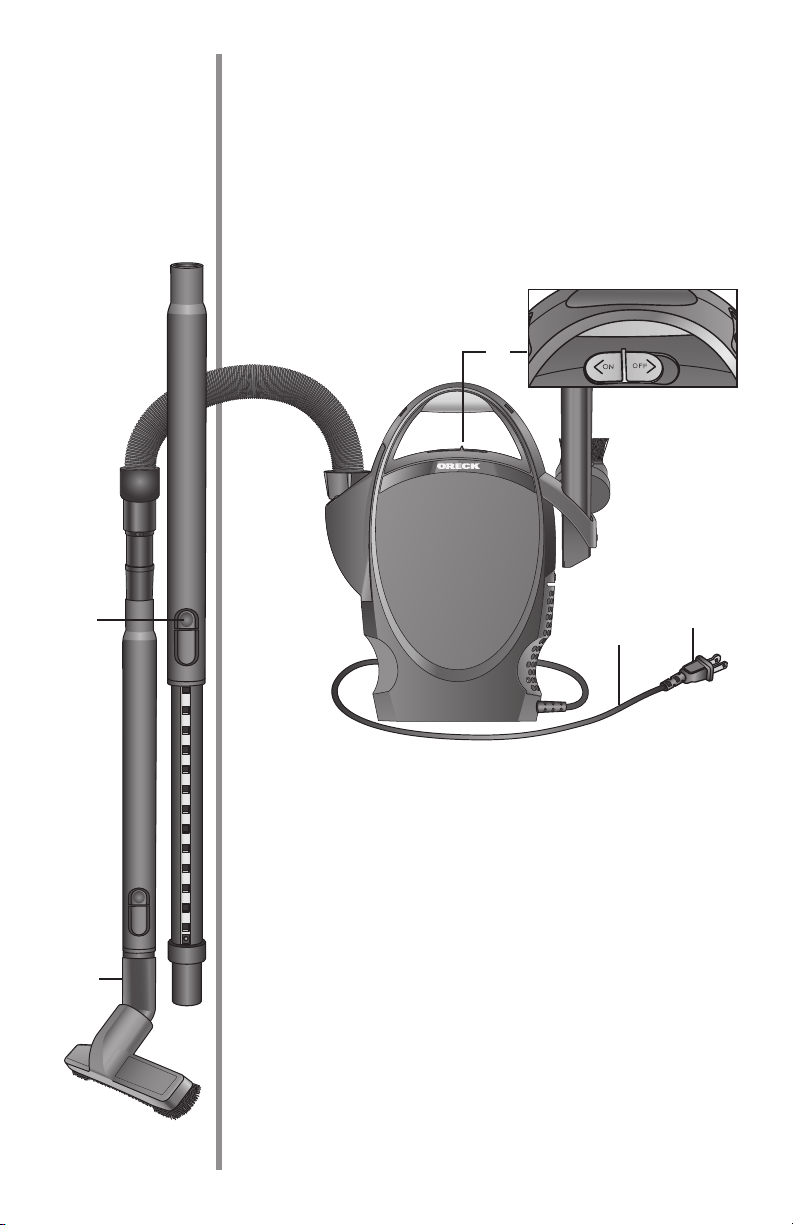
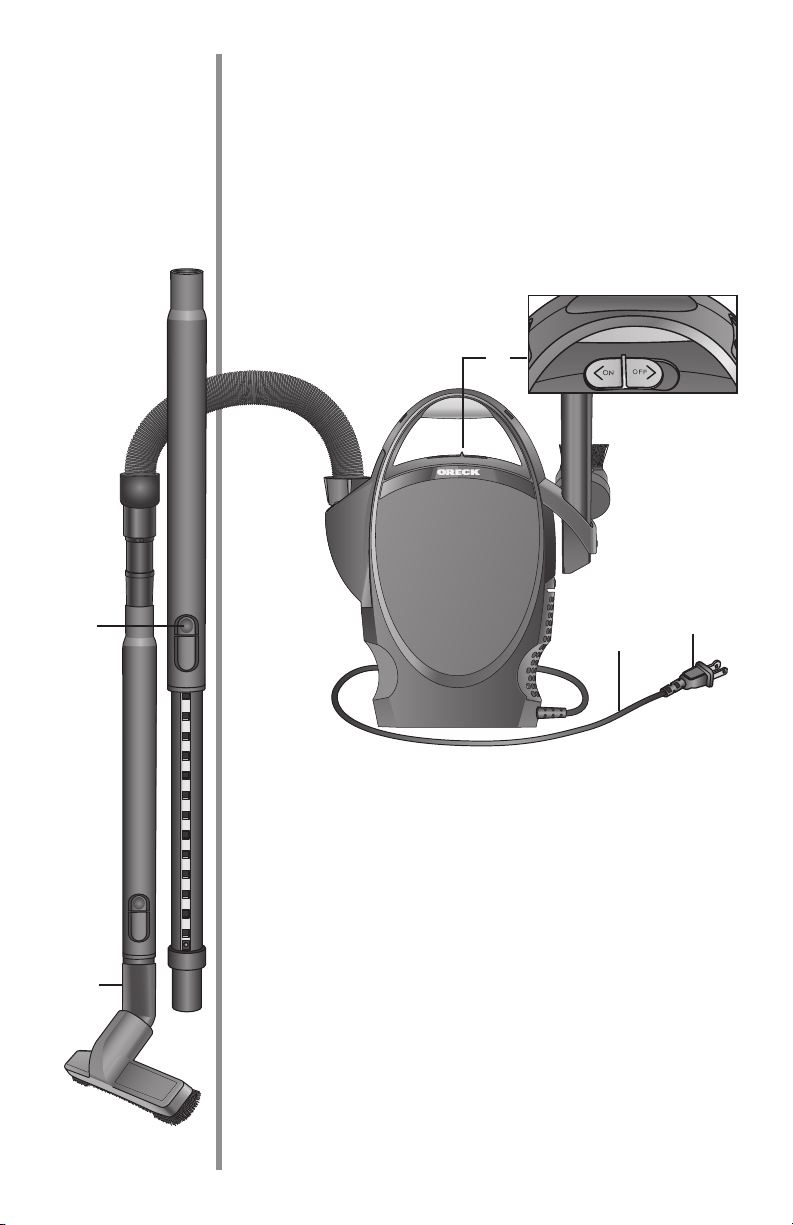
Use
After Using the Vacuum
7. Slide the power switch to the OFF position.
8. Unplug the power cord.
9. Wrap the cord around the cord wrap area and store.
Note: The Ultimate Handheld Vacuum has a MOTOR
PROTECTION SYSTEM: If fine materials such as soot,
cement, plaster dust, copy machine powder, etc. are picked up,
the bag surface may seal and cause the motor to shut off to
avoid overheating. If this happens, turn the switch off and
unplug the cleaner. If full, replace disposable inner bag. Check
andclearanyclogsinhoseoraccessories.Afterapproximately
thirty minutes the motor will have cooled and the cleaner will
be ready to use.
IMPORTANT: The cleaner must remain unplugged for thirty
minutes for motor to cool and system to reset.
Using the Vacuum
1. Unwrap the cord around the bottom of the cord wrap area.
2. Plug the cord into the electrical socket.
3. Attach the tool you need for your cleaning job to the end of
theextensionwand.
4. Pressthebuttonontheextensionwandformorelength
if needed.
5. Slide the power switch to the ON position.
6. Begin vacuuming.
1
2
3
5
4

12
Maintain
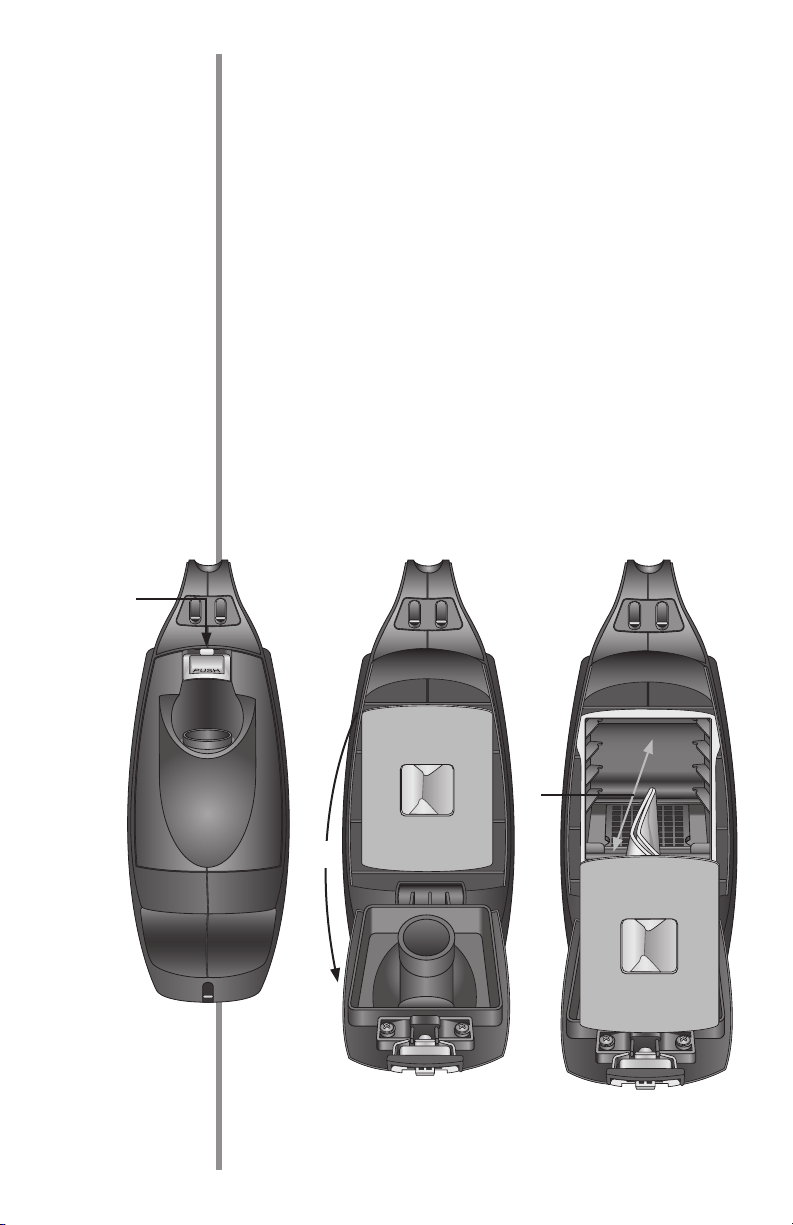
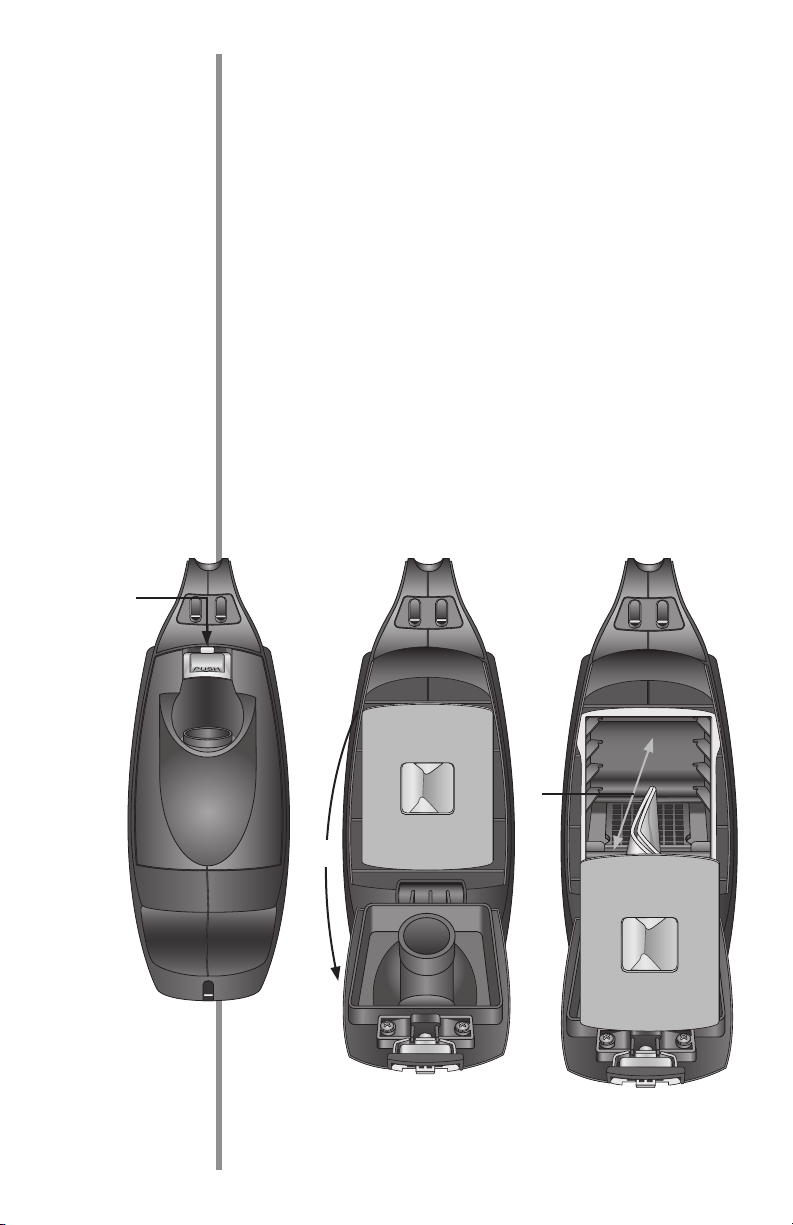
ReplacingtheDisposableInnerBag
When the disposable inner bag is full you will need to replace
the bag with a new one. Use only genuine Oreck filter bags.
For best results, change disposable inner bag regularly even if it
isnotcompletelyfull.Anextremelydirtybagorabagcloseto
fullwillaffectthesuctionofthecleanerandcancreateexces-
sive motor heat that could damage the motor.
To replace the inner bag:
1. Push down on the inner bag door release button located
above the hose inlet.
2. Rotate the inner bag door down.
3. Pull the inner bag out.
4. Insert a new inner bag by fitting the cardboard rim between
the tabs inside the recessed bag holder.
5. Close the inner bag door.
2
1
3
13
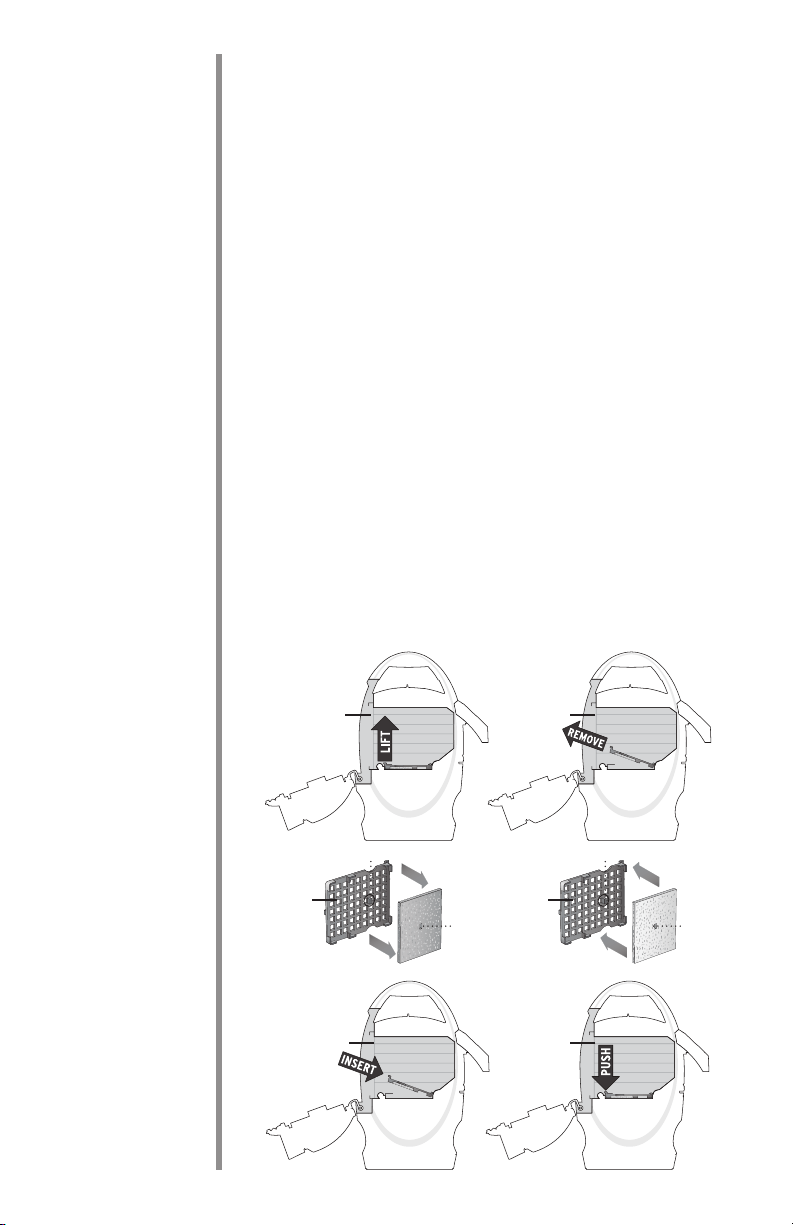
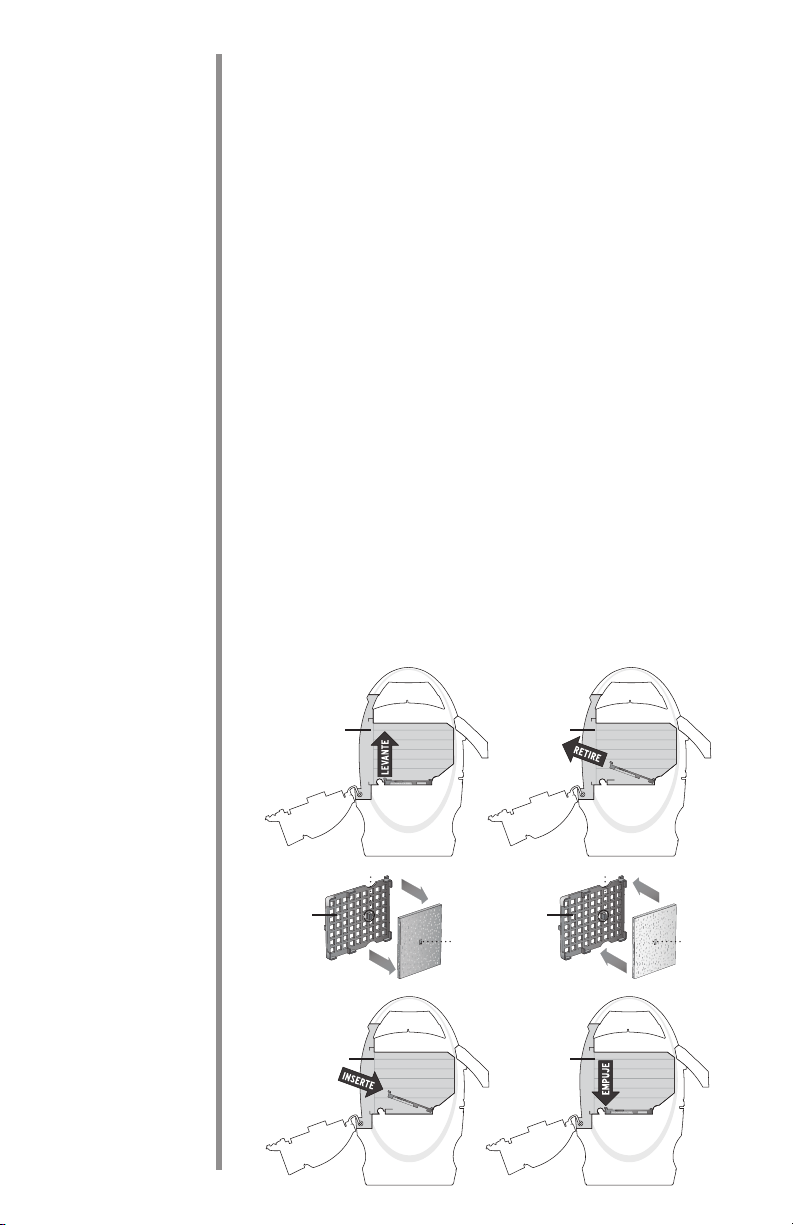
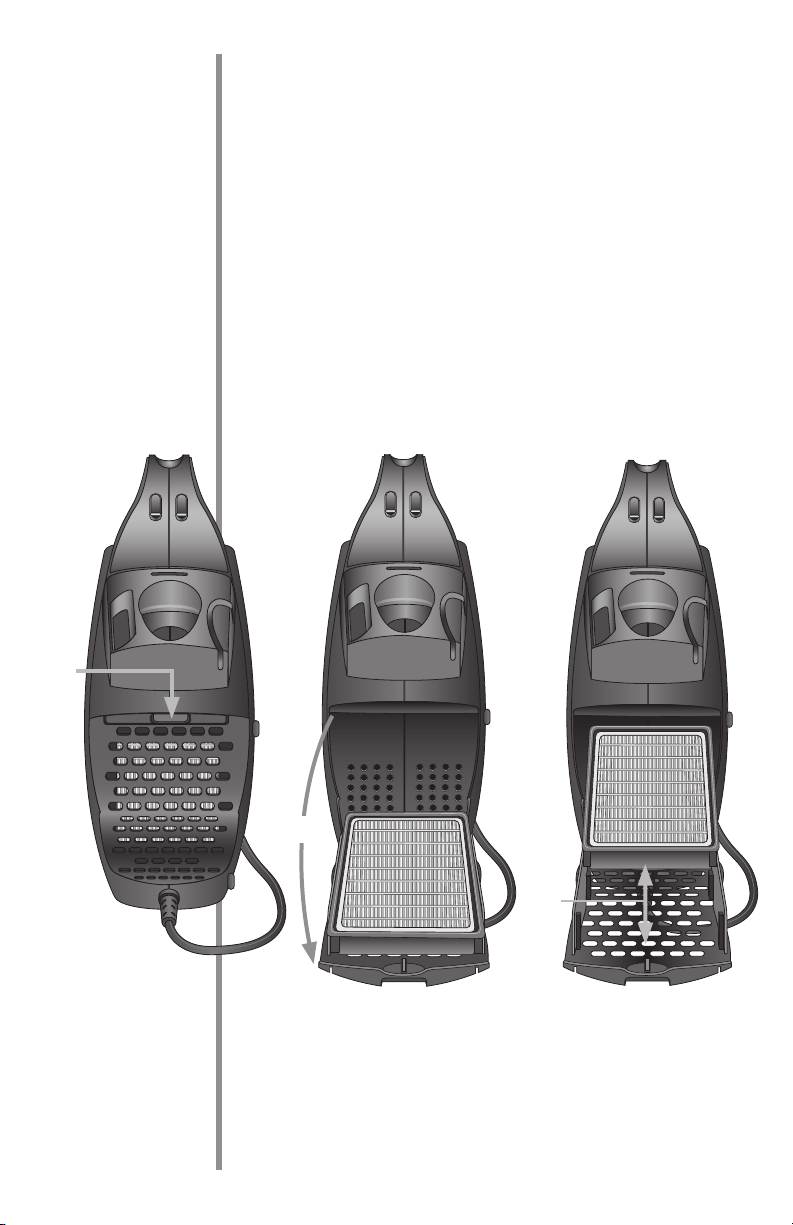
Replacing the Micro Filter
Themicrolterisextraprotectionagainstdustanddirt
getting into the vacuum motor. To keep your vacuum running
in top condition you will want to change the micro filter when
it gets dirty.
To replace the micro filter:
1. Follow steps 1-3 on page 12, Replacing the Disposable
Inner Bag.
4. To remove the Micro Filter, lift up on the recessed finger tab
and pull out.
5. Remove the Micro Filter from the Micro Filter Frame.
6.Replace by pressing a new Micro Filter onto the tab located
on the underside of the Micro Filter Frame.
7.Insert the Micro Filter Frame into the housing under the ribs
located at the back of the housings, and locate the rear tab
between the ribs.
8. Insert the inner bag back into place, and close the inner
bag door.
IMPORTANT: Never remove the white gasket surrounding the
inner bag opening. The vacuum will leak air and not
run properly.
HOLE
4
5
TAB
TAB
7 7
6
4
HOLE

14
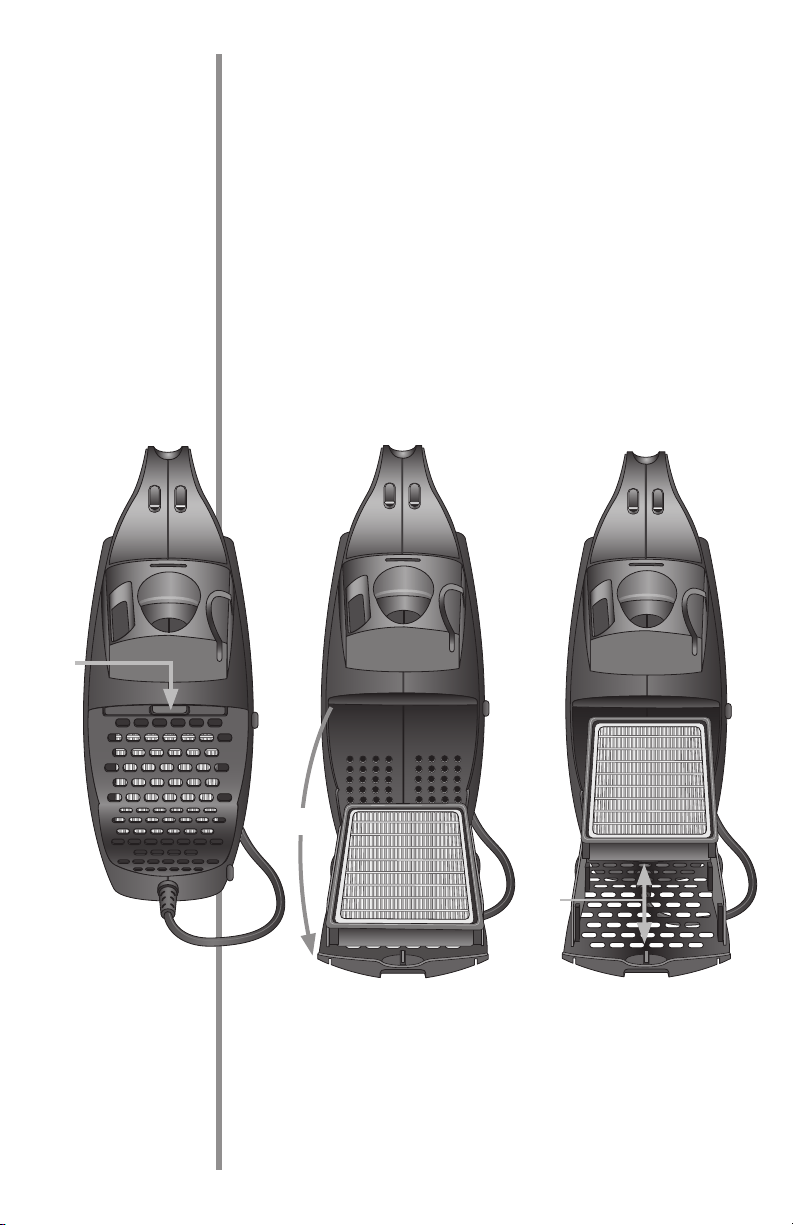
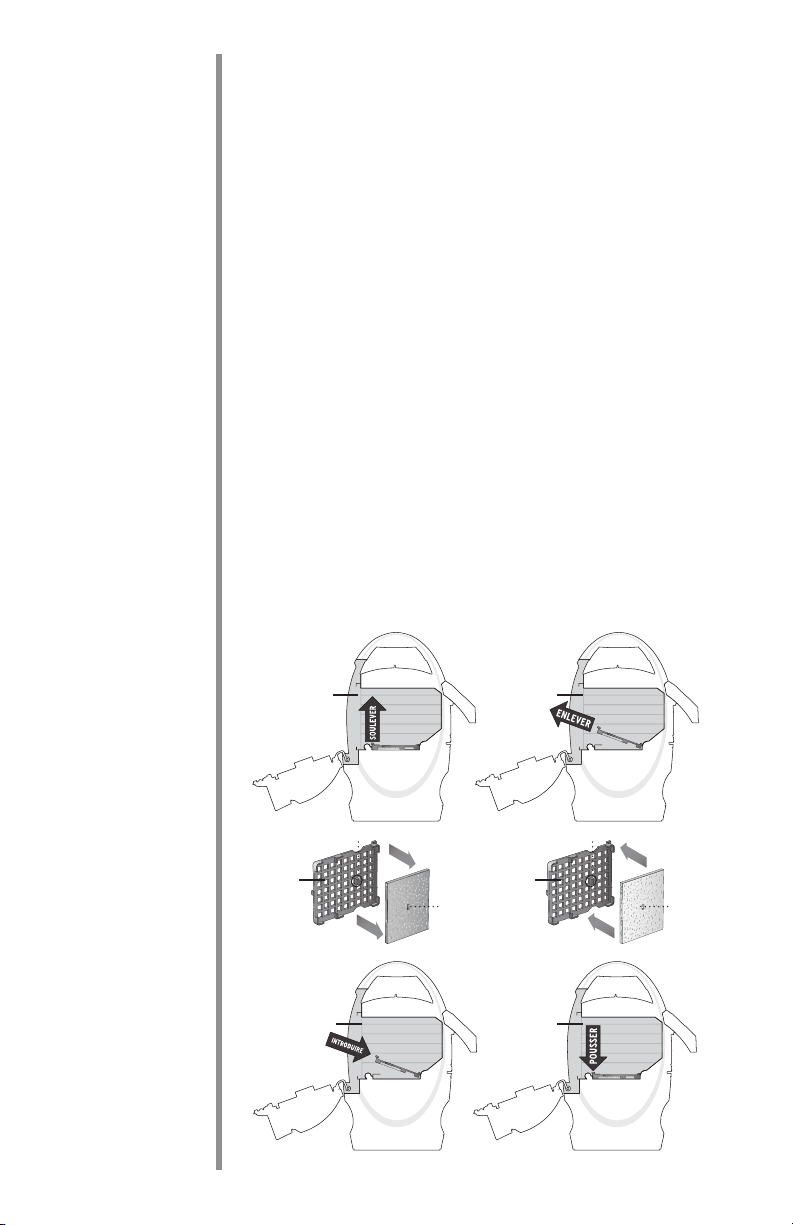
ReplacingtheHEPAFilter
TheHEPAltershouldbereplacedeverysixmonths,ormore
often if the vacuum is used to pick up fine particles or in
extremelydirtyareas.
To replace the HEPA door:
1. Push down on tab of the HEPA filter door.
2. Pull the door out of its slot.
3. Slide the HEPA filter up and out of the door.
4. Insert a new filter by aligning the slots on the side of the
filter with the tabs on the inside of the filter door.
5. Place the HEPA filter door assembly back into the slot and
rotate the door up until it snaps into place.
1
2
3

15
Trouble
shoot
Service problems that appear to be major can often be solved
easily. You can be your own troubleshooter by reviewing this
guide. All other servicing should be done by an Oreck
authorized service center.
Problem Check Solution
Vacuum will
not run
• Not plugged in
properly
• No electricity in
wall outlet.
• Motor protector
tripped.
• Needs service.
• Be sure cleaner is
firmly plugged into
wall outlet.
• Reset circuit
breaker/ground
fault interrupter, or
replace fuse. If you
need assistance
contact a licensed
electrician.
• See Motor Protec-
tion System
page 11.
• Visit or call your
nearest service
center.
Vacuum will not
pick up or has
low suction.
• Inner bag is full.
• Hose/wand tool is
clogged.
• Air leak due to
missing or
damaged gasket.
• Replace the Inner
bag. See Replacing
the Disposable In-
ner Bag, page 12.
• Remove
obstructions.
• Replace the white
bag gasket.
Extensionwand
and tools will
not stay together.
Proper friction fit
not being obtained.
Push and twist the
tools together to
properly attach.

16
Parts
Part Number
Replacement Paper inner bags
(Twelve pack with one Micro filter)
PKBB12DW
Replacement Odor Fighting inner bags
(Twelve pack with one Micro filter)
PKBB12OF
Replacement HEPA filter HF1000
Replacement Micro filter 72005-01
Replacement white bag gasket 72017-02
All accessories and replacement parts are sold separately.
To order, call our customer service group or visit our website.
Please have your model number from the data label on the
bottom of the unit.

17
Warranty
Ultimate
HandheldVac-
uum
ORECKMANUFACTURINGCOMPANY:(ORECKgivesyouthe
following limited warranty for this product only if it was originally
purchasedforuse,notresale,fromORECKoranORECK
Authorized Retail Dealer.)
ORECKwillrepairorreplace,freeofcharge,totheoriginal
purchaser, any part which is found to be defective in material or
workmanship within three (3) years of the date of purchase. This
limited warranty applies to normal domestic use. Any commercial
use of this product will void this limited warranty.
Parts subject to normal wear are not covered by this limited warranty.
This limited warranty does not apply to any part subjected to
accident, abuse, commercial use, alteration, misuse, damage caused
by fire or act of God, the use of voltages other than indicated on the
serial number plate of this product or service of this product by other
thanORECKoranORECKFactoryAuthorizedServiceCenter.
ORECKdoesnotauthorizeanypersonorrepresentativetoassumeor
grant any other warranty obligation with the sale of this product.
ORECK’slimitedwarrantyisvalidonlyifyouretainproofof
purchasefromORECKoranORECKAuthorizedRetailDealerfor
this product. If you purchase this product from any other source, your
purchaseis“ASIS,”whichmeansORECKgrantsyounowarranty,
andthatyou,notORECK,assumetheentireriskofthequality
and performance of this product, including the entire cost of any
necessary servicing or repairs of any defects.
ORECK’sliabilityfordamagestoyouforanycostswhatsoever
arising out of this statement of limited warranty shall be limited to
the amount paid for this product at the time of original purchase, and
ORECKshallnotbeliableforanydirect,indirect,consequentialor
incidental damages arising out of the use or inability to use this
product.
Somestatesdonotallowtheexclusionorlimitationofincidentalor
consequentialdamages,sotheabovelimitationorexclusionmaynot
apply to you.
ALL EXPRESS AND IMPLIED WARRANTIES FOR THIS
PRODUCT, INCLUDING IMPLIED WARRANTIES OF
MERCHANTABILITY AND FITNESS FOR A PARTICULAR
PURPOSE, ARE LIMITED IN DURATION TO THE
WARRANTY PERIOD, AND NO WARRANTIES, WHETHER
EXPRESS OR IMPLIED, WILL APPLY AFTER THIS PERIOD.
Some states do not allow limitations on the duration of implied
warranties, so the above limitation may not apply to you.
This warranty gives you specific legal rights, and you may also have
other rights which vary from state to state.
La mejor aspiradora
portátil del mercado
¡Importante!
Lea cuidadosamente este manual y guárdelo para consultas
futuras.
Guía
del
usuario
Serie 1600
19
Other Oreck accessories available at:
Other Oreck accessories available at:
Gracias por comprar la más moderna aspiradora portátil del
mercado. Esta aspiradora pesa cerca de cinco libras y viene
conunavariedaddeaccesoriosparacualquiernecesidadde
limpieza. El filtro HEPA instalado en su aspiradora ayuda a
evitarqueelpolvoylasuciedadseanexpulsadosconelaire
cuando la usa.
Bienvenido a nuestro programa de Atención al cliente
Llame” o “Clic”.
Para ponerse en contacto con Oreck Llame o “Clic”.
Disfrute
su nueva
Clic
Llame
EE.UU.: 1•800•989•3535
Canadá: 1•888•676•7325
En Internet, apunte y haga clic en: www.oreck.
com o visite www.oreck.com y haga clic arriba a
la derecha para localizar una tienda.

20
Índice
Seguridad . . . . . . . . . . . . . . . . . . . . . . . . . . . . . 21
Advertencias generales ...................21
Enchufe polarizado ......................22
Partes y características ...................23
Armado................................25
Sujeción del soporte para herramientas.......25
Conexióndelamangueraylosaccesorios . . . . 26
Instalación de la correa de hombro ajustable ..27
Utilización..............................28
Uso de la aspiradora . . . . . . . . . . . . . . . . . . . . 28
Después de usar la aspiradora ..............28
Mantenimiento ..........................29
Sustitución de la bolsa interior desechable . . . . 29
Reemplazo del Micro Filtro................30
Sustitución del filtro HEPA . . . . . . . . . . . . . . . . 31
Solución de problemas ...................32
Piezas de repuesto ......................33
Garantía ..............................34

21
Seguri-
dad
INSTRUCCIONES DE
SEGURIDAD IMPORTANTES
!
¡Advertencias generales!
Lea todas las instrucciones antes de usar la aspiradora.
¡ADVERTENCIA! Para reducir el riesgo de incendio, descargas
eléctricas o lesiones personales al usar un aparato eléctrico, siempre
deben seguirse ciertas precauciones básicas, inclusive las siguientes:
• No deje la aspiradora desatendida mientras esté conectada.
Desconéctela de la toma de corriente cuando no la use y
antes de limpiarla o realizar tareas de mantenimiento.
• Noutilicelaaspiradoraenexterioresosobresuperciesmojadas.
• Nopermitaquelaaspiradoraseautilizadacomounjuguete.
Preste especial atención cuando es utilizada por o cerca de niños.
• Utilicelaaspiradoraúnicamentecomosedescribeenestemanual.
Utiliceúnicamentelosaccesoriosrecomendadosporelfabricante.
• Noutilicelaaspiradorasielcableoelenchufeestánaveria-
dos. Si la aspiradora no funciona como debiera, se ha caído,
estáaveriada,quedóalaintemperieohacaídoalagua,en-
víela a un Centro de servicios o llame al servicio de atención
al cliente: EE.UU.: 1-800-989-3535 Canadá: 1-888-676-7325
• Notirenitransportelaaspiradoratirandodelcable,nouse
el cable como un mango, no cierre puertas sobre el cable, no
tiredelcableporsobrebordesoesquinasalados.
• Mantengaelcablealejadodesuperciescalientes.
• Nopaselaaspiradoraporsobreelcable.
• Nodesconectelaaspiradoratirandodelcable.Paradesco-
nectar la aspiradora, agarre el enchufe, no tire del cable.
• Notoqueelenchufenilaaspiradoraconlasmanosmojadas.
• Nocoloqueningúnobjetoenlasaberturasdelaaspiradora.
No utilice la aspiradora con alguna de sus aberturas obstru-
idas;manténgalaslimpiasdepolvo,pelusas,pelosycualqui-
erotroelementoquepuedareducirelujodeaire.
• Mantengaelcabello,laropasuelta,losdedosytodaslas
partes del cuerpo alejados de las aberturas y piezas móviles.
• Noutilicelaaspiradorapararecogerelementosqueesténardi-
endo o humeando, como cigarrillos, fósforos o cenizas calientes.
• Noutilicelaaspiradorasinlabolsafiltrantebieninstaladaensulugar.
22
• Apaguetodosloscontrolesantesdedesconectarlaaspiradora.
• Tengamuchocuidadoallimpiarlasescaleras.
• Noutilicelaaspiradorapararecogerlíquidosinamableso
combustibles,comogasolinaolíquidoparaencendedores,ni
enáreasdondeestoslíquidospuedanestarpresentes.
• Noutilicelaaspiradoraenlugarescerradosdondehayava-
poresinamables,explosivosotóxicosemitidosporpinturas
al aceite, diluyentes de pintura o sustancias antipolillas;
tampoco la utilice en lugares donde haya polvos inflamables.
• Noutiliceestaaspiradorapararecogermaterialestóxicoscomo
hipoclorito de sodio, limpiador de desagües, gasolina, etc.
• Tengacuidadoalpasarlaaspiradoraenlosbordesylos
flecos de las alfombras.
Enchufe polarizado
Un enchufe polarizado tiene una clavija redondeada y una
clavija plana. La clavija redondeada entra en la ranura más
larga de la toma de corriente. Para reducir el riesgo de recibir
unadescargaeléctrica,esteequipotieneunenchufepolarizado
(unaclavijaesmásanchaquelaotra).Esteenchufeseconecta
en una toma de corriente polarizada de una sola manera. Si
no puede insertar el enchufe hasta el fondo en la toma de
corriente,inviertaelenchufe.Siaúnasínoencaja,consultea
unapersonacalicadaparaqueinstaleunatomadecorriente
adecuada.Nomodiqueelenchufedeningunamanera.
GUARDE ESTAS INSTRUCCIONES
Únicamente para uso doméstico
Clavija redondeada
23
Partes y
caracter-
ísticas
1. Aspiradora portátil: car-
casa con depósito colector.
2. Correa ajustable para
el hombro: se sujeta a
la carcasa en posición
horizontal o vertical.
3. Boquillaparatapicería:
limpia muebles tapizados
y cortinas.
4. Cepillo grande para pisos:
accesorio para la limpieza
de pisos y paredes.
5. Cepilloparaelpolvo: el
más adecuado para super-
ficies delicadas.
6. Boquillapararincones:
limpia lugares difíciles
de alcanzar tales como
grietas y rincones.
7. Cabledealimentación:
cordón de veinte pies de
longitudquepermite
alcanzar largas distancias.
8. Enrollacables: lugar para guar-
dar el cable de alimentación.
9. Porta-accesorios: permite
alojar los accesorios en la
misma aspiradora.
10.Interruptordeencendido/
apagado: enciende y apaga la
alimentación de la aspiradora.
11. Asa de transporte con gan-
chos para correa: Se utiliza
para llevar la aspiradora y
sujetar las correas.
2
1
13
5
12
43 6
9
7
11
8
10
se muestra con
la manguera,
laboquilla
para rincones
y el cepillo
para el polvo
instalados
24
12. Manguera flexible: muy
exible,facilitaelusode
la aspiradora.
13.Entradadelamanguera:
ubicacióndelaconexión
de la manguera.
14. Tubo de extensión:
aumenta la longitud del
tubo en diez pulgadas
(25 cm) con sólo pulsar
un botón.
15. Microltro:evitaque
la suciedad y el polvo
penetren en el motor de
la aspiradora.
16. Puertadelabolsainte-
rior: permite el acceso a
la bolsa interior.
17. Juntadelabolsa: crea un
sello hermético para pro-
teger contra fugas de aire.
No la retire.
18. Bolsainteriordesechable:
recoge los desechos del pro-
ceso de pasar la aspiradora.
19.FiltroHEPA: ayuda a man-
tener el polvo y la suciedad
en el interior de la aspira-
dora mientras limpia.
20.TapadelltroHEPA: el
filtro HEPA está asegurado
a esta tapa.
21. Marco para Micro Filtro:
Sostiene el Micro Filtro.
14
17
18
15
19
Lado del filtro HEPA Lado de la entrada de
la manguera
Extensiónde10”(30cm)
2016
21
25
Armado
Sujeción del soporte para herramientas
Antesdesujetarlamangueraocualquierherramientaensu
aspiradora, usted primero debe sujetar el soporte para herra-
mientas.
1. Alinee la ranura central y las dos lengüetas dentadas del
soporte para herramientas con la lengüeta central y las dos
ranuras en la parte lateral de la aspiradora.
2. Gire y sujete a presión el soporte para herramientas.
3.Coloquelasherramientasenelsoporteparaherramientasen
lasaberturasexterioresdesignadas.
1
26
Conexión de la manguera y los
accesorios
1. Alinee la ranura en forma de J en
elextremodelamangueraconla
lengüeta de la entrada de la manguera.
2. Gire el collarín de la manguera para
trabarla en su lugar. Para destrabar,
gireelcollarínhacialaizquierda.
3.Acopleeltubodeextensiónajustable.
El tubo y todos los accesorios de
limpieza suministrados con la aspira-
dora se acoplan entre sí por fricción.
Para acoplar estos elementos, gire y
empuje para trabarlos firmemente.
Gire y tire para desacoplarlos.
4.Seleccioneelaccesorioquedesea
utilizar para su trabajo de limpieza.
5. Acopleelaccesorioenelextremo
deltubodeextensióngirandoy
empujando con el método descrito
en el paso tres.
Limpia tapicería
1
ranura en
forma de J
collarín de la
manguera
Limpia superfi-
cies delicadas
2
3
5
4
Limpia espacios
reducidos
Limpia pisos
y paredes
27
Instalación de la correa de hombro ajustable
La correa de hombro se puede sujetar para usar la aspiradora
en posición horizontal o vertical, de acuerdo a cual posición le
resulte más cómoda.
1. Para ajustar el largo de la correa de hombro, afloje las cintas
y deslice el broche hacia arriba o hacia abajo de acuerdo a la
longitud deseada.
2. Para llevar la aspiradora en posición vertical: enganche cada
extremodelacorreaparahombroenlasranurasaambos
lados del asa de transporte.
3. Para llevar la aspiradora en posición horizontal: enganche uno
delosextremosdelacorreaenlaranuradelasadetransporte,
delladodelaentradadelamanguera.Engancheelextremo
opuesto de la correa en la ranura ubicada en la parte inferior de
la aspiradora del lado de la entrada de la manguera.
deslice el
broche
afloje la cinta
posición vertical
posición horizontal
28
Uti-
lización
Despuésdeusarlaaspiradora
7. Gire el interruptor de alimentación a la posición OFF(apagado).
8. Desconecte el cable de alimentación.
9. Enrolle el cable en el enrollacables y guarde la aspiradora.
Nota: Esta aspiradora de mano dispone de un SISTEMA DE
PROTECCIÓN DEL MOTOR: Si se recogen materiales finos,
como hollín, cemento, polvo de yeso, tinta en polvo para copiadora,
etc.,lasuperciedelabolsapuedesellarse.Estoocasionaráqueel
motor se apague para evitar el sobrecalentamiento. Si esto sucede,
apague el interruptor y desconecte la aspiradora. Si la bolsa interior
desechableestállena,reemplácela.Reviseylimpiecualquier
obstrucciónqueencuentreenlamangueraolosaccesorios.Después
deaproximadamentetreintaminutos,elmotorsehabráenfriadoyla
aspiradora estará lista para usar.
IMPORTANTE: la aspiradora deberá permanecer desconectada durante
treinta minutos para enfriar el motor y restablecer el sistema.
Uso de la aspiradora
1. Desenrolle el cable del enrollacables en la parte inferior de la carcasa.
2. Conecte el cable a la toma de corriente.
3.Coloqueelaccesorioquenecesitaparasutrabajodelimp-
iezaenelextremodeltubodeextensión.
4. Pulseelbotóndeltubodeextensiónsinecesitamayorlongitud.
5. Gire el interruptor de alimentación a la posición ON(Encendido).
6. Comience a aspirar.
1
2
3
5
4
29
Manten-
imiento
Sustitución de la bolsa interior desechable
Cuandolabolsainteriordesechableestállenatendráquesusti-
tuirlaporunanueva.UtiliceúnicamentebolsasltrantesOreck
XL legítimas.
Para obtener los mejores resultados, reemplace periódicamente
la bolsa interior desechable, incluso si no está completamente
llena.Unabolsaextremadamentesuciaocasillenaafectarála
succióndelaaspiradoraypuedegenerarexcesivocalorenel
motorquepodríaaveriarlo.
Para reemplazar la bolsa interior:
1. Empuje hacia abajo el botón de la traba de la puerta de la bol-
sa interior, ubicado por encima de la entrada de la manguera.
2. Gire la puerta de la bolsa interior hacia abajo.
3. Saquelabolsainterior.
4. Inserte una bolsa interior nueva encajando el aro de cartón
entre las lengüetas internas del compartimiento de la bolsa.
5. Cierre la puerta.
1
2
3
30
Reemplazo del Micro Filtro
El Micro Filtro es una protección adicional contra el polvo y la
suciedadqueingresanalmotordelaspiradora.Paramantener
su aspiradora funcionando en óptimas condiciones, usted debe
cambiar el Micro Filtro cuando éste se ensucie.
Para reemplazar el Micro Filtro:
1. Siga los pasos 1 a 3 de la página 12, Reemplazo de la bolsa
interior desechable.
4. Para retirar el Micro Filtro, levante la lengüeta interior y
hale hacia afuera.
5. Para hacer esto, retire el Micro Filtro fuera del Marco de
Micro Filtro. Reemplace presionando un Micro Filtro nuevo
sobre el reborde saliente ubicado en la parte de abajo del
Marco del Micro Filtro.
6.Inserte el Marco del Micro Filtro en el alojamiento debajo
de los rebordes ubicados en la parte trasera del alojamiento,
ycoloquelalengüetatraseraentrelosrebordes.
7. Inserte la bolsa interior de regreso en su sitio, y cierre la
puerta de la bolsa interior.
IMPORTANTE:Nuncaretirelaempaquetadurablancaquerodea
la boca de la bolsa interior. La aspiradora tendrá fuga de aire y
no funcionará apropiadamente.
ORIFICIO
4
5
LENGÜETA
LENGÜETA
7 7
6
4
ORIFICIO
31
SustitucióndelltroHEPA
El filtro HEPA debe ser reemplazado cada seis meses, o más a
menudo si la aspiradora se utiliza para recoger partículas finas
o en lugares muy sucios.
Para sustituir el filtro HEPA:
1. Empuje hacia abajo la pestaña de la tapa del filtro HEPA.
2. Retire la tapa de su ranura.
3. Deslice el filtro HEPA hacia arriba y fuera de la tapa.
4. Inserte un filtro nuevo alineando las ranuras laterales del
filtro con las lengüetas en el interior de la tapa del filtro.
5.ColoquelatapaconelltroHEPAenlaranuraygirelatapa
haciaarribahastaqueencajeensulugar.
1
2
3

32
Solución
de prob-
lemas
Amenudo,losproblemasqueparecenserimportantespueden
resolverse fácilmente. Usted puede solucionarlos por su cuenta
mediantelalecturadeestaguía.Cualquierotratareademan-
tenimiento o reparación debe ser realizada por un Centro de
servicios autorizado por Oreck.
Problema Revisar Solución
La aspiradora no
funciona
• No está conectada
correctamente.
• No hay electric-
idad en la toma de
corriente.
•El protector del
motor ha actuado.
• Necesita manten-
imiento o repara-
ción.
• Veriquequelaas-
piradora esté bien
conectada en la
toma de corriente.
• Restaure el inter-
ruptor automático
o el interruptor
de falla a tierra
queprotegenel
circuito de la toma
de corriente, o re-
emplace el fusible
correspondiente.
Si necesita ayuda
llame a un electri-
cista matriculado.
• Consulte el
apartado Sistema
de protección
del motor en la
página 28.
• Visite o llame al
Centro de servicios
más cercano.
La aspiradora no
recoge la sucie-
dad o tiene baja
succión.
• La bolsa interior
está llena.
• La manguera o el
tubo están obstruidos.
• Fuga de aire
debidoaquela
junta falta o está
averiada.
• Reemplace la
bolsa interior. Con-
sulte el apartado
Sustitución de
la bolsa interior
desechable, pá-
gina 29.
• Elimine las ob-
strucciones.
• Reemplace la junta
blanca de la bolsa
interior.
Eltubodeex-
tensión y los ac-
cesorios no están
acoplados.
No se ha logrado la
fricción adecuada
de la unión.
Empuje y gire juntos
los accesorios para
acoplarlos correcta-
mente.

33
Piezas
de
repuesto
Pieza Número
Bolsainteriordepapel(paquetecon
doce bolsas y un microfiltro de repues-
to).
PKBB12DW
Bolsainteriordepapelanti-olor(paquete
con doce bolsas y un microfiltro de
repuesto).
PKBB12OF
Filtro HEPA de repuesto. HF1000
Replacement Micro filter 72005-01
Filtro HEPA de repuesto. 72017-02
Todos los accesorios y piezas de repuesto se venden por
separado. Para hacer su pedido de repuestos, llame a nuestro
grupo de atención al cliente o visite nuestro sitio de Internet.
Porfavor,tengaamanoelnúmerodemodelodesuaspiradora,
queseencuentraenlaetiquetaadheridaenlaparteinferiorde
la unidad.

34
Garantía
La mejor aspira-
dora portátil del
mercado
ORECKMANUFACTURINGCOMPANY:(ORECKleofrecela
siguientegarantíalimitadaparaesteproductoúnicamentesihasido
compradoenORECKoenundistribuidorminoristaautorizadopor
ORECK,exclusivamenteparasuuso,noparareventa.)
ORECKrepararáoreemplazará,sincostoalguno,alcompradororiginal,
cualquierpiezaqueseencuentredefectuosa,yaseaporproblemasde
material o de mano de obra, dentro de los tres (3) años a partir de la fecha
de compra. Esta garantía limitada se aplica a un uso doméstico normal.
Cualquierusocomercialdeesteproductoanularáestagarantíalimitada.
Las piezas sujetas a un desgaste normal no están cubiertas por esta
garantía limitada.
Esta garantía limitada no se aplica a ninguna pieza sujeta a accidentes,
abuso, uso comercial, alteración, uso indebido, daños causados por
el fuego o hechos fortuitos, uso de voltajes diferentes del indicado en
laplacadelnúmerodeseriedeesteproductooenlaquetercerosno
pertenecientesaORECK,oaunCentrodeServicioautorizadopor
ORECK,hanrealizadotrabajosdereparaciónomantenimiento.
ORECKnoautorizaaningunapersonaorepresentanteaasumiruotorgar
cualquierotraobligacióndegarantíaconlaventadeesteproducto.
LagarantíalimitadadeORECKparaesteproductoesválidasólo
siustedpresentaelcomprobantedecompradeORECK,odeun
distribuidorminoristaautorizadoporORECK.Siustedcompraeste
productoencualquierotrafuente,sucompraes“TALCUAL”,locual
signicaqueORECKnoleofreceningunagarantía,yqueusted,no
Oreck, asume todo el riesgo por la calidad y el rendimiento de este
producto,incluyendoelcostototaldecualquiertrabajonecesariode
mantenimientooreparacióndecualquierdefecto.
LaresponsabilidaddeORECKporlosdañosyperjuiciosqueusted
sufra,yporcualquiercostoqueresultedeestadeclaracióndegarantía
limitada, se limitará al importe pagado por este producto en el
momentodelacompraoriginal,yORECKnoseráresponsablepor
daños directos, indirectos, derivados o incidentales causados por el
uso o por la imposibilidad de usar este producto.
Algunosestadosnopermitenlaexclusiónolimitacióndelos
dañosincidentalesoderivados,porloquelalimitaciónoexclusión
anteriores pueden no aplicarse a usted.
TODAS LAS GARANTÍAS EXPRESAS O IMPLÍCITAS PARA
ESTE PRODUCTO, INCLUIDAS LAS GARANTÍAS IMPLÍCITAS
DE COMERCIALIZACIÓN Y APTITUD PARA UN PROPÓSITO
PARTICULAR, SE LIMITAN AL PERÍODO DE VIGENCIA DE
LA GARANTÍA, Y NINGUNA GARANTÍA, YA SEA EXPRESA
O IMPLÍCITA, SE APLICARÁ DESPUÉS DE ESTE PERÍODO.
Algunos estados no permiten limitaciones en la duración de las
garantíasimplícitas,porloquelalimitaciónanteriorpuedeno
aplicarse a usted.
Esta garantía le otorga derechos legales específicos, y usted también
puedetenerotrosderechosquevaríandeestadoenestado.

Aspirateur-balai
Ultimate
Important!
Lisez attentivement ce manuel, et conservez-le comme ré-
férence ultérieure.
Guide
d’utilisation
Série 1600
36
Other Oreck accessories available at:
Other Oreck accessories available at:
Merci pour votre achat de notre aspirateur-balai Ultimate.
Cet appareil pèse environ 2,25 kg, il est livré avec une variété
d’accessoires pour tous les besoins de nettoyage. Le filtre
HEPA installé empêche la poussière et la saleté de s’échapper
de votre aspirateur.
Bienvenue dans notre programme de service à la clientèle
Call, Click.PourcontacterOreck,appelezoucliquezen
utilisant les informations suivantes :
Ap-
préciez
Cliquez
Appelez
USA: 1•800•989•3535
Canada: 1•888•676•7325
Sur le Web, allez sur le site www.oreck.com
etcliquezenhautàdroitepourtrouvezunmaga-
sin proche.

37
Contenu
Sécurité . . . . . . . . . . . . . . . . . . . . . . . . . . . . . . . 38
Avertissements généraux . . . . . . . . . . . . . . . . . 38
Fiche polarisée..........................39
Piècesetcaractéristiques . . . . . . . . . . . . . . . . . 40
Montage ...............................42
Fixationdusupportd’accessoires . . . . . . . . . . . 42
Fixationdutuyauanneléetdesaccessoires . . . 43
Fixationdelabandoulièreréglable ..........44
Utilisation ..............................45
Utilisation de l’aspirateur ..................45
Après l’utilisation de l’aspirateur ............45
Entretien...............................46
Remplacement du sac intérieur jetable . . . . . . . 46
Remplacement du micro-filtre ..............47
Remplacement du filtre HEPA . . . . . . . . . . . . . 48
Dépannage .............................49
Pièces.................................50
Garantie . . . . . . . . . . . . . . . . . . . . . . . . . . . . . . . 51

38
Sécurité
IMPORTANTES INSTRUCTIONS
DE SÉCURITÉ
!
Avertissements généraux
Lisez toutes les instructions avant d’utiliser l’aspirateur.
AVERTISSEMENT!Pourréduirelerisquededépartd’incendie,decom-
motionélectriqueoudeblessureenutilisantunappareilélectrique,des
précautions élémentaires doivent toujours être suivies, dont celles-ci :
• Nelaissezpasunappareilsanssurveillances’ilestbranché.
Débranchez-le de la prise secteur s’il n’est pas en utilisation
ou avant une intervention dessus.
• Nel’utilisezpasdehorsousurdessurfaceshumides.
• Nelaissezpasl’appareilêtreutilisécommeunjouet.Ilfaut
fairebienattentionquandilestutiliséprèsd’enfants.
• Nel’utilisezquecommeindiquédanscemanuel.N’utilisez
quedesaccessoiresrecommandésparleconstructeur.
• Nel’utilisezpasavecuncordonouuneched’alimentation
secteur présentant des dommages. Si l’appareil ne fonc-
tionne pas comme il le devrait, est tombé, a été endommagé,
laissé dehors ou plongé dans l’eau, ramenez-le à un centre
de dépannage ou appelez notre service à la clientèle : USA :
1-800-989-3535 Canada : 1-888-676-7325
• Neletirezpasetneletransportezpasparsoncordon,n’utilisez
pas ce cordon comme une poignée, ne refermez pas de port sur le
cordon, et ne le tirez pas autour de bords ou d’angles tranchants.
• Gardezlecordonàdistancedesurfaceschauffées.
• Nefaitespasroulerd’appareilsurlecordon.
• Nedébranchezpasdelaprisesecteurentirantsurlecordon.
Pour débrancher, prenez la fiche, pas le cordon.
• Nemanipuleznilafichesecteurnil’appareilavecdesmainshumides.
• N’introduisezaucunobjetdanslesouvertures.N’utilisez
pas l’appareil avec une des ouvertures obstruée. Gardez-le
exemptdepoussière,depeluche,decheveuxetdetoutcequi
pourrait réduire l’écoulement d’air.
• Maintenezlachevelure,lesvêtementslâches,lesdoigtsettoutesles
parties du corps à l’écart des ouvertures et des pièces en mouvement.
• N’utilisezpasl’appareilpourrécupérerquoiquecesoitqui
brûle ou fume, comme des cigarettes, des allumettes ou des
cendres chaudes.
• N’utilisezpasl’appareilsansqu’unensembledesacdel-
trage soit en place.

39
• Coupeztouteslescommandesavantdedébrancher.
• Faitesparticulièrementattentionquandvousnettoyezdesescaliers.
• Nerécupérezpasavecl’appareildesliquidesinammables
oucombustibles,telsquedel’essenceouunuideléger,ou
ne l’utilisez pas dans des zones où ils sont présents.
• N’utilisezpasunappareildansunespaceferméoùdesvapeurs
inammables,explosivesoutoxiquessontdégagéespardela
peinture à l’huile, du diluant à peinture, certaines substances insec-
ticides, ou dans une zone où il y a de la poussière inflammable.
• Nerécupérezpasdematièretoxique,commedel’agentblan-
chissant chloré, de l’essence, etc. avec cet appareil.
• Faitesattentionenaspirantsurlesbordsetlesfrangesdetapis.
Fiche polarisée
Unechepolariséeaunebrochearrondiequiestplusgrosse
quelabrochedroiteplate.C’estlaterminaisonarrondiequien-
tre dans la fente la plus longue de la prise secteur. Pour réduire
lerisquedecommotionélectrique,cetéquipementpossèdeune
chepolarisée(unelameestpluslargequel’autre).Cetteche
nes’adaptedansuneprisepolariséequed’uneseulefaçon.Si
la broche ne veut pas rentrer complètement dans la prise, inver-
sez la fiche. Si elle n’entre toujours pas, contactez du personnel
qualiépourinstalleruneprisesecteurcompatible;Vousne
devezenaucunefaçonaltérerlache.
CONSERVEZ CES INSTRUCTIONS
Pouruneutilisationdomestiqueuniquement
Broche arrondie
40
Pièces et
caracté-
ristiques
1. Aspirateur-balai Ultimate : Unité
de traineau d’aspirateur.
2. Bandoulièreréglable:Fixele
traîneau en positions horizon-
tale et verticale.
3. Accessoirepourtentures:
Pour nettoyer les meubles
tapissés et les draperies.
4. Accessoire large pour sols :
Outil à main pour nettoyer
les sols nus et les murs.
5. Brosseàdépoussiérer:
Le meilleur accessoire pour
les surfaces délicates.
6. Accessoiresuceurplat
: Nettoie dans les zones
étroitescommelescraque-
lures et crevasses.
7. Cordond’alimentation:
Cordon de 6 mètres pour un
branchement à distance.
8. Enroulagedecordon:
Dispositif de rangement du
cordon d’alimentation.
9. Porte-accessoires: Permet
de ranger les accessoires sur
l’aspirateur.
10.CommutateurM/A: Permet de
démarrer et d’arrêter l’aspirateur.
11. Poignée de transport avec ac-
crochages pour attaches : Per-
met de transporter l’aspirateur
etdexerlesattaches.
2
1
13
5
12
43 6
9
7
11
8
10
Montré avec
tuyau, suceur
plat et brosse
à poussière
installés
41
12. Tuyau annelé : Tuyau
exiblefacileàutiliser.
13.Entréedetuyau: Em-
placement du raccorde-
ment de tuyau.
14. Tubed’extension:
Permet de gagner 25 cm
de longueur par appui
sur un bouton.
15. Micro-ltre: Empêche
la poussière et la saleté
d’entrer dans le moteur
de l’aspirateur.
16. Trappedesacintérieur
: Permet l’accès au sac
intérieur.
17. Jointdesac: Crée une
bonne étanchéité pour
empêcher les fuites d’air.
N’enlevez pas ce joint.
18. Sacintérieurjetable: Col-
lecte les débris pendant le
processus d’aspiration.
19.FiltreHEPA: Aide à
conserver la poussière et
la saleté dans l’aspirateur
durant le nettoyage.
20.CouvercledeltreHEPA:
Le filtre HEPA est protégé
sous ce couvercle.
21.Cadredemicro-ltre:
Maintient le micro-filtre
14
17
18
15
19
Côté d’entrée du tuyau Côté du filtre HEPA
Extensionde25cm
2016
21

42
Fixation du porte-accessoires
Avant de monter le tuyau ou un des accessoires sur votre aspira-
teur,vousdevezd’abordxerleporte-accessoires.
1.Alignezlafentecentraleetlesdeuxpattessurledessousdu
porte-accessoiresavecletaquetcentraletlesdeuxfentesdu
coté de l’aspirateur.
2. Faites pivoter le porte-accessoires en l’abaissant en place.
3. Chargez les outils sur le porte-accessoire dans les fentes
extérieuresdésignées.
1
Montage
43
Fixation du tuyau annelé et des
accessoires
1. AlignezlafenteenJàl’extrémitédu
tuyauavecletaquetàl’intérieurde
l’entrée de tuyau.
2. Tournez le collier de tuyau en sens
horaire pour le verrouiller en place.
Pour le déverrouiller, tournez ce
collier en sens antihoraire.
3. Fixezletubed’extensionréglable.
Le tube et tous les accessoires
de nettoyage sont fournis pour se
verrouiller sur l’aspirateur par fric-
tion. Tournez et poussez pour bien
verrouilleràlaxation.Tournezet
tirez pour enlever.
4. Choisissezl’accessoirequevousvoulez
utiliserdansvotretâchedenettoyage.
5. Fixezcetaccessoireàl’extrémitédu
tubed’extensionaveclaméthodede
verrouillage par rotation et poussée
décrite à l’étape précédente.
Nettoie les
tentures
1
Fente en J
Collier de tuyau
Nettoie les sur-
faces délicates
2
3
5
4
Nettoie les
zones étroites
Nettoie les sols
nus et les murs
44
Fixation de la bandoulière réglable
Labandoulièrepeutsexerpourutiliserl’aspirateurenposi-
tionhorizontaleouverticaleseloncequiestpourvousleplus
confortable pour l’utilisation.
1. Pour régler la longueur de la bandoulière, desserrez les
attaches, et glissez la boucle vers le haut ou le bas selon la
longueur voulue.
2. Pour transporter l’aspirateur en position verticale : Accro-
chezchaqueextrémitédelabandoulièredanslesdeuxfentes
sur les côtés de la poignée de transport.
3. Pour transporter l’aspirateur en position horizontale : Ac-
crochezuneextrémitédelabandoulièredanslafentedela
poignée de transport, du côté de l’entrée du tuyau. Accro-
chezl’extrémitéopposedelabandoulièredanslafenteen
bas de l’aspirateur, du côté de l’entrée du tuyau.
Boucle
coulissante
Attache
desserrée
Position verticale
Position horizontale
45
Utilisa-
tion
Aprèsl’utilisationdel’aspirateur
7. Poussez le commutateur de vapeur sur la position d’arrêt (OFF).
8. Débranchez la fiche du cordon.
9. Enroulez le cordon autour du bas du support de cordon.
Remarque: L’aspirateur-balai Ultimate comporte un SYSTÈME
DE PROTECTION DU MOTEUR : Si des matières fines
commedelasuie,duciment,delapoussièredeplâtre,dela
poudre d’encre de polycopieuse, etc. sont récupérées, la surface du
sac peut s’obstruer et causer l’arrêt du moteur pour éviter sa
surchauffe. Si cela se produit, coupez l’aspirateur à son commuta-
teur et débranchez-le. S’il est plein, remplacez le sac à poussière
intérieur jetable. Vérifiez et évacuez tout bouchage éventuel dans le
tuyau ou l’accessoire. Après environ trente minutes, le moteur aura
suffisamment refroidi et l’aspirateur sera prêt à servir de nouveau.
IMPORTANT: L’appareil doit rester débranché durant trente minutes
pourquelemoteurrefroidisseetquelesystèmeserestaure.
Utilisationdel’aspirateur
1. Déroulez le cordon d’autour du bas du support de cordon.
2. Branchez la fiche du cordon dans une prise secteur.
3.Fixezl’accessoiredontvousavezbesoinpourvotretâchede
nettoyagesurletubed’extension.
4. Sinécessaireactionnezleboutonsurletubed’extension
pour augmenter la longueur.
5. Poussez le commutateur de vapeur sur la position
d’activation (ON).
6. Commencez à aspirer.
1
2
3
5
4
46
Entretien
Remplacement du sac intérieur jetable
Quand le sac à poussière intérieur jetable est plein, vous devez le
remplacerparunneuf.N’utilisezquedessacdeltrageOreck
XL véritables.
Pour obtenir les meilleurs résultats, changez le sac intérieur
remplaçablerégulièrementmêmes’iln’estpastoutàfaitplein.
Unsactrèssaleoupresquepleinaffecteralaforced’aspiration
del’appareil,etcelapeutcauserunéchauffementexcessifdu
moteur pouvant l’endommager.
Pour remplacer le sac intérieur :
1. Appuyez sur le bouton de libération de la trappe de sac intéri-
eur situé au-dessus de l’entrée de tuyau.
2. Faites pivoter cette trappe vers le bas.
3. Tirez le sac intérieur pour le sortir.
4. Insérez un nouveau sac intérieur en ajustant son rebord en
cartonentrelestaquetsàl’intérieurdusupportdesacencreux.
5. Refermez la trappe d’accès au sac intérieur.
1
2
3
47
Replacementdumicro-ltre
Le micro-filtre est une protection supplémentaire contre la pous-
sièreetlasaletéquipourraiententrerdanslemoteurd’aspiration.
Pourmaintenirvotreaspirateuraumieuxdesonfonctionnement,
vousdevezchangercemicro-ltrequandildevientsale.
Pour remplacer le micro-filtre :
1. Suivez les étapes 1-3 de la page 12, Remplacement du sac
intérieur jetable.
4. Pour enlever le micro-filtre, levez le doigt renfoncé et tirez
pour le sortir.
5. Pour cela, enlevez le micro-filtre de son cadre. Remplacez-le
parunmicro-ltreneufenl’appuyantsurletaquetsituésous
le cadre de micro-filtre.
6.Insérez le cadre de micro-filtre dans le logement, sous les
nervures situées à l’arrière du logement, et positionnez le
taquetarrièreentrelesnervures.
7. Remettez le sac intérieur à sa place, et refermez la trappe d’accès.
IMPORTANT: N’enlevez jamais le joint blanc entourant
l’ouverture pour sac intérieur. L’aspirateur perdrait de l’air et ne
fonctionnerait pas correctement.
TROU
4
5
PATTE
PATTE
7 7
6
4
TROU
48
RemplacementdultreHEPA
LeltreHEPAdoitêtreremplacétouslessixmois,ouplus
souvent si l’aspirateur est utilisé pour récupérer des particules
fines, ou dans des environnements très sales.
Pour remplacer le filtre HEPA :
1. AppuyezsurletaquetducouvercledeltreHEPA.
2. Tirez le couvercle hors de sa fente.
3. Sortez en le glissant vers le haut le filtre HEPA hors du
couvercle.
4. Insérez un nouveau filtre en alignant les fentes sur le côté du
ltreaveclestaquetssurl’intérieurducouvercledeltre.
5. Remettez l’ensemble de couvercle de filtre HEPA dans la
fente,ettournezlecouverclejusqu’àcequ’ils’insèreenplace.
1
2
3

49
Dépan-
nage
Lesproblèmesdeservicequisemblentmajeurspeuvent
souvent être résolus facilement. Vous pouvez être votre propre
dépanneur en passant ce guide en revue. Toutes les autres
interventions doivent être réalisées par un centre de réparations
agréé par Oreck.
Problème Vérication Solution
L’aspirateur ne
fonctionne pas.
• Mauvais branche-
ment.
• Pas de tension à la
prise secteur.
• Déclenchement de
la protection du
moteur
• Besoin
d’intervention de
service
• La fiche du cordon
doit être bien
enfoncée dans la
prise secteur.
• Réenclenchez le
disjoncteur en
amont, ou changez
le fusible. Si vous
avez besoin d’aide,
contactez un
électricien profes-
sionnel.
• Voyez la section
Système de protec-
tion du moteur en
page 45.
• Allez au centre
de réparation le
plus proche ou
contactez-le.
L’appareil
n’aspire pas ou
peu.
• Le sac intérieur
jetable est plein.
• Le tuyau ou le
tubed’extension
est bouché.
• Il y a une fuite
d’air due à un
jointmanquantou
endommagé.
• Remplacez le sac
intérieur jetable.
Voyez la section
Remplacement
du sac intérieur
jetable en page 46.
• Enlevez les ob-
structions.
• Remplacez le joint
blanc de sac.
Le tube
d’extensionet
les accessoires
ne restent pas
solidaires.
Le bon verrouillage
par friction n’est pas
réalisé.
Poussez et tournez
les accessoires
ensemble pour une
bonnexation.

50
Pièces
Pièce Numéro
Sacs intérieurs de rechange en papier
(paquetde12avecunmicro-ltre)
PKBB12DW
Sacs intérieurs de rechange pour lutte
contrelesodeurs(paquetde12avecun
micro-filtre)
PKBB12OF
Filtre HEPA de rechange HF1000
Micro-filtre de rechange 72005-01
Joint blanc de sac de rechange 72017-02
Tous les accessoires et les pièces de rechange sont vendus
séparément. Pour commander, appelez notre ligne spéciale de
service à la clientèle, ou visitez notre site Web. Veuillez avoir
souslamainlaréférencedemodèledel’étiquettesignalétique
en bas de l’unité.

51
Garantie
Aspirateur-balai
Ultimate
ORECKMANUFACTURINGCOMPANY:(ORECKvousprocure
lagarantielimitéequisuitpourceproduituniquements’ilaétéà
l’origineachetépourêtreutilisé,etnonrevendu,chezORECKouun
détaillantORECKagréé.)
ORECKrépareraouremplacera,sansfraispourl’acheteurd’origine,
toutepièceavéréedéfectueusepourcausedematériauxoudemain-
d’œuvre, pendant trois (3) année suivant la date d’achat. Cette garantie
limitées’appliquepouruneutilisationdomestiquenormale.Toute
utilisation commerciale de ce produit annulerait cette garantie limitée.
Les pièces sujettes à une usure normale ne sont pas couvertes par
cette garantie limitée.
Cettegarantielimitéenes’appliquepasàtoutepièceayantsubi
: accident, abus, utilisation commerciale, altération, mésusage,
dommages dus au feu ou à une catastrophe naturelle, alimentation par
destensionsautresquecellesdelaplaquesignalétique,intervention
surleproduitparuntiersautrequ’ORECKouuncentrede
dépannage agréé par l’usine.
ORECKn’autoriseaucunepersonneoureprésentationàassumerouà
garantir toute obligation de garantie avec la vente de ce produit.
Lagarantielimitéed’ORECKn’estvalidequesivousavezconservé
lapreuvedevotreachatchezORECKouundétaillantORECK
agréé.Sivousavezachetéceproduitd’uneautresourcequelconque,
vousl’avezacheté“TELQUEL”,caquisigniequ’ORECKne
vousaccordepasdegarantie,etquec’estvous,etnonORECK,qui
assumeratoutlerisquedelaqualitéetdelaperformancepource
produit, y compris le coût complet de toutes les interventions ou
réparations nécessaires pour tous défauts.
Laresponsabilitéd’ORECKencasdedommagespourvouspour
toutes les sortes de coûts venant des clauses de cette garantie limitée
sera limitée au montant payé pour ce produit au moment de son achat
originel,etORECKneseraresponsabled’aucunsdommages,directs
ouindirects,consécutifsouannexes,venantdel’utilisationdece
produit ou de l’impossibilité de l’utiliser.
Certainesprovincesnepermettentpaslalimitationoul’exclusion
desdommagesconsécutifsouannexes,decefaitlalimitationou
exclusionprécédentepeutnepass’appliquerdansvotrecas.
TOUTES LES GARANTIES EXPLICITES OU IMPLICITES
POUR CE PRODUIT, INCLUANT LES GARANTIES
IMPLICITES DE VALEUR MARCHANDE ET D’ADÉQUATION
À UNE FINALITÉ SPÉCIFIQUE, SONT LIMITÉES EN DURÉE
À LA PÉRIODE DE GARANTIE, ET AUCUNE GARANTIE,
EXPLICITE OU IMPLICITE, NE SERA APPLICABLE APRÈS
CETTE PÉRIODE.
Certaines provinces ne permettent pas de limitations sur la durée des
garanties implicites, de ce fait la limitation précédente peut ne pas
s’appliquerdansvotrecas.
Cettegarantievousdonnedesdroitslégauxspéciques,etvouspouvez
égalementavoird’autresdroitsquivarientd’uneprovinceàl’autre.

© 2011 Oreck Holdings, LLC.
Allrightsreserved.Allmarks,text,logos,product
configurations and registered trademarks are owned and used
under the authority of Oreck Holdings, LLC.
73136-01 REV A 04/11 R-10315