

2
LICENSE
LICENSE
Manufactured under license from Dolby Laboratories. Dolby and
the double-D symbol are trademarks of Dolby Laboratories.
ABOUT DIVX VIDEO: DivX
®
is a digital video format created by
DivX, LLC, a subsidiary of Rovi Corporation. This is an ofcial
DivX Certied
®
device that has passed rigorous testing to verify
that it plays DivX video. Visit divx.com for more information and
software tools to convert your les into DivX videos.
ABOUT DIVX VIDEO-ON-DEMAND: This DivX
Certied
®
device must be registered in order to play purchased
DivX Video-on-Demand (VOD) movies. To obtain your registration
code, locate the DivX VOD section in your device setup menu.
Go to vod.divx.com for more information on how to complete your
registration.
DivX Certied
®
to play DivX
®
video up to HD 1080p, including
premium content.
DivX
®
, DivX Certied
®
and associated logos are trademarks of
Rovi Corporation or its subsidiaries and are used under license.
Covered by one or more of the following U.S. patents: 7,295,673;
7,460,668; 7,515,710; 7,519,274
The terms HDMI and HDMI High-Denition Multimedia Interface,
and the HDMI logo are trademarks or registered trademarks of
HDMI Licensing LLC in the United States and other countries.
For DTS patents, see http://patents.dts.com. Manufactured under
license from DTS Licensing Limited. DTS, the Symbol, & DTS
and the Symbol together are registered trademarks, and DTS
2.0+Digital Out is a trademark of DTS, Inc. © DTS, Inc. All Rights
Reserved.
This device meets the EMC requirements for home appliances (Class B) and is
intended for home usage. This device can be used in all regions.
•The product images and On-Screen Display (OSD) in this manual are examples to
help you understand how to operate the product, so they may be different from the
actual Laser TV.
NOTE
3
SAFETYINSTRUCTIONS
SAFETYINSTRUCTIONS
Please take note of the safety instructions to prevent any potential accident or misuse of
the Laser TV.
• Safety precautions are given in two forms, i.e. Warning and Caution as detailed below.
WARNING: Failure to follow the instructions may cause serious injury and even
death.
CAUTION: Failure to follow the instructions may cause injury to persons or damage
to the product.
• Read the owner’s manual carefully and keep it to hand.
WARNING/CAUTION
RISK OF ELECTRIC SHOCK
DO NOT OPEN
TO REDUCE THE RISK OF
ELECTRIC SHOCK DO NOT
REMOVE COVER (OR BACK).
NO USER SERVICEABLE PARTS
INSIDE. REFER TO QUALIFIED
SERVICE PERSONNEL.
The lightning ash with
arrowhead symbol, within an
equilateral triangle, is
intended to alert the user to the
presence of uninsulated “dangerous
voltage” within the product’s
enclosure that may be of sufcient
magnitude to constitute a risk of
electric shock to persons.
The exclamation point within
an equilateral triangle is
intended to alert the user to
the presence of important operating
and maintenance (servicing)
instructions in the literature
accompanying the appliance.
WARNING/CAUTION
TO REDUCE THE RISK OF FIRE
AND ELECTRIC SHOCK, DO NOT
EXPOSE THIS PRODUCT TO RAIN OR
MOISTURE.
Readtheseinstructions.
Keeptheseinstructions.
Heedallwarnings.
Followallinstructions.
IndoorInstallation
WARNING
• Do not place the product in direct
sunlight or near heat sources such as
radiators, fires, stoves, etc.
– This may cause re.
• Do not place inflammables such as
flammable spray near the product.
– This may cause re.
• Do not allow children to cling to or climb
up to the product.
– This may cause the product to fall,
causing injury or death.

4
SAFETYINSTRUCTIONS
• Do not place the product directly on a
carpet, rug or place where ventilation
is restricted such as a book shelf or
closet.
– This may cause the product’s
internal temperature to rise and
cause re.
• Do not place the product close to
sources of steam, oil or oil mist, such
as humidifiers and kitchen counters.
– Failure to do so may result in re,
electric shock, or corrosion.
• Do not install the product onto a wall or
ceiling that is close to sources of oil or
oil mist.
– The product may be damaged and
fall, resulting in serious injury.
• Do not place the product where it might
be exposed to dust.
– This may cause re.
• Do not use the product in a damp
place, such as a bathroom or a place
exposed to the wind and rain, where it
is likely to get wet.
– This may cause re or electric shock.
• Do not allow a tablecloth or curtain to
block the vents.
– This may cause the internal
temperature of the product to rise
and cause re.
• The distance between the air vent
of the product and the wall should
be more than 30 cm for ventilation
purposes.
– Otherwise, this may cause the
internal temperature of the product to
rise and cause re.
• When installing the product on a ceiling,
a professional technician should install
it using the authorized tools. If installed
improperly, the product may fall.
– This may cause personal injury or
property damage. For installation
of the product, please contact the
customer support center.
• If you use a ceiling mounting device,
use adhesive to prevent loosening of
screws, or apply oil or lubricant to the
product, this may cause the case to
crack and the product to fall.
• This may also cause serious personal
injury to the person below the device
(if any) and damage to the product as
well.
CAUTION
• When installing the product on a table
or shelf, be careful not to place it near
the edge.
– This may fall causing injury to
persons or the product malfunction.
Make sure that you use the cabinet
or stand that ts the product.
• Turn off the product, disconnect it from
the power supply and all connected
apparatus before moving it.
– Otherwise, the power cord may be
damaged causing re or electric
shock.
• Do not place the product on an
unstable or vibrating surface such as a
wobbly shelf or a slope.
– It may fall or ip and cause injury.
• Be careful not to tip or drop the product
over when connecting external devices
to the product.
– This may cause injury to persons or
damage to the product.

5
SAFETYINSTRUCTIONS
Power
WARNING
• The appliance coupler is used as the
disconnect device.
– Please make sure the device is
installed near the wall outlet to which
it is connected and that the outlet is
easily accessible.
• The grounding wire should be
connected.
– Be sure to connect the grounding
wire to avoid damage to the product
or an electric shock when there is a
short circuit.
• If it is not possible to ground the unit,
purchase a circuit breaker and connect
the product to its wall outlet.
• Do not try to ground the product to the
gas pipe, water pipe, lightning rod, or
telephone line, etc.
• The power plug should be inserted fully
into the power outlet.
– An unstable connection may cause
re.
• Do not place heavy objects on the
power cord.
– This may cause re or electric shock.
• Never touch the power plug with a wet
hand.
– This may cause electric shock.
• Do not plug too many devices into one
multi-power outlet.
– This may cause re due to the power
outlet overheating.
• Remove dust or contaminants around
power plug pins or wall outlets.
– Failure to do so may cause re.
• To turn off the main power, remove the
power plug, which should be positioned
so it is easy to access for operation.
CAUTION
• Hold the plug firmly when unplugging.
– A broken wire in the cord may cause
re.
• Ensure the power cord and plug are
not damaged, modified, severely bent,
twisted, pulled, sandwiched or hot. Do
not use the product if the power outlet
is loose.
– This may cause re or electric shock.
• Keep the power cord away from any
heating devices.
– The cord coating may melt and
cause re or electric shock.
• Place the product where people will not
trip over or tread on the power cord to
protect the power cord and plug from
any damage.
– This may cause re or electric shock.
• Do not turn the product on or off
by plugging in the power plug or
unplugging it from the wall outlet.
(Do not use the power plug as a
switch.)
– This may cause electric shock or
product malfunction.
• Do not insert a conductor into the other
side of the wall outlet while the power
plug is inserted into the wall outlet.
• In addition, do not touch the power plug
immediately after it is disconnected
from the wall outlet.
– This may cause electric shock.
• Only use the official power cord
provided by LG Electronics. Do not use
other power cords.
– This may cause re or electric shock.

6
SAFETYINSTRUCTIONS
WheninUse
WARNING
• Do not place anything containing liquid
on top of the product, such as a vase,
flower pot, cup, cosmetics, or medicine;
or ornaments, candles, etc.
– This may cause re or electric shock,
or injury due to falling.
• In the event that there is a heavy
impact on the product or the cabinet
is damaged, switch it off, unplug it
from the power outlet and contact an
authorized service center.
– Failure to do so may cause re or
electric shock.
• Do not insert pieces of metal, such
as coins, hairpins or metal debris, or
flammable materials, such as paper or
matches, into the product.
– This may cause re or electric shock.
• In the event that liquid or a foreign
object falls into the product, switch it off
and unplug it from the power outlet and
contact our service center.
– Failure to do so may cause re or
electric shock.
• Make sure that a child does not swallow
the batteries when you replace the old
remote control batteries with new ones.
Keep batteries out of reach of children.
– If a child swallows a battery, consult
a doctor immediately.
• Do not look directly into the lens when
the product is in use. The strong light
may damage your eyes.
• When the product is on or has just
been turned off, avoid touching the air
vent because it will be very hot.
• If there is a gas leak, do not touch
the wall outlet. Open the window for
ventilation.
– A spark may cause a re or burn.
• Never touch the product or power cord
during thunder or lightning.
– This may cause electric shock.
• Do not use the product near electronic
devices that generate a strong
magnetic field.
• Do not wear the plastic package used
to pack the product around your head.
– This may cause suffocation.
• Do not touch the product with your
hand for a long time when it is running.
• When you play a game by connecting
a game console to a product, it is
recommended that you maintain a
distance of more than 1.5 times the
diagonal length of the screen.
• Make sure that the length of connecting
cable is long enough.
– Otherwise, the product may fall
causing personal injury or damage to
the product.
CAUTION
• Do not place a heavy object on the
product.
– It may fall down and cause physical
injury.
• Be careful to protect the lens from
heavy impact during transportation.
• Do not touch the cover glass of the
product.
– Otherwise, the cover glass may be
damaged.
• Do not use any sharp tools on the
product, such as a knife or hammer,
because this may damage the casing.

7
SAFETYINSTRUCTIONS
• In the event that no image appears
on the screen or no sound is heard,
stop using the product. Switch off the
product, unplug it from the power outlet
and contact our service center.Failure to
do so may cause fire or electric shock.
• Do not drop anything onto the product
or apply heavy pressure to it.
– This may cause injury to persons or
the product malfunction.
• It is recommended that you maintain a
distance of more than 1.5 - 3 times the
diagonal length of the screen between
your eyes and the screen.
– If you watch the screen at a close
distance for a long time, your
eyesight may become worse.
• When closing the door of the product,
be careful not to jam your finger.
– This may cause injury to persons or
the product malfunction.
• Do not block the light emitted from the
product’s lens with a book or a cover.
Long exposure to the light may melt or
burn the object, possibly causing fire.
In addition, the lens may be overheated
and the product may be damaged
by the reflected light. Stop projecting
temporarily or turn off the power.
• Do not start the product with volume high.
– High volume may damage hearing. Be
sure to lower the volume before turning
off the product. Raise the volume
gradually after turning on the product.
• When you go out, place the product out
of reach of pets or other animals, and
unplug it from the wall outlet.
– Otherwise, it may cause short circuit
and re.
• Do not use high voltage electrical
equipment near the projector, (e.g. bug
zapper).
– This may result in product
malfunction.
Cleaning
WARNING
• Do not spray water directly to the
product when cleaning. Do not allow
water to get into the product or do not
allow it to get wet.
– This may cause re or electric shock.
• In the event that smoke or a strange
smell comes out from the product or a
foreign object falls into the product, stop
using it. Switch off the product, unplug
it from the power outlet and contact our
service center.
– Otherwise, this may cause re or
electric shock.
• To remove dust or stains on the cover
glass, use an air spray or use a swab
or soft cloth to wipe the glass gently.
CAUTION
• Contact your seller or our service
center once a year to clean the internal
parts of the product.
– If you do not clean the Laser TV
for a long period of time, dust will
accumulate, which may cause re or
damage to the product.
• When cleaning plastic parts, such as
the product case, unplug the power
first and wipe with a soft cloth. Do not
spray with water or wipe with a wet
cloth. When cleaning the plastic parts,
such as the product case, do not use
cleanser, automobile or industrial
shiner, abrasive or wax, benzene,
alcohol, etc., which can damage the
product.
– This can cause re, electric shock
or product damage (deformation,
corrosion and damage).

8
SAFETYINSTRUCTIONS
Others
WARNING
• Only a qualified technician can
disassemble or modify the product.
For inspection, adjustment, or repair,
contact your seller or our service center.
– Otherwise, this may cause re or
electric shock.
• Do not stare directly into lens when in
operation, eye damage can occure.
• No user serviceable parts inside unit.
High voltage parts can cause shock
and even electrocution.
• Proper ventilation required, do not block
airflow around unit.
Doing so can cause injury and internal
overheating.
• To prevent damage to lamp, unit must
remain plugged in for approximately 3
minutes after power down to allow for
proper cool down (not applicable on
LED models).
• Do not touch the lens; doing so can
result in burns or damage to lens.
Lens and unit may be HOT during and
immediately after use.
Use caution when handling unit,
allowing for proper cool down.
• Only use a grounded electrical outlet.
• Do not insert anything into or cover up
the exhaust vents.
– This may result in re or electric
shock.
• Follow all maintenance guidelines
for optimal use; service only at an
authorized service center.
• Lamp contains mercury and as such
must be disposed of according to local,
state and federal laws (not applicable
on LED models).
CAUTION
• Make sure you use the same type of
new battery for replacement.
• Do not mix new batteries with old ones.
– Burst or leaking batteries may cause
re or electric shock.
• Unplug the power cord if the product is
not used for a long period.
– Accumulated dust may cause
electric shock due to overheating,
ignition, or poor insulation, or re due
to a short circuit.
• Do not charge the battery using any
devices other than the one provided
with the product.
– This may cause damage to the
battery or re.
• Dispose of the used battery properly.
– Failure to do so may cause
explosion or re. The correct method
of disposal may vary depending on
your country or region. Dispose of
the battery pack according to the
appropriate instructions.
• Do not throw or disassemble the
battery.
– This may cause re or explosion due
to damage to the battery.
• Always use batteries approved and
certified by LG Electronics.Failure to do
so may cause fire or explosion.
• Store the battery away from metallic
objects, such as keys and paper clips.
– Excess current may cause a rapid
increase in temperature, resulting in
damage to battery, re or burns.
• Do not store the battery near any heat
source, such as a heater. This may
cause fire or product malfunction.
9
SAFETYINSTRUCTIONS
• Do not store it at temperatures higher
than 60 °C or in high humidity.
– This may cause explosion or re.
• Keep the battery out of reach of
children.
– Failure to do so may cause personal
injury or product malfunction.
• Make sure that the battery is installed
correctly.Failure to do so may cause
explosion or fire.
• The battery contains lithium-ion, so it
must be handled with care.
– Failure to do so may cause
explosion or re.
Antenna
WARNING
• If you are using an outdoor antenna,
please install it away from electrical
wires to make sure it does not touch
any nearby wires even when it falls
down due to heavy wind.
• Failure to do so may cause electric
shock or physical injury.
CAUTION
• To prevent any raindrops flow into the
product, bend the outdoor antenna wire
where it comes indoors.
• Raindrops flowing into the product may
cause fire or electric shock.
Antennagroundingaccordingtothe
NationalElectricalCode,ANSI/NFPA70
Antenna Lead in Wire
Grounding Conductor
(NEC Section 810-21)
Antenna Discharge Unit
(NEC Section 810-20)
Power Service
GroundingElectrode
System (NEC Art
250, Part H)
NEC:NationalElectricalCode
Ground Clamp
Electric Service
Equipment
Ground Clamp
ForUSA
NOTE TO CABLE/TV INSTALLER
This reminder is provided to call the
CATV system installer’s attention to
Article 820 - 40 of the National Electric
Code (U.S.A.). The code provides
guidelines for proper grounding and, in
particular, species that the cable ground
shall be connected to the grounding
system of the building, as close to the
point of the cable entry as practical.
EyeCareSensor
WARNING
• Do not poke the sensor with a sharp
object.
– This can damage the sensor and
cause it to malfunction.
Laser
WARNING
• This product contains a laser module.
Do not disassemble or modify the
product as this could be dangerous.
• You risk being exposed to laser
radiation if you manipulate or alter the
product in a way not specified in the
user manual.
• To protect your eyes avoid looking
directly into the bright light from the unit.
• Prevent babies and children or anyone
with a disease or injury from looking at
the light.
• Please kindly take a 5 W 440 - 460 nm
Laser protective goggles when you
need direct access the Light, and
do not use sun glasses for the eye
protection.
10
SAFETYINSTRUCTIONS
CAUTION
• Use of controls or adjustments or
performance of procedures other than
those specified herein may result in
hazardous radiation exposure.
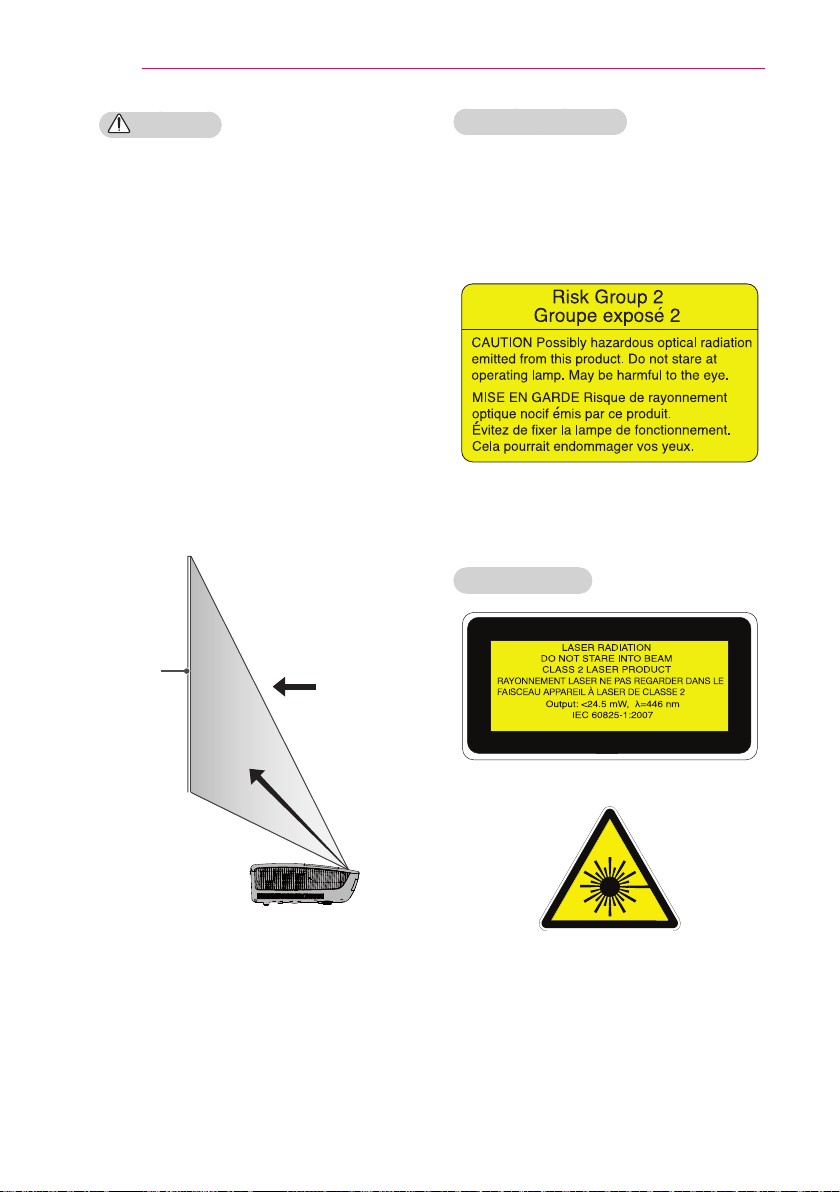
• This product is a class 2 laser device
that meets IEC 60825-1.
LaserTVstandard:class2laserproduct
• Wavelength: 446 nm
• Wave source : Approximately 0.2 mW
• Light output: < 24.5 mW
• Radiation angle: 66 °
• Built-in laser standard: Class 3B laser
module
• Wavelength: 440 nm - 455 nm
• Light output: approx. 3.5 W x 24
Viewing direction
Laser beam
direction
Screen
LASERRADIATION
DO NOT STARE INTO BEAM CLASS 2
LASER PRODUCT
– This laser Laser TV is a Risk Group 2
device that meets safety standard IEC
62471 standard.
The label of Laser TV is attached to the
top of the product.
LaserTVLabel
Laser warning symbol and danger symbol

11
SAFETYINSTRUCTIONS
USA
FederalCommunicationsCommission
(FCC)Statement
You are cautioned that changes or
modications not expressly approved by
the part responsible for compliance could
void the user’s authority to operate the
equipment.
This equipment has been tested and
found to comply with the limits for a Class
B digital device, pursuant to part 15 of
the FCC rules. These limits are designed
to provide reasonable protection against
harmful interference in a residential
installation. This equipment generates,
uses and can radiate radio frequency
energy and, if not installed and used
in accordance with the instructions,
may cause harmful interference to
radio communications. However, there
is no guarantee that interference will
not occur in a particular installation.
If this equipment does cause harmful
interference to radio or television
reception, which can be determined
by turning the equipment off and on,
the user is encouraged to try to correct
the interference by one or more of the
following measures:
- Reorient or relocate the receiving
antenna.
- Increase the separation between the
equipment and receiver.
- Connect the equipment into an outlet on
a circuit different from that to which the
receiver is connected.
- Consult the dealer or an experienced
radio/TV technician for help.
This device complies with Part 15 of the
FCC Rules. Operation is subject to the
following two conditions:
1) this device may not cause harmful
interference, and
2) this device must accept any
interference received, including
interference that may cause undesired
operation of the device.
CAUTION : Any changes or modications
not expressly approved by the party
responsible for compliance could void the
user’s authority to operate this equipment.
FCCRadioFrequency
InterferenceRequirements
(forUNIIdevices)
High power radars are allocated as
primary users of the 5.25 to 5.35 GHz
and 5.65 to 5.85 GHz bands. These radar
stations can cause interference with and/
or damage this device. This device cannot
be co-located with any other transmitter.
FCCRFRadiationExposure
Statement:
This equipment complies with FCC
radiation exposure limits set forth for an
uncontrolled environment. This transmitter
must not be co-located or operating in
conjunction with any other antenna or
transmitter.
This equipment should be installed and
operated with minimum distance 20 cm
between the radiator and your body. End
users must follow the specic operating
instructions for satisfying RF exposure
compliance.

12
SAFETYINSTRUCTIONS
CANADA
IndustryCanadaStatement:
This device complies with RSS-210 of
the Industry Canada Rules. Operation is
subject to the following two conditions:
1) this device may not cause interference
and
2) this device must accept any
interference, including interference that
may cause undesired operation of the
device.
Avisd’IndustrieCanada:
Cet appareil est conforme à la norme
CNR-210 des règlements d’Industrie
Canada. Son fonctionnement est sujet
aux deux conditions suivantes :
1) Cet appareil ne doit pas provoquer
d’interférences et
2) Cet appareil doit accepter toutes les
interférences, y compris celles pouvant
entraîner son dysfonctionnement.
ICRadiationExposure
Statement:
This equipment complies with IC
radiation exposure limits set forth for an
uncontrolled environment. This equipment
should be installed and operated with
minimum distance 20 cm between the
radiator & your body.
NOTE: THE MANUFACTURER IS NOT
RESPONSIBLE FOR ANY RADIO OR
TV INTERFERENCE CAUSED BY
UNAUTHORIZED MODIFICATIONS
TO THIS EQUIPMENT. SUCH
MODIFICATIONS COULD VOID THE
USER’S AUTHORITY TO OPERATE
THE EQUIPMENT.
Avisd’IndustrieCanada
surl’expositionaux
rayonnements
Cet appareil est conforme aux limites
d’exposition aux rayonnements d’Industrie
Canada pour un environnement non
contrôlé. Il doit être installé de façon
à garder une distance minimale de
20 centimètres entre la source de
rayonnements et votre corps.
REMARQUE : LE FABRICANT
N’EST PAS RESPONSABLE DES
INTERFÉRENCES
RADIOÉLECTRIQUES CAUSÉES
PAR DES MODIFICATIONS NON
AUTORISÉES APPORTÉES À
CET APPAREIL. DE TELLES
MODIFICATIONS POURRAIENT
ANNULER L’AUTORISATION
ACCORDÉE À L’UTILISATEUR DE
FAIRE FONCTIONNER L’APPAREIL.

13
SAFETYINSTRUCTIONS
Forproducthavingthe
wirelessfunctionusing
5GHzfrequencybands
Warning
i. the device for operation in the band
5150–5250 MHz is only for indoor
use to reduce the potential for harmful
interference to co-channel mobile satellite
systems;
ii. the maximum antenna gain permitted
for devices in the bands 5250–5350 MHz
and 5470–5725 MHz shall comply with
the e.i.r.p. limit; and
iii. the maximum antenna gain permitted
for devices in the band 5725–5825
MHz shall comply with the e.i.r.p. limits
specied for point-to-point and non point-
to-point operation as appropriate.
iv. High-power radars are allocated as
primary users (i.e. priority users) of the
bands 5250–5350 MHz and 5650–5850
MHz and that these radars could cause
interference and/or damage to LE-LAN
devices.
Avertissement
i. les dispositifs fonctionnant dans la
bande 5 150-5 250 MHz sont réservés
uniquement pour une utilisation à
l’intérieur an de réduire les risques de
brouillage préjudiciable aux systèmes
de satellites mobiles utilisant les mêmes
canaux;
ii. le gain maximal d’antenne permis pour
les dispositifs utilisant les bandes 5 250-
5 350 MHz et 5 470-5 725 MHz doit se
conformer à la limite de p.i.r.e.;
iii. le gain maximal d’antenne permis (pour
les dispositifs utilisant la bande 5 725-
5 825 MHz) doit se conformer à la limite
de p.i.r.e. spéciée pour l’exploitation
point à point et non point à point, selon
le cas.
iv. Radars de haute puissance sont
désignés utilisateurs principaux (c.-à-d.,
qu’ils ont la priorité) pour les bandes
5 250-5 350 MHz et 5 650-5 850 MHz
et que ces radars pourraient causer du
brouillage et/ou des dommages aux
dispositifs LAN-EL.
LGRecyclingPolicy
LG Electronics offers a customized
e-waste take-back & recycling service that
meets local needs and requirements in
the countries where e-waste regulations
are in place, and also provides product
and packaging take-back & recycling
service voluntarily in some countries.
LG Electronics evaluates products’
recyclability at the design step using
LG’s recyclability evaluation tool, with
the goal of improving recyclability where
practicable. Through these activities,
LG seeks to contribute to conserving
natural resources and protecting the
environment.
For more information about the LG
Recycling Policy, please visit our
global site at http://www.lg.com/global/
sustainability/environment/take-back-
recycling

14
CONTENTS
CONTENTS
LICENSE 2
SAFETYINSTRUCTIONS 3
PREPARATION 17
Accessories 17
OptionalAccessories 18
PartsandComponents 19
– Front 19
– Back 20
StatusIndicator 21
Installation 22
– Installation Precautions 22
– Projection Distance per
Screen Size 23
– Kensington Security System 24
MAGICREMOTECONTROL 25
– To Register the Magic Remote
Control 27
– To Re-register the Magic Remote
Control 27
– Using the Magic Remote Control 28
SETTINGUPTHETV 29
ConnectingtheAntennaorCable 29
WatchingLaserTV 30
– Initial Setup 30
– Watching with the TV 33
ToSetChannel 33
– To View Program Information 33
– To set favorite channels 34
– To use Favorite 34
AdditionalOptions 34
– Adjusting Aspect Ratio 34
– Using the Edge Adj Function 35
– Changing Input Device 37
– To Use SIMPLINK 38
UsingtheQuickMenu 40
ToSetSound 41
– To Set Sound Output 41
– To connect and use a Bluetooth
headset 43
– Using the Multi Audio 43
ENTERTAINMENT 44
ToUseSmartFeatures 44
– To Use Home Screen 44
– To Use MY APPS 45
– To Edit Items in MY APPS 45
ToConnectNetwork 46
– One-click Network Connection 46
– To Connect to a Network Through
Set Expert 46
– To Use the Wi-Fi Direct Function 46
– To Use the Miracast™ /
Intel’s WiDi Function 47
– Tips for Network Settings 48
TagOn 49
– What is Tag On? 49
– To Start Tag On For the First Time 49
– To use the Tag On 50
SMARTSHARE 51
BeforeUsing 51
– Connecting a USB Device 51
– Removing a USB Device 51
TouseSmartShare™ 53
– Watching the Videos 54
– Viewing the Photos 56
– Listening to Music 57
– To Set SmartShare™ Related
Functions 58

15
CONTENTS
ToUsetheLGCloud 61
– What is LG Cloud? 61
– To Use LG Cloud 61
ToconnectDLNA 63
– To Connect a DLNA-authenticated
Smartphone 63
– To connect a DLNA DMR
(Digital Media Renderer) 63
– To connect a DLNA DMP
(Digital Media Player) 64
– SmartShare™ PC SW Installing
and Setting 64
– In Case of a DLNA Malfunction 65
ToUseAPremiumService 66
– To Use Paid Content 67
– To Reset Premium 67
TouseLGSmartWorld 68
ToUseSearchFunction 69
ToUsetheVoiceRecognition
Function 70
– Using this Function
Through Search 70
– Using this Function on the Internet 70
ToUseVoiceMateFunction 71
– What Is Voice Mate? 71
– How to Use Voice Mate? 72
– What Are Other Functions
of Voice Mate? 72
WhatIsOnNow? 73
– To Use On Now 73
ToUseInternet 75
FrequentlyAskedQuestionsfor
SmartLaserTV 76
USINGADVANCEDFUNCTIONS 80
ToUseScreenRemote 80
– To Use Screen Remote 80
– To Control a Device Connected
to the Porjector Using the Screen
Remote 80
ToUsetheUniversalControl
function 81
ToControlaLaserTVUsing
aSmartphone 82
ToUseaUSBInputDeviceOn
aLaserTV 83
– To Use a USB Wired/wireless
Mouse 83
– To Use a USB Wired/wireless
Keyboard 83
CUSTOMIZINGSETTINGS 84
SETTINGS 84
PICTURESettings 85
SOUNDSettings 90
CHANNELSettings 93
TIMESettings 94
LOCKSettings 95
OPTIONSettings 97
NETWORKSettings 103
SUPPORT 104
CONNECTINGDEVICES 105
ConnectinganHDReceiver,
DVDPlayer,orVCR 106
– HDMI connection 106
– HDMI to DVI Connection 107
ConnectingExternalDevices 108
– AV Connection 108
– Component Connection 108
ConnectingaPC 109
– HDMI Connection 109

16
CONTENTS
ConnectingHeadphones 110
ConnectingaLaptop 111
– HDMI connection 111
ConnectingaDigitalAmp 112
UsingtheMirroringFunctionof
aMobilePhone 113
– MHL Connection 113
SERIALCOMMUNICATION
FUNCTION 114
UsingSerialCommunication 114
EstablishingSerial
Communication 114
CommunicationProtocol 115
KeyCode 122
MAINTENANCE 123
Cleaning 123
– Cleaning Cover Glass 123
– Cleaning the Laser TV Case 123
INFORMATION 124
ToupdateLaserTVsoftware 124
Beforereportingaproblem,
checkthefollowing: 125
– General 125
– Picture 125
– Sound 126
– PC connection problem 127
– Problems replaying movies in My
Media 128
SPECIFICATIONS 129
17
PREPARATION
PREPARATION
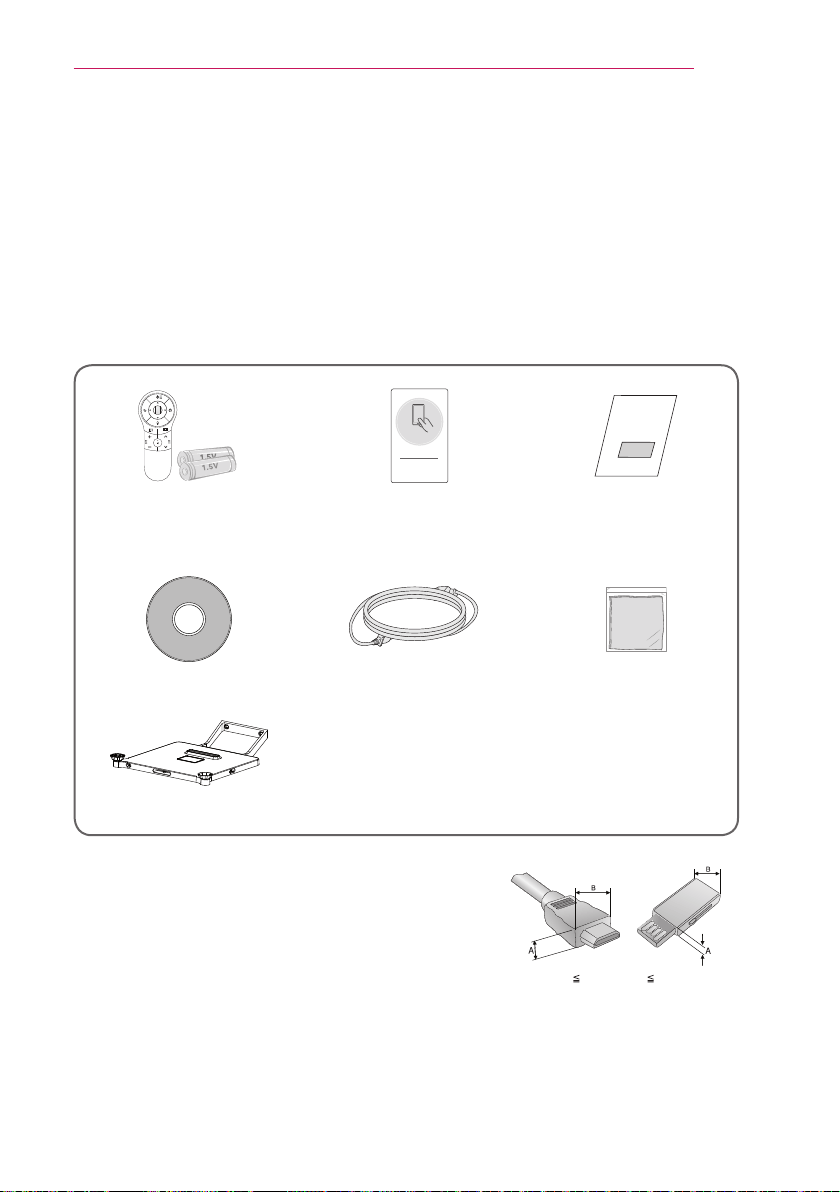
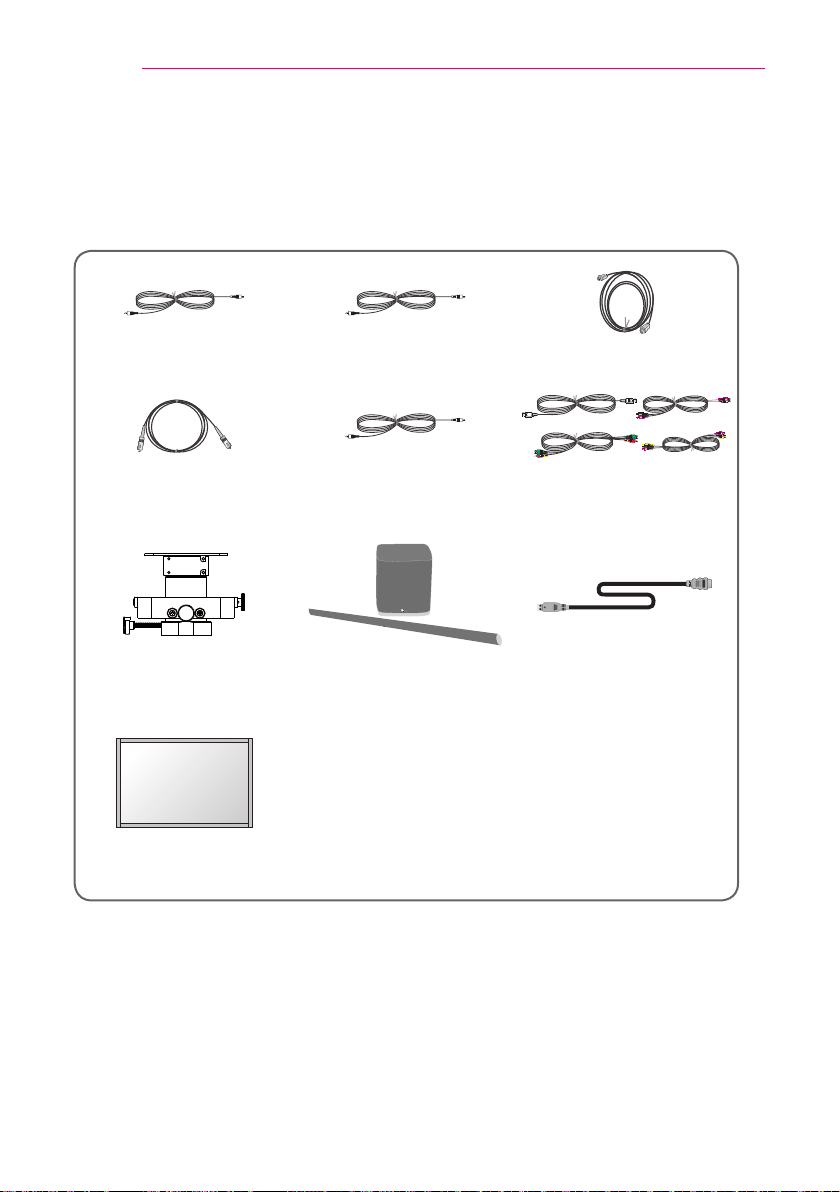
Accessories
Check the accessories provided with the product.
The picture may be different from the actual product.
Accessories are subject to change without prior notice in order to improve the performance
of the product. New accessories may be added or old ones may be removed.
CH
VOL
BACK SMART
/Q.MENU
Tag On
Magic Remote Control
Two AA Batteries
Tag On User Guide
Owner’s Manual CD Power Cord Polishing Cloth
Ez Bracket (AJ-BB105)
• When connecting an HDMI or USB cable, or
connecting a USB flash drive to the HDMI or USB port,
use a product that has a width of 24 mm or less and a
height of 10 mm or less. If the USB cable or USB flash
drive does not fit the USB ports of the Laser TV, use
an extension cable that supports USB 2.0.
A
10 mm
B
24 mm
• Use a certified cable with the HDMI logo attached.
• If you do not use a certified HDMI cable, the screen may not display or a connection
error may occur. (Recommended HDMI cable types)
– High-Speed HDMI
®
/
TM
Cable
– High-Speed HDMI
®
/
TM
Cable with Ethernet
18
PREPARATION
OptionalAccessories
To purchase optional accessories, visit an electronics store or an online shopping site.
Optional extras are subject to change without prior notice in order to improve the product
quality, and new optional accessories may be added.
Video Cable Audio Cable HDMI Cable
Optical Cable
PC Audio Port
Connection Cable
Cables for Connecting
External Devices
Ceiling Bracket
(AJ-CB100)
Sound Bar MHL Cable
Laser TV Projection
Screen (SC200)
19
PREPARATION
PartsandComponents
• This Laser TV is manufactured using high-precision technology. You may, however,
see tiny black dots and/or bright spots that continuously appear on the screen. This is a
normal result of the manufacturing process and does not indicate a malfunction.
• Ceiling light glare depends on the light levels in a room and the distance between the
product and the ceiling. It is not a product defect.
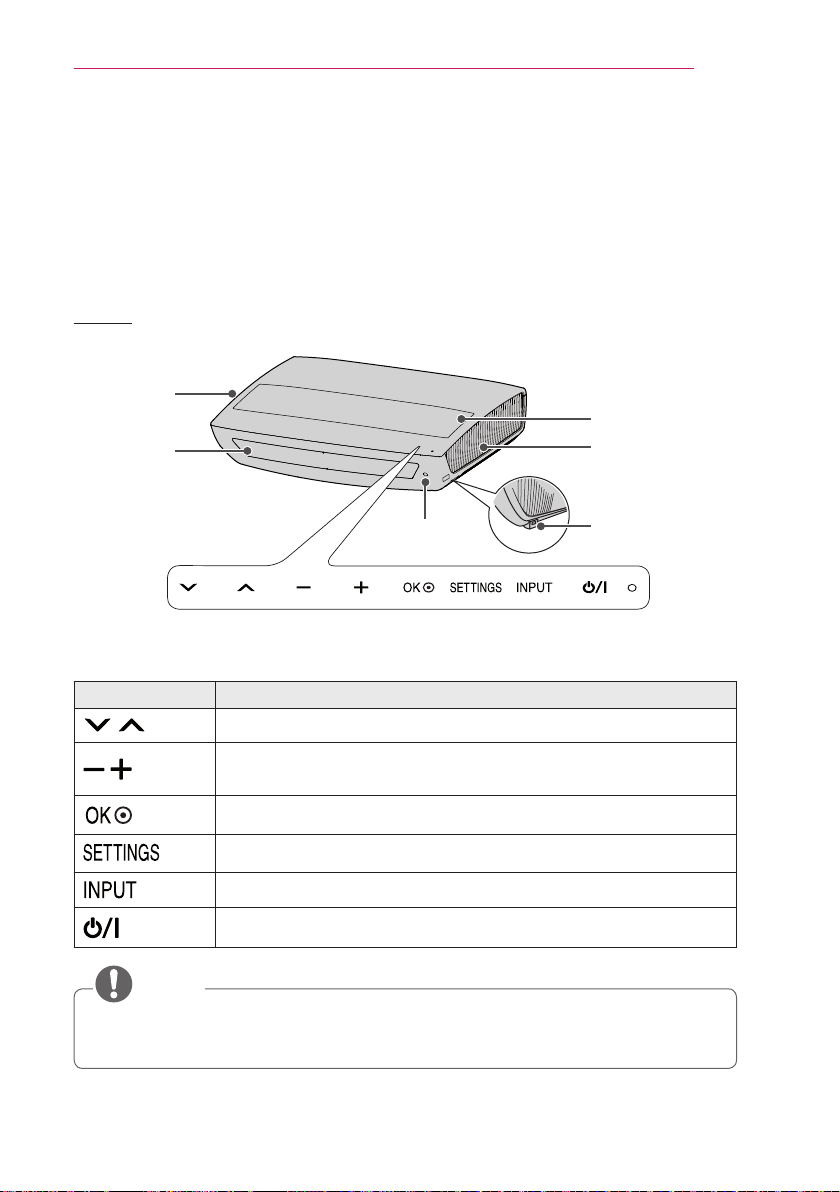
Front
Control Panel
Vent
1
Vent
1
Electric Door
Speaker
USB IN 2 Port
Remote control
sensor
Button Description
Changes the channel or sets the features.
Adjusts the volume level, or enters a sub menu and changes the
settings.
Shows the current mode and saves changes to the settings.
Displays or closes the Settings menu.
Changes the input source.
Turns the the Laser TV on or off.
• Press the “USB IN 2” label shown in the figure above to make the USB IN 2 port
visible.
NOTE
20
PREPARATION
Back
RS-232C IN
1
2
3
4
5
6
7
8
9
Description
1
COMPONENT IN Port
2
USB IN 1 Port
3
H/P OUT Port
4
AV IN Port
5
ANTENNA/CABLE IN Port
6
HDMI IN 1 (ARC), 2 (PC), 3 (MHL) Port
7
LAN Port
8
OPTICAL DIGITAL AUDIO OUT Port
In standby mode, digital audio is not output.
9
RS-232C IN Port
21
PREPARATION
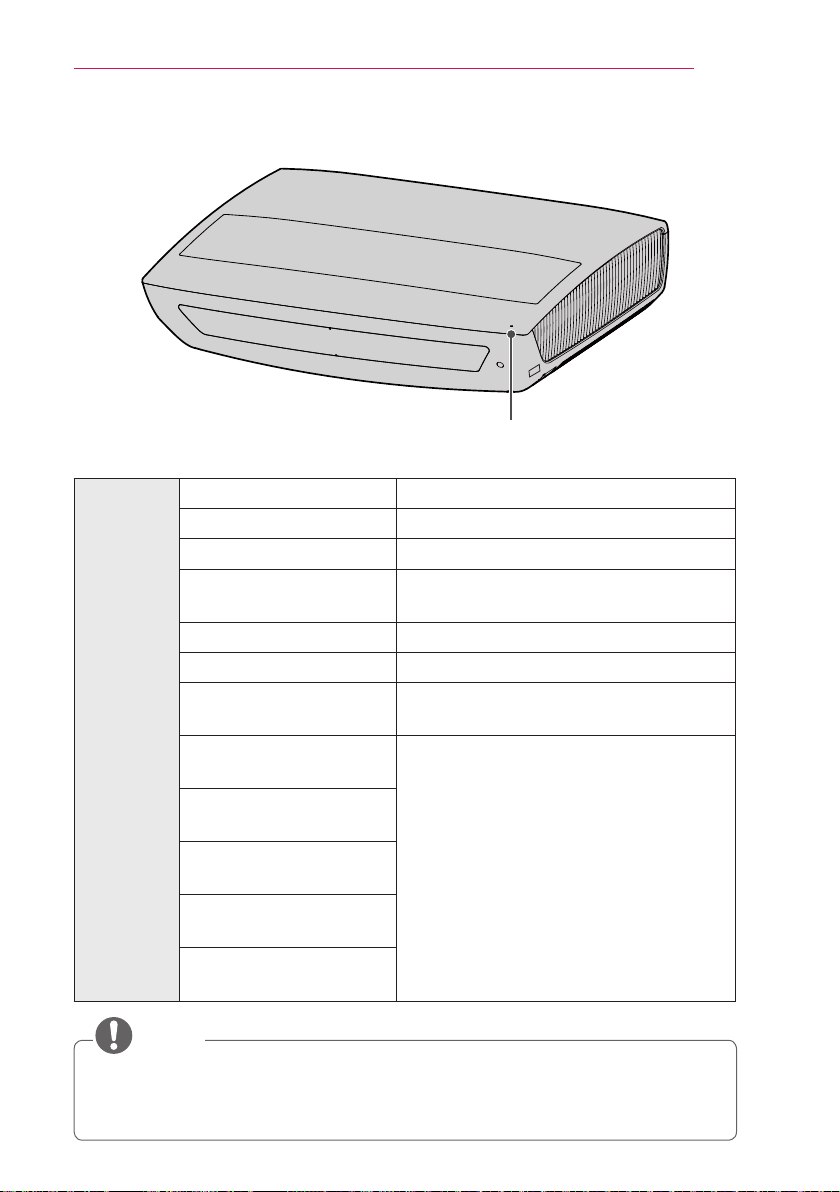
StatusIndicator
Operation/Status Indicator
O p e r a t i o n /
Status
Indicator
Off Power standby state (Power is off.)
Red Power standby state
White Warm stand-by (Power standby state)
White(Brightness
changesslowly.)
The Laser TV is in the process of turning
on or off.
Off In operation
Red(blinking) High temperature warning
Red(blinking)+Purple
once(blinking)
The Laser TV has turned off due to the high
temperature.
Red(blinking)+Purple
twice(blinking)
There may be a problem inside the product,
so contact a local service center.
Red(blinking)+Purple
threetimes(blinking)
White(blinking)+Purple
once(blinking)
White(blinking)+Purple
twice(blinking)
White(blinking)+Purple
threetimes(blinking)
• If you turn off the power, the Laser TV may not complete the operation in progress
depending on conditions and the operation/status indicator may turn red (standby
mode).
NOTE
22
PREPARATION
Installation
InstallationPrecautions
• Place the product in a well-ventilated
environment.
– To prevent the internal heat from
building up, install the Laser TV in a
well-ventilated place.
Do not place anything near the Laser
TV. That may block its air vents. If
the air vents are blocked, the internal
temperature will increase.
– Do not place the Laser TV on a
carpet or rug. If a product has its
inlet vent on its bottom, do not block
the vent and use the product on a
leveled solid surface.
– Be sure to prevent foreign objects,
such as scraps of paper, from
entering the inlet vent.
– Leave enough distance (30 cm or
more) around the vent of the Laser
TV.
• Do not place the Laser TV in a hot or
humid environment.
• Do not place the Laser TV in a dusty
place.
– This may cause re.
• Never open any cover on the Laser TV.
There is a high risk of electric shock.
• The Laser TV is manufactured using
high-precision technology. You may,
however, see tiny black dots and/or
bright spots that continuously appear
on the screen. This is a normal result
of the manufacturing process and does
not indicate a malfunction.
• The remote control may not work
in an environment where a lamp
equipped with electronic ballasts or
a three-wavelength fluorescent lamp
is installed. Replace the lamp with an
international standard lamp for the
remote control to work normally.
• Do not open or press the electric door
or by force.
– This may cause product malfunction.
23
PREPARATION
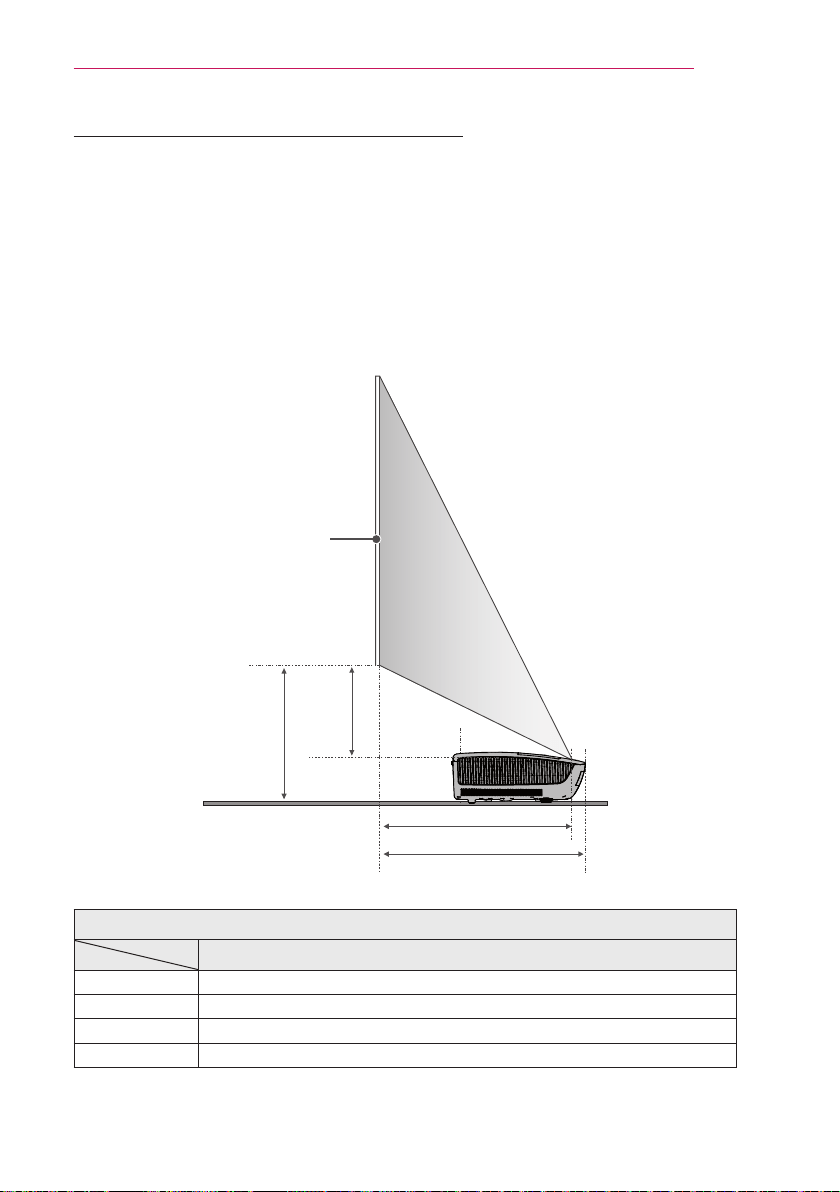
ProjectionDistanceperScreenSize
1
Place the Laser TV on a sturdy level surface, together with the computer or audio/video
source.
2
Place the Laser TV at an appropriate distance away from the screen. The distance
between the Laser TV and the screen determines the actual size of the image.
3
Position the Laser TV so that the lens is perpendicular to the screen. If the lens is not
perpendicular to the screen, the image displayed on the screen may be distorted. To
correct the distortion, use the Edge Adj function.
4
Connect the power cords of the Laser TV and the connected devices to the wall outlet.
A
B
D
C
Screen
16:9AspectRatio(Unit:mm)
ARC
2540 (2213 x 1245)
A 550
B 530
C 262.5
D 370
24
PREPARATION
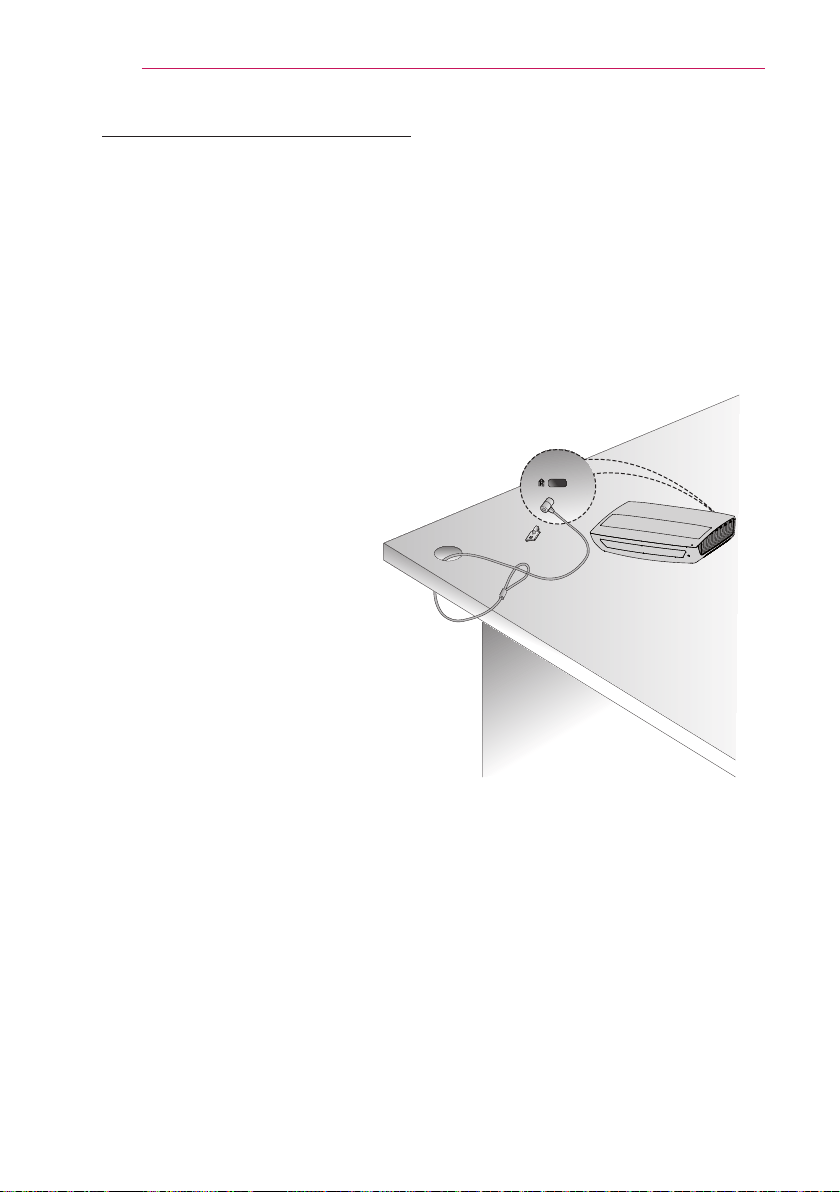
KensingtonSecuritySystem
• This the Laser TV has a Kensington Security Standard connector to prevent theft.
Connect a Kensington Security System cable as shown below.
• For more information on installation and use of the Kensington Security System, refer to
the user guide provided with the Kensington Security System.
• The Kensington Security System is an optional accessory.
• What is Kensington?
Kensington is a company that provides safety systems for laptops and other electronic
devices.
Website: http://www.kensington.com
25
MAGICREMOTECONTROL
MAGICREMOTECONTROL
If the battery low message appears while using the Laser TV,
replace the batteries.
As shown in the gure, press the top of the battery cover and
slide it down the cover. Insert two new and identical batteries
(1.5 V, AA type) with + and - poles pointing in the correct
direction in the remote control.
1
2
•Do not mix new batteries with old ones.
NOTE
CH
VOL
BACK SMART
/Q.MENU
Pointer Signal
Transmitter
(POWER)
Turns the Laser TV on or off.
(Up/Down/Left/Right)
BACK
Press this button during menu selection to return to the
previous step.
SMART
Displays the Home menu.
Wheel(OK)
Select a menu or option. If you press the
button while the pointer is moving, the pointer
disappears and the magic remote control operates as
a normal remote control.
To display the pointer on the screen, shake the magic
remote control to the left/right.
(Voicerecognition)
Check the network connection before using the voice
recognition function.
1. Press the voice recognition button.
2. Speak your request when the voice display bar on
the left of the Laser TV screen is activated. Use the
magic remote control no further than 10 cm from
your face. The voice search may fail if you speak
too quickly or too slowly. The recognition rate may
vary depending on the user’s characteristics (voice
volume, pronunciation, intonation, and speed) and
the environment (noise and Laser TV volume).

26
MAGICREMOTECONTROL
CH
VOL
BACK SMART
/Q.MENU
Opens the self-diagnosis window.
/Q.MENU
The universal remote is displayed. Allows you to
change the Laser TV settings easily.
VOL
Adjusts the volume level.
(MUTE)
Mutes the sound of the Laser TV.
CH
Changes the TV channel.
1
2
1
Displayed when you press
the Wheel(OK) button on
the magic remote control. Check
program information.
2
If you point and hold the pointer at
the bottom left of the screen while
watching Laser TV, the MYAPPS
icon is displayed. Clicking the icon
displays the MYAPPS menu.
27
MAGICREMOTECONTROL
ToRegistertheMagicRemoteControl
To use the magic remote control, register it with your Laser TV rst.
1
Turn on the Laser TV and wait for about 10 seconds and then press
the Wheel(OK) button while pointing the remote control at the Laser TV.
2
The remote control is automatically registered and the registration completion message
appears on the Laser TV screen.
• If you failed to register the magic remote control, turn off the Laser TV and try again.
ToRe-registertheMagicRemoteControl
1
Press the SMART and BACK buttons together for about 5 seconds.
2
Press the Wheel(OK) button towards the Laser TV to re-register the magic remote
control.
• Press the SMART and BACK buttons at the same time, for five seconds, to reset
the Magic Remote Control.
• Press the BACK button while pointing the remote control at the Laser TV for five
seconds to reset and re-register it.

28
MAGICREMOTECONTROL
UsingtheMagicRemoteControl
1
Shake the magic remote control lightly when there is no pointer
displayed on the screen. A pointer will be displayed on the
screen.
– The pointer disappears if the remote control is not used for a
certain period of time.
2
When you move the pointer signal transmitter up/down/left/right
while pointing it toward the Laser TV, the pointer moves.
– If the pointer is not working properly, do not move the magic
remote control for about 10 seconds, and then try again.
3
If you press the navigation button while moving the pointer on
the screen, the pointer disappears, and the magic remote control
works as a common remote control.
4
Use within an effective distance of 10 meters. Using the remote
control from greater distances or when obstructions block the sight
line may cause malfunctions.
5
Electronic devices nearby may cause communication
interference. Devices such as microwave ovens and wireless
LANs use the same frequency range (2.4 GHz) as the Magic
Remote Control and may cause interference.
6
Take care not to bang it against other hard objects such as
furniture or the oor.
29
SETTINGUPTHETV
SETTINGUPTHETV
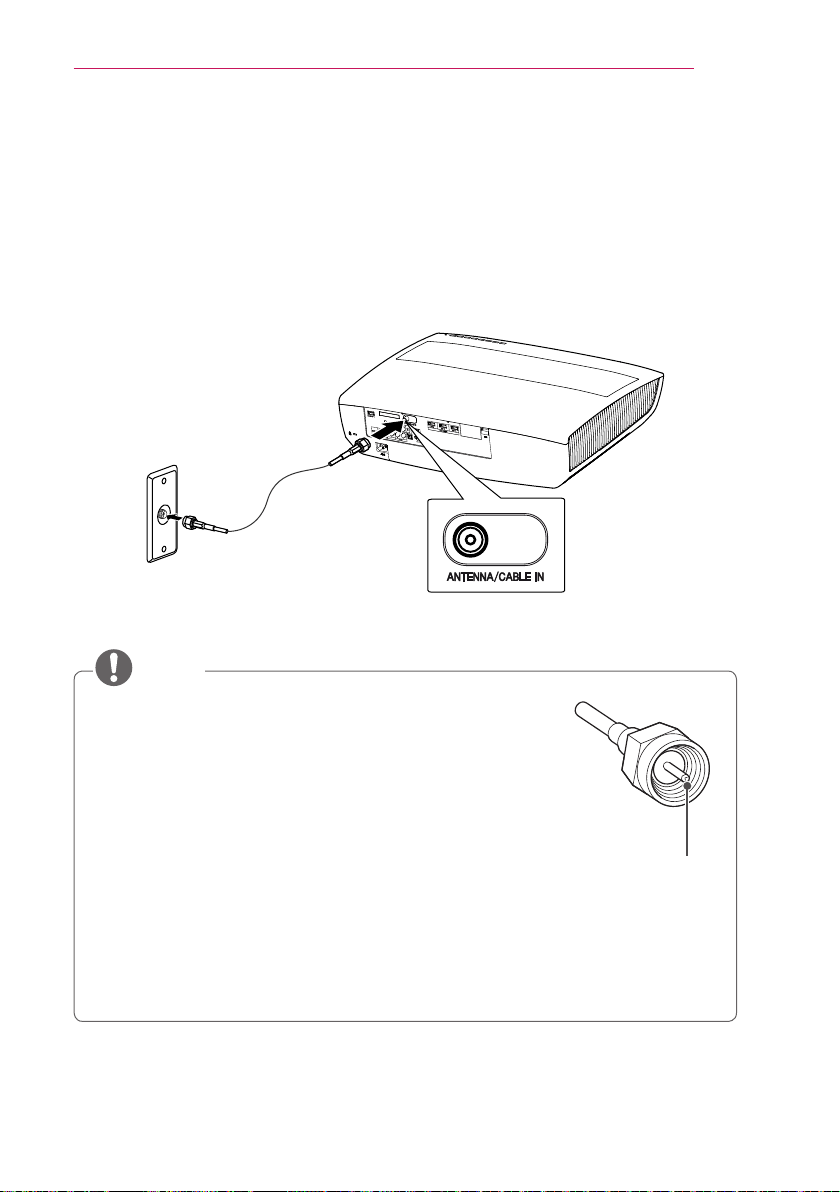
ConnectingtheAntennaorCable
To watch TV using an indoor/outdoor antenna, connect a wall terminal and the ANTENNA/
CABLEIN port of the Laser TV using an RF cable (75 Ω).
You can watch public TV or cable (analog, digital) TV.
• Be careful not to bend the copper wire when connecting the
coaxial cable (75 Ω).
Fasten the cable connection terminal by turning it clockwise.
• Ensure you use a standard coaxial cable (75 Ω) when
connecting to the Laser TV input.
• To obtain better image quality in locations where signal
strength is low, please purchase and install a signal amplifier
(booster).
• A signal splitter is required to use one antenna to send a
signal to more than two Laser TVs.
• If you have any problems with antenna installation, please consult the antenna
specialized retailer or the store where you purchased the antenna.
Copper Wire
NOTE
30
SETTINGUPTHETV
WatchingLaserTV
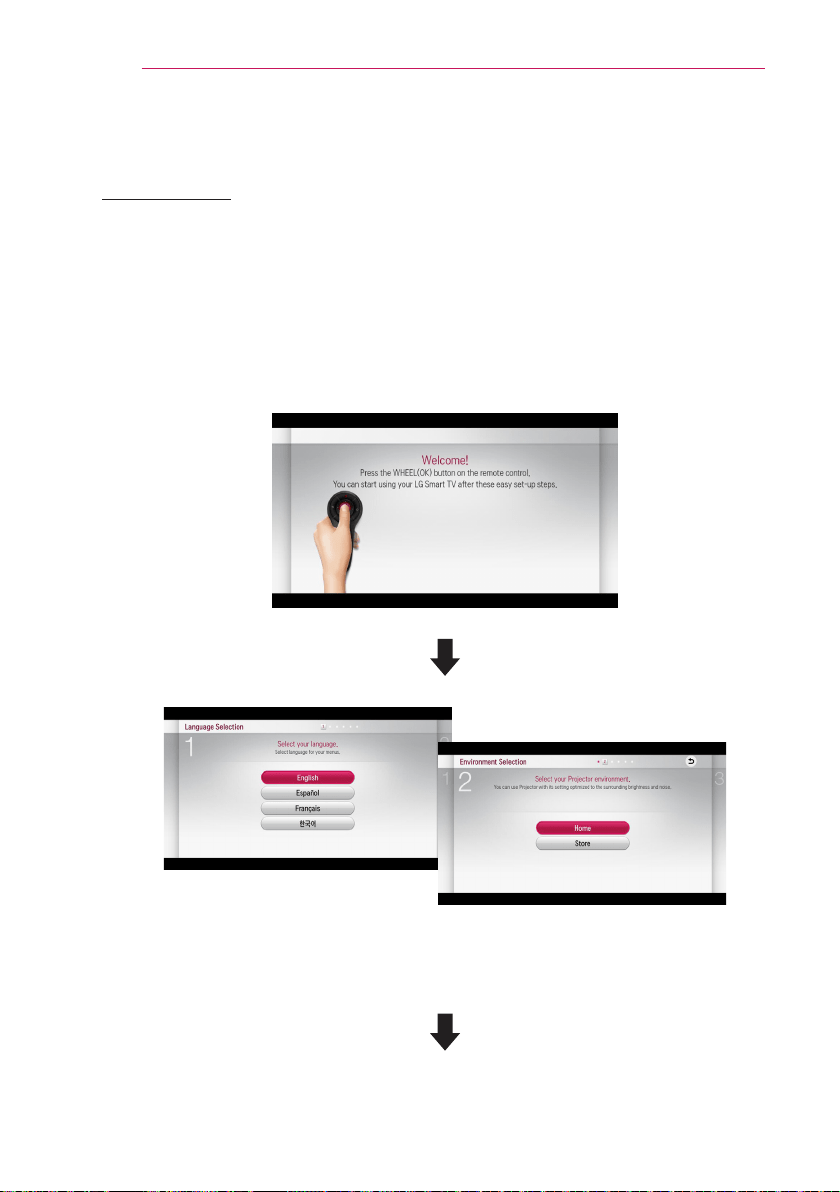
InitialSetup
The menu screen display in this owner’s manual is an example to help users understand
how to operate the product and may look different from the actual screen.
1
Connect the power cord correctly.
2
After waiting for a moment, press the POWER button on the magic remote control or
the control panel.
3
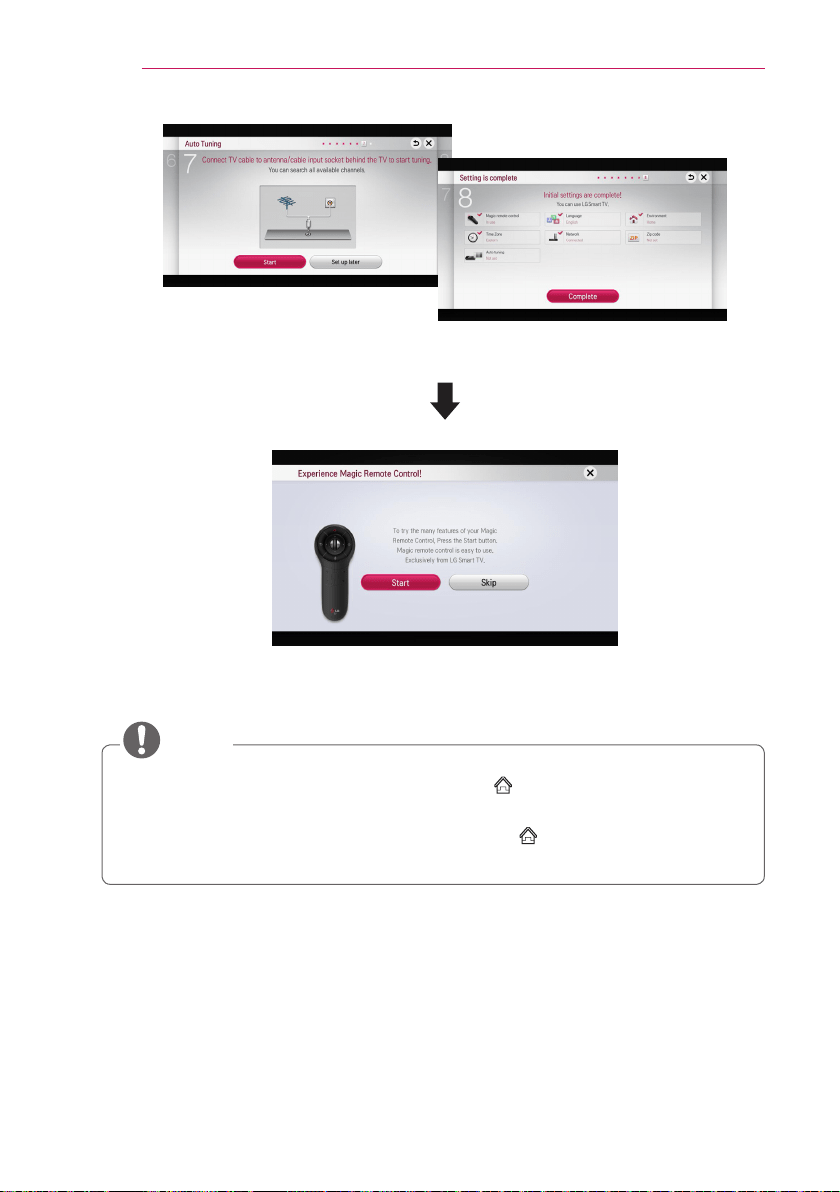
When you turn on the Laser TV for the rst time, a setting screen appears as shown
below. Here, you can specify the items required for watching the Laser TV more easily.
– Store mode is used when displaying the product in-store. The picture mode is
automatically reset after a certain period of time. You can select Home to use the
product at home.
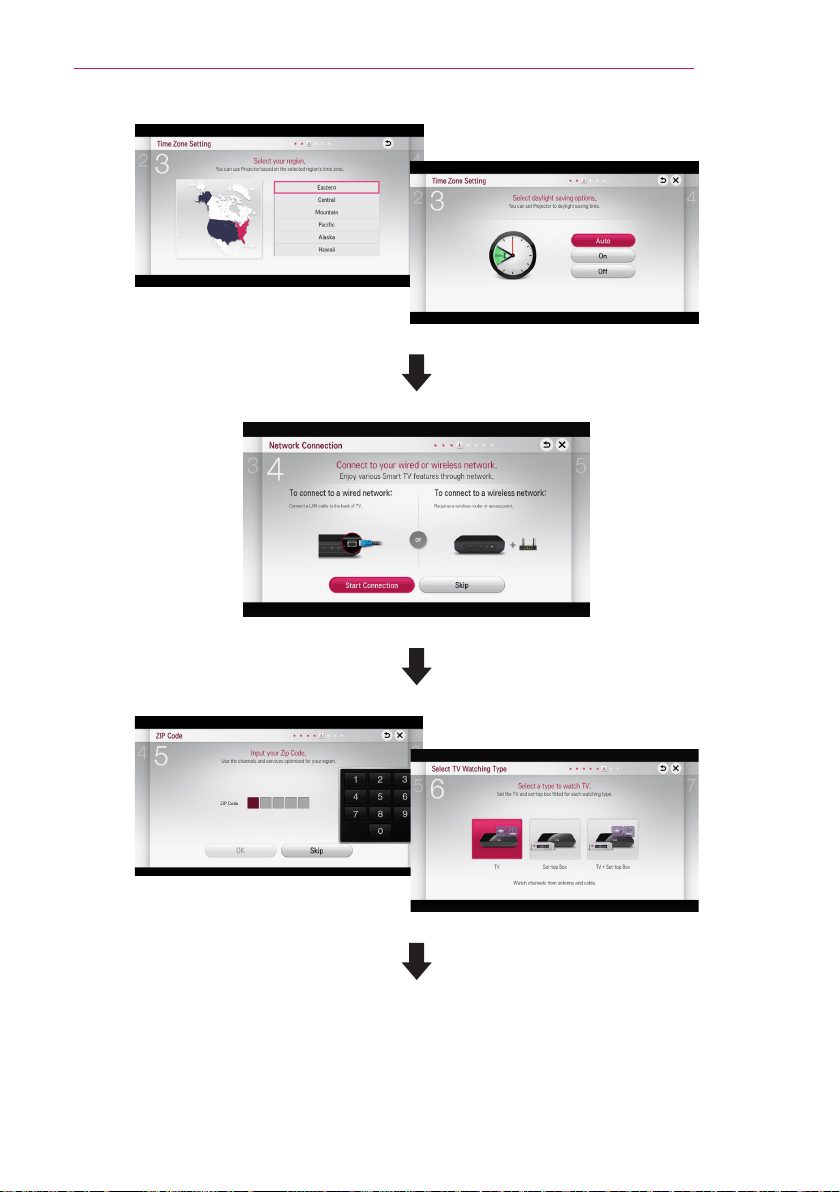
31
SETTINGUPTHETV
32
SETTINGUPTHETV
– The initial settings are completed when you select the settings above.
– Simple guide of Magic Remote Control.
• For AutoTuning while using the Laser TV, go to SMART → Settings →
CHANNEL and select AutoTuning.
• To change the mode while using the Laser TV, go to
SMART → Settings →
OPTION and select ModeSetting.
NOTE
33
SETTINGUPTHETV
WatchingwiththeTV
1
In Standby mode, press the POWER button to turn the Laser TV on.
2
Select SMART → InputList and select the input signal you want.
3
Control the Laser TV using the following buttons while watching Laser TV.
Button Description
CH Changes the TV channel.
VOL
Adjusts the volume level.
(MUTE)
Mutes the sound from the Laser TV
4
To turn the Laser TV off, press the POWER button.
ToSetChannel
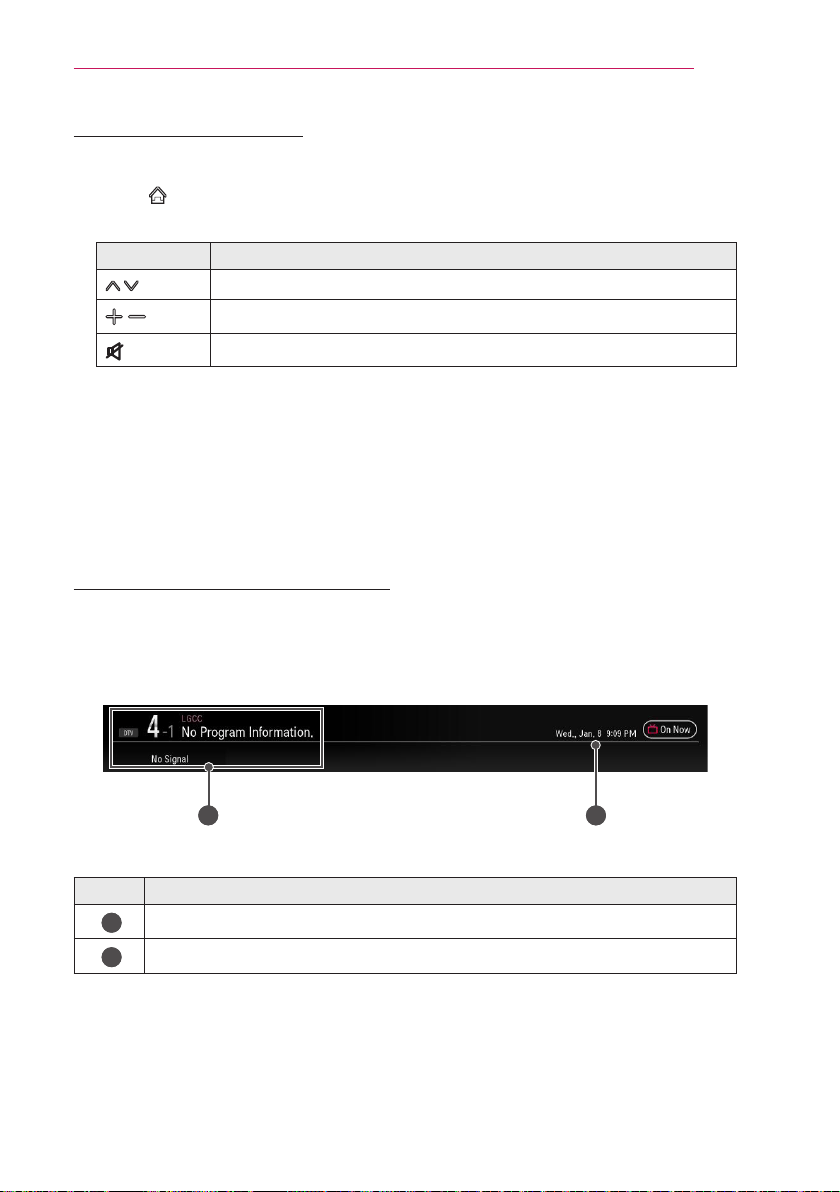
Displays information on current program or current time, etc.
Image shown may differ from your Laser TV.
ToViewProgramInformation
1
Move the pointer of the magic remote control to the top of the Laser TV screen.
2
Click the activated channel banner area.
3
The program details will be displayed at the bottom of the Laser TV screen.
1
2
Description
1
Program name/ Detail information on program (for digital broadcast)
2
Current time
34
SETTINGUPTHETV
Tosetfavoritechannels
SMART → Settings → CHANNEL → ChannelEdit
1
Move to the desired channel on Wheel(OK) button. Channel is selected.
2
Press SetasFavorite.
3
Select the desired Favorite channel group.
4
Select OK. Favorite is set.
TouseFavorite
SMART → Ch.List
Channel list will appear. Select the desired preset favorite channel from Favorite List A to D.
AdditionalOptions
AdjustingAspectRatio
Select SMART → Settings → PICTURE → AspectRatio, to change the aspect ratio.
Menu Description
16:9 Resizes the image ratio to t a 16:9 screen.
JustScan
Displays high-quality image without loss.
• In DTV/HDMI/Component (over 720p) mode, JustScan is available.
SetBy
Program
Depending on the input signal, screen aspect ratio changes to 4:3 or
16:9.
4:3 Resizes the image ratio to t 4:3 screen.
Zoom
Resizes the image to t the screen width. The top and bottom parts of the
image may be cut off.
Cinema
Zoom1
Formats an image to the cinemascope ratio (2.35:1) and zooms in on the
ratio.
•Available picture size may differ depending on the input signal.
•The screen aspect ratios on HDMI-PC input are available in 4:3 and 16:9 only.
NOTE
35
SETTINGUPTHETV
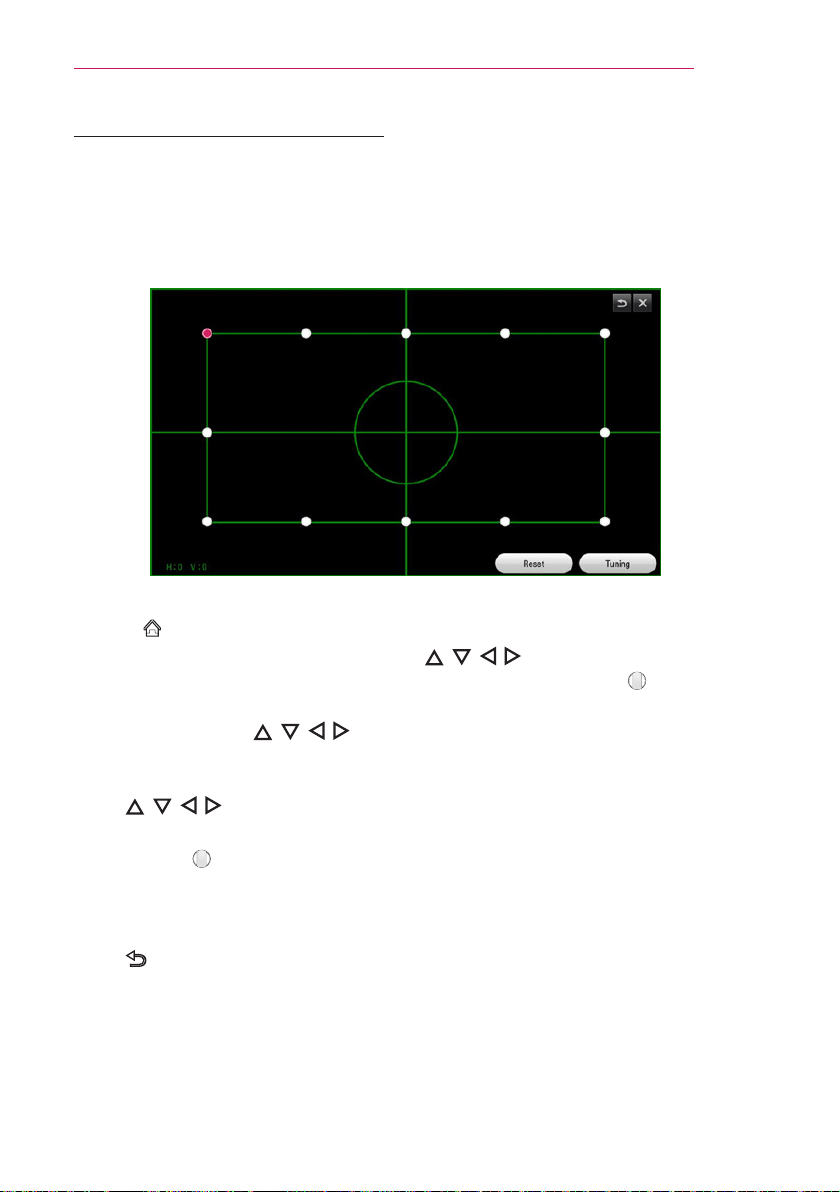
UsingtheEdgeAdjFunction
EdgeAdj adjusts the right, left, top, and bottom width of the projected image if the
projected image and screen are not perpendicular to each other due to a tilted screen or
TV.
Because the EdgeAdj function may cause inferior screen image quality, use this fuction
only when it is not possible to set up the Laser TV at an optimal angle.
1
Go to SMART → Settings → OPTION → EdgeAdj.
2
Move to a point you want to adjust using the , , , (Up,Down,Left,orRight)
button of the Magic Remote Control and select the point by pressing the Wheel
(OK).
3
The four-way arrows , , , (Up,Down,Left,orRight) are shown around the
selected point.
4
The vertical and horizontal value of the point can be changed by pressing
the , , , (Up,Down,Left,orRight) buttons of the magic remote control.
5
Adjust the value of the point to the desired value and complete the adjustment by
pressing the Wheel(OK) button of the magic remote control.
– The vertical and horizontal value of each point is changed by 5 in Tuningmode, and
by 1 in FineTuningmode.
6
After all adjustments have been made, close the EdgeAdj function by pressing
the BACK button.

36
SETTINGUPTHETV
• As the pointer cursor of the Magic Remote Control is disabled while running the
EdgeAdj function, press the
, , , (Up,Down,Left,orRight) buttons or
the Wheel(OK)button of the Magic Remote Control to adjust the value of a point.
• Select Reset to initialize the vertical and horizontal values of the 12 points to 0.
• Tuning mode is the default mode upon running the EdgeAdj function. Press the
Tuning button to change the mode to fine tuning. Press the FineTuning button to
change the fine tuning mode to tuning mode.
• While running the EdgeAdj function, the keys on the control panel are disabled.
• While running the EdgeAdj, the EyeCareSensor is disabled.
• If the power cord is unplugged while running the EdgeAdj function, the adjusted
value may not be saved.
• The adjustable value ranges of each point are as follows:
– Top leftmost point (H: 0 ~ 70, V: 0 ~ 70)
– Top left point (H: -70 ~ 70, V: 0 ~ 70)
– Top center point (H: -70 ~ 70, V: 0 ~ 70)
– Top right point (H: -70 ~ 70, V: 0 ~ 70)
– Top rightmost point (H: -70 ~ 0, V: 0 ~ 70)
– Center left point (H: 0 ~ 70, V: -70 ~ 70)
– Center right point (H: -70 ~ 0, V: -70 ~ 70)
– Bottom leftmost point (H: 0 ~ 70, V: -70 ~ 0)
– Bottom left point (H: -70 ~ 70, V: -70 ~ 0)
– Bottom center point (H: -70 ~ 70, V: -70 ~ 0)
– Bottom right point (H: -70 ~ 70, V: -70 ~ 0)
– Bottom rightmost point (H: -70 ~ 0, V: -70 ~ 0)
NOTE
37
SETTINGUPTHETV
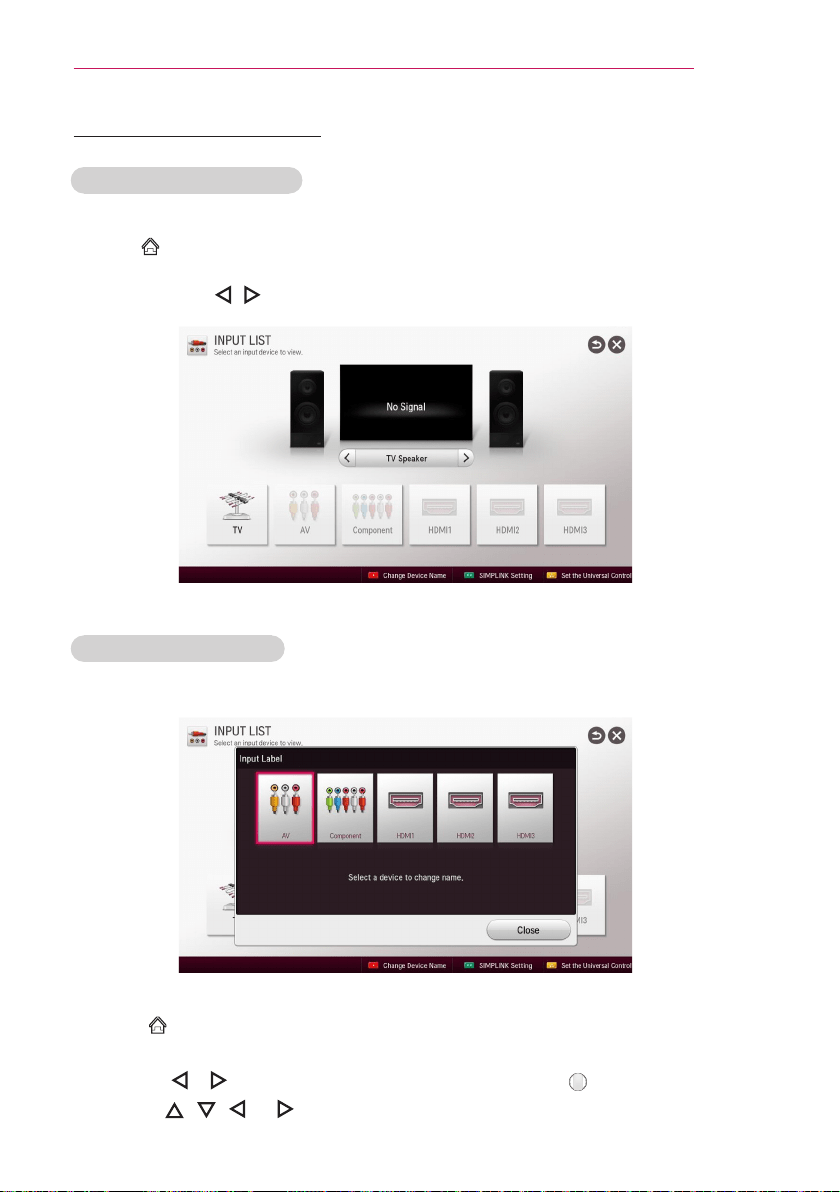
ChangingInputDevice
Toselectanexternalinput
Selects external input.
• Select SMART → InputList to display the input selection screen.
– Connected inputs are displayed rst.
• You can use the , button to switch among all the input modes.
SelectinganInputLabel
Displays which devices are connected to which input ports.
1
Select SMART → InputList.
2
Select the ChangeDeviceName.
3
Press the or button to go to the desired input and press the Wheel(OK) button.
4
User the , , , or button to select a device name.
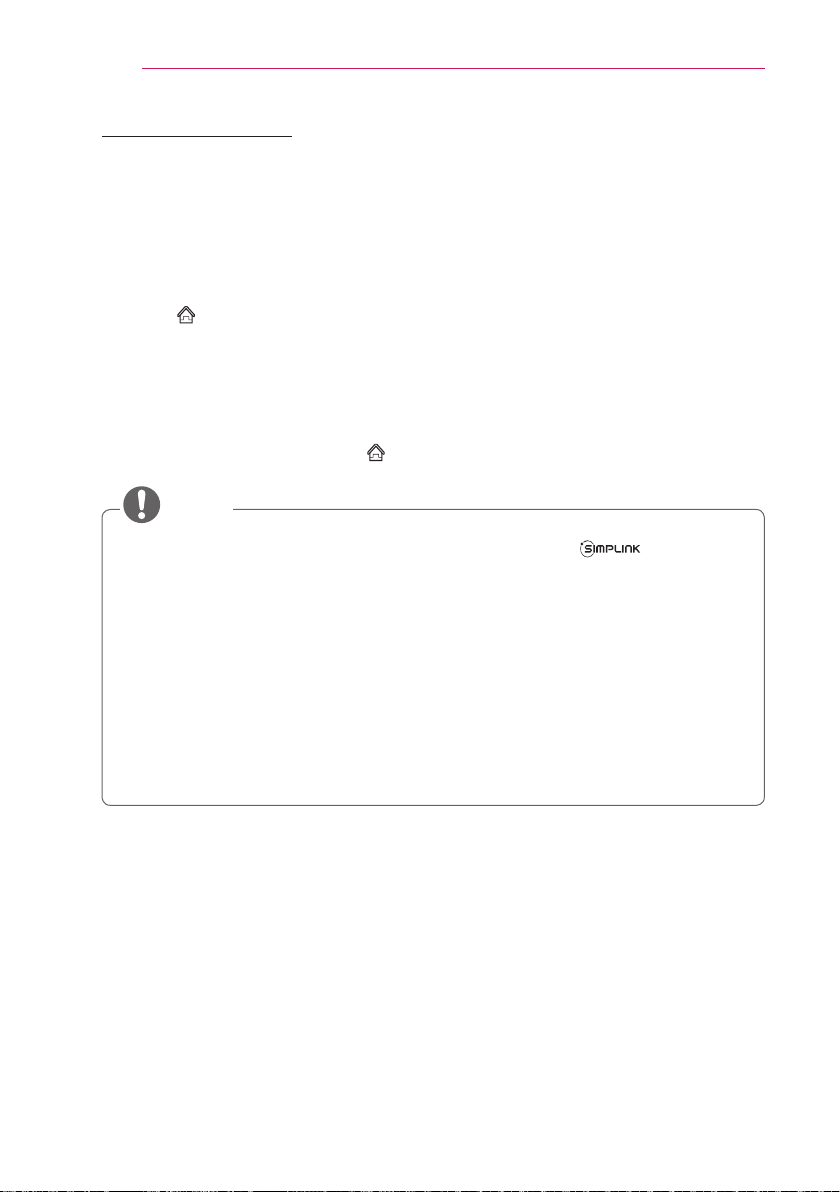
38
SETTINGUPTHETV
ToUseSIMPLINK
SIMPLINK is a feature that enables you to control and manage various multimedia
devices conveniently using the Laser TV remote control only via the SIMPLINK menu.
1
Connect the Laser TV’s HDMI IN terminal with SIMPLINK device’s HDMI output
terminal using HDMI cable. For home theater units with SIMPLINK function, connect
HDMI terminals as above and use an optical cable to connect Optical Digital Audio Out
from the Laser TV to Optical Digital Audio In of the SIMPLINK device.
2
Select SMART → SIMPLINK. SIMPLINK menu window appears.
3
Select SIMPLINKSetting on SIMPLINK menu window. SIMPLINK setup window
appears.
4
SIMPLINKSetting to On in SIMPLINK setup window.
5
Close SIMPLINK setup window.
6
Select the device to control from SMART → SIMPLINK.
• This function only works on devices with the SIMPLINK logo ( ). Verify that
the external device has a SIMPLINK logo.
• To use the SIMPLINK function, you need to use a high-speed HDMI
®
cable (with
CEC, or Consumer Electronics Control, feature added). High-speed HDMI
®
cables
have the No. 13 pin connected for information exchange between devices.
• Turn on or select the media of a device with home theatre features to see the
speaker switch to External Speaker.
• Connect with an Optical cable (sold separately) to use External Speaker.
• Switching to external input causes devices operating with SIMPLINK to stop.
• Use of a third-party device with HDMI-CEC features may cause malfunctions.
NOTE
39
SETTINGUPTHETV
ExplanationOfSIMPLINKFeatures
Menu Description
DirectPlay Plays the multimedia device on the Laser TV instantly.
Select
multimedia
device.
Selects the desired device via the SIMPLINK menu to control it from
the Laser TV screen instantly.
Discplayback Manages the multimedia device with the Laser TV remote control.
Poweroffall
devices
If the AutoPower function is set to On in the SIMPLINK settings,
turning the Laser TV off will turn the power off on all SIMPLINK-
connected devices.
SyncPoweron
If the AutoPower function is set to On in the SIMPLINK settings,
turning on a SIMPLINK device will turn the Laser TV on.
Speaker Selects speaker either on the home theatre unit or the Laser TV.

40
SETTINGUPTHETV
UsingtheQuickMenu
You can customize frequently used menus.
1
Press the SMART button and select QuickMenu.
2
Press the or button to select a menu and press Wheel(OK).
Menu Description
AspectRatio Resizes the picture.
PictureMode Changes the picture mode.
SoundMode Sets the sound mode.
SleepTimer Sets the Laser TV to be turned off at the specied time.
Caption Sets whether to display captions.
MultiAudio
Sets MONO or STEREO, or a language for a bilingual broadcast
(Digital signal).
SAP Changes the MTS sound (Analog signal).
EnergySaving Adjusts the brightness.
AVMode
Sets the genre.
Mode
Off
You can watch using the settings in the video/audio
menu.
Cinema Change to optimal video/audio settings for movies.
Game Change to optimal video/audio settings for games.
Del/Add Can delete or add channels.
USBDevice Allows you to remove a connected USB device in a safe manner.
3
Press the , , , or button to scroll through the following menus.
41
SETTINGUPTHETV
ToSetSound
ToSetSoundOutput
TouseLaserTV’sspeakers
• SMART → Settings → SOUND → SoundOut → TVSpeaker
Sound is output through the TV speaker.
TouseExternalSpeakers
• SMART → Settings → SOUND → SoundOut → ExternalSpeaker(Optical/HDMI
ARC)
Sound is output through the speaker connected to the optical port.
SIMPLINK is supported.
TouseDigitalSoundOut
• SMART → Settings → SOUND → SoundOut → ExternalSpeaker(Optical/HDMI
ARC) → DigitalSoundOut
Sets up DigitalSoundOutput.
Item SoundInput DigitalSoundOutput
Auto
MPEG PCM
Dolby Digital Dolby Digital
Dolby Digital Plus Dolby Digital
HE-AAC Dolby Digital
PCM All PCM
42
SETTINGUPTHETV
ToconnectanduseanLGaudiodevice
LG audio device allows you to enjoy rich powerful sound easily.
• WiredConnection:
SMART → Settings → SOUND → SoundOut → LGSoundSync(Optical)
Connect an LG audio device with the logo to the optical digital audio output port.
• WirelessConnection:
SMART → Settings → SOUND → SoundOut → LGSoundSync(Wireless)
An LG audio device with the logo can be connected wirelessly.
• You can use the Laser TV remote control to adjust the volume of the connected
device.
• For a wireless connection, if the device fails to connect, check the device power and
make sure the LG Audio device is set up properly.
• When you select LGSoundSync(Wireless), devices available for connection are
searched and one of searched devices is automatically connected. When a device is
connected, its name is shown.
• If two or more devices are detected, the first detected device is connected first. To
view more detected devices to connect, press the ShowMore button.
• When LGSoundSync(Wireless) is active and you turn on the Laser TV, it will
search and try to connect the device which recently connected.
NOTE
43
SETTINGUPTHETV
ToconnectanduseaBluetoothheadset
Sound output is through the Bluetooth headset.
• SMART → Settings → SOUND → SoundOut → LGSoundSync(Wireless)
• The devices that can be connected are:LG BTS1, LG HBS-700, LG HBS-730, LG HBS-
800 (Product availability may vary by country.)
• For wireless connection, if the device fails to connect. Check the device power to
connect and if the LG Audio device is in a proper operating condition.
• If two or more devices are detected, the first detected device is connected first. To view
more detected devices to connect, press the ShowMore button.
UsingtheMultiAudio
Multi Audio means stereo and multiple language broadcast from the channel provider.
• SMART → QuickMenu → MultiAudio
Inthecaseofdigitalbroadcast
Multiple languages can be selected depending on the multi-language signals from the TV
station.
• For default language, select at SMART → Settings → OPTION → Language →
AudioLanguage.
Inthecaseofanalogbroadcast
Item Description
MONO
Left and right speakers produce sound, and the sound model is mono.
Select this menu to listen in MONO mode regardless of broadcast state.
This can be set for a stereo broadcast signal. Select MONO in poor
reception areas (e.g., areas with weak or erratic signals) or when multi
audio reception is not clear.
STEREO
The sound mode is in stereo when the sound comes out of both left and
right speakers.
SAP Changes the MTS sound.
44
ENTERTAINMENT
ENTERTAINMENT
ToUseSmartFeatures
ToUseHomeScreen
With all smart Laser TV features on one screen, everyone can access a wealth of content
and applications conveniently via the quick and easy-to-use menu, arranged by themes
such as Card, MY APPS, etc.
• Press the SMART button on the remote control.
Movie Weather
News
Sports UCC
Picture Map Game
1 2 3 4
5
Description
1
Displays the screen you are currently watching.
2
Displays the premium menu.
3
Edit the card list.
4
Login button
5
Displays the list of my apps.
Select More at the bottom of the Home screen.
Select More to check pre-installed and downloaded apps.
Select an app to use.
45
ENTERTAINMENT
ToUseMYAPPS
• SMART → More
• Select More at the bottom of the home screen.
• Select More to check apps pre-installed apps and apps you have downloaded.
ToEditItemsinMYAPPS
On the MYAPPS page, select (Edit) at the top of the screen to move or delete apps.
Please note that system apps can be moved, but cannot be deleted.
• Select SMART → More → MYAPPS → (Edit).
• Changes orders / deletes items by dragging the app icons with a magic remote control.
46
ENTERTAINMENT
ToConnectNetwork
A wireless or wired network connection is required to use smart features.
When connected to the network, you can use premium content, LG Smart World, DLNA
and more.
One-clickNetworkConnection
Connects easily to a wired/wireless network.
• SMART → Settings → NETWORK → NetworkConnection to connect to an
available network automatically. Follow the prompts on the Laser TV.
ToConnecttoaNetworkThroughSetExpert
For use in special circumstances such as in ofces (in cases where a static IP is used).
• Select SMART → Settings → NETWORK → NetworkConnection → Start
Connection → OtherNetworkList → ManualSetup.
1
Select a NetworkConnection, either Wired or Wireless.
2
When connecting via Wi-Fi, use the one of the following network connection methods.
Item Description
APList
Connects the network by selecting a network from the AP (Access
Point) List.
EntertheSSID Connects by typing in the name of wireless AP.
WPS-PBC
Connects easily by pressing the button of a wireless access point
supporting PBC.
WPS-PIN
Connects easily by typing in the PIN from the admin page of the
desired wireless AP.
ToUsetheWi-FiDirectFunction
Wi-Fi Direct is a function that allows your Laser TV to connect with a Wi-Fi Direct device
without Internet connection. With SmartShare™, you can watch the les stored on a
device connected via Wi-Fi Direct.
• Select SMART → Settings → NETWORK → Wi-FiDirect.
1
Set Wi-FiDirect to On. (If you do not use it, please change it to Off.)
2
Enable the Wi-Fi Direct settings on the device that you want to connect to.
3
A list of devices that can be connected to the Laser TV is displayed.
4
Select a device to connect.
5
Select Yes when the connection request message appears.
6
If the device that you want to connect accepts the request, Wi-FiDirect is connected.
47
ENTERTAINMENT
ToUsetheMiracast™/Intel’sWiDiFunction
You can view the screen of a device with Miracast™ and Intel’s WiDi technologies on your
Laser TV. Contact the device manufacturer to nd out if the device supports this function.
• Select SMART → Settings → NETWORK → Miracast™/Intel’sWiDi.
1
Set Miracast™/Intel’sWiDi to On. (If you do not use it, please change it to Off.)
2
Enable the Miracast™/Intel’sWiDi settings on the device that you want to connect
to.
3
A list of devices that can be connected to the Laser TV is displayed.
4
Select a device to connect.
5
Select Yes, when the connection request message appears.
6
If the device that you want to connect accepts the request, Miracast™/Intel’sWiDi is
connected.
• When Wi-FiDirect is set to Off, if you set Miracast™/Intel’sWiDi to On, Wi-FiDirect
is automatically set to On.
• When you set the Miracast™/Intel’sWiDi function to Off, Wi-Fi Direct returns to the
previous setting.
• It is recommended to connect a laptop using Intel’sWiDi within close range.
• Though Intel’sWiDi can be connected without a wireless router, it is recommended
to connect the wireless router first for optimal performance.
• You may not connect your Laser TV to a non-LG Electronics device even when it is
detected.
• It is recommended you to connect a device to a 5 GHz router.
• The response rate may vary depending on the user’s environment.
• For more information on the device you want to connect to, refer to its owner’s
manual.
NOTE

48
ENTERTAINMENT
TipsforNetworkSettings
• Use a standard LAN cable (Cat5 or higher with RJ45 connector, 10 Base-T or 100 Base
TX LAN port).
• Resetting your modem can cause network connection problems. To resolve the
problem, turn the power off, disconnect and reconnect, and then turn the power back on.
• LG Electronics is not responsible for any network connection problems or any faults,
malfunctions and errors caused by an network connection.
• A network connection may not work properly depending on the Internet service provider.
• A DSL modem is required for a DSL service; a cable modem is required for a cable
service. Only a limited number of network connections may be available, and Laser
TV network setting may not be available depending on your contract with your Internet
Service Provider (ISP.)
(If only one device is allowed per line and the PC is already connected, other devices
cannot be used.)
• Wireless networks can be subject to interference from other devices operating at a
frequency of 2.4 GHz (wireless phones, Bluetooth devices or microwave ovens). There
may also be interference from devices with a frequency of 5 GHz, same as other Wi-Fi
devices.
• The surrounding wireless environment can cause the wireless network service to run
slowly.
• If you do not turn off the entire local home network, network traffic may occur on some
devices.
• For an AP connection, an access point device that supports wireless connection is
required and the wireless connection feature must be enabled on the device. Contact
your service provider regarding availability of wireless connection on your access point.
• Check the SSID and security settings of the AP for AP connection. Refer to the
appropriate documentation for SSID and security settings of the AP.
• Invalid settings on network devices (wired/wireless line sharer, hub) can cause the Laser
TV to run slowly or not operate properly. Install the devices correctly according to the
appropriate manual and set the network.
• Connection method may differ according to the AP manufacturer.
49
ENTERTAINMENT
TagOn
WhatisTagOn?
Tag On is a data transmission technology that can be used on smartphones with NFC
(Near Field Communication). Simply by tapping your smartphone to a Tag On sticker, you
can share content between your smartphone and Laser TV.
• To connect your smartphone to the Laser TV using Tag On, they must be connected on
the same Wi-Fi network or Miracast™/Intel’sWiDi of the smart Laser TV is set to On.
•Do not attach the sticker to a metal part of the Laser TV. Otherwise, your
smartphone cannot recognize the Tag On sticker.
•Do not crumple or fold the Tag On sticker. Otherwise, the Tag On is not recognized.
•To purchase a Tag On sticker, please contact the LG Electronics Service Centre.
•This function is supported only on a smartphone with Android 4.0 (ICS) or later.
NOTE
ToStartTagOnFortheFirstTime
To connect your smartphone to the Laser TV using NFC, install the Tag On app on the
smartphone and complete the authentication process.
1
Make sure that the smart Laser TV is on the same network as your smartphone. If
Wi-Fi cannot be enabled, go to SMART → Settings → NETWORK → Miracast™/
Intel’sWiDi and set to On.
2
Enable the smartphone’s NFC function and set to Read/WriteandP2PMode. For
more information on enabling NFC and setting the mode, refer to the owner’s manual
of your smartphone.
3
Tap your smartphone to a Tag On sticker. Make sure to follow the instructions on the
smartphone screen and install the Tag On app and LG TV Remote app.
4
Tap the smartphone to the Tag On sticker again.
5
Enter the pairing key displayed on the smart Laser TV into the smartphone. When two
or more Laser TVs are detected, the pairing key is displayed only after the Laser TV
you want to connect to is selected in the device list.
6
When the connection is made properly, you can use Tag On.
• The information of the connected Laser TV is saved in the Tag On sticker. You can
change or reset the information in the Settings menu of the smartphone Tag On app.

50
ENTERTAINMENT
TousetheTagOn
Follow the steps below to share content on your NFC-enabled smartphone.
1
Tap the NFC-enabled smartphone to a Tag On sticker.
2
The Tag On app starts running on the smartphone to connect to the smart Laser TV.
– To use a Wi-Fi network, make sure that the smart Laser TV is on the same network
as your smartphone.
– If the smart Laser TV and the smartphone are not on the same network, use Wi-Fi
Direct.
• If the Tag On app is not installed, the installation page appears automatically.
• For more information on how to share content between your smartphone and Laser TV,
refer to the Tag On app’s help. Click to run the Tag On app on your smartphone and
select the Settings menu to view the help.
51
SMARTSHARE
SMARTSHARE
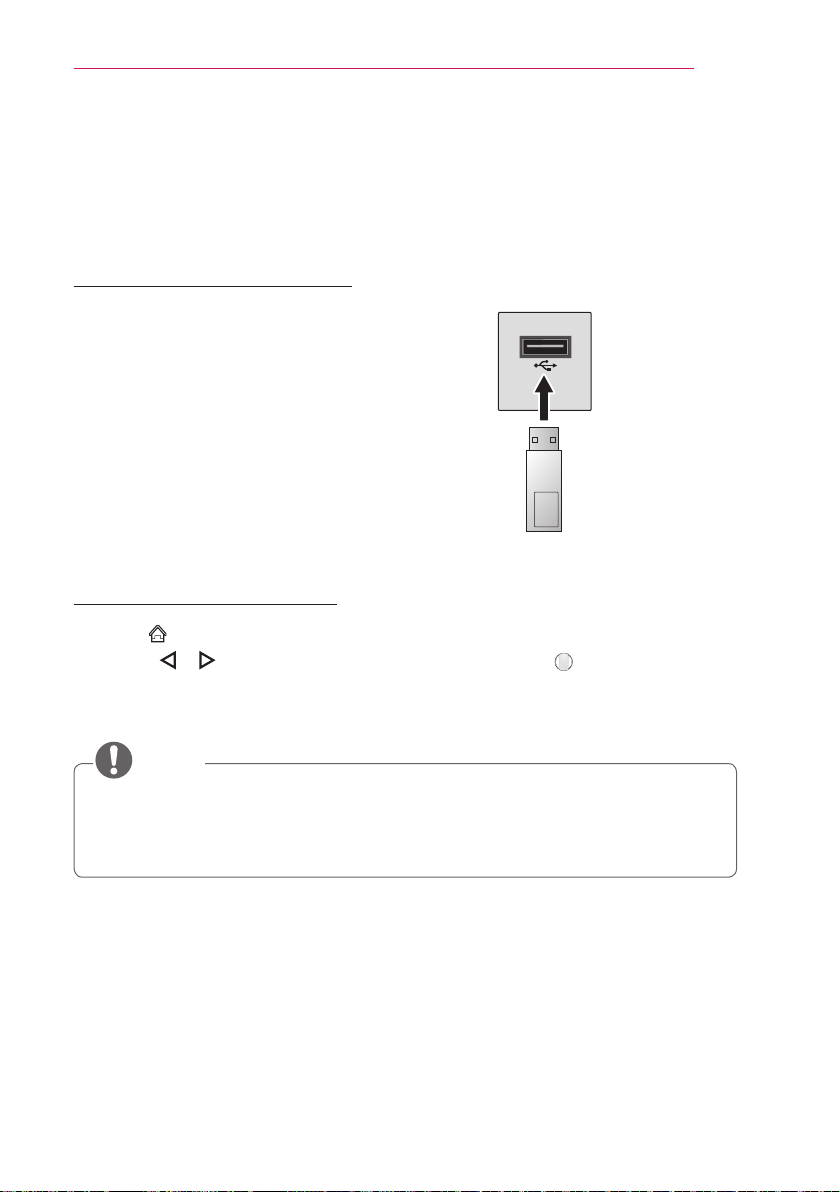
BeforeUsing
ConnectingaUSBDevice
Connect a USB device (external HDD, USB memory)
to the USB port of Laser TV to enjoy the content les
stored in the USB device with your Laser TV. You
cannot write or delete data in the USB device. Connect
a USB ash drive as shown on the right.
USB Flash Drive
RemovingaUSBDevice
1
Select SMART → QuickMenu.
2
Use the or button to move to USBDevice and press the Wheel(OK) button.
3
Select a USB to remove. Wait for conrmation that the USB device has stopped before
removing the USB.
• If detached early, an error may occur on the Laser TV or the USB storage device.
• Once a USB device has been selected for removal, it can no longer be read.
Remove the USB storage device and then re-connect it.
NOTE

52
SMARTSHARE
TipsforUsingaUSBDevice
• If the USB storage device has a built-in auto recognition program or uses its own driver,
it may not work.
• Some USB storage devices may not work or may work incorrectly.
• If you use a USB extension cable, the USB device may not be recognized or may not
work properly.
• Use only USB storage devices formatted with the Windows FAT32 or NTFS file system.
• For external USB HDDs, it is recommended that you use devices with a rated voltage of
less than 5 V and a rated current of less than 500 mA.
• It is recommended to use a USB hub or hard disk drive with power supplied. (If the
power supplied is not enough, the USB storage device may not be detected properly.)
• It is recommended that you use USB flash drives of 32 GB or less and USB HDDs of
2 TB or less.
• If a USB HDD with power-saving function does not work properly, turn the power off and
on. For more information, refer to the user manual of the USB HDD.
• Data in USB storage device can be damaged so be sure to back up important files to
other devices. Data maintenance is the user’s responsibility and the manufacturer is not
responsible for data loss.
53
SMARTSHARE
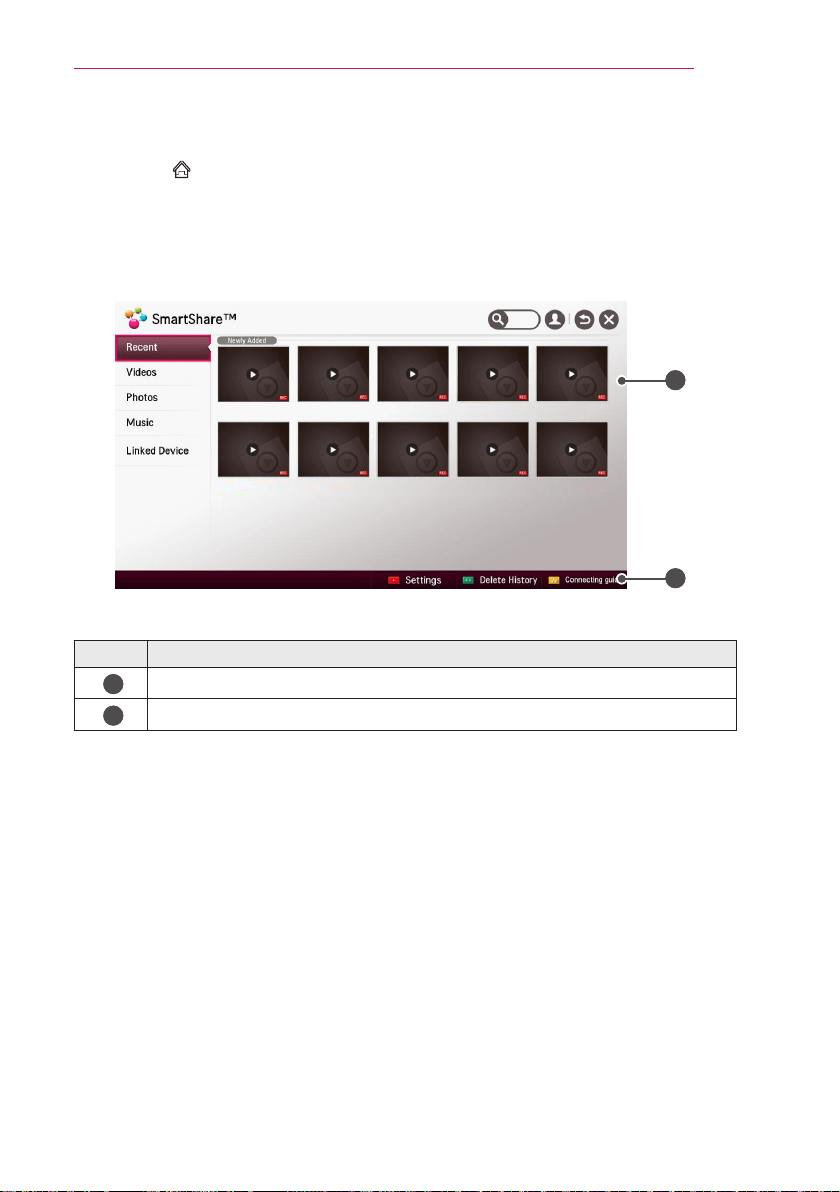
TouseSmartShare™
1
Press the SMART button on the magic remote control.
2
Select SmartShare™.
Playback photo/music/video les on the Laser TV from a USB device or home
network(DLNA). The photo, music and video of all devices connected to the Laser TV are
displayed.
000 001 002 003 004
005 006 007 008 009
2
1
Description
1
Displays photo/music/video les on all devices connected to the Laser TV.
2
Shows how to connect PC, smartphone/device, and USB.

54
SMARTSHARE
WatchingtheVideos
In the Videos, you can watch movies stored on the connected USB device.
Controls playback and sets options while viewing videos.
Playingvideo-warning
• Some subtitles created by users may not work properly.
• The video and subtitle files should be placed in the same folder. In this case, you must
assign the same names for the video and subtitle files for proper display.
• Subtitles on an NAS (Network Attached Storage) device may not be supported
depending on the manufacturer and model.
• We do not support any stream that contains GMC (Global Motion Compensation) or
Qpel (Quarterpel Motion Estimation).
• Full HD Video: 1920 X 1080
– Only H.264 / AVC prole level 4.1 and lower is supported.
• The file size limit is dependent on the encoding environment.
• Only Window Media Audio V2 and above is supported.
• AAC Main Profile is not supported.
• Video files created by some encoders may not be played back.
• Video files in formats other than the ones specified here may not be played back.
• Playback of video files stored on a USB device that does not support High Speed, may
not work properly.
• The Laser TV supports DTS audio codec when the USB/HDMI video file playback.

55
SMARTSHARE
Tocontrolvideoplayback
You can control playback using the following buttons.
Shows the current playing position.
Use the , button to move forward or backward.
Item Description
Resumes normal playback.
Pauses the video player.
Displays in slow motion.
Whenever this button is pressed, the playback speed is increased or
decreased by one unit.
Plays the previous/next le.
Option Sets the option.
56
SMARTSHARE
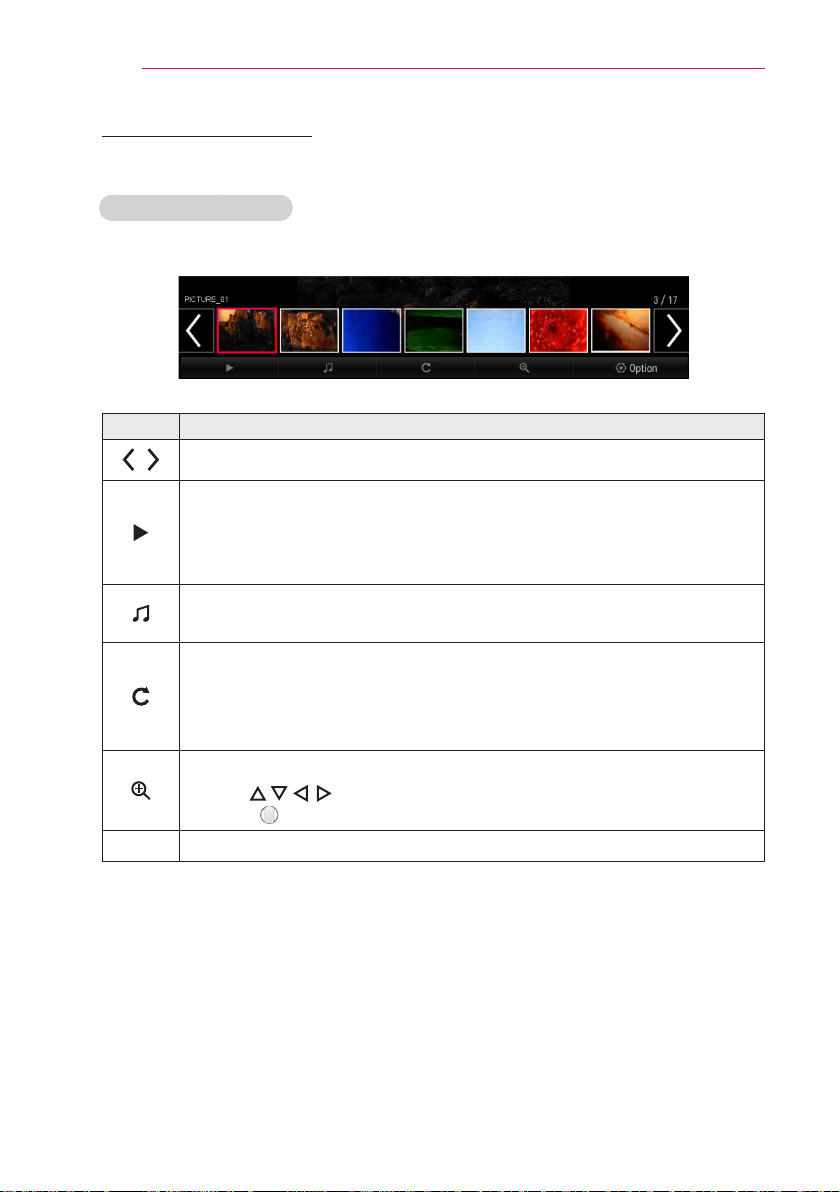
ViewingthePhotos
You can view photos stored on a connected device.
Tocontrolphotoview
You can control playback using the following buttons.
Item Description
,
Selects the previous or next photo.
If no picture is selected, all photos in the current folder are displayed in a
slide show. If some photos are selected, those photos are displayed in a slide
show.
• Set SlideSpeed in the Option → SetPhotoView. menu.
You can listen to music while viewing full-size photos.
• Set BGM in the Option → SetPhotoView. menu.
Rotates photos.
• Rotates a photo 90 °, 180 °, 270 °, 360 ° clockwise.
• Photos cannot be rotated if their width is greater than the height of the
maximum supported resolution.
Enlarges or reduces the photo.
Use the (Up/Down/Left/Right) buttons to select a page and
press the Wheel(OK) button.
Option A setting popup window will appear.
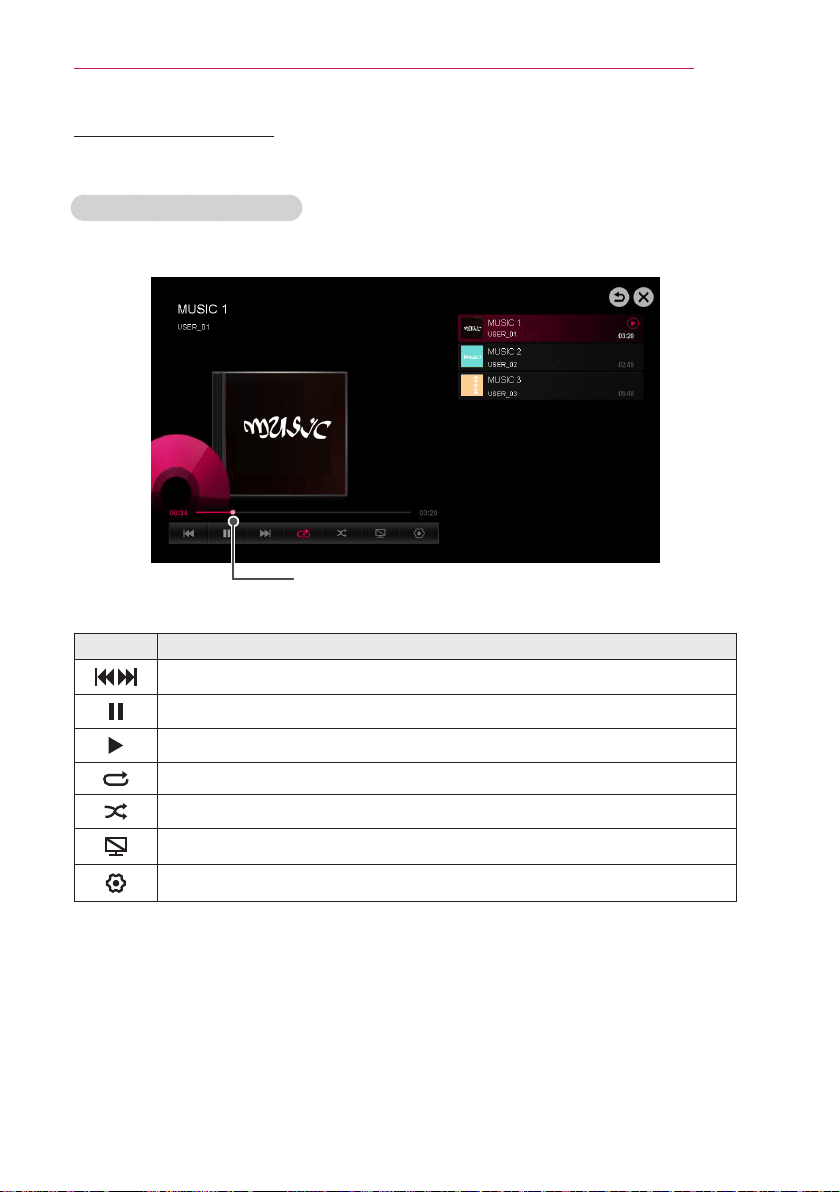
57
SMARTSHARE
ListeningtoMusic
You can play audio les stored on the connected device.
Tocontrolmusicplayback
You can control playback using the following buttons.
Changes the playing position.
Item Description
Plays the previous/next le.
Pauses the music player.
Resumes normal playback.
Sets the repeat playback.
Sets the random playback.
Plays music with the Laser TV screen turned off.
Sets Option for the music list.
If you use the USB device, time information will be not shown on screen.
58
SMARTSHARE
ToSetSmartShare™RelatedFunctions
Select SMART → SmartShare™ → Settings.
Changes settings related to SmartShare™ content playback.
AdvancedSetting
Item Description
MyTVName
Changes the name that appears when searching for the Laser TV
from other devices.
NetworkStatus Checks the network connection.
Wi-FiDirect
Allows use of wireless connection functions such as Wi-Fi Direct
and WiDi.
AutoPlayon
Receive
Accepts / rejects content transferred from other devices.
DivX(R)VOD
Registers or releases DivX.
Checks DivX Registration Code for playing DivX-protected videos.
Register at http://vod.divx.com.
Uses Registration Code to rent or purchase movies at
www.divx.com/vod.
• When using the DivX Registration Code of another device, the
rented/purchased DivX file cannot be played. Use only the DivX
Registration Code granted to this device.
• Converted files not conforming to DivX Codec Standard may
produce abnormal images and sound.
DeleteHistory
• To delete contents history, press DeleteHistory button. Use the contents at Recent
menu.
SmartShare™supportingfile
• Maximum data transfer rate: 20 Mbps (Mega bit per second)
• External subtitle formats supported: *.smi, *.srt, *.sub (MicroDVD, SubViewer 1.0/2.0),
*.ass, *.ssa, *.txt (TMPlayer), *.psb (PowerDivX),
*.dcs(DLP Cinema)
• Internal subtitle formats supported: XSUB
(supports internal subtitles generated from DivX6)
59
SMARTSHARE
VideoSupportedCodec
Maximum resolution: 1920 x 1080 @ 30p
Extension Codec
.asf
.wmv
Video VC-1 Advanced Prole, VC-1 Simple and Main Prole
Audio WMA Standard, WMA 9 Professional
.divx
.avi
Video
DivX3.11, DivX4, DivX5, DivX6, XViD, H.264/AVC, Motion
Jpeg, MPEG-4 Part 2
Audio
MPEG-1 Layer I, II, MPEG-1 Layer III (MP3), Dolby Digital,
Dolby Digital Plus, LPCM, ADPCM, DTS
.mp4
.m4v
.mov
Video H.264/AVC, MPEG-4 Part 2
Audio
AAC , MPEG-1 Layer III (MP3)
.3gp
.3g2
Video H.264/AVC, MPEG-4 Part 2
Audio
AAC, AMR-NB, AMR-WB
.mkv
Video H.264/AVC
Audio HE-AAC, Dolby Digital
.ts
.trp
.tp
.mts
.m2ts
Video H.264/AVC, MPEG-2, VC-1
Audio
MPEG-1 Layer I, II, MPEG-1 Layer III (MP3), Dolby Digital,
Dolby Digital Plus, AAC
.vob
Video MPEG-1, MPEG-2
Audio Dolby Digital, MPEG-1 Layer I, II, DVD-LPCM
.mpg
.mpeg
Video MPEG-1, MPEG-2
Audio MPEG-1 Layer I, II, MPEG-1 Layer III(MP3), AAC
60
SMARTSHARE
AudioFile
Filetype Item Info
mp3
Bitrate 32 Kbps - 320 Kbps
Samplefreq.
16 kHz - 48 kHz
Support MPEG1, MPEG2, Layer2, Layer3
Availablephotofile
Filetype Item Info
2D(jpeg,jpg,jpe)
JPEG
Minimum: 64 x 64
Maximum: Normal Type: 15360 (W) x 8640 (H)
Progressive Type: 1920 (W) x 1440 (H)
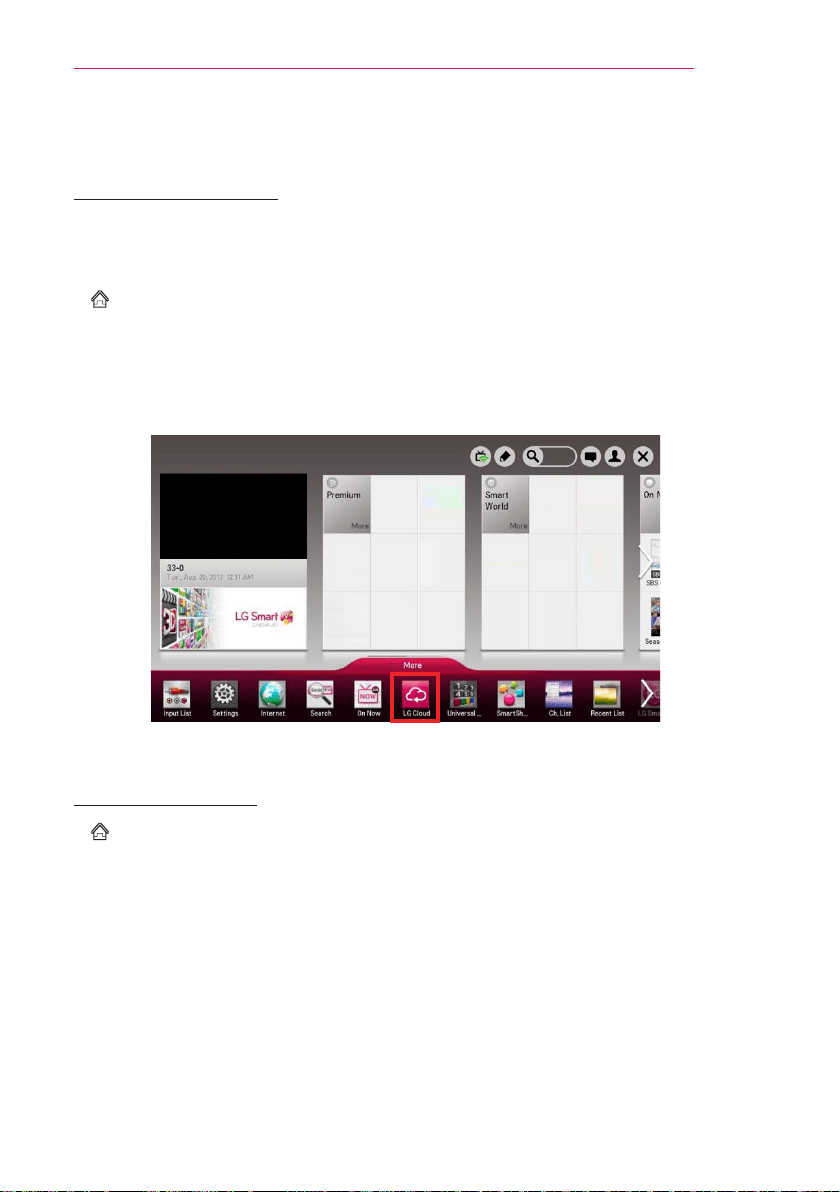
61
SMARTSHARE
ToUsetheLGCloud
WhatisLGCloud?
LGCloud is a service that allows you to enjoy your contents, such as video, music and
photos on your LG Laser TV, Smartphone and LG Website at any time, regardless of
where you are.
• SMART → More → LGCloud
• Sign up for LG Cloud to use the services.
• You can sign up from your LG Smart Laser TV, Smartphone or LG Website.
• The service or membership can only be cancelled at the LG Cloud website
(http://www.lgecloud.com).
Movie Weather
News
Sports UCC
Picture Map Game
ToUseLGCloud
• SMART → More → LGCloud
• Enter the e-mail and password you provided during the sign-up procedure to sign in to
the service.

62
SMARTSHARE
Mainscreenlayout
This is the main screen you will see rst after signing in.
NO
IMAGE
NO
IMAGE
NO
IMAGE
NO
IMAGE
NO
IMAGE
Folder
selection tabs
Sort criteria
selection
File display area
Selection mode
Videoplayback
Playback control Add or remove favorites
Set options
LGCloudMovetoHome/Notice/MyAccount/FAQ
Item Description
MovetoHome Displays a default screen.
Notice Shows notices about the LG Cloud service.
MyAccount Shows the user ID and e-mail address.
FAQ Displays the FAQ regarding LG cloud service.

63
SMARTSHARE
ToconnectDLNA
DLNA stands for Digital Living Network Alliance, which allows you to enjoy video / music /
photo les stored on a PC or server on your Laser TV via home networking.
ToConnectaDLNA-authenticatedSmartphone
TV and the smartphone should be on the same network.
1
Enable Wi-Fi on the smartphone.
2
Install/run a DLNA app to share content on the smartphone (It’s called SmartShare on
LG phones).
3
Run “Share my mobile phone Content”.
4
Select the kind of Content (video/music/photo) to play.
5
Select the video, music, or photo le to play on the Laser TV.
6
Select AddtoPlayList.
7
Select Laser TV model name on the device to replay content. (Laser TV model name is
on the label of the device.)
8
Press Play to enjoy the selected le on the Laser TV.
ToconnectaDLNADMR(DigitalMediaRenderer)
With the Windows 7 or Windows 8 PC operating system or DLNA-certied device (e.g.
mobile phone), music/videos/photos may be played on the Laser TV without installing a
separate program.
1
Congure the Laser TV and PC on the same network. Congure the Windows 7 or
Windows 8 PC on the network.
2
To play a music/video/photo le, right-click on the le and use the Remote Playback or
PlayTo Windows 7 or Windows 8 feature.
For playback on devices like a mobile phone, refer to the model’s user guide.
3
Content will be played on only one device even if more than one Laser TV or device is
connected. Play speed can vary depending on network speed.
64
SMARTSHARE
ToconnectaDLNADMP(DigitalMediaPlayer)
With a PC having SmartShare PC Software, music/video/photo les may be played on the
Laser TV via home networking.
1
Congure the Laser TV and the PC on the same network. The Laser TV and each
device should be connected through a single access point to enable DLNA service.
2
Install the SmartShare PC Software from the web site onto a PC. Before installation,
close all running programs including rewall and Anti-Virus programs.
3
The server should be running in order to watch shared les on your Laser TV.
• For the website information, go to SMART → Settings → SUPPORT → Product/
ServiceInfo.
• For how to use the SmartShare PC software, refer to the software help.
SmartShare™PCSWInstallingandSetting
Install the SmartShare™ PC SW (DLNA) program on your PC.
1
Download the setup le from the path below in order to use the DLNA function.
http://liu.lge.com/smartshare/release/smartshare.zip
2
Install the downloaded SmartShare™ PC software.
3
You can run the program when installation is complete.
• DLNA or Media Link service is only available if Laser TV and other devices are
connected via a single router.
NOTE
65
SMARTSHARE
PCrequirementforinstallingLGSmartShare™
Item MinimumSpecications RecommendedSpecications
CPU
Intel Pentium4 2.0 G or higher/
AMD Sempron 2000 or higher
Intel Pentium Dual Core or higher/
AMD Athlon 64 x 2 or higher
RAM 1 GB or higher 2 GB or higher
VGA
64 MB RAM, 1024 x 768 or higher
resolution, and a video card that
supports 16 bit or more colors
128 MB RAM, 1024 x 768 or
higher resolution, and a video card
that supports 16 bit or more colors
HardDiskDrive 200 MB or higher
Operating
System
Windows XP (Service Pack 2 or later), Windows Vista, Windows 7,
Windows 8
l Windows Media Player: 11.0.5721.5280 or higher is recommended
Network
Environment
100 MB Ethernet, Wireless LAN (WLAN) IEEE 802.11g or higher
• Program speed can be delayed depending on the system performance and the network
environment.
InCaseofaDLNAMalfunction
• If a DLNA feature does not work properly, check network settings.
• A 5-GHz access point is needed to view 1080p videos via DLNA.
• A 2.4-GHz access point may cause frequent buffering or other problems.
• DLNA may not work properly on a wireless network. It is recommended to use a wired
connection.
• Multi audio and internal subtitles are not supported in DLNA mode.
• If more than one Laser TV is connected to a single server in DLNA mode, the content
may not play depending on server performance.
• Subtitles may not be supported depending on DLNA device.
• The DLNA feature may not work properly in all network environments.
• The DLNA feature cannot be used with some access points that do not support
multicasting. For more information, refer to access point manual or consult with the
manufacturer.
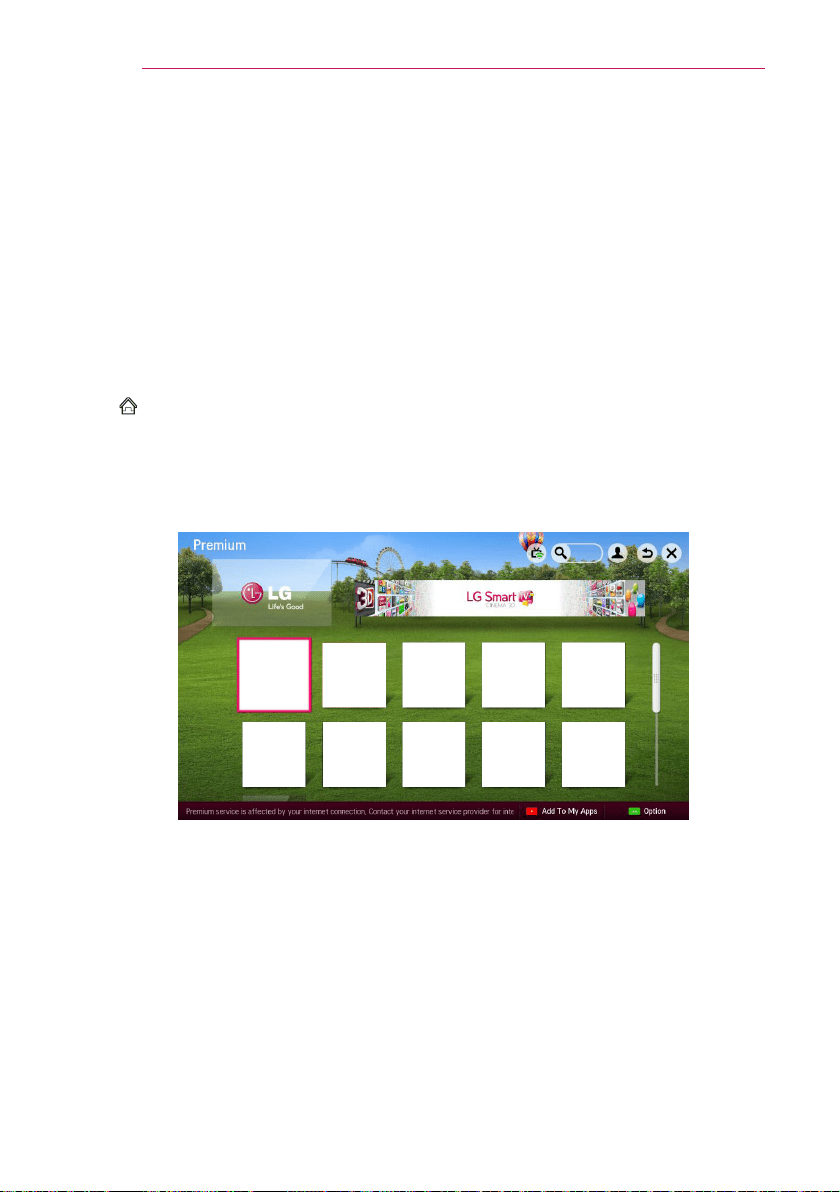
66
SMARTSHARE
• Supported file types may differ depending on the DLNA server environment, even for
the file types supported by Laser TV.
• Too many sub-folders and files included in one folder may cause a malfunction.
• Information about the file from DLNA server may not be displayed correctly.
• SmartShare PC Software is recommended when watching video subtitles from a DLNA
server.
• To add a subtitle file later, turn off the shared folder and reset.
• DRM files located in SmartShare PC Software server are not played.
ToUseAPremiumService
• SMART → Premium
• This service gives you easy access to a wide variety of content, such as video, news,
and UCC, at any time, as long as you are connected to the network. Premium content
includes specialized country-specific services taking regional cultural sensitivities into
account as well as global content.
WEB Movie Map SNS Play
NEWS Comic
Entertainment
Information TV
67
SMARTSHARE
ToUsePaidContent
• A fee is payable for some Premium content. Fee-paying services are paid for either
through LG Electronics’ proprietary billing system or through that of the relevant content
provider. Before using the LG billing system, you will need to sign up for membership
and register payment information on Laser TV or the website (www.lgappstv.com) to
purchase paid content.
• You can sign up for membership on the login screen on your Laser TV or our website.
You can then log into both the Laser TV and the website with one ID.
1
Click Sign In button on the upper-right side of the screen on the home page to sign in.
2
Moves to the desired Premium service. (For some premium services, separate sign-in
is required after signing up for the premium service.)
3
After reviewing the pricing and service information for the content, click the Purchase
button. (There may be limitations on the available period and number of times
depending on content.)
4
Once the purchasing process is complete, view your purchased content by clicking the
Buy button.
5
Select your ID on upper menu of Home screen and check history of purchases from
MyPage → Paymentinquiry. It is also available on MyPage → PurchaseHistory of
web site (www.lgappstv.com).
ToResetPremium
• SMART → Premium → Option → InitializationofPremium
• Resets premium list, premium information, country setting, and user sign-in information.
• Resetting will resolve errors occurring during premium update.
• Content offered by service providers are subject to change or deletion without prior
notice to enhance their service quality. Refer to the website of the relevant content
provider for questions, troubleshooting, or the latest information about content.
LG Electronics assumes no legal responsibility for content services and related
information, even when a service is discontinued by the service provider.
• The quality of your premium service may be affected by your Internet connection.
For any questions related to Internet speed or other service problems, consult your
Internet service provider.
• For best service quality, we recommend that you subscribe to an Internet service
providing a speed of 4.0 Mbps (1.5 Mbps or faster). If you experience any Internet
speed problem, contact your Internet service provider.
• Some content providers may provide content that is unsuitable for minors. Parental
discretion is advised.
NOTE
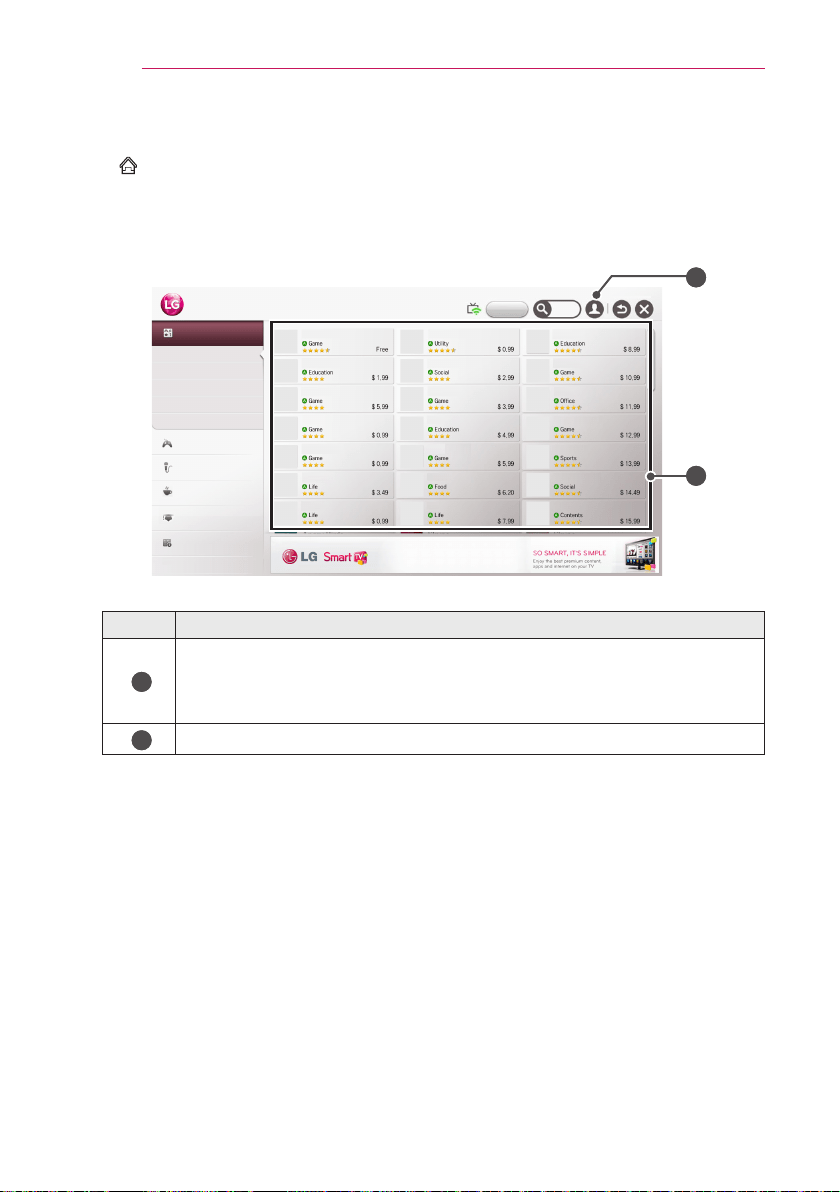
68
SMARTSHARE
TouseLGSmartWorld
• SMART → LGSmartWorld
LG Smart World is a TV application service available through Smart TV Service. You
can download and enjoy many different apps (for fee or free) including education,
entertainment, life and news.
SMART WORLD
All
Hot
Top Paid
App 1 App 8 App 15
App 2 App 9 App 16
App 3 App 10 App 17
App 4 App 11 App 18
App 5 App 12 App 19
App 6 App 13 App 20
App 7 App 14 App 21
My Apps
Top Free
New
Total
Game
Entertainment
Life
Education
News/Info.
2
1
Description
1
Sign in.
When you sign in, ID is displayed.
When you select the ID, you can select MyPage and SignOut.
2
Select the app to install.
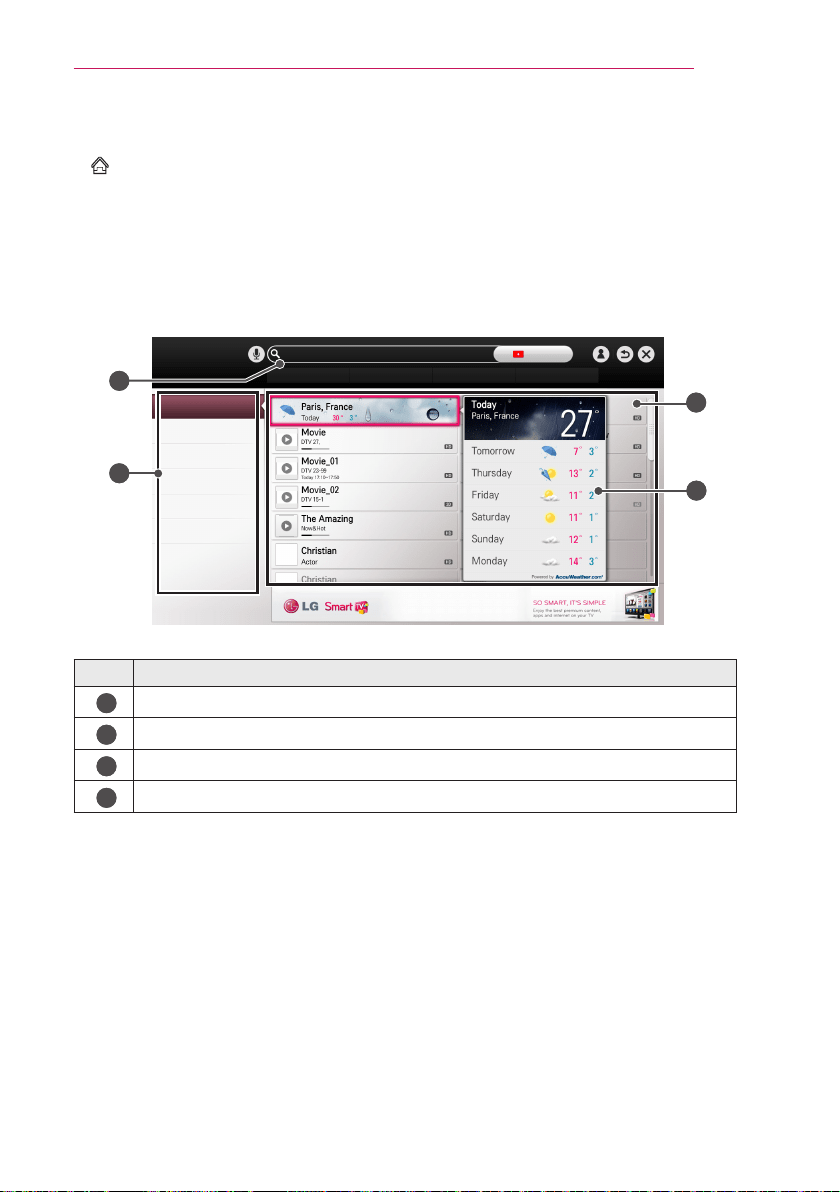
69
SMARTSHARE
ToUseSearchFunction
• SMART → Search
• You can search apps and contents using the Search function of LG Smart Laser TV.
When you enter keywords using the input device, such as the remote control, you can
find apps of LG Smart World and some contents of the Premium service. Links are
also provided to go for web search. If you are using SmartShare
TM
, you can also search
contents of SmartShare
TM
. The Search categories and content types vary depending on
the country and will be kept updating.
Search
weather
Prev. Keywords
weather
Search
All
App contents
LG Smart World
Premium
YouTube
NEWS
SmartShareTM
Web
1
2
3
4
Description
1
Enter search terms.
2
Category of search results
3
Search results
4
Detailed information about the search item

70
SMARTSHARE
ToUsetheVoiceRecognitionFunction
UsingthisFunctionThroughSearch
1
Go to SMART → Search. Select the voice recognition icon on the left of the text
eld.
2
Speak slowly and clearly after the voice recognition window appears.
3
After the voice recognition is completed, the Similar List window pops up. If the pop-up
window does not have the results you want, press Retry to try again. Select the most
similar result, then it will be displayed in the text eld. Press the Search button to get
the result you want.
UsingthisFunctionontheInternet
1
Go to SMART → Internet. Move the Magic Remote Control pointer in the text eld
on a website to open the virtual keyboard.
2
Select the voice recognition icon on the left the virtual keyboard.
3
Speak slowly and clearly after the voice recognition window appears.
4
After the voice recognition is completed, the Similar List window pops up. If the pop-up
window does not have the results you want, press Retry to try again. Select the most
similar result, then it will be displayed on the text eld. Press the Search button on the
website to get the result you want.
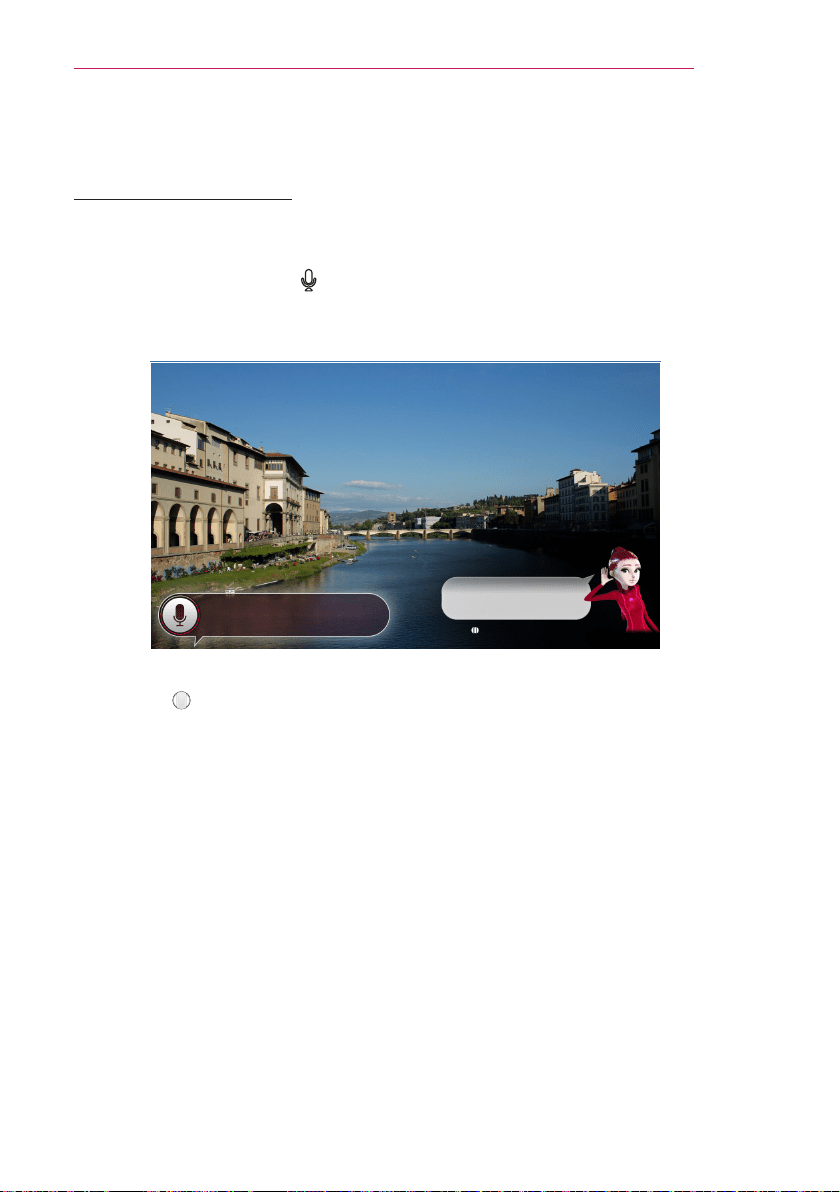
71
SMARTSHARE
ToUseVoiceMateFunction
WhatIsVoiceMate?
Voice Mate allows you to search desirable programs and content with your voice and
adjust the Laser TV.
1
Press the voice recognition button on the magic remote control.
2
When the Voice Display bar is activated on the left of the screen, say what you want to
watch.
Let me know what you want.
“Show me the hottest YouTube
video,and timer-record it (a program).”
WHEEL(OK) button: See voice user guide
3
Press the Wheel(OK) button with the Voice Search standby to see the supported
language in the voice guide.
72
SMARTSHARE
HowtoUseVoiceMate?
• To use all the functions and services of Voice Mate, you need to set Smart Wizard and
Time. Set up the network, region, auto tuning, and universal remote control through the
Smart Wizard.
• In order to use Voice Mate, you must set up the network, time, region, and tuning.
• Set the language of your country to use Voice Mate.
• You can change the language for Voice Search in SMART → Settings → OPTION
→ Language → VoiceRecognitionLanguage.
• You can turn the avatar On/Off in SMART → Settings → OPTION → SeeAvatar.
• Point the universal remote control towards the set-top box when you use Voice Mate
with it.
• When speaking a command, hold the remote within 10 cm of your face.
• The voice search may fail when you speak too fast or too slow.
• The recognition rate of Voice Mate may vary depending on the user’s characteristics
(voice, pronunciation, intonation, and speed) and the environment (noise and Laser TV
volume).
• If your voice is not recognized properly, Voice Mate may function regardless of your
intention.
WhatAreOtherFunctionsofVoiceMate?
You can access various Laser TV features using Voice Mate.
Item Description
Channel
You can tune TV channels and search channel information.
Example: “What time is *** on?”
Recommen-
dationand
Search
You can recommend and search TV programs and content les.
Example: “Look up ***”
Information
andInternet
You can also search other information such as today’s weather.
Example: “How’s the weather today?”
• Available functions may vary depending on the country.
• For more supported examples, see the voice user guide.
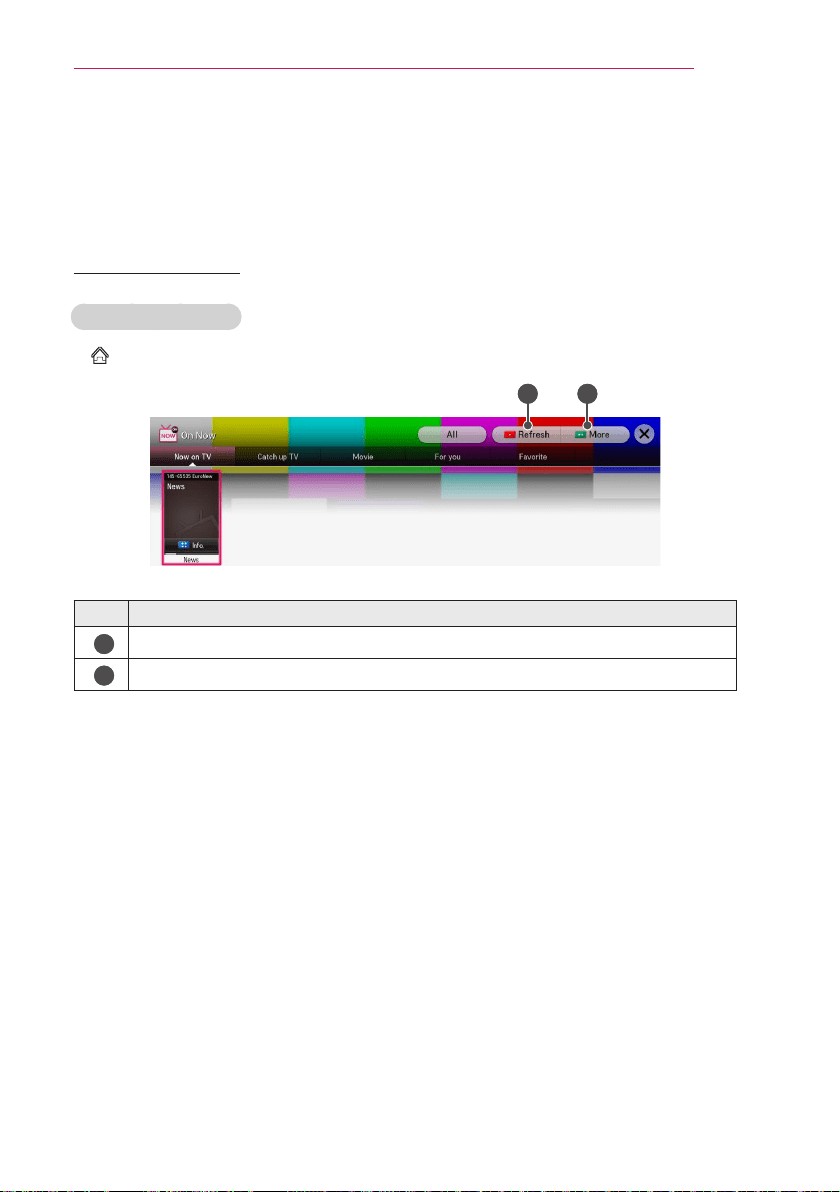
73
SMARTSHARE
WhatIsOnNow?
On Now allows you to select and watch recommended programs currently available
on your Laser TV. The Favorite function allows you to select and watch recommended
content related to the program you are watching.
ToUseOnNow
ToseeinMiniview
• SMART → OnNow
21
Description
1
Refreshes all list items and moves to the beginning of the screen simultaneously.
2
Moves to Full View.
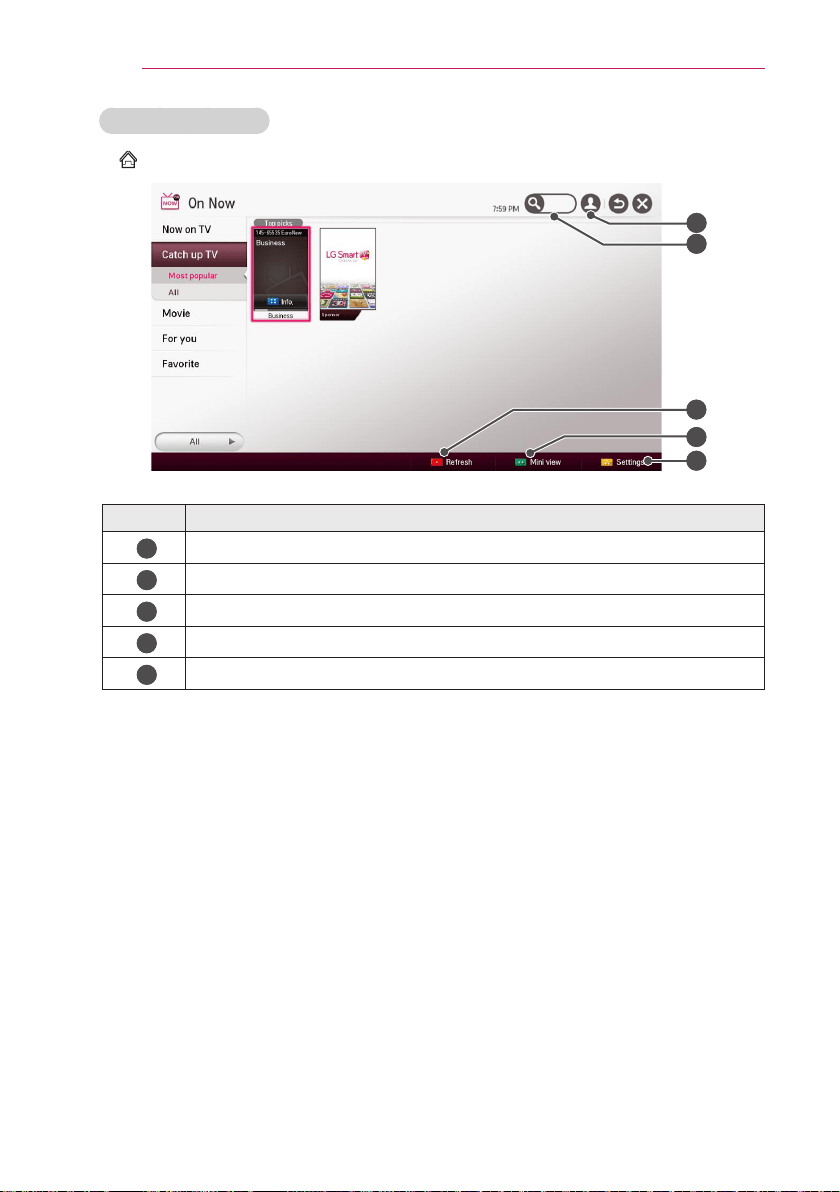
74
SMARTSHARE
ToSeeinFullView
• SMART → MyCard → OnNow
1
2
5
3
4
Description
1
Sign in
2
Search
3
Refreshes all the list items and moves the screen up simultaneously.
4
Move to Mini view
5
Sets the options.
• For TV channels, you need to complete Auto Tuning to use this service properly.
• If you move to a different region, you need to set the region to your current location in
order to use this service.
• The digital EPG (Electronic Program Guide) information which the TV receives may
be different from the programs on the On Now TV list which uses an external EPG
(Electronic Program Guide).
• You can control a connected set-top box tuner with the magic remote control.
• An internet connection is required to use On Now.
• The channels in the On Now TV list are provided from the cable broadcasting service
provider. If the provider changes them without notice, the actual TV channels may differ.
• The channel names of analog cable broadcasting on the On Now TV list are provided
from an external EPG (Electronic Program Guide), so each name refers a cable
broadcasting service provider but may not match.
• The program thumbnail image on the On Now TV list is the representative image of the
program, and it may be different from the image of the actual TV program schedule.
• If the channel information on the On Now TV list is different from the actual TV channel
or set-top box channel, set the set-top box and channel menu in the On Now Settings.
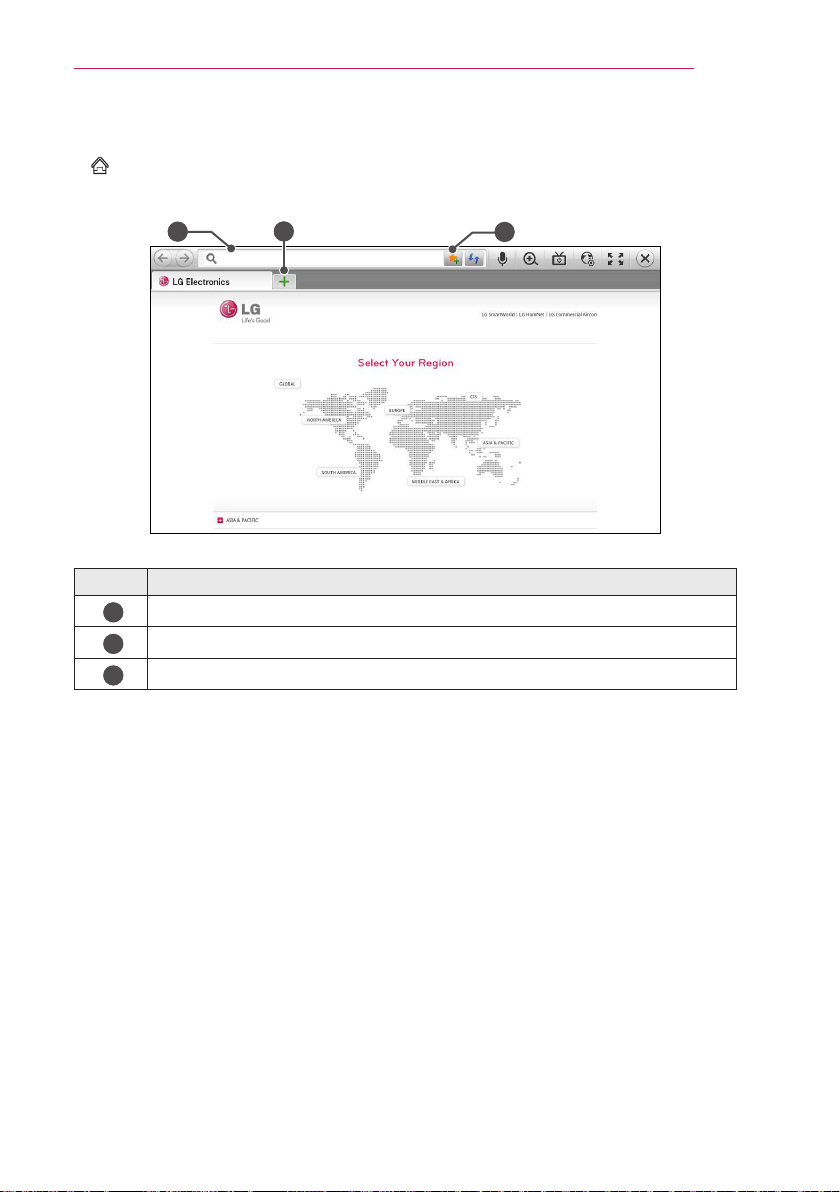
75
SMARTSHARE
ToUseInternet
• SMART → Internet
• Types URL manually on Laser TV or visits websites added to favorite.
2
1
3
Description
1
Types in the web address.
2
Chooses when you open several web browsers.
3
Add the current page to favorites.
• Internet supports up to Flash 11 but does not support platform-dependent technology
like ActiveX.
• Internet only works with a pre-installed plug-in.
• Internet may not play any media file format other than the following: JPEG / PNG / GIF
• Internet will be forcibly closed when there is insufficient memory.
• For the Internet, fonts installed on the Laser TV are used and may not be displayed
normally depending on the content played.
• Internet does not support file and font download.
• Internet is made for Laser TV so it may have a different function to browsers made for
PC.
• Internet is a Laser TV browser and may not work properly when playing some content
files.

76
SMARTSHARE
FrequentlyAskedQuestionsforSmartLaserTV
Sign up is required to use LG Smart World.
You can sign up on either your Laser TV or the LG website (www.lgappstv.com). Free
apps are available immediately after signing up.
You can purchase paid apps using your credit card registered with the website or credits.
Paid apps can also be purchased through carrier billing.
Problem Solution
Whenenteringmenu,
theInitializingmessage
alwaysappears.
• The Initializing message shows you how long it takes to
reboot the microprocessor and hardware, set up network
communications, and communications with SDP (device
authentication and basic information download). It takes
about 20 seconds and this is a normal process.
Thereisnocontent
shownonthePremium
card.
• Content may not be shown after changing the country
setting on Smart Laser TV. Change to desired country in
SMART → Settings → OPTION → ServiceCountry
Setting
Whileusinginternet
features,thereisa
blankspaceonsome
Webpages.
• The internet of the Laser TV supports up to Flash 11 and
may not replay any file format other than the following
: JPEG, PNG, GIF
Internetcloses
automaticallywhen
visitingwebsite.
• If memory is insufficient because of large volume of
image information in the web page, the browser may be
forced to close.
Ialreadysignedupon
LaserTV.DoIneedto
signupagainatweb
site
(www.lgappstv.com)?
• If you sign up on your Laser TV, no additional sign-up on
the LG website (www.lgappstv.com) is required.
• After signing up on the Laser TV, you can sign into
the website by using the same ID and password and
entering the additional information to complete the email
verification process.
Caneachfamily
memberuseadifferent
IDwithasingleLaser
TV?
• It is possible to register and use more than one ID on one
Laser TV.
• To check the ID registered with Laser TV from
SMART → SignIn → IDList.
• You can check the list of apps purchased by each ID.
However, you can see all apps installed by each ID in
SMART → SignIn → MyPage.
77
SMARTSHARE
Problem Solution
WhatshouldIdoifI
forgetmyID?
• After signing up on a PC, use the Forgot ID? feature on
web site (www.lgappstv.com) when needed.
• After signing up on Laser TV, check it from SMART →
SignIn → FindID.
Ipurchasedanapp
fromtheLGwebsite
(www.lgappstv.com).
HowcanIuseitonthe
LaserTV?
• To check purchased apps from the Laser TV, sign in and
open the Purchased Apps menu.
• Select the ID at the top of Home and check the app in My
Page → Purchasedapps.
CanIseehistoryofmy
purchasedapps?
• Select the ID at the top of Home and check the app in My
Page → Purchasedapps.
• Sign in to website (www.lgappstv.com) and then select
MyPage → PurchaseHistory.
Ideletedapaidapp.
DoIhavetopurchase
againtodownloadit?
• If a purchased app is accidentally deleted, you can
download and reinstall it without having to buy it again, as
long as it is still in service.
• Select the ID at the top of Home and re-download apps
in MyPage → Purchasedapps. (Previously owned
apps may not be re-downloaded or run depending on the
software version.)
CanIuseappsfromLG
SmartLaserTV’sLG
SmartWorldonbotha
LaserTVandaPC?
• Please check if the Laser TV model supports LG Smart
World.
• The apps provided from LG Smart Laser TV’s LG Smart
World can only be used on an LG Smart Laser TV.
• Apps may be purchased from the website
(www. lgappstv.com) but cannot be used on a PC or
Mac. Use care when purchasing.
HowcanIchecktheID
currentlysignedinon
theLaserTV?
• Select the ID at the top of Home and check the currently
signed-in ID in MyPage → MyInformation.
Iinstalledanapponthe
LaserTV.Wherecan
Ichecktheinstalled
app?
• Select SMART → MYAPPS. All paid and free apps
installed on Laser TV are displayed.

78
SMARTSHARE
Problem Solution
Thereisadifference
betweentheappsize
shownonthescreen
andtheactualappsize
installedonLaserTV.
• The app size shown in the screen includes the additional
space needed for installing apps so it may be different
from actually installed app size.
Iforgotmypassword
ontheLaserTV.What
shouldIdo?
• If you only provide the ID and password when signing
up on your Laser TV, you cannot recover your password
when it is lost. Create a new ID and sign up with the ID.
• If you provide other information than the ID and password
when signing up on your Laser TV or the LG website
(www.lgappstv.com), you can recover your password on
the website.
DoIneedtostore
paymentinformation
inwebsitetopurchase
paidapps?
• The following payment methods are available to
purchase paid apps on your Laser TV: credit card,
credits, and carrier billing.
• To purchase paid apps using your credit card or credits,
you should have a credit card registered with the LG
website (www.lgappstv.com) or have enough credits.
Paid apps can also be purchased through carrier billing if
your credit card details are not registered with the website
or you do have enough credits. If you purchase paid
apps on the website, the following payment methods are
available: credit card or credits.
CanIcancelanappthat
Ihavepurchased?
• As a member you cannot demand refund just because
you changed your mind after purchase.
• If there is a defect in the product or a problem of using
the product, which does not caused by your fault, you
can ask for a refund. However, the valid reason for refund
must be provided.
ShouldIuseonlyan
emailaddressformy
ID?
• For new sign-up members, the ID format has changed
from a combination of alphanumerics to your email
address.
• You can only use an email address for your ID when
signing up.
DoIneedtochangemy
IDformattotheemail
address?
• For new sign-up members, the ID format has changed
from a combination of numbers and alphabets to the
email address.
• If you are already a member, you can still use your
existing ID or change it to the email address.

79
SMARTSHARE
Problem Solution
WhatistheLG
account?
• The LG account allows you to sign into all of the LG
Smart service with a single ID and password. You can
use the following services with your LG account:
• LG Smart TV, LG Smart Laser TV, LG Cloud, LG Smart
World (excluding some countries), LG Smart ThinQ, and
LG Smart air conditioning, etc.
• Additional information may be required depending on the
service.
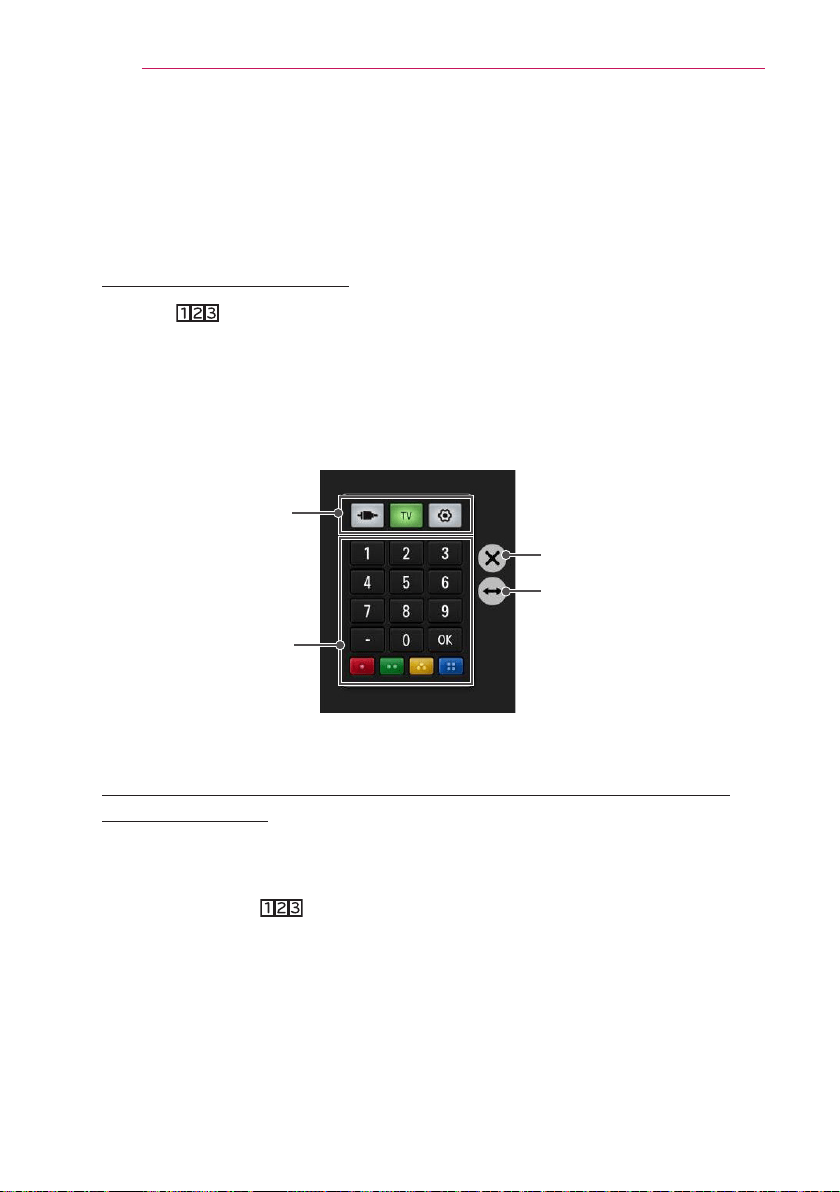
80
USINGADVANCEDFUNCTIONS
USINGADVANCEDFUNCTIONS
ToUseScreenRemote
ToUseScreenRemote
Press the button on the magic remote control.
Select a button on the screen remote displayed on the screen using the magic remote
control.
• The type of buttons on the screen remote varies depending on the region or the type of
a connected device.
• Image shown may differ from your Laser TV.
Exits the Screen Remote
Moves the position of
the Screen Remote to
left or right
TV operation buttons
Change Device tab
ToControlaDeviceConnectedtothePorjectorUsingthe
ScreenRemote
You can control a device connected via SIMPLINK or MHL using the Screen Remote.
1
Check if the device is connected to the Laser TV.
2
After pressing the button on the magic remote control, select the device you want
to control in the Change Device tab. The screen remote that can control the device
appears.
– This may not work with some buttons.
81
USINGADVANCEDFUNCTIONS
ToUsetheUniversalControlfunction
With the magic remote control, you can control a set-top box, Blu-ray player, home theatre
system, etc.
1
Check if a device you want to set is connected to your Laser TV.
2
After pressing the button on the magic remote control, select the icon of a device
you want in the change device tab.
If there is no device you want, press the on the tab, and select the external device
you want. Once the setup is complete, the name of the selected device is displayed in
the Change Device tab.
3
When you select a device you want in the change device tab, the screen remote that
can control the device appears on the screen.
TochangeorcleartheUniversalControlsettings
1
After pressing the button on the magic remote control, select the (TV/input
selection) button.
2
Select ChangeSetting or CancelSetting at the bottom of the device to be changed.
• When change setting, check if the power of the device to be changed is turned on.
• You can set one device per type.
• With the screen remote, you can only control the devices of a brand or manufacturer
that you can select in the setup screen.
• If you connect to a network before setting the universal remote control, update for the
latest manufacturer list is available.
• Some buttons may not work depending on the external device model.
• Place the device near the Laser TV for seamless operation.
• If the device is in a drawer, open the drawer.
• Go to SMART → UniversalControl or SMART → InputList → Setthe
UniversalControl and add, delete, or change a device.

82
USINGADVANCEDFUNCTIONS
ToControlaLaserTVUsingaSmartphone
You can download the LG TV Remote app from Google Play Store or Apple App Store
and use it on any Laser TV connected with your smartphone.
– Now you can enjoy your favorite Laser TV shows on your smartphone. (Some models
only.)
– You can easily enter your account information to log in.
– You can add your favorite channels on your smartphone.
– You can use the functions such as Premium, MYAPPS, and SmartShare™ directly on
your smartphone.
– The text input function is supported, so you can enter text easily. (Text cannot be
entered on some screens.)
– Select the app’s touch pad to control in the same way the pointer of the magic remote
control works.
– Keypad which allows you to control the set-top box and media devices is provided.
(Some models with specied conditions only.)
– You can set the Laser TV to the power-saving mode while watching Laser TV on your
smartphone.

83
USINGADVANCEDFUNCTIONS
ToUseaUSBInputDeviceOnaLaserTV
ToUseaUSBWired/wirelessMouse
Connect your mouse to the USB port. Use the mouse to move the pointer on the Laser TV
screen and select the menu you want.
Mouse MagicRemoteControl
LeftButton OK Button on Magic Remote Control
WheelButton Wheel Button on Magic Remote Control
• The right mouse button and any special buttons will not work with the Laser TV.
• The usability of a wireless USB mouse and keyboard may be affected by Radio
Frequency environment and the distance.
ToUseaUSBWired/wirelessKeyboard
Connect your keyboard to the USB port. You can enter text with the keyboard when using
the search function and the Internet.
• Text cannot be entered on some screens.
• It is recommended to use the product which is tested for compatibility with the LG Laser
TV.
• LOGITECH K200, LOGITECH K400, MICROSOFT Comfort Curve 2000, MICROSOFT
MS800, and LG Electronics ST-800
• You can change the input language by pressing the language switch key (or the right Alt
key) on your keyboard.
84
CUSTOMIZINGSETTINGS
CUSTOMIZINGSETTINGS
SETTINGS
1
Press the SMART button and select Settings.
2
Use the or button to select the desired item and press the Wheel(OK) button.
3
Use the , , , or button to set up the desired item and press the Wheel
(OK) button.
4
Press the BACK button when completed.
Menu Description
PICTURE Adjusts the image quality for optimal viewing.
SOUND Adjusts the sound quality and volume level.
CHANNEL Sets up or edits a channel.
TIME Sets the time and time-related features.
LOCK Locks or unlocks a channel or a program.
OPTION Customizes the general settings.
NETWORK Sets the network.
SUPPORT Shows the Laser TV information.

85
CUSTOMIZINGSETTINGS
PICTURESettings
1
Press the SMART button and select
Settings.
2
Use the or button to select PICTURE and
press the Wheel(OK) button.
3
Use the , , , or button to set up the
desired item and press the Wheel(OK)
button.
– To return to the previous menu,
press the BACKbutton.
?
• ꕊ Energy Saving : Minimum
• Picture Mode : Standard
• Contrast 100
• Brightness 50
• Sharpness 20
• Color 60
• Tint 0
R
G
PICTURE
The available picture settings are described as follows.
Item Description
Energy
Saving
Reduces power consumption by adjusting screen brightness.
Mode
Minimum/
Medium/
Maximum
Applies the pre-set EnergySaving mode.
– If EnergySaving is set to Minimum and the ambient
temperature is 35 °C or higher, EnergySaving will be
disabled.
Picture
Mode
Selects the picture mode optimized for the viewing environment or the
programme. You can also customize advanced options for each mode.
Mode
Vivid
Maximizes the visual effect of video.
Heightens contrast, brightness, and sharpness to display
vivid images.
Standard
Displays images in standard levels of contrast, brightness,
and sharpness.
Cinema Optimizes the image for a movie.
Game
Optimizes the image for playing games on fast-moving
screens.
Expert1/2
Menu for adjusting picture quality that allows experts and
amateurs to enjoy the best Laser TV viewing.
– Expert mode is for picture tuning professionals to
control and ne-tune using a specic image. For normal
images, the effects may not be dramatic.
Contrast Adjusts the difference between bright and dark regions of the screen.

86
CUSTOMIZINGSETTINGS
Item Description
Brightness Adjusts the overall screen brightness.
Sharpness
Adjusts the sharpness of the borders between bright and dark.
Horizontal and Vertical Sharpness are available only in Expert1/2.
Color Adjusts the intensity of all colors.
Tint Adjusts the red/green color balance.
Advanced
Control
(Expert
Control)
Customizes the advanced settings.
Picture
Option
Sets optional settings.
Picture
Reset
Resets values customized by the user.
Each picture mode is reset. Select the picture mode you wish to reset.
Aspect
Ratio
Resizes the picture.
Picture
WizardII
Use the remote control and follow the instructions of the Picture Wizard
to calibrate and adjust for optimum picture quality without expensive
pattern devices or help from a specialist. Follow the instructions to
obtain the optimum picture quality.
87
CUSTOMIZINGSETTINGS
AdvancedControl
Item Description
Dynamic
Contrast
Adjusts contrast and color to the optimal level according to the screen’s
brightness.
Dynamic
Color
Adjusts colors for more natural-looking colours.
Preferred
Color
SkinColor
Skin color spectrum can be separately set to implement
the skin color as dened by the user.
Grass
Color
Natural color spectrum (meadows, hills, etc.) can be
separately set.
SkyColor Sky color is set separately.
Super
Resolution
Provides a crystal-clear picture by improving the details in areas where
the picture is blurry or unclear.
Gamma
Sets the gradation curve according to the output of the picture signal in
relation to the input signal.
ExpertControl
Item Description
Dynamic
Contrast
Adjusts contrast and color to the optimal level according to the
screen’s brightness.
Super
Resolution
Provides a crystal-clear picture by improving the details in areas
where the picture is blurry or unclear.
ColorGamut
Selects the range of colors that can be expressed.
• Standard: Displays the original colors of an input signal regardless
of the display features.
• Wide: Sets to use the rich colors of the display.
Edge
Enhancer
Shows clearer and distinctive yet natural edges of the video.
ColorFilter
Filters a specic color spectrum in RGB colours to ne-tune colour
saturation and hue accurately.
ExpertPattern Patterns used for expert adjustment.
Gamma
Sets the gradation curve according to the output of the picture signal
in relation to the input signal.

88
CUSTOMIZINGSETTINGS
Item Description
WhiteBalance
Adjusts white balance. Detailed adjustment is possible as shown
below.
a.Method:2points
– Pattern: Inner, Outer
– Points: Low, High
– Red/Green/Blue: Adjustable range -50 - +50.
– Applytoallinputs: The values of the WhiteBalance is applied
to all the input modes.
b.Method:20pointIRE
– Pattern: Inner, Outer
– InstituteofRadioEngineers(IRE) is the unit indicating the size
of a video signal and can be set to 5, 10, 15, ... 100. You can
ne-tune for each setting as shown below.
– Red/Green/Blue: The adjustment range is -50 - +50.
– Applytoallinputs: The values of the WhiteBalance is applied
to all the input modes.
Color
Management
System
Adjusts Red/Green/Blue/Cyan/Magenta/Yellow colors. Allows an
expert to adjust the tint using a test pattern. Six colors (Red/Green/
Blue/Cyan/Magenta/Yellow) can be selectively adjusted without
affecting other colors. You may not see colors change on a normal
picture even after adjustment.
– SaturationRed/Green/Blue/Yellow/Cyan/Magenta,
TintRed/Green/Blue/Yellow/Cyan/Magenta,
LuminanceRed/Green/Blue/Yellow/Cyan/Magenta:
The adjustment range is -30 - +30 each.
* Depending on input signal or other picture settings, the range of detailed items for
adjustment may differ.
89
CUSTOMIZINGSETTINGS
PictureOption
Item Description
NoiseReduction Reduces screen noise in the video.
MPEGNoise
Reduction
Eliminates noise generated while creating digital picture signals.
BlackLevel
Adjusts the brightness or darkness of the screen to suit the black
level of the picture input using the degree of darkness (black level)
of the screen.
RealCinema Optimizes the screen for movie viewing.
TruMotion
Corrects images to display smoother motion sequences.
Mode
Smooth De-Judder value is set to 3.
Clear De-Judder value is set to 7.
User
De-Judder can be set manually.
• De-Judder: This function adjusts juddering of the
screen.
Off • De-Judder value is set to 0
Color
Temperature
Adjusts the overall color of the screen to suit your preference.
You can select Natural, Cool, Medium, or Warm.
* If the video signal is 60 Hz, TruMotion may not work.
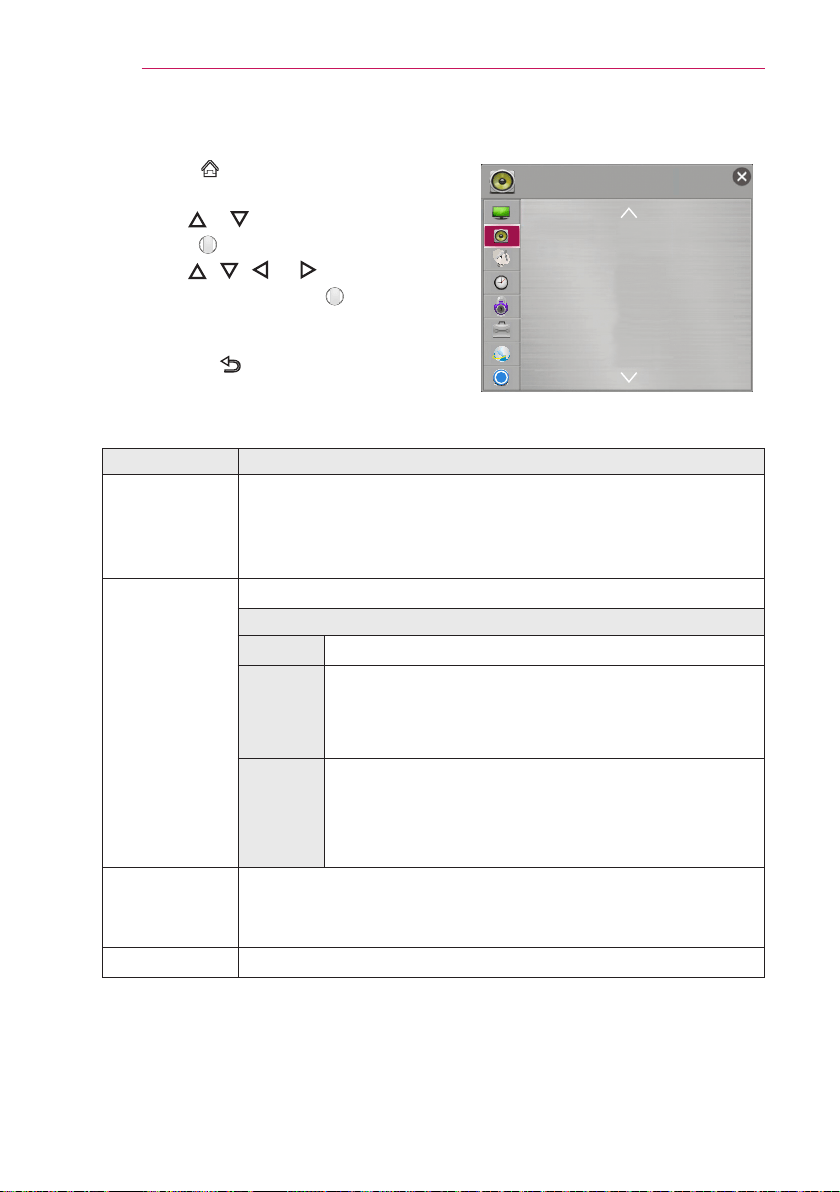
90
CUSTOMIZINGSETTINGS
SOUNDSettings
1
Press the SMART button and select
Settings.
2
Use the or button to select SOUND and
press the Wheel(OK) button.
3
Use the , , , or button to set up the
desired item and press the Wheel(OK)
button.
– To return to the previous menu,
press the BACK button.
?
• Smart Sound Mode
: O
• Sound Mode : Standard
• Virtual Surround Plus
: O
• Clear Voice II : O
• Volume Mode
• Sound Out : TV Speaker
• AV Sync. Adjust : O
SOUND
The available sound settings are described as follows.
Item Description
SmartSound
Mode
Provides the optimized sound adjusted for each content type.
• If the SmartSoundMode function is enabled, SoundMode,
VirtualSurroundPlus and ClearVoicell are automatically
adjusted.
SoundMode
Sets the sound mode.
Mode
Standard
Suitable for all types of video.
Music/
Cinema/
Sport/
Game
Sets audio optimized for a specic genre.
User
Setting
Adjusts volume level.
• 100Hz/300Hz/1kHz/3kHz/10kHz: Sets EQ by
manual adjustment of sound bands.
• Reset: Resets the equalizer value changed by the user.
Virtual
SurroundPlus
Provides realistic 5.1 channel stereo sound from two speakers.
• If ClearVoicell is set to On, VirtualSurroundplus will not be
chosen.
ClearVoiceII Boosts voice clarity.

91
CUSTOMIZINGSETTINGS
Item Description
VolumeMode
Sets various modes for volume control.
Mode
Auto
Volume
Sets AutoVolume to On. The volume varies from
channel to channel and program to program. When
clicking through the channels, the volume is adjusted
automatically to maintain the same level.
Volume
Control
Using a single volume curve may result in an inaudible
or loud sound depending on the environment. Adjusts
volume levels depending on the time of day (day/night).
SoundOut
Sets the audio output of the Laser TV.
Mode
TVSpeaker Sound is output through the Laser TV speaker.
External
Speaker
(Optical/
HDMIARC)
Sound is output through the speaker connected to the
optical port. SIMPLINK is supported.
• DigitalSoundOut: Sets up digital sound output.
LGSound
Sync
(Optical)
Sound is output through an LG audio device
connected to the optical digital audio output port.
LGSound
Sync
(Wireless)
Sound is output through a wirelessly connected LG
audio device.
Headphone
Sound is output through headphones.
• Headphones are detected and connected
automatically when the Laser TV is on.
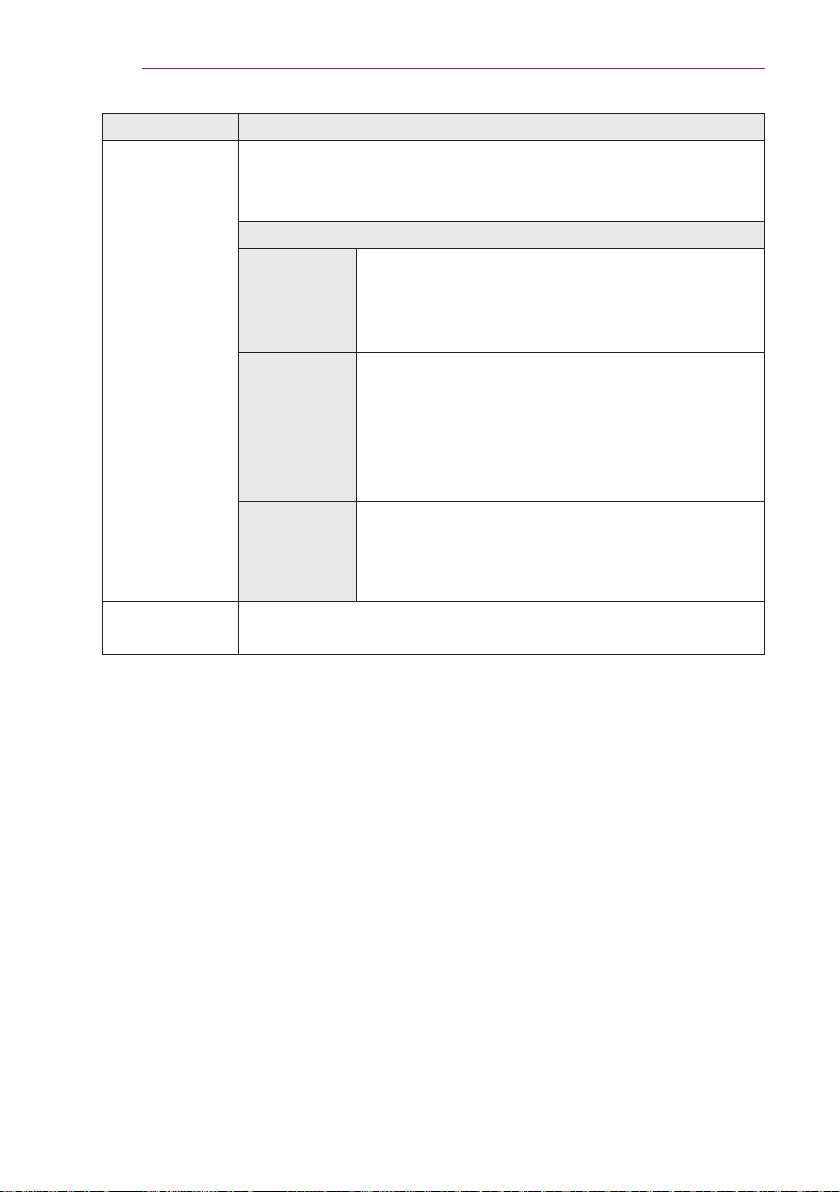
92
CUSTOMIZINGSETTINGS
Item Description
AVSync.
Adjust
Synchronizes video and audio directly when they do not match.
If you set AVSync.Adjust to ON, you can adjust the sound output
(Laser TV speakers or SPDIF) to the screen image.
Mode
TVSpeaker
Adjusts the synchronization of the sound from the
Laser TV’s internal speakers.
The + and - buttons allow the viewer to synchronize
the audio with the video.
External
Speaker
Adjusts how the sound is synced to external
speakers, such as an external speaker connected
to the digital audio output port, LG audio device and
headphone.
The + and - buttons allow the viewer to synchronize
the audio with the video.
Bypass
Outputs broadcasting signals or the audio of an
external device without audio delay. Audio may be
output before video as it takes time to process video
input into the Laser TV.
SoundOption
Setting
Balance: Adjusts left/right audio balance.
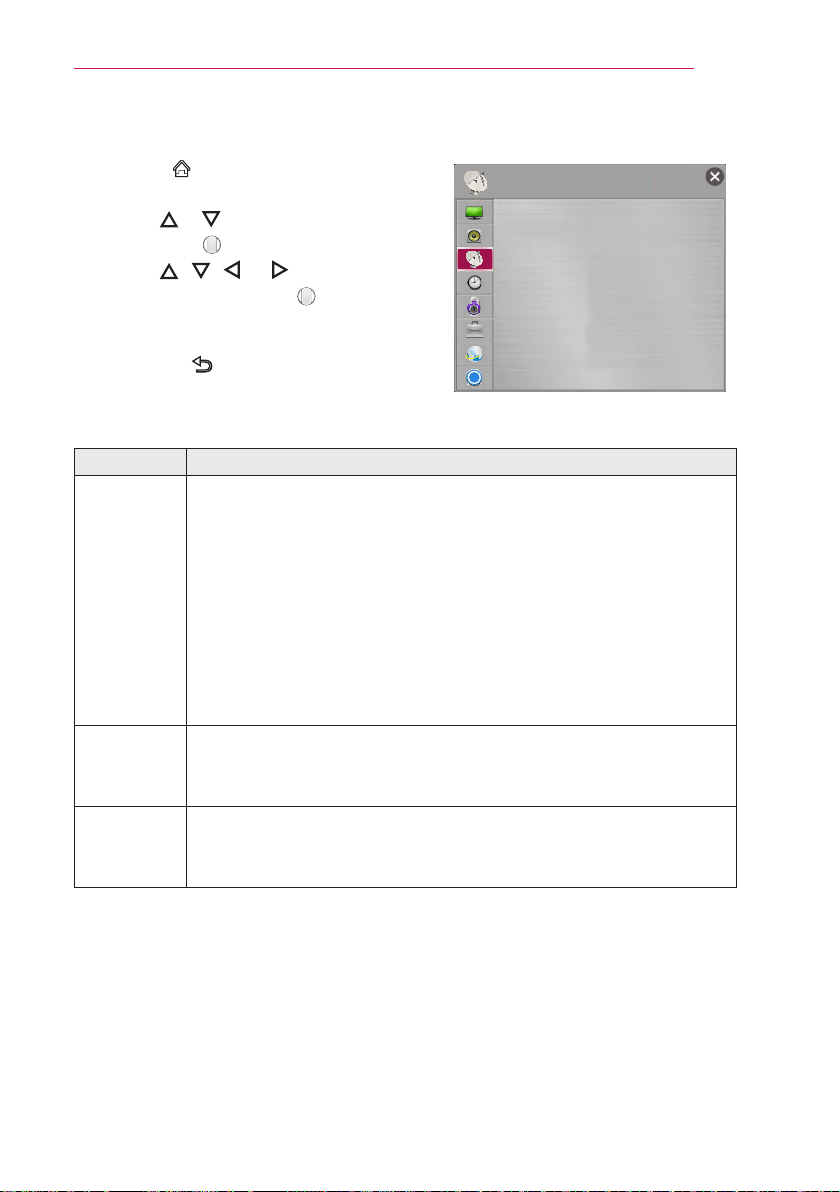
93
CUSTOMIZINGSETTINGS
CHANNELSettings
1
Press the SMART button and select
Settings.
2
Use the or button to select CHANNEL
and press the Wheel(OK) button.
3
Use the , , , or button to set up the
desired item and press the Wheel(OK)
button.
– To return to the previous menu,
press the BACK button.
?
• Auto Tuning
• Manual Tuning
• Channel Edit
CHANNEL
The available channel settings are described as follows.
Item Description
Auto
Tuning
Remembers a channel which is currently broadcasting. You should use
this function when you move to another house or move the Laser TV to
other place. It must be used while the antenna is connected and there
are channel broadcasting signals.
• Channels are not registered properly unless the antenna/cable is
connected correctly.
• AutoTuning only finds programs that are currently broadcasting. only
finds programs that are currently broadcasting.
• If LockSystem is turned on, a pop-up window will appear asking for
password.
Manual
Tuning
Adjusts programs manually and saves the results.
For digital broadcasting, signal strength and signal quality can be
checked.
Channel
Edit
Edits the saved programs.
Set as favorite program, block/unblock program, skip program etc. of the
selected program.
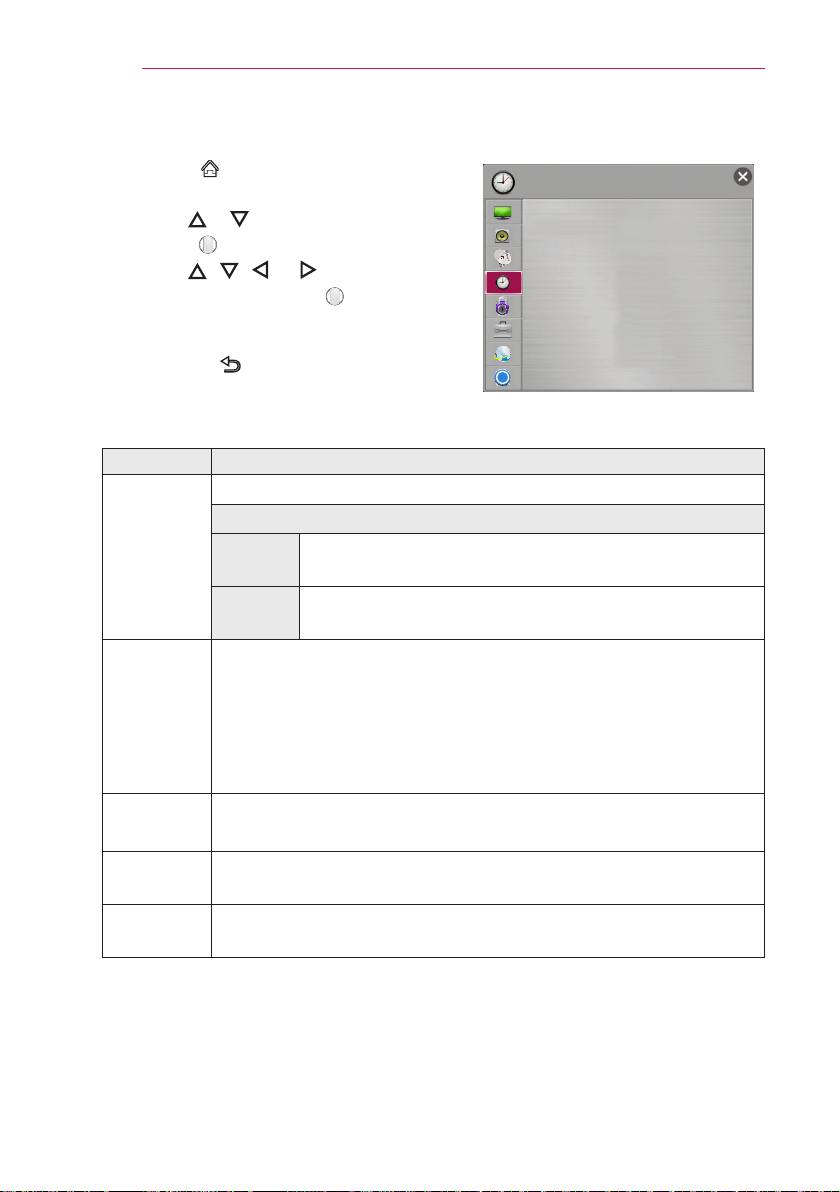
94
CUSTOMIZINGSETTINGS
TIMESettings
1
Press the SMART button and select
Settings.
2
Use the or button to select TIME and
press the Wheel(OK) button.
3
Use the , , , or button to set up the
desired item and press the Wheel(OK)
button.
– To return to the previous menu,
press the BACK button.
?
• Clock
• O Time : O
• On Time : O
• Sleep Timer : O
• Auto O : 60 min.
• Automatic Standby
: O
TIME
The available time settings are described as follows.
Item Description
Clock
Checks or changes the time while watching Laser TV.
Mode
Auto
Synchronizes the Laser TV clock to the digital time
information sent by the TV station.
Manual
Sets the time and date manually if the auto setup does not
correspond to the current time.
OffTime/
OnTime
Sets On/Off time. Select Off on Repeat to discontinue OnTime/Off
Time.
• To use OnTime/OffTime, set the current time correctly.
• Even when the OnTime function is on, the Laser TV will turn off
automatically in 120 minutes when no button is pressed within that
time.
Sleep
Timer
Turns off the Laser TV after a preset number of minutes.
To cancel the SleepTimer, select Off.
AutoOff
If there is no signal, the Laser TV automatically turns off after the preset
time has elapsed.
Automatic
Standby
If you do not press any button on the Laser TV or remote control for a
certain period, the Laser TV will automatically turns off.
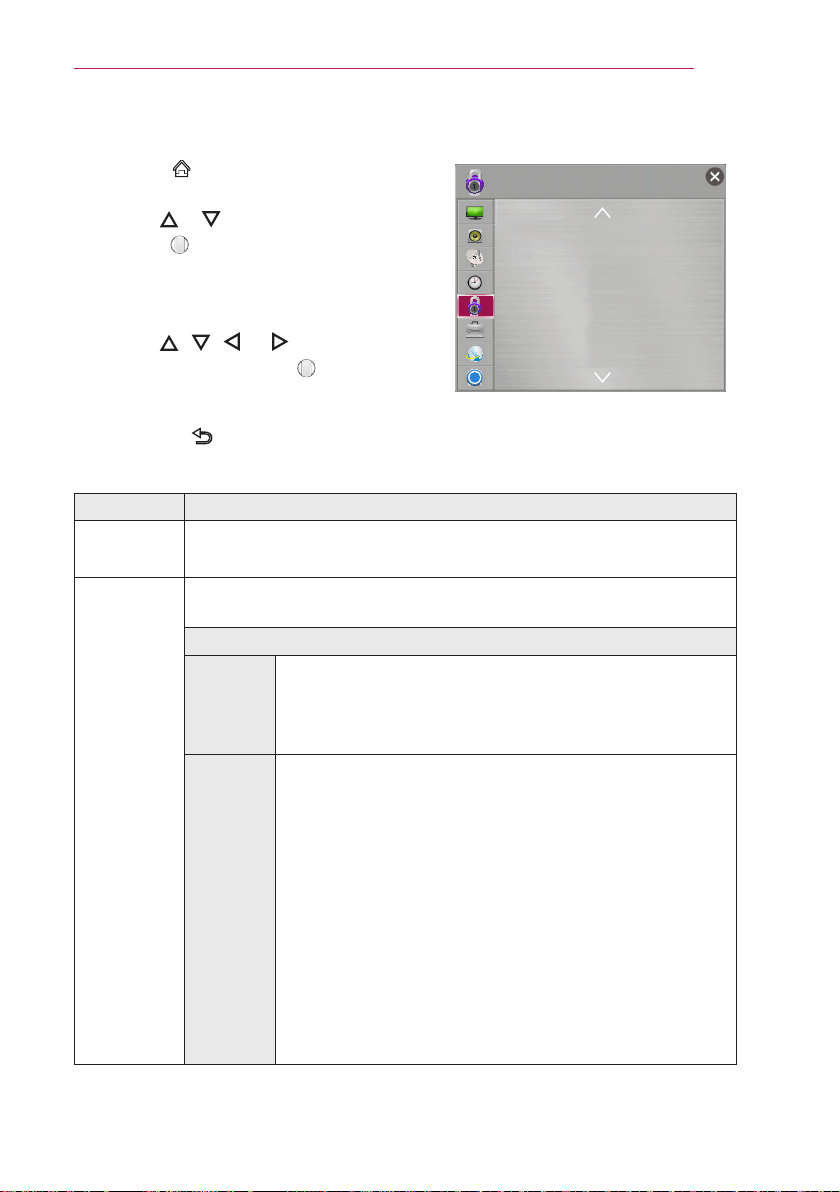
95
CUSTOMIZINGSETTINGS
LOCKSettings
1
Press the SMART button and select
Settings.
2
Use the or button to select LOCK and
press the Wheel(OK) button.
– To enter the LOCK menu, enter the preset
4-digit password. The initial password is set
as 0000.
3
Use the , , , or button to set up the
desired item and press the Wheel(OK)
button.
– To return to the previous menu,
press the BACK button.
?
• Set Password
• Lock System : O
• Block Channel
• Movie Rating
• TV Rating-Children
• TV Rating-General
• Downloadable Rating
LOCK
The available lock settings are described as follows.
Item Description
Set
Password
Sets or changes Laser TV password.
• The initial password is set as 0000.
Lock
System
Permits only specic programs by blocking channels or external input. Select
the LockSystem to On.
Item
Block
Channel
Blocks the programs that contain inappropriate contents for
children. The programs can be selected but the screen is
blank and the audio is muted. To watch a locked program,
enter the password.
Movie
Rating
Blocks the movies that are only broadcasted on the TV and
contain inappropriate contents, based on the Motion Picture
Association of America (MPAA) rating.
• G (General audiences) All ages admitted
• PG (Parental guidance suggested) Some material may
not be suitable for children
• PG-13 (Patents strongly cautioned) Some material may
be inappropriate for children under 13
• R (Restricted) Under 17 requires accompanying parent or
adult guardian
• NC-17 No one 17 and under admitted.
• X Adults only
96
CUSTOMIZINGSETTINGS
Item Description
Lock
System
Item
TVRating-
Children
Blocks the children’s TV programs that parents do
not want their children to watch. To block other TV
programs, you should set the TV Rating-General
feature.
• Age TV-Y (All children, including children from ages
2-6), TV-Y7 (Directed to older children, suitable for
children age 6 and above)
• FantasyViolence TY-Y7 (Directed to older children
- Fantasy violence, suitable for children age 6 and
above, containing more intense or combative fantasy
violence)
TVRating-
General
Blocks the TV programs that you want based on
the ratings by using the Parental Control Function
(V-Chip).
The V-Chip electronically reads TV program ratings
and allows parents to block program that are
unsuitable for children.
• Age TV-G (General audience, suitable for all ages)
TV-PG (Parental guidance suggested, containing
material that are unsuitable for younger children)
TV-14 (Parents strongly cautioned, containing
material that are unsuitable for children age 14 and
under) TV-MA (Mature audience only, unsuitable for
children age
• Dialog (suggestive dialogue) TV-PG or TV-14
• Language (coarse language)TV-PG, TV-14, or
TV-MA
• Sex (sexual situation) TV-PG, TV-14, or TV-MA
• Violence TV-PG, TV-14, or TV-MA
Downloadable
Rating
This function operates only when TV has received
Region5 Rating data. The name of the rating option
may differ.
InputBlock Block the input sources.
Application
Lock
Lock the application.
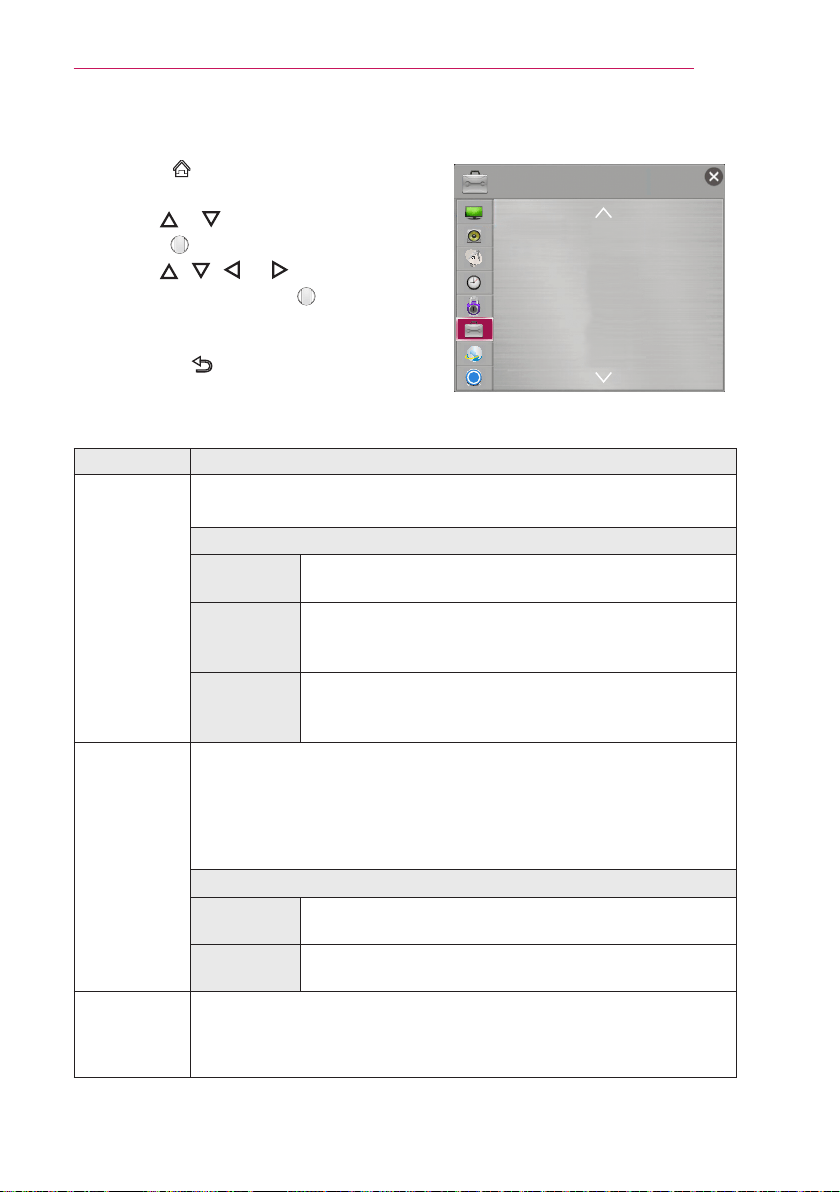
97
CUSTOMIZINGSETTINGS
OPTIONSettings
1
Press the SMART button and select
Settings.
2
Use the or button to select OPTION and
press the Wheel(OK) button.
3
Use the , , , or button to set up the
desired item and press the Wheel(OK)
button.
– To return to the previous menu,
press the BACK button.
?
• Language
• Service Country Setting
• ZIP Code
• Caption : O
• Set the Universal Control
• Live Plus : On
• Live Shopping : On
OPTION
The available option settings are described as follows.
Item Description
Language
Selects MenuLanguage and AudioLanguage displayed on the
screen.
Item
Menu
Language
Selects a screen menu language.
Audio
Language
Selects the desired language when watching digital
broadcasting containing several audio languages. (In
digital mode only)
Voice
Recognition
Language
Select the language to make voice search.
Service
Country
Setting
You can change the country setting of your smart Laser TV. The
premium service and LG Smart World that are available for the country
you selected will be provided.
• If a network is disconnected while setting the service country, it may
not be set properly.
Item
AutoSetting
A service country is automatically set for your smart Laser
TV.
Manual
Setting
A service country can be set manually for your smart
Laser TV.
ZIPCode
You can check the information of area when network is connected.
• This function sets your area as the ZIP Code.
• You can check the information of area when network is connected.
98
CUSTOMIZINGSETTINGS
Item Description
Caption
View subtitles when the TV station provides subtitled programing. Program
subtitles work only on digital/analog broadcasts or external input.
Change Caption to On and select caption setting.
Mode
CC1-4 (Closed Captioning) / Text1-4Text1-4
Displays the audio portion of a TV program as text on the
TV screen. CC1 is the most common mode in use.
Field 1 data channels: two Captions (CC1, CC2), two
Text (T1, T2).
Field 2 data channels: two Captions (CC3, CC4), two
Text (T3, T4).
Service1-6
This is only available for the digital broadcasting system.
Digital
Option
Set up the size and color of the subtitles on Digital
Option. Please select SetbyProgram or Custom.
Select Custom to adjust minute options such as the
subtitles’ size and color.
Item
Size Selects the wordsize.
Font Selects a typeface for the text.
TextColor Selects a color for the text.
TextOpacity Adjusts the opacity for the text color.
BgColor Selects a color for the background color.
BgOpacity
Adjusts the opacity for the background color.
EdgeType Selects an edge type.
EdgeColor Selects a color for the edges.
WindowColor Selects a color for the window color.
Window
Opacity
Adjust the opacity for the window color.
Setthe
Universal
Control
With the magic remote control, you can control a set-top box, blu-ray
player, home theatre system, etc.
LivePlus
LivePlus is a service that provides various information on the program
you watch in a pop-up format.
• Press the Wheel(OK) button in the first pop-up while watching a
program to use LivePlus.
• LivePlus is available only with the LG remote control.
• Information only some some programs and broadcasting companies
provide this service.
99
CUSTOMIZINGSETTINGS
Item Description
Live
Shopping
LiveShopping is a T-commerce (TV shopping service) that provides
information, in a pop-up, about various products related to the TV
program that you are watching.
• To use LiveShopping, press Shop Now in the first pop-up window
that appears when watching a program.
• LiveShopping is available only using the LG remote control.
• The service is available only for some programs.
• LivePlus should be On to use LiveShopping function.
Pointer
Sets the speed and shape of the pointer that appears on the Laser TV
screen.
Speed Sets the moving speed of the pointer.
Shape Selects a pointer shape from various options.
Size Chooses the size of the pointer.
Alignment
Set to On. If there is any misalignment between the
pointer and the actual direction the remote control
indicates, move the magic remote control left and right
to realign. The pointer will automatically realign to the
centre, making it easier to control.
• If it is set to Off, the alignment function will not work
even when you move the magic remote control left and
right.
PJTMode This function turns the projected image upside down or ips horizontal.
EdgeAdj
EdgeAdj adjusts the right, left, top, and bottom width of the projected
image if the projected image and screen are not perpendicular to
each other due to a tilted screen or TV. (Refer to “Using the Edge Adj
Function” on 35 page)
AutoPower
Makes the Laser TV turn on automatically when the power code is
connected to the Laser TV.
Item
On
When the power code is connected to the Laser TV, it
turns on automatically.
Off
When the power code is connected to the Laser TV, it
goes into standby mode.
Power
Sound
The alert sound plays upon turning on/off the power.

100
CUSTOMIZINGSETTINGS
Item Description
High
Altitude
If the Laser TV is used at an altitude higher than 1200 meters, turn this
on.
Otherwise, the Laser TV may overheat or its protection function may be
activated. If this happens, turn the Laser TV off and then on again after
waiting for several minutes.
TestPattern
You can run this option when installing the Laser TV to adjust the
screen size and focus.
• While you use the Test Pattern option, the keys on the control
panel do not work.
NOTE
AutoInput
Search
Automatically searches for and displays the input signal type when
it is received. It is available only with external inputs (HDMI, AV, and
Component).
EyeCare
Sensor
Change the eye care sensor settings.
Item
Sensor Turn the eye care sensor on/off.
Sensitivity
Set the sensitivity of the eye care sensor.
The default is medium, but set it higher for better
sensitivity or lower for less sensitivity.
• If a user gets closer to the product while the eye care sensor is
turned on, the sensor detects it and reduces the light intensity
automatically to protect the user’s eyes.
• The eye care sensor does not work when the test pattern or the
Edge Adj function is used.
• The eye care sensor may not work properly if the sensor is
blocked by an object or placed in an area where direct sunlight or
wind comes in contact with it.
NOTE
101
CUSTOMIZINGSETTINGS
Item Description
EyeCare
Sensor
• The eye care sensor is more sensitive to horizontal movement
than vertical movement.
• The detection range may vary depending on the installation
environment, temperature, or brightness.
• The eye care sensor detects heat sources, so it may respond to
animals moving or heaters placed close by.
• The eye care sensor detects heat sources, so it may not be able
to detect the user if there is no exposed skin or if an obstacle is
placed between the sensor and the user.
• It may not be able to detect the user if there is no movement for
a long time.
• The eye care sensor may also detect a small animal (e.g. cat or
dog) or rotating heater.
• The eye care sensor may not be able to detect when room
temperature rises to skin temperature (30 °C or more in summer)
or when a user is wearing thick clothes or standing with their back
to the sensor.
• The detection area may change if curtains or plants move in the
wind. Detection also depends on variable conditions such as
clothing and temperature.
• The eye care sensor works normally even if the product is
wobbling.
• A wired/wireless communication device may cause the sensor to
malfunction.
• The eye care sensor may not work for a maximum of one minute
after it is turned on.
• When a user moves away from the unit, the light intensity is
recovered within three seconds.
• The eye care sensor may be disabled if the EnergySaving
settings are changed while the eye care sensor is enabled.
NOTE

102
CUSTOMIZINGSETTINGS
Item Description
Balloon
Help
Enables/disables the balloon help.
Control
DeviceList
Displays the list of control devices connected to the Laser TV.
SeeAvatar Turns the Avatar function on or off.
Initial
Setting
Deletes all optional settings and returns to initial default mode. Once
initialization is complete, the Laser TV will turn off and on by itself.
• If LockSystem is activated, a pop-up password prompt will appear.
• Do not turn off the power during initialization.
SetID
The range of the set ID is 1 - 99.
Only the saved set ID takes effect.
Mode
Setting
Selects HomeUse or StoreDemo. For use at home, select Home
Use. StoreDemo is a mode used for store display.
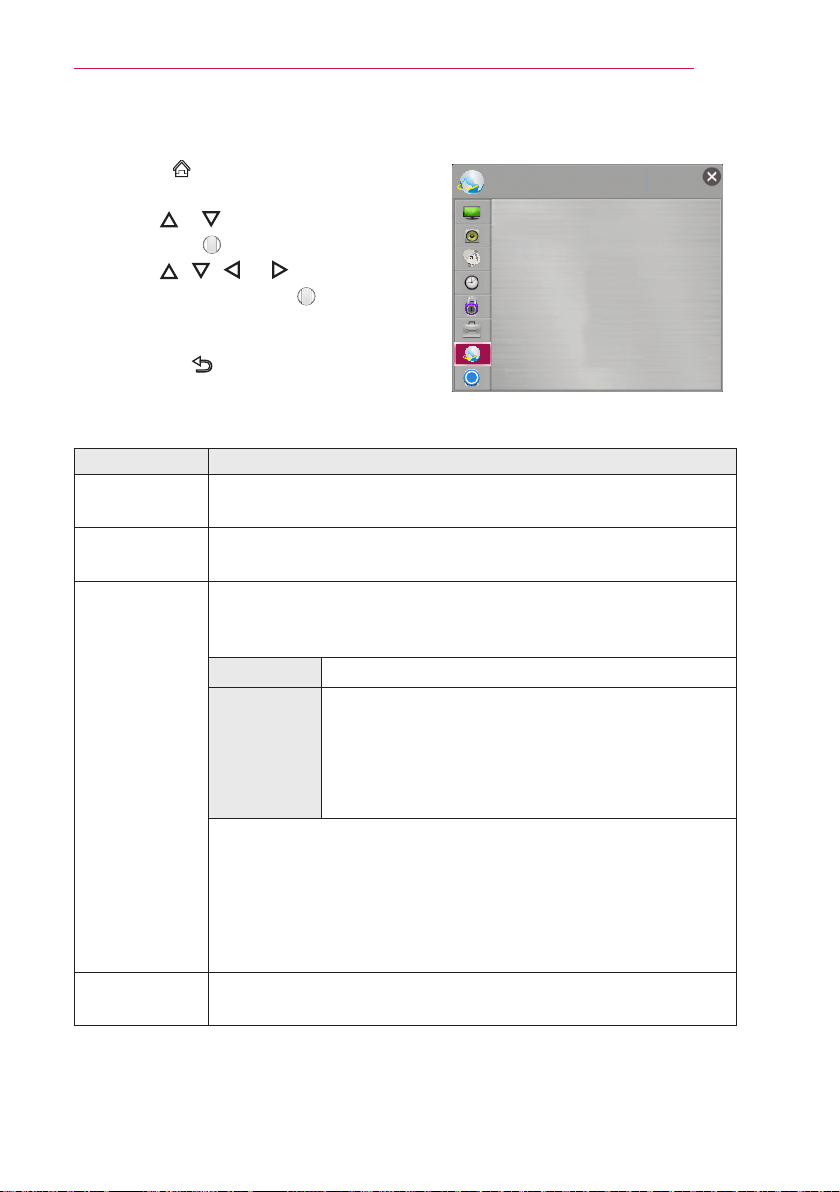
103
CUSTOMIZINGSETTINGS
NETWORKSettings
1
Press the SMART button and select
Settings.
2
Use the or button to select NETWORK
and press the Wheel(OK) button.
3
Use the , , , or button to set up the
desired item and press the Wheel(OK)
button.
– To return to the previous menu,
press the BACK button.
?
• Network Connection
• Network Status
• Soft AP
• Wi-Fi Direct
• Miracast
TM
/ Intel's WiDi
• My TV Name : HECTO2
NETWORK
The available network settings are described as follows.
Item Description
Network
Connection
Connects a network.
Network
Status
Displays the connection status of the network.
SoftAP
This function allows you to change a wired Internet connection to your
TV to Wi-Fi, allowing you to connect various external devices or to
use wireless Internet.
SoftAP Sets to On/Off.
Security
Key
Sets the Wi-Fi security number.
• You can set the security key with a combination
of English letters and numbers between 8 and 64
characters long.
• The default setting is “LG123456”.
• To enable the SoftAP function, your TV must be turned on and
have a wired Internet connection.
• Up to four external devices can be connected.
• If the SoftAP function is enabled, the Wi-FiDirect and Miracast
TM
functions become unavailable. You must set the SoftAP function
to Off to use the Wi-FiDirect and Miracast
TM
functions.
Wi-FiDirect
Wi-Fi Direct is a function that allows your Laser TV to connect with a
Wi-Fi Direct device without Internet connection.
104
CUSTOMIZINGSETTINGS
Item Description
Miracast™/
Intel’sWiDi
The Miracast™ allows you to enjoy video and audio from a portable
device through the Laser TV wirelessly. Intel’sWiDi allows you to
view a laptop screen through the Laser TV without a cable.
MyLaserTV
Name
Changes the name that appears when searching for the Laser TV
from other devices.
SUPPORT
1
Press the SMART button and select
Settings.
2
Use the or button to select SUPPORT
and press the Wheel(OK) button.
3
Use the , , , or button to set up the
desired item and press the Wheel(OK)
button.
– To return to the previous menu,
press the BACK button.
?
?
• Software Update
• Picture Test
• Sound Test
• Product/Service Info.
• Initialization of App
• Self Diagnosis
SUPPORT
The available support settings are described as follows.
Item Description
Software
Update
Updates to the latest software.
PictureTest Check whether a video signal is properly displayed.
SoundTest Check whether an audio signal is properly output.
Product/Service
Info.
Shows the product/service information.
Initializationof
App
If problems occur after updates, try initializing the system.
• During initialization, the Laser TV will restart automatically.
SelfDiagnosis
Troubleshoots functional problems that can arise while using the
product.
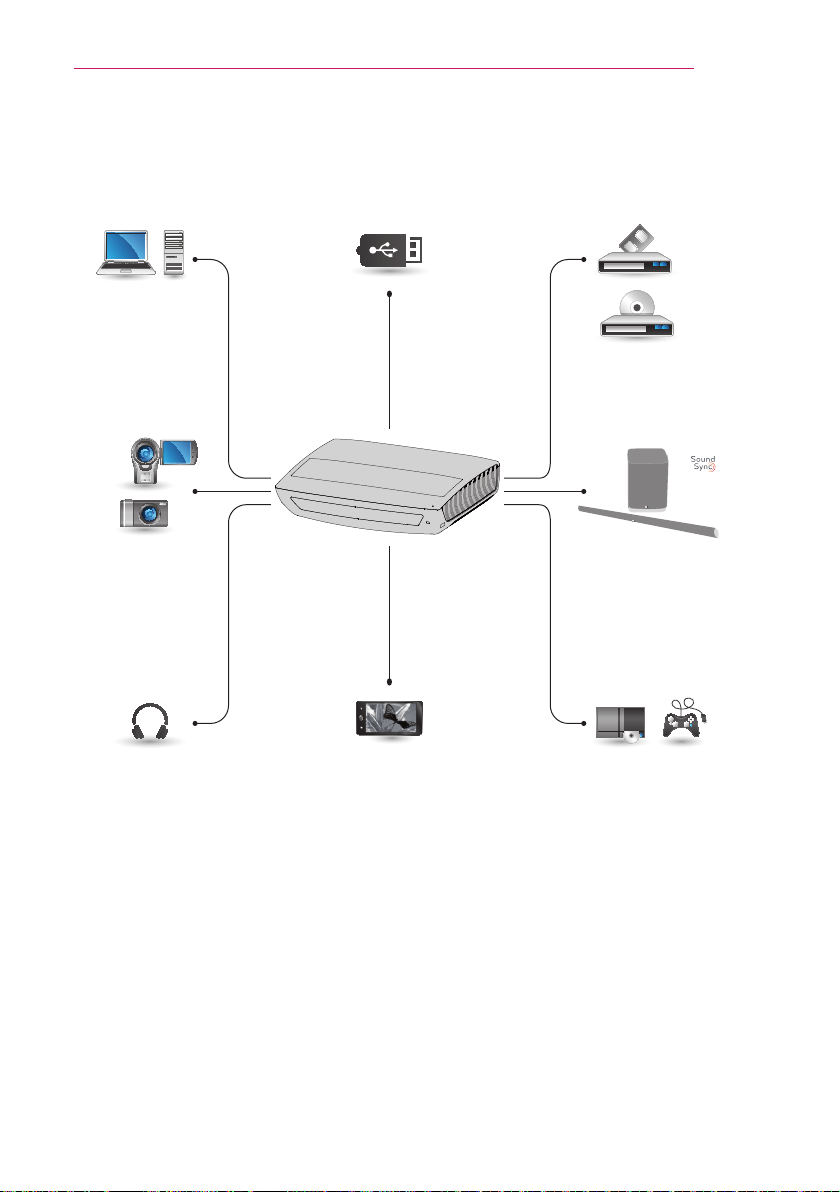
105
CONNECTINGDEVICES
CONNECTINGDEVICES
You can connect various external devices to the Laser TV.
Computer/Laptop
Digital Device
Headphones Mobile Phone Game console
LG Audio Device
USB Video/DVD
HDMI - page 106
Composite (AV) - page 108
Component - page 108
PC - page 109
USB Devices - page 51
Headphones - page 110
Mobile Phone - page 113
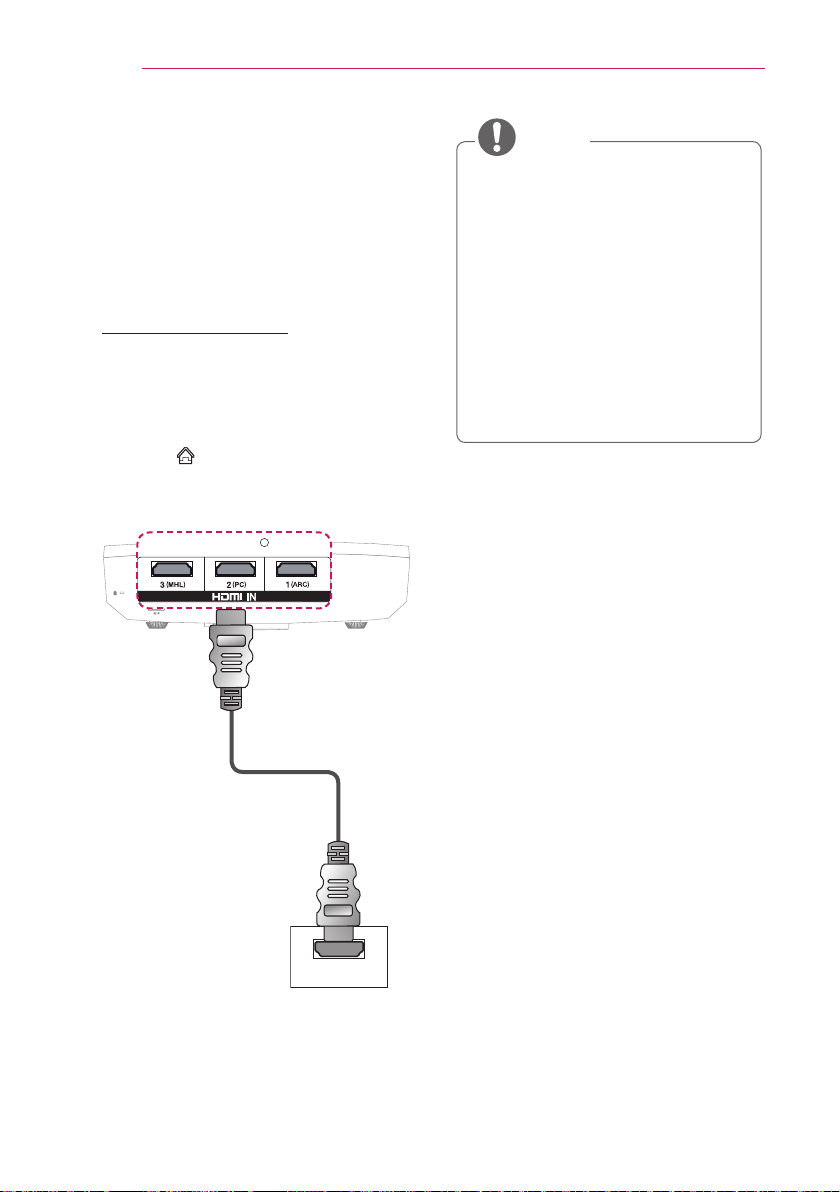
106
CONNECTINGDEVICES
ConnectinganHD
Receiver,DVDPlayer,or
VCR
Connect an HD receiver, DVD, or
VCR player to Laser TV and select an
appropriate input mode.
HDMIconnection
With an HDMI cable, you can enjoy high
quality picture and sound. Connect the
HDMI input port of Laser TV to the HDMI
output port.
Press the SMART button and select
the InputList to select HDMI. You can
use any HDMI input port for connection.
Optional Accessories
HDMI
RS-232C IN
AudioReturnChannel(ARC)
• An external audio device that
supports SIMPLINK and ARC must
be connected using HDMIIN1
(ARC) port.
• When connected with a high-
speed HDMI
®
cable, the external
audio device supporting ARC
outputs optical SPDIF works with
the SIMPLINK function without
additional optical audio cable.
NOTE
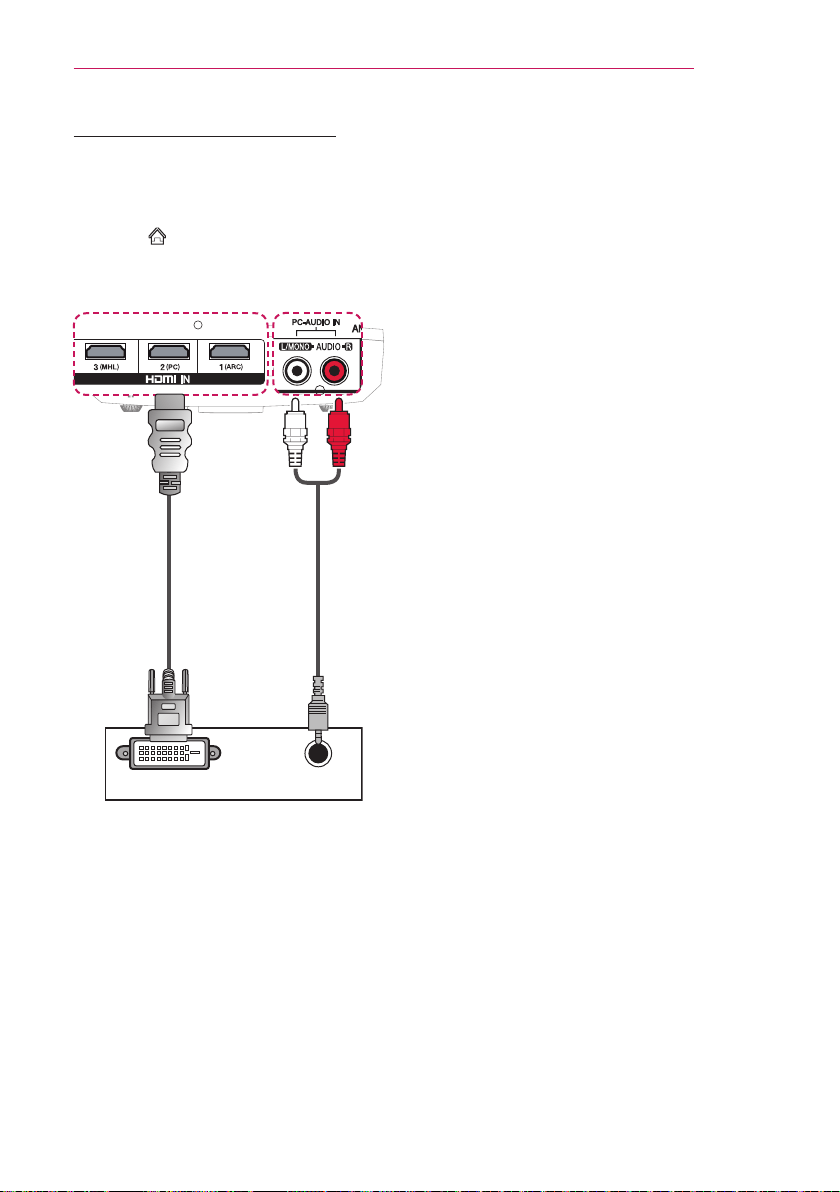
107
CONNECTINGDEVICES
HDMItoDVIConnection
Use the HDMI to DVI cable to connect
the HDMI input port of the Laser TV to the
DVI output port.
Press the SMART button and select
the InputList to select HDMI. You can
select any HDMI input port for connection.
Optional
Accessories
Optional
Accessories
DVI OUT AUDIO OUT
RS-232C IN
RS-232C IN
Red
White
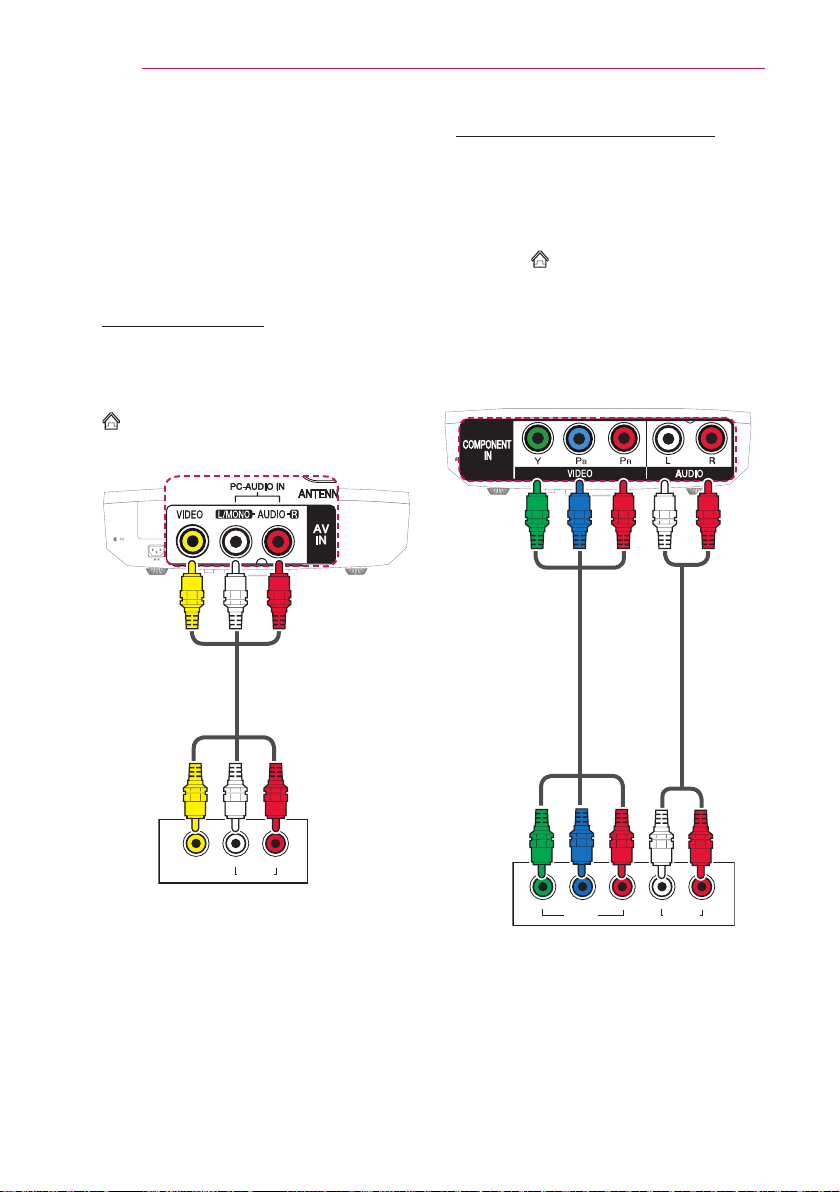
108
CONNECTINGDEVICES
ConnectingExternal
Devices
This Laser TV supports the Plug & Play
function. Your PC will automatically detect
the Laser TV and requires no driver
installation.
AVConnection
Connect the output ports of an external
device and the AVIN ports of the Laser
TV using AV connection cables. Press the
SMART button and select the Input
List to select AV.
Optional
Accessories
A/V OUT
(Left) (Right)
AUDIO OUT
RS-232C IN
Red
Red
White
White
Yellow
Yellow
ComponentConnection
You can enjoy more vivid images when
you connect an external device with a
component port to the COMPONENTIN
port of the Laser TV.
Press the SMART button and select
the InputList to select Component.
The output jack Y, PB or PR of the DVD
player may be marked as Y, B-Y, R-Y/Y,
Cb, Cr/Y, Pb or Pr depending on the
model.
Optional
Accessories
Optional
Accessories
RS-232C IN
A/V OUT
(Left)Y PB PR (Right)
AUDIO OUT
Red
Red
White
Red
Blue
Green
White
Red
Blue
Green
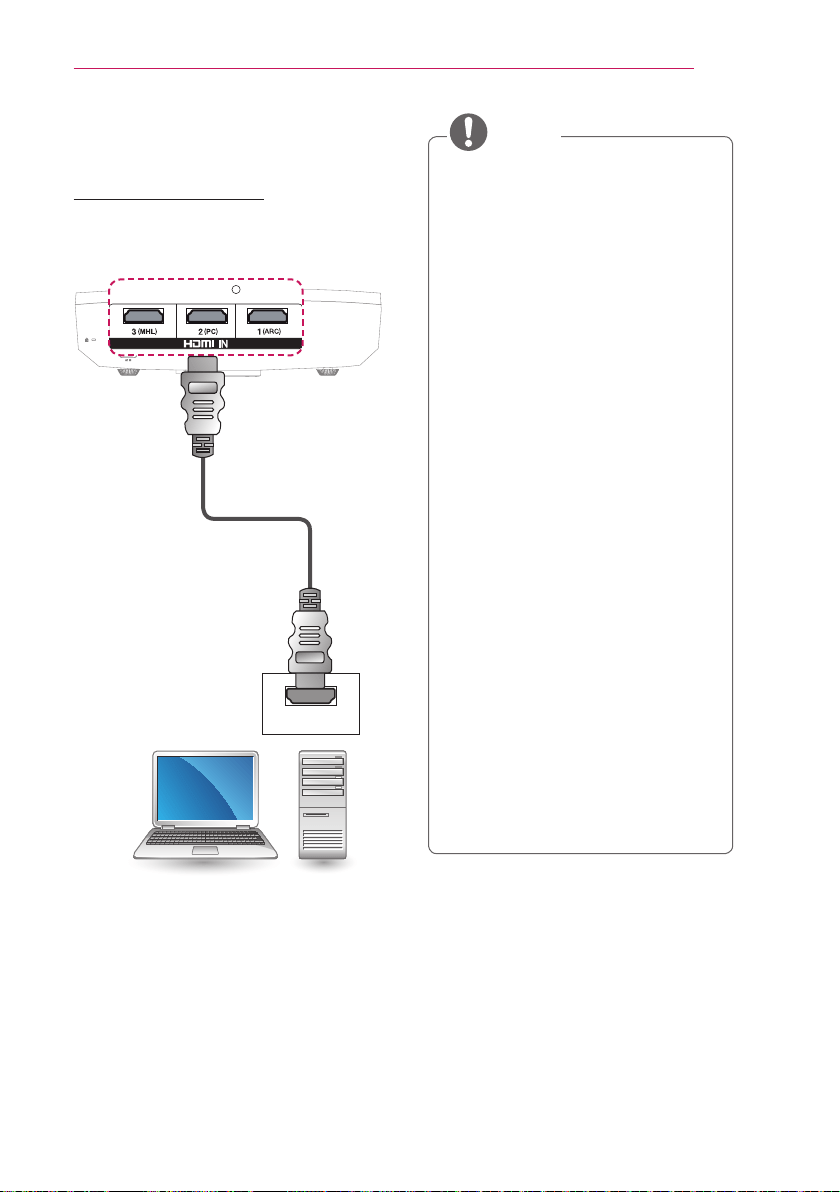
109
CONNECTINGDEVICES
ConnectingaPC
HDMIConnection
Choose any HDMIIN port to connect. It
does not matter which port you use.
Optional Accessories
HDMI
RS-232C IN
• It is recommended to use an HDMI
connection for the best image
quality.
• Depending on the graphics card,
DOS mode video may not work if a
HDMI to DVI Cable is in use.
• In PC mode, there may be noise
associated with the resolution,
vertical pattern, contrast, or
brightness. If noise is present,
change the PC output to another
resolution, change the refresh
rate to another rate or adjust the
brightness and contrast on the
PICTURE menu until the picture is
clear.
• The synchronization input form for
Horizontal and Vertical frequencies
is separate.
• Depending on the graphics card,
some resolution settings may not
allow the image to be positioned on
the screen properly.
• If you are using DVI out from a PC,
you have to connect analog audio
separately.
• When using the HDMI/DVI cable,
Single link is only supported.
NOTE

110
CONNECTINGDEVICES
ConnectingHeadphones
You can listen to the sound from Laser TV
using headphones.
Optional
Accessories
RS-232C IN
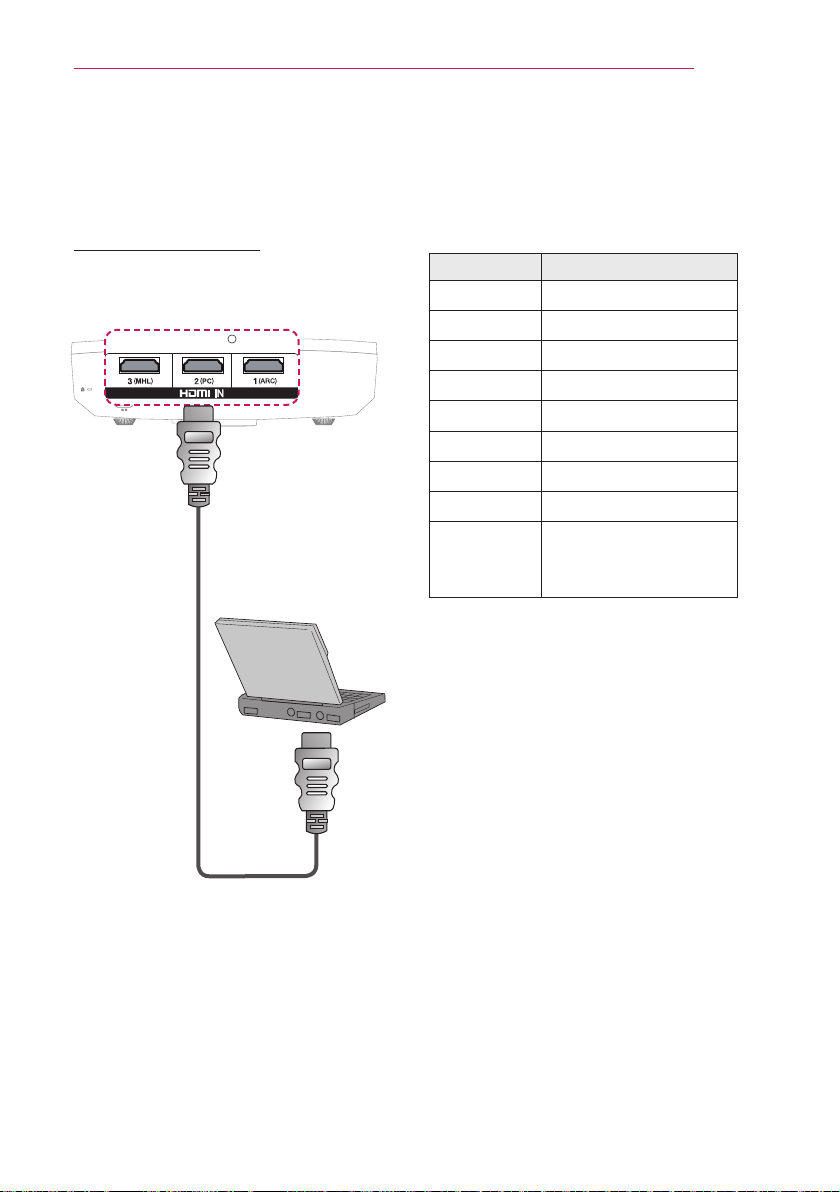
111
CONNECTINGDEVICES
ConnectingaLaptop
You can connect the Laser TV to a laptop
to use various functions.
HDMIconnection
Connect the HDMIIN port of Laser TV to
the HDMI output port.
Optional
Accessories
RS-232C IN
The table below shows examples
of switching the output. For more
information, refer to the ExternalOutput,
ConnectingtoanExternalMonitor, or
similar sections of the owner’s manual of
your computer.
Brand SwitchingOutput
NEC [Fn]+[F3]
Panasonic [Fn]+[F3]
Toshiba [Fn]+[F5]
IBM [Fn]+[F7]
Sony [Fn]+[F7]
Fujitsu [Fn]+[F10]
LG [Fn]+[F7]
Samsung [Fn]+[F4]
Macintosh
Adjust the control panel
to enable mirroring after
start-up.
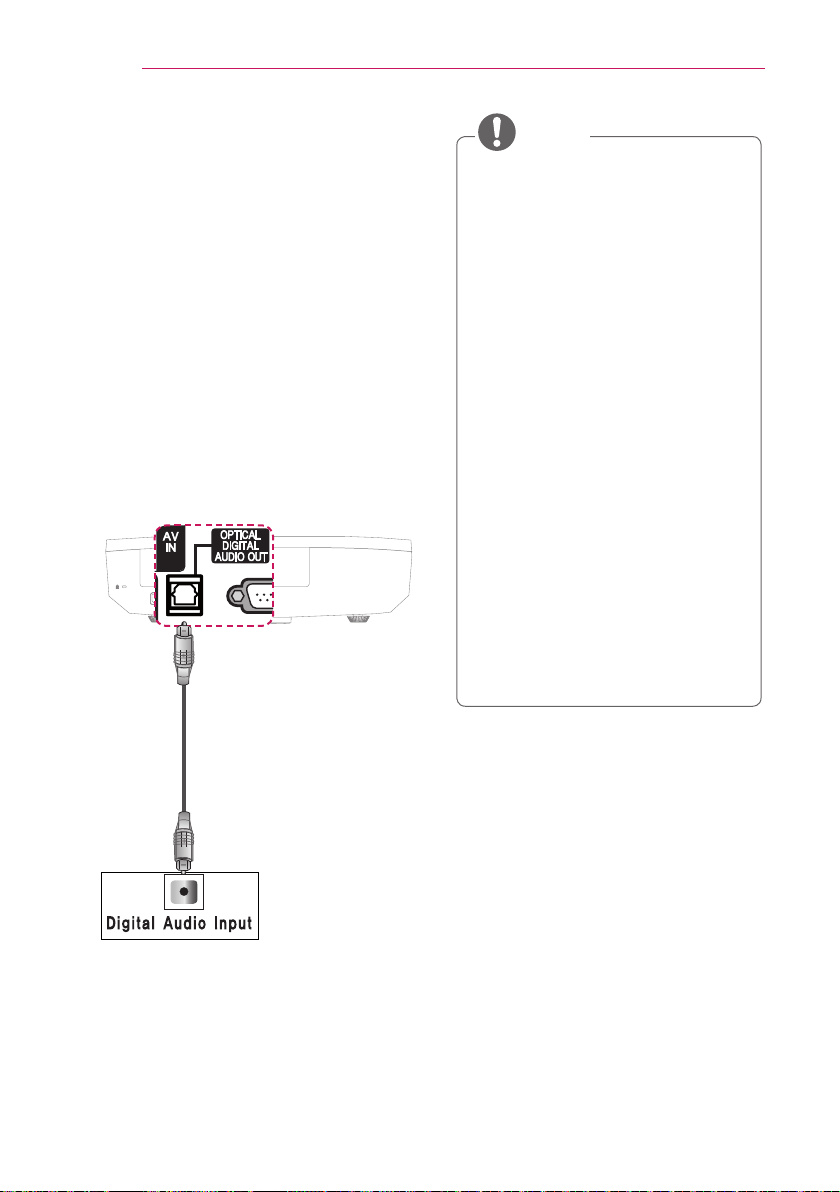
112
CONNECTINGDEVICES
ConnectingaDigital
Amp
Using an optical cable, connect the digital
audio input port of a digital amp to the
OPTICALDIGITALAUDIOOUT port
of the Laser TV. The output of an amp
with a digital converter must be set to
the desired audio format. When using a
HDMI cable to connect a home theater
or when connecting an optical output to
an external audio device, set Sound Out
to External Speaker (Optical/HDMI ARC)
as shown below. If a Laser TV, home
theater, or the speaker of an external
audio device is operating at the same
time, there will be an echo.
RS-232C IN
Optional
Accessories
• Also, refer to the user manual of the
audio device to connect.
• When connecting this product to
other devices, make sure to turn off
and unplug all the devices.
• The audio output of this product
has wide-ranging audio bandwidth,
so the receiver volume must be
adjusted properly. Speakers can
be damaged by unexpected high
frequencies.
• Connecting the OPTICALDIGITAL
AUDIOOUT port of the Laser TV
to the digital audio input port of a
digital amp and the audio input port
of the Laser TV to the analog audio
output port of the digital amp can
cause sound oscillation due to the
closed loop. Remove one of the
two connections to prevent this.
(This also applies to home theater
devices.)
NOTE
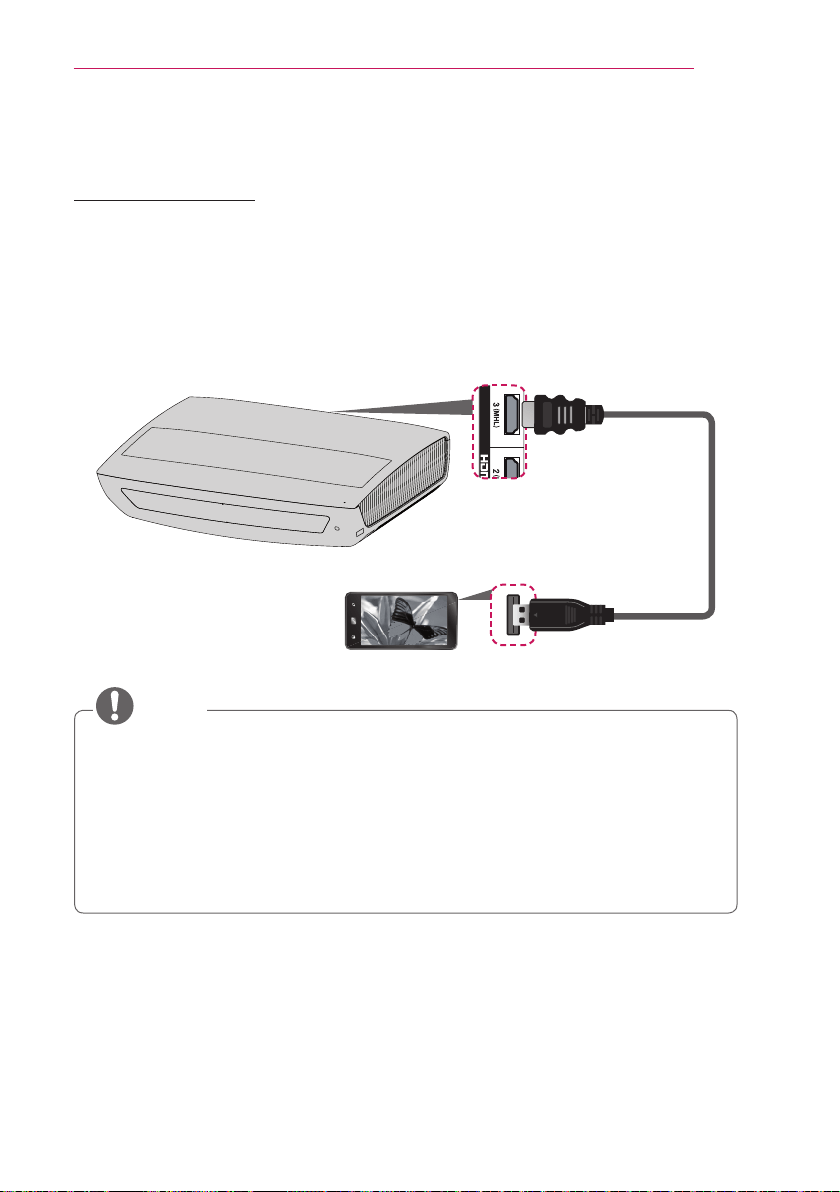
113
CONNECTINGDEVICES
UsingtheMirroringFunctionofaMobilePhone
MHLConnection
The Mobile High-denition Link (MHL) is an interface that can connect a mobile phone to
the Laser TV and play video and audio from the mobile phone through the Laser TV.
This only applies to products with a HDMI input that supports MHL. (Contact the device
manufacturer to nd out if the device supports this function.)
For MHL support, check the HDMIIN3(MHL) port.
Use a dedicated cable for MHL.
Optional
Accessories
RS-232C IN
•When you connect a mobile phone to the HDMIIN3(MHL) port, you can see the
mobile phone screen through a Laser TV.
– This only applies to mobile phones that support MHL.
– You can use the remote control for some applications.
•Disconnect the MHL cable from the Laser TV when:
– The MHL function is disabled.
– Your mobile device is fully charged in standby mode.
NOTE
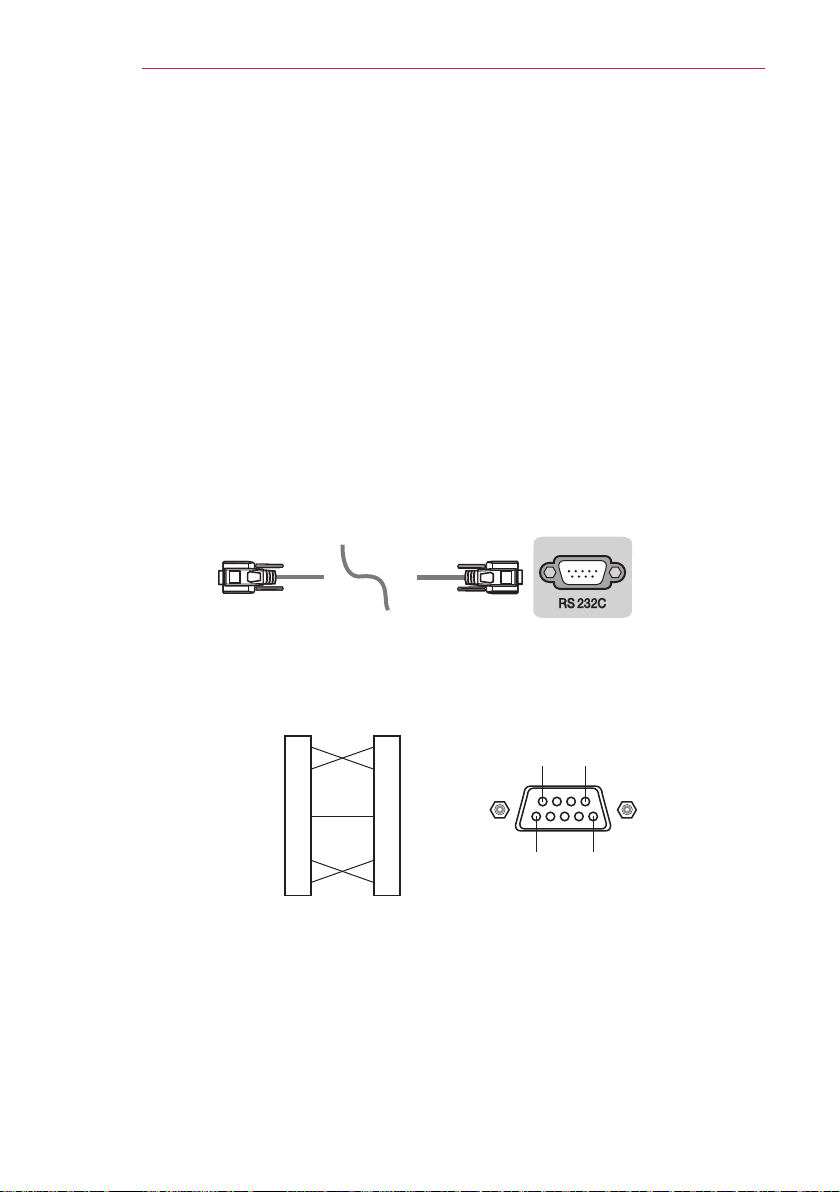
114
SERIALCOMMUNICATIONFUNCTION
SERIALCOMMUNICATIONFUNCTION
UsingSerialCommunication
If the Laser TV is connected to a PC through an RS-232C cable, you can use the PC to
control functions of the Laser TV such as power On/Off or input selection, etc.
This function may not be available for a particular menu or input mode.
EstablishingSerialCommunication
Connect the RS-232C (serial connector) of the PC to the RS-232C connector at the back
of the Laser TV.
You need to purchase a cable to connect the RS-232C connectors as it is not provided as
an accessory.
A RS-232C cable is necessary for the remote control of the Laser TV (see Figure 1).
(Laser TV)(PC)
Figure1: RS-232 Connection Diagram
PC Laser TV
9 6
5 1
2
3
4
5
6
7
8
2
3
4
5
6
7
8
RXD
TXD
DTR
GND
DSR
RTS
CTS
RXD
TXD
DTR
GND
DSR
RTS
CTS
* There is no connection to Pin 1 and Pin 9.

115
SERIALCOMMUNICATIONFUNCTION
CommunicationParameterSetup
•Baud Rate: 9600 bps(UART)
•Data Length: 8 bit
•Parity: none
•Stop bit: 1 bit
•Flow Control: none
•Communication code: ASCII code
CommunicationProtocol
1. Transmission
[Command1] [Command2] [ ] [Set ID] [ ]
[Data] [Cr]
*[Command1]: The first command to control
the Laser TV (k. j, x, m, n,
ASCII code, 1 Character)
*[Command2]: The second command to
control the Laser TV (ASCII
code, 1 character)
*[Set ID]: You can adjust the set ID
to choose desired monitor
ID number in option menu.
Adjustment range is 1 to 99.
When selecting Set ID ‘0’, every
connected set is controlled. Set ID
is indicated as decimal (1 to 99)
on menu and as Hexa decimal
(0x0 to 0x63) on transmission/
receiving protocol.
*[Data]: To transmit command data
(hexadecimal). Transmit ‘FF’ data
to read status of command.
*[Cr]: Carriage Return
It corresponds to ASCII code ‘0x0D’.
*[ ]: ASCII code ‘space (0x20)
2. OK Acknowledgement
[Command2] [ ] [Set ID] [ ] [OK] [Data]
[x]
*The set transmits ACK (acknowledgement)
based on this format when receiving
normal data. At this time, if the data is
data read mode, it indicates present status
data. If the data is data write mode, it
returns the data of the PC computer.
3. Error Acknowledgement
[Command2] [ ] [Set ID] [ ] [NG] [Data]
[x]
*If a set receives an abnormal piece of data
such as a non-supported function or there
is a communication error, it returns ACK in
the above format.
Data [00]: Illegal Code
(This command is not supported.)
DataStructure
10 16
10 16 10 16 10 16 10 16 10 16 10 16 10 16 10 16 10 16
0 00
1 01 11 0B 21 15 31 1F 41 29 51 33 61 3D 71 47 81 51 91 5B
2 02 12 0C 22 16 32 20 42 2A 52 34 62 3E 72 48 82 52 92 5C
3 03 13 0D 23 17 33 21 43 2B 53 35 63 3F 73 49 83 53 93 5D
4 04 14 0E 24 18 34 22 44 2C 54 36 64 40 74 4A 84 54 94 5E
5 05 15 0F 25 19 35 23 45 2D 55 37 65 41 75 4B 85 55 95 5F
6 06 16 10 26 1A 36 24 46 2E 56 38 66 42 76 4C 86 56 96 60
7 07 17 11 27 1B 37 25 47 2F 57 39 67 43 77 4D 87 57 97 61
8 08 18 12 28 1C 38 26 48 30 58 3A 68 44 78 4E 88 58 98 62
9 09 19 13 29 1D 39 27 49 31 59 3B 69 45 79 4F 89 59 99 63
10 0A 20 14 30 1E 40 28 50 32 60 3C 70 46 80 50 90 5A 100 64

116
SERIALCOMMUNICATIONFUNCTION
CommandReferenceList
Command1 Command2 Data(Hexadecimal)
01.POWER k a 00 - 01
02.AspectRatio k c *
03.Contrast k g 00 - 64
04.Brightness k h 00 - 64
05.Color k i 00 - 64
06.Tint k j 00 - 64
07.Sharpness k k 00 - 32
08.OSDControl k l 00 - 01
09.KeyLock k m 00 - 01
10.ColorTemperature k u 00 - 04 (excluding 03)
11.BlackLevel n m 00 - 01
12.EnergySaving n p 00 - 02
13.Input x b *
14.Key m c Key Code
15.PictureMode n s 00 - 05
16.Mute k e 00 - 01
17.Volume k f 00 - 64
18.Channel(Add/Del) m b 00 - 01
• For more information about the data(*), refer to next page.
• When playing a video or photo file stored on a storage media (USB flash drive or HDD,
etc.) that is connected through USB, all commands are disabled, other than Power
(ka) and Key (mc). If a command cannot be used in a specific menu or input state, it is
processed as NG.

117
SERIALCOMMUNICATIONFUNCTION
02.AspectRatio(Command:kc)
Adjusts the aspect ratio.
Transmission
[k][c][][Set ID][][Data][Cr]
Data 01: 4:3
02: 16:9
04: Zoom
06: Set By Program
09: Just scan
10 - 1f: Cinema Zoom 1 - 16
Ack
[c][] [Set ID][][OK][Data][x]
Data 01: 4:3
02: 16:9
04: Zoom
06: Set By Program
09: Just scan
10 - 1f: Cinema Zoom 1 - 16
01.Power(Command:ka)
Powers the set on/off.
Transmission
[k][a][][Set ID][][Data][Cr]
Data 00: Power Off
01: Power On
Ack
[a][][Set ID][][OK][Data][x]
Data 00: Power Off
01: Power On
* To Show Power On (Only working when
the Laser TV is turned on)
Transmission
[k][a][][Set ID][][FF][Cr]
Ack
[a][] [Set ID][][OK][Data][x]
Data 01: Power On
* As with other functions, if data is
transmitted as ‘0 x FF’ in the above format,
the current status of each function is
returned as a feedback in Ack data.

118
SERIALCOMMUNICATIONFUNCTION
03.Contrast(Command:kg)
Adjusts the screen contrast.
Transmission
[k][g][][Set ID][][Data][Cr]
Data Min: 0H - Max: 64H
(* Transmitted in hexadecimal code)
* See the data structure.
Ack
[g][][Set ID][][OK][Data][x]
Data Min: 0H - Max: 64H
04.Brightness(Command:kh)
Adjusts the screen brightness.
Transmission
[k][h][][Set ID][][Data][Cr]
Data Min: 0H - Max: 64H
(* Transmitted in hexadecimal code)
* See the data structure.
Ack
[h][] [Set ID][][OK][Data][x]
Data Min: 0H - Max: 64H
05.Color(Command:ki)
Adjusts the screen color.
Transmission
[k][i][][Set ID][][Data][Cr]
Data Min: 0H - Max: 64H
(* Transmitted in hexadecimal code)
* See the data structure.
Ack
[i][][Set ID][][OK][Data][x]
Data Min: 0H - Max: 64H
06.Tint(Command:kj)
Adjusts the screen tint.
Transmission
[k][j][][Set ID][][Data][Cr]
Data Red: 0H - Green: 64H
(* Transmitted in hexadecimal code)
* See the data structure.
Ack
[j][][Set ID][][OK][Data][x]
Data Red: 0H - Green: 64H

119
SERIALCOMMUNICATIONFUNCTION
07.Sharpness(Command:kk)
Adjusts screen sharpness.
Transmission
[k][k][][Set ID][][Data][Cr]
Data Min: 0H - Max: 32H
(* Transmitted in hexadecimal code)
* See the data structure.
Ack
[k][][Set ID][][OK][Data][x]
Data Min: 0H - Max: 32H
08.OSDControl(Command:kl)
Selects OSD On/Off.
Transmission
[k][l][][Set ID][][Data][Cr]
Data 00: OSD selection mode off
01: OSD selection mode on
Ack
[l][][Set ID][][OK][Data][x]
Data 00: OSD selection mode off
01: OSD selection mode on
09.KeyLock(Command:km)
To Set the function of locking the remote
control and front panel control on the Laser
TV.
Transmission
[k][m][][Set ID][][Data][Cr]
Data 00: Disables the key lock.
01: Enables the key lock.
Ack
[m][] [Set ID][][OK][Data][x]
Data 00: Disables the key lock.
01: Enables the key lock.
* This function is congured when the keys
on the remote control or control panel are
not used. If the unit is fully discharged after
its power plug is pulled out of a wall outlet,
the LOCK function is cleared.
* If the unit is in the key lock standby mode,
the Laser TV will not respond to the power
button on the remote control or control
panel.
10.ColorTemperature(Command:ku)
Adjusts the value of color temperature.
Transmission
[k][u][][Set ID][][Data][Cr]
Data 00: Medium 01:Cool
02: Warm 04: Natural
(* Transmitted in hexadecimal code)
* Data 03 is not used.
Ack
[u][][Set ID][][OK][Data][x]
Data 00: Medium 01: Cool
02: Warm 04: Natural

120
SERIALCOMMUNICATIONFUNCTION
11.BlackLevel(Command:nm)
Adjusts the value of black level.
Transmission
[n][m][][Set ID][][Data][Cr]
Data 00: Low 01: High
(* Transmitted in hexadecimal code)
Ack
[m][][Set ID][][OK][Data][x]
Data 00: Low 01: High
12.EnergySaving(Command:np)
Sets the energy saving mode.
Transmission
[n][p][][Set ID][][Data][Cr]
Data 00: Minimum 01: Medium
02: Maximum
(* Transmitted in hexadecimal code)
Ack
[p][] [Set ID][][OK][Data][x]
Data 00: Minimum 01: Medium
02: Maximum
13.Input(Command:xb)
Selects the input signal.
Transmission
[x][b][][Set ID][][Data][Cr]
Data 00: DTV (Digital broadcasting)
01: DTV cable
10: TV (Analog broadcasting)
11: TV cable
20: AV
40: Component
90: HDMI 1
91: HDMI 2
92: HDMI 3
(* Transmitted in hexadecimal code)
Ack
[b][] [Set ID][][OK][Data][x]
Data 00: DTV (Digital broadcasting)
01: DTV cable
10: TV (Analog broadcasting)
11: TV cable
20: AV
40: Component
90: HDMI 1
91: HDMI 2
92: HDMI 3
14.Key(Command:mc)
Sends a key code of the IR remote control.
Transmission
[m][c][][Set ID][][Data][Cr]
Data Key Code: See “Key Code” on page 122.
(* Transmitted in hexadecimal code)
Ack
[c][] [Set ID][][OK][Data][x]
Data Key Code

121
SERIALCOMMUNICATIONFUNCTION
15.PictureMode(Command:ns)
Sets the picture mode.
Transmission
[n][s][][Set ID][][Data][Cr]
Data 00: Vivid
01: Standard
02: Cinema
03: Game
04: Expert1
05: Expert2
(* Transmitted in hexadecimal code)
Ack
[b][] [Set ID][][OK][Data][x]
Data 00: Vivid
01: Standard
02: Cinema
03: Game
04: Expert1
05: Expert2
(* Transmitted in hexadecimal code)
16.Mute(Command:ke)
Enables/disables the mute function.
Transmission
[k][e][][Set ID][][Data][Cr]
Data 00: Mute On (volume off)
01: Mute Off (volume on)
Ack
[e][][Set ID][][OK][Data][x]
Data 00: Mute On (volume off)
01: Mute Off (volume on)
17.Volume(Command:kf)
Controls the volume.
Transmission
[k][f][][Set ID][][Data][Cr]
Data Min: 0H(Vol 0) - Max: 64H(Vol 100)
(* Transmitted in hexadecimal code)
* See the data structure.
Ack
[f][] [Set ID][][OK][Data][x]
Data Min: 0H(Vol 0) - Max: 64H(Vol 100)
18.ChannelAdd/Del(Command:mb)
To add and delete the channels.
Transmission
[m][b][ ][Set ID][ ][Data][Cr]
Data 00: Channel Delete
01 : Channel Add
Ack
[b][ ][Set ID][ ][OK/NG][Data][x]
Data 00: Channel Delete
01 : Channel Add
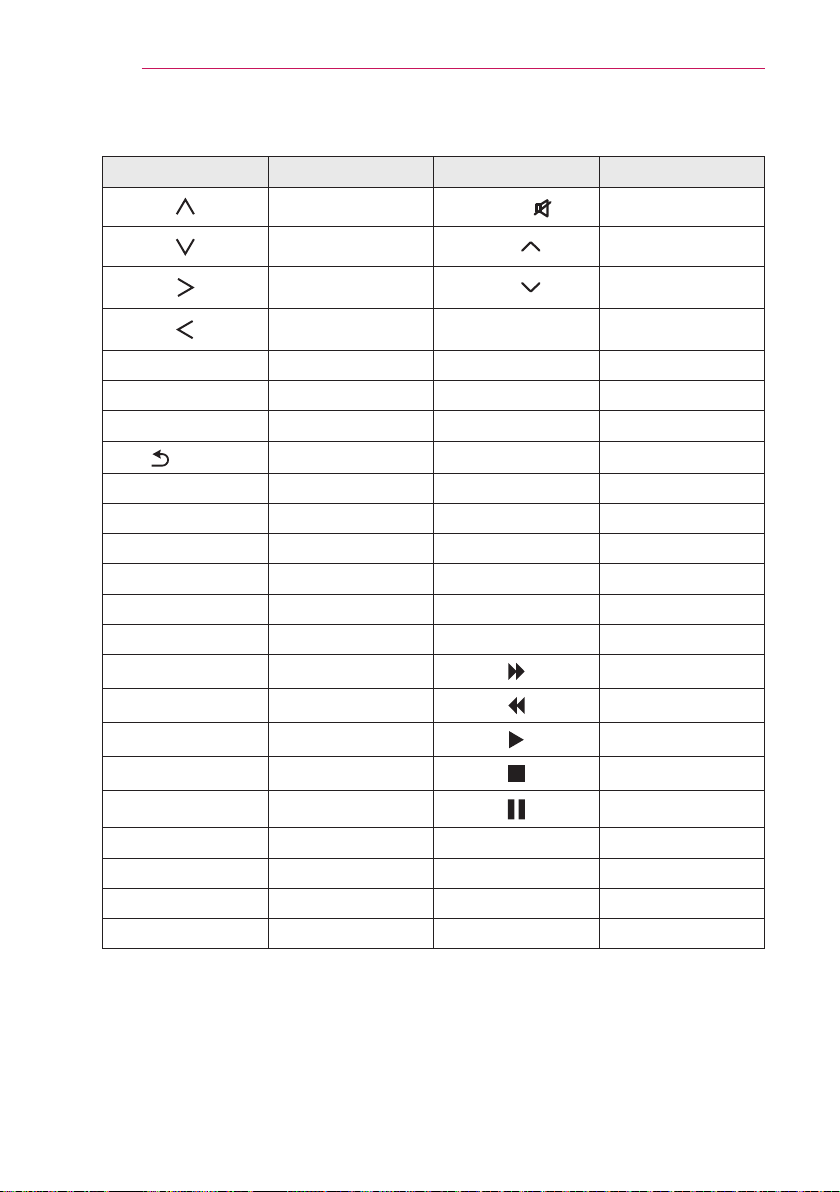
122
SERIALCOMMUNICATIONFUNCTION
KeyCode
KeyName KeyCode KeyName KeyCode
0x40
MUTE
0x09
0x41 CH 0x00
0x06 CH 0x01
0x07 EXIT 0x5B
POWER 0x08 0 0x10
INPUT 0x0B 1 0x11
SETTINGS 0x43 2 0x12
BACK
0x28 3 0x13
OK 0x44 4 0x14
ENERGY SAVING 0x95 5 0x15
RATIO 0x79 6 0x16
AV MODE 0x30 7 0x17
VOL+ 0x02 8 0x18
VOL - 0x03 9 0x19
RED 0x72 0x8E
GREEN 0x71 0x8F
YELLOW 0x63 0xB0
BLUE 0x61 0xB1
SIMPLINK 0x7E 0xBA
TV 0x0F FAV 0x1E
FLASHBK 0x1A INFO 0xAA
LIST,- 0x4C Q.MENU 0x45
HOME 0x7C MY APPS 0x42

123
MAINTENANCE
MAINTENANCE
Clean your Laser TV to keep it in optimal condition.
Cleaning
CleaningCoverGlass
To remove dust or stains on the cover glass, use an air spray or use a swab or soft cloth to
wipe the glass gently.
CleaningtheLaserTVCase
To clean the case of Laser TV, rst unplug the power cord.
To remove dust or stains, use only a dry, lint-free, soft cloth to polish the lens.
Do not use alcohol, benzene, thinners or other chemicals, which may damage the case.
124
INFORMATION
INFORMATION
ToupdateLaserTVsoftware
Uses Software Update to check and obtain the latest version.
It is also possible to check manually for available updates.
1
Press the SMART button and select Settings.
2
Select SUPPORT and go to SoftwareUpdate.
Item Description
SoftwareUpdate
Set it to On.
If an update is available, a prompt will appear to perform the
update.
Automaticupdatemode
If an update is available, the update automatically starts
without prompting.
CheckUpdateVersion
Checks the latest update version installed. When a
new update is available, the download process can be
performed manually.
• When the update starts, the update progress window appears for a short time and
disappears.
• The latest version can be obtained via an internet connection.
• If software is not updated, certain functions may not work properly.
125
INFORMATION
Beforereportingaproblem,checkthefollowing:
If the following symptoms occur, please carry out the checks and adjustments described
below. There may be no malfunction.
General
Problem Solution
Cannotviewcertain
programs.
• Adjust the location or orientation of the antenna.
• Save the programmes you wish to view later using
AutoTuning or ChannelEdit.
Thereisadelayafterthe
LaserTVisswitchedon
beforetheimageisfully
visible.
• This is not a problem. Image noise that may occur
when the Laser TV is first switched is being cleaned
up.
Picture
SMART → Settings → SUPPORT → PictureTest
First run a Picture Test to verify that the image signal output is normal.
If there is no problem with the test image, check external device connections and
broadcast signals.
Problem Solution
Imagesfromprevious
programorother
programslingerorthe
screendisplaysannoying
lines.
• Adjust the orientation of the antenna to the TV
transmitter, or refer to the manual for instructions on
connecting the antenna.
Vibratinghorizontal/
verticallinesand
shnetpatternsappear
momentarily.
• Such a problem may happen when there is strong
electronic interference. Turn off other electronic
devices such as mobile phones, power tools, and
other small electrical appliances.
Thescreendisplayfreezes
ordoesnotworkproperly
duringadigitalbroadcast.
• This may occur in case of a weak signal or unstable
reception. Adjust the antenna orientation and cable
connections.
• If the signal strength or quality is low on Manual
Tuning, check with the TV station or administration
office.
126
INFORMATION
Problem Solution
Digitalbroadcastingisnot
availableeventhoughthe
cableisconnected.
• Check with the cable operator providing your
subscription and/or signal. (Depending on your
subscription, digital broadcasting may not be
supported.)
Thedisplayisinactiveor
unclearwhenconnected
toanHDMI
®
source.
• Check the HDMI
®
cable specifications. If your HDMI
®
cable is not genuine, images may fade in and out or
not be displayed properly.
• Ensure that all cables are securely connected. When
connections are not secure, images may not be
properly displayed.
DoesnotworkwithaUSB
storagedevice.
• Verify that the USB device and cable is version 2.0 or
higher.
Sound
SMART → Settings → SUPPORT → SoundTest
First run a Sound Test to verify that the sound signal output is normal.
If there is no problem with the test sound, check connected external devices and the
broadcast signal.
Problem Solution
Screendisplayisonbut
thereisnosound.
• Check other TV programs.
• Check if the audio output settings for the Laser TV are
configured correctly.
Forananalogue
broadcast,stereoisnot
clearorsoundcomes
fromonespeakeronly.
• In a poor reception area (areas with weak or unstable
signals) or if multi audio is not stable, select Mono on
MultiAudio.
• Adjust the balance using the navigation button.
TVsoundisnotin
syncwiththeimageor
thesoundbreaksup
occasionally.
• If the issue affects a specific TV program only, it may
be caused by problems with the broadcast signal for
the individual station. Check with the TV station or
your cable operator.
Thevolumechangeswhen
Ichangeprogram.
• Volume can vary from program to program.
• Set AutoVolume to On.
127
INFORMATION
Problem Solution
Oncertainprogrammes,
thereisnosoundatall,
oronlythebackground
musiccanbeheard
(incaseofaprograms
createdforoverseas
viewers).
• In Language, set Language → AudioLanguage to
the language of your choice. Even if you change the
language on MultiAudio, you can go back to the
default setup once you turn off the power or change
the programme.
Thereisnosoundwhen
connectedtoHDMI/USB.
• Verify that the HDMI
®
cable is high speed.
• Check if the USB device and cable is version 2.0 or
higher.
• Use only regular music (*mp3) files.
PCconnectionproblem
Problem Solution
Thescreendisplay
doesnotcomeon
afterconnectingtothe
computer.
• Verify that the computer and the Laser TV are
securely connected.
• Turn the Laser TV off and back on using the remote
control.
• Restart the PC with the Laser TV on.
• Check whether the resolution is correctly set for PC
input.
• Reconnect the HDMI cable.
Thereisnosoundafter
connectingthecomputer
withtheHDMIcable.
• Check with manufacturer of your video card to ensure
it supports HDMI voice output. (Video cards in DVI
format require connection of a separate sound cable.)
Whenconnectedtothe
computer,thedisplayis
partiallycutofforshiftsto
oneside.
• Set the resolution to support PC input. (If this does not
work, reboot the computer.)
128
INFORMATION
ProblemsreplayingmoviesinMyMedia
Problem Solution
Icannotviewtheleson
theMovieList.
• Check whether the file on the USB storage device can
be read on a computer.
• Check whether the file extension is supported.
Thisleisinvalid.
messageappearsor
theimagedisplayisnot
normaleventhoughthe
soundisOK.
• Make sure that the file replays normally on the
computer’s video player. (Check for damaged files.)
• Check whether the resolution is supported by the
computer.
• Verify that the video/audio codec is supported.
• Verify that the frame rate is supported.
Audionotsupported.
messageappearsorthe
soundisnotnormaleven
thoughtheimagedisplay
isOK.
• Make sure that the file replays normally on the
computer’s video player. (Check for damaged files.)
• Check if the audio codec is supported by the
computer.
• Verify that the bit rate is supported.
• Verify that the sample rate is supported.
Subtitlesarenot
displayed.
• Make sure that the file replays normally on the
computer’s video player. (Check for damaged files.)
• Check if the video file has the same name as the
subtitle file.
• Make sure that the video and subtitle files are in the
same folder.
• Verify that the subtitle file format is supported.
• Verify that the subtitle language is supported.
(Subtitle files can be opened in Notepad to check the
language.)
• Image shown may differ from your Laser TV.
• For information on requesting service, refer to the following menu.
SMART → Settings → SUPPORT → Product/ServiceInfo.
129
SPECIFICATIONS
SPECIFICATIONS
MODELS HECTO2(HECTO2-NA)
Resolution(Pixel) 1920 (Horizontal) × 1080 (Vertical)
Aspectratio 16:9 (Horizontal:Vertical)
Panelsize(mm) 14.5152 (Horizontal), 8.1648 (Vertical)
Projectiondistance
(Videosize)
0.53 m (2.54 m)
Ratioofupward
projection
123 %
POWER AC 100 - 240 V, 50/60 Hz
Audiooutput 10 W + 10 W
Receptiontype NTSC-M, ATSC
Receptionchannels
VHF 2 - 13, UHF 14 - 69, CATV 1 - 135,
DTV 2 - 69, CADTV 1 - 135
ExternalAntenna
Impedance
75 Ω
Height(mm) 145 (excluding foot), 156.1 (including foot)
Width(mm) 546.3
Depth(mm) 406.6
Weight(kg) 14
USBDevice 5 V, 0.5 A (Max.)
Operation
environment
Temperature
Operation 0 °C to 40 °C
Storage -20 °C to 60 °C
Relative humidity
Operation 0 % - 80 %
Storage 0 % - 85 %
* Contents in this manual may be changed without prior notice due to upgrade of product
functions.
130
SPECIFICATIONS
HDMI(DTV)supportedmode
Resolution
Horizontal
Frequency
(kHz)
Vertical
Frequency
(Hz)
720 x 480
31.469 59.94
31.50 60.00
1280 x 720
44.96 59.94
45.00 60.00
1920 x 1080
33.72 59.94
33.75 60.00
26.97 23.97
27.000 24.000
33.716 29.976
33.75 30.00
67.43 59.94
67.500 60
HDMI(PC)supportedmode
Resolution
Horizontal
Frequency
(kHz)
Vertical
Frequency
(Hz)
640 x 480 31.469 59.94
800 x 600 37.879 60.31
1024 x 768 48.363 60.00
1152 x 864 54.348 60.053
1360 x 768 47.712 60.015
1280 x 1024 63.981 60.020
1920 x 1080 67.5 60.00
• If an invalid signal is input into the
product, it will not be displayed properly
on the screen or a message such as
“No Signal” or “Invalid Format” will be
displayed.
• The product supports the DDC1/2B
type as the Plug & Play function
(Auto-recognition of PC monitor).
• 1920 x 1080 is recommended as the
best picture quality in the PC mode.
Componentsupportedmode
Resolution
Horizontal
Frequency
(kHz)
Vertical
Frequency
(Hz)
720 x 480i
15.73 59.94
15.75 60.00
720 x 480p
31.47 59.94
31.50 60
1280 x 720p
44.96 59.94
45.00 60.00
1920 x 1080i
33.72 59.94
33.75 60.00
1920 x 1080p
26.97 23.976
27.00 24.00
33.71 29.97
33.75 30.00
67.432 59.94
67.500 60.00

131
SPECIFICATIONS
ComponentportConnecting
information
Component
portsontheTV
Y PB PR
Videooutput
portsonDVD
player
Y PB PR
Y B-Y R-Y
Y Cb Cr
Y Pb Pr
OpenSourceSoftwareInformation
To obtain the source code under GPL,
LGPL, MPL and other open source
licenses, that is contained in this product,
please visit http://opensource.lge.com.
In addition to the source code, all referred
license terms, warranty disclaimers
and copyright notices are available for
download.
LG Electronics will also provide open
source code to you on CD-ROM for a
charge covering the cost of performing
such distribution (such as the cost of
media, shipping and handling) upon email
request to [email protected]. This
offer is valid for three (3) years from the
date on which you purchased the product.