Guía del usuario
LG 238C
ESPAÑOL
Printed in XXXXX
User Guide
LG 238C
MFL69535301 (1.0)
ENGLISH
www.lg.com

t
Screen displays and illustrations may differ from
those you see on actual phone.
t
Actual displays and the color of the phone may
vary.
t
Some of the contents of this guide may not apply
to your phone, depending on the software and your
service provider. All information in this document is
subject to change without notice.
t
This handset is not suitable for people who have
a visual impairment due to the touch screen
keyboard.
t
Copyright ©2016 LG Electronics, Inc. All rights
reserved. LG and the LG logo are registered
trademarks of LG Group and its related entities.
All other trademarks are the property of their
respective owners.
6TFS(VJEF
ENGLISH

LIMITED WARRANTY STATEMENT
ARBITRATION NOTICE: THIS LIMITED WARRANTY CONTAINS AN ARBITRATION
PROVISION THAT REQUIRES YOU AND LG TO RESOLVE DISPUTES BY BINDING
ARBITRATION INSTEAD OF IN COURT, UNLESS YOU CHOOSE TO OPT OUT. IN
ARBITRATION, CLASS ACTIONS AND JURY TRIALS ARE NOT PERMITTED. PLEASE
SEE THE SECTION TITLED “PROCEDURE FOR RESOLVING DISPUTES” BELOW.
Warranty Laws
The following laws govern warranties that arise in retail sales of consumer goods:
t
The California Song-Beverly Consumer Warranty Act [CC §§1790 et seq],
t
The California Uniform Commercial Code, Division Two [Com C §§2101 et seq],
and
t
The federal Magnuson-Moss Warranty Federal Trade Commission Improvement
Act [15 USC §§2301 et seq; 16 CFR Parts 701– 703]. A typical Magnuson-
Moss Act warranty is a written promise that the product is free of defects or
a written promise to refund, repair, or replace defective goods. [See 15 USC
§2301(6).] Remedies include damages for failing to honor a written warranty or
service contract or for violating disclosure provisions. [See 15 USC §2310(d).]
Except for some labeling and disclosure requirements, the federal Act does not
preempt state law. [See 15 USC §2311.]
1. WHAT THIS WARRANTY COVERS:
LG offers you a limited warranty that the enclosed subscriber unit and its enclosed
accessories will be free from defects in material and workmanship, according to
the following terms and conditions:

(1) The limited warranty for the product extends for TWELVE (12) MONTHS
beginning on the date of purchase of the product with valid proof of purchase,
or absent valid proof of purchase, FIFTEEN (15) MONTHS from date of
manufacture as determined by the unit's manufacture date code.
(2) The limited warranty extends only to the original purchaser of the product and
is not assignable or transferable to any subsequent purchaser/end user.
(3) This warranty is good only to the original purchaser of the product during
the warranty period as long as it is in the U.S., including Alaska, Hawaii, U.S.
Territories and Canada.
(4) The external housing and cosmetic parts shall be free of defects at the time
of shipment and, therefore, shall not be covered under these limited warranty
terms.
(5) Upon request from LG, the consumer must provide information to reasonably
prove the date of purchase.
(6) The customer shall bear the cost of shipping the product to the Customer
Service Department of LG. LG shall bear the cost of shipping the product back
to the consumer after the completion of service under this limited warranty.
2. WHAT THIS WARRANTY DOES NOT COVER:
(1) Defects or damages resulting from use of the product in other than its normal
and customary manner.
(2) Defects or damages from abnormal use, abnormal conditions, improper
storage, exposure to moisture or dampness, unauthorized modifications,
unauthorized connections, unauthorized repair, misuse, neglect, abuse,
accident, alteration, improper installation, or other acts which are not the fault
of LG, including damage caused by shipping, blown fuses, spills of food or
liquid.

(3) Breakage or damage to antennas unless caused directly by defects in material
or workmanship.
(4) That the Customer Service Department at LG was not notified by consumer of
the alleged defect or malfunction of the product during the applicable limited
warranty period.
(5) Products which have had the serial number removed or made illegible.
(6) This limited warranty is in lieu of all other warranties, express or implied either
in fact or by operations of law, statutory or otherwise, including, but not limited
to any implied warranty of marketability or fitness for a particular use.
(7) Damage resulting from use of non LG approved accessories.
(8) All plastic surfaces and all other externally exposed parts that are scratched or
damaged due to normal customer use.
(9) Products operated outside published maximum ratings.
(10) Products used or obtained in a rental program.
(11) Consumables (such as fuses).
3. WHAT LG WILL DO:
LG will, at its sole option, either repair, replace or refund the purchase price of
any unit that is covered under this limited warranty. LG may choose at its option
to use functionally equivalent re-conditioned, refurbished or new units or parts or
any units. In addition, LG will not re-install or back-up any data, applications or
software that you have added to your phone. It is therefore recommended that you
back-up any such data or information prior to sending the unit to LG to avoid the
permanent loss of such information.

4. STATE LAW RIGHTS:
No other express warranty is applicable to this product. THE DURATION OF ANY
IMPLIED WARRANTIES, INCLUDING THE IMPLIED WARRANTY OF MARKETABILITY
OR MERCHANTABILITY OR FITNESS FOR A PARTICULAR PURPOSE, IS LIMITED TO
THE DURATION OF THE EXPRESS WARRANTY HEREIN. LG SHALL NOT BE LIABLE
FOR THE LOSS OF THE USE OF THE PRODUCT, INCONVENIENCE, LOSS OR ANY
OTHER DAMAGES, DIRECT OR CONSEQUENTIAL, ARISING OUT OF THE USE OF,
OR INABILITY TO USE, THIS PRODUCT OR FOR ANY BREACH OF ANY EXPRESS OR
IMPLIED WARRANTY, INCLUDING THE IMPLIED WARRANTY OF MARKETABILITY OR
MERCHANTABILITY OR FITNESS FOR A PARTICULAR PURPOSE APPLICABLE TO
THIS PRODUCT.
Some states do not allow the exclusive limitation of incidental or consequential
damages or limitations on how long an implied warranty lasts; so these limitations
or exclusions may not apply to you. This warranty gives you specific legal rights
and you may also have other rights which vary from state to state.
5. HOW TO GET WARRANTY SERVICE:
To obtain warranty service, please call or fax to the following telephone numbers
from anywhere in the continental United States:
Tel. 1-800-793-8896 or Fax. 1-800-448-4026
Or visit http://www.lg.com/us/support. Correspondence may also be mailed to:
LG Electronics Service- Mobile Handsets, P.O. Box 240007, Huntsville, AL 35824
DO NOT RETURN YOUR PRODUCT TO THE ABOVE ADDRESS. Please call or
write for the location of the LG authorized service center nearest you and for the
procedures for obtaining warranty claims.

PROCEDURE FOR RESOLVING DISPUTES:
ALL DISPUTES BETWEEN YOU AND LG ARISING OUT OF OR RELATING IN ANY
WAY TO THIS LIMITED WARRANTY OR THE PRODUCT SHALL BE RESOLVED
EXCLUSIVELY THROUGH BINDING ARBITRATION, AND NOT IN A COURT OF
GENERAL JURISDICTION. BINDING ARBITRATION MEANS THAT YOU AND LG ARE
EACH WAIVING THE RIGHT TO A JURY TRIAL AND TO BRING OR PARTICIPATE IN A
CLASS ACTION.
Definitions. For the purposes of this section, references to “LG” mean LG
Electronics MobileComm U.S.A., Inc., its parents, subsidiaries and affiliates, and
each of their officers, directors, employees, agents, beneficiaries, predecessors
in interest, successors, assigns and suppliers; references to “dispute” or “claim”
shall include any dispute, claim or controversy of any kind whatsoever (whether
based in contract, tort, statute, regulation, ordinance, fraud, misrepresentation or
any other legal or equitable theory) arising out of or relating in any way to the sale,
condition or performance of the product or this Limited Warranty.
Agreement to Binding Arbitration and Class Action Waiver. You and LG agree to
resolve any claims between us only by binding arbitration on an individual basis,
unless you opt out as provided below. Any dispute between you and LG shall not
be combined or consolidated with a dispute involving any other person’s or entity’s
product or claim. More specifically, without limitation of the foregoing, any dispute
between you and LG shall not under any circumstances proceed as part of a class
or representative action. Instead of arbitration, either party may bring an individual
action in small claims court, but that small claims court action may not be brought
on a class or representative basis.

Arbitration Rules and Procedures. To begin arbitration of a claim, either you or LG
must make a written demand for arbitration. The arbitration will be administered
by the American Arbitration Association (AAA) and will be conducted before a
single arbitrator under the AAA’s Consumer Arbitration Rules that are in effect at
the time the arbitration is initiated (referred to as the “AAA Rules”) and under the
procedures set forth in this section. The AAA Rules are available online at
www.adr.org/consumer. Send a copy of your written demand for arbitration, as
well as a copy of this provision, to the AAA in the manner described in the AAA
Rules. You must also send a copy of your written demand to LG at LG Electronics,
USA, Inc. Attn: Legal Department-Arbitration1000 Sylvan AvenueEnglewood
Cliffs, NJ 07632. If there is a conflict between the AAA Rules and the rules set
forth in this section, the rules set forth in this section will govern. This arbitration
provision is governed by the Federal Arbitration Act. Judgment may be entered on
the arbitrator’s award in any court of competent jurisdiction. All issues are for the
arbitrator to decide, except that issues relating to the scope and enforceability of
the arbitration provision and to the arbitrability of the dispute are for the court to
decide. The arbitrator is bound by the terms of this provision.
Governing Law: The law of the state of your residence shall govern this Limited
Warranty and any disputes between us except to the extent that such law is
preempted by or inconsistent with applicable federal law.
Fees/Costs. You do not need to pay any fee to begin an arbitration. Upon receipt
of your written demand for arbitration, LG will promptly pay all arbitration filing
fees to the AAA unless you seek more than $25,000 in damages, in which case
the payment of these fees will be governed by the AAA Rules. Except as otherwise
provided for herein, LG will pay all AAA filing, administration and arbitrator fees

for any arbitration initiated in accordance with the AAA Rules and this arbitration
provision. If you prevail in the arbitration, LG will pay your reasonable attorneys’
fees and expenses to the extent required by applicable law. If the arbitrator finds
either the substance of your claim or the relief sought in the demand is frivolous
or brought for an improper purpose (as measured by the standards set forth in
Federal Rule of Civil Procedure 11(b)), then the payment of all arbitration fees
will be governed by the AAA Rules. In such a situation, you agree to reimburse
LG for all monies previously disbursed by it that are otherwise your obligation to
pay under the AAA Rules. Except as otherwise provided for, LG waives any rights
it may have to seek attorneys’ fees and expenses from you if LG prevails in the
arbitration.
Hearings and Location. If your claim is for $25,000 or less, you may choose to
have the arbitration conducted solely on the basis of (1) documents submitted
to the arbitrator, (2) through a telephonic hearing, or (3) by an in-person hearing
as established by the AAA Rules. If your claim exceeds $25,000, the right to a
hearing will be determined by the AAA Rules. Any in-person arbitration hearings
will be held at a location within the federal judicial district in which you reside
unless we both agree to another location or we agree to a telephonic arbitration.
Opt Out. You may opt out of this dispute resolution procedure. If you opt out,
neither you nor LG can require the other to participate in an arbitration proceeding.
To opt out, you must send notice to LG no later than 30 calendar days from
the date of the first consumer purchaser’s purchase of the product by either: (i)
sending an e-mail to [email protected], with the subject line: “Arbitration Opt Out”
or (ii) calling 1-800-980-2973. You must include in the opt out e-mail or provide
by telephone: (a) your name and address; (b) the date on which the product was

purchased; (c) the product model name or model number; and (d) the IMEI or
MEID or Serial Number, as applicable (the IMEI or MEID or Serial Number can be
found (i) on the product box; (ii) on a label on the back of the product beneath
the battery, if the batter is removable;or (iii) from the settings menu via the
following path: Settings > Phone info > ESN/MEID). You may only opt out of the
dispute resolution procedure in the manner described above (that is, by e-mail
or telephone); no other form of notice will be effective to opt out of this dispute
resolution procedure. Opting out of this dispute resolution procedure will not affect
the coverage of the Limited Warranty in any way, and you will continue to enjoy
the full benefits of the Limited Warranty. If you keep this product and do not opt
out, then you accept all terms and conditions of the arbitration provision described
above.

10
Contents
Phone Overview ................................. 13
Menus Overview ................................ 16
.FOV"DDFTT 16
Getting Started with Your Phone ....... 19
5IF#BUUFSZ 19
$IBSHJOHUIF#BUUFSZ 20
$IBSHJOHXJUIB64#DBCMF 21
#BUUFSZ5FNQFSBUVSF1SPUFDUJPO 21
#BUUFSZ$IBSHF-FWFM 22
4JHOBM4USFOHUI 22
5VSOJOHUIF1IPOF0OBOE0GG 22
.BLJOH$BMMT 23
3FEJBMJOH$BMMT 23
3FDFJWJOH$BMMT 24
4DSFFO*DPOT 24
Quick Access to Convenient
Features ............................................. 25
7JCSBUFNPEF 25
4PVOET0GG 25
.VUF'VODUJPO 25
2VJDL7PMVNF"EKVTUNFOU 25
2VJDL'POU3FTJ[F 26
$BMM8BJUJOH 26
XBZDBMM 26
$BMMFS*% 27
7PJDFDPNNBOET 27
Entering and Editing Information ...... 28
5FYU*OQVU 28
Contacts in Your Phone’s Memory .... 29
4UPSJOH#BTJDT 29
$VTUPNJ[JOH*OEJWJEVBM&OUSJFT 29
4QFFE%JBM 30
4UPSJOHB/VNCFSXJUI1BVTFT 30
"EEJOH"OPUIFS1IPOF/VNCFS 32
$IBOHJOH4BWFE*OGPSNBUJPO 33
$IBOHJOHUIF%FGBVMU/VNCFS 33
%FMFUJOH 34
4QFFE%JBMJOH 35
Using the Phone Menus ..................... 36
1SFQBJE 36
1. My phone number .......................36
2.
Serial number .............................36
$POUBDUT 37
1. New contact ...............................37
2. Contact list .................................38
3. Favorites ....................................38
4. Groups .......................................39
5. Speed dials ................................40

11
6. My vCard ....................................41
.FTTBHFT 41
1. New message .............................42
2. Inbox ..........................................45
3. Sent ...........................................47
4. Drafts .........................................47
5. Voicemail ....................................48
6. Templates ...................................49
Messages settings ..........................49
Erasing messages...........................51
3FDFOUDBMMT 51
1. Missed calls ...............................51
2. Received calls .............................52
3. Dialed calls .................................53
4. All calls ......................................53
5. Call timer ...................................54
(BNFTBQQT 55
#SPXTFS 55
.VMUJNFEJB 55
1. Take picture ................................55
2. Record voice ...............................57
3. Pictures ......................................57
4. Ringtones ...................................60
5PPMT 62
1. Voice commands ........................62
2. Calculator ...................................65
3. Ez tip calculator ..........................65
4. Eco-calculator.............................66
5. Info search .................................67
6. Stopwatch ..................................67
7. Notepad ....................................68
8. Unit converter .............................68
.ZTDIFEVMF 69
1. Calendar ....................................69
2. Alarm clock ................................70
#MVFUPPUI 71
1. Add new device ..........................72
My phone info ................................74
Discovery mode ..............................75
Supported profiles...........................75
"DDFTTJCJMJUZ 76
1. Readout .....................................76
2. Invert color .................................78
3. Large text ...................................79
4. Mono audio ................................79
5. Turn off all sounds .......................79
4FUUJOHT 80
1. Sounds settings ..........................80
2. Display settings ..........................84
3. Phone settings ...........................88

12
Contents
4. Call settings................................95
5. Memory .....................................98
6. Phone info ..................................99
Safety ............................................... 102
Glossary ........................................... 104
Terminology .................................. 104
Acronyms and Abbreviations ..........104
13
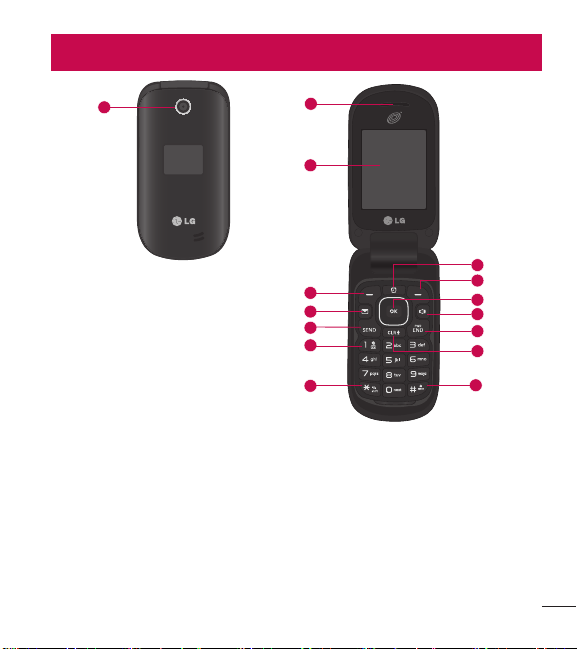
1 Camera Lens Lets you take pictures.
2 Earpiece Lets you hear the caller and automated prompts.
3 LCD Screen Displays messages and status icons. When the phone is turned
on, Power Save mode automatically dims the screen and then darkens it if no
keys are pressed.
4 Left Selection Key Performs functions identified on the bottom-left corner of
the screen.
Phone Overview
1
2
3
5
7
9
8
10
11
12
13
14
15
4
6
R

14
Phone Overview
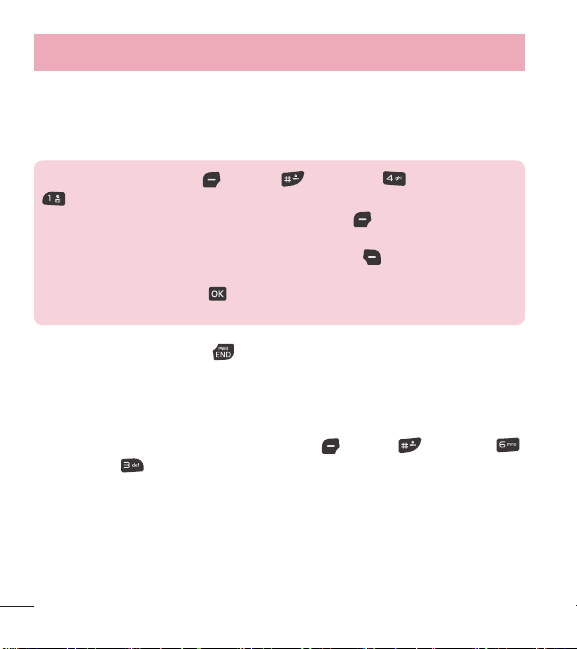
5 Message Key Quickly and easily opens a new text message.
6 Send Key Use to make and answer calls. Press once to access the All Calls list.
7 Alphanumeric Keypad Use to enter numbers and characters and select menu
items.
8 Vibrate Mode Key Use to set Vibrate mode (from standby mode press and hold
for about 3 seconds).
9 Lock Mode Key Use to lock the phone from standby mode, press and hold for
about 2 seconds.
10 Clear/Voice Commands Key Deletes single spaces or characters with a
quick press. Press and hold to delete entire words while entering text. Press
once to back out of menus, one level at a time. For quick access to Voice
commands, press this key once from the idle screen.
11 Power/End Key Use to turn the power on/off and to end a call. Also returns
to standby mode while browsing a menu or performing other actions.
12 Speakerphone Key Use to change to speakerphone mode.
13 OK/Directional Key Use the OK Key to select the function displayed at the
bottom of the LCD between the Left and Right Selection Key functions. Use
the Directional Key
to scroll through the menu items and highlight a
specific field or object by moving up, down, left or right.
14 Right Selection Key Performs functions identified on the bottom-right corner
of the screen.
15 Alarm Clock Key Use to manage your alarms.
15
4
1
2
3
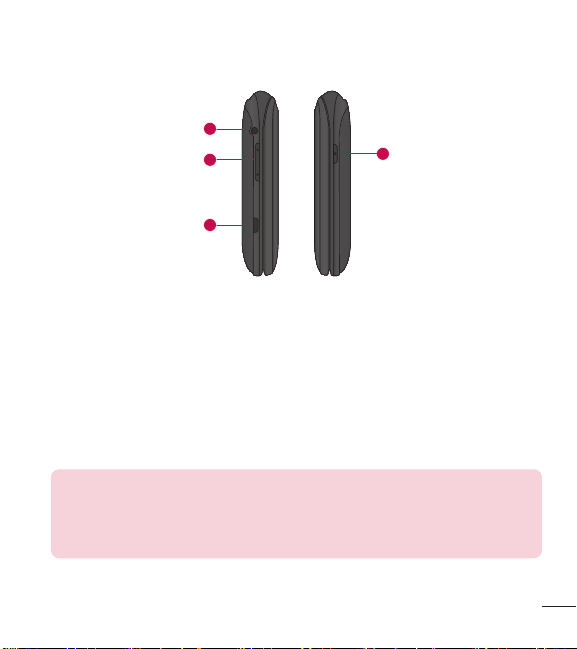
1 Headset Jack Allows you to plug in an optional 3.5mm headset for convenient,
hands-free conversations.
2 Volume Keys Use to adjust the Master Volume in standby mode and the
Earpiece Volume during a call. Use to adjust font sizes when viewing messages,
entering phone numbers (in standby mode) or browsing menus (except for the
Main menu).
3 Charger/Accessory Port Connects the phone to the charger or other
compatible accessories.
Charging with PC & USB cable: You can use your computer to charge
your phone. Connect one end of a USB cable to the Charger/ Accessory
Port on your phone and the other end to a high-power USB port on your
PC (commonly located on the front panel of the computer).
4 Camera Key Use to take photos. Keep it clean for optimal photo quality.
16
Menus Overview
Menu Access
While in standby mode, press the Left Selection Key [Menu] to access your
phone’s menus. There are two methods of accessing menus and submenus:
t
Use the Directional Keys to highlight a menu/option and press to select it.
t
Press the number key on the keypad to activate the corresponding menu/option.
Prepaid
1. My phone number
2. Serial number
3. Code entry mode
Contacts
1. New contact
2. Contact list
3. Favorites
4. Groups
5. Speed dials
6. My vCard
Messages
1. New message
2. Inbox
3. Sent
4. Drafts
5. Voicemail
6. Templates
Recent calls
1. Missed calls
2. Received calls
3. Dialed calls
4. All calls
5. Call timer
Games & apps
1. Buy games
Browser
Multimedia
1. Take picture
2. Record voice
3. Pictures
1. My pictures
2. Default pictures
3. Buy graphics
4. Ringtones
1. My sounds
2. Default ringtones

17
3. Buy ringtones
Tools
1. Voice commands
1. Call <Name or
Number>
2. Send msg to <Name or
Number or Group>
3. Go to <Menu>
4. Check <Item>
5. Contacts <Name>
6. Redial
7. Help
2. Calculator
3. Ez tip calculator
4. Eco-calculator
5. Info search
6. Stopwatch
7. Notepad
8. Unit converter
1. Area
2. Length
3. Mass
4. Temperature
5. Volume
6. Velocity
My Schedule
1. Calendar
2. Alarm clock
Bluetooth
1. Bluetooth menu
1. Add new device
Accessibility
1. Readout
1. Full Readout
2. Menu Readout
3. Digit dial Readout
4. Caller ID Readout
5. Passwords Readout
6. Speech rate
2. Invert color
3. Large text
4. Mono audio
5. Turn off all sounds
Settings
1. Sounds settings
1. Master volume
2. Call sounds
1. Call ringtone
2. Call vibrate
3. Caller ID Readout
3. Alert sounds
1. TXT message
2. Multimedia message
3. Voicemail
4. Emergency tone
5. Missed call
4. Keypad volume
5. Service alerts

18
Menus Overview
1. Call connect
2. Call disconnect
3. Charge complete
6. Power on/off
1. Power on
2. Power off
7. Hearing assist
2. Display settings
1. Backlight
1. Display backlight
2. Keypad backlight
2. Brightness
3. Wallpaper
1. My pictures
2. Slide show
4. Menu style
1. Grid(Default)
2. List
5. Font type
6. Font size
1. Dial digits
2. Menu & list
3. Message
7. Clock format
8. Name match for dialing
3. Phone settings
1. Airplane mode
2. Set shortcut keys
1. Set my shortcuts
2. Set directional keys
3. Voice commands
1. Confirm choices
2. Sensitivity
3. Train voice
4. Prompts
4. Language
5. Location
6. Security
7. System select
4. Call settings
1. Answer options
2. TTY mode
3. One touch dial
4. Voice privacy
5. DTMF tones
5. Memory
1. Memory usage
2. My pictures
3. My sounds
4. My contacts
6. Phone info
1. My number
2. ESN/MEID
3. Icon glossary
4. SW/HW version
5. Open source license
19
Getting Started with Your Phone
The Battery
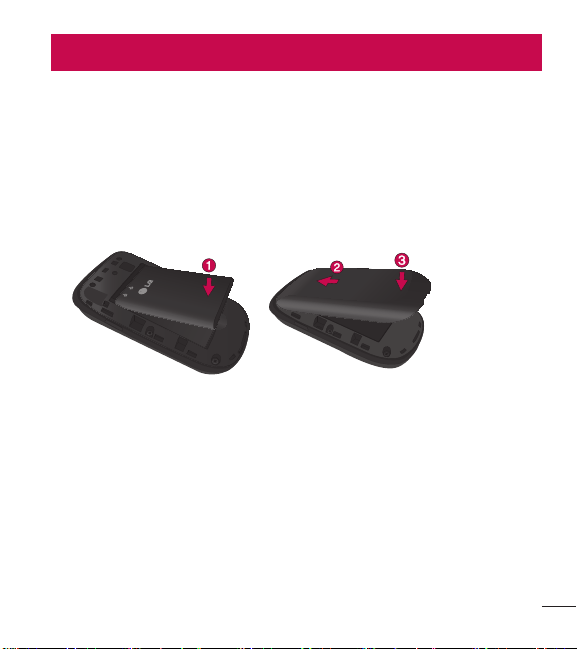
Installing the Battery
1 Use the fingernail cutout at the bottom of the back cover to lift and remove the
cover.
2 Align the battery contacts with the terminals near the top of the battery
compartment and insert the battery into the compartment.
3 Align the back cover and press it downwards until it clicks into place.
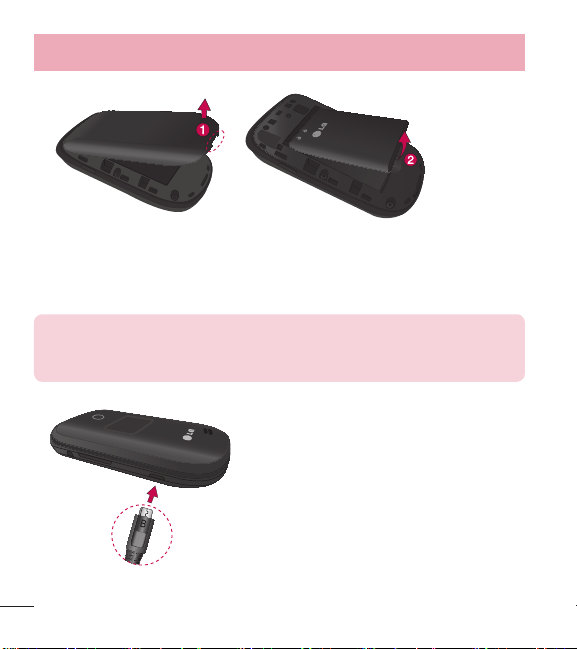
Removing the Battery
1 Turn the phone off.
2 Use the fingernail cutout at the bottom of the back cover to lift and remove the
cover.
3 Use the fingertip opening near the bottom of the battery compartment to lift the
battery out.
Getting Started with Your Phone
20
Getting Started with Your Phone
Charging the Battery
Use the charger provided with your phone.
WARNING: Use only the charger provided with the phone. Using any
charger other than the one included with the phone may damage your
phone or battery.

21
NOTICE: Please make sure that the 'B' side faces up before inserting a
charger or USB cable into the Charger/ Accessory Port of your phone.
Plug one end of the charging adapter into the phone’s Charger/Accessory Port and
the other end into an electrical outlet.
The charge time varies depending upon the battery level.
Charging with a USB cable
You can use your computer to charge your phone. To be able to charge with the
USB cable, you may need to have the necessary USB driver installed on your PC
first. Connect one end of the USB cable to the Charger/Accessory Port on your
phone and the other end to the USB port on your PC.
NOTE: Low-power USB ports are not supported, such as the USB ports
on your keyboard or bus-powered USB hub.
Battery Temperature Protection
If the battery gets overheated, the phone will automatically turn off. When you turn
the phone back on, a message pops up alerting you that the phone was powered
off for your safety.

22
Getting Started with Your Phone
Battery Charge Level
You can find the battery charge level at the top right corner of the LCD screen.
When the charge level becomes low, the battery sensor sounds a warning tone,
blinks the battery icon, and/or displays a warning message.
If the battery charge level becomes exceedingly low, the phone automatically
switches off and any function in progress is not saved.
Signal Strength
Call quality depends on the signal strength in your area. You can tell how much
signal strength you have by the number of bars next to the signal strength icon
: the more bars, the stronger the signal. If you’re having problems with
signal quality, move to an open area or, when inside a building, try moving near a
window.
Turning the Phone On and Off
Turning the Phone On
1 Insert the battery and connect the phone to an external power source if the
battery level is low.
2 With the flip open, press the Power/End Key
until the LCD screen lights
up.
Turning the Phone Off
With the flip open, press and hold the Power/End Key
until the LCD screen
turns off.

23
Making Calls
1 Make sure the phone is turned on.
2 Enter the phone number.
3 Press the Send Key
to dial the call.
4 Press the Power/End Key
to end the call.
NOTE: Your phone has a Voice commands feature that also lets you
make calls by saying a phone number or contact name. Refer to page
27 for more information.
Correcting Dialing Mistakes
While entering a phone number, press the Clear Key
once to erase the last
digit entered. You can also hold it down for at least two seconds to delete all the
digits you entered.
Redialing Calls
With the flip open, press the Send Key twice to redial the last number dialed.
24
Getting Started with Your Phone
Receiving Calls
1 When the phone rings or vibrates, you can answer the call by simply opening
the flip.
NOTE: If the 'Flip open' ( Menu > Settings > Call settings >
Answer options) answer option is NOT MARKED, you can:
t
Open the flip and press the Left Selection Key [Quiet] to mute the
ringing or vibration for that call.
t
Open the flip and press the Right Selection Key [Ignore] to end the
call and send it directly to Voicemail.
t
Open the flip and press [Text] to end the call and send a quick text
message.
2 Press the Power/End Key to end the call, or simply close the flip.
Screen Icons
When the phone is on, the top line of the LCD screen displays phone status icons.
To see the icon glossary, open the flip and go to
Menu > Settings >
Phone info >
Icon glossary on your phone.

25
Quick Access to Convenient Features
Vibrate mode
Sets the phone to vibrate instead of ringing ( is displayed). To set Vibrate Mode,
open the flip and press and hold
. To return to Normal mode, press and hold
again.
Sounds Off
Quickly deactivate your phone's sounds when you're in a place where phone
sounds would be disruptive.
From standby mode with the flip open, press and hold the lower volume key for 3
seconds. To return to normal sounds mode, press and hold the upper volume key.
Mute Function
The Mute Function prevents the transmission of your voice to the caller. To quickly
activate Mute while on a call, press the Left Selection Key
[Mute]. To unmute,
press the Left Selection Key
[Unmute] again.
Quick Volume Adjustment
Quickly adjust ringer and earpiece volumes by pressing the Volume Keys on the
left side of the phone. Press the upper volume key to increase and lower volume
key to decrease the volume.
NOTE: The earpiece volume can only be adjusted during a call and
Keypad Volume can only be adjusted through the Sounds settings menu.
Quick Access to Convenient Features

26
Quick Access to Convenient Features
Quick Font Resize
When you view messages, enter phone numbers, or view sub-menus, press the
Volume Keys
up or down to quickly adjust the font size. Three levels (small,
normal, large) of font sizes are available.
NOTE: Not supported on the Main menu.
Call Waiting
During a call, one beep indicates another incoming call. Press the Send Key
to answer it and put the first call on hold. Press the Send Key
again to return
to the first call.
3-way call
You can talk with two people at the same time with a three-way conversation on
your wireless phone. Airtime and other charges, which may include toll or long
distance charges, will apply for all simultaneous calls until you end one call.
1 While on the first call, dial the 10-digit number of the second person.
2 Press the Send Key
. The first person is automatically put on hold while the
call is made.
3 When the second person answers, press
[Merge] to create a conference
call.
4 If the second person does not answer, press the Send Key
twice to end
the connection and go back to the first person.
5 To end both conversations completely, press the Power/End Key
.

27
Caller ID
Caller ID displays the number and/or name and picture (if applicable) of the person
calling when your phone rings.
Voice commands
Voice commands allow you to do things by verbal command (e.g., make calls,
check voicemail, etc.). With the flip open, press the Voice Commands Key
on
the keypad.
1 Call Say "Call" and then call someone simply by saying the name or phone
number.
2 Send msg to Say "Send message" and the command will prompt you for the
type of message.
3 Go to This allows you to access a menu within the phone.
4 Check This allows you to check out a wide range of items such as Phone
status, Voicemail, Messages, Missed calls, Time, Signal strength, Battery level,
Volume and My number.
5 Contacts You can look up names in your Contacts as well as manage your
Contact List including creating, erasing or modifying.
6 Redial Say "Redial" and the phone will redial the last phone number.
7 Help Provides a general guideline to using Voice commands.
NOTE: Voice commands can also be started with the designated key on
your Bluetooth
®
device. Please check the user manual of the Bluetooth
®
device for further instructions.

28
Text Input
The following key functions are available to help with text entry:
Left Selection Key: Press to change the text input mode.
Shift: Press to change capitalization (initial cap, caps lock, lowercase).
Next: Press to display other matching words in the database in T9 word
mode.
Space: Press to complete a word and insert a space.
Clear: Press to delete a single space or character. Hold to delete the entire
text.
Punctuation: Press to insert punctuation symbols.
Text Input Modes
In a text field, press the Left Selection Key
to select a text input mode:
T9 Word/ Abc/ ABC/ 123/ T9 Palabra/ Symbols/ Templates
NOTE: T9 Palabra is the Spanish counterpart of T9 Word which utilizes
accents, tildas, etc. for correct Spanish word spelling.
Entering and Editing Information

29
Contacts in Your Phone’s Memory
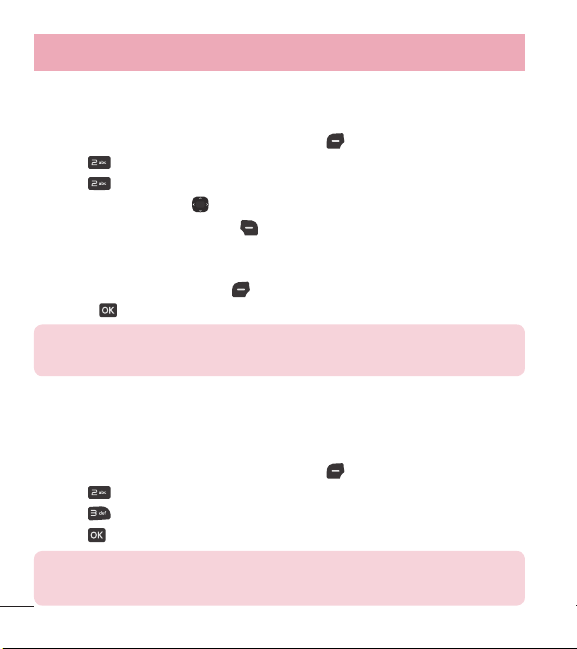
Storing Basics
1 With the flip open, enter a number (max. 48 digits), then press the Left
Selection Key
[Save].
2 Use the Directional Key
to highlight Add new contact/ Update existing,
then press
.
3 Use the Directional Key
to highlight Mobile 1/ Home/ Business/ Mobile 2/
Fax, then press
.
4 Enter a name (max. 32 characters), and any additional information, then press
[Save].
NOTE: If you selected Update existing after you select the number type,
the contact information is automatically updated.
Customizing Individual Entries
1 Open the flip and press the Left Selection Key [Menu].
2 Press
Contacts.
3 Press
Contact list.
4 Use the Directional Key
to highlight a Contact entry, then press the Left
Selection Key
[Edit].
5 Use the Directional Key
to highlight the information you want to customize.
6 Change the entry as you want, then press
[Save] to save your changes.

30
Contacts in Your Phone’s Memory
Speed Dial
Allows you to set up your Speed dials.
1 Open the flip and press the Left Selection Key
[Menu].
2 Press
Contacts.
3 Press
Contact list.
4 Use the Directional Key
to highlight a Contact entry, then press the Left
Selection Key
[Edit].
5 Use the Directional Key
to highlight a phone number, then press the Right
Selection Key
[Options].
6 Use the Directional Key
to highlight Set speed dial, then press .
7 Select a Speed dial digit.
t
Enter a digit using the keypad, then press [Set].
t
Use the Directional Key to highlight the Speed dial digit, then press
[Set].
8 Press
Yes to confirm, then press [Save] to update your contact entry.
Storing a Number with Pauses
Pauses allow you to enter additional series of numbers to access automated
systems such as Voicemail or credit billing numbers. Pause types are:
Wait (W) The phone stops dialing until you press the Left Selection Key
[Release] to advance to the following series of numbers.
2-Sec Pause (P) The phone waits two seconds before dialing the next string of
digits.

31
1 With the flip open, enter the phone number, then press the Right Selection Key
[Options].
2 Use the Directional Key
to highlight Add 2-sec pause or Add wait, then
press
.
3 Enter the additional number(s) (e.g., pin number, credit card number, etc.).
4 Press the Left Selection Key
[Save].
5 Choose Add new contact/ Update e
xisting.
6 Choose Mobile 1/ Home/ Business/ Mobile 2/ Fax.
7 Continue entering information for the Contact entry as necessary.
NOTE: If you selected Update existing after you select the number type,
the contact information is automatically updated. You do not have the
option to enter additional information.
8 Press [Save] to update your contact entry.
Adding a Pause to an Existing Contact Entry
1 Open the flip and press the Left Selection Key
[Menu].
2 Press
Contacts.
3 Press
Contact list.
4 Use the Directional Key
to highlight a Contact entry, then press the Left
Selection Key
[Edit].
5 Use the Directional Key
to highlight the number, then press the Right
Selection Key
[Options].
6 Press
Add 2-sec pause or Add wait.

32
Contacts in Your Phone’s Memory
7 Enter the additional number(s), then press [Save] to update your contact
entry.
Adding Another Phone Number
From standby mode
1 With the flip open, enter a phone number, then press the Left Selection Key
[Save].
2 Use the Directional Key
to highlight Update existing, then press .
3 Use the Directional Key
to highlight an existing entry then press to
update your contact entry.
4 Use the Directional Key
to highlight Mobile 1/ Home/ Business/ Mobile 2/
Fax, then press
to update your contact entry.
From the Contact list Screen
1 Open the flip and press the Left Selection Key
[Menu].
2 Press
Contacts.
3 Press
Contact list.
4 Use the Directional Key
to highlight an entry, then press the Left Selection
Key
[Edit].
5 Use the Directional Key
to highlight the phone number field you wish to add.
Then enter the number and press
[Save] to update your contact entry.

33
Changing Saved Information
To edit any information you stored, access the Edit Contact screen:
1 Open the flip and press the Left Selection Key
[Menu].
2 Press
Contacts.
3 Press
Contact list.
4 Use the Directional Key
to highlight a Contact entry, then press the Left
Selection Key
[Edit].
5 Use the Directional Key
to highlight the field you want to change.
6 Make the changes, then press
[Save] to update your contact entry.
Changing the Default Number
The Default Number is the phone number you first entered when you created the
Contact. However, another number can be saved as the Default number.
1 Open the flip and press the Left Selection Key
[Menu].
2 Press
Contacts.
3 Press
Contact list.
4 Use the Directional Key
to highlight an entry.
5 Press the Left Selection Key
[Edit].
6 Use the Directional Key
to highlight a phone number, then press the Right
Selection Key
[Options].
7 Use the Directional Key
to highlight Set as default, then press .
8 Press
[Yes] to confirm the new number as the default.
A confirmation message is displayed.
9 Press
[Save] to update your contact entry.

34
Contacts in Your Phone’s Memory
Deleting
Deleting a Contact Entry
1 Open the flip and press the Left Selection Key
[Menu].
2 Press
Contacts.
3 Press
Contact list.
4 Use the Directional Key
to highlight an entry.
5 Press the Right Selection Key
[Options].
6 Press
Erase.
7 Press
[Yes] to confirm.
Removing a Speed Dial
1 Open the flip and press the Left Selection Key
[Menu].
2 Press
Contacts.
3 Press
Contact list.
4 Use the Directional Key
to highlight a Contact entry to edit and press
[View].
5 Highlight the phone number with the speed dial, then press the Right Selection
Key
[Options].
6 Press
Remove speed dial.
7 Press
[Yes] to confirm.

35
Speed Dialing
Allows you to make phone calls quickly and easily to numbers stored in Contacts.
When you press and hold a number key, it signals the phone to call a Speed dial.
NOTE: Speed dial 1 is reserved for Voicemail.
Single Digit Speed dials
Press and hold the speed dial digit. Your phone recalls the phone number from
your Contacts, displays it, and dials it for you.
Multiple Digit Speed dials
To dial Speed dials with multiple digits, press the first digit(s), then press and hold
the last digit. For example, to call Speed dial 25, press
, then press and hold
.
NOTE: You can also enter the Speed dial digit(s) and press the Send
Key .

36
Prepaid
Allows you to access various prepaid services.
1. My phone number
This menu displays your phone number.
1 Open the flip and press the Left Selection Key
[Menu].
2 Press
Prepaid.
3 Press
My phone number.
2. Serial number
This menu simply displays the information of your phone’s MEID.
1 Open the flip and press the Left Selection Key
[Menu].
2 Press
Prepaid.
3 Press
Serial number.
Using the Phone Menus

37
Contacts
The Contacts menu allows you to store names, phone numbers and other
information in your phone’s memory.
1. New contact
Allows you to add a new contact to your contact list.
NOTE: Using this submenu, the number is saved as a new contact, not
into an existing contact.
1 Open the flip and press the Left Selection Key [Menu].
2 Press
Contacts.
3 Press
New contact.
4 Enter the name and press the Directional Key
downward until the phone
number type you want is highlighted.
5 Enter the number and any additional contact information and press
[Save]
to update your contact entry.
NOTE: For more detailed information, see page 29.
38
Using the Phone Menus
2. Contact list
Allows you to view your contact list.
1 Open the flip and press the Left Selection Key
[Menu].
2 Press
Contacts.
3 Press
Contact list.
4 Use the Directional Key
to scroll through your contacts alphabetically.
t
Press the Right Selection Key [Options] to select one of the following:
New contact/ Erase/ New message/ Call/ Manage contacts/
Set as favorite/ Search entry mode
t
Press the Left Selection Key [Edit] to edit the contact.
t
Press [View] to view the entry details.
TIP: Use the Go to field, for quick access to an entry without scrolling.
For example, to go to "Vet", enter the letter V.
3. Favorites
Allows you to add contact entries or contact groups to your list of favorites to
easily view, call, or send messages.
1 Open the flip and press the Left Selection Key
[Menu].
2 Press
Contacts.
3 Press
Favorites.
4 Press
[Add].
TIP: You can add up to 10 contacts and/or contact groups as favorites
to easily make calls, send messages, and view messages.

39
5 Select whether you want to add a favorite from your Contacts or Groups.
6 Use the Directional Key
to scroll through your contacts or groups
alphabetically and press
[Mark].
7 Press the Left Selection Key
[Done]. Once you have added contacts to the
Favorites list, the following options will become available in the Favorites menu:
Left Selection Key
: View
OK Key
: New message
Right Selection Key
: Options
Move position/ Remove/ Remove all
4. Groups
Allows you to view your grouped contacts, add a new group, change the name of
a group, delete a group, or send a message to everyone in the selected group.
1 Open the flip and press the Left Selection Key
[Menu].
2 Press
Contacts.
3 Press
Groups.
The following options are available:
t
View a group
Use the Directional Key
to highlight a group, then press [View].
t
Add a new group
Press the Left Selection Key
[New] to add a new group to the list. Enter a
name, insert a picture (if necessary), and press
[Save].

40
Using the Phone Menus
t
Group's options
Press the Right Selection Key
[Options] to select one of the following:
New message/ Edit group name & ID/ Edit members / Erase group/ Set as
favorite/ Search entry mode
Adding contacts to a group
1 From the Groups submenu, press
[View] and press [Add].
2 Highlight a desired contact and press
[Mark].
3 Press the Left Selection Key
[Done] to add the contact to the group.
5. Speed dials
Allows you to view your list of speed dials or designate speed dials for numbers
entered in your contacts.
1 Open the flip and press the Left Selection Key
[Menu].
2 Press
Contacts.
3 Press
Speed dials.
4 Use the Directional Key
to highlight the speed dial position, or enter the
speed dial digit and press
[Set].
5 Use the Directional Key
to highlight the contact and press [Set]. (For
contacts with multiple numbers, highlight the number for the speed dial, then
press
.)
6 Press
[Yes] to confirm.
A confirmation message is displayed.
41
6. My vCard
Allows you to create, edit, and view your own personal contact information
including name, phone numbers, and email address in one entry.
1 Open the flip and press the Left Selection Key
[Menu].
2 Press
Contacts.
3 Press
My vCard.
4 Press
[Edit] to enter your personal contact information.
5 Use the Directional Key
to scroll to the information you want to enter.
6 Enter your information as necessary, then press
[Save].
NOTE: Press the Right Selection Key [Send] to send your name
card.
Messages
Depending on the content and size of your messages, the phone can store up to
790 messages (including a max. of 300 text messages, 100 emergency alerts,
100 multimedia message notifications, and 100 multimedia messages in the
Inbox; 100 text messages and 50 multimedia messages in the Outbox; 20 text
messages and 20 multimedia messages in Drafts). Content stored in the message
may be limited by phone model and service capability. Other limits to available
characters per message may exist. Please check with your service provider for
system features and capabilities.
t
When viewing a received message, you can call the sender back by pressing the
Send Key
.

42
Using the Phone Menus
New Message Alert
Your phone can alert you when you have new messages. Options include:
1 The phone displays a message on the screen.
2 The message icon (
) is displayed on the screen. In the case of a high priority
message, the icon (
) will flash.
1. New message
This menu allows you to send messages. Depending on the type of message you
choose to send, you can also attach files to your messages including pictures,
sounds, voice recordings and name cards.
The Basics of Sending a Text Message
1 Open the flip and press the Left Selection Key
[Menu].
2 Press
Messages.
3 Press
New message.
To access this feature, you can press the Message Key
from standby mode.
4 Enter a phone number or a recipient's name in the To field.
As you enter the phone number or a recipient's name, matching contacts
appear. You can choose a suggested recipient or continue entering the phone
number.
5 Press
to access the text field.
6 Use the keypad to enter your message.
7 Press
[Send].

43
Select Recipient(s) Using the Add Function
1 Open the flip and press the Left Selection Key
[Menu].
2 Press
Messages.
3 Press
New message.
4 With the To field highlighted, press the Right Selection Key
Add.
5 Select an option and press
.
From contacts To select a recipient from your contact List.
From recent calls To select a recipient from recent calls.
Favorites To select a recipient from Favorites.
Groups To Select a recipient from your groups.
6 Use the keypad to enter your message.
7 Press
[Send].
Multimedia Message Using Options
Allows you send messages with text, picture, sound and name card attachments.
1 Open the flip and press the Left Selection Key
[Menu].
2 Press
Messages.
3 Press
New message.
4 Enter a phone number or a recipient's name in the To field.
5 Press
to access the text field.
6 Use the keypad to enter your message.
7 Press the Right Selection Key
Options.

44
Using the Phone Menus
8 Select an option and press .
1. Attach
1. Picture Allows you to insert a picture. Highlight a picture, then press
.
2. Take picture Allows you to take a picture and insert it.
3. Sound Allows you to insert a sound. Highlight a sound, then press
.
4. Record voice Allows you to record a new sound file. Press
to start
recording and then press
to stop.
5. Name card
1. My vCard Press
to add your name card.
2. From contacts Press
[Mark] to mark the name cards you want to
send and press the Left Selection Key
[Done].
2. Preview Allows you to preview the message before sending it.
3. Insert templates Allows you to insert a text template. Highlight the template
and press
.
4. Save as draft Allows you to save the message as a draft.
5. Add slide Allows you to add another slide so you can insert additional
attachments.
6. Priority level Allows you to choose the message's priority level. Choose
from High or Normal and press
[Set].
7. Cancel message Allows you to cancel editing the message. Select Yes to
save the message in drafts or No to cancel the message without saving the
message in drafts.
9 Use the keypad to enter your subject in the subject field.
10 Press
[Send].

45
2. Inbox
The phone alerts you in up to 3 ways when you receive a new message:
t
By displaying a notification message on the screen.
t
By sounding a tone or vibration, if set.
t
By displaying (The icon will be when you get a high priority message.)
Viewing Your Inbox
1 Open the flip and press the Left Selection Key
[Menu].
2 Press
Messages.
3 Press
Inbox.
4 Highlight a message. The following options are available.
t
Press [Open] to view the message.
t
Press the Left Selection Key [Erase] to erase the highlighted message.
t
Press the Right Selection Key [Options] to access the following options:
Reply Replies to the sender's address of the received message.
Reply with copy Replies to the sender's address with a copy of the original
message text included.
Forward Forwards the message to other destination address(es).
Add to contacts Stores the callback number, email address, and numbers
from the address of the received message into your contacts.
Extract addresses Allows you to extract the message's contact addresses
and save them (if desired).
Message info Allows you to check the received message information.
46
Using the Phone Menus
Manage inbox Allows you to manage (lock, erase and more) multiple
messages.
Sort by sender/time Allows you to sort messages alphabetically by sender's
name or by time received.
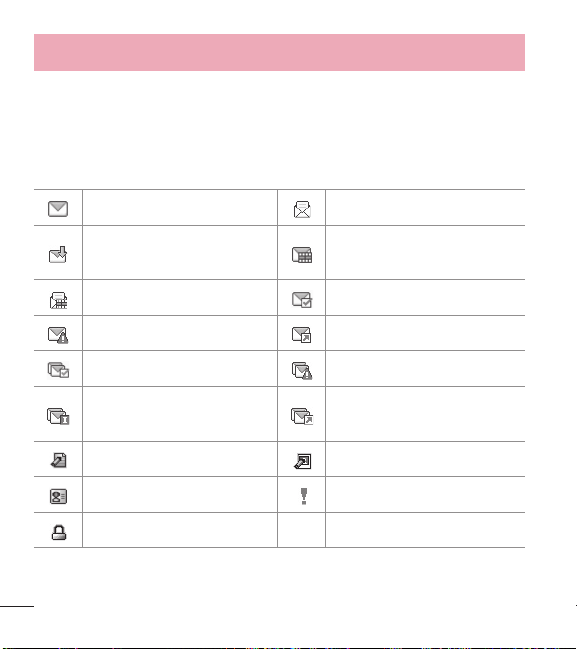
Message Icon Reference
New text message Read text message
New media message received Unread multimedia message
Read multimedia message Message delivered
Massage failed Message sent
Multiple messages delivered Multiple messages failed
Multiple messages delivery
incomplete
Multiple messages sent
Text message draft Media message draft
Namecard High priority
Lock
* Multimedia message indicates picture/voice message.

47
3. Sent
The Sent menu stores your sent messages.
1 Open the flip and press the Left Selection Key
[Menu].
2 Press
Messages.
3 Press
Sent.
4 Highlight a message. The following options are available.
t
Press [Open] to view the message.
t
Press the Left Selection Key [Erase] to erase the message.
t
Press the Right Selection Key [Options] for the following options.
Forward/ Send/ Add to contacts/ Message info/ Manage sent/ Sort by
recipient
5 While viewing a message, choose for the following options:
Play again/ Forw
ard/ Lock/ Save as template/ Add to contacts/ Extract
address/ Message info
4. Drafts
Saved message drafts are stored here.
1 Open the flip and press the Left Selection Key
[Menu].
2 Press
Messages.
3 Press
Drafts.
4 Highlight a message. The following options are available.
t
Press [Edit] to continue editing the message.
t
Press the Left Selection Key [Erase] to erase the message.

48
Using the Phone Menus
t
Press the Right Selection Key [Options] for the following options.
Send Sends the selected message.
Add to contacts Stores the number, email address, and numbers from the
address included in the message into your contacts.
Manage drafts Allows you to manage (erase or lock) messages.
Message Icon Reference
Text Message Draft
Media Message Draft
5. Voicemail
Allows you to view the number of new voice messages recorded in the voicemail
box. Once you exceed the storage limit, old messages are overwritten. When you
have a new voice message, your phone will alert you.
Checking Your Voicemail Box
1 Open the flip and press the Left Selection Key
[Menu].
2 Press
Messages.
3 Press
Voicemail.
4 The following options are available.
t
Press the Left Selection Key [Clear] to clear the Voicemail counter. Then
press
[Yes].
t
Press the Send Key or [Call] to listen to the message(s).
OR

49
1 Enter your phone number and press the Send Key from your phone or dial
your wireless phone number from any touch-tone phone.
OR
Press and hold
from your phone, as a speed dial to your voicemail.
2 When the recorded announcement begins, press
to interrupt (if applicable).
3 When prompted, enter your password, then press
.
6. Templates
Allows you to manage your text templates.
1 Open the flip and press the Left Selection Key
[Menu].
2 Press
Messages.
3 Press
Templates.
4 Select a message to view its content and edit it. Press
[Save] to save it.
Messages settings
Allows you to configure settings for your messages.
1 With the flip open, press the Left Selection Key
[Menu].
2 Press
Messages.
3 Press the Left Selection Key
[Settings].
4 Use the Directional Key
to highlight one of the settings and press to
select it.

50
Using the Phone Menus
Message Settings Options
1 Entry mode
Select T9 Word, Abc, ABC, 123, T9 Palabra to be your default input method.
2 Messages font size
Allows you to select Small, Normal or Large for the size of the text characters.
3 TXT instant reply
Select On to text a reply instantly. Or select Off.
4 TXT auto scroll
Select On to automatically scroll text down while viewing messages. Or select
Off.
5 CMAS alert
Set your configuration for receiving emergency alerts. This menu has three
options: Receive alerts/ Alert reminder/ Alert tone/ Alert vibrate
6 Signature
Select Custom to create/edit a signature to automatically send with your
messages. Select None for no signature.
7 TXT-media msg notification
Displays a pop-up notification when switching message types between text and
media.

51
Erasing messages
You can erase messages stored in your inbox, sent, or drafts folders. You can also
erase all messages at the same time.
1 Open the flip and press the Left Selection Key
[Menu].
2 Press
Messages.
3 Press the Right Selection Key
[Options] then select one of the following:
Erase inbox/ Erase sent/ Erase drafts/ Erase all
4 Press
[Yes] to confirm the deletion or select which messages you want to
delete.
A confirmation message is displayed.
Recent calls
The Recent calls menu has lists of phone numbers and/or contacts entries for
calls you placed, accepted, or missed. It is continually updated as new numbers
are added to the beginning of the list and the oldest entries are removed from the
bottom of the list.
1. Missed calls
Allows you to view the list of missed calls; up to 90 entries.
1 Open the flip and press the Left Selection Key
[Menu].
2 Press
Recent calls.
3 Press
Missed calls.
4 Use the Directional Key
to highlight an entry, then

52
Using the Phone Menus
t
Press [Open] to open the entry.
t
Press the Send Key to place a call to the number.
t
Press the Right Selection Key [Options] to select:
Save to contacts (Contact info)/ Erase/ Lock (Unlock)/ Erase all/
Call timer
t
Press the Left Selection Key [Message] to send a message to the
number.
2. Received calls
Allows you to view the list of incoming calls; up to 90 entries.
1 Open the flip and press the Left Selection Key
[Menu].
2 Press
Recent calls.
3 Press
Received calls.
4 Use the Directional Key
to highlight an entry, then
t
Press [Open] to open the entry.
t
Press the Send Key to place a call to the number.
t
Press the Right Selection Key [Options] to select:
Save to contacts (Contact info)/ Erase/ Lock (Unlock)/ Erase all/
Call timer
t
Press the Left Selection Key [Message] to send a message to the
number.

53
3. Dialed calls
Allows you to view the list of outgoing calls; up to 90 entries.
1 Open the flip and press the Left Selection Key
[Menu].
2 Press
Recent calls.
3 Press
Dialed calls.
4 Use the Directional Key
to highlight an entry, then
t
Press [Open] to open the entry.
t
Press the Send Key to place a call to the number.
t
Press the Right Selection Key [Options] to select:
Save to contacts (Contact info)/ Erase/ Lock (Unlock)/ Erase all/
Call timer
t
Press the Left Selection Key [Message] to send a message to the
number.
4. All calls
Allows you to view the list of all calls; up to 270 entries.
1 Open the flip and press the Left Selection Key
[Menu].
2 Press
Recent calls.
3 Press
All calls.
4 Use the Directional Key
to highlight an entry, then
t
Press [Open] to open the entry.
t
Press the Send Key to place a call to the number.
t
Press the Right Selection Key [Options] to select:
54
Using the Phone Menus
Save to contacts (Contact info)/ Erase/ Lock (Unlock)/ Erase all/
Call timer
t
Press the Left Selection Key [Message] to send a message to the
number.
SHORTCUT: To view a quick list of all your recent calls, press the Send
Key
from standby mode.
5. Call timer
Allows you to view the duration of selected call types.
1 Open the flip and press the Left Selection Key
[Menu].
2 Press
Recent calls.
3 Press
Call timer.
4 Use the Directional Key
to highlight a call timer.
Last call/ All calls/ Received calls/ Dialed calls/ Roaming calls/
Last reset/ Lifetime calls
5 Press the Left Selection Key
[Reset] to reset the highlighted timer.
6 Reset all the recorded timers by pressing the Right Selection Key
[Reset
all].
NOTE: Lifetime Calls cannot be reset.
55
Games & apps
Allows you to enjoy downloaded games and apps.
1 Open the flip and press the Left Selection Key
[Menu].
2 Press
Games & apps.
3 Select a game or press
Buy games to browse for more.
Browser
Allows you to access news, sports, weather, and email from your device.
Accessibility and selections within this feature are dependent upon your service
provider. For specific information on Internet access through your phone, contact
your service provider.
1 Open the flip and press the Left Selection Key [Menu].
2 Press
Browser.
Multimedia
Everything you need to know while you’re on the go.
1. Take picture
Lets you to take digital pictures.
SHORTCUT: Press the Camera Key from standby mode to open the
camera function.
1 Open the flip and press the Left Selection Key [Menu].

56
Using the Phone Menus
2 Press Multimedia.
3 Press
Take picture.
4 Set the brightness by pressing the Directional Key
up and down, zoom by
pressing the Directional Key
left and right, and press the Right Selection Key
[Options] to change other settings.
NOTE: Zooming is not available on the highest resolution.
t
Select the option(s) to customize.
Resolution Allows you to change the image resolution. Choose from
1280X960/ 640X480/ 320X240.
Self timer Allows you to set a timer so that you can take part of the picture.
Choose from Off/ 3 Seconds/ 5 Seconds/ 10 Seconds.
White balance Allows you to adjust the white balance for the image.
Choose from Auto/ Sunny/ Cloudy/ Fluorescent/ Glow.
Shutter sound Allows you to choose the shutter sound heard when taking a
picture. Choose from Shutter/ No sound/ Say “cheese”/ Ready! 1 2 3.
Color effects Allows you to adjust the color effects for the image. Choose
from Normal/ Negative/ Aqua/ Sepia/ Black&White.
Night mode Allows you to set night mode. Choose from On/ Off.
Noise reduction Allows you to adjust the noise reduction. Choose from On/
Off.
Auto save Allows you to set if you would like to automatically save the image
after taking it. Choose from On/ Off.

57
Preview Allows you to choose the preview screen size. Choose from Actual
view/ Full screen.
5 Take a picture by pressing
[Take].
6 Press the Left Selection Key
[Save]. The picture is stored in My pictures.
2. Record voice
Allows you to record voice.
1 Open the flip and press the Left Selection Key
[Menu].
2 Press
Multimedia.
3 Press
Record voice.
4 Press
to start recording and then press to [Stop] to stop the recording.
3. Pictures
This menu allows you to view all of your pictures and buy graphics.
1 Open the flip and press the Left Selection Key
[Menu].
2 Press
Multimedia.
3 Press
Pictures.
4 Browse the submenus.
3.1 My pictures
Allows you to view and manage photos stored in the phone.
1 Open the flip and press the Left Selection Key
[Menu].
2 Press
Multimedia.
3 Press
Pictures.

58
Using the Phone Menus
4 Press My pictures.
5 Highlight a picture with the Directional Key
.
The following options are available:
t
Press [View] to view it.
t
Press the Left Selection Key [Erase] to delete it.
t
Press the Right Selection Key [Options] to select from the following options:
Send Allows you to share the picture with others via message or Bluetooth.
Set as Allows you to set the picture as your wallpaper or picture ID for a
contact.
Take picture Allows you access the camera function to take a picture.
Slide show Plays all pictures as a slide show.
Manage pictures Allows you to mark multiple pictures to be erased, sent or
locked/unlocked.
Rename Allows you to change the file name.
Lock (Unlock) Allows you to lock or unlock. Locked files can't be erased
accidentally.
File info Allows you to view information for the image file.
Editing a Picture
Access My pictures, then use the Directional Key
to highlight a picture. Press
[View] and then press the Right Selection Key [Options] and select Edit to
zoom, rotate and crop the photo.

59
3.2 Default pictures
Allows you to view and manage default photos stored in the phone.
1 Open the flip and press the Left Selection Key
[Menu].
2 Press
Multimedia.
3 Press
Pictures.
4 Press
Default pictures.
5 Highlight a picture with the Directional Key
.
The following options are available:
t
Press [View] to view it.
t
Press the Right Selection Key [Options] to access the option to set the
image as your wallpaper.
3.3 Buy graphics
This menu allows you to buy images.
1 Open the flip and press the Left Selection Key
[Menu].
2 Press
Multimedia.
3 Press
Pictures.
4 Press
Buy graphics.

60
Using the Phone Menus
4. Ringtones
Personalize your phone with ringtones. A wide variety of choices are available,
such as current hits, pop, hip-hop, and more.
4.1 My sounds
Allows you to record a new sound or select a desired sound.
How to record a new sound
1 Open the flip and press the Left Selection Key
[Menu].
2 Press
Multimedia.
3 Press
Ringtones.
4 Press
My sounds.
5 Press
Record new and press to start recording, then press [Stop]
to end recording.
How to select a sound
1 Open the flip and press the Left Selection Key
[Menu].
2 Press
Multimedia.
3 Press
Ringtones.
4 Press
My sounds.
5 Use the Directional Key
to scroll and highlight a preloaded sound.
Options with a sound file highlighted:
t
Press the Left Selection Key [Set as] to set it as the Ringtone, Contact ID or
Alert sounds.
t
Press [Play] to play the sound.

61
t
Press the Right Selection Key [Options] to select:
Send via bluetooth/ Rename/ Lock (Unlock)/ Erase/ Erase all/ File info.
4.2 Default ringtones
Allows you to manage your preloaded sounds.
1 Open the flip and press the Left Selection Key
[Menu].
2 Press
Multimedia.
3 Press
Ringtones.
4 Press
Default ringtones.
5 Use the Directional Key
to highlight a ringtone and press [Play] to play
the ringtone or the Left Selection Key
[Set as] to set the ringtone as:
t
Ringtone: Sets the ringtone for your incoming calls.
t
Contact ID: Highlight and select the Contact to be identified by the
ringtone you selected.
t
Alert sounds: Press the corresponding number key to set the ringtone
for one of the following:
All messages/ TXT message/ Multimedia message/ Voicemail
4.3 Buy ringtones
This menu allows you to buy ringtones.
1 Open the flip and press the Left Selection Key
[Menu].
2 Press
Multimedia.
3 Press
Ringtones.
4 Press
Buy ringtones.

62
Using the Phone Menus
Tools
Your phone tools include Voice commands, Calculator, Ez tip calculator, Eco-
calculator, Info search, Stopwatch, Notepad, and Unit converter.
1 Open the flip and press the Left Selection Key
[Menu].
2 Press
Tools.
1. Voice commands
This feature provides you with the following options equipped with AVR (Advanced
Voice Recognition) technology. Each option has its detailed information on the
phone and you can check it out by pressing the Left Selection Key
[Info].
1 Open the flip and press the Left Selection Key
[Menu].
2 Press
Tools.
3 Press
Voice commands.
Access and Options
With the flip open, press the Voice Commands Key
on the keypad.
The Voice commands feature has several settings which allow you to customize
how you want to use it. Access Voice commands, then press the Right Selection
Key
[Settings].
Confirm choices Allows you to choose if the command system prompts you with
a list of potential matches. Choose from Automatic/ Always confirm/ Never
confirm.
Sensitivity Allows you to control how the system filters for matches. Choose from
More sensitive/ Automatic/ Less sensitive.
63
Train voice This option allows you to train the phone to recognize your voice
patterns. Choose from Train words/ Train digits.
Prompts Allows you to set how you are notified by the voice commands system
and the duration in which you can respond. Choose from Mode/ Audio playback/
Timeout.
t
For Mode, set Prompts/ Readout + Alerts/ Readout/ Tones only.
t
For Audio playback, set Speakerphone or Earpiece.
t
For Timeout, set 5 Seconds or 10 Seconds.
1.1 Start command
1 Open the flip and press the Left Selection Key [Menu].
2 Press
Tools.
3 Press
Voice commands.
NOTE: You can also press the Voice Commands Key from standby
mode to quickly access the Voice commands feature.
1.1.1 Call <Name or Number>
Say "Call" and then call someone simply by saying the name or phone number.
Please speak clearly and say the name or number exactly as it is entered in your
Contact List. When you have more than one contact number, you can state the
name and number type of the contact (for example, 'Call John Work').
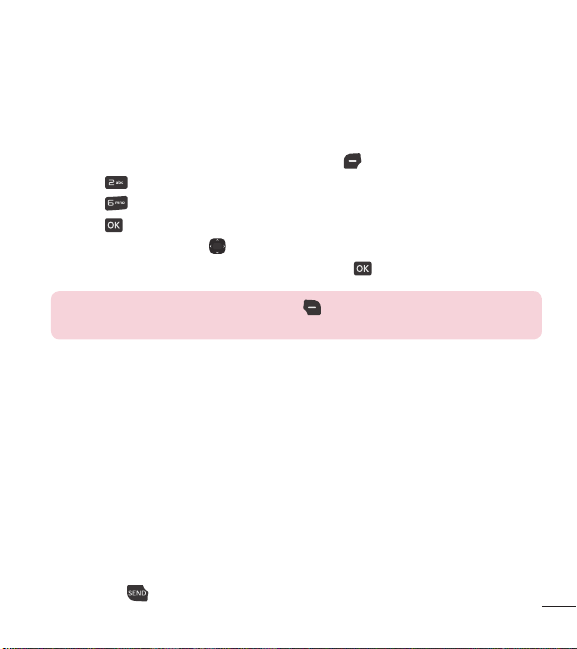
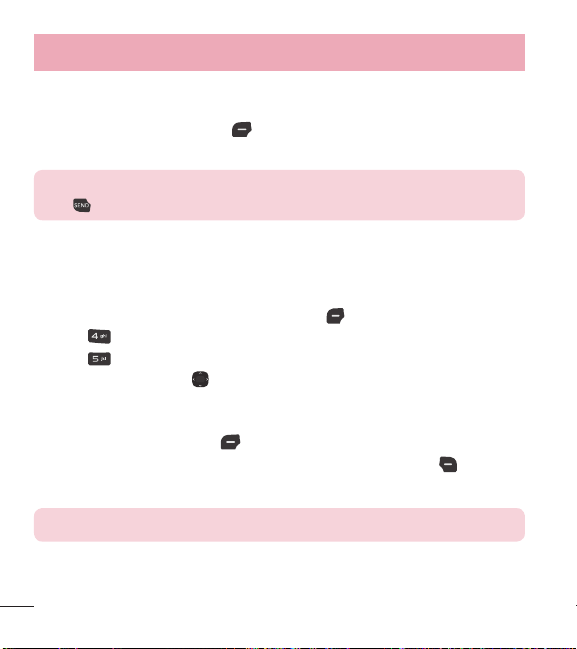
1.1.2 Send msg to <Name or Number or Group>
Say "Send Message" and the command will prompt you for the type of message.
After choosing the message type, you will be prompted for the contact name,

64
Using the Phone Menus
number or group. It will automatically start a message. If you say a full-sentence
command, such as 'Send Message to Bob', it will automatically start a text
message without asking for the message type. When using 'Send Message'
command, speak clearly and say the name, number or group exactly as it is
entered in your Contact List.
1.1.3 Go to <Menu>
The 'Go to' command allows you to access a menu within the phone (for example,
'Go to Calendar').
If no menu option is stated, a list of options will be provided.
1.1.4 Check <Item>
The ‘Check’ command allows you to check out a wide range of items such as
Phone status, Voicemail, Messages, Missed calls, Time, Signal strength, Battery
level, Volume and My number.
1.1.5 Contacts <Name>
You can look up names in your Contacts (for example, 'Contacts John') as well as
manage your Contact List including creating, erasing or modifying.
1.1.6 Redial
Say "Redial" and the phone will redial the last phone number.
1.1.7 Help
Provides a general guideline to using Voice commands.
65
2. Calculator
Allows you to perform simple mathematical calculations.
1 Open the flip and press the Left Selection Key
[Menu].
2 Press
Tools.
3 Press
Calculator.
4 Enter the numbers to get the value you want. To clear entered items, press the
Left Selection Key
[Clear].
5 Use the Right Selection Key
[Operators] to add other operators.
6 Use the Directional Key
to enter an operation between numbers and press
[ = ] for the result.
NOTE: To insert a decimal, press . To make the number positive and
negative, press .
3. Ez tip calculator
Allows you to quickly and easily calculate bill amounts using the bill total, tip %
and number of people as variables.
1 Open the flip and press the Left Selection Key
[Menu].
2 Press
Tools.
3 Press
Ez tip calculator.
4 Enter the variable fields (Total Bill, Tip (%), Split) and the corresponding
calculation fields (tip and total for each person) appear automatically.
5 Press the Left Selection Key
[Reset] for another calculation.

66
Using the Phone Menus
4. Eco-calculator
Allows you to keep track of your walking and cycling distances. The amount of CO
2
that is decreased by walking and cycling is displayed for you to see.
1 Open the flip and press the Left Selection Key
[Menu].
2 Press
Tools.
3 Press
Eco-calculator.
4 Select the Walking or Cycling fields to edit the hours and miles.
NOTE: The decreasing CO
2
amount is automatically updated when you
enter the hour or mile amounts.
5 Press the Left Selection Key [Settings] to set the following settings.
t
Mode Allows you to switch the Eco-Calculator home screen animation to
Person or Tree. Depending on what information you entered last (Walking
or Cycling) an animation will appear. The number of trees in the animation is
calculated depending on the amount of CO
2
decreased.
t
Character Allows you to change the character to Man, Woman, or Man &
Woman. This option is unavailable when Tree is set as the Mode.
t
Unit Allows you to change the unit amount to Hour or Mile.
t
My car Allows you to select the type of fuel your car uses and the fuel
efficiency (mpg) of your car to measure the amount of CO
2
discharged.

67
5. Info search
Allows you to search items stored on the phone.
1 Open the flip and press the Left Selection Key
[Menu].
2 Press
Tools.
3 Press
Info search.
4 Enter two or more characters in the search field and press
[Search].
5 By default, the phone will search all the categories. To specify the categories,
highlight All and press the Left Selection Key
[Set]. Use the Directional Key
to highlight a category and press [Mark] to mark/unmark the category.
After specifying the categories, press the Left Selection Key
[Done].
6 To view a search result, highlight the desired results and press
[View]. If
you want to retry the search, press the Right Selection Key
[Retry]. If you
want to start a new search, press the Left Selection Key
[Search], enter
your key word, then press
.
7 If no results are found, you will be prompted to try again. Choose Yes to try
again or No to return to the Tools menu.
6. Stopwatch
Allows you to use your phone as a typical stopwatch.
1 Open the flip and press the Left Selection Key
[Menu].
2 Press
Tools.
3 Press
Stopwatch.
4 Press
[Start].

68
Using the Phone Menus
5 Pressing [Stop] will stop or resume Stopwatch time.
t
While measuring time, press the Left Selection Key [Lap] to record a lap.
t
After time has stopped, press the Right Selection Key [Reset].
7. Notepad
Allows you to add, read, edit, and erase notes to yourself.
1 Open the flip and press the Left Selection Key
[Menu].
2 Press
Tools.
3 Press
Notepad.
4 Press the Left Selection Key
[Add] to write a new note.
5 Press the Left Selection Key
to change the entry mode. Or press the Right
Selection Key
[Options] to Copy text and Paste or to Cancel the notepad
entry.
6 After filling in the note, press
[Save] to save it.
8. Unit converter
Allows you to converts units to desired units.
1 Open the flip and press the Left Selection Key
[Menu].
2 Press
Tools.
3 Press
Unit converter.
4 Choose from Area/ Length/ Mass/ Temperature/ Volume/ Velocity.
5 Select the known unit type and enter the quantity you would like to convert. The
conversion will occur upon entering the desired quantity.

69
My schedule
Allows you to keep your agenda convenient and easy to access. Simply store your
appointments and your phone will alert you with a reminder you set.
1. Calendar
Allows you to keep your agenda convenient and easy to access. Simply store your
appointments and your phone will alert you with a reminder you set.
1 Open the flip and press the Left Selection Key
[Menu].
2 Press
My schedule.
3 Press
Calendar.
4 Use the Directional Key
to highlight the scheduled day.
Left: Previous day
Right: Next day
Up: Previous week
Down: Next week
5 Press the Left Selection Key [Add].
6 Enter the subject, then scroll down to set the remaining settings.
7 Highlight a Calendar setting field, then press the Left Selection Key
[Set].
For each Calendar event you can set:
t4UBSUEBUF t4UBSUUJNF
t&OEEBUF t&OEUJNF
t3FQFBU t6OUJM
t"MFSUT t5POFT
t7JCSBUF

70
Using the Phone Menus
8 Use the Directional Key to highlight the setting you want, then press .
9 Press
[Save] when Calendar information is complete.
Editing and Deleting calendar entries
1 From the calendar entry list, press
[View].
2 Press
[Edit] to edit the calendar entry or press the Left Selection Key
[Erase] to delete the calendar entry.
2. Alarm clock
Allows you to set up to 10 alarms. At the alarm time, your alarm will be displayed
on the LCD screen and the alarm will sound.
1 Open the flip and press the Left Selection Key
[Menu].
2 Press
My schedule.
3 Press
Alarm clock.
4 Press the Left Selection Key
[Add].
5 Use the Directional Key
to highlight the information you want to set, then
press the Left Selection Key
[Set] to view your setting choices.
Enter the alarm information including:
t5VSOPOPGG t4FUUJNF
t3FQFBU t3JOHUPOF
6 Press
[Save] after setting all of the Alarm fields as necessary.
How to delete alarms
1 From the Alarm clock list, press the Right Selection Key
[Options] to view
the available options.

71
2 Press Erase to delete an alarm or Erase all to delete all alarm entries.
3 Press
[Yes].
How to edit alarms
1 From the Alarm Clock list, press
[View] and then press [Edit].
Bluetooth
Your phone is compatible with devices that support the Headset, Handsfree,
Phonebook access, Object push, and File transfer profiles.
You may create and store 20 pairings within the phone and connect to one device.
The approximate communication range for Bluetooth
®
wireless technology is up to
30 feet (9.14 meters).
NOTE: Read the user guide of each Bluetooth
®
accessory that you are
trying to pair with your phone because the instructions may be different.
NOTE: Your phone is based on the Bluetooth
®
specification, but it is not
guaranteed to work with all devices enabled with Bluetooth
®
wireless
technology. The phone does not support ALL Bluetooth
®
OBEX Profiles.
Turn On Bluetooth
Allows you to set the phone's Bluetooth
®
power On/Off.
1 Open the flip and press the Left Selection Key
[Menu].
2 Press
Bluetooth.
3 Press
Bluetooth menu.
72
Using the Phone Menus
4 Press the Left Selection Key [Turn on].
NOTE: By default, your device’s Bluetooth
®
functionality is turned off.
1. Add new device
Pairing is the process that allows the handset to locate, establish, and register
1-to-1 connection with the target device.
For pairing with a new Bluetooth
®
device
1 Follow the Bluetooth
®
accessory instructions to set the device to pairing mode.
2 Open the flip and press the Left Selection Key
[Menu].
3 Press
Bluetooth.
4 Press
Bluetooth menu.
5 Press
Add new device.
6 Press
.
7 Set the desired device to discovery mode.
8 The device will appear in Add New Device menu once it has been located.
Highlight the device and press
[Pair].
9 The handset will prompt you for the passcode. Consult the Bluetooth
®
accessory instructions for the appropriate passcode (typically “0000” - 4
zeroes). Enter the passcode and press
. When Auto Pair Handsfree is set to
On, the device will try to autopair for headsets.
10 When pairing with the PC or PDA is successful, highlight either Always ask or
Always connect and press
to connect with the device.
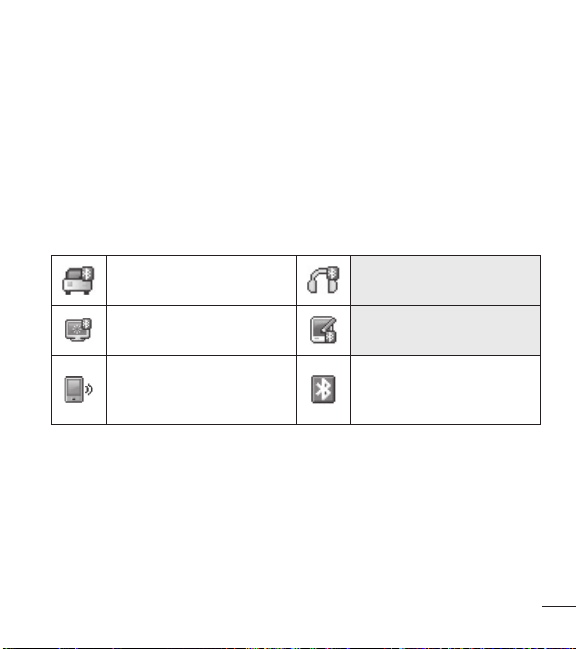
73
11 Once connected, you will see the device listed in the Bluetooth
®
Menu and
when the pair is transferring information the Bluetooth
®
indicator will show up
on your screen.
Icon Reference in Adding New Device
When the Bluetooth
®
wireless connection is built and paired devices are found, the
following icons are displayed.
Icon References When a Bluetooth
®
Wireless Connection is Searched
(neither connected nor paired).
When a carkit device is found
by your phone.
When an audio device is
found by your phone.
When a PC is found by your
phone.
When a PDA is found by your
phone.
When another phone device
is found by your phone.
When other undefined
devices are found by your
phone.
Icon References When Successfully Connected
The following options are available in the paired device.
1 Remove device: You can remove the device from the pairing list.
2 Rename device: You can rename the paired device.
3 Incoming security: Allows you to set permission before connecting an
incoming device.
4 Service discovery: Allows you to search for the services that the selected
device supports.

74
Using the Phone Menus
5 Device info: Shows the device information.
NOTE: While in the Bluetooth menu, you can turn the Bluetooth
functionality off by pressing the Left Selection Key [Turn off].
Reversely, you can turn it on by pressing the Left Selection Key [Turn
on].
When connected with a phone or PC supporting OPP, the following
menus are possible:
t
Send name card: Allows my contact data to send other device up to
999 contacts.
t
Get name card: Allows you to pull name card from other devices.
t
Exchange name card: Allows you to exchange the phone’s name card
with another device.
t
Send calendar event: Allows you to send Calendar events to other
devices.
t
Send picture: Allows you to send your pictures to other devices.
t
Send sound: Allows you to send your sounds to other devices.
My phone info
Allows you to view and/or edit the name of the Bluetooth
®
device.
1 Open the flip and press the Left Selection Key
[Menu].
2 Press
Bluetooth.
3 Press
Bluetooth menu.
4 Press the Right Selection Key
[Options].
5 Press
My phone info.
6 Press
to clear the existing name.

75
7 Use the keypad to enter a new custom name.
8 Press
[Set] to save and exit.
Discovery mode
Allows you to set whether your device is able to be discovered/found by other
Bluetooth
®
devices in the area.
1 Open the flip and press the Left Selection Key
[Menu].
2 Press
Bluetooth.
3 Press
Bluetooth menu.
4 Press the Right Selection Key
[Options].
5 Press
Discovery mode.
6 Use the Directional Key
to highlight a setting, then press [Set].
NOTE: If you choose On for Discovery mode, your device is able to be
searched by other in-range Bluetooth
®
devices.
Supported profiles
Allows you to see profiles that your phone can support.
1 Open the flip and press the Left Selection Key
[Menu].
2 Press
Bluetooth.
3 Press
Bluetooth menu.
4 Press the Right Selection Key
[Options].
5 Press
Supported profiles.
6 Choose a Bluetooth profile to view information about it.

76
Using the Phone Menus
Accessibility
Allows you to set the Accessibility settings.
1 Open the flip and press the Left Selection Key
[Menu].
2 Press
Accessibility.
1. Readout
Allows you to set the Readout settings.
1 Open the flip and press the Left Selection Key
[Menu].
2 Press
Accessibility.
3 Press
Readout.
1.1 Full Readout
Allows your phone to read the screens out loud for blind and low-vision users or
when your eyes are busy.
1 Open the flip and press the Left Selection Key
[Menu].
2 Press
Accessibility.
3 Press
Readout.
4 Press
Full Readout.
5 Use the Directional Key
to highlight a setting, then press [Set].

77
1.2 Menu Readout
Allows you to set the phone to read out menus.
1 Open the flip and press the Left Selection Key
[Menu].
2 Press
Accessibility.
3 Press
Readout.
4 Press
Menu Readout.
5 Use the Directional Key
to highlight a setting, then press [Set].
1.3 Digit dial Readout
Allows you to set the phone to read out the digits entered in the dialing screen.
1 Open the flip and press the Left Selection Key
[Menu].
2 Press
Accessibility.
3 Press
Readout.
4 Press
Digit dial Readout.
5 Use the Directional Key
to highlight a setting, then press [Set].
1.4 Caller ID Readout
Allows you to set how you want the Caller ID to be read out.
1 Open the flip and press the Left Selection Key
[Menu].
2 Press
Accessibility.
3 Press
Readout.
4 Press
Caller ID Readout.
5 Use the Directional Key
to highlight a setting, then press [Set].
78
Using the Phone Menus
1.5 Passwords Readout
Allows the phone to read out your passwords.
1 Open the flip and press the Left Selection Key
[Menu].
2 Press
Accessibility.
3 Press
Readout.
4 Press
Passwords Readout.
5 Use the Directional Key
to highlight a setting, then press [Set].
1.6 Speech rate
Allows you to set the menu readout speech rate.
1 Open the flip and press the Left Selection Key
[Menu].
2 Press
Accessibility.
3 Press
Readout.
4 Press
Speech rate.
5 Use the Directional Key
to highlight a setting, then press [Set].
2. Invert color
Allows you to invert the color theme.
1 Open the flip and press the Left Selection Key
[Menu].
2 Press
Accessibility.
3 Press
Invert color.
4 Use the Directional Key
to highlight a setting, then press [Set].

79
3. Large text
Allows you to use larger font for menus.
1 Open the flip and press the Left Selection Key
[Menu].
2 Press
Accessibility.
3 Press
Large text.
4 Use the Directional Key
to highlight a setting, then press [Set].
4. Mono audio
Allows you to play the same sounds to both earpieces so you can hear everything
with just one ear.
1 Open the flip and press the Left Selection Key
[Menu].
2 Press
Accessibility.
3 Press
Mono audio.
4 Use the Directional Key
to highlight a setting, then press [Set].
5. Turn off all sounds
This menu turns off all of device's sounds.
1 Open the flip and press the Left Selection Key
[Menu].
2 Press
Accessibility.
3 Press
Turn off all sounds.
4 Use the Directional Key
to highlight a setting, then press [Set].

80
Using the Phone Menus
Settings
This menu allows you to set various phone settings and view phone information.
1. Sounds settings
Provides options to customize the phone’s sounds.
1.1 Master volume
Allows you to quickly set the main Sounds settings for keypad volume, incoming
calls and messages (text, multimedia, and Voicemail).
1 Open the flip and press the Left Selection Key
[Menu].
2 Press
Settings.
3 Press
Sounds settings.
4 Press
Master volume.
5 Adjust the volume with the Directional Key
and press [Set] to save the
setting.
1.2 Call sounds
Allows you to set how the phone alerts you for types of incoming calls.
1 Open the flip and press the Left Selection Key
[Menu].
2 Press
Settings.
3 Press
Sounds settings.
4 Press
Call sounds.
81
1.2.1 Call ringtone
Allows you to set the ringtones for incoming calls.
1 Open the flip and press the Left Selection Key
[Menu].
2 Press
Settings.
3 Press
Sounds settings.
4 Press
Call sounds.
5 Press
Call ringtone.
6 Hightlight a submenu and press
to open it.
7 Use the Directional Key
to highlight a ringtone, then press [Set] to save
the sound.
TIP: To hear a ringtone before you set it, press the Left Selection Key
[Play].
1.2.2 Call vibrate
Allows you to set the phone to vibrate when you receive an incoming call.
1 Open the flip and press the Left Selection Key
[Menu].
2 Press
Settings.
3 Press
Sounds settings.
4 Press
Call sounds.
5 Press
Call vibrate.
6 Use the Directional Key
to highlight a setting, then press [Set].

82
Using the Phone Menus
1.2.3 Caller ID Readout
Allows you to set how you want the Caller ID to be read out.
1 Open the flip and press the Left Selection Key
[Menu].
2 Press
Settings.
3 Press
Sounds settings.
4 Press
Call sounds.
5 Press
Caller ID readout.
6 Use the Directional Key
to highlight a setting, then press [Set].
1.3 Alert sounds
Allows you to select the alert type sounds.
1 Open the flip and press the Left Selection Key
[Menu].
2 Press
Settings.
3 Press
Sounds settings.
4 Press
Alert sounds.
5 Select TXT message/ Multimedia message/ Voicemail/ Emergency tone/
Missed call.
The Alert sounds menu has these options: Tone/ Vibrate/ Reminder
The exception for this is the Emergency tone menu. This menu includes the
following options: Alert/ Vibrate/ Off.
1.4 Keypad volume
Allows you to set the keypad volume.
1 Open the flip and press the Left Selection Key
[Menu].
2 Press
Settings.

83
3 Press Sounds settings.
4 Press
Keypad volume.
5 Adjust the volume with the Directional Key
and press [Set] to save the
setting.
1.5 Service alerts
Allows you to set any of the three available service alerts.
1 Open the flip and press the Left Selection Key
[Menu].
2 Press
Settings.
3 Press
Sounds settings.
4 Press
Service alerts.
5 Select an alert option.
Call connect Alerts you when the call is connected.
Call disconnect Alerts you when the call is disconnected.
Charge complete Alerts you when the battery is completely charged.
6 Use the Directional Key
to highlight a setting, then press [Set].
1.6 Power on/off
Allows you to select the sounds when turning the phone on and off.
1 Open the flip and press the Left Selection Key
[Menu].
2 Press
Settings.
3 Press
Sounds settings.
4 Press
Power on/off.
5 Press
Power on or Power off.
6 Use the Directional Key
to highlight a setting, then press [Set].
84
Using the Phone Menus
1.7 Hearing assist
Allows you to set the phone to automatically adapt to noisy environments by
adjusting the listening level and improving speech intelligibility.
NOTE: The Hearing assist feature is automatically disabled when you use
the speakerphone or the hands-free devices.
1 Open the flip and press the Left Selection Key [Menu].
2 Press
Settings.
3 Press
Sounds settings.
4 Press
Hearing assist.
5 Use the Directional Key
to highlight a setting, then press [Set].
2. Display settings
Provides options to customize the phone’s display screen.
1 Open the flip and press the Left Selection Key
[Menu].
2 Press
Settings.
3 Press
Display settings.
2.1 Backlight
Allows you to set the duration for illuminating the backlight for the main display,
front display, and keypad. Each is set separately.
1 Open the flip and press the Left Selection Key
[Menu].
2 Press
Settings.
85
3 Press Display settings.
4 Press
Backlight.
5 Highlight a Backlight submenu and press
.
t
Display backlight:
7 Seconds/ 15 Seconds/ 30 Seconds/ Always off
t
Keypad backlight:
7 Seconds/ 15 Seconds/ 30 Seconds/ Always off
2.2 Brightness
Allows you to set the backlight levels.
1 Open the flip and press the Left Selection Key
[Menu].
2 Press
Settings.
3 Press
Display settings.
4 Press
Brightness.
5 Use the Directional Key
to highlight a setting, then press [Set].
NOTE: Brightness level can be 1 to 7.
2.3 Wallpaper
Allows you to choose the kind of background to be displayed on the phone's LCD
in standby mode.
1 Open the flip and press the Left Selection Key
[Menu].
2 Press
Settings.
3 Press
Display settings.
4 Press
Wallpaper.
86
Using the Phone Menus
5 Highlight a Wallpaper submenu and press .
6 Highlight a picture and press
[Set] to set it as the wallpaper.
2.4 Menu style
Allows you to choose between the different themes for the phone's menus.
1 Open the flip and press the Left Selection Key
[Menu].
2 Press
Settings.
3 Press
Display settings.
4 Press
Menu style.
5 Use the Directional Key
to highlight a setting, then press [Set].
NOTE: Press the Left Selection Key [Preview] to preview the
selected display theme. The default setting is Grid.
2.5 Font type
Allows you to set the font type.
1 Open the flip and press the Left Selection Key
[Menu].
2 Press
Settings.
3 Press
Display settings.
4 Press
Font type.
5 Use the Directional Key
to highlight a setting, then press [Set].
NOTE: Press the Left Selection Key [Preview] to preview the
selected font type.
87
2.6 Font size
Allows you to set the font size for Dial digits, Menu & List and Message. The
Resizeable setting allows you to use the Volume Keys
to instantly scale screen
fonts. This setting is helpful for those who need the text to display a little bit larger.
1 Open the flip and press the Left Selection Key
[Menu].
2 Press
Settings.
3 Press
Display settings.
4 Press
Font size.
5 Use the Directional Key
to highlight Dial digits/ Menu & list/ Message.
6 Press the Directional Key
left and right to scroll through the settings, then
press
[Set].
Dial digits: Resizable/ Small/ Normal/ Large
Menu & list: Resizable/ Small/ Normal/ Large
Message: Resizable/ Small/ Normal/ Large
NOTE: Press the Left Selection Key [Preview] to preview the
selected font size.
2.7 Clock format
Allows you to choose the kind of clock to be displayed on the front and main LCD
screens.
1 Open the flip and press the Left Selection Key
[Menu].
2 Press
Settings.
3 Press
Display settings.
88
Using the Phone Menus
4 Press Clock format.
5 Use the Directional Key
to highlight a setting, then press [Set].
NOTE: Press the Left Selection Key [Preview] to preview the
selected clock format.
2.8 Name match for dialing
Allows you to display names when entering matching phone numbers to dial.
1 Open the flip and press the Left Selection Key
[Menu].
2 Press
Settings.
3 Press
Display settings.
4 Press
Name match for dialing.
5 Use the Directional Key
to highlight a setting, then press [Set].
3. Phone settings
The Phone Settings menu allows you to designate specific settings to customize
how you use your phone.
3.1 Airplane mode
Turning on Airplane mode will disable all wireless communications.
1 Open the flip and press the Left Selection Key
[Menu].
2 Press
Settings.
3 Press
Phone settings.
4 Press
Airplane mode.

89
5 Use the Directional Key to highlight a setting, then press [Set].
3.2 Set shortcut keys
Allows you to set shortcuts to phone menus using the down, up, left and right
Directional Keys.
3.2.1 Set my shortcuts
NOTE: To access these shortcuts, press the Directional Key from
standby mode (by default) to display My shortcuts.
1 Open the flip and press the Left Selection Key [Menu].
2 Press
Settings.
3 Press
Phone settings.
4 Press
Set shortcut keys.
5 Press
Set my shortcuts.
6 Use the Directional Key
to highlight a shortcut key you want to set.
7 Press
[Set] to display the available shortcuts. Use the Directional Key to
highlight one, then press
[Set].
3.2.2 Set directional keys
NOTE: To access these shortcuts open the flip, then press the
Directional Key in the direction (up, left) set from standby mode for the
Shortcut you want to access.
1 Open the flip and press the Left Selection Key [Menu].
2 Press
Settings.
90
Using the Phone Menus
3 Press Phone settings.
4 Press
Set shortcut keys.
5 Press
Set directional keys.
6 Use the Directional Key
to highlight a shortcut key you want to set.
7 Press
[Set] to display the available shortcuts. Use the Directional Key to
highlight one, then press
[Set].
3.3 Voice commands
Please refer to page 62 for details.
3.4 Language
Allows you to set your preferred language (English or Spanish).
1 Open the flip and press the Left Selection Key
[Menu].
2 Press
Settings.
3 Press
Phone settings.
4 Press
Language.
5 Use the Directional Key
to highlight a setting, then Press [Set].
3.5 Location
Allows you to set GPS (Global Positioning System: Satellite assisted location
information system) mode.
1 Open the flip and press the Left Selection Key
[Menu].
2 Press
Settings.
3 Press
Phone settings.
4 Press
Location.
91
5 Use the Directional Key to highlight a setting, then press [Set].
NOTES:
t
GPS satellite signals are not always received by the phone, especially
under bad atmospheric and environmental conditions, indoors, etc.
t
When in Airplane Mode, services supporting Location On functionality
will be suspended.
3.6 Security
The Security menu allows you to secure the phone electronically.
1 Open the flip and press the Left Selection Key
[Menu].
2 Press
Settings.
3 Press
Phone settings.
4 Press
Security.
5 Enter the four-digit lock code.
The lock code is the last 4 digits of your mobile phone number if it is set. The
lock code is the last 4 digits of your MEID if your mobile phone number is not
set.
3.6.1 Edit codes
Allows you to enter a new four-digit lock code.
1 Open the flip and press the Left Selection Key
[Menu].
2 Press
Settings.
3 Press
Phone settings.
4 Press
Security.

92
Using the Phone Menus
5 Enter the four-digit lock code.
6 Press
Edit codes.
7 Select Phone only or Calls & services.
8 Enter your new four-digit lock code.
9 For confirmation, you will be prompted to enter the new lock code again.
3.6.2 Restrictions
Allows you to set separate restrictions for calls, text and multimedia messages,
and data.
1 Open the flip and press the Left Selection Key
[Menu].
2 Press
Settings.
3 Press
Phone settings.
4 Press
Security.
5 Enter the four-digit lock code.
6 Press
Restrictions.
7 Enter the four-digit service code.
8 Select a Restrictions menu, then press
.
9 Use the Directional Key
to highlight the restriction then press .
Calls: Incoming calls Allow all/ Contacts only/ Block all
Calls: Outgoing calls Allow all/ Contacts only/ Block all
Text msgs: Incoming messages Allow all/ Contacts only/ Block all
Text msgs: Outgoing messages Allow all/ Contacts only/ Block all
Multimedia msgs: Incoming messages Allow all/ Contacts only/ Block all
Multimedia msgs: Outgoing messages Allow all/ Contacts only/ Block all
Data: Allow all/ Block all

93
3.6.3 Phone lock setting
Keeps your phone from unauthorized use. Once the phone is locked, it's in
restricted mode until the lock code is entered. You can still receive phone calls and
make emergency calls. You can modify the lock code using Edit codes submenu
within the Security menu.
1 Open the flip and press the Left Selection Key
[Menu].
2 Press
Settings.
3 Press
Phone settings.
4 Press
Security.
5 Enter the four-digit lock code.
6 Press
Phone lock setting.
7 Highlight an option and press
[Set].
Unlocked The phone remains unlocked, by default.
On power up The phone is locked when it is turned on.
3.6.4 Lock phone now
Allows you to lock your phone immediately.
1 Open the flip and press the Left Selection Key
[Menu].
2 Press
Settings.
3 Press
Phone settings.
4 Press
Security.
5 Enter the four-digit lock code.
6 Press
Lock phone now.
94
Using the Phone Menus
NOTE: To unlock the phone from standby mode, press the Right
Selection Key [Unlock] and enter the four-digit lock code.
3.6.5 Reset default
Allows you to reset your phone to the factory default settings.
1 Open the flip and press the Left Selection Key
[Menu].
2 Press
Settings.
3 Press
Phone settings.
4 Press
Security.
5 Enter the four-digit lock code.
6 Press
Reset default.
7 Press
after reading the warning message.
8 Highlight Revert and press
.
A confirmation message is displayed briefly before the phone resets itself.
3.7 System select
Allows you to set up the phone management environment. Leave this setting as
the default unless you want to alter system selection as instructed by your service
provider.
1 Open the flip and press the Left Selection Key
[Menu].
2 Press
Settings.
3 Press
Phone settings.
4 Press
System select.
5 Use the Directional Key
to highlight a setting, then press [Set].

95
4. Call settings
The Call settings menu allows you to set various configurations for calling features.
4.1 Answer options
Allows you to determine how the phone will answer an incoming call.
1 Open the flip and press the Left Selection Key
[Menu].
2 Press
Settings.
3 Press
Call settings.
4 Press
Answer options.
5 Use the Directional Key
to to select the setting(s) you want to use, then
press
[Mark].
6 Press the Left Selection Key
[Done] when you have marked the setting(s)
you want.
NOTE: Auto with handsfree is available when any external device is
connected to your phone or speaker is set to on.
4.2 TTY mode
Allows you to attach a TTY device enabling you to communicate with parties also
using a TTY device. A phone with TTY support is able to translate typed characters
to voice. Voice can also be translated into characters and then displayed on the
TTY.
1 Open the flip and press the Left Selection Key
[Menu].
2 Press
Settings.

96
Using the Phone Menus
3 Press Call settings.
4 Press
TTY mode.
5 An explanation message is displayed.
6 Press
to continue.
7 Use the Directional Key
to highlight a setting, then press [Set].
TTY full: Users who cannot talk or hear send and receive a text message
through TTY
equipment.
TTY + talk: Users who can talk but cannot hear receive a text message and
send voice through TTY equipment.
TTY + hear: Users who can hear but cannot talk send a text message and
receive voice through TTY equipment.
TTY off: Users send and receive without TTY equipment.
Connecting TTY Equipment and a Terminal
1 Connect a TTY cable to TTY connection on the terminal (TTY connection location
is the same as a headset jack).
2 Enter the phone menu and set the desired TTY mode.
3 After setting a TTY mode, check the LCD screen of the phone for the TTY icon.
4 Connect the TTY equipment to the power source and turn it on.
5 Make a phone connection to the desired number.
6 When connection is made, use the TTY equipment to type in and send a text
message or send voice.
7 The voice or text message from the receiver end displays on the TTY equipment
display.
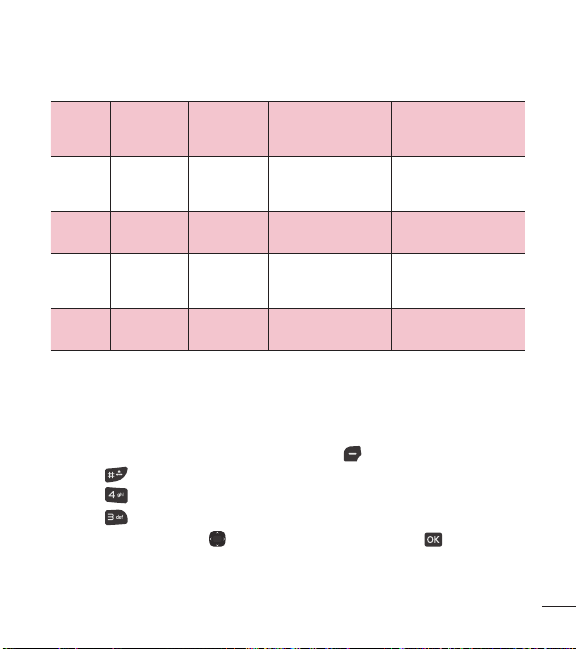
97
Menu User Menu
Transmission/
Receiving Mode
When making
communications with a
non-TTY terminal
TTY full
For hearing-/
verbally-
impaired
Text message
transmission, text
message receiving
Operator
required
TTY + talk
For hearing-
impaired
Able to talk
Voice transmission, text
message receiving
Operator required
TTY +
hear
For verbally-
impaired
Audible
Text message
transmission, voice
receiving
Operator required
TTY off
Voice transmission, voice
receiving
TTY mode (Teletypewriter)
4.3 One touch dial
Allows you to initiate a speed dial call by pressing and holding the speed dial digit.
If set to Off, Speed dial numbers designated in your Contacts will not function.
1 Open the flip and press the Left Selection Key
[Menu].
2 Press
Settings.
3 Press
Call settings.
4 Press
One touch dial.
5 Use the Directional Key
to highlight a setting, then press [Set].
98
Using the Phone Menus
4.4 Voice privacy
Allows you to set the voice privacy feature for CDMA calls. CDMA offers inherent
voice privacy. Check with your service provider for availability.
1 Open the flip and press the Left Selection Key
[Menu].
2 Press
Settings.
3 Press
Call settings.
4 Press
Voice privacy.
5 Use the Directional Key
to highlight a setting, then press [Set].
4.5 DTMF tones
Allows you to set the DTMF tone length.
1 Open the flip and press the Left Selection Key
[Menu].
2 Press
Settings.
3 Press
Call settings.
4 Press
DTMF tones.
5 Use the Directional Key
to highlight a setting, then press [Set].
5. Memory
Allows you to check your phone’s internal memory. Shows the memory information
saved in your phone.
1 Open the flip and press the Left Selection Key
[Menu].
2 Press
Settings.
3 Press
Memory.
4 Use the Directional Key
to select a submenu, then press to view the
memory used.

99
6. Phone info
Allows you to view the information specific to your phone and software.
1 Open the flip and press the Left Selection Key
[Menu].
2 Press
Settings.
3 Press
Phone info.
6.1 My number
Allows you to view your phone number.
1 Open the flip and press the Left Selection Key
[Menu].
2 Press
Settings.
3 Press
Phone info.
4 Press
My number.
6.2 ESN/MEID
Allows you to view your phone's ESN/ MEID number.
1 Open the flip and press the Left Selection Key
[Menu].
2 Press
Settings.
3 Press
Phone info.
4 Press
ESN/MEID.
6.3 Icon glossary
Allows you to view all the icons and their meanings.
1 Open the flip and press the Left Selection Key
[Menu].
2 Press
Settings.
3 Press
Phone info.

100
Using the Phone Menus
4 Press Icon glossary.
5 Select a submenu and browse through the icons.
6.4 SW/HW version
Allows you to view the versions of various applications such as SW, PRL, Browser,
AVR, MMS, Bluetooth, and hardware version.
1 Open the flip and press the Left Selection Key
[Menu].
2 Press
Settings.
3 Press
Phone info.
4 Press
SW/HW version.
6.5 Open source license
Allows you to view the Open source license.
1 Open the flip and press the Left Selection Key
[Menu].
2 Press
Settings.
3 Press
Phone info.
4 Press
Open source license.

101
Notice: Open Source Software
To obtain the source code under GPL, LGPL, MPL, and other open
source licenses, that is contained in this product, please visit
http://opensource.lge.com.
In addition to the source code, all referred license terms, warranty
disclaimers and copyright notices are available for download.
LG Electronics will also provide open source code to you on CD-ROM
for a charge covering the cost of performing such distribution (such
as the cost of media, shipping, and handling) upon email request to
[email protected]. This offer is valid for three (3) years from the date
on which you purchased the product.

102
Safety
The highest SAR value for this model phone when tested for use at the ear is 1.18
W/kg and when worn on the body, as described in this user guide, is 0.79 W/kg
(body-worn measurements differ among phone models, depending upon available
accessories and FCC requirements).
While there may be differences between SAR levels of various phones and at
various positions, they all meet the government requirement for safe exposure.
The FCC has granted an Equipment Authorization for this model phone with
all reported SAR levels evaluated as in compliance with the FCC RF emission
guidelines. SAR information on this model phone is on file with the FCC and can
be found under the Display Grant section of http://www. fcc.gov/oet/ea/fccid/ after
searching on FCC ID ZNFVN170.
t
This product contains chemicals known to the State of California to cause cancer
and birth defects or other reproductive harm.
Wash hands after handling
.
t
To reduce risk of fire or burns, do not expose to temperature above 45°C
(113°F), or dispose of in fire.
t
To reduce risk of fire or burns, do not dispose of in fire or water.
t
Do not disassemble or open crush, bend or deform, puncture or shred.
t
There is a danger of explosion if battery is incorrectly replaced. To reduce risk
of fire or burns, do not disassemble, crush, puncture, short external contacts,
expose to temperature above 45°C (113°F), or dispose of in fire or water. Keep
this product away from excessive moisture and extreme temperatures. Keep the
battery or device dry and away from water or any liquid as it may cause a short
circuit.
t
Avoid using your phone near strong electromagnetic sources, such as
microwave ovens, sound speakers, TV and radio.

103
t
Use only original manufacturer-approved accessories, or accessories that do not
contain any metal. Please only use an approved charging accessory to charge
your LG phone. Improper handling of the Accessory/Charger Port, as well as the
use of an incompatible charger, may cause damage to your phone and void the
warranty.
t
Only use the approved battery charger. Otherwise, you may cause serious
damage to your phone.

104
Glossary
Terminology
Ez tip calculator
Feature for easy bill calculation using the total cost, tip, and number of people as
variables.
Voice commands
Feature that allows you to perform a wide range of verbal commands by training
the phone to recognize your individual speech patterns.
Bluetooth
®
wireless technology
Technology used to allow mobile phones, computers, and other personal devices
to be easily coordinated and interconnected using a short-range wireless
connection.
Acronyms and Abbreviations
DTMF
Dual-Tone Multi Frequency (or “touch-tone”) is a method used to communicate
keys pressed on the phone. Pressing a key generates two simultaneous tones, one
for the row and one for the column to determine which key was pressed.
GPS
Global Positioning System is a system of satellites, computers, and receivers able
to determine the latitude and longitude of a specific receiver on Earth.
Position is calculated using time and distance.

105
IS 2000
Type of digital signaling. It's the second generation of CDMA digital cellular, an
extension of IS-95. Differences between signaling types have to do with pilot
signal and links to provide more traffic channels, and control protocols.
NAM
Number Assignment Module is how the phone stores the phone number and its
electronic serial number.
SSL
Secure Sockets Layer Protocol is used to encrypt data sent over the air.
TTY
Teletypewriter. An electromechanical typewriter that either transmits or receives
messages coded in electrical signals. A phone with TTY support is able to translate
typed characters to voice or translate voice into characters to display on the TTY.

t
Las visualizaciones e ilustraciones de la pantalla
pueden variar de las que ve en el teléfono.
t
Las pantallas reales y el color del teléfono pueden
variar.
t
Es posible que parte del contenido de esta guía no
aplique a su teléfono, eso dependerá del software y de
su proveedor de servicios. Toda la información de este
documento está sujeta a cambios sin previo aviso.
t
Este teléfono no es adecuado para personas con
alguna discapacidad visual ya que cuenta con un
teclado en pantalla táctil.
t
Copyright ©2016 LG Electronics, Inc. Todos los
derechos reservados. LG y el logotipo de LG son
marcas registradas de LG Group y sus entidades
relacionadas.
Todas las demás marcas son propiedad de sus
respectivos titulares.
(VÓBEFMVTVBSJP
ESPAÑOL

DECLARACIÓN DE GARANTÍA LIMITADA
AVISO DE ARBITRAJE: ESTA GARANTÍA LIMITADA CONTINE UNA CLÁUSULA
DE ARBITRAJE QUE LE DEMANDA A USTED Y A LG RESOLVER CONFLICTOS A
TRAVÉS DE UN ARBITRAJE VINCULANTE EN LUGAR DE HACERLO EN LA CORTE,
A MENOS QUE USTED DECIDA NO PARTICIPAR.EN EL ARBITRAJE NO ESTÁN
PERMITIDAS LAS ACCIONES COLECTIVAS NI LOS JUCIOS CON JURADO. POR
FAVOR, VEA A CONTINUACIÓN LA SECCIÓN TITULADA "PROCEDIMIENTO PARA
RESOLVER CONFLICTOS".
Leyes relacionadas con la garantía
Las siguientes leyes rigen las garantías en ventas minoristas para bienes de
consumo:
t
La ley Song-Beverly sobre garantía al consumidor de California [CC §§1790 et
seq].
t
El código comercial uniforme de California, división dos [Com C §§2101 et seq].
t
La ley Magnuson-Moss de mejora de garantías del comité de comercio federal
[15 USC §§2301 et seq; 16 CFR partes 701–703]. Una garantía Magnuson-
Moss típica es una promesa escrita de que un producto está libre de defectos o
una promesa escrita de devolución de dinero, reparación o reemplazo de bienes
defectuosos. [Consulte 15 USC §2301(6).] Las medidas de compensación
incluyen daños por no cumplir con un contrato de servicios escrito, garantía
escrita o por violar las provisiones de publicación. [Consulte 15 USC §2310(d).]
Salvo para algunos requisitos de publicación y etiquetado, la ley federal no se
sobrepone a la ley del estado. [Consulte 15 USC §2311.]

1. LO QUE CUBRE ESTA GARANTIA:
LG le ofrece una garantia limitada de que la unidad de suscriptor adjunta y sus
accesorios incluidos estaran libres de defectos de materiales y mano de obra
segun los terminos y condiciones siguientes:
(1) La garantia limitada del producto se prolonga durante DOCE (12) MESES
contado a partir de la fecha de adquisicion del producto. El periodo de
garantia restante QUINCE (15) MESES de la unidad que se esta reparando o
sustituyendo se determinara mediante la presentacion del recibo de ventas
original por la compra de la unidad.
(2) La garantia limitada se extiende solo al comprador original del producto y no es
asignable ni transferible a ningun otro comprador o usuario final subsecuentes.
(3) Esta garantia solo es buena para el comprador original del producto durante el
periodo de garantia siempre que sea en los EE.UU., incluidos Alaska, Hawaii,
los territorios de los EE.UU. y todas las provincias canadienses.
(4) La carcasa externa y las partes cosmeticas estaran libres de defectos al
momento de la distribucion, y por tanto no estaran cubiertas por los terminos
de esta garantia limitada.
(5) A solicitud de LG, el consumidor debera aportar informacion aceptable para
probar la fecha de compra.
(6) El cliente se hara cargo del costo de envio del producto al Departamento de
servicio al cliente de LG. LG se hara cargo del costo de envio del producto
de vuelta al consumidor despues de realizar el servicio segun esta garantia
limitada.

2. LO QUE NO CUBRE ESTA GARANTIA:
(1) Defectos o danos producto del uso del producto de una forma distinta de la
normal y acostumbrada.
(2) Defectos o danos producto de un uso anormal, condiciones anormales,
almacenamiento inadecuado, exposicion a humedad o agua, modificaciones
no autorizadas, conexiones no autorizadas, reparacion no autorizada, mal uso,
negligencia, abuso, accidentes, alteraciones, instalacion incorrecta o cualquier
otro acto que no sea responsabilidad de LG, incluido el dano causado por la
transportacion, fusibles fundidos y derrames de alimentos o liquidos.
(3) Rotura o danos a las antenas a menos que hayan sido ocasionadas
directamente por defectos en los materiales o mano de obra.
(4) El consumidor debe notificar al Departamento de servicio al cliente de LG el
supuesto defecto o desperfecto del producto durante el periodo de garantia
limitada aplicable para hacer efectiva la garantia.
(5) Productos a los que se haya eliminado el numero de serie, o en los que este
sea ilegible.
(6) Esta garantia limitada se otorga en lugar de cualquier otra garantia, explicita
o implicita, de hecho o por lo dispuesto en las leyes, establecido por ellas o
implicado, incluso, aunque de manera enunciativa y no limitativa, cualquier
garantia implicita de comerciabilidad o adecuacion para un uso en particular.
(7) Danos resultantes del uso de accesorios no aprobados por LG.
(8) Todas las superficies de plastico y todas las demas piezas externas expuestas
que se rayen o danen debido al uso normal por parte del cliente.
(9) Productos que hayan sido puestos en funcionamiento por encima de las
limitaciones maximas indicadas.

(10) Productos utilizados u obtenidos en un programa de arrendamiento.
(11) Consumibles (como seria el caso de los fusibles).
3. LO QUE HARÁ LG:
LG, a su exclusivo criterio, reparará, reemplazará o rembolsará el precio de
compra de cualquier unidad que no cumpla con la presente garantía limitada.
LG puede, a su elección, optar por usar partes o unidades nuevas, restauradas
o reacondicionadas equivalentes en cuanto a funcionalidad. Además, LG no
reinstalará o realizará copias de seguridad de ningún dato, aplicación o software
que el usuario haya agregado al teléfono. Por lo tanto, se recomienda que usted
realice una copia de seguridad de todo dato o información de ese tipo antes
de enviar la unidad a LG, de modo de evitar una pérdida permanente de esa
información.
4. DERECHOS DE LA LEY ESTATAL:
No se aplica a este producto ninguna otra garantia explicita. LA DURACION
DE CUALQUIER GARANTIA IMPLICITA, INCLUIDA LA GARANTIA IMPLICITA DE
COMERCIABILIDAD, SE LIMITA A LA DURACION DE LA GARANTIA EXPLICITA AQUI
INDICADA. LG NO TENDRA RESPONSABILIDAD LEGAL POR LA PERDIDA DEL USO
DE ESTE PRODUCTO, LAS INCOMODIDADES, PERDIDAS O CUALQUIER OTRO
DANO, DIRECTO O CONSECUENCIAL, QUE SE PRODUZCA POR EL USO O LA
INCAPACIDAD DE USAR ESTE PRODUCTO, NO POR LA VIOLACION DE CUALQUIER
GARANTIA EXPLICITA O IMPLICITA, INCLUIDA LA GARANTIA IMPLICITA DE
COMERCIABILIDAD APLICABLE A ESTE PRODUCTO.
Algunos paises no permiten la excluyente de limitacion de danos incidentales
o consecuenciales, o las limitaciones sobre la duracion de la garantia implicita,
de modo que es posible que estas limitaciones o exclusiones no se le apliquen

a usted. Esta garantia le concede derechos legales concretos y es posible que
tambien tenga otros derechos, que varian de estado a estado.
5. CÓMO OBTENER SERVICIO POR LA GARANTÍA:
Para obtener servicio de esta garantia llame al siguiente telefono desde cualquier
ubicacion continental de los Estados Unidos:
Tel. 1-800-793-8896 o Fax. 1-800-448-4026
O visite http://www.lg.com/us/support. También puede enviar correspondencia a:
LG Electronics Service- Mobile Handsets, P.O. Box 240007, Huntsville, AL 35824
NO DEVUELVA SU PRODUCTO A LA DIRECCIÓN ARRIBA INDICADA.
Llame o escriba para conocer la ubicación del centro de servicio autorizado
LG más cercano a usted y los procedimientos necesarios para presentar una
reclamación por garantía.
PROCEDIMIENTO PARA RESOLVER CONFLICTOS:
TODOS LOS CONFLICTOS ENTRE USTED Y LG QUE SURJAN FUERA DE O
RELACIONADOS DE ALGUNA MANERA CON ESTA GARANTÍA LIMITADA O CON
EL PRODUCTO, SE RESOLVERÁN EXCLUSIVAMENTE A TRAVÉS DE UN ARBITRAJE
VINCULANTE Y NO EN UNA CORTE DE JURISDICCIÓN GENERAL. ARBITRAJE
VINCULANTE SIGNIFICA QUE USTED Y LG RENUNCIAN AL DERECHO DE UN JUICIO
CON JURADO Y A REALIZAR O PARTICIPAR EN UNA DEMANDA COLECTIVA.
Definiciones. Para el propósito de esta sección, las referencias a “LG” significan:
LG Electronics MobileComm U.S.A., Inc., sus empresas matrices, subsidiarias y
filiales y cada uno de sus directivos, directores, empleados, agentes, beneficiarios,
predecesores en interés, sucesores, cesionarios y proveedores;las referencias a
"conflicto" o "reclamación" incluirán cualquier conflicto, reclamo o controversia

de cualquier tipo, sin importar (ya sea basado en contrato, agravio, estatuto,
regulación, ordenanza, fraude, falsa representación o cualquier teoría legal
o equitativa) que surja de o esté relacionada con cualquier forma de venta,
condición o desempeño del producto o de esta Garantía Limitada.
Acuerdo de arbitraje vinculante y renuncia de demanda colectiva. Usted y LG se
comprometen a resolver cualquier reclamo entre nosotros, solamente a través
de arbitraje vinculante sobre una base individual, a menos que usted se excluya,
conforme a lo dispuesto a continuación. Cualquier conflicto entre usted y LG
no estarán combinados o consolidados con una controversia relacionada con
cualquier otro producto o reclamo de otra persona o entidad. Más específicamente
y sin prejuicio de lo anterior, no procederá bajo ninguna circunstancia cualquier
disputa entre usted y LG como parte de una acción colectiva o representativa.
En lugar del arbitraje, cualquiera de las partes podrá iniciar una acción individual
en la corte de reclamos menores, pero tales acciones en la corte de reclamos
menores no podrán ser realizadas en una acción colectiva o representativa.
Normas y procedimientos de arbitraje. Para comenzar con el arbitraje de un
reclamo, usted o LG deben realizar una demanda escrita para arbitraje. El arbitraje
será administrado por la Asociación Americana de Arbitraje (AAA) y se llevará a
cabo ante un árbitro único bajo las Normas de Arbitraje del Consumidor de la
AAA, que tienen efecto al momento de inicio del arbitraje (en adelante "Normas
de la AAA") y bajo los procedimientos establecidos en esta sección. Las Normas
de la AAA están disponibles en línea en www.adr.org/consumer. Envíe una copia
de su solicitud de arbitraje por escrito, así como una copia de esta disposición, a
la AAA de la forma descrita en las Normas de la AAA. También debe enviar una
copia de su solicitud por escrito a LG en LG Electronics, USA, Inc. Atención: Legal

Department-Arbitration1000 Sylvan AvenueEnglewood Cliffs, NJ 07632. Si hay un
conflicto entre las Normas de la AAA y las reglas establecidas en esta sección,
prevalecerán dichas reglas de esta sección. Esta disposición de arbitraje se rige
por la Ley Federal de Arbitraje. El juicio se puede introducir en el laudo arbitral en
cualquier tribunal de jurisdicción competente. Todos son temas para que el árbitro
tome sus decisiones, excepto aquellos asuntos relativos al alcance y aplicabilidad
de la cláusula de arbitraje y de la capacidad de arbitraje de la controversia para
que el tribunal decida. El árbitro se regirá por los términos de esta disposición.
Legislación vigente:La legislación del estado de su residencia regirá esta Garantía
Limitada, así como todas las disputas entre nosotros, salvo que sea invalidada o
inconsistente con leyes federales aplicables.
Tarifas / Costos. Usted no debe pagar ninguna tarifa para comenzar un arbitraje.
Al recibir su solicitud de arbitraje por escrito, LG pagará todos los gastos
administrativos rápidamente a la AAA, a menos que usted solicite más de
$25,000.00 por daños, en cuyo caso el pago de estos gastos se regirá por las
Normas de la AAA. Salvo disposición contraria prevista en el presente documento,
LG pagará a la AAA todos los gastos documentales, administrativos y de arbitraje
para cualquier arbitraje iniciado, de conformidad con las Normas de la AAA y esta
disposición de arbitraje.Si usted prevalece en el arbitraje, LG pagará honorarios y
gastos razonables de sus abogados en la medida requerida por las leyes vigentes.
Si el árbitro considera que la sustancia de su reclamo o la reparación solicitada en
la demanda es frívola o se utiliza para un propósito inadecuado (calificado según
las normas establecidas en la Norma Federal de Procedimiento Civil 11 (b)), el
pago de todos los honorariosde arbitraje se regirá por las Normas de la AAA.En
tal situación usted se compromete a reembolsar a LG todos los fondos erogados

previamente por ella, cuyo pago es, por otra parte, su obligación, según las
Normas de la AAA. Salvo disposición contraria, LG renuncia a cualquier derecho
que pudiera tener para solicitarle los honorarios y gastos de sus abogados, si LG
prevaleceen el arbitraje.
Audiencias y ubicación. Si su reclamo es por $25,000 o menos, usted puede
optar queel arbitraje sea realizado únicamente sobre la base de: (1) documentos
presentados al árbitro, (2) a través de una audiencia telefónica o (3) por una
audiencia en persona, según lo establecido por las Normas de la AAA. Si su
reclamo excede $25,000, el derecho a una audiencia estará determinado por las
Normas de la AAA. Cualquier audiencia de arbitraje en persona se realizará en
un lugar dentro del distrito judicial federal en el cual resida, a menos que ambos
acuerden otra ubicación o estemos de acuerdo con el arbitraje telefónico.
Exclusión. Usted puede quedarse fuera de este procedimiento de resolución de
la disputa. Si se excluye, ni usted ni LG pueden solicitar al otro que participe en
un procedimiento de arbitraje. Para excluirse usted debe enviar una notificación
a LG, en un lapso de hasta 30 días continuos, contados a partir de la fecha de la
primera compra del consumidor del producto, ya sea por: (i) el envío de un correo
electrónico a [email protected] con el siguiente Asunto: "Exclusión del arbitraje" o
(ii) llamada al 1-800-980-2973. Debe incluir en el correo electrónico de exclusión
o suministrar por teléfono:(a) su nombre y dirección; (b) la fecha en la cual el
producto fue comprado; (c) el nombre o el número del modelo del producto; y (d)
el IMEI o MEID o número del serial, según aplique (el IMEI o MEID o número del
serial puede ser hallado (i) en la caja del producto; (ii) en una etiqueta en la parte
posterior del producto, debajo de la batería, si ésta es extraíble; o (iii) en el menú
de configuración a través de la siguiente ruta: Configuración > Información de
teléfono > ESN/MEID). Sólo puede excluirse del procedimiento de resolución

de conflictos en la forma descrita anteriormente (es decir, por correo electrónico
o por teléfono); ninguna otra forma de notificación será efectiva para hacerlo.
Excluirse de este procedimiento de resolución de controversias no afectará de
ninguna manera la cobertura de la Garantía Limitada, por lo que usted continuará
disfrutando de todos sus beneficios.Si conserva este producto y no se excluye,
usted acepta todos los términos y condiciones de la cláusula de arbitraje descrita
anteriormente.

11
ContenidoContenido
Descripción general del teléfono ...... 14
Descripción general de menús ......... 18
"DDFTPBMNFOÞ 18
Introducción a su teléfono ................ 22
#BUFSÓB 22
$BSHBSMBCBUFSÓB 23
$BSHBSDPOVODBCMF64# 24
1SPUFDDJØOEFMBUFNQFSBUVSBEFMB
CBUFSÓB 24
/JWFMEFDBSHBEFMBCBUFSÓB 25
1PUFODJBEFMBTF×BM 25
&ODFOEFSZBQBHBSFMUFMÏGPOP 25
)BDFSMMBNBEBT 26
3FNBSDBSMMBNBEBT 26
3FDJCJSMMBNBEBT 27
*DPOPTEFMBQBOUBMMB 27
Acceso rápido a características
convenientes ...................................... 28
.PEPEFWJCSBDJØO 28
4POJEPTEFTBDUJWBEPT 28
'VODJØO4JMFODJP 28
"KVTUFSÈQJEPEFMWPMVNFO 28
"KVTUFSÈQJEPEFMUBNB×PEFGVFOUF 29
-MBNBEBFOFTQFSB 29
-MBNBEBEFDPOGFSFODJB 29
*EFOUJmDBDJØOEFMMBNBEB 30
$PNBOEPTEFWP[ 30
Introducir y editar información ......... 32
&OUSBEBEFUFYUP 32
Contactos en la memoria de su
teléfono .............................................. 33
1SJODJQJPTCÈTJDPTEF
BMNBDFOBNJFOUP 33
1FSTPOBMJ[BSFOUSBEBTJOEJWJEVBMFT 33
.BSDBDJØOSÈQJEB 34
"MNBDFOBSVOOÞNFSPDPOQBVTBT 34
"HSFHBSPUSPOÞNFSPEFUFMÏGPOP 36
.PEJmDBSMBJOGPSNBDJØOHVBSEBEB 37
$BNCJBSFMOÞNFSPQSFEFUFSNJOBEP 37
&MJNJOBS 38
.BSDBDJØOSÈQJEB 39
Uso de menús del teléfono ................ 40
1SFQBHP 40
1. Mi número telefónico ..................40
2.
Número de serie .........................40

12
Contenido
$POUBDUPT 41
1. Nuevo contacto ...........................41
2. Lista de contactos .......................42
3. Favoritos ....................................43
4. Grupos .......................................44
5. Marcación rápida ........................45
6. Mi vCard ....................................45
.FOTBKFT 46
1. Nuevo mensaje ...........................47
2. Entrada ......................................50
3. Enviado ......................................52
4. Borradores .................................53
5. Buzón de voz ..............................54
6. Plantillas ....................................55
Ajustes de mensajes .......................55
Borrar mensajes .............................56
-MBNBEBTSFDJFOUFT 57
1. Perdidas .....................................57
2. Recibidas ...................................58
3. Marcadas ...................................58
4. Todas .........................................59
5. Tiempo de llamadas ....................60
+VFHPT 60
"DDFTPXFC 61
.VMUJNFEJB 61
1. Tomar foto ..................................61
2. Grabar voz ..................................63
3. Fotos..........................................63
4. Timbres ......................................66
)FSSBNJFOUBT 68
1. Comandos de voz .......................68
2. Calculadora ................................71
3. Ez sugerencia .............................72
4. Eco-calculadora ..........................72
5. Búsqueda de info ........................73
6. Cronómetro ................................74
7. Cuaderno de notas ......................75
8. Convertidor de unidades ..............75
.JBHFOEB 76
1. Calendario ..................................76
2. Reloj despertador ........................77
#MVFUPPUI 78
1. Añadir nuevo aparato ..................79
Mi info de dispositivo ......................82
Modo de descubrimiento .................83
Perfiles soportados .........................83
"DDFTJCJMJEBE 84
1. Lectura ......................................84
2. Invertir color ...............................86
3. Texto grande ...............................87

13
4. Audio mono ................................87
5. Desactivar todos los sonidos ........88
$POmHVSBDJØO 88
1. Programación de sonidos ............88
2. Programación de pantalla ............93
3. Programación de teléfono ............98
4. Programación de llamada ..........105
5. Memoria...................................110
6. Información de teléfono .............110
Seguridad ......................................... 113
Glosario ............................................ 115
Terminología ................................. 115
Acrónimos y abreviaturas ..............115
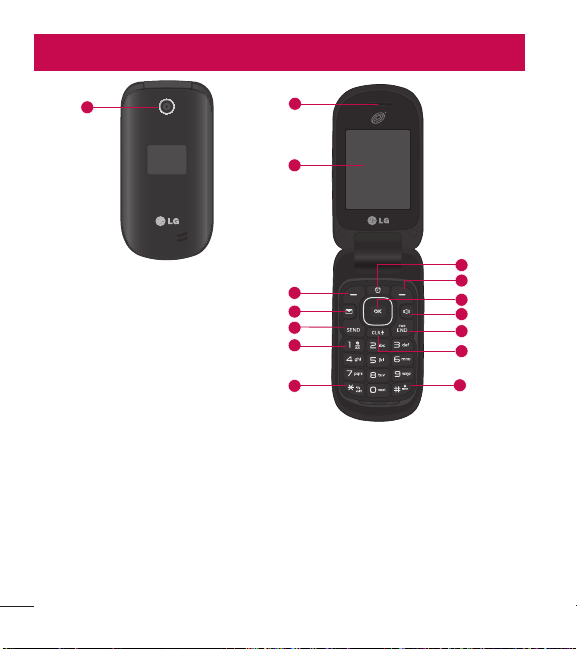
14
Descripción general del teléfonoDescripción general del teléfono
1 Lente de la cámara: Le permite tomar fotos.
2 Auricular: Le permite escuchar a la persona con la que está hablando y las
indicaciones automatizadas.
3 Pantalla LCD: Muestra mensajes e iconos de estado. Cuando el teléfono está
encendido, el modo de ahorro de energía atenúa automáticamente la pantalla y
luego la oscurece si no se oprime ninguna tecla.
4 Tecla de selección izquierda: Realiza las funciones identificadas en la esquina
inferior izquierda de la pantalla.
1
2
3
5
7
9
8
10
11
12
13
14
15
4
6
R

15
5 Tecla Mensajes: Abre un nuevo mensaje de texto en forma rápida y
fácilmente.
6 Tecla Enviar: Sirve para realizar y contestar llamadas. Presiónela una vez para
acceder a la lista Todas las llamadas.
7 Teclado alfanumérico: Úselo para introducir números y caracteres y
seleccionar elementos de menú.
8 Tecla Modo de vibración: Úsela para establecer el modo de vibración (en el
modo de espera, manténgala presionada durante unos 3 segundos).
9 Tecla Modo de bloqueo: Úsela para bloquear el teléfono (en el modo de
espera, manténgala presionada durante unos 2 segundos).
10 Tecla Borrar/Comandos de voz: Elimina espacios o caracteres individuales
con solo presionar rápidamente. Manténgala presionada para eliminar
palabras completas en pantallas de entrada de texto. Presiónela una vez
para retroceder menús, un nivel por vez. Para acceder rápidamente a los
comandos de voz, presione esta tecla una vez desde la pantalla de espera.
11 Tecla Encender/Finalizar: Úsela para apagar o encender el teléfono y para
finalizar una llamada. También le permite volver al modo de espera mientras
navega por un menú o al realizar otras acciones.
12 Tecla Altavoz: Úsela para cambiar al modo de altavoz.
13 Tecla OK/Direccional: Use la Tecla OK para seleccionar la función que se
muestra en la parte inferior de la pantalla LCD entre la Tecla de selección
izquierda y derecha. Use la Tecla Direccional
para desplazarse por los
elementos del menú y resaltar un campo u objeto específico al moverse hacia
arriba, hacia abajo, hacia la izquierda o hacia la derecha.
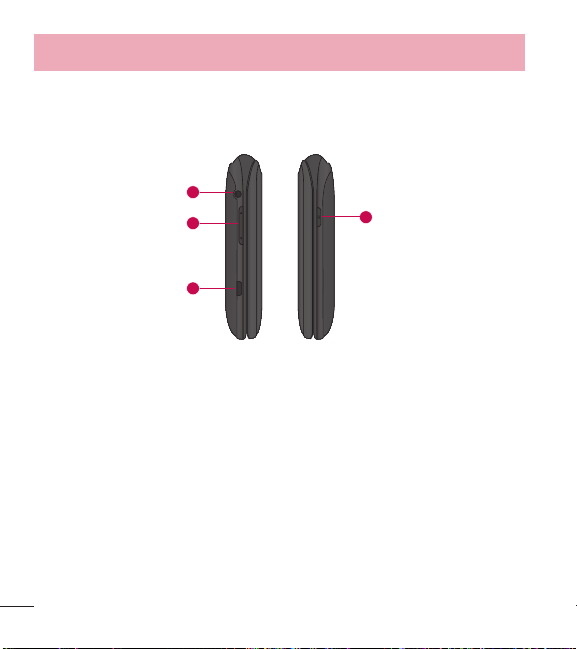
16
Descripción general del teléfono
14 Tecla de selección derecha: Realiza las funciones identificadas en la
esquina inferior derecha de la pantalla.
15 Tecla Alarma: Úsela para administrar las alarmas.
4
1
2
3
1 Toma para auriculares: Permite conectar un auricular opcional de 3.5 mm
para mantener conversaciones cómodas de manos libres.
2 Teclas de volumen: Úselas para ajustar el volumen maestro en el modo de
espera y el volumen del auricular durante una llamada. Úsela para ajustar el
tamaño de fuente cuando vea mensajes, ingrese números de teléfono (en
modo de espera) o explore los menús (excepto el Menú principal).
3 Puerto para cargador/accesorios: Conecta el teléfono al cargador u otros
accesorios admitidos.

17
Cargar con el cable USB y PC: Puede usar su computadora para
cargar el teléfono. Conecte uno de los extremos del cable USB al puerto
para cargador/accesorios del teléfono y el otro extremo a un puerto USB
con alta potencia de la PC (por lo general, ubicado en el panel frontal de
la computadora).
4 Tecla Cámara: Úsela para tomar fotos. Manténgala limpia para obtener una
calidad óptima de las fotografías.
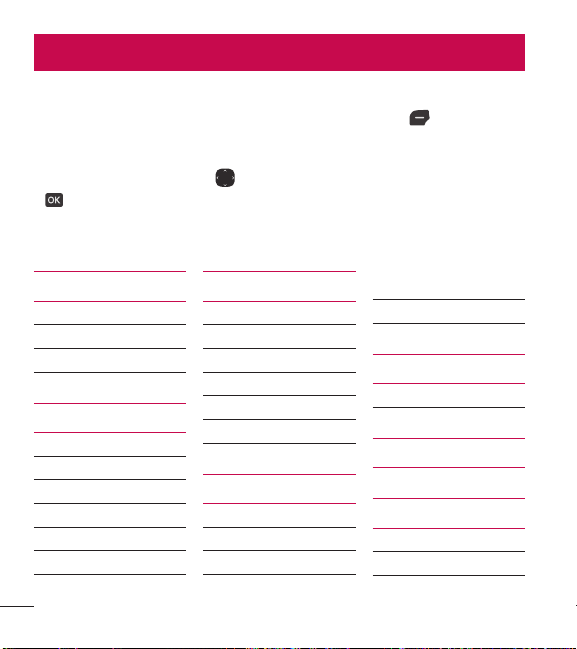
18
Descripción general de menús
Acceso al menú
En el modo de espera, presione la Tecla de selección izquierda [Menú] para
acceder a los menús del teléfono. Existen dos métodos para acceder a los menús
y submenús:
t
Use las Teclas Direccionales para resaltar un menú o una opción y presione
para seleccionarlo.
t
Presione la tecla numérica en el teclado para activar el menú/opción
correspondiente.
Prepago
1. Mi número teléfono
2. Número de serie
3. Modo ingreso de código
Contactos
1. Nuevo contacto
2. Lista de contactos
3. Favoritos
4. Grupos
5. Marcación rápida
6. Mi vCard
Mensajes
1. Nuevo mensaje
2. Entrada
3. Enviado
4. Borradores
5. Buzón de voz
6. Plantillas
Llamadas recientes
1. Perdidas
2. Recibidas
3. Marcadas
4. Todas
5. Tiempo de llamadas
Juegos
1. Juegos
Acceso web
Multimedia
1. Tomar foto
2. Grabar voz

19
3. Fotos
1. Mis fotos
2. Predetermin. fotos
3. Comprar gráficos
4. Timbres
1. Mis sonidos
2. Predetermin. timbres
3. Comprar timbres
Herramientas
1. Comandos de voz
1. Llamar <Nombre o
Número>
2. Enviar msj a <Nombre
o Número o Grupo>
3. Ir a <Menú>
4. Verificar <Elemento>
5. Contactos <Nombre>
6. Remarcar
7. Ayuda
2. Calculadora
3. Ez sugerencia
4. Eco-calculadora
5. Búsqueda de info
6. Cronómetro
7. Cuaderno de notas
8. Convertidor de unidades
1. Área
2. Longitud
3. Masa
4. Temperatura
5. Volumen
6. Velocidad
Mi agenda
1. Calendario
2. Reloj despertador
Bluetooth
1. Menú de bluetooth
1. Añadir nuevo aparato
Accesibilidad
1. Lectura
1. Lectura completa
2. Lectura de menú
3. Lectura de dígito
marcado
4. Lectura de ID de
llamador
5. Lectura de contraseñas
6. Velocidad de voz
2. Invertir color
3. Texto grande
4. Audio mono
5. Desactivar todos los
sonidos
Configuración
1. Programación de sonidos
1. Volumen maestro
2. Sonidos de llamada
1. Timbre de llamada

20
Descripción general de menús
2. Vibrar de llamada
3. Lectura de ID de
llamador
3. Sonidos de alerta
1. Mensaje de TXT
2. Mensaje de
multimedia
3. Buzón de voz
4. Timbre de emergencia
5. Llamadas perdidas
4. Volumen de teclado
5. Alertas de servicio
1. Conexión de llamada
2. Desconectar llamada
3. Cargar completado
6. Encendido/apagado
1. Encendido
2. Apagado
7. Asistencia auditiva
2. Programación de pantalla
1. Luz de pantalla
1. Pantalla luz de fondo
2. Luz del teclado
2. Brillo
3. Fondo de pantalla
1. Mis fotos
2. Presentación de
diapositivas
4. Estilo de menú
1. Cuadrícula
(Predeterminado)
2. Lista
5. Tipo de fuente
6. Tamaño de fuente
1. Dígitos de marcación
2. Menú & lista
3. Mensaje
7. Formato de reloj
8. Coincidencia de
nombre para marcación
3. Programación de teléfono
1. Modo avión
2. Acceso directo para
ajustar
1. Establecer mis atajos
2. Establecer teclas
direccionales
3. Comandos de voz
1. Confirmar selecciones
2. Sensibilidad
3. Entrenar de voz
4. Avisos
4. Idioma
5. Ubicación
6. Seguridad
7. Selección de sistema
4. Programación de llamada
1. Opciones de contestar
2. Modo TTY
3. Marcado oprimiendo un
botón
4. Privacidad de voz
5. Tonos DTMF
5. Memoria
1. Uso de la memoria
2. Mis fotos

21
3. Mis sonidos
4. Mis contactos
6. Información de teléfono
1. Mi número
2. ESN/MEID
3. Glosario de iconos
4. Versión SW/HW
5. Licencias de codigo
abierto
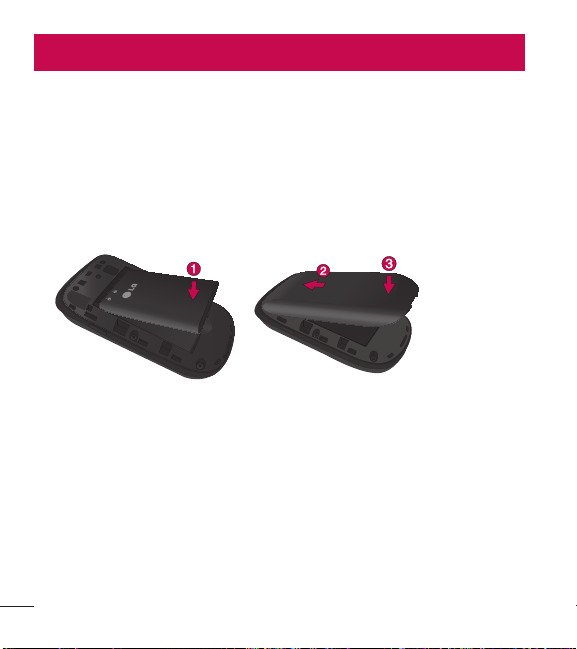
22
Introducción a su teléfonoIntroducción a su teléfono
Batería
Instalar la batería
1 Utiliza la abertura de uña en la parter inferior de la tapa posterior para levantar
y retirar la tapa.
2 Alinee los contactos de la batería con los terminales cerca de la parte superior
del compartimiento de la batería e inserte la batería dentro del compartimiento.
3 Alinee la tapa posterior y presiónela hacia abajo hasta que encaje en su lugar.
Extraer la batería
1 Apague el teléfono.
2 Utiliza la abertura de uña en la parter inferior de la tapa posterior para levantar
y retirar la tapa.
3 Use la abertura para dedo que se encuentra cerca de la parte inferior del
compartimiento de la batería para levantarla.
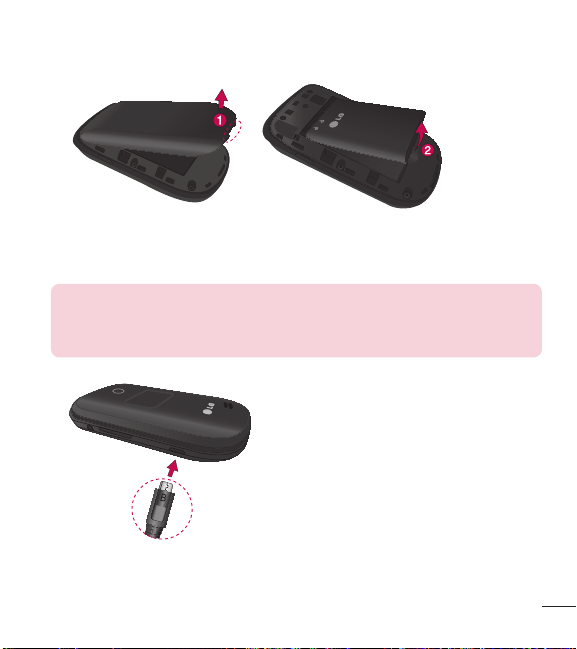
23
Cargar la batería
Use el cargador incuido con su teléfono.
ADVERTENCIA: Use únicamente el cargador que viene incluido con el
teléfono. El uso de cualquier cargador distinto del que viene incluido con
el teléfono puede dañar el teléfono o la batería.

24
Introducción a su teléfono
AVISO: Por favor asegúrese de que el lado 'B' esté orientado hacia
arriba antes de insertar el cargador o cable USB en el puerto para
cargador/accesorios de su teléfono.
Enchufe un extremo del adaptador de carga en el puerto para cargador/accesorios
del teléfono y el otro extremo en un toma corrientes.
El tiempo de carga varía dependiendo del nivel de la batería.
Cargar con un cable USB
Puede usar la computadora para cargar el teléfono. Para poder cargar con el
cable USB, primero debe tener el controlador USB adecuado instalado en su
PC. Conecte un extremo del cable USB al puerto para cargador/accesorios en el
teléfono y el otro extremo al puerto USB de la PC.
NOTA: No se admiten puertos USB con poca potencia, como los
puertos USB del teclado o el nodo USB alimentado desde el bus.
Protección de la temperatura de la batería
Si la batería se sobrecalienta, el teléfono se apagará en forma automática. Cuando
vuelve a encender el teléfono, aparece un mensaje de alerta avisando que el
teléfono se apagó por seguridad.

25
Nivel de carga de la batería
Puede ver el nivel de carga de la batería en la esquina superior derecha de
la pantalla LCD. Cuando baja el nivel de carga, el sensor de la batería emite un
tono de advertencia, el icono de la batería parpadea y/o aparece un mensaje de
advertencia.
Si el nivel de cargar la batería baja demasiado, el teléfono se apaga
automáticamente y no se guarda ninguna de las funciones en curso.
Potencia de la señal
La calidad de la llamada depende de la potencia de la señal en su área. Puede
determinar la intensidad de la señal al observar el número de barras al lado del
icono de intensidad de señal
: más barras se traduce en una mejor señal. Si
tiene problemas con la calidad de la señal, desplácese a un área abierta, si está
dentro de un edificio, o intente acercarse a una ventana.
Encender y apagar el teléfono
Encender el teléfono
1 Si el nivel de cargar la batería es bajo, inserte la batería y conecte el teléfono a
un tomacorriente externo.
2 Con el teléfono abierto, presione la Tecla Encender/Finalizar
hasta que se
encienda la pantalla LCD.

26
Introducción a su teléfono
Apagar el teléfono
Con el teléfono abierto, mantenga presionada la Tecla Encender/Finalizar
hasta que se apague la pantalla LCD.
Hacer llamadas
1 Verifique que el teléfono esté encendido.
2 Introduzca el número de teléfono.
3 Presione la Tecla Enviar
para marcar la llamada.
4 Presione la Tecla Encender/Finalizar
para finalizar la llamada.
NOTA: El teléfono dispone de una función de Comandos de voz que
también le permite hacer llamadas al decir un número de teléfono o
nombre de contacto. Consulte la página 30 para más información.
Corrección de errores de marcación
Mientras ingresa un número de teléfono, presione la Tecla Borrar
una
vez para borrar el último dígito introducido. También puede mantener la tecla
presionada por dos segundos para borrar todos los dígitos introducidos.
Remarcar llamadas
Con el teléfono abierto, presione la Tecla Enviar dos veces para remarcar el
último número marcado.

27
Recibir llamadas
1 Cuando el teléfono suene o vibre, puede contestar la llamada con sólo abrir el
teléfono.
NOTA: Si la opción de respuesta "Al abrirlo" ( Menú >
Configuración > Programación de llamada > Opciones de
contestar) NO ESTÁ MARCADA, puede:
t
Abrir el teléfono y presionar la Tecla de selección izquierda [Silenc.]
para silenciar el timbre o la vibración de esa llamada.
t
Abrir el teléfono y presionar la Tecla de selección derecha [Ignorar]
para finalizar la llamada y enviarla directamente al correo de voz.
t
Abrir el teléfono y presionar [Texto] para finalizar la llamada y enviar
un rápido mensaje de texto.
2 Presione la Tecla Encender/Finalizar para finalizar la llamada o
simplemente cierre la tapa del teléfono.
Iconos de la pantalla
Cuando el teléfono está encendido, la línea superior de la pantalla LCD muestra
los iconos de estado del teléfono.
Para ver el glosario de iconos, abra el teléfono y vaya a
Menú >
Configuración > Información de teléfono > Glosario de iconos en el
teléfono.

28
Acceso rápido a características convenientes
Modo de vibración
Ajusta el teléfono para vibrar en lugar de sonar (se muestra ). Para configurar
el Modo de vibración, abra el teléfono mantenga presionada
. Para volver al
Modo normal, vuelva a mantener presionada
.
Sonidos desactivados
Desactive rápidamente los sonidos del teléfono cuando usted se encuentre en un
lugar en el que los sonidos perturbarían el ambiente.
En el modo de espera con el teléfono abierto, mantenga presionada la tecla
de volumen inferior por 3 segundos. Para volver al modo normal de sonidos,
mantenga presionada la tecla de volumen superior.
Función Silencio
La función Silencio evita la transmisión de su voz a quien llama. Parta activar
rápidamente el Silencio mientras está en una llamada, presione la Tecla de
selección izquierda
[Mudo]. Para cancelar el silencio, presione la Tecla de
selección izquierda
[No mudo] nuevamente.
Ajuste rápido del volumen
Para ajustar rápidamente los volúmenes del timbre y del audífono, presione
las teclas de volumen
en el lateral izquierdo del teléfono. Presione la tecla de
volumen superior para aumentar el volumen y la tecla de volumen inferior para
disminuirlo.

29
NOTA: El volumen del auricular sólo puede ajustarse durante una
llamada y el volumen del teclado sólo puede ajustarse a través del menú
Ajustes de sonidos.
Ajuste rápido del tamaño de fuente
Cuando vea mensajes, ingrese números de teléfono o vea submenús, presione
las teclas de volumen
hacia arriba o hacia abajo para ajustar el tamaño de la
fuente rápidamente. Existen 3 niveles de tamaños de fuente disponibles (pequeño,
normal, grande).
NOTA: No se admite en el menú principal.
Llamada en espera
Durante una llamada, un pitido indica otra llamada entrante. Presione la Tecla
Enviar
para responderla y poner en espera la primera llamada. Vuelva a
presionar la Tecla Enviar
para reanudar la primer llamada.
Llamada de conferencia
Puede conversar con dos personas al mismo tiempo mediante una llamada de
conferencia en su teléfono inalámbrico. Se pueden aplicar cargos por tiempo de
difusión y otros cargos, que pueden incluir tasas o cargos por llamadas de larga
distancia, entre otros, por todas la llamadas simultáneas hasta que finalice una
llamada.

30
Acceso rápido a características convenientes
1 Mientras está en la primera llamada, marque el número de 10 dígitos de la
segunda persona.
2 Presione la Tecla Enviar
. La primera persona se pone automáticamente en
espera mientras realiza la llamada.
3 Cuando responda la segunda persona, presione
[Fundir] para crear una
llamada de conferencia.
4 Si la segunda persona no responde, presione la T
ecla Enviar
dos veces
vez para finalizar la conexión y reanudar la conversación con la primera
persona.
5 Para finalizar ambas conversaciones, presione la Tecla Encender/Finalizar
.
Identificación de llamada
La identificación de llamada muestra el número y/o el nombre y la foto (si
corresponde) de la persona que llama cuando suena el teléfono.
Comandos de voz
La opción Comandos de voz permite ejecutar funciones mediante comandos
orales (por ejemplo, realizar llamadas, revisar el correo de voz, etc.). Con el
teléfono abierto, presione la Tecla Comandos de voz
en el teclado.
1 Llamar:
Diga "Llamar" y luego llame a alguien con solo pronunciar el nombre o
el número de teléfono.
2 Enviar msj a: Diga "Enviar mensaje" y el comando le preguntará por el tipo de
mensaje.

31
3 Ir a: Esta opción le permite acceder a un menú en el teléfono.
4 Verificar: Le permite verificar varios elementos, como el estado del teléfono,
buzón de voz, mensajes, llamadas perdidas, hora, fuerza de señal, nivel de
batería, volumen y el número del teléfono.
5 Contactos: Puede buscar nombres en sus Contactos, así como también
administrar su Lista de contactos al crear, borrar o modificar.
6 Remarcar: Diga "Remarcar" y el teléfono marcará nuevamente el último
número.
7 Ayuda: Proporciona los lineamientos generales para usar los comandos de voz.
NOTA: Los comandos de voz también pueden iniciarse con la tecla
designada en el dispositivo Bluetooth
®
. Consulte la guía de usuario del
dispositivo Bluetooth
®
para obtener más instrucciones.

32
Introducir y editar información
Entrada de texto
Las siguientes funciones de teclas están disponibles para ayudarle a ingresar
texto:
Tecla de selección izquierda: Presiónela para cambiar el modo de entrada
de texto.
Mayúscula: Presiónela para cambiar el uso de mayúsculas (mayúscula
inicial, todas mayúsculas, minúsculas).
Siguiente: Presiónela para ver otras palabras coincidentes en la base de
datos cuando usa el modo de palabras T9.
Espacio: Presiónela para finalizar una palabra e insertar un espacio.
Borrar: Presiónela para eliminar un espacio o carácter individual. Mantenga
presionada para borrar el texto entero.
Puntuación: Presiónela para insertar signos de puntuación.
Modos de entrada de texto
En un campo de texto, presione la Tecla de selección izquierda
para
seleccionar un modo de entrada de texto:
T9 Palabra/ Abc/ ABC/ 123/ T9 Word/ Símbolos/ Plantillas
NOTA: T9 Palabra es el equivalente español de la función T9 Word
que utiliza acentos, tildes, etc. para obtener una ortografía en español
correcta.

33
Contactos en la memoria de su teléfono
Principios básicos de almacenamiento
1 Con el teléfono abierto, ingrese un número (48 dígitos máximo) y luego
presione la Tecla de selección izquierda
[Grdr].
2 Use la Tecla Direccional
para resaltar Nuevo contacto/ Actualizar
existente y luego presione
.
3 Use la Tecla Direccional
para resaltar Móvil 1/ Casa/ Negocio/ Móvil 2/
Fax y luego presione
.
4 Ingrese un nombre (32 caracteres máximo) y cualquier información adicional y
después presione
[Grdr].
NOTA: Si seleccionó Actualizar existente después de seleccionar el
tipo de número, la información de contacto se actualiza de manera
automática.
Personalizar entradas individuales
1 Abra el teléfono y presione la Tecla de selección izquierda [Menú].
2 Presione
Contactos.
3 Presione
Lista de contactos.
4 Use la Tecla Direccional
para resaltar una entrada de contacto y luego
presione la Tecla de selección izquierda
[Corregir].
5 Use la Tecla Direccional
para resaltar la información que desea personalizar.
6 Modifique la entrada como desee y luego presione
[Grdr] para guardar los
cambios.

34
Contactos en la memoria de su teléfono
Marcación rápida
Le permite configurar sus Marcación rápida.
1 Abra el teléfono y presione la Tecla de selección izquierda
[Menú].
2 Presione
Contactos.
3 Presione
Lista de contactos.
4 Use la Tecla Direccional
para resaltar una entrada de contacto y luego
presione la Tecla de selección izquierda
[Corregir].
5 Use la Tecla Direccional
para resaltar un número de teléfono y luego
presione la Tecla de selección derecha
[Opciones].
6 Use la Tecla Direccional
para resaltar Fijar marcado rápido y luego
presione
.
7 Seleccione un dígito de marcación rápida.
t
Ingrese un dígito con el teclado y luego presione [Ajust].
t
Use la Tecla Direccional para resaltar el dígito de marcación rápida y luego
presione
[Ajust].
8 Presione
Sí para confirmar y luego [Grdr] para actualizar la entrada del
contacto.
Almacenar un número con pausas
Las pausas le permiten introducir series de números adicionales para acceder a
sistemas automatizados, como el Correo de voz o los números de facturación de
tarjeta de crédito. Los tipos de pausa son:

35
Esperar (E): El teléfono deja de marcar hasta que presione la Tecla de selección
izquierda
[Liberar] para avanzar a la serie de números siguientes.
Pausa de 2 seg. (P): El teléfono espera dos segundos antes de marcar la
siguiente cadena de dígitos.
1 Con el teléfono abierto, ingrese el número de teléfono y luego presione la Tecla
de selección derecha
[Opciones].
2 Use la Tecla Direccional
para resaltar Añadir 2-seg pausa o Añadir espera
y luego presione
.
3 Ingrese los números adicionales (por ejemplo, número de PIN, número de
tarjeta de crédito, etc.).
4 Presione la Tecla de selección izquierda
[Grdr].
5 Elija Nuevo contacto/ Actualizar existente.
6 Elija Móvil 1/ Casa/ Negocio/ Móvil 2/ Fax.
7 Según sea necesario, siga ingresando información para la entrada del contacto.
NOTA: Si seleccionó Actualizar existente después de seleccionar el
tipo de número, la información de contacto se actualiza de manera
automática. Usted no puede ingresar información adicional.
8 Presione [Grdr] para actualizar la entrada del contacto.
Agregar una pausa a una entrada de contacto existente
1 Abra el teléfono y presione la Tecla de selección izquierda
[Menú].
2 Presione
Contactos.
3 Presione
Lista de contactos.

36
Contactos en la memoria de su teléfono
4 Use la Tecla Direccional para resaltar una entrada de contacto y luego
presione la Tecla de selección izquierda
[Corregir].
5 Use la Tecla Direccional
para resaltar el número y luego presione la Tecla de
selección derecha
[Opciones].
6 Presione
Añadir 2-seg pausa o Añadir espera.
7 Ingrese los números adicionales y luego presione
[Grdr] para actualizar la
entrada del contacto.
Agregar otro número de teléfono
Desde el modo de espera
1 Con el teléfono abierto, ingrese el número de teléfono y luego presione la Tecla
de selección izquierda
[Grdr].
2 Use la Tecla Direccional
para resaltar Actualizar existente y luego presione
.
3 Use la Tecla Direccional
para resaltar una entrada existente y luego presione
para actualizar la entrada del contacto.
4 Use la Tecla Direccional
para resaltar Móvil 1/ Casa/ Negocio/ Móvil 2/
Fax y luego presione
para actualizar la entrada del contacto.
En la pantalla de Lista de contactos
1 Abra el teléfono y presione la Tecla de selección izquierda
[Menú].
2 Presione
Contactos.
3 Presione
Lista de contactos.
4 Use la Tecla Direccional
para resaltar una entrada y luego presione la Tecla
de selección izquierda
[Corregir].

37
5 Use la Tecla Direccional para resaltar el campo de número de teléfono que
desea agregar. A continuación, ingrese el número y presione
[Grdr] para
actualizar la entrada del contacto.
Modificar la información guardada
Para editar cualquier información que haya guardado, acceda a la pantalla Editar
contacto:
1 Abra el teléfono y presione la Tecla de selección izquierda
[Menú].
2 Presione
Contactos.
3 Presione
Lista de contactos.
4 Use la Tecla Direccional
para resaltar una entrada de contacto y luego
presione la Tecla de selección izquierda
[Corregir].
5 Use la Tecla Direccional
para resaltar el campo que desea modificar.
6 Realice los cambios y presione
[Grdr] para actualizar la entrada de
contacto.
Cambiar el número predeterminado
El número predeterminado es el número de teléfono que ingresó primero cuando
creó el contacto. Sin embargo, puede guardar otro número como número
predeterminado.
1 Abra el teléfono y presione la Tecla de selección izquierda
[Menú].
2 Presione
Contactos.
3 Presione
Lista de contactos.
4 Use la Tecla Direccional
para resaltar una entrada.

38
Contactos en la memoria de su teléfono
5 Presione la Tecla de selección izquierda [Corregir].
6 Use la Tecla Direccional
para resaltar un número de teléfono y luego
presione la Tecla de selección derecha
[Opciones].
7 Use la Tecla Direccional
para resaltar Fijar como predet y presione .
8 Presione
[Sí] para confirmar el nuevo número como predeterminado.
Aparecerá un mensaje de confirmación.
9 Presione
[Grdr] para actualizar la entrada del contacto.
Eliminar
Eliminar una entrada de contacto
1 Abra el teléfono y presione la Tecla de selección izquierda
[Menú].
2 Presione
Contactos.
3 Presione
Lista de contactos.
4 Use la Tecla Direccional
para resaltar una entrada.
5 Presione la Tecla de selección derecha
[Opciones].
6 Presione
Borrar.
7 Presione
[Sí] para confirmar.
Eliminar un número de marcación rápida
1 Abra el teléfono y presione la Tecla de selección izquierda
[Menú].
2 Presione
Contactos.
3 Presione
Lista de contactos.
4 Use la Tecla Direccional
para resaltar una entrada de contacto que desee
editar y presione
[Ver].

39
5 Resalte el número de teléfono con marcación rápida y luego presione la Tecla
de selección derecha
[Opciones].
6 Presione
Borrar marcado rápido.
7 Presione
[Sí] para confirmar.
Marcación rápida
Le permite hacer llamadas de teléfono rápido y fácilmente a los números
almacenados en Contactos.
Cuando mantiene presionada una tecla numérica, esta le indica al teléfono que
llame a un número de marcación rápida.
NOTA: El número 1 de marcación rápida está reservado para el buzón
de voz.
Marcados rápidos de un dígito
Mantenga presionado el dígito de marcación rápida. El teléfono recuerda el
número de teléfono de sus contactos, lo muestra y lo marca por usted.
Marcación rápida de varios dígitos
Para llamar a un número de marcación rápida de más de un dígito, presione los
primeros dígitos y luego mantenga presionado el último dígito. Por ejemplo para el
número 25 de marcación rápida, presione
y luego mantenga presionada .
NOTA: También puede ingresar dígitos de marcación rápida y presionar
la Tecla Enviar .

40
Uso de menús del teléfono
Prepago
Permite acceder a varios servicios de prepago.
1. Mi número telefónico
Este menú muestra su número de teléfono.
1 Abra el teléfono y presione la Tecla de selección izquierda
[Menú].
2 Presione
Prepago.
3 Presione
Mi número telefónico.
2. Número de serie
Este menú sencillamente muestra la información de MEID de su teléfono.
1 Abra el teléfono y presione la Tecla de selección izquierda
[Menú].
2 Presione
Prepago.
3 Presione
Número de serie.

41
Contactos
El menú Contactos le permite almacenar nombres, números de teléfono y otra
información en la memoria del teléfono.
1. Nuevo contacto
Le permite agregar un nuevo contacto a la lista de contactos.
NOTA: Usando este submenú, el número se guarda como un nuevo
contacto, no en un contacto existente.
1 Abra el teléfono y presione la Tecla de selección izquierda [Menú].
2 Presione
Contactos.
3 Presione
Nuevo contacto.
4 Ingrese el nombre y presione la Tecla Direccional
hacia abajo hasta resaltar
el tipo de número de teléfono que desea usar.
5 Ingrese el número y cualquier información de contacto adicional y presione
[Grdr] para actualizar la entrada del contacto.
NOTA: Para obtener información más detallada, consulte la página 33.

42
Uso de menús del teléfono
2. Lista de contactos
Le permite ver su lista de contactos.
1 Abra el teléfono y presione la Tecla de selección izquierda
[Menú].
2 Presione
Contactos.
3 Presione
Lista de contactos.
4 Use la Tecla Direccional
para desplazarse por sus contactos en orden
alfabético.
t
Presione la Tecla de selección derecha [Opciones] para seleccionar una
de las siguientes opciones:
Nuevo contacto/ Borrar/ Nuevo mensaje/ Llamada/ Administrar
contactos/ Fijar como favorito/ Modo de ingreso de la búsqueda
t
Presione la Tecla de selección izquierda [Corregir] para editar el contacto.
t
Presione [Ver] para ver los detalles de la entrada.
SUGERENCIA: Use el campo Ir a para acceder rápidamente a una
entrada sin necesidad de desplazarse. Por ejemplo, para ir a la entrada
"Veterinario", ingrese la letra V.
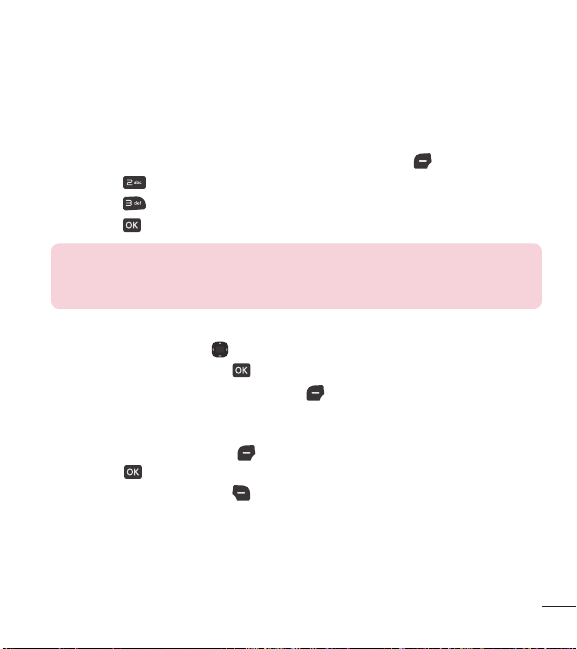
43
3. Favoritos
Le permite agregar entradas de contactos o grupos de contactos a su lista de
favoritos para ver, llamar o enviar mensajes fácilmente.
1 Abra el teléfono y presione la Tecla de selección izquierda
[Menú].
2 Presione
Contactos.
3 Presione
Favoritos.
4 Presione
[Añadir].
SUGERENCIA: Puede agregar hasta 10 contactos y/o grupos de
contactos como Favoritos para realizar llamadas, enviar y revisar
mensajes fácilmente.
5 Seleccione si desea agregar un favorito desde sus Contactos o Grupos.
6 Use la Tecla Direccional
para desplazarse por sus contactos o grupos en
forma alfabética y presione
[Subry].
7 Presione la Tecla de selección izquierda
[Hecho]. Después de agregar los
contactos a la lista de favoritos, tendrá las siguientes opciones disponibles en
el menú Favoritos:
Tecla de selección izquierda
: Ver
Tecla OK
: Nuevo mensaje
Tecla de selección derecha
: Opciones
Mover posición/ Quitar/ Quitar todo

44
Uso de menús del teléfono
4. Grupos
Le permite ver sus contactos agrupados, agregar un nuevo grupo, cambiar el
nombre de un grupo, eliminar un grupo o enviar un mensaje a todos los contactos
de un grupo seleccionado.
1 Abra el teléfono y presione la Tecla de selección izquierda
[Menú].
2 Presione
Contactos.
3 Presione
Grupos.
Las siguientes opciones están disponibles:
t
Ver un grupo
Use la Tecla Direccional
para resaltar un grupo y luego presione [Ver].
t
Agregar un nuevo grupo
Presione la Tecla de selección izquierda
[Nuevo] para agregar un nuevo
grupo a la lista. Introduzca un nombre, inserte una foto (si es necesario) y
presione
[Grdr].
t
Opciones de grupo
Presione la Tecla de selección derecha
[Opciones] para seleccionar una de
las siguientes opciones:
Nuevo mensaje/ Editar grupo nombre & ID/ Corregir miembros/ Borrar
grupo/ Fijar como favorito/ Modo de ingreso de la búsqueda
Agregar contactos a un grupo
1 En el submenú Grupos, presione [Ver] y luego [Añadir].
2 Resalte el contacto deseado y presione
[Subry].
3 Presione la Tecla de selección izquierda
[Hecho] para agregar el contacto
al grupo.

45
5. Marcación rápida
Le permite ver su lista de números de marcación rápida o designar marcación
rápida para números ingresados en sus contactos.
1 Abra el teléfono y presione la Tecla de selección izquierda
[Menú].
2 Presione
Contactos.
3 Presione
Marcación rápida.
4 Use la Tecla Direccional
para resaltar la posición de marcación rápida o
ingresar el dígito de marcación rápida y presione
[Ajust].
5 Use la Tecla Direccional
resaltar el contacto y presione [Ajust]. (Para
contactos que tienen varios números, resalte el número de marcación rápida y
luego presione
.)
6 Presione
[Sí] para confirmar.
Aparecerá un mensaje de confirmación.
6. Mi vCard
Le permite crear, editar y ver toda su información de contacto personal, incluidos
el nombre, los números de teléfono y la dirección de correo electrónico de una
entrada.
1 Abra el teléfono y presione la Tecla de selección izquierda
[Menú].
2 Presione
Contactos.
3 Presione
Mi vCard.
4 Presione
[Crrgr] para ingresar su información de contacto personal.
5 Use la Tecla Direccional
para desplazarse a la información que desea
ingresar.

46
Uso de menús del teléfono
6 Ingrese la información necesaria y presione [Grdr].
NOTA: Presione la Tecla de selección derecha [Enviar] para enviar su
tarjeta de nombre.
Mensajes
Dependiendo del contenido y el tamaño de sus mensajes, el teléfono puede
almacenar hasta 790 mensajes (incluido un máximo de 300 mensajes de
texto, 100 alertas de emergencia, 100 notificaciones de mensajes multimedia
y 100 mensajes multimedia la bandeja de entrada; 100 mensajes de texto y
50 mensajes multimedia en la bandeja de salida; 20 mensajes de texto y 20
mensajes multimedia en Borradores). El contenido almacenado en el mensaje
puede verse limitado por el modelo del teléfono y la capacidad del servicio. Puede
haber otros límites a los caracteres disponibles por mensaje. Compruebe con su
proveedor de servicio las funciones y capacidades del sistema.
t
Cuando vea un mensaje recibido, puede llamar al remitente presionando la
Tecla Enviar
.
Alerta de nuevos mensajes
El teléfono puede alertarle cuando recibe nuevos mensajes. Las opciones incluyen:
1 El teléfono muestra un mensaje en la pantalla.
2 Aparece el icono de mensaje (
) en la pantalla. En el caso de un mensaje de
alta prioridad, el icono (
) parpadeará.

47
1. Nuevo mensaje
Este menú le permite enviar mensajes. Dependiendo del tipo de mensaje que
desee enviar, también puede adjuntar archivos a sus mensajes, como imágenes,
sonidos, grabaciones de voz y tarjetas de nombre.
Aspectos básicos del envío de un mensaje de texto
1 Abra el teléfono y presione la Tecla de selección izquierda
[Menú].
2 Presione
Mensajes.
3 Presione
Nuevo mensaje.
Para acceder a esta función, puede presionar la Tecla Mensajes
desde el
modo de espera.
4 Ingrese un número de teléfono o el nombre de un destinatario en el campo
Para.
Mientras los ingresa, aparecen contactos coincidentes. Puede elegir un
destinatario sugerido o seguir ingresando el número de teléfono.
5 Presione
para acceder al campo de texto.
6 Use el teclado para escribir el mensaje.
7 Presione
[Enviar].
Seleccionar destinatarios con la función Agregar
1 Abra el teléfono y presione la Tecla de selección izquierda
[Menú].
2 Presione
Mensajes.
3 Presione
Nuevo mensaje.
4 Seleccione el campo Para, presione la Tecla de selección derecha
[Añadir].

48
Uso de menús del teléfono
5 Seleccione una opción y presione .
De contactos Para seleccionar un destinatario de su lista de contactos.
De llamadas rctes Para seleccionar un destinatario de las llamadas recientes.
Favoritos Para seleccionar un destinatario de la lista de favoritos.
Grupos Para seleccionar un destinatario de sus grupos.
6 Use el teclado para escribir el mensaje.
7 Presione
[Enviar].
Mensajes multimedia usando opciones
Le permite enviar mensajes con archivos adjuntos de texto, imágenes, sonidos y
tarjetas de nombre.
1 Abra el teléfono y presione la Tecla de selección izquierda
[Menú].
2 Presione
Mensajes.
3 Presione
Nuevo mensaje.
4 Ingrese el número de teléfono o el nombre de un destinatario en el campo
Para.
5 Presione
para acceder al campo de texto.
6 Use el teclado para escribir el mensaje.
7 Presione la Tecla de selección derecha
[Opciones].

49
8 Seleccione una opción y presione .
1. Adjuntar
1. Foto Permite insertar una foto. Resalte la foto y luego presione
.
2. Tomar foto Permite tomar una foto e insertarla.
3. Sonido Permite insertar un sonido. Resalte el sonido y luego presione
.
4. Grabar voz Permite grabar un archivo nuevo de sonido. Presione
para comenzar a grabar y luego presione
para detener.
5. Tarjeta de nombre
1. Mi vCard Presione
para agregar su tarjeta de nombre.
2. De contactos Presione
[Subry] para marcar las tarjetas de
nombre que desea enviar y presione la Tecla de selección izquierda
[Hecho].
2. Avance Permite ver una vista previa del mensaje antes de enviarlo.
3. Insertar plantillas Permite insertar una plantilla de texto. Resalte una
plantilla y presione
.
4. Guardar como borrador Permite guardar el mensaje como borrador.
5. Añadir diapositiva Permite agregar otra diapositiva para poder insertar
adjuntos adicionales.
6. Prioridad Permite elegir el nivel de prioridad del mensaje. Elija entre Alto o
Normal y presione
[Fijado].
7. Cancelar mensaje Permite cancelar la edición del mensaje. Seleccione Sí
para guardar el mensaje en borradores o No para cancelar el mensaje sin
guardarlo en borradores.
9 Use el teclado para ingresar el asunto en el campo Asunto.
10 Presione
[Env].

50
Uso de menús del teléfono
2. Entrada
El teléfono le avisa de tres formas cuando recibe un nuevo mensaje:
t
Al mostrar un mensaje de notificación en la pantalla.
t
Al emitir un tono o una vibración, si los configura.
t
Al mostrar (el icono aparece cuando recibe un mensaje de alta prioridad.)
Visualización de la bandeja de entrada
1 Abra el teléfono y presione la Tecla de selección izquierda
[Menú].
2 Presione
Mensajes.
3 Presione
Entrada.
4 Resalte un mensaje. Están disponibles las opciones siguientes.
t
Presione [Abrir] para ver el mensaje.
t
Presione la Tecla de selección izquierda [Borrar] para eliminar el mensaje
resaltado.
t
Presione la Tecla de selección derecha [Opciones] para acceder a las
siguientes opciones:
Contestar Responde a la dirección del remitente del mensaje recibido.
Responder con copia Responde a la dirección del remitente con una copia
del texto del mensaje original incluida.
Adelantar Reenvía el mensaje a otras direcciones de destino.
Añadir a contactos Guarda el número de devolución, la dirección de
correo electrónico y los números de la dirección del mensaje recibido en sus
contactos.
Extraer direcciones Permite extraer las direcciones de contacto del
mensaje y guardarlas (si desea).
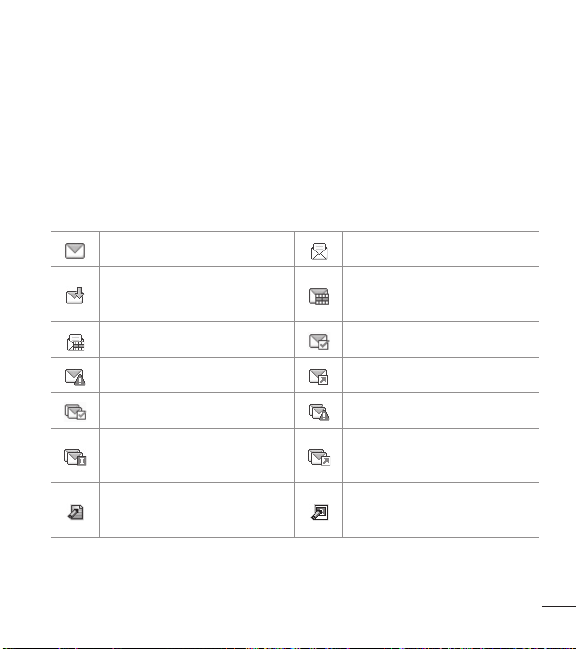
51
Info. mensaje Le permite revisar la información del mensaje recibido.
Administrar entrada Le permite administrar (bloquear, eliminar y más)
varios mensajes.
Ordenar por remitente/Ordenado por tiemp Le permite ordenar los
mensajes en forma alfabética por el nombre del remitente o la hora de
recepción.
Referencia de iconos de mensajes
Nuevo mensaje de texto Mensaje de texto leído
Nuevo mensaje multimedia
recibido
Nuevo mensaje multimedia
no leído
Mensaje multimedia leído Mensaje entregado
Error de envío Mensaje enviado
Múltiples mensajes entregados Múltiples mensajes con error
Envío de múltiples mensajes
incompleto
Múltiples mensajes enviados
Borrador de mensaje de texto
Borrador de mensaje
multimedia
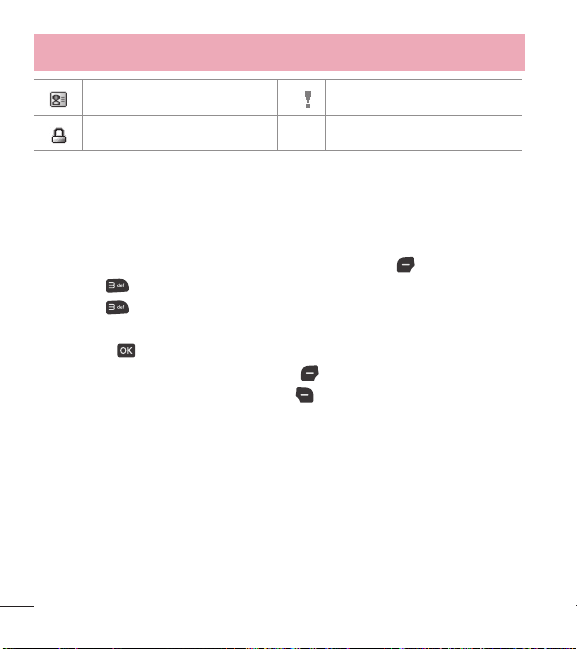
52
Uso de menús del teléfono
Tarjeta de nombre Alta prioridad
Bloquear
* Mensaje multimedia indica que se trata de un mensaje de imagen voz.
3. Enviado
El menú Enviado almacena todos los mensajes enviados.
1 Abra el teléfono y presione la Tecla de selección izquierda
[Menú].
2 Presione
Mensajes.
3 Presione
Enviado.
4 Resalte un mensaje. Las siguientes opciones están disponibles.
t
Presione [Abrir] para ver el mensaje.
t
Presione la Tecla de selección izquierda [Borrar] para borrar el mensaje.
t
Presione la Tecla de selección derecha [Opciones] para las siguientes
opciones.
Adelantar/ Enviar/ Añadir a contactos/ Info. mensaje/ Administrar
enviado/ Ordenado por destinatario
5 Mientras ve un mensaje, elija las siguientes opciones:
V
olver a escu/ Adelantar/ Bloq/ Guardar como plantilla/ Añadir a
contactos/ Info. mensaje

53
4. Borradores
Los borradores de mensajes guardados se almacenan aquí.
1 Abra el teléfono y presione la Tecla de selección izquierda
[Menú].
2 Presione
Mensajes.
3 Presione
Borradores.
4 Resalte un mensaje. Están disponibles las opciones siguientes.
t
Presione [Crrgr] para seguir editando el mensaje.
t
Presione la Tecla de selección izquierda [Borrar] para eliminar el
mensaje.
t
Presione la Tecla de selección derecha [Opciones] para acceder a las
siguientes opciones:
Enviar Envía el mensaje seleccionado.
Añadir a contactos Guarda el número, la dirección de correo electrónico y
los números de la dirección incluida en el mensaje en sus Contactos.
Administrar borradores Le permite administrar (borrar o bloquear)
mensajes.
Referencia de iconos de mensajes
Borrador de mensaje de texto
Borrador de mensaje multimedia

54
Uso de menús del teléfono
5. Buzón de voz
Le permite ver la cantidad de nuevos mensajes de voz grabados en el buzón de
correo de voz. Cuando exceda el límite de almacenamiento, los mensajes antiguos
se sobrescribirán. Cuando reciba un nuevo mensaje de voz, el teléfono le avisará.
Consultar su buzón de correo de voz
1 Abra el teléfono y presione la Tecla de selección izquierda
[Menú].
2 Presione
Mensajes.
3 Presione
Buzón de voz.
4 Están disponibles las opciones siguientes.
t
Presione la Tecla de selección izquierda [Anular] para borrar el contador
de buzón de voz. Luego presiona
[Sí].
t
Presione la Tecla Enviar o [Llmd] para escuchar los mensajes.
O
1 Ingrese su número de teléfono y presione la Tecla Enviar
desde el
teléfono o marque su número de teléfono inalámbrico desde cualquier teléfono
convencional de tono.
O
Mantenga presionada
en el teléfono para activar el marcación rápida a su
correo de voz.
2 Cuando comience el anuncio grabado, presione
para interrumpirlo (si
corresponde).
3 Cuando se lo soliciten, ingrese su contraseña y presione
.

55
6. Plantillas
Permite administrar las plantillas de texto.
1 Abra el teléfono y presione la Tecla de selección izquierda
[Menú].
2 Presione
Mensajes.
3 Presione
Plantillas.
4 Seleccione un mensaje para ver su contenido y editarlo. Presione
[Guardar]
para guardarlo.
Ajustes de mensajes
Le permite configurar los ajustes de sus mensajes.
1 Con el teléfono abierto, presione la Tecla de selección izquierda
[Menú].
2 Presione
Mensajes.
3 Presione la Tecla de selección izquierda
[Prog].
4 Use la Tecla Direccional
para resaltar uno de los ajustes y presione para
seleccionarlo.
Opciones de ajustes de mensajes
1 Mod ingrs
Seleccione T9 Palabra, Abc, ABC, 123 o T9 Word para que sea su método de
entrada predeterminado.
2 Tamaño de fuente de mensajería
Permite seleccionar Pequeña, Normal o Grande para indicar el tamaño de los
caracteres del texto.

56
Uso de menús del teléfono
3 Respuesta instantánea de TXT
Seleccione Encendido para escribir una respuesta en forma instantánea. De lo
contrario, seleccione Apagado.
4 Auto-dsplz TXT
Seleccione Encendido para desplazarse automáticamente hacia abajo por el
texto mientras ve los mensajes o seleccione Apagado.
5 Alerta CMAS
Ajuste su configuración para recibir alertas de emergencia. Este menú le ofrece
tres opciones: Recibir alertas/ Recordatorio de alerta/ Alerta tono/ Alerta
vibración
6 Firma
Seleccione Personalizada para crear/editar una firma para enviar en forma
automática con los mensajes. Seleccione Ninguno para no enviar mensajes
con firma.
7 Notificación msj TXT-multimedia
Muestra una notificación desplegable cuando cambia entre mensajes de texto y
multimedia.
Borrar mensajes
Puede borrar los mensajes almacenados en las carpetas Entrada, Enviados o
Borradores. También puede borrar todos los mensajes de una vez.
1 Abra el teléfono y presione la Tecla de selección izquierda
[Menú].
2 Presione
Mensajes.

57
3 Presione la Tecla de selección derecha [Opciones] y seleccione una de las
siguientes opciones:
Borrar entrada/ Borrar enviado/ Borrar borradores/ Borrar todo
4 Presione
[Sí] para confirmar la eliminación o seleccione los mensajes que
desea eliminar.
Aparecerá un mensaje de confirmación.
Llamadas recientes
El menú Llamadas recientes tiene listas de números de teléfono y/o entradas
de contactos de las llamadas que realiza, acepta o pierde. Se actualiza
continuamente a medida que se agregan nuevos números al principio de la lista y
se eliminan las entradas más antiguas desde la parte inferior de la lista.
1. Perdidas
Le permite ver la lista de llamadas perdidas; hasta 90 entradas.
1 Abra el teléfono y presione la Tecla de selección izquierda
[Menú].
2 Presione
Llamadas recientes.
3 Presione
Perdidas.
4 Use la Tecla Direccional
para resaltar una entrada y luego
t
Presione [Abrir] para abrir la entrada.
t
Presione la Tecla Enviar para llamar al número.
t
Presione la Tecla de selección derecha [Opciones] para seleccionar:
Guardar en contactos (Info de contacto)/ Borrar/ Asegurar (Abrir)/
Borrar todo/ Tiempo de llamadas

58
Uso de menús del teléfono
t
Presione la Tecla de selección izquierda [Mensaje] para enviar un
mensaje al número.
2. Recibidas
Le permite ver la lista de llamadas entrantes; hasta 90 entradas.
1 Abra el teléfono y presione la Tecla de selección izquierda
[Menú].
2 Presione
Llamadas recientes.
3 Presione
Recibidas.
4 Use la Tecla Direccional
para resaltar una entrada y luego
t
Presione [Abrir] para abrir la entrada.
t
Presione la Tecla Enviar para llamar al número.
t
Presione la Tecla de selección derecha [Opciones] para selecionar:
Guardar en contactos (Info de contacto)/ Borrar/ Asegurar (Abrir)/
Borrar todo/ Tiempo de llamadas
t
Presione la Tecla de selección izquierda [Mensaje] para enviar un
mensaje al número.
3. Marcadas
Le permite ver la lista de llamadas salientes; hasta 90 entradas.
1 Abra el teléfono y presione la Tecla de selección izquierda
[Menú].
2 Presione
Llamadas recientes.
3 Presione
Marcadas.
4 Use la Tecla Direccional
para resaltar una entrada y luego
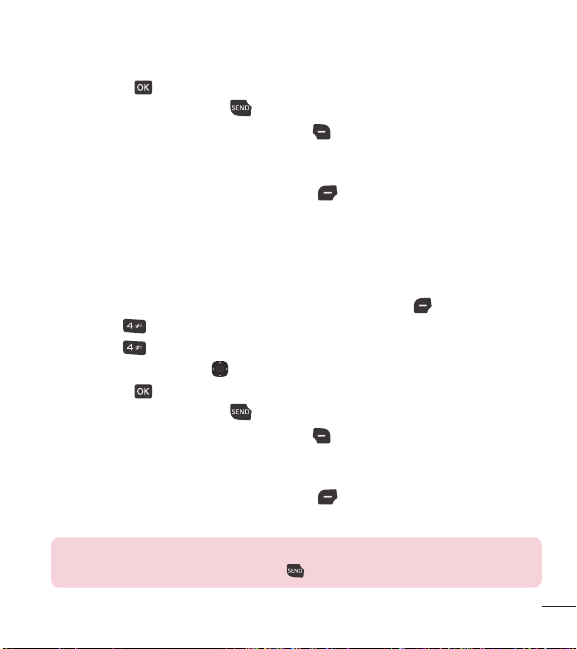
59
t
Presione [Abrir] para abrir la entrada.
t
Presione la Tecla Enviar para llamar al número.
t
Presione la Tecla de selección derecha [Opciones] para seleccionar:
Guardar en contactos (Info de contacto)/ Borrar/ Asegurar (Abrir)/
Borrar todo/ Tiempo de llamadas
t
Presione la Tecla de selección izquierda [Mensaje] para enviar un
mensaje al número.
4. Todas
Le permite ver la lista de todas las llamadas; hasta 270 entradas.
1 Abra el teléfono y presione la Tecla de selección izquierda
[Menú].
2 Presione
Llamadas recientes.
3 Presione
Todas.
4 Use la Tecla Direccional
para resaltar una entrada y luego
t
Presione [Abrir] para abrir la entrada.
t
Presione la Tecla Enviar para llamar al número.
t
Presione la Tecla de selección derecha [Opciones] para seleccionar:
Guardar en contactos (Info de contacto)/ Borrar/ Asegurar (Abrir)/
Borrar todo/ Tiempo de llamadas
t
Presione la Tecla de selección izquierda [Mensaje] para enviar un
mensaje al número.
ACCESO DIRECTO: Para ver una lista rápida de todas sus llamadas
recientes, presione la Tecla Enviar desde el modo de espera.

60
Uso de menús del teléfono
5. Tiempo de llamadas
Le permite ver la duración de los tipos de llamada seleccionados.
1 Abra el teléfono y presione la Tecla de selección izquierda
[Menú].
2 Presione
Llamadas recientes.
3 Presione
Tiempo de llamadas.
4 Use la Tecla Direccional
para resaltar un contador de llamada.
Última llamada/ Todas las llamadas/ Llamadas recibidas/ Llamadas
marcadas/ Llamadas roaming/ Último reajuste/ Total de llamadas
5 Presione la Tecla de selección izquierda
[Reaj] para restablecer el
temporizador resaltado.
6 Restablezca todos los temporizadores registrados al presionar la Tecla de
selección derecha
[Reaj tod].
NOTA: El contador Total de llamadas no se puede restablecer.
Juegos
Permite disfrutar juegos y aplicaciones descargadas.
1 Abra el teléfono y presione la Tecla de selección izquierda
[Menú].
2 Presione
Juegos.
3 Seleccione un juego o presione
Comprar juegos para buscar más.

61
Acceso web
Le permite acceder a noticias, deportes, información del clima y correo electrónico
desde su dispositivo. El acceso y las selecciones dentro de esta función dependen
de su proveedor de servicios. Para obtener información específica sobre el acceso
a Internet desde el teléfono, comuníquese con su proveedor de servicios.
1 Abra el teléfono y presione la Tecla de selección izquierda
[Menú].
2 Presione
Acceso web.
Multimedia
Todo lo que necesita saber mientras está en movimiento.
1. Tomar foto
Le permite tomar fotos digitales.
ACCESO DIRECTO: Presione la Tecla Cámara desde el modo de
espera para abrir la función de cámara.
1 Abra el teléfono y presione la Tecla de selección izquierda [Menú].
2 Presione
Multimedia.
3 Presione
Tomar foto.
4 Ajuste el brillo al presionar la Tecla Direccional
arriba y abajo, presione
la Tecla Direccional
izquierda y derecha para acercar y alejar la imagen
y presione la Tecla de selección derecha
[Opciones] para cambiar otros
ajustes.

62
Uso de menús del teléfono
NOTA: La función de zoom no está disponible en la resolución más alta.
t
Seleccione las opciones que desea personalizar.
Resolución Permite cambiar la resolución de la imagen. Elija entre
1280X960/ 640X480/ 320X240.
Disparo auto Permite establecer un contador para que pueda formar parte
de la foto.
Elija entre Apagado/ 3 Segundos/ 5 Segundos/ 10 Segundos.
Equil blanco Permite ajustar el balance de blanco para la imagen. Elija
entre Automático/ Soleado/ Nublado/ Fluorescente/ Brillo.
Sonido dispa Permite elegir el sonido de disparo que se escucha cuando
toma una foto. Elija entre Obturador/ Sin sonido/ Say “cheese”/ Ready! 1
2 3.
Efectos color Permite ajustar los efectos de color para la imagen. Elija entre
Normal/ Negativo/ Agua/ Sepia/ Blanco y Negro.
Modo nocturno Permite establecer el modo nocturno. Elija entre
Encendido/ Apagado.
Reduc. de ruido Permite ajustar la reducción de ruido. Elija entre
Encendido/ Apagado.
Guardar Permite establecer si desea guardar la imagen automáticamente
después de tomarla. Elija entre Encendido/ Apagado.
Avance Permite elegir el tamaño de la pantalla de vista previa. Elija entre
Vista real/ Pantalla llena.
5 Para tomar una foto, presione
[Foto].
6 Presione la Tecla de selección izquierda
[Guar]. La foto se guarda en Mis
fotos.

63
2. Grabar voz
Le permite grabar su voz.
1 Abra el teléfono y presione la Tecla de selección izquierda
[Menú].
2 Presione
Multimedia.
3 Presione
Grabar voz.
4 Presione
para comenzar a grabar y luego presione [Alto] para detener
la grabación.
3. Fotos
Este menú le permite ver todas las fotos y comprar gráficos.
1 Abra el teléfono y presione la Tecla de selección izquierda
[Menú].
2 Presione
Multimedia.
3 Presione
Fotos.
4 Explore los submenús.
3.1 Mis fotos
Le permite ver y administrar las fotos almacenadas en el teléfono.
1 Abra el teléfono y presione la Tecla de selección izquierda
[Menú].
2 Presione
Multimedia.
3 Presione
Fotos.
4 Presione
Mis fotos.
5 Resalte una imagen con la Tecla Direccional
.

64
Uso de menús del teléfono
Están disponibles las siguientes opciones:
t
Presione [Ver] para verla.
t
Presione la Tecla de selección izquierda [Borrar] para eliminarla.
t
Presione la Tecla de selección derecha [Opciones] para seleccionar de las
siguientes opciones:
Enviar Permite compartir la foto con otros a través de mensaje o Bluetooth.
Fijar como Permite establecer la foto como su fondo de pantalla o identificador
de foto para un contacto.
Tomar foto Permite acceder la función de cámara para tomar una foto.
Presentación de diapositivas Reproduce todas las imágenes como una
presentación de diapositivas.
Administrar fotos Le permite marcar varias imágenes para borrarlas, enviarlas
o bloquearlas/desbloquearlas.
Renombrar Le permite cambiar el nombre del archivo.
Aseg (Abrir) Le permite bloquear o desbloquear. Los archivos bloqueados no
pueden borrarse accidentalmente.
Info de arch Permite ver información del archivo de imagen.
Editar una foto
V
aya a Mis fotos y use la Tecla Direccional
para resaltar una imagen. Presione
[Ver] y luego presione la Tecla de selección derecha [Opciones] y
seleccione Editar para realizar zoom, girar y recortar la fotografía.

65
3.2 Predetermin. fotos
Le permite ver y administrar las fotos predeterminadas almacenadas en el
teléfono.
1 Abra el teléfono y presione la Tecla de selección izquierda
[Menú].
2 Presione
Multimedia.
3 Presione
Fotos.
4 Presione
Predetermin. fotos.
5 Resalte una imagen con la Tecla Direccional
.
Están disponibles las siguientes opciones:
t
Presione [Ver] para verla.
t
Presione la Tecla de selección derecha [Opciones] para acceder la opción
para establecer la imagen como fondo de pantalla.
3.3 Comprar gráficos
Este menú le permite comprar imágenes.
1 Abra el teléfono y presione la Tecla de selección izquierda
[Menú].
2 Presione
Multimedia.
3 Presione
Fotos.
4 Presione
Comprar gráficos.

66
Uso de menús del teléfono
4. Timbres
Personalice su teléfono con tonos de timbre. Está disponible una amplia variedad
de opciones, como hits, hip-hop, y más.
4.1 Mis sonidos
Le permite grabar un nuevo sonido o seleccionar el sonido que desee.
Grabar un nuevo sonido
1 Abra el teléfono y presione la Tecla de selección izquierda
[Menú].
2 Presione
Multimedia.
3 Presione
Timbres.
4 Presione
Mis sonidos.
5 Presione
Grabar nuevo y luego para iniciar la grabación; después,
presione
[Alto] para finalizar la grabación.
Seleccionar un sonido
1 Abra el teléfono y presione la Tecla de selección izquierda
[Menú].
2 Presione
Multimedia.
3 Presione
Timbres.
4 Presione
Mis sonidos.
5 Use la Tecla Direccional
para desplazarse y seleccionar un sonido
precargado.
Opciones con un archivo de sonido resaltado:
t
Presione la Tecla de selección izquierda [Fij como] para establecer como
Timbre, Contacto ID o Sonidos de alerta.
t
Presione [Escu] para escuchar el sonido.

67
t
Presione la Tecla de selección derecha [Opciones] para seleccionar:
Enviar vía bluetooth/ Renombrar/ Aseg (Abrir)/ Borrar/ Borrar todo/ Info de
arch
4.2 Predetermin. timbres
Permite administrar los sonidos precargados.
1 Abra el teléfono y presione la Tecla de selección izquierda
[Menú].
2 Presione
Multimedia.
3 Presione
Timbres.
4 Presione
Predetermin. timbres.
5 Use la Tecla Direccional
para resaltar un tono de timbre y presione
[Escu] para reproducir el tono de timbre o la Tecla de selección izquierda
[Fij como] para establecer el tono de timbre como:
t
Timbre: Establece el tono de timbre para las llamadas entrantes.
t
Contacto ID: Resalta y selecciona el contacto que identificará el tono de
timbre que seleccione.
t
Sonidos de alerta: Presione la tecla numérica correspondiente para
definir el tono de timbre para una de las siguientes opciones:
Todo mensaje/ Mensaje de TXT/ Mensaje de multimedias/ Buzón de voz
4.3 Comprar timbres
Este menú le permite comprar timbres.
1 Abra el teléfono y presione la Tecla de selección izquierda
[Menú].
2 Presione
Multimedia.
3 Presione
Timbres.
4 Presione
Comprar timbres.

68
Uso de menús del teléfono
Herramientas
Las herramientas del teléfono incluyen comandos de voz, calculadora, calculadora
de propinas, eco-calculadora, búsqueda de info, cronómetro, cuaderno de notas y
convertidor de unidades.
1 Abra el teléfono y presione la Tecla de selección izquierda
[Menú].
2 Presione
Herramientas.
1. Comandos de voz
Esta función brinda las siguientes opciones con tecnología de reconocimiento de
voz avanzado (AVR). Cada opción le ofrece información detallada en el teléfono a
la que puede acceder presionando la Tecla de selección izquierda
[Info].
1 Abra el teléfono y presione la Tecla de selección izquierda
[Menú].
2 Presione
Herramientas.
3 Presione
Comandos de voz.
Acceso y opciones
Con el teléfono abierto, presione la Tecla Comandos de voz
en el teclado.
La función Comandos de voz tiene varios ajustes que le permiten personalizar
cómo desea usarla. Acceda a Comandos de voz y presione la Tecla de selección
derecha
[Prog].
Confirmar selecciones Permite elegir si desea que el sistema de comandos
le solicite con una lista de coincidencias potenciales. Elija entre Automático/
Siempre confirmar/ Nunca confirmar.

69
Sensibilidad Permite controlar cómo el sistema filtra las coincidencias. Elija entre
Más sensible/ Automático/ Menos sensible.
Entrenar de voz Esta opción le permite entrenar el teléfono para que reconozca
los patrones de voz. Elija entre Entrenar palabras/ Entrenar dígitos.
Avisos Permite establecer cómo es notificado por el sistema de comandos de voz
y la duración que se le permite responder. Elija entre Modo/ Reproducción de
audio/ Tiempo de espera.
t
Para Modo, establezca Avisos/ Lectura + Alertas/ Lectura/ Sólo tonos.
t
Para Reproducción de audio, establezca Altavoz o Auricular.
t
Para Tiempo de espera, establezca 5 Segundos o 10 Segundos.
1.1 Iniciar Comando de voz
1 Abra el teléfono y presione la Tecla de selección izquierda [Menú].
2 Presione
Herramientas.
3 Presione
Comandos de voz.
NOTA: También puede presionar la Tecla Comandos de voz desde
el modo de espera para acceder a la función de Comandos de voz
rápidamente.

70
Uso de menús del teléfono
1.1.1 Llamar <Nombre o Número>
Diga "Llamar" y luego llame a alguien con solo pronunciar el nombre o el número
de teléfono. Hable claramente y diga el nombre o el número exactamente como lo
ingresó en su Lista de contactos. Si tiene más de un número de contacto, puede
decir el nombre y el tipo de número del contacto (por ejemplo, "Llamar a Juan -
Oficina").
1.1.2 Enviar msj a <Nombre o Número o Grupo>
Diga "Enviar mensaje" y el comando le pedirá que defina el tipo de mensaje. Una
vez elegido el tipo de mensaje, se le solicitará el nombre, número o grupo del
contacto. El mensaje se iniciará automáticamente. Si dice un comando de oración
completa, como "Enviar mensaje a Roberto", el sistema iniciará automáticamente
un mensaje de texto sin preguntar el tipo de mensaje. Al usar el comando "Enviar
mensaje", hable claro y mencione el nombre, el número, o el nombre del grupo
exactamente como se ingresó en la Lista de contactos.
1.1.3 Ir a <Menú>
El comando "Ir a" le permite acceder a un menú en el teléfono (por ejemplo, "Ir a
Calendario").
Si no se menciona ninguna opción de menú, se proporcionará una lista de
opciones.
1.1.4 Verificar <Elemento>
El comando "Verificar" le permite verificar varios elementos, como el Estado del
teléfono, Buzón de voz, Mensajes, Llamadas perdidas, Hora, Fuerza de la señal,
Nivel de batería, Volumen y Mi número.

71
1.1.5 Contactos <Nombre>
Puede buscar nombres en sus Contactos (por ejemplo, "Contactos Juan") así
como también administrar su lista de contactos al crear, borrar o modificar.
1.1.6 Remarcar
Diga "Remarcar" y el teléfono marcará nuevamente el último número.
1.1.7 Ayuda
Proporciona los lineamientos generales para usar los comandos de voz.
2. Calculadora
Permite realizar cálculos matemáticos simples.
1 Abra el teléfono y presione la Tecla de selección izquierda
[Menú].
2 Presione
Herramientas.
3 Presione
Calculadora.
4 Introduzca los números para obtener el valor que desea. Para borrar los
elementos ingresados, presione la Tecla de selección izquierda
[Despejar].
5 Utilice la Tecla de selección derecha
[Operadores] para agregar otros
operadores.
6 Use la Tecla Direccional
para introducir una operación con números y luego
presione
[ = ] para obtener el resultado.
NOTA: Para insertar un decimal, presione . Para cambiar el número a
positivo o negativo, presione .

72
Uso de menús del teléfono
3. Ez sugerencia
Le permite calcular las cantidades de una cuenta fácilmente y rápidamente
utilizando el total de la cuenta, el % de propina y el número de personas como
variables.
1 Abra el teléfono y presione la Tecla de selección izquierda
[Menú].
2 Presione
Herramientas.
3 Presione
Ez sugerencia.
4 Ingrese los campos variables (Cuenta, Propina (%), Dividir) y los campos de
cálculo correspondientes (Propina ($) y Cada) aparecerán en forma automática.
5 Presione la Tecla de selección izquierda
[Reaj] para hacer otro cálculo.
4. Eco-calculadora
Le permite hacer seguimiento de sus distancias a pie o en bicicleta. Le muestra la
cantidad de CO
2
que se reduce al caminar y andar en bicicleta.
1 Abra el teléfono y presione la Tecla de selección izquierda
[Menú].
2 Presione
Herramientas.
3 Presione
Eco-calculadora.
4 Seleccione los campos Caminata o Ciclismo para editar las horas y millas.
NOTA: La cantidad de CO
2
decreciente se actualiza en forma automática
cuando ingresa la cantidad de horas o millas.

73
5 Presione la Tecla de selección izquierda [Prog] para ajustar las siguientes
ajustes.
t
Modo Le permite cambiar la animación de la pantalla principal de la eco-
calculadora a Persona o Árbol. Dependiendo de la información que ingresó
por última vez (Caminata o Ciclismo), aparecerá una animación. El número de
árboles en la animación se calcula según la cantidad de CO
2
que se redujo.
t
Caracter Le permite cambiar el caracter a Hombre, Hombre & Mujer y
Mujer. Esta opción no está disponible cuando define el modo como Árbol.
t
Unidad Le permite cambiar la unidad a Hora o Milla.
t
Mi carro Le permite seleccionar el tipo de combustible que utiliza su auto y
la eficiencia de combustible (mpg) de su auto con el fin de medir la cantidad
de CO
2
descargado.
5. Búsqueda de info
Le permite buscar elementos almacenados en el teléfono.
1 Abra el teléfono y presione la Tecla de selección izquierda
[Menú].
2 Presione
Herramientas.
3 Presione
Búsqueda de info.
4 Ingrese dos o más caracteres en el campo de búsqueda y presione
[Buscar].
5 De forma predeterminada, el teléfono buscará todas las categorías. Para
especificar las categorías, seleccione Todo y presione la Tecla de selección
izquierda [Fijado]. Use la Tecla Direccional para resaltar una categoría
y presione
[Subry] para marcar/desmarcar la categoría. Después de
especificar las categorías, presione la Tecla de selección izquierda
[Hecho].

74
Uso de menús del teléfono
6 Para ver un resultado de búsqueda, resalte los resultados deseados y presione
[Ver]. Si desea reintentar la búsqueda, presione la Tecla de selección
derecha
[Reintentar]. Si desea iniciar una nueva búsqueda, presione
la Tecla de selección izquierda
[Búsqueda], ingrese la palabra clave y
presione
.
7 Si no se encuentran resultados, se le solicitará volver a intentarlo. Elija Sí para
volver a intentarlo o No para regresar al menú Herramientas.
6. Cronómetro
Le permite usar el teléfono como un cronómetro típico.
1 Abra el teléfono y presione la Tecla de selección izquierda
[Menú].
2 Presione
Herramientas.
3 Presione
Cronómetro.
4 Presione
[Cmnzr].
5 Al presionar
[Alto] se detendrá o reanudará el tiempo del cronómetro.
t
Mientras calcula el tiempo, presione la Tecla de selección izquierda
[Vuelta] para registrar una vuelta.
t
Una vez que el tiempo se ha detenido, presione la Tecla de selección derecha
[Reaj].

75
7. Cuaderno de notas
Le permite agregar notas para usted mismo, leerlas, editarlas y borrarlas.
1 Abra el teléfono y presione la Tecla de selección izquierda
[Menú].
2 Presione
Herramientas.
3 Presione
Cuaderno de notas.
4 Presione la Tecla de selección izquierda
[Añadir] para crear una nueva
nota.
5 Presione la Tecla de selección izquierda
para cambiar el modo de entrada.
O presione la Tecla de selección derecha
[Opciones] para Copiar texto y
Pegar o Cancelar la entrada del cuaderno de notas.
6 Después de escribir la nota, presione
[Grdr] para guardarla.
8. Convertidor de unidades
Permite convertir unidades a las unidades deseadas.
1 Abra el teléfono y presione la Tecla de selección izquierda
[Menú].
2 Presione
Herramientas.
3 Presione
Convertidor de unidades.
4 Elija entre Área/ Longitud/ Masa/ Temperatura/ Volumen/ Velocidad.
5 Seleccione el tipo de unidad conocida e introduzca la cantidad que desea
convertir. La conversión ocurre al introducir la cantidad deseada.

76
Uso de menús del teléfono
Mi agenda
Le permite mantener la conveniencia y la facilidad de acceso a su agenda. Sólo
tendrá que almacenar sus citas y el teléfono le avisará con un recordatorio.
1. Calendario
Le permite mantener la conveniencia y la facilidad de acceso a su agenda. Sólo
tendrá que almacenar sus citas y el teléfono le avisará con un recordatorio.
1 Abra el teléfono y presione la Tecla de selección izquierda
[Menú].
2 Presione
Mi agenda.
3 Presione
Calendario.
4 Use la Tecla Direccional
para resaltar el día programado.
Izquierda: Día anterior
Derecha: Día siguiente
Arriba: Semana anterior
Abajo: Semana siguiente
5 Presione la Tecla de selección izquierda [Añadir].
6 Introduzca el asunto y desplácese hacia abajo para configurar los ajustes
restantes.
7 Resalte un campo de ajuste en el Calendario y presione la Tecla de selección
izquierda
[Ajustar]. Para cada evento del Calendario, puede ajustar lo
siguiente:
t'FDIBEFJOJDJP t)BSBEFDPNJFO[P
t'FDIBEFUÏSNJOP t)PSBEFUÏSNJOP
t3FQFUJS t)BTUB

77
t"MFSUB t5POPT
t7JCSBS
8 Use la Tecla Direccional
para resaltar el ajuste que desea y luego presione
.
9 Presione
[Grdr] cuando termine de ingresar la información en el Calendario.
Editar y eliminar entradas del calendario
1 En la lista de entradas del calendario, presione
[Ver].
2 Presione
[Crrgr] para editar la entrada del calendario o presione la Tecla de
selección izquierda
[Borrar] para eliminar la entrada.
2. Reloj despertador
Le permite configurar hasta 10 alarmas. A la hora de la alarma, su alarma
aparecerá en la pantalla LCD y sonará la alarma.
1 Abra el teléfono y presione la Tecla de selección izquierda
[Menú].
2 Presione
Mi agenda.
3 Presione
Reloj despertador.
4 Presione la Tecla de selección izquierda
[Añadir].
5 Use la Tecla Direccional
para resaltar la información que desea configurar
y luego presione la Tecla de selección izquierda
[Ajustar] para ver sus
ajustes.
Ingrese la información de la alarma, incluida:
t&ODFOEFSBQBHBS t'JKBSUJFNQ
t1FSJPEJDJEBE t5JNCSF

78
Uso de menús del teléfono
6 Presione [Grdr] después de configurar todos los campos de Alarma, según
sea necesario.
Eliminar alarmas
1 En la lista Alarma, presione la Tecla de selección derecha
[Opciones] para
ver las opciones disponibles.
2 Presione
Borrar para eliminar una alarma o Borrar todo para eliminar
todas las entradas de alarma.
3 Presione
[Sí].
Editar alarmas
1 En la lista Alarma, presione
[Ver] y luego presione [Crrgr].
Bluetooth
Su teléfono es compatible con dispositivos que admiten los perfiles Auricular,
Manos libres, Acceso a agenda telefónica, Push de objeto y Transferencia de
archivos.
Puede crear y almacenar 20 emparejamientos dentro del teléfono y conectarse
con un dispositivo.
El alcance de comunicación aproximado de la tecnología inalámbrica Bluetooth
®
es de hasta 9.14 metros (30 pies).
NOTA: Lea la guía de usuario de los accesorios Bluetooth
®
que desea
conectar a su teléfono ya que es posible que las instrucciones sean
diferentes.

79
NOTA: Su teléfono se basa en la especificación Bluetooth
®
, pero no
existe garantía de que funcione con todos los dispositivos compatibles
con la tecnología inalámbrica Bluetooth
®
. El teléfono no admite TODOS
los Perfiles OBEX de Bluetooth
®
.
Activar Bluetooth
Le permite activar o desactivar Bluetooth
®
en el teléfono.
1 Abra el teléfono y presione la Tecla de selección izquierda
[Menú].
2 Presione
Bluetooth.
3 Presione
Menú de bluetooth.
4 Presione la Tecla de selección izquierda
[Encendido].
NOTA: De forma predeterminada, la funcionalidad Bluetooth
®
del
dispositivo está apagada.
1. Añadir nuevo aparato
El emparejamiento es el proceso que permite al teléfono localizar, establecer y
registrar una conexión 1 a 1 con el dispositivo de destino.
Emparejamiento del teléfono con un nuevo dispositivo Bluetooth
®
1 Siga las instrucciones del accesorio Bluetooth
®
para configurar el dispositivo en
el modo de emparejamiento.
2 Abra el teléfono y presione la Tecla de selección izquierda
[Menú].
3 Presione
Bluetooth.
4 Presione
Menú de bluetooth.

80
Uso de menús del teléfono
5 Presione Añadir nuevo aparato.
6 Presione
.
7 Ajuste el dispositivo deseado en modo de descubrimiento.
8 El dispositivo aparecerá en el menú Añadir nuevo aparato cuando se localice.
Resalte el dispositivo y presione
[Par].
9 El teléfono le solicitará el código de acceso. Consulte las instrucciones
del accesorio de Bluetooth
®
para obtener el código de acceso adecuado
(generalmente son 4 ceros, “0000”). Ingrese el código de acceso y presione
.
Cuando la función Emparejamiento automático de manos libres está activada, el
dispositivo intenta emparejarse en forma automática con los auriculares.
10 Cuando el emparejamiento con un teléfono, una PC o un asistente digital
personal se realice correctamente, resalte las opciones Siempre preguntar o
Siempre conectar y presione para conectarse con el dispositivo.
11 Una vez conectado, usted verá el dispositivo en el menú Bluetooth
®
y, cuando
el par esté transmitiendo información, el indicador de Bluetooth
®
aparecerá
en la pantalla.
Referencia de iconos en Añadir nuevo aparato
Cuando la conexión inalámbrica Bluetooth
®
está activada y se han encontrado los
dispositivos emparejados, aparecen los siguientes iconos.
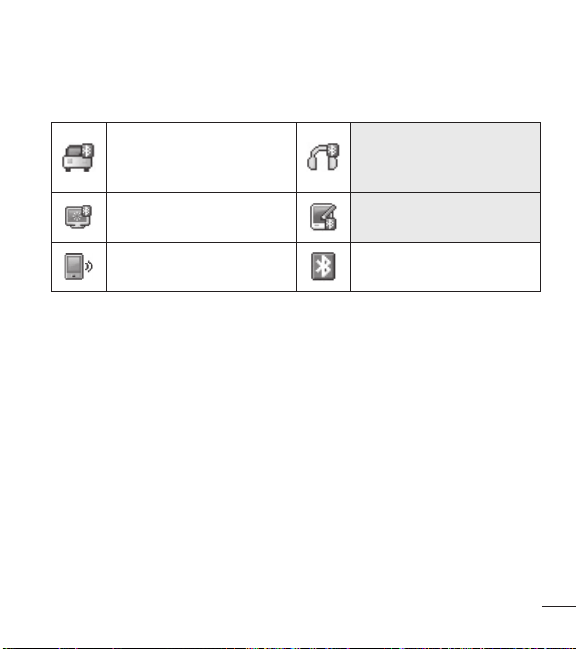
81
Referencias de iconos cuando se busca una conexión inalámbrica
Bluetooth
®
(no conectado ni emparejado).
Cuando su teléfono encuentra
un dispositivo móvil para
automóvil.
Cuando su teléfono encuentra
un dispositivo de audio.
Cuando su teléfono encuentra
una PC.
Cuando su teléfono encuentra
una PDA.
Cuando su teléfono encuentra
otro teléfono.
Cuando su teléfono encuentra
un dispositivo no definido.
Referencias de iconos cuando la conexión se establece correctamente
Están disponibles las opciones siguientes en el dispositivo emparejado.
1 Quitar dispositivo: Puede eliminar el dispositivo de la lista de emparejamiento.
2 Cambiar nombre de dispositivo: Puede cambiar el nombre del dispositivo
emparejado.
3 Seguridad entrante: Le permite establecer un permiso antes de conectarse a
un dispositivo entrante.
4 Descubrimiento de servicios: Le permite buscar los servicios seleccionados
que admite el dispositivo.
5 Info de dispositivo: Muestra la información del dispositivo.

82
Uso de menús del teléfono
NOTA: En el menú Bluetooth, puede desactivar la funcionalidad
Bluetooth al presionar la Tecla de selección izquierda [Apagado].
Por el contrario, puede encenderla al presionar la Tecla de selección
izquierda [Encendido]. Cuando se conecte a un teléfono o PC que
admiten OPP, es posible que los siguientes menús estén disponibles:
t
Enviar tarjeta de nombre: Permite al dispositivo enviar mis datos de
contacto a hasta 999 contactos.
t
Obtener tarjeta de nombre: Permite obtener la tarjeta de nombre de
otros dispositivos.
t
Intercambiar tarjeta de nombre: Permite intercambiar la tarjeta de
nombre del teléfono con otro dispositivo.
t
Enviar mi calendario: Permite enviar eventos del calendario a otros
dispositivos.
t
Enviar foto: Permite enviar fotos a otros dispositivos.
t
Enviar sonido: Permite enviar sonidos a otros dispositivos.
Mi info de dispositivo
Le permite ver y/o editar el nombre del dispositivo Bluetooth
®
.
1 Abra el teléfono y presione la Tecla de selección izquierda
[Menú].
2 Presione
Bluetooth.
3 Presione
Menú de bluetooth.
4 Presione la Tecla de selección derecha
[Opciones].
5 Presione
Mi info de dispositivo.
6 Presione
para borrar el nombre existente.

83
7 Use el teclado para ingresar un nuevo nombre personalizado.
8 Presione
[Fijado] para guardar y salir.
Modo de descubrimiento
Le permite configurar si su dispositivo podrá encontrar/ser encontrado por otros
dispositivos Bluetooth
®
en el área.
1 Abra el teléfono y presione la Tecla de selección izquierda
[Menú].
2 Presione
Bluetooth.
3 Presione
Menú de bluetooth.
4 Presione la Tecla de selección derecha
[Opciones].
5 Presione
Modo de descubrimiento.
6 Use la Tecla Direccional
para seleccionar un ajuste y luego presione
[Fijado].
NOTA: Si activa el modo de descubrimiento, su dispositivo podrá
ser reconocido por otros dispositivos dentro del rango de alcance de
Bluetooth
®
.
Perfiles soportados
Le permite ver los perfiles que admite su dispositivo.
1 Abra el teléfono y presione la Tecla de selección izquierda
[Menú].
2 Presione
Bluetooth.
3 Presione
Menú de bluetooth.
4 Presione la Tecla de selección derecha
[Opciones].

84
Uso de menús del teléfono
5 Presione Perfiles soportados.
6 Elija un perfil de Bluetooth para ver información acerca del perfil.
Accesibilidad
Le permite configurar los ajustes de Accesibilidad.
1 Abra el teléfono y presione la Tecla de selección izquierda
[Menú].
2 Presione
Accesibilidad.
1. Lectura
Le permite establecer los ajustes de lectura.
1 Abra el teléfono y presione la Tecla de selección izquierda
[Menú].
2 Presione
Accesibilidad.
3 Presione
Lectura.
1.1 Lectura completa
Permite que el teléfono lea las pantallas en voz alta para personas ciegas y con
poca visión o para cuando sus ojos estén ocupados.
1 Abra el teléfono y presione la Tecla de selección izquierda
[Menú].
2 Presione
Accesibilidad.
3 Presione
Lectura.
4 Presione
Lectura completa.
5 Use la Tecla Direccional
para resaltar un ajuste y luego presione
[Fijado].

85
1.2 Lectura de menú
Permite que el teléfono lea los menús en voz alta.
1 Abra el teléfono y presione la Tecla de selección izquierda
[Menú].
2 Presione
Accesibilidad.
3 Presione
Lectura.
4 Presione
Lectura de menú.
5 Use la Tecla Direccional
para resaltar un ajuste y luego presione
[Fijado].
1.3 Lectura de dígito marcado
Permite que el teléfono lea los dígitos introducidos en la pantalla de marcación en
voz alta.
1 Abra el teléfono y presione la Tecla de selección izquierda
[Menú].
2 Presione
Accesibilidad.
3 Presione
Lectura.
4 Presione
Lectura de dígito marcado.
5 Use la Tecla Direccional
para resaltar un ajuste y luego presione
[Fijado].
1.4 Lectura de ID de llamador
Permite establecer cómo desea que el teléfono lea la identificación de llamada en
voz alta.
1 Abra el teléfono y presione la Tecla de selección izquierda
[Menú].
2 Presione
Accesibilidad.
3 Presione
Lectura.

86
Uso de menús del teléfono
4 Presione Lectura de ID de llamador.
5 Use la Tecla Direccional
para resaltar un ajuste y luego presione
[Fijado].
1.5 Lectura de contraseñas
Permite que el teléfono lea las contraseñas en voz alta.
1 Abra el teléfono y presione la Tecla de selección izquierda
[Menú].
2 Presione
Accesibilidad.
3 Presione
Lectura.
4 Presione
Lectura de contraseñas.
5 Use la Tecla Direccional
para resaltar un ajuste y luego presione [Fijado].
1.6 Velocidad de voz
Permite establecer la velocidad de voz de la lectura de menú.
1 Abra el teléfono y presione la Tecla de selección izquierda
[Menú].
2 Presione
Accesibilidad.
3 Presione
Lectura.
4 Presione
Velocidad de voz.
5 Use la Tecla Direccional
para resaltar un ajuste y luego presione
[Fijado].
2. Invertir color
Permite invertir el tema de color.
1 Abra el teléfono y presione la Tecla de selección izquierda
[Menú].
2 Presione
Accesibilidad.

87
3 Presione Invertir color.
4 Use la Tecla Direccional
para resaltar un ajuste y luego presione
[Fijado].
3. Texto grande
Permite utilizar fuente más grande para los menús.
1 Abra el teléfono y presione la Tecla de selección izquierda
[Menú].
2 Presione
Accesibilidad.
3 Presione
Texto grande.
4 Use la Tecla Direccional
para resaltar un ajuste y luego presione
[Fijado].
4. Audio mono
Permite reproducir el mismo sonido de ambos auriculares para que puedas
escuchar todo con una sola oreja.
1 Abra el teléfono y presione la Tecla de selección izquierda
[Menú].
2 Presione
Accesibilidad.
3 Presione
Audio mono.
4 Use la Tecla Direccional
para resaltar un ajuste y luego presione
[Fijado].

88
Uso de menús del teléfono
5. Desactivar todos los sonidos
Este menú desactiva todos los sonidos del teléfono.
1 Abra el teléfono y presione la Tecla de selección izquierda
[Menú].
2 Presione
Accesibilidad.
3 Presione
Desactivar todos los sonidos.
4 Use la Tecla Direccional
para resaltar un ajuste y luego presione
[Fijado].
Configuración
Este menú le permite establecer varios ajustes del teléfono y ver información del
teléfono.
1. Programación de sonidos
Ofrece opciones para personalizar los sonidos del teléfono.
1.1 Volumen maestro
Le permite ajustar rápidamente los ajustes de sonidos principales para el volumen
del teclado, llamadas entrantes y mensajes (texto, multimedia y correo de voz).
1 Abra el teléfono y presione la Tecla de selección izquierda
[Menú].
2 Presione
Configuración.
3 Presione
Programación de sonidos.
4 Presione
Volumen maestro.
89
5 Ajuste el volumen con la Tecla Direccional y presione [Fijado] para
guardar el ajuste.
1.2 Sonidos de llamadas
Le permite ajustar la manera en que el teléfono le avisa sobre los tipos de
llamadas entrantes.
1 Abra el teléfono y presione la Tecla de selección izquierda
[Menú].
2 Presione
Configuración.
3 Presione
Programación de sonidos.
4 Presione
Sonidos de llamada.
1.2.1 Timbre de llamada
Permite establecer timbres para llamadas entrantes.
1 Abra el teléfono y presione la Tecla de selección izquierda
[Menú].
2 Presione
Configuración.
3 Presione
Programación de sonidos.
4 Presione
Sonidos de llamada.
5 Presione
Timbre de llamada.
6 Resalte un submenú y presione
para abrirlo.
7 Use la Tecla Direccional
para resaltar un tono de timbre y luego presione
[Fijado] para guardar el sonido.
SUGERENCIA: para escuchar un tono de timbre antes de establecerlo,
presione la Tecla de selección izquierda [Escu].
90
Uso de menús del teléfono
1.2.2 Vibrar de llamada
Permite establecer que el teléfono vibre cuando recibe una llamada entrante.
1 Abra el teléfono y presione la Tecla de selección izquierda
[Menú].
2 Presione
Configuración.
3 Presione
Programación de sonidos.
4 Presione
Sonidos de llamada.
5 Presione
Vibrar de llamada.
6 Use la Tecla Direccional
para seleccionar un ajuste y luego presione
[Fijado].
1.2.3 Lectura de ID de llamador
Permite establecer cómo desea que el teléfono lea la identificación de llamada en
voz alta.
1 Abra el teléfono y presione la Tecla de selección izquierda
[Menú].
2 Presione
Configuración.
3 Presione
Programación de sonidos.
4 Presione
Sonidos de llamada.
5 Presione
Lectura de ID de llamador.
6 Use la Tecla Direccional
para resaltar un ajuste y luego presione
[Fijado].
1.3 Sonidos de alerta
Le permite seleccionar los sonidos de los tipos de alerta.
1 Abra el teléfono y presione la Tecla de selección izquierda
[Menú].
2 Presione
Configuración.

91
3 Presione Programación de sonidos.
4 Presione
Sonidos de alerta.
5 Seleccione Mensaje de TXT/ Mensaje de multimedia/ Buzón de voz/
Timbre de emergencia/ Llamadas perdidas.
El menú Sonidos de alerta ofrece las siguientes opciones: Tono/ Vibrar/
Recordatorio
La excepción es el menú Tono de emergencia. Este menú incluye las siguientes
opciones: Alerta/ Vibrar/ Apagado.
1.4 Volumen del teclado
Le permite ajustar el volumen del teclado.
1 Abra el teléfono y presione la Tecla de selección izquierda
[Menú].
2 Presione
Configuración.
3 Presione
Programación de sonidos.
4 Presione
Volumen de teclado.
5 Ajuste el volumen con la Tecla Direccional
y presione [Fijado] para
guardar el ajuste.
1.5 Alertas de servicio
Permite establecer cualquiera de las alertas de servicio disponibles.
1 Abra el teléfono y presione la Tecla de selección izquierda
[Menú].
2 Presione
Configuración.
3 Presione
Programación de sonidos.
4 Presione
Alertas de servicio.

92
Uso de menús del teléfono
5 Seleccione una opción de alerta.
Conexión de llamada Le avisa cuando la llamada se conecta.
Desconectar llamada Le avisa cuando la llamada se desconecta.
Cargar completado Le avisa cuando la batería está completamente cargada.
6 Use la Tecla Direccional
para seleccionar un ajuste y luego presione
[Fijado].
1.6 Encendido/apagado
Permite seleccionar los sonidos escuchados cuando apaga y enciende el teléfono.
1 Abra el teléfono y presione la Tecla de selección izquierda
[Menú].
2 Presione
Configuración.
3 Presione
Programación de sonidos.
4 Presione
Encendido/apagado.
5 Presione
Encendido o Apagado.
6 Use la Tecla Direccional
para resaltar un ajuste y luego presione
[Fijado].
1.7 Asistencia auditiva
Le permite ajustar el teléfono para que se adapte en forma automática a entornos
ruidosos al ajustar el nivel de sonido y mejorar la inteligibilidad de la voz.
NOTA: La función de asistencia auditiva se desactiva de forma
automática cuando utiliza el altavoz o un dispositivo de manos libres.

93
1 Abra el teléfono y presione la Tecla de selección izquierda [Menú].
2 Presione
Configuración.
3 Presione
Programación de sonidos.
4 Presione
Asistencia auditiva.
5 Use la Tecla Direccional
para seleccionar un ajuste y luego presione
[Fijado].
2. Programación de pantalla
Ofrece opciones para personalizar la pantalla del teléfono.
1 Abra el teléfono y presione la Tecla de selección izquierda
[Menú].
2 Presione
Configuración.
3 Presione
Programación de pantalla.
2.1 Luz de pantalla
Permite establecer la duración de la luz de fondo de la pantalla principal, la
pantalla frontal y el teclado. Cada uno se establece por separado.
1 Abra el teléfono y presione la Tecla de selección izquierda
[Menú].
2 Presione
Configuración.
3 Presione
Programación de pantalla.
4 Presione
Luz de pantalla.
5 Resalte un submenú de Luz de pantalla y presione
.
t
Pantalla luz de fondo:
7 Segundos/ 15 Segundos/ 30 Segundos/ Siempre apagado
t
Luz del teclado:
7 Segundos/ 15 Segundos/ 30 Segundos/ Siempre apagado
94
Uso de menús del teléfono
2.2 Brillo
Le permite establecer los niveles de la luz de fondo.
1 Abra el teléfono y presione la Tecla de selección izquierda
[Menú].
2 Presione
Configuración.
3 Presione
Programación de pantalla.
4 Presione
Brillo.
5 Use la Tecla Direccional
para seleccionar un ajuste y luego presione
[Fijado].
NOTA: El nivel de brillo va del 1 al 7.
2.3 Fondo de pantalla
Le permite elegir el tipo de fondo que mostrará la pantalla LCD del teléfono en el
modo de espera.
1 Abra el teléfono y presione la Tecla de selección izquierda
[Menú].
2 Presione
Configuración.
3 Presione
Programación de pantalla.
4 Presione
Fondo de pantalla.
5 Resalte un submenú de Fondo de pantalla y presione
.
6 Resalte una foto y presione
[Fijado] para para establecerla como fondo de
pantalla.
95
2.4 Estilo de menú
Le permite elegir entre distintos temas para los menús del teléfono.
1 Abra el teléfono y presione la Tecla de selección izquierda
[Menú].
2 Presione
Configuración.
3 Presione
Programación de pantalla.
4 Presione
Estilo de menú.
5 Use la Tecla Direccional
para seleccionar un ajuste y luego presione
[Fijado].
NOTA: Presione la Tecla de selección izquierda [Avance] para
obtener una vista previa del tema de pantalla seleccionado. El ajuste
predeterminado es Cuadrícula.
2.5 Tipo de fuente
Le permite establecer el tipo de fuente.
1 Abra el teléfono y presione la Tecla de selección izquierda
[Menú].
2 Presione
Configuración.
3 Presione
Programación de pantalla.
4 Presione
Tipo de fuente.
5 Use la Tecla Direccional
para resaltar un ajuste y luego presione [Fijado].
NOTA: Presione la Tecla de selección izquierda [Avance] para
previsualizar el tipo de fuente seleccionado.
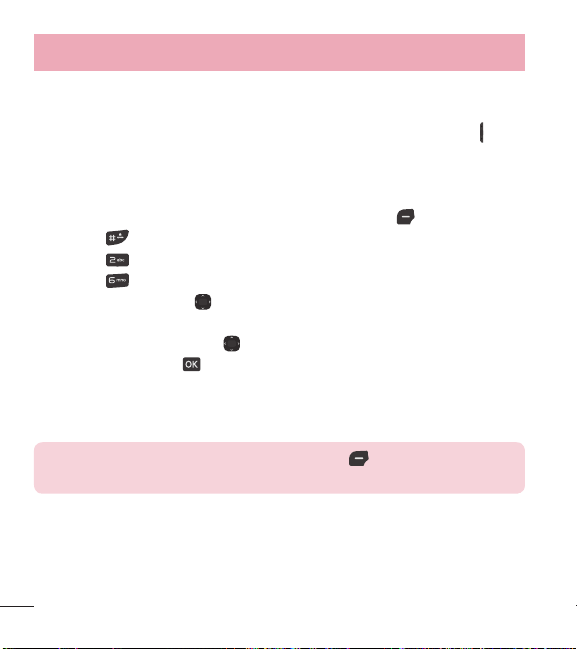
96
Uso de menús del teléfono
2.6 Tamaño de fuente
Permite establecer el tamaño de la fuente para Dígitos de marcación, Menú & lista
y Mensaje. La opción Dimensionable permite utilizar las Teclas de volumen
para
ajustar de manera instantánea las fuentes de la pantalla. Estos ajustes son útiles
para aquellas personas que necesitan ver el texto en un tamaño un poco más
grande.
1 Abra el teléfono y presione la Tecla de selección izquierda
[Menú].
2 Presione
Configuración.
3 Presione
Programación de pantalla.
4 Presione
Tamaño de fuente.
5 Use la Tecla Direccional
para resaltar Dígitos de marcación/ Menú &
lista/ Mensaje.
6 Presione la Tecla Direccional
hacia la izquierda y derecha para desplazar por
los ajustes y presione
[Fijado].
Dígitos de marcación: Dimensionable/ Pequeña/ Normal/ Grande
Menú & lista: Dimensionable/ Pequeña/ Normal/ Grande
Mensaje: Dimensionable/ Pequeña/ Normal/ Grande
NOTA: Presione la Tecla de selección izquierda [Avance] para
previsualizar el tamaño de fuente seleccionado.
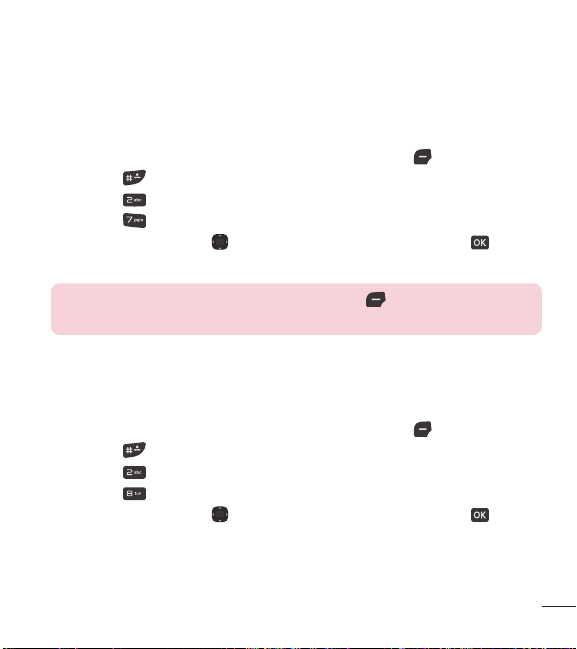
97
2.7 Formato de reloj
Le permite elegir el tipo de reloj que aparecerá en las pantallas LCD frontal y
principal.
1 Abra el teléfono y presione la Tecla de selección izquierda
[Menú].
2 Presione
Configuración.
3 Presione
Programación de pantalla.
4 Presione
Formato de reloj.
5 Use la Tecla Direccional
para resaltar un ajuste y luego presione
[Fijado].
NOTA: Presione la Tecla de selección izquierda [Avance] para
previsualizar el formato de reloj seleccionado.
2.8 Coincidencia de nombre para marcación
Le permite mostrar nombres al ingresar números de teléfono que coincidan para
marcarlos.
1 Abra el teléfono y presione la Tecla de selección izquierda
[Menú].
2 Presione
Configuración.
3 Presione
Programación de pantalla.
4 Presione
Coincidencia de nombre para marcación.
5 Use la Tecla Direccional
para resaltar un ajuste y luego presione
[Fijado].

98
Uso de menús del teléfono
3. Programación de teléfono
El menú Programación de teléfono le permite designar ajustes específicos para
personalizar la manera en que usa el teléfono.
3.1 Modo avión
Si se activa el modo avión, se desactivarán todas las comunicaciones
inalámbricas.
1 Abra el teléfono y presione la Tecla de selección izquierda
[Menú].
2 Presione
Configuración.
3 Presione
Programación de teléfono.
4 Presione
Modo avión.
5 Use la Tecla Direccional
para seleccionar un ajuste y luego presione
[Fijado].
3.2 Acceso directo para ajustar
Le permite establecer accesos directos a menús del teléfono utilizando las teclas
direccionales hacia abajo, arriba, izquierda y derecha.
3.2.1 Establecer mis atajos
NOTA: Para acceder a estos accesos directos, presione la Tecla
Direccional en el modo de espera (de manera predeterminada) para
ver Mis accesos directos.
1 Abra el teléfono y presione la Tecla de selección izquierda [Menú].
2 Presione
Configuración.

99
3 Presione Programación de teléfono.
4 Presione
Acceso directo para ajustar.
5 Presione
Establecer mis atajos.
6 Use la Tecla Direccional
para resaltar una tecla de acceso directo que desee
ajustar.
7 Presione
[Jg de] para ver los accesos directos disponibles. Use la Tecla
Direccional
para resaltar uno y luego presione [Fijado].
3.2.2 Establecer teclas direccionales
NOTA: Para acceder a estos accesos directos, abra el teléfono y
presione la Tecla Direccional en una dirección (arriba, izquierda)
establecida para el acceso directo que desea usar.
1 Abra el teléfono y presione la Tecla de selección izquierda [Menú].
2 Presione
Configuración.
3 Presione
Programación de teléfono.
4 Presione
Acceso directo para ajustar.
5 Presione
Establecer teclas direccionales.
6 Use la Tecla Direccional
para resaltar una tecla de acceso directo que desee
ajustar.
7 Presione
[Jg de] para ver los accesos directos disponibles. Use la Tecla
Direccional
para resaltar uno y luego presione [Fijado].

100
Uso de menús del teléfono
3.3 Comandos de voz
Para obtener detalles, consulte la página 68.
3.4 Idioma
Permite establecer el idioma preferido (inglés o español).
1 Abra el teléfono y presione la Tecla de selección izquierda
[Menú].
2 Presione
Configuración.
3 Presione
Programación de teléfono.
4 Presione
Idioma.
5 Use la Tecla Direccional
para resaltar un ajuste y luego presione
[Fijado].
3.5 Ubicación
Permite ajustar el modo de GPS (Sistema de posicionamiento global: sistema de
información de ubicación asistido por satélite).
1 Abra el teléfono y presione la Tecla de selección izquierda
[Menú].
2 Presione
Configuración.
3 Presione
Programación de teléfono.
4 Presione
Ubicación.
5 Use la Tecla Direccional
para seleccionar un ajuste y luego presione
[Fijado].
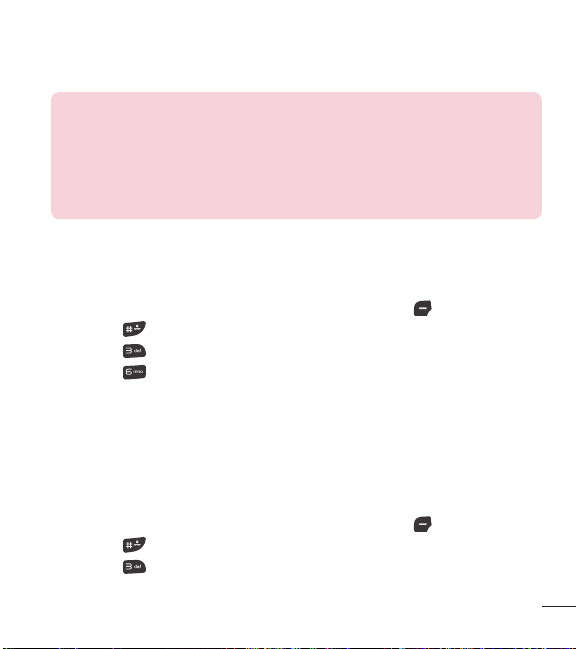
101
NOTAS:
t
El teléfono no siempre recibe las señales satelitales de GPS,
especialmente si las condiciones atmosféricas no son buenas o se
encuentra dentro de un edificio, etc.
t
Durante el modo avión, se suspenderán los servicios que admiten la
funcionalidad Ubicación activada.
3.6 Seguridad
El menú Seguridad permite proteger el teléfono en forma electrónica.
1 Abra el teléfono y presione la Tecla de selección izquierda
[Menú].
2 Presione
Configuración.
3 Presione
Programación de teléfono.
4 Presione
Seguridad.
5 Ingrese el código de bloqueo de cuatro dígitos.
Si está configurado, el código de bloqueo consta de los 4 últimos dígitos de
su número de teléfono móvil. El código de bloqueo consiste en los últimos 4
dígitos de su MEID, si no configura su número de teléfono móvil.
3.6.1 Editar códigos
Le permite ingresar un nuevo código de bloqueo de cuatro dígitos.
1 Abra el teléfono y presione la Tecla de selección izquierda
[Menú].
2 Presione
Configuración.
3 Presione
Programación de teléfono.

102
Uso de menús del teléfono
4 Presione Seguridad.
5 Introduzca el código de bloqueo de cuatro cifras.
6 Presione
Editar códigos.
7 Seleccione Sólo teléfono o Llamadas & servicios.
8 Ingrese su nuevo código de bloqueo de cuatro dígitos.
9 Para confirmar la acción, se le solicitará que introduzca el código nuevo otra
vez.
3.6.2 Restricciones
Permite establecer restricciones separadas para llamadas, mensajes de texto y
multimedia y datos.
1 Abra el teléfono y presione la Tecla de selección izquierda
[Menú].
2 Presione
Configuración.
3 Presione
Programación de teléfono.
4 Presione
Seguridad.
5 Introduzca el código de bloqueo de cuatro cifras.
6 Presione
Restricciones.
7 Ingrese el código de bloqueo de cuatro dígitos.
8 Seleccione un menú de Restricciones, y presione
.
9 Use la Tecla Direccional
para resaltar la restricción y luego presione .
Llamadas: Llamadas entrantes Permitir todas/ Solo de contactos/ Bloquear
todas
Llamadas: Llamadas salientes Permitir todas/ Solo de contactos/ Bloquear
todas

103
Texto msjs: Mensajes entrantes Permitir todas/ Solo de contactos/ Bloquear
todas
Texto msjs: Mensajes salientes Permitir todas/ Solo de contactos/ Bloquear
todas
Multimedias msjs: Mensajes entrantes Permitir todas/ Solo de contactos/
Bloquear todas
Multimedias msjs: Mensajes salientes Permitir todas/ Solo de contactos/
Bloquear todas
Datos: Permitir todas/ Bloquear todas
3.6.3 Programación de bloqueo de teléfono
Protege el teléfono contra el uso no autorizado. Cuando se bloquea el teléfono,
este permanece en el modo restringido hasta que se ingresa el código de bloqueo.
Podrá recibir llamadas telefónicas y realizar llamadas de emergencia. Sólo puede
modificar el código de bloqueo en el submenú Editar códigos del menú Seguridad.
1 Abra el teléfono y presione la Tecla de selección izquierda
[Menú].
2 Presione
Configuración.
3 Presione
Programación de teléfono.
4 Presione
Seguridad.
5 Introduzca el código de bloqueo de cuatro cifras.
6 Presione
Programación de bloqueo de teléfono.
7 Resalte una opción y presione
[Fijado].
Desbloqueado Se mantiene desbloqueado en forma predeterminada.
Al encender el teléfono El teléfono se bloquea cuando se enciende.
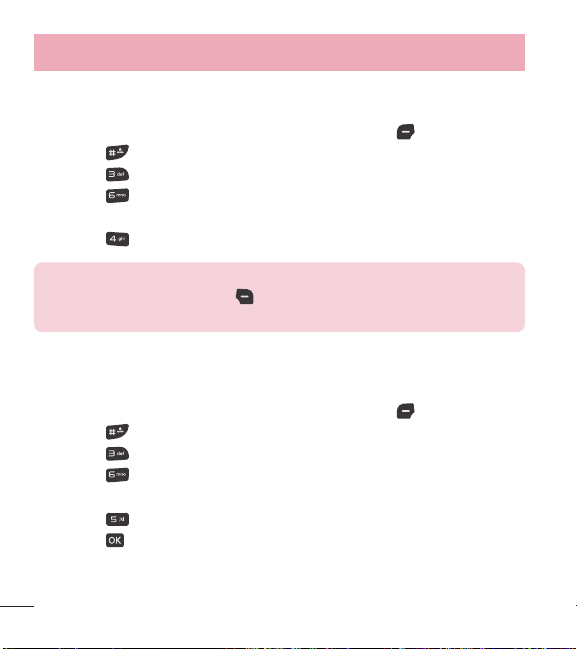
104
Uso de menús del teléfono
3.6.4 Bloquear teléfono ahora
Le permite establecer el ajuste de Bloquear teléfono ahora del teléfono.
1 Abra el teléfono y presione la Tecla de selección izquierda
[Menú].
2 Presione
Configuración.
3 Presione
Programación de teléfono.
4 Presione
Seguridad.
5 Introduzca el código de bloqueo de cuatro cifras.
6 Presione
Bloquear teléfono ahora.
NOTA: Para desbloquear el teléfono desde el modo de espera, presione
la Tecla de selección derecha [Abrir] e ingrese el código de bloqueo
de cuatro dígitos.
3.6.5 Restablecer implícito
Le permite restaurar el teléfono a la configuración predeterminada de fábrica.
1 Abra el teléfono y presione la Tecla de selección izquierda
[Menú].
2 Presione
Configuración.
3 Presione
Programación de teléfono.
4 Presione
Seguridad.
5 Introduzca el código de bloqueo de cuatro cifras.
6 Presione
Restablecer implícito.
7 Presione
después de leer el mensaje de advertencia.

105
8 Resalte Revertir y presione .
Aparecerá brevemente un mensaje de confirmación antes de que el teléfono se
restablezca.
3.7 Selección de sistema
Permite configurar el entorno de administración del teléfono. Deje este ajuste
como predeterminado a menos que desee alterar la selección del sistema según
las instrucciones de su proveedor de servicios.
1 Abra el teléfono y presione la Tecla de selección izquierda
[Menú].
2 Presione
Configuración.
3 Presione
Programación de teléfono.
4 Presione
Selección de sistema.
5 Use la Tecla Direccional
para seleccionar un ajuste y luego presione
[Fijado].
4. Programación de llamada
El menú Programación de llamada le permite establecer varias configuraciones
para las funciones de llamadas.
4.1 Opciones de contestar
Le permite determinar cómo responderá el teléfono a una llamada entrante.
1 Abra el teléfono y presione la Tecla de selección izquierda
[Menú].
2 Presione
Configuración.
3 Presione
Programación de llamada.
4 Presione
Opciones de contestar.
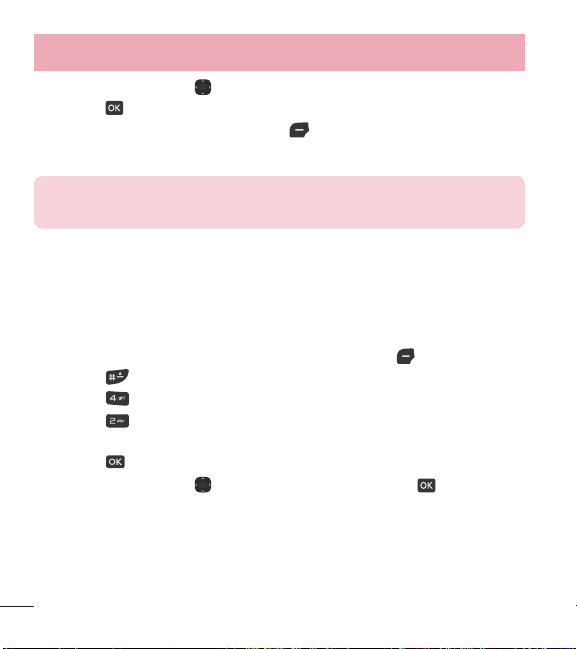
106
Uso de menús del teléfono
5 Use la Tecla Direccional para seleccionar los ajustes que desea utilizar y
presione
[Subry].
6 Presione la Tecla de selección izquierda
[Hecho] cuando haya marcado el
ajuste deseado.
NOTA: La opción Auto con manos libres está disponible cuando conecta
cualquier dispositivos externo al teléfono o el altavoz está activado.
4.2 Modo TTY
Le permite conectar un dispositivo TTY para comunicarse con otras personas
que también estén usando uno de ellos. Un teléfono con compatibilidad TTY
puede traducir los caracteres escritos en voz. También se puede traducir la voz a
caracteres y después mostrarse en el TTY.
1 Abra el teléfono y presione la Tecla de selección izquierda [Menú].
2 Presione
Configuración.
3 Presione
Programación de llamada.
4 Presione
Modo TTY.
5 Aparecerá un mensaje de explicación.
6 Presione
para continuar.
7 Use la Tecla Direccional
para resaltar un ajuste y presione [Fijado].
TTY completo Sirve para que las personas que no pueden oír o hablar envíen
mensajes de texto mediante el equipo TTY.
TTY + charla Sirve para que las personas que pueden hablar, pero no pueden
oír, reciban mensajes de texto y envíen mensajes de voz mediante el equipo
TTY.

107
TTY + oír Sirve para que las personas que no pueden hablar pero sí oír envíen
mensajes de texto y reciban mensajes de voz mediante el equipo TTY.
TTY apagado Sirve para que las personas sin problemas para hablar ni
auditivos envíen y reciban mensajes sin usar el equipo TTY.
Conexión de un equipo TTY y un terminal
1 Conecte un cable TTY a una conexión TTY en el terminal (la ubicación de la
conexión TTY es la misma que la toma para auriculares).
2 Ingrese en el menú del teléfono y configure el modo TTY que desee.
3 Una vez establecido el modo TTY, compruebe que el icono TTY esté en la
pantalla LCD del teléfono.
4 Conecte el equipo TTY a la fuente de alimentación y enciéndalo.
5 Realice una conexión telefónica con el número que desee.
6 Una vez establecida la conexión, use el equipo TTY para escribir y enviar un
mensaje de texto o de voz.
7 El mensaje de texto o de voz que reciba se verá en la pantalla del equipo TTY.
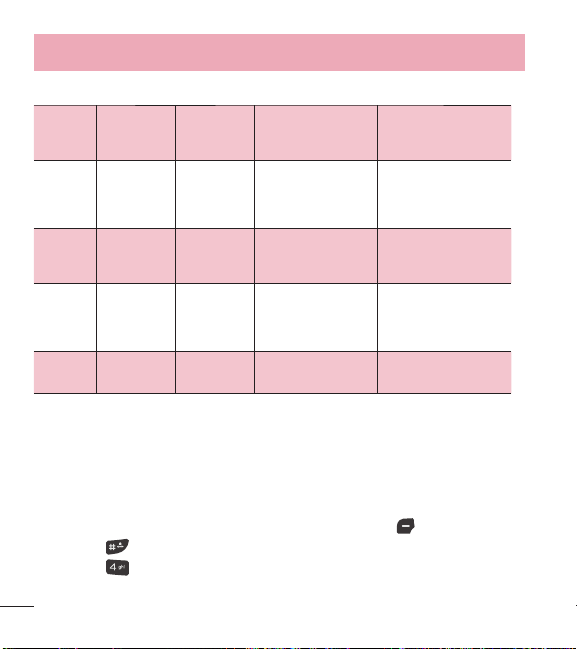
108
Uso de menús del teléfono
Menú Usuario Menú
Modo de transmisión/
recepción
Cuando se establece
comunicación con un
terminal no TTY
TTY
completo
Para que
personas con
discapacidad
auditiva/verbal
Transmitan y reciban
mensajes de texto
Debe intervenir
el operador
TTY +
charla
Para personas
con problemas
auditivos
Que pueden
hablar
Transmisión de voz,
recepción de mensajes
de texto
Debe intervenir un operador
TTY + oír
Para que
personas con
discapacidad
verbal
Que pueden oír
Transmitan mensajes de
texto y reciban voz
Debe intervenir un operador
TTY
apagado
Transmisión de voz,
recepción de voz
Modo TTY (Teletypewriter)
4.3 Marcado oprimiendo un botón
Le permite iniciar una llamada de marcación rápida al mantener presionado
el dígito de marcación rápida. Si está ajustado en Apagado, los números de
Marcación rápida designados en sus Contactos no funcionarán.
1 Abra el teléfono y presione la Tecla de selección izquierda
[Menú].
2 Presione
Configuración.
3 Presione
Programación de llamada.

109
4 Presione Marcado oprimiendo un botón.
5 Use la Tecla Direccional
para seleccionar un ajuste y luego presione
[Fijado].
4.4 Privacidad de voz
Le permite ajustar la función de privacidad de voz para llamadas CDMA. CDMA
ofrece en forma inherente privacidad de voz. Si necesita más información,
consulte a su proveedor de servicios.
1 Abra el teléfono y presione la Tecla de selección izquierda
[Menú].
2 Presione
Configuración.
3 Presione
Programación de llamada.
4 Presione
Privacidad de voz.
5 Use la Tecla Direccional
para seleccionar un ajuste y luego presione
[Fijado].
4.5 Tonos DTMF
Le permite establecer la longitud de los tonos DTMF.
1 Abra el teléfono y presione la Tecla de selección izquierda
[Menú].
2 Presione
Configuración.
3 Presione
Programación de llamada.
4 Presione
Tonos DTMF.
5 Use la Tecla Direccional
para seleccionar un ajuste y luego presione
[Fijado].

110
Uso de menús del teléfono
5. Memoria
Permite comprobar la memoria interna del teléfono. Muestra la información de
memoria guardada en el teléfono.
1 Abra el teléfono y presione la Tecla de selección izquierda
[Menú].
2 Presione
Configuración.
3 Presione
Memoria.
4 Use la Tecla Direccional
para seleccionar un submenú y luego presione
para ver la memoria utilizada.
6. Información de teléfono
Le permite ver información específica de su teléfono y del software.
1 Abra el teléfono y presione la Tecla de selección izquierda
[Menú].
2 Presione
Configuración.
3 Presione
Información de teléfono.
6.1 Mi número
Le permite ver su número de teléfono.
1 Abra el teléfono y presione la Tecla de selección izquierda
[Menú].
2 Presione
Configuración.
3 Presione
Información de teléfono.
4 Presione
Mi número.

111
6.2 ESN/MEID
Le permite ver el número ESN/MEID de su teléfono.
1 Abra el teléfono y presione la Tecla de selección izquierda
[Menú].
2 Presione
Configuración.
3 Presione
Información de teléfono.
4 Presione
ESN/MEID.
6.3 Glosario de iconos
Le permite ver todos los iconos y su significado.
1 Abra el teléfono y presione la Tecla de selección izquierda
[Menú].
2 Presione
Configuración.
3 Presione
Información de teléfono.
4 Presione
Glosario de iconos.
5 Seleccione un submenú y navegue por los iconos.
6.4 Versión SW/HW
Le permite ver las versiones de distintas aplicaciones como software, PRL, Acceso
Web, AVR, MMS, Bluetooth y hardware.
1 Abra el teléfono y presione la Tecla de selección izquierda
[Menú].
2 Presione
Configuración.
3 Presione
Información de teléfono.
4 Presione
Versión SW/HW.

112
Uso de menús del teléfono
6.5 Licencias de codigo abierto
Le permite ver Licencias de codigo abierto
1 Abra el telefono y presione la Tecla de seleccion izquierda
[Menú].
2 Presione
Configuración.
3 Presione
Información de teléfono.
4 Presione
Licencias de codigo abierto.
Aviso: Software de código abierto
Para obtener el código fuente bajo GPL, LGPL, MPL y otras licencias de
código abierto que se contienen en este producto, visite
http://opensource.lge.com.
Además del código fuente, todos los términos, las exclusiones de
garantía y los avisos de derechos de autor a los que se hace referencia
están disponibles para descargar.
LG Electronics también le proporcionará el código fuente abierto en un
CD-ROM con un cargo que cubra el costo de realizar tal distribución
(como el costo de los medios, el envío y el manejo), previa solicitud por
correo electrónico a [email protected]. Esta oferta es válida durante
tres (3) años a partir de la fecha en la que compró el producto.

113
Seguridad
El valor SAR más alto para este modelo de teléfono cuando se lo probó para
usarse en el oído es de 1,18 W/kg y cuando se lo usa sobre el cuerpo, según lo
descrito en esta guía del usuario, es de 0,79 W/kg (las mediciones del uso en
el cuerpo varían en función de los modelos de los teléfonos y dependen de los
accesorios disponibles y los requisitos de la FCC).
Aun cuando pueden haber diferencias entre los niveles de SAR de varios teléfonos
y en varias posiciones, todos ellos cumplen el requisito gubernamental para una
exposición segura.
La FCC ha otorgado una Autorización de equipo para este modelo de teléfono
con todos los niveles de SAR reportados y evaluados, en cumplimiento de los
lineamientos de emisión de RF de la FCC. La información de SAR sobre este
modelo de teléfono está archivada en la FCC y puede encontrarse en la sección
Display Grant de http://www. fcc.gov/oet/ea/fccid/ after searching on FCC ID
ZNFVN170.
t
Este producto contiene químicos conocidos por el Estado de California de causar
cáncer y defectos de nacimiento u otros daños reproductivos.
Lávese las manos después de manipular
.
t
Para reducir el riesgo de incendio o quemaduras, no lo exponga a una
temperatura superior a los 45°C (113°F) ni lo deseche en fuego.
t
Para reducir el riesgo de incendio o quemaduras, no lo deseche en fuego o
agua.
t
No desarme, abra, aplaste, doble, deforme, perfore ni ralle la batería.

114
Seguridad
t
Si la batería se reemplaza en forma incorrecta, existe un peligro de explosión.
Para reducir el riesgo de incendios o quemaduras, no desarme, aplaste, perfore,
cause cortocircuito a los contactos externos, exponga a una temperatura mayor
que 45°C (113°F) o deseche en fuego o agua. Mantenga este producto
alejado de la humedad excesiva y de temperaturas extremas. Mantenga la
batería o el dispositivo secos y alejados del agua o cualquier líquido, dado que
puede ocasionar un cortocircuito.
t
Evite usar el teléfono cerca de fuentes electromagnéticas intensas como hornos
microondas, altoparlantes, televisores y radios.
t
Use solo accesorios originales aprobados por el fabricante o accesorios que no
contengan metales. Use solamente accesorios de carga aprobados para cargar
el teléfono LG. La manipulación inadecuada del puerto del cargador/accesorios,
así como también el uso de un cargador no compatible pueden ocasionarle
daños al teléfono y anular la garantía.
t
Use sólo el cargador de batería aprobado. De lo contrario, podría ocasionar un
daño grave en su teléfono.

115
Glosario
Terminología
Calculadora de propina
Funcionalidad para calcular fácilmente la cuenta utilizando el costo total, la propina
y el número de personas como variables.
Comandos de voz
Función que le permite ejecutar una gran variedad de comandos verbales al
configurar el teléfono para que reconozca sus patrones de voz personales.
Tecnología inalámbrica Bluetooth
®
Tecnología que se utiliza para facilitar la coordinación e interconexión de teléfonos
celulares, computadoras y otros dispositivos personales a través de una conexión
inalámbrica de corto alcance.
Acrónimos y abreviaturas
DTMF
Dual-Tone Multi Frequency (multifrecuencia de tono dual o "tono táctil") es un
método que se utiliza para comunicar las teclas que se presionan en el teléfono.
Cuando se presiona una tecla se generan dos tonos simultáneos, uno para la fila y
otro para la columna, a fin de determinar cuál fue la tecla que se presionó.
GPS
Global Positioning System (sistema de posicionamiento global) es un sistema de
satélites, computadoras y receptores capaces de determinar la latitud y longitud
de un receptor específico en la Tierra.
La posición se calcula con el tiempo y la distancia.

116
Glosario
IS 2000
Tipo de transmisión digital de señales. Es la segunda generación de celulares
digitales CDMA, una extensión de IS-95. Las diferencias entre los tipos de
transmisión de señal tienen que ver con la señal de control y los enlaces para
ofrecer más canales de tráfico y protocolos de control.
NAM
Number Assignment Module (módulo de asignación de número) es la manera en
que el teléfono almacena el número teléfono y su número de serie electrónico.
SSL
Secure Sockets Layer (capa de conexión segura) es un protocolo que se utiliza
para cifrar los datos enviados por aire.
TTY
Teletypewriter (teletipo). Se trata de una máquina de escribir electromecánica
que transmite o recibe mensajes codificados en señales eléctricas. Un teléfono
compatible con TTY puede convertir los caracteres introducidos a voz, o bien,
convertir la voz a caracteres para que aparezcan en el TTY.