After unpacking all parts, check for any transport damage and for completeness of delivery.
If you have any complaints, contact the dealer or our after-sale service Page 27
The delivery consists of the following:
Free-standing appliance
Equipment and accessories1
Installation material
Installation instructions
User manual
Customer service directory
Warranty enclosure2
Energy label
Information on energy consumption and noises
1 Depending on the appliance specifications
2 Not in all countries
Criteria for the installation location
WARNING: Risk of explosion!
If the appliance is in a space that is too small, a leak in the refrigeration circuit may result in a flammable mixture of gas and air.
Only install the appliance in a space with a volume of at least 1 m3 per 8 g refrigerant. The volume of refrigerant is indicated on the rating plate. → "Appliance", Fig. , Page 14
The weight of the appliance ex works may be up to 65 kg depending on the model.
The subfloor must be sufficiently stable to bear the weight of the appliance.
Permitted room temperature
The permitted room temperature depends on the appliance's climate class.
The climate class can be found on the rating plate. → "Appliance", Fig , Page 14
Climate class
Permitted room temperature
SN
10 °C to 32 °C
N
16 °C to 32 °C
ST
16 °C to 38 °C
T
16 °C to 43 °C
The appliance is fully functional within the permitted room temperature.
If an appliance with climate class SN is operated at colder room temperatures, the appliance will not be damaged up to a room temperature of 5 °C.
Over-and-under and side-by-side installation
If you want to install 2 refrigerating appliances one over the other or side by side, you must maintain a clearance of at least 150 mm between the appliances. Selected appliances can be installed without a minimum clearance. Ask your dealer or kitchen planner about this.
Installing the appliance
Install the appliance in accordance with the enclosed installation instructions.
Preparing the appliance for the first time
Remove the informative material.
Remove the protective foil and transit bolts, e.g. remove the adhesive strips and carton.
Clean the appliance for the first time. → Page 20
Connecting the appliance to the electricity supply
1. Insert the mains plug of the appliance's power cable in a socket nearby.
The connection data of the appliance can be found on the rating plate. → "Appliance", Fig.Page 14
2. Check the mains plug is inserted properly.
The appliance is now ready for use.
Familiarising yourself with your appliance
Appliance
You can find an overview of the parts of your appliance here
Refrigerator compartment → Page 18
Freezer compartment → Page 18
Control panel → Page 14
Lighting
Temperature controller (refrigerator compartment)
Rating plate → Page 27
Fruit and vegetable container → Page 15
Frozen food container → Page 21
Screw foot
Door storage compartment for large bottles → Page 15
Note: Deviations between your appliance and the diagrams may differ with regard to their features and size.
Control panel
You can use the control panel to configure all functions of your appliance and to obtain information about the operating status.
sets the temperature of the freezer compartment.
super lights up when Super freezing is switched on.
Displays the set temperature for the freezer compartment in °C.
eco lights up when the energy-saving mode in the freezer compartment is switched on.
Features
The features of your appliance depend on the model.
Shelf
To vary the shelf as required, you can remove the shelf and re-insert it elsewhere.
→ "Removing the shelf", Page 21
Fruit and vegetable container
Store fresh fruit and vegetables in their packaging in the fruit and vegetable container.
Cover any chopped fruit and vegetables, or store in air-tight packaging. Condensation may form in the fruit and vegetable container depending on the food and quantity stored. Remove the condensation with a dry cloth.
To ensure that the quality and aroma are retained, store fruit and vegetables that are sensitive to cold outside of the appliance at temperatures of approx. 8 °C to 12 °C, e.g. pineapple, bananas, citrus fruits, cucumbers, courgettes, peppers, tomatoes and potatoes.
Door rack
To adjust the door rack as required, you can remove the door rack and re-insert elsewhere.
→ "Removing door rack", Page 21
Accessories
Use original accessories. These have been made especially for your appliance.
The accessories for your appliance depend on the model.
Egg tray
Store eggs safely on the egg tray.
Ice cube tray
Use the ice cube tray to make ice cubes.
Making ice cubes
Use only drinking water to make ice cubes.
1. Fill the ice cube tray with drinking water up to ¾ and place in the freezer compartment.
If the ice cube tray is stuck to the freezer compartment, loosen it with a blunt implement only (e.g. spoon handle).
2. To loosen the ice cubes, twist the ice cube tray slightly or hold it briefly under flowing water. operation
Basic operation
Switching on the appliance
1. Electrically connect the appliance. → Page 12
The appliance begins to cool.
A warning signal sounds and the temperature display flashes because the freezer compartment is still too warm.
2. Switch off the warning signal using .
3. Set the required temperature. → Page 16
Operating tips
Once you have switched on the appliance, the set temperature is only reached after several hours. Do not put any food in the appliance until the set temperature has been reached.
The front panels of the housing are temporarily heated slightly. This prevents condensation in the area of the door seal.
When you close the door, a vacuum may be created. The door is then difficult to open again. Wait a moment until the vacuum is offset.
The temperature in the appliance varies due to the following conditions:
– How often the appliance is opened
– Load capacity
– Temperature of newly stored food
– Ambient temperature
– Direct sunlight
Switching off the appliance
Disconnect the appliance from the power supply. Unplug the appliance from the mains or switch off the circuit breaker in the fuse box.
Setting the temperature
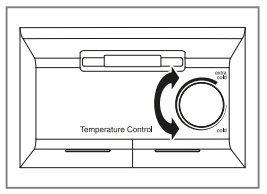
Setting the refrigerator compartment temperature
1. To reduce the temperature, turn the temperature controller in the extra cold direction.
Select a very cold setting only temporarily; if the door is opened frequently or before placing large quantities of food in the refrigerator compartment.
2. To increase the temperature, turn the temperature controller in the cold direction.
Note: At a room temperature above 32 °C, slightly reduce the temperature setting in the appliance.
At a room temperature below 16 °C, slightly increase the temperature setting in the appliance.
Setting the freezer compartment temperature
Press °C repeatedly until the temperature display shows the required temperature.
The recommended temperature in the freezer compartment is −18 °C.
Additional functions
Find out which additional functions can be used for your appliance.
Super freezing
With Super freezing, the freezer compartment cools as cold as possible. Switch on Super freezing four to six hours before placing food weighing 2 kg or more into the freezer compartment.
In order to utilise the freezer capacity, use Super freezing.
→ "Prerequisites for freezing capacity", Page 18
Note: When Super freezing is switched on, increased noise may occur.
Switching on Super freezing
Press °C repeatedly until super lights up.
Note: After approx. 54 hours, the appliance switches to normal operation.
Switching off Super freezing
Press °C repeatedly until the temperature display shows the required temperature.
Energy-saving mode
You can set the appliance to save energy with the energy-saving mode. The appliance automatically sets the temperatures.
Refrigerator compartment
Temperature remains unchanged
Freezer compartment
−16 °C
Switching on energy-saving mode
Press °C repeatedly until eco lights up.
Switching off energy-saving mode
Press °C repeatedly until the temperature display shows the required temperature.
Alarm
Door alarm
If the appliance door is open for a while, the door alarm switches on. A warning tone sounds.
Switching off the door alarm
Close the appliance door.
The warning tone is switched off.
Temperature alarm
If the freezer compartment becomes too warm, the temperature alarm is switched on.
A warning tone sounds and the temperature display flashes.
CAUTION: Risk of harm to health!
During the thawing process, bacteria may multiply and spoil the frozen food.
Do not refreeze food after it has been defrosted or started to defrost.
Refreeze food only after cooking.
These items should no longer be stored for the maximum storage period.
The temperature alarm can be switched on in the following cases:
The appliance is switched on.
Do not store any food until the appliance has reached the set temperature.
Large quantities of fresh food are being placed inside.
Switch on Super freezing before placing large quantities of food in the appliance.
The freezer compartment door is open for too long.
Check whether the frozen food has defrosted or thawed.
Switching off the temperature alarm
Press.°C
The warning tone is switched off.
Refrigerator compartment
You can keep meat, sausage, fish, dairy products, eggs, prepared meals and pastries in the refrigerator compartment.
The temperature can be set from cold to extra cold.
The refrigerator compartment can also be used to store highly perishable foods in the short to medium term. The lower the selected temperature, the longer the food remains fresh.
Tips for storing food in the refrigerator compartment
Only store food when fresh and undamaged.
Store food covered or in air-tight packaging.
To avoid impeding the circulation of air and to prevent food from freezing, do not place food in front of the inner ventilation openings or in direct contact with the back wall.
Allow hot food and drinks to cool down first before placing in the appliance.
Observe the best-before date or use-by date specified by the manufacturer.
Chill zones in the refrigerator compartment
The air circulation in the refrigerator compartment creates different chill zones.
Coldest zone
The coldest zone is on the top shelf.
Tip: Store highly perishable food such as fish, sausages and meat in the coldest zone.
Warmest zone
The warmest zone is at the very bottom of the door and in the lower vegetable container.
Tip: Store food that does not spoil easily in the warmest zone, e.g. hard cheese and butter. Cheese can then continue to release its aroma and the butter will still be easy to spread.
Freezer compartment
You can store frozen food, freeze food and make ice cubes in the freezer compartment.
The temperature can be set from −16 °C to −24 °C.
Long-term storage of food should be at –18 °C or lower.
The freezer compartment can be used to store perishable food longterm. The low temperatures slow down or stop the spoilage.
Freezing capacity
The freezing capacity indicates the quantity of food that can be frozen right through to the centre within a specific period of time.
Information on freezing capacity can be found on the rating plate. → "Appliance", Fig. , Page 14
Prerequisites for freezing capacity
1. Approx. 24 hours before placing fresh food in the appliance, switch on Super freezing.
→ "Switching on Super freezing", Page 17
2. Place food in the bottom frozen food container first.
Fully utilising the freezer compartment volume
Learn how to store the maximum amount of frozen food in the freezer compartment.
Remove all fittings from the freezer compartment. → Page 21
Store food directly on the shelves and on the floor of the freezer compartment.
Tips for storing food in the freezer compartment
Store food in air-tight packaging.
Do not bring food which is to be frozen into contact with frozen food.
Place the food over the whole area of the frozen food containers.
To ensure that the air can circulate freely in the appliance, push the frozen food containers in as far as they will go.
Tips for freezing fresh food
Freeze fresh and undamaged food only.
Freeze food in portions.
Cooked food is more suitable than food that can be eaten raw.
Vegetables: Wash, chop up and blanch before freezing.
Fruit: Wash, pit and perhaps peel, possibly add sugar or ascorbic acid solution.
Food that is suitable for freezing includes baked items, fish and seafood, meat, game, poultry, eggs without shells, cheese, butter and quark, ready meals and leftovers.
Food that is unsuitable for freezing includes lettuce, radishes, eggs in shells, grapes, raw apples and pears, yoghurt, sour cream, crème fraîche and mayonnaise.
Packing frozen food
If you select suitable packaging material and the correct type of packaging, you can determine the product quality and prevent freezer burn.
Place the food in the packaging.
Squeeze out the air.
Pack food airtight to prevent it from losing flavour and drying out.
Label the packaging with the contents and the date of freezing.
Shelf life of frozen food at −18 °C
Food
Storage time
Fish, sausages, prepared meals and baked goods
up to 6 months
Poultry, meat
up to 8 months
Vegetables, fruit
up to 12 months
The imprinted freezer calendar indicates the maximum storage duration in months at a constant temperature of –18 °C.
Defrosting methods for frozen food
CAUTION: Risk of harm to health!
During the thawing process, bacteria may multiply and spoil the frozen food.
Do not refreeze food after it has been defrosted or started to defrost.
Refreeze food only after cooking.
These items should no longer be stored for the maximum storage period.
Defrost animal-based food, such as fish, meat, cheese, quark, in the refrigerator compartment.
Defrost bread at room temperature.
Prepare food for immediate consumption in the microwave, in the oven or on the hob.
Defrosting
Defrosting in the refrigerator compartment
The refrigerator compartment in your appliance defrosts automatically.
Defrosting in the freezer compartment
The fully automatic NoFrost system ensures that the freezer compartment remains frost-free. Defrosting is not required.
Cleaning and servicing
To keep your appliance working efficiently for a long time, it is important to clean and maintain it carefully. Customer Service must clean inaccessible points. Cleaning by customer service can give rise to costs.
Preparing the appliance for cleaning
1. Disconnect the appliance from the power supply
Unplug the appliance from the mains or switch off the circuit breaker in the fuse box.
2. Take out all of the food and store it in a cool place.
Place ice packs (if available) onto the food.
3. Remove all fittings and accessories from the appliance. → Page 21
Cleaning the appliance
WARNING: Risk of electric shock!
An ingress of moisture can cause an electric shock.
Do not use steam- or high-pressure cleaners to clean the appliance.
Liquid in the lighting, controls or inner ventilation openings can be dangerous.
The rinsing water must not drip into the lighting, controls or inner ventilation openings.
ATTENTION! Unsuitable cleaning products may damage the surfaces of the appliance.
Do not use hard scouring pads or cleaning sponges.
Do not use harsh or abrasive detergents.
Do not use cleaning products with a high alcohol content.
If you clean fittings and accessories in the dishwasher, this may cause them to become deformed or discolour.
Never clean fittings and accessory in the dishwasher.
Prepare the appliance for cleaning. → Page 20
Clean the appliance, the fittings, the accessories and the door seals with a dish cloth, lukewarm water and a little pH-neutral washing-up liquid.
Dry thoroughly with a soft, dry cloth.
Insert the fittings.
Electrically connect the appliance. → Page 12
Putting the food into the appliance.
Removing the fittings
If you want to clean the fittings thoroughly, remove these from your appliance.
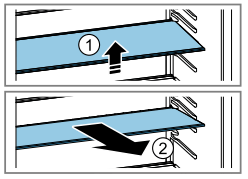
Removing the shelf
Lift the shelf at the front , pull it out and remove it .
Removing door rack
Lift the door rack and remove it.
Removing the fruit and vegetable container
Pull out the fruit and vegetable container as far as it will go.
Lift the fruit and vegetable container at the front and remove it .
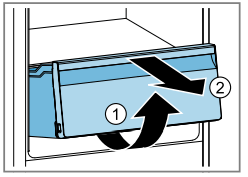
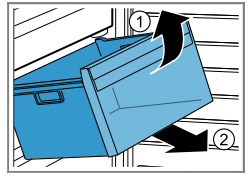
Removing the frozen food container
Take out the frozen food container as far as it will go.
Lift the frozen food container at the front and remove it .
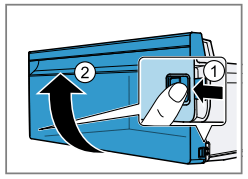
Removing the front of the container
You can remove the front of the fruit and vegetable container to facilitate cleaning.
Press in the snap-in hooks on the side of the container and remove the front from the container in a turning motion
Troubleshooting
You can rectify minor faults on your appliance yourself. Read the troubleshooting information before contacting after-sales service. This will avoid unnecessary costs.
WARNING: Risk of electric shock!
Improper repairs are dangerous.
Repairs to the appliance should only be carried out by trained specialist staff.
Only use genuine spare parts when repairing the appliance.
If the power cord of this appliance is damaged, it must be replaced by the manufacturer, the manufacturer's Customer Service or a similarly qualified person in order to prevent any risk.
Fault
Cause and troubleshooting
The appliance is not cooling, the displays and lighting are lit.
Showroom mode is switched on.
Press and hold for 5 seconds until an audible signal sounds.
Switch the appliance off and on again, and check whether it is cooling.
The LED lighting does not work.
Different causes are possible.
Call customer service.
The customer service number can be found in the enclosed customer service directory.
Side panels of the appliance are warm.
Not a fault. The side panels contain pipes which heat up during the cooling process. Units touching the appliance will not be damaged by the heat. No action required.
The warning tone sounds.
The door alarm is switched on.
The appliance door is open.
Close the appliance door
A warning tone sounds and the temperature display flashes.
The temperature alarm is switched on
Different causes are possible.
Press .
The alarm is switched off.
External ventilation openings are covered up.
Remove any obstructions from in front of the external ventilation openings.
Larger quantities of fresh food have been put in.
Do not exceed the max. freezing capacity.
→ "Freezing capacity", Page 18
The set temperature is not reached.
Fully automatic defrosting no longer works.
The freezer compartment door was open for a long time. The evaporator (refrigeration unit) in the noFrost system is heavily iced up.
Requirement: Store the frozen food well insulated in a cool place.
1. Switch off the appliance. → Page 16
2. Disconnect the appliance from the mains.
Unplug the appliance from the mains or switch off the circuit breaker in the fuse box.
3. Move the appliance away from the wall.
4. Leave the appliance door open.
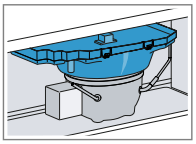
After approx. 20 minutes, the condensation starts to run into the evaporation pan at the rear of the appliance.
5. To prevent the evaporation pan from overflowing, mop up the condensation water with a sponge.
The evaporator is defrosted if no more condensation water runs into the evaporation pan.
6. Clean the interior of the appliance. → Page 20
7. Switch the appliance back on. → Page 15
The temperature differs greatly from the setting.
Different causes are possible.
Switch off the appliance. → Page 16
Switch the appliance back on after five minutes. → Page 15
‒ If the temperature is too warm, check the temperature again after a couple of hours.
‒ If the temperature is too cold, check the temperature again on the following day
Condensation accumulates on the surface of the appliance and on the shelves inside.
The water contained in warm and humid air condenses on the colder surfaces of the appliance.
Wipe away the water with a soft, dry cloth.
Open the appliance as briefly as possible.
Ensure that the appliance is always closed properly.
The appliance hums, bubbles, buzzes, gargles, clicks or crackles.
Not a fault. A motor is running, e.g. refrigerating unit, fan. Refrigerant flows through the pipes. The motor, switches or solenoid valves are switching on or off. Automatic defrosting is running.
No action required.
The appliance makes noises.
The appliance is not level.
Align the appliance using a spirit level and the screw feet.
The appliance is not free-standing.
Observe the minimum clearances for the appliance.
Fittings wobble or stick.
Check the removable fittings and, if required, replace these.
Bottles or containers are touching.
Move the bottles or containers away from each other.
Super freezing is switched on.
No action required.
Power failure
During a power failure, the temperature in the appliance rises; this reduces the storage time and the quality of the frozen food.
On the website for your appliance, the technical data provides you with the storage times for frozen food in the event of a fault.
Notes
Open the appliance as little as possible during a power failure and do not place any other food in the appliance.
Check the quality of the food immediately after a power failure.
– Dispose of any frozen food that has defrosted and is hotter than 5 °C.
– Cook or fry slightly thawed frozen food, and then either consume it or freeze it again.
Storage and disposal
Taking the appliance out of operation
1. Disconnect the appliance from the power supply.
Unplug the appliance from the mains or switch off the circuit breaker in the fuse box.
2. Remove all of the food.
3. Clean the appliance. → Page 20
4. To guarantee the ventilation inside the appliance, leave the appliance open.
Disposing of old appliance
Valuable raw materials can be reused by recycling.
WARNING: Risk of harm to health!
Children can lock themselves in the appliance, thereby putting their lives at risk.
Leave shelves and containers inside the appliance to prevent children from climbing in.
Keep children away from the redundant appliance.
WARNING: Risk of fire!
If the tubes are damaged, flammable refrigerant and harmful gases may escape and ignite.
Do not damage the tubes of the refrigerant circuit or the insulation.
Unplug the appliance from the mains.
Cut through the power cord.
Dispose of the appliance in an environmentally friendly manner. Information about current disposal methods are available from your specialist dealer or local authority.
This appliance is labelled in accordance with European Directive 2012/19/EU concerning used electrical and electronic appliances (waste electrical and electronic equipment - WEEE). The guideline determines the framework for the return and recycling of used appliances as applicable throughout the EU.
#1 Can the fridge door shelves accept 4pint plastic milk bottles
We would advise the the bottom door tray will be an adequate size for the requested item.
#2 How long do I have to wait after installation before can load the fridgelfreezer with food etc.? Dont seem able to download or view manual on line.
After installing the appliance, wait at least 1 hour until the appliance is switched on. During transportation the oil in the compressor may have flowed into the refrigeration system. Before switching on the appliance for the first time, clean the interior of the appliance
#3 Do you have a wine rack shelf available that will fit this model of fridge KGN36NWEAG?
Unfortunately there isn't a compatible wine rack for this model.
 Page 27
 , Page 14
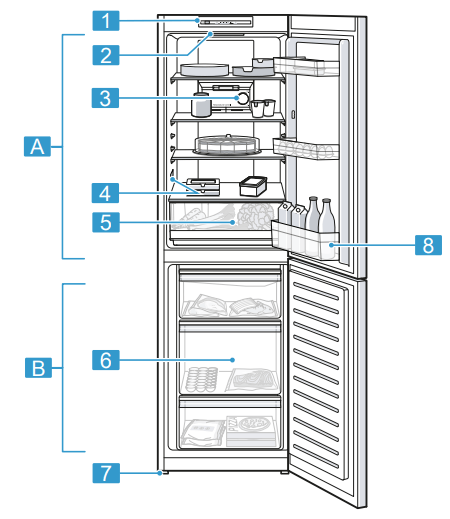
 Refrigerator compartment → Page 18
 Freezer compartment → Page 18
 Control panel → Page 14
 Lighting
 Temperature controller (refrigerator compartment)
 Rating plate → Page 27
 Fruit and vegetable container → Page 15
 Frozen food container → Page 21
 Screw foot
 Door storage compartment for large bottles → Page 15
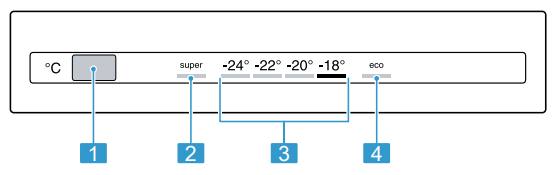
 sets the temperature of the freezer compartment.
 .
.
 , Page 14
 , pull it out and remove it
  .
.

 for 5 seconds until an audible signal sounds.