Door/Window Sensor User Manual
1. PRODUCT OVERVIEW
Door/Window Sensor is a Wi-Fi wireless Door/Window sensor. It can monitor the
status of door/window after proper installed through your smart phone. When it is
triggered, such as open, close or tampered, a push notification will be reported to your
smart phone.
2. PRODUCT FEATURES
Working in 2.4G wireless Wi-Fi;
Support EZ or AP mode for Wi-Fi connection;
Send notification about Tampered event;
Detect the battery level and report;
Report the low battery level alarm;
Open/Close history record and record clear;
Compliant with CE, FCC and ROHS.
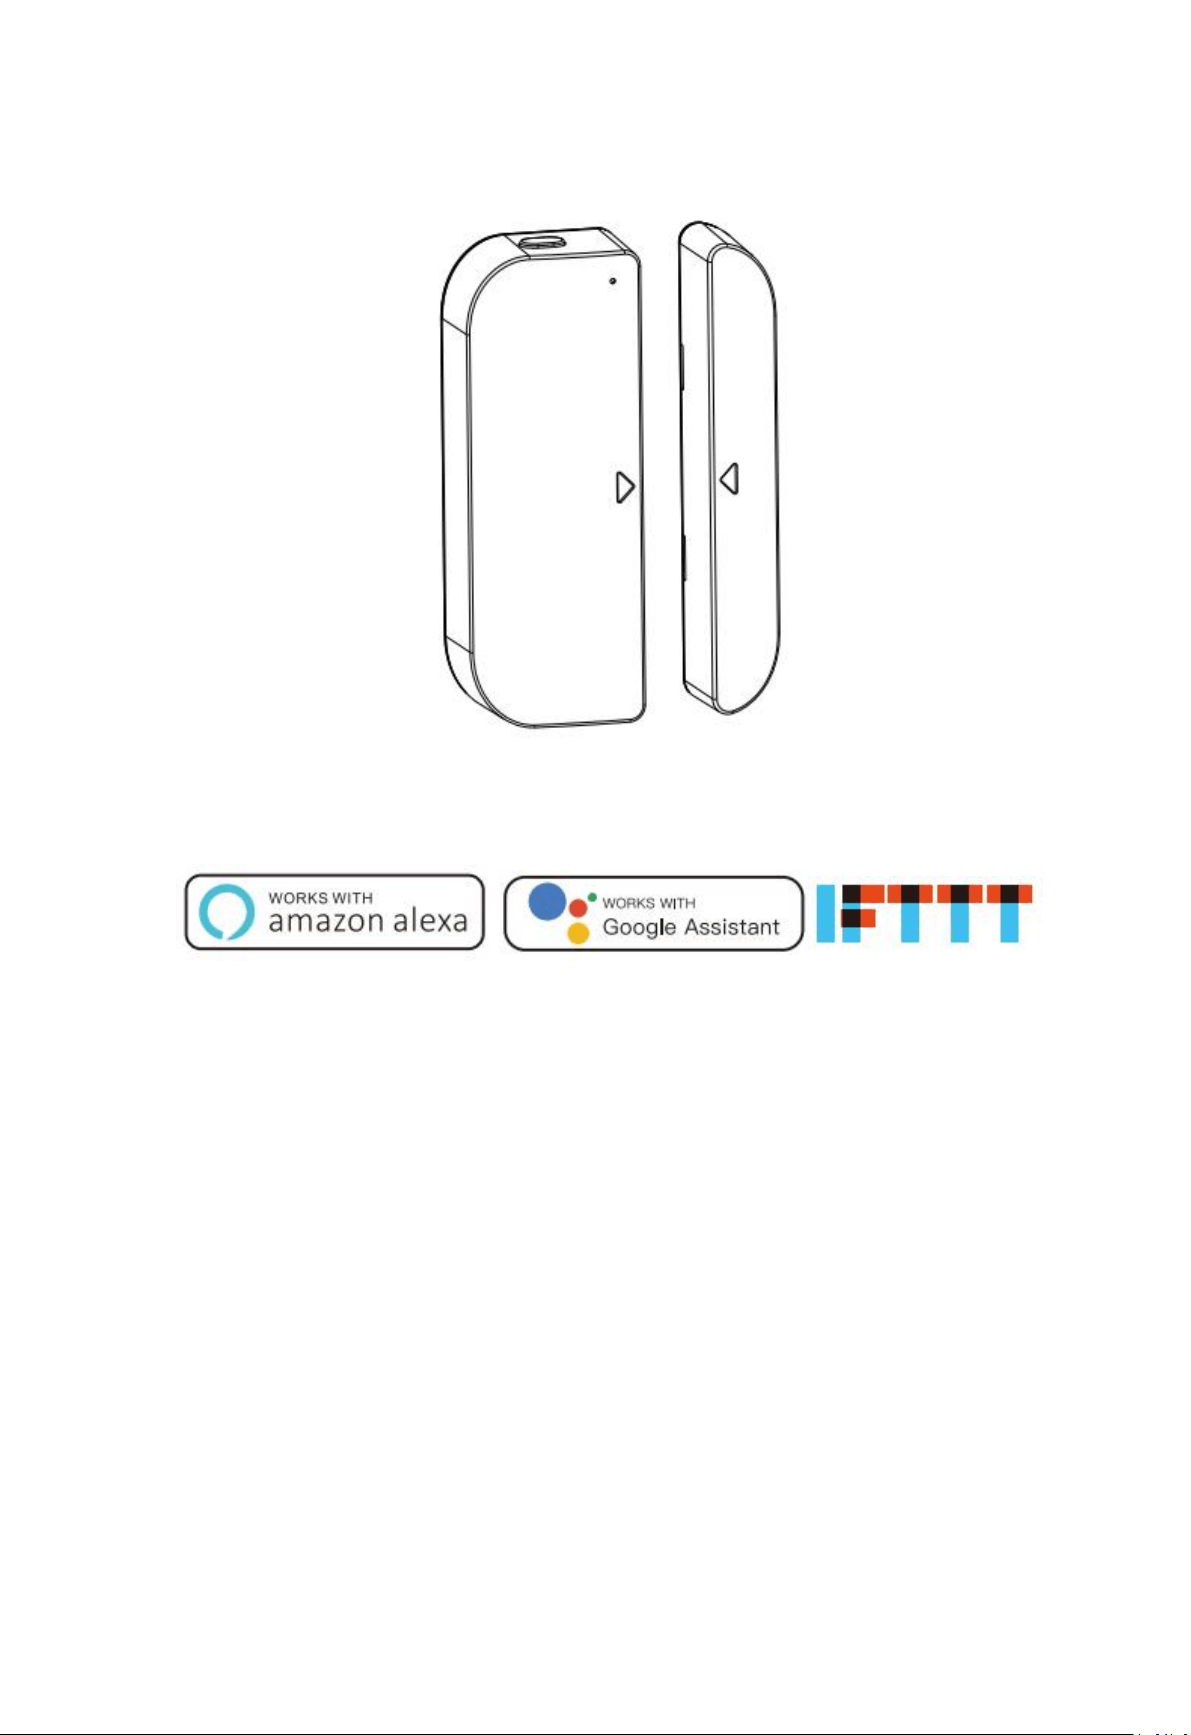
3. PRODUCT STRUCTURE
Latch button LED Button Tamper button
Sensor body Magnet
Button activities and LED indicator:
1) In the condition of clicking the button, if LED indicator turns blue, the device is working.
If not, the device is out of work, please check the battery supply.
2) In the condition of clicking the tamper button or trigger the window sensor (by taking
apart the magnet from body), if the LED indicator turns purple, the device is non Wi-Fi
connected. If the LED indicator turns blue, the device is Wi-Fi connected;
3) To press and hold the button for 5s makes device enter Wi-Fi Connection configuration,
and the LED indicator blinks rapidly (EZ Mode) or slowly (AP Mode). Device works in EZ
mode default. Pressing and holding the button for 5s will make the device switch between
EZ mode and AP mode.
4. SPECIFICATIONS
Power supply
2*AAA battery , 3V
Wireless transmitting and
receiving frequency
2.4GHz ~ 2.484GHz
Network protocol supported
IEEE802.11 b/g/n
Transmitting power
802.11b:20dBm±2dBm@1Mbps
802.11g:14dBm±2dBm@54Mbps
802.11n:14dBm±2dBm@MCS7_HT20
Receiving sensitivity
802.11b:-91dBm@11Mbps 8%PER
802.11g:-75dBm@54Mbps 10%PER
802.11n:-72dBm@MCS7_HT20 10%PER
Vector error EVM
802.11b:≤35%
802.11g:-28dBm max.
802.11n:-28dBm max.@MCS7_HT20
Working temperature
-10 ~ +40℃
Storage temperature
-40 ~ +70℃
Relative humidity
8% ~ 80%
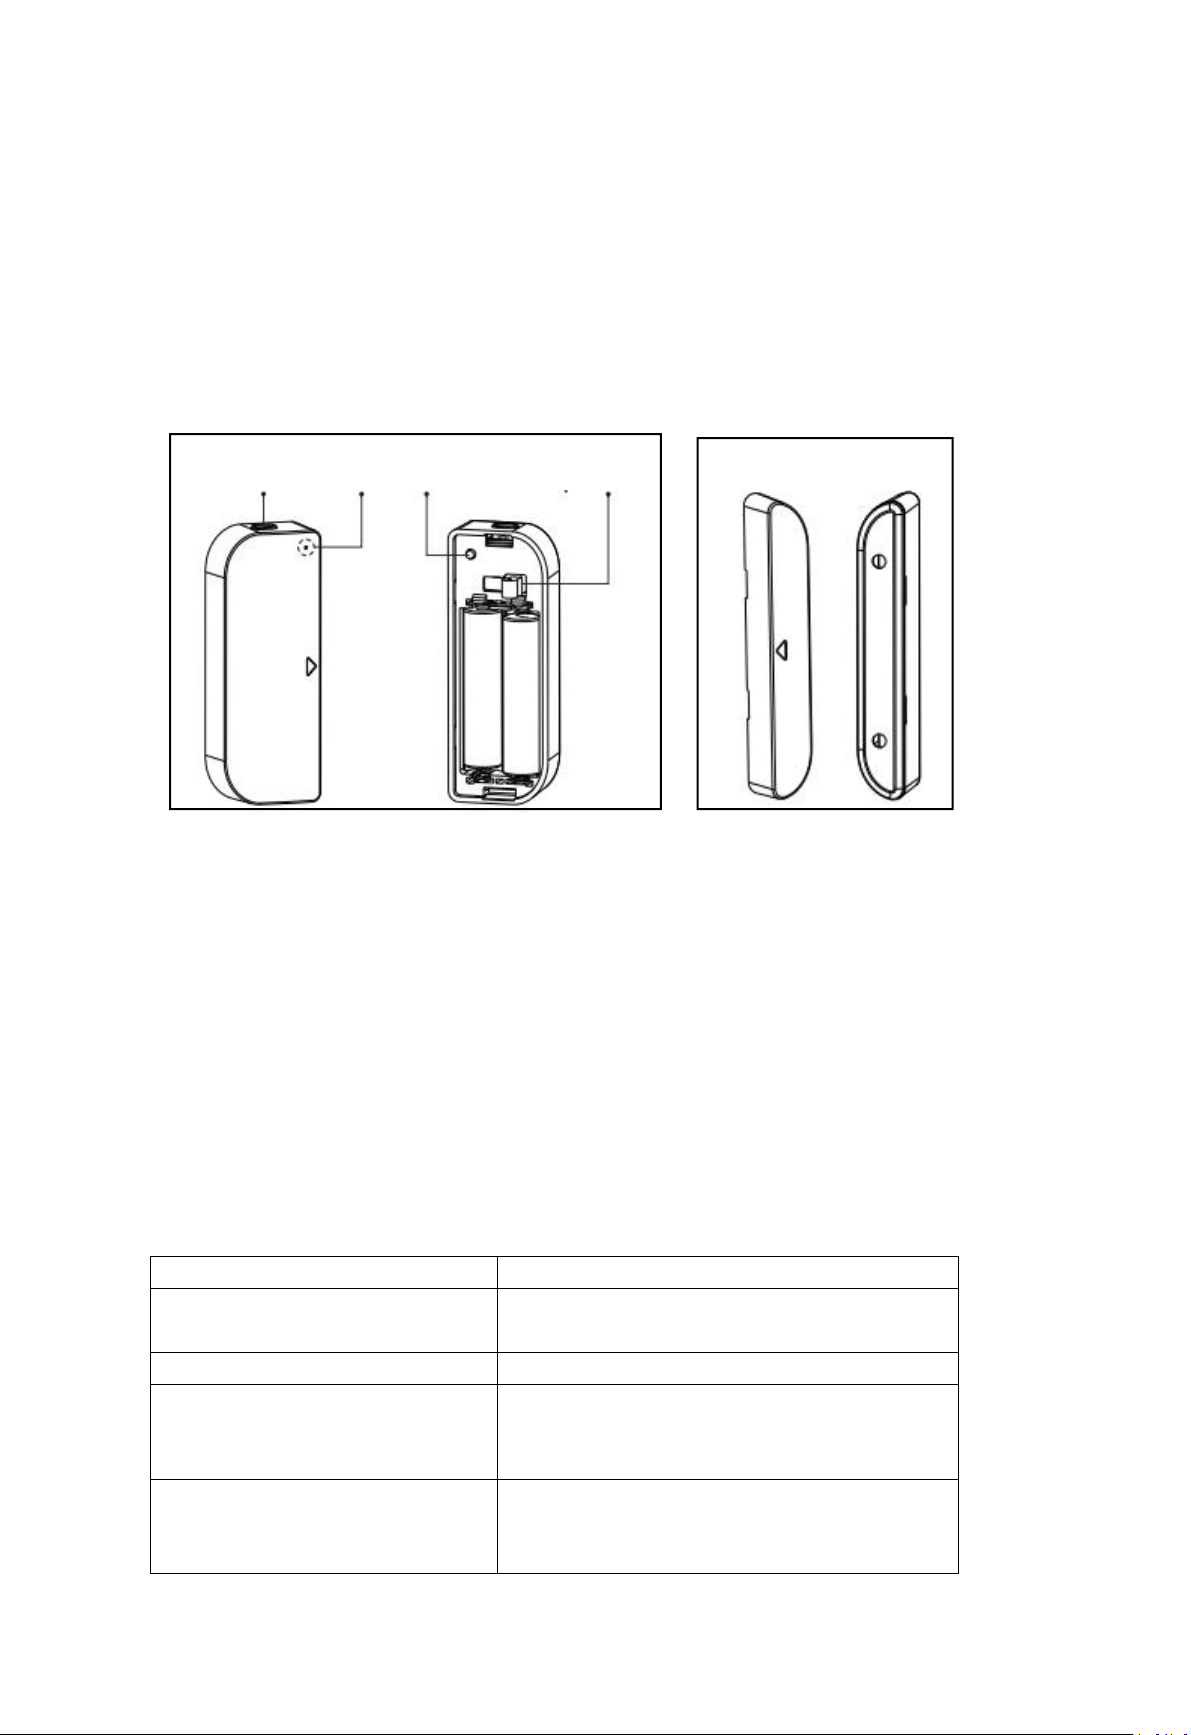
5. INSTALLATION
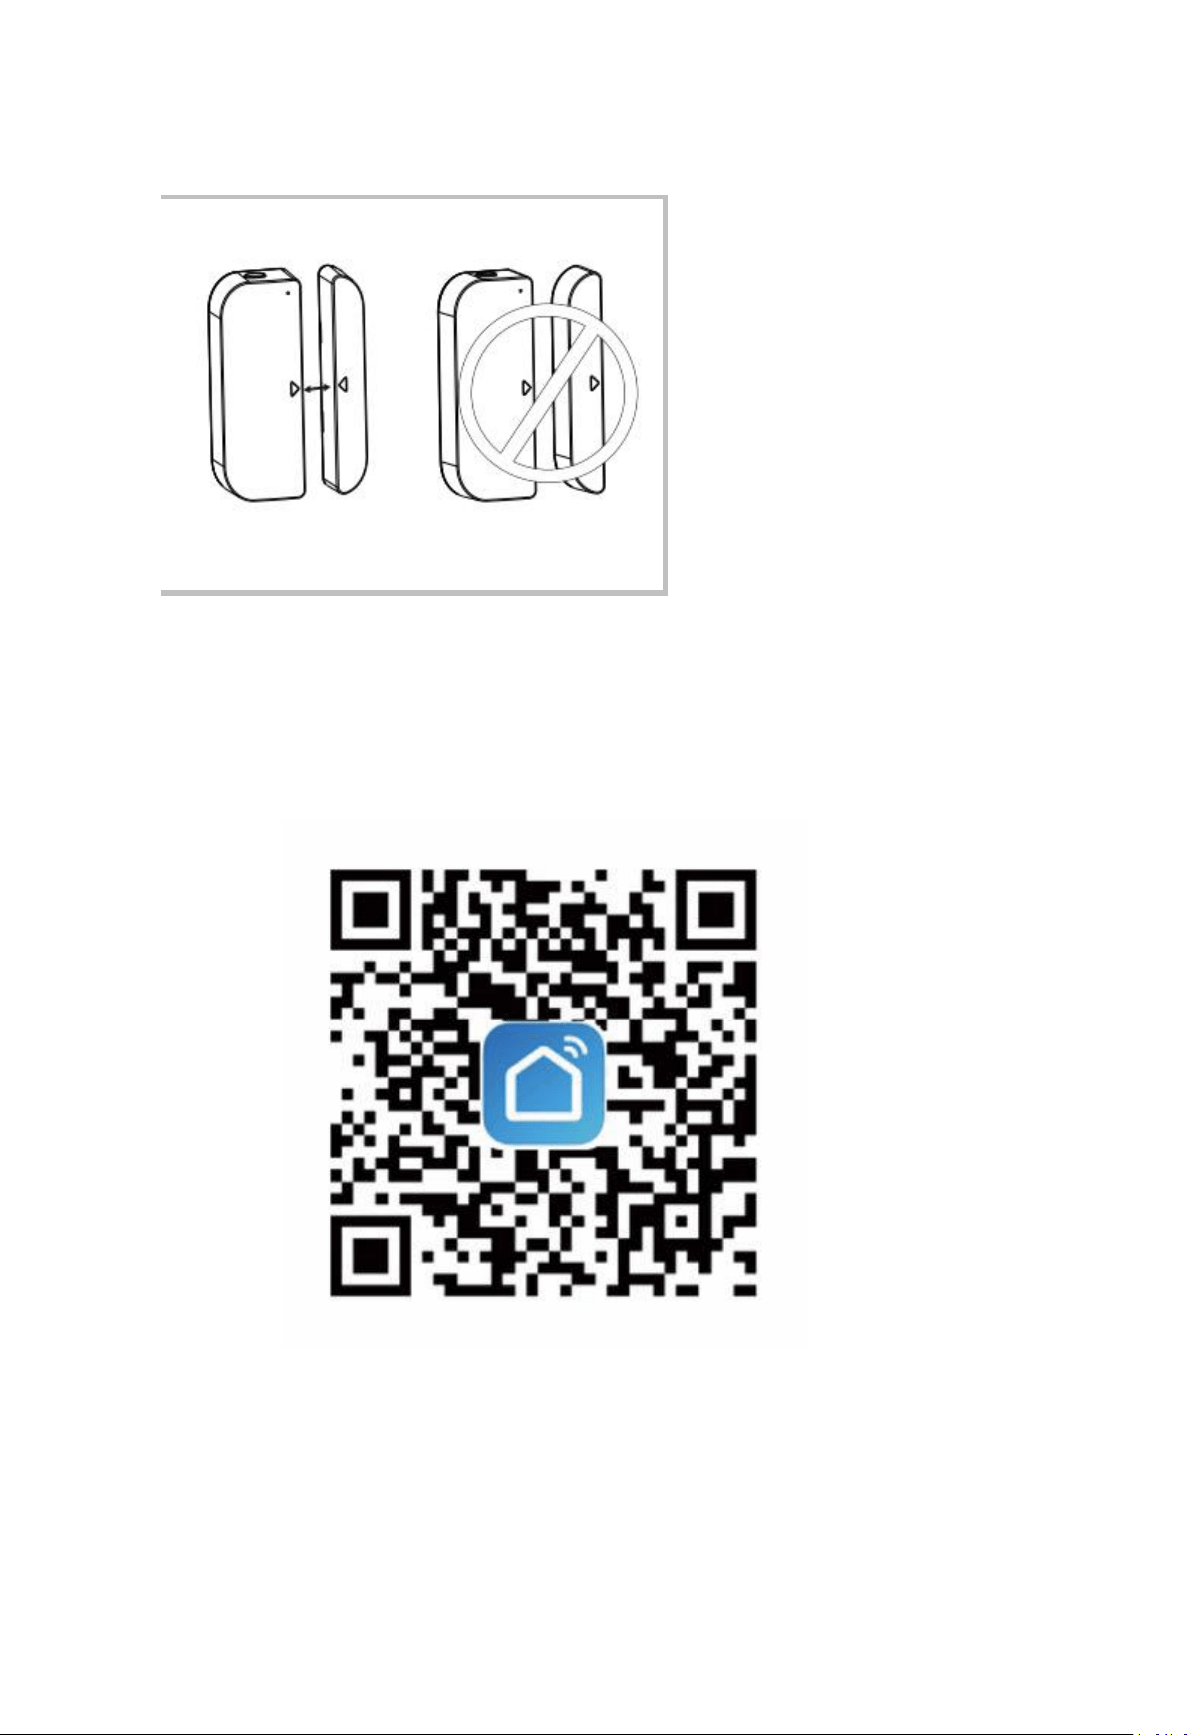
1) The sensor body and magnet part have to be installed within 10MM when the
door/window is closed.
NOTE:
1. This Sensor should not be mounted directly on or near metal framing or other large
metallic objects since metal objects may weaken the radio signal strength.
2. This Sensor should only be placed indoor and away from water and other extreme
weather conditions.
2) Using one of the following methods to Mount the device to the wall, door or window:
2.1) Screw the bidirectional mounting plate and magnet into the wall, door or window frame. (presented
below figure)
!
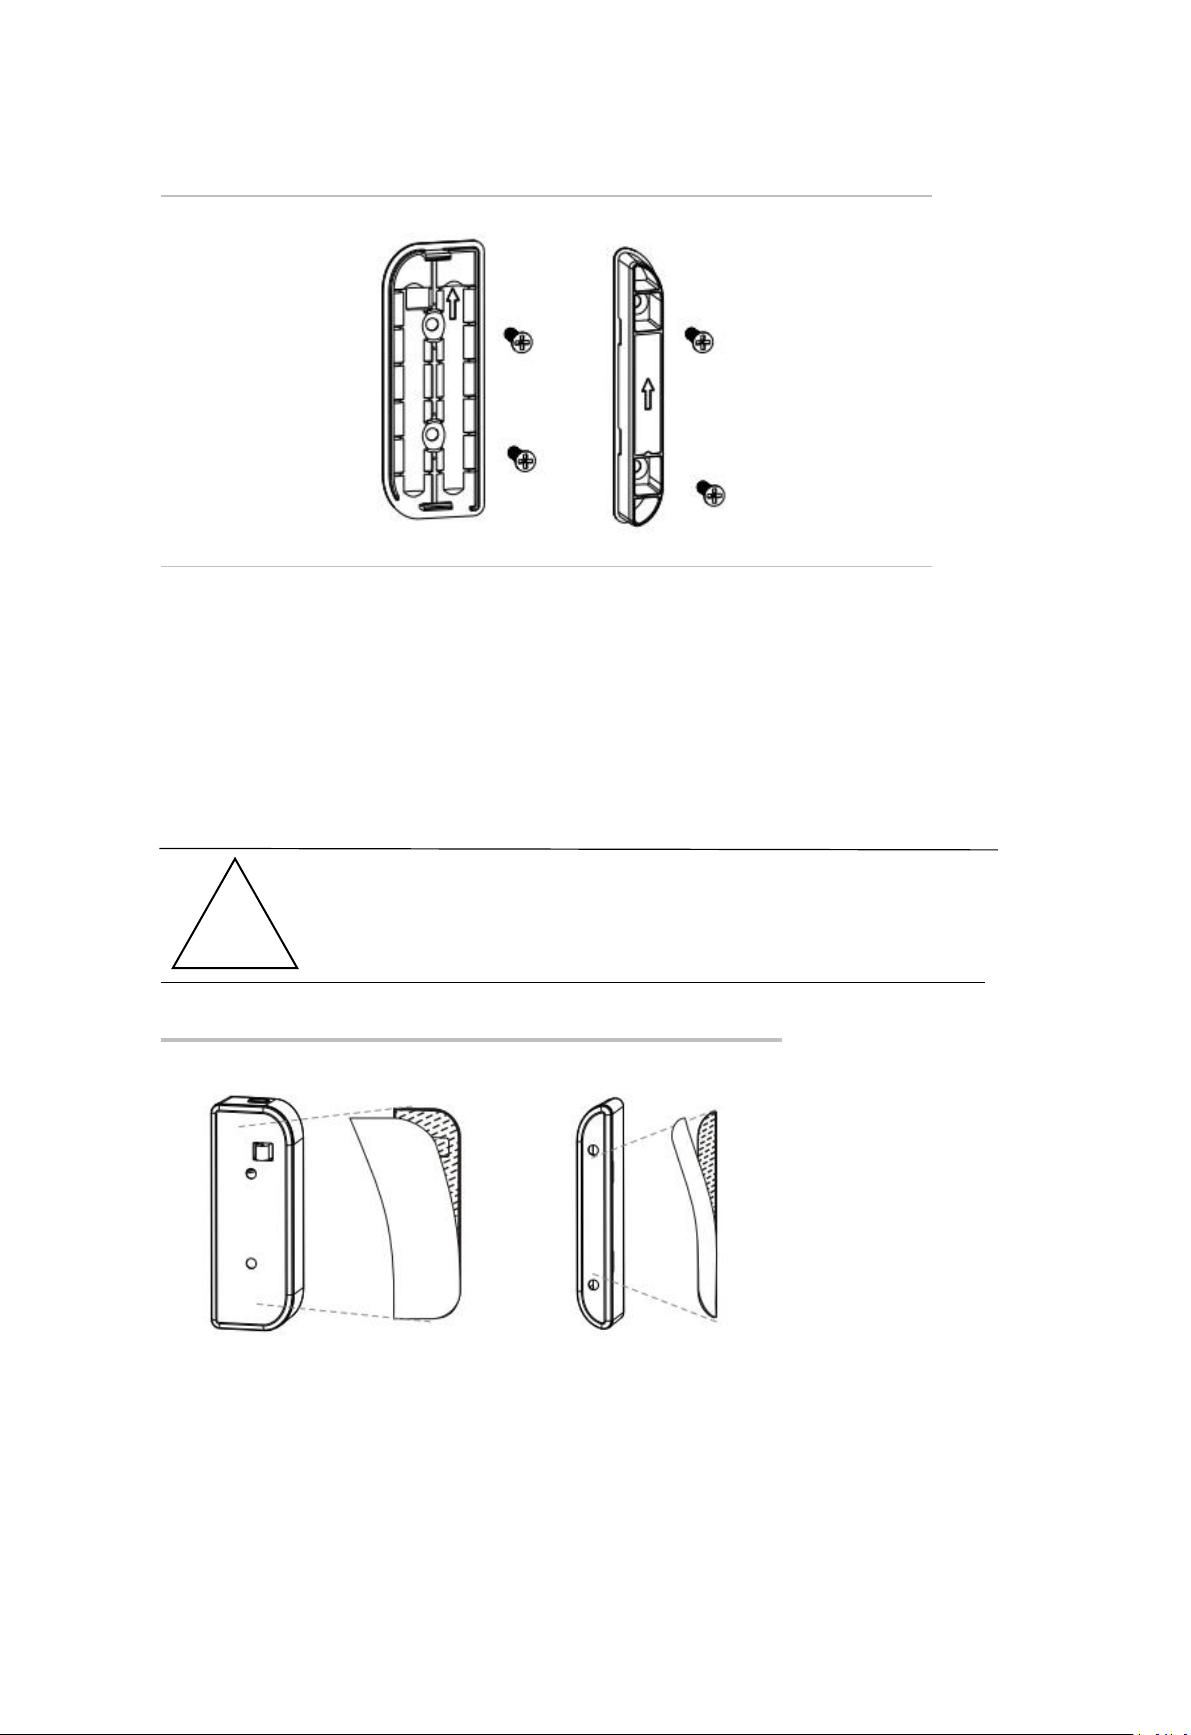
2.2) Attach the double-sided mounting tape to the covers and to adhere to the wall, door or window
frame.
NOTE:
Wipe clean the surface where the Door Window Sensor will be mounted.
Any dust and particles can reduce the adhesion of double-sided mounting tape.
3) Ensure that the orientation marks of the sensor body and the magnet are oriented towards each
other.
!
’
6. Start APP and Account
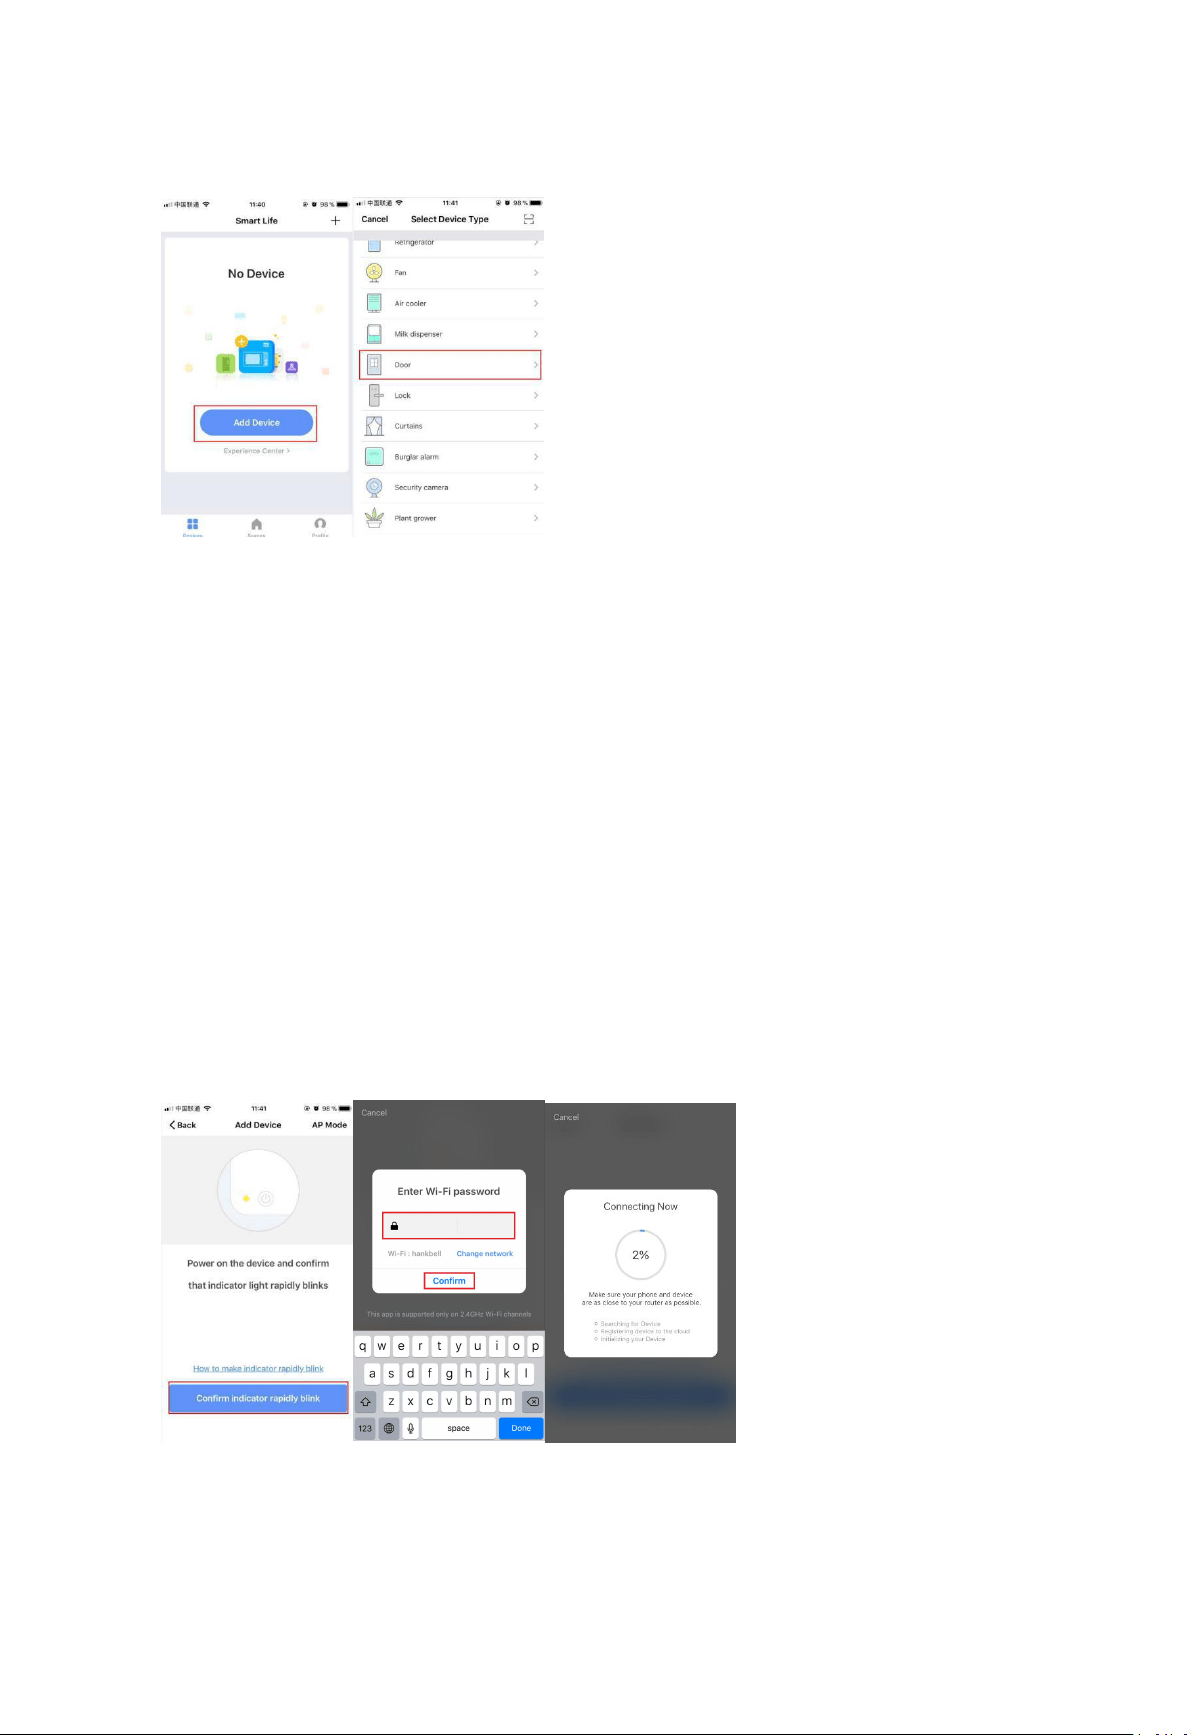
6.1 Scanning the following QR codes to download APP for Android and IOS System. Or you
can download the APP from Apple store and Google Play with “Smart Life”.
6.2 Start the APP and register an account with your email address then login APP with your
account;
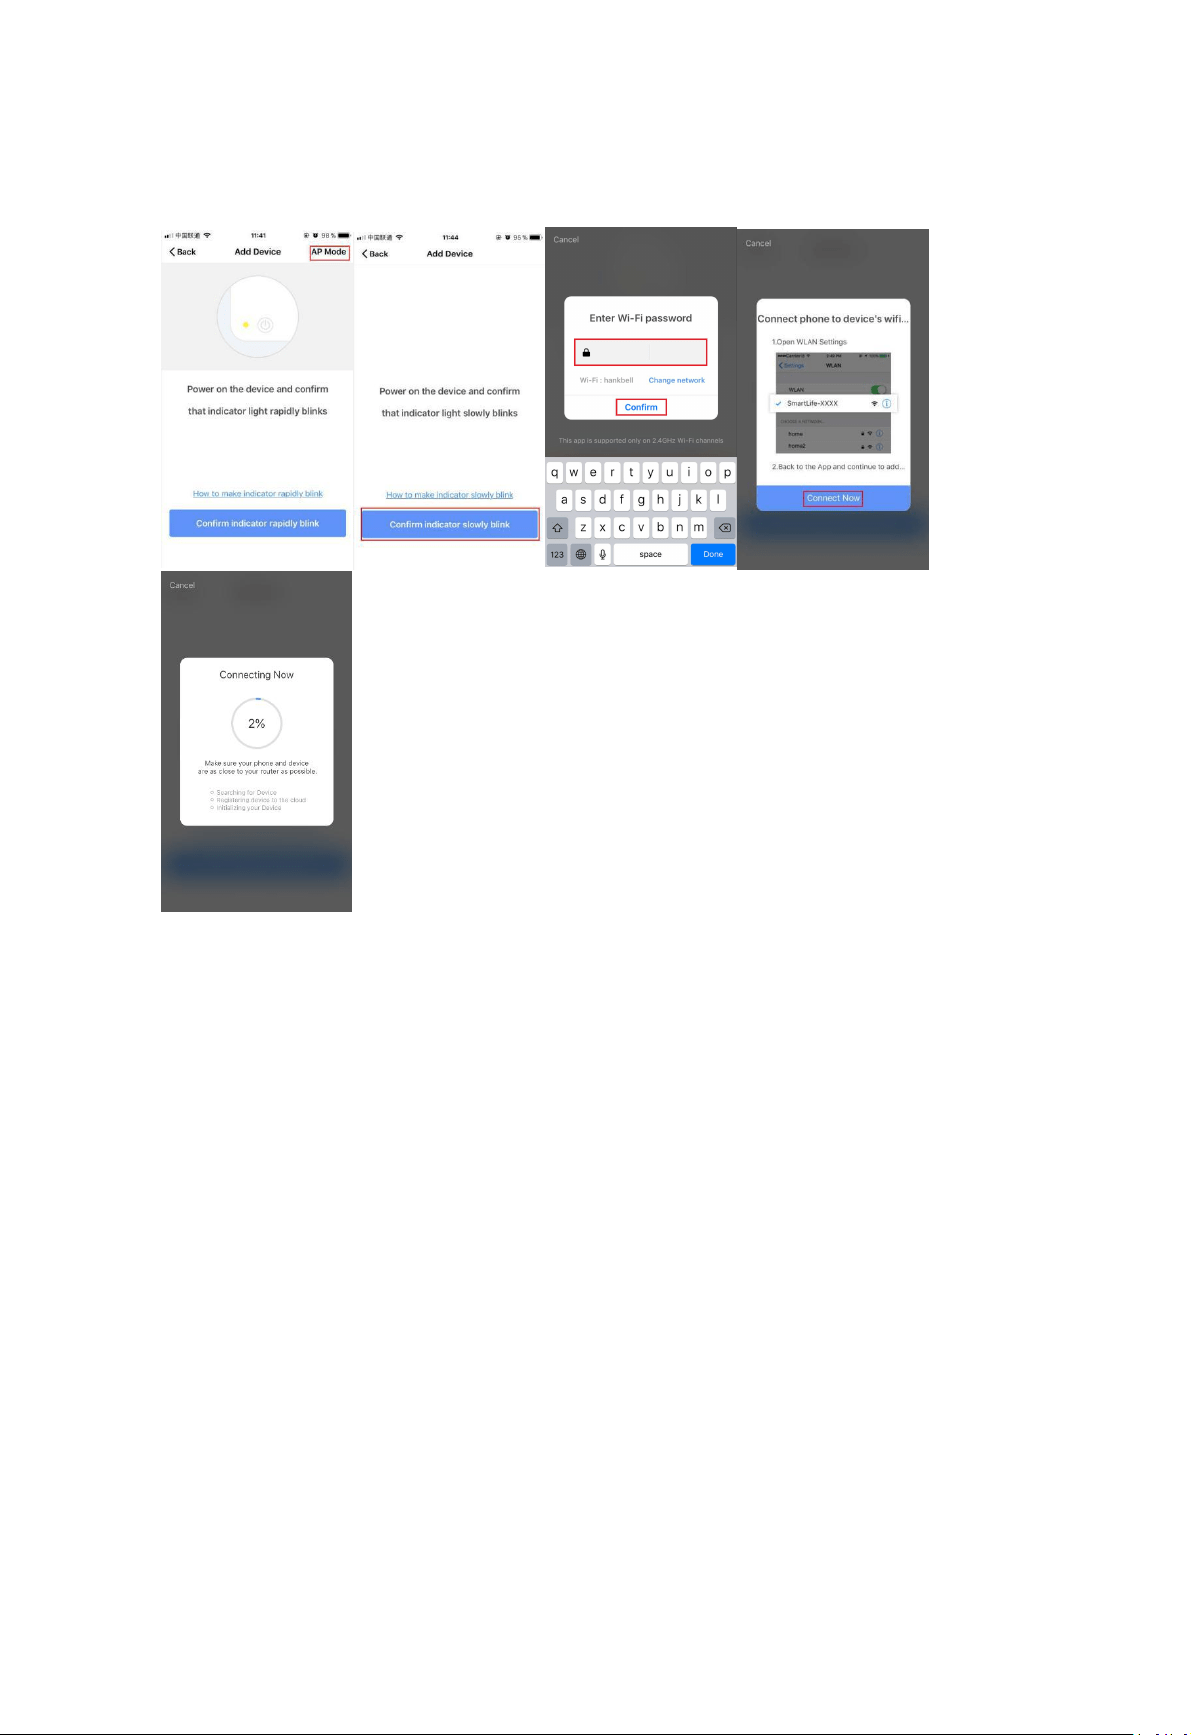
7. Add Device
7.1 Click“ADD DEVICES”,Select the Device Type“Door”
7.2 Make sure the device is in waiting Wi-Fi configuration mode with LED blinking in red fast
or slow. The device will enter the waiting configuration after it is first time powered on or
pressing and holding the button till the LED is blinking in red fast or slow.
7.3 Follow the APP guideline to enter the Wi-Fi SSID and password, then waiting for the
Wi-Fi configuration finished.
7.4 After the Wi-Fi connection is finished, the device can be re-named and can be shared
with family immediately.
Make sure the device is working in EZ mode, if the APP works in EZ mode. Make sure the
device is working in AP mode, if the APP works in AP mode. To press and hold the button for
5S switches between EZ mode and AP mode. EZ mode is a default one.
EZ mode: make sure your APP is connected to a Wi-Fi Router. Then enter the Wi-Fi
Router password to finish the Wi-Fi connection.
AP mode:Click AP Mode, select the Wi-Fi that your APP is working on, enter it’s
password,then select the Device AP name in Wi-Fi list with SmartLife-xxxx to finish the
Wi-Fi connection.
8. FCC NOTICE (for USA)
This device complies with part 15 of the FCC Rules. Operation is subject to the following two
conditions:
(1) This device may not cause harmful interference
(2) This device must accept any interference received, including interference that may cause
undesired operation.
The manufacturer is not responsible for any radio or tv interference caused by
unauthorized modifications or change to this equipment. Such modifications or change
could void the user’s authority to operate the equipment.
This equipment has been tested and found to comply with the limits for a Class B digital
device, pursuant to part 15 of the FCC Rules. These limits are designed to provide
reasonable protection against harmful interference in a residential installation. This
equipment generates, uses and can radiate radio frequency energy and, if not installed and
used in accordance with the instructions, may cause harmful interference to radio
communications. However, there is no guarantee that interference will not occur in a
particular installation. If this equipment does cause harmful interference to radio or

television reception, which can be determined by turning the equipment off and on, the
user is encouraged to try to correct the interference by one or more of the following
measures:
-- Reorient or relocate the receiving antenna.
-- Increase the separation between the equipment and receiver.
-- Connect the equipment into an outlet on a circuit different from that to which the
receiver is connected.
-- Consult the dealer or an experienced radio/TV technician for help.
RF Warning statement:
To maintain compliance with FCC's RF exposure guidelines,this equipment should be
installed and operated with a minimum distance of 20cm between the radiator and your
body
9. QUICK GUIDE OF USING AMAZON ECHO TO CONTROL SMART DEVICES
9.1. What you need to get started
Before using Echo to control your smart devices, make sure you meet the following
conditions.
Stable Wi-Fi network which could access to Amazon server.
An Echo device, such as Echo, Echo Tap, or Echo Dot.
An Amazon Alexa account.
Smart Life app and a related account.
Make sure there's at least one device under your Smart Life account, and the device's
name could be easily recognized by Echo.
9.2 Add devices in Smart Life app(Refer to App Instruction)
You can skip this part if you've already add some devices to your Smart Life account, and in
the meantime the devices' name are easily recognized.
Download Smart Life app(Refer to App Instruction)
Search " Smart Life " in either App Store or Google Play to install the app.
iOS version download: App Store
Android version download:Google Play
Register a Smart Life account and sign in the app (Refer to App Instruction)
Open the Smart Life app, tap "Register" to register an account, then sign in the app.
Add device and change device's name (Refer to App Instruction)
Sign in with the Smart Life account, add the device, then change device name to a easily
recognized word or phrase, like "front door".
Link Smart Life account to Echo
1.Tap "Skills" in the hamburger menu, then search "Smart Life". Select "Smart Life" and tap
"ENABLE" to enable the Skill.
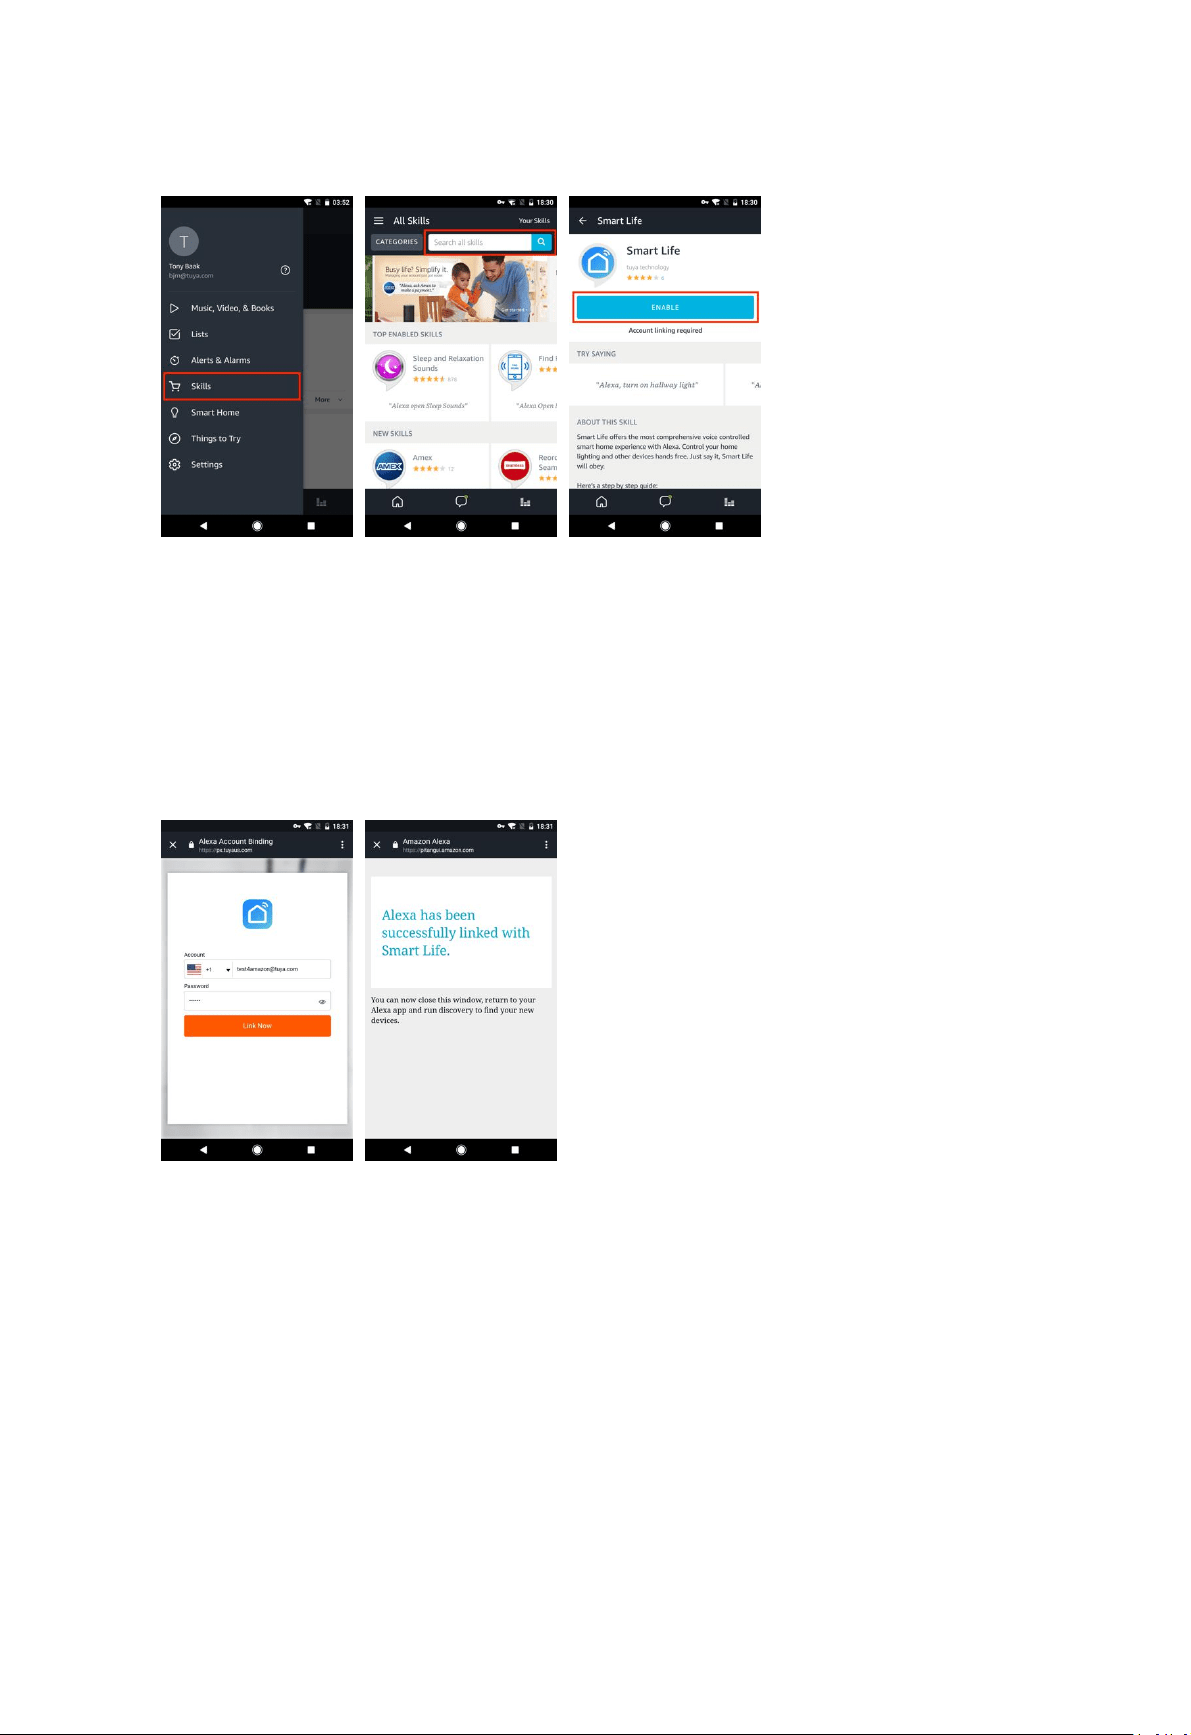
2.You will be redirected to the account link page. Type in your Smart Life account and
password, don't forget to select the country/region where your account belongs to. Then
tap "Link Now"to link your Smart Life account. The country/region, the account, and the
password must match with the exact content in Step 2.2 when you registered the account.
When "Alexa has been successfully linked with Smart Life " shows up, tap on the top left
corner.
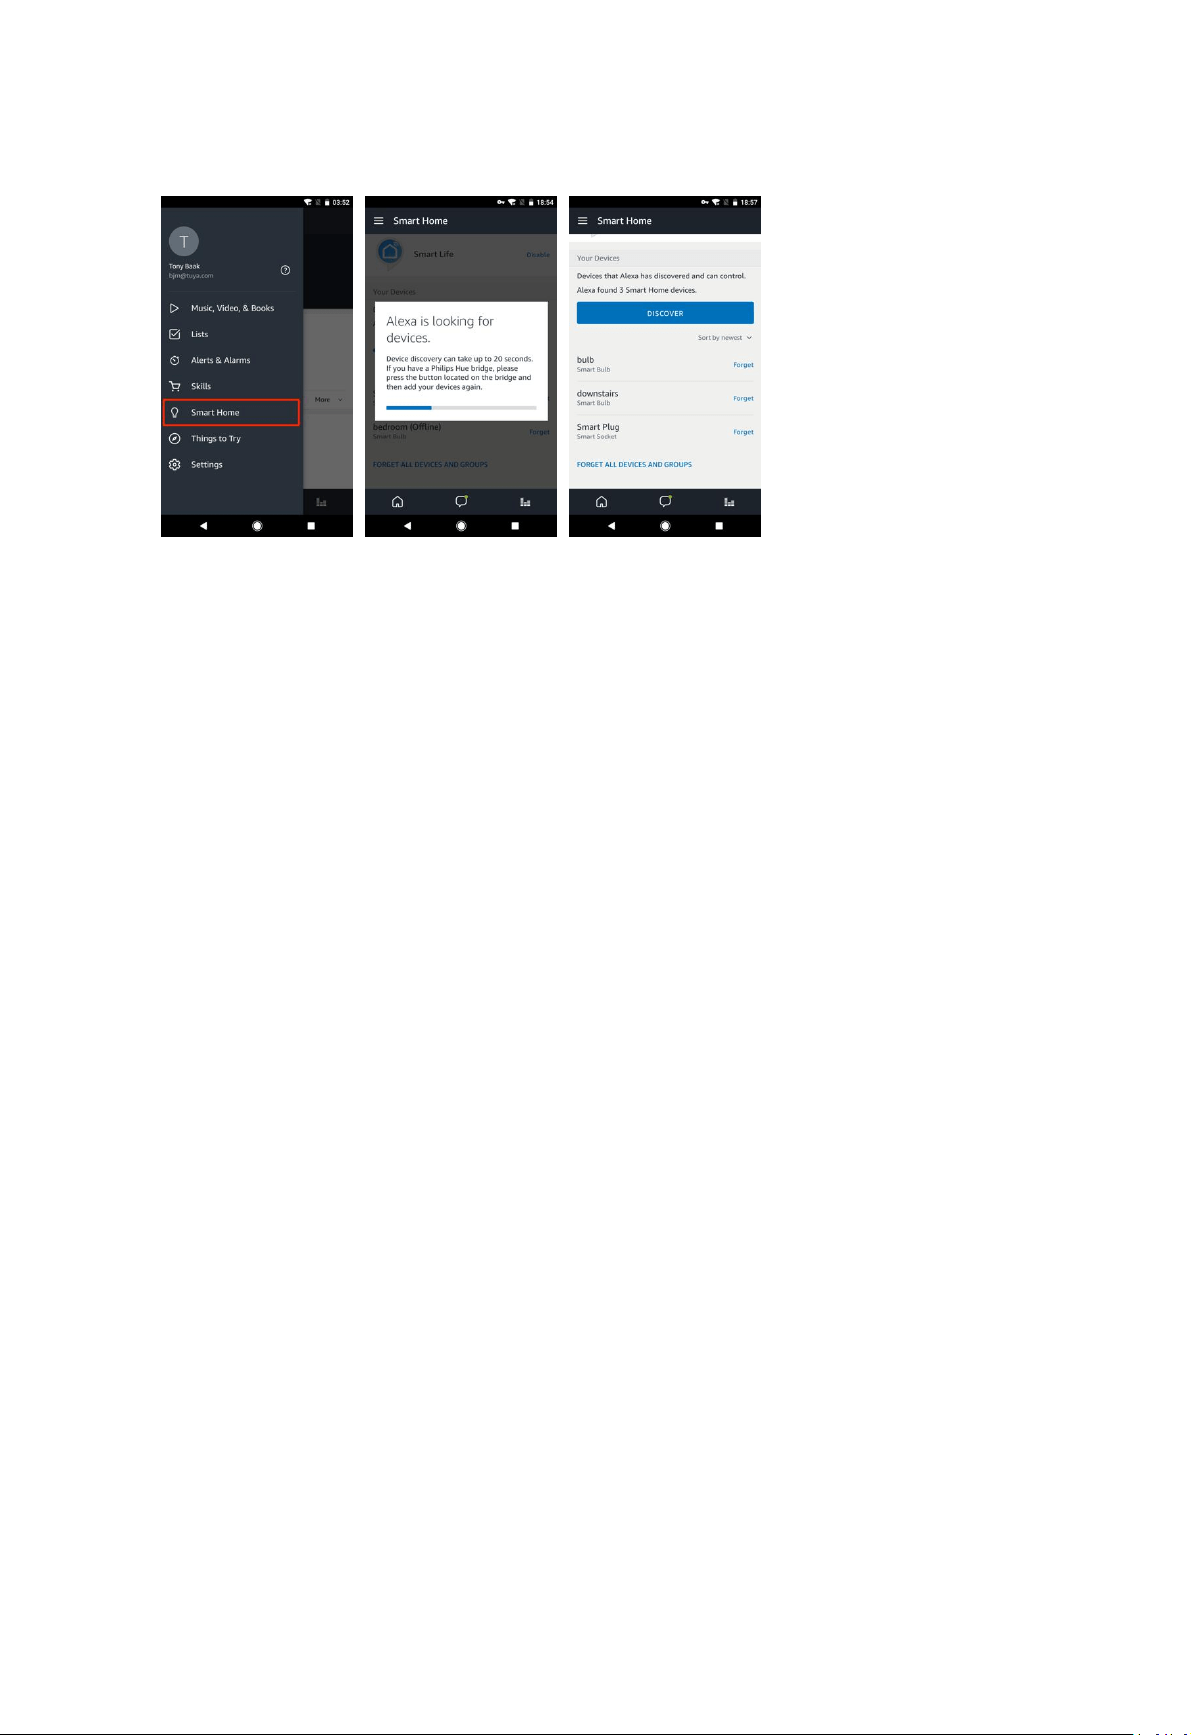
9.3 Control your smart devices through Echo
Discover devices
Echo needs to discover your smart devices before it controls them. You can say "Alexa,
discover devices" to Echo. Echo will discover devices which have already been added in the
Smart Life app.
You can also tap "DISCOVER"to discover the smart devices. Discovered devices will be
shown in the list.
Note:
When you change the device's name on Smart Life app, Echo must re-discover before
you control them.
If the Echo can not find the Devices added in Smart Life APP, please disable the Smart
Life skill, enable Smart Life skill, link the APP account to Alexa account, and discover the
devices again to make Echo voice control work.
Control devices by voice commands
Now you can control your smart devices through Echo. As an example, the supported voice
command is as below to get the state of the “front door”:
Alexa, is the front door locked?
10. QUICK GUIDE OF USING GOOGLE HOME TO CONTROL SMART DEVICES
10.1. Control your smart devices through Google Home
Before using Google Home to control your devices, make sure you meet the following
conditions.
A Google Home device, or Android phone with Google Assistant.
Latest Google Home app.
Latest Google app (Android only)
A Google account.
The device display language must be set to English US.
Smart Life app and a related account.
Smart devices.
10.2. Add devices in Smart Life app(Refer to App Instruction)
You can skip this part if you've already add some devices to your Smart Life account, and in
the meantime the devices' name are easily recognized. And refer to section 9 for adding
devices in Smart Life APP.
Link Smart Life account in Home Control
1) Tap "Home Control" in the hamburger menu on the Google Home app's home page,
then tap "+".

2) Find "Smart Life"in the list. In the new window, select your Smart Life account’s region,
type your Smart Life account and password, then tap "Link Now". After you assign rooms
for devices, your devices will be listed in the Home Control page.
10.3. Control your smart devices through Google Home
Now you can control your smart devices through Google Home. As an example, the
supported voice command is as below to get the state of the “front door”:
Ok Google, is the front door on?
Ok Google, is the front door off?
Ok Google, is the front door on or off?
11. IFTTT - Setup and Usage
Get Started: How to connect Smart product to IFTTT?
Step1.
Visit the lFTTT official website on your PC and sign in with your lFTTT account.
Note: You can also use lFTTT app and follow similar steps to connect your device
to the lFTTT ln this FAQ we take the website setting method for example.(Download IFTTT APP from
Google play or App store)
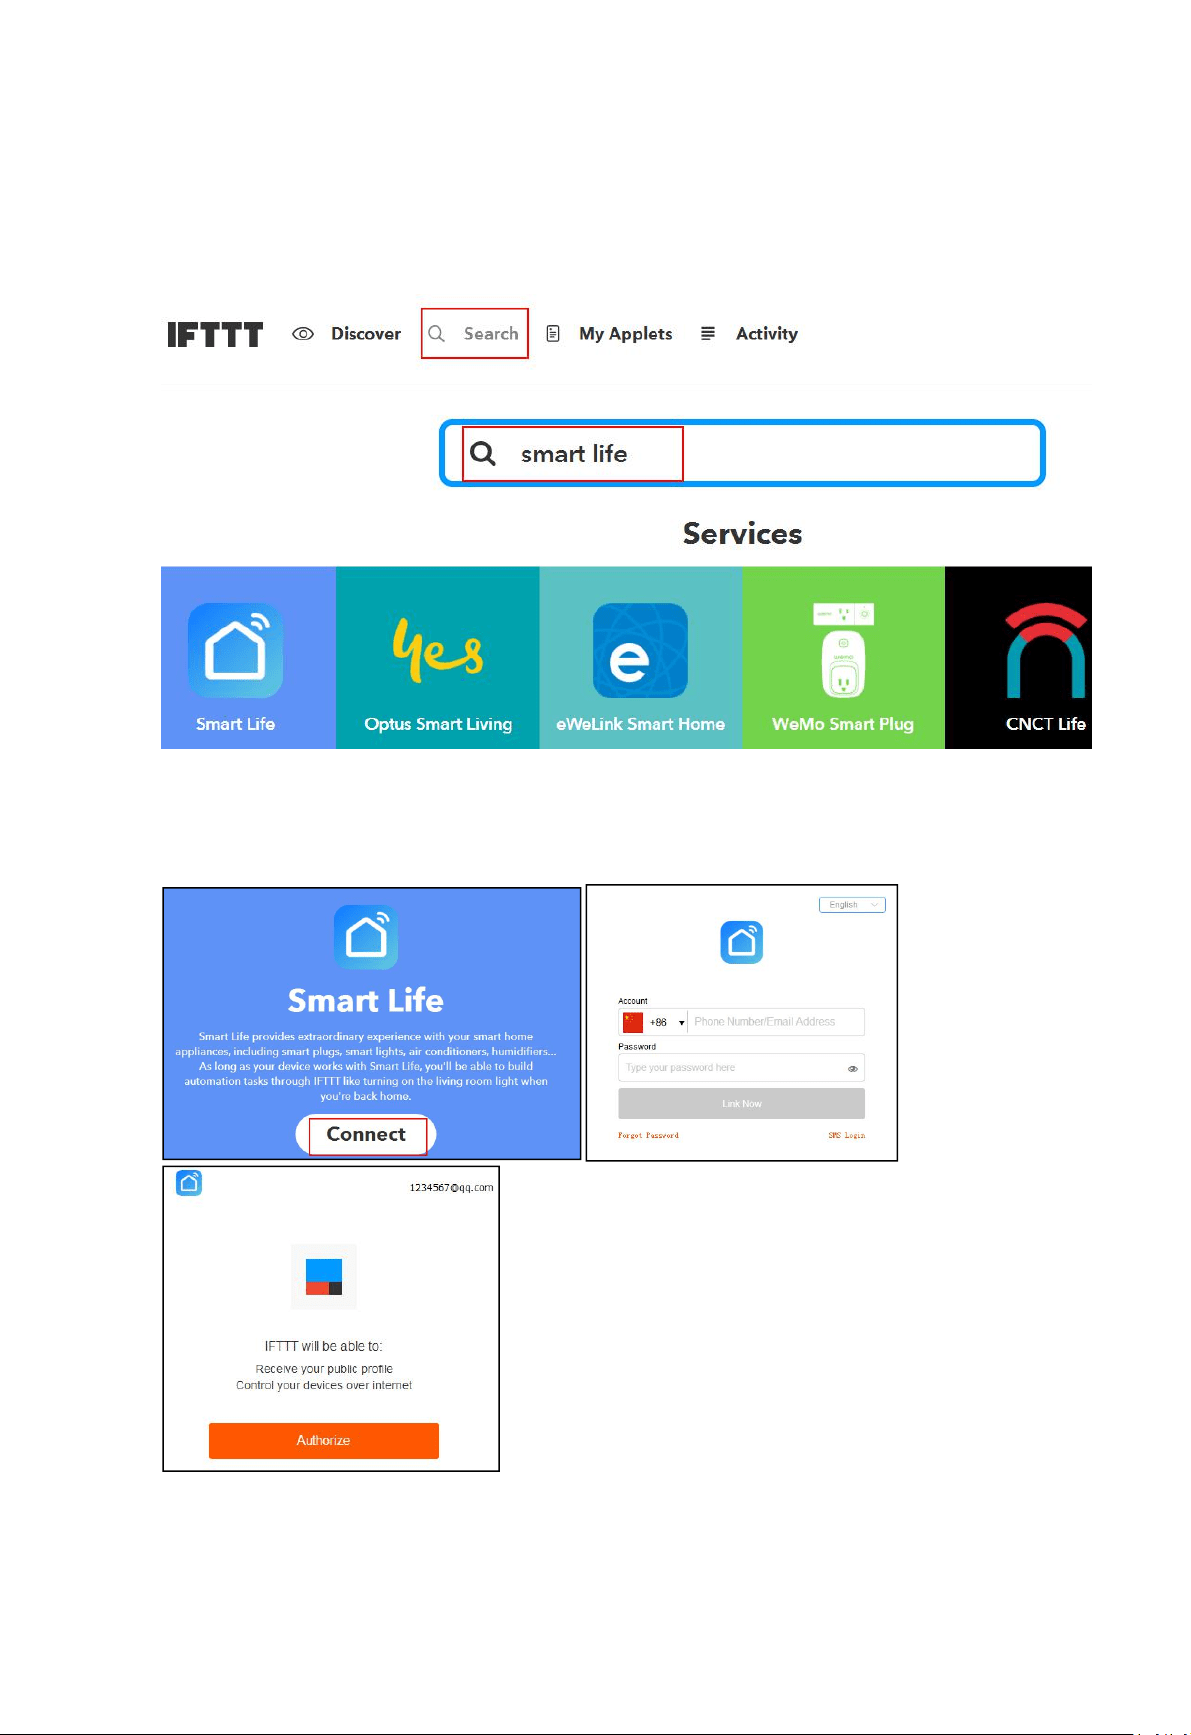
Step2.
“Search” for“Smart Life”, and then click“Smart Life” service
Step3.
Click "Connect" to enter your account and password to log in. Click “authorize” and the
associated account is successful
There are 2 methods to use IFTTT with samrt products
Method 1:on Smart life service page,choose an existing Applet you need ,turn on it and then finish the
configuration.
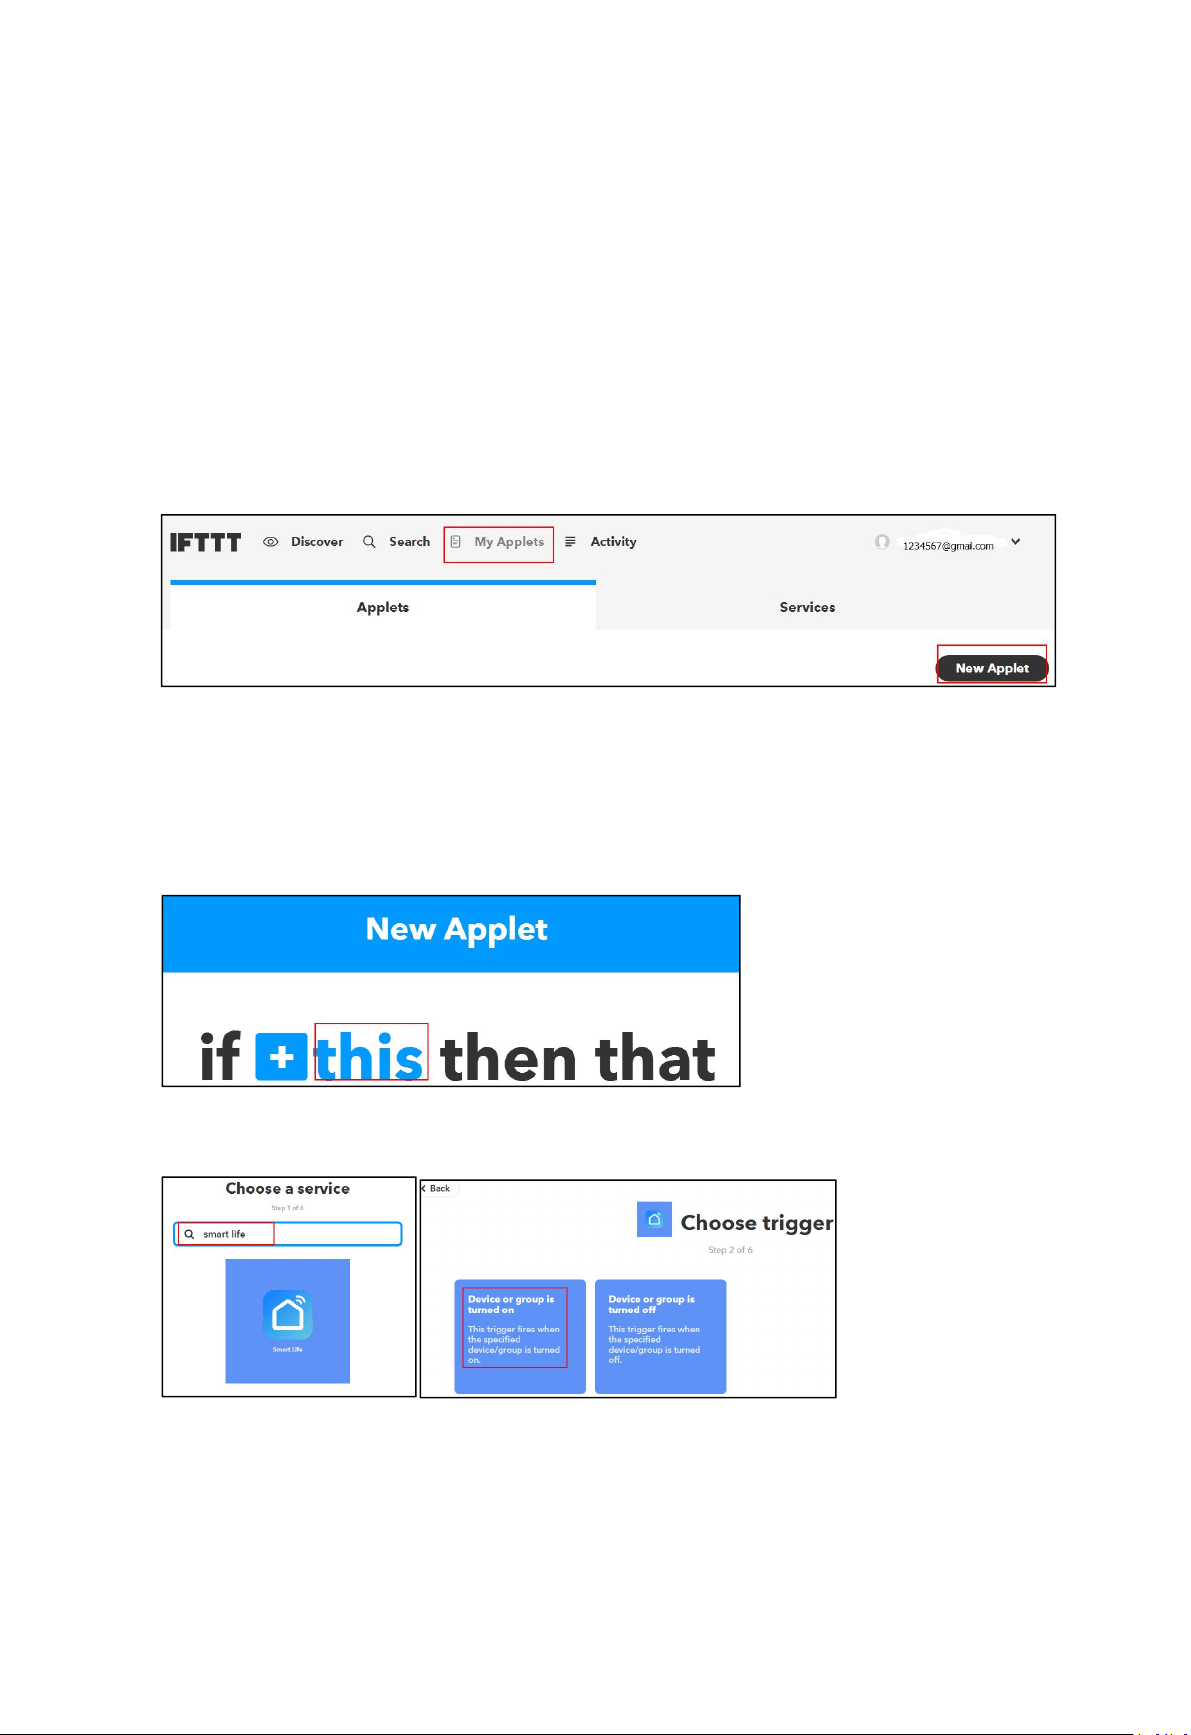
Method 2:Create a new Applet on your own
Click “My Applets”to create an Applet
Step 1. Create a Trigger
tap
“
this
”
to shoose a trigger
,
You can search for
“
smart life
”
to choose a Smart life Trigger.
For example, use a door sensor as a trigger
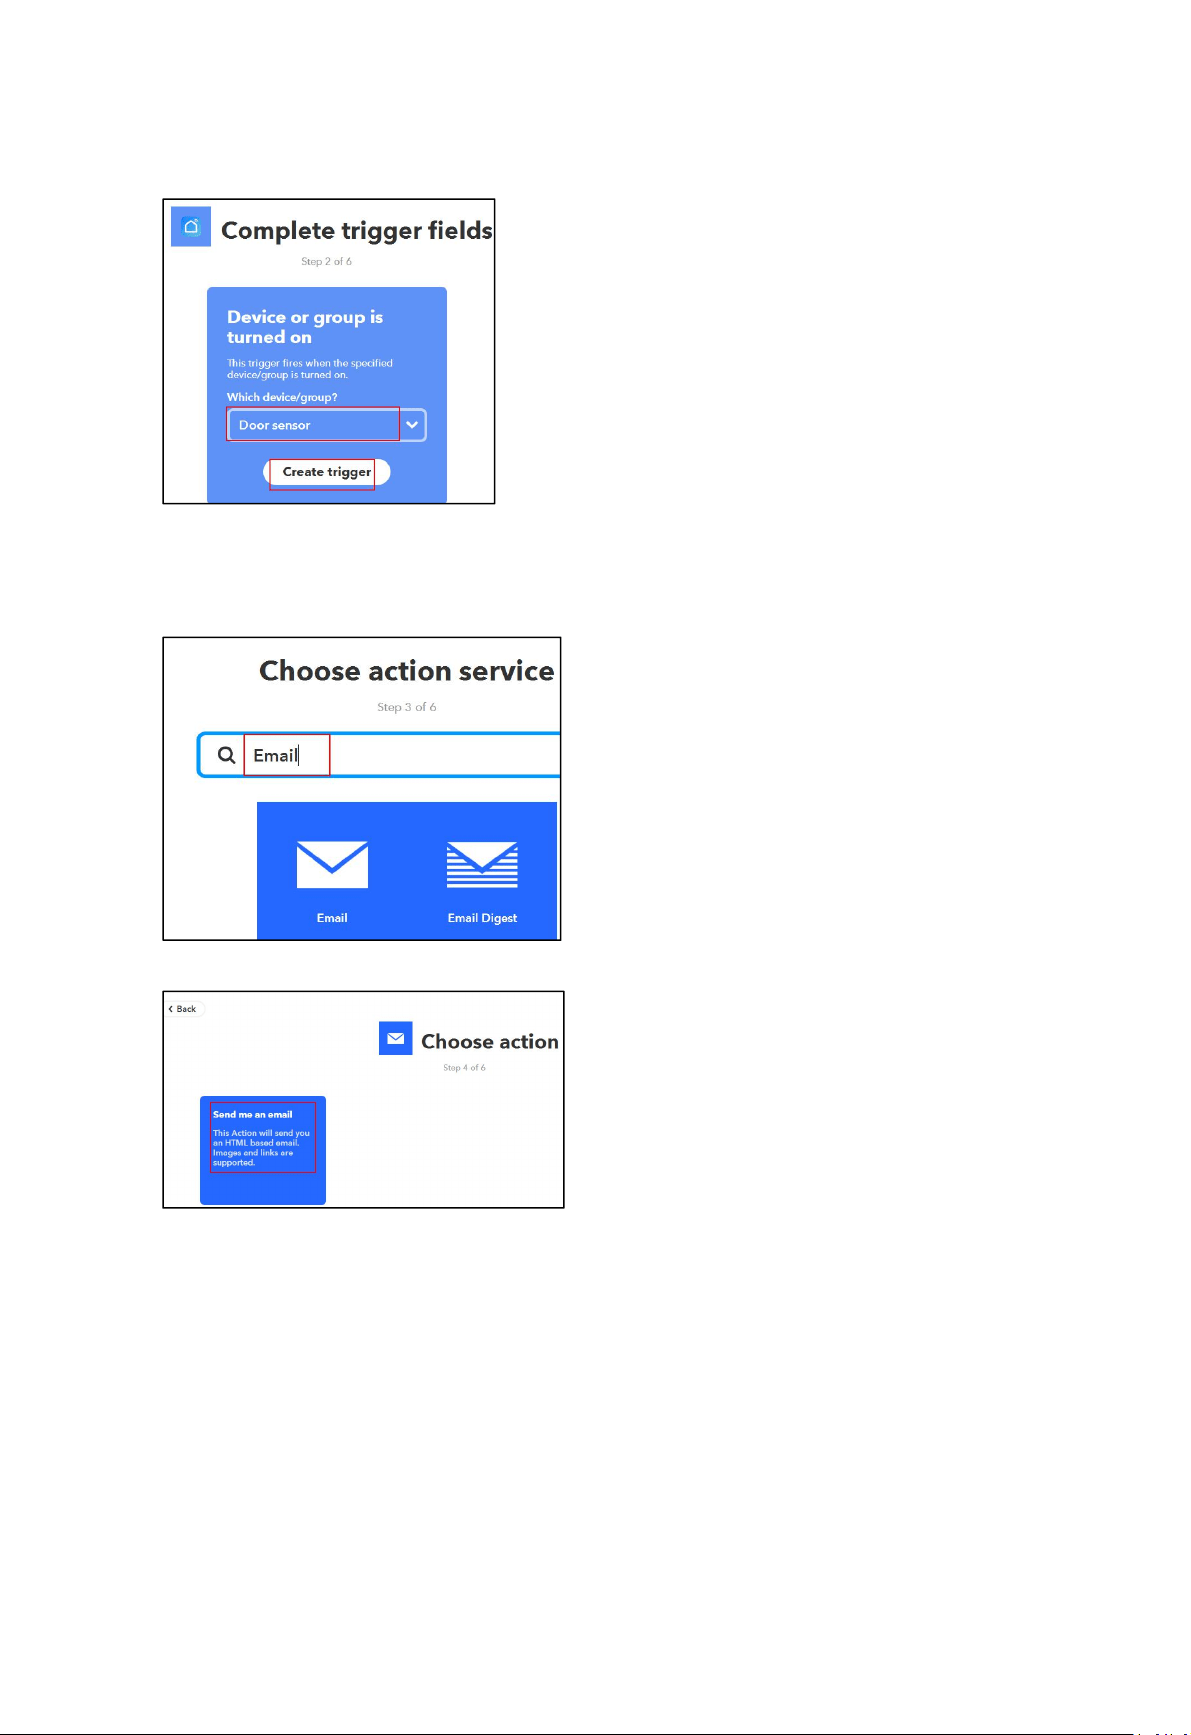
Step 2. Create a Action
Tap“that” to choose an Action. You can search for “Email”to choose a action
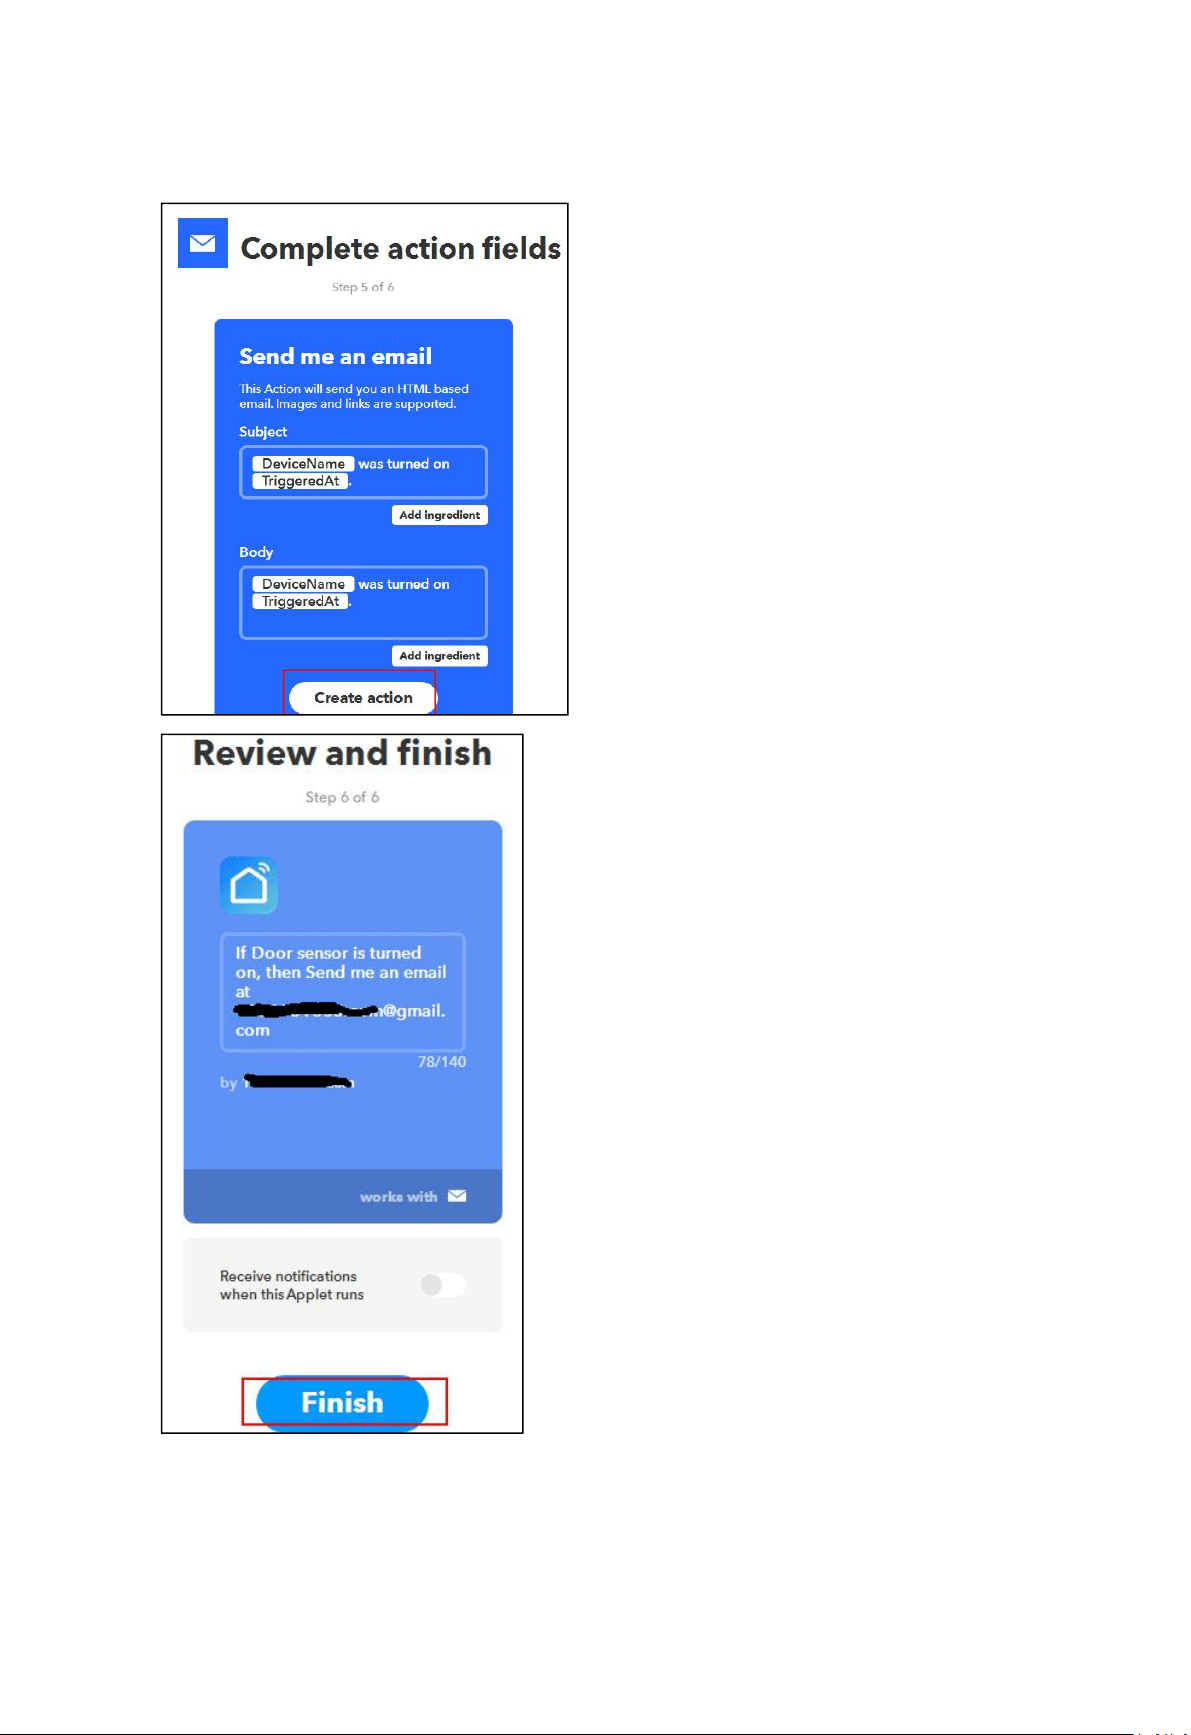
Step 3.
New Applet “IF Door sensor is turned on,then Send me an email at xxxxxxx@gmail.com” is created as
a result.