WARNING: After ten (10) years from initial power up, this alarm will “beep” two times every 30 seconds to indicate that it is time to replace the alarm. Replace the alarm immediately! It will not detect CO in this condition.
End of Life Notification
End of Life “Hush”: This model has an End of Life Hush feature which allows you to press the test/reset button on the alarm and disable the “chirps” for a period of 3 days. This gives you a chance to replace the alarm at a more convenient time while still providing protection. The two chirps will repeat again every 3 days and can be reset a total of 30 days. After 30 days, the End of Life signal cannot be “Hushed.” The alarm must be replaced.
During this End of Life HUSH period, your alarm is monitoring for CO.
To help identify the date to replace the alarm, a label has been affixed to the side of the alarm. Write the “replace by” date (ten years from power up) in a permanent marker on this label. Model KN-COB-LP2 !
CO alarms should be mounted in or near bedrooms and living areas. It is recommended that you install a Kidde CO alarm on each level of your home.
When choosing your installation locations, make sure you can hear the alarm from all sleeping areas. If you install only one CO alarm in your home, install it near bedrooms, not in the basement or furnace room.
When wall mounting, place out of reach of children. Under no circumstances should children be allowed to handle the CO alarm.
Locations To Avoid
IMPORTANT: Improper location can affect the sensitive electronic components in this alarm. To avoid causing damage to the unit, to provide optimum performance, and to prevent unnecessary nuisance alarms:
Do not install in kitchens, garages or furnace rooms that may expose the sensor to substances that could damage or contaminate it.
Do not install in areas where the temperature is colder than 40°F (4.4°C) or hotter than 100°F (37.8°C) such as crawl spaces, attics, porches and garages.
Do not install within 5 ft. of heating or cooking appliances. (Kidde recommends 15 ft. to prevent nuisance alarms).
Do not install near vents, flues, chimneys or any forced/unforced air ventilation openings.
Do not install near ceiling fans, doors, windows or areas directly exposed to the weather.
Do not install in dead air spaces, such as peaks of vaulted ceilings or gabled roofs, where CO may not reach the sensor in time to provide early warning.
Do not install this unit near deep-cell large batteries. Large batteries have emissions that can cause the alarm to perform at less than optimum performance.
Do not obstruct the vents located on the alarm. Do not place the alarm where drapes, furniture or other objects block the flow of air to the vents.
Installation Instructions
Battery Installation and Replacement
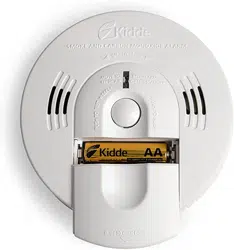
To install or replace the batteries in this Kidde CO alarm, please perform the following steps.
Slide open the bottom cover to expose the battery compartment.
If replacing batteries, remove the old batteries and properly dispose of them as recommended by the battery manufacturer.
Install the new batteries. Note the polarity illustration in the battery compartment.
Close the bottom cover. Note: The bottom cover will not close if all AA batteries are not installed.
When replacing the batteries, use one of the following approved Alkaline brands:
Duracell MN1500 or MX1500
Energizer E91
Gold Peak 15A
Golden Power GLR6A
These batteries can be purchased where you bought the alarm or at a local hardware store. Use of a different battery may have a detrimental effect on the alarm operation.
NOTE: Do not use LIthium batteries in this unit.
IMPORTANT: Constant exposures to high or low humidity may reduce battery life. A good safety measure is to replace the battery at least once a year, or at the same time as you change your clocks for daylight saving time.
After installing or changing the batteries, reinstall your alarm. Test your alarm by using the Test/Reset button and check that the green LED flashes once approximately every 60 seconds.
Low Battery HUSH® CONTROL
When the batteries need to be replaced, the unit will produce a low battery warning. The Low Battery HUSH® feature allows you to press the button on the alarm and disable the “chirp” for a random period of up to 12 hours. This gives you a chance to replace the battery at a more convenient time by disconnecting the alarm from power. During this Low Battery HUSH® period, your alarm is monitoring for CO.
Mounting
This CO alarm can be either wall mounted or placed on a tabletop.
For wall mounting, follow these steps:
1. Remove back mounting plate from the alarm, place it in the desired location, and mark the location of the two holes needed on the wall
2. Insert the two screws provided until the screw heads are protruding approximately 1/8” from the wall. (If mounting in a plasterboard or drywall, drill a 3/16” hole in the wall and use the plastic anchors provided.)
3. Hook the CO alarm over the screws and onto the keyholes in the back mounting plate of the alarm. After the mounting plate is secured to the wall, slide the alarm down over the mounting plate until it snaps into place.
Your CO alarm may also be placed on a tabletop. If the alarm is not wall mounted, be sure it is no more than three feet from the floor. The alarm does not have to be within three feet from the floor to detect CO, but at this height it is less likely to sustain damage from a fall.
Important Labels Provided
Two labels have been provided that have important information on what to do in case of an alarm. Add the phone number of your emergency service provider in the space provided. Place one label next to the alarm after it is mounted, and one label near a fresh air source such as a door or window.
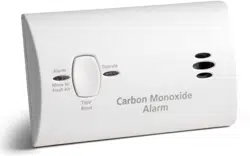
Model KN-COB-LP2 Operating Characteristics
Whenever the alarm is operating, the green Power LED flashes every 60 seconds to indicate the unit is monitoring for CO. If the alarm senses dangerous levels of CO, the red Alarm LED will flash and the alarm will emit an audible alarm pattern.
Operating and Alarm Characteristics
Function
LED Display
Alarm Sound
Unit Status
Recommendation
Normal Operation
Green LED flashes every 60 seconds
None
Normal DC operation (sensing no CO) and with good batteries
None
Carbon monoxide alarm
Red LED flashes with beeps.
4 quick beeps, 5 seconds silence, repeating
Alarm condition. Dangerous concentrations of CO detected
Refer to “What to do When the Alarm Sounds” (inside front cover)
Low battery
Red LED flashes every 60 seconds
One quick beep every 60 seconds
Batteries need to be replaced
Replace all AA batteries
Error / service alarm
Red LED flashes every 30 seconds
One quick beep every 30 seconds
Unit is in error condition
Replace batteries . If condition continues, unit has malfunctioned. Replace immediately. Unit will not respond to CO
Error
Red LED constantly on
Constant alarm
Very low battery or unit malfunction
Normal Test/Reset function
Red LED flashes with beeps.
4 quick beeps, 5 seconds silence, repeated once
Normal operation when Test/Reset button is pressed
CO not detected. Alarm for test purposes only
End of unit life indicator
Red LED flashes two times every 30 seconds
Two quick beeps every 30 seconds
End of unit life
Replace unit immediately. Unit will not respond to CO
Event Memory
Green LED flashes every 10 seconds
None
100ppm or more CO previously detected
Push button to clear and test unit.
Alarm Characteristics
Carbon Monoxide Alarm Indicator
When the alarm senses a dangerous level of CO, the unit will emit a loud alarm pattern. The alarm pattern is 4 quick beeps followed by 5 seconds of silence, repeating for as long as dangerous conditions exist. The red Alarm LED will flash the same pattern.
Event Memory
If the unit has detected a CO concentration of 100ppm or greater, the Green LED will flash every 10 seconds. Pushing the test button will clear the Event Memory and initiate the test sequence.
Maintenance
NOTE: This unit is sealed. The cover is not removable.
Due to the loudness of the alarm, we suggest that you place your fingers over the sounder opening while testing your alarm.
Caution: Continuous exposure to the high sound level of this alarm over an extended period of time may cause hearing loss.
Testing
To test the alarm, press the Test/Reset button. If the unit is operating properly, you will hear 4 quick beeps – followed by 5 seconds of silence – followed by 4 quick beeps. The red LED will flash along with the beeps. Within several seconds the unit will return to monitor for CO.
Note: You do not need to press the Test button to take a CO reading.
Maintenance Tips
To keep your alarm in good working order, you must follow these steps:
Test the alarm once a week by pressing the Test/Reset button.
Vacuum the alarm cover once a month to remove accumulated dust.
Never use detergents or solvents to clean the alarm. Chemicals can permanently damage or temporarily contaminate the sensor.
Avoid spraying air fresheners, hair spray, paint or other aerosols near the alarm.
Do not paint the unit. Paint will seal the vents and interfere with proper sensor operation.
Move the CO Alarm to a remote location, to prevent possible damage or contamination of the sensor, prior to performing any of the following:
Staining or stripping floors or furniture, painting or wall-papering,
Using aerosols or adhesives
WARNING: Reinstall the CO Alarm as soon as possible to assure continuous protection.
The following is a list of substances that at high levels can damage the sensor or cause temporary readings that are not CO readings:
Also most aerosol sprays, alcohol based products, paint, thinner, solvent, adhesive, hair spray, after shave, perfume, auto exhaust (cold start) and some cleaning agents.
FCC COMPLIANCE STATEMENT
This equipment has been tested and found to comply with the limits for a Class B digital device, pursuant to part 15 of the FCC Rules. These limits are designed to provide reasonable protection against harmful interference in a residential installation. This equipment generates, uses and can radiate radio frequency energy and, if not installed and used in accordance with the instructions, may cause harmful interference to radio communications. However, there is no guarantee that interference will not occur in a particular installation. If this equipment does cause harmful interference to radio or television reception, which can be determined by turning the equipment off and on, the user is encouraged to try to correct the interference by one or more of the following measures:
—Reorient or relocate the receiving antenna.
—Increase the separation between the equipment and receiver.
—Connect the equipment into an outlet on a circuit different from that to which the receiver is connected.
—Consult the dealer or an experienced radio/TV technician for help