Loading ...
Loading ...
Loading ...

13
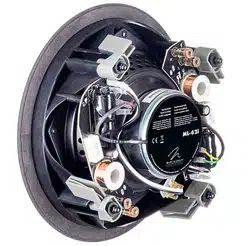
6. Connect speaker cables. Be consistent when connecting the speaker leads to the
terminals. Take great care to assign the same color to the (+) terminal on both
the speaker and the amplifier. ML-62i: See the following section, "Connecting the
ML-62i".
7. Set your power drill to the low setting.
8. Ensure the clamps on the lip of the speaker are positioned exactly as shown in the
Warning Diagrams.
9. Gently push the assembly into the ceiling or wall hole (Figs. 5c & 6c).
10. Supporting the assembly with one hand, tighten each screw. Stop tightening
when you sense resistance (Figs. 5d & 6d). ML-62i and ML-67i: Before tightening
screws orient speaker so the drivers are positioned towards the desired position.
11. Gently press the grill into place (Figs. 5e & 6e). Apply the MartinLogan logo
badge if desired.
Painting the Speaker Grille
IMPORTANT! Before painting remove grille from speakers. Also remove the cloth scrim
attached inside the grille. Do not paint the surface of the speaker behind the grille.
1. Remove the grille from the speaker. A protective cloth scrim is attached to the back
with low-tack adhesive. Remove this scrim by gently pulling it away from the grille.
2. Paint the grille, being careful not to plug the holes. For best results use a spray rather
than a brush. Allow the paint to completely dry before proceeding. Do not paint the
surface behind the grille.
3. Gently press the scrim back into place before re-installing the speaker grille.
Loading ...
Loading ...
Loading ...