

2
ENG
ENGLISH
TABLE OF CONTENTS
CONTENTS
3 LICENSES
4 ASSEMBLING AND
PREPARING
4 Accessories
5 OptionalAccessories
6 Partsandbuttons
7 Connectingthestand
7 ConnectingtheSpeakers
8 CableManagement
9 Connectingstandholecover
9 ToinstallPortrait
10 Installingonawall
11 REMOTE CONTROL
12 USING THE MONITOR SET
12 ConnectingtoaPC
12 - Usingtheinputlist
13 - RGBconnection
13 - HDMI/DVIconnection
14 - HDMIconnection
14 - LANconnection
15 CUSTOMIZING SETTINGS
15 Accessingmainmenus
16 - PICTUREsettings
20 - AUDIOsettings
21 - TIMEsettings
22 - OPTIONsettings
25 - INFORMATIONsettings
26 MAKING CONNECTIONS
27 ConnectingtoaHDreceiver,DVD,
Camcorder,Camera,GamingDeviceor
VCRplayer
27 - HDMIconnection
27 - HDMI/DVIconnection
28 - AV(CVBS)connection
29 TROUBLESHOOTING
32 SPECIFICATIONS
35 RS-232C
35 Connectingthecable
35 RS-232CConfigurations
35 CommunicationParameter
36 Commandreferencelist
38 Transmission/Receivingprotocol
47 IRCODES

LICENSES
3
ENG
ENGLISH
LICENSES
Supportedlicensesmaydifferbymodel.Formoreinformationofthelicenses,visitwww.lg.com.
HDMI,theHDMIlogoandHigh-DefinitionMultimediaInterfacearetrademarks
orregisteredtrademarksofHDMILicensingLLC.
4
ENG
ENGLISH
ASSEMBLING AND PREPARING
ASSEMBLING AND PREPARING
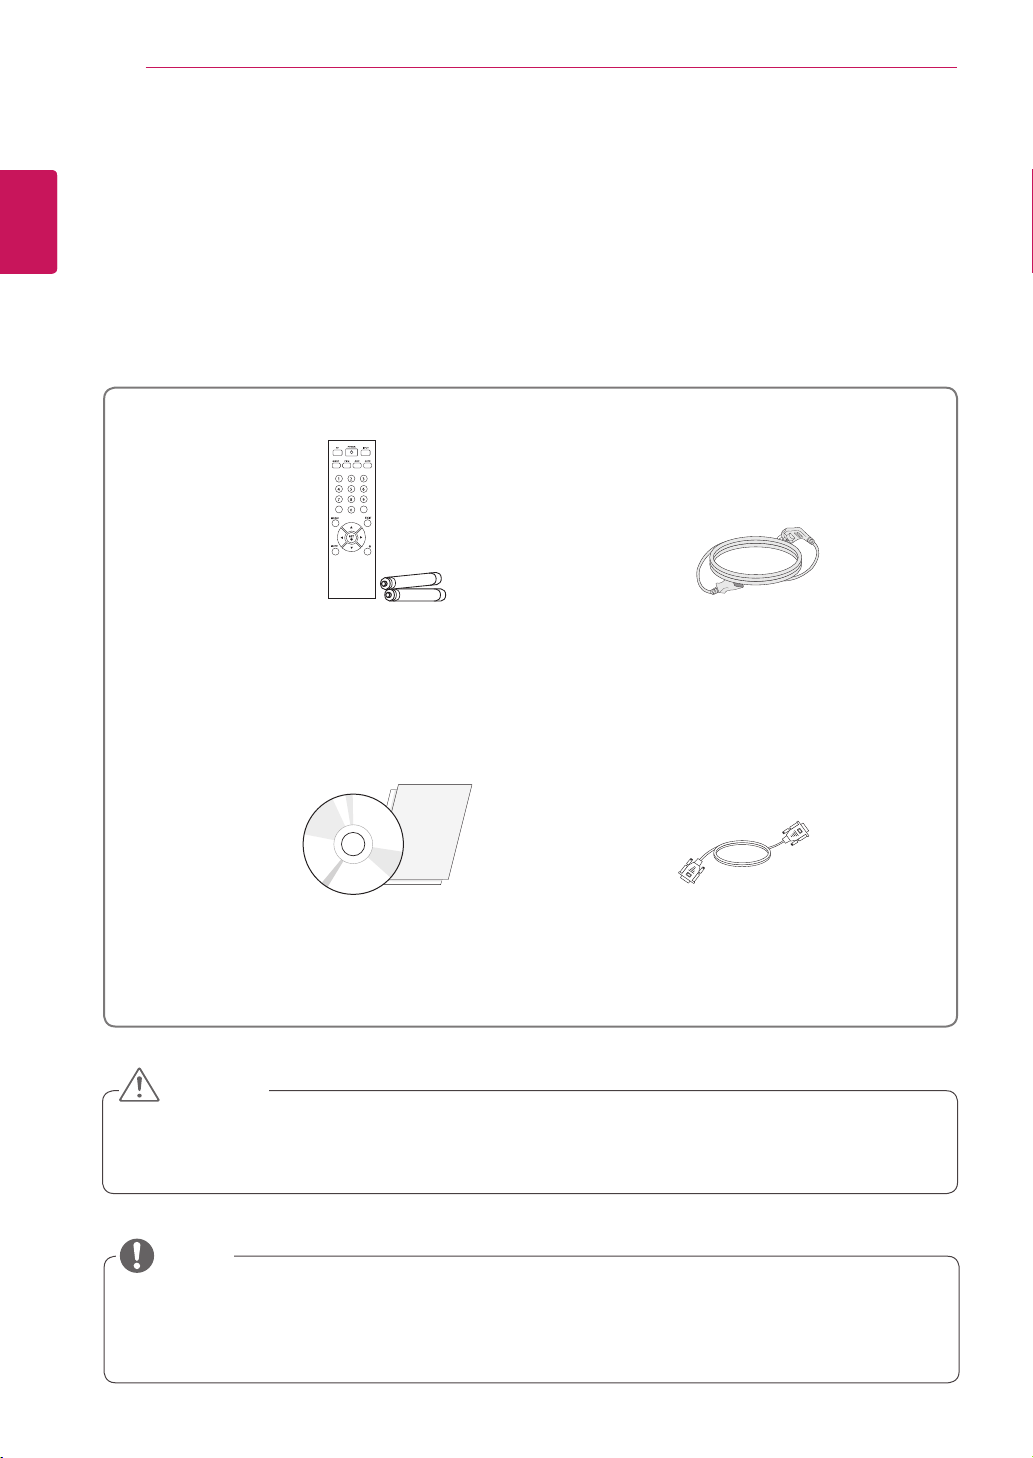
Accessories
Checkyourproductboxforthefollowingitems.Ifthereareanymissingaccessories,contactthelocal
dealerwhereyoupurchasedyourproduct.Theillustrationsinthismanualmaydifferfromtheactualproduct
andaccessories.
Donotuseanypirateditemstoensurethesafetyandproductlifespan.
Anydamagesorinjuriesbyusingpirateditemsarenotcoveredbythewarranty.
Theaccessoriessuppliedwithyourproductmayvarydependingonthemodel.
Productspecificationsorcontentsinthismanualmaybechangedwithoutpriornoticeduetoupgrade
ofproductfunctions.
Remote control and Batteries
Power Cord
CAUTION
NOTE
User Manual/Card
15-pin D-SUB Signal Cable
5
ENG
ENGLISH
ASSEMBLING AND PREPARING
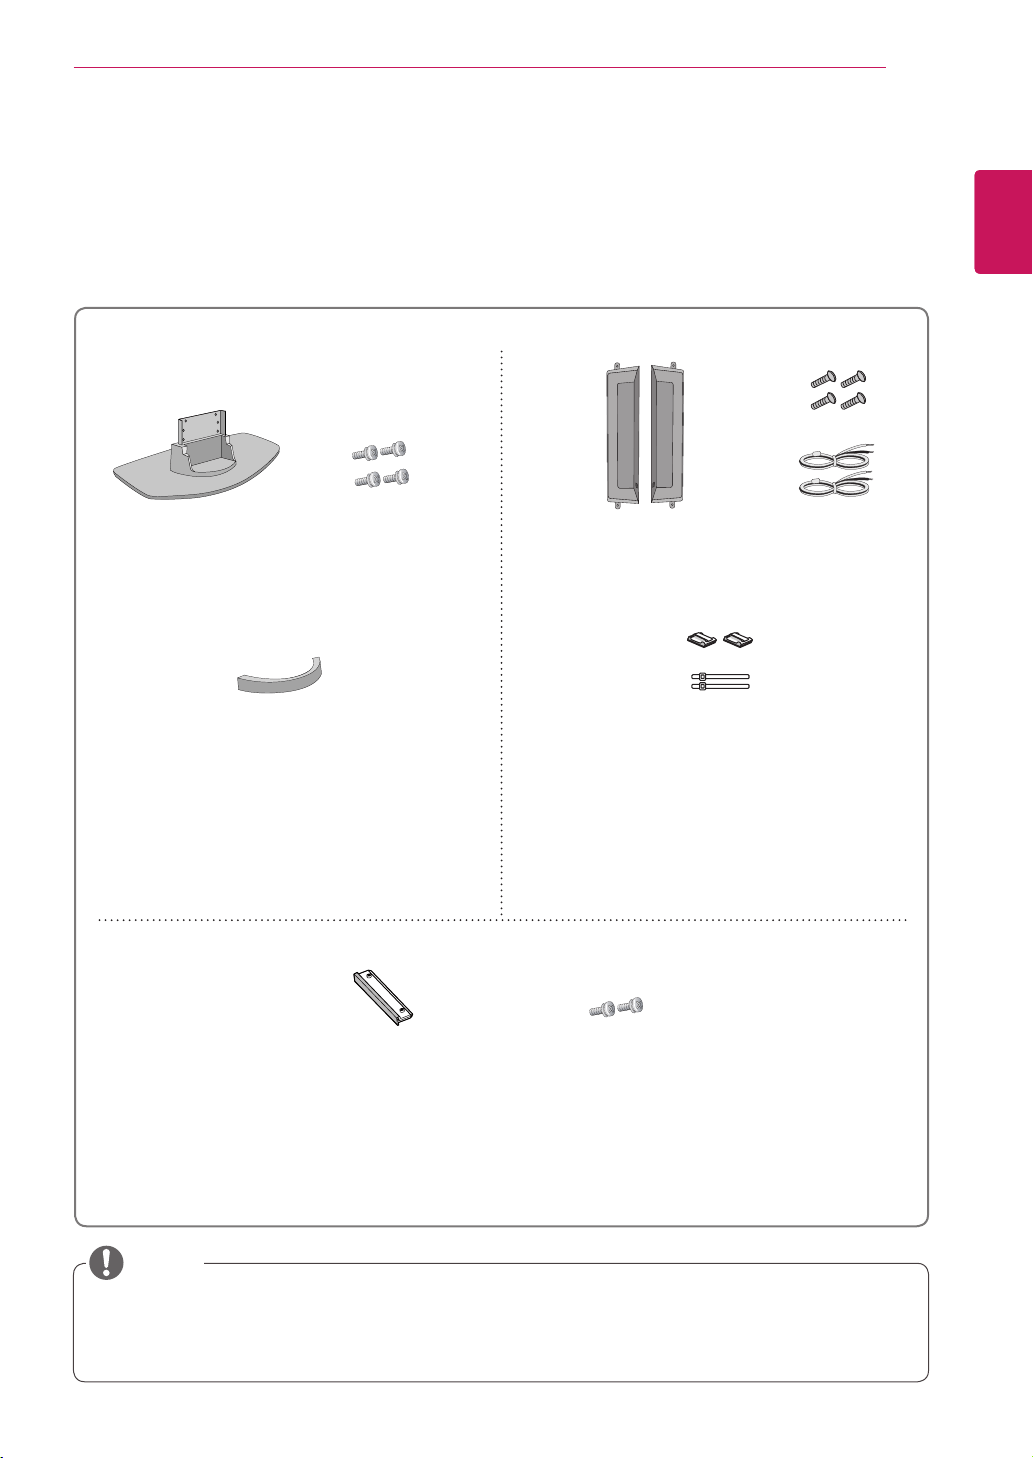
Optional Accessories
Withoutpriornotice,optionalaccessoriesaresubjecttochangetoimprovetheperformanceoftheproduct,
andnewaccessoriesmaybeadded.Theillustrationsinthismanualmaydifferfromtheactualproductand
accessories.
Cableholder/Cabletiemaynotbeavailableinsomeareasorforsomemodels.
Optionalaccessoriesarenotincludedforallmodels.
Stand kit
Speaker kit
Stand hole cover
kit
Stand
Screws
cable management
Cable holder/
Cable Tie
Screws/Cable Speaker
NOTE
Screws
Stand hole cover
6
ENG
ENGLISH
ASSEMBLING AND PREPARING
YoucansetthePowerindicatortoonoroffbyselectingOPTIONinthemainmenus.
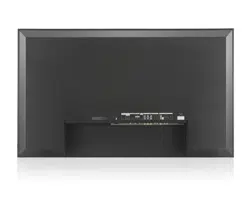
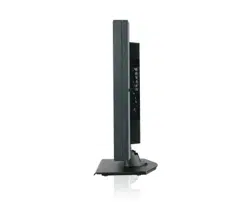
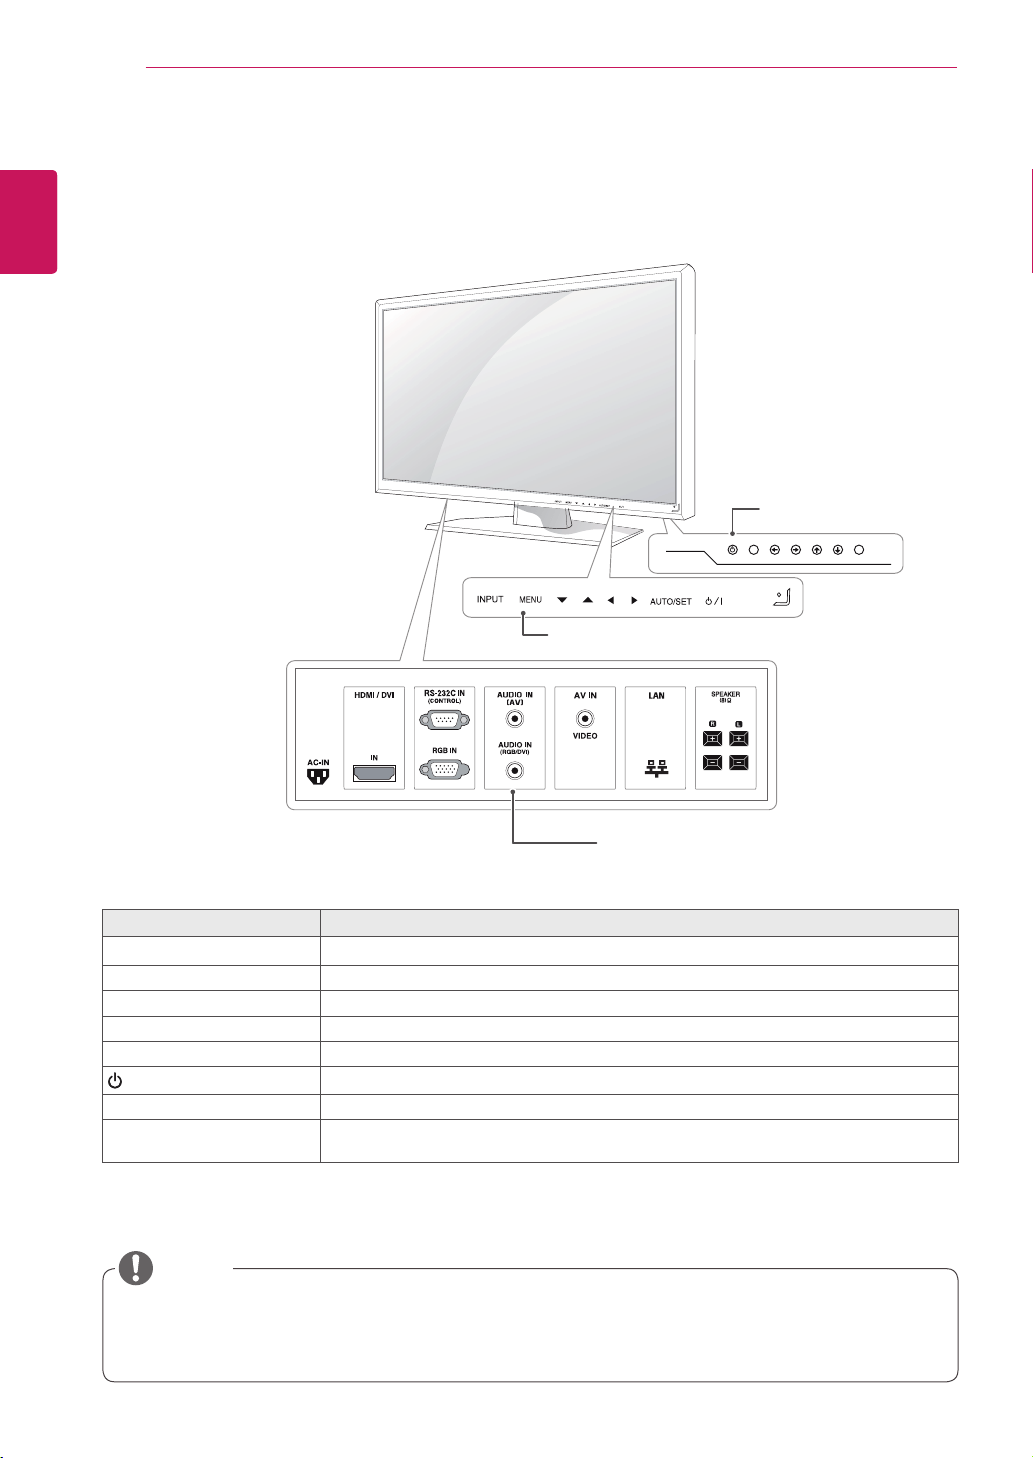
Parts and buttons
Screen Marks
Description
INPUT Changestheinputsource.
MENU Accessesthemainmenus,orsavesyourinputandexitsthemenus.
▼▲ Adjusttheupanddown.
◄► Adjuststhevolumelevel.
AUTO/SET Foroptimalscreendisplay,automaticallyadjustsscreenresolution.
/I
Turnsthepoweronoroff.
IRReceiver Thisiswheretheunitreceivessignalsfromtheremotecontrol.
PowerIndicator ThisIndicatorlightsupbluewhenthedisplayoperatesnormally(onmode).Ifthedisplay
isinsleep(EnergySaving)mode,thisindicatorcolorchangestoamber.
Connection panel
Screen Buttons
NOTE
Screen Marks
7
ENG
ENGLISH
ASSEMBLING AND PREPARING
Connectthespeakerterminalsnotingthe
correctpolarity.
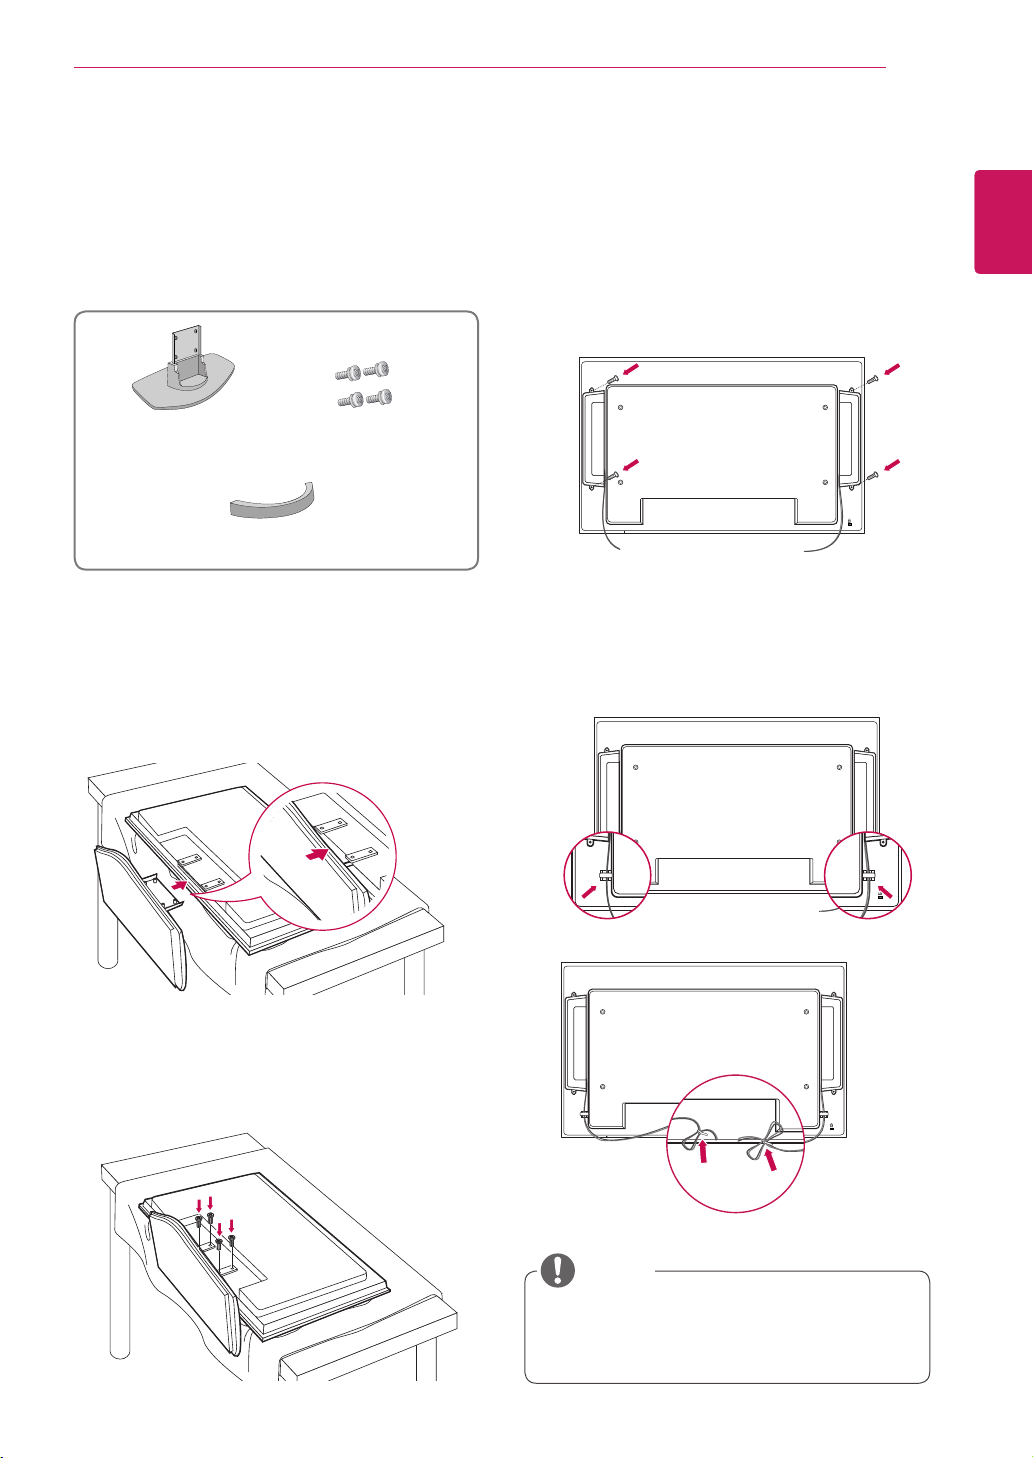
Connecting the stand
-Onlyonsomemodels.
1
Takethepartsforthestandoutoftheboxand
assemblethemasshowninthepicture.
Connecting the Speakers
-Onlyonsomemodels.
1
Mounttheproductontothespeakerbyusing
ascrewasshowninthefollowingconnectthe
speakercable.
2
Placeasoftclothonthetableandputthe
productwiththescreenfacingdownward.
Connectthestandasshowninthefollowing
picture.
2
Afterinstallingyourspeakers,useholdersand
cabletiestoorganizethespeakercables.(This
featureisnotavailableinallmodel.)
3
Usethescrewstosecurethestandontherear
sideoftheproductasshowninthediagram.
Stand
Screws
cable management
NOTE
8
ENG
ENGLISH
ASSEMBLING AND PREPARING
Donotusethecablemanagementasa
handlefortheMonitor.
Theillustrationsinthismanualmaydiffer
fromactualcableinterfaces.
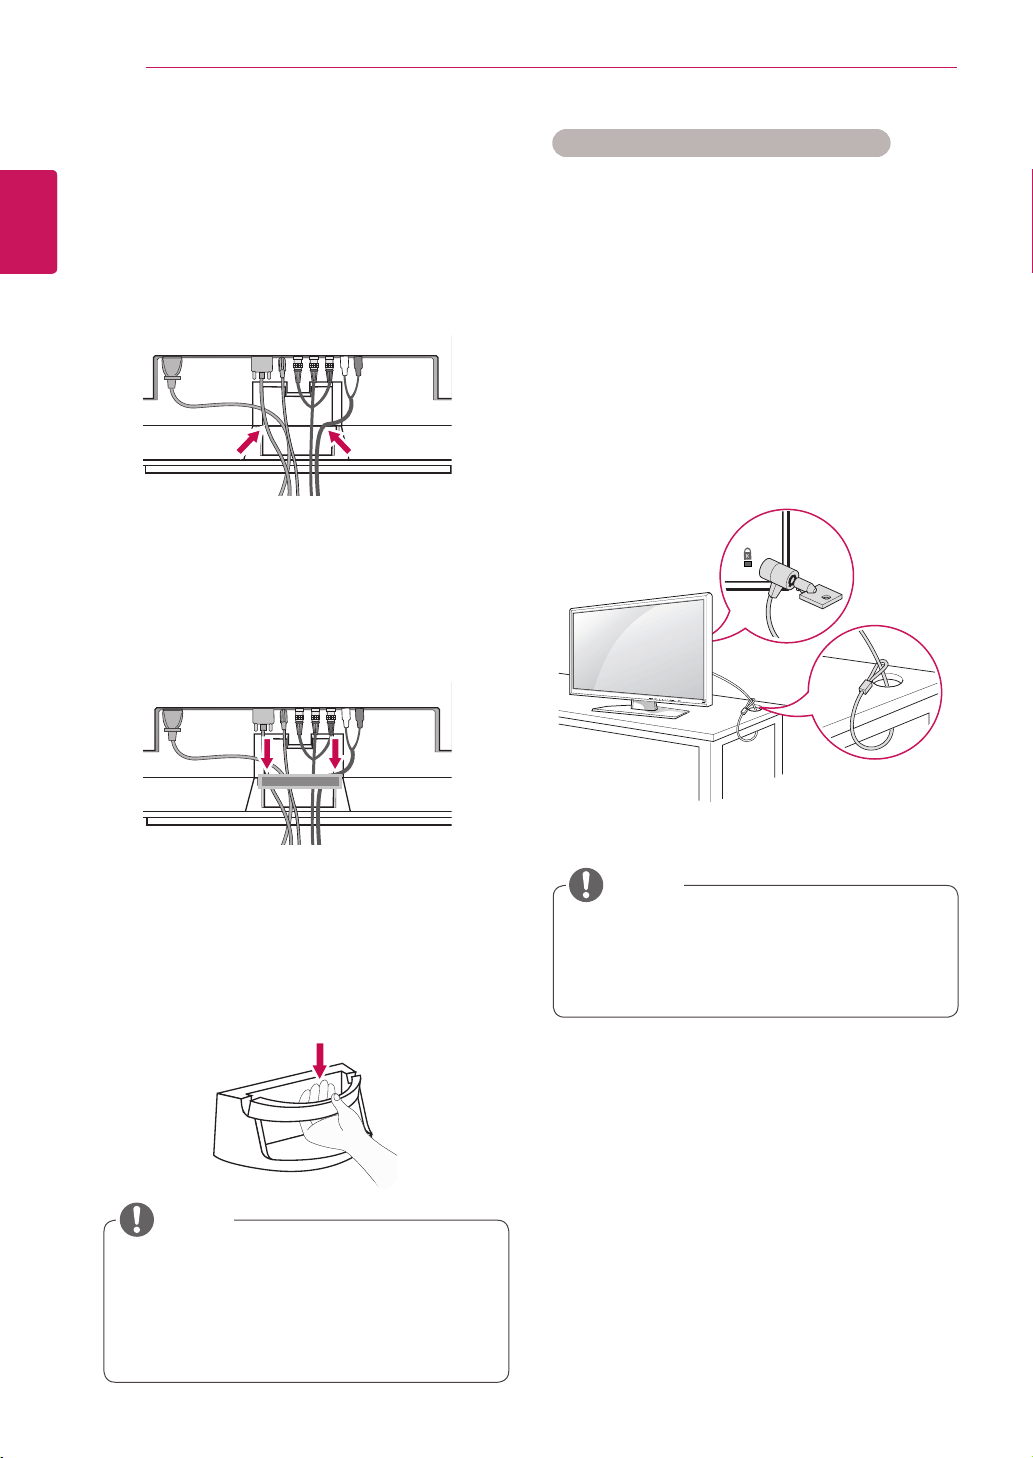
Cable Management
-Onlyonsomemodels.
1
Arrangethecablesinthecenterasshownin
thefollowingpicture.
2
Fitthecablemanagementtothebacktohelp
managethecables.
3
Forremovingthecablemanagement,holdthe
Cablemanagementwithbothhandsandpullit
downward.
Using the Kensington security system
TheKensingtonsecuritysystemconnectoris
locatedatthebackoftheMonitorset.Formore
informationofinstallationandusing,refertothe
manualsuppliedwiththeKensingtonsecurity
systemorvisit
http://www.kensington.com
.
ConnecttheKensingtonsecuritysystemcable
betweentheMonitorsetandatable.
TheKensingtonsecuritysystemisoptional.
Youcanobtainadditionalaccessoriesfrom
mostelectronicsstores.
NOTE
NOTE
9
ENG
ENGLISH
ASSEMBLING AND PREPARING
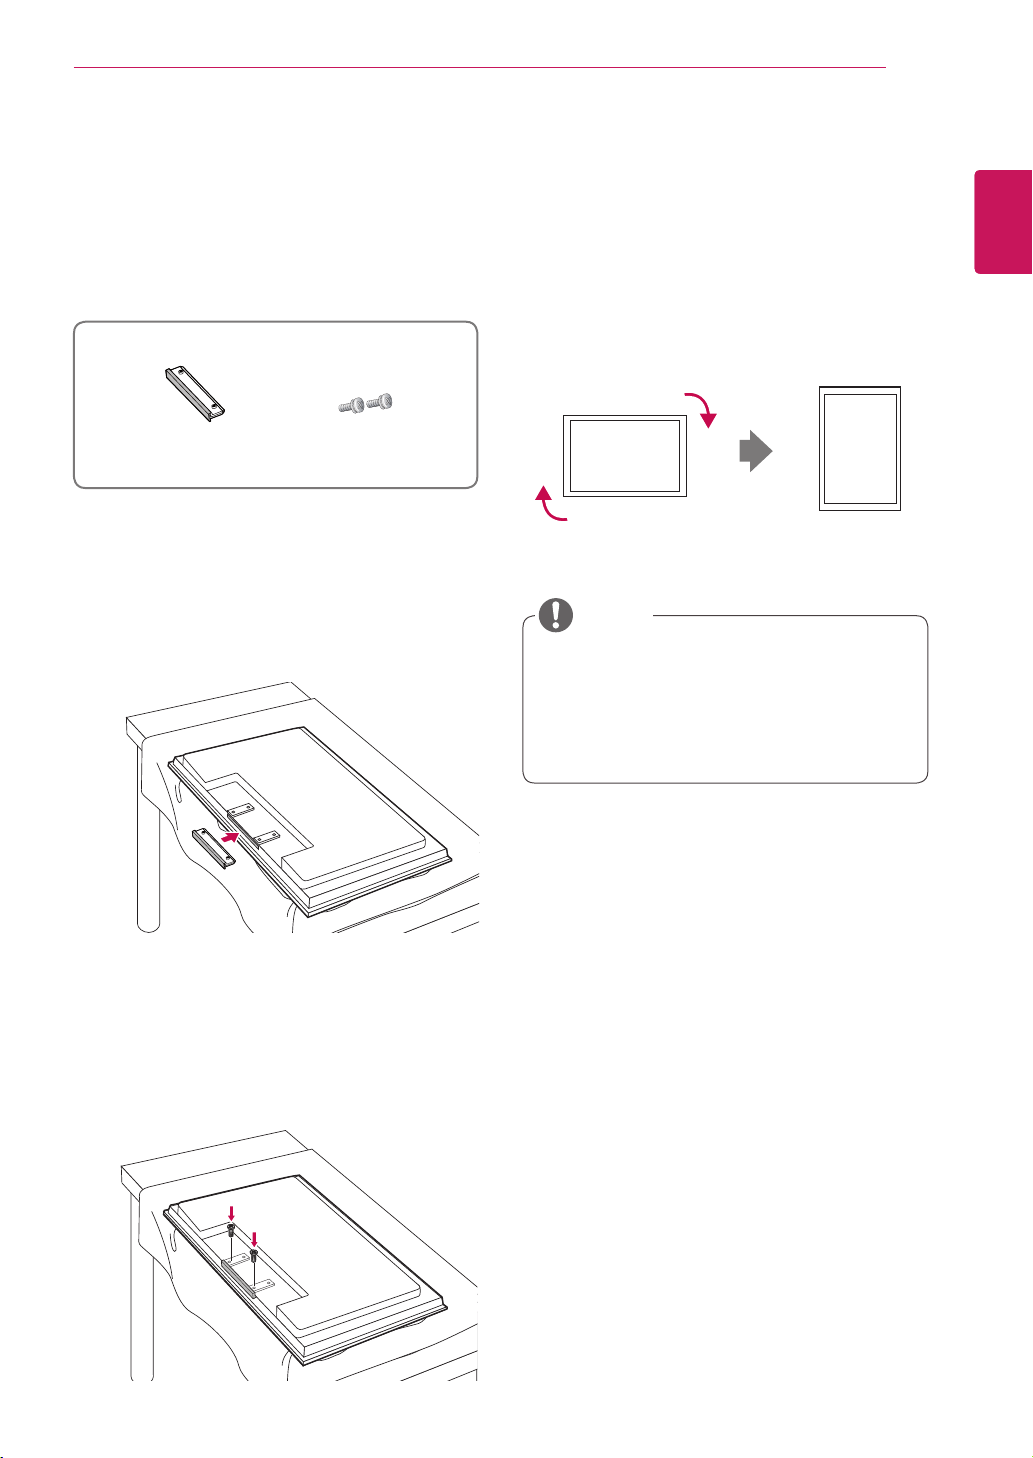
To install Portrait
-Onlyonsomemodels.
WheninstallingPortrait,rotateitclockwisebased
onitsfront.
Whenusingthewallmountingbracketor
theportraitscenemode,theopeningcanbe
coveredbythestandholecover.
Connecting stand hole cover
-Onlyonsomemodels.
1
Takethepartsforthestandoutoftheboxand
assemblethemasshowninthepicture.
2
Placeasoftclothonthetableandputthe
productwiththescreenfacingdownward.
Connectthestandholecoverasshowninthe
followingpicture.
3
Usethescrewstosecurethestandholecover
ontherearsideoftheproductasshowninthe
diagram.
ScrewsStand hole cover
NOTE
10
ENG
ENGLISH
ASSEMBLING AND PREPARING
Disconnectthepowercordfirst,andthen
moveorinstalltheMonitorset.Otherwise
electricshockmayoccur.
IfyouinstalltheMonitorsetonaceilingor
slantedwall,itmayfallandresultinsevere
injury.UseanauthorizedLGwallmount
andcontactthelocaldealerorqualified
personnel.
Donotovertightenthescrewsasthismay
causedamagetotheMonitorsetandvoid
yourwarranty.
Usethescrewsandwallmountsthat
meettheVESAstandard.Anydamages
orinjuriesbymisuseorusinganimproper
accessoryarenotcoveredbythewarranty.
UsethescrewsthatarelistedontheVESA
standardscrewspecifications.
Thewallmountkitincludesaninstallation
manualandnecessaryparts.
Thewallmountbracketisoptional.Youcan
obtainadditionalaccessoriesfromyourlocal
dealer.
Thelengthofscrewsmaydifferdepending
onthewallmount.Besuretousetheproper
length.
Formoreinformation,refertothe
instructionssuppliedwiththewallmount.
CAUTION
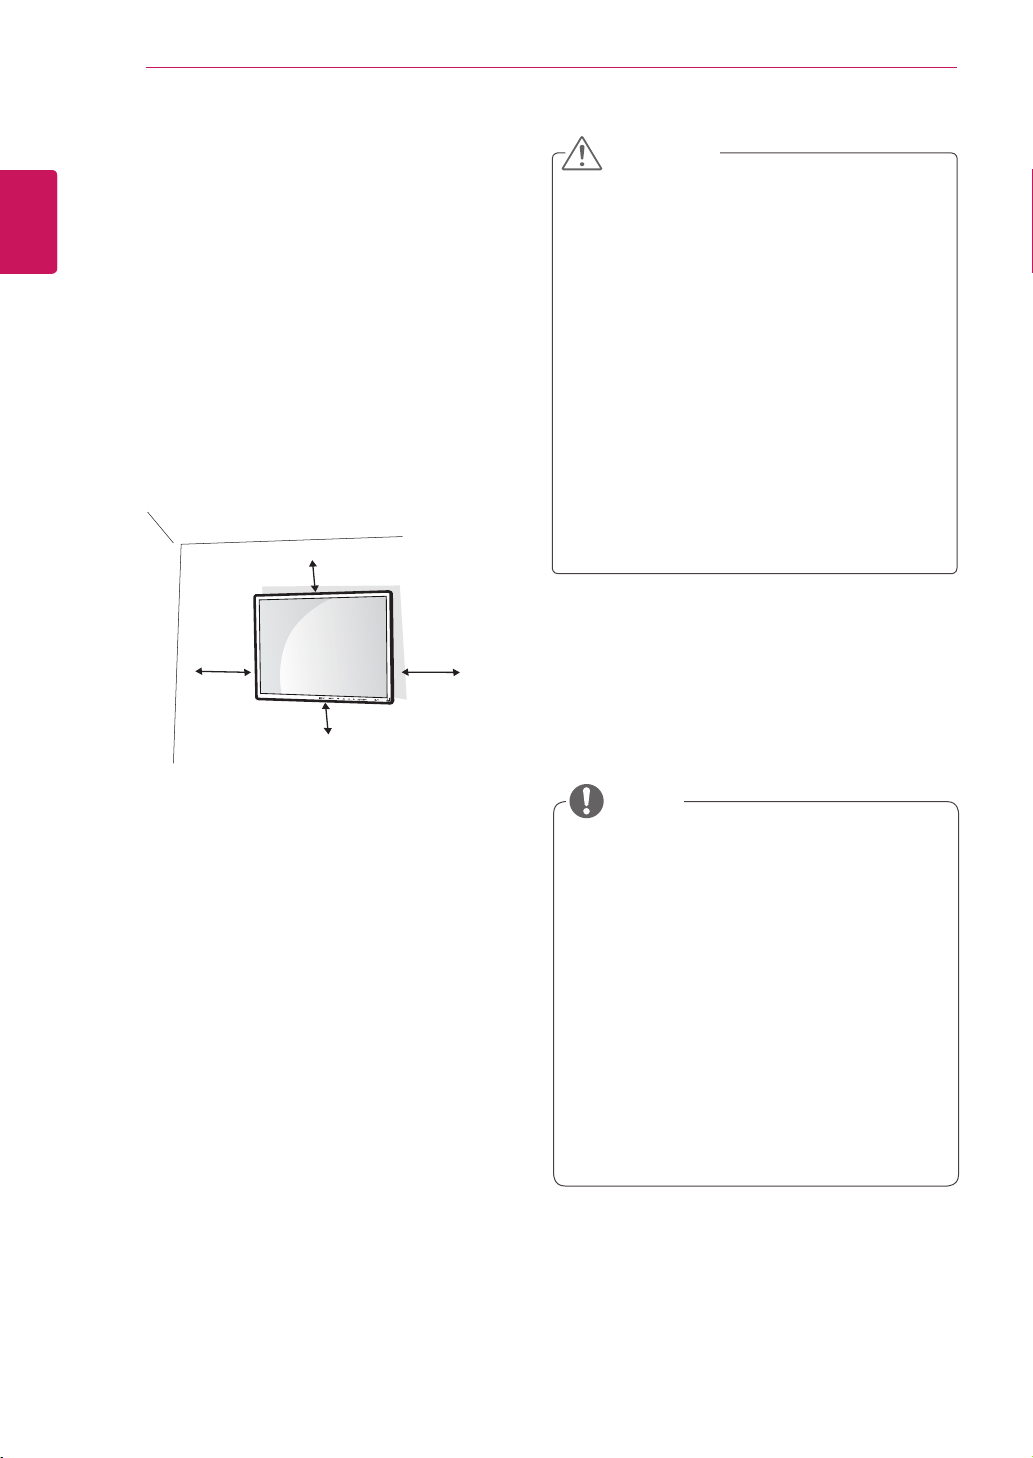
Ifyouwanttomountthemonitoronthewall(op-
tional),attachthewallmountingbrackettotherear
ofthemonitor.
Makesurethatthewallmountingbracketisse-
curelyfixedtothemonitorandtothewall.
Usethewallmountplateandscrewsthatcomply
withtheVESAstandardasspecifiedbelow.
785mm(31inch)orgreater
*Fasteningscrew:Diameter6.0mmxPitch1.0
mmxLength10mm
(32inchisDiameter4.0mmxPitch0.7mmx
Length10mm)
Installing on a wall
Installthemonitoratleast10cmawayfromthe
wallandleaveabout10cmofspaceateachside
ofthemonitortoensuresufficientventilation.De-
tailedinstallationinstructionscanbeobtainedfrom
yourlocalretailstore.Pleaserefertothemanual
toinstallandsetupatiltingwallmountingbracket.
10cm
10cm
10cm
10cm
NOTE
11
ENG
ENGLISH
REMOTE CONTROL
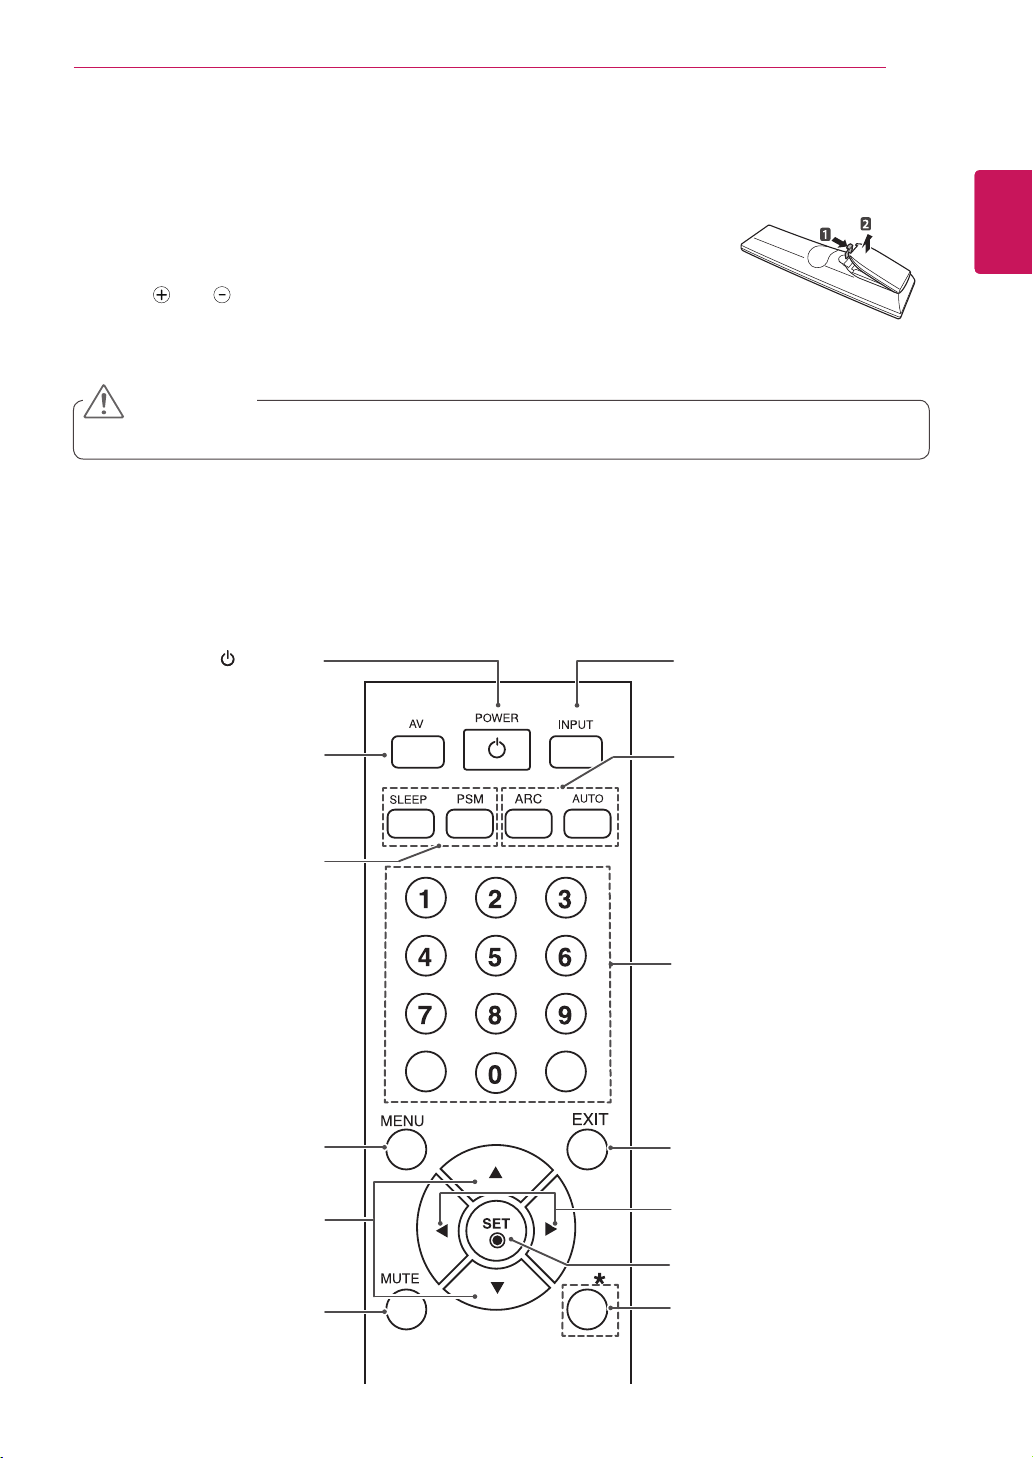
REMOTE CONTROL
The descriptions in this manual are based on the buttons of the remote
control.PleasereadthismanualcarefullyandusetheMonitorsetcorrectly.
Toreplacebatteries,openthebatterycover,replacebatteries (1.5VAAA)
matching and endstothe labelinside thecompartment,andclosethe
battery cover.To remove thebatteries, perform the installation actions in
reverse.
(POWER)
TurnstheMonitorsetonoroff.
AV
Togglesthroughvideo.
AV->RGBPC->HDMI/DVI
UP and Down
Bringupanddowndirection
adjustment.
Sleep
WhenwatchingAV,RGB
PC,HDMI/DVI.Theproductwill
beautomaticallyturnedoffafter
acertainperiodoftime.
Pressthisbuttonrepetitively
toselectanappropriatetime
duration.
PSM
Togglesthroughpresetvideo
settings.
INPUT
Selectstheinputmode.
ARC
AspectRatioCorrection.
Togglesthroughaspectratio
options.
Auto
Automaticadjustmentfunction
(Operationalfortheanalog
signalonly)
Thereisnotafunction
whichissupported
Mute
Menu
Volume ◄ ►
Volumeupanddown.
Exit
Check
Thereisnotafunction
whichissupported.
Donotmixoldandnewbatteries,asthismaydamagetheremotecontrol.
MakesuretopointtheremotecontroltotheremotecontrolsensorontheMonitorset.
CAUTION

12
ENG
ENGLISH
USING THE MONITOR SET
USING THE MONITOR SET
Connecting to a PC
YourMonitorsetsupportsthePlug&Play*feature.
*Plug&Play:ThefunctionwhenaPCrecognizes
aconnecteddevicethatusersconnecttoaPC
andturnon,withoutdeviceconfigurationoruser
intervention.
ItisrecommendedtousetheMonitorset
withtheHDMIconnectionforthebestimage
quality.
Useashieldedsignalinterfacecable,such
asD-sub15pinsignalcableandDVI/
HDMIcable,withaferritecoretomaintain
standardcompliancefortheproduct.
IfyouturntheMonitorsetonwhentheset
becomescold,thescreenmayflicker.This
isnormal.
Somered,green,orbluespotsmayappear
onthescreen.Thisisnormal.
NOTE
Connectthesignal
inputcableandtighten
itbyturningthescrews
clockwise.
CAUTION
Donotpressthescreenwithyourfingerfor
alongtimeasthismayresultintemporary
distortiononthescreen.
Avoiddisplayingafixedimageonthe
screenforalongperiodoftimetoprevent
imageburn.Useascreensaverifpossible.
Using the input list
Selecting an input source
1
PressINPUTtoaccesstheinputsourcelist.
-Theconnecteddevicedisplaysoneachinput
source.
2
PresstheNavigationbuttonstoscrolltooneof
theinputsourcesandpressOK.
Input source Description
AV WatchthecontentsinaVCRor
otherexternaldevices
RGB-PC ViewaPCdisplayonthescreen
HDMI/DVI WatchcontentsinaPC,DVD
orDigitalsettopboxotherhigh
definitiondevices
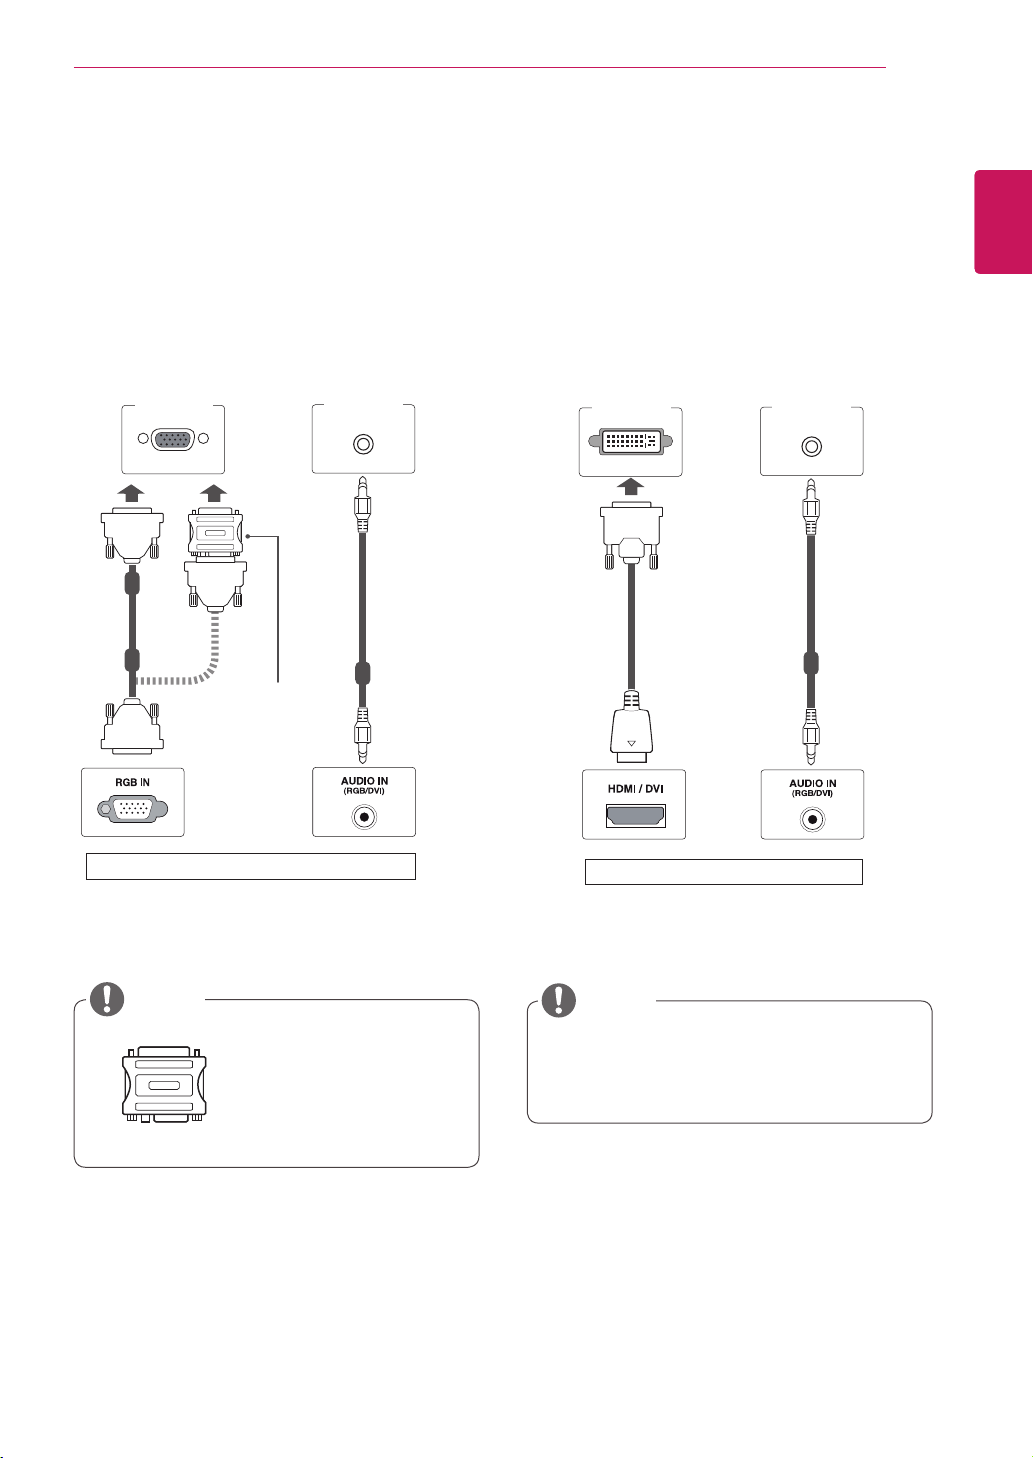
13
ENG
ENGLISH
USING THE MONITOR SET
HDMI/DVI IN
WhenHDMIPCisused,acompatiblity
problemmightoccur.
HDMI/DVI connection
TransmitsthedigitalvideosignalfromyourPCto
theMonitorset.ConnectthePCandtheMonitor
setwiththeHDMI/DVIcableasshownthe
followingillustrations.
SelectHDMI/DVIinputsource.
PC PC
NOTE
BackoftheMonitorSet
HDMI/DVI IN
RGB connection
TransmitstheanalogvideosignalfromyourPCto
theMonitorset.ConnectthePCandtheMonitor
setwiththeD-sub15pincableasshownthe
followingillustrations.
SelectRGBinputsource.
Usethestandard
Macintoshadapter
sinceanincompatible
adapterisavailablein
themarket.(Different
signalingsystem)
PC/MAC
MacintoshAdapter
(notincluded)
NOTE
(notincluded)
(notincluded) (notincluded)
PC
BackoftheMonitorSet
14
ENG
ENGLISH
USING THE MONITOR SET
HDMI/DVI IN
UseaHighSpeedHDMI™Cable.
PleasecheckthePCenvironmentifyou
cannothearthesoundinHDMImode.
IfyouwanttouseHDMI-PCmode,youmust
settheinputlabeltoPCmode.
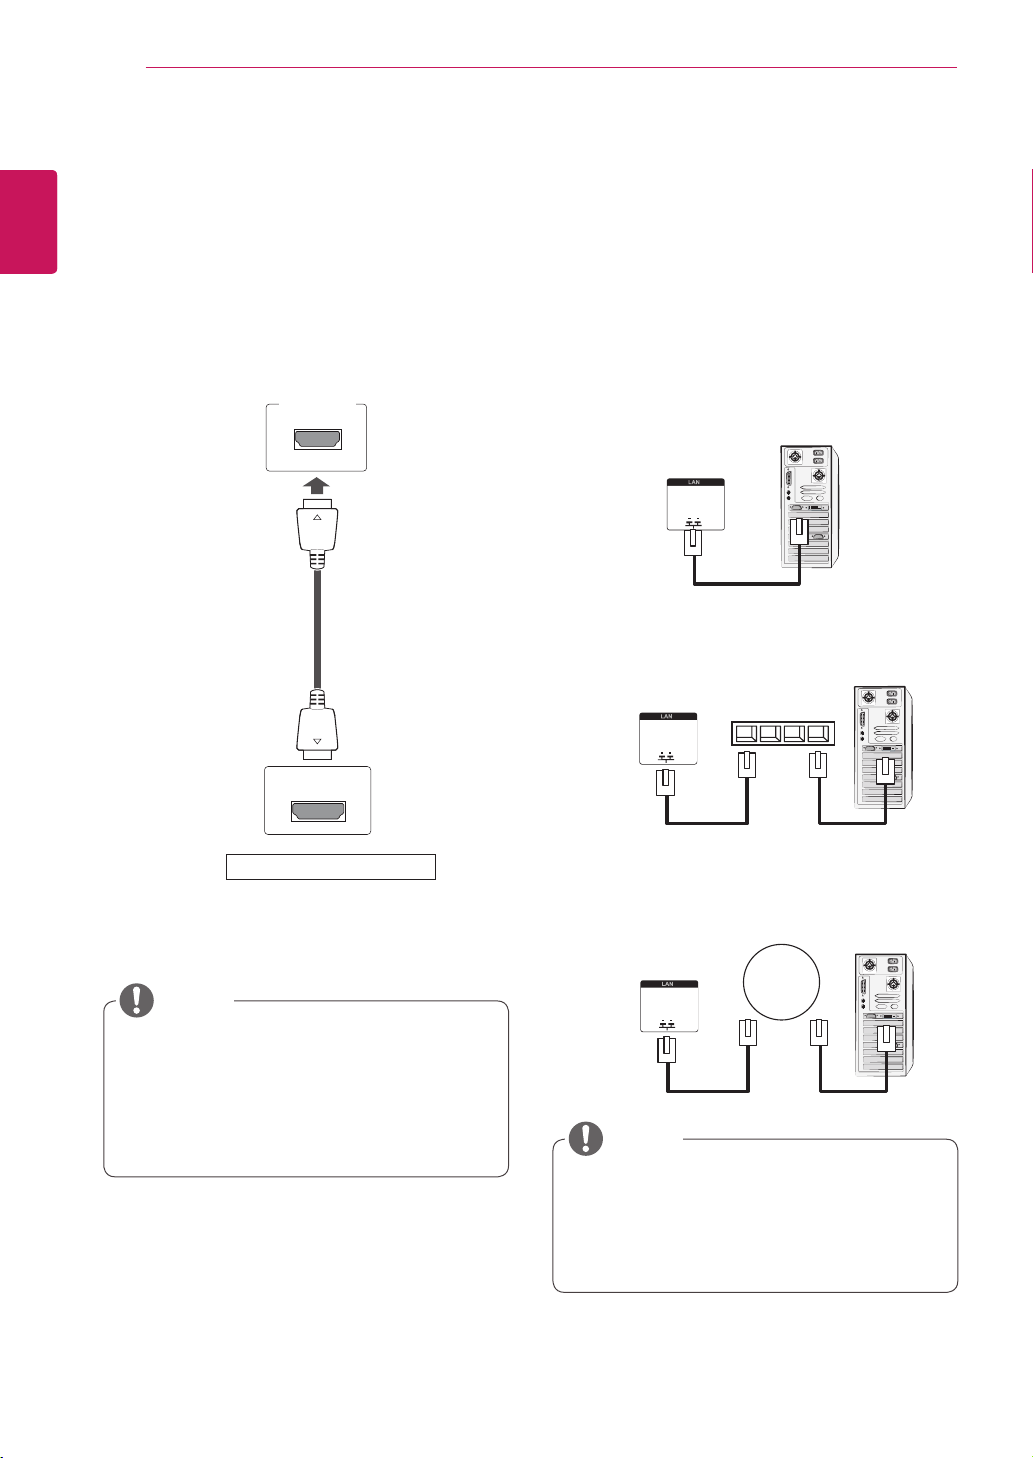
HDMI connection
Transmitsthedigitalvideoandaudiosignalsfrom
yourPCtotheMonitorset.ConnectthePCand
theMonitorsetwiththeHDMIcableasshownin
thefollowingillustrations.
SelectHDMI/DVIinputsource.
PC
NOTE
BackoftheMonitorSet
(notincluded)
UsingLANestablishescommunication
betweenyourPCandthemonitorand
enablestousetheOSDmenusonthePCas
wellasonthemonitor.
LAN connection
ConnecttheLANcableandinstalltheeZ-Net
ManagerprogramontheCD-ROM.
Formoreinformationabouttheprogram,please
refertoeZ-NetGuideintheenclosedCD-ROM.
A
ConnectPCtoMonitordirectly.
B
Usingarouter(Switch)
PC
MonitorSet
Network
LAN
C
UsingtheInternet.
NOTE
Network
LAN
Switch
PCMonitorSet
Network
LAN
PC
MonitorSet
15
ENG
ENGLISH
CUSTOMIZING SETTINGS
PICTURE ( See p.16 )
Adjuststheimagesize,quality,or
effect
AUDIO ( See p.20 )
Adjuststhesoundquality,effect,or
volumelevel
OPTION ( See p.22 )
Customizesthegeneralsettings
INFORMATION ( See p.25 )
AdjustSetIDandcheckSerialNo.
andSWversion.
TIME ( See p.21 )
Setsthetime,dateorTimerfeature
CUSTOMIZING SETTINGS
Accessing main menus
1
PressMENUtoaccessthemainmenus.
2
PresstheNavigationbuttonstoscrolltooneofthefollowingmenusandpressSET.
3
PresstheNavigationbuttonstoscrolltothesettingoroptionyouwantandpressSET.
4
Whenyouarefinished,pressEXIT.
16
ENG
ENGLISH
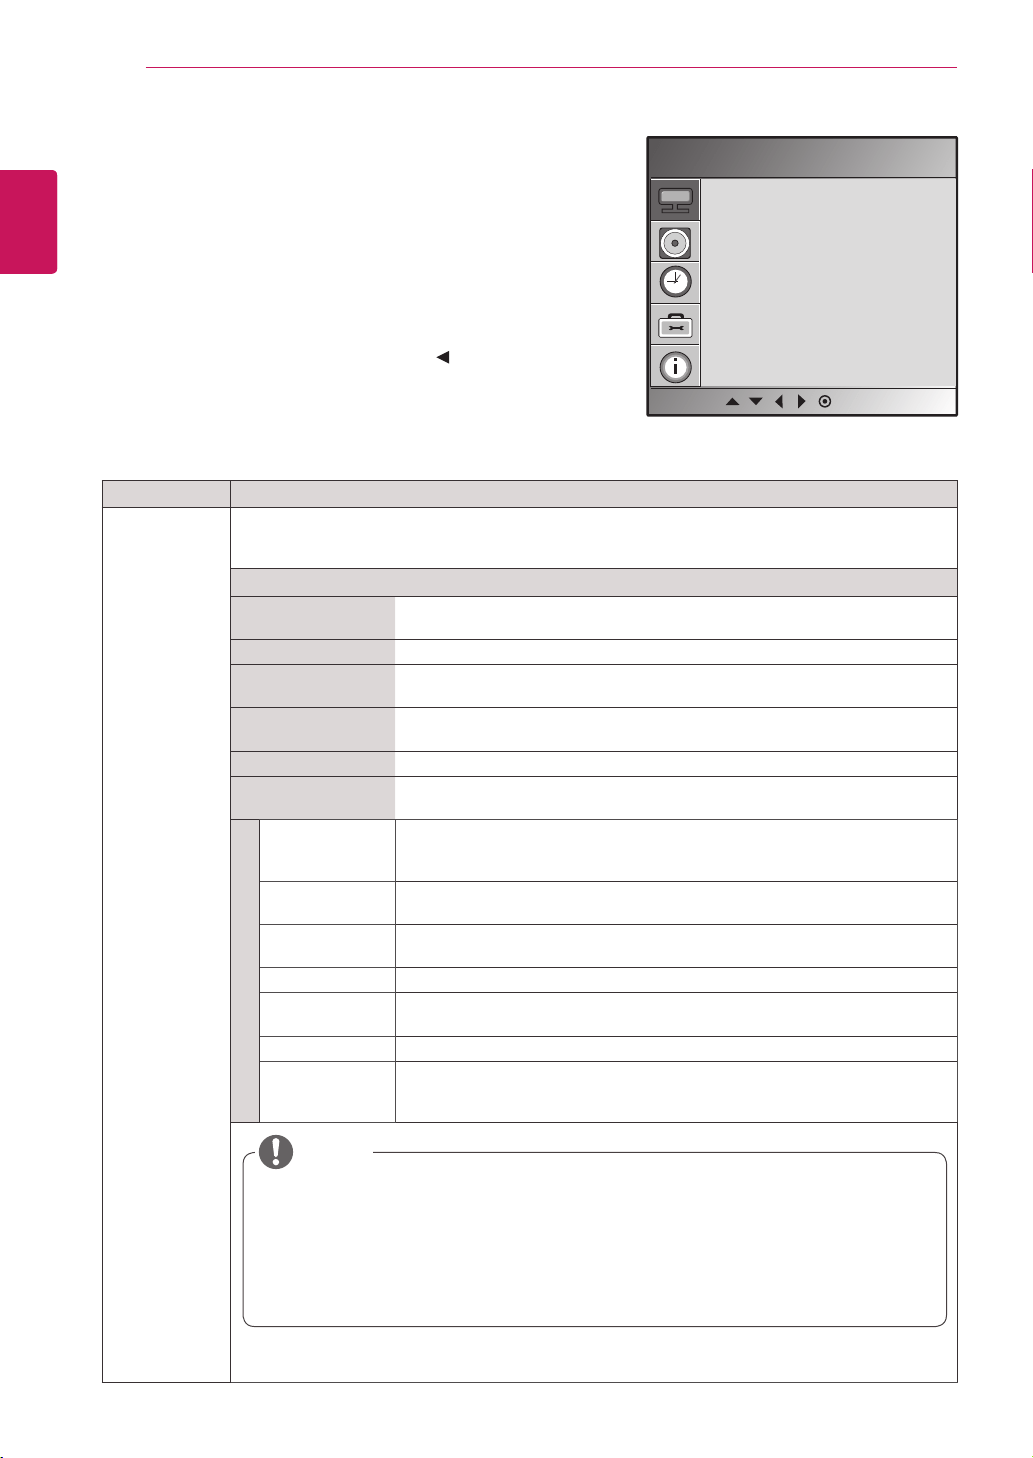
CUSTOMIZING SETTINGS
Setting Description
Picture Mode SelectsoneofthepresetimageorcustomizesoptionsineachmodeforthebestMonitorsetscreen
performance.Youarealsoabletocustomizeadvancedoptionsofeachmode.
TheavailablepresetpicturemodesvarydependingontheMonitorset.
Mode
Vivid Adjuststhevideoimagefortheretailenvironmentbyenhancingthecontrast,
brightness,Colour,andsharpness.
Standard Adjuststheimageforthenormalenvironment.
Cinema Optimizesthevideoimageforacinematiclooktoenjoymoviesasifyouare
inamovietheater.
Sport Optimizesthevideoimageforhighanddynamicactionsbyemphasizing
primaryColourssuchaswhite,grass,orskyblue.
Game OptimizesthevideoimageforafastgamingscreensuchasPCsorgames.
User1,2 Adjuststhedetailedvideoimagesettingsforvideoexpertsaswellasgeneral
viewers.
Backlight AdjuststhebrightnessofthescreenbycontrollingtheLCDbacklight.Ifyou
decreasethebrightnesslevel,thescreenbecomesdarkerandthepower
consumptionwillbereducedwithoutanyvideosignalloss.
Contrast Increasesordecreasesthegradientofthevideosignal.Youmayuse
Contrastwhenthebrightpartofthepictureissaturated.
Brightness Adjuststhebaselevelofthesignalinthepicture.YoumayuseBrightness
whenthedarkpartofthepictureissaturated.
Color AdjustsintensityofallColors.
Sharpness Adjuststhelevelofclearnessofthepicture.Thelowerthelevel,thesofterthe
image.
Tint Adjuststhebalancebetweenredandgreenlevels.
Expert Tocompensateforeachimagemode,oradjustimagevaluesaccordingto
aparticularimage.(AppliedonlytoUser2menu.)(Functionworksinthe
followingmode-AV,HDMI-DTV)
PICTURE settings
1
PressMENUtoaccessthemainmenus.
2
PresstheNavigationbuttonstoscrolltoPICTUREand
pressSET.
3
PresstheNavigationbuttonstoscrolltothesettingor
optionyouwantandpressSET.
-Toreturntothepreviouslevel,press .
4
Whenyouarefinished,pressEXIT.
Theavailablepicturesettingsaredescribedinthefollowing:
PictureMode
ColorTemperature
Advanced
AspectRatio
PictureReset
Screen
Picture
MENU
NOTE
Ifthe'Picture Mode'settinginthePicturemenuissettoVivid, Standard,
Cinema, SportorGamethesubsequentmenuswillbeautomaticallyset.
YoucannotadjustcolourandtintintheRGB-PC/HDMI-PCmode.
WhentheUser1,2isselected,youcanselectBacklight, Contrast,
Brightness, Color, Sharpness, Tint or
Expert
.
17
ENG
ENGLISH
CUSTOMIZING SETTINGS
Setting Description
Color
Temperature
ColorSettings
Option
Cool Setsthescreencolortoabluishtone.
Medium Setsthescreentothestandardcolor.
Warm Setsthescreencolortoareddishtone.
User Selectthisoptiontousetheuser-definedsettings.
Advanced
Gamma
(Low/Medium/High)
Youcanadjustbrightnessofdarkareaandmiddlegraylevelareaofthe
picture.
» Low:Makedarkandmiddlegraylevelareaofthepicturebrighter.
» Medium:Expressoriginalpicturelevels.
» High:Makedarkandmiddlegraylevelareaofthepicturedarker.
FilmMode
(On/Off)
Youcanwatchacinema-likevideobyeliminatingjuddereffect.
Usethisfunctionwhenyouwatchmovies.
BlackLevel
(Low/High)
» Low:Thepictureofthescreengetsdarker.
» High:Thepictureofthescreengetsbrighter.
Setblacklevelofthescreentoproperlevel.
Thisfunctionenablestoselect'Low'or'High'inthefollowingmode:AV,HDMI-
DTV.
*ThisisavailableinAV,HDMI-DTV.
NR
(Off/Low/High/
Adaptive)
Reducesscreennoisewithoutcompromisingvideoquality.
Aspect Ratio Changestheimagesizetoviewimagesatitsoptimalsize.
Picture Reset ReturnPictureMode,ColorTemperature,Advanced,AspectRatiotothedefaultfactorysettings.
SCREEN
(In RGB)
CustomizesthePCdisplayoptionsinRGBmode.
Option
AutoConfig.(RGB
PCinputonly)
Thisbuttonisfortheautomaticadjustmentofthescreenposition,clockand
phase.Thisfunctionisavailableforanalogsignalsonly.
*Phase,ClockfunctionarenotavailableinHDMI/DVIDTV.
ManualConfig. Ifthepictureisn'tclearafterautoadjustmentandcharactersarestill
trembling,adjustthepicturephasemanually.
*Phase,ClockfunctionarenotavailableinHDMI/DVIDTV.
Phase:Toadjustthefocusofthedisplay.Thisitemallowsyoutoremoveany
horizontalnoiseandclearorsharpentheimageofcharacters.This
functionisavailableforanalogsignalsonly.
Clock:Tominimizeanyverticalbarsorstripesvisibleonthescreen
background.Thehorizontalscreensizewillalsochange.Thisfunction
isavailableforanalogsignalsonly.
H-Position:Movingthescreenpositionhorizontally.
V-Position:Movingthescreenpositionvertically.
H-Size:Adjustthehorizontalsizeofthescreen.
V-Size:Adjusttheverticalsizeofthescreen.
XGAMode(RGB-PC
only)
Formoreimprovedorbetterpicturequality,selectthesamemode
correspondingtocomputerresolution.
Reset ReturnManualconfig.andXGAModetothedefaultfactorysettings.

18
ENG
ENGLISH
CUSTOMIZING SETTINGS
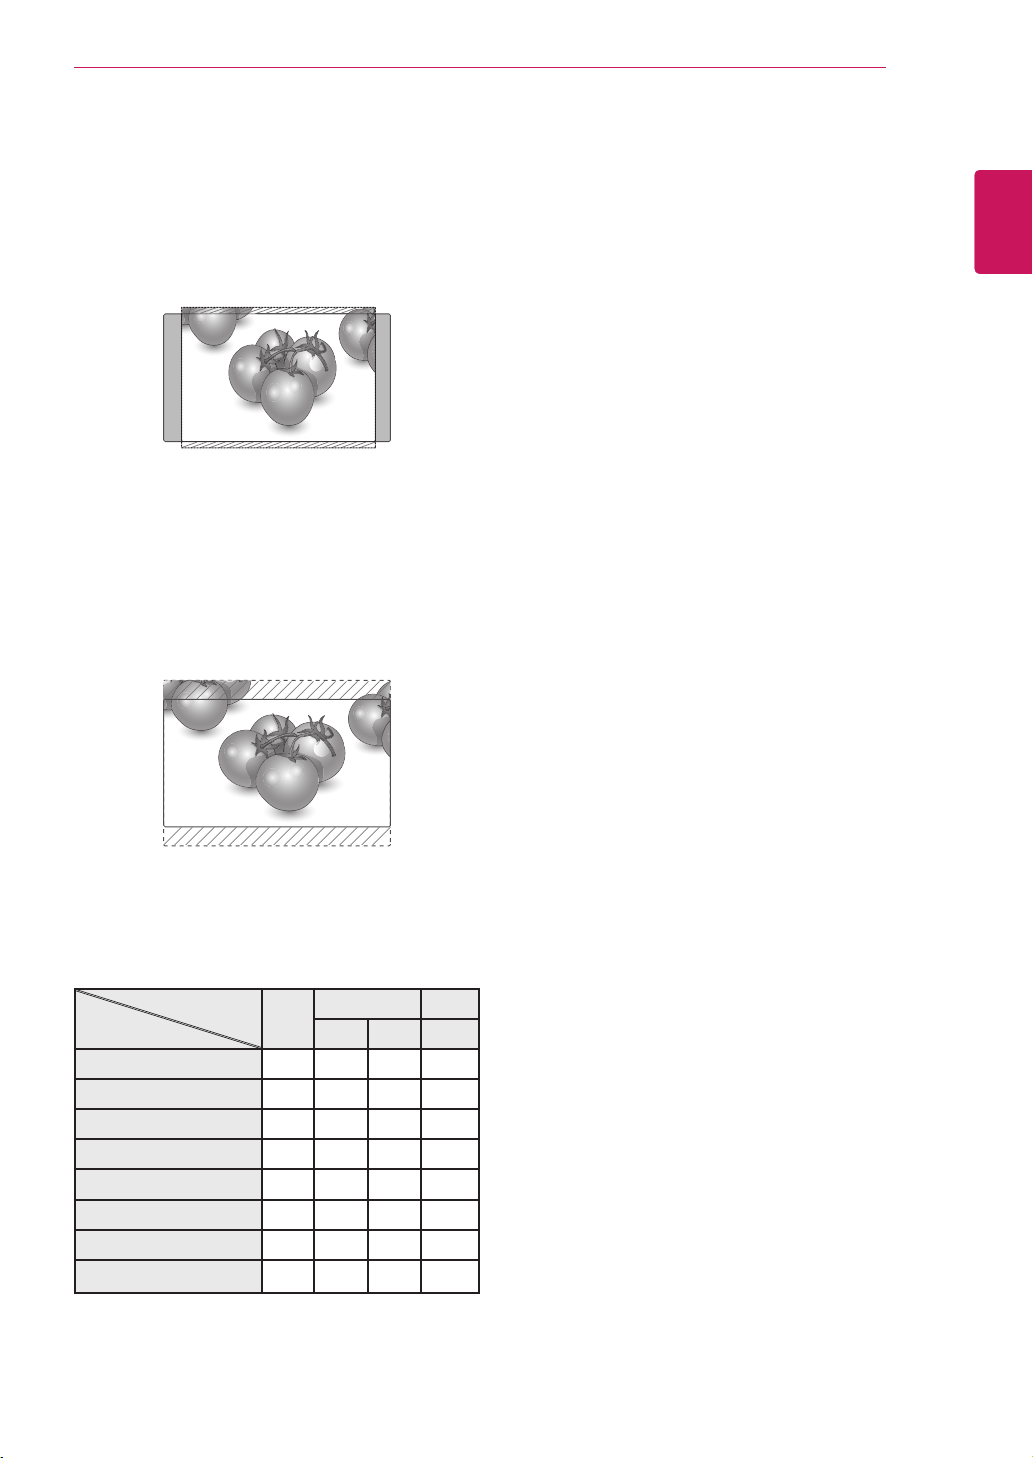
Aspect Ratio
Resizetheimagetoviewtheimageatitsoptimal
sizebypressingARC button whileyouare
watchingMonitorset.
Ifafixedimagedisplaysonthescreenfora
longperiodoftime,itwillbeimprintedand
becomeapermanentdisfigurementonthe
screen.Thisis“imageburn”or“burn-in”and
notcoveredbythewarranty.
Iftheaspectratioissetto4:3foralong
periodoftime,imageburnmayoccuron
theletterboxedareaofthescreen.
CAUTION
Just Scan
Original
You can also change the image size by
accessingthemainmenus.
NOTE
- 16:9 : The following selection will allow you
to adjust the picture horizontally, in linear
proportion, to fill the entire screen(useful for
viewing4:3formattedDVDs).
-Just Scan:FollowingSelectionwillleadtoyou
viewthepictureofbestqualitywithoutlossof
originalpictureinhighresolutionimage.
*Note:IfthereisnoiseinoriginalPicture,Youcan
seethenoiseattheedge.
-Original:Theaspectratioisnotadjustedfrom
theoriginal.Itissetbytheprogrambeing
watched.
-4:3 :Thefollowingselectionwillallowyouto
viewapicturewithanoriginal4:3aspectratio,
graybarswillappearonboththeleftandrightof
thescreen.
-1:1 :Theaspectratioisnotadjustedfromthe
original.(OnlyHDMI/DVIPC,RGBPC)
19
ENG
ENGLISH
CUSTOMIZING SETTINGS
-Zoom 1,2 :Thefollowingselectionwillallowyou
toviewthepicturewithoutanyalteration,while
fillingtheentirescreen.However,thetopand
bottomofthepicturewillbecropped.
14:9 :Youcanviewapictureformatof14:9ora
generalMonitorsetprogrammeinthe14:9mode.
The14:9screenisviewedinthesamewayasin
4:3,butismagnifiedtotheleftandright.
MODE
ARC
AV HDMI/DVI RGB
DTV PC PC
16:9 o o o o
Just Scan x o x x
Original o x x x
4:3 o o o o
1:1 x x o o
14:9 o x x x
Zoom 1 o x x x
Zoom 2 o x x x
20
ENG
ENGLISH
CUSTOMIZING SETTINGS
Setting Description
Sound Mode Selectsoneofthepresetsoundmodesorcustomizeeachoptionineachmode.
Mode
ClearVoice Bydifferentiatingthehumansoundrangefromothers,ithelpsuserslistento
humanvoicesbetter.
Standard Selectwhenyouwantstandard-qualitysound.
Music Selectwhenyoulistentomusic.
Cinema Selectwhenyouwatchmovies.
Sport Selectwhenyouwatchsportsevents.
Game Selectwhenyouplaygames.
User Selectthisoptiontousetheuser-definedaudiosettings.
Auto Volume ActivatestheAutoVolumefeaturetokeepthevolumelevelconsistentwheneveryouchange
programmes.
Balance Adjustsbalancebetweentheleftandrightspeakersaccordingtoyourroomenvironment.
Speaker ON:Enablessoundtothemonitorspeaker.(*Themonitorspeakerissoldseparately.)
OFF:Disablessoundtothemonitorspeaker.Usethisoptionwhenusinganexternalsounddevice.
AUDIO settings
1
PressMENUtoaccessthemainmenus.
2
PresstheNavigationbuttonstoscrolltoAUDIOandpress
SET.
3
PresstheNavigationbuttonstoscrolltothesettingor
optionyouwantandpressSET.
-Toreturntothepreviouslevel,press .
4
Whenyouarefinished,pressEXIT.
Theavailableaudiooptionsaredescribedinthefollowing:
AUDIO
SoundMode
AutoVolume
Balance
Speaker
MENU
NOTE
Ifsoundqualityorvolumeisnotatthelevelyouwant,itisrecommendedto
useaseparatehometheatersystemoramplifiertocopewithdifferentuser
environments.

21
ENG
ENGLISH
CUSTOMIZING SETTINGS
TIME settings
1
PressMENUtoaccessthemainmenus.
2
PresstheNavigationbuttonstoscrolltoTIMEandpress
SET.
3
PresstheNavigationbuttonstoscrolltothesettingoroption
youwantandpressSET.
-Toreturntothepreviouslevel,press .
4
Whenyouarefinished,pressEXIT.
Theavailabletimesettingsaredescribedinthefollowing:
Setting Description
Sleep Timer SetsthelengthoftimeuntiltheMonitorsettoturnsoff.WhenyouturntheMonitorsetoffand
turnitonagain,theSleepTimerwillbesettooff.
Auto Sleep IfAutoSleepisactiveandthereisnoinputsignal,thesetswitchestooffmodeautomatically
after10minutes.
Power On Delay Whenconnectingmultiplemonitorsandturningthepoweron,themonitorsareturnedon
individuallytopreventoverload.
Power Saving Thisscreenbrightnessadjustingmenuhelpsyousaveenergy.
Level:Total4screenbrightnesslevelsareprovided.
-Off:100%light
-Level1:80%light
-Level2:60%light
-Level3:40%light
Automatic
Standby
Ifyoudonotusethemonitorformorethan4hours,itwillbeinstandbymodeautomatically.
TIME
SleepTimer
AutoSleep
PowerOnDelay
PowerSaving
AutomaticStandby
MENU
TheAutomaticStandbyfunctionmaynotbeavailabledependingonthecountry.
NOTE
22
ENG
ENGLISH
CUSTOMIZING SETTINGS
Setting Description
Language Tochoosethelanguageinwhichthecontrolnamesaredisplayed.
Key Lock UsethebuttonstoselectOnorOff.Themonitorcanbesetupsothatitcanonlybeusedwith
theremotecontrol.Thisfeaturecanpreventunauthorizedviewing.
InordertolocktheOSDscreenadjustment,settheKeyLocktabtothe'On'position.
Inordertounlockit,dothefollowing:
PushtheMENUbuttonontheremotecontrolandsetKeyLocktothe'Off'position.
ISM Method AfrozenorstillpicturefromaPC/Videogamedisplayedonthescreenforprolongedperiods
couldresultinaghostimageremainingevenwhenyouchangetheimage.Avoidallowinga
fixedimagetoremainonthescreenforalongperiodoftime.
Mode
Normal Leaveonnormalifyoudon'tforeseeimageburninbeingaproblem.
Whitewash Whitewashfillsthescreenwithsolidwhite.Thishelpsremovespermanent
imagesburnedintothescreen.Apermanentimagemaybeimpossibleto
clearentirelywithwhitewash.
Orbiter Mayhelppreventghostimages.However,itisbestnottoallowanyfixed
imagetoremainonthescreen.Toavoidapermanentimageonthescreen,
thescreenwillmoveevery2minutes.
Inversion Thisfunctioninvertsthepanelcolorofthescreen.Thepanelcoloris
automaticallyinvertedevery30minutes.
DotWash Thisfunctionmovestheblackdotsofthescreen.Theblackdotsis
automaticallymovedevery5second.
Power Indicator UsethisfunctiontosetthepowerindicatoronthefrontsideoftheproducttoOnorOff.
DPM Select Ausercanchoosetoturnthepowersavingmodeon/off.
OPTION settings
1
PressMENUtoaccessthemainmenus.
2
PresstheNavigationbuttonstoscrolltoOPTIONandpress
SET.
3
PresstheNavigationbuttonstoscrolltothesettingor
optionyouwantandpressSET.
-Toreturntothepreviouslevel,press .
4
Whenyouarefinished,pressEXIT.
Theavailableoptionsettingsaredescribedinthefollowing:
OPTION
Language
KeyLock
ISMMethod
PowerIndicator
DPMSelect
TileMode
NetworkSetup
FactoryReset
MENU

23
ENG
ENGLISH
CUSTOMIZING SETTINGS
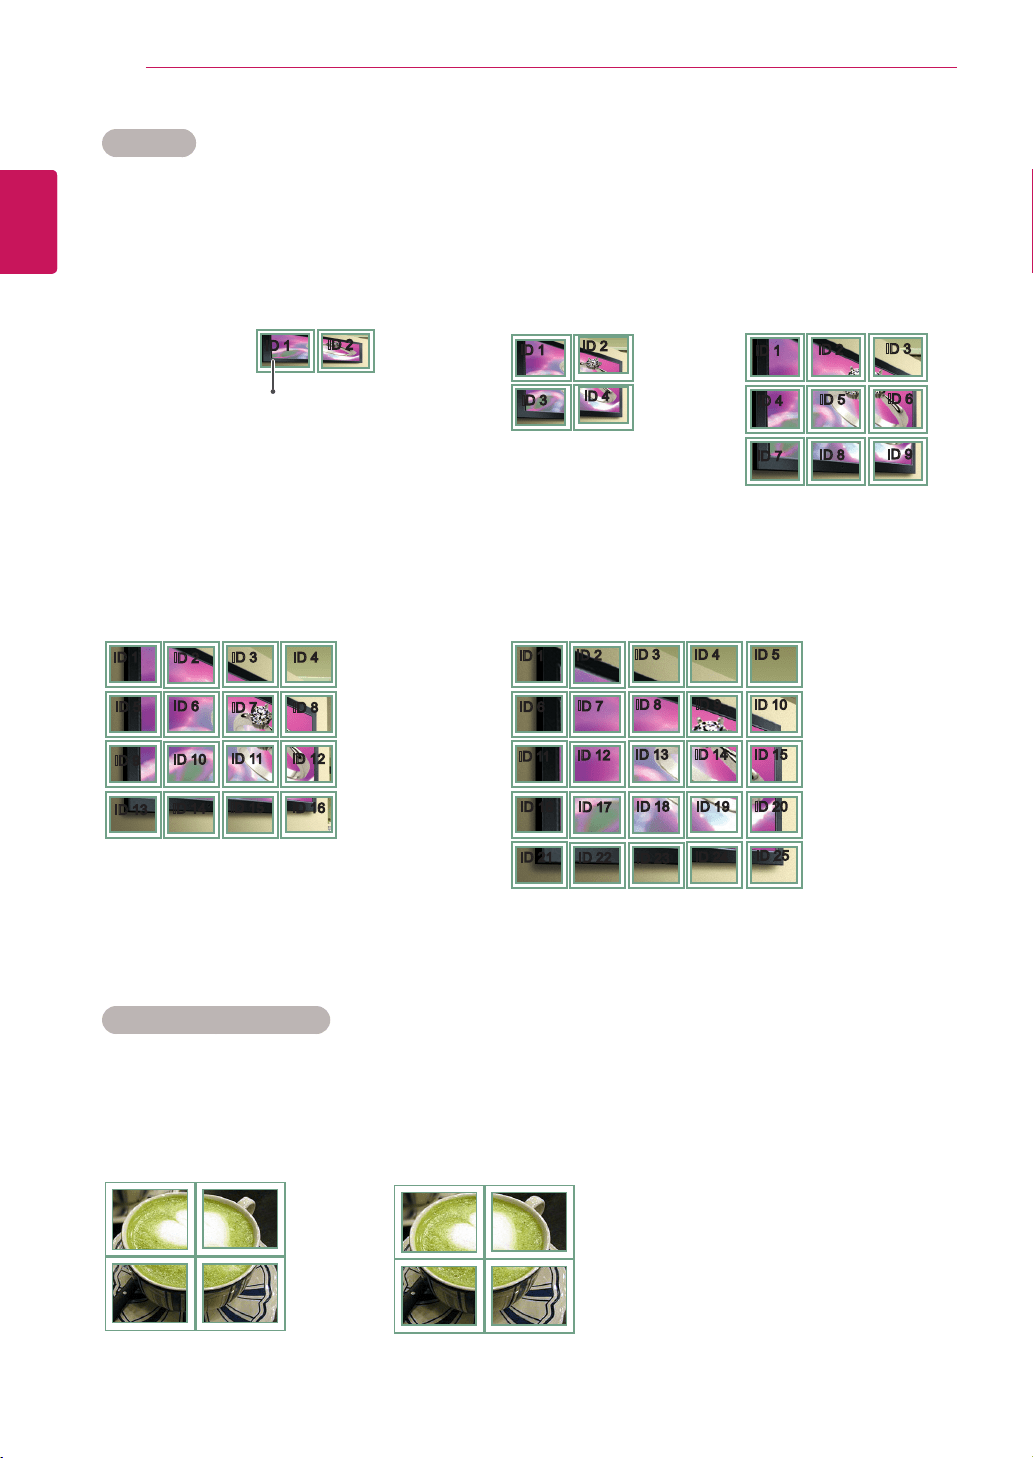
Setting Description
Tile Mode Tousethisfunction
-Mustbedisplayedwithvariousotherproducts.
-MustbeinafunctionthatcanbeconnectedtoRGBCablebydistributorandRS-232C.
TilemodeandchooseTilealignmentandsettheIDofthecurrentproducttosetlocation.
*OnlyafterpressingtheSETbuttontheadjustmentsmadetothesettingswillbesaved.
-Tilemode:columnxrow(c=1,2,3,4,5r=1,2,3,4,5)
-5x5available.
-ConfigurationofanintegrationscreenisavailableaswellasconfigurationofOnebyone
Display.
Mode
H-Size Adjustthehorizontalsizeofthescreentakingintoaccountthesizeofthe
bezel.
V-Size Adjusttheverticalsizeofthescreentakingintoaccountthesizeofthebezel.
H-Position Movingthescreenpositionhorizontally.
V-Position Movingthescreenpositionvertically.
Reset FunctiontoinitializeandreleaseTile.
AllTilesettingarereleasedwhenselectingTilerecallandthescreenreturns
toFullscreen.
TileID SelectthelocationoftheTilebysettinganID.
Natural Theimageisomittedbythedistancebetweenthescreenstobenaturally
shown.
Network Setup -DHCP:AllocatesandsetsupIPautomatically.
-Manual:SetsupIPaddress,Gateway,SubnetMask,PrimaryDNSandSecondaryDNS.
ThesetupprocessiscompletewhenyouselectExecute,and"IPSetupCompleted"isdisplayed
atthebottomofthescreen.While"WaitforIPSetup"isdisplayed,youcannotusethelocalkeys
andremotecontrol."WaitforIPSetup"isdisplayedforupto40seconds.
*IfNetworkselectissettoRS232C.DHCPandManualaredisabled.
Factory Reset Selectthisoptiontoreturntothedefaultfactorysettings.
24
ENG
ENGLISH
CUSTOMIZING SETTINGS
Tile Mode
ConfigurationofanintegrationscreenisavailableaswellasconfigurationofOnebyoneDisplay.
Tile Mode - Natural mode
Todisplaytheimagenaturally,thepartoftheimagethatwouldnormallybedisplayedinthegapbetween
themonitorsisomitted.
Before After
ID1
ID2
ID3
ID4
•2X2:
Whenusing4monitors
ID1
ID2
ID4
ID5
ID3
ID6
ID7
ID8
ID9
•3X3:
Whenusing9monitors
ID1
ID2
ID5
ID6
ID3
ID7
ID9
ID10
ID11
ID4
ID8
ID12
ID13
ID14
ID15
ID16
•4X4:
Whenusing16monitors
•Off:
WhentheTile
Modeoptionis
disabled
•2X1:
Whenusing2monitors
ID1
ID2
ID6
ID7
ID3
ID8
ID11
ID12
ID13
ID4 ID5
ID9 ID10
ID14 ID15
ID16
ID21
ID17
ID22
ID18
ID23
ID19
ID24
ID20
ID25
•5X5:
Whenusing25monitors
ID1
ID2
TileID
25
ENG
ENGLISH
CUSTOMIZING SETTINGS
Setting Description
Set ID YoucanassignauniqueSetIDNO(nameassignment)toeachproductwhenseveralproducts
areconnectedfordisplay.Specifythenumber(1to99)usingthebuttonandexit.Usethe
assignedSetIDtoindividuallycontroleachproductusingtheProductControlProgram.
Serial No.
Thismenushowstheserialnumberoftheproduct.
SW Version
Thismenushowsthesoftwareversion.
IP Address
Displaysaselectednetwork'sIPaddress.
MAC Address
Displaysaselectednetwork'sMACadd
r
ess.
INFORMATION
SetID
SerialNo.
SWVersion
IPAddress
MACAddress
INFORMATION settings
1
PressMENUtoaccessthemainmenus.
2
PresstheNavigationbuttonstoscrolltoOPTIONandpress
SET.
3
PresstheNavigationbuttonstoscrolltothesettingor
optionyouwantandpressSET.
-Toreturntothepreviouslevel,press .
4
Whenyouarefinished,pressEXIT.
Theavailableoptionsettingsaredescribedinthefollowing:
MENU
26
ENG
ENGLISH
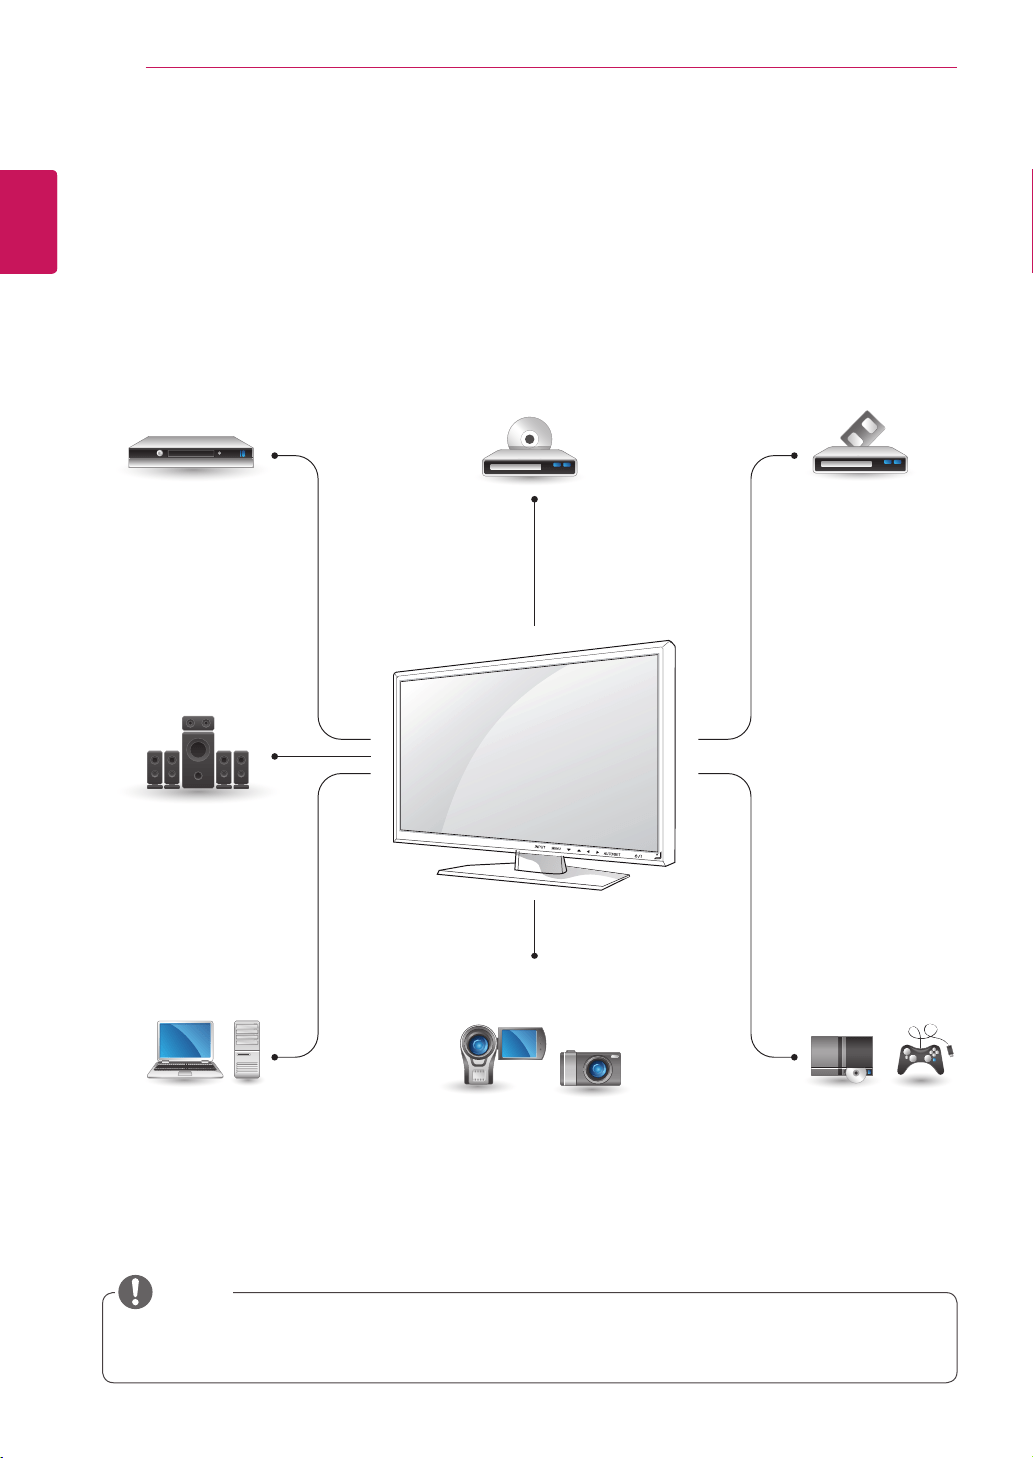
MAKING CONNECTIONS
MAKING CONNECTIONS
ConnectvariousexternaldevicestotheportsontheMonitorset’sbackpanel.
1
FindanexternaldeviceyouwanttoconnecttoyourMonitorsetshownonthefollowingillustration.
2
Checktheconnectiontypeoftheexternaldevice.
3
Gototheappropriateillustrationandchecktheconnectiondetails.
IfyouconnectagamingdevicetotheMonitorset,usethecablesuppliedwiththegamingdevice.
NOTE
HDMI-See p.27
DVI-See p.27
AV(CVBS)-See p.28
HDMI-See p.14
DVI-See p.13
RGB-See p.13
LAN
-See p.14
HDMI-See p.27
DVI-See p.27
AV(CVBS)-See p.28
HDMI-See p.27
DVI-See p.27
AV(CVBS)-See p.28
AV(CVBS)-See
p.28
HDMI-See p.27
AV(CVBS)-See
p.28
HD Receiver
PC
Speaker
DVD
Camcorder/Camera
VCR
Gaming device
27
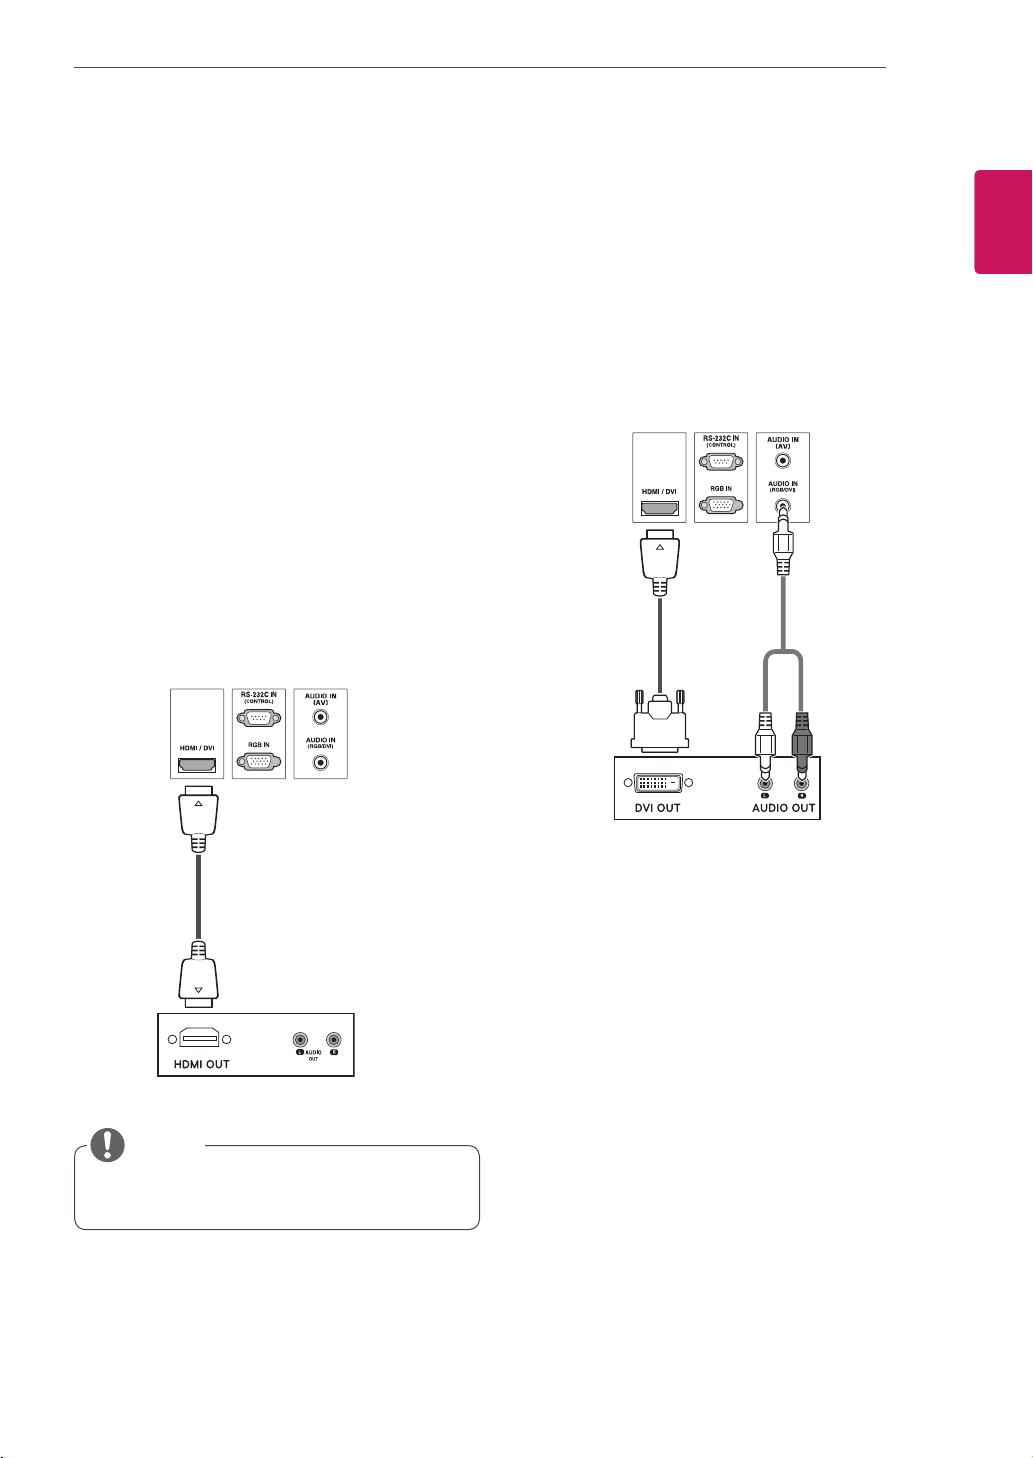
ENG
ENGLISH
MAKING CONNECTIONS
Connecting to a HD receiver,
DVD, Camcorder, Camera,
Gaming Device or VCR
player
ConnectaHDreceiver,DVD,orVCRplayertothe
Monitorsetandselectanappropriateinputmode.
HDMI connection
Transmitsthedigitalvideoandaudiosignalsfrom
anexternaldevicetotheMonitorset.Connectthe
externaldeviceandtheMonitorsetwiththeHDMI
cableasshownonthefollowingillustration.
HDMI/DVI connection
Transmitsthedigitalvideosignalfromanexternal
devicetotheMonitorset.Connecttheexternal
deviceandtheMonitorsetwiththeHDMI/DVI
cableasshowninthefollowingillustration.To
transmitanaudiosignal,connectanoptionalaudio
cable.
UseaHighSpeedHDMI™Cable.
RCA-PC
AudioCable
(notincluded)
HDMI/DVI
SignalCable
(notincluded)
HDMISignalCable
(notincluded)
NOTE
28
ENG
ENGLISH
MAKING CONNECTIONS
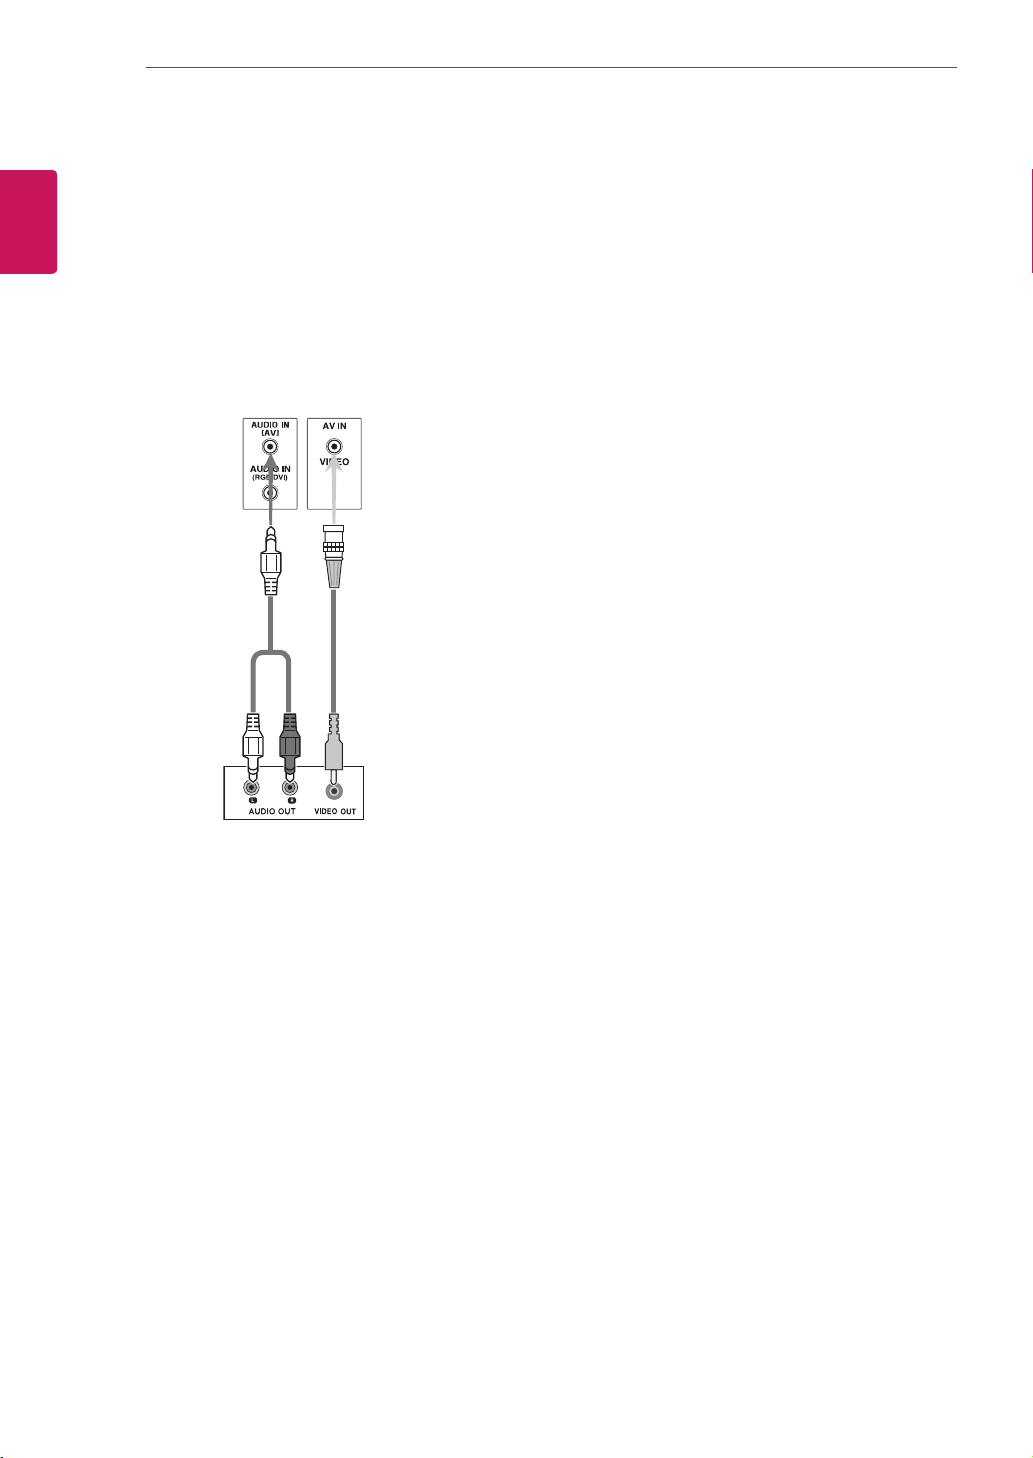
AV(CVBS) connection
Transmitsthedigitalvideoandaudiosignalsfrom
anexternaldevicetotheMonitorset.Connectthe
externaldeviceandtheMonitorsetwiththeBNC
cableasshownonthefollowingillustration.
BNCCable
(notincluded)
RCA-PC
AudioCable
(notincluded)

29
ENG
ENGLISH
TROUBLESHOOTING
TROUBLESHOOTING
No image is displayed
Problem Resolution
Istheproductpowercord
connected?
Seeifthepowercordisproperlyconnectedtotheoutlet.
Isthepowerindicatorlighton?
Seeifthepowerswitchisturnedon.
Mayneedservice.
Powerison,powerindicatorisblue
butthescreenappearsextremely
dark.
Adjustbrightnessandcontrastagain.
Backlightmayneedrepair.
Thepowerindicatoramber?
Iftheproductisinpowersavingmode,movethemouseorpressany
key.
Turnbothdevicesoffandthenbackon.
Doesthe'Outofrange'message
appear?
ThesignalfromthePC(videocard)isoutoftheverticalorhorizontal
frequencyrangeoftheproduct.Adjustthefrequencyrangeby
referringtotheSpecificationsinthismanual.
*Maximumresolution
RGB:1920x1080@60Hz
HDMI/DVI:1920x1080@60Hz
Doesthe'Nosignal'message
appear?
ThesignalcablebetweenPCandproductisnotconnected.Check
thesignalcable.
Pressthe'INPUT'menuintheremoteControltochecktheinput
signal.
Verticalfrequency:Toenabletheusertowatchtheproductdisplay,screenimageshouldbechanged
tensoftimeseverysecondlikeafluorescentlamp.Theverticalfrequencyorrefreshrateisthetimes
ofimagedisplaypersecond.TheunitisHz.
Horizontalfrequency:Thehorizontalintervalisthetimetodisplayoneverticalline.When1isdivided
bythehorizontalinterval,thenumberofhorizontallinesdisplayedeverysecondcanbetabulatedas
thehorizontalfrequency.TheunitiskHz.
NOTE

30
ENG
ENGLISH
TROUBLESHOOTING
'Unknown Product' message appears when the product is connected.
Problem Resolution
Didyouinstallthedriver?
Installtheproductdriver,whichisprovidedwiththeproduct,or
downloaditfromthewebsite.(http://www.lg.com)
Seeiftheplug&playfunctionissupportedbyreferringtothevideo
cardusermanual.
'Key Lock On' message appears.
Problem Resolution
The'KeyLockOn'message
appearswhenpressingtheMenu
button.
TheLockfunctionpreventstheOSDsettingsfrombeingchanged
inadvertently.Toreleasethelock,gotoMenuandOptionanddisable
theKeyLockoption.
The screen image looks abnormal.
Problem Resolution
Isthescreenpositionwrong?
D-Subanalogsignal-Pressthe"AUTO"buttonintheremotecontrol
toautomaticallyselecttheoptimalscreenstatusthatfitsintothe
currentmode.Ifadjustmentisnotsatisfactory,usethePositionOSD
menu.
Seeifthevideocardresolutionandfrequencyaresupportedbythe
product.Ifthefrequencyisoutofrange,settotherecommended
resolutionintheControlPanel"Display"Settingmenu.
Dothinlinesappearonthe
backgroundscreen?
D-Subanalogsignal-Pressthe"AUTO"buttonintheremotecontrol
toautomaticallyselectanoptimalscreenstatusthatfitsintothe
currentmode.Ifadjustmentisnotsatisfactory,usetheClockOSD
menu.
Horizontalnoiseappearsorthe
characterslookblurred.
D-Subanalogsignal-Pressthe"AUTO"buttonintheremotecontrol
toautomaticallyselectanoptimalscreenstatusthatfitsintothe
currentmode.Ifadjustmentisnotsatisfactory,usethePhaseOSD
menu.
Thescreenisdisplayedabnormally.
Theproperinputsignalisnotconnectedtothesignalport.Connect
thesignalcablethatmatcheswiththesourceinputsignal.

31
ENG
ENGLISH
TROUBLESHOOTING
After-image appears on the product.
Problem Resolution
After-imageappearswhenthe
productisturnedoff.
Ifyouuseafixedimageforalongtime,thepixelsmaybedamaged
quickly.Usethescreen-saverfunction.
The audio function does not work.
Problem Resolution
Nosound?
Seeiftheaudiocableisconnectedproperly.
Adjustthevolume.
Seeifthesoundissetproperly.
Soundistoodull.
Selecttheappropriateequalizesound.
Soundistoolow.
Adjustthevolume.
Screen color is abnormal.
Problem Resolution
Screenhaspoorcolorresolution
(16colors).
Setthenumberofcolorstomorethan24bits(truecolor)Select
ControlPanel-Display-Settings-ColorTablemenuinWindows.
Screencolorisunstableormono-
colored.
Checktheconnectionstatusofthesignalcable.Or,re-insertthePC
videocard.
Doblackspotsappearonthe
screen?
Severalpixels(red,green,whiteorblackcolor)mayappearonthe
screen,whichcanbeattributabletotheuniquecharacteristicsofthe
LCDpanel.ItisnotamalfunctionoftheLCD.
The operation does not work normally.
Problem Resolution
Thepowersuddenlyturnedoff.
Isthesleeptimerset?
Checkthepowercontrolsettings.Powerinterrupted.
"Caution,FanError!"
Ifthepoweristurnedoffafterthismessageappears,itmeansthat
thefanisoutoforder.Inthiscase,contactyourlocalservicecenter.

32
ENG
ENGLISH
SPECIFICATIONS
SPECIFICATIONS
LCDPanel ScreenType 1192.8mmWide(46.96inch)TFT(ThinFilmTransistor)
LCD(LiquidCrystalDisplay)Panel.
Visiblediagonalsize:1192.8mm
PixelPitch 0.5415mm(H)x0.5415mm(V)
VideoSignal Max.Resolution RGB:1920X1080@60Hz
HDMI/DVI:1920X1080@60Hz
-ItmaynotbesupporteddependingontheOSorvideocardtype.
RecommendedResolution RGB:1920X1080@60Hz
HDMI/DVI:1920X1080@60Hz
-ItmaynotbesupporteddependingontheOSorvideocardtype.
HorizontalFrequency
RGB:30kHzto83kHz
HDMI/DVI:30kHzto83kHz
VerticalFrequency RGB:56Hzto75Hz
HDMI/DVI:56Hzto60Hz
SynchronizationType SeparateSync,CompositeSync,Digital
InputConnector 15-pinD-Subtype,HDMI(digital),AV(CVBS)Video,
RS-232C,LAN
Power RatedVoltage AC100-240V~50/60Hz3.0A
PowerConsumption OnMode:300WTyp.
SleepMode:≤1W(RGB)/2W(HDMI/DVI)
OffMode:≤0.5W
Environmental
conditions
OperatingTemperature
OperatingHumidity
5°Cto40°C
10%to80%
StorageTemperature
StorageHumidity
-20°Cto60°C
5%to95%
Productspecificationsshownabovemaybechangedwithoutpriornoticeduetoupgradeofproduct
functions.
33
ENG
ENGLISH
SPECIFICATIONS
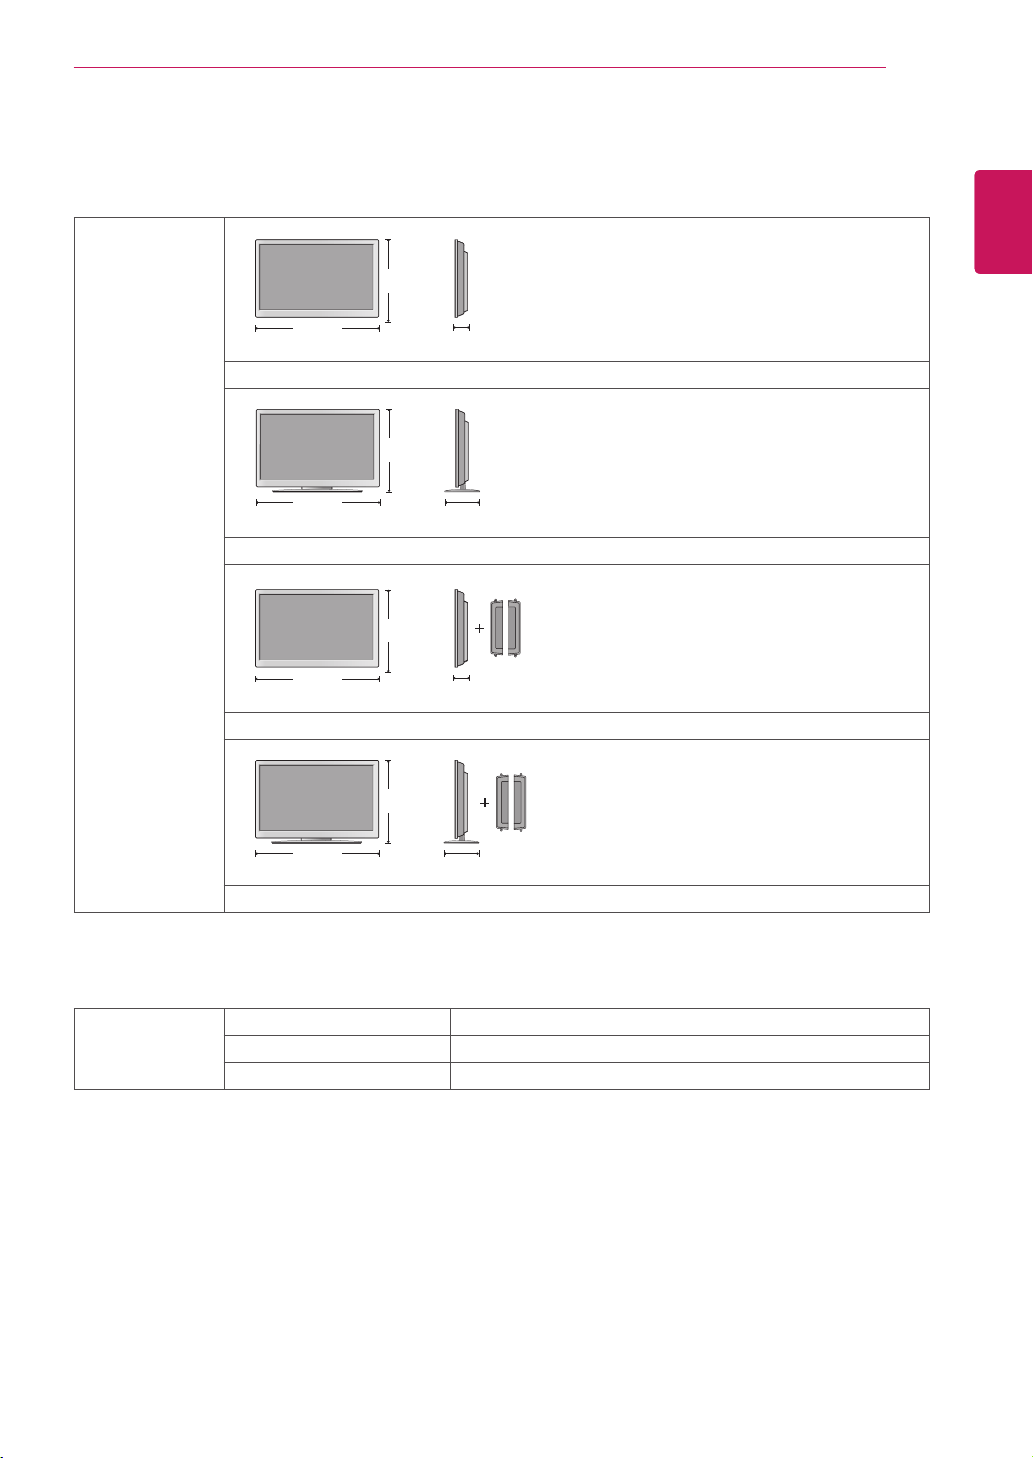
Dimensions
(WidthxHeightx
Depth)/Weight
1117mmx661mmx118.7mm/28.54kg
1117mmx757.8mmx302.6mm/32.56kg
1117mmx661.0mmx118.7mm/29.29kg
1117mmx757.8mmx302.6mm/33.3kg
* Applicable only for models that support the speakers
Audio RMSAudioOutput 10W+10W(R+L)
InputSensitivity 0.7Vrms
SpeakerImpedance 8Ω
Productspecificationsshownabovemaybechangedwithoutpriornoticeduetoupgradeofproduct
functions.
H
W
D
H
W
D
H
W
D
H
W
D
34
ENG
ENGLISH
SPECIFICATIONS
RGB (PC) supported mode
Resolution
Horizontal
Frequency(kHz)
Vertical
Frequency(Hz)
640x350
31.469 70.8
720x400
31.468 70.8
640x480
31.469 59.94
640x480
37.5 75
800x600
37.879 60.317
800x600
46.875 75
832x624
49.725 74.55
1024x768
48.363 60
1024x768
60.123 75.029
1280x720
44.772 59.855
1280x768
47.7 60
1360x768
47.72 59.799
1366x768
47.7 60
1280x1024
63.981 60.02
1280x1024
79.98 75.02
1680x1050
65.290 59.954
1920x1080
67.5 60
HDMI/DVI(PC) supported mode
Resolution
Horizontal
Frequency(kHz)
Vertical
Frequency(Hz)
640x480
31.469 59.94
800x600
37.879 60.317
1024x768
48.363 60
1280x720
44.772 59.855
1280x768
47.7 60
1360x768
47.72 59.799
1366x768
47.7 60
1280x1024
63.981 60.02
1680x1050
65.290 59.954
1920x1080
67.5 60
DTV/PCselectiononRGBandHDMI/DVI
inputsisavailableforPCresolutions:640
x480/60Hz,1280x720/60Hz,1920x
1080/60HzandDTVresolutions:480p,
720p,1080p.
DTV Mode
Resolution
HDMI/DVI
(DTV)
480i x
576i x
480p o
576p o
720p o
1080i o
1080p o
Power Indicator
Mode Monitor Set
OnMode Blue
SleepMode Amber
OffMode -
NOTE
RS-232C
35
ENG
ENGLISH
Connecting the cable
ConnecttheRS-232Ccableasshowninthepicture.
TheRS-232CprotocolisusedforcommunicationbetweenthePCandproduct.Youcanturnthe
producton/off,selectaninputsourceoradjusttheOSDmenufromyourPC.
Communication Parameter
Monitor Set
PC
RS-232CCable
(notincluded)
RS-232C Configurations
7-WireConfigurations(StandardRS-232Ccable)
RXD
TXD
GND
DTR
DSR
RTS
CTS
RXD
TXD
GND
DTR
DSR
RTS
CTS
TXD
RXD
GND
DSR
DTR
CTS
RTS
TXD
RXD
GND
DSR
DTR
CTS
RTS
PC Set PC Set
2
3
5
4
6
7
8
3
2
5
6
4
8
7
D-Sub9D-Sub9
(Female)(Female)
D-Sub9D-Sub9
(Female)(Female)
3-WireConfigurations(NotStandard)
2
3
5
4
6
7
8
3
2
5
6
4
7
8
BaudRate:9600buadRate(UART)
DataLength:8bit
ParityBit:None
StopBit:1bit
FlowControl:None
CommunicationCode:ASCIIcode
Useacrossed(reverse)cable
RS-232C

RS-232C
36
ENG
ENGLISH
Command reference list
COMMAND DATA
1 2 1 2 3
01.Power
k
a 00Hto01H
02.InputSelect
k
b 02Hto09H
03.AspectRatio
k
c 01Hto09H
04.ScreenMute
k
d 00Hto01H
05.VolumeMute
k
e 00Hto01H
06.VolumeControl
k
f 00Hto64H
07.Contrast
k
g 00Hto64H
08.Brightness
k
h 00Hto64H
09.Color
k
i 00Hto64H
10.Tint
k
j 00Hto64H
11.Sharpness
k
k 00Hto64H
12.OSDSelect
k
l 00Hto01H
13.RemoteLock/keyLock
k
m 00Hto01H
14.Balance
k
t 00Hto64H
15.ColorTemperature
k
u 00Hto03H
16.Abnormalstate
k
z FFH
17.ISMmode
j
p 00Hto10H
18.Autoconfiguration
j
u 01H
19.Key
m
c KeyCode
20.TileMode
d
d 00Hto55H
21.TileHPosition
d
e 00Hto64H
22.TileVPosition
d
f 00Hto64H
23.TileHSize
d
g 00Hto64H
24.TileVSize
d
h 00Hto64H
25.TileIDSet
d
i 00Hto19H
26.NaturalMode(InTilemode)
d
j 00Hto01H
27.Picturemode(PSM)
d
x 00Hto06H
28.Soundmode
d
y 00Hto06H
29.FanFaultcheck
d
w FFH
30.Elapsedtimereturn
d
l FFH
31.Temperaturevalue
d
n FFH
32.Lampfaultcheck
d
p FFH
33.AutoVolume
d
u 00Hto01H
34.Speaker
d
v 00Hto01H
35.SleepTime
f
f 00Hto08H
RS-232C
37
ENG
ENGLISH
COMMAND DATA
1 2 1 2 3
36.AutoSleep
f
g 00Hto01H
37.PowerOnDelay
f
h 00Hto64H
38.Language
f
i 00Hto09H
39.DPMSelect
f
j 00Hto01H
40.Reset
f
k 00Hto02H
41.PowerSaving
f l
00Hto03H
42.PowerIndicator
f o
00Hto01H
43.HPosition
f
q 00Hto64H
44.VPosition
f
r 00Hto64H
45.HSize
f
s 00Hto64H
46.VSize
f
t 00Hto64H
47.Serialno.
f
y FFH
48.S/WVersion
f
z FFH
49.InputSelect
x
b 20HtoA0H

RS-232C
38
ENG
ENGLISH
Transmission
[Command1][Command2][][SetID][][Data][Cr]
*[Command1]:Firstcommand.(k,j,m,d,f,x)
*[Command2]:Secondcommand.(atou)
*[SetID]:SetuptheSetIDnumberofproduct.
range:01Hto63H.bysetting'0',servercancontrolallproducts.
*Incaseofoperatingwithmorethan2setsusingsetIDas'0'atthesametime,itshouldnotbecheckedtheack
message.Becauseallsetswillsendtheackmessage,soit'simpossiblethecheckthewholeackmessages.
*[DATA]:Totransmitcommanddata.
Transmit'FF'datatoreadstatusofcommand.
*[Cr]:CarriageReturn(ASCIIcode'0x0D')
*[]:ASCIIcodeSpace(0x20)
OK Acknowledgement
[Command2][][SetID][][OK][Data][x]
*TheProducttransmitsACK(acknowledgement)basedonthisformatwhenreceivingnormaldata.Atthistime,
ifthedataisdatareadmode,itindicatespresentstatusdata.Ifthedataisdatawritemode,itreturnsthedataof
thePCcomputer.
Error Acknowledgement
[Command2][][SetID][][NG][Data][x]
*Ifthereiserror,itreturnsNG
Transmission / Receiving protocol

RS-232C
39
ENG
ENGLISH
01. Power (Command: k a)
TocontrolPowerOn/Offoftheset.
Transmission
[k][a][][SetID][][Data][Cr]
Data0:PowerOff Data1:PowerOn
Acknowledgement
[a][][SetID][][OK][Data][x]
ToshowthestatusofPowerOn/Off.
Transmission
[k][a][][SetID][][FF][Cr]
Acknowledgement
[a][][SetID][][OK][Data][x]
Data0:PowerOff Data1:PowerOn
9:DPM
02. Input Select (Command: k b) (Main Picture Input)
ToselectinputsourcefortheSet.
YoucanalsoselectaninputsourceusingtheINPUT
buttonontheremotecontrol.
Transmission
[k][b][][SetID][][Data][Cr]
Data2:AV
7:RGB(PC)
8:HDMI(DTV)
9:HDMI(PC)
Acknowledgement
[b][][SetID][][OK][Data][x]
Data2:AV
7:RGB(PC)
8:HDMI(DTV)
9:HDMI(PC)
03. Aspect Ratio (Command: k c) (Main Picture Input)
Toadjustthescreenformat.
YoucanalsoadjustthescreenformatusingtheARC
(AspectRatioControl)buttononremotecontrolorin
theScreenmenu.
Transmission
[k][c][][SetID][][Data][Cr]
Data1:NormalScreen(4:3)
2:WideScreen(16:9)
4:Zoom1(AV)
5:Zoom2(AV)
6:Original(AV)
7:14:9(AV)
9:JustScan(HDDTV),
1:1(RGBPC,HDMI/DVIPC)
Acknowledgement
[c][][SetID][][OK][Data][x]
04. Screen Mute (Command: k d)
Toselectscreenmuteon/off.
Transmission
[k][d][][SetID][][Data][Cr]
Data0:Screenmuteoff(Pictureon)
1:Screenmuteon(Pictureoff)
Acknowledgement
[d][][SetID][][OK][Data][x]
05. Volume Mute (Command: k e)
TocontrolOn/OffoftheVolumeMute.
Transmission
[k][e][][SetID][][Data][Cr]
Data0:VolumeMuteOn(VolumeOff)
1:VolumeMuteOff(VolumeOn)
Acknowledgement
[e][][SetID][][OK][Data][x]
Data0:VolumeMuteOn(VolumeOff)
1:VolumeMuteOff(VolumeOn)
06. Volume Control (Command: k f)
ToadjustVolume.
Transmission
[k][f][][SetID][][Data][Cr]
DataMin:00HtoMax:64H
(Hexadecimalcode)
Acknowledgement
[f][][SetID][][OK][Data][x]
DataMin:00HtoMax:64H
* Real data mapping
0:STEP0
:
A:STEP10
:
F:STEP15
10:STEP16
:
64:STEP100

RS-232C
40
ENG
ENGLISH
07. Contrast (Command: k g)
Toadjustscreencontrast.
YoucanalsoadjustthecontrastinthePicturemenu.
Transmission
[k][g][][SetID][][Data][Cr]
DataMin:00HtoMax:64H
Acknowledgement
[g][][SetID][][OK][Data][x]
*Referto'Realdatamapping’.Seep.39
08. Brightness (Command: k h)
Toadjustscreenbrightness.
YoucanalsoadjustthebrightnessinthePicture
menu.
Transmission
[k][h][][SetID][][Data][Cr]
DataMin:00HtoMax:64H
(Hexadecimalcode)
*Referto'Realdatamapping’.Seep.39
Acknowledgement
[h][][SetID][][OK][Data][x]
*Referto'Realdatamapping’.Seep.39
09. Color (Command: k i) (Video Timing only)
Toadjustthescreencolor.
YoucanalsoadjustthecolorinthePicturemenu.
Transmission
[k][i][][SetID][][Data][Cr]
DataMin:00HtoMax:64H
(Hexadecimalcode)
Acknowledgement
[i][][SetID][][OK][Data][x]
DataMin:00HtoMax:64H
10. Tint (Command: k j) (Video Timing only)
Toadjustthescreentint.
YoucanalsoadjustthetintinthePicturemenu.
Transmission
[k][j][][SetID][][Data][Cr]
DataMin:00HtoMax:64H
(Hexadecimalcode)
*Referto'Realdatamapping’.Seep.39
Acknowledgement
[j][][SetID][][OK][Data][x]
Data Red:00HtoGreen:64H
*TintRealdatamapping
0:Step0toRed
:
64:Step100toGreen
11. Sharpness (Command: k k) (Video Timing only)
ToadjustthescreenSharpness.
YoucanalsoadjustthesharpnessinthePicture
menu.
Transmission
[k][k][][SetID][][Data][Cr]
DataMin:00HtoMax:64H
(Hexadecimalcode)
*Referto'Realdatamapping’.Seep.39
Acknowledgement
[k][][SetID][][OK][Data][x]
DataMin:00HtoMax:64H
12. OSD Select (Command: k l)
TocontrolOSDon/offtotheset.
Transmission
[k][l][][SetID][][Data][Cr]
Data0:OSDOff Data1:OSDOn
Acknowledgement
[l][][SetID][][OK][Data][x]
Data0:OSDOff Data1:OSDOn

RS-232C
41
ENG
ENGLISH
13. Remote Lock /Key Lock (Command: k m)
TocontrolRemoteLockon/offtotheset.
Thisfunction,whencontrollingRS-232C,locksthe
remotecontrolandthelocalkeys.
Transmission
[k][m][][SetID][][Data][Cr]
Data0:Off Data1:On
Acknowledgement
[m][][SetID][][OK][Data][x]
Data0:Off Data1:On
14. Balance (Command: k t)
Toadjustthesoundbalance.
Transmission
[k][t][][SetID][][Data][Cr]
DataMin:00HtoMax:64H
(Hexadecimalcode)
*Referto'Realdatamapping’.Seep.39
Acknowledgement
[t][][SetID][][OK][Data][x]
DataMin:00HtoMax:64H
*Balance:L50toR50
15. Color Temperature (Command: k u)
Toadjustthescreencolortemperature.
Transmission
[k][u][][SetID][][Data][Cr]
Data0:Medium
1:Cool
2:Warm
3:User
Acknowledgement
[u][][SetID][][OK][Data][x]
Data0:Medium
1:Cool
2:Warm
3:User
*RunningtheColorTemperaturecommandchanges
thePictureModesettingstoUser1.
16. Abnormal state (Command: k z)
UsedtoReadthepoweroffstatuswhenStand-by
mode.
Transmission
[k][z][][SetID][][Data][Cr]
DataFF:Read
0:Normal(Poweronandsignalexist)
1:Nosignal(Poweron)
2:Turnthemonitoroffbyremotecontrol
3:Turnthemonitoroffbysleeptimefunction
4:TurnthemonitoroffbyRS-232Cfunction
8:Turnthemonitoroffbyofftimefunction
9:Turnthemonitoroffbyautoofffunction
Acknowledgement
[z][][SetID][][OK][Data][x]
17. ISM mode (Command: j p)
Usedtoselecttheafterimagepreventingfunction.
Transmission
[j][p][][SetID][][Data][Cr]
Data1H:Inversion
2H:Orbiter
4H:WhiteWash
8H:Normal
10H:DotWash
Acknowledgement
[p][][SetID][][OK][Data][x]
18. Auto Configure (Command: j u)
Toadjustpicturepositionandminimizeimage
shakingautomatically.itworksonlyinRGB(PC)
mode.
Transmission
[j][u][][SetID][][Data][Cr]
Data1:Toset
Acknowledgement
[u][][SetID][][OK][Data][x]

RS-232C
42
ENG
ENGLISH
19. Key (Command: m c)
TosendIRremotekeycode.
Transmission
[m][c][][SetID][][Data][Cr]
DataKeycode:Referto‘IRCODES’.Seep.47
Acknowledgement
[c][][SetID][][OK][Data][x]
20. Tile Mode (Command: d d)
ChangeaTileMode.
Transmission
[d][d][][SetID][][Data][Cr]
Data Description
00or11 Tilemodeisoff.
12 1x2mode(columnxrow)
13 1x3mode
14 1x4mode
...
...
55 5x5mode
*Thedatacannotbesetto0XorX0except00.
Acknowledgement
[d][][SetID][][OK/NG][Data][x]
21. Tile H Position (Command: d e)
TosettheHorizontalposition.
Transmission
[d][e][][SetID][][Data][Cr]
DataMin:00HtoMax:64H
*Referto'Realdatamapping’.Seep.39
Acknowledgement
[e][][SetID][][OK/NG][Data][x]
22. Tile V Position (Command: d f)
TosettheVerticalposition.
Transmission
[d][f][][SetID][][Data][Cr]
DataMin:00HtoMax:64H
*Referto'Realdatamapping’.Seep.39
Acknowledgement
[f][][SetID][][OK/NG][Data][x]
23. Tile H Size (Command: d g)
TosettheHorizontalsize.
Transmission
[d][g][][SetID][][Data][x]
DataMin:00HtoMax:64H
*Referto'Realdatamapping’.Seep.39
Acknowledgement
[g][][SetID][][OK/NG][Data][x]
24. Tile V Size (Command: d h)
TosettheVerticalsize.
Transmission
[d][h][][SetID][][Data][x]
DataMin:00HtoMax:64H
*Referto'Realdatamapping’.Seep.39
Acknowledgement
[h][][SetID][][OK/NG][Data][x]
25. Tile ID Set (Command: d i)
ToassigntheTileIDforTilingfunction.
Transmission
[d][i][][SetID][][Data][x]
DataMin:00HtoMax:19H
(Hexadecimalcode)
Acknowledgement
[i][][SetID][][OK/NG][Data][x]

RS-232C
43
ENG
ENGLISH
26. Natural Mode (In Tile mode)(Command: d j)
ToassigntheTileNaturalmodeforTilingfunction.
Transmission
[d][j][][SetID][][Data][x]
Data0:NaturalOff
1:NaturalOn
ff:ReadStatus
Acknowledgement
[j][][SetID][][OK/NG][Data][x]
27. Picture Mode (Command: d x)
Toadjustthepicturemode.
Transmission
[d][x][][SetID][][Data][x]
DataStructure
Data(Hex) Mode
00 Vivid
01 Standard
02 Cinema
03 Sport
04 Game
05
User1
06
User2
Acknowledgement
[x][][SetID][][OK/NG][Data][x]
28. Sound Mode (Command: d y)
ToadjusttheSoundmode.
Transmission
[d][y][][SetID][][Data][x]
DataStructure
Data(Hex) Mode
00
ClearVoice
01
Standard
02
Music
03
Cinema
04
sport
05
Game
06
User
Acknowledgement
[y][][SetID][][OK/NG][Data][x]
29. Fan Fault check (Command: d w)
TochecktheFanfaultoftheSet.
Transmission
[d][w][][SetID][][Data][x]
*ThedataisalwaysFF(inHex).
Dataff:ReadStatus
Acknowledgement
[w][][SetID][][OK/NG][Data][x]
*DataisthestatusvalueoftheFanfault.
Data0:Fanfault
1:FanOk
2:N/A(NotAvaliable)
30. Elapsed time return (Command: d l)
Toreadtheelapsedtime.
Transmission
[d][l][][SetID][][Data][x]
*ThedataisalwaysFF(inHex).
Acknowledgement
[l][][SetID][][OK/NG][Data][x]
*ThedataisalwaysFF(inHex).
(Hexadecimalcode)
31. Temperature value (Command: d n)
Toreadtheinsidetemperaturevalue.
Transmission
[d][n][][SetID][][Data][x]
*ThedataisalwaysFF(inHex).
Acknowledgement
[n][][SetID][][OK/NG][Data][x]
*Thedatais1bytelonginHexadecimal.

RS-232C
44
ENG
ENGLISH
32. Lamp fault Check (Command: d p)
Tochecklampfault.
Transmission
[d][p][][SetID][][Data][x]
*ThedataisalwaysFF(inHex).
Acknowledgement
[p][][SetID][][OK/NG][Data][x]
*Thedatais1bytelonginHexadecimal.
Data0:LampFault
1:LampOk
33. Auto volume (Command: d u)
Automaticallyadjustthevolumelevel.
Transmission
[d][u][][SetID][][Data][x]
Data0:Off Data1:On
Acknowledgement
[u][][SetID][][OK/NG][Data][x]
34. Speaker (Command: d v)
Turnthespeakeronoroff.
Transmission
[d][v][][SetID][][Data][x]
Data0:Off Data1:On
Acknowledgement
[v][][SetID][][OK/NG][Data][x]
35. Sleep Time (Command: f f)
SetSleepTime.
Transmission
[f][f][][SetID][][Data][Cr]
Data00:Off
01:10
02:20
03:30
04:60
05:90
06:120
07:180
08:240
(Orderly)
Acknowledgement
[f][][SetID][][OK/NG][Data][x]
36. Auto Sleep (Command: f g)
SetAutoSleep.
Transmission
[f][g][][SetID][][Data][Cr]
Data0:Off Data1:On
Acknowledgement
[g][][SetID][][OK/NG][Data][x]
37. Power On Delay (Command: f h)
Setthescheduledelaywhenthepoweristurnedon
(Unit:second).
Transmission
[f][h][][SetID][][Data][Cr]
Data:00Hto64H(Datavalue)
*Referto'Realdatamapping’.Seep.39
Acknowledgement
[h][][SetID][][OK/NG][Data][x]

RS-232C
45
ENG
ENGLISH
38. Language (Command: f i)
SettheOSDlanguage.
Transmission
[f][i][][SetID][][Data][Cr]
Data0:English
1:French
2:German
3:Spanish
4:Italian
5:Portuguese
6:Chinese
7:Japanese
8:Korean
9:Russian
Acknowledgement
[i][][SetID][][OK/NG][Data][x]
39. DPM Select (Command: f j)
SettheDPM(DisplayPowerManagement)function.
Transmission
[f][j][][SetID][][Data][Cr]
Data0:Off
1:On
Acknowledgement
[j][][SetID][][OK/NG][Data][x]
40. Reset (Command: f k)
SettheDPM(DisplayPowerManagement)function.
Transmission
[f][k][][SetID][][Data][Cr]
Data0:PictureReset
1:ScreenReset
2:FactoryReset
Acknowledgement
[k][][SetID][][OK/NG][Data][x]
41. Power saving (Command: f l)
TosetthePowersavingmode.
Transmission
[f][l][][SetID][][Data][Cr]
Data0:Off
1:Level1
2:Level2
3:Level3
Acknowledgement
[l][][SetID][][OK/NG][Data][x]
42. Power Indicator (Command: f o)
TosettheLEDforPowerIndicator
Transmission
[f][o][][SetID][][Data][Cr]
Data00:Off
01:On
Acknowledgement
[o][][SetID][][OK/NG][Data][x]
43. H Position (Command : f q)
TosettheHorizontalposition
Transmission
[f][q][][SetID][][Data][Cr]
Data:00Hto64H
*Referto'Realdatamapping’.Seep.39
Acknowledgement
[q][][SetID][][OK/NG][Data][x]
44. V Position (Command : f r)
TosettheVerticalpositionTransmission
[f][r][][SetID][][Data][Cr]
Data:00Hto64H
*Referto'Realdatamapping’.Seep.39
Acknowledgement
[r][][SetID][][OK/NG][Data][x]

RS-232C
46
ENG
ENGLISH
45. H Size (Command : f s)
TosettheHorizontalsize.
Transmission
[f][s][][SetID][][Data][Cr]
Data:00Hto64H
*Referto'Realdatamapping’.Seep.39
Acknowledgement
[s][][SetID][][OK/NG][Data][x]
*HSizeRealDataMapping
[Data1]
0x00:Step0
0x0A:Step10
0x14:Step20
0x1E:Step30
0x28:Step40
0x32:Step50
0x3C:Step60
0x46:Step70
0x50:Step80
0x5A:Step90
0x64:Step100
46. V Size (Command : f t)
TosettheVerticalsize
Transmission
[f][t][][SetID][][Data][Cr]
Data:00Hto64H
*Referto'Realdatamapping’.Seep.39
Acknowledgement
[t][][SetID][][OK/NG][Data][x]
*VSizeRealDataMapping
[Data1]
0x00:Step0
0x0A:Step10
0x14:Step20
0x1E:Step30
0x28:Step40
0x32:Step50
0x3C:Step60
0x46:Step70
0x50:Step80
0x5A:Step90
0x64:Step100
47. Serial no. (Command: f y)
ChecktheSerialno.
Transmission
[f][y][][SetID][][Data][Cr]
DataFF(toreadtheserialnumbers)
Acknowledgement
[y][][SetID][][OK/NG][Data1]to[Data13][x]
*ThedataformatisASCIICode.
48. S/W Version (Command: f z)
Checkthesoftwareversion.
Transmission
[f][z][][SetID][][Data][Cr]
DataFF:Read
Acknowledgement
[z][][SetID][][OK/NG][Data][x]
49. Input Select (Command: x b)
ToselectinputsourcefortheSet.
Transmission
[x][b][][SetID][][Data][Cr]
Data20H:AV
60H:RGB(PC)
90H:HDMI/DVI(DTV)
A0H:HDMI/DVI(PC)
Acknowledgement
[b][][SetID][][OK/NG][Data][x]
Data20H:AV
60H:RGB(PC)
90H:HDMI/DVI(DTV)
A0H:HDMI/DVI(PC)

RS-232C
47
ENG
ENGLISH
Code(Hex) Function Note
00
R/CButton
01
R/CButton
02
VOL( ) R/CButton
03
VOL( ) R/CButton
08
POWERON/OFF R/CButton(PowerOn/Off)
C4
POWERON DiscreteIRCode(OnlyPowerOn)
C5
POWEROFF DiscreteIRCode(OnlyPowerOff)
09
MUTE R/CButton
98
AV R/CButton
0B
INPUT R/CButton
0E
SLEEP R/CButton
43
MENU R/CButton
5B
EXIT R/CButton
6E
PSM R/CButton
44
SET R/CButton
10
NumberKey0 R/CButton
11
NumberKey1 R/CButton
12
NumberKey2 R/CButton
13
NumberKey3 R/CButton
14
NumberKey4 R/CButton
15
NumberKey5 R/CButton
16
NumberKey6 R/CButton
17
NumberKey7 R/CButton
18
NumberKey8 R/CButton
19
NumberKey9 R/CButton
5A
AV DiscreteIRCode(InputAVSelection)
D5
RGBPC DiscreteIRCode(InputRGBPCSelection)
C6
HDMI/DVI DiscreteIRCode(InputHDMI/DVISelection)
79
ARC R/CButton
76
ARC(4:3) DiscreteIRCode(Only4:3mode)
77
ARC(16:9) DiscreteIRCode(Only16:9mode)
AF
ARC(ZOOM) DiscreteIRCode(OnlyZOOM1,ZOOM2mode)
99
AUTOCONFIG DiscreteIRCode
IR CODES

Make sure to read the Safety Precautions
before using the product.
Keep the Owner's Manual(CD) in an accessible
place for future reference.
The model and serial number of the SET is
located on the back and one side of the SET.
Record it below should you ever need service.
MODEL
SERIAL
Temporary noise is normal when powering ON or
OFF this device.