You can use the control panel to configure all functions of your appliance and to obtain information about the operat- ing status.
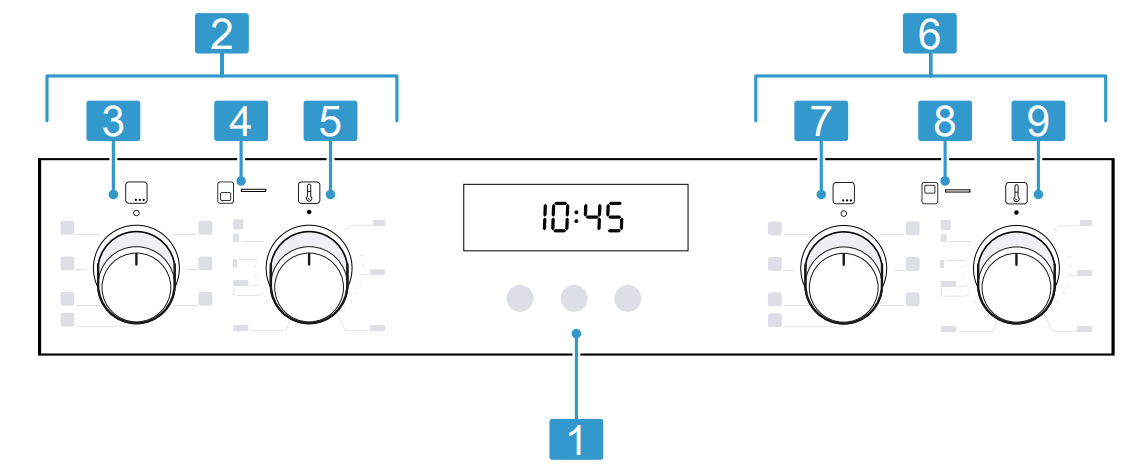
1. Buttons and display
The buttons are touch-sensitive surfaces. To se- lect a function, simply press lightly on the relev- ant field.
The display shows symbols for active functions and the time-setting options.
→ "Buttons and display", Page 7
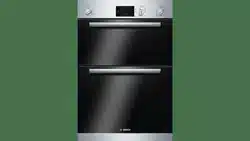
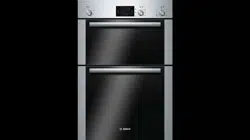
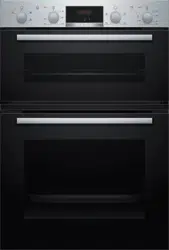
2. Main oven
Controls for the main oven
3. Function selector
Use the function selector to set the types of heating and other functions.
You can turn the function selector clockwise or anti-clockwise from the zero setting .
Depending on the appliance, the function se- lector can be pushed in. Press on the function selector to click it into or out of the zero set- ting .
→ "Types of heating and functions", Page 7
4. Heating-up control
→ "Heating-up control", Page 8
5. Temperature selector
Use the temperature selector to set the temper- ature for the type of heating and select settings for other functions.
You can only turn the temperature selector clockwise from the zero setting until it offers resistance. You cannot turn it any further than this.
Depending on the appliance, the temperature selector can be pushed in. Press on the tem- perature selector to click it into or out of the zero setting .
→ "Temperature and setting levels", Page 8
6. Top oven
Controls for the top oven
7. Function selector
Use the function selector to set the types of heating and other functions.
You can turn the function selector clockwise or anti-clockwise from the zero setting .
Depending on the appliance, the function se- lector can be pushed in. Press on the function selector to click it into or out of the zero set- ting .
→ "Types of heating and functions", Page 7
8. Heating-up control
→ "Heating-up control", Page 8
9. Temperature selector
Use the temperature selector to set the temper- ature for the type of heating and select settings for other functions.
You can only turn the temperature selector clockwise from the zero setting until it offers resistance. You cannot turn it any further than this.
Depending on the appliance, the temperature selector can be pushed in. Press on the tem- perature selector to click it into or out of the zero setting .
→ "Temperature and setting levels", Page 8
Buttons and display
You can use the buttons to set various functions for your appliance. The display shows the settings.
If a function is active, the corresponding symbol lights up in the display. The clock symbol only lights up when you change the time.
Symbol
Function
Use
Time-setting options
Select the time , timer , cooking time and the end time .
To select the individual time-setting options, press the button sev- eral times.
Minus Plus
Decrease the setting values. Increase the setting values.
Childproof lock
Activate or deactivate the childproof lock.
Types of heating and functions
To ensure that you always use the right type of heating to cook your food, we have explained the differences and ap- plications below.
Main oven
Symbol
Type of heating
What it's used for/how it works
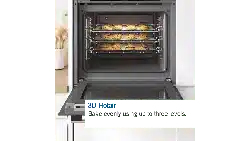
3D hot air
Bake and roast on one or more levels.
The fan distributes the heat from the ring-shaped heating element in the back wall evenly around the cooking compartment.
Gentle hot air
Cook selected dishes gently on one level without preheating.
The fan distributes the heat from the ring-shaped heating element in the back wall evenly around the cooking compartment. The food is cooked in phases us-ing residual heat.
Select a temperature of between 120 °C and 230 °C. Always keep the appliance door closed when cooking.
This type of heating is used to determine the energy consumption in air recircu-lation mode and the energy efficiency class.
Top oven
Symbol
Type of heating
What it's used for/how it works
Top/bottom heating
Bake on one level.
The heat is emitted evenly from above and below.
This type of heating is used to measure the energy consumption in the conven-tional mode.
Grill, small area
Grill small quantities of steak, sausages or toast. Brown small quantities of food.
The central area underneath the grill element becomes hot.
Full-surface grill
Grill flat items such as steak, sausages, or toast. Brown food. The entire area underneath the grill element becomes hot.
Other functions
Here, you can find an overview of other functions of your appliance.
Main oven
Symbol
Function
Use
Oven light
Illuminate the cooking compartment without heating.
→ "Lighting", Page 9
Top oven
Symbol
Function
Use
Oven light
Illuminate the cooking compartment without heating.
→ "Lighting", Page 9
Temperature and setting levels
There are different settings for the types of heating and functions.
Note: For temperature settings above 250 °C, the appliance reduces the temperature to approx. 240 °C after ap- prox. 10 minutes. If your appliance has the top/bottom heating or bottom heating types, this temperature reduction does not take place.
Heating-up control
The heating-up indicator for the oven remains lit while the appliance is heating.
Note: Due to thermal inertia, the temperature displayed may differ slightly from the actual temperature inside the cooking compartment.
Heating-up indicator
When the main oven heats up, the symbol also lights up in the display. This symbol goes out when heating is paused.
Cooking compartment
The functions in the cooking compartment make your appliance easier to use.
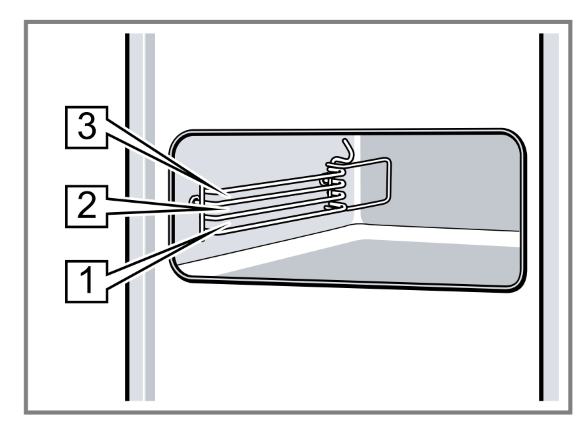
Rails
The rails in the cooking compartment enable you to place accessories at different heights.
→ "Accessories", Page 9
The shelf positions are numbered from bottom to top.
You can remove the rails, e. g. for cleaning.
→ "Shelf supports", Page 15
Main cooking compartment
The cooking compartment has five shelf positions.
Top cooking compartment
The cooking compartment has three shelf positions.
Self-cleaning surfaces
The self-cleaning surfaces in the cooking compartment are coated with a porous, matt ceramic layer and have a rough surface. When the appliance is in operation, the self-cleaning surfaces absorb splashes from roasting or grilling and break them down.
The following surfaces are self-cleaning:
Lighting
The oven light lights up the cooking compartment.
With most types of heating and functions, the lighting lights up during operation. When the function selector is turned to bring operation to an end, the lighting goes out.
The Oven light setting on the function selector can be used to switch on the light without heating.
Cooling fan
The cooling fan switches on and off depending on the appliance's temperature. The hot air escapes above the door.
ATTENTION!
Do not cover the ventilation slot above the appliance door. The appliance overheats.
Ensure that the ventilation slots are unobstructed.
To ensure that the appliance cools down more quickly after operation, the cooling fan continues to run for a certain period afterwards.
Appliance door
If you open the appliance door during operation, the operation continues.
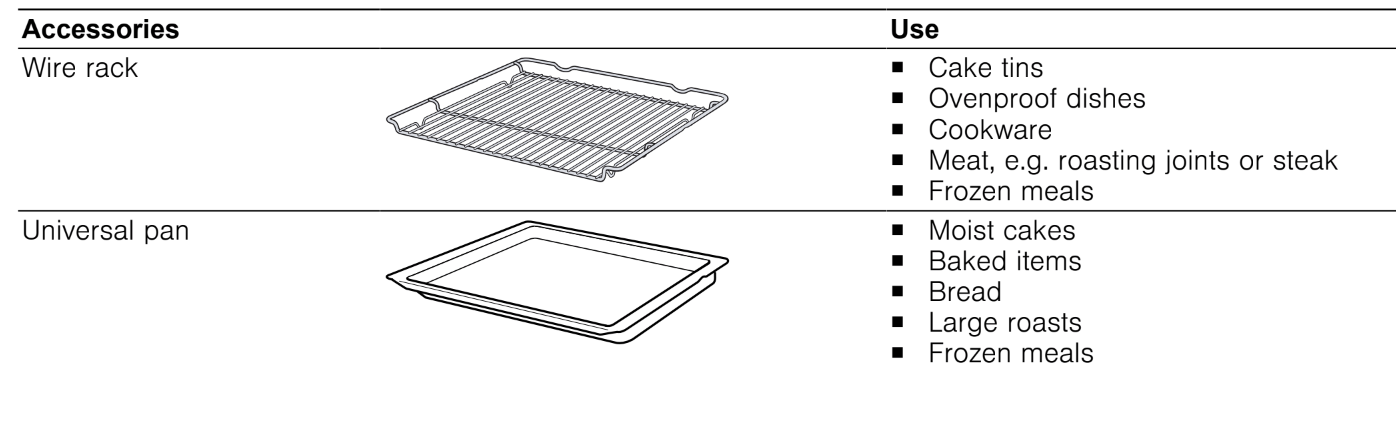
Accessories
Use original accessories. These have been made especially for your appliance.
Note: Accessories may become deformed if they get hot. Deformation has no effect on function. As the accessory cools down, it will regain its original shape.
The accessories supplied may differ depending on the appliance model.
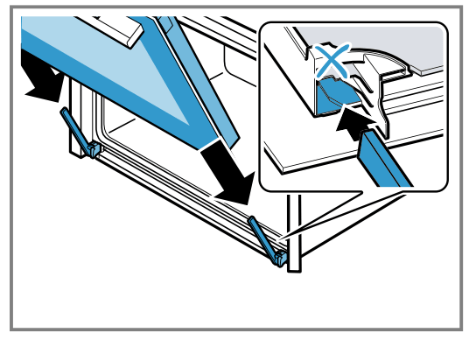
Locking function
The locking function prevents the accessories from tilt- ing when they are pulled out.
You can pull out the accessories approximately halfway without them tipping. The accessories must be inserted into the cooking compartment correctly for the tilt pro- tection to work properly.
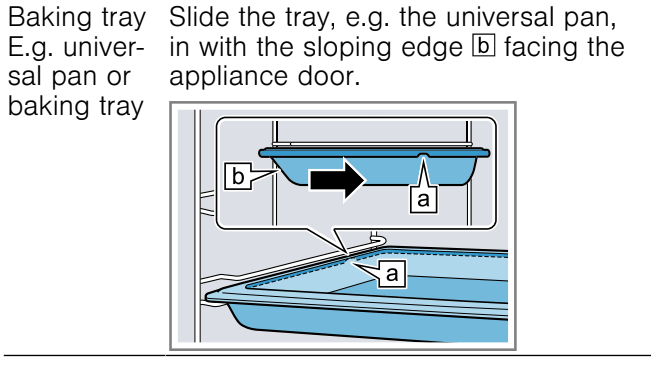
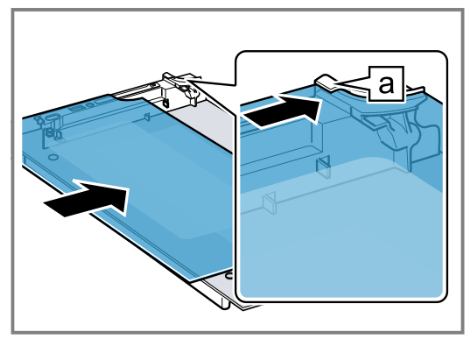
Sliding accessories into the cooking compartment
Always slide accessories into the cooking compartment correctly. This is the only way to ensure that accessor- ies can be pulled out approximately halfway without tip- ping.
1.Turn the accessories so that the notch is at the rear and is facing downwards.
2. Insert accessories between the two guide rods for the shelf position.
3. Push the accessory all the way in, making sure that it does not touch the appliance door.
Note: Take any accessories that you will not be using out of the cooking compartment while the appliance is in operation.
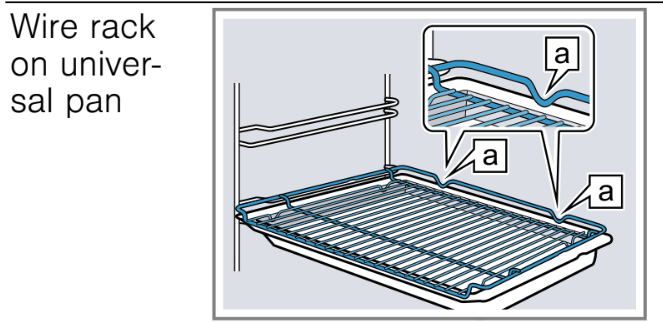
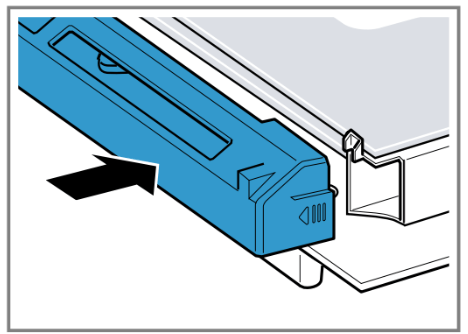
Combining accessories
You can combine the wire rack with the universal pan to catch any liquid that drips down.
1.Place the wire rack on the universal pan so that both spacers are on the rear edge of the univer- sal pan.
2. Insert the universal pan between the two guide rods for a shelf position. In so doing, the wire rack is on top of the upper guide rod.
Other accessories
You can purchase other accessories from our after- sales service, specialist retailers or online.
You will find a comprehensive range of products for your appliance in our brochures and online: www.bosch-home.com
Accessories vary from one appliance to another. When purchasing accessories, always quote the exact product number (E no.) of your appliance.
You can find out which accessories are available for your appliance in our online shop or from our after- sales service.
Before using for the first time
Configure the settings for initial start-up. Clean the ap- pliance and accessories.
Initial use
You need to make settings for initial use before you can use your appliance.
Setting the time on the clock
Once the appliance has been connected to the mains or following a power failure, the time flashes on the dis- play. The time starts at "12:00". Set the current time.
Requirement: The function selector must be set to the "Off" position .
1. Use the - or + button to set the time.
2. Press the button .
The time that is set appears on the display.
Cleaning the appliance before using it for the first time
Clean the cooking compartment and accessories be- fore using the appliance to prepare food for the first time.
1. Remove any accessories and leftover packaging, such as polystyrene pellets, from the cooking com- partment.
2. Before heating the appliance, wipe the smooth sur- faces in the cooking compartment with a soft, damp cloth.
3. Keep the room ventilated while the appliance is heating.
4. Set the type of heating and temperature.
→ "Basic operation", Page 11
5. Switch off the appliance after the specified cooking time.
6. Wait until the cooking compartment has cooled down.
7. Clean the smooth surfaces with soapy water and a dish cloth.
8. Clean the accessories using soapy water and a dish cloth or soft brush.
Basic operation
Switching on the appliance
Turn the function selector to any position other than the "Off" position . a The appliance is switched on.
Switching off the appliance
Turn the function selector to the "Off" position .
The appliance is switched off.
Setting the type of heating and temperature
1. Use the function selector to set the type of heating.
2. Use the temperature selector to set the temperature or grill setting.
The appliance starts heating after a few seconds.
3. When your food is ready, switch off the appliance.
Tip: The most suitable type of heating for your food can be found in the description of the type of heating.
Changing the type of heating
You can change the type of heating at any time.
Use the function selector to set the required type of heating.
Changing the temperature
You can change the temperature at any time.
Use the temperature selector to set the required temperature.
Time-setting options
Your appliance has different time-setting options, with which you can control its operation.
Overview of the time-setting options
With the button , select the different time-setting op- tions.
Setting the timer
The timer runs independently of the appliance when it is in operation. The timer can be set when the appli- ance is switched on or off, up to 23 hours and 59 minutes. The timer has its own audible signal so that you can tell whether it is the timer or a cooking time which has elapsed.
Note: The timer and cooking time cannot count down at the same time. If a cooking time has already been set, you cannot set the timer.
Press the button repeatedly until is highlighted in the display.
Use the - or + button to set the timer duration.
The timer duration can be set in 30-second incre- ments up to 10 minutes. Above 10 minutes, the time increments become longer the higher the value.
The timer starts and the timer duration begins to count down after a few seconds.
An audible signal sounds and the timer duration is zero in the display when the timer duration has elapsed.
3. Once the timer duration has elapsed:
- Press any button to switch off the timer.
Changing the timer
You can change the timer duration at any time.
Requirement: is highlighted on the display.
Use the - or + button to change the timer duration.
The appliance applies the change after a few seconds.
Cancelling the timer
You can cancel the timer duration at any time.
Requirement: is highlighted on the display.
Use the - button to reset the timer duration to zero.
After a few seconds, the appliance applies the change and goes out.
Setting the cooking time
You can set a cooking time for operation of up to 23 hours 59 minutes.
Requirement: A type of heating and a temperature or setting are set for the main oven .
1. Press the button repeatedly until is highlighted in the display.
2. Use the - or + button to set the cooking time.
The cooking time can be set in 1-minute increments up to 1 hour, and then in 5-minute increments.
The appliance starts heating and the cooking time counts down after a few seconds.
If the cooking time has elapsed, an audible signal sounds and the display shows the cooking time as zero.
3. When the cooking time has elapsed:
Press any button to end the audible signal before it sounds.
To set a cooking time again, press the button.
When your food is ready, switch off the appli- ance.
Changing the cooking time
You can change the cooking time at any time.
Requirement: is highlighted on the display.
Change the cooking time using the or button.
The appliance applies the change after a few seconds.
Cancelling the cooking time
You can cancel the cooking time at any time.
Requirement: is highlighted on the display.
Reset the cooking time to zero using the button.
After a few seconds, the appliance applies the change and continues to heat without a cooking time.
Setting the end time
You can delay the time at which cooking is due to fin- ish by up to 23 hours and 59 minutes.
Notes
The end time cannot be set for types of heating with grill function.
In order to achieve a good cooking result, do not delay the end time once the appliance is already in operation.
Food will spoil if you leave it in the cooking com- partment too long.
Requirements
A type of heating and a temperature or setting are set for the main oven .
A cooking time is set.
1. Press the button repeatedly until is highlighted in the display.
2. Press the - or + button.
The display shows the calculated end time.
3. Use the or button to delay the end time.
After a few seconds, the appliance applies the set- ting and the display shows the set end time.
Once the calculated start time has been reached, the appliance starts heating up and the cooking time starts counting down.
Once the time has elapsed, an audible signal sounds and the display shows the cooking time as zero.
4. When the cooking time has elapsed:
Press any button to end the signal prematurely.
To set another cooking time, press the button.
When your food is ready, switch off the appli- ance.
Changing the end time
In order to achieve a good cooking result, you can only change the set end time before operation starts and the cooking time starts counting down.
Requirement: is highlighted on the display.
Use the - or + button to delay the end time.
The appliance applies the change after a few seconds.
Cancelling the end time
You can delete the set end at any time.
Requirement: is highlighted on the display.
Reset the end time to the current time plus the set cooking time using the button.
After a few seconds, the appliance applies the change and starts heating up. The cooking time counts down.
Setting the time on the clock
Once the appliance has been connected to the mains or following a power failure, the time flashes on the dis- play. The time starts at "12:00". Set the current time.
Requirement: The function selector must be set to the "Off" position .
1.Use the - or + button to set the time.
2.Press the button.
The time that is set appears on the display.
Changing the time on the clock
You can change the time on the clock at any time.
Requirement: The function selector must be set to the"Off" position .
1.Press and hold the button until the clock flashes on the display.
2. Use the - or + button to change the time.
The appliance applies the change after a few seconds.
Childproof lock
Secure your appliance to prevent children from acci- dentally switching on the main oven or changing the settings.
Note: After a power cut, the childproof lock is deactiv- ated.
Activating and deactivating the childproof lock
Requirement: The function selector must be set to the "Off" position .
To activate the childproof lock, press and hold the button until appears in the display.
To deactivate the childproof lock, press and hold the button until goes out in the display.
Cleaning and servicing
To keep your appliance working efficiently for a long time, it is important to clean and maintain it carefully.
Cleaning products
In order to avoid damaging the various oven surfaces on the appliance, do not use unsuitable cleaning products.
Suitable cleaning agents
Only use cleaning agents that are suitable for the differ- ent surfaces on your appliance.
Follow the instructions on cleaning the appliance.
→Cleaning the appliance", Page 14
Appliance front
Surface
Suitable cleaning agents
Notes
Stainless steel
Hot soapy water
Special stainless steel cleaning products suitable for hot sur- faces
To prevent corrosion, remove any limescale, grease, starch or albu- min (e.g. egg white) stains on stainless steel fronts immediately.
Apply a thin layer of the stainless steel cleaning product with a soft cloth.
Plastic or painted surfaces E.g. control panel
Hot soapy water
Do not use glass cleaner or a glass scraper.
Appliance door
Area
Suitable cleaning agents
Notes
Door panels
Hot soapy water
Do not use a glass scraper or a stainless steel wool.
Tip: Remove the door panels in order to clean them thoroughly. → "Appliance door", Page 16
Door cover
Made of stainless steel: Stainless steel cleaner
Made of plastic: Hot soapy water
Do not use glass cleaner or a glass scraper. Tip: Remove the door cover for thorough cleaning. → "Appliance door", Page 16
Door handle
Hot soapy water
To avoid permanent stains, remove descaling agents from the door handle immediately.
Door seal
Hot soapy water
Do not remove or scrub.
Cooking compartment
Area
Suitable cleaning agents
Notes
Enamel surfaces
Hot soapy water
Vinegar water
Oven cleaner
Soak any heavily soiled areas and use a brush or steel wool. Leave the appliance door open to dry the cooking compartment after cleaning it.
Notes
Enamel burns at very high temperatures, causing minor discol- ouration. The functionality of your appliance is not affected by this.
The edges of thin trays cannot be completely enamelled and may be rough. This does not impair corrosion protection.
Food residues will leave a white coating on the enamel surfaces. The coating does not pose a health risk. The functionality of your appliance is not affected by this. You can remove residues with lemon juice.
Self-cleaning sur-faces
Follow the instructions for self-cleaning surfaces.
→ "Cleaning self-cleaning surfaces in the main cooking compart-ment", Page 14
Glass cover for the oven light
Hot soapy water
Use oven cleaner to remove very heavy soiling.
Rails
Hot soapy water
Soak any heavily soiled areas and use a brush or steel wool.
Tip: Remove the shelf supports for cleaning. → "Shelf supports", Page 15
AccessorIes
Hot soapy water
Oven cleaner
Soak any heavily soiled areas and use a brush or steel wool. Enamelled accessories are dishwasher-safe.
Cleaning the appliance
In order to avoid damaging the appliance, you must clean your appliance only as specified, and with suit- able cleaning products.
Requirement: Read the information on cleaning products.
→ "Cleaning products", Page 13
1. Clean the appliance using hot soapy water and a dish cloth.
For some surfaces, you can use alternative cleaning agents. → "Suitable cleaning agents", Page 13
2. Dry with a soft cloth.
Cleaning self-cleaning surfaces in the main cooking compartment
The back wall in the main cooking compartment is self- cleaning. The self-cleaning surfaces are coated with a porous, matt ceramic layer and have a rough surface. When the appliance is in operation, the self-cleaning surfaces absorb splashes from baking, roasting or grilling and break them down. If the self-cleaning sur- faces no longer clean themselves adequately during operation, heat up the cooking compartment specific- ally to the right temperature.
ATTENTION!
If you do not clean the self-cleaning surfaces regularly, they may become damaged.
If dark stains are visible on the self-cleaning sur-faces, heat up the cooking compartment.
Do not use oven cleaner or abrasive cleaning aids. If oven cleaner accidentally comes into contact with the self-cleaning surfaces, dab it off immediately us- ing water and a sponge cloth. Do not rub.
1. Remove accessories and cookware from the cook- ing compartment.
2. Detach the rails and remove them from the cooking compartment.
3. Use a detergent solution and a soft cloth to remove heavy soiling:
From the smooth enamel surfaces
From the inside of the appliance door
From the glass cover for the oven light
This prevents stains that cannot be removed.
4. Remove any objects from the cooking compartment.
5. The cooking compartment must be empty.
6. Use the function selector to set 3D hot air.
Use the temperature selector to set the maximum temperature. a The appliance starts heating after a few seconds.
7. Switch off the appliance after one hour.
8. Once the appliance has cooled down, wipe the cooking compartment with a damp cloth.
Note: Reddish marks may appear on the self-clean- ing surfaces. This is residue from food. These spots are not harmful and are not rust. These marks do not impair the cleaning ability of the self-cleaning surfaces.
9. Attach the rails.
Shelf supports
To clean the rails and the cooking compartment, or to replace the rails, you can remove these.
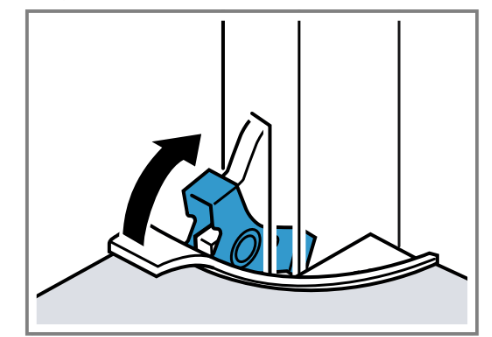
Detach the rails in the main cooking compartment
1. Lift the rail forwards slightly 1 and detach it 2 .
2. Pull the whole rail to the front 3 and remove it.
3. Clean the rail.
→ "Cleaning products", Page 13
Attaching the rails in the main cooking compartment
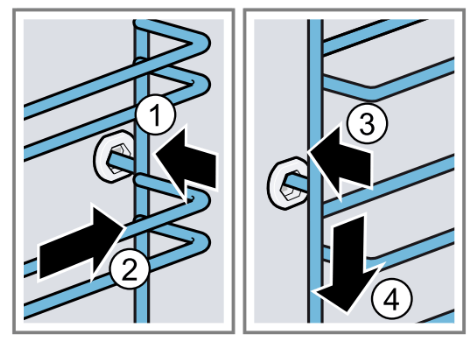
1. First, push the rail into the middle of the rear socket 1 until the rail rests against the cooking compartment wall, and then push this back 2 .
2. Push the rail into the front socket 3 until the rail also rests against the cooking compartment wall, and then press this downwards 4 .
Detaching the rails in the top cooking compartment
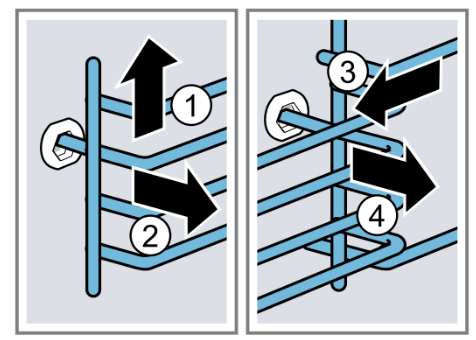
1. Lift the rail forwards slightly 1 and detach it 2 .
2. Pull the rail to the front 3 and remove it 4.
3. Clean the rail.
→ "Cleaning products", Page 13
Attaching the rails in the top cooking compartment
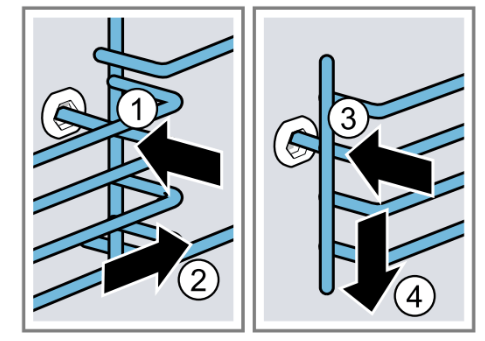
1. First, push the rail into the middle of the rear socket 1 until the rail rests against the cooking compartment wall, and then push this back 2 .
2. Push the rail into the front socket 3 until the rail also rests against the cooking compartment wall, and then press this downwards 4.
Appliance door
To ensure that your appliance retains its appearance and remains fully functioning for a long time, you can detach the appliance door and clean it.
Detaching the lower appliance door
1. Open the appliance door fully.
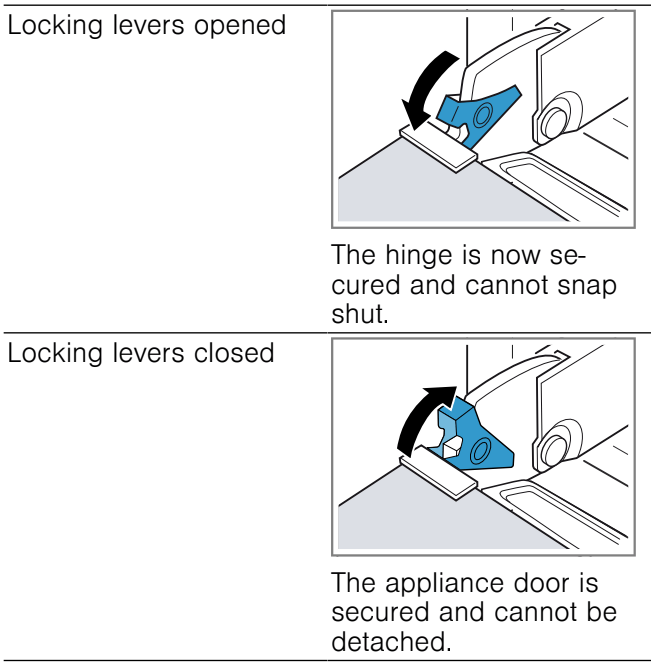
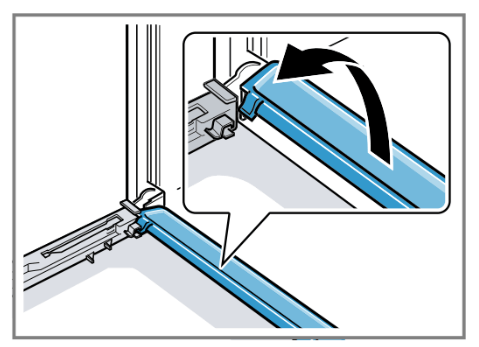
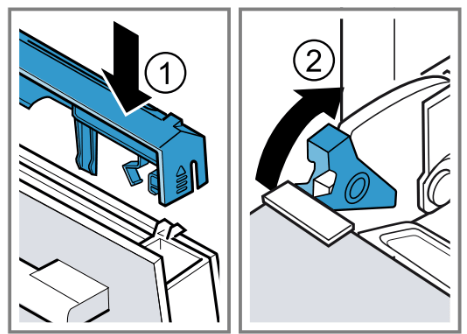
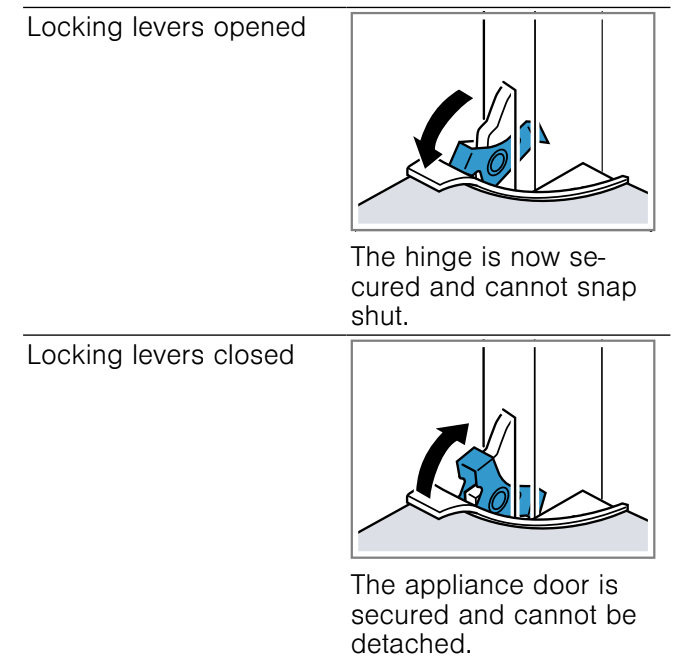
2. Open the locking levers on the left- and right-hand hinges.
The locking levers are open. The hinges are now se-cured and cannot snap shut.
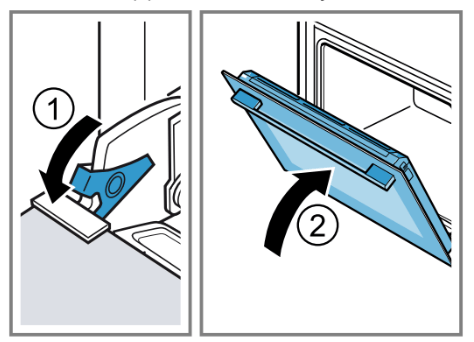
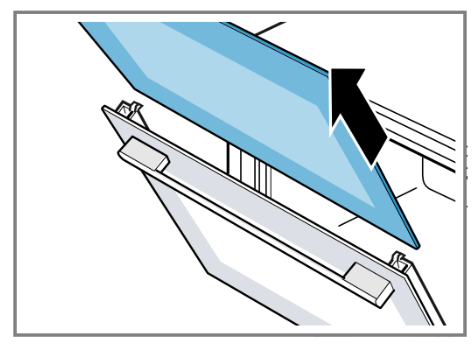
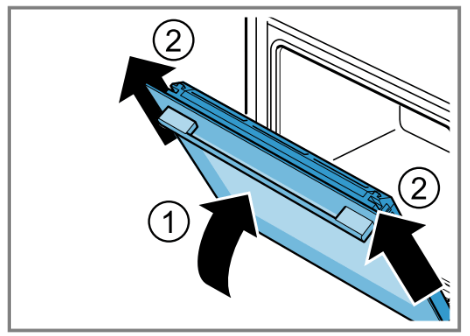
3. Close the appliance door fully 1 . Grab hold of the appliance door with both hands (on the left and right) and pull it upwards and out 2.
4. Carefully place the appliance door on a level sur- face.
Attaching the lower appliance door
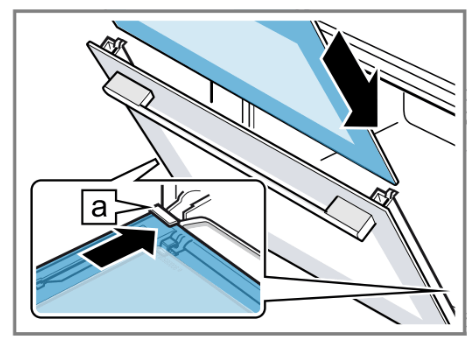
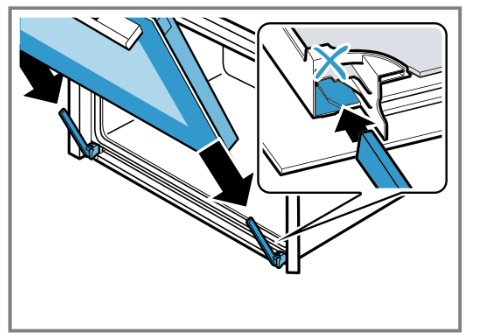
1. Slide the appliance door straight onto the two hinges 1. Slide the appliance door on as far as it will go.
2.Open the appliance door fully.
3. Close the locking levers on the left- and right-hand hinges 2.
The locking levers are closed. The appliance door is secured and cannot be detached.
4. Close the appliance door.
Removing the door panes from the lower the appliance door
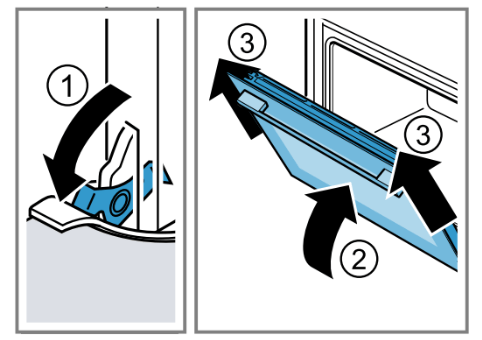
1. Open the appliance door fully.
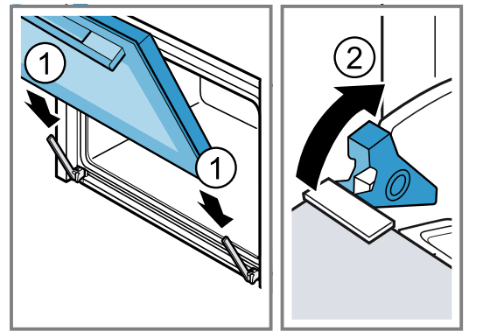
2. Open the locking levers on the left- and right-hand hinges 1.
The locking levers are open. The hinges are now se- cured and cannot snap shut.
3. Close the appliance door fully 2.
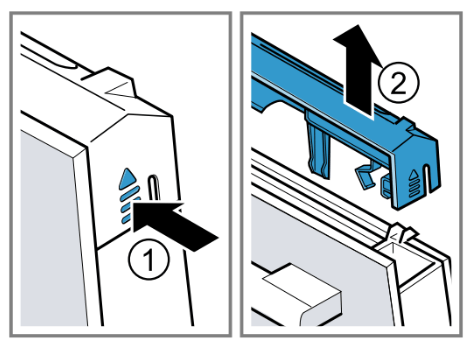
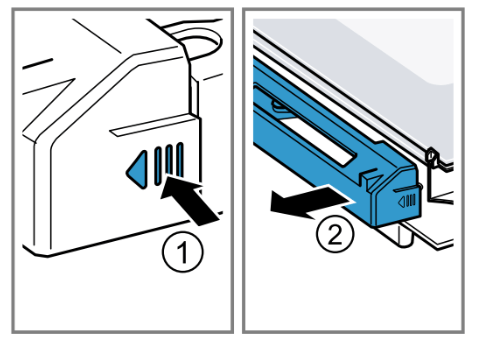
4. Push on the left- and right-hand side of the door cover from the outside 1 until it is released.
5. Remove the door cover 2.
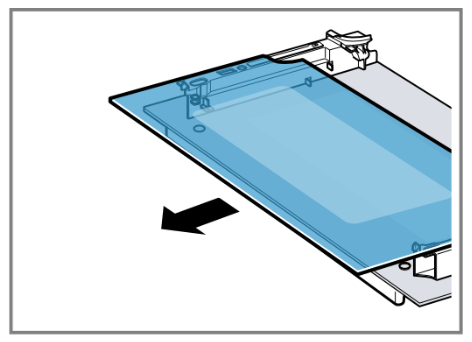
6. Lift out the inner pane and set it down carefully on a flat surface.
7.If necessary, you can remove the condensate trough for cleaning.
Open the appliance door.
Tilt the condensate trough upwards and remove it.
8. Clean the removed door panes on both sides with glass cleaner and a soft cloth.
9. Clean the condensate trough with a cloth and hot soapy water.
10. Clean the appliance door.→ "Suitable cleaning agents", Page 13
11. Dry the door panes and refit them.→ "Installing the door panes for the lower the appli- ance door ", Page 18
Installing the door panes for the lower the appliance door
1. Open the appliance door fully.
2. Place the condensate trough vertically in the re- tainer and turn it downwards.
3. Slide the inner pane into the left- and right-hand retainers .
4. Push the inner pane upwards until it is in the left- and right-hand retainers .
5. Put the door cover in position 1 and push down on it until you hear it click into place.
6. Open the appliance door fully.
7. Close the locking levers on the left- and right-hand hinges 2.
The locking levers are closed. The appliance door is secured and cannot be detached.
8. Close the appliance door.
Detaching the upper appliance door
1. Open the appliance door fully.
2. Open the locking levers on the left- and right-hand hinges.
The locking levers are open. The hinges are now se- cured and cannot snap shut.
3. Close the appliance door fully 1. Grab hold of the appliance door with both hands (on the left and right) and pull it upwards and out 2.
4. Carefully place the appliance door on a level sur- face.
Attaching the upper appliance door
1. Slide the appliance door straight onto the two hinges. Slide the appliance door on as far as it will go.
2. Open the appliance door fully.
3. Close the locking levers on the left- and right-hand hinges.
The locking levers are closed. The appliance door is secured and cannot be detached.
4. Close the appliance door.
Removing the door panes from the upper the appliance door
1. Open the appliance door fully.
2. Open the locking levers on the left- and right-hand hinges 1.
The locking levers are open. The hinges are now se- cured and cannot snap shut.
3. Close the appliance door fully 2. Grab hold of the appliance door with both hands (on the left and right) and pull it upwards and out 3.
4. Carefully place the appliance door on a level sur- face.
5. Push on the left- and right-hand side of the door cover from the outside 1 until it is released.
6. Remove the door cover 2.
7. Lift out the inner pane and set it down carefully on a flat surface.
8. Clean the removed door panes on both sides with glass cleaner and a soft cloth.
9. Clean the appliance door.→ "Suitable cleaning agents", Page 13
10. Dry the door panes and refit them.→ "Installing the door panes for the upper the appli- ance door ", Page 20
Installing the door panes for the upper the appliance door
1. Slide the inner pane in. In doing so, ensure that the inner pane is in the retainer .
2. Push the inner pane upwards until it is in the left- and right-hand retainers .
3. Put the door cover in position and push down on it until you hear it click into place.
4. Slide the appliance door straight onto the two hinges. Slide the appliance door on as far as it will go. When doing so, ensure that the hinges are in- serted into the correct opening.
5. Close the locking levers on the left- and right-hand hinges.
The locking levers are closed. The appliance door is secured and cannot be detached.
6. Close the appliance door.
Troubleshooting
You can rectify minor faults on your appliance yourself.
Read the troubleshooting information before contacting after-sales service. This will avoid unnecessary costs.
Malfunctions
Fault
Cause and troubleshooting
The appliance is not working.
The circuit breaker is faulty.
Check the circuit breaker in the fuse box.
There has been a power cut.
Check whether the lighting in your kitchen or other appliances are working.
The appliance does not switch off fully at the end of a cooking time.
At the end of a cooking time, the appliance stops heating up. The oven light and cooling fan do not switch off. For types of heating with recirculation, the fan con- tinues to run in the back wall of the cooking compartment.
Turn the function selector to the off position.
The appliance is switched off.
The oven light and the fan in the back wall are switched off.
The cooling fan switches off automatically as soon as the appliance has cooled down.
The time flashes in the display.
There has been a power cut.
Reset the time.
→ "Setting the time on the clock", Page 12
lights up in the display and no settings can be made on the appliance.
Childproof lock is activated.
Use the button to deactivate the childproof lock.
→ "Childproof lock", Page 13
A message with appears in the display, e.g.
Electronics fault
1. Press the button.
If required, reset the time.
If the fault was a one-off, the error message disappears.
2. If the error message appears again, call the after-sales service. Quote the ex- act error message and the E no. of your appliance.
→ "Customer Service", Page 23
Replacing the oven light bulb
If the light in the cooking compartment fails, change the oven light bulb.
1. Place a tea towel in the cooking compartment to prevent damage.
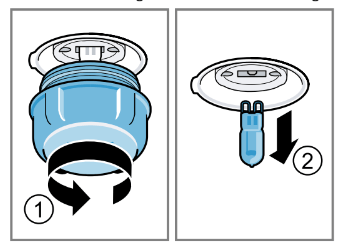
2. Turn the glass cover anti-clockwise to remove it 1.
3. Pull out the halogen bulb without turning it 2.
4. Insert the new halogen lamp and press it firmly into the socket. Make sure the pins are positioned correctly.
5. Depending on the appliance model, the glass cover may have a sealing ring. Put the sealing ring in posi- tion.
6. Screw the glass cover on.
7. Take the tea towel out of the cooking compartment.
#1 I previously asked question re cleaning above the grilling element. Can you advise me how to clean this successfully as the burnt-on fat from the grill is getting worse. Overall pleased with oven, but cleaning is a nightmare.
This would involve removing the full grill element to clean the roof. We would advise to clean around this area where possible.
#2 What is the difference between the MHA133BR0B and the MHS133BR0B to justify the massive price difference?
MHS133BR0B has the slim size universal pan whereas model MHA133BR0B does not.
#3 I have just started using this oven. When you have something to cook that says 180/350 degrees, which one do you use.? Is this a fan oven, as I didn't order it myslf?
The main oven on this appliance is a fan oven. We are in the UK so we use Degree Celsius (°C) and our machines work with Degree Celsius as the temperature options. The 350 that you're seeing would be degrees Fahrenheit.

 .
. until it offers resistance. You cannot turn it any further than this.
 only lights up when you change the time.
 , timer
  , cooking time
  and the end time


 also lights up in the display. This symbol goes out when heating is paused.
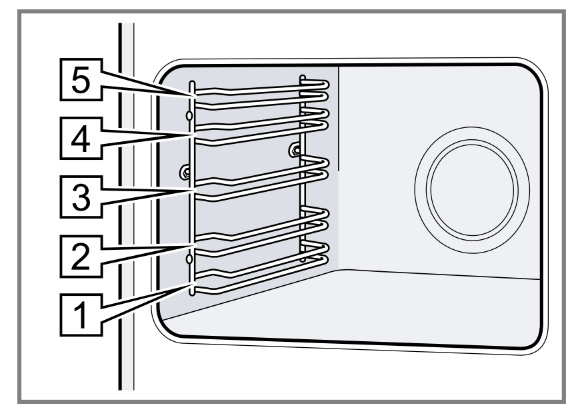


 is at the rear and is facing downwards.
 button .
 The time that is set appears on the display.
 is highlighted in the display.
 is highlighted on the display.
 button repeatedly until
  is highlighted in the display.
 button repeatedly until
  is highlighted in the display.
 is highlighted on the display.
 button.
 button until the clock flashes on the display.
 appears in the display.
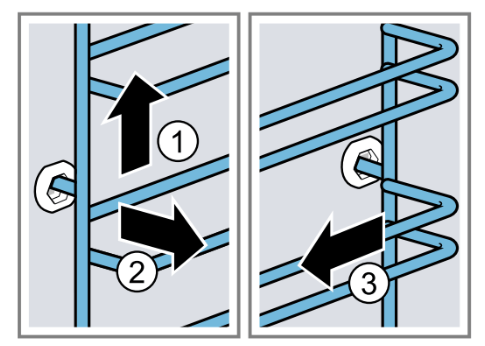

 ", Page 18
 and turn it downwards.
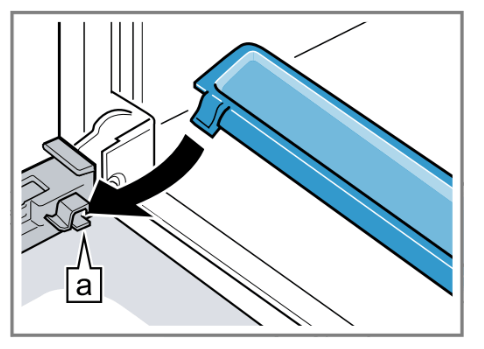


 lights up in the display and no settings can be made on the appliance.
 appears in the display, e.g.