Loading ...
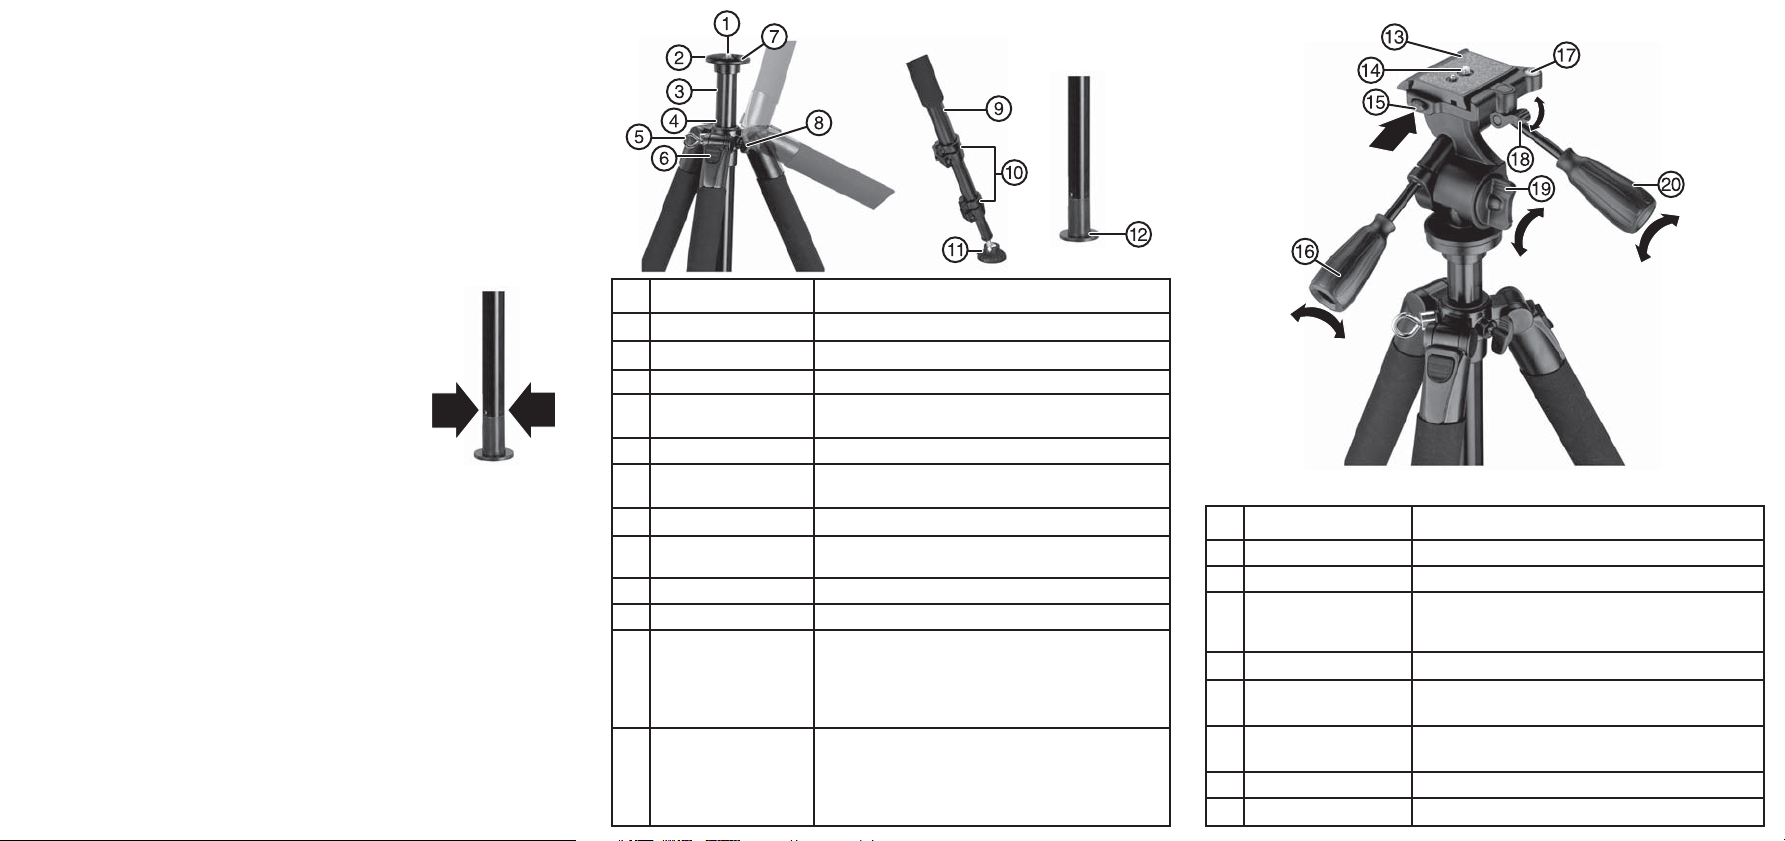
7 Insert the mounting plate into the tripod head and lock it into place
by pressing up on the quick-release clamp knob.
8 Make final adjustments with the two angle adjustment knobs.
To adjust the tripod leg spread:
• Press down on the variable leg angle release on each leg to open
the leg to the next preset angle (three available). Each leg can be
adjusted over 90°.
To capture images from a low angle:
1 Remove the tripod head from the tripod by unscrewing it from the
head mounting plate.
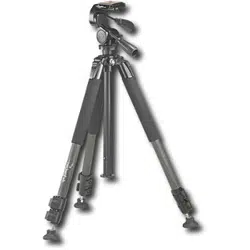
2 Remove the bottom end of the center column by
pressing the two small buttons on the sides of the
column while pulling the end cap away from
the column.
3 Remove the center column from the tripod body
by pulling it up and out of the tripod.
4 Insert the 3/8" (9.5 mm) center column end cap
into the tripod body and secure it by tightening
the center column locking knob.
5 Remount the tripod head to the head mounting plate.
6 Mount your device to the tripod head.
7 Spread the tripod legs to lower your device to the desired height.
# Component Description
1 3/8" screw Thread into the bottom of the tripod head.
2 Head mounting plate Mount the tripod head on this plate.
3 Center column Adjustable column provides quick height adjustments.
4 Leveling bubble Lets you level the tripod platform. The tripod platform
is level when the bubble is within the circle.
5 Metal ring Use as a hook when attached.
6 Variable leg angle Push downward to adjust the tripod legs to one of
release three preset angles.
7 Tightening screw Use to secure the tripod head to the base.
8 Center column Locks the center column in place.
locking knob
9 Leg Supports your tripod and device.
10 Flip-lever leg locks Lift to adjust leg height, then close to lock.
11 Retractable spike Use the spike feet to prevent slipping on soft surfaces,
rubber feet and use the rubber feet to prevent slipping on
smooth or hard surfaces. Turning the rubber feet
clockwise extends the retractable spike, and turning
the rubber feet counter-clockwise retracts the spike.
12 Center column end cap Can be removed and mounted as the center column for
low-angle photography. Two end caps are included with
your tripod. One has a 1/4" (6.4 mm) screw for attaching
your device directly to the end cap, and the other has a
3/8" (9.5 mm) screw for attaching the included tripod head.
# Component Description
13 Mounting plate Mount your device to this plate.
14 1/4" screw Tighten to secure your device to the mounting plate.
15 Safety lock pin Prevents the mounting plate from accidentally
falling out when the quick release clamp knob
is released.
16 Angle adjustment knob Controls the tripod head’s vertical angle movement.
17 Leveling bubble Lets you level the tripod head. The tripod head
is level when the bubble is within the circle.
18 Quick-release Press down to unlock the mounting plate and
clamp knob up to lock the mounting plate.
19 Pan locking knob Locks the horizontal movement of the head.
20 Angle adjustment knob Controls the tripod head’s horizontal angle movement.