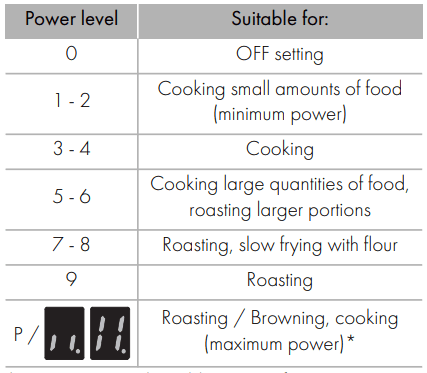
* power levels are approximate and may vary according to the pan used or the settings made.
Advantages of induction cooking
• Energy saving thanks to the direct transmission of energy to the pan (suitable magnetizable cookware is required) compared to traditional electric cooking.
• Improved safety as the energy is only transmitted to the pan placed on the hob.
• High level of energy transmitted from the induction cooking zone to the base of the pan.
• Rapid heating speed.
• Reduced danger of burns as the cooking surface is only heated under the base of the pan; foods that overflow do not stick.
Power control
The hob is fitted with a power control module that optimizes/limits consumption. If the overall set power level exceeds the maximum limit permitted, the electronic circuit board will automatically manage the power supplied by the hot plates. The module tries to maintain the maximum deliverable power levels. Levels set by the automatic control will appear on the display.
Use
Preliminary operations
In order to remove any moisture that could have accumulated during the manufacturing process and for the electronic circuits and control keypad to work properly:
1. Remove the protective films from the external surfaces of the appliance and accessories.
2. Remove any labels (apart from the technical data plate).
Using the hob
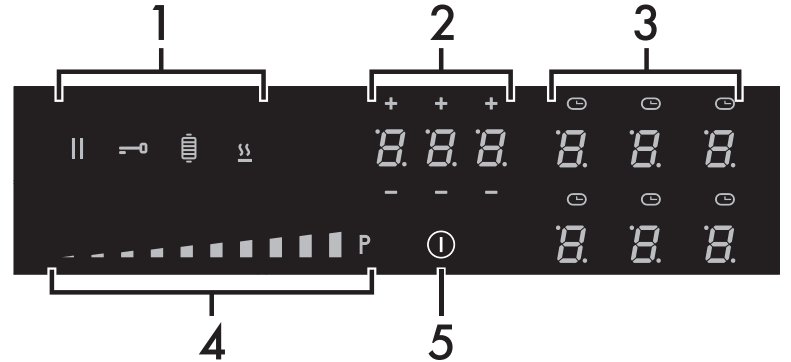
All the appliance’s control and monitoring devices are located together on the front panel. The induction hob is controlled by means of the Touch control sensor buttons. Lightly touch a symbol on the glass ceramic surface. A beep will sound to confirm every effective touch.
Switching on the hob for the first time
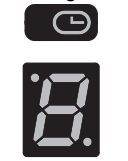
When the appliance is used for the first time, after having been connected to the mains the flashing symbol appears on the display. It is used to access the appliance’s technical menu and is intended only for Technical Support personnel.
List of symbols
On/Off button: turns the hob on or off.
Pause button: pauses cooking.
Controls lock button: prevents accidental operation of controls.
Grill function button: activates the Grill function
Warming function button: activates the keep warm function.
Scroll bar: increases or decreases the power level of a cooking zone.
Cooking zones setting area
The buttons for selecting the cooking zones and the timer icons above each of them are located in this zone.
Timer setting area
The controls for setting the independent timer and the timer for the cooking zones are located in this area.
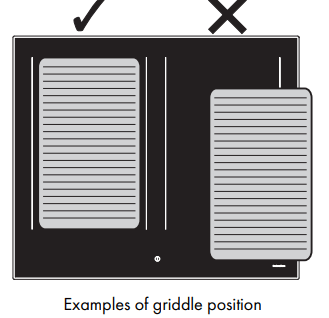
Minimum cookware diameter
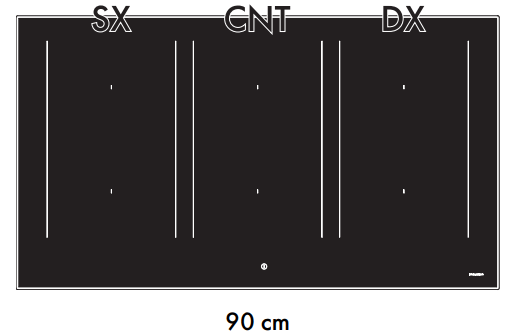
Make sure that the minimum diameter of the pans are those indicated in the following table, for both configurations.
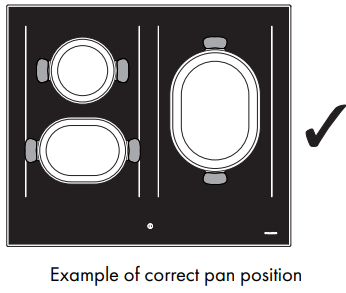
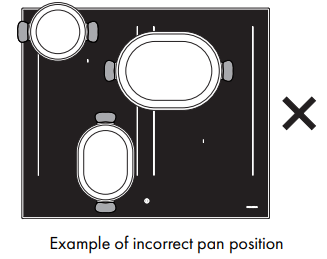
Bear in mind the following:
• Do not allow the pans to extend beyond the vertical lines.
• Do not cover the control panel.
• Do not place the pans next to the edges of the glass.
• If you use a griddle, it must be a maximum of 36 x 24 cm and must anyway not be larger than the zones marked on the hob (see “Maximum power consumption table”)
Cookware suitable for use in induction cooking
Cookware used on the induction cooking surface must be made of metal, with magnetic properties and a sufficiently large base.
Suitable cookware:
• Enamelled steel cookware with thick bases.
• Cast iron cookware with an enameled base.
• Cookware in multilayer stainless steel, ferritic stainless steel, and aluminum with a special base.
To see whether the pan is suitable, bring a magnet close to the bottom: if it is attracted, the pan is suitable for induction cooking. If you do not have a magnet, you can put a small amount of water in the pan, place it on a cooking zone and start the hot plate. If the symbol appears on the display, it means the pan is not suitable.
Limiting the cooking duration
The hob has an automatic device that limits the duration of use.
If the cooking zone settings are not changed, the maximum duration of operation for each zone depends on the power level selected.
When the device for limiting the duration of use is activated, the cooking zone turns off, a short alert sounds and, if the zone is hot, the symbol appears on the display
Protection from overheating
If the hob is used on full power for a long period, the electronics will have trouble cooling down if the room temperature is high.
If the temperature of the internal electronic components exceeds the safety threshold, the appliance will switch off automatically and “ER21” will be displayed (see “Error codes”).
Advice on energy-saving
• The diameter of the base of the pan must not exceed the width of the silk-screened cooking zone.
• Pans must not be placed outside the perimeter of the hob or above the front control panel.
• When buying a pan, check whether the diameter indicated is that of the base or the top of the pan, as the top is almost always larger than the base.
• When preparing dishes with long cooking times, you can save time and energy by using a pressure cooker, which also helps to retain vitamins contained in the food.
• Make sure that the pressure cooker contains enough liquid as, if there is not enough and it overheats, this may cause damage to both the pressure cooker and the cooking zone.
• If possible, always cover pans with a suitable lid.
• Choose a pan suitable for the quantity of food to be cooked. A large, half-empty saucepan leads to a waste of energy.
Power levels
The power in the cooking zone can be adjusted to various levels. The table shows the levels suitable for various types of cooking
* see Booster and Double Booster function
Switching the hob on and off
Keep the On/Off button pressed in for at least 1 second to activate the hob. Press it again for at least one second to deactivate it.
Switching on the cooking zone automatically
After switching on the hob:
• Position a pan (suitable for induction cooking and not empty) on the cooking zone you wish to use.
• The button corresponding to the zone on which the container has been placed turns on automatically and displays . The first segment of the scroll bar will light up.
• Select the cooking zone by pressing the corresponding button (see “Cooking zones setting area”).
• Once a zone has been selected, a dot appears in the lower right corner of the digit field: the power level shown is .
Adjusting the cooking zone
After selecting a cooking zone:
1. Place a finger on the left-hand side of the scroll bar of the cooking zone to be used.
The power level is now
2. Move your finger to the left or right on the scroll bar to select the power level, from to or activate the Booster function (see “Booster Function”)
The display of the zone being used will indicate the selected power level.
Switching off the cooking zone
1. Move your finger all the way to the left on the scroll bar of the cooking zone you wish to turn off.
The display of the zone being used indicates
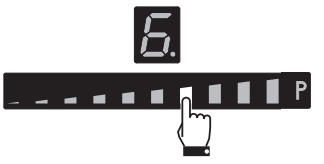
Quick selection
After switching on the hob and having selected a cooking zone:
1. Place a finger on the scroll bar at approximately the required power level.
2. Move your finger to the left or right to select the required cooking power.
Booster Function
After switching on the hob and having selected a cooking zone:
1. Place a finger on the left-hand side of the scroll bar.
The display of the cooking zone used will turn on: the power value indicated is
2. Move your finger all the way to the right of the scroll bar to select the Booster function.
The display of the cooking zone used will show
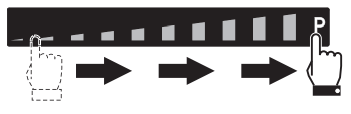
The Booster function can be activated quickly.
• After switching on the hob, place your finger at the far right of the scroll bar of the cooking zone you wish to use.
Double Booster Function
The Double Booster function allows more power to be supplied compared to the Booster function.
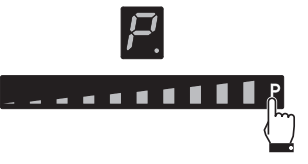
After having activated the Booster function for a cooking zone, press “P” at the far right of the scroll bar. The symbols , and will be displayed in sequence.
Multizone function
After switching on the hob:
1. Place a finger simultaneously on the buttons of two cooking zones one above the other.
After a short beep, the symbol will appear next to the button of the rear zone. The Multizone function is now active.
2. Use the left-hand scroll bar to set the required cooking power.
The same parameters are set on both cooking zones.
If a large, oval or oblong pan is being used, make sure that it is placed in the center of the cooking zone.
To deactivate the Multizone function:
Simultaneously press the buttons of the cooking zones on which the Multizone function is active. The symbol disappears and the two zones can be regulated separately.
Cooking guidelines
The table below shows the power values which can be set, together with the corresponding type of food. Settings may vary depending on the amount of food and consumer taste.
Residual heat
If the cooking zone is still hot after being switched off, the symbol will be displayed on the display. The symbol clears once the temperature drops below 60 °C.
Special functions
Warming Function
To activate the Warming function, first turn on the hob, then:
1. Select a cooking zone.
2. Press the button to activate the function. The symbol appears on the display of the selected cooking zone.
To deactivate the Warming function:
1. Select the cooking zone on which the function is active.
2. Press the button
Pause function
To activate the Pause function:
1. Switch on at least one cooking zone.
2. Hold down the pause button appears on the displays of all the cooking zones.
To deactivate the Pause function:
1. Hold down the button . The pause symbol, which has just been pressed, starts to flash.
2. Press any button apart from the Pause button
3. The pause function has now been deactivated and the previously set functions are restored.
Grill Function
To activate the Grill function:
1. Place a griddle or a long pan on the left zones.
2. Press the button. The symbol appears on the front zone display and the symbol appears on the rear zone display. The scroll bar will be set automatically to level 8 (preheating stage).
After two minutes of operation, the power will be reduced to level 6.
Press the button and use the scroll bar to modify the power level at any time.
Controls lock
This is useful when cleaning the appliance and to prevent functions being activated by mistake.
To activate the control lock:
• Press the button for at least one second.
All the buttons, apart from the and buttons, are locked. To deactivate the control lock:
• press the button again for at least one second.
Additional functions
Rapid heating
The rapid heating function heats one cooking zone at maximum power for a limited time, after which it continues cooking at the set power level.
After selecting a cooking zone:
• Press and hold a power level (from 1 to 8) for at least 3 seconds.
• appears on the display of the cooking zone.
• After the heating time has elapsed, the cooking zone reverts to the previously selected power level.
This function can be deactivated by pressing and holding the set power level for at least 3 seconds, or by selecting a lower power level.
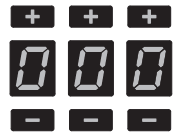
Timer
After having switched on the hob, without having selected a cooking zone:
1. Touch the inside of the timer setting area.
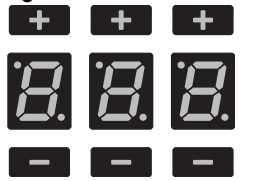
2. Use the + and - buttons to select the required time.
• The first digit on the left is used to select the hours, the middle one to set the tens of minutes and the one on the right the minutes.
3. After 10 seconds, the timer will start the countdown.
4. When the time elapses, a series of beeps will sound. Press any button to deactivate them
Modifying or deactivating the timer
To modify or deactivate the timer during the countdown:
1. Press the On/Off button to activate the hob (if it is in stand-by).
• The timer setting area will indicate the minutes that were set.
2. Use the + and - buttons to modify or reset the timer.
3. After 10 seconds, the timer will start the new countdown or will be deactivated.
Timed cooking
The timed cooking function can be activated when at least one cooking zone is switched on:
1. Select a power level.
2. Touch the inside of the timer setting area.
• The flashing symbol will appear above the cooking zone display.
3. Use the + and - buttons to select the required time.
4. Timed cooking will start a few seconds after the last selection. At the end of the set time, a buzzer tells the user that the Minute minder has finished.
5. Press any button to deactivate the buzzer.
Modifying or deactivating timed cooking
To modify timed cooking during the countdown:
1. Press the On/Off button to activate the hob (if it is in stand-by).
2. Press the display button of the timed cooking zone.
• The timer setting area will indicate the minutes that were set.
3. Use the + and - buttons to modify or reset the timer.
4. After 10 seconds, the timer will start the new countdown or will be deactivated.
If the appliance is switched off unintentionally, carry out the following procedure within 6 seconds:
1. Switch on the appliance.
• The button starts to flash.
2. Press the pause button immediately to restore the functions that were previously active.
User menu
The user menu is used to modify the operating characteristics of the appliance. 7 options in the user menu can be modified. Each option is indicated on the display with the letter “U”, which alternates with a progressive number.
User menu options table
Accessing the user menu
1. If the hob is off, switch it on using the On/Off button .
2. Press again within 3 seconds to switch it off; the button starts to flash.
3. Press and hold .
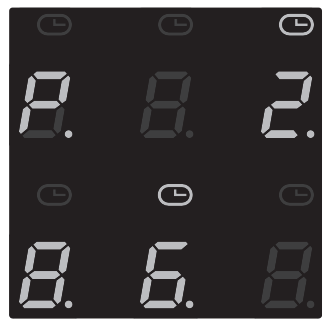
4. Keeping pressed, in the cooking zone setting area symbols will appear to be pressed in sequence to access the menu options.
Press all the buttons of the cooking zones in sequence in a clockwise direction starting from the front left. Every effective touch will be confirmed by a beep.
5. Release the button. The user menu is active and the symbol alternating with the number will appear at the top of the cooking zones display.
6. Press the symbol to go back to selecting the options. The scroll bar appears, in which each segment is associated with a menu option.
7. Press the segments of the scroll bar (except the first two) to select the available options.
Option U2 modifies the volume of the button sounds; 4 sound levels can be selected using the scroll bar.
• 0: minimum volume.
• 3: maximum volume.
Option U3 modifies the volume of the signals (for example the sound of the alarm when the timer has finished). 4 levels can be selected.
• 0: minimum volume.
• 3: maximum volume.
Option U4 modifies the brightness of the display. 10 levels can be selected.
• 0: maximum brightness.
• 9: minimum brightness.
Option U5 allows you to display the countdown of the minute minder timer and timed cooking in seconds, from 59 to 0 seconds
• 0: animation off.
• 1: animation on.
Option U6 allows you to activate or deactivate the automatic pan detection function. (see “Switching on the cooking zone automatically”).
• 0: automatic detection off.
• 1: automatic detection on.
Option U7 specifies the length of the alarm when the timer has finished. 3 levels can be selected:
• 0: alarm duration 120 seconds.
• 1: alarm duration 10 seconds.
• 2: alarm disabled.
Exiting the user menu
There are two ways to exit from the user menu:
1. Press the button. Any modifications will be discarded and the hob will be switched off.
Or
2. Press and hold the On/Off button for at least 2 seconds. The modifications will be saved and the hob will be switched off.
Error codes
If the appliance malfunctions or operates incorrectly, the associated error code appears on the cooking zones display. The error codes always begin with “E..” or “Er..”, followed by a number.
The following error codes can be corrected without having to contact the Technical Support Service.
• Er03: Remove any materials or pans from the area of the front control panel.
• E2: Make sure that the pans are suitable for induction cooking and that they are not empty; allow the appliance to cool down.
For all other errors, make a note of the code, if possible, and contact Technical Support.
Cleaning and maintenance
Cleaning the surfaces
To keep the surfaces in good condition, they should be cleaned regularly after use. Let them cool first.
Ordinary weekly cleaning
Clean and maintain the hob once a week using an ordinary glass cleaning product. Always follow the manufacturer’s instructions. The silicon in these products creates a protective, water-repellent membrane which also resists dirt. All marks stay on the membrane and can therefore be removed easily. After cleaning, dry the surface with a clean cloth. Make sure that there is no detergent left on the cooking surface as it will undergo a corrosive reaction when heated up and could modify the structure of the cooking surface.
Food stains or residues
Light coloured marks from pans with aluminium bases can be easily cleaned off with a cloth moistened in vinegar. Remove any burnt-on residues after cooking; then rinse with water and dry thoroughly with a clean cloth. Dirt which may have fallen on the hob while cleaning lettuce or potatoes can scratch the hob when moving pans. Consequently, remove any dirt from the cooking surface immediately
Changes in colour do not affect the operation and stability of the glass. These are not alterations to the material of the hob but just residues which have not been removed and have then carbonised.
Shiny surfaces can form due to the bases of pans, especially aluminium ones, rubbing on the surface, and due to the use of unsuitable detergents. They are difficult to remove using conventional cleaning products. It may be necessary to repeat the cleaning process several times. Use of corrosive detergents or rubbing of pan bases can wear away the decoration on the hob over time and contribute to the formation of stains.
What to do if...
The hob does not work:
• Make sure that the hob is connected and that the main switch is turned on.
• Make sure that there is no power failure.
• Make sure that the fuse has not blown. In this case replace the fuse.
• Make sure that the circuit breaker of the residential electrical system has not tripped. In this case, reset the circuit breaker.
The cooking results are unsatisfactory:
• Make sure that the cooking temperature is not too high or too low.
The hob smokes:
• Let the hob cool down and clean it once cooking is complete.
• Make sure that the food has not spilled out of the pan and use a larger cooking vessel, if needed.
The fuses blow or the circuit breaker of the residential electrical system trips repeatedly.
• Call Technical Support or an electrician.
There are cracks or fissures in the hob:
• Turn off the appliance immediately, disconnect the power supply and contact Technical Support.

 symbol appears on the display. It is used to access the appliance’s technical menu and is intended only for Technical Support personnel.
 On/Off button: turns the hob on or off.
 Pause button: pauses cooking.
 Controls lock button: prevents accidental operation of controls.
 Grill function button: activates the Grill function
 Warming function button: activates the keep warm function.

 symbol appears on the display, it means the pan is not suitable.
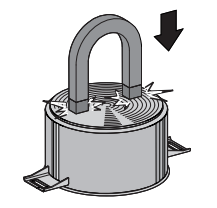
 symbol appears on the display
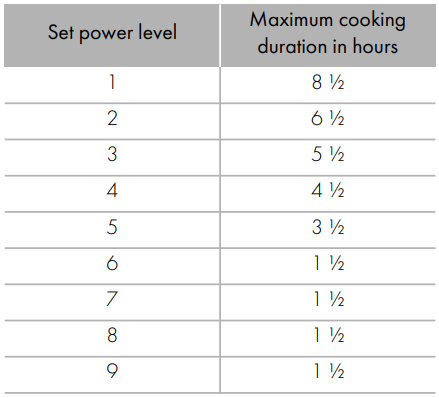
 pressed in for at least 1 second to activate the hob. Press it again for at least one second to deactivate it.
 . The first segment of the scroll bar will light up.

 to
to  or activate the Booster function (see “Booster Function”)


 ,
, and
and  will be displayed in sequence.
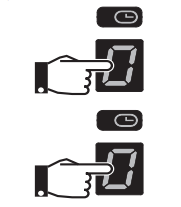
 symbol will appear next to the button of the rear zone. The Multizone function is now active.
 symbol disappears and the two zones can be regulated separately.
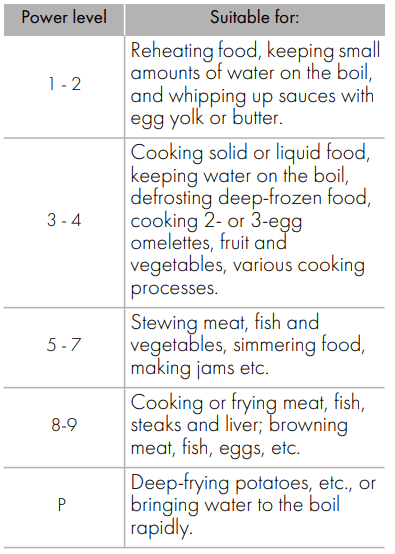
 symbol clears once the temperature drops below 60 °C.
 button to activate the function. The
  symbol appears on the display of the selected cooking zone.
 appears on the displays of all the cooking zones.
 . The pause symbol, which has just been pressed, starts to flash.
 button. The
 symbol appears on the front zone display and the
  symbol appears on the rear zone display. The scroll bar will be set automatically to level 8 (preheating stage).
 button for at least one second.
 and
and appears on the display of the cooking zone.
 to activate the hob (if it is in stand-by).
 symbol will appear above the cooking zone display.
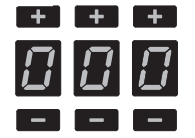
 button starts to flash.
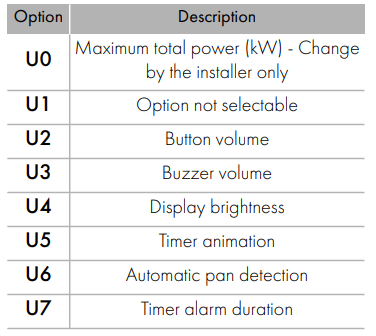
 .
. button starts to flash.
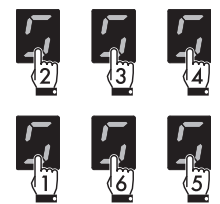
 symbol alternating with the number
  will appear at the top of the cooking zones display.
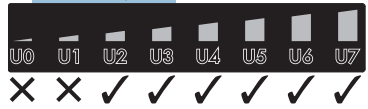
 button. Any modifications will be discarded and the hob will be switched off.
 button for at least 2 seconds. The modifications will be saved and the hob will be switched off.