www.lg.com
MFL69121501 (1.0)
USER GUIDE
ENGLISH
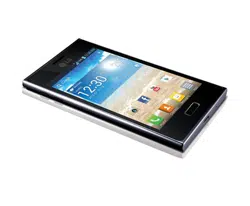
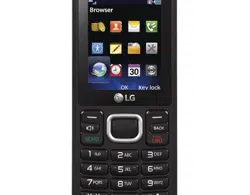
LG 329G
BC
www.lg.com
Printed in China
GUÍA DEL USUARIO
ESPAÑOL
LG 329G


•
Screen displays and illustrations may differ from those you see on actual phone.
•
Actual displays and the color of the phone may vary.
•
Some of the contents of this guide may not apply to your phone, depending on
the software and your service provider. All information in this document is subject
to change without notice.
•
This handset is not suitable for people who have a visual impairment due to the
touch screen keyboard.
•
Copyright
©
2015 LG Electronics, Inc. All rights reserved. LG and the LG logo are
registered trademarks of LG Group and its related entities.
All other trademarks are the property of their respective owners.
User Guide
ENGLISH

2
Phone Overview ................................... 5
Getting Started ..................................... 7
Removing the Battery ........................ 7
Installing the Battery ......................... 8
Charging the Battery ......................... 9
On-Screen Icons .............................. 10
General Functions .............................. 11
Before you begin ............................. 11
Making a Call ................................... 11
Making a Call with the Send Key ......11
Making International Calls ...............11
Ending a Call ..................................12
Making a Call from the Contacts ......12
Answering a Call .............................. 12
Adjusting the Volume ....................... 13
Slient mode (Quick) .........................13
Signal Strength ...............................13
Entering Text .................................... 13
Changing the Text input mode .........13
123 mode (Numbers mode) .............13
Using the 123 (Numbers) mode .......14
Symbol mode .................................14
ABC mode ......................................14
Using the ABC mode .......................14
In-Call Menu ...................................... 16
During a Call .................................... 16
Making a Second Call .....................16
Swapping Between Two Calls ..........16
Answering an Incoming Call ............16
Rejecting an Incoming Call ..............17
Muting the Microphone ...................17
Using the Speakerphone .................17
Contacts ............................................. 18
Contact list ...................................... 18
New contact .................................... 18
Groups ............................................. 18
Speed dial ........................................ 19
SIM management ............................ 19
Own number .................................... 19
My business card ............................ 19
Messages ........................................... 20
Create message ............................... 20
Inbox ................................................ 23
Drafts ............................................... 24
Outbox ............................................. 24
Message settings ............................ 25
Message alert .................................25
Save to ..........................................25
Signature .......................................25
Contents

3
Text message .................................25
Multimedia message .......................26
Voicemail .......................................26
Recent calls ....................................... 27
Accessibility ....................................... 28
Menu readout .................................28
Multimedia .....................................28
Large text .......................................28
Invert color .....................................28
Mono sound ...................................28
Senior mode ...................................28
TTY ................................................ 28
Hearing aid .....................................28
Voice command ..............................29
Notepad .............................................. 30
My Folder ........................................... 31
Audio ............................................... 31
Pictures ........................................... 31
Video ................................................ 31
Other fi les ........................................ 32
File manager.................................... 32
Tools ................................................... 33
Voice command ............................... 33
Voice command Options ..................34
Calculator ........................................ 35
Tasks ............................................... 35
Stopwatch ....................................... 36
Tip calculator ................................... 36
Unit converter .................................. 37
Voice recorder ................................. 37
Browser .............................................. 38
Launch the Browser ........................ 38
Using the Browser ........................... 38
Menus for the Browser .................... 39
Using the Navigation Keys ............... 39
Alarm clock ........................................ 40
Calendar ............................................. 41
Settings .............................................. 42
Audio & ringtones ............................ 42
Ringtone ........................................42
Message tone .................................42
Alert tone .......................................43
Keypad tone ...................................43
Multimedia .....................................43
Call ................................................43
Phone settings ................................. 43
Languages .....................................43
Set hotkeys ....................................43
Auto key lock .................................44
Airplane mode ................................44
Security..........................................44
Reset settings .................................45

4
Display ............................................. 45
Wallpapers .....................................45
Fonts .............................................45
Clocks & calendar ...........................46
Brightness ...................................... 46
Backlight timer ...............................46
Menu styles ....................................46
Call................................................... 46
Send my number ............................46
Answer mode .................................46
Senior mode ...................................47
Connection vibration .......................47
Call duration ...................................47
Memory ........................................... 47
Used space ....................................47
Applications ..................................... 48
Messages ......................................48
Browser .........................................48
Phone information ........................... 50
Accessories ........................................ 51
For your safety ................................... 52
5
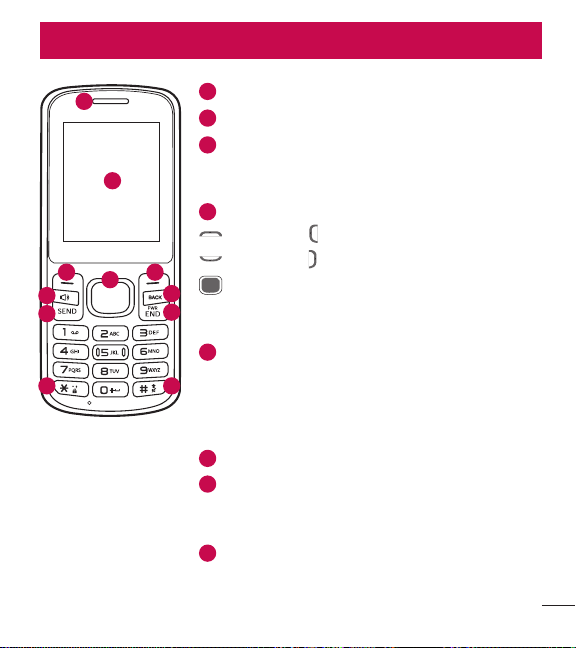
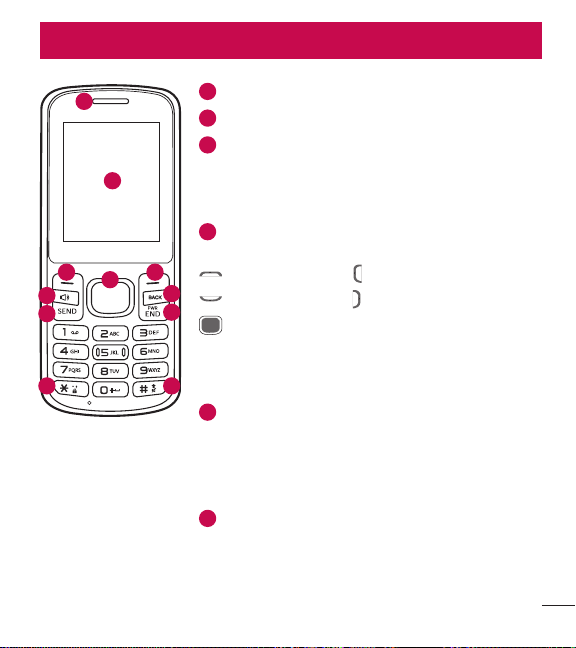
Phone Overview
Phone Overview
1
Earpiece
2
LCD Screen
3
Selection Keys
Each of these keys performs the functions indicated by
the text on the display immediately above them.
4
Navigation Keys Home screen functions
: Accessibility : Alarm clock
: Contact list : Messages
OK Key: Select options and menus.
•
My airtime info : Press and hold while the phone is
in idle mode to view airtime-related information.
5
Speakerphone Key
Toggle speakerphone mode at the standby screen or
during a call.
When speaker turned on from the standby screen,
speakerphone will be turn off after 1 minute of inactivity.
6
Send Key
7
Lock mode Key
Symbols (while entering text)
Key lock (Press and hold while the phone is in idle mode)
8
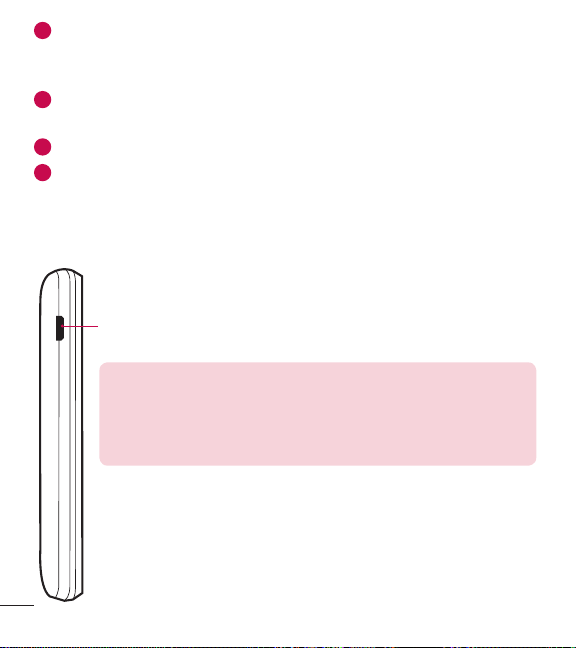
Silent mode Key
Press and hold to activate/deactivate Silent mode.
1
2
3
5
6
7 8
9
10
4
3
6
Phone Overview
9
Power/End Key
10
Back/Voice command Key
Allows you to return to the previous screen.
Press and hold from standby mode to activated the Voice recorder function, and press from
standby mode to activated the Voice command function. You can also use this key to erase
text/numbers you have entered.
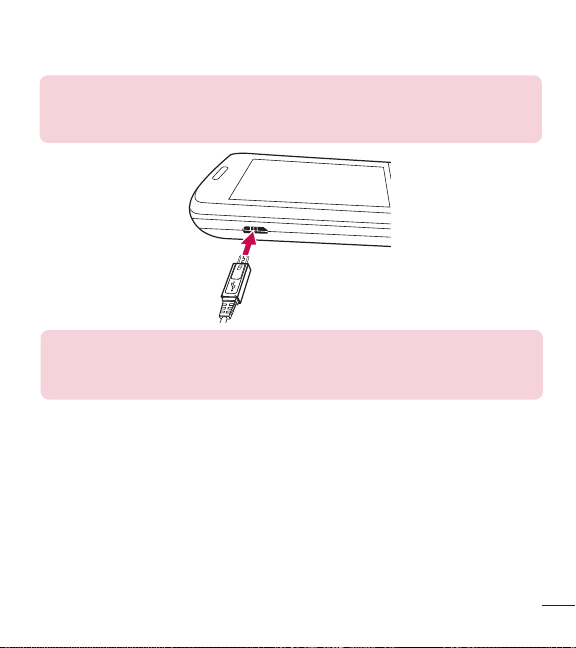
Charger/Accessory Port Connects the phone to the charger or other
compatible accessories.
Charging with PC & USB cable: You can use your computer
to charge your phone. Connect one end of a USB cable to the
Charger/ Accessory Port on your phone and the other end to
a high-power USB port on your PC (commonly located on the
front panel of the computer).
7
Getting Started
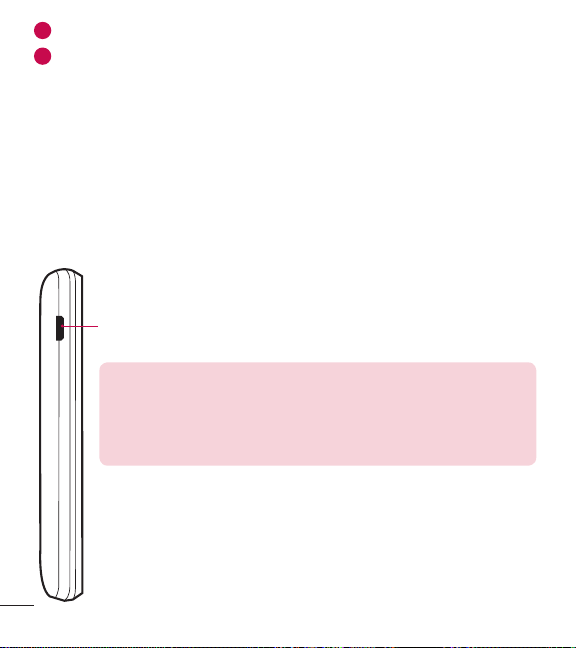
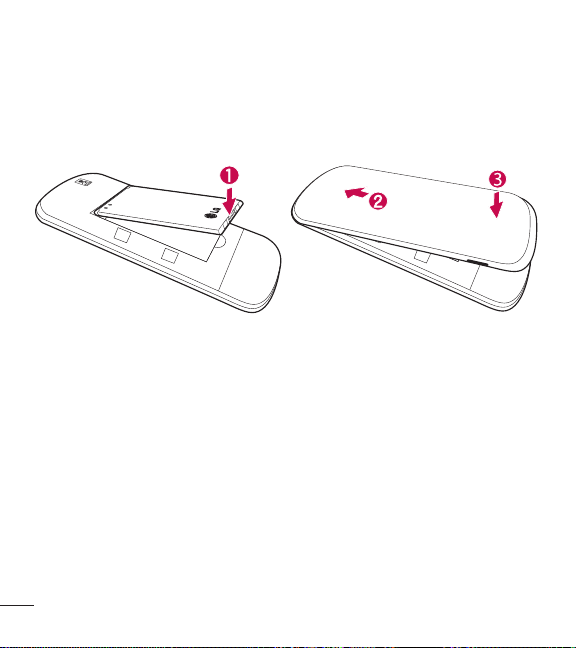
Removing the Battery
1 Turn the phone off.
2 Use the fingernail cutout at the bottom of the back cover to lift and remove the
cover.
3 Use the fingertip opening near the bottom of the battery compartment to lift the
battery out.
Getting Started

8
Getting Started
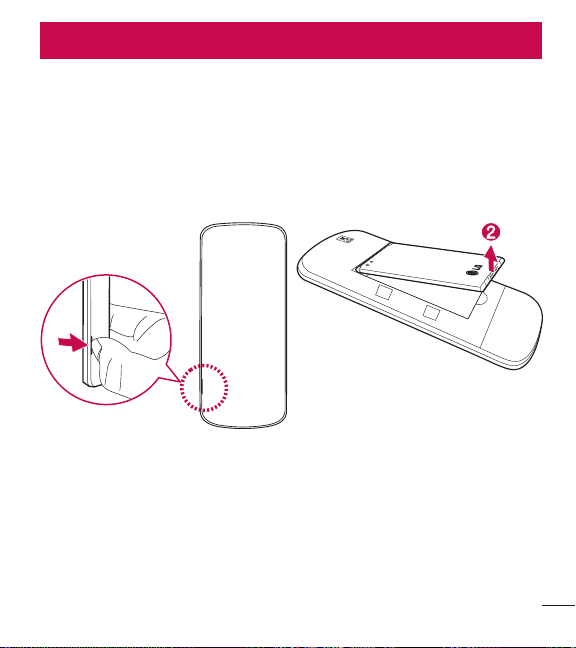
Installing the Battery
1 Use the fingernail cutout at the bottom of the back cover to lift and remove the
cover.
2 Align the battery contacts with the terminals near the top of the battery
compartment and insert the battery into the compartment.
3 Align the back cover and press it downwards until it clicks into place.
9
Getting Started
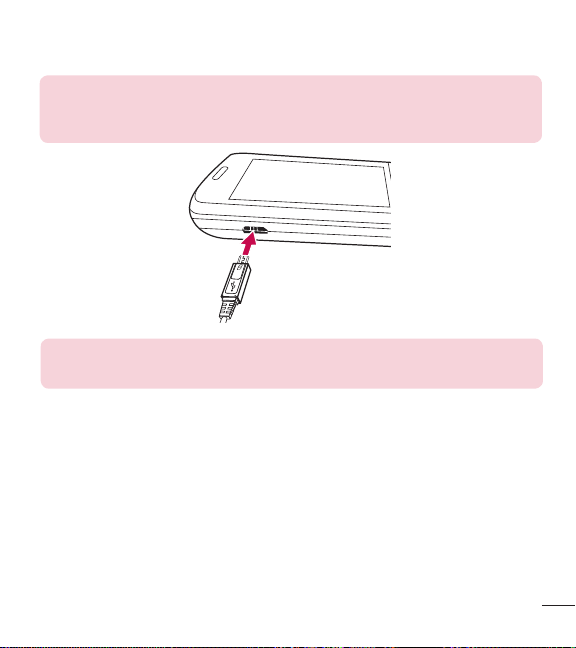
Charging the Battery
Use the charger provided with your phone.
WARNING: Use only the charger provided with the phone. Using any
charger other than the one included with the phone may damage your
phone or battery.
NOTICE: Please make sure that the 'B' side faces up before inserting a
charger or USB cable into the Charger/Accessory Port of your phone.
Plug one end of the charging adapter into the phone’s Charger/Accessory Port and
the other end into an electrical outlet.
The charge time varies depending upon the battery level.
10
Getting Started
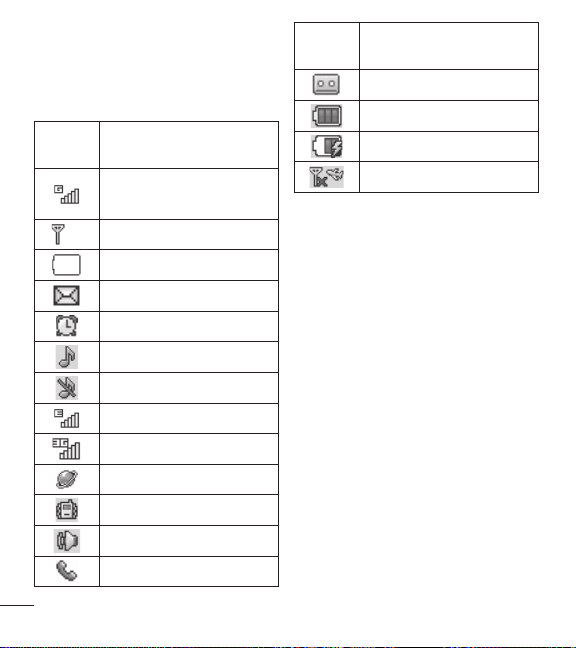
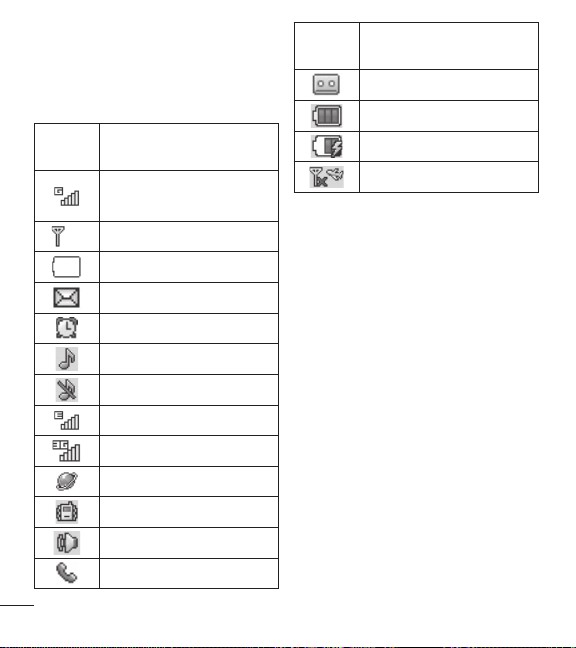
On-Screen Icons
The table below describes various
display indicators or icons that appear
on the phone’s display screen.
ICON/
INDICATOR
DESCRIPTION
Network signal strength
(number of bars will vary)
No network signal
Low battery
New text message
An alarm is set
Ring profile in use
Silent all profile in use
EDGE network available
3G network available
The browser is active
Vibrating mode on
Speakerphone
Call in progress
ICON/
INDICATOR
DESCRIPTION
Voicemail
Battery full
Battery charging
Airplane mode on
11
General Functions
Before you begin
Remember that you can select the menu icons from the Menu screen using the
number keys if you set the Menu Styles option as List. If you set the Menu Styles
option as Icon, you can only use the Navigation Keys to select the menu icons.
Making a Call
1 Make sure your phone is powered on.
2 Enter a phone number including the area code. To edit a number on the display
screen, simply press the Clear/Back Key
to erase one digit at a time.
•
Press and hold the Clear/Back Key to erase the entire number.
3 Press the Send Key to call the number.
4 To end the call, press the End/Power Key .
Making a Call with the Send Key
1 Press the Send Key to display the most recent missed, dialed and received
calls will be displayed.
2 Highlight the desired number by using the Navigation Keys.
3 Press the Send Key .
Making International Calls
1 Press and hold the key and the international access character ‘+’ will
appear.
2 Enter the country code, area code, and the phone number.
3 Press the Send Key to call the number.
General Functions
12
General Functions
Ending a Call
To end a call, press the End/Power Key .
Making a Call from the Contacts
You can store frequently called names and phone numbers in the SIM card as well
as in your Contacts list.
You can dial a number by simply highlighting a name in the Contacts list and
pressing the Send Key
.
1 Press the Down Navigation Key to access the Contact list.
2 Highlight the Contact and press the Send Key .
Answering a Call
When you receive a call, the phone displays a notification on the screen and rings
and/or vibrates. If the caller can be identified, the caller’s phone number (or name, if
stored in your Contacts) is displayed.
1 Press the Send Key or the Left Selection Key Accept to answer an
incoming call.
If the Answer mode has been set as Any Key (
Menu > Settings >
Call > Answer mode), any key press will answer a call, except for the
End/Power Key
, Right Selection Key , and Volume Keys (Up/Down
Navigation Keys)
.
2 End the call by pressing the End/Power Key .
NOTE: You can answer a call while using other functions or features.

13
General Functions
Adjusting the Volume
Use the Volume Keys during a call to adjust the earpiece volume.
Slient mode (Quick)
Silent mode can be activated by pressing and holding down the key.
Signal Strength
If you are inside a building, being near a window may give you better reception. You
can see the strength of your signal by the signal indicator on your phone’s display
screen.
Entering Text
You can enter alphanumeric characters by using the phone’s keypad. For example,
storing names in the Contacts, writing a message, or scheduling events in the
calendar all require text to be entered.
Changing the Text input mode
Change the text input mode by pressing when in a text entry field.
You can check the current text input mode in the upper right corner of the screen.
The following text input modes are available on the phone.
123 mode (Numbers mode)
Type numbers using one keystroke per number. To change to 123 mode in a text
entry field, press the
key until 123 mode is displayed in the upper right corner.

14
General Functions
Using the 123 (Numbers) mode
The 123 mode enables you to enter numbers in a text message (a telephone
number, for example) more quickly. Press the keys corresponding to the required
digits before manually switching back to the appropriate text entry mode.
Symbol mode
The Symbol mode enables you to enter various symbols or special characters.
To enter a symbol, press the
key. Use the Navigation Keys to highlight the
desired symbol and press the OK Key
.
ABC mode
This mode allows you to enter letters by pressing the key labeled with the required
letter.
Using the ABC mode
Use the alphanumeric keypad to enter your text.
1 Press the key labeled with the required letter.
2 To insert a space, press the key once. To delete letters, press the Clear/
Back Key
. Press and hold down the Clear/Back Key to erase all of the
entered text.
NOTE: Refer to the table below for more information on the characters
available using the keys.

15
General Functions
Key
Characters in the order displayed
Upper case Lower case
11
A B C 2 a b c 2
D E F 3 d e f 3
G H I 4 g h i 4
J K L 5 j k l 5
M N O 6 m n o 6
P Q R S 7 p q r s 7
T U V 8 t u v 8
W X Y Z 9 w x y z 9
Space Key,
0 (Long press)
Space Key,
0 (Long press)

16
In-Call Menu
During a Call
Your phone provides a number of control functions that you can use during a call.
To access these functions during a call, press the Left Selection Key
Options.
Making a Second Call
You can select a number you wish to dial from the Contacts to make a second call.
1 Press the Left Selection Key Options, then select Contacts.
2 Highlight the contact, then press the Send Key to make a second call.
Swapping Between Two Calls
Once the second call has been dialed (or answered), you can switch between the
calls by using one of the following three methods:
1 Press the Send Key .
2 Press the Left Selection Key Options and then select Swap Calls.
Answering an Incoming Call
To answer an incoming call when the phone is ringing, simply press the Send Key
.
The phone is also able to warn you of an incoming call while you are already on
a call. A tone sounds in the earpiece and the display will show that a second call
is waiting. This feature, known as Call Waiting, is only available if your network
supports it.
If Call Waiting is turned on, you can put the first call on hold and answer the second
call by pressing the Send Key
.
In-Call Menu

17
In-Call Menu
Rejecting an Incoming Call
You can reject an incoming call without answering by simply pressing the End/
Power Key
and Right Selection Key .
Muting the Microphone
You can mute the microphone during a call by pressing the Right Selection Key
Mute. The phone can be unmuted by pressing the Right Selection Key
Unmute. When the phone is muted, the caller cannot hear you, but you can still
hear the caller.
Using the Speakerphone
You can use the integrated Speakerphone during a call by pressing the Speaker
On/Off key
. The loudspeaker is automatically deactivated when you end the
call.
Warning: Due to increased volume levels, do not place the phone near
your ear while the speakerphone is enabled.

18
Contacts
Contact list
This menu allows you to save and manage contact address information. The Contact
List allows you to add a new address or search saved contact addresses by name.
To access Contact list, from the standby screen, press the Left Selection Key
Menu, Contacts
and Contact list.
New contact
This menu allows you to add a new contact to the Contact List. You can enter
contact address information including name, phone numbers, group information
items, memos, ringtones, and a contact Picture ID.
To access New contact, from the standby screen, press the Left Selection Key
Menu, Contacts
and New contact.
Groups
This menu allows you to manage group information. You can also configure a
ringtone for a group so that the group ringtone sounds when a call from a specific
contact address within that group is received and there is no ringtone configured for
the specific contact address.
To access Groups, from the standby screen, press the Left Selection Key
Menu, Contacts
and Groups.
Contacts

19
Contacts
Speed dial
This menu allows you to assign a frequently-called contact to the Speed Dial List.
You can select a number from 2 to 9 as a speed dial.
To access Speed dial list, from the standby screen, press the Left Selection Key
Menu, Contacts and Speed dial.
SIM management
This menu allows you to copy information from your SIM card to your phone and
vice versa. If a name is duplicated during the copying operation, the information is
also duplicated. You can also delete information from the SIM card.
To access SIM management, from the standby screen, press the Left Selection Key
Menu, Contacts and SIM management.
Own number
This displays your personal phone number.
To access Own number, from the standby screen, press the Left Selection Key
Menu, Contacts
and Own number.
My business card
This displays your business card stored in the phone. You can also edit it.
To access My business card, from the standby screen, press the Left Selection Key
Menu, Contacts and My business card.

20
Messages
This menu includes functions related to SMS (Short Message Service), MMS
(Multimedia Message Service), Voicemail as well as the network’s service messages.
Create message
1 From the standby screen, press the Left Selection Key Menu.
2 Select Messages .
3 Press Create message.
NOTE: If you insert a picture, audio, or video file while writing a multimedia
message, the file loading time will take about 5 seconds. You will not be
able to activate any key during the file loading time. When the file loading
is complete, you will be able to continue writing your multimedia message.
Editing a message
The following options are available when editing a message.
Using Insert
While entering text, press the Right Selection Key Insert. The following
options are available.
•
Symbol: You can insert various symbols into your message. Pressing the Left
Selection Key
and Right Selection Key scrolls through the pages.
•
Picture: You can select a picture to insert by using the Navigation Keys. You can
preview the selected picture by pressing the Right Selection Key
View.
•
Audio: You can insert an audio file from your saved audio files.
•
Video: You can insert a video clip from your saved video clips.
Messages

21
Messages
•
Record new audio: You can record a new audio clip by pressing the OK Key
Record. Press the Left Selection Key Options before you begin recording
to set the options (below). After recording a new audio clip, you can delete it by
pressing the Left Selection Key
Discard.
Quality: Set the audio’s quality to Fine, Normal, or Economy.
•
Template
Text: Allows you to easily insert frequently used sentences in the text message.
Multimedia: Preset multimedia templates can be created (
Menu >
Messages
> Message settings > Multimedia message >
Multimedia templates > New).
Signature: Allows you to insert your own created signature.
•
More: Allows you to insert vCard, vCalendar, vNote, vTask or Contact.
NOTE: vCard, vCalendar, vNote and vTask are created by the Contacts,
Calendar, Notepad, and Tasks functions, respectively.
Using Options
While entering text, press the Left Selection Key Options.
•
Text entry mode: Sets the text input mode.
•
Text entry settings
Text entry language: Allows you to set the text entry language to English or
Spanish.
T9 word candidate list: Displays the word candidates as you type.
T9 next word prediction: Allows the phone to predict the next word when
typing in T9 mode.
T9 dictionary: Allows you to add, delete, reset, and modify words.
Save to drafts: Saves the message to Drafts.

22
Messages
Cancel message: Allows you to exit the text input mode without saving your
message.
Sending a Message
After completing a message, press the OK Key Send To to select a recipient.
•
Enter the recipient(s). For more options, press the Left Selection Key
Options. In this menu, you can choose from the following options:
Enter number: Allows you to enter the phone number using the keypad.
Enter email : Allows you to enter an email address instead of a phone number.
Insert symbol: Allows you to enter symbols.
Caller groups: Displays Contacts Groups.
Recent messages: Choose a Contact from Recent Messages.
Recent calls: Choose a Contact from Recent Calls.
Delivery options: Allows you to set the options for Add Cc and Add Bcc.
Save to drafts: Saves the selected message to Drafts.
Text entry mode: Allows you to change the text entry mode.
Text entry settings: Allows you to set the options for Text entry language, T9
Word candidate list, T9 next word prediction, and T9 dictionary.
Cancel message: Allows you to cancel the message.

23
Messages
Inbox
You will be alerted when you receive a message. New messages are stored in the
Inbox. In the Inbox, you can identify each message by icons. If you are notified that
you have received a multimedia message, you can download the whole multimedia
message by selecting it in the Inbox menu. To reach the Inbox, from the standby
screen, press the Left Selection Key
Menu > Messages > Inbox.
You can reply to the sender of the message by pressing the Right Selection Key
Reply.
While viewing the Inbox, press the Left Selection Key
Options for the
following options:
•
Add to contact: You can save the sender’s phone number in the Contact list.
•
Delete: You can delete the selected message.
•
Forward: You can forward the selected message to another person.
•
Copy to SIM/Copy to phone: You can copy the message to the phone or SIM
card depending on where the text message is stored.
•
Move to SIM/Move to phone: You can move the message to the phone or SIM
card depending on where the text message is stored.
•
Select multiple: You can select multiple messages to delete.
•
Sort by: Allows you to sort the messages by date, sender, read/unread, or subject.
•
Message details: You can view the following information about received
messages: Type, Subject, From, and Time.
•
Delete all read msg: You can delete all read messages.

24
Messages
Drafts
Allows you to view and edit the messages saved as drafts. To access drafts, from
the standby screen, press the Left Selection Key
Menu, Messages , and
Drafts. You can delete the message by pressing the Right Selection Key
Delete.
While viewing the Drafts, press the Left Selection Key
Options for the
following options:
•
Select multiple: Allows you to select multiple messages to delete.
•
Message details: Allows you to view the details of the message.
Outbox
Outbox is the storage place for recently sent messages. When you press the Send
Key
, you can call the recipient of the selected message.
If the message is not sent from the Outbox, you will receive a sound alert along with
a Message Sending Failure notice on the screen.
To access the Outbox, from the standby screen, press the Left Selection Key
Menu, Messages
, and Outbox.
The following options are available for the Outbox folder by pressing the Left
Selection Key
Options:
•
View status: Display the status of message.
•
Delete: Deletes the selected message.
•
Edit: Allows you to edit the selected message.
•
Select multiple: Allows you to select multiple messages to delete.
•
Sort by: Allows you to sort the messages by date and recipient.
•
Message detail: Allows you to view the details of the message.
Press the Right Selection Key
Forward to send the selected message to
another.

25
Messages
Message settings
To access and configure your Message Settings, from the standby screen, press the
Left Selection Key
Menu, Messages , and Message settings.
Message alert
Allows you to set the Sounds, Volume, Alert type, and Alert Interval.
Save to
Allows you to choose whether to save messages to the SIM card or the Phone.
Signature
Allows you to create, edit, and delete your signature, which can be configured to be
sent out with your outgoing messages.
Text message
Allows you to set preferences for text messages.
The following options are available:
•
Text templates: Predefined messages that can quickly be sent. Press the Left
Selection Key
Options to access the following available options:
Send: Allows you to send the selected template via Message.
Delete: Allows you to delete the selected template message.
Edit: Allows you to edit the selected template message.
Delete all: Deletes all messages in the folder.
Cancel: Returns to Text Message menu.
•
Msg center no.: Allows you to view the phone number for the Message center.
•
Insert signature: Allows you to insert your signature in outgoing messages.

26
Messages
Multimedia message
Allows you to set your preferences for multimedia messages.
The following options are available:
•
Multimedia templates: Allows you to add, edit, and delete multimedia templates.
Press the Right Selection Key
New to create a new multimedia template.
Press the Left Selection Key
Options to access the following available
options:
Send: Allows you to send the selected message via Multimedia Message.
Delete: Allows you to delete the selected template message.
Edit: Allows you to edit the selected template message.
Rename: Allows you to rename the selected template message.
Delete all: Allows you to delete all the messages at one time.
Voicemail
Displays the voicemail number used for your voicemail service. Please do not modify
unless instructed by your service provider.

27
Recent calls
This menu allows you to see the list of recent calls. To access Recent calls, from the
standby screen, press the Left Selection Key
Menu and select Recent calls
.
You can access the following menus:
All calls, Missed calls, Dialed calls, and Received calls.
Recent calls

28
Accessibility
This menu allows you to easily control various accessibility options.
Press the Left Selection Key
Menu and select Accessibility.
Menu readout
This option allows the phone to read out menus that are accessed.
Multimedia
Allows you to control your Multimedia volume.
Large text
Allows you to set a large size for text. Select from On or Off.
Invert color
Allows you to set the color contrast for better screen viewing. Select from On or Off.
Mono sound
Allows you to enable or disable the Mono sound function.
Senior mode
Allows you to turn the senior mode on or off. Senior mode enhances high
frequencies to reduce the effects of hearing loss.
TTY
Allows you to enable TTY Mode in order to contact other TTY devices. Select from
TTY full, TTY talk, TTY hear or TTY off.
Hearing aid
Allows you to enable or disable the Hearing aid function.
Accessibility

29
Accessibility
Voice command
Allows you to set the Voice command options.

30
Notepad
You can create up to a maximum of 30 memos.
To access Notepad, from the standby screen, press the Left Selection Key
Menu and select
Notepad.
1 Press the Left Selection Key New to create a new memo.
2 Input the memo and press the OK Key Save to save.
Notepad

31
My Folder
Audio
To access Audio, from the standby screen, press the Left Selection Key
Menu, My folder
and Audio.
•
Buy ringtones: Allows you to buy ringtones.
•
Record voice: Allows you to record voice notes.
•
Saved audio files are displayed in the list.
Pictures
To access Pictures, from the standby screen, press the Left Selection Key
Menu, My folder
and Pictures.
•
Buy graphics: Allows you to buy images.
•
The picture files saved on your phone are displayed.
Video
To access Video, from the standby screen, press the Left Selection Key Menu,
My folder
and Video.
•
The video files saved on your phone are displayed.
NOTE: Please note that DRM can restrict some functions, such as
sending and editing.
My Folder

32
My Folder
Other files
When you receive files of an undefined format (such as .vcs, .vcf, etc.) the files are
saved in this folder.
To access Other files, from the standby screen, press the Left Selection Key
Menu, My folder
and Other files.
The following options are available by pressing the Left Selection Key
Options:
•
Send via: Send the selected file via Message.
•
Delete: Allows you to delete the selected file.
•
Move: Allows you to move the selected file to another folder.
•
Copy: Allows you to copy the selected file to another folder.
•
Rename: Allows you to edit the name of the selected file.
•
Select multiple: Allows you to select multiple files at once to perform various
functions.
•
Sort By: Allows you to sort the files by Name, Date, and Type.
•
File information: Allows you to view information about the selected file or used
memory space on your phone.
File manager
This function allows you to view the content in your internal phone memory.
To access File manager, from the standby screen, press the Left Selection Key
Menu, My folder
and File manager.

33
Tools
Voice command
Voice command is the function whereby your phone’s voice recognition engine
identifies the voice of the user and carries out the requested commands. When the
user operates the Voice command function, there are four possible commands, Call
<Name or Number>, Listen voicemail, Missed calls, and Time & date. To activate
the Voice command function, press the Back/Voice command Key
while the
phones is in standby mode or press the Left Selection Key
Menu, Tools
and
Voice command.
1 Call <Name or Number>: This function is activated only when the user says
the command “Call” followed by the name stored in the address book or say
the phone number. Please note that interfering noise might cause a problem
displaying candidates. Additionally, the user has the option to select a number
type at the end, such as “mobile”, “home”, or “work”.
2 Listen voicemail: This command is activated when the user says “Listen
voicemail”. The user will then be automatically connected to voicemail.
3 Missed calls: This command is activated when the user says the words “Missed
calls”. The mobile phone presents the missed call list.
•
Follow-up Commands Available
Yes: Make the phone call.
No: Moves to the next result.
Cancel: Go back to the main Voice command menu.
Exit: Terminate Voice command.
Next: Moves to the next result.
4 Time & date: This command is activated when the user says “Time & date”. The
phone displays the current local time and date.
Tools

34
Tools
Voice command Options
When the Voice command option is activated, you can press the Left Selection Key
Options for the following options:
•
Mode
Speed: Voice command is abbreviated.
Normal: Voice command is played normally with prompts.
•
Best match
1 match: The most likely match will be displayed when finding a number from
the address book.
4 matches: The four most likely matched names will be displayed when finding
a name from the address book.
•
Sensitivity
High: Operation and performance of the voice recognition engine is rarely
affected by the user’s voice command and surrounding sound.
Medium: Operation of the voice recognition engine is normally affected by
user’s voice command and surrounding sound.
Low: Operation of the voice recognition engine is strongly affected by user’s
voice command and surrounding sound.
•
Spk. on mode
Automatic on: When this option is selected, the speakerphone is turned on
and the sound is loud enough so you can hear the output when the phone is
away from the ear, at a distance
Off: When this option is selected, the speakerphone is turned off and the sound
comes from the earpiece, which is quieter and cannot be heard when the
phone is away from the ear, at a distance.

35
Tools
•
Call alert
Ring only: This option will not read out the caller name. You will only hear the
selected ringtone.
Ring after name: This option will read out the caller name once, and then will
ring.
Name repeat: This option will read out the caller name continuously.
Calculator
The Calculator function allows you to calculate simple mathematical equations.
To access Calculator, from the standby screen, press the Left Selection Key
Menu, Tools
and Calculator.
Tasks
This feature allows you to save and manage a task.
To access Tasks, from the standby screen, press the Left Selection Key
Menu, Tools
and Tasks.
1 To add a new task item, press the Left Selection Key New.
2 Input the Due Date, Note, Priority, and Status information for the new Task.
3 Press the Left Selection Key Save to save the Task item.
The following options are available in the Task list by pressing the Left Selection
Key
Options:
•
Mark ‘Complete’: Allows you to change the status of the selected task as
Completed.
•
Edit: Allows you to edit a saved task.
•
Delete: Deletes the selected task.
•
Selective delete: Allows you to delete All completed/All past tasks/All tasks
selectively.

36
Tools
•
Send task via: Enables the selected task to be sent via Text message, Multimedia
message.
•
Select multiple: Allows you to select multiple Tasks.
•
View calendar: Allows you to view the Calendar.
Stopwatch
This menu allows you to record the elapsed time of an event. The duration of an
individual lap time (up to 20 laps) and the total time can also be displayed.
To access Stopwatch, from the standby screen, press the Left Selection Key
Menu, Tools
and Stopwatch.
•
Show last: Displays the last time recorded (only available if previous time was not
reset).
•
New time
1 To start timing, press the OK Key Start. The running time is displayed as
HH.MM.SS.hh (hours, minutes, seconds, hundredths of a second).
2 During the timing, you can record an individual lap time by pressing the Right
Selection Key
Lap. Up to 20 lap times can be recorded.
3 You can stop or restart timing by pressing the OK Key again.
4 To reset the stop watch, press the Right Selection Key Reset after
stopping the time, or to save the stop watch, press the Left Selection Key
Options and then select Save.
•
Saved times: Allows you to see a list of the saved recorded times.
Tip calculator
This feature allows you to quickly and easily calculate the tip amount based on the
total bill as well as the split of the total bill based on the number of people.
To access Tip calculator, from the standby screen, press the Left Selection Key

37
Tools
Menu, Tools and Tip calculator.
1 Enter the Total bill ($), Tip (%), and Split amounts.
2 The Tip ($) and You owe ($) amounts will be automatically calculated.
Unit converter
This function allows you to convert units of measurement.
There are 6 types of units that can be converted: Area, Length, Weight, Temperature,
Volume, and Velocity.
To access Unit converter, from the standby screen, press the Left Selection Key
Menu, Tools and Unit converter.
Voice recorder
Allows you to record an audio clip to your phone. The recorded audio file is saved
automatically in the Audio menu.
To access Voice recorder, hold down the Clear/Back Key
while the phone is
in standby mode or press the Left Selection Key
Menu, Tools and
Voice recorder.
The following options are available when you press the Left Selection Key
Options:
•
Record mode: Sets the recording mode to either MMS mode or General mode.
•
Quality: Allows you to set the quality of an audio clip. You can set it to Fine,
Normal, or Economy.
When you press the Right Selection Key
Gallery, it will take you to the Audio
gallery.

38
Browser
The Browser is one of the services provided by your network operator and it gives
you access to all the cool things you can do with your wireless phone.
NOTE:
•
Check the availability of services, pricing, and tariffs with your network
operator and/or the service provider whose service you wish to use.
Service providers will also give you instructions on how to use their
services.
•
Please contact your service provider to open an Internet account.
Launch the Browser
To launch the browser from the standby screen, press the Right Selection Key
Browser or press the Left Selection Key
Menu and select the Browser
using the Navigation Keys.
To exit the browser at any time, press the End/Power Key
.
Using the Browser
Once you are connected to the Internet, the following menu options are available
when you press the Left Selection Key
Options:
•
Zoom: Allows you to zoom in/out for better look.
•
Home: Directs you to the homepage.
•
Enter URL: Allows you to enter URL you desire to visit.
•
Send link: Allows you to send the URL link in a message.
Browser

39
Browser
•
Bookmarks: You can add or save the current page to Bookmarks or view your
saved Bookmarks.
•
Navigation mode: Allows you to select Back, Forward, and Refresh.
•
Search text: Allows you to search the text.
•
Recent pages: Allows you to view your history of recently viewed web sites.
•
Settings: Allows you to set options for web pages and appearance.
Menus for the Browser
You can surf the Internet using either the phone keys or the Browser menu.
Using the Navigation Keys
When surfing the Internet, the Navigation Keys function similarly from when the
phone is on standby mode.

40
Alarm clock
The alarm clock function allows you to set up multiple separate alarms. You can also
set the time, repetition interval, and alarm tone. If there is no alarm setting, press
the Left Selection Key
New to add a new alarm.
To access Alarm clock from the standby screen, press the Left Selection Key
Menu and select
Alarm clock.
•
Time: Input your desired alarm time by specifying the hour and minutes.You can
also choose a predefined amount of time (15 minutes later, 30 minutes later, 45
minutes later, 1 hour later, Off).
•
Repeat: Select the desired repeat mode (Once, Daily, Mon ~ Fri, Sat ~ Sun, Select
weekday).
•
Alarm tone: Press the OK Key List to access the list of available Alarm
Tones.
•
Volume: Set the volume of the alarm by pressing the up and down Volume Keys.
•
Type: Select the Ring Alert type between Ring, Vibrate, Ring & vibrate and Vibrate
after ring.
•
Memo: Enter an alarm name.
•
Snooze interval: Select the snooze interval between 5 minutes, 15 minutes, 30
minutes, 45 minutes, 1 hour and Off.
Press the Left Selection Key
Save to save your new Alarm.
Alarm clock
41
Calendar
When you enter this menu, a calendar will be displayed. The red square cursor is
used to locate a particular day. The bottom bar on the calendar indicates saved
schedules (if any) for that day. This function helps you keep track of your schedule.
The phone can sound an alarm tone if it has been set for a specific schedule item.
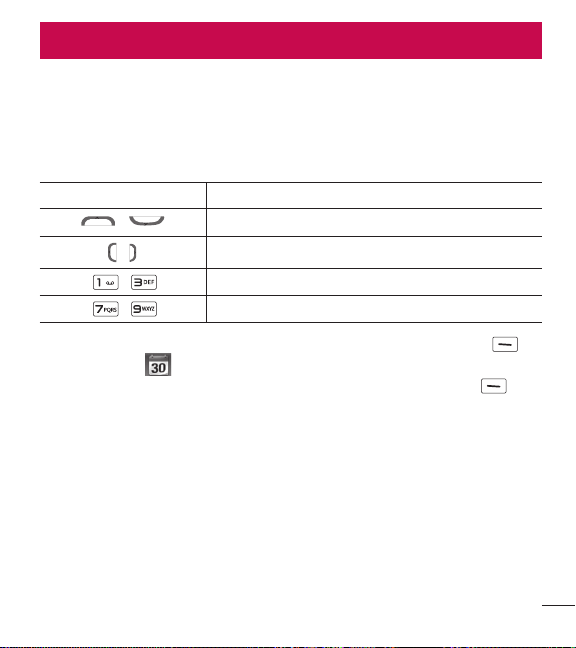
The chart below shows the keys that can be used to navigate the Calendar:
Key
Description
/
Weekly
/
Daily
/ Annually
/ Monthly
To access Calendar, from the standby screen, press the Left Selection Key
Menu and select
Calendar.
The following options are available when pressing the Left Selection Key
Options:
•
Set holiday: Allows you to set specific dates to display as Holidays on your
calendar.
•
Week view: Allows you to view the calendar by week.
•
Go to date: Allows you to jump to a specific date.
•
Settings: Allows you to set various calendar settings.
Calendar

42
Settings
Audio & ringtones
This menu allows you to configure the audio and ringtone settings for your phone.
To access Audio & ringtones, from the standby screen, press the Left Selection Key
Menu, Settings and Audio & ringtones.
Ringtone
•
Sounds: Allows you to set a sound as the ringtone for your phone.
•
Volume: Allows you to control your ringtone volume.
•
Alert type: Supports 3 ring alert types: Ring, Ring and vibration, and Ring after
vibration.
NOTE: Full length music tracks cannot be set as either ringtones or
message tones.
Message tone
•
Sounds: Allows you to set a sound as your message tone.
•
Volume: Allows you to control your Message tone volume.
•
Alert type: Supports 4 message alert types: Silent, Vibrate, Ring only, Ring &
vibrate.
•
Alert interval: Allows you to set the interval alert to Once, Every 2 min, Every 5
min, Every 10 min, or Every 15 min.
Settings

43
Settings
Alert tone
•
Sounds: Allows you to select a set of alert tones. Supports 2 alert tone types: Alert
tone 1 and Alert tone 2.
•
Volume: This menu allows you to control your Alert tone volume.
•
Alert type: You can select to turn Alert tones to Ring or Silent.
Keypad tone
This menu allows you to control your Keypad tone volume.
Multimedia
This menu allows you to control your Multimedia volume.
Call
This menu allows you to control your Call volume.
Phone settings
This menu allows you to configure the Phone settings. To access Phone settings,
from the standby screen, press the Left Selection Key
Menu, Settings
and
Phone settings.
Languages
Allows you to change the language for the display text on your phone. This change
will also affect the Language Input mode.
Set hotkeys
Allows you to change the preferences on the Hotkeys that are currently assigned for
your Navigation Keys (when in standby mode).

44
Settings
Auto key lock
Allows you to lock your keypad automatically after a defined length of display
backlight time.
(Left Selection Key
Menu > Settings > Display > Backlight
timer >
Display).
You can set the Auto Key lock to On or Off.
Airplane mode
This allows you to only use the phone’s features that do not require the use of the
wireless network, excluding emergency calls, when you are in an airplane or in
places where the wireless network is prohibited. If you set the Airplane mode on,
the Airplane mode icon will be displayed on the screen instead of the network signal
icon.
•
On: You cannot make (or receive) calls, excluding emergency calls, or use other
features that require network coverage.
•
Off: You can deactivate the Airplane mode to access the network.
Security
Various codes and passwords are used to protect the features and settings of your
phone.
•
Phone lock: You can use a security code to avoid unauthorized use of the phone.
If you set the Phone Lock to When power on, the phone will request a security
code whenever you switch the phone on. If you set the Phone Lock to Lock phone
now your phone will lock immediately.
•
Change codes: The Change Codes feature allows you to change your current
password to a new one. You must enter the current password before you can
specify a new one. You can change the access codes for: Security code.

45
Settings
Reset settings
This function allows you to restore factory settings. To do this, you need the security
code.
•
Master reset: Restores the phone settings (e.g.: Audio, Display, Language) to
default values.
•
Master clear: Deletes downloaded/user created contents (e.g.: images, videos)
from the phone.
Phone
Deletes all downloaded/user created images and audios from the phone
memory. Deletes personal information stored in the phone memory (e.g.:
Contacts, Messages, Tasks, Alarm, Calendar Schedules). Restores the settings
stored in the phone memory to the default values.
Display
This menu allows you to configure your Display settings.
To access Display, from the standby screen, press the Left Selection Key
Menu, Settings
and Display.
Wallpapers
This menu allows you to set a picture or color as your background.
Fonts
You can configure the font size and color of the font that your phone uses.

46
Settings
Clocks & calendar
This feature allows you to select a Clock or Calendar to display on the standby
screen.
Brightness
You can set the brightness of the display screen.
Backlight timer
Use this to set the duration of the display backlight and keypad.
Menu styles
You can set the main menu style to Icon or List view.
Call
This menu allows you to configure your Call settings.
To access Call, from the standby screen, press the Left Selection Key
Menu,
Settings
and Call.
Send my number
This network service allows you to set your phone number to be displayed or hidden
from the person you are calling. You can select Set by network if you prefer to have
different settings for different service providers.
Answer mode
This allows you to determine how to answer the phone.
•
Any key: Allows you to answer an incoming call by pressing any key, except the
End/Power Key
, Volume Keys (Up/Down Navigation Keys) , or the
Right Selection Key
.

47
Settings
•
Send key only: Allows you to only answer an incoming call by pressing the Send
Key
or Left Selection Key Accept.
Senior mode
Senior mode is a function that amplifies a sound for seniors to hear the voice well by
emphasizing a low voice. It is used for enhancing the speech quality while you are
on the phone.
You can set the Senior mode to On or Off.
Connection vibration
Allows you to choose if you want the phone to vibrate when a connection is
established.
Call duration
Allows you to view Call duration information about Last call, Dialed calls, Received
calls and All calls.
Memory
This menu allows you to configure your Memory settings.
To access Memory, from the standby screen, press the Left Selection Key
Menu, Settings
and Memory.
Used space
This function shows the memory status of the phone.
•
Phone common
This function shows the memory status of the phone and the memory being used
by Audio, Pictures, Video, Multimedia msg and Others types of files.

48
Settings
•
Phone reserved
This function shows the status of the reserved memory used by Text message,
Contacts, Calendar, Tasks, and the Notepad.
•
SIM card
This function shows the status of the SIM card memory.
Applications
This menu allows you to configure application settings
To access Applications, from the standby screen, press the Left Selection Key
Menu, Settings
and Applications.
Messages
This option allows you to configure the Messaging option.
Browser
This menu allows you to configure the Browser settings.
Appearance
You can choose the settings of the browser appearance (Text size, Character
encoding, Show image).
Cache
The web pages you have accessed are stored in the phone memory. This menu
allows you to manage that function.
•
Clear cache: Remove all cached data in the memory.
•
Cache: Allows you to turn the memory cache on or off.
NOTE: Cache is a type of buffer memory, which is used to store data
temporarily, especially when it is online.

49
Settings
Cookies
The information of services you have accessed are stored in what is called a cookie.
From this menu, you can choose to allow cookies or to delete cookies that are
already on your phone.
Clear login info.
You can delete the history of ID or Password information that you have saved
previously.
Screen settings
You can change the settings of the browser screen (Rendering mode).
Security
A list of the available certificates is shown.
•
Certificates: You can see the list of certificates and view them in detail.
•
Clear session: Removes the secure session.
Navigation mode
You can change the methods of browser navigation.
•
4 way navigation: The cursor of the browser moves scroll amounts or follows
hyperlinks.
•
Mouse pointer: You can move the cursor like a mouse pointer.
Secure popup
You can activate or deactivate the pop-up which indicates a secure page.

50
Settings
Shortcuts
If set to On, you can use the Browser more quickly and conveniently with the keypad
in the phone. If Shortcuts is on, the following shortcuts are available:
1. Enter URL
3. View bookmarks
5. Full screen
7. Page up
9. Zoom in
*. Page down
2. This page
4. Info.
6. Saved pages
8. Recent pages
0. Search text
#. Zoom out
Phone information
This menu is used to view My number, Manufacturer, Model name, Device ID,
Hardware version, Software version, Language.
To access Phone Information, from the standby screen, press the Left Selection
Key
Menu, Settings and Phone information.

51
Accessories
These accessories are available for use with your phone. (Items described below
may be optional and sold separately.)
•
Travel adapter
•
User Guide
•
Battery
NOTE:
•
Always use genuine LG accessories. Failure to do this may invalidate
your warranty.
•
Accessories may be different in different regions; please check with our
regional service company or agent for further enquiries.
Accessories

52
For your safety
The highest SAR value for this model phone when tested for use at the ear is 1.22
W/kg and when worn on the body, as described in this user guide, is 1.09 W/kg
(body-worn measurements differ among phone models, depending upon available
accessories and FCC requirements).
While there may be differences between SAR levels of various phones and at various
positions, they all meet the government requirement for safe exposure.
The FCC has granted an Equipment Authorization for this model phone with
all reported SAR levels evaluated as in compliance with the FCC RF emission
guidelines.
SAR information on this model phone is on file with the FCC and can be found under
the Display Grant section of http://www. fcc.gov/oet/ea/fccid/ after searching on FCC
ID ZNF329G.
•
To reduce risk of fire or burns, do not expose to temperature above 45 °C / 113
°F, or dispose of in fire.
•
To reduce risk of fire or burns, do not dispose of in fire or water.
•
Do not disassemble or open crush, bend or deform, puncture or shred.
•
There is a danger of explosion if battery is incorrectly replaced. To reduce risk
of fire or burns, do not disassemble, crush, puncture, short external contacts,
expose to temperature above 45 °C / 113 °F, or dispose of in fire or water. Keep
this product away from excessive moisture and extreme temperatures. Keep the
battery or device dry and away from water or any liquid as it may cause a short
circuit.
•
Avoid using your phone near strong electromagnetic sources, such as microwave
ovens, sound speakers, TV and radio.
For your safety

53
For your safety
•
Use only original manufacturer-approved accessories, or accessories that do not
contain any metal. Please only use an approved charging accessory to charge your
LG phone. Improper handling of the Accessory/Charger Port, as well as the use of
an incompatible charger, may cause damage to your phone and void the warranty.
•
Only use the approved battery charger. Otherwise, you may cause serious damage
to your phone.
FCC Hearing-Aid Compatibility (HAC) Regulations for
Wireless Devices
On July 10, 2003, the U.S. Federal Communications Commission (FCC) Report and
Order in WT Docket 01-309 modified the exception of wireless phones under the
Hearing Aid Compatibility Act of 1988 (HAC Act) to require digital wireless phones
be compatible with hearing-aids. The intent of the HAC Act is to ensure reasonable
access to telecommunications services for persons with hearing disabilities.
While some wireless phones are used near some hearing devices (hearing aids and
cochlear implants), users may detect a buzzing, humming, or whining noise. Some
hearing devices are more immune than others to this interference noise, and phones
also vary in the amount of interference they generate.
The wireless telephone industry has developed a rating system for wireless phones,
to assist hearing device users to find phones that may be compatible with their
hearing devices. Not all phones have been rated. Phones that are rated have the
rating on their box or a label located on the box.
The ratings are not guarantees. Results will vary depending on the user’s hearing
device and hearing loss. If your hearing device happens to be vulnerable to
interference, you may not be able to use a rated phone successfully. Trying out
the phone with your hearing device is the best way to evaluate it for your personal
needs.

54
For your safety
M-Ratings: Phones rated M3 or M4 meet FCC requirements and are likely to
generate less interference to hearing devices than phones that are not labeled. M4
is the better/ higher of the two ratings.
T-Ratings: Phones rated T3 or T4 meet FCC requirements and are likely to generate
less interference to hearing devices than phones that are not labeled. T4 is the
better/ higher of the two ratings.
Hearing devices may also be rated. Your hearing device manufacturer or hearing
health professional may help you find this rating.
Higher ratings mean that the hearing device is relatively immune to interference
noise.
The hearing aid and wireless phone rating values are then added together. A sum of
5 is considered acceptable for normal use. A sum of 6 is considered for best use.
In the example to the left, if a hearing aid meets the M2 level
rating and the wireless phone meets the M3 level rating, the
sum of the two values equal M5. This should provide the
hearing aid user with “normal usage” while using their
hearing aid with the particular wireless phone. “Normal usage” in this context is
defined as a signal quality that’s acceptable for normal operation.
The M mark is intended to be synonymous with the U mark. The T mark is intended
to be synonymous with the UT mark. The M and T marks are recommended by the
Alliance for Telecommunications Industries Solutions (ATIS).
The U and UT marks are referenced in Section 20.19 of the FCC Rules. The
HAC rating and measurement procedure are described in the American National
Standards Institute (ANSI) C63.19 standard. To ensure that the Hearing Aid
Compatibility rating for your phone is maintained, secondary transmitters such as
Bluetooth and WLAN components must be disabled during a call.
When you’re talking on a cell phone, it’s recommended that you turn the BT
(Bluetooth) or WLAN mode off for HAC.

55
For your safety
For information about hearing aids and digital wireless phones
Wireless Phones and Hearing Aid Accessibility
http://www.accesswireless.org/
Gallaudet University, RERC
http://tap.gallaudet.edu/Voice/
FCC Hearing Aid Compatibility and Volume Control
http://www.fcc.gov/cgb/dro/hearing.html
The Hearing Aid Compatibility FCC Order
http://hraunfoss.fcc.gov/edocs_public/attachmatch/FCC-03-168A1.pdf
Hearing Loss Association of America [HLAA]
http://hearingloss.org/content/telephones-and-mobile-devices
7.11 Warranty Laws
The following laws govern warranties that arise in retail sales of consumer goods:
•
The California Song-Beverly Consumer Warranty Act [CC §§1790 et seq],
•
The California Uniform Commercial Code, Division Two [Com C §§2101 et seq],
and
•
The federal Magnuson-Moss Warranty Federal Trade Commission Improvement
Act [15 USC §§2301 et seq; 16 CFR Parts 701– 703]. A typical Magnuson-Moss
Act warranty is a written promise that the product is free of defects or a written
promise to refund, repair, or replace defective goods. [See 15 USC §2301(6).]
Remedies include damages for failing to honor a written warranty or service
contract or for violating disclosure provisions. [See 15 USC §2310(d).] Except for
some labeling and disclosure requirements, the federal Act does not preempt state
law. [See 15 USC §2311.]
The Consumer Warranty Act does not affect the rights and obligations of parties
under the state Uniform Commercial Code, except the provisions of the Act prevail

56
For your safety
over provisions of the Commercial Code when they conflict. [CC §1790.3.]
For purposes of small claims actions, this course will focus on rights and duties
under the state laws.

•
Las visualizaciones e ilustraciones de la pantalla pueden variar de las que ve en
el teléfono.
•
Las pantallas reales y el color del teléfono pueden variar.
•
Es posible que parte del contenido de esta guía no aplique a su teléfono, eso
dependerá del software y de su proveedor de servicios. Toda la información de
este documento está sujeta a cambios sin previo aviso.
•
Este teléfono no es adecuado para personas con alguna discapacidad visual ya
que cuenta con un teclado en pantalla táctil.
•
Copyright
©
2015 LG Electronics, Inc. Todos los derechos reservados. LG
y el logotipo de LG son marcas registradas de LG Group y sus entidades
relacionadas.
Todas las demás marcas son propiedad de sus respectivos titulares.
Guía del usuario
ESPAÑOL

2
Descripción general del teléfono ........ 5
Introducción ......................................... 7
Extraer la batería ............................... 7
Inserte la batería ............................... 8
Cargar la batería ................................ 9
Iconos en pantalla ........................... 10
Funciones generales ......................... 11
Antes de comenzar .......................... 11
Hacer una llamada .......................... 11
Hacer una llamada con la Tecla Enviar 11
Hacer llamadas internacionales .......11
Finalizar una llamada ......................12
Hacer una llamada desde contactos .12
Responder una llamada ................... 12
Ajuste del volumen .......................... 13
Modo Silencio (rápido) .....................13
Potencia de la señal ........................13
Introducir texto ................................ 13
Cambio del modo de entrada de texto 13
Modo 123 (Modo de números) ........14
Uso del modo 123 (modo de
números)........................................14
Modo de símbolos ..........................14
Modo ABC ......................................14
Uso del modo ABC ..........................14
Menú En llamada ............................... 16
Durante una llamada ....................... 16
Hacer una segunda llamada ............16
Alternar entre dos llamadas .............16
Responder una llamada entrante .....17
Rechazar una llamada entrante........17
Silenciar el micrófono ......................17
Usando el altavoz ............................17
Contactos ........................................... 18
Lista de contactos ........................... 18
Nuevo contacto ................................ 18
Grupos ............................................. 18
Lista de marcación rápida ............... 19
Administración de la tarjeta SIM ..... 19
Número propio ................................. 19
Mi tarjeta de visita ........................... 19
Mensajes ............................................ 20
Create message ............................... 20
Buzón de entrada ............................ 23
Borradores ....................................... 24
Buzón de salida ............................... 25
Confi guración de mensaje ............... 26
Alerta de mensajes .........................26
Guardar en .....................................26
Firma .............................................26
Contenido

3
Mensaje de texto ............................26
Mensaje multimedia ........................27
Correo de voz .................................27
Llamadas recientes ........................... 28
Accesibilidad ..................................... 29
Lectura de menú ............................29
Multimedia .....................................29
Texto grande ..................................29
Invertir color ...................................29
Sonido mono ..................................29
Modo senior ...................................29
TTY ................................................ 29
Prótesis auditiva .............................30
Comando de voz .............................30
Bloc de notas ..................................... 31
Mi carpeta .......................................... 32
Audio ............................................... 32
Imágenes ......................................... 32
Video ................................................ 32
Otros archivos.................................. 33
Admin. de archivos .......................... 33
Herramientas ..................................... 34
Comando de voz .............................. 34
Opciones de Comando de voz ..........35
Calculadora ...................................... 36
Tareas .............................................. 36
Cronómetro ...................................... 37
Calculadora de propinas .................. 38
Conversor de unidad........................ 38
Grabador de voz .............................. 39
Acceso web ........................................ 40
Inicio del navegador ........................ 40
Uso del navegador ........................... 41
Menús del navegador ...................... 41
Uso de las teclas de navegación ..... 41
Alarma ................................................ 42
Calendario .......................................... 43
Confi guración .................................... 44
Audio y tonos de timbre................... 44
Timbre ...........................................44
Tono de mensaje ............................44
Tono de alerta.................................45
Tono de teclado ..............................45
Multimedia .....................................45
Llamada ......................................... 45
Confi g. del teléfono.......................... 45
Idiomas ..........................................45
Establecer teclas de acceso directo .45
Bloqueo automático del teclado .....46
Modo de avión ................................46
Seguridad ......................................46
Restaurar confi guraciones ...............47

4
Pantalla ............................................ 47
Fondos de pantalla..........................47
Fuentes .......................................... 47
Relojes y calendario ........................48
Brillo ..............................................48
Tiempo de luz de fondo ...................48
Estilos de menú ..............................48
Llamada ........................................... 48
Enviar mi número............................48
Modo de respuesta .........................49
Modo senior ...................................49
Vibrar al conectarse ........................49
Duración de llamada .......................49
Memoria .......................................... 49
Espacio utilizado .............................49
Aplicaciones .................................... 50
Mensajes .......................................50
Acceso web ....................................50
Información del teléfono.................. 52
Accesorios ......................................... 53
Por su seguridad ................................ 54
5
Descripción general del teléfono
Descripción general del teléfono
1
Auricular
2
Pantalla LCD
3
Teclas de selección
Cada una de estas teclas realiza las funciones
indicadas por el texto de la pantalla que se encuentra
inmediatamente arriba de ellas.
4
Funciones de las teclas de navegación de la
pantalla de inicio
: Accesibilidad : Alarma
: Lista de contactos : Mensajes
Tecla OK: Seleccione opciones y menús.
•
Información de mi tiempo aire: Mantenga
presionado mientras el teléfono está en modo de
espera para ver información de tiempo aire.
5
Tecla Altavoz
Permite cambiar al modo altavoz en la pantalla de espera
o durante una llamada. El altavoz se apagará después
de 1 minuto de inactividad cuando se encienda desde la
pantalla de espera.
6
Tecla Enviar
1
2
3
5
6
7 8
9
10
4
3
6
Descripción general del teléfono
7
Tecla Modo de bloqueo
Símbolos (mientras ingresa texto)
Bloqueo de teclas (Mantenga presionado mientras el teléfono está en modo de espera)
8
Tecla Modo silencioso
Mantenga presionado para activar/desactivar el modo Silencio.
9
Tecla Finalizar/Encender
10
Tecla Volver/Comando de voz
Presione esta tecla para regresar a la pantalla anterior.
Manténgala presionada desde la pantalla de espera activar la función de grabadora
de voz y presiónela desde la pantalla de espera para activar la función comando de
voz. También puede usar esta tecla para borrar texto/números que haya ingresado.
Puerto para cargador/accesorios Conecta el teléfono al cargador u
otros accesorios admitidos.
Cargar con el cable USB y PC: Puede usar su computadora
para cargar el teléfono. Conecte uno de los extremos del cable
USB al puerto para cargador/accesorios del teléfono y el otro
extremo a un puerto USB con alta potencia de la PC (por lo
general, ubicado en el panel frontal de la computadora).

7
Introducción
Extraer la batería
1 Apague el teléfono.
2 Coloque una uña en la ranura de la parte inferior izquierda de la tapa posterior
para levantarla y quitarla.
3 Use la abertura para dedo que se encuentra cerca de la parte inferior del
compartimiento de la batería para levantarla.
Introducción
8
Introducción
Inserte la batería
1 Coloque una uña en la ranura de la parte inferior izquierda de la tapa posterior
para levantarla y quitarla.
2 Alinee los contactos de la batería con los terminales cerca de la parte superior
del compartimiento de la batería e insertarla dentro del compartimiento.
3 Alinee la tapa posterior y presione hacia abajo hasta que se ajuste en su lugar.
9
Introducción
Cargar la batería
Use el cargador incluido con su teléfono.
ADVERTENCIA: Use únicamente el cargador que viene incluido con el
teléfono. El uso de cualquier cargador distinto del que viene incluido con
el teléfono puede dañar el teléfono o la batería.
AVISO: Por favor asegúrese de que el lado 'B' esté orientado hacia arriba
antes de insertar el cargador o cable USB en el puerto para cargador/
accesorios de su teléfono.
Enchufe un extremo del adaptador de carga en el puerto para cargador/accesorios
del teléfono y el otro extremo en un toma corrientes.
El tiempo de carga varía dependiendo del nivel de la batería.
10
Introducción
Iconos en pantalla
La tabla debajo describe varios
indicadores o iconos que aparecen en la
pantalla principal del teléfono.
ICONO/
INDICADOR
DESCRIPCIÓN
Potencia de la señal de red
(varía la cantidad de barras)
Sin señal de red
Batería baja
Nuevo mensaje de texto
Hay una alarma establecida
Perfil de Timbre en uso
Perfil de Silencio en uso
Red EDGE disponible
Red 3G disponible
El navegador está activo
Modo vibración activado
Altavoz
Llamada en curso
ICONO/
INDICADOR
DESCRIPCIÓN
Correo de voz
Batería llena
Batería cargando
Modo de Avión encendido

11
Funciones generales
Antes de comenzar
Recuerde que puede seleccionar los iconos de menú en la pantalla Menú utilizando
las teclas numéricas si establece la opción Estilos de menú como Lista. Si establece
la opción Estilos de menú como Icono, sólo puede utilizar las Teclas de Navegación
para seleccionar los iconos del menú.
Hacer una llamada
1 Asegúrese de que el teléfono esté encendido.
2 Ingrese un número de teléfono, incluido el código de área. Para modificar un
número que aparece en la pantalla de visualización, sólo tiene que oprimir la
Tecla Borrar/Volver
y borrar los dígitos, de a uno por vez.
•
Mantenga oprimida la Tecla Borrar/Volver para borrar todo el número.
3 Oprima la Tecla Enviar para llamar al número seleccionado.
4 Para finalizar la llamada, oprima la Tecla Finalizar/Encender .
Hacer una llamada con la Tecla Enviar
1 Oprima la Tecla Enviar y aparecerán los historiales de las llamadas
recibidas, realizadas y perdidas más recientes.
2 Resalte el número que desea usar con las Teclas de Navegación.
3 Oprima la Tecla Enviar .
Hacer llamadas internacionales
1 Mantenga oprimida la tecla y aparecerá “+”, el carácter de larga distancia
internacional.
2 Introduzca el código de país, el código de área y el número de teléfono.
Funciones generales

12
Funciones generales
3 Oprima la Tecla Enviar .
Finalizar una llamada
Para finalizar una llamada, oprima la Tecla Finalizar/Encender .
Hacer una llamada desde contactos
Es posible guardar nombres de personas y números de teléfono a los que llama con
frecuencia en la tarjeta SIM y también la Lista de Contactos.
Se puede marcar un número con sólo resaltar un nombre de la Lista de Contactos y
oprimir la Tecla Enviar
.
1 Oprima la Tecla de Navegación Inferior para acceder a la Lista de
Contactos.
2 Resalte el Contacto y oprima la Tecla Enviar .
Responder una llamada
Al recibir una llamada, el teléfono suena y/o vibra y una notificación aparece en la
pantalla. Si la persona que llama puede ser identificada, se mostrará el número de
teléfono (o el nombre, si almacenado en la Contactos).
1 Oprima la Tecla Enviar o la Tecla de Selección Izquierda Aceptar
para contestar una llamada entrante.
Si el Modo de Respuesta se ha establecido en Cualquier tecla (
Menú
> Configuración >
Llamada > Modo de respuesta), puede oprimir
cualquier tecla para responder la llamada, excepto la Tecla Finalizar/Encender
, la Tecla de Selección Derecha , y Teclas de Volumen (Teclas de
Navegación Superior/Inferior)
.
2 Para finalizar la llamada, oprima la Tecla Finalizar/Encender .

13
Funciones generales
NOTA: Puede responder una llamada mientras usa otras funciones del
menú.
Ajuste del volumen
Si desea ajustar el volumen de los auriculares durante una llamada, use las Teclas
de Volumen del teléfono.
Modo Silencio (rápido)
El Modo silencio se puede activar manteniendo presionada la tecla .
Potencia de la señal
Si está dentro de un edificio, ubicándose cerca de una ventana puede mejorar la
recepción. Se puede conocer la potencia de la señal a través del indicador de señal
que aparece en la pantalla principal del teléfono.
Introducir texto
Puede introducir caracteres alfanuméricos usando el teclado del teléfono. Por
ejemplo, ya sea para guardar nombres en la Lista de Contactos, escribir un mensaje
o planeando actividades en el calendario, es necesario introducir texto.
Cambio del modo de entrada de texto
Para cambiar el modo de entrada de texto, oprima al encontrarse en un campo
de entrada de texto.
Puede comprobar el modo de entrada de texto actual en la parte superior derecha
de la pantalla. El teléfono cuenta con los siguientes modos de entrada de texto.

14
Funciones generales
Modo 123 (Modo de números)
Introduzca los números oprimiendo la tecla una vez por número. Para cambiar al
modo 123 en un campo de entrada de texto, oprima la tecla
hasta que se
muestre el modo 123 en la esquina superior derecha.
Uso del modo 123 (modo de números)
El modo 123 le permite introducir números en un mensaje de texto (un número de
teléfono, por ejemplo) con mayor rapidez. Oprima las teclas correspondientes a los
dígitos que quiere marcar y luego regrese manualmente al modo de entrada de
texto que corresponda.
Modo de símbolos
El modo de símbolos le permite introducir varios símbolos o caracteres especiales.
Para introducir un símbolo, oprima la tecla
. Use las Teclas de Navegación para
resaltar el símbolo que desea y oprima la Tecla OK
.
Modo ABC
Este modo le permite introducir letras oprimiendo la tecla etiquetada con la letra
requerida.
Uso del modo ABC
Utilice las teclas alfanuméricas para introducir el texto.
1 Oprima la tecla que tenga impresa la letra deseada.
2 Para insertar un espacio, oprima la tecla una vez. Para borrar letras, oprima
la Tecla Borrar/Volver
. Mantenga oprimida la Tecla Borrar/Volver
para borrar todo el texto introducido.
NOTA: Consulte la tabla a continuación para más información acerca de
los caracteres disponibles con las teclas.
15
Funciones generales
Tecla
Caracteres en orden de aparición
Mayúsculas Minúsculas
11
A Á B C 2 a á b c 2
D E É F 3 d e é f 3
G H I Í 4 g h i í 4
J K L 5 j k l 5
M N Ñ O Ó 6 m n ñ o ó 6
P Q R S 7 p q r s 7
T U Ú Ü V 8 t u ú ü v 8
W X Y Z 9 w x y z 9
Tecla de espacio,
0 (mantener presionado)
Tecla de espacio,
0 (mantener presionado)

16
Menú En llamada
Durante una llamada
El teléfono brinda una cantidad de funciones de control que pueden utilizarse
durante una llamada. Para acceder a estas funciones durante una llamada, oprima
la Tecla de Selección Izquierda
Opcions.
Hacer una segunda llamada
Es posible seleccionar un número de la Contactos y hacer una segunda llamada.
1 Oprima la Tecla de Selección Izquierda Opcions y seleccione Contactos.
2 Resalte el contacto y oprima la Tecla Enviar para hacer una segunda
llamada.
Alternar entre dos llamadas
Cuando existen dos llamadas activas, puede alternar entre una y otra a través uno
de los siguientes tres métodos:
1 Oprima la Tecla Enviar .
2 Oprima la Tecla de Selección Izquierda Opcions y luego seleccione
Intercambiar llamadas.
Menú En llamada

17
Menú En llamada
Responder una llamada entrante
Para responder una llamada entrante cuando el teléfono está sonando, oprima la
Tecla Enviar
.
El teléfono también puede advertirle que tiene una llamada entrante mientras está
respondiendo otra llamada.
Suena un tono en el auricular y la pantalla muestra que una segunda llamada está
en espera. Esta función, conocida como Llamada En Espera, sólo estará disponible
si su red la admite. Si la llamada en espera está activada, es posible poner en
espera la primera llamada y contestar la segunda oprimiendo la Tecla Enviar
.
Rechazar una llamada entrante
Puede rechazar una llamada entrante sin responderla, simplemente presione la
Tecla Finalizar/Encender
y la Tecla de Selección Derecha .
Silenciar el micrófono
Durante una llamada, puede silenciar el micrófono si oprima la Tecla de Selección
Derecha
Silencio. Se puede anular el silencio del teléfono al oprimir la Tecla
de Selección Derecha
No sil. Si silencia el teléfono, la persona que lo llama
no podrá oírlo, pero usted sí la oirá.
Usando el altavoz
Puede usar el altavoz integrado durante una llamada presionando la Tecla Altavoz
. El altavoz se desactiva automáticamente cuando finaliza la llamada.
Advertencia: Debido al aumento en el nivel del volumen, no coloque el
teléfono cerca de su oído mientras está activado el altavoz.

18
Contactos
Lista de contactos
Este menú permite guardar y administrar información sobre las direcciones de los
contactos. La Lista de contactos le permite agregar nuevas direcciones o buscar las
direcciones de contactos guardadas por nombre.
Para acceder Lista de contactos, desde la pantalla de espera, oprima la Tecla de
Selección Izquierda
Menú, Contactos y Lista de contactos.
Nuevo contacto
Este menú permite agregar un nuevo contacto a la Lista de contactos. Puede
ingresar información de contactos incluido nombre, números de teléfono, elementos
de información de grupos, notas, timbres y fotos de ID del contacto.
Para acceder Nuevo contacto, desde la pantalla de espera, oprima la Tecla de
Selección Izquierda
Menú, Contactos y Nuevo contacto.
Grupos
Este menú permite administrar información sobre los grupos. También puede
configurar un tono de timbre para un grupo determinado.
Cuando reciba una llamada de una dirección de contacto perteneciente a ese grupo
y no haya un tono de timbre configurado para esa dirección de contacto específica,
escuchará el tono de timbre elegido.
Para acceder Grupos, desde la pantalla de espera, oprima la Tecla de Selección
Izquierda
Menú, Contactos y Grupos.
Contactos

19
Contactos
Lista de marcación rápida
Este menú permite configurar los números de marcación rápida. Se puede
seleccionar un número del 2 al 9 como marcación rápida.
Para acceder Lista de marcación rápida, desde la pantalla de espera, oprima
la Tecla de Selección Izquierda
Menú, Contactos y Lista de
marcación rápida.
Administración de la tarjeta SIM
Este menú permite copiar información de la tarjeta SIM al teléfono y viceversa. Si
un nombre es duplicado durante la función de copiar, la información también se
duplica. También puede borrar información de la tarjeta SIM.
Para acceder Administración de la tarjeta SIM, desde la pantalla de espera, oprima
la Tecla de Selección Izquierda
Menú, Contactos y Administración
de la tarjeta SIM.
Número propio
Muestra su número personal.
Para acceder Número propio, desde la pantalla de espera, oprima la Tecla de
Selección Izquierda
Menú, Contactos y Número propio.
Mi tarjeta de visita
Este menú muestra su tarjeta de visita almacenada en su teléfono. También puede
borrarla o editarla.
Para acceder Mi tarjeta de visita, desde la pantalla de espera, oprima la Tecla de
Selección Izquierda
Menú, Contactos y Mi tarjeta de visita.

20
Mensajes
Este menú incluye funciones relacionadas con los servicios SMS (servicio de
mensajes cortos), MMS (servicio de mensajes multimedia) y Correo de voz, así como
con los mensajes de servicio de la red.
Create message
1 Desde la pantalla de espera, oprima la Tecla de Selección Izquierda
Menú.
2 Seleccione Mensajes .
3 Oprima Nuevo mensaje.
NOTA: Si inserta un archivo de imagen, audio o video al escribir un
mensaje multimedia, el tiempo de carga del archivo será de unos 5
segundos. No podrá activar ninguna tecla durante el tiempo de carga.
Cuando se complete la carga del archivo, podrá continuar a escribir su
mensaje de multimedia.
Editar un mensaje
Las siguientes opciones están disponibles al editar un mensaje.
Usando Insertar
Mientras introduzca texto, oprima la Tecla de Selección Derecha Insertar.
Las siguientes opciones están disponibles:
•
Símbolo: Permite insertar varios símbolos en el mensaje. Desplácese por las
páginas con la Tecla de Selección Izquierda
y la Tecla de Selección
Derecha
.
Mensajes

21
Mensajes
•
Imagen: Permite seleccionar una imagen e insertarla usando las Teclas de
Navegación. Se puede obtener una vista previa de la imagen seleccionada al
oprimir la Tecla de Selección Derecha
Ver.
•
Audio: Permite insertar un archivo de audio de los archivos de audio guardados.
•
Video: Permite insertar un clip de video de los archivos de video guardados.
•
Grabar nuevo audio: Permite grabar un nuevo clip de audio al presionar la Tecla
OK
Grabar. Antes de comenzar la grabación, oprima la Tecla de Selección
Izquierda
Opciones para configurar las opciones (a continuación). Después
de grabar el nuevo clip de audio, puede borrarlo al oprimir la Tecla de Selección
Izquierda
Descartar.
Calidad: Permite establecer la calidad del audio en Fino, Normal o Economía.
•
Plantilla
Texto: Permite introducir las frases que usa con más frecuencia en los
mensajes de texto fácilmente.
Multimedia: Permite crear plantillas multimedia preestablecidas (
Menú
> Mensajes
> Config. de mensaje > Mensaje multimedia >
Plantillas MMS > Nuevo).
Firma: Permite insertar la firma que haya creado.
•
Más: Permite insertar vCard, vCalendar, vNote, vTask o Contacto.
NOTA: vCard, vCalendar, vNote y vTask se crean por las funciones
Contactos, Calendario, Bloc de notas y Tareas, respectivamente.

22
Mensajes
Usar opciones
Mientras introduce texto, oprima la Tecla de Selección Izquierda Opciones.
•
Modo de entrada de texto: Establece el modo de entrada de texto.
•
Ajustes de entrada de texto
Idioma de entrada de texto: Permite establecer el idioma de entrada de texto
en inglés o español.
Lista de palabras T9 más probables: Muestra las palabras más probables a
medida que escribe.
Predicción de palabra T9: Permite que el teléfono predicta la siguiente
palabra cuando escribe en modo T9.
Diccionario T9: Permite agregar, eliminar, restaurar y modificar las palabras.
Guardar en borradores: Guarda el mensaje en Borradores.
Cancelar mensaje: Permite salir del modo de entrada de texto sin guardar el
mensaje.
Enviar un mensaje
Una vez completado el mensaje oprima la Tecla OK Enviar para seleccionar un
destinatario.
•
Introduzca los destinatarios. Para obtener más opciones, oprima la Tecla de
Selección Izquierda
Opciones. En este menú, puede elegir una de las
siguientes opciones.
Introducir el número: Permite introducir el número telefónico con el teclado.
Introducir e-mail: Permite introducir la dirección de correo electrónico en lugar
del número de teléfono.
Insertar símbolo: Permite introducir símbolos.
Grupos: Muestra los contactos en los grupos guardados.
Mensajes recientes: Permite elegir un contacto de los mensajes recientes.

23
Mensajes
Llamadas recientes: Permite elegir un contacto de las llamadas recientes.
Opciones de entrega: Permite elegir entre las opciones Agregar a CC y
Agregar a CCO.
Guardar en borradores: Permite guardar el mensaje seleccionado en
Borradores.
Modo de entrada de texto: Permite cambiar el modo de entrada de texto.
Ajustes de entrada de texto: Permite establecer las opciones de Idioma
de entrada, Lista de palabras T9 más probables, Predicción de palabra T9 y
Diccionario T9.
Cancelar mensaje: Permite cancelar el mensaje.
Buzón de entrada
Se le dará una alerta cuando reciba un mensaje. Los mensajes nuevos se
almacenan en el Buzón de entrada. En el Buzón de Entrada, puede identificar cada
mensaje mediante iconos. Si se le notifica que recibió un mensaje multimedia,
puede descargar todo el mensaje multimedia seleccionándolo en el Buzón de
entrada.
Para acceder al Buzón de entrada, desde la pantalla de espera, oprima la Tecla de
Selección Izquierda
Menú > Mensajes > Buzón de entrada.
Al presionar la Tecla de Selección Derecha
Resp., puede responder al
remitente del mensaje.
Mientras está viendo el Buzón de Entrada, oprima la Tecla de Selección Izquierda
Opciones para las siguientes opciones:
•
Agregar a contacto: Permite guardar el número de teléfono del remitente en la
Lista de Contactos.
•
Borrar: Permite borrar el mensaje actual.
•
Reenviar: Permite reenviar el mensaje seleccionado a otra persona.

24
Mensajes
•
Copiar en SIM/a teléfono: Puede copiar el mensaje al teléfono o a la tarjeta SIM
dependiendo de donde está guardado el mensaje.
•
Mover a la tarjeta SIM/al teléfono: Puede mover el mensaje al teléfono o a la
tarjeta SIM dependiendo de donde está guardado el mensaje.
•
Seleccionar varios: Permite seleccionar varios mensajes para borrarlos.
•
Ordenar por: Permite ordenar los mensajes por fecha, remitente, leído/no leído o
asunto.
•
Detalles del mensaje: Puede ver la siguiente información acerca de los mensajes
recibidos: Tipo, Asunto, Desde y Tiempo.
•
Borrar todos los mensajes leídos: Permite borrar todos los mensajes leídos.
Borradores
Le permite ver y editar los mensajes guardados como borradores.
Para acceder Borradores, desde la pantalla de espera, oprima la Tecla de
Selección Izquierda
Menú, Mensajes , y Borradores. Oprimiendo la
Tecla de Selección Derecha
Borrar le permite eliminar el mensaje.
Mientras está viendo Borradores, oprima la Tecla de Selección Izquierda
Opciones para las siguientes opciones:
•
Seleccionar varios: Permite seleccionar varios mensajes de la lista para
borrarlos.
•
Detalles del mensaje: Permite ver los detalles del mensaje.

25
Mensajes
Buzón de salida
El Buzón de salida es la ubicación en la que se almacenan los mensajes enviados
recientemente. Al oprimir la Tecla Enviar
, puede realizar una llamada al
número del destinatario del mensaje seleccionado.
Si el mensaje no envía del Buzón de salida, recibirá una alerta de sonido junto con
un aviso de falla de envío del mensaje en la pantalla.
Se reintentará enviar el mensaje fallido y, después de dos intentos sin éxito, ya no
volverá a enviarlo en forma automática.
Para acceder al Buzón de salida, desde la pantalla de espera, oprima la Tecla de
Selección Izquierda
Menú, Mensajes , y Buzón de salida.
Las siguientes opciones son disponible para el Buzón de salida al oprimir la Tecla
de Selección Izquierda
Opciones:
•
Ver estado: Muestra el estado del mensaje.
•
Borrar: Borra el mensaje seleccionado.
•
Editar: Permite editar el mensaje seleccionado.
•
Seleccionar varios: Permite seleccionar varios mensajes de la lista para
borrarlos.
•
Ordenar por: Permite ordenar los mensajes del Buzón de salida por remitente o
fecha.
•
Detalles del mensaje: Permite ver los detalles del mensaje.
Oprima la Tecla de Selección Derecha
Reenviar para enviar el mensaje
seleccionado a otra persona.

26
Mensajes
Configuración de mensaje
Para acceder a la configuración de mensajes, desde la pantalla de espera, oprima
la Tecla de Selección Izquierda
Menú, Mensajes , y Config. de
mensaje.
Alerta de mensajes
Permite establecer los Sonidos, Volumen, Tipo de alerta e Intervalo de la alerta.
Guardar en
Permite elegir si desea guardar mensajes en la Tarjeta SIM o el Teléfono.
Firma
Permite crear, editar y borrar su firma, la cual puede configurarse para enviar con
sus mensajes enviados.
Mensaje de texto
Permite establecer sus preferencias para mensajes de texto.
Las siguientes opciones son disponibles:
•
Plantillas de texto: Mensajes predefinidos que se pueden enviar rápidamente.
Oprima la Tecla de Selección Izquierda
Opciones para acceder a las
siguientes opciones:
Enviar: Permite enviar la plantilla seleccionada vía mensaje.
Borrar: Permite borrar el mensaje de plantilla seleccionado.
Editar: Permite editar el mensaje de la plantilla seleccionada.
Borrar todo: Permite borrar todos los mensajes de la carpeta.
Cancelar: Vuelve al menú de Mensaje de texto.
•
Número de centro de mensajes: Le permite ver el número de teléfono del
Centro de mensajes.
•
Insertar firma: Permite insertar su firma en mensajes salientes.

27
Mensajes
Mensaje multimedia
Permite establecer sus preferencias para mensajes multimedia.
Las siguientes opciones son disponibles:
•
Plantillas MMS: Permite agregar, editar y borrar plantillas multimedia. Oprima la
Tecla de Selección Derecha
Nuevo para crear una plantilla nueva. Presione
la Tecla de Selección Izquierda
Opciones para acceder a las siguientes
opciones disponibles:
Enviar: Permite enviar el mensaje seleccionado a través de mensaje
multimedia.
Borrar: Permite borrar la plantilla del mensaje seleccionado.
Editar: Permite editar la plantilla del mensaje seleccionado.
Cambiar nombre: Permite cambiar el nombre de la plantilla del mensaje
seleccionado.
Borrar todo: Permite borrar todos los mensajes de una sola vez.
Correo de voz
Muestra el número de teléfono utilizado para su servicio de correo de voz. Por favor
sólo cambie el número si se lo dirige su proveedor de servicios.

28
Llamadas recientes
Este menú le permite ver la lista de llamadas recibidas recientemente.
Para acceder a Llamadas recientes desde la pantalla de espera, oprima la Tecla de
Selección Izquierda
Menú y Llamadas recientes .
Puede acceder a los siguientes menús: Todas llamadas, Llamadas perdidas,
Llamadas realizadas y Llamadas recibidas.
Llamadas recientes

29
Accesibilidad
Este menú permite controlar fácilmente varias opciones de accesibilidad.
Presione la Tecla de Selección Izquierda
Menú y seleccione
Accesibilidad.
Lectura de menú
Esta opción permite al teléfono leer en voz alta los menús que son accedidos.
Multimedia
Permite controlar el volumen de multimedia.
Texto grande
Le permite establecer un tamaño grande de texto. Seleccione entre Encendido o
Apagado.
Invertir color
Le permite establecer el contraste de color para visualizar mejor la pantalla.
Seleccione entre Encendido o Apagado.
Sonido mono
Le permite habilitar o deshabilitar la función de sonido mono.
Modo senior
Permite activar o desactivar el modo senior. El Modo senior mejora las altas
frecuencias para reducir los efectos de la pérdida de la audición.
TTY
Permite activar el modo TTY para contactar con otros dispositivos de TTY. Seleccione
entre TTY llena, Conversar TTY, Escuchar TTY o TTY apagado.
Accesibilidad

30
Accesibilidad
Prótesis auditiva
Le permite habilitar o deshabilitar la función de Prótesis auditiva.
Comando de voz
Le permite configurar las opciones del Comando de voz.

31
Bloc de notas
Es posible crear un máximo de 30 notas.
Para acceder al Bloc de notas, desde la pantalla de espera, presione la Tecla de
Selección Izquierda
Menú y seleccione Bloc de notas.
1 Oprima la Tecla de Selección Izquierda Nuevo para crear una nueva nota.
2 Escriba la nota y oprima la Tecla OK Guardar para guardarla.
Bloc de notas
32
Mi carpeta
Audio
Para acceder Audio, desde la pantalla de espera, oprima la Tecla de Selección
Izquierda
Menú, Mi carpeta y Audio.
•
Comprar tonos de timbre: Permite comprar tonos de timbre.
•
Grabar voz: Permite grabar notas de voz.
•
Los archivos de audio guardados aparecen en la lista.
Imágenes
Para acceder Imágenes, desde la pantalla de espera, oprima la Tecla de Selección
Izquierda
Menú, Mi carpeta e Imágenes.
•
Comprar gráficos: Le permite comprar imágenes.
•
Se muestran los archivos de imagen guardados en el teléfono.
Video
Para acceder Video, desde la pantalla de espera, oprima la Tecla de Selección
Izquierda
Menú, Mi carpeta y Video.
•
Se muestran los archivos de video guardados en el teléfono.
NOTA: La administración de derechos digitales en ocasiones restringe
algunas funciones, como enviar a otros.
Mi carpeta

33
Mi carpeta
Otros archivos
Los archivos de formato indefinido (como .vcs, .vcf, entre otros) que reciba por
correo electrónico se guardarán en esta carpeta.
Para acceder Otros archivos, desde la pantalla de espera, oprima la Tecla de
Selección Izquierda
Menú, Mi carpeta y Otros archivos.
Están disponibles las siguientes opciones al oprimir la Tecla de Selección
Izquierda
Opciones:
•
Enviar vía: Envía el archivo seleccionado mediante Mensaje.
•
Borrar: Permite borrar el archivo seleccionado.
•
Mover: Permite mover el archivo seleccionado.
•
Copiar: Permite copiar el archivo seleccionado.
•
Renombrar: Permite editar el nombre del archivo seleccionado.
•
Seleccionar varios: Permite seleccionar múltiple archivos a la vez para realizar
varias funciones.
•
Ordenar por: Permite ordenar los archivos por Nombre, Fecha y Tipo.
•
Información del archivo: Permite ver información sobre el archivo seleccionado o
el espacio utilizado en su teléfono.
Admin. de archivos
Esta función le permite ver el contenido en la memoria interna de su teléfono.
Para acceder Admin. de archivos, desde la pantalla de espera, oprima la Tecla de
Selección Izquierda
Menú, Mi carpeta y Admin. de archivos.

34
Herramientas
Comando de voz
El Comando de voz es la función por la que el mecanismo de reconocimiento de voz
del teléfono identifica la voz del usuario y ejecuta los comandos solicitados. Cuando
el usuario opera la función Comando de voz, hay cuatro comandos posibles, Call
< Name or Number >, Listen Voicemail, Missed Calls, y Time & Date. Para activar
la función de comando de voz, presione la Tecla Volver/Comando de voz
mientras el teléfono esta en modo de espera o presione la Tecla de Selección
Izquierda
Menú, Herramientas y Comando de voz.
1 Call <Name or Number>: Esta función se activa sólo si el usuario dice el
comando “Call” (Llamar) seguido por el nombre almacenado en la agenda o el
número de teléfono específico. Tenga en cuenta que el ruido de interferencia
puede ocasionar problemas para mostrar los resultados. Además, el usuario tiene
la opción de seleccionar un tipo de número al final como “mobile” (móvil), “home”
(casa) o “work” (trabajo).
2 Listen voicemail: Este comando se activa cuando el usuario dice “Listen
Voicemail” (Escuchar correo de voz). Se conectará con su Correo de voz
automáticamente.
3 Missed calls: Este comando se activa cuando el usuario dice “Missed
Calls”(Llamadas perdidas). El teléfono móvil presenta la lista de llamadas
perdidas.
•
Comandos de seguimiento disponibles
Yes (Sí): Permite marcar la llamada.
No: Permite mover al siguiente resultado.
Herramientas

35
Herramientas
Cancel (Cancelar): Permite volver al menú principal de Comandos de Voz.
Exit (Salir): Permite finalizar la función de Comandos de Voz.
Next (Siguiente): Permite mover al siguiente resultado.
4 Time & date: Este comando se activa cuando el usuario dice “Time & Date”
(Fecha y Hora). El teléfono muestra la hora y la fecha actual.
Opciones de Comando de voz
Cuando se activa la opción Comando de voz, puede oprimir la Tecla de Selección
Izquierda
Opciones para ver las siguientes opciones:
•
Modo
Velocidad: El Comando de voz es abreviado.
Normal: El Comando de voz se reproduce normalmente.
•
Mejor coincidencia
1 coincidencia: Se muestra la coincidencia más probable para encontrar un
número en la agenda.
4 coincidencias: Se muestran los cuatro nombres con mayor coincidencia
para encontrar un nombre en la agenda.
•
Sensibilidad
Alto: El Comando de voz del usuario y el sonido del entorno raramente afectan
el funcionamiento y el rendimiento del mecanismo de reconocimiento de voz.
Medio: El Comando de voz del usuario y el sonido del entorno normalmente
afectan el funcionamiento del mecanismo de reconocimiento de voz.
Bajo: El Comando de voz del usuario y el sonido del entorno afectan
considerablemente el funcionamiento del mecanismo de reconocimiento de voz.

36
Herramientas
•
Modo de altavoz
Activación automática: Cuando selecciona esta opción, el altavoz se enciende
y el sonido es suficientemente alto para ser escuchado cuando el teléfono está
lejos del oído, en un lugar distante.
Apagado: Cuando selecciona esta opción, el altavoz se apaga y el sonido viene
del auricular y es más bajo y no puede escucharse cuando el teléfono está
lejos del oído, en un lugar distante.
•
Alerta de llamada
Sólo timbre: Esta opción permitirá que se lea en voz alta el nombre de la
persona que llama. Sólo escuchará el tono de timbre seleccionado.
Timbre después de nombre: Esta opción permitirá que se lea en voz alta el
nombre de la persona que llama una vez y luego comenzará a sonar.
Repetición de nombre: Esta opción permitirá que se lea en voz alta el nombre
de la persona que llama de manera continua.
Calculadora
La función Calculadora permite realizar cálculos matemáticos simples.
Para acceder Calculadora, desde la pantalla de espera, oprima la Tecla de
Selección Izquierda
Menú, Herramientas y Calculadora.
Tareas
Esta función le permite guardar y administrar tareas.
Para acceder Tareas, desde la pantalla de espera, oprima la Tecla de Selección
Izquierda
Menú, Herramientas y Tareas.
1 Para agregar un nuevo elemento de tarea, oprima la Tecla de Selección
Izquierda
Nuevo.
2 Introduzca información de la Fecha límite, Nota, Prioridad y el Estado.

37
Herramientas
3 Oprima la Tecla de Selección Izquierda Guar. para guardar el elemento
Tarea. Las siguientes opciones son disponibles en la lista de Tareas al oprimir la
Tecla de Selección Izquierda
Opcions:
•
Marcar ‘Finalizada’: Permite cambiar el estado de la tarea seleccionada a
Finalizada.
•
Editar: Permite editar una tarea guardada.
•
Borrar: Permite borrar la tarea seleccionada.
•
Borrado selectivo: Permite borrar Todos los completados/Todas las tareas
pasadas/Todas las tareas de manera selectiva.
•
Enviar tarea por: Permite enviar la tarea seleccionada por Mensaje de texto,
Mensaje multimedia.
•
Seleccionar varios: Permite seleccionar varias tareas.
•
Ver calendario: Permite ver el Calendario.
Cronómetro
Este menú le permite registrar el tiempo transcurrido de un evento. Puede mostrar
la duración de una vuelta individual (hasta 20 vueltas) y el tiempo total.
Para acceder Cronómetro, desde la pantalla de espera, oprima la Tecla de
Selección Izquierda
Menú, Herramientas y Cronómetro.
•
Mostrar último: Muestra el último tiempo grabado (sólo está disponible si el
tiempo anterior no se reinició).
•
Nuevo tiempo
1 Para iniciar el cronometraje, oprima la Tecla OK Inicio. El tiempo continuo
se muestra como HH.MM.SS.hh (horas, minutos, segundos, centésimas de
segundo).

38
Herramientas
2 Durante el cronometraje, puede registrar un tiempo de vuelta individual si oprima
la Tecla de Selección Derecha
Vuelta. Pueden registrarse hasta 20
tiempos de vuelta.
3 Para detener o reiniciar el cronometraje, oprima la Tecla OK de nuevo.
4 Para restaurar el cronómetro, oprima la Tecla de Selección Derecha
Restaur. después de detener el tiempo, o bien, para guardar el cronómetro,
oprima la Tecla de Selección Izquierda
Opciones y después seleccione
Guardar.
•
Tiempos guardados: Permite ver una lista de los registros de tiempo guardados.
Calculadora de propinas
Esta función permite calcular la propina según el total de la factura y también dividir
el total de la factura entre la cantidad de personas.
Para acceder la Calculadora de propinas, desde la pantalla de espera, oprima la
Tecla de Selección Izquierda
Menú, Herramientas y Calc. de
propinas.
1 Ingrese las cantidades para Total ($), Propina (%) y Dividir.
2 Las cantidades para Propina ($) y Debe ($) serán calculadas automáticamente.
Conversor de unidad
Esta función permite convertir unidades de medida.
Se pueden convertir seis tipos de unidades: Área, Longitud, Peso, Temperatura,
Volumen y Velocidad.
Para acceder Conversor de unidad, desde la pantalla de espera, oprima la Tecla de
Selección Izquierda
Menú, Herramientas y Conversor de unidad.

39
Herramientas
Grabador de voz
Puede grabar un clip de audio en este menú. El archivo de audio grabado se guarda
automáticamente en el menú Audio.
Para acceder a la función grabadora de voz, mantenga presionada la Tecla Borrar/
Atrás
mientras el teléfono está en modo de espera o presione la Tecla de
Selección Izquierda
Menú, Herramientas y Grabador de voz.
Las siguientes opciones están disponibles al oprimir la Tecla de Selección
Izquierda
Opciones:
•
Modo de grabación: Establece el modo de grabación en Modo MMS o Modo
general.
•
Calidad: Permite establecer la calidad de una grabación de audio. Seleccione
entre Fino, Normal y Economía.
Presione la Tecla de Selección Derecha
Galería para abrir la galería de audio.

40
Acceso web
El acceso web es uno de los servicios proporcionados por su proveedor de servicios
y brinda acceso a todas las cosas interesantes que se pueden hacer con el teléfono
inalámbrico.
NOTA:
•
Compruebe la disponibilidad de servicios, precios y tarifas con su
operador de red o con el proveedor de los servicios que desee usar.
Los proveedores de servicio también le darán instrucciones sobre cómo
utilizar sus servicios.
•
Para abrir una cuenta de Internet, comuníquese con su proveedor de
servicios.
Inicio del navegador
Para iniciar el navegador desde la pantalla de espera, oprima la Tecla de Selección
Derecha
Acceso web. También puede oprimir la Tecla de Selección
Izquierda
Menú y seleccione Acceso web con las Teclas de Navegación.
Para salir del navegador en cualquier momento, oprima la Tecla Finalizar/
Encender
.
Acceso web

41
Acceso web
Uso del navegador
Una vez que se conecte a Internet, las siguientes opciones de menú estarán
disponibles cuando oprima la Tecla de Selección Izquierda
Opciones:
•
Zoom: Permite acercar y alejar la página para ver mejor.
•
Casa: Lo dirige la la página de inicio.
•
Introduzca URL: Permite introducir una dirección para la página web que desee
visitar.
•
Enviar enlace: Permite enviar el enlace por mensaje.
•
Favoritos: Puede agregar o guardar la página actual a Favoritos o ver los
Favoritos guardados.
•
Modo de navegación: Permite seleccionar Volver, Reenviar y Actualizar.
•
Buscar texto: Permite buscar el texto.
•
Páginas recientes: Permite ver el historial de sitios de web visitados
recientemente.
•
Configuraciones: Permite establecer las opciones para páginas de web,
apariencia y la red.
Menús del navegador
Puede navegar por Internet usando las teclas del teléfono o el menú del navegador.
Uso de las teclas de navegación
Al navegar por Internet, el funcionamiento de las Teclas de Navegación es similar al
que presentan en el modo de espera.

42
Alarma
Esta función sirve para configurar múltiples alarmas por separado. También sirve
para establecer el sonido de la alarma, la hora y el intervalo de repetición. Si no hay
alarmas establecidas, oprima la Tecla de Selección Izquierda
Nuevo para
agregar una alarma nueva.
Para acceder a la alarma desde la pantalla de espera, presione la Tecla de
Selección Izquierda
Menú y seleccione Alarma.
•
Hora: Introduzca la hora de alarma deseada especificando la hora y minutos.
También puede elegir una cantidad de tiempo predefinido (15 minutos después,
30 minutos después, 45 minutos después, 1 hora después, Apagado).
•
Repetir: Seleccione el modo de repetir deseado (Una vez, Diariamente, Lun ~ Vie,
Sáb ~ Dom, Seleccione el día de la semana).
•
Tono de alarma: Oprima la Tecla OK Lista para acceder a la lista de tonos
de alarma disponibles.
•
Volumen: Establezca el volumen de las alarmas con la Tecla de Volumen.
•
Tipo: Seleccione el tipo de alerta de llamada entre Timbrar, Vibrar, Timbrar y vibrar,
Vibrar después de timbrar.
•
Nota: Permite introducir el nombre de la alarma.
•
Intervalo de alarma: Seleccione el intervalo para posponer entre 5 minutos, 15
minutos, 30 minutos, 45 minutos, 1 hora y Apagado.
Oprima la Tecla de Selección Izquierda
Guardar para guardar la alarma.
Alarma
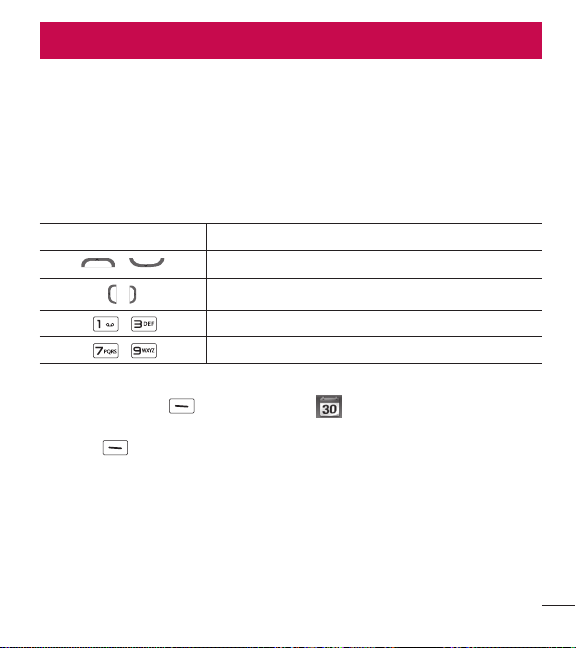
43
Calendario
Cuando acceda a este menú, se mostrará un calendario. El cursor rojo cuadrado
se utiliza para ubicar un día en particular. La barra inferior del calendario indica las
citas guardadas (si hay alguno) para ese día.
Esta función permite llevar un registro de las citas. El teléfono puede emitir un tono
de alarma si ha sido configurado para un elemento específico del calendario.
La siguiente tabla muestra las teclas que se pueden usar para navegar el
Calendario:
Tecla
Descripción
/
Semanal
/
Diario
/ Anualmente
/ Mensual
Para acceder al Calendario, desde la pantalla de espera, presione la Tecla de
Selección Izquierda
Menú y seleccione Calendario.
Las siguientes opciones son disponibles cuando un oprima la Tecla de Selección
Izquierda
Opciones:
•
Fijar feriado: Permite establecer fechas específicas y mostrarlas como días
festivos en el calendario.
•
Vista semanal: Permite ver el calendario en vista de semana.
•
Ir a fecha: Permite ir directamente a una fecha determinada.
•
Configuraciones: Permite establecer varias configuraciones del calendario.
Calendario

44
Configuración
Audio y tonos de timbre
Este menú permite configurar los ajustes de Audio y tonos de timbre de su teléfono.
Para acceder Audio y tonos de timbre, desde la pantalla de espera, oprima la Tecla
de Selección Izquierda
Menú, Configuración y Audio y tonos de
timbre.
Timbre
•
Sonidos: Permite fijar un sonido como tono de timbre para su teléfono.
•
Volumen: Permite controlar el volumen del tono de timbre.
•
Tipo de alerta: Admite tres tipos de alertas: Timbrar, Timbrar y vibrar, y Timbrar
después de vibrar.
NOTA: No es posible configurar pistas de música completas como tonos
de timbre ni de mensaje.
Tono de mensaje
•
Sonidos: Permite fijar un sonido como tono de mensaje para su teléfono.
•
Volumen: Permite controlar el volumen de la alerta de mensaje nuevo.
•
Tipo de alerta: Admite 4 tipos de alertas de mensajes: Silencio, Vibrar, Sólo
timbre, Timbrar y vibrar.
•
Intervalo de la alerta: Le permite establecer el intervalo de alerta a Una vez,
Cada 2 min, Cada 5 min, Cada 10 min o Cada 15 min.
Confi guración

45
Configuración
Tono de alerta
•
Sonidos: Permite seleccionar un conjunto de tonos de alerta. Admite 2 tipos de
tono de alerta: Tono de alerta 1 y Tono de alerta 2.
•
Volumen: Permite controlar el volumen de las alertas.
•
Tipo de alerta: Permite establecer los tonos de alerta en Timbrar o Silencio.
Tono de teclado
Este menú permite controlar el volumen del tono del teclado.
Multimedia
Este menú permite controlar el volumen multimedia.
Llamada
Este menú permite controlar el volumen de las llamadas.
Config. del teléfono
Este menú permite configurar el teléfono. Para acceder Config. del teléfono,
desde la pantalla de espera, oprima la Tecla de Selección Izquierda
Menú,
Configuración
y Config. del teléfono.
Idiomas
Permite cambiar el idioma para el texto que se visualiza en su teléfono. Este cambio
también afectará al Modo de entrada de idioma.
Establecer teclas de acceso directo
Permite modificar las preferencias sobre las teclas de atajos actualmente asignadas
a las Teclas de Navegación (cuando se encuentre en el modo de espera).

46
Configuración
Bloqueo automático del teclado
Permite bloquear automáticamente el teclado después de un tiempo definido de luz
de fondo de la pantalla.
(Tecla de Selección Izquierda
Menú > Ajustes > Pantalla >
Tiempo de luz de fondo >
Pantalla).
Puede alternar el bloqueo automático de teclas a encendido o apagado.
Modo de avión
Permite usar sólo las funciones del teléfono que no requieran el uso de la red
inalámbrica cuando esté en un avión o en lugares en los que se prohíbe usar la red
inalámbrica. Si ajusta el Modo de avión como activado, el icono de Modo de avión
se mostrará en la pantalla en lugar del icono de señal de red.
•
Encendido: No se pueden realizar (ni recibir) llamadas, incluidas las de
emergencia, ni usar otras funciones que requieran cobertura de red.
•
Apagado: Permite el Modo de avión para acceder a la red.
Seguridad
Existen varios códigos y contraseñas para proteger las funciones y la configuración
del teléfono.
•
Bloqueo de teléfono: Usted puede usar un código de seguridad para prevenir
el uso no autorizado del teléfono. Si fija el Bloqueo del Teléfono a al encender,
el teléfono solicitará un código de seguridad cada vez que lo encienda. Si
fija el Bloqueo del Teléfono a Bloquear teléfono ahora el teléfono se bloquea
inmediatamente.
•
Cambiar códigos: La función Cambiar códigos permite cambiar el código actual
a uno nuevo. Debe introducir el código actual antes de especificar uno nuevo.
Para eso, deberá ingresar la contraseña actual y luego especificar la nueva. Puede
cambiar los códigos de acceso por: Código de seguridad.

47
Configuración
Restaurar configuraciones
Esta función permite restaurar la configuración de fábrica. Para hacerlo, se necesita
introducir el código de seguridad.
•
Reinicio maestro: Restaura los ajustes del teléfono (por ej.: Audio, Pantalla,
Idioma) a sus valores predeterminados.
•
Borrado maestro: Borra el contenido descargado o creado por el usuario (por
ejemplo, imágenes o videos) del teléfono.
Teléfono
Borra de la memoria del teléfono todas las imágenes, el audio y los
videos descargados o creados por el usuario. Borra la información
personal almacenada en la memoria del teléfono (por ejemplo, Lista de
contactos, Mensajes, Tareas, Alarmas, y Citas de calendario) a los valores
predeterminados. Restaura la configuración almacenada en la memoria del
teléfono a los valores predeterminados.
Pantalla
Este menú permite configurar los ajustes de Pantalla.
Para acceder a Pantalla, desde la pantalla de espera, oprima la Tecla de Selección
Izquierda
Menú, Configuración y Pantalla.
Fondos de pantalla
Este menú permite fijar una imagen o un color como fondo de pantalla.
Fuentes
Este menú permite configurar el tamaño y el color de las fuentes que usa el
teléfono.

48
Configuración
Relojes y calendario
Esta función permite seleccionar un reloj o calendario para que aparezca en la
pantalla de espera.
Brillo
Puede configurar el brillo de la pantalla y el teclado.
Tiempo de luz de fondo
Permite establecer el tiempo que debe permanecer encendida la luz de fondo de la
pantalla y el teclado.
Estilos de menú
Es posible establecer el estilo del menú principal como vista de Icono o Lista.
Llamada
Este menú permite configurar los ajustes de Llamada.
Para acceder a Llamada, desde la pantalla de espera, oprima la Tecla de Selección
Izquierda
Menú, Configuración y Llamada.
Enviar mi número
Este servicio de red permite establecer que se muestre o se oculte su número de
teléfono a la persona que está llamando.
Si prefiere usar distintos valores de configuración para diferentes proveedores de
servicios, puede seleccionar Fijado por la red.

49
Configuración
Modo de respuesta
Le permite determinar cómo contestar el teléfono.
•
Cualquier tecla: Permite contestar una llamada entrante presionando cualquier
tecla, excepto la Tecla Finalizar/Encender
, Teclas de Volumen (Teclas de
Navegación Superior/Inferior)
, o la Tecla de Selección Derecha .
•
Solamente tecla enviar: Permite responder una llamada entrante solamente al
oprimir la Tecla Enviar
o la Tecla de Selección Izquierda Aceptar.
Modo senior
Modo senior es una función que amplifica el sonido para gentes mayores de edad
para oir la voz mejor con el énfasis en la voz baja. Se utiliza para mejorar la calidad
de voz mientras está en el teléfono.
Se puede activar o desactivar el Modo senior.
Vibrar al conectarse
Permite elegir si desea que el teléfono vibre cuando se establece una conexión.
Duración de llamada
Le permite ver la información de la duración de llamada acerca de la última
llamada, las llamadas realizadas, las llamadas recibidas y todas llamadas.
Memoria
Este menú permite configurar los ajustes de Memoria.
Para acceder a Memoria, desde la pantalla de espera, oprima la Tecla de
Selección Izquierda
Menú, Configuración y Memoria.
Espacio utilizado
Esta función muestra el estado de la memoria del teléfono.

50
Configuración
•
Común (teléf.)
Esta función muestra el estado de la memoria del teléfono y la memoria utilizada
por Audio, Fotos, Video, Mensajes multimedia y otros tipos de archivos.
•
Reservada (teléf.)
Esta función muestra el estado de la memoria reservada que se utiliza para
Mensaje de texto, Contactos, Calendario, Tareas y Bloc de notas.
•
Tarjeta SIM
Esta función muestra el estado de la memoria de la tarjeta SIM.
Aplicaciones
Este menú permite ajustar la configuración de aplicaciones.
Para acceder al menú de configuración Aplicaciones, desde la pantalla de espera,
oprima la Tecla de Selección Izquierda
Menú, Configuración y
Aplicaciones.
Mensajes
Esta opción permite establecer la configuración de la opción de Mensajería.
Acceso web
Este menú permite configurar los ajustes del acceso web.
Aspecto
Puede elegir la configuración del aspecto del acceso web (Tamaño del texto,
Codificación de caracteres, Mostrar imagen).
Caché
Las páginas web visitadas almacenan información en la memoria del teléfono. Este
menú permite administrar esa función.
•
Borrar caché: Permite borrar todos los datos almacenados en la memoria caché.

51
Configuración
•
Permitir caché: Permite encender o apagar la memoria caché.
NOTA: La memoria caché es una memoria de búfer que permite
almacenar datos de forma temporal, especialmente los que provienen del
Internet.
Cookies
La información de los servicios a los que ha accedido está almacenada en lo que se
denomina Cookie.
Desde este menú, puede elegir Permitir cookies o Borrar cookies que ya contiene el
teléfono.
Borrar información de inicio de sesión
Borrar información de inicio de sesión. Puede borrar el historial de información de
identificación o contraseña que haya guardado anteriormente.
Configuración de pantalla
Puede cambiar la configuración de la pantalla del acceso Web (Modo de
procesamiento).
Seguridad
Se muestra una lista de certificados disponibles.
•
Certificados: Permite ver la lista de certificados y visualizarla en detalle.
•
Borrar sesión: Permite eliminar la sesión segura.
Modo de navegación
Puede cambiar los métodos de navegación del Acceso Web.
•
Navegación de 4 modos: El cursor del Acceso Web se desplaza o sigue los
enlaces.
•
Puntero del mouse: Puede mover el cursor como el puntero de un ratón.

52
Configuración
Emergente seguro
Puede activar o desactivar los elementos emergentes que indican si la página es
segura.
Teclas de acceso rápido
Si se activa, puede usar el Acceso Web de manera más rápida y conveniente con el
teclado del teléfono. Si se activan las Teclas de acceso rápido, se pueden utilizar los
siguientes atajos son disponibles:
1. Introduzca URL
3. Ver marcadores
5. Pantalla completa
7. Retroceder página
9. Ampliar
*. Página abajo
2. Esta página
4. Guía de acceso rápido
6. Páginas guardadas
8. Páginas recientes
0. Buscar texto
#. Reducir
Información del teléfono
Este menú permite ver datos como Mi número, Fabricante, Nombre del modelo, ID
del dispositivo, Versión de hardware, Versión del software, Idioma.
Para acceder a Información del teléfono, desde la pantalla de espera, oprima la
Tecla de Selección Izquierda
Menú, Configuración y Información
del teléfono.

53
Accesorios
Estos accesorios están disponibles para usarlos con su teléfono. (Los elementos
descritos podrían ser opcionales y venderse por separado).
•
Adaptador de viaje
•
Guía del Usuario
•
Batería
NOTA:
•
Utilice siempre accesorios LG originales. Si no lo hace, la garantía puede
anularse.
•
Los accesorios pueden variar según la región; para mayor información,
consulte con la empresa o el agente de servicio técnico de su región.
Accesorios

54
Por su seguridad
El valor más elevado de la SAR para este modelo de teléfono cuando se lo probó
para usarse en el oído es de 1,22 W/kg y cuando se lo usa sobre el cuerpo, según
lo descrito en esta guía del usuario, es de 1,09 W/kg (las mediciones del uso en
el cuerpo varían en función de los modelos de los teléfonos y dependen de los
accesorios disponibles y los requisitos de la FCC).
Aun cuando puede haber diferencias entre los niveles de SAR de varios teléfonos
y en varias posiciones, todos ellos cumplen el requisito gubernamental para una
exposición segura.
La FCC ha otorgado una Autorización de equipo para este modelo de teléfono
con todos los niveles de SAR reportados y evaluados en cumplimiento de los
lineamientos de emisión de RF de la FCC. La información de la SAR sobre este
modelo de teléfono está archivada en la FCC y puede encontrarse en la sección
Display Grant de http://www.fcc.gov/oet/ea/fccid/ después de buscar FCC ID
ZNF329G.
•
Para reducir el riesgo de incendios o quemaduras, no exponga el dispositivo a una
temperatura mayor que 45 °C / 113 °F ni deseche en fuego o agua.
•
Para reducir el riesgo de incendios o quemaduras, no deseche el dispositivo en
fuego o agua.
•
No desarme, abra, aplaste, doble, deforme, perfore ni raye el teléfono.
•
Existe peligro de explosión si se reemplaza la batería en forma inadecuada.
Para reducir el riesgo de incendios o quemaduras, no desarme, aplaste, perfore,
cause cortocircuito a los contactos externos, exponga a una temperatura mayor
que 45 °C / 113 °F o deseche en fuego o agua. Mantenga este producto alejado
de la humedad excesiva y de temperaturas extremas. Mantenga la batería o
el dispositivo secos y alejados del agua o cualquier líquido, dado que puede
ocasionar un cortocircuito.
Por su seguridad

55
Por su seguridad
•
Evite usar el teléfono cerca de fuentes electromagnéticas intensas como hornos
microondas, altoparlantes, televisores y radios.
•
Use solo accesorios originales aprobados por el fabricante o accesorios que no
contengan metales. Utilice solamente accesorios de carga aprobados para cargar
el teléfono LG. La manipulación inadecuada del puerto de carga/accesorio y el uso
de un cargador no compatible pueden ocasionarle daños al teléfono y anular la
garantía.
•
Use sólo el cargador de batería aprobado. De lo contrario, podría ocasionar un
daño grave en su teléfono.
Reglamentaciones de compatibilidad con audífonos
(HAC) para dispositivos inalámbricos
El 10 de julio de 2003, el informe y orden de la Comisión Federal de
Comunicaciones (FCC) de los EE. UU. en el expediente sobre comunicaciones
inalámbricas 01-309 modificó la excepción de los teléfonos inalámbricos en virtud
de la Ley de Compatibilidad con Audífonos (Ley HAC, por su sigla en inglés) de
1988 para exigir que los teléfonos inalámbricos digitales sean compatibles con
los audífonos. La intención de la Ley HAC es garantizar que las personas con
discapacidades auditivas puedan acceder en forma razonable a los servicios de
telecomunicaciones.
Al usar ciertos teléfonos inalámbricos cerca de algunos dispositivos auditivos
(audífonos e implantes cocleares), es posible que los usuarios detecten un ruido
de zumbido, murmullo o chirrido. Algunos dispositivos para la audición son más
inmunes que otros a este ruido de interferencia, y los teléfonos también varían en la
cantidad de interferencia que generan.
La industria de los teléfonos inalámbricos ha desarrollado un sistema de
clasificación de teléfonos inalámbricos con el fin de ayudar a los usuarios de
dispositivos auditivos a encontrar teléfonos que puedan ser compatibles con sus

56
Por su seguridad
dispositivos auditivos. No se han clasificado todos los teléfonos. Los teléfonos
clasificados incluyen la clasificación en su caja o llevan una etiqueta en la caja.
Las clasificaciones no son garantías. Los resultados variarán en función del
dispositivo auditivo del usuario y su pérdida de audición. Si su dispositivo
auditivo resultara ser vulnerable a la interferencia, es posible que no pueda usar
satisfactoriamente un teléfono clasificado. Probar el teléfono con su dispositivo
auditivo es la mejor forma de evaluarlo para sus necesidades personales.
Clasificaciones M: los teléfonos con clasificación M3 o M4 cumplen los requisitos
de la FCC y probablemente generen menos interferencia con los dispositivos
auditivos que los teléfonos no etiquetados. M4 la mejor o más alta de las dos
clasificaciones.
Clasificaciones T: Los teléfonos clasificados como T3 o T4 cumplen con los
requisitos de la FCC y es probable que generen menos interferencia a los
dispositivos para la audición que los teléfonos que no están etiquetados. T4 la mejor
o más alta de las dos clasificaciones.
Los dispositivos auditivos también pueden tener una clasificación. El fabricante
del dispositivo auditivo o un otorrinolaringólogo pueden ayudarlo a encontrar esta
clasificación. Las clasificaciones más altas significan que el dispositivo auditivo es
relativamente inmune al ruido de interferencia.
Los valores de clasificación del audífono y del teléfono inalámbrico se suman. Una
suma de 5 se considera aceptable para el uso normal. Una suma de 6 se considera
que corresponde a un uso óptimo.

57
Por su seguridad
En el ejemplo de la izquierda, si un audífono cumple con la
clasificación de nivel M2 y el teléfono inalámbrico cumple con la
clasificación de nivel M3, la suma de los dos valores es igual a M5.
Esto debería proporcionarle al usuario del audífono un “uso normal” mientras usa su
audífono con ese teléfono inalámbrico en particular. En este contexto, “uso normal”
se define como una calidad de señal que es aceptable para la operación normal.
La marca M es sinónimo de la marca U. La marca T es sinónimo de la marca UT.
La Alianza para Soluciones de la Industria de las Telecomunicaciones (ATIS, por
su siglas en inglés) recomienda las marcas M y T. La sección 20.19 de las reglas
de la FCC hace referencia a las marcas U y UT. El procedimiento de clasificación y
medición de la HAC se encuentra descrito en el estándar C63.19 del Instituto de
Estándares Nacionales de los EE. UU. (ANSI, por su sigla en inglés).
Al hablar por un teléfono celular, se recomienda apagar el modo BT (Bluetooth) o
WLAN para HAC.
Información sobre audífonos y teléfonos inalámbricos digitales
Accesibilidad de prótesis auditivas y teléfonos móviles
http://www.accesswireless.org/
Gallaudet University, RERC
http://tap.gallaudet.edu/Voice/
Compatibilidad de prótesis auditivas y control de volume de la FCC
http://www.fcc.gov/cgb/dro/hearing.html
Orden de compatibilidad de prótesis auditivas de la FCC
http://hraunfoss.fcc.gov/edocs_public/attachmatch/FCC-03-168A1.pdf
Hearing Loss Association of America [HLAA]
http://hearingloss.org/content/telephonesand-mobile-devices

58
Por su seguridad
Legislación sobre la garantía
Las leyes siguientes rigen las garantías que surgen en virtud de las ventas minorista
de productos para el consumidor:
•
Ley Song-Beverly de Garantía del Consumidor de California [CC, Sección 1790 y
siguientes]
•
El Código Uniforme de Comercio de California, División Dos [Cód. de Comercio,
Sección 2101 y siguientes], y
•
La Ley Federal de Mejora de Garantías Magnuson-Moss de la Comisión Federal
de Comercio (Magnuson-Moss Warranty Federal Trade Commission Improvement
Act) [Sección 2301 y siguientes del Código de los Estados Unidos (USC); Título 16
del Código de Reglamentos Federales (CFR) Partes 701– 703]. Una garantía típica
de la Ley Magnuson-Moss es una promesa escrita de que el producto no presenta
defectos o una promesa escrita de devolver el dinero, reparar o reemplazar los
productos defectuosos. [Ver el Título 15 del Cód. de los Estados Unidos, Sección
2301(6)]. Entre los resarcimientos se incluyen los daños y perjuicios por incumplir
con una garantía escrita o un contrato de servicios o por violar las disposiciones
sobre divulgación. [Ver el Título 15 del Cód. de los Estados Unidos, Sección
2310(d)]. Con excepción de determinados requisitos respecto de divulgación y
difamación, la ley federal no prevalece sobre la ley estatal. [Ver el Título 15 del
Cód. de los Estados Unidos, Sección 2311].
La Ley de Garantía del Consumidor no afecta los derechos y las obligaciones de
las partes en virtud del Código Uniforme de Comercio, con la excepción de que las
disposiciones de la Ley prevalecen sobre las disposiciones del Código de Comercio
en caso de surgir un conflicto. [CC §1790.3.]
A los fines de demandas de menor cuantía, este curso se enfocará en los derechos
y obligaciones en virtud de las leyes estatales.