Press and hold: Activate or deactivate the childproof lock.
Time-setting options
Timer, cooking time or set the time.
Temperature
Select set the temperature.
Weight
Select set the weight.
Start/stop
Press briefly: Start or stop operation.
Press and hold: End operation. The settings are reset.
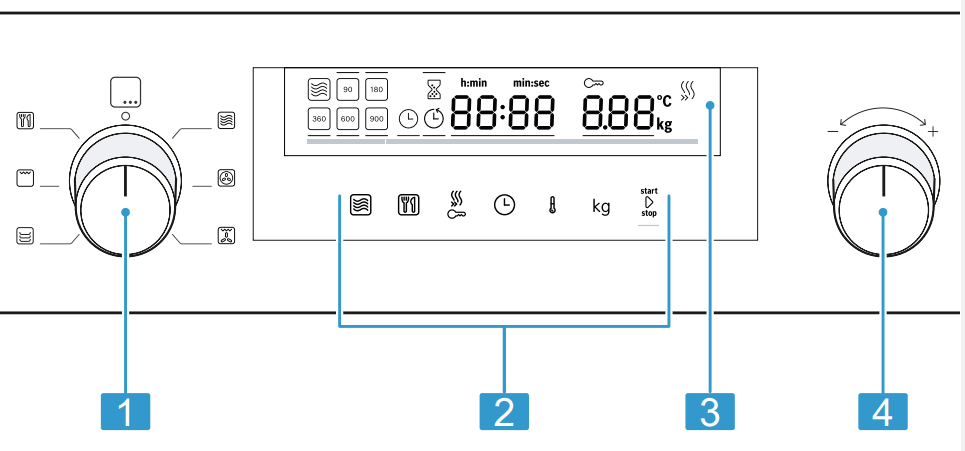
Display
You can see the current setting values or options in the display.
Active value: The directly adjustable value is highlighted white with a red bar underlined. You can use the rotary selector to change the active value.
Passive value: You cannot directly adjust the values outside the brackets. If you want to change a value, you must first activate the value.
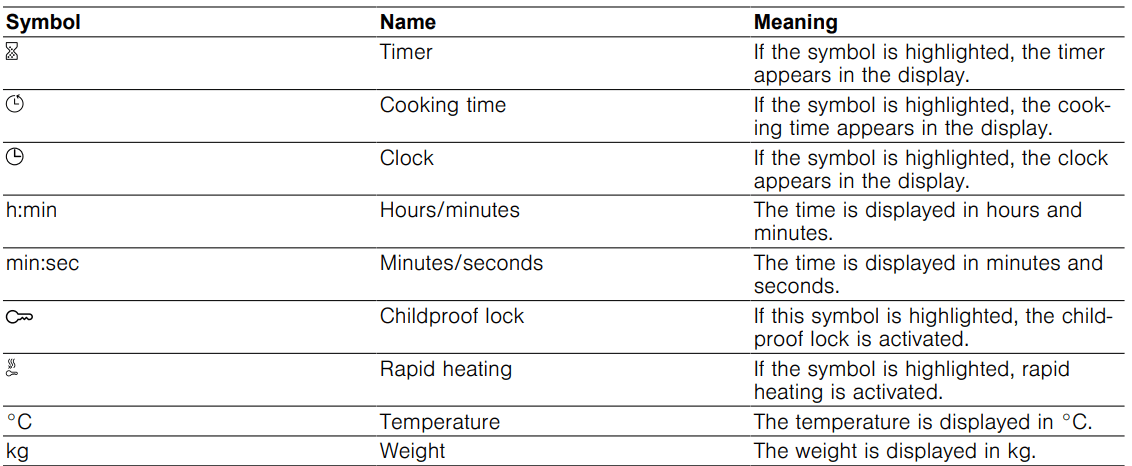
Display elements
Here you can find a short explanation of the various display elements.
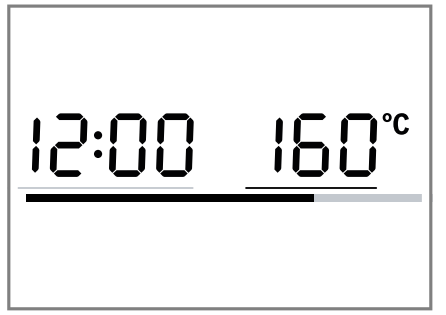
Temperature display
The temperature display shows the heating progress.
After starting operation, the red line in the lower area of the display shows the heating up progress of the interior temperature. The line gradually turns red as the appliance heats up. When the line turns completely red, the appliance has reached the set temperature. When using the grill, the heating line turns red immediately.
When using the microwave, there is no temperature display.
Due to thermal inertia, the temperature displayed may differ slightly from the actual temperature inside the cooking compartment.
Night mode
To save energy, the control panel brightness is automatically reduced to a lower level between 10 p.m. and 5.59 a.m.
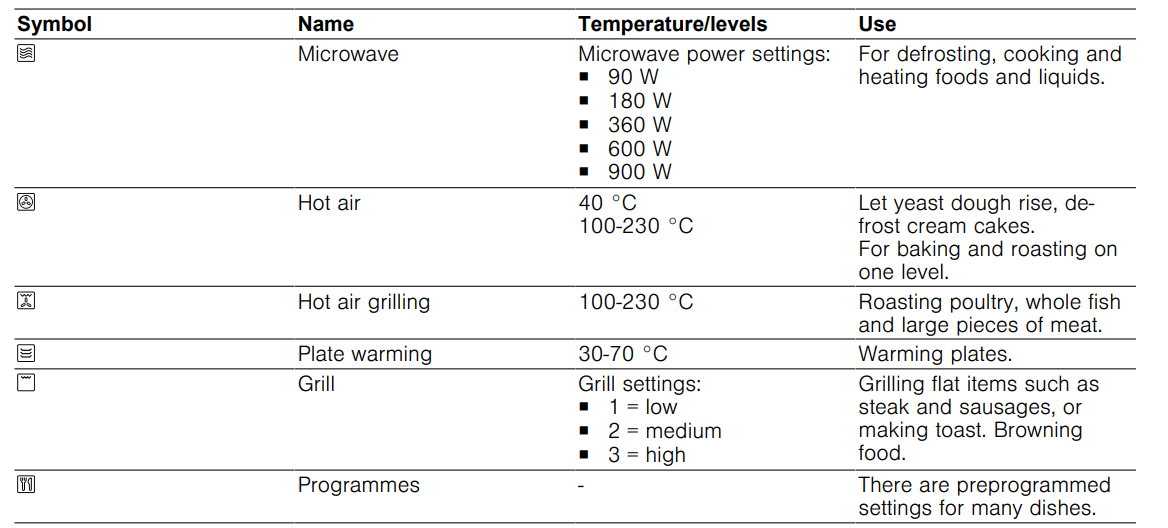
Types of heating
Here you can find an overview of the types of heating. You can find recommendations on using the types of heating.
Cooking compartment
The features of the cooking compartment make your appliance easier to use.
Interior lighting
When you open the appliance door, the light in the cooking compartment switches on. If the appliance door remains open for longer than 15 minutes, the light switches off again.
In most operating modes, the interior lighting switches on as soon as operation starts. The interior lighting switches off again when operation stops.
You can specify whether you want the interior lighting to switch on during operation in the → "Basic settings", Page 17.
Cooling fan
The cooling fan switches on and off as required. The hot air escapes through the ventilation slots above the appliance door.
ATTENTION!
Covering the ventilation slots will cause the appliance to overheat.
Do not cover the ventilation slots.
To cool the cooking compartment more quickly after operation, the cooling fan continues to run for a certain period afterwards. If the appliance is running in microwave operation, the appliance remains cool, but the cooling fan still switches on. The cooling fan may continue to run even when microwave operation has ended.
Condensation
Condensation can occur in the cooking compartment and on the appliance door when cooking. Condensation is normal and does not adversely affect appliance operation. Wipe away the condensation after cooking.
Appliance door
If you open the appliance door during operation, operation stops. If the appliance door is closed, you can continue operation with .
Accessories
Only use original accessories. These have been made especially for your appliance. Here you can find an overview of your appliance's accessories and how to use them.
Accessories - Use
Wire rack
Wire rack for baking and roasting in oven operation.
Wire rack for grilling, e.g. steaks, sausages and bread
Wire rack as a storage space, e.g. for flat ovenproof dishes
Other accessories
You can purchase other accessories from our aftersales service, specialist retailers or online.
You will find a comprehensive range of products for your appliance in our brochures and online: www.bosch-home.com
Accessories vary from one appliance to another. When purchasing accessories, always quote the exact product number (E no.) of your appliance.
You can find out which accessories are available for your appliance in our online shop or from our aftersales service.
Glass roasting dish
Use
Stews
Bakes
Pizza tray
Use
Tray bakes
Biscuits
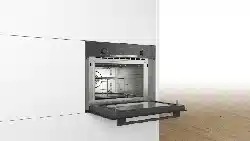
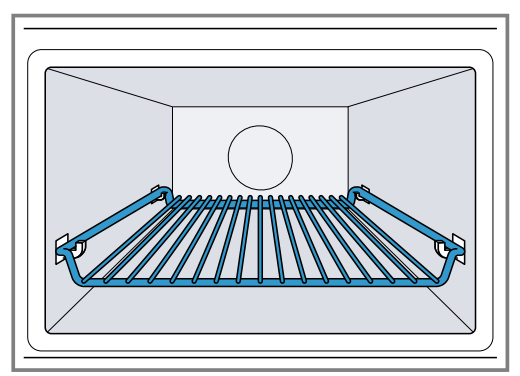
Inserting the accessory
The accessory can be inserted in two positions.
Insert the accessory so that it does not touch the appliance door.
Insert the accessory in the high position.
Insert the accessory in the low position.
The image shows the position.
The image shows the position.
Before using for the first time
Configure the settings for initial start-up. Clean the appliance and accessories.
Performing the initial configuration
After connecting the appliance to the power supply or following a power cut, the following prompt appears in the display for the setting the time. It may take a few seconds for the prompt to appear.
Connect the appliance to the power supply.
flashes in the display and lights up.
Setting the time
Set the time using the rotary selector.
Press .
The clock time is set.
Cleaning the appliance before using it for the first time
Clean the cooking compartment and accessories before using the appliance to prepare food for the first time.
Make sure that there is no leftover packaging, accessories or other objects in the cooking compartment.
Close the appliance door.
Use the function selector to set Hot air .
Use the rotary selector to set the temperature to 180 °C.
Press startstop .
The appliance starts.
After one hour, press startstop .
Turn the function selector to the off position.
The appliance is cleaned.
The appliance is switched off.
Cleaning the accessories
Clean the accessories thoroughly using soapy water and a soft cloth.
Basic operation
Switching on the appliance
Turn the function selector to switch on the appliance.
The appliance is ready to use.
A default value appears in the display.
Switching off the appliance
Switch your appliance off when you are not using it. If no settings are applied for an extended period, the appliance switches itself off automatically.
Turn the function selector to the off position.
The appliance stops any ongoing functions.
The time appears in the display.
Some displays also remain visible in the display when the appliance has been switched off.
Setting the type of heating and temperature
Use the function selector to set the required type of heating.
A default value appears in the display.
If necessary, change the settings. To do this, touch the appropriate field and use the rotary selector to change the value.
Press startstop .
The appliance starts.
startstop lights up.
With a type of heating with temperature, the temperature display lights up gradually.
If necessary, use the rotary selector to change the temperature while the oven is in operation.
When the appliance is in operation, you cannot set the temperature to 40 °C.
Pausing operation
You can pause operation at any time.
Press startstop or open the appliance door.
Operation is paused.
startstop flashes.
To continue operation, close the appliance door and press startstop .
Operation continues.
startstop lights up.
Stopping operation
You can stop operation at any time.
Turn the function selector to the off position. The fan may continue to run after operation has been paused or stopped.
The appliance stops any ongoing functions.
Rapid heating
To save time, you can shorten the preheat time for certain types of heating from a minimum temperature of 100 °C.
You can use rapid heating for the following types of heating:
Hot air, exception: Hot air 40 °C
Hot air grilling
Configuring rapid heating
To ensure an even cooking result, do not place the accessory with the food in the cooking compartment until rapid heating has finished. Do not set a cooking time until rapid heating has finished.
Set a suitable type of heating and a temperature of at least 100 °C.
Press.
lights up in the display.
Press startstop .
Rapid heating starts.
startstop lights up.
Once the set temperature has been reached, the rapid heating process ends. A signal sounds and goes out in the display. Your appliance continues to run with the set type of heating and temperature.
Rapid heating is automatically deactivated within no more than 15 minutes.
Cancelling rapid heating
Press
goes out in the display. Your appliance continues to run with the set type of heating and temperature
Safety switch-off function
For your safety, the appliance has a safety switch-off function. The appliance is automatically switched off if it has been in operation for an extended period.
How long the appliance waits before switching itself off depends on the setting:
Hot air 40 °C and preheating: 24 hours
Hot air 100-230°C and hot air grilling: 5 hours
Grill: 90 minutes
If the appliance has been switched off by the safety switch-off function, E2 is shown in the display. You can confirm this message by pressing startstop .
Microwave
You can use the microwave to cook, heat up, bake or defrost food very quickly. The microwave can be used on its own or in combination with a type of heating.
Microwave power settings
Here you can find an overview of the different microwave power settings and when to use them.
Microwave output in watts
Maximum cooking time
Use
90 W
1:30 hours
Defrosting delicate foods.
180 W
1:30 hours
Defrosting food and continued cooking.
360 W
1:30 hours
Cooking meat and fish or heating delicate foods.
600 W
1:30 hours
Heating and cooking food.
900 W
30 minutes
Heating liquids.
The maximum power setting is not designed for heating food.
Default settings
The appliance suggests a cooking time for each microwave power setting. You can accept this value or change it in the relevant area.
Microwave-safe cookware and accessories
To heat food evenly and avoid damaging your appliance, it is important to use the right cookware and accessories.
Read the manufacturer's instructions before using any cookware in the microwave. If in doubt, carry out a cookware test. Testing cookware for microwave suitability → Page 13
Microwave-safe
Cookware and accessories
Reason
Cookware made from heat-resistant, microwave- safe material:
Glass
Glass ceramic
Porcelain
Temperature-resistant plastic
Fully glazed ceramic without cracks
Microwaves do not damage heat resistant material.
Accessories supplied:
Wire rack
The wire rack supplied has been designed specifically for the appliance and is therefore suitable for microwave use.
Metal cutlery
You can use metal cutlery, e.g. place a spoon in a glass, to prevent delayed boiling.
Note: Metal may create sparks, which could damage the cooking compartment and the inner door pane. Metal must be kept at least 2 cm from the cooking compartment walls and the inside of the door.
Not microwave-safe
Cookware and accessories
Reason
Metal cookware
Microwaves cannot pass through metal. The food is barely heated or not heated at all.
Cookware with gold or sil-
Microwaves can damage
ver decoration
gold and silver decoration. Only use this kind of cookware if the manufacturer guarantees that it is microwave-safe.
Microwave-safe in MicroCombi mode
In MicroCombi mode, a microwave output of up to 600 W watts can be added to a type of heating. This means that metal dishes can be used in MicroCombi mode.
Cookware and accessories
Reason
Accessories supplied
The accessories supplied, e.g. the wire rack, do not create sparks in MicroCombi mode.
Metal baking tins
Cakes will brown both on top and on the bottom, as baking tins made of metal conduct heat more efficiently.
Note: Metal may create sparks, which could damage the cooking compartment and the inner door pane. Metal must be kept at least 2 cm from the cooking compartment walls and the inside of the door.
Testing cookware for microwave suitability
Test cookware to see whether it is suitable for microwave use. Testing cookware is the only time the appliance should be operated in microwave mode without any food inside.
Place the empty cookware in the cooking compartment.
Set the appliance to run for 30 seconds to 1 minute at maximum power.
Press startstop to start.
Check the cookware several times:
If the cookware is cold or warm to the touch, it is suitable for microwave use.
If the cookware becomes hot or sparks are created, the stop the cookware test. The cookware is not microwave-safe.
Configuring the microwave settings
Different power levels and settings are available for different types of food and recipes.
Read the safety instructions → Page 4 and the section on how to prevent material damage → Page 5.
Read the information on microwave-safe cookware and accessories. → Page 12
Set the function selector to .
To set the required microwave power setting, press
Use the rotary selector to set the required cooking time.
Press startstop to start. You can change the cooking time at any time during operation using the rotary selector.
The cooking time starts to count down and the microwave starts.
Once the cooking time has elapsed, the microwave stops and a signal sounds.
When the dish is cooked, turn the function selector to the off position.
Intervals for the time settings
The interval for setting a cooking time in microwave operation changes with the length of the cooking time.
Cooking time
Interval
0-1 minutes
5 seconds
1-3 minutes
10 seconds
3-15 minutes
30 seconds
15 minutes - 1 hour
1 minute
1 hour - 1 hour 30 minutes
5 minutes
Changing the microwave power
Press .
Repeatedly pressing switches from the highest to the lowest microwave power setting. If the microwave function is only added after starting, the appliance pauses. Press startstop to start.
Pausing operation
You can pause operation at any time.
1. Press startstop or open the appliance door.
Operation is paused.
flashes.
2. To continue operation, close the appliance door and press startstop .
Operation continues.
startstoplights up.
Stopping operation
You can stop operation at any time.
Turn the function selector to the off position.
The fan may continue to run after operation has been paused or stopped.
The appliance stops any ongoing functions.
MicroCombi
To reduce the cooking time, you can use certain of the types of heating in combination with microwave mode. MicroCombi mode can be used with the following types of heating:
Hot air
Hot air grilling
Grill
Exceptions:
Microwave power setting 900 W
Hot air 40 °C
Warming plates
Drying the cooking compartment by hand
Always dry the cooking compartment after operation to ensure that no moisture remains.
Allow the appliance to cool down.
Remove the worst of the food residues from the cooking compartment.
Dry the cooking compartment with a sponge.
Leave the appliance door open for 1 hour so that the cooking compartment dries completely.
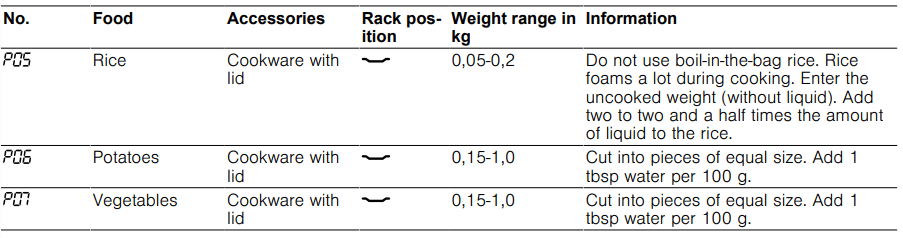
Automatic programmes
Automatic programmes can help you prepare different dishes by selecting the optimal settings automatically.
Tips on configuring the settings for dishes
Follow these tips to achieve optimal cooking results.
Only use food that is in perfect condition.
Only use meat at refrigerator temperature.
Only use frozen food straight from the freezer.
Take the food out of its packaging and weigh it. If you cannot set the exact weight on the appliance, round the weight up or down.
Place the food in the cold cooking compartment.
Always use microwave-safe, heat-resistant cookware, for example made of glass or ceramic.
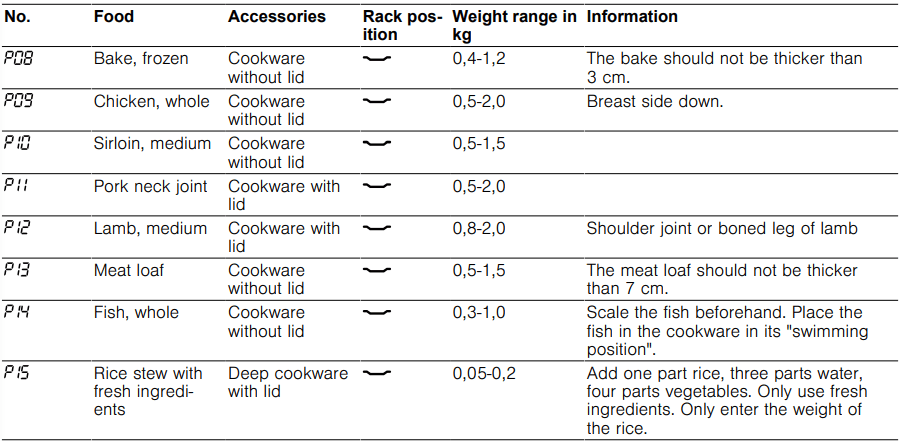
Overview of dishes
The appliance prompts you to enter the weight. You can only enter weights within the intended weight range.
Defrosting
Cooking programmes
Combi cooking programmes
Time-setting options
Your appliance features time-setting options that you can use to set the cooking time and the timer.
Checking the time-setting options
Requirement: If multiple time-setting options are set, the corresponding symbols light up. During operation, the timer and cooking time are available. In standby, the timer and the time are available.
Press until , or is in focus.
The respective value is shown in the display.
Changing the time
Requirement: To change the time on the clock, the appliance must be switched off.
Press twice.
The symbol and the clock time appear in the display.
Set the time using the rotary selector.
Press .
The clock time is set.
If is not pressed, the set value is applied after a few seconds.
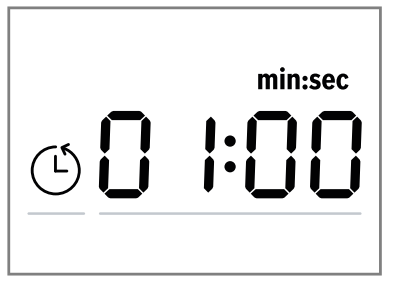
Cooking time
You can set a time after which operation ends automatically. The maximum cooking time is 23 hours and 59 minutes.
Setting the cooking time
Set the type of heating and temperature.
Press until is in focus.
Use the rotary selector to set the required cooking time.
Press startstop.
The appliance starts.
startstop lights up.
You will see the cooking time counting down.
Ending the cooking time
Requirement: A signal sounds. The appliance stops heating. is shown in the display.
Press .
The signal is switched off.
Turn the function selector to the off position.
The appliance is switched off.
Changing the cooking time
Change the cooking time using the rotary selector.
After a few seconds, the display shows the changed cooking time
You will see the cooking time counting down.
Clearing the cooking time
If the timer function has been set, press .
Use the rotary selector to set the cooking time to
After a few seconds, the cooking time is cleared. The appliance does not interrupt operation.
Timer
You can specify for a signal to sound after a certain period of time. The maximum duration of the timer is 24 hours.
The timer works independently of the operation and other time-setting options. The timer signal is different to the other signals the appliance sounds.
Setting the timer
Press until is in focus.
Use the rotary selector to set the required timer duration.
After a few seconds, the appliance displays the set timer duration.
The timer starts.
lights up in the display.
You will see the timer duration counting down.
Ending the timer
Requirement: A signal sounds.is shown in the display.
Press any symbol.
The timer is switched off.
Changing the timer
Use the rotary selector to change the timer duration.
After a few seconds, the appliance displays the set timer duration.
Cancelling the timer
Use the rotary selector to set the timer duration to
The timer is switched off.
Childproof lock
You can secure your appliance to prevent children from accidentally switching it on or changing the settings.
Activating the childproof lock
Requirement: The appliance is switched off.
Press and hold . for approx. 4 seconds.
The control panel is locked.
The symbol appears in the display.
If a timer duration has been set, this continues to count down. While the childproof lock is active, the timer duration cannot be changed. Signal tones, e.g. when the timer duration has elapsed, can be ended by pressing any button
Deactivating the childproof lock
Press and hold for approx. 4 seconds.
The control panel is unlocked.
Basic settings
You can configure the appliance to meet your needs.
Overview of the basic settings
Here you can find an overview of the basic settings and factory settings. The basic settings depend on the features of your appliance
Changing the basic settings
Requirement: The appliance must be switched off.
Press and hold for a few seconds.
The first basic setting is shown in the display.
Use the rotary selector to change the basic setting.
Press.
The next basic setting is shown in the display.
Use to select all the required basic settings and change the values.
To save the changes, press and hold for a few seconds.
Tip: Your changes to the basic settings will be retained even after a power cut.
Discarding changes to the basic settings
Turn the function selector.
All changes are discarded and not saved.
Cleaning and servicing
To keep your appliance working efficiently for a long time, it is important to clean and maintain it carefully.
Cleaning products
Only use suitable cleaning products.
ATTENTION!
Unsuitable cleaning products may damage the surfaces of the appliance.
Do not use harsh or abrasive detergents.
Do not use cleaning products with a high alcohol content.
Do not use hard scouring pads or cleaning sponges.
Do not use any special cleaners for cleaning the appliance while it is hot.
Only use glass cleaners, glass scrapers or stainless steel care products if recommended in the cleaning instructions for the relevant part.
Wash sponge cloths thoroughly before use.
Using oven cleaner while the cooking compartment is still warm may damage the enamel.
Never use oven cleaner in the cooking compartment when it is still warm.
Remove all food remnants from the cooking compartment and the appliance door before you next heat up the appliance.
You can find out which cleaning products are suitable for each surface or part of the appliance in the individual cleaning instructions.
Cleaning the appliance
Clean the appliance as specified. This will ensure that the different parts and surfaces of the appliance are not damaged by incorrect cleaning or unsuitable cleaning products.
Scratched glass in the appliance door may develop into a crack.
Do not use glass scrapers, sharp or abrasive cleaning aids, or harsh cleaning products.
Follow the instructions for→"Cleaning products", Page 18.
Follow the instructions on cleaning the appliance components or surfaces.
Unless otherwise specified:
Clean the appliance components with hot soapy water and a dish cloth.
Dry with a soft cloth.
Cleaning the cooking compartment
Follow the instructions for→"Cleaning products", Page 18.
Use hot soapy water or a vinegar solution for cleaning.
Use oven cleaner to remove very heavy soiling. Only use oven cleaner when the cooking compartment is cold. Do not use oven spray, other aggressive oven cleaners or abrasive materials. To avoid scratching the surface, do not use scouring pads, rough sponges or pan cleaners. Tip: To eliminate unpleasant odours, heat up a cup of water with a few drops of lemon juice for 1 to 2 minutes at maximum microwave power. Always place a spoon in the container to prevent delayed boiling.
Dry with a soft cloth.
Cleaning the glass floor
Follow the instructions for →"Cleaning products", Page 18.
Clean the glass floor with hot soapy water and a soft dish cloth. Do not use metal or glass scrapers for cleaning. Do not scour.
Dry with a soft cloth.
Cleaning the front of the appliance
1.Follow the instructions for →"Cleaning products", Page 18.
2. Clean the front of the appliance using hot soapy water and a dish cloth.
Follow the cleaning instructions.
Part/surface
Cleaning instructions
Appliance front
Do not use glass cleaners or metal or glass scrapers for cleaning.
Appliance front with stainless steel
Do not use glass cleaners or metal or glass scrapers for cleaning. To prevent corrosion, remove any limescale, grease, starch or albumin (e.g. egg white) stains on stainless steel fronts immediately. On stainless steel surfaces, use special stainless steel cleaning products suitable for hot surfaces. You can obtain stainless steel cleaning products from our after-sales service or from specialist retailers. Apply a thin layer of the stainless steel cleaning product with a soft cloth.
Note: Slight differences in colour on the front of the appliance are caused by the use of different materials, such as glass, plastic or metal.
3. Dry with a soft cloth.
Cleaning the display
Follow the instructions for → "Cleaning products", Page 18.
Wipe the display using a microfibre cloth or a slightly damp cloth. Do not wipe with a wet cloth.
Dry with a soft cloth.
Cleaning the accessories
Follow the instructions for → "Cleaning products", Page 18.
Soften burnt-on food residues with a damp dish cloth and hot soapy water.
Clean the accessories with hot soapy water and a soft dish cloth or washing-up brush.
Clean the wire rack with stainless steel cleaner or in the dishwasher. Use steel wool or oven cleaner to remove very heavy soiling.
Dry with a soft cloth.
Tips on caring for your appliance
Follow the tips on appliance care to make sure your appliance functions properly at all times.
Measure- Advantage
Always keep the appliance clean and remove dirt immediately. Always clean the cooking compartment after use.
Prevents dirt from accumulating and burning on.
Remove splashes and patches of limescale, grease, starch and albumin (e.g. egg white) immediately.
Prevents corrosion.
Use the pizza tray for very moist cakes.
Keeps the cooking compartment cleaner.
Use suitable cookware for roasting, e.g. a roasting dish.
Keeps the cooking compartment cleaner.
You can purchase suitable cleaning and care products from our aftersales service. Always follow the manufacturer's instructions.
Cleaning the door panels
Follow the instructions for → "Cleaning products", Page 18.
Clean the door panels with a damp dish cloth and glass cleaner. Do not use a glass scraper. Note: Shadows on the door panels, which look like streaks, are caused by reflections made by the interior lighting.
Dry with a soft cloth.
Cleaning the door seal
Follow the instructions for → "Cleaning products", Page 18.
Clean the door seal with hot soapy water and a soft dish cloth. Do not use metal or glass scrapers for cleaning. Do not scour.
Dry with a soft cloth.
Drying the cooking compartment by hand
WARNING ‒ Risk of burns!
The appliance will become hot during operation.
Allow the appliance to cool down before cleaning it.
Remove any food remnants from the cooking compartment.
Dry the cooking compartment with a soft cloth.
Leave the appliance door open until the cooking compartment has dried completely.
Cleaning aid
The cleaning aid is a quick alternative for occasionally cleaning the cooking compartment. The cleaning aid softens dirt by vaporising the soapy water. The dirt can then be removed more easily.
Setting the cleaning aid
Add a few drops of washing-up liquid to a cup of water.
Place a spoon in the cup to prevent delayed boiling.
Place the cup in the centre of the cooking compartment.
Set the microwave output to 600 W.
Set the cooking time to 5 minutes.
Start the microwave.
Once the cooking time has elapsed, leave the doors closed for an additional three minutes.
Wipe out the cooking compartment with a soft cloth.
Leave the cooking compartment to dry with the door open.
Trouble shooting
You can rectify minor faults on your appliance yourself. Read the troubleshooting information before contacting after-sales service. This will avoid unnecessary costs.
Malfunctions
Fault
Cause and troubleshooting
The appliance is not working.
The mains plug of the power cord is not plugged in. Connect the appliance to the power supply.
The circuit breaker is faulty.
Check the circuit breaker in the fuse box.
There has been a power cut.
Check whether the lighting in your kitchen or other appliances are working.
Malfunction
Switch off the fuse in the fuse box.
Switch the fuse back on after approx. 10 seconds.
If the fault was a one-off, the message disappears.
If the message appears again, call the after-sales service. Please specify the exact error message when calling. →"Customer Service", Page 34
Appliance is not heating, colon is flashing in the display.
Demo mode is activated in the basic settings.
Disconnect the appliance from power supply by briefly switching off the circuit breaker in the fuse box.
Deactivate demo mode in the basic settings in the next 3 minutes.
Microwave operation is stopped.
Malfunction
Switch off the fuse in the fuse box.
Switch the fuse back on after approx. 10 seconds.
If the fault was a one-off, the message disappears.
If the message appears again, call the after-sales service. Please specify the exact error message when calling. →"Customer Service", Page 34
Food takes longer than usual to heat up.
The microwave power setting was too low.
Select a higher microwave power setting.
You have placed a larger amount of food than normal in the appliance.
Set a longer cooking time.
Double the amount needs double the cooking time.
The food was colder than usual.
Stir or turn the food during cooking.
The microwave does not work.
The door was not fully closed.
Check whether food residue or debris is trapped in the door.
startstop has not been pressed.
Press startstop .
12:00 flashes in the display and the symbol lights up.
There has been a power cut.
Reset the time. →"Setting the time", Page 10
The appliance is not in operation. A cooking time is shown in the display.
startstop has not been pressed.
Press startstop .
Information on display panel
Fault
Cause and troubleshooting
A message with "D" or "E" appears in the display, e.g. D0111 or E0111.
Malfunction
Switch off the fuse in the fuse box.
Switch the fuse back on after approx. 10 seconds.
If the fault was a one-off, the message disappears.
If the message appears again, call the after-sales service. Please specify the exact error message when calling.
→"Customer Service", Page 34
The message appears in the display.
The automatic safety cut-out function has been activated.


 .
. Insert the accessory in the high position.
 Insert the accessory in the low position.
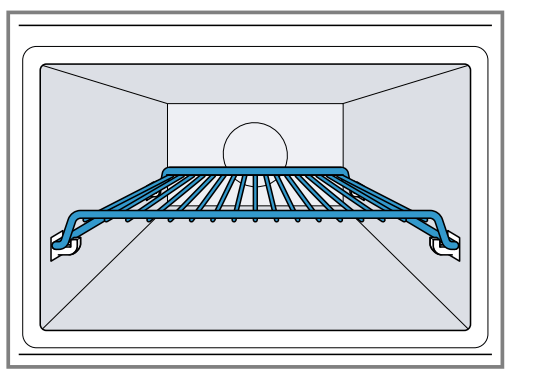

 flashes in the display and
  lights up.
 .
. stop .
 Hot air, exception: Hot air 40 °C
 Hot air grilling
 .
. lights up in the display.
 .
. Hot air
 Hot air grilling
 Grill
Grill Microwave power setting 900 W
 Warming plates
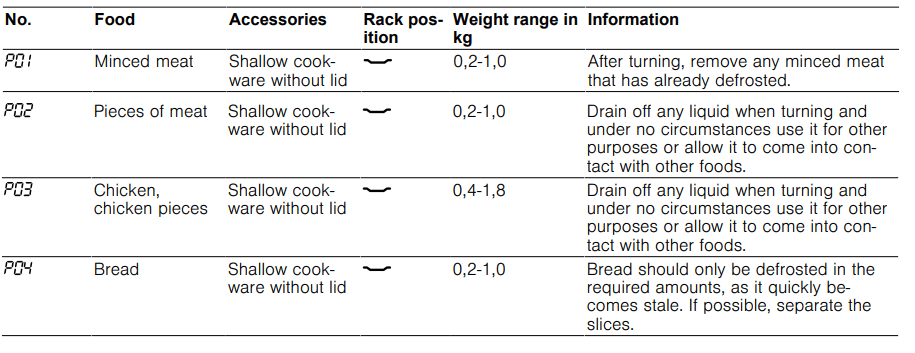
 until
until  or
or is in focus.
 is shown in the display.
 . for approx. 4 seconds.
 symbol appears in the display.
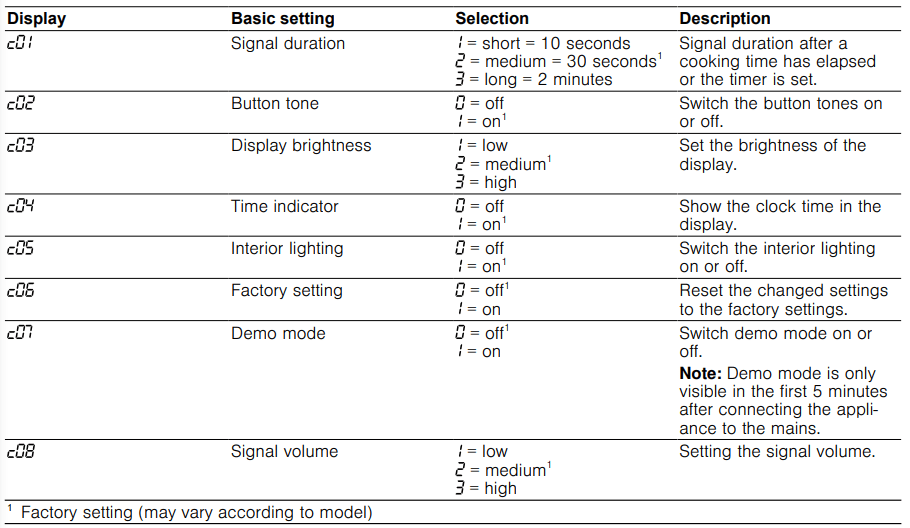
 appears in the display.
 appears in the