OWNER’S GUIDE Air Purifier
SETTING UP YOUR UNIT
TIPS FOR SETTING UP YOUR UNIT
- Make sure the front panel of the unit faces away from the closest wall.
- Do not move the unit while it is running. Turn off the power and unplug the unit before moving it.
- Use the handles on the sides when lifting or moving the air purifier.
- Make sure the vents are not blocked.
- Do not place anything on the air purifier.
- Do not place the air purifier near heaters or radiators.
- Keep the unit out of direct sunlight and away from water or other liquid.
- Keep all nearby doors and windows closed when operating the air purifier.
- Avoid using in very humid environments.
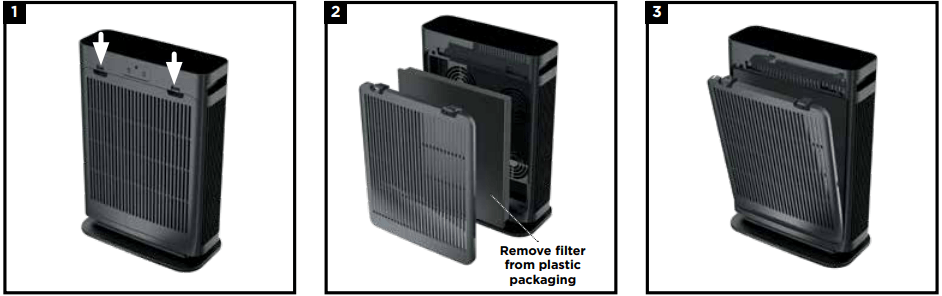
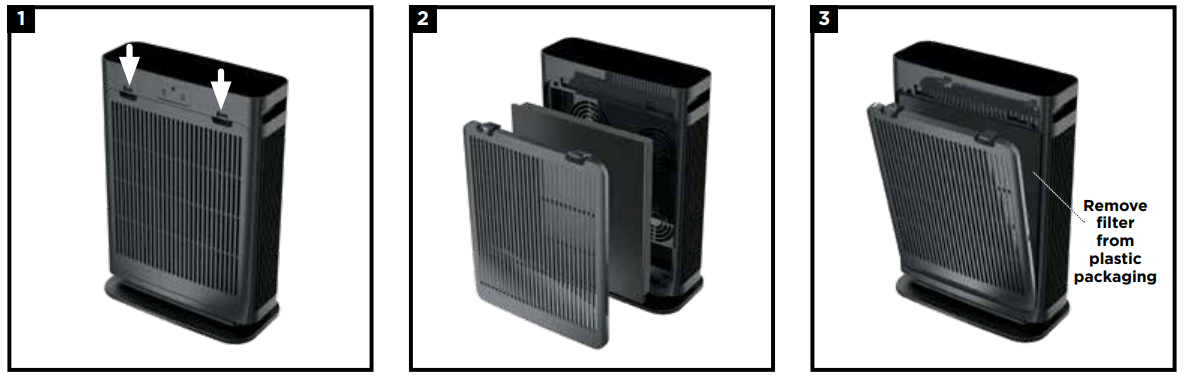
- Before plugging in the unit for the first time, you must remove the filter and take it out of its packaging. First, remove the filter cover from the back of the unit. Press the tabs near the top and pull the cover toward you.
- Remove the filter from the unit. Take the filter out of its sealed plastic packaging. To reinstall it, insert it into the unit.
- With the filter installed, replace the filter cover. Insert the tabs on the bottom of the cover into the slots on the unit. Press the top of the cover, then the sides, until it clicks into place. DO NOT run the air purifier unless the filter is removed from its packaging and installed correctly
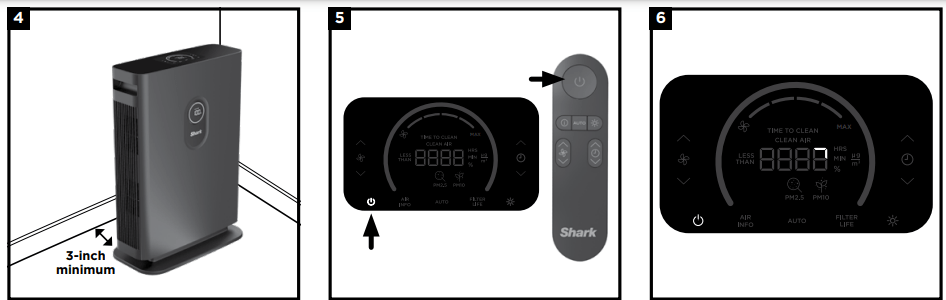
- Set up the unit upright on a level floor. For best results, set it up in the space you spend the most time in, such as the kitchen, living room, or bedroom. Make sure the unit is at least 3 inches (8cm) away from all walls, large objects, or electronics.
- Plug the unit into an electrical outlet and press the power button on the top control panel or on the remote.
- When the unit is powered on, it will begin to analyze the air quality indicated by the rotating lights. After a few seconds the unit will display the current air quality and you can customize the settings on your unit.
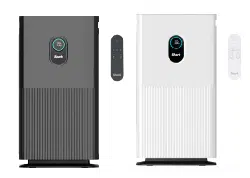
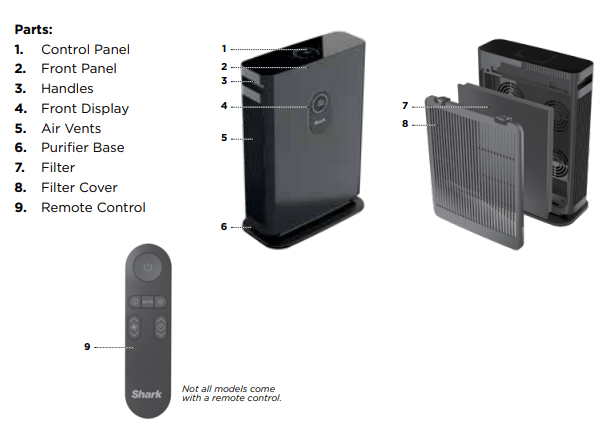
CONTROL PANEL
Your Air Purifier 4 is equipped with digital displays on both the top and front of the unit.
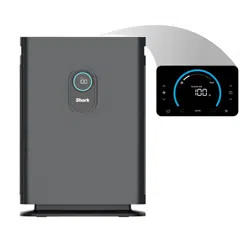
TOP CONTROL PANEL
- Displays the current air quality status based on the AIR INFO option selected, and includes controls that allow you to customize the settings.
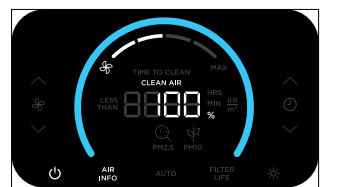
FRONT DISPLAY SCREEN
- Displays the current air quality status based on the Air Info mode selected on the top control panel.
TOP CONTROL PANEL BUTTONS
 On/Off: Press to turn the power on or off.
 Air Info: Press to switch between air quality display options. See the Air Info Settings section for more information.
 Auto Mode: Press to turn on Auto Mode. In this setting the fan speed automatically adjusts based on real time air quality readings. As the air quality improves, the fan speed will decrease. If air quality worsens, the fan speed will increase. Leave your unit in Auto Mode for optimal filter life and performance.
 Filter Life: Press to show the remaining filter life in hours. Once the filter has 0 hours remaining, the FILTER LIFE button will flash to indicate the filter needs to be changed. See Installing and Removing the Filter section for more information.
 Brightness: Adjusts the brightness of both the front display screen and the top control panel. Switch between 3 options: full brightness, partially dim, fully dim.
 Shut-Off Timer: Set the number of hours for the air purifier to run before it automatically shuts off. Timer can be set between 1–12 hours.
 Fan Speed: Adjusts the speed of the fan. Select one of 4 settings: 1 Low, 2 Medium, 3 High, 4 Maximum. Note: If fan speed is manually changed, auto mode will be deactivated. For tips on optimal fan setting, see Optimizing Fan Speed section.
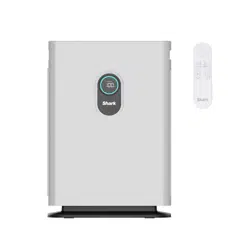
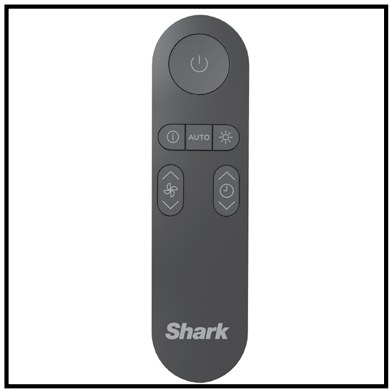
REMOTE CONTROL
Your air purifier includes a remote control that can turn the power on or off, and adjust the settings.
USING THE REMOTE CONTROL
- To use the remote control, aim it at the front display screen and press the buttons on the remote. The remote control has a range of 15 ft. (5 meters). For best results, make sure no obstacles are between the remote control and the display screen.
REMOTE CONTROL BATTERY
This remote uses a CR2025 3-volt replaceable battery. To replace the battery, follow the steps below.
- With a Phillips-head screwdriver (not included) unscrew the battery tray on the back of the remote.
- Slide out the battery tray.
- Remove the old battery and dispose of it according to local regulations. Take additional caution to keep old battery out of reach of children.
- Insert the new battery, making sure the polarities (+) (–) are oriented correctly.
- Reinsert the battery tray and use the screw to completely secure it in place.
REMOTE CONTROL BUTTONS
- On/Off: Turns the unit on/off.
- Air Info: Switch between air quality display options.
- Auto: Enables Auto Mode.
- Brightness: Adjusts brightness.
- Fan Speed: Adjusts fan speed.
- Shut-Off Timer: Sets timer.

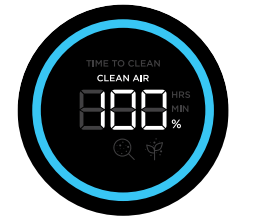
AIR INFO SETTINGS
The built-in sensor detects your air quality to give you real-time information. Use the AIR INFO button to switch between air quality display options.
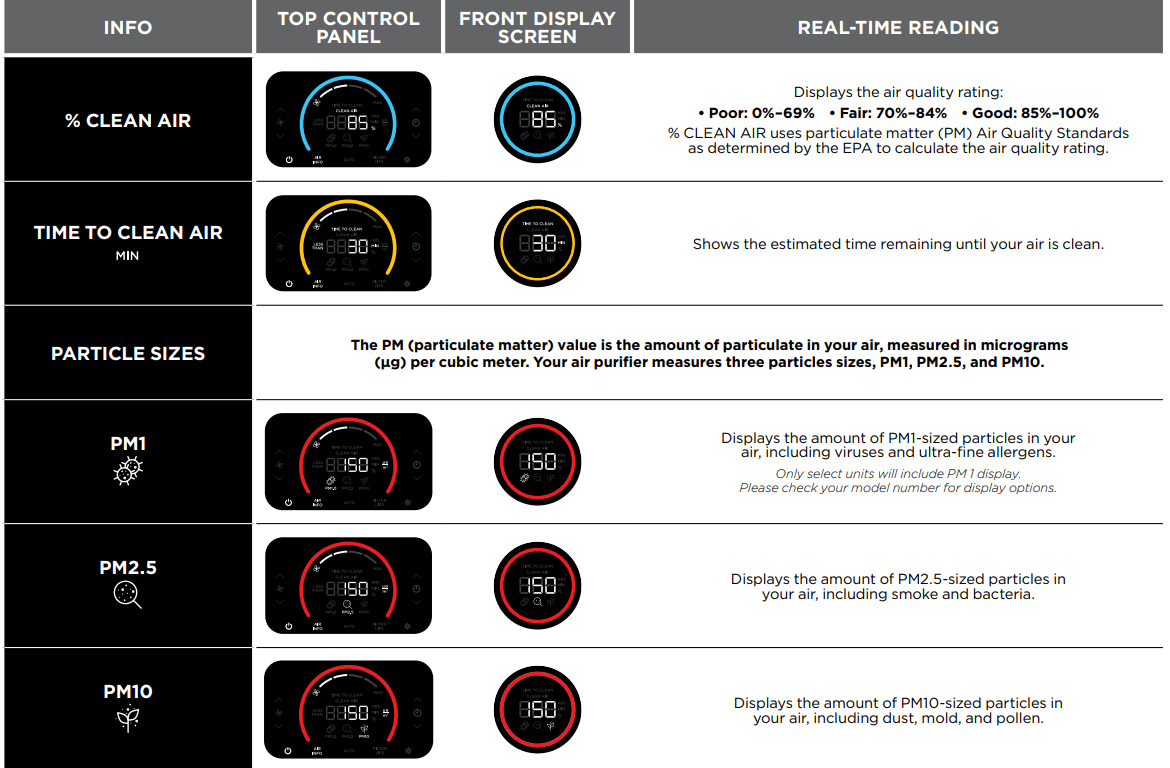
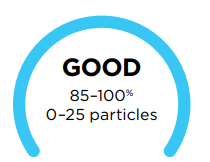
UNDERSTANDING YOUR AIR QUALITY
The ring on the front and top displays will change color as your air quality changes, allowing you to easily monitor your air quality even when you are far from the unit.
 : A blue ring means your air quality is good, with a low level of particle concentration.
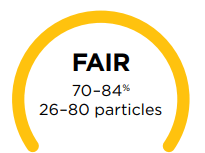 : An amber ring means your air quality is fair, with a moderate level of particle concentration. For better results, increase fan speed or select Auto Mode.
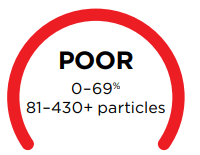 : A red ring means your air quality is poor, with a high level of particle concentration. For better results, increase fan speed or select Auto Mode.
Note: Air quality sensor uses a cumulative particle count across all particle sizes to determine air quality percentage.
OPTIMIZING FAN SPEED
- Your air purifier is equipped with 4 fan speed settings. Adjust fan speed to optimize your cleaning performance.

INSTALLING AND REMOVING THE FILTER
NOTE: Always remove all protective packaging from the filter before installing.
When the filter timer has 0 hours remaining, the FILTER LIFE button on the top control panel will blink, indicating that it’s time to install a new filter.
- Turn off and unplug the unit before removing or installing filters.
- Remove the back cover from the unit by pressing the tabs at the top (1), then pulling the cover toward you.
- To remove the old filter, pull it out by the tabs at the top and bottom of the filter (2). Discard old filter in trash.
- Remove all packaging and wrapping from the new filter.
- Insert the new filter, then replace the filter cover. Insert the tabs on the bottom of the cover into the slots on the unit (3). Press the top of the cover, then the sides, until it clicks into place.
- Plug the unit back in and turn on power. Calibration will begin.
- After installing a new filter, press and hold the Filter Life button on the top control panel for 3 seconds to reset the timer. The unit will beep when the timer is activated.
Disposing of used filters Filters can’t be cleaned or recycled. After removing a used filter, wrap it in an airtight plastic bag for disposal. As an extra precaution, wear gloves when handling a dirty filter.
MAINTAINING YOUR AIR PURIFIER
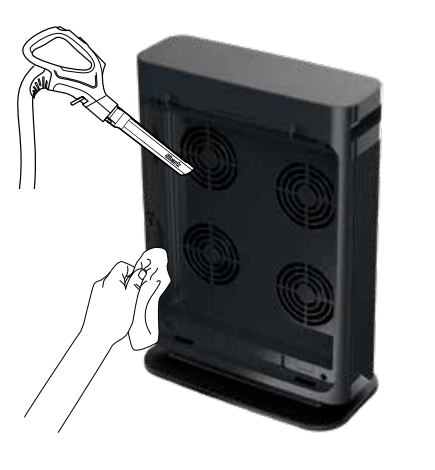
NOTE: Always unplug the unit before doing any cleaning or maintenance.
Exterior Cleaning:
- For best results, clean the exterior of the unit every two months or as needed. Use a microfiber cloth to remove dust. To sanitize, wipe down the exterior with a microfiber cloth dampened with warm, soapy water. Avoid excess water and abrasive chemical cleaners to prevent damage.

Interior Cleaning:
- For best results, clean the interior of the unit every two months or as needed. Remove the filter cover, take out the filter, and use a vacuum cleaner or a microfiber cloth to remove dust and debris from the interior of the unit. DO NOT use abrasive chemical cleaners on the inside of the unit.
AVAILABLE ACCESSORIES
ORDER ADDITIONAL ACCESSORIES AND REPLACEMENT FILTERS
- Additional accessories and replacement filters are available on sharkaccessories.com
Remote Control: Use the remote control to operate your air purifier from a distance.
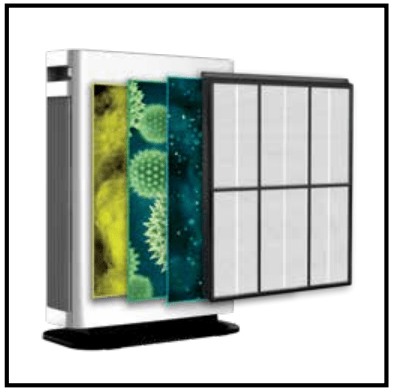
- SHARK™ AIR PURIFIER 4 ANTI-ALLERGEN HEPA FILTER: Captures 99.97% of pollutants down to 0.3 microns from the air and is equipped with carbon for protection against household odors and VOCs.
- SHARK™ AIR PURIFIER 4 ANTI-ALLERGEN HEPA FILTER WITH ADVANCED ODOR LOCK: Captures 99.97% of pollutants down to 0.3 microns front the air and is equipped with carbon for heightened protection against household odors and VOCs.
- SHARK™ AIR PURIFIER 4 ANTI-ALLERGEN HEPA FILTER WITH ADVANCED ODOR LOCK & FUMES LOCK: Captures 99.97% of pollutants down to 0.3 microns front the air and is equipped with carbon for heightened protection against household odors, VOCs, and fumes such as formaldehyde found in plants, furniture, and flooring.
TROUBLESHOOTING
1. My air purifier is not powering on. What should I do?
- Make sure the unit is plugged in and that the outlet works. Press the power button to start air purification.
- Make sure the filter cover is properly installed.
2. Why is there no air flow?
- Increase the fan speed on your unit to improve performance.
- Make sure that all packaging is removed from the filter and it is properly installed in the unit.
- Unplug the unit and clean off any dust or debris from the intake and the air vent areas.
3. Why is my air purifier vibrating or making unusual loud noises?
- Make sure the unit is set up on its base, and on a flat, level space on the floor.
4. Why does my air smell bad?
- If there recently have been odors in the area, such as from cigarettes or food, allow more time for the unit to remove them.
- Clean off any dust or debris from the intake and the air vent areas.
- The filter may need to be replaced
5. Can I wash the filter?
- No, the filter is not washable. Keep filter away from water and dispose of it when it is dirty.
6. How do I know when my air purifier is in Auto Mode?
- The Auto Mode button on the top control panel illuminates when the unit is in Auto Mode
IMPORTANT SAFETY INSTRUCTIONS
This appliance has a polarized plug (one blade is wider than the other). To reduce the risk of electric shock, this plug is intended to fit in a polarized outlet only one way. If the plug does not fit fully in the outlet, reverse the plug. If it still does not fit, contact a qualified electrician. Do not attempt to defeat this safety feature. Unplug or disconnect the appliance from the power supply before servicing.
WARNING - TO REDUCE THE RISK OF FIRE, ELECTRIC SHOCK, OR INJURY:
GENERAL WARNINGS
1. DO NOT operate any fan with a damaged cord or plug. Discard fan or return to an authorized service facility for examination and/or repair.
2. DO NOT run cord under carpeting. DO NOT cover cord with throw rugs, runners, or similar coverings. DO NOT route cord under furniture or appliances. Keep cord away from high traffic areas and place cord where it will not be tripped over.
3. If the power cord is damaged, it must be replaced by the manufacturer, its service agent, or similarly qualified persons in order to avoid a hazard.
4. This appliance is not intended for use by anyone (including children) with reduced physical, sensory or mental capabilities, or lack of experience and knowledge, unless they have been given supervision or instruction concerning use of the appliance by a person responsible for their safety.
USE WARNINGS
5. Children should be supervised to ensure that they DO NOT play with the appliance.
6. Cleaning and user maintenance shall not be made by children without supervision.
7. Prior to cleaning or other maintenance, the appliance must be unplugged from the electrical outlet.
8. DO NOT handle plug or appliance with wet hands.
9. DO NOT use without filter in place.
10. Only use Shark™ branded filters and accessories.
11. DO NOT damage the power cord:
- DO NOT pull or carry appliance by the cord or use the cord as a handle.
- DO NOT unplug by pulling on cord. Grasp the plug, not the cord.
- DO NOT stand the appliance on the power cord, close a door on the cord, pull the cord around sharp corners, or leave the cord near heated surfaces.
12. DO NOT use with any opening blocked; keep free of dust, lint, hair, and anything that may reduce airflow
13. DO NOT use if airflow is restricted. If the air paths become blocked, turn the appliance off and unplug from electrical outlet. Remove all obstructions before you plug in and turn on the unit again.
14. DO NOT use if appliance is not working as it should, or has been dropped, damaged, left outdoors, or dropped into water.
15. DO NOT place appliance on unstable surfaces such as chairs or other furniture.
16. DO NOT use in the following areas:
- Wet or damp surfaces
- Outdoor areas
- Spaces that are enclosed and may contain explosive or toxic fumes or vapors (lighter fluid, gasoline, kerosene, paint, paint thinners, mothproofing substances, or flammable dust)
17. Turn off all controls before unplugging the appliance.
18. Unplug from electrical outlet when not in use and before any maintenance or cleaning.
19. Hand wash with soapy water only. Washing with cleaning chemicals could damage the unit.
20. Make sure filter is in place after routine maintenance.
21. Not suitable for use with solid-state speed controls.
REMOTE BATTERY WARNINGS
22. Dispose of coin cell batteries according to local regulations. Keep batteries away from children at all times. Even used batteries can cause injury.
WARNING: Chemical Burn Hazard. Keep batteries away from children. This product contains a lithium button/coin cell battery. If a new or used lithium button/coin cell battery is swallowed or enters the body, it can cause severe internal burns and can lead to death in as little as 2 hours. After changing batteries, always completely close and secure the battery compartment. If the battery compartment does not close securely, stop using the product, remove the battery, and keep it away from children. If you think battery might have been swallowed or placed inside any part of the body, seek immediate medical attention.