
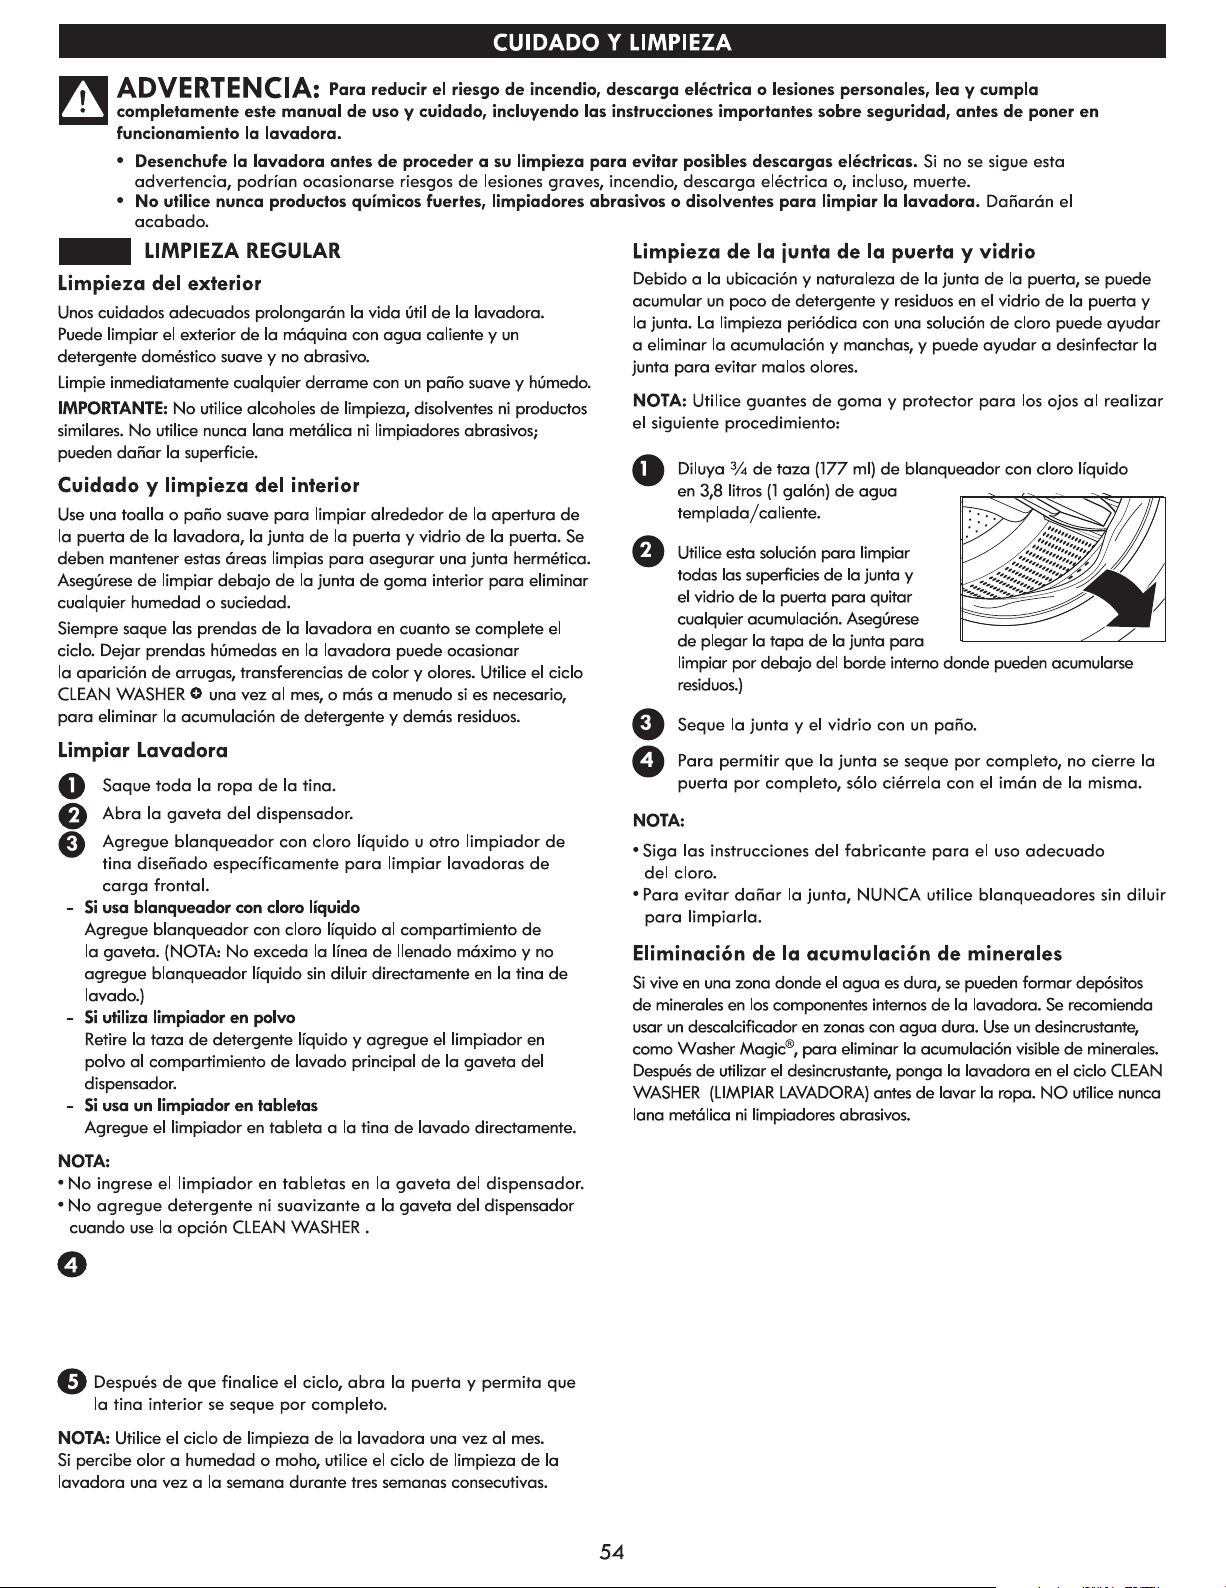
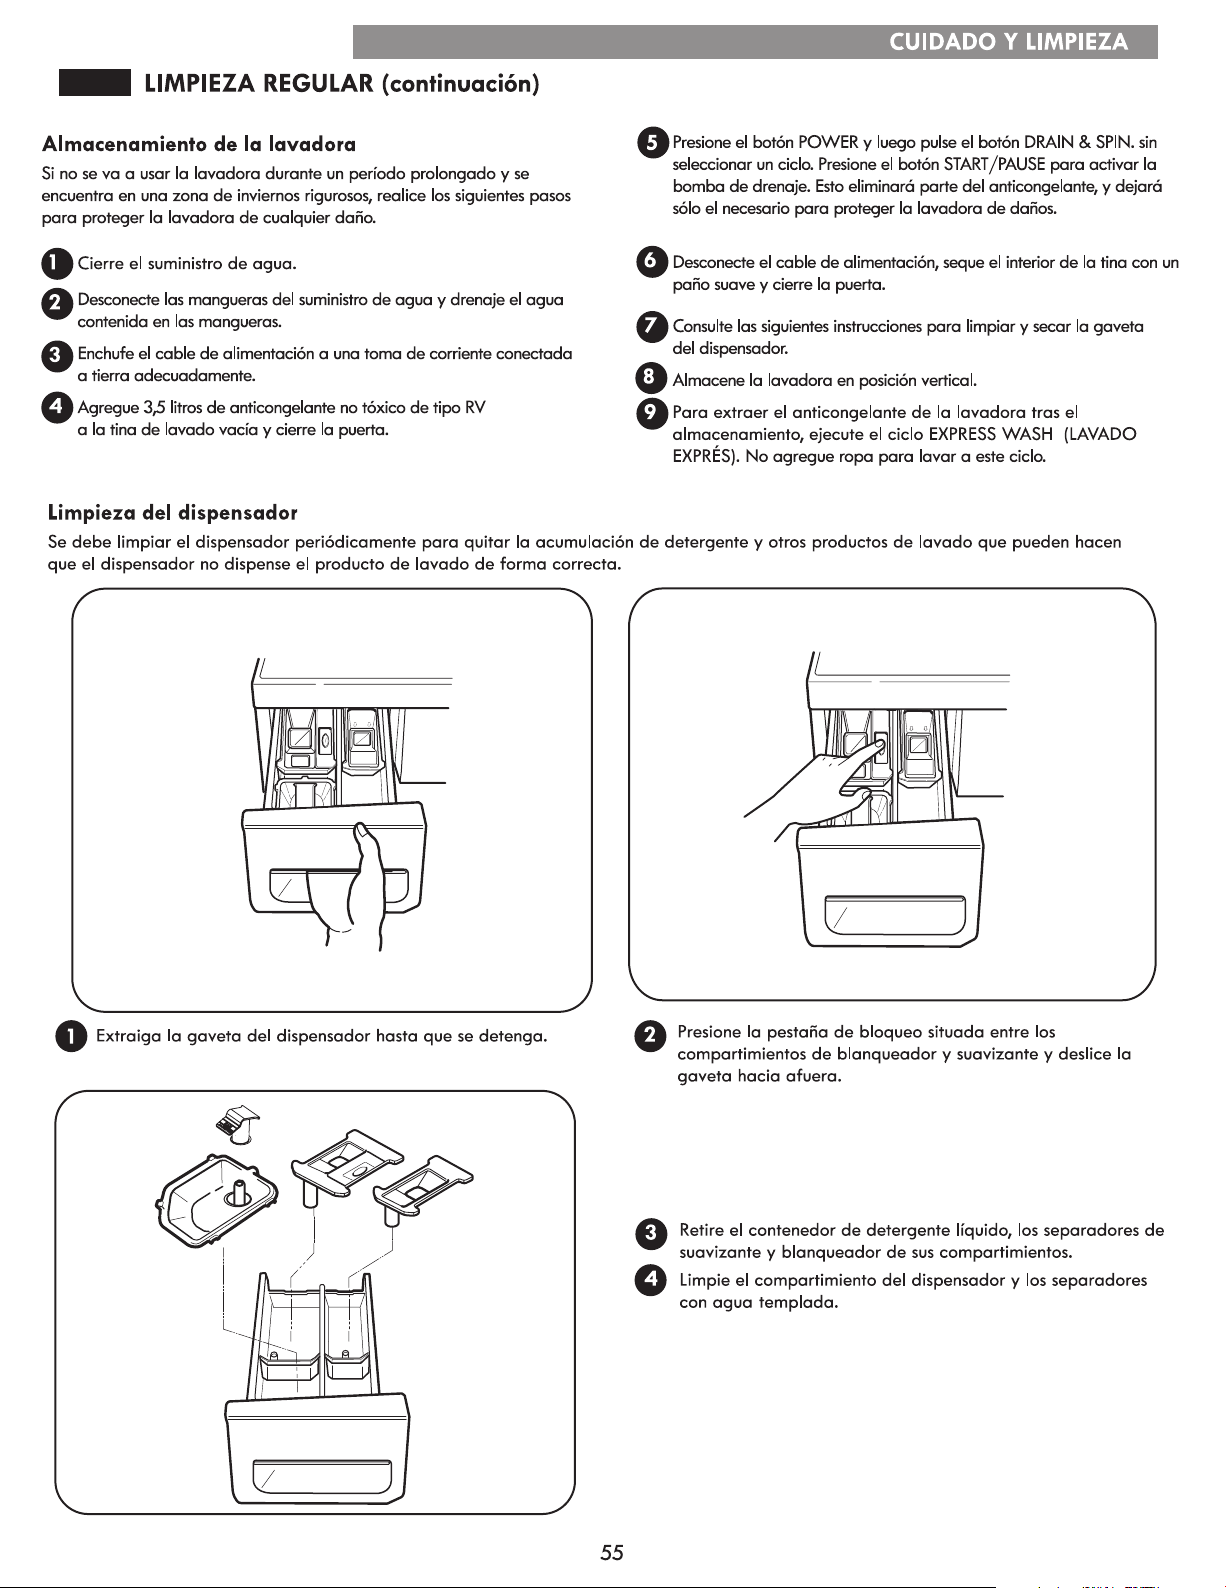
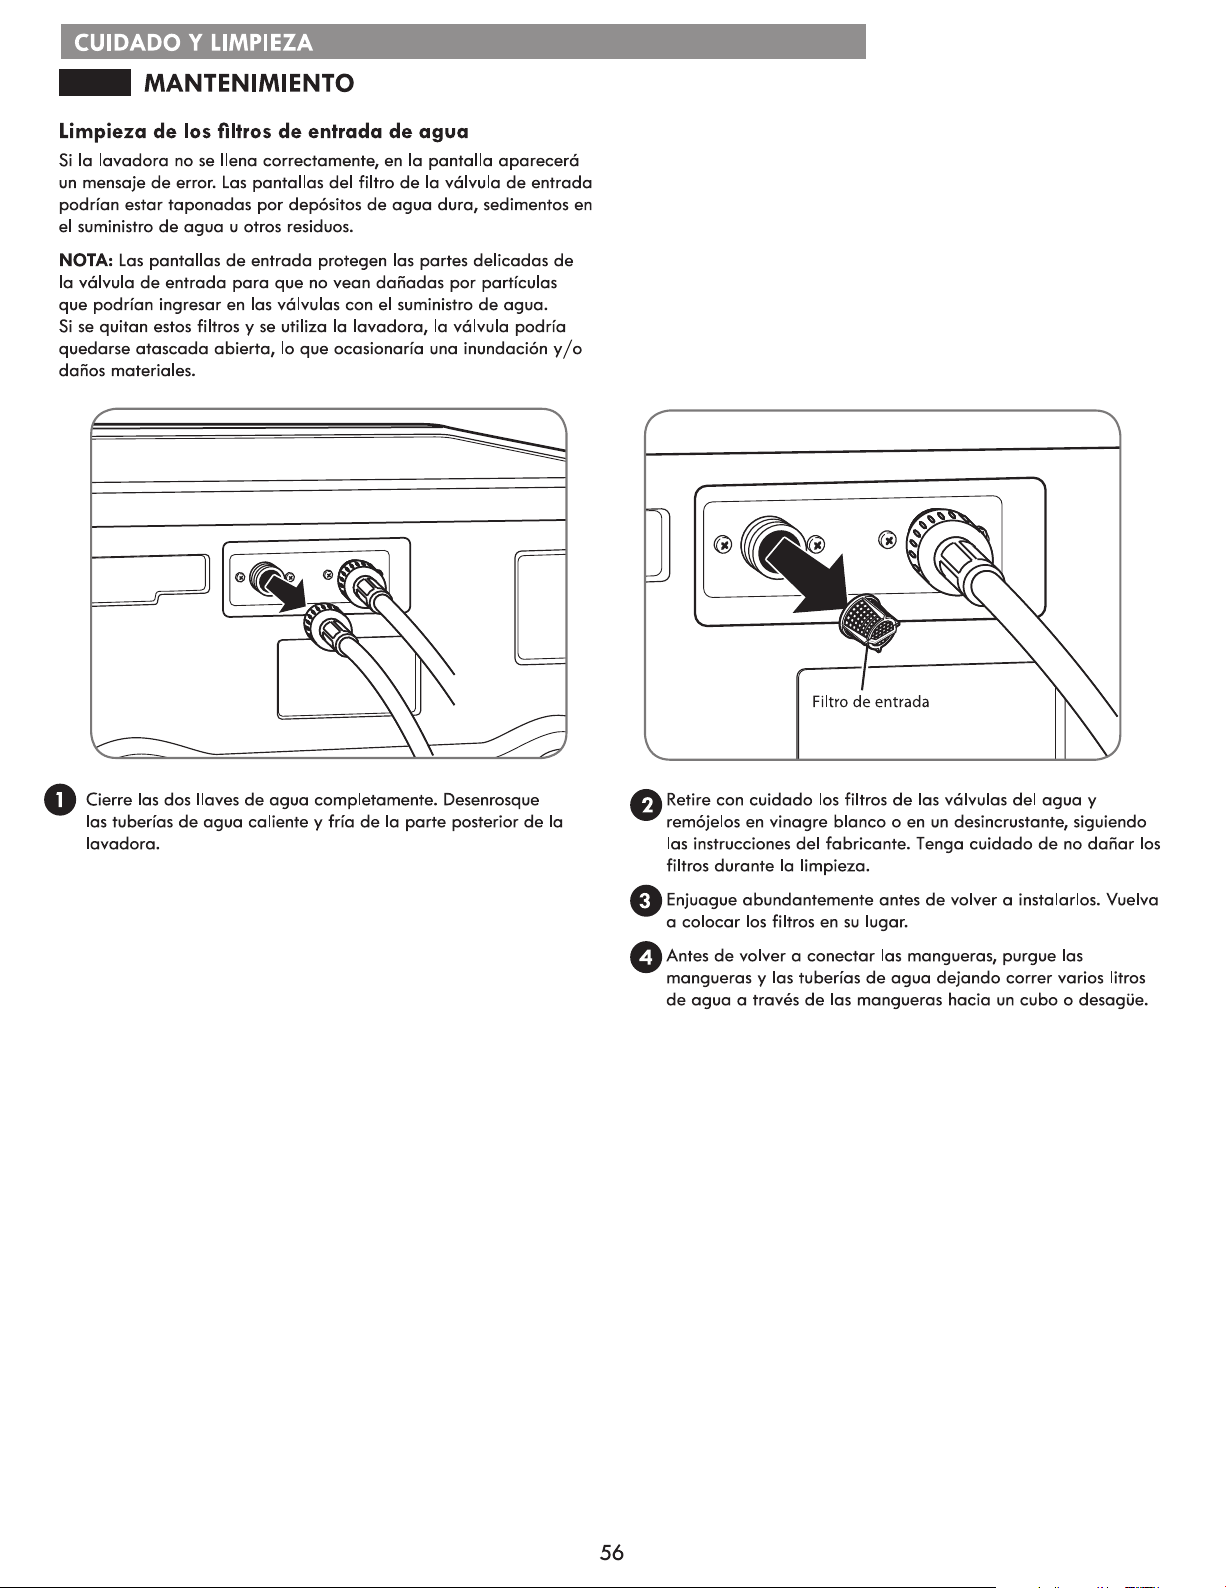
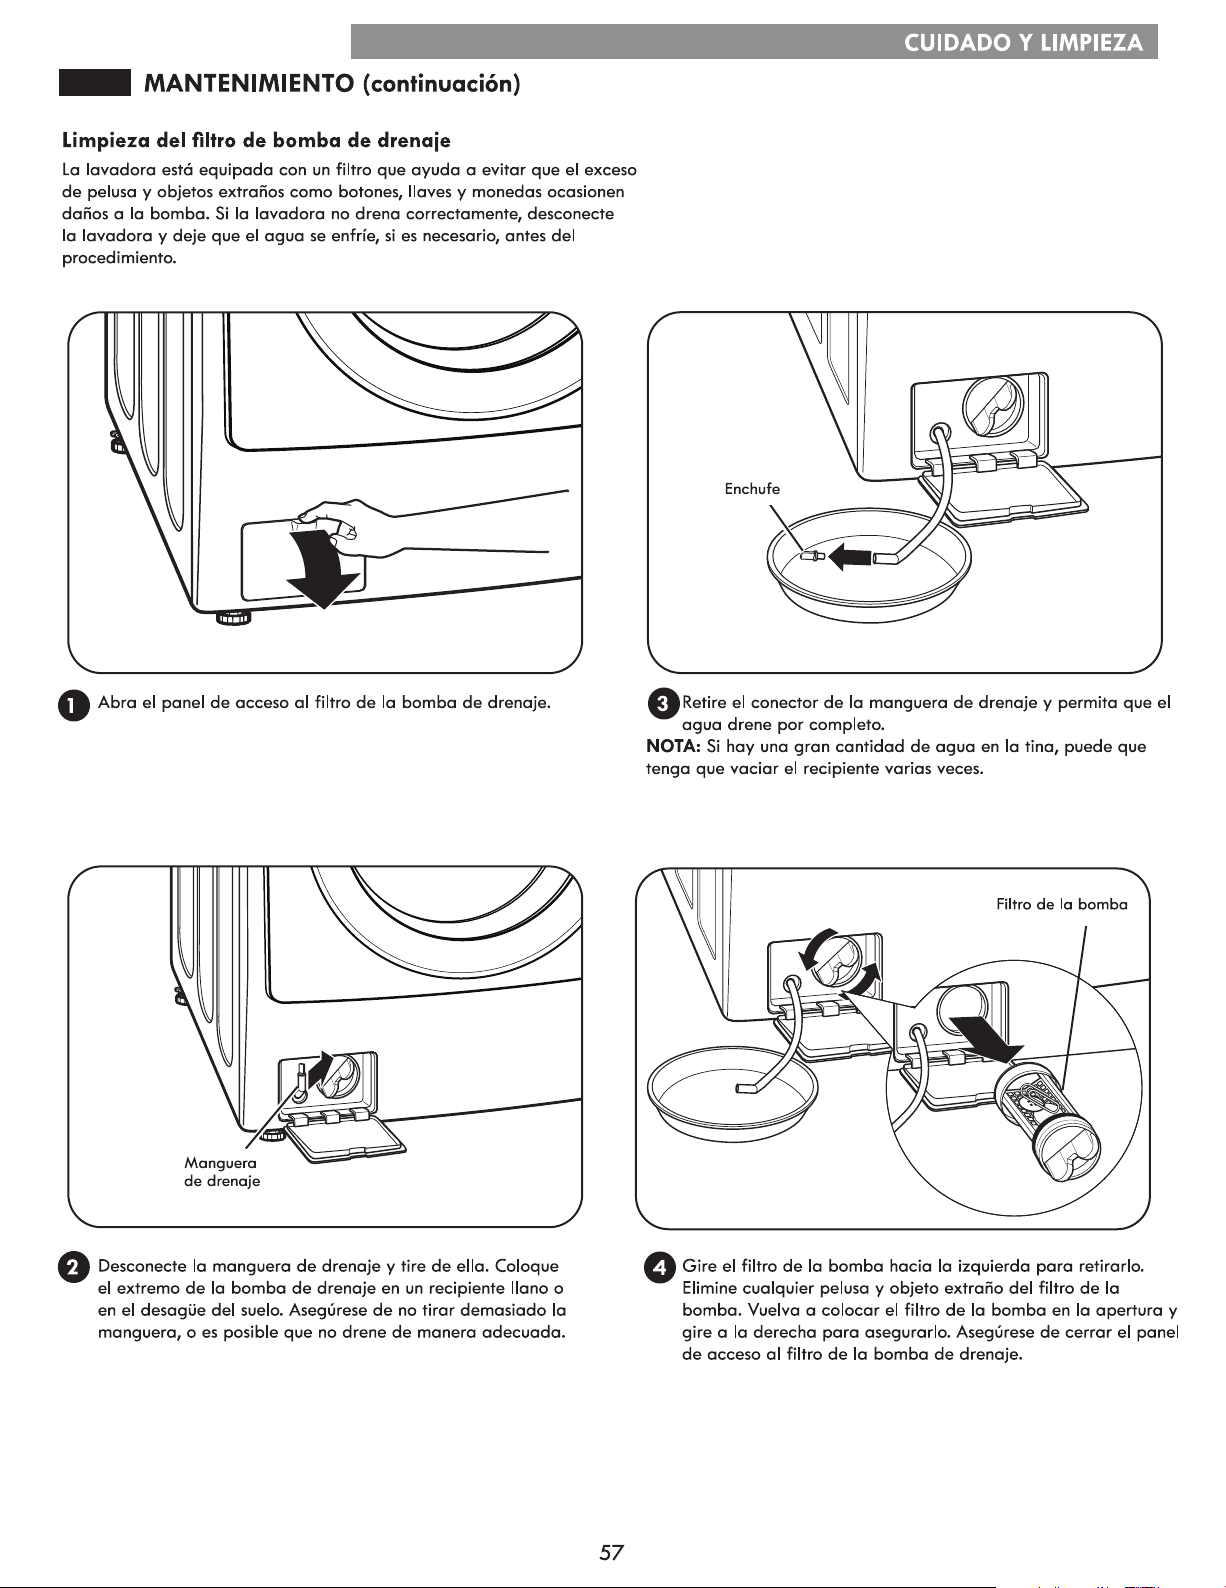
MFL68005528
Model/Modelo: 796.4168*

Master Protection Agreements
Congratulations on making a smart purchase. Your new
Kenmore
®
product is designed and manufactured for years
of dependable operation. But like all products, it may require
preventive maintenance or repair from time to time. That’s when
having a Master Protection Agreement can save you money
and aggravation.
The Master Protection Agreement also helps extend the life of
your new product. Here’s what the Agreement includes:
• Parts and labor not just for repairing defects, but to help keep
products operating properly under normal use. Our coverage
goes well beyond the product warranty. No deductible, no
functional failure excluded from coverage – real protection.
• Expert service by experienced service technicians trusted in
millions of homes every year.
• Unlimited service calls and nationwide service, as often as
you want us, whenever you want us.
• “No-lemon” guarantee – replacement of your covered
product after three separate product failures occur within
twelve months and a fourth repair is required. Includes free
delivery and installation, if necessary, of replacement product.
•
Product replacement if your covered product can not be xed.
• Annual Preventive Maintenance Check at your request – no
extra charge.
• Fast help by phone – phone support from a service agent on
all products to help troubleshoot problems. Think of us as a
“talking owner’s manual.”
• Power surge protection against electric damage due to
power uctuations.
• $300 Food Loss Protection for any food spoilage that is the
result of mechanical failure of any covered refrigerator or
freezer.
• Service Promise: $50 if rst attempt repair of your covered
product can’t be accomplished and product is not usable
while awaiting further repair service.
• 25% discount o the regular price of any non-covered repair
service and related installed parts.
Once you purchase the Agreement, a simple phone call is all
that it takes for you to schedule service. You can call anytime
day or night.
The Master Protection Agreement is a risk-free purchase. If you
cancel for any reason during the product warranty period, we
will provide a full refund, or a prorated refund any time after
the product warranty period expires. Purchase your Master
Protection Agreement today!
Some limitations and exclusions apply.
For prices and additional information in the U.S.A.
call 1-800-827-6655.
*Coverage in Canada varies on some items.
For full details call Sears Canada at 1-800-361-6665.
Sears Installation Service
For Sears professional installation of home appliances, garage
door openers, water heaters, and other major home items, in
the U.S.A. call 1-844-553-6667, and in Canada call 1-800-469-
4663.
PROTECTION AGREEMENTS
TABLE OF CONTENTS
PRODUCT RECORD
In the space below, record the date of purchase, model,
and serial number of your product. You will nd the
model and serial number printed on an identication
plate located inside the washer door. Have these items
of information available whenever you contact Sears
concerning your product.
Model No.
Date of Purchase
Serial No.
Save these instructions and your sales receipt for future
reference.
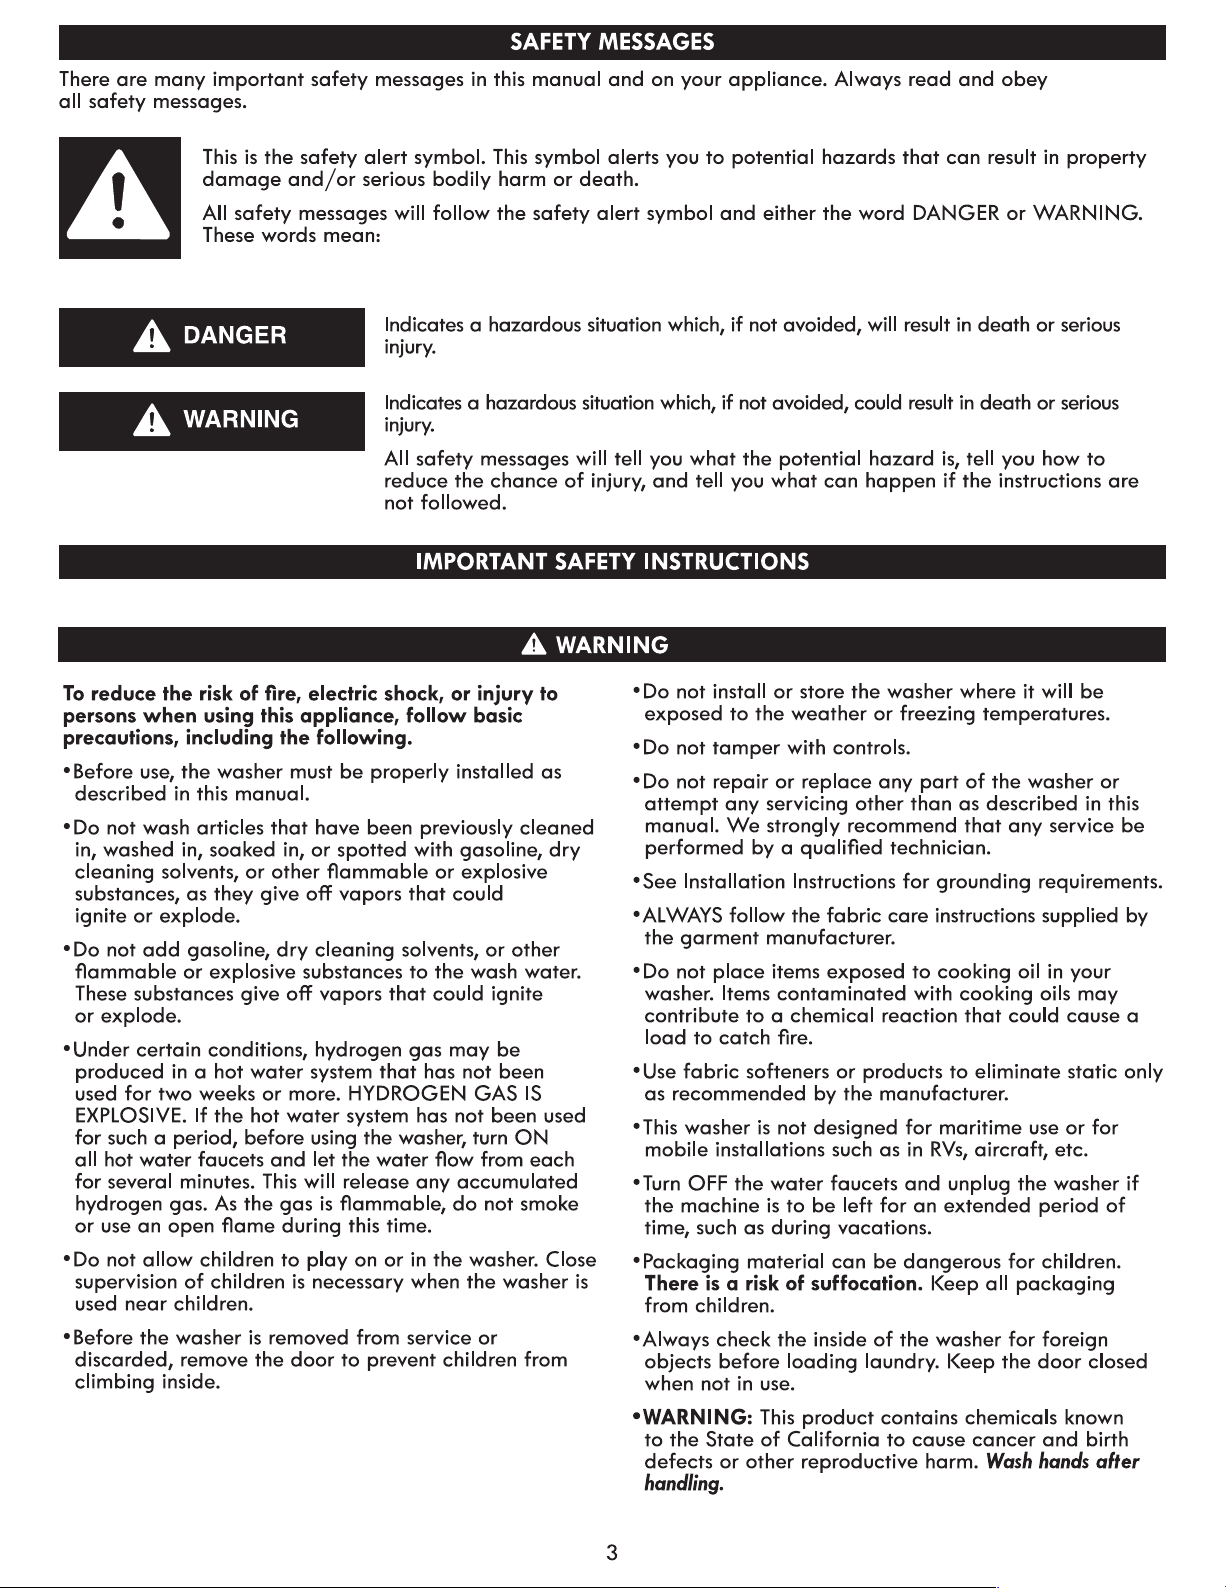
SAFETY MESSAGES .........................................................................3
IMPORTANT SAFETY INSTRUCTIONS ....................................3-5
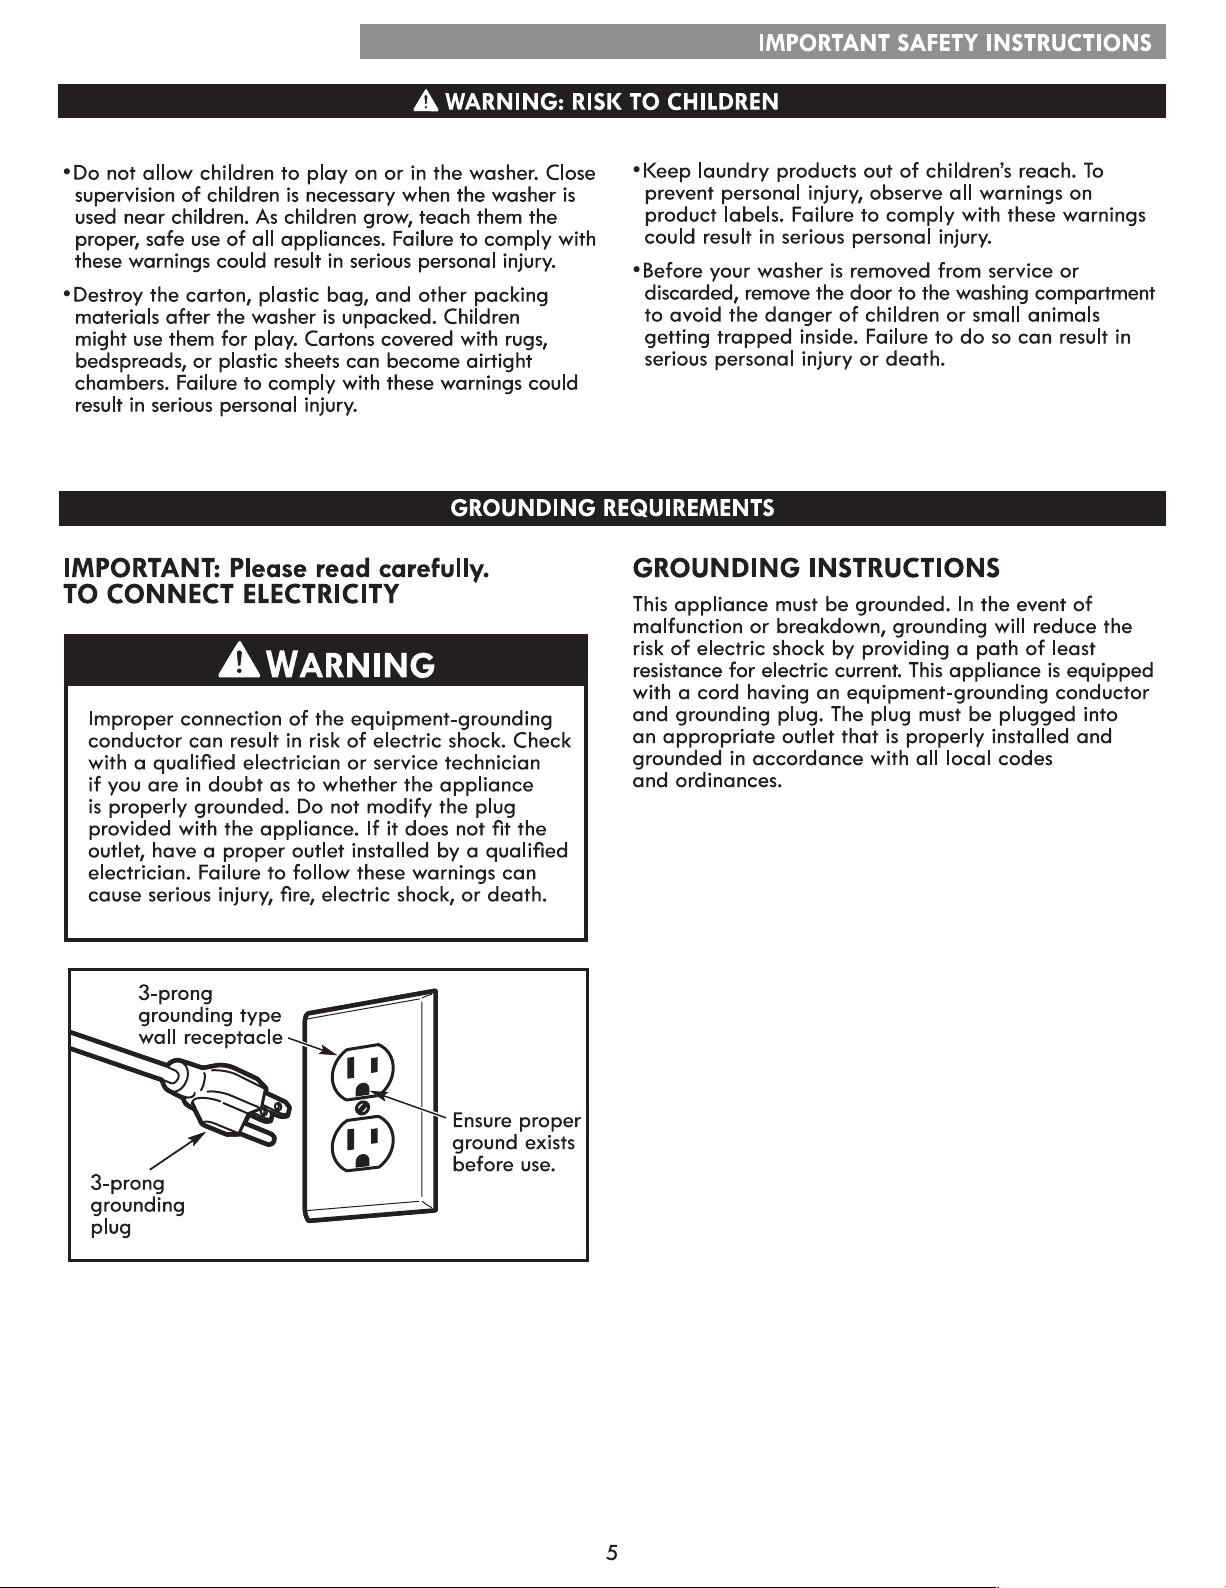
GROUNDING REQUIREMENTS................................................... 5
FEATURES AND BENEFITS
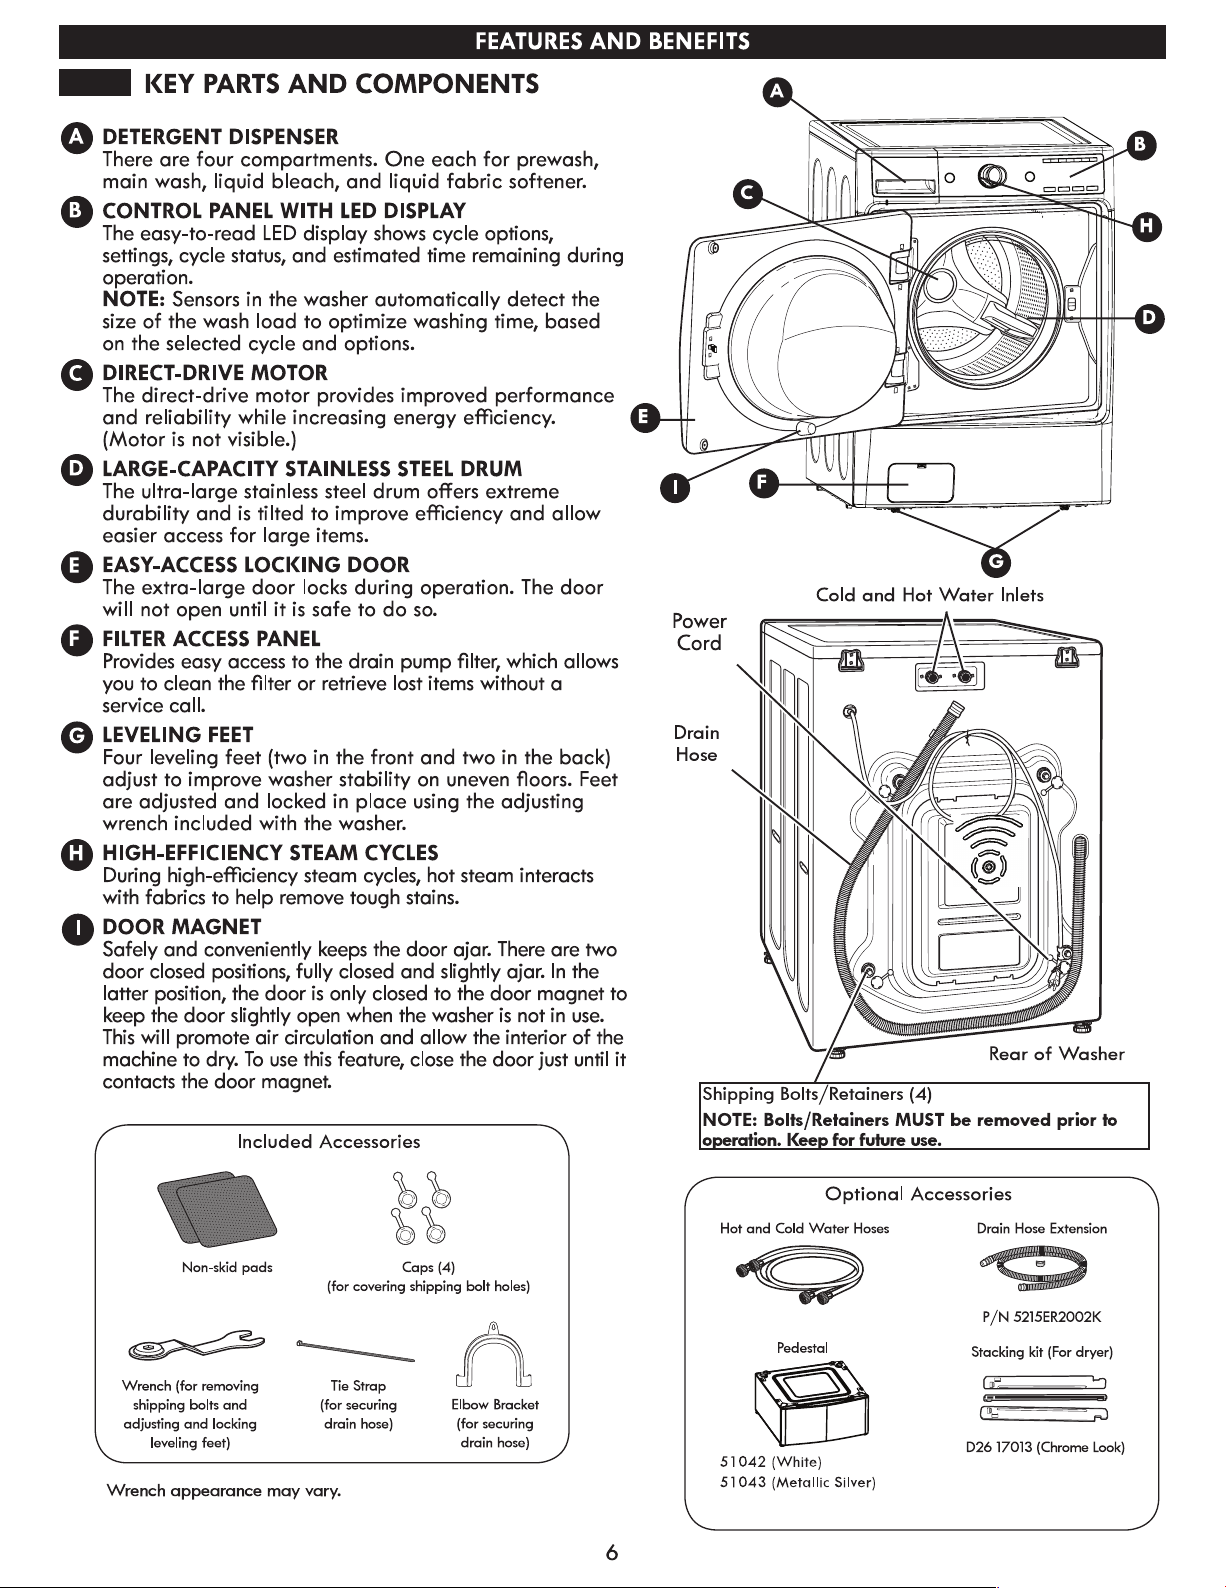
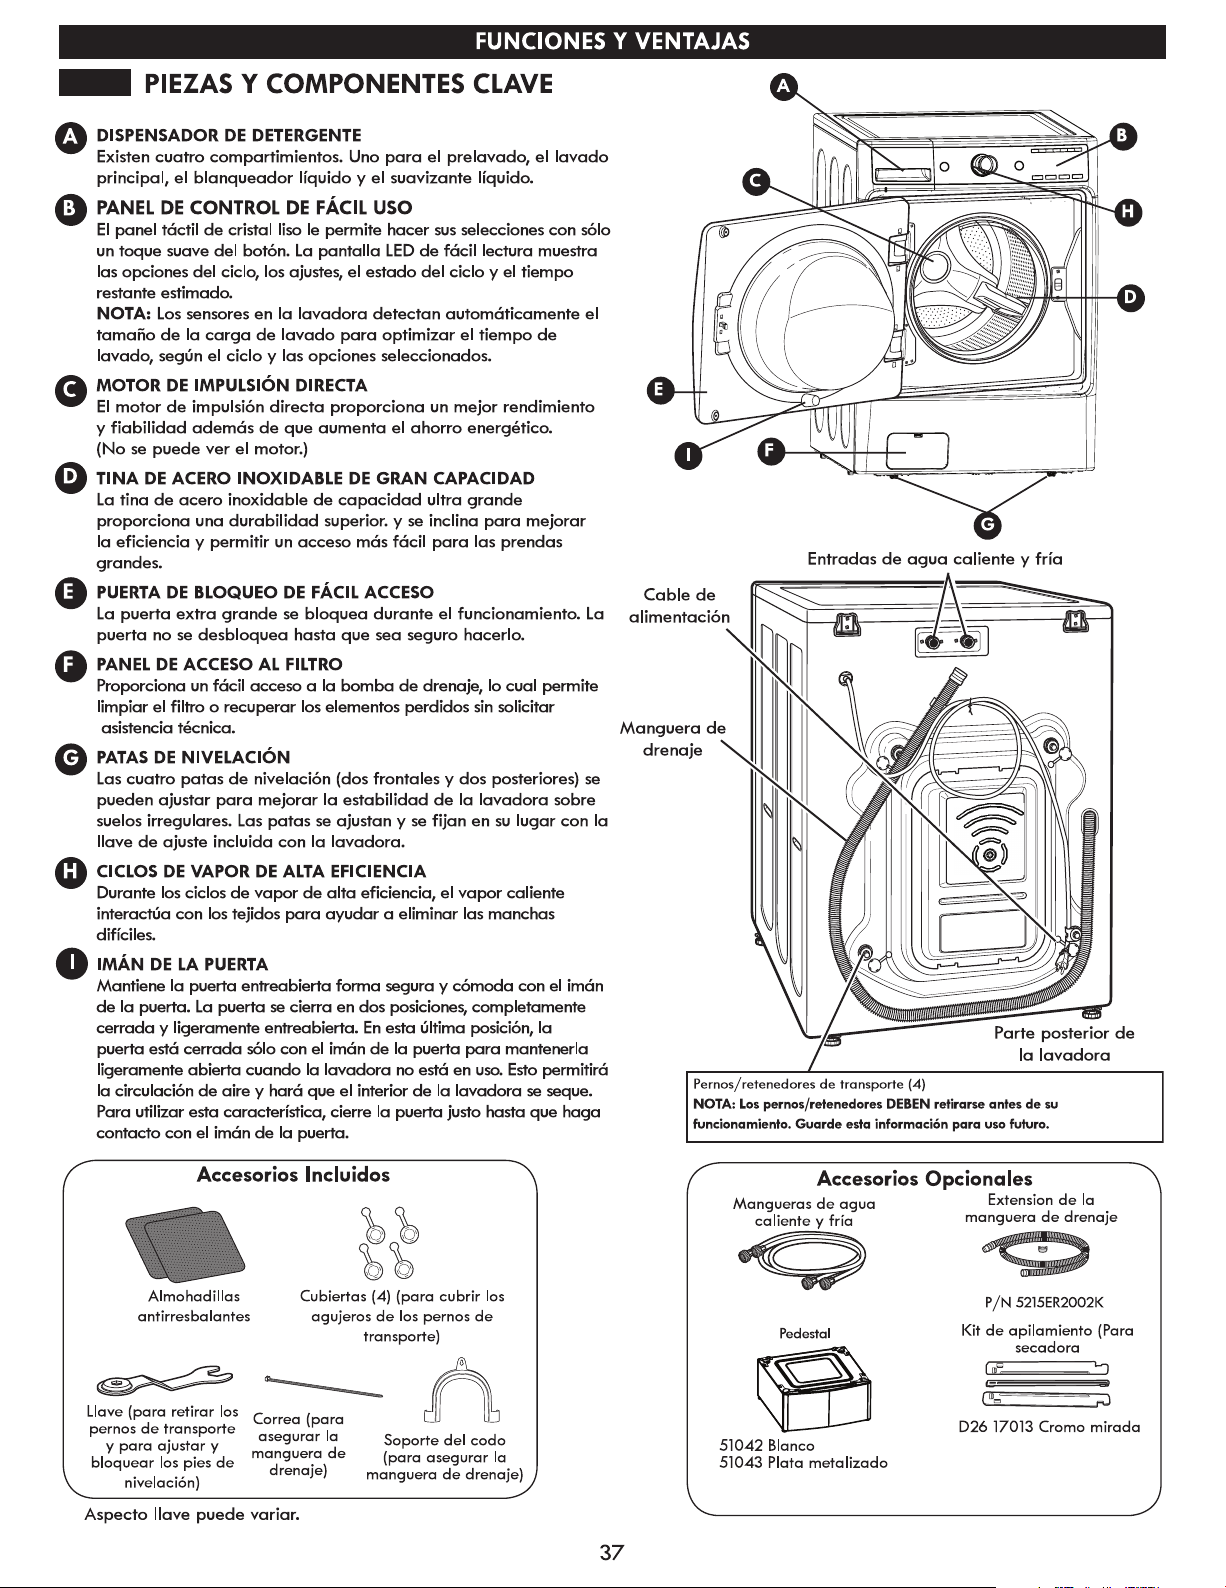
Key Parts and Components .......................................................6
Included Accessories ................................................................. 6
Optional Accessories ................................................................. 6
INSTALLATION REQUIREMENTS
Key Dimensions and Specications ......................................... 7
Choose the Proper Location ...................................................... 7
Flooring ....................................................................................... 7
Clearances ................................................................................... 7
INSTALLATION INSTRUCTIONS
Unpacking and Removing Shipping Bolts ................................8
Connecting the Water Lines ...................................................... 9
Connecting the Drain Hose ......................................................10
Connecting to the Power Supply ..............................................10
Leveling the Washer .................................................................. 11
Installation of Non-Skid Pads (optional) .................................11
HOW TO USE
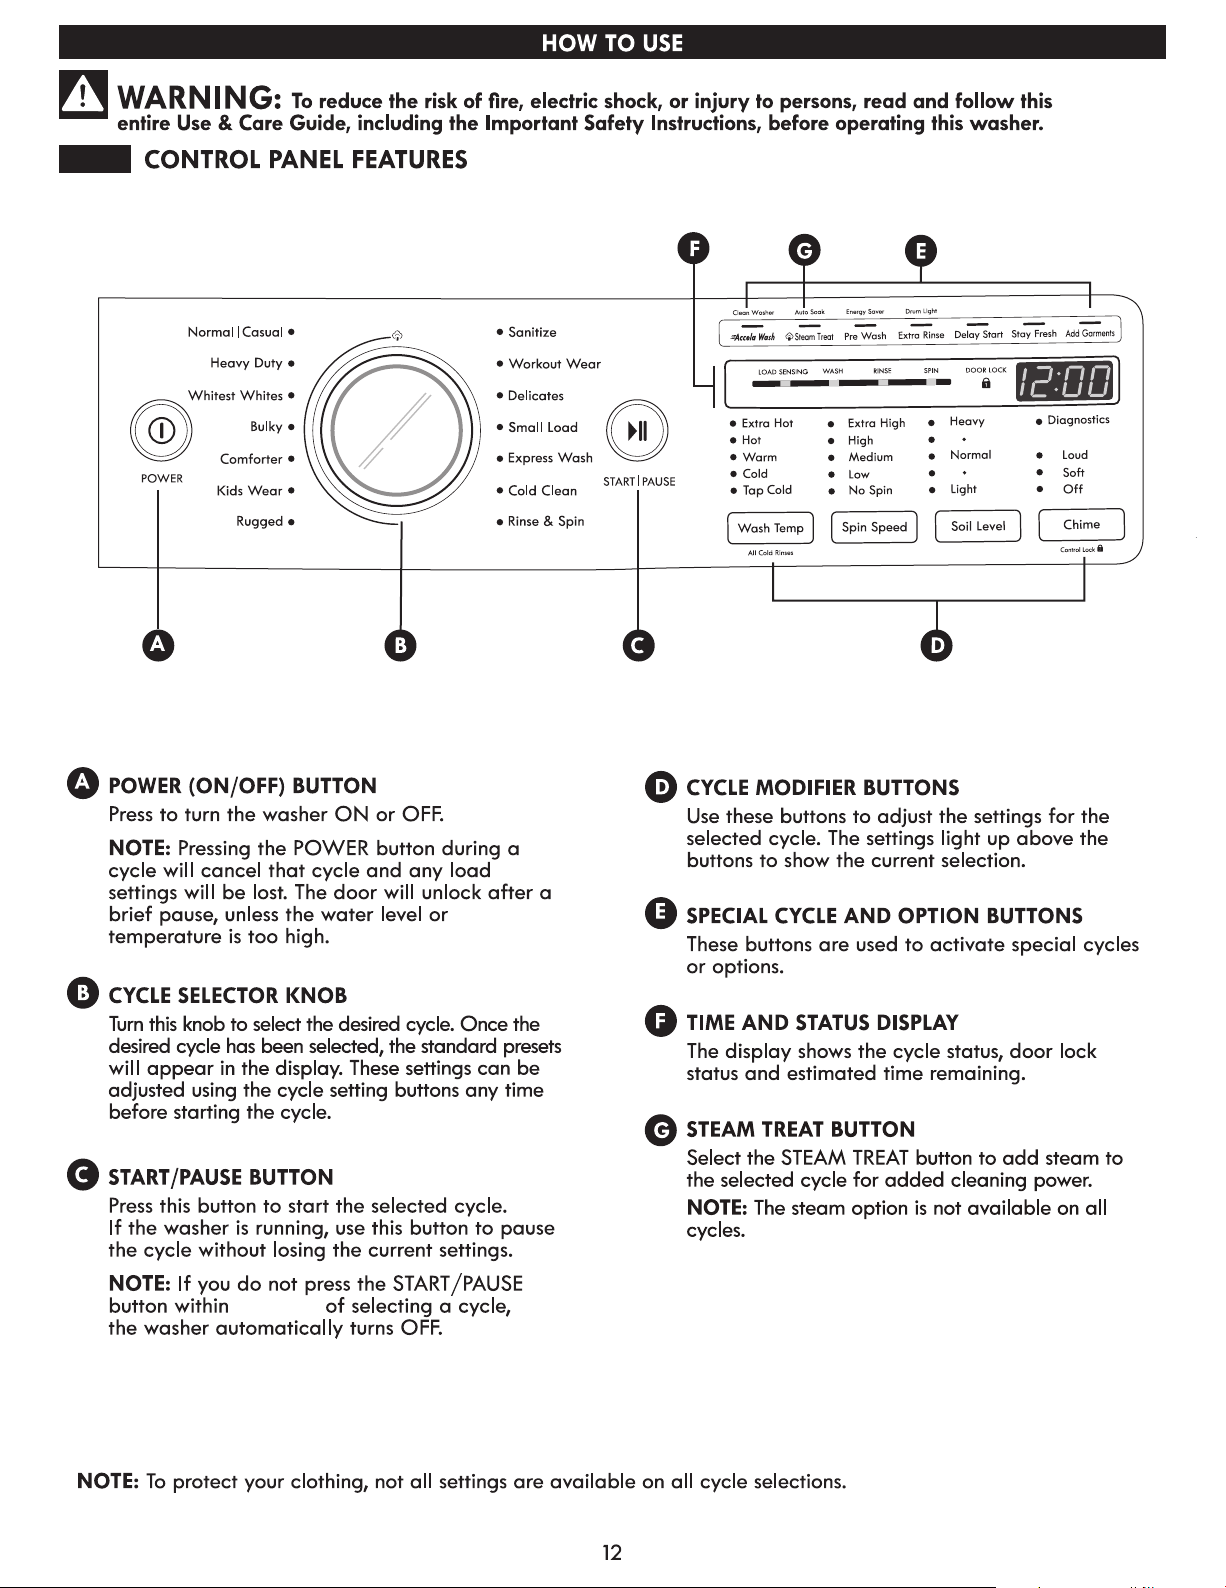
Control Panel Features ...............................................................12
Operating the Washer .............................................................. 13
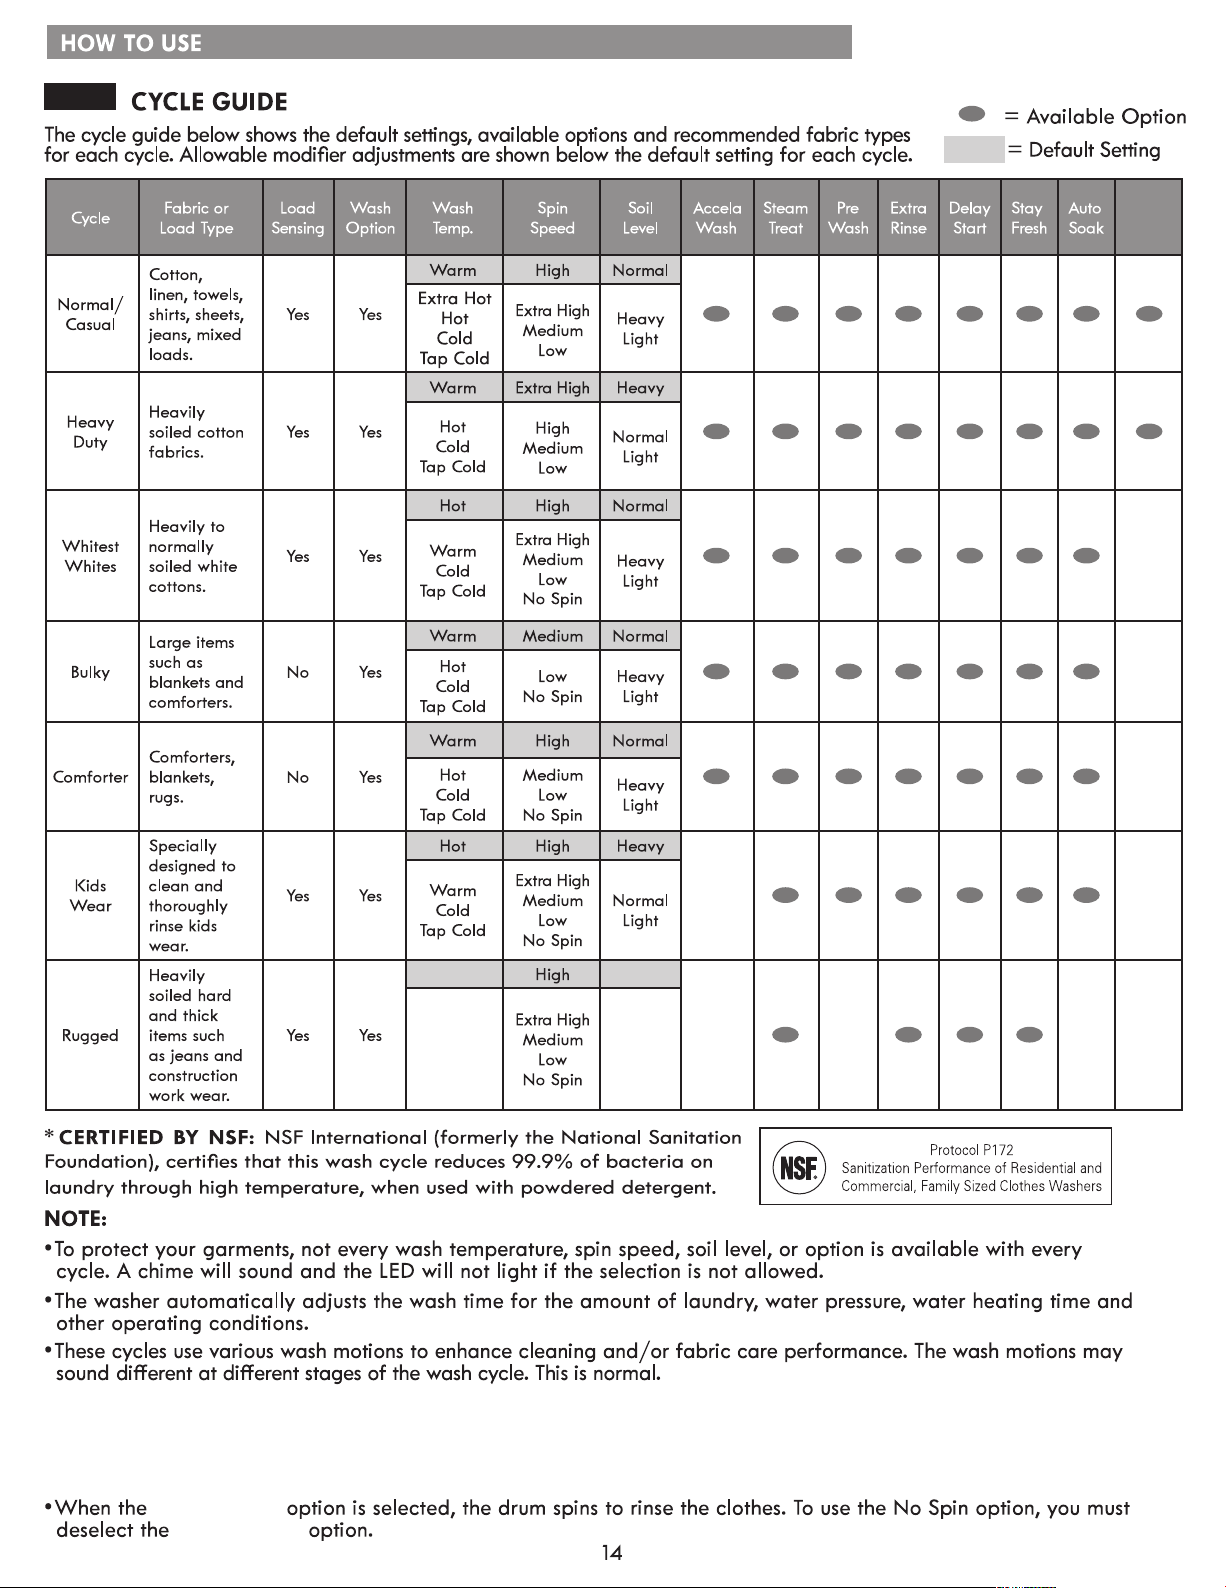
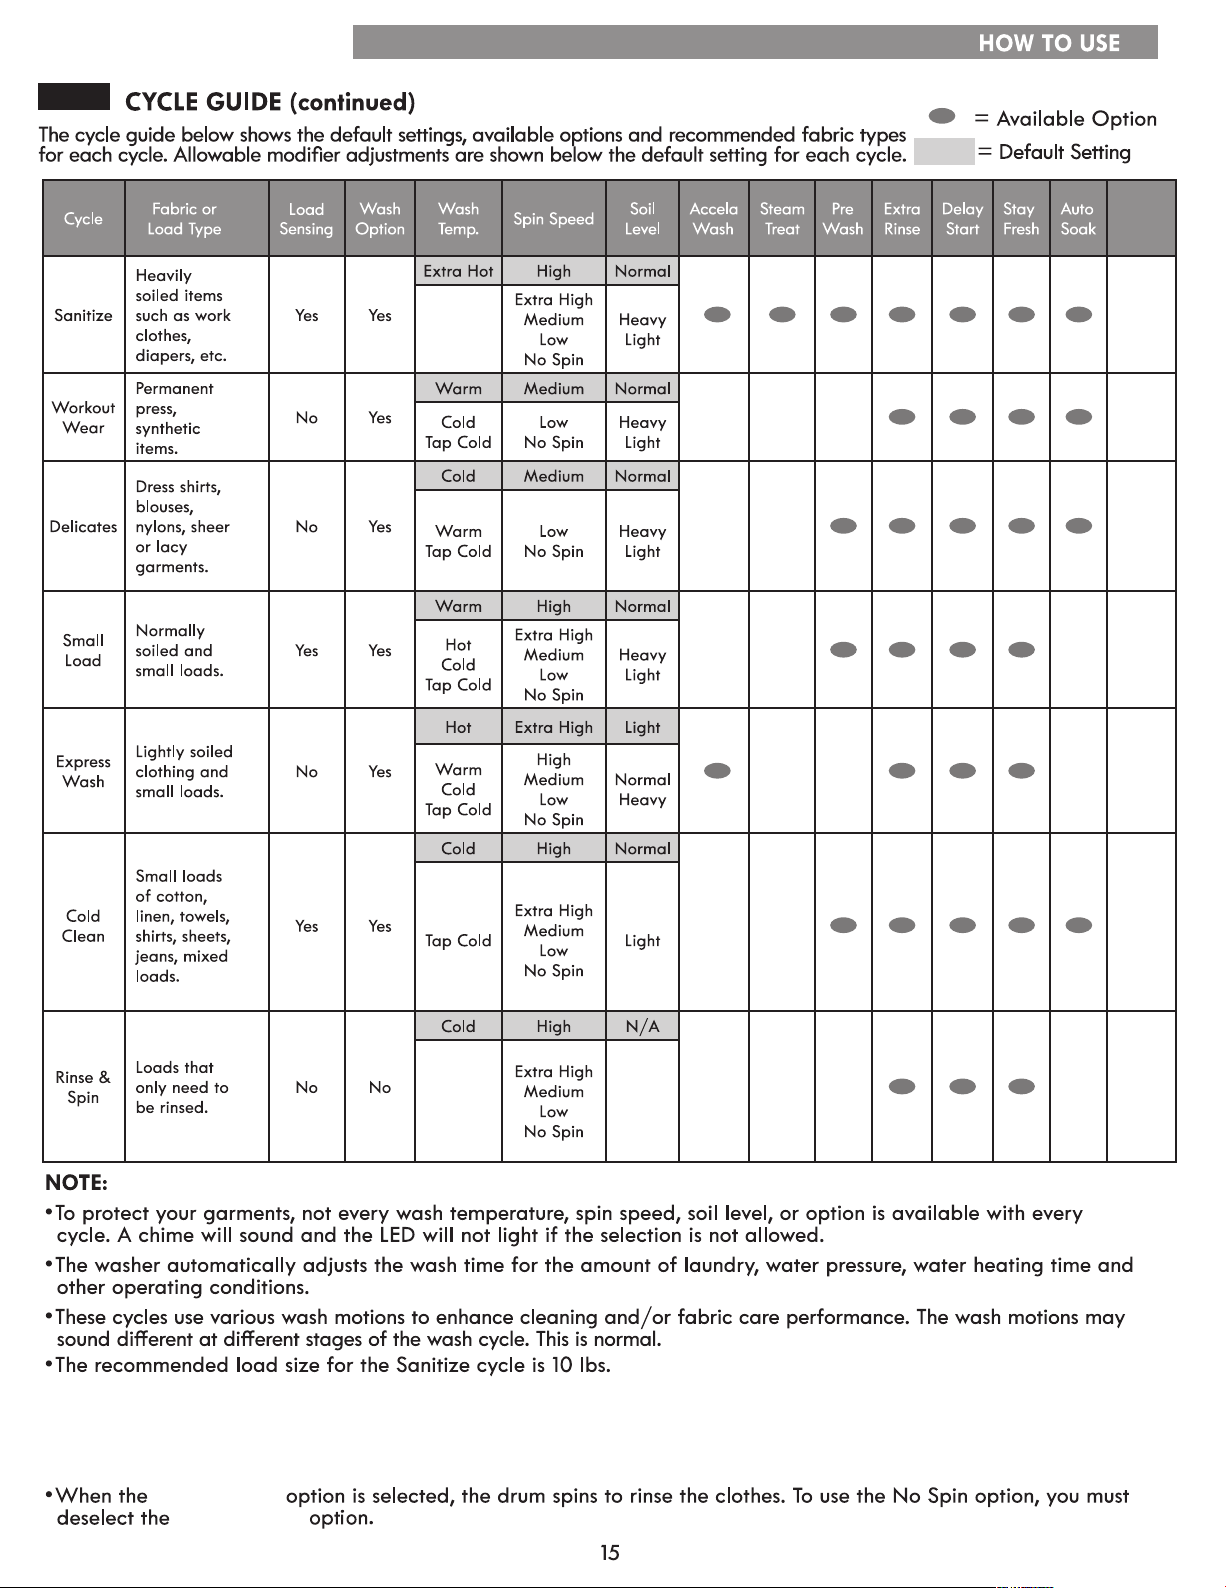
Cycle Guide .......................................................................... 14-15
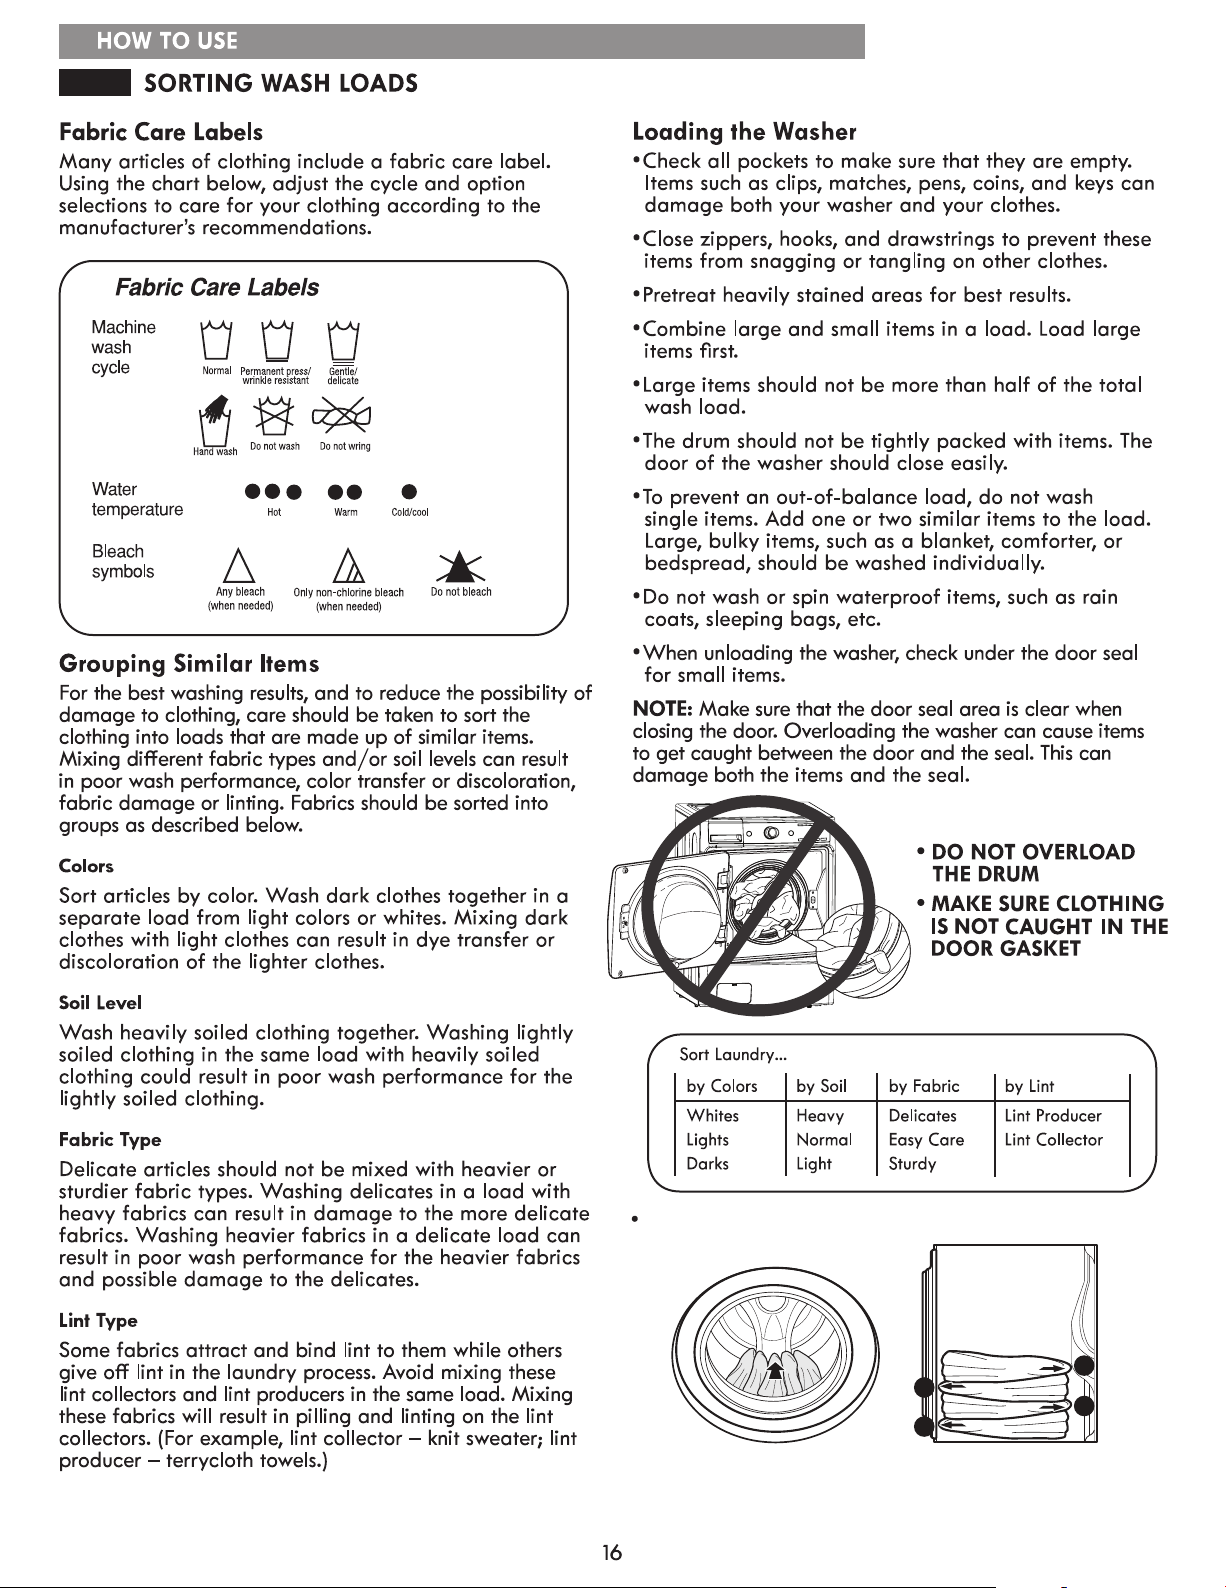
Sorting Wash Loads ..................................................................16
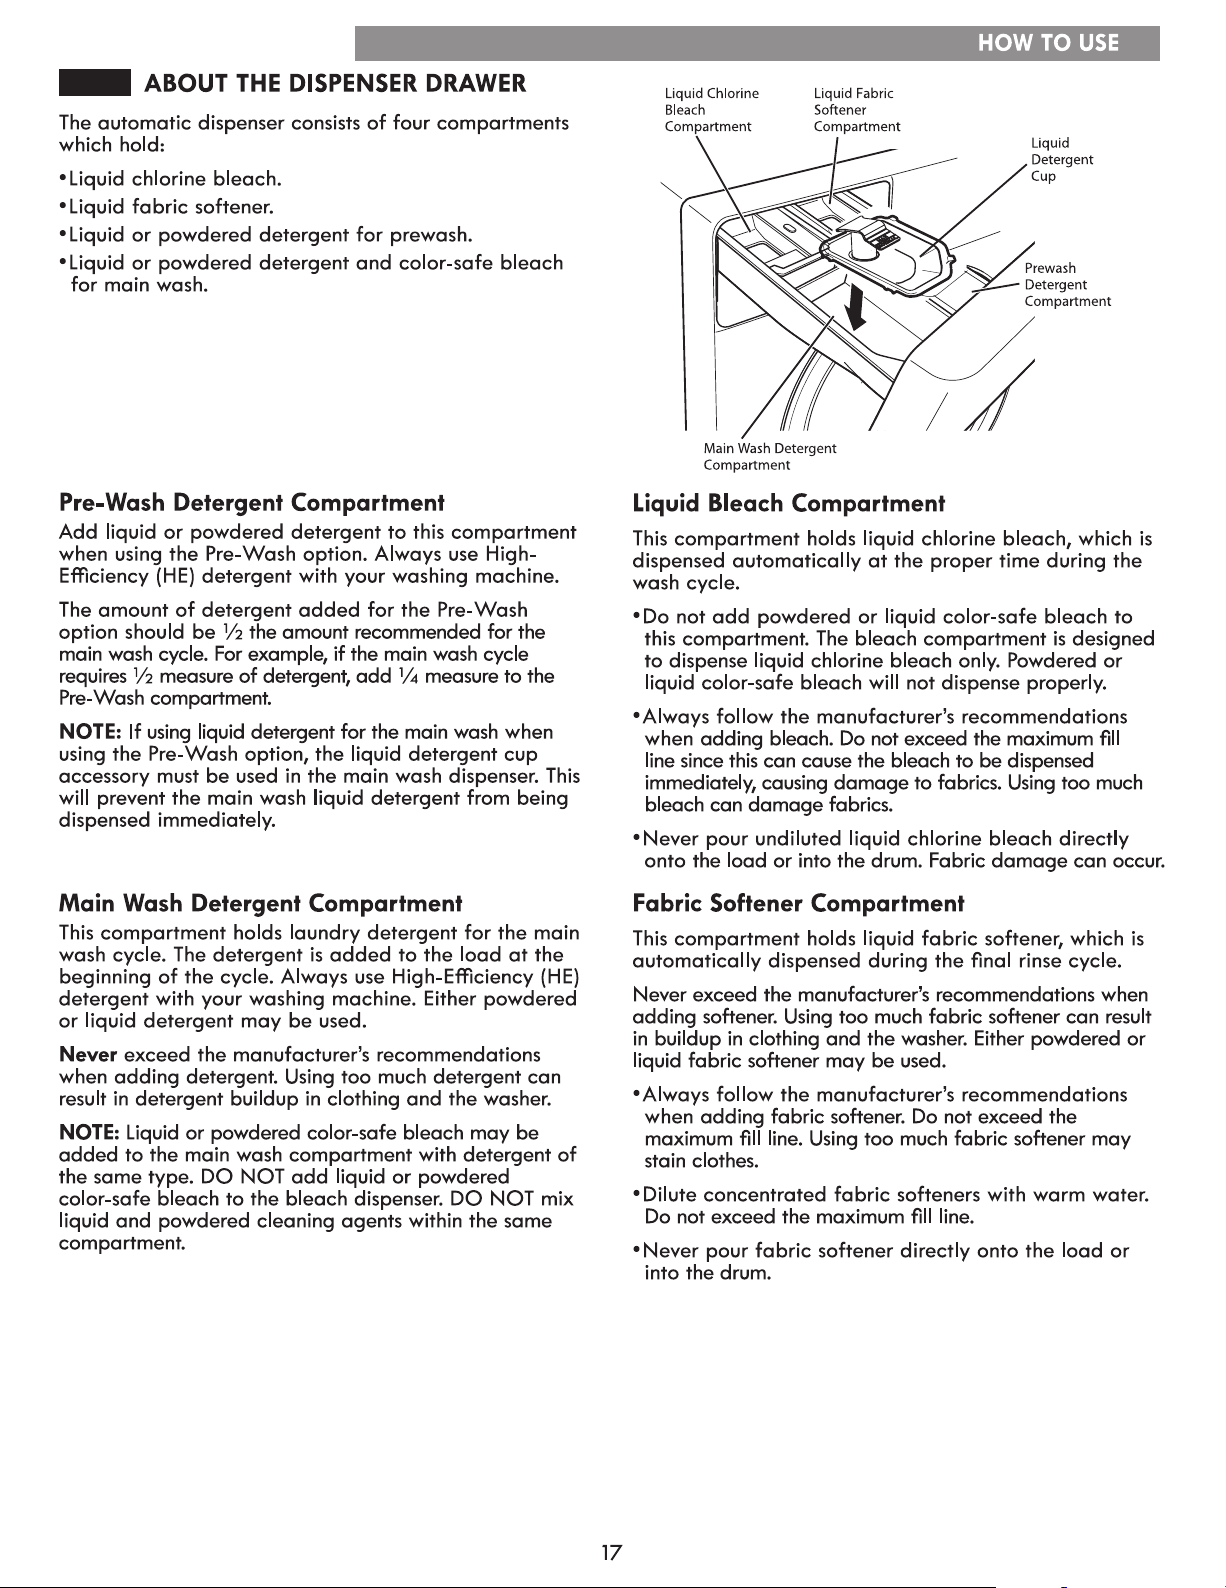
About the Dispenser Drawer ....................................................17
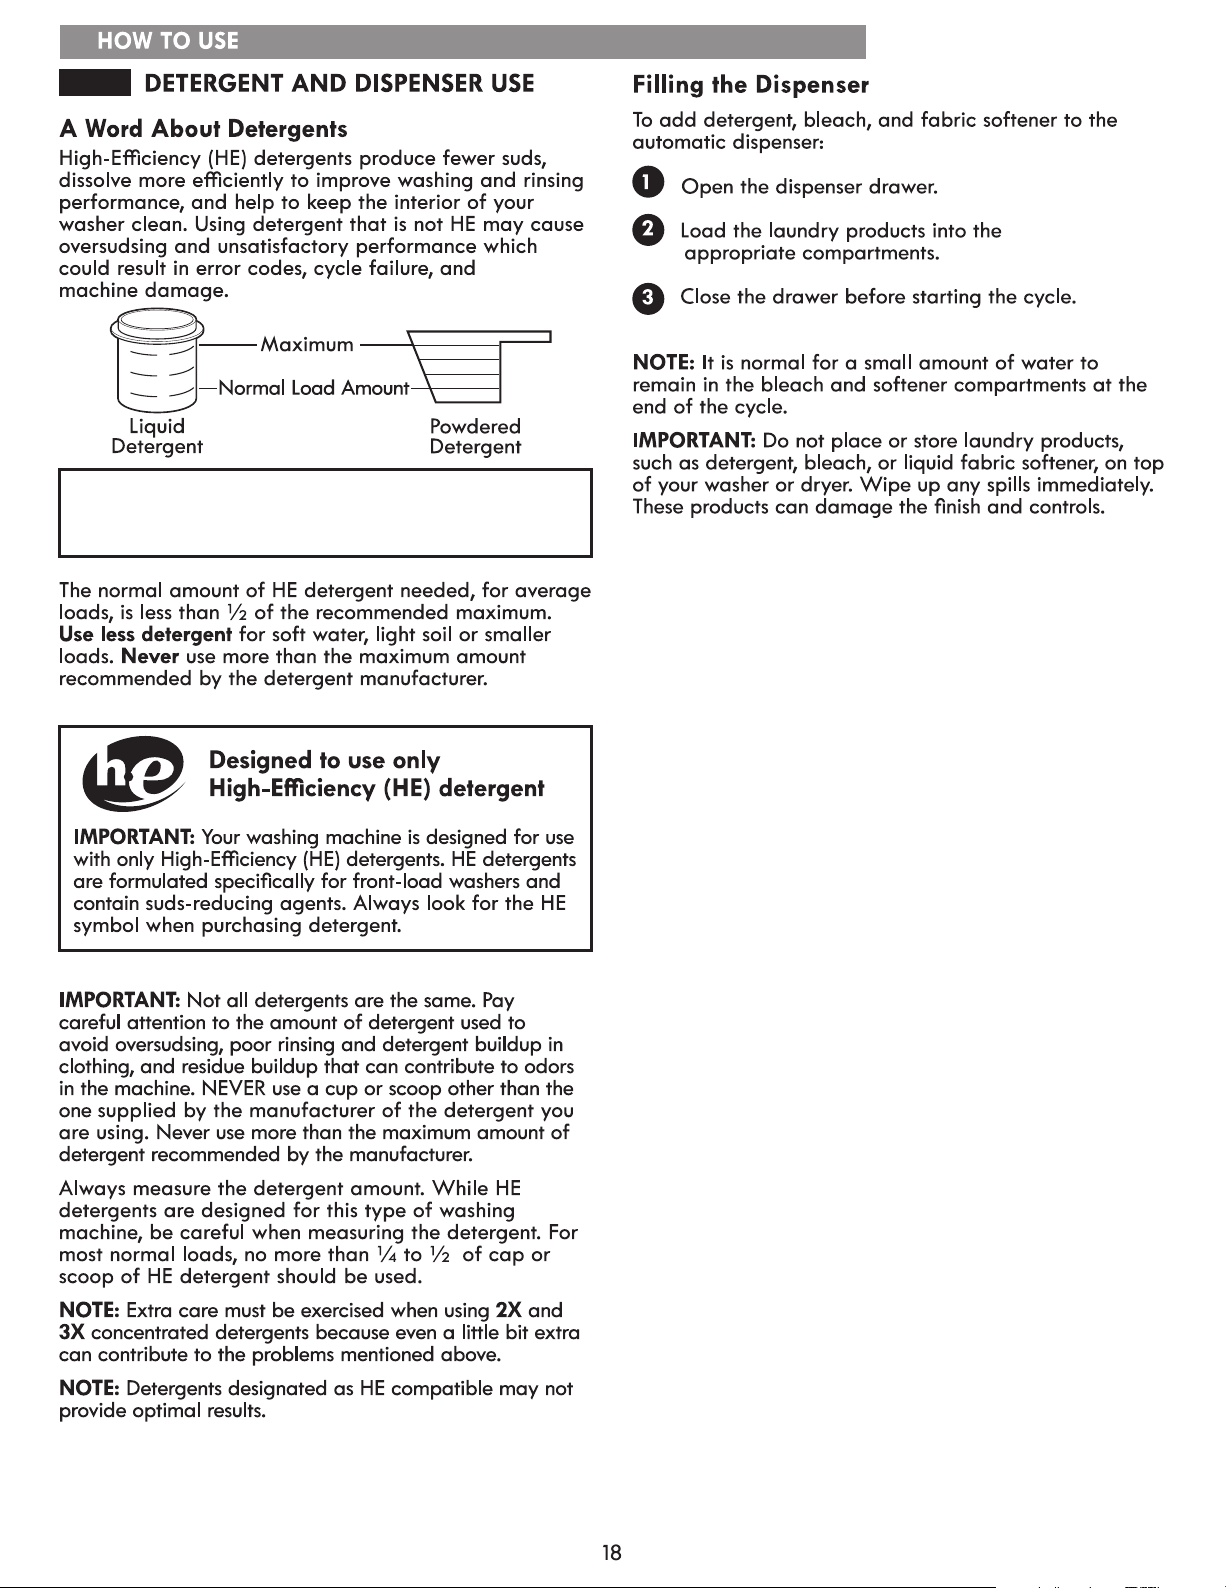
Detergent and Dispenser Use ..................................................18
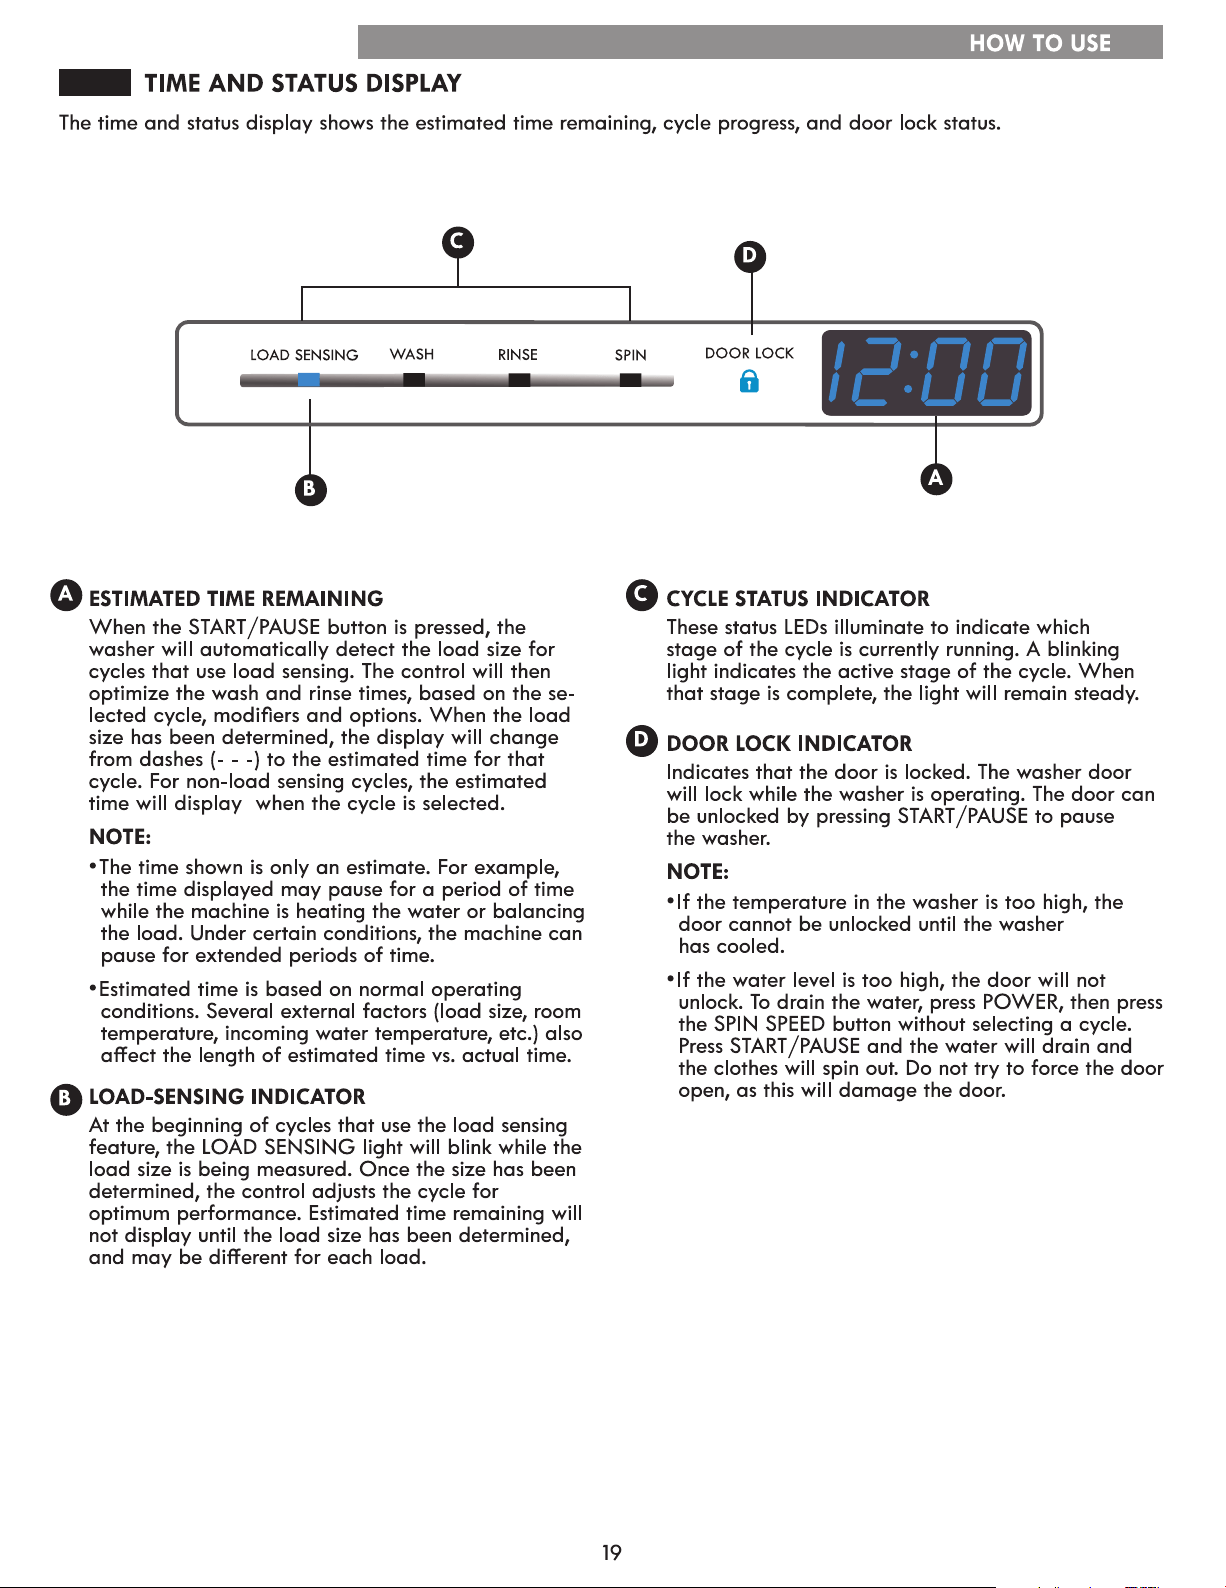
Time and Status Display ...........................................................19
Cycle Modier Buttons ............................................................. 20
Steam Cycles and Options ....................................................... 21
Special Functions ...................................................................... 22
CARE AND CLEANING
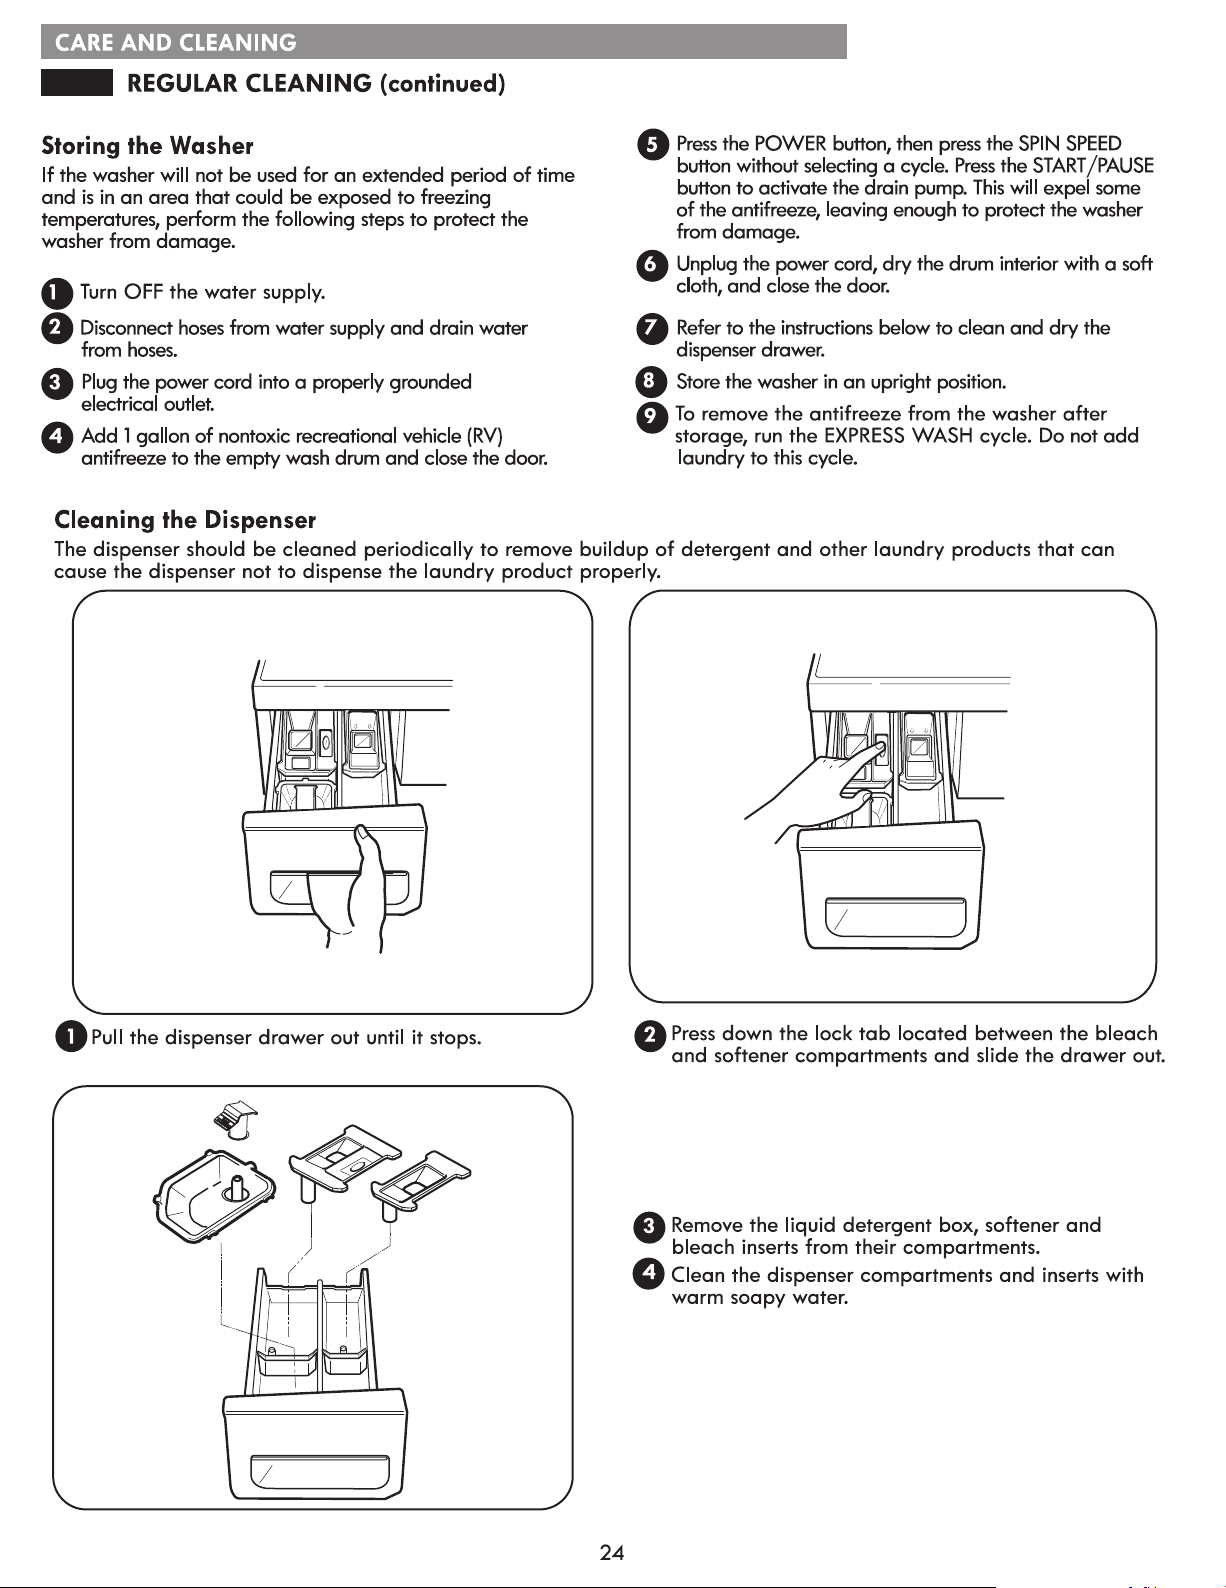
Regular Cleaning ................................................................ 23-24
Maintenance ........................................................................25-26
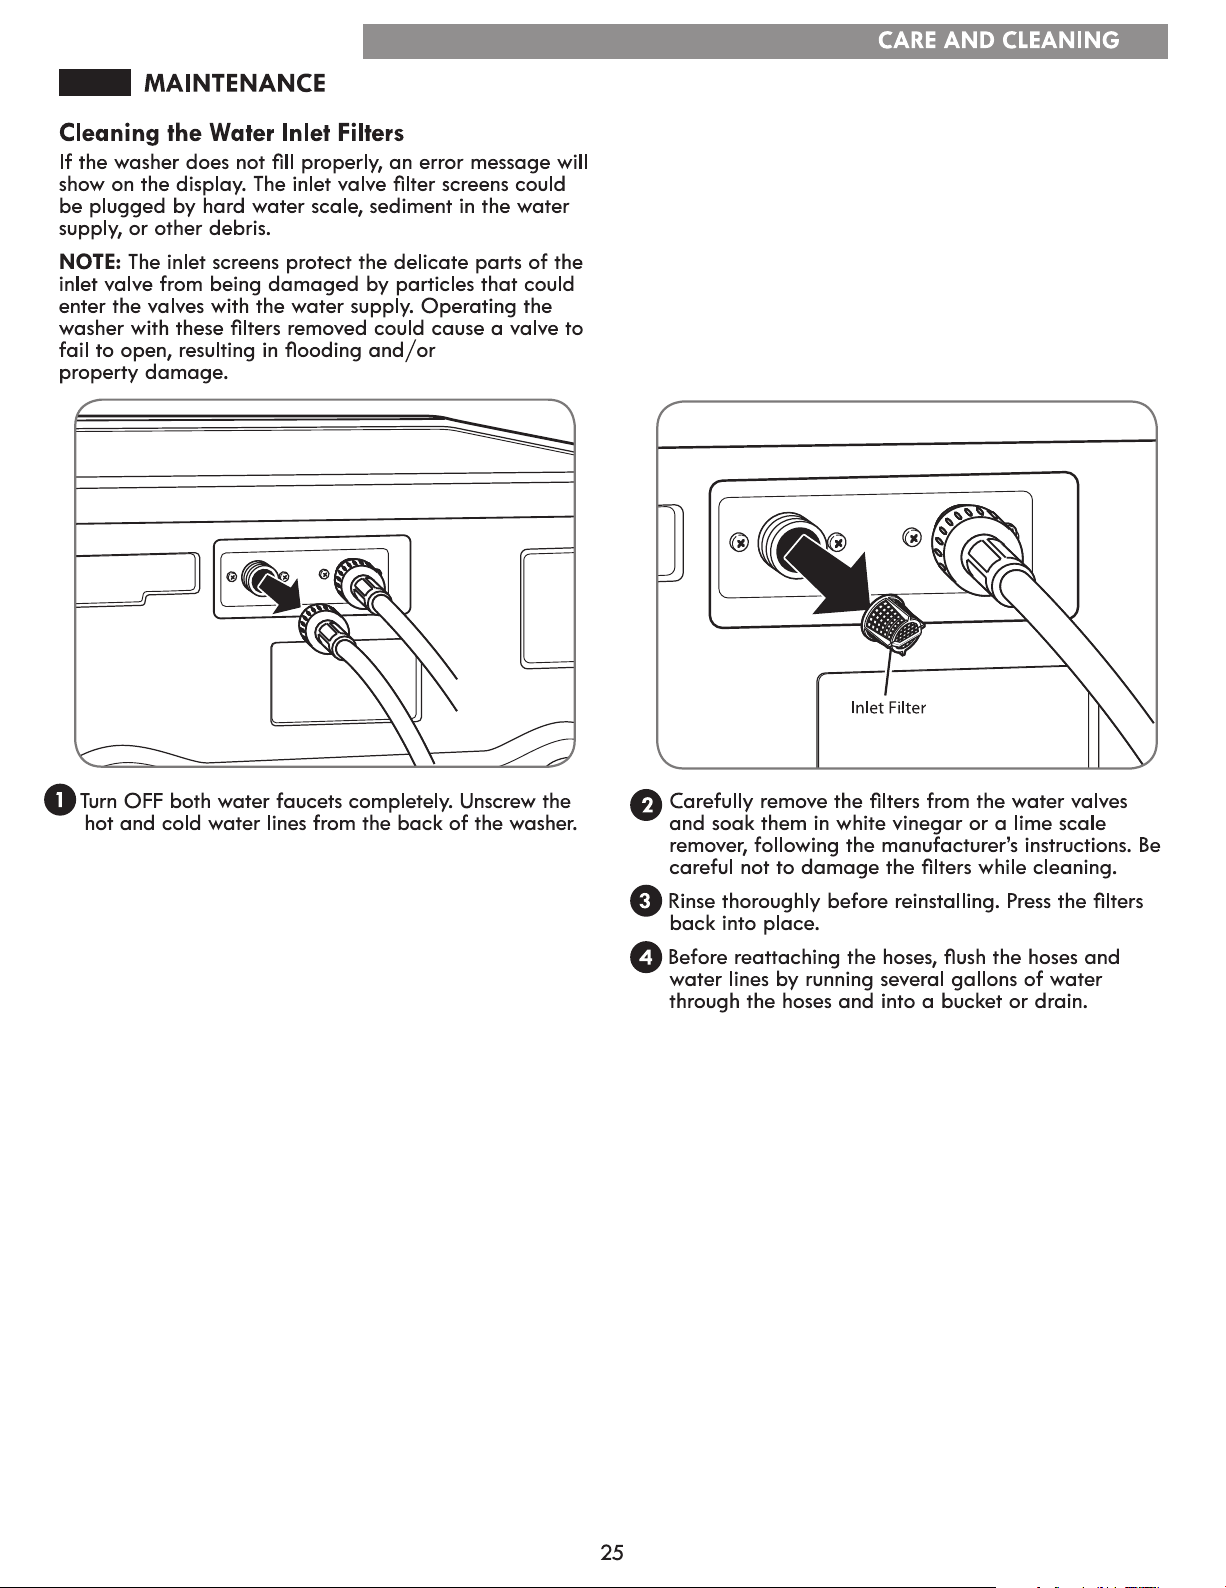
Cleaning the Water Inlet Filters.......................................... 25
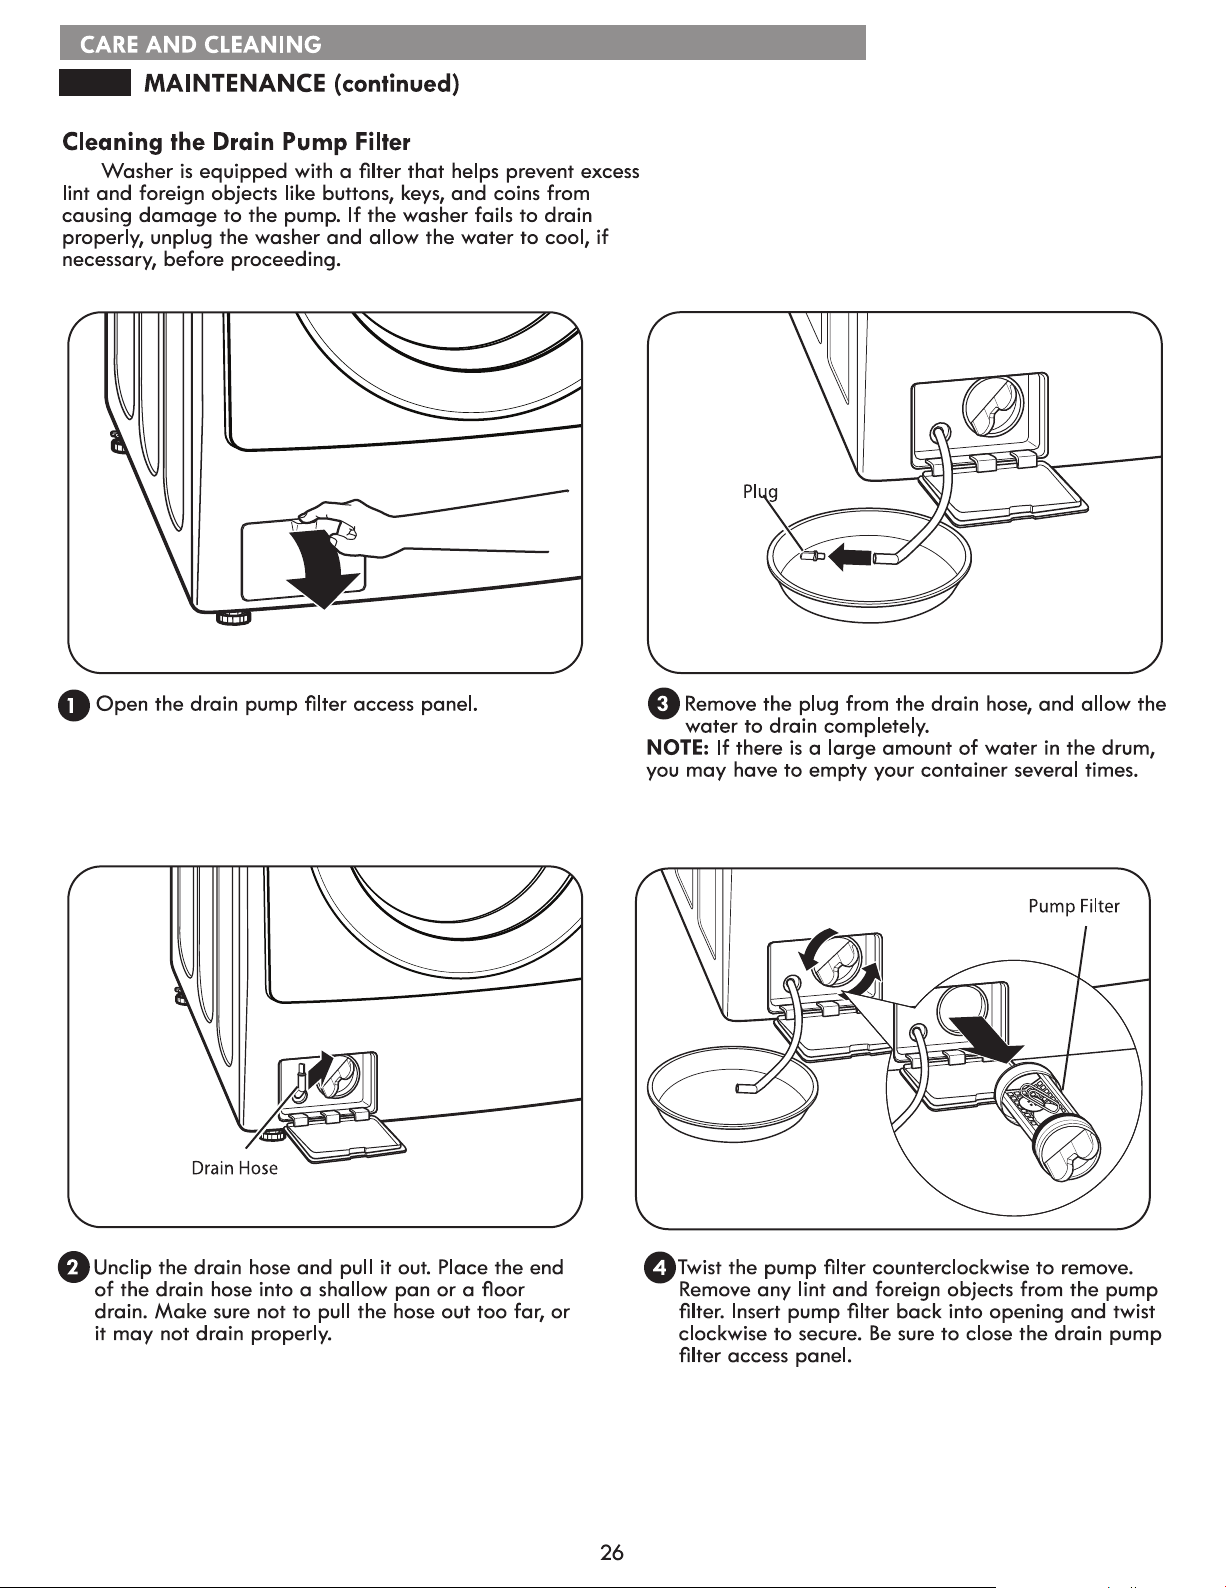
Cleaning the Drain Pump Filter........................................... 26
DIAGNOSTICS
Using Diagnostics ..................................................................... 27
TROUBLESHOOTING GUIDE
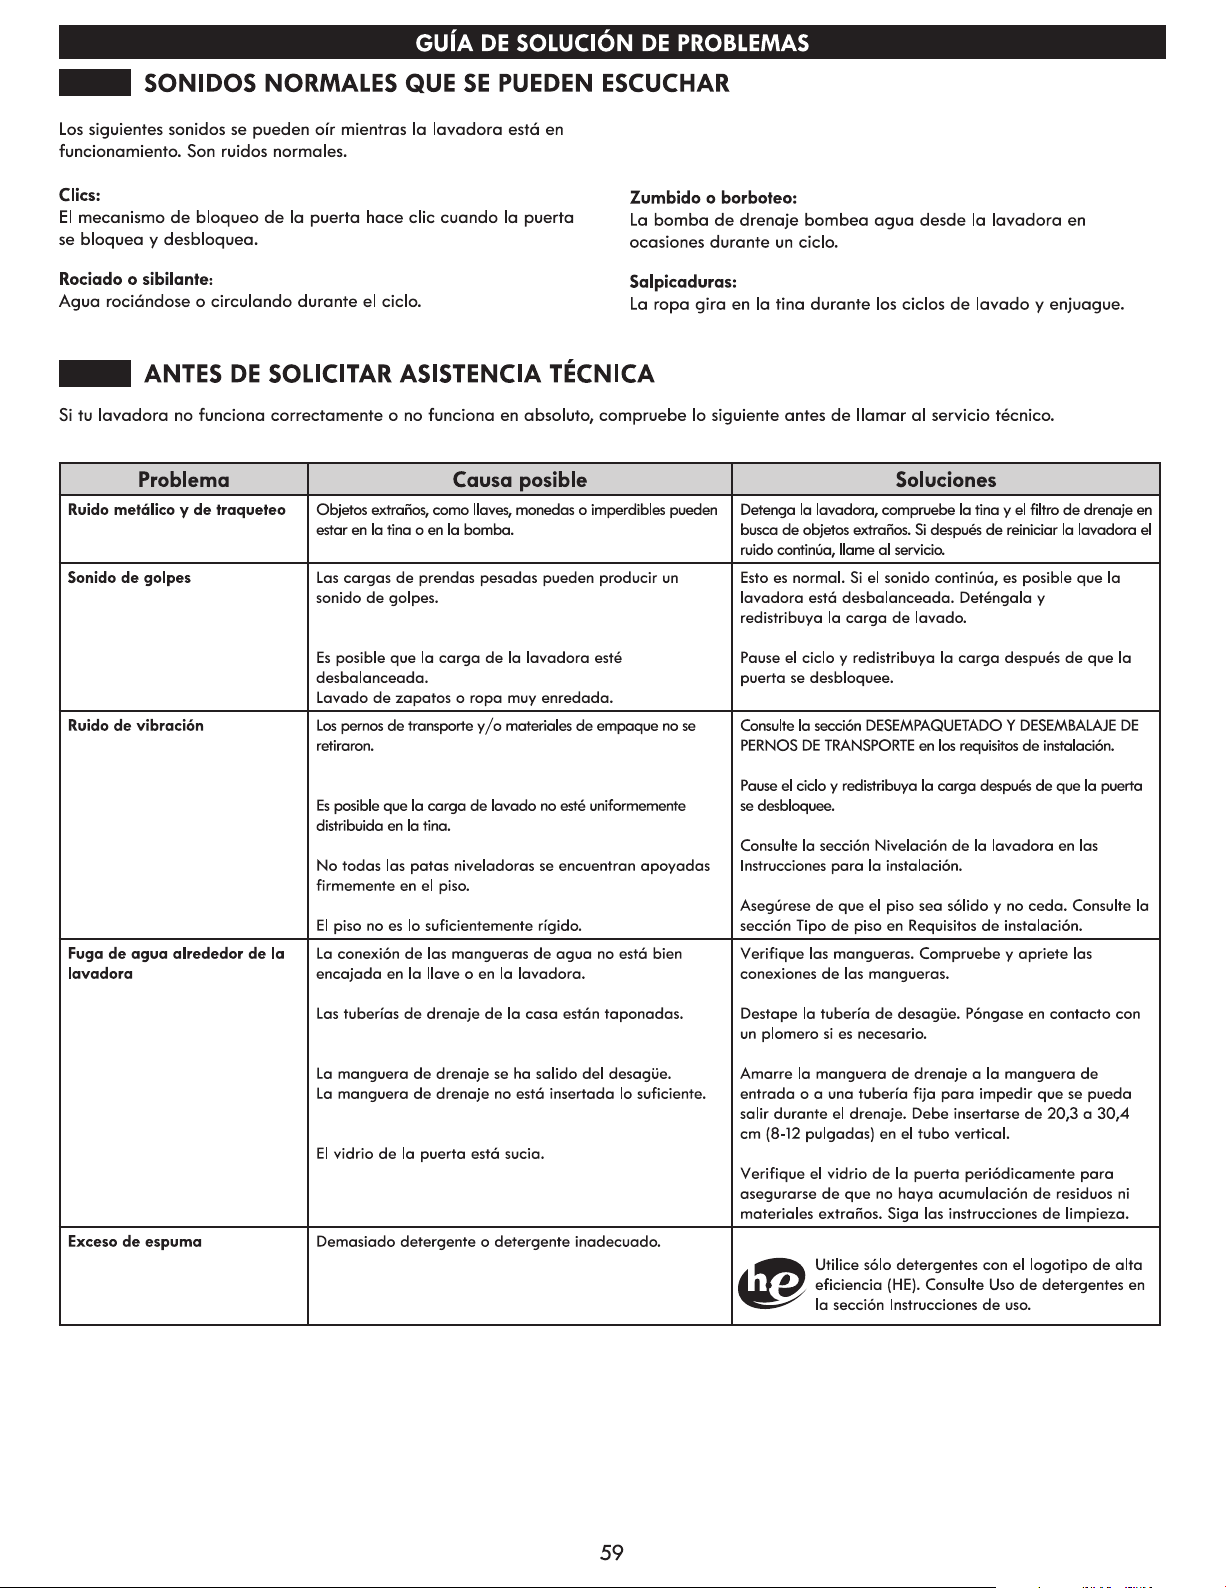
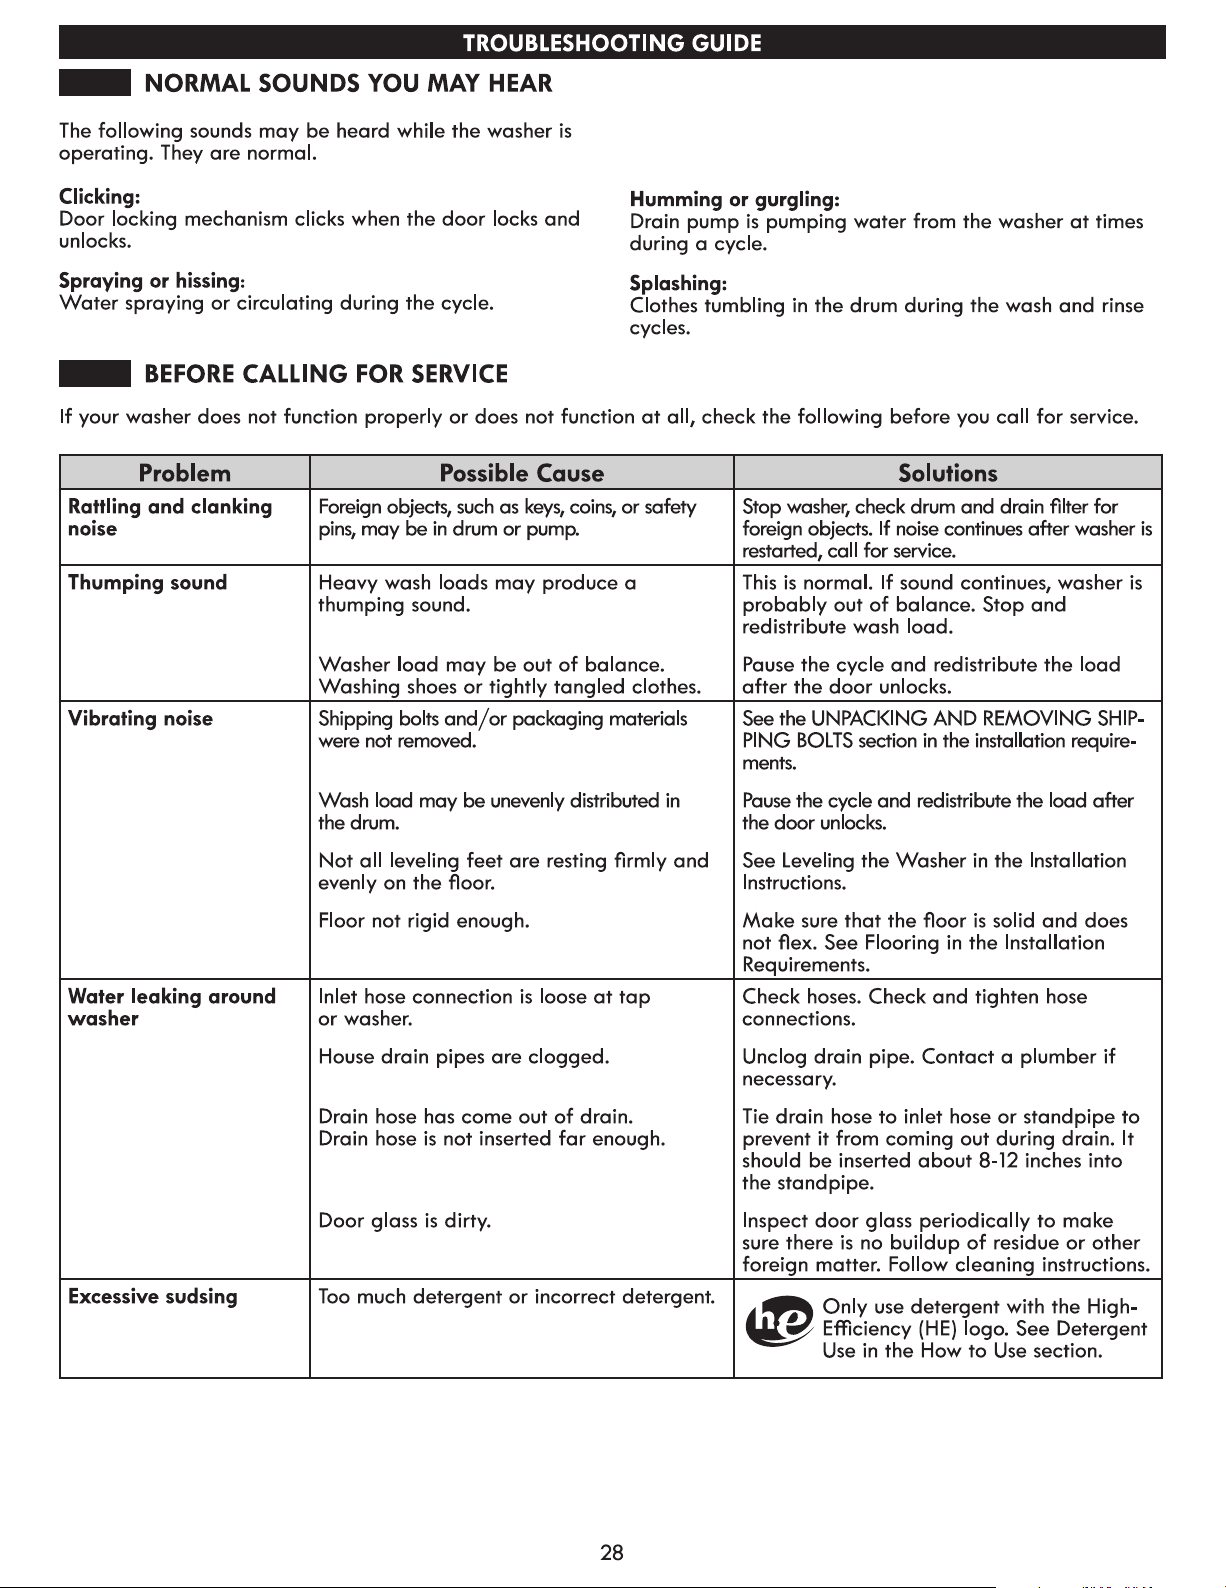
Normal Sounds You May Hear ............................................... 28
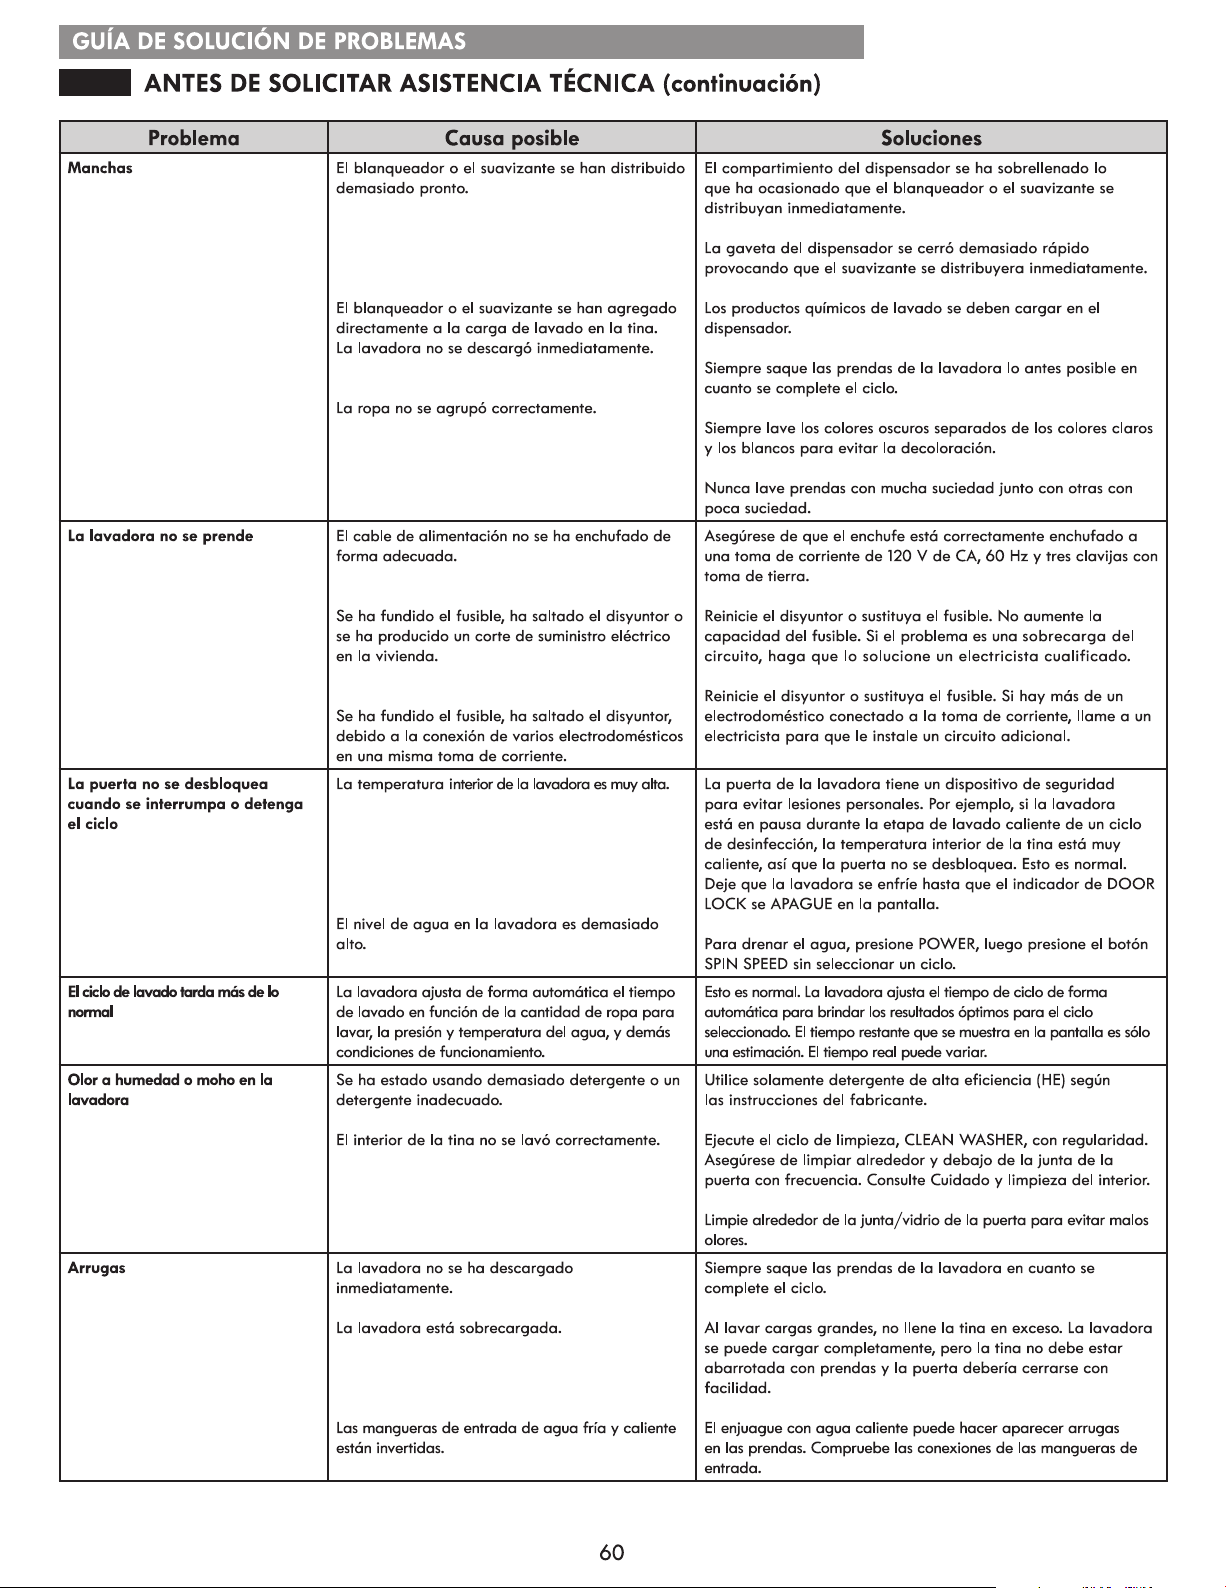
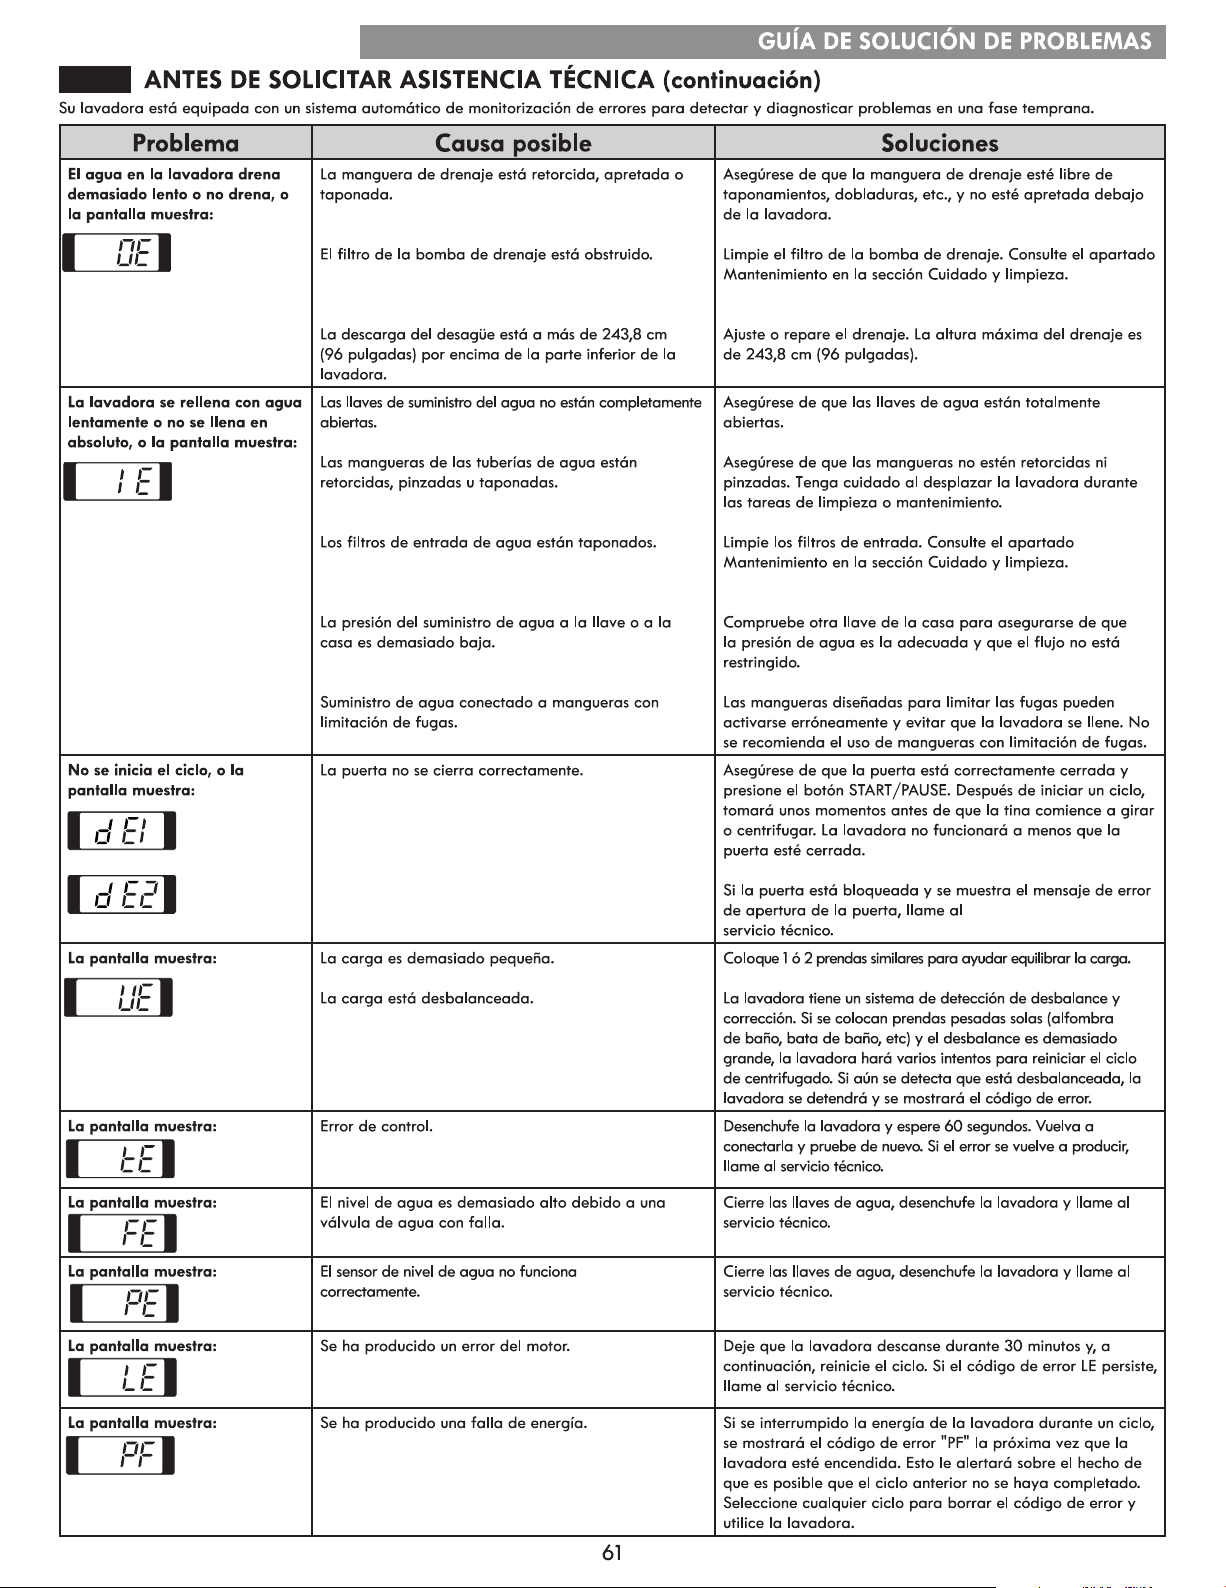
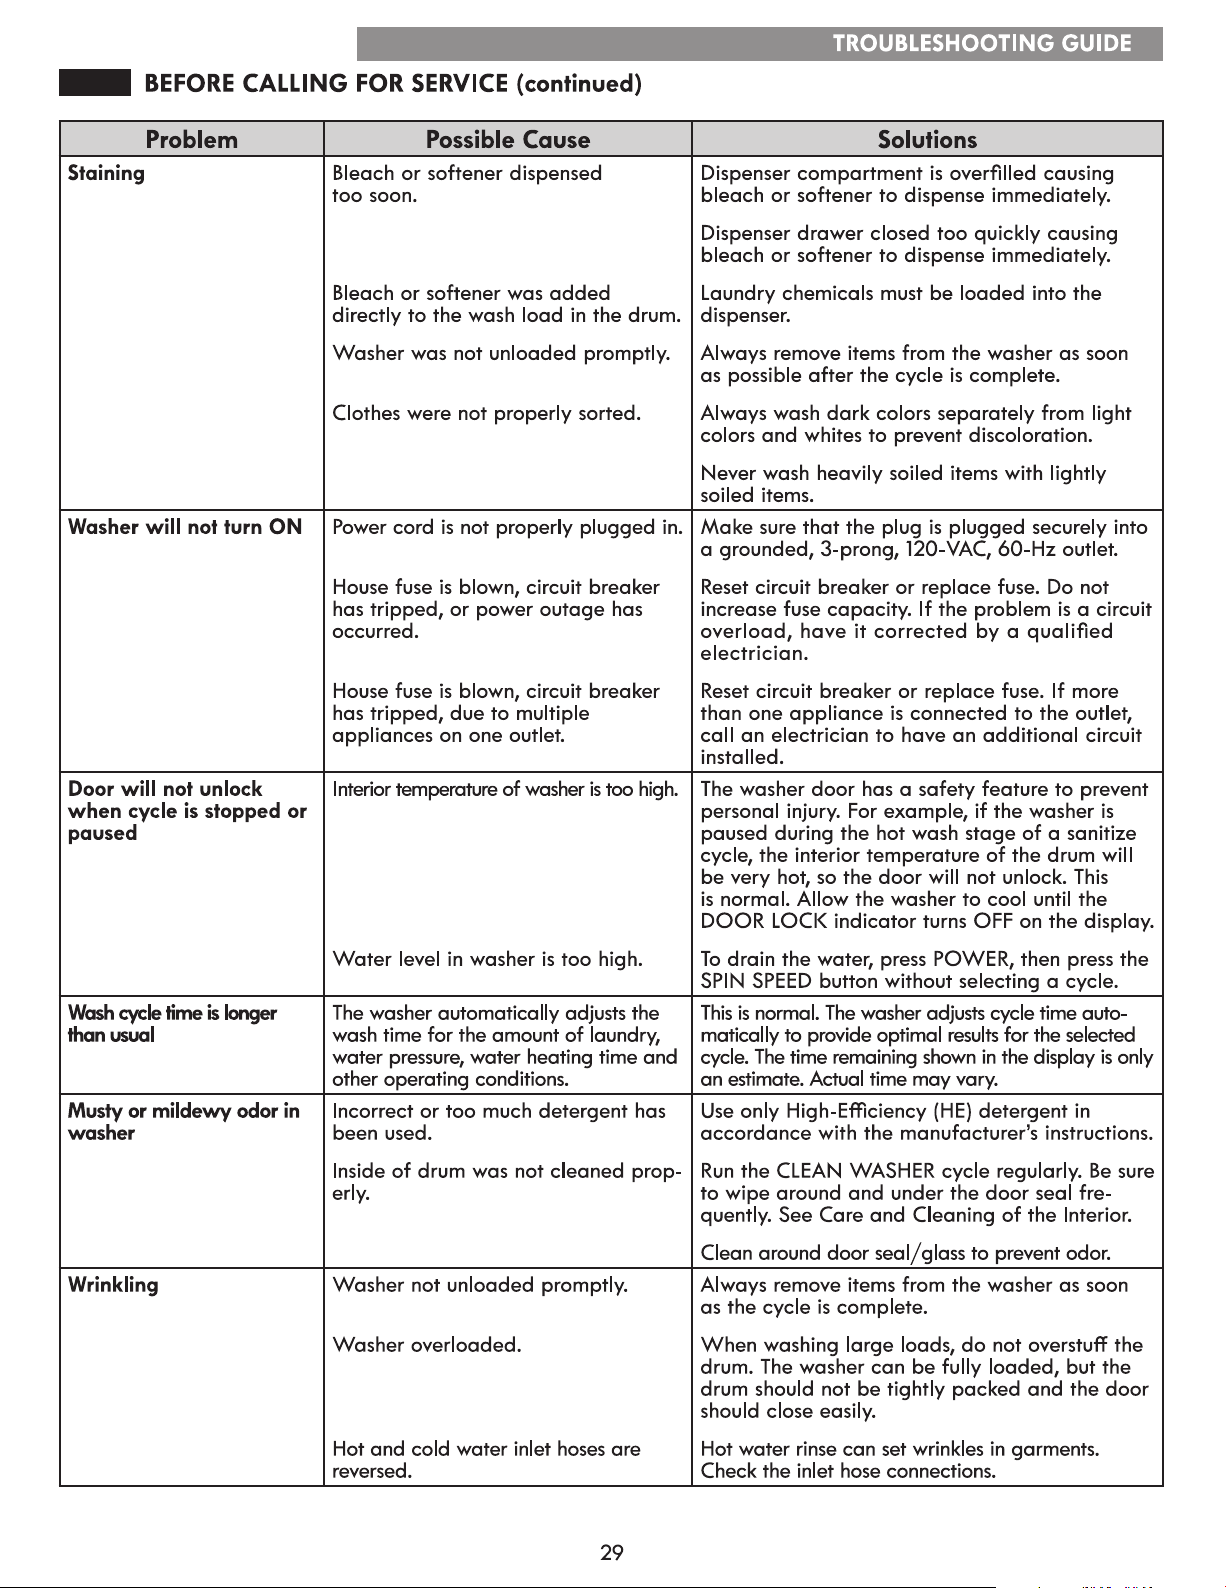
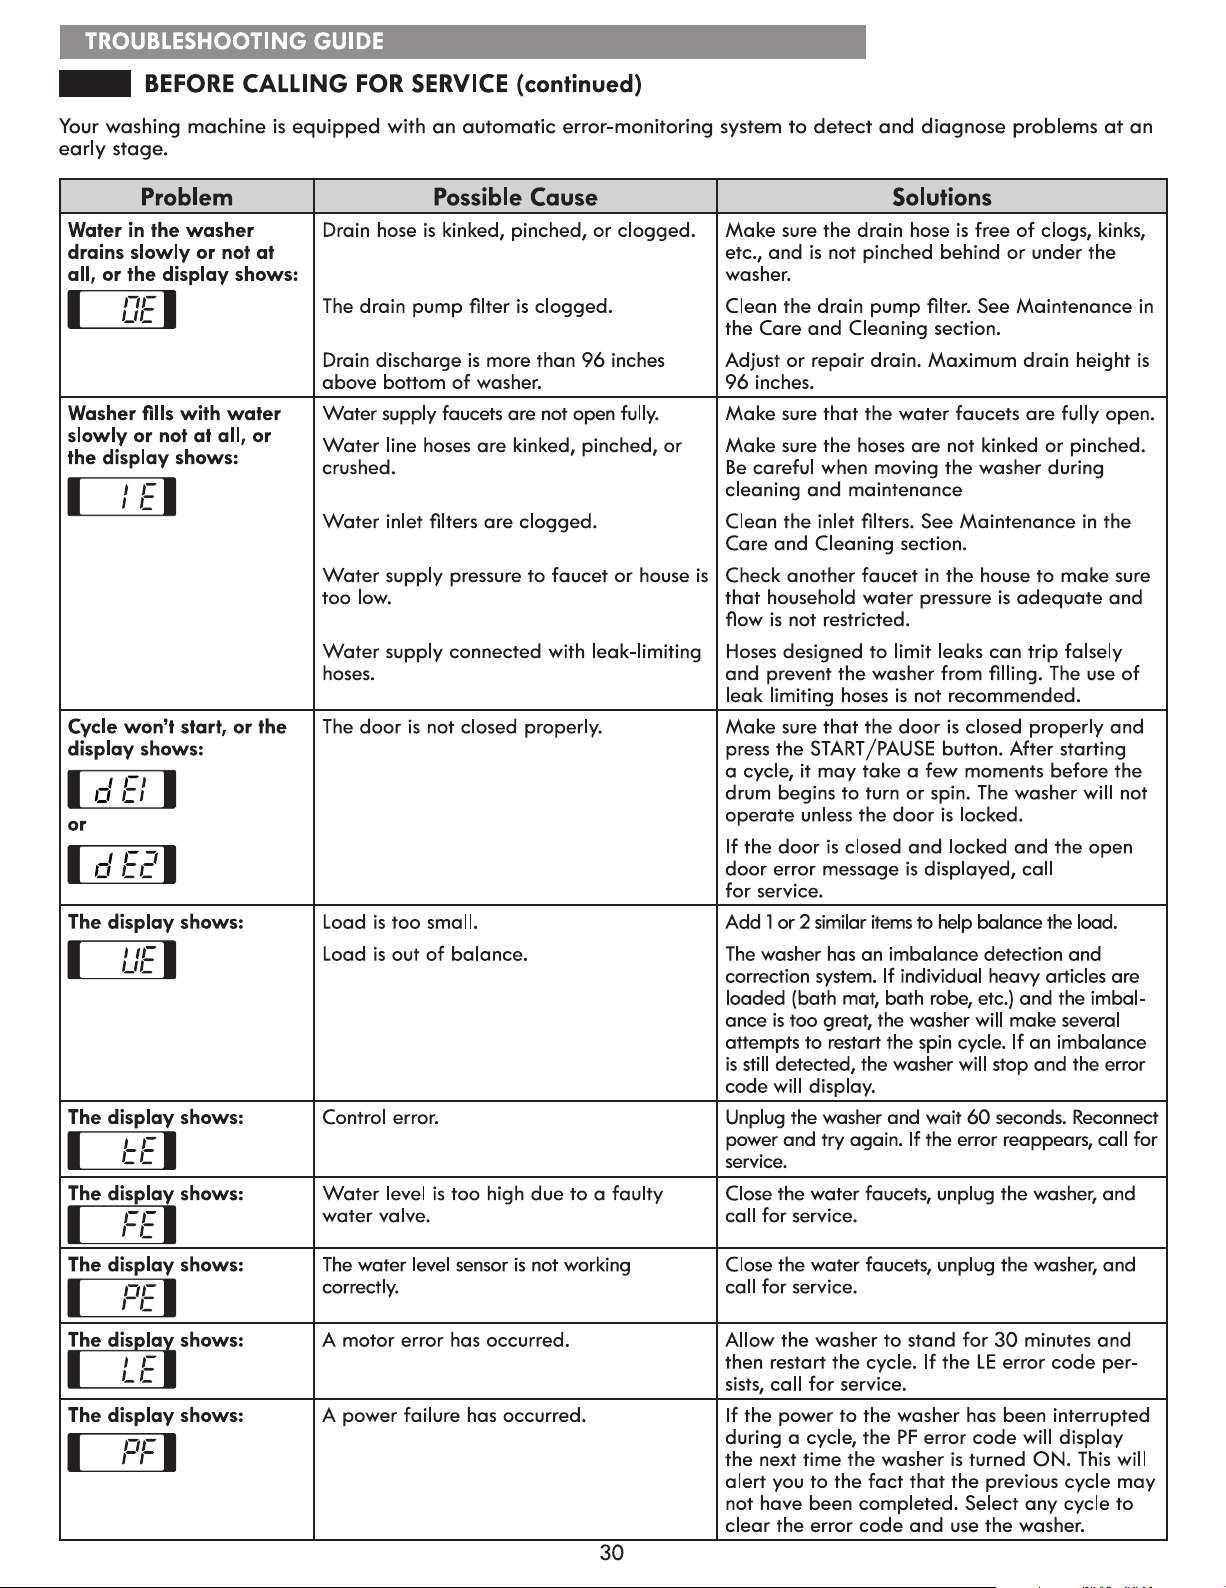
Before Calling for Service .................................................28-30
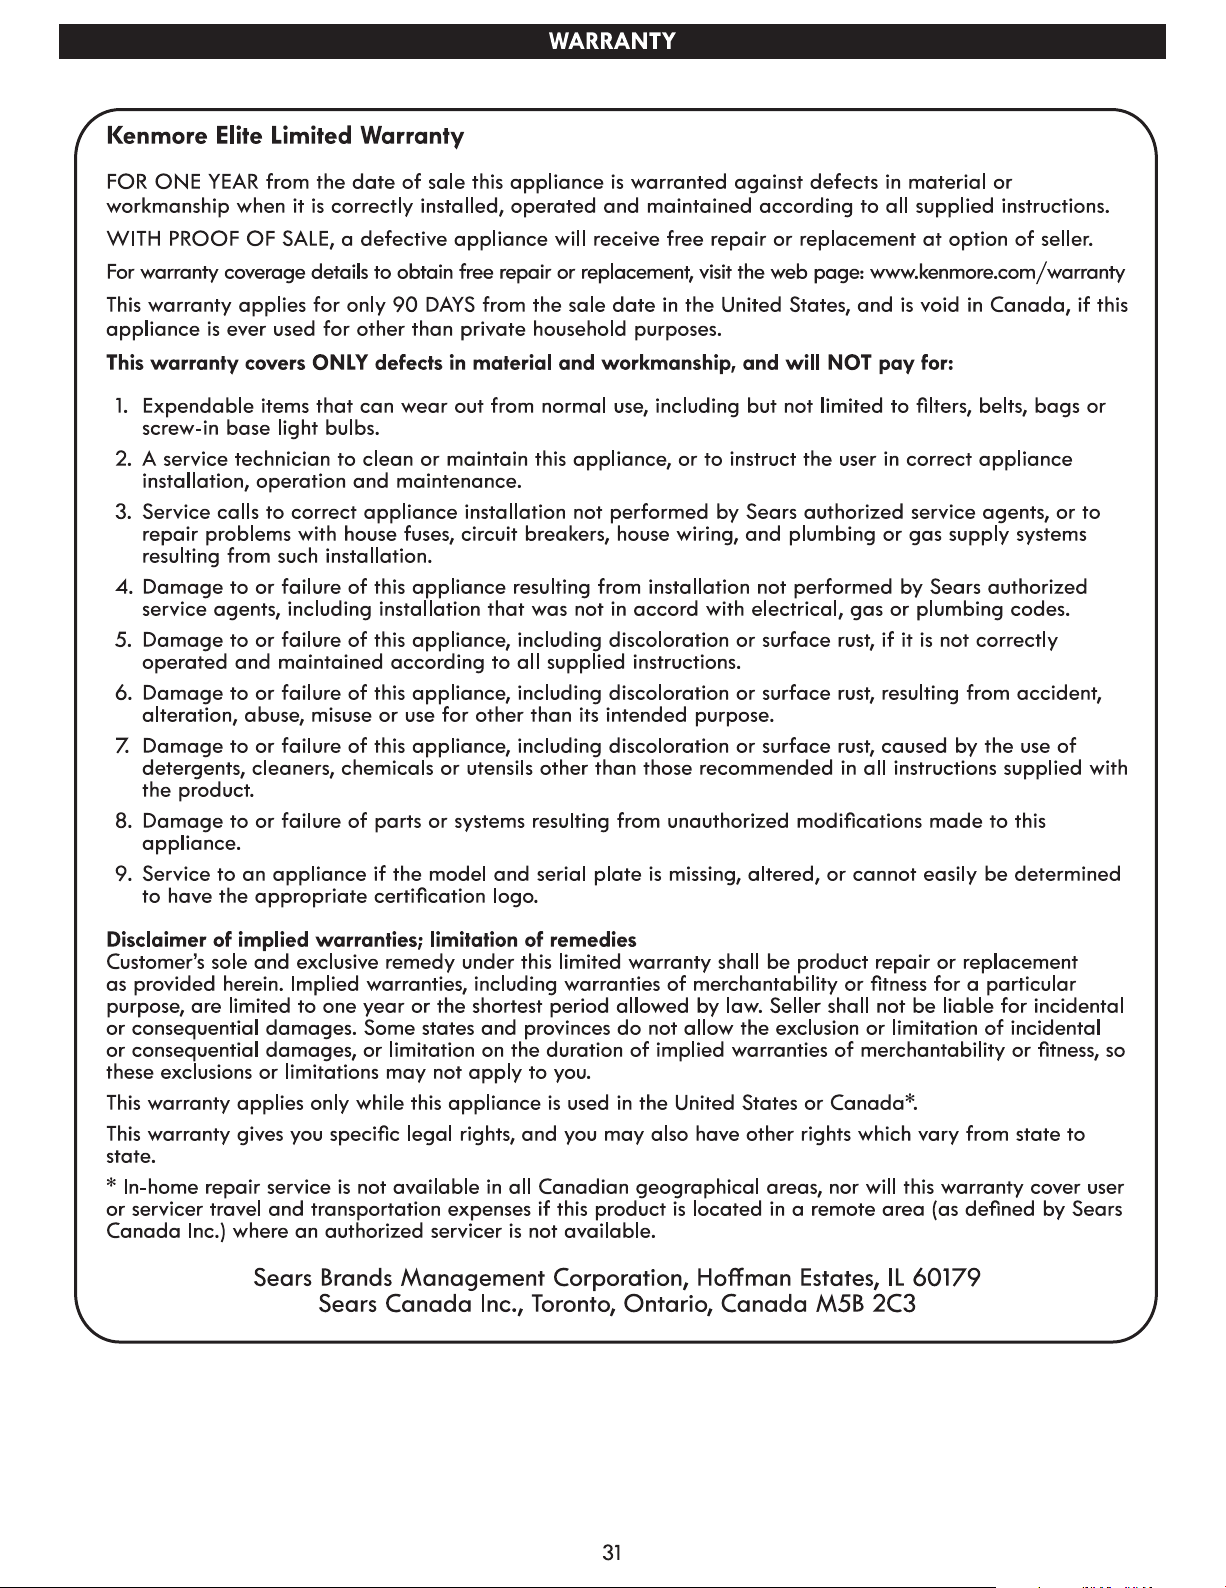
WARRANTY ...................................................................................31
2
7
This washer is heavy. Two or more people are required •
when moving and unpacking the washer. Failure to do so
may result in damage to property or serious bodily harm.
Store and install the washer where it will not be exposed •
to temperatures below freezing or exposed to outdoor
weather conditions. Failure to follow this warning can
cause serious injury, re, electric shock, or death.
Properly ground washer to conform with all electric •
governing codes and ordinances. Failure to follow this
warning can cause serious injury, re, electric shock, or
death.
To reduce the risk of electric shock, do not install the •
washer in humid spaces. Failure to follow this warning
can cause serious injury, re, electric shock, or death.
Toensureproperairow,donotblockthelarge•
opening on the bottom of the washer with carpeting or
other materials.
Do not remove ground prong. Do not use an adapter •
or extension cord. Plug into a grounded 3-prong outlet.
Failure to follow this warning can cause serious injury,
re, electric shock, or death.
NOTE: Installing the washer in a humid space, or installing
or storing the washer where it will be exposed to the
weather or freezing temperatures, may result in rust or
other damage that is not covered by the product warranty.
Power Outlet
The power outlet must be within 60 in. (1.5 m) of either •
side of the washer.
The appliance and outlet must be positioned so that the •
plug is easily accessible.
Do not overload the outlet with more than, one appliance.•
The outlet must be grounded in accordance with current •
wiring electric codes and regulations.
Time-delay fuse or circuit breaker is recommended.•
NOTE: It is the personal responsibility and obligation of
the product owner to have a proper outlet installed by a
qualied service technician.
To minimize noise and vibration, the washer MUST be •
installed on a solidly constructed oor. See the NOTE at
right.
Allowable slope under the entire washer is a maximum •
1 in. dierence from side to side or from front to back.
Installing on carpeting and soft tile surfaces is not •
recommended.
Never install the washer on a platform or weakly •
supported structure.
NOTE: The oor must be strong and rigid enough to
support the weight of the washer, when fully loaded,
without exing or bouncing. If your oor has too much ex,
reinforce it to make it more rigid.
A oor that is adequate for a top-loading washer may
not be rigid enough for a front loading washer, due to the
dierence in the spin speed and direction. If the oor is not
solid, your washer may vibrate and you may hear and feel
the vibration throughout your house.
Description Front-Loading Washer
Electrical Requirements 120 VAC, 60 Hz
Max. Water Pressure 14.5 - 142 psi (100 - 980 kPa)
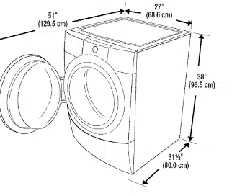
Dimensions 27" (W) X 29
3
/4" (D) X 38
11
/16" (H), 52" (D with door open)
68.6 cm (W) X 75.6 cm (D) X 98.3 cm (H), 132.2 cm (D with door open)
Net Weight 205 lbs (93 kg)
Max. Spin Speed 1,300 RPM
WARNING
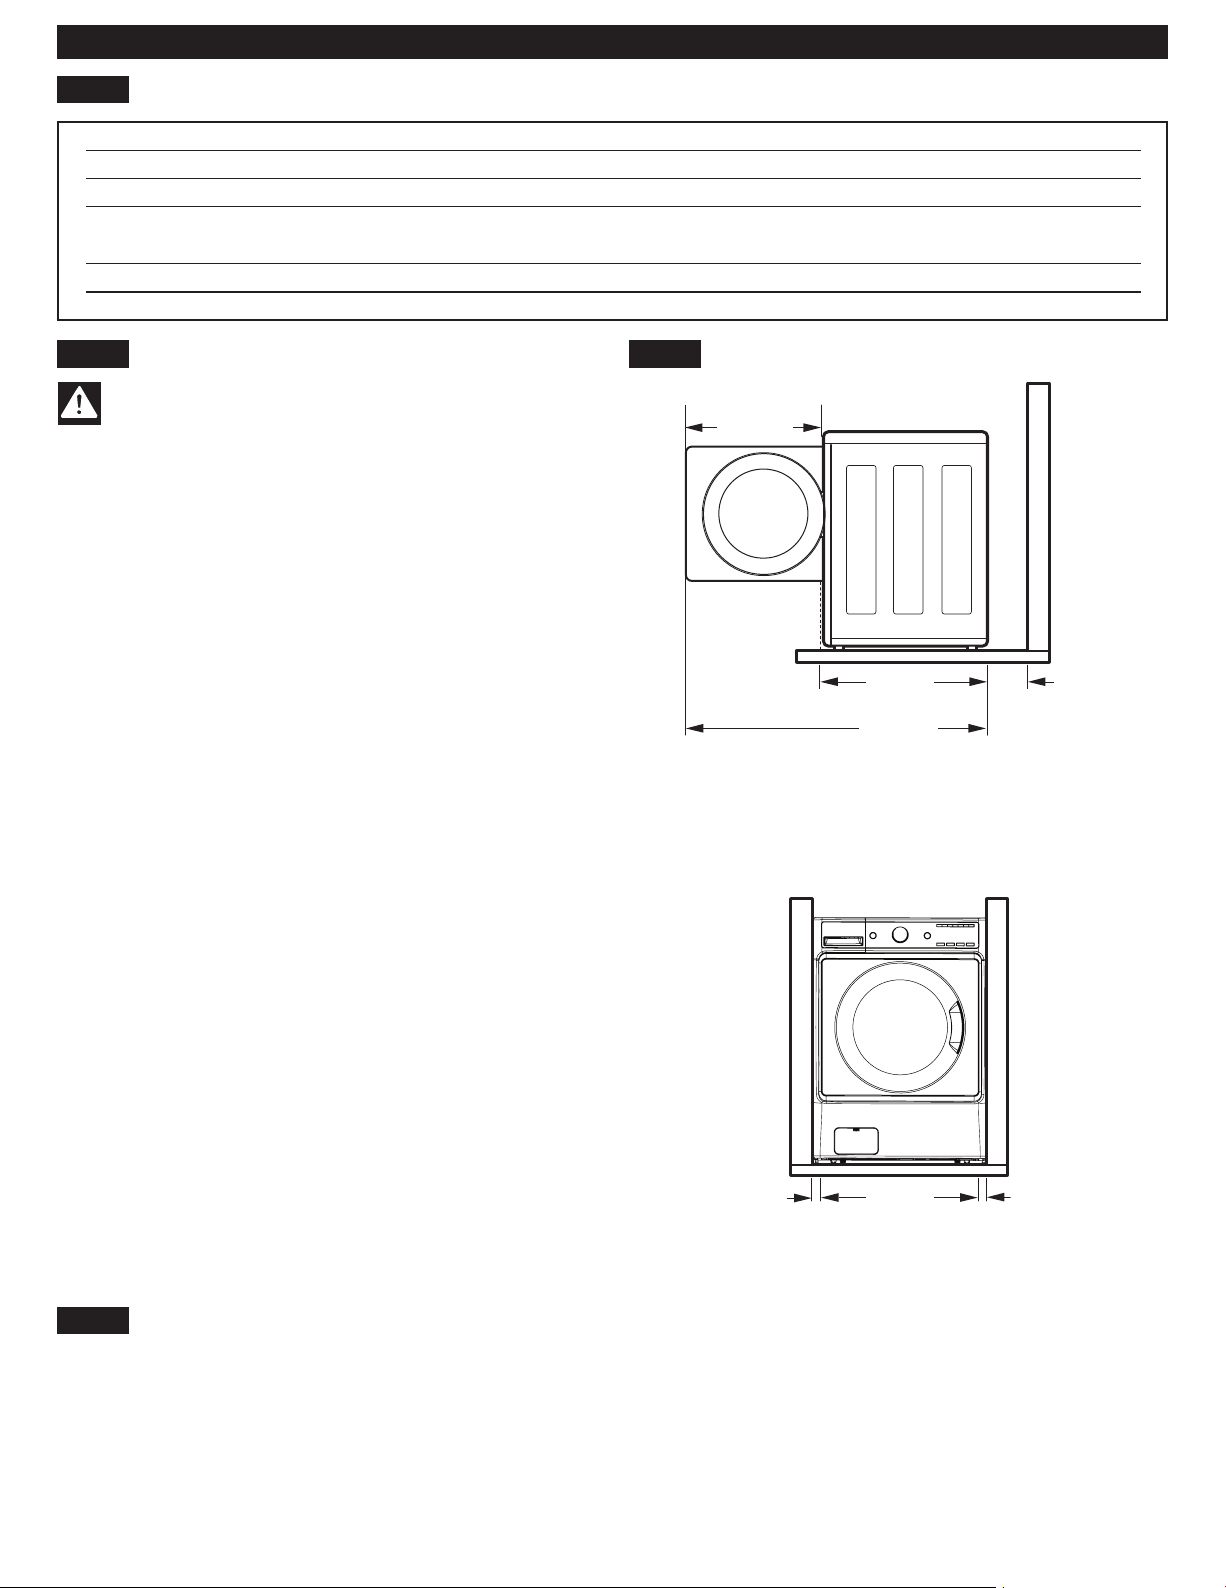
To ensure sucient clearance for water lines and airow,
allow minimum clearances of at least 1 in. (2.5 cm) at the
sides and 4 in. (10 cm) behind the unit. Be sure to allow
for wall, door, or oor moldings that may increase the
required clearances.
Allow at least 22
1
/4 in. (56.6 cm) in front of
the washer to open the door.
KEY DIMENSIONS AND SPECIFICATIONS
CHOOSE THE PROPER LOCATION
FLOORING
CLEARANCES
INSTALLATION REQUIREMENTS
1"
(2.5 cm)
1"
(2.5 cm)
27"
(68.6 cm)
"
4"
(10 cm)
22
1
/
4
"
(56.6 cm)
29
3
/
4
"
(75.6 cm)
52"
(132.2 cm)

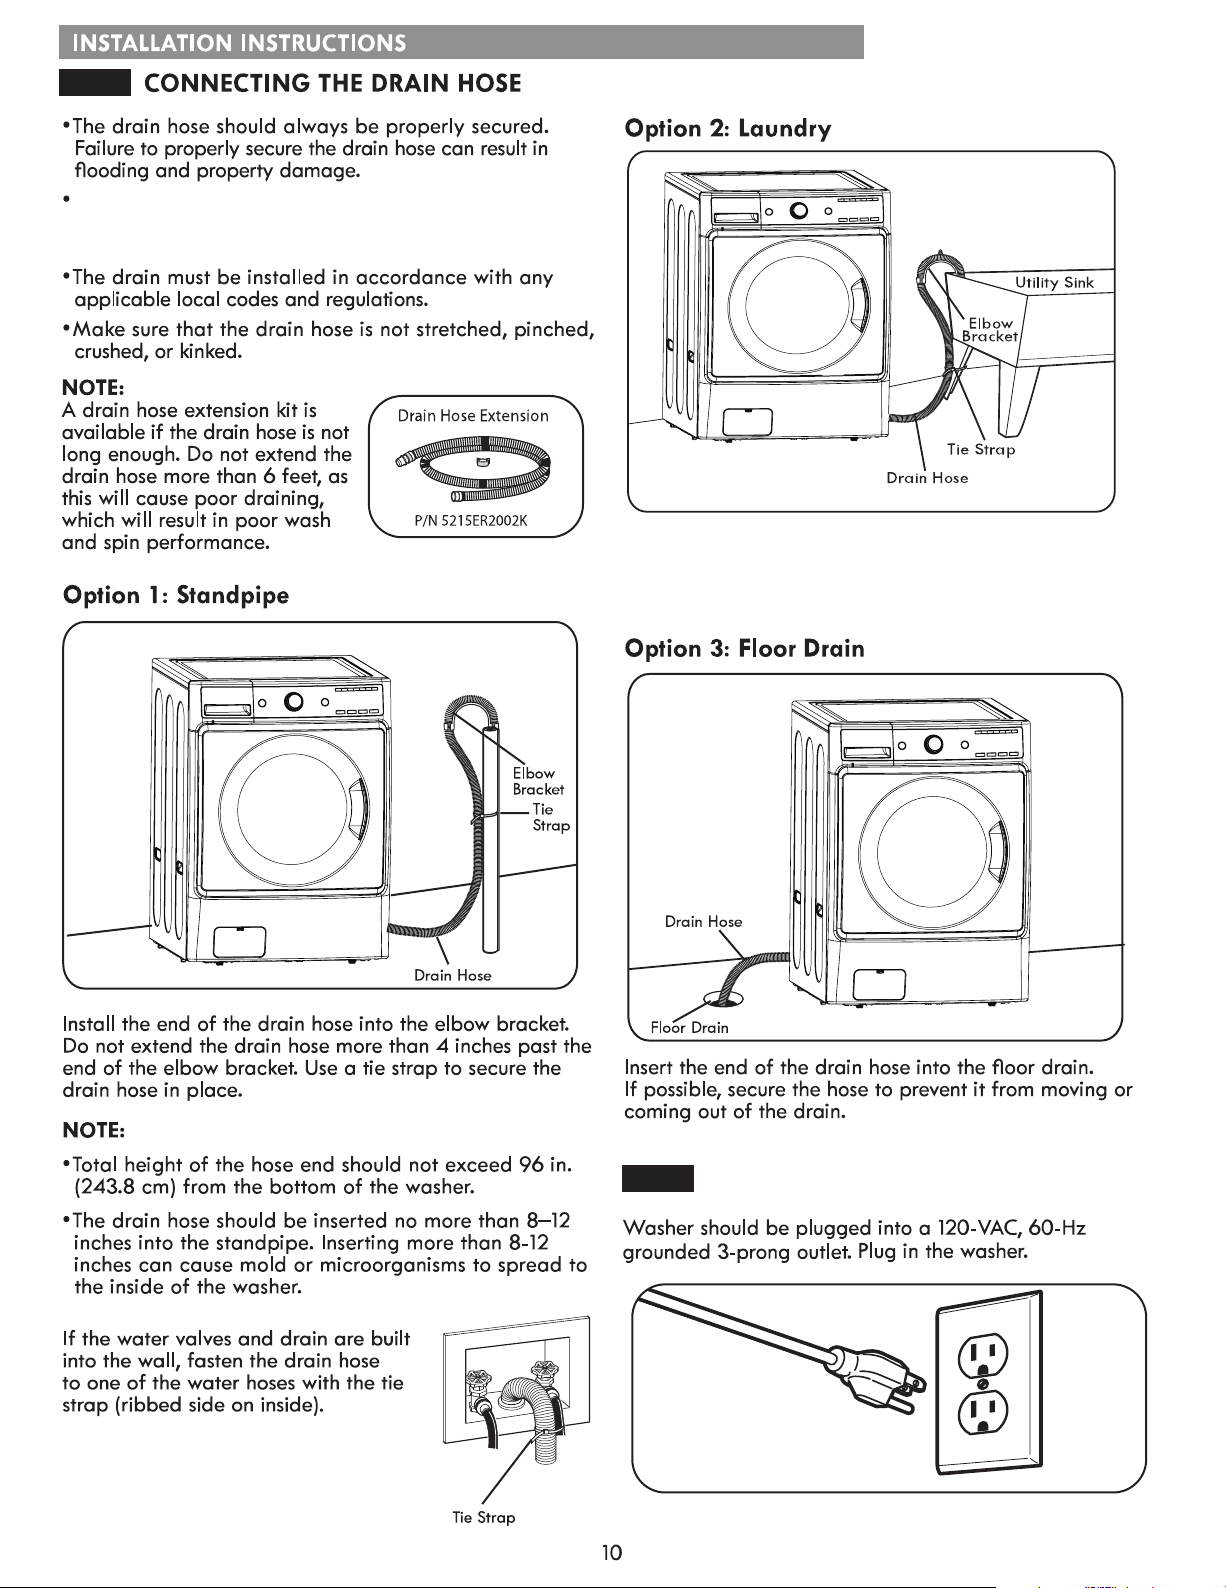
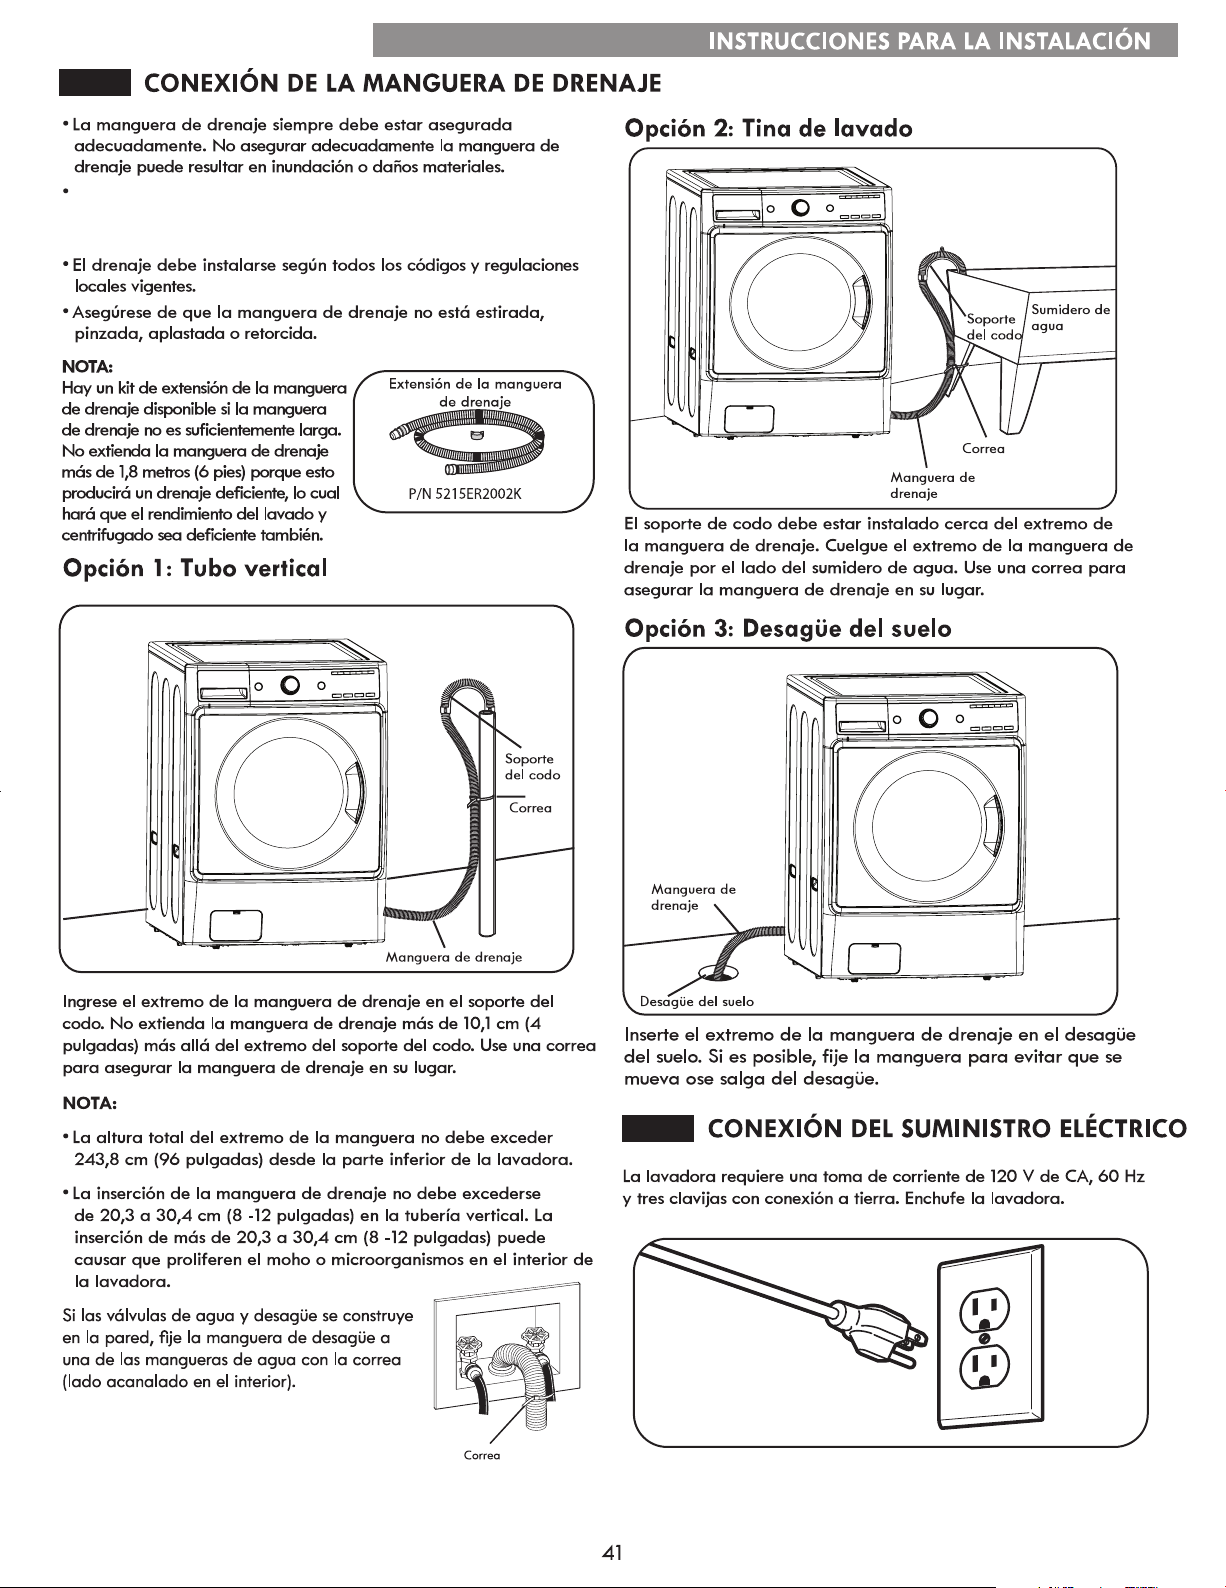
Do not install the end of the drain hose lower than
29 in. (73.7 cm) or higher than 96 in. (243.8 cm)
above the bottom of the washer.
Install the elbow bracket near the end of the drain
hose. Hang the end of the drain hose over the side
of the utility sink. Use a tie strap to secure the drain
hose in place.
Tub
CONNECTING TO THE POWER SUPPLY
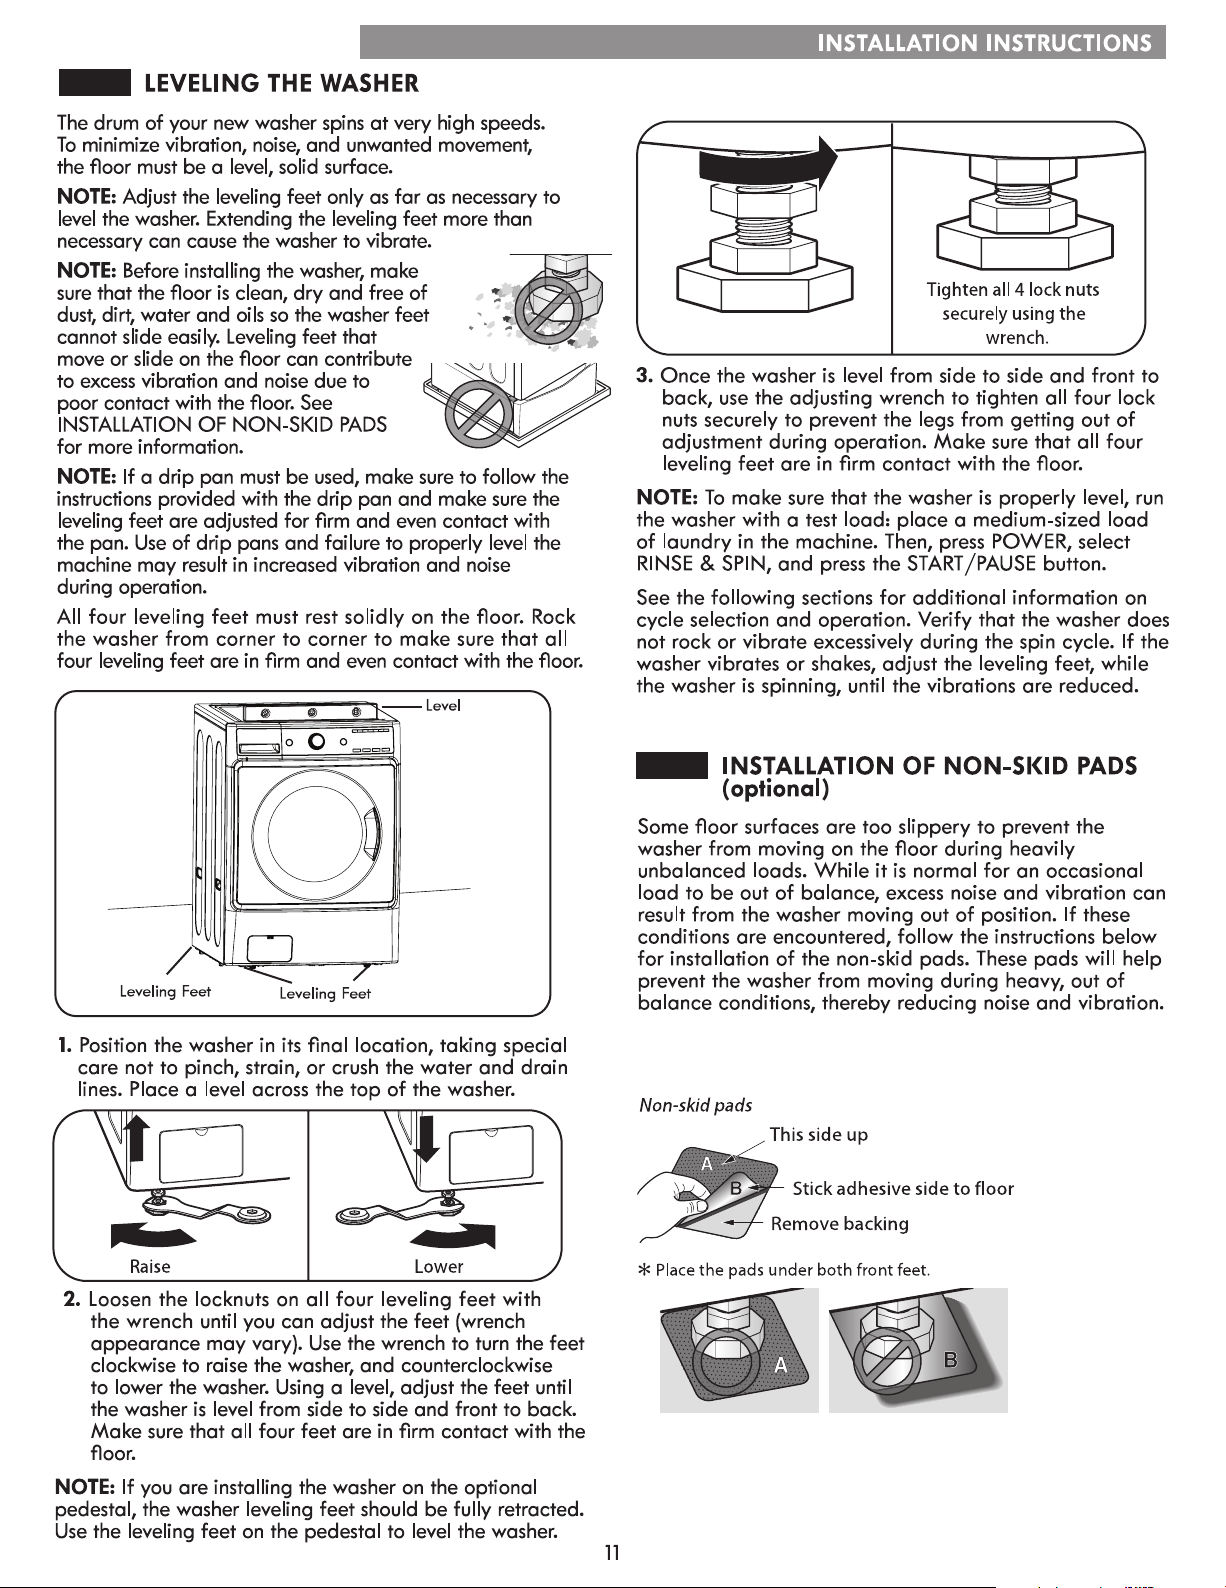
NOTE: Non-skid pads are included in the installation
packet
one hour
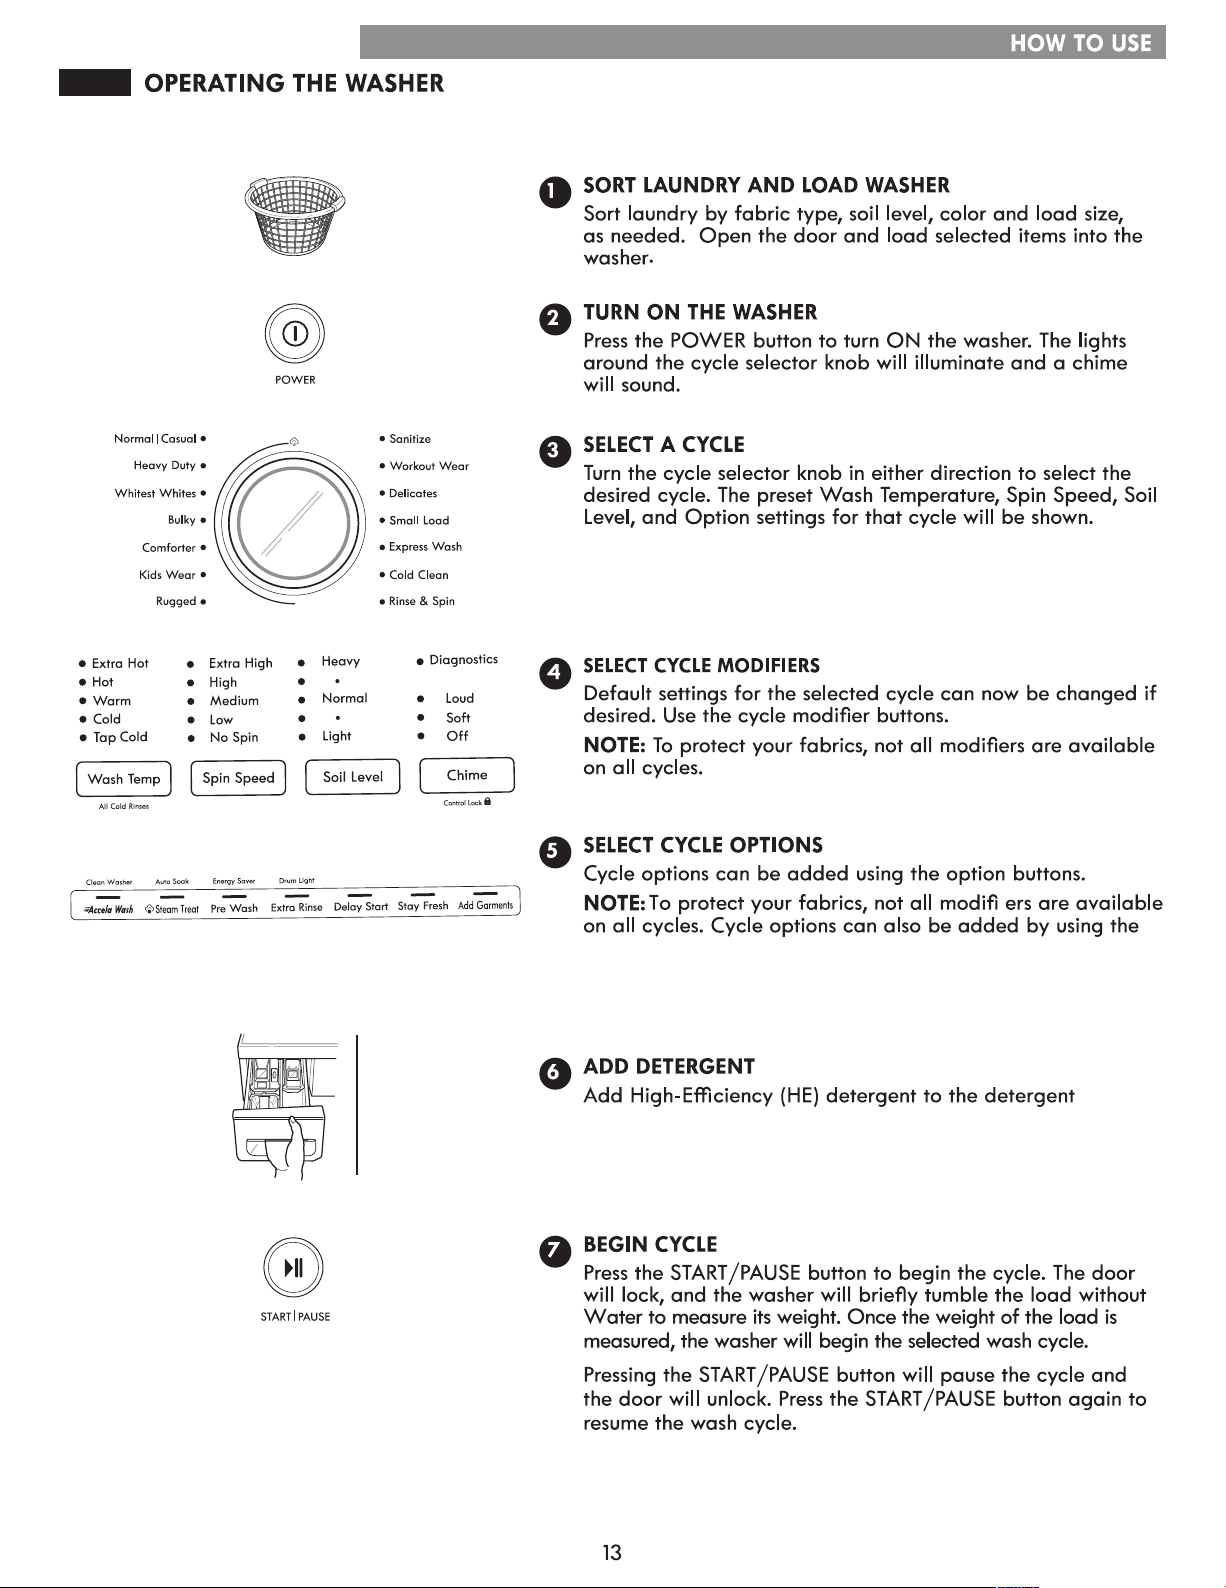
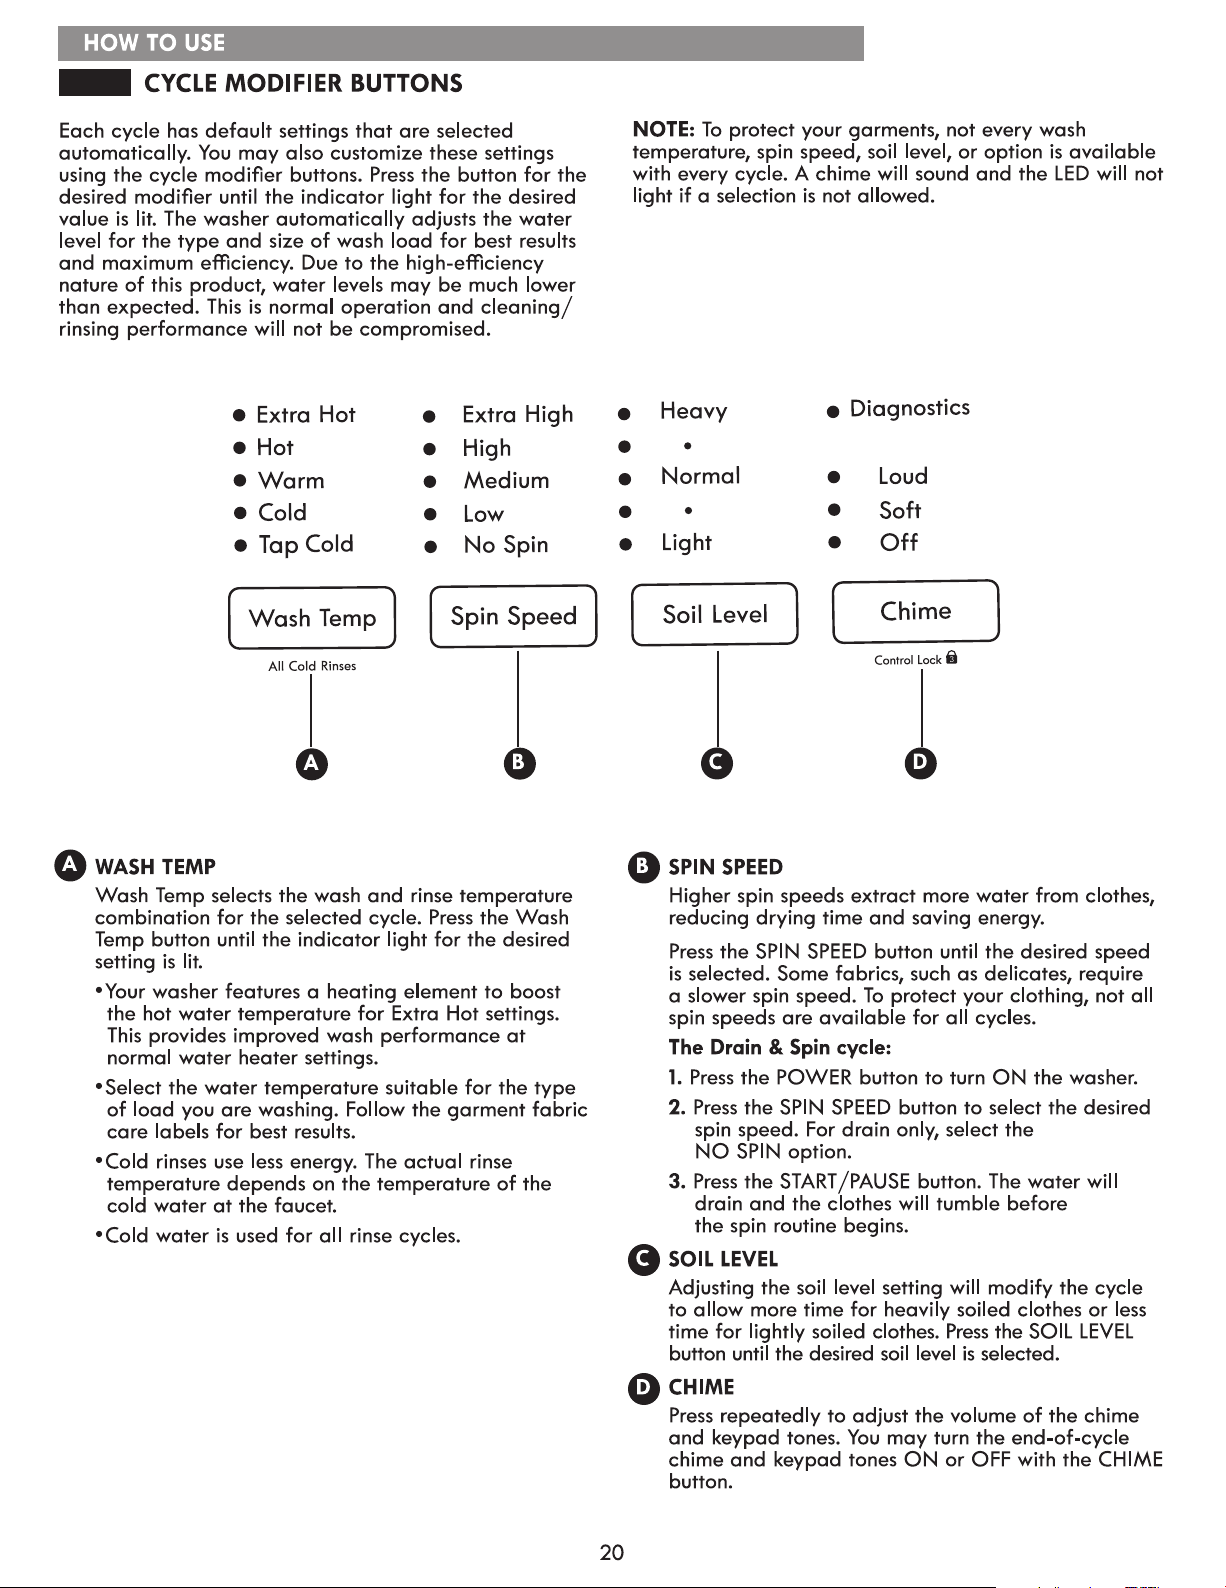
option buttons. Not all options are available on all cycles.
A different chime will sound and the LED will not come on
if the selection is not allowed.
dispenser drawer. For proper wash performance, always
measure the detergent using the measuring device provided
by the detergent manufacturer.
Energy
Saver
Accela Wash
•Do not load more than 22 lb. (10 kg) in the washer. (1 thick, dry bath towel = 1 lb.)
Do not use the Sanitize cycle with more than 10 lb. (4.5 kg) of laundry.
•Do not overload the Bulky cycle. If the washer does not function properly, manually redistribute the load or wash
one item at a time.
Accela Wash
N/AN/A
Energy
Saver
Accela Wash
Accela Wash
•Do not load more than 22 lb. (10 kg) in the washer. (1 thick, dry bath towel = 1 lb.)
Do not use the Sanitize cycle with more than 10 lb. (4.5 kg) of laundry.
•Do not overload the Bulky cycle. If the washer does not function properly, manually redistribute the load or wash
one item at a time.
For best performance, load clothes as shown.
- Load clothes loosely, and do not overfill the drum.
Clothes need room to circulate in order to get clean.
- Do not press down on items while stacking them in the drum.
1
3
2
4
For proper wash performance, always measure the
detergent using the measuring device provided by
the detergent manufacturer.
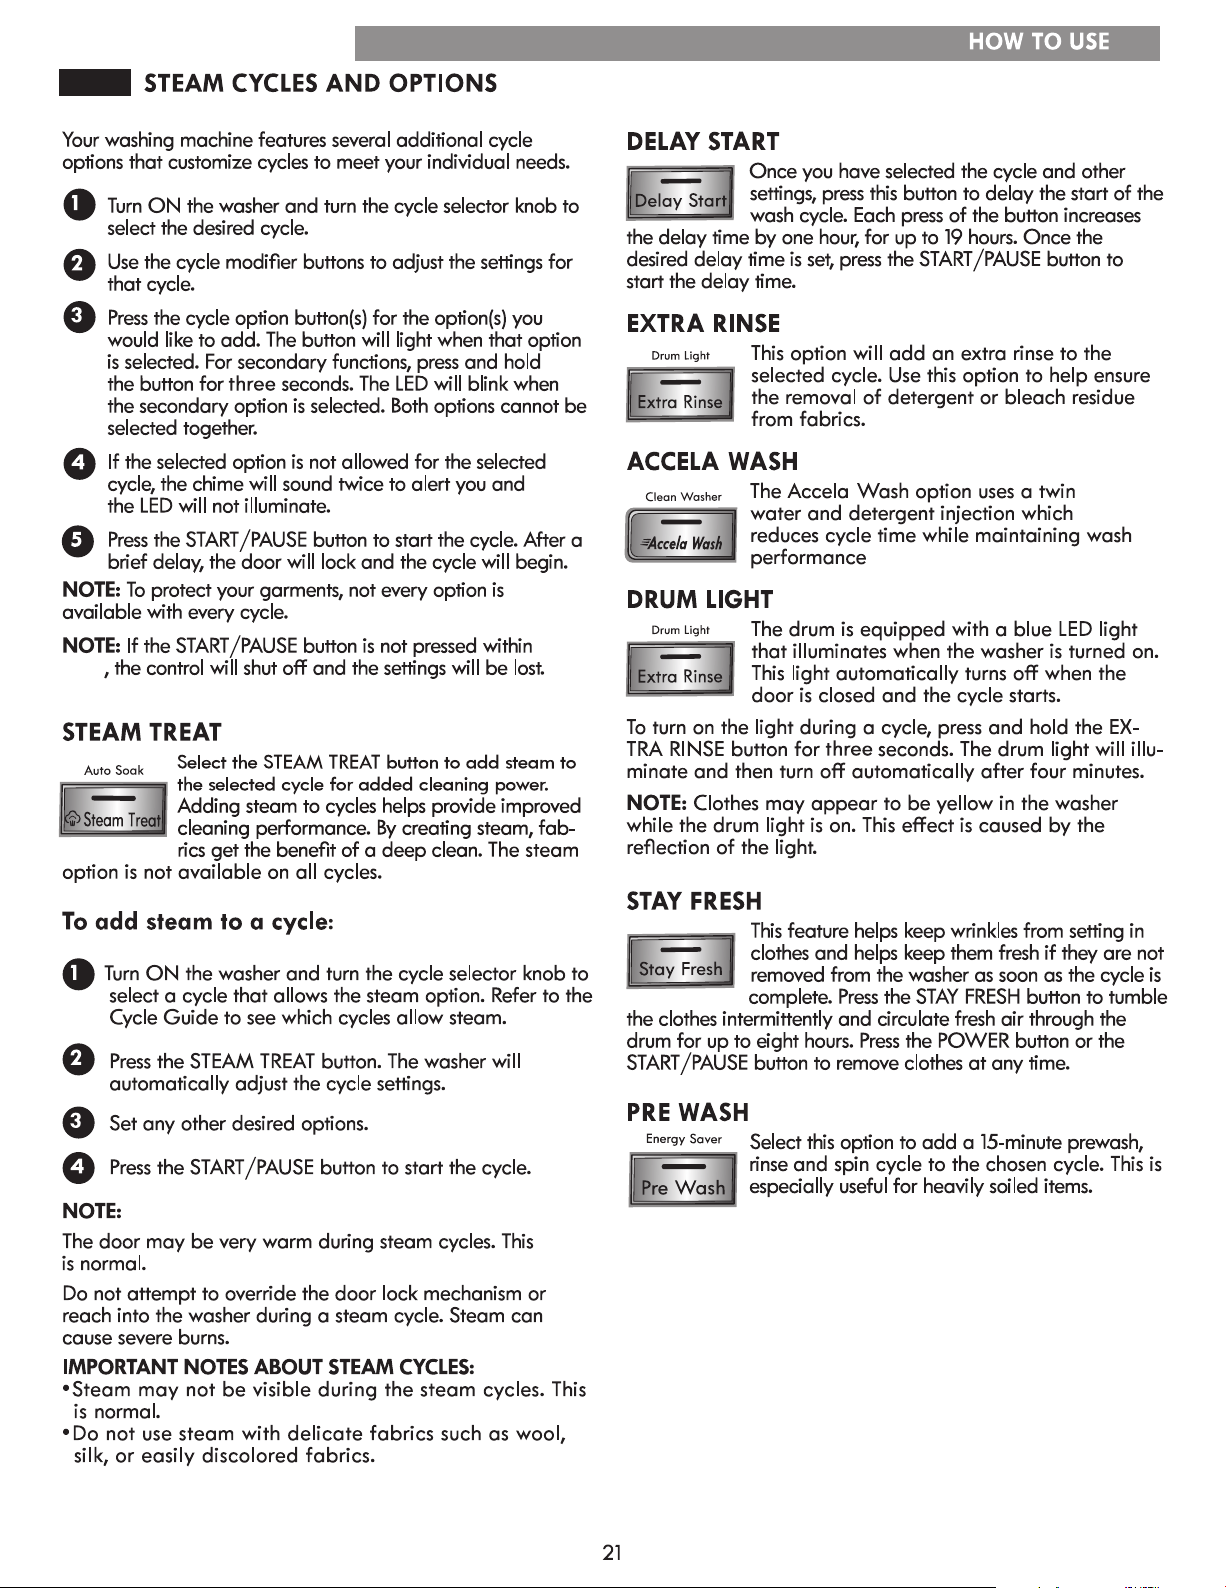
hour
one
spray-
when added to a cycle.
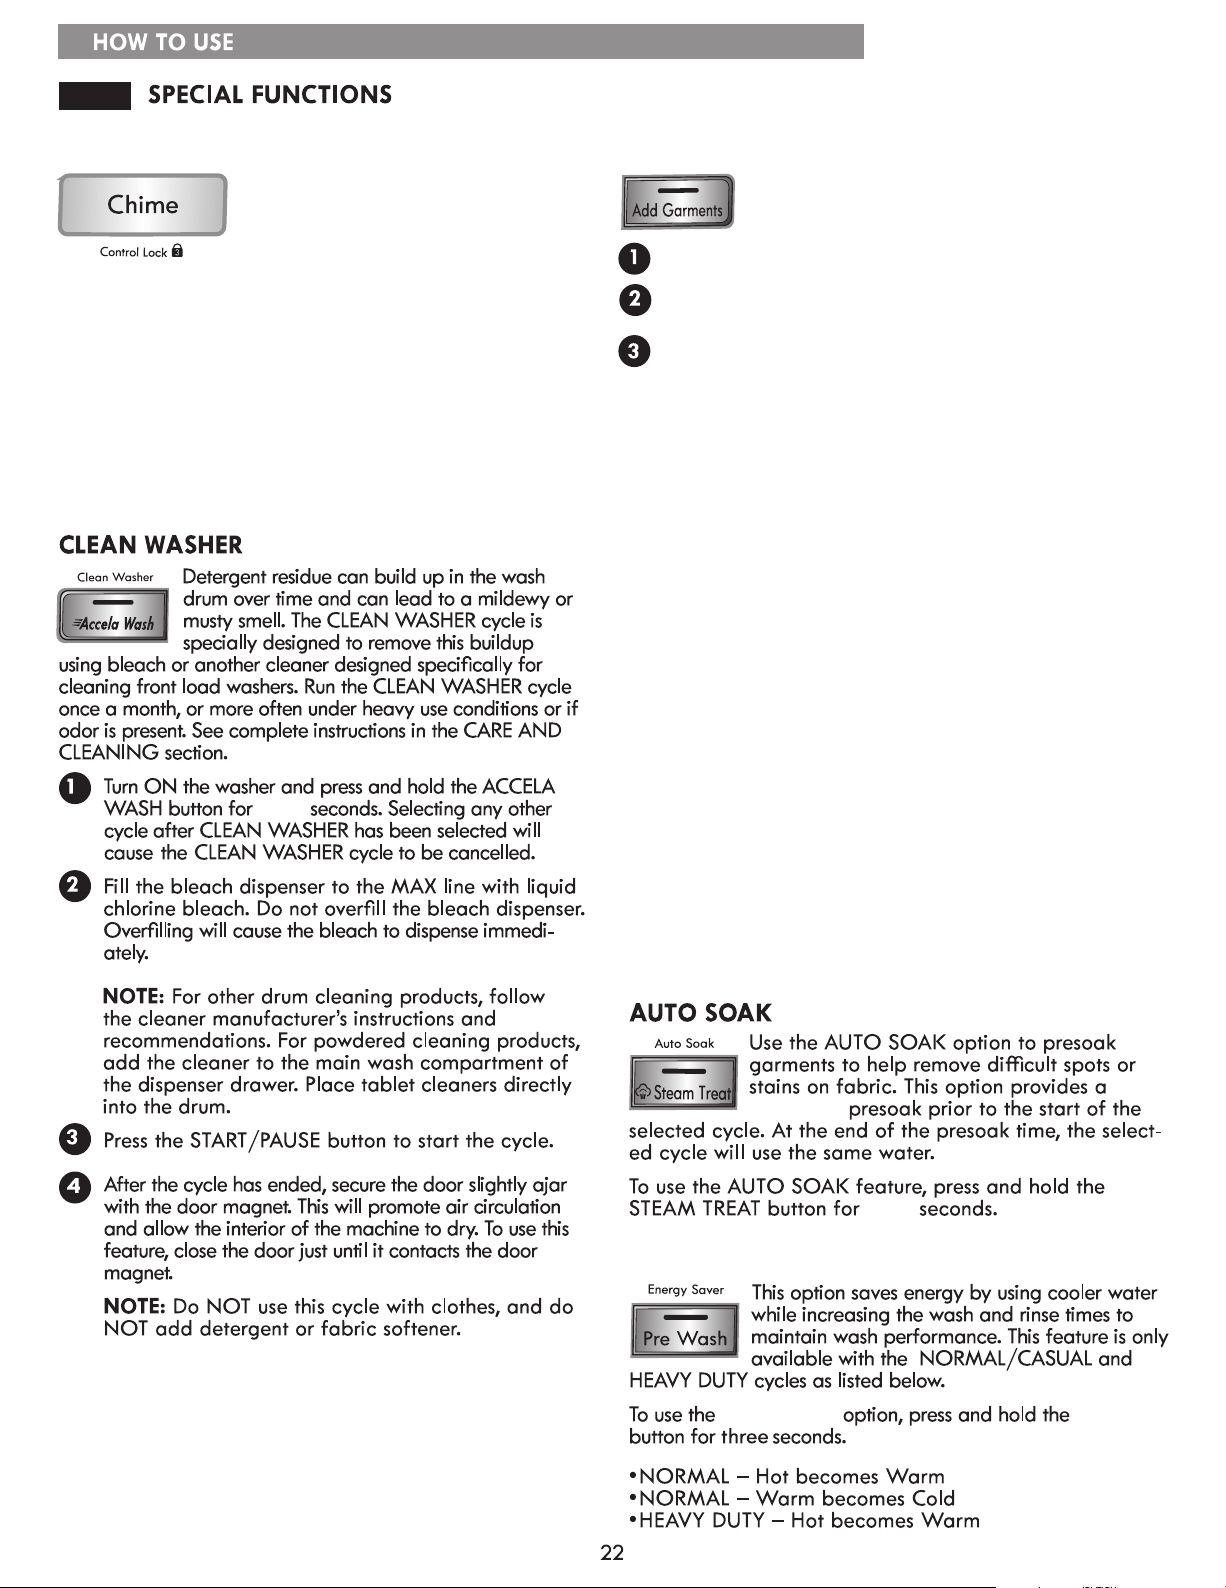
Use this function to add garments or remove
foreign objects like coins or keys after the cycle
has started.
NOTE:
• After checking the water level/temperature conditions for
safety, the door unlocks once the wash movement has
stopped. (Door Lock LED turns off.)
- This may take several seconds depending on the water
level. When a lot of water is in the tub, the door unlocks
after water drains to a safe level.
- If the temperature in the tub is higher than 113°F (45°C),
a short warning chime sounds and ADD GARMENTS is
NOT allowed for safety.
• ADD GARMENTS is disabled during the TUB CLEAN cycle
for safety.
• To preserve wash performance, wash time may be extended
depending on when garments are added to a cycle.
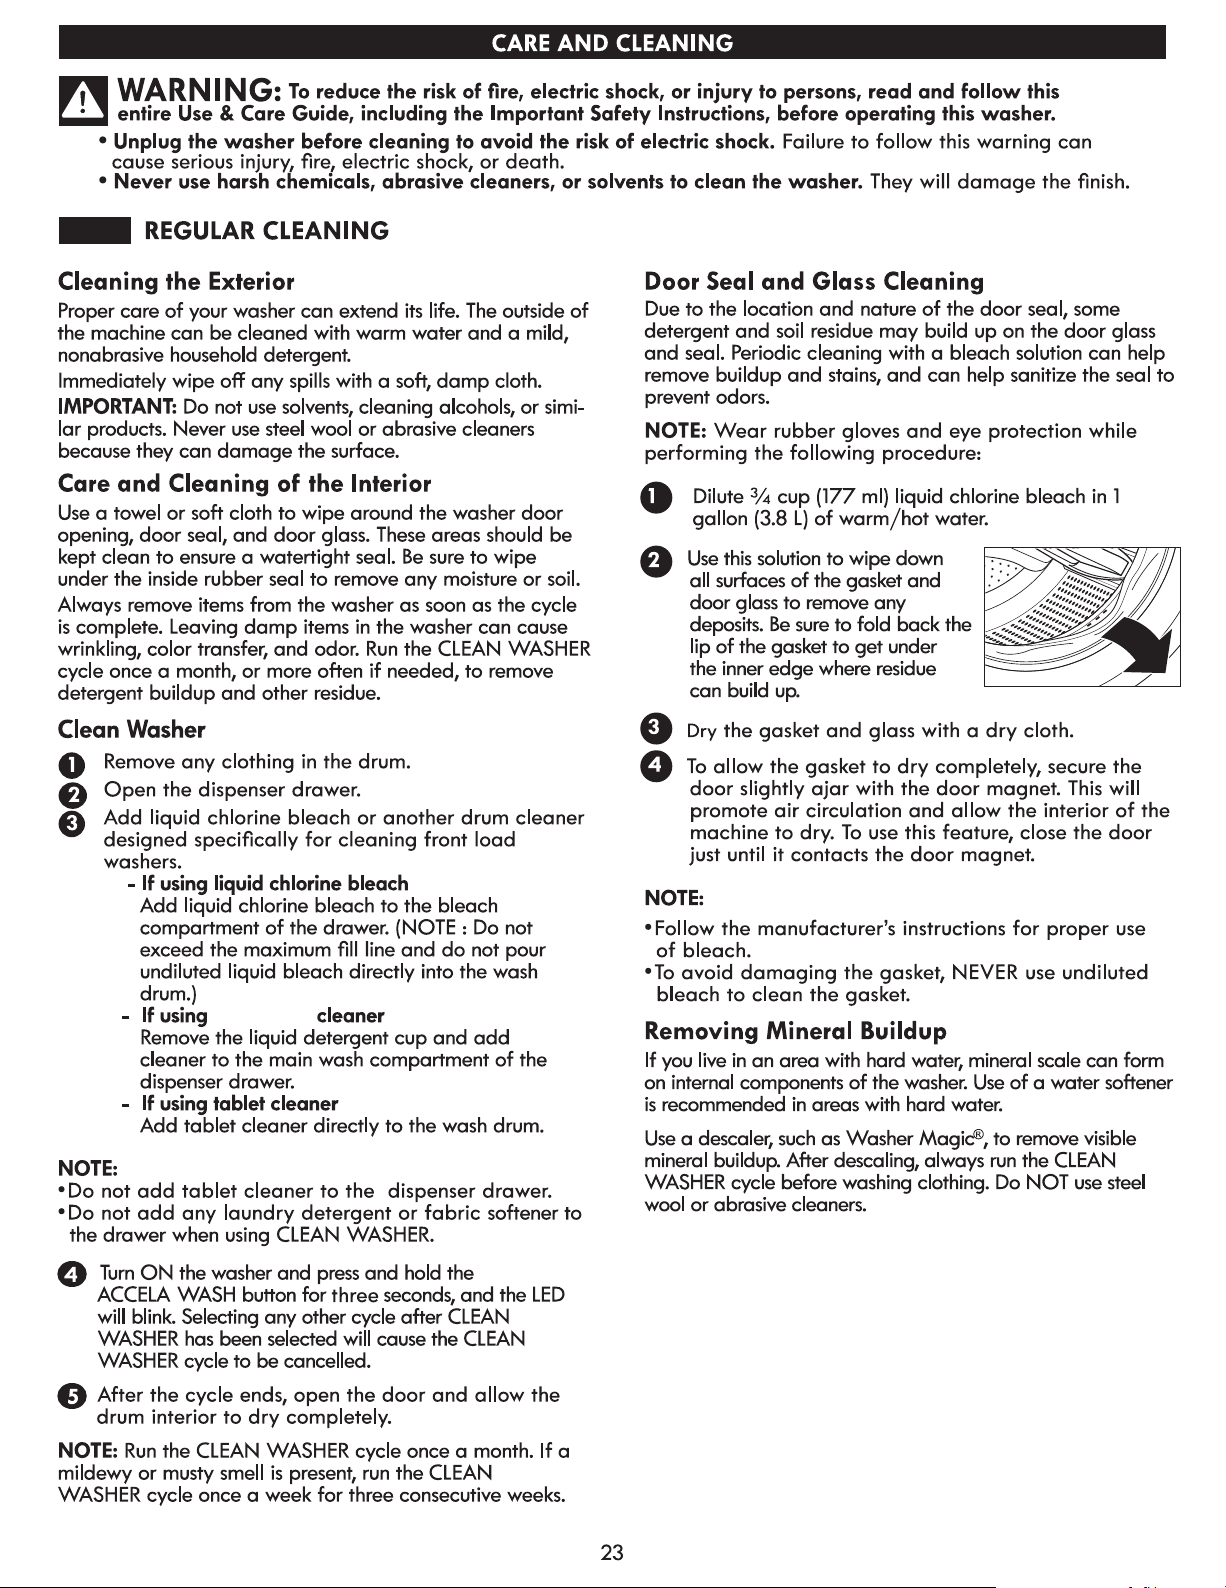
WARNING:
• Be careful when opening the door as wet laundry may drip
or fall out when the door is opened.
• Do not attempt to force the door to open when locked.
Doing so could result in damage to the machine,
malfunction, or personal injury.
• Make sure the area around the door seal is clear before
closing the door. If laundry gets caught between the door
and the seal, it can damage the rubber gasket and may
result in leaking.
Press ADD GARMENTS. The cycle pauses and the door unlocks.
Open the door, add garments or remove foreign objects, and
close the door.
Press START/PAUSE to restart the cycle. The cycle continues
automatically.
ADD GARMENTS
ENERGY SAVER
Use this option to disable the controls.
The washer can only be locked during
a cycle. This feature can prevent
children from changing cycles or
operating the machine. Once set, the controls remain
locked and Control Lock must be turned OFF before
the controls can be used again. Once the washer has
shut off, the power button will allow the machine to be
turned ON, but the controls will still be locked. When
the controls are locked, “CL” will display alternately
with the estimated time remaining.
Press and hold the CHIME button for three seconds
to activate or deactivate the controls.
three
three
30-minute
CONTROL LOCK
PRE WASH
Energy Saver
powdered
powdered
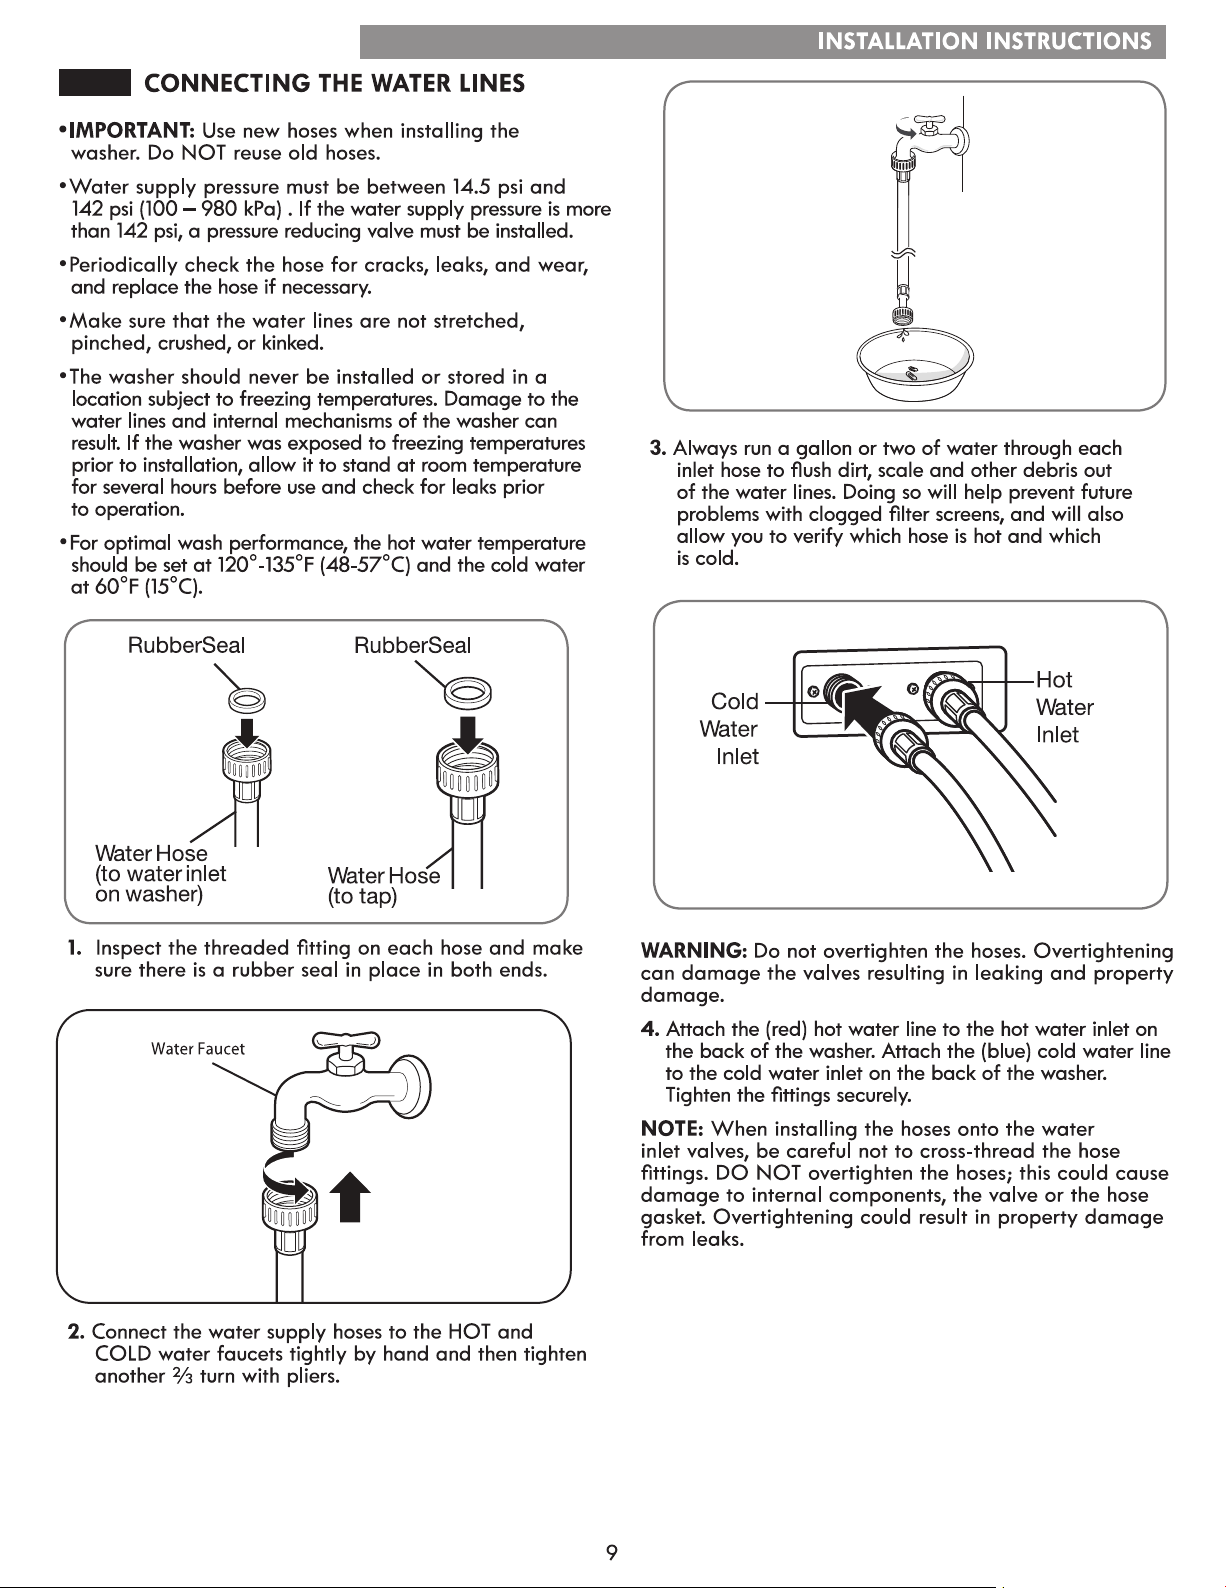
IMPORTANT: ONLY use new, high-quality inlet hoses
when installing this laundry product. Aftermarket hoses
are not guaranteed to fit or function correctly. Other
hoses may not tighten correctly and could cause leaks.
Subsequent damage to product or property will not be
covered under the terms of the product warranty.
The

If you experience problems with your washer, in the
U.S.A. call 1-844-553-6667, and in Canada call
1-800-469-4663. Only use the Diagnostics feature
when instructed to do so by the Diagnostics Team.
The transmission sounds that you will hear are normal
and sound similar to a fax machine.
Diagnostics cannot be activated unless your washing
machine is turned on by pressing the POWER button.
If your washing machine is unable to turn on, then
troubleshooting must be done without using Diagnostics.
First, call 1-844-553-6667 (U.S.A.) or 1-800-469-4663 (Canada). If the number of the phone you are using ins on file
and is associated with your washer, you will be quickly relayed to a Diagnostics team agent. Follow the technician’s
instructions and perform the following steps only when requested to by the Diagnostics agent.
Should you experience any problems with your washing
machine, it has the capability of transmitting data via
your telephone to the Diagnostics Team. This gives you
the capability of speaking directly to our specially
trained technicians. The technician records the data
transmitted from your machine and uses it to analyze
the issue, providing a fast and effective diagnosis.
Using Diagnostics
DIAGNOSTICS


Para solicitar la instalación profesional de Sears de
electrodomésticos, dispositivos para apertura de puertas de garaje,
calentadores de agua y otros electrodomésticos, llame en los
EE.UU. 1-844-553-6667, y llame en Canadá 1-800-469-4663.
ÍNDICE
REGISTRO DEL PRODUCTO
Acuerdos maestros de protección
Felicidades por haber realizado una compra inteligente. Su nuevo
producto Kenmore
®
está diseñado y fabricado para brindar años
de funcionamiento able. No obstante, al igual que cualquier otro
producto, es posible que requiera un mantenimiento preventivo o alguna
reparación cada cierto tiempo. Ahí es cuando contar con un Acuerdo
maestro de protección puede ayudarle a ahorrar tiempo y dinero.
El acuerdo maestro de protección también lo ayuda a extender la
vida útil de su nuevo producto. El Acuerdo* incluye los siguientes
puntos:
• Piezas y mano de obra, no solo para reparar defectos sino también
para mantener los productos en buen funcionamiento bajo un uso
normal. Nuestra cobertura va mucho mas allá de la garantía del
producto. No hay ninguna falla funcional deducible que se excluya
de la cobertura: se trata de una protección real.
• Servicio experto de técnicos de servicio experimentados en el que
confían millones de hogares cada año.
• Visitas a su domicilio ilimitadas y servicio en todo el país todas las
veces que nos necesite, cuando nos necesite.
• Garantía de reemplazo por reparaciones reiteradas: reemplazo del
producto cubierto si se producen tres fallas diferentes del producto
dentro de los doce meses y se requiere una cuarta reparación.
• Reemplazo del producto: si éste no puede repararse.
• Control de mantenimiento preventivo anual a pedido, sin cargos
extra.
• Ayuda rápida por teléfono: soporte técnico telefónico de un agente
de servicios para todos los productos para ayudar a detectar y
resolver problemas.
• Protección de picos de tensión contra daños eléctricos debidos a
uctuaciones de la energía.
• Protección ante pérdida de alimentos por $300 por alimentos que
se echen a perder como consecuencia de una falla mecánica de
refrigeradores y congeladores cubiertos.
• Promesa de servicio: $50 si el primer intento de reparación del
producto cubierto no se puede concretar y el producto no es
utilizable mientras se espera un nuevo servicio de reparación.
• 25% de descuento del precio normal de cualquier servicio de
reparación no cubierto de piezas relacionadas instaladas.
Cuando adquiera el contrato, con una simple llamada telefónica
podrá programar el servicio. Puede llamar en cualquier momento del
día o de la noche.
El Acuerdo maestro de protección es una compra sin riesgos.
Si usted lo cancela por cualquier razón durante el período de garantía
del producto, le devolveremos la totalidad del dinero, o una devolución
prorrateada en cualquier momento después de que expire el período
de garantía. Adquiera hoy mismo su Acuerdo maestro de protección.
Se aplican algunas limitaciones y exclusiones.
Para consultar precios e información adicional en los EE. UU. llame
al 1-800-827-6655.
* La cobertura en Canadá varía en algunos aspectos.
Para más detalles, llame a Sears Canadá al 1-800-361-6665.
Servicio de instalación de Sears
Para solicitar la instalación profesional de Sears de electrodomésticos,
dispositivos para apertura de puertas de garaje, calentadores de
agua y otros electrodomésticos, llame en los EE. UU. al 1-844-553-
6667, y llame en Canadá al 1-800-469-4663.
En el espacio de abajo, registre la fecha de la compra,
el modelo y número de serie del producto. Usted encon-
trará el número de modelo y de serie impreso en una
placa de identicación ubicada dentro de la puerta de
la lavadora. Tenga esta información a mano siempre
que se ponga en contacto con Sears en relación con su
producto.
N.º de modelo
Fecha de compra
N.º de serie
Guarde estas instrucciones y su recibo de venta para
referencia futura.
ACUERDOS DE PROTECCIÓN
MENSAJES DE SEGURIDAD ...................................................... 34
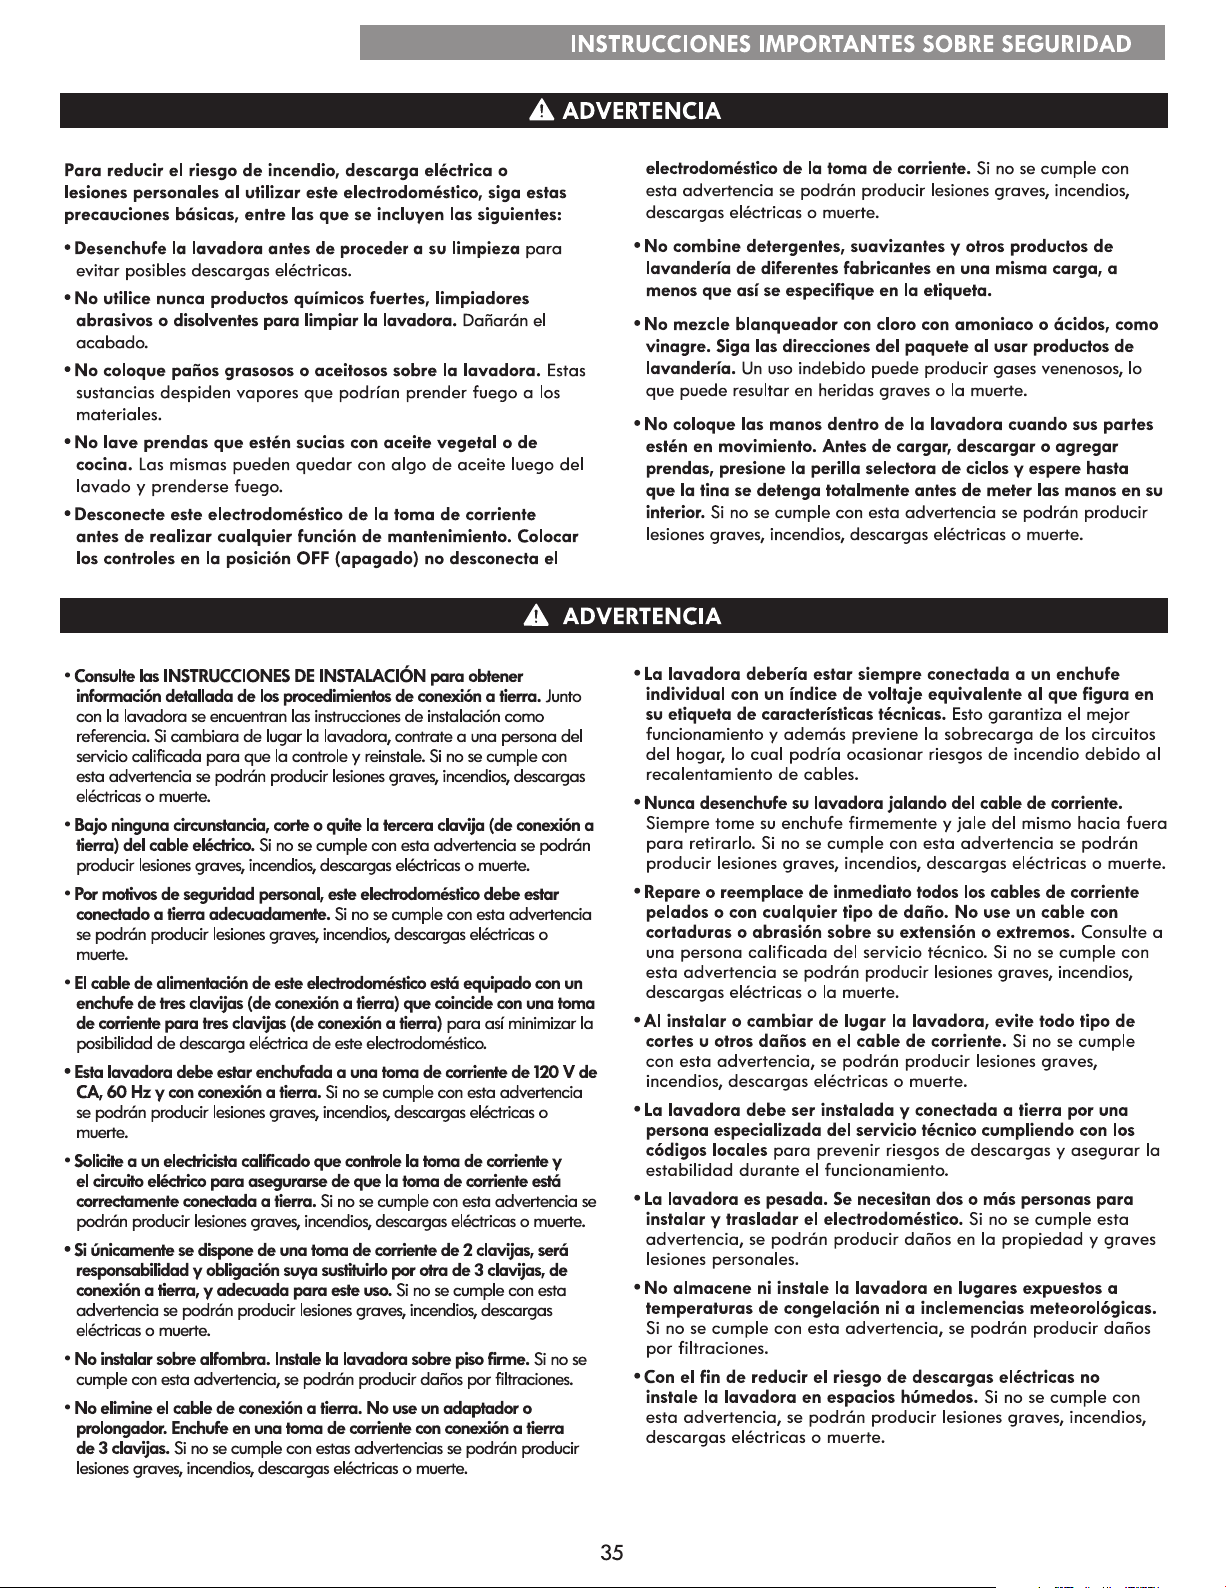
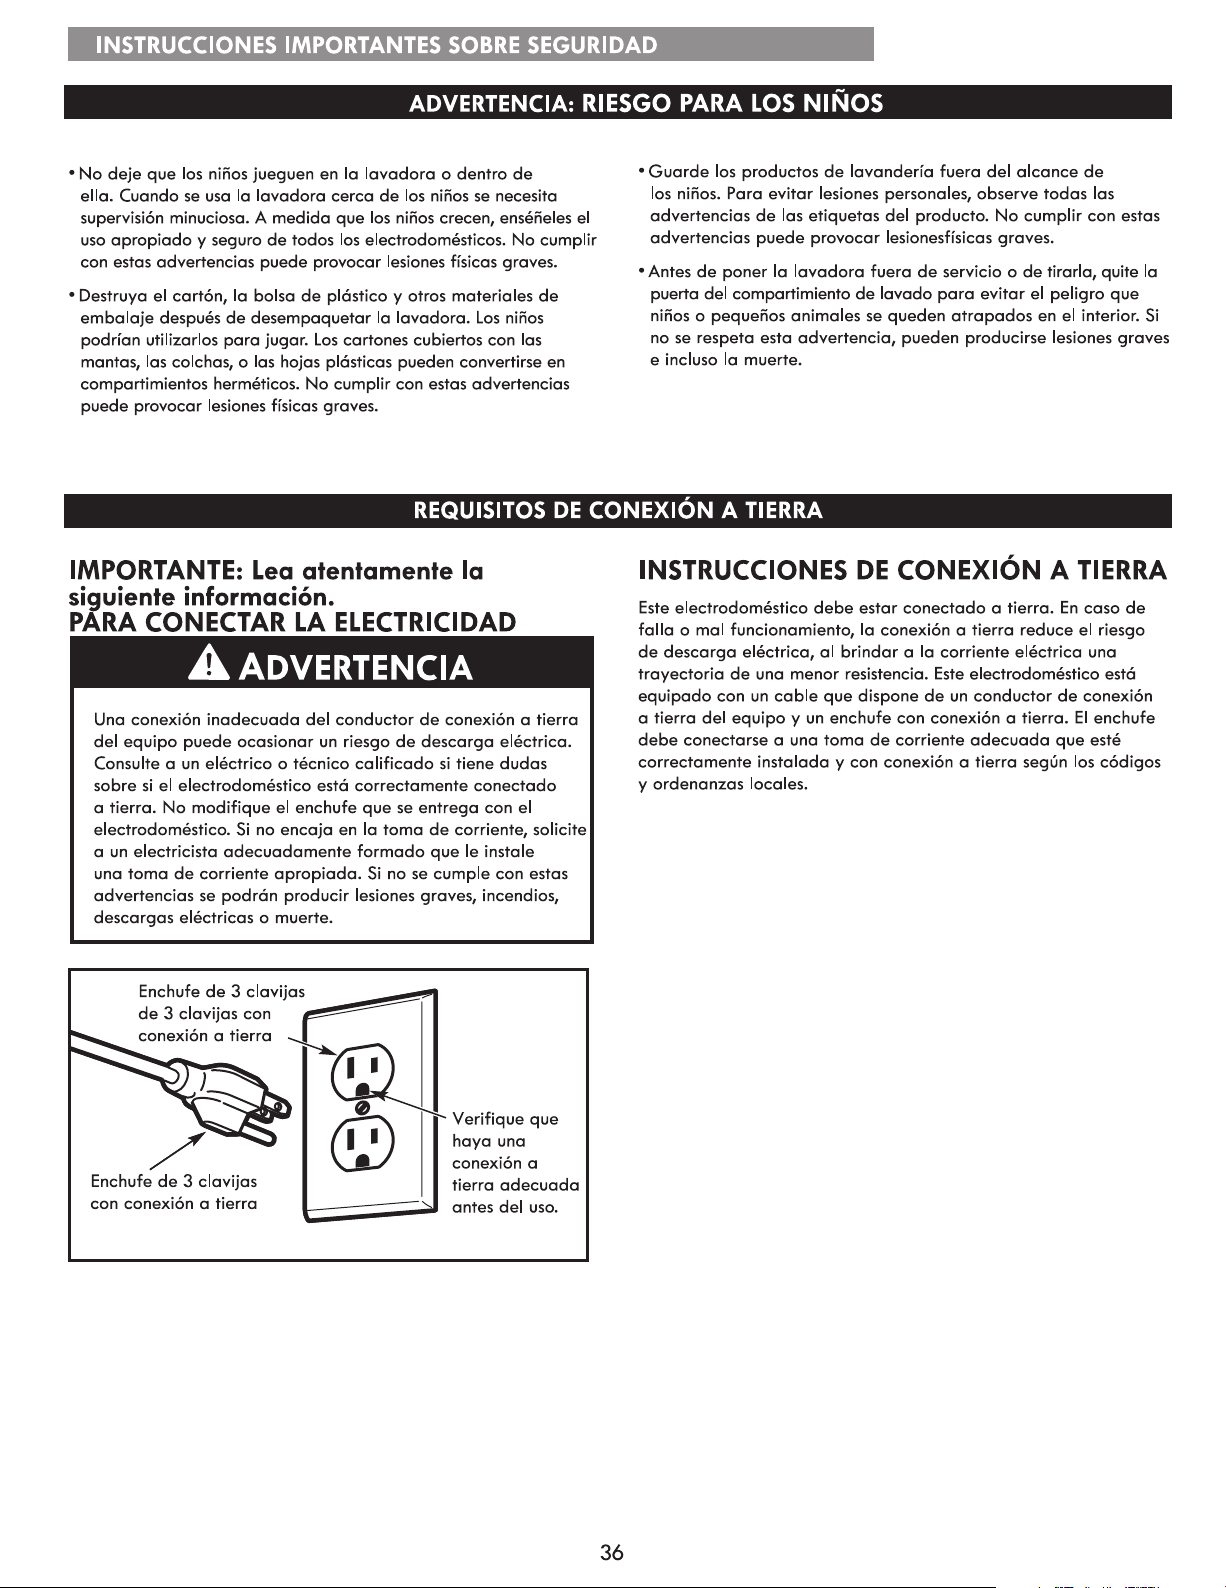
INSTRUCCIONES IMPORTANTES SOBRE SEGURIDAD .. 34-36
REQUISITOS DE CONEXIÓN A TIERRA .................................36
FUNCIONES Y VENTAJAS
Piezas y componentes claves .................................................37
Accesorios incluidos ................................................................ 37
Accesorios opcionales ............................................................37
REQUISITOS DE INSTALACIÓN
Dimensiones y especicaciones clave .................................. 38
Cómo elegir la ubicación más adecuada ........................... 38
Tipo de piso ............................................................................. 38
Espacios de instalación .......................................................... 38
INSTRUCCIONES PARA LA INSTALACIÓN
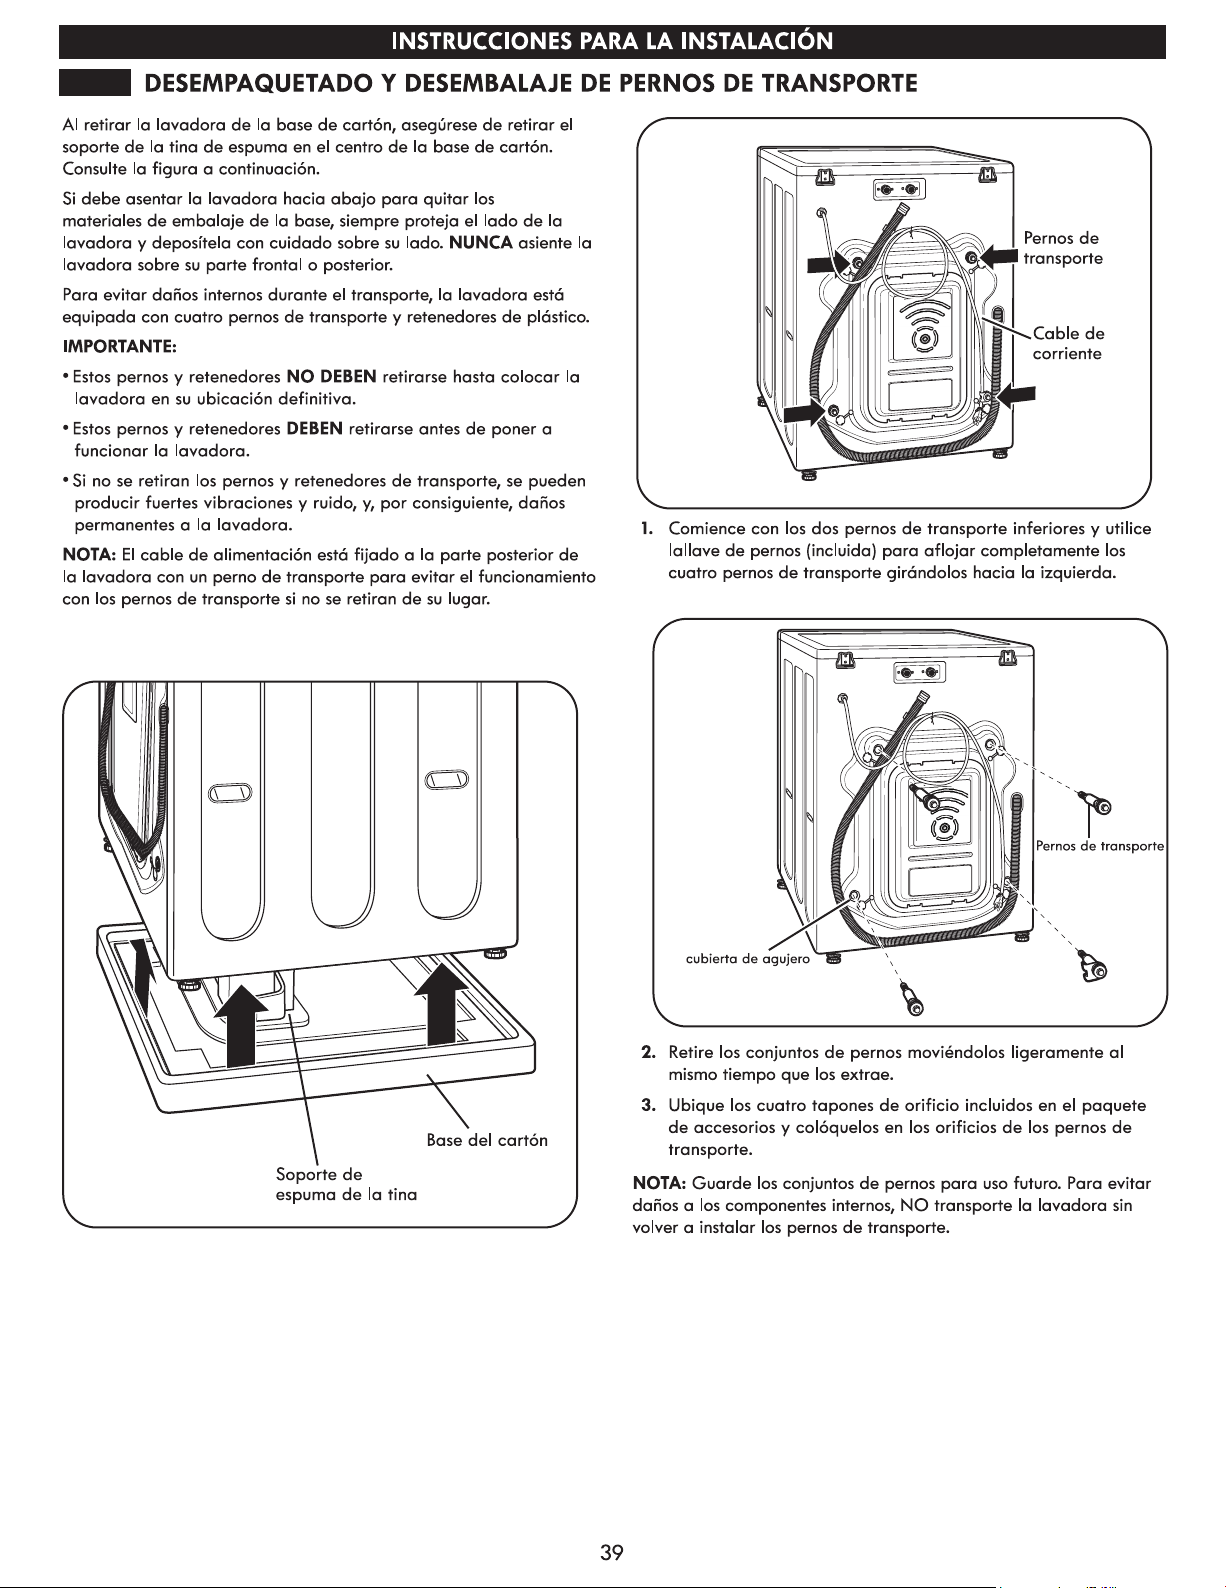
Desempaquetado y desembalaje de pernos de transporte..39
Conexión de las tuberías de agua ........................................40
Conexión de la manguera de drenaje ..................................41
Conexión del suministro eléctrico ...........................................41
Nivelación de la lavadora .....................................................42
Instalación de almohadillas antirresbalantes (opcional) ... 42
INSTRUCCIONES DE USO
Funciones del panel de control ..............................................43
Manejo de la lavadora ...........................................................44
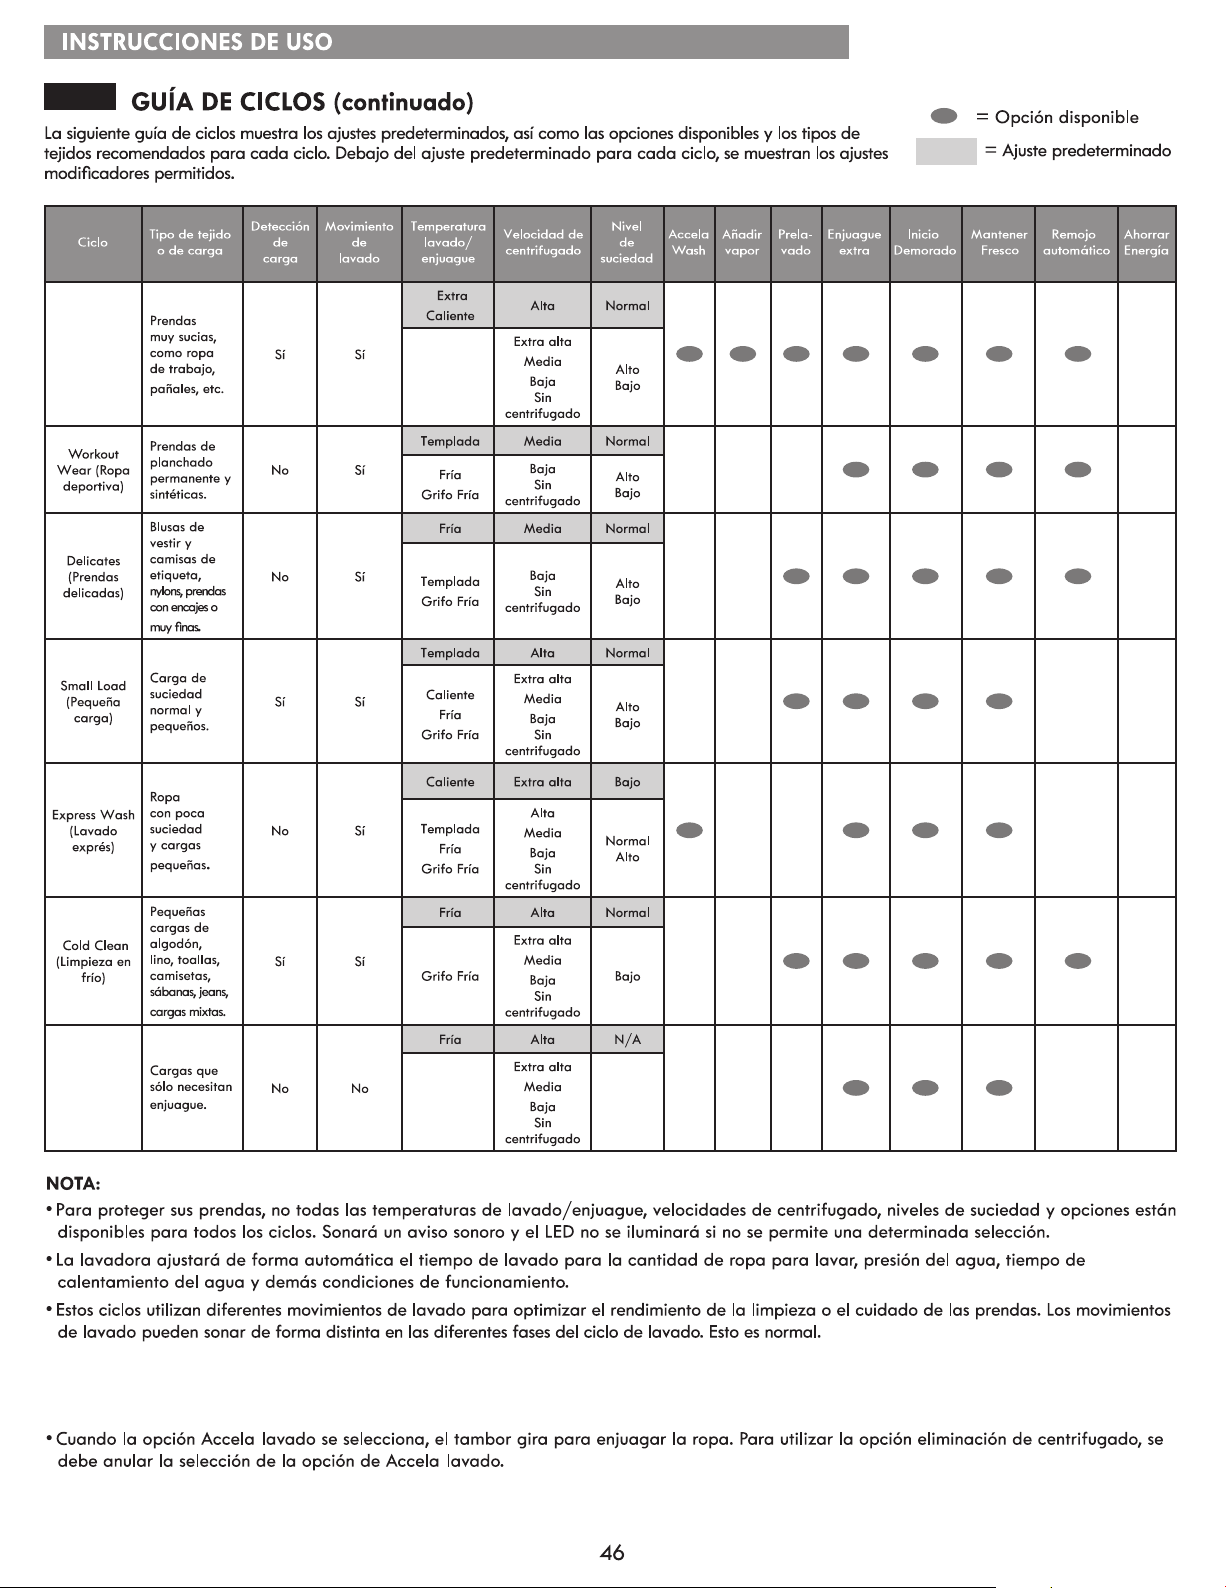
Guía de ciclos .....................................................................45-46
Clasicación de las cargas de lavado .................................47
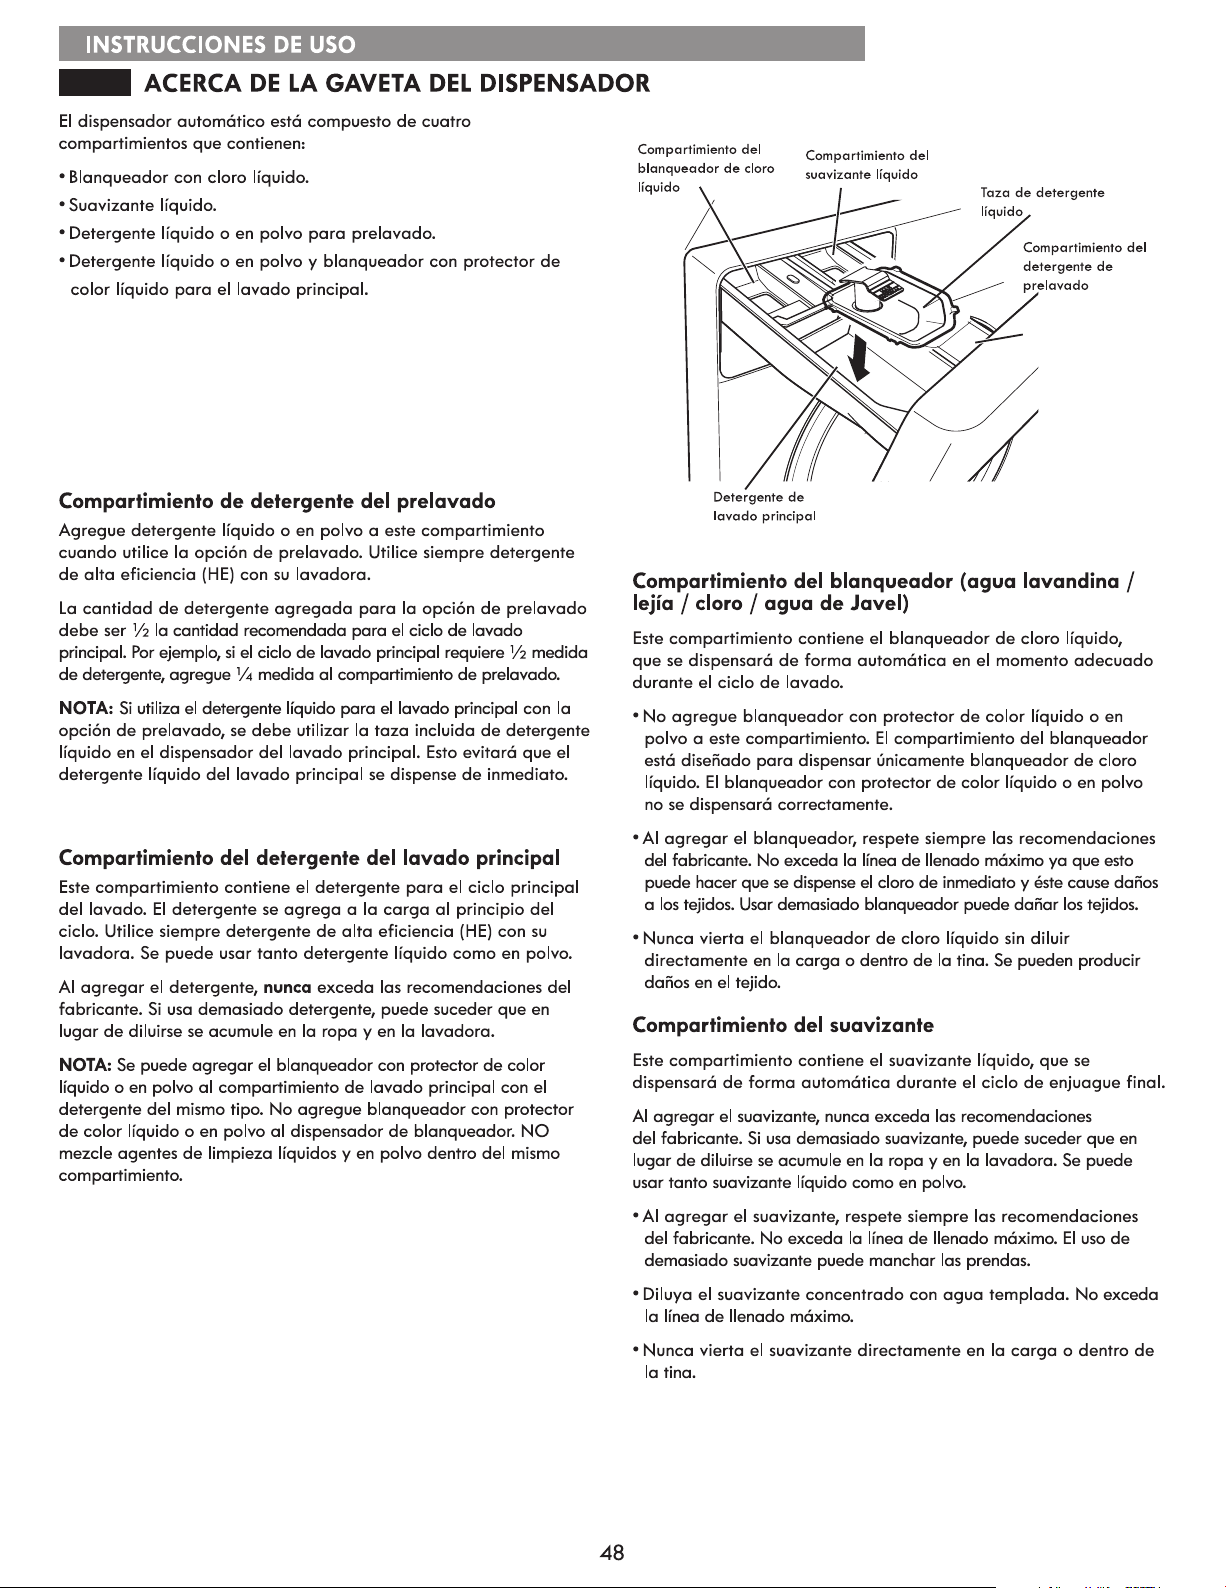
Acerca de la gaveta del dispensador .................................. 48
Uso del detergente y dispensador ........................................49
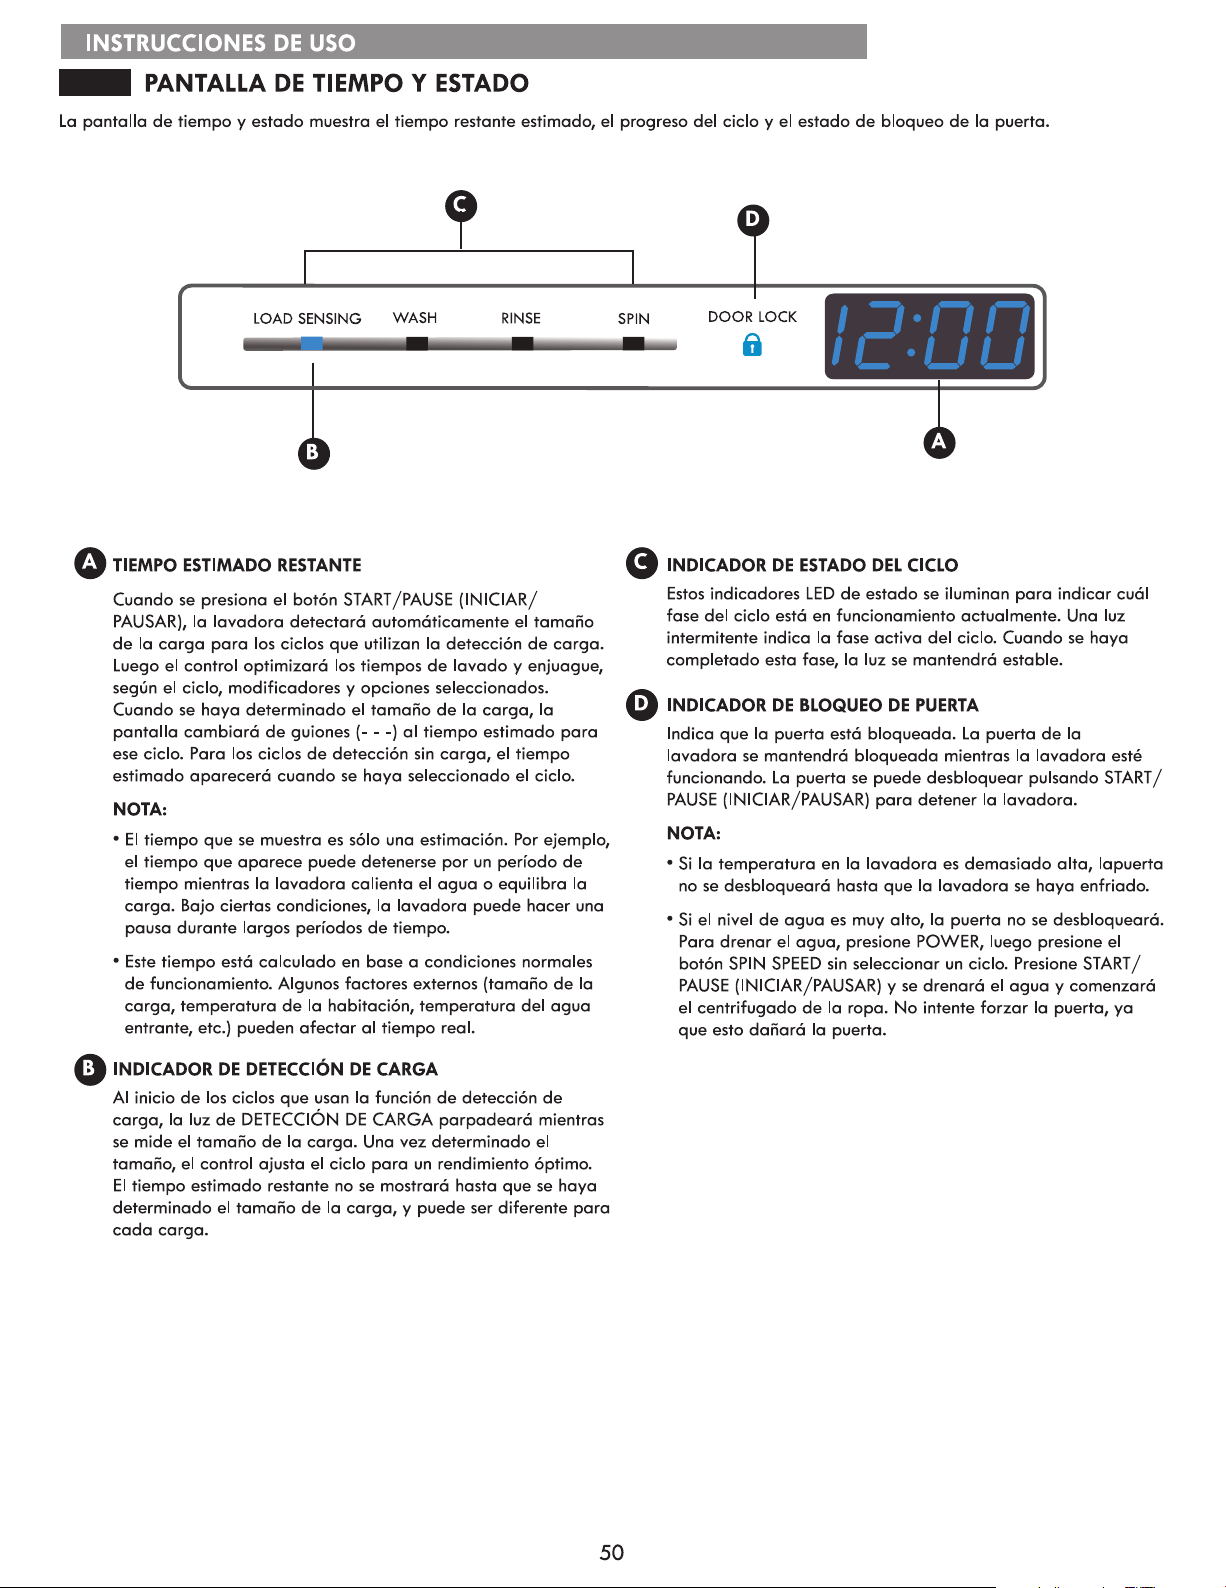
Pantalla de tiempo y estado.................................................. 50
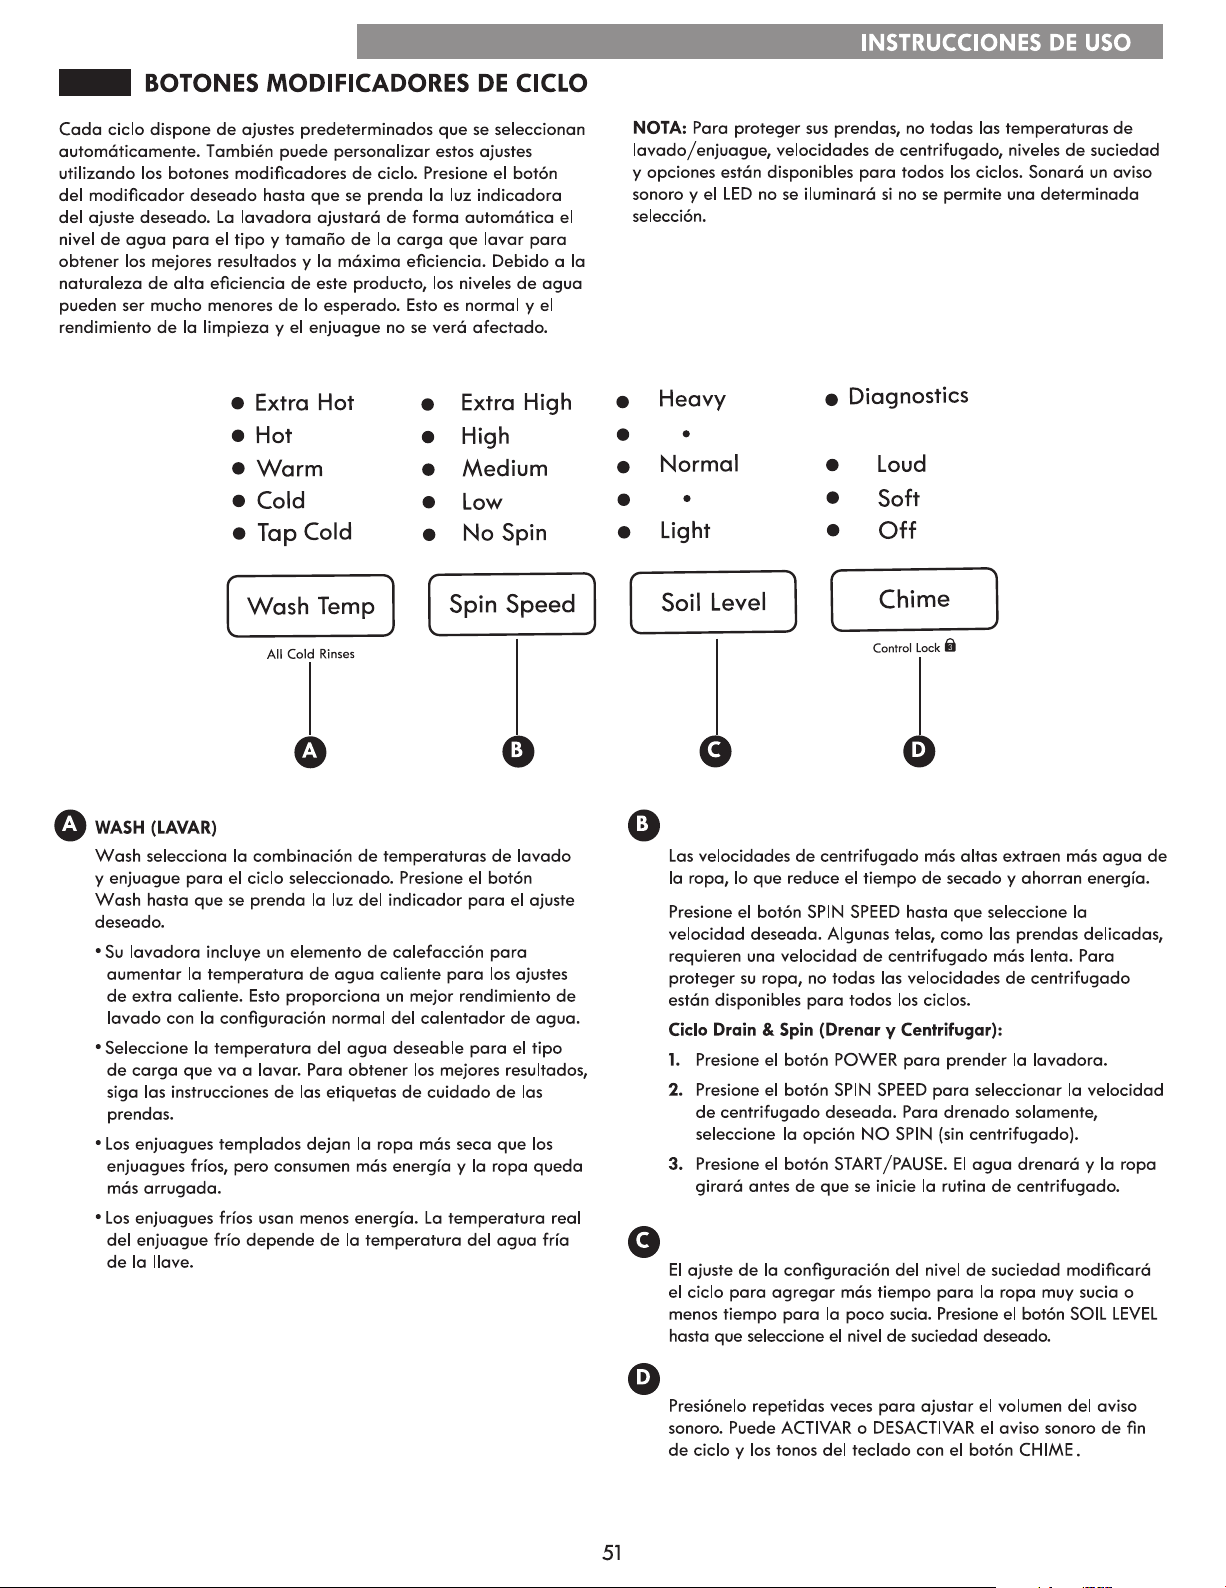
Botones modicadores de ciclo ............................................. 51
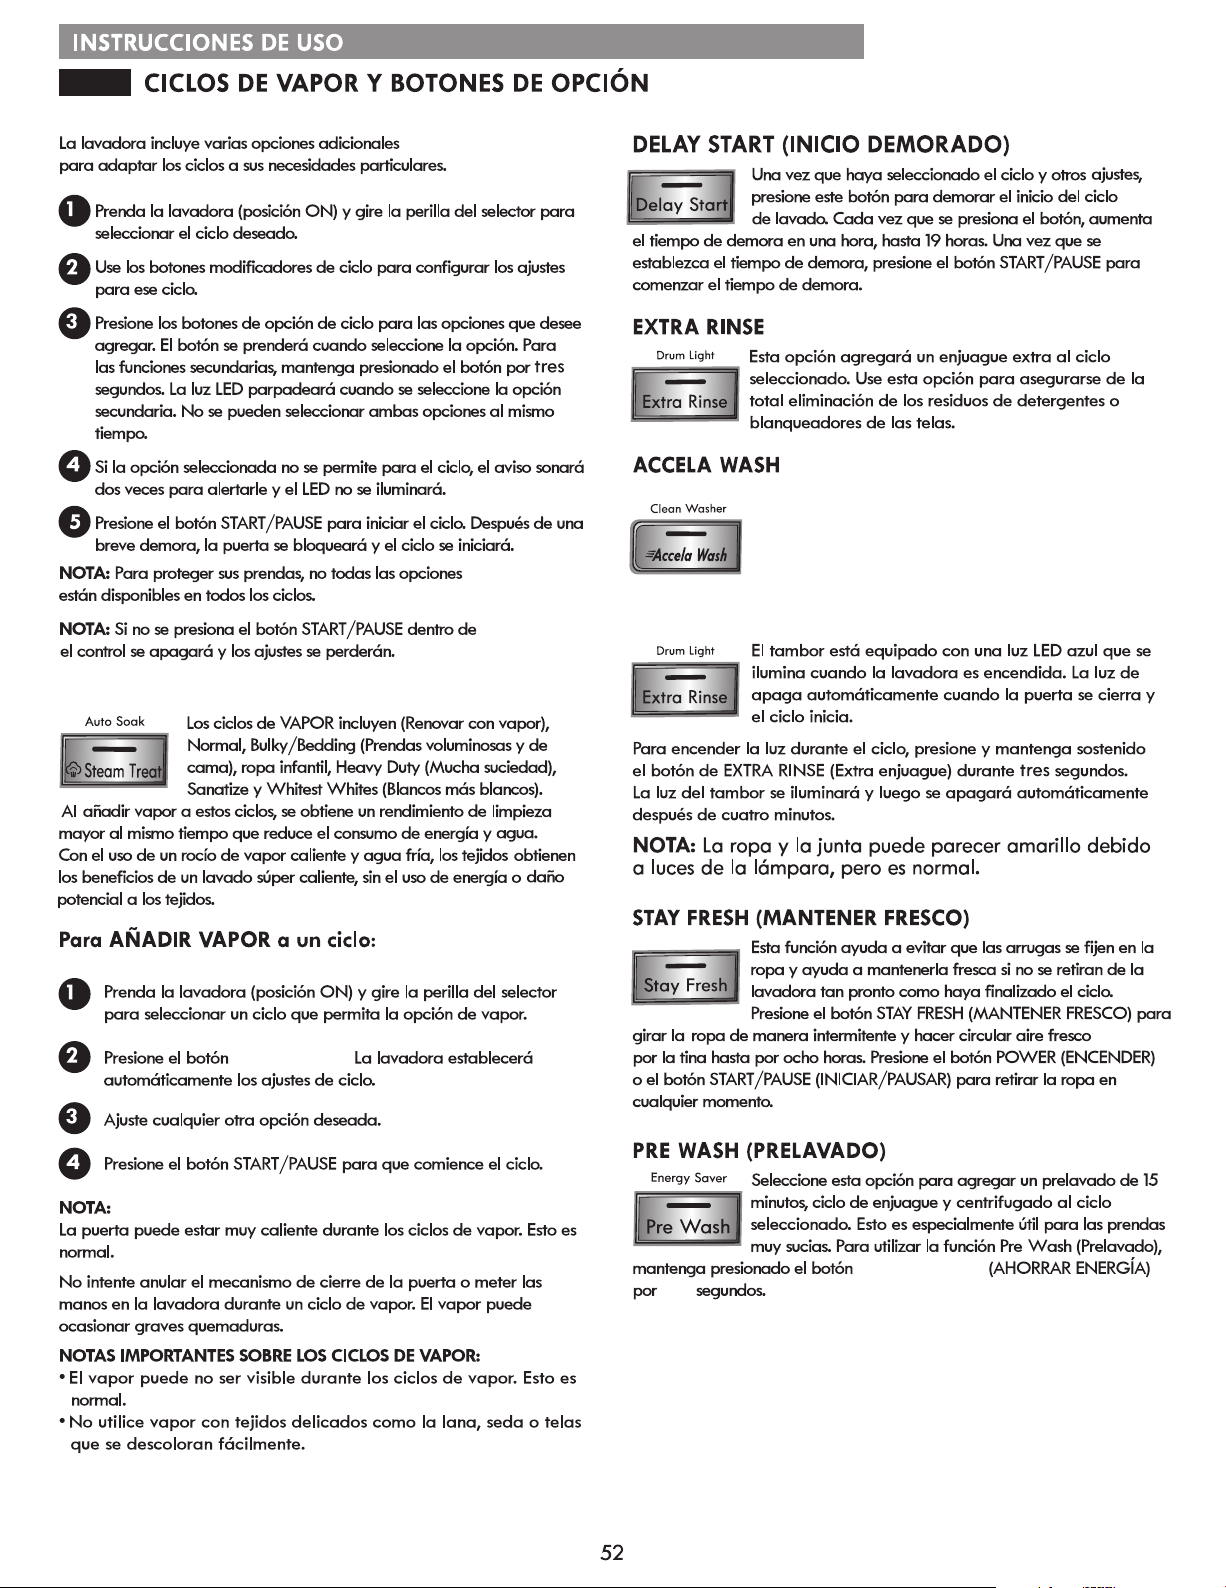
Ciclos de vapor y botones de opción .................................. 52
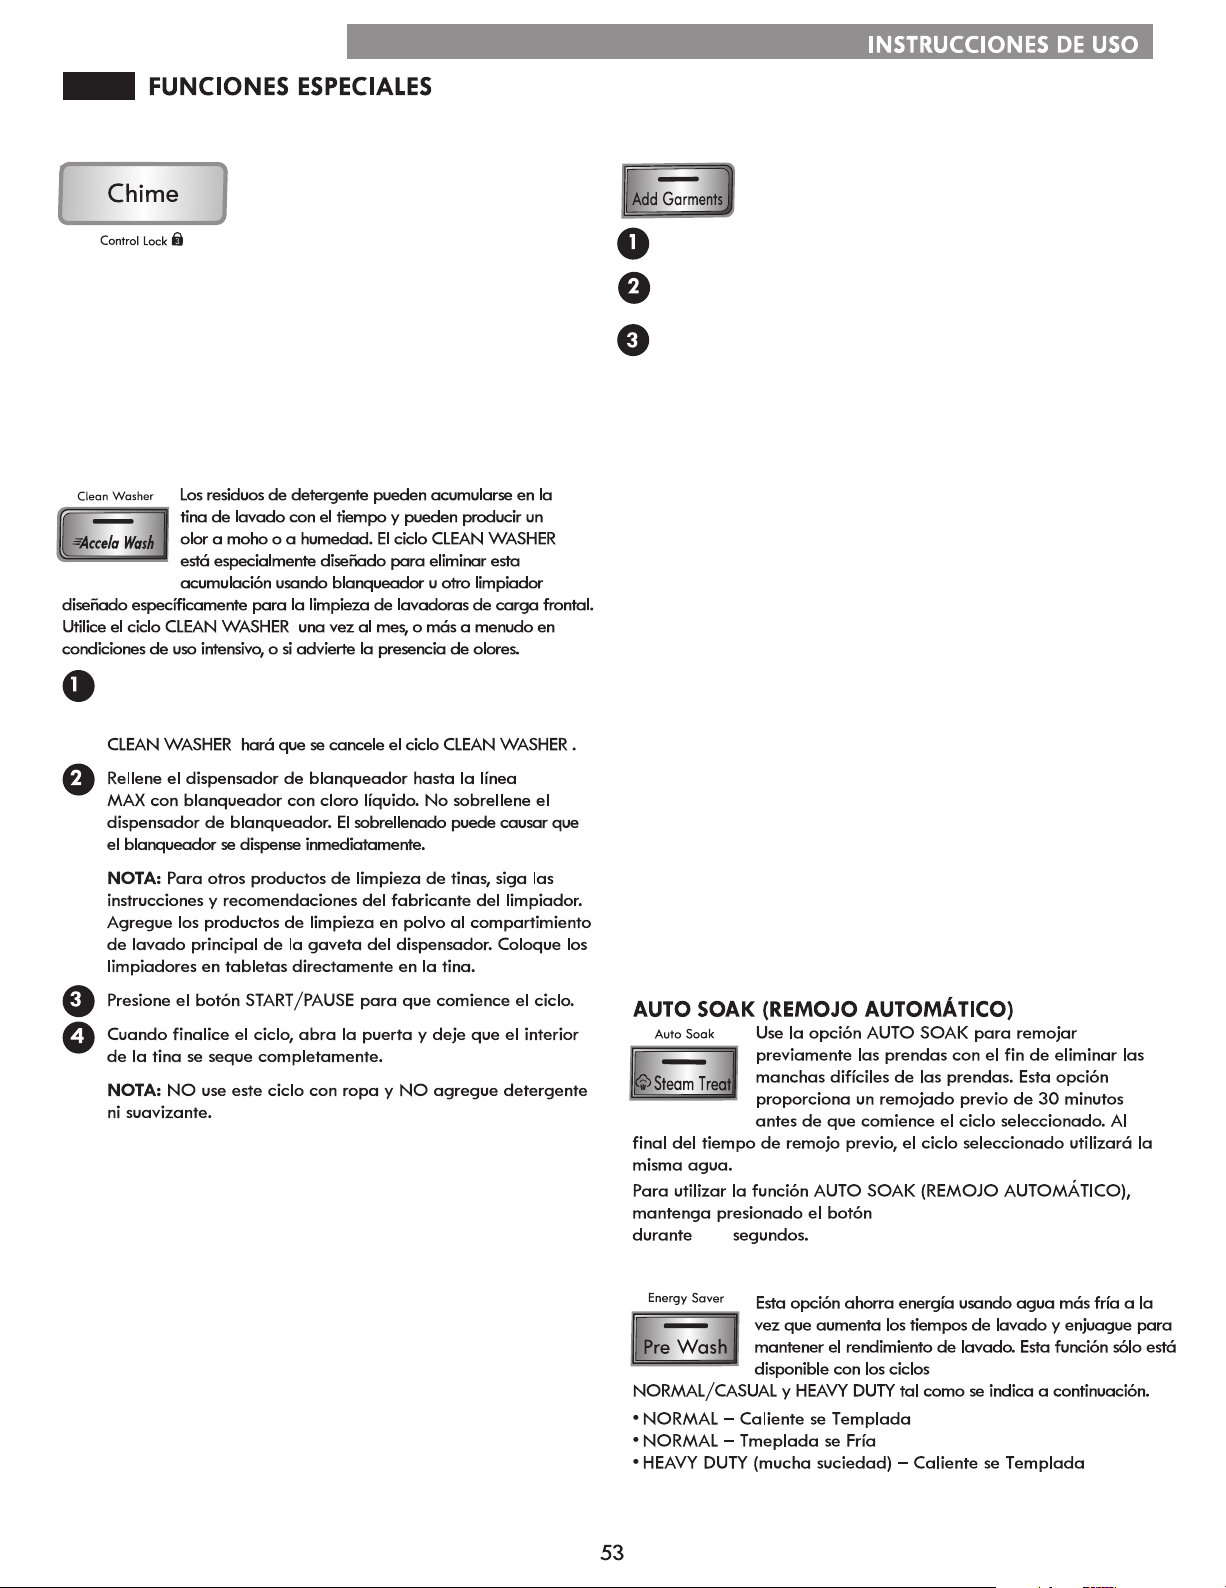
Funciones especiales ............................................................... 53
CUIDADO Y LIMPIEZA
Limpieza regular ................................................................ 54-55
Mantenimiento ...................................................................56-57
Limpieza de los ltros de entrada de agua .................... 56
Limpieza del ltro de bomba de drenaje ........................57
DIAGNÓSTICO
Uso del Diagnóstico ................................................................ 58
GUÍA DE SOLUCIÓN DE PROBLEMAS
Sonidos normales que se pueden escuchar ......................... 59
Antes de solicitar asistencia técnica ................................58-61
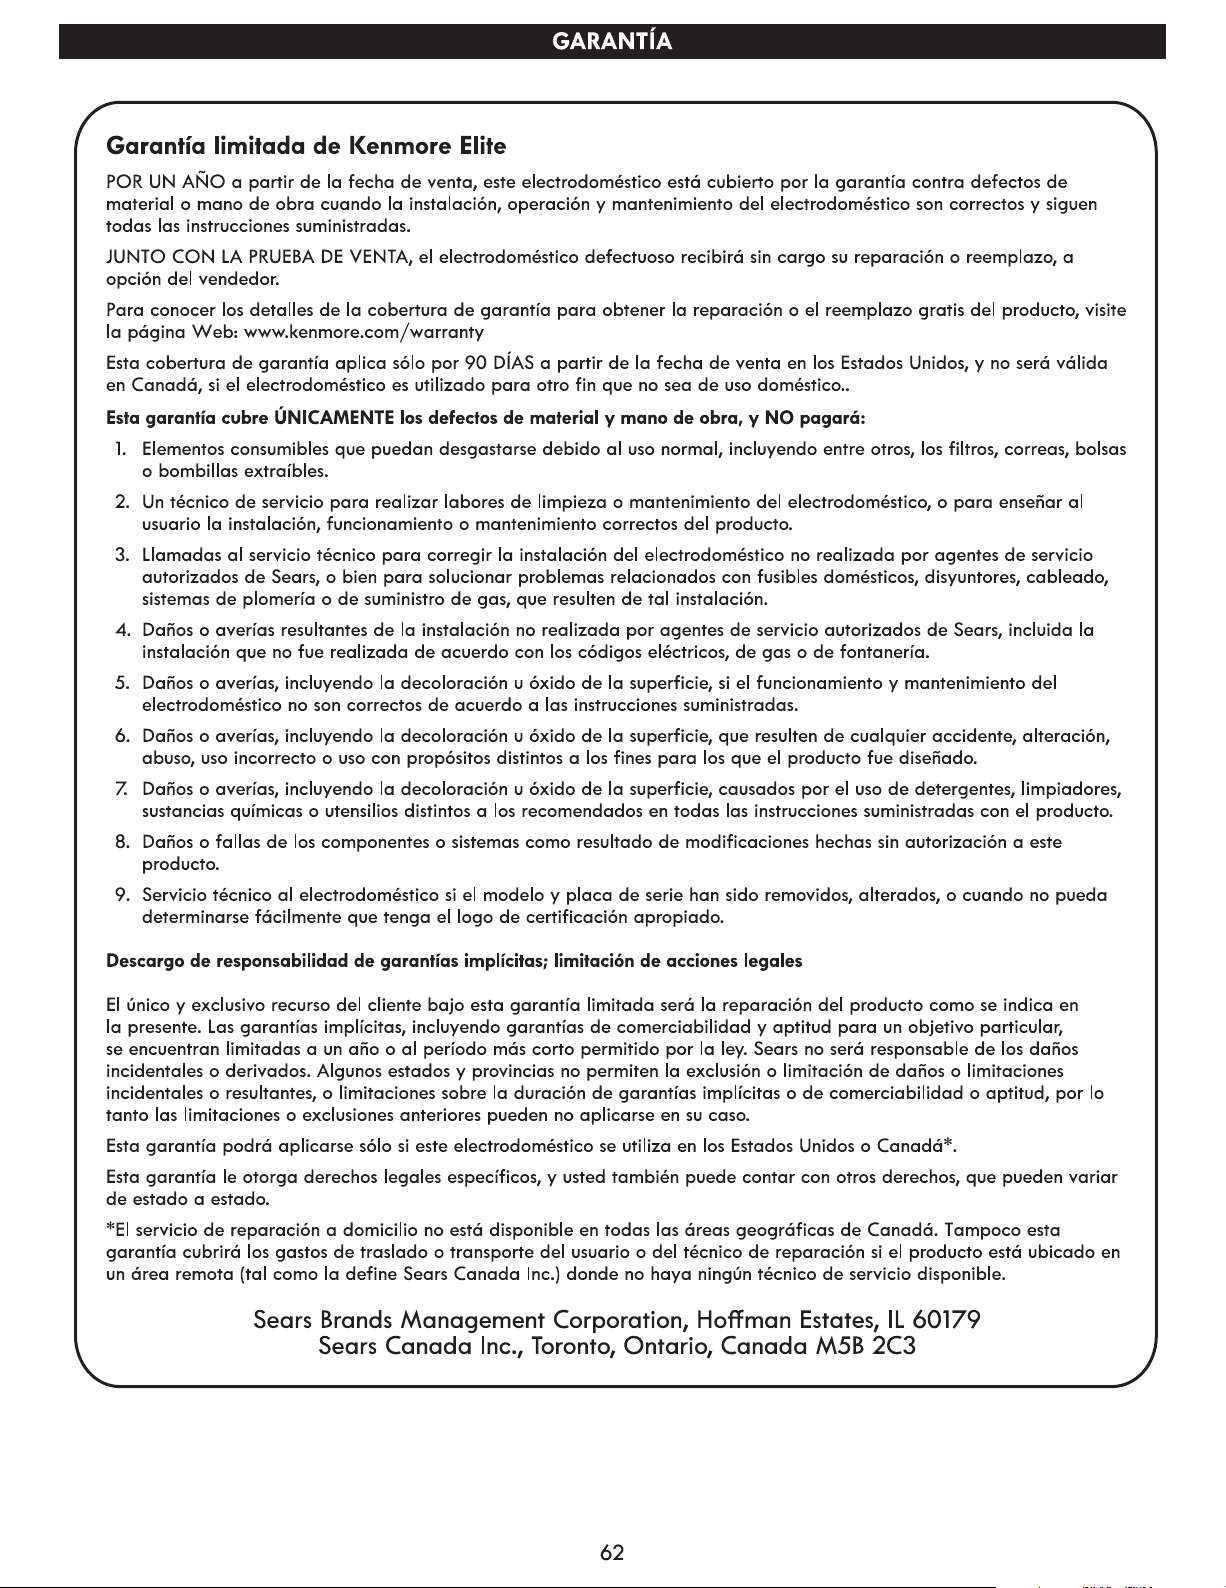
GARANTÍA ...................................................................................62
33

38
La lavadora es pesada. Se necesitan dos o más personas para •
trasladar y desempaquetar la lavadora. Si no se cumple esta
advertencia, se podrán producir daños en la propiedad y graves
daños personales.
N•
o almacene ni instale la lavadora en lugares expuestos a
temperaturas de congelación ni a inclemencias meteorológicas.
Si no se cumple con esta advertencia se podrán producir lesiones
graves, incendios, descargas eléctricas o muerte.
Conecte la lavadora adecuadamente a tierra según los códigos •
y las ordenanzas vigentes. Si no se cumple con esta advertencia,
se podrán producir lesiones graves, incendios, descargas
eléctricas o muerte.
Conelndereducirelriesgodedescargaseléctricasno•
instale la lavadora en espacios húmedos. Si no se cumple con
esta advertencia, se podrán producir lesiones graves, incendios,
descargas eléctricas o muerte.
Paraasegurarunadecuadoujodelaire,nobloqueelagran•
aberturasituadaenlaparteinferiordelalavadoraconuna
alfombrauotrosmateriales.
Noelimineelcabledeconexiónatierra.Nouseunadaptadoro•
prolongador.Enchufeenunatomadecorrienteconconexióna
tierrade3clavijas. Si no se cumple con esta advertencia se podrán
producir lesiones graves, incendios, descargas eléctricas o muerte.
NOTA: La instalación de la lavadora en un lugar húmedo, ni instalar
o almacenar la lavadora donde esté expuesta a la intemperie o
a temperaturas bajo cero, puede dar lugar a oxidaciones y otros
daños que no están cubiertos por la garantia del producto.
Toma de corriente
La toma de corriente debe estar dentro de un área mínima de •
1,5 m (60 pulgadas) a cualquiera de los lados de la lavadora.
El electrodoméstico y la toma de corriente deben estar colocados •
de forma tal que se pueda acceder al enchufe fácilmente.
No sobrecargar la toma de corriente con más de un electrodoméstico.•
La toma de corriente deberá estar conectada a tierra de acuerdo •
con los códigos y las regulaciones de cableado actuales.
Se recomienda utilizar un fusible de demora de tiempo o disyuntor.•
NOTA: Es responsabilidad ad y obligación personal del dueño del
productopediraunapersonadelserviciotécnicocalicadoque
instale la toma de corriente adecuada.
Para minimizar el ruido y vibración, se DEBE instalar la lavadora •
en un piso sólidamente construido. Ver la NOTA a la derecha.
La cuesta permisible debajo de toda la lavadora es una •
diferencia máxima de 2,5 cm (1 pulgada) de lado a lado o
entre la parte delantera y la trasera.
Noserecomiendanlassuperciesalfombradasodebaldosas•
blandas.
Nunca instale la lavadora en una plataforma o estructura •
soportada con poca solidez.
NOTA:Elsuelodebeserlosucientementefuertey
rmeparasoportarelpesodelalavadora,cuandoestá
totalmente cargada, sin desajustes ni rebotes. Si el suelo es
pocorme,reforzarloparaqueseamásrígido.Unsuelo
que es adecuado para una lavadora de carga superior
puedenoserlosucientementerígidoparaunalavadora
de carga frontal, debido a la diferencia en la velocidad
de centrifugado y la dirección. Si el suelo no es sólido,
la lavadora puede vibrar y podrá escuchar y sentir la
vibración en toda la casa.
Descripción Lavadora de carga frontal
Tensión nominal y frecuencia 120 V de CA, 60 Hz
Presión máxima del agua 14,5 - 142 psi (100 - 980 kPa)
Dimensiones 27 pulgadas (ancho) X 29
3
/4 pulgadas (largo) X 38
11
/16 pulgadas (alto), 52 pulgadas (S, con la puerta abierta)
68,6 cm (ancho) X 75,6 cm (largo) X 98,3 cm (alto), 132,2 cm (S, con la puerta abierta)
Peso neto 93 kg (205 lbs)
Velocidad máxima de cetrifugado
1 300 RPM
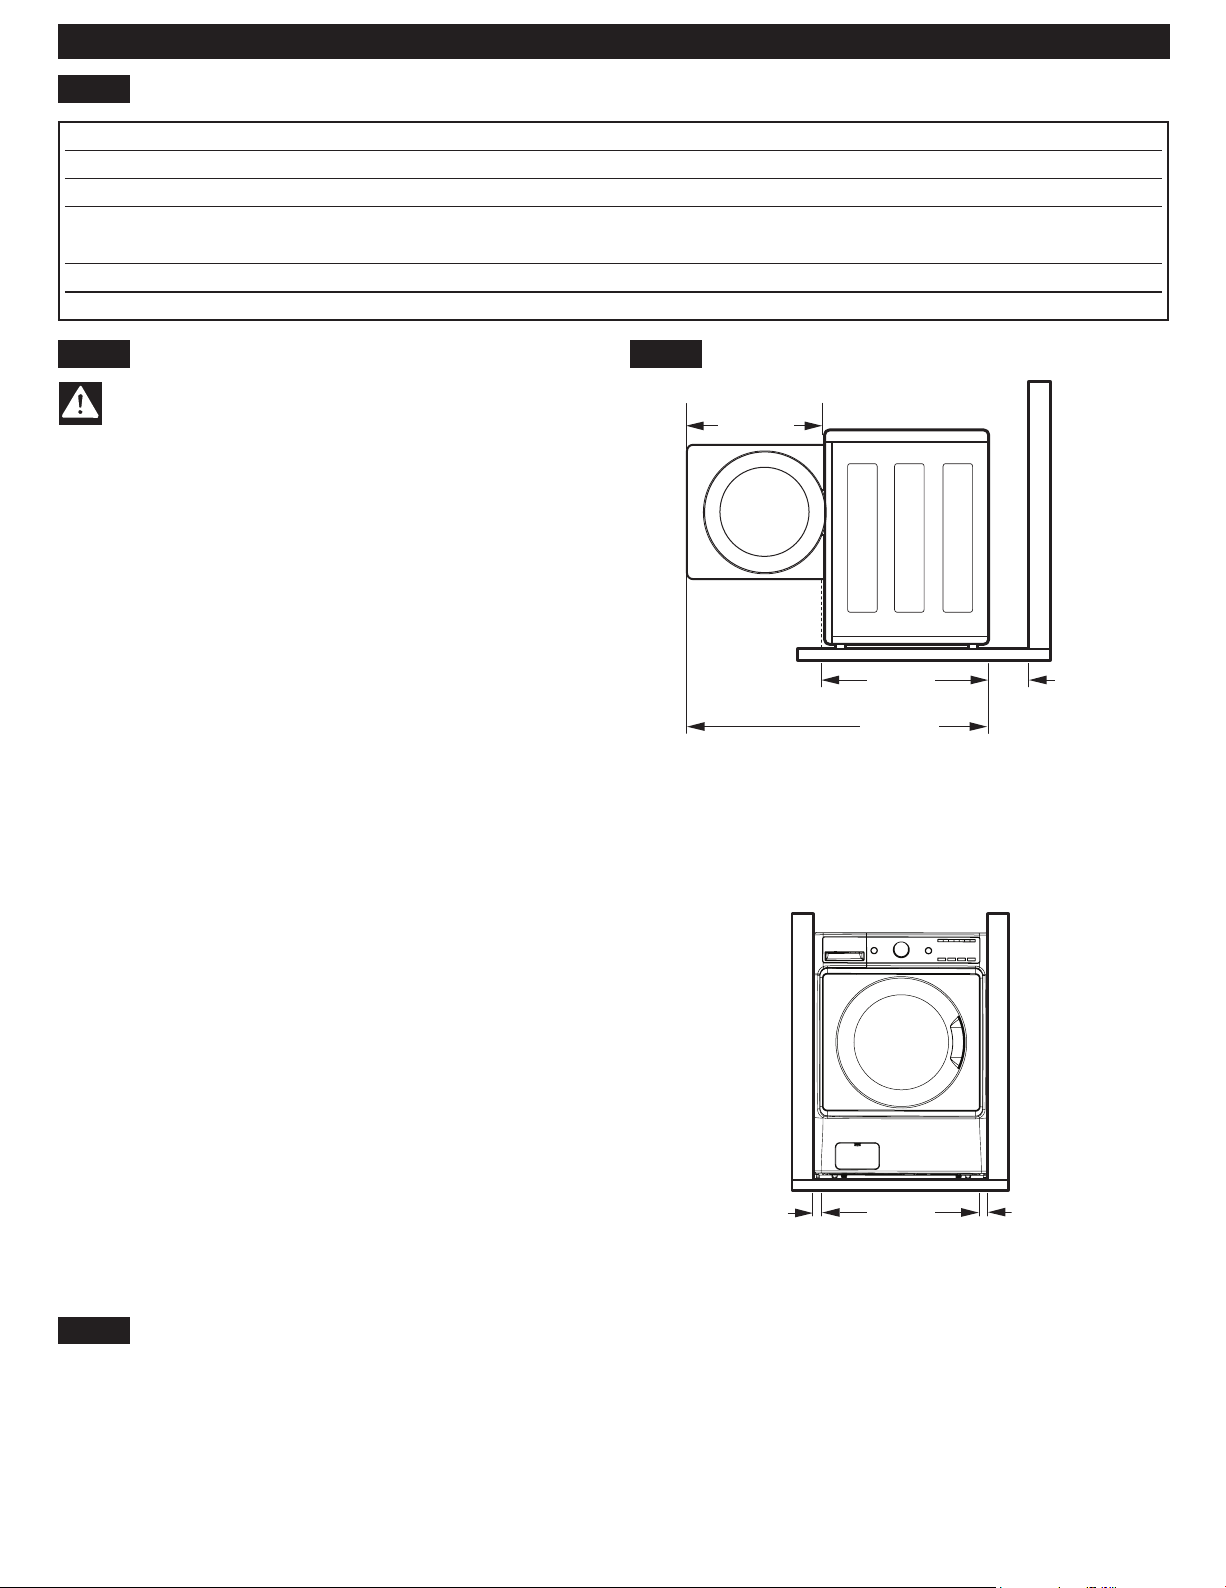
ADVERTENCIA
Paraasegurarquesehayadotadodesucienteespacio
paralastuberíasdeaguayujodeaire,dejeespacios
mínimos de por lo menos 2,5 cm (1 pulgada) en los lados
y de 10 cm (4 pulgadas) detrás de la unidad. No olvide
tener en cuenta las molduras de paredes, puertas o
piso, que podrían aumentar la distancia de separación
necesaria.
Permita al menos 56,6 cm (22
1
/4 pulgadas) en frente de
la lavadora para abrir la puerta.
KEY DIMENSIONS AND SPECIFICATIONS
CÓMO ELEGIR LA UBICACIÓN MÁS ADECUADA
TIPO DE PISO
ESPACIOS DE INSTALACIÓN
REQUISITOS DE INSTALACIÓN
2,5 cm
(1 pulg.)
2,5 cm
(1 pulg.)
68,6 cm
(27 pulg.)
10 cm
(4 plug.)
56,6 cm
(22
1
/
4
plug.)
75,6 cm
(29
3
/
4
plug.)
132,2 cm
(52 plug.)

142
No instale el extremo de la manguera de drenaje a una altura
inferior a 73,7 cm (29 pulgadas) ni superior a 243,8 cm
(96 pulgadas) sobre la parte inferior de la lavadora.
NOTA: Las almohadillas antirresbalantes se incluyen en el paquete
de instalación.

1 hora
NOTA: Para proteger sus telas, no todos los modificadores se admiten
en todos los ciclos. También se pueden agregar opciones de ciclos
mediante el uso de los botones de opción. No todas las opciones están
disponibles para todos los ciclos. Sonará un aviso sonoro diferente y
el LED no se encenderá si no se permite una determinada selección.
Agregue detergente de alta eficiencia (HE) a la gaveta del dispensador
de detergente. Para un rendimiento adecuado del lavado, mida siempre
el detergente usando el dispositivo de medición que proporciona el
fabricante del detergente.
N/A
Heavy Duty
(Mucha
suciedad)
Whitest
Whites
(Blancos más
blancos)
N/A
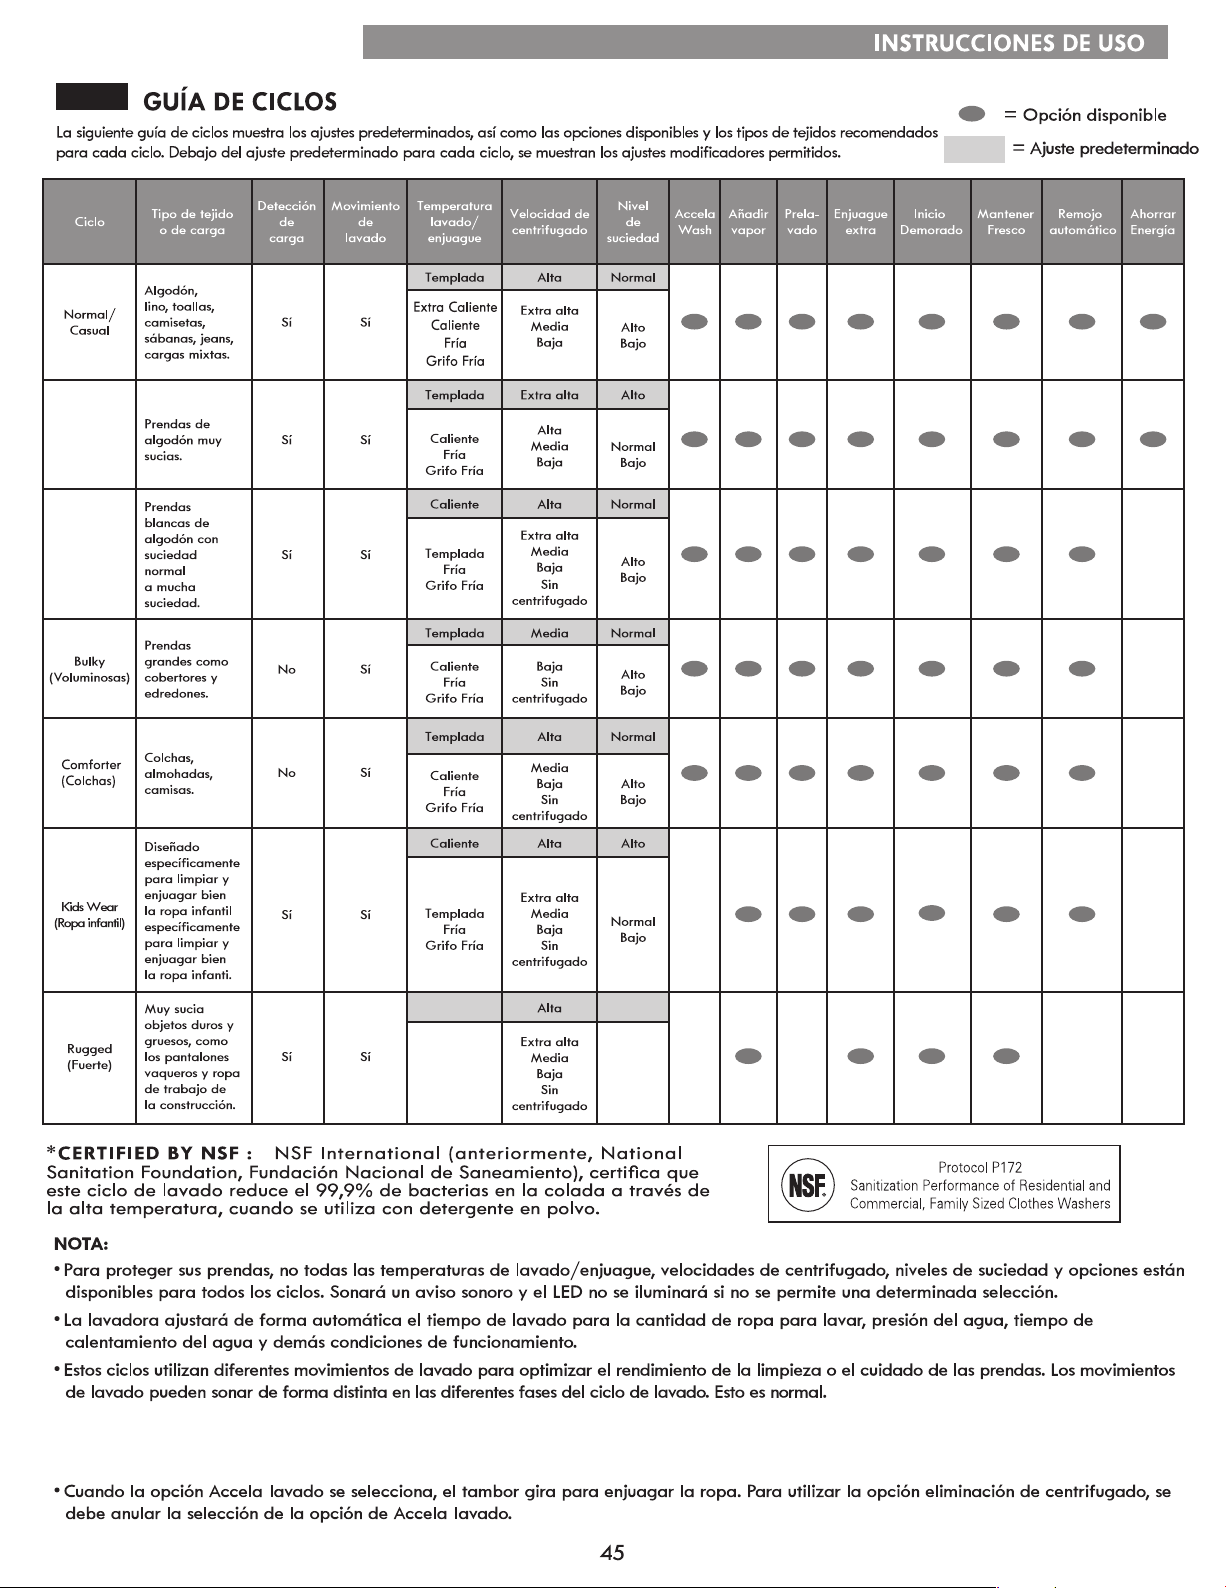
• No cargue más de 22 lb (10 kg) en la lavadora. (1 toalla de baño gruesa y seca = 1 lb)
No use el ciclo Sanitario con más de 10 lb (4,5 kg) de ropa sucia.
• No sobrecargue el ciclo Voluminoso. Si la lavadora no funciona correctamente, redistribuya manualmente la carga o lave una prenda a la vez.
• No cargue más de 22 lb (10 kg) en la lavadora. (1 toalla de baño gruesa y seca = 1 lb)
No use el ciclo Sanitario con más de 10 lb (4,5 kg) de ropa sucia.
• No sobrecargue el ciclo Voluminoso. Si la lavadora no funciona correctamente, redistribuya manualmente la carga o lave una prenda a la vez.
Rinse & Spin
(Enjuagar y
centrifugar)
Sanitize
(Sanitario)
Para un mejor rendimiento, cargue la ropa como se muestra.
- Cargue las prendas sueltas y no llene el tambor en exceso.
Las prendas necesitan espacio para circular y así limpiarse.
- No apriete las prendas al introducirlas en el tambor.
1
3
2
4
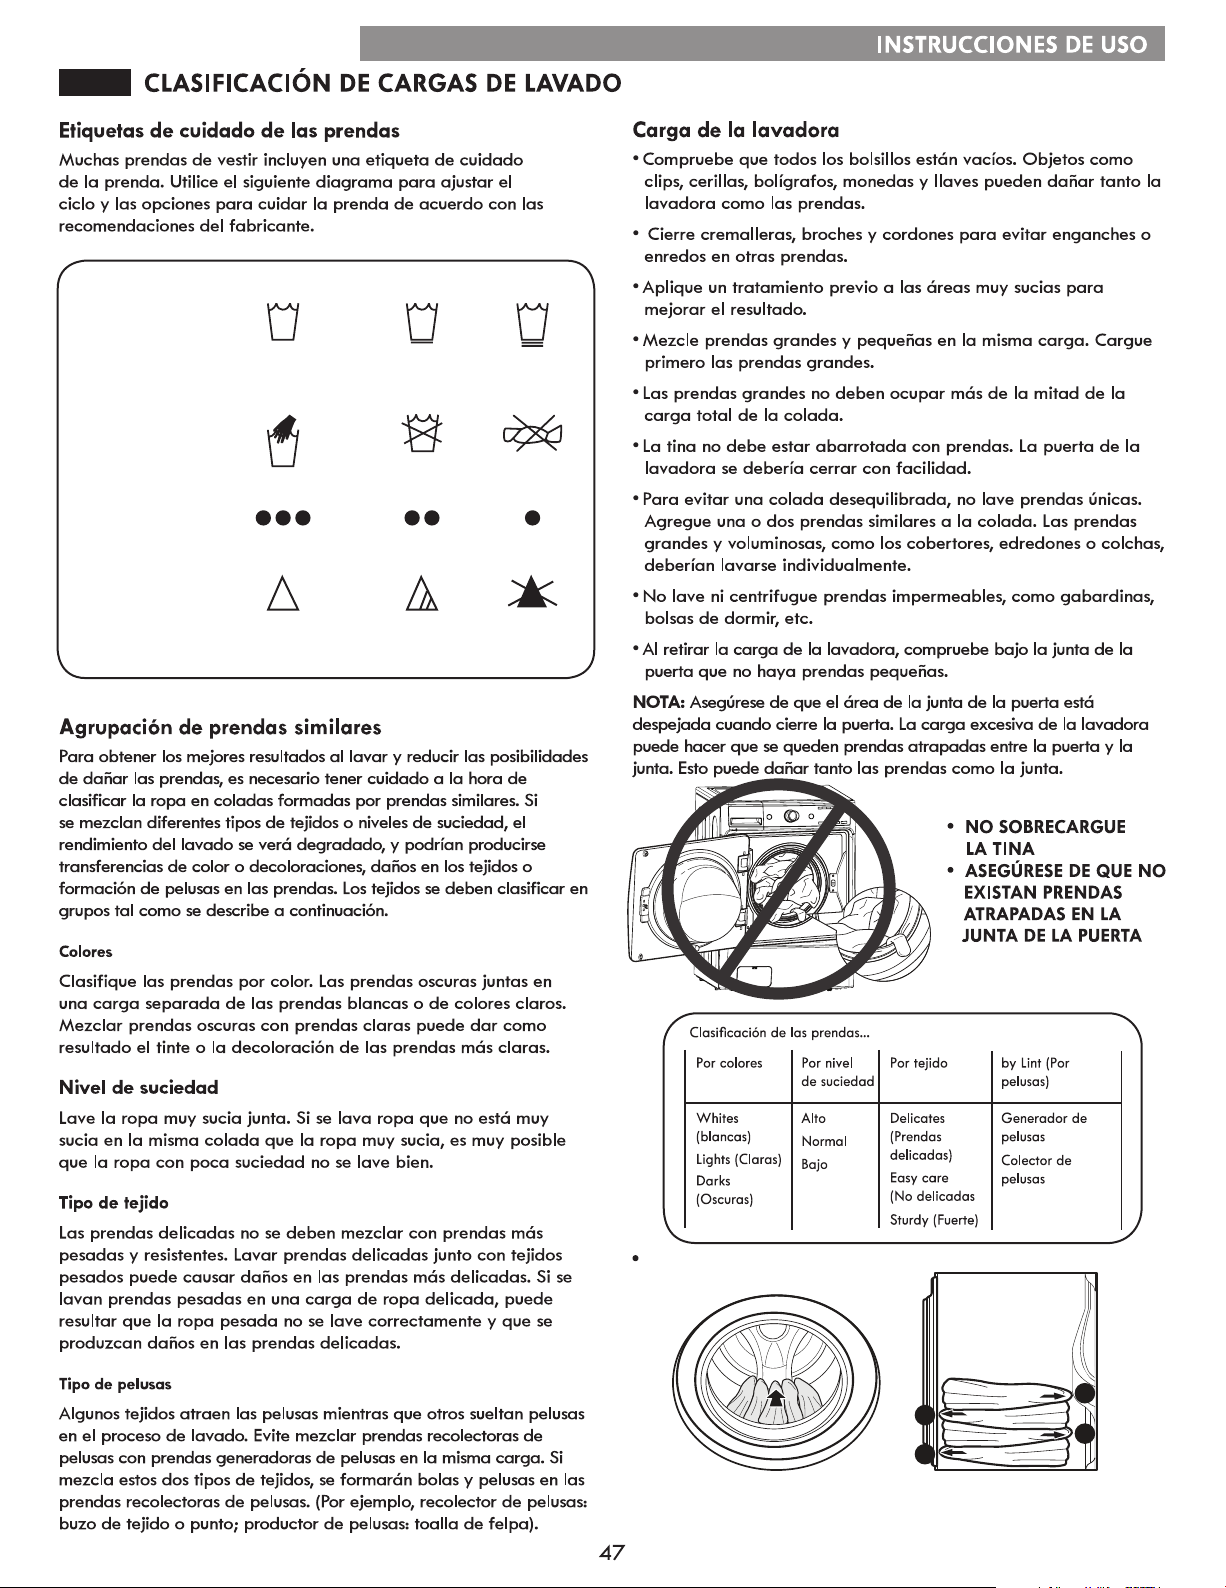
Etiquetas de cuidado de las prendas
Ciclo lavado a
máquina
Normal Planchado perma-
nente/ resistente a
las arrugas
Prendas
delicadas
Lavado a mano No lavarNo escurrir
Temperatura
del agua
CalienteTibia Frio
Blanqueado
Cualquier
blanqueador (cuando
sea necesario)
Sólo blanqueador
sin lejía (cuando
sea necesario)
No utilizar
blanqueador
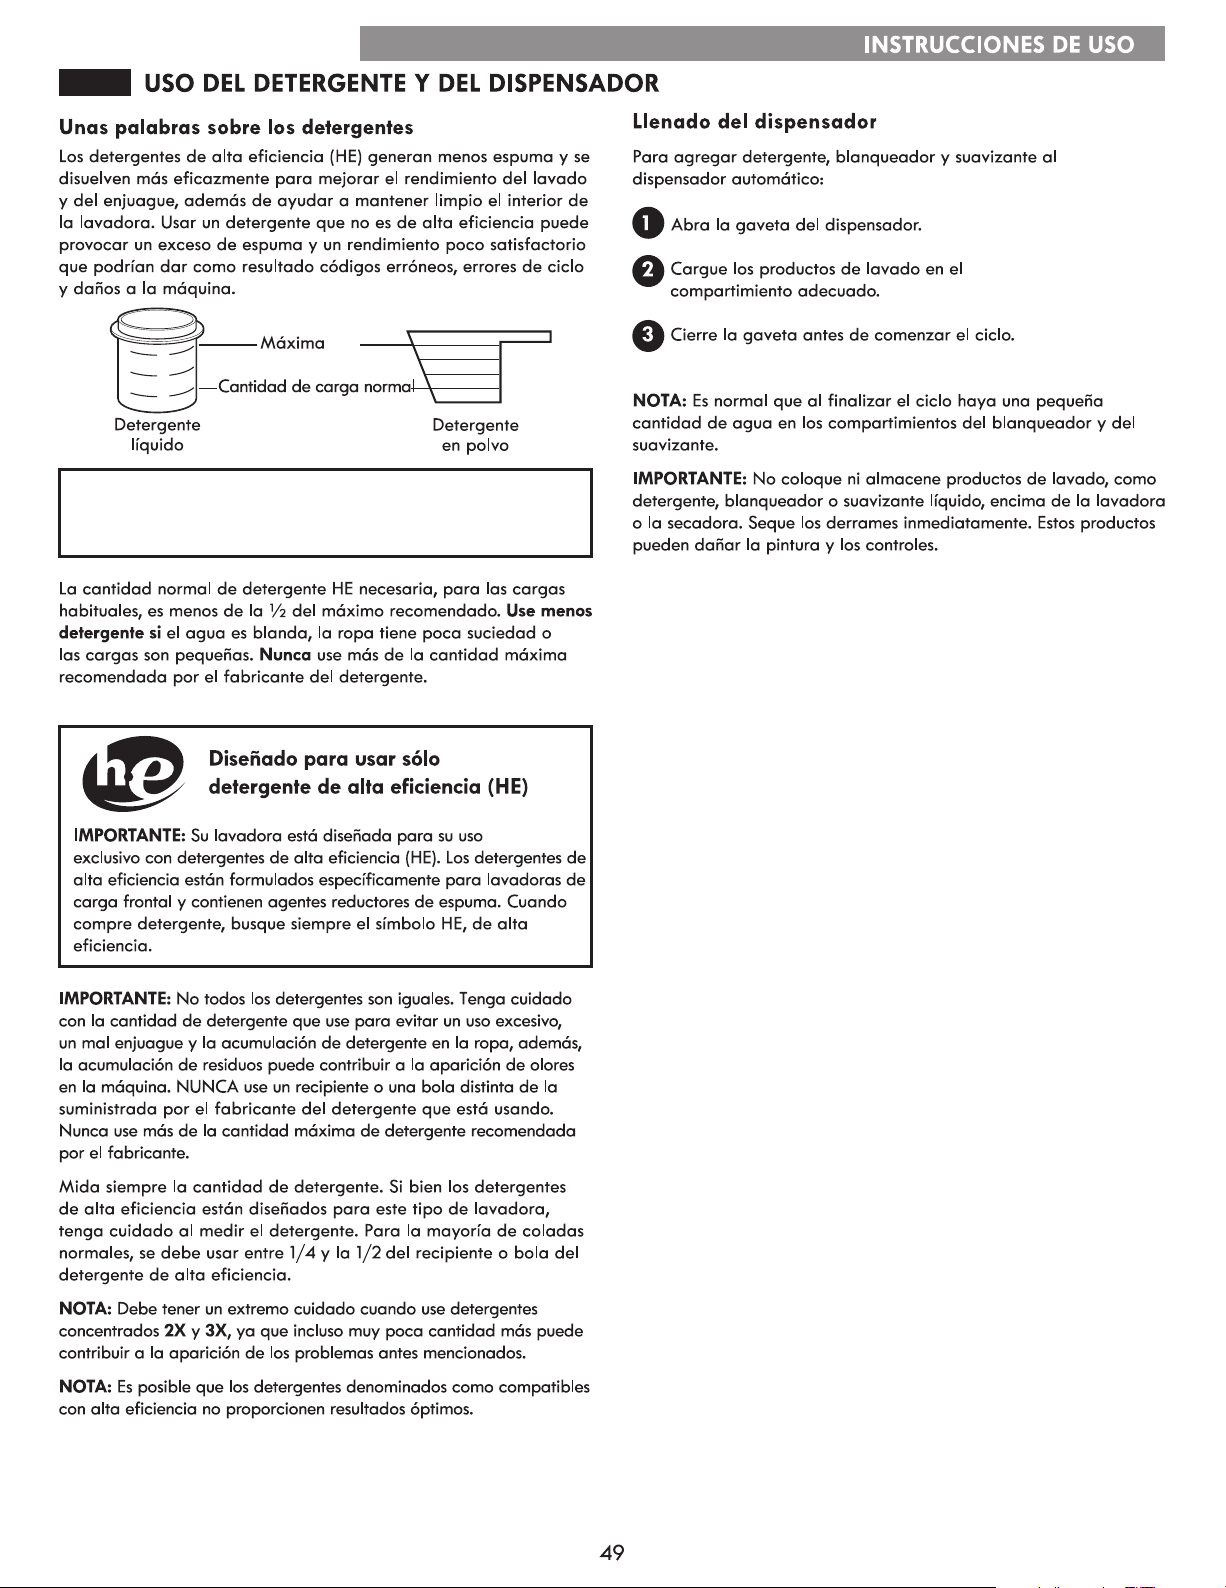
Para un rendimiento adecuado del lavado, mida siempre
el detergente usando el dispositivo de medición que
proporciona el fabricante del detergente.
SPIN SPEED (VELOCIDAD DE CENTRIFUGADO)
SOIL LEVEL (NIVEL DE SUCIEDAD)
CHIME (AVISO SONORO)
ENERGY SAVER
1 hora,
STEAM TREAT.
La opción Accela Wash utiliza doble rocío de agua
e inyección de detergente, lo que reduce el tiempo
del ciclo, manteniendo el rendimiento del lavado
cuando se lo agrega a un ciclo.
tres
(ENJUAGUE EXTRA)
DRUM LIGHT (ILUMINACIÓN DE LA TINA)
STEAM TREAT (AÑADIR VAPOR)
Use esta funcion para anadir prendas o retirar objetos
extranos como monedas o llaves despues de haberse
iniciado el ciclo.
NOTA:
• Despues de verificar las condiciones del nivel o temperatura del
agua por seguridad, la puerta unicamente se libera cuando se
ha detenido el movimiento. (El indicador LED “Door Lock”
(Bloqueo de la puerta) se apaga).
- Esto podria llevar varios segundos dependiendo del nivel del
agua. Cuando hay mucha agua en la tina, la puerta solo se
libera despues de haberse drenado el agua a un nivel seguro.
- Si la temperatura en la tina es superior a 113°F (45°C), suena
un aviso acustico y la funcion ADD GARMENTS (AÑADIR
PRENDAS) NO esta disponible por seguridad.
• ADD GARMENTS (AÑADIR PRENDAS) esta desactivado durante
el ciclo TUB CLEAN (LIMPIEZA DE LA TINA) por seguridad.
• Para preservar el rendimiento de lavado, el tiempo de lavado
podria extenderse dependiendo de cuando se anadieron las
prendas al ciclo.
ADVER TENCIA:
• Tenga cuidado al abrir la puerta ya que la ropa mojada podria
gotear o caerse al abrir la puerta.
• No intente abrir la puerta por la fuerza cuando este bloqueada.
Hacerlo podria danar el aparato, ocasionar mal funcionamiento
o lesiones personales.
• Asegurese de que el area alrededor de la junta de la puerta este
libre antes de cerrar la puerta. Si la ropa queda atrapada entre
la puerta y la junta, esto podria danar la junta de goma y ello
podria producir fugas.
Presione ADD GARMENTS. El ciclo se pausa y se libera la puerta.
Abra la puerta, anada prendas o retire los objetos extranos y cierre
la puerta.
Presione START/PAUSE para reiniciar el ciclo. El ciclo continua
automaticamente.
CONTROL LOCK (BLOQUEO DE LOS CONTROLES)
CLEAN WASHER (LIMPIAR LAVADORA)
ENERGY SAVER (AHORRAR ENERGÍA)
ADD GARMENTS (AÑADIR PRENDAS)
Utilice esta opción para deshabilitar los
controles. La lavadora sólo se puede bloquear
durante un ciclo. Esta función impide que los
niños cambien los ciclos o manejen la máquine.
Una vez activada, los controles permanecen
bloqueados y es necesario DESACTIVAR el bloqueo de los controles
antes de poder utilizar los controles nuevamente. Una vez apagada
la lavadora, el botón de alimentación permitirá prender la máquina,
pero los controles continuarán bloqueados. Si los controles están
bloqueados, se iluminará el LED de CONTROL LOCK y en la pantalla
se alternarán las letras “CL” con el tiempo del ciclo estimado.
Mantenga presionado el botón CHIME por tres sugundos para activar
o desactivar los controles.
tres
STEAM TREAT (AÑADIR VAPOR)
Encienda la lavadora y mantenga presionado el botón
ACCELA WASH durante tres segundos. La selección de
cualquier otro ciclo después de haber seleccionado.
ENCIENDA la lavadora y mantenga presionado el botón
ACCELA WASH durante tres segundos y el indicador LED de
tratamiento de manchas parpadeará. La selección de cualquier
otro ciclo después de haber seleccionado CLEAN WASHER
hará que el ciclo CLEAN WASHER sea cancelado.
IMPORTANTE: SÓLO use las mangueras de entrada nuevas, de
alta calidad al instalar este producto de lavandería. Las
mangueras comerciales no tienen garantía de que se ajusten o
funcionen correctamente. Otras mangueras puede que no se
aprieten correctamente y ocasionen fugas. Los daños
subsiguientes a los productos o la propiedad no quedarán
cubiertos de acuerdo con los términos de la garantía del producto.

Si experimenta problemas con la lavadora, llame en los
EE.UU. 1-844-553-6667, y llame en Canadá 1-800-469-
4663. Sólo utilice el Diagnóstico cuando se lo pida el
equipo de Diagnóstico. Los sonidos de transmisión que
oirá son normales y suenan de forma parecida a un
equipo de fax.
Diagnóstico no se puede activar a menos que
la lavadora se encienda pulsado el botón POWER.
Si la lavadora no se puede encender, la solución de
problemas deberá llevarse a cabo sin utilizar
Diagnóstico.
En primer lugar, llame al 1-844-553-6667 (EE. UU.) o 1-800-469-4663 (Canadá). Si el número del teléfono que está
utilizando está en el archivo, y se asocia con la lavadora, usted será retransmitido rapidamente a un agente del
equipo de Diagnóstico. Siga las instrucciones del técnico y realice los pasos siguientes solo cuando se lo solicite el
agente del equipo de Diagnóstico.
Diagnóstico. Así podrá hablar
Uso del Diagnóstico
DIAGNÓSTICO