Loading ...
About the Hold Settings
InHoldmode,thethermostatwillnotchangethedesiredtemperaturesettings
by program schedule or remote system.
Modifying the Program Schedule
To changetheholdsetting,press[HOLD].Whenrstpressed,theHold
Setting Screen is displayed:
HOLD
Turn the Scroll Wheel to scroll through the list of hold settings.
PresstheScrollWheelor[Select]toselectthehighlightedsetting.
Press[Cancel]todiscardchangesandreturntotheHomePage.
Cancel SelectVacation
On
Off
Hold
Turn the Scroll Wheel
to adjust the desired
HeatSettingsthatthe
thermostat will maintain
for the selected period on
the respective day.
WhenthedesiredHeat
Setting is displayed for
the selected period,
press the Scroll Wheel
to highlight the Cool
temperature setting.
Turn the Scroll Wheel to
adjust the desired Cool
Settings.
Turn the Scroll Wheel to highlight
RuntimeGraph.
PresstheScrollWheelor[Select]
to view the runtime graph of air
conditioning and heating usage
overthepast4weeks.
Turn the Scroll Wheel
to adjust the desired
Cool Settings that the
thermostat will maintain
for the selected period on
the respective day.
When the desired Cool
Setting is displayed for
the selected period,
press the Scroll Wheel
to highlight the time for
thenextperiodonthe
respective day.
• InHoldOffmode,thethermostatrespondstoprogramscheduleand
remote system temperature setting changes.
• InHoldOnmode,thethermostatignoresprogramscheduleandremote
system temperature setting changes.
• InHoldVacationmode,thethermostatignoresprogramscheduleand
remote system temperature setting changes for the duration of your
scheduled time away.
WhenHoldVacationisselected,youarepromptedforheatandcoolsettings
and the number of days that it will hold those settings.
Cancel Ok Next
Hold Cool Setting :
And Heat Setting :
For :
82
63
4.5 Days
VACATION HOLD TIME
Turn the Scroll Wheel to adjust the desired Cool Settings that the
thermostat will maintain while you are on vacation.
PresstheScrollWheelor[Next]tohighlighttheheatsetting.
Tu r n theScrollWheeltoadjustthedesiredHeatSettingsthatthe
thermostat will maintain while you are on vacation.
PresstheScrollWheelor[Next]tohighlightthedayssetting.
Tu r n theScrollWheeltoselectthenumberofdays(inhalfday
increments)thatthedesiredtemperaturesettingswillremainbefore
Holdisturnedoffandthethermostatreturnstonormaloperation
When temperature settings and number of days have been set,
press[Ok]toactivetheHoldsettings.
Press[Cancel]todiscardchangesandreturntotheHomePage.
Setting the Time and Date
To setorchangethecurrenttimeanddate,pressandhold[MODE]for5seconds:
Cancel Ok Next
01:22pm
TIME
03-14-08
DATE
1. Set the current hour
2. Set the current minutes
3. SetAMorPM
4. Set the month
5. Set the day
6. Set the year
Turn the Scroll Wheel to adjust each item for the time and date.
Aftereachitemisset,presstheScrollWheelor[Next]toadjustthe
nextitem.
Afterthetimeanddatehasbeenset,press[Ok]tosaveittomemory.
Press[Cancel]todiscardchanges.
Tu r n theScrollWheeltohighlightthedesiredday(s).
PresstheScrollWheeltochecktheboxnexttotheday(s)inwhich
the current schedule will be used.
Whenthedesireddayshavebeenselected,press[Ok]tosavethe
schedule tor each of the checked days.
Press[Cancel]todiscardchanges.
Turn the Scroll Wheel to adjust the time for the selected period on
the respective day. This is the time in which the selected period
starts and the previous period ends.
Modifying the Program Schedule
Your new thermostat has been preprogrammed with energy saving settings.
Yo u maymodifythetimesandtemperaturesettingstomaximizeenergysavings
and comfort based on your lifestyle.
Your thermostat may be programmed to adjust the heating and cooling
temperaturesettingsupto4timesperday,withdifferenttimesandtemperature
settingsforeverydayoftheweek(Monday–Sunday).Yo u mayalsomodify
the schedule for a day, and then copy that schedule to other days. This is
especiallybenecialifyouhavethesamescheduleonweekdays.Yo u can
modify a single day’s schedule and then copy it to the remaining weekdays.
Program
Humidity
Setup
Back Select
MAIN MENU
Select Program by pressing the Scroll Wheel to view or change the
time schedule for each day of the week.
To modifytheexistingprogramschedule,presstheScroll
WheeloncetodisplaytheMainMenu.
MAIN MENU
When the desired time is displayed for the selected period,
presstheScrollWheeltohighlighttheHeattemperaturesetting
for the selected period on the respective day.
Monday
Tuesday
Wednesday
Back Select
PROGRAM
Turn the Scroll Wheel to highlight the day of week
PresstheScrollWheelor[Select]toviewthetimescheduleforthe
highlighted day.
Morning
TIME
6:00AM
Day
Evening
Night
8:00AM
6:00PM
10:00PM
HEAT
70
62
70
62
COOL
78
85
78
82
OkCancel Copy
Monday
• Thetimeisincreasedand
decreasedin15minuteincrements.
• Todisableaperiod,setitandthe
nextperiodtothesametime.
Morning
TIME
6:00AM
Day
Evening
Night
8:00AM
6:00PM
10:00PM
HEAT
70
62
70
62
COOL
78
85
78
82
OkCancel Copy
Monday
Morning
TIME
6:00AM
Day
Evening
Night
8:00AM
6:00PM
10:00PM
HEAT
70
62
70
62
COOL
78
85
78
82
OkCancel Copy
Monday
Morning
TIME
6:00AM
Day
Evening
Night
8:00AM
6:00PM
10:00PM
HEAT
70
62
70
62
COOL
78
85
78
82
OkCancel Copy
Monday
Monday
Tuesday
Wednesday
OkCancel
COPY TO DAYS:
X
Program
Humidity
Setup
Back Select
MAIN MENU
Humidity
Setup
Runtime Graph
Back Select
MAIN MENU
Hours
Week
s0
123
43
35
26
22
SYSTEM RUNTIME
Humidity Setpoint:
Dehumidity Setpoint:
25 %RH
55 %RH
Ok NextCancel
HUMIDITY TARGETS
The4timeperiodsforeachdayoftheweekareasfollows:
MORNING
This is the time in which you typically awaken in the morning,
along the desired temperature settings that will remain until
you leave your home for the day.
DAY
This is the time in which you leave your home for the day,
along with the desired temperature settings that will remain
until you return home in the evening.
EVENING
This is the time in which you return home in the evening, along
with the desired temperature settings that will remain until you
go to bed at night.
NIGHT
This is the time in which you go to bed at night, along with the
desired temperature settings that will remain until you awake
thenextmorning.
When the schedule
for each period of
the respective day is
complete,press[Ok]to
save the changes.
When the schedule
for each period of
the respective day is
complete,press[Copy]
to save the changes and
copy the schedule to other
days in the week.
Press[Cancel]todiscard
changes.
Makeanydesiredmodicationsforthe
selected period.
Notes:
• Atanytime,youcanundochangesmadetothecurrentscheduleonthe
respectivedaybypressing[Cancel].
- Select a day from the list of days and modify the program schedule for
that day, OR
- Press[Back]twice,toreturntotheHomeScreen
• Whenallofthemodicationsarecomplete,youcansavetheschedulefor
therespectivedaybypressing[Ok].
- Select a different day from the list of days and modify the program
schedule for that day, OR
- Press[Back]twice,toreturntotheHomeScreen
• Whenallofthemodicationsarecomplete,youcansaveandcopythe
schedule for the respective day to any of the other days in a week by
pressing[Copy].
Copying a Time Schedule to other Days
You may copy the program schedule from any given day, and copy it to any
otherday(s)inaweek.Aftertheschedulefortherespectivedayhasbeen
completed,press[Copy].
To change the desired humidity settings, press the Scroll Wheel
oncetodisplaytheMainMenu.
MAIN MENU
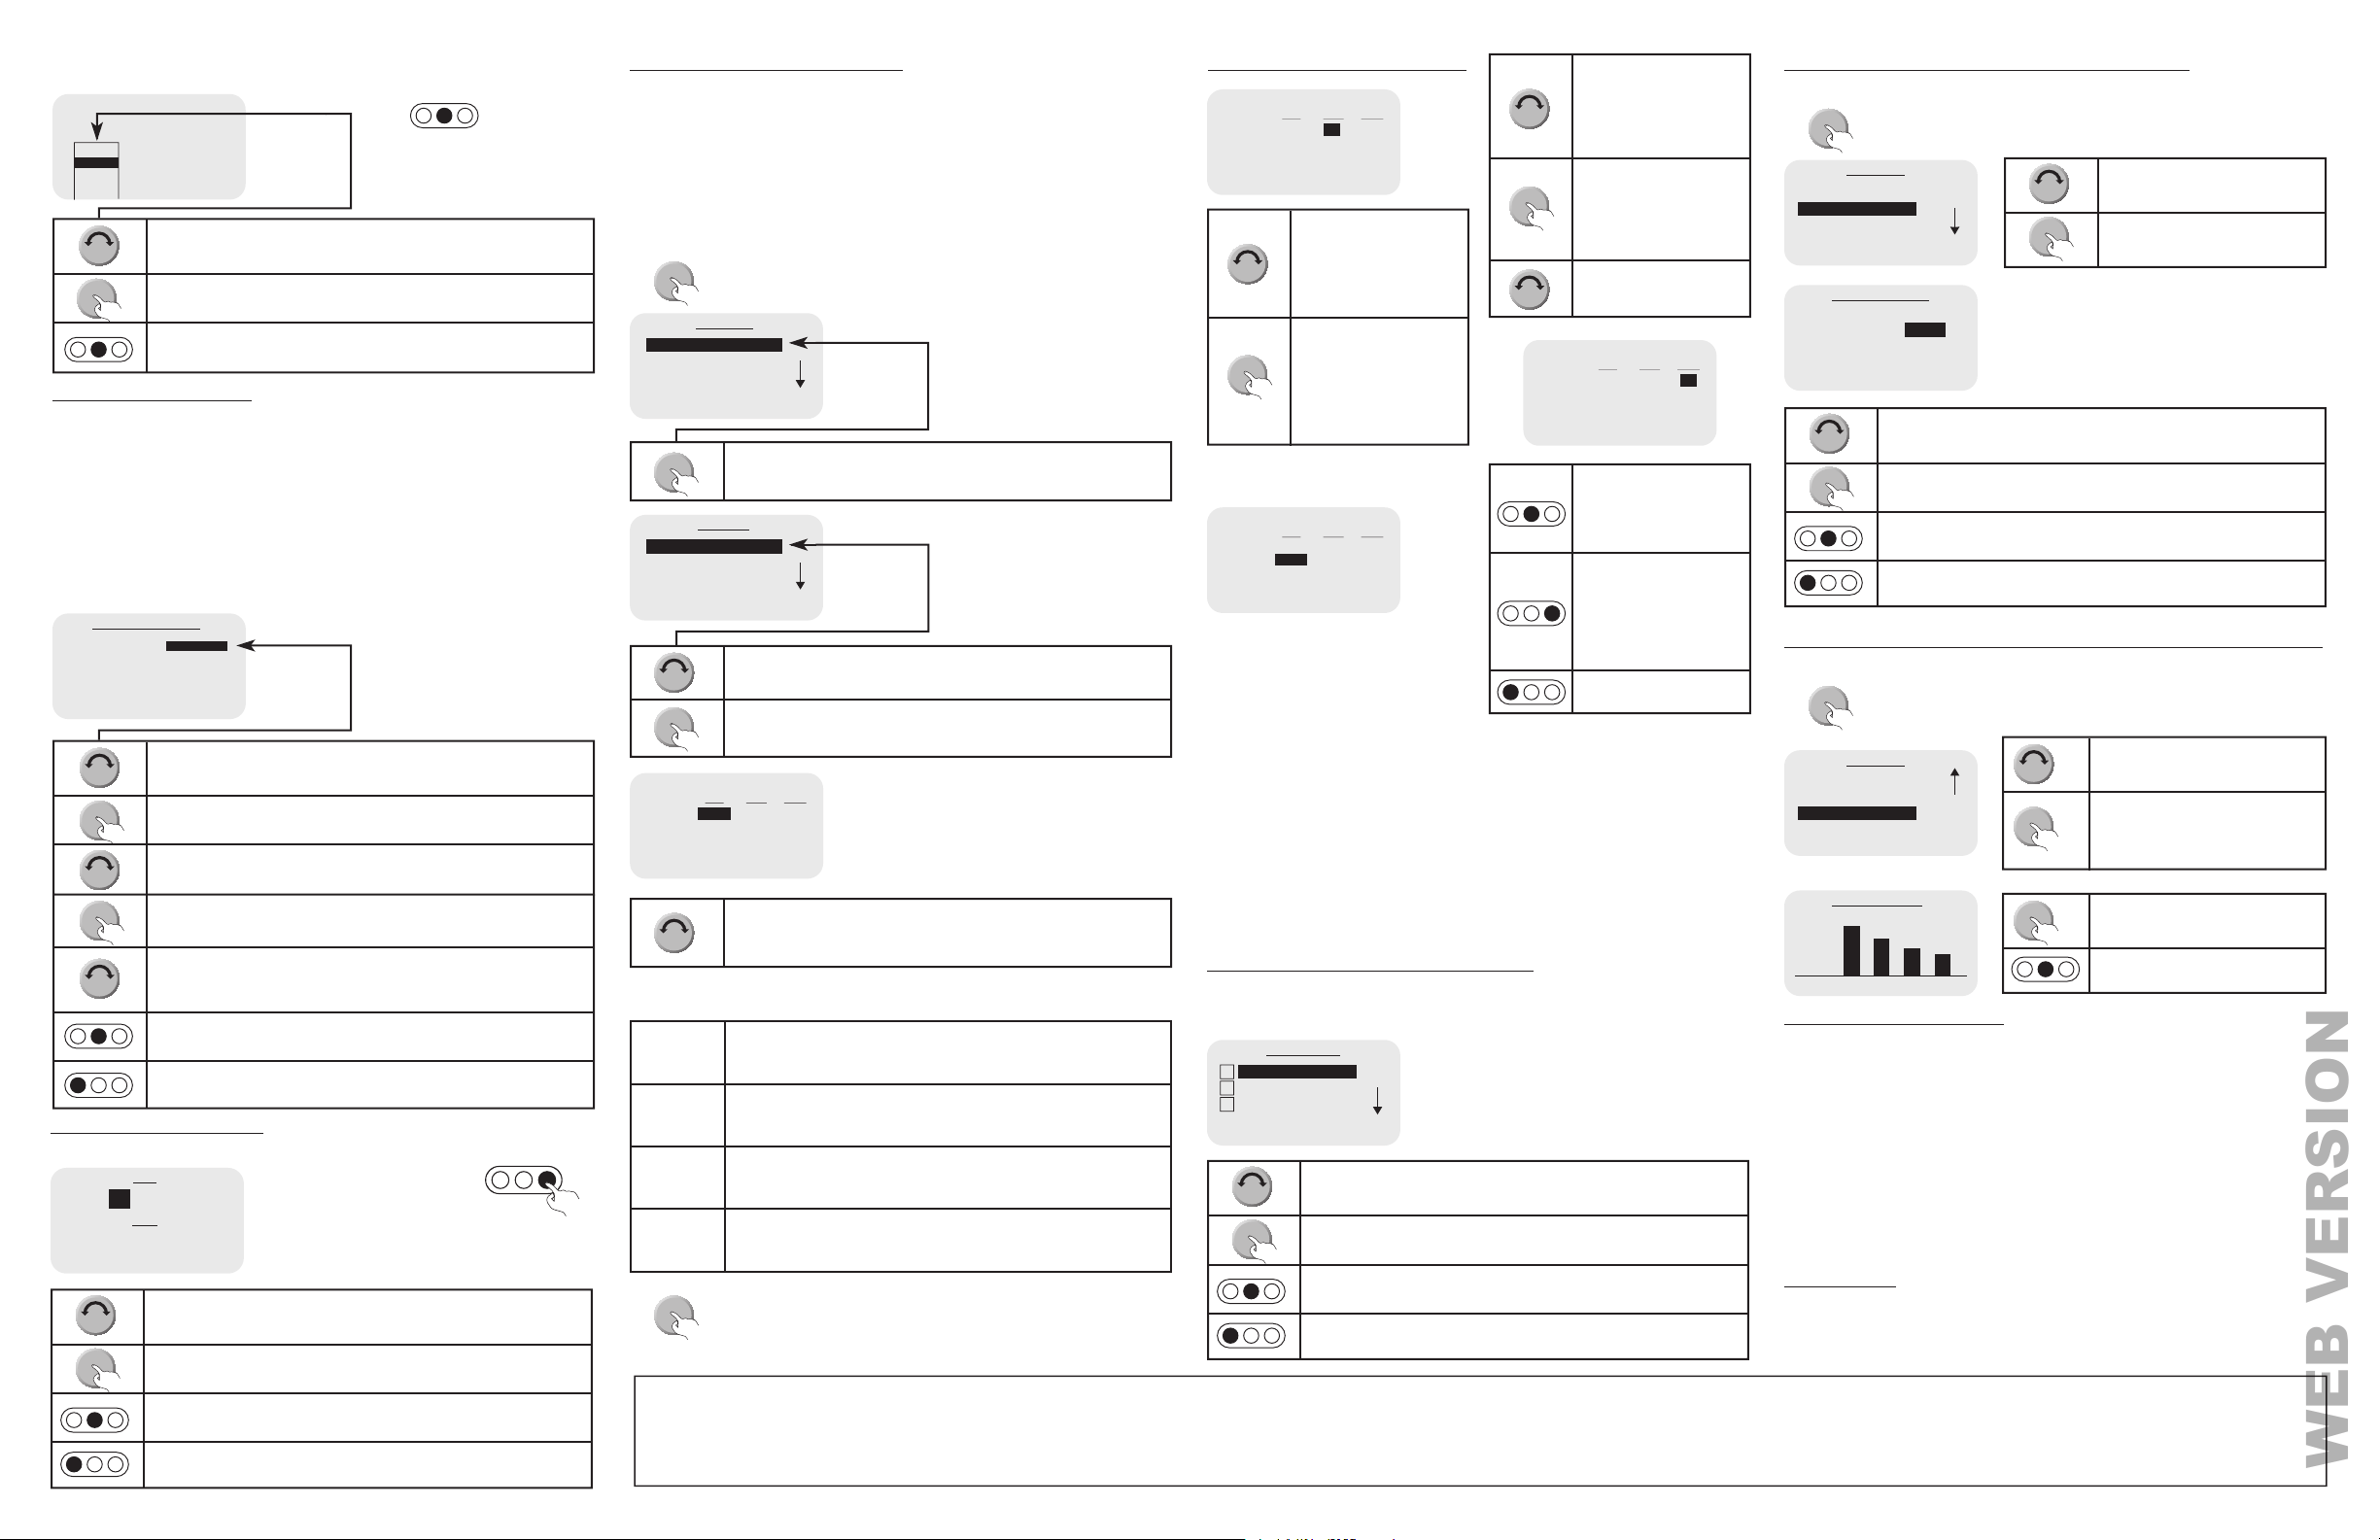
To view a System Runtime graph of air conditioning and
heatingusageoverthepast4weeks, presstheScrollWheel
oncetodisplaytheMainMenu.
MAIN MENU
Changing the desired humidity setting (RC-2000)
Display the Runtime Graph of Air Conditioning and Heating Usage
Turn the Scroll Wheel to highlight
Humidity.
PresstheScrollWheelor[Select]
to view the humidity settings.
Turn the Scroll Wheel to adjust the desired humidity and dehumidify
setting.
PresstheScrollWheelor[Next]toswitchbetweenthehumidityand
dehumidify setpoints.
Whenhumiditysettingshavebeenset,press[Ok]andthen[Back]to
returntotheHomePage.
Press[Cancel]twotimes,todiscardchangesandreturntotheHome
Page.
SystemRuntimeBarGraph0-3: This area displays the bar values and hours
thattheairconditioningand/orheatingsystemoperatedinthecurrentweek
(Week0)andinthethreepreviousweeks(Weeks1-3),respectively.
Press the Scroll Wheel to return to
theMainMenu.
Press[Back]toreturntotheHome
Page.
FCC Compliance
This equipment has been tested and found to comply with the limits for a Class B digital device, pursuant
topart15oftheFCCRules.Theselimitsaredesignedtoprovidereasonableprotectionagainstharmful
interference in a residential installation. This equipment generates, uses and can radiate radio frequency
energy and, if not installed and used in accordance with the instructions, may cause harmful interference
toradiocommunications.However,thereisnoguaranteethatinterferencewillnotoccurinaparticular
installation. If this equipment does cause harmful interference to radio or television reception, which
can be determined by turning the equipment off and on, the user is encouraged to try to correct the
interference by one or more of the following measures:
•Reorientorrelocatethereceivingantenna.
•Increasetheseparationbetweentheequipmentandreceiver.
•Connecttheequipmentintoanoutletonacircuitdifferentfromthattowhichthereceiverisconnected.
•Consultthedealeroranexperiencedradio/TVtechnicianforhelp.
For Technical Assistance Call: 800-824-3005 - www.leviton.com
©2013LevitonMfg.Co.,Inc.
FOR CANADA ONLY
Forwarrantyinformationand/orproductreturns,residentsofCanadashouldcontactLevitoninwritingat
Leviton Manufacturing of Canada Ltd to the attention of the Quality Assurance Department, 165
Hymus Blvd, Pointe-Claire (Quebec), Canada H9R 1E9 or by telephone at 1 800 405-5320.
PK-93329-10-A0-0A
AR2213
LEVITON LIMITED WARRANTY
Levitonwarrants to the original consumer purchaser and not for the benet of anyone else that products manufactured by Leviton under the Leviton brand name (“Product”) will be free from defects in material and workmanship for the time periodsindicated below, whichever is shorter: • OmniPro II and Lumina
Pro: three (3) years from installation or 42 months from manufacturedate. • OmniLT, Omni IIe, and Lumina: two (2) years from installation or 30 months from manufacture date. • Thermostats, Accessories: two (2) years from installation or 30 months from manufacturedate. • Batteries: Rechargeable batteries
in products are warranted for ninety (90) days from date of purchase. Note: Primary (non-rechargeable) batteries shipped in products are not warranted. Products with Windows
®
Operating Systems: During the warranty period, Leviton will restore corrupted operating systems to factory default at no charge,
provided that the product has been used as originallyintended.Installation of non-Leviton software or modication of the operating system voids this warranty.Leviton’s obligation under this LimitedWarrantyis limited to the repair or replacement, at Leviton’s option, of Product that fails due to defect in material or
workmanship. Leviton reserves the right to replace product under this Limited Warranty with new or remanufactured product. Leviton will not be responsible for labor costs of removal or reinstallation of Product. The repaired or replaced product is then warranted under the terms of this Limited Warranty
for the remainder of the Limited Warrantytime period or ninety (90) days, whichever is longer.This LimitedWarranty does not cover PC-based software products. Leviton is not responsible for conditions or applications beyond Leviton’s control. Leviton is not responsible for issues related to improper
installation, including failure to follow written Installation and operation instructions, normal wear and tear, catastrophe, fault or negligence of the user or other problems external to the Product. To view complete warranty and instructions for returning product, please visit us at www.leviton.com.
Usehereinofthirdpartytrademarks,servicemarks,tradenames,brandnamesand/or
productnamesareforinformationalpurposesonly,are/maybethetrademarksoftheir
respectiveowners;suchuseisnotmeanttoimplyafliation,sponsorship,orendorsement.
WEB VERSION