

CDI 5015
DISHW
ASHER
User instr
uctions
EN
ZH
使用说明书
洗碗机


3
Congratulations!
Thank you for choosing a Candy
appliance; quality dishwashers which
guarantee high performance and
reliability.
Candy manufacture a vast range
of domestic appliances: washing
machines, washer/dryers, cookers,
microwave ovens, ovens and hobs,
refrigerators and freezers.
Ask your dealer for the catalogue with
the complete range of Candy products.
Please read this booklet carefully as
it provides important information
regarding the safe installation, use,
and maintenance of the machine,
together with some useful advice on
how to achieve the best results from
your dishwasher.
For future reference please keep this
instruction booklet in a safe place.
GUARANTEE
This appliance is supplied with a
guarantee certificate which allows free
use of Technical Assistance Service.
Please retain your purchase receipt.
This should be kept in a safe place and
preserved to the engineer if a service
call is required.
4
CONTENTS
Safety advice
Setting up, installation
W
ater softener unit
Loading the salt
Adjusting the upper basket
Loading the dishes
Information for test laboratories
Loading the detergent
Types of detergent
Loading the rinse aid
Cleaning the filters
Some practical hints
Routine cleaning and maintenance
Description of the control panel
Technical data
Programme selection and special functions
Programme guide
Waterblock
Identifying minor faults
pag. 5
pag. 6
pag. 9
pag. 10
pag. 11
pag. 12
pag. 14
pag. 15
pag. 16
pag. 17
pag. 18
pag. 19
pag. 20
pag. 21
pag. 21
pag. 22
pag. 26
pag. 28
pag. 29
Please read the instructions in this booklet carefully because they contain important
information on how to install, use and maintain your dishwasher safely as well as
containing useful tips on how to make the most of it.
Keep this booklet safe for future reference.
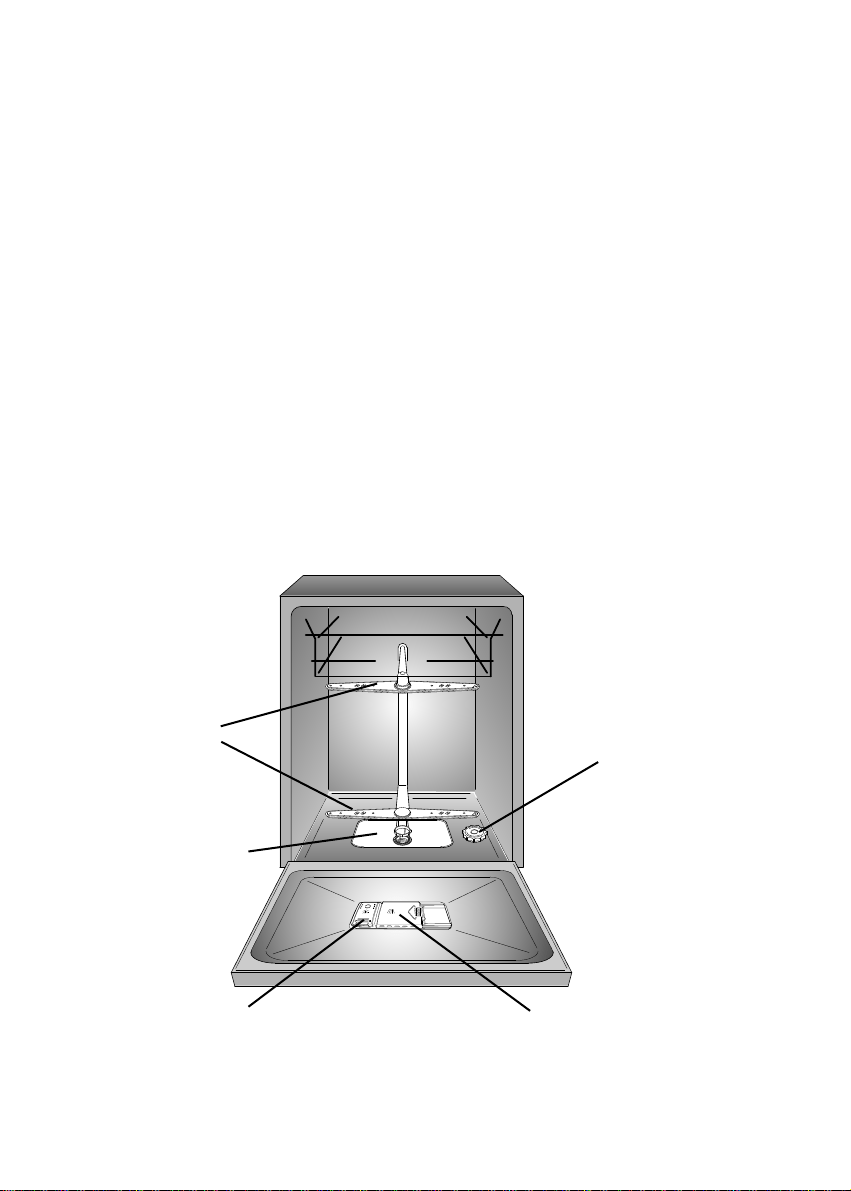
Fig. A
3
2
1
4
5

5
SAFETY INSTRUCTIONS
There are certain basic safety rules
which are valid for any domestic
appliance.
Installation
■ Make sure that the plug fitted to the
machine is compatible with the power
supply socket. If it is not, get a suitably
qualified person to fit the correct type,
and to make sure that the cables to the
mains socket are able to cope with the
power rating of the appliance.
■ Ensure that the dishwasher does not
crush power cables.
■ In general it is not advisable to use
adaptors, multiple plugs and/or extension
cables.
■ Should it be necessary to replace the
supply cord, call the After Sales Service
Centre.
Safety
■ Never touch the appliance when your
hands or feet are wet or damp.
■ Do not use when your feet are bare.
■ Do not remove the plug from the mains
supply socket by pulling the mains cable
or the machine itself.
■ Do not leave the appliance exposed to
the elements (rain, sun etc).
■ This appliance is not intended for use by
persons (including children) with reduced
physical, sensory or mental capabilities,
or lack of experience and knowledge,
unless they have been given supervision
or instruction concerning use of the
appliance by a person responsible for
their safety.
Children should be supervised to ensure
that they do not play with the appliance.
■ Water left in the machine or on the
dishes at the end of the wash programme
should not be swallowed.
■ The door should not be left in the open
position since this could present a potential
hazard ( es. tripping ).
■ Leaning or sitting on the open door of
the dishwasher could cause it to tip over.
WARNING !
Knives and other utensils with sharp
points must be loaded in the basket
with their points down or placed in a
horizontal position.
Daily use
■ This appliances is intended to be used in
household and similar applications such
as:
- staff kitchen areas in shops, offices
and other working environments;
- farm houses;
- by clients in hotels, motels and other
residential type environments;
- bed and breakfast type environments.
A different use of this appliance from
household environment or from typical
housekeeping functions, as commercial
use by expert or trained users, is excluded
even in the above applications.
If the appliance is used in a manner
inconsistent with this it may reduce the
life of the appliance and may void the
manufacturer’s warranty.
Any damage to the appliance or other
damage or loss arising through use that is
not consistent with domestic or household
use (even if located in a domestic or
household environment) shall not be
accepted by the manufacturer to the fullest
extent permitted by law.
■ The dishwasher is designed for normal
kitchen utensils.
Objects that have been contamined by
petrol, paint, traces of steel or iron,
corrosive chemicals, acids or alkalis
must not be washed in the dishwasher.
■ If there is a water softening device installed
in the home there is no need to add
salt to the water softener fitted in the
dishwasher.
6
■ Cutlery is washed best if it is placed in
the basket with the handles downwards.
■ If the appliance breaks down or stops
working properly, switch it off, turn off the
water supply and do not tamper with it.
Repair work should only be carried out
by an approved service agent and only
genuine spare parts should be fitted. Any
failure to follow the above advice may
have serious consequences for the safety
of the appliance.
Disposal
■ The dishwasher has been made from
materials which can be recycled so that it
can be disposed of in an environmentally
friendly way.
■ If you wish to dispose of an old dishwasher
be careful to remove the door to
eliminate the risk of children becoming
trapped inside it.
INSTALLATION
(Technical notes)
IMPORTANT
When the appliance is located on a
carpet floor, attention must be paid to
ensure that there is no obstruction to
the bottom vents.
Make sure that the plug on the
appliance remains accessible after
installation.
Electrical connection
This appliance complies with international
safety standards, and is fitted with a 3 pin
plug with earth connection to ensure
complete earthing of the product.
Before connecting the appliance to the
mains supply it is important to ensure:
1. that the supply socket is properly
earthed;
2. that your electricity supply is capable of
meeting the consumption requirements
listed on the rating plate of your
appliance.
WARNING!
Ensure that your product is properly
earthed.
In the absence of adequate earthing
you will notice that when touching
the metal parts of your appliance an
electrical dispersion can be felt, due
to the presence of a radio interference
suppressor.
Manufacturer declines all responsibility
for any damage due to non-earthing of
the machine.
Appliance complies with
European Directives 73/23/EEC
and 89/336/EEC, replaced by
2006/95/EC and 2004/108/EC, and
subsequent amendments.
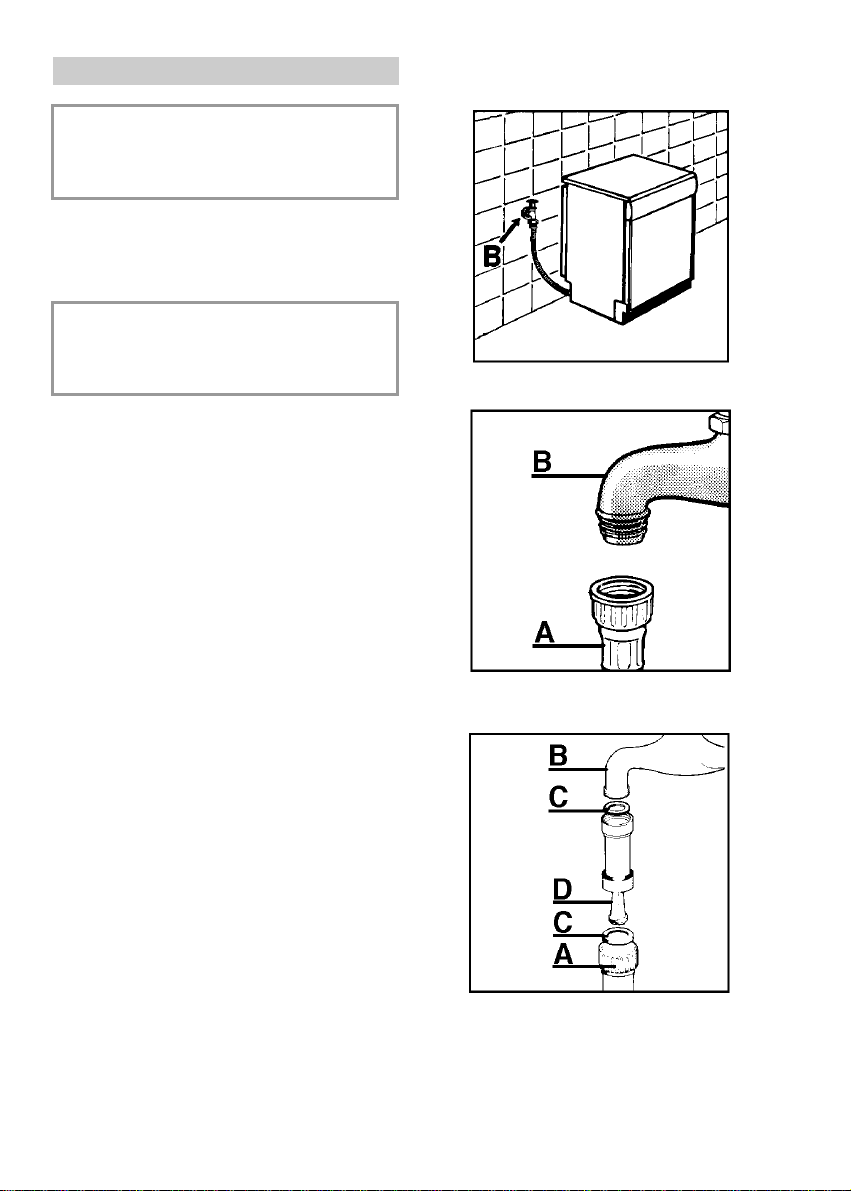
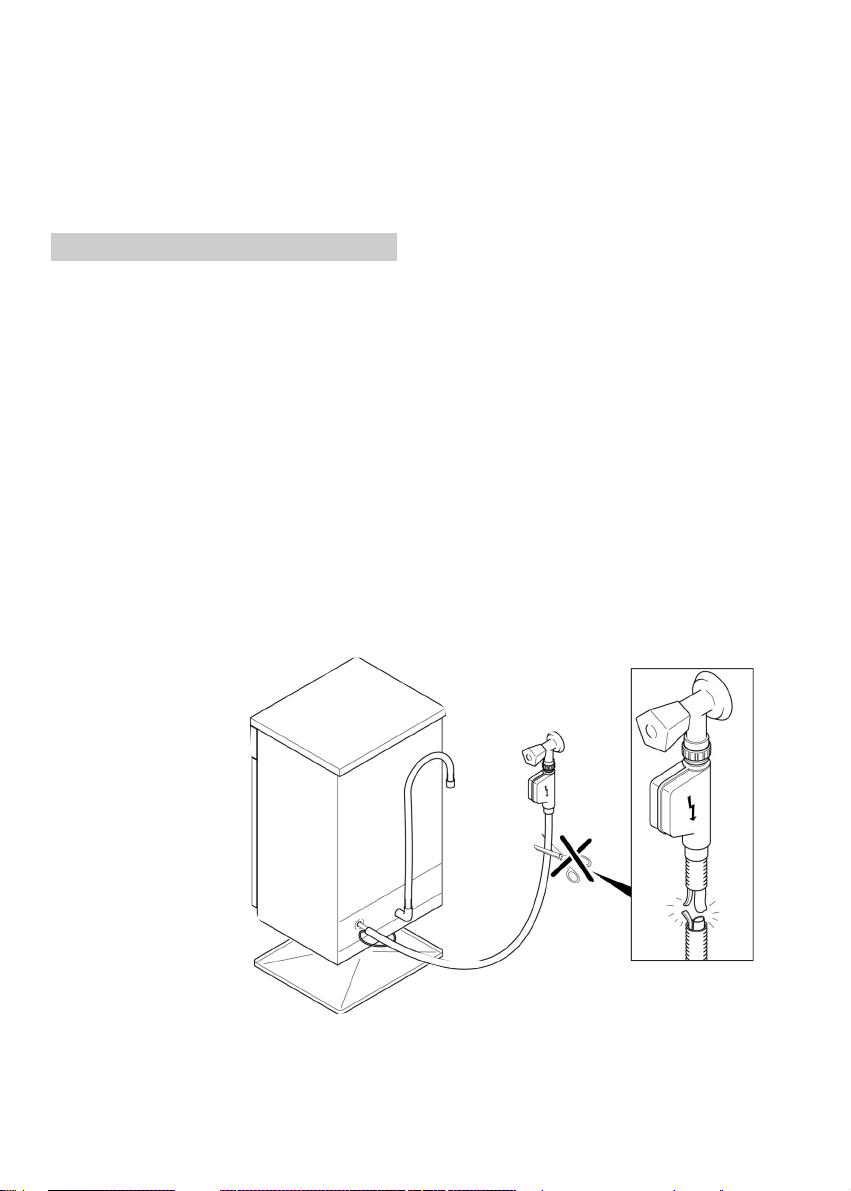
Water connection
IMPORTANT
The appliance must be connected to
the water mains using new hose-sets.
The old hose-sets should not be reused.
■ The inlet and drain hoses can be directed
to left or right.
IMPORTANT
The dishwasher can be connected to
either cold or hot water, as long as it
is no hotter than 60 °C.
■ Water pressure must be between
0,08 MPa and 0,8 MPa. If the pressure is
below the minimum consult our service
department for advice.
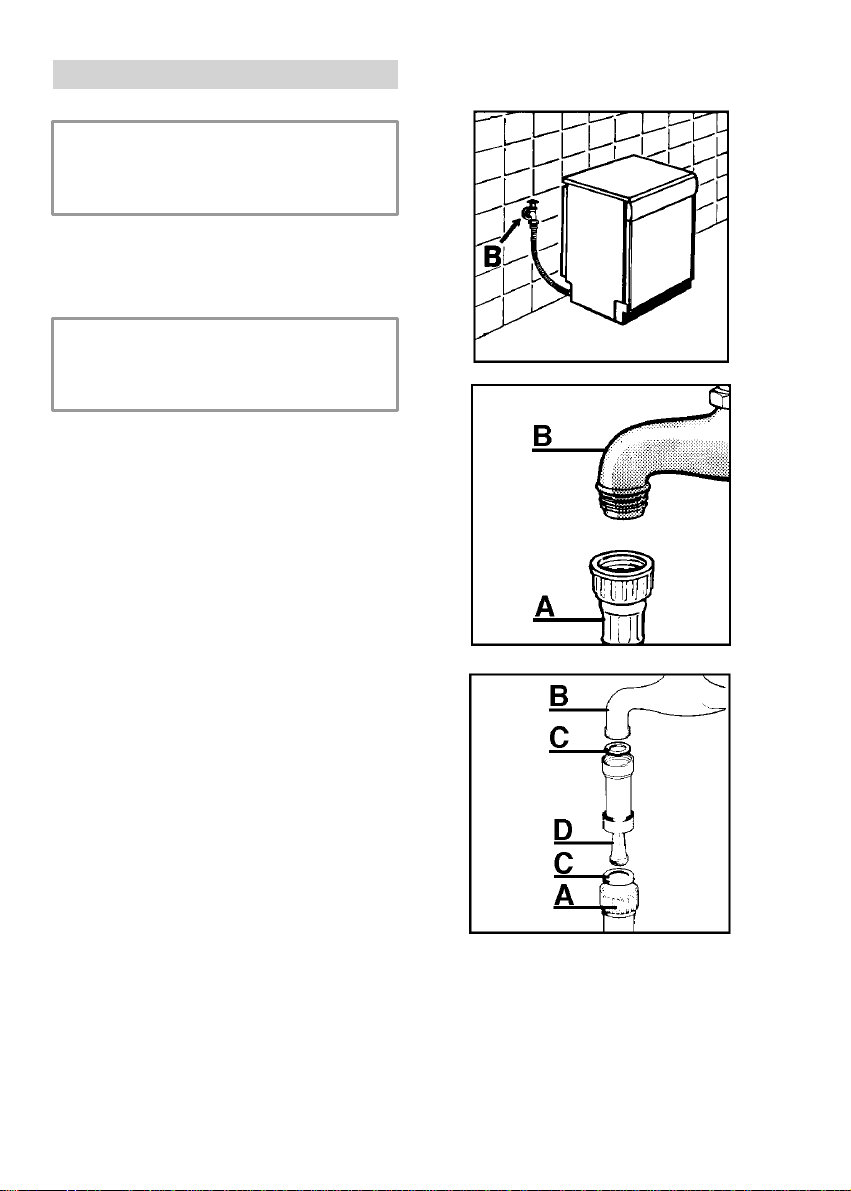
■ The inlet hose must be connected to a
tap so that the water supply can be cut
off when the machine is not in use
(fig. 1 B).
■ The dishwasher is fitted with 3/4" threaded
connector (fig. 2).
■ Connect inlet hose “A” to water tap “B”
with a 3/4" attachment making sure that
it has been properly tightened.
■ If it is necessary, the inlet pipe can be
lengthened up to 2,5 m. The extension
pipe is available from the After Sales
Service Centre.
■ If limescale deposits or sand are present
in the water, it is advisable to obtain the
appropriate filter, art. 9226085, from the
After Sales Service Centre (fig. 3). The
filter “D” must be inserted between the tap
“B” and the inlet hose “A”, remembering
to fit the washer “C”.
■ If the dishwasher is connected to new
pipes or to pipes which have not been in
use for a long time run water through for
a few minutes before connecting the
inlet hose. In this way no deposits of
sand or rust will clog up the water inflow
filter.
1
2
3
7
8
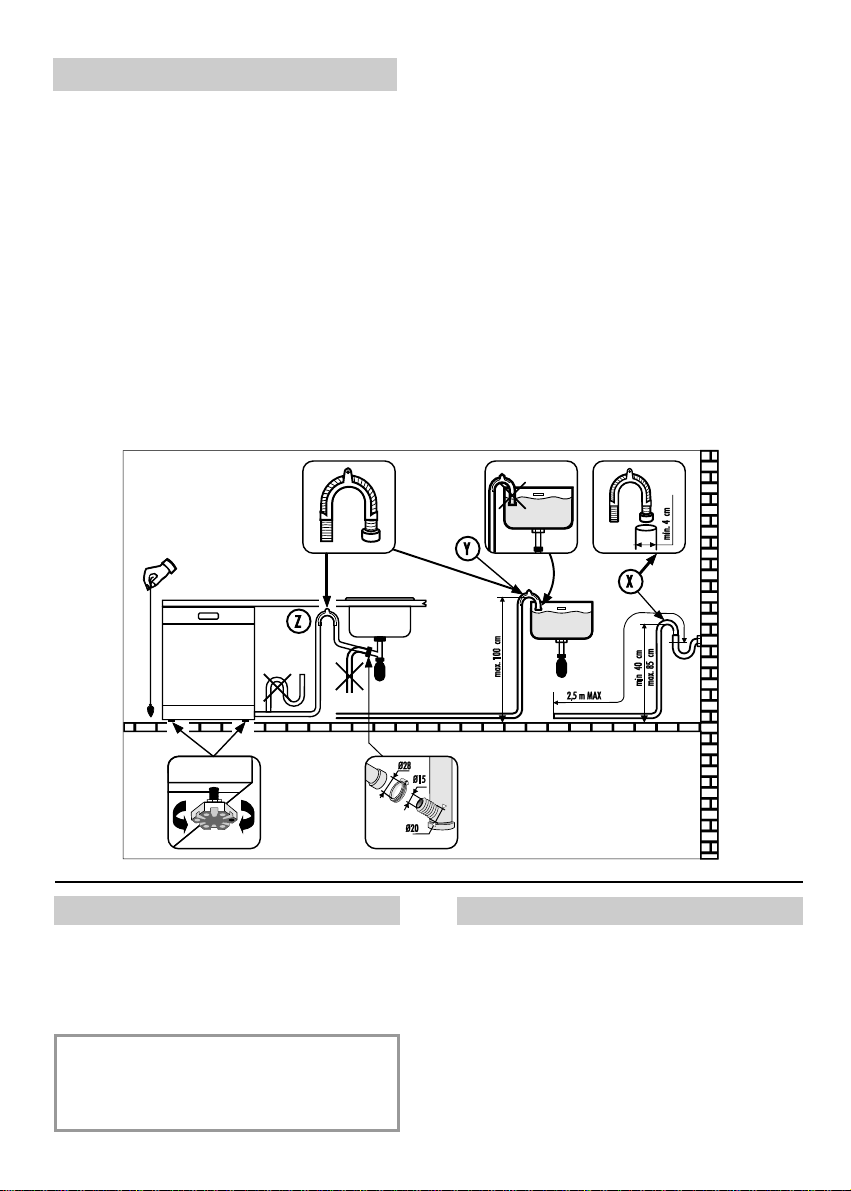
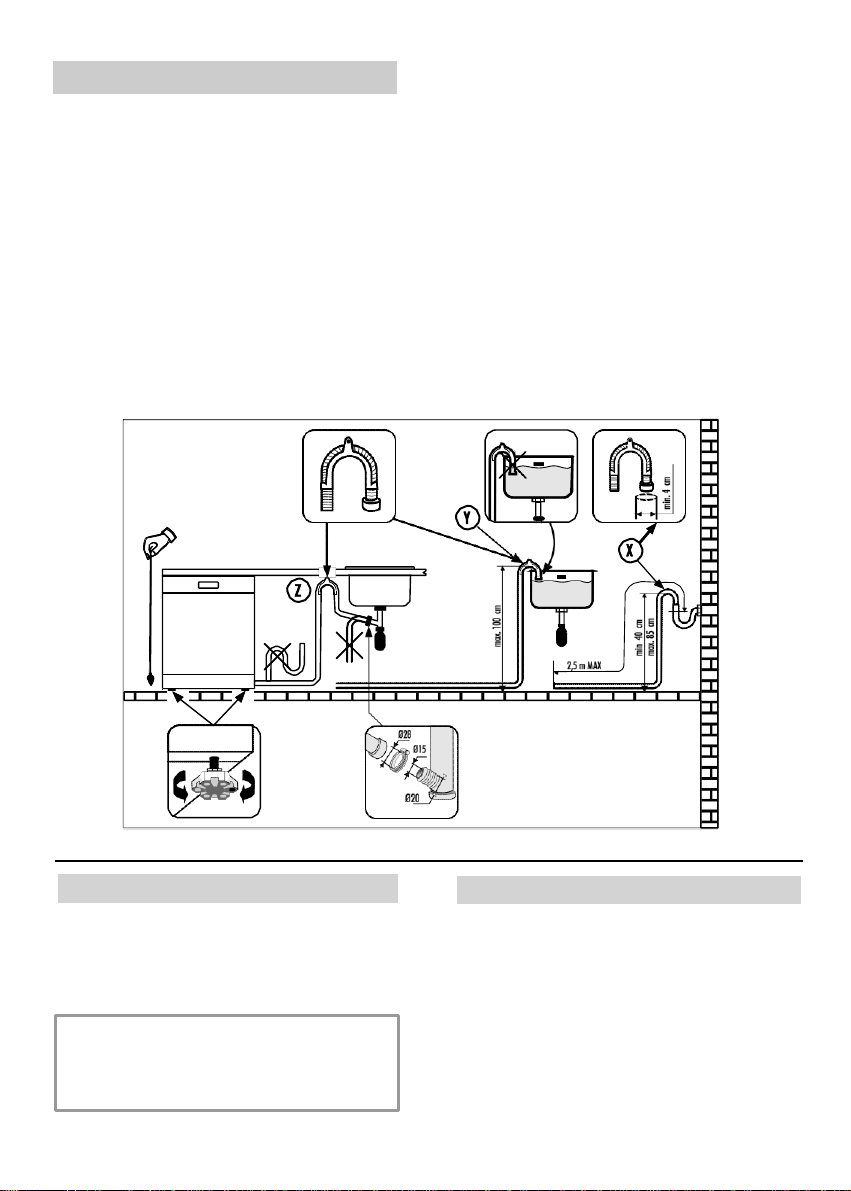
Connecting the outlet hose
■ The outlet hose should disharge into a
standpipe, making sure that there are no
kinks (fig. 4).
■ The standpipe must be at least 40 cm
above floor level and it must have an
internal diameter of at least 4 cm.
■ It is advisable to fit an anti-odour air trap
(fig. 4X).
■ If necessary the outlet hose can be
extended up to 2,5 m, provided that it is
kept at a maximum height of 85 cm
above floor level. The extension pipe is
available from the After Sales Service
Centre.
■ The hose can be hooked over the side of
the sink, but it must not be immersed in
water, in order to prevent water from
being syphoned back to the machine
when this is in operation (fig. 4Y).
■ When installing the appliance under a
worktop the hose pipe clamp must be
attached to the wall in the highest possible
position under the worktop (fig. 4Z).
■ Check that there are no kinks in the inlet
and outlet hoses.
4
Opening the door
If the machine comes open while it is working,
an electrical safety device automatically
switches everything off.
IMPORTANT
For the machine to work properly,
the door should not be opened while
it is in operation.
Closing the door
Place the baskets in the machine.
Make sure that both the spray arms are
free to rotate and are not obstructed by
cutlery, crockery or pans. Close the door,
pressing on it to make sure it is firmly shut.
*
The softener unit is set in the factory
at level 4 (d4) as this satisfies the
requirements of the majority of users.
Regulate the setting of your water softener
unit according to the degree of hardness
of your water as follows:
1. Hold down the "PROGRAMME
SELECTION" button and at the same
time switch on the dishwasher by
pressing the "ON/OFF" button (a brief
audible signal will sound).
2. Keep the "PROGRAMME SELECTION"
button pressed for at least 5 seconds,
UNTIL a brief audible signal sounds.
The current water softener setting level
will be shown on the display.
3. Press the same button again to select
the required water softener level: each
time the button is pressed, the setting
will increase by one level. When you
have reached "d7", the display will go
back to "d0".
4. Turn off the dishwasher by pressing the
"ON/OFF" button to confirm the new
setting.
WARNING!
If any problem occurs, turn the
dishwasher off by pressing the
"ON/OFF" button and start the
procedure again from the beginning
(STEP 1).
WATER SOFTENER UNIT
Depending on the source of the supply,
water contains varying amounts of limestone
and minerals which are deposited on the
dishes leaving whitish stains and marks.
The higher the level of these minerals
present in the water, the harder the water is.
The dishwasher is fitted with a water
softener unit which, through the use of
special regenerating salt, supplies
softened water for washing the dishes.
The degree of hardness of your water can
be obtained from your water supply
company.
Regulating the water softener
The water softener can treat water with a
hardness level of up to 90°
fH (French
grading) or 50°dH (German grading)
through 8 settings.
The settings are listed in the table below:
NO
YES
YES
YES
YES
YES
YES
YES
0
1
2
3
*4
5
6
7
0-5
6-10
1
1-20
21-30
31-40
41-50
51-60
61-90
0-3
4-6
7-11
12-16
17-22
23-27
28-33
34-50
Level
°fH
(French)
°dH
(German)
d0
d1
d2
d3
d4
d5
d6
d7
W
ater
hardness
W
ater
softener
setting
Use of
regenerating
salt
“ON/OFF”
button
“PROGRAMME SELECTION”
button
Digital display
9
IMPORTANT
The dishwasher must ALWAYS be
off before start of this procedure.
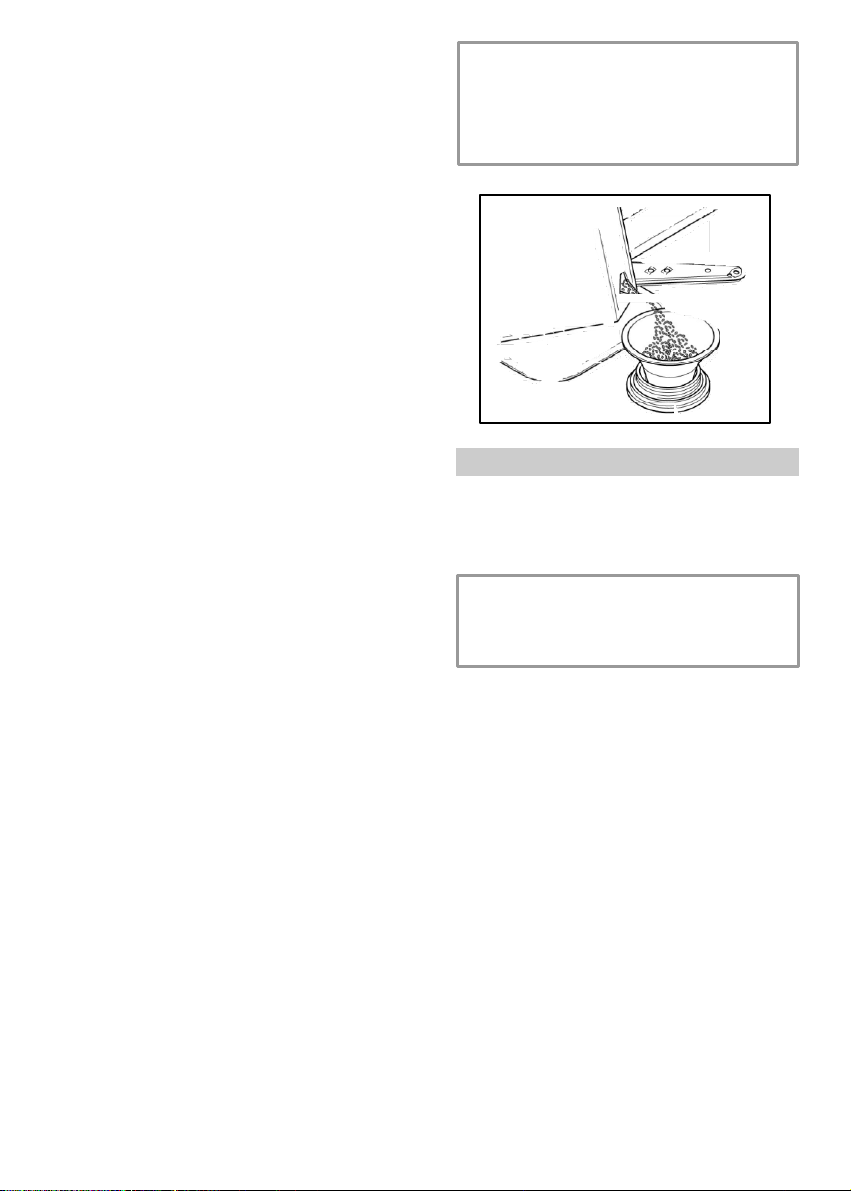
LOADING THE SALT
■ On the bottom of the machine there is a
container for the salt for regenerating
the softener.
■ It is important to use only a salt that is
specifically designed for dishwasher.
Other types of salt contain small quantities
of insoluble particles which over a long
period of time may affect and deteriorate
the softener performance.
■ To add salt, unscrew the cap of the con-
tainer on the bottom and then refill the
container.
■ During this operation a little water will
overflow; but keep adding salt until the
container is full. When the container is
full, clean the thread of salt residue and
retighten the tap.
■ After loading the salt, it is recommended
running a complete washing cycle,
or COLD RINSE programme. The salt
dispenser has a capacity of between 1.5
and 1.8 kg and, for efficient use of the
appliance, it should be refilled from time
to time according to the regulation of the
water softener unit.
10
IMPORTANT
(Only for first start up)
When the appliance is used for the
first time, after completely filling the
salt container, it is necessary to add
water until the container overflows.
Salt loading indicator
This model is provided with an indicator light
on the control panel which will light up
when it is necessary to reload the salt
container.
IMPORTANT
The appearance of white stains on
dishes is generally an important
sign that the salt container needs
filling.
11
1
3
a
b
a
b
2
ADJUSTMENT OF THE
UPPER BASKET
If 29 cm to 32,5 cm plates are normally
used, load them onto the lower basket after
the upper basket has been placed in its
upper position and proceed as detailed
below:
1. Pull out the upper basket;
2. Then grasp the basket from both sides
and lift it upwards (fig. 1).
Dishes that are bigger than 20 cm in
diameter can no longer be loaded onto the
upper basket and the mobile supports
cannot be used when the basket is in the
upper position.
ADJUST BASKET TO THE LOWER
POSITION:
1. Grasp the basket from both sides and lift
slightly upwards (fig. 2a);
2. Then slowly release into the correct
position (fig. 2b).
N. B. : NEVER LIFT OR LOWER THE
BASKET BY ONE SIDE ONLY (fig.3).
Attention :
it is advisable to adjust the basket before
loading the dishes.
12
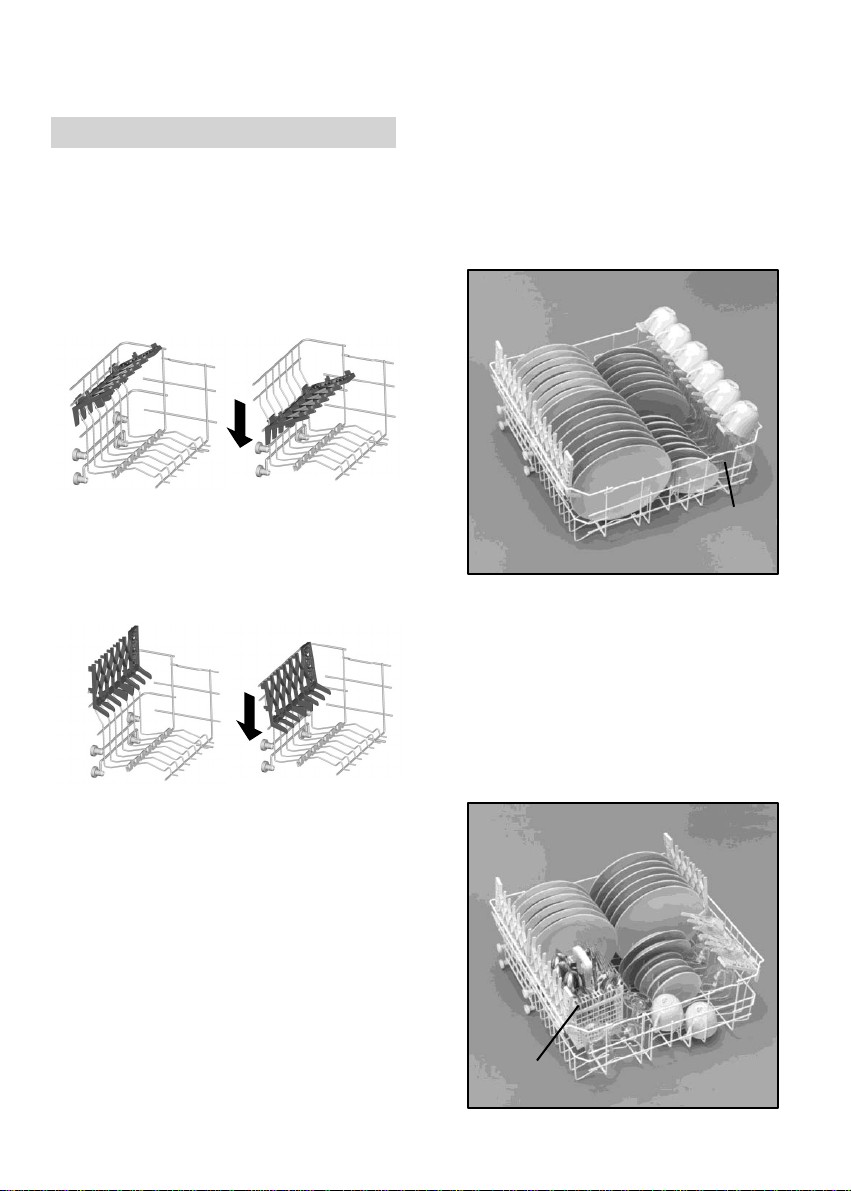
LOADING DISHES
Using the upper basket
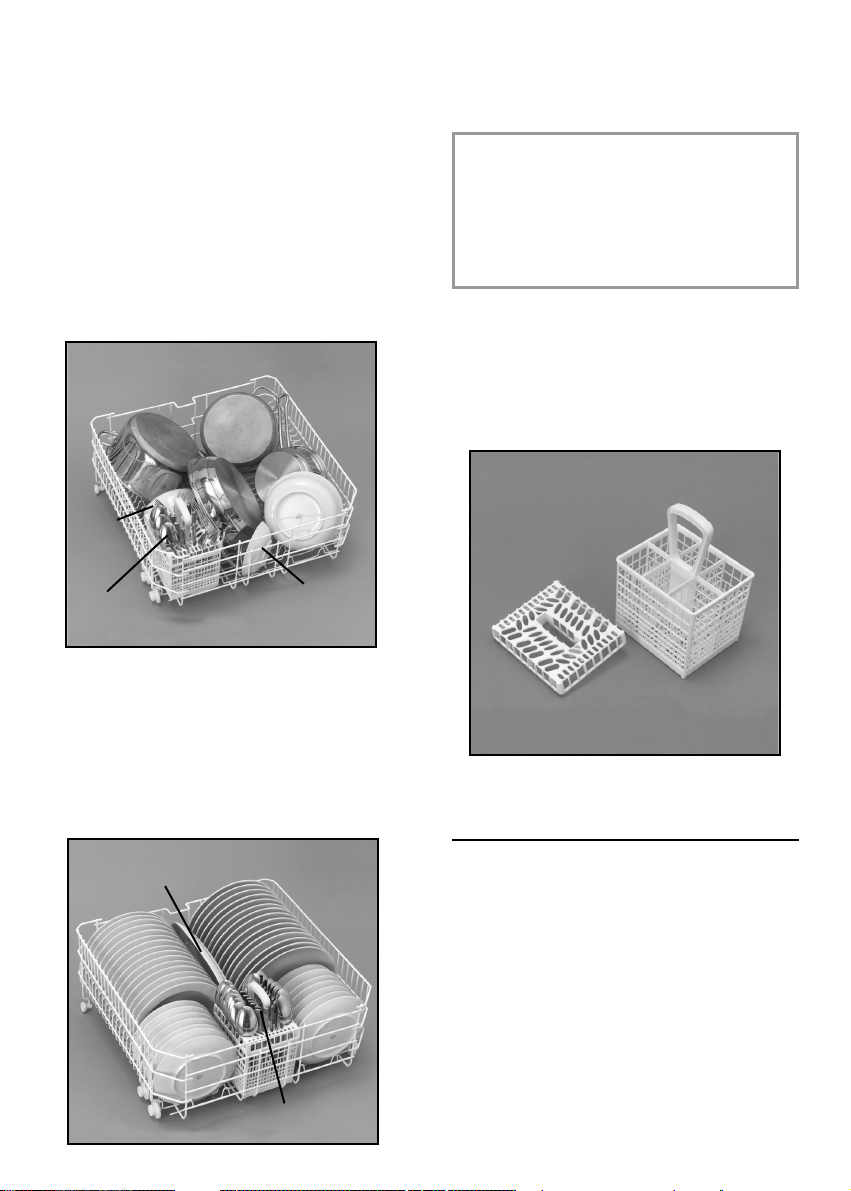
■ The upper basket is provided with
mobile racks hooked to the sides of the
basket, which can be regulated into 4
positions.
■ In the lowered position (A-A1) the racks
may be used for such items as: tea and
coffee cups, kitchen knives and ladles.
Also glasses with stems may be safely
hung on the ends of the racks.
■ In the upright position (B-B1) the racks
allow you to load dinner plates and soup
plates. Plates should be loaded
vertically with the underside of the plate
towards the back of the dishwasher with
a space between each plate to allow
water to pass freely.
■ It is advisable to load large plates
(approx. 26 or more cm) slightly tilted
towards the rear to facilitate introduction
of the basket into the machine.
■ Salad bowls and plastic bowls may also
be loaded on the upper basket. It is
advisable to block these in place so that
the jets of water do not make them
overturn.
■ The upper basket has been designed to
offer maximum flexibility in use and can
be loaded with up to 24 plates on two
rows, up to 30 glasses on five rows or a
mixed load.
A standard daily load is represented in
figs. 1, 2 and 3.
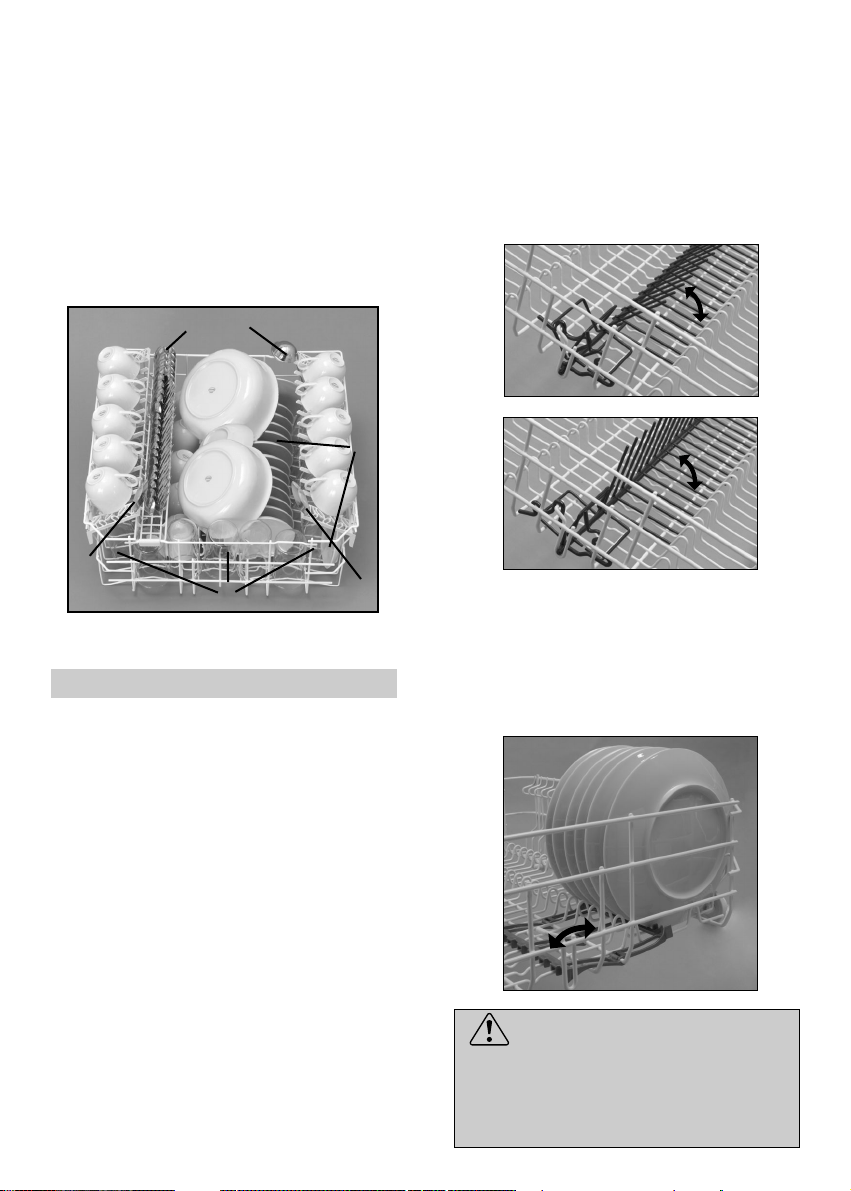
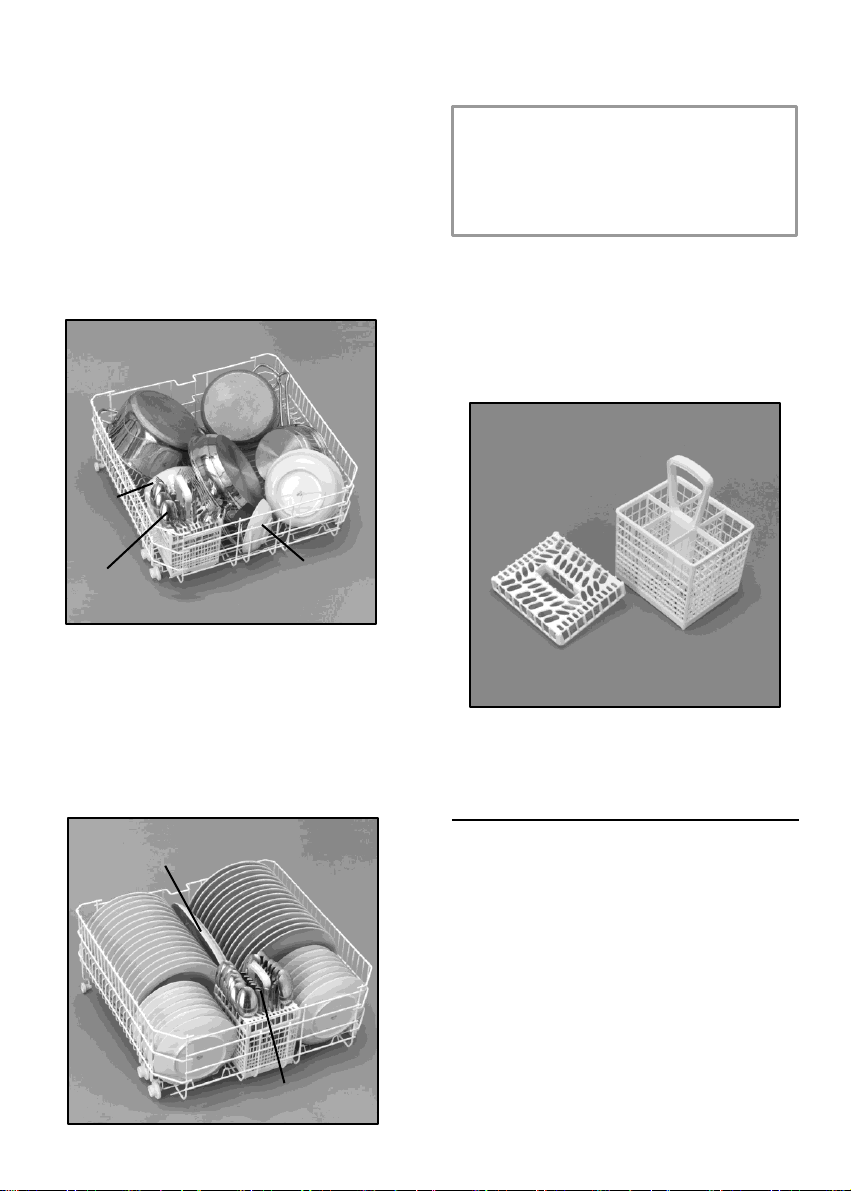
Upper basket (fig. 1)
A = soup plates
B = dinner plates
C = dessert plates
D = saucers
E = cups
F = glasses
Upper basket (fig. 2)
A = soup plates
B = dinner plates
C = dessert plates
D = saucers
E = cups
F = glasses with stems
G = glass
H = cutlery basket
BB1
AA1
A
B
C
D
E
F
A
B
C
D
E
F
1
2
H
F
G
13
Upper basket (fig. 3)
A = glasses
B = saucers
C = cups
D = small bowl
E = medium bowl
F = large bowl
G = dessert plate
H = serving spoons
I =
ladle
L = cutlery
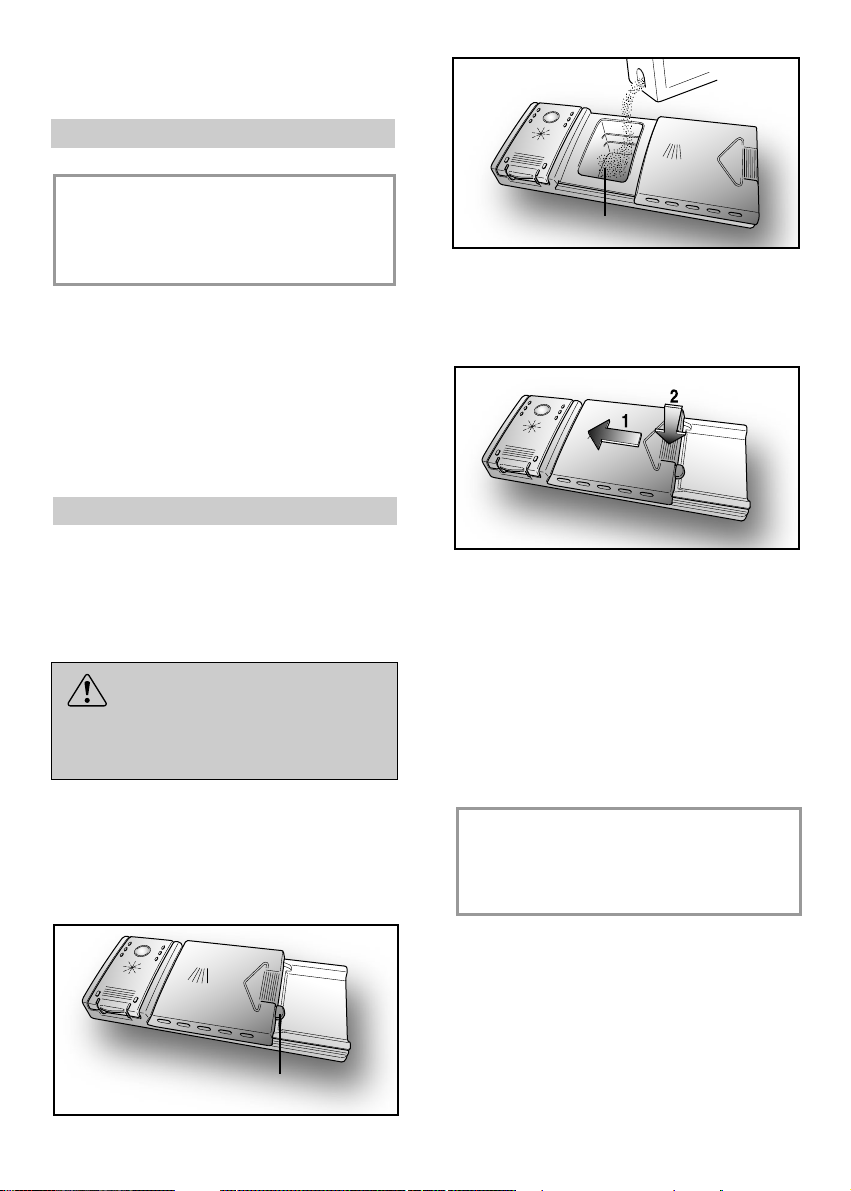
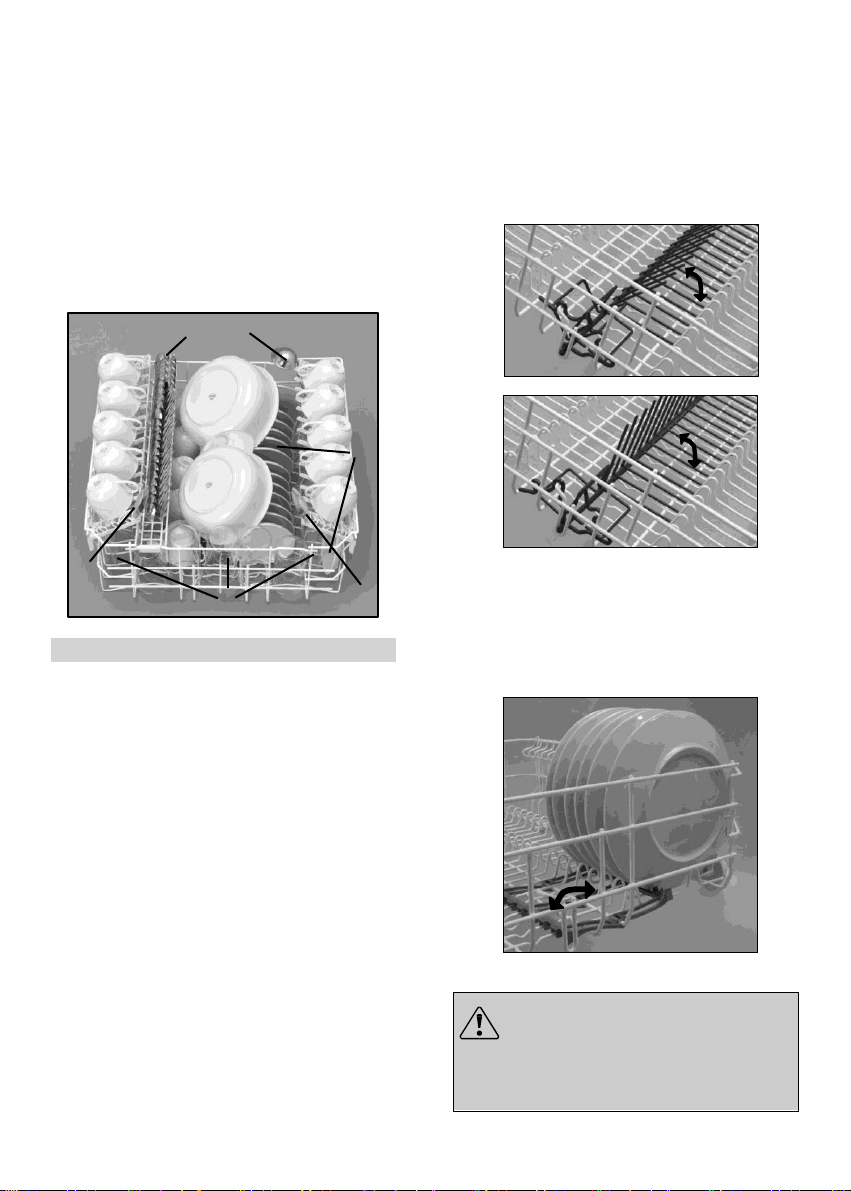
Using the lower basket
■ Saucepans, oven dishes, tureens, salad
bowls, lids, serving dishes, dinner
plates, soup plates and ladles can be
loaded on the lower basket.
■ Place the cutlery in the plastic cutlery
holder with the handles pointing
upwards.
■ Place the cutlery holder on the lower
basket (fig. 7 and 8), making sure that
the cutlery does not get in the way of the
rotating arms.
■ The lower basket is fitted with a special
adjustable central rack (fig. 4 and 5).
This permits stable and optimum
loading, even when the size and/or
shape of the dishes is non-standard.
- POSITION “A”: for a standard load, or
one that excludes pans, salad bowls and
the like.
- POSITION “B”: for dishes which,
although standard size, have a particular
shape (very deep bowls, square dishes
or ones without borders etc.).
- POSITION “C”: for larger than average
flat plates and/or ones with non-
standard shapes (square, hexagonal,
oval, pizza dishes etc.).
■ The small plates, as those used for
desserts for example, must be placed in
the lower basket as shown in the figure 6,
with the support flap placed outwards ("B").
For normal or large plates the flap must
be in the position ("A").
WARNING!
If the small plates are placed in the
basket with the support flap in the
incorrect position, the plates will
interfere with the lower spraying arm
preventing it to rotate.
4
5
A
C
A
B
6
A
B
A
F
C
C
G
L
E
D
B
3
H
I
H
C
14
A standard daily load is represented in
figs. 7 and 8.
Lower basket (fig. 7)
A = medium-sized saucepan
B = large saucepan
C = frying pan
D = tureens, serving dishes
E = cutlery
F = oven dishes
G = medium bowl
H = small bowl
Lower basket (fig. 8)
A = soup plates
B = dinner plates
C = dessert plates
D = serving dish
E = cutlery
Please load the dishwasher sensibly to
ensure the best wash results.
IMPORTANT
The lower basket has a safety-stop
device, for its safe extraction, also
especially useful with a full load.
For loading salt, cleaning filter and for
ordinary maintenance, the complete
extraction of the basket is necessary.
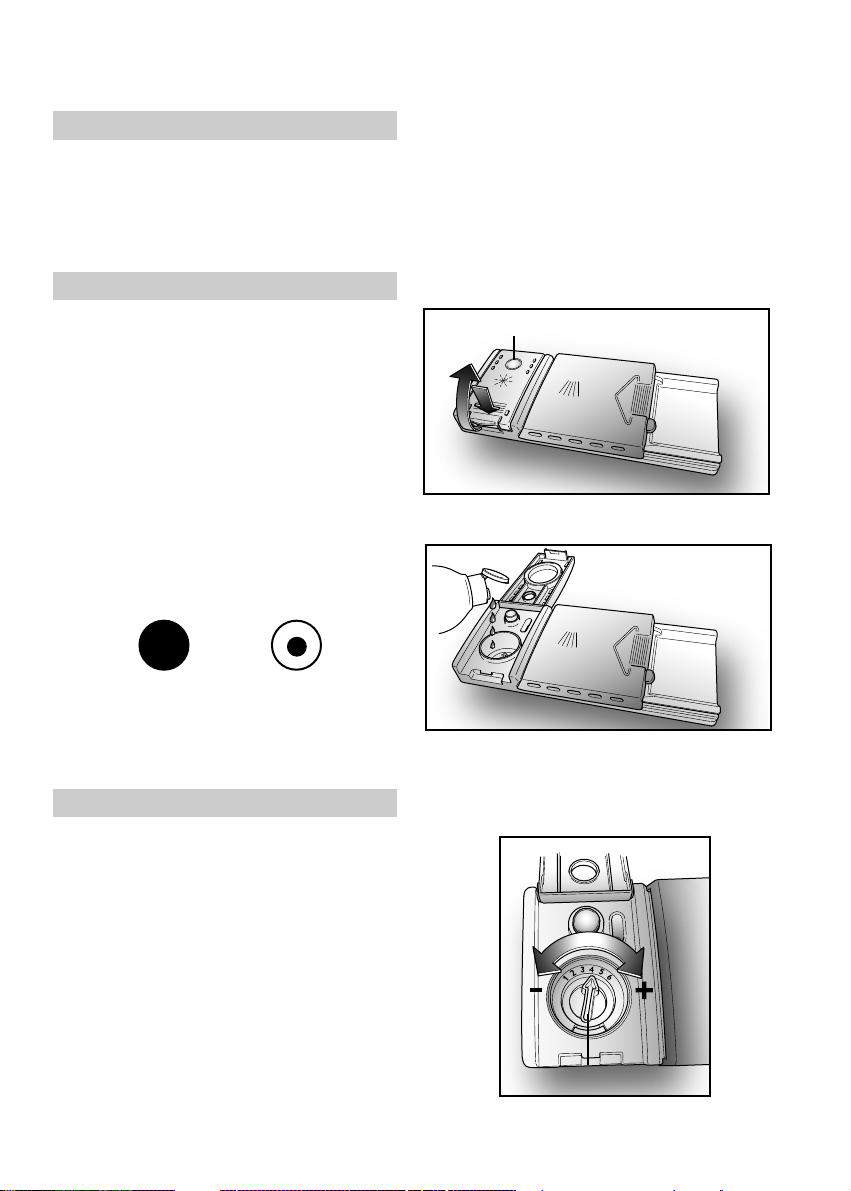
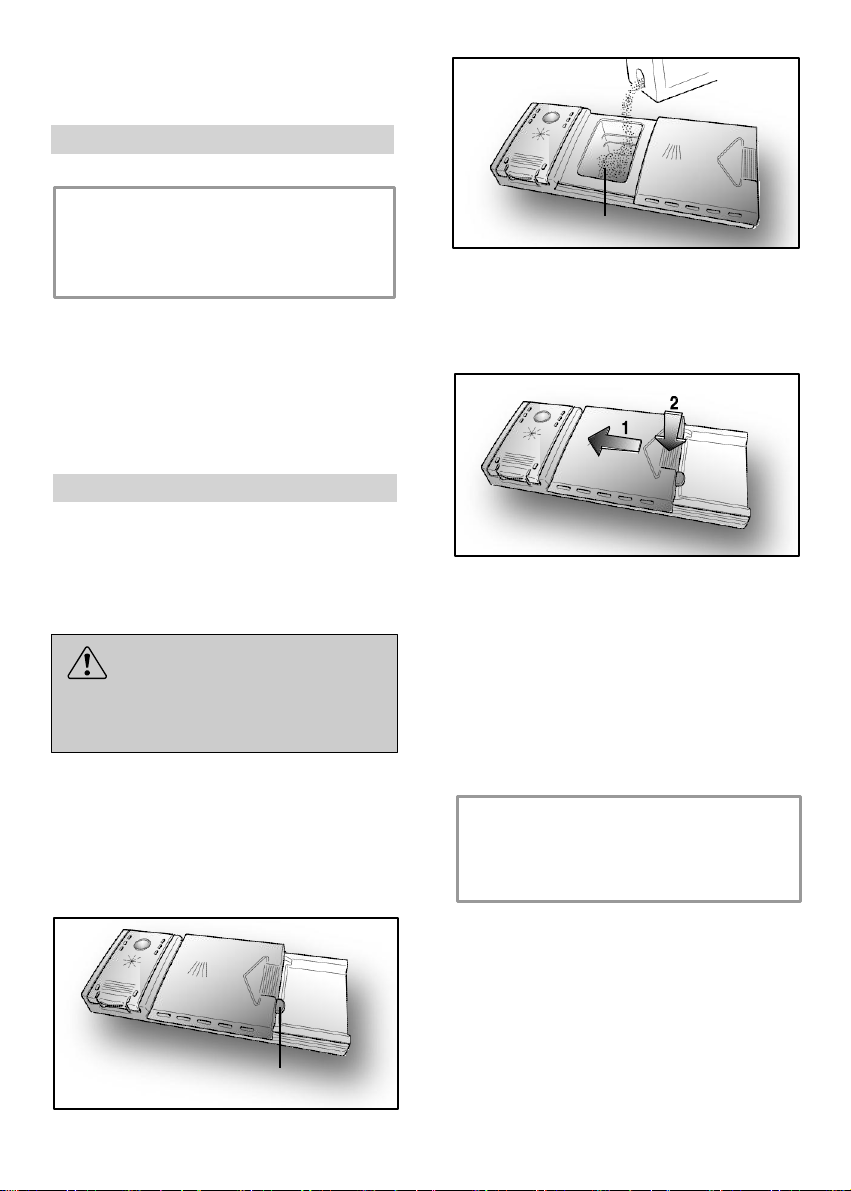
Cutlery basket (fig. 9)
The top of cutlery basket can be removed,
for enable various loading options.
INFORMATION FOR THE TEST
LABORATORIES
Please ask information required for
comparison testing and measuring noise
levels, according to EN normative, to the
following address:
testinfo-dishwasher@candy.it
In the request, please specify model name
and number of the dishwasher (see rating
plate).
D
F
B
C
E
H
G
7
A
9
D
A
E
C
B
8
C
LOADING THE DETERGENT
The detergent
IMPORTANT
It is essential to use a detergent
that is specifically designed for
dishwashers either in powder, liquid
or tablet form.
“FINISH” gives very good results and can
be easily obtained.
Unsuitable detergents (like those for
washing up by hand) do not contain the
proper ingredients for use in a dishwasher,
and stop the dishwasher from working
correctly.
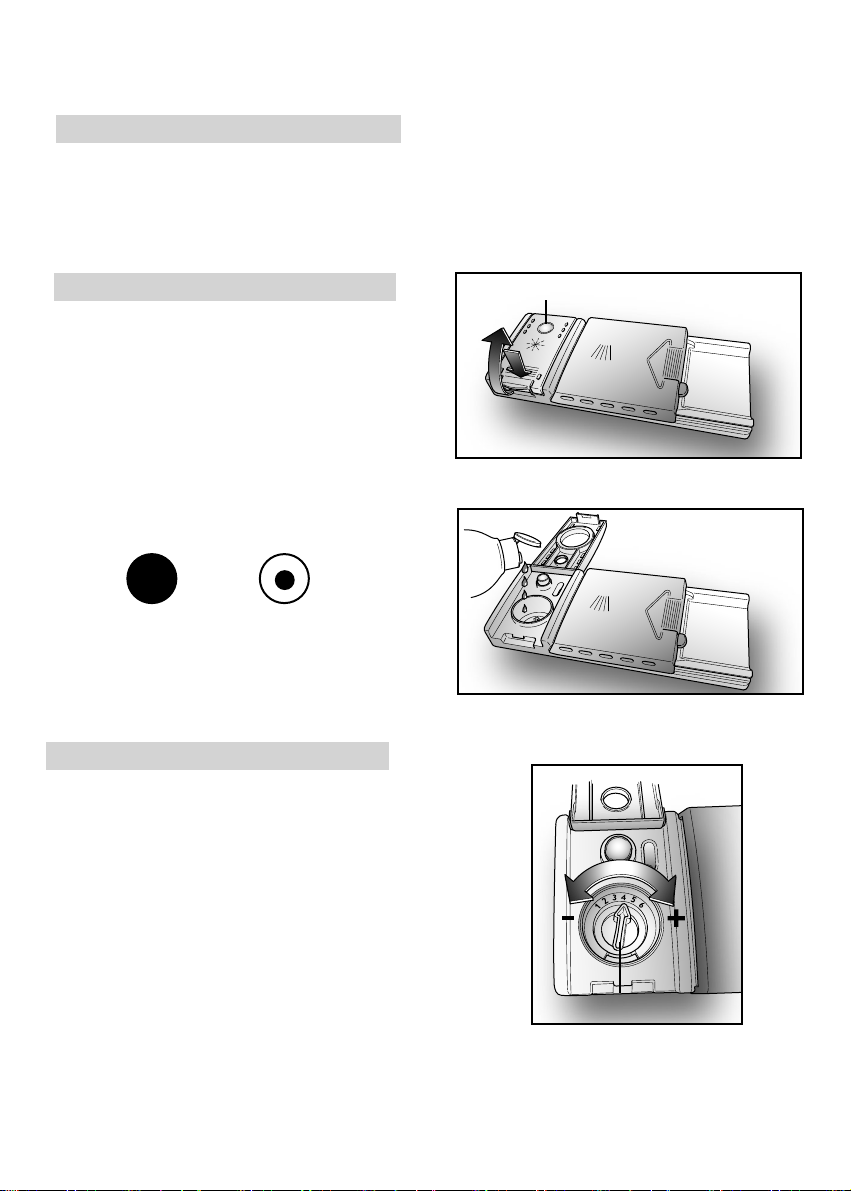
Filling the detergent container
The detergent container is inside the door
(fig. A “2”). If the lid of the container is
closed, press the button (A) to open.
At the end of every wash cycle the lid is
always open and ready for the next time
the dishwasher is used.
WARNING!
When loading the lower basket, please
ensure that the plates or others do not
obstruct the detergent dispenser.
The amount of detergent to be used varies
according to how dirty the dishes are and
on the type of dishes to be washed.
We advise using 20÷30 g of detergent in the
wash section of detergent compartment (B).
15
After pouring the detergent into the container,
close the lid, firstly pushing (1) and then
pressing on it (2) until you hear the click.
Since not all detergents are the same the
instructions on the boxes of detergent can
vary. We should just like to remind users
that too little detergent does not clean the
dishes properly whilst too much detergent
will not produce better results and is also a
waste.
IMPORTANT
Do not use an excessive amount of
detergent and help limit damage to
the environment at the same time.
A
B

16
TYPES OF DETERGENT
Detergent tablets
Detergent tablets of different manufacturers
dissolve at different speeds, for this
reason, during short programmes, some
detergent tablets may be not fully effective,
because they are not completely dissolved.
If these products are used, is recommended
to choose longer programmes to guarantee
the complete use of the detergent.
IMPORTANT
To get satisfactory washing results,
the tablets MUST be placed in the
wash section of the detergent
container and NOT directly in the
tub.
Concentrated detergents
The concentrated detergents, with reduced
alkalinity and with natural enzymes, in
conjunction with 50°C wash programmes,
have a smaller impact on the environment
and they protect the dishes and the
dishwasher.
The 50°C wash programmes purposely
exploit the dirt-dissolving properties of the
enzymes, allowing therefore, with the use
of the concentrated detergents, to achieve
the same results of the 65°C programmes
but at a lower temperature.
Combined detergents
The detergents that also contain the rinse
aid must be placed in the wash section of
the detergent container. The rinse aid
container must be empty (if it is not empty,
set the rinse aid regulator to lowest position
before using combined detergents).
"ALL in 1" combined detergents
If you are planning to use “ALL in 1” (“3 in 1 “/
“4 in 1”/ “5 in 1”, etc.) combined detergents i.e.
those with built in salt and/or rinse agent,
we would advise the following:
■ read carefully and follow the manufacturer’s
instructions given on the packaging;
■ the effectiveness of detergents containing
the built in water softener/salt depends
on the hardness of your water supply.
Check that the hardness of your water
supply is within the effective range given
on the detergent packaging.
If when using this type of product, you
don't get satisfactory washing results,
please contact the detergent
manufacturer.
In certain circumstances use of combined
detergents can cause:
■ limescale deposits on dishes or in the
dishwasher;
■ a reduction in washing and drying
performance.
IMPORTANT
Any problems which arise as a direct
result of the use of these products
are not covered by our warranty.
Please note that using the "ALL in 1"
combined detergents, the rinse aid and
salt indicator lights (only used on
selected models) are superfluous, so you
must ignore the lights.
If washing and/or drying problems occur,
we recommend you return to use traditional
separate products (salt, detergent and
rinse agent). This will ensure that the water
softener in the dishwasher operates
correctly.
In this case, we recommends that you:
■ refill both the salt and rinse aid container;
■ run one normal washing cycle without a
load.
Please note that on return to the use of
conventional salt, a number of cycles will
be required before the system becomes
fully efficient again.
LOADING THE RINSE AID
The rinse aid
The rinse aid, which is automatically
released during the last rinsing cycle, helps
the dishes to dry quickly and prevents
spots and stains forming.
Filling the rinse aid container
The rinse aid container can be found to the
left of the detergent container (fig. A "3").
To open the lid, push the reference mark
and, in the same time, pull the tab of
opening.
It is always advisable to use rinse aid that
is specifically designed for dishwasher.
Check the rinse aid level through the
indicator eye (C) which is located on the
dispenser.
Regulating the rinse aid from 1 to 6
The regulator (D) is placed under the lid
and can be turned using a coin.
The recommended position is 4.
The limestone content of the water
considerably affects the formation of
limescale and the drying performance.
It is therefore important to regulate the
quantity of rinse aid to achieve good
washing results.
If, after the wash, streaks occur on the
dishes, decrease the amount by one
position. If whitish spots occur, increase the
amount by one position.
17
FULL EMPTY
dark light
C
D
18
1
2
3
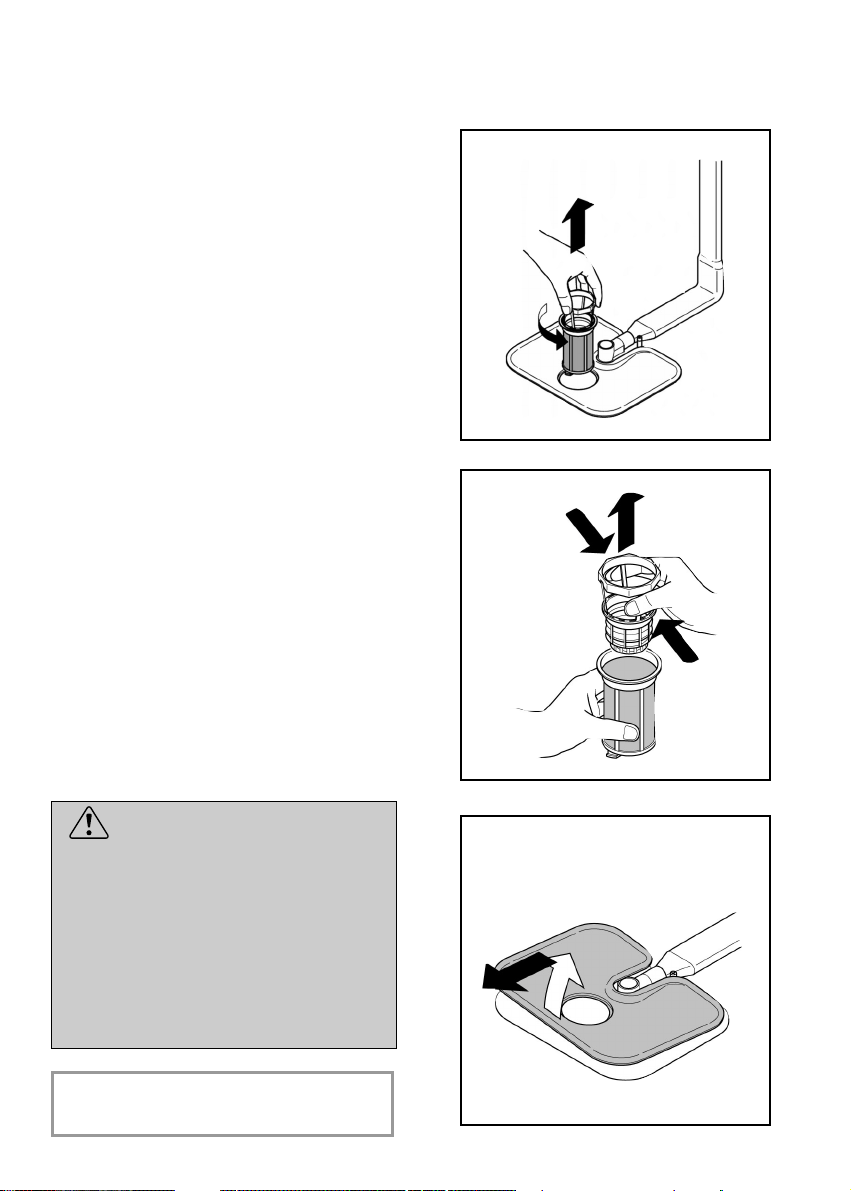
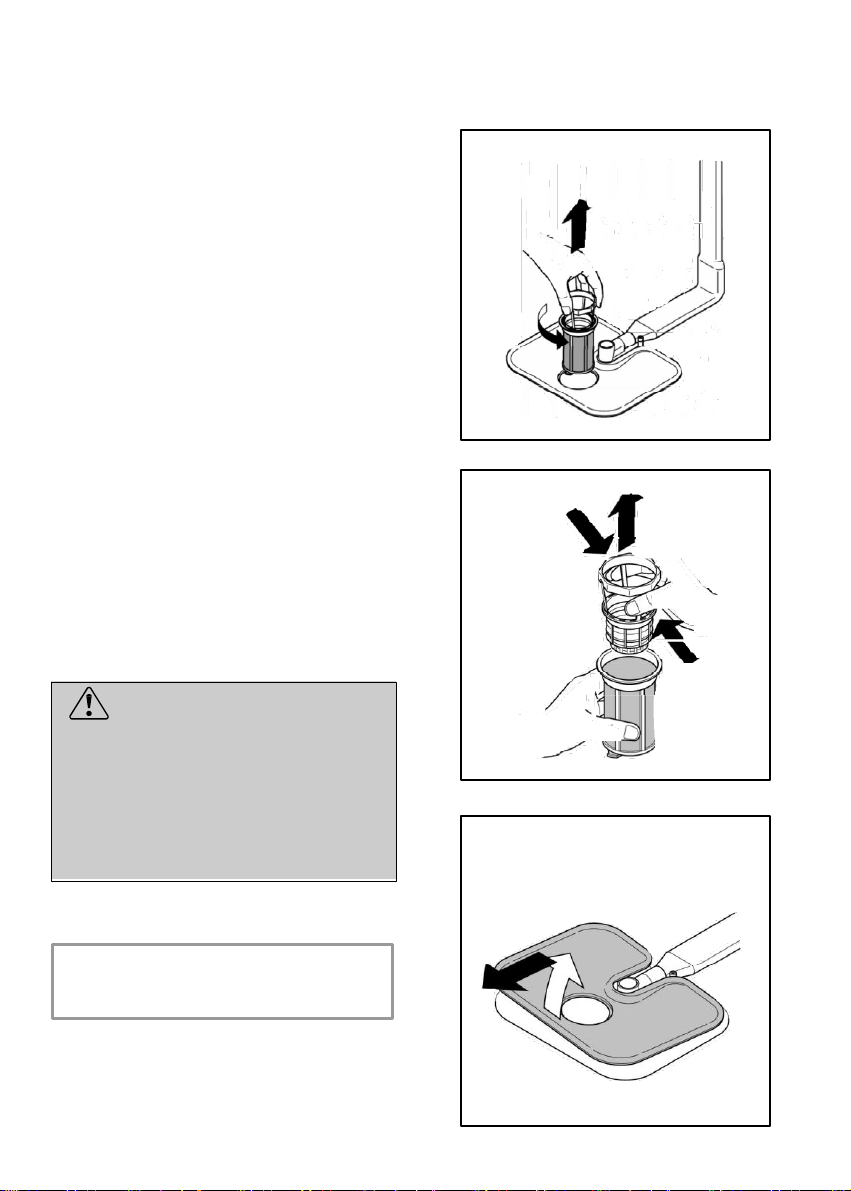
CLEANING THE FILTERS
The filter system (fig.A “4”) consists of:
a central container that traps the larger
particles;
a flat gauze that continuously filters the
wash water;
a micro filter, located beneath the gauze,
that traps the tiniest particles ensuring a
perfect rinse.
■ To achieve excellent results every time,
the filters should be checked and
cleaned after each wash.
■ To remove the filter unit, simply turn the
handle anticlockwise (fig. 1).
■ For ease of cleaning, the central container
is removable (fig. 2).
■ Remove the gauze filter (fig.3) and
wash the whole unit under a jet of
water. If necessary a small brush can
be used.
■ With the Self-cleaning Micro filter,
maintenance is reduced and the filter
unit need only be checked every two
weeks. Nevertheless, after each wash it
is advisable to check that the central
container and the gauze filter are not
clogged.
WARNING!
After cleaning the filters, make sure
that they are correctly reassembled
and that the gauze filter is properly
positioned at the bottom of the
dishwasher.
Make sure that the filter is screwed
back, clockwise, into the gauze, as
poor seating of the filter unit could
have an adverse effect on the
efficiency of the appliance.
IMPORTANT
Never use the dishwasher without
the filters.

19
PRATICAL HINTS
How to get really good wash
results
■ Before placing the dishes in the
dishwasher, remove any remaining
food (bones, shells, pieces of meat or
vegetables, coffee grounds, skin of fruit,
cigarette ash, tooth picks etc. to avoid
blocking the filters, water outlet and
washing arm nozzles.
■ Try not to rinse the dishes before
loading them into the dishwasher.
■ If saucepans and oven dishes are
encrusted with the remains of burnt or
roast food, it is advisable to leave them
to soak before washing.
■ Place the dishes face downwards.
■ Try to place the dishes in such a way
that they are not touching one another.
If they are loaded properly you will get
better results.
■ After loading the dishes check that the
washing arms can rotate freely.
■ Pans and other dishes that have
particularly stubborn food particles or
remnants of burnt food should be left to
soak in water with dishwasher
detergent.
■ To wash silver properly:
a) rinse the silver immediately after
use, especially if it has been used for
mayonnaise, eggs, fish etc.;
b) do not sprinkle detergent onto it;
c) keep it separate from other metals.
How to make savings
■ If you want the dishwasher to give a
complete wash, place the dishes in the
dishwasher at the end of each meal and
if necessary turn on the COLD RINSE
cycle to soften the food remains and
remove bigger particles of food from the
new load of dishes.
When the dishwasher is full start the
complete wash cycle programme.
■ If the dishes are not very dirty or if the
baskets are not very full select an
ECONOMY programme, following the
instructions in the program list.
What not to wash
■ It should be remembered that not all
dishes are suitable for washing in a
dishwasher.We advise against using
the dishwasher to wash items in
thermoplastic, cutlery with wooden or
plastic handles, saucepans with
wooden handles, items in aluminium,
crystal, leaded glass unless otherwise
stated.
■ Certain decorations may fade. It is
therefore a good idea before loading the
whole batch to wash just one of the
items first so as to be sure that others
like it will not fade.
■ It is a good idea not to put silver cutlery
with non-stainless steel handles into
the dishwasher as there could be a
chemical reaction between them.
IMPORTANT
When buying new crockery or
cutlery always make sure that they are
suitable for washing in a dishwasher.
Useful hints
■ In order to avoid any dripping from the
top rack, remove the lower rack first.
■ If the dishes are to be left in the
machine for some time, leave the door
ajar, to let some air circulate and to
improve the drying performance.

20
WHEN CYCLE IS FINISHED
After every wash it is essential to turn off
water supply and to switch off the machine
by pressing the On/Off button to the off
position.
If the machine is not going to be used for
some time, it is advisable to follow these
rules:
1. do an empty wash with detergent in order
to clean the machine of any deposits;
2. pull out the electric plug;
3. turn off the water tap;
4. fill the rinse aid container;
5. Ieave the door ajar;
6. keep the inside of the machine clean;
7. If the machine is left in places where the
temperature is below 0°C any water left
inside the pipes may freeze. Wait until
the temperature rises above zero and
then wait for about 24 hours before
starting up the dishwasher.
CLEANING AND
MAINTENANCE
■ To clean the dishwasher outside, do not
use solvents (degreasing action) neither
abrasives, but only a cloth soaked with
water.
■ The dishwasher does not require special
maintenance, because the tank is
self-cleaning.
■ Regularly wipe the door gasket with a
damp cloth to remove any food remains
or rinse aid.
■ It is advisable to remove limestone
deposits or dirt periodically, by doing an
empty wash; pour a glass of vinegar on
the bottom of the tank and select the
light wash.
■ If, in spite of the routine cleaning of the
filters, you notice that the dishes or pans
are not properly washed or rinsed, check
that all the spray heads on the rotor
arms (fig. A “5”) are clear.
If they are blocked, clean them in the
following way:
1. to remove the upper rotor arm, turn it
until it lines up with the stop marked
by the arrow (fig. 1). Push it upwards
(fig. 1b) and, keeping it pushed in,
unscrew it in a clockwise direction
(to reassemble it repeat the same
operation, but turn it anticlockwise).
The lower rotor arm can be removed
simply by pulling it upwards (fig. 2);
2. wash the rotor arms under a jet of water
to clear any blockage in the spray
heads;
3. when you have finished, refit the rotor
arms in the same position, remembering
to re-align the arrow and screw into
position.
■ Both the door lining and the tank lining
are in stainless steel; however, should
spots caused by oxidation occur, this is
probably due to a high level of iron salts
presents in the water.
■ The spots can be removed with a mild
abrasive agent; never use chlorine
based materials, steel wool, etc.
1
2
1b
21
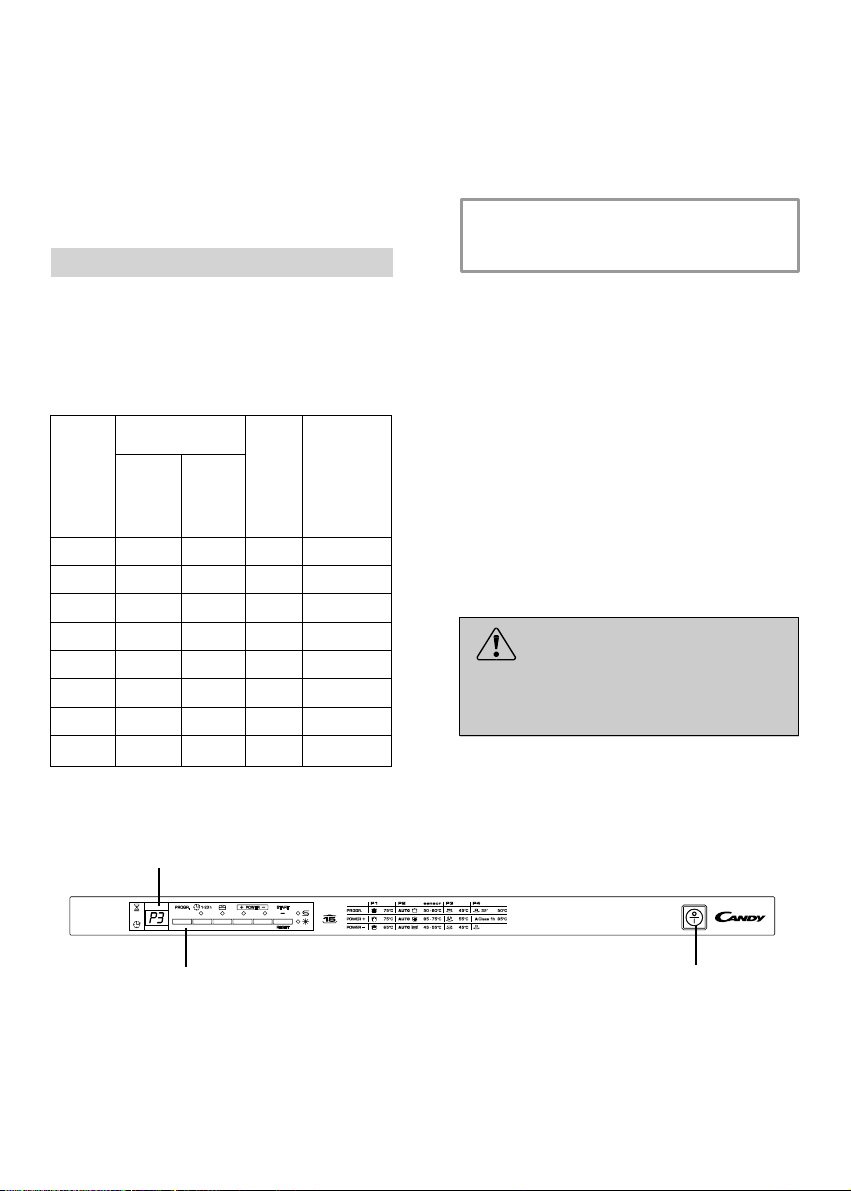
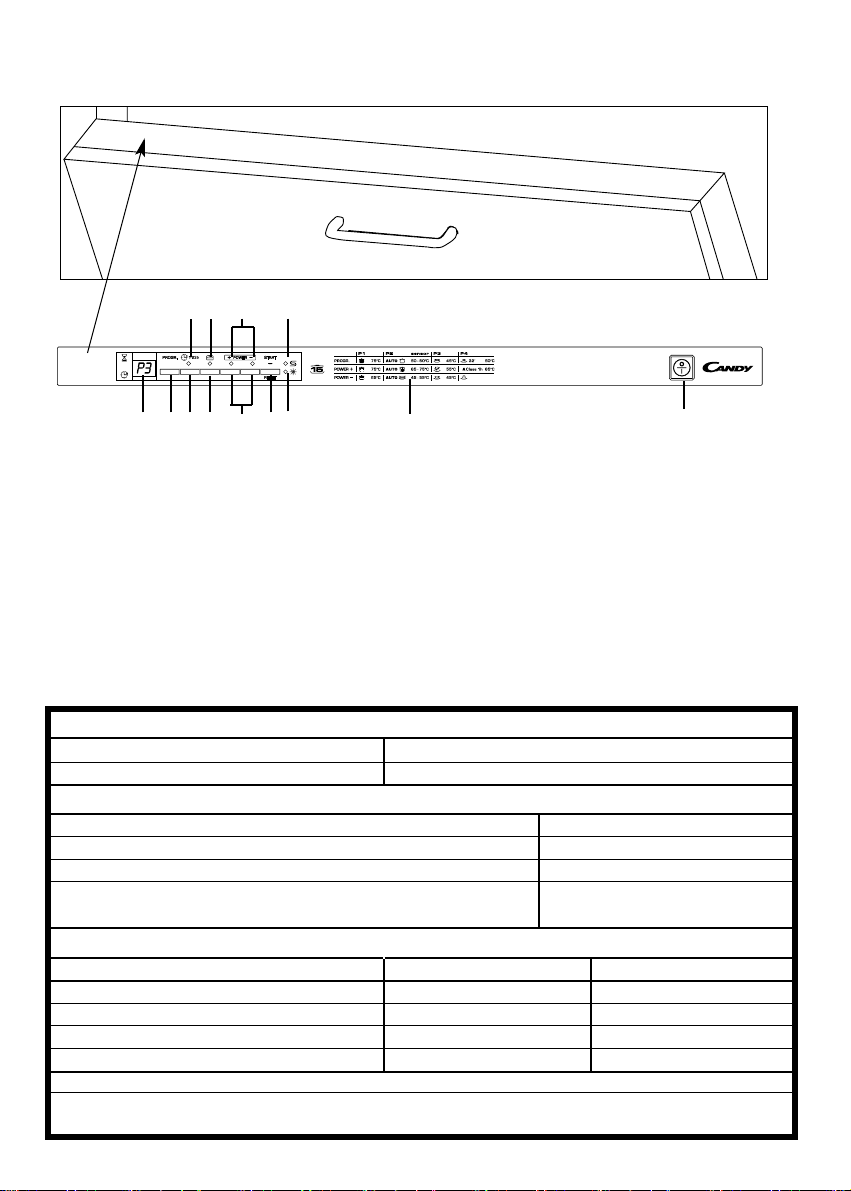
DESCRIPTION OF THE CONTROL
PANEL
A DIGITAL DISPLAY
B
"PROGRAMME SELECTION" button
C
"DELAY START" button
D
"ALL in 1" option button
E
"DEGREE OF SOILING" buttons
F
"START"/"RESET" button
(start/cancelling programme)
G
"DELAY START" indicator light
H
"OPTION SELECTION" light
I "DEGREE OF SOILING" lights
L
"SALT EMPTY" light
M
"RINSE AID EMPTY" light
N
Programme guide
O
"ON/OFF" button
AB
CD E FM
N
O
LGH I
DIMENSIONS
TECHNICAL DATA
CONSUMPTION (main programmes)*
Programme
Energy (kWh) Water (L)
INTENSIVE
AUTO UNIVERSAL
ECO
RAPID 32'
Width x Height x Depth (cm)
Depth with door open (cm)
EN 50242 place load
Capacity with pans and dishes
Water supply pressure (MPa)
Fuse / Power input / Supply voltage
15
9 persons
Min. 0,08 - Max. 0,8
See rating plate
*Values are measured in a laboratory according to European Standard EN 50242 (consumption may
vary according to conditions of usage).
59,8 x 82 ÷
90 x 55
117
2,03
1,50
1,04
0,73
20
14
10
9
Power consumption of the off-mode and of the left-on mode: 0,30 W / 0,45 W
22
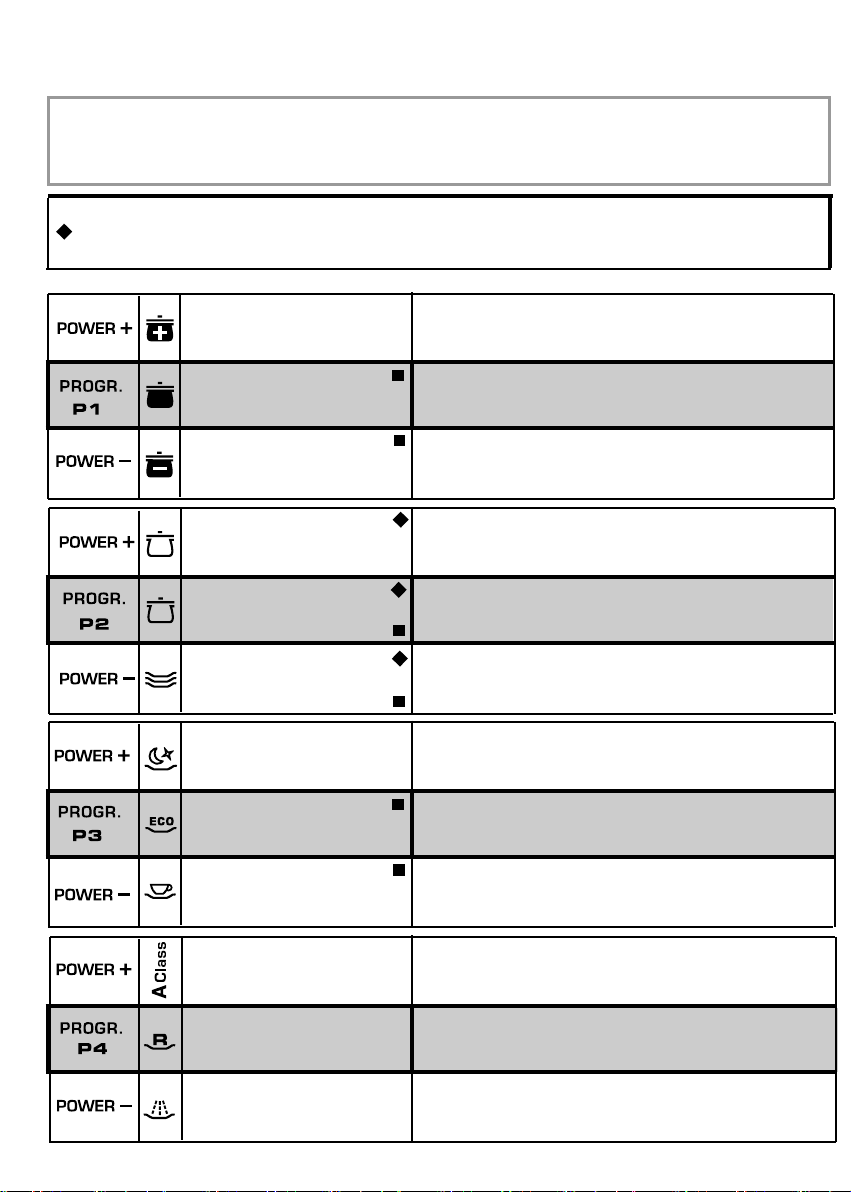
PROGRAMME SELECTION
AND SPECIAL FUNCTIONS
(Use in conjunction with programme guide)
"DEGREE OF SOILING" buttons
These buttons allow to modify the wash
intensity, according to how dirty the dishes
are. The wash time and temperature will be
modified.
Pressing the button
+
the intensity of
wash will be increased, pressing the
button
–
the intensity of wash will be
reduced and the wash time will be
remarkably shorter.
The combination of the buttons with the 4
main wash programmes enable to have 8
additional wash cycles.
IMPORTANT
When the dishwasher is switched on,
the "DEGREE OF SOILING" last used
will be indicated.
Programme settings
■ Open the door and place the dirty dishes
inside the appliance.
■ Press the "ON/OFF" button . The
display will show two lines.
■ Choose a programme by pressing the
"PROGRAMME SELECTION" button
("PROGR.").
■ If you wish to choose the "DEGREE OF
SOILING", press the corresponding button.
■ If you wish to select an option, press the
option button (the corresponding indicator
light will light up).
The option button can be selected or
deselected WITHIN one minute of the
programme commencing.
■ Press the "START" button.
The length of the program will be shown on
the display alternating hours with minutes
[I.e.: 1 h (1 hour) / 25 (25 minutes)].
■ Close the door (after an audible signal
has sounded, the programme will start
automatically).
WHITIN one minute of the programme
commencing, another programme
can be selected, by pressing the
"PROGRAMME SELECTION" button
(it is also possible to change the
"DEGREE OF SOILING" setting).
“AUTOMATIC” programmes
The dishwasher is equipped with a dirt
sensor, able to analyse water murkiness
during all "AUTOMATIC" programme
phases (see programme list); thanks to
this sensor the washing cycle parameters
are automatically adapted to the real
quantity of dirt on dishes. Thus excellent
washing results are guaranteed while
optimising water and energy consumption.
"IMPULSE" programmes
The “IMPULSE” programmes use an
impluse washing technology, which reduces
consumption, noise and increases
performances.
IMPORTANT
The “intermittent” working of the
washing pump MUST NOT BE
considered a malfunction, it is a
characteristic of the impulse washing
so must be considered a normal
function of the programme.
23
Programme interruption
Opening the door when a programme is
running is not recommended especially
during the main wash and final hot rinse
phases. However, if the door is opened
while a programme is running (for example,
to add dishes) the machine stops
automatically and the display will flash the
remaining time before the end of the cycle.
Close the door, without pressing any
buttons. The cycle will start from where it
left off.
WARNING!
If you open the door during the
drying cycle, an audible audio signal
advises you that the drying cycle has
not yet finished.
Changing a running programme
Proceed as follows to change or cancel a
running programme:
■ Open the door.
■ Hold the "RESET" button down for at
least 5 seconds. "00" will appear on the
display and some audible signals will
sound.
■ The running programme will be cancelled.
The display will show two lines.
■ At this point a new programme can be set.
WARNING!
Before starting a new programme,
you should check that there is still
detergent in the dispenser.
If necessary, top up the dispenser.
If there is any break in the power supply
while the dishwasher is operating, a
special memory stores the selected
programme and, when the power is
restored, it continues where it left off.
Programme end
A 5 second alarm will sound (if not muted)
3 times at 30 second intervals to signal that
the programme has ended.
Dishes can now be removed and the
dishwasher turned off by pressing the
"ON/OFF" button or dishes can be loaded
for a new cycle.
Option buttons
“ALL in 1” button
This option optimises the use of “ALL in 1”
(“3 in 1”/ “4 in 1”/“5 in 1”, etc...) combined
detergents. By pressing this button, the
selected washing programme is modified
to get the best performance from combined
detergents; furthermore, the salt and rinse
aid shortage lights are de-activated.
WARNING!
Once selected, this option keeps
being on (light on) also for next
washing cycles and it can be de-activate
(light off) only by pressing the button
once again.
IMPORTANT
When this option is selected, the
"RAPID" cycle is 10 minutes longer.

24
"DELAY START" button
Dishwasher start time can be set with this
button, delaying start from 1 to 23 hours.
Proceed as follows to set a delayed start:
■ Press the "DELAY START" button ("00"
will appear on the display).
■ Press the button again to increase the
delay in hours (each time the button is
pressed the delay is increased by 1 hour
to a maximum of 23). The “DELAY
START” indicator light will turn on.
■ To start the countdown press the
"START" button (the “DELAY START”
indicator light will start to flash). At the
end of the countdown, the programme
will automatically start (the “DELAY
START” indicator light will turn off).
If you wish to see which programme has
been selected, press the "PROGRAMME
SELECTION" button.
Proceed as follows to cancel a delayed
start:
■ Hold the "RESET" button down for at
least 5 seconds. "00" will appear on the
display and some audible signals will
sound.
■ The delayed start and the selected
programme will be cancelled.
The display will show two lines.
■ At this point, a new programme and
option buttons must be set to start a
new programme as indicated in the
"PROGRAMME SETTINGS" section.
Alarm mute for the PROGRAMME
END
The alarm for the programme end may be
muted as follows:
IMPORTANT
The dishwasher must ALWAYS be off
before start of this procedure.
1. Hold down the "PROGRAMME
SELECTION" button and at the same
time switch on the dishwasher by
pressing the "ON/OFF" button (a brief
audible signal will sound).
2. Keep the "PROGRAMME SELECTION"
button pressed for at least 15 seconds
(during this time, 2 audible signals will
sound).
3. Release the button when the second
audible signal sounds ("b1" will appear on
the display to indicate that the alarm is on).
4. Press the same button again ("b0" will
appear on the display to indicate that the
alarm is off).
5. Turn off the dishwasher by pressing the
"ON/OFF" button to confirm the new
setting.
To turn the alarm on again, follow the same
procedure.
25
AUTOMATIC FAULT SIGNALS
Turn off the dishwasher, open the
inlet hose and reset the cycle.
Check if the drain tube is bent or if
the siphon or filters are clogged.
If the problem persists, contact
Customer Service.
Check if the drain tube is bent or if
the siphon or filters are clogged.
If the problem persists, contact
Customer Service.
Contact Customer Service.
Clean the filter plate.
If the problem persists, contact
Customer Service.
FAULTS CAUSE SOLUTION
E2
appears on the display and
the alarm sounds.
E3
appears on the display and
the alarm sounds.
E4
appears on the display and
the alarm sounds.
E5,E6,E7,Ef
or
EL
appears
on the display and the alarm
sounds.
E8
or
Ei
appear on the display
and the alarm sounds.
No water (inlet hose closed).
The machine cannot drain water.
Water leak
Electronic control fault.
The water heating element is not
working correctly or the filter plate is
clogged.
The dishwasher is able to signal a series of faults in the display.
Memorization of the last
programme used
The last programme used can be
memorized by following the below:
IMPORTANT
The dishwasher must ALWAYS be
off before start of this procedure.
1. Hold down the "PROGRAMME
SELECTION" button and at the same
time switch on the dishwasher by
pressing the "ON/OFF" button (a brief
audible signal will sound).
2. Keep the "PROGRAMME SELECTION"
button pressed for at least 30 seconds
(during this time, 3 audible signals will
sound).
3. Release the button when the THIRD
audible signal sounds ("A0 " will appear
on the display to indicate that the
memorization is off).
4. Press the same button again ("A1" will
appear on the display to indicate that the
memorization is on).
5. Turn off the dishwasher by pressing the
"ON/OFF" button to confirm the new
setting.
To disable the memorization, follow the
same procedure.
WARNING!
To ensure the correct operation of
the anti-overflow safety device, we
recommend that the dishwasher is
not moved or tilted during operation.
If however it is necessary to tilt or
move the dishwasher, please ensure
that the washing cycle is complete
and that there is no remaining water
inside the dishwasher.

26
PROGRAMME GUIDE
W
ash with prewash
For wash programmes with prewash, it is advisable to add a second dose of detergent (max.
10 g) directly in the machine.
Once a day - for heavily soiled pans and any
other items that have been left all day for
washing.
Hygienic 75°C
Suitable for heavily soiled items that are to be
washed straight after a meal (Max 8 place load).
- W
ASHING CLASS A-
Quick wash for dishes which are to be washed
immediately after the meal. Wash load of
4/6 persons.
Suitable for delicate crockery and glassware. Also
for less soiled items excluding pans.
Short cold pre-wash for items that are stored in
the dishwasher until you are ready to wash a full
load.
INTENSIVE 75°C
Str
ong & Fast 65°C
AUTO
Universal
plus 65 - 75°C
AUTO
UNIVERSAL
50 - 60°C
AUTO
Daily
45 - 55°C
Night 55°C
ECO 45°C
Delicate 45°C
A
Class 1h 65°C
RAPID 32' 50°C
Pr
e-wash
An antibacterial cycle, intended for washing and
sterilising dishes (even heavily stained ones)
babies’
bottles etc.
Intended for rapid washing of very dirty dishes.
Intended for everyday dishwashing. Two final
rinses ensure a high level of hygiene and
cleanliness.
Fast cycle, for “normally” dirty dishes - intended
for frequent washes and normal loads.
Quietest washing cycle. Ideal for functioning by
night and for taking advantage of reduced energy
fares.
+
+
/(
) = "AUTOMATIC" PROGRAMMES ARE OPTIMISED THANKS TO THE DIRT SENSOR THAT ADAPTS
WASHING PARAMETERS TO DISH DIRT LEVELS.
••
Programme for normally soiled tableware (the
most ef
ficient in terms of its combined energy and
water consumption for that type of tableware).
Programme standardised to EN 50242.
Once a day - for normal soiled pans and any other
items that have been left all day for washing.
27
140
•••
•
75°C
•
•••
•
•
•••
•
•
130
85
75°C
65°C
•••
•
•••
•
•••
•
•••
•
•••
•
•••
•
•••
•
•
•••
•
•
(
)
(
)
115/
125
100/
120
70/
80
240
170
85
60
32
5
55°C
45°C
45°C
65°C
50°C
65°C/
75°C
50°C/
60°C
45°C/
55°C
•
( )
(
)
(
)
Check list
A
varage
duration
in minutes
Special function
buttons
available
Detergent for soaking
(Prewash)
Detergent for washing
Clean filter
Check rinse aid
dispenser
Check salt container
Hot pre-wash
Cold pre-wash
Main wash
First cold rinse
Second cold rinse
Hot rinse with rinse aid
W
ith cold water (15°C)*
-T
olerance ± 10%-
"DELA
Y START" button
"ALL in 1" button
Programme contents
YES
YES
YES
YES
YES
YES
YES
YES
YES
YES
YES
YES
YES
YES
YES
YES
YES
YES
YES
YES
YES
YES
YES
= "IMPULSE" programmes = "AUTOMATIC" programmes
*
WITH HOT W
ATER THE TIME REMAINING UNTIL THE END OF THE PROGRAMME IS AUTOMATICALLY DISPLAYED WHILE THE
PROGRAMME IS RUNNING.
•
28
THE W
ATERBLOCK SYSTEM
Fig. 1
A
The waterblock system has been designed to improve the safety of your appliance,
particularly when the machine is left unattended.
The waterblock system actually prevents flooding which might b
e caused by a
machine malfunction or as a result of a fracture on the pipes.
How does waterblock work
The sump located in the base of the appliance collects any possible water leakage
and operates a sensor which subsequently activates a valve placed under the water
tap and stops any water from the supply even with the tap fully opened. If the box
containing the electrical parts is damaged, remove the plug from the socket
immediately.
To ensure perfect operation of the safety system, box “A” with the hose, should be
connected to the tap as shown in figure “1”. The inlet hose should not be cut, as it
contains parts under load. If the hose is not long enough for correct connection, it
must be replaced with a longer one. The hose can be obtained from your Service
Agent.
This dishwasher is also equipped with an anti-overflow safety device which, if water
exceeds normal levels due to malfunctions, automatically blocks water flow and/or
drains excess quantities.
IDENTIFYING MINOR FAULTS
Should the dishwasher fail to operate, before contacting the Service Centre, make
the following checks:
29
F
AULT CAUSE REMEDY
1 - Machine completely dead
2 - Machine does not
draw water
3 - Machine does not
discharge water
4 - Machine discharges
water continuously
5 - Spray arms are not heard
to rotate
6 - On electronic appliances
without a display: one or
more indicator lights
flashing quickly.
Plug is not connected to wall
socket
O/I button has not been pressed
Door is open
No electricity
See causes for no. 1
Water tap is turned off
Programme selector is not at
correct position
The inlet hose is bent
The inlet hose filter is not
correctly connected
Filter is dirty
Outlet hose is kinked
The outlet hose extension is
not correctly connected
The outlet connection on the
wall is pointing downwards not
upwards
Position of outlet hose is too
low
Excessive amount of detergent
Item prevents arms from rotating
Plate and cup filter very dirty
Water inlet tap turned off
Connect electric plug
Press button
Close door
Check the fuse in the plug and
the electricity supply
Check
Turn water tap on
Turn programme selector to
correct position
Eliminate the bends in the hose
Clean the filter at the end of the
hose
Clean filter
Straighten outlet hose
Follow the instructions for
connecting the outlet hose
carefully
Call a qualified technician
Lift outlet hose to at least 40 cm
above floor level
Reduce amount of detergent
Use suitable detergent
Check
Clean plate and cup filter
Switch off the appliance.
Turn on the tap.
Re-set the cycle.
30
N.B.: Should any of the situations occur and should the machine give a bad wash performance, it is
necessary to remove the deposits from the dishes by hand since the final drying cycle hardens the
deposits which a second wash in the machine would not be able to remove.
If the malfunction continues contact a Service Centre quoting the serial number of the dishwasher
.
This is found on the plaque on the inside of the dishwasher door at the top or on the guarantee.
This information will make it possible to take more effective action more quickly.
The manufacturers decline any responsibility for any printing mistakes in this instruction booklet.
They also reserve the right to modify their own appliances as necessary without altering the
essential characteristics.
FAULT CAUSE REMEDY
7 - Load of dishes is only
partially washed
8 - Detergent not dispensed
or partially dispensed
9 - Presence of white spots
on dishes
10 -Noise during wash
11 -The dishes are not
completely dry
See causes for no. 5
Bottom of saucepans have not
been washed well
Edge of saucepans have not
been washed well
Spray arms are partially blocked
The dishes have not been
properly loaded
The end of the outlet hose is in
the water
The incorrect amount of
detergent has been measured
out; the detergent is old and hard
The wash programme is not
thorough enough
The lower basket dishes have
not been washed
Cutlery, dishes, pans, etc... stop
the detergent dispenser opening
Water is too hard
The dishes knock against one
another
The revolving arms knock against
the dishes
Inadequate air flow
Rinse aid missing
Check
Burnt on food remains must
be soaked before putting pans
in dishwasher
Reposition saucepans
Remove spray arms by
unscrewing ring nuts clockwise
and wash under running water
Do not place the dishes too
closely together
The end of the outlet hose
must not come into contact
with the outflow water
Increase the measure
according to how dirty the
dishes are and change detergent
Choose a more vigorous
programme
Depress half load button
Position dishes not to obstruct
the dispenser
Check salt and rinse aid level
and regulate amount.
Should the fault persist,
Contact Service Centre
Re-check loading of dishes in
the basket
Again re-check loading
Leave the dishwasher door ajar
at the end of the wash program
to allow the dishes to dry naturally
Fill the rinse aid dispenser

The manufacturer declines all responsibility in the event of any printing mistakes in this
booklet. The manufacturer also reserves the right to make appropriate modifications to
its products without changing the essential characteristics.


33
祝贺!
感谢您选择 Candy 设备;保证高性能
和可靠性的高质量洗碗机。
Candy 制造各种家用设备:洗衣机、洗
碗机/干燥机、炊具、微波炉、烤箱和炉
盘、冰箱和冷冻机等。
请向经销商索要全系 Candy 产品目录。
请认真阅读本手册,它提供了关于设备
安全安装、使用和维护的重要信息以及
一些如何获得最佳效果的有用建议。
请妥善保管本说明书,以备未来参考。
保修
本设备还附带一份保修证书,允许免费
使用技术帮助服务。请妥善保管好您的
购物发票。请将发票放在一个安全的地
方,并在需要服务时出示给工程师。

34
目录
安全建议
页码
调试安装
页码
水软化装置
页码
加盐
页码
40
调整上篮筐
页码
41
装载器皿
页码
42
测试实验室信息
页码
44
加洗涤剂
页码
45
洗涤剂类型
页码
46
加冲洗辅助剂
页码
47
过滤器清洁
页码
48
实用提示
页码
49
日常清洁和维护
页码
50
控制面板描述
页码
51
技术数据
页码
51
程序选择和特殊功能
页码
52
程序指南
页码
56
水控制
页码
58
确定小故障
页码
59
图.A
5
1
4
3
2
请认真阅读本说明书,它包含关于如何安全地安装、使用和维护洗碗机的重要信息以及如何充
分利用洗碗机的有用小技巧。
请妥善保管本手册,以备未来参考。
35
36
39

35
安全说明
某些基本安全规则适用于所有家用设备。
安装
■
确保设备插头与电源插座兼容。如果不兼
容,则由具备资格的人员安装正确型号,
并确保电源插座电缆能够承受设备的额定
功率。
■
确保洗碗机不会挤压电缆。
■
通常不建议使用适配器、多个插头和/或延
长电缆。
■
如果必须更换电线,则请打电话给售后服
务中心。
安全
■
禁止用湿手或湿脚触摸设备。
■
请勿赤脚使用设备。
■
请勿通过拉扯电缆或设备本身将插头从电
源插座拔出。
■
请勿将设备暴露在雨、阳光等环境中。
■
本设备不得由身体、感官或精神能力受伤
害的人(包括儿童)或缺乏经验和知识的
人操作,除非他们受到负责其安全的人监
督,或了解设备操作说明。
儿童应受到监督,确保其不会玩弄设备。
■
洗涤程序结束后设备或器皿内残留的水不能
喝。
■
门不得处于打开状态,因为这可能造成潜
在危险(如绊倒)。
■
斜靠或坐在洗碗机打开的门上可能使其翻
倒。
警告!
刀子以及有锋利尖部的其它器具必须放在
篮筐内,且尖部朝下,或置于水平位置。
日常使用
■
本设备供家庭以及其它类似应用使用,
如:
-商店、办公室和其它工作场所的
员工厨房区;
-农舍;
-客户在酒店、汽车旅馆和其它居住型场
所使用;
-床和早餐型环境。
除家庭环境或典型家务功能外,本设备的其
它使用(如专家或受过培训用户的商业使
用)均不包含在上述应用内。
如果设备的使用方式与此不符,则设备寿命
可能缩短,并使制造商的保修失效。
在法律许可的最大范围内,制造商对因与家
庭用途不符的使用所造成的任何设备损坏或
其它损坏或损失(即使在家庭环境中)不承
担任何责任。
■
洗碗机是为常用厨房用具而设计的。
被汽油、油漆、钢或铁锈、腐蚀剂、酸或
碱污染的物体不得在洗碗机内清洗。
■
如果家中安装有水软化设备,则无需在洗
碗机配备的水软化器中加盐。
36
■
刀具可放在篮筐内,刀柄朝下,这样的清
洗效果最好。
■
如果设备故障或不能正常工作,请将其关
闭,切断供水,请勿瞎捣鼓。只能由获准
的服务商进行维修,只能使用正品备件。
未遵循上述建议可能造成严重后果,危及
设备安全。
处理
■
洗碗机是用可回收材料制成的,因此,它
可以环保的方式进行处理。
■
如果您要处理旧洗碗机,请小心地取下
门,以避免儿童被陷于其中的危险。
安装
(技术说明)
重要
当设备放在铺有地毯的地板上时,必须注
意确保底部通风口没有堵塞。
确保设备插头在安装后可够得到。
电气连接
本设备符合国际安全标准,配备带接地连接
的 3 脚插头,以保证设备完全接地。
在将设备连接到电源前,应确保:
1.电源插座正确接地;
2. 电源满足设备标牌所列的功耗需求。
警告!
确保设备正确接地。
如果未充分接地,您会发现,在触摸设
备金属部件时,由于无线电干扰抑制器
的存在,您会感到电分散。
制造商对因设备未接地造成的任何损坏不承
担任何责任。
设 备 符 合 欧 洲 指 令 73/23/EEC 和
89/336/EEC(分别被 2006/95/EC 和
2004/108/EC 代替)以及后续修正
案。
37
2
3
1
水管连接
重要
设备必须使用新软管连接到供水。旧软管
不得重复使用。
■
进水和排水软管可通向左侧或右侧。.
重要
洗碗机可连接到冷水或热水,只要温度不
超过 60°C。
■
水压必须介于 0,08MPa 和 0,8MPa 之间。
如果水压低于最小值,则请咨询我们服务
部。
■
进水软管必须连接到水龙头,使得在设备
不用时可切断供水(图.1B)。
■
洗碗机配备 3/4"螺纹连接器(图.2)。
■
用 3/4"附件将进水软管“A”连接到水龙
头“B”,确保拧紧。
■
如果必要,进水管可延长至 2,5 米。延长
管可由售后服务中心提供。
■
如果水中有水垢沉淀或沙子,则建议从售
后 服 务 中 心 购 买 适 当 的 过 滤 器 art.
9226085(图. 3)。过滤器“D”必须插
入水龙头“B”和进水软管“A”之间,记
得安装垫圈“C”。
■
如果洗碗机连接到新管或长时间未使用的
水管,则在连接进水软管前,让水流动几
分钟。这样就不会有沙子或铁锈沉淀堵塞
进水过滤器。
38
出水软管连接
■
出水软管应排入一根竖管,确保无弯曲
(图.4)。
■
竖管必须高于地板至少 40 厘米,其内径
至少为 4 厘米。
■
建议安装防气阀(图.4X)。
■
如果必要,出水软管可延长到 2,5 米,只
要保持其距地板最大高度 85 厘米。延长
水管可由售后服务中心提供。
■
软管可挂在水槽侧面,但不得浸入水中,
以防止在设备工作时水通过虹吸管回流到
设备中(图.4Y)。
■
在台面下安装设备时,软管夹必须固定到
台 面 下 尽 可 能 最 高 的 墙 壁 位 置
(图.4Z)。
■
检查并确保进水和出水软管无弯曲。
4
开门
如果在工作时打开设备,则电气安全装置会
自动关闭所有操作。
重要
为使设备正常工作,在设备工作时请勿打
开门。
关门
请将篮筐放在设备内。
确保喷臂自由旋转,不被刀具、陶器或平底
锅阻碍。关门,并按压门,确保其牢牢关
闭。
39
等级
水硬度
使用再生盐
水软化器
设置
°fH
(法国)
°dH
(德国)
0
0-5
0-3
无
d0
1
6-10
4-6
有
d1
2
11-20
7-11
有
d2
3
21-30
12-16
有
d3
*4
31-40
17-22
有
d4
5
41-50
23-27
有
d5
6
51-60
28-33
有
d6
7
61-90
34-50
有
d7
水软化装置
根据水源,水中含有不同数量的石灰岩和矿
物质,它们会沉淀在器皿上,形成白色污渍
和痕迹。水中矿物质含量越高,水就会越
硬。洗碗机配备有水软化装置,它使用特殊
的再生盐供应软化水,用于清洗器皿。水的
硬度可从供水公司获得。
调节水软化器
软化装置可以 8 种不同设置处理硬度高达
90°fH(法国等级)或 50°dH(德国等级)
的水。
设置如下表所示:
*
软化装置出厂时设置为
4
级(
d4
),因为
这可满足大多数用户的需求。
根据水硬度,以下列方式调节水软化装置
的设置:
重要
在开始本程序前,洗碗机必须始终关闭。
1.按 住 “程序 选择” 按 钮, 同时 按“开 /
关”按钮启动洗碗机(可听到一个短促
的信号声)。
2.按住“程序选择”按钮至少 5 秒钟,直到
听到一个短促的信号声。当前水软化器
设置等级显示在显示器上。
3.再次按相同按钮,以选择所需水软化器等
级:每次按按钮时,设置将增加一个等
级。 当达到 “ d7 ”时, 显 示器 将返 回
“d0”。
4.按“开/关”按钮关闭洗碗机,以确认新设
置。
警告!
如果出现任何问题,按“开/关”按钮关
闭洗碗机,重新启动程序(步骤 1)。
数字显示器
“程序选择
”
按钮
“开
/
关”
按钮
40
加盐
■
在设备底部有一个容器,用于盛放软化器
再生盐。
■
只能使用专门为洗碗机设计的盐,这非常
重要 。其它 类型 的盐 含有少 量不 溶颗
粒,长时间使用可能影响和降低软化器
性能。
■
要加盐,拧下底部容器的盖子,然后重新加注
容器。
■
在操作时,少量水会溢出,但仍继续加
盐,直到加满容器。当容器加满时,清除
螺纹上的盐残留,重新拧紧塞子。
■
加盐后,建议运转一次完整的洗涤周期或
“冷水冲洗”程序。盐分配器的容量为
1.5 - 1.8kg,为高效使用设备,应根据水
软化装置的调节情况随时重新加注。
重要
(仅适用于首次启动)
首次使用设备时,在加满盐容器后,必
须加水,直到容器溢流。
加盐指示器
本型号控制面板上有一个指示灯,当必须重
新为容器加盐时,它将变亮。
重要
器皿上的白色污渍通常是盐容器需要加注
的一个重要标记。

41
1
2
a
b
3
调整上篮筐
如果通常使用 的盘子,则在将
上篮筐放置到位后,将盘子放入下篮筐内,
并按如下步骤操作:
1.拉出上篮筐;
2.然后抓住篮筐两侧,将其抬起(图.1)。
a
b
直径大于 20cm 的盘子可不再装入上篮筐,
当篮筐在上面位置时,不得使用活动架。
将篮筐调整至下面位置:
1.抓住篮筐两侧,轻轻抬起(图.2a);
2.然后缓慢放入正确位置(图.2b)。
备 注 : 禁 止 仅 用 一 侧 抬 起 或 放 下 篮 筐
(图.3)。
注意:
建议在装载器皿前调整篮筐。
29cm-32,5cm
42
装载器皿
使用上篮筐
■
建议将较大盘子(约 26 cm 以上)微向
后倾放置,以便于将篮筐放入设备内。
■
沙拉碗和塑料碗也可放在上篮筐内。建议
进行固定,以免水流将其打翻。
■
上篮筐是为提供最大使用灵活性而设计
的,可装载双排 24 个盘子、五排 30 个玻
璃杯或混合装载。
日常标准负荷如图 1、2 和 3 所示。
上篮筐(图.1)
A=汤盘
B=餐盘
C=甜点盘
D=碟子
E =杯子
F =玻璃杯
1
A
C
E
B
D
F
上篮筐(图.2)
A=汤盘
B=餐盘
C=甜点盘
D=碟子
E =杯子
F =带把玻璃杯
G=玻璃杯
H=刀具篮筐
2
B
A
C
D
F
E
H
G
F
■
上篮筐配备有活动架,挂在篮筐侧面,可
有四个调节位置.
■
在放下位置,(A-A1)活动架可用于下列物品
:茶杯和咖啡杯、厨房刀具和长柄勺。带
把玻璃杯可安全地挂在架子端部。
A A1
■
在直立位 置 (B-B1)架子使您可放入餐盘和
汤
盘。盘子应垂直放置,盘子底部朝向洗碗机
后部,盘子间隙使水能够自由通过。
B B1
43
上篮筐(图.3)
A =玻璃杯
B =碟子
C =杯子
D =小碗
E =中碗
F =大碗
G=甜点盘
H =餐勺
I =长柄勺
- 位置“B”:尽管是标准大小但具有特定
形状的器皿(非常深的碗、方形器皿或
无边器皿等)。
- 位置“C”:较大的浅盘和/或非标准形状
器皿(方形、六角形、椭圆形、比萨盘
等)。
L =刀具
3
C
H
4
B
L
I
A
F
G
C
D
C
B
5
C
E
A
A
H
使用下篮筐
■
深平底锅、烤箱器皿、汤碗、沙拉碗、盖
子、餐具、餐盘、汤盘和长柄勺可放在下
篮筐内。
■
将刀具放在塑料刀架上,把手朝下。
■
将刀架放在下篮筐内(图. 7 和 8),确保
刀具不会阻挡转臂。
■
下篮筐配备有一个专用可调中间架(图 4
和 5)。这实现了稳定和最佳装载,即使
器皿的大小和/或形状不标准。
- 位置“A”:标准负荷或不包括平底锅、
沙拉碗等的负荷。
6
A
B
警告!
如果篮筐内小盘子的支撑位置不正确,则盘
子将阻挡下喷臂的转动。
■
小盘子(如甜点盘)必须放置在下篮筐内,
如图 6 所示,支撑朝外(“B”)。
对于正常或较大盘子,支撑必须在位置
(“A”)。
44
A
B
C
E
日常标准负荷如图 7 和 8 所示。
下篮筐(图. 7)
A=中型深平底锅
B=大型深平底锅
C=煎锅
D=汤碗、餐具
E =刀具
F =烤箱器皿
G=中碗
H=小碗
7
B
A
C
G
F
D
请合理装载洗碗机,以保证最佳洗涤效果。
重要
下篮筐有一个安全止动装置,方便安全伸
缩,在满负荷时特别有用。加盐时要清洁
过滤器,通常维护时,必须完全拉出篮筐。
刀具篮(图.9)
刀具篮顶部可取下,以方便各种装载选项。
9
E
H
下篮筐(图. 8)
A =汤盘
B =餐盘
C =甜点盘
D =餐具
E =刀具
8
D
测试实验室信息
根据 EN 规范,欲了解比较测试和噪声级测
量的相关信息,请咨询:
C
testinfo-dishwasher@candy.it
在要求中,请指明洗碗机的型号和数量(参
见标牌)。
45
加洗涤剂
洗涤剂
重要
使用专门为洗碗机设计的粉状、液体或片
状洗涤剂是至关重要的。
“FINISH”提供非常好的效果,可轻松获
得。
不合适的洗涤剂(如手洗用洗涤剂)不含
有洗碗机所用的正确成分,可能妨碍洗碗
机正常工作。
加注洗涤剂容器
洗涤剂容器在门里面(图. A“2”)。如果容
器盖关闭,则按按钮(A)打开。
在每个洗涤周期结束时,盖子始终打开,准
确洗碗机下次使用。
警告!
在装载下篮筐时,请确保盘子或其它器皿
不要妨碍洗涤剂分配器。
所用洗涤剂数量根据器皿脏度以及要洗涤的
器皿类型而不同。
我们建议在洗涤剂隔间(B)的洗涤部分使用
20÷30g 洗涤剂。
B
在将洗涤剂倒入容器后,关闭盖子,首先推
(1),然后按压(2),直到您听到咔嗒声。
由于并非所有洗涤剂均相同,洗涤剂盒上的
说明可能不同。我们只想提醒用户,太少洗
涤剂不能彻底清洁器皿,而太多洗涤剂不会
产生更好效果,而且还浪费。
重要
请勿使用过量洗涤剂,同时有助于限制
对环境的损害。
A

46
洗涤剂类型
洗涤片
不同制造商的洗涤片溶解速度不同,因此,
对于时间短的程序,洗涤片可能不会完全有
效,因为它们没有彻底溶解。如果使用这些
产品,则建议选择时间较长程序,以保证洗
涤剂充分使用。
重要
要获得满意的洗涤效果,洗涤片必须放在
洗涤剂容器的洗涤部分,请勿直接放在盆
内。
浓缩洗涤剂
浓 缩 洗 涤 剂 ( 碱 度 降 低 并 加 自 然 酶) 与
50°C 洗涤程序一起使用,可对环境产生较
小影响,有助于保护器皿和洗碗机。
50°C 洗涤程序可有意利用酶的脏物溶解特
性 , 与 浓缩 洗 涤 剂 一 起 使 用 ,可 达 到 与
65°C 程序相同的效果,但温度更低。
合成洗涤剂
还包含冲洗辅助剂的洗涤剂必须放在洗涤剂
容器的洗涤部分。冲洗辅助剂容器必须是空
的(如果不是空的,则在使用合成洗涤剂
前 , 将 冲 洗 辅 助 剂 调节 器 设 置在 最 低 位
置)。
“多合一”合成洗涤剂
如果您想使用“多合一”(“三合一”/“四
合一”/“五合一”等合成洗涤剂,即含有盐
和/或冲洗剂的洗涤剂,我们建议如下:
■
认
真阅读包装上的制造商说明,并严格遵
循;
■
含有水软化剂/盐的洗涤剂效果取决于供水
硬度。检查您的供水硬度是否在洗涤剂包
装上指示的有效范围内。
如果在使用这种产品时,您没有获得满意的
洗涤效果,则请联系洗涤剂制造商。
在某些情况下,使用合成洗涤剂可能造成:
■
器皿或洗碗机内水垢沉淀;
■
洗涤和干燥性能下降。
重要
因使用这些产品直接造成的任何问题均
不在保修范围内。
请注意,在使用“多合一”合成洗涤剂时,
冲洗辅助剂和盐指示灯(只用于选择型号)
是多余的,因此您必须忽视指示灯。
如果出现洗涤和/或干燥问题,我们建议您使
用 传 统 的 各 种 产 品 ( 盐 、 洗 涤 剂 和冲 洗
剂)。这将保证洗碗机中的水软化器正确工
作。
在这种情况下,我们建议您:
■
重新加满盐和冲洗辅助剂容器;
■
无负荷运转一次正常的洗涤周期。
请注意,在使用常规盐时,在系统恢复高效
之前,需要运转多个周期。
47
加冲洗辅助剂
冲洗辅助剂
冲洗辅助剂在最后冲洗周期自动释放,有
助于器皿迅速干燥,并防止斑点和污渍形
成。
加注冲洗辅助剂容器
冲洗辅助剂容器位于洗涤剂容器左侧(图
.A"3"
)。
要打开盖子,按参照标记,同时拉开口拉环。
建议使用专门为洗碗机设计的冲洗辅助剂。
通过分配器上的指示器(C)查看冲洗辅助剂液位。
满 空
暗 亮
从 1-6调节冲洗辅助剂
调节器(D)位于盖子下面,可用硬币转动。
建议位置为 4。
水中的石灰岩含量会极大地影响水垢的形成
及干燥性能。
因此,调节冲洗辅助剂的数量,以达到良好
的洗涤效果,这是至关重要的。
如果在洗涤后器皿上出现条纹,则减少一个
刻度的数量。如果出现白斑,则增加一个刻
度的数量。
C
D
48
2
3
过滤器清洁
过滤器系统(图.A“4”)包括:
1
一个中央容器,用于收集较大颗粒;
一个平网,用于连续过滤洗涤水;
一个微过滤器,位于平网下面,用于收集最
小的颗粒,以保证完美的冲洗效果。
■
为保证每次都达到卓越效果,过滤器应在每次
洗涤后检查和清洁。
■
要取下过滤装置,只需逆时针转动把手
(图.1)。
■
为便于清洁,中央容器可取下(图.2)。
■
取下平网过滤器(图.3),在水流下清洗
整个装置。必要时,可使用小刷子。
■
自动清洁微过滤器减少了维护,过滤装置
只需每两周检查一次。然而,在每次清
洗后,建议检查中央容器和平网过滤器
是否堵塞。
警告!
清洁过滤器后,确保它们正确组装,平网
过滤器正确放置在洗碗机底部。
确保将过滤器顺时针拧入平网内,因为过
滤装置未拧紧可能对设备效能造成不利影
响。
重要
禁止在无过滤器时使用洗碗机。

49
实用提示
如何获得真正良好的洗涤效果
■
在将器皿放入洗碗机前,清除所有残留食
物(骨头、贝壳、肉块或蔬菜、咖啡
渣、果皮、烟灰、牙签等),以避免阻
塞过滤器、出水口和清洗臂喷嘴。
■
请勿在将器皿装入洗碗机前进行冲洗。
■
如果深平底锅和烤箱器皿沾有烧糊或烧烤
食物的残留物,则建议在洗涤前进行浸
泡。
■
将器皿面朝下放置。
■
器皿放置应不得相互触碰。如果正确装载,
则您会获得更好效果。
■
装载器皿后,检查清洗臂能否自由旋转。
■
具有特别顽固食物颗粒或烧糊食物残留的
平底锅和其它器皿应在洗碗机用的洗涤
剂水中浸泡。
■
要正确洗涤银器:
a) 使用后立即冲洗银器,特别是用于蛋
黄酱、鸡蛋、鱼等时;
b) 请勿将洗涤剂喷于其上;
c) 与其它金属分开。
如何节约
■
如果您想让洗碗机进行完全洗涤,则在餐
后将器皿放在洗碗机内,必要时打开
“冷水冲洗”周期,以软化食物残留,
并清除新装载器皿上的较大食物颗粒。
当洗碗机装满时,启动完全洗涤周期程
序。.
■
如果器皿不是很脏或篮筐不很满,则选择
“经济”程序,遵循程序清单说明。
哪些不能洗涤
■
应记住的是,并非所有器皿适合在洗碗机
内洗涤。我们建议,除非另外指明,否
则不要使用洗碗机洗涤热塑器皿、带木
头或塑料把手的刀具、带木头把手的深
平底锅、铝制器皿、水晶含铅玻璃杯。
■
某些装饰可能褪色。因此,在装载整批器
皿前,最好先洗涤一只,以确保其它同
类器皿不会褪色。
■
最好不要将带不锈钢把手的银制刀具放入
洗碗机内,因为两者可能会发生化学反
应。
重要
在购买新陶器或刀具时,始终确保它们适
合在洗碗机中洗涤。
有用提示
■
为避免顶架滴落物,首先取出下架。
■
如果器皿要留在设备中一段时间,将门半
开,以使空气循环,并提高干燥性能。

50
1
2
清洁和维护
1b
■
要清洁洗碗机外部,请勿使用溶剂(除油作
用)或磨蚀剂,只能使用浸水的布。
■
洗碗机不需要特殊维护,因为水箱是自动
清洁的。
■
定期用湿布擦拭门封条,以清除任何食物
残留或冲洗辅助剂。
■
建议通过空转洗涤定期清除石灰岩沉淀或
脏物;将一杯醋倒入水箱底部,选择轻
柔洗涤。
■
尽管对过滤器进行例行清洁,但如果您发
现器皿或平底锅未正确清洗或冲洗,则检
查转臂上的所有喷头(图.A“5”)是否畅
通。
如果喷头堵塞,则按下列方式进行清洁:
1.要取下上转臂,对其旋转,直到它与箭头
标记的符号对齐(图 1)。向上推(图.
1b),并保持向里推,以顺时针方向将
其旋出(要重新组装,重复相同操作,但
逆时针旋转)。下转臂可通过向上拉而取
出(图 2);
2.在水流下清洗转臂,以清除喷头的任何堵
塞;
3.完成后,重新将转臂安装在相同位置,记
住对准箭头,并拧紧。
当周期结束时
在每次洗涤后,必须关闭供水,并按开/关
按钮关闭设备,使其处于“关”位置。
如果在一段时间内不使用设备,则建议遵循
下列规定:
1. 用洗涤剂进行空洗,以清除设备内的任何
沉淀物;
2. 拔出电插头;
3.关闭水龙头
4.加注冲洗辅助剂容器;
5. 让门半开;
6.保持设备内部干净;
7.如果设备要放在温度低于 0°C 的地方,则
管道内残留的水可能冻结。等待温度升高到
零度以上,然后在启动洗碗机前等待约 24 小
■
门封条和水箱内衬是不锈钢;然而,如果
出现氧化斑点,则这可能是由于水中存在高
含量的铁盐。
■
斑点可用温和的磨蚀剂清除;禁止使用氯
基材料、钢丝绒等。
时。
51
控制面板描述
A 数字显示器
B “程序选择
”
按钮
C “延迟启动”按钮
D “多合一”选择按钮
E “沾污度”按钮
F “启动”/“复位”按钮
(启动/取消程序)
G “延迟启动”指示灯
H “选项选择”指示灯
I “沾污度”指示灯
L “盐空”指示灯
M “冲洗辅助剂空”指示灯
N 程序指南
O “开/关”按钮
尺寸
宽 x 高 x 深(cm)
门开时深度(cm)
117
技术数据
EN50242 负荷
15
平底锅和器皿容量
9 人
供水压力(MPa)
最小 0,08 -最大 0,8
保险丝/功率输入/电源电压
参见标牌
消耗量(主程序)
*
程序
能源(kWh)
水(L)
密集
2,03
20
自动通用
1,50
14
经济
1,04
10
快速 32'
0,73
9
关闭模式和启动模式的功耗:0,30
W /
0
,
45
W
*数值是根据欧洲标准 EN50242 在实验室中测量的(消耗量可能根据使用条件而变化)。
AB
CD E FM
N
O
LGH I
59,8 x 82 ÷
90 x 55
52
程序选择和特殊功能
(与程序指南一起使用)
“沾污度”按钮
重要
当洗碗机启动时,最后使用的“沾污
度”将显示。
程序设置
■
关门(在听到一声信号后,程序将自动启
动)。
在程序开始一分钟内,可按“程序选择”
按钮选择另一程序(还可修改“沾污度”
设置)。
“自动”程序
“脉冲”程序
重要
洗涤泵“间歇”工作不得被认为故障,
它是脉冲洗涤的一种特征,因此必须被
视为程序正常运行。
这些按钮允许根据器皿脏度修改洗涤强度。
洗
和温度将被修改。
按按钮+,洗涤强度将增大,按按钮–,洗涤
强度将减小,洗涤时间将显著缩短。按钮与
4 种主要洗涤程序相结合,可提供 8 种额外
洗涤周期
■
打开门,将脏器皿放入设备内。
■
按”开/ 关”按钮 显示器将显示两行。
■
按“程序选择”按钮(“PROGR.”),
选择一个程序。
■
如果您要选择“脏度”,按相应按钮。
■
如果您要选择一个选项,按选项按钮(对
应指示灯将变亮)。
选项按钮可在程序开始
选项按钮可在程序开始选项按钮可在程序开始
选项按钮可在程序开始
1
分钟内选择或取
分钟内选择或取分钟内选择或取
分钟内选择或取
消选择
消选择消选择
消选择。
。。
。
■
按“启动”按钮。 程序长度以小时和分钟
交替方式显示在显 示器上[即:1h(1 小
时)/ 25(25 分钟)
洗碗机配备一个脏度传感器,它能够在所有
“自动”程序阶段分析水脏度(参见程序清
单);由于该传感器,洗涤周期参数自动适
应器皿的实际脏度。因此,良好洗涤效果得
到保证,同时优化水和能源消耗
“脉冲”程序利用脉冲洗涤技术,它降低
了消耗和噪音,提高了性能。
53
程序中断
不建议在程序运行时打开门,尤其是在主洗
涤和最后热冲洗阶段。然而,如果在程序运
行时打开门(例如,增加器皿),设备会自
动停止,显示器闪烁显示周期结束前的剩余
时间。关闭门,不要按任何按钮。周期将从
停止时开始。
警告!
如果您在干燥周期打开门,则可听到一声
信号,表明干燥周期尚未结束。
修改正在运行的程序
按如下步骤修改或取消正在运行的程序:
■
打开门。
■
此时可设置新程序。
警告!
在启动新程序前,应检查分配器中是否还
有洗涤剂。如果必要,加满分配器。
如果在洗碗机工作时出现断电,则特殊内
存会存储所选程序,当电源恢复时,它将
在停止时继续。
程序结束
您会听到 30 秒间隔的 3 次 5 秒报警声(如
果未静音),表示程序结束。
现在可取出器皿,按“开/关”按钮关闭洗
碗机,或装入器皿,以执行新的周期。
选项按钮
“多合一”按钮
该
选项优化“多合一”(“三合一”/“四
合一”/ “ 五 合一 ”等 )合 成洗 涤剂 的使
用。按该按钮,选择的洗涤程序被修改,以
获得合成洗涤剂最佳性能;此外,盐和冲洗
辅助剂不足指示灯失效。
警告!
选择后,该选项在下个洗涤周期仍有效
(指示灯变亮),它只能通过再次按按
钮取消(指示灯熄灭)。
重要
当选择该选项时,“快速”周期延长 10
分钟。
■
按住“复位”按钮至少 5 秒钟。
“
““
“00”
””
”将出现在显示器上,并可听到一些信
号声。
。。
。
■
显示器将显示两行。
正在运行
的程序将被取消 。

54
“延迟启动”按钮
洗碗机启动时间可通过该按钮设置,延迟启
动时间为 1 – 23 个小时。
按如下步骤设置延迟启动:
■
按 “ 延 迟 启 动 ” 按 钮 ( 显 示 器 显 示
“00”)。
■
再次按按钮,以小时为单位增加延迟(每
按一次按钮,延迟时间增加 1 小时,最大
延迟 23 小时)。“延迟启动”指示灯变
亮。
■
要开始倒计时,按“启动”按钮(“延迟启
动”指示灯开始闪烁)。在倒计时结束时,
程序将自动开始(“延迟启动”指示灯熄
灭)。
如果您想查看哪个程序被选择,则按“程序
选择”按钮。
按如下步骤取消延迟启动:
■
此时,必须设置新程序和选项按钮,以启
动新程序,如“程序设置”部分所示。
程序结束报警静音
程序结束报警可按如下步骤静音:
重要
在
启动该程序前,洗碗机必须始终关闭。
1.按 住“ 程序 选择 ”按 钮, 同时 按 “ 开 /
关”按钮启动洗碗机(将听到一声短信
号)。
2.按住“程序选择”按钮至少 15 秒钟(期
间,可听到 2 声信号)。
3.当听到第二声信号时,释放按钮(显示器
将显示“b1”,表示报警打开)。
4.再次按相同按钮(显示器显示“b0”,表
示报警关闭)。
5.按“开/关”按钮关闭洗碗机,确认新设
置。
要再次打开报警,执行相同程序。
■
按住“复位”按钮至少 5 秒钟。
“
““
“00”
””
”将出现在显示器上,并可听到一些信
号声。
。。
。
■
延迟启动和选择的程序将被取消。显示器
将显示两行。
55
洗碗机能够通过显示器发出一系列故障信号。
自动故障信号
故障
原因
解决方案
显示器显示 E2,听到报警。
无水(进水软管关闭)。
关闭洗碗机,打开进水软管,重设
周期。
显示器显示 E3,听到报警。
设备不能排水。
检查排水管是否弯曲,或虹吸管或过
滤器是否堵塞。如果问题依然存在,
请联系客服。
显示器显示 E4,听到报警。
水泄露。
检查排水管是否弯曲,或虹吸管或过
滤器是否堵塞。如果问题依然存在,
请联系客服。
显示器显示 E5、E6、E7、
Ef 或 EL,听到报警。
电子控制故障。
联系客服。
显示器显示 E8 或 Ei,听到报
警。
水加热元件工作不正常,或滤板堵
塞。
清洁滤板。
如果问题依然存在,请联系客服。
记住最后使用的程序
记住最后使用的程序记住最后使用的程序
记住最后使用的程序
最后使用的程序可通过下列方式记住:
1.按住“程序选择”按钮,同时按“开/关”
按钮打开洗碗机(可听到一个简短的信
号声)。
2.按住“程序选择”按钮至少 30 秒(在此
期间,可听到 3 个信号声)。
3.当听到第三个信号声时,释放按钮(“A0”
将出现在显示器上,表明记忆关闭)。
重要
在
启动该程序前,洗碗机必须始终关闭。
4.再次按相同按钮(“A1”将出现在显示器
上,表明记忆打开)。
5.按“开/关”按
钮
关
闭
洗碗机,确
认
新
设
置。
要显示记忆,遵循相同程序。
警告!
要保证正确操作防溢流安全
装置,我们建议洗
碗机在操作时不要移动或倾斜。然而,如果必
须倾斜或移动洗碗机,请确保洗涤周期完成,
且洗碗机内无剩余的水。
56
卫生
75°C
密集
75°C
强劲和快速
65°C
AUTO
通用+
65
-
75°C
AUTO
通用
50-
60°C
AUTO
每日
45
-
55°C
夜间
55°C
ECO
45°C
易碎
45°C
A 级 1h
65°C
快速 32'
50°C
预洗
抗菌周期,用于婴儿奶瓶等器皿的洗涤和消毒(即
使很脏器皿)。
每天一次–用于很脏平底锅和整天放置等待洗涤的
任何其它器皿。
用于很脏器皿的快速洗涤。
用于日常洗涤。两次最终冲洗保证高度卫生和清洁
度。
每天一次–用于正常脏度的平底锅和整天放置等待洗
涤的任何其它器皿。
“正常”脏度器皿的快速周期–用于频繁洗涤和正常
负荷。
最安静洗涤周期。夜间洗涤的理想选择,可节约
电费。
针对正常脏度餐具的程序(对于该类餐具,在综
合耗能和耗水量方面最高效)。根据 EN 50242
的标准化程序。
适合易碎的陶器和玻璃器皿。也适合除平底锅外不
太脏的器皿。
适合在餐后直接洗涤的很脏器皿(最多 8 个装载
位)。
-洗涤等级 A-
餐后立即洗涤器皿的快速洗涤。可洗涤 4/6 人负
荷。
对放在洗碗机内直到满负荷再洗涤器皿的短时冷水
预洗。
预洗洗涤
对于带预洗的洗涤程序,建议直接向设备添加第二份洗涤剂(最多 10g)。
/(o)=由于脏度传感器,“自动程序”被优化,它使洗涤参数适应器皿的脏度。
程序指南
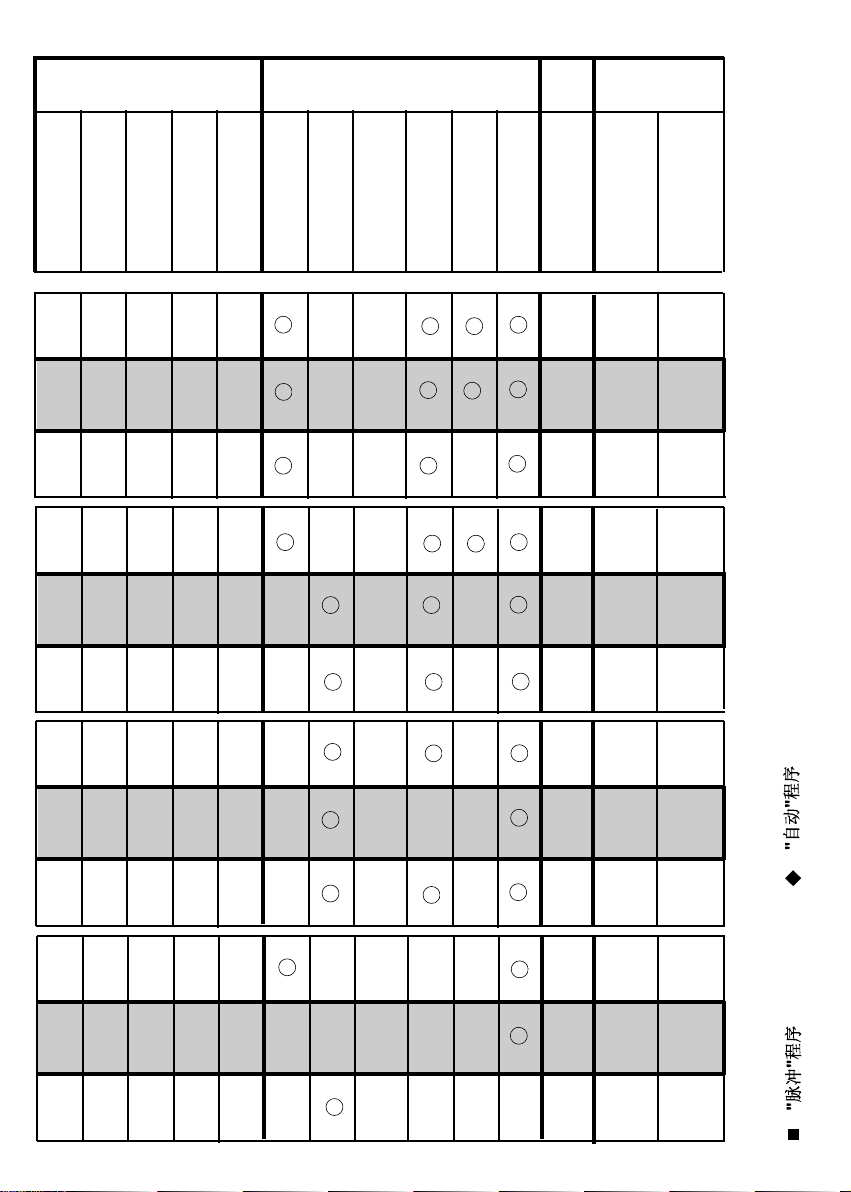
57
140
•••
•
75°C
•
•••
•
•
•••
•
•
130
85
75°C
65°C
•••
•
•••
•
•••
•
•••
•
•••
•
•••
•
•••
•
•
•••
•
•
(
)
(
)
115/
125
100/
120
70/
80
240
170
85
60
32
5
55°C
45°C
45°C
65°C
50°C
65°C/
75°C
50°C/
60°C
45°C/
55°C
•
( )
(
)
(
)
•
核对表
程序内容
平均持
续时
间,分
钟
可用特殊功能按钮
浸泡用洗涤剂(预洗)
洗涤用洗涤剂
清洁过滤器
检查冲洗辅助剂分
配器
检查盐容器
热水预洗
冷水预洗
主洗涤
首次冷水冲洗
第二次冷水冲洗
加冲洗辅助剂的热水冲洗
冷水
(15
°C) (
公差
±10%)
“延迟启动”按钮
“多合一”按钮
有
有
有
有
有
有
有
有
有
有
有
有
有
有
有
有
有
有
有
有
有
有
有
*
对于热水,程序结束前的剩余时间在程序运行时自动显示。“脉冲”程序“自动”程序
.
=
=
*

58
水封系统
水封系统是为提高您设备的安全性而设计的,尤其是在设备无值守操作时。
实际上,水封系统可防止设备故障或管道断裂造成的溢流。
水封如何工作
设备底座内的水槽会收集任何可能泄露的水,并操作传感器,以激活水龙头下面的阀
门,阻止水流出,即使水龙头完全打开。如果包含电气部件的盒子破损,请立即将插
头从插座拔出。
要保证安全系统正常工作,带软管的盒“A”应连接至水龙头,如图 1 所示。进水软管不得关
闭,因为它包含负荷部件。如果软管不够长,不能正确连接,则必须用较长软管更换。软管可向
服务商购买。
洗碗机还配备防溢流安全装置,如果因故障水超过正常水位,则自动堵塞水流和/或排
出多余的水。
图.1
A
59
确定小故障
如果洗碗机不能正常工作,在联系服务中心前,请进行下列检查:
故障
原因
校正
1–设备完全死机
插头未连接至墙壁插座
连接电插头
O/I 按钮未按
按按钮
门打开
关门
无电
检查插头保险丝和电源
2–设备不汲水
参见 1 号原因
检查
水龙头关闭
打开水龙头
程序选择器位置不正确
将程序选择器转至正确位置
进水软管弯曲
消除软管弯曲
进水软管过滤器未正确连
接
清洁软管末端的过滤器
3–设备不排水
过滤器较脏
清洁过滤器
出水软管弯曲
拉直出水软管
出水软管延长部分未正确连
接
认真遵循出水软管连接的说
明
墙壁出口连接朝下,而不是朝
上
打电话给具备资格的技术人员
4–设备连续排水
出水软管位置太低
将出水软管抬升至距地板至少
40cm
5–喷臂未听到旋转
洗涤剂过量
减少洗涤剂量
使用合适的洗涤剂
物品阻挡喷臂旋转
检查
盘子和杯子过滤器太脏
清洁盘子和杯子过滤器
6–在无显示器的电子设备上,
一个或多个指示灯快速闪
烁。
进水龙头关闭
关闭设备。打开水龙头。
重新设置周期。
60
故障
原因
校正
7- 器皿部分洗涤
参见 5 号原因
检查
深平底锅底部没有洗干净
在将平底锅放入洗碗机前,烧糊
食物残留必须浸泡
深平底锅边缘没有洗干净
调整深平底锅位置
喷臂被部分阻挡
顺时针旋出环形螺母,取下喷
臂,在水流下清洗
器皿未正确装载
请勿将器皿靠得太近
出水软管末端在水中
出水软管末端不得接触外流
的水
洗涤剂量不合适;洗涤剂时间长
且较硬
根据器皿脏度增加数量,更换洗
涤剂
洗涤程序不彻底
选择更强劲的程序
下篮筐器皿未洗涤
按半负荷按钮
8- 洗涤剂未使用或部分使用
刀具、器皿、平底锅等...不要打
开洗涤剂分配器
器皿放置不得阻碍分配器
9- 器皿上有白斑
水太硬
检查盐和冲洗辅助剂液位,并
调整数量。
如果故障依然存在,请
联系服务中心
10–洗涤中有噪音
器皿相互撞击
重新检查篮筐中的器皿装载
转臂撞击器皿
再次检查装载情况
11–器皿未完全干燥
气流不足
在洗涤程序结束时,让洗碗机门
半开,使器皿自然干燥
无冲洗辅助剂
加注冲洗辅助剂分配器
备注:如果任一情况出现且设备洗涤性能变差,则必须手动清除器皿的沉淀物,因为最终干燥周期会使沉
淀物变硬,使得第二次洗涤不能清除。
如果故障依然存在,请联系服务中心,并提供洗碗机的序列号。序列号可在顶部洗碗机门内侧的标牌或保修
卡上找到。
该信息可便于更迅速地采取更高效的措施。
制造商对本手册印刷错误不承担任何责任。他们还保留在不改变基本特性的情况下根据需要改进其设备的
权力。


制造商对本手册印刷错误不承担任何责任。制造商还保留在不改变基本特性的情况下适
当改进其产品的权力。

该设备根据关于垃圾电气和电子设备(
WEEE
)的欧洲指令
2002/96/EC
进行标记。
通过保证本产品得到正确处理,您将帮助防止对环境和人身健康造成潜在不利后果,这可能因本产品垃圾不当处理而引起。
产品上的符号表示,本产品不可作为家庭垃圾处理。相反,应将其交给适当的回收点,以循环使用电气和电子设备。
必须根据当地垃圾处理的环境法规进行处理。
欲了解关于本产品处理、回收和循环使用的更详细信息,请联系本地市政机构、家庭垃圾处理服务中心或您购买产品的商店。
This appliance is marked according to the European directive 2002/96/EC on Waste Electrical and Electronic
Equipment (WEEE).
By ensuring this product is disposed of correctly, you will help prevent potential negative consequences for the
environment and human health, which could otherwise be caused by inappropriate waste handling of this
product.
The symbol on the product indicates that this product may not be treated as household waste. Instead it shall
be handed over to the applicable collection point for the recycling of electrical and electronic equipment.
Disposal must be carried out in accordance with local environmental regulations for waste disposal.
For more detailed information about treatment, recovery and recycling of this product, please contact your local
city office, your household waste disposal service or the shop where you purchased the product.
13.01 - 41901071
EN
ZH

