
13592 Desmond St., Pacoima, CA 91331 818.897.0808 tel 888.753.9898 toll free www.americanrange.com
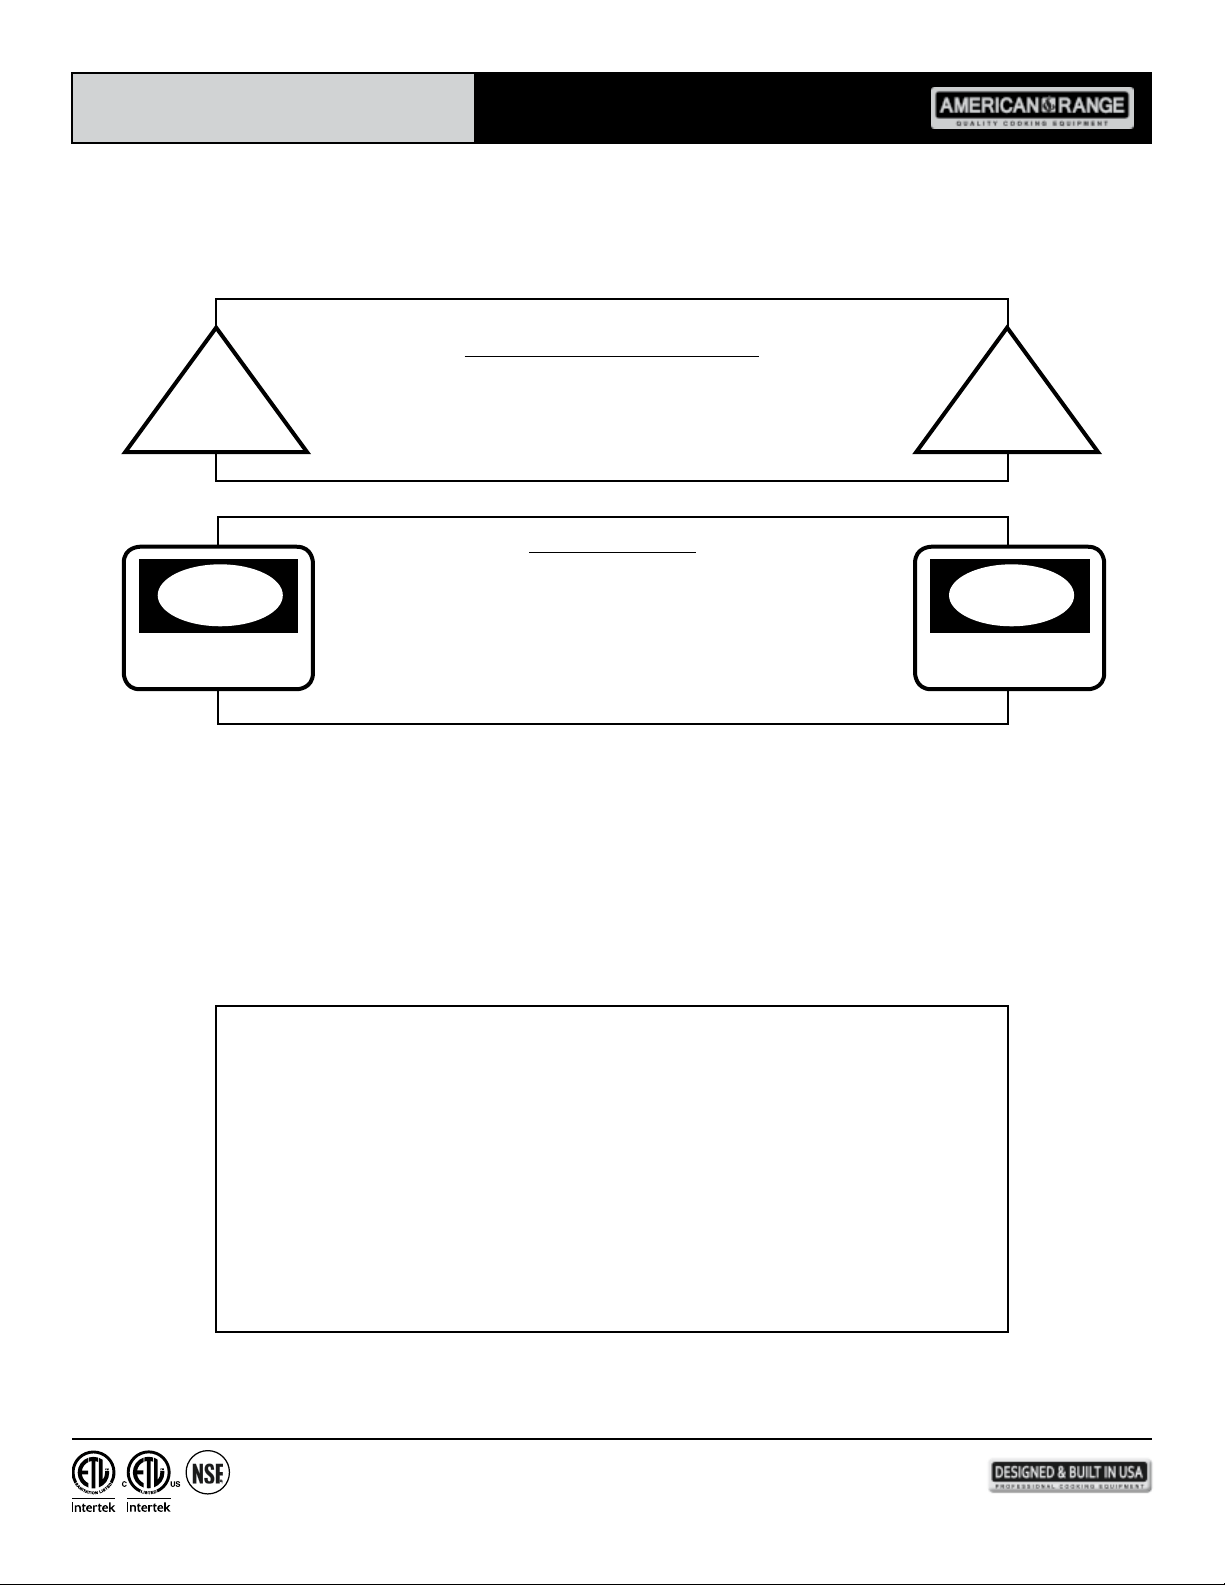
USE AND CARE MANUAL FOR
CUISINE & PERFORMER RANGES
MODEL NUMBERS: ARR-530, ARR-636, ARR-436GD, ARR-436GR
ARROB-430, ARROB-636, ARROB-436GD, ARROB-436GR
PROFESSIONAL QUALITY COOKING EQUIPMENT
CUISINE
ARR-530
PERFORMER
ARROB-430
RETAIN THIS MANUAL FOR FUTURE REFERENCE
DESIGN CLASS FUNCTION
Shown with optional 4" stub back and leg caps.
© 2012 American Range
All Rights Reserved
Cuisine & Performer Ranges Use & Care Manual
13592 Desmond St., Pacoima, CA 91331 818.897.0808 tel 888.753.9898 toll free www.americanrange.com
FOR YOUR SAFETY!
Do not store or use gasoline or
other ammable vapors or liquids
in the vicinity of this or any other appliance.
Model Number: __________________________________________
Serial Number: ___________________________________________
Purchase Date: ___________________________________________
Installed By: __________________________ Install Date:__________
Gas Type: _______________________________________________
Electrical Information: ______________________________________
FOR
YOUR
SAFETY
FOR
YOUR
SAFETY
Instruction to be followed in the event the user smells gas appears on Page 1 of this manual and
should be posted in a prominent location. This information should be obtained by
consulting the local gas supplier.
RETAIN THIS MANUAL FOR FUTURE REFERENCE.
WARNING!
Improper installation, adjustment, alteration, service
or maintenance can cause property damage, injury
or death. Read the installation, operating and
maintenance instructions thoroughly before
installing or servicing this equipment.
WARNING
IMPROPER
INSTALLATION
WARNING
IMPROPER
INSTALLATION
13592 Desmond St., Pacoima, CA 91331 818.897.0808 tel 888.753.9898 toll free www.americanrange.com
To Our Most Valued Customer:
Congratulations on your purchase of an American Range product. We hope you will enjoy the
design, manufactured quality, innovative features and cooking performance of this product – it
represents our continuing dedication to satisfying the most demanding needs of customers
like you.
Please read this manual and become familiar with important safety information about how
to install and set-up the unit, basic operating instructions, and how to maintain that just-like-
brand-new appearance and performance - over years of day-to-day and special holiday use.
If you should encounter any sort of problem, turn to the section of the manual entitled,
"Troubleshooting" – for a quick solution or guidance regarding the next step required to get
back to tip-top condition.
Thank you for choosing an American Range product for your home. As you can expect, this
appliance is designed for years of reliable service. If you have any questions or comments,
please contact the dealer from whom you purchased the unit, or contact American Range
Customer Service at www.americanrange.com or 818.897.0808.
PROFESSIONAL QUALITY COOKING EQUIPMENT
Sincerely,
President, American Range Corporation
Shane Demirjian

Cuisine & Performer Ranges
Use & Care Manual
13592 Desmond St., Pacoima, CA 91331 818.897.0808 tel 888.753.9898 toll free www.americanrange.com
Table of Contents
GENERAL ............................................................................................................................ 1-5
General Information .........................................................................................................................................1
About This Manual ............................................................................................................................................. 2
Shipping Damage Claim Procedure ......................................................................................................... 3
Precautions .........................................................................................................................................................3-5
INSTALL .............................................................................................................................6-20
Site Preparation ................................................................................................................................................... 6
Electrical Connection ....................................................................................................................................... 6
Gas Connection ..................................................................................................................................................6
Rating Plates ...........................................................................................................................................................6
Gas Regulator ....................................................................................................................................................... 7
Gas Requirements ..............................................................................................................................................7
Gas Connection/Flexible Connections ..................................................................................................7
Installation Instructions .................................................................................................................................... 8
Installation Diagrams .................................................................................................................................. 9-17
Installation Checklist ........................................................................................................................................18
Performance Checklist ...................................................................................................................................19
Range Start-up Procedure ..........................................................................................................................19
Model and Parts Identication ..................................................................................................................20
OPERATE ........................................................................................................................ 21-23
Before Using the Cook top ........................................................................................................................21
Operation of Burners ....................................................................................................................................21
Auto-Reignition ..................................................................................................................................................21
Cookware .............................................................................................................................................................22
Suggested Burner Settings ...........................................................................................................................22
Ovens 101 ............................................................................................................................................................23
Oven Operations .............................................................................................................................................23
Broil ..........................................................................................................................................................................23
Grill ...........................................................................................................................................................................24
Best Cooking Results ......................................................................................................................................24
Grill Chart .............................................................................................................................................................24
Griddle ....................................................................................................................................................................25
To Start Cooking ..............................................................................................................................................25
Season the Griddle ..........................................................................................................................................25
Cleaning the Griddle ......................................................................................................................................25
Griddle Chart .....................................................................................................................................................25
MAINTAIN ..................................................................................................................... 26-27
Drying and Dehydrating ...............................................................................................................................26
Care and Cleaning ...........................................................................................................................................26
To Clean the Cook top .................................................................................................................................26
To Clean the Oven ..........................................................................................................................................26
Cleaning Recommendations ......................................................................................................................27
TROUBLESHOOT ...............................................................................................................28
13592 Desmond St., Pacoima, CA 91331 818.897.0808 tel 888.753.9898 toll free www.americanrange.com
1
Cuisine & Performer Ranges
Use & Care Manual
WARNING
If the information in this manual is not followed exactly, a re or
explosion may result causing damage, personal injury or death.
• INSTALLATION AND SERVICE MUST BE PERFORMED BY A
CERTIFIED / LICENSED INSTALLER, SERVICE AGENCY OR THE GAS SUPPLIER
• Do not store or use gasoline or other ammable vapors or liquids in the vicinity
of this or any other appliance.
• Please observe all local and national codes and ordinances.
• Do not remove any permanent warning labels or plates from this product.
• Please ensure that this product is electrically grounded.
• Consumers should retain these instructions for local inspectors and for
future use.
• The included Anti-Tip Device must be installed prior to operation
• WHAT TO DO IF YOU SMELL GAS
º
Do not try to light any appliance.
º
Do not touch any electrical switch, do not use any phone in your building.
º
Immediately call your gas company. Follow the gas supplier instructions.
º
If you cannot reach your gas supplier, call the Fire Department.
WARRANTY REQUIREMENT
For reliable operation and for your own safety, this professional cooking equipment
must be installed by a certied/licensed contractor.
Failure to comply will void any written or implied warranty.
Should the equipment require service during the standard warranty period, the
receipt proving certied installation must be made available to American Range for
verication.
If installation was not performed by a certied/licensed contractor be prepared to
submit a major credit card for payment for proper installation.
13592 Desmond St., Pacoima, CA 91331 818.897.0808 tel 888.753.9898 toll free www.americanrange.com
2
Cuisine & Performer Ranges
Use & Care Manual
The Use and Care Manual is divided into several sections:
The Safety Section informs you about signicant safety precautions when installing and operating your
new fryer. This is a must read section of the manual.
Quick Start and Installation Section describes how to unpack the unit, what to save and what to discard,
installation dimensions, gas and electrical connections and how to identify the primary parts of the
product so you can better understand what’s going on "under the hood".
How to Use Your Product shows you how to light the pilot and set frying temperatures.
The Care and Maintenance and Troubleshooting and Service Sections discuss how to keep your product
in good operating condition, how to identify what might be going wrong with the unit, and how to
communicate your observations with authorized eld service technicians.
Before using your appliance, please read this manual paying special attention to the important safety
instructions located in the next several pages.
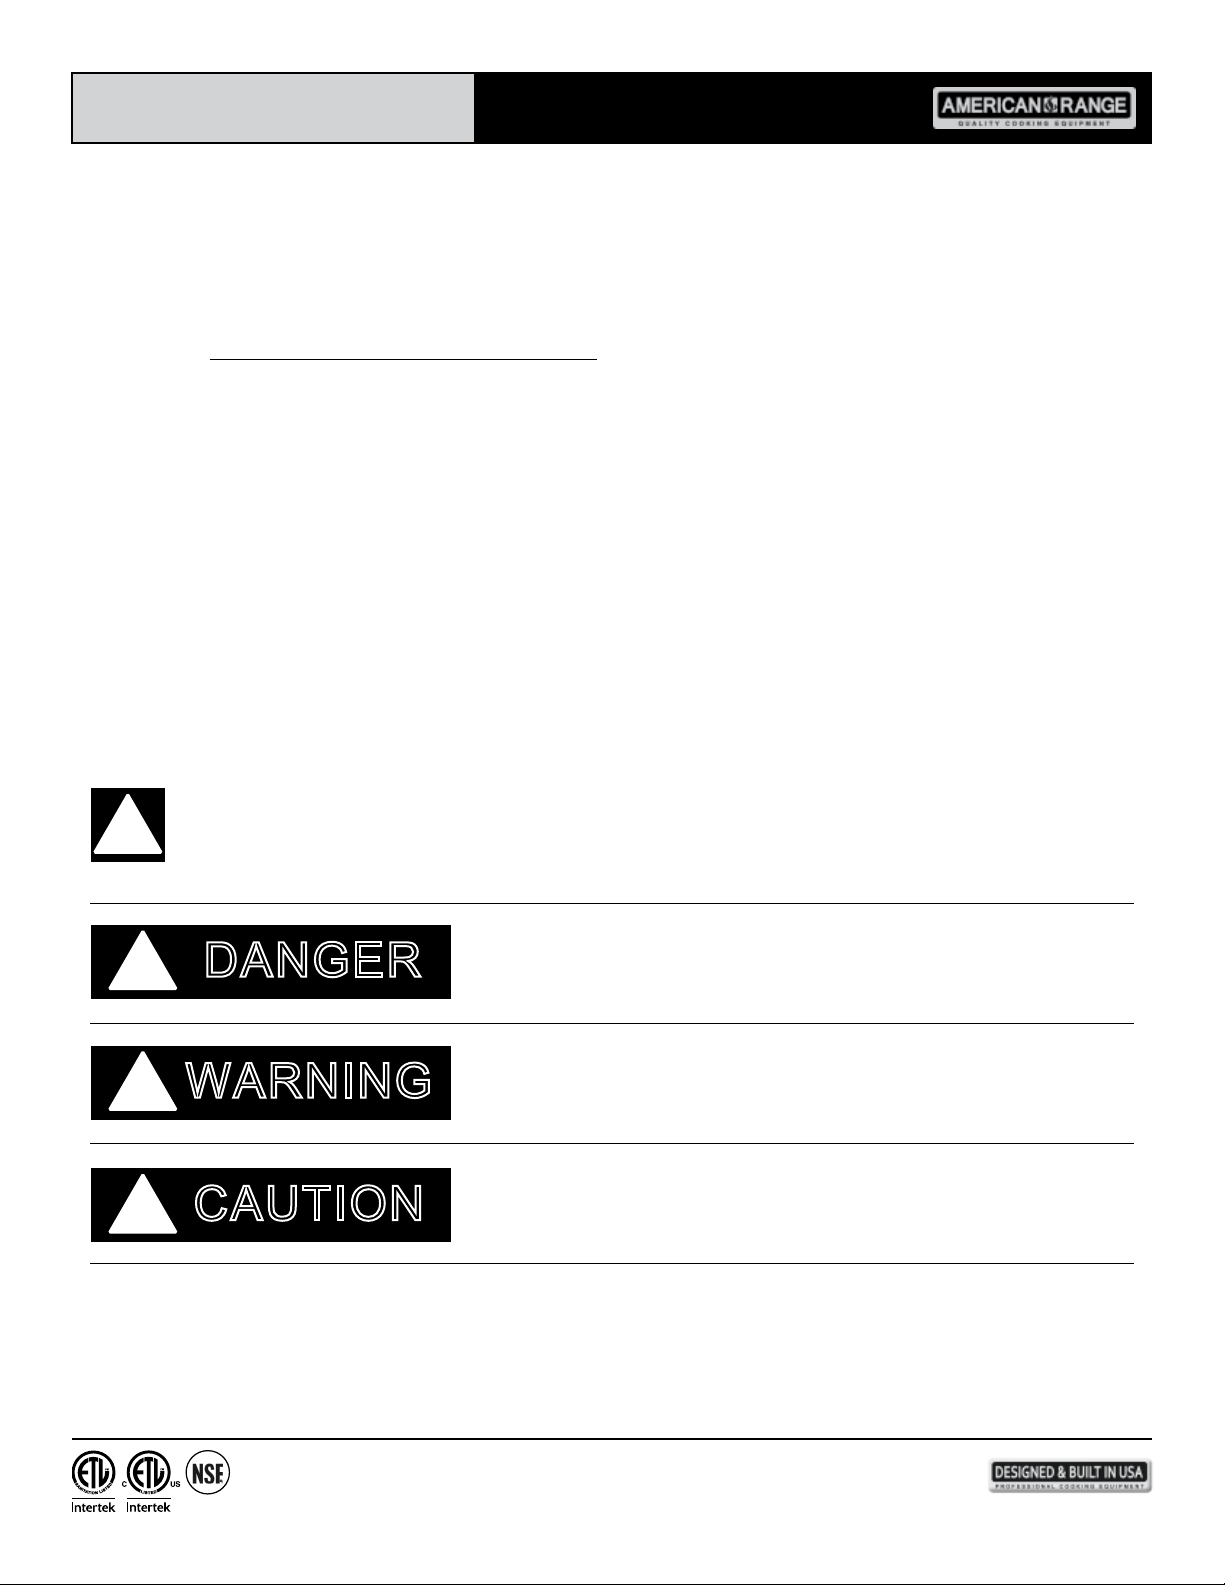
ABOUT THIS MANUAL
!
DANGER
!
CAUTION
!
This is the SAFETY ALERT SYMBOL. This symbol alerts
you to hazards which will result in severe injury or death.
Hazards or unsafe practices which will result in severe
personal injury or death.
Hazards or unsafe practices which may result in minor
personal injury or property damage.
WARNING
!
Hazards or unsafe practices which may result in severe
personal injury or death.
CALIFORNIA PROPOSITION 65 WARNING
The burning of gas cooking fuel generates some by-products which are on the list of substances known by the State of
California to cause cancer or reproductive harm. California law requires businesses to warn customers of potential exposure
to such substances. To minimize exposure to these substances, always operate this unit according to the Owners Manual,
ensuring you provide proper ventilation when cooking with gas.
Cuisine & Performer Ranges
Use & Care Manual
13592 Desmond St., Pacoima, CA 91331 818.897.0808 tel 888.753.9898 toll free www.americanrange.com
3
PRECAUTIONS
CAUTION
!
Check your local building codes for proper installation methods. In the absence of local codes, this appliance should be installed
in accordance with the National Fuel Gas Code No. Z223.1 current issue, and the National Electrical Code ANSI/NFPA No. 70
current issue, or the CAN – B149 Installation Codes for Gas Burning Appliances, and C22.1 Canadian Electrical Code Part 1.
Verify the type of gas supplied to the location, being sure that the appliance is connected to the type of gas for which it is
certied. Models come from the factory certied for use with Natural Gas (NG) or Liquid Propane (LP) gas. Your product,
shown on the rating label and the supplied gas type must be the same. Upon opening your product, the rating label can be
located on the front panel if it is a range or oven. If it is a cook top it can be found on the side panel underneath the left burner.
If connecting this appliance to propane gas, make certain the propane gas tank is equipped with its own high-pressure
regulator - in addition to the pressure regulator supplied with this product when applicable. The maximum propane gas pressure
to this appliance must not exceed 14.0 inches of water column (34.9 millibar) from the propane gas tank to the pressure
regulator.
Your appliance must be installed by a qualied gas installation technician. Have the technician show you the exact location of the
gas shut-off valve on the incoming gas line so you know how to turn off the gas if necessary.
For personal safety, this appliance must be connected to a properly grounded and polarized electrical power supply. If only a
two-prong outlet is available, it is the customer’s responsibility to have it replaced with a dedicated, grounded, three-prong
electrical outlet by a licensed technician. The gas surface burner re-ignition system when applicable depends on a low resistance
electrical ground connection for reliable operation.
• Do not cut or remove the third (ground) prong from the power cord
• Do not use an adapter plug
• Do not use an extension cord
• Do not use a power cord that is frayed or damaged
• Do not plug the appliance into an electrical outlet with a Ground Fault Circuit Interrupter (GFCI)
CAUTION
!
SHIPPING DAMAGE CLAIM PROCEDURE
The equipment is crafted and inspected carefully by skilled personnel before leaving the factory. The transportation company
assumes full responsibility for the safe delivery upon acceptance of the equipment.
If you receive a damaged product, immediately contact your delivery company, your dealer, your builder or installer. Do not
install or attempt to operate a damaged appliance.
1. Note any visible loss or damage on the freight bill or express delivery and have the note signed by the person making
the delivery.
2. File claim for damages immediately regardless of the extent of damages.
3. For damage noticed after unpacking (concealed loss or damage), notify the transportation company immediately and le
a "Concealed Damage" claim with them. This should be done within fteen (15) days from the date that delivery
is made to you. Retain the shipping container for inspection.
13592 Desmond St., Pacoima, CA 91331 818.897.0808 tel 888.753.9898 toll free www.americanrange.com
4
Cuisine & Performer Ranges
Use & Care Manual
Always disconnect the electrical plug from the wall outlet before servicing the unit. It is recommended that a dedicated
electrical circuit be used for this appliance.
Always turn gas shut-off valve to OFF position before servicing unit.
WARNING
!
POWER FAILURE WARNING
Due to safety considerations and the possibility of personal injury, when applicable do not attempt to light or operate range
burners, grills, griddles, the oven or broiler during a power failure. Safety systems which detect the presence of an ignition
source and operate the gas safety valve do not function during a power failure. Be sure all gas valve knobs are turned to and
remain in the OFF position during a power failure.
IMPORTANT SAFETY NOTICE AND WARNING
The California Safe Drinking Water and Toxic Enforcement Act of 1986 (Proposition 65) requires the Governor of California to
publish a list of substances known to the State of California to cause cancer or reproductive harm, and requires businesses to
warn customers of potential exposures to such substances. Users of this appliance are hereby warned that when the oven is
operated, there may be some low-level exposure to some of the listed substances including carbon monoxide. Exposure to
these substances can be minimized by properly venting the oven to the outdoors using approved overhead ventilation equipment
or by opening the windows and/or doors in the room where the appliance is located.
This appliance should not be operated without a properly sized and functional ventilation hood.
WARNING
!
To reduce the risk of appliance tipping, it must be secured to the wall with a properly installed anti-tip bracket. To make sure the
bracket has been installed properly, inspect behind the range using a ashlight.
• Anti-tip devices are supplied where applicable and are only necessary for range products.
• This range can tip causing personal injury
• See Installation Instructions supplied with the range and install the anti-tip device packaged with the range
• If the anti-tip device cannot be located, contact American Range Customer Service by calling 818.897.0808 or by
contacting us at www.americanrange.com
WARNING
!
Do not store items of interest to children above or near the appliance. Children, as well as adults, should never be allowed to
sit, stand or climb on any part of the appliance. Serious personal injury may occur.
DANGER
!
To avoid the possibility of explosion or re, do not store or use combustible, ammable or explosive liquids (such
as gasoline) or vapors inside or in the vicinity of this or any other appliance. Keep items that could explode, such as
aerosol cans, away from the product. Do not store explosive or ammable materials in nearby cabinets or areas.
When operating the oven or broiler, do not touch the surfaces of the ceramic tile broiler, the rack or rack supports, the
walls of the oven or the inside surfaces of the oven door - interior surfaces become hot enough to cause burns. The heat
deector, which deects heat away from the control panel, and the oven door sides will also be hot during use.
DANGER
!
13592 Desmond St., Pacoima, CA 91331 818.897.0808 tel 888.753.9898 toll free www.americanrange.com
5
Cuisine & Performer Ranges
Use & Care Manual
NEVER use this appliance as a space heater to heat or warm the room. Doing so may result in carbon monoxide poisoning
and overheating of the appliance. Do not use the range top or oven as a food or kitchen item storage area.
Never block or cover any slots, holes or passages located anywhere inside or outside the range. These structures are
important to safe operation of the appliance and doing so may block airow through the oven or cook top possibly causing
carbon monoxide poisoning or re. Routinely keep all slots free of grease and other materials.
This appliance has been tested for safe performance using conventional cookware. DO NOT USE any device or accessory not
specically recommended in this guide. DO NOT USE pan or pan covers on surface units, grills or griddles. These devices can
create serious safety hazards including personal injury, create performance problems and may damage the appliance.
Do not store or use corrosive chemicals, vapors, ammables or non-food products in or near this appliance. It is specically
designed for use when heating or cooking food. The use of corrosive chemicals while heating or cleaning could result in
personal injury or damage to the appliance.
WARNING
!
Purchase a kitchen re extinguisher for your home and store it in close proximity to your appliance. Should an uncontrolled re
occur, never use water on grease res. Never pick up a aming pan.The oven door interior and exterior, especially the glass can
get hot during operation. Do not touch the glass – use the door handle to open or close the range door.
The push-to-turn gas valve knobs on the appliance are designed to be child-safe, however, they are not a guarantee
of operation. Children should not be left alone or unattended in the kitchen while the appliance is in use.
Never leave the appliance unattended during use. Boil-overs may occur, causing spills which may ignite.
Never wear loose tting or long sleeved apparel while cooking. Never wear garments made of ammable materials.
Clothing may ignite or catch utensil handles. DO NOT drape towels or other items on door handles. These
items could ignite and cause burns.
If your product is a range or oven ALWAYS place oven racks in the desired position before you start cooking and while the oven
is cool. Always use dry and sturdy pot-holders to carefully slide the oven rack out to add or remove food.
If your product is a range or cooktop located near a window, be certain window curtains or other ammable objects do not
blow over or near the range burners; the items could catch on re.
If operating the surface burners, the ame should be adjusted to just cover the bottom of the pan or pot.
Excessive high ame settings may cause scorching of the nearby counter-top surface, as well as the outside of the utensil
and handles.
ALWAYS turn the appliance off at the end of cooking.
When dehydrating food items, periodically check during the process to ensure that they do not catch on re.
If you are "aming" liquor or other spirits under an exhaust, TURN THE FAN OFF. The draft from the fan could cause the
ames to spread out of control.
Care should be exercised if your appliance is equipped with a high-shelf. During heavy or continuous use, this shelf may be
come hot. Do not place combustible materials or plastic items on the shelf.
Turn the knobs to the OFF position prior to removing them from the valve stems for cleaning.
CAUTION
!
13592 Desmond St., Pacoima, CA 91331 818.897.0808 tel 888.753.9898 toll free www.americanrange.com
6
Cuisine & Performer Ranges
Use & Care Manual
The location selected for the range must meet the following criteria. If any of these criteria are not met, select another location.
SITE PREPARATION
0 The range is a free standing appliance. If the range is to be installed adjacent to cabinets, the clearances where indicated are
required.
0 This range may not be recessed into the cabinets. The rear of the oven door must be beyond the edge of the frontface of the
adjacent cabinet.
0 The gas and electrical supplies should be located below the unit or in the adjacent right cabinet.
0 Any openings in the wall behind the range and in the oor under the range must be sealed.
0 Always keep the appliance free and clear of combustible materials, gasoline, or other ammable vapors and liquids.
0 Do not obstruct the ow of combustion exhaust and ventilation air to the unit.
ELECTRICAL CONNECTION
0 The Range must be electrically grounded in compliance with local codes or, in the absence of local codes, with the
National Electrical Code, ANSI/NFPA70.
0 This range requires a 120 volt supply to operate the ignition system. The supply cord provided on the range is equipped with
a three-prong (grounding) plug for protection against electrical shock.
0 The electrical service in the building must be equipped with a properly grounded three-prong receptacle.
0 Do not cut or remove grounding prong from this plug.
POWER REQUIREMENTS FOR THIS RANGE
0 120 VAC, 60 Hz, single phase, 15 AMP Max
GAS CONNECTION
Be certain the appliance being installed is correct for the gas service being provided. Refer to the appliance rating plate for the gas
supply requirements.
A manual gas shut-off valve must be remotely installed and easily accessible in the adjacent cabinet. The regulator inlet is for a 3/4
inch gas line. The appliance ships with a 1/2 inch to 3/4 inch adapter connected to the regulator.
0 Use at least a 1/2" commercial ex hose to connect range to the gas supply (service line).
0 A manual gas shut-off valve must be installed, in easy access in front of the gas supply (service line) and ahead of the range for
safety and ease of maintenance.
0 All valves must be in the OFF position before connecting to the gas supply line.
INSTALLATION INSTRUCTIONS
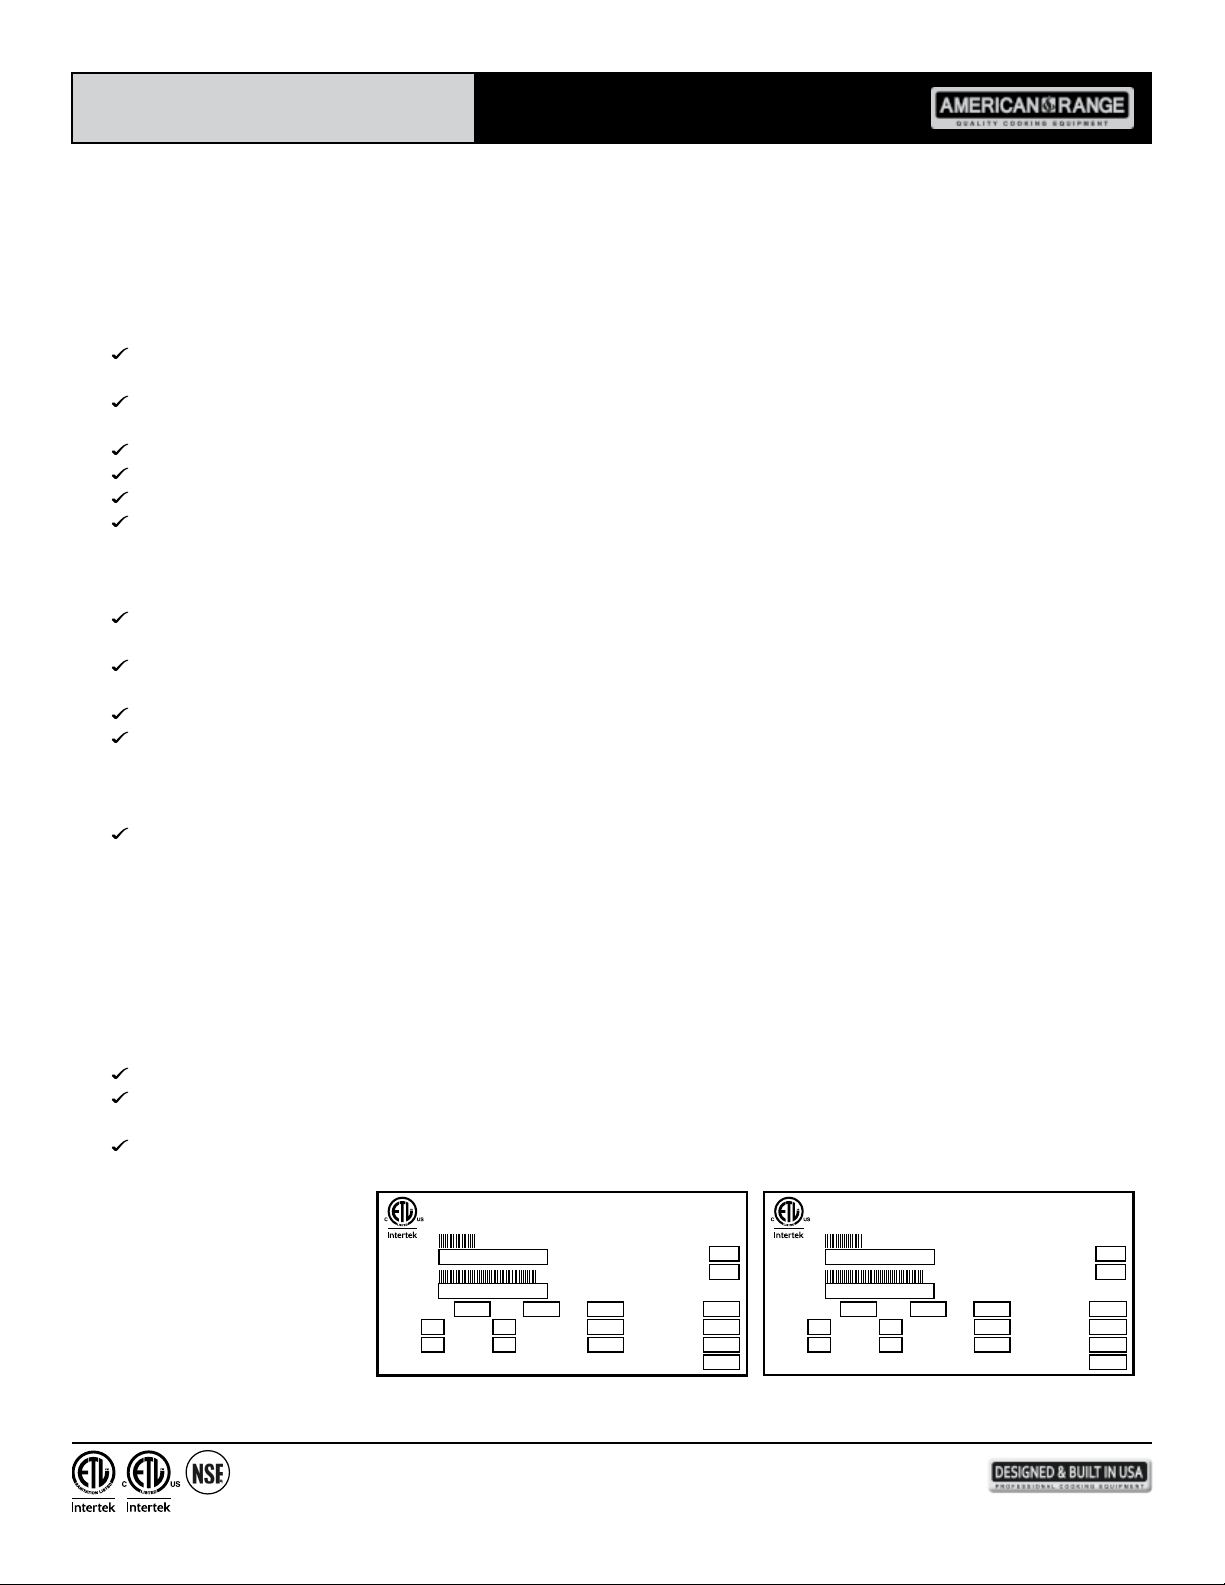
RATING PLATE - The information
on the rating plate denes the
model, serial number, gas type
(natural or liquid propane),
operating pressures and burner
BTU ratings. Keep this information
for future reference. It is essential
for proper identication of the
unit when requesting additional
information or factory support.
BTU INPUT/HR/SECTION
3013256
MODEL NO.
ARR-530
XXXXXX-XXX
XXX
GAS TYPE
MAN. PRESS.
IN W.C.
X.X
COOK TOP
Large
17,000
Medium
13,500
Small
9,000
VOLTS
120
OVEN BK 18 BROIL 18AMPS
CYCLES BK 24,30,36
28,000
BR 24,30,36PHASE
SERIAL NO.
GRILL
GRIDDLE
60
9
1 17,000
AMERICAN
American Range (www.americanrange.com)
13592 DESMOND ST., PACOIMA, CA 91331
ANSI Z21. 1b - 2003 HOUSEHOLD COOKING APPLIANCES
Cuisine Rating Plate
BTU INPUT/HR/SECTION
3013256
MODEL NO.
ARROB-430
XXXXXX-XXX
XXX
GAS TYPE
MAN. PRESS.
IN W.C.
X.X
COOK TOP
Large
25,000
Medium
18,000
Small
12,000
ANSI Z21. 1b - 2003 HOUSEHOLD COOKING APPLIANCES
VOLTS
120
OVEN BK 18 BROIL 18AMPS
CYCLES BK 24,30,36
28,000
BR 24,30,36PHASE
SERIAL NO.
GRILL
GRIDDLE
60
9
1 17,000
AMERICAN
American Range (www.americanrange.com)
13592 DESMOND ST., PACOIMA, CA 91331
Performer Rating Plate
13592 Desmond St., Pacoima, CA 91331 818.897.0808 tel 888.753.9898 toll free www.americanrange.com
7
Cuisine & Performer Ranges
Use & Care Manual
INSTALLATION INSTRUCTIONS
PRESSURE REGULATOR
0 The regulator installed in the range is adjusted at the factory for 5" WC (natural gas) or 10" WC (L.P.) depending on the
customer’s request. Regulators must not be removed.
0 The regulator can withstand a maximum pressure of 1/2 PSIG (14" WC). If the line pressure is beyond this limit, a step-down
regulator will be required.
0 Any adjustment to regulators must be made ONLY BY QUALIFIED service personnel with proper test equipment.
GAS REQUIREMENTS
0 Ensure supplied gas matches the range’s gas type.
0 Natural gas connection is 1/2" N.P.T. minimum 1/2" diameter ex line.
0 Natural gas inlet pressure to measure 7" to 10" W.C.
0 Propane gas connection is 1/2" N.P.T. minimum 1/2" diameter ex line.
0 LP gas inlet pressure to measure 11" to 14" W.C.
0 A step-down regulator is required at the LP (Propane) source to limit a pressure maximum of 14" W.C. to work with the
regulator provided with the LP range.
Check that all gas connections are properly sealed with a suitable gas joint compound.
TEST ALL JOINTS WITH A SOAPY WATER SOLUTION BEFORE LIGHTING THE BURNERS.
1. Turn ON the manual gas valve at the inlet side of the gas supply line.
2. Remove the kick plate by lifting and pulling away from the unit.
3. Check for gas leaks at the exible coupling or gas connector tting using a solution of one part soap and three parts water.
4. Sparingly spray or brush the soapy solution at the gas ttings; active bubbling indicates location of gas leak.
5. If a gas leak is detected turn off the manual gas valve at the inlet side of the gas line. Call your certied service technician.
FLEXIBLE COUPLINGS, CONNECTORS AND CASTERS
0 Flexible couplings and/or quick-disconnect ttings must be heavy duty, CSA/UL design certied of at least 1/2" NPT with
suitable strain reliefs.
0 The exible connector must comply with the standard for Connectors for Movable Gas Appliances, ANSI Z21.69-CSA 6.16
and any Quick-Disconnect Devices For Use With Gas Fuel Appliances should comply with ANSI Z21.41CSA 6.9.
0 All connections must be sealed with joint compound specied for LP or Natural gas; and all connections must be tested with a
soapy water solution before using.
0 When disconnection of the restraint is necessary, make sure to reconnect restraint after the range has been returned to its
original position.
13592 Desmond St., Pacoima, CA 91331 818.897.0808 tel 888.753.9898 toll free www.americanrange.com
8
Cuisine & Performer Ranges
Use & Care Manual
• Do not remove protective packaging until you are ready to perform the installation.
• Do not remove the protective wrapping from the product control panel until the product is installed.
• Caution - the appliance is heavy. Use extreme care when handling!
• Use proper equipment to move products.
• Any openings in the wall and in the oor behind or under the oven must be sealed.
• Do not use an extension cord with this appliance. Such use may result in re, electrical shock or other personal injury.
• Installation of this appliance should be performed by qualied, licensed contractors.
• To remove the packaging, rst remove the staples located at the bottom perimeter of the corrugated cardboard cover.
• Remove the corrugated cardboard carton by lifting it off the product and remove the inner packing.
• Detach the product from the metal anchor strip by removing the attachment screw.
• Conrm available access to adequate power and gas. See specications & electrical requirements table.
• Fill out the inside cover of this installation manual with the requested data. Model Number and Serial Number can be found
on the plate located underneath the control panel on the front of the appliance.
INSTALLATION INSTRUCTIONS
Do not use the handle or oven door to lift the oven. Remove pull down door before installation to ensure that it is not used to
lift the unit. Make sure the hinge catch is fully open or closed before removing door to prevent injury to hands and/or ngers.
WARNING
!
For optimal performance, the range should be installed away from drafts that may be caused by doors, windows, and heating
and air conditioning outlets.
IMPORTANT
WARNING
!
Important - The maximum depth of the overhead cabinets installed on either side of the hood is 13".
CABINET PREPARATION
• This Range is a free standing unit.
• When installed, Range door must be beyond face of cabinet and cannot be installed ush.
• Check cabinet materials to be sure they can be used in proximity of the Range.
• The maximum depth of overhead cabinets installed on either side of the hood is 13".
• Any openings in the wall behind the Range and in the oor under the Range must be sealed.
• When there is less than 12" clearance between combustible material and the back edge of the Range above the cooking surface,
a backguard must be installed.
• When clearance to combustible material is over 12" no backguard is necessary.
• Backguards must be ordered separately.
13592 Desmond St., Pacoima, CA 91331 818.897.0808 tel 888.753.9898 toll free www.americanrange.com
9
Cuisine & Performer Ranges
Use & Care Manual
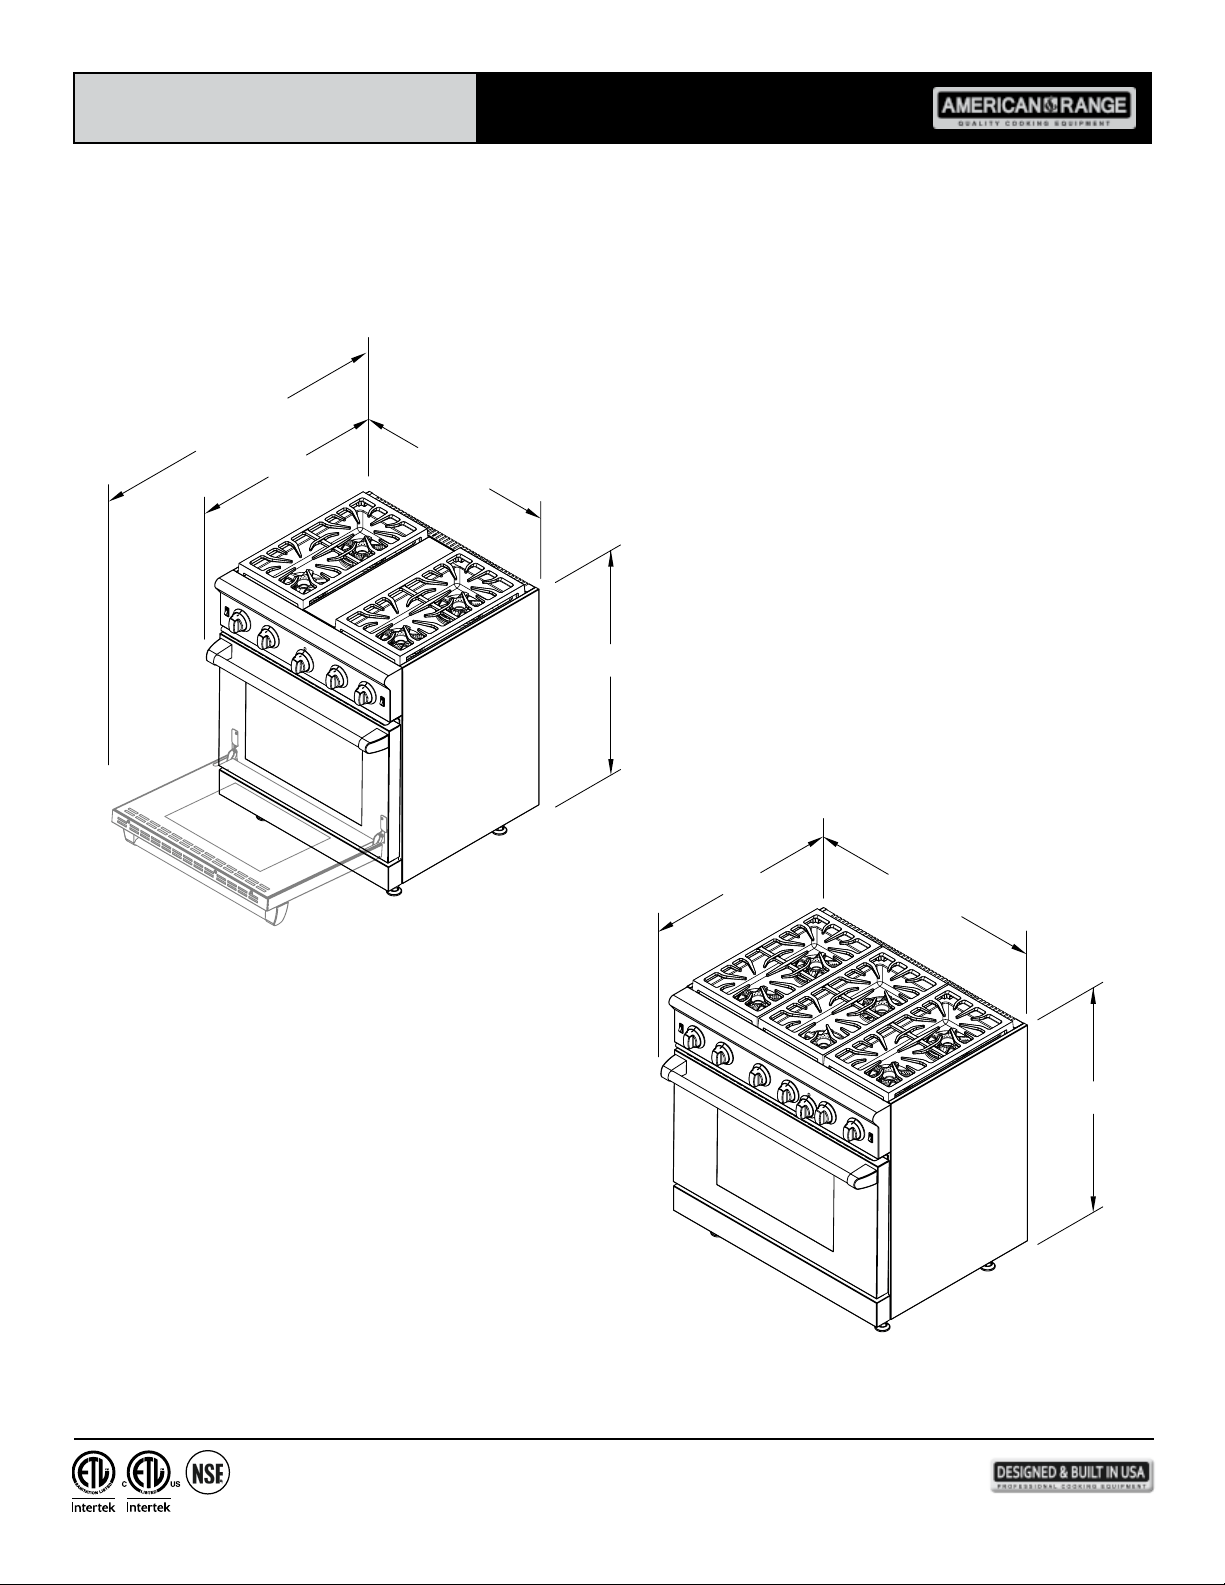
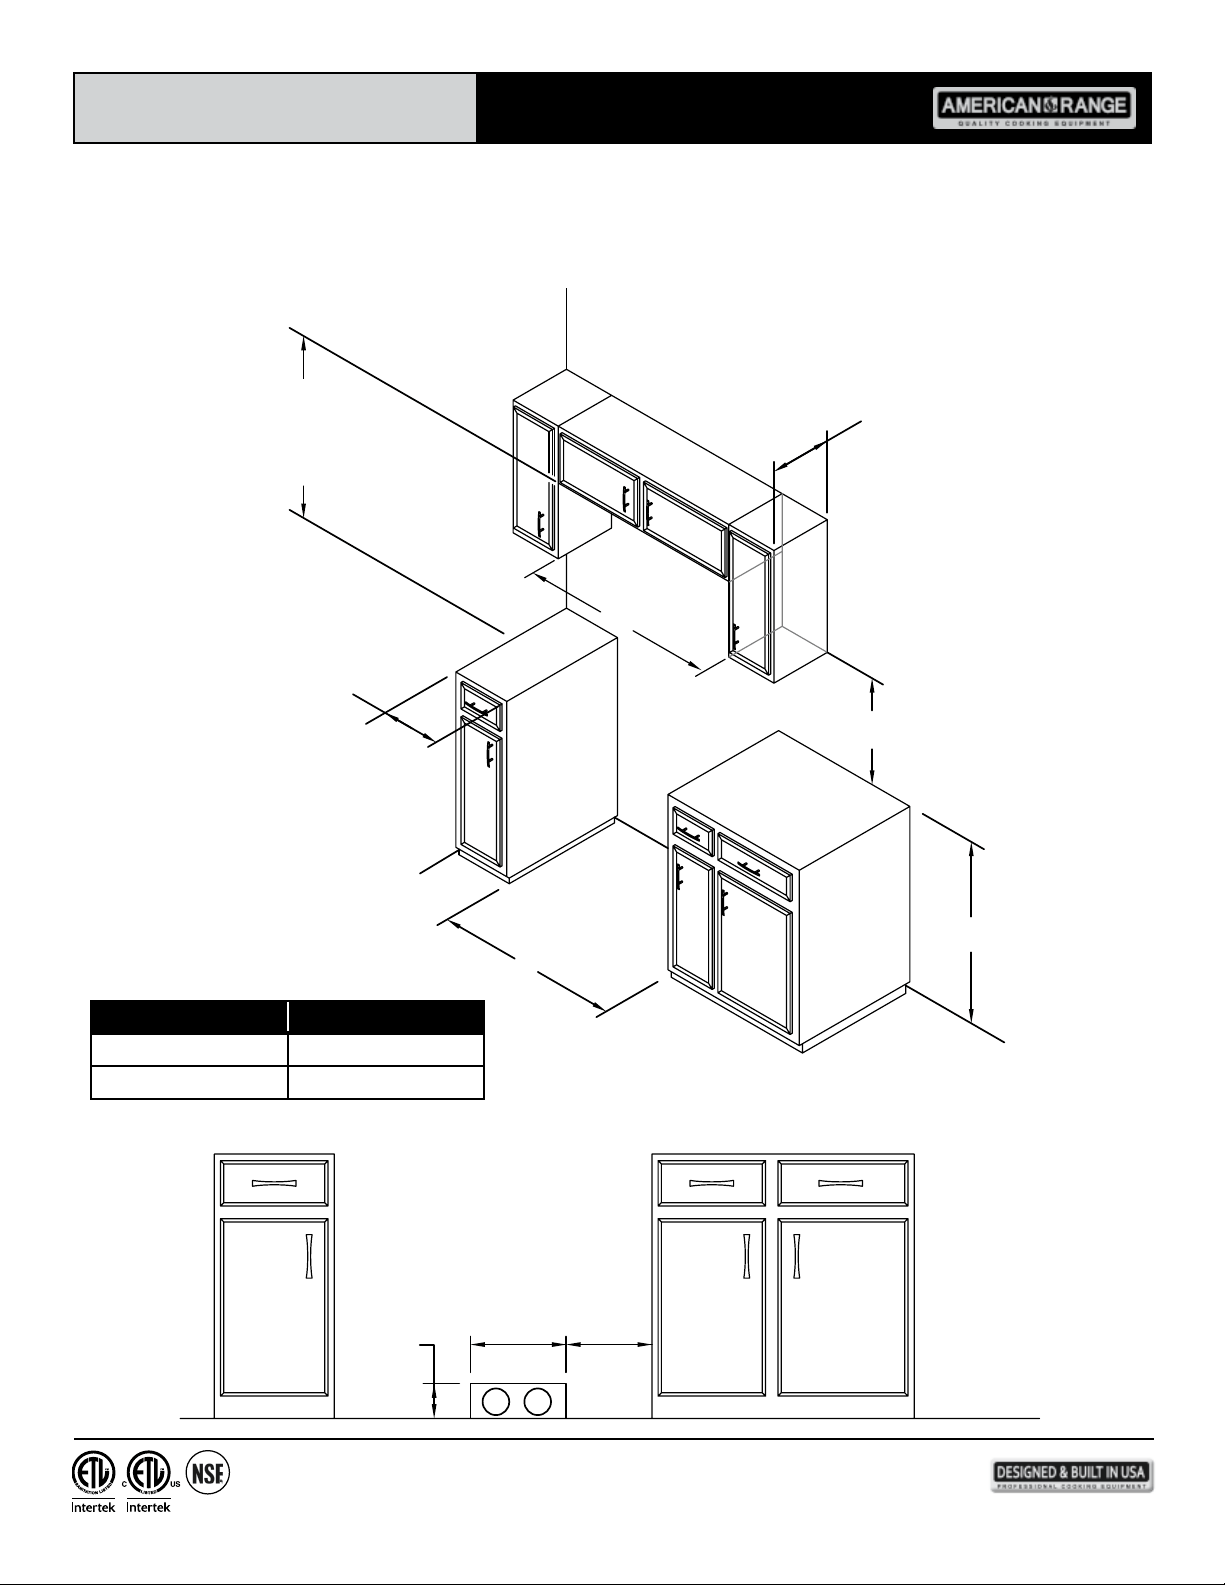
OVERALL DIMENSIONS
PERFORMER OPEN BURNER GAS RANGES
30"
29-7/8"
30"
35-7/8"
37"
45 -1/4"
37"
30" Range
36" Range
13592 Desmond St., Pacoima, CA 91331 818.897.0808 tel 888.753.9898 toll free www.americanrange.com
10
Cuisine & Performer Ranges
Use & Care Manual
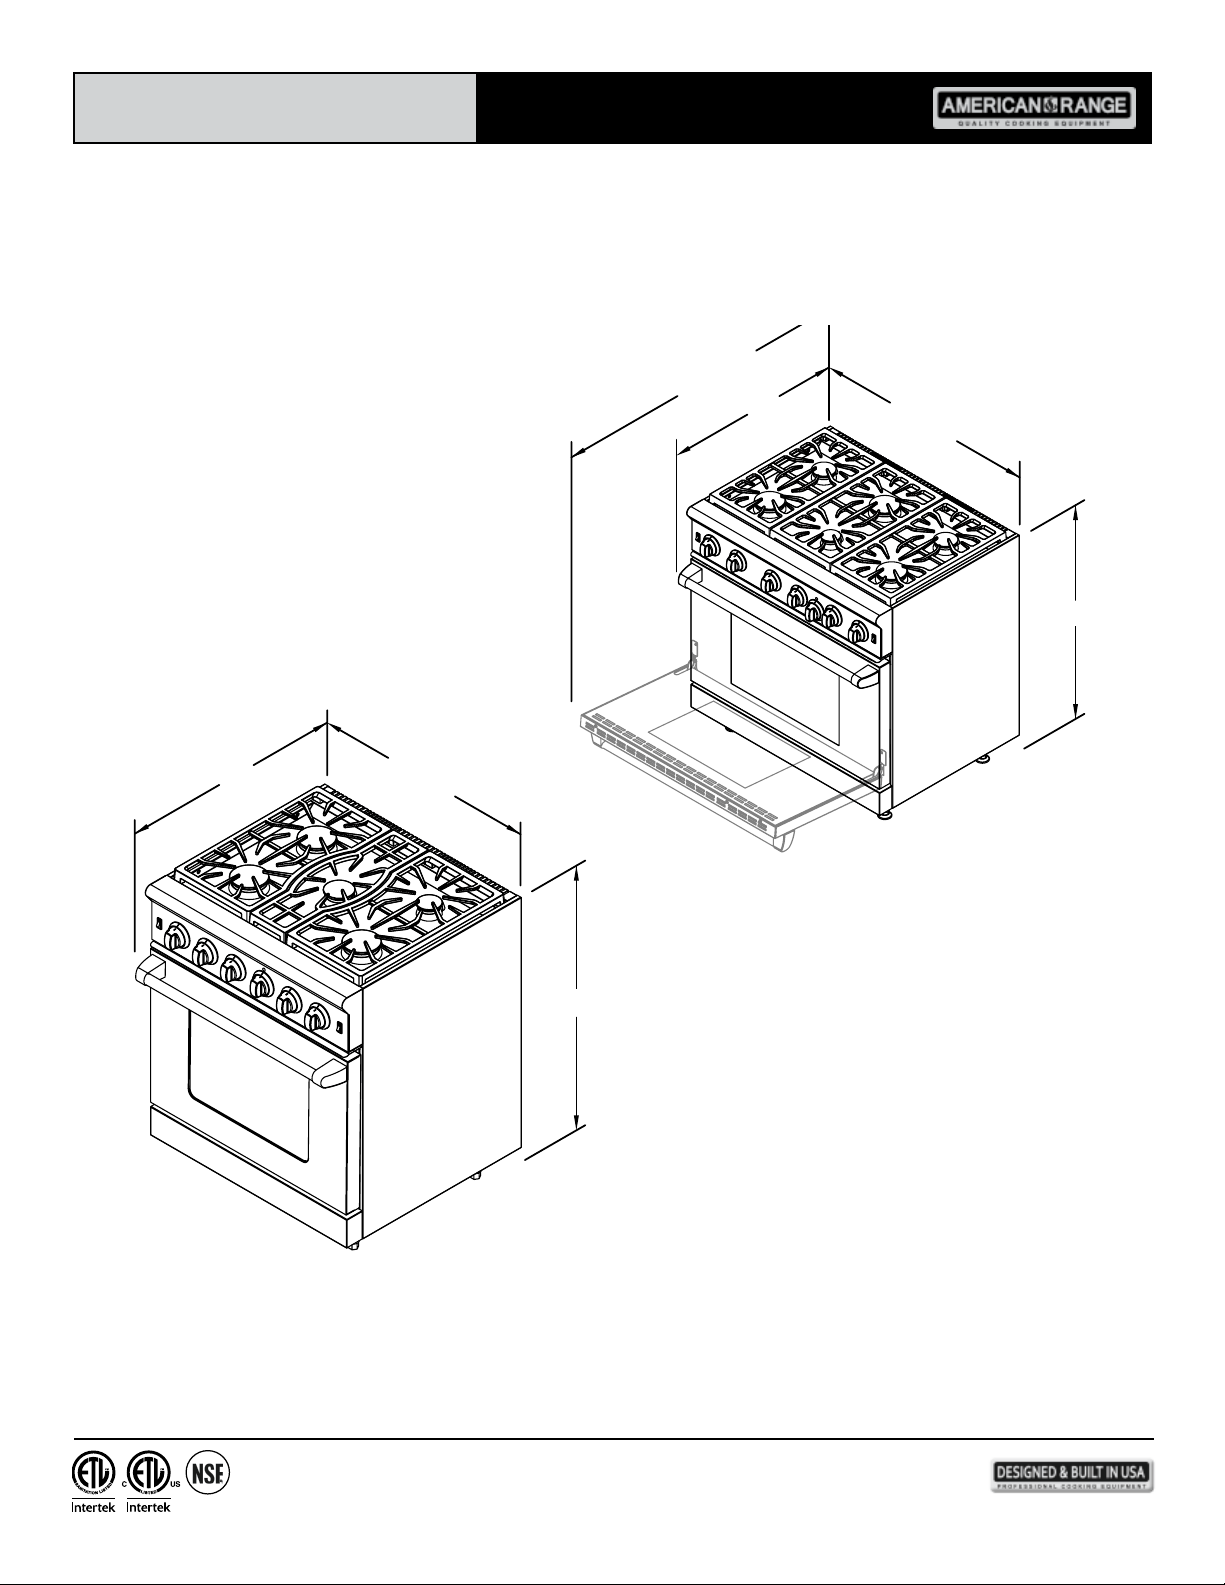
OVERALL DIMENSIONS
CUISINE SEALED BURNER GAS RANGES
30"
35-7/8"
45 -3/4"
30"
29-7/8"
37"
37"
30" Range
36" Range
13592 Desmond St., Pacoima, CA 91331 818.897.0808 tel 888.753.9898 toll free www.americanrange.com
11
Cuisine & Performer Ranges
Use & Care Manual
OVERALL DIMENSIONS
SEALED AND OPEN BURNER GAS RANGES
A
8" MIN.
24" MIN TO
NON-COMBUSTIBLE MATERIAL
30" MIN TO
COMBUSTIBLE MATERIAL
A
18" MIN.
13" MAX
36"
CABINET DEPTH
10"
6-7/8"
3-1/2"
ELECTRICAL & GAS
SUPPLY LOCATION
EG
RANGE WIDTH "A" DIMENSION
29-7/8" 30"
35- 7/8" 36"
13592 Desmond St., Pacoima, CA 91331 818.897.0808 tel 888.753.9898 toll free www.americanrange.com
12
Cuisine & Performer Ranges
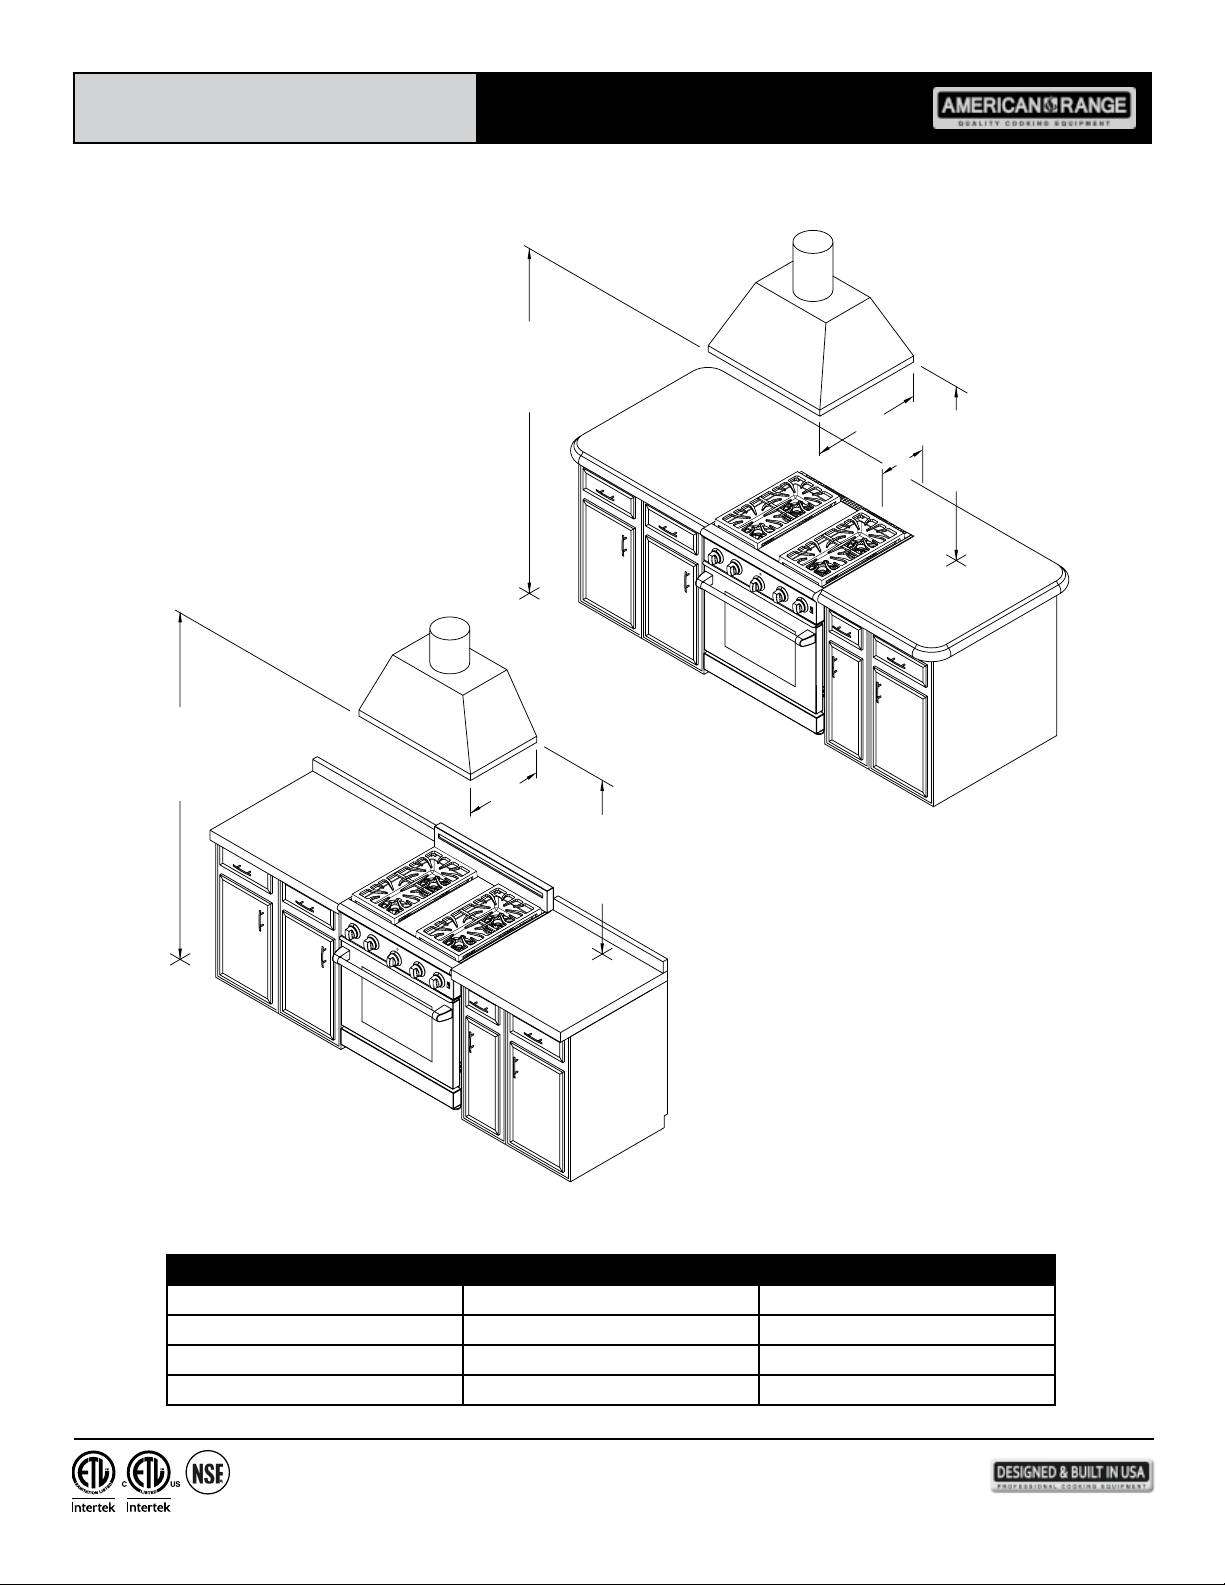
Use & Care Manual
VENT HOOD CLEARANCE DIMENSIONS
6"
30"
66" min.
TO
72" max.
30" min.
TO
36" max.
66" min.
TO
72" max.
30" min.
TO
36" max.
24"
VENT HOOD REQUIREMENTS & RECOMMENDATIONS
UNIT STANDARD COUNTER ISLAND INSTALLATION
24" Deep 30" Deep
48" Range 800-1200 CFM 800-1200 CFM
36" Range 600-800 CFM 600-1200 CFM
30" Range 500 CFM 500 CFM
13592 Desmond St., Pacoima, CA 91331 818.897.0808 tel 888.753.9898 toll free www.americanrange.com
13
Cuisine & Performer Ranges
Use & Care Manual
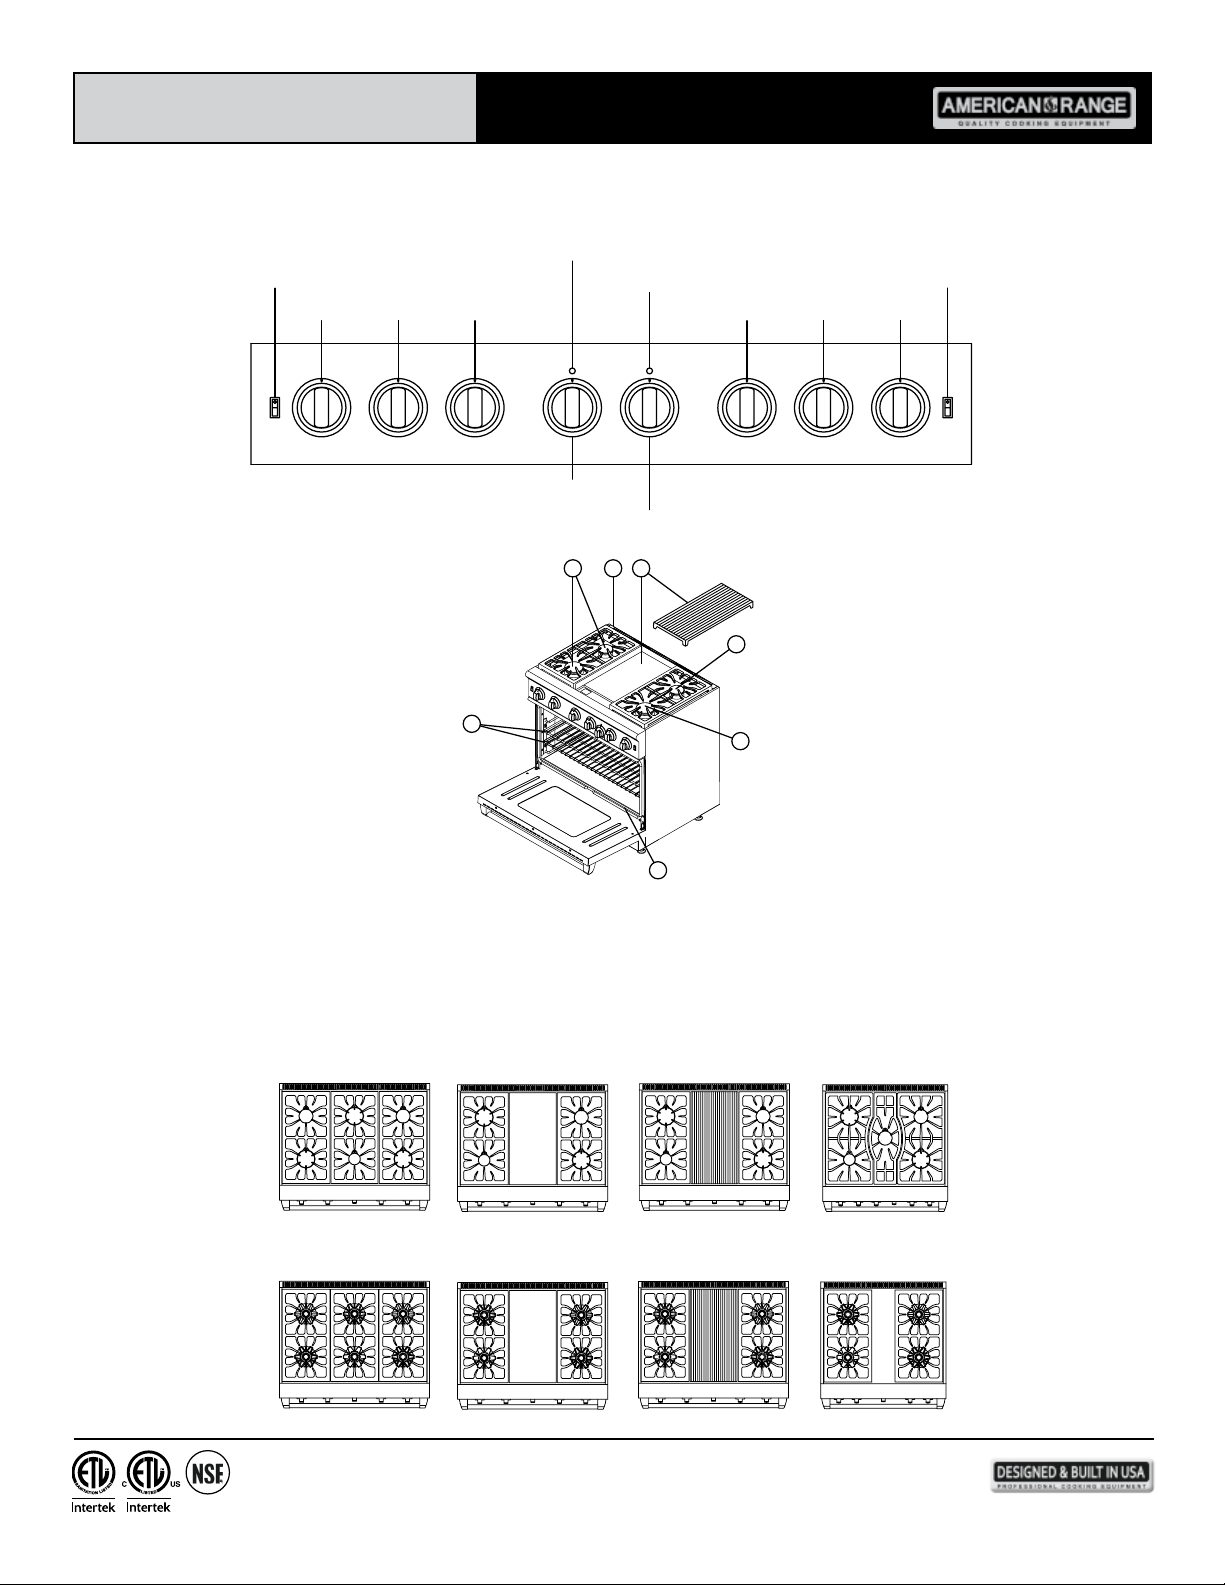
ARROB-430ARROB-436GRARROB-436GDARROB-636
ARR-636 ARR-436GD ARR-436GR ARR-530
5 TWO STANDARD HEAVY-DUTY TILT-PROOF RACKS
IDENTIFICATION PLATE4
3 GRIDDLE OR GRILL
ISLAND TRIM2
CAPS AND AUTOMATIC IGNITION / RE-IGNITION
1 FOUR SEALED BURNERS WITH PORCELAIN/CAST IRON
4
5
1
1
1
32
WITH INDICATOR
LIGHTLIGHT
WITH INDICATOR
FAN SWITCH
CONVECTION OVEN INTERIOR
LIGHT SWITCH
KNOB
GRILL OR GRIDDLE
OVEN THERMOSTAT
RIGHT
REARFRONT
RIGHTCENTER
REAR
GRILL OR GRIDDLE
INDICATOR LIGHT
OVEN TEMPERATURE
INDICATOR LIGHT
FRONT
CENTERLEFT
REARFRONT
LEFT
Medium Large Large GriddleMedium
Large Large
Medium Large Medium
Large Small SmallLarge Large Small Large
Large Medium Medium
Small Large
Small
Medium Medium
Large
Medium
Large
Medium
Large
Large
Small
Large
Small
Medium
Large
Large
Small
Grill
Griddle Grill
TYPICAL MODEL & PARTS IDENTIFICATION
13592 Desmond St., Pacoima, CA 91331 818.897.0808 tel 888.753.9898 toll free www.americanrange.com
14
Cuisine & Performer Ranges
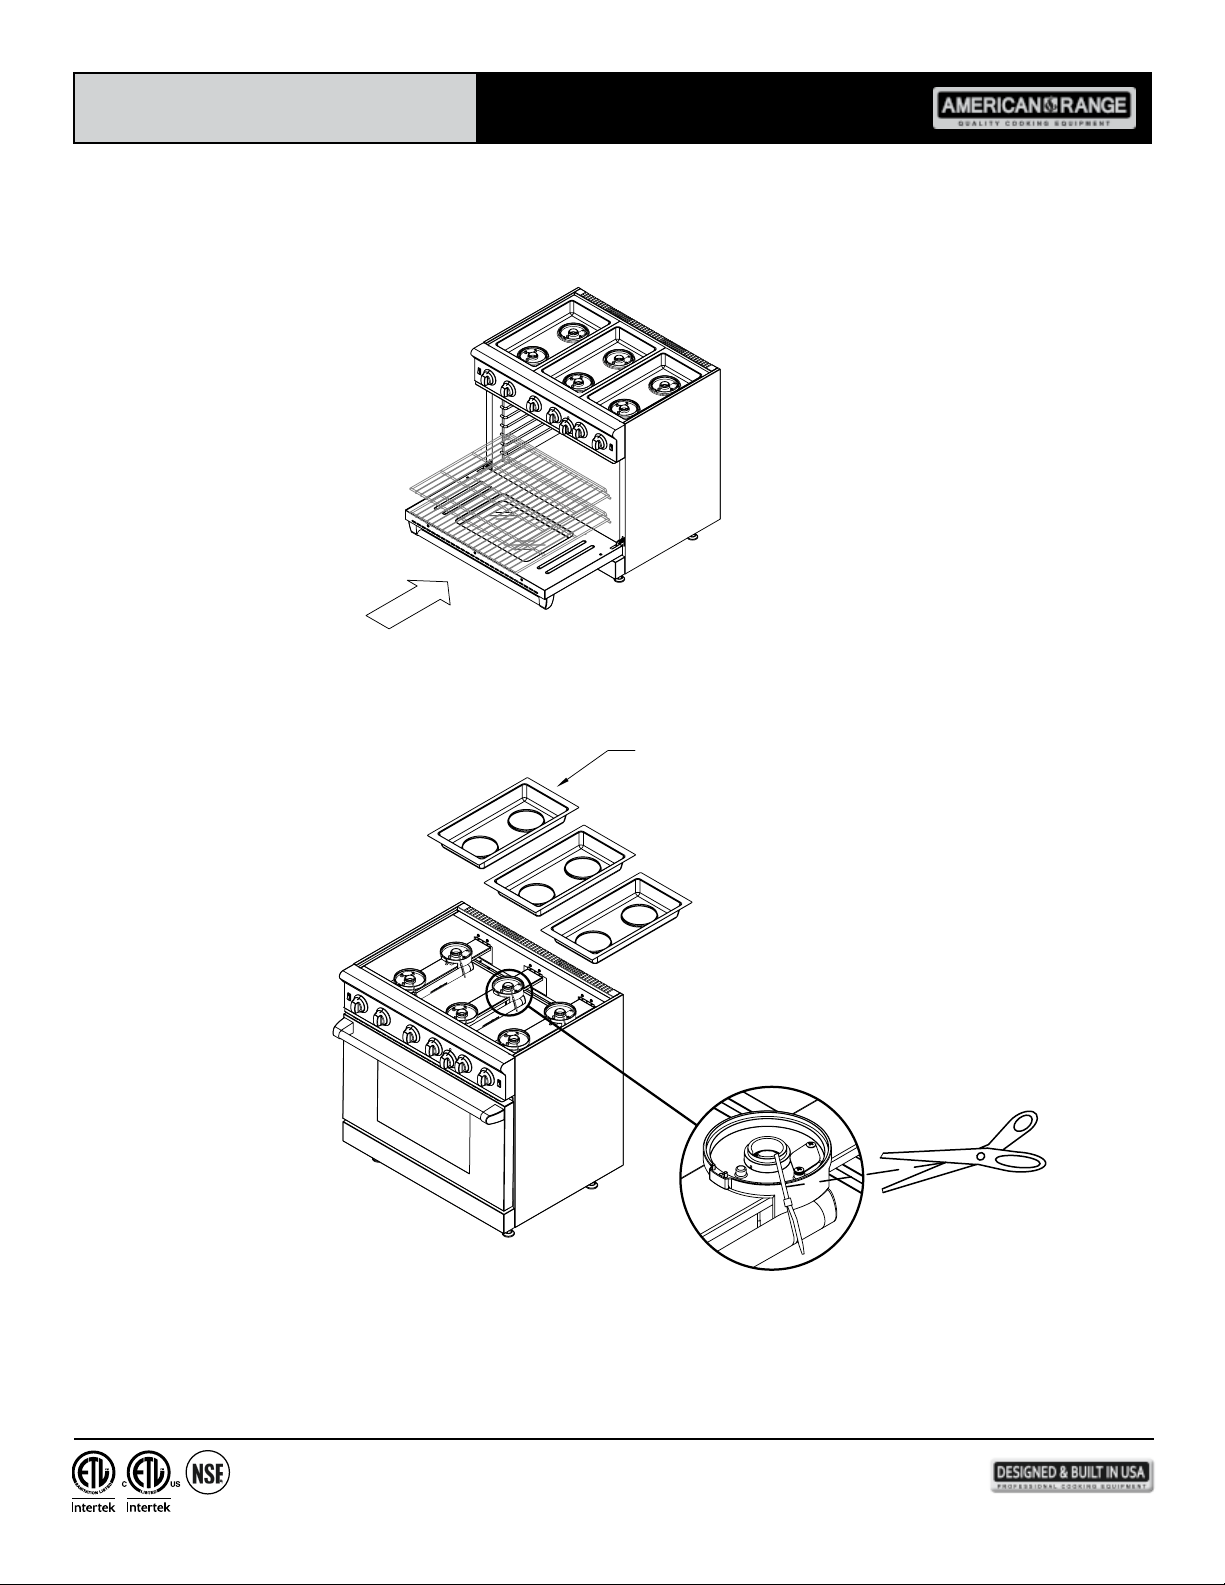
Use & Care Manual
BURNER PAN
Insert racks into oven.
Remove the burner pans, then cut and discard the shipping
ties on the burner base. Conrm that burner base is at
on the burner support and that the air shutter is positioned
over the gas orice. Replace the burner pans.
PREPARING FOR OPERATION
PERFORMER OPEN BURNER RANGES
LARGE LARGE
MEDIUM MEDIUM
LARGE
SMALL
LARGE MEDIUM SMALL
PIN
BURNER BASE
13592 Desmond St., Pacoima, CA 91331 818.897.0808 tel 888.753.9898 toll free www.americanrange.com
15
Cuisine & Performer Ranges
Use & Care Manual
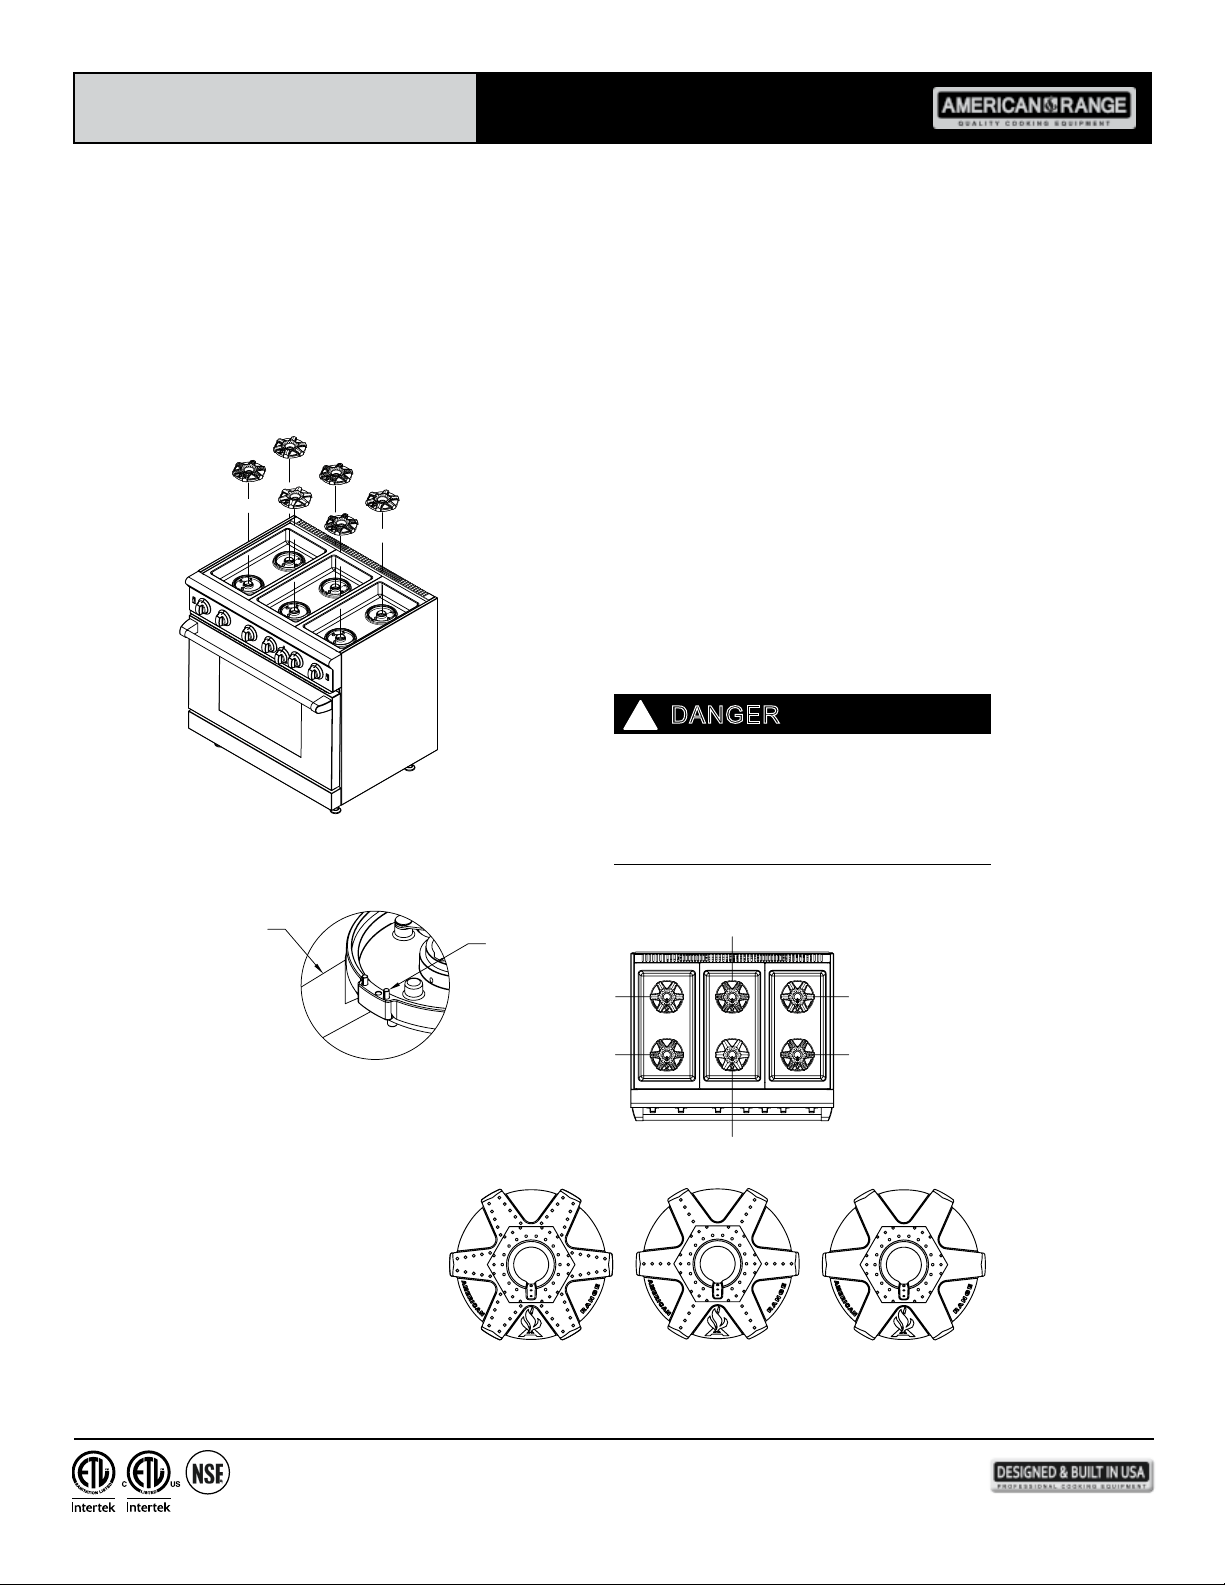
PREPARING FOR OPERATION
PERFORMER OPEN BURNER RANGES
Your new range cook top is equipped with one of two types of gas burners - Open Burners or Sealed Burners. Open Burners are more
powerful and Sealed Burners are a little easier to maintain.
In either case, we’re sure you’ll appreciate how easy they are to light and operate, and the great cooking performance they deliver.
The open burner heads are packed in a
separate box. Unpack and place the burner
heads on the burner base. Align holes in the
top burner with pins on the base of burner for
proper capacity & operation. For locations of
burner heads, see the diagram below.
DANGER
!
Please note: Each burner has a different power
level or BTU/Hr capacity. Misplacement could
create an unsafe level of carbon monoxide gas.
Misalignment could also alter the design
performance of the range.
LARGE MEDIUM SMALL
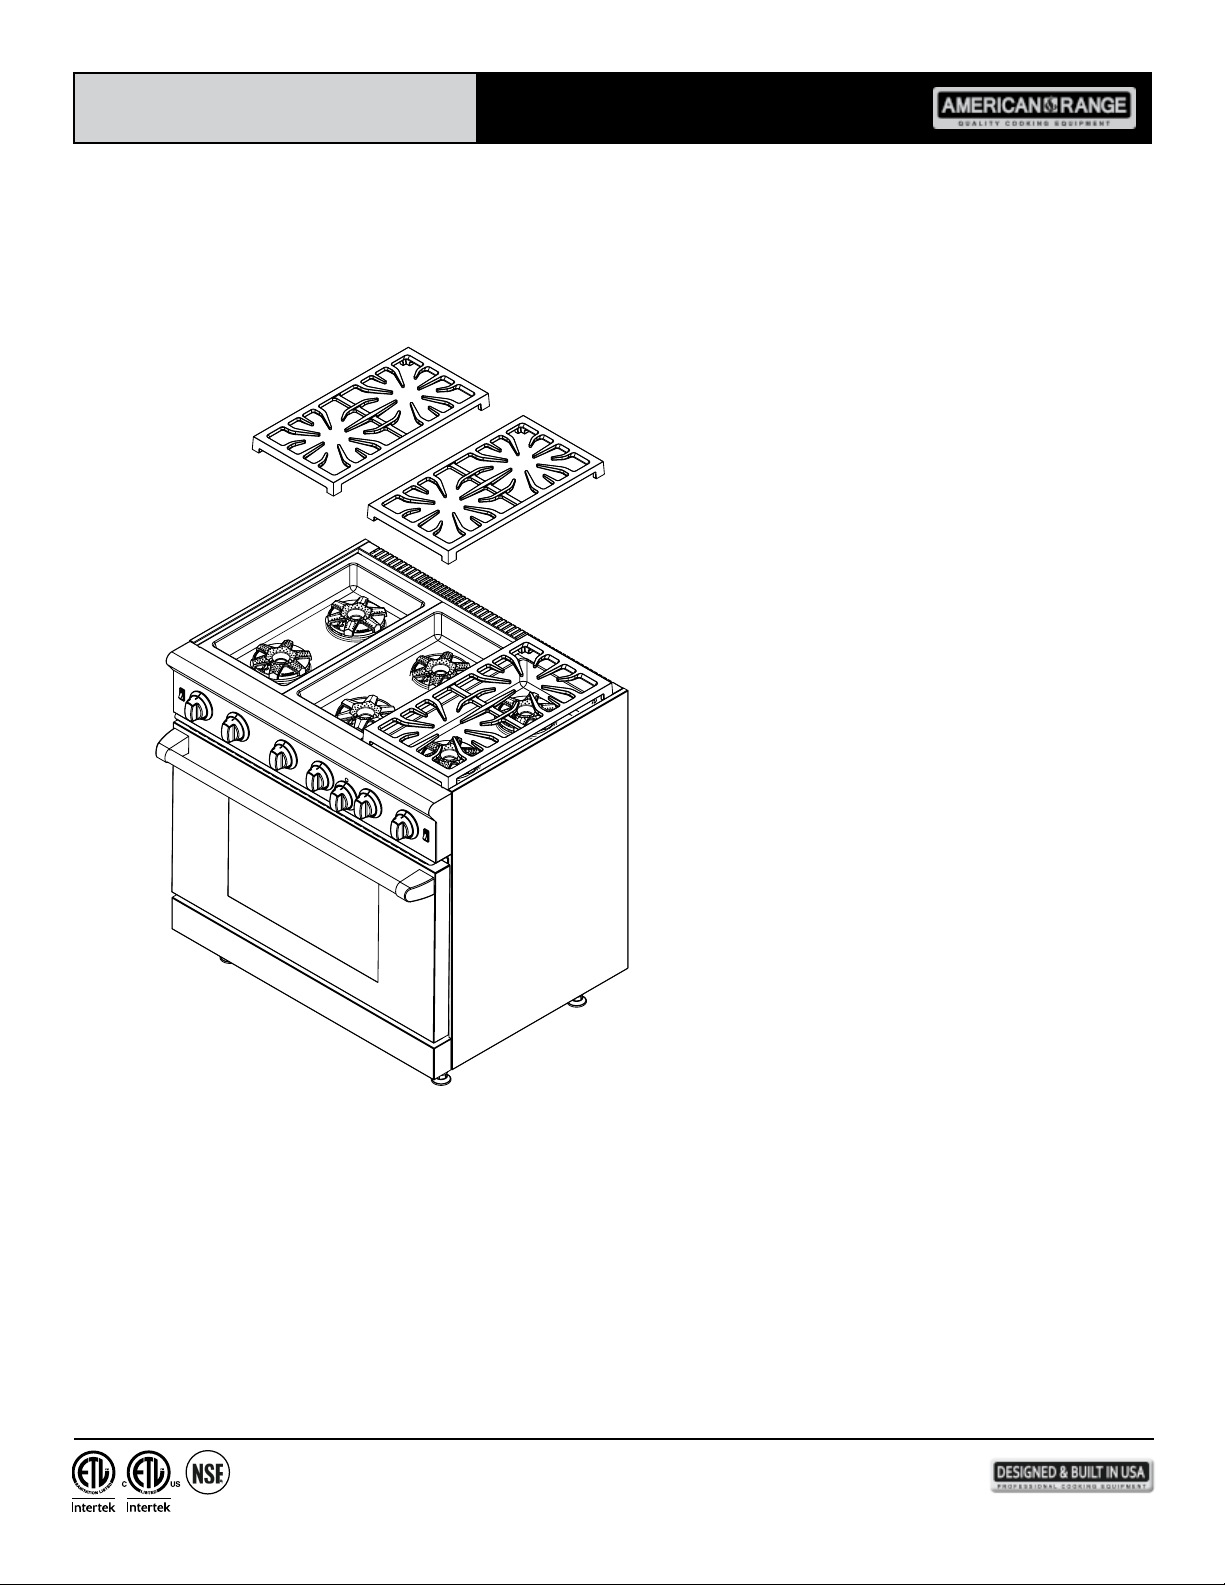
Grates are packed in a separate box. Inspect
grates for rubber feet. Each grate must have
four feet. Place grates on top of cook top.
13592 Desmond St., Pacoima, CA 91331 818.897.0808 tel 888.753.9898 toll free www.americanrange.com
16
Cuisine & Performer Ranges
Use & Care Manual
PREPARING FOR OPERATION
PERFORMER OPEN BURNER RANGES
13592 Desmond St., Pacoima, CA 91331 818.897.0808 tel 888.753.9898 toll free www.americanrange.com
17
Cuisine & Performer Ranges
Use & Care Manual
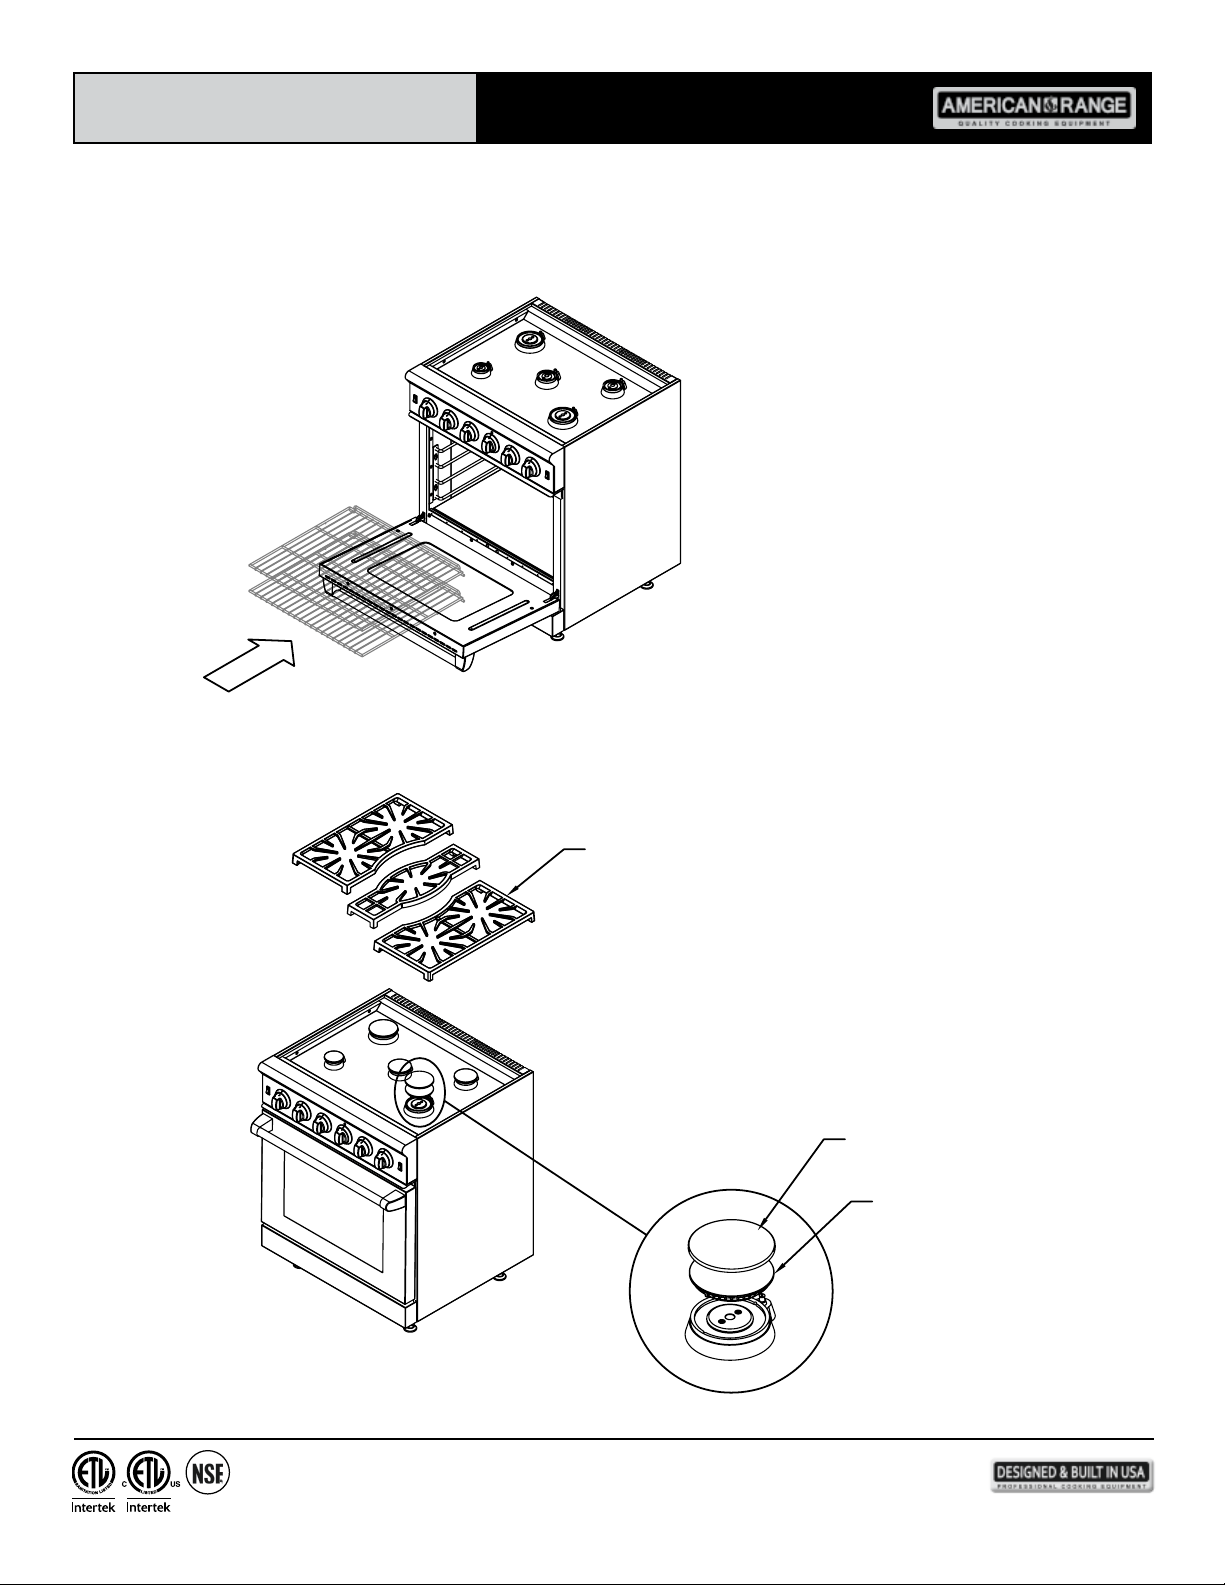
PREPARING FOR OPERATION
CUISINE SEALED BURNER RANGES
BURNER CAP
BURNER HEAD
GRATE
Insert racks into oven.
Burner caps are packed in a separate box with the
grates. Place burner and caps on the top of range.
Place burner grate on top of burner cap and grate
support.
13592 Desmond St., Pacoima, CA 91331 818.897.0808 tel 888.753.9898 toll free www.americanrange.com
18
Cuisine & Performer Ranges
Use & Care Manual
INSTALLATION CHECKLIST
This checklist has been developed to assure proper installation of your range.
To validate warranty, you must mail, e-mail or fax this form and a copy of your receipt to:
AMERICAN RANGE CUSTOMER SERVICE, 13592 DESMOND STREET, PACOIMA, CA 91331
info@americanrange.com
818.897.8839 FAX
City:___________________________________________
State, Zip Code:__________________________________
E-mail:_________________________________________
Telephone:______________________________________
Dealer:________________________________________
Purchase Date:___________________________________
Installation Date:__________________________________
Installer’s Name:__________________________________
Company:______________________________________
Telephone:______________________________________
CHECK ALL THAT APPLY
Appearance and Aesthetics
0 Exterior
0 Top section
0 Oven interior
0 Anti-Tip Bracket
Installation
0 Read User Manual
0 Review Safety Instructions
0 Proximity to cabinets
0 Backguard in place
0 Level
0 Ventilation system
Ignition
0 Top Burners
0 Griddle
0 Char Broiler
0 Oven Burner
0 Infrared Broiler
Controls
0 Burner Knobs
0 Thermostats
0 Char Broiler
0 Convection Oven Fan & Switch
0 Oven Light Switch
Air/Gas Mixture
0 Top Burners
0 Griddle
0 Char Broiler
0 Oven Burner
0 Infrared Broiler
Flame Adjustment
0 Top Burners
0 Griddle
0 Char Broiler
0 Oven Burner
0 Infrared Broiler
Oven Door
0 Alignment
0 Door Seal
0 Hinges
Valve Operation
0 Top Burners
0 Griddle
0 Char Broiler
0 Oven Burner
0 Infrared Broiler
Customer Copy
Electrical Connection
0 Correct voltage
0 Grounded outlet
0 Polarized outlet
0 No GFCI
Gas Connection
0 Verify fuel: 0 Natural -or- 0 LP
0 Gas shut-off present and accessible
0 Gas Supply line properly sized
0 Gas Supply pressure checked
0 Operating pressure checked
0 All connections checked for leaks

13592 Desmond St., Pacoima, CA 91331 818.897.0808 tel 888.753.9898 toll free www.americanrange.com
19
Cuisine & Performer Ranges
Use & Care Manual
PERFORMANCE CHECKLIST
A qualied installer should carry out the following performance checks referring to the User Manual as necessary:
Check operation of oven setting Bake at 350°.
Check operation of Broil function.
Check operation of all top burners at high and low ame.
Check operation of oven light using front panel control switch.
Check operation of the convection fan using front panel control switch.
Check operation of all indicator lights on control panel.
Before cooking in your oven for the rst time remove oven racks and wash them with hot soapy water. Thoroughly rise, dry and replace
them in the oven.
During initial start-up of the oven, after all performance checks and adjustments have been made, the oven should be allowed to burn off
any oils or solvents left from the manufacturing process. In any case, these materials are safe for the environment – but it is best they not
contribute to the taste or odor of your rst oven cooking experience.
OVEN BURN-OFF PROCEDURE
• Turn on the kitchen ventilating hood.
• Light the oven according to the instructions in the manual.
• Set the oven thermostat temperature to 350ºF.
• Let the oven run for 1/2 hour.
• Turn on the convection fan.
• Set the oven thermostat to 450ºF.
• Leave the oven operational for an additional 1/2 hour.
• Shut off the oven by turning the thermostat to the OFF position.
BROILER BURN-OFF PROCEDURE
• Turn on the kitchen ventilating hood.
• Light the broil burner according to the instructions in the manual.
• Operate the broiler for ten minutes.
• Open the door briey – about ten seconds.
• Operate the broiler for an additional ten minutes.
• Shut off the broiler by turning the thermostat to the OFF position.
During the oven or broiler burn-off process, some strong odors or minor smoke may be experienced as remaining oils or solvents on
internal parts are oxidized. This is the primary reason for the burn-off process and should dissipate by the completion of the time period.
RANGE START-UP PROCEDURE
0
0
0
0
0
0

13592 Desmond St., Pacoima, CA 91331 818.897.0808 tel 888.753.9898 toll free www.americanrange.com
20
Cuisine & Performer Ranges
Use & Care Manual
MODEL AND PARTS IDENTIFICATION
CUISINE SERIES - SEALED BURNER RANGES PERFORMER SERIES - OPEN BURNER RANGES
DESCRIPTION
30" Range
5 Burners
36" Range
6 Burners
36" Range
4 Burners &
Griddle
36" Range
4 Burners
and Grill
30" Range
4 Burners
36" Range
6 Burners
36" Range
4 Burners &
Griddle
36" Range
4 Burners &
Grill
Oven Racks 2 2 2 2 2 2 2 2
Sealed Burners 5 6 4 4
Star Burners 4 6 4 4
Center Plate 1
Burner Grates 3 3 2 2 2 3 2 2
Control Knobs 6 7 6 6 5 7 6 6
Griddle 1 1
Backyard Grill 1 1
Regis. Card 1 1 1 1 1 1 1 1
Island Back 1 1 1 1 1 1 1 1
U&C Manual 1 1 1 1 1 1 1 1
Oven Racks: Each oven is supplied with two heavy chrome-
plated adjustable oven racks.
Rack Supports: On each side of the oven, heavy chrome-plated
rack supports allow ve positions, numbered from the bottom up.
Oven Control Knob: The oven control knob is used to set the
Baking temperature or to select the Broil function. During baking,
the convection fan may be activated.
Bake Burner: The Bake burner is located in the center of the oven,
below the oor and is activated by the Oven Control Knob.
Ceramic Tile Infrared Broil Burner: Positioned in the oven ceiling,
burning gas heats the ceramic tile to a temperature of 1,850ºF –
creating searing heat similar to the glowing coals of a wood re.
Broil Burner Igniter: The igniter glows a very hot, bright red-orange
color, reaching proper ignition temperature to light the Ceramic Tile
Infrared Broil Burner.
Burner On Indicator Light: Whenever an oven burner is
activated (either Bake or Broil), the burner on indicator will glow.
It is normal for the indicator light to cycle off and on during baking
or broiling – showing that the requested temperature has been
achieved – or that more heat is required.
Door Gasket: The door gasket is made from high temperature
materials and creates a seal between the hot oven and the cool
kitchen.
Convection Fan and Switch: Operated by the front panel
switch, the convection fan circulates oven air, removing the "thermal
boundary layer" on items being baked – and in doing so – speeding
up heat transfer and cook time by as much as 25%. Convection is
active only during baking.
Oven Light and Switch: A single lamp is provided in the oven to
illuminate baked and broiled food items, as well as shed some light
on the wall to help during clean-up – activated by the front panel
switch.

13592 Desmond St., Pacoima, CA 91331 818.897.0808 tel 888.753.9898 toll free www.americanrange.com
21
Cuisine & Performer Ranges
Use & Care Manual
OPERATION OF THE BURNERS
1. Press in on the knob that corresponds to the burner that you would like to light. Use the front panel graphic to conrm your
selection until you become familiar with the range. Turn the knob counter-clockwise to the "American Flame" icon located on the
knob – this is the light position of the burner valve.
2. The igniter for all the surface burners will begin sparking – however, gas will ow to only the selected burner.
3. After the burner lights, the igniter clicking will stop – indicating that the ame sensing and re-ignition system is active on the
selected burner.
4. Rotate the knob to any ame setting that you desire between MAX and SIMMER. The blue panel light will remain lit until the
valve is returned to the OFF position.
The surface burners are rated at different power levels:
When you are using the surface burners, select the burner power and location depending on the heating or cooking function you would
like to perform.
A normal ame is blue in color and steady. Foreign materials in the kitchen air or the gas line, especially in new construction installations,
may cause some orange color bursts during initial operation. This will disappear with continued use. Small yellow tips on the ends of
ames are normal when using LP gas.
If the ames look odd, (too small, too large, lazy or drifting, uneven around the burner circle, etc.), check to see that the burner head
is seated correctly on the burner base. Do this when the burner is cold by gently rocking the burner head or rotating the head from
side to side. If it is correctly seated, it will nest in detents, in the case of the sealed burners, or on the corresponding pin/hole for open
burners. If this does not correct the problem, turn to the Troubleshooting section of this manual.
AUTO RE-IGNITION
The surface burners are equipped with a special ignition and re-ignition system that senses the presence of ame and re-ignites the
burner should the ame disappear while gas is still owing to the burner.
Strong drafts, spills and general grime inuence the operation of the automatic re-ignition system – a clean system will generally function
better than a dirty system. Periodically, remove any materials or grime that might build up on the high voltage spark electrode – using a
toothbrush or other non-metallic cleaning utensil.
BURNER TYPE SMALL MEDIUM LARGE
Open Burners 12,000 BTU/hr. 18,000 BTU/hr. 25,000 BTU/hr.
Sealed Burners 9,000 BTU/hr. 13,000 BTU/hr. 17,000 BTU/hr.
BEFORE USING THE NEW COOK TOP
• Before using the cook top for the rst time, wash the outside area with soap and water to remove any shipping & factory residue.
• The burner grates are designed in sections and are easy to remove and clean. They are made of cast iron with a porcelain coating
and will remain hot after the burner is turned off creating a residual heat for continued cooking. Use caution when handling.
• Your new professional Range is equipped with burners that are similar to those used in restaurants.
The burner heads are large and designed to ensure even heat distribution for better cooking. They must be in place and properly
seated before lighting.
• The Range must not be operated without the burner heads.
• There are no continuously burning pilot lights. An electronic spark ignition system is used to light the burner. If the ame should
go out from a boil-over or a strong draft, the burner will automatically reignite.
13592 Desmond St., Pacoima, CA 91331 818.897.0808 tel 888.753.9898 toll free www.americanrange.com
22
Cuisine & Performer Ranges
Use & Care Manual
COOKWARE RECOMMENDATIONS
To avoid the risk of serious injury, damage to the range or cookware, please observe the following guidelines.
Bakeware, such as large casserole pans, cookie sheets, etc., should never be used on the cook top.
Placement of large stock pots should be staggered when used on the cook top.
Select the base diameter of the pot to match the diameter of the ame. The diameter of the ame and the diameter of the pan bottom
should match or be slightly smaller. Too large or too small pots on a burner will compromise cooking performance.
Do not place food packaged or wrapped in aluminum foil directly on the burner grate above the burner. Aluminum foil can melt during
cooking.
Be careful to not let plastic, paper or cloth come in contact with a hot burner grate. These materials can catch re or melt.
Never let a pan boil dry – and if it occurs remember it can be extremely hot – and very dangerous. If this should occur, turn off the
burner immediately. Wait a while, until the pot cools down enough to handle – this could be several minutes, but could save you from
burns or other serious injury.
The pan bottom should be at, the heavier the better – and well balanced on the cook top grate – sitting at without rocking –
preferably with tight tting lids. Try not to slide the pot across the grates – while it is very handy to do so – you may end up scratching
the pot or the grate.
Always be careful when using high ames, as in wok cooking, as they may contact ammable materials or make the handles of the wok
very hot. Use the wok ring (optional) to stabilize the wok.
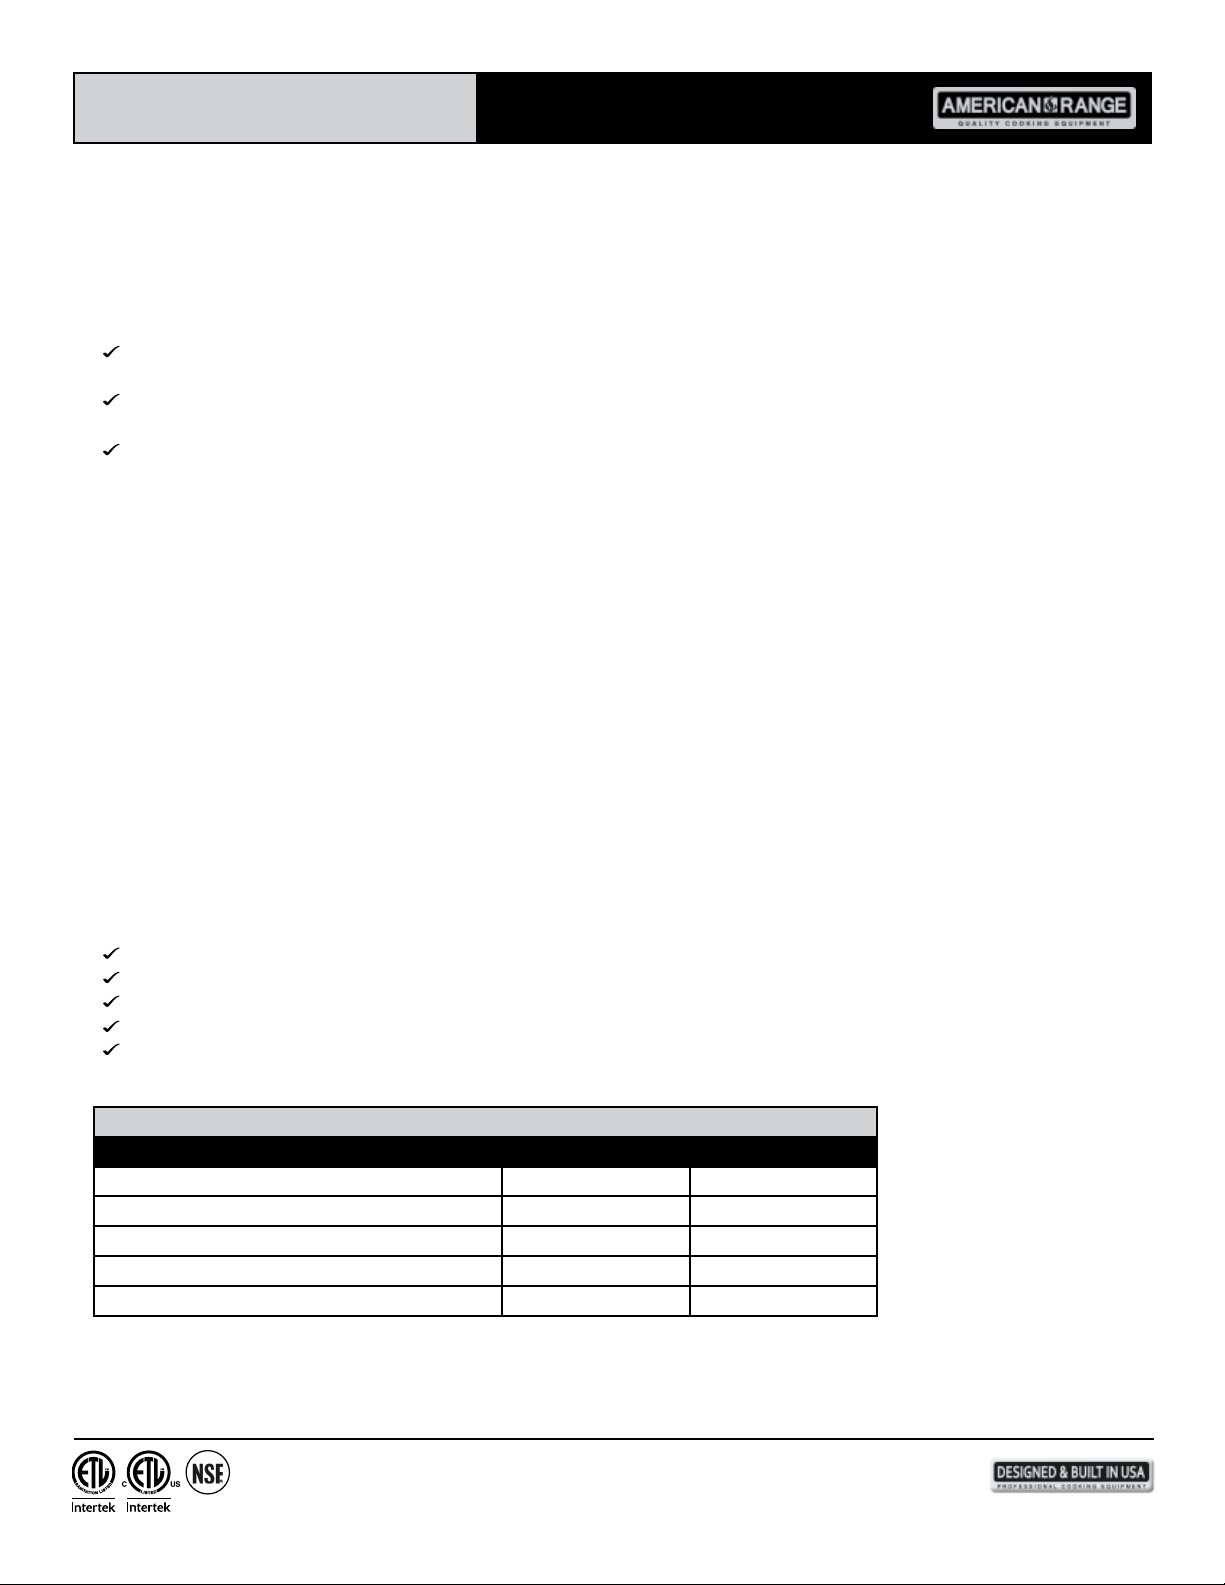
SUGGESTED BURNER SETTINGS
HEAT SETTINGS USE
Simmer Melting small quantities of butter, simmer grains, rice, oatmeal
Low Poaching eggs, sh, poultry
Low - Medium Fry eggs, heat milk, cream sauces
Medium Puddings, custards, gravies
Medium High
Sauté vegetables, braise meats, soups and stews, deep fat frying, boiling water and pasta, blanching
vegetables, searing meats
High Large quantity of water to boil, large quantity frying and cooking

13592 Desmond St., Pacoima, CA 91331 818.897.0808 tel 888.753.9898 toll free www.americanrange.com
23
Cuisine & Performer Ranges
Use & Care Manual
OVEN OPERATION
To light the oven, push in and turn the thermostat to the desired operating temperature from 150ºF to 500ºF. You may be able to see a
bright glow from the sides of the oven bottom – this is normal and indicates the hot surface igniter is activated. Once the igniter is hot
enough for ignition, the gas valve will open, allowing the ow of gas into the bake burner. This may take up to one minute.
During the rst few minutes of operation, a mild condensation may appear on the interior glass pane of the door window. Water vapor is
a normal by-product of combustion, and the condensation will disappear as the oven warms.
If you would like to bake using the Convection feature, you may turn on the fan at any time – allowing the oven about twenty or thirty
minutes to preheat before use.
Never place any pan or food item on the bottom of the oven, always use an oven rack place in at least the lowest position.
To use the Broil feature of the range, rst consider what type of broiling you would like to perform. The closer you are to the broil burner,
the faster you will evaporate moisture from the surface of food and the quicker the surface will brown. In a similar fashion, the further
away you place the food (on the lowest rack, for example) the slower you will evaporate surface moisture and the longer it will take for
the surface to brown. A good rule of thumb is to start about 6" away from the broiler and watch for how quickly the food is browning.
BROILER OPERATION
To light the broiler, push in and turn the thermostat to the position labeled BROIL on the control knob. In about twenty seconds, you will
see a bright glow in the oven - this is the hot surface igniter. Once the igniter is hot enough for ignition, the gas valve will open,
allowing the ow of gas into the broil burner. This may take up to one minute.
The broiler will have a blue ame that covers the ceramic tiles – after a few minutes, the tiles will glow bright red/orange and radiate infrared
energy. Remember the red surface is over 1800ºF in temperature and can be a source of serious burns or injury.
The Bake burner and Broil burner will not operate at the same time; the convection fan will not operate during Broiling.
OVENS 101
The oven is a gas red, temperature controlled cooking cavity which is highly insulated to keep the kitchen cool and the food hot. The oven
contains two burners - the Bake burner positioned below the oven oor and the Broil burner located in the ceiling of the oven. Bake and
Broil are very different cooking operations and the burners are designed to deliver energy in a way appropriate to the task.
There are two types of baking - called Standard Bake (or conventional) and Convection Bake. Standard or conventional baking make best
use of Grandma’s cookie, cake or pie recipes – like Bake at 350ºF for forty-ve minutes – to get the job done. These recipes are tried and
true – conventional or standard bake will deliver wonderful performance every time you cook.
When you convection cook (using a fan to circulate the high temperature air inside the oven) you can lower the thermostat about 25º and
reduce the cook time by about 25% - and achieve ne cooking results just like Grandma’s – taking less time and using less energy. Use the
same recommended temperatures for meats and poultry dishes – but keep watch of the time. Convection cooking technology was rst
developed in Europe and has been used for many years – recently taking hold in US residential kitchens and cookbooks.
In convection cooking, not only is the cook time faster, but also, the oven temperature is more even, top to bottom and side to side – so
cookies on several racks will have the same brown color and texture. However, to best take advantage of convection, use low, shallow
bakeware so that moving air can get over the sides and up to the food surface. Foods in covered dishes (like casseroles or pot roasts) do
not benet from convection cooking.
To get started, remove all plastic wrappers used to protect the nish of the Stainless Steel surfaces. If you do not, the wrapper may get
stuck on the Stainless Steel when the oven is hot – making removal later very difcult.
Although care is taken at the factory to remove processing oils, consider a nal wipe down using a soft cloth and hot, soapy water, well
rinsed and dried from the surface.
13592 Desmond St., Pacoima, CA 91331 818.897.0808 tel 888.753.9898 toll free www.americanrange.com
24
Cuisine & Performer Ranges
Use & Care Manual
GRILL OPERATION
To turn on the grill, make sure there is nothing on the grilling rack, push in and turn the control counter now clockwise to the HIGH
position. The power ON indicator light will glow indicating the grill valve is on. The grill is equipped with a ame-sensing ignition system –
that automatically detects the presence of ame on the grill burner – and relights it in the event it should go out. Adjust the ame to the
desired height.
After cooking, allow the module to cool completely and remove the drip tray slowly, discarding grease and other food particles. The
grill grate may be removed - exposing the radiants - which may be lifted out and placed in the dishwasher along with the drip tray for
cleaning. The grate is porcelain coated and may be washed with hot soapy water and a soft brush.
BEST COOKING RESULTS WHEN USING YOUR GRILL
The intense radiant heat from the grill vaporizes the surface of your food, locking in avor.
• Add any barbecue sauces during the last few minutes of cooking, long enough to caramelize the sauce.
• For best results, turn food with tongs or a at spatula to avoid piercing meat or poultry.
• Turn meat once when juices rise to the surface. Turning meat more than once results in the loss of meat juices.
• Never squeeze juices out of meat.
• Before cooking steaks or chops, trim most of the outside fat to prevent excessive are-ups. Slash into the edges of
steaks or chops to keep meat at on the grill.
• Fish should be cooked at the lowest setting eight to ten minutes for every inch of thickness, measured at the thickest part
of the sh.
GRILL CHART
FOOD ITEM INTERNAL TEMPERATURE HEAT SETTING TIME
Hamburgers 1/2" to 3/4" 160º Medium 8 to 10 minutes
Steaks 1" to 1-1/2" Rare 140º Medium - High 10 to 20 minutes
Steaks 1" to 1-1/2" Medium 160º Medium - High 12 to 25 minutes
Pork chops 3/4" to 1" 145º & 3 minutes rest time Medium 15 to 25 minutes
Lamb chops 160º High 12 to 15 minutes
Poultry pieces 170º Low - Medium 25 to 35 minutes
Fish 1" thick 145º Minimum Medium 8 to 10 minutes
Allow grill to cool completely before cleaning. Remove the grates, grease collector and Stainless Steel
Radiant and place in hot soapy water. Clean the grill with hot soapy water and a soft grill brush.
Do not apply water or cleaner directly on the infrared burner.
Cuisine & Performer Ranges
13592 Desmond St., Pacoima, CA 91331 818.897.0808 tel 888.753.9898 toll free www.americanrange.com
25
Use & Care Manual
GRIDDLE CHART
FOOD ITEM TEMP. SETTING HEAT SETTING
Eggs 225ºF to 250ºF Low
Bacon, Ham, Hot dogs 300ºF to 325ºF Medium - Low
Sausage, Grilled cheese sandwiches 325ºF to 350ºF Medium
Pancakes, French toast 350ºF to 375ºF Medium
Hash brown potatoes, Grilled onions 400ºF to 425ºF Medium - High
The temperature settings
are meant as a guide.
You may need to vary
the settings according
to taste.
GRIDDLE OPERATION
The built-in griddle is made of polished steel to provide a smooth cooking surface. A griddle drip pan is included.
Always pre-heat the griddle on the low setting, at least ten minutes before cooking. The griddle burner is equipped with a hot surface
igniter and gas safety valve system.
To Start Cooking:
Push knob in and turn the knob clockwise to the MAX position. Preheat griddle for two to three minutes and turn knob to a
medium or low cook setting.
The blue indicator light comes on and stays on until the desired setting is reached and then turns off and on with the heating
cycle.
For best results, add a small amount of butter, oil, or a cooking spray to the griddle surface. Fatty meats like bacon and sausage do
not need extra fat.
Season the Griddle:
1. The griddle has a factory applied coating that must be washed off prior to use. (See Cleaning the Griddle)
2. Pour 1 tablespoon of vegetable oil (not corn or olive oil) and rub on the entire surface of the griddle using a rough towel.
3. Push the griddle control knob in and turn to a medium setting (350°F).
4. Heat until griddle begins to smoke. Turn off griddle and allow it to cool.
5. Returning to step 2, repeat the process.
When you are done "griddling" and while the griddle surface is still warm, remove any left-on food particles. Allow the griddle to cool
and scrape off any excess grease from the surface with a exible nylon spatula. Pull the spatula forward toward the front and push any
material into the front grease receiver.
To clean the griddle, moisten a soft scrub cloth, adding a drop of mild degreaser dish soap to create a soapy lather - and wipe the griddle
from left to right. Clean in rows from the top to the bottom, taking time to wash the entire griddle surface, including the sides. When
you are done, rinse away all the soap from the cloth and wipe any suds from the griddle surface. Remove all remaining moisture from
the griddle with the second, clean soft cloth. Wipe the area in rows again as well as the sides and front. You may have to repeat action to
ensure the griddle plate is dry and sparkling.
Cleaning the Griddle:
The griddle is not to be removed for cleaning.
Using a at plastic spatula gently remove burned on food.
Clean the griddle thoroughly with hot soapy water and a rough towel.
The griddle drip pan and trough should be cleaned after each use with hot soapy water and a sponge.
It is normal for the griddle to darken with age and use, similiar to commercial cooking equipment.
0
0
0
0
0
0
0
0

13592 Desmond St., Pacoima, CA 91331 818.897.0808 tel 888.753.9898 toll free www.americanrange.com
26
Cuisine & Performer Ranges
Use & Care Manual
CARE AND CLEANING
It is always easier to clean as you go – and while some evenings you’d rather sit down with a good book instead of a Scrubbie, keeping
your range cook top and oven in a ready to go state for the next meal makes everything a little more tolerable.
When cleaning the range:
0 Use the mildest procedure that will do the job efciently and effectively – and since some cleaners are harsher than others, it is
best to try them on a small, inconspicuous area rst.
0 Use only clean, soft cloths, sponges, paper towels, plastic brushes, non-metal soap pads for cleaning and scouring.
0 When cleaning the oven door, control panel, top curved section (called the bull nose) or the at top area – always pretend it is
made of wood – and rub the nish in the direction of the grain. This is the most effective cleaning direction, to prevent marring
the surface.
0 Any part of this appliance can be cleaned with hot, sudsy water. When rinsing is required, rinse thoroughly.
0 Always wipe dry immediately to reduce the appearance of water marks.
DRYING AND DEHYDRATING
While the United States Department of Agriculture advises: DO NOT hold foods at temperature between 40ºF to 140ºF more than
2 hours – and cooking raw foods below 275ºF is not recommended, the low setting of the oven (ranging from 150ºF to 225ºF) may be
used to keep food hot and in special recipes, used to dehydrate fruits and vegetables.
During dehydration, the convection fans circulates hot air over the food, causes moisture to escape from the food surface – generally
drying it out. This removal of water inhibits growth of microorganisms and slows down the activity of enzymes. Starting with only the
freshest, best quality food items, prepare as directed and:
• Place the food on drying racks spaced evenly in the oven cavity.
• Set the temperature control to 200ºF and switch on the convection fan.
• Remember to periodically check the food items for dryness state.
To Clean the Cook Top
The cook top is brushed Stainless Steel with polished aluminum burner heads. The burner caps are steel coated porcelain.
0 Do not use abrasives on Stainless Steel. Use towels, sponges or soft plastic scrubbers. RUB ONLY WITH THE "GRAIN".
0 Do not use steel wool pads or green rough Scrubee’s.
0 Wash all cooking surfaces with hot water and dish detergent such as Simple Green, Ivory Liquid, or Joy.
0 Rub stubborn spots with baking soda or liquid cleaner such as Windex All Surface Cleaner or 409.
0 Grates and burner caps can be soaked in hot soapy water. Mild scouring cleaners can be used, such as Bon Ami or Cameo on
grates and burner caps.
To Clean the Oven
The oven cavity is porcelainized with steel rack guides and racks. The infrared broiler does not need to be cleaned. Any soil is burned
off by the intense heat.
0 Place a medium glass baking dish lled with two cups of ammonia. Close the door and allow the dish to sit overnight. This process
softens the soil for easier removal.
0 Wash the interior of the oven with soap and water. Make a paste with baking soda and water and using a sponge or nylon pad
rub away stubborn stains.
0 Use mild scrubbing compounds such as Bon Ami or Cameo if necessary.
0 Do not use steel wool pads or abrasive sponges or scrubbers.
0 If necessary, spray oven cleaner can be used. DO NOT SPRAY OVEN CLEANER INTO THE CONVECTION FANS OR UP
ONTO THE INFRARED BROILER.
0 When spray oven cleaners are used, follow using a 1/4 cup vinegar mixed with one quart of water to rinse the oven.
0 Do not use scouring powders on the glass window; oven spray may be used on the window. Rinse with vinegar and water solution.
13592 Desmond St., Pacoima, CA 91331 818.897.0808 tel 888.753.9898 toll free www.americanrange.com
27
Cuisine & Performer Ranges
Use & Care Manual
CLEANING RECOMMENDATIONS
PART / MATERIAL CLEANING SUGGESTIONS BEING CAREFUL
Main Top/
Porcelain Enamel
Soft Scrub may be used here. With a cool or
slightly warm surface, use a damp sponge or cloth
as recommended by the manufacturer.
Since the surface is glass (it can be scratched by
certain materials) try to rub gently in small circles to
allow time and chemical reactions to take place.
Sealed Burners
Caps and burner heads can be removed for
cleaning using hot sudsy water. A stiff nylon bristle
tooth brush can be used to clean burner port
openings.
Remember to dry out the ports (try to blow air
through them if you like). Water clogged ports burn
with erratic ames and could be dangerous.
Open Burners
The cast iron burner heads are heavy and porcelain
coated. If they are dirty, remove any large debris
and gently scrub under hot, soapy water.
Like the sealed burners, remember to dry out the
ports (try to blow air through them if you like).
Water clogged ports burn with erratic ames and
could be dangerous.
Control Knobs/
Powder Paint
Use dry hands to pull off the knobs; hot sudsy
water works best here…
…with a sponge to avoid scratching
Chrome Knob
Bezels
Hot soapy water works well here, with a sponge or
soft cloth.
As with any round feature that meets the stainless
steel grain, be careful to clean the bezels in a circular
motion – and not contact the S/Steel control panel.
Exterior Finish
Island Trim
Use hot soapy water, Fantastic, Formula 409, rinse
and dry immediately. For hard water spots, try
household vinegar or CLR. If there is any heat
discoloration, consider using Zud, Wright’s All
Purpose Polish or Blue Away.
Rub lightly in the direction of the grain of the
Stainless Steel. Salt (sodium chloride), chlorine or
chlorine compounds in some cleaners are corrosive
to Stainless Steel.
Grates/Porcelain
Enamel on
Cast Iron
Hot water & detergent with scrubbie, or soap lled
steel wool pad for really tough stains will work.
Remove sugar or acid based spills, they tend to attack
the enamel. Remember the grates are heavy, use care
when lifting and replacing.
Griddle
Moisten a soft scrub cloth, adding a drop of mild
dish soap to create a soapy lather - and wipe the
griddle from left to right.
Use plastic spatulas and spoons when working the
griddle. See more tips in the discussion on griddle
operation above.

13592 Desmond St., Pacoima, CA 91331 818.897.0808 tel 888.753.9898 toll free www.americanrange.com
28
Cuisine & Performer Ranges
Use & Care Manual
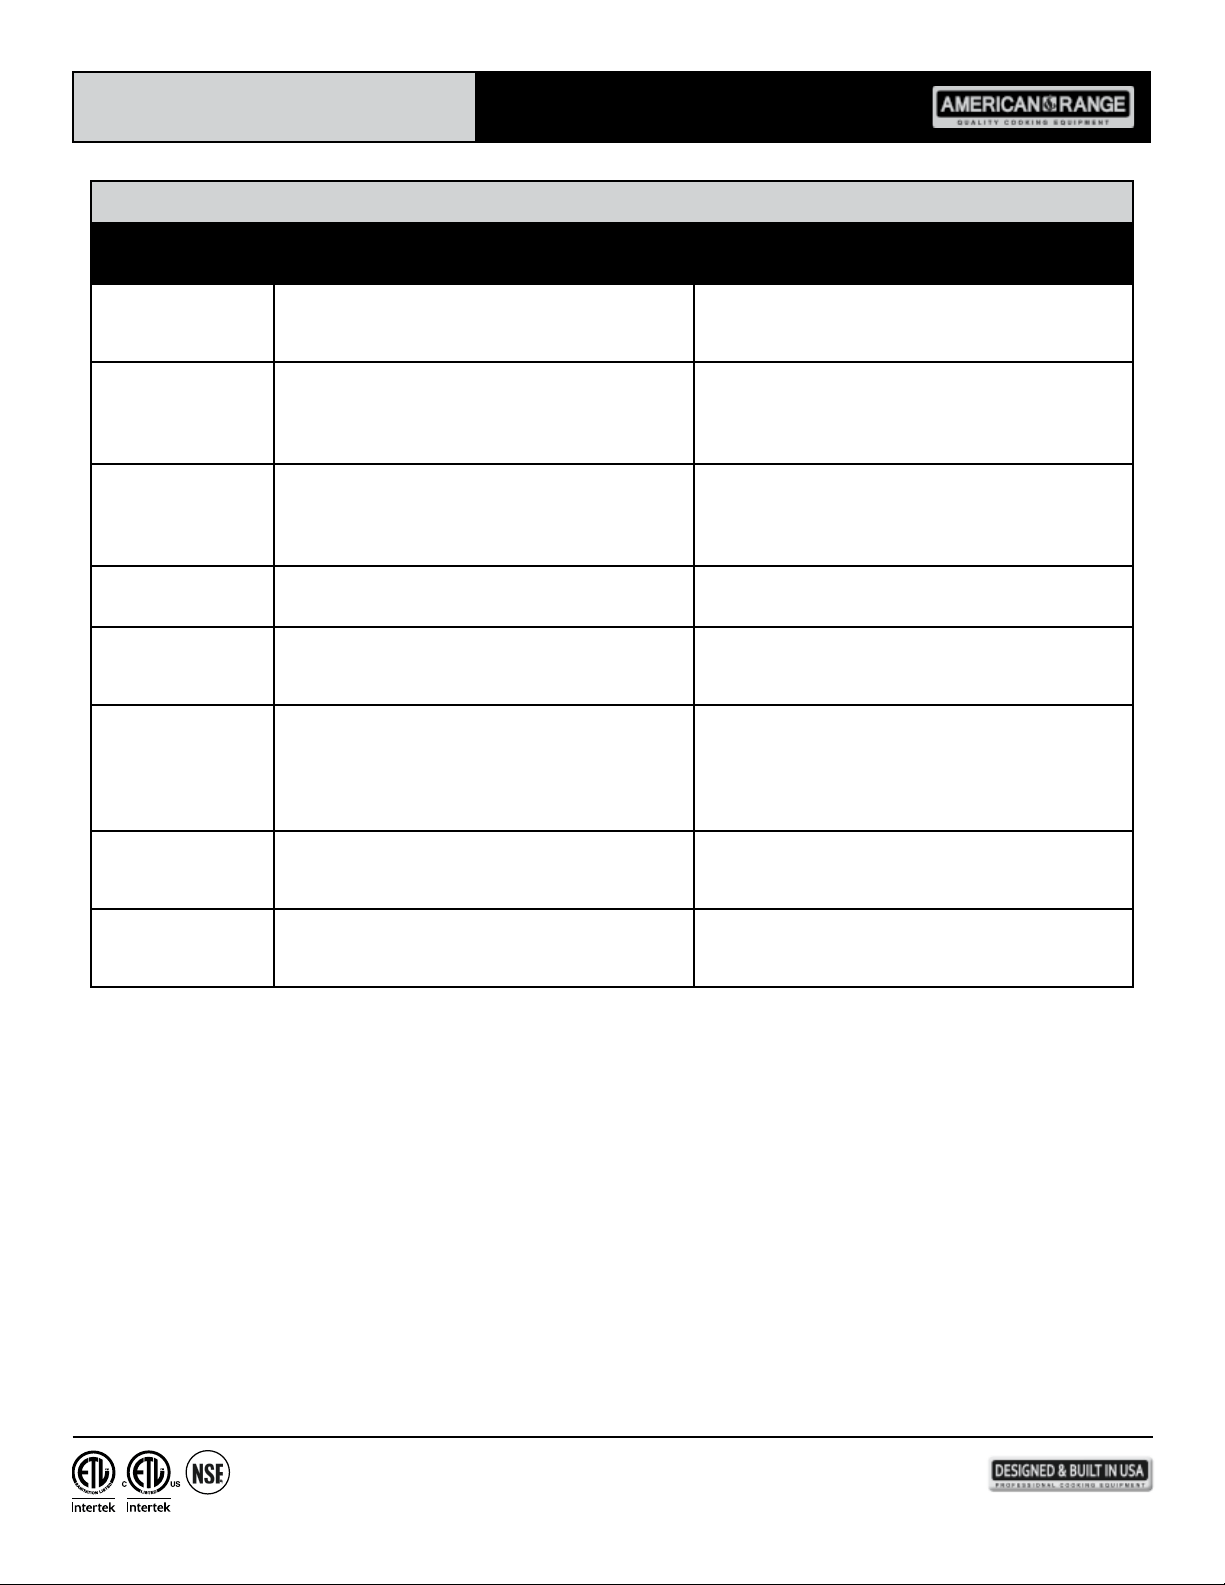
TROUBLESHOOTING
PROBLEM POSSIBLE CAUSE WHAT TO DO
Oven will not heat
No electrical power to the range
Gas service is turned off
Gas supply has been interrupted
Look for red glow of hot surface igniter
Check circuit breakers in house
Try to light a surface burner
Contact the gas company
If no glow, call for service
Oven light does not
work
Light switch is in the off position
Light is burned out
Try switching the light on
Locate and test a new
replacement light, unscrew glass lens, remove bad
light, replace
Broiler will not light
No electrical power to the range
Gas service is turned off
Look for red glow of hot surface igniter
Check circuit breakers in house
Try to light a surface burner
If no glow, call for service
Burner lights, but
clicking won’t stop
Mis-wired high voltage connections
See that the burners are correctly matched to the
high voltage connections
Convection fan does
not turn
Switch the fan on
Unit in broil mode
Bad fan
Use the control panel switch
Turn thermostat to bake temperatures
Call for service
Igniters keep clicking
Reverse polarity of the electrical supply line
Poor electrical ground
Check the polarity with hand held tester
Be sure range power cord has three prongs and
plugs directly (no adapter) into the power
receptacle
Condensation on the
oven window
Cold appliance
During cold weather, it is normal for some
condensation to appear of the window, it will
disappear in about ten minutes.
Foods over-cook
Defective thermostat
Incorrect temperature or cooking time
Watch that thermostat indicator light cycles on and
off every ve or ten minutes at temperature
Reduce cooking time or temperature

Notes
13592 Desmond St., Pacoima, CA 91331 818.897.0808 tel 888.753.9898 toll free www.americanrange.com
Notes
13592 Desmond St., Pacoima, CA 91331 818.897.0808 tel 888.753.9898 toll free www.americanrange.com

Notes
13592 Desmond St., Pacoima, CA 91331 818.897.0808 tel 888.753.9898 toll free www.americanrange.com
13592 Desmond Street, Pacoima, CA 91331
818.897.0808 tel 888.753.9898 toll free
818.897.1670 fax
www.americanrange.com
WARRANTY REQUIREMENT
For reliable operation and for your own safety, this professional cooking equipment must
be installed by a certied/licensed contractor.
Failure to comply will void any written or implied warranty.
Should the equipment require service during the standard warranty period, the receipt
proving certied installation must be made available to American Range for verication.
If installation was not performed by a certied/licensed contractor be prepared to submit
a major credit card for payment for proper installation prior to service.
R70006 110912