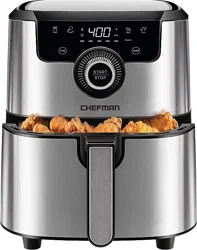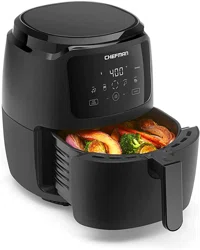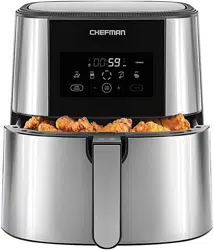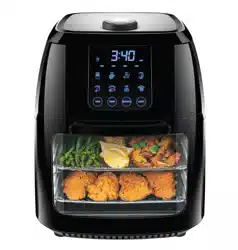

6.5 Liter
AIR FRYER
QUICK LINKS
• User Guide
• Recipe Book
This is your one-stop guide to using your
product. From the below links, you can jump
ahead to a specific document if desired.

3
READ ALL INSTRUCTIONS BEFORE USE
For your safety and continued enjoyment of this product, always read the instruction manual before using.
USER GUIDE
Congratulations on your purchase!
Every Chefman product is manufactured to the highest standards of performance and safety, and
we are confident that you will be so satisfied with your purchase that Chefman will be your go-to
company for appliances in the future.
Customer satisfaction is a key element of our company’s philosophy. The Chefman brand exists to
fill a void on retail shelves and in consumer kitchens for a truly value-focused kitchen appliance. By
questioning and adding value and innovation at every touch point in the manufacturer to end user
journey, Chefman provides home chefs with the tools they need to achieve picture-perfect results
with maximum efficiency. In addition to manufacturing appliances that are dependable, affordable,
and built with intuitive features to enhance your kitchen experience, we pride ourselves on providing
top-of-the line post purchase support, which includes complimentary access to ClubChefman.com for
product tutorials, delicious recipes & how-to videos, and access to our team of dedicated Chefs.
Should a problem arise, each product is backed by a comprehensive manufacturer’s 1-year warranty
as well as outstanding after-sales service support through our dedicated customer service team. In
the unlikely event that your product does not operate as described in the manual please feel free to
call or email our helpline for assistance. We understand that sometimes products can malfunction,
so if you feel that your appliance is not operating as it should, warranty claims can be made within
one year from the date of purchase when accompanied by a dated receipt.
This guarantee is in addition to your statutory rights; your statutory rights are not affected. This
limited warranty does not apply in cases of damage caused by accident, improper use, abuse or force
majeure.
This warranty gives you specific legal rights. Rights may vary depending on your state or province
of residence. Some locations do not allow limitations on implied warranties or special incidental,
or consequential damages, so the limitations may not apply to you. This limited warranty will be
invalidated if the appliance is tampered with in any way whatsoever.
4 Safety Instructions
7 Features
8 Operating Instructions
13 Troubleshooting
14 Cleaning and Maintenance
15 Terms and Conditions
16 Warranty Card
CONTENTS
2

4
5
SAFETY INSTRUCTIONS SAFETY INSTRUCTIONS
IMPORTANT SAFEGUARDS IMPORTANT SAFEGUARDS
WARNING: When using electrical appliances especially when children are present, basic safety
precautions should always be followed to reduce the risk of fire, electric shock,
and/or injury to persons, including the following:
1. Read all instructions.
2. Do not touch hot surfaces. Use handles or knobs.
3. To protect against electrical shock do not immerse cord, plugs or unit body in water
or other liquid.
4. Close supervision is necessary when any appliance is used by or near children.
5. Unplug from outlet when not in use and before cleaning. Allow to cool before putting
on or taking off parts.
6. Do not operate any appliance with a damaged cord or plug or after the appliance
malfunctions or has been damaged in any manner. Return appliance to the nearest
authorized service facility for examination, repair, or adjustment.
7. The use of accessory attachments not recommended by the appliance manufacturer
may cause injuries.
8. Do not use outdoors.
9. Do not let cord hang over edge of table or counter, or touch hot surfaces.
10. Do not place on or near a hot gas or electric burner, or in a heated oven.
11. Extreme caution must be used when moving an appliance containing hot oil or other
hot liquids.
12. Always attach plug to appliance first, then plug cord into the wall outlet. To
disconnect, turn any control to off, then remove plug from wall outlet.
13. Do not use appliance for other than intended use.
14. This product is not a deep fryer. It is NOT meant to be filled with oil. Never fill the
basket or any parts of the Air Fryer with oil. If you choose to use oil, lightly toss food
with oil in a separate bowl and then transfer food to the tray inside the basket.
15. When using this appliance, provide adequate ventilation above and on all sides for air
circulation. Do not allow this appliance to touch curtains, wall coverings, clothing, dish
towels or other flammable materials during use. Do not cover air fryer and ensure air
vents, located on the back of the fryer, are not covered.
16. This appliance generates heat during use. Proper precautions must be taken to
prevent the risk of burns, fire or other damage to persons or property. Keep hands
clear of the immediate area surrounding the Air Fryer during operation and use grips
and handles on the appliance when operating. Do not put hands or other body parts
inside the Air Fryer housing while in use or hot.
17. Use caution when opening the Air Fryer. The inside of the basket and its contents are
very hot. Use tongs or protective gloves to remove food from basket.
18. Do not move the Air Fryer while it is in use and/or full of food.
19. Always unplug Air Fryer after use.
20. Never yank cord to disconnect from outlet; instead, grasp the plug and pull firmly.
21. Never place the Air Fryer in the dishwasher. This product housing cannot be immersed
in water and is not dishwasher safe. Only the tray and the basket itself can be
submerged in water. The basket and tray are top-rack dishwasher safe.
22. The housing of the Air Fryer can be wiped down between uses with a
non-abrasive cleaner.
23. Store Air Fryer in a cool, dry place.
24. Never wrap the cord tightly around the appliance during use or storage; this may
cause the wire to fray and break.
SAVE THESE INSTRUCTIONS.
6
7
5
6
7
SHORT CORD INSTRUCTIONS
A short power supply cord is provided to reduce the hazards of entanglement or tripping
over a longer cord. Longer detachable power supply cords or extension cords are available
and may be used if care is exercised in their use. If a longer detachable power supply
extension cord is used:
1. The marked electrical rating of the extension cord should be at least as great as the
electrical rating of the appliance.
2. The cord should be arranged so that it will not drape over the countertop or tabletop
where it can be pulled on by children or tripped over unintentionally.
POWER CORD SAFETY TIPS
1. Never pull or yank on the cord or the appliance.
2. To insert the plug, grasp it firmly and guide it into the outlet.
3. To disconnect appliance, grasp the plug and remove it from the outlet.
4. Before each use, inspect the power cord for cuts and/or abrasion marks. If any are found,
this indicates that the appliance should be serviced, and the power cord replaced. Please
contact Chefman
®
Customer Support for assistance.
5. Never wrap the cord tightly around the appliance, as this could place undue stress on the
cord where it enters the appliance and cause it to fray and break.
DO NOT OPERATE APPLIANCE IF THE POWER CORD SHOWS ANY DAMAGE OR IF THE
APPLIANCE WORKS INTERMITTENTLY OR STOPS WORKING ENTIRELY.
IMPORTANT SAFEGUARDS
SAFETY INSTRUCTIONS
Do not place the appliance
on a stovetop or any other
hot surface.
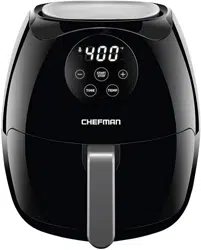
FEATURES
2
3
4
1
0
5
10
25
30
0
5
10
15
20
25
30
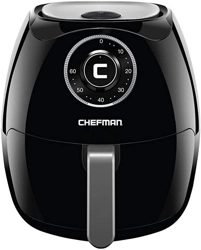
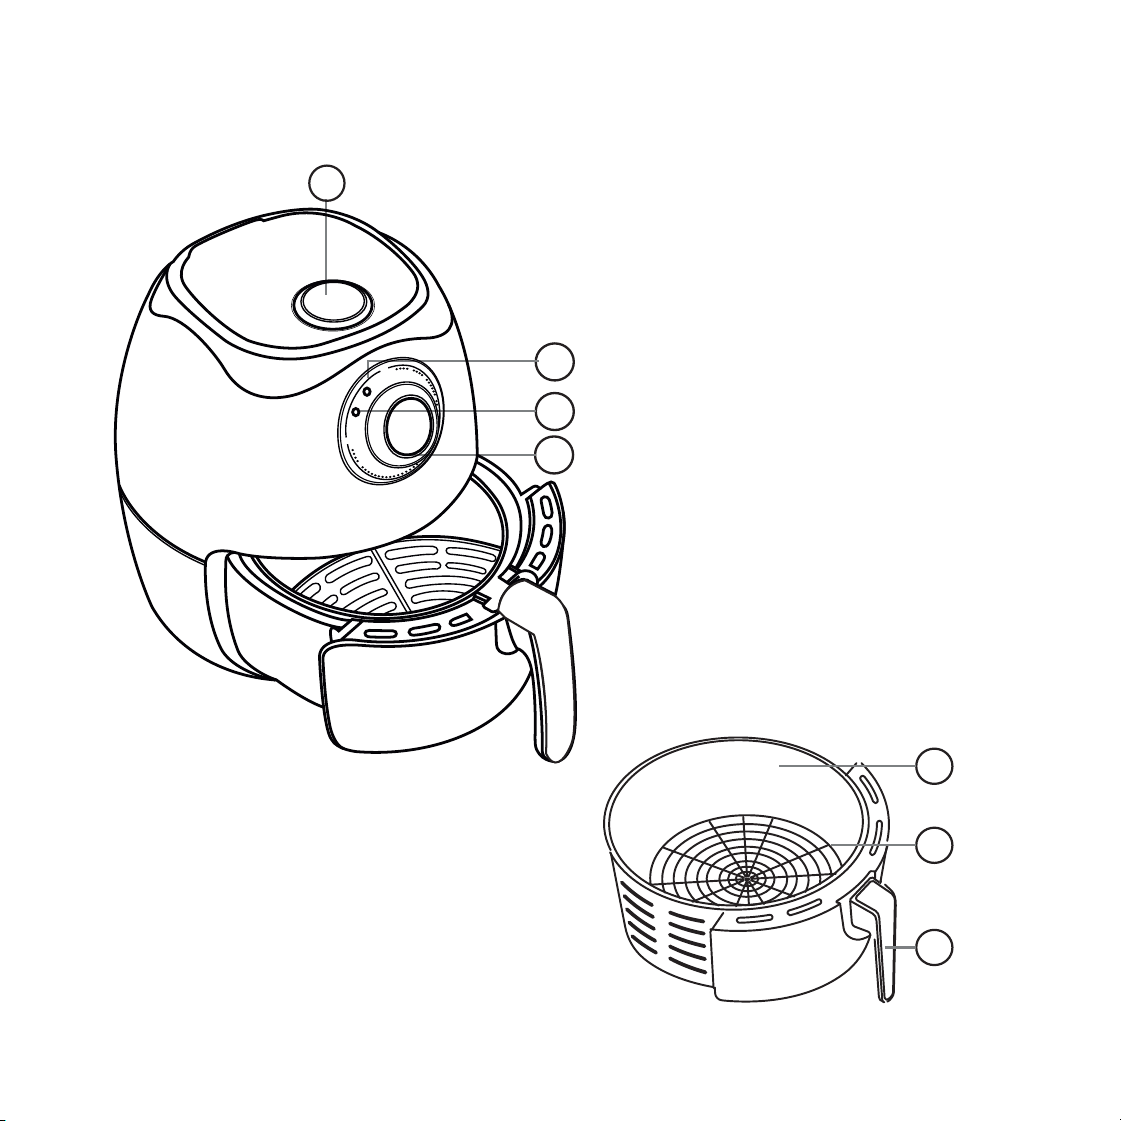
1. TEMPERATURE CONTROL KNOB
2. HEATING LIGHT
3. POWER ON LIGHT
4. TIMER CONTROL KNOB
5. FRYER BASKET
6. BASKET TRAY
7. BASKET HANDLE
6
7
5
6
7
SHORT CORD INSTRUCTIONS
A short power supply cord is provided to reduce the hazards of entanglement or tripping
over a longer cord. Longer detachable power supply cords or extension cords are available
and may be used if care is exercised in their use. If a longer detachable power supply
extension cord is used:
1. The marked electrical rating of the extension cord should be at least as great as the
electrical rating of the appliance.
2. The cord should be arranged so that it will not drape over the countertop or tabletop
where it can be pulled on by children or tripped over unintentionally.
POWER CORD SAFETY TIPS
1. Never pull or yank on the cord or the appliance.
2. To insert the plug, grasp it firmly and guide it into the outlet.
3. To disconnect appliance, grasp the plug and remove it from the outlet.
4. Before each use, inspect the power cord for cuts and/or abrasion marks. If any are found,
this indicates that the appliance should be serviced, and the power cord replaced. Please
contact Chefman
®
Customer Support for assistance.
5. Never wrap the cord tightly around the appliance, as this could place undue stress on the
cord where it enters the appliance and cause it to fray and break.
DO NOT OPERATE APPLIANCE IF THE POWER CORD SHOWS ANY DAMAGE OR IF THE
APPLIANCE WORKS INTERMITTENTLY OR STOPS WORKING ENTIRELY.
IMPORTANT SAFEGUARDS
SAFETY INSTRUCTIONS
Do not place the appliance
on a stovetop or any other
hot surface.
FEATURES
2
3
4
1
0
5
10
25
30
0
5
10
15
20
25
30
1. TEMPERATURE CONTROL KNOB
2. HEATING LIGHT
3. POWER ON LIGHT
4. TIMER CONTROL KNOB
5. FRYER BASKET
6. BASKET TRAY
7. BASKET HANDLE
8
9
OPERATING INSTRUCTIONS
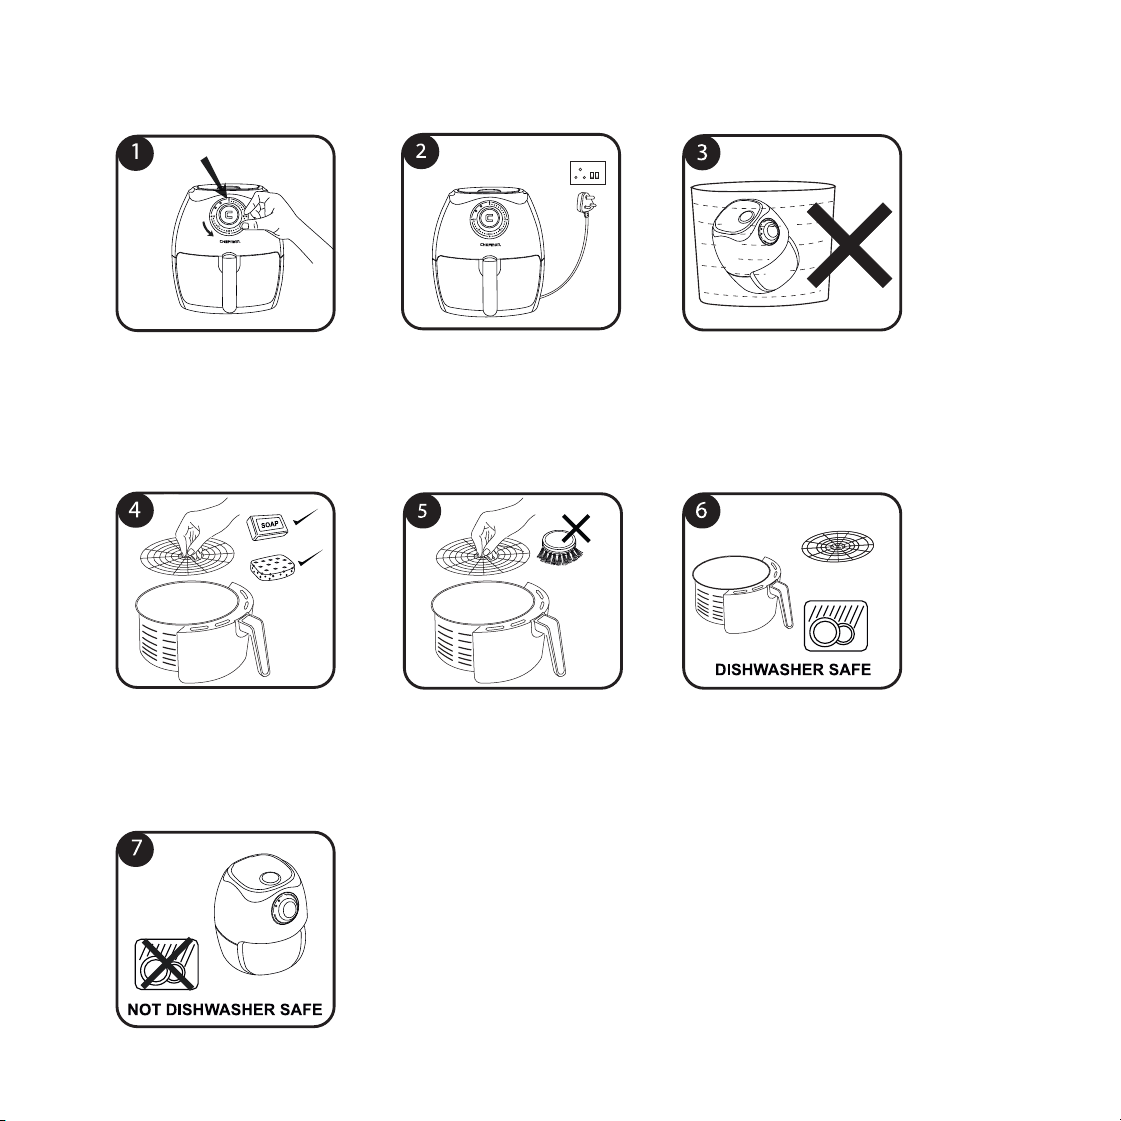
BEFORE FIRST USE
1. Remove all packaging materials.
2. Remove stickers from unit before use. Do not remove the rating label from underneath
the unit.
3. Thoroughly clean the fryer basket and tank with soap, hot water and a
non-abrasive sponge. Wipe the inside and outside of the appliance with a damp
cloth and allow to dry before using.
NOTE: Fryer basket and tank are dishwasher safe.
4. This is a healthy electric oil free fryer that works on hot air. Do not fill the basket with
oil or frying fat.
HOW TO USE
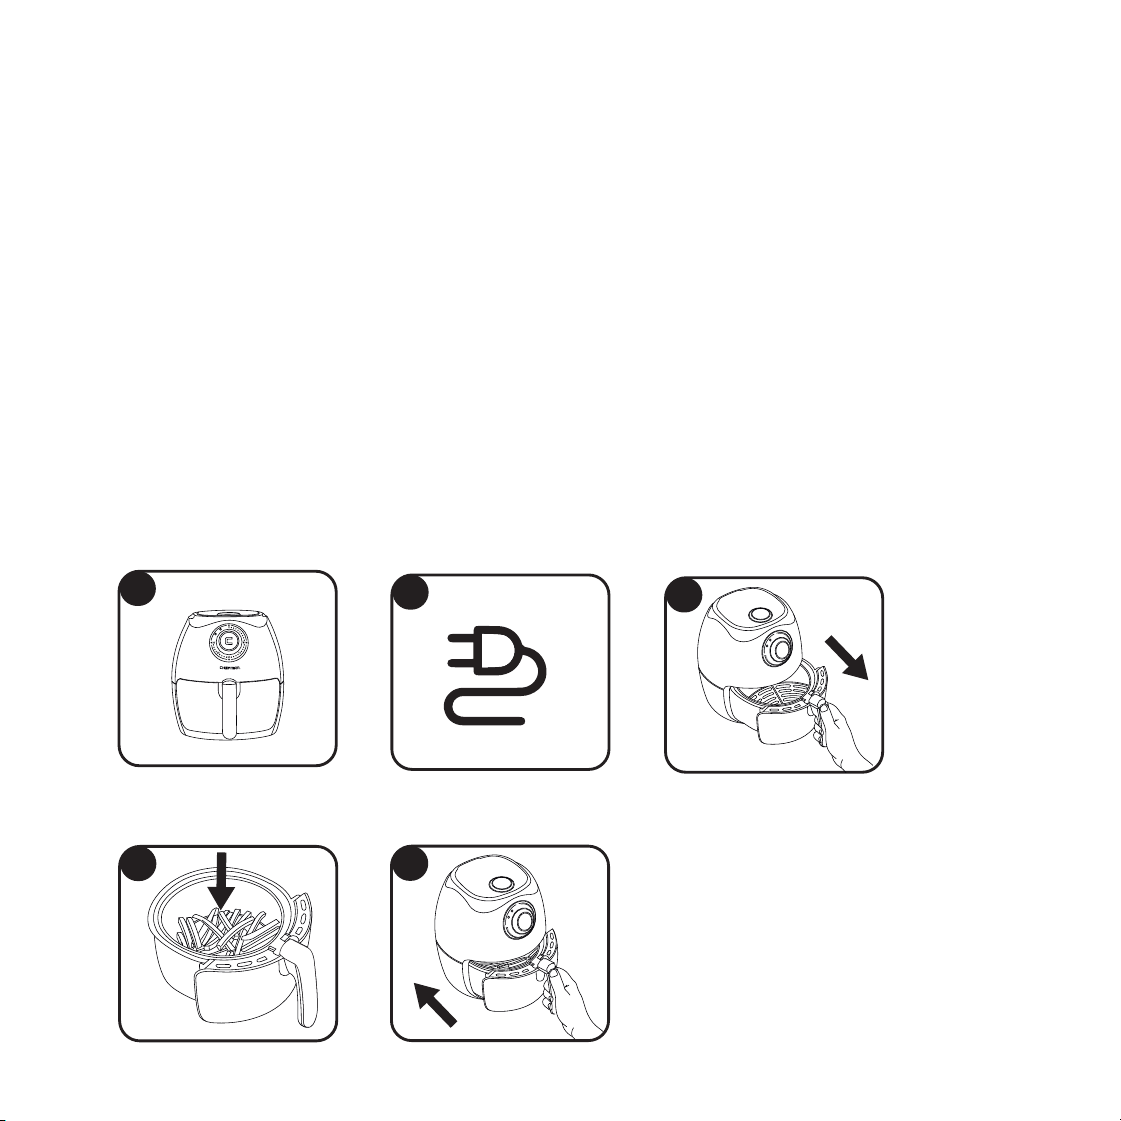
To assemble the fryer basket and tray, lower the basket tray until it firmly clicks into place
inside the tank.
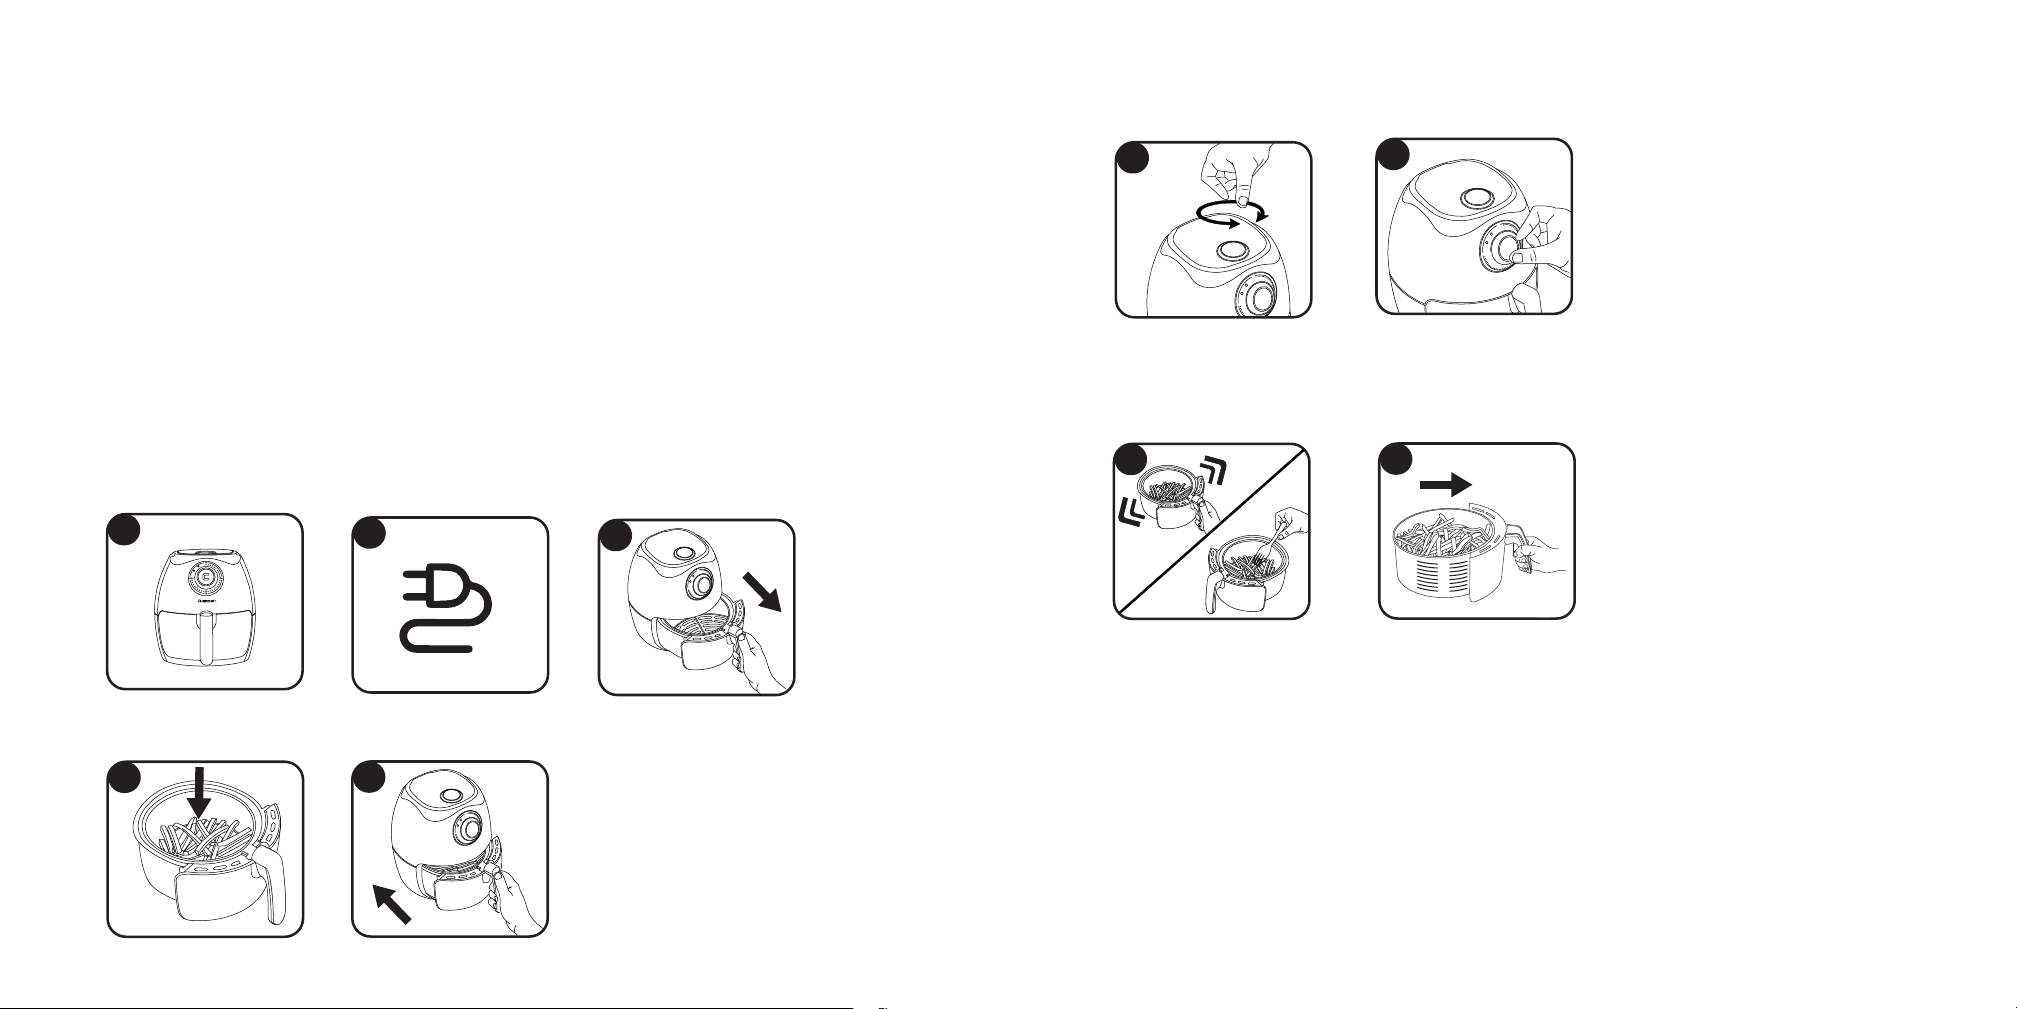
OPERATING INSTRUCTIONS
Place appliance on a flat,
stable surface.
Connect the power plug to a
grounded wall electrical socket.
Place the ingredients into
the basket.
NOTE: Do not fill the basket more than
indicated in your recipe or in the table on
page 7 as this can adversely affect the
cooking result.
NOTE: Be sure to carefully pull air fryer
basket straight out to avoid spillage.
Carefully pull fryer basket
straight out of the fryer.
Slide the tank back into the
air fryer.
4
1
2
3
5
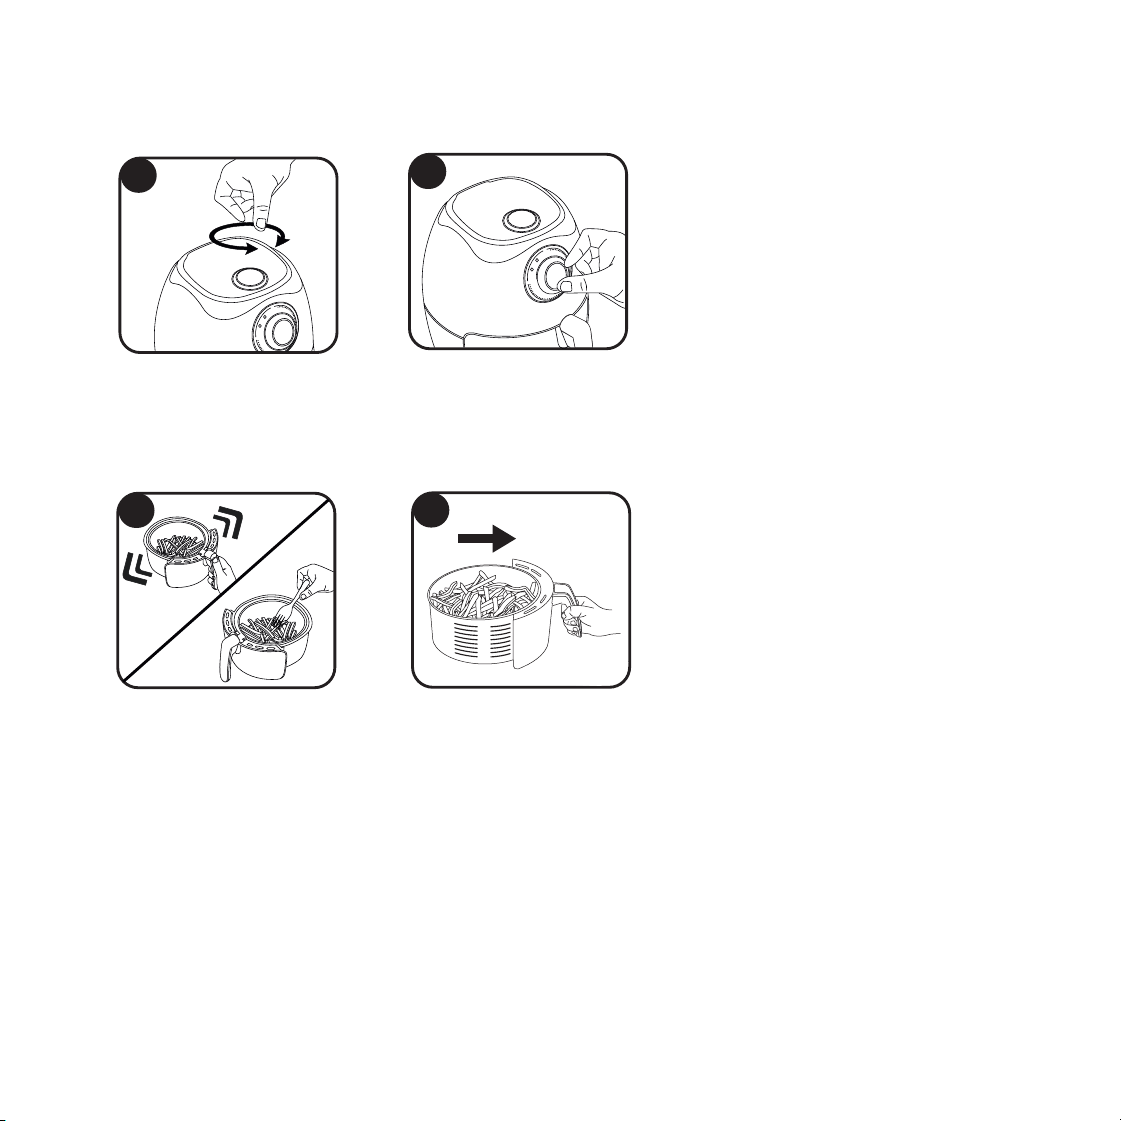
Turn the temperature control
knob to the recommended
temperature for your recipe
(see page 8).
Pull the fryer basket out of the
appliance and shake or turn
using a fork (or tongs). Then put
the fryer basket back into the air
fryer.
After the bell rings, pull out
the tank and and check if the
ingredients are ready. If not
ready, simply slide the tank
back in and reset the timer.
Turn the timer control knob
to the required preparation
time.
NOTE: Add 3 minutes of preparation
time when the appliance is cold. If
not preheated, some ingredients
may require shaking halfway through
preparation time.
You can also preheat the appliance
without food for approx. 4 minutes.
6
8
7
9
8
9
OPERATING INSTRUCTIONS
BEFORE FIRST USE
1. Remove all packaging materials.
2. Remove stickers from unit before use. Do not remove the rating label from underneath
the unit.
3. Thoroughly clean the fryer basket and tank with soap, hot water and a
non-abrasive sponge. Wipe the inside and outside of the appliance with a damp
cloth and allow to dry before using.
NOTE: Fryer basket and tank are dishwasher safe.
4. This is a healthy electric oil free fryer that works on hot air. Do not fill the basket with
oil or frying fat.
HOW TO USE
To assemble the fryer basket and tray, lower the basket tray until it firmly clicks into place
inside the tank.
OPERATING INSTRUCTIONS
Place appliance on a flat,
stable surface.
Connect the power plug to a
grounded wall electrical socket.
Place the ingredients into
the basket.
NOTE: Do not fill the basket more than
indicated in your recipe or in the table on
page 7 as this can adversely affect the
cooking result.
NOTE: Be sure to carefully pull air fryer
basket straight out to avoid spillage.
Carefully pull fryer basket
straight out of the fryer.
Slide the tank back into the
air fryer.
4
1
2
3
5
Turn the temperature control
knob to the recommended
temperature for your recipe
(see page 8).
Pull the fryer basket out of the
appliance and shake or turn
using a fork (or tongs). Then put
the fryer basket back into the air
fryer.
After the bell rings, pull out
the tank and and check if the
ingredients are ready. If not
ready, simply slide the tank
back in and reset the timer.
Turn the timer control knob
to the required preparation
time.
NOTE: Add 3 minutes of preparation
time when the appliance is cold. If
not preheated, some ingredients
may require shaking halfway through
preparation time.
You can also preheat the appliance
without food for approx. 4 minutes.
6
8
7
9

10
11
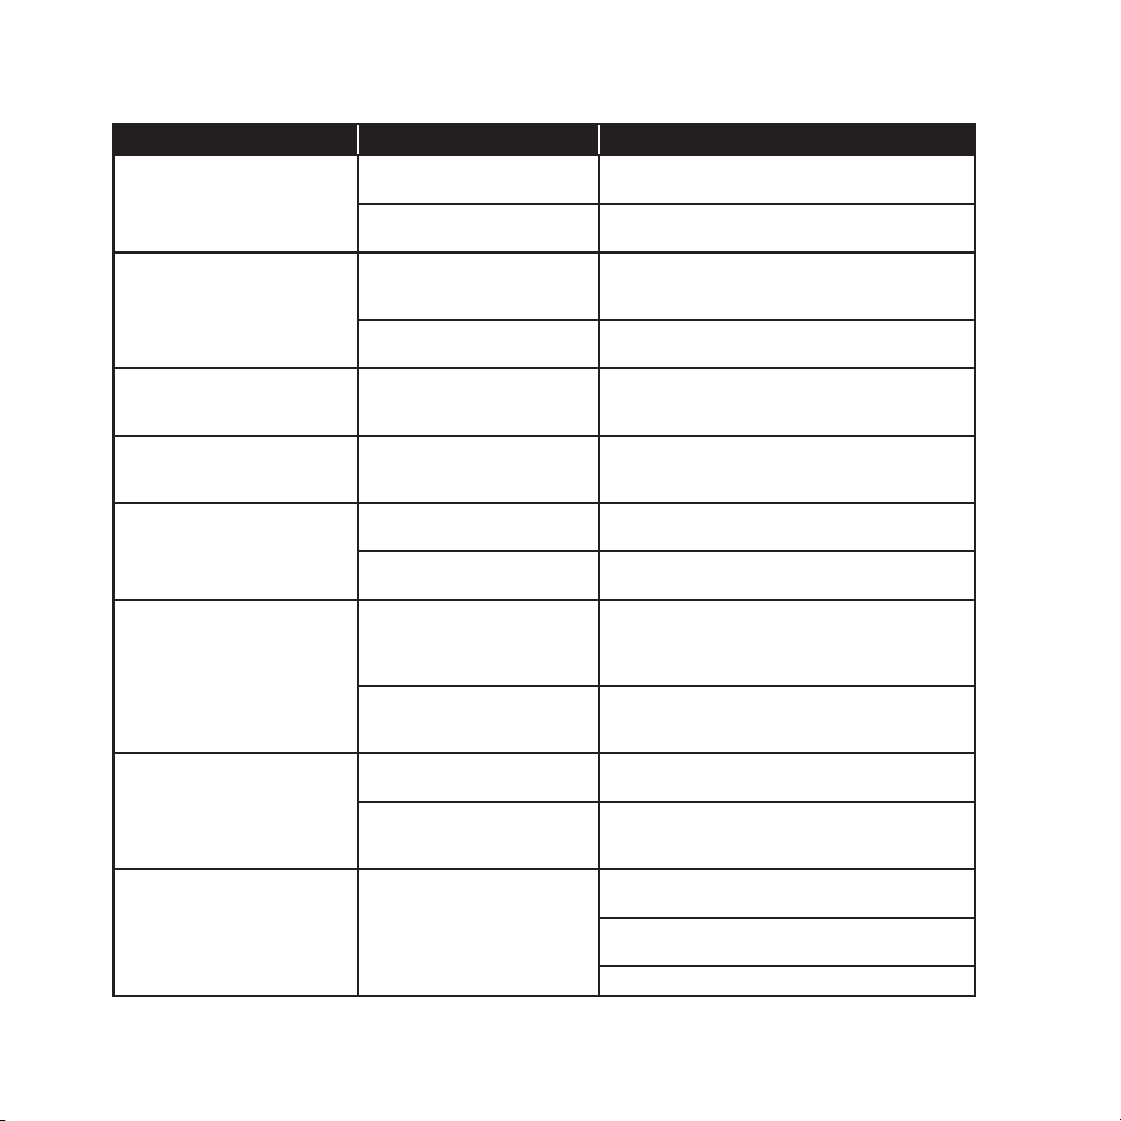
OPERATING INSTRUCTIONS COOKING TIPS
Type
Min to Max
Amount
Time (mins)
Temp (°F)
Shake Cooking Tip
Thin Frozen Fries 100-400g 9-16 390 Yes
Thick Frozen Fries 100-400g 11-20 390 Yes
Home-made Fries 100-400g 16-20 390 Yes Add 1/2 tablespoon of oil
Home-made
Potato Wedges
100-400g
18-22
360 Yes Add 1/2 tablespoon of oil
Home-made
Potato Cubes
100-350g 12-18 360 Yes Add 1/2 tablespoon of oil
Rösti 250g
15-18
360 Yes
Potato Gratin 400g 15-18 390 Ye s
Steak 100-400g 8-12 360 No
Pork Chops 100-400g 10-14 360 No
Hamburger 100-400g 7-14 360 No
Sausage Roll
100-400g 13-15 390 No
Drumsticks
100-400g 18-22 360 No
Chicken Breast
100-400g 10-15 360 No
Spring Rolls
100-400g 8-10 390 Ye s Use oven-ready
Frozen Chicken
Nuggets
100-400g 6-10 390 Yes Use oven-ready
Frozen Fish
Fingers
100-400g 6-10 390 No Use oven-ready
Frozen Breaded
Cheese Snacks
100-400g 8-10 360 No Use oven-ready
Stuffed
Vegetables
100-400g 10 320 No
Cake
300g 20-25 320 No Use baking tin
Quiche
400g 20-22 360 No Use baking tin/oven dish
Muffins
300g 15-18 390 No Use baking tin
Sweet Snacks
400g 20 320 No Use baking tin/oven dish
Please see table below for tips on how to be prepare different foods.
NOTE: This table is only a guide and does noit contain exact recipes.
NOTE: Use extreme caution while handling hot food in fryer basket and tank. Excess
oil will drip into tank when preparing greasy foods.
1. Smaller ingredients usually require a slightly shorter preparation time than larger
ingredients.
2. For best results of smaller foods such as fries, onion rings and chicken nuggets,
remove the fryer basket halfway through preparation time and shake to mix the food
around. This will help to evenly fry the food being prepared.
3. Add some oil to fresh potatoes for a crispy result. Fry your ingredients in the airfryer
within a few minutes after you added the oil. Do not fill basket with oil.
4. Do not prepare extremely greasy ingredients such as sausages in the air fryer.
5. Snacks that can be prepared in an oven can also be prepared in the air fryer.
6. For French fries, use 14 ounces of fries at a time for best frying results.
7. This air fryer is great for reheating food. To reheat your food, set the temperature
control to 300º Fahrenheit for up to 10 minutes.

10
11
OPERATING INSTRUCTIONS COOKING TIPS
Type
Min to Max
Amount
Time (mins)
Temp (°F)
Shake Cooking Tip
Thin Frozen Fries 100-400g 9-16 390 Yes
Thick Frozen Fries 100-400g 11-20 390 Yes
Home-made Fries 100-400g 16-20 390 Yes Add 1/2 tablespoon of oil
Home-made
Potato Wedges
100-400g
18-22
360 Ye s Add 1/2 tablespoon of oil
Home-made
Potato Cubes
100-350g 12-18 360 Ye s Add 1/2 tablespoon of oil
Rösti 250g
15-18
360 Ye s
Potato Gratin 400g 15-18 390 Ye s
Steak 100-400g 8-12 360 No
Pork Chops 100-400g 10-14 360 No
Hamburger 100-400g 7-14 360 No
Sausage Roll
100-400g 13-15 390 No
Drumsticks
100-400g 18-22 360 No
Chicken Breast
100-400g 10-15 360 No
Spring Rolls
100-400g 8-10 390 Ye s Use oven-ready
Frozen Chicken
Nuggets
100-400g 6-10 390 Yes Use oven-ready
Frozen Fish
Fingers
100-400g 6-10 390 No Use oven-ready
Frozen Breaded
Cheese Snacks
100-400g 8-10 360 No Use oven-ready
Stuffed
Vegetables
100-400g 10 320 No
Cake
300g 20-25 320 No Use baking tin
Quiche
400g 20-22 360 No Use baking tin/oven dish
Muffins
300g 15-18 390 No Use baking tin
Sweet Snacks
400g 20 320 No Use baking tin/oven dish
Please see table below for tips on how to be prepare different foods.
NOTE: This table is only a guide and does noit contain exact recipes.
NOTE: Use extreme caution while handling hot food in fryer basket and tank. Excess
oil will drip into tank when preparing greasy foods.
1. Smaller ingredients usually require a slightly shorter preparation time than larger
ingredients.
2. For best results of smaller foods such as fries, onion rings and chicken nuggets,
remove the fryer basket halfway through preparation time and shake to mix the food
around. This will help to evenly fry the food being prepared.
3. Add some oil to fresh potatoes for a crispy result. Fry your ingredients in the airfryer
within a few minutes after you added the oil. Do not fill basket with oil.
4. Do not prepare extremely greasy ingredients such as sausages in the air fryer.
5. Snacks that can be prepared in an oven can also be prepared in the air fryer.
6. For French fries, use 14 ounces of fries at a time for best frying results.
7. This air fryer is great for reheating food. To reheat your food, set the temperature
control to 300º Fahrenheit for up to 10 minutes.
12
13
TROUBLESHOOTING CLEANING AND MAINTENANCE
Problem Possible Cause Solution
The Air Fryer does
not work
The appliance is not plugged
in
Insert plug into the electrical outlet
The timer was not set Turn the timer knob to the desired cook time
to switch on the appliance
The ingredients fried
with the air fryer are
not done
The amount of
ingredients in the basket is
too large
Put smaller batches of
ingredients in the basket.
Smaller batches fry more evenly
The set temperature is too
low
Turn the temperature control knob to the
desired temperature setting
The ingredients are
fried unevenly in the
air fryer
Certain ingredients need to
be shaken halfway through
Shake halfway through
the preparation time
Fried snacks are not
crispy when they come
out of the air fryer.
The snack was meant to be
prepared in a
traditional deep fryer
Lightly brush some oil onto the snacks for a
crisper result
I cannot slide the
basket into the
appliance properly
Too many ingredients in the
basket
Do not fill the basket beyond the MAX indi-
cation
Basket is not placed in the
fryer correctly
Push the basket into the fryer until you hear
a click
White smoke comes
out from the appliance
Greasy ingredients are being
prepared
Frying greasy ingredients, a large amount of
oil will leak into the basket. The oil
produces white smoke but does not affect the
appliance or end result
The pan still cointains grease
residues from
previous use
White smoke is caused by grease heating up
in the basket. Make sure the basket is cleaned
properly after use
Fresh fries are fried
unevenly in the air fryer
The right type of potato was
not used
Use fresh potatoes and make sure that they
stay firm during frying
You did not rinse the
potato sticks properly be-
fore you fried them
Rinse the potato sticks properly to
remove starch from the outside
of the sticks
Fresh fries are not
crispy when they come
out of the air fryer
The crispiness of the fries
depends on the amount of
oil and water in the fries
Make sure you dry the potato sticks
properly before adding oil
Cut the potato sticks smaller for a
crispier result
Add slightly more oil for a crisper result
Before cleaning, turn the
Timer control knob to "0".
Remove the fryer basket
tray and wash with soap, hot
water and a non-abrasive
sponge.
Unit housing is NOT
dishwasher safe.
Do not use abrasive cleaning
materials, they may cause
scratching or damage to the
non-stick coating.
Tip: If food is stuck to the basket or bottom of the tank, fill
the tank with hot, soapy water and allow the basket and
inside of the tank to soak for approximately 10 minutes.
Fryer basket and basket tray
are dishwasher safe.
Wipe the outside of the unit
housing with a damp cloth.
Do not immerse unit housing
in water or rinse under
running water.
Unplug the appliance and
allow to cool.
Tip: After the unit has been
turned off, remove the tank
to help the unit to cool down
quickly.

14
15
Our products are backed by a limited 1-year warranty. To register, follow the instructions on the Chefman
®
Warranty Registration page in this User Guide.
We offer a limited 1-year warranty from the date of purchase. This warranty is void without proof of purchase
within the USA, Canada or Mexico. Service centers and retail stores do not have the right to alter or change
the Terms & Conditions of this warranty.
WHAT THE WARRANTY COVERS
• Manufacturer Defects
Chefman
®
products are warranted against defects in material and workmanship for a period of 1 year from
the date of purchase, when used in accordance with the Chefman
®
User Guide.
• Qualified Replacements
If your product does not work as it should, we will send you a new one. If the product is no longer available,
we will replace it with an identical product or one that is comparable.
THIS WARRANTY DOES NOT COVER
• Misuse - Damage that occurs from neglectful or improper use of products; damage that occurs as a result of
usage with incompatible voltage. See Safety Instructions for information on proper use.
• Poor Maintenance - General lack of proper care. See Cleaning & Maintenance Instructions for information on
proper maintenance.
• Commercial Use - Damage that occurs from commercial use.
• Altered Products - Damage that occurs from alterations or modifications by any entity other than
Chefman
®
; removal of rating label.
• Catastrophic Events - Damage that occurs from fire, floods or natural disasters.
• Loss of Interest - Claims of loss of interest or enjoyment.
TERMS & CONDITIONS
Limited Warranty
Register your product to extend your warranty for 3 months.
What do I need to register my product?
•Contact Information
•Model Number
•Proof of Purchase
(i.e. online confirmation, receipt, gift receipt)
•Date code
How do I register my product?
We offer 2 convenient ways to access the Chefman
®
registration form:
1. Visit chefman.com/register.
2. Scan the QR code below to access the form:
Have a question?
Please reach out to us at Chefman.com/contact.
Need more help?
We’re here for you! Contact us at customersupport@chefman.com or 888.315.6553 Monday-Friday.
OTHER LIMITATIONS: ALL WARRANTIES OF ANY KIND WHATSOEVER, EXPRESS, IMPLIED AND STATUTORY, ARE HEREBY DISCLAIMED. ALL IMPLIED
WARRANTIES OF MERCHANTABILITY AND FITNESS FOR A PARTICULAR PURPOSE ARE HEREBY DISCLAIMED, PROVIDED THAT IF ANY IMPLIED
WARRANTIES OF ANY KIND IS REQUIRED BY ANY JURISDICTION, INCLUDING MERCHANTABILITY AND FITNESS FOR A PARTICULAR PURPOSE, THE
DURATION OF SUCH IMPOSED IMPLIED WARRANTY IS LIMITED TO ONE (1) YEAR. THIS WARRANTY DOES NOT COVER, AND CHEFMAN® SHALL NOT BE
LIABLE, FOR INCIDENTAL, INDIRECT, SPECIAL OR CONSEQUENTIAL DAMAGES, INCLUDING WITHOUT LIMITATION, DAMAGE TO, OR LOSS OF USE OF THE
PRODUCT, OR LOST SALES OR PROFITS OR DELAY OR FAILURE TO PREFORM THIS WARRANTY OBLIGATION. THE REMEDIES PROVIDED HEREIN ARE THE
EXCLUSIVE REMEDIES UNDER THIS WARRANTY, WHETHER BASED ON CONTRACT, TORT OR OTHERWISE.
This Warranty gives you specific legal rights, and you may also have other rights that vary from state to state or Province to Province. Some states or Provinces do not
allow the exclusions or limitations set forth in this Warranty, so the above limitations or exclusions may not apply to you depending on the jurisdiction of purchase.
Chefman® is a registered trademark of RJ BRANDS, LLC. ETL
CM
is a registered certification mark of Intertek Testing Services NA, Inc.
CHEFMAN
®
WARRANTY REGISTRATION
MADE IN CHINA/FABRIQUE EN CHINE
AC ONLY/ AC SEULEMENT
DATE CODE:
ACCESS CODE:
Model/Modele: RJ25-C
Conveyor toaer
120v~60hz 1800W
CONFORMS TO UL STD. 1026
CERTIFIED TO CSA STD.C22.2 No.64
CAUTION: DO NOT IMMERSE IN WATER
ATTENTION: NE PAS PLONGER DANS L’EAU
WARNING: TO PREVENT ELECTRIC SHOCK,
UNPLUG BEFORE CLEANING
PRÉAVIS: POUR ÉVITER LES CHOCS ÉLECTRIQUES,
DÉBRANCHEZ L’APPAREIL AVANT DE L’UTILISER
READ INSTRUCTIONS BEFORE USING
LISEZ LES INSTRUCTIONS AVANT DE L’UTILISER
HOUSEHOLD USE ONLY
POUR USAGE DOMESTIQUE SEULEMENT
0000000
0000
XXXXXXXX

16
CHEFMAN AIR FRYER
RECIPE BOOK
Easy, healthy and delicious recipes using
your Chefman Air Fryer
FRYING FIT

17
18
PREP TIME COOK TIME SERVINGS
10 min 5 min 2
CAJUN SHRIMP
1. In a small bowl, combine the Cajun Spice Mix ingredients.
Set aside.
2. In a large bowl, combine the peeled and deveined shrimp,
olive oil and 1½ tablespoons of the Cajun Spice Mix. Store
remaining for another use.
2. Transfer the seasoned shrimp to the tray inside the air fryer
basket. Insert basket into Air Fryer.
3. Set the Air Fryer to 400°F and 5 minutes. Press Start.
Shake halfway through.
4. When shrimp is opaque and cooked through, transfer to a
serving plate. Serve with lime wedges.
• 8 ounces (about 25) large
shrimp, peeled and dev-
eined
• ½ tablespoon olive oil
• Lime wedges, for serving
Cajun Spice Mix:
• 2 teaspoons Kosher salt
• ½ tablespoon cayenne
pepper
• ½ tablespoon garlic
powder
• ½ tablespoon onion
powder
INGREDIENTS
Tip: This Cajun Spice Mix is spicy! For a milder
version, omit the cayenne and add only
¼
teaspoon
black pepper.
19
20
PREP TIME COOK TIME SERVINGS
10 min 20 min 2
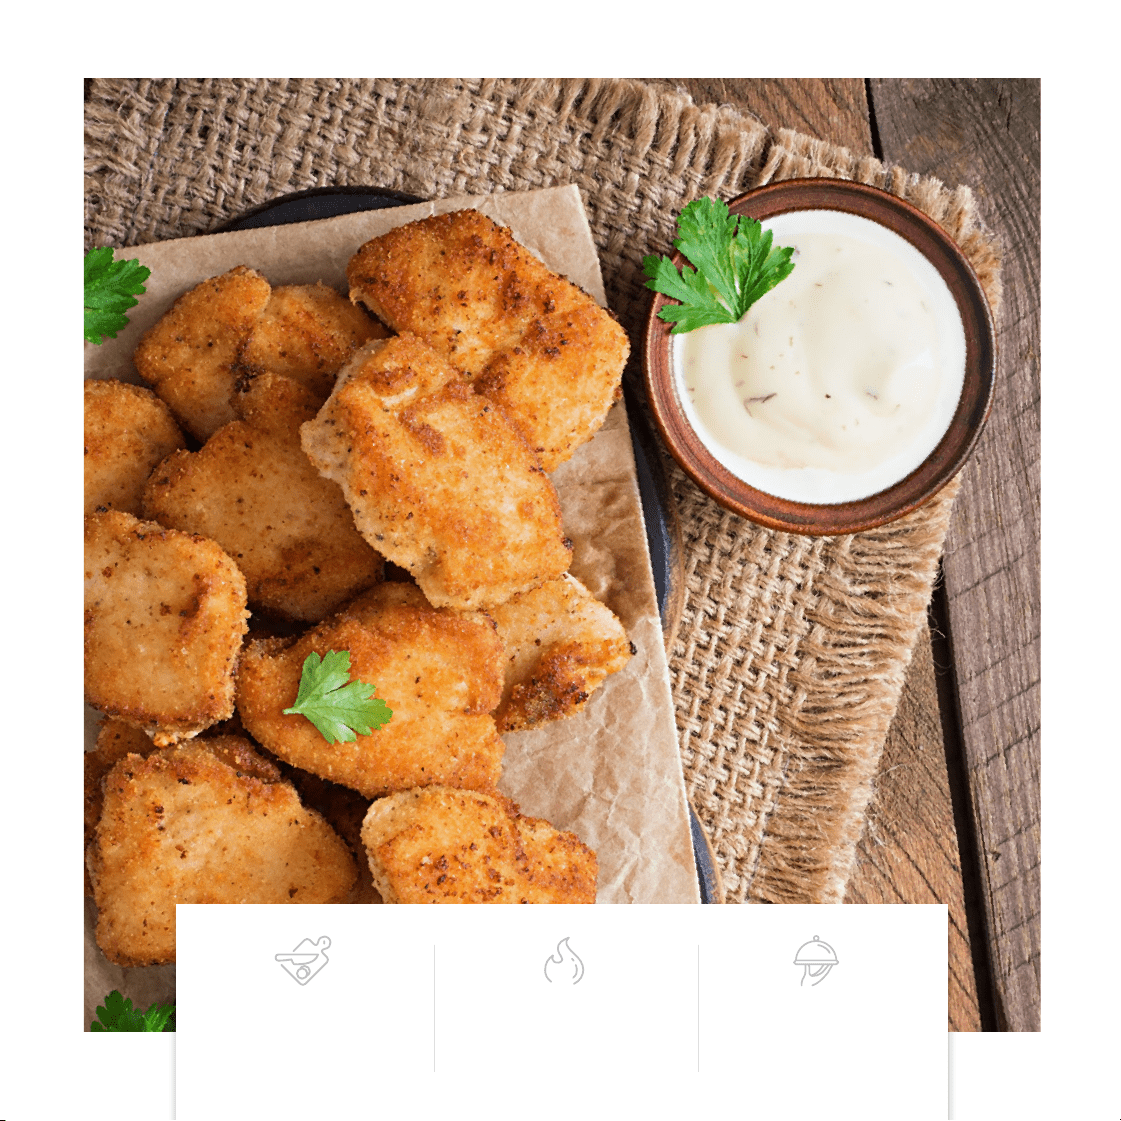
CHICKEN NUGGETS
1. Cut the chicken breasts into 1- to 2-inch cubes. Set aside.
2. Place the flour in a shallow bowl and the eggs in another
shallow bowl.
3. In a food processor, chop the panko bread crumbs, olive oil
and salt into a fine crumb. Transfer to a third shallow bowl.
4. Dip one chicken cube into the flour, then the egg and then
the panko mixture.
Place on a plate. Repeat with remaining chicken cubes.
5. Spray the panko-breaded chicken cubes with oil. Transfer
half of the chicken to the tray inside the air fryer basket.
Insert basket into Air Fryer.
6. Set the Air Fryer to 400°F and 10 minutes. Press Start.
7. When chicken nuggets are golden-brown and fully cooked
through, transfer to
a serving plate. Repeat with remaining chicken cubes.
• 2, 6-ounce chicken breasts
• Oil, for spraying
For the breading:
•
¾
cup panko bread crumbs
• 2 large eggs, lightly beaten
• 2 tablespoons olive oil
• 1 cup unbleached,
all-purpose flour
• 1 pinch salt
• 1 pinch ground black
pepper
INGREDIENTS
Tip: This recipe could also work for chicken fingers.
Simply cut into strips instead of cubes and adjust
cooking time based on thickness to ensure they are
fully cooked through.

19
20
PREP TIME COOK TIME SERVINGS
10 min 20 min 2
CHICKEN NUGGETS
1. Cut the chicken breasts into 1- to 2-inch cubes. Set aside.
2. Place the flour in a shallow bowl and the eggs in another
shallow bowl.
3. In a food processor, chop the panko bread crumbs, olive oil
and salt into a fine crumb. Transfer to a third shallow bowl.
4. Dip one chicken cube into the flour, then the egg and then
the panko mixture.
Place on a plate. Repeat with remaining chicken cubes.
5. Spray the panko-breaded chicken cubes with oil. Transfer
half of the chicken to the tray inside the air fryer basket.
Insert basket into Air Fryer.
6. Set the Air Fryer to 400°F and 10 minutes. Press Start.
7. When chicken nuggets are golden-brown and fully cooked
through, transfer to
a serving plate. Repeat with remaining chicken cubes.
• 2, 6-ounce chicken breasts
• Oil, for spraying
For the breading:
•
¾
cup panko bread crumbs
• 2 large eggs, lightly beaten
• 2 tablespoons olive oil
• 1 cup unbleached,
all-purpose flour
• 1 pinch salt
• 1 pinch ground black
pepper
INGREDIENTS
Tip: This recipe could also work for chicken fingers.
Simply cut into strips instead of cubes and adjust
cooking time based on thickness to ensure they are
fully cooked through.
21
22
PREP TIME COOK TIME SERVINGS
10 min 20 min 4-6
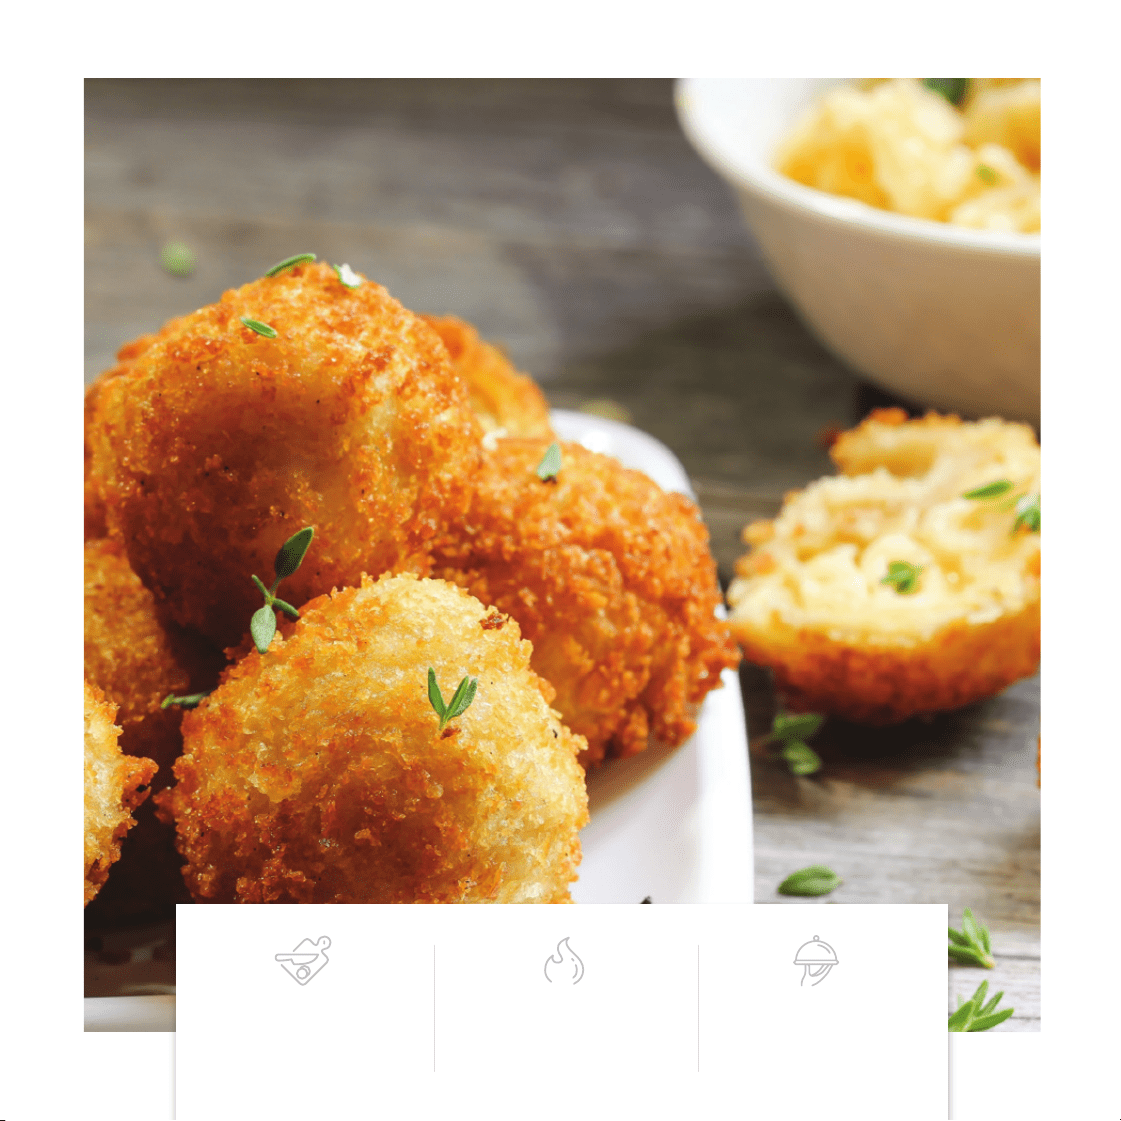
MAC AND CHEESE BITES
1. Remove mac and cheese from refrigerator. Scoop
2 tablespoons and, with wet hands, roll into a ball. Place
on a plate or baking sheet. Repeat with remaining mac
and cheese. Refrigerate until mac and cheese balls are
firm, about 4 hours or more.
2. When mac and cheese balls are firm, place the eggs in
one shallow bowl and the panko bread crumbs in another.
Remove mac and cheese balls from the refrigerator.
3. Dip one mac and cheese ball into the eggs and then the
panko. Place on a plate and repeat with remaining.
4. Spray the coated mac and cheese balls with oil, or toss
with oil. Transfer half to the tray
inside the air fryer basket. Insert basket into Air Fryer.
5. Set the Air Fryer to 400°F and 10 minutes. Press Start.
6. When the mac and cheese balls are golden-brown and
warmed through, transfer to a serving plate. Repeat with
remaining coated mac and cheese balls.
• 3 cups prepared mac
and cheese, cooled and
refrigerated
• 2 eggs, lightly beaten
• 1 cup bread crumbs
• Oil, for spraying, or
1 tablespoon oil
INGREDIENTS
Tip:
This recipe is great for using leftover mac and
cheese, and the kids will love it!

21
22
PREP TIME COOK TIME SERVINGS
10 min 20 min 4-6
MAC AND CHEESE BITES
1. Remove mac and cheese from refrigerator. Scoop
2 tablespoons and, with wet hands, roll into a ball. Place
on a plate or baking sheet. Repeat with remaining mac
and cheese. Refrigerate until mac and cheese balls are
firm, about 4 hours or more.
2. When mac and cheese balls are firm, place the eggs in
one shallow bowl and the panko bread crumbs in another.
Remove mac and cheese balls from the refrigerator.
3. Dip one mac and cheese ball into the eggs and then the
panko. Place on a plate and repeat with remaining.
4. Spray the coated mac and cheese balls with oil, or toss
with oil. Transfer half to the tray
inside the air fryer basket. Insert basket into Air Fryer.
5. Set the Air Fryer to 400°F and 10 minutes. Press Start.
6. When the mac and cheese balls are golden-brown and
warmed through, transfer to a serving plate. Repeat with
remaining coated mac and cheese balls.
• 3 cups prepared mac
and cheese, cooled and
refrigerated
• 2 eggs, lightly beaten
• 1 cup bread crumbs
• Oil, for spraying, or
1 tablespoon oil
INGREDIENTS
Tip:
This recipe is great for using leftover mac and
cheese, and the kids will love it!
23
24
PREP TIME COOK TIME SERVINGS
8 min 10 min 2
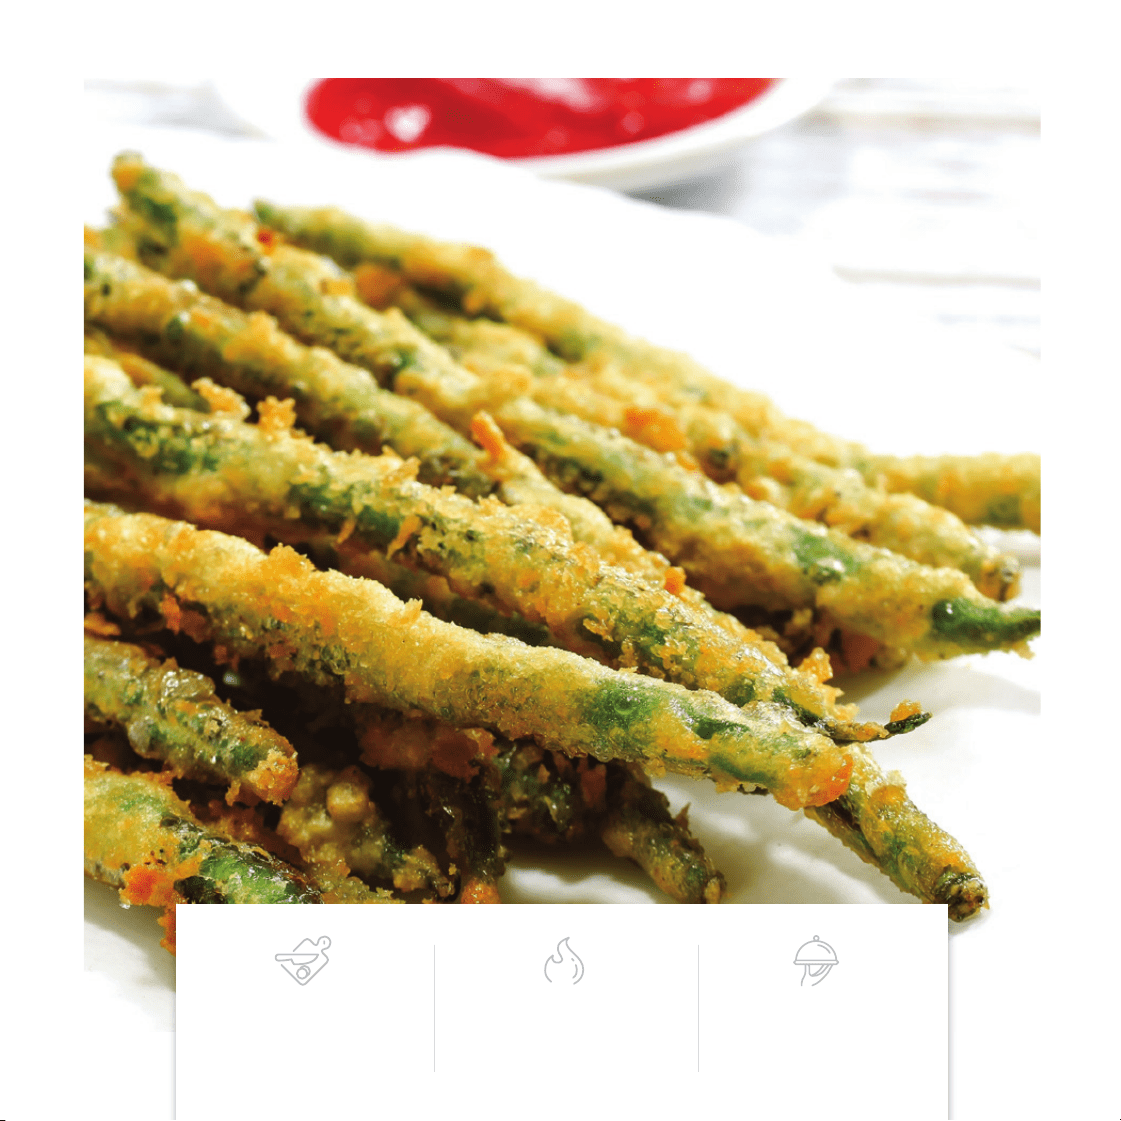
Panko GREEN BEANS
1. Place the eggs in a shallow bowl. Combine the panko
bread crumbs, salt and pepper in another shallow bowl.
2. Dip one of the green beans into the eggs and then
the panko. Place on a plate or in a bowl. Repeat with
remaining.
3. Spray the coated green beans with oil, or toss with oil.
Transfer to the tray inside the air fryer basket. Insert bas-
ket into Air Fryer.
4. Set the Air Fryer to 400°F and 10 minutes. Press Start.
Shake halfway through.
5. When the green bean fries are golden-brown, transfer
to a serving plate.
• 1 pound fresh green
beans, trimmed and
strings removed
• 2 eggs, lightly beaten
• 1
½
cups panko bread
crumbs
• 1 pinch Kosher salt
• 1 pinch cracked black
pepper
INGREDIENTS
Tip: If your green beans are too long, you can cut
them in half to fit better. Try adding your favorite
seasoning in the bread crumbs along with the salt
and pepper.

23
24
PREP TIME COOK TIME SERVINGS
8 min 10 min 2
Panko GREEN BEANS
1. Place the eggs in a shallow bowl. Combine the panko
bread crumbs, salt and pepper in another shallow bowl.
2. Dip one of the green beans into the eggs and then
the panko. Place on a plate or in a bowl. Repeat with
remaining.
3. Spray the coated green beans with oil, or toss with oil.
Transfer to the tray inside the air fryer basket. Insert bas-
ket into Air Fryer.
4. Set the Air Fryer to 400°F and 10 minutes. Press Start.
Shake halfway through.
5. When the green bean fries are golden-brown, transfer
to a serving plate.
• 1 pound fresh green
beans, trimmed and
strings removed
• 2 eggs, lightly beaten
• 1
½
cups panko bread
crumbs
• 1 pinch Kosher salt
• 1 pinch cracked black
pepper
INGREDIENTS
Tip: If your green beans are too long, you can cut
them in half to fit better. Try adding your favorite
seasoning in the bread crumbs along with the salt
and pepper.
25
26
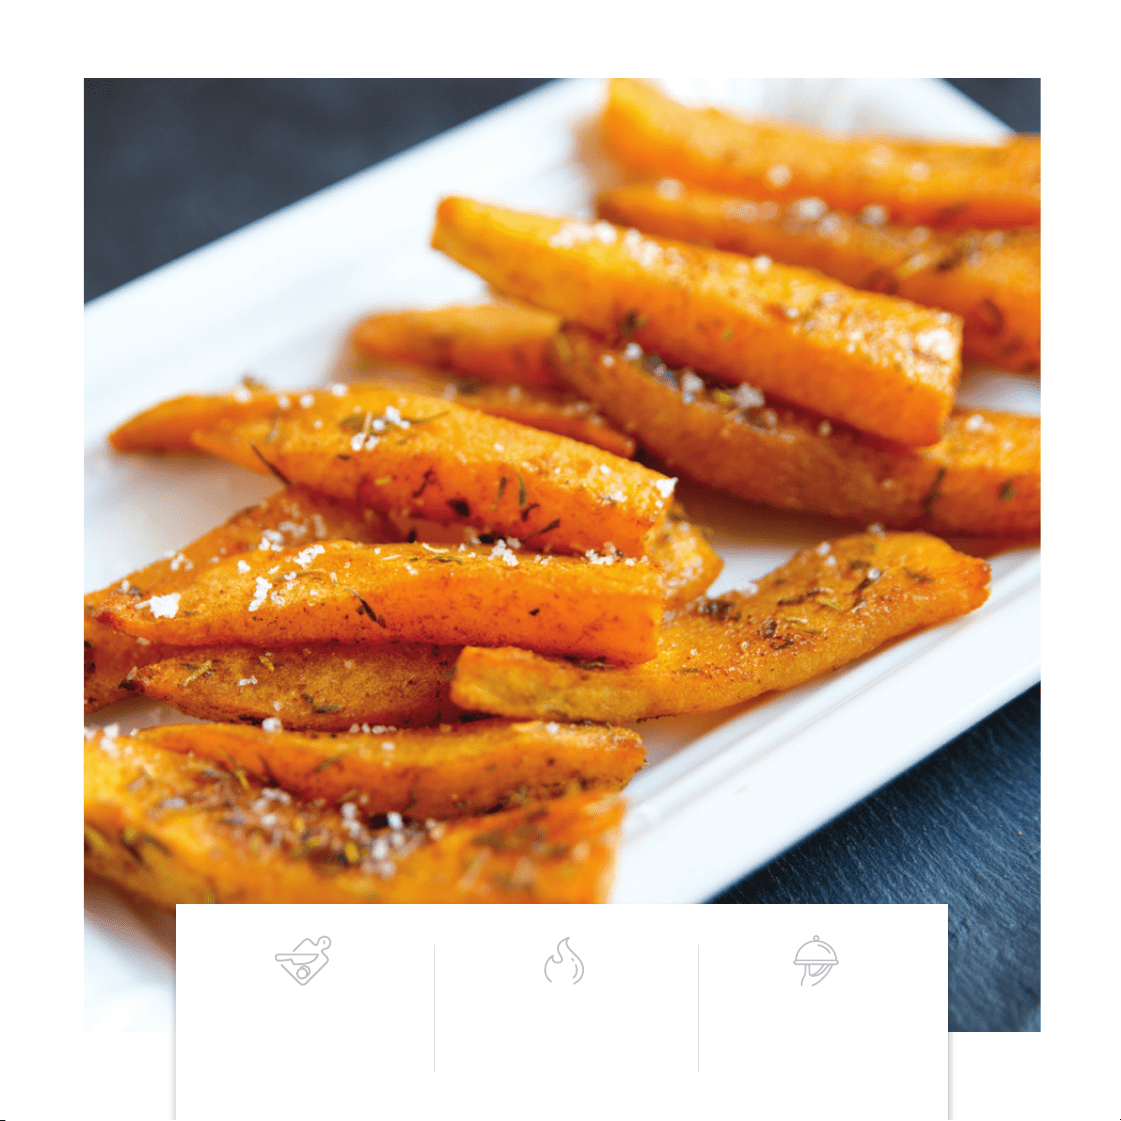
PREP TIME COOK TIME SERVINGS
15 min 30 min 2
PARMESAN REGGIANO SWEET POTATO FRIES
1. Cut the sweet potatoes into even pieces, about 4 inches
long and
¼
-inch thick.
2. In a large bowl, toss cut sweet potatoes with the olive oil,
rosemary and salt. Transfer half of the cut sweet potatoes
to the tray inside the air fryer basket. Insert basket into
Air Fryer.
3. Set the Air Fryer to 400°F and 15 minutes. Shake halfway
through.
4. When sweet potato fries are golden-brown and fully
cooked through, transfer to a bowl and toss with half of
the Parmesan Reggiano cheese. Repeat with remaining
sweet potatoes. Serve immediately.
• 2 pounds sweet potatoes,
peeled
• 1 tablespoon olive oil
• 2 teaspoons fresh
rosemary, chopped
• 1 pinch Kosher salt
• 3 tablespoons grated
Parmesan Reggiano
cheese
INGREDIENTS
Tip: Try substituting with your favorite potato, such
as Yukon Gold or Russet. Just be sure to soak white
potatoes in cold water for 30 minutes, rinse and pat
dry completely before cooking.

25
26
PREP TIME COOK TIME SERVINGS
15 min 30 min 2
PARMESAN REGGIANO SWEET POTATO FRIES
1. Cut the sweet potatoes into even pieces, about 4 inches
long and
¼
-inch thick.
2. In a large bowl, toss cut sweet potatoes with the olive oil,
rosemary and salt. Transfer half of the cut sweet potatoes
to the tray inside the air fryer basket. Insert basket into
Air Fryer.
3. Set the Air Fryer to 400°F and 15 minutes. Shake halfway
through.
4. When sweet potato fries are golden-brown and fully
cooked through, transfer to a bowl and toss with half of
the Parmesan Reggiano cheese. Repeat with remaining
sweet potatoes. Serve immediately.
• 2 pounds sweet potatoes,
peeled
• 1 tablespoon olive oil
• 2 teaspoons fresh
rosemary, chopped
• 1 pinch Kosher salt
• 3 tablespoons grated
Parmesan Reggiano
cheese
INGREDIENTS
Tip: Try substituting with your favorite potato, such
as Yukon Gold or Russet. Just be sure to soak white
potatoes in cold water for 30 minutes, rinse and pat
dry completely before cooking.

27
28
PREP TIME COOK TIME SERVINGS
10 min 30 min 5-6
FRESH HERB QUICHE CUPS
1. In a measuring cup with a spout, whisk together the first
six ingredients and 1 teaspoon of the thinly sliced chives.
2. Fill each phyllo cup to the top. Transfer to the tray inside
the air fryer basket. Insert basket into Air Fryer.
3. Set the Air Fryer to 375°F and 15 minutes. Press Start.
4. Check the phyllo cups at 12 minutes. When the egg
mixture is just set, transfer to a serving plate. Repeat
with remaining phyllo cups. Serve warm or room
temperature.
• 1 large egg
• ¼
cup heavy cream
• ¼
cup whole milk
• ½
teaspoons Kosher salt
• ¼
teaspoons ground black
pepper
• ½
teaspoon fresh thyme
leaves
• 1 teaspoon thinly sliced
chives, plus more for
garnish
• 2 boxes (15 pieces each)
mini phyllo cups
INGREDIENTS
Tip: Add Tabasco sauce or other hot pepper sauce for
a spicy kick.
29
30
PREP TIME COOK TIME SERVINGS
10 min 34 min 2
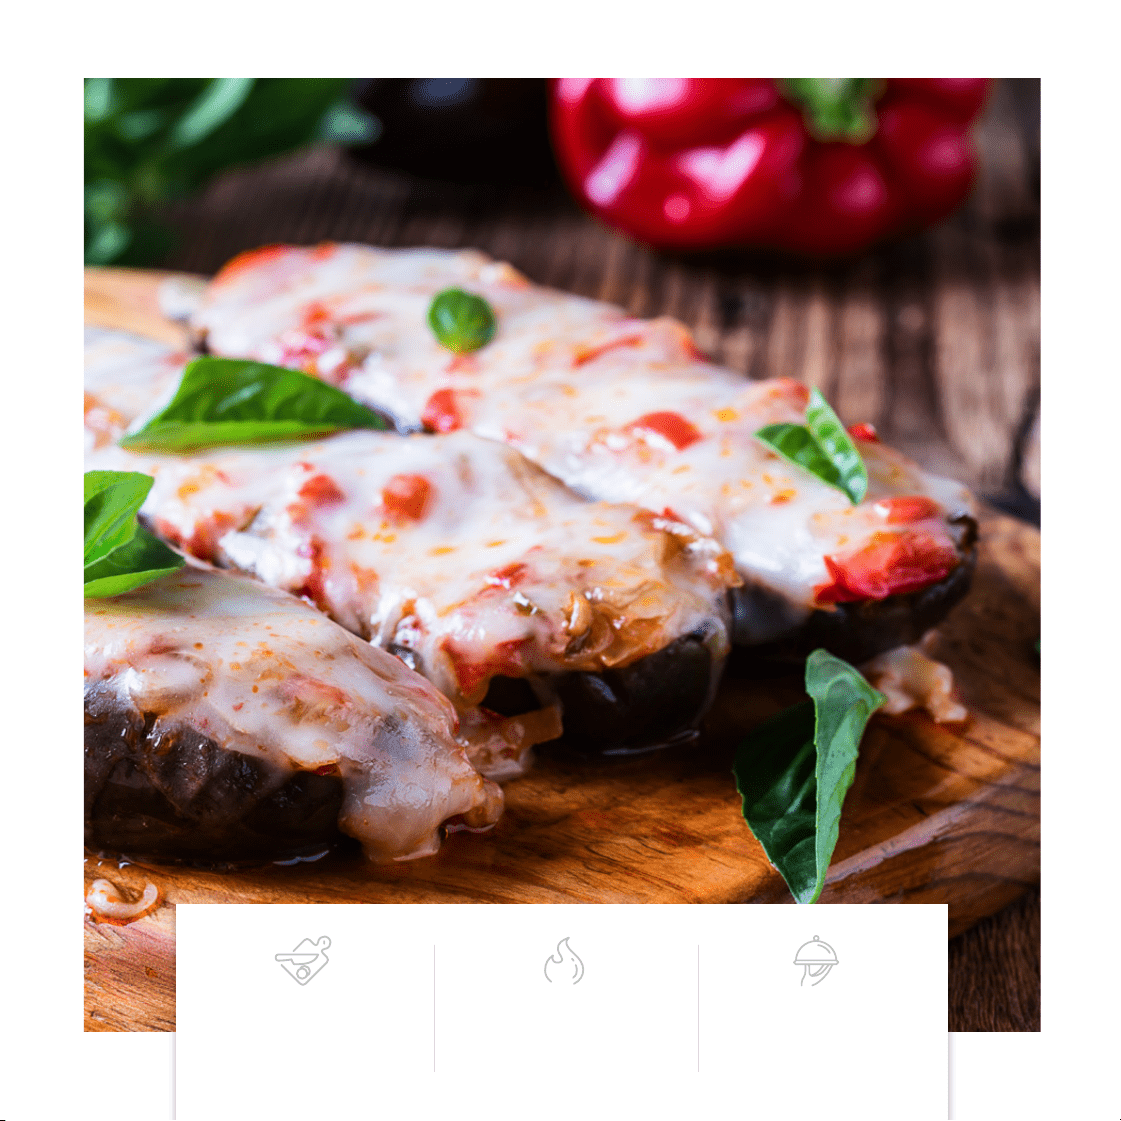
Eggplant Parmesan
1. Brush the eggplant halves with the olive oil and sprinkle
with the salt and pepper. Transfer 2 halves to the tray
inside the air fryer basket. Insert basket into Air Fryer.
2. Set the Air Fryer to 375°F and 15 minutes. Press Start.
3. After 15 minutes, spoon
¼
scant cup marinara sauce onto
each eggplant half. Sprinkle each with 1 tablespoon of the
Parmesan cheese and top each with 1 slice of mozzarella
cheese. Insert air fryer basket back into the Air Fryer. Set
to 400°F and 2 minutes. Press Start.
4. When cheese is melted, carefully use a spatula to
transfer eggplant parmesan to a serving plate. Repeat
with remaining eggplant halves.
5. Before serving, tear the basil into small pieces and sprinkle
on top.
• 2 baby eggplants, about
6.5 ounces each, cut in
half lengthwise and stems
trimmed
• 3 tablespoons olive oil
• 1 teaspoon Kosher salt
• ½
teaspoon ground black
pepper
• 1 scant cup marinara sauce
• 4 slices mozzarella cheese
• ¼
cup grated Parmesan
cheese
• ¼
cup fresh basil leaves
INGREDIENTS
Tip: Remember that the air fryer basket has vents.
If sauce drips onto the bottom of the basket, be s
ure to empty it before cooking the second batch to
avoid spillage.

29
30
PREP TIME COOK TIME SERVINGS
10 min 34 min 2
Eggplant Parmesan
1. Brush the eggplant halves with the olive oil and sprinkle
with the salt and pepper. Transfer 2 halves to the tray
inside the air fryer basket. Insert basket into Air Fryer.
2. Set the Air Fryer to 375°F and 15 minutes. Press Start.
3. After 15 minutes, spoon
¼
scant cup marinara sauce onto
each eggplant half. Sprinkle each with 1 tablespoon of the
Parmesan cheese and top each with 1 slice of mozzarella
cheese. Insert air fryer basket back into the Air Fryer. Set
to 400°F and 2 minutes. Press Start.
4. When cheese is melted, carefully use a spatula to
transfer eggplant parmesan to a serving plate. Repeat
with remaining eggplant halves.
5. Before serving, tear the basil into small pieces and sprinkle
on top.
• 2 baby eggplants, about
6.5 ounces each, cut in
half lengthwise and stems
trimmed
• 3 tablespoons olive oil
• 1 teaspoon Kosher salt
• ½
teaspoon ground black
pepper
• 1 scant cup marinara sauce
• 4 slices mozzarella cheese
• ¼
cup grated Parmesan
cheese
• ¼
cup fresh basil leaves
INGREDIENTS
Tip: Remember that the air fryer basket has vents.
If sauce drips onto the bottom of the basket, be s
ure to empty it before cooking the second batch to
avoid spillage.
31
32
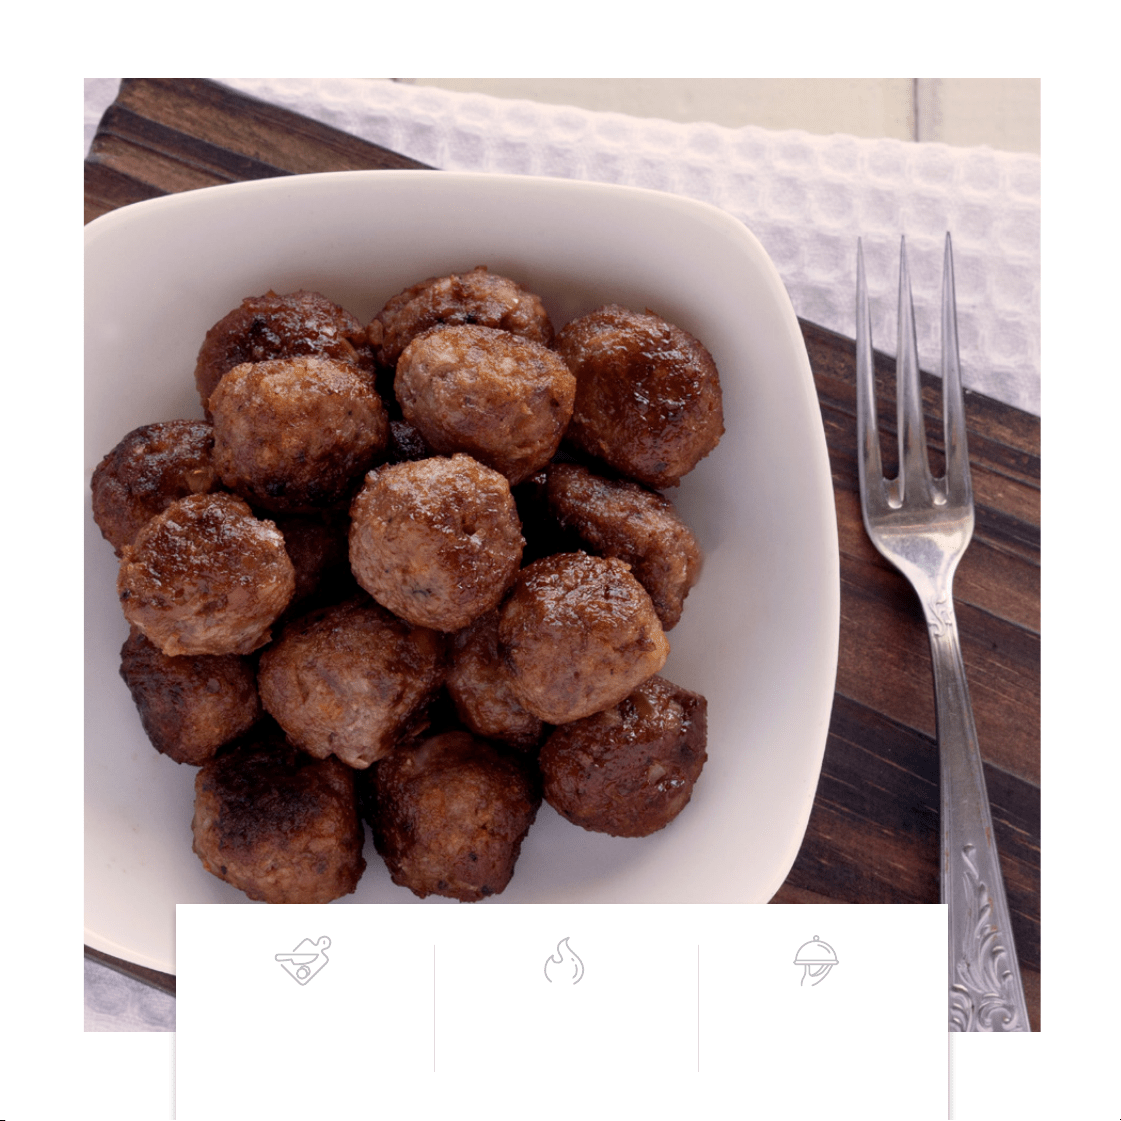
PREP TIME COOK TIME SERVINGS
10 min 20 min 5
SPICY FRIED MEATBALLS
1. In a large bowl, use your hands to loosely combine all of
the ingredients except for the olive oil.
2. Scoop about 1 tablespoon of the meat mixture and roll it
into a ball. Place on a plate.
3. Brush meatballs with olive oil. Transfer half of the
meatballs to the tray inside the air fryer basket. Insert
basket into Air Fryer.
4. Set the Air Fryer to 400°F and 10 minutes. Press Start.
Shake halfway through.
5. When the first batch of meatballs are browned and fully
cooked through, transfer to a serving plate. Repeat with
remaining meatballs.
• 1 pound ground beef or
chuck
• 1 onion, finely chopped
• 1 clove garlic, minced
• 1 large egg, beaten
•
¼
cup panko bread
crumbs
• 1 teaspoon Kosher salt
• 1 teaspoon dark chili
powder
•
¼
teaspoon ground black
pepper
• 1 tablespoon olive oil
INGREDIENTS
Tip: You can substitute chili powder with your
favorite spice.

31
32
PREP TIME COOK TIME SERVINGS
10 min 20 min 5
SPICY FRIED MEATBALLS
1. In a large bowl, use your hands to loosely combine all of
the ingredients except for the olive oil.
2. Scoop about 1 tablespoon of the meat mixture and roll it
into a ball. Place on a plate.
3. Brush meatballs with olive oil. Transfer half of the
meatballs to the tray inside the air fryer basket. Insert
basket into Air Fryer.
4. Set the Air Fryer to 400°F and 10 minutes. Press Start.
Shake halfway through.
5. When the first batch of meatballs are browned and fully
cooked through, transfer to a serving plate. Repeat with
remaining meatballs.
• 1 pound ground beef or
chuck
• 1 onion, finely chopped
• 1 clove garlic, minced
• 1 large egg, beaten
•
¼
cup panko bread
crumbs
• 1 teaspoon Kosher salt
• 1 teaspoon dark chili
powder
•
¼
teaspoon ground black
pepper
• 1 tablespoon olive oil
INGREDIENTS
Tip: You can substitute chili powder with your
favorite spice.
33
34
PREP TIME COOK TIME SERVINGS
5 min 15 min 2-4
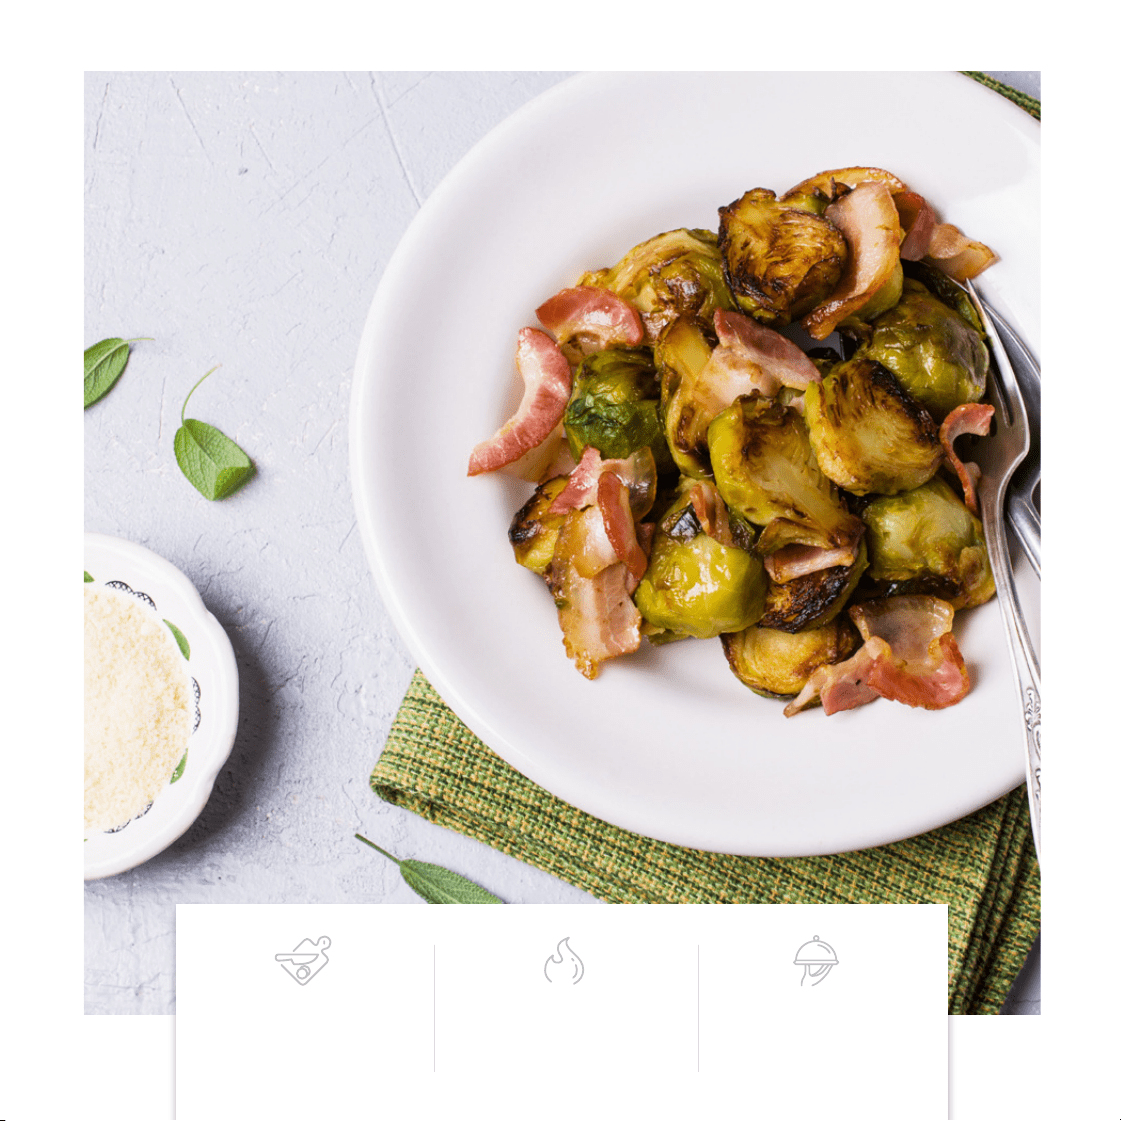
Bacon Parmesan Brussel Sprouts
1. Place the bacon on the tray inside the air fryer basket.
Insert basket into Air Fryer.
2. Set the Air Fryer to 400°F and 6 minutes. Press Start.
3. Check the bacon at 5 minutes. When it is browned and
crispy, remove from Air Fryer and place on a plate to cool.
Set aside.
3. In a large bowl, combine the remaining ingredients except
for the Parmesan cheese and balsamic glaze. Transfer
Brussels sprouts to the tray inside the air fryer basket.
Insert basket into Air Fryer.
4. Set the Air Fryer to 400°F and 10 minutes. Press Start.
Shake halfway through.
5. When Brussels sprouts are crispy and mostly cooked
through, transfer to a serving plate. Sprinkle with
Parmesan cheese and drizzle with balsamic glaze.
6. Crumble cooked bacon and sprinkle on top.
• 4 strips bacon
• 16 - 20 Brussels sprouts,
cut in half lengthwise
• 1 tablespoon olive oil
• ½
tablespoon garlic salt
• ½
tablespoon onion
powder
• ½
teaspoon Kosher salt
• ¼
teaspoon ground
black pepper
• Parmesan cheese
• Balsamic glaze
INGREDIENTS
Tip: Keep an eye on the bacon while it’s air frying.
You’ll be surprised how quickly it crisps up.
Bacon Parmesan Brussel Sprouts

33
34
PREP TIME COOK TIME SERVINGS
5 min 15 min 2-4
Bacon Parmesan Brussel Sprouts
1. Place the bacon on the tray inside the air fryer basket.
Insert basket into Air Fryer.
2. Set the Air Fryer to 400°F and 6 minutes. Press Start.
3. Check the bacon at 5 minutes. When it is browned and
crispy, remove from Air Fryer and place on a plate to cool.
Set aside.
3. In a large bowl, combine the remaining ingredients except
for the Parmesan cheese and balsamic glaze. Transfer
Brussels sprouts to the tray inside the air fryer basket.
Insert basket into Air Fryer.
4. Set the Air Fryer to 400°F and 10 minutes. Press Start.
Shake halfway through.
5. When Brussels sprouts are crispy and mostly cooked
through, transfer to a serving plate. Sprinkle with
Parmesan cheese and drizzle with balsamic glaze.
6. Crumble cooked bacon and sprinkle on top.
• 4 strips bacon
• 16 - 20 Brussels sprouts,
cut in half lengthwise
• 1 tablespoon olive oil
• ½
tablespoon garlic salt
• ½
tablespoon onion
powder
• ½
teaspoon Kosher salt
• ¼
teaspoon ground
black pepper
• Parmesan cheese
• Balsamic glaze
INGREDIENTS
Tip: Keep an eye on the bacon while it’s air frying.
You’ll be surprised how quickly it crisps up.
Bacon Parmesan Brussel Sprouts
35
36
PREP TIME COOK TIME SERVINGS
10 min 50 min 5
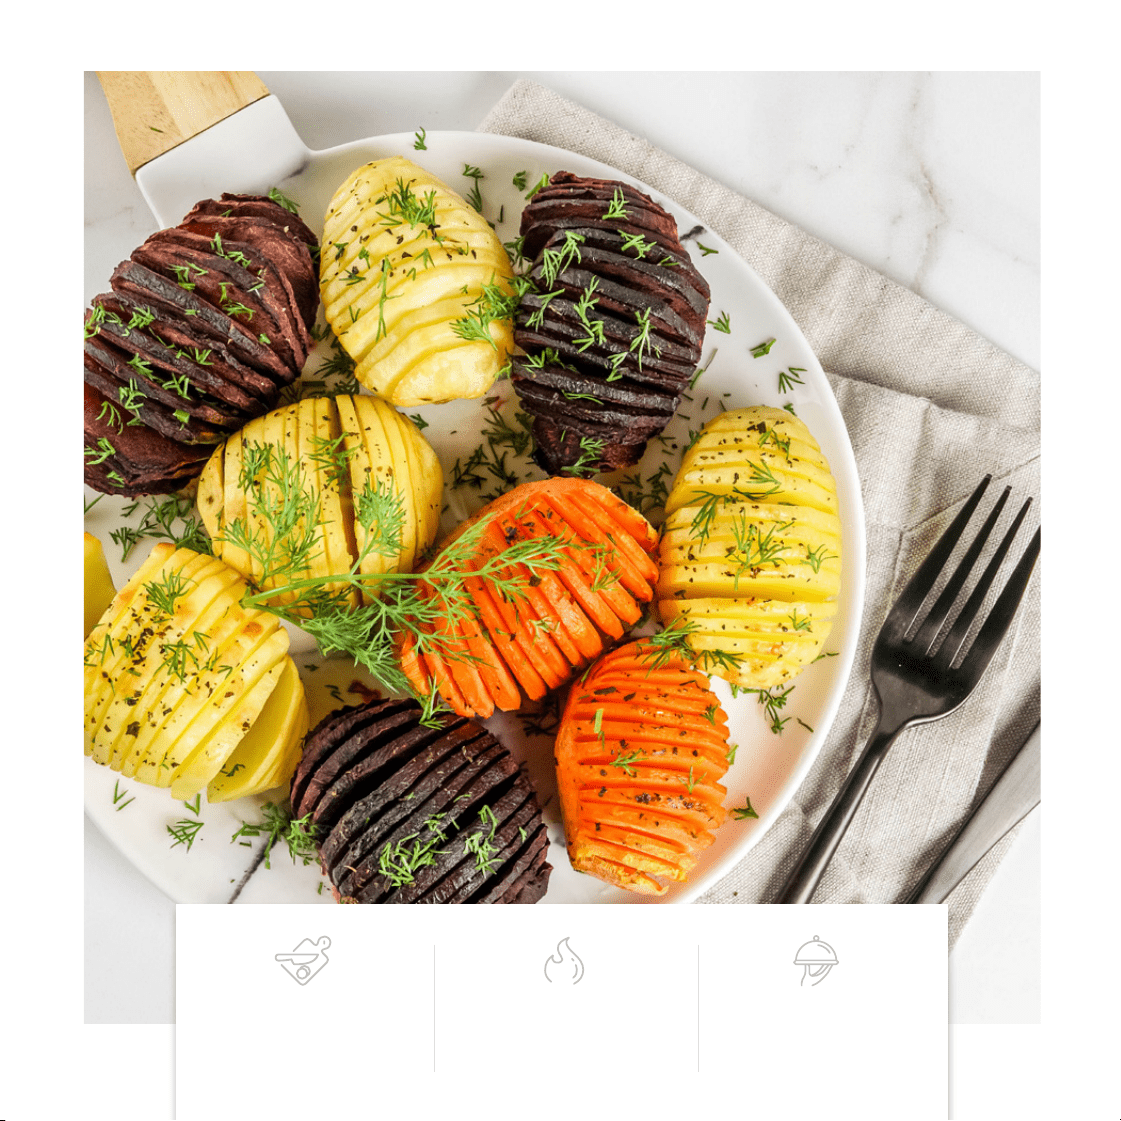
HASSELBACk TRIO
1. Cut the potatoes, sweet potatoes and beets
¾
of the way
through into
⅛
-inch slices so that the bottoms stay intact.
Do NOT cut the slices all the way through.
2. If cut vegetables are not easy to fan out in your hands,
trim the bottoms so the cuts still remain intact but the
bottoms become thinner.
3. Brush each with a generous amount of olive oil and sprin-
kle with salt, onion powder and pepper. Transfer half to
the tray inside the air fryer basket in a single layer. Insert
basket into Air Fryer.
4. Set the Air Fryer to 375°F and 25 minutes. Press Start.
5. Check the vegetables at 20 minutes. If they are crispy,
brush with more oil and resume cooking. During the last
2 minutes of cooking, sprinkle with cheese and cook for
remaining time.
6. When cheese has melted, transfer to a serving plate and
sprinkle with fresh dill. If desired, serve with sour cream.
Repeat with remaining vegetables.
• 4 small potatoes, about
6 ounces each, peeled
• 2 small sweet potatoes,
about 6 ounces each,
peeled
• 2 small beets, about
4 ounces each, scrubbed
• 2 tablespoons olive oil
•
¼
cup grated or shredded
Asiago cheese
• 1 teaspoon Kosher salt
•
¼
teaspoon onion powder
• 1 pinch cracked black
pepper
• 2 tablespoons dill, finely
chopped
• Sour cream, for serving,
optional
INGREDIENTS
Tip: Scrub, cut and handle the beets last so their red
color doesn’t bleed onto the potatoes.

35
36
PREP TIME COOK TIME SERVINGS
10 min 50 min 5
HASSELBACk TRIO
1. Cut the potatoes, sweet potatoes and beets
¾
of the way
through into
⅛
-inch slices so that the bottoms stay intact.
Do NOT cut the slices all the way through.
2. If cut vegetables are not easy to fan out in your hands,
trim the bottoms so the cuts still remain intact but the
bottoms become thinner.
3. Brush each with a generous amount of olive oil and sprin-
kle with salt, onion powder and pepper. Transfer half to
the tray inside the air fryer basket in a single layer. Insert
basket into Air Fryer.
4. Set the Air Fryer to 375°F and 25 minutes. Press Start.
5. Check the vegetables at 20 minutes. If they are crispy,
brush with more oil and resume cooking. During the last
2 minutes of cooking, sprinkle with cheese and cook for
remaining time.
6. When cheese has melted, transfer to a serving plate and
sprinkle with fresh dill. If desired, serve with sour cream.
Repeat with remaining vegetables.
• 4 small potatoes, about
6 ounces each, peeled
• 2 small sweet potatoes,
about 6 ounces each,
peeled
• 2 small beets, about
4 ounces each, scrubbed
• 2 tablespoons olive oil
•
¼
cup grated or shredded
Asiago cheese
• 1 teaspoon Kosher salt
•
¼
teaspoon onion powder
• 1 pinch cracked black
pepper
• 2 tablespoons dill, finely
chopped
• Sour cream, for serving,
optional
INGREDIENTS
Tip: Scrub, cut and handle the beets last so their red
color doesn’t bleed onto the potatoes.
37
38
PREP TIME COOK TIME SERVINGS
2 min 40 min 6
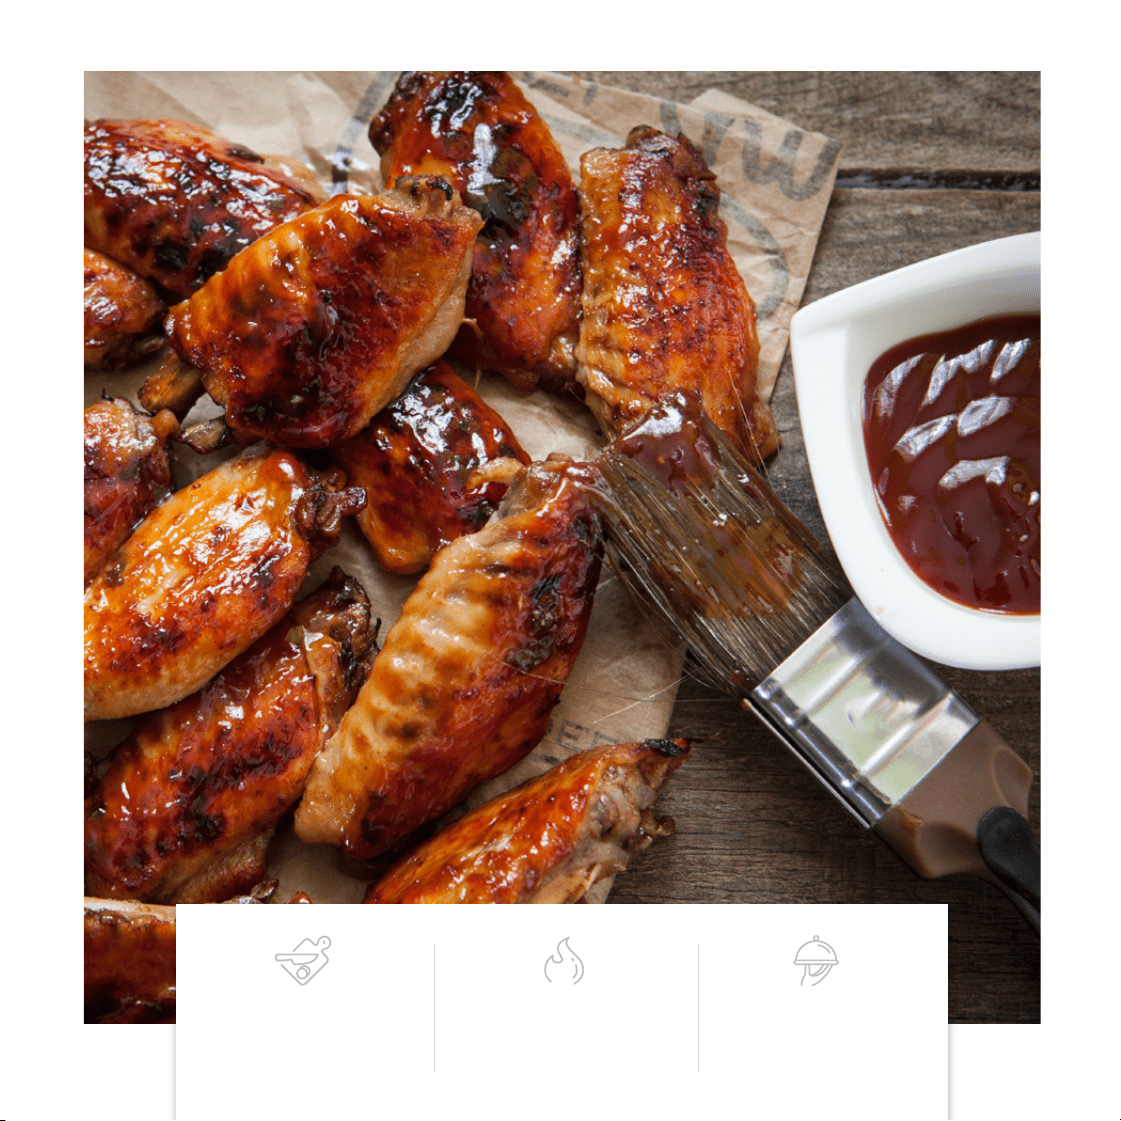
BBQ WINGS
1. In a large bowl, combine chicken wings and BBQ sauce.
Transfer half of the chicken wings to the tray inside the air
fryer basket. Insert basket into Air Fryer.
2. Set the Air Fryer to 390°F for 20 minutes. Press Start.
Shake halfway through.
3. When chicken wings are ready, transfer to a serving plate.
Repeat with remaining chicken wings.
• 1 pound chicken wings
• 1 cup BBQ sauce
(Choose your favorite
breading and flavoring).
INGREDIENTS
Tip: Place the first batch of wings in aluminum foil to
keep warm while the second batch is cooking.

37
38
PREP TIME COOK TIME SERVINGS
2 min 40 min 6
BBQ WINGS
1. In a large bowl, combine chicken wings and BBQ sauce.
Transfer half of the chicken wings to the tray inside the air
fryer basket. Insert basket into Air Fryer.
2. Set the Air Fryer to 390°F for 20 minutes. Press Start.
Shake halfway through.
3. When chicken wings are ready, transfer to a serving plate.
Repeat with remaining chicken wings.
• 1 pound chicken wings
• 1 cup BBQ sauce
(Choose your favorite
breading and flavoring).
INGREDIENTS
Tip: Place the first batch of wings in aluminum foil to
keep warm while the second batch is cooking.
39
40
PREP TIME COOK TIME SERVINGS
10 min 20 min 50 chips
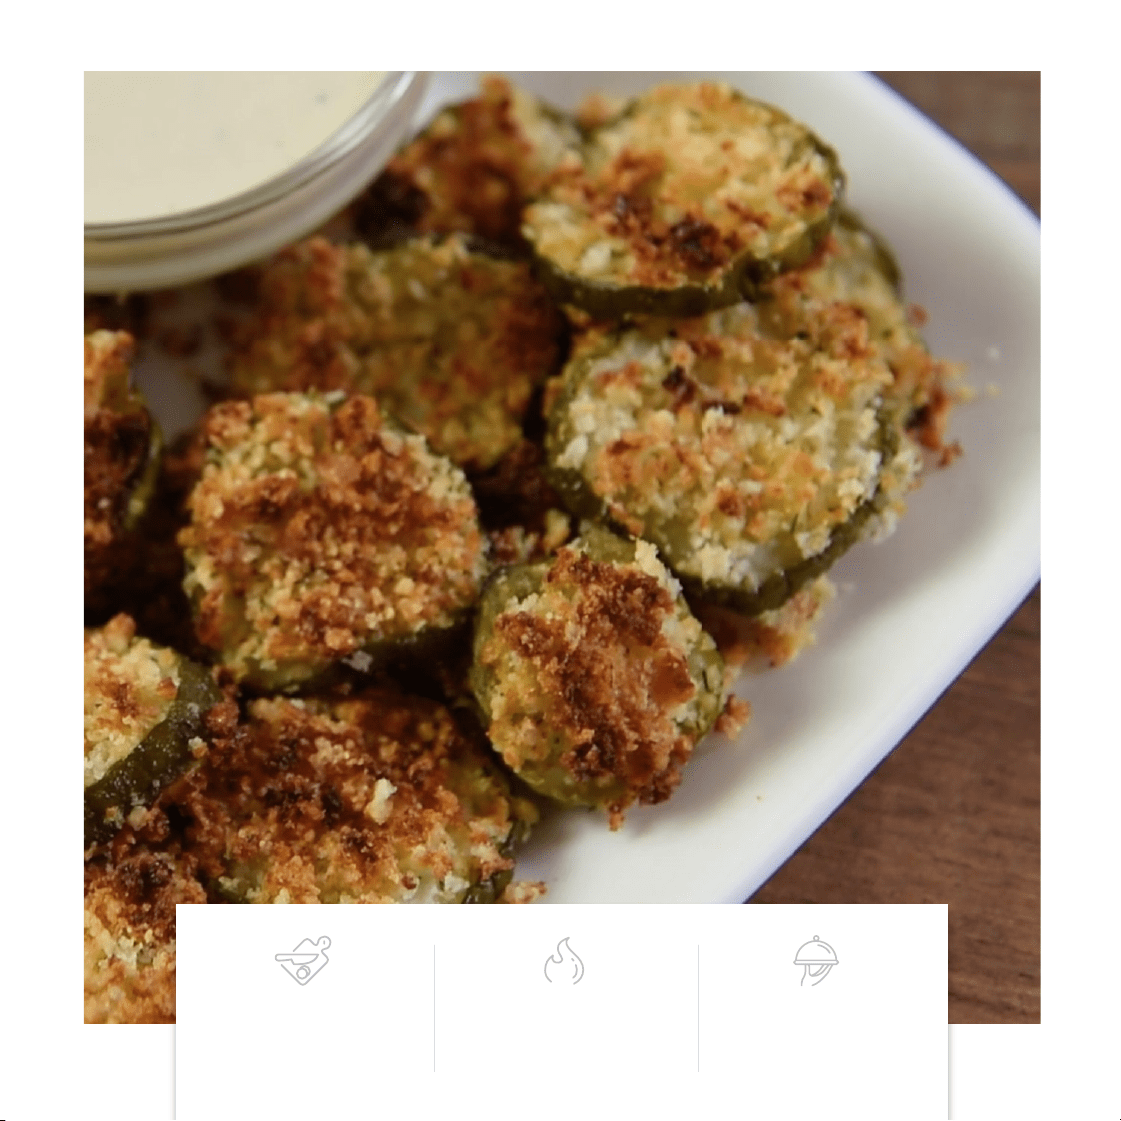
PARMESAN PICKLE CHIPS
1. Cut the pickles into
¼
-inch slices. Place on a paper
towel-lined plate. Blot with another paper towel to dry
and remove as much liquid as possible.
2. In a small bowl, whisk the egg.
3. In another small bowl, combine the panko bread crumbs
and Parmesan cheese.
4. Dip the pickle slices into the egg, and then the panko
mixture.
5. Spray all of the coated pickle slices with oil. Transfer half
to the tray inside the air fryer basket. Insert basket into Air
Fryer.
6. Set the Air Fryer to 400°F and 10 minutes. Check with a
few minutes left and shake if necessary.
7. When pickle chips are golden-brown, transfer to a serving
plate. Repeat with remaining.
8. Serve with Ranch dressing, if desired.
• 4 garlic dill pickles, about
2 ounces each
• 1 large egg
• 2 tablespoons Parmesan
cheese
•
½
cup panko bread
crumbs
• Oil, for spraying
INGREDIENTS
Tip: The more you blot your pickle slices, the more
the egg and panko bread crumb coating will stick to
your cooked pickle chips.

39
40
PREP TIME COOK TIME SERVINGS
10 min 20 min 50 chips
PARMESAN PICKLE CHIPS
1. Cut the pickles into
¼
-inch slices. Place on a paper
towel-lined plate. Blot with another paper towel to dry
and remove as much liquid as possible.
2. In a small bowl, whisk the egg.
3. In another small bowl, combine the panko bread crumbs
and Parmesan cheese.
4. Dip the pickle slices into the egg, and then the panko
mixture.
5. Spray all of the coated pickle slices with oil. Transfer half
to the tray inside the air fryer basket. Insert basket into Air
Fryer.
6. Set the Air Fryer to 400°F and 10 minutes. Check with a
few minutes left and shake if necessary.
7. When pickle chips are golden-brown, transfer to a serving
plate. Repeat with remaining.
8. Serve with Ranch dressing, if desired.
• 4 garlic dill pickles, about
2 ounces each
• 1 large egg
• 2 tablespoons Parmesan
cheese
•
½
cup panko bread
crumbs
• Oil, for spraying
INGREDIENTS
Tip: The more you blot your pickle slices, the more
the egg and panko bread crumb coating will stick to
your cooked pickle chips.

41
42
PREP TIME COOK TIME SERVINGS
10 min 40 min 4
APPLE TURNOVERS
1. In a small skillet over medium heat, melt butter. Remove
from heat.
2. Core apple and cut into
¼
-inch dice. Toss in a small
bowl with a small squeeze of lemon, the granulated
sugar, cinnamon and 1 tablespoon of the melted butter.
Set aside.
3. Cut puff pastry sheet into 4 equal squares. Roll each
square into a 6-inch by 6-inch square.
4. Place an even amount of the apple mixture into the center
of each square. Fold each into a triangle. Use a fork to seal
the edges.
5. Brush each apple turnover with an even amount of the
melted butter. Put 2 on the tray inside the air fryer basket.
Insert basket into Air Fryer.
6. Set Air Fryer to 350°F and 18 minutes. Press Start.
7. While apple turnovers are cooking, in a small bowl c
ombine confectioners’ sugar and water to make a royal
icing. Set aside.
8. When turnovers are golden-brown, remove from Air Fryer
and repeat with remaining turnovers.
9. Drizzle with royal icing and serve.
• 3 tablespoons butter,
divided
• 1 Granny Smith apple
•
½
lemon
• 2 tablespoons granulated
sugar
•
¼
teaspoon ground
cinnamon
• 1 pinch ground nutmeg
• 1 sheet frozen puff pastry,
thawed
•
⅔
cup confectioners’ sugar
• 1 tablespoon water
INGREDIENTS
Tip: This recipe skips the traditional step of
softening the apples first in a pan. Apples may be
a little crunchier than you’re used to, but we love
that the prep time is quicker.

43
44
PREP TIME COOK TIME SERVINGS
10 min 36 min 8
SNowfall Cupcakes
1. In a small bowl whisk flour, baking soda and salt. Set aside.
2. In a medium bowl, use a hand blender on speed 1 to
cream the sugar and butter until fluffy. Add vanilla and
beat in 1 egg at a time until fully combined, about
2 minutes total.
3. Add half of the flour mixture from the small bowl into the
medium bowl until just combined. Then, add half of the
sour cream until just combined. Repeat.
4. Fill
⅔
of each silicone cupcake liner with batter.
5. Put 4 of the filled silicone cupcake liners on the tray inside
the air fryer basket. Insert basket into Air Fryer.
6. Set the Air Fryer to 350°F and 18 minutes. Press Start.
7. Check the cupcakes at 15 minutes. If the tops are
golden-brown, spring back to touch and a toothpick
comes out clean when inserted into the center, remove
from Air Fryer. Transfer to a cooling rack andrepeat
with remaining filled cupcake liners.
8. While cupcakes are baking, make the Snowfall Frosting: In
a small bowl, use a hand blender on speed 2 to beat the
cream cheese and butter until creamy. Add the vanilla and
salt. Slowly add in the confectioners’ sugar until frosting is
smooth and fluffy.
9. Put coconut into a shallow dish. When cupcakes are
completely cool, remove the liner, frost the tops and dip
into the coconut.
•
¾
cup granulated sugar
• 6 tablespoons butter,
softened at room temp
•
½
teaspoon vanilla extract
• 2 large eggs
• 1
¼
cup unbleached,
all-purpose flour
•
½
teaspoon baking soda
•
¼
teaspoon table salt
•
½
cup sour cream
• 2 cups shredded coconut
SNOWFALL FROSTING:
• 8 oz. cream cheese,
softened at room temp
• 8 tbsp. butter, softened
at room temp
• 2 tbsp. vanilla extract
• 1 pinch table salt
• 4 cups confectioners’ sugar
INGREDIENTS

45
46
PREP TIME COOK TIME SERVINGS
10 min 36 min 8
CRAB CAKES
1. In a large bowl, use your hands to gently combine all of the
ingredients, except for the olive oil.
2. Scoop
¼
cup of the mixture and form into patties. Place
on a plate. 3. Brush with oil.
4. Transfer half of the crab cakes to the tray inside the air
fryer basket in a single layer. Insert basket into Air Fryer.
5. Set the Air Fryer to 350°F and 18 minutes. Check when
there are 10 minutes remaining and flip if necessary.
6. When crab cakes are golden-brown and cooked through,
transfer to a serving dish. Repeat with remaining crab
cakes.
• 2 pounds crab meat
• 2 large eggs, lightly beaten
•
½
cup mayo
• 2 tablespoons fresh lemon
juice
•
½
cup fresh parsley leaves,
chopped
• 1 cup buttery cracker
crumbs
•
¼
cup celery, finely
chopped
•
¼
cup green bell pepper,
finely chopped
•
¼
red bell pepper, finely
chopped
•
¼
cup onion, finely
chopped
• Olive oil, for brushing
INGREDIENTS
Tip: Serve with your favorite dipping sauce or aioli.
47
48
PREP TIME COOK TIME SERVINGS
10 min 36 min 8
CRAB CAKES
1. In a medium bowl, mash
¾
of the drained beans. Store
remaining for another use.
2. Add the remaining ingredients to the bowl and mix well.
3. Divide the mixture evenly and form into 4 patties of the
same size.
4. Put 2 patties onto the tray inside the air fryer basket.
Insert basket into Air Fryer.
5. Set the Air Fryer to 375°F and 10 minutes. Press Start.
6. When patties are cooked through, transfer to a serving
plate. Repeat with remaining patties.
7. Serve with your favorite buns and condiments.
• 1 can (15oz) black beans,
drained
• 1 small sweet onion, finely
chopped
•
½
cup wheat flour
• 1 large egg, lightly beaten
• 1 pinch cayenne pepper
•
½
teaspoon ground cumin
•
¼
teaspoon ground
black pepper
•
¼
teaspoon garlic powder
•
¼
teaspoon Kosher salt
•
½
teaspoon oregano
•
¼
teaspoon fresh sage
•
¼
teaspoon fresh thyme
INGREDIENTS

49
®
CHEFMAN.COM | @MYCHEFMAN
©CHEFMAN 2020