Loading ...
Loading ...
www.oster.com
4
www.oster.com
5
HOW TO:
Before First Use
Before using the appliance for the rst time, remove and peel o any promotional materials
and packaging materials, and check that the cooking plates and accessories are clean and
free of dust. Read entire instruction manual for a full understanding of your new appliance.
1 Clean the grill, plates and the accessories (see “Cleaning and Care). It is recommended
to heat up the grill for about 10 minutes without any food in order to eliminate any
grease that may have adhered during the manufacturing process.
2 Ventilate the room during this period. When your Panini Maker/Grill is heated for the
rst time, it may emit slight smoke or odor. This is normal with many heating appliances.
This does not aect the safety of your appliance.
Operation
Note: Ensure that the cord is kept well away from the cooking surfaces at all times while in
use or when the unit is hot.
• With unit UNPLUGGED insert plates into unit (insert plates while the unit is in the 180°/
at position).
Note: Each plate is labeled “Upper” or “Lower” on bottom of grill plates. Insert
accordingly.
• With the thermostat set to “Min”, plug the appliance in. The red light will light up.
• Apply a little oil on the cooking plate. Turn the knob to desired temperature level.
Preheat the grill to reach the ideal cooking temperature. When the appliance reaches
the desired temperature, the green pilot light will light up.
Note: Green pilot light may turn on and o during cooking. This indicates that the
thermostat is maintaining the proper cooking temperature to grill to perfection.
• Position the fat collecting tray near the spout on the right side of the appliance.
WARNING: THE METAL TOP COVER GETS VERY HOT. KEEP HANDS AND OTHER OBJECTS
AWAY FROM IT. ALLOW THE UNIT TO COOL OFF COMPLETELY FOLLOWING OPERATION
(USUALLY APPROXIMATELY 40 MINUTES) BEFORE TOUCHING THE PLATES OR HOUSING.
Inserting/Removing Grill Plates
1 Unit should be in the 180 degree/Flat position. To do this hold the handle with you left
hand, press the Grill/Griddle Release Button up with your thumb and slowly move the
handle back towards the counter. Ensure the appliance is o, unplugged and cool.
2 Insert one plate at a time. Plates are labeled “Upper” and “Lower” and are designed to t
into those places. Insert accordingly.
3 To insert the lower plate stand directly in front of the unit – the grease drip spout
should be at the bottom right hand corner of the base of the unit.
4 There are metal brackets at the center of the unit. Line up the cutouts located at the
back of the grill plate with the metal brackets at the center of the unit. Slide the plate
underneath the metal brackets and push down gently on the front of the plate (you will
hear it snap into place).
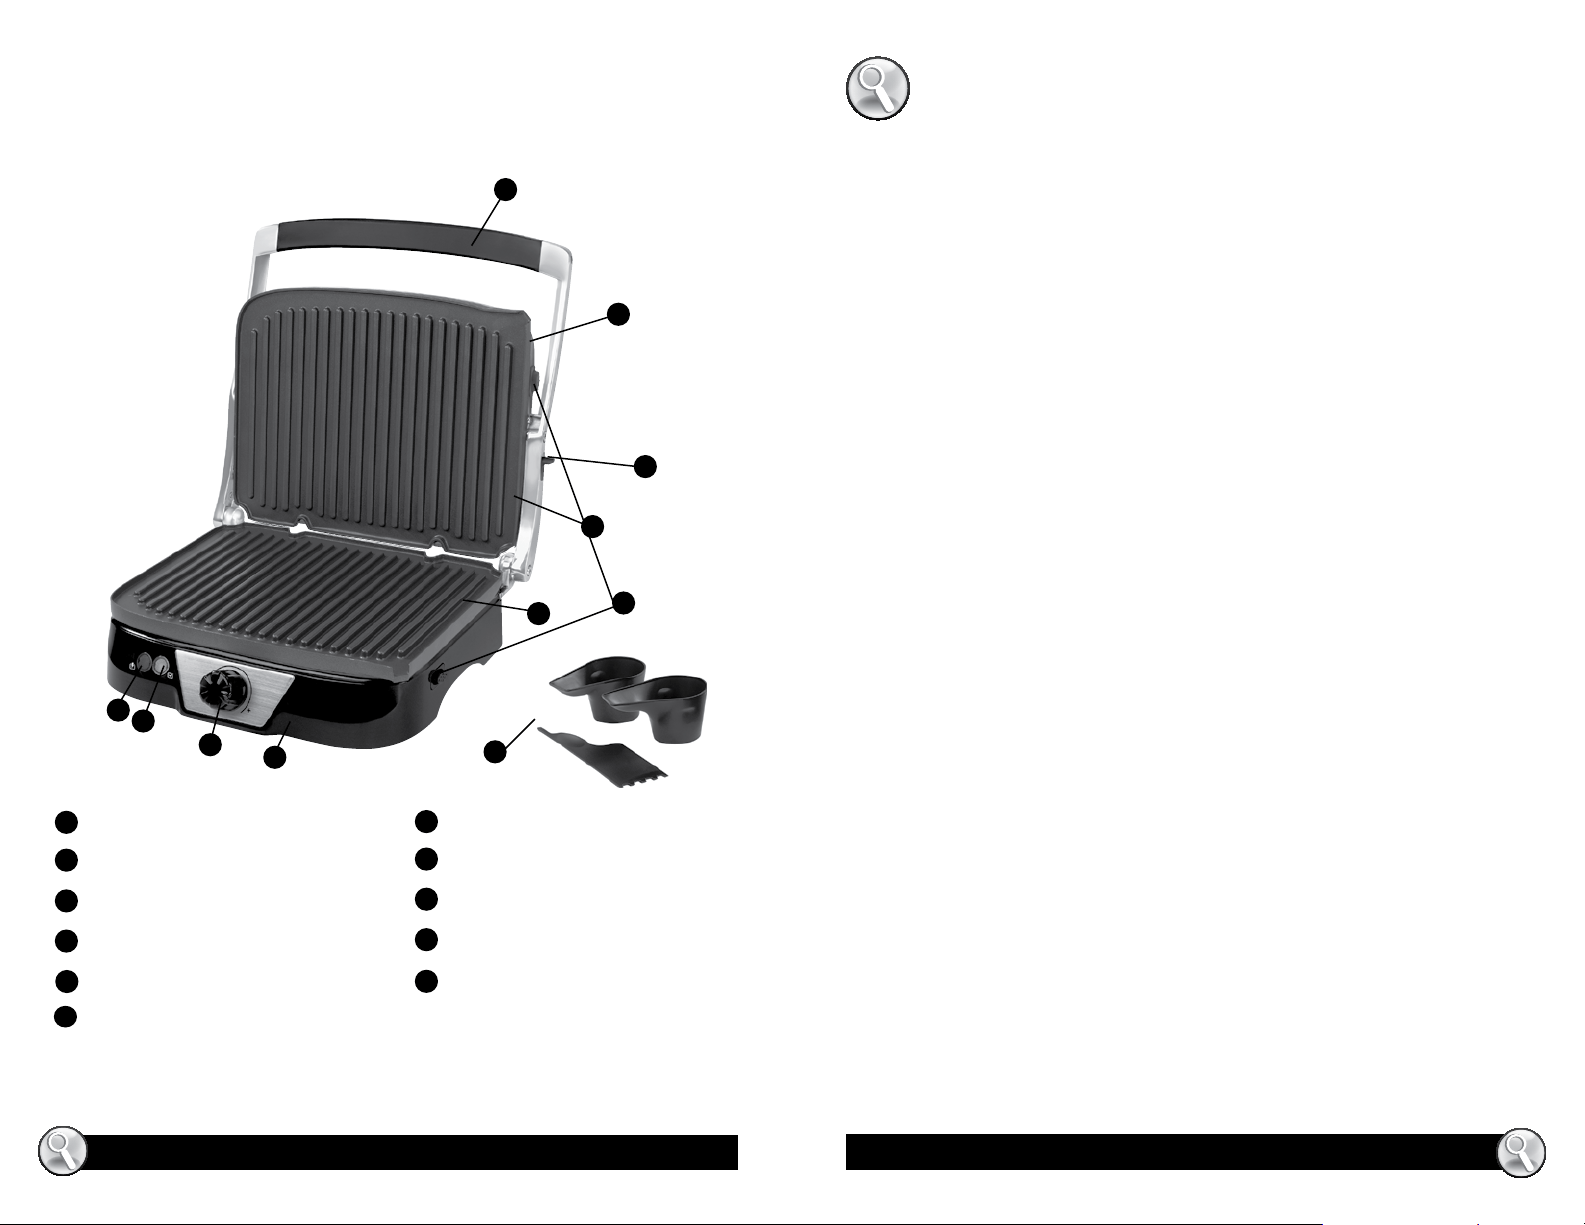
LEARNING ABOUT YOUR
PANINI MAKER/GRILL
a
b
e
f
g
h
i
j
k
c
d
Handle
Stainless Steel Upper Housing
Grill/Griddle Release Switch
Upper Removable Grill Plate
Lower Removable Grill Plate
Removable Plate Release Button
Bottom Housing
Thermostat Knob
Green Pilot Light
Red Power Light
Drip Cups and Cleaning Tool
c
e
f
b
d
a
g
k
h
j
i
Loading ...
Loading ...
Loading ...