
DVD
Recorder
Combi
Receiver
OWNER'S
MANUAL
MODEL:
LHY-518
(
Speakers:
LHS-95PAF,
LHS-95PAS,
LHS-95PAC,
LHS-95PAA)
Before
connecting,
operating
or
adjusting
this
product,
please
read
this
owner's
manual
carefully
and
completely.
CD-R/RW
LH-RC9500PA
NA1ULLS_ENG
Call
us
and
we
will
guide
you
through
your
first
recording,
for free.
1-800-243-0000

2
Safety
Precautions
This
lightning
flash
with
arrowhead
symbol
within
an
equilateral
triangle
is
intended
to
alert
the
user
to
the
presence
of
uninsulated
dangerous
voltage
within
the
product's
enclosure
that
may
be
of
sufficient
magnitude
to
constitute
a
risk
of electric
shock
to
persons.
The
exclamation
point
within
an
equilateral
triangle
is
intended
to
alert
the
user
to
the
presence
of
important operating
and
maintenance
(servicing)
instructions
in
the
literature
accompanying
the
product.
WARNING:
Do
not
install
this
equipment
in
a
confined
space
such
as a
bookcase
or
similar
unit.
NOTE
TO
CABLE/TV
INSTALLER:
This
reminder
is
provided
to
call
the
cable
TV
system
installer
's
attention
to
Article
820-40
of
the
National
Electric
Code
(U.S.A.).
The
code
provides
guidelines
for
proper
grounding
and,
in
particular,
specifies
that
the
cable
ground
shall
be
connected
to
the
grounding
system
of
the
building,
as
close
to
the
point
of
the
cable
entry
as
practical.
CAUTION:
This
Recorder
Combi
Receiver
employs
a
Laser
System.
To
ensure
proper
use
of
this
product,
please
read
this
owner's
manual
carefully
and
retain
for
future
reference.
Should
the
unit
require
maintenance,
contact
an
authorized
service
center.
Use
of
controls,
adjustments,
or
the
performance
of
proce-
dures
other
than
those
specified
herein
may
result
in
haz-
ardous
radiation
exposure.
To
prevent
direct
exposure
to
laser
beam,
do
not
try
to
open
the enclosure.
Visible
laser
radiation
when
open.
DO
NOT
STARE
INTO
BEAM.
CAUTION:
The
apparatus
should
not
be
exposed
to
water
(dripping
or
splashing)
and
no
objects
filled
with
liquids,
such
as
vases,
should
be
placed
on
the
apparatus.
FCC
WARNING:
This
equipment
may
generate
or
use
radio
frequency
energy.
Changes
or
modifications
to
this
equipment
may
cause
harmful
interference
unless
the
modifi-
cations
are
expressly
approved
in
the
instruction
manual.
The
user
could
lose
the
authority
to
operate
this
equipment
if
an
unauthorized
change
or
modification
is
made.
REGULATORY
INFORMATION:
FCC
Part
15
This
product
has
been
tested
and
found
to
comply
with
the
limits
for
a
Class
B
digital
device,
pursuant
to
Part
15
of
the
FCC
Rules.
These
limits
are
designed
to
provide
reasonable
protection
against
harmful
interference
when
the
product
is
operated
in
a
residential
installation.
This
product
generates,
uses,
and
can
radiate
radio
frequency
energy
and,
if
not
installed
and
used
in
accordance
with
the
instruction
manual,
may
cause
harmful
interference
to
radio
communications.
However,
there
is
no
guarantee
that
interference
will
not
occur
in
a
particular
installation.
If
this
product
does
cause
harmful
interference
to
radio
or
television
reception,
which
can
be
determined
by
turning
the
product
off
and
on,
the
user
is
encouraged
to
try
to
correct
the
interference
by
one
or
more
of
the
following
measures:
Reorient
or
relocate
the
receiving
antenna.
Increase
the
separation
between
the
product
and
receiver.
Connect
the
product
into
an
outlet
on a
circuit
different
from
that
to
which
the
receiver
is
connected.
Consult
the
dealer
or
an
experienced
radio/TV
technician
for
help.
FCC
COMPLIANCE:
The
responsible
party
for this
product's
compliance
is:
LG
Electronics
U.S.A.,
Inc.,1000
Sylvan
Avenue,
Englewood
Cliffs,
NJ.
Phone: 1-201-816-2000.
CAUTION
concerning
the
Power
Cord
Most
appliances
recommend
they
be
placed
upon
a
dedicated
circuit;
That
is,
a
single
outlet
circuit
which
powers
only
that
appliance
and
has
no
additional
outlets
or
branch
circuits.
Check
the
speci-
fication
page
of this
owner's
manual
to
be
certain.
Do
not
overload
wall
outlets.
Overloaded
wall
outlets,
loose
or
damaged
wall
outlets,
extension
cords,
frayed
power
cords,
or
damaged
or
cracked
wire
insulation
are
dangerous.
Any
of
these
conditions
could
result
in
electric
shock
or
fire.
Periodically
exam-
ine
the
cord
of
your
appliance,
and
if
its
appearance
indicates
damage
or
deterioration,
unplug
it,
discontinue
use
of
the
appli-
ance,
and
have
the
cord
replaced
with
an
exact
replacement
part
by
an
authorized
servicer.
Protect
the
power
cord
from
physical
or
mechanical
abuse,
such
as
being
twisted,
kinked,
pinched,
closed
in
a
door,
or
walked
upon.
Pay
particular
attention
to
plugs,
wall
outlets,
and
the
point
where
the
cord
exits
the
appliance.
SERIAL
NUMBER:
The
serial
number
is
found
on
the
back
of
this
unit.
This
number
is
for
this
unit
only.
You
should
record
requested
information
here
and
retain
this
guide
as
a
perma-
nent
record
of
your
purchase.
Model
No.
___________________________________
Serial
No.
___________________________________
CAUTION:
TO
PREVENT
ELECTRIC
SHOCK,
MATCH
WIDE BLADE
OF
PLUG
TO
WIDE
SLOT,
FULLY
INSERT.
ATTENTION:
POUR
EVITER
LES
CHOC
ELECTRIQUES,
INTRODUIRE
LA
LAME
LA
PLUS
LARGE
DE
LA
FICHE
DANS
LA
BORNE
CORRESPONDANTE
DE
LA
PRISE
ET
POUSSER
JUSQU'AU
FOND.
WARNING:
TO
REDUCE
THE
RISK
OF
FIRE
OR
ELEC-
TRIC
SHOCK,
DO
NOT
EXPOSE
THIS
APPARATUS
TO
RAIN
OR
MOISTURE.
CAUTION
RISK
OF
ELECTRIC
SHOCK
DO
NOT
OPEN
CAUTION:
TO
REDUCE
THE
RISK
OF
ELECTRIC
SHOCK
DO
NOT
REMOVE
COVER
(OR
BACK)
NO
USER-SERVICEABLE
PARTS
INSIDE
REFER
SERVICING
TO
QUALIFIED
SERVICE
PERSONNEL.

INTRODUCTION
3
IMPORTANT
SAFETY
INSTRUCTIONS
1.
Read
these
instructions.
-
All
these
safety
and
oper-
ating
instructions
should
be
read
before
the
product
is
operated.
2.
Keep
these
instructions.
-
The
safety,
operating
and
use
instructions
should
be
retained
for
future
refer-
ence.
3.
Heed
all
warnings.
-
All
warnings
on
the
product
and
in
the
operating
instructions
should
be adhered
to.
4.
Follow
all
instructions.
-
All
operating
and
use
instructions
should
be
followed.
5.
Do
not
use
this
product
near
water.
--
For
example:
near
a
bath
tub,
wash
bowl,
kitchen
sink,
laundry
tub,
in
a
wet
basement;
or
near a
swimming
pool;
and
other
areas
located
near
water.
6.
Clean
only
with
dry
cloth.
--
Unplug
this
product
from
the
wall
outlet
before
cleaning.
Do
not
use
liquid
cleaners.
7.
Do
not
block
any
ventilation
openings.
Install
in
accordance
with
the
manufacturer's
instructions.
-
Slots
and
openings
in
the
cabinet
are
provided
for
ventilation
and
to
ensure
reliable
operation
of
the
product
and
to
protect
it
from
over-
heating.
The
open-
ings
should
never
be
blocked
by
placing
the
product
on
a
bed,
sofa,
rug
or
other
similar
surface.
This
prod-
uct
should
not
be
placed
in
a
built-in
installation
such
as
a
bookcase
or
rack
unless
proper
ventilation
is
pro-
vided
or
the
manufacturer's
instructions
have
been
adhered
to.
8.
Do
not
install
near
any
heat
sources
such
as
radi-
ators,
heat
registers,
stoves,
or
other
apparatus
(including
amplifiers)
that
produce
heat.
9.
Do
not
defeat
the
safety
purpose
of
the
polarized
or
grounding-type
plug.
A
polarized
plug
has
two
blades
with
one
wider
than
the
other.
A
ground-
ing
type
plug
has
two
blades
and
a
third
ground-
ing
prong.
The
wide
blade
or
the
third
prong
are
provided
for
your
safety.
If
the
provided
plug
does
not
fit
into
your
outlet,
consult
an
electrician
for
replacement
of
the
obsolete
outlet.
10.
Protect
the
power
cord
from
being
walked
on
or
pinched
particularly
at
plugs,
convenience
receptacles,
and
the
point
where
they
exit
from
the
product.
11.Only
use
attachments/accessories
specified
by
the
manufacturer.
12.
Use
only
with
the
cart,
stand,
tripod,
bracket,
or
table
specified
by
the
manufacturer,
or
sold
with
apparatus.
When
a
cart
is
used,
use
caution
when
moving
the
cart/product
combination
to
avoid
injury
from
tip-over.
13.
Unplug
this
product
during
lightning
storms
or
when
unused
for
long
periods
of
time.
14.
Refer
all
servicing
to
qualified
service
personnel.
Servicing
is
required
when
the
product
has
been
damaged
in
any
way,
such
as
power-supply
cord
or
plug
is
damaged,
liquid
has
been
spilled
or
objects
have
fallen
into
the
product,
the
product
has
been
exposed
to
rain
or
moisture,
does
not
operate
normally,
or
has
been
dropped.
CAUTION:
PLEASE
READ
AND
OBSERVE
ALL
WARNINGS
AND
INSTRUCTIONS
IN
THIS
OWNER'S
MANUAL.
AND
THOSE
MARKED
ON
THE
PRODUCT.
RETAIN
THIS
MANUAL
FOR
FUTURE
REFERENCE.
This
product
has
been
designed
and
manufactured
to
assure
personal
safety.
Improper
use can
result
in
electric
shock
or
fire
hazard.
The
safeguards
incorporated
in
this
product
will
protect
you
if
you
observe
the
following
proce-
dures
for
installation,
use,
and
servicing.
This
product
does
not
contain
any
parts
that
can
be
repaired
by
the
user.
DO
NOT
REMOVE
THE
CABINET
COVER,
OR YOU
MAY
BE
EXPOSED
TO
DANGEROUS
VOLTAGE.
REFER
SERVICING
TO
QUALIFIED
SERVICE
PERSONNEL
ONLY.

4
Table
of
Contents
INTRODUCTION
SafetyPrecautions.......................2
IMPORTANT
SAFETY
INSTRUCTIONS
. . . . . . .
3
TableofContents......................4-5
Overview............................6-11
RecordableDiscs.......................6
PlayableDiscs.........................6
Disc-relatedterms......................7
AboutSymbols.........................7
?Aboutthesymboldisplay............7
?
About
the
disc
symbols
for
instructions
. . . .
7
AboutRecordablediscs..................8
?Whatare"Recordingmodes"?.
. . . . . . . .
.8
?
Is
editing
a
DVD
like
editing
a
video
tape?
.
8
?
About
word
'Original'
and
'Playlist'
. . . . . . .
8
AboutDVDrecording..................9-11
?
Disc
types
and
recording
formats,
modes,
andsettings........................9
?Notesforrecording...................9
?
RecordingTVaudiochannels.
. . . . . . . .
.10
?
Restrictions
on
video
recording.
. . . . . . . .
10
?Whatis'CPRM'?...................10
?Copyright.........................10
Card
capable
of
displaying
and
saving
. . . . . .
10
?
Using
Photo
or
Music
menu
forMemoryCard...................10
Precautions...........................11
?Handlingtheunit...................11
?Cleaningtheunit...................11
?MoistureCondensation...............11
NotesonDiscs........................11
?Handlingdiscs.....................11
?Storingdiscs.......................11
?Cleaningdiscs.....................11
RemoteControlOperationRange.
. . . . . . . .
.11
Remote
Control
Battery
Installation
. . . . . . . . .
11
FrontPanel............................12
FunctionDisplayWindow................13
RemoteControlOverview................14
RearPanel............................15
HOOKUP
Connections........................16-21
Connecting
Antenna/Cable
TV
toRecorderCombiReceiver..............16
ConnectingtoaTV.....................17
Accessory
Audio/Video
(A/V)
Connections
toRecorderCombiReceiver..............18
ConnectingaDigitalCamcorder.
. . . . . . . . .
.19
RadioAntennaConnections..............19
Assembling
and
Connecting
to
the
Speakers
(FrontSpeaker).......................20
SpeakerSystemConnections.
. . . . . . . . . . .
.21
BeforeOperation.....................22-37
SpeakerPositioning....................22
MiniGlossaryforSoundMode.
. . . . . . . . . .
.23
DelayTimeSetting.....................24
SoundLevel..........................25
TestTone............................25
GENERAL.........................26-28
?T
uningBandSelect.................26
?AutoChannelSet...................26
?T
o
Add
or
Erase
Channels
from
Memory
.
27
?AutoClockSet.....................27
?ManualClockSet...................27
?TVAspect........................28
?ProgressiveScan...................28
?PowerSaveMode..................28
?FactorySetting.....................28
LANGUAGE..........................29
?DisplayMenu......................29
?DiscLanguage.....................29
AUDIO..............................29
?
DRC(DynamicRangeControl).
. . . . . .
.29
?V
ocal............................29
LOCK(ParentalControl).
. . . . . . . . . . . .
.30-31
?MovieRating......................30
?SetPassword......................30
?CountryCode......................31
RECORD..........................31-32
?DiscRecordMode..................31
?VCRRecordMode..................31
?DVRecordAudio...................32
?AutoChapter......................32
DISC.............................32-34
?DiscInitialize......................32
?DiscFinalize......................33
?DiscProtect.......................33
?AutoPlay.........................33
?DiscLabel........................34
General
Explanation
of
On-Screen
Display
. . .
35
?
Displaying
Information
on-screen
. . . . . . .
35
?D
isplaying
OSD
While
Watching
TV
. . . . .
35
?ChangingTVChannels..............35
?ChangingTVAudioChannel.
. . . . . . . . .
.35
OSDMenuOptionsbyMediaType
. . . . .
.36-31
?DVD.............................36
?V
R.
.
............................36
?V
ideo/+RW/+R.....................37
?VHS.............................37
PLAYBACK
OperationwithDVD..................38-49
PlayingaDVD......................38-41
?MovingtoanotherTITLE.............38
?
Moving
to
another
CHAPTER/TRACKs.
. .
38
?SlowMotion.......................38
?
Still
Picture
and
Frame-by-Frame
Playback
.
39
?Search...........................39
?Random..........................39
?Repeat..........................39
?RepeatA-B.......................39
?T
imeSearch.......................40
?Zoom............................40
?MarkerSearch....................40
?DiscMenus.......................40
?T
itleMenus.......................40
?CameraAngle.....................41
?ChangingtheAudioLanguage.
. . . . . . .
.41
?ChangingtheAudioChannel.
. . . . . . . .
.41
?3DSurround......................41
?Subtitles..........................41
?LastConditionMemory...............41

Table
of
Contents
Audio
CD
and
MP3/WMA
Operation
. . . . . .
42-44
PlayinganAudioCDorMP3/WMADisc.
. . .
.42
Musicmenuoptions....................42
?Pause...........................43
?MovingtoAnotherTrack..............43
?Repeat...........................43
?Random..........................43
?ChangingtheAudioChannel.
. . . . . . . .
.43
?Search...........................43
?RepeatA-B.......................43
NotesonMP3/WMARecordings.
. . . . . . . . .
.43
Copying
MP3/WMA
file(s)
onthedisctoMemoryCard..............44
Erasing
MP3/WMA
file(s)
or
folder(s)
fromtheMemoryCard..................44
Programmed
Playback
with
Audio
CD
andMP3/WMA........................45-46
ProgramListmenuoptions...............45
?RepeatProgrammedTracks
. . . . . . . . .
.46
?
Erasing
a
Track from
the
Program
List
. . .
46
?
Erasing
the
multi
tracks
ontheProgramList.................46
?
Changing
the
order
of
Program
List
. . . . .
46
PhotoDiscOperation..................47-48
ViewingaJPEGFile....................47
Photomenuoptions....................47
?Photo-CDmenuoptions..............47
?Photo-Memorymenuoptions.
. . . . . . . .
.47
?Stillpicture........................48
?SkipImages.......................48
?RotateImages.....................48
?V
iewSlideShows...................48
?
Copying
JPEG
file(s)
on
the
disc
toMemoryCard....................48
?
Erasing
JPEG
file(s)
or
folder
from
theMemoryCard...................48
?NotesonJPEGRecordings.
. . . . . . . . .
.48
VCRModeTapePlayback................49
Preparation...........................49
NormalPlayback......................49
?T
rackingControl....................49
SpecialEffectPlayback..................49
?Search...........................49
?
Still
Picture
and
Frame-by-FramePlayback.
. . . . . . . . . .
.49
?SlowMotion.......................49
?CounterMemoryFunction.
. . . . . . . . . .
.49
RECORDING
BasicRecording.....................50-51
BasicRecordingfromaTV...............50
InstantTimerRecording.................50
DubbingfromDVDtoVCR...............51
DubbingfromVCRtoDVD...............51
TimerRecording.......................52
Checking
Timer
Recording
Details
. . . . . . . . .
52
CancelingaTimerRecording.
. . . . . . . . . . .
.52
Stopping
a
Timer
Recording
in
Progress
. . . . .
52
Timer
Recording
Troubleshooting
. . . . . . . . . .
52
RecordingfromanExternalInput.
. . . . . . . .
.53
Recording
from
External
Components
. . . . . . .
53
Recording
from
a
Digital
Camcorder
. . . . . . . .
53
WhatisDV?..........................54
?D
V
-RelatedMessages...............54
?T
roubleshooting....................54
EDITING
TitleListandChapterListMenu
. . . . . . .
.55-59
UsingtheTitleList-Originalmenu.
. . . . . . . .
.55
Using
the
Chapter
List-Original
menu
. . . . . . .
55
UsingtheTitleList-PlaylistMenu.
. . . . . . . . .
.56
Using
the
Chapter
List-Playlist
Menu.
. . . . . . .
56
UsingtheTitleListmenu.................57
DeletingaTitle........................57
Ifthedischasalreadybeenfinalized.
. . . . .
.57
UsingtheTitleListmenu(+RW).
. . . . . . . . .
.58
UsingtheChapterListmenu(+RW).
. . . . . .
.58
UsingtheTitleListmenu(+R).
. . . . . . . . . . .
.59
UsingtheChapterListmenu(+R).
. . . . . . . .
.59
TitleandChapterEditing.
. . . . . . . . . . . .
.60-66
Titles,ChaptersandParts................60
AddingChapterMarkers................60
ChangingTitleThumbnails...............60
MakingaNewPlaylist..................61
Adding
Additional
Titles/Chapters
tothePlaylist.........................61
DeletingaTitle/Chapter.................62
DeletingaPart........................62
NamingaTitle........................63
CombiningTwoChaptersIntoOne.
. . . . . . .
.63
MovingaPlaylistChapter...............64
ProtectaTitle.........................64
HideaTitle/Chapter....................65
DivideOneTitleIntoTwo................65
Clean-upRecording....................66
OverwriteRecording...................66
Viewing
Title
List
menu
displayed
onotherDVDrecordersorplayers.
. . . . . . .
.66
Playing
Your
Recordings
on
Other
DVD
Players
(Finalizing
a
Disc)
. . . .
66
REFERENCE
Controlling
Your
TV
withtheSuppliedRemote................67
PresettingtheRadioStations.
. . . . . . . . . . .
.68
ListeningtotheRadio...................69
Language
Code
and
Country
Code
List
. . . . .
70
Troubleshooting.....................71-72
ResettheRecorderCombiReceiver.
. . . . . .
.72
Specifications.......................73-74
About
the
symbols
for
instructions
Indicates
hazards
likely
to
cause
harm
to
the
unit
itself
or
other
material
damage.
Indicates
special
operating
features
of
this
unit.
Indicates
tips
and
hints
for
making
the
task
easier.
INTRODUCTION
5
Manufactured
under
license
from
Dolby
Laboratories.
"Dolby",
"Pro
Logic"
and
the
double-D
symbol
are
trademarks
of
Dolby
Laboratories.
DTS
and
DTS
Digital
Out
are
registered
trademarks
of
Digital
Theater
Systems,
Inc.

6
Overview
Recordable
Discs
DVD-RW
(DVD
-
ReWritable):
These
Discs
can
be
recorded
on
repeatedly.
Recordings
can
be
erased,
then
you
can
record
again
on
the
same
Disc.
DVD-R
(DVD
-
Recordable):
These
Discs
can
be
recorded
only
once.
After
you
finalize
a
DVD-R,
you
cannot
record
on
it
or
edit
it.
DVD+RW
(DVD
+
ReWritable):
These
Discs
can
be
recorded
on
repeatedly.
Recordings
can
be
erased,
then
you
can
record
again
on
the
same
Disc.
DVD+R
(DVD
+
Recordable):
These
Discs
can
be
recorded
only
once.
After
you
finalize
a
DVD+R,
you
cannot
record
on
it
or
edit
it
any
more.
otes
?
This
recorder
cannot
record
CD-R
or
CD-RW
discs.
?
DVD-R/RW
and
CD-R/RW
discs
recorded
using
a
personal
computer
or
a
DVD
or
CD
recorder
may
not
play
if
the
disc
is
damaged
or
dirty,
or
if
there
is
dirt
of
condensation
on
the
recorder's
lens.
?
If
you
record
a
disc
using
a
personal
computer,
even
if it
is
recorded
in
a
compatible
format,
there
are
cases
in
which
it
may
not
play
because
of
the
settings
of
the
application
software
used
to
create
the
disc.
(Check
with
the
software
publisher
for
more
detailed
information.)
?
The
company
does
not
hold
any
responsibility
to
com-
pensate
the
contents
which
should
have
been
record-
ed,
and
any
losses
or
damages
(e.g.
losses
of
busi-
ness
profit,
or
business
intermission)
that
may
arise
from
malfunction
of
this
recorder
(not
recording/edit-
ing
as
intended).
Problems
arising
in
the
following
sit-
uations
are
included.
-
When
a
DVD
disc
recorded
on
this
Recorder
Combi
Receiver
is
used
in
a
DVD
recorder
of
another
manufacturer,
or
used
(insertion,
playback,
record-
ing
or
editing)
in
a
personal
computer
DVD
drive.
-
When
a
DVD
that
has
been
used
as
above
is
used
again
in
this
Recorder
Combi
Receiver.
-
When
a
DVD
disc
recorded
in
a
DVD
recorder
of
another
manufacturer,
or
in
a
personal
computer
DVD
drive
is
used.
Playable
Discs
DVD
(8
cm/12
cm
disc)
Audio
CD
(8
cm/12
cm
disc)
In
addition,
the
Recorder
Combi
Receiver
can
play
DVD±R/DVD±RW
discs,
CD-R/CD-RW
discs
that
contain
audio
titles,
MP3/WMA
files
or
JPEG
files.
otes
?
Depending
on
the
conditions
of
the
recording
equip-
ment
or
the
CD-R/RW
(or
DVD±R/±RW)
disc
itself,
some
CD-R/RW
(or
DVD±R/±RW)
discs
cannot
be
played
on
the
unit.
?
Do
not
attach
any
seal
or
label
to
either
side
(the
labeled
side
or
the
recorded
side)
of
a
disc.
?
Do
not
use
irregularly
shaped
CDs
(e.g.,
heart-shaped
or
octagonal).
Doing
so
may
result
in
malfunctions.
?
Depending
on
the
recording
software
&
the
finalization,
some
recorded
discs
(CD-R/RW
or
DVD±R/RW)
may
not
be
playable.
Regional
code
of
the
Recorder
Combi
Receiver
and
DVDs
This
Recorder
Combi
Receiver
is
designed
and
manufac-
tured
for
playback
of
Region
1
encoded
DVD
software.
The
region
code
on
the
labels
of
some
DVD
discs
indicates
which
type
of
Recorder
Combi
Receiver
can
play
those
discs.
This
unit
can
play
only
DVD
discs
labeled
1
or
ALL.
If
you
try
to
play
any
other
discs,
the
message
"Incorrect
region
code.
Can't
playback"
will
appear
on
the
TV
screen.
Some
DVD
discs
may
not
have
a
region
code
label
even
though
their
playback
is
prohibited
by
area
limits.
otes
on
DVDs
Some
playback
operations
of
DVDs
may
be
intentional-
ly
fixed
by
software
manufacturers.
As
this
unit
plays
DVDs
according
to
disc
content
designed
by
the
soft-
ware
manufacturer,
some
playback
features
of
the
unit
may
not
be
available
or
other
functions
may
be
added.
Refer
also
to
the
instructions
supplied
with
the
DVDs.
Some
DVDs
made
for
business
purposes
may
not
be
played
on
the
unit.
1
ALL

Disc-related
terms
Title
(DVD
only)
The
main
film
content
or
accompanying
feature
content
or
music
album.
Each
title
is
assigned
a
title
reference
number
enabling
you
to
locate
it
easily.
Chapter
(DVD
only)
Sections
of
a
picture
or
a
musical
piece
that
are
smaller
than
titles.
A
title
is
composed
of
one
or
several
chap-
ters.
Each
chapter
is
assigned
a
chapter
number
to
enable
you
to
locate
the
chapter
you
want.
Depending
on
the
disc,
chapters
may
not
be
labeled.
Track
(Audio
CD
only)
Sections
of
a
picture
or
a
musical
piece
on
an
audio
CD.
Each
track
is
assigned
a
track
number,
enabling
you
to
locate
the
track
you
want.
MP3
MP3
is
a
popular
compression
format
used
for
digital
audio
files
that
yields
very
high
near-CD
quality.
WMA
Windows
media
audio
file.
A
type
of
coding
/
decoding
developed
by
Microsoft
Corp.
JPEG
Joint
Pictures
Expert
Group.
JPEG
is
a
compressed
file
format
that
allows
you
to
save
images
with
no
limit
on
the
number
of
colors.
About
Symbols
About
the
symbol
display
"
"
may
appear
on
the
TV
screen
during
operation.
This
icon
means
the
function
explained
in
this
owner's
manual
is
not
available
on
that
specific
disc,
or
at
that
time.
About
the
disc
symbols
for
instructions
A
section
whose
title
has
one
of
the
following
symbols
are
applicable
only
to
those
discs
represented
by
the
symbol.
Many
functions
provided
on
this
Recorder
are
depend-
ent
on
the
recording
mode.
One
or
more
of
the
symbols
(,
,
,
)
appear
by
each
function
(explained
in
this
manual)
so
that
you
can see
at
a
glance
whether
it's
applicable
to
the
disc
loaded.
DVD-R/RW
with
Video
recording
mode
DVD-RW
with
VR
recording
mode
DVD+R
disc
DVD+RW
disc
DVD-Video
disc
Audio
CDs
MP3
CDs
WMA
CDs
JPEG
CDs
Memory
Card
VHS
Tape
The
finalized
DVD
disc
is
a
DVD-Video
disc
VHS
M/C
JPEG
WMA
MP3
CD
DVD
+RW
+R
VR
Video
+RW
+R
VR
Video
Overview
(Continued)
INTRODUCTION
7
DVD-R
DVD+R
DVD-RW
DVD+RW
SONY SONY SONY SONY
TDK TDK TDK TDK
Imation Imation Imation Imation
Verbatim
MAXELL
Verbatim Verbatim
RiDATA RiDATA
Memorex
RiDATA
Panasonic
Fujifilm Fujifilm Fujifilm
LG
Ricoh
LG
Ricoh
Mitsubishi
HP
Mitsubishi
HP
That's That's
Samsung
Ritek
Pioneer
Philips
Pioneer
Radus
The
Recommendable
DVD
discs
:

Overview
(Continued)
About
Recordable
discs
How
are
recordable
discs
different?
The
essential
difference
among
DVD-R,
DVD-RW,
DVD+R
and
DVD+RW
is
that
DVD-R
and
DVD+R
are
a
record-once
medium,
while
DVD-RW
and
DVD+RW
are
a
re-recordable/erasable
medium.
You
can
re-record/
erase
a
DVD-RW
and
DVD+RW
disc
approximately
1,000
times.
Can
I
play
my
recordable
discs
in
a
regular
DVD
player?
Generally,
DVD-R,
DVD+R
discs
and
DVD-RW
discs
recorded
in
Video
mode
are
playable
in
a
regular
DVD
player,
but
they
must
be
'finalized'
first.
This
process
fixes
the
contents
of
the
disc
to
make
them
readable
to
other
DVD
players
as
DVD-Video
discs.
DVD-RW
discs
recorded
in
VR
(Video
Recording)
mode
are
playable
in
some
players.
Unfinalized
DVD+RW
discs
are
playable
in
a
regular
DVD
player.
This
indicates
a
product
feature
that
is
capable
of
playing
DVD-RW
discs
recorded
with
Video
Recording
(VR)
format.
What
are
"Recording
modes"?
There
are
various
recording
modes
available
using
this
recorder.
When
recording
to
a
DVD-R,
DVD+R
or
DVD+RW
disc,
recordings
are
always
in
Video
mode.
DVD-RW
discs
can
be
formatted
for
VR
mode
recording
or
Video
mode
recording.
VR
mode
recording
?4different
picture
quality/recording
time
settings
avail-
able
(SP,
LP,
EP,
XP)
?
Not
playable
on
regular
DVD
players
?
Recordings
can
be
extensively
edited
Video
mode
recording
?4different
picture
quality/recording
time
settings
avail-
able
(SP,
LP,
EP,
XP)
?
Playable
on
regular
DVD
players
(after finalizing)
?
Limited
editing
features
DVD+RW
mode
recording
?4different
picture
quality/recording
time
settings
avail-
able
(SP,
LP,
EP,
XP)
?
Playable
on
regular
DVD
players
?
The
edited
contents
is
playable
on
regular
DVD
play-
ers
only
after
finalizing
?
Recordings
can
be
edited
the
title/chapter
DVD+R
mode
recording
?4different
picture
quality/recording
time
settings
avail-
able
(SP,
LP,
EP,
XP)
?
Playable
on
regular
DVD
players
(after
finalization)
?
Any
edited
contents
are
not
be
compatible
on
regular
DVD
players.
(Hide,
chapter
combine,
added
chapter
mark,
etc.)
?
Limited
title/chapter
editing
features
ote
DVD-Video
Format
(Video
mode)
is
a
new
format
for
recording
on
DVD-R/RW
and
DVD+R/RW
discs
that
was
approved
by
the
DVD
Forum
in
2000.
You
may
therefore
experience
problems
playing
recordable
DVD
discs
in
some
players.
Symptoms
include
video
arti-
facts,
audio
and/or
video
dropouts
and
playback
sud-
denly
stopping.
Our
company
cannot
take
responsibility
for
problems
playing
discs
recorded
on
this
Recorder
Combi
Receiver
in
other
players.
Is
editing
a
DVD
like
editing
a
video
tape?
No.
When
you
edit
a
video
tape
you
need
one
video
deck
to
play
the
original
tape
and
another
to
record
the
edits.
With
DVD,
you
edit
by
making
a
'Playlist'
of
what
to
play
and
when
to
play
it.
On
playback,
the
Recorder
Combi
Receiver
plays
the
disc
according
to
the
Playlist.
About
word
'Original'
and
'Playlist'
Throughout
this
manual,
you
will
often
see
the
words
Original
and
Playlist
to
refer
to
the
actual
content
and
the
edited
version.
?
Original:
content
refers
to
what's
actually
recorded
on
the
disc.
?
Playlist:
content
refers
to
the
edited
version
of
the
disc
---
how
the
Original
content
is
to
be
played.
+R
+RW
Video
VR
8
Disc
type
Disc
format
Recording
mode
Functions
DVD-Video
Video
format
n/a
Playback
only
DVD-RW
Video
Recording
VR
mode
Playback,
Recording,
Original/Playlist
Editing
format
(default)
Video
format
Video
mode
Playback,
limited
Recording,
limited
Editing
DVD-R
Video
format
Video
mode
Playback,
limited
Recording,
limited
Editing
DVD+RW
+RW
Video
format
DVD+RW
Playback,
limited
Recording,
Title/Chapter
Editing
DVD+R
+R
Video
format
DVD+R
Playback,
limited
Recording,
limited
Title/Chapter
Editing

INTRODUCTION
9
Overview
(Continued)
About
DVD
recording
otes
?
This
recorder
cannot
make
recordings
on
CD-R
or
CD-RW
discs.
?
Our
company
takes
no
responsibility
for
recording
fail-
ure
due
to
power
cuts,
defective
discs,
or
damage
to
the
recorder.
?
Fingerprints
and
small
scratches
on
a
disc
can
affect
playback
and/or
recording
performance.
Please
take
proper
care
of
your
discs.
Disc
types
and
recording
formats,
modes,
and
settings
This
recorder
can
play
five
different
kinds
of
DVD
disc:
pre-recorded
DVD-Video
discs,
DVD-RW,
DVD-R,
DVD+RW
and
DVD+R
discs.
The
disc
format
for
DVD-R
discs
is
always
"Video
format"---the
same
as
pre-record-
ed
DVD-Video
discs.
This
means
that
once
finalized,
you
can
play
a
DVD-R
in
a
regular
DVD
player.
The
recording
mode
is
closely
related
to
the
disc
for-
mat.
If
the
disc
format
is
Video
Recording
format,
then
the
recording
mode
is
VR
mode;
if
the
disc
format
is
Video
mode,
then
the
recording
mode
is
Video
mode
(except
for
DVD-Video,
which
is
not
recordable,
and
so
does
not
have
a
recording
mode).
Within
the
recording
modes
(which
are
fixed
for
the
whole
disc)
are
the
record
settings.
These
can
be
changed
as
required
for
each
recording
and
determine
the
picture
quality
and
how
much
space
the
recording
will
take
up
on
the
disc.
Notes
for
recording
?
The
recording
times
shown
are
not
exact
because
the
Recorder
Combi
Receiver
uses
variable
bit-rate
video
compression.
This
means
that
the
exact
recording
time
will
depend
on
the
material
being
recorded.
?
When
recording
a
TV
broadcast,
if
the
reception
is
poor
or
the
picture
contains
interference,
the
record-
ing
times
may
be
shorter.
?
If
you
record
still
pictures
or
audio
only,
the
recording
time
may
be
longer.
?
The
displayed
times
for
recording
and
time
remaining
may
not
always
add
up
to
exactly
the
length
of
the
disc.
?
The
recording
time
available
may
decrease
if
you
heavily
edit
a
disc.
?
If
using
a
DVD-RW
disc,
make
sure
you
change
the
recording
format
(Video
mode
or
VR
mode)
before
you
record
anything
on
the
disc.
See
page
26
(Disc
Initialize)
for
how
to
do
this.
?
When
using
a
DVD-R
disc,
you
can
keep
recording
until
the
disc
is
full,
or
until
you
finalize
the
disc.
Before
you
start
a
recording
session,
check
the
amount
of
recording
time
left
on
the
disc.
?
When
using
a
DVD-RW
disc
in
Video
mode,
recording
time
available
will
only
increase
if
you
erase
the
last
title
recorded
on
the
disc.
?
The
Erase
Title
option
in
the
Title
List-Original
menu
only
hides
the
title,
it
does
not
actually
erase
the
title
from
the
disc
and
increase
the
recording
time
avail-
able
(except
for
the
last
recorded
title
on
a
DVD-RW
disc
in
Video
mode).
?
The
overwrite
recording
is
available
with
DVD+RW
disc.

Overview
(Continued)
Recording
TV
audio
channels
This
recorder
can
record
one
or
two
channel
audio.
For
TV
broadcasts,
this
usually
means
mono
or
stereo,
but
some
programs
are
broadcast
with
a
main
and
a
SAP
(Secondary
Audio
Program)
audio
channel.
If
you're recording
in
Video
mode
(or
in
VR
mode),
you
can
record
either
the
main
audio
or
the
SAP
audio.
Restrictions
on
video
recording
?Y
ou
cannot
record
copy-protected
video
using
this
recorder.
Copy-protected
video
includes
DVD-Video
discs,
pre-recorded
VHS
tapes
and
some
satellite
broadcasts.
If
copy-protected
material
is
encountered
during
a
recording,
recording
will
pause
or
stop
auto-
matically
and
an
error
message
will
be
displayed.
?V
ideo
that
is
'copy-once
only'
can
only
be
recorded
using
a
DVD-RW
disc
in
VR
mode
with
CPRM
(see
below).
What
is
'CPRM'?
CPRM
is
a
copy
protection
system
(with
scramble
sys-
tem)
only
allowing
the
recording
of
'copy
once'
broad-
cast
programs.
CPRM
stands
for
Content
Protection
for
Recordable
Media.
This
recorder
is
CPRM
compatible,
which
means
that
you
can
record
copy-once
broadcast
programs,
but
you
cannot
then
make
a
copy
of
those
recordings.
CPRM
recordings
can
only
be
made
on
DVD-RW
discs
format-
ted
in
VR
mode,
and
CPRM
recordings
can
only
be
played
on
players
that
are
specifically
compatible
with
CPRM.
Copyright
?
Audio
and
video
recordings
you
make
using
this
recorder
are
for
your
personal
use
only.
You
may
not
sell,
lend
or
rent
them
to
other
people.
?
This
product
incorporates
copyright
protection
tech-
nology
that
is
protected
by
method
claims
of
certain
U.S.patents
and
other
intellectual
property
rights
owned
by
Macrovision
Corporation
and
other
rights
owners.
Use
of
this
copyright
protection
technology
must
be
authorized
by
Macrovision
Corporation,
and
is
intended
for
home
and
other
limited
viewing
uses
only
unless
otherwise
authorized
by
Macrovision
cor-
poration.
Reverse
engineering
or
disassembly
is
pro-
hibited.
Cards
capable
of
displaying
and
saving
Readable
Cards
?
SmartMedia
Card
(SMC)
?
Compact
Flash
Card
(CF)
?
Micro
Drive
(MD)
?
Secure
Digital
Card
(SD)
?
Multi
Media
Card
(MMC)
?
Memory
Stick
(MS)
?
Memory
Stick
Pro
(MS-Pro)
-
Compatible
with:
FAT
12,
FAT
16,
or
FAT
32
-
Only
use
the
memory
cards
recommended.
Regarding
Write
Protect
For
cards
that
have
a
write
protect
switch,
if
the
switch
is
on
it
will
not
be
possible
to
write
or
erase
the
contents
of
the
card.
Inserting/Removing
the
Memory
Card
Inserting
the
card.
Insert
straight-in
until
it
fits
into
place.
Removing
the card
Extract
the
card
from
the
card
slot.
otes
?
Keep
the
memory
card
out
of
reach
of
children.
If
swallowed,
seek
medical
advice
immediately.
?
This
Recorder
Combi
Receiver
can
not
format
a
memory
card.
Caution
?
Do
not
remove
the
card
in
operation
(copying,
writing,
playing
back,
etc.).
Should
you
do
so,
the
unit
may
malfunction
or
the
card
may
be
damaged.
?
Do
not
insert
or
extract
the
smart
card
when
access-
ing
the
CF
(Compact
Flash)
card.
Using
Photo
or
Music
menu
for
Memory
Card
1.
Insert
a
memory
card
recorded
with
JPEG
or
MP3/WMA
file.
2.
Press
MEMORY
on
the
Remote
Control
in
Tuner
mode
and
press
ENTER.
The
Photo
or
Music
menu
appears
on
the
TV
screen.
ote
If
both
slots
are
connected
with
Memory
Card,
use
v/
V
to
select
the
desired
Memory
Card
slot.
3.
You
can
select
between
the
Music
menu
and
Photo
menu
using
TITLE
button
on
the
Remote
Control.
4.
Press
RETURN
to
exit
the
Photo
or
Music
menu
for
memory
card.
10
CForMD
or

Precautions
Handling
the
unit
When
shipping
the
unit
The
original
shipping
carton
and
packing
materials
come
in
handy.
For
maximum
protection,
re-pack
the
unit
as
it
was
originally
packaged
at
the
factory.
When
setting
up
the
unit
The
picture
and
sound
of
a
nearby
TV,
VCR,
or
radio
may
be
distorted
during
playback.
In
this
case,
position
the
unit
away
from
the
TV,
VCR,
or
radio,
or
turn
off
the
unit
after
removing
the
disc.
To
keep
the surface
clean
Do
not
use
volatile
liquids,
such
as
insecticide
spray,
near
the
unit.
Do
not
leave
rubber
or
plastic
products
in
contact
with
the
unit
for
a
long
period
of
time.
They
will
leave
marks
on
the
surface.
Cleaning
the
unit
To
clean
the
cabinet
Use
a
soft,
dry
cloth.
If
the
surfaces
are
extremely
dirty,
use
a
soft
cloth
lightly
moistened
with
a
mild
detergent
solution.
Do
not
use
strong
solvents
such
as
alcohol,
benzine,
or
thinner,
as
these
might
damage
the
surface
of
the
unit.
To
obtain
a
clear
picture
The
Recorder
Combi
Receiver
is
a
high-tech,
precision
device.
If
the
optical
pick-up
lens
and
disc
drive
parts
are
dirty
or
worn,
the
picture
quality
will
be
poor.
Regular
inspection
and
maintenance
are
recommended
after
every
1,000
hours
of
use.
(This
depends
on
the
operating
environment.)
For
details,
please
contact
your
nearest
dealer.
Moisture
Condensation
Never
operate
the
Recorder
Combi
Receiver
immedi-
ately
after
moving
it
from
a
cold
location
to
a
warm
location.
Leave
it
for
two
or
three
hours
without
operat-
ing
it. If
you
use
the
Recorder
Combi
Receiver
in
such
a
situation,
it
may
damage
discs/tapes
and
internal
parts.
Notes
on
Discs
Handling
discs
Do
not
touch
the
playback
side
of
the
disc.
Hold
the
disc
by
the
edges
so
that
fingerprints
will
not
get
on
the
surface.
Do
not
stick
paper
or
tape
on
the
disc.
Storing
discs
After
playing,
store
the
disc
in
its
case.
Do
not
expose
the
disc
to
direct
sunlight
or
sources
of
heat,
or
leave
it
in
a
parked
car
exposed
to
direct
sun-
light,
as
there
may
be
a
considerable
temperature
increase
inside
the
car.
Cleaning
discs
Fingerprints
and
dust
on
the
disc
can
cause
poor
pic-
ture
quality
and
sound
distortion.
Before
playing,
clean
the
disc
with
a
clean
cloth.
Wipe
the
disc
from
the
cen-
ter
outward.
Do
not
use
strong
solvents
such
as
alcohol,
benzine,
thinner,
commercially
available
cleaners,
or
anti-static
spray
intended
for
older
vinyl
records.
INTRODUCTION
11
Overview
(Continued)
No
Yes
Remote
Control
Operation
Range
Point
the
Remote
Control
at
the
remote
sensor
and
press
the
buttons.
Distance:
About
23
ft
(7
m)
from
the
front
of
the
remote
sensor.
Angle:
About
30°
in
each
direction
of
the
front
of
the
remote
sensor.
Remote
Control
Battery
Installation
Detach
the
battery
cover
on
the
rear
of
the
Remote
Control,
and
insert
two
AAA
batteries
with
and
aligned
correctly.
Caution
Do
not
mix
old
and
new
batteries.
Never
mix
different
types
of
batteries
(standard,
alkaline,
etc.).

12
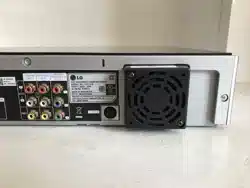
Front
Panel
DVD/VCR
z
(REC)
button
Starts
recording.
Press
repeatedly
to
set
the
recording
time.
VOLUME
Control
Turn
the
knob
clockwise
to
increase
sound
level,
counterclockwise
to
decrease
sound
level.
B
(PLAY)
To
play
back
a
disc
or
tape.
Z
OPEN/CLOSE
Opens
or
closes
the
disc
tray.
AV2
IN
(VIDEO
/
AUDIO
(Left/Right))
Connect
the
audio/video
output
of
an
external
source
(Audio
system,
TV/
Monitor,
VCR,
Camcorder,
etc.).
S-VIDEO
IN
Connect
the
S-Video
output
of
an
external
source
(TV/
Monitor,
VCR,
Camcorder,
etc.).
DV
INPUT
Connect
the
DV
output
of
a
digital
camcorder.
Disc
Tray
(DVD
deck)
Insert
a
disc
here.
POWER
button
and
indicator
Switches
the
Recorder
Combi
Receiver
ON
and
OFF.
Lights
blue
when
the
Recorder
Combi
Receiver
is
turned
on.
x
(STOP)
Stops
playback.
DUB
(DUBBING)
Press
to
copy
DVD
to
VCR
(or
VCR
to
DVD).
Cassette
Compartment
(VCR
deck)
Insert
a
video
cassette
here.
Z
EJECT
Ejects
the
tape
in
the
VCR
deck.
DVD/VCR
Toggles
control
between
the
DVD
deck
and
the
VCR
deck.
Display
window
Shows
the
current
status
of
the
Recorder
Combi
Receiver.
Remote
Sensor
Point
the
Recorder
Combi
Receiver
Remote
Control here.
MEMORY
CARD
Slot
Insert
a
memory
card
(CF,
MD,
SMC,
MMC,
SD,
MS
or
MS-Pro).

13
INTRODUCTION
Function
Display
Window
ST
Indicates
a
stereo
broadcast
is
being
received.
Hi-Fi
Indicates
when
the
Recorder
Combi
Receiver
is
playing
a
tape
in
Hi-Fi.
DUB
Indicates
that
a
DVD
to
VCR
(or
VCR
to
DVD)
dubbing
is
in
progress.
SAP
Indicates
when
a
SAP
BILINGUAL
broadcast
is
being
received.
Character
indicators
Indicates
clock,
total
playing
time,
elapsed
time,
remaining
time,
title
number,
chapter/track
number,
channel,
etc.
Indicates
when
the
recorder
is
in
timer
recording
or
a
timer
recording
is
programmed.
PROG
Programmed
playback
active.
A
VHS
tape
is
inserted
in
the
VCR
deck.
Indicates
a
DVD-RW
disc
(VR
mode
only)
is
inserted
in
the
DVD
deck.
TV
Indicates
that
TV
mode
is
active.
Indicates
current
audio
stream
Indicates
current
surround
mode
MUTE
indicator

PA
USE/STEP
MEMORY
/ENTER
CARD
14
Remote
Control
Overview
POWER
Turns
Recorder
Combi
Receiver
ON
and
OFF.
DVD
Select
the
Recorder
Combi
Receiver's
function
mode
to
DVD.
VCR
Select
the
Recorder
Combi
Receiver's
function
mode
to
VCR.
FM/AM
Tuner
select
Select
FM
or
AM
band
as
the
listening
choice.
(FM
and
AM
bands).
0-9
numerical
buttons
Selects
numbered
options
in
a
menu.
TITLE
Displays
the
disc's
Title
menu,
if
available.
MARKER
Marks
any
point
during
playback.
SEARCH
Displays
Marker
Search
menu.
ZOOM
Enlarges
DVD
video
image.
MENU/LIST
Accesses
menu
on a
DVD
disc,
Title
List
or
Playlist
menu.
DISPLAY
Accesses
On-Screen
Display.
Displays
information
while
viewing
a
TV
program.
LEVEL
To
set
the
sound
level
of
desired
channel.
SKIP(-/+)
(.
/
>)
Go
to
next
chapter
or
track.
Returns
to
beginning
of
current
chapter
or
track
or
go
to
previous
chapter
or
track.
DELAY
To
set
the
delay
time
of
each
speaker
in
Dolby
Digital
and
Dolby
Pro
Logic
II
mode.
SCAN(-/+)
(m/M)
-
DVD:
Search
backward
or
forward.
-
VCR:
Rewinds/Advances
the
tape
dur-
ing
the
STOP
mode,
for
fast
reverse/
for-
ward
picture
search.
PAUSE/STEP
(X)
-
Pause
playback
or
recording
temporarily.
-
Press
repeatedly
for
frame-by-frame
playback.
B
(PLAY)
Starts
playback.
STOP
(x)
Stops
playback
or
recording.
z
REC
Starts
recording.
Press
repeatedly
to
set
the
recording
time.
REC
MODE
Selects
the
recording
mode:
-DVD:SP,LP,EPorXP.
-VCR:SPorSLP.
TIMER
REC
Displays
Timer
Record
menu.
MUTE
Turns
the
sound
on
and
off
temporarily.
EJECT,
OPEN/CLOSE
-
Opens
and
closes
the
disc
tray.
-
Ejects
the
tape
in
the
VCR
deck.
AV
Changes
the
input
to
use
for
recording.
(Tuner,
OPT,
AV
1,
AV
2
or
DV).
TEST
TONE
To
adjust
the
sound
balance
of
the
speakers
from
the
listener's
position.
SUBTITLE
Selects
a
subtitle
language.
AUDIO/MO.ST.
-
Selects
an
audio
language.
-
Selects
STEREO
or
MONO.
SOUND
MODE
Selects
sound mode.
XTS
To
enjoy
great
sound
effect.
SETUP
Accesses
or
removes
the
Setup
menu.
bBvV(left/right/up/down)
Selects
menu
options.
TRK/PRESET(-/+)(v/V):
-
Adjusts
manually
the
tape's
picture
onscreen.
-
Selects
a
program.
MEMORY/ENTER
-
Confirms
menu
selections.
-
Stores
a
radio
station's
frequency
in
the
tuner's
memory.
RETURN
(O)
Removes
the
menu.
VOLUME
(+/-)
To
adjust
speaker
volume
and
TV
volume.
DUBBING
Press
to
copy
DVD
to
VCR
(or
VCR
to
DVD).
CHP
ADD
Inserts
a
chapter
marker
when
playing/
recording.
THUMBNAIL
Selects
a
thumbnail
picture
for
the
current
title
for
use
in
the
Title List
or
Chapter
List
menu.
CLEAR
Removes
a
mark
on
the
Marker
Search
menu.
REPEAT
Repeat
chapter,
track,
title
or
all.
REPEAT
A-B
Repeats
sequence
between
two
points
(A
and
B)
RANDOM
Plays
tracks
in
random
order.
TV/VCR
To
view
channels
selected
by
the
VCR
tuner
or
by
the
TV
tuner.
CARD
Accesses
the
Photo
(or
Music)
menu
for
memory
card.
TV
Control
Buttons
-
POWER:
Switches
TV
ON
and
OFF.
-
CHANNEL
v/V:
Selects
TV's
channel.
-
VOLUME
+/--:
Adjusts
TV's
volume.
-
TV
INPUT:
Selects
the
TV's
source.
-
MUTE:
Turns
on
or
off
TV
sound.

INTRODUCTION
15
Rear
Panel
DVD/VCR
OUT
Caution
Do
not
touch
the
inner
pins
of
the
jacks
on
the
rear
panel.
Electrostatic
discharge
may
cause
permanent
damage
to
the
unit.
ANT.IN
Connect
the
VHF/UHF/CATV
antenna
to
this
terminal.
SYSTEM
Connect
the
SPEAKER
SYSTEM
at
the
Active
Speaker.
DVD/VCR
OUT
(VIDEO
OUT/AUDIO
OUT
(Left/Right))
Connect
to
a
TV
with
video
and
audio
inputs.
COMPONENT/PROGRESSIVE
SCAN
VIDEO
OUT
(Pr
Pb
Y)
Connect
to
a
TV
with
Pr
Pb
Y
inputs.
VCR
IN
LINE
1
(VIDEO
IN
/AUDIO
IN
(Left/Right))
Connect
the
audio/video
output
of
an
external
source
(Audio
system,
TV/Monitor,
VCR,
Camcorder).
AC
Power
Cord
Plug
into
the
power
source.
S-VIDEO
OUT
Connect
to
a
S-Video
Input
on
TV.
Cooling
fan
OPTICAL
IN
Connector
Connect
an
optical
output
of
Digital
Device.
RF.
OUT
(DVD/VCR
OUT)
Connect
to
a
TV
with
RF
coaxial
inputs.

Connections
ips
Depending
on
your
TV
and
other
equipment
you
wish
to
connect,
there
are
various
ways
you
could
connect
the
Recorder
Combi
Receiver.
Use
only
one
of
the
connections
described
below.
Please
refer
to
the
manuals
of
your
TV,
VCR,
Stereo
System
or
other
devices
as
necessary
to
make
the
best
connections.
Caution
Make
sure
the
Recorder
Combi
Receiver
is
connect-
ed
directly
to
the
TV.
Tune
the
TV
to
the
correct
video
input
channel.
Do
not
connect
the
Recorder
Combi
Receiver's
AUDIO
OUT
jack
to
the
phono
in
jack
(record
deck)
of
your
audio
system.
Do
not
connect
your
Recorder
Combi
Receiver
via
your
VCR.
The
DVD
image
could
be
distorted
by
the
copy
protection
system.
Connecting
Antenna/Cable
TV
to
Recorder
Combi
Receiver
1
Disconnect
the
antenna
leads
from
the
rear
of
the
TV.
2
Identify
the
type
of
cable
from
your
antenna.
If
it
is
a
round
cable
as
illustrated,
it
is
a
75
ohm
coaxial
antenna
cable.
This
cable
will
connect
directly
to
the
jack
marked
ANT.IN
on
your
Recorder
Combi
Receiver.
ip
If
your
antenna
lead
wire
is
a
flat
type
antenna
cable,
connect
it
to
an
Antenna
Adapter
(300-ohm
to
75-ohm)
(not
supplied)
and
slip
the
Adapter
onto
the
ANT.IN
jack.
The
Adapter
does
not
screw on
to
the
Recorder
Combi
Receiver,
it
just
slips
over
the
jack.
Cable
Service
Without
Cable
Box
If
your
cable
wire
is
connected
to
your
TV
without
a
converter
or
descrambler
box,
unscrew
the
wire
from
your
TV
and
attach
it
to
the
ANT.IN
jack
on
the
Recorder
Combi
Receiver.
Use
the
supplied
round
coaxial
cable
to
connect
between
the
Recorder
Combi
Receiver
's
RF.OUT
jack
and
the
75
ohm
antenna
input
jack
on
the
TV.
With
this
connection,
you
can
receive
all
mid-
band,
super
band,
and
hyperband
channels.
(All
cable
chan-
nels.)
Cable
Service
With
Cable
Box
If
a
converter
is
required
in
your
cable
system,
follow
the
instruction
below:
The
cable
hookup
permits
both
TV
and
Recorder
Combi
Receiver
operation.
To view
or
record
a
CATV
channel
1
Tune
the
TV
to
the
correct
video
input
channel.
2
Set
the
Recorder
Combi
Receiver
channel
selector
to
the
output
channel
of
the
Cable
Converter
box
using
TRK/
PRESET(-/+)
(v
/
V)
or
number
(0-9)
of
your
Recorder
Combi
Receiver.
(Example:
CH3)
3
Select
the
channel
to
view
at
the
Cable
Converter
Box.
ote
If
you
are
using
a
cable
box
to
tune
channels,
it
is
not
neces-
sary
to
do
Auto
Channel
Set
as
indicated
on
page
26.
16
DVD/VCR
OUT
DVD/VCR
OUT
Cable
TV
Wall
Jack
Back
Panel
of
Typical
Cable
Box

HOOKUP
17
Connections
(Continued)
Audio/Video
connection
1
Connect
the
VIDEO
OUT
jack
on
the
Recorder
Combi
Receiver
to
the
video
in
jack
on
the
TV
using
the
video
cable
(V).
2
Connect
the
Left
and
Right
AUDIO
OUT
jacks
from
the
Recorder
Combi
Receiver
to
the
audio
left/right
in
jacks
from
the
TV
using
the
audio
cables
(A).
S-Video
connection
1
Connect
the
S-VIDEO
OUT
jack
on
the
Recorder
Combi
Receiver
to
the
S-Video
in
jack
on
the
TV
using
the
S-Video
cable
(S).
2
Connect
the
Left
and
Right
AUDIO
OUT
jacks
from
the
Recorder
Combi
Receiver
to
the
audio
left/right
in
jacks
on
the
TV
using
the
audio
cables
(A).
Component
Video
(Color
Stream)
connection
1
Connect
the
COMPONENT/PROGRESSIVE
SCAN
VIDEO
OUT
jacks
on
the
Recorder
Combi
Receiver
to
the
corresponding
in
jacks
on
the
TV
using
an
Y
Pb
Pr
cable
(C).
2
Connect
the
Left
and
Right
AUDIO
OUT
jacks
from
the
Recorder
Combi
Receiver
to
the
audio
left/right
in
jacks
on
the
TV
using
the
audio
cables
(A).
Progressive
Scan
(ColorStream
pro)
connection
If
your
television
is
a
high-definition
or
"digital
ready"
television,
you
may
take
advantage
of
the
Recorder
Combi
Receiver's
progressive
scan
output
for
the
highest
video
resolution
possible.
If
your
TV
does
not
accept
the
Progressive
Scan
for-
mat,
the
picture
will
appear
scrambled
if
you
try
Progressive
Scan
on
the
Recorder
Combi
Receiver.
1
Connect
the
COMPONENT/PROGRESSIVE
SCAN
VIDEO
OUT
jacks
on
the
Recorder
Combi
Receiver
to
the
corresponding
in
jacks
on
the
TV
using
an
optional
Y
Pb
Pr
cable
(C).
2
Connect
the
Left
and
Right
AUDIO
OUT
jacks
from
the
Recorder
Combi
Receiver
to
the
audio
left/right
in
jacks
on
the
TV
using
the
supplied
audio
cables
(A).
otes
Set
Progressive
Scan
option
to
"ON"
in
the
General
menu,
see
page
28.
Progressive
Scan
does
not
work
with
the
RF,
Audio/Video
or
S-Video
connections.
DVD/VCR
OUT
ANTENNA
INPUT
L
R
Y
Pb
Pr
COMPONENT/PROGRESSIVE
VIDEO
INPUT
AUDIO
INPUT
VIDEO
INPUT
S-VIDEO
INPUT
R
Rear
of
TV
Rear
of
Recorder
Combi
Receiver
S
AV C
Connecting
to
a
TV
Make
one
of
the
following
connections,
depending
on
the
capabilities
of
your
existing
equipment.
RF
coaxial
connection
Connect
the
RF.OUT
jack
on
the
Recorder
Combi
Receiver
to
the
antenna
in
jack
on
the
TV
using
the
75-ohm
Coaxial
Cable
supplied
(R).
ote
If
you
use
this
connection,
tune
the
TV
to
the
Recorder
Combi
Receiver's
RF
output
channel
(CH
3
or
4).
How
to
set
the
Recorder
Combi
Receiver's
RF
output
channel
When
the
Recorder
Combi
Receiver
is
turned
off,
press
and
hold
TRK/PRESET(-/+)
(v
or
V)
on
the
remote
control
for
about
five
seconds
to
change
the
RF
output
channel
(CH
03
or
CH
04).
"RF-03"
or
"RF-04"
appears
in
the
dis-
play
window.

Connections
(Continued)
18
Accessory
Audio/Video
(A/V)
Connections
to
Recorder
Combi
Receiver
Connect
the
VCR
IN
LINE
1
or
VIDEO/AUDIO(L/R)
jacks
on
the
Recorder
Combi
Receiver
to
the
AUDIO/VIDEO
OUT
jacks
on
your
accessory
component,
using
the
optional
audio/video
cables.
If
the
auxiliary
devices
(e.g.
DVD)
are
equipped
with
OPTICAL
OUT
jack,
connect
them
to
the
OPTICAL
IN
jack
of
the
Recorder
Combi
Receiver.
ote
If
you
use
the
S-VIDEO
IN
jack
on
the
front
panel,
the
VIDEO
jack
on
the
front
panel
is
not
available.

HOOKUP
19
Connecting
a
Digital
Camcorder
Using
the
front
panel
DV
IN
jack,
it
is
possible
to
con-
nect
a
DV
digital
camcorder
or
video
deck
or
DVD-R/RW
recorder
and
digitally
transfer
DV
tapes
or
DVD-R/RW
discs
to
DVD-R/RW.
Use
a
DV
cable
(not
supplied)
to
connect
the
DV
in/out
jack
of
your
DV
Digital
Camcorder
to
the
front
panel
DV
IN
jack
of
this
Recorder
Combi
Receiver.
ote
This
jack
is
for
connection
to
DV
equipment
only.
It
is
not
compatible
with
digital
satellite
tuners
or
D-VHS
video
decks.
Radio
Antenna
Connections
Connect
the
supplied
FM/AM
antennas
for
listening
to
the
radio.
Connect
the
AM
loop
antenna
to
the
AM
antenna
connector.
Connect
the
FM
wire
antenna
to
the
FM
antenna
connector.
otes
To
prevent
noise
pickup,
keep
the
AM
loop
antenna
away
from
the
Recorder
Combi
Receiver
and
other
components.
Be
sure
to
fully
extend
the
FM
wire
antenna.
After
connecting
the
FM
wire
antenna,
keep
it
as
close
to
horizontal
as
possible.
Connections
(Continued)
DV
Digital
Camcorder
Front
of
Recorder
Combi
Receiver
DV
IN/OUT
FM
Wire
antenna
(supplied)
AM
FM
GND
GND
ANTENNA
CONNECTOR
SYSTEM
FRONT
R
REAR
R
CENTER
REAR
L
FRONT
L
SPEAKERS
4 4 4 4 4
AM
Loop
antenna
(supplied)

Connections
(Continued)
20
Assembling
and
Connecting
to
the
Speakers
(Front
Speaker)
The
front
speakers
are
detached
from
the
speaker
stands.
Connect
the
speaker
cables
and
assemble
the
front
speakers
from
speaker
stands
as
illustrated.
To
attach
the
speaker
to
the
stand
How
to
connect
the
Speakers
Connect
the
speaker
cables
to
the
appropriate
terminals
on
the
bottom
of
each
front
speaker.
After
connecting
the
speaker
cables
to
the
appropriate
terminals
on
the
bottom
of
each
front
speaker
and
attach
the
front
speakers
to
the
speaker
stands.
ote
You
cannot
detach
the
speaker
from
the
stand
after
assem-
bling
the
front
and
rear
speakers.
About
Ferrite
Core
Be
sure
to
attach
the
ferrite
core
to
the
System
cable
(for
connecting
to
this
unit).
This
ferrite
core
can
reduce
noises.
How
to
attach
the
ferrite
core
1
Press
the
stopper
[a]
of
the
ferrite
core
to
open.
2
Insert
the
ferrite
core
on
the
System
cable.
3
Close
the
ferrite
core
unit
it
clicks.
ote
Attach
the
ferrite
core
near
the
unit
(Refer
to
the
fig.3
and
comment.).
The
length
here
is
short
as
much
as
possible.

Connections
(Continued)
HOOKUP
21
System
cable
Speaker
System
Connections
Connect
the
SYSTEM
on
the
Recorder
Combi
Receiver
to
the
SYSTEM
SELECTOR
rear
of
the
Active
Subwoofer
Speaker,
using
the
supplied
System
cable.
Connect
the
speakers
using
the
supplied
speaker
cables.
To
obtain
the
best
possible
surround
sound,
adjust
the
speaker
parameters
(volume,
distance,
etc.).
otes
Be
sure
to
match
the
speaker
cable
to
the
appropriate
terminal
on
the
components:
+
to
+
and
--
to
--.
If
the
cables
are
reversed,
the
sound
will
be
distorted
and
will
lack
base.
If
you
use
front
speakers
with
low
maximum
input
rating,
adjust
the
volume
carefully
to
avoid
excessive
output
on
the
speakers.

Before
Operation
22
Center
Speaker
Front
Speaker
(Left)
Speaker
Positioning
Example
Rear
Speaker
(Right)
Front
Speaker
(Right)
Subwoofer
Speaker
Positioning
In
the
case
of
normal
position
use
the
6
speakers
(2
front
speakers,
1
center
speaker,
2
rear
speakers
and
sub-
woofer).
If
you
want
to
play
the
excellent
bass
sound,
DTS
digital
surround
or
Dolby
Digital
surround,
you
should
connect
a
subwoofer.
?
Front
speakers
According
to
your
listening
position
set
up
the
speakers
for
equal
distance.
And
by
hearing
position
set
up
the
interval
between
speakers
to
45
degree.
?
Center
speaker
The
center
speaker
and
front
speakers
are
ideally
the
same
height.
But
normally
place
it
above
or
below
the
television.
?
Rear
speakers
Place
left
and
right
behind
the
listening
area.
These
speakers
recreate
sound
motion
and
atmosphere
required
for
surround
sound
playback.
For
best
results,
do
not
install
the
rear
speakers
too
far
behind
the
listening
position
and
install
them
at
or
above
the
level
of
the
listener's
ears.
It
is
also
effective
to
direct
the
rear
speak-
ers
towards
a
wall
or
ceiling
to
further
disperse
the
sound.
In
the
case
of
a
smaller
room
size,
if
the
audience
is
near
to
the
rear
wall
set
the
rear
speakers
opposite
each
other,
and
set
the
rear
speakers
above
60
-
90
cm
than
the
listener's
ears.
?
Subwoofer
This
can
be
placed
in
any
front
position.

Before
Operation
(Continued)
Mini
Glossary
for
Sound
Mode
HOOKUP
23
Allows
you
to
enjoy
5.1(or
6)
discrete
channels
of
high
quality
digi-
tal
audio
from
DTS
program
sources
bearing
the
trademark
such
as
discs,
DVD
and
compact
discs,
etc.
DTS
Digital
Surround
deliv-
ers
up
to
6
channels
of
transparent
audio(which
means
identical
to
the
original
masters)
and
results
in
exceptional
clarity
throughout
a
true
360
degree
sound
field.
The
term
DTS
is
a
trademark
of
DTS
Technology,
LLC.
Manufactured
under
license
from
DTS
Technology,
LLC.
The
Dolby
Digital
surround
format
lets
you
enjoy
up
to
5.1(or
6)
channels
of
digital
surround
sound
from
a
Dolby
Digital
program
source.
If
you
play
DVDs
with
"
"
mark,
you
can
enjoy
even
better
sound
quality,
greater
spatial
accuracy,
and
improved
dynamic
range.
(II)
Dolby
Pro
Logic
II
creates
five
full-bandwidth
output
channels
from
two-channel
sources.
This
is
done
using
an
advanced,
high-purity
matrix
surround
decoder
that
extracts
the
spatial
properties
of
the
original
recording
without
adding
any
new
sounds
or
tonal
colorations.
MOVIE
mode:
The
Movie
mode
is
for
use
with
stereo
television
shows
and
all
programs
encoded
in
Dolby
Surround.
The
result
is
enhanced
soundfield
directionality
that
approaches
the
quality
of
discrete
5.1-channel
sound.
MUSIC
mode:
The
Music
mode
is
for
use
with
any
stereo
music
recordings,
and
provides
a
wide
and
deep
sound
space.
The
Music
mode
includes
controls
that
allow the
sound
to
be
tailored
to
individual
listening
tastes.
MATRIX
mode:
The
Matrix
mode
is
the
same
as
the
Music
mode
except
that
the
directional
enhancement
logic
is
turned
off.
It
may
be
used
to
enhance
mono
signals
by
making
them
seem
"larger."
The
Matrix
mode
may
also
find
use
in
auto
systems,
where
the
fluc-
tuations
from
poor
FM
stereo
reception
can
otherwise
cause
dis-
turbing
surround
signals
from
a
logic
decoder.
The
ultimate
"cure"
for
poor
FM
stereo
reception
may
be
simply
to
force
the
audio
to
mono.
When
playing
recordings
of
live
music
and
classic,
this
mode
pro-
vides
a
feeling
similar
to
actually
being
in
a
small
concert
hall.
When
playing
recordings
of
live
music
and
classic,
this
mode
provides
a
feeling
similar
to
actually
being
in
a
large
concert
hall.
This
mode
provides
a
three
dimensional
effect
similar
to
that
of
a
movie
theater.
BYPASS
(2CH
STEREO)
Outputs
the
sound
from
the
front
left
and
right
speakers
and
subwoofer.
You
can
select
BYPASS
by
pressing
SOUND
MODE
on
the
remote
control.

Before
Operation
(Continued)
Delay
Time
Setting
In
Dolby
Digital
or
Dolby
Pro
Logic
mode
it
is
assumed
that
the
distance
from
the
listener
to
each
of
the
speak-
ers
is
equal.
If
not
then
setting
the
delay
times
of
the
center
or
rear
speakers
the
sound
will
be
heard
simulta-
neously
by
the
listener.
The
interval
from
the
speakers
to
the
listener.
If
the
dis-
tance
from
the
listener
to
each
speaker
is
the
same,
in
the
Dolby
Digital
and
Dolby
Pro
Logic
mode
the
delay
time
of
each
speaker
is
as
follows
In
Dolby
Digital
mode
Center
delay
time
:
0
~
5ms
Rear
delay
time:
0
~
15ms
In
Dolby
Pro
Logic
mode
Center
delay
time
:
cannot
be
set
If
the
rear
delay
time
is
set
in
Dolby
Digital
mode,
in
the
Dolby
Pro
Logic
mode
the
delay
time
will
be
automatical-
ly
set.
The
delay
time
is
1
msec
per
30
cm.
If
the
Center
and
rear
speakers
are
further
than
the
front
speakers
from
the
listener,
the
delay
time
will
be
at
minimum.
Surround
delay
time
setting
If
the
distance
of
DS
is
equal
to
or
longer
than
the
DF
in
the
left
figure,
set
the
Surround
Delay
Time
as
0ms.
Otherwise,
change
the
setting
according
to
the
below.
Ex)
If
the
distance
from
front
speakers
to
the
listener
is
3
m
and
from
rear
speakers
from
the
listener
is
1.5
m,
in
the
Dolby
Digital
mode
the
rear
delay
time
is
5
msec.
3m
(DF)
-
1.5m
(DS)
=
1.5m
(B)
1.5m
(B)
=
150cm
/
30cm
=
5msec
In
Dolby
Pro
Logic
II
(Surround
delay
time):
Pro
Logic:
15
~
30msec
Movie:
10
~
25msec
Music:
0
~
15msec
Matrix:
0
~
15msec
Center
delay
time
setting
(Dolby
Digital
mode
only)
If
the
distance
of
DF
is
equal
to
the
distance
of
DC
in
the
left
figure,
set
the
Center
Delay
Time
as
0ms.
Otherwise,
change
the
setting
according
to
the
table
below.
Ex)
If
the
distance
from
the
front
speakers
to
the
listen-
er
is
3m
and
from
the
center
speaker
to
the
listener
is
2.4m,
the
center
delay
time
is
2msec.
3m
(DF)
-
2.4m
(DC)
=
60cm
(A)
60cm
(A)
/
30cm
=
2msec
Setting
the
delay
time
in
the
Dolby
Digital
and
Dolby
Pro
Logic
(II)
mode
1
Press
DELAY.
The
current
surround
delay
time
appears
in
the
Display
Window.
2
Press
/
to
change
the
delay
time.
3
If
setting
is
complete,
press
DELAY.
ote
You
can
adjust
the
center
delay
time
only
in
the
Dolby
Digital
mode
and
its
delay
time
appears.
Setting
the
Sound
Effects
in
the
Music
mode
of
Dolby
Pro
Logic
(II)
1
Press
SOUND
MODE
repeatedly
to
select
the
Music
mode.
Each
time
you
press
these
buttons,
the
sound
mode
is
changed
in
the
following
order;
PRO
LOGIC
→
PLII
MOVIE
→
PLII
MUSIC
→
PLII
MATRIX→
HALL
1→
HALL
2
→
THEATER
→
BYPASS
...
2
Press
DELAY.
The
current
surround
delay
time
appears
in
the
Display
Window.
3
Press
/
to
select
a
desired
Sound
mode.
Each
time
you
press
the
/
button,
it
is
changed
in
the
following
order;
PANO
y
C
WIDT
y
DIMEN...
4
Press
/
to
change
the
steps.
CWIDT:0~+7
DIMEN:
-3
~
+3
PANO:
ON/OFF
5
If
setting
is
complete,
press
DELAY.
24
L
SL
SR
R
C
DC
DF
DS
(A)
(B)
SW

Before
Operation
(Continued)
PANO
(PANORAMA)
This
control
extends
the
front
stereo
image
to
include
the
surround
speakers
for
an
exciting
"wraparound"
effect
with
side-wall
imaging.
It
is
particularly
effective
for
recordings
which
have
strong
left-
or
right-channel
elements
in
the
mix,
as
these
are
detected
and
accen-
tuated
by
the
Panorama
process.
C
WIDT
(Center
Width)
This
control
allows
center-channel
sounds
to
be
posi-
tioned
between
the
center
speaker
and
the
left/right
speakers
over
a
range
of
eight
steps.
Step
"3"
uses
a
combination
of
all
three
front
speakers
to
give
the
best
vocal
imaging
and
most
seamless
soundstage
presen-
tation,
and
is
recommended
for
most
recordings.
Step
"0"
places
all
center
sound
in
the
center
speaker.
Step
"7"
places
all
center
sound
equally
in
the
left/right
speakers,
just
as
in
conventional
stereo.
DIMEN
(DIMENSION)
This
control
allows
the
user
to
gradually
adjust
the
sound
field
either
towards
the
front
or
the
rear.
This
can
be
useful
to
help
achieve
the
desired
balance
from
all
the
speakers
with
certain
recordings
that
may
contain
either
too
much
or
too
little
spatial
effect.
Step
"0"
is
the
recommended
setting,
which
has
no
effect
on
the
sound.
Steps
1,
2,
and
3
gradually
move
the
sound
for-
ward,
and
steps
--1,
--2,
and
--3
move
the
sound
towards
the
surrounds.
Sound
Level
Yo
u
can
set
the
sound
level
of
the desired
channel.
1
Press
LEVEL
on
the
remote
control.
The
level
indicator
will
appear
in
the
Display
Window.
2
Press
/
to
select
a
desired
speaker
to
set.
Each
time
you
press
the
/
button,
it
is
changed
in
the
following
order;
FL
(Front
Left)
→
C
(Center)
→
FR
(Front
Right)
→
SR
(Surround
Right)
→
SL
(Surround
Left)
→
SW
(Subwoofer)
→
FL
(Front
Left)
...
3
Press
/
to
adjust
the
sound
level
of
the
selected
channel.
(-6dB
~
+6dB)
4
Repeat
step
2-3
and
adjust
the
sound
level
of
the
other
channels.
5
If
setting
is
complete,
press
LEVEL.
Test
Tone
This
function
allows
you
to
can
easily
adjust
the
sound
balance
of
the
speakers
from
the
listener's
position.
1
Select
the
test
tone
mode
by
pressing
TEST
TONE.
A
hiss
noise
comes
out
for
2
seconds
from
each
speakers
in
the
following
order;
FL
(Front
Left)
→
C
(Center)
→
FR
(Front
Right)
→
SR
(Surround
Right)
→
SL
(Surround
Left)
→
SW
(Subwoofer)
→
FL
(Front
Left)
...
2
You
can
adjust
the
sound
level
while
the
test
tone
is
operating.
First
press
LEVEL
then
press
the
/
buttons,
so
that
the
sound
level
from
all
the
speakers
is
same
from
the
listener's
position.
?
During
the
test
tone,
if
you
adjust
the
sound
level,
it
will
be
paused
in
the
current
speaker
channel.
3
If
setting
is
complete,
press
TEST
TONE.
XTS
(Excellent
True
Sound)
You
can
enjoy
the
vivid
stereophonic
sound
of
the
digital
original
source
without
any
signal
distortion.
Each
time
you
press
XTS
during
2
channel
mode,
the
setting
changes
in
the
following
order.
XTS-1→XTS-2→XTS-3→XTSOFF...
Tips:
XTS-
1:
When
playing
the
movie
with
the
weak
bass
sound
relatively
to
the
general
music,
it
enforces
the
sense
of
sound
at
woofer
for
you
to
satisfy
with.
XTS-
2:
In
the
mode
of
2
CH
BYPASS,
It
creates
the
high
display
effect
by
playing
the
sound
source
via
the
rear
speakers
same
as
the
front
speakers.
XTS-
3:
You
can
operate
both
XTS-
1
and
XTS-
2
simultaneously
and
it
can
complement
the
relative
degrading
of
the
sound
pitch
of
the
woofer
at
the
XTS-
2
mode.
ote
The
XTS-
2
mode
is
temporarily
disabled
when
changing
from
2.1
CH
to
5.1
CH
and
it
is
enabled
when
changing
it
to
2.1
CH.
HOOKUP
25

26
Initial
Settings
In
this
menu
system,
there
are
several
ways
to
cus-
tomize
the
settings
provided.
Most
menus
consist
of
three
levels
to
set
up
the
options,
but
some
require
greater
depth
for
the
variety
of
settings.
If
you
press
SETUP,
only
the
first
and
second
level
of
the
menu
sys-
tem
will
appear
on
the
TV
screen.
The
third
level
can
be
displayed
by
pressing
B.
For
navigating
the
menu
lev-
els,
you
will
see
"B"
on
the
right
side
of
the
menu
label
to
help
you
go
to
the
next
level.
To
bring
up
and
exit
the
Menu:
Press
SETUP
to
bring
up
the
menu.
A
second
press
of
SETUP
will
take
you
back
to
initial
screen.
To
go
to
the
next
level:
Press
B
on
the
Remote
Control.
To
go
back
to
the
previous
level:
Press
b
on
the
Remote
Control.
General
Operation
1
Press
SETUP.
The
Setup
menu
appears.
2
Use
v
/
V
to
select
the
desired
option.
3
While
the
desired
item
is
selected,
press
B
to
move
to
the
second
level.
4
Use
v
/
V
to
select
the
second
desired
option.
5
Press
B
to
move
to
the
third
level.
6
Use
v
/
V
to
select
the
desired
setting
then
press
ENTER
to
confirm
your
selection.
Some
items
require
additional
steps.
7
Press
SETUP
to
exit
the
Setup
menu.
GENERAL
Tuning
Band
Select
1
Press
SETUP.
The
Setup
menu
appears.
2
Use
v
/
V
to
select
the
GENERAL
option.
3
While
the
GENERAL
option
is
selected,
press
B
to
move
to
the
second
level.
4
Use
v
/
V
to
select
the
"Tuning
Band"
option.
5
Press
B
to
move
to
the
third
level.
6
Use
v
/
V
to
select
the
tuning
band
option
(TV
or
CATV)
then
press
ENTER.
TV:
If
you
are
using
a
standard
antenna
to
receive
channels.
CATV:
If
you
are
using
basic
cable
to
receive
channels.
Auto
Channel
Set
This
Recorder
Combi
Receiver
is
equipped
with
a
fre-
quency
synthesized
tuner
capable
of
receiving
up
to
181
channels.
These
include
VHF
channels
2-13,
UHF
channels
14-69
and
CATV
channels
1-125.
Preparation:
Connect
the
Recorder
Combi
Receiver
to
the desired
type
of
antenna
or
cable
TV
system,
as
shown
in
"Connecting
Antenna/Cable
TV
to
Recorder
Combi
Receiver"
on
page
16
1
Press
SETUP.
The
Setup
menu
appears.
2
Use
v
/
V
to
select
the
GENERAL
option.
3
While
the
GENERAL
option
is
selected,
press
B
to
move
to
the
second
level.
4
Use
v
/
V
to
select
the
"Auto
Channel
Set"
option.
5
Press
B
to
move
to
the
third
level.
"Start"
icon
is
highlighted.
6
Press
ENTER
to
begin
the
channel
search.
The
tuner
will
automatically
cycle
through
all
available
channels
in
the
area
and
place
them
in
the
tuner's
memory.
ote
After
the
Auto
Channel
Set
proceeding
is
complete,
make
sure
the
Tuning
Band
is
set
appropriately
(TV
or
CATV)
on
tuning
band,
follow
steps
1~6
as
shown
pre-
vious
(Tuning
Band
Select)
to
choose
the
correct
Tuning
Band
(TV
or
CATV).
Before
Operation
(Continued)
Tuning
Band
Auto
Channel
Set
CH.
Add/Del
Clock
Set
TV
Aspect
Progressive
Scan
Factory
Setting
Power
Save
Mode
TV
CATV
Prev.
Select
Close
Tuning
Band
Auto
Channel
Set
CH.
Add/Del
Clock
Set
TV
Aspect
Progressive
Scan
Factory
Setting
11%
Stop
Prev.
Select
Close
Power
Save
Mode

HOOKUP
27
Before
Operation
(Continued)
To
Add
or
Erase
Channels
from
Memory
This
feature
allows
you
to
add
to
or
erase
channels
from
memory
manually.
1
Follow
steps
1-3
as
shown
above
to
the
previous
page
(Auto
Channel
Set).
2
Use
v
/
V
to
select
the
CH.
Add/Del
option.
3
Press
B
to
move
to
the
third
level.
"Edit"
icon
is
highlighted.
4
Press
ENTER.
The
Channel
Edit
menu
appears.
5
Use
v
/
V
or
number
buttons
to
select
a
channel
to
add
or
delete
then
press
B.
"Add"
or
"Delete"
icon
is
highlighted.
6
Press
ENTER
to
confirm
your
setting.
7
Repeat
steps
5-6
to
add
or
erase
additional
channels.
8
Press
SETUP
or
RETURN
to
exit
the
menu.
Auto
Clock
Set
The
Recorder
Combi
Receiver
gives
you
two
ways
to
set
the
time
and
date:
the
Auto
Clock
Feature
or
manually.
The
Auto
Clock
Feature
enables
the
Recorder
Combi
Receiver
to
set
up
the
clock
when
the
Recorder
Combi
Receiver
is
turned
off.
The
Clock
Set
feature
is
set
to
Auto
at
the
factory.
In
the
"Auto"
setting,
the
Recorder
Combi
Receiver
looks
for
a
channel
carrying
XDS
(Extended
Data
Services)
infor-
mation.
XDS
updates
the
clock
using
the
Coordinated
Universal
Time.
1
Press
SETUP.
The
Setup
menu
appears.
2
Use
v
/
V
to
select
the
GENERAL
menu.
3
While
the
GENERAL
menu
is
selected,
press
B
to
move
to
the
second
level.
4
Use
v
/
V
to
select
the
"Clock
Set"
option.
5
Press
B
to
move
to
the
third
level.
6
Use
v
/
V
to
select
the
"Auto"
option
then
press
ENTER.
The
Auto
option
is
set
at
the
factory.
In
the
Auto
option,
the
Recorder
Combi
Receiver
looks
for
a
channel
carrying
XDS
(Extended
Data
Services)
information.
XDS
updates
the
clock
using
the
Coordinated
Universal
Time.
7
Use
v
/
V
to
choose
your
"Time
Zone".
You
can
set
your
local
Time
Zone
manually.
When
Timezone
is
set
to
Auto,
the
Recorder
Combi
Receiver
will
use
XDS
information
to
determine
the
proper
setting.
8
Use
B
to
choose
the
"Daylight
Savings"
option.
Use
v
/
V
to
choose
Auto,
On,
or
Off.
You
can
turn
Daylight
Savings
On
or
Off
manually.
When
it
is
set
to
Auto,
the
Recorder
Combi
Receiver
will
use
XDS
information
to
determine
the
proper
setting.
9
Press
ENTER
to
confirm
your
setting,
then
press
SETUP
to
exit
the
Setup
menu.
ote
If
your
local
TV
station
does
not
send
date
and
time
informa-
tion,
or
sends
incorrect
information,
you
can
set
the
clock
man-
ually.
Manual
Clock
Set
1
Follow
steps
1-5
as
shown
above
to
the
left
(Auto
Clock
Set).
2
Use
v
/
V
to
select
the
"Manual"
option
then
press
ENTER.
3
Enter
the
necessary
information
for
date
and
time.
b
/
B
(left/right):
Moves
the
cursor
to
the
previous
or
next
column.
v
/
V
(up/down):
Changes
the
setting
at
the
current
cursor
position.
4
Press
ENTER
to
confirm
your
setting,
then
press
SETUP
to
exit
the
Setup
menu.
Tuning
Band
Auto
Channel
Set
CH.
Add/Del
Clock
Set
TV
Aspect
Progressive
Scan
Factory
Setting
Time
Zone
Manual
Auto
Auto
Daylight
Savings
Auto
Prev.
Select
Close
Power
Save
Mode
Tuning
Band
Auto
Channel
Set
CH.
Add/Del
Clock
Set
TV
Aspect
Progressive
Scan
Factory
Setting
AM
Manual
Auto
Year
Date
Time
12
2005
00
11
/
:
OK
Power
Save
Mode
Ch.
2
Delete
Add
0-9
Input
Close

28
Before
Operation
(Continued)
TV
Aspect
4:3
Letter
Box:
Select
when
a
standard
4:3
TV
is
con-
nected.
Displays
theatrical
images
with
masking
bars
above
and
below
the
picture.
4:3
Pan
Scan:
Select
when
a
standard
4:3
TV
is
con-
nected.
Displays
pictures
cropped
to
fill
your
TV
screen.
Both
sides
of
the
picture
are
cut
off.
16:9
Wide:
Select
when
a
16:9
wide
TV
is
connected.
Progressive
Scan
Progressive
Scan
Video
provides
the
highest
quality
pictures
with
less
flickering.
?
If
you
are
using
the
COMPONENT/PROGRESSIVE
SCAN
VIDEO
OUT
jacks,
but
are
connecting
the
Recorder
Combi
Receiver
to
a
standard
(analog)
tel-
evision,
set
Progressive
Scan
to
OFF.
?
If
you
are
using
the
COMPONENT/PROGRESSIVE
SCAN
VIDEO
OUT
jacks
for
connection
to
a
TV
or
monitor
that
is
compatible
with
a
progressive
scan
signal,
set
Progressive
Scan
to
ON.
Caution
Once
the
setting
for
Progressive
Scan
output
is
entered,
an
image
will
only
be
visible
on a
Progressive
Scan
compatible
TV
or
monitor.
If
you
set
Progressive
Scan
to
ON
in
error,
you
must
reset
the
Recorder
Combi
Receiver.
First,
remove
the
disc
in
the
Recorder
Combi
Receiver.
Next,
press
STOP
(x)
and
hold
it
for
five
seconds
before
releasing
it.
The
video
out-
put
will
be
restored
to
the
standard
setting,
and
a
picture
will
once
again
be
visible
on
a
conventional
analog
TV
or
monitor.
Power
Save
Mode
Set
Power
Save
Mode
to
ON
to
place
your
Recorder
Combi
Receiver
into
an
economic
power
save
mode.
ote
All
indicators
will
turn
off
in
the
Recorder
Combi
Receiver's
Display
window.
Factory
Setting
If
you
wish,
you
can
reset
the
Recorder
Combi
Receiver
to
its
original
factory
settings.
Select
"SET"
then
press
ENTER.
The
Initialize
menu
will
appear.
Use
the
b
B
buttons
to
select
"Yes"
and
press
ENTER.
ote
Some
options
cannot
be
reset.
(Movie
Rating,
Password
and
Country
Code)
Tuning
Band
Auto
Channel
Set
CH.
Add/Del
Clock
Set
TV
Aspect
Progressive
Scan
Factory
Setting
ON
OFF
Prev.
Select
Close
Power
Save
Mode
Tuning
Band
Auto
Channel
Set
CH.
Add/Del
Clock
Set
TV
Aspect
Progressive
Scan
Factory
Setting
Power
Save
Mode
4:3
Letter
Box
4:3
Pan
Scan
16:9
Wide
Tuning
Band
Auto
Channel
Set
CH.
Add/Del
Clock
Set
Factory
Setting
SET
Prev.
Select
Close
It
initializes
the
system
status.
Proceed?
No
Yes
Tuning
Band
Auto
Channel
Set
CH.
Add/Del
Clock
Set
TV
Aspect
Factory
Setting
Progressive
Scan
ON
OFF
Prev.
Select
Close
Power
Save
Mode

29
HOOKUP
Before
Operation
(Continued)
LANGUAGE
Display
Menu
Select
a
language
for
the
Setup
menu
and
on-screen
display.
Disc
Language
Select
a
language
for
the
disc's
Menu,
Audio,
and
Subtitle.
Original
:
The
original
language
set
for
the
disc
is
selected.
Other
:
To
select
another
language,
select
Other
option
then
press
ENTER.
Use
the
numbered
buttons
to
key-in
the
corre-
sponding
4-digit
number
according
to
the
language
code
list
on
page
62.
If
you
enter
the
wrong
number,
press
b
repeatedly
to
delete
one
by
one
and
correct
it.
AUDIO
DRC
(Dynamic
Range
Control)
With
the
DVD
format,
you
can
hear
a
program's
sound-
track
in
the
most
accurate
and
realistic
presentation
possible,
thanks
to
digital
audio
technology.
However,
you
may
wish
to
compress
the
dynamic
range
of
the
audio
output
(the
difference
between
the
loudest
sounds
and
the
quietest
ones).
Then,
you
may
listen
to
a
movie
at
a
lower
volume
without
losing
clarity
of
sound.
Set
DRC
to
ON
for
this
effect.
Vocal
Set
Vocal
to
ON
only
when
a
multi-channel
karaoke
DVD
is
playing.
The
karaoke
channels
on
the
disc
will
mix
into
normal
stereo
sound.
DRC
Vocal
ON
OFF
Prev.
Select
Close
DRC
Vocal
ON
OFF
Prev.
Select
Close
Display
Menu
Disc
Menu
Disc
Audio
Disc
Subtitle
English
Prev.
Select
Close
Display
Menu
Disc
Menu
Disc
Audio
Disc
Subtitle
English
French
Spanish
Italian
Japanese
Chinese
Other----
Original
Prev.
Select
Close

Before
Operation
(Continued)
LOCK
(Parental
Control)
Movie
Rating
Movies
on
DVDs
may
contain
scenes
not
suitable
for
children.
Therefore,
discs
may
contain
Parental
Control
information
that
applies
to
the
complete
disc
or
to
certain
scenes
on
the
disc.
These
scenes
are
rated
from
Level
1
to
8,
and
alternatively,
more
suitable
scenes
are
available
for
selection
on
some
discs.
Ratings
are
country-dependent.
The
Parental
Control
feature
allows
you
to
prevent
discs
from
being
played
by
your
children
or
to
have
certain
discs
played
with
alternative
scenes.
1
Press
SETUP.
The
Setup
menu
appears.
2
Use
v
/
V
to
select
the
LOCK
option.
3
While
the
LOCK
option
is
selected,
press
B
to
move
to
the
second
level.
4
Use
v
/
V
to
select
the
"Movie
Rating"
option.
5
Press
B
to
move
to
the
third
level.
6
When
you
have
not
entered
a
password
yet.
Enter
a
4-digit
password
using
the
numbered
but-
tons
to
create
a
personal
4-digit
security
password.
Enter
the
4-digit
password
again
to
confirm.
When
you
have
already
entered
a
password;
Enter
a
4-digit
password
using
the
numbered
but-
tons
to
confirm
the
personal
4-digit
security
pass-
word.
ip
If
you
enter
the
wrong
number,
press
b
repeatedly
to
delete
password
numbers
one
by
one
then
correct
it.
7Selectaratingfrom1to8usingthev/Vbut-
tons.
One
(1)
has
the
least
playback
restrictions.
Eight
(8)
has
the
most
playback
restrictions.
No
Limit
:
If
you
select
"No
Limit",
Parental
Control
is
not
active.
The
disc
will
play
in
full.
Level
1
to
8:
Some
discs
contain
scenes
not
suit-
able
for
children.
If
you
set
a
rating
for
the
recorder,
all
disc
scenes
with
the
same
rating
or
lower
will
be
played.
Higher
rated
scenes
will
not
be
played
unless
an
alternative
scene
is
available
on
the
disc.
The
alternative
must
have
the
same
rating
or
a
lower
one.
If
no
suitable
alternative
is
found,
play-
back
will
stop.
You
must
enter
the
4-digit
password
or
change
the
rating
level
in
order
to
play
the
disc.
8
Press
ENTER
to
confirm
your
rating
selection,
then
press
SETUP
to
exit
the
menu.
Set
Password
Changing
the
4-digit
code
1
Follow
steps
1-3
as
shown
above
to
the
left
(Movie
Rating).
2
Use
v
/
V
to
select
the
"Set
Password"
option.
3
Press
B
to
move
to
the
third
level.
4
Follow
step
6
as
shown
above
to
the
left
(Movie
Rating).
5
While
"Change"
is
selected,
press
ENTER.
If
you
select
"Delete"
then
press
ENTER.
The
pass-
word
is
deleted.
6
Enter
a
4-digit
password
using
the
numbered
buttons
to
create
a
personal
4-digit
security
password.
7
Enter
the
4-digit
password
again.
ip
If
you
enter
the
wrong
number,
press
b
repeatedly
to
delete
password
numbers
one
by
one
then
correct
it.
If
you
forget
your
4-digit
code
If
you
forget
your
password,
to
clear
the
current
pass-
word,
follow
the
procedure
below.
1
Press
SETUP
to
display
the
Setup
menu.
2
Use
the
Number
buttons
to
enter
the
5-digit
number
"21019".
The
message
appears
on
the
TV
screen.
3
Select
"Yes"
then
press
ENTER.
The
4-digit
pass-
word
is
cleared.
Enter
a
new
code
as
shown
above.
30
8(Adult)
7
6
5
4
3
2
1(Kids)
No
Limit
Movie
Rating
Set
Password
Country
Code
Prev.
Select
Close
Prev.
Reset Close
CLEAR
Change
Delete
Movie
Rating
Set
Password
Country
Code
New
Password
0-9
Input

Before
Operation
(Continued)
Country
Code
Enter
the
code
of
a
country/area
whose
standards
were
used
to
rate
the
DVD
video
disc,
referring
to
the
list
(See
"Country
Codes",
page
70).
1
Press
SETUP.
The
Setup
menu
appears.
2
Use
v
/
V
to
select
the
LOCK
option.
3
While
the
LOCK
option
is
selected,
press
B
to
move
to
the
second
level.
4
Use
v
/
V
to
select
the
"Country
Code"
option.
5
Press
B
to
move
to
the
third
level.
6
When
you
have
not
entered
a
password
yet.
Enter
a
4-digit
password
using
the
numbered
but-
tons
to
create
a
personal
4-digit
security
password.
Enter
the
4-digit
password
again.
When
you
have
already
entered
a
password;
Enter
a
4-digit
password
using
the
numbered
but-
tons
to
confirm
the
personal
4-digit
security
pass-
word.
ip
If
you
enter
the
wrong
number,
press
b
repeatedly
to
delete
password
numbers
one
by
one
then
correct
it.
7
Select
the
first
character
using
the
v
/
V
buttons.
8
Shift
the
cursor
using
B
buttons
and
select
the
second
character
using
v
/
V
buttons.
9
Press
ENTER
to
confirm
your
country
code
selection,
then
press
SETUP
to
exit
the
menu.
RECORD
Disc
Record
Mode
You
can
set
the
picture
quality
for
DVD
recording;
XP
(High
quality),
SP
(Standard
quality),
LP
(Low
quality),
EP
(Extend
quality).
1
Press
SETUP.
The
Setup
menu
appears.
2
Use
v
/
V
to
select
the
RECORD
option.
3
While
the
RECORD
option
is
selected,
press
B
to
move
to
the
second
level.
4
Use
v
/
V
to
select
the
"Disc
Record
Mode"
option.
5
Press
B
to
move
to
the
third
level.
6
Use
v
/
V
to
select
a
desired
Disc
Record
Mode
(XP,
SP,
LP
or
EP).
7
Press
ENTER
to
confirm
your
selection,
then
press
SETUP
to
exit
the
menu.
VCR
Record
Mode
You
can
set
the
picture
quality
for
VCR
recording;
SP
(Standard
Play),
SLP
(Super
Long
Play).
HOOKUP
31
Movie
Rating
Set
Password
Country
Code
US
Prev.
Select
Close
XP
SP
LP
EP
Disc
Record
Mode
VCR
Record
Mode
DV
Record
Audio
Auto
Chapter
Prev.
Select
Close
SLP
SP
Disc
Record
Mode
VCR
Record
Mode
DV
Record
Audio
Auto
Chapter
Prev.
Select
Close

DV
Record
Audio
You
need
to
set
this
if
you
have
a
camcorder
using
32kHz/12-bit
sound
connected
to
the
front
panel
DV
IN
jack.
Some
digital
camcorders
have
two
stereo
tracks
for
audio.
One
is
recorded
at
the
time
of
shooting;
the
other
is
for
overdubbing
after
shooting.
On
the
Audio
1
setting,
the
sound
that
was
recorded
while
shooting
is
used.
On
the
Audio
2
setting,
the
overdubbed
sound
is
used.
Auto
Chapter
During
recording,
chapter
markers
are
added
automati-
cally
at
fixed
intervals.
You
can
set
this
interval
to
5
min-
utes
or
10
minutes.
To
turn
off
automatic
chapter
mark-
ing,
select
"None".
DISC
Disc
Initialize
If
you
load
a
completely
blank
disc,
the
recorder
will
ini-
tialize
the
disc.
DVD-R:
The
recorder
initialize
the
disc
to
Video
mode.
The
recording
mode
will
always
be
Video
mode.
DVD-RW:
The
Initialize
menu
will
appear.
Select
"VR
Mode"
or
"Video
Mode"
then
press
ENTER.
DVD+R:
The
Initialize
menu
will
appears.
Select
"Yes"
then
press
ENTER.
DVD+RW:
The
recorder
initialize
the
disc
to
DVD+RW
mode.
Also,
you
can
format
the
disc
from
the
Setup
menu
as
below.
1
Press
SETUP.
The
Setup
menu
appears.
2
Use
v
/
V
to
select
the
DISC
option.
3
While
the
DISC
option
is
selected,
press
B
to
move
to
the
second
level.
4
Use
v
/
V
to
select
the
"Disc
Initialize"
option.
5
Press
B
to
move
to
the
third
level.
"Start"
icon
is
highlighted.
6
Press
ENTER.
Disc
Initialize
menu
appears.
7
In
case
of
DVD-RW,
use
b
/
B
to
select
a
desired
Disc
Initialize
Mode
(VR
Mode
or
Video
Mode)
then
press
ENTER.
In
case
of
DVD+RW,
go
to
step
8.
8
Use
b
/
B
to
select
"OK",
and
press
ENTER.
It
takes
a
few
moments
to
format
the
disc.
Caution
If
you
want
to
change
the
disc
format,
everything
recorded
on
the
disc
will
be
erased.
32
Before
Operation
(Continued)
Audio
2
Audio
1
Disc
Record
Mode
VCR
Record
Mode
DV
Record
Audio
Auto
Chapter
Prev.
Select
Close
5
Min
10
Min
None
Disc
Record
Mode
VCR
Record
Mode
DV
Record
Audio
Auto
Chapter
Prev.
Select
Close
Start
Disc
Initialize
Disc
Finalize
Disc
Label
Disc
Protect
AutoPlay
Prev.
Select
Close
Video
Mode
Select
a
mode.
Disc
Initialize
VR
Mode
Cancel
All
data
on
the
disc
will
be
deleted.
Proceed?
Disc
Initialize
OK

Before
Operation
(Continued)
Disc
Finalize
Finalizing
'fixes'
the
recordings
in
place
so
that
the
disc
can
be
played
on
a
regular
DVD
player
or
computer
equipped
with
a
suitable
DVD-ROM
drive.
Finalizing
a
Video
mode
disc
creates
a
menu
screen
for
navigating
the
disc.
This
is
accessed
by
pressing
MENU/LIST
or
TITLE.
Caution
Once
you
have
finalized
a
DVD-R
and
DVD+R
disc,
you
cannot
edit
or
record
anything
else
on
that
disc
except
DVD+RW.
However,
you
can
record
and
edit
a
DVD-RW
disc
by
choosing
Unfinalize.
1
Follow
steps
1-3
as
shown
on
page
32
(Disc
Initialize).
2
Use
v
/
V
to
select
the
"Disc
Finalize"
option.
3
Press
B
to
move
to
the
third
level.
Finalize
is
highlighted.
4
Press
ENTER.
Finalize
menu
appears.
5
Use
b
/
B
to
select
OK
then
press
ENTER.
The
Recorder
Combi
Receiver
starts
finalizing
the
disc.
ote
Finalization
can
take
up
to
3-4
minutes
or
more
depend-
ing
on
the
type
of
disc,
how
much
is
recorded
on
the
disc,
and
the
number
of
titles
on
the
disc.
ips
If
you
load
a
DVD-RW
that
has
already
been
finalized,
you
can
'Unfinalize'
it
by
choosing
Unfinalize
from
the
Finalize
menu.
After
doing
this,
you
can
edit
and
re-
record
onto
the
disc.
You
cannot
unfinalize
a
DVD-R
and
DVD+R
disc.
Disc
Protect
When
recording
in
VR
mode
formatted
DVD-RW
disc,
set
to
ON
to
prevent
accidental
recording,
editing
or
erasing
of
the
disc
loaded
and
recording
in
DVD+R/+RW
disc,
set
to
ON
to
prevent
accidental
over-
write
recording,
clean-up
recording,
editing
or
erasing
of
the
disc
loaded.
If
you
need
to
unlock
the
disc
to
make
edits,
select
OFF.
AutoPlay
When
you
load
a
DVD
with
AutoPlay
turned
on,
the
Recorder
Combi
Receiver
will
bypass
the
Disc
menu
and
trailers
and
start
playing
the
movie
automatically.
Set
"AutoPlay"
to
ON
or
OFF.
HOOKUP
33
Disc
Initialize
Disc
Finalize
Disc
Label
Disc
Protect
Unfinalize
Finalize
AutoPlay
Prev.
Select
Close
OK
Do
you
want
finalization?
Finalize
Cancel
Disc
Initialize
Disc
Finalize
Disc
Label
Disc
Protect
ON
OFF
AutoPlay
Prev.
Select
Close
Disc
Initialize
Disc
Finalize
Disc
Label
Disc
Protect
ON
OFF
Prev.
Select
Close
AutoPlay

Before
Operation
(Continued)
Disc
Label
Use
the
Disc
Label
feature
to
enter
a
name
for
the
disc.
This
name
appears
when
you
load
the
disc
and
when
you
display
disc
information
on-screen.
?
The
Disc
label
can
be
up
to
32
characters
long.
?
For
discs
formatted
on
a
different
DVD
Recorder,
you
will
see
only
a
limited
character
set.
1
Follow
steps
1-3
as
shown
"Disc
Initialize"
on
page
32.
2
Use
v
/
V
to
select
the
"Disc
Label"
option.
3
Press
B
to
move
to
the
third
level.
"Edit"
icon
is
highlighted.
4
Press
ENTER.
Keyboard
menu
appears.
5
Enter
a
name
for
the
disc.
Use
vVbBto
select
a
character
then
press
ENTER
to
confirm
your
selection.
?
English/Latin
Capital:
Selects
a
keyboard
with
uppercase
characters.
?
English/Latin
Lowercase:
Selects
a
keyboard
with
lowercase
characters
.
?
Symbols:
Selects
a
keyboard
with
all
symbols.
?
Space:
Inserts
a
space
at
the
cursor
position.
?
Delete:
Deletes
the
character
to
the
left
of
the
cursor
position.
?
b
/
B:
Moves
the
cursor
left
or
right.
?
OK:
Confirms
the
name
you
have
entered.
?
Cancel:
Deletes
all
characters
and
exits
the
Keyboard
menu.
You
can
also
use
the
Remote
Control
to
enter
Disc
Labels:
B
(PLAY):
Inserts
a
space
at
the
cursor
position.
PAUSE/STEP
(X):
Deletes
the
character
to
the
right
of
the
cursor
position.
SKIP
(.
/
>):
Moves
the
cursor
left
or
right.
STOP
(x),
CLEAR:
Deletes
the
character
to
the
left
of
the
cursor
position.
0-9:
Enters
the
character
corresponding
to
the
selected
column.
MENU/LIST,
DISPLAY:
Switches
the
keyboard
type
(English/Latin
Capital,
English/Latin
Lowercase,
Symbols).
6
Choose
OK
then
press
ENTER
to
set
the
name
and
return
to
the
DISC
menu.
7
Press
SETUP
to
exit
the
menu.
34
Disc
Initialize
Disc
Finalize
Disc
Label
Disc
Protect
Edit
AutoPlay
Prev.
Select
Close
0
1
23456789
ABCDE
FGH
I
J
KLMNOPQRST
UVWXY
Z
DVD-VR
English/Latin
Capital
Language
OK
Cancel
Space
Delete

HOOKUP
35
Before
Operation
(Continued)
General
Explanation
of
On-Screen
Display
This
manual
gives
basic
instructions
for
operating
the
Recorder
Combi
Receiver.
Some
DVDs
require
specific
operation
or
allow
only
limited
operation
during
play-
back.
When
this
occurs,
the
symbol
appears
on
the
TV
screen,
indicating
that
the
operation
is
not
permitted
by
the
Recorder
Combi
Receiver
or
is
not
available
on
the
disc.
Displaying
Information
on-screen
You
can
display
various
information
about
the
disc
or
tape
loaded
on-screen.
On-screen
display
operation
1
Press
DISPLAY
repeatedly
to
display/change
the
information
displayed
on-screen.
2
To
remove
the
on-screen
display,
press
DIS-
PLAY
or
RETURN
(O)
repeatedly
until
it
disap-
pears.
See
the
descriptions
on
pages
36
and
37
for
detailed
explanations
of
on-screen
displays
for
each
media
type.
otes
Some
discs
may
not
provide
all
the
features
shown
in
the
on-screen
display
examples.
The
on-screen
display
disappears
automatically
if
no
button
is
pressed
for
seven
seconds.
Temporary
Feedback
Icons
Resume
play
from
this
point
Action
prohibited
or
not
available
Displaying
OSD
While
Watching
TV
While
watching
TV,
press
DISPLAY
to
display/
remove
the
on-screen
display.
For
example,
when
a
DVD-RW
in
VR
mode
is
inserted,
you
would
see a
screen
similar
to
the
fol-
low-
ing:
Changing
TV
Channels
If
no
disc
is
playing,
you
can
change
TV
channels
using
the
number
or
TRK/PRESET
(+/-)
(v
/
V)
buttons
on
the
Remote
Control.
ote
Antenna
channels
are
numbered
2
through
69.
Cable
channels
are
numbered
1
through
125.
Changing
TV
Audio
Channel
Some
TV
programs
are
broadcast
with
both
a
main and
a
Secondary
Audio
Program
(SAP).
You
can
change
the
TV
audio
using
the
AUDIO
button.
Press
AUDIO
repeatedly
to
change
the
TV
audio,
according
to
Broadcast
audio
signal
as
shown
below.
?
STEREO+SAP
Audio
Signal
Stereo
→
SAP
→
Mono
→
Stereo
?
STEREO
Audio
Signal
Stereo→L→R→Mono→Stereo
?
SAP
Audio
Signal
Mono
→
SAP
→
Mono
?
MONO
Audio
Signal
Mono
The
current
audio
channel
is
displayed
on-screen.
?
If
SAP
is
selected,
but
there
is
no
SAP
channel
being
broadcast,
you
will
still
hear
the
main
audio
(Mono
or
Stereo)
channel.
?
If
the
sound
is
poor
quality
when
set
to
Stereo,
you
can
often
improve
it
by changing
to
Mono.
?
When
an
external
input
is
selected,
the
audio
channel
can
be
switched
only
to
Stereo.
DVD-VR
VR
Mode
SP
1H
32M
Free
03/08/2005
Mono
11:35AM
MONO
DVD
Ch.
6
Indicates
disc
type.
Indicates
channel
number
and
audio
input
signal
received
by
the
tuner.
Indicates
the
Recording
mode,
free
space,
and
elapsed
time
progress
bar.
Indicates
current
date
and
time.
Indicates
output
audio
signal.

36
Before
Operation
(Continued)
Menu
Options
Title
Number
Chapter
Number
Time
search
Audio
language
and
Digital
Audio
Output
mode
Subtitle
language
Angle
Sound
Function
(Use
v
/
V
to
select
desired
option)
Shows
the
current
title
number
and
total
number
of
titles,
and
skips
to
the
desired
title
number.
Shows
the
current
chapter
number
and
total
number
of
chapters,
and
skips
to
the
desired
chapter
number.
Shows
the
elapsed
playing
time,
and
searches
the
point
by
the
elapsed
time
directly.
Shows
the
current
audio
soundtrack
language,
encoding
method,
and
channel
number,
and
changes
the
setting.
Shows
the
current
subtitles
language,
and
changes
the
setting.
Shows
the
current
angle
number
and
total
number
of
angles,
and
changes
the
angle
number.
Shows
the
current
sound
mode,
and
changes
the
setting.
Selection
Method
b/B,or
Numbers,
ENTER
b/B,or
Numbers,
ENTER
Numbers,
ENTER
b/B
b/B
b/B
b/B
1/6
4/26
-:--:--
ABC
OFF
NORMAL
1/3
5.1CH
1.
ENG
DVD
Title
:
1/4
Chapter
:
3/28
0:06:32
/
2:12:10
DVD
Shows
the
current
title/chapter
number
and
total
number
of
titles/chapters
Shows
the
Current
mode
Shows
the
elapsed
playing
time
and
total
time.
Menu
Options
Title
Number
Chapter
Number
Time
search
Digital
Audio
Output
mode
Sound
Function
(Use
v
/
V
to
select
desired
option)
Shows
the
current
title
number
and
total
number
of
titles,
and
skips
to
the desired
title
number.
Shows
the
current
chapter
number
and
total
number
of
chapters,
and
skips
to
the desired
chapter
number.
Shows
the
elapsed
playing
time,
and
searches
the
point
by
the
elapsed
time
directly.
Shows
the
current
audio
soundtrack
encoding
method,
and
channel
number,
and
changes
the
setting.
Shows
the
current
sound
mode,
and
changes
the
setting.
Selection
Method
b/B,or
Numbers,
ENTER
b/B,or
Numbers,
ENTER
Numbers,
ENTER
b/B
b/B
1/6
1/2
2CH
L+R
NORMAL
VR
LP
ORG
Title
1
01/02/03
0:06:32
/
2:12:10
DVD
Shows
the
title
name,
recording
date,
recording
mode,
etc.
ORG:
Original
PList:
Playlist
Shows
the
Current
mode
Shows
the
elapsed
playing
time
and
total
time.
OSD
Menu
Options
by
Media
Type
-:--:--

HOOKUP
37
Before
Operation
(Continued)
Video
0:06:32
/
2:12:10
DVD
LP
Title
1
01/02/03
Shows
the
title
name,
recording
date,
recording
mode.
Shows
the
Current
mode.
Shows
the
elapsed
playing
time
and
total
time.
Menu
Options
Title
Number
Chapter
Number
Time
search
Digital
Audio
Output
mode
Sound
Function
(Use
v
/
V
to
select
desired
option)
Shows
the
current
title
number
and
total
number
of
titles,
and
skips
to
the
desired
title
number.
Shows
the
current
chapter
number
and
total
number
of
chapters,
and
skips
to
the desired
chapter
number.
Shows
the
elapsed
playing
time,
and
searches
the
point
by
the
elapsed
time
directly.
Shows
the
current
audio
soundtrack
language,
encoding
method,
and
channel
number,
and
changes
the
setting.
Shows
the
current
sound
mode,
and
changes
the
setting.
Selection
Method
b/B,or
Numbers,
ENTER
b/B,or
Numbers,
ENTER
Numbers,
ENTER
b/B
b/B
1/6
1/1
-:--:--
2CH
1.
L+R
NORMAL
+RW
+R
Shows
playing
speed,
the
elapsed
progress
bar
and
playing
time.
Menu
Options
Time
Audio
Channel
Function
(Use
v
/
V
to
select
desired
option)
Shows
the
elapsed
playing
time
(Display
only).
Shows
the
audio
channel,
and
changes
the
audio
channel.
Selection
Method
--
b/B
0:00:20
HIFI
VCR
VCR
0:12:10
SP
Shows
recording
tape
information.
Shows
the
Current
mode
VHS
OSD
Menu
Options
by
Media
Type
(Continued)

38
Operation
with
DVD
Playing
a
DVD
Playback
Setup
Before
using
the
Remote
Control,
press
the
DVD
button
to
select
the
device
to
be
operated.
Turn
the
TV
on
and
select
the
video
input
source
connected
to
the
Recorder
Combi
Receiver.
Audio
system:
Turn
the
audio
system
on
and
select
the
input
source
connected
to
the
Recorder
Combi
Receiver.
1
Press
OPEN/CLOSE
to
open
the
disc
tray.
2
Load
your
chosen
disc
in
the
tray,
with
the
playback
side
down.
3
Press
OPEN/CLOSE
to
close
the
tray.
READING
appears
on
the
display
window,
and
playback
starts
automatically.
If
playback
does
not
start,
press
PLAY.
In
some
cases,
the
disc
menu
might
appear
instead.
ip
If
a
menu
screen
is
displayed
The
menu
screen
may
be
displayed
first
after
loading
a
DVD
which
contains
a
menu.
Use
the
bBvVbuttons
to
select
the
title/chapter
you
want
to
view,
then
press
ENTER
to
start
playback.
Press
TITLE
or
MENU/LIST
to
return
to
the
menu
screen.
otes
If
Parental
Control
is
set
and
the
disc
is
not
within
the
Movie
Rating
settings
(not
authorized),
the
4-digit
code
must
be
entered
in
order
to
authorize
the
disc.
(see
"Movie
Rating",
on
page
30).
DVDs
may
have
a
Region
Code.
Your
Recorder
Combi
Receiver
will
not
play
discs
that
have
a
region
code
different
from
your
Recorder
Combi
Receiver.
The
region
code
for
this
Recorder
Combi
Receiver
is
1
(one).
ote
Unless
stated
otherwise,
all
operations
described
use
the
Remote
Control.
Some
features
may
also
be
avail-
able
on
the
Setup
menu.
Moving
to
another
TITLE
When
a
disc
has
more
than
one
title,
you
can
move
to
another
title
as
follows:
Press
DISPLAY
twice
and
use
v
/
V
to
select
the
title
icon.
Then,
press
the
appropriate
numbered
button
(0-9)
or
b
/
B
to
select
a
title
number
and
press
ENTER
to
confirm.
Moving
to
another
CHAPTER/TRACKs
When
a
title
on
a
disc
has
more
than
one
chapter/track,
you
can
move
to
another
chapter/track
as
follows:
Press
SKIP
(.
or
>)
briefly
during
playback
to
select
the
next
chapter/track
or
to
return
to
the
begin-
ning
of
the
current
chapter/track.
Press
SKIP
(.)
twice
briefly
to
step
back
to
the
previous
chapter/track.
To
go
directly
to
any
chapter/track
during
playback,
press
DISPLAY
twice.
Then,
use
v
/
V
to
select
chap-
ter
icon.
Then,
enter
the
chapter/track
number
using
the
numbered
buttons
(0-9)
or
press
b
/
B
and
press
ENTER.
Slow
Motion
1
Press
BACKWARD
(m)
or
FORWARD
(M)
during
pause
mode.
The
Recorder
Combi
Receiver
will
enter
SLOW
mode.
2
Use
the
BACKWARD
(m)
or
FORWARD
(M)
to
select
the
required
speed:
t
1/16,
t
1/8,
t
1/4,
t1/2,orT1/16,T1/8,T1/4,T1/2.
3
To
exit
Slow
Motion
mode,
press
PLAY.
+R
+RW
VR
Video
DVD
1/4
4/26
+R
+RW
VR
Video
DVD
+R
+RW
VR
Video
DVD
1/6
DVD

PLAYBACK
39
Operation
with
DVD
(Continued)
Playing
a
DVD
Still
Picture
and
Frame-by-Frame
Playback
1
Press
PAUSE/STEP
(X)
during
playback.
The
recorder
will
now
go
into
PAUSE
mode.
2
You
can
advance
or
back
up
the
picture
frame-by-
frame
by
pressing
b/B
repeatedly
during
PAUSE
mode.
Search
1
Press
BACKWARD
(m)
or
FORWARD
(M)
during
playback.
The
recorder
will
now
go
into
SEARCH
mode.
2
Press
BACKWARD
or
FORWARD
to
select
the
required
speed:
b,
m,
,,
mm,
m,,
,,
(backward)
or
B,
M,
<,
MM,
M<,
<<
(forward).
3
To
exit
SEARCH
mode,
press
PLAY
(N).
ote
When
you
press
BACKWARD
or
FORWARD
during
a
fast
forward
search
or
a
fast
reverse
search
mode
to
go
to
normal
speed,
search
mode
is
canceled.
Random
1
Press
RANDOM
during
playback
or
in
Stop
mode.
The
unit
automatically
begins
Random
Playback
and
"RANDOM"
appears
on
the
TV
screen.
2
To
return
to
normal
playback,
press
RANDOM
until
"NORMAL"
appears
on
the
TV
screen.
ip
By
pressing
SKIP
(>)
during
Random
playback,
the
Recorder
Combi
Receiver
selects
another
title
(track)
and
resumes
Random
playback.
ote
This
function
only
works
with
DVD
Karaoke
discs.
Repeat
DVD
Discs
-
Repeat
Chapter/Title/All/Off
Press
REPEAT
to
select
a
desired
repeat
mode.
?
CHAPTER:
repeats
the
current
chapter.
?
TITLE:
repeats
the
current
title
.
?
All:
repeats
the
all
titles
on
the
disc.
(VR
mode
DVD-RW
disc
only)
?
OFF:
does
not
play
repeatedly.
ote
?
If
you
press
SKIP
(>)
once
during
Repeat
Chapter
(Track)
playback,
the
repeat
playback
cancels.
Repeat
A-B
To
repeat
a
sequence
in
a
title:
1
Press
A-B
at
your
chosen
starting
point.
REPEAT
A-
appears
on
the
TV
screen.
2
Press
A-B
again
at
your
chosen
end
point.
REPEAT
A-B
appears
briefly
on
the
TV
screen,
and
the
repeat
sequence
begins.
3
To
cancel
the
sequence,
press
A-B
repeatedly
to
select
REPEAT
OFF.
+R
+RW
VR
Video
DVD
REPEATA
-
B
+R
+RW
VR
Video
DVD
REPEAT
CHAPTER
Karaoke
DVD
+R
+RW
VR
Video
DVD
+R
+RW
VR
Video
DVD

Operation
with
DVD
(Continued)
Playing
a
DVD
Time
Search
The
Time
Search
function
allows
you
to
start
playing
at
any
chosen
time
on
the
disc.
1
Press
DISPLAY
twice
during
playback.
The
on-screen
display
appears
on
the
TV
screen.
The
Time
Search
box
shows
the
elapsed
playing
time
of
the
current
disc.
2
Within
7
seconds,
use
v
/
V
to
select
the
Time
Search
icon
in
the
on-screen
display.
The
"-:--:--"
appears
in
the
Time
Search
box.
3
Within
7
seconds,
use
the
number
buttons
to
enter
the
required
start
time.
Enter
hours,
minutes,
and
sec-
onds
from
left
to
right
in
the
box.
You
can
not
enter
an
invalid
time.
If
you
enter
the
wrong
numbers,
press
b
/
B
to
move
the
under
bar
(_)
to
the
wrong
number.
Then
reenter
the
correct
numbers.
4
Within
7
seconds,
press
ENTER
to
confirm
the
start
time.
Playback
starts
from
the selected
time
on
the
disc.
Zoom
The
Zoom
function
allows
you
to
enlarge
the
video
image
and
to
move
through
the
enlarged
image.
1
Press
ZOOM
during
playback
or
still
playback
to
acti-
vate
the
Zoom
function.
The
square
frame
will
be
displayed
in
the
right
bottom
of
the
picture.
If
no
button
is
pressed
for
more
than
5
seconds,
the
square
frame
will
disappear.
Each
press
of
the
ZOOM
button
changes
the
TV
screen
in
the
sequence
shown
below.
X1
(normal
size)
→
X2
size
→
X4
size
→
X1
(normal
size)
2
Use
the
bBvVbuttons
to
move
through
the
zoomed
picture.
3
To
resume
normal
playback,
press
CLEAR
or
press
ZOOM
repeatedly
until
the
normal
picture
appears.
ote
The
zoom
function
may
not
work
for
some
DVDs.
Marker
Search
You
can
start
playback
from
a
memorized
point.
Up
to
six
points
can
be memorized.
To
enter
a
mark,
follow
these
steps.
1
During
disc
playback,
press
MARKER
when
playback
reaches
the
spot
that
you
want
to
memorize.
The
Marker
icon
will
appear
on
the
TV
screen
briefly.
2
Repeat
step
1
to
enter
up
to
six
Marker
points
on
a
disc.
To
Recall
a
Marked
Scene
1
During
disc
playback,
press
SEARCH.
The
Marker
Search
menu
will
appear
on
the
TV
screen.
2
Use
the
bBvVbuttons
to
select
a
Marked
scene
that
you
want
to
recall.
3
Press
ENTER.
Playback
will
start
from
the
Marked
scene.
4
To
remove
the
Marker
Search
menu,
press
RETURN
(O)
To
clear
a
Marked
Scene
1
During
disc
playback,
press
SEARCH.
The
Marker
Search
menu
will
appear
on
the
TV
screen.
2
Use
bBvVto
select
the
Marked
scene
that
you
want
to
erase.
3
Press
CLEAR.
"Delete
selected
marker?
Proceed?"
message
appears.
4
Use
b
/
B
to
select
"Yes"
then
press
ENTER.
5
Repeat
steps
2-4
to
erase
additional
Marked
scene.
6
To
remove
the
Marker
Search
menu,
press
RETURN
(O).
Disc
Menus
Many
DVDs
contain
Disc
menus
that
allow
you
to
access
special
features.
To
open
a
Disc
menu,
press
MENU/LIST.
Then
use
the
0-9
buttons
to
directly
select
the
desired
option,
or
use
the
bBvVbuttons
to
high-
light
your
selection
and
press
ENTER.
1
Press
MENU/LIST.
The
Disc
menu
is
displayed.
2
To
exit
the
Disc
menu,
press
STOP
(x).
Title
Menus
1
Press
TITLE.
If
the
current
title
has
a
menu,
the
Title
menu
will
appear
on
the
TV
screen.
Otherwise,
the
Disc
menu
may
appear.
2
The
Title
menu
may
contain
camera
angles,
spoken
languages
and
subtitle
options,
as
well
as
the
chap-
ters
for
the
title.
DVD
DVD
+R
+RW
VR
Video
DVD
MARKER
1/6
+R
+RW
VR
Video
DVD
+R
+RW
VR
Video
DVD
-:--:--
Delete
CLEAR
Close
Select
Marker
Search
Marker
Search
Move
40

PLAYBACK
41
Operation
with
DVD
(Continued)
Playing
a
DVD
(Continued)
Camera
Angle
If
the
disc
contains
scenes
recorded
at
different
camera
angles,
you
can
change
to
a
different
camera
angle
during
playback.
1
Press
DISPLAY
twice
then
use
v
/
V
to
select
the
angle
icon.
2
Press
b
/
B
repeatedly
during
playback
to
select
a
desired
angle.
The
number
of
the
current
angle
appears
on
the
TV
screen.
ip
The
Camera
Angle
icon
is
displayed
on
the
TV
screen
when
alternate
angles
are
available.
Changing
the
Audio
Language
Press
AUDIO
then
press
b
/
B
repeatedly
during
play-
back
to
hear
a
different
audio
language
or
audio
track.
Changing
the
Audio
Channel
Press
AUDIO
then
press
b
/
B
repeatedly
during
play-
back
to
hear
a
different
audio
channel.
-
Video,
+R/RW
:
L+R,
L+L
or
R+R.
With
DVD-RW
discs
recorded
in
VR
mode
that
have
both
a
main
and
a
Bilingual
audio
channel,
you
can
switch
between
Main
(L),
Bilingual
(R),
or
a
mix
of
both
(Main
+
Bilingual)
by
pressing
AUDIO.
3D
Surround
This
unit
can
produce
a
3D
Surround
effect,
which
simulates
multi-channel
audio
playback
from
two
conventional
stereo
speakers,
instead
of
the
five
or
more
speakers
normally
required
to
listen
to
multi-
channel
audio
from
a
home
theater
system.
1
Press
DISPLAY
twice
then
use
v
/
V
to
select
the
sound
icon.
Then,
use
b
/
B
to
select
"3D
SUR.".
2
To
turn
off
the
3D
Surround
effect,
select
"NORMAL".
Subtitles
Press
SUBTITLE
then
press
b
/
B
repeatedly
during
playback
to
see
the
different
subtitle
languages.
Last
Condition
Memory
This
Recorder
Combi
Receiver
memorizes
the
user
set-
tings
for
the
last
disc
that
you
have
viewed.
Settings
remain
in
memory
even
if
you
remove
the
disc
from
the
Recorder
Combi
Receiver
or
switch
off
the
Recorder
Combi
Receiver.
If
you
load
a
disc
that
had
its
settings
memorized,
the
latest
stop
position
is
automatically
recalled.
otes
Settings
are
stored
in
memory
for
use
any
time.
This
Recorder
Combi
Receiver
does
not
memorize
settings
of
a
disc
if
you
switch
off
the
Recorder
Combi
Receiver
before
commencing
to
play
it.
The
Last
Condition
Memory
function
may
not
work
on
some
DVDs.
Last
Condition
Memory
function
for
a
previous
DVD
title
is
erased
once
a
different
DVD
title
is
played.
DVD
ABC
OFF
DVD
+R
+RW
VR
Video
DVD
NORMAL
+R
+RW
Video
VR
5.1CH
1.
ENG
DVD
1/3
DVD

42
Audio
CD
and
MP3/WMA
Operation
Playing
an
Audio
CD
or
MP3/WMA
Disc
The
Recorder
Combi
Receiver
can
play
Audio
CDs
and
MP3/WMA
files
on
CD-ROM,
CD-R,
CD-RW,
DVD+R/+RW,
DVD-R/-RW
discs
or
Memory
Card.
Before
playing
MP3/WMA
files,
read
"Notes
on
MP3/WMA
Recordings"
on
page
43.
1
Insert
a
disc
and
close the
tray.
To
display
the
Music
menu
for
MP3/WMA
file
recorded
on
the
memory
card,
see
"Using
Photo
or
Music
menu
for
Memory
Card"
on
page
10.
The
Music
menu
appears
on
the
TV
screen.
Music-Audio
CD
Menu
Music-CD
Menu
2
Use
v/V
to
select
a
track
then
press
PLAY
(B).
Playback
starts.
During
playback,
the
current
track's
elapsed
playing
time
will
appear
on
the
display
window
and
menu.
Playback
will
stop
at
the
end
of
the
disc.
ips
You
can
view
TV
channel
or
video
input
source
by
pressing
RETURN.
If
you
want
to
return
to
the
Music-
CD
or
Music-Audio
CD
menu,
press
MENU/LIST.
On
the
Music-CD
menu,
you
can
display
the
folders
on
the
disc.
Use
vVbBto
select
the
"Folder"
icon
on
the
Music-CD
menu
then
press
ENTER
twice.
On
CDs
with
mixed
content
(audio
tracks,
MP3/WMA
files
and
JPEG
files),
you
can
select
among
the
Music-
Audio
CD
menu,
Music-CD
menu,
and
Photo-CD
menu
by
pressing
TITLE
repeatedly
in
Stop
mode.
If
you
select
a
folder
and
press
DISPLAY,
the
number
of
subfolders
and
number
of
MP3/WMA
files
in
the
folder
are
displayed.
If
you
are
in
a
file
list
and
want
to
return
to
the
Folder
list,
use
the
v/V
to
highlight
and
press
ENTER
to
return
to
the
previous
menu
screen.
3
To
stop
playback
at
any
time,
press
STOP
(x).
Music
menu
options
1.
To
display
menu
options,
select
a
tack
(or
folder)
on
the
menu
then
press
ENTER.
2.
Use
v
/
V
to
select
an
option
then
press
ENTER
to
confirm
your
selection.
Music-Audio
CD
menu
options
Play:
Starts
playback
the selected
track.
Program
Add:
Adds
the
track(s)
to
Program
List.
(page
45)
Music-CD
menu
options
?
When
you
select
a
track.
Play:
Starts
playback
the selected
track.
Program
Add:
Adds
the
track(s)
to
Program
List.
(page
45)
Copy:
Copies
the
track(s)
to
the
memory
card.
(page
44)
?
When
you
select
a
folder.
Open:
Displays
sub-folders
and
MP3/WMA
files
only
in
the
folder.
Program
Add:
Adds
all
track(s)
in
the
folder
to
Program
List.
(page
45)
Copy:
Copies
the
folder(s)
to
the
memory
card.
(page
44)
Music-MP3/WMA
Memory
menu
options
?
When
you
select
a
track.
Play:
Starts
playback
the selected
track.
Program
Add:
Adds
the
track(s)
to
Program
List.
(page
45)
Delete:
Deletes
the
track(s)
from
the
memory
card.
(page
44)
?
When
you
select
a
folder.
Open:
Displays
sub-folders
and
MP3/WMA
files
only
in
the
folder.
Program
Add:
Adds
all
track(s)
in
the
folder
to
Program
List.
(page
45)
Delete:
Deletes
the
folder(s)
from
the
memory
card.
(page
44)
M/C
WMA
MP3
CD
WMA
MP3
CD
Music
1:07:30
Title
Duration
Track
1
04:47
Track
2 04:01
03:01
03:30
04:24
05:01
03:48
04:09
05:10
04:11
Track
3
Track
4
Track
5
Track
6
Track
7
Track
8
Track
9
Tr
ack
10
Program
Close
Mark
MARKER
Select
LIST
-
Audio
CD
Music
00:00
Root
152
Items
FOLDER
01
FILE
2.mp3
FILE
3.mp3
FILE
4.mp3
FILE
5.mp3
FILE
6.mp3
FILE
7.mp3
FILE
8.mp3
FILE
9.mp3
FILE
10.mp3
Program
Close
Mark
MARKER
Select
LIST
-CD
Play
Program
Add
Play
Program
Add
Copy
Open
Program
Add
Copy
Play
Program
Add
Delete
Open
Program
Add
Delete

PLAYBACK
43
Audio
CD
and
MP3/WMA
Operation
(Continued)
Pause
1
Press
PAUSE(X)
during
playback.
2
To
return
to
playback,
press
PAUSE(X)
again.
Moving
to
Another
Track
Press
SKIP
.
or
>
briefly
during
playback
to
go
to
the
next
track
or
to
return
to
the
beginning
of
the
current
track.
Press
SKIP
.
twice
briefly
to
step
back
to
the
pre-
vious
track.
On
an
Audio
CD,
to
go
directly
to
any
track,
enter
the
track
number
using
the
numbered
buttons
(0-9)
dur-
ing
playback.
Repeat
Press
REPEAT
to
select
a
desired
repeat
mode.
?
TRACK:
Repeats
the
current
track.
?
ALL
(CD):
Repeats
all
the tracks
on a
disc.
?
FOLDER
(MP3/WMA):
Repeats
all
the
tracks
on
a
folder
of
a
disc.
?
OFF
(No
display):
Does
not
play
repeatedly.
Random
1
Press
RANDOM
during
playback
or
when
playback
has
stopped.
The
Recorder
Combi
Receiver
automatically
begins
Random
Playback
and
RANDOM
appears
on
the
left
side
of
menu
screen.
2
To
return
to
normal
playback,
press
RANDOM
again,
then
RANDOM
disappears
from
the
menu
screen.
Changing
the
Audio
Channel
Press
AUDIO
repeatedly
to
hear
a
different
audio
chan-
nel
(stereo,
left
or
right).
Search
1
Press
BACKWARD
(m)
or
FORWARD
(M)
during
playback.
The
recorder
will
now
go
into
SEARCH
mode.
2
Press
BACKWARD
(m)
or
FORWARD
(M)
to
select
the
required
speed:
m,
,,
mm
(back-
ward)
or
M,
<,
MM
(forward).
Search
speed
and
direction
are
indicated
on
the
menu
screen.
3
To
exit
SEARCH
mode,
press
PLAY
(B).
Repeat
A-B
To
repeat
a
sequence
in
a
title:
1
Press
A-B
at
your
chosen
start
point.
Repeat
icon
and
"A-"
appears
on
the
menu
screen.
2
Press
A-B
again
at
your
chosen
end
point.
The
Repeat
icon
and
"A
-
B"
appears
on
the
left
side
of
menu
screen,
and
the
repeat
sequence
begins.
3
To
exit
the
sequence
and
return
to
normal
play,
press
A-B
again.
The
Repeat
icon
disappears
from
the
menu
screen.
CD
CD
M/C
WMA
MP3
CD
M/C
WMA
MP3
CD
M/C
WMA
MP3
CD
M/C
WMA
MP3
CD
M/C
WMA
MP3
CD
Notes
on
MP3/WMA
Recordings
About
MP3
?A
n
MP3
file
is
audio
data
compressed
by
using
the
MPEG1
audio
layer-3
file-coding
scheme.
We
call
files
that
have
the
".mp3"
file
extension
"MP3
files".
?
The
Recorder
Combi
Receiver
can
not
read
an
MP3
file
that
has
a
file
extension
other
than
".mp3".
About
WMA
(Window
Media
Audio)
Files
?A
WMA
file
is
made
using
Microsoft
audio
compression
technology.
?
WMA
(Windows
Media
Audio)
offers
double
the
audio
compression
of
the
MP3
format.
MP3/WMA
Disc
compatibility
with
this
recorder
is
limited
as
follows:
?
CD-R/RW
physical
format
should
be
"ISO
9660"
and
"JOLIET".
?
If
you
record
MP3
files
using
the
software
which
cannot
create
a
FILE
SYSTEM,
for
example
"Direct-CD"
etc.,
it
is
impossible
to
playback
MP3
files.
We
recommend
that
you
use
"Easy-CD
Creator",
which
creates
an
ISO9660
or
JOLIET
file
system.
?T
h
e
t
o
tal
number
of
files
and
folders
on
the
disc
are
free
but the
total
number
of
files
and
folders
on
the
folder
should
be
less
than
999.
This
Recorder
Combi
Receiver
requires
discs/record-
ings
to
meet
certain
technical
standards
in
order
to
achieve
optimal
playback
quality.
Pre-recorded
DVDs
are
automatically
set
to
these
standards.
There
are
many
different
types
of
recordable
disc
formats
(includ-
ing
CD-R
containing
MP3
or
WMA
files)
that
require
certain
pre-existing
conditions
(see
above)
to
insure
compatible
playback.
Customers
should
also
note
that
permission
is
required
in
order
to
download
MP3/WMA
files
and
music
from
the
Internet.
Our
company
has
no
right
to
grant
such
permission.
Permission
should
always
be
sought
from
the
copyright
owner.

Audio
CD
and
MP3/WMA
Operation
(Continued)
Copying
MP3/WMA
file(s)
on
the
disc
to
Memory
Card
1
Use
v
/
V
to
select
an
MP3/WMA
file
or
folder
on
the
Music-CD
menu.
Selecting
multiple
files
(folders)
1.
Select
a
MP3/WMA
file
or
folder
then
press
MARKER.
A
check
mark
appears
on
the
file
(folder).
Press
MARKER
again
to
cancel
the
marked
file
or
folder
2.
Repeat
step
1
to
mark
additional
files
(folders).
2
Press
ENTER.
The
options
appear
on
the
left
side
of
the
menu.
3
Use
v
/
V
to
select
the
"Copy"
option
then
press
ENTER.
Copy
menu
will
appear.
4
Use
v
/
V
to
select
a
copied
folder
then
press
B.
"Copy"
option
is
highlighted.
5
When
"Copy"
option
is
highlighted
on
the
Copy
menu,
press
ENTER
to
begin
copying.
otes
?
If
you
select
a
folder
on
the
disc
to
copy,
the
sub-folders
in
the
folder
will
not
be
copied.
?Y
ou
must
insert
a
memory
card
in
the
Recorder
Combi
Receiver
to
use
this
function.
ip
You
can
create
new
album
(folder).
Select
"New
album"
option
on
the
Copy
menu
then
press
ENTER.
"NONAME##"
folder
is
created.
Erasing
MP3/WMA
file(s)
or
folder(s)
from
the
Memory
Card
1.
Select
an
MP3/WMA
file
or
folder
you
wish
to
erase
on
the
Music-Memory
Card
menu.
ip
Use
the
MARKER
button
to
select
multiple
files
and/or
folders.
2.
Press
ENTER.
The
menu
options
appear
on
the
left
side
of
the
menu.
3.
Select
"Delete"
option
then
press
ENTER.
The
confirm
message
for
deleting
will
appear.
4.
Use
b
/
B
to
select
"Yes"
then
press
ENTER.
The
selected
file(s)
or
folder(s)
is
deleted
from
the
Memory
Card.
M/CM/C
WMA
MP3
44
Select
the
album
Copy
Copy
Cancel
New
album
C:\
NONAME
01
NONAME
02
NONAME
03

Programmed
Playback
with
Audio
CD
and
MP3/WMA
The
Program
function
enables
you
to
store
your
favorite
tracks
from
any
disc
in
the
recorder
memory.
Program
can
contain
99
tracks
(Audio
CD)
or
256
tracks
(MP3/WMA).
1
Insert
an
Audio
CD
or
MP3/WMA
disc.
Music
menu
will
appear.
2
Use
vVto
select
a
track
or
fold
on
the
List
then
press
ENTER.
The
options
appears
on
the
left
side
of
the
menu.
otes
Press
and
hold
V
for
fast
to
move
to
the
next
track
or
folder.
Press
and
hold
v
for
fast
to
move
to
the
previ-
ous
track
or
folder.
3
Use
vVto
highlight
the
"Program
Add"
icon
then
press
ENTER.
The
selected
track
is
added
to
the
Program
List.
ote
You
can
switch
between
the
Track
List
and
Program
List
menus
by
pressing
MENU/LIST
(Music-CD
only).
4
Repeat
steps
2-3
to
place
additional
tracks
on
the
Program
list.
ip
You
can
add
multi
tracks
on
the
List
to
the
Program
List.
1.
Select
a
track
then
press
MARKER.
2.
Repeat
step
1
to
mark
additional
tracks.
3.
Select
any
track
then
press
ENTER.
The
options
appears
on
the
left
side
of
the
menu.
4.
Use
v
/
V
to
highlight
the
"Program
Add"
icon
then
press
ENTER.
The
all
marked
tracks
are
added
to
the
Program
List.
otes
Use
the
CLEAR
button
to
select
all
tracks,
or
cancel
all
marked
tracks.
If
you
select
folder
for
Programmed
Playback,
all
tracks
in
the
folder
are
added
to
the
program
list.
5AudioCD:UseBto
movethetrackstothe
Program
list.
The
programmed
track
you
selected
last
is
highlighted
on
the
program
list.
MP3/WMA
:
Go
to
next
step.
6
Use
v
/
V
to
select
the
track
you
want
to
start
playing.
7
Press
PLAY
(B)
to
start.
Playback
begins
in
the
order
in
which
you
programmed
the tracks
and
"PRG"
indicator
appears
on
the
display
window.
Playback
stops
after
playing
the
last
programmed
track
on
the
program
list.
Program
List
menu
options
1.
To
display
menu
options,
select
a
tack
on
the
Program
List
menu
then
press
ENTER.
The
menu
options
appear
on
the
left
side
of
the
menu.
2.
Use
v
/
V
to
select
an
option
then
press
ENTER
to
confirm
your
selection.
Play:
Playback
begins
in
the
order
in
which
you
programmed
the
tracks
from
the
selected
track.
Move:
Moves
the
track(s)
to
change
the
program
order.
Delete:
Deletes
the
track(s)
from
the
Program
List
menu.
WMA
MP3
CD
PLAYBACK
45
Track
1
Track
2
Track
3
Track
4
Track
5
Track
6
Track
7
Track
8
Track
9
Tr
ack
10
Track
5
Track
2
Track
8
Track
4
1:07:30
Title
Program
List
Program
Close
Mark
MARKER
Select
LIST
Music
-
Audio
CD
Music
00:00
Program
List
4
Items
FILE
2.mp3
FILE
2.mp3
FILE
3.mp3
FILE
4.mp3
List
Close
Mark
MARKER
Select
LIST
-CD
Play
Move
Delete

46
Programmed
Playback
with
Audio
CD
and
MP3/WMA
(Continued)
Repeat
Programmed
Tracks
Press
REPEAT
to
select
a
desired
Repeat
mode.
?
TRACK
:
Repeats
the
current
track.
?
ALL
:
Repeats
all
the
tracks
on
the
program
list
?
OFF
(no
display)
:
Does
not
play
repeatedly.
Erasing
a
Track
from
the
Program
List
1
Select
the
track
that
you
wish
to
erase
from
the
Program
List
then
press
ENTER.
The
options
appears
on
the
left
side
of
the
menu.
2
Select
the
Delete
icon
then
press
ENTER.
The
selected
track
is
deleted
on
the
Program
List.
3
Repeat
steps
1-2
to
delete
additional
tracks
on
the
Program
List.
Erasing
the
multi
tracks
on
the
Program
List
1.
Select
a
track
on
the
Program
List
then
press
MARKER.
2.
Repeat
step
1
to
mark
additional
tracks.
3.
Select
any
track
then
press
ENTER.
The
options
appears
on
the
left
side
of
the
menu.
4.
Use
v
/
V
to
highlight
the
"Delete"
icon
then
press
ENTER.
The
all
marked
tracks
are
deleted
from
the
Program
List.
Changing
the order
of
Program
List
1
Select
the
track
you
wish
to
move
on
the
Program
List
then
press
ENTER.
The
options
appear
on
the
left
side
of
the
menu.
2
Select
Move
then
press
ENTER.
A
yellow
bar
appears
in
the
Program
List.
3
Use
v/V
to
move
the
yellow
bar
to
the desired
loca-
tion,
then
press
ENTER.
The
selected
track
is
moved.
4
If
you
wish
to
move
other
tracks
repeat
stages
1
-
3.
ip
Use
MARKER
to
move
multiple
tracks.

Photo
Disc
Operation
Viewing
a
JPEG
File
The
recorder
can
play
discs
or
Memory
Card
with
JPEG
files.
Before
playing
JPEG
recordings,
read
"Notes
on
JPEG
Recordings"
on
page
48.
Insert
a
disc
and
close
the
tray.
To
display
the
Photo-CD
menu
for
JPEG
files
recorded
on
the
memory
card,
see
"Using
Photo
or
Music
menu
for
Memory
Card"
on
page
10.
The
Photo-CD
menu
appears
on
the
TV
screen.
2
Use
vVbB
to
select
a
folder,
and
ENTER.
Open
icon
is
highlighted
on
the
left
side
of
the
menu.
3
Press
ENTER.
A
list
of
files
in
the
folder
appears.
ote
If
the
icon
displays
in
the
Photo-CD
menu,
it
means
you
cannot
see
those
JPEG
files.
4
Use
vVbBto
select
a
file,
then
press
ENTER.
The
options
appear
on
the
left
side
of
the
menu.
ip
You
can
view
TV
channel
or
video
input
source
by
pressing
RETURN.
If
you
want
to
return
to
the
Photo-CD,
press
MENU/LIST.
On
CDs
with
mixed
content
(Audio
tracks,
MP3/WMA
files
and
JPEG
files),
you
can
select
among
the
Music-Audio
CD
menu,
Music-CD
menu,
and
Photo-CD
menu
by
pressing
TITLE
repeatedly
in
Stop
mode.
If
you
are
in
a
file
list
and
want
to
return
to
the
Folder
list,
use
the
v/V
to
highlight
and
press
ENTER
to
return
to
the
previous
menu
screen.
5
Use
v
/
V
to
select
"Full
Screen"
option
then
press
ENTER.
6
To
stop
viewing
at
any
time,
press
STOP.
The
Photo-CD
menu
reappears.
Photo
menu
options
1.
To
display
menu
options,
select
a
file
(or
folder)
on
the
menu
then
press
ENTER.
2.
Use
v
/
V
to
select
an
option
then
press
ENTER
to
confirm
your
selection.
Photo-CD
menu
options
?
When
you
select
a
photo
file.
Full
Screen:
Shows
the
selected
file
as
full
screen.
Slide
Show:
Displays
Slide
Show
menu.
(page
48)
Copy:
Copies
the
file(s)
to
Memory
card.
(page
48)
?
When
you
select
a
folder.
Open:
Displays
sub-folders
and
JPEG
files
in
the
folder.
Copy:
Copies
the
folder
to
memory
card.
(page
48)
Photo-Memory
menu
options
?
When
you
select
a
photo
file.
Full
Screen:
Shows
the
selected
file
as
full
screen.
Slide
Show:
Displays
Slide
Show
menu.
(page
48)
Delete:
Deletes
the
selected
file(s)
from
the
Memory
card.
(page
48)
?
When
you
select
a
folder.
Open:
Displays
sub-folders
and
JPEG
files
in
the
folder.
Delete:
Deletes
the
selected
folder(s)
from
the
memory
card.
(page
48)
M/C
JPEG
M/C
JPEG
PLAYBACK
47
Photo
JPEG
Select
MARKER Mark
Close
-CD
Select
MARKER
Mark
Photo
JPEG
Folder
01
Folder
02
Folder
03 Folder
04
Folder
05
Folder
08
Folder
06
Folder
07
Close
-CD
Full
Screen
Slide
Show
Copy
Open
Copy
Full
Screen
Slide
Show
Delete
Open
Delete
4/20
90
90
Stop
Hide
Prev
Next
File
03.jpg

Photo
Disc
Operation
(Continued)
Still
picture
Use
PAUSE(X)
while
showing
a
picture
to
pause
mode.
Skip
Images
While
viewing
a
picture,
press
SKIP
(.
or
>)
once
to
advance
to
the
next
file
or
return
to
the
previous
file.
Rotate
Images
Use
v
/
V
while
viewing
a
picture
to
flip
the
picture
clockwise
or
counterclockwise.
View
Slide
Shows
1.
Select
"Slide
Show"
option
on
the
Photo-CD
menu.
2.
Press
ENTER.
The
Slide
Show
menu
appears.
3.
Use
vVbBto
set
the
options.
Object:
Selected
file
or
All
files.
Speed:
Sets
the
speed
for
Slide
Show
(Slow,
Normal,
or
Fast)
4.
Select
the
"Start"
option
then
press
ENTER
to
start
the
Slide
Show.
5.
Press
STOP
to
stop
the
Slide
Show
and
returns
to
the
Photo-CD
menu.
ote
Use
the
MARKER
button
to
select
multiple
files.
Copying
JPEG
file(s)
on
the
disc
to
Memory
Card
1Usev/VtoselectanJPEGfileorfolderonthe
Photo-CD
menu.
Selecting
multiple
files
1.
Select
a
JPEG
file
then
press
MARKER.
A
check
mark
appears
on
the
file.
Press
MARKER
again
to
cancel
the
marked
file.
2.
Repeat
step
1
to
mark
additional
files.
2
Press
ENTER.
The
options
appear
on
the
left
side
of
the
menu.
3
Use
v
/
V
to
select
the
"Copy"
option
then
press
ENTER.
Copy
menu
will
appear.
4
Use
v
/
V
to
select
a
copied
folder
then
press
B.
"Copy"
option
is
highlighted.
5
When
"Copy"
option
is
highlighted
on
the
Copy
menu,
press
ENTER
to
begin
copying.
otes
?
If
you
select
a
folder
on
the
disc
to
copy,
the
sub-folders
in
the
folder
will
not
be
copied.
?Y
ou
must
insert
a
memory
card
in
the
Recorder
Combi
Receiver
to
use
this
function.
ip
You
can
create
new
album
(folder).
Select
"New
album"
option
on
the
Copy
menu
then
press
ENTER.
"NONAME##"
folder
is
created.
Erasing
JPEG
file(s)
or
folder
from
the
Memory
Card
1.
Select
an
JPEG
file
or
folder
you
wish
to
erase
on
the
Photo-Memory
Card
menu.
ip
Use
the
MARKER
button
to
select
multiple
files.
2.
Press
ENTER.
The
menu
options
appear
on
the
left
side
of
the
menu.
3.
Select
"Delete"
option
then
press
ENTER.
The
confirm
message
for
deleting
will
appear.
4.
Use
b
/
B
to
select
"Yes"
then
press
ENTER.
The
selected
file(s)
or
folder
is
deleted
from
the
Memory
Card.
Notes
on
JPEG
Recordings
Depending
on
the
size
and
number
of
JPEG
files,
it
may
take
several
minutes
for
the
recorder
to
read
the
disc's
content.
If
you
don't
see
an
on-screen
display
after
several
minutes,
some
of
the
files
are
too
big
---
reduce
the
resolution
of
the
JPEG
files
to
less
than
4
mega
pixels
and
burn
another
disc.
The
total
number
of
files
and
folders
are
free
but the
total
number
of
files
on
the
folder
should
be
less
than
999.
Some
discs
may
be
incompatible
due
to
different
recording
formats
or
the
condition
of
the
discs.
When
you
are
using
software
such
as
"Easy
CD
Creator"
to
burn
JPEG
files
on
a
CD-R,
ensure
that
all
selected
files
have
the
".jpg"
or
".jpeg"
extension
before
copying
them
into
the
CD
layout.
If
the
files
have
".jpe"
extensions,
please
rename
them
as
".jpg"
or
".jpeg"
files.
File
names
without
the
".jpg"
or
".jpeg"
extension
cannot
be
read
by
this
recorder,
even
though
the
files
are
shown
as
JPEG
image
files
in
Windows
Explorer.
M/C
M/C
JPEG
48
Start
Object
Speed
Slide
Show
Cancel
All
Normal
Select
the
album
Copy
Copy
Cancel
New
album
C:\
NONAME
01
NONAME
02
NONAME
03

VCR
Mode
Tape
Playback
Preparation
Before
using
the
Remote
Control,
press
the
VCR
but-
ton
to
select
the
device
to
be
operated.
Turn
the
TV
on
and
select
the
video
input
source
con-
nected
to
the
Recorder
Combi
Receiver.
Audio
system:
Turn
the
audio
system
on
and
select
the
input
source
connected
to
the
Recorder
Combi
Receiver.
Normal
Playback
1
Insert
a
prerecorded
video
cassette.
The
indicator
will
light
and
the
Recorder
Combi
Receiver
will
power-up
automatically.
Make
sure
that
the
indicator
in
the
display
window
is
not
on.
If
it
is,
press
POWER
once.
If
a
tape
without
a
safety
tab
is
inserted,
the
Recorder
Combi
Receiver
will
start
playback
automatically.
2
Press
PLAY
(B)
once.
PLAY
icon
appears
on
the
TV
screen.
It
is
not
necessary
to
select
the
tape
speed
for
play-
back.
It
will
be
automatically
selected
by
the
Recorder
Combi
Receiver.
In
playback,
the
TV/VCR
selector
switches
to
VCR
mode
automatically.
3
Press
STOP
(x)
to
stop
playback.
STOP
icon
appears
on
the
TV
screen.
If
the
tape
reaches
the
end
before
STOP
(x)
is
pressed,
the
Recorder
Combi
Receiver
will
automatically
stop,
rewind
and
eject
the
tape,
and
turn
itself
off.
Tracking
Control
Auto
Tracking
The
automatic
tracking
function
adjusts
the
picture
to
remove
snow
or
streaks.
The
AUTO
TRACKING
function
works
in
the
following
cases:
A
tape
is
played
back
for
the
first
time.
Tape
speed
(SP,
LP,
SLP)
changes.
Streaks
or
snow
appear
because
of
scratches
on
the
tape.
Manual
Tracking
If
noise
appears
on
the
screen
during
playback,
press
either
TRK/PRESET(-/+)
(v/V)
on
the
Remote
Control
until
the
noise
on
the
screen
is
reduced.
In
case
of
vertical
jitter,
adjust
these
controls
very
carefully.
Tracking
is
automatically
reset
to
normal
when
the
tape
is
ejected
or
the
power
cord
is
unplugged
for
more
than
3
seconds.
Special
Effect
Playback
Special
effects
playback
notes
Horizontal
lines
(noise
bars)
will
appear
on
the
TV
screen.
This
is
normal.
The
audio
is
automatically
muted
during
special
effect
modes,
so
there
is
no
sound
during
search.
During
the
high-speed
picture
search
modes,
a
short
time
is
needed
to
stabilize
tape
speed
when
re-entering
the
PLAY
mode.
Slight
interference
may
be
observed
during
this
time.
Search
This
function
lets
you
visually
search
forward
and
back-
ward
for
a
desired
scene
on
your
tape.
1
Press
SCAN
(m)
or
SCAN
(M)
during
playback.
The
Recorder
Combi
Receiver
will
be
activated
in
the
SEARCH
mode.
If
the
Recorder
Combi
Receiver
is
left
in
the
SEARCH
mode
for
more
than
3
minutes,
the
Recorder
Combi
Receiver
will
automatically
enter
the
PLAY
mode,
to
pro-
tect
the
tape
and
video
heads.
2
To
return
to
playback,
press
PLAY
(B).
Still
Picture
and
Frame-by-Frame
Playback
1
Press
PAUSE(X)
during
playback.
A
still
picture
appears
on
the
TV
screen.
If
a
still
picture
vibrates
vertically,
stabilize
it
by
using
TRK/PRESET(-/+)
(v/V)
on
the
Remote
Control.
If
the
Recorder
Combi
Receiver
is
left
in
the
STILL
mode
for
more
than
5
minutes,
the
Recorder
Combi
Receiver
will
automatically
enter
the
STOP
mode
to
protect
the
tape
and
video
heads.
2
Press
PAUSE(X)
repeatedly
to
advance
the
video
picture
one
frame
at
a
time
while
viewing
a
still
picture.
3
To
return
to
playback,
press
PLAY
(B).
Slow
Motion
1
While
in
still
mode,
press
SCAN
(M).
The
tape
will
be
played
back
at
a
speed
1/19
times
slower
than
the
normal
speed.
During
slow
playback,
use
TRK/PRESET(-/+)
(v/V)
on
the
Remote
Control
to
minimize
noise
bands.
If
slow
motion
mode
continues
for
more
than
3
minutes,
the
Recorder
Combi
Receiver
will
automatically
change
to
normal
play
mode.
2
To
return
to
playback,
press
PLAY
(B).
Counter
Memory
Function
This
is
useful
if
there
is
a
section
of
tape
you
want
to
view
immediately
after
recording
or
if
you
want
to
return
to
the
same
point
several
times.
1
Begin
recording
or
playing
a
tape.
2
Press
DISPLAY
repeatedly
to
display
the
real-time
counter
on
the
TV
screen.
3
At
the
point
you
want
to
locate
later,
reset
the
real-
time
counter
to
0:00:00
by
pressing
CLEAR.
Continue
to
play
or
record.
4
Press
STOP
when
recording
or
playback
finishes.
5
Press
RETURN
(O).
The
tape
automatically
stops
when
the
tape
counter
returns
to
about
"0:00:00".
VHS
VHS
VHS
PLAYBACK
49

Basic
Recording
50
Basic
Recording
from
a
TV
Follow
the
instructions
below
to
record
a
TV
program.
Recording
starts
immediately
and
continues
until
the
disc
or
tape
is
full
or
you
stop
the
recording.
1
Switch
on
the
Recorder
Combi
Receiver,
select
the
device
(VCR
or
DVD)
for
Recording
and
load
a
recordable
disc
or
tape.
Also
make
sure
that
the
TV
input
is
set
to
this
recorder.
If
you
load
a
completely
blank
DVD±RW
disc,
Disc
initial-
ize
menu
will
appear,
to
select
a
desired
Recording
Mode
to
initialize
the
disc
(See
page
32).
2
Set
a
recording
mode
as
necessary
by
pressing
REC
MODE
repeatedly.
DVD:
XP
(High
quality),
SP
(Standard
quality),
LP
(Low
quality),
EP
(Extend
quality).
VCR:
SP
(Standard
Play),
SLP
(Super
Long
Play)
3
Use
TRK/PRESET(-/+)(v/V)
on
the
Remote
Control
to
select
the
TV
channel
to
record.
4
Use
AUDIO
to
select
the
audio
channel
to
record.
The
table
below
shows
what
will
be
recorded
on
the
differ-
ent
settings
for
different
types
of
broadcast.
The
last
col-
umn
(Monitor
Audio)
shows
what
you'll
hear
as
it
is
recording.
?
If
you
set
the
audio
channel
to
SAP,
but
there
is
no
SAP
channel
being
broadcast,
the
main
audio
(mono
or
stereo)
will
be
recorded.
5
Press
z
REC
once.
Recording
will
start.
(The
REC
indicator
lights
in
the
display
window.)
Recording
continues
until
you
press
STOP
(x)
or
the
disc
(or
tape)
is
full.
To
record
for
a
fixed
length
of
time,
see
Instant
Timer
Recording
on
right.
6
Press
STOP
(x)
to
stop
recording.
otes
The
maximum
number
of
DVD
titles
is
99
(DVD-R/RW)
or
49
(DVD+R/RW).
If
the
Recorder
Combi
Receiver
is
powered
off
during
DVD
recording,
the
recording
will
not
be
saved.
Instant
Timer
Recording
Instant
Timer
Recording
allows
you
to
make
a
recording
easily
of
a
preset
length
without
using
the
program
timer.
1
Follow
steps
1-4
as
shown
left
(Basic
Recording
from
a
TV).
2
Press
z
REC
repeatedly
to
select
the
recording
time
length.
Recording
starts
after
the
first
press.
DVD:
Each
subsequent
press
increases
the
recording
time
by
10
minutes
(maximum
360
minutes).
VCR:
Each
subsequent
press
increases
the
recording
time
by
30
minutes
(maximum
540
minutes).
Please
con-
firm
the
VHS
tape
has
enough
remaining
time
to
be
recorded
before
recording.
Instant
Timer
Record
Menu
Checking
the
Recording
Time
Press
z
REC
or
DISPLAY
once
to
check
the
recording
time.
The
recalled
setting
will
automatically
return
to
the
TV
screen
for
a
moment.
Also,
remaining
time
of
recording
is
shown
in
the
dis-
play
window.
To
Extend
the
Recording
Time
The
recording
time
can
be
extended
anytime
by
press-
ing
z
REC.
Each
subsequent
press
increases
the
recording
time
by
10
minutes
(DVD)
or
30
minutes
(VCR).
To
Pause
the
Recording
1
Press
PAUSE(X)
to
pause
the
disc
during
recording.
2
When
you
want
to
continue
recording,
press
PAUSE(X)
or
z
REC.
otes
?
If
you
press
PAUSE(X)
during
the
Instant
Timer
Recording,
it
will
be
canceled.
?
The
Recorder
Combi
Receiver
will
automatically
power
off
when
the
Instant
Timer
Recording
ends.
To
record
one
TV
program
while
watching
another
1
Press
TV/VCR
to
select
the
TV
mode
during
recording.
The
TV
indicator
appears.
2
Using
the
TV,
select
the
channel
to
be
viewed.
ips
(VCR
mode
only)
Always
use
PAUSE(X)
for
best
results
when
making
changes
during
recording
.
For
example:
To
change
channels
during
recording,
first
press
PAUSE(X)
to
put
the
unit
in
pause
mode.
Then
select
the
desired
channel
on
the
Recorder
Combi
Receiver,
and
press
PAUSE(X)
again
to
resume
recording.
TV
Broadcast
Selected
Audio
Broadcast
Audio
Monitor
LChR
Ch
Audio
MONO
MONO MONO MONO MONO
STEREO STEREO
L
R
STEREO
Left
L L
Left
Right
R R
Right
MONO MONO MONO MONO
MONO+SAP
MONO MONO MONO MONO
SAP SAP SAP SAP
STEREO+SAP
STEREO
L
R
STEREO
SAP SAP SAP SAP
MONO MONO MONO MONO
VCR
120min Rec
DVD
00:09:05
30min
Rec.
MONO
Input:
Ch.
6
0:17:32
MONO
Input:
Ch.
6
2H
01M
Free
SP
SP

Basic
Recording
(Continued)
RECORDING
51
Dubbing
from
DVD
to
VCR
You
can
copy
the
contents
of
a
DVD
to
a
VHS
tape
using
the
DUBBING
(or
DUB)
button.
ote
If
the
DVD
(or
Discs)
you
are
attempting
to
copy
is
copy
protected,
you
will
not
be
able
to
copy
the
disc.
It
is
not
permitted
to
copy
Macrovision
encoded
DVDs
(or
Discs).
"Copy-protected.
Cannot
record."
is
displayed
on
the
TV
screen.
1
Insert
a
VHS
Tape
Insert
a
blank
VHS
videotape
into
the
VCR
deck.
2
Insert
a
Disc
Insert
the
disc
you
wish
to
copy
in
the
DVD
deck
and
close
the
disc
tray.
3
Select
DVD
mode
by
pressing
DVD
on
the
Remote
Control.
4
Find
the
place
on
the
DVD
(or
Disc)
from
which
you
want
to
start
dubbing
using
the
PLAY,
FF,
REW
and
PAUSE
functions.
For
best
results,
pause
playback
at
the
point
from
which
you
want
to
record.
5
Press
the
DUBBING
button
on
the
Remote
Control
or
DUB
on
the
front
panel.
The
Dubbing
menu
appears.
6Usev/V/b/BtoselectthedesiredRecord
Mode:
?
SP
(Standard
Play)
?
SLP
(Super
Long
Play,
3
times
SP).
7
Select
"Dubbing"
then
press
ENTER
or
DUBBING
to
start
copying.
ip
If
you
press
PAUSE
during
Dubbing
mode,
both
the
DVD
and
VCR
decks
go
into
Pause
mode
and
the
"DUB"
indi-
cator
blinks
on
the
front
panel
display.
While
in
Pause
mode,
you
can
adjust
the
DVD
playback
position
using
PLAY,
REW,
FF,
PAUSE,
etc.
The
VCR
deck
will
remain
in
Pause
mode.
To
resume
Dubbing,
press
the
DUBBING
button
twice.
8
Stop
the
Dubbing
Process
To
stop
dubbing
at
any
other
time,
press
STOP
(x).
You
must
stop
the
dubbing
process
manually
when
the
DVD
movie
ends,
or
the
unit
may
replay
and
record
over
and
over
again.
Dubbing
from
VCR
to
DVD
You
can
copy
the
contents
of
a
VHS
tape
to
a
DVD±R
or
DVD±RW
using
the
DUBBING
(DUB)
button.
This
allows
you
to
archive
your
old
VHS
tapes
to
DVD.
ote
If
the
VHS
video
tape
you
are
attempting
to
copy
is
copy
protected,
you
will
not
be
able
to
copy
the
tape.
It
is
not
permitted
to
copy
Macrovision
encoded
tapes.
1
Insert
a
DVD±R
or
DVD±RW
disc.
Insert
a
blank
DVD±R
or
DVD±RW
disc
in
the
DVD
deck
and
close
the
disc
tray.
ote
When
using
a
DVD±RW
disc,
you
must
initialize
before
copying;
see
page
32.
2
Insert
a
VHS
Tape
Insert
the
VHS
video
tape
you
wish
to
copy
into
the
VCR
deck.
3
Select
VCR
mode
by
pressing
VCR
on
the
Remote
Control.
4
Find
the
place
on
the
VHS
tape
from
which
you
want
to
start
dubbing
using
the
PLAY,
FF,
REW
and
PAUSE
functions.
For
best
results,
pause
playback
at
the
point
from
which
you
want
to
record.
5
Press
the
DUBBING
button
on
the
Remote
Control
or
DUB
on
the
front
panel.
The
Dubbing
menu
appears.
6Usev/V/b/BtoselectthedesiredRecord
Mode:
?
EP
(Extend
Quality)
?
LP
(Low
Quality)
?
SP
(Standard
Quality)
?
XP
(High
Quality)
7
Select
"Dubbing"
then
press
ENTER
or
DUBBING
to
start
copying.
ip
If
you
press
PAUSE
during
Dubbing
mode,
both
the
DVD
and
VCR
decks
go
into
Pause
mode
and
the
"DUB"
indi-
cator
blinks
on
the
front
panel
display.
While
in
Pause
mode,
you
can
adjust
the
VCR
playback
position
using
PLAY,
REW,
FF,
PAUSE,
etc.
The
DVD
deck
will
remain
in
Pause
mode.
To
resume
Dubbing,
press
the
DUBBING
button
twice.
8
Stop
the
Dubbing
Process
To
stop
dubbing
at
any
other
time,
press
STOP
(x).
Dubbing
will
stop
automatically
when
the
VHS
tape
ends.
Free
Space
Rec.
Mode
Dubbing
55%
SP
Dubbing
Stop
Dubbing
Free
Space
Rec.
Mode
Dubbing
01H54M
SP
Stop

Timer
Recording
52
The
Timer
Recording
function
allows
you
to
record
up
to
8
programs
within
a
period
of
one
month.
1
Press
TIMER
REC.
The
Timer
Record
menu
will
appear.
?
Media
--
Choose
a
media
(DVD
or
VCR).
?
Ch.
--
Choose
a
channel
(2-69
or
1-125
for
anten-
na
or
cable
channels
respectively,
excluding
skip
channels),
or
one
of
the
external
inputs
from
which
to
record
(AV1
or
AV2).
?
Date
--
Choose
a
date
up
to
1
month
in
advance,
or
select
a
daily
or
weekly
program.
?
Start
Time
--
Set
the
recording
start
time.
?
End
Time
--
Set
the
recording
end
time.
?
Mode
--
Choose
a
record
mode.
DVD:
EP,
LP,
SP,
XP,
or
AT
(Auto)
VCR:
SP,
SLP,
or
AT
(Auto)
AUTO
mode
determines
how
much
time
is
avail-
able
on
the
disc
or
tape
and
switches
record
mode,
if
necessary,
to
complete
recording
the
program.
2
Enter
the
necessary
information
for
your
timer
recording(s).
?
b
/
B
(left/right)
--
Move
the
cursor
left/right
?
v
/
V
(up/down)
--
Change
the
setting
at
the
cur-
rent
cursor
position
?
Press
RETURN
(O)
to
exit
the
Timer
Record
menu.
?
Press
ENTER
after
filling
in
all
the
program
infor-
mation.
?
Press
TIMER
REC
to
display
Timer
Record
List.
3
Press
ENTER
to
save
the
program.
The
Timer
Record
List
will
appear.
4
Press
RETURN
(O)
to
exit
the
Timer
Record
List.
5
Be
sure
to
load
a
recordable
disc
or
tape.
otes
?
The
Timer
indicator
lights
on
the
front
panel
display.
?
If
the
Disc
and
Tape
indicator
are
blinking,
either
no
disc
or
tape
is
loaded,
or
the
loaded
disc
is
not
recordable.
?
The
Recorder
Combi
Receiver
will
record the
audio
according
to
the
current
TV
tuner
setting
(Stereo,
Mono
or
SAP).
Use
the
AUDIO
button
to
set
the
audio
before
switching
the
Recorder
Combi
Receiver
to
Standby
mode.
?Y
ou
must
press
STOP
to
stop
the
Timer
Recording.
?
The
Recorder
Combi
Receiver
will
automatically
power
off
when
the
Timer
Recording
ends.
?
There
is
a
short
delay
when
a
timer
recording
finishes
to
confirm
the
recorded
program.
If
two
timer
recordings
are
set
to
record
sequentially
(one
right
after
the
other),
the
very
beginning
of
the
later
program
may
not
be
recorded.
Checking
Timer
Recording
Details
Programming
can
be
checked
whenever
the
Recorder
Combi
Receiver
is
turned
on.
Press
TIMER
REC
twice.
?
Use
v
/
V
to
select
a
timer
recording.
?
Press
ENTER
to
edit
the selected
program.
Timer
Record
menu
appears.
?
Press
CLEAR
to
delete
the
selected
program
from
the
Timer
Record
List.
Canceling
a
Timer
Recording
You
can
clear
a
timer
setting
anytime
before
the
record-
ing
actually
starts.
?Usev/Vtoselectaprogramyouwanttoeraseon
the
Timer
Recorder
List.
If
you
want
to
erase
the
program,
press
CLEAR.
Stopping
a
Timer
Recording
in
Progress
After
a
timer
recording
has
started,
you
can
still
cancel
the
program.
?
Press
STOP.
Timer
Recording
Troubleshooting
Even
though
the
timer
is
set,
the
recorder
will
not
record
when:
?
There
is
no
disc
(or
tape)
loaded.
?Anon-recordable
disc
(or
tape)
is
loaded.
?
Disc
Protect
is
set
to
ON
in
the
Disc
menu
(see
page
33).
?
There
are
already
99
titles
(DVD-RW,
DVD-R),
49
titles
(DVD+RW,
DVD+R)
recorded
on
the
disc.
You
cannot
enter
a
timer
program
when:
?Arecording
is
already
underway.
?
The
time
you're
trying
to
set
has
already
passed.
?
There
are
already
8
timer
programs
set.
If
two
or
more
timer
programs
overlap:
?
The
earlier
program
takes
priority.
?
When
the
earlier
program
finishes,
the
later
program
starts.
?
If
two
programs
are
set
to
start
at
exactly
the
same
time,
the
program
entered
first
takes
priority.
Confirmation
is
not
possible
when:
?
Disc
Protect
setting
is
set
to
ON.
?
There
are
already
99
titles
(DVD-RW,
DVD-R),
49
titles
(DVD+RW,
DVD+R)
recorded
on
the
disc.
If
the
disc
is
damaged,
the
recording
may
not
complete
successfully.
In
this
case even
though
the
Check
field
shows
"Rec.
OK",
it
may
not
be.
TIMER
REC
Media
Ch.
Date
Start
Time
End
Time
Mode
Timer
Record
OK
Timer
Rec
List
Close
198
min
Free
Ch.11
DVD
01/02
Fri
10:07
AM
11:00
AM
EP
SP
Media
Start
Time
Duration
Date
Ch.
Mode
Check
Timer
Record
List
Edit
Close
Delete
CLEAR
10/19
Sun
Ch.11
18:07
AM
30min
SP
Rec.
OK
Timer
Rec
TIMER
REC

RECORDING
53
Recording
from
an
External
Input
Recording
from
External
Components
You
can
record
from
an
external
component,
such
as a
camcorder
or
VCR,
connected
to
any
of
the
Recorder
Combi
Receiver's
external
inputs.
1
Make
sure
that
the
component
you
want
to
record
from
is
connected
properly
to
the
Recorder
Combi
Receiver.
See
page
18-19.
2
Press
AV
repeatedly
to
select
the
external
input
to
record
from.
?A
V1:
Audio/Video
Input
mounted
on
back
panel
?A
V2:
Audio/Video
Input
mounted
on
front
panel
?D
V:
DV
Input
mounted
on
front
panel
3
Load
a
recordable
disc
or
tape.
4
Set
a
recording
mode
as
necessary
by
pressing
REC
MODE
repeatedly.
DVD:
XP
(High
quality),
SP
(Standard
quality),
LP
(Low
quality),
EP
(Extend
quality).
VCR:
SP
(Standard
Play),
SLP
(Super
Long
Play)
5
Press
z
REC
once.
Recording
will
start.
(The
REC
indicator
lights
in
the
display
window.)
Recording
continues
until
you
press
STOP
(x)
or
the
disc
is
full.
To
record
for
a
fixed
length
of
time,
see
Instant
Timer
Recording
on
page
44.
6
Press
STOP
(x)
to
stop
recording.
ote
If
your
source
is
copy-protected
using
CopyGuard,
you
will
not
be
able
to
record
it
using
this
recorder.
See
Copyright
on
page
10
for
more
details.
Recording
from
a
Digital
Camcorder
You
can
record
from
a
digital
camcorder
connected
to
the
DV
IN
jack
on
the
front
panel
of
this
Recorder
Combi
Receiver.
You
can use
the
Recorder
Combi
Receiver's
remote
to
control
both
the
camcorder
and
the
Recorder
Combi
Receiver.
Before
recording,
make
sure
that
the
audio
input
for
the
DV
IN
jack
is
set
up
(see
page
32).
ips
?
The
source
signal
must
be
DVC-SD
format.
?
Some
camcorders
cannot
be
controlled
using
the
Recorder
Combi
Receiver
remote.
?
If
you
connect
a
second
DVD
recorder
using
a
DV
cable,
you
cannot
control
the
second
recorder
from
this
one.
?Y
ou
cannot
control
the
Recorder
Combi
Receiver
remotely
from
a
component
connected
to
the
DV
IN
jack.
?Y
ou
cannot
record
date
and
time
information
from
a
DV
cassette.
1
Make
sure
your
digital
camcorder
is
connected
to
the
front
panel
DV
IN
jack.
See
page
18.
2
Check
that
the
DV
audio
input
is
as
you
require.
You
can
choose
between
Audio
1
(original
audio)
and
Audio
2
(overdubbed
audio).
?
DV
Input
is
set
from
the
DV
Record
Audio
in
sub-menu
of
the
General
menu.
See
DV
Record
Audio
on
page
32
for
more
information.
3
Press
AV
repeatedly
to
select
the
DV
input.
DV
appears
in
the
display
window.
4
Find
the
place
on
the
camcorder
tape
from
which
you
want
to
start
recording.
For
best
results,
pause
playback
at
the
point
from
which
you
want
to
record.
?
Depending
on
your
camcorder,
you
can use
this
Recorder
Combi
Receiver's
Remote
Control
to
control
the
camcorder
using
the
STOP,
PLAY
and
PAUSE
func-
tions.
5
Press
z
REC
once
to
start
recording.
?
Recording
is
automatically
stopped
if
the
recorder
detects
no
signal.
?Y
ou can
pause
or
stop
the
recording
by
pressing
PAUSE
or
STOP.
You
cannot
control
the
camcorder
from
this
Remote
Control
during
recording.
?
In
Video
mode,
the
final
frame
of
the
recording
may
remain
displayed
on
screen
for
a
while
after
recording
stops.

Recording
from
an
External
Input
(Continued)
What
is
DV?
Using
DV,
also
known
as
i.LINK,
you
can
connect
a
DV-equipped
camcorder
to
this
recorder
using
a
single
DV
cable
for
input
and
output
of
audio,
video,
data
and
control
signals.
The
i.LINK
interface
is
also
known
as
IEEE
1394-1995.
"i.LINK"
and
the
"i.LINK"
logo
are
trademarks.
?
This
recorder
is
only
compatible
with
DV-format
(DVC-SD)
camcorders.
Digital
satellite
tuners
and
Digital
VHS
video
recorders
are
not
compatible.
?Y
ou
cannot
connect
more
than
one
DV
camcorder
at
a
time
to
this
recorder.
?Y
ou
cannot
control
this
recorder
from
external
equip-
ment
connected
via
the
DV
IN
jack
(including
two
DVD
Recorders).
?
It
may
not
always
be
possible
to
control
the
connect-
ed
camcorder
via
the
DV
IN
jack.
?
Digital
camcorders
can
usually
record
audio
as
stereo
16-bit/48kHz,
or
twin
stereo
tracks
of
12-bit/32kHz.
The
Recorder
Combi
Receiver
can
only
record
one
stereo
audio
track.
Set
DV
Record
Audio
to
Audio
1
or
Audio
2
as
necessary
(see
page
26).
?
Audio
input
to
the
DV
IN
jack
should
be
32
or
48kHz
(not
44.1kHz).
?P
icture
disturbance
on
the
recording
may
occur
if
the
source
component
pauses
playback
or
plays
an
unrecorded
section
of
tape,
or
if
the
power
fails
in
the
source
component,
or
the
DV
cable
becomes
discon-
nected.
?
If
DV
Record
Audio
is
set
to
Audio
2,
but
no
Audio
2
signal
is
present,
DV
Record
Audio
will
be
reset
to
Audio
1
automatically.
DV-Related
Messages
You
may
see
the
following
messages
appear
on
your
TV
screen
when
using
the
DV
IN
jack.
Not
connected
to
Camcorder.
The
camcorder
is
not
connected
properly,
or
the
cam-
corder
is
switched
off.
Too
many
devices
connected.
The
DV
jack
on
this
recorder
supports
connection
to
just
one
camcorder.
Check
the
tape.
There
is
no
cassette
loaded
into
the
connected
equip-
ment.
Uncontrollable
device.
The
Recorder
Combi
Receiver
cannot
control
the
cam-
corder.
Updating
the
Information.
Camcorder
is
updating
information
for
DV.
Camera
mode.
Camcorder
is
set
to
camera
mode.
Troubleshooting
If
you
cannot
get
a
picture
and/or
audio
through
the
DV
IN
jack,
check
the
following:
?M
ake
sure
the
DV
cable
is
properly
connected.
?T
ry
switching
off
the
connected
equipment,
then
switch
it
back
on.
?T
ry
switching
the
audio
input.
otes
?
Depending
on
the
connected
camcorder,
you
may
not
be
able
to
control
it
using
the
Remote
Control
sup-
plied
with
this
Recorder
Combi
Receiver.
?
Before
you
set
the
mode
of
your
Camcorder
to
cam-
era
mode,
turn
down
the
volume
of
connected
Sound
device.
There
can
be
a
howling
sound.
54

Title
List
and
Chapter
List
Menu
Using
the
Title
List-Original
menu
The
Title
List-Original
is
where
you
build
and
edit
your
Playlist,
and
where
you
can
delete
titles
and
make
other
changes
to
the
Original
content
of
the
disc.
You
can
also
play
individual
titles
directly
from
the
Title
List-
Original
menu.
1
Press
MENU/LIST
repeatedly
to
display
the
Title
List-Original
menu.
?
Use
the
v/V
buttons
to
display
the
previous/next
page
if
there
are
more
than
6
titles
or
chapters.
?T
o
exit
the
menu,
press
RETURN
(O).
ote
To
switch
between
the
Title
List-Original
and
Title List-
Playlist
menu,
press
MENU/LIST
repeatedly.
The
Original
and
Playlist
heading
at
the
top
of
the
screen
indicate
which
mode
you
are
in.
2
To
view
Title
List-Original
options,
select
the
title
you
want
then
press
ENTER.
Title
List-Original
options
appears
on
the
left
side
of
the
menu.
3
Use
v
/
V
to
select
an
option
then
press
ENTER
to
confirm.
Play:
Start
playback
of
the
selected
title.
Chapter:
Shows
the
Chapter
List-Original
menu
of
the
title
(Refer
to
right
on
this
page).
Delete:
Deletes
the
title
from
the
Title
List-Original
menu.
(see
page
62)
Protect:
Protects
accidental
recording,
editing
or
deleting
of
the
title.
(page
64)
Edit:
Selects
Edit
options.
?T
itle
Name:
Edits
the
title
name.
(page
63)
?
Delete
Part:
Deletes
a
part
of
the
Title.
(see
page
62)
Playlist
Add:
Adds
the
title
to
the
Playlist.
(see
page
61)
Dubbing:
Copys
the
title
to
a
VHS
tape.
4
Press
RETURN
(O)
repeatedly
to
exit
the
Title
List-Original
menu.
ip
Press
DISPLAY
to
display
more
detailed
title
information
for
selected
title.
Using
the
Chapter
List-Original
menu
1
Press
MENU/LIST
repeatedly
to
display
Title
List-Original
menu.
2
Use
vVbBto
choose
the
title
you
want
to
view
Chapter
List-Original
menu
then
press
ENTER.
Title
List-Original
options
appears
on
the
left
side
of
the
menu.
3
Use
v
/
V
to
select
"Chapter"
from
Title List-
Original
options
then
press
ENTER.
Chapter
List-Original
menu
appears
on
the
TV
screen.
4
To
view
Chapter
List-Original
options,
select
the
chapter
you
want
then
press
ENTER.
Chapter
List-Original
options
appears
on
the
left
side
of
the
Chapter
List-Original
display.
5
Use
v
/
V
to
select
an
option
then
press
ENTER
to
confirm.
Play:
Starts
playback
of
the
selected
chapter.
Title:
Shows
the
Title List-
Original
menu
(refer
to
left
on
this
page)
Delete:
Deletes
the
chapter
from
the
Chapter
List-Original
menu.
(page
62)
Combine:
Merges
two
chapters
into
one.
(page
63)
Playlist
Add:
Adds
the
chapter
to
the
Playlist.
(page
61)
6
Press
RETURN
(O)
repeatedly
to
exit
Chapter
List-Original
menu.
VR
VR
EDITING
55
DVD-VR
57min
Playlist
LIST
Free
SP
Close
Info.
DISPLAY
Select
TITLE
1
10/12
0:25:20
TITLE
2
10/14
0:5:12
TITLE
3
10/16
0:2:34
1/4
TITLE
4
10/17
0:6:06
Title
List
Original
Play
Chapter
Delete
Protect
Edit
Playlist
Add
Dubbing
Title
Name
Delete
Part
Chapter
List
TITLE
1
12/07/2004
Tue
0:25:20
TV
11
1/3
Playlist
LIST
Close
Select
Original
Play
Title
Delete
Combine
Playlist
Add

Title
List
and
Chapter
List
Menu
(Continued)
56
Using
the
Title
List-Playlist
Menu
1
Press
MENU/LIST
repeatedly
to
display
the
Title
List-Playlist
menu.
?
Use
the
v/V
buttons
to
display
the
previous/next
page
if
there
are
more
than
6
titles
or
chapters.
?T
o
exit
the
Title
List-Playlist,
press
RETURN
(O).
2
To
view
Title
List-Playlist
options,
select
the
title
you
want
then
press
ENTER.
Title
List-Playlist
options
appears
on
the
left
side
of
the
menu.
3
Use
v
/
V
to
select
an
option
then
press
ENTER
to
confirm.
Play:
Start
playback
the
select-
ed
title.
Chapter:
Shows
the
Chapter
List-Playlist
menu
of
the
title
(Refer
to
right
on
this
page).
Title
Name:
Edits
the
title
name.
(page
63)
Delete:
Deletes
the
title
from
the
Title
List-Playlist
menu.
(page
62)
Delete
Part:
Deletes
a
part
of
the
Title.
(page
62)
Dubbing:
Copys
the
title
to
a
VHS
tape.
4
Press
RETURN
(O)
repeatedly
to
exit
Title List-
Playlist
menu.
Using
the
Chapter
List-Playlist
Menu
1
Press
MENU/LIST
repeatedly
to
display
the
Title
List-Playlist
menu.
2
Use
vVbBto
choose
the
title
you
want
to
view
Title
List-Playlist
menu
then
press
ENTER.
Title
List-Playlist
options
appears
on
the
left
side
of
the
menu.
3
Use
v
/
V
to
select
"Chapter"
from
Title
List-
Playlist
options
then
press
ENTER.
Chapter
List-Playlist
menu
appears
on
the
TV
screen.
4
To
view
Chapter
List-Playlist
options,
select
the
chapter
you
want
then
press
ENTER.
Chapter
List-Playlist
options
appears
on
the
left
side
of
the
menu.
5
Use
v
/
V
to
select
an
option
then
press
ENTER
to
confirm.
Play:
Starts
playback
of
the
selected
chapter.
Title:
Shows
the
Title
List-
Playlist
menu
(Refer
to
left
on
this
page).
Delete:
Deletes
the
chapter
from
the
Chapter
List-Playlist
menu
(page
62).
Move:
Moves
a
chapter
of
Chapter
List-Playlist
to
a
posi-
tion
on
the
Chapter
List-Playlist
menu
(page
64)
Combine:
Merges
two
chapters
into
one
(page
63).
6
Press
RETURN
(O)
repeatedly
to
exit
Chapter
List-Playlist
menu.
VR
VR
TITLE
1
10/12
0:25:20
TITLE
2
10/14
0:5:12
1/2
Original
LIST
Close
Select
Title
List
Playlist
Play
Chapter
Title
Name
Delete
Delete
Part
Dubbing
Original
LIST
Close
Select
1/3
Chapter
List
TITLE
1
12/07/2004
Tue
0:25:20
Playlist
Play
Title
Delete
Move
Combine

Title
List
and
Chapter
List
Menu
(Continued)
Using
the
Title
List
menu
From
the
Title
List
display
you
can
play,
name
and
erase
titles.
Once
a
Video
mode
disc
is
finalized,
the
Title
List
screen
changes
its
appearance
and
all
you
can
do
is
select
titles
to
play.
1
Press
MENU/LIST
to
display
the
Title
List.
2
Use
v
/
V
to
choose
a
title
then
press
ENTER.
Title
List
options
appears
on
the
left
side
of
the
Title
List
display.
3
Use
v
/
V
to
select
an
option
then
press
ENTER
to
confirm.
Play:
Start
playback
the
select-
ed
title.
Title
Name:
Edits
the
title
name
(page
63).
Delete:
Deletes
the
title
from
the
Title
List.
Dubbing:
Copys
the
title
to
a
VHS
tape.
4
Press
RETURN
(O)
repeatedly
to
exit
Title
List.
ip
Press
DISPLAY
to
display
more
detailed
title
information
for
selected
title.
Deleting
a
Title
Before
a
disc
is
finalized,
you
can
erase
titles
recorded
on
the
disc.
Caution
?
If
you
erase
a
title
from
a
DVD-R
disc,the
title
will
dis-
appear
from
the
Title
List,
but
the
available
recording
time
will
not
increase.
?
When
erasing
a
title
from
a
DVD-RW
disc,
the
remaining
time
available
for
recording
will
only
increase
if
it
is
the
last
title
on
the
disc.
1
Press
MENU/LIST
to
display
Title
List
2
Use
vVbBto
choose
a
title
you
want
to
erase
then
press
ENTER.
Title
List
options
appears
on
the
left
side
of
the
Title
List
screen.
3
Use
v
/
V
to
select
'Delete'
then
press
ENTER
to
confirm.
The
confirm
message
for
deleting
will
appear.
4
Use
b
/
B
to
select
'Yes'
then
press
ENTER.
The
selected
title
is
deleted.
After
pressing
ENTER,
the
new,
updated
menu
is
displayed.
5
Repeat
steps
2
-
4
to
continue
to
delete
from
the
menu.
6
Press
RETURN
(O)
to
exit
the
menu.
If
the
disc
has
already
been
finalized
You
will
see
a
screen
as
shown
below:
Video
Video
EDITING
57
Play
Title
Name
Delete
Dubbing
Play
Title
Name
Delete
Dubbing
Title
List
DVD
VIDEO
TITLE
1
1/ 3
0:02:01
TITLE 2
1/ 3
0:06:21
TITLE
3
4/
12
0:52:31
1/3
1hour
57min
Free
SP
Title
Duration
Date
Close
Info.
DISPLAY
Select
DVD
VIDEO
1/1
PAGE
UP
PAGE
DOWN
EXIT
1
TITLE
1
1/03
0:02:01
2
TITLE
2
1/03
0:24:12
3
TITLE
3
1/03
0:36:30
Disc
name
Title
list
Exits
the
Title
List
screen.
Moves
to
the
next
or
previous
page
Indicates
total
and
current
page
number

Title
List
and
Chapter
List
Menu
(Continued)
Using
the
Title
List
menu
The
Title
List
is
where
you
can
see
the
all
recorded
titles,
and
where
you
can
delete
titles
and
make
other
changes
to
the
Original
content
of
the
disc.
You
can
also
play
titles
directly
from
the
Title
List
menu.
The
recorder
must
be
stopped
in
order
to
edit
using
the
Title
List
menu.
1
Press
MENU/LIST
to
display
the
Title
List
menu.
?
Use
the
v
/
V
buttons
to
display
the
previous/
next
page
if
there
are
more
than
6
titles.
?T
o
exit
the
Title
List
menu,
press
RETURN
(O).
2
To
view
Title
List
options,
select
the
title
you
want
then
press
ENTER.
Title
List
options
appears
on
the
left
side
of
the
menu.
3
Use
v
/
V
to
select
an
option
then
press
ENTER
to
confirm.
Play:
Starts
playback
the
selected
title
except
the
hidden
chapters
or
titles.
Full
Play:
Starts
playback
the
selected
title
including
the
hid-
den
chapters.
Chapter:
Moves
Chapter
List
menu
of
the
title.
(refer
to
right
on
this
page)
Delete:
Deletes
the
title.
(page
62)
Protect:
Protects
accidental
recording,
editing
or
deleting
of
the
title.
(page
64)
Edit:
Selects
Edit
options.
?T
itle
Name:
Edits
the
title
name.
(page
63)
?
Divide:
Divides
one
title
into
two
titles.
(page
65)
?
Hide
(Show):
Hides
(or
Shows)
the
title
or
all
chapters
within
the
title.
(page
65)
Dubbing:
Copys
the
title
to
a
VHS
tape.
4
Press
RETURN
(O)
repeatedly
to
exit
Title
List
menu.
ip
Press
DISPLAY
to
display
more
detailed
title
information
for
selected
title.
Caution
If
you
press
z
REC
when
the
Title
List
menu
appears,
the
selected
title
is
erased
then
overwrite
recording
starts.
(See
page
66
for
more
details.)
Using
the
Chapter
List
menu
1
Press
MENU/LIST
to
display
Title
List
menu.
2
Use
vVbBto
choose
the
title
you
want
to
view
Chapter
List
menu
then
press
ENTER.
Title
List
options
appears
on
the
left
side
of
the
menu.
3
Use
v
/
V
to
select
"Chapter"
from
Title
List
options
then
press
ENTER.
Chapter
List
menu
appears
on
the
TV
screen.
4
To
view
Chapter
List
options,
select
the
chapter
you
want
then
press
ENTER.
Chapter
List
options
appears
on
the
left
side
of
the
menu.
5
Use
v
/
V
to
select
an
option
then
press
ENTER
to
confirm.
Play:
Starts
playback
of
the
selected
chapter.
Title:
Moves
to
Title
List
menu
of
the
chapter.
(refer
to
left
on
this
page)
Combine:
Combines
two
chap-
ters
into
one.
(page
63)
Hide
(Show):
Hides
(or
Shows)
the selected
chapter.
(page
65)
6
Press
RETURN
(O)
repeatedly
to
exit
Chapter
List
menu.
+RW
+RW
58
DVD+RW
57min
REC
Free
SP
Close
Info.
DISPLAY
Select
TITLE
1
10/12
0:25:20
TITLE
2
10/14
0:5:12
TITLE 3
10/16
0:2:34
1/4
TITLE
4
10/17
0:6:06
Title
List
Play
Full
Play
Chapter
Delete
Protect
Edit
Dubbing
Title
Name
Divide
Hide
(Show)
Chapter
List
TITLE
1
12/07/2004
Tue
0:25:20
1/3
SP
Close
Select
Play
Title
Combine
Hide
(Show)

Title
List
and
Chapter
List
Menu
(Continued)
Using
the
Title
List
menu
The
Title
List
is
where
you
build
and
edit
your
Playlist,
and
where
you
can
delete
titles
and
make
other
changes
to
the
Original
content
of
the
disc.
You
can
also
play
individual
titles
directly
from
the
Title
List
menu.
The
recorder
must
be
stopped
in
order
to
edit
using
the
Title
List
menu.
1
Press
MENU/LIST
repeatedly
to
display
the
Title
List-Original
menu.
?
Use
the
v/V
buttons
to
display
the
previous/next
page
if
there
are
more
than
6
titles
or
chapters.
?T
o
exit
the
menu,
press
RETURN
(O).
2
To
view
Title
List
options,
select
the
title
you
want
then
press
ENTER.
Title
List
options
appears
on
the
left
side
of
the
Title
List
display.
3
Use
v
/
V
to
select
an
option
then
press
ENTER
to
confirm.
Play:
Start
playback
of
the
selected
title.
Full
Play:
Starts
playback
the
selected
title
including
the
hid-
den
chapters.
Chapter:
Shows
the
Chapter
List
menu
of
the
title
(Refer
to
right
on
this
page).
Delete:
Deletes
the
title
from
the
Title
List
menu.
(page
62)
Protect:
Protects
accidental
recording,
editing
or
deleting
of
the
title.
(page
64)
Edit:
Selects
Edit
options.
?T
itle
Name:
Edits
the
title
name.
(page
63)
?
Divide:
Unavailabel
(DVD+RW
only).
?
Hide
(Show):
Hides
(or
Shows)
the
all
chapters
within
the
title.
(page
65)
Dubbing:
Copys
the
title
to
a
VHS
tape.
4
Press
RETURN
(O)
repeatedly
to
exit
the
Title
List
menu.
ip
Press
DISPLAY
to
display
more
detailed
title
information
for
selected
title.
Using
the
Chapter
List
menu
1
Press
MENU/LIST
repeatedly
to
display
Title
List
menu.
2
Use
vVbBto
choose
the
title
you
want
to
view
Chapter
List
menu
then
press
ENTER.
Title
List
options
appears
on
the
left
side
of
the
Title
List
display.
3
Use
v
/
V
to
select
"Chapter"
from
Title
List
options
then
press
ENTER.
Chapter
List
menu
appears
on
the
TV
screen.
4
To
view
Chapter
List
options,
select
the
chapter
you
want
then
press
ENTER.
Chapter
List
options
appears
on
the
left
side
of
the
Chapter
List
display.
5
Use
v
/
V
to
select
an
option
then
press
ENTER
to
confirm.
Play:
Starts
playback
of
the
selected
chapter.
Title:
Shows
the
Title
List
menu
of
the
chapter
(refer
to
left
on
this
page)
Combine:
Combines
two
chap-
ters
into
one.
(page
63)
Hide
(Show):
Hides
(or
Shows)
the selected
chapter.
(page
65)
6
Press
RETURN
(O)
repeatedly
to
exit
Chapter
List
menu.
+R
+R
EDITING
59
DVD+R
2hour
57min
Free
EP
Close
Info.
DISPLAY
Select
TITLE
1
10/12
0:25:20
TITLE
2
10/14
0:5:12
TITLE
3
10/16
0:2:34
1/4
Empty
Title
--/--
0:6:06
Title
List
Chapter
List
TITLE
1
12/07/2004
Tue
0:25:20
1/3
SP
Close
Select
Play
Full
Play
Chapter
Delete
Protect
Edit
Dubbing
Title
Name
Divide
Hide
(Show)
Play
Title
Combine
Hide
(Show)

Title
and
Chapter
Editing
Edits
you
make
to
the
Original
content
changes
the
actual
content
of
the
disc.
For
example,
if
you
delete
a
title
or
chapter
from
the
Original
content
(Title
or
Chapter),
that
title
or
chapter
is
deleted
from
the
disc,
freeing
up
extra
recording
time.
When
you
edit
the
Playlist,
on
the
other
hand,
you
are
not
changing
the
content
of
the
disc.
For
example,
when
you
delete
a
title
from
the
Playlist,
you
are
just
telling
the
recorder
not
to
play
that
title;
nothing
is
actu-
ally
deleted
from
the
disc.
Titles,
Chapters
and
Parts
Titles
in
the
disc's
original
content
contain
one
or
more
chapters.
When
you
insert
a
title
into
the
Playlist,
all
the
chapters
within
that
title
also
appear.
In
other
words,
chapters
in
the
Playlist
behave
exactly
as
chapters
on
a
DVD-Video
disc
do.
Parts
are
sections
of
Original
or
Playlist
titles.
From
the
Original
and
Playlist
menu
you
can
add
or
delete
parts.
Adding
a
chapter
or
title
to
the
Playlist
creates
a
new
title
made
up
of
a
section
(ie.,
chapter)
of
an
Original
title.
Deleting
a
part
removes
part
of
a
title
from
the
Original
or
Playlist
menu.
Caution
?
When
editing
using
the
Delete,
Add
and
Move
func-
tions,
the
start
and
end
frames
may
not
be
exactly
as
set
in
the
start
and
end
point
display.
?
During
Playlist
playback,
you
may
notice
a
momen-
tary
pause
between
edits.
This
is
not
a
malfunction.
Adding
Chapter
Markers
You
can
put
a
chapter
marker
anywhere
in
a
title
during
recording
or
playback.
Once
the
chapter
is
marked,
you
can use
the
Chapter
Search
feature,
as
well
as
Erase,
combine
and
move
chapters
in
the
Chapter
List
menu.
ote
Chapter
markers
are
inserted
at
regular
intervals
auto-
matically.
You
can
change
this
interval
from
the
Initial
Setup
menu
(see
Auto
Chapter
on
page
32).
1
Play
the
title
(Original
or
Playlist).
2
At
the
point
you
want
to
start
a
new
chapter,
press
CHP
ADD.
A
chapter
marker
icon
appears
on
the
TV
screen.
?Y
ou
can
also
put
chapter
markers
during
recording.
Changing
Title
Thumbnails
Each
title
displayed
in
the
Title
List
menu
is
represented
by
a
thumbnail
picture
taken
from
the
start
of
that
title
or
chapter.
If
you
prefer,
select
a
different
still
picture
from
within
a
title.
1
Play
the
title
(Original
or
Playlist).
2
Press
THUMBNAIL
to
make
the
currently
dis-
played
picture
the
one
that
appears
in
the
Original
or
Playlist
menu.
The
still
picture
that
you
choose
appears
in
both
the
Original
or
Playlist
menu.
ip
You
can
also
change
the
thumbnail
picture
of
the
title
on
the
Chapter
List-Original
or
Chapter
List-Playlist
menu.
Select
a
chapter
on
the
Chapter
List-Original
or
Chapter
List-Playlist
menu
then
press
THUMBNAIL.
The
thumb-
nail
picture
of
the
title
that
includes
the
chapter
is
changed.
Thumb.
+RW
+R
VR
Chapter
+RW
+R
VR
VR
60

Title
and
Chapter
Editing
(Continued)
Making
a
New
Playlist
Use
this
function
to
add
an
Original
title
or
chapter
to
the
Playlist.
When
you
do
this,
the
whole
title
or
chapter
is
put
into
the
Playlist
(you
can
delete
bits
you
don't
need
later
---
see
Deleting
a
Title/Chapter
on
page
62).
The
title
appears
in
the
Playlist
complete
with
the
chap-
ter
markers
that
appear
in
the
Original.
However,
if
you
add
more
chapter
markers
to
the
Original
later,
these
are
not
automatically
copied
over
into
the
Playlist
title.
If
you
only
want
to
add
a
chapter
of
a
title,
use
the
Adding
Additional
Title/Chapter
to
the
Playlist
on
this
page.
1
Press
MENU/LIST
repeatedly
to
display
Title
List-Original
menu.
If
you
want
to
display
the
Chapter
List-Original
menu,
refer
to
"Using
the
Chapter
List-Original
menu"
on
page
55.
2
Choose
a
title
or
chapter
on
the
Original
menu
to
put
into
the
Playlist,
then
press
ENTER.
The
Title
List-Original
or
Chapter
List-Original
options
appear
on
the
left
side
of
the
screen.
Title
List-Original
Chapter
List-Original
3
Use
v
/
V
to
select
"Playlist
Add"
from
the
Original
(Title
or
Chapter)
options
then
press
ENTER.
4
Select
'New
Playlist'
then
press
ENTER.
The
new
title
appears
in
the
updated
Playlist.
All
chapters
of
the
title
are
added
to
the
Playlist.
Adding
Additional
Titles/Chapters
to
the
Playlist
You
can
add
an
Original
title
or
chapter
to
add
to
a
Playlist
title
even
if
it
is
already
registered.
1
Press
MENU/LIST
repeatedly
to
display
Title
List-Original
menu.
If
you
want
to
show
the
Chapter
List-Original
menu,
refer
to
"Using
the
Chapter
List-Original
"
on
page
55.
2
Choose
an
Original
title
or
chapter
to
put
into
the
Playlist,
then
press
ENTER.
The
Title
List-Original
or
Chapter
List-Original
options
appear
on
the
left
side
of
the
screen.
Title
List-Original
Chapter
List-Original
3
Use
v
/
V
to
select
'Playlist
Add'
from
the
Title
List-Original
or
Chapter
List-Original
options
then
press
ENTER.
4
Choose
a
title
that
is
already
registered
to
insert
a
title,
then
press
ENTER.
The
title
appears
in
the
updated
Playlist
menu.
5
Repeat
steps
1-4
to
continue
adding
to
the
Playlist.
6
Press
RETURN
(O)
repeatedly
to
exit
the
menu.
VR
VR
EDITING
61
New
Playlist
Select
Playlist.
TITLE
1
New
Playlist
Select
Playlist.
Play
Chapter
Delete
Protect
Edit
Playlist
Add
Dubbing
Play
Title
Delete
Combine
Playlist
Add
Play
Chapter
Delete
Protect
Edit
Playlist
Add
Dubbing
Play
Title
Delete
Combine
Playlist
Add

Deleting
a
Title/Chapter
When
you
erase
a
title
or
chapter
from
the
Playlist
menu
on
DVD+R,
DVD+RW
or
DVD-RW
discs
format-
ted
in
VR
mode,
you
only
remove
it
from
the
Playlist;
the
title/chapter
remains
in
the
Original
menu.
If
you
choose
to
delete
a
title
or
chapter
from
Title
List
or
Chapter
List
menu,
the
title
or
chapter
is
actually
deleted
from
the
disc
and
the
remaining
time
available
for
recording
increases.
Titles/chapters
deleted
from
the
Original
are
also
removed
from
the
Playlist.
ote
It
may
not
be
possible
to
delete
chapters
that
are
less
than
5
seconds
long.
1
On
the
Title
List
or
Chapter
List
menu,
use
vV
bBto
choose
a
chapter
or
title
you
want
to
delete
then
press
ENTER.
Options
appears
on
the
left
side
of
the
screen.
2
Select
'Delete'
option
on
the
options
on
the
menu.
e.g.,
If
you
select
"Delete"
on
Title
List-Original
menu.
3
Press
ENTER
to
confirm.
The
confirm
message
for
deleting
will
appear.
4
Use
b
/
B
to
select
"Yes"
then
press
ENTER.
The
selected
chapter
or
title
is
deleted.
After
pressing
ENTER,
the
new,
updated
menu
is
displayed.
5
Repeat
steps
1-
4
to
continue
to
delete
from
the
menu.
6
Press
RETURN
(O)
repeatedly
to
exit
the
menu.
ote
When
DVD+RW
recording,
the
deleted
title's
name
is
changed
to
'Deleted
Title'.
If
more
than
two
titles
are
repeatedly
deleted,
the
titles
are
combined
into
one.
Deleting
a
Part
You
can
delete
a
part
which
you
do
not
want
in
the
title.
1
Press
MENU/LIST
repeatedly
to
display
Title
List-Original
or
Title
List-Playlist
menu.
2
Use
vVbBto
choose
a
title
you
want
to
delete
then
press
ENTER.
The
options
appears
on
the
left
side
of
the
menu.
3
Select
'Delete
Part'
from
the
options
on
the
menu.
e.g.,
If
you
select
"Delete
Part"
on
Title
List-Original
menu.
4
Press
ENTER.
The
Title
Edit
(Delete
Part)
menu
appears
on
the
TV
screen
and
the
Recorder
Combi
Receiver
goes
into
Pause
mode.
The
Start
Point
option
is
highlighted.
5
Use
PLAY,
PAUSE,
FF,
REW,
and
Slow
Motion
playback
to
find
the
starting
point.
The
segment
is
indicated
in
yellow
on
the
Progress
Bar.
6
Press
ENTER
at
the
starting
point
of
the
seg-
ment
you
want
to
erase.
The
End
Point
option
is
highlighted.
7
Use
PLAY,
PAUSE,
FF,
REW,
and
Slow
Motion
playback
to
find
the
ending
point.
8
Press
ENTER
at
the
ending
point
of
the
section
you
want
to
erase.
The
Done
option
is
highlighted.
To
cancel
the
Edit
mode,
select
"Cancel"
using
v
/
V
then
press
ENTER.
9
Press
ENTER
to
delete
the
selected
part.
When
the
confirm
message
appears,
select
"Yes"
using
b
/
B
then
press
ENTER.
To
erase
additional
segments,
repeat
steps
5-9.
10
When
finished
editing,
press
RETURN
(O).
The
Title
List-Original
or
Title
List-Playlist
menu
appears.
ote
If
you
select
"Cancel"
then
press
ENTER,
the
Recorder
Combi
Receiver
will
go
to
previous
option
and
into
Pause
mode.
VR
+R
+RW
VR
Title
and
Chapter
Editing
(Continued)
62
Play
Chapter
Delete
Protect
Edit
Playlist
Add
Dubbing
Protect
Edit
Playlist
Ad
Dubbing
Title
Name
Delete
Part
Title
Edit
Move
Point
Select
Start
Point
Play
&
Select
the
Start
Point
-Delete
Part
End
Point
Cancel
Done
00:00:00
Start
End
TITLE 2
10/14
0:34:12
Close

Title
and
Chapter
Editing
(Continued)
EDITING
63
Naming
a
Title
You
can
name
Original
and
Playlist
titles
independently.
1
On
the
Title
List
menu,
use
vVbBto
choose
the
title
you
want
to
name
then
press
ENTER.
Options
appears
on
the
left
side
of
the
menu.
2
Use
v/V
to
select
"Title
Name"
option
then
press
ENTER.
The
Keyboard
menu
appears.
e.g.,
If
you
select
"Title
Name"
on
Title
List-Original
menu.
3
Enter
a
name
for
the
title.
Use
vVbBto
select
a
character
then
press
ENTER
to
confirm
your
selection.
Refer
step
5
as
shown
on
page
28
(Disc
Label).
4
Choose
OK
then
press
ENTER
to
save
the
name
and
return
to
the
previous
menu
screen.
5
Press
RETURN
(O)
repeatedly
to
exit
the
menu.
otes
?
Names
can
be
up
to
32
characters
long.
?
For
discs
formatted
on
a
different
DVD
Recorder,
you
will
see
only
a
limited
character
set.
?
When
recording
in
DVD-R,
DVD+R
or
DVD+RW,
the
entered
name
is
displayed
on
the
DVD
player
only
after
finalizing.
Combining
Two
Chapters
Into
One
Use
this
function
to
combine
two
adjacent
Playlist
or
Original
chapters
into
one.
1
On
the
Chapter
List
menu,
select
the
second
chapter
of
the
two
chapters
you
want
to
com-
bine
then
press
ENTER.
Chapter
List
options
appears
on
the
left
side
of
the
menu.
e.g.,
If
you
select
"Combine"
on
Chapter
List-
Original
menu.
3
Use
v
/
V
to
select
"Combine"
option
then
press
ENTER.
After
pressing
ENTER,
the
new,
updated
menu
is
displayed.
4
Repeat
steps
1
-
3
to
continue
to
combine
from
the
menu.
5
Press
RETURN
(O)
repeatedly
to
exit
the
menu.
ote
This
function
cannot
operate
listed
as
below;
?
If
there
is
only
one
chapter
within
the
title.
?
If
two
chapters
created
by
erasing
a
part
from
an
orig-
inal
title.
?
If
two
chapters
created
from
different
titles.
?
If
two
chapters
created
by
moving
an
order
from
an
original
title.
+R
+RW
VR
+R
+RW
Video
VR
0
1
23456789
ABCDEFGH
I
J
KLMNOPQRST
UVWXYZ
TITLE
2
English/Latin
Capital
Language
OK
Cancel
Space
Delete
Protect
Edit
Playlist
Add
Dubbing
Title
Name
Delete
Part
Play
Title
Delete
Combine
Playlist
Add

Title
and
Chapter
Editing
(Continued)
Moving
a
Playlist
Chapter
Use
this
function
to
re-arrange
the
playing
order
of
Playlist
chapters
on
the
Title
List-Playlist
menu.
1
Press
MENU/LIST
repeatedly
to
display
Title
List-Playlist
menu.
To
display
the
Chapter
List-Playlist
menu,
refer
to
"Using
the
Chapter
List-Playlist"
on
page
50.
ote
This
function
is
not
available
if
there
is
only
one
chapter.
2
Select
a
chapter
from
the
Chapter
List-Playlist
menu.
3
Press
ENTER.
Chapter
List-Playlist
options
appears
on
the
left
side
of
the
screen.
4
Use
v
/
V
to
select
"Move"
from
Playlist
options
then
press
ENTER.
5
Use
vVbBto
choose
the
place
you
want
to
move
the
chapter
to
then
press
ENTER.
After
pressing
ENTER,
the
new,
updated
menu
is
displayed.
6
Repeat
steps
2
-
5
to
continue
to
move
from
the
menu.
7
Press
RETURN
(O)
repeatedly
to
exit
the
menu.
Protect
a
Title
Use
this
function
to
protect
accidental
recording,
editing
or
deleting
of
the
title.
1
Press
MENU/LIST
to
display
Title
List
menu.
2
Use
vVbBto
choose
a
title
you
want
to
protect
then
press
ENTER.
Options
appears
on
the
left
side
of
the
screen.
3
Select
"Protect"
option
on
the
options.
e.g.,
If
you
select
"Protect"
on
Title
List-Original
menu.
4
Press
ENTER
to
confirm.
The
lock
mark
will
appears
on
the
title's
thumbnail.
ip
If
you
select
a
title
that
has
already
been
protected
on
the
Title
List
menu,
you
can
'unprotect'
it
by
choosing
"Unprotect"
from
the
Title
List
menu
options.
After
doing
this,
you
can
edit
and/or
delete the
title.
+R
+RW
VR
VR
64
Play
Chapter
Delete
Protect
Edit
Playlist
Add
Dubbing
Original
LIST
Close
Select
1/3
Chapter
List
TITLE
1
12/07/2004
Tue
0:25:20
Playlist
Play
Title
Delete
Move
Combine

Title
and
Chapter
Editing
(Continued)
Hide
a
Title/Chapter
Use
this
function
to
hide
a
title/chapter
on
the
Title
List
or
Chapter
List
menu.
1
On
the
Title
List
or
Chapter
List
menu,
use
vVbBto
choose
a
title
or
chapter
you
want
to
hide
then
press
ENTER.
Options
appears
on
the
left
side
of
the
screen.
2
Select
'Hide'
option
on
the
options.
e.g.,
If
you
select
"Hide"
on
Title
List
menu.
3
Press
ENTER
to
confirm.
The
title's
thumbnail
will
be
dim.
ip
If
you
select
a
title
that
has
already
been
dim
on
the
Title
List
menu,
you
can
'show'
it
by
choosing
"Show"
from
the
Title
List
menu
options.
After
doing
this,
you
can see
the
title.
Divide
One
Title
Into
Two
Use
this
command
to
split
a
title
up
into
two
new
titles.
1
On
the
Title
List
menu,
select
a
title
you
want
to
divide
then
press
ENTER.
The
menu
options
appears
on
the
left
side
of
the
screen.
2
Select
"Divide"
from
the
Title
List
menu
options
and
press
ENTER.
Title
Edit-Divide
menu
appears
and
goes
into
STOP
mode.
"Divide"
option
is
highlighted.
3
Use
PLAY,
PAUSE/STEP,
FF,
REW,
and
Slow
Motion
playback
to
find
the
dividing
point.
The
segment
is
indicated
in
yellow
on
the
Progress
Bar.
4
Press
ENTER
at
the
point
of
the
section
you
want
to
divide
the
title.
The
Done
option
is
selected.
To
cancel
the
dividing
point,
select
"Cancel"
using
v
/
V
then
press
ENTER.
5
Press
ENTER
to
fix
the
dividing
point.
The
title
is
divided
into
two
new
titles.
It
take
up
to
4
minutes
to
divide.
+RW
+R
+RW
EDITING
65
Play
Full
Play
Chapter
Delete
Protect
Edit
Dubbing
Title
Name
Divide
Hide
Play
Full
Play
Chapter
Delete
Protect
Edit
Dubbing
Title
Name
Divide
Hide
Title
Edit
Move
Point
Select
Divide
-Divide
Cancel
Done
00:00:00
#1
Thumbnail
TITLE
2
12/07
12:00:00
Close
The
first
title's
thumbnail
Current
picture
The
second
title's
thumbnail

Title
and
Chapter
Editing
(Continued)
Clean-up
Recording
You
can
simply
clean-up
(erase)
all
contents
on
the
disc
then
start
recording
from
the
first
section
of
the
disc.
The
disc
format
is
not
changed.
1
Switch
on
the
recorder
and
load
a
recordable
disc.
2
Press
and
hold
z
REC
button
for
more
than
3
seconds
in
Tuner
mode.
The
message
will
appears
on
the
TV
screen.
3
Use
b
/
B
to
select
"Yes"
then
press
ENTER.
Recording
will
start.
(The
REC
indicator
lights
in
the
display
window.)
Overwrite
Recording
To
overwrite
a
new
video
recording
to
a
previously
recorded
title,
follow
these
steps.
This
feature
is
not
available
on
DVD+R,
which
always
record
at
the
end
of
the
Disc.
1
Select
input
source
you
want
to
record
(chan-
nel,
AV1,
AV2
or
DV).
2
Press
MENU/LIST
to
display
the
Title
List
menu.
3
Use
vVbBto
choose
a
title
you
want
to
over-
write.
4
Press
z
REC
to
start
overwrite
recording.
Overwrite
recording
is
started
from
the
start
point
of
the
title.
5
Press
STOP
(x)
to
stop
the
overwrite
recording.
The
new
title
is
created
and
updated
menu
is
dis-
played.
otes
This
function
is
not
available
with
a
protected
title.
If
the
overwriting
is
elapsed
more
than
the
recording
length
of
the
current
title,
the
next
title
is
overwriten.
But
if
next
title
is
protected,
the
overwriting
is
stopped
at
the
starting
point
of
the
title.
If
the
selected
title's
recording
length
is
less
than
10
seconds,
the
next
title
is
overwriten.
But
if
next
title
is
protected,
the
overwriting
is
impossible.
Viewing
Title
List
menu
displayed
on
other
DVD
recorders
or
players
You
can
view
the
Title
List
menu
displayed
on
the
another
DVD
player
that
is
capable
of
playing
DVD+RW
or
DVD+R
discs.
1
Insert
DVD+R
or
DVD+RW
disc
recorded
already.
2
Press
TITLE.
Title
List
menu
will
appear
as
below.
ip
You
can
remove
the
Title
List
menu
by
pressing
STOP
(x).
3
To
play
back
a
title,
select
the
title
you
want
then
press
ENTER
or
B
(PLAY).
Playing
Your
Recordings
on
Other
DVD
Players
(Finalizing
a
Disc)
Most
regular
DVD
players
can
play
finalized
discs
recorded
in
Video
mode,
finalized
DVD+R
or
DVD+RW.
A
small
number
of
players
can
also
play
DVD-RW
discs
recorded
in
VR
mode,
finalized
or
not.
Check
the
manu-
al
that
came
with
the
other
player
to
check
what
kinds
of
discs
it
will
play.
Finalizing
'fixes'
the
recordings
and
editings
in
place
so
that
the
disc
can
be
played
on
a
regular
DVD
player
or
computer
equipped
with
a
suitable
DVD-ROM
drive.
Finalizing
a
Video
mode
disc
creates
a
menu
screen
for
navigating
the
disc.
This
is
accessed
by
pressing
MENU/LIST
or
TITLE.
To
finalize
a
disc,
refer
to
"Disc
Finalize"
on
page
33.
otes
Unfinalized
DVD+RW
is
playable
on
regular
DVD
players.
The
edited
contents
of
DVD+RW
disc
is
compatible
on
regular
DVD
players
only
after
finalizing.
Any
edited
contents
of
the
DVD+R
disc
are
not
be
compatible
on
regular
DVD
players.
(Hide,
chapter
combine,
added
chapter
mark,
etc.)
+R
+RW
+RW
+RW
VR
Video
66
Yes
Delete
all
titles
and
record?
No
TITLE
1
10/12
0:25:20
TITLE 2
10/14
0:5:12
TITLE
3
10/16
0:2:34
DVD+RW
TITLE
4
10/17
0:6:06
TITLE
5
10/17
0:6:06
TITLE
6
10/17
0:6:06
Title
List
1/2
DVD+RW
57min
REC
Free
SP
Close
Info.
DISPLAY
Select
TITLE
1
10/12
0:25:20
TITLE 2
10/14
0:5:12
TITLE
3
10/16
0:2:34
1/4
TITLE
4
10/17
0:6:06
Title
List

Controlling
Your
TV
with
the
Supplied
Remote
You
can
control
the
sound
level,
input
source,
and
power
switch
of
your
LG
TV
with
the
supplied
remote.
You
can
control
your
TV
using
the
buttons
below.
By
pressing
You
can
POWER
Turn
the
TV
on
or
off.
CHANNEL(v
/
V)
Scans
up
or
down
through
memorized
channels.
VOLUME
+/--
Adjust
the
volume
of
the
TV.
TV
INPUT
Switch
the
TV's
input
source
between
the
TV
and
other
input
sources.
MUTE
Turns
on
or
off
TV
sound.
ote
Depending
on
the
unit
being
connected,
you
may
not
be
able
to
control
your
TV
using
some
of
the
buttons.
Controlling
other
TVs
with
the
remote
You
can
control
the
sound
level,
input
source,
and
power
switch
of
non-LG
TVs
as
well.
If
your
TV
is
listed
in
the
table
below,
set
the
appropriate
manufacturer
code.
1.
While
holding
down
TV
POWER
button,
press
the
number
buttons
to
select
the
manufacturer
code
for
your
TV
(Refer
to
table
on
the
right
col-
umn).
2.
Release
TV
POWER
button.
Code
numbers
of
controllable
TVs
If
more
than
one
code
number
is
listed,
try
entering
them
one
at
a
time
until
you
find
the
one
that
works
with
your
TV.
otes
Depending
on
your
TV,
some
or
all
buttons
may
not
function
on
the
TV,
even
after
entering
the
correct
manufacturer
code.
If
you
enter
a
new
code
number,
the
code
number
previously
entered
will
be
erased.
When
you
replace
the
batteries
of
the
remote,
the
code
number
you
have
set
may
be
reset
to
the
default
setting.
Set
the
appropriate
code
number
again.
REFERENCE
67
CARD
TV
Control
Buttons
Manufacturer
Code
Number
ADMIRAL
16,33,37,44,45
AIWA
70
AKAI
01
AMARK
09
AOC
01
BELL
&
HOWELL
33
BROKSONIC
18,19
CANDLE
51
CCE
07
CENTURION
08
CINERAL
43
CITIZEN
49,50,51,52,53,54,55
CORONADO
09
CROWN
09
CURTIS
MATHES
01,03,08,33,35,37,44
DAEWOO
16,38,39,40,41,42,43
DAYTRON
01,08
EMERSON
01,09,16,17,18,19
FISHER
28,29
FUNAI
46,47
GENERAL
ELECTRIC
03,10,11,13,37,44
GRADIENTE
01,56,57,63,67
HITACHI
09,14,15,43
JC
PENNEY
01,08,10,27,35
JVC
20,21,63,67
KIOTE
43
KMC
09
KTV
01,08,09,31
LG
(GOLDSTAR)
01,07,08,09,35,39,40
LODGENET
33
LOGIK
33
LXI
09,24,25,26,27,28,29
MAGNAVOX
01,02,04,05,06,
07,08,09,20,
34,35,43,51,61,62,65
MAJESTIC
33
MARANTZ
01,32
MEMOREX
33
MGA/MITSUBISHI
01,08,32,34
Manufacturer
Code
Number
MONTGOMERY
01,06,08,09
WARD
23,24,32,33,34
NEC
01,08
NOBLEX
07
PACKARD
BELL
43
PANASONIC
07,11,13,25,35,36
PHILCO
01,06,07,08,09,
15,38,43,58
PHILIPS
06,07,43,61,62,65
PIONEER
30
PORTLAND
09
PROSCAN
03,37,44
QUASAR
11,13
RADIO
SHACK
16,17,23
RCA
01,03,37,44,69
REALISTIC
16,17,23
SAMPO
08
SAMSUNG
01,08,09,25,68
SANYO
28,29
SCOTT
01,08
SEARS
09,25,26,27,28,29
SEMP
64
SHARP
09,22,23,24,60,66
SIGNATURE
2000
01,06,08,09,10,
23,24,33,34
SONY
12,62
SOUNDESIGN
51
SYLVANIA
01,04,05,06,07,
08,35,51
SYMPHONIC
46,47
TATUNG
11
TEKNIKA
07,09,16,33,51
TELERENT
09,33
THOMSON
69
YORX
08
TOSHIBA
01,25,26,27,64
WARDS
01,06,08,09,10,33,34
XR1000
48
ZENITH
01,
02,33,59

Other
Operations
Presetting
the
Radio
Stations
You
can
preset
50
stations
for
FM
and
AM
(MW).
Before
tuning,
make
sure
that
you
have
turned
down
the
vol-
ume.
1
Press
FM/AM
on
the
remote
control
until
FM
or
AM
(MW)
appears
in
the
display
window.
2
And
then
every
time
you
press
FM/AM,
FM
and
AM
(MW)
changes
alternately.
3
Press
and
hold
TUN.-
or
TUN.+
on
the
remote
control
for
about
three
seconds
until
the
frequency
indication
starts
to
change,
then
release.
Scanning
stops
when
the
Recorder
Combi
Receiver
tunes
in
a
station.
"TUNED"
and
"S."
(for
stereo
program)
appear
in
the
display
window.
4
Press
ENTER
on
the
remote
control.
A
preset
number
will
flash
in
the
display
window.
5
Press
TRK/PRESET-
or
TRK/PRESET-
on
the
remote
control
to
select
the
preset
number
you
want.
6
Press
ENTER
on
the
remote
control.
The
station
is
stored.
7
Repeat
steps
3
to
6
to
store
other
stations.
To
tune
in
a
station
with
a
weak
signal
Press
TUN.-
or
TUN.+
repeatedly
in
step
3
to
tune
in
the
station
manually.
To
clear
all
the stored
stations
Press
and
hold
ENTER
for
about
two
seconds
and
"MEM
CLEAR"
is
appeared
in
the
display
window
and
then
press
ENTER
again,
the
stations
are
cleared.
If
you
have
accidentally
entered
into
the
"MEM
CLEAR"
mode
and
you
do
not
wish
to
clear
the
mem-
ory,
do
not
press
any
key.
After
a
few
seconds,
the
"MEM
CLEAR"
display
will
go
off
by
itself
and
change
to
normal
mode.
68

Other
Operations
(Continued)
Listening
to
the
Radio
Preset
radio
stations
in
the
Recorder
Combi
Receiver's
memory
first
(see
"Presetting
radio
stations"
on
the
left).
1
Press
FM/AM
until
AM
(MW)
or
FM
appears
in
the
display
window.
The
last
received
station
is
tuned
in.
2
Press
TRK/PRESET-
or
TRK/PRESET-
repeatedly
on
the
remote
control
to
select
the
preset
station
you
want.
Each
time
you
press
this
button,
the
Recorder
Combi
Receiver
tunes
in
one
preset
station
at
a
time.
3
Adjust
the
volume
by
rotating
VOLUME
on
the
front
panel
or
by
pressing
VOLUME
+
or
-
on
the
remote
control
repeatedly.
To
turn
off
the
radio
Press
POWER
to
turn
the
Recorder
Combi
Receiver
off
or
select
another
function
mode
(DVD,
AV
1,
AV
2
etc.,).
To
listen
to
non-preset
radio
stations
Use
manual
or
automatic
tuning
in
step
2.
For
manual
tuning,
press
TUN.-
or
TUN.+
on
the
remote
control
repeatedly.
For
automatic
tuning,
press
and
hold
TUN.-
or
TUN.+
on
the
remote
control
for
about
three
sec-
onds
on
the
remote
control.
For
your
reference
If
an
FM
program
is
noisy
Press
MO./ST.
on
the
front
panel
so
that
"ST"
dis-
appears
in
the
display
window.
There
will
be
no
stereo
effect,
but
the
reception
will
improve.
Press
this
button
again
to
restore
the
stereo
effect.
To
improve
reception
Reorient
the
supplied
antennas.
REFERENCE
69

Language
Code
and
Country
Code
List
70
Country
Code
Afghanistan
AF
Argentina
AR
Australia
AU
Austria
AT
Belgium
BE
Bhutan
BT
Bolivia
BO
Brazil
BR
Cambodia
KH
Canada
CA
Chile
CL
China
CN
Colombia
CO
Congo
CG
Costa
Rica
CR
Croatia
HR
Czech
Republic
CZ
Denmark
DK
Ecuador
EC
Egypt
EG
El
Salvador
SV
Country
Code
Ethiopia
ET
Fiji
FJ
Finland
FI
France
FR
Germany
DE
Great
Britain
GB
Greece
GR
Greenland
GL
Islands
HM
Hong
Kong
HK
Hungary
HU
India
IN
Indonesia
ID
Israel
IL
Italy
IT
Jamaica
JM
Japan
JP
Kenya
KE
Kuwait
KW
Libya
LY
Luxembourg
LU
Country
Code
Malaysia
MY
Maldives
MV
Mexico
MX
Monaco
MC
Mongolia
MN
Morocco
MA
Nepal
NP
Netherlands
NL
Netherlands
Antilles
AN
New
Zealand
NZ
Nigeria
NG
Norway
NO
Oman
OM
Pakistan
PK
Panama
PA
Paraguay
PY
Philippines
PH
Poland
PL
Portugal
PT
Romania
RO
Russian
Federation
RU
Country
Code
Saudi
Arabia
SA
Senegal
SN
Singapore
SG
Slovak
Republic
SK
Slovenia
SI
South
Africa
ZA
South
Korea
KR
Spain
ES
Sri
Lanka
LK
Sweden
SE
Switzerland
CH
Taiwan
TW
Thailand
TH
Turkey
TR
Uganda
UG
Ukraine
UA
United
States
US
Uruguay
UY
Uzbekistan
UZ
Vietnam
VN
Zimbabwe
ZW
Country
Codes
Choose
a
country
code
from
this
list.
Language
Code
Abkhazian
6566
Afar
6565
Afrikaans
6570
Albanian
8381
Ameharic
6577
Arabic
6582
Armenian
7289
Assamese
6583
Aymara
6588
Azerbaijani
6590
Bashkir
6665
Basque
6985
Bengali;
Bangla
6678
Bhutani
6890
Bihari
6672
Breton
6682
Bulgarian
6671
Burmese
7789
Byelorussian
6669
Cambodian
7577
Catalan
6765
Chinese
9072
Corsican
6779
Croatian
7282
Czech
6783
Danish
6865
Dutch
7876
English
6978
Esperanto
6979
Estonian
6984
Faroese
7079
Language
Code
Fiji
7074
Finnish
7073
French
7082
Frisian
7089
Galician
7176
Georgian
7565
German
6869
Greek
6976
Greenlandic
7576
Guarani
7178
Gujarati
7185
Hausa
7265
Hebrew
7387
Hindi
7273
Hungarian
7285
Icelandic
7383
Indonesian
7378
Interlingua
7365
Irish
7165
Italian
7384
Japanese
7465
Javanese
7487
Kannada
7578
Kashmiri
7583
Kazakh
7575
Kirghiz
7589
Korean
7579
Kurdish
7585
Laothian
7679
Latin
7665
Latvian,
Lettish
7686
Language
Code
Lingala
7678
Lithuanian
7684
Macedonian
7775
Malagasy
7771
Malay
7783
Malayalam
7776
Maltese
7784
Maori
7773
Marathi
7782
Moldavian
7779
Mongolian
7778
Nauru
7865
Nepali
7869
Norwegian
7879
Oriya
7982
Panjabi
8065
Pashto,
Pushto
8083
Persian
7065
Polish
8076
Portuguese
8084
Quechua
8185
Rhaeto-Romance
8277
Rumanian
8279
Russian
8285
Samoan
8377
Sanskrit
8365
Scots
Gaelic
7168
Serbian
8382
Serbo-Croatian
8372
Shona
8378
Sindhi
8368
Language
Code
Singhalese
8373
Slovak
8375
Slovenian
8376
Somali
8379
Spanish
6983
Sudanese
8385
Swahili
8387
Swedish
8386
Tagalog
8476
Tajik
8471
Tamil
8465
Tatar
8484
Telugu
8469
Thai
8472
Tibetan
6679
Tigrinya
8473
Tonga
8479
Turkish
8482
Turkmen
8475
Twi
8487
Ukrainian
8575
Urdu
8582
Uzbek
8590
Vietnamese
8673
Volapuk
8679
Welsh
6789
Wolof
8779
Xhosa
8872
Yiddish
7473
Yoruba
8979
Zulu
9085
Language
Codes
Use
this
list
to
input
your
desired
language
for
the
following
initial
settings:
Disc
Audio,
Disc
Subtitle,
Disc
Menu.

REFERENCE
71
Troubleshooting
Check
the
following
guide
for
the
possible
cause
of
a
problem
before
contacting
service.
Symptom
No
power.
No
picture.
No
sound.
Playback
picture
is
poor.
Recorder
Combi
Receiver
does
not
start
playback.
Picture
from
external
input
is
distorted
Some
channels
are
skipped
over
when
using
CH(v/V)
Picture
or
sound
of
broadcasting
channel
is
weak
or
missing.
Camcorder
image
not
shown.
Camcorder
image
via
A/V
input
or
DV
IN
to
Recorder
Combi
Receiver
is
not
shown
on
TV
screen.
Can't
play
disc
recorded
on
this
Recorder
Combi
Receiver
on
another
DVD
player.
Cause
The
power
cord
is
disconnected.
The
TV
is
not
set
to
receive
Recorder
Combi
Receiver
signal
output.
The
video
cable
is
not
connected
securely.
The
TV
power
is
turned
off.
The
equipment
connected
with
the
audio
cable
is
not
set
to
receive
Recorder
Combi
Receiver
signal
output.
The
audio
cables
are
not
connected
securely.
The
power
of
the
equipment
connected
with
the
audio
cable
is
turned
off.
The
audio
connecting
cord
is
damaged.
The
disc
is
dirty.
Tape
heads
are
dirty.
Tape
is
a
rental
or
was
recorded
on
another
VCR.
No
disc
is
inserted.
No
tape
is
inserted.
An
unplayable
disc
is
inserted.
The
disc
is
placed upside
down.
The
disc
is
not
placed
within
the
guide.
The
disc
is
dirty.
The
Movie
Rating
level
is
set.
The
video
signal
from
the
external
compo-
nent
is
copy-protected.
The
skipped
channels
were
deleted
with
the
CH.
Add/Del
feature.
Antenna
or
cables
are
loose.
Wrong
Tuning
Band
is
selected
in
the
Recorder
Combi
Receiver
Setup
menu.
Camcorder
is off.
Recorder
Combi
Receiver's
source
is
not
set
to
AV1,
AV2
or
DV
IN.
The
disc
was
recorded
in
Video
mode.
Some
players
will
not
play
even
a
finalized
disc
recorded
in
Video
mode.
The
disc
was
recorded
in
VR
mode.
Discs
recorded
with
copy-once
material
can-
not
be
played
on
other
players.
Solution
Plug
the
power
cord
into
the
wall
outlet
securely.
Select
the
appropriate
video
input
on
the
TV
so
the
picture
from
the
Recorder
Combi
Receiver
appears
on
the
TV
screen.
Connect
the
video cable
securely.
Turn
on
the
TV.
Select
the
correct
input
mode
on
the
audio
receiver
so
you
can
listen
to
the
sound
from
the
Recorder
Combi
Receiver.
Connect
the
audio
cable
securely.
Turn
on
the
equipment
connected
with
the
audio
cable.
Replace
it
with
a
new
one.
Clean
the
disc.
Clean
video
heads.
Use
v/V
for
manual
tracking
adjustment
while
tape
is
playing.
Insert
a
disc
or
tape.
(Check
that
the
disc
indicator
on
the
front
panel
display
is
lit.)
Insert
a
playable
disc.
(Check
the
disc
type,
color
system,
and
regional
code.)
Place
the
disc
with
the
playback
side
down.
Place
the
disc
on
the
disc
tray
correctly
inside
the
guide.
Clean
the
disc.
Cancel
the
Movie
Rating
function
or
change
the
rating
level.
You
cannot
connect
via
the
Recorder
Combi
Receiver.
Connect
the
component
directly
to
your
TV.
Use
the
CH.
Add/Del
feature
to
restore
chan-
nels.
See
"To
Add
or
Erase
Channels
from
Memory"
on
page
27.
Tighten
connections
or
replace
cable.
Try
"Tuning
Band
Select"
options;
see
page
26
for
details.
Turn
camcorder
on
and
operate
properly.
Use
INPUT
to
select
AV
input
channel
(AV1,
AV2
or
DV
IN).
Finalize
the
disc;
see
page
33.
No
solution.
The
other
player
must
be
RW
compatible
in
order
to
play
it.
No
solution.

Troubleshooting
(Continued)
72
Symptom
Cannot
record
or
did
not
record
successfully.
Timer
Recording
not
possi-
ble.
Stereo
Audio
Record
and/or
Playback
not
pres-
ent.
Remote
control
does
not
work
properly.
Radio
stations
cannot
be
tuned
in.
Cause
The
remaining
blank
space
on
the
disc
is
insufficient.
The
source
you
are
trying
to
record
is
copy-
protected.
When
setting
the
recording
channel,
the
channel
is
tuned
on
the
TV's
own
tuner.
When
recording
to
a
Video
mode
disc,
pro-
grams
that
are
copy-once
protected
cannot
be
recorded.
Clock
in
Recorder
Combi
Receiver
is
not
set
to
correct
time.
Timer
has
been
programmed
incorrectly.
TIMER
indicator
light
does
not
appear
after
programming
timer.
TV
is
not
Stereo-compatible.
Broadcast
program
is
not
in
stereo
format.
Recorder
Combi
Receiver
A/V
Out
jacks
are
not
connected
to
TV
A/V
In
jacks.
Recorder
Combi
Receiver Audio/Video
Out
is
not
selected
for
viewing
at
the
TV.
Recorder
Combi
Receiver's
TV
audio
chan-
nel
is
set
to
SAP
or
MONO.
The
Remote
Control
is
not
pointed
at
the
remote
sensor
of
the
Recorder
Combi
Receiver.
The
Remote
Control
is
too
far
from
the
Recorder
Combi
Receiver.
There
is
an
obstacle
in
the
path
of
the
Remote
Control
and
the
Recorder
Combi
Receiver.
The
batteries
in
the
Remote
Control
are
weak
or
dead.
The
antenna
is
positioned
or
connected
poorly.
The
signal
strength
of
the
stations
is
too
weak
(when
tuning
in
with
automatic
tuning).
No
stations
have
been
preset
or
preset
sta-
tions
have
been
cleared
(when
tuning
by
scanning
preset
stations).
Solution
Use
another
disc.
You
cannot
record the
source.
Select
the
channel
on
the
Recorder
Combi
Receiver's
built-in
TV
tuner.
Use
a
VR
mode
formatted
disc
for
copy-once
material.
Set
clock
to
correct
time.
See
"Auto
Clock
Set"
or
"Manual
Clock
Set"
on
page
27.
Reprogram
Timer.
See
"Timer
Recording"
on
page
46.
Reprogram
Timer.
No
solution.
No
solution.
Make
A/V
connections.
Stereo
is
available
only
via
A/V
output
from
Recorder
Combi
Receiver.
Select
AUX
or
A/V
source
as
TV
input.
Set
TV
audio
channel
mode
to
Stereo.
See
"Changing
TV
Audio
Channel"
on
page
35.
Point
the
Remote
Control
at
the
remote
sen-
sor
of
the
Recorder
Combi
Receiver.
Operate
the
Remote
Control
within
23
ft
(7
m).
Remove
the
obstacle.
Replace
the
batteries
with
new
ones.
Connect
the
antenna
securely.
Adjust
the
antennas
and
connect
an
external
antenna
if
necessary.
Tune
in
the
station
manually.
Preset
the
stations
(page
68).
Reset
the
Recorder
Combi
Receiver
If
you
observe
any
of
the
following
symptoms...
When
the
Recorder
Combi
Receiver
is
plugged
in,
but
the
power
will
not
turn
on
or
off.
When
the
display
window
does
not
working.
When
the
Recorder
Combi
Receiver
does
not
operate
normally.
You
can
reset
the
Recorder
Combi
Receiver
as
follows
:
Press
and
hold
the
POWER
button
for
more
than
five
seconds.
This
will
force
the
Recorder
Combi
Receiver
to
power
off.
Press
the
POWER
button
again
to
turn
the
Recorder
Combi
Receiver
back
on.
Unplug
the
power
cord
and
then
plug
the
power
cord
again
after
more
than
five
seconds.

Specifications
REFERENCE
73
General
Power
requirements
AC
120V,
60
Hz
Power
consumption
35W
Dimensions
(approx.)
435
X
81
X
358
mm
(17.1
x
3.2
x
14.1
inches)
(w
x
h
x
d)
Mass
(approx.)
5.54
kg
(12.21
lbs)
Operating
temperature
5˚C
to
35˚C
(41˚F
to
95˚F)
Operating
humidity
5
%
to
90
%
Signal
system
NTSC
Recording
Recording
format
DVD
VideoRecording,
DVD-VIDEO
Recordable
discs
DVD-ReWritable,
DVD-Recordable,
DVD+ReWritable,
DVD+Recordable
Recordable
time
DVD
;
Approx.
1
hour
(XP
mode),
2
hours
(SP
mode),
4
hours
(LP
mode),
6
hours
(EP
mode)
VCR
;
SP:
2
HOURS
(T-120),
SLP:
6
HOURS
(T-120)/8
HOURS
(T-160)
Video
recording
format
Sampling
frequency
27MHz
Compression
format
MPEG
2
Audio
recording
format
Sampling
frequency
48kHz,
96kHz
Compression
format
Dolby
Digital
VCR
Specifications
Head
system
Four
head
helical
scan
azimuth
system
Timer
12-hour
display
type
with
AM,
PM
Tape
speed
SP:
33.35
mm/sec,
LP:
16.67
mm/sec,
SLP:
11.12
mm/sec
Tape
width
12.7
mm
Rewind
time
About
65
seconds
(T-120)
Antenna
75
ohms
(VHF/UHF)
VHF
output
signal
Channel
3
or
4
(Switchable)
Channel
coverage
VHF:
2-13,
UHF:
14-69,
CATV:
1-125
(4A,
A-W,
W+1
-
W+84,
A-5
-
A-1)
Frequency
range
20Hz
to
20kHz
Signal-to-noise
ratio
43dB
Dynamic
range
88
dB
Channel
separation
60
dB
DVD
Specifications
Laser
system
Semiconductor
laser,
wavelength
650
nm
Frequency
response
DVD
(PCM
48
kHz):
8
Hz
to
22
kHz,
CD:
8
Hz
to
20
kHz
Signal-to-noise
ratio
More
than
95dB
Harmonic
distortion
Less
than
0.008%
Dynamic
range
More
than
90
dB
Tuner
Specifications
Tuning
Range
(FM)
87.5
-
108
MHz
Intermediate
Frequency
(FM)
10.7
MHz
Signal-to-noise
ratio
60
dB
(Mono)
Tuning
Range
(AM)
530
-
1,720
kHz
Intermediate
Frequency
(AM)
450
kHz
Antenna
Wire
antenna
(FM)
Loop
antenna
(AM)

Specifications
(Continued)
74
Amplifier
Power
consumption
110W
Stereo
mode
125W
+
125W
(4Ω
at
1
kHz,
THD
10
%)
Surround
mode
Front:
125W
+
125W
(THD
10
%)
Center*:
125W
Surround*:
125W
+
125W
(4Ω
at
1
kHz,
THD
10
%)
Subwoofer*:
180W
(3Ω
at
30
Hz,
THD
10
%)
Max
Power
Front/Center/Surround:
180W
Woofer:
300W
Inputs
ANTENNA
IN
Antenna
or
CATV
input,
75
ohms
VIDEO
IN
(AV1,2)
1.0
Vp-p
75
ohms,
sync
negative,
RCA
jack
x
2
AUDIO
IN
(AV1,2)
-6
dBm
more
than
47
kohms,
RCA
jack
(L,
R)
x
2
S-VIDEO
IN
(Y)
1.0
V
(p-p),
75
Ω,
negative
sync,
Mini
DIN
4-pin
x
1
(C)
0.286
V
(p-p)
75
Ω
OPTICAL
IN
Optical
connector
x
1
DV
IN
4
pin
(i.LINK/IEEE
1394
standard)
Outputs
VIDEO
OUT
1
Vp-p
75
Ω,
sync
negative,
RCA
jack
x
1
S-VIDEO
OUT
(Y)
1.0
V
(p-p),
75
Ω,
negative
sync,
Mini
DIN
4-pin
x
1
(C)
0.286
V
(p-p)
75
Ω
COMPONENT
VIDEO
OUT
(Y)
1.0
V
(p-p),
75
Ω,
negative
sync,
RCA
jack
x
1
(PROGRESSIVE
SCAN)
(Pb)/(Pr)
0.7
V
(p-p),
75
Ω,
RCA
jack
x
2
Audio
output
(analog
audio)
1.1
Vrms
(1
kHz,
-6
dB),
600
Ω,
RCA
jack
(L,
R)
x
2
RF
OUT
Channel
3
or
4
(Switchable)
Accessories:
Video
cable
x
1,
Audio
cable
x
1,
RF
75-ohm
Coaxial
Cable
x
1,
System
cable
x
1,
Speaker
cable
x
5,
FM
Antenna
cable
x
1,
AM
Antenna
cable
x
1,
Remote
control
x
1,
Batteries
(AAA)
x
2,
Ferrite
core
x
1
Design
and
specifications
are
subject
to
change
without
notice.
ISpeakers
Front
(LHS-95PAF)
Type:
1
Way
2
Speaker
Impedance:
4
Ω
Frequency Response:
80
-
20,000
Hz
Sound
Pressure
Level:
85
dB/W
(1m)
Max
Input
Power:
180W
Net
Dimensions
(W
x
H
x
D):
269.5
x
1200
x
269.5
mm
Net
Weight:
2.9
kg
Satellite
(LHS-95PAS)Type:
1
Way
1
Speaker
Impedance:
4
Ω
Frequency Response:
100
-
20,000
Hz
Sound
Pressure
Level:
85
dB/W
(1m)
Max
Input
Power:
180W
Net
Dimensions(WxHxD):
120
x
223
x
151
mm
Net
Weight:
1.1
kg
Center
(LHS-95PAC)
Type:
1
Way
2
Speaker
Impedance:
4
Ω
Frequency
Response:
80
-
20,000
Hz
Sound
Pressure
Level:
85
dB/W
(1m)
Max
Input
Power:
180W
Net
Dimensions
(WxHxD):
448
x
85
x
105
mm
Net
Weight:
1.2
kg
Active
Subwoofer
(LHS-95PAA)
Type:
1
Way
1
Speaker
Impedance:
3
Ω
Frequency
Response:
35
-
1,500
Hz
Sound
Pressure
Level:
83
dB/W
(1m)
Max
Input
Power:
300W
Net
Dimensions
(WxHxD):
295
x
432
x
414
mm
Net
Weight:
14
kg
(*
Depending
on
the
sound
mode
settings
and
the
source,
there
may
be
no
sound
output.)
This
LG
Electronics
product,
will
be
repaired
or
replaced,
at
LG's
option,
if it
proves
to
be
defective
in
material
or
workmanship,
under
normal
use,
during
the
warranty
period
("Warranty
Period")
listed
below,
effective
from
the
date
("Date
of
Purchase")
of
original
consumer
purchase
of
the
product.
This
warranty
is
good
only
to
the
original
pur-
chaser
of
the
product
and
effective
only
when
used
in
the
United
States,
excluding
U.S.
Territories.
THIS
WARRANTY
IS
IN
LIEU
OF
ANY
OTHER
WARRANTIES,
EXPRESS
OR
IMPLIED,
INCLUDING
WITHOUT
LIMITATION,
ANY
WARRANTY
OF
MERCHANTABILITY
OR
FITNESS
FOR
A
PARTICULAR
PURPOSE.
TO
THE
EXTENT
ANY
IMPLIED
WARRANTY
IS
REQUIRED
BY
LAW,
IT
IS
LIMITED
IN
DURATION
TO
THE
EXPRESS
WARRANTY
PERIOD
ABOVE.
LG
ELEC-
TRONICS
WILL
NOT
BE
LIABLE
FOR
ANY
INCIDENTAL,
CONSEQUENTIAL,
INDIRECT,
SPECIAL
OR
PUNITIVE
DAMAGES
OF
ANY
NATURE,
EVEN
IF
ADVISED
OF
THE
POSSIBILITY
OF
SUCH
DAMAGES,
INCLUDING
WITHOUT
LIMITATION,
LOST
REVENUES
OR
PROFITS,
LOST
OR
CORRUPTED
PROGRAMMING
OR
DATA,
OR
ANY
OTHER
DAMAGE
WHETHER
BASED
IN
CONTRACT,
TORT
OR
OTHERWISE.
Some
states
do
not
allow
the exclusion
or
limitation
of
incidental
or
consequential
dam-
ages
or
limitation
on
how
long
an
implied
warranty
lasts,
so
the
above
exclusion
or
limitation
may
not
apply
to
you.
This
warranty
gives
you
specific
legal
rights
and
you
may
also
have
other
rights
that
may
vary
from
state
to
state.
THIS
LIMITED
WARRANTY
DOES
NOT
APPLY
TO:
?
Damages
or
operating
problems
that
result
from
shipping,
installation,
adjustment
of
user
controls,
calibration,
maintenance
or
failure
to
maintain,
or
separate
system
components;
and
?
Damages
or
operating
problems
that
result
from
normal
wear
and
tear,
misuse,
abuse,
operation
outside
environmental
specifications
or
contrary
to
the
requirements
or
precautions
in
the
Operating
Guide,
accident,
lightning
strikes
or
other
natural
causes,
unauthorized
modification
or
alteration,
incorrect
electrical
current
or
voltage,
reception
problem
caused
by
inadequate
home
antenna
or
faulty
antenna
connections,
computer
software,
institutional
or
commercial
use,
or
other
causes
not
arising
out
of
defect
in
material
or
workmanship.
Therefore,
the
cost
of
repair
or
replacement
of
such
defective
product
shall
be
borne
by
the
consumer.
CUSTOMER
INTER-ACTIVE
CENTER
NUMBERS:
WARRANTY
PERIOD:
LABOR:
90
days
from
the
Date
of
Purchase.
PARTS:
One
Year
from
the
Date
of
Purchase.
*
Parts
replaced
are
warranted
for
the
remaining
portion
of
the
original
warranty
period.
HOW
SERVICE
IS
HANDLED:
Call
1-800-243-0000
for
instructions
on
getting
the
defective
unit
repaired
or
replaced.
Please
retain
dated
sales
receipt
and
your
box
to
return
the
unit
to
LG
for
repair
or
replacement.
Shipping
both
ways
will
be
paid
by
LG
during
the
first
90
days
of
the
Warranty
Period.
During
the
remainder
of
the
Warranty
Period
(91-365days),
you pay
inbound
shipping
charges
and
LG
pays
return
shipping
charges.
Visit
our
website
at:
http://www.lgservice.com
For
nearest
Authorized
Service
Center,
Where
to
buy,
Product
Assistance,
or
Customer
Assistance
Call
1-800-243-0000
(24
hours
a
day,
365
days
per
year)
and
select
appropriate options
from
the
menu.
Or
visit
our
website
at
http://www.lgservice.com
LG
ELECTRONICS
U.S.A.,
INC.
1000
SYLVAN
AVENUE
ENGLEWOOD
CLIFFS,
NJ
P/N
:
3835RH0075D
Issue
O
Printed
in
Indonesia

