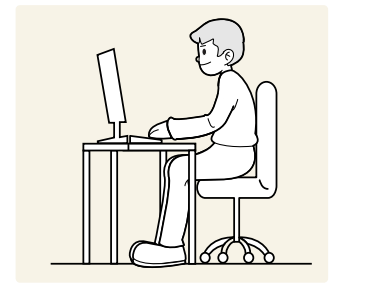
Use the product in the correct posture as follows:
• Straighten your back.
• Allow a distance of 45 to 50cm between your eye and the screen, and look slightly downward at the screen.
• Keep your eyes directly in front of the screen.
• Adjust the angle so light does not reflect on the screen.
• Keep your forearms perpendicular to your upper arms and level with the back of your hands.
• Keep your elbows at about a right angle.
• Adjust the height of the product so you can keep your knees bent at 90 degrees or more, your heels attached to the floor, and your arms lower than your heart.
• Do the Eye excercises or blink frequently, then eye fatigue will be relieved.
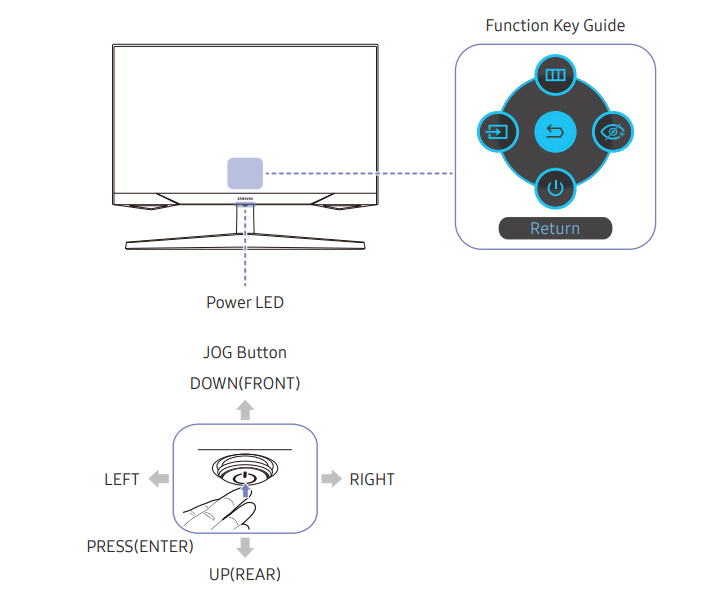
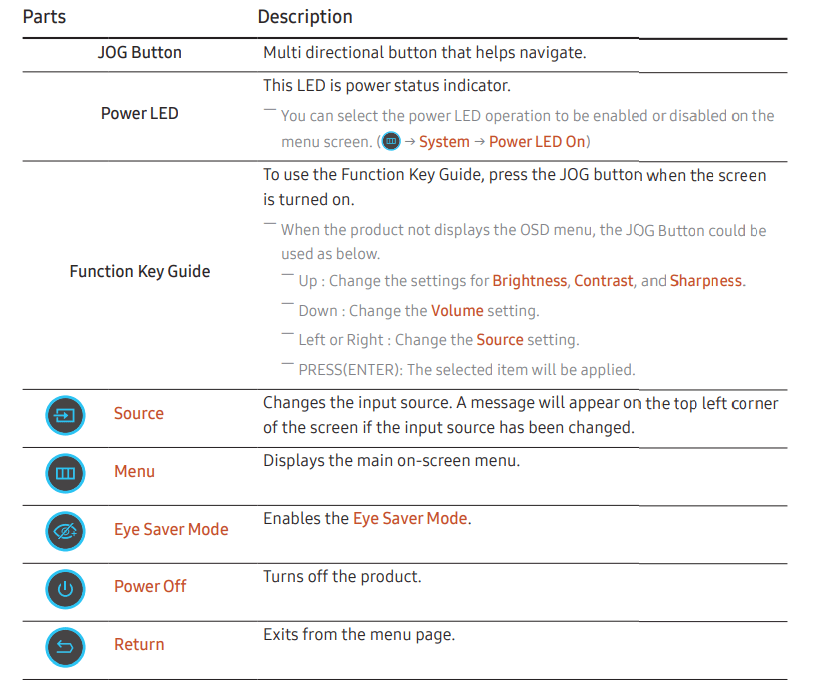
Control Panel
― The color and shape of parts may differ from what is shown. Specifications are subject to change without notice to improve quality.
Connecting and Using a Source Device
Read below before connecting the product.
1 Before connecting the product, check the shapes of both ports of the supplied signal cables and the shapes and locations of the ports on the product and external device.
2 Before connecting the product, make sure you remove the power cables from both the product and the external device to prevent damage to the product due to a short circuit or over current.
3 After all signal cables have been properly connected, connect the power cables back to the product and the external device.
4 After connecting is completed, make sure you read the manuals to acquaint yourself with the product functions, precautions and other information required to use the product properly.
― Connecting parts may differ in different products.
― Provided ports may vary depending on the product.
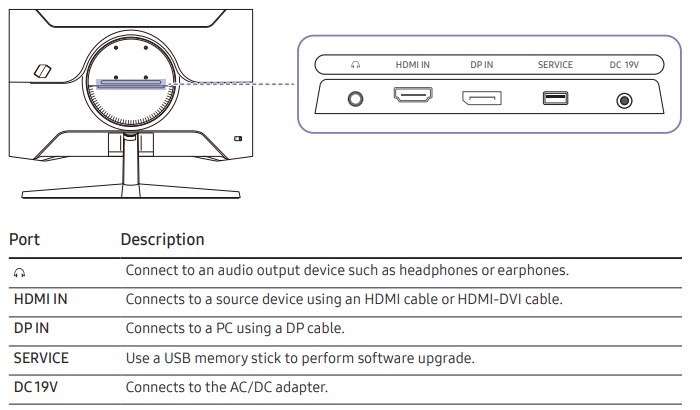
Ports
― The functions available may vary depending on the product model. The color and shape of parts may differ from what is shown. Specifications are subject to change without notice to improve quality. Refer to the actual product.
Connecting and Using a PC
Select a connection method suitable for your PC.
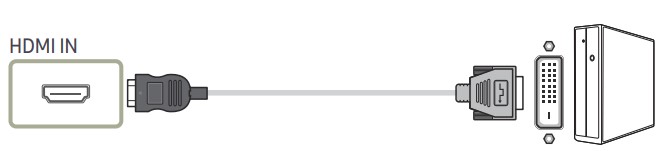
Connection Using the HDMI Cable
Connection Using an HDMI-DVI Cable
― The audio function is not supported if the source device is connected using the HDMI-DVI cable.
― The optimum resolution may not be available with an HDMI-DVI cable.
Connection Using an DP Cable
― A DP cable shorter under 1.5 m in length is recommended. Using a cable longer than 1.5 m can affect the picture quality.
― Use a VESA certified DP 1.2 cable or higher and its gender
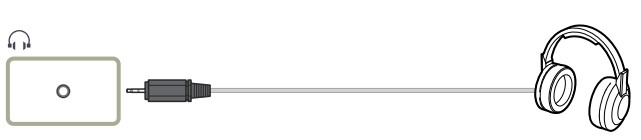
Connecting to headphones or earphones
― Use headphones or earphones when activating sound with an HDMI-HDMI or DP cable.
― The headphones or earphones jack supports only the 3 conductor tip-ring-sleeve (TRS) type
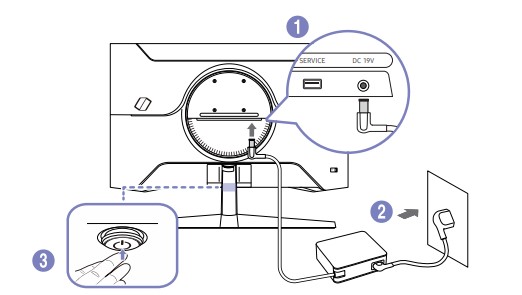
Connecting the Power
1 Connect the power cable to the AC/DC adapter. Then, connect the AC/DC adapter to the DC 19V port on the back of the product.
2 Next, connect the power cable to the power outlet.
3 Press the JOG button at the bottom of the product to turn it on.
― The input voltage is switched automatically.
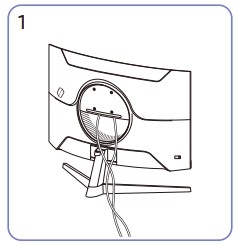
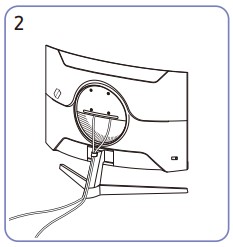
Tidying Up the Connected Cables
Connect the corresponding cables.
Put both cables in the cable holder on the stand (HOLDER-STAND CABLE) to organize the cables, as shown in the figure. Assembly is complete.
Setting Optimum Resolution
An information message about setting optimum resolution will appear if you power on the product for the first time after purchase.
Select a language on information message and change the resolution on your PC to the optimum setting.
― If the optimum resolution is not selected, the message will appear up to three times for a specified time even when the product is turned off and on again.
― If you want to set the optimum resolution for your computer, please refer to (Q&A) → “How can I change the resolution?”
― You can adjust the refresh rate according to the screen resolution by selecting Game → Refresh Rate in the OSD menu.
― To enable the maximum refresh rate, set FreeSync to On or set Refresh Rate to 144 Hz.
List of graphic cards supporting HDR10
HDR10 is accessible only on Windows 10 systems equipped with graphic cards that support Play Ready 3.0 Digital Rights Management (for protected HDR content). Use graphic cards listed below for HDR10.
NVIDIA GeForce 1000 series or higher
AMD Radeon™ RX 400 series or higher
Intel UHD Graphics 600 series or higher
― Graphic cards that support hardware-accelerated 10-bit video decoding for HDR video codecs are recommended.
Cleaning
High-glossy models can develop white stains on the surface if an ultrasonic wave humidifier is used nearby.
― Contact your nearest Samsung Customer Service Center if you want to clean the inside of the product (Service fee will be charged.)
Do not press the product screen with hands or other objects. There is a risk of damaging the screen.
― Exercise care when cleaning as the panel and exterior of advanced LCDs are easily scratched.
Take the following steps when cleaning.
1. Power off the product and PC.
2. Disconnect the power cord from the product.
― Hold the power cable by the plug and do not touch the cable with wet hands. Otherwise, an electric shock may result.
3. Wipe the product with a clean, soft and dry cloth. Wet a soft cloth in water, wing it out well, and then use the cloth to wipe the exterior of the product clean.
‒ Do not apply a cleaning agent that contains alcohol, solvent, or surfactant to the product.
‒ Do not spray water or detergent directly on the product.
4. Connect the power cord to the product when cleaning is finished.
5. Power on the product and PC.
Troubleshooting Guide
Installation issue (PC mode)
The screen keeps switching on and off.
Check the cable connection between the product and PC, and ensure the connectors are locked
Blank spaces are found on all four sides of the screen when an HDMI or HDMI-DVI cable is connected to the product and PC.
The blank spaces found on the screen have nothing to do with the product.
Blank spaces on the screen are caused by the PC or graphics card. To resolve the problem, adjust the screen size in the HDMI or DVI settings for the graphics card.
If the graphics card settings menu does not have an option to adjust the screen size, update the graphics card driver to the latest version.
(Please contact the graphics card or PC manufacturer for further details about how to adjust the screen settings.)
Screen issue
The power LED is off. The screen will not switch on.
Check that the power cable is connected properly.
If a problem occurs with the monitor screen, run Self Diagnosis to check that the monitor is working properly
The message Check the cable connection and the settings of the source device. appears.
Check that the cable is properly connected to the product.
If the monitor is in HDMI or DisplayPort mode, press the JOG button to display the Function Key Guide screen and select the → System → PC/AV Mode → HDMI, DisplayPort → PC or AV.
Not Optimum Mode is displayed.
This message appears when the signal from the graphics card exceeds the maximum resolution or frequency for the product.
Change the maximum resolution and frequency to suit the product performance, referring to Standard Signal Mode Table
The images on the screen look distorted.
Check the cable connection to the product.
The screen is not clear. The screen is blurry.
Remove any accessories (video extension cable, etc.) and try again.
Set the resolution and frequency to the recommended level.
The screen appears unstable and shaky. There are shadows or ghost images left on the screen.
Check that the resolution and frequency for the PC are within the range of resolution and frequency compatible with the product. Next, if required, change the settings, referring to Standard Signal Mode Table (P.33) in this manual and the Information menu on the product.
The screen is too bright. The screen is too dark.
Adjust Brightness and Contrast.
Screen color is inconsistent.
Change the Color settings.
The colors on the screen have a shadow and are distorted.
Change the Color settings.
White does not really look white.
Change the Color settings.
There is no image on the screen and the power LED blinks every 0.5 to 1 second.
The product is operating in power-saving mode.
Press any key on the keyboard or move the mouse to return to normal operating mode.
Text is blurry.
If using a Windows OS (e.g. Windows 7, Windows 8, Windows 8.1 or Windows 10): Go to Control Panel → Fonts → Adjust ClearType text and change Turn on ClearType.
Video playback is choppy.
Playback of high-definition large video files can be choppy. This may be because the video player is not optimized for the PC resource.
Try playing the file on another video player.
Sound issue
There is no sound.
Re-check the condition of the connected audio cable and/or adjust the volume.
Check the volume.
Check whether audio is set to mute.
The volume is too low.
Adjust the volume.
If the volume is still low after turning it up to the maximum level, adjust the volume on your PC sound card or software program
Video is available but there is no sound.
Sound cannot be heard if an HDMI-DVI cable is used to connect the input device.
Connect the device using an HDMI cable or a DP cable.
Source device issue
A beeping sound is heard when my PC is booting.
If a beeping sound is heard when your PC is booting, have your PC serviced.
Q & A
― Refer to the user manual for your PC or graphics card for further instructions on adjustment.
― The path to the settings depends on the installed OS.
How can I change the frequency?
Set the frequency on your graphics card.
Windows 7: Go to Control Panel → Appearance and Personalization → Display → Screen Resolution → Advanced settings → Monitor, and adjust Screen Refresh Rate under Monitor settings.
Windows 8(Windows 8.1): Go to Settings → Control Panel → Appearance and Personalization → Display → Screen Resolution → Advanced settings → Monitor, and adjust Refresh rate under Monitor settings.
Windows 10: Go to Settings → System → Display → Advanced display settings → Display adapter properties → Monitor, and adjust Screen refresh rate under Monitor settings.
How can I change the resolution?
Windows 7: Go to Control Panel → Appearance and Personalization → Display → Screen Resolution → Adjust Resolution.
Windows 8(Windows 8.1): Go to Settings → Control Panel → Appearance and Personalization → Display → Adjust Resolution, and adjust the resolution.
Windows 10: Go to Settings → System → Display → Advanced display settings, and adjust the resolution
How do I set power-saving mode?
Windows 7: Go to Control Panel → Appearance and Personalization → Personalization → Screen Saver Settings → Power options or BIOS SETUP on the PC.
Windows 8(Windows 8.1): Go to Settings → Control Panel → Appearance and Personalization → Personalize → Screen Saver Settings → Power options or BIOS SETUP on the PC.
Windows 10: Go to Settings → Personalization → Lock screen → Screen timeout settings → Power & sleep or BIOS SETUP on the PC.
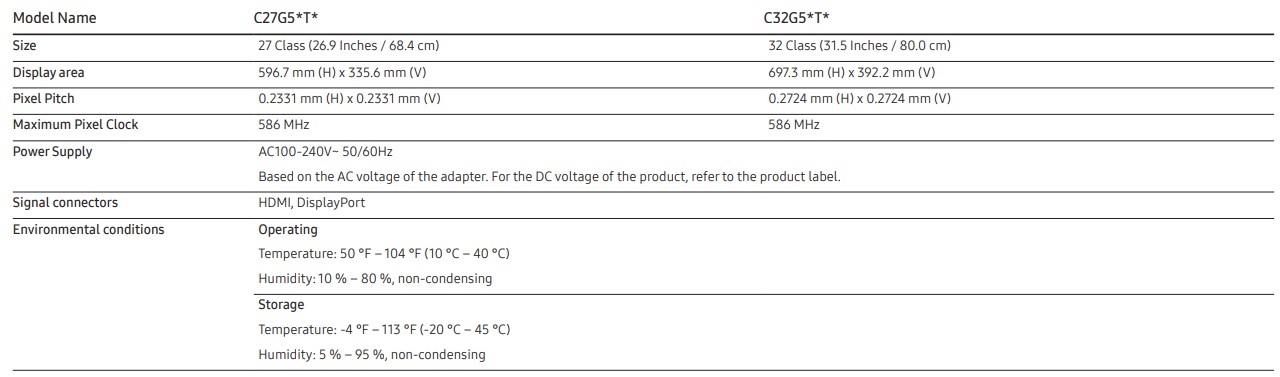
Specifications
General
― Plug-and-Play
This product can be installed and used with any Plug-and-Play compatible systems. Two-way data exchange between the product and PC system optimizes the product settings. Product installation takes place automatically. However, you can customize the installation settings if desired.
― Panel Dots (Pixels) Due to the nature of the manufacturing of this product, approximately 1 pixel per million (1ppm) may be brighter or darker on the LCD panel. This does not affect product performance.
― The above specifications are subject to change without notice to improve quality.
― For detailed device specifications, visit the Samsung website.
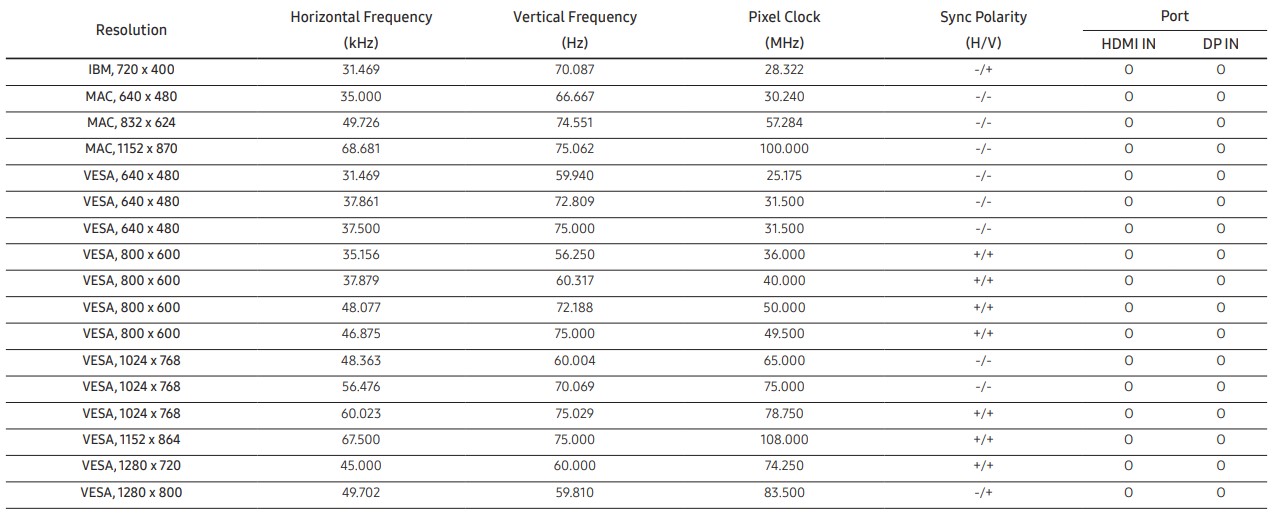
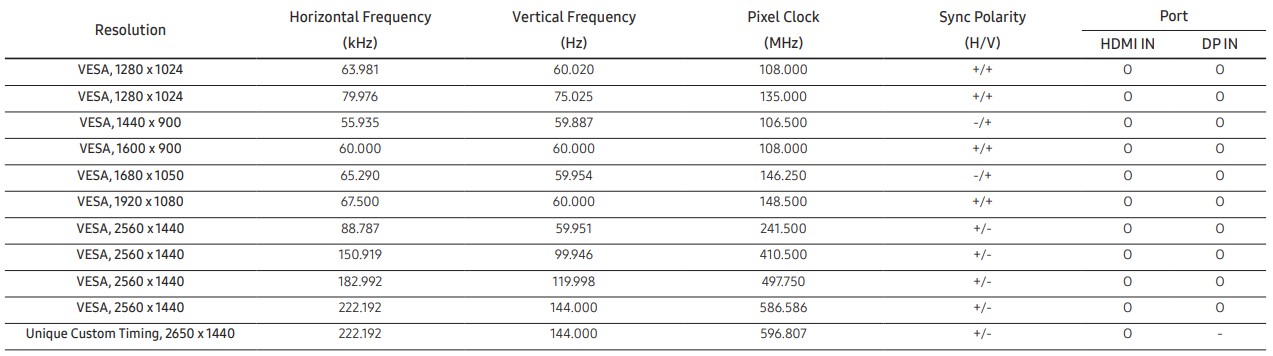
Standard Signal Mode Table
If a signal that belongs to the following standard signal modes is transmitted from your PC, the screen will automatically be adjusted. If the signal transmitted from the PC does not belong to the standard signal modes, the screen may be blank even though the power LED turns on. In such a case, change the settings according to the following table by referring to the graphics card user manual.
― Horizontal Frequency
The time required to scan a single line from the left to the right side of the screen is called a horizontal cycle. The reciprocal number of a horizontal cycle is called horizontal frequency. Horizontal frequency is measured in kHz.
― Vertical Frequency
Repeating the same picture dozens of times per second allows you to view natural pictures. The repeat frequency is called "vertical frequency" or "refresh rate" and is indicated in Hz.
― This product can be set to only one resolution for each screen size to obtain the optimum picture quality due to the nature of the panel. Using a resolution other than the specified resolution may degrade the picture quality. To avoid this, it is recommended that you select the optimum resolution specified for your product


 → System → PC/AV Mode → HDMI, DisplayPort → PC or AV.