User Manual Pressure Washer
OPERATING INSTRUCTIONS
NOTE: Before using the tool, read the instruction book carefully.
INTENDED USE
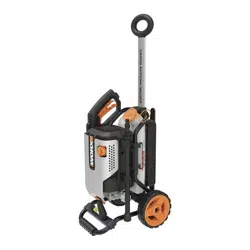
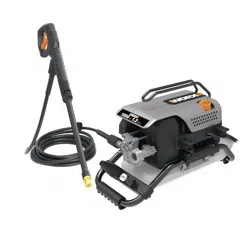
The electric high pressure washer is intended for residential cleaning projects-from porch to patio, driveways and decks, boats, pavers, bricks, BBQs and more.
ASSEMBLY & OPERATION
ASSEMBLY
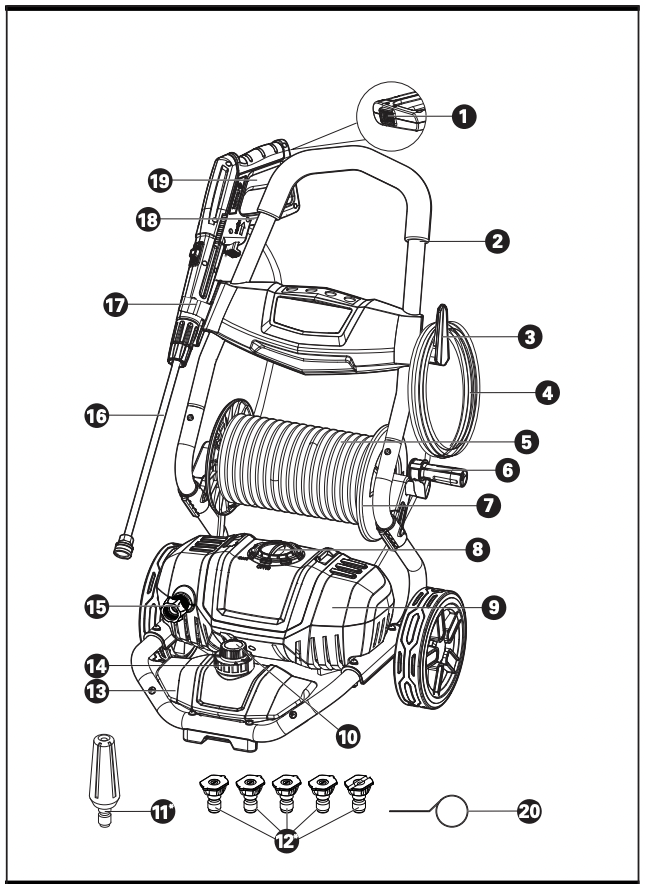
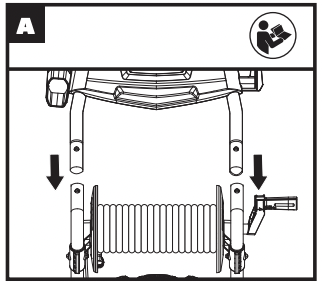
- Cart Handle assembly - See Fig. A
Note: when you hear “click ”,it means that the handle has been assembled successfully Attach the metal
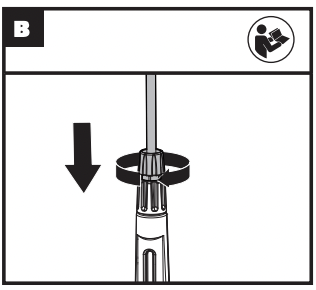
- Attach the metal lance - See Fig. B
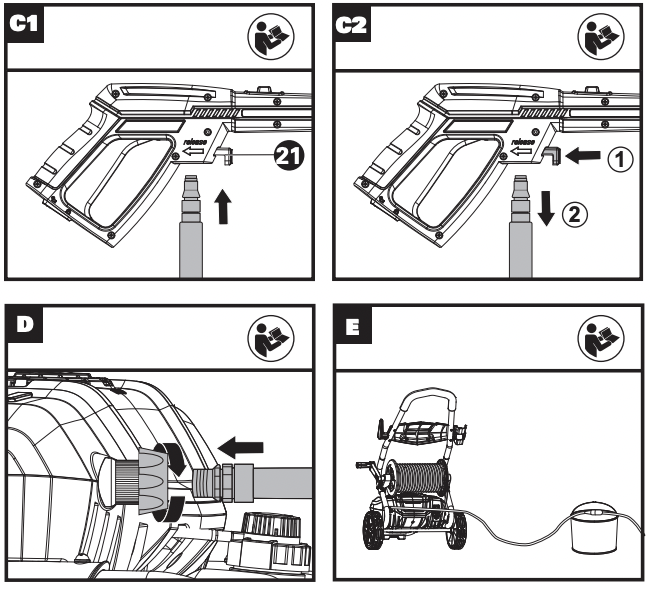
- Attach& Detach the high pressure hose - See Fig. C1,C2
Note: after the high pressure hose is connected, check the connection by gently pulling on the hose to ensure it stays connected. Press the release trigger on the wand to detach the hose.
Note: For detaching the hose easily, please pull the trigger to drain water from wand when operation is completed and switch is in “OFF/II ”position.
- Attach the garden hose - See Fig. D
Connect one end of the home garden hose (not supplied) to the adapter and another end to waterspout.
OPERATION
Extension cord
It is not recommended to use the extension cord. If necessary, ensure the plug and extension cord connection is on an elevated surface that does not contact the water area. See Fig. E
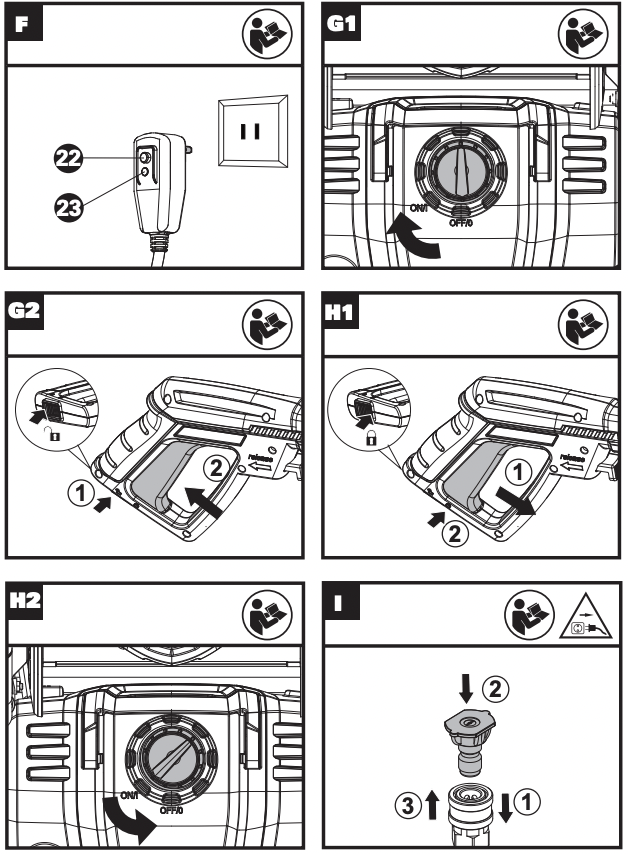
GFCI plug test
Press “test”, the light will be out. Press “reset”, the power regains and the light will illuminate.
Note: To keep good operation of GFCI, please implement it once a month. See Fig.F
START/STOP
- Turn on the water supply tap. Connect the washer to the power supply and turn the switch to “ON/I ”position. Then press trigger - See Fig. G1,G2
Note: Before pressing trigger, make sure Lockoff switch is in “unlock” position.
WARNING: Do not start the machine without connecting and turning on the water supply because it may cause damage to high pressure seals and reduce the service life of pump.
- Release the trigger and turn the switch to “OFF/II”position. Turn Off the water supply tap
Note: When not in use, make sure Lock-off switch is in “lock” position.
See Fig.H1,H2
- Select the right nozzles - See Fig.I
Choose a suitable nozzle pattern according to your work. Nozzle 00 (red) and Nozzle 150 (yellow) are applicable for cleaning stubborn stain on concrete. Nozzle 250 (green) is applicable for cleaning on concrete, bricks and masonry. Nozzle 400 (white) is applicable for cleaning on wooden and other soft objects . The soap nozzle is applicable for soaping while other nozzles cannot be used to do it. Turbo nozzle is applicable for cleaning on concrete, bricks and masonry.
WARNING: Do not change the nozzle pattern when the tool is powered on.
Begin with the nozzle 1-2ft away from the surface and approach with caution until it reaches the desired position for overly close spray may do harm to surface.
WARNING: Do not connect the machine to water supplies that are dirty, rusty, muddy, or corrosive. (Including window cleaning liquids, plant foods, or fertilizers etc.)
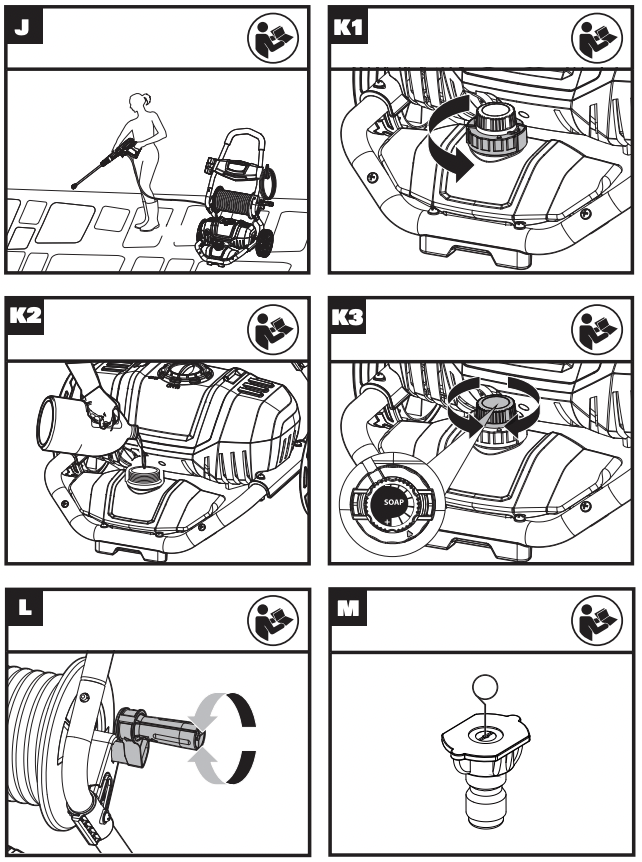
- Add and use detergent -See Fig.K1,K2,K3
Unscrew the Soap tank cap and add appropriate detergent .Then screw the Soap tank Knob. Install the soap nozzle . Turn soap adjusting knob left and right to decrease and increase the dosage.
Note: If necessary, use a funnel (not supplied) to prevent accidental overflows of detergent outside of the tank.
MAINTENANCE
Remove Plug from the socket before carrying out any adjustment, servicing or maintenance.
Inspect the product for damaged or worn parts before each use. Do not operate it if you find damaged or worn parts. Contact your supplier or the manufacturer for replacement parts.
Power cord maintenance
If the supply cord is damaged, it must be replaced by the manufacturer, its service agent or similarly qualified persons in order to avoid a hazard
Pump maintenance
Inspect the pump frequently whether any leaking occurs around the pump seal. If leaking occurs, please contact service center for repair.
Nozzle maintenance
Remove the nozzle from the lance, then remove any possible obstructions using the included declogging needle(See Fig.M)..Then use a garden hose to rinse the nozzle by backwashing.
WARNING: Any other servicing should be performed by an authorized service representative.
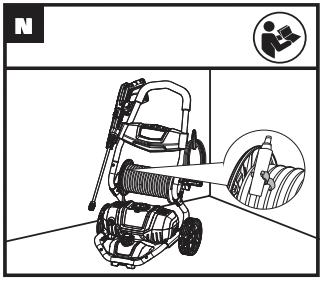
STORAGE
- 1. Disconnect the water source.Turn on the pressure washers for a few seconds until the remaining water flows out.Then turn it off quickly.
- 2. Unplug the power supply and hang it on the Power Cord Holder .
- 3. Disconnect the high pressure hose and the garden hose (not supplied) .Then wind high pressure hose. Insert the Wand into the Wand Holder. ( See Fig N)
- 4. Store in a frost free area with a temperature above 0℃(32OF).
TROUBLESHOOTING
Machine does not start when the switch is in” ON/I”position.
Power cord is not plugged in
Socket is defective
- Check or replace plug, socket, fuses
GFCI is triggered
Machine pressure is not consistent.
Pump is faulty
Air in line.
- Remove the nozzle, turn on the machine for a while and install the nozzle back.
Water inlet adapter is clogged or dirty.
- Remove the adapter, rinse it with water and put is back.
The pressure of the pump is not adequate
water supply is Insufficient
- open water source completely
Water supply is restricted
- Check If the water hose kinks or leaks
Diameter of garden hose is too small
- Replace with right garden hose
Leak or kick in hose
- Replace hose or untie kinks in hose.
No detergent
Wrong nozzle is attached
Lance leaks
O-ring needs to be replaced
- Replace o-ring .If the problem is not solved ,contact service center to buy a new lance
PRODUCT SAFETY
WARNING Read all safety warnings and all instructions. Failure to follow the warnings and instructions may result in electric shock, fire and/or serious injury. Save all warnings and instructions for future reference.
WARNING: This product can expose you to chemicals including lead and Di(2-ethylhexyl)phthalate (DEHP) which are known to the State of California to cause cancer and birth defects or other reproductive harm.
IMPORTANT SAFETY INSTRUCTIONS
WARNING – When using this product basic precautions should always be followed, including the following:
- 1. Read all the instructions before using the product.
- 2. To reduce the risk of injury, close supervision is necessary when a product is used near children.
- 3. Know how to stop the product and bleed pressures quickly. Be thoroughly familiar with the controls.
- 4. Stay alert – watch what you are doing.
- 5. Do not operate the product when fatigued or under the influence of alcohol or drugs.
- 6. Keep operating area clear of all persons
- 7. Do not overreach or stand on unstable support. Keep good footing and balance at all times.
- 8. Follow the maintenance instructions specified in the manual.
- 9. This Product Is Provided With A Ground Fault Circuit Interrupter Built Into The Power Cord Plug. If Replacement Of The Plug Or Cord Is Needed, Use Only Identical Replacement Parts.
- 10. Do not spray electrical apparatus and wiring.
- 11. WARNING – To reduce the risk of electrocution, keep all connections dry and off the ground. Do not touch plug with wet hands.
- 12. WARNING – Risk of injection or injury– do not direct discharge stream at persons.
CORD CONNECTED, DOUBLE INSULATED PRODUCTS
1.GROUND FAULT CIRCUIT INTERRUPTER PROTECTION
This pressure washer is provided with a ground-fault circuit-interrupter (GFCI) built into the plug of the power-supply cord. This device provides additional protection from the risk of electric shock. Should replacement of the plug or cord become necessary, use only identical replacement parts that include GFCI protection.
2. SERVICING OF A DOUBLE-INSULATED APPLIANCE
In a double-insulated product, two systems of insulation are provided instead of grounding. No grounding means is provided on a double-insulated product, nor should a means for grounding be added to the product. Servicing a double-insulated product requires extreme care and knowledge of the system, and should be done only by qualified service personnel. Replacement parts for a double-insulated product must be identical to the parts they replace.
3. EXTENSION CORDS
Use only extension cords that are intended for outdoor use. These extension cords are identified by a marking “Acceptable for use with outdoor appliances; store indoors while not in use.” Use only extension cords having an electrical rating not less than the rating of the product. Do not use damaged extension cords. Examine extension cord before using and replace if damaged. Do not abuse extension cord and do not yank on any cord to disconnect. Keep cord away from heat and sharp edges. Always disconnect the extension cord from the receptacle before disconnecting the product from the extension cord.
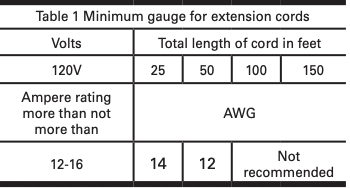
SAFETY RULES FOR EXTENSION CORD
Make sure your extension cord is in good condition. When using an extension cord, be sure to use one heavy enough to carry the current your product will draw. An undersized extension cord will cause a drop in line voltage resulting in loss of power and overheating. Table 1 shows the correct size to use depending on cord length and nameplate ampere rating. If in doubt, use the next heavier gage. The smaller the gage number, the heavier the cord. To reduce the risk of disconnection of appliance cord from the extension cord during operating:
i) Make a knot as shown in Figure 1; or
ii) Use one of the plug-receptacle retaining straps or connectors described in this manual.