
Loading ...
Loading ...
Loading ...
Black plate (163,1)
北米Model "A2470BE-B" EDITED: 2010/ 9/ 21
mode, press and hold the power button for
12 to 15 seconds while the transmission is
in the “R” (reverse) position, and then
release it. The display is now in the non-
operational mode. After the display has
been set to the non-operational mode, the
function indicator will illuminate in orange
while the transmission is in the “R”
(reverse) position.
To return the display to the operational
mode, press and hold the power button for
12 to 15 seconds again.
For precautions about the rear view
camera and the rear view image, refer to
“Rear view camera” F6-18.
! Electronic compass display
By briefly pressing the compass button,
the compass display is toggled on or off.
When the compass display is on, an
illuminated compass reading will appear
on the mirror.
Using the electronic compass properly,
the following compass zone adjustment
and compass calibration will be neces-
sary.
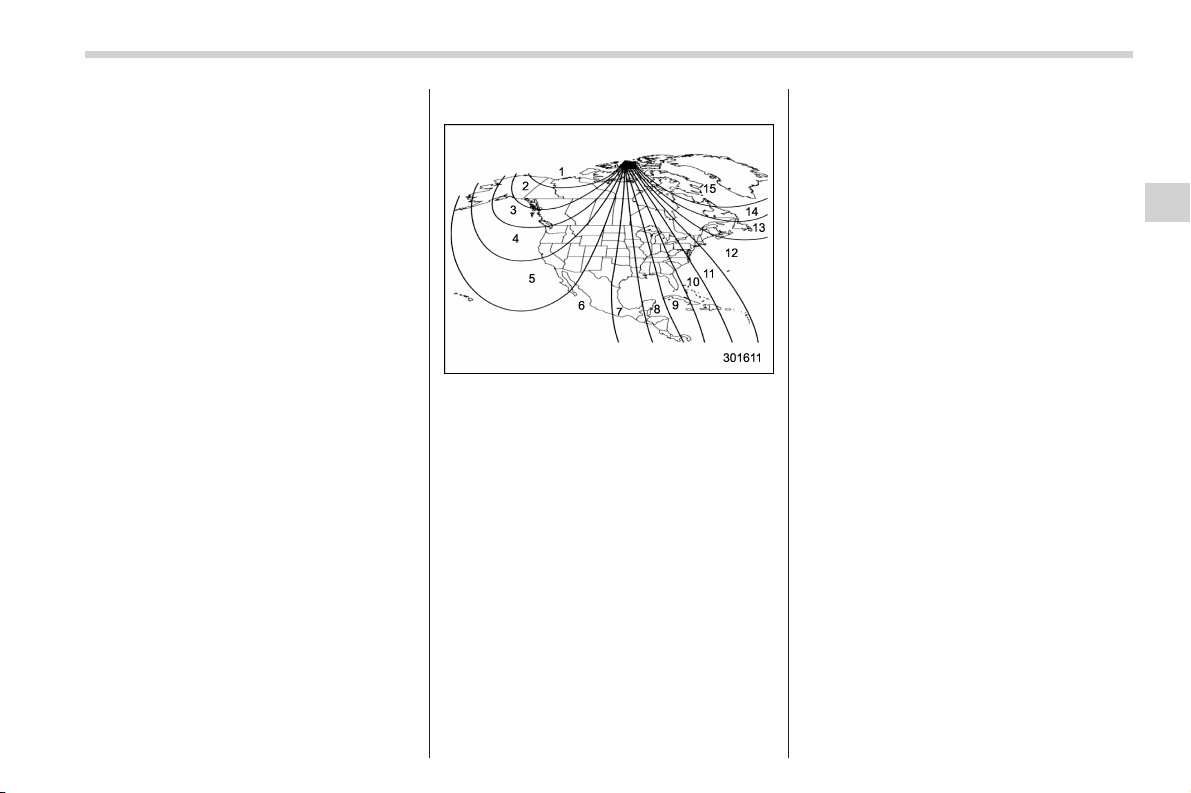
! Compass zone adjustment
Compass calibration zones
1. Refer to the “Compass c alibration
zones” map shown above to verify that
the compass zone setting is correct for
your geographical location.
2. Press and hold the compass button for
3 to 6 seconds, and then release it. The
zone number will be shown on the
electronic compass display.
3. Press the compass button repeatedly
until the correct zone number for your
location is displayed.
4. Releasing the button for 3 seconds will
exit the zone setting mode.
! Compass calibration
1. For optimum calibration, switch off all
nonessential electrical accessories (rear
window defogger, heater/air conditioning
system, spotlight, etc.) and ensure all
doors are shut.
2. Drive to an open, level area away from
large metallic objects or structures and
make certain the ignition switch is in the
“ON” position.
3. Press and hold the compass button for
6 to 9 seconds, and then release it. The
compass will enter the calibration mode,
then “C” and the direction will be dis-
played.
4. Drive slowly in a circle until “C”
disappears from the display. Driving in
two or three circles might be necessary.
The compass is now calibrated.
5. Further calibration may be necessary
should outside influences cause the com-
pass to read inaccurately. You will notice
any outside influence if the compass tends
to read in only one particular direction.
Should you encounter this situation, return
to step 1 of the above procedure and
recalibrate the compass.
Instruments and controls 3-39
– CONTINUED –
3
Loading ...
Loading ...
Loading ...