User Manual
Getting to know your appliance
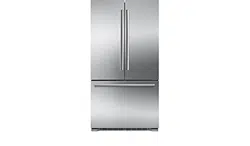
Appliance

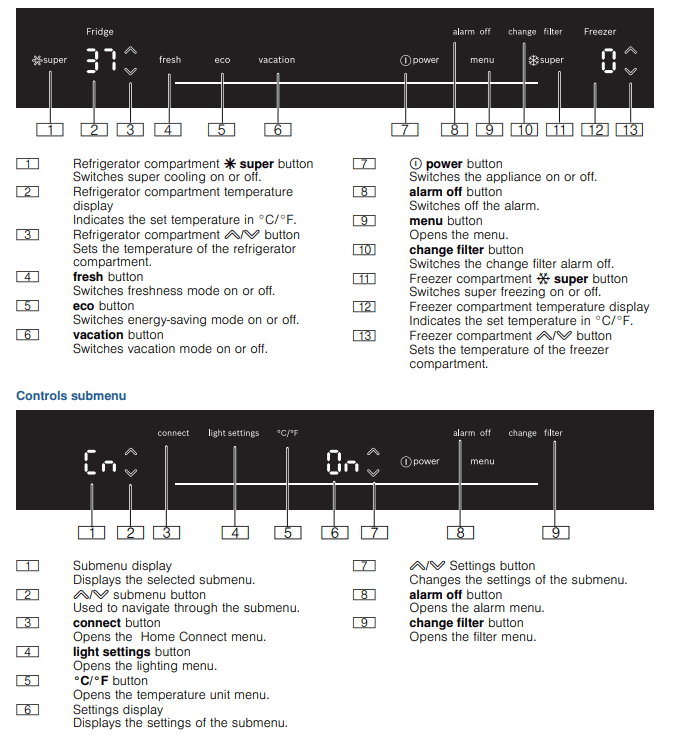
Operating controls
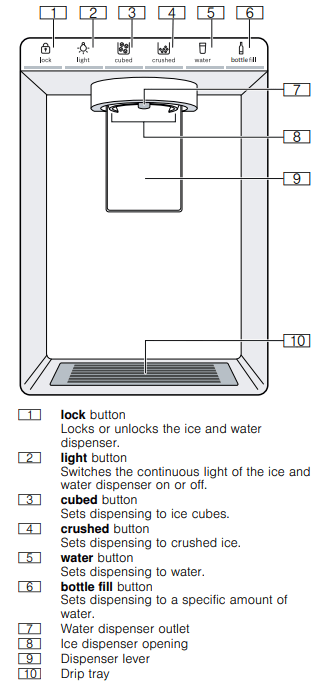
Ice and water dispenser
Operating the appliance
Switching the appliance on
1. Press  power button.
The appliance begins to cool. The alarm off button will blink and a warning sound will beep if the temperature in the freezer compartment is still too warm.
2. Press alarm off button. The warning sound switches off.
3. Set the required temperature. ~"Setting the temperature"
Switching off and disconnecting the appliance
Switching off the appliance
- Press power button.
The appliance is no longer cooling.
Disconnecting the appliance
If you are not going to use the appliance for a long period:
1. Interrupt the water supply to the appliance.
2. Take all food out of the appliance.
3. Press power button.
The appliance is no longer cooling.
4. Pull out the power plug or switch off the circuit breaker.
5. Remove the water filter, empty the ice cube bin and clean the appliance. ~ "Cleaning"
6. Leave the doors and drawers of the appliance open.
Setting the temperature unit
You can choose between the units °C and °F:
1. Press menu button.
2. Press °C/°F button.
3. Press  Settings button until settings display
shows °C or °F.
4. Press menu button.
The setting is saved
Setting the temperature
Recommended temperature
Refrigerator compartment: 37 °F (3 °C)
Freezer compartment: 0 °F (–18 °C)
Cooling compartment
- Keep pressing the button until the display indicates the required temperature.
Freezer compartment
- Keep pressing button until the display indicates the required temperature.
Super cooling
Super cooling cools the refrigerator compartment as cold as possible.
Switch on super cooling, e.g.:
- Before placing large quantities of food into the compartment
- For cooling drinks quickly
Note: When super cooling is switched on, increased operating noises may occur.
After approx. 6 hours, the appliance switches to normal operation.
Switching super cooling on/off:
- Press
 super button.
When super cooling is switched on, the button is lit up.
Super freezing
With super freezing, the freezer compartment cools down to the coldest temperature setting of the freezer compartment.
Switch on super freezing, e.g.:
- To quickly freeze food all the way to the center
- To increase ice cube production
Note: When super freezing is switched on, increased operating noise may occur.
After approx. 8 hours, the appliance automatically returns to normal operation.
Switching super freezing on/off:
- Press
 super button.
When super freezing is switched on, the button lights up
Energy saving mode
You can set the appliance to save energy with the energy-saving mode.
The appliance automatically sets the following temperatures:
- Refrigerator compartment: 43 °F (6 °C)
- Freezer compartment: 6 °F (–14 °C)
Switch energy-saving mode on or off:
The temperatures are changed, and the display shows the new temperatures. When energy�saving mode is switched off, the last temperature set is displayed.
Freshness mode
Food stays fresh for even longer with freshness mode.
The appliance automatically sets the following temperature:
- Refrigerator compartment: 36 °F (2 °C)
The temperature in the freezer compartment remains unchanged.
Switch freshness mode on or off:
The temperature is changed, and the display shows the new temperature. When freshness mode is switched off, the last temperature set is displayed.
Vacation mode
If leaving the appliance for a long period, you can switch it to energy-saving vacation mode.
The appliance automatically sets the following temperature:
- Refrigerator compartment: 43 °F (6 °C)
The temperature in the freezer compartment remains unchanged.
Switch on vacation mode:
The temperature is changed and the display shows the new temperature. Empty the ice cube bin for hygiene reasons.
Switching off vacation mode:
The last temperature set is displayed. For hygiene reasons, dispense water for 5 minutes and discard
Sabbath mode
All non-essential functions are switched off so you can also use the appliance on the Sabbath.
The appliance switches off the following:
- Super cooling and super freezing
- Audible signals
- Interior light
- Messages on the control panel
- Water dispenser
- Ice maker
Note: Background illumination of display is reduced in Sabbath mode.
Switch on Sabbath mode:
- Press and hold vacation button for 10 seconds until an audible signal sounds.
When Sabbath mode is switched on, the alarm display lights up.
Switching Sabbath mode off:
- Press and hold the alarm display for 5 seconds until an audible signal sounds.
Note: After approx. 72 hours, the appliance automatically returns to normal operation.
Setting the light
You can adjust the brightness levels of the interior lighting from 0 to 5:
Note:
0 = lighting off
1 = minimum brightness
5 = maximum brightness
1. Press menu button.
2. Press light settings button.
The submenu display shows In.
3. Press  Settings button repeatedly until the settings display shows the desired brightness level.
4. Press menu button.
The setting is saved.
Change filter alarm
When the change filter alarm switches on, the change filter button lights up. The alarm is designed to switch on every 6 months. It is recommended to change the water filter every 6 months.
Note: An increase in ice and water consumption will cause the change filter alarm to be switched on earlier.
Switching off the change filter alarm:
1. Change water filter or replace with bypass filter. ~ "Water filter"
2. Press and hold change filter button for 3 seconds.
The change filter alarm is switched off and the change filter button no longer lights up. The water filter timer is reset automatically.
If you replace the water filter before the change filter alarm lights up, reset the water filter timer manually:
Note:
1 = water filter timer running
0 = reset water filter timer
1. Press menu button.
2. Press change filter button.
3. Press Settings button until settings display shows 0.
4. Press menu button.
The setting is saved.
Switching the ice and water dispenser button lock (child lock) on or off
The button lock protects the ice and water dispenser from being operated unintentionally:
Note: When the button lock is switched on, no ice or water can be dispensed. The ice maker continues to produce ice cubes.
- Press and hold lock button until all light bars light up.
The button lock is switched on and the light bar of the lock button lights up. When the button lock is switched off, the light bar of the last button used lights up.
Light of ice and water dispenser
Note: If no ice or water is dispensed for a long period, the ice and water dispenser light will turn off.
You can switch the light of the ice and water dispenser permanently on or off:
The ice and water dispenser light is switched on permanently, and the light bar of the light button lights up
Setting the bottle fill water amount
You can adjust the factory-set water bottle filling amount:
Note: The maximum fill time is 60 seconds. The light bars flash during the operation.
1. Press bottle fill button.
2. Place a pitcher or bottle under the water dispenser opening.
3. Simultaneously press and hold bottle fill and crushed buttons until the required water amount has been dispensed. The new water amount is now preset to memory. Every time you press the bottle fill button, that water amount will be dispensed.
Switching the ice and water dispenser and ice maker on or off
If you are not going to use the ice and water dispenser and the ice maker for a long period:
- Press and hold lock and light buttons until all light bars light up. The ice and water dispenser and the ice maker are switched off. When switched on, the light bar of the last button used lights up
Alarm
Door alarm
If the appliance door is left open for a while, a warning sound is switched on and the alarm offbutton flashes.
Switching off door alarm:
- Close the door or press the alarm off button.
The warning sound is switched off and the alarm off button no longer flashes.
You can switch the door alarm warning sound on or off:
Note: On = switch on door alarm warning sound
OF = switch off door alarm warning sound
1. Press menu button.
2. Press alarm off button.
3. Press Settings button until settings display shows On or OF.
4. Press menu button.
The setting is saved.
Temperature alarm
If the freezer compartment becomes too warm, the warning sound switches on and the alarm off button flashes.
Note: The temperature alarm can be set off without risk to the frozen food in the following situations:
- The appliance is switching on.
- If the freezer compartment door has been open too long.
- Large quantities of fresh food are being placed inside.
Switching off the temperature alarm:
1. Check that the cause of the temperature alarm has been eliminated.
2. Press the alarm off button.
The warning sound will be switched off and the freezer compartment temperature display will briefly indicate the warmest temperature reached in the freezer compartment. Then the display indicates the set temperature again. The warmest temperature will be measured again and saved.
Note: The alarm off button remains lighted until the set temperature has been reached again.
Home Connect
This appliance is Wi-Fi-capable and can be controlled remotely using a mobile device.
Note: Wi-Fi is a registered trade mark of the Wi-Fi Alliance.
The appliance functions without a network connection and can still be operated manually via the controls:
- The appliance is not connected to a home network.
- The availability of the Home Connect function depends on the availability of Home Connect services in your country. Home Connect services are not available in every country. You can find more information on www.home-connect.com.
Note: Please observe the safety information in this instruction manual. Ensure that this is also observed if you operate the appliance via the Home Connect app and are not at home when doing so. ~ "Important safety instructions"
Follow the instructions in the Home Connect app as well.
Setting up Home Connect
Notes
- Take note of the Home Connect supplementary sheet, which is available for download at http://www.bosch-home.com together with the instructions. To do so, enter the E-number of your appliance in the search field.
- After switching on the appliance, wait at least two minutes until the internal device initialization process has been completed. Only then start setting up Home Connect.
- To be able to make settings with Home Connect, you need to install the Home Connect app on your end device.
To do this, please take note of the documentation that has also been supplied from Home Connect.
Follow the steps specified by the app to make the settings.
- If the device is not operated for a prolonged period, the Home Connect menu will close automatically. You can find information on how to open the Home Connect menu at the start of the appropriate chapter.
Automatic connection with the WLAN home network (Wi-Fi)
If a router with WPS function is available, the refrigerator can be automatically connected to the home network.
1. Press menu button.
The connect button lights up. The submenu display shows Cn.
2. Press submenu button repeatedly until submenu display shows AC and the settings display OF.
3. Press  Settings button.
The appliance is ready for automatic connection.
The settings display shows an animation for 2 minutes.
The appliance is ready for automatic connection for as long as the animation is displayed.
4. Within those 2 minutes, activate the WPS function on the home network router (e.g. using WPS button, note the information in the router documentation).
If the connection is successful, On flashes in the settings display.
The refrigerator is ready to connect with the app.
Note: If the settings display shows OF, it was not possible to establish a connection.
1. Check whether the refrigerator is located within the range of the WLAN home network (Wi-Fi).
2. Repeat the process or establish the connection manually.
Manual connection with the WLAN home network (Wi-Fi)
If the available router does not have a WPS function, or or if this is unknown, you can connect the refrigerator to the WLAN home network (Wi-Fi) manually.
1. Press the menu button.
The connect button lights up. The submenu display shows Cn.
2. Press the submenu button repeatedly until submenu display shows SA and the settings display OF.
3. Press the Settings button.
The appliance is ready for manual connection.
The settings display shows an animation.
The appliance is ready for manual connection for as long as the animation is displayed.
4. The refrigerator has now set up its own WLAN home network (Wi-Fi) with the network name
HomeConnect.
You can now access this network with your mobile device.
5. Follow the instructions in the app until the process is complete.
- If the connection is successful, On flashes in the settings display.
The device connects automatically to the app.
- If the settings display shows OF, it was not possible to establish a connection.
Check whether the refrigerator is located within the range of the WLAN home network (Wi-Fi).
Repeat the process.
Connecting the refrigerator to the Home Connect app
The appliance automatically connects to the app with set-up for the first time after a connection to the WLAN home network has been established (Wi-Fi). If the appliance does not automatically connect to the app, connect the appliance manually:
1. Press the menu button. The connect button lights up. The submenu display shows Cn.
2. Press the submenu button repeatedly until the submenu display shows PA and the settings display OF.
3. Press Settings button to connect the appliance to the app. The settings display shows an animation. As soon as the refrigerator and the app are connected, the settings display shows On.
4. Open the app and wait until the refrigerator is displayed.
Press Add to confirm the connection between the app and the refrigerator. If the refrigerator is not automatically displayed, click on Add appliance in the app and follow the instructions. As soon as your refrigerator is displayed, add it with +.
5. Follow the instructions in the app until the process is complete.
The submenu display shows PA and the settings display On. The refrigerator has been connected to the app. If the connection fails, check whether the mobile device is connected to the WLAN home network (Wi-Fi). Then try to establish the connection again. If the settings display shows Er, reset the Home Connect settings.
Note: On resetting, all Home Connect settings are reset.
Verifying signal strength
You should verify the signal strength if no connection can be established.
1. Press the menu button. The connect button lights up. The submenu display shows Cn.
2. Press the submenu button repeatedly until the submenu display shows SI. The settings display shows a value between 0 (no reception) and 3 (full reception). The signal strength should be at least 2. If the signal strength is too weak, the connection may be interrupted.
- Place the router and refrigerator closer together.
- Check that screening walls do not interfere with the connection.
- Alternatively, install a repeater to make the signal stronger.
Reset Home Connect settings
If there is a problem when trying to establish a connection, or if you would like to register the appliance on a different WLAN home network (Wi-Fi), the Home Connect settings can be reset:
1. Press the menu button. The connect button lights up. The submenu display shows Cn.
2. Press the submenu button repeatedly until submenu display shows rE and the settings display OF.
3. Press Settings button. The settings display shows an animation for 15 seconds. The display then shows OF settings. The Home Connect settings have been reset
Installing updates for the Home Connect software
The refrigerator checks at regular intervals whether updates are available for the Home Connect software.
If an update is available, the submenu display shows UP:
- Confirm update in Home Connect app. Do not switch the refrigerator off during updates. The settings display shows an animation. The update is being installed.
Note: All buttons are locked during installation.
- If installation has been completed successfully, the settings display shows On.
- If installation has not been completed successfully, the settings display shows Er. Start the update again at a later time. If installation could not be completed even after multiple attempts, notify customer service.
Press any button to reset the display to the set temperature.
Refrigerator compartment
The refrigerator compartment is suitable for storing meat, sausages, fish, dairy products, eggs, ready meals and pastries.
The temperature can be set from 33° F (1° C) to 43° F (6° C).
The refrigerator compartment can also be used to store highly perishable groceries in the short to medium term. A temperature of +39°F (+4°C) or lower ensures optimum freshness and hygiene of the stored groceries.
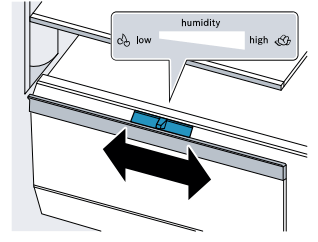
Vegetable bin
The vegetable bin is the optimum storage location for fresh fruit and vegetables. You can adjust the humidity in the vegetable bin via the division plate's humidity controller and a special seal.
The humidity in the vegetable bin can be set according to the type and quantity of products to be stored:
- Mainly fruit as well as for a large load – set lower air humidity
- Mainly vegetables as well as for a mixed or small load – set higher air humidity
Notes
- Fruit sensitive to cold (e.g. pineapple, banana, papaya and citrus fruit) and vegetables sensitive to cold (e.g. eggplant, cucumbers, zucchini, peppers, tomatoes and potatoes) should be stored outside of the appliance at temperatures of approx. +46°F ... +54°F (+8°C ... +12°C) for optimum preservation of quality and aroma.
- Condensation may form in the vegetable bin depending on the type and quantity of products stored. Remove condensation with a dry cloth and adjust air humidity in the vegetable bin with the humidity controller.
Cold storage bin
The temperatures in the cold storage bin are lower than in the refrigerator compartment. Temperatures below +32 °F (0 °C) may occur.
Ideal for storing fish, meat and sausage. Not suitable for salads, vegetables and groceries sensitive to cold.
Note when storing food
- Store fresh undamaged food. The quality and freshness will then be retained for longer.
- In the case of convenience products and bottled goods, do not exceed the minimum sell-by date or use-by date specified by the manufacturer.
- To retain aroma, color and freshness, pack or cover food well before placing it into the appliance. This will prevent flavors being transferred between foods and the plastic parts from becoming discolored.
- Leave warm food and drinks to cool down before placing them into the refrigerator compartment.
Freezer compartment
The freezer compartment is suitable for:
- storing frozen food
- making ice cubes
- freezing food
The temperature can be set from 6 °F (–14 °C) to –7 °F (–22 °C).
The freezer compartment can be used to store perishable foods long-term almost without any noticeable reduction in quality, as the low temperatures considerably slow down or stop deterioration. Appearance, flavor and all valuable ingredients are largely retained.
The time between putting fresh food in the freezer compartment and it freezing solid depends on the following factors:
- temperature set
- type of food
- amount of food in the freezer compartment
- quantity and type of storage
Ice and water dispenser
You can use the ice and water dispenser to dispense:
- cooled water
- crushed ice
- ice cubes
To obtain maximal ice production (up to 12 lb (5.4 kg) in a 24 hour period):
- The appliance must be installed according to the installation instructions.
- The freezer compartment must be set to the coldest temperature.
- The ice cube bin must be emptied every 3 hours.
Results may vary depending on operating conditions such as:
- door openings
- food load
- ambient temperature and ambient humidity
- water pressure and water filter condition
Observing drinking water quality
All materials used in the ice and water dispenser are odorless and tasteless.
If the water has an aftertaste, this may be due to the following causes:
- Mineral content and chlorine content of the drinking water
- Material of the water line leading to the appliance
- Freshness of the drinking water
Note: If you dispense water again after a long period, it may taste stale. Allow water to dispense for at least 5 minutes and discard.
You will obtain optimum water quality if you dispense some water regularly
Operation of the ice and water dispenser
- When the appliance door is open, the ice and water dispenser stops, and the button lock is switched on.
- To prevent water damage, the ice and water dispenser stops automatically after a period of continuous dispensing. Wait a few seconds before dispensing ice or water again.
- The ice and water dispenser stops automatically after several consecutive dispensing operations. Wait a few minutes before dispensing ice or water again.
- To prevent ice from falling on the floor, hold the glass directly under the ice dispenser opening when dispensing crushed ice.
- When you switch from the crushed button to the cubed button, a little crushed ice may be dispensed.
- The dispensed water is cooled to a palatable temperature. To obtain a colder drinking temperature, put additional ice cubes in the glass.
- The water may become warmer when dispensing large amounts of water.
- If ice cubes taste stale, discard the remainder and the cubes produced over the next 24 hours. If ice cubes still taste stale, change the water filter.
- Regularly check the drip tray and clean as necessary. ~ "Cleaning"
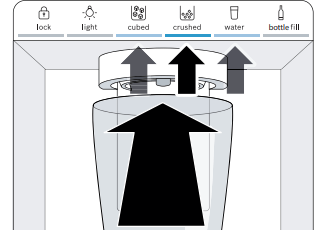
Dispensing ice or water
Note: Always hold the glass directly under the dispenser opening.
1. Press cubed button, crushed button or water button.
2. Keep pressing a glass against the dispenser lever until the glass contains the required amount of ice or water.
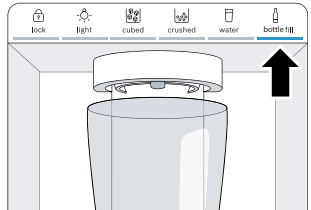
Bottle fill option
You can dispense a specific water amount with the bottle fill option: Note: The factory-set amount of water is approx. 17 fl oz (0.5 l). ~ "Setting the bottle fill water amount"
1. Press bottle fill button.
2. Place a pitcher or bottle under the water dispenser opening.
3. Press bottle fill button. The bottle filling is dispensed.
Notes
- To interrupt dispensing, press any button of the ice and water dispenser.
- To dispense the bottle filling again, press bottle fill button.
- If no bottle filling is dispensed for a long period, dispensing switches to the water button
Defrosting
The fully automatic NoFrost system ensures that the appliance remains frost-free. Defrosting is not required
Cleaning
Cleaning the appliance interior
Proceed as follows:
1. Press  power button.
2. Pull out the power plug or switch off the circuit breaker.
3. Take out food and store in a cool location.Place ice pack (if available) on the food.
4. Clean the appliance with a soft cloth, lukewarm water and a little pH-neutral liquid detergent.
5. Wipe door seal with clean water and dry thoroughly with a cloth.
6. Switch appliance back on and load the food.
Cleaning the equipment
To clean, take the removable parts out of the appliance. ~ "Equipment"
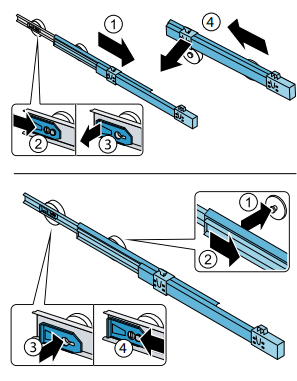
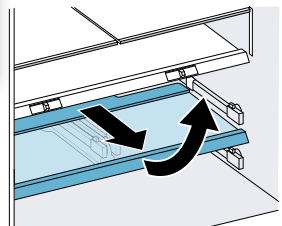
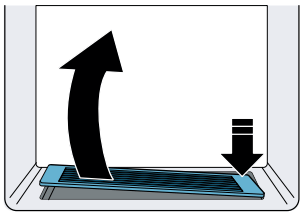
Telescopic rails
Removing telescopic rails
1. Pull out telescopic rail.
2. Push lock in the direction of the arrow.
3. Detach telescopic rail from the rear pin.
4. Push telescopic rail together, push backwards above the rear pin, and disengage.
Installing telescopic rails
1. Place the extended telescopic rail on the front pin.
2. Pull the telescopic rail forwards slightly until it engages.
3. Insert telescopic rail on the rear pin.
4. Push lock backwards.
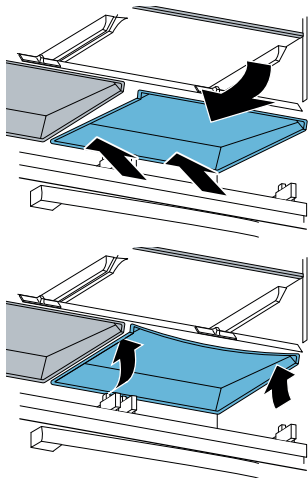
Vegetable bin cover
Remove the cover:
1. Take out the vegetable bin.
2. Bend down the cover slightly in the middle and detach at the front on one side.
3. Detach the cover at the front on the other side.
4. Detach the cover at the back and take out.
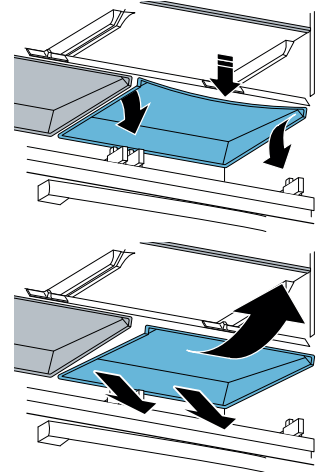
Installing the cover:
1. Attach the cover at the back.
2. Attach the cover at the front on one side.
3. Bend down the cover slightly in the middle and attach at the front on the other side.
Note: If the cover remains bent, move the humidity controller to allow the cover to engage
Shelf above the vegetable bin
1. Pull out the vegetable bin all the way.
2. Lift the shelf at the front and take out.
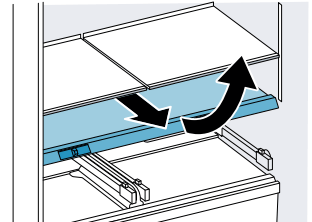
Shelf above the cold storage bin
1. Pull the cold storage bin all the way out.
2. Lift the shelf at the front and take out.
Drip tray
1. Press down and remove drip grate in top right corner.
2. Wipe drips away with a soft cloth and clean the drip tray with lukewarm water.
3. Re-insert drip grate.
Odors
Odor s If you notice any unpleasant odors:
1. Switch off the appliance with the power button.
2. Take all food out of the appliance and look for spoiled food or any spillage.
3. Clean the inside.~ "Cleaning"
4. Seal strong-smelling food.
5. Switch the appliance on again.
6. Arrange food in the appliance.
7. After 24 hours, check whether odors are building up again.
Troubleshooting – what to do?
Appliance
Appliance overcooling or food too cold.
- Temperature has been set too low.
- Adjust setpoint to a higher temperature.
Appliance not cooling or food too warm.
- Door(s) or drawer not closing properly.
- Check if the appliance is leveled ~ "Aligning the appliance"
- Check if there is no food or equipment obstructing the door.
- Check the door seals are free from damage.
- Temperature has been set too high.
- Adjust the setpoint to a lower temperature.
- Air vent(s) are blocked.
- Remove any food blocking the air vent(s).
- Door(s) or drawer opened frequently or for an extended period of time.
- Wait at least 2 hours for the temperature in the appliance to cool down.
- Appliance is in Eco Mode or Vacation mode.
- Check to ensure that the appliance is not in Eco or Vacation mode.
- A large amount of fresh food has been loaded in the refrigerator.
- Wait at least 2 hours for the temperature in the appliance to cool down.
- Appliance is in Showroom mode.
- If the appliance has the internal lights ON and the operating control display is also ON and showing no errors, the product might be in Showroom mode. Start the appliance self-test. ~ "Appliance self-test"
- Wait at least 2 hours for the temperature in the appliance to cool down. If appliance still does not cool down. please contact customer service. ~ "Customer service"
Displays do not light up.
- The power plug has not been inserted properly.
- Check that the power plug ends are fully inserted into the back of the appliance and into the wall power outlet.
- The circuit breaker has tripped.
- Check the circuit breaker box.
- Power outage.
- Check if power is available at the wall outlet.
Display indicates E….
- The electronics have detected an error.
- Disconnect the appliance from power for 1 minute, either by removing the power cord from the wall outlet or by switching off the circuit breaker. After reconnecting the appliance, if error persists please con�tact customer service. ~ "Customer service"
The alarm off button flashes and a warning signal sounds.
- Press alarm off button. Alarm is switched off.
- Door(s) or drawer ajar.
- Close door or drawer. Check if there is no food or equipment obstruct�ing the door.
- Temperature of compartments too warm
- Blocked air vents located on the back wall of the refrigerator and freezer compartments. Remove any food blocking the air vents.
- If compartments have just been loaded with fresh food, then wait at least 2 hours for the temperature in the appliance to cool down
Dispenser
Ice and water dispenser not working.
- Ice and water dispenser is switched off.
- Switch on the ice and water dispenser. ~ "Switching the ice and water dispenser and ice maker on or off"
- Ice and water dispenser is locked.
- Unlock the ice and water dispenser. ~ "Switching the ice and water dispenser button lock (child lock) on or off"
- Door(s) or drawer ajar.
- Close door or drawer. Check if there is no food or equipment obstruct�ing the door.
- Ice cubes may freeze together and block the dispenser or ice maker.
- Open the door. Check from inside whether ice cubes are blocking the ice chute.
- Carefully remove the ice cubes blocking the ice chute with a wooden spoon.
- Ice is being produced and dispensed but no water.
- Make sure the water supply is turned on. Disconnect the appliance from power for 1 minute, either by removing the power cord from the wall outlet or by switching off the circuit breaker. After reconnecting the appliance, if error persists please contact customer service. ~ "Customer service"
- No water supply.
- Check water connection, make sure the water supply is turned on and contact a certified plumber if necessary.
- Low water pressure.
- Appliance needs to be connected in accordance with instructions. ~ "Water connection" on page 13
- If a reverse osmosis water filtration system is connected to your refrigerator water supply, install a bypass filter. New bypass filter can be purchased from customer service and our website. ~ "Water filter"
- The water filter is blocked or needs to be replaced.
- Kink in water hose.
- Turn off water supply, straighten out kink. Replace the water hose if necessary.
Ice and water dispenser not working.
- Water is dripping from dispenser.
- Air may be trapped in the water system. To remove air, allow water to dispense for at least 5 minutes and discard. Repeat this step if you still experience water dripping. After dispensing, a few drops of water are normal. To minimize, slowly remove your glass from the dispenser. Residual ice in the dispenser chute is melting. Make sure the ice chute is free of ice shavings or pieces.
- Ice and water dispenser without power.
- Disconnect the appliance from power for 1 minute, either by removing the power cord from the wall outlet or by switching off the circuit breaker. After reconnecting the appliance, if error persists please contact customer service. ~ "Customer service"
Ice cube production is low.
- Appliance just plugged in
- It can take several hours for the first batch of ice. ~ "Ice maker"
- Recently dispensed a large amount of ice cubes
- It could take a few hours until ice cube bin is full again.
- Low water pressure.
- Appliance needs to be connected in accordance with instructions. ~ "Water connection"
- Door(s) or drawer opened frequently or for an extended period of time.
- Wait at least 2 hours for the temperature in the appliance to cool down.
No ice production.
- Ice and water dispenser is switched off
- Switch on the ice and water dispenser. ~ "Switching the ice and water dispenser and ice maker on or off"
- Ice cube bin ajar.
- Check if the ice cube bin is properly installed. ~ "Ice cube bin"
- No water supply
- Check water connection, make sure the water supply is turned on and contact a technician if necessary. Switch off the appliance and back on again. Check whether ice cubes are being produced after 2 hours.
- Disconnect the appliance from power for 1 minute, either by removing the power cord from the wall outlet or by switching off the circuit breaker. After reconnecting the appliance, if error persists please contact customer service. ~ "Customer service"
Water is leaking out of the appliance.
- Supply line connection is not tight.
- Check if the connections are fastened firmly and the water hose is undamaged. Replace the water hose if necessary.
- Recently installed filter.
- When changing, some water will drip from the filter. Wipe drips dry with a soft cloth. ~ "Water filter"
- Dispenser drip tray overflowing.
- Regularly check the drip tray for drips and clean as necessary. ~ "Cleaning"
- Any other source.
- Please contact customer service. ~ "Customer service"