1/8”
1/4”
1/2”
3/8”
IMPORTANT SAFEGUARDS
When using your electrical appliance, basic precautions should
always be followed, including the points listed below. (Read all
instructions before using.)
DANGER
To reduce the risk of death or injury by electric shock:
1 Do not reach for an appliance that has fallen into water.
Unplug immediately. Some electrical parts inside the clip-
per are electrically live, even with the switch “off.”
2 Do not use while bathing or in a shower.
3 Do not place or store appliance where it can fall or be pulled
into a tub or sink. Do not place in or drop into water or
other liquid.
4 Always unplug this appliance from the electrical outlet
immediately after using.
5 Unplug this appliance before cleaning.
WARNING
To reduce the risk of burns, fire, electric shock or injury to
persons:
1 This power unit is intended to be correctly orientated in a
vertical or floor mount position.
2 An appliance should never be left unattended when plugged
in.
3 Close supervision is necessary when this appliance is used
by, on, or near children or disabled persons.
4 Use this appliance only for its intended use, as described in
this manual. Do not use attachments not recommended by
the manufacturer.
5 Never operate this appliance if it has a damaged cord or
plug, if it is not working properly, if it has been dropped or
damaged, or dropped into water. Return the appliance to
Wahl Clipper Corporation for examination and repair.
6 Keep the cord away from heated surfaces.
7 Never operate the appliance with the air openings blocked
or while on a soft combustible surface, such as a bed or
couch, where air openings may be blocked. Keep the air
openings (if any) free from lint, hair or the like.
8 Never drop or insert any object into any opening on this
appliance.
9 Do not use outdoors or operate with aerosol (spray) products
or where oxygen is being administered.
10 Do not use this appliance with a damaged or broken comb
nor with teeth missing from the blades, as injury may
occur. Before use, make certain blades are aligned proper-
ly. (See Clipper Maintenance Instructions.)
11 During use, do not place or leave appliance where it may be
damaged by an animal or exposed to weather.
12 To disconnect, turn all controls to “OFF,” then remove plug
from outlet.
SAVE THESE INSTRUCTIONS
This clipper has been designed for household use.
Part # 1000140 (94638-101)
© 2015 Wahl Clipper Corp.
WAHL CLIPPER CORPORATION
World Headquarters
P.O. Box 578
Sterling, Illinois 61081 USA
Wahl UK, Ltd
Herne Bay Trade Park
Sea Street, Herne Bay
Kent CT6 8JZ, England
Phone: (44) 1227 740066
FAX: (44) 1227 375636
Wahl GmbH
Roggenbachweg 9
D-78089 Unterkirnach, Germany
Phone: (49) 7721 8060
FAX: (49) 7721 806114
2-YEAR LIMITED WARRANTY
VALID IN U.S.A. ONLY
If this Wahl product fails to operate properly under normal household use conditions within two (2) years
from the date of purchase or receipt as a gift because of defects in workmanship or material, Wahl will, at our
option, repair or replace this product without cost to the purchaser for parts and labor. This warranty does not
cover blades, which are “wear-out” parts. Products needing repair under this warranty should be returned
with postage prepaid to a Wahl Authorized Service Center or to:
Wahl Clipper Corporation
Attn: Repair Department
3001 Locust Street • Sterling, IL 61081
(Do not return this product to the store where purchased.)
Please enclose a check or money order in the amount of $6.50 to cover postage and handling along with a
note describing the defect and the date of original purchase or receipt as a gift (if in warranty). Products out
of warranty will be repaired at our standard repair charges.
This warranty is void and no repair or replacement will be made under this warranty or otherwise if:
1) The product is modified in any manner.
2) The product is repaired by anyone other than Wahl Clipper Corporation
or an Authorized Service Center.
3) The product has been subject to unreasonable use.
4) The product has been subject to other than normal household use conditions.
This warranty gives you specific legal rights and you may also have other rights which may vary from
state to state. No other written express warranty is given. Any implied warranty, including any warranty
of merchantability which may arise from purchase or use is limited to the two-year period provided in this
express warranty. Some states may not allow such limitation, so it may not apply to you. No responsibility
is assumed for incidental or consequential damages of any type or for the use of unauthorized attachments.
Some states may not allow the exclusion or limitation of incidental or consequential damages, so the limitation
or exclusion may not apply to you. Warranty valid in U.S.A. only. Outside U.S.A., check with store for Wahl
authorized distributor's warranty.
H
ome
H
aircutting
witH
For more information or product
registration, visit grooming.wahl.com
For personal attention from
one of our customer
service representatives
please contact us at:
www.grooming.wahl.com
or
1-800-767-9245
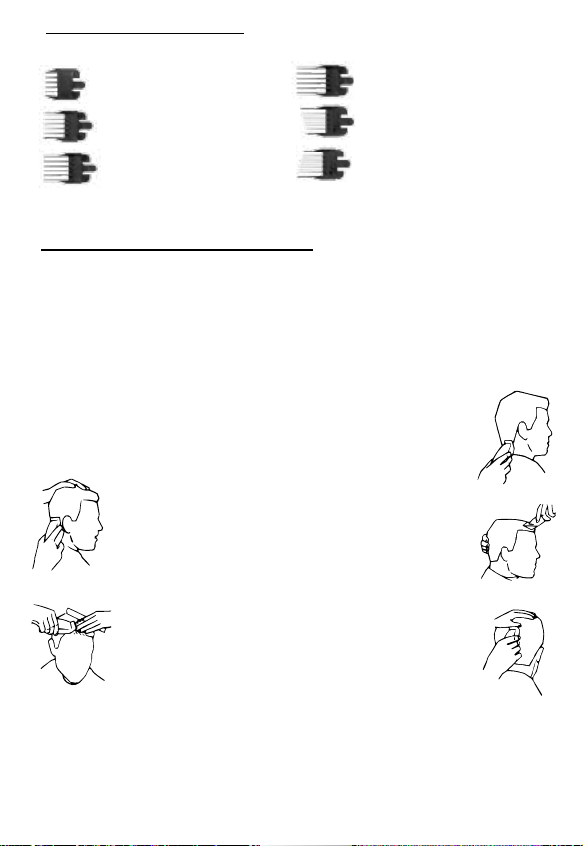
OUTLINING:
No attachments are needed. Comb hair into desired style. Starting
between the ear and the sideburns, as shown at left, hold clipper with
corner edge of blade against the hairline. Slowly follow the desired
outline of the hair over, around and behind the ears. For
defining sideburns and the back of the neck, hold the clipper
upside down, against the skin at the desired
length and move down.
Comb hair and check that sides are even.
Check for uneven spots throughout the haircut.
CREW CUTS AND SHORT CUTS
Starting with the longest guide comb, cut from the back of the neck to
the crown. Hold the guide comb flat against the head and slowly move
the clipper through the hair, as shown.
Use the same procedure from the lower side to
the upper side of the head, as shown. Then cut
the hair against the direction in which it grows,
from the front to the crown, and even up the cut
with the sides.
To give a “flattop” look, the hair on top of the
head must be cut over the top of a flat comb,
rather than using the guide comb.
Use closer-cutting guide combs to “taper” the
hair down to the neckline, as desired. Comb
hair and check for uneven spots. Outline sideburns and neckline as pre-
viously described.
If a short, tapered cut on the sides and back is desired, follow the dia-
gram at left.
The five basic areas illustrated on the Wahl
haircutting guide are your “road map” to easy, do-it-yourself haircutting.
For tips on the latest trends and fashions in haircutting, visit us at www.
wahlhaircuts.com.
This entire procedure requires practice, and it is always better to leave too
much hair the first few haircuts.
For the top of the head, you will give a fairly short cut if you use the 1" guide
comb (If your kit includes the 1-1/4” or 1-1/2” guide comb, you may use this for
a slightly longer cut.) With the teeth flat against the head, slowly start trimming
from the front to the back. Again, it is better to leave the hair longer the first few
haircuts.
FOR LONGER HAIR ON TOP:
By not using a guide comb, a longer cut can be achieved. Use either a bar-
ber comb or a regular comb and lift the hair on top of the head, cutting over
the comb, or grasp the hair between the fingers and cut to desired length.
Continue this procedure from the front to the back of the head, gradually cut-
ting the hair shorter by reducing the space between the comb or fingers and
the head. Comb frequently to remove trimmed hair and check for uneven
strands.
TAPERING AROUND EARS:
USING LEFT AND RIGHT EAR GUIDE COMBS
The Left and Right Ear Guide Combs have a built in taper ranging from 1/8”
to 1/2”. By following the outline of the ear with the appropriate comb you
achieve a gradual taper and blending without having to use multiple combs.
TO TAPER THE AREA BORDERING THE LEFT EAR:
Attach the Left Ear Taper Comb to your clipper and stand facing the left ear.
While holding the clipper at a slight angle against the head, position the
guide comb just back of the left ear at the hairline. Then move the clipper
in a small half circle pattern around the left ear toward the front of the head.
Depending on the length of hair you are working with you may need to take
several small strokes as you proceed around the ear. When doing so, slowly
move the clipper upward and outward being mindful of the ear. This will
allow you to guide hair into the comb towards the clipper blades.
NOTE: You may also achieve a tapering of sideburns by including the side-
burn area as you begin to move the clipper around the ear.
TO TAPER THE AREA BORDERING THE RIGHT EAR:
Attach the Right Ear Guide Comb to your clipper. Stand facing the right ear
and repeat the process described above for the left ear.
Finish by outlining the area around the ear as described in the following
section.
USING GUIDE COMBS:
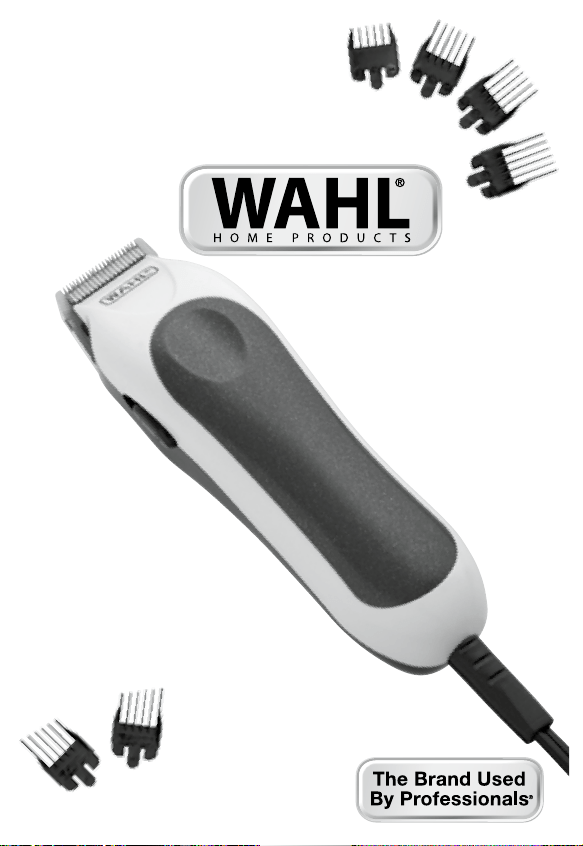
INDIVIDUAL GUIDE COMB LISTING:
1/8” (3mm) 1/2” (13mm)
1/4” (6mm) Right Ear Taper
3/8” (10mm) Left Ear Taper
CUTTING HAIR
FOR MEDIUM TO LONG CUTS:
The first time you cut the hair, cut only a small amount until you become
accustomed to how long each guide comb leaves the hair. Always
start by placing the largest guide comb on the clipper, then use shorter
combs (or settings - if using adjustable guide combs) if a shorter length
is desired.
Remember, between professional haircuts, the hair grows evenly all
over the head and a light trimming at the lower neck and
sides may be all that is needed to bring back that neat, well-
groomed look.
For uniform cutting, allow the clipper to cut its way through
the hair. Do not force it through at a faster rate.
1 Start by combing the hair so it falls into its
natural direction.
2 Place the largest guide comb onto your clipper
and start by trimming the sides from the bottom
upwards. Hold the clipper lightly against the hair,
with teeth of the guide comb pointing up but flat
against the head. Slowly lift the clipper up and
outward through the hair, cutting only a small
amount at a time.
Repeat around sides and back of head.
If you desire shorter hair, either change to a shorter guide comb (or set-
ting - if using adjustable guide combs) or apply more pressure and less
lift away from head with the present attachment.
CLIPPER MAINTENANCE
OIL
The blades of your new clipper
should be oiled every few hair-
cuts. Simply place a few drops
of Wahl Clipper Oil on the teeth of
the blades. Use only the Wahl Clipper Oil included in the pack. Due to the
high speed of your Wahl clipper, the correct type of oil must be used. Do
not use hair oil, grease or any oil mixed with kerosene or any solvent, as
the solvent will evaporate and leave the thick oil, slowing down the blades.
Wahl Clipper Oil is a very thin, natural oil which will not evaporate and will
not slow down the blades.
CORD
The cord should not be used to pull the clipper. Since freedom of move-
ment needs to be maintained, care should be used to-keep the cord
untwisted and unobstructed. When stored, the cord should be coiled and
the unit placed in original box or-storage pouch (if provided).
If your clipper has a polarized plug: To reduce the risk of electric shock,
this appliance has a polarized plug (one blade is wider than the other).
This plug fits in a polarized outlet only one way. In the event the plug does
not fit fully in the outlet, reverse the plug. In the event it still does not fit,
contact a qualified electrician to install the proper outlet. Do not change the
plug in any way.
WAHL'S GUIDE TO FOOLPROOF HAIRCUTTING
BEFORE YOU CUT HAIR
1 Your clipper should be clean, oiled and in perfect working condition.
2 Position the person whose hair is to be cut on a stool or chair so that
the top of his head is about even with your eyes.
3 After combing the hair to remove all tangles, hold the clipper in a
relaxed, comfortable grip, with the nameplate under the palm near your
index finger. This grip will help you maintain comfortable, accurate cutting
control.
NOTE: To attach guide combs, hold comb with the
teeth up. Snap guide comb attachment firmly to
the bottom of the clipper blade.
1 2 3 4

1/8”
1/4”
1/2”
3/8”
IMPORTANT SAFEGUARDS
When using your electrical appliance, basic precautions should
always be followed, including the points listed below. (Read all
instructions before using.)
DANGER
To reduce the risk of death or injury by electric shock:
1 Do not reach for an appliance that has fallen into water.
Unplug immediately. Some electrical parts inside the clip-
per are electrically live, even with the switch “off.”
2 Do not use while bathing or in a shower.
3 Do not place or store appliance where it can fall or be pulled
into a tub or sink. Do not place in or drop into water or
other liquid.
4 Always unplug this appliance from the electrical outlet
immediately after using.
5 Unplug this appliance before cleaning.
WARNING
To reduce the risk of burns, fire, electric shock or injury to
persons:
1 This power unit is intended to be correctly orientated in a
vertical or floor mount position.
2 An appliance should never be left unattended when plugged
in.
3 Close supervision is necessary when this appliance is used
by, on, or near children or disabled persons.
4 Use this appliance only for its intended use, as described in
this manual. Do not use attachments not recommended by
the manufacturer.
5 Never operate this appliance if it has a damaged cord or
plug, if it is not working properly, if it has been dropped or
damaged, or dropped into water. Return the appliance to
Wahl Clipper Corporation for examination and repair.
6 Keep the cord away from heated surfaces.
7 Never operate the appliance with the air openings blocked
or while on a soft combustible surface, such as a bed or
couch, where air openings may be blocked. Keep the air
openings (if any) free from lint, hair or the like.
8 Never drop or insert any object into any opening on this
appliance.
9 Do not use outdoors or operate with aerosol (spray) products
or where oxygen is being administered.
10 Do not use this appliance with a damaged or broken comb
nor with teeth missing from the blades, as injury may
occur. Before use, make certain blades are aligned proper-
ly. (See Clipper Maintenance Instructions.)
11 During use, do not place or leave appliance where it may be
damaged by an animal or exposed to weather.
12 To disconnect, turn all controls to “OFF,” then remove plug
from outlet.
SAVE THESE INSTRUCTIONS
This clipper has been designed for household use.
Part # 1000140 (94638-101)
© 2015 Wahl Clipper Corp.
WAHL CLIPPER CORPORATION
World Headquarters
P.O. Box 578
Sterling, Illinois 61081 USA
Wahl UK, Ltd
Herne Bay Trade Park
Sea Street, Herne Bay
Kent CT6 8JZ, England
Phone: (44) 1227 740066
FAX: (44) 1227 375636
Wahl GmbH
Roggenbachweg 9
D-78089 Unterkirnach, Germany
Phone: (49) 7721 8060
FAX: (49) 7721 806114
2-YEAR LIMITED WARRANTY
VALID IN U.S.A. ONLY
If this Wahl product fails to operate properly under normal household use conditions within two (2) years
from the date of purchase or receipt as a gift because of defects in workmanship or material, Wahl will, at our
option, repair or replace this product without cost to the purchaser for parts and labor. This warranty does not
cover blades, which are “wear-out” parts. Products needing repair under this warranty should be returned
with postage prepaid to a Wahl Authorized Service Center or to:
Wahl Clipper Corporation
Attn: Repair Department
3001 Locust Street • Sterling, IL 61081
(Do not return this product to the store where purchased.)
Please enclose a check or money order in the amount of $6.50 to cover postage and handling along with a
note describing the defect and the date of original purchase or receipt as a gift (if in warranty). Products out
of warranty will be repaired at our standard repair charges.
This warranty is void and no repair or replacement will be made under this warranty or otherwise if:
1) The product is modified in any manner.
2) The product is repaired by anyone other than Wahl Clipper Corporation
or an Authorized Service Center.
3) The product has been subject to unreasonable use.
4) The product has been subject to other than normal household use conditions.
This warranty gives you specific legal rights and you may also have other rights which may vary from
state to state. No other written express warranty is given. Any implied warranty, including any warranty
of merchantability which may arise from purchase or use is limited to the two-year period provided in this
express warranty. Some states may not allow such limitation, so it may not apply to you. No responsibility
is assumed for incidental or consequential damages of any type or for the use of unauthorized attachments.
Some states may not allow the exclusion or limitation of incidental or consequential damages, so the limitation
or exclusion may not apply to you. Warranty valid in U.S.A. only. Outside U.S.A., check with store for Wahl
authorized distributor's warranty.
H
ome
H
aircutting
witH
For more information or product
registration, visit grooming.wahl.com
For personal attention from
one of our customer
service representatives
please contact us at:
www.grooming.wahl.com
or
1-800-767-9245
OUTLINING:
No attachments are needed. Comb hair into desired style. Starting
between the ear and the sideburns, as shown at left, hold clipper with
corner edge of blade against the hairline. Slowly follow the desired
outline of the hair over, around and behind the ears. For
defining sideburns and the back of the neck, hold the clipper
upside down, against the skin at the desired
length and move down.
Comb hair and check that sides are even.
Check for uneven spots throughout the haircut.
CREW CUTS AND SHORT CUTS
Starting with the longest guide comb, cut from the back of the neck to
the crown. Hold the guide comb flat against the head and slowly move
the clipper through the hair, as shown.
Use the same procedure from the lower side to
the upper side of the head, as shown. Then cut
the hair against the direction in which it grows,
from the front to the crown, and even up the cut
with the sides.
To give a “flattop” look, the hair on top of the
head must be cut over the top of a flat comb,
rather than using the guide comb.
Use closer-cutting guide combs to “taper” the
hair down to the neckline, as desired. Comb
hair and check for uneven spots. Outline sideburns and neckline as pre-
viously described.
If a short, tapered cut on the sides and back is desired, follow the dia-
gram at left.
The five basic areas illustrated on the Wahl
haircutting guide are your “road map” to easy, do-it-yourself haircutting.
For tips on the latest trends and fashions in haircutting, visit us at www.
wahlhaircuts.com.
This entire procedure requires practice, and it is always better to leave too
much hair the first few haircuts.
For the top of the head, you will give a fairly short cut if you use the 1" guide
comb (If your kit includes the 1-1/4” or 1-1/2” guide comb, you may use this for
a slightly longer cut.) With the teeth flat against the head, slowly start trimming
from the front to the back. Again, it is better to leave the hair longer the first few
haircuts.
FOR LONGER HAIR ON TOP:
By not using a guide comb, a longer cut can be achieved. Use either a bar-
ber comb or a regular comb and lift the hair on top of the head, cutting over
the comb, or grasp the hair between the fingers and cut to desired length.
Continue this procedure from the front to the back of the head, gradually cut-
ting the hair shorter by reducing the space between the comb or fingers and
the head. Comb frequently to remove trimmed hair and check for uneven
strands.
TAPERING AROUND EARS:
USING LEFT AND RIGHT EAR GUIDE COMBS
The Left and Right Ear Guide Combs have a built in taper ranging from 1/8”
to 1/2”. By following the outline of the ear with the appropriate comb you
achieve a gradual taper and blending without having to use multiple combs.
TO TAPER THE AREA BORDERING THE LEFT EAR:
Attach the Left Ear Taper Comb to your clipper and stand facing the left ear.
While holding the clipper at a slight angle against the head, position the
guide comb just back of the left ear at the hairline. Then move the clipper
in a small half circle pattern around the left ear toward the front of the head.
Depending on the length of hair you are working with you may need to take
several small strokes as you proceed around the ear. When doing so, slowly
move the clipper upward and outward being mindful of the ear. This will
allow you to guide hair into the comb towards the clipper blades.
NOTE: You may also achieve a tapering of sideburns by including the side-
burn area as you begin to move the clipper around the ear.
TO TAPER THE AREA BORDERING THE RIGHT EAR:
Attach the Right Ear Guide Comb to your clipper. Stand facing the right ear
and repeat the process described above for the left ear.
Finish by outlining the area around the ear as described in the following
section.
USING GUIDE COMBS:
INDIVIDUAL GUIDE COMB LISTING:
1/8” (3mm) 1/2” (13mm)
1/4” (6mm) Right Ear Taper
3/8” (10mm) Left Ear Taper
CUTTING HAIR
FOR MEDIUM TO LONG CUTS:
The first time you cut the hair, cut only a small amount until you become
accustomed to how long each guide comb leaves the hair. Always
start by placing the largest guide comb on the clipper, then use shorter
combs (or settings - if using adjustable guide combs) if a shorter length
is desired.
Remember, between professional haircuts, the hair grows evenly all
over the head and a light trimming at the lower neck and
sides may be all that is needed to bring back that neat, well-
groomed look.
For uniform cutting, allow the clipper to cut its way through
the hair. Do not force it through at a faster rate.
1 Start by combing the hair so it falls into its
natural direction.
2 Place the largest guide comb onto your clipper
and start by trimming the sides from the bottom
upwards. Hold the clipper lightly against the hair,
with teeth of the guide comb pointing up but flat
against the head. Slowly lift the clipper up and
outward through the hair, cutting only a small
amount at a time.
Repeat around sides and back of head.
If you desire shorter hair, either change to a shorter guide comb (or set-
ting - if using adjustable guide combs) or apply more pressure and less
lift away from head with the present attachment.
CLIPPER MAINTENANCE
OIL
The blades of your new clipper
should be oiled every few hair-
cuts. Simply place a few drops
of Wahl Clipper Oil on the teeth of
the blades. Use only the Wahl Clipper Oil included in the pack. Due to the
high speed of your Wahl clipper, the correct type of oil must be used. Do
not use hair oil, grease or any oil mixed with kerosene or any solvent, as
the solvent will evaporate and leave the thick oil, slowing down the blades.
Wahl Clipper Oil is a very thin, natural oil which will not evaporate and will
not slow down the blades.
CORD
The cord should not be used to pull the clipper. Since freedom of move-
ment needs to be maintained, care should be used to-keep the cord
untwisted and unobstructed. When stored, the cord should be coiled and
the unit placed in original box or-storage pouch (if provided).
If your clipper has a polarized plug: To reduce the risk of electric shock,
this appliance has a polarized plug (one blade is wider than the other).
This plug fits in a polarized outlet only one way. In the event the plug does
not fit fully in the outlet, reverse the plug. In the event it still does not fit,
contact a qualified electrician to install the proper outlet. Do not change the
plug in any way.
WAHL'S GUIDE TO FOOLPROOF HAIRCUTTING
BEFORE YOU CUT HAIR
1 Your clipper should be clean, oiled and in perfect working condition.
2 Position the person whose hair is to be cut on a stool or chair so that
the top of his head is about even with your eyes.
3 After combing the hair to remove all tangles, hold the clipper in a
relaxed, comfortable grip, with the nameplate under the palm near your
index finger. This grip will help you maintain comfortable, accurate cutting
control.
NOTE: To attach guide combs, hold comb with the
teeth up. Snap guide comb attachment firmly to
the bottom of the clipper blade.
1 2 3 4

1/8”
1/4”
1/2”
3/8”
MEDIDAS IMPORTANTES DE
SEGURIDAD:
Al utilizar un aparato eléctrico siempre se deben tomar ciertas
precaúciones, tal como las siguientes: (Lea todo el instructivo antes de
usar la cortadora)
PELIGRO
Para reducir el riesgo de electrocutación:
1 No toque la cortadora si se ha caído al agua. Desenchufela de
inmediato. La cortadora está eléctricamente cargada por dentro.
2 No la use mientras se esté bañando o duchando.
3 No la ponga, ni la guarde en lugares de donde pueda caer al piso,
a una bañera o lavabo. No la ponga en contacto con agua u otros
líquidos.
4 Inmediatamente después de usar la cortadora, desenchufela
siempre de la toma de corriente.
5 Siempre desenchufe la cortadora antes de limpiarla.
ADVERTENCIA
Para reducir el riesgo de quemaduras, descargas eléctricas o lesiones
personales:
1 Esta unidad electrical debe de ser usada correctamente en una posi-
cion vertical o una posición del montaje del piso.
2 No deje nunca la cortadora sola mientras está enchufada.
3 Es necesaria una vigilancia cercana cuando este electrodoméstico se
use por o cerca de niños o personas inválidas.
4 Utilice solamente esta cortadora de acuerdo con las instrucciones de
este manual. No la utilice con accesorios que no hayan sido recomen-
dados por el fabricante.
5 No haga nunca funcionar esta cortadora si esté dañado el cable o
el enchufe, o si no funciona bien, o si se ha caída al piso, o al agua.
Envíela a Wahl Clipper Corporation, para examinarla y repararla.
6 No acerque el cable a superficies calientes.
7 No haga funcionar la cortadora con los orificios de ventilación cerra-
dos o mientras está en una superficie combustible donde los orificios
de ventilación pueden taparse, tal como una cama oun sillón. Si
hay orificios de ventilación, es importante que los mantenga libre de
pelusa, cabello or cosas semejantes.
8 No deje caer, ni meta objetos por los orificios de la cortadora.
9 No utilice la cortadora al aire libre, o donde se estén utilizando aero-
seles (productos de pulverización), o en lugares donde se adminstre
oxígeno.
10 No utilice la cortadora si tiene accesorios defectuosos, o si tiene
una hoja dañada, ya que este puede producir lesiones personales.
Antes de usarla, asegurese que estén bien alineadas las hojas. Vea
el instructivo de mantenimiento.
11 Durante su uso, no ponga o deje la cortadora en lugares donde puede
ser dañada por un animal o ser expuesta a los cambios de clima.
12 Para desconectar la cortadora, deslíce el interruptor a la posición de
“OFF,” y desenchufela de la toma decorriente.
GUARDE ESTAS
INSTRUCCIONES
MANTENIMIENTO DE LA MAQUINA CORTADORA
ACEITE
Al utilizar por primera vez la cor-
tadora Wahl, y después de varios
cortes de cabello, se deberán lubri-
car los dientes de las hojas de la
cortadora. Debido a la alta velocidad de la cortadora Wahl, es mejor usar un
tipo especial de aceite. El aceite Wahl, el cual viene incluído en el empaque,
es el más apropiado, ya que es un aceite delgado y natural. No se evapo-
rará, ni disminuirá la velocidad de las hojas de la cortadora. Es de suma
importancia que no utilice grasa o aceite para cabello, ni aceite mezclado
con kerosina o de cualquier otro tipo de solvente, ya que éste se evaporará
y dejará el aceite espeso, lo cual disminuirá la velocidad de las hojas de la
cortadora Wahl.
CABLE
El cable no debe usarse nunca para sujetar la cortadora. Debido a que ha
de mantenerse la libertad de movimiento, hay que procurar que el cable no
se doble o retuerza o se obstruya. Cuando guarde la cortadora, el cable ha
de ser enroscado, y la cortadora ha de guardarse en la caja original o en el
espacio proveído en el paquete (Si se provee). Si su cortadora posee un
enchufe polarizado: Para reducir el riesgo de electrocución, este aparato
eléctrico posee un enchufe polarizado (una de las “patas” es más ancha que
la otra). Este tipo de enchufe encaja perfectamente en una toma de corriente,
solamente en una dirección. En el caso de que el enchufe no encaje perfecta-
mente en la toma de corriente, invierta el enchufe y pruebe de nuevo. En caso
de que aún así, no encaje, contacte con un electricista cualificado para instalar
la toma de corriente adecuada. No intente modificar el enchufe de ninguna
forma.
GUÍA WAHL PARA CORTAR EL CABELLO EN
CASA SIN PROBLEMAS:
ANTES DE CORTAR EL CABELLO:
1 La cortadora Wahl debe estar limpia, lubricada y en perfectas
condiciones de uso.
2 Siente a la persona en un banco o silla, de modo que la parte
superior de la cabeza esté a la misma altura de sus ojos.
3 Desenrede el cabello de la persona, peinandoselo. De forma cómoda
y relajada, mantenga la cortadora en su mano con la placa de
identificación debajo de la palma cerca de su dedo índice. De este
modo podrá cortar el cabello, manteniendo un
control preciso y cómodo.
NOTE: Para instalar el peine accesorio,
simplemente deslícelo con los dientes hacia arriba
sobre las hojas de la cortadora encájelo firmemente
en la parte inferior de las hojas.
UTILIZACIÓN DE PEINES INDIVIDUALES
LISTADO DE PEINES INDIVIDUALES (FIJOS) DISPONIBLES:
1/8” (3mm) 1/2” (13mm)
1/4” (6mm) Peine Oreja Derecha
3/8” (10mm) Peine Oreja Izquierda
COMO CORTAR EL CABELLO
(CORTE NORMAL, CORTE MEDIO Y CORTE LARGO)
La primera vez que vaya a cortar el cabello únicamente corte una
cantidad pequeña, hasta que se acostumbre a la longitud que cada peine
accesorio dejará al cabello. Siempre comience colocando a la cortadora el
peine accesorio más grande, y si desea una longitud de cabello más corto,
utilice un peine más pequeño. Acuerdese, entre cortes de cabello hecho por
un professional, el cabello crece de forma pareja, y para volver a tener un
aspecto limpio y aseado puede que lo único que necesite es un recorte ligero
de la nuca y de ambos lados de la cabeza. Si el empaque no contiene todos
los peines accesorios de Wahl, no se preocupe. Los puede encontrar en las
tiendas distribuidoras de Wahl, o simplemente utilizando el formulario adjunto,
los puede ordenar directamente a Wahl.
Si desea un corte uniforme, deje que la cortadora avance suavamente por el
cabello. No la fuerze a un ritmo más rápido, y utilice el siguiente método:
1 2 43
GARANTÍA LIMITADA DE 2 AÑOS
VÁLIDA SOLO EN LOS ESTADOS UNIDOS
Si este producto de Wahl dejara de funcionar apropiadamente, bajo condiciones de uso
normal en el hogar, dentro de dos (2) años a partir de la fecha de compra, o de haberlo
recibido nuevo como regalo, debido a defectos de fabricación o por materiales defec-
tuosos, Wahl optará por reparar o reemplazar este producto sin costo para el usuario
por concepto de reparaciones o repuestos. Esta garantía no cubre las cuchillas de corte
porque son partes desgastables en uso normal. Los productos que requieran reparación
bajo esta garantía deben ser devueltos por correo pagado a un centro de servicio autor-
izado, o directamente a:
Wahl Clipper Corporation
Attn: Repair Department
3001 Locust Street
Sterling, IL 61081
Por favor incluya cheque u orden de pago por $ 6.50, pagadero a Wahl Clipper Corp.
para pagar por gastos de retorno, además de una breve nota describiendo la naturaleza
del problema e indicando la fecha de compra o de haberlo recibido como regalo, sí el
producto todavía está bajo garantía.
Productos fuera de garantía serán reparados a los precios usuales.
Esta garantía queda invalidada si:
1. El producto ha sido modificado
2. El producto ha sido reparado por alguien que no sea
Wahl o un centro de servicios autorizado por Wahl.
3. El producto ha sido sometido a uso abusivo.
4. El producto ha sido sometido a condiciones de servicio
deferentes a las del hogar.
Esta garantía le da a Usted derechos legales específicos. Además, Usted podría tener
otros derechos, los cuales podrían variar en diferentes jurisdicciones estatales. No se
otorga ninguna otra garantía escrita.
Cualquier garantía implícita, incluyendo cualquier garantía de ventas que pudiera origi-
narse desde la compra o uso de este articulo, esta limitada a los dos años provistos en
esta garantía escrita. Algunos estados no permiten este tipo de
limitación, de manera que en tal estados esta limitación no procede. No nos responsabi-
lizamos por daños incidentales ocurridos en el uso con accesorios no autorizados por
nosotros. . Algunos estados no permiten este tipo de limitación por daños incidentales,
de manera que en tal estados esta limitación no procede. Esta garantía solo es válida en
los Estados Unidos. En el extranjero, verifique con la tienda donde compró el producto
para informarse de la garantía provista por el importador local autorizado por Wahl
Clipper Corporation.
cortadora al revés, como muestra la figura y mantengala contra
la piel y de el largo deseado, avanzando hacia abajo.
Peine el cabello y compruebe que ambos lados de la cabeza
estén parejos Asegurese que el cabello no esté disparejo.
CORTE CORTO:
Como muestra la figura, empiece a cortar desde la nuca hasta la parte
superior de la cabeza con el peine accesorio más largo. Sujete el accessorio
pegado a la cabeza y avance lentamente con la
cortadora por el cabello. Siga el método anterior
para cortar el cabello desde la parte inferior hasta
la parte superior, como muestra la figura. Después
corte el cabello en sentido contrario desde la parte
del frente hasta la parte posterior, emparejando
ambos lados de la cabeza. Si desea obtener el
cabello de la parte superior de la cabeza corto,
no utilice el peine accesorio, y cortelo por encima
de un peine de peluquero. Si desea rebajar grad-
ualmente lo largo del cabello, utilice un peine accesorio de mayor nivel de
corte hasta llegar a la nuca. Peine el cabello y compruebe que esté parejo.
Delinee las patillas y la nuca en la forma antes mencionada.
Si desea rebajar gradualmente el cabello de ambos
lados de la cabeza, y la parte posterior de la
misma, el siguiente diagrama mostrará como
lograrlo.
Las cuatro áreas básicas, ilustradas en la Guía
Wahl Para Cortar el Cabello, son las que debe
seguir para lograr cortar el cabello en casa sin
problemas.
PARA CORTAR ALREDEDOR DE LOS OÍDOS
UTILIZANDO LOS PEINES-GUIA EL OIDO IZQUIERDO Y DERECHO.
Los peines-guía para el oído izquierdo y derecho tienen dientes de
longitud incremental y cortan a un largo que varía de 1/8” a 1/2”
pulgadas. Al seguir el borde del oído con el peine-guía apropiado, se logra un
corte gradual y mezcla uniforme sin tener que usar múltiples peines.
Para Cortar el area alrededor del oido izquierdo:
Coloque el peine-guía designado Left Ear Taper, en la máquina y parese
de frente al oído izquierdo. Comenzando en la parte izquierda de la nuca,
mueva la máquina hacia arriba, bordeando la oreja hasta terminar en el
area de la patilla. Dependiendo del largo del cabello, es posible que tenga
que pasar la cortadora varias veces alrededor del oído. Cuando haga esto,
mueva letamente la cortadora hacia arriba y hacia afuera teniendo cuidado
con el oído. Esto permite dirigir el cabello hacia el peineguía y hacia las
cuchillas de la cortadora.
NOTE: Se pueden cortar las patillas con este movimiento, con tan solo
incluír el área de estas al empezar a mover la cortadora alrededor del oído.
PARA CORTAR EL AREA ALREDEDOR DEL OIDODERECHO
Coloque el peine-guía designado Right Ear Taper, en la máquina y parese de
frente al oído derecho. Comenzando en la parte derecha de la nuca, mueva
la máquina hacia arriba, bordeando la orja hasta terminar en el area de la
patilla.
Finalice delineando el área del oído como se describe a continuación.
CONTORNO
Si posee la Cortadora MC (cortadora de niveles) no es necesario utilizar los
peines accesorios. Para ello, mueva la palanca de
control de las hojas hacia arriba a la posición de cabello más corto. Peine
el cabello al estilo deseado. Comience cortando entre la oreja
y la patilla, como muestra la figura. Sujete la cortadora con la
orilla de la esquina de las hojas pegada al perfil del cabello, siga
lentamente el perfil deseado del cabello por encima, y alrededor
y de las orejas. Para delinear las patillas y la nuca, sujete la
1 Peine el cabello de manera que adopte su posición natural.
2 Coloque el peine accesorio más grande a la cortadora.
Comience a los lados de la cabeza, recortando desde abajo hacia
arriba. Con los
dientes del peine accesorio sobre la cabeza y voltea-
dos arriba, mantenga la cortadora ligeramente sobre
el cabello, pero pegado a la cabeza. Levante lenta-
mente la cortadora en movimientos verticaleshacia
arriba y hacia afuera. Asegurese cortar cantidades
pequeñas de cabello a la vez.
Repita la misma operación por ambos lados de la
cabeza y por la parte posterior de la misma.
Si desea el cabello más corto, cambie de peine acce-
sorio a un número menor, o si no quiere cambiar de
peine accesorio, aplique más presión y no separe tanto la corta-
dora de la cabeza.
Se requiere práctica para aprender este procedimiento. De modo que, es
mejor cortar poco cabello las primeras veces.
Si desea el cabello de la parte superior más corto, se logrará utilizando el
peine accesorio No. 8. Pegue los dientes contra la cabeza. Utilizando mov-
imientos horizontales y lentos, empiece de la parte del frente hasta la parte
posterior de la cabeza. Como ya habíamos dicho, es mejor cortar poco cabello
las primeras veces.
PARA CABELLO MÁS LARGO EN EL TOPE DE LA CABEZA
Si no quiere utilizar los peines accesorios y desea el cabello más largo en la
parte superior de la cabeza, utilice un peine de peluquero y levante el cabello
de la parte superior de la cabeza, cortando por encima del peine, o sujete
el cabello entre los dedos y cortelo al tamaño que desea. Use este método
desde la parte del frente hasta la parte posterior de la cabeza. Si desea el
cabello más corto, reduzca el espacio entre el peine (o los dedos) y la cabe-
za. Peine el cabello continuamente. Compruebe que no esté disparejo y
sacuda el cabello recortado.
5 6 7 8
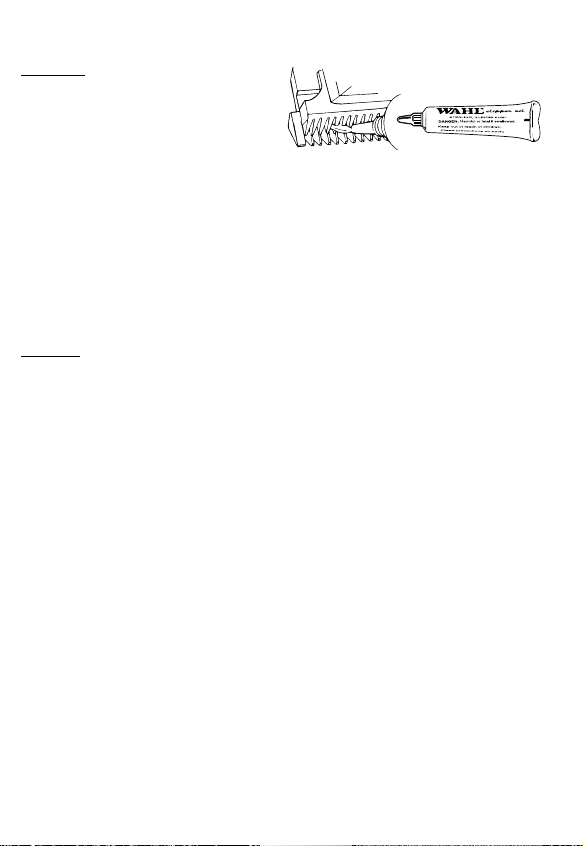
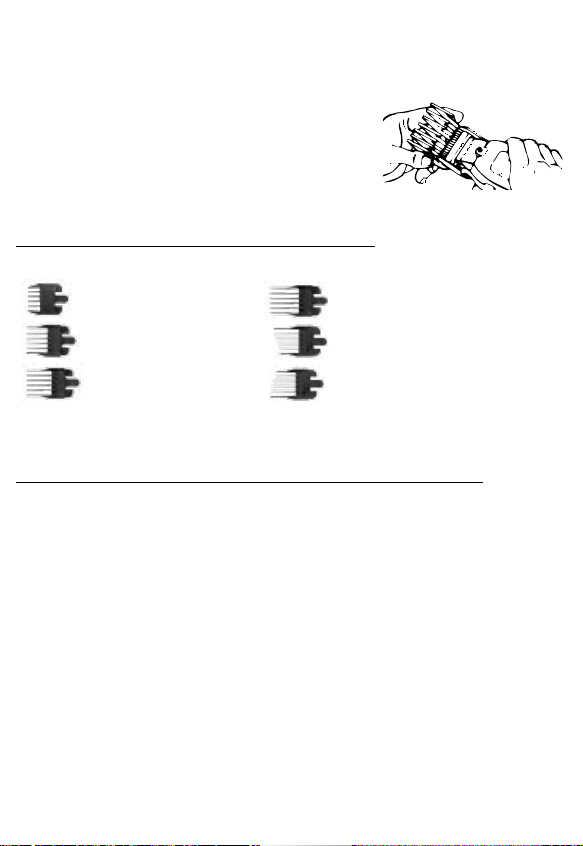
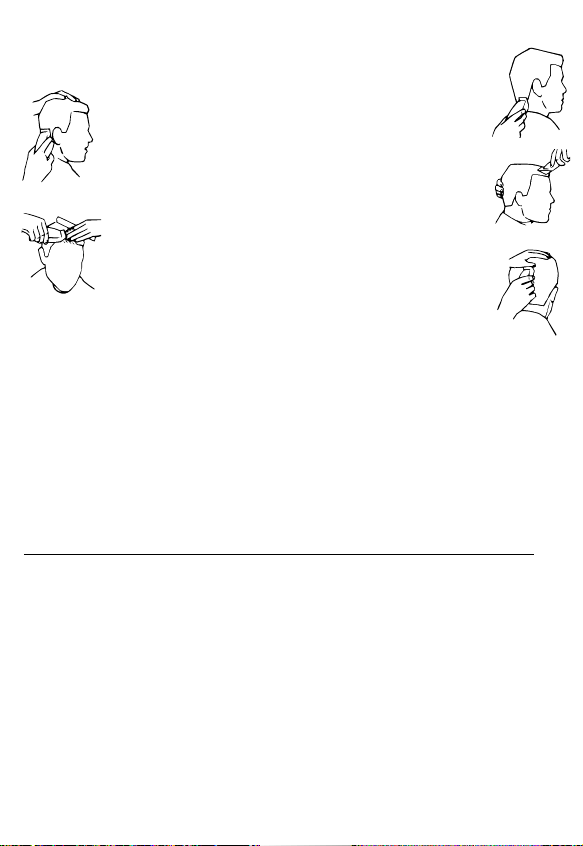
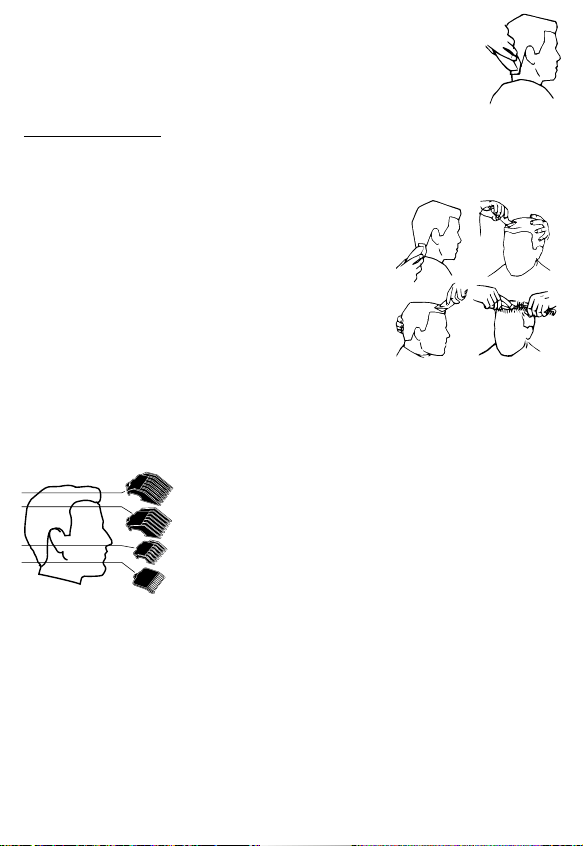