USER MANUAL Microwave Oven
PARTS AND FEATURES
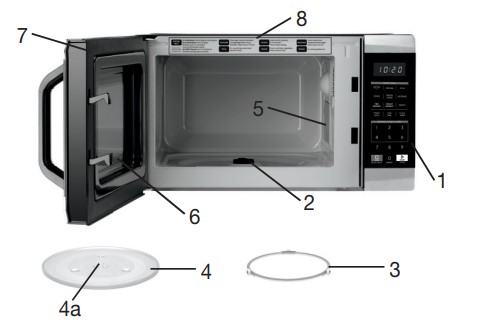
Remove all packing material and accessories. Examine the oven for any damage such as dents or broken door. Do not install if oven is damaged.
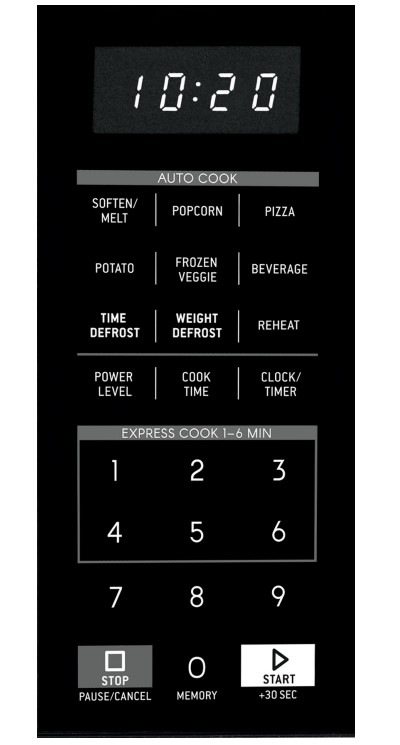
1. Control panel
2. Turntable shaft
3. Turntable ring assembly
4. Glass tray
4a. Tray hub
5. MicroGuide (DO NOT REMOVE)
6. Observation window
7. Door assembly
8. Cooking Guide Chart
OPERATING INSTRUCTIONS
Setting the Clock
1. Press CLOCK/TIMER once, the display will show “00:00” or the previously set time. The first digit will flash.
2. Press the number buttons to set time. Example: To set 12:30, press 1–2–3–0.
NOTE: This is a 12-hour clock. Time will display from 01:00–12:59.
3. Once time is selected, press CLOCK/TIMER to set, [:] will flash in display.
NOTE: While setting the clock, if the STOP PAUSE/CANCEL button is pressed or if nothing is selected for more than 1 minute, the clock will go back to the previous setting.
Setting the Timer
1. Press CLOCK/TIMER twice, the display will show “00:00.”
Press the number buttons to set the timer. Example: To set 12 minutes and 15 seconds, press 1–2–1–5.
NOTE: Timer can be set for up to 99 minutes and 99 seconds, 99:99.
2. Press the START +30 SEC button to confirm the setting. Time will begin to count down on the display.
3. When time has elapsed, the tone will beep 5 times.
NOTE: When the kitchen timer is engaged, the oven will not start with any program and the oven light will not light.
Stop Pause/Cancel
Touch the STOP PAUSE/CANCEL button to:
- Start over if you make a mistake while programming.
- Cancel the timer.
- Stop the oven during operation. (Press START +30SEC to resume.)
- Cancel a program during operation (press twice).
COOKING OPTIONS
Manual Cook
You can manually program your desired cooking time and power level.
- Press COOK TIME once, the screen will display “00:00.”
- Use the number buttons to input desired cooking time, up to 99 minutes and 99 seconds.
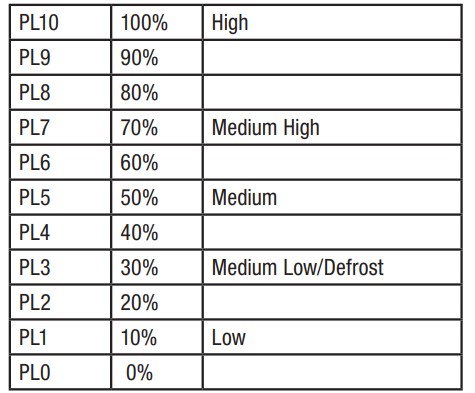
- Select power level from the chart on page 8. Press POWER LEVEL, the screen will display PL10 (default power level: 100%). To select a different power level, press a number button, 1 through 9.
- Once cook time and power level are programmed, press START +30SEC to start cooking. Time will begin to count down in the display
Power Level Chart
Express Cook
This feature provides a shortcut to programming your oven. Power level is always at 100% when using Express Cook. You can select 1 to 6 minutes or 30-second increments.
- Select a cooking time from 1 to 6 minutes by pressing Express Cook number buttons 1 to 6.
- Once the number button is pressed, oven will instantly start cooking.
- To increase the cooking time by 30-second increments, press the START +30SEC button.
- To select cooking time in 30-second increments, skip steps 1 to 3. Press START +30SEC button (microwave will begin operating), and then press and release button until desired cooking time appears in the display.
NOTE: During manual cooking and timed defrost, time can be added by pressing the START +30SEC button.
Auto Cook
Auto Cook functions are preprogrammed to cook many popular foods using professionally recommended power levels and cooking times.
- FUNCTIONS: Press the button for the desired Auto Cook function. The display window will show the first option for that function, as listed in the DISPLAY column of the Auto Cook Guide on page 9. See the TIPS column to help you decide which option to use.
- OPTIONS: Press the function button repeatedly until the desired option appears on the display. Options include food weight (oz.), or food portions (tablespoons or units).
- Once you have made your selection, press the START +30SEC button to start cooking. The tone will sound once.
- Once cook time elapses, the tone will sound 5 times.
NOTE: Final cooking results will vary according to food’s initial temperature, shape, quality, etc. Check the TIPS column in the Auto Cook Guide for the best results.
Time Defrost
This feature allows you to defrost by time.
- Press TIME DEFROST once, the screen will display “00:00.”
- Press number buttons to input time from 0:01–99:99 minutes/seconds.
- The default power level for defrost is power level 3. To change the power level, press POWER LEVEL once, the screen will display PL3. Use the number button to select another power level.
- Press the START +30SEC button to begin defrosting; the display will begin counting down the time.
Weight Defrost
This feature allows you to defrost by weight.
- Press WEIGHT DEFROST once, the screen will display “0.”
- Press number buttons to input weight to be defrosted. Input the weight in a range 4–100 oz.
- Press the START +30SEC button to start defrosting; the display will automatically begin counting down the correct defrost time based on the unit’s weight.
Defrost Tips
- Frozen food in paper or plastic can be defrosted in the package. Closed packages should be slit, pierced or vented AFTER the food has partially defrosted. Plastic storage containers should be partially uncovered
- If the food is in a foil container, transfer it to a microwave-safe dish.
- For more even defrosting of larger foods, use Weight Defrost. Be sure large meats are completely defrosted before cooking
- When defrosted, food should be cool but softened in all areas. If food is still icy, return to the microwave for brief additional cooking time, or let it stand for a few minutes.
Two-Stage Cooking
This function lets you program your oven to automatically switch from one function to a second function. Be sure to follow steps in the order listed below; cooking time must always be selected before choosing the power level.
Example: To begin cooking at an 80% power level for 5 minutes, and then switch to cook at a 60% power level for 10 minutes:
- Press COOK TIME once, then press 5–0–0 to set the cooking time.
- Press POWER LEVEL once, then press 8 to select 80% microwave power.
- Press COOK TIME once, then press 1–0–0–0 to set the cooking time.
- Press POWER LEVEL once, then press 6 to select 60% microwave power.
- Press START +30SEC to start two-stage cooking.
NOTE: Auto cooking cannot be set as part of twostage cooking
Memory
You can save up to three cooking procedures (one or two stages) that you frequently use. They will be stored in the oven’s memory as numbers 1, 2 and 3 and can be used at any time. Auto Cook cannot be saved as memory
To Program Memory Procedure
- Press 0/MEMORY button. The screen will display 1, 2 or 3, depending on the number of times you press the 0/MEMORY button
- Press COOK TIME, then use the number buttons to set the desired cooking time.
- Press POWER LEVEL button. Default power level PL10 appears in the display, but can be changed by pressing the number button (see Power Level Chart on page 8).
- Press START +30SEC to save the setting. The tone will sound once and the screen will display the number (1, 2 or 3) for the memory procedure you programmed and saved.
- Press STOP PAUSE/CANCEL.
NOTE: To program a two-stage memory procedure, press 0/MEMORY button to save it as 1, 2 or 3. Follow instructions under TwoStage Cooking. After pressing START +30SEC to save it, press STOP PAUSE/CANCEL.
CLEANING & CARE
Unplug the cord before cleaning any part of this oven. Clean your oven regularly to avoid grease build-up.
To clean the inside of the unit:
- An occasional thorough wiping with a solution of baking soda and water keeps the inside fresh.
- Remove greasy spatters with a sudsy cloth, then wipe with a damp cloth. Never use abrasive cleaners or sharp utensils on any part of the microwave.
- Clean surfaces where the door meets the oven when closed with mild, nonabrasive soap or detergent on a soft cloth. Wipe with damp cloth.
- To remove greasy stains, put 1 cup water mixed with 2 tablespoons lemon juice or baking soda in a cup and bring this mixture to a boil in the microwave. Allow it to stand in microwave for 5 minutes to steam. Then wipe walls of microwave with clean paper towels, a damp clean towel or a dampened microfiber cloth to remove softened cooking residue.
To clean the outside of the unit:
- It is important to keep the area clean where the door seals against the microwave.
- Wipe with a damp cloth. Dry thoroughly. Do not use cleaning sprays, large amounts of soap and water, abrasives or sharp objects, as they can damage the unit. NOTE: Some paper towels can also scratch the control panel. Use caution.
To remove unwanted odors:
- Select Power Level 0 (PL0) and the oven will operate with the fan but, no power.
Maintenance
- Any other servicing should be performed by an authorized service representative.
TROUBLESHOOTING
| TROUBLE |
POSSIBLE CAUSE |
POSSIBLE REMEDY |
| Oven will not start |
a. Electrical cord is not plugged in.
b. Door is open.
c. Wrong operation is set.
|
a. Electrical cord is not plugged in.
b. Door is open.
c. Wrong operation is set.
|
| Arcing or sparking |
a. Materials to be avoided in microwave were used.
b. The oven was operated when empty.
c. Spilled food remains in the cavity.
|
a. Use microwave-safe cookware only.
b. Do not operate with oven empty.
c. Clean cavity with wet towel.
|
| Unevenly cooked foods |
a. Materials to be avoided in microwave were used.
b. Food is not defrosted completely.
c. Cooking time, power level is not suitable.
d. Food is not turned or stirred.
e. Food is positioned incorrectly on turntable.
|
a. Use microwave-safe cookware only.
b. Completely defrost food.
c. Adjust cooking time, power level accordingly.
d. Turn or stir food.
e. When possible position food off-center
|
| Overcooked foods |
Cooking time, power level is not correct |
Adjust cooking time, power level accordingly. |
| Undercooked foods |
a. Materials to be avoided in microwave were used.
b. Food is not defrosted completely.
c. Oven ventilation ports are restricted.
d. Cooking time, power level is not suitable.
|
a. Use microwave-safe cookware only.
b. Completely defrost food.
c. Check oven ventilation ports are not restricted.
d. Adjust cooking time, power level accordingly.
|
| Improper defrosting |
a. Materials to be avoided in microwave were used.
b. Cooking time, power level is not correct.
c. Food is not turned or stirred.
|
a. Use microwave-safe cookware only.
b. Adjust cooking time, power level accordingly.
c. Turn or stir food.
|